

Page 1
TASCAM Tutorial:
Importing Audio between the MX-2424 and Digidesign Pro Tools
Importing Audio from the MX-2424 into a Pro Tools Session
Follow the steps below to import audio files from a TASCAM MX-2424 hard disk into a Digidesign Pro
Tools Session.
Requirements: MX-2424 and Pro Tools System Configuration
In order to move a hard disk from the MX-2424 onto a Mac Pro Tools System each system must be
configured with a portable SCSI solution. The most common is a Storcase Removable/hot-swappable
drive system. The Macintosh system may be configured in one of two ways with an installed Pro Tools
system:
SCSI64 Kit
This includes ATTO Technology's ExpressPCI Dual Channel Ultra/WIDE SCSI card, the ATTO Express
SCSI Utility and ATTO extension.
Adaptec SCSI card and FWB Hard Disk Toolkit
When an Adaptec SCSI card is used, FWB Hard Disk Toolkit 3.0 or higher must be installed on the
Macintosh.
NOTE: Individual components of the systems above are not cross-compatible. Do not use ATTO software with Adaptec
SCSI cards or FWB with ATTO SCSI cards.
TASCAM Division/TEAC America Inc. www.tascam.com
7733 Telegraph Road, Montebello, CA 90640 USA Page 1 of 8
Page 2
Step 1: TapeMode or Non-Destructive
Prior to removing a hard disk from the MX-2424, one has the option of converting the entire session into a
TapeMode session or leaving it in Non-Destructive mode.
Performing a TapeMode convert will create a single contiguous audio file for each track, which
incorporates any edits and fills blank areas with silence. A TapeMode convert can be performed on a
Non-Destructive or TapeMode project. It is recommended that a TapeMode convert be performed even
on a TapeMode session, so that unrecorded areas are filled in with silence (digital 0s). The advantage to
TapeMode Conversion is that the import process into Pro Tools is simplified by the fact that only 24 files
need to be imported.
To Perform a TapeMode Convert (from the front panel):
a. Press the PROJ Key
b. Hit the Up/Down Arrows until "TapeMode Convert" is selected. Press "Yes".
c. Choose the desired project using the Up/Down Arrow keys and press "Yes".
d. Choose a destination disk using the Trim to select SCSI ID.
A TapeMode Convert is processor intensive and may take a while to complete.
The other option is leaving the session in Non-Destructive mode. The advantage of this is that a time
consuming TapeMode Convert is not necessary. The disadvantage is that a Project with many audio files
per track will be difficult to properly import and spot into a Pro Tools Session. However, Non-Destructive
Projects that consist of 24 tracks without any edits will not require a TapeMode Convert.
Note: A TapeMode convert retains the Time Stamp.
Step 2 Transporting a SCSI drive
The Disk from the MX-2424 must be mounted on the Macintosh Computer. Remember to always power
down when connecting SCSI cables, and always Mount/Un-mount when using Storecase Carriers.
Step 3 Updating the Driver and Mounting the Disk
The very first time an MX-2424 Mac-formatted disk is placed on the Macintosh SCSI bus, a driver must be
installed on the disk. The process of driver installation depends on the type of SCSI card and software
used on the Macintosh. Note: this does not destroy the data on the disk.
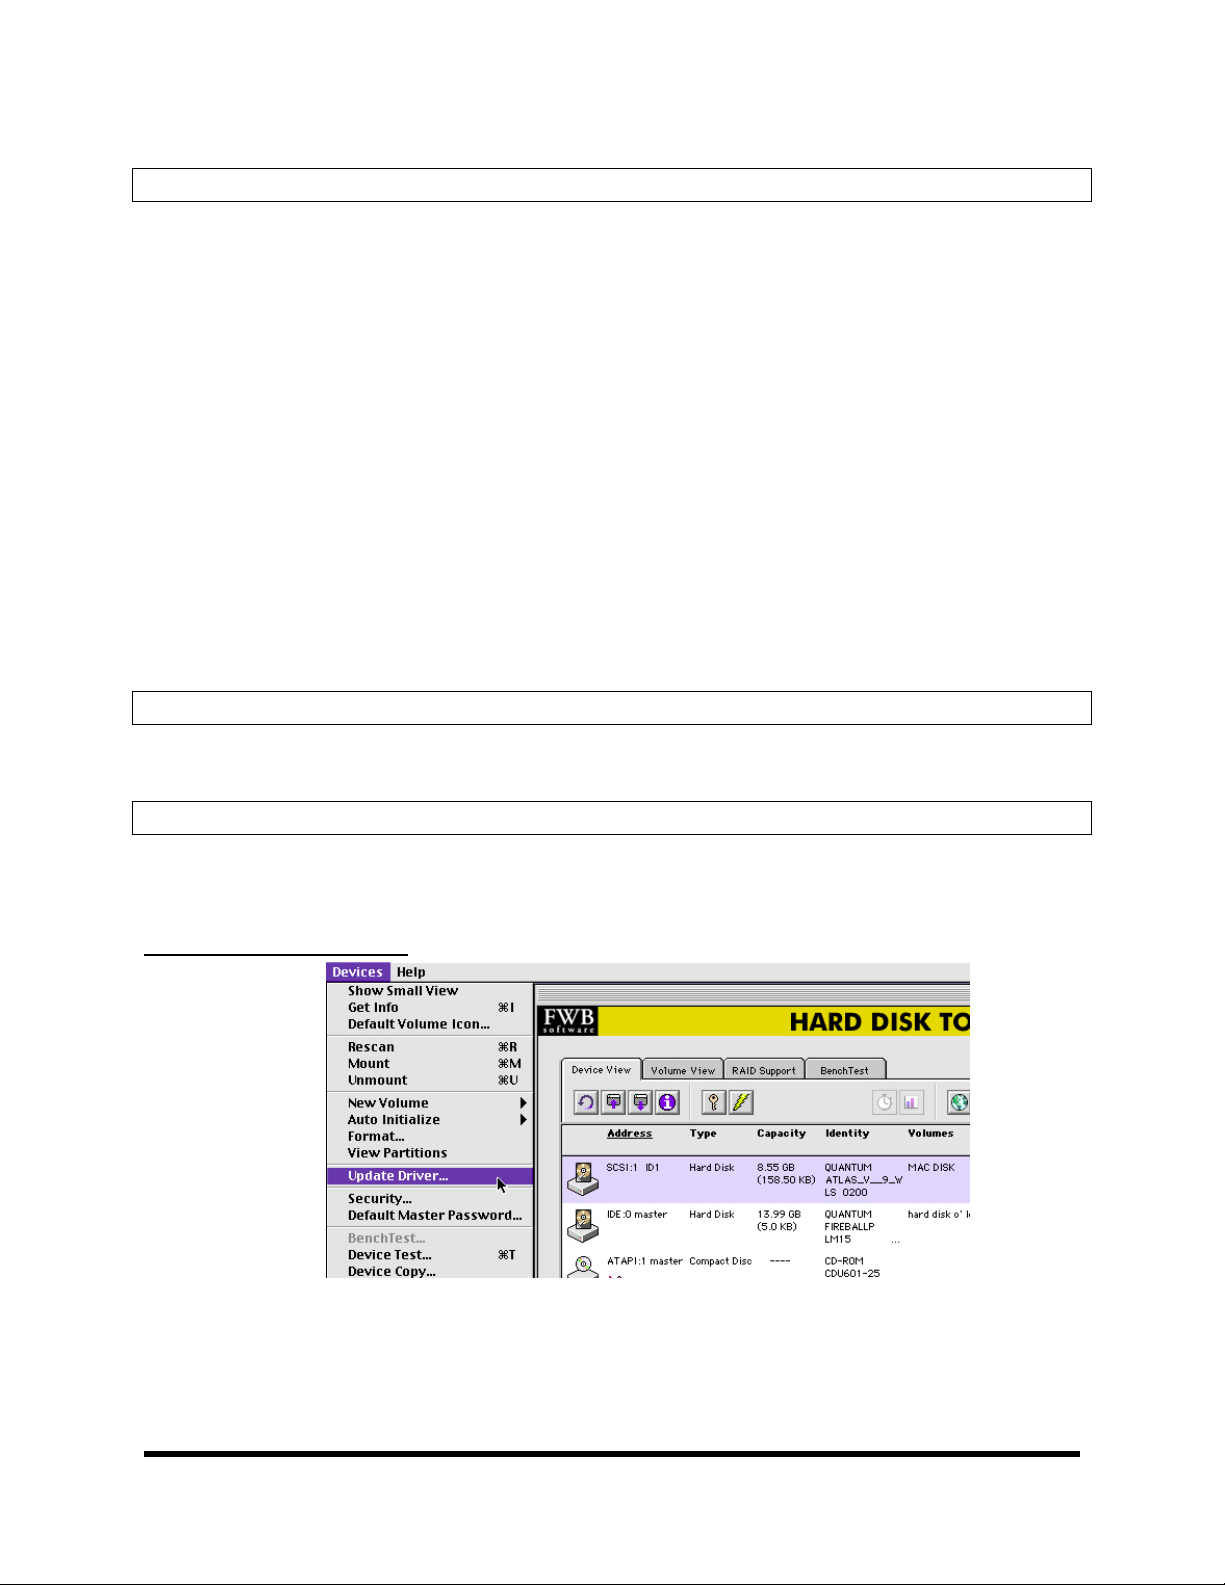
Adaptec SCSI Cards & FWB
Figure 1: Updating disk driver in FWB Hard Disk Toolkit
After Updating the Driver, Hard Disk Tool Kit requests that you restart the system. YOU MUST
RESTART! IF YOU DO NOT RESTART, YOUR DATA MAY BE DESTROYED!
computer, the drive will appear on the desktop.
After restarting the
TASCAM Division/TEAC America Inc. www.tascam.com
7733 Telegraph Road, Montebello, CA 90640 USA Page 2 of 8
Page 3
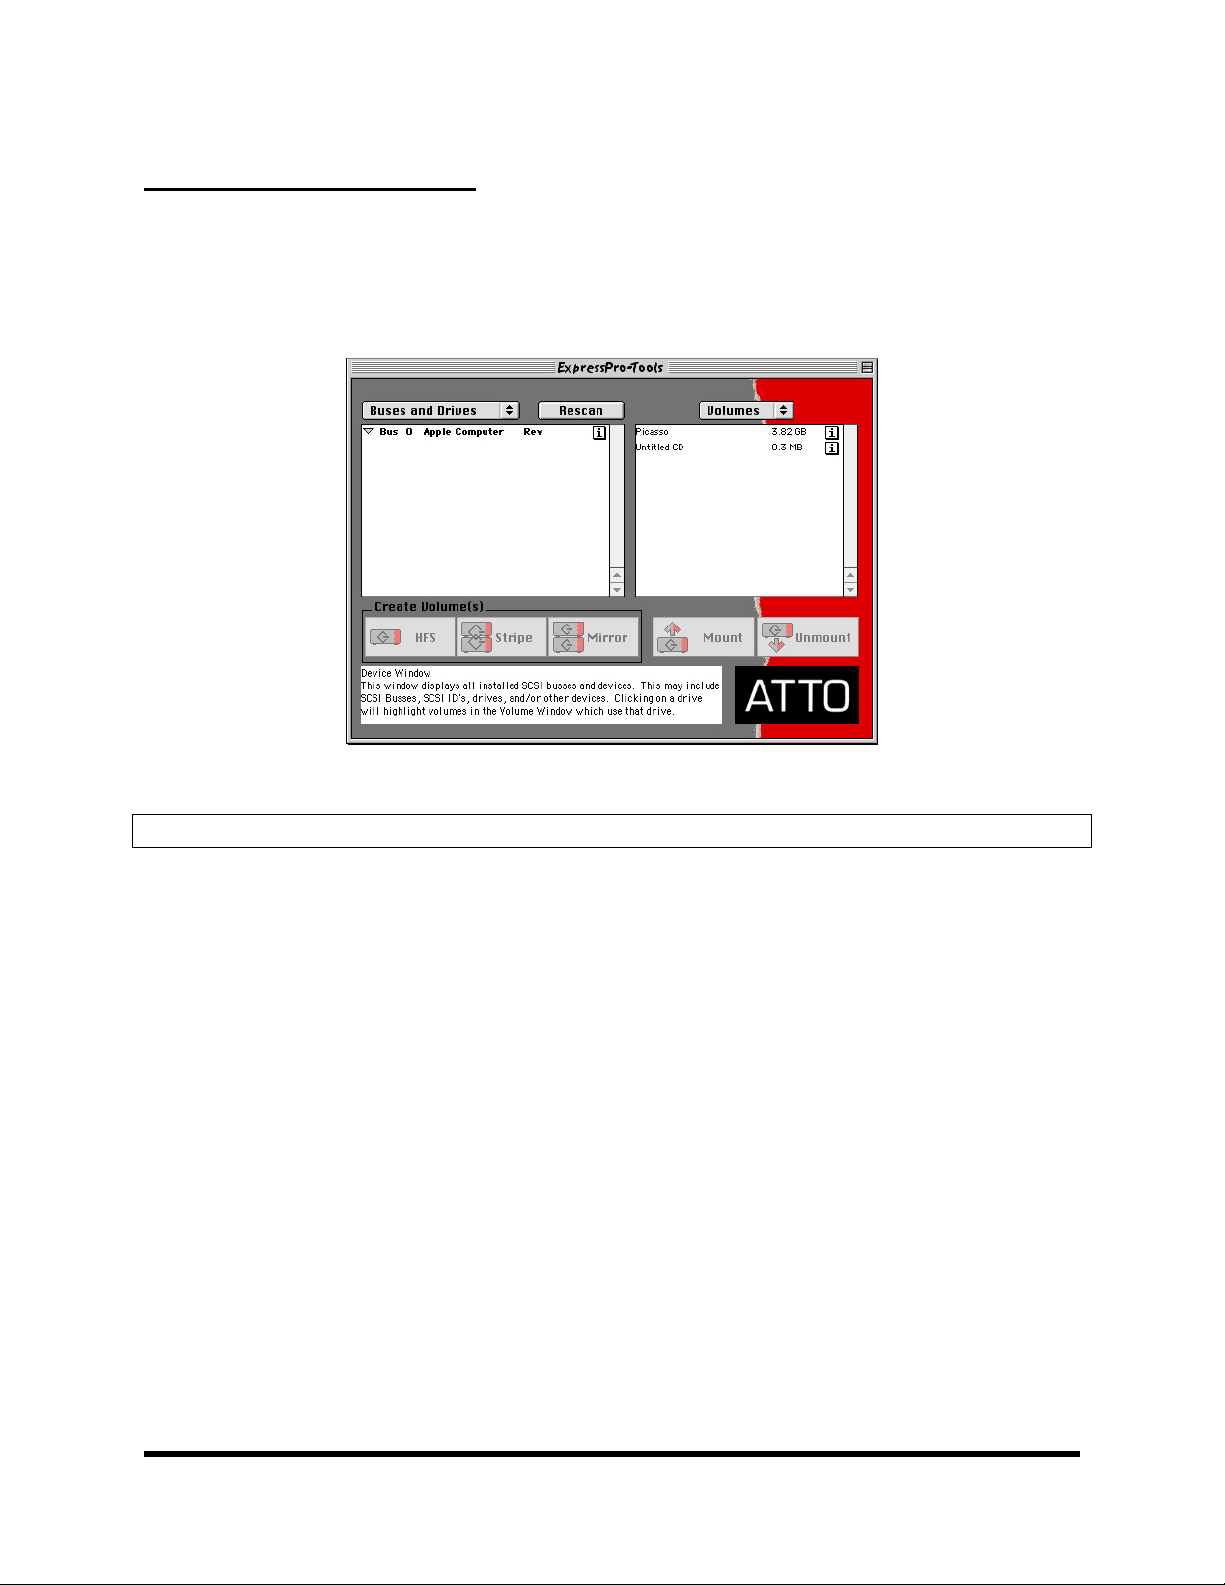
ATTO SCSI Cards & ATTO Express
When an MX-2424 Mac-formatted disk is placed on the Macintosh SCSI bus, a driver must be installed
on the disk. To install a driver, first launch the ATTO Express SCSI Utility. Highlight the drive from the
MX-2424, which will be in the left window and click on “Mount”. You will be prompted to confirm
installation of the driver. Click on OK and the drive will appear in the right window. Highlight the drive on
the right and click “Mount”. The drive will appear on the desktop. Note: this does not destroy the data on
the disk.
Figure 2: Updating the disk driver in ATTO Express
Step 4 Setting Up a Pro Tools Session
Launch Pro Tools and start a new session. Set the bit depth appropriately (24-bit or 16-bit). Next, choose
the appropriate Sample Rate and TimeCode type in the Session Setup window.
TASCAM Division/TEAC America Inc. www.tascam.com
7733 Telegraph Road, Montebello, CA 90640 USA Page 3 of 8
Page 4

Step 5 Importing Audio Files
There are two ways to do this. The first imports all of the audio and creates a new track for each file, while
the second simply places all of the imported audio into the bin.
To utilize the first method, choose "Import Audio Track" from the “File” menu:
Figure 3: Importing audio files in Pro Tools
This will bring up the following window, which will allow multiple audio files to be imported into the
Session:
Figure 4: Importing multiple audio files into a Pro Tools session
Go to the TL Projects folder on the MX-2424 drive and choose the desired project. Within the project
folder is the Audio Files folder containing all audio files. Choose the desired audio files by clicking on
"Add". Click on "Done" to proceed. Pro Tools will then calculate waveforms and add tracks containing
audio files to the Edit window.
There are two ways to utilize the second method. With a session created, click on the bar over the audio
bin that says “Audio“ (right side of the edit screen). Select “Import audio files”. The dialog box that will
come up looks very similar to the screen that you saw for the first importing example. Select your files and
push “OK”. Your selected audio files will be loaded into the bin without creating new tracks.
To use the other method, go directly to the “Audio Files” folder on your MX drive. Select all of the files that
you wish to import to PT (hold down shift to select multiple files). Drag all of the files onto the icon for the
Pro Tools application. Your selected audio files will be loaded into the bin.
TASCAM Division/TEAC America Inc. www.tascam.com
7733 Telegraph Road, Montebello, CA 90640 USA Page 4 of 8
Page 5

Step 6 Spot Mode
In the upper left of the Pro Tools Edit screen, click on "Spot" to enter Spot Mode.
Figure 4: Selecting Spot Mode in the Pro Tools edit window
If you’ve used the import command under the “File” menu, use the Hand Tool to select each audio file on
the edit screen. The "Spot Dialog" box will appear.
Click the Up Arrow to the right of "Original Time Stamp", and press OK.
Figure 6: Selecting “Original Time Stamp” in the Pro Tools Spot Dialog window
Each audio file will then be placed at its original TimeCode location.
Figure 7: Audio files spotted at their originally recorded location
If you’ve used either of the second import options mentioned, create a new track for each file you wish to
play at the same time (Shift/Command/N). If all of the files start at the same time, or you’ve Tape Mode
Converted them, you can select all of the files and drag them out of the bin onto the timeline. The Spot
dialog should appear, and at that point you should click the Up Arrow to the right of “Original Time Stamp”
and press “OK”. Your audio will be spotted to its originally recorded time stamp.
TASCAM Division/TEAC America Inc. www.tascam.com
7733 Telegraph Road, Montebello, CA 90640 USA Page 5 of 8
Page 6

Importing Audio from a Pro Tools Session into an MX-2424
Follow the steps below to import audio files from a Pro Tools session into an MX-2424 project.
Step 1: What Type of Pro Tools Session?
There are three possible scenarios that you may need to use the audio files from a Pro Tools session in
an MX-2424 project: 1} A straight recording; 2} An edited recording (no processing or automation); 3}
Processed tracks with automation or plug-in effects. These three scenarios require different steps in Pro
Tools before moving the audio files to the MX-2424.
It will be necessary to have the MX-2424 connected to a computer running ViewNet to perform this
procedure.
SCENARIO 1: A Straight Recording:
This is a recording of audio directly into Pro Tools in single passes. No editing, automation or processing
has been applied. There is nothing further to do in Pro Tools except name the audio files as desired. To
do so, double-click on a region in Pro Tools with the Hand Tool. A dialog box will open allowing you to
rename the region only or the region and its associated disk file. Choose to rename the region and the
disk file since it is the disk file (audio file) that you will be moving to the MX-2424.
Figure 8: Renaming region and audio file in Pro Tools
SCENARIO 2: An Edited Recording:
This is a recording of in Pro Tools that has been edited but does not utilize any automation or processing.
Such a Pro Tools session is considered to be an EDL (Edit Decision List) in which the regions in Pro
Tools reference parts of larger audio files. It is necessary to create audio files, which can be imported
into an MX-2424 project, that contain these edits. There are two ways to do this:
under the edit menu or
contiguous audio files of the selected regions in the Pro Tools edit window, replacing the selected
regions. The
versions. Name the new audio files created by the
Playlist
Duplicate
function of Pro Tools may be used if it is desired to keep both the new and old
under the AudioSuite Menu. Both of those functions will create
Consolidate Selection
Figure 9: Before Consolidate
Figure 10: After Consolidate
or
Consolidate Selection
Duplicate
as needed.
TASCAM Division/TEAC America Inc. www.tascam.com
7733 Telegraph Road, Montebello, CA 90640 USA Page 6 of 8
Page 7

SCENARIO 3: Processed/Automated Tracks
These are tracks is a Pro Tools session that may or may not be edited but do contain automation (such
as volume automation) and/or plug-in insert processing (such as compression). These tracks must be
bounced to new tracks. The bounced tracks will reference audio files that are recordings of the original
tracks with automation and processing.
This may be done is Pro Tools routing the output of the original track to the input of a destination track to
be used for the bounce (shown below).
Be sure to observe odd/even panning.
Figure 11: Routing output of original track to input of destination track
Step 2: Place the Audio Files in the Desired Location on the Hard Drive
The audio files from Step 1 may be placed directly into the Audio Files folder of the desired MX-2424
project on the hard drive while mounted on the computer. If an MX-2424 project does not yet exist on the
hard drive, a special folder named exactly TL_Imports may be created at the root level of the drive and
the audio files placed there.
Step 3: Mounting the Hard Drive on the MX-2424
The Disk from the computer must be mounted on the MX-2424. Remember to always power down when
connecting SCSI cables, and always Mount/Un-mount when using Storcase Carriers.
NOTE: If you are already using Ethernet for backup/restore or file transfer, it would be possible to
transfer the audio files to the MX-2424 using the ViewNet application. However, when dealing with
Sound Designer II audio files, the resource fork is stripped by the Java Runtime Environment leaving non-timestamped WAV or AIFF files. This limitation does not exist when moving a hard
drive from the computer to the MX-2424 or when using Broadcast Wave files on a PC.
TASCAM Division/TEAC America Inc. www.tascam.com
7733 Telegraph Road, Montebello, CA 90640 USA Page 7 of 8
Page 8

Step 4: Importing the Audio Files into an MX-2424 Project
Figure 12: Importing an audio file at its Originally recorded location in an MX-2424 project
Once the hard drive is mounted on the MX-2424 and the desired project open:
1. Select
Import/export
audio from the
2. Choose the place to look for the audio files using the
3. Choose the way the audio files are to be used in the current project using the
pulldown menu.
4. Edit-enable the desired destination track.
Clipboard
•
Original time
•
Selected event
•
will place the audio files into the clipboard for pasting at any desired location.
will place the audio files in the project according to their time stamp.
will place the audio files on an edit-enabled track at the In point.
File
menu. The window shown above will open.
Display files
pulldown menu.
Import destination
NOTE:
Original time
information.
may not be used on WAV or AIFF files since they do not contain time stamp
TASCAM Division/TEAC America Inc. www.tascam.com
7733 Telegraph Road, Montebello, CA 90640 USA Page 8 of 8
 Loading...