

Page 1
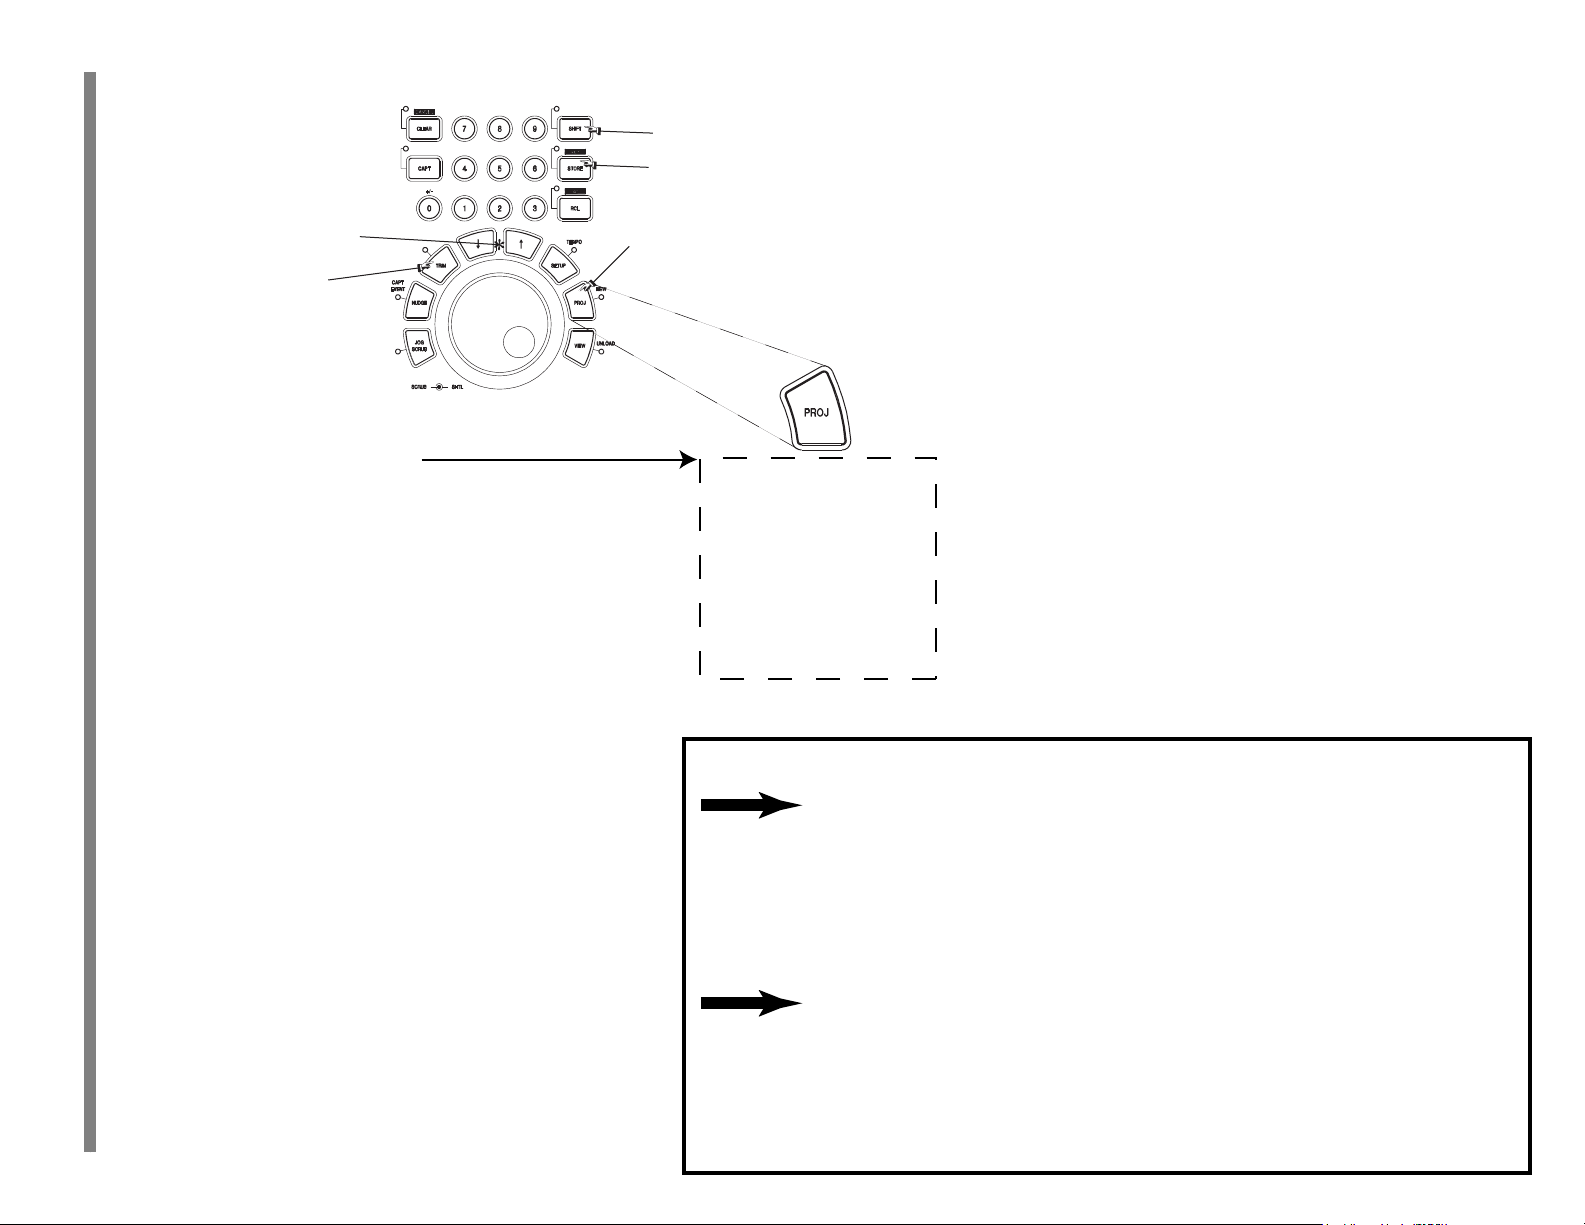
THE PROJECT KEY
TASCAM MX-2424 QUICK REFERENCE GUIDE
SHIFT
YES
PROJECTARROW KEYS
TRIM KEY
LOAD
This function loads the selected project from a hard
drive into the MX-2424. Any currently open project will
be automatically closed.
DELETE
This function deletes the selected project from the
MX-2424's file directory. To recover the drive space
it will be necessary to use the Disk Cleanup function
in Menu 720.
RENAME
This function will rename the selected project.
Press PROJ once to access
1
these Project level functions.
2 Use the Arrow Keys to select the function.
Press PROJ again (or YES) to activate
3
the desired function.
4 Use the Arrow Keys to select a source Project
then press YES to complete the selection.
If a project of the same name exists on more than
one drive attached to the MX-2424 the SCSI ID #
of the drives will be displayed in the LCD.
Use of LOAD, DELETE, or RENAME will only require steps
1 through 4.
Use of SMART COPY or TAPEMODE CONVERT
will additionally require steps 5 through 7.
5 The MX-2424 will prompt for the SCSI ID number
of the destination drive. Press the TRIM key then
use the Arrow keys to change the selected SCSI device.
Press YES to confirm the selection.
6 A new name may then be entered for the destination
project by pressing TRIM, using the Shuttle Wheel to
move the cursor and the Arrow Keys to change the
character. Press YES to confirm a new or existing
project name.
Load
Delete
Rename
Smart Copy
TapeMode Convert
Convert/Copy Abort
1 If more than one hard drive is attached to the MX-2424 press
More Than
1 Drive
Internal
Drive Only
SETUP, then the numerical key "7", then the Up arrow key to access
Menu 701.
2 Press TRIM and use the Arrow keys to select the SCSI ID number of the
drive that will contain the new project. Press YES to confirm the selection.
Proceed to Step #3.
3 If the MX-2424 has only one hard drive attached
press SHIFT then PROJ to directly access Menu 800.
4 Use the SHTL ring to move the cursor and the UP/DOWN Arrow keys
to change the character to enter the desired new project name.
SMART COPY
This function is used to backup, restore and copy
projects from one drive to another.
TAPEMODE CONVERT
This function will make a TapeMode copy of a selected
project creating a single contiguous audio file per track.
CONVERT/COPY ABORT
This command will abort and Smart Copy or TapeMode
Convert operation in progress.
TO CREATE A NEW PROJECT
7 "Are you sure (y/n)?" Press YES to complete the
operation or NO to abort.
5 Press YES to confirm.
Page 2

0xx Rates & References
0xx Rates & References
2xx System Controls
2xx System Controls
3xx MIDI/P2
000 Control Mode
Local/TL-Bus
Timecode Chase
MTC Chase
Varispeed
Theatre Play
001 Frame Reference
Automatic
Video
002 Sample Reference
Internal/Frame
Ext Wordclock
Dig In 1,2
Dig In 9,10
Dig In 17,18
2CH In
003 Samp Ref Status
Display Only
004 Timecode Type
23.976/24
24/24
24.975/25
25/25
29.97/DF
29.97/NDF
30/DF
30/NDF
005 Sample Rate
42294
42336
44056
44100
44144
45938
45983
46034
46080
47952
48000
48048
50000
50050
84587
84672
88112
88200
88288
91875
91967
92068
92160
95904
96000
96096
100000
100100
006 Varispeed Rate
87.50%
~
100%
~
112.50%
020 Auto Chase
Off
On
030 Timecode Muting
Normal
Mute High Speed
Mute Low Speed
Mute High & Low
035 MTC Full Message
Off
On
060 Word->AES Phase
Low-High (dflt)
High-Low
1xx Bus Controls
110 TL-Bus Request
Off
Slave
Master
111 Ident Request
Auto Assign
01
~
32
112 Ident Assigned
Display Only
115 TL-Bus Rate Mult
Use Master 1x,2x
Use Local 1x,2x
200 Record Mode
Non-Destructive
TL-Tape Mode
202 Record Key
Record + Play
Record
203 Rehearse Key
Rehearse + Play
Rehearse
204 Capt React Time
0 Frames
~
255 Frames
205 Punch to In/Out
On
Off
206 Track Key Punch
On
Off
210 Loop Mode
Play Repeatedly
Play Once & Cue
Play Once & Stop
211 Auto V Track
Auto V Track Off
Auto V Track On
212 Pre-Roll
00:00:03:00
213 Post-Roll
00:00:02:00
230 Tape Mode Start
01:00:00:00
231 Tape Mode Length
00:10:00:00
260 Rollback Length
00:00:05:00
270 Subframe Display
On
Off
280 Mix Mode
Off
Record
Playback
290 More Edits
Left Cut
Left Local Cut
Multi Insert
Multi Paste
Paste Left
Render
Reverse
Capture Track
3xx MIDI/P2
300 MIDI Device ID
1
~
74
~
127
301 MMC Tracks/ID
24
8
340 Remote Assign
RC-2424
P2 In
360 P2 Device
TASCAM MX-2424
Sony PCM-3324S
Sony PCM-7030
Sony BVU-950
[Hex 00]
[Hex 49]
[Hex 7E]
[one ID]
[three ID's]
361 P2 Track Arm
Digital Audio
Analog A1-A4
Local
Local [enbl=A1]
Local [enbl=A2]
Local [enbl=A3]
Local [enbl=A4]
Console
362 P2 Punch Delay
Off
1 frame
2 frames
3 frames
4 frames
5 frames
6 frames
364 P2 Chase Control
Disabled
Enabled LTC
Enabled MTC
Enabled Auto
4xx Input/Output
400 Inputs 1-8 /1x
Analog
Dig In
2Ch In
401 Inputs 9-16 /1x
Analog
Dig In
2Ch In
Analog 1-8
Digital1-8
402 Inputs 17-24 /1x
Analog
Dig In
2Ch In
Analog 1-8
Digital1-8
410 Inputs 1-12 /2x
Analog
Dig In
2Ch In
Page 3

4xx Input/Output
5xx Audio Controls
7xx Disk
8xx Project
900 System
450 Dig I/O 2x Mode
High Speed
1/2 Spd, 2 Line
451 Dig In Rate Conv
Off
On
460 2CH I/O 2x Mode
High Speed
1/2 Spd, Mono
461 2Ch In Rate Conv
Off
On
462 2Ch In Source
AES/EBU
SPDIF
465 2Ch Out Select
Silent Clock
1,2
~
23,24
[Mono:1]
[Mono:12]
466 2Ch Out Encoding
501 Auto Input
On
Off
Post
[Rec,NonPlay]
[Rec,RecRdy]
[Rec Only]
510 Crossfade Length
0 ms
~
10 ms
~
90 ms
522 Meter Clip Mode
Input Only
Input or Play
540 Gapless Punchout
On
Off
570 Waveform Record
On
Off
6xx Reserved
700 Disk Encoding
SDII 16-bit
SDII 24-bit
WAV 24-bit
WAV 16-bit
701 Rec Disk
SCSI Disk 0
~
SCSI Disk 6
None
702 Rec Disk Status
Display Only
703 Rec Disk Free
Display Only
710 Disk Initialize
Init Disk 0
~
Init Disk 6
711 Disk Low Format
Format Disk 0
~
Format Disk 6
800 Project Name
MX Project.tl
800 Mix Project Name
MX Project-1.tl
810 Track Prefix
MX Trk
820 File Prefix
MX Project
900 System
900 Store Settings
User Default
User 1 ~ 10
901 Recall Settings
Factory Default
User Default
User 1 ~ 10
910 Set MM:DD:YY
950 IP Address
192.168.000.016
951 Net Mask
255.255.255.000
952 Gateway Address
000.000.000.000
988 Installed RAM
Display Only
990 Software Version
Display Only
995 Save S/W To Card
Press Store Key
999 Copyright (c)
TimeLine 2000
Professional
Consumer
This Menu Bank
is reserved for
future use
Bold Text Setup Menu Name
BlackText Possible Parameter Value
Italic Text Default Parameter Value
Grey Text Read-Only
http://www.tascam.com
720 Disk Cleanup
Cleanup Disk 0
~
Cleanup Disk 6
730 Backup Erase
Erase Device 0
~LEGEND
Erase Device 6
740 Copy Status
Display Only
790 Drives Mounted
Display Only
Date: --:--:--
911 Set HH:MM:SS
Time: --:--:--
920 LED Brightness
0
~
8
~
15
930 Machine ID
Display Only
940 Machine Name
My MX-2424
Page 4

Quick locate functions
• Press LOOP & LOCATE simultaneously to send the play head to the
In point (minus pre-roll)
• Press STOP & REW to move the play head back 5 seconds from its
current location
• Press STOP & FF to move the play head forward 5 seconds from its
current location
• Press CAPT then IN to store an In point
• Press CAPT then OUT to store an Out point
• Press IN to locate directly to the In point
• Press OUT to locate directly to the Out point
• Press PLAY & REW simultaneously to play backwards
Recalling the Factory Defaults
1. Press SETUP
2. Press the numerical key “9”
3. Press the UP Arrow key once
4. Press YES
Storing a User Default
This will store all current menu settings into a special memory location
that will become the startup condition for the MX-2424 if a User Default
is saved. If no User Default it saved the Factory Default will remain the
startup condition.
1. Press SETUP
2. Press the numerical key “9”
3. Press YES
Setting the input source
1. Press SETUP
2. Press the numerical key “4”
3. Use the UP/DOWN Arrow keys to select Menu 400 (inputs 1-8),
Menu 401 (inputs 9-16) or Menu 402 (inputs 17-24)
4. Press TRIM
5. Use the UP/DOWN Arrow keys to select the desired input source
6. Press YES
Arming a track for record
1. Press the REC SEL key
2. Press the triangular track select key(s) for desired tracks to be
recorded on
Setting the clock source
1. Press SETUP
2. Press the numerical key “0”
3. Press the UP Arrow key twice
4. Press TRIM
5. Use the UP/DOWN Arrow keys to select the desired clock source
6. Press YES
Enabling time code chase
1. Press SETUP
2. Press the numerical key “0”
3. Press TRIM
4. Press the UP or DOWN Arrow key until Timecode Chase
is displayed in the LCD
5. Press YES
6. Press ONLINE
7. The TC Chase LED will flash until time code is received
Enabling TL-Bus Operation (Master)
1. Connect a TL-Bus cable from the TL-Bus Out of the
master machine to the TL-Bus In of the slave machine
2. Press SETUP
3. Press the numerical key “1”
4. Press TRIM
5. Use the UP/DOWN Arrow keys until Master is displayed
in the LCD
6. Press YES
7. Press SETUP
8. Press ONLINE
Enabling TL-Bus Operation (Slave)
1. Connect a TL-Bus cable from the TL-Bus Out of the
master machine to the TL-Bus In of the slave machine
2. Press SETUP
3. Press the numerical key “1”
4. Press TRIM
5. Use the UP/DOWN Arrow keys until Slave is displayed in
the LCD
6. Press YES
7. Press SETUP
8. Press ONLINE
Enabling varispeed operation
1. Press SETUP
2. Press the numerical key “0”
3. Press TRIM
4. Use the UP/DOWN Arrow keys until Varispeed is
displayed in the LCD
5. Press YES
6. Press the UP Arrow key until Varispeed Rate appears in
the LCD
7. Press TRIM
8. Use the UP/DOWN Arrow keys or Jog Wheel to change
the varispeed amount
9. Press TRIM
10. Press SETUP
Performing an Auto Rehearse
1. Play the recording
2. Press CAPT at the desired punch in point then press IN
3. Press CAPT at the desired punch out point then press OUT
4. Press LOOP and LOCATE simultaneously
5. Press SHIFT then REH, the REH LED will flash
6. Press PLAY, the MX-2424 will perform the Auto Rehearse on any
track(s) that are record-enabled
7. Press STOP after the auto punch is completed
8. Press REH to disable Auto Rehearse
Performing an Auto Record
1. Play the recording
2. Press CAPT at the desired punch in point then press IN
3. Press CAPT at the desired punch out point then press OUT
4. Press LOOP and LOCATE simultaneously
5. Press SHIFT then REC, the REC LED will flash
6. Press PLAY, the MX-2424 will perform the Auto Record on any
track(s) that are record-enabled
7. Press STOP after the auto punch is completed
8. Press REC to disable Auto Rehearse
Performing an edit (from the front panel)
1. Play the recording
2. Press CAPT at the desired edit in point then press IN
3. Press CAPT at the desired edit out point then press OUT
4. Press IN or OUT to locate directly to that point
5. Press SCRUB/SHTL to use the Jog Dial to scrub the audio to “fine
tune” the In and Out points then recapture them as in steps 2 & 3
above.
6. Press STOP
7. Press the EDIT key
8. Select the desired tracks to edit with the triangular track select
keys. The SEL indicator will light on selected tracks.
9. Press the key for the desired edit function. (ie. Cut, Copy, etc.)
• Edits may be undone with the UNDO key.
• Edits are only possible when the EDIT indicator is lit.
Enabling one-button punching
1. Press SETUP
2. Press the numerical key “2”
3. Press the UP Arrow key once
4. Press TRIM
5. Press the UP or DOWN Arrow key until Record is displayed in the
LCD
6. Press YES
7. Confirm your selection by pressing YES again
8. Press SETUP
• Pressing only REC will initiate recording
 Loading...