

Page 1
TCL电子控股有限公司
李良
繁
数字签名人 李良繁
DN:cn=李良繁,c=<无
>
日期:2020.08.21
09:21:09 +08'00'
运营中心-惠州T V工厂-PE 部
产品辅助设计室(外销订单)
制作表编号:HZ2020-08-287R
物 料 编 号:72-RT51GS-XRUCQ
内 容:说明书
型 号:P715
机 芯:RT51GS2-RU
牌子名称: TCL P717
销 往 RUSSIA 地:
BOM编号:H7-50V83NH-URND1AA
批 次 号:
日 期:2020-8-20
ELQ154931F
1:1
A5
80g双胶纸
白底黑字
基础说明书72-RT51GS-ERU1B R2
英语+俄语
包含底插:70-STDP80-EAP1A(75P717)
70-STDV83-EAP1A(43~65P717)
俄语部分增加客户要求的内容,以业务确认为准。
制 作 人
PREPARED BY
:
黄艳霞
项目/美工 工程师
ENG.CHECKED BY:
市场业务中心确认
CONFIRM BY:
Page 2
43P717/50P717/55P717/65P717/75P717
Page 3
Table of Contents
Chapter 1: Introduction
Precautions ...............................................................3
Warning ...................................................................3
Product ....................................................................3
Power and Plug .......................................................3
Power Cord and Signal Cable .................................3
Use Environment .....................................................3
Cleaning ..................................................................3
Sockets ......................................................................4
Remote Control Functions ........................................5
RC802V remote control .............................................5
RC802N remote control .............................................6
Chapter 2: Getting Started
Switching On .............................................................7
Switching Off .............................................................7
Network Connection .................................................8
TV Buttons ...........................................................9
Initial Setup .............................................................9
Chapter 3: Basic TV Operations
Accessing Channels ..............................................10
By RC802V remote control ...................................10
By RC802N remote control.....................................10
Watching Connected Devices ...............................10
Adjusting Volume ...................................................10
Accessing Smart TV Homepage ............................ 01
Accessing TCL Channel .........................................10
Using System Settings Menu .................................10
Using TV Settings Menu ........................................10
Chapter 4: Using More of Your TV
Installing Channels ......................................11
Common Inter face.....................................................11
Using the Common Interface Function.....................11
Accessing Common Interface Services....................11
Using Subtitles ........................................................11
Turning On/Off Subtitles .........................................11
Enabling Subtitle Languages on Digital TV Channels .......11
Selecting a Subtitle Type on Digital TV Channels ...12
Using Teletext .........................................................12
Selecting Decoding Page Language ......................12
Digital Teletext Language .......................................12
Using Instant Power On ..........................................12
Network Wake Up ................................................12
T-Link .......................................................................12
Enabling or Disabling T-Link ...................................12
Using Auto Power On .............................................12
Using Auto Standby .................................................12
Using EPG (Electronic Programme Guide).................12
Bluetooth Function ..................................................13
Time Shift ..................................................................13
PVR (Personal Video Recorder)
T-Cast .........................................................................14
Reset Shop ...............................................................14
Password in Parental Control ................................14
Using the Hands-free TV Voice Control ..............14
.................................13
Chapter 5: Other Information
Problems & Solutions .............................................16
Troubleshooting .....................................................17
Legal Statement ......................................................18
Mount the Stand .......................................................19
..........14
2
Page 4
IntroductionChapter 1
N
Precautions
Read all of the instructions before operating the set.
Keep these instructions well for future use.
Warning
Never place a television set in an unstable location. A
television set may fall, causing serious personal injury
or death. Many injuries, particularly to children, can be
avoided by taking simple precautions such as:
- Using cabinets or stands recommended by the
manufacturer of the television set.
- Only using furniture that can safely support the
television set.
- Ensuring the television set is not overhanging the
edge of the supporting furniture.
- Not placing the television set on tall furniture
(for example, cupboards or bookcases) without
anchoring both the furniture and the television set to
a suitable support.
- Not placing the television set on cloth or other
materials that may be located between the television
set and supporting furniture.
- Educating children about the dangers of climbing on
furniture to reach the television set or its controls
This symbol indicates that high voltage is
present inside. It is dangerous to make any
kind of contact with any internal part of this
product.
This symbol indicates that the fuse may
be in the neutral, and that the mains shall
be disconnected to deenergize the phase
conductors.
If an outside antenna or cable system is connected to
the product, be sure the antenna or cable system is
grounded by a skilled person so as to provide some
protection against voltage surges and built-up static
charges.
If your existing television set is being retained and
relocated, the same considerations as above should be
applied.
Product
• Do not block or cover the ventilation openings on the
back cover.
• Do not push objects of any kind into this unit through
the cabinet slots as they could touch the current
carrying parts or short-circuit parts, resulting in re,
electric shock, or damage to the unit.
• Do not attempt to open the cabinet as this may cause
damage. There are no parts inside you can service by
yourself. Refer all servicing to qualied personnel.
• Do not touch the screen surface with ngers as this
may scratch or mar the TV screen.
• Do not impact the TV screen with hard pressure as
this may damage the TV screen severely.
Power and Plug
Unplug the set under the following conditions:
.
- If the set will not be used for a long period of time.
- If the power cord or the power outlet/plug is
damaged.
- Follow the instructions to install and adjust the
product. Adjust those controls that are covered in
these operating instructions as improper adjustment
of other controls may result in damage. If this
happens, unplug the set and refer to the service
personnel.
- If the set is subject to impact or has been dropped
and the cabinet has been damaged.
• Where the mains plug or an appliance coupler is
used as disconnect device, the disconnect device
shall remain readily operable.
(*Where an all-pole mains switch is used as the
disconnect device, the switch shall remain readily
operable.)
Power Cord and Signal Cable
• Do not allow anything to rest on or roll over the power
cord and the signal cable.
• Protect the power cord and the signal cable from
being trampled.
• Do not overload the power cord or the power outlet.
• Do not expose the power cord and the signal cable to
moisture.
Use Environment
• Do not place the set on an unstable cart, stand, or
table.
• Place the set on a place that allows good ventilation.
• Do not use the set near damp, and cold areas.
• Do not expose the set to excessive heat such as direct
sunlight, re, or the like and no naked ame sources,
such as lighted candles, should be placed on the
apparatus.
• Do not expose the set to dripping or splashing and
no objects lled with liquids, such as vases, shall be
placed on the apparatus.
• Do not use the set in dusty environments.
• Operating Temperature: 5°C to 35°C (41°F to 95°F)
Operating Humidity: 20% to 80%, non-condensing
Storage Temperature: -15°C to 45°C (5°F to 113°F)
Storage Humidity: 10% to 90%, non-condensing
Cleaning
• Dust the set by wiping the screen and the cabinet with
a soft, clean cloth or some special liquid cleaner.
• Do not apply excessive force to the screen when
cleaning.
• Do not use water or other chemical cleaner to clean
the screen as this may damage the surface of the TV
screen.
All other safety instructions about our TV sets are
also applicable here. (Note: Certain TV model is not
designed to be mounted to the wall.)
3
Page 5
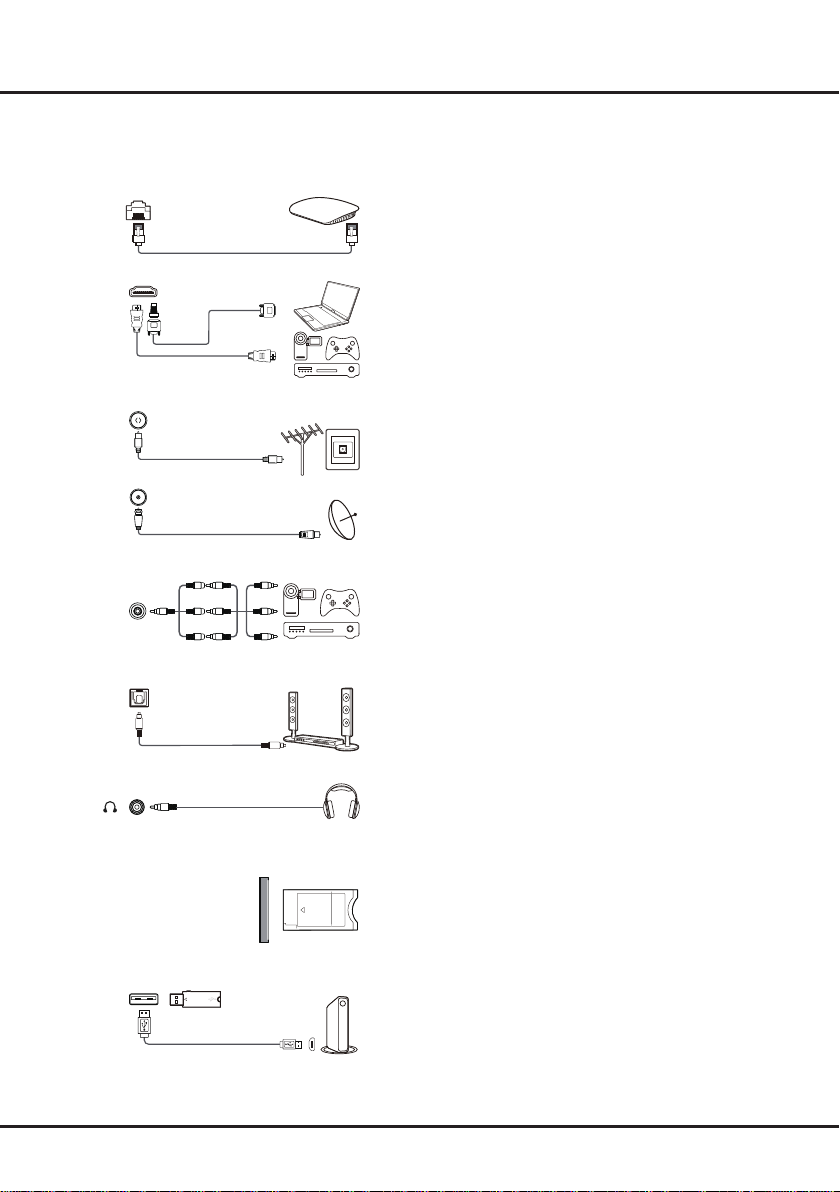
Introduction
Cable input
AV adapter
Sockets
Note: The location and names of the sockets on the TV may vary according to TV model, and not all sockets
available on all models.
LAN
HDMI
or HDMI
(Service port)
or HDMI
(ARC)
Antenna/
Satellite
input
Digital
audio out
(Optical)
LAN
Router / Modem
This socket can be used to connect to external modem or network
access equipment.
HDMI, HDMI (Service port) or HDMI (ARC) socket (input)
The HDMI (High-Denition Multimedia Interface) socket can be
used to connect a Blu-ray player, PC with a compatible video
card installed, certain DVD players or a high-denition compatible
digital satellite decoder. This socket provides an uncompressed
digital connection that carries both video and audio data by way
of an integrated mini-plug cable.
Antenna/Cable input socket
This socket can be used to connect the outside aerial or cable
network.
Satellite input socket
This socket can be used to connect a coaxial cable to receive the
signal from your satellite receiver.
AV adapter socket (input)
This socket can be used to connect the attached AV adapter
V L R
V L R
V L R
cable with VIDEO and AUDIO L & R IN sockets. The AV IN
sockets can be used to connect a range of equipment, including
video recorders, camcorders, decoders, satellite receivers, DVD
players, or games consoles.
Digital audio out (Optical) socket
This socket can be used to connect a compatible digital audio
receiver.
Headphone socket (output)
This socket can be used to connect headphones or stereo
earphones.
Warning: Excessive sound pressure from earphones and
headphones can cause hearing loss.
Common interface
USB 2.0
Common interface slot
This slot can be used to watch encrypted digital TV channels by
inserting a CAM (Conditional Access Module) along with a smart
card provided by a digital TV service operator.
USB 2.0 socket (input)
HDD
This socket can be used to connect a USB 2.0 device.
Note: The number of USB sockets on the TV may vary
according to TV model.
4
Page 6

Introduction
1 2
3
Remote Control Functions
Most of your television's functions are available via the menus that appear on the screen. The remote control(s)
supplied with your set can be used to navigate through the menus and to congure all the general settings.
Notes:
1. Figures and illustrations in this operation manual are provided for reference only and may differ from actual product
appearance. 2. The remote control type may be changed without notice, please refer to your acutal remote conrtol
supplied with your TV. 3. Certain function may not be available for some models, e.g. GUIDE functions are only
available under DTV source. And DTV is not available for certain model. 4. The Google Assistant is not available in
certain languages and countries.
RC802V remote control
Standby / quit standby.
To display the TV settings menu.
To access the Smart TV homepage.
To display the Option menu.
▲/▼/◄/►
Navigation direction buttons. The ▲/▼ buttons are also used to change
channels in TV mode.
To conrm an entry or selection. The button is also used to display the
OK
channel list in TV mode.
To return to the previous menu or quit an app.
To select input source.
Press the Assistant button on your remote to talk to the Google Assistant.
(Available only when the network connection works normally.)
To pop up the virtual remote control keyboard when available.
/
To control the volume.
P
+/P-
To change channels.
To access Netix. (Not available for some models.)
To access TCL Channel.
Note: Certain function may be accessed from the virtual remote control keyboard only,
please press
button on the remote to display it and operate accordingly.
Google and Android TV are trademarks of Google LLC.
How to Use the Remote Control
When using the Google Assistant button for the rst time, you will be prompted to pair the remote with the TV.
a. Keep the remote control and TV in 1 meter, please follow the on-screen guide for pairing instructions. You can use
the Google Assistant button after activating successfully.
b. This Google Assistant function is only available for content search from certain apps.
c. Set languages in the Settings to your local language or ofcial language to enhance voice search successfully.
Installing Batteries
1. Push to open the back cover as illustrated.
2. Insert two AAA batteries according to the
polarities marked on the battery case.
3. Replace the back cover as illustrated.
5
Page 7
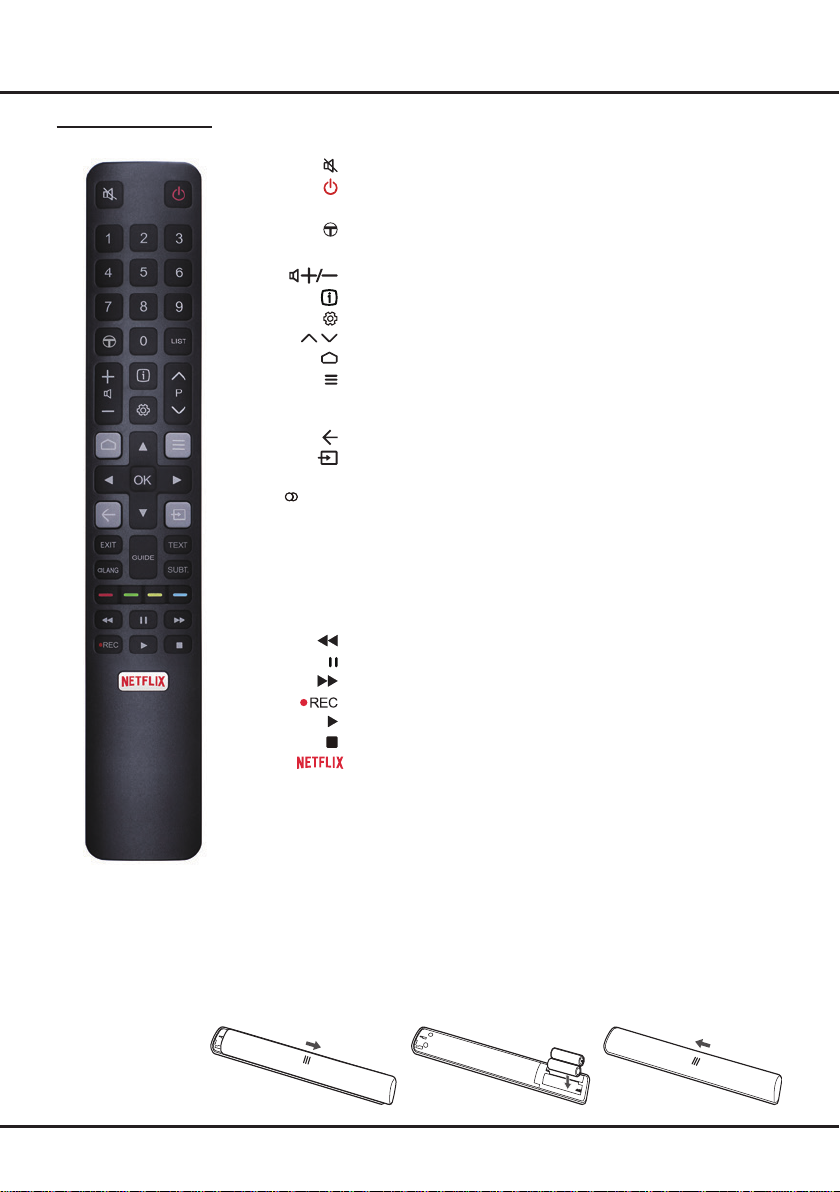
RC802N remote control
To switch the sound off and back on.
Standby / quit standby.
Numeric buttons To enter channel numbers or a digit.
To access TCL Channel.
LIST To display the channel list.
To control the volume.
To display program information, if available.
To display the TV settings menu.
P
/
To change channels.
To access the Smart TV homepage.
▲/▼/◄/► Navigation direction buttons.
Colored buttons
To display the Option menu.
OK To conrm an entry or selection.
To return to the previous menu or quit an app.
To select input source.
EXIT To exit the Settings menu.
LANG
To select an audio language available for selected
digital TV programme.
GUIDE To toggle the Electronic Program Guide on or off (only available for
digital channels).
TEXT To toggle Teletext on or off.
SUBT.
To select a subtitle language available for selected digital TV
To select tasks or Teletext pages.
To start fast reverse.
To pause playback.
To start fast forward.
To access the Record menu.
To start playback.
To stop playback.
To access Netix. (Not available for some models.)
Introduction
- Installing Batteries
1. Push to open the back cover as illustrated.
2. Insert two AAA batteries according to the polarities marked on the battery case.
3. Replace the back cover as illustrated.
6
Page 8
Chapter 2 Getting Started
Switching On
Follow the instructions on this page on how to switch on your TV set
and the remote control before going on to following pages describing
how to use the channel set-up procedure.
1. Insert two AAA batteries in the remote control.
Precautions on using batteries:
- Only use the battery types specied.
- Make sure you use the correct polarity.
- Do not mix new and used batteries.
- Do not use rechargeable batteries.
- Do not expose batteries to excessive heat such as sunshine,
re or the like, throw them in a re, recharge them or try to open
them, as this could cause them to leak or explode.
- Remove the batteries from the remote control if you are not using
it for a long period of time.
- Attention should be drawn to the environmental aspects of battery
disposal.
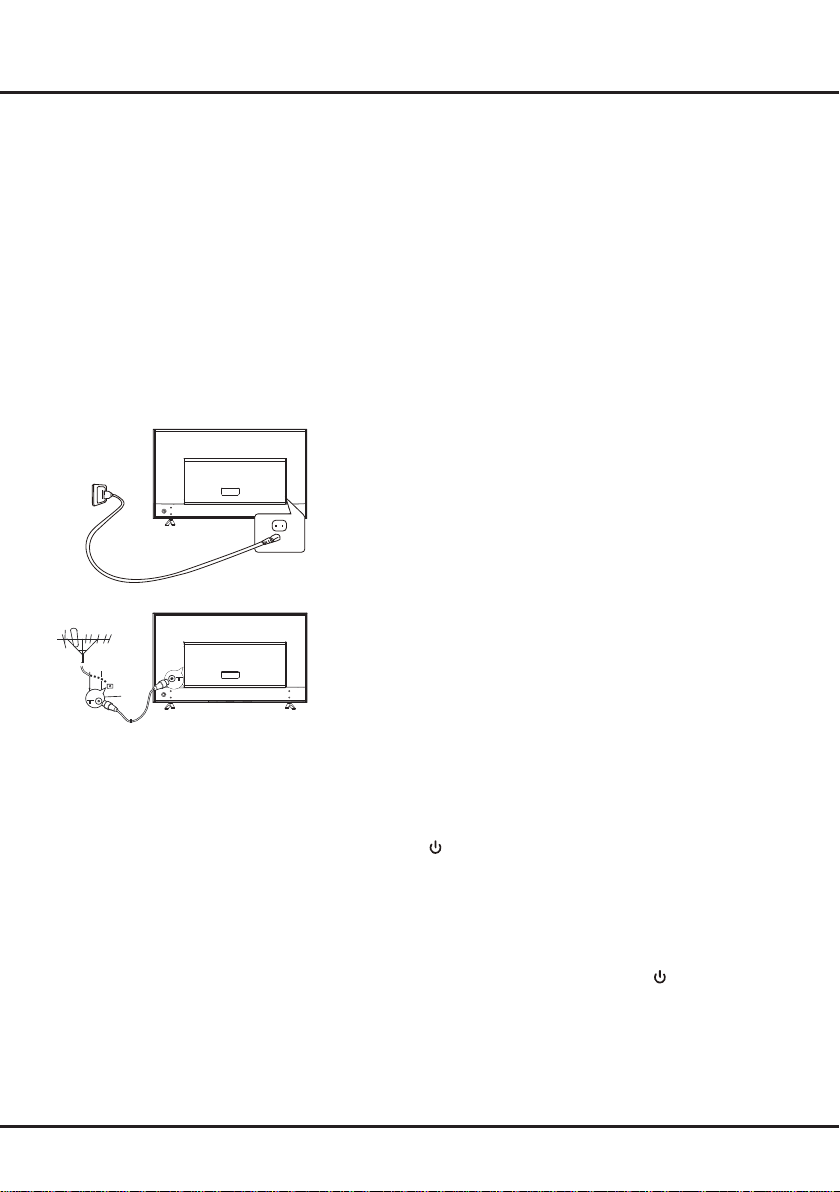
2. Connect the power cable FIRST to the television, THEN to a mains
socket. (Note: If the power cable is connected to the television,
please only connect the power cable to the mains socket.)
Your TV set should only be connected to an AC supply. It must not
be connected to a DC supply. If the plug is detached from the cable, do not, under any circumstances, connect it to a mains socket,
as there is a risk of electric shock.
Note: The gures are for representation only, the location of power
socket of the television may differ depending on the model.
3. Connect an outside aerial to the ANTENNA IN socket at the back
of the TV set.
The aerial socket (75 OHM - VHF / UHF / cable) can be used for
connecting an external aerial or other equipment tted.
Note: If you want to receive the signal from your cable or cable
box, please connect a coaxial cable to the CABLE IN socket at the
back of the TV set.
4. When powered on, the TV will be turned on directly or be in
standby mode.
If the power indicator lights up, the TV set is in standby mode.
Press the
on the TV.
button on the remote control or on the TV set to turn
Switching Off
• To put the TV set into standby mode, press the button on the
remote control. The TV set remains powered up, but with low
energy consumption.
• To switch off the TV set, unplug the mains socket from the mains
outlet.
7
Page 9
Getting Started
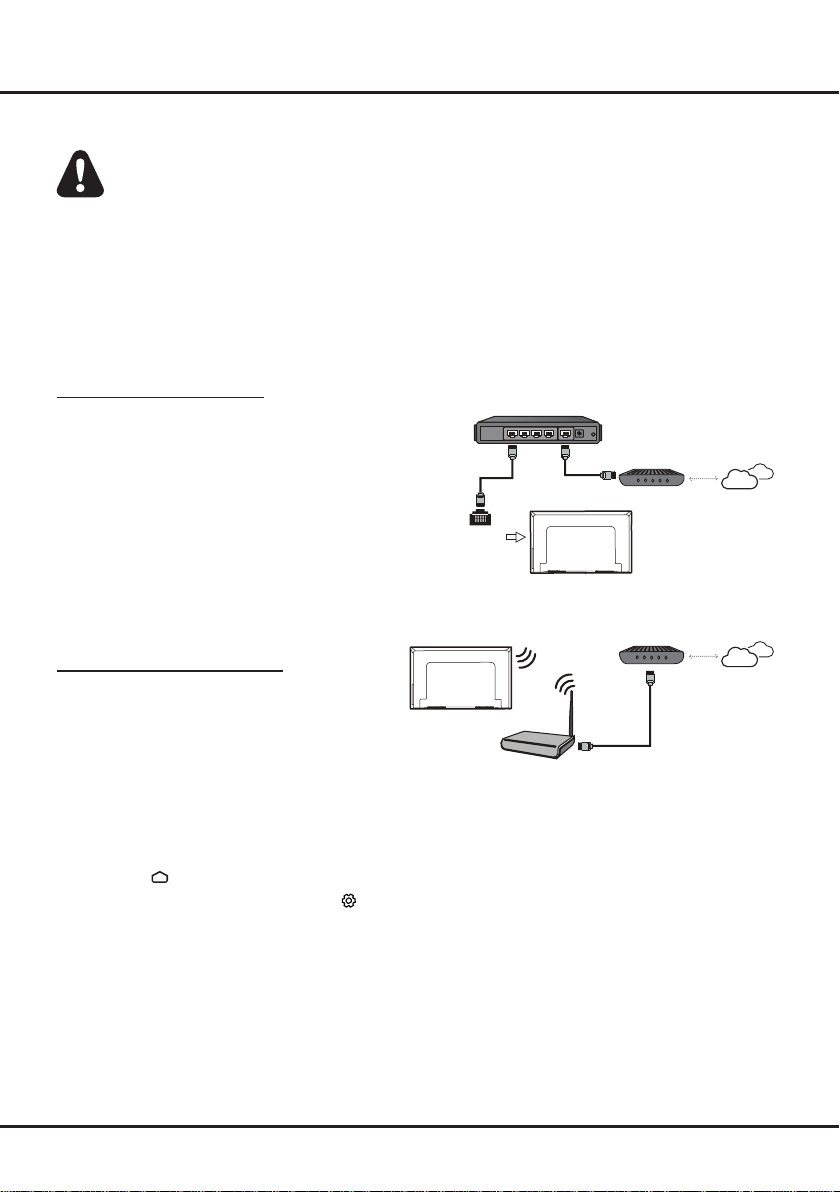
Network Connection
Your TV will require an internet connection to operate all functions. Data usage charges may apply.
Please refer to your Internet Service Provider (ISP) for additional information.
To access the Internet, you must subscribe to high speed broadband Internet service with your Internet service
provider (ISP).
Your TV can be connected to your home network in two ways:
• Wired, using the RJ45 (LAN) connector on the back panel.
• Wireless, using the internal wireless and your home wireless network.
Note: Instructions below are just the usual ways to connect your TV to the wired or wireless network. The connection
method may be different depending on your actual network conguration. If you have any questions about your
home network, please refer to your ISP.
Connecting to a Wired Network
To connect to a wired network:
1. Ensure you have:
• An Ethernet cable long enough to reach your TV
• A router or modem with an available Ethernet
port
• A high-speed Internet connection
• An Ethernet (LAN) port on the back of the TV
2. Connect your Ethernet cable to the router and to
the Ethernet port on the back of the TV.
3. Use the Network & Internet menu to configure the
TV.
Connecting to a Wireless Network
To connect to a wireless network:
1. Ensure you have:
• A router broadcasting a high-speed wireless
signal
• A high-speed Internet connection
2. Use the Network & Internet menu to configure the
TV.
LAN port
Router
Modem Internet
Modem Internet
Wireless router
Note: Please follow below steps to enter the Network & Internet menu.
1. Press
2. Press
system settings.
3. Press ▲/▼ to select Network & Internet, then press OK to enter the submenu and follow the on-screen
guidance to set up your network.
on the remote control to display the Smart TV homepage.
◄/► to move the cursor to
▲/
(Settings) on the right top of the screen and press OK to enter the
8
Page 10
Getting Started
TV Buttons
- Power button
If the batteries in your remote control are run down, you can use the button on your TV set.
The model has only one
You can turn on the TV by pressing the
While the TV is on, the multi-function menu appears by pressing
about how to use the multi-function menu, please refer to the figure below.
• Press to move the highlight to the next function selection
• Press and hold the button for more than 2 seconds to conrm your selection.
Note:
You can follow the on-screen guide to operate.
Figures and illustrations are provided for reference only and may vary depending on the model.
- MIC switch
button. It may work just as Power on/Standby button, or as a multi-function controller.
button at the bottom left of the TV back case.
button on the TV set. More information
The MIC switch is located next to the power button. If you want to use the feature of hands-free TV voice control,
turn on the switch(not available for some models).
Initial Setup
The rst time you switch the set on, the Welcome screen appears, which guides you through the initial setup process.
Follow the on-screen instructions to nish the initial setup process such as selecting the language, connecting to the
network, and more. During each step, either make a choice or skip the step. If you skip a step, you can perform the
setup later from the settings menu.
9
Page 11
Chapter 3 Basic TV Operations
Accessing Channels
By RC802V remote control
Using the ▲/▼ buttons: press the ▲/▼ buttons on the
remote control to scroll through the channels.
Using the OK button: press the OK button to display
the channel list and press ▲/▼/◄/► and OK to select
channels.
Using the P
on the remote control to scroll through the channels.
Using the
remote control keyboard, then you can use the numeric
buttons or the LIST button to operate accordingly.
By RC802N remote control
Using the numeric buttons: press the corresponding
numeric buttons on the remote control to access the
channels.
Using the P
on the remote control to scroll through the channels.
Using the LIST button: press the LIST button on the
remote control to display the channel list and press
▲/▼/◄/► and OK to select channels.
/ buttons : press the P /
button: press
buttons: press the P
to display the virtual
buttons
buttons
Watching Connected Devices
Press on the remote control to display the source
list. Press ▲/▼ to select TV or other input sources and
press OK to conrm.
You can also press
the homepage, press
the
(Inputs) area on the right top of the screen, and
press OK to enter. Then press ▲/▼ and OK to select
the input source.
on the remote control to display
◄/► to move the cursor to
▲/
Adjusting Volume
Press the buttons on the remote control to
increase or decrease the volume.
Accessing Smart TV Homepage
Allows you to enjoy Internet Applications (Apps) and
specially adapted Internet websites, and perform system
settings for your TV. You can make controlling with the
TV remote control.
WARNING:
• Congure the network settings before using Smart TV
applications.
• Slow responses and/or interruptions may occur,
depending on your network conditions.
• If you experience a problem using an application,
please contact the content provider.
• According to circumstances of the content provider, an
application’s updates or the application itself may be
discontinued.
• Depending on your country's regulations, some
applications may have limited service or not be
supported.
• Changes in application content may be made without
prior notice by the service provider.
1. Press
on the remote control to display the Smart
TV homepage.
2. Press ▲/▼/◄/► and OK to enter the desired apps,
functions or settings.
3. Press
4. To exit the homepage, use ▲/◄/► to move the
Note: Since the connection with Internet takes time, it’s
to return to the homepage.
(Inputs) area on the right top of the
to the
cursor
screen, and press OK to enter. Then press ▲/▼ and
OK to select your desired input source
recommended that you wait a few minutes to use
the Smart TV feature after activation of TV from
standby.
.
Accessing TCL Channel
Allows you to enjoy more VOD(Video on Demand)
contents or featured applications.
1. Press
2. Press
Note: UI layout of TCL Channel will vary according to
on the remote control to enter TCL
Channel, or access through the TCL Channel icon
on homepage.
or to exit.
models or countries.
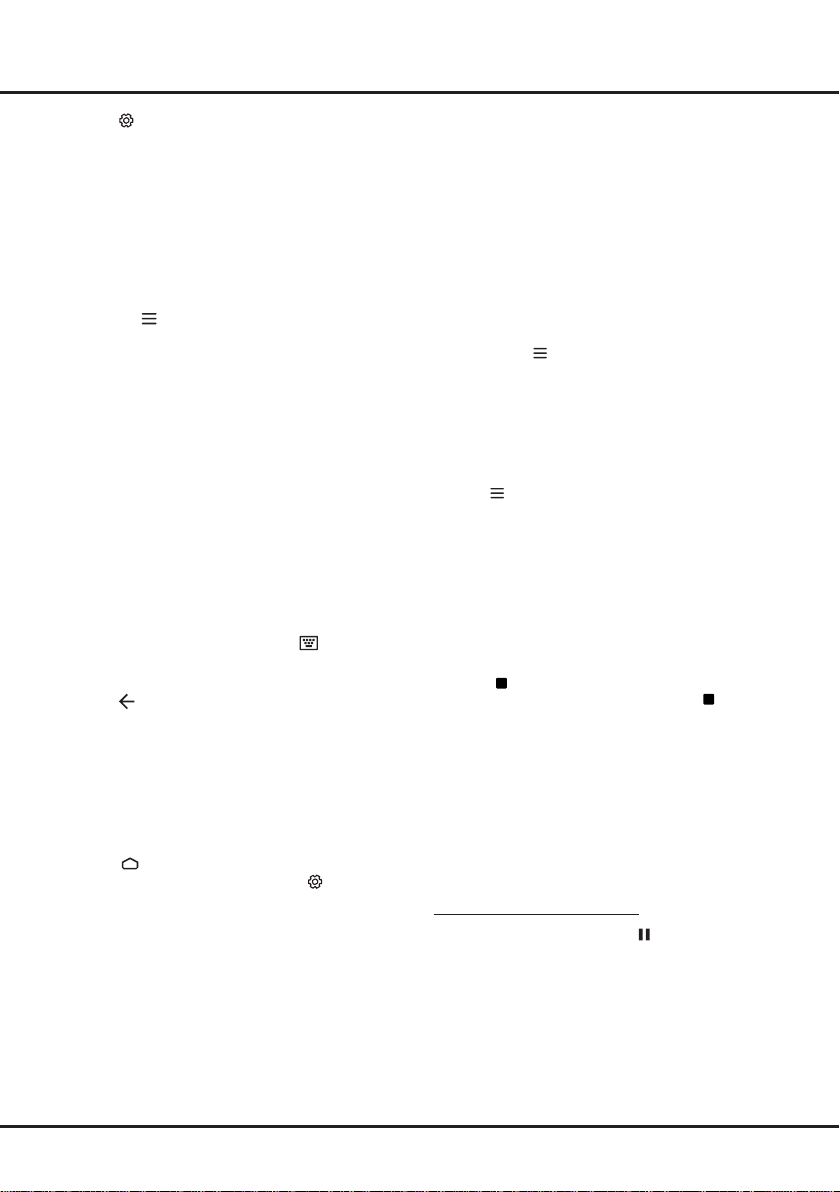
Using System Settings Menu
Allows you to not only adjust device settings, such as
Network & Internet, Accounts & Sign-In and Apps, etc.,
but also set Device Preferences.
1. Press
2. Press
3. Press ▲/▼ to choose the items and
4. Press
on the remote control to display the Smart
TV homepage.
◄/► to move the cursor to (Settings) on
▲/
the right top of the screen and press OK to enter the
system settings.
to return to previous interface.
press OK to enter.
Using TV Settings Menu
Allows you to adjust TV settings, such as picture and
sound.
1. Press
2. Press ▲/▼ to select the desired item, then press
3. In submenus, press ▲/▼ to select menu options,
4. Press
5. Press
Notes:
- You can also press
- Setting LED motion clear on will make fast
on the remote control to display the TV
settings menu.
OK/► to enter the corresponding submenu.
then press OK/► to enter the option list, the
adjustment interface, or the corresponding submenu.
to return to the previous menu.
to close the menu.
on the remote control,
select Settings (if available) and press OK to
enter the TV settings menu. Some options may
not be available for certain signal sources.
moving images clearer by controlling the LED
backlight, but the picture will be darker and more
ickering than with LED motion clear off .
10
Page 12
Chapter 4 Using More of Your TV
Installing Channels
This section describes how to search and store
channels automatically. This may be done in either of
the cases below:
- you are prompted that there are no channels in TV
mode;
- you want to update your channels.
1. In TV mode, press
select Channel > Channel scan. Press OK/► to
enter.
2. The TV installs and arranges channels according
to your country or region. Press ▲/▼ to select
Country/Region, and press OK/► to enter. Enter
the default password 1234 or your own password in
case you have changed the password in the System
> Lock menu. Press ▲/▼ to select your country or
region and press OK to confirm.
3. Press ▲/▼ to select Automatic search and press
OK/► to enter.
4. Press ▲/▼ to select Tuner mode and press ◄/► to
select Cable, Antenna or Satellite. (Note: Satellite
option is available only in selected models.)
5. Press ▲/▼ to select other options and use ◄/► to
configure.
6. After configuration is completed, press ▼ to select
Search and press OK to start scanning channels.
7. The channel search may take a few minutes. After
the automatic search, channels are arranged in a
preset order. If you wish to hide or swap channels,
on the remote control, select Channel >
press
Channel organizer and press OK/► to enter.
Note: If the channel search retrieved only the analogue
channels it could be caused by poor broadcasting
and therefore is not covered by manufacturer
warranty. Manufacturers cannot be held
responsible for lack of or poor broadcasting in
some areas.
on the remote control and
Common Interface
(* not available for some models)
Encrypted digital TV channels can be decoded with a
Conditional Access Module (CAM) and a card provided
by a digital TV service operator.
The CAM may enable several digital services,
depending on the operator and services you choose
(for example, pay TV). Contact your digital TV service
operator for more information about services and terms.
Using the Common Interface Function
WARNING: Switch off your TV before inserting a
CAM. Be sure to follow the instructions described
below. Wrong insertion of a CAM may damage both
the module and your TV.
1. Following the directions printed on the CAM, gently
insert the module into the common interface slot on
the TV.
2. Push the module in as far as it will go.
3. Turn on the TV and wait for the common interface
function to be activated. This may take several
minutes.
Note: Do not remove the CAM from the slot.
Removing the module will deactivate the
digital services.
Accessing Common Interface Services
After inserting and activating the CAM, press
remote control, select Channel > Common Interface
and press OK/► to enter. This menu option is only
available if the CAM is correctly inserted and activated.
On-screen applications and content are provided by
your digital TV service operator.
Note: This feature is only available under DTV source.
on the
Using Subtitles
You can enable subtitles for each TV channel.
Subtitles are broadcast via Teletext or DVB-T/DVB-T2/
DVB-C/DVB-S/DVB-S2 digital broadcasts. With digital
broadcasts, you have the additional option of selecting a
preferred subtitle language.
Note: Some options are available only when Subtitle is
set to on.
Turning On/Off Subtitles
1. Press on the remote control, select Channel >
Subtitle and press OK/► to enter.
2. Select the Subtitle option, and press OK to toggle
between on or off.
3. Press
Enabling Subtitle Languages on Digital TV
Channels
1. Press on the remote control, select Channel >
2. Press ▲/▼ to select a subtitle language as your
3. Press ▲/▼ to select Digital subtitle language 2nd
4. Press ▲/▼ to select a secondary subtitle language
5. Press
to close the menu.
Subtitle > Digital subtitle language 1st and press
OK/► to enter.
preferred language and press OK to conrm.
and press OK/► to enter.
and press OK to conrm.
to close the menu.
11
Page 13
Using More of Your TV
Selecting a Subtitle Type on Digital TV
Channels
1. Press on the remote control, select Channel >
Subtitle > Subtitle type and press OK/► to enter.
2. Press ▲/▼ to select a subtitle type and press OK to
conrm. You can select Hearing impaired to display
the hearing impaired subtitles with your selected
language.
3. Press
to close the menu.
Using Teletext
Selecting Decoding Page Language
1. Press on the remote control, select Channel >
Teletext > Decoding page language and press
OK/► to enter.
2. Press ▲/▼ to select a proper type of language in
which Teletext will display and press OK to conrm.
3. Press
to close the menu.
Digital Teletext Language
On digital TV channels, depending on the broadcaster,
you may be able to enjoy a service with multiple initial
Teletext pages in different languages. This function
allows you to select an available language as primary
language, which relates to different initial Teletext
pages.
1. Press
2. Press ▲/▼ to select a language and press OK to
3. Press
on the remote control, select Channel >
Teletext > Digital teletext language and press
OK/► to enter.
conrm.
to close the menu.
Using Instant Power On
It enables you to turn on your TV faster from standby
mode than turning this function off, but it will also
increase standby power consumption .
1. Press
on the remote control to display the
homepage,
Press ▲/◄/► to select
(Settings)
>
Device Preferences > Power > Instant power
on and press OK to toggle between on and off.
2. Press
repeatedly to return to the homepage.
Network Wake Up
This function allows you to turn on your TV from standby
mode via a network. To use this function, please make
sure:
1. Your TV is connected to an effective wireless home
network;
2. The desired controller, such as a smartphone, is
connected to the same network as your TV;
3. An app which supports network waking up function,
such as YouTube, has been installed into the
controller;
4. Networked standby is set to on in the Network &
Internet menu under homepage. Press
remote control, select
Internet, use ▼ to select Networked standby and
press OK to activate it.
When the TV is in networked standby mode, you can
use the app to wake up the TV remotely.
Notes:
- This feature is disabled if you press and hold the
button on the remote control and conrm to
shut the TV down
- Before using the feature of network wake up, make
sure
>
Power > Instant power on is set to on.
(Settings) > Device Preferences >
(Settings) > Network &
on the
T-Link
Use this function to search for CEC devices connected
to the HDMI sockets in your TV and enable auto power
on and auto standby between the TV and CEC devices.
Enabling or Disabling T-Link
1. Press on the remote control, select System >
T-Link and press OK/► to enter.
2. Select the T-Link option, and press OK to toggle
between on or off.
3. Press
to close the menu.
Using Auto Power On
Enables the TV to automatically power on when you
power on a CEC device (e.g. DVD) with the device’s
remote. Press OK to turn it on to enable this function.
Using Auto Standby
Enables all CEC devices to automatically go to the
standby mode when you turn off the TV with the TV
remote. Press OK to turn it on to enable this function.
Note: The CEC functions depend on the devices
connected and it is possible that some
devices may not interoperate correctly when
connected to this TV. The user manual or
the manufacturer of the problematic devices
should be consulted for further information.
Using EPG (Electronic Programme Guide)
EPG is an on-screen guide that displays scheduled
digital TV programmes. You can navigate, select and
view programmes.
12
Page 14
Using More of Your TV
1. Press
2. Use the related buttons shown at the bottom of the
Note: If using RC802V remote control to access the
3. Press
on the remote control, select Channel
> EPG and press OK/► to enter, the Programme
Guide menu will appear, which allows you to get
information about the current or next programme
playing on each channel. Navigate through the
different programmes using the ▲/▼/◄/► buttons
on the remote control.
screen to view EPG.
- Programme lter: Programme guide lter for
digital TV programmes.
• Press
• Navigate through the different types using the
• Select one or more types, which you want to
- Custom schedule: Press ▲/▼ to select a
programme, then press the RED button to set
the schedule, press OK to enter and use ▲/▼
buttons to select Schedule reminder or Schedule
recording.
- Select date: Press the GREEN button to select
date.
- Schedule list: Press the YELLOW button to view
your schedule list.
to display the type list of the
programme.
▲/▼ buttons on the remote control.
highlight from the type list, press OK to select or
deselect. A checkmark will appear to the right of
the type when selected.
color buttons, you need to press
remote control to display the virtual remote control
keyboard rst.
repeatedly to exit EPG.
button on the
Bluetooth Function
(* not available for some models)
®
Bluetooth
exchanging data over short distance between Bluetooth
devices. You can connect Bluetooth audio device,
mouse or keyboard via the TV.
1. Press
2. Select Add accessory and press OK to enter.
3. Select an available device, press OK and follow the
Note: Bluetooth technology (if available in your TV) uses
2.4GHz frequency thus close proximity to Wi-Fi access
points, routers or microwave ovens might interfere with
Bluetooth audio streaming. If you face interruptions
in audio reception, you should restart your Bluetooth
is a wireless technology standard for
on the remote control to display the
homepage,
Remotes & Accessories and press OK to enter.
The TV will search nearby Bluetooth devices
automatically.
guides on the screen to connect it.
Press ▲/◄/► to select
(Settings)
>
device to nd frequency with less interferences and if
you continue to face issues you should move closer
to TV or increase space between TV and source of
interferences.
The Bluetooth word mark and logos are registered
trademarks owned by Bluetooth SIG, Inc. and any use of
such marks by TCL is under license. Other trademarks
and trade names are those of their respective owners.
Time Shift
(* not available for some models)
Note: this option is available only when Time shift is
set to on: press
to select Settings> Channel> Time shift, press OK to
turn it on.
Allows you to pause, fast forward and rewind live TV,
so you don’t have to miss any part of your favourite
programs. Before you use the function, connect
a USB drive to the TV rst. For the rst time, you
should complete the disk setup for the USB drive.
Press
then press OK/► to confirm.
1. Follow the directions on the screen to do the disk
setup if you use time shift for the first time.
2. After the disk setup is done, time shift will start, and
the time shift menu displays on the screen.
3. When the time shift menu disappears and only the
timing of the time shift remains on the screen, you
can press OK to call out the time shift menu and
operate according to the on-screen prompt.
4. Press
shift and exit.(For RC802V,you can nd
the virtual remote control keyboard.)
Notes:
- Before you plug the USB drive to TV, make sure
you have backed up the data on the drive to avoid
unforeseen malfunction and data loss.
- We recommend that you use a USB drive with at
least 1GB free space and a disk speed faster than
5.0MB/sec.
- The bigger the USB drive free space for time shift,
the bigger the recording length.
on the remote control, press ▲/▼
on the remote control and select Time shift,
button on the remote control stop the time
button on
Quick Access of Time Shift
Insert a USB disk, press PAUSE( ) on the remote
control, it will access time shift automatically
(Available for RC802N remote control only).
PVR (Personal Video Recorder)
(* not available for some models)
Allows you to record your favourite TV programmes.
Before you use the function, connect a USB drive to
13
Page 15

Using More of Your TV
the TV rst.
Note: The feature is available only in selected products
and, due to specific TV network limitations and country
technical requirements, might not be available in
product or place of installation. Feature might also be
blocked by TV network due to copyright protection (HD
content, recording protection). Please use
remote control to check if the feature is available in your
product.
1. Press
2. Press OK/► to enter and select Record. It starts to
3. Press blue button to access Settings and use
4. Press OK or
Note: you can nd
5. In recording, the PVR mini pane will also show on
6. To watch the recorded programme, exit PVR mode
Notes:
- This feature is available only for digital non encrypted
channels.
- Before you connect the USB drive to the TV, make
sure you have backed up the data in the drive to avoid
the loss of your important data due to unforeseen
malfunction.
- The bigger the USB drive free memory for the PVR
function, the bigger the recording length.
- If you want to change channel or signal source during
recording, store the recording data before changing the
channel or source.
- The TV cannot play files normally if the parameters
of the file exceed the limitations of the system, the file
format is not supported, the file is damaged, or the file
cannot be decoded.
- Do not disconnect the USB drive when the system is
reading a file or transmitting data, otherwise the system
or the drive may be damaged.
on the remote control and select PVR.
record automatically.
▲/▼/◄/► to adjust the recording duration.
recorded file will be saved. In normal operation, the
recording will stop automatically when the recording
duration expires.
remote control keyboard for RC802V.
the screen to indicate the recording progress.
first.Press
the related record file. Press OK to play. (It is the
same if you record a digital radio programme.)
to stop recording manually, the
and color buttons on the virtual
and select PVR > PVR list, then select
on the
T-Cast
T-Cast lets you enjoy plenty of videos, rich of
applications, and share great contents on large
screen. It also allows you to turn a smart device
into a sophisticated remote control, providing more
features than your normal TV remote control. You
can then control your TV through your smart device.
Follow the on-screen instructions to scan the QR
code on the TV screen and download T-Cast.
Note: Make sure the smart device and your TV are
in the same home LAN (local area network) or
network segment to use TV remote function.
Reset Shop
Allows you to reset the TV to factory default settings.
1. Press
on the remote control to display the
homepage,
Press ▲/◄/► to select
(Settings)
>
Device Preferences > Reset and press OK to
enter.
2. Press ▲/▼ to select Factory data reset
OK to enter. Then select
OK to confirm.
press
Erase everything
and press
and
3. Enter 1234 or the PIN according to the on-screen
prompt.
4. Select OK and press OK to conrm.
5. The Initial setup wizard appears. Follow the
instructions in the section Initial setup.
Netix Settings
Netix provides on-demand movies and TV shows
delivered via the Internet. Netix is available in certain
countries.Unlimited membership is required. More
information can be found at www.netix.com <http://
www.netix.com/> .
Note: you can directly access Netix via clicking the
Netix button on the remote control.
Password in Parental Control
• The default password is 1234. You can change it to a
new one.
• The super password is 0423. If you forget your code,
enter the super password to override any existing
codes.
Using the Hands-free TV Voice
Control
(* not available for some models)
Before using the hands-free TV voice control, connect
the TV to the network and make sure it can access the
Google website rst. Then follow the steps below to
access.
1. Turn the built-in MIC switch (next to the power button)
to on before using this function.
2. Access the Android TV homepage by pressing
the remote control.
3. Select
(Settings) > Device Preferences > Google
Assistant > "Ok Google" detection and press OK
on
14
Page 16

Using More of Your TV
to turn it on. You can also set it by selecting
tings) > Quick Settings > "Ok Google" detection,
if available.
4. Say “OK Google” to activate it.
Notes:
- The availability of hands-free TV voice control
depends on your region/country/language and your
model. For details, please refer to your local dealer.
- A quiet surrounding is required for better function
when using it. The recommended distance for using
the hands-free TV voice control is within 2 meters in
front of TV set.
- Turn the built-in MIC switch to off if you are not going
to use it. Or set the "Ok Google" detection to off.
- Standby power consumption will increase because
the built-in MIC is always listening when the Google
Assistant or voice control with the built-in MIC is
enabled.
(Set-
15
Page 17

Chapter 5 Other Information
Problems & Solutions
Note: problems & solutions 1 to 2 are for the TV models which have network functions, so users of non-connected
TV models can disregard them.
1. Fail to link to the network.
- Check if your TV is connected with the network;
- Reboot your TV;
- Consult your internet service provider, to conrm
if access of your router is supported. Refer to the
operation manual of your router.
- Make sure your TV is connected to a router, and
make sure your router is powered on. Check that
your router/modem has an internet connection, and
that your Ethernet cables/wireless connection is OK.
Test your connection with a computer to make sure it
is OK. Should the problem persist, contact customer
service.
2. The video could not be played smoothly.
- Videos from your USB ash drive --- It may result
from data transmission, or its code ow is far beyond
the supported formats of this TV set.
- Videos downloaded from internet, or online videos.
a. It may be caused by the lower bandwidth of your
network. A high network speed is required to
handle online videos.
b. Peak internet usage times may affect the
bandwidth.
c. Check if any other computers on the same
network are also operating, as they may be using
up bandwidth. Especially if they are downloading
or playing on-line videos.
d. The video may not be smooth itself, it is not the
problem of your TV or network.
3. When two portable hard drives are connected
with the TV at the same time, they will not be
recognized sometimes.
- All portable hard drives consume a lot of power,
which may result in power supply problems. We
recommend inserting only one hard drive, or a low
power consumption portable hard drive.
4. The video from a portable hard drive (USB) is
playing with no sound.
- The audio format of the video in your portable hard
drive is not supported by the TV player.
5. Some videos fail to play.
- The formats of the videos may not be supported
by the TV, especially videos shot by certain kinds
of cameras, generally with their private protocol of
formats, which are not compatible with your TV.
6. Video stops playing midway.
- Mistakes may occur when videos are copied or
compressed, so they may automatically stop playing
during playback.
7. What should I pay attention to, when I do
software updating?
- No power cuts when software updating;
- Avoid any operations with your remote control when
software updating;
- Depending on your internet connection speed, the
software updating process may take some time.
8. There are no distinct changes of TV interface
after software updating.
- Under certain conditions, software updating may not
only update or add new functions but also improve
the performance of the TV set, without distinct
changes of interface. Also, there may be no changes
to the user interface at all.
9. What should I do when software updating
process stops due to a sudden power-off?
- If you do software updating by USB, do not pluck the
USB from your TV, and restart your TV to continue
software updating; If you do software updating
by Network, also restart your TV and check if it is
functioning correctly.
10. With a USB device being inserted into the TV in
advance, I am prompted that no USB devices are
detected after I access Media, why?
- There may be something wrong with your portable
hard drive(s), damaged or with low voltage. It's
recommended to provide an additional power supply
to the hard drive(s).
11. External device cannot be recognized.
- Some external devices (e.g. webcam, smart phone,
tablet, game handle, and external wireless adapter)
may not be compatible with the TV and cannot be
supported for certain functions (nScreen, wireless
display, gesture control, face recognition, if any).
Please try a similar device. If it does not work,
contact your local dealer.
12. Voice search does not work.
- Check if your remote control has been successfully
paired with your TV.
- Check if the language setting is correct.
- Check if Google server is available and stable.
16
Page 18

Other Information
Troubleshooting
Most problems you encounter with your TV can be corrected by consulting the following troubleshooting list.
No picture, no sound
1. Check if the fuse or circuit breaker is working.
2. Plug another electrical device into the outlet to make
sure it is working or turned on.
3. Power plug is in a bad contact with the outlet.
4. Check the signal source.
No color
1. Change the color system.
2. Adjust the saturation.
3. Try another channel. Black-white programme may
be received.
Remote control does not work
1. Change the batteries.
2. Batteries are not installed correctly.
No picture, normal sound
1. Adjust the brightness and contrast.
2. Broadcasting failure may happen.
Normal picture, no sound
1. Press the
2. Volume is set to mute, press the
restore sound.
3. Change the sound system.
4. Broadcasting failure may happen.
Unorderly ripples on the picture
It is usually caused by local interference, such as cars,
daylight lamps and hair driers. Adjust the antenna to
minimize the interference.
button to increase volume.
button to
Snowy dots and interference
If the antenna is located in the fringe area of a television
signal where the signal is weak, the picture may be
marred by dots. When the signal is extremely weak,
it may be necessary to install a special antenna to
improve the reception.
1. Adjust the position and orientation of the indoor/
outdoor antenna.
2. Check the connection of antenna.
3. Fine tune the channel.
4. Try another channel. Broadcasting failure may
happen.
Ignition
Black spots or horizontal streaks appear, or the picture
utters or drifts. This is usually caused by interference
from car ignition system, neon lamps, electric drills, or
other electrical appliance.
Ghost
Ghosts are caused by the television signal following
two paths. One is the direct path, the other is reected
from tall buildings, hills, or other objects. Changing the
direction or position of the antenna may improve the
reception.
Radio frequency interference
This interference produces moving ripples or diagonal
streaks, and in some case, loss of contrast in the
picture. Find out and remove the radio interference
source.
* To bring you better visual experience, please remove
all labels from TV front panel and screen before use.
17
Page 19

Legal Statement
Other Information
[Legal Statement] of TCL - manufacturer of this TV set
Due to the various capabilities of products featuring
the SmartTV - Services, as well as limitations in the
available content, certain features, applications, and
services may not be available on all devices or in all
territories. Some features on SmartTV may also require
additional peripheral devices or membership fees that
are sold separately. Please visit our website for more
information on specic device information and content
availability. The services and availability of content
through SmartTV are subject to change from time to
time without prior notice.
All content and services accessible through this device
belong to third parties and are protected by copyright,
patent, trademark and/or other intellectual property
laws. Such content and services are provided solely
for your personal noncommercial use. You may not
use any content or services in a manner that has
not been authorized by the content owner or service
provider. Without limiting the foregoing, unless expressly
authorized by the applicable content owner or service
provider, you may not modify, copy, republish, upload,
post, transmit, translate, sell, create derivative works,
exploit, or distribute in any manner or medium any
content or services displayed through this device.
You expressly acknowledge and agree that use of the
device is at your sole risk and that the entire risk as to
satisfactory quality, performance and accuracy is with
you. The device and all third party content and services
are provided “as is” without warranty of any kind,
either express or implied. TCL expressly disclaims all
warranties and conditions with respect to the device and
any content and services, either express or, implied,
including but not limited to, warranties of merchantability,
of satisfactory quality, tness for a particular purpose, of
accuracy, of quiet enjoyment, and non-infringement of
third party rights. TCL does not guarantee the accuracy,
validity, timeliness, legality, or completeness of any
content or service made available through this device
and does not warrant that the device, content or services
will meet your requirements, or that operation of the
device or services will be uninterrupted or error-free.
Under no circumstances, including negligence, shall
TCL be liable, whether in contract or tort, for any direct,
indirect, incidental, special or consequential damages,
attorney fees, expenses, or any other damages arising
out of, or in connection with, any information contained
in, or as a result of the use of the device, or any content
or service accessed by you or any third party, even if
advised of the possibility of such damages.
Third party services may be changed, suspended,
removed, terminated or interrupted, or access may be
disabled at any time, without notice, and TCL makes no
representation or warranty that any content or service
will remain available for any period of time. Content
and services are transmitted by third parties by means
of networks and transmission facilities over which TCL
has no control. Without limiting the generality of this
disclaimer, TCL expressly disclaims any responsibility or
liability for any change, interruption, disabling, removal
of or suspension of any content or service made
available through this device. TCL may impose limits
on the use of or access to certain services or content,
in any case and without notice or liability. TCL is neither
responsible nor liable for customer service related to
the content and services. Any question or request for
service relating to the content or services should be
made directly to the respective content and service
providers.
18
Page 20

Mount the Stand
43P717/50P717/55P717/65P717
Notes:
If the table stand has been assembled, just ignore the following instructions.
•
Follow the instructions accordingly based on the table stand supplied to you.
•
Graphics contained within this publication are for representation only.
•
Keep the screws and plastic parts away from grease and organic solvents to avoid damage,
•
During installation, lay some soft materials below the screen to avoid scratch and damage to
•
the screen.
When the TV faced down, do not impact the screen with sharp edges to avoid scratching the
•
screen.
especially during the assembly process.
Other Information
1
2
19
Page 21

Mount the Stand
75P717
Notes:
If the table stand has been assembled, just ignore the following instructions.
•
Follow the instructions accordingly based on the table stand supplied to you.
•
Graphics contained within this publication are for representation only.
•
Keep the screws and plastic parts away from grease and organic solvents to avoid damage,
•
During installation, lay some soft materials below the screen to avoid scratch and damage to
•
the screen.
When the TV faced down, do not impact the screen with sharp edges to avoid scratching the
•
screen.
If you want to mount the TV to the wall, please purchase an appropriate wall mount bracket.
•
especially during the assembly process.
1
Other Information
2
20
Page 22

The terms HDMI, HDMI High-Denition Multimedia Interface, and the
HDMI logo are trademarks or registered trademarks of HDMI Licensing
Administrator, Inc.
Manufactured under license from Dolby Laboratories.
Dolby, Dolby Audio, and the double-D symbol are trademarks of Dolby
Laboratories.
* Figures and illustrations in this User Manual are provided for reference only and may differ from actual product
appearance. Product design and specications may be changed without notice.
Page 23

ТЕЛЕВИЗОР ЦВЕТНОГО ИЗОБРАЖЕНИЯ ЖИДКОКРИСТАЛЛИЧЕСКИЙ
Руководство по эксплуатации
43P717/50P717/55P717/65P717/75P717
Рисунки и иллюстрации в настоящем Руководстве пользователя приведены только для
справки и могут отличаться от фактического внешнего вида продукта. Конструкция и
спецификации продукта могут быть изменены без предварительного уведомления.
Page 24

...................................... 3
Предупреждение .................................................... 3
Продукт ................................................................... 3
Питание и вилка ..................................................... 3
Кабель питания и сигнальный кабель .................. 3
Условия эксплуатации ........................................... 3
Очистка ................................................................... 3
................................................................... 4
................................................. 5
Пульт ДУ RC802V ................................................... 5
Пульт ДУ RC802N................................................... 6
............................................................... 7
............................................................ 7
............................................... 8
................................................................. 9
............................................. 9
Доступ к каналам ..................................................
С помощью пульта ДУ RC802V ........................... 10
С помощью пульта ДУ RC802N........................... 10
.................
........................................
............
...........................................
....
.........
вашего телевизора
...............................................
................................................
Использование функции общего интерфейса ... 11
Доступ к сервисам общего интерфейса ............. 11
Использование субтитров ..................................
Включение/выключение субтитров ..................... 11
Включение языка субтитров на цифровых
телеканалах .......................................................... 11
Выбор типа субтитров на цифровых т
елеканалах ........................................................... 11
Использование телетекста ..................................
Выбор языка страницы декодирования ............. 12
Язык цифрового телетекста ................................ 12
питания ...................................................................
...........................................
.......................................................................
Подключение и отключение функции T-Link ...... 12
Использование автоматического включения .... 12
Использование автоматического режима
ожидания .............................................................. 12
Использование EP
передач) ...................................................................
(Персональный видеомагнитофон) ..............
Пароль для родительского контроля ............... 14
Использование голосового управления телеви-
зором по громкой связи ..................................... 14
(Электронная программа
................................................ 3
...................................................... 3
..................................................... 4
..................................................... 4
................................................... 14
Глава 5: Другие сведения
Проблемы и решения ........................................... 16
Выявление и устранение неисправностей ...... 17
Монтаж подставки ............................................... 19
Texнические характеристики 12..............................
2
18Юридическое заявление .....................................
Page 25

ВведениеГлава 1
N
Настоящее руководство по эксплуатации распространяется на телевизор цветного изображения жидкокристаллический
TCL, предназначенный для приема сигналов вещательного телевидения и содержит информацию, необходимую
потребителю для правильной и безопасной эксплуатации.
Меры предосторожности
Прочтите все инструкции перед началом работы с устройством. Храните эти инструкции хорошо для дальнейшего
использования.
Предупреждение
Никогда не устанавливайте телевизор на неустойчивой
поверхности. Телевизор может упасть, что может привести
к серьезным травмам или смерти. Во избежание различных
травм, в особенности для детей, необходимо соблюдать
следующие меры предосторожности:
- Используйте шкафы или подставки, рекомендованные
производителем телевизора.
- Используйте только такую мебель, которая может
надежно поддерживать телевизор.
- Убедитесь, что телевизор не нависает над краями
поддерживающей мебели.
- Не устанавливайте телевизор на высокой мебели
(например, на стенных или книжных шкафах) без
надлежащего крепления мебели и телевизора к
подходящей опорной конструкции.
- Не ставьте телевизор на ткань или другие материалы,
которые могут находиться между телевизором и
поддерживающей мебелью.
- Разъясните детям, что влезать на мебель, чтобы
добраться до телевизора или его элементов управления,
опасно.
Этот символ указывает, что внутри присутствует
высокое напряжение. Соприкосновение с любой
внутренней частью этого продукта опасно.
Этот символ указывает на то, что предохранитель
может находиться в нейтральном положении и
что сеть должна быть отключена для отключения
Если к устройству подключена внешняя антенна или кабельная система, убедитесь, что антенная или кабельная система
заземлена квалифицированным специалистом, чтобы
обеспечить защиту от скачков напряжения и накопленных
статических зарядов.
Если ваш телевизор установлен и его требуется переместить,
необходимо учесть указанные выше факторы.
фазовых проводов.
Продукт
• Не блокируйте и не закрывайте вентиляционные отверстия
на задней крышке.
• Не проталкивайте в это устройство никакие предметы через
щелевые отверстия шкафа, так как они могут коснуться
оковедущих частей или частей короткого замыкания, что
т
может привести к возгоранию, поражению электрическим
током или повреждению устройства.
• Не пытайтесь открыть шкаф, так как это может привести
к повреждению. Внутри нет деталей, которые вы можете
обслуживать самостоятельно. Обратитесь за полным
обслуживанием к квалифицированному персоналу.
• Не прикасайтесь к поверхности экрана пальцами, так как
это может привести к царапинам или повреждению экрана
телевизора.
• Не подвергайте экран телевизора сильному давлению, так
как это может привести к серьезному повреждению экрана
телевизора .
Питание и вилка
• Отключите устройство от сети при следующих условиях:
- Если устройство не будет использоваться в течение
длительного периода времени.
- Если кабель питания или электрическая розетка/вилка
повреждены.
- Следуйте инструкциям по установке и настройке
продукта. Отрегулируйте те элементы управления,
которые описаны в данных инструкциях по эксплуатации,
так как неправильная регулировка других элементов
управления может привести к повреждению. Если
это произойдет, отсоедините устройство от розетки и
обратитесь к обслуживающему персоналу.
- Если устройство подвержено ударам или упало, а шкаф
был поврежден.
• Если в качестве отключающего устройства используется
сетевая вилка или приборный соединитель, то
отключающее устройство должно оставаться в рабочем
состоянии.
(*В тех случаях, когда в качестве отключающего устройства
используется многополюсный сетевой выключатель, он
должен оставаться в рабочем состоянии.)
Кабель питания и сигнальный кабель
• Не допускайте, чтобы что-либо упиралось или
опрокидывалось на кабель питания и сигнальный кабель.
• Уберегите кабель питания и сигнальный кабель от
растаптывания.
• Не перегружайте кабель питания или электрическую
розетку.
• Не подвергайте кабель питания и сигнальный кабель
воздействию влаги.
Условия эксплуатации
• Не ставьте устройство на неустойчивую тележку, подставку
или стол.
• Поместите устройство в такое место, где обеспечена
хорошая вентиляция.
• Не используйте устройство вблизи влажных и холодных
зон.
• Не подвергайте устройство воздействию чрезмерного
тепла, такому как прямым солнечным лучам, огню и
т.п. Никакие источники открытого пламени, такие как
зажженные свечи, не должны размещаться на устройстве.
• Не подвергайте устройство воздействию падающих капель
жидкости или брызг. Никакие предметы, наполненные
жидкостью, такие как вазы, не должны помещаться на
устройство.
• Не используйте устройство в пыльной среде.
•
Время выдержки телевизора при комнатной
температуре до включения питания после
транспортирования или хранения при пониженной
температуре окружающей среды должно быть не
менее 5 часов.
Очистка
• Очистите от пыли устройство, протерев экран и корпус
мягкой чистой тканью или специальным жидким чистящим
средством.
• Не прикладывайте чрезмерную силу к экрану при очистке.
• Не используйте воду или другой химический очиститель для
очистки экрана, так как это может повредить поверхность
экрана телевизора .
Все другие инструкции по технике безопасности, касающиеся
наших телевизоров, также применимы здесь. (Примечание:
Некоторые модели телевизоров не предназначены для
установки на стену.)
3
Page 26

Примечание Расположение и названия разъемов на телевизоре могут отличаться в зависимости от мо-
Антенный /
Кабельный
Av-адаптер
дели телевизора, и не все разъемы доступны на всех моделях.
LAN
HDMI
или HDMI
(Сервисный
порт)
или HDMI
(ARC)
вход
Спутнико
вый
вход
Цифровой
аудиовыход
(оптический)
Роутер / модем
V L R
V L R
V L R
Общий интерфейс
USB 2.0
Предупреждение: Чрезмерное звуковое давление от наушников может привести к потере слуха.
HDD
Примечание:Количество USB-разъемов на телевизоре может варьи
роваться в зависимости от модели телевизора.
Page 27

Введение
Функции пульта ДУ
Большинство функций вашего телевизора доступны через меню, которые появляются на экране. Пульт ДУ, поставляемый в комплекте с вашим устройством, можно использовать для навигации по меню и настройки всех общих параметров.
Примечание:
1.Чертежи и иллюстрации в данном руководстве по эксплуатации приведены только для справки и могут отличаться от
фактического внешнего вида продукта. 2. Тип пульта ДУ может быть изменен без предварительного уведомления, пожалуйста, ознакомьтесь с пультом ДУ, прилагаемому к вашему телевизору. 3. Определенные функции могут быть недоступны на некоторых моделях, например функции руководства/субтитров доступны только в разделе цифрового телевидения.
А цифровое телевидение не доступно на определенных моделях. 4. Кнопка Google Ассистент или кнопкаGoogle Поиск зависят от региона продаж.
Пульт ДУ RC802V
▲/▼/◄/►
P /
Примечание: Доступ к определенной функции можно получить только с виртуальной
Отобразить меню Настройки
Режим ожидания/выход из режима ожидания.
Получить доступ к домашней странице Smart TV
Отобразить меню Опции.
Кнопки направлений навигации. Кнопки ▲/▼также используются для
переключения каналов в режиме ТВ.
Подтвердить ввод или выбор. Эта кнопка также используется для
ОК
отображения списка каналов в режиме ТВ.
Вернуться в предыдущее меню или выйти из приложения.
Выбрать источник входного сигнала.
Нажмите на кнопку Ассистент на вашем пульте ДУ, чтобы погово-
рить с Google Ассистент. (Доступно только тогда, когда сетевое
соединение работает нормально.)
Показать виртуальную клавиатуру ДУ, когда она доступна.
Регулировать громкость.
/
Переключить каналы.
Получить доступ к Netix. (Не доступно для некоторых моделей.)
Для доступа к TCL Channel.
клавиатуры пульта ДУ. Пожалуйста, нажмите на кнопку на пульте ДУ,
чтобы отобразить ее и работать соответствующим образом.
Google и Android TV являются товарными знаками компании Google LLC.
Как использовать пульт ДУ
При первом использовании кнопки Google Ассистент или кнопки Google Поиск вам будет предложено выполнить сопряжение
пульта дистанционного управления с телевизором. Пожалуйста, следуйте инструкциям по сопряжению на экране.
а. Держите пульт ДУ и телевизор в 1 метре, пожалуйста, следуйте инструкциям по сопряжению на экране. Вы можете
использовать кнопки Google Ассистент или Google Поиск после их успешной активации.
б. Кнопки Google Ассистент и Google Поиск доступны только для поиска контента из определенных приложений.
в. Чтобы повысить эффективность голосового поиска, в языковых настройках выберите свой местный или официальный
язык.
- Установка батареек
1. Снимите заднюю крышку, как показано на
рисунке.
2. Вставьте две батарейки типа ААА, соблюдая
полярность, указанную в батарейном отсеке.
3. Установите на место заднюю крышку, как
показано на рисунке.
1 2
3
3
При неправильной установке литиевых батарей возможен взрыв.
Батареи заменять батареями того же или аналогичного типа.
ВНИМАНИЕ!
5
Page 28

Пульт ДУ RC802N
Цифровые кнопки
СПИСОК
/
P /
▲/▼/◄/►
ОК
EXIT
LANG
GUIDE
TEXT
SUBT.
Цветные кнопки
Введение
Выключить и включить звук
Режим ожидания/выход из режима ожидания.
Ввести номер канала или цифру
Для доступа к TCL Channel.
Отобразить список каналов.
Регулировать громкость.
Отобразить информацию о программе, если она доступна.
Отобразить меню Настройки
Переключить каналы.
Получить доступ к домашней странице Smart TV или выйти из нее.
Отобразить меню Опции.
Кнопки направлений навигации.
Подтвердить ввод или выбор.
Вернуться в предыдущее меню или выйти из приложения.
Выбрать источник входного сигнала.
Выйти из меню Настройки.
Выбрать язык звукового сопровождения текущей
цифровой телевизионной программы.
Переключение электронной программы передач.
(доступно только для цифровых каналов.)
Переключение в режим телетекста или выход из него.
Выбор языка субтитров, доступного для текущей цифровой
телепрограммы.
Выбрать задачи или страницы телетекста.
Начать быструю перемотку назад.
Поставить воспроизведение на паузу.
Начать быструю перемотку вперед.
Получить доступ к меню Записи.
Начать воспроизведение
Остановить воспроизведение
Получить доступ к Netix. (Не доступно для некоторых моделей.)
- Установка батареек
1. Снимите заднюю крышку, как показано на рисунке.
2. Вставьте две батарейки типа ААА, соблюдая полярность, указанную в батарейном отсеке.
3. Установите на место заднюю крышку, как показано на рисунке.
3
При неправильной установке литиевых батарей возможен взрыв.
Батареи заменять батареями того же или аналогичного типа.
ВНИМАНИЕ!
6
Page 29

Глава 2 Начало работы
Включение
Прежде чем перейти к следующим страницам, описывающим процедуру настройки каналов, следуйте инструкциям на этой странице о том, как включить
телевизор и пульт ДУ.
1. Вставьте две батарейки типа ААА в пульт ДУ.
Меры предосторожности при использовании батареек:
- Используйте только указанные типы батареек.
- Убедитесь, что вы используете правильную полярность.
- Не смешивайте новые и использованные батарейки.
- Не используйте аккумуляторные батарейки.
- Не подвергайте батарейки чрезмерному теплу, например от солнечного
света, огня и т.п. Не бросайте их в огонь, не заряжайте и не пытайтесь
открыть, так как это может привести к утечке или взрыву.
- Извлеките батарейки из пульта ДУ, если вы не используете его в течение длительного периода времени.
- Следует обратить внимание на экологические аспекты по утилизации
батареек.
2. Подсоедините кабель питания сначала к телевизору, а затем к сетевой
розетке. (Примечание: Если кабель питания подключен к телевизору,
пожалуйста, подключите его к сетевой розетке. )
Ваш телевизор должен быть подключен только к источнику переменного
тока. Он не должен быть подключен к источнику постоянного тока. Если
вилка отсоединена от кабеля, ни в коем случае не подсоединяйте ее к
сетевой розетке, так как существует опасность поражения электрическим
током.
Примечание: Чертежи приведены только для наглядности, расположе-
ние розетки питания телевизора может отличаться в зависимости
от модели.
3. Подключите внешнюю антенну к гнезду антенны в задней части
телевизора.
Антенное гнездо (75 ОМ - УКВ/УВЧ/кабель) может использоваться
для подключения внешней антенны или другого установленного
оборудования.
Примечание: Если вы хотите получить сигнал от вашего кабеля или
кабельной коробки, пожалуйста, подключите коаксиальный кабель к
кабельному гнезду на задней панели телевизора.
4. Если питание включено, то телевизор будет сразу включен или будет
находиться в режиме ожидания.
Если индикатор питания загорается, то телевизор находится в режиме
ожидания. Нажмите на кнопку
включить телевизор.
на пульте ДУ или на телевизоре, чтобы
Выключение
• Чтобы перевести телевизор в режим ожидания, нажмите на кнопку на
пульте ДУ. Телевизор остается включенным, но с низким энергопотреблением.
• Чтобы выключить телевизор, отсоедините сетевую розетку от электрической розетки.
7
Page 30
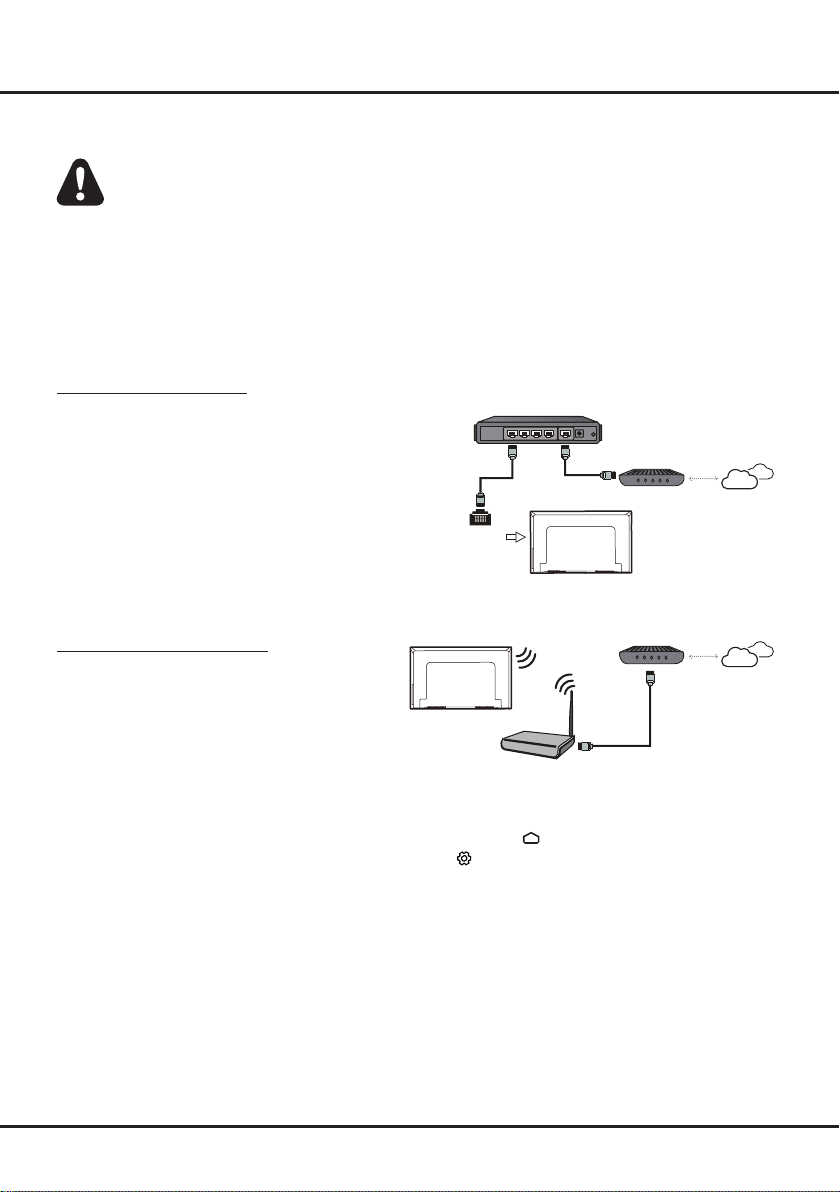
Начало работы
Подключение к сети
Для работы всех функций вашего телевизора потребуется подключение к интернету. Может взиматься плата за тра-
фик данных. Пожалуйста, обратитесь к своему интернет-провайдеру (ISP) за дополнительной информацией.
Чтобы получить доступ в Интернет, вы должны оформить подписку на услугу высокоскоростного широкополосного доступа в
Интернет у своего интернет-провайдера (ISP).
Ваш телевизор можно подключить к домашней сети двумя способами:
• Проводной, с использованием соединителя RJ45 (локальная сеть) на задней панели.
• Беспроводной, с использованием внутренней беспроводной сети и вашей домашней беспроводной сети.
Примечание: Приведенные ниже инструкции – это всего лишь обычные способы подключения телевизора к проводной или
Подключение к проводной сети
Чтобы подключиться к проводной сети:
1. Убедитесь, что у вас есть:
2. Подключите кабель Ethernet к маршрутизатору и порту
3. Используйте меню Сеть и Интернет, чтобы настроить
Подключение к беспроводной сети
Чтобы подключиться к беспроводной сети:
1. Убедитесь, что у вас есть:
2. Используйте меню Сеть и Интернет, чтобы настроить
беспроводной сетям. Способ подключения может отличаться в зависимости от фактической конфигурации
сети. Если у Вас есть какие- либо вопросы о вашей домашней сети, пожалуйста, обратитесь к своему
интернет-провайдеру.
Роутер
• Кабель Ethernet достаточно длинный, чтобы дотянуться до вашего телевизора
• Маршрутизатор или модем с доступным портом Ethernet
• Высокоскоростное подключение к интернету
• Порт Ethernet (LAN) на задней панели телевизора
Ethernet на задней панели телевизора.
телевизор.
• Маршрутизатор, передающий высокоскоростной
беспроводной сигнал
• Высокоскоростное подключение к интернету
телевизор.
Порт LAN
Беспроводной
Модем Интернет
Модем Интернет
Примечание: Пожалуйста, выполните следующие действия, чтобы войти в меню Сеть и Интернет .
1. Чтобы отобразить домашнюю страницу Smart TV, нажмите на
2. Нажмите на ▲/◄/►, чтобы переместить курсор на
нажмите ОК, чтобы войти в системные настройки.
3. Нажмите на ▲/▼, чтобы выбрать Сеть и Интернет, затем нажмите ОК, чтобы войти в подменю, и
следуя инструкциям на экране, выполните настройку сети.
(Настройки) в правой верхней части экрана и
на пульте ДУ.
8
Page 31

Начало работы
Кнопки ТВ
- Кнопка включения
•
•
Примечание:
Для работы, Вы можете следовать инструкциям на экране.
Чертежи и иллюстрации приведены только для справки и могут варьироваться в зависимости от модели.
ВКЛ.
- Кнопка MIC
ВЫКЛ.
Начальная настройка
Мастер
Page 32

Глава 3 Основные телевизионные операции
Доступ к каналам
С помощью пульта ДУ RC802V
Использование кнопок▲/▼: нажмите кнопки ▲/▼ на пульте
ДУ, чтобы прокрутить каналы.
Использование кнопки ОК: для отображения списка
каналов нажмите кнопку ОК, а затем нажмите ▲/▼/◄ /► и
ОК для выбора каналов.
Использование кнопок P
пульте ДУ, чтобы прокрутить каналы.
Использование кнопки
виртуальную клавиатуру дистанционного управления. После
этого Вы сможете использовать цифровые кнопки или кнопку
LIST для работы соответственно.
/ : нажмите кнопки P /
: нажмите
,чтобы отобразить
на
С помощью пульта ДУ RC802N
Использование цифровых кнопок : нажмите на
соответствующие цифровые кнопки на пульте ДУ, чтобы
получить доступ к каналам.
Использование кнопок P / : нажмите кнопки P /
пульте ДУ, чтобы прокрутить каналы.
Использование кнопки LIST : нажмите на кнопку
LIST на пульте ДУ, чтобы отобразить список каналов и
нажмите▲/▼/◄/► и ОК, чтобы выбрать каналы.
на
Просмотр подключенных
устройств
Нажмите на пульте ДУ, чтобы отобразить список
источников. Нажмите ▲/▼, чтобы выбрать ТВ и другие
источники входного сигнала, нажмите ОК для подтверждения.
Вы также можете нажать на пульте ДУ для отображения
домашней страницы. Нажмите ▲/◄/►, чтобы переместить
курсор в область
и нажмите ОК,чтобы войти. Затем нажмите ▲/▼ и ОК, чтобы
выбрать источник входного сигнала.
(Ввода) в правой верхней части экрана
Регулировка громкости
Нажмите на кнопки
или убавить громкость.
/
на пульте ДУ, чтобы прибавить
Доступ к домашней странице
Smart TV
Позволяет вам пользоваться интернет-приложениями (Apps)
и специально адаптированными интернет-сайтами, а также
выполнять системные настройки для вашего телевизора.
Вы можете настроить управление с помощью пульта ДУ
телевизора.
ПРЕДУПРЕЖДЕНИЕ:
• Настройте параметры сети перед использованием
приложений Smart TV.
• В зависимости от состояния вашей сети могут возникать
медленные отклики и/или прерывания.
• Если у вас возникли проблемы с использованием
приложения, пожалуйста, обратитесь к поставщику
контента.
• В зависимости от обстоятельств поставщика контента,
обновление приложения или использование самого
приложения может быть остановлено.
• В зависимости от правил вашей страны некоторые
приложения могут иметь ограниченный сервис или не
поддерживаться.
• Изменения в контент приложения могут быть внесены без
предварительного уведомления поставщиком услуг .
1. Нажмите
страницу Smart TV.
на пульте ДУ, чтобы отобразить домашнюю
2. Нажмите▲/▼/◄/► и ОК, чтобы войти в нужные
приложения, функции и настройки.
3. Нажмите
4. Для выхода из домашней страницы, используйте▲/◄/►
чтобы переместить курсор в область
правой верхней части экрана, затем нажмите OK, чтобы
войти. Затем нажмите ▲/▼ и ОК, чтобы выбрать нужный
источник входного сигнала.
Примечание: Поскольку подключение к интернету требует
, чтобы вернуться на домашнюю страницу.
(выходов) в
времени, рекомендуется подождать несколько
минут, чтобы использовать функцию Smart
TV после активации телевизора из режима
ожидания.
Доступ к TCL Channel
Позволяет Вам наслаждаться большим количеством контента
VOD (видео по запросу) или избранных приложений.
1. Нажмите
получите доступ через значок TCL Channel на домашней
странице.
2. Нажмите или , чтобы выйти.
Примечание:
на пульте ДУ, чтобы войти в TCL Channel или
Макет пользовательского интерфейса
TCL Channel будет отличаться в зависимости
от моделей или стран.
Использование меню системных
настроек
Позволяет не только отрегулировать настройки устройства,
такие как сеть и интернет, учетные записи и вход в систему,
приложения и т.д., но также установить параметры
устройства.
1. Нажмите
страницу Smart TV.
2. Нажмите ▲/◄/► , чтобы переместить курсор в
(Настройки) в верхней правой части экрана и нажмите
ОК для входа в системные настройки.
3. Нажмите ▲/▼, чтобы выбрать нужные пункты и нажмите
ОК для входа.
4. Нажмите
интерфейсу.
на пульте ДУ, чтобы отобразить домашнюю
, чтобы вернуться к предыдущему
Использование меню настроек
телевизора
Позволяет настроить параметры телевизора, такие как
изображение и звук.
1. Нажмите на пульте ДУ, чтобы отобразить настройки меню.
2. Нажмите ▲/▼, чтобы выбрать необходимый элемент, затем
нажмите OK/►для входа в соответствующее подменю.
3. В подменю нажмите ▲/▼, чтобы выбрать пункты меню, затем
нажмите OK/► для входа в список опций, интерфейс настроек
или соответствующее подменю.
4. Нажмите для возврата в предыдущее меню.
5. Нажмите
Примечание:
– Вы также можете нажать на пульте ДУ, выбрать
Настройки
– Включение «LED motion clear»
четкости для быстро движущихся изображений с помощью
контроля светодиодной подсветки, однако изображение будет
более темным и мерцающим, чем при отключенном «LED motion
clear».
ВЫХОД или , чтобы закрыть меню.
и нажать ОК для входа в меню Настроек телевизора
позволит добиться большей
.
10
Page 33

Глава 4
Дополнительные возможности вашего телевизора
Настройка каналов
В этом разделе описывается, как автоматически искать и
сохранять каналы. Это может быть сделано в любом из приведенных ниже случаев:
- Вы уведомлены, что в режиме телевизора нет никаких
каналов;
- Вы хотите обновить каналы.
1. В режиме телевизора, нажмите
выберите Канал > Сканирование канала. Нажмите
ОК/►, чтобы войти.
2. Телевизор устанавливает и упорядочивает каналы в
соответствии с вашей страной или регионом. Нажмите
▲/▼, чтобы выбрать Страну/Регион, затем намите
ОК/►, чтобы войти. Введите пароль по умолчанию 1234
или свой собственный пароль, если вы изменили пароль
в меню Система > Блокировка . Нажмите▲/▼, чтобы
выбрат страну или регион, затем нажмите OK, чтобы
подтвердить.
3. Нажмите▲/▼, чтобы выбрать Автоматический поиск,
затем нажмите ОК/►, чтобы войти.
4. Нажмите ▲/▼ , чтобы выбратьрежим тюнера, затем
нажмите◄/►, чтобы выбратьКабель, Антенна или
Спутник. (Примечание: Опция спутника доступна
только в некоторых моделях.)
5. Нажмите ▲/▼, чтобы выбрать другие опции и
используйте ◄/► для конфигурации.
6. После завершения конфигурации, нажмите▼, чтобы
выбрать Поиск, затем нажмите ОК, чтобы начать
сканирование каналов.
7. Поиск канала может занять несколько минут. После
автоматического поиска, каналы будут расположены в
заданном порядке. Если вы хотите скрыть или поменять
местами каналы, нажмите
Канал > Организатор канала, затем нажмите ОК/►,
чтобы войти.
Примечание: Если при поиске канала были получены
только аналоговые каналы, то это может
быть вызвано плохим вещанием и поэтому
не покрывается гарантией производителя.
Производители не могут нести
ответственность за отсутствие или плохое
вещание в некоторых областях.
на пульте ДУ и
на пульте ДУ, выберите
Общий интерфейс
(* не доступна на некоторых моделях)
Зашифрованные цифровые телеканалы могут быть
декодированы с помощью модуля условного доступа (CAM)
и карты, предоставляемой оператором сервиса цифрового
телевидения
CAM может включать несколько цифровых сервисов, в
зависимости от выбранных Вами оператора и сервисов
(например, платное телевидение). Свяжитесь с Вашим
оператором сервиса цифрового телевидения для получения
дополнительной информации о сервисах и условиях.
Использование функции общего
интерфейса
ПРЕДУПРЕЖДЕНИЕ: Перед установкой CAM выключите
телевизор Четко следуйте инструкциям, описанным
ниже. Неправильная установка CAM может повредить как
модуль, так и телевизор.
1. Следуя указаниям, напечатанным на CAM, аккуратно
вставьте модуль в общий слот интерфейса на ТВ.
2. Вставьте модуль до упора.
3. Включите телевизор и дождитесь активации функции
общего интерфейса. Это может занять несколько минут.
Примечание: Не извлекайте CAM из слота. Извлечение
модуля приведет к отключению цифровых
сервисов.
Доступ к сервисам общего интерфейса
После установки и активации CAM, нажмите
дистанционного управления, выберите Канал > Общий
интерфейс, затем нажмите OK/►, чтобы войти. Эта опция
доступна только в том случае, если CAM был правильно
установлен и активирован. Экранные приложения и
контент предоставляются оператором сервиса цифрового
телевидения.
Примечание: Эта функция доступна только в источнике
DTV.
на пульте
Использование субтитров
Вы можете включить субтитры для каждого телеканала.
Субтитры транслируются посредством цифрового телетекста
или цифрового вещания DVB-T/DVB-T2/DVB-C/DVB-S/
DVB-S2. Благодаря цифровым трансляциям, у Вас есть
дополнительная возможность выбора предпочтительного
языка субтитров.
Примечание: Некоторые опции доступны только, когда
Включение/выключение субтитров
1. Нажмите на пульте ДУ, выберите Канал > Субтитры и
2. Выберите опцию Субтитры, нажмите ОК/►, чтобы войти,
3. Нажмите
Включение языка субтитров на цифровых
телеканалах
1. Нажмите на пульте ДУ, выберите Канал > Субтитры >
2. Нажмите▲/▼, чтобы выбрать язык субтитров в
3. Нажмите ▲/▼, чтобы выбрать Второй язык цифровых
4. Нажмите ▲/▼, чтобы выбрать дополнительный язык
5. Нажмите
Субтитры установлены в положении Вкл.
нажмите ОК/►, чтобы войти.
затем нажмите ▲/▼, чтобы выбрать Вкл или Выкл и
нажмите ОК для подтверждения.
, чтобы закрыть меню.
Первый язык цифровых субтитров, затем нажмите
ОК/►, чтобы войти.
качестве предпочтительного языка, нажмите ОК для
подтверждения.
субтитров, затем нажмите ОК/►, чтобы войти.
субтитров, нажмите ОК для подтверждения.
, чтобы закрыть меню.
11
Page 34

Дополнительные возможности вашего телевизора
Выбор типа субтитров на цифровых
телевизионных каналах
1. Нажмите на пульте ДУ, выберите Канал > Субтитры >
Тип субтитров и нажмите ОК/► для входа.
2. Нажмите ▲/▼, чтобы выбрать тип субтитров и
нажмите ОК для подтверждения. Вы можете выбрать
Слабослышащий, чтобы отобразить субтитры для
слабослышащих на выбранном языке.
3. Нажмите
, чтобы закрыть меню.
Использование телетекста
Выбор языка страницы декодирования
1. Нажмите на пульте ДУ, выберите Канал > Телетекст >
Язык страницы декодирования и нажмите OK/► для
входа.
2. Нажмите ▲/▼, чтобы выбрать правильный тип языка, на
котором будет отображаться телетекст, затем нажмите ОК
для подтверждения.
3. Нажмите
, чтобы закрыть меню.
Язык цифрового телетекста
На цифровых телевизионных каналах, в зависимости от
вещателя, вы можете пользоваться услугой с несколькими
начальными страницами телетекста на разных языках. Эта
функция позволяет выбрать доступный язык в качестве
основного языка, который относится к различным начальным
страницам телетекста.
1. Нажмите
Телетекст > Язык цифрового телетекста, затем нажмите
ОК/► для того, чтобы войти.
2. Нажмите ▲/▼, чтобы выбрать язык, нажмите ОК для
подтверждения.
3. Нажмите
на пульте ДУ, чтобы выбрать Канал >
, чтобы закрыть меню.
Использование мгновенного
включения питания
Когда эта функция включена, включение телевизора из
режима ожидания происходит быстрее, но энергопотребление
в режиме ожидания будет выше.
1. Нажмите
страницу, нажмите ▲/◄/► , чтобы выбрать
(Настройки) > Параметры устройства > Питание >
Мгновенное включение питания и нажмите ОК для
переключения между режимами включено и выключено.
2. Для возврата на домашнюю страницу нажмите несколько
раз
на пульте ДУ, чтобы отобразить домашнюю
.
Пробуждение по сети
Эта функция позволяет включить телевизор из режима ожидания через сеть. Чтобы использовать эту функцию, пожалуйста, убедитесь, что:
1. Ваш телевизор подключен к эффективной беспроводной
домашней сети;
2. Нужный контроллер, например смартфон, подключен к
той же сети, что и ваш телевизор;
3. В контроллер было установлено приложение,
поддерживающее функцию пробуждения сети, например
YouTube;
4. Сетевой режим ожидания устанавливается в
положениеВкл в меню Сеть и Интернет под домашней
страницей Нажмите
Интернет и используйте кнопку ▼, чтобы выбрать
Сетевой режим ожидания и нажмите ОК для активации.
Когда телевизор находится в сетевом режиме ожидания, вы
можете использовать приложение для удаленного пробуждения телевизора.
Примечание:
- Эта функция отключится, если вы нажмете и будете
удерживать кнопку
выключение телевизора
- Перед использованием функции сетевого пробуждения
убедитесь, что
устройства > Питание > Мгновенное включение
питания установлены в положение ВКЛ.
(Настройки) > Сеть и
>
на пульте ДУ и подтвердите
>
(Настройки) > Параметры
T-Link
Используйте эту функцию для поиска устройств CEC, подключенных к разъему HDMI в телевизоре, а также для включения
автоматического включения питания и автоматического
ожидания между телевизором и устройствами CEC.
Подключение и отключение функции T-Link
1. Нажмите на пульте ДУ, чтобы выбратьСистема > T-Link
и нажмите OK/►, чтобы войти.
2. Нажмите ▲/▼, чтобы выбрать T-Link и нажмите ОК/►,
чтобы войти.
3. Нажмите ▲/▼, чтобы выбрать Вкл или Выкл и нажмите
OK, чтобы подтвердить.
4. Нажмите
, чтобы выбрать меню.
Применение автоматического включения
питания
Позволяет телевизору автоматически включаться при включении устройства CEC (например, DVD) с помощью пульта ДУ
устройства. Выберите Вкл, чтобы активировать эту функцию.
Применение автоматического режима
ожидания
Позволяет всем устройствам CEC автоматически переходить
в режим ожидания при выключении телевизора с помощью
пульта ДУ. Выберите Вкл, чтобы активировать эту функцию.
Примечание: Функции CEC зависят от подключенных
устройств, и вполне возможно, что
некоторые устройства могут неправильно
взаимодействовать при подключении
к этому телевизору. Для получения
дополнительной информации следует
обратиться к руководству пользователя
или производителю проблемных
устройств.
Использование EPG (Электронная
программа передач)
EPG — это экранное руководство, которое отображает запланированные программы цифрового телевидения. Вы можете
перемещаться, выбирать и просматривать программы.
12
Page 35

Дополнительные возможности вашего телевизора
1. Нажмите на кнопку на пульте ДУ, выберитеКанал>
EPG и нажмитеОК/► для входа, или сразу нажмите на
кнопку GUIDE (при наличии) на пульте ДУ, появится меню
«Программа передач», которое позволит Вам получить
информацию о текущей или следующей программе,
проходящей на каждом канале. Перемещайтесь по
различным программам с помощью кнопок ▲/▼/◄/► на
пульте ДУ.
2. Используйте соответствующие кнопки, отображаемые в
нижней части экрана, для просмотра EPG.
- Программный фильтр: Фильтр программы передач
для цифровых телевизионных программ.
• Нажмите на кнопку
типов программ.
• Переходите от типа к типу с помощью кнопок ▲/▼ на
пульте ДУ.
• Выберите один или несколько типов, которые Вы
хотите выделить из списка типов, нажмите ОК, чтобы
выбрать или отменить выбор. При выборе, справа от
типа появится галочка.
- Пользовательское расписание: Нажмите▲/▼, чтобы
выбрать программу, затем нажмите на красную кнопку,
чтобы установить расписание, нажмите ОК, чтобы войти и используйте кнопки ▲/▼, чтобы выбрать Напоми-
нание о расписании или Запись по расписанию.
- Выбрать дату: Нажмите на ЗЕЛЕНУЮ кнопку, чтобы
выбрать дату.
- Список расписания: Нажмите на ЖЕЛТУЮ кнопку,
чтобы просмотреть список расписания.
Примечание: Если Вы используете пульт ДУ RC802V для
3. Чтобы выйти из EPG, нажмите
доступа к цветным кнопкам, Вам необходимо
нажать на кнопку
сначала отобразить виртуальную клавиатуру
пульта ДУ.
, чтобы отобразить список
на пульте ДУ, чтобы
несколько раз.
Функция Bluetooth
(* не доступна на некоторых моделях)
®
Bluetooth
– это стандарт беспроводной технологии для
обмена данными на небольшом расстоянии между устройствами Bluetooth. Вы можете подключить аудиоустройство
Bluetooth, мышь или клавиатуру через телевизор.
1. Нажмите
страницу. Нажмите ▲/◄/► , чтобы выбрать
(Настройки) > Пульты ДУ и Аксессуары и нажмите ОК,
чтобы войти.
2. ВыберитеДобавить аксессуар и нажмите ОК,
чтобы войти. Телевизор будет автоматически искать
близлежащие устройства Bluetooth.
3. Выберите доступное устройство, нажмитеОК и следуйте
инструкциям на экране, чтобы подключить его.
Примечание: Технология Bluetooth (если она доступна на
вашем телевизоре) использует частоту 2,4 ГГц, поэтому
близость к точкам доступа Wi-Fi, маршрутизаторам или
микроволновым печам может создать помехи для потоковой передачи звука по Bluetooth. Если Вы столкнулись
с перебоями в приеме звука, Вам следует перезагрузить
устройство Bluetooth, чтобы найти частоту с меньшим количеством помех. Если же Вы продолжаете сталкиваться с
проблемами, вам следует переместиться ближе к телевизору или увеличить пространство между телевизором и
источником помех
на пульте ДУ, чтобы отобразить домашнюю
Словесный знак и логотипы Bluetooth являются зарегистрированными товарными знаками, принадлежащими компании
Bluetooth SIG, Inc. и любое использование таких знаков компанией TCL осуществляется по лицензии. Другие товарные
знаки и торговые наименования принадлежат их соответствующим владельцам.
Сдвиг времени
(* не доступна на некоторых моделях)
Примечание: Эта опция доступна только в том случае,
если Сдвиг времени установлен в позицию Вкл: нажмите
на пульте ДУ, нажмите ▲/▼, чтобы выбрать Настройки>
Канал> Сдвиг времени, нажмите ОК/►, чтобы войти и
используйте ▲/▼, чтобы настроить Сдвиг времени на
позиции Вкл или Выкл.
Позволяет Вам поставить на паузу, быстро перемотать
вперед и назад прямой эфир, так что вам не придется
пропустить какую-либо часть ваших любимых программ.
Перед использованием этой функции, сначала подключите к телевизору USB-накопитель. Для первого раза, Вы
должны завершить настройку диска для USB- накопителя.
Нажмите
затем нажмите ОК/►, чтобы подтвердить.
1. Следуйте указаниям на экране, чтобы выполнить
настройку диска, если вы используете сдвиг времени в
первый раз.
2. После завершения настройки диска начнется сдвиг
времени, и на экране появится меню сдвига времени.
3.
Когда меню сдвига времени исчезнет и на экране
останется только хронометраж сдвига времени, Вы
можете нажать OK, чтобы отобразить меню сдвига
времени и действовать в соответствии с экранной
подсказкой.
4. Нажатие кнопки
сдвига времени и выходу из этого меню. (Для RC802V вы
можете найти кнопку
пульта ДУ. )
Примечание:
- Прежде чем подключить USB-накопитель к телевизору,
убедитесь, что вы создали резервную копию данных на
диске, чтобы избежать непредвиденной неисправности
и потери данных.
- Мы рекомендуем использовать USB-накопитель со
свободным пространством не менее 1 ГБ и скоростью
диска более 5,0 МБ/сек.
- Чем больше на USB-накопителе свободного места для
сдвига времени, тем больше длина записи.
на пульте ДУ и выберите Сдвиг времени,
на пульте ДУ приведет к остановке
на виртуальной клавиатуре
Быстрый доступ к сдвигу времени
Вставьте USB-диск, нажмите на кнопку ПАУЗА (〓) на
пульте ДУ, он автоматически получит доступ к сдвигу
времени (доступно только для пульта ДУ RC802N).
PVR (Персональный
видеомагнитофон)
(* не доступна на некоторых моделях)
13
Page 36

Дополнительные возможности вашего телевизора
Позволяет записывать ваши любимые телевизионные
программы. Перед использованием этой функции, сначала
подключите к телевизору USB-накопитель.
Примечание: Эта функция доступна только на
некоторых продуктах. Из-за специфических ограничений
телевизионной сети и технических требований страны,
она может быть недоступна на конкретном продукте или
в конкретном месте установки. Функция также может
быть заблокирована телевизионной сетью из-за защиты
авторских прав (контент высокой четкости, защита
записи). Пожалуйста, используйте
проверить, доступна ли эта функция на вашем продукте.
1. Нажмите на
2. Нажмите OK/►, чтобы войти и выбрать Запись. Он
начнет записывать автоматически.
3. Нажмите на синюю кнопку для получения доступа к
Настройкам и используйте ▲/▼/◄/► дя регулирования
длительности записи.
4. Нажмите OK или
записанный файл будет сохранен. При нормальной
работе, запись автоматически останавливается по
истечении ее продолжительности.
Примечание: вы можете найти
5. При записи мини-панель PVR также будет отображаться
на экране, чтобы показывать ход записи.
6. Чтобы посмотреть записанную программу, сначала
выйдите из режима PVR. Нажмите на
> список PVR , затем выберите соответствующий файл
записи. НажмитеОК , чтобы начать воспроизведение.
(Точно так же, если вы записываете цифровую
радиопрограмму.)
Примечания:
- Эта функция доступна только для цифровых не
зашифрованных каналов.
- Перед подключением USB-накопителя к телевизору
убедитесь, что вы создали резервную копию данных на
диске, чтобы избежать потери важных данных из-за
непредвиденной неисправности.
- Чем больше свободная память USB- накопителя для
функции PVR, тем больше длина записи.
- Если вы хотите переключить канал или источник
сигнала во время записи, сохраните данные записи перед
переключением канала или источника.
- Телевизор не может нормально воспроизводить файлы,
если параметры файла превышают ограничения системы,
формат файла не поддерживается, файл поврежден или
файл не может быть декодирован.
- Не отсоединяйте USB-накопитель, когда система
читает файл или передает данные, иначе система или
накопитель могут быть повреждены.
на пульте ДУ и выберите PVR.
, чтобы остановить запись вручную,
виртуальной клавиатуре пульта ДУ для
RC802V.
на пульте ДУ, чтобы
и цветные кнопки на
и выберите PVR
Пульт ДУ T-Cast
Пульт ДУ T-Cast позволит вам насладиться большим количеством видео, богатством приложений и делиться отличным
контентом на большом экране. Кроме того, он позволяет превратить смарт-устройство в сложный пульт ДУ, предоставляя
больше функций, чем обычный пульт ДУ вашего телевизора.
После этого вы сможете управлять телевизором с помощью
своего смарт-устройства.
Следуйте инструкциям на экране, чтобы отсканировать QRкод на экране телевизора и загрузить пульт ДУ T-Cast.
Примечание: Убедитесь, что смарт-устройство и
телевизор находятся в одной домашней
локальной сети или сетевом сегменте, чтобы
использовать функцию удаленного доступа к
телевизору.
Сброс настроек
Позволяет сбросить настройки телевизора до
заводских настроек по умолчанию.
1. Нажмите
страницу, нажмите на ▲/◄/► ,чтобы выбрать
(Настройки) > Параметры устройства > Сброс и
нажмите ОК, чтобы ввести.
2. Нажмите на ▲/▼, чтобы выбрать Сброс заводских
данных и нажмите на ОК, чтобы ввести. Затем выберите
Стереть все и нажмите OK, чтобы подтвердить.
3. Введите пароль 1234 или свой собственный пароль в
случае, если вы изменили пароль.
4. Выберите ОК и нажмите ОК, чтобы подтвердить.
5. Появится мастер начальной настройки. Следуйте
инструкциям в разделе Начальная настройка.
на пульте ДУ, чтобы отобразить домашнюю
Настройки Netix
Netix предоставляет фильмы и телепередачи по запросу, поставляемые через Интернет. Netix доступен в определенных
странах. Требуется безлимитное членство. Более подробную
информацию можно найти на сайте www.netix.com <http://
www.netix.com/> .
Примечание: Вы можете напрямую получить доступ к
Netix, нажав на кнопку Netix на пульте ДУ.
Пароль для родительского
контроля
• Пароль по умолчанию – 1234. Вы можете изменить его на
новый.
• Супер пароль – 0423. Если вы забыли свой код, введите
супер пароль, чтобы отменить все существующие коды.
Применение голосового
управления телевизором по
громкой связи
(* не доступна на некоторых моделях)
Перед применением голосового управления телевизором
по громкой связи, подключите его к сети и убедитесь, что он
может получить доступ к веб-сайту Google. Далее для получения доступа выполните следующие действия.
1. Перед использованием этой функции включите переклю-
чатель встроенного микрофона (рядом с кнопкой питания).
2. Откройте домашнюю страницу Android TV, нажав
пульт ДУ.
3. Выберите
обнаружение ‘ОК Google’ и нажмите ОК, чтобы включить.
Вы также можете установить его, выбрав
Параметры устройства > Google Ассистент > обнаружение ‘ОК Google’.
(Настройки) > Быстрые настройки >
на
(Настройки) >
14
Page 37

4. Скажите “ОК Google”, чтобы активировать его.
Примечание:
- Наличие голосового управления телевизором по громкой
связи зависит от вашего региона/страны/языка и вашей
модели. Для получения более подробной информации ,
пожалуйста, обратитесь к вашему местному дилеру.
- Для лучшей работы при его использовании требуется
спокойная обстановка. Рекомендуемое расстояние
использования – в пределах 2 метров от телевизора.
- Выключите встроенный микрофон, если вы не
собираетесь его использовать. Или установите
обнаружение ‘Ok Google’ в позицию отключено.
- Потребление энергии в режиме ожидания будет
увеличиваться, потому что встроенный микрофон
всегда прослушивает, когда Google Ассистент или
голосовое управление со встроенным микрофоном
включены.
15
Page 38

Глава 5 Другие сведения
Проблемы и решения
Примечание: Проблемы и решения от 1 до 2 относятся к моделям телевизоров, которые имеют сетевые функции, поэто-
му пользователи моделей телевизоров, без таких функций, могут игнорировать их.
1. Не удается подключиться к сети.
- Проверьте, подключен ли ваш телевизор к сети;
- Перезагрузите ваш телевизор;
- Обратитесь к своему интернет-провайдеру, чтобы удосто-
вериться, поддерживается ли доступ к вашему маршрутизатору. Ознакомьтесь с руководством по эксплуатации
вашего маршрутизатора.
- Убедитесь, что ваш телевизор подключен к маршрути-
затору, и убедитесь, что ваш маршрутизатор включен.
Проверьте, имеет ли подключение к интернету ваш
маршрутизатор/модем, а также в порядке ли ваши кабели
Ethernet/беспроводное соединение. Проверьте ваше
соединение с компьютером, чтобы убедиться, что оно в
порядке. Если проблема остается, обратитесь в службу
поддержки клиентов .
2. Видео не может проигрываться непрерывно.
- Видео с вашего USB-накопителя --- Это может быть
результатом передачи данных, или его кодовый поток
находится далеко за пределами поддерживаемых форматов этого телевизора.
- Видео, скачанные из интернета, или онлайн-видео.
а. Это может быть вызвано более низкой пропускной спо-
собностью вашей сети. Для обработки видео онлайн,
требуется высокая скорость работы сети.
б. Пиковое время использования интернета может повли-
ять на пропускную способность сети.
в. Проверьте, работают ли другие компьютеры в той же
сети, так как они могут использовать большую пропускную способность . Особенно, если они скачивают
или показывают видео онлайн.
г. Само по себе видео не может быть непрерывным, это
не проблема вашего телевизора или сети.
3. При одновременном подключении к телевизору
двух мобильных жестких дисков, они иногда не
распознаются.
- Все мобильные жесткие диски потребляют много электро-
энергии, что может привести к проблемам с электропитанием. Мы рекомендуем вставлять только один жесткий
диск или мобильный жесткий диск с низким энергопотреблением.
4. Видео с мобильного жесткого диска (USB)
воспроизводится без звука.
- Аудиоформат видео на вашем мобильном жестком диске
не поддерживается телевизионным плеером.
5. Некоторые видео не воспроизводятся.
- Форматы видео могут не поддерживаться телевизором,
особенно видео, снятые определенными видами камер,
как правило, с их частным протоколом форматов, которые не совместимы с вашим телевизором.
6. Видео перестает воспроизводиться на середине.
- При копировании или сжатии видео могут возникать
ошибки, поэтому они могут автоматически остановиться
во время воспроизведения.
7. На что мне следует обратить внимание, при
обновлении ПО?
- Никаких отключений питания при обновлении ПО;
- При обновлении ПО, избегайте любых операций с вашим
пультом ДУ;
- В зависимости от скорости вашего интернет-соединения,
процесс обновления программного обеспечения может
занять некоторое время.
8. После обновления ПО никаких отчетливых изменений
в интерфейсе телевизора не происходит.
- При определенных условиях, обновление ПО может
не только обновить или добавить новые функции, но и
улучшить производительность телевизора без явных
изменений интерфейса. Кроме того, в пользовательском
интерфейсе может вообще не быть никаких изменений.
9. Что я должен делать, когда процесс обновления
ПО останавливается из-за внезапного отключения
питания?
- Если вы обновляете ПО по USB, не выдергивайте USB из
телевизора и перезагрузите телевизор, чтобы продолжить обновление; если вы обновляете ПО по Сети, также
перезагрузите телевизор и проверьте, правильно ли он
работает.
10. При предварительном подключении USB-устройства
к телевизору, мне приходит подсказка о том, что
после получения доступа к носителю USB-устройства
не обнаруживаются. Почему?
- Возможно, что-то не так с вашим мобильным жестким
диском (дисками), поврежден или низкий уровень напряжения. Рекомендуется обеспечить дополнительный
источник питания для жесткого диска (ов).
11. Внешнее устройство не может быть распознано.
- Некоторые внешние устройства (например, веб-камера,
смартфон, планшет, игровая ручка и внешний беспроводной адаптер) могут быть несовместимы с телевизором и
не могут поддерживать определенные функции (nScreen,
беспроводной дисплей, управление жестами, распознавание лиц, если таковые имеются). Пожалуйста, попробуйте использовать аналогичное устройство. Если это не
сработает, обратитесь к местному дилеру.
12. Голосовой поиск не работает.
- Проверьте, успешно ли ваш пульт ДУ был сопряжен с
телевизором.
- Проверьте правильность настройки языка.
- Проверьте, доступен и стабилен ли сервер Google.
16
Page 39

Другие сведения
Выявление и устранение неисправностей
Большинство проблем, возникающих с вашим телевизором, можно устранить, обратившись к следующему списку устранения
неисправностей.
Нет изображения, нет звука
1. Проверьте, работает ли предохранитель или
автоматический выключатель.
2. Подсоедините другое электрическое устройство к розетке,
чтобы убедиться, что оно работает или включено.
3. Штепсельная вилка питания находится в плохом контакте
с розеткой.
4. Проверьте источник сигнала.
Нет цвета
1. Измените цветовую систему.
2. Отрегулируйте насыщенность.
3. Попробуйте другой канал. Может быть получена черно-
белая программа.
Пульт ДУ не работает
1. Поменяйте батарейки
2. Батарейки установлены неправильно.
Нет изображения, звук нормальный
1. Отрегулируйте яркость и контрастность.
2. Может произойти сбой вещания.
Нормальное изображение, нет звука
1. Нажмите на
2. Громкость настроена на беззвучный режим, нажмите на
кнопку для восстановления звука.
3. Измените звуковую систему.
4. Может произойти сбой вещания.
Беспорядочная рябь на изображении
Обычно это вызвано местными помехами, такими как автомобилями, лампами дневного света и фенами для волос.
Отрегулируйте антенну, чтобы минимизировать помехи.
кнопку, чтобы прибавить громкость.
Снежные точки и помехи
Если антенна расположена в пограничной зоне телевизионного сигнала, где сигнал слабый, изображение может быть
испорчено точками. Если сигнал крайне слаб, то для улучшения приема может потребоваться установка специальной
антенны.
1. Отрегулируйте положение и ориентацию внутренней/
наружной антенны.
2. Проверьте подключение антенны.
3. Тонкая настройка канала.
4. Попробуйте другой канал. Может произойти сбой
вещания.
Зажигание
Появляются черные пятна или горизонтальные полосы, изображение дрожит или плывет. Это обычно вызвано помехами
от системы зажигания автомобиля, неоновых ламп, электрических дрелей или других электроприборов.
Призрачное изображение
Призрачные изображения вызываются телевизионным сигналом, идущим по двум путям. Один из них – это прямой путь,
другой отражается от высоких зданий, холмов или других
объектов. Изменение направления или положения антенны
может улучшить качество приема.
Радиочастотные помехи
Эта помеха создает движущуюся рябь или диагональные
полосы, а в некоторых случаях и потерю контрастности изображения. Выясните и удалите источник радиопомех.
* Чтобы улучшить визуальное восприятие, пожал
удалите все этикетки с передней панели телевизора и
экрана перед использованием.
уйста,
Комплектация
1. ЖК-телевизор ................................................. 1шт.
2. Шнур сетевой ................................................. 1шт.
3. Основание опоры (компл.) ............................. 1шт.
4. Комплект крепежных элементов.................... 1шт.
5. Пульт ДУ .......................................................... 1шт.
6. Элемент питания ............................................. 2шт.
7. Руководство по эксплуатации ........................ 1шт.
8. Талон гарантийный ......................................... 1шт.
9. Кабель MINI JACK.............................................. 1шт.
17
Page 40

Юридическое положение
Другие сведения
[Юридическое положение] TCL – производителя данного телевизора
Из-за различных возможностей продукции, использующих
Смарт ТВ-сервисы, а также ограничений в доступном контенте, некоторые функции, приложения и услуги могут быть
доступны не на всех устройствах или не на всех территориях. Нек оторые функции Смарт ТВ также могут потребовать
дополнительных периферийных устройств или членских
взносов, которые продаются отдельно. Пожалуйста, посетите
наш веб-сайт для получения дополнительной информации о
конкретных устройствах и доступности контента. Услуги и доступность контента через Смарт ТВ могут время от времени
меняться без предварительного уведомления.
Весь контент и услуги, доступные через это устройство, принадлежат третьим лицам и защищены законами об авторских
правах, патентах, товарных знаках и/или другими законами
об интеллектуальной собственности. Такой контент и услуги
предоставляются исключительно для вашего личного некоммерческого использования. Вы не можете использовать
какой-либо контент или услуги способом, который не был
разрешен владельцем контента или поставщиком услуг. Не
ограничивая вышесказанное, если это прямо не разрешено
владельцем соответствующего контента или поставщиком
услуг, Вы не можете изменять, копировать, переиздавать,
загружать, публиковать, передавать, переводить, продавать,
создавать производные работы, использовать или распространять любым способом или средством контент или услуги,
отображаемые через это устройство.
Вы прямо признаете и соглашаетесь с тем, что использование устройства осуществляется исключительно на Ваш
собственный риск и что весь риск в отношении удовлетворительного качества, производительности и точности лежит
на Вас. Устройство и весь сторонний контент и услуги предоставляются “как есть” без каких-либо явных или подразумеваемых гарантий. TCL прямо отказывается от всех гарантий
и условий в отношении устройства и любого контента и услуг,
как явных, так и подразумеваемых, включая, помимо прочего,
гарантии товарной пригодности, удовлетворительного качества, пригодности для определенной цели, точности, спокойного пользования и не нарушения прав третьих сторон. TCL
не гарантирует точность, достоверность, своевременность,
законность или полноту какого-либо контента или услуги,
предоставляемых через это устройство, и не гарантирует, что
устройство, контент или услуги будут соответствовать вашим
требованиям, или что работа устройства или услуги будут
бесперебойными или безошибочными. Ни при каких обстоятельствах, включая халатность, TCL не несет ответственности, будь то по контракту или деликту, за любые прямые,
косвенные, случайные, особые или сопутствующие убытки,
гонорары адвокатов, расходы или какие-либо другие убытки,
возникающие в результате или в связи с какой-либо информацией, содержащейся в устройстве или в результате использования устройства, а также за любой к онтент или услугу, к
которым вы или любая третья сторона получили доступ, даже
если были предупреждены о возможности таких убыток.
Услуги третьей стороны могут быть изменены, приостановлены, удалены, прекращены или прерваны, или доступ
может быть отключен в любое время без предварительного
уведомления, и TCL не дает никаких заверений или гарантий,
что любой контент или услуга будут оставаться дост упными
в течение любого периода времени. Контент и услуги передаются третьими сторонами посредством сетей и средств
передачи информации, над которыми TCL не имеет никак ого
контроля. Не ограничивая общий характер данного отказа от
ответственности, TCL однозначно отказывается от какой-либо
ответственности за любые изменения, прерывания, отключение, удаление или приостановку любого контента или услуг,
доступных через это устройство. TCL может устанавливать
ограничения на использование или доступ к определенным
услугам или контенту при любых обстоятельствах, без предварительного уведомления или ответственности. TCL не
несет никакой ответственности за обслуживание клиентов,
связанное с контентом и услугами. Любой вопрос или запрос
на обслуживание, связанный с контентом или услугами,
должен быть адресован непосредственно соответствующим
поставщикам контента и услуг.
18
Page 41

Монтаж подставки
43P717/50P717/55P717/65P717
Примечания:
• Если подставка уже установлена, следующий раздел можно пропустить.
• Выполняйте указания, относящиеся к вашему типу подставки.
• Рисунки в настоящем документе приводятся только в ознакомительных целях.
• Чтобы избежать повреждений, держите винты и пластмассовые детали вдали от
смазочных веществ и органических растворителей, особенно в процессе сборки.
• При монтаже подставки подстелите мягкий материал под устройство, чтобы не
поцарапать экран.
• • Если телевизор лежит экраном вниз, не допускайте контакта с острыми
предметами, чтобы не поцарапать экран.
Другие сведения
1
2
19
Page 42

75P717
Другие сведения
Примечания:
• Если подставка уже установлена, следующий раздел можно пропустить.
• Выполняйте указания, относящиеся к вашему типу подставки.
• Рисунки в настоящем документе приводятся только в ознакомительных целях.
• Чтобы избежать повреждений, держите винты и пластмассовые детали вдали от
смазочных веществ и органических растворителей, особенно в процессе сборки.
• При монтаже подставки подстелите мягкий материал под устройство, чтобы не
поцарапать экран.
•
Если телевизор лежит экраном вниз, не допускайте контакта с острыми
предметами, чтобы не поцарапать экран.
•
•
1
2
20
Page 43

43P717
50P717
55P717
65P717
75P717
Вес нетто с подствкой
Format of
signal
The power
cord type
"43
DVB-C/T/T2/S/S2
270 cd/m2
3840x2160
178°/178°
кг
6.94
16:9
Съемный
"50
DVB-C/T/T2/S/S2
270 cd/m2
3840x2160
178°/178°
9.5 Вт х 29.5 Вт х 2
10 кг
16:9
Съемный
"55
DVB-C/T/T2/S/S2
270 cd/m2
3840x2160
178°/178°
9.5 Вт х 2
11.6 кг
16:9
Съемный
DVB-C/T/T2/S/S2
300 cd/m2
3840x2160
178°/178°
9.5 Вт х 2
17.7 кг
Съемный
Условия эксплуатации:
- температура воздуха от 15 до 35 ℃
- относительная влажность воздуха от 45 до 75 %
- атмосферное давление от 86 до 106 кПа (от 650 до 800 мм рт. ст.)
Правила перевозки отражены на упаковке товара
Перемещение
· Перед перемещением телевизора отсоедините от него все кабели.
· Для переноски телевизора больших размеров требуются два или три человека.
· При переноске телевизора вручную не прикладывайте усилия к ЖК-панели и рамке экрана.
· При перевозке берегите телевизор от ударов и сильной вибрации.
· Если необходимо доставить телевизор в ремонтную мастерскую или перевезти в другое место, упакуйте его в картонную
коробку и упаковочный материал, в которых он поставлялся изначально.
16:9
"65
"75
DVB-C/T/T2/S/S2
330 cd/m2
3840x2160
178°/178°
15 Вт х 2
29.2 кг
16:9
Съемный
21
Page 44

ПЕРЕЧЕНЬ ПОВРЕЖДЕНИЙ, НЕ ДОПУСКАЮЩИХ ДАЛЬНЕЙШУЮ ЭКСПЛУАТАЦИЮ ТЕЛЕВИЗОРА
• Сетевой шнур или вилка повреждены;
• Экран телевизора поврежден;
• При попадании в телевизор влаги;
• После падения телевизора;
• Если телевизор не работает должным образом после того как Вы обратились в раздел по устранению
неисправностей.
ТРАНСПОРТИРОВАНИЕ И ХРАНЕНИЕ
Упакованные телевизоры допускается транспортировать всеми видами транспорта в условиях,
соответствующих группе 5 ГОСТ 15150 – 69 при температуре окружающего воздуха от + 5 до + 40
и относительной влажности воздуха от 75 до 100 %.
Хранение телевизоров должно осуществляться в условиях группы 1 по ГОСТ 15150 – 69 при
температуре окружающего воздуха от + 5 до + 40℃ и отсутствии в воздухе кислотных, щелочных и
других агрессивных примесей.
Дисплеи телевизоров TCL со светодиодной подсветкой состоят из множества субпикселей, и его изготовление
требует применения наиболее совершенных технологий. Однако на экране может быть несколько светлых или
темных пикселей. Они не влияют на качество работы изделия. Для получения конкретной информации о
допустимых значениях битых пикселей для вашей модели телевизора просим обращаться в техническую
поддержку через форму обратной связи на сайте http://tcl.com.ru, указав в сообщении модель телевизора и
серийный номер своего устройства.
℃
УТИЛИЗАЦИЯ ИЗДЕЛИЯ
После окончания срока службы данное изделие подлежит сдаче в соответствующий пункт
приема электрического и электронного оборудования для последующей переработки и
утилизации.
Обеспечивая правильную утилизацию, вы помогаете сберечь природные ресурсы и
предотвращаете ущерб для окружающей среды и здоровья людей, который возможен в
случае ненадлежащего обращения.
Более подробную информацию о пунктах приема и утилизации данного вида аппаратуры
можно получить в местных муниципальных органах или на предприятии по вывозу бытового
мусора.
Информация о наименовании и местонахождении изготовителя (уполномоченного изготовителем
лица), телефон для связи с ним, а также месяц и год изготовления технического средства указаны
в гарантийном талоне.
Page 45

(мультимедийный интерфейс высокой четкости), а также логотип HDMI
являются торговыми марками или зарегистрированными торговыми
марками компании HDMI Licensing Administrator, Inc.
Произведено по лицензии Dolby Laboratories. Dolby, Dolby Audio, а
также значок «двойная буква D» являются товарными знаками Dolby
Laboratories.
* Рисунки и иллюстрации в настоящем руководстве пользователя представлены только для справки
и могут отличаться от фактического внешнего вида устройства. Конструкция и характеристики
устройства могут быть изменены без предварительного уведомления.
72-RT51GS-XRUCQ
 Loading...