

Page 1

Instruction manual and warranty for Cafissimo Mini
Page 2
Contents
1 Intended use and location
1 About these instructions
2 Safety warnings
4 At a glance
4 Control panel — button functions
5 Initial operation — prior to first use
6 Rinsing the machine
6 The finest aroma — the finest flavour
6 Using large / small cups or glasses
7 Brewing coffee
8 Adjusting the strength of the coffee
9 Standby mode
9 Cleaning
10 Descaling
11 For a long period o
12 Problems / solutions
13 Disposal
13 Technical specifications
14 Warranty
14 Service Form
f n
on-use
Intended use and location
The coffee machine has been devised for the following uses:
Brewing filter coffee, caffè crema, espresso and tea with Tchibo capsules.•
It has been designed for use in households or for similar
applications such as
in shops, offices or similar work areas,
•
agricultural buildings,•
by customers in hotels, motels, bed and breakfast estab-•
lishments or other places offering accommodation.
Set up the machine in a dry, indoor room. Avoid rooms with high humidity or
high dust content. The machine is suitable for use at ambient temperatures
of +10 to +40°C.
About these instructions
Read these safety warnings carefully and only use the machine as described in
these instructions to avoid accidental injury or damage. Keep these instructions
for future reference. If you pass the machine on to another person, remember
to give them these instructions.
Symbols used in these instructions:
This symbol warns you of
the danger of injury.
Signal words:
DANGER warns you of potential severe injuries and danger to life.
WA
RNING warns you of injuries and severe material damage.
CAUTION warns you of minor injuries or damage.
This indicates additional information.
This symbol warns against the
danger of injury caused by
electricity.
1
Page 3

Safety warnings
DANGER to children and people with a restricted capability of operating
appliances
Children must not be allowed to play with the machine.•
Keep the machine and mains cord away from children
under the age of 8.
•
This machine can be used by children aged 8 and over or
by people with reduced physical, sensory or mental capabilities, or who lack experience and/or knowledge, provided
they are supervised or have
been trained in the safe use of
the machine and understand the potential dangers.
Children must not be allowed to clean the machine unless
•
they are over 8 years of age and supervised while doing so.
This machine is maintenance-free.
In order to make the front drawer, used capsule container
•
and drip tray easier to insert in the machine, all these
parts are equipped with magnets. If one of these built-
in
magnets should come loose, keep it away from children.
In the case that magnets are swallowed or inhaled, seek
medical advice immediately. Magnets connecting inside
the body can lead to serious injuries.
Set up the machine out of the reach of children.
•
Keep the packaging material out of the reach of children. •
There is a risk of suffocation!
DANGER due to electricity
Never immerse the coffee machine, mains plug or mains•
cord in water, as this could cause an electric shock. Never
touch the mains plug with wet hands. Do not use the
machine outdoors.
•
Never leave the machine to operate unattended.
Only connect the machine to a properly installed, grounded•
wall socket. The mains voltage must comply with the
requirements stated in the machine’s te
chnical specifica-
tions.
•
The mains cord must not be kinked or squeezed. Keep it
away from sharp edges and sources of heat.
•
Do not use the machine if the machine, mains cord or
mains plug is damaged or if the machine has been
dropped.
•
Do not make any modifications to the machine, mains cord
or other parts. Electrical appliances must only be repaired
by qualified electricians, as improper repairs can ca
use
considerable damage. Only have repairs carried out by a
specialist workshop, or contact the customer care service.
Remove the mains plug from the wall socket...•
... if a fault occurs,
... if the machine will not be used for any length of time,
... before cleaning the machine.
To unplug, always pull on the mains plug, not the cord.
To disconnect the machine fully from the mains, unplug the
•
mains plug from the wall socket.
2
Page 4

WARNING – risk of scalds/burns
Do not touch the coffee spout during or immediately after•
use. Avoid contact with coffee being dispensed from the
spout.
•
Do not raise the lever while the machine is being used.
Keep the capsule opening closed and do not pull out the
used capsule container.
CAUTION – risk of injuries or material damage
Use only original Tchibo Cafissimo capsules. Neither use•
capsules from other manufacturers, nor damaged or misshapen capsules, and never fill capsules or the machine
with ground coffee or instant coffee, as this would damage
the machine. In these cases, any necessary repairs would
not be covered by the warranty.
Only use the machine with the used capsule container and
•
drip grid inserted.
Always pour fresh, cold tap or other drinking water into the
•
water tank. Do not use carbonated mineral water or any
other liquids.
Descale the machine as soon as the machine indicates that
•
this is necessary.
The capsule opening contains two capsule punchers. These
•
punchers pierce both sides of the capsule when the lever
is pressed down. Never reach into the capsule opening.
Keep your fingers and any objects away from the capsule
opening as you fold down the lever.
Do not lift the mach
•
ine u
p by the lever. To move the
machine, hold it by the outer casing.
Place the machine on a solid, level surface that is well
•
illuminated and resistant to water and heat.
•
To ensure that the casing does not melt, do not place
the machine on a hob or immediately next to a hot oven,
radiator or anything similar.
•
Route the mains cord in such a way that it cannot be
tripped over. Do not let the mains cord hang down from the
surface the machine is put on so that the machine cannot
be pulled down by it.
Keep all cards with magnetic strips, such as credit cards,•
debit cards, etc. away from the front drawer, used capsule
container and the drip tray, as well as all built-in magnets.
The cards could become damaged. Also keep magnetic
memory storage media and all devices that are affected
by magnetism or
ay sustain functional impairment away
m
from the machine.
•
The machine is equipped with non-slip feet. Work surfaces
often have varnished or plastic finishes and are treated
with a variety of care products. Some of these may contain
substances that react adversely to the non-slip feet and
soften them. If necessary, place a non-slip mat under the
machine.
The machine must not be exposed to temperatures
•
below 4°C. Residual water in the heating system could
freeze and cause damage.
3
Page 5
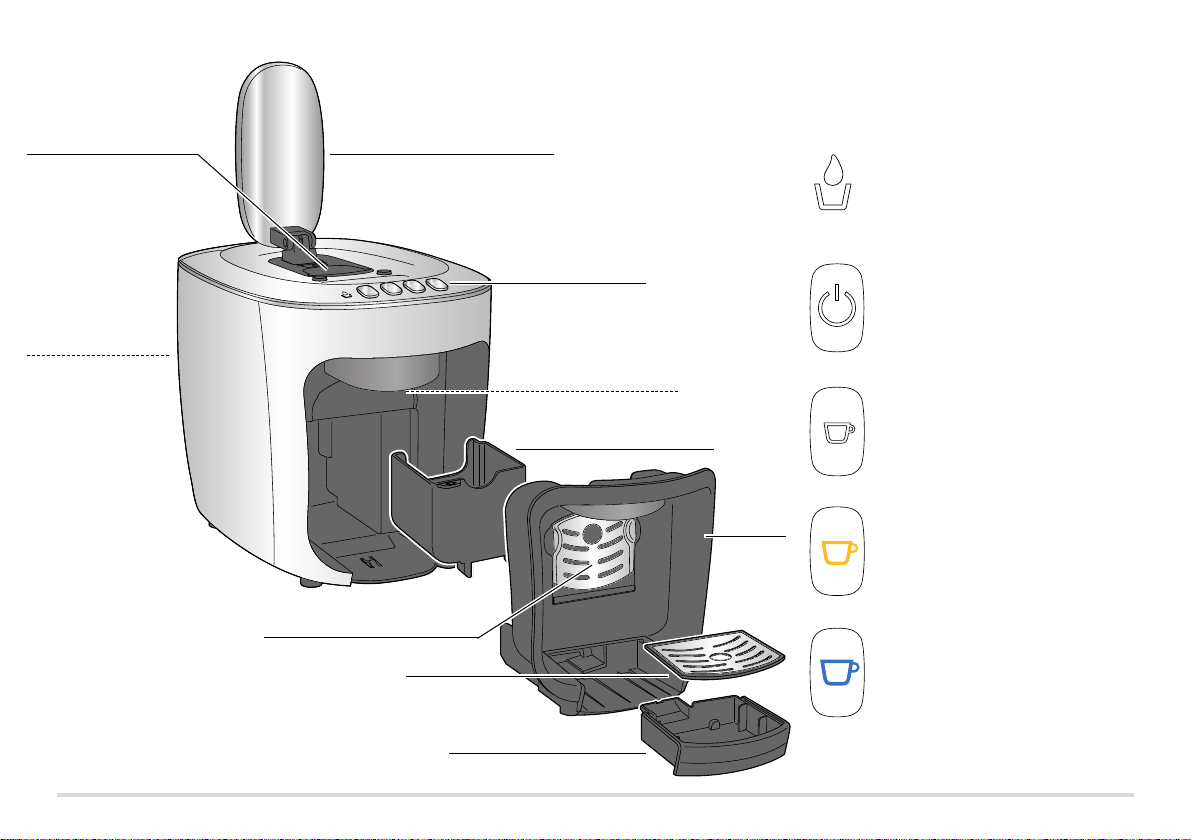
Capsule opening
Water tank
(on the back)
At a glance
Lever for opening and closing the
capsule opening
Control panel — button functions
The colours of the buttons are visible only when the
machine is switched on.
Indicator light
• Flashes red (water tank empty)
• Lights up yellow (machine needs to
be descaled)
Control panel
On/Off switch for machine
Fold-down cup tray
for small cups
Drip grid
Drip tray
Coffee spout
Used capsule container
4
Front
drawer
Making espresso
(small white cup for black capsule)
Making caffè crema
(yellow cup for yellow capsule)
Making tea
(Cafissimo tea capsules)
Making filter coffee
(blue cup for blue c
aps
ule)
Page 6

Initial operation — prior to first use
MAX
1. Make sure that the used capsule container is correctly inserted in the front
drawer. The front drawer needs to be
pushed in all the way and the drip tray
correctly inserted.
2. Fill the water tank with fresh, cold tap
water or drinking water up to the MAX
mark.
- To do so, either leave the water tank in
the machine, open the flap on top of the
water tank and pour the water in through
the tank’s filling
inlet,
or...
- ... pull the water tank straight up and out
of the machine and then fill it with water.
When you reinsert the water tank into the
machine, push it down as far as it will go.
3. The lever must be in the down position.
Fold it down if necessary.
4. Place an empty cup beneath the coffee
spout.
5. Plug the mains plug into an easily accessible wall socket.
6. Press the On/Off button.
A short signal will sound. The On/Off
button and coffee buttons flash.
7. Press the yellow coffee button.
The pump starts to operate. As soon as
the pipes are filled with water the pump
stops automatically. A small quantity of
water runs into the cup beneath the
spout.
The On/O
ff
button and coffee buttons
flash and the machine heats up to brew
coffee.
8. Pour away the water that is in the cup and rinse the machine twice as
described in the section “Rinsing the machine”. The machine is then ready
for use.
5
Page 7

Rinsing the machine
After switching the machine on for the first time or if you have not used the
machine for longer than two days, rinse the machine by allowing two cups of
water to flow through it (without a capsule).
MAX
6. Pour the water away.
7. Repeat steps 2
8. Finally, empty the drip tray.
6.
to
1. Fill the water tank
water or drinking water up to the MAX
mark.
2. Place an empty cup beneath the coffee
spout.
3. The lever must be in the down position.
Fold it down if necessary.
4. Switch the machine on.
5. Press the yellow coffee button as soon as
all buttons remain permanently lit.
The pump will flush water through the
pipes to be dispensed into the cup below.
To do so, pull out the drip tray and remove
the drip grid.
Empty the drip tray.
ith fresh, cold tap
w
The finest aroma — the finest flavour
One capsule per cup
Each capsule is a single portion for one cup.
Full aroma
Only insert a capsule when you intend to use the machine. The capsule is pierced
as it is inserted. If it is not used immediately, the aroma will fade.
Preheating the cup
Fill the cup with hot water and then pour it away shortly before using the cup.
This helps espresso, caffè crema and filt
Coffee strength
Adjust the strength of the coffee to suit your personal taste by changing the
quantity of water. This is very easy to do, and is described in the section
“Adjusting the strength of the coffee”.
er coffe
e taste their best.
Using large / small cups or glasses
9. Set the drip grid back in place and reinsert the drip tray in the machine.
For small cups, fold
down the cup tray as
illustrated.
6
For large cups, fold up
the cup tray.
For glasses or large mugs,
fold up the cup tray and
remove the drip tray.
Page 8

Brewing coffee
1. Press the On/Off button to switch on the
machine.
The On/Off button and coffee buttons
flash and the machine starts to heat up.
The machine is ready for operation once
all the buttons remain permanently lit.
A short signal will also sound.
2. Place an empty cup beneath the coffee
spout.
3. Fold back the lever as far as it will go and
insert a capsule as illustrated with the lid
facing forwards.
The capsu
Do not pierce it and do not remove the
capsule lid or insert a misshapen capsule!
4. Fold the lever fully down.
This action pierces the base and lid of the
capsule.
le m
ust be intact:
5. Press the coffee button that corresponds to the capsule you have inserted.
The brewing process starts and stops automatically.
As is the case with professional
espresso machines, for espresso and
=
black capsule
(espresso)
yellow
capsule
(caffè crema)
blue
capsule
(filter coffee)
Default settings (amounts are approximate):
Espresso 40 ml I Caffè crema 125 ml I Filter coffee 125 ml
If you would like to stop the brewing process prematurely, press the samem
coffee button again while brewing.
white
coffee button
=
yellow
coffee button
=
blue
coffee button
Tip: You can adjust the strength of the
caffè cream capsules a small quantity
of coffee is pre-brewed. This enhances
the aroma. This process can be identified by the short pause at the beginning
of the brewing process. Filter coffee is
prepared
process, just like with standard coffee
machines.
coffee by adjusting the quantity of
water. Refer to the section “Adjusting
the strength of the coffee” for information on how to do this.
6. Before removing the coffee cup, fold back
t
he l
capsule falls into the used capsule container.
7. Then fold the lever down again so that the
capsule opening is closed.
without a pre-brewing
ever as far as it will go, so that the
7
Page 9

8. After every use, pull out the drip tray to
remove it and pour out any excess water.
Due to how the machine operates, a small
amount of water and coffee grounds
collect in the drip tray after each coffee
is brewed.
9. Pull the front drawer out by the grip as
illustrated.
10. Remove the used capsule container.
11. Empty the used capsule container daily or
whenever it is full. Approx. 4 capsules fit
ins
ide.
Do not leave a used capsule in the capsule opening. Empty the used capsule
d
rawer daily. In case you forget a capsule in the machine for a few days,
rinse the machine as described in the section “Rinsing the machine”.
12. Then insert all parts back into the
machine.
Make sure that the used capsule container
is positioned correctly when reinserting
it – the arrow on the container should be
s the front drawer.
pointing towa
rd
Adjusting the strength of the coffee
Adjust the strength of the coffee to suit your personal taste by adjusting the
quantity of water. You can do this for one single brewing procedure or save the
setting.
Adjusting the strength for the current brewing procedure (without saving
the setting)
If the coffee is too weak, you can stop the water flow prematurely bym
pressing the flashing coffee button.
If the c
offe
e is too strong, start the brewing procedure again withoutm
inserting a new capsule. Press the button as soon as sufficient water has
run through.
Default settings (amounts are approximate):
Espresso 40 ml I Caffè crema 125 ml I Filter coffee 125 ml
The water quantity can be set between approx. 30 and 250 ml.
Setting the strength permanently (saving the setting)
You can change the factory settings for the water quantity permanently. This
enables you to make your favourite coffee every time at exactly the strength you
prefer. You can customise the setting fo
cup), caffè crema (yellow cup) and filter coffee (blue cup).
Proceed in the same way as for brewing coffee: Fill the water tank, insert 1.
a capsule and place a cup beneath the spout.
Press and hold the relevant coffee button until the required quantity of coffee2.
has been dispensed into the cup.
When you release the button, the machine will save that quantity.3.
If t
he settings are not to your taste, simply repeat the procedure to change them
again.
r each type of coffee: espresso (white
8
Page 10

Cleaning
Restoring the factory settings
You can restore the original settings for the water quantity.
1. Press the On/Off button to switch off the
machine.
2. Press and hold the left and right coffee
buttons and then press the On/Off button.
The three coffee buttons flash and
a signal will sound in confirmation.
3. Release the buttons. The factory settings for the water quantity have been
restored.
Standby mode
If no button is pressed for about nine minutes, the machine will automatically
switch to standby mode. The On/Off button and coffee buttons will go out. The
machine will then use very little energy. This is both a safety function and a way
to save energy. However, you should still always switch the machine off using the
On/Off button.
To disconnect the machine completely from the mains powe
mains plug from the wall socket.
To switch the machine back on,
m
simply press the On/Off button.
r, remove the
DANGER – risk of fatal electric shock
Remove the mains plug from the wall socket beforecleaning the•
device.
Never immerse the machine, mains plug or mains cord in water •
or any other liquids.
Do not clean the machine with a water jet. Clean it only as•
described in the following instructions.
CAUTION – material damage
Do not use any caustic, aggressive or abrasive products for cleaning.
Cleaning the casing
Wipe the casing with a soft, damp cloth. m
Also wipe the compartment for the used capsule container with a soft, dampm
cloth as required.
Rinsing the water tank daily
Rinse out the water tank daily under running water. This will preventm
limescale deposits or other particles clogging the filter on the bottom of the
water tank.
Thoroughly cleaning the water tank weekly
The water
nk should be cleaned once a week.
ta
Wash the water tank in warm water with a mild washing-up liquid. Rinse it outm
thoroughly under running water and dry it. The tank is not dishwasher-safe.
9
Page 11

Cleaning the used capsule container and drip tray/grid
1. Pull out the drip tray to remove it.
2. Remove the drip grid from the drip tray
and empty the drip tray.
3. Pull out the front drawer and remove the
used capsule container.
4. Empty the capsule container.
5. Wash all parts using a washing-up liquid.
Dry all parts thoroughly. All parts (except
for the machine itself) can also be cleaned
in the dish
washer.
6. Then reinsert all parts in the machine.
Cleaning the cup tray
The cup tray can be removed for easy cleaning.
1. Fold down the cup tray.
2. Remove the cup tray by pulling the right
side of the tray straight to the front.
3. Clean the cup tray by hand or in the dishwasher and then dry it thoroughly.
4. Insert the left side of the cup tray into the
holder and then press the right side – as
illus
ted – into the guide slot.
tra
Descaling
If the indicator light is lit up yellow, the machine needs to be descaled.
Do this within the next couple of days. Do not wait any longer, otherwise
so much limescale may collect that a descaling agent will no longer have
any effect. Descaling takes about 30 minutes.
The descaling process cannot be interrupted. If an interruption nevertheless occurs during the descaling process (e.g. due
must be completed the next time the machine is switched on. The machine
will not be able to brew coffee again until the process is completed.
CAUTION — damage to the machine due to limescale deposits
Descale the machine as soon as the machine indicates that this is •
necessary (after approx. 50 litres).
This increases its service life and saves energy.
Do not use any descaling agents made on the basis of formic acid.•
Use a standard, liquid, descaling agent suitable for coffee and espresso•
machines. Other agents may damage materials in the m
no effect.
Tip: Descaling agent: We recommend durgol
®
swiss espresso®, which is available
from any Tchibo branch and from specialist retailers.
To descale the machine, proceed as follows:
1. Press the On/Off button to switch off the
machine.
Using durgol
®
swiss espresso®:
Take the water tank out of the machine and pour one portion (125 ml) ofm
®
durgol
swiss espresso® into the empty water tank. Add water up to the MAX
mark. Reinsert the tank.
If you are using a different descaling agent, read the manufacturer’s instruc-m
tions. Add descaling solution up to the MAX mark. Reinsert the tank.
to
a power outage), it
achine a
nd/or have
10
Page 12

2. Fold down the lever.
3. Remove the drip tray if necessary.
4. Place a container with a capacity of at least 250ml under the coffee spout.
You will need to empty this container several times during the descaling phase.
5. Press and hold the On/Off button for
approx. 5 seconds.
6. Release the button. The On/Off button and
indicator light will flash.
7. Press the On/Off button again to start
descaling.
The white coffee button will flash.
The machine pumps descaling solution into the pipes several times at 5-minute
intervals. Each time about125 ml is dispensed into the container.
8. Pour out the dispensed water each time to ensure that the container does
not overflow.
Once finished, the white coffee button will go
out and the yellow coffee button lights up.
Two signals will
9. Pull the water tank straight up and out of the machine. Thoroughly clean the
water tank as described in the chapter “Cleaning” / section “Thoroughly
cleaning the water tank weekly”.
A rinsing phase will now start.
Rinsing phase
10. For the rinsing phase, fill the water tank up to the MAX mark with cold tap
water.
e descaling phase begins.
Th
und.
so
11. Place an empty container (at least 250 ml) beneath the coffee spout.
12. Press the yellow coffee button to start
rinsing. The On/Off button lights up and
the middle coffee button flashes.
13. Approx. 600 ml water will be rinsed through the system. Keep an eye on the
container and empty it before it overflows.
14. To finish, three signals will sound, all buttons will flash 3 times, the indicator
light
ashes red 3 times and the machine will automatically switch to standby
fl
mode. The On/Off button, coffee buttons and indicator light will go out.
The descaling process is completed.
For a long period of non-use
If you will not be using the machine for a prolonged period, e.g. when you go on
holiday, we recommend for reasons of hygiene that you should drain the water
from the machine’s pipes. The machine must be warmed up before doing so:
1. Press the On/Off button to switch the
machine on.
The On/Off button and the coffee buttons
flash and the machine starts heating up.
Once all
2. ... press the On/Off button to switch the
t
he buttons stay lit up...
machine off again.
11
Page 13

Problems / solutions
3. Place a container under the coffee spout.
4. Fold down the lever if necessary.
5. Empty the water tank and reinsert it.
6. Press and hold the three coffee buttons
simultaneously and then press the On/Off
button in addition.
7. Release the buttons again.
The On/Off button flashes red.
The pump transports the remaining water
out of the pipes of the machine. It stops
automatically as soon as there is no
water inside. The residual water runs into
the container beneath the spout.
A signal sounds and the machine auto-
matically switches into standby mode.
8. Empty the drip tray.
When you wish to use the machine again at a later time, proceed as described in
the section “Initial operation – prior to first use”.
more
The indicator light
is flashing red and
a signal is sounding.
There are coffee
grounds in the cup.
The coffee is not hot
enough.
The indicator light
lights up yellow
permanently.
Is the water tank empty?
Fill the water tank with fresh water.m
Press one of the coffee buttons. The pump starts tom
operate. As soon as the pipes are filled with water the
pump stops automatically.
When the coffee buttons remain permanently lit, them
machine is ready for use again.
Has the lever been raised during the brewing
procedure?
This will immediately stop the brewing procedure.
Fold down the lev
Press one of the coffee buttons to switch off them
acoustic signal.
A small residue of coffee grounds always remains at the
bottom of the cup.
This is a feature of the system and is not a fault.
Especially in the case of espresso, the quantity of coffee is
so small compared with the size of the cup that it cools
down quickly. Preheat the cup by filling it with hot water
and pouring it away shortly before using the cup.
The machine needs to be descaled.
Do this within the next couple of days. Do not wait any
longer, otherwise so much limescale may collect that
a descaling agent will no longer have any effect. A selfinduced defect of this kind will not be covered by the
warranty. Proceed as described in the section “Descaling”.
er again.m
12
Page 14

Water is dripping out
of the coffee spout.
It is not possible to
press down the
lever.
The water in the system expands as the machine heats up
and as a result a little water drips out of the coffee spout.
Check whether the used capsule container is full. Empty it
if necessary.
If a capsule is trapped in the compartment, fold the lever
fully back and press the capsule through from the top to
the bottom. Do not reinsert a capsule if it is misshapen.
Disposal
Dispose of the packaging in the proper manner. Make use of the local facilities
provided for collecting paper, cardboard and lightweight packaging.
Appliances marked with this symbol must not be disposed of along
with household refuse!
You are legally bound to dispose of old appliances separately from
household waste. Information about where old appliances can be disposed of free
of charge is avail
able f
rom your local authorities.
Technical specifications
Type / Model: Cafissimo 313212
Product number: see “Warranty” section
Mains voltage: 220—240 V ~ 50 Hz
Power: 1500 watts
Power consumption
when turned off: 0.04 watts
Automatic switch-off: approx. 9 minutes
Protection class: I
Pump pressure: max. 15 bar
Sound pressure level: <70dB(A)
Ambient temperature: +10 to +40°C
Preset brew quantities: Filter coffee 125 ml
Caffè crema 125 ml
Espr
40 ml
esso
Made exclusively for: Tchibo GmbH, Überseering 18,
22297 Hamburg, Germany
13
Page 15

Warranty
We grant a 36-month warranty from the date of purchase.
Tchibo GmbH, Überseering 18, 22297 Hamburg, Germany
We will remedy all defects in workmanship or materials within the warranty
period. In order for the warranty to be granted, all warranty claims must be
accompanied by proof of purchase from Tchibo or from an authorised Tchibo
distribution partner. This warranty is only valid within the
EU,
Switzerland
and Turkey.
If, contrary to our expectations, a defect is found, please contact our
customer care service at the following e-mail address:
service@tchibo.de
Our customer consultants will be pleased to advise you on further procedure.
Damage due to improper use, failure to decalcify as well as worn parts and
consumables, are not covered by the warranty.
Please have the product numbe
t hand in case of any queries.
r a
This warranty does not restrict statutory warranty rights.
Product number
Product
number
Type / Model
Before laying the Cafissimo on its side, remove the water tank and pull out
the front drawer with the used capsule container and drip tray. Lay a cloth or
mat underneath the machine to protect the surface from remaining water
and coffee that may leak out.
You can find your
Cafissimo machine’s
product number on the
type plate on the
bottom of the casing.
Service Form
Please fill out the form in capital letters and send it along with the product.
Product number
(please fill in)
Surname, first name
Street, no.
Postcode, city
Country
Tel. (daytime)
Fault/Defect
Date of purchase
Date/Signature
(You can find your Cafissimo machine’s
product number on the type plate on
the bottom of the casing.)
Return checklist:
Package the product well.•
Secure any loose parts.•
Copy and include the proof of •
purchase.
Remove any used capsules.•
If not covered by the warranty* :
(please tick box)
*You will be responsible f
returning any products which are not
covered by the warranty.
_ _ _ _ _ _
Please send back the coffee
machine unrepaired.
Please send a cost estimate.
he cost of
or t
 Loading...