

Page 1
User Manual
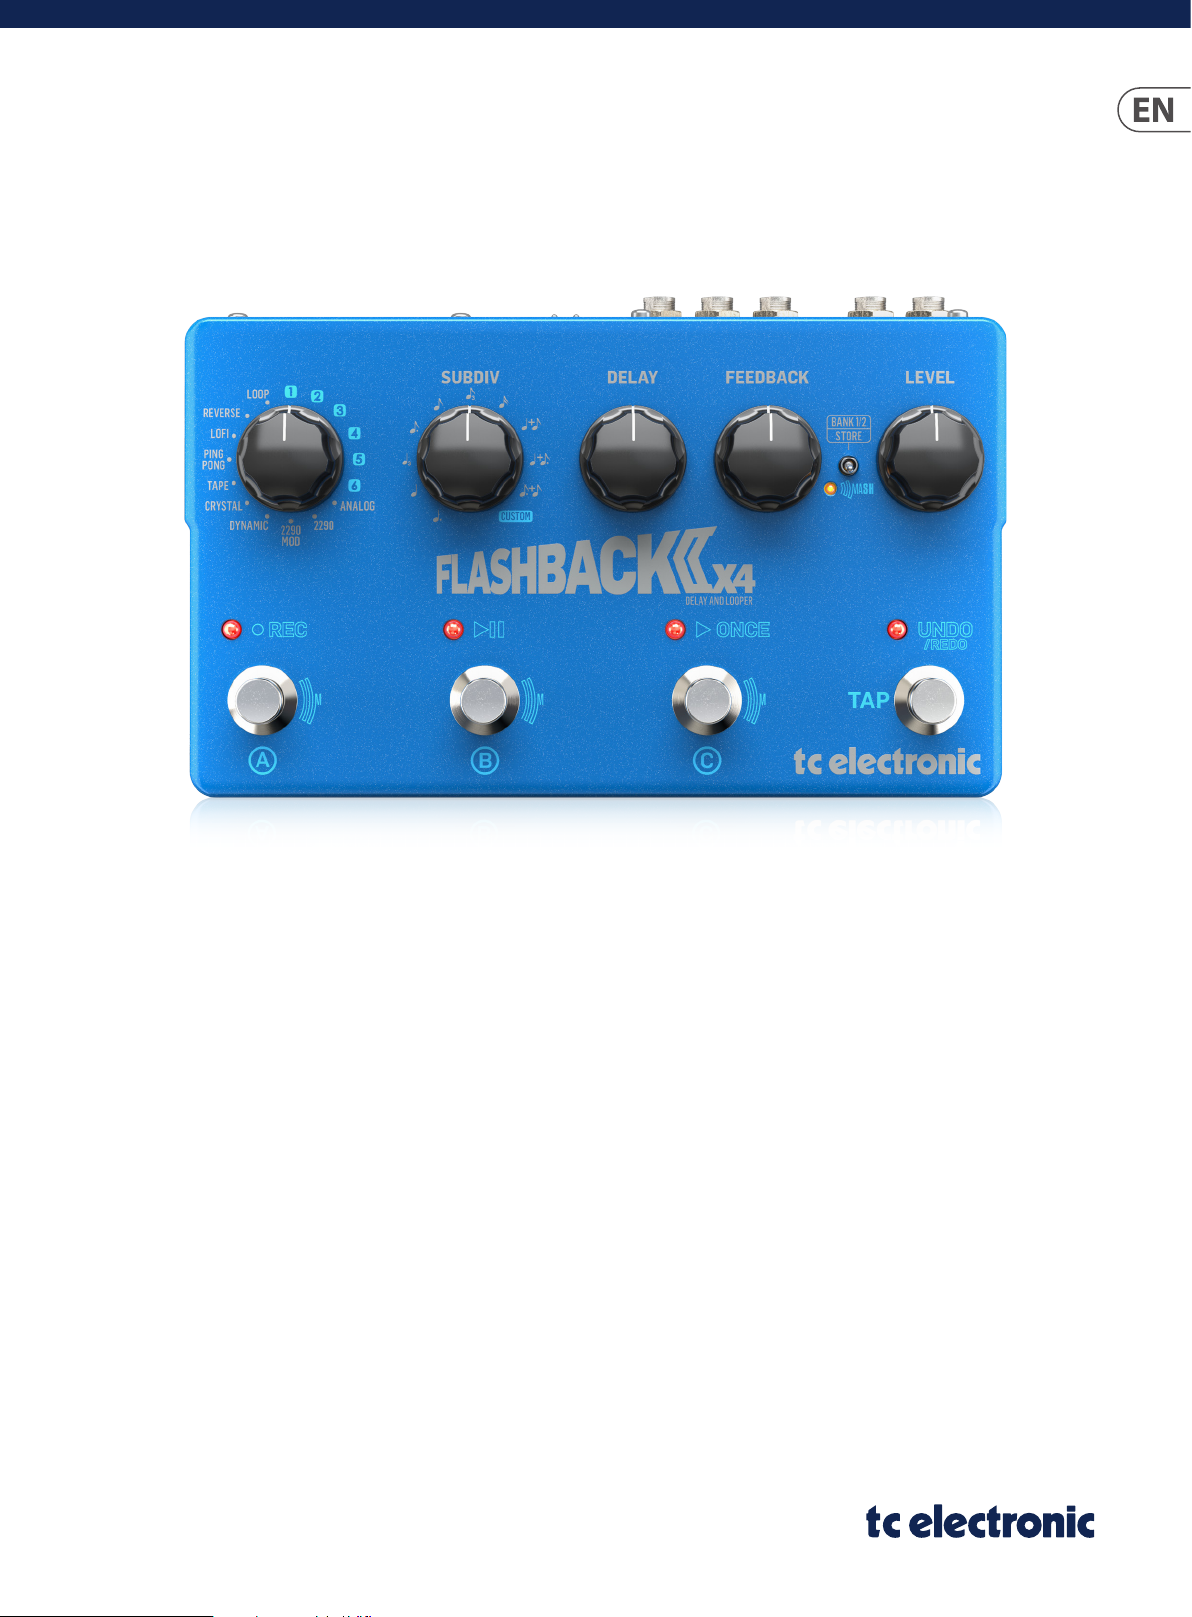
FLASHBACK 2 X4 DELAY
Flagship Delay Pedal Expanded with 3 MASH Switches, Tap Tempo,
New Crystal, Analog and Tape Delays and 6 Delay Presets
Page 2

2 FLASHBACK 2 X4 DELAY User Manual
Table of Contents
Important Safety Instructions ...................................... 3
Legal Disclaimer ............................................................. 3
Limited warranty ............................................................ 3
1. About this Manual ..................................................... 4
2. Introduction ............................................................... 4
2.1 Unpacking ............................................................................. 4
2.2 True Bypass ........................................................................... 4
2.3 Setting Up ............................................................................. 4
3. TonePrint .................................................................... 4
3.1 What are TonePrints? ......................................................... 4
3.2 Transferring TonePrints to your pedal ....................... 5
3.3 Editing TonePrints with the TonePrint App .............. 5
4. Inputs, Output and Controls ....................................6
4.1 Power / Computer connection ...................................... 6
4.2 Audio in and out ................................................................. 6
4.3 Other rear panel features ................................................ 6
4.4 Switching ............................................................................... 6
4.5 Eect controls ...................................................................... 7
4.6 Delay types ........................................................................... 7
5. Operation .................................................................. 8
5.1 Signal chain placement ................................................... 8
5.2 MASH switch ........................................................................ 8
5.3 Using the looper ................................................................. 9
5.4 Expression Pedal Setup .................................................... 9
6. Bypass Mode ............................................................ 10
6.1 True Bypass and Buered Bypass explained .......... 10
6.2 Switching between True Bypass and
Buered Bypass ......................................................................... 10
6.3 Kill-dry on/o ..................................................................... 10
7. Maintenance ............................................................. 10
7.1 Updating the rmware .................................................... 10
8. MIDI ........................................................................... 11
9. Links .......................................................................... 11
10. Specications ......................................................... 12
Page 3
3 FLASHBACK 2 X4 DELAY User Manual
9. Do not defeat the safety purpose of the polarized
20. Please keep the environmental aspects of battery
Important Safety Instructions
Terminals marked with this symbol carry
electrical current of sucient magnitude
to constitute risk of electric shock.
Use only high-quality professional speaker cables with
¼" TS or twist-locking plugs pre-installed. Allother
installation or modication should be performed only
by qualiedpersonnel.
This symbol, wherever it appears,
alertsyou to the presence of uninsulated
dangerous voltage inside the
enclosure-voltage that may be sucient to constitute a
risk ofshock.
This symbol, wherever it appears,
alertsyou to important operating and
maintenance instructions in the
accompanying literature. Please read the manual.
Caution
To reduce the risk of electric shock, donot
remove the top cover (or the rear section).
No user serviceable parts inside. Refer servicing to
qualied personnel.
Caution
To reduce the risk of re or electric shock,
do not expose this appliance to rain and
moisture. The apparatus shall not be exposed to dripping
or splashing liquids and no objects lled with liquids,
suchas vases, shall be placed on the apparatus.
Caution
These service instructions are for use
by qualied service personnel only.
Toreduce the risk of electric shock do not perform any
servicing other than that contained in the operation
instructions. Repairs have to be performed by qualied
servicepersonnel.
1. Read these instructions.
2. Keep these instructions.
3. Heed all warnings.
4. Follow all instructions.
5. Do not use this apparatus near water.
6. Clean only with dry cloth.
7. Do not block any ventilation openings. Install in
accordance with the manufacturer’s instructions.
8. Do not install near any heat sources such as
radiators, heat registers, stoves, or other apparatus
(including ampliers) that produce heat.
or grounding-type plug. A polarized plug has two blades
with one wider than the other. A grounding-type plug
has two blades and a third grounding prong. The wide
blade or the third prong are provided for your safety. Ifthe
provided plug does not t into your outlet, consult an
electrician for replacement of the obsolete outlet.
10. Protect the power cord from being walked on or
pinched particularly at plugs, convenience receptacles,
and the point where they exit from the apparatus.
11. Use only attachments/accessories specied by
themanufacturer.
12. Use only with the
cart, stand, tripod, bracket,
or table specied by the
manufacturer, orsold with
the apparatus. When a cart
is used, use caution when
moving the cart/apparatus
combination to avoid
injury from tip-over.
13. Unplug this apparatus during lightning storms or
when unused for long periods of time.
14. Refer all servicing to qualied service personnel.
Servicing is required when the apparatus has been
damaged in any way, such as power supply cord or plug
is damaged, liquid has been spilled or objects have fallen
into the apparatus, the apparatus has been exposed
to rain or moisture, does not operate normally, or has
beendropped.
15. The apparatus shall be connected to a MAINS socket
outlet with a protective earthing connection.
16. Where the MAINS plug or an appliance coupler is
used as the disconnect device, the disconnect device shall
remain readily operable.
17. Correct disposal of this
product: This symbol indicates that
this product must not be disposed
of with household waste,
according to the WEEE Directive
(2012/19/EU) and your national
law. This product should be taken
to a collection center licensed for the recycling of waste
electrical and electronic equipment (EEE). The
mishandling of this type of waste could have a possible
negative impact on the environment and human health
due to potentially hazardous substances that are generally
associated with EEE. At the same time, your cooperation
in the correct disposal of this product will contribute to
the ecient use of natural resources. For more
information about where you can take your waste
equipment for recycling, please contact your local city
oce, or your household waste collection service.
18. Do not install in a conned space, such as a book
case or similar unit.
19. Do not place naked ame sources, such as lighted
candles, on the apparatus.
disposal in mind. Batteries must be disposed-of at a
battery collection point.
21. Use this apparatus in tropical and/or
moderate climates.
LEGAL DISCLAIMER
Music Tribe accepts no liability for any loss which
may be suered by any person who relies either
wholly or in part upon any description, photograph,
or statement contained herein. Technical specications,
appearances and other information are subject to
change without notice. All trademarks are the property
of their respective owners. Midas, Klark Teknik,
Lab Gruppen, Lake, Tannoy, Turbosound, TC Electronic,
TC Helicon, Behringer, Bugera, Auratone and Coolaudio
are trademarks or registered trademarks of Music Tribe
Global Brands Ltd. © Music Tribe Global Brands Ltd.
2019 All rights reserved.
LIMITED WARRANTY
For the applicable warranty terms and conditions
and additional information regarding Music Tribe’s
Limited Warranty, please see complete details online at
musictribe.com/warranty.
Zhongshan Eurotec Electronics Limited
No. 10 Wanmei Road, South China Modern Chinese
Medicine Park, Nanlang Town, 528451, Zhongshan City,
Guangdong Province, China
Page 4
4 FLASHBACK 2 X4 DELAY User Manual
1. About this Manual
Thank you for spending your hard-earned money on this TC Electronic product!
We have done our best to ensure that it will ser ve you for many years to come,
and we hope that you will enjoy using it.
This manual is available as a PDF download from the TC Electronic website.
Please read this manual in full, or you may miss
important information.
Please do not operate your TC device before you have made all connections
to external equipment as described in the “2.3 Setting Up” section. In the
subsequent sections of the manual, we assume that all connections are made
correctly and that you are familiar with the previous sections.
We reserve the right to change the contents of this
manual at any time.
To download the most current version of this manual, view the product warranty,
and access the growing FAQ database for this product, visit the web page
tcelectronic.com/support/
2. Introduction
FLASHBACK 2 X4 DELAY packs our entire delay legacy into a 4-footswitch
stompbox that's designed for now – and the future. Our groundbreaking MASH
technology adds ex tra expression capability to a world-class delay stompbox
that responds to your touch and saves precious pedalboard space – and blends
the ethereal world of delay with the ultimate in personal expression. A dedicated
tap tempo switch gives you direct control over the delay time parameter, and a
built-in looper lets you layer and jam creatively. Add the brand-new Crystal delay
algorithm and two additional TonePrint slots, and the soon-to-be legendary
FLASHBACK 2 X4 DELAY brings a wealth of new dimensionality to your quest for
tonal perfection!
2.1 Unpacking
Your TC Electronic eect pedal box should contain the following items:
• Your TC Electronic eect pedal
• 1 USB cable (Type A to Mini-B)
• 1 TC Electronic sticker
• 9 V power supply
• 2 rubber feet
• Quick Start Guide
Inspect all items for signs of transit damage. In the unlikely event of transit
damage, inform the carrier and supplier. If damage has occurred, keep all
packaging, as it can be used as evidence of excessive handling force.
2.3 Setting Up
Connect the included 9 V power supply, or a regulated 9 V power supply with at
least 300 mA and the following symbol (center negative) to the DC input socket of
your TC Electronic eect pedal.
• Plug the power supply into a power outlet.
• Connect your instrument to the input jack using a ¼" jack cable.
• Connect the output jack to your amplier using a ¼" jack cable.
• The pedal also supports stereo operation (see Chapter 4.2).
3. TonePrint
This TC Electronic product supports TonePrints. To learn more about TonePrints,
go to tcelectronic.com/toneprint/
3.1 What are TonePrints?
When you look at your TC Electronic eect pedal, you’ll only see a few knobs.
For some pedals, it’s just one knob. So – one knob, one function, right?
Actually, there’s a lot more to it than meets the eye.
Star-tweaked signature sounds
When TC Electronic builds an eect pedal, the relationship between its controls
and many parameters “under the hood” are dened by developers, musicians
and product specialists who live and breathe sound. This gives you an excellent
starting point: a great-sounding pedal with well-balanced controls.
But wouldn’t it be cool to have world-famous guitar players – guys like
Paul Gilbert, Guthrie Govan, John Petrucci or Steve Vai – virtually rewire your
eect pedal, dening what should happen “behind the scenes”?
And how about doing this yourself?
This is exactly what TonePrint allows you to do.
TC Electronic is working with top guitar players who explore a pedal’s hidden
tonal potential, redening the controls and creating their personal TonePrints.
And we are making these custom TonePrints available to you. Uploading
them to your pedal is really easy (see chapter 3.2 for details) – and with the
amazing TonePrint app, you can even create your own signature pedal, tweaked
specically to your liking.
You can change the TonePrints in your pedal as often as you like,
and the best part: It’s totally free.
2.2 True Bypass
Here at TC, we have a simple philosophy: When you are using one of our products,
you should hear something great – and when it’s o, you shouldn’t hear it at all.
This is why this pedal sports True Bypass. When it is bypassed, it is really o and
has zero inuence on your tone, resulting in optimum clarity and zero loss of
high end.
Sometimes, it is advisable to switch an eect pedal from True Bypass to
Buered Bypass mode. For more information, see “6.2 Switching the pedal from
True Bypass to Buered Bypass”.
Page 5

5 FLASHBACK 2 X4 DELAY User Manual
3.2 Transferring TonePrints to your pedal
TonePrints can be transferred via USB connection or via TCs
“Beaming” technology.
Transferring via USB – step by step
• Connect the pedal to the power supply.
• Connect your pedal via USB cable to your computer or smar tphone/tablet
(use a “USB On-The-Go” adapter for Android devices and the Camera
Connection Kit for iOS devices).
• Launch the TonePrint app and follow the instructions to turn the TonePrint
selector knob to a TonePrint slot.
• Find the TonePrint you want to audition or use. You can browse TonePrints
by Artist or Product (i.e. pedal type). Browsing by Artist or Product is
selected in the Settings par t of the app (press the “ ” icon).
• Listen to the new sound through your pedal. As long as you’re connected
via USB, selecting a TonePrint will change the sound in your product
immediately.
• Alternatively, you can create your own TonePrint using the editor part of the
app – see section 3.3.
• Press “Store in Pedal” to store the TonePrint of your choice in the selected
TonePrint slot.
• Turn the TonePrint selector knob to a dierent slot if you want to store more
TonePrints.
3.3 Editing TonePrints with the TonePrint App
The TonePrint app allows you to use TonePrints created by your favorite guitar
and bass players. But this is only the start. Using the TonePrint editor within the
app, you can create your very own signature pedal sounds. All of TCs own artist
TonePrints in the Library tab (or alternatively all TonePrints in the Templates tab)
can be edited, as can your own User TonePrints. In order to use the editor the
TonePrint pedal must be connected to your computer or smartphone/tablet via
USB, like described previously. Simply navigate to a TonePrint or Template and
click on the “ ” icon to enter the editor part of the app.
Features of the editor part of the app
• Use the TonePrint app to build your own custom sounds and save them in
your pedal or as User TonePrints which will show up in the User tab.
• Enjoy complete control over all eect parameters and eect behavior - it's
your vision, your sound.
• Customize knob function and knob range to suit your needs and sounds.
• Audition your sonic creations in real time - make changes on the y and
listen to results immediately.
• Works with PC, Mac, and smartphones (iOS and Android).
Beaming TonePrints to your pedal – step by step
• When not connected via USB, simply launch the TonePrint app on your
smartphone.
• Navigate to the TonePrint you want to use. You can browse by Artist or by
Product (as described above).
• Plug your guitar or bass into the pedal.
• Turn your TonePrint pedal on.
• Turn up the volume on your instrument and set the pickup selector to
one pickup.
• Hold the speaker of your smartphone next to the chosen pickup and touch
“Beam to Pedal”. Follow instructions on your screen. A series of green ashes
of the LED will conrm successful beaming.
Page 6
6 FLASHBACK 2 X4 DELAY User Manual
4. Inputs, Output and Controls
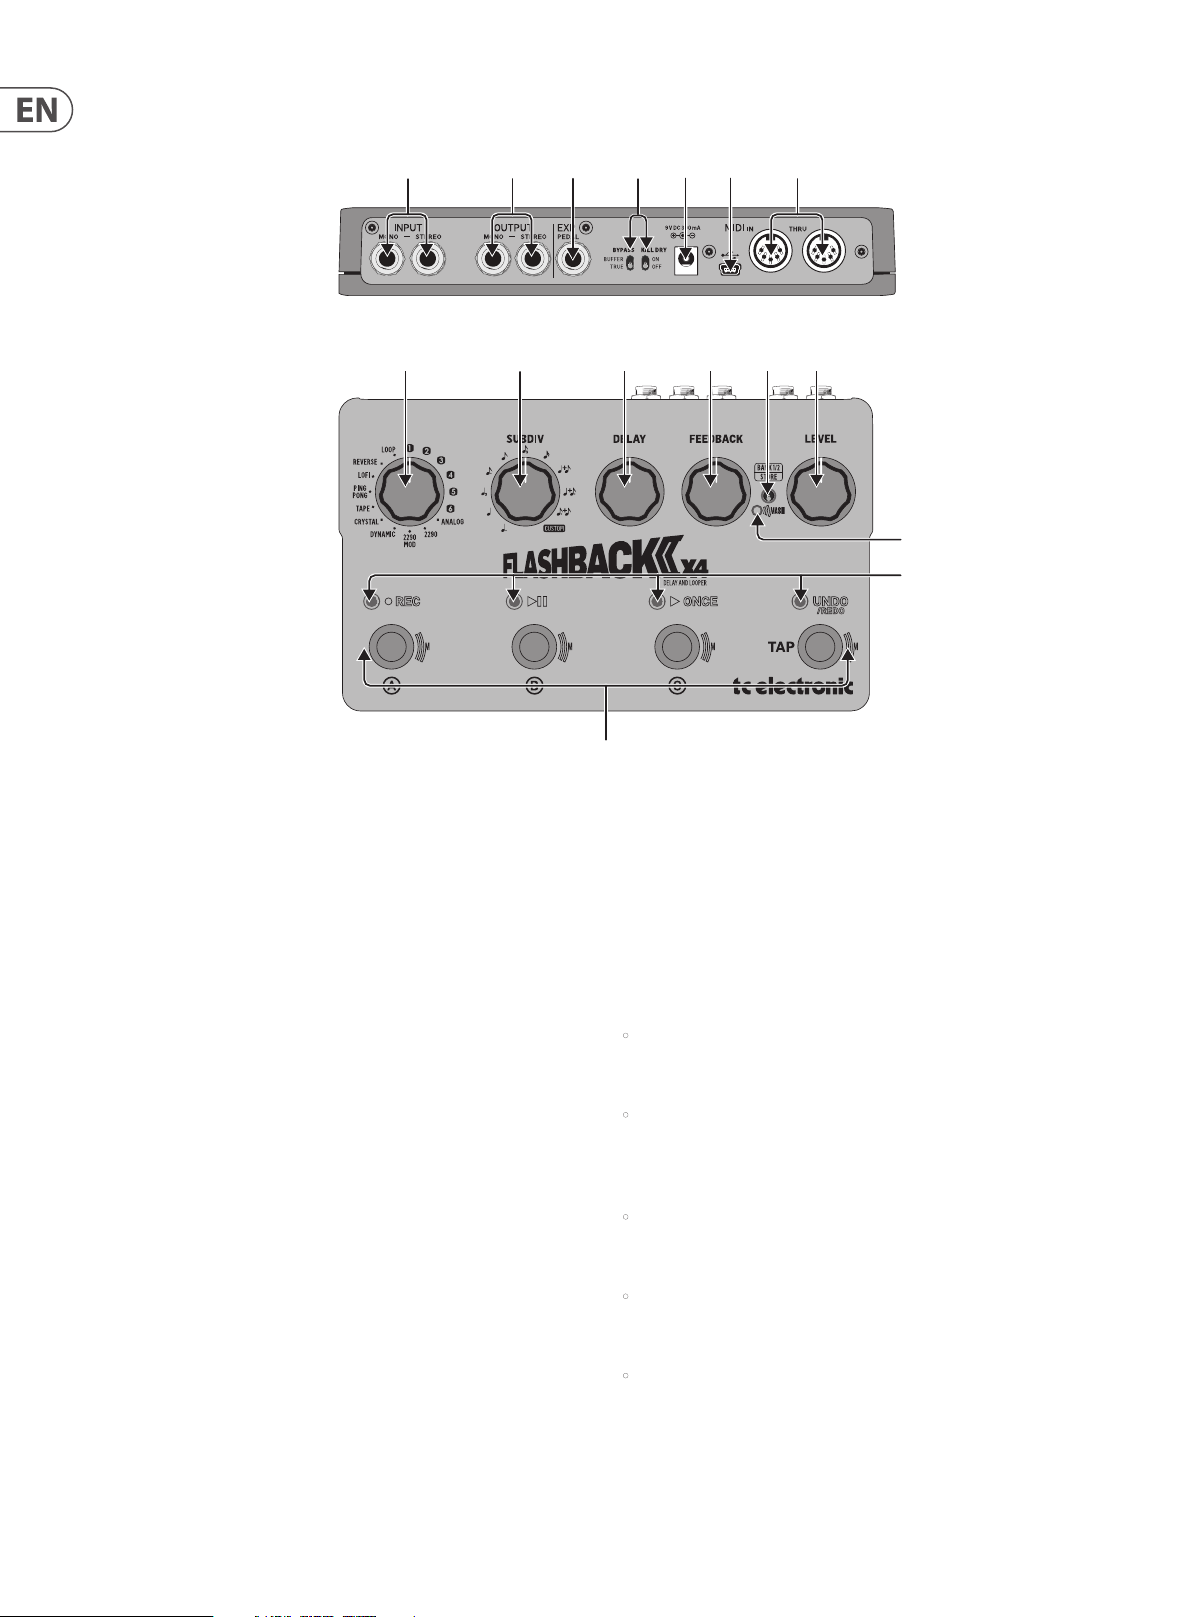
(10) (11) (12) (13) (14) (15)
(1) (2) (7)
(6)(5)(4)(3)
(16)
(9)
4.1 Power / Computer connection
(1) To power up your pedal, connect a power supply to its power input socket.
The power input socket of your TC Electronic eec t pedal is a standard
5.5/2.1 mm DC plug (centre = negative).
Your TC Electronic eect pedal requires a 9 V power supply providing 300 mA
or more. To minimize hum, use a power supply with isolated outputs.
(2) USB port - Use the standard Mini-B USB port on your TC Electronic
eect pedal to connect your pedal to a computer. If there are rmware
updates for this pedal, they can be installed using the USB port –
see “7.1 Updating the rmware”.
4.2 Audio in and out
(3) AUDIO INPUT - The audio inputs are standard ¼" jacks (mono/TS). Connect
your guitar to the mono audio input using a regular ¼" instrument cable.
The pedal also accepts stereo signals using a pair of ¼" TS cables.
(4) AUDIO OUTPUT - The audio outputs are standard ¼" jacks (mono/TS).
Connect the audio output of your pedal to the next device in the signal chain,
either with a single cable or with a pair of ¼" cables for stereo operation.
4.3 Other rear panel features
(5) EXPRESSION PEDAL – Connect a ¼" TS cable to a 25 kΩ linear pot
expression pedal to control delay time, feedback, and/or level.
See Chapter 5.4 for details on conguring parameters. .
(6) BYPASS/KILL DRY – The bypass modes can be conveniently switched from
the rear panel, and are set to true bypass and kill dry o from the factory.
See Chapter 6 for details about these alternate bypass modes.
(8)
(7) MIDI IN/THRU – Connect a MIDI controller to the MIDI IN jack to control
preset changes, delay tempo, and other parameters. Pass the MIDI
information on to another device with the THRU connector.
See Chapter 8 for details.
4.4 Switching
(8) FOOTSWITCHES – The footswitches perform 5 functions –
preset, tap tempo, bank select, looping, and MASH.
• To turn one of the preset eects on, tap footswitch A, B or C. To turn the
eect o, tap the same footswitch again. Note that 2 banks of presets
are available.
• The TAP footswitch can be tapped in rhythm to set the desired tempo.
The LED will ash to indicate the current tempo. Note that taps are always
“heard” by the pedal as quar ter notes, even though the Subdivision knob
will determine the actual delay rhythm.
• Holding the TAP footswitch will toggle the 2 preset banks. Bank 1 is
indicated by red LEDs, while bank 2 has green LEDs. Note that bank selection
can also be achieved by pressing up on the Bank/Store switch.
• When the Delay type selector knob is set to LOOP, the footswitches will
control Record, Play/Pause, Play Once, and Undo/Redo.
See section 5.3 for details.
• The footswitches also control the MASH function assigned to each switch.
See section 5.2 for details.
(9) INDICATOR LEDs – The LEDs above footswitches A, B and C will light to
indicate that the pedal is engaged. When preset bank 1 is selected, the LEDs
light red, and light green when bank 2 is selected. The LED above the TAP
footswitch will ash red in time with the current delay tempo. LEDs also
indicate various looping functions as detailed in Chapter 5.3.
Page 7

7 FLASHBACK 2 X4 DELAY User Manual
4.5 Eect controls
Please note that the knob assignments on your TC Electronic pedal are the default
assignments. Using the TonePrint app, you can rewire knobs so they control one
or several parameters of your choice.
(10) Delay type selector – Select the type of delay, TonePrint slot, or enable
the looper with this knob. The available delay types are described in the
following sec tion (4.6).
(11) SUBDIVISION knob – This switch determines the note intervals that the
delay repetitions are based on. The options are dot ted quarter, quarter
note, quarter note triplet, dotted eighth, eighth note, eighth note triplet,
sixteenth note, quarter plus eighth note, quarter plus dotted eighth, dotted
eighth plus eighth, and a custom subdivision.
(12) DELAY knob – Use this knob to adjust the time of the delay. Most delay
types have a range of 20 ms to 7000 ms (7 seconds!).
(13) FEEDBACK knob – Use the Feedback knob to determine the number of
delay repeats.
(14) BANK/STORE switch – Press the switch up to toggle between presets 1-3
or 4-6. Bank 1 is indicated by red LEDs (presets 1-3), and Bank 2 is indicated
by green LEDs (presets 4-6).
Adjusting any of the knobs will override the current preset. To keep these
changes, press the Bank/Store switch down briey.
(15) LEVEL knob – This knob adjusts the volume level of the delay repeats.
The direct, unprocessed signal is always passed through at the original
(unity) level. The Level knob only controls how prominently the delay
repeats are mixed with the dry signal.
DYNAMIC
This is a replica of the legendary Dynamic Delay initially introduced in the
renowned TC 2290. The delay’s output level is actively altered by the dynamics
of the input level. While playing, the delay level is attenuated, and in between
phrases the delay level is increased. This allows you to play with a relatively large
amount of delay without muddying fast ris.
2290 MOD
Take the 2290’s pristine sound, send it through three (!) chorus pedals… et voilà.
If you’re into the sound of The Edge, you don’t want to miss this setting. Oh, and
while you’re at it, try playing around with the SUBDIVISION knob.
CRYSTALS
The Crystals eect pitch shifts the echoes up an octave through each delay loop,
creating a haunting and other-worldly sound. This is a very unique eect that
may open some interesting options, particularly when paired with the
MASH function.
REVERSE
If you’ve been around for some time, you know the drill: Record a guitar part on
tape. Flip the tape over. Play it back. This is a classic eect made famous by guitar
legends such as Jimi Hendrix – and although it’s kind of “old school”, the reverse
eect still seems to inspire people to try out new things.
LOFI
Fed up with hi-? Try the “Lo” setting to get that dirty feel.
(16) MASH LED - This will light up when the MASH function is engaged by
pressing down rmly on one of the footswitches. The LED gets brighter
as the footswitch receives more pressure, giving visual feedback to how
the expression is controlling the assigned parameter(s). See section
5.2 for details.
4.6 Delay types
2290
Once upon a time… (i.e., back in 1985) TC Electronic released the 2290 Dynamic
Digital Delay. It set the bar for professional delays for years to come, even paving
the way for tap tempo control with its “learn” function, and is still held in high
regard among delay enthusiasts. Use the “2290” delay for the crispest and
cleanest delay you can imagine. This is the standard.
ANALOG
This is as close as you can get to the charming nature of an old analog transistor
bucket-brigade delay without buying the real thing! With ever y repeat, you get
more of that old-school “fade to grey” vibe.
TAPE
Who doesn’t love the smooth sound of an old tape echo machine? This new-andimproved algorithm meticulously replicates ever y aspect of authentic tape delay,
including the pitch shif ting that occurs when the delay time is altered.
PING PONG
Like the ball in the eponymous game, the delay repeats jump from left to right
(provided you’re using both outputs for a stereo signal). The eect is really wide.
While this eect is ideal for stereo, it works well in mono, too.
LOOPER
Set the Delay type selector to LOOP to use the built-in audio looper.
This functionality is explained in ‘Chapter 5.3 Using the looper’.
TONEPRINT
Select one of the 6 TonePrint settings to access a default setting, or create your
own presets! See Chapter 3 for more details on creating and loading TonePrints.
Page 8
8 FLASHBACK 2 X4 DELAY User Manual
5. Operation
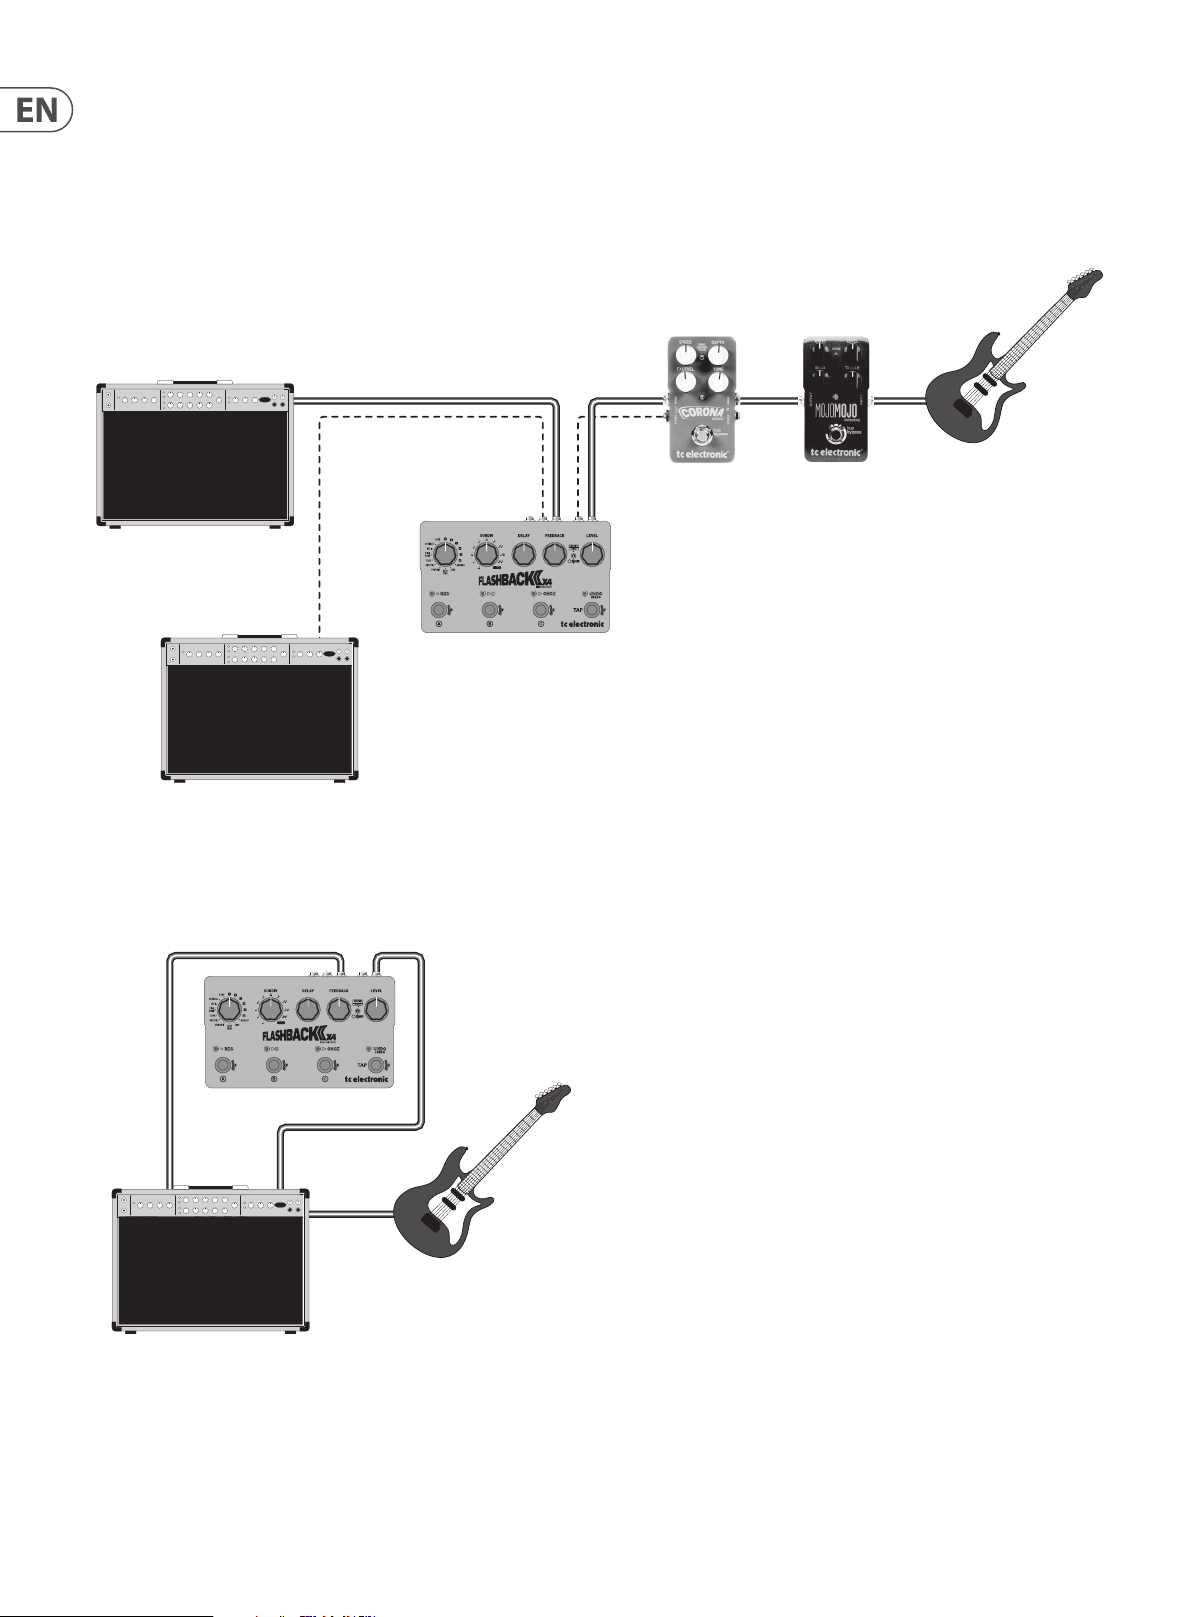
5.1 Signal chain placement
The FLASHBACK 2 X4 can be used several ways depending on your situation. While there isn’t necessarily a right and wrong use, here are the most common scenarios.
Example 1: Before the amp’s input
Input
Guitar
Combo Amp
Input
(Optional amp
for stereo operation)
FLASHBACK 2 x4 DELAY
Chorus
(mono or stereo
Drive pedal
When using the FLASHBACK 2 X4 before the amp’s input, it is generally best to place it af ter your other pedals. If any stereo eects are used before the delay pedal,
you can preserve this stereo signal by connecting to both of the FLASHBACK 2 X4’s inputs and sending the output jacks to dierent amps or to a stereo input on a mixer.
Example 2: In the amp’s FX loop
5.2 MASH switch
The MASH function on the FLASHBACK 2 X4 is a very exciting and innovative
feature that allows continuous control of a desired parameter through pressure
on one of the footswitches. This opens up countless creative possibilities,
particularly with the user-dened TonePrints.
FLASHBACK 2 x4 DELAY
FX SendFX Return
Input
Guitar
Combo Amp
The FLASHBACK 2 X4 input can handle a very wide range of signal levels thanks to
high internal headroom, and can easily be used with guitar or line-level signals.
Simply connect the amp’s Send jack to the the pedal’s input, and connect the
output to the amp’s Return jack.
The standard toggle function of the footswitches reacts to single, quick presses
of the switch to engage a preset. If you press the switch slightly harder and
hold it down, the MASH func tion will engage, causing the associated MASH LED
to light up slightly. As you press down harder on the switch, the LED lights up
brighter and the parameter that has been assigned to this function will change
accordingly. Releasing the footswitch will exit the MASH function and the LED
will turn o, but the pedal will still be engaged. This operation is the same for
MASH parameters assigned to footswitches A, B and C.
Note that the pressure needed to reach the maximum MASH level is only 10 kg
(around 20 pounds), which can be achieved just by squeezing with your ngers.
You shouldn’t need to lean too much weight on the pedal. With some practice,
this feature will become familiar and expressive much like a wah or
volume pedal.
Using the TonePrint app, you can assign your own parameters (up to 3!) to this
unique feature and save a custom preset that allows you to create sounds that
very few delay units have been capable of before. See Chapter 3 for more details
on TonePrints.
Page 9
9 FLASHBACK 2 X4 DELAY User Manual
5.3 Using the looper
With the looper built into your FLASHBACK 2 X4, you can record and play back
grooves and lines to play along with. You can even overdub your recording an
unlimited number of times.
The rst round of recording always sets the length of the loop. The duration of a
loop can be up to 40 seconds in mono and 20 seconds in stereo, regardless of how
many overdubs you make.
If an overdub exceeds the length of the loop, a third round of recording begins.
This gives a very natural logic and musical feel when recording loops.
The DELAY and FEEDBACK knobs are inactive in Loop mode.
Recording and playing loops:
• Set the Delay type selector to LOOP.
• Feel the groove and prepare for recording. Tap the 1st/REC footswitch to
start your recording and begin playing. The LED ashes red.
• To stop recording, press the REC footswitch again. Flashback Delay
immediately switches to playback mode and star ts playing the loop.
In playback mode, the LED is green.
• To overdub your recording, press the REC switch once more.
The LED now blinks.
• Use the LEVEL knob to adjust the volume of the loop.
• Press the 2nd/Play/Pause footswitch to stop a loop that is playing back.
Press it again to start playing the loop from the beginning.
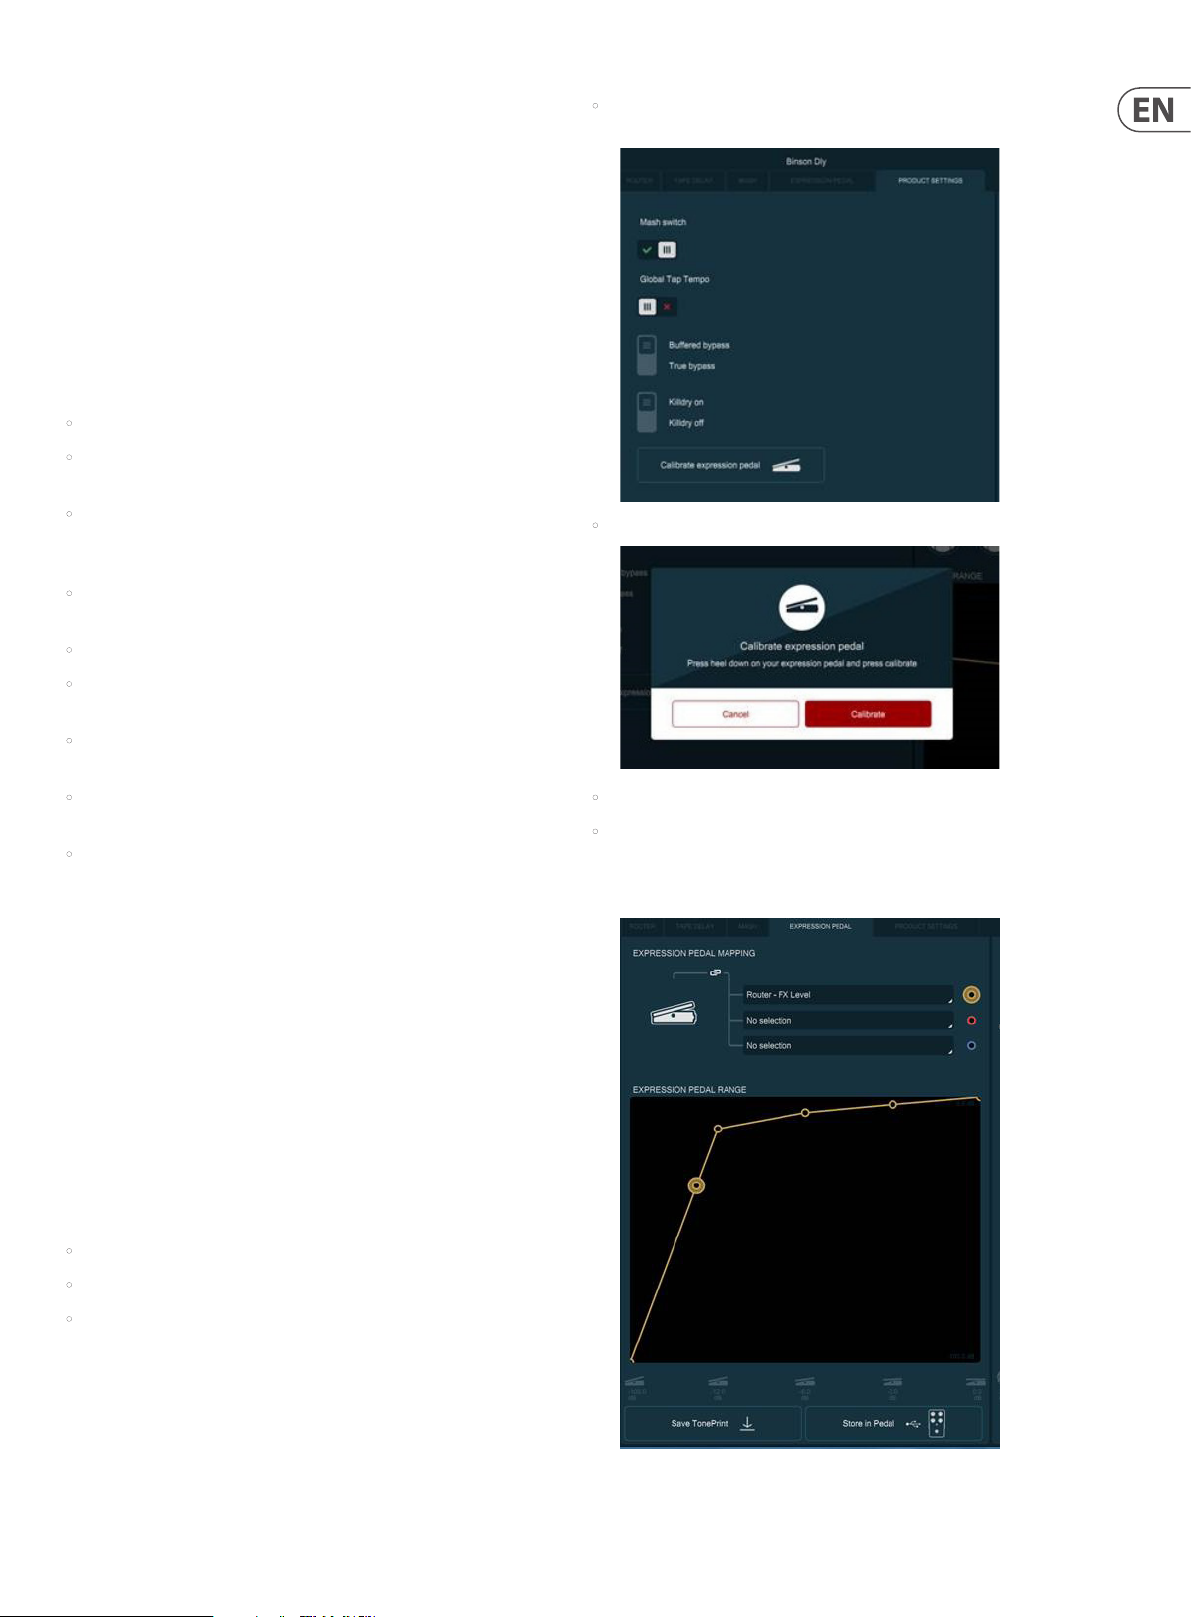
• Navigate to the Product Settings tab and click the 'Calibrate expression
pedal' button.
• Follow the instructions for calibration.
• To stop a loop at the end of its cycle, press the 3rd/Play Once footswitch.
The LED will ash until the end of the loop cycle, and the loop will stop.
• To undo the previous overdub, press the 4th/Undo footswitch.
Press again to add the overdub back in.
• To delete all recordings, press and hold the 4th/Undo footswitch.
Note that loops are not stored across power cycles.
5.4 Expression Pedal Setup
Connecting an expression pedal allows continuous control of feedback length,
delay time or delay level. You will be able to dene which parameters are
controlled with the pedal, as well as the range of control. For example, if
controlling the delay level with a pedal, you may not want the “heel down”
position to turn the delay level all the way o, and you may not want the
“toe down” position to actually reach maximum output level achievable with
the Level knob.
It’s important to note that the FLASHBACK 2 X4 does not work with standard
250 kΩ guitar volume pedals. You will need a 25 kΩ linear pot expression pedal
for proper function.
Follow these steps to assign one or more parameters to an expression pedal:
• Connect an expression pedal to the EXP PEDAL input.
• Connect your pedal to a computer or smartphone/tablet via USB cable.
• Open the TonePrint app.
• When the heel and toe positions have been established, click 'Done'.
• Navigate to the Expression Pedal tab to assign parameters that will be
controlled with the expression pedal. The pedal response curve is indicated
in a graphic display, and a peg will move along the curve as the pedal is
rocked back and forth.
Page 10

10 FLASHBACK 2 X4 DELAY User Manual
6. Bypass Mode
6.1 True Bypass and Buered Bypass explained
True Bypass mode is a hard-wire bypass that gives absolutely no coloration of
tone when the pedal is bypassed. This is the default mode for your eec t pedal.
Using True Bypass on all pedals is a perfect choice in setups with a few pedals and
relatively short cables before and af ter the pedals.
If...
• you use a long cable between your guitar and the rst pedal or
• if you use many pedals on your board or
• if you use a long cable from your board to the amp,
... then the best solution will most likely be to set the rst and the last pedal in
the signal chain to Buered Bypass mode.
Can you hear the dierence between a pedal in True
Bypass or Buered Bypass mode?
Maybe, maybe not – many factors apply: active vs. passive pick-ups, single-coil
vs. humbucker, cable quality, amp impedance and more. We cannot give a single
ultimate answer. Use your ears and nd the best solution for your setup!
Delay spillover
When the pedal is in True Bypass mode, switching a preset o will turn the entire
pedal o, including the delay trails that would normally be heard fading away
naturally. In Buered Bypass mode, disengaging a preset will still allow those
echoes to “spill over” and fade out naturally even though the pedal is no longer
processing delays for the incoming audio. If this is an important feature for you,
it may aect your decision to use Buered over True Bypass.
7. Maintenance
7.1 Updating the rmware
TC may provide updates for the built-in sof tware of your pedal, the rmware.
Updating your TC pedal’s rmware requires...
• a computer running Microsoft Windows or OS X with a standard USB
interface
• the specied DC power supply for your pedal.
Preparing the rmware update
• Download the newest rmware from the “Support” page for your TC pedal.
There are updaters for Microsoft Windows (these are ZIP archives containing
the rmware installer) and for OS X (these are disk image les containing the
rmware installer).
• Unplug all cables (including the power supply) from your TC pedal.
• Connect the pedal to your computer using a USB cable.
• Press and hold the footswitch on your TC pedal. If your TC pedal has more
than one footswitch, press and hold the lef tmost footswitch.
• Insert the DC power supply plug.
• The LED on your pedal should turn green. If your TC pedal has more than
one LED, the leftmost LED should turn green. This indicates that the pedal is
ready to receive the software update.
• Release the footswitch.
• Your TC pedal will now be recognized as an updatable device.
Applying the rmware update
6.2 Switching between True Bypass and
Buered Bypass
While some TC pedals require the back to be removed, the bypass mode on the
FLASHBACK 2 X4 can be easily switched on the rear panel.
6.3 Kill-dry on/o
When you activate Kill-dry, the direct signal is removed from the pedal’s output.
This mode can be useful when you place the FLASHBACK 2 X4 in an amp’s parallel
eects loop. Parallel loops have their own mix control, so you can send a strong
delay-only signal from the pedal back to the amp, and use the loop mix knob to
set an appropriate mix of delay signal. This can theoretically preserve more of the
amp’s original tone by avoiding passing the entire signal through additional
A/D conversion.
• Quit all MIDI-related applications (e.g. your DAW) on your computer and
launch the rmware updater you have downloaded in step 1.
• In the rmware updater app, select your TC pedal from the drop-down list
under the “STEP 1” heading.
• When the “Update” button under the “STEP 2” heading turns green, click it.
• The updated rmware will now be transferred to your TC pedal. Wait for the
progress bar to reach 100%. When the update procedure is complete, the
pedal will automatically restart.
Page 11
11 FLASHBACK 2 X4 DELAY User Manual
8. MIDI
The FLASHBACK 2 X4 is equipped with MIDI IN and THRU jacks, allowing an
external MIDI controller to control preset and parameter changes. An incoming
MIDI clock signal will also override the pedal’s own Delay Time knob, but will not
aect the Subdivision setting.
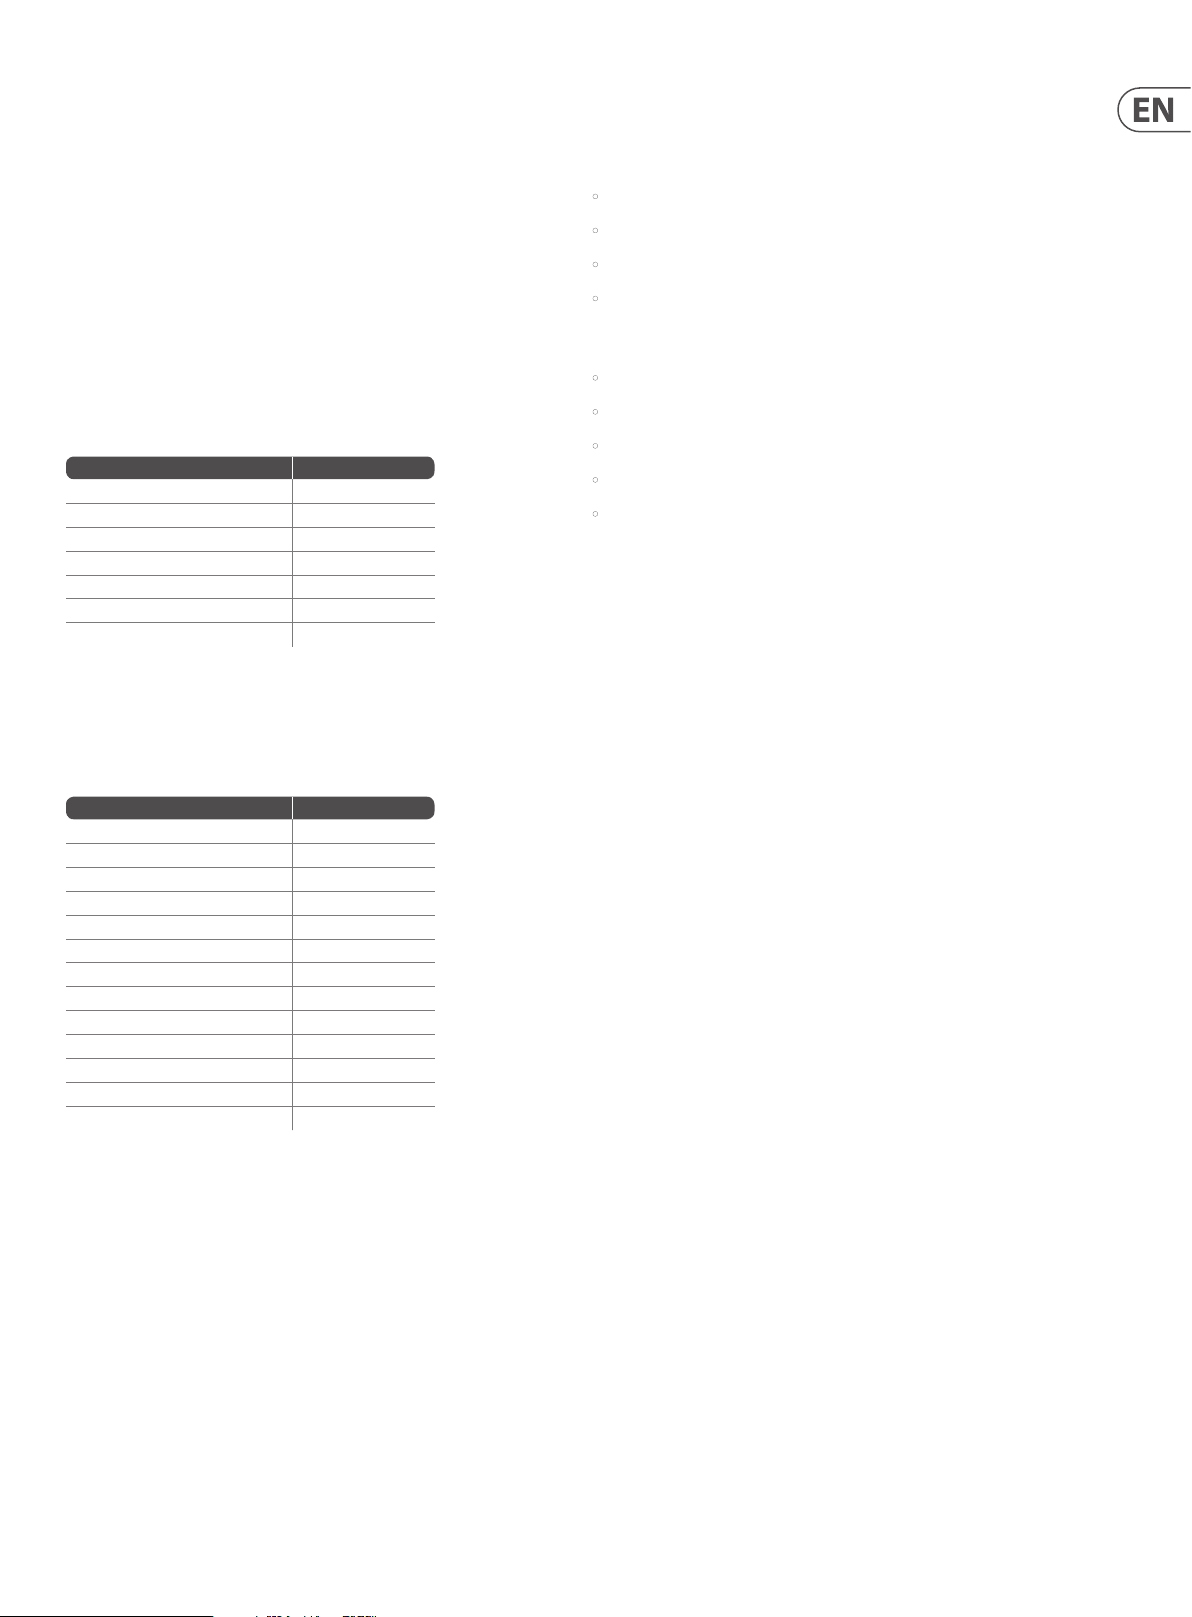
The following charts detail the control and program changes accepted by
FLASHBACK 2 X4. Note that the MIDI receive channel is 6.
Preset Changes
Initiating a program change will load the associated preset and un-bypass the
pedal. To bypass the currently-selected preset, either use program change 1
(all FX o) or use the bypass command (cc 12) if you need to toggle the same
preset on/o.
Preset number Program change
Bypass Al l 1
Preset A / B ank 1 2
Preset B / B ank 1 3
Preset C / B ank 1 4
Preset A / B ank 2 5
Preset B / B ank 2 6
Preset C / B ank 2 7
* Note that dependi ng how the MIDI controlle r handles program ch ange messages (0 -127 or 1-128),
the progr am number may need to be 1 di git higher than what is lis ted in the chart .
9. Links
Support resources
• TC Electronic Support: tcelectronic.com/support/
• TC Electronic – product sof tware: tcelectronic.com/support/software/
• TC Electronic – all product manuals: tcelectronic.com/support/manuals/
• TC Electronic user forum: forum.tcelectronic.com/
TC Electronic on...
• the Web: tcelectronic.com/
• Facebook : facebook.com/tcelectronic
• Google Plus: plus.google.com/+tcelectronic/
• Twitter: twitter.com/tcelectronic
• YouTube: youtube.com/user/tcelectronic
Parameter Control
Preset number Control change
Subdivision (modier 2) 1
Delay time (modier 3) 2
Feedback (modier 4) 3
Delay level (mod ier 1) 4
Tap tempo 13
MASH swi tch (active FX engin e) 5
Exp Pedal ( jack must be unp lugged) 11
Bypass (active FX engine) 12
Looper Record 6
Looper Play/Pause 7
Looper Play O nce 8
Looper Und o/Redo 9
Looper Stop+Clear 10
Note that the modiers (knobs) can control up to 3 user-selectable
parameters, so MIDI control may aect more than just the parameters listed.
Custom controller setups can be arranged via the TonePrint app, and each
TonePrint slot can store unique modier congurations.
Page 12

12 FLASHBACK 2 X4 DELAY User Manual
10. Specications
Connectors
Inputs 2 x ¼" TS, unbalanced
Impedance ≥1 MΩ
Outputs 2 x ¼" TS, unbalanced
Impedance 100 Ω
Expression pedal input ¼" TRS connector
USB port Mini-B USB connector for rmware
updates and TonePrint App
MIDI In/Thru 5-pin DIN connector
Bypass mode True bypass (buered bypass
selectable)
Power
Connec tor Standard 5.5/2.1 mm DC, center negative,
9 V, ≥300 mA (included)
Physical
Dimensions (HWD) 56 x 235 x 145 mm (2.2 x 9.3 x 5.7")
Weight 1.3 kg (2.9 lbs)
Page 13

13 FLASHBACK 2 X4 DELAY User Manual
FEDERAL COMMUNICATIONS
COMMISSION COMPLIANCE
INFORMATION
FLASHBACK 2 X4 DELAY
Responsible Party Name: Music Tribe Commercial NV Inc.
Address: 5270 Procyon Street
Las Vegas, NV 89118
USA
Phone Number: +1 702 800 8290
FLASHBACK 2 X4 DELAY
complies with the FCC rules as mentioned in the followingparagraph:
This equipment has been tested and found to comply with the limits for a ClassB
digital device, pur suant to part 15 of the FCC Rules. These limits are designed
to provide reasonable protection against harmful interference in a residential
installation. This equipment generates, uses and can radiate radio frequency
energy and, if not installed and used in accordance with the instruc tions, may cause
harmful interference to radio communications. However, there is no guarantee that
interference will not occur in a particular installation. If this equipment does cause
harmful interference to radio or television reception, which can be determined
by turning the equipment o and on, the user is encouraged to try to correct the
interference by one or more of the following measures:
• Reorient or relocate the receiving antenna.
• Increase the separation between the equipment and receiver.
• Connect the equipment into an outlet on a circuit dierent from that to which the
receiver is connected.
• Consult the dealer or an experienced radio/TV technician for help.
This equipment complies with Part 15 of the FCC Rules. Operation is subject to the
following two conditions:
(1) This device may not cause harmful interference, and
(2) This device must accept any interference received, including interference that
may cause undesired operation.
Caution!
Any changes or modications not expressly approved by the party
responsible for compliance could void the user's authority to operate
the equipment.
Page 14

 Loading...