

Page 1

Ditto X4 Looper
Page 2

2 Ditto X4 Looper User Manual
Table of Contents
Important Safety Instructions ...................................... 3
Legal Disclaimer ............................................................. 3
Limited warranty ............................................................ 3
1. Introduction ............................................................... 4
2. Setup ........................................................................... 4
3. Hookup ....................................................................... 5
4. Controls ...................................................................... 7
5. Creating Loops ........................................................... 8
Recording a single loop............................................................ 8
Overdubbing ................................................................................ 8
Undo ................................................................................................ 8
Redo ................................................................................................ 8
Using undo/redo creatively .................................................... 8
Stopping loop playback/recording ...................................... 8
Stopping loop playback/recording and
deleting the loop ........................................................................ 8
Deleting the loop when you are not recording
or playing back ............................................................................ 9
7. Onboard FX............................................................... 11
Reverse ......................................................................................... 11
Half ................................................................................................. 11
Once .............................................................................................. 11
Tap e Sto p ..................................................................................... 11
Fade ............................................................................................... 11
Double .......................................................................................... 11
Hold ............................................................................................... 11
Multiple FX .................................................................................. 12
8. Mode Switches ......................................................... 12
Switch 1 ........................................................................................ 12
Switch 2 ........................................................................................ 12
Switch 3 ........................................................................................ 12
Switch 4 ........................................................................................ 12
9. Firmware Updates ................................................... 12
Preparing the rmware update ........................................... 12
Applying the rmware update ............................................ 12
Using two loops in Serial mode ............................................ 9
Using two loops in Sync mode .............................................. 9
6. Store, Import, Export ................................................ 9
Current (in-memory) loop vs. stored loop (backing track)
9
Current loop stays in memory ............................................... 9
USB operation vs. looping ....................................................... 9
Exporting Ditto X4 Looper loops to a computer ......... 10
About audio formats .............................................................. 10
Importing loops into Ditto X4 Looper from a computer 10
Importing MP3 les to Ditto X4 Looper ........................... 11
Balancing backing track and current loop levels .......... 11
10. Specications ......................................................... 13
Page 3
3 Ditto X4 Looper User Manual
9. Do not defeat the safety purpose of the polarized
20. Please keep the environmental aspects of battery
or statement contained herein. Technical speci cations,
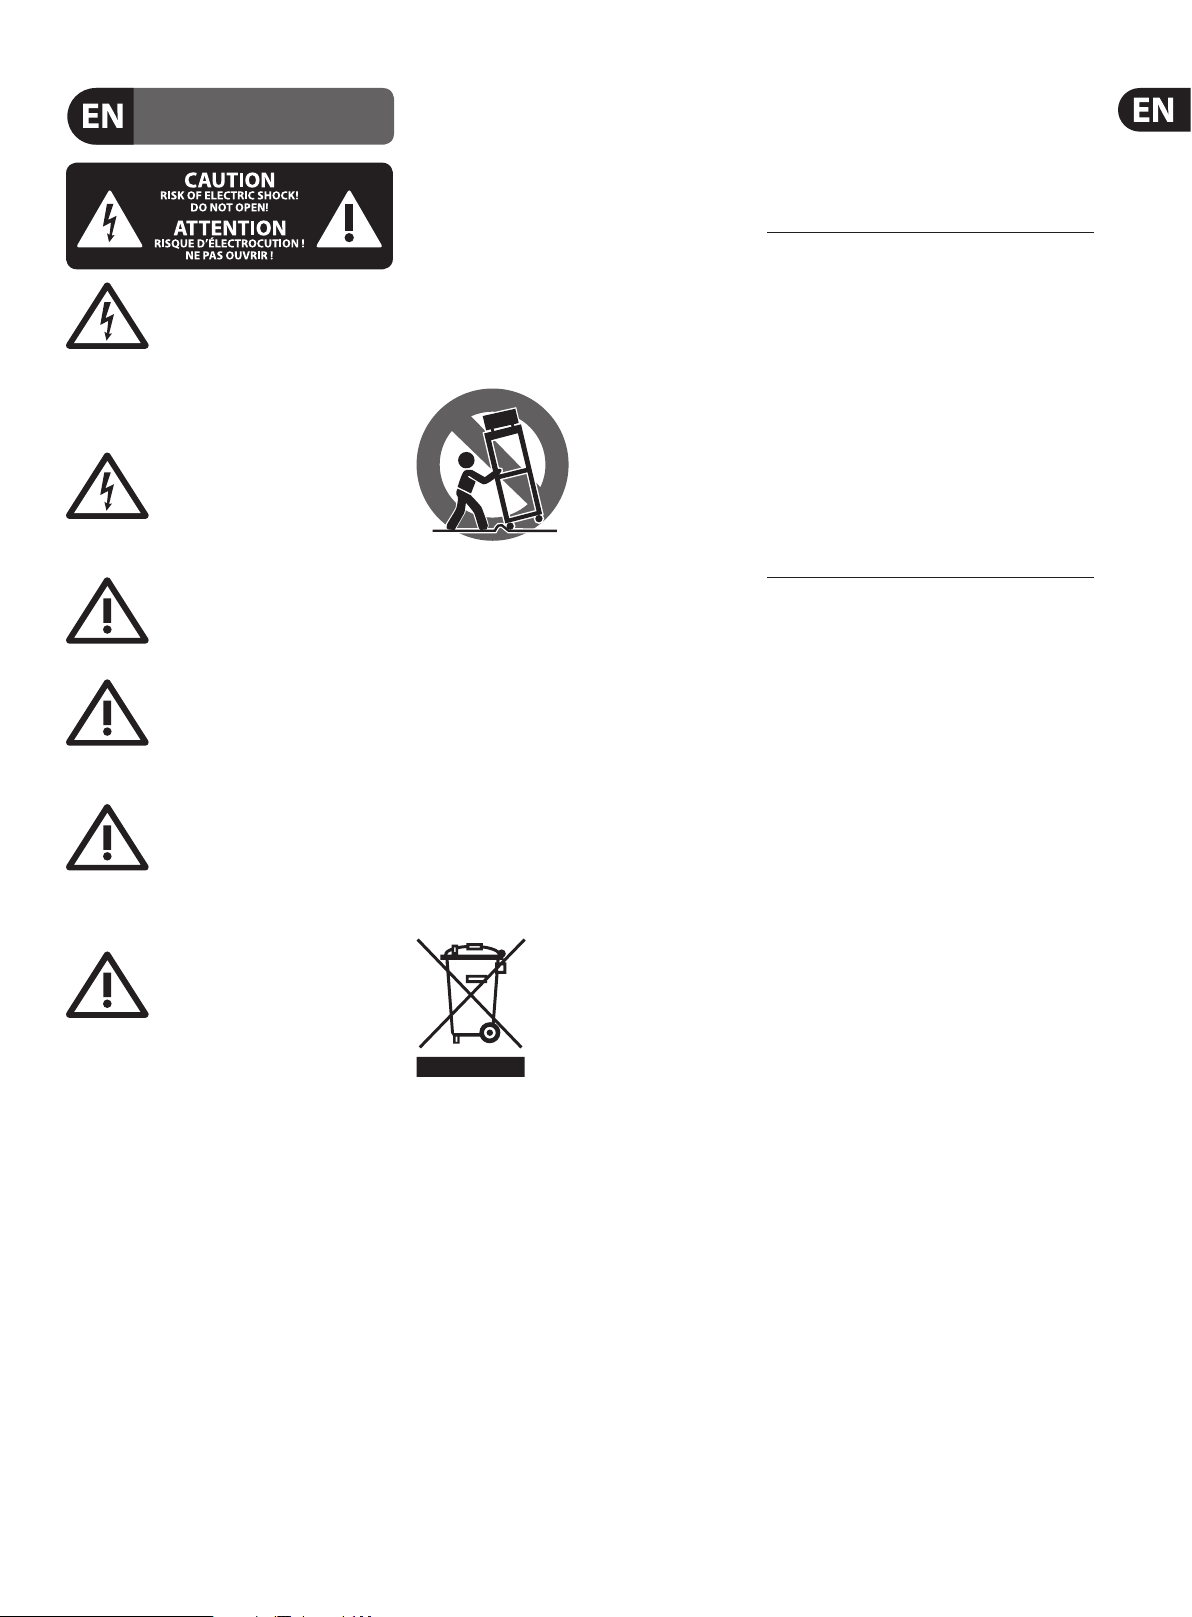
Important Safety Instructions
Terminals marked with this symbol carry
electrical current of su cient magnitude
to constitute risk of electric shock.
Use only high-quality professional speaker cables with
¼" TS or twist-locking plugs pre-installed. Allother
installation or modi cation should be performed only
by quali edpersonnel.
This symbol, wherever it appears,
alertsyou to the presence of uninsulated
dangerous voltage inside the
enclosure-voltage that may be su cient to constitute a
risk ofshock.
This symbol, wherever it appears,
alertsyou to important operating and
maintenance instructions in the
accompanying literature. Please read the manual.
Caution
To reduce the risk of electric shock, donot
remove the top cover (or the rear section).
No user serviceable parts inside. Refer servicing to
quali ed personnel.
Caution
To reduce the risk of re or electric shock,
do not expose this appliance to rain and
moisture. The apparatus shall not be exposed to dripping
or splashing liquids and no objects lled with liquids,
suchas vases, shall be placed on the apparatus.
Caution
These service instructions are for use
by quali ed ser vice personnel only.
Toreduce the risk of electric shock do not perform any
servicing other than that contained in the operation
instructions. Repairs have to be performed by quali ed
servicepersonnel.
1. Read these instructions.
2. Keep these instructions.
3. Heed all warnings.
4. Follow all instructions.
5. Do not use this apparatus near water.
6. Clean only with dry cloth.
7. Do not block any ventilation openings. Install in
accordance with the manufacturer’s instructions.
8. Do not install near any heat sources such as
radiators, heat registers, stoves, or other apparatus
(including ampli ers) that produce heat.
or grounding-type plug. A polarized plug has two blades
with one wider than the other. A grounding-type plug
has two blades and a third grounding prong. The wide
blade or the third prong are provided for your safety. Ifthe
provided plug does not t into your outlet, consult an
electrician for replacement of the obsolete outlet.
10. Protect the power cord from being walked on or
pinched particularly at plugs, convenience receptacles,
and the point where they exit from the apparatus.
11. Use only attachments/accessories speci ed by
themanufacturer.
12. Use only with the
cart, stand, tripod, bracket,
or table speci ed by the
manufacturer, orsold with
the apparatus. When a cart
is used, use caution when
moving the cart/apparatus
combination to avoid
injury from tip-over.
13. Unplug this apparatus during lightning storms or
when unused for long periods of time.
14. Refer all servicing to quali ed service personnel.
Servicing is required when the apparatus has been
damaged in any way, such as power supply cord or plug
is damaged, liquid has been spilled or objects have fallen
into the apparatus, the apparatus has been exposed
to rain or moisture, does not operate normally, or has
beendropped.
15. The apparatus shall be connected to a MAINS socket
outlet with a protective earthing connection.
16. Where the MAINS plug or an appliance coupler is
used as the disconnect device, the disconnect device shall
remain readily operable.
17. Correct disposal of this
product: This symbol indicates that
this product must not be disposed
of with household waste,
according to the WEEE Directive
(2012/19/EU) and your national
law. This product should be taken
to a collection center licensed for the recycling of waste
electrical and electronic equipment (EEE). The
mishandling of this type of waste could have a possible
negative impact on the environment and human health
due to potentially hazardous substances that are generally
associated with EEE. At the same time, your cooperation
in the correct disposal of this product will contribute to
the e cient use of natural resources. For more
information about where you can take your waste
equipment for recycling, please contact your local city
o ce, or your household waste collection service.
18. Do not install in a con ned space, such as a book
case or similar unit.
19. Do not place naked ame sources, such as lighted
candles, on the apparatus.
disposal in mind. Batteries must be disposed-of at a
battery collection point.
21. Use this apparatus in tropical and/or
moderate climates.
LEGAL DISCLAIMER
MUSIC Group accepts no liability for any loss which
may be su ered by any person who relies either
wholly or in part upon any description, photograph,
appearances and other information are subject to
change without notice. All trademarks are the property
of their respective owners. MIDAS, KLARK TEKNIK,
LAB GRUPPEN, LAKE, TANNOY, TURBOSOUND,
TC ELECTRONIC, TC HELICON, BEHRINGER, BUGERA
and DDA are trademarks or registered trademarks
of MUSIC Group IP Ltd. © MUSIC Group IP Ltd.
2016 All rights reserved.
LIMITED WARRANTY
For the applicable warranty terms and conditions
and additional information regarding MUSIC Group’s
Limited Warranty, please see complete details online at
music-group.com/warranty.
Page 4
4 Ditto X4 Looper User Manual
1. Introduction
Ditto X4 Looper is the pedal that'll let you turn a single moment in time into
something truly spectacular. By perfectly merging ease of use with stellar
creative features like dual loop tracks, 7 loop FX, loop decay and MIDI sync,
Ditto X4 Looper will instantly become the canvas on which you paint your
multi-layered sonic masterpieces. If you can dream it, you can loop it!
• The guitar player’s looper - made for guitarists by guitarists
• Dual loop tracks - create evolving multi-track compositions or
fully edged songs
• 7 loop FX - endless creative potential
Even though Ditto X4 Looper basically oers endless creative possibilities, it still
honors the core principle of our famed Ditto Looper. Simplicity! No drummachines, no deep-editing menus or other time consuming tech-nonsense,
only immediate unltered fun. So all you have to think about is - What will you
create today?
2. Setup
The Ditto X4 should contain the following items in the box:
• 1 Ditto X4 looper pedal
LOOP 2LOOP 1
• 1 9V power supply
• 2 rubber feet for “non-velcro” pedalboard mounting
• 1 USB cable
• 1 “Quick Start Guide” sheet
• 1 TC Electronic sticker
• 1 leaet about TC’s guitar FX product range
Inspect all items for signs of transit damage. In the unlikely event of transit
damage, inform the carrier and supplier. If damage has occurred, keep all
packaging as it can be used as evidence of excessive handling force.
Connect the 9V power supply to the X4’s DC input socket, and plug the power
supply into a power outlet.
Connect your guitar and other pedals to the Ditto X4 as described in the
Hookup chapter.
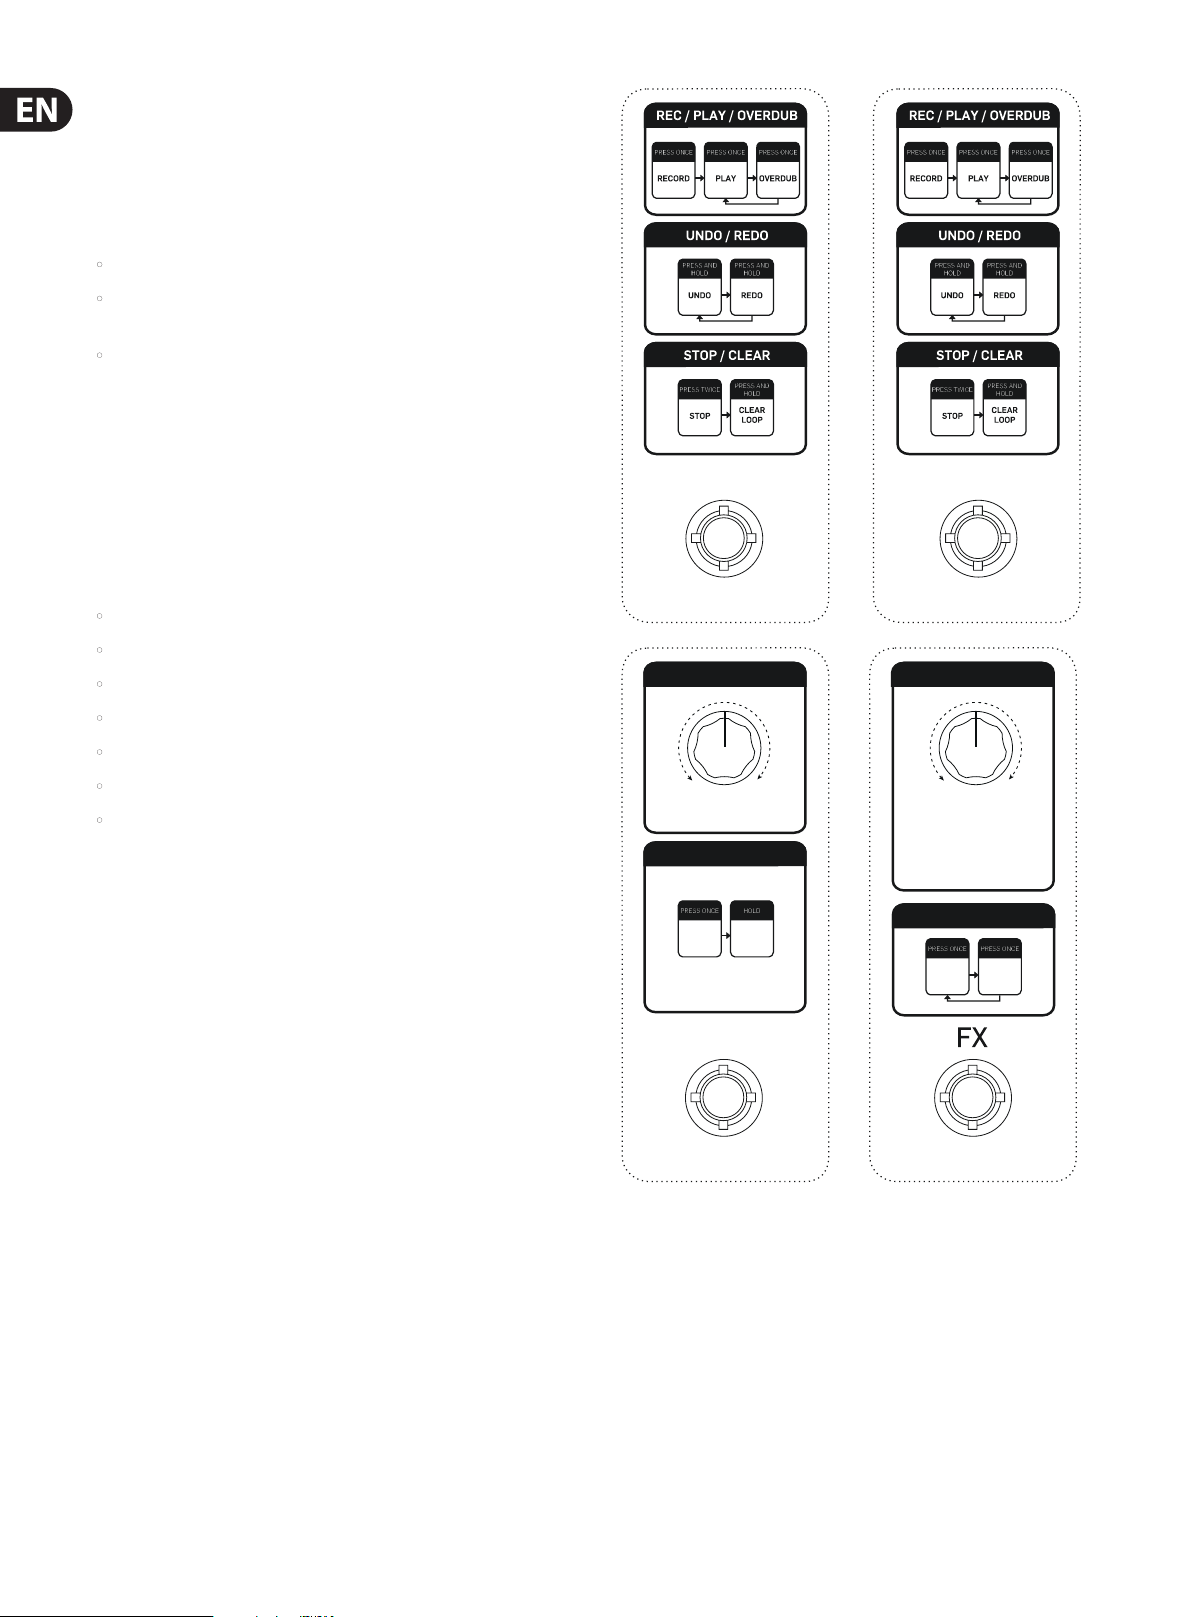
The Quick Start Guide graphic will give you a basic understanding of the
hardware functions. Proceed through this manual for an in-depth explanation of
all the features.
DECAY SELECT FX
LAYER FADING NO LAYER FADING
STOP
STOP
CLEAR
ALL
ALL
STOP
NOTE: When the loop is cleared,
DITTO X4 returns to true bypass
TAPE STOP
FADE
DOUBLE
HOLD
REVERSE
HALF
ONCE
ENGAGE/DISENGAGE FX
ENGAGE
DISENGAGE
FX
FX
Page 5
5 Ditto X4 Looper User Manual
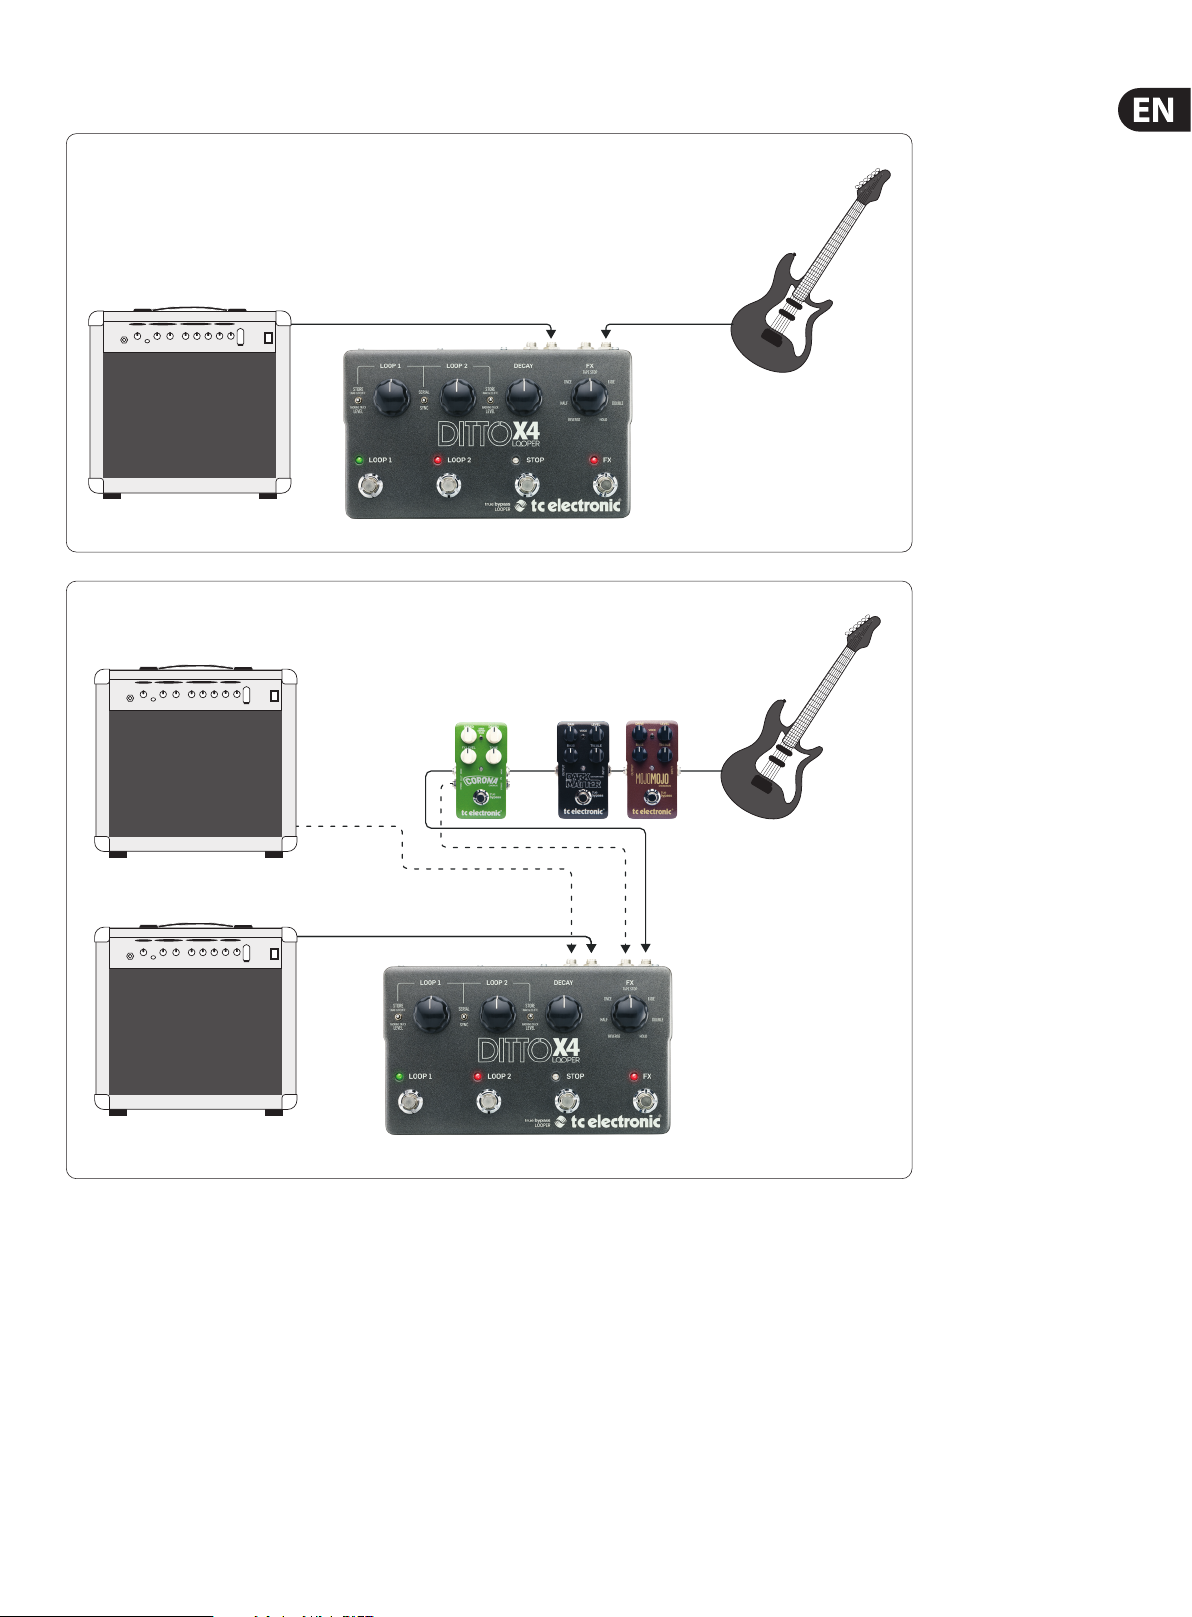
3. Hookup
Basic Looping - No Eects
Input
Combo
Ditto X4 looper with eects (mono or stereo)
Optional second amp
Input
Combo
Modulation
Pedals
Drive
Pedals
Page 6

6 Ditto X4 Looper User Manual
Ditto X4 looper in an FX loop
Drive Pedal(s)
FX Loop Send
Input
Combo
FX Loop Return
Reverb, delay and
modulation pedals
Dual mono with two instruments
Combo
Page 7

7 Ditto X4 Looper User Manual
4. Controls
(1)
(6)
(4)(2) (3)
(5)
(8)(7)
(1) STORE/LEVEL switches – these per form the following functions for their
associated loop:
• Briey ip the switch up to store the current loop as a backing track.
• Hold the switch in the up position for three seconds to delete the stored
backing track.
• Hold the switch in the down position while turning the associated
LOOP knob to set the level of the backing track. See the “Store,
Import, Export ” chapter for details.
(2) LOOP knobs – adjust the level of loop 1 and 2 with these knobs. When
holding the adjacent STORE/LEVEL switch in the down position, the knobs
adjust the volume of their respective stored backing track.
(3) SERIAL/SYNC switch – when set to Serial, either loop 1 or loop 2 can be
played at a time, allowing distinct parts to be switched back and forth.
In Sync mode, both loops can be played simultaneously.
(13)(12)(11) (14)(10)(9)
(4) DECAY knob – this controls the amount of volume reduction that occurs
each time an overdub repeats. When set fully clockwise, the loop will not
decay at all. This is useful for creating stacks of overdubs that gradually
disappear from the main loop.
(5) FX knob – select one of the 7 FX with this knob. See the “Onboard FX”
chapter for details.
(6) LOOP 1 and 2 footswitches – use these to control several loop-related
functions. See the “Creating Loops” chapter for details.
(7) STOP footswitch – press this to stop both loops immediately. Press and hold
the switch to erase the loops.
(8) FX footswitch – press this to engage the selected loop FX. See the
“Onboard FX” chapter for details.
(9) INPUT jacks – Connect one ¼" TS cable for mono operation, or 2 cables
for stereo.
Page 8

8 Ditto X4 Looper User Manual
(10) OUTPUT jacks – Send audio via one or two ¼" TS cables.
(11) Power input – connect the 9V power supply. Note that this pedal cannot
operate on batteries.
(12) MODE switches – these allow ne details of the pedal’s operation
to be adjusted. See “Mode Switches” chapter for details.
Switch Down Up
1
2
3
4 True Bypass Buered Bypass
REC PL AY OVERDUB REC OVERDUB P LAY
Overdub starts immediately
(Sync mode only)
Serial mo de - record 2nd loop at en d
of 1st loop’s cyc le
Sync mode - lo ops are synced
Overdub s tarts at the en d of loop
Serial mo de - begin recordi ng
2nd loop immediately
Sync mode - lo ops are un-synce d,
allowing simultaneous playback of
loops with dierent lengths
(13) USB input – connect the Ditto X4 to a computer to transfer les back and
forth. This connection is also used for rmware updates.
(14) MIDI IN and THRU jacks – connect an external MIDI clock to keep your
loops perfectly in sync.
5. Creating Loops
Depending on the setting of the Serial/Sync switch, the Ditto X4 can function a
bit dierently. We’ll discuss how each loop operates by itself, then dive into the
possibilities with 2 loops. These instructions also assume that the pedal’s MODE
switches are set to their default “down” position (see callout #12).
Recording a single loop
To start recording, press one of the LOOP footswitches. The LED will light up red
to indicate that the loop is in record mode. At the end of your loop, press the
same footswitch again.
The LED will turn green and the loop will repeat continuously. The LED will
blink every time the loop starts over again. Each loop allows up to 5 minutes of
record time.
Adjust the corresponding LOOP 1 or LOOP 2 knob to set the playback volume for
the loop you have recorded. These knobs have no aect on the direct sound of
your guitar.
Undo
It’s very possible that at some point during your looping experimentation,
you will not be satised with a loop layer you have just created. To clear the last
layer that you recorded, press and hold the loop footswitch for the loop you want
to delete for 1.5 seconds or longer during playback. The LED will blink twice in
rapid succession and the last take will be removed. Any previously-recorded takes
will remain.
Redo
If you delete the most recent loop layer by mistake, or simply change your mind,
it can easily be restored. Press and hold the loop footswitch for 1.5 seconds again
during playback. The LED will blink twice in rapid succession and the previouslydeleted layer will be restored.
Using undo/redo creatively
Undoing and redoing overdubs can be used for more than just correc ting
mistakes. You can make your performance more interesting by removing and
bringing back sections. Here is a simple example:
• Record a bass line (loop cycle 1).
• Record a chord progression (loop cycle 2).
• Record a melody (loop cycle 3).
• Press and hold the loop footswitch to clear the melody, allowing you to play
dierent lines over the loop.
• Press and hold the loop footswitch to bring back melody from loop cycle 3.
Note – undoing or redoing by using the footswitch is only possible during
playback. If you hold down the footswitch after you have stopped loop playback
or recording, you will delete the full loop, including all overdubs!
Stopping loop playback/recording
To stop loop playback, press the relevant LOOP footswitch twice in shor t
succession. This is particularly useful when using both loops in Sync mode, since it
will allow you to stop one loop while the other continues.
Alternatively, you can press the dedicated STOP footswitch to stop one or
both loops.
To stop recording, press the LOOP footswitch for the loop you are recording to.
Playback will begin immediately.
Overdubbing
To record another layer (overdub) on top of the rst loop, press the same LOOP
button (1 or 2) that you initially used. The footswitch LED will turn red to indicate
that you are recording.
When you’ve completed the second layer, press the footswitch again to quit
record mode. The Ditto X4 will begin looping both layers.
Note that the length of the loop will not increase when overdubbing. If you
continue playing while in record mode after the rst layer repeats, you will create
a 3rd layer of overdubbed audio. There is no limit to overdub layers.
Tip: Use the Decay knob to cause overdubs to gradually fade with each loop cycle.
Various onboard FX, such as TAPE STOP and FADE, will also stop the loop in an
interesting and less immediate way.
The associated LOOP LED will start ashing green to indicate that your loop is still
in memory and ready for playback.
Stopping loop playback/recording and deleting the loop
To stop loop playback/recording and delete everything you have recorded, press
the LOOP footswitch twice in short succession and hold the switch down on the
second tap. After 1.5 seconds, the in-memory loop will be deleted.
Pressing and holding the STOP footswitch will delete BOTH loops, so only use this
method if you don't want to keep one of the loops intact.
The LED will turn o to indicate that the loop has been deleted. At this point, you
can start recording loops from scratch again.
Page 9

9 Ditto X4 Looper User Manual
Deleting the loop when you are not recording or playing back
To delete everything you have recorded for one of the loops while you are not
recording or playing back audio, press and hold the LOOP footswitch. Doing this
will cause a brief moment of playback to occur before the pedal “realizes” that
you intend to delete the loop.
Holding the STOP footswitch for 1.5 seconds will delete both loops without any
audio being heard. If you do not intend to keep one of the recorded loops intact,
this is better method.
The LED will icker red and then turn o to indicate the loop is clear. Note that
while using the “undo” function that clears an overdub, deleting a whole loop
has no “redo” feature. Deleting loops as described in this section permanently
removes the loop.
A safe way to save a loop that you want to keep is to store the loop as a backing
track as described in chapter 6.
Using two loops in Serial mode
Set the SERIAL/SYNC switch up to the Serial position. In this mode, the 2 loops
are kept separate from one another, enabling dierent loop lengths and creative
switching back and forth.
You can start with either loop, but for this example, create a loop in loop 1. While
the loop is playing back, press the LOOP 2 footswitch. This will arm loop 2 and
the LED will rapidly ash red. Loop 1 will stop playback at the end of its cycle and
recording will automatically begin for loop 2.
After loop 2 has been created, it will continue to cycle automatically. You can
press the LOOP 2 footswitch again to record additional layers as described earlier
in this chapter. Pressing the LOOP 1 footswitch while loop 2 is playing will cause
both LEDs to rapidly ash green to indicate that the playback will switch.
Loop 2 will stop its playback after the cycle completes and loop 1 will
start automatically.
When 2 loops exist in Serial mode, the LED for the loop that is currently playing
will be solid green, and the paused loop will be ashing green.
To stop a loop’s playback, either press the current loop's footswitch twice in short
succession, or press the STOP footswitch. The LED will rapidly ash green and the
loop will stop at the end of its cycle.
After material is recorded for both loops, you can stop and start either loop
at will. If only loop 1 is playing, loop 2’s LED will ash green. Press the LOOP 2
footswitch once to begin the second loop at any point during playback, not just at
the beginning of a cycle. Press a loop footswitch twice is short succession to stop
that loop.
Note that both loops can still contain multiple layers, so many creative options
exist for creating a stack of loops in loop 1, then creating another stack of layers
in loop 2 that can be started and stopped at will.
Keep in mind that a loop must be currently playing to record an additional
layer on top of it. If a loop is currently paused, you will need to press the loop
footswitch once to play the loop, then again to start recording.
6. Store, Import, Export
Current (in-memory) loop vs. stored loop (backing track)
Ditto X4 Looper is very exible when it comes to recording, importing and
exporting audio loops. When you are recording something, this is the “current
loop”. It will be available even after powering down Ditto X4 Looper.
In addition to the memory that holds the current loops, there is an onboard
storage module (similar to a hard disk or a USB ash drive) for each of the 2 loops.
This storage module is used to transfer loops (or even complete backing tracks)
from and to your computer/DAW.
You can set playback volume for the in-memory loops and the stored loops
(backing tracks) independently. See “Balancing backing track and current loop
levels” at the end of this chapter.
Current loop stays in memory
When you power down Ditto X4 Looper and there are still loops in memory, the
loops will be available even after you power down the device.
When you power up Ditto X4 Looper again, the LOOP footswitch LED will ash
green, indicating your previously-recorded loop is available. Just hit the LOOP
footswitch and playback will start. If you want to star t from scratch instead,
delete the loop (see “Stopping loop playback / recording and deleting the loop/
backing track” in chapter 5.
Using two loops in Sync mode
Set the SERIAL/SYNC switch down to the Sync position. This mode allows loop 1
and 2 to be played independently or simultaneously. The rst recorded loop sets
the overall phrase length and the second loop can be multiples of that length.
For example, if the rst loop represents 4 measures of music, the second loop
could be 4 measures, 8 measures, 12, etc.
You can start with either loop, but for this example, create a loop in loop 1. Just
as loop 1 is completing its cycle and starting over, press the LOOP 2 footswitch.
The LED will turn red and recording will begin. Loop 1 will continue to play as you
record onto loop 2.
*note that f lipping Mode swi tch 2 to the “up” position will allow t he second loop to be ar med during loop 1
playback , and recording will auto matically begin at th e start of the ne xt cycle.
To stop loop 2 recording, either press the LOOP 2 footswitch at the end of
1 phrase to keep the 2 loops the same length, or simply let the recording
continue. The second loop’s length will always end in multiples of the rst loop,
so even if you stop the loop 2 recording a bit too early, the loops will still be in
sync when dual playback begins.
USB operation vs. looping
The following sections (“Exporting Ditto X4 Looper loops to a computer” and
“Importing loops into Ditto X4 Looper from a computer”) describe how you can
connect Ditto X4 Looper to a computer using the supplied USB cable to import or
export loops and backing tracks.
Please note that once you have attached it to a computer, your Ditto X4 Looper
eectively becomes a USB storage device, and audio is disabled. This means that
you can transfer audio les to and from Ditto X4 Looper – but you cannot play
back (or record) audio at the same time. Ditto X4 Looper does not act as a USB
audio interface. This means that to get back to looping, you will have to unplug/
eject Ditto X4 Looper.
On computers running Microsoft Windows or Apple OS X operating systems, no
software is required for accessing Ditto X4 Looper as described in this section –
it’s all plug & play.
Page 10

10 Ditto X4 Looper User Manual
Exporting Ditto X4 Looper loops to a computer
If you have created a really great loop (e.g. a song idea or a beautiful ri), you
may want to reuse it. Now you could simply record the signal coming from Ditto
X4 Looper’s audio outputs to your DAW – but this could lead to signal quality
degradation and requires post-editing (trimming) the recording. This is why Ditto
X4 Looper allows you to export your loops in pristine quality.
1. When you are happy with your loops, nudge the STORE/LEVEL switch(es)
up briey. This will store each loop within the device in a format (actually,
two formats) that can easily be transferred to a computer. After storing
the current loops, please wait a few seconds before connecting the pedal
to your computer.
2. After power has been connected to the looper and it has run its startup
sequence, connect a USB port on your computer to the USB port of Ditto X4
Looper using the supplied USB cable. The LOOP footswitch LEDs will start
blinking orange, indicating that Ditto X4 Looper now is in USB transfer mode,
and audio will be disabled.
3. Your computer will recognize Ditto X4 Looper as an external USB storage
device. It will be shown in the Finder (OS X) or Windows Explorer as a drive
called “DITTO” containing folders called “TRACK1” and “TRACK2”.
About audio formats
Ditto X4 Looper saves audio les in 32 bit oating point format. If your DAW
does not support this AIFF/WAV “avor” – or if it doesn’t support AIFF or WAV
at all – you will have to convert the les coming from Ditto X4 Looper to a
supported format.
Please consult your DAW’s manual or support pages to nd out which audio
formats it supports. You should then be able to nd a free audio format
converter – either as an application for your operating system or as an
online service.
If nothing else works, you can simply record the signal from Ditto X4 Looper’s
audio outs into your DAW.
Importing loops into Ditto X4 Looper from a computer
Did you nd (or create) an insanely great song that you would like to use on
stage as a backing track? Well, with Ditto X4 Looper, you can – without having to
schlep your notebook on stage. All you have to do is transfer your backing track or
base loop from your computer to Ditto X4 Looper using a USB connection.
1. Create a loop in your DAW and export it as an audio le in either AIFF or
WAV format.
2. Connect a USB port on your computer to the USB port of Ditto X4 Looper
using the supplied
Each “TRACK” folder should hold two les: “TRACK.AIF” and “TRACK.WAV”.
These les contain the loops that you have previously stored (see step 1) in
both AIFF and WAV formats. AIFF is commonly used in OS X, while WAV is the
commonly used format for Microsoft Windows.
Please refer to the instruction manual of your DAW to learn which format you
should use.
4. Copy the respective le (“TRACK.AIF” or “TRACK.WAV”) to your computer,
e.g. by dragging it from the “TRACK” folders to the desktop. Wait for the le
transfer to nish. Note that you may need to rename one or both tracks if
they are carried to the same folder on your computer.
5. On a Windows PC, eject the “DITTO” drive by clicking it with the right mouse
button in Windows Explorer and selecting “Eject” from the context menu.
On a Mac, eject/unmount the “DITTO” drive by selecting it and pressing
[Cmd] and [E] simultaneously.
6. Disconnect Ditto X4 Looper from your computer. The LOOP footswitch
LEDs will stop blinking orange and return to green, and audio will be
enabled again.
USB cable. The LOOP footswitch LEDs will start blinking orange, indicating
that Ditto X4 Looper is now in USB transfer mode, and audio will be disabled.
3. Your computer will recognize Ditto X4 Looper as an external USB storage
device. It will be shown in the Finder (OS X) or Windows Explorer as a drive
called “DITTO” containing a folder called “TRACK”.
4. Copy your audio le (in AIFF or WAV format) from your computer to Dit to X4
Looper by dragging it to the “TRACK1” folder of the “DITTO” drive for the
track to be played from LOOP 1 controls and "TRACK2" folder for the track to
be played from the LOOP 2 controls. Wait for the le transfer to nish.
5. Eject/unmount Ditto X4 Looper as described in “Exporting Ditto X4 Looper
loops to a computer”. The LOOP footswitch LEDs will icker as the loop
is read.
6. Disconnect Ditto X4 Looper from your computer. The LOOP footswitch
LEDs will stop blinking orange and return to green, and audio will
be enabled again.
Page 11

11 Ditto X4 Looper User Manual
Importing MP3 les to Ditto X4 Looper
Usually, you will want to import AIFF or WAV les into Ditto X4 Looper: This will
give you the highest possible audio quality, and no conversion is required.
However, you can also import MP3 les with a 44.1 kHz sampling rate. Ditto X4
Looper will convert an imported MP3 le to AIFF and WAV format.
The procedure is the same, with the following exceptions:
– Converting an MP3 le takes some time. During conversion, the LOOP
footswitch LED will icker red. Converting a long (6 minute) MP3 le
will take about 90 seconds.
– Importing tight/short MP3 loops with MP3 metadata will add a few
milliseconds of silence to the end of the loop. If you want to ensure
seamless, sample-accurate playback, please use les in AIFF or
WAV format.
Notes about working with imported backing tracks:
– Levels of imported backing tracks are reduced so you can jam to these
tracks and hear yourself.
– Track/le names of imported loops/backing tracks are irrelevant, as
long as the sux (“.WAV” or “.AIF”) is correct.
– You only have to delete existing backing tracks if you need to make
room for new tracks. If there are several tracks in the TRACK folder,
the last imported track will be used.
Balancing backing track and current loop levels
What you are recording with Ditto X4 Looper is called “the current loop”. If you
store this current loop (by using the STORE/LEVEL switch), or if you import a
previously-recorded track from a computer as described in the previous section,
this is a “backing track”.
Half
Engaging this eect causes the loop to play back at half speed and also detunes
the pitch by one octave.. This can be used to create bass lines by playing the ri
in double time, then engaging the Half eect. Press the FX footswitch again to
return to normal playback speed and pitch. Additional loops can be created while
this eect is engaged, and all loops will play back at half speed.
Once
This eect is useful if you know you want the loop to stop at the end of its phrase.
Rather than trying to manually stop the loop right before it cycles around, you
can press the FX footswitch mid-way through playback. The LED will rapidly ash
green and the loop will stop at the end of the current cycle.
Tape Stop
This eect oers a fancier way of stopping a loop than the dedicated STOP
footswitch. Pressing the FX footswitch causes the loop to fade out and detune
over the course of a couple seconds, similar to an analog tape machine being
powered down during playback. The LED will ash red even after playback has
stopped, and the loop can be re-engaged by pressing the FX footswitch again.
Fade
Rather than an abrupt end to the loop when using the STOP footswitch, this
eect causes the loop to gradually fade out over the course of ~5 seconds, which
is perfect for the end of a performance. The LED will ash orange as the audio is
fading and continue ashing even af ter playback has stopped. Pressing the FX
footswitch again will start the loop again.
Note – after audio has fully faded, you can press the STOP footswitch, then press
the FX footswitch without the loop resuming.
You can set the volume for the current loop and the backing track independently.
– To set the level of the current loop, turn the LOOP LEVEL knob.
– To set the level of the stored backing track, turn the LOOP LEVEL knob
while pulling the associated STORE/LEVEL switch towards you.
The ability to control the volume of the current loop and the backing track
independently allows you to control the mix very eectively.
Note that the LOOP knob still controls the overall level of the backing track and
current loop. Adjusting the backing track level eectively balances its volume
against the level of the current loop.
7. Onboard FX
On top of all the useful looping, layering and storing features on the Ditto X4,
there are also 7 loop eects that can be used to enhance your experience.
Reverse
This eect plays the recorded loop backwards. This can be done on a single loop
or with both loops playing back in Sync mode. When you engage the eect, the
FX LED will ash red, and you can return to normal 'forward' playback by pressing
the FX footswitch again. Note that you can record a second loop while the rst
loop is playing in reverse, but it is very dicult to do this in a way that causes the
loops to match when you disengage the reverse eect.
Double
This is the opposite of the 'Half ' eect. Engaging the eect will cause the
loop to play back the loop at double the recorded speed, and also shift the
pitch by one octave.
Hold
This option is a momentary stutter eect, meaning the eect is only engaged
while you press the FX footswitch. A short sample of the loop is taken right
as the footswitch is depressed, allowing a specic note or chord to repeat on
a “mini-loop” until the switch is released. When you release the footswitch,
playback will resume from the point that the loop would have been had you
never engaged the eect at all.
The eect also supports tap tempo, allowing you to determine exactly how
long the "mini loop" will be. Simply tap the FX footswitch in rhythm, and the
eect will use that tempo to loop one "beat" as soon has you hold down the
FX footswitch.
As an example, let's say you recorded a progression of G, D, Em, C, with each
chord lasting 1 measure. If you pressed the FX footswitch just as the D chord
started and held it for 2 measures, a loop of just the D chord would ring
during that time, and when you released the footswitch the C chord would
just be starting. In other words, your hold time paved over the measure of
D and measure of C. This allows you to keep the phrasing on track during
a performance.
Page 12

12 Ditto X4 Looper User Manual
Multiple FX
It is possible to run more than one eect at the same time. For example, start
playback from a loop, then engage the Reverse eect. The LED will ash red.
Then turn the FX knob to the Half setting and press the FX footswitch again.
The loop will play back in reverse and at half speed, and the LED will ash orange.
To undo either eect, make sure the FX knob is set to the desired eect and press
the FX footswitch. Only the other eect will be heard on the loop.
Note that it is possible to remove all active eects at once, which is handy
when you have added several eects to multiple layers or loops. With playback
stopped, hold the FX footswitch for 2 seconds and all eects will be removed
from the loops.
8. Mode Switches
Since loopers are all about creativity and experimentation, the Ditto X4 was
designed with some customization options. The tiny MODE switches on the
back are set to the “down” position by default, but can be ipped with a pen,
toothpick, paper clip, etc. to suit your needs.
Switch 1
The standard workow for most loopers is such that pressing a footswitch starts
the recording, pressing again stops the recording and automatically loops the
audio, and a 3rd press starts an overdub recording. However, this can be switched
so that the rst press begins the initial loop recording, then the second press
immediately starts the rst loop and begins recording the overdub. The 3rd press
stops the overdub and loops both layers. This modied workow allows you to
build stacked loops more quickly.
Switch 4
True Bypass mode is a hard-wire bypass that gives absolutely no coloration of
tone when the pedal is bypassed. This is the default mode for your eect pedal.
Using True Bypass on all pedals is a perfect choice in setups with a few pedals and
relatively short cables before and after the pedals.
If…
– you use a long cable between your guitar and the rst pedal or
– if you use many pedals on your board or
– if you use a long cable from your board to the amp,
…then the best solution will most likely be to set the rst and the last pedal in
the signal chain to Buered Bypass mode. Can you hear the dierence between
a pedal in True Bypass or Buered Bypass mode? Maybe, maybe not – many
factors apply: active/ passive pick-ups, single coil/humbucker, cable quality, amp
impedance and more. We cannot give a single ultimate answer, so experiment
with switch 4 in the “up” position to hear what sounds best to you.
9. Firmware Updates
TC may provide updates for the built-in sof tware of your pedal, the rmware.
Updating your TC pedal’s rmware requires…
– a computer running Microsoft Windows or OS X with a standard
USB interface
– the specied DC power supply for your pedal.
Preparing the rmware update
Switch 2
By default, recording an additional layer over a loop, or recording a second loop in
Sync mode, will start immediately upon pressing one of the LOOP footswitches.
However, ipping switch 2 to the “up” position will cause the associated LED to
rapidly ash red to indicate that the loop is armed for recording. When the cycle
repeats, the LED will light solid red and recording will begin.
This setting also causes “stop” commands (either by double tapping a LOOP
footswitch or press the STOP footswitch) to end the loop at the completion of
its cycle.
*note – in Serial m ode, pressing the LO OP 2 footswitch w hile loop 1 is playing will s till arm loop 2 for re cording
upon comple tion of loop 1's cycle.
Switch 3
Serial mode
Serial mode is geared toward having 2 distinct parts to a song that are not
meant to be played simultaneously. Therefore, pressing a LOOP footswitch
during another loop's playback arms the loop for recording. After the rst loop
nishes its cycle, the rst loop stops and the second loop begins recording. This is
convenient for a verse/chorus arrangement, but there may be times when you
don’t want to wait for the rst loop to end before recording. Flip switch 3 to the
“up” position to allow the second loop to begin recording immediately upon
pressing its footswitch.
Sync mode
This mode was primarily designed to allow 2 independent loops to be played
on top of one another in perfect synchronization. However, some players like to
approach looping in a more ambient and experimental way, which is why Sync
mode can be un-synced! Setting switch 3 to the "up" position allows loops 1 and
2 to have dierent lengths, enabling creative "whalesong" layers of audio that
loop at dierent intervals.
1. Download the newest rmware from the “Support” page for your TC pedal.
There are updaters
– for Microsof t Windows (these are ZIP archives containing the
rmware installer) and
– for OS X (these are disk image les containing the rmware installer).
2. Unplug all cables (including the power supply) from your TC pedal.
3. Connect the pedal to your computer using a USB cable.
4. Press and hold the leftmost footswitch on your TC pedal.
5. Insert the DC power supply plug. The leftmost LED on your pedal should
turn green.
6. Release the footswitch.
Your TC pedal will now be recognized as an updatable device.
Applying the rmware update
7. Quit all MIDI-related applications (e.g. your DAW) on your computer and
launch the rmware updater you have downloaded in step 1.
8. In the rmware updater app, select your TC pedal from the drop-down list
under the “STEP 1” heading.
If you are using Windows XP, select “USB Audio Device” from the list.
9. When the “Update” button under the “STEP 2” heading turns green, click it.
The updated rmware will now be transferred to your TC pedal. Wait for the
progress bar to reach 100%. When the update procedure is complete, the pedal
will automatically restart.
Page 13

13 Ditto X4 Looper User Manual
10. Specications
Bypass mode True Bypass (Buered Bypass optional)
Signal circuitry Analog dry-through
Dimensions (W x D x H) 235 x 145 x 57mm (9.3 x 5.7 x 2.2")
Input connector 2 Standard ¼” jacks – mono/TS with
automatic mono/stereo sensing
Input impedance 1MΩ
Output connector 2 Standard ¼” jacks – mono/TS with
automatic mono/stereo sensing
Output impedance 100Ω
Power input Standard 9V DC, centre negative
>300mA (power supply included)
MIDI IN + MIDI THRU Standard 5 Pin DIN connectors
USB port Mini USB connector for le transfers
and for software updates
Page 14

 Loading...