

Page 1
English Manual
Ditto X2 Looper
Page 2

Important safety instructions 1
EMC / EMI 2
Explanation of graphic symbols 2
About this manual 3
Introduction 3
Setup 4
Setup examples 5
Inputs, outputs, controls 10
1. Power input 10
2. Audio inputs 10
3. Audio outputs 10
4. LOOP footswitch and LED 10
5. FX footswitch and LED 10
6. Loop / backing track level
control knob 10
7. Store / Delete / Backing
track level switch 10
8. FX selector switch 10
9. USB port 10
Creating loops 11
Storing, importing and exporting loops 14
Jam Track Central tracks 17
Using effects 18
Bypass modes 20
Frequently asked questions 20
Footswitch LED state reference 21
Updating the firmware 22
Changing the batteries 22
Technical specifications 23
Getting support 23
Product Ditto X2 Looper
Product (firmware) version 1.0
Document English Manual
Document version / date 2014-01-16
Ditto X2 Looper English Manual a
Page 3

Important safety instructions
Important safety instructions
1. Read these instructions.
2. Keep these instructions.
3. Heed all warnings.
4. Follow all instructions.
5. Do not use this apparatus near water.
6. Clean only with a dry cloth.
7. Do not block any ventilation openings. In-
stall in accordance with the manufacturer’s
instructions.
8. Do not install near any heat sources such
as radiators, heat registers, stoves, or other
apparatus (including amplifiers) that produce heat.
9. Do not defeat the safety purpose of the po-
larized or grounding-type plug. A polarized
plug has two blades with one wider than
the other. A grounding-type plug has two
blades and a third grounding prong. The
wide blade or the third prong is provided for
your safety. If the provided plug does not fit
into your outlet, consult an electrician for
replacement of the obsolete outlet.
10. Protect the power cord from being walked
on or pinched, particularly at plugs, convenience receptacles, and the point where
they exit from the apparatus.
11. Only use attachments/accessories speci-
fied by the manufacturer.
12. Use only with a cart, stand, tripod,
bracket, or table specified by the
manufacturer, or sold with the apparatus. When a cart is used, use
caution when moving the cart/apparatus
combination to avoid injury from tip-over.
13. Unplug this apparatus during lightning
storms or when unused for long periods of
time.
14. Refer all servicing to qualified service personnel. Servicing is required when the apparatus has been damaged in any way,
such as power-supply cord or plug is damaged, liquid has been spilled or objects
have fallen into the apparatus, the apparatus has been exposed to rain or moisture,
does not operate normally, or has been
dropped.
Caution
You are cautioned that any change or modifications not expressly approved in this manual
could void your authority to operate this equipment.
Service
– All service must be performed by qualified
personnel.
Warning
– To reduce the risk of fire or electric shock, do
not expose this apparatus to rain or moisture
and objects filled with liquids, such as vases,
should not be placed on this apparatus.
– Do not install this device in a confined space.
Ditto X2 Looper English Manual 1
Page 4
Explanation of graphic symbols
EMC / EMI
Electromagnetic compatibility /
Electromagnetic interference
This equipment has been tested and found to
comply with the limits for a Class B digital device, pursuant to part 15 of the FCC rules.
These limits are designed to provide reasonable
protection against harmful interference in residential installations. This equipment generates,
uses and can radiate radio frequency energy
and, if not installed and used in accordance with
the instructions, may cause harmful interference
to radio communications. However, there is no
guarantee that interference will not occur in a
particular installation.
If this equipment does cause harmful interference to radio or television reception, which can
be determined by turning the equipment off and
on, the user is encouraged to try to correct the
interference by one or more of the following
measures:
For customers in Canada
This Class B digital apparatus complies with Canadian ICES-003.
Cet appareil numérique de la classe B est
conforme à la norme NMB-003 du Canada.
Explanation of
graphic symbols
The lightning bolt triangle is used to
alert the user to the presence of uninsulated “dangerous voltages” within
the unit’s chassis that may be of sufficient magnitude to constitute a risk of
electric shock to humans.
The exclamation point triangle is used
to alert the user to presence of important operating and service instructions
in the literature accompanying the
product.
– Reorient or relocate the receiving antenna.
– Increase the separation between the equip-
ment and receiver.
– Connect the equipment into an outlet on a cir-
cuit different from that to which the receiver is
connected.
– Consult the dealer or an experienced ra-
dio / TV technician for help.
Ditto X2 Looper English Manual 2
Page 5

Introduction
About this manual
This manual will help you learn understanding
and operating your TC product.
This manual is only available as a PDF download
from the TC Electronic website.
Of course, you can print this manual, but we encourage you to use the PDF version, which has
both internal and external hyperlinks. For example, clicking the TC Electronic logo in the upper
left corner of each page will take you to the table
of contents.
To get the most from this manual, please read it
from start to finish, or you may miss important
information.
To download the most current version of this
manual, visit tcelectronic.com/support/manuals/
Enjoy your TC product!
Introduction
Ditto X2 Looper is the logical heir to the looping
throne after the smash hit Ditto Looper. It houses
all the features that made the original Ditto Looper such a runaway hit – and then some!
New to Ditto X2 Looper is a user interface sporting two footswitches. The FX footswitch allows
you to trigger two types of loop effects: “Re-
verse” and “Half speed”. This second foot-
switch can also be used as a dedicated stop
switch – allowing you to stop and delete loops on
stage more effectively. You can export and im-
port loops to and from your PC or Mac, allowing
you to use your creations in your DAW or prepare
complex backing tracks for use on stage. Last
but not least, Ditto X2 Looper features stereo
inputs and outputs
Of course, Ditto X2 Looper sports the same features that made the original Ditto such a success:
– five minutes of looping time,
– unlimited overdubs,
– overdub undo/redo,
– true-bypass, analog dry-through design and
– 24 bit uncompressed high quality audio.
Ditto X2 Looper English Manual 3
Page 6
Setup
Setup
Ready…
The Ditto X2 Looper box should contain the following items:
– 1 Ditto X2 Looper pedal
– 2 rubber feet for “non-velcro” pedalboard
mounting
– 1 USB cable (for transferring loops from and
to a computer and for updating the pedal
firmware)
– 1 “Quick Start Guide” sheet
– 1 TC Electronic sticker
– 1 leaflet about TC’s guitar FX product range
Inspect all items for signs of transit damage. In
the unlikely event of transit damage, inform the
carrier and supplier.
If damage has occurred, keep all packaging as it
can be used as evidence of excessive handling
force.
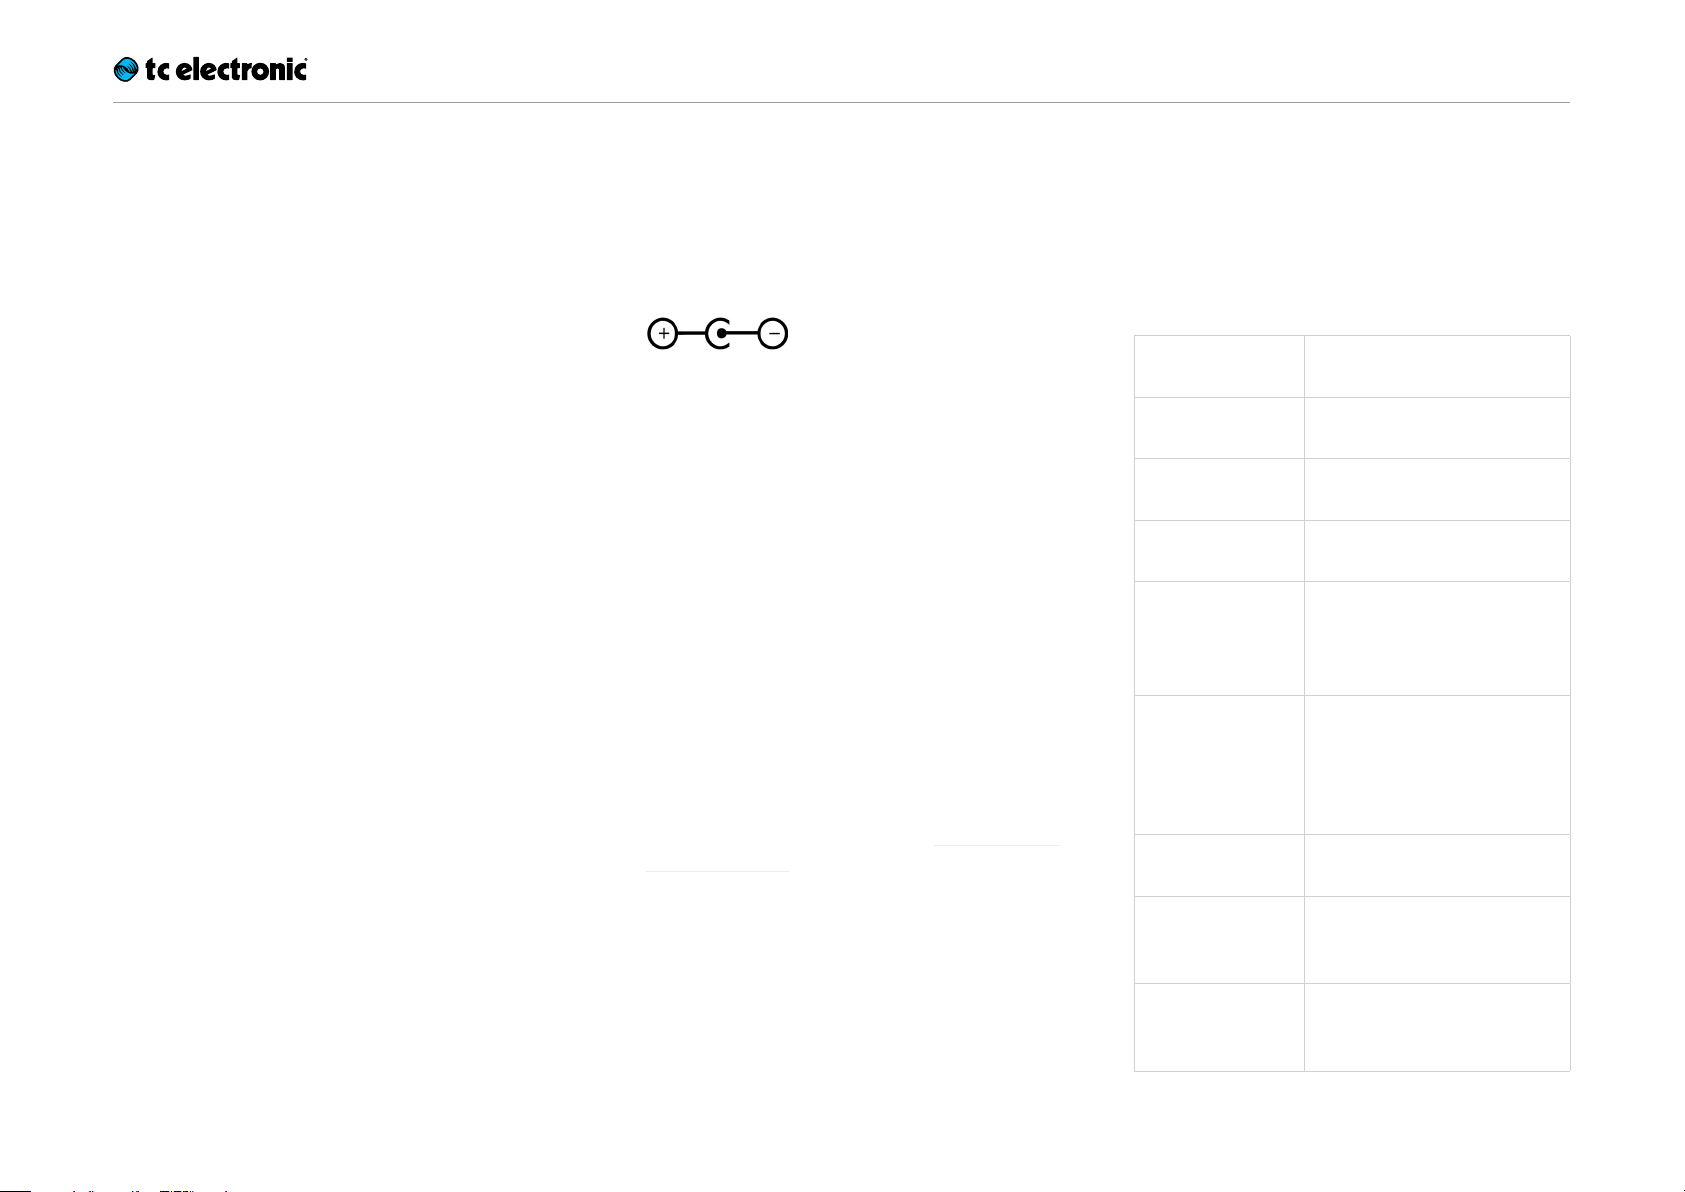
Set…
– Connect a 9V power supply delivering a mini-
mum of 150 mA with the following symbol to
the DC input socket of Ditto X2 Looper.
! Please note that Ditto X2 Looper does not
come with a power supply.
– Plug the power supply into a power outlet.
– Alternatively, you can operate Ditto X2 Looper
using one or two 9V batteries.
Ditto X2 Looper has two battery slots. You
can operate the pedal using only one battery,
but using two batteries will prolong operation
time.
– Connect your instrument to the MONO input
jack on the rear of the pedal using a ¼“ jack
cable. You can also feed the pedal with a stereo signal by using both INPUT jacks.
– Connect the MONO output jack on the rear
of the pedal to your amplifier using a ¼“ jack
cable. You can also send a stereo signal from
the pedal to the next device in the signal chain
by using both OUTPUT jacks.
For more complex setups, see “Setup exam-
ples” on page 5.
Let’s get loopin’!
If you are in a hurry, chances are you’ll find what
you’re looking for in this overview.
Operation
Power up
Ditto X2 Looper
Record Tap the LOOP footswitch
Switch to
playback
Undo / Redo last
recording
Stop Double-tap the LOOP foot-
Stop & clear the
loop
Resume
playback
Connect a power supply or insert a battery.
once.
Tap the LOOP footswitch
again.
Press and hold the LOOP footswitch.
switch or
Tap the FXfootswitch (FX selector has to be set to “Stop”)
Double-tap and hold the LOOP
footswitch or
Tap and hold the FXfootswitch
(FX selector has to be set to
“Stop”)
Tap the LOOP footswitch
again.
Engage
Reverse effect
Engage
½ Speed effect
Ditto X2 Looper English Manual 4
Tap the FXfootswitch
(FX selector has to be set to
“Reverse”)
Tap the FXfootswitch
(FX selector has to be set to
“½ Speed”)
Page 7
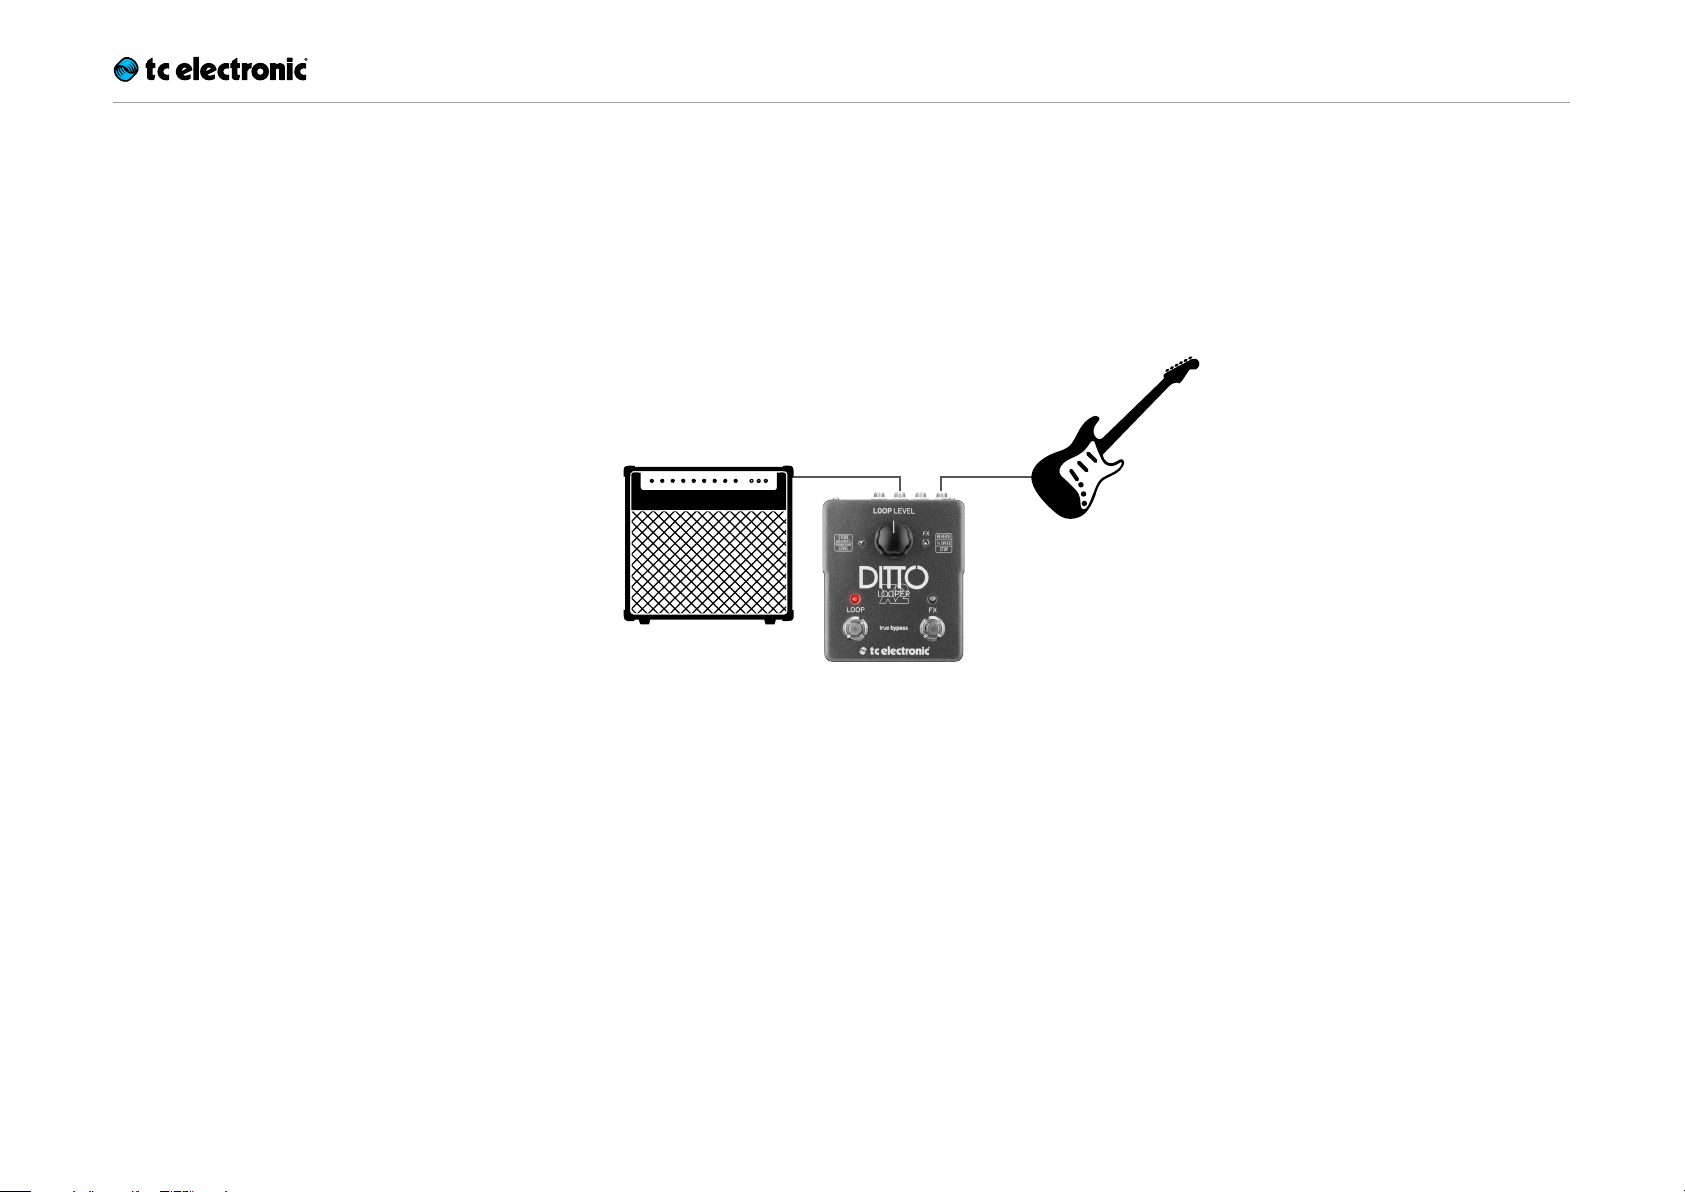
Setup examples
Setup examples
Setup example 1:
Basic looping – no effects
This is the most basic mono setup: your instrument, Ditto X2 Looper and your amp.
Input
Combo
Ditto X2 Looper English Manual 5
Page 8
Setup examples
Setup example 2:
Ditto X2 Looper and effects
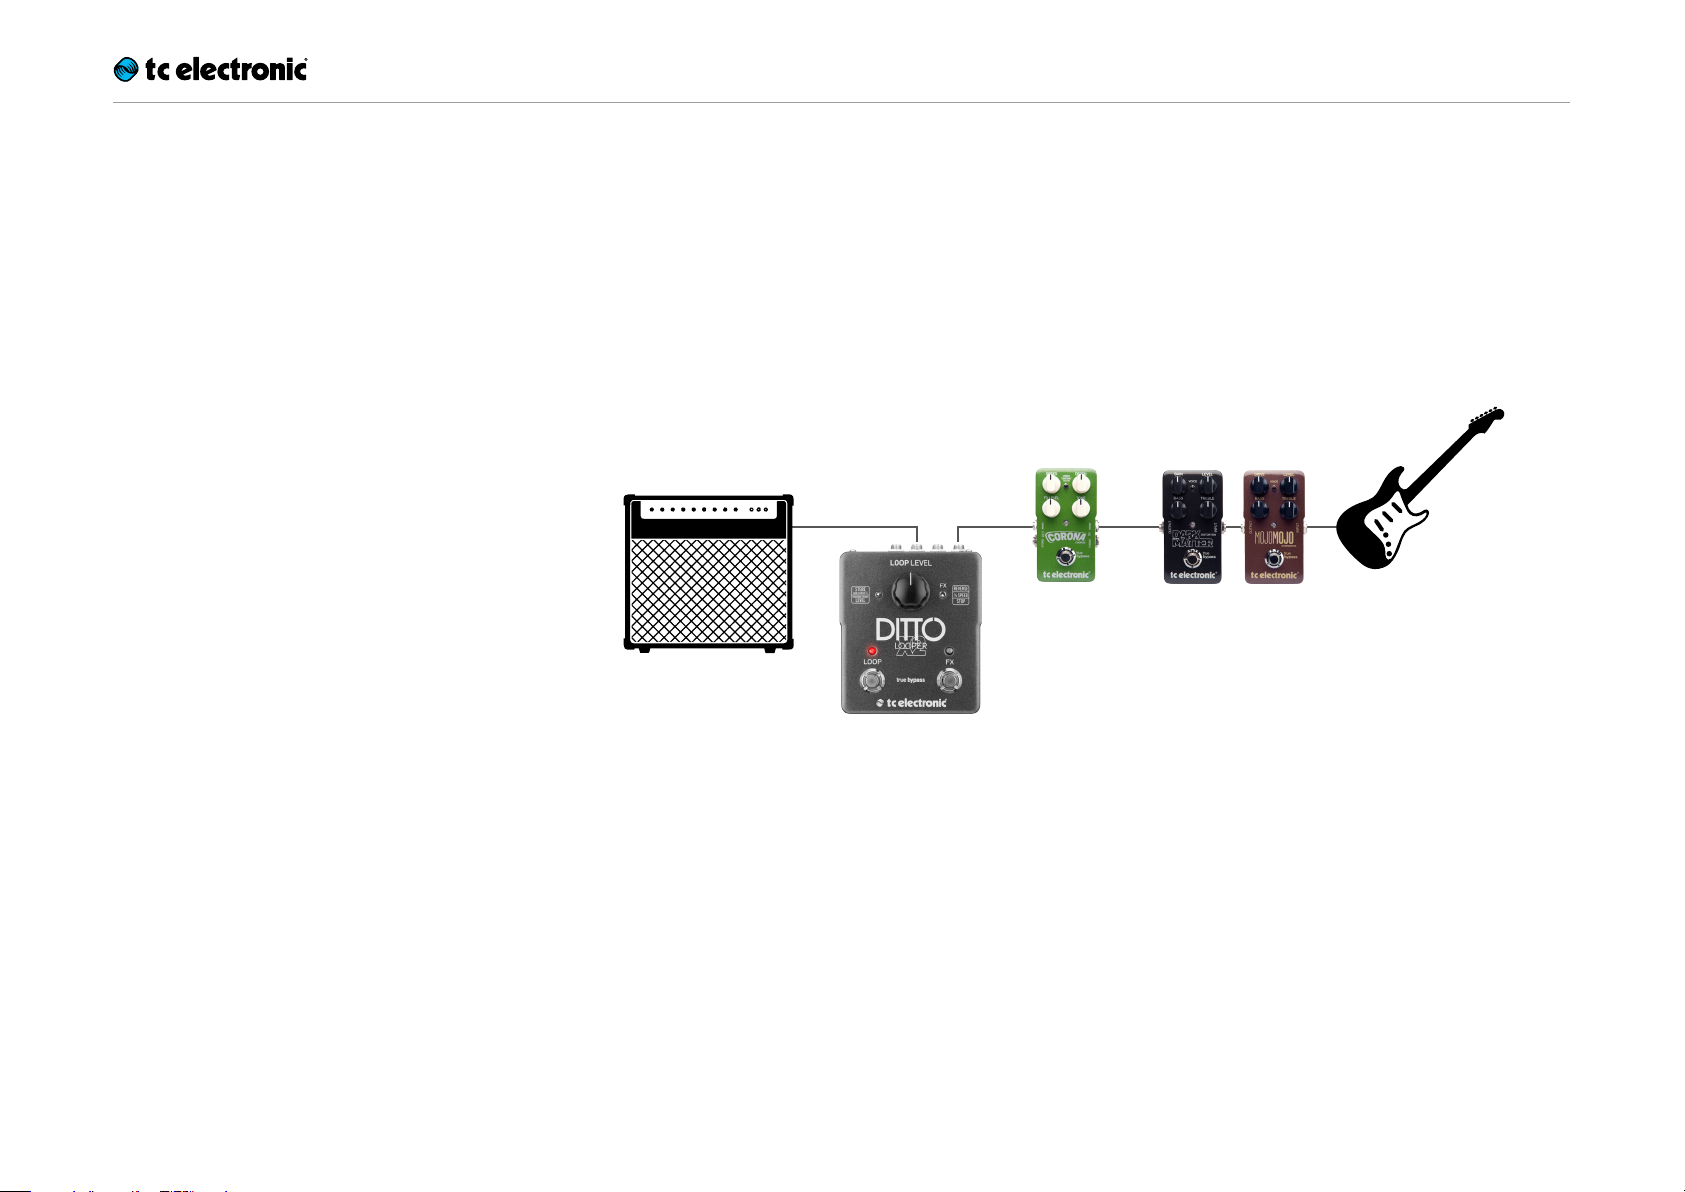
Place your effects before Ditto X2 Looper. This
will allow you to create and record different
sounds within the same looping session simply
by switching your effects on and off.
Input
Combo
Modulation
Pedals
Drive
Pedals
Ditto X2 Looper English Manual 6
Page 9

Setup examples
Setup example 3:
Ditto X2 Looper in an FX loop
If you are using an amp equipped with an FX
loop, place your modulation effects and Ditto X2
Looper in that FX loop. Again: To get the most
out of your setup, place Ditto X2 Looper at the
end of the FX loop. This gives you the flexibility
to add parts with or without signal processing by
simply switching effects on and off as required.
Input ▼
Combo
Drive
Pedal(s)
FX Loop Send ►
◄ FX Loop Return
Reverb, delay and
modulation pedals
Ditto X2 Looper English Manual 7
Page 10

Setup examples
Setup example 4:
Dual amp setup
Got two amps? Feed’em!
Stereo effect pedals
Drive
pedal
Combos
Ditto X2 Looper English Manual 8
Page 11

Setup examples
Setup example 5:
Dual mono with two instruments
As they say: Two can play!
Share the love (i.e., your Ditto) with another guitar
(or bass) player. You’ll just have to agree on who
gets to hit the LOOP footswitch…
Combos
Ditto X2 Looper English Manual 9
Page 12

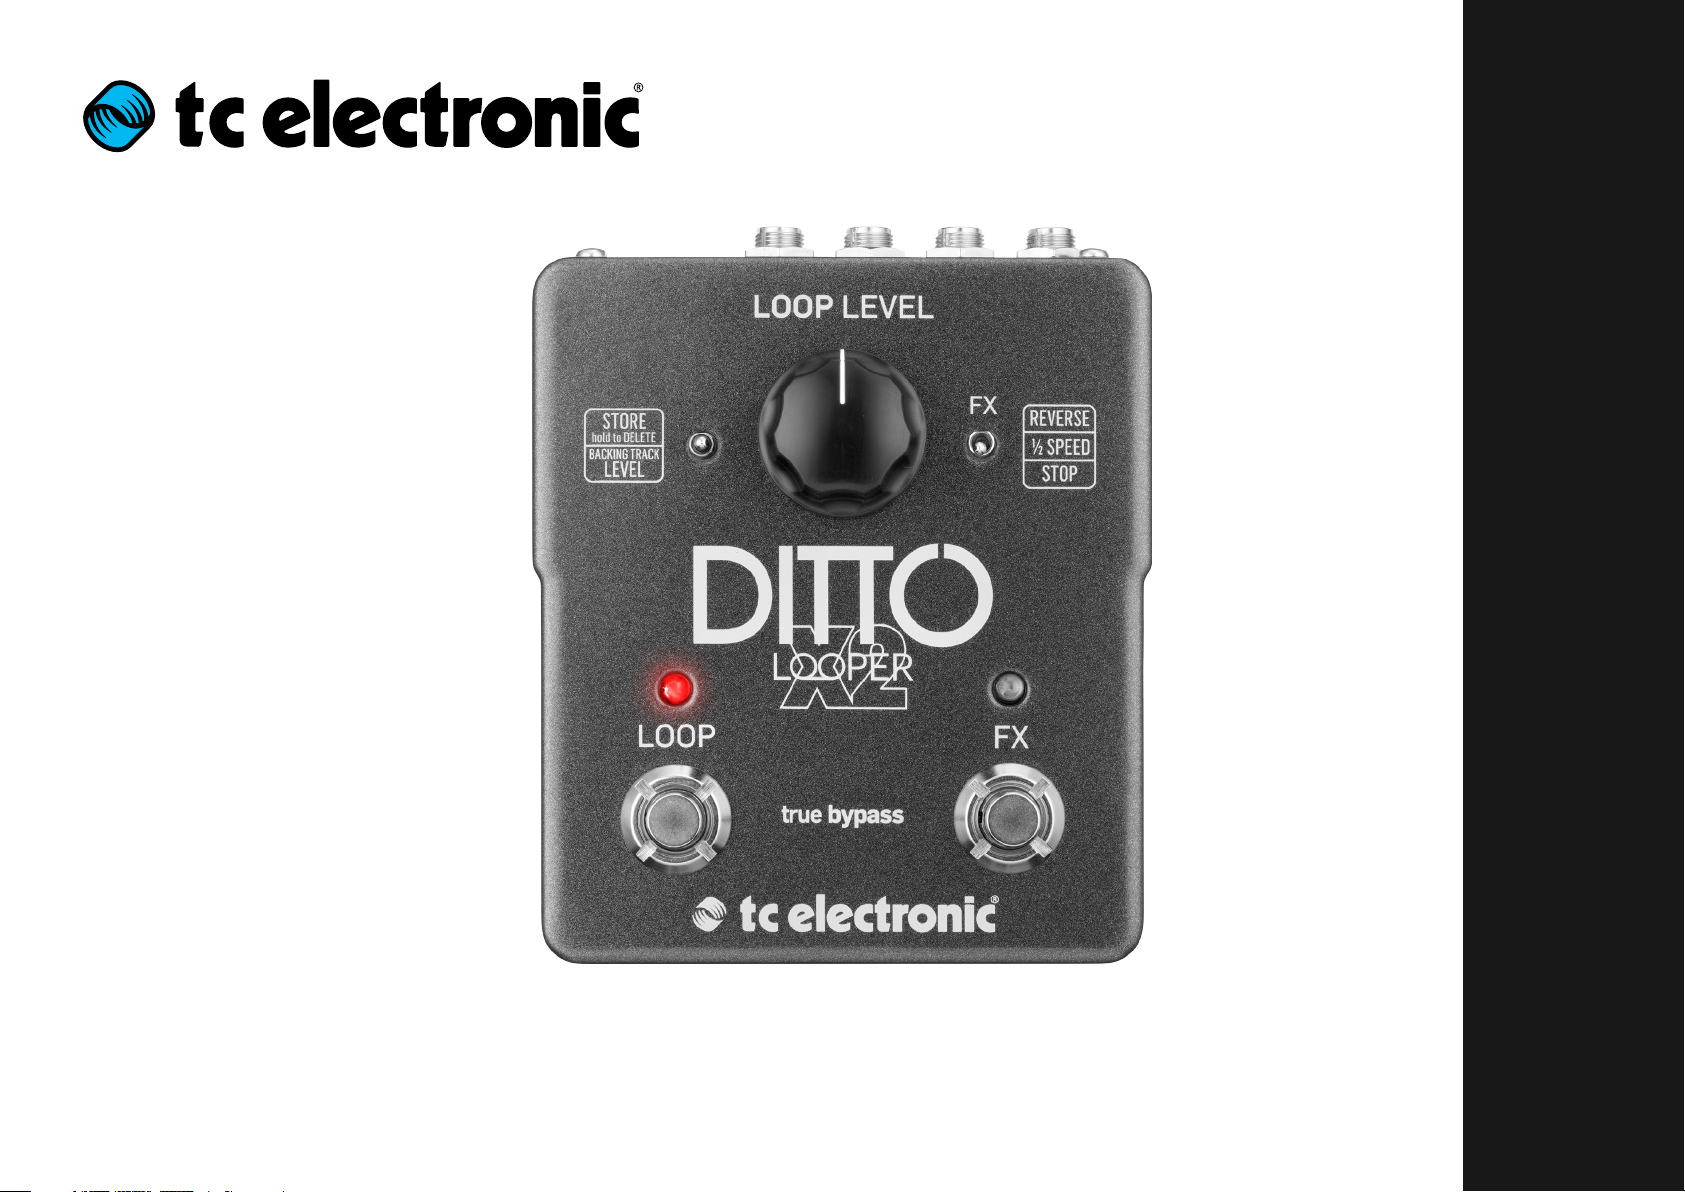
Inputs, outputs, controls
9
1
3
2
8
546
7
Inputs, outputs, controls
1. Power input
The power input of this pedal is a standard
5.5 / 2.1mm DC plug (centre = negative). To power up your pedal, connect a power supply to its
power input socket. Ditto X2 Looper requires a
9V power supply providing 100mA or more (not
supplied). To minimize hum, use a power supply
with isolated outputs. You can also run Ditto X2
Looper using batteries.
2. Audio inputs
This pedal has two standard ¼” jack (mono/TS)
inputs for stereo operation. If your signal source
is mono (e.g. a regular guitar or a mono effect
pedal), connect it to the MONO input. For other
setups, see “Setup examples” on page 5.
3. Audio outputs
This pedal has two standard ¼” jack (mono/TS)
outputs for stereo operation. If the next device in
the signal chain is mono, connect it to the MONO
output. For other setups, see “Setup examples”
on page 5.
4. LOOP footswitch and LED
Use this footswitch to control all loop-related
functions of the pedal (record, playback, undo/
redo, clear). See “Creating loops” on page 11.
5. FX footswitch and LED
Use this footswitch to either control one of Ditto
X2 Looper’s built-in effects (see “Using effects”
on page 18) or to stop loop playback. The assignment of this footswitch is determined by the
setting of the FX selector switch.
6. Loop / backing track
level control knob
Use the Loop level control knob to control the
level of your loops. Use the Loop level control
knob while holding down the Store / Backing
track level switch to control the level of your
backing track. See “Balancing backing track and
current loop levels” (page 16).
7. Store / Delete /
Backing track level switch
– To store the current loop as a backing track,
nudge this switch up.
– To delete the stored loop/backing track, hold
this switch in the up position for three seconds.
– To set the level of the backing track, turn
the Loop level control knob while holding this
switch in the down position.
The difference between current loop and the
stored backing track is explained in “Current
(in-memory) loop vs. stored loop (backing
track)” (page 14).
8. FX selector switch
Use this switch to determine the function of the
FX footswitch. Available settings are:
– Reverse:
FX footswitch toggles the Reverse effect on
and off.
– ½ Speed:
FX footswitch toggles the Half speed effect
on and off.
– Stop:
FX footswitch acts as a dedicated stop footswitch. For the advantages of using the FX
footswitch as a dedicated Stop footswitch,
see “Deleting the loop when you are not recording or playing back” (page 12).
9. USB port
Connect Ditto X2 Looper to a computer to transfer loops between your computer and Ditto X2
Looper. If there should be firmware updates for
this device, they can also be installed using the
USB port.
Ditto X2 Looper English Manual 10
Page 13

Creating loops
Creating loops
Recording your first loop
Important: On the following pages, operation is
described based on the default operation mode
of Ditto X2 Looper (Record loop > Playback > Record overdubs). You can also use an alternative
operation mode. See “Setting operation mode”
(page 13).
To start recording, press the LOOP footswitch
once. The LED will light up in red, indicating Ditto
X2 Looper is in Record Mode.
At the end of the loop (for example, after eight
bars), press the LOOP footswitch again.
The LED will turn green, and Ditto X2 Looper will
repeat the loop continuously. The LED will blink
every time Ditto X2 Looper reaches the starting
point of the loop.
Your loop can be up to five minutes long!
Setting loop playback volume
To change the playback volume of the loop you
just recorded, adjust the knob labelled “Loop
Level ”.
The Loop Level knob only controls loop playback
level – it has no influence on the signal from your
instrument.
Overdubbing
When you’re happy with your original loop, you
can start overdubbing.
To record another take (overdub), press the
LOOP footswitch again while the original loop is
playing back. The LOOP footswitch LED will turn
red, indicating you’re in Record mode again.
When you’re done, press the LOOP footswitch
once more to quit Record mode.
Ditto X2 Looper will repeat the loop with both the
original recording and the overdub.
Please note that the length of the loop will
never increase when overdubbing. When you
continue playing, you will simply create additional overdubs. You can record as many overdubs
as you like – there is no limit.
Undo (clearing the last take)
To undo the last take you recorded (i.e., remove
it), simply press and hold the LOOP footswitch
for 1.5 seconds or longer during playback.
The LED will blink twice in rapid succession, and
the last take will be cleared (removed). Previously
recorded takes will stay intact.
Redo (restoring a previously
cleared take)
If you have cleared (removed) the last take using
Undo and you changed your mind, you can restore that take. To do so, simply press and hold
the LOOP footswitch for 1.5 seconds or longer
during playback.
The LED will blink twice in rapid succession, and
the previously deleted take will be restored.
Using Undo/Redo creatively
Undoing and redoing overdubs can be used
for more than just correcting mistakes. You can
make your performance more interesting by removing and bringing back sections. Here is a
simple example:
– Record a bass line (loop cycle 1).
– Record some chords (loop cycle 2).
– Record a melody (loop cycle 3).
– Press and hold the LOOP footswitch to clear
the last take, i.e., remove the melody. Improvise or record something else.
– Press and hold the LOOP footswitch again to
bring back the previously cleared melody.
Please note that undoing or redoing by using
the LOOP footswitch is only possible during playback. If you hold down the LOOP foot-
switch after you have stopped loop playback or
recording, you will delete the full loop, including
all overdubs!
Ditto X2 Looper English Manual 11
Page 14

Creating loops
Stopping loop playback / recording
To stop loop playback, press the LOOP footswitch twice in short succession.
To stop recording, press the LOOP footswitch
once.
If you have set the small FX selector switch to
“Stop”, you can use the FX footswitch to stop
loop playback.
The LED will start flashing in green to indicate
that your loop is still in memory and ready for
playback.
Stopping loop playback / recording
and deleting the loop/backing track
To stop loop playback/recording and delete everything you have recorded, press the LOOP
footswitch twice in short succession and hold
down your foot on the second tap. Please note
that it takes three seconds until the backing
track is actually deleted.
If you have set the small FX selector switch to
“Stop”, you can use the FX footswitch to stop
and delete the loop. The advantage of having a
dedicated Stop footswitch is that it’s easier to
stop loop playback exactly when you need to,
as you only need to hit this dedicated footswitch
once.
The LED will turn off to indicate that the loop has
been deleted. At this point, you can start recording loops from scratch again.
Deleting the loop when you are
not recording or playing back
To delete everything you have recorded (instead
of just removing the last take) when you are not
recording or playing back, press and hold the
LOOP footswitch.
If you have set the small FX selector switch to
“Stop”, you can use the FX footswitch to delete
the loop in the same manner.
! When you delete a loop by pressing and hold-
ing the LOOP footswitch, playback will start
before the loop is actually deleted. This simply
cannot be avoided, because hitting the LOOP
footswitch triggers playback before Ditto X2
Looper „realizes“ that you actually want to delete the loop. If you assign the Stop function
to the FX footswitch instead, you will not experience this effect – the loop will be cleared
sile ntly.
The LED will flicker red and then turn off to indicate that the loop has been deleted.
When you delete your loop from Ditto X2 Looper,
the device goes into True Bypass mode.
Other than clearing the last overdub (which
can be undone), deleting the full loop as described in this section cannot be undone.
Ditto X2 Looper English Manual 12
Page 15

Creating loops
Setting operation mode
(“Record loop > Playback > Record” overdubs vs.
“Record loop > Record overdubs > Play”)
Looping means creating music in real-time. This
process should be fun and intuitive. But one
guy’s “intuitive” is another guy’s “weird”. This is
why we give you the opportunity to choose your
preferred method.
Some musicians prefer this workflow:
1. Press a footswitch to start recording.
2. Press it again to switch to playback.
3. Press it a third time to create additional takes
(overdubs).
This is Ditto X2 Looper’s default mode.
Other people prefer this method:
1. Press a footswitch to start recording.
2. Press it again to switch from recording your
original loop to creating additional takes (overdubs) right away.
3. Press it a third time to go to playback.
With Ditto X2 Looper, you can choose your preferred method.
To switch to the alternative operation mode (“Record loop > Record overdubs > Play”), do this:
– Unscrew the cross-head screw on the back of
the pedal and detach the backplate.
– If there is a battery in the right battery com-
partment, remove it.
– You will see two dip switches on the right side
of the battery compartment. By default, both
switches will be “up” – i.e., both dip switches
will face towards the top of the pedal.
– Use a toothpick to set the dip switch labelled
“2” to the “down” position, so it is facing to-
wards the bottom of the pedal.
– Re-insert the battery/batteries.
– Remount the backplate.
Ditto X2 Looper English Manual 13
Page 16

Storing, importing and exporting loops
Storing, importing and
exporting loops
Current (in-memory) loop vs.
stored loop (backing track)
Ditto X2 Looper is very flexible when it comes to
recording, importing and exporting audio loops.
When you are recording something, this is the
current loop. It will be available even after pow-
ering down Ditto X2 Looper.
In addition to the memory that holds the current loop, there is an on-board storage module
(similar to a hard disk or a USB flash drive). This
storage module is used to transfer loops (or even
complete backing tracks) from and to your computer/DAW.
You can set playback volume for the in-memory
loop and the stored loop (backing track) independently – see “Balancing backing track and
current loop levels” (page 16).
In this chapter, you will learn how to use this feature effectively.
Current loop stays in memory
When you power down Ditto X2 Looper and
there is still a loop in memory, this loop will be
available even after you power down the device.
When you power up Ditto X2 Looper again, the
LOOP footswitch LED will flash green, indicating
your previously recorded loop is available. Just
hit the LOOP footswitch, and playback will start.
If you want to start from scratch instead, delete
the loop (see “Stopping loop playback / recording and deleting the loop/backing track” on page
12).
USB operation vs. looping
The following sections (“Exporting Ditto X2
Looper loops to a computer” and “Importing
loops into Ditto X2 Looper from a computer”)
describe how you can connect Ditto X2 Looper
to a computer using the supplied USB cable to
import or export loops and backing tracks.
Please note that once you have attached it to
a computer, your Ditto X2 Looper effectively
becomes a USB storage device, and audio is
disabled. This means that you can transfer au-
dio files to and from Ditto X2 Looper – but you
cannot play back (or record) audio at the same
time. Ditto X2 Looper does not act as a USB
audio interface. This means that to get back to
looping, you will have to unplug/eject Ditto X2
Looper.
On computers running Microsoft Windows or
Apple OS X operating systems, no software is
required for accessing Ditto X2 Looper as described in this section – it’s all plug & play.
Ditto X2 Looper English Manual 14
Page 17

Storing, importing and exporting loops
Exporting Ditto X2 Looper
loops to a computer
Never let a great loop go to waste!
If you have created a really great loop (e.g. a
song idea or a beautiful riff), you may want to
reuse it. Now you could simply record the signal
coming from Ditto X2 Looper’s audio outputs to
your DAW – but this could lead to signal quality
degradation and requires post-editing (trimming)
the recording. This is why Ditto X2 Looper allows
you to export your loops in pristine quality.
1. When you are happy with your loop, nudge the
Store / Backing track level switch up briefly.
This will store the current loop within the de-
vice in a format (actually, two formats) that can
easily be transferred to a computer.
After storing the current loop, please wait a
few seconds before connecting the pedal to
your computer.
2. Connect a USB port on your computer to the
USB port of Ditto X2 Looper using the supplied USB cable. The LOOP footswitch LED
will start blinking orange, indicating that Ditto
X2 Looper now is in USB transfer mode, and
audio will be disabled.
3. Your computer will recognize Ditto X2 Looper
as an external USB storage device. It will be
shown in the Finder (OS X) or Windows Explorer as a drive called “DITTO” containing a
folder called “TRACK”.
The “TRACK” folder should hold two files:
“TRACK.AIF” and “TRACK.WAV”. These files
contain the loop that you have previously
stored (see step 1) in both AIFF and WAV formats. AIFF is commonly used in OS X, while
WAV is the commonly used format for Microsoft Windows.
Please refer to the instruction manual of your
DAW to learn which format you should use.
4. Copy the respective file (“TRACK.AIF” or
“TRACK.WAV”) to your computer, e.g. by
dragging it from the “TRACK” folder to the
desktop. Wait for the file transfer to finish.
5. On a Windows PC, eject the “DITTO” drive by
clicking it with the right mouse button in Windows Explorer and selecting “Eject” from the
context menu.
On a Mac, eject/unmount the “DITTO” drive
by selecting it and pressing [Cmd] and [E] simultaneously.
6. Disconnect Ditto X2 Looper from your computer.
The LOOP footswitch LED will stop blinking
orange and return to green, and audio will be
enabled again.
About audio formats
Ditto X2 Looper saves audio files in 32 bit floating point format. If your DAW does not support
this AIFF/WAV “flavor” – or if it doesn’t support
AIFF or WAV at all – you will have to convert the
files coming from Ditto X2 Looper to a supported
format.
Please consult your DAW’s manual or support
pages to find out which audio formats it supports. You should then be able to find a free audio format converter – either as an application
for your operating system or as an online service.
If nothing else works, you can simply record the
signal from Ditto X2 Looper’s audio outs into
your DAW.
Ditto X2 Looper English Manual 15
Page 18

Storing, importing and exporting loops
Importing loops into Ditto X2
Looper from a computer
Did you find (or create) an insanely great song
that you would like to use on stage as a backing
track? Well, with Ditto X2 Looper, you can – without having to schlep your notebook on stage. All
you have to do is transfer your backing track or
base loop from your computer to Ditto X2 Looper using a USB connection.
1. Create a loop in your DAW and export it as an
audio file in either AIFF or WAV format.
2. Connect a USB port on your computer to the
USB port of Ditto X2 Looper using the supplied USB cable. The LOOP footswitch LED
will start blinking orange, indicating that Ditto
X2 Looper now is in USB transfer mode, and
audio will be disabled.
3. Your computer will recognize Ditto X2 Looper
as an external USB storage device. It will be
shown in the Finder (OS X) or Windows Explorer as a drive called “DITTO” containing a
folder called “TRACK”.
4. Copy your audio file (in AIFF or WAV format)
from your computer to Ditto X2 Looper by
dragging it to the “TRACK” folder of the “DITTO” drive. Wait for the file transfer to finish.
5. Eject/unmount Ditto X2 Looper as described
in “Exporting Ditto X2 Looper loops to a computer” (page 15).
The LOOP footswitch LED will flicker as the
loop is read.
6. Disconnect Ditto X2 Looper from your computer.
The LOOP footswitch LED will stop blinking
orange and return to green, and audio will be
enabled again.
Importing MP3 files to
Ditto X2 Looper
Usually, you will want to import AIFF or WAV files
into Ditto X2 Looper: This will give you the highest possible audio quality, and no conversion is
required. However, you can also import MP3 files
with a 44.1 kHz sampling rate. Ditto X2 Looper
will convert an imported MP3 file to AIFF and
WAV format.
The procedure is the same, with the following
exceptions:
– Converting an MP3 file takes some time. Dur-
ing conversion, the LOOP footswitch LED will
flicker red. Converting a long (6 minute) MP3
file will take about 90 seconds.
– Importing tight/short MP3 loops with MP3
metadata will add a few milliseconds of silence to the end of the loop. If you want to
ensure seamless, sample-accurate playback,
please use files in AIFF or WAV format.
Notes about working with
imported backing tracks
– Levels of imported backing tracks are re-
duced, so you can jam to these tracks and
hear yourself.
– Track/file names of imported loops/back-
ing tracks are irrelevant, as long as the suffix
(“.WAV” or “.AIF”) is correct.
– You only have to delete existing backing
tracks if you need to make room for new
tracks. If there are several tracks in the TRACK
folder, the last imported track will be used.
Balancing backing track
and current loop levels
What you are recording with Ditto X2 Looper is
called “the current loop”. If you store this current
loop (by using the Store / Backing track level
switch), or if you import a previously recorded
track from a computer as described in the previous section, this is a “backing track”.
You can set the volume for the current loop
and the backing track independently.
– To set the level of the current loop, turn the
LOOP LEVEL knob.
– To set the level of the stored backing track,
turn the LOOP LEVEL knob while pulling the
Store / Backing track level switch towards
you.
The ability to control the volume of the current
loop and the backing track independently allows
you to control the mix very effectively.
Ditto X2 Looper English Manual 16
Page 19

Jam Track Central tracks
Jam Track Central tracks
We know, we know: Playing with yourself is fun.
But how about spicing things up a bit with some
top-notch backing tracks?
TC Electronic has collaborated with the team at
Jam Track Central to give you a package containing some of the best backing tracks available. These tracks are expertly recorded, they
feature solos by top guitarists and – best of all
– they come free of charge with your Ditto X2
Looper.
About Jam Track Central
Jam Track Central is the home of high quality, original artist jam track and album backing
packages. Featuring content from artists such as
Guthrie Govan, Andy James, Jeff Loomis, Alex
Hutchings, Zakk Wylde and many more, they deliver content that is designed to get you inspired,
learning and jamming.
Every product comes with the solo track, jam
(or backing) track and tab/notation, plus in many
cases the live video performance by the artist. Brand new content is released every single
week, plus there are more and more new artists
getting involved each month too.
Free Jam Track Central tracks will be available for every Ditto X2 Looper owner on the
JTC site starting February 7, 2014.
Downloading your free Jam
Track Central tracks
You need to have (or register) a free Jam Track
Central account to access your free tracks.
– Go to jamtrackcentral.com/promo/dittox2.
You can also scan the QR code on your Ditto
X2 Looper product box with your smartphone.
– Enter your Ditto X2 Looper’s serial number.
– Enter the e-mail address and password for
your Jam Track Central account.
– If you don’t have a Jam Track Central account
yet, click on “Don’t have an account?” and fol-
low the instructions for creating your free ac-
count.
– Click on “Give me my free Jamtracks”.
– For more information, see
jamtrackcentral.com/help/
What you’ll get
Every registered X2 owner gets access to the
solo tracks, jam tracks and tab/notation files for
these songs:
– Andy James: “Drive”
– Dave Lockwood: “Gone So Long”
– Denny Ilett: “Lazy Day Blues”
– Dominic Dawes: “Bluesy Jazz”
– Jan Cyrka: “Blow Your Top”
– Jan Cyrka: “Clapton Smoky”
– Jan Cyrka: “Johnny Winter Style”
– Luke Roberts: “Roundhouse”
– Paul Harvey & Martin Miller: “Sassafras”
Please note that Jamtrackcentral.com owns the
full rights to all of these tracks. Only use them as
specified on their Terms & Conditions page.
Ditto X2 Looper English Manual 17
Page 20

Using effects
Using effects
What’s even more fun than working with loops?
Using time-based effects to spice things up!
Applying effects to your Ditto X2 loops is easy.
Just press the FXfootswitch to apply an effect.
Two time-based effects are available: “Reverse”
and “Half Speed”.
Using the Reverse effect
– Set the small FX selector switch right to the
LOOP Level knob to “Reverse”.
– Record a loop.
– Press the FXfootswitch to activate the effect.
The FX footswitch will light up red, and Ditto
X2 Looper will immediately start playing back
the loop (including all takes) in reverse.
– To return to regular (forward) loop playback,
tap the FX footswitch again.
Using the Half Speed effect
– Set the small FX selector switch right to the
LOOP Level knob to “½ Speed”.
– Record a loop.
– Press the FXfootswitch to activate the effect.
The FX footswitch will light up green, and Ditto
X2 Looper will immediately slow down loop
playback (including all layers) to half speed.
– To return to the original loop playback speed,
tap the FX footswitch again.
Combining Reverse and
Half Speed effects
You can apply both effects to a loop and switch
them on and off independently. There are two
ways to do this.
Working with two effects – method 1
– Set the FX selector switch to the first effect
you want to apply (e.g. “Reverse”).
– Press the FX footswitch.
The effect will be activated, and the FX foot-
switch LED will light up (red for the Reverse
effect).
– Set the FX selector switch to the other ef-
fect (“½ Speed”) and press the FX footswitch
again.
The second effect will be applied, and the FX
footswitch LED will alternate between red and
green.
– You can switch off the effect that you have
currently selected with the FX selector switch
by pressing the FX footswitch again.
Working with two effects – method 2
– Set the FX selector switch to the first effect
you want to apply (e.g.“Reverse”).
– Press the FX footswitch.
The effect will be activated, and the FX foot-
switch LED will light up (red for the Reverse
effect).
– Press the FX footswitch twice in short succes-
sion.
The second effect will be applied, and the FX
footswitch LED will alternate between red and
green.
– To switch off the original effect, press the FX
footswitch again.
– To switch off the second effect, press the FX
footswitch twice in short succession.
Mastering this method will allow you to create
dramatic and fun musical effects without hav-
ing to select the desired effect manually.
Ditto X2 Looper English Manual 18
Page 21

Using effects
Effects, playback and
and recording
When you have recorded a loop and you switch
to playback, activating one or both time-based
effects in Ditto X2 Looper will apply them “nondestructively”: What you have recorded will be
played back in reverse and/or at half speed.
Switching the effect(s) off will return playback to
the previous, “dry” state. This is the usual, “conventional” way of using effects.
However, you can also record with effects. In
this case, things work a bit differently.
Recording with the Half Speed effect
If you switch on the Half speed effect before recording a new loop, you are effectively “running
the tape at half speed” during recording.
Once you switch off the Half Speed effect, your
new loop / overdub is played back at double
speed.
You can use this method to record licks that
would otherwise be, well, tricky to play.
Recording with the Reverse effect
If you switch on the Reverse effect before recording, that loop / overdub will be recorded in
reverse.
However, as the Reverse effect is still active
when this new loop / overdub is played back, it
will be “reversed again” – i.e., played forward.
To actually hear what you have recorded (i.e., a
reverse loop / overdub), you have to switch the
Reverse effect off.
Here is an elegant shortcut to go from recording
with the Reverse effect to reverse playback without having to press two footswitches:
Instead of hitting the Loop footswitch to stop
recording, hit the FX footswitch. This will disengage the Reverse effect and allow you to continue overdubbing.
Ditto X2 Looper English Manual 19
Page 22

Frequently asked questions
Bypass modes
Here at TC, we have a simply philosophy: When
you are using one of our products, you should
hear something great – and if you don’t, you
shouldn’t hear it at all. This is why this pedal
sports True Bypass. When it is bypassed, it is
really off and has zero influence on your tone, resulting in optimum clarity and zero loss of highend. Also please note that the pedal lets your
dry, unprocessed sound pass without ever converting it to digital – keeping your original tone
pure and without any latency.
Frequently asked questions
“Where should I place Ditto X2
Looper in my signal chain?”
To get the most out of your setup and the loops
you’re recording, place Ditto X2 Looper at the
end of your signal chain. This gives you the flexibility to add parts with or without signal processing by simply switching effects on and off
as required. For more information, see “Setup
examples” (page 5).
“How much loop time can I
get out of Ditto X2 Looper?”
Ditto X2 Looper provides five minutes of looping time.
“What’s the maximum number
of overdubs that I can record?”
Our guess is that you will tire out before Ditto X2
Looper does. Ditto X2 Looper allows an unlimited number of overdubs – so do your worst!
“I made a mistake – how
do I undo a part?”
Press and hold the LOOP footswitch on Ditto
X2 Looper while it is playing back your recorded
loop. The last part you recorded will be removed.
“The LOOP footswitch LED is
blinking orange, and I can’t
play or record. What gives?”
Your Ditto X2 Looper is added to a computer via
USB and running in USB transfer mode. Make
sure that no files are currently being transferred
to or from Ditto X2 Looper and remove the USB
cable to return to normal operation.
Ditto X2 Looper English Manual 20
Page 23

Footswitch LED state reference
Footswitch LED
state reference
Use this section as a reference when you are not
sure what the current LED status means.
LOOP footswitch LED…
Off Device disconnected or no
loop in memory
Blinking green Loop in memory, playback/
recording stopped
Green Loop running (LED will blink
shortly when LOOP end is
reached)
Red Loop recording
Blinking red Loop currently being erased
or converted
FX footswitch LED
Red Reverse effect active
Green Half speed effect active
Blinking red &
green
Reverse and Half speed ef-
fects active
Ditto X2 Looper English Manual 21
Page 24

Changing the batteries
Updating the firmware
TC may provide updates for the built-in software
of your pedal, the firmware. Updating your TC
pedal’s firmware requires…
– a computer running Microsoft Windows or
OSX with a standard USB interface
– the specified DC power supply for your pedal.
Preparing the firmware update
1. Download the newest firmware from the “Support” page for your TC pedal. There are updaters
– for Microsoft Windows (these are ZIP ar-
chives containing the firmware installer) and
– for OS X (these are disk image files contain-
ing the firmware installer).
2. Unplug all cables (including the power supply)
from your TC pedal.
3. Connect the pedal to your computer using a
USB cable.
4. Press and hold the leftmost footswitch on your
TC pedal.
5. Insert the DC power supply plug.
The leftmost LED on your pedal should turn
green.
6. Release the footswitch.
Your TC pedal will now be recognized as an
updatable device.
Applying the firmware update
7. Quit all MIDI-related applications (e.g. your
DAW) on your computer and launch the firmware updater you have downloaded in step1.
8. In the firmware updater app, select your TC
pedal from the drop-down list under the
“STEP 1” heading.
If you are using Windows XP, select “USB Au-
dio Device” from the list.
9. When the “Update” button under the “STEP 2”
heading turns green, click it.
The updated firmware will now be transferred
to your TC pedal. Wait for the progress bar to
reach 100%. When the update procedure is
complete, the pedal will automatically restart.
Changing the batteries
If you need to change the batteries of your pedal,
proceed as follows:
– Unscrew the cross-head screw on the back of
the pedal and detach the backplate.
– Unmount the old batteries and attach the new
batteries to the battery clips. Make sure the
polarity is correct!
– Remount the backplate.
Notes regarding batteries
– Batteries must never be heated, taken apart or
thrown into fire or water.
– Only rechargeable batteries can be recharged.
– Remove the batteries when the pedal is not
being used for a longer period of time to save
battery life.
– Dispose batteries according to local laws and
regulations.
Ditto X2 Looper English Manual 22
Page 25

Getting support
Technical specifications
– Maximum loop length: 5 minutes
– Maximum no. of overdubs: Unlimited
– Bypass mode: True Bypass
– Latency: None (analog dry-through)
– Dimensions (Width x depth x height):
135 mm x 113 mm x 54 mm /
5.31” x 4.44” x 2.13
– Weight: 512 g / 1.13 lbs.
– Input connectors:
Stereo – 2 standard TS ¼” jacks
– Output connector type:
Stereo – 2 standard TS ¼” jacks
– Power input: Standard 9 V DC,
centre negative (not supplied)
– USB connector type: Mini-B USB
Controls:
– Loop level knob
– Loop footswitch
– FX footswitch
– FX selector switch
– Store / Backing track level switch
Getting support
If you still have questions about the product after reading this manual, please get in touch with
TC Support:
http://tcelectronic.com/support/
Due to continuous development, these speci-
fications are subject to change without no-
tice.
Ditto X2 Looper English Manual 23
Page 26

Ditto X2 Looper English Manual 24
 Loading...