

Page 1
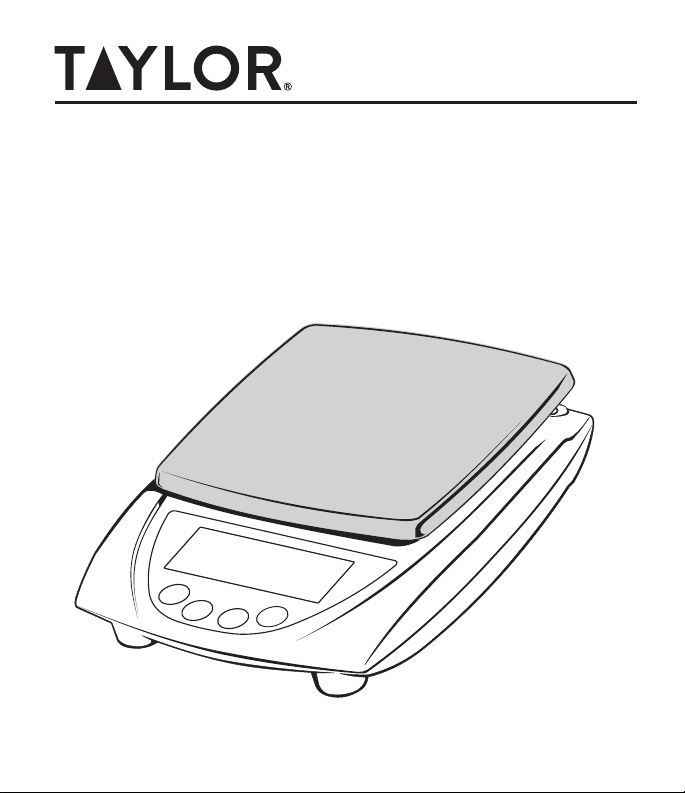
TE21P
Digital Precision Scale
INSTRUCTION MANUAL
Page 2

Thank you for purchasing a Taylor® Digital Scale. Your scale is an example of
superior design and craftsmanship. In order to optimize its function, be sure the
read this instruction manual carefully before use. Keep these instructions handy
for future reference.
TO READY SCALE FOR USE
1. Remove the scale from its box along with its stainless steel platform cover.
2. Place the scale on a hard, flat surface. Uneven surfaces will affect accuracy. If
using the adapter, make sure the scale is not resting on the cord, otherwise it
may be unstable.
3. Install the plastic platform assembly onto the scale by matching the platform
posts with the mating holes on the top of the scale. Place the stainless steel
platform cover on top of the plastic platform assembly. Remove any protective
film from the platform cover.
GENERAL WEIGHING OPERATION
1. Place the scale on a hard, level surface.
2. Press the “ON/OFF” button to turn the scale on. The display first shows “88888”,
followed by zero. If the display does not show zero, press the “ZERO/ ”
button to reset (tare) the scale to zero.
3. The scale is set at the factory to weigh in pounds (lb). While the scale is on,
press the “UNIT” button to switch to ounces (oz), pounds/ounces (lb oz) or
gram (g) units of measurement.
4. Place the item to be weighed onto the platform. The display will count up to the
weight of the item. As you add weight, the weight displayed increases. The
weight is locked in when the “” icon appears. When all the weight is removed,
the display will return to zero.
5. If the scale is operating on battery power, it will automatically turn off after
approximately 2 minutes of nonuse (if the auto off function is engaged). Press
the “ON/OFF” button to turn the scale off manually. If the scale is operating on
adapter power, it will remain on until the “ON/OFF” button is manually pressed.
Page 3

TARE OPERATION
You may wish to weigh ingredients in a bowl or other container (not included). In
this case, you will need to tare, or offset, the weight of the bowl so that only the
weight of the ingredients is displayed.
1. Choose a container that will safely balance on the platform without tipping or
falling. Do not use a heavy container, as this might reduce the maximum
capacity of the scale.
2. While the scale is off, place the empty container on the scale platform. Turn the
scale on. The display will show “88888” then zero. The weight of the container
has been zeroed out.
3. Add the ingredient to be weighed. The weight of the ingredient alone will
display.
4. The weight of additional ingredients may be tared out as well. For example, to
measure ½ lb rice and ½ lb beans together, place the rice into the bowl. Once
the correct amount of rice is weighed, press the “ZERO/ ” button until the
display resets to zero. Add ½ lb of beans. Both ingredients have been
accurately weighed in the same bowl.
5. When weights have been tared out, the display will show a negative number
when the items are removed from the scale. To reset the scale back to zero for
a new measurement, simply press the “ZERO/ ” button again. The scale
will reset to zero.
BACKLIGHT FEATURE
Your Taylor® scale is equipped with a backlight feature for easy viewing. While
the scale is on, press and hold the “ZERO/ ” button for 3 seconds to activate the
backlight. The backlight will activate for 5 seconds when a button is pushed, or
when weight is added or removed from the platform. Press and hold “ZERO/ ” for
3 seconds to deactivate the backlight.
Page 4

COUNTING FEATURE
The counting feature will calculate the number of like items based on total
weight. To use the counting feature:
1. Press the “ON/OFF” button to turn the scale on. If using a container, press
“ZERO/ ” to tare (zero) out the weight of the container.
2. Press the “COUNT” button. “S=10” appears.
3. Place 10 sample pieces to be weighed on the platform. The display will show
“10” and the stable weight “o” icon when weighing is complete. The weight of
10 pieces is stored in memory.
4. Remove the 10 sample pieces from the platform.
5. Place another group of the sample pieces on the platform. The scale will
calculate the number of pieces in the group.
6. To clear the count in memory, turn the scale off.
7. To weigh 20, 50 or 100 sample pieces: In Step 2, press the “COUNT” button until
the desired number appears. Repeat steps with the correct number of sample
pieces.
ELECTRICAL POWER
This scale operates on an AC adapter (included) or 4 AA alkaline batteries (not
included).
Electrical Power
To power the scale using the AC adapter, insert the connector plug into the jack at
the back of the scale, then plug the other end into the proper electrical outlet.
Battery Power
1. To power the scale with 4 AA alkaline batteries, remove the battery compartment
cover from the bottom of the scale.
2. Insert 4 AA batteries according to the polarity markings in the compartment.
3. Replace the battery compartment cover.
4. Replace the batteries when “LobAt ” (low battery) appears on the LCD.
5. Remove the batteries if the scale will not be used for a long period of time.
Page 5
AUTO SHUT-OFF FEATURE
The scale will automatically shut off to conserve the batteries if operating on
battery power. The auto-shut off feature can be disabled to allow the scale to
operate continuously or set from 2 minutes to 5 minutes.
1. While the scale is off, press and hold the “ON/OFF” button.
2. While continuing to hold the “ON/OFF” button, press the “COUNT” button 3 times.
3. Release the buttons. The display shows “SEt”, then “P-1.00”, then “AOFF”.
4. Press “ZERO/ ”. The display shows the current auto-shut off time (example:
“120” for 120 second auto shut-off).
5. Press “UNIT” to cycle through the options: “120”, “180”, “240”, “300”, or “OFF”
(the scale will remain on until “ON/OFF” is manually pressed).
6. Press “ZERO/ ” to select the desired setting. The display shows “AOFF”.
7. Press “UNIT” until “End” displays, then press “ZERO/ ”.
8. Set up is complete. The scale returns to weighing mode.
Note: If the scale is operating on adapter power, it will remain on until the
“ON/OFF” button is manually pressed.
Page 6

CALIBRATION FUNCTION
Occasionally the scale's accuracy should be verified by measuring a known weight
of the scale's approximate capacity. Tare the scale by pressing “ZERO/ ”, place
the weight on the platform and note the reading. Calibrate the scale if necessary.
CALIBRATION PROCEDURE
You must use a 500g calibrated weight ONLY to properly recalibrate the scale.
1. While the scale is off, press and hold the "ON/OFF" button and then press the
"UNIT" button 3 times. Release all buttons. A number between 40000 and
180000 will display.
2. Press the “ZERO/ ” button. The display will show zero.
3. Place a 500g calibrated weight on the scale platform.
4. Press the “ZERO/ ” button. The display shows “CAl” then 500.0 g.
5. Remove the weight. Calibration is complete.
Note: If the calibration is unsuccessful, the display will show a number between
4000 and 70000 instead of 500.0 g. If this occurs, repeat the steps above.
Page 7

TROUBLESHOOTING
• If there are no items on the platform, but the LCD does not show zero, press
the “ZERO/ ” button to reset the scale to zero.
• Overload Warning: Should “Err” appear on the display during a weighing, this
indicates that the maximum weighing capacity of the scale has been
exceeded. Remove the weight immediately; otherwise, permanent damage
could occur.
• Low Battery Warning: Should “LobAt” appear on the LCD, or readings grow dim
or irregular, replace the batteries.
• For all other error messages, reset the scale. To reset it, turn the instrument
off, remove the batteries and wait for a minimum of one minute, reinsert the
batteries and turn on. If the error message remains, please contact Customer
Service for further assistance.
NOTE: please recycle or dispose of batteries per local regulations.
WARNING: Batteries may pose a choking hazard. As with all small items, do not let
children handle batteries. If swallowed, seek medical attention immediately.
PRECAUTION: Do not dispose of batteries in fire. Batteries may explode or leak.
Remove the battery if the scale will not be used for a long period of time.
Page 8

Precautions
This scale is engineered to give you years of satisfactory service if you handle it
carefully. Here are a few precautions:
1. Always read instructions thoroughly to ensure that you have the full benefit of
all the unit's features.
2. DO NOT immerse unit in water, as doing so will cause damage to internal
components and void the warranty. If you spill liquid on it, dry it immediately
with a soft, lint-free cloth.
3. DO NOT clean the unit with an abrasive or corrosive material. This may scratch
the plastic parts and corrode the electronic circuits.
4. DO NOT subject the units to excessive force, shock, dust, temperature or
humidity. This may result in malfunction, shorter electronic life span, damaged
battery and distorted parts.
5. DO NOT operate or store the scale in high temperature or humidity conditions.
The heat or moisture may interfere with the scale's internal components.
6. DO NOT tamper with the unit's internal components. Doing so will invalidate the
warranty on the units and may cause damage. Other than replacing the
batteries, the unit contains no user-serviceable parts.
7. This scale is an extremely sensitive weighing device. To avoid damage to the
unit or the battery, do not store anything on the scale.
8. This scale operates on an A/C adaptor (included) or 4 AA batteries (not
included). Do not dispose of this scale or batteries in fire, as the batteries may
explode or leak. Always replace all batteries at the same time; do not mix old
and new batteries. Do not mix alkaline, standard (carbon-zinc) or
rechargeable (ni-cad, ni-mh, etc.) batteries. Remove the batteries if the scale
will not be used for a long period of time.
Page 9

Caution: Changes or modifications not expressly approved by the party
responsible for compliance could void the user's authority to operate the
equipment.
Note: This device complies with part 15 of the FCC Rules. Operation is subject to
the following two conditions: (1) this device may not cause harmful interference,
and (2) this device must accept any interference received, including interference
that may cause undesired operation.
This equipment has been tested and found to comply with the limits for a Class B
digital device, pursuant to part 15 of the FCC rules. These limits are designed to
provide reasonable protection against harmful interference in a residential
installation. This equipment generates, uses and can radiate radio frequency
energy and, if not installed and used in accordance with the instructions, may
cause harmful interference to radio communications. However, there is no
guarantee that interference will not occur in a particular installation. If this
equipment does cause harmful interference to radio or television reception,
which can be determined by turning the equipment off and on, the user is
encouraged to try to correct the interference by one or more of the following
measures:
- Reorient or relocate the receiving antenna.
- Increase the separation between the equipment and receiver.
- Connect the equipment into an outlet on a circuit different from that to which
the receiver is connected.
- Consult the dealer or an experienced radio/TV technician for help.
Page 10

LIMITED WARRANTY
This product is warranted against defects in materials or workmanship
(excluding batteries) for one (1) year from date of original purchase for the
original purchaser. The adapter is warranted for 90 days from date of original
purchase for the original purchaser. It does not cover damages or wear
resulting from accident, misuse, abuse or unauthorized adjustment and/or
repair. Should this product require service (or replacement at our option)
while under warranty, please pack the item carefully and return it prepaid,
along with receipt showing date of purchase and a note explaining reason
for return to:
Taylor Precision Products
2220 Entrada Del Sol, Suite A
Las Cruces, New Mexico 88001 USA
Customer Service Phone: 1-800-225-4834
Customer Service Fax: 1-575-526-4347
www.taylorusa.com
There are no expressed warranties except as listed above. This warranty gives you
specific legal rights, and you may also have other rights which vary from state to state.
For additional product information, or warranty information outside the USA, please
contact us through www.taylorusa.com
©2017 Taylor Precision Products and its affiliated companies, all rights reserved.
Taylor® is a registered trademark of Taylor Precision Products and its affiliated
companies. All rights reserved.
Made to our exact specifications in China.
NOT LEGAL FOR TRADE
TE21P 7.17 WC
Page 11

Page 12

MANUEL D'INSTRUCTIONS
TE21P
Balance électronique de précision
Page 13

Merci de votre achat d'une balance numérique Taylor®. Votre balance Taylor® est un exemple
de design et de travail supérieurs. Afin d'en soutirer le maximum, veuillez lire attentivement
votre manuel d'instructions avant d'utiliser l'appareil. Conservez ces instructions à portée de
la main à titre de référence.
PRÉPARATION DE LA BALANCE
1. Retirez la balance de la boîte et le couvercle de plate-forme d'acier inoxydable.
2. Placez la balance sur une surface rigide et horizontale. L'utilisation de la balance sur une
surface inégale affectera la précision de l'appareil. Si vous utilisez l'adaptateur, assurezvous que la balance ne repose pas sur le cordon car elle sera instable.
3. Installez le plateau plastique sur la balance, en alignant les tenons sous le plateau avec les
trous correspondants sur le dessus de la balance. Placez le couvercle de plate-forme
d'acier inoxydable sur le dessus du plateau plastique. Enlevez toute pellicule protectrice du
couvercle de la plate-forme.
FONCTIONNEMENT GÉNÉRAL DE PESÉE
1. Placez la balance sur une surface rigide et horizontale.
2. Appuyez sur le bouton «ON/OFF» (marche/arrêt) pour mettre la balance sous tension.
L'affichage indiquera d'abord «88888», suivi de zéro. Si l'affichage n'indique pas zéro,
appuyer sur le bouton «ZERO/ » (zéro/ ) pour réinitialiser (tarage) la balance à
zéro.
3. La balance est réglée en usine indiquer les poids en livres (lb). Pour passer en onces
(oz), livres/onces (lb oz) ou grammes (g) unités de mesure, appuyez sur le bouton
«UNIT» (unité) lorsque la balance est en marche.
4. Placer l'item à peser sur la plate-forme. Les chiffres de l'afficheur ACL changeront
jusqu'à ce que l'affichage indique le poids de l'item. Que vous ajouterez des items sur
la plate-forme, le poids indiqué augmentera. Le poids est verrouillé lorsque l'icône
«o» à droite apparaît. Lorsque tous les items auront été enlevés de la plate-forme,
l'affichage indiquera à nouveau zéro.
5. Si la balance fonctionne à pile, elle s'éteindra automatiquement après environ 2
minutes de non utilisation (si la fonction "auto off" est activée). Appuyez sur le
bouton «ON/OFF» pour mettre la balance hors tension manuellement. Si la balance
fonctionne avec le courant de l'adaptateur, elle restera en marche jusqu'à ce que le
bouton «ON/OFF» soit enfoncé manuellement.
Page 14

OPÉRATION DE TARAGE
Vous pouvez vouloir peser des ingrédients dans un bol ou un autre contenant (non
inclus). Dans ce cas, vous devez déduire le poids du bol ou du contenant de sorte que
seul le poids des ingrédients sera affiché (le terme français pour ce type d'opération
est «tarage»).
1. Choisissez un contenant dont la forme et la grandeur lui permettent d'être en
équilibre stable sur la plate-forme de la balance. N'utilisez pas un contenant trop
lourd qui réduirait la capacité maximum de la balance.
2. Alors que la balance est hors tension, placez le contenant vide sur la plate-forme de
la balance. Mettre la balance sous tension. L'affichage indiquera «88888», et ensuite
zéro. Cette opération permet à la balance «d'annuler» le poids du contenant.
3. Ajoutez les ingrédients à peser. Seul le poids des ingrédients sera affiché.
4. Le tarage peut également être utilisé pour mesurer le poids d'ingrédients
additionnels. Par exemple, supposons que vous vouliez peser ensemble ½ lb de riz et
½ lb de fèves. Placez d'abord le riz dans le contenant. Lorsque la quantité correcte
de riz a été atteinte, appuyez sur la touche «ZERO/ » (zéro/ ) jusqu'à ce que
l'affichage indique zéro. Ajoutez ½ lb de fèves. Les deux ingrédients auront alors été
précisément pesés dans le même contenant.
5. Lorsque les poids sont tarés, l'affichage montrera un chiffre négatif lorsque les
articles sont retirés de la balance. Pour réinitialiser la balance pour une nouvelle
série de mesures, simplement appuyez à nouveau sur la touche «ZERO/ ». La
balance sera ainsi remise à zéro.
FONCTION DE RÉTROÉCLAIRAGE
Votre balance Taylor® est dotée d'une fonction de rétroéclairage pour faciliter
l'affichage. Alors que la balance est en marche, appuyez et gardez enfoncé la touche
«ZERO/ )» (zéro / ) pendant 3 secondes pour activer la fonction de rétroéclairage.
Le rétroéclairage s'activera pendant 5 secondes lorsque vous enfoncez une touche, ou
lorsqu'on ajoute du poids ou retirez poids de la plate-forme. Appuyez et gardez enfoncé
la touche «ZERO/ » enfoncé pendant 3 secondes pour désactiver le rétroéclairage.
Page 15

FONCTION DE COMPTE
La fonction de compte calculera le nombre de même objets basé sur le poids total. Pour
utiliser la fonction de compte:
1. Appuyez sur le bouton «ON/OFF» (marche/arrêt) pour mettre la balance sous tension. Si
utilisez un contenant, appuyer sur le bouton «ZERO/ » (zéro/ ) à tarar (zéro) le poids du
contenant.
2. Appuyez sur le bouton «COUNT» (compter). «S=10» apparaît.
3. Placez 10 objets d'échantillon à peser sur la plate-forme. L'affichage indiquera «10» et
l'icône de poids stable «o» lorsque le pesage est achevé. Le poids de 10 objets est
sauvegardé dans mémoire.
4. Retirez les 10 objets d'échantillon de la plate-forme.
5. Placez un autre groupe des objets échantillon sur la plate-forme. La balance calculera le
nombre d'objets d'échantillon dans le groupe.
6. Pour effacer le compte dans la mémoire, éteindre la balance.
7. Pour peser 20, 50, ou 100 objets d'échantillon : À l'étape 2, appuyez sur le bouton «COUNT»
jusqu'à ce que le nombre voulu apparaisse. Répétez les étapes avec le correct nombre
d'objets d'échantillon.
SOURCES D'ALIMENTATION ÉLECTRIQUE
Cette balance fonctionne lorsque branchée à une prise de courant régulière à l'aide d'un
adaptateur courant alternatif (ou CA, inclus) ou à l'aide de 4 piles de AA alcalines (non
incluses).
Alimentation par branchement à une prise de courant
Pour utiliser votre balance en utilisant l'adaptateur CA, insérez le connecteur de
l'adaptateur dans le connecteur situé à l'arrière de la balance, puis branchez
l'adaptateur dans une prise de courant.
Alimentation par pile
1. Pour utiliser votre balance en utilisant 4 piles d'AA alcalines comme source
d'alimentation, enlevez le couvercle du compartiment des piles situé sous la balance.
2. Insérez 4 piles de AA alcalines selon la polarité indiquée sur le compartiment.
3. Replacez le couvercle du compartiment de piles.
4. Remplacez les piles lorsque "LobAt " (pile faible) apparaît sur l'afficheur à cristaux
liquides (ACL)
5. Enlevez les piles si la balance n'est pas utilisée pour une période de temps prolongée.
Page 16

FONCTION DE MISE HORS TENSION AUTOMATIQUE
Afin d'économiser les piles, la balance se mettra automatiquement hors tension si
la balance fonctionne avec le courant des piles. On peut désactiver la fonction de
mise hors tension automatique pour permettre une utilisation continue de la
balance ou réglé de 2 minutes à 5 minutes.
1. Alors que la balance est hors tension, appuyez et gardez enfoncé la touche
«ON/OFF» (marche/arrêt).
2. Alors que en continuant à enfoncer la touche «ON/OFF», appuyez sur le bouton
«COUNT» (compter) 3 fois.
3. Dégagez les touches. L'affichage montre «SEt» (régler), puis «P-1.00», puis
«AOFF».
4. Appuyez sur «ZERO/ » (zéro/ ). L'affichage montre la courante de temps
d'arrêt automatique (par exemple, «120» pour d'arrêt automatique de 120
secondes).
5. Appuyez sur «UNIT» pour passer à les options: «120», «180», «240», «300», ou
«OFF» (arrêt) (la balance restera en marche jusqu'à ce que le bouton «ON/OFF»
soit enfoncé manuellement).
6. Appuyez sur «ZERO/ » (zéro/ ) pour choisir le réglage désiré. L'affichage
montre «AOFF».
7. Appuyez sur «UNIT» jusqu'à “End” (fin) apparaît, puis appuyez sur «ZERO/ »
(zéro/ ).
8. La configuration est maintenant complétée. La balance revient au mode de
pesée.
Remarque: Si la balance fonctionne avec le courant de l'adaptateur, elle restera en
marche jusqu'à ce que le bouton «ON/OFF» soit enfoncé manuellement.
Page 17

FONCTION DE RECALIBRAGE
On devrait à l'occasion vérifier la précision de la balance en pesant un objet du le
poids connu se rapproche de la capacité maximale de la balance. Appuyez sur la
touche «ZERO/ » (zéro/ ) pour réinitialiser (tarage) la balance, placez le poids
sur la plate-forme et effectuez une lecture. Si nécessaire, procéder à l'étalonnage
de la balance.
PROCÉDURE DE RECALIBRAGE
Vous devez utiliser UNIQUEMENT un poids étalonné de 500g afin de procéder au
recalibrage de la balance.
1. Alors que la balance est hors tension, appuyez et tenez enfoncé sur le bouton
«ON/OFF» (marche/arrêt), puis appuyez le bouton «UNIT» (unité) 3 fois.
Relâchez les boutons. Un nombre compris entre 40000 à 180000 s'affichera.
2. Appuyez sur le bouton «ZERO/ » (zéro/ )». Zéro apparaît à l'écran.
3. Placez un poids étalonné de 500g sur la plate-forme de la balance.
4. Appuyez sur le bouton «ZERO/ » (zéro/ )». L'affichage montre «CAL » puis
500.0 g.
5. Retirez le poids. La procédure de recalibrage est terminée.
Remarque : Si la calibration ne réussit pas, l'ACL affichera un nombre compris
entre 4000 à 70000 au lieu de 500.0 g. Si ceci se produit, répétez les étapes
précédentes.
Page 18

DÉPANNAGE
• S'il n'y a pas d'items sur la plate-forme, mais que l'afficheur ACL n'indique pas
zéro, appuyez sur la touche «ZERO/ » (zéro/ )» pour remettre la balance à
zéro.
• Avertisseur de surcharge: Si «Err» apparaît sur l'afficheur ACL durant une
opération de pesage, ceci signifie que la capacité maximale de la balance a été
dépassée. Enlevez immédiatement l'item se trouvant alors sur la plate-forme de
la balance, à défaut de quoi des dommages permanents à la balance pourraient
s'ensuivre.
• Avertissement de pile faible: Si «LobAt» apparaît sur l'afficheur ACL, ou les
relevés seront plus faibles ou irréguliers, remplacez les piles.
• Pour tous les autres messages d'erreur, réinitialiser la balance. Pour le
réinitialiser, éteignez l'appareil, retirez les piles et attendez au moins une
minute avant de réinsérer la pile et de remettre l'appareil en marche. Si le
message d'erreur ne disparaît pas, contactez le Service à la clientèle pour
obtenir de l'aide.
REMARQUE: Veuillez recycler ou jetez piles conformément à réglementations
locales.
AVERTISSEMENT: Les piles peuvent poser un risque d'obstruction. Comme avec
tous les petits objets, ne laissez pas les enfants manipuler les piles. En cas
d'ingestion, consulter immédiatement un médecin.
ATTENTION: Ne jetez pas les piles usées dans le feu afin d'éviter tout risque
d'explosion ou de fuite. Veillez à retirer les piles de l'appareil si vous envisagez de
ne pas l'utiliser pour une période prolongée.
Page 19

PRÉCAUTIONS
Cette balance a été conçue et fabriquée afin de vous procurer des années de satisfaction
si vous en prenez soin adéquatement. Voici quelques mesures préventives qui vous
permettront d'en profiter longtemps:
1. Toujours lire le guide d'utilisation afin de permettre de soutirer le maximum des
possibilités de l'appareil.
2. NE PAS immerger l'appareil dans l'eau, puisque ceci entraînera des dommages aux
composantes internes et annulera la garantie. Si vous répandez du liquide sur la
balance, essuyez-la immédiatement avec un linge doux et non-pelucheux.
3. NE PAS nettoyer l'appareil avec des matériaux abrasifs ou corrosifs. Ceci peut rayer les
composantes en plastique de l'appareil, et corroder les circuits électroniques.
4. NE PAS soumettre l'appareil à une force abusive, à des chocs, à la poussière, et à des
extrêmes de température et d'humidité. Ceci pourrait causer un mauvais
fonctionnement de l'appareil, une déformation des pièces, une diminution de la durée
de vie des composantes électroniques, ou des dommages à la pile.
5. NE PAS utiliser ou entreposer l'appareil dans des conditions de température ou
d'humidité élevées. La chaleur et l'humidité peuvent affecter les composantes
internes de la balance.
6. NE PAS tenter de modifier ou réparer vous-mêmes les composantes internes de
l'appareil. Ceci annulera la garantie et pourrait causer des dommages. Autre que les
piles à remplacer, cet appareil ne contient aucune pièce pouvant être réparée par
l'utilisateur.
7. Cette balance un appareil de mesure d'une très grande sensibilité. Afin d'éviter tout
dommage à l'appareil ou à la pile, ne rien entreposer sur la plate-forme de la balance.
8. Cette balance fonctionne lorsque branchée à une prise de courant régulière à l'aide
d'un adaptateur courant alternatif (ou CA, inclus) ou à l'aide de 4 piles de AA alcalines
(non incluses). Ne pas jeter cet appareil ou les piles au feu, puisque les piles peuvent
exploser ou engendrer des fuites de produits corrosifs. Remplacez toujours toutes les
piles en même temps, ne mélangez pas vieilles et nouvelles piles. N'utilisez pas divers
types de piles en même temps, par ex. des piles alcalines, standards (carbone/ zinc)
ou rechargeables (ni-cad, ni-mh, etc.). Enlever les piles si l'appareil n'est pas utilisé
durant une période de temps prolongée.
Page 20

Attention: Changements ou modifications non expressément approuvées par la
partie responsable de la conformité pourraient annuler l'autorisation de
l'utilisateur à faire fonctionner l'équipement.
Note: Cet appareil est conforme à la section 15 des règles de la FCC. Son
fonctionnement est soumis aux deux conditions suivantes : (1) cet appareil ne
doit pas causer d'interférences nuisibles; (2) cet appareil doit supporter toutes
les interférences reçues, y compris les interférences pouvant causer un
fonctionnement indésirable. Cet appareil a été testé et déclaré conforme aux
limites relatives à un appareil numérique de classe B, en vertu de la section 15
des règles de la FCC. Ces limites visent à assurer une protection raisonnable
contre les interférences nuisibles dans un environnement résidentiel. Cet
appareil génère, utilise et peut émettre de l'énergie sous forme de fréquences
radio et, s'il n'est pas installé et utilisé conformément aux instructions, peut
causer des interférences perturbant les communications radio. Il n'y a toutefois
aucune garantie qu'il ne se produira pas d'interférences dans une installation
donnée. Si cet appareil interfère avec la réception radiophonique ou télévisuelle,
ce qui peut être vérifié en éteignant puis en rallumant l'appareil, l'utilisateur est
invité à essayer de corriger le problème en prenant une ou plusieurs des mesures
suivantes:
- changer l'orientation ou la position de l'antenne de réception;
- augmenter la distance entre l'appareil et le récepteur;
- brancher l'appareil dans une prise de courant se trouvant sur un circuit
différent de celui sur lequel est branché le récepteur;
- consulter le fournisseur ou un technicien d'expérience en radio/télévision afin
d'obtenir de l'assistance.
Page 21

GARANTIE LIMITÉE
Taylor® garantit que ce produit est libre de tout défaut de matériaux ou de main
d'oeuvre pour une période d'un (1) an pour l'acheteur original à partir de la date
d'achat original (à l'exclusion des piles.) L'adaptateur est garanti pour 90 jours
pour l'acheteur original à partir de la date d'achat original. Elle ne couvre pas les
dommages ou l'usure suite à un accident, une mauvaise utilisation, tout abus ou
réglage interdit et/ou réparation interdite. Si ce produit doit être réparé (ou
remplacement à notre discrétion), ne le retournez pas au détaillant. Veuillez
l'emballer avec soin et le retourner à frais prépayés avec la facture du magasin
indiquant la date d'achat et une note expliquant la raison du retour à l'adresse
suivante.
Taylor Precision Products
2220 Entrada Del Sol, Suite A
Las Cruces, New Mexico 88001 USA
Téléphone de Service à la clientèle: 1-800-225-4834
Fax de Service à la clientèle: 1-575-526-4347
www.taylorusa.com
Il n'y a aucune garantie expresse sauf celle indiquée précédemment. Cette garantie
vous donne des droits précis, mais vous pouvez aussi avoir d'autres droits qui varient
d'une juridiction à l'autre.
Pour de l'information supplémentaire sur le produit ou sur la garantie à l'extérieur des
É.-U. veuillez nous contacter par www.taylorusa.com
©2017 Taylor Precision Products et ses sociétés affiliées, tous droits réservés. Taylor®
est une marque de commerce déposées et une marque de Taylor Precision Products et
ses sociétiés affiliées. Tous droits réservés.
Fabriqué en Chine selon nos spécifications exactes.
Non légal pour le commerce.
Page 22

Page 23

TE21P
Báscula digital de precisión
MANUAL DE INSTRUCCIONES
Page 24

Gracias por comprar una báscula electrónica Taylor®. Su báscula Taylor® es un ejemplo de
diseño y mano de obra superiores. Antes de usarla, sírvase leer con atención este manual de
instrucciones. Guarde estas instrucciones en un lugar de fácil acceso para referencia futura.
PARA DEJAR LISTA LA BÁSCULA
1. Quite la báscula de la caja junto con la cubierta de la plataforma de acero inoxidable.
2. Coloque la báscula sobre una superficie plana y dura. Las superficies desparejas pueden
afectar la precisión. Si se usa el adaptador, asegúrese de que la báscula no esté puesta
sobre el cable, de lo contrario puede estar inestable.
3. Instale el montaje de la plataforma plástica en la báscula uniendo los postes de la
plataforma con los orificios de encastre de la parte superior de la báscula. Coloque la
cubierta de la plataforma de acero inoxidable sobre el montaje de la plataforma plástica.
Quite la película protectora de la cubierta de la plataforma.
MEDICIÓN DE PESO GENERAL
1. Coloque la báscula sobre una superficie plana y dura.
2. Presione el botón “ON/OFF” (encendido/apagado) para encender la báscula. El
visualizador primero muestra “88888”, y a continuación cero. Si la pantalla no
muestra cero, presione el botón“ZERO/ ” (cero/ ) para reiniciar (tarar) la báscula
a cero.
3. La báscula ha sido ajustada en fábrica para mostrar el peso en libras (lb). Mientras la
báscula está encendida, presione el botón “UNIT” (unidad) para cambiar a onzas (oz),
libras/onzas (lb oz) o gramo (g) unidades de medición.
4. Coloque el artículo que desea pesar sobre la plataforma. La pantalla contará y luego
mostrará el peso del artículo. A medida que agrega peso, el peso que se indica
aumenta. El peso queda fijo cuando aparece un ícono “o” estable. Cuando se retira
todo el peso, el visualizador vuelve a cero.
5. Si la báscula está funcionando con batería, se apagará automáticamente después de
aproximadamente 2 minutos de no usarse (si está activada la función de auto
apagado). Presione el botón “ON/OFF” para apagar la báscula en forma manual. Si la
báscula está funcionando con adaptador de corriente, seguirá encendida hasta que
el botón de “ON/OFF” se presione manualmente.
Page 25

OPERACIÓN DE TARA
Si lo desea puede pesar ingredientes en un recipiente (no incluido). En este caso,
necesitará tarar o compensar el peso del recipiente, para que se muestre solamente el
peso de los ingredientes.
1. Elija un recipiente que quede equilibrado sobre la plataforma en forma segura, sin
tambalearse ni caerse. No utilice un recipiente pesado, ya que esto puede reducir la
capacidad máxima de la báscula.
2. Mientras la báscula esté apagada, coloque el recipiente vacío en la plataforma de la
báscula. Encienda la báscula. La pantalla mostrará “88888” y luego cero. El peso del
recipiente se puso en cero.
3. Agregue el ingrediente que desea pesar. Se mostrará el peso del ingrediente solo.
4. El peso de los ingredientes adicionales también se tarará. Por ejemplo, si una receta
requiere ½ lb de arroz y ½ lb de frijoles, coloque el arroz en el recipiente. Una vez
que se haya pesado la cantidad correcta de arroz, presione el botón “ZERO/ ”
(cero/ ) hasta que la pantalla vuelva a cero. Agregue la ½ lb de frijoles. Ambos
ingredientes se han pesado en forma precisa en el mismo recipiente.
5. Cuando los pesos se hayan tarado, la pantalla mostrará un número negativo cuando
los artículos se retiren de la báscula. Para reiniciar la báscula a cero para una nueva
medición, presione el botón “ZERO/ ” hasta que la pantalla se reinicie a cero.
CARACTERÍSTICA DE ILUMINACIÓN POSTERIOR
Su báscula Taylor® está equipada con un característica de iluminación posterior para
facilitar la visualización. Mientas la báscula está encendida, presione sin soltar el botón
“ZERO/ ” (cero/ ) durante 3 segundos para activar el iluminación posterior. La
iluminación posterior se activará por 5 segundos cuando se presiona un botón, o
cuando agregue peso o el peso es quitado de la plataforma. Presione sin soltar el botón
“ZERO/ ” durante 3 segundos para desactivar la iluminación posterior.
Page 26

CARACTERÍSTICA DE CONTANDO
La característica de contando calculará el número de los mismos artículos basados en
el peso total. Para usar la característica de contando:
1. Presione el botón “ON/OFF” (encendido/apagado) para encender la báscula. Si se usa
un recipiente, presione el botón “ZERO/ ” (cero/ ) para tara (cero) el peso del
recipiente.
2. Presione el botón “COUNT” (contar). “S=10” aparece.
3. Coloque 10 artículos de muestra que desea pesar sobre la plataforma. La pantalla
mostrará “10” y el ícono de peso estable "o" cuando el pesar esté completo. El peso
de 10 artículos es guarda en la memoria.
4. Quite los 10 artículos de muestra de la plataforma.
5. Coloque otro grupo de los artículos de muestra sobre la plataforma. La báscula
calculará el número de artículos en el grupo.
6. Para borrar el contando en la memoria, apagar la báscula.
7. Para pesar 20, 50, o 100 artículos de muestra: En el paso 2, presione el botón “COUNT”
hasta que aparezca el número deseado. Repita los pasos con el número correcto
artículos de muestra.
FUENTES DE ENERGÍA
Esta báscula funciona con un adaptador de CA (incluido) o 4 baterías alcalinas AA (no
incluidas).
Energía eléctrica
Para encender la báscula usando el adaptador de CA, introduzca el enchufe conector en
el enchufe hembra en la parte posterior de la báscula, luego enchufe el otro extremo en
un tomacorriente adecuado.
Energía de las baterías
1. Para encender la báscula usando 4 baterías alcalinas AA, quite la tapa del
compartimiento de las baterías de la parte inferior de la báscula.
2. Inserte 4 baterías alcalinas AA de acuerdo a la polaridad indicada en el
compartimiento.
3. Vuelva a colocar la tapa del compartimiento de las baterías.
4. Reemplace las baterías cuando “LobAt” (batería baja) aparecen en la pantalla.
5. Retire las baterías si la báscula no se utilizará por un largo tiempo.
Page 27

FUNCIÓN DE APAGADO AUTOMÁTICO
La báscula se apagará automáticamente si no usarse para la conservación de las
baterías si está funcionando con energía de las baterías. La función de apagado
automático puede ser desactivada para permitir que la báscula funcione de forma
continua o configurada de 2 minutos a 5 minutos.
1. Mientras la báscula esté apagada, presione sin soltar el botón “ON/OFF”
(encendido/apagado)
2. Mientras continúe presionando el botón “ON/OFF”, presione el botón “COUNT”
(contar) 3 veces.
3. Suelte los botones. La pantalla muestra “SEt” (configurar), entonces ”P-1.00”,
entonces “AOFF”.
4. Presione “ZERO/ ” (cero/ )”. La pantalla muestra el tiempo actual de apagará
automáticamente (por ejemplo, “120” para apagará automáticamente de 120
segundos).
5. Presione “UNIT” para ver las opciones: “120”, “180”, “240”, “300”, o “OFF” (apagado)
(la báscula seguirá encendida hasta que el botón de “ON/ OFF” se presione
manualmente).
6. Presione “ZERO/ ” (cero/ )” para seleccionar la configuración deseada. La
pantalla muestra “AOFF”.
7. Presione “UNIT” hasta que “End” (fin) aparece, luego presione “ZERO/ ” (cero/ )”.
8. La configuración se ha finalizado. La báscula vuelve al modo de peso.
Nota: Si la báscula está funcionando con adaptador de corriente, seguirá
encendida hasta que el botón de “ON/OFF” se presione manualmente.
Page 28

FUNCIÓN DE CALIBRACIÓN
Debe verificar ocasionalmente la precisión de la báscula midiendo un peso
conocido de la capacidad aproximada de la báscula. Tare la báscula presionando
“ZERO/ ” (cero/ ), coloque el peso en la plataforma y tome nota de la lectura.
Calibre la báscula si fuera necesario.
PROCEDIMIENTO DE CALIBRACIÓN
Debe usar SOLAMENTE un peso calibrado de 500 gramos para calibrar
adecuadamente la báscula.
1. Mientras la báscula esté apagada, presione sin soltar el botón “ON/OFF”
(encendido/apagado), entonces presione el botón “UNIT” (unidad) 3 veces.
Suelte ambos botones. La pantalla LCD indicará un número entre 40000 y
180000.
2. Presione el botón “ZERO/ ” (cero/ )”. En la pantalla aparece cero.
3. Coloque un peso calibrado de 500 gramos en la plataforma de la báscula.
4. Presione el botón “ZERO/ ”. La pantalla muestra “CAL” y luego 500.0 g.
5. Quite el peso. La calibración ha finalizado.
Nota: Si la calibración es fallida, la pantalla indicará un número entre 4000 y
70000 en lugar de 500.0 g. Si esto ocurriera, repita los pasos anteriores.
Page 29

DIAGNÓSTICO Y RESOLUCIÓN DE PROBLEMAS
• Si no hay artículos en la plataforma, pero la pantalla LCD no muestra cero,
presione el botón “ZERO/ ” (cero/ )” para restablecer la báscula a cero.
• Advertencia de Sobrecarga: Si la pantalla presenta “Err” durante una medida,
esto indica se ha excedido la capacidad de peso máxima de la báscula. Retire el
peso de inmediato; de lo contrario se ocasionará un daño permanente a la
báscula.
• Advertencia de batería baja: Si la pantalla presenta “LobAt”, o las lecturas se
volverán borrosas o irregulares, cambie las baterías.
• Para los otros mensajes de error, restablecer la báscula. Para restablecerlo,
apague el instrumento, retire las baterías y espere un mínimo de un minuto,
reinserte la batería y enciéndalo. Si el mensaje de error continúa, póngase en
contacto con Servicio al cliente para recibir asistencia.
NOTA: Por favor, recicle o deseche las baterías con las regulaciones locales.
ADVERTENCIA: Las baterías pueden representar un peligro de asfixia. Como con
todos los artículos pequeños, no deje que los niños manipulen las baterías. Si se
ingiere, busque atención médica inmediata.
PRECAUCIÓN: No tire las baterías al fuego. Las baterías pueden explotar o tener
pérdidas. Retire las baterías si la báscula no se utilizará por un largo tiempo.
Page 30

PRECAUCIONES
Esta báscula está diseñada para proporcionarle años de servicio satisfactorio si la
maneja con cuidado. A continuación le presentamos algunas precauciones:
1. Lea siempre las instrucciones por completo para asegurarse de disfrutar del
beneficio completo de todas las funciones de esta unidad.
2. NO sumerja la unidad en el agua, puesto que eso causaría daño a los componentes
internos y anularía la garantía. Si derrama líquido sobre la misma, séquela
inmediatamente con un paño suave, sin pelusas.
3. NO limpie la unidad con materiales abrasivos ni corrosivos. Esto puede rayar las
piezas plásticas y corroer los circuitos electrónicos.
4. NO exponga la unidad a fuerza, choques, polvo, temperatura ni humedad en exceso.
Esto puede hacerla funcionar mal, acortar la vida útil electrónica, dañar las baterías
o deformar las piezas.
5. NO haga funcionar ni guarde esta báscula en condiciones de alta temperatura o
humedad. El calor y la humedad pueden interferir con los componentes internos de
la báscula.
6. NO manipule los componentes internos de la unidad. Hacerlo invalidará la garantía
de este producto y puede causar daños. Aparte del reemplazar las baterías, esta
unidad no contiene piezas que necesiten servicio por parte del usuario.
7. Esta báscula es un dispositivo de pesaje extremadamente sensible. Para evitar daño
a la unidad o la batería, no almacene nada sobre la báscula.
8. Esta báscula funciona con un adaptador AC (incluido) o con 4 baterías AA (no
incluidas). No tire esta báscula o las baterías al fuego, Las baterías pueden explotar
o tener pérdidas. Siempre cambie todas las baterías a la vez; no combine baterías
nuevas y viejas. No mezcle baterías alcalinas, normales (carbón-cinc) o recargables
(ní-cad, ní-mh, etc). Retire las baterías si la báscula no se utilizará por un largo
tiempo.
Page 31

Precaución: Los cambios o modificaciones no aprobados expresamente por la
parte responsable del cumplimiento podrían anular la autoridad del usuario para
operar el equipo.
Nota: Este dispositivo cumple con la Parte 15 de las Normas FCC. El
funcionamiento está sujeto a las dos condiciones siguientes: (1) este dispositivo
no puede causar interferencia dañina y (2) este dispositivo debe aceptar
cualquier interferencia recibida, incluyendo interferencia que pueda causar un
funcionamiento no deseado.
Este equipo ha sido probado y cumple con los límites de un dispositivo digital de
clase B según lo establecido por la parte 15 de las reglas de FCC. Estos límites
han sido diseñados para brindar protección razonable contra interferencias
nocivas en una instalación residencial. Este equipo genera, usa y puede emitir
energía de radiofrecuencia y, si no se instala y utiliza de acuerdo con las
instrucciones, puede causar interferencia dañina a las comunicaciones de radio.
Sin embargo, no existe garantía de que la interferencia no ocurrirá en una
instalación en particular. Si este equipo causa interferencia dañina a la recepción
de radio o televisión, lo cual puede determinarse encendiendo y apagado el
equipo, se anima al usuario a intentar corregir la interferencia a través de una o
más de las siguientes medidas:
- Cambie de orientación o de lugar la antena receptora.
- Aumente la separación entre el equipo y el receptor.
- Conecte el equipo a un enchufe en un circuito diferente a donde está conectado
el recibidor.
- Consulte con el vendedor o con un técnico experimentado en radio y televisión
para obtener ayuda.
Page 32

GARANTÍA LIMITADA
Taylor® garantiza este producto contra defectos en los materiales y en la mano de
obra durante 1 (un) año para el comprador original, a partir de la fecha de compra al por
menor (excepto las baterías). El adaptador está garantizado durante 90 días para el
comprador original, a partir de la fecha de compra al por menor. No cubre daños ni
desgastes que sean consecuencia de accidentes, uso inadecuado, abuso ni ajustes
y/o reparaciones no autorizadas. Si este producto requiere mantenimiento (o cambio a
nuestro entender), no la devuelva al vendedor minorista. Sírvase empacar el artículo
cuidadosamente y envíelo con el franqueo pagado, junto con el recibo de la tienda en
el que aparezca la fecha de compra y una nota explicando el motivo de la devolución.
Taylor Precision Products
2220 Entrada Del Sol, Suite A
Las Cruces, New Mexico 88001 USA
Teléfono del Servicio al cliente: 1-800-225-4834
Fax del Servicio al cliente: 1-575-526-4347
www.taylorusa.com
No existen garantías expresas excepto las enunciadas anteriormente. Esta garantía le
otorga derechos legales específicos y es posible que usted tenga otros derechos que
varíen de un estado a otro.
Para obtener información adicional sobre el producto, o información de la garantía
fuera de los EE.UU., sírvase contactarnos a través de www.taylorusa.com.
©2017 Taylor Precision Products y sus compañías afiliadas, todos los derechos
reservados. Taylor® es una marca comercial registrada es una marca registrada de
Taylor Precision Products y sus compañías afiliadas. Todos los derechos reservados.
Fabricado en China según nuestras especificaciones exactas.
No es legal para uso comercial.
 Loading...