

Page 1
EN
1855
User Manual
1855
Digital Multifunctional System
Copy / Print / Scan
A3
Page 2

> Preface
Preface
This Operation Guide is intended to help you operate the machine correctly, perform routine maintenance, and take
simple troubleshooting measures as needed so that the machine can always be used in the optimum condition.
Please read this Operation Guide before using the machine.
We recommend the use of our own brand supplies.
Please use our genuine toner containers, which have passed rigorous quality control testing.
The use of non-genuine toner containers may cause failure.
We will not be liable for any damages caused by the use of third party supplies in this machine.
i
Page 3

Contents
Preface ..................................................................................................................................... i
Overview ................................................................................................................................ vi
Machine Features ................................................................................................................. vii
Guides Provided with the Machine....................................................................................... x
About the Operation Guide (this Guide) ............................................................................. xi
Structure of the guide.................................................................................................... xi
Conventions Used in This Guide.................................................................................. xii
Menu Map.............................................................................................................................. xv
1 Legal and Safety Information .............................................. 1-1
Notice .................................................................................................................................. 1-2
Safety Conventions in This Guide .............................................................................. 1-2
Environment ............................................................................................................... 1-3
Precautions for Use .................................................................................................... 1-3
Laser Safety (Europe) ................................................................................................ 1-4
Safety Instructions Regarding the Disconnection of Power ....................................... 1-5
Legal Restriction on Copying/Scanning ..................................................................... 1-5
EN ISO 7779 .............................................................................................................. 1-5
EK1-ITB 2000 ............................................................................................................. 1-5
Legal Information ....................................................................................................... 1-6
Energy Saving Control Function ................................................................................ 1-7
Automatic 2-Sided Copy Function .............................................................................. 1-7
Resource Saving - Paper ........................................................................................... 1-7
Environmental benefits of "Power Management" ....................................................... 1-7
Energy Star (ENERGY STAR®) Program .................................................................. 1-7
2 Installing and Setting up the Machine ................................. 2-1
Part Names .......................................................................................................................... 2-2
Machine Exterior ........................................................................................................ 2-2
Connectors/Interior ..................................................................................................... 2-4
With Optional Equipments Attached .......................................................................... 2-5
Determining the Connection Method and Preparing Cables .......................................... 2-6
Connection Example .................................................................................................. 2-6
Preparing Necessary Cables ..................................................................................... 2-6
Connecting Cables ............................................................................................................. 2-7
Connecting USB Cable .............................................................................................. 2-7
Connecting the Power Cable ..................................................................................... 2-7
Power On/Off ...................................................................................................................... 2-8
Power On ................................................................................................................... 2-8
Power Off ................................................................................................................... 2-9
Installing Software ........................................................................................................... 2-10
Software on Product Library Disc (Windows) ........................................................... 2-10
Installing Software in Windows ................................................................................ 2-11
Uninstalling the Software ......................................................................................... 2-15
Setting the Shared Printer ........................................................................................ 2-16
Installing Software in Mac Computer ....................................................................... 2-17
Client Tool ................................................................................................................ 2-18
Setting WIA Driver .................................................................................................... 2-19
Administrator User Name and Password ....................................................................... 2-20
Administrator Setting ................................................................................................ 2-20
Setting Energy Saver Function ....................................................................................... 2-22
Sleep and Sleep Timer ............................................................................................. 2-22
Power Off Timer ....................................................................................................... 2-23
Checking the Counter ...................................................................................................... 2-26
ii
Page 4

3 Preparation before Use ........................................................ 3-1
Using the Operation Panel ................................................................................................ 3-2
Operation Panel Keys ................................................................................................ 3-2
Operation Method ...................................................................................................... 3-3
Display for Originals and Paper ................................................................................. 3-4
Loading Paper .................................................................................................................... 3-5
Before Loading Paper ................................................................................................ 3-6
Loading in the Cassettes ............................................................................................ 3-7
Loading Paper in the Multi Purpose Tray ................................................................. 3-10
Specifying Paper Size and Media Type ................................................................... 3-13
4 Printing from PC ................................................................... 4-1
Printing from PC ................................................................................................................. 4-2
Printer Driver Print Settings ........................................................................................ 4-5
Printer Driver Help ...................................................................................................... 4-6
Changing the Default Printer Driver Settings (Windows 7) ........................................ 4-6
Canceling Jobs ........................................................................................................... 4-6
Using Print Box .................................................................................................................. 4-8
Saving Document to a Print Box ................................................................................ 4-9
Printing Document from Print Box ............................................................................ 4-10
5 Operation on the Machine .................................................... 5-1
Loading Originals ............................................................................................................... 5-2
Placing Originals on the Platen .................................................................................. 5-2
Loading Originals in the Document Processor (Option) ............................................. 5-3
Checking the Equipment's Serial Number ....................................................................... 5-5
Copying ............................................................................................................................... 5-6
Basic Operation .......................................................................................................... 5-6
Interrupt Copy ............................................................................................................ 5-7
ID Card Copy ............................................................................................................. 5-8
Using Various Functions .......................................................................................... 5-10
Program ................................................................................................................... 5-25
Canceling Jobs ......................................................................................................... 5-29
Scanning ........................................................................................................................... 5-30
Scan the Image to the Specified Destination ........................................................... 5-32
Scan the Image by Selecting the Destination (Quick Scan) ..................................... 5-34
Scanning using TWAIN ............................................................................................ 5-35
Canceling Jobs ......................................................................................................... 5-36
6 Checking the Status ............................................................. 6-1
Checking Job Status .......................................................................................................... 6-2
Checking Job History ........................................................................................................ 6-4
Pause and Resumption of Jobs ........................................................................................ 6-7
Canceling the Jobs in Printing/Waiting ............................................................................ 6-8
Checking Device Status ..................................................................................................... 6-9
Checking the Remaining Amount of Toner and Paper ................................................. 6-10
Checking from Client Tool ............................................................................................... 6-11
7 System Menu and Client Tool .............................................. 7-1
Default Settings on the Machine (System Menu) ............................................................ 7-2
System Menu Settings ............................................................................................... 7-3
Report ........................................................................................................................ 7-4
System ....................................................................................................................... 7-5
Admin/Accounting ...................................................................................................... 7-5
Common Settings ....................................................................................................... 7-5
Copy ......................................................................................................................... 7-14
iii
Page 5

Printer ....................................................................................................................... 7-15
Adjust/Maint. (Adjustment/Maintenance) ................................................................. 7-15
Default Settings on the PC (Client Tool) ........................................................................ 7-16
Operation Method .................................................................................................... 7-16
Screen Overview ...................................................................................................... 7-17
Configuring the Administrative Settings ................................................................... 7-19
Scan Destination Settings ........................................................................................ 7-20
Quick Scan/TWAIN Settings .................................................................................... 7-23
Print Box Settings ..................................................................................................... 7-26
8 Job Accounting .................................................................... 8-1
Overview of Job Accounting ............................................................................................. 8-2
Enabling Job Accounting .................................................................................................. 8-3
Setting an Account .............................................................................................................8-4
Adding an Account ..................................................................................................... 8-4
Restricting the Use of the Machine ............................................................................ 8-6
Editing an Account ..................................................................................................... 8-7
Deleting an Account ................................................................................................... 8-8
Job Accounting when Sharing the Printer .................................................................. 8-9
Unknown ID Job ....................................................................................................... 8-11
Configuring Job Accounting ........................................................................................... 8-12
Default Setting .......................................................................................................... 8-12
Counting the Number of Pages Printed ................................................................... 8-13
Account. Report (Accounting Report) ...................................................................... 8-14
Using Job Accounting ..................................................................................................... 8-15
Login/Logout ............................................................................................................ 8-15
Printing When Sharing the Printer ............................................................................ 8-15
9 Troubleshooting ................................................................... 9-1
Regular Maintenance ......................................................................................................... 9-2
Cleaning ..................................................................................................................... 9-2
Toner Container Replacement ................................................................................... 9-3
Waste Toner Box Replacement ................................................................................. 9-6
Troubleshooting ................................................................................................................. 9-8
Solving Malfunctions .................................................................................................. 9-8
Responding to Messages ......................................................................................... 9-11
Clearing Paper Jams ................................................................................................ 9-16
10 Appendix ............................................................................. 10-1
Optional Equipment ......................................................................................................... 10-2
Overview of Optional Equipment .............................................................................. 10-2
Character Entry Method ................................................................................................... 10-4
Using the Keys ......................................................................................................... 10-4
Characters That Can be Entered Using the Numeric Keys ...................................... 10-4
Entering Symbols ..................................................................................................... 10-5
Entering Characters ................................................................................................. 10-6
Paper ................................................................................................................................. 10-7
Basic Paper Specifications ....................................................................................... 10-7
Choosing the Appropriate Paper .............................................................................. 10-8
Special Paper ......................................................................................................... 10-11
Specifications ................................................................................................................. 10-15
Common Functions ................................................................................................ 10-15
Copy Functions ...................................................................................................... 10-16
Printer Functions .................................................................................................... 10-16
Scanner Functions ................................................................................................. 10-17
Document Processor (Reverse Automatic) (Option) .............................................. 10-17
Paper Feeder (300-sheet) (Option) ........................................................................ 10-18
iv
Page 6

Duplex Unit (Option) ............................................................................................... 10-18
Glossary .......................................................................................................................... 10-19
Index .............................................................................................................................Index-1
v
Page 7
> Overview
NOTE
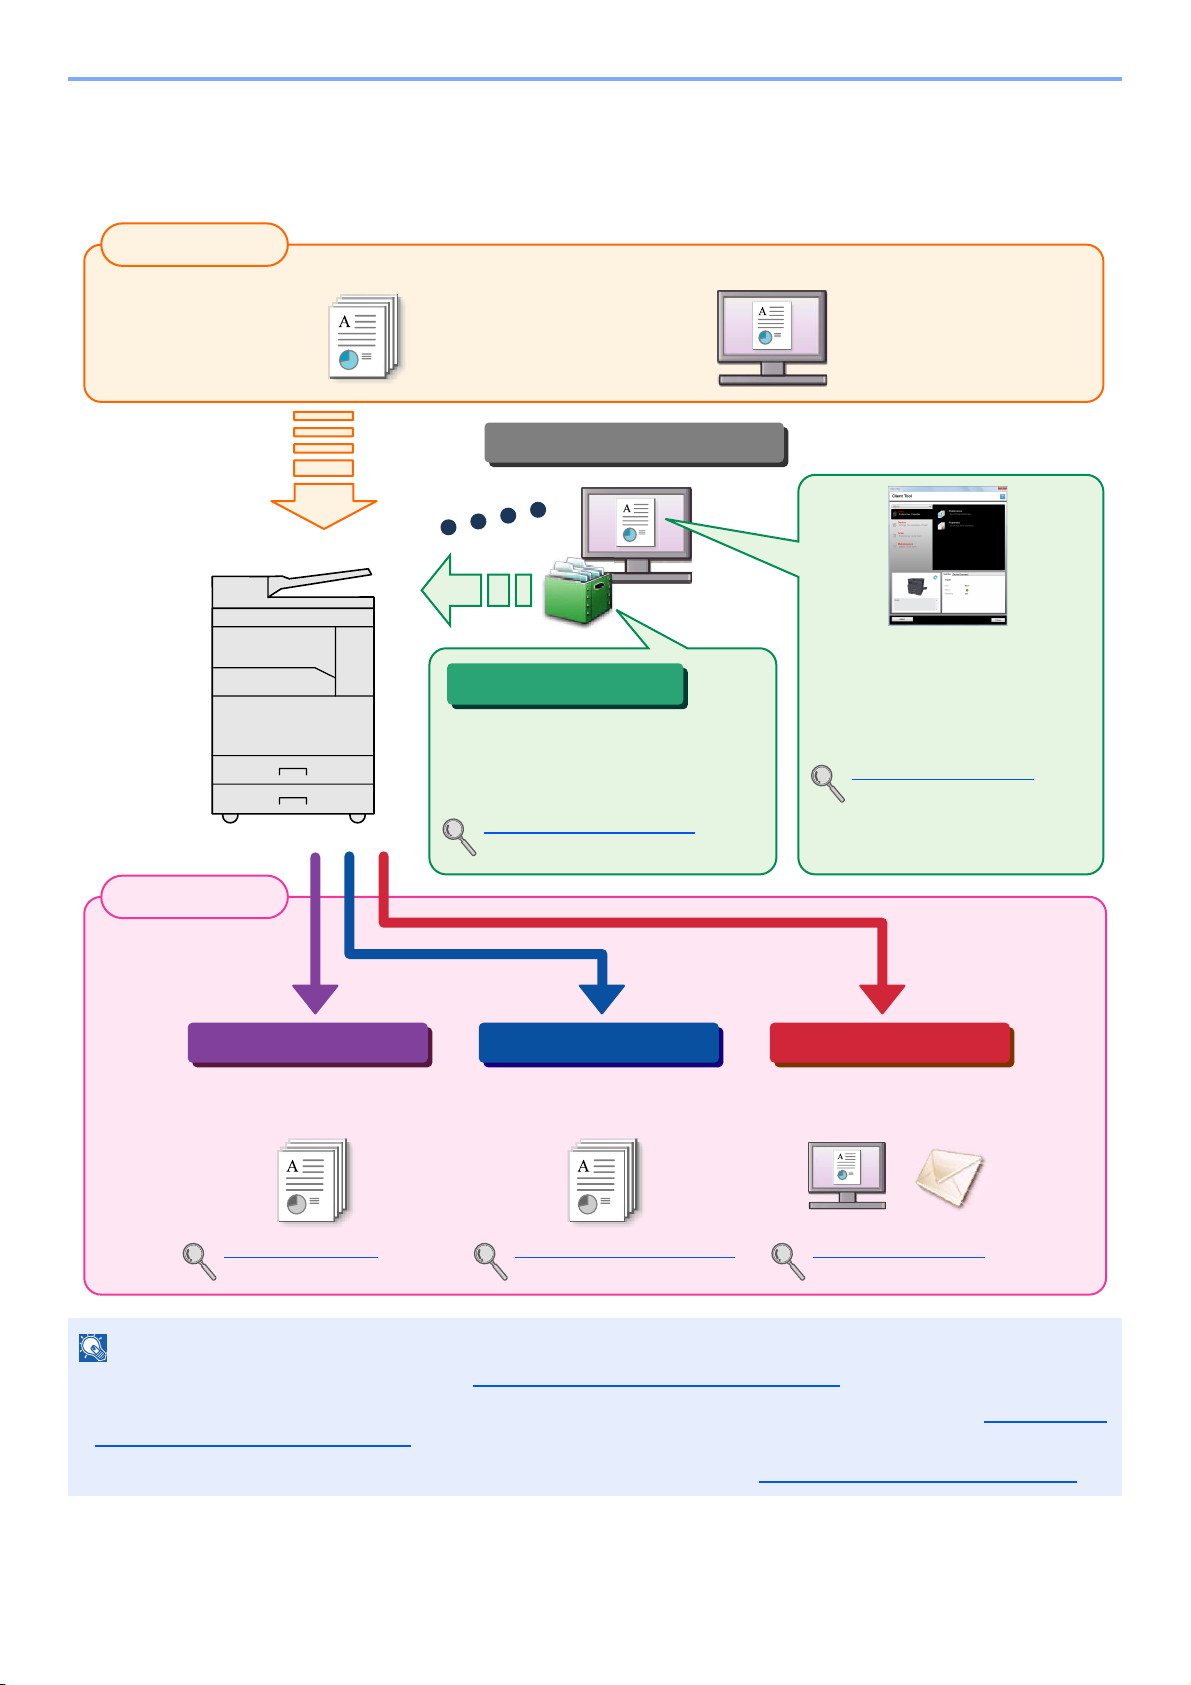
Copy functions Printer functions Scan functions
Output Data
Input Data
Operations from PC
Original Electronic data
Print Box functions
Print Box functions allow you to
temporarily save print data in the Print
Box on your computer and to print the
data via operations on the machine.
Using Print Box (page 4-8)
Client Tool
You can check the status and
configure the scan settings of the
machine from Client Tool installed
on your computer.
Client Tool (page 2-18)
Copying (page 5-6) Printing from PC (page 4-2) Scanning (page 5-30)
Copies and prints originals. Prints data of a PC. Scans originals and sends the
data to a PC.
Overview
This machine has copy and print functions equipped as standard and can save scanned images on your computer.
• Before using the machine, be sure to read Legal and Safety Information on page 1-1.
• For preparations for use of the machine such as cable connections and software installation, refer to Installing and
• For information on how to use the operation panel, and load paper, refer to Preparation before Use on page 3-1
Setting up the Machine on page 2-1.
vi
.
Page 8

> Machine Features
Machine Features
The machine is equipped with many useful functions. Here are some examples. For details, refer to Operation on the
Machine on page 5-1.
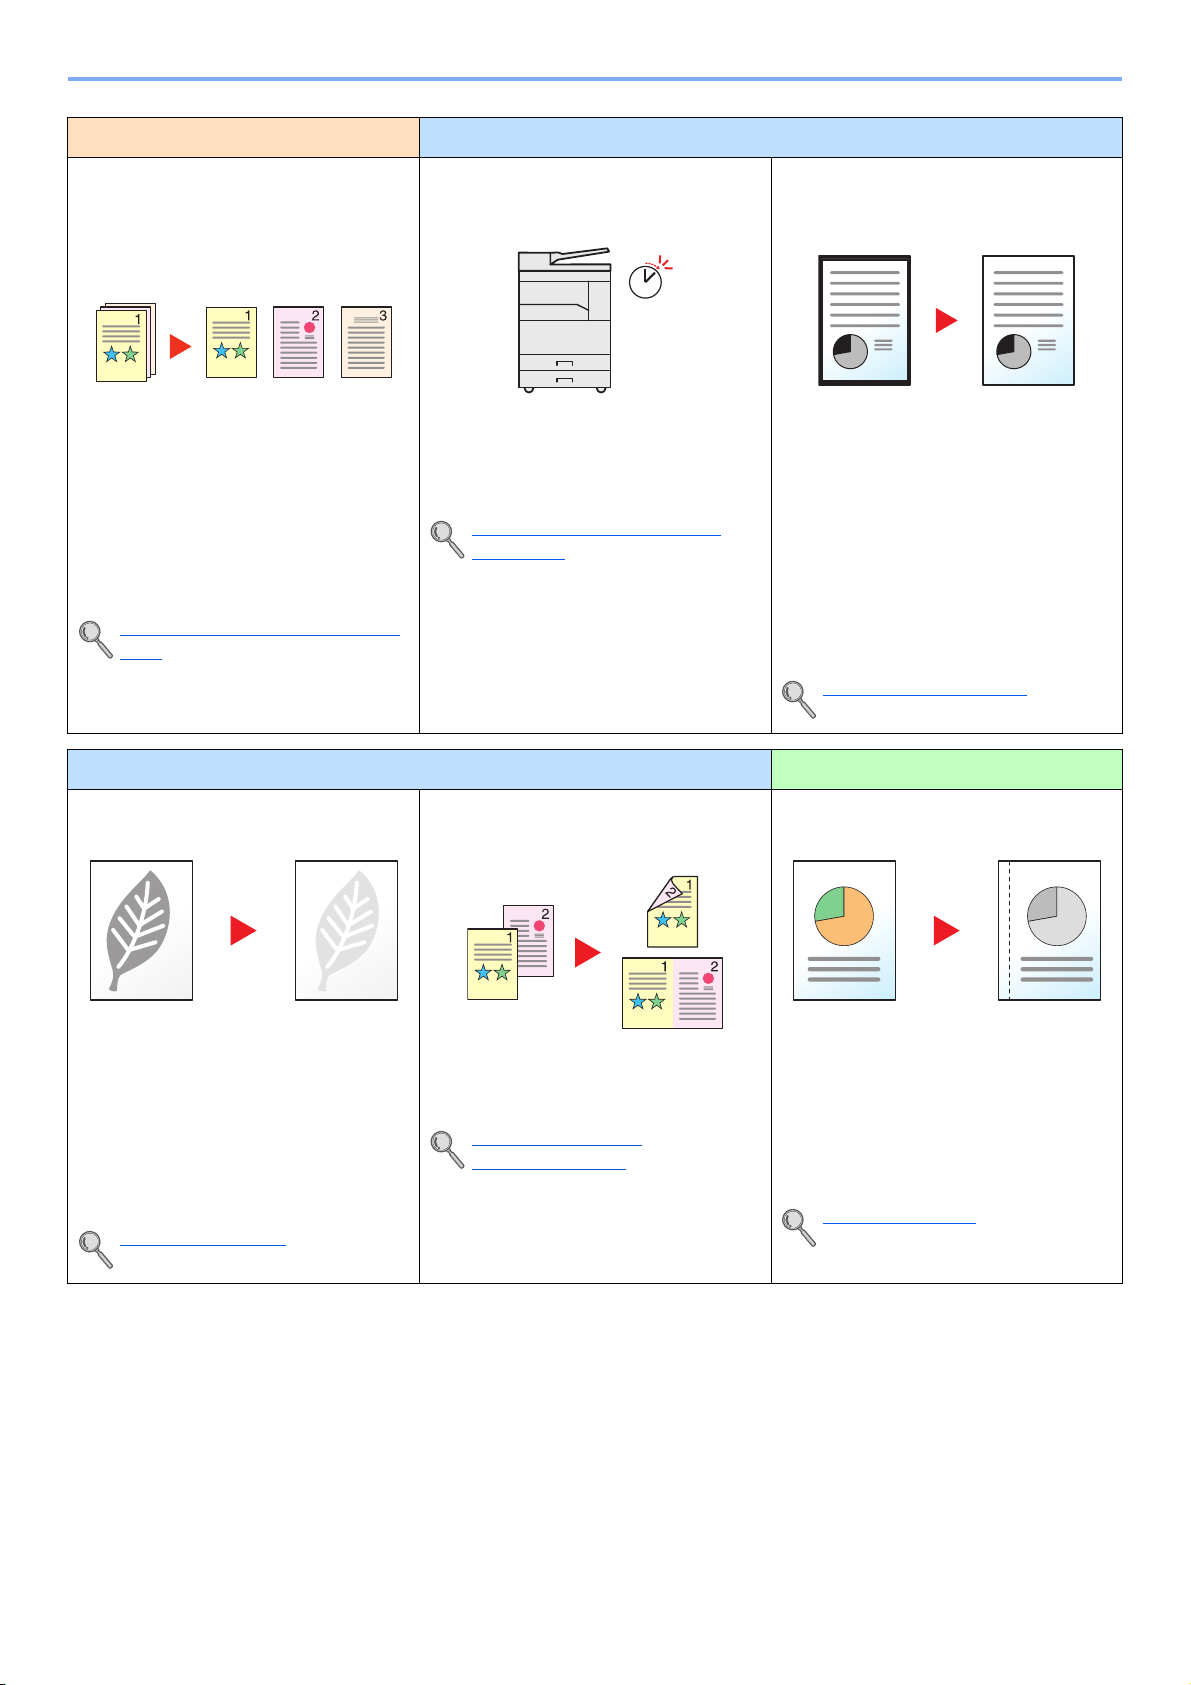
Optimize your office workflow
Access to frequently used functions
with just one touch (Program)
You can preset frequently used functions.
Once you set the functions as a preset
program, all you need to do is press the
program number to call up the functions.
Using this program brings the same
results even if operated by another
person.
Program (page 5-25)
Optimize your office workflow
Copy both sides of an ID card on a
single sheet (ID Card Copy)
You can copy the front and back sides of
an ID card on a single sheet of paper.
ID Card Copy (page 5-8)
Interrupt other running jobs and
execute your copy job immediately
(Interrupt Copy)
You can interrupt other running jobs and
execute your copy job immediately.
When other users are copying a large
number of sheets, this function allows you
to interrupt those jobs and make your
copies immediately.
When the interruption copy ends, the
machine resumes the paused print jobs.
Interrupt Copy (page 5-7)
Scan originals of different sizes at a
time (Mixed Size Originals)
It is useful when preparing conference
materials.
You can set the different sized originals at
one time so you don't need to reset the
originals regardless of size.
Mixed Size Orig. (Mixed Size
Originals) (page 5-21)
Scan a large number of originals in
separate batches and produce as one
job (Continuous Scan)
It is useful when preparing many-page
handouts.
When a large number of originals cannot
be placed in the document processor at
one time, the originals can be scanned in
separate batches and then copied as one
job.
Continuous Scan (page 5-24)
Scan documents into highcompression PDF files
(High-Compression PDF)
You can create documents in high-quality
color PDF format with file capacities as
small as black-and-white documents.
This function allows you to scan
documents into high-compression PDF
files while maintaining the legibility.
As full-color documents can be
compressed to files as small as blackand-white documents, they are suitable
for mail attachments.
Quick Scan/TWAIN Settings (page
7-23)
vii
Page 9
> Machine Features
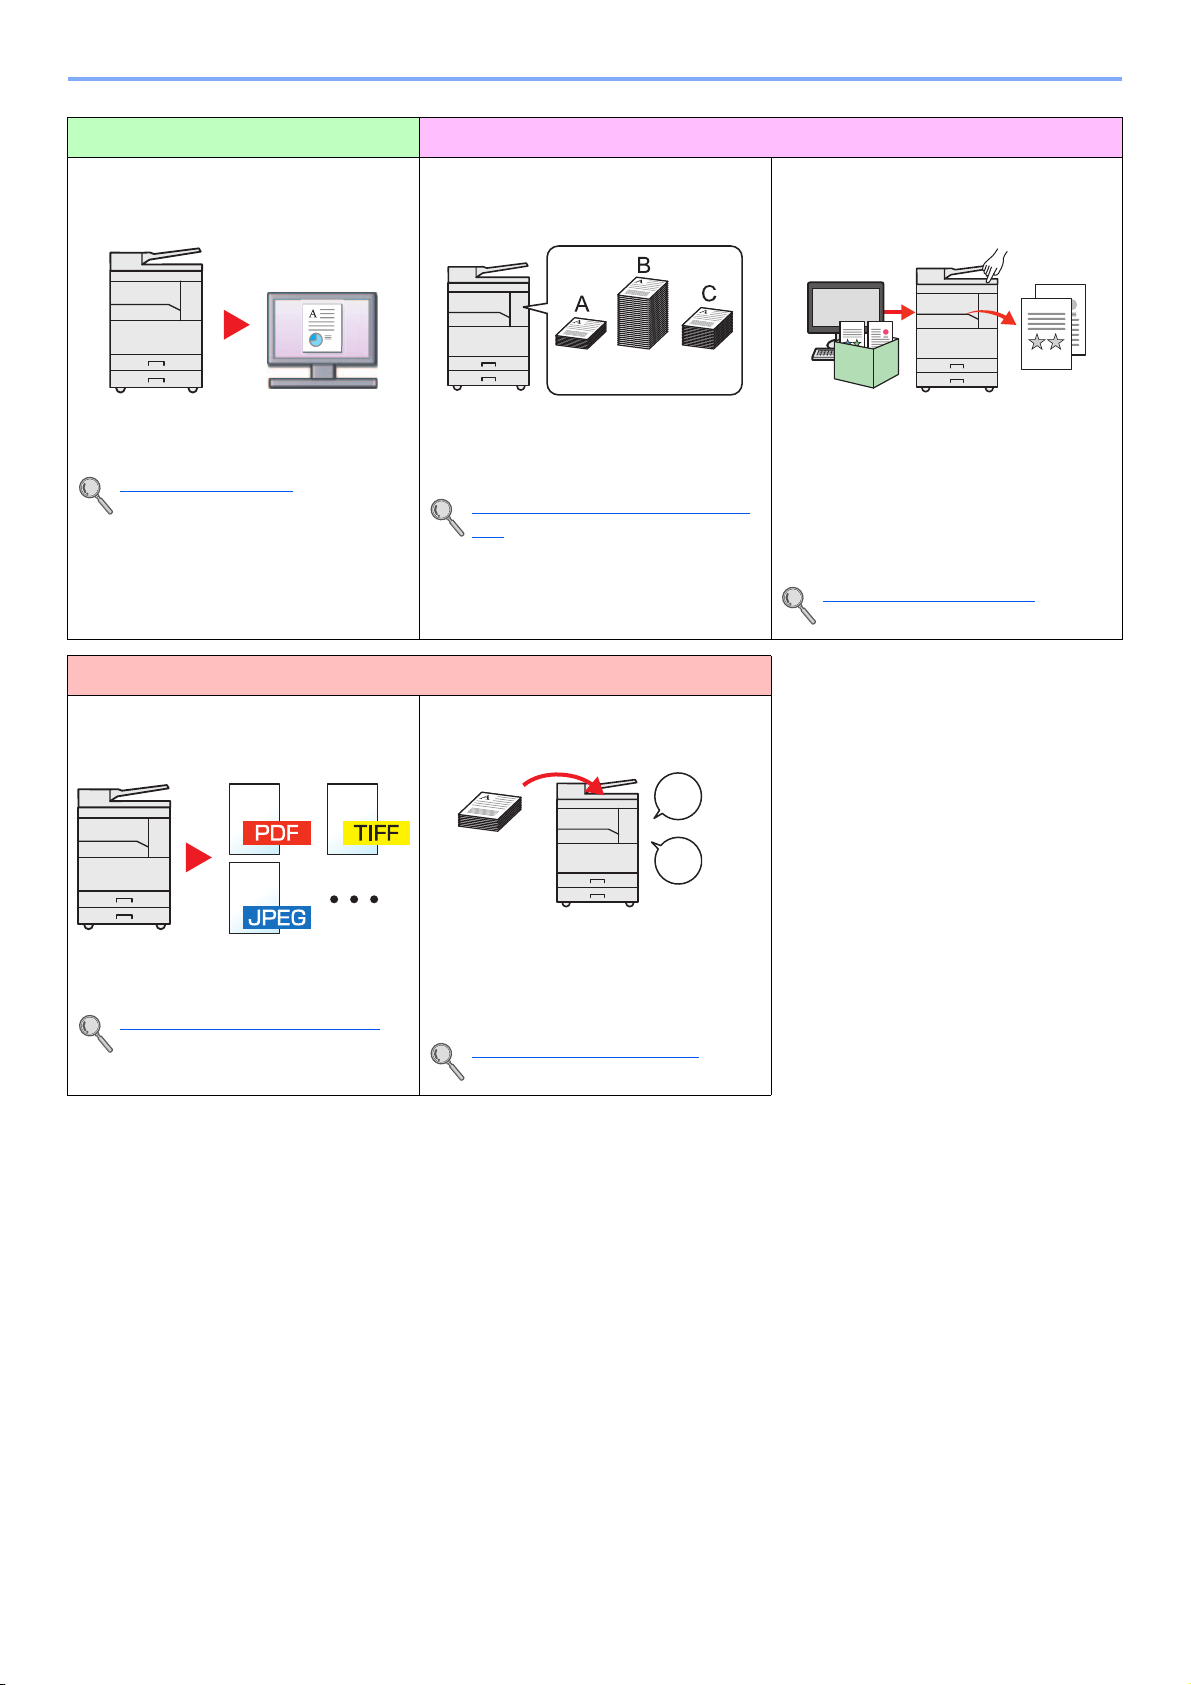
Optimize your office workflow Save energy and cost
Separate each page of a scanned
document into a single file
(File separation)
You can create a single file for each page
of a document.
A single file is created and saved for each
page of the original that was scanned.
A three-digit serial number such as
abc_001.pdf or abc_002.pdf is attached
to the end of the file name.
Quick Scan/TWAIN Settings (page
7-23)
Save energy as needed
(Sleep / Power Off)
Off
The machine is equipped with the Energy
Saver function that automatically turns off
the power or puts the machine into Sleep
Mode.
Setting Energy Saver Function
(page 2-22)
Erase black shadows that appear at
the edges of a copy (Border Erase)
This function allows you to print
documents without copying unnecessary
portions so that you can save toner
consumption.
You can remove the shadows that appear
around the border of a copy when the
original is scanned. You can also remove
the shadows that appear at the border
and at the center of the copy when a book
is scanned. This creates a more attractive
document.
Border Erase (page 5-23)
Save energy and cost Create attractive documents
Use less toner for printing (EcoPrint)
You can save toner consumption with this
function.
When you only need to check the printed
content, such as a trial print run or
documents for internal confirmation, use
this function to save toner.
Use this function when a high-quality print
is not required.
EcoPrint (page 5-21)
Print multiple originals onto one sheet
(Duplex / Combine)
You can print originals on both sides of
the paper. You can also print multiple
originals onto one sheet.
Combine (page 5-17)
Duplex (page 5-14)
Add margins for stapling (Margin)
This is convenient when preparing
materials to be filed.
The copy image can be shifted to add a
margin for binding the copies.
When the copies are two-sided, the
margins on the front and back sides can
be aligned to the same position.
Margin (page 5-22)
viii
Page 10
> Machine Features
100 400 200
01
File
Create attractive documents Strengthen security
Scan originals in color and send them
to a PC (Scan)
You can scan originals and convert them
into electronic data, such as a color PDF.
Scanning (page 5-30)
Use functions more efficiently
Specify an image file format
(File format)
Manage the copy/print count by
account (Job Accounting)
You can check and restrict the copy/print
count by account by assigning an account
ID to each account.
Overview of Job Accounting (page
8-2)
Add a file name (File Name Entry)
Prevent loss of finished documents
(Print Box)
You can temporarily save a printer
document in a Print Box of your computer.
Printing the document from the machine
can prevent someone from taking your
document. With a PIN code assigned to
the Print Box, you can further strengthen
security.
Using Print Box (page 4-8)
You can select from various file formats
when storing images.
Quick Scan Settings (page 7-24)
This function makes it easier to check the
job history and status.
You can add a name and job number to a
job.
File Name Entry (page 5-24)
ix
Page 11

> Guides Provided with the Machine
Guides Provided with the Machine
The following guides are provided with the machine. Refer to each guide as needed.
The contents of the guides are subject to change without notice for the purpose of improvement of machine
performance.
Printed guides
Start using the
machine quickly
Quick Guide
Explains how to use basic functions of the machine.
Safety Guide
Provides safety and cautionary information for installation and use of the machine. Be sure to
For safe use of the
machine
read this guide before using the machine.
Safety Guide (1855)
Indicates the space required for machine installation, and describes the cautionary labels
and other safety information. Be sure to read this guide before using the machine.
Guides (PDF) on the Product Library disc
Use the machine
thoughtfully
Print data from a
computer
Use Client Tool
Install the Adobe Reader (version 8.0 or later) to view the manuals on the Product Library disc.
Operation Guide (This Guide)
Explains how to load paper and perform copy, print and scan operations, and indicates
default settings and other information.
Printer Driver User Guide
Explains how to install the printer driver and use the printer function.
Client Tool User Guide
Explains how to use Client Tool.
x
Page 12

> About the Operation Guide (this Guide)
About the Operation Guide (this Guide)
Structure of the guide
The Operation Guide contains the following chapters.
Chapter Contents
1 Legal and Safety Information Provides precautions regarding use of the machine and trademark information.
2 Installing and Setting up the
Machine
3 Preparation before Use Explains preparations and settings that are required in order to use the machine, such
4 Printing from PC Explains functions that are available when the machine is used as a printer.
5 Operation on the Machine Explains the basic procedures for using the machine, such as placing originals, making
6 Checking the Status Explains how to check the status of a job and the job history, and how to cancel jobs
7 System Menu and Client Tool Explains System Menu related to overall machine operation and utilities.
8 Job Accounting Explains job accounting.
9 Troubleshooting Explains what to do when toner runs out, an error is displayed, or a paper jam or other
10 Appendix Describes convenient options that are available for the machine. Provides information
Explains part names, cable connections, installation of the software, and other matters
related to administration of the machine.
as how to use the operation panel, and load paper.
copies, and scanning.
being printed or waiting to print. Also explains how to check paper and toner levels, and
how to check the device status.
problem occurs.
on media types and paper sizes, and gives a glossary of terms. Explains how to enter
characters, and lists the specifications of the machine.
xi
Page 13

> About the Operation Guide (this Guide)
NOTE
Click to move from the current page to the previously
displayed page. This is convenient when you want to return to
the page from which you jumped to the current page.
Click an item in the Table of Contents
to jump to the corresponding page.
CAUTION
Indicates that personal injury or
mechanical damage may result
from insufficient attention to or
incorrect compliance with the
related points.
NOTE
Indicates supplemental
explanations and reference
information for operations.
IMPORTANT
Indicates operational
requirements and restrictions to
operate the machine correctly,
and avoid damage to the machine
or property.
Refer to
Click the underlined text to jump to
the corresponding page.
Conventions Used in This Guide
Adobe Reader X is used as an example in the explanations below.
The items that appear in Adobe Reader vary depending on how it is used. If the Table of Contents or tools do not
appear, refer to Adobe Reader Help.
Certain items are indicated in this guide by the conventions described below.
Convention Description Example
[Bold] Indicates keys on the operation panel and buttons on
your computer screen.
[Regular] Indicates a message or setting displayed on the
message display.
"Regular" Indicates a message or setting displayed on the
computer screen.
Press the [Start] key.
Click the [OK] button.
[Ready to copy.] appears in the message display.
Press the [▲] or [▼] key to select [On].
You can select from the "Print size" menu.
xii
Page 14
> About the Operation Guide (this Guide)
2
1
Conventions used in operation procedures
Operation panel keys that are pressed are outlined in red.
Procedures consisting of a sequence of operation panel actions or computer operations are numbered as shown below.
xiii
Page 15
> About the Operation Guide (this Guide)
Original
Original
Paper
Paper
Original
Original
Paper
Paper
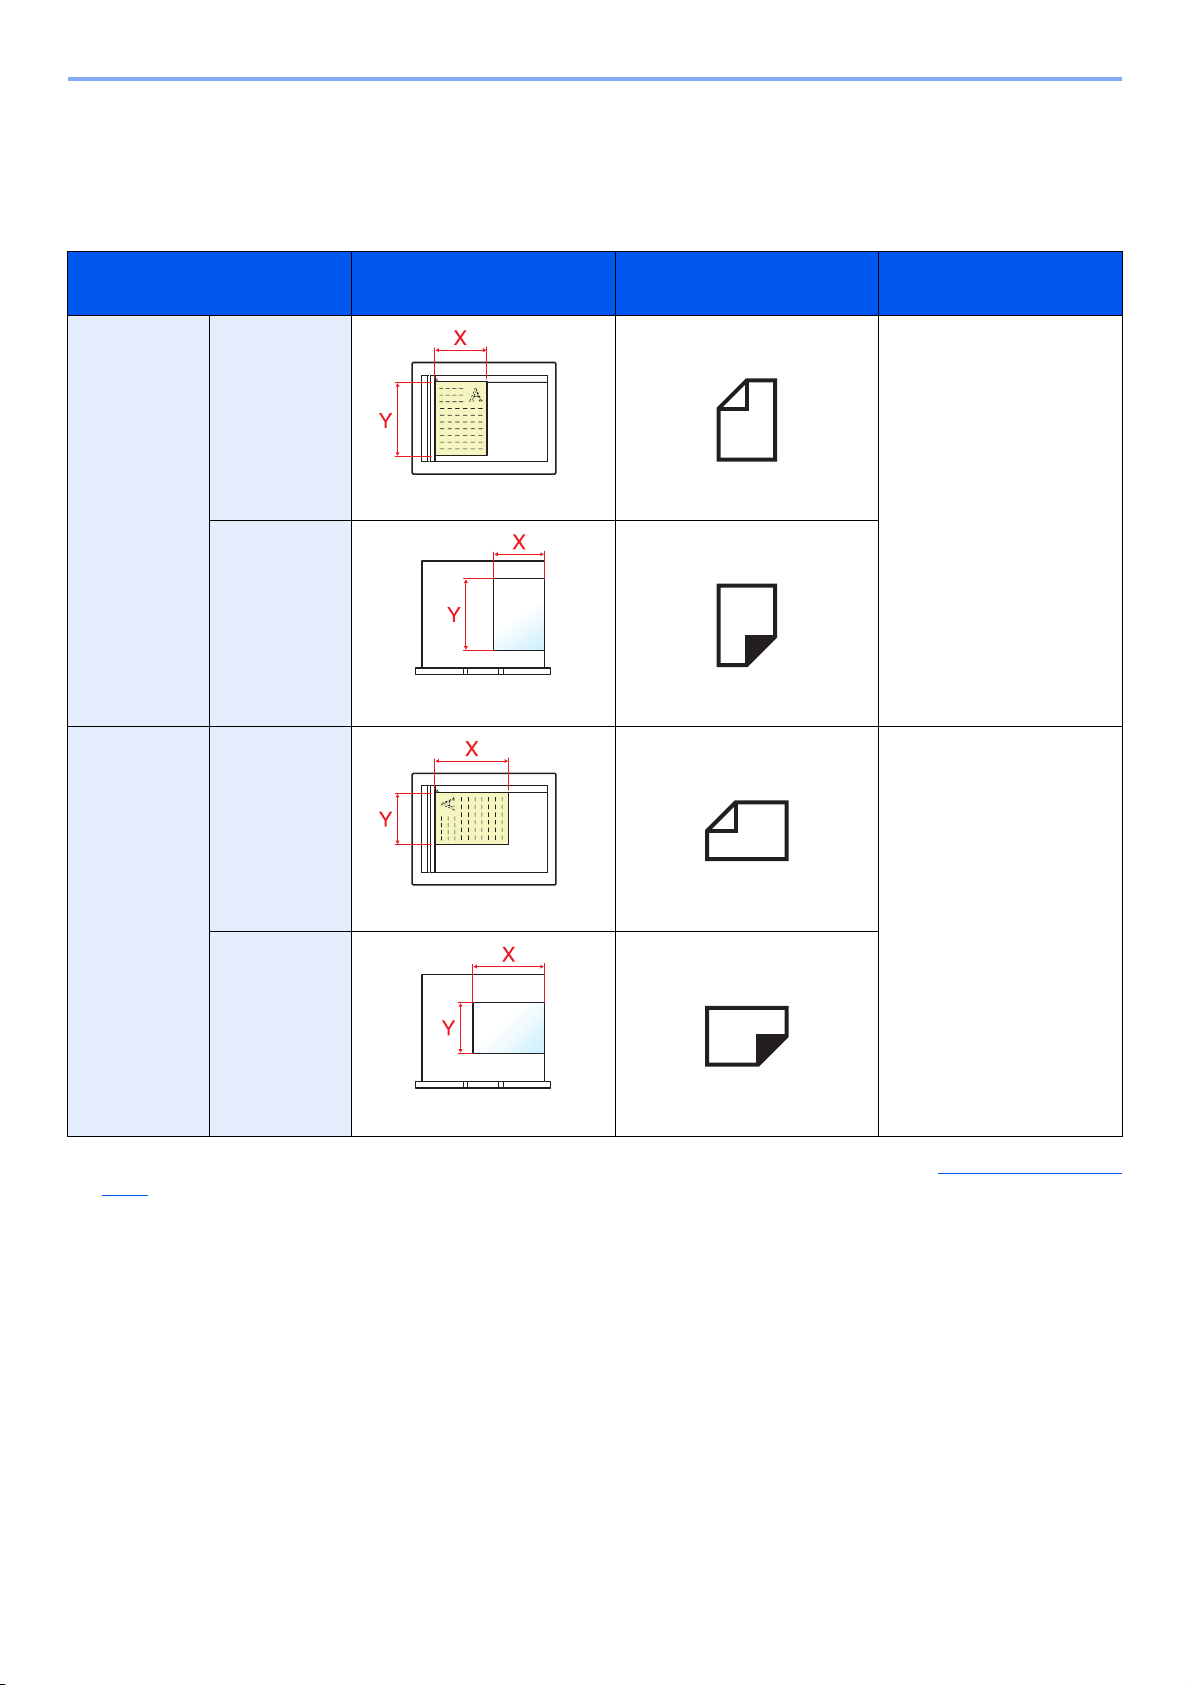
Size and Orientation of Originals and Paper
Original sizes and paper sizes such as A4, B5, and Letter can be used in both the horizontal and vertical orientations. To
distinguish the orientations when these sizes are used, "-R" is added to sizes used in the horizontal orientation.
The following icons are used to indicate original and paper placement orientations on the message display.
Orientation Setting Position
(X: Width, Y: Length)
Vertical Original A4, B5, Letter, etc.
Paper
Horizontal Original A4-R, B5-R, Letter-R, etc.
Display Indicated Size in this
Guide
*1
Paper
*1 Original/paper sizes that can be used vary depending on the function and source tray. For details, refer to Specifications on page
10-15.
xiv
Page 16
> Menu Map
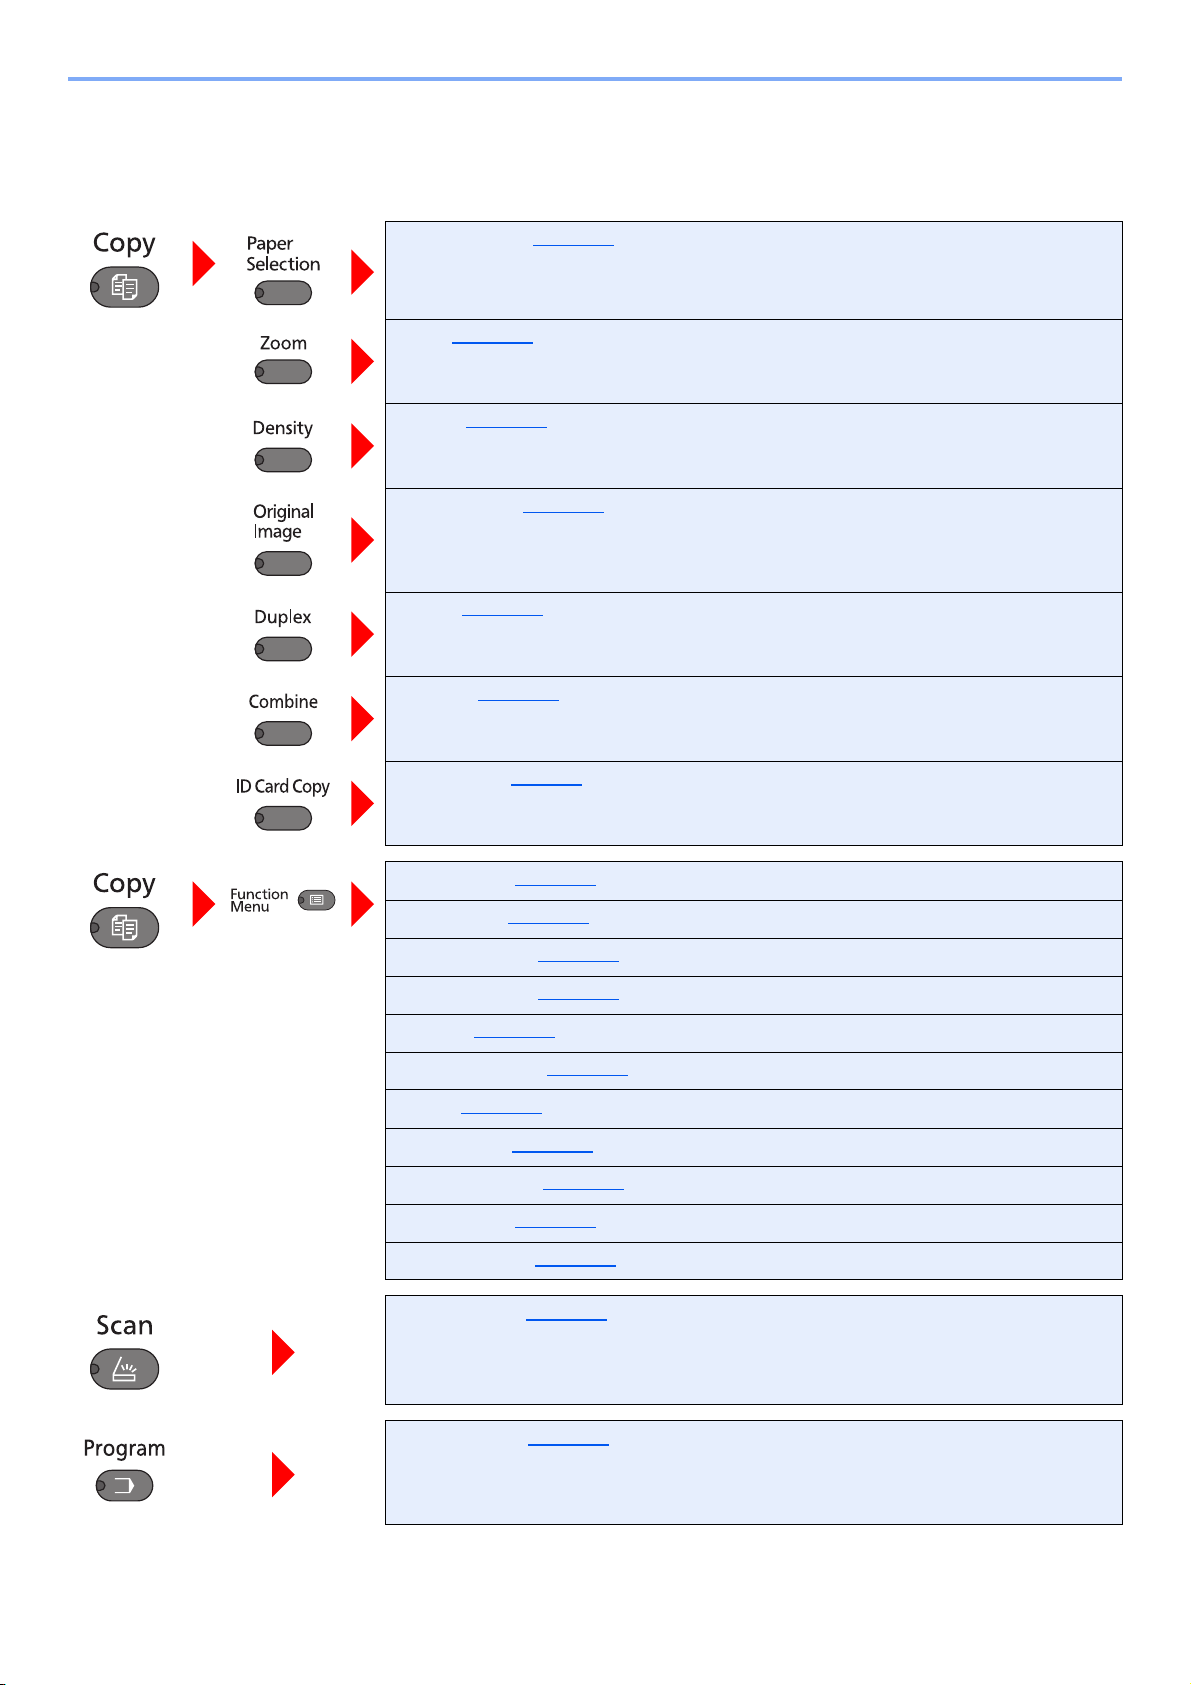
Menu Map
(The names displayed on the message display are used here. These may differ from the referenced titles.)
Paper Selection (page 5-12)
Zoom (page 5-13)
Density (page 5-14)
Original Image (page 5-14)
Duplex (page 5-14)
Combine (page 5-17)
ID card Copy (page 5-8)
Collate/Offset (page 5-19)
Original Size (page 5-19)
Orig. Orientation (page 5-20)
Mixed Size Orig. (page 5-21)
EcoPrint (page 5-21)
Backgrnd Density (page 5-21)
Margin (page 5-22)
Border Erase (page 5-23)
Continuous Scan (page 5-24)
Auto Rotation (page 5-24)
File Name Entry (page 5-24)
Ready to scan. (page 5-32)
Select program (page 5-25)
xv
Page 17
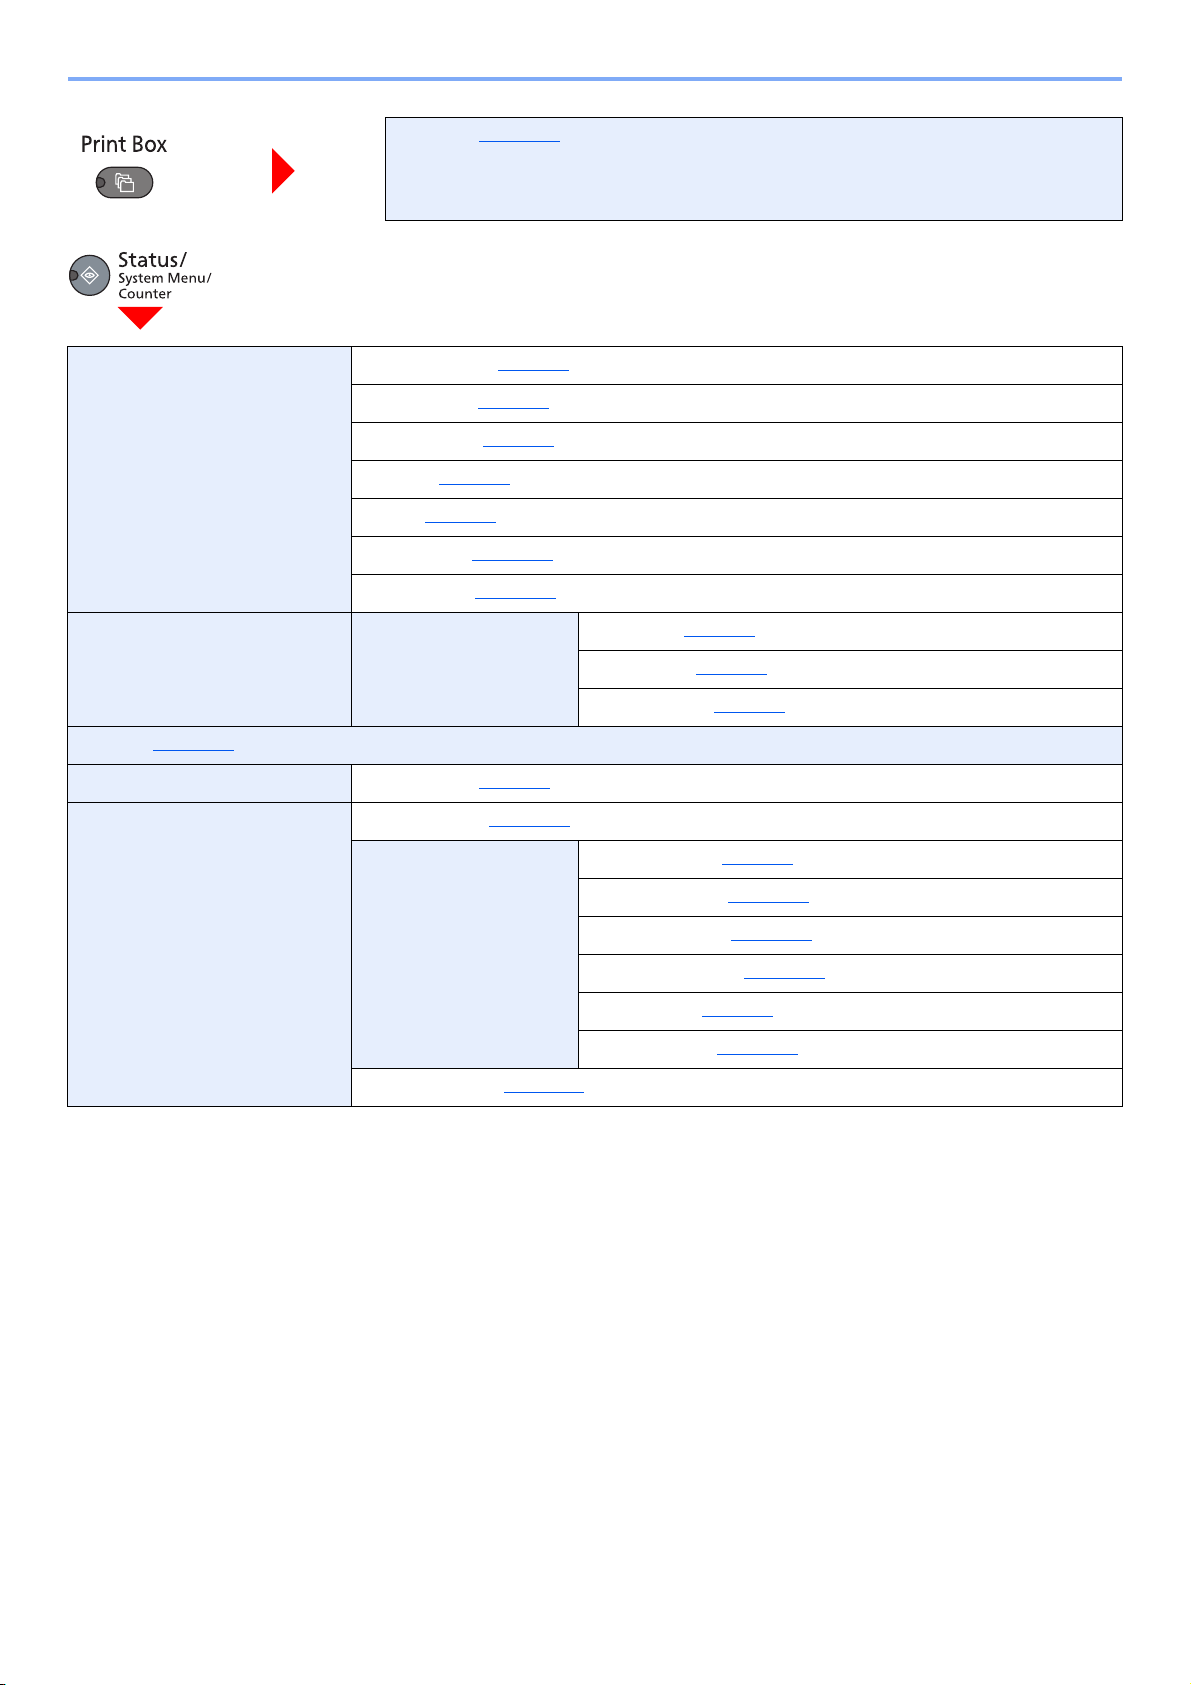
> Menu Map
Print Box (page 4-10)
Status Print Job Status (page 6-2)
Print Job Log (page 6-4
Send Job Log (page 6-4
Scanner (page 6-9
Printer (page 6-9
Toner Status (page 6-10
Paper Status (page 6-10
Report Report Print Menu Map (page 7-4)
Counter (page 2-26)
System I/F Block Set. (page 7-5)
Admin/Accounting Admin. Setting (page 2-20)
Job Account. Set. Job Accounting (page 8-3)
)
)
)
)
)
)
Status Page (page 7-4
Service Status (page 7-4
Account. Report (page 8-14
Total Accounting (page 8-13
Each Job Account (page 8-13
)
)
)
)
)
Unknown ID Job (page 8-11
Account. List (page 8-4
Default Setting (page 8-12
)
)
)
xvi
Page 18
> Menu Map
Common Settings Language (page 7-5)
Default Screen (page 7-6
Sound Buzzer (page 7-6)
Display Bright. (page 7-6
Quiet Mode (page 7-6
Orig./Paper Set. Custom Orig.Size (page 7-7)
)
)
)
Custom PaperSize (page 7-7
Cassette 1 Set. Cassette 1 Size (page 7-9)
Cassette 2 Set. Cassette 2 Size (page 7-9)
Cassette 3 Set. Cassette 3 Size (page 7-9)
Cassette 4 Set. Cassette 4 Size (page 7-9)
MP Tray Set. MP Tray Size (page 7-9)
)
Cassette 1 Type (page 7-9
Cassette 2 Type (page 7-9
Cassette 3 Type (page 7-9
Cassette 4 Type (page 7-9
MP Tray Type (page 7-9
)
)
)
)
)
Media Type Set. (page 7-7
Auto Detect Orig. (page 7-7
Media for Auto (page 7-8
Def. PaperSource (page 7-8
SpcialPaper Act. (page 7-8
Preset Limit (page 7-11
Measurement (page 7-11
Error Handling DuplexPaperError (page 7-11)
Timer Setting Err. Clear Timer (page 7-12)
)
)
PaperMismatchErr (page 7-11
Sleep Timer (page 7-12
PanelReset Timer (page 7-12
Interrupt Clear (page 7-12
Power Off Rule (page 7-12
Power Off Timer (page 7-12
Auto Err. Clear (page 7-12
)
)
)
)
)
)
)
)
)
)
)
)
Auto Panel Reset (page 7-12
xvii
)
Page 19
> Menu Map
Common Settings Function Default Original Image (page 7-13)
Zoom (page 7-13
Collate/Offset (page 7-13
Orig. Orientation (page 7-13
Border Erase (page 7-13
Margin (page 7-13
Backgrnd Density (page 7-13
EcoPrint (page 7-13
Auto Rotation (page 7-13
File Name Entry (page 7-13
Continuous Scan (page 7-13
Detail Settings 2 in 1 Layout (page 7-14)
)
)
)
)
)
)
)
)
)
)
4 in 1 Layout (page 7-14
Border Line (page 7-14
Orig. Binding (page 7-14
BookOrg. Binding (page 7-14
Finish. Binding (page 7-14
)
)
)
)
)
Copy Paper Selection (page 7-14)
AutoPaperSelect. (page 7-14
Auto % Priority (page 7-14
Printer FormFeed TimeOut (page 7-15)
Adjust/Maint. Density Adj. (page 7-15)
Backgrnd Density (page 7-15
Correct. Bk Line (page 7-15
Service Settings Drum Refresh (page 7-15)
)
)
)
)
xviii
Page 20

1 Legal and Safety
Information
Please read this information before using your machine. This chapter provides information on the following topics.
Notice ................................................................................................................................................................. 1-2
Safety Conventions in This Guide ........................................................................................................... 1-2
Environment ............................................................................................................................................. 1-3
Precautions for Use ................................................................................................................................. 1-3
Laser Safety (Europe) .............................................................................................................................. 1-4
Safety Instructions Regarding the Disconnection of Power ..................................................................... 1-5
Legal Restriction on Copying/Scanning ................................................................................................... 1-5
Legal Information ..................................................................................................................................... 1-6
Energy Saving Control Function .............................................................................................................. 1-7
Automatic 2-Sided Copy Function ........................................................................................................... 1-7
Resource Saving - Paper ......................................................................................................................... 1-7
Environmental benefits of "Power Management" ..................................................................................... 1-7
Energy Star (ENERGY STAR®) Program ................................................................................................ 1-7
1-1
Page 21

Legal and Safety Information > Notice
Notice
Safety Conventions in This Guide
The sections of this guide and parts of the machine marked with symbols are safety warnings meant to protect the user,
other individuals and surrounding objects, and ensure correct and safe usage of the machine. The symbols and their
meanings are indicated below.
WARNING: Indicates that serious injury or even death may result from insufficient
attention to or incorrect compliance with the related points.
CAUTION: Indicates that personal injury or mechanical damage may result from
insufficient attention to or incorrect compliance with the related points.
Symbols
The symbol indicates that the related section includes safety warnings. Specific points of attention are indicated
inside the symbol.
... [General warning]
... [Warning of high temperature]
The symbol indicates that the related section includes information on prohibited actions. Specifics of the prohibited
action are indicated inside the symbol.
... [Warning of prohibited action]
... [Disassembly prohibited]
The symbol indicates that the related section includes information on actions which must be performed. Specifics of
the required action are indicated inside the symbol.
... [Alert of required action]
... [Remove the power plug from the outlet]
... [Always connect the machine to an outlet with a ground connection]
Please contact your service representative to order a replacement if the safety warnings in this Operation Guide are
illegible or if the guide itself is missing (fee required).
1-2
Page 22

Legal and Safety Information > Notice
Environment
The service environmental conditions are as follows:
• Temperature: 50 to 90.5 °F (10 to 32.5 °C)
• Humidity: 15 to 80%
However, adverse environmental conditions may affect the image quality. Avoid the following locations when selecting a
site for the machine.
• Avoid locations near a window or with exposure to direct sunlight.
• Avoid locations with vibrations.
• Avoid locations with drastic temperature fluctuations.
• Avoid locations with direct exposure to hot or cold air.
• Avoid poorly ventilated locations.
If the floor is delicate against casters, when this machine is moved after installation, the floor material may be damaged.
During copying, some ozone is released, but the amount does not cause any ill effect to one's health. If, however, the
machine is used over a long period of time in a poorly ventilated room or when making an extremely large number of
copies, the smell may become unpleasant. To maintain the appropriate environment for copy work, it is suggested that
the room be properly ventilated.
Precautions for Use
Cautions when handling consumables
CAUTION
Do not attempt to incinerate parts which contain toner. Dangerous sparks may cause burns.
Keep parts which contain toner out of the reach of children.
If toner happens to spill from parts which contain toner, avoid inhalation and ingestion, as well as contact with your eyes
and skin.
• If you do happen to inhale toner, move to a place with fresh air and gargle thoroughly with a large amount of water. If
coughing develops, contact a physician.
• If you do happen to ingest toner, rinse your mouth with water and drink 1 or 2 cups of water to dilute the contents of
your stomach. If necessary, contact a physician.
• If you do happen to get toner in your eyes, flush them thoroughly with water. If there is any remaining tenderness,
contact a physician.
• If toner does happen to get on your skin, wash with soap and water.
Do not attempt to force open or destroy parts which contain toner.
Other precautions
Return the exhausted toner container and waste toner box to your dealer or service representative. The collected toner
container and waste toner box will be recycled or disposed in accordance with the relevant regulations.
Store the machine while avoiding exposure to direct sunlight.
Store the machine in a place where the temperature stays below 40 °C while avoiding sharp changes of temperature
and humidity.
If the machine will not be used for an extended period of time, remove the paper from the cassette and the Multi Purpose
(MP) Tray, return it to its original package and reseal it.
1-3
Page 23
Legal and Safety Information > Notice
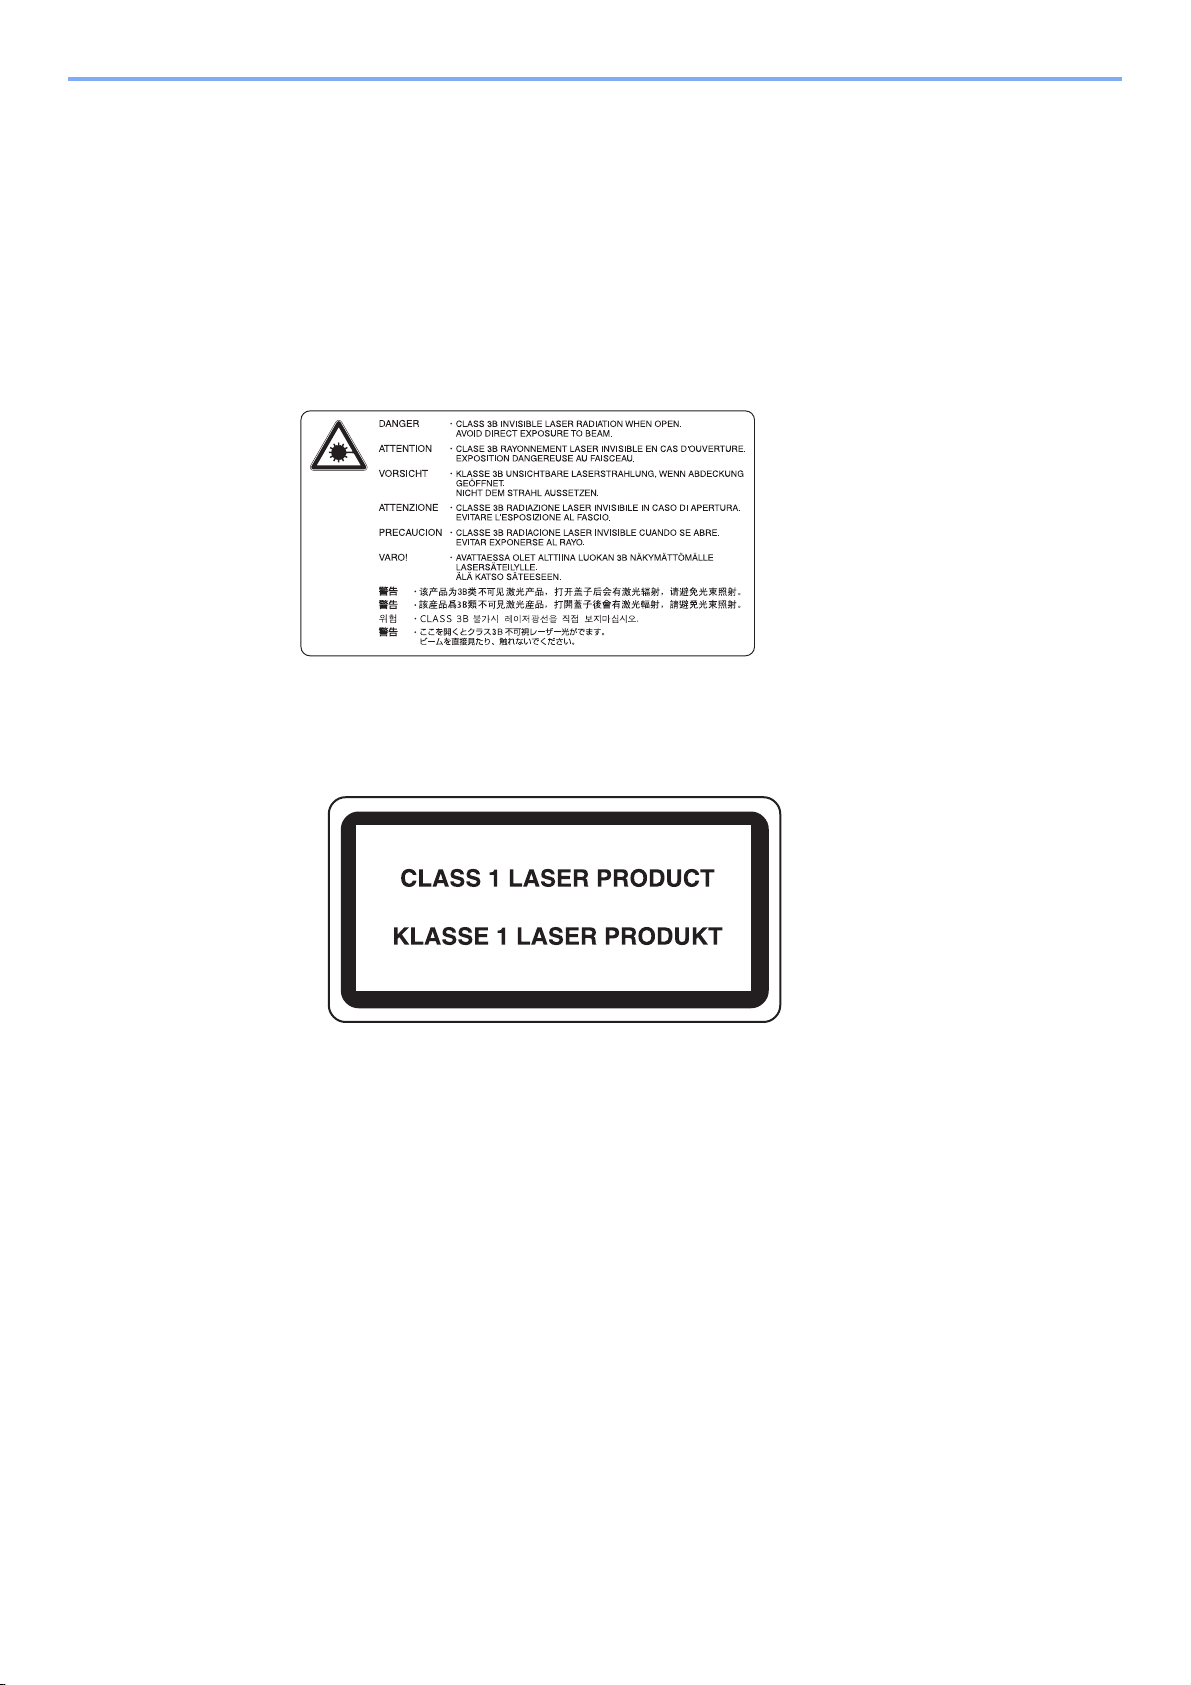
Laser Safety (Europe)
Laser radiation could be hazardous to the human body. For this reason, laser radiation emitted inside this machine is
hermetically sealed within the protective housing and external cover. In the normal operation of the product by user, no
radiation can leak from the machine.
This machine is classified as Class 1 laser product under IEC/EN 60825-1:2007.
Caution: Performance of procedures other than those specified in this manual may result in hazardous radiation
exposure.
These labels are attached to the laser scanner unit inside the machine and are not in a user access area.
The label shown below is attached on the rating label.
1-4
Page 24

Legal and Safety Information > Notice
NOTE
Safety Instructions Regarding the Disconnection of Power
Caution: The power plug is the main isolation device! Other switches on the equipment are only functional switches and
are not suitable for isolating the equipment from the power source.
Attention: Le débranchement de la fiche secteur est le seul moyen de mettre l'appareil hors tension. Les interrupteurs
sur l'appareil ne sont que des interrupteurs de fonctionnement: ils ne mettent pas l'appareil hors tension.
Legal Restriction on Copying/Scanning
It may be prohibited to copy/scan copyrighted material without permission of the copyright owner.
Copying/Scanning the following items is prohibited and may be penalized by low. It may not be limited to these items. Do
not knowingly copy/scan the items that are not to be copied/scanned.
• Paper money
• Bank note
• Securities
•Stamp
• Passport
• Certificate
Local laws and regulations may prohibit or restrict copying/scanning of other items not mentioned above.
An original which resembles a bank note closely may not be copied properly in some rare cases.
EN ISO 7779
Maschinenlärminformations-Verordnung 3. GPSGV, 06.01.2004: Der höchste Schalldruckpegel beträgt 70 dB (A) oder
weniger gemäß EN ISO 7779.
EK1-ITB 2000
Das Gerät ist nicht für die Benutzung im unmittelbaren Gesichtsfeld am Bildschirmarbeitsplatz vorgesehen. Um
störende Reflexionen am Bildschirmarbeitsplatz zu vermeiden, darf dieses Produkt nicht im unmittelbaren Gesichtsfeld
platziert werden.
1-5
Page 25

Legal and Safety Information > Notice
Legal Information
Copying or other reproduction of all or part of this guide without the prior written consent of Copyright owner is
prohibited.
Regarding Trade Names
• Microsoft, Windows, Windows XP, Windows Server 2003, Windows Vista, Windows Server 2008, Windows 7,
Windows Server 2012, Windows 8 and Internet Explorer are registered trademarks or trademarks of
Microsoft Corporation in the U.S.A. and/or other countries.
• Adobe Acrobat, and Flash are registered trademarks of Adobe Systems Incorporated.
• IBM and IBM PC/AT are trademarks of International Business Machines Corporation.
• AppleTalk, Bonjour, Macintosh, and Mac OS are trademarks of Apple Inc., registered in the U.S. and other countries.
All other brands and product names are registered trademarks or trademarks of their respective companies. The
designations ™ and ® will not be used in this Operation Guide.
1-6
Page 26

Legal and Safety Information > Notice
Energy Saving Control Function
To reduce energy consumption while in a waiting state, the device comes equipped with an energy saving control
function for switching to Sleep as well as Power Off Mode where power consumption is automatically reduced to a
minimum after a certain amount of time elapses since the device was last used.
Sleep
The device automatically enters Sleep when 1 minute has passed since the copy function was last used. The amount of
time of no activity that must pass before Sleep is activated may be lengthened. When printing in Sleep mode, the device
returns to Sleep mode after it has finished printing. For more information see Sleep and Sleep Timer on page 2-22
.
Power Off Mode
The device automatically turns its power off when 1 hour has passed since the device was last used. The amount of time
of no activity that must pass before Power Off Mode is activated may be lengthened by changing the Power Off Timer
setting. For more information see Power Off Timer on page 2-23
.
Automatic 2-Sided Copy Function
This device includes 2-sided copying as an optional function. For example, by copying two 1-sided originals onto a
single sheet of paper as a 2-sided copy, it is possible to lower the amount of paper used. For more information refer to
Duplex on page 5-14
Printing in duplex mode reduces paper consumption and contributes to the conservation of forest resources. Duplex
mode also reduces the amount of paper that must be purchased, and thereby reduces cost. It is recommended that
machines capable of duplex printing be set to use duplex mode by default.
.
Resource Saving - Paper
For the preservation and sustainable use of forest resources, it is recommended that recycled as well as virgin paper
certified under environmental stewardship initiatives or carrying recognised ecolabels, which meet EN 12281:2002
an equivalent quality standard, be used.
This machine also supports printing on 64 g/m² paper. Using such paper containing less raw materials can lead to
further saving of forest resources.
* : EN12281:2002 "Printing and business paper - Requirements for copy paper for dry toner imaging processes"
Your sales or service representative can provide information about recommended paper types.
*
or
Environmental benefits of "Power Management"
To reduce power consumption when idle, this machine is equipped with a power management function that
automatically activates energy-saving mode when the machine is idle for a certain period of time.
Although it takes the machine a slight amount of time to return to READY mode when in energy-saving mode, a
significant reduction in energy consumption is possible. It is recommended that the machine be used with the activation
time for energy-saving mode set to the default setting.
Energy Star (ENERGY STAR®) Program
We have determined as a participating company in the International Energy Star Program that this
product is compliant with the standards laid out in the International Energy Star Program.
®
ENERGY STAR
use of products with high energy efficiency in order to help prevent global warming. By purchasing
ENERGY STAR
product use and cut energy-related costs.
is a voluntary energy efficiency program with the goal of developing and promoting the
®
qualified products, customers can help reduce emissions of greenhouse gases during
1-7
Page 27

2 Installing and Setting
up the Machine
This chapter provides information for the administrator of this machine, such as part names, cable connection, and
software installation.
Part Names ........................................................................................................................................................ 2-2
Machine Exterior ...................................................................................................................................... 2-2
Connectors/Interior .................................................................................................................................. 2-4
With Optional Equipments Attached ........................................................................................................ 2-5
Determining the Connection Method and Preparing Cables .............................................................................. 2-6
Connection Example ................................................................................................................................ 2-6
Preparing Necessary Cables ................................................................................................................... 2-6
Connecting Cables ............................................................................................................................................. 2-7
Connecting USB Cable ............................................................................................................................ 2-7
Connecting the Power Cable ................................................................................................................... 2-7
Power On/Off ..................................................................................................................................................... 2-8
Power On ................................................................................................................................................. 2-8
Power Off ................................................................................................................................................. 2-9
Installing Software ............................................................................................................................................ 2-10
Software on Product Library Disc (Windows) ........................................................................................ 2-10
Installing Software in Windows ............................................................................................................... 2-11
Uninstalling the Software ....................................................................................................................... 2-15
Setting the Shared Printer ..................................................................................................................... 2-16
Installing Software in Mac Computer ..................................................................................................... 2-17
Client Tool .............................................................................................................................................. 2-18
Setting WIA Driver ................................................................................................................................. 2-19
Administrator User Name and Password ......................................................................................................... 2-20
Administrator Setting ............................................................................................................................. 2-20
Setting Energy Saver Function ........................................................................................................................ 2-22
Sleep and Sleep Timer .......................................................................................................................... 2-22
Power Off Timer ..................................................................................................................................... 2-23
Checking the Counter ...................................................................................................................................... 2-26
2-1
Page 28
Installing and Setting up the Machine > Part Names
21
11
345 6 78
910 12 13
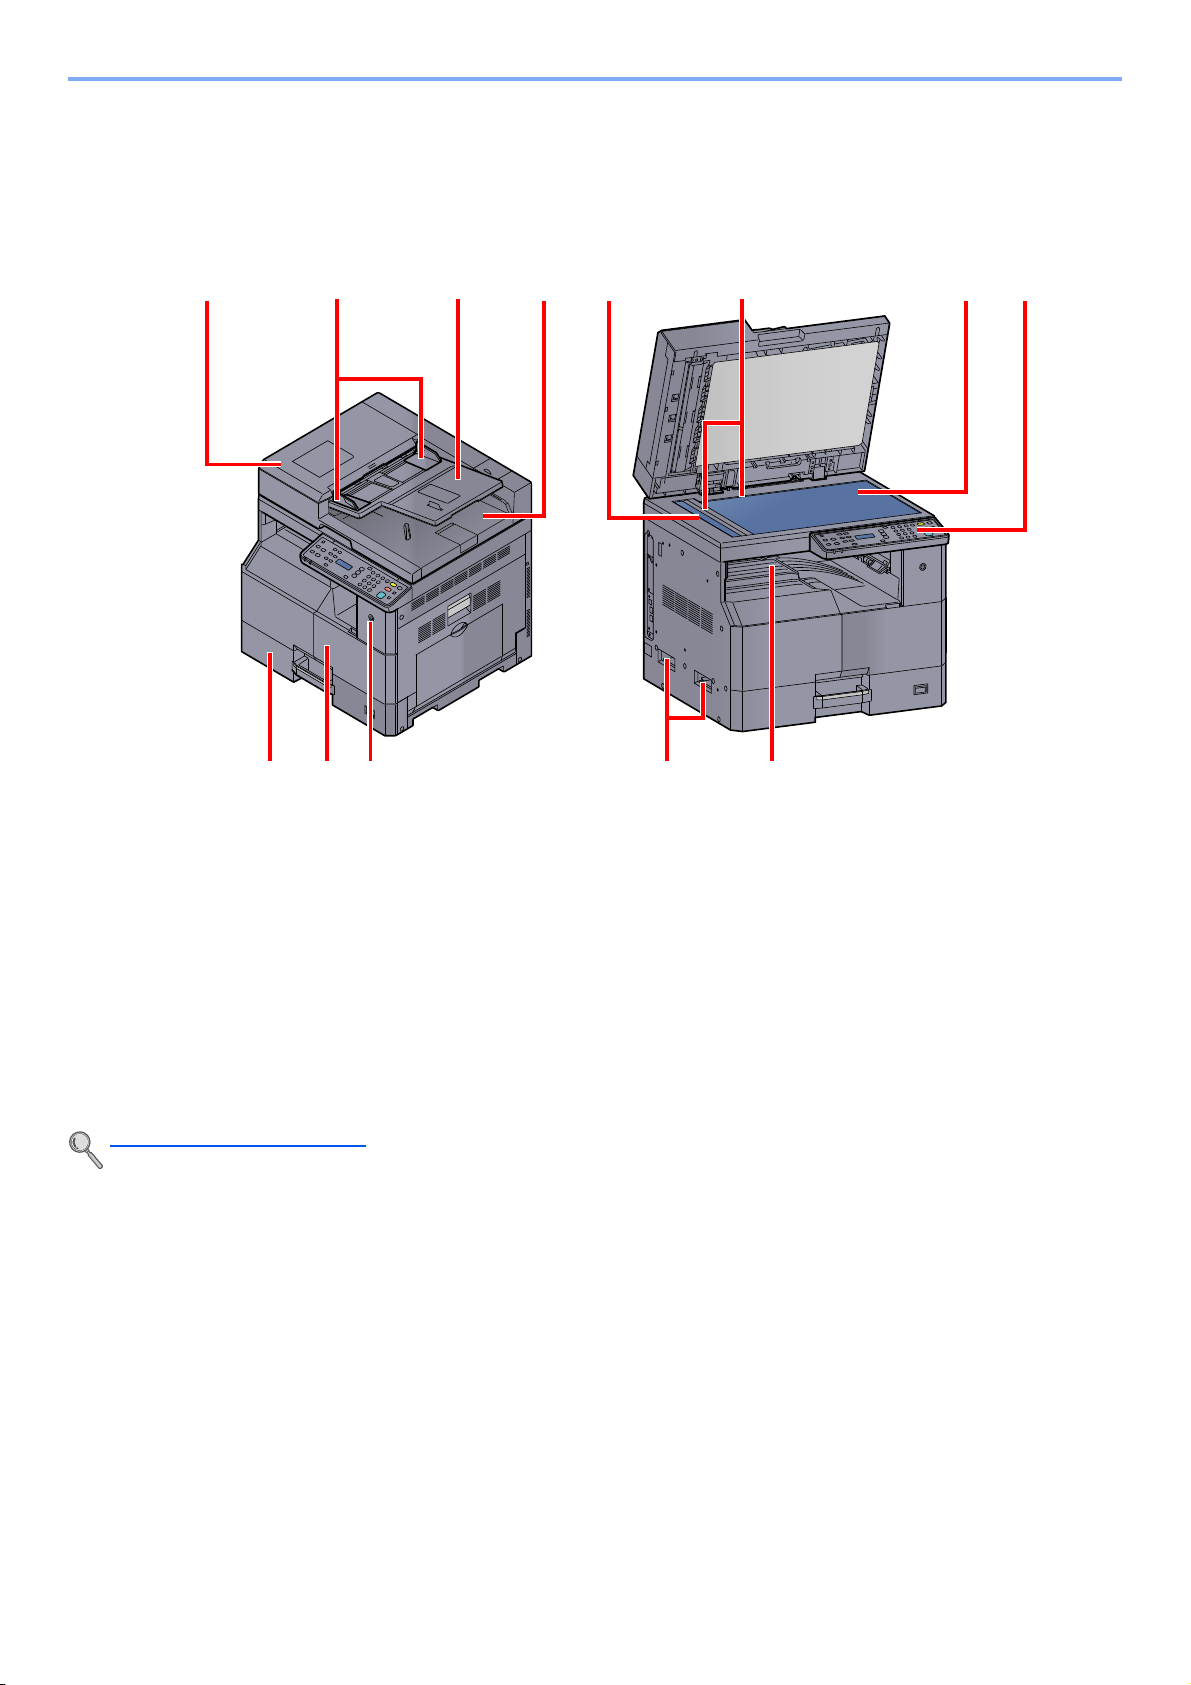
Part Names
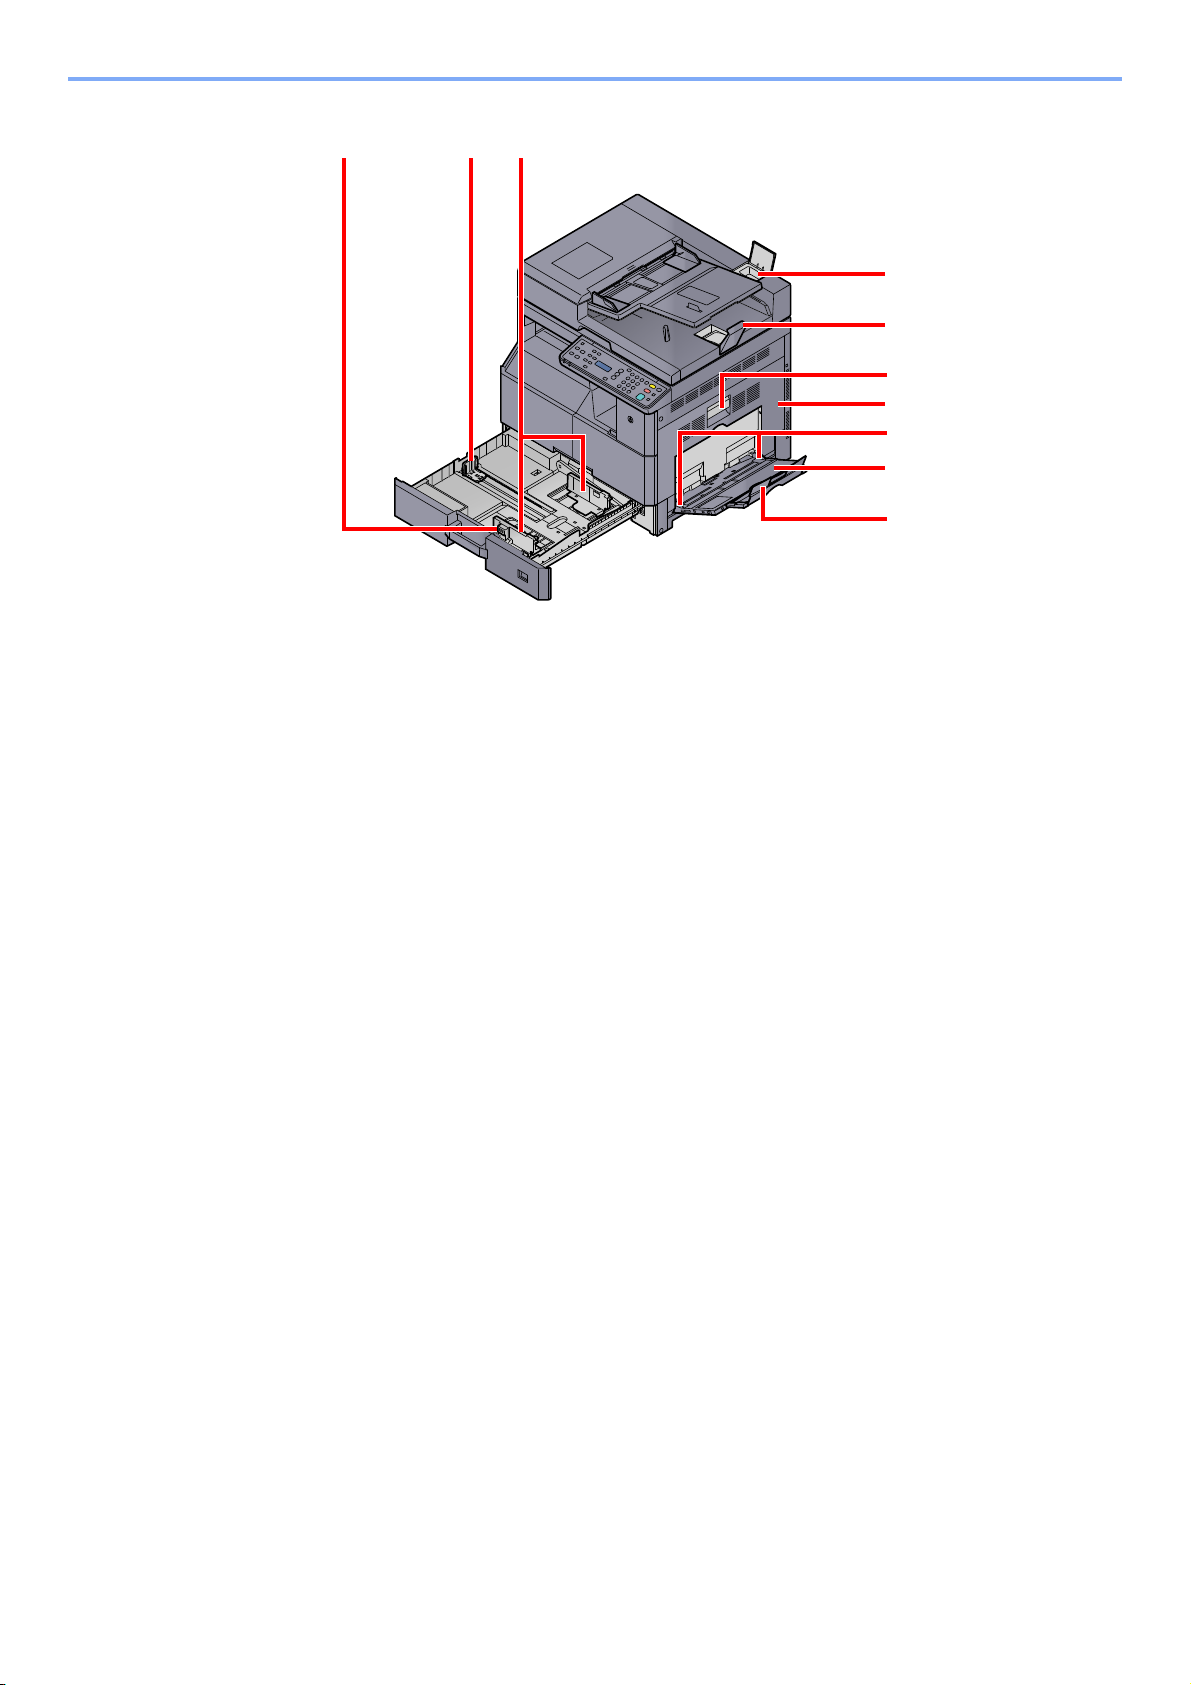
Machine Exterior
1 Document Processor (DP)
2 Original Width Guides
3 Original Table
4 Original Eject Table
5 Slit Glass
6 Original Size Indicator Plates
7Platen
Optional Equipment (page 10-2)
8 Operation Panel
9 Cassette 1
10 Front Cover
11 Power Switch
12 Handles
13 Inner Tray
2-2
Page 29
Installing and Setting up the Machine > Part Names
1514
19
20
21
16
22
23
17
18
14 Paper Width Adjusting Tab
15 Paper Length Guide
16 Paper Width Guide
17 Cleaning Cloth Compartment
18 Original Stopper
19 Right Cover 1 Lever
20 Right Cover 1
21 Paper Width Guide
22 Multi Purpose Tray
23 Support Tray Section of the Multi Purpose Tray
2-3
Page 30
Installing and Setting up the Machine > Part Names
1
4
2
3
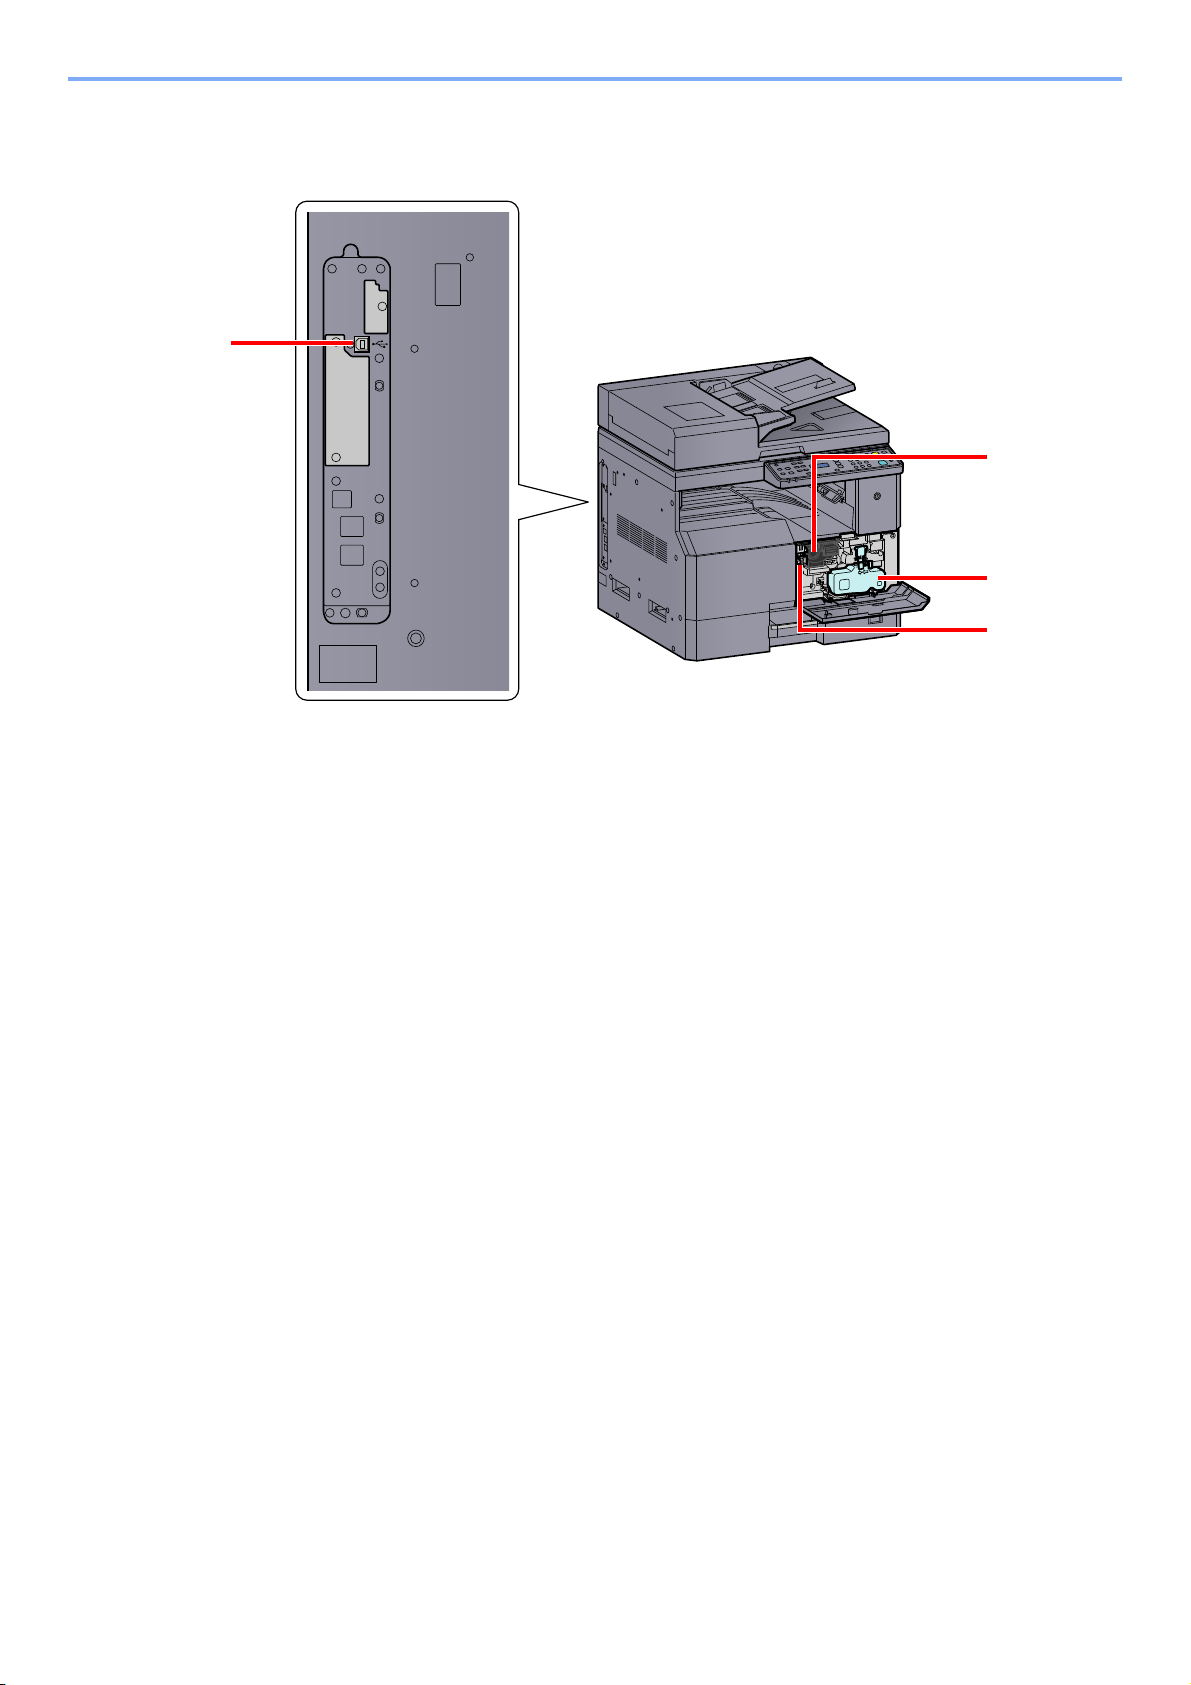
Connectors/Interior
1 USB Interface Connector
2 Toner Container
3 Toner Container Lever
4 Waste Toner Box
2-4
Page 31

Installing and Setting up the Machine > Part Names
1
6
2
3
4
5
8
9
7
With Optional Equipments Attached
1 Original Cover
2 Document Processor (DP)
3 Cassette 2
4 Cassette 3
5 Cassette 4
6 Duplex Unit
7 Right Cover 2
8 Right Cover 3
9 Right Cover 4
Optional Equipment (page 10-2)
2-5
Page 32

Installing and Setting up the Machine > Determining the Connection Method and Preparing Cables
Client Tool
• Printer settings
• Device settings
• Scanner settings
• Maintenance
Printing
Scanning
USB
MFP
Determining the Connection Method and Preparing Cables
Check how to connect the machine to a PC, and prepare the necessary cables for your environment.
Connection Example
Connect the machine to the PC by referring to the illustration below.
Preparing Necessary Cables
Prepare the necessary cables according to the interface you use.
Available Standard Interfaces
Connection Environment Function Necessary Cable
Connect a USB cable to the
machine.
Printer/Scanner USB2.0 compatible cable (Hi-Speed USB
compliant, Max. 5.0 m, Shielded)
2-6
Page 33

Installing and Setting up the Machine > Connecting Cables
IMPORTANT
IMPORTANT
Connecting Cables
Connecting USB Cable
If the power is on, turn the power switch off.
Power Off (page 2-9)
Connect the machine.
1
1 Connect the USB cable to the USB interface connector located on the left side of the body.
2 Connect the other end of the cable to the PC.
Connecting the Power Cable
Connect one end of the supplied power cable to the machine and the other end to a power outlet.
Only use the power cable that comes with the machine.
2-7
Page 34

Installing and Setting up the Machine > Power On/Off
IMPORTANT
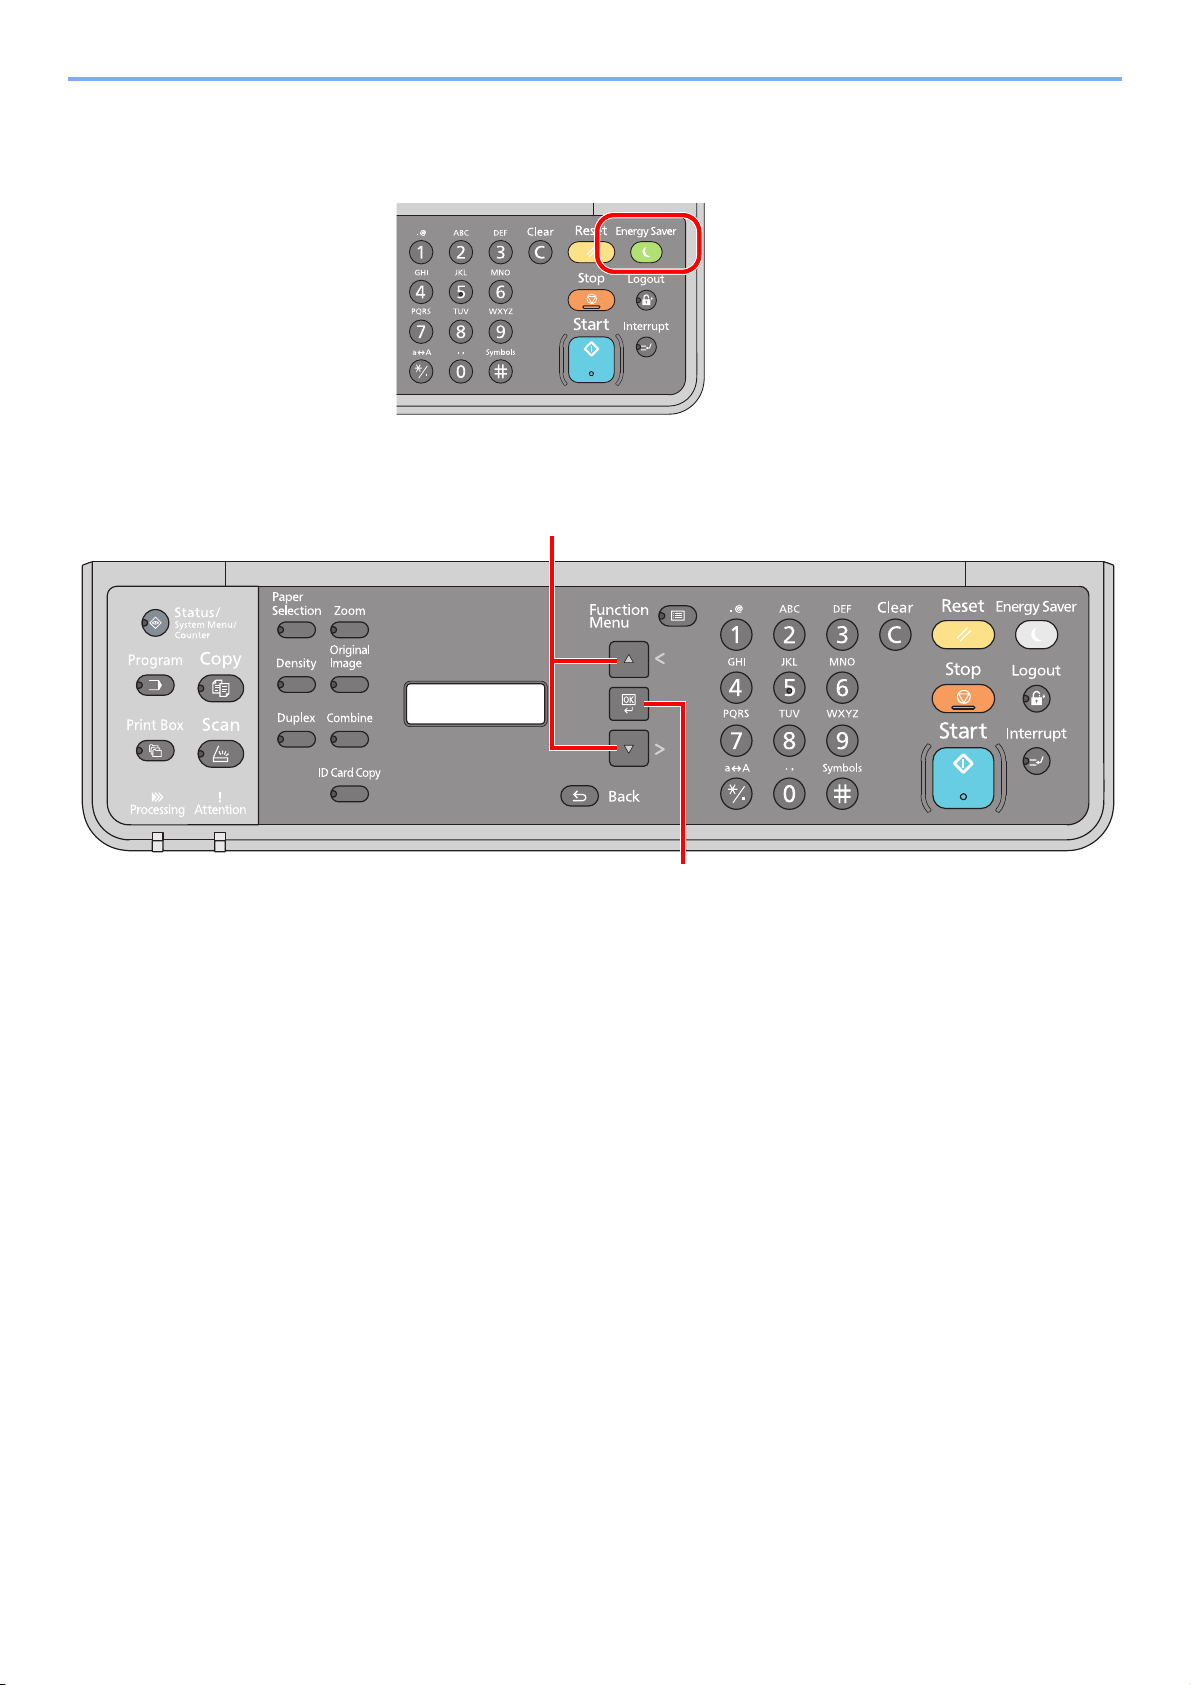
[Energy Saver] indicator
Power On/Off
Power On
When the [Energy Saver] indicator is lit... (Recovery from sleep)
Press any key on the operation panel.
When the [Energy Saver] indicator is off...
Turn the power switch on.
When turning off the power switch, do not turn on the power switch again
immediately. Wait more than 5 seconds, and then turn on the power switch.
2-8
Page 35

Installing and Setting up the Machine > Power On/Off
IMPORTANT
CAUTION
IMPORTANT
[Energy Saver] indicator
Power Off
When not turning off the power switch... (sleep)
Press the [Energy Saver] key. The [Energy Saver] indicator will light up.
Sleep and Sleep Timer (page 2-22)
When turning off the power switch...
Note that when the power switch is turned off, the machine will be unable to automatically receive print data from
computers.
When the [Processing] indicator is lit up or blinked, the machine is operating. Turning off the power switch
while the machine is operating may cause it to malfunction.
Turn the power switch off.
In case of not using the machine for an extended period of time...
If this machine will be left unused for an extended period (e.g. overnight), turn it off at the power switch. If the
machine will not be used for an even longer period of time (e.g. vacation), remove the power plug from the
outlet as a safety precaution.
Remove paper from the cassettes and seal it in the paper storage bag to protect it from humidity.
2-9
Page 36

Installing and Setting up the Machine > Installing Software
NOTE
Installing Software
Install appropriate software on your PC from the included Product Library disc if you want to use the printer function of
this machine or perform TWAIN / WIA transmission from your PC.
Software on Product Library Disc (Windows)
You can use either [Express Install] or [Custom Install] can be selected for the installation method. [Express Install] is
set as the standard installation method. For items that cannot be installed by using [Express Install], install them by
using [Custom Install]. For how to use [Custom Install], refer to Custom Install on page 2-13
Software Description Express Install
Client Tool Utility that enables current and all supported devices status, features and
settings to be accessed.
When Client Tool is installed, the following utilities are installed.
• Status Monitor (page 7-19
• Scan Destination and Print Box settings (page 7-20
• Configuration (page 7-19
)
, page 7-26)
)
.
GX XPS DRIVER Printer driver for XPS (XML Paper Specification) format developed by
Microsoft Corporation.
GX DRIVER Driver for printing files on a computer using the machine. This printer
driver enables full use of the machine’s features.
TWAIN Driver GX This driver enables scanning on the machine using a TWAIN-compliant
software application.
WIA Driver WIA (Windows Imaging Acquisition) is a function of Windows that
enables reciprocal communication between an imaging device such as a
scanner and an image processing software application. An image can be
acquired using a WIA-compliant software application, which is convenient
when a TWAIN-compliant software application is not installed in the
computer.
• Installation on Windows must be done by a user logged on with administrator privileges.
• Plug and Play is disabled on this device when in Sleep. To continue the installation, press any key on the operation
panel to wake the device from Sleep before continuing.
• WIA driver and GX XPS DRIVER cannot be installed on Windows XP.
• When connecting the computer (Host PC) connected to the machine via USB to the computer on the network (Client
PC) and using the machine as a shared printer, Client Tool needs to be installed on the Host PC.
—
2-10
Page 37

Installing and Setting up the Machine > Installing Software
NOTE
Installing Software in Windows
The following procedure is an example for installing the software in Windows 7.
You can use either [Express Install] or [Custom Install] can be selected for the installation method. [Express Install]
automatically detects connected machines and installs the required software. Use [Custom Install] if you want to
specify the printer port and select the software to be installed.
Insert the Product Library disc.
1
• Installation on Windows must be done by a user logged on with administrator privileges.
• If the "Welcome to the Found New Hardware Wizard" dialog box displays, select [Cancel].
• If the autorun screen is displayed, click [Run Setup.exe].
• If the user account management window appears, click [Yes ] ([Allow]).
Display the screen.
2
Click [View License Agreement] and read the License Agreement. Click [Accept].
The following procedures vary between [Express Install] and [Custom Install]. Go to the
appropriate step.
• Express Install (page 2-12)
• Custom Install (page 2-13)
2-11
Page 38

Installing and Setting up the Machine > Installing Software
NOTE
NOTE
1
2
3
4
Packages include the following software:
• Driver Package
GX DRIVER, TWAIN Driver GX, WIA
Driver, Client Tool
Express Install
Install using [Express Install].
1
• The machine cannot be detected unless it is on. If the computer fails to detect the
machine, verify that it is connected to the computer via a USB cable and that it is turned
on and click (Reload).
• If the Windows security window appears, click [Install this driver software anyway].
Finish the installation.
2
Configure the settings for options installed on the machine. Device settings can be
configured after the installation is completed. For details, refer to the Device Settings in the
Printer Driver User Guide on the Product Library disc.
If a system restart message appears, restart the computer by following the screen prompts.
This completes the printer driver installation procedure.
If you are installing the TWAIN driver or WIA driver, continue by configuring the Quick Scan/
TWAIN Settings on page 7-23 or Setting WIA Driver on page 2-19.
2-12
Page 39

Installing and Setting up the Machine > Installing Software
NOTE
2
3
1
1
2
3
Custom Install
Install using [Custom Install].
1
1 Select [Custom Install] tab.
Select the device to be installed, and click the arrow button to move it to the "Products to
Install" list.
The following buttons are available.
: This button is used to switch the display between icon and text display.
: This button is used to select multiple items.
: If the target device is not displayed, press this button to directly select the device to be used.
The machine cannot be detected unless it is on. If the computer fails to detect the
machine, verify that it is connected to the computer via a USB cable and that it is turned
on and click (Reload).
2 Select the device to be installed and driver to be installed, and then click the arrow button
to move it to the "Products to Install" list.
2-13
Page 40

Installing and Setting up the Machine > Installing Software
NOTE
NOTE
1
2
3 Select the utility to be installed, and then click the arrow button to move it to the "Products
to Install" list.
4 Click [Install].
If the Windows security window appears, click [Install this driver software anyway].
Finish the installation.
2
Configure the settings for options installed on the machine. Device settings can be
configured after the installation is completed. For details, refer to the Device Settings in the
Printer Driver User Guide on the Product Library disc.
If a system restart message appears, restart the computer by following the screen prompts.
This completes the printer driver installation procedure.
If you are installing the TWAIN driver or WIA driver, continue by configuring the Quick Scan/
TWAIN Settings on page 7-23 or Setting WIA Driver on page 2-19.
2-14
Page 41

Installing and Setting up the Machine > Installing Software
NOTE
NOTE
2
1
Uninstalling the Software
Perform the following procedure to delete the Software from your computer.
Uninstallation on Windows must be done by a user logged on with administrator privileges.
Display the screen.
1
Click [Start] button on the Windows and then select [All Programs], [(name of offer
company)], and [Uninstall Product Library] to display the Uninstall Wizard.
In Windows 8, select [Search] in charms, [Apps], and then [Uninstall Product Library].
Uninstall the software.
2
Place a check in the check box of the software to be deleted.
Finish uninstalling.
3
If a system restart message appears, restart the computer by following the screen prompts.
This completes the software uninstallation procedure.
• The software can also be uninstalled using the Product Library disc.
• In the installation screen, click [Uninstall], and follow the on-screen instructions to
uninstall the software.
2-15
Page 42

Installing and Setting up the Machine > Installing Software
Host PCClient PC
Network
Network
USB
Setting the Shared Printer
If the computer connected to the machine (Host PC) via USB is also connected to the computer on the network (Client
PC), printing from the computer on the network is enabled by setting the machine as the shared printer.
This section explains how to operate the device on the Host PC and on the Client PC respectively by using the setting
example on Windows 7.
Sharing Printer on the Host PC
1 Click [Start] button on the Windows, and then click [Devices and Printers].
In Windows 8, select [Settings] in charms on Desktop, and select [Control Panel], and then
[Devices and Printers].
2 Right-click the printer driver icon of the machine, and click the [Printer properties] menu of
the printer driver.
3 Select [Share this printer] on the [Sharing] tab.
4 Click the [OK] button.
Adding the Shared Printer on the Client PC
1 Click [Start] button on the Windows, and then click [Devices and Printers].
In Windows 8, select [Settings] in charms on Desktop, and select [Control Panel], and then
[Devices and Printers].
2 Click [Add a printer].
3 Click [Add a network, wireless or Bluetooth printer].
4 Select the printer added via an operation on the Host PC from the list, and then click
[Next].
5 Confirm that the printer is added, and then click [Next].
6 Print the test page as needed, and then click [Finish].
2-16
Page 43

Installing and Setting up the Machine > Installing Software
NOTE
2
1
Installing Software in Mac Computer
Only the machine's printer functionality can be used by a Mac computer.
• Installation on Mac OS must be done by a user logged on with administrator privileges.
• In the Authenticate screen, enter the name and password used to log in to the operating system.
Insert the Product Library disc.
1
Double-click the [GEN_LIB] icon.
Display the screen.
2
Double-click [OS X 10.5 or higher] and [(Brand Name) OS X 10.5+].
Install the Software.
3
Install the printer driver as directed by the instructions in the installation software.
This completes the printer driver installation.
2-17
Page 44

Installing and Setting up the Machine > Installing Software
1
2
Client Tool
Client Tool gives you quick access to common machine features and settings, plus the current status of all supported
machines.
You can also use Client Tool to order toner.
Client Tool has the following functions.
Function Description Reference Page
Print Access to printing preferences and machine driver properties. page 7-17
Device Configure Status Monitor, Scan Destination, and Print Box settings. page 7-17
Scan Configure TWAIN and Quick Scan settings.
Scan to PDF, Scan to Email and Scan to Folder can also be executed
from this tab.
Maintenance Order replacement toner. page 7-18
page 7-18
Accessing Client Tool
Start Client Tool.
In Windows 8, select [Search] in charms, [Apps], and then [Client Tool].
2-18
Page 45

Installing and Setting up the Machine > Installing Software
1
2
If managing the number of jobs scanned by using WIA
with job accounting, select the checkbox beside
[Account ID], and enter the account ID containing as
many as eight digits.
Setting WIA Driver
Register this machine to the WIA Driver. Instructions are based on interface elements as they appear in Windows 7.
Display the screen.
1
1 Click [Start] button on the Windows and enter [Scanner] in [Search programs and files].
Click [View scanners and cameras] in the search list then the Scanners and Cameras
screen appears.
In Windows 8, click [Search] in charms, and then [Settings], and enter "Scanner" in the search box.
Click [View scanners and cameras] in the search list then the Scanners and Cameras screen
appears.
2 Select the same name as this machine from WIA Drivers, and press [Properties].
Configure WIA Driver.
2
2-19
Page 46

Installing and Setting up the Machine > Administrator User Name and Password
Login User Name
1
2
Login Password
1
2
Status/Sys. Menu
Admin/Accounting
21
Administrator User Name and Password
If you are setting a function that requires administrator rights, you must enter your login user name and login password.
The factory default login user name and login password are set as shown below.
Login User Name Login Password
*1
Admin
*1 Upper case and lower case letters are distinguished (case sensitive).
Admin
*1
You can change the default login user name and login password. Refer to Administrator Setting on page 2-20
You will be unable to log in if you forget your login user name or login password.
If job accounting is enabled, you need to enter an account ID. Refer to Login/Logout on page 8-15
Enter the login user name.
1
If this screen is displayed during operations, enter the login user name using the numeric keys
and press the [OK] key.
Character Entry Method (page 10-4)
Enter the login password.
2
.
.
Enter the login password using the numeric keys and press the [OK] key.
Character Entry Method (page 10-4)
Administrator Setting
Change the login user name and login password for the administrator.
Display the screen.
1
1 Press the [Status/System Menu/Counter] key.
2 Press the [▲] or [▼] key to select [Admin/Accounting], and press the [OK] key.
2-20
Page 47

Installing and Setting up the Machine > Administrator User Name and Password
NOTE
Login User Name Login Password
Admin
*1
*1 Upper case and lower case letters are distinguished (case sensitive).
Admin
*1
Admin/Accounting
Admin. Setting
21
Admin. Setting
Admin
Login User Name
Admin
1
2
New Password
1
2
If the login user name entry screen appears during operations, log in by referring to
Administrator User Name and Password on page 2-20
The factory default login user name and login password are set as shown below.
3 Press the [▲] or [▼] key to select [Admin. Setting], and press the [OK] key.
Configure the settings.
2
1 Press the [OK] key.
.
2 Enter a new login user name using the numeric keys and press the [OK] key.
Character Entry Method (page 10-4)
3 Enter a new login password using the numeric keys and press the [OK] key.
4 Reenter the same login password for confirmation and press the [OK] key.
5 Press the [▲] or [▼] key to select [Yes], and press the [OK] key.
The login user name and login password for the administrator are changed.
2-21
Page 48

Installing and Setting up the Machine > Setting Energy Saver Function
Status/Sys. Menu
Common Settings
21
Setting Energy Saver Function
To use the Energy Saver function, configure the following settings:
• Sleep and Sleep Timer (page 2-22)
• Power Off Timer (page 2-23)
Sleep and Sleep Timer
Sleep
To enter Sleep, press the [Energy Saver] key. [Sleeping] is displayed on the message display, and all indicators on the
operation panel will go out to save power except the [Energy Saver] indicators. This status is referred to as Sleep.
If print data is received during Sleep, the print job is performed while the message display remains unlit.
To use the machine, press any key on the operation panel.
The machine will be ready to operate within 11 seconds.
Note that ambient environmental conditions, such as ventilation, may cause the machine to respond more slowly.
Sleep Timer
Sleep Timer automatically switches the machine into Sleep if left idle for a preset time.
The default preset time is 1 minute.
To change the preset sleep time, refer to Sleep Timer on page 7-12
Follow the steps below to set the sleep timer for the machine to go into sleep mode when not in use.
Display the screen.
1
1 Press the [Status/System Menu/Counter] key.
2 Press the [▲] or [▼] key to select [Common Settings], and press the [OK] key.
.
2-22
Page 49

Installing and Setting up the Machine > Setting Energy Saver Function
NOTE
Common Settings
Timer Settings
21
Login User Name Login Password
Admin
*1
*1 Upper case and lower case letters are distinguished (case sensitive).
Admin
*1
Timer Settings
Sleep Timer
21
Sleep Timer
(1 - 60)
60 min.
21
3 Press the [▲] or [▼] key to select [Timer Settings], and press the [OK] key.
If the login user name entry screen appears during operations, log in by referring to
Administrator User Name and Password on page 2-20
The factory default login user name and login password are set as shown below.
4 Press the [▲] or [▼] key to select [Sleep Timer], and press the [OK] key.
.
Set the sleep time.
2
Use the numeric key or press the [▲] or [▼] key to enter the sleep time, and press the [OK]
key.
Power Off Timer
If the machine is not used while in sleep mode, the power automatically turns off. The Power Off Timer is used to set the
time until the power turns off. The factory setting for the time until the power turns off is 1 hour.
To change the preset power off time, refer to Power Off Rule on page 7-12
To use the Power Off Timer, configure the following settings:
• Power Off Rule (page 2-23)
• Power Off Timer (page 2-24)
Power Off Rule
Follow the steps below to set whether the power automatically turns off when not used.
and Power Off Timer on page 7-12.
Display the screen.
1
1 Press the [Status/System Menu/Counter] key.
2-23
Page 50

Installing and Setting up the Machine > Setting Energy Saver Function
NOTE
Status/Sys. Menu
Common Settings
21
Common Settings
Timer Settings
21
Login User Name Login Password
Admin
*1
*1 Upper case and lower case letters are distinguished (case sensitive).
Admin
*1
Timer Settings
Power Off Rule
21
Power Off Rule
USB Cable
21
USB Cable
Off
*
21
2 Press the [▲] or [▼] key to select [Common Settings], and press the [OK] key.
3 Press the [▲] or [▼] key to select [Timer Settings], and press the [OK] key.
If the login user name entry screen appears during operations, log in by referring to
Administrator User Name and Password on page 2-20
The factory default login user name and login password are set as shown below.
.
2
Power Off Timer
4 Press the [▲] or [▼] key to select [Power Off Rule], and press the [OK] key.
5 Press the [▲] or [▼] key to select [USB Cable], and press the [OK] key.
Set the power off rule.
Press the [▲] or [▼] key to select [Off] or [On], and press the [OK] key.
Follow the steps below to select the length of time before the machine shuts off automatically when not in use.
Display the screen.
1
1 Press the [Status/System Menu/Counter] key.
2-24
Page 51

Installing and Setting up the Machine > Setting Energy Saver Function
NOTE
Status/Sys. Menu
Common Settings
21
Common Settings
Timer Settings
21
Login User Name Login Password
Admin
*1
*1 Upper case and lower case letters are distinguished (case sensitive).
Admin
*1
Timer Settings
Power Off Timer
21
Power Off Timer
1 hour
*
21
2 Press the [▲] or [▼] key to select [Common Settings], and press the [OK] key.
3 Press the [▲] or [▼] key to select [Timer Settings], and press the [OK] key.
If the login user name entry screen appears during operations, log in by referring to
Administrator User Name and Password on page 2-20
The factory default login user name and login password are set as shown below.
.
4 Press the [▲] or [▼] key to select [Power Off Timer], and press the [OK] key.
Set the power off time.
2
Press the [▲] or [▼] key to select the power off time, and press the [OK] key.
2-25
Page 52

Installing and Setting up the Machine > Checking the Counter
Status/Sys. Menu
Counter
21
Counter
Printed Pages
21
Checking the Counter
Press the [Status/System Menu/Counter] key to check the number of sheets printed and scanned.
Display the screen.
1
1 Press the [Status/System Menu/Counter] key.
2 Press the [▲] or [▼] key to select [Counter], and press the [OK] key.
Check the counter.
2
Press the [▲] or [▼] key to select the item you want to check, and press the [OK] key.
2-26
Page 53

3 Preparation before
Use
This chapter explains the following operations.
Using the Operation Panel ................................................................................................................................. 3-2
Operation Panel Keys .............................................................................................................................. 3-2
Operation Method .................................................................................................................................... 3-3
Display for Originals and Paper ............................................................................................................... 3-4
Loading Paper .................................................................................................................................................... 3-5
Before Loading Paper .............................................................................................................................. 3-6
Loading in the Cassettes ......................................................................................................................... 3-7
Loading Paper in the Multi Purpose Tray ............................................................................................... 3-10
Specifying Paper Size and Media Type ................................................................................................. 3-13
3-1
Page 54

Preparation before Use > Using the Operation Panel
Message display.
Displays the setting menu, machine status,
and error messages.
Lights or blinks when
an error occurs and a
job is stopped.
Blinks while printing
or sending/receiving.
Numeric keys.
Enter numbers and
characters.
Returns settings to their default
states.
Puts the machine to sleep
or wakes it up.
Cancels or pauses the job in
progress.
Returns to the account ID
entry screen (i.e. log out).
Clears entered
numbers and
characters.
Starts copying and scanning
operations and processing for
setting operations.
Displays the Interrupt
Copy screen.
Displays the function
menu for copy.
Increments or
decrements numbers, or
selects menu in the
message display. In
addition, moves the
cursor when entering the
characters
Finalizes a function or
menu, and numbers that
have been entered.
Returns to the previous
display.
Displays the paper
selection screen.
Displays the zoom setting
screen.
Displays the density setting
screen.
Displays the original image
setting screen.
Displays the duplex setting
screen.
Displays the combine
setting screen.
Displays the ID card Copy
screen.
Displays the following
screens.
Status / Report / Counter /
System / Admin/
Accounting / Common
Settings / Copy / Printer /
Adjust/Maint.
Displays the Program
screen.
Displays the Print Box
screen.
Displays the Copy screen.
Displays the Scan screen.
Using the Operation Panel
Operation Panel Keys
3-2
Page 55

Preparation before Use > Using the Operation Panel
Language
Deutsch
*
Status/Sys. Menu
Common Settings
Ready to copy.
A4
A4 1
Press the [Status/System Menu/Counter]
key, [Function Menu] key, or function keys
to display the setting menus.
Status/Sys. Menu
Status
When [▲] or [▼] is
displayed, press the [▲]
or [▼] key to select a
menu.
Press the [▲] or [▼] key to
select a menu.
Press the [▲] or [▼]
key to move to the
previous or next menu.
When [OK] is displayed, press the [OK]
key to confirm the selection.
Common Settings
Language
Press the [OK] key to display the
selected menu.
Language
English
*
The selected item is displayed with
[*] (asterisk) at the beginning.
Press the [OK] key to confirm
the selected setting.
Press the [▲] or [▼] key to change
the setting value.
Press the [Back] key to return to
the screen one level higher.
Setting menus
Normal screen
Canceling the menu operation
When other function keys are pressed, the
menu operation is canceled and the screen
of the corresponding function appears.
If the menu operation is performed by
pressing the [Function Menu] key, the
menu operation ends when the [Function
Menu] key is pressed again.
Ready to copy.
A4
A4 1
Operation Method
This section explains how to operate the setting menus on the message display.
Displaying the Menus and Configuring Settings
Press the [Status/System Menu/Counter] key, [Function Menu] key, or function keys to display the setting menus.
Press the [▲] key, [▼] key, [OK] key, or [Back] key to select a menu, and perform settings.
3-3
Page 56

Preparation before Use > Using the Operation Panel
Ready to copy.
A4
A4 1
Original size
Paper source
Original orientation
Paper size
Paper orientation
Display for Originals and Paper
The copy screen displays the selected paper source.
3-4
Page 57

Preparation before Use > Loading Paper
NOTE
1
5
PF-480
2
3
4
Loading Paper
Paper can be loaded in the one standard cassette and the multi purpose tray. A paper feeder is also available as an
option. (Refer to Optional Equipment on page 10-2
For the paper load methods for each cassette, refer to the page below.
.)
No. Cassettes Page
1 Cassette 1 page 3-7
2 Cassette 2 page 3-7
3 Cassette 3 page 3-7
4 Cassette 4 page 3-7
5 Multi Purpose Tray page 3-10
• The number of sheets that can be held varies depending on your environment and paper type.
• You should not use inkjet printer paper or any paper with a special surface coating. (Such paper may cause paper
jams or other faults.)
3-5
Page 58

Preparation before Use > Loading Paper
IMPORTANT
NOTE
Before Loading Paper
When you open a new package of paper, fan the sheets to separate them slightly prior to loading in the following steps.
1 Bend the whole set of sheets to swell them in the middle.
2 Hold the stack at both ends and stretch it while keeping the entire stack swelled.
3 Raise the right and left hands alternately to create a gap and feed air between the papers.
4 Finally, align the papers on a level, flat table.
If the paper is curled or folded, straighten it before loading. Paper that is curled or folded may
cause a jam.
If you copy onto used paper (paper already used for printing), do not use paper that is
stapled or clipped together. This may damage the machine or cause poor image
quality.
• Note that some paper types have a tendency to curl and may jam in the paper eject unit.
• If you use special paper such as letterhead, paper with holes or paper with pre-prints like
logo or company name, refer to Paper on page 10-7
Avoid exposing opened paper to high temperatures and high humidity as dampness can be a
cause of problems. Seal any remaining paper after loading in the multi purpose tray or
cassettes back in the paper storage bag.
If the machine will not be used for a prolonged period, protect all paper from humidity by
removing it from the cassettes and sealing it in the paper storage bag.
.
3-6
Page 59

Preparation before Use > Loading Paper
IMPORTANT
NOTE
Loading in the Cassettes
The standard cassette can hold plain paper, recycled paper or color paper.
Cassette 1 hold up to 300 sheets of plain paper (80 g/m²).
The following paper sizes are supported: A3, B4, A4, A4-R, B5, B5-R, A5-R, Folio, Ledger, Legal, Oficio II, Letter,
Letter-R, Statement-R, 8K, 16K, 16K-R, and 216 × 340 mm.
• When using media types other than plain paper (such as recycled or colored paper), always specify the
media type and paper weight settings.
Specifying Paper Size and Media Type for the Cassettes (page 3-13)
Media Type Set. (Media Type Settings) (page 7-10)
• The cassettes can hold paper with weight between 64 - 105 g/m².
• Do not load thick paper that is heavier than 106 g/m² in the cassettes. Use the multi purpose tray for paper
that is heavier than 106 g/m².
Pull the cassette out toward you until it stops.
1
Do not pull out more than one cassette at a time.
Push down on the cassette base plate and secure it.
2
3-7
Page 60

Preparation before Use > Loading Paper
IMPORTANT
IMPORTANT
Adjust the cassette size.
3
1 Holding the paper width adjusting tab, move the paper width guides to fit the paper.
Paper sizes are marked on the cassette.
Make sure that the width guides are flush against the paper. If there is space
between the guides and the paper, set the width guides again.
2 Squeeze the ends of the bottom of the paper length guide and move the guide to fit the
length of the paper.
Paper sizes are marked on the cassette.
Make sure that the length guide is flush against the paper. If there is space
between the guide and the paper, set the length guide again.
Load paper.
4
1 Set the paper strait from the upper part.
3-8
Page 61

Preparation before Use > Loading Paper
IMPORTANT
NOTE
• Load the paper with the print side facing up.
• After removing new paper from its packaging, fan the paper before loading it in
the cassette. (Refer to Before Loading Paper on page 3-6
• Before loading the paper, be sure that it is not curled or folded. Paper that is
curled or folded may cause paper jams.
• Ensure that the loaded paper does not exceed the level indicator (see illustration
below).
• The paper length and width guides must be adjusted to the paper size before
loading the paper. Loading the paper without adjusting these guides may cause
skewed feeding and paper jams.
• Be sure that the paper length and width guides rest securely against the paper. If
there is a gap, readjust the guides to fit the paper.
.
.)
2 Insert the appropriate paper size card in the slot to indicate the size of the paper inside.
Gently push the cassette back in.
5
• If the machine will not be used for a prolonged period, protect all paper from humidity by
removing it from the cassettes and sealing it in the paper storage bag.
• Select the media type (plain, recycled, etc.) loaded in the cassette.
Specifying Paper Size and Media Type for the Cassettes (page 3-13)
3-9
Page 62

Preparation before Use > Loading Paper
IMPORTANT
NOTE
Loading Paper in the Multi Purpose Tray
The multi purpose tray will hold up to 100 sheets of A4 or smaller plain paper (80 g/m²) or up to 25 sheets of plain paper
(80 g/m²) lager than A4.
The multi purpose tray accepts paper sizes from A3 to A6-R and Hagaki and from Ledger to Statement-R, 8K, 16K and
16K-R. Be sure to use the multi purpose tray when you print on any special paper.
• When using media types other than plain paper (such as recycled or colored paper), always specify the
media type and paper weight settings.
Specifying Paper Size and Media Type for the Multi Purpose Tray (MP Tray Setting) (page 3-15)
Media Type Set. (Media Type Settings) (page 7-10)
• If you are using a paper weight of 106 g/m² or more, set the media type to Thick and set the weight of the
paper you are using.
The capacity of the multi purpose tray is as follows.
• A4 or smaller plain paper (80 g/m²), recycled paper or color paper: 100 sheets
• B4 or larger plain paper (80 g/m²), recycled paper or color paper: 25 sheets
• Hagaki: 15 sheets
• OHP film: 25 sheets
• Envelope DL, Envelope C4, Envelope C5, Envelope #10, Envelope #9, Envelope #6, Monarch, Youkei 4, Youkei 2:
5 sheets
• When you load custom size paper, enter the paper size by referring to Specifying Paper Size and Media Type for the
Multi Purpose Tray (MP Tray Setting) on page 3-15.
• When you use special paper such as transparencies or thick paper, select the media type by referring to Specifying
Paper Size and Media Type for the Multi Purpose Tray (MP Tray Setting) on page 3-15.
Open the multi purpose tray.
1
Pull out the MP tray extension to match the paper size. Refer to the label which sealed inside
the machine when opening the MP tray.
3-10
Page 63

Preparation before Use > Loading Paper
IMPORTANT
Adjust the multi purpose tray size.
2
Load paper.
3
Insert the paper along the paper width guides into the tray until it stops.
After removing new paper from its packaging, fan the paper before loading it in the multipurpose tray.
Before Loading Paper (page 3-6)
• When loading the paper, keep the print side facing down.
• Curled paper must be uncurled before use.
• Straighten the top edge if it is curled.
• When loading paper into the multi purpose tray, check that there is no paper left
over in the tray from a previous job before loading the paper. If there is just a small
amount of paper left over in the multi purpose tray and you want to add more, first
remove the left-over paper from the tray and include it with the new paper before
loading the paper back into the tray.
• If there is a gap between the paper and the paper width guides, readjust the guides
to fit the paper in order to prevent skewed feeding and paper jams.
3-11
Page 64

Preparation before Use > Loading Paper
IMPORTANT
NOTE
Close the flap.
Portrait form
envelopes
Landscape form
envelopes
Cardstocks
(Hagaki)
Return postcard
(Oufukuhagaki)
Open the flap.
When you load envelopes or cardstock in the multi purpose tray
Load the paper with the print side facing down. For the procedure for printing, refer to the Printer Driver User Guide.
Example: When printing the address.
• Use unfolded return postcard (Oufukuhagaki).
• How to load envelopes (orientation and facing) will differ depending on the type of envelope. Be sure to
load it in correctly, otherwise printing may be done in the wrong direction or on the wrong face.
When you load envelopes in the multi purpose tray, select the envelope type by referring to Specifying Paper Size and
Media Type for the Multi Purpose Tray (MP Tray Setting) on page 3-15.
3-12
Page 65

Preparation before Use > Loading Paper
Status/Sys. Menu
Common Settings
21
Common Settings
Orig./Paper Set.
21
Specifying Paper Size and Media Type
The default paper size setting for cassette 1 and for the optional paper feeder (cassettes 2 to 4) is [Auto], and the default
media type setting is [Plain]. For the multi purpose tray, the default paper size setting is [A4], and the default media type
setting is [Plain].
To fix the type of paper to be used in cassettes, specify the paper size and media type setting. (Refer to Specifying
Paper Size and Media Type for the Cassettes on page 3-13.) To change the type of paper to be used in the multi
purpose tray, specify the paper size and media type setting. (Refer to Specifying Paper Size and Media Type for the
Multi Purpose Tray (MP Tray Setting) on page 3-15.)
Specifying Paper Size and Media Type for the Cassettes
To fix the type of paper to be used in cassette 1 or the optional paper feeders (cassettes 2 to 4), specify the paper size.
Also, if you use a media type other than plain paper, specify the media type setting.
Selection Item Selectable Size/Type
Cassette 1 (to 4)
Size
Cassette 1 (to 4) Type
Auto Paper size is automatically detected and selected.
Val ue: Metric, inch
Standard Sizes Available options are as follows:
Val ue: A3, A4-R, A4, A5-R, B4, B5-R, B5, Folio, 216 × 340 mm, Ledger, Letter-R,
Letter, Legal, Statement-R, Oficio II, 8K, 16K-R, 16K
*1
Select the media type.
Val ue: Plain (52 to 105 g/m²), Rough, Vellum (52 to 105 g/m²), Recycled,
Preprinted*2, Bond, Color, Prepunched*2, Letterhead*2, Thick (106 to 128 g/m²),
High Quality, Custom 1-8
*1 To change to a media type other than [Plain], refer to Media Type Set. on page 7-7. When the paper weight settings shown below
are selected, the media indicated for each setting cannot be selected.
Plain, Preprinted, Recycled, Vellum, Rough, Letterhead, Color, Preprinted, High Quality: [Heavy 1], [Heavy 2] or [Extra Heavy]
Bond, Thick: [Heavy 2] or [Extra Heavy]
Custom 1 to 8: [Extra Heavy]
*2 To print on preprinted or prepunched paper or on letterhead, refer to SpcialPaper Act. on page 7-8.
Display the screen.
1
1 Press the [Status/System Menu/Counter] key.
2 Press the [▲] or [▼] key to select [Common Settings], and press the [OK] key.
3 Press the [▲] or [▼] key to select [Orig./Paper Set.], and press the [OK] key.
3-13
Page 66

Preparation before Use > Loading Paper
NOTE
Orig./Paper Set.
Cassette 1 Set.
21
Cassette 1 Set.
Cassette 1 Size
21
Cassette 1 Size
Auto
*
21
Auto
Metric
*
21
Cassette 1 Size
Standard Size
*
21
Standard Size
A4
*
21
Cassette 1 Set.
Cassette 1 Type
21
4 Press the [▲] or [▼] key to select [Cassette 1 (to 4) Set.], and press the [OK] key.
[Cassette 2] to [Cassette 4] are shown when the optional paper feeder is installed.
Specify the paper size.
2
1 Press the [▲] or [▼] key to select [Cassette 1 (to 4) Size], and press the [OK] key.
• For automatic detection of the paper size, press the [▲] or [▼] key to select [Auto], and
press the [OK] key.
Press the [▲] or [▼] key to select [Metric] or [inch] as the unit, and press the [OK] key.
• To select the paper size, press the [▲] or [▼] key to select [Standard Size], and press the
[OK] key.
Press the [▲] or [▼] key to select the paper size, and press the [OK] key.
2 Press the [Back] key.
Specify the media type.
3
1 Press the [▲] or [▼] key to select [Cassette 1 (to 4) Type], and press the [OK] key.
3-14
Page 67

Preparation before Use > Loading Paper
Cassette 1 Type
Plain
*
21
Status/Sys. Menu
Common Settings
21
Common Settings
Orig./Paper Set.
21
2 Press the [▲] or [▼] key to select the media type, and press the [OK] key.
Specifying Paper Size and Media Type for the Multi Purpose Tray (MP Tray
Setting)
To change the type of paper to be used in the multi purpose tray, specify the paper size. When using other than a plain
paper, specify the media type.
Selection Item Selectable Size/Type
MP Tray Size Standard Sizes Available options are as follows:
Val ue: A3, A4-R, A4, A5-R, A6-R, B4, B5-R, B5, B6-R, Folio, 216 × 340 mm, Ledger,
Letter-R, Letter, Legal, Statement-R, Executive, Oficio II, 8K, 16K-R, 16K, ISO B5,
MP Tray Type
Envelope #10, Envelope #9, Envelope #6, Envelope Monarch, Envelope DL,
Envelope C5, Envelope C4, Hagaki, Oufukuhagaki, Youkei 4, Youkei 2, Custom
Size Entry Enter the size not included in the standard size.
Val ue
Metric
X: 148 to 432 mm (in 1 mm increments)
Y: 98 to 297 mm (in 1 mm increments)
Inch
X: 5.83 to 17.00" (in 0.01" increments)
Y: 3.86 to 11.69" (in 0.01" increments)
*2
Select the media type.
Val ue: Plain (52 to 105 g/m²), Transparency, Rough, Vellum (52 to 105 g/m²),
Labels, Recycled, Preprinted
Letterhead
*3
, Envelope, Thick (106 to 163 g/m²), High Quality, Custom 1-8
*3
, Bond, Cardstock, Color, Prepunched*3,
*1
*1 For instructions on how to specify the custom paper size, refer to Custom PaperSize on page 7-7.
*2 To change to a media type other than [Plain], refer to Media Type Set. on page 7-7.
*3 To print on preprinted or prepunched paper or on letterhead, refer to SpcialPaper Act. on page 7-8
Display the screen.
1
1 Press the [Status/System Menu/Counter] key.
2 Press the [▲] or [▼] key to select [Common Settings], and press the [OK] key.
3 Press the [▲] or [▼] key to select [Orig./Paper Set.], and press the [OK] key.
.
3-15
Page 68

Preparation before Use > Loading Paper
Orig./Paper Set.
MP Tray Set.
21
MP Tray Set.
MP Tray Size
21
MP Tray Size
Standard Size
*
21
Standard Size
A4
*
21
MP Tray Size
Size Entry
21
Size Entry(Y)
(98 - 297)
297 mm
2
1
Size Entry(X)
(148 - 432)
432 mm
2
1
MP Tray Set.
MP Tray Type
21
4 Press the [▲] or [▼] key to select [MP Tray Set.], and press the [OK] key.
Specify the paper size.
2
1 Press the [▲] or [▼] key to select [MP Tray Size], and press the [OK] key.
• To select the paper size, press the [▲] or [▼] key to select [Standard Size], and press the
[OK] key.
Press the [▲] or [▼] key to select the paper size, and press the [OK] key.
• To enter a size not displayed in the standard sizes, press the [▲] or [▼] key to select [Size
Entry], and press the [OK] key.
Use the numeric keys or press the [▲] or [▼] key to enter the paper length, and press the [OK] key.
Use the numeric keys or press the [▲] or [▼] key to enter the paper width, and press the [OK] key.
2 Press the [Back] key.
Specify the media type.
3
1 Press the [▲] or [▼] key to select [MP Tray Type], and press the [OK] key.
3-16
Page 69

Preparation before Use > Loading Paper
MP Tray Type
Plain
*
21
2 Press the [▲] or [▼] key to select the media type, and press the [OK] key.
3-17
Page 70

4 Printing from PC
This chapter explains the following topics:
Printing from PC ................................................................................................................................................. 4-2
Printer Driver Print Settings ..................................................................................................................... 4-5
Printer Driver Help ................................................................................................................................... 4-6
Changing the Default Printer Driver Settings (Windows 7) ...................................................................... 4-6
Canceling Jobs ........................................................................................................................................ 4-6
Using Print Box .................................................................................................................................................. 4-8
Saving Document to a Print Box .............................................................................................................. 4-9
Printing Document from Print Box ......................................................................................................... 4-10
4-1
Page 71

Printing from PC > Printing from PC
NOTE
12
Printing from PC
Follow the steps below to print documents from applications.
• To print the document from applications, install the printer driver on your computer from the supplied Product Library
disc.
• In some environments, the current settings are displayed at the bottom of the printer driver.
• When printing the cardstock or envelopes, load the cardstock or envelopes before performing the following
procedure. (Refer to When you load envelopes or cardstock in the multi purpose tray on page 3-12
Display the screen.
1
Click [File] and select [Print] in the application.
Configure the settings.
2
1 Select the machine from the "Name" menu and click the [Properties] button.
.)
4-2
Page 72

Printing from PC > Printing from PC
NOTE
2 Select the [Basic] tab.
3 Click "Print size" menu and select the paper size to use for printing.
To load the paper of size that is not included in print sizes of the machine such as cardstock or
envelopes, the paper size needs to be registered.
Registering the Original Size (page 4-3)
To print on the special paper such as thick paper or transparency, click "Media type" menu and select
the media type.
4 Click the [OK] button to return to the Print dialog box.
Click the [OK] button.
3
Start printing.
Registering the Original Size
If you loaded a paper size that is not included in the print sizes of the machine, register the paper size in the [Basic] tab
of the print settings screen of the printer driver.
The registered size can be selected from the "Print size" menu.
To execute printing at the machine, set the paper size and type in Specifying Paper Size and Media Type for the
Cassettes on page 3-13.
Display the print settings screen.
1
Register the paper size.
2
1 Click the [Basic] tab.
2 Select [Custom] in the "Print size" menu.
3 Click the [New] button.
4 Enter the name of the paper.
5 Enter the paper size.
6 Click the [OK] button.
7 In the "Print size" menu, select the paper size (name) that you registered in steps 4 to 7.
4-3
Page 73

Printing from PC > Printing from PC
NOTE
4
5
3
6
2, 7
1
8
9
8 Click [MP tray] in the "Source" menu.
9 Select the type of paper in the "Media type" menu.
If you loaded a postcard or envelope, select [Cardstock] or [Envelope] in the "Media type" menu.
4-4
Page 74

Printing from PC > Printing from PC
1
2
3
Printer Driver Print Settings
The printer driver print settings screen allows you to configure a variety of print-related settings. For more information,
refer to the Printer Driver User Guide on the Product Library disc.
No. Description
1[Quick Print] tab
Provides icons that can be used to easily configure frequently used functions. Each time you click an icon, it changes to an
image resembling the print results and applies the settings.
[Basic] tab
This tab groups basic functions that are frequently used. You can use it to configure the paper size, destination, and duplex
printing.
[Layout] tab
This tab lets you configure settings for printing various layouts, including booklet printing, combine mode, poster printing,
and scaling.
[Finishing] tab
This tab lets you offset printed media.
[Imaging] tab
This tab lets you configure settings related to the quality of the print results.
[Publishing] tab
This tab lets you create covers and inserts for print jobs and put inserts between sheets of OHP film.
[Job] tab
This tab lets you configure the settings for saving print data in a Print Box. Since saved documents can be printed directly
from the machine, this function is convenient when you wish to print a document that you don't want others to see.
[Advanced] tab
This tab lets you configure settings for adding watermarks to print data.
2[Profiles]
Printer driver settings can be saved as a profile. Saved profiles can be recalled at any time, so it's a convenient practice to
save frequently used settings.
3[Reset]
Click to revert settings to their initial values.
4-5
Page 75

Printing from PC > Printing from PC
1
2
Print Job List
0010 doc001.doc
21
Printer Driver Help
The printer driver includes Help. To learn about print settings, open the printer driver print settings screen and display
Help as explained below.
• Click the [?] button in the upper right corner of the screen and then click the item you want to know about.
• Click the item you want to know about and press the [F1] key on your keyboard.
Changing the Default Printer Driver Settings (Windows 7)
The default printer driver settings can be changed. By selecting frequently used settings, you can omit steps when
printing. For the settings, refer to Printer Driver User Guide.
1 Click [Start] button on the Windows, and then click [Devices and Printers].
2 Right-click the printer driver icon of the machine, and click the [Printer properties] menu of
the printer driver.
3 Click the [Preferences] button on the [General] tab.
4 Select the default settings and click the [OK] button.
Canceling Jobs
You can cancel jobs by pressing the [Stop] key.
When a job is being executed
The print job is canceled.
When there are waiting jobs
[Print Job List] is displayed.
1 Press the [▲] or [▼] key to select the job to cancel, and press the [OK] key.
4-6
Page 76

Printing from PC > Printing from PC
NOTE
NOTE
0010 doc001.doc
Cancel Job
21
Cancel
Yes
21
2 Press the [▲] or [▼] key to select [Cancel Job], and press the [OK] key.
Select [Details] and press the [OK] key to show the detailed information of the job.
3 Press the [▲] or [▼] key to select [Yes] in the confirmation screen, and press the [OK] key.
The job is canceled.
If a print job remains on a PC, you can cancel the job by following the steps below.
1 Double-click the printer icon ( ) displayed on the taskbar at the bottom right of the
Windows desktop to display a dialog box for the printer.
2 Click the file for which you wish to cancel printing and select [Cancel] from the
"Document" menu.
4-7
Page 77

Printing from PC > Using Print Box
NOTE
1
Select [Box 01] from the GX driver and
then execute printing. (Refer to Saving
Document to a Print Box on page 4-9.)
2
Select [Box 01] to be printed at the
machine when needed. (Refer to Printing
Document from Print Box on page 4-10.)
USB
1
Preset the Print Box by
using Client Tool. (Refer to
Default Settings on the PC
(Client Tool) on page 7-16.)
3
A print job is saved in
a Print Box in the
Host PC.
4
Select the Print Box to be
printed at the machine when
needed. (Refer to Printing
Document from Print Box on
page 4-10.)
Host PC Client PC
Select the Print Box from the
Client PC and execute
printing. (Refer to Saving
Document to a Print Box on
page 4-9.)
2
Host PC
USB Network
USB
Network
Using Print Box
Print Box is a function to temporarily save a printer document in the box on a PC and execute printing at the machine. A
job is not printed until you operate the machine, and this prevents the printed papers from being taken by someone. With
a PIN code assigned to the Print Box, you can further strengthen security.
If you configure settings in the [Print Box] of [Job] tab of the printer driver and then print, the printed data will be saved
in the box on the PC and printing can be executed at the machine.
The Print Box can be set in the Client Tool. Refer to Default Settings on the PC (Client Tool) on page 7-16
Use the Preset Print Box
Save the print data in the preset Print Box. Box 01 is set by default. When selecting Box 01 from the GX Driver and
printing, printing can be executed only by selecting Box 01 in the operation panel.
.
Use Multiple Boxes
A maximum of 10 Print Boxes (Box 01 to 10) can be set by using Client Tool. When connecting the computer (Host PC)
connected to the machine via USB to the computer on the network (Client PC) and using the machine as a shared
printer, each Client PC can use a different Print Box.
When using the machine as a shared printer, settings must be made for the shared printer. Refer to Setting the
Shared Printer on page 2-16.
4-8
Page 78

Printing from PC > Using Print Box
NOTE
Saving Document to a Print Box
Use the procedure below to save a document in the Print Box created on the Host PC. Print Box can be selected from
[Box 01] to [Box 10]. To use the other boxes or to change the default box name, configure the settings on Client Tool.
Refer to Default Settings on the PC (Client Tool) on page 7-16
In addition, a PIN code can be set for a Print Box. Since the PIN code must be entered when printing at the machine,
security is enhanced.
Start Client Tool on the Host PC.
1
Refer to Accessing Client Tool on page 2-18.
Display the screen on your PC.
2
1 Click [File] and select [Print] in the application.
2 Select the machine from the "Name" menu and click the [Properties] button.
3 Select the [Job] tab.
.
Configure the settings.
3
1 Select [Print Box] then select the Print Box where the print job should be stored from the
[Box 1] to [Box 10].
2 As necessary, set the job name for the print job.
Note that the same job name is set and the job is overwritten if [Custom] and [Replace
existing file] are set.
Start printing.
4
Select [OK] to return to the "Print" screen and click [OK] to start storing.
4-9
Page 79

Printing from PC > Using Print Box
NOTE
NOTE
Print Box
Box 01
PIN Code
2
1
Printing Document from Print Box
Print a document saved in a Print Box.
• All documents saved in the selected Print Box are printed.
• Client Tool must be running on the computer from which printing from Print Box is executed. Refer to Accessing
Client Tool on page 2-18.
• After being printed, the documents in the Print Box are deleted.
Start Client Tool on the Host PC.
1
Refer to Accessing Client Tool on page 2-18.
Press the [Print Box] key on the machine.
2
Select the Print Box.
3
Press the [▲] or [▼] key to select the Print Box.
The name set by using Client Tool appears. When using Box 01, the default name (Box 01)
is set by Client Tool. When using any of Box 02 to 10, a Box name needs to be set by using
Client Tool. If a box with no Box name is set, [----------------] appears on the message display.
If a document is stored in the box for which no Box name is set, printing from the box is not
available.
For details on setting the box name, refer to Default Settings on the PC (Client Tool) on
page 7-16.
Press the [Start] key.
4
Printing starts.
If you have assigned a PIN code to the Box with Client Tool, enter the PIN code using the
numeric keys and press the [OK] key.
4-10
Page 80

5 Operation on the
Machine
This chapter explains the following topics:
Loading Originals ............................................................................................................................................... 5-2
Placing Originals on the Platen ................................................................................................................ 5-2
Loading Originals in the Document Processor (Option) .......................................................................... 5-3
Checking the Equipment's Serial Number ......................................................................................................... 5-5
Copying .............................................................................................................................................................. 5-6
Basic Operation ....................................................................................................................................... 5-6
Interrupt Copy .......................................................................................................................................... 5-7
ID Card Copy ........................................................................................................................................... 5-8
Using Various Functions ........................................................................................................................ 5-10
Program ................................................................................................................................................. 5-25
Canceling Jobs ...................................................................................................................................... 5-29
Scanning .......................................................................................................................................................... 5-30
Scan the Image to the Specified Destination ......................................................................................... 5-32
Scan the Image by Selecting the Destination (Quick Scan) .................................................................. 5-34
Scanning using TWAIN .......................................................................................................................... 5-35
Canceling Jobs ...................................................................................................................................... 5-36
5-1
Page 81

Operation on the Machine > Loading Originals
NOTE
CAUTION
IMPORTANT
A3 A3 1
Align it flush against the original
size indicator plates with the back
left corner as the reference point.
Put the scanning side facedown.
Original size
* When selecting the copying
function
Loading Originals
Placing Originals on the Platen
You may place books or magazines on the platen in addition to ordinary sheet originals.
• For details on original size, refer to Original Size on page 5-19.
• For details on original orientation, refer to Orig. Orientation (Original Orientation) on page 5-20
Do not leave the optional original cover or document processor open as there is a danger of personal injury.
• Do not push the optional original cover or document processor forcefully when you close it. Excessive
pressure may crack the platen glass.
• When placing books or magazines on the machine, do so with the optional original cover or document
processor in the open position.
.
5-2
Page 82

Operation on the Machine > Loading Originals
IMPORTANT
Loading Originals in the Document Processor (Option)
The optional document processor automatically scans each sheet of multiple originals. Both sides of two-sided originals
are scanned.
Originals Supported by the Document Processor
The document processor supports the following types of originals.
Detail Document Processor
Weight 1-sided: 45 to 120 g/m²
2-sided: 50 to 120 g/m²
Sizes Maximum: Ledger/A3
Minimum: Statement-R/A5-R
No. of sheets Plain paper (50 to 80 g/m²), Colored paper, Recycled paper, High Quality: 50 sheets
(Mixed size originals: 30 sheets)
Thick paper (120 g/m²): 33 sheets
Art paper: 1 sheet
Originals Not Supported by the Document Processor
Do not use the document processor for the following types of originals.
• Soft originals such as vinyl sheets
• Transparencies such as OHP film
• Carbon paper
• Originals with very slippery surfaces
• Originals with adhesive tape or glue
• Wet originals
• Originals with correction fluid which is not dried
• Irregularly shaped (non-rectangular) originals
• Originals with cut-out sections
• Crumpled paper
• Originals with folds (Straighten the folds before loading. Failure to do so may cause the originals to jam.)
• Originals bound with clips or staples (Remove the clips or staples and straighten curls, wrinkles or creases before
loading. Failure to do so may cause the originals to jam.)
How to Load Originals
• Before loading originals, be sure that there are no originals left on the original eject table. Originals left on
the original eject table may cause the new originals to jam.
• Do not make an impact on the document processor top cover, such as aligning the originals on the top
cover. It may cause an error in the document processor.
5-3
Page 83

Operation on the Machine > Loading Originals
NOTE
IMPORTANT
A3 A3 1
Original size
* When selecting the copying function
Adjust the original width guides.
1
Place the originals.
2
Put the side to be scanned (or the first side of two-sided originals) face-up. Slide the leading
edge into the document processor as far as it will go.
• For details on original size, refer to Original Size on page 5-19.
• For details on original orientation, refer to Orig. Orientation (Original Orientation) on page
5-20.
• Confirm that the original width guides exactly fit the originals. If there is a gap,
readjust the original width guides. The gap may cause the originals to jam.
• Ensure that loaded originals do not exceed the level indicator. Exceeding the
maximum level may cause the originals to jam.
• Originals with punched holes or perforated lines should be placed in such a way
that the holes or perforations will be scanned last (not first).
5-4
Page 84

Operation on the Machine > Checking the Equipment's Serial Number
NOTE
1855
Checking the Equipment's Serial Number
The equipment's serial number is printed in the location shown in the figure.
You'll need the equipment's serial number when contacting your Service Representative. Please check the number
before contacting your Service Representative.
5-5
Page 85

Operation on the Machine > Copying
NOTE
A3 A3 1
Original size Paper size
Copying
Basic Operation
Follow the steps as below for basic copying.
Press the [Copy] key.
1
Place the originals.
2
Check the original size and the paper size.
• For loading instructions, refer to Loading Originals on page 5-2.
• For selecting the paper source, refer to Paper Selection on page 5-12
Select the functions.
3
Select the copier functions to use.
Using Various Functions (page 5-10)
Use the numeric keys to enter the copy quantity.
4
Specify the desired number up to 999.
.
Press the [Start] key.
5
Copying starts.
5-6
Page 86

Operation on the Machine > Copying
NOTE
NOTE
Interrupt Copy
This function allows you to pause the current jobs in progress when you need to make copies immediately.
When the interruption copy ends, the machine resumes the paused print jobs.
If the machine is left unused for 60 seconds in interrupt copy mode, interrupt copying is automatically cancelled and
printing resumes. You can change the delay until interrupt copying is canceled. Change the delay as required.
Interrupt Clear (page 7-12)
Press the [Interrupt] key.
1
The current print job is temporarily interrupted.
Place the originals onto the machine for interrupt copy.
2
For loading instructions, refer to Loading Originals on page 5-2.
Select the functions.
3
Select the copier functions to use.
Using Various Functions (page 5-10)
Press the [Start] key.
4
Interrupt copying starts.
When interrupt copying ends, press the [Interrupt] key.
5
The machine resumes the paused print jobs.
5-7
Page 87

Operation on the Machine > Copying
NOTE
ID card Copy
On
21
ID Card Copy
Use to copy the front and back sides of a license or other ID card on one sheet of paper.
Configure the settings.
1
1 Press the [ID Card Copy] key.
2 Press the [▲] or [▼] key to select [On], and press the [OK] key.
Place the original.
2
Align with the ID Card marks on the Original Size Indicator Plates.
For loading instructions, refer to Loading Originals on page 5-2.
Select the functions.
3
Select the copier functions to use.
Using Various Functions (page 5-10)
Use the numeric keys to enter the copy quantity.
4
Refer to Basic Operation on page 5-6.
5-8
Page 88

Operation on the Machine > Copying
Turn over the card.
Put it on same place.
Press Start Key.
(Displayed alternately)
Press the [Start] key.
5
One side of the card is scanned.
Turn the original over.
6
Align with the ID Card marks on the Original Size Indicator Plates.
Press the [Start] key.
7
The front and back sides of the card are copied on one sheet of paper.
5-9
Page 89

Operation on the Machine > Copying
2
Selects the item displayed or changes the
numeric value.
1
Confirms the selected setting.Cancels the current menu setting to
return to the menu one level higher.
Using Various Functions
To configure the settings for functions, press the key of the function you want to configure. You can also press the
[Function Menu] key to select from other functions displayed on the message display.
Operation Method (page 3-3).
For details on each function, see the table below.
Key Function Description
Paper Selection Select the cassette or multi-purpose tray that contains
Zoom Adjusts the zoom to reduce or enlarge the image. page 5-13
Density Adjust density. page 5-14
Original Image Select original image type. page 5-14
*1
Duplex
Combine Combines 2 or 4 original sheets into 1 printed page. page 5-17
the required paper size.
Prints 1-sided or open book originals to 2-sided, or 2sided or open book originals to 1-sided.
Reference
page
page 5-12
page 5-14
ID card Copy Use to copy the front and back sides of a license or
other ID card on one sheet of paper.
*1 The optional duplex unit and document processor are required for some of the duplex modes.
5-10
page 5-8
Page 90

Operation on the Machine > Copying
Key Function Description
Collate/Offset Offsets the output by page or set. page 5-19
Original Size Specify the original size to be scanned. page 5-19
Orig. Orientation Select the orientation of the original document top edge
to scan correct direction.
*1
Mixed Size Orig.
EcoPrint Saves toner when printing. page 5-21
Backgrnd Density Removes dark background from originals, such as
Margin Adds margin (white space) when printing to allow you
Border Erase Erases black borders around original when printing. page 5-23
Continuous Scan Scans a large number of originals in separate batches
Auto Rotation Rotates image 90 degrees when original and paper
Scans all sheets in the document processor, even if
they are of different sizes.
newspapers.
to bound copies.
and then produce as one job.
source sizes are the same, but their orientation is
different.
Reference
page
page 5-20
page 5-21
page 5-21
page 5-22
page 5-24
page 5-24
File Name Entry Adds a file name. page 5-24
*1 The optional document processor is required.
5-11
Page 91

Operation on the Machine > Copying
NOTE
NOTE
Paper Selection
Select the cassette or multi-purpose tray that contains the required paper size.
Specify in advance the size and type of the paper loaded in the cassette (refer to Specifying Paper Size and Media
Type on page 3-13).
Item Value Description
Auto The paper matching the size of the original is
selected automatically.
Cassette 1 (to 4)
MP Tray Feed paper from the multi purpose tray.
MP Tray Set. Before selecting [MP Tray], you need to select
*1
Feed paper from cassette 1 (to 4).
[MP Tray Set.] and specify the paper size and
media type.
Standard Size A3, A4-R, A4, A5-R, A6-R, B4, B5-R, B5, B6-R,
Folio, 216 × 340 mm, Ledger, Letter-R, Letter,
Legal, Statement-R, Executive, Oficio II, 8K, 16K,
16K-R, ISO B5, Envelope #10, Envelope #9,
Envelope #6, Envelope Monarch, Envelope DL,
Envelope C5, Envelope C4, Hagaki,
Oufukuhagaki, Youkei 4, Youkei 2, Custom
Size Entry
Media Type Plain, Transparency, Rough, Vellum, Labels,
*1 Cassette 2 to Cassette 4 are displayed when the optional paper feeder is installed.
*2 For instructions on how to specify the custom paper sizes, refer to Custom PaperSize on page 7-7.
*3 The input units can be changed in System Menu. For details, refer to Measurement on page 7-11
Set the sizes of [Y] (vertical).
Metric: 98 to 297 mm (in 1 mm increments)
Inch: 3.86 to 11.69" (in 0.01" increments)
Set the sizes of [X] (horizontal).
Metric: 148 to 432 mm (in 1 mm increments)
Inch: 5.83 to 17.00" (in 0.01" increments)
Recycled, Preprinted, Bond, Cardstock, Color,
Prepunched, Letterhead, Envelope, Thick, High
Quality, Custom 1 to 8
*2
Select from the standard size.
Enter the size not included in the standard size.
Use the numeric keys or press the [▲] or [▼] key
to set th
key.
Set the sizes of [X] (horizontal) as well.
Select the media type.
Displayed after [Standard Size] or [Size Entry] is
set in [MP Tray Set].
e sizes of
[Y]
(vertical) and
.
*3
press the [OK]
• You can conveniently select in advance the size and type of paper that will be used often and set them as default
(refer to Specifying Paper Size and Media Type on page 3-13
).
• If the specified size of paper is not loaded in the paper source cassette or multi purpose tray, [Load paper in
cassette # (MP tray).] appears. Refer to Responding to Messages on page 9-11
.
5-12
Page 92

Operation on the Machine > Copying
A4
A3: 141%
A5: 70%
Zoom
Adjust the zoom to reduce or enlarge the image. The following zoom options are available.
Item Value Description
100% Reproduces the original size.
Auto Adjusts the image to match the paper size.
Standard Zoom Reduces or enlarges at preset
Metric 100%
90% Folio>>A4
75% 11×15" >>A4
70% A3>>A4 A4>>A5
50%
25% Min.
400% Max.
200% A5>>A3
141% A4>>A3 A5>>A4
127% Folio>>A3
106% 11 × 15">>A3
magnifications.
Press the [▲] or [▼] key to select the
desired magnification.
Metric (Asia
Pacific)
Inch 100%
Zoom Entry 25 to 400% (in 1% increments) Manually reduces or enlarges the original
100%
86% A3>>B4 A4>>B5
81% B4>>A4 B5>>A5
70% A3>>A4 B4>>B5
50%
25% Min.
78% Legal>>Letter
77% Ledger>>Legal
64% Ledger>>Letter
50% Ledger>>STMT
25% Min.
400% Max.
200% A5 >> A3
141% A4>A3 B5>B4
122% A4>>B4 A5>>B5
115% B4>>A3 B5>>A4
400% Max.
200% STMT>>Ledger
154% STMT>>Legal
129% Letter>Ledger
121% Legal>>Ledger
image in 1% increments between 25% and
400%.
Use the numeric keys or press the [▲] or
[▼] key to enter the any magnification.
Character Entry Method (page 10-4)
5-13
Page 93

Operation on the Machine > Copying
Original Copy
ghi
def
abc
ghi
abc
def
ghi
abc
def
Original
Copy
AB
Original
Copy
Density
Adjust density.
Press the [▲] or [▼] key to select [Darker +3] to [Lighter -3].
Original Image
Select original image type.
Item Description
Text+Photo Best for mixed text and photo documents.
Photo Best for photos taken with a camera.
Text Sharply renders pencil text and fine lines.
Duplex
Produces two-sided copies.
You can also create single-sided copies from two-sided originals or originals with facing pages such as books. The
following modes are available.
One-sided to Two-sided
Produces two-sided copies from one-sided originals. In case of an odd
number of originals, the back side of the last copy will be blank. The optional
duplex unit is required.
The following binding options are available.
A Original Left/Right to Binding Left/Right: Images on the second sides are
not rotated.
B Original Left/Right to Binding Top: Images on the second sides are rotated
180 degrees. Copies can be bound on the top edge, facing the same
orientation when turning the pages.
Two-sided to One-sided
Copies each side of a two-sided original onto two individual sheets.
The optional document processor is required.
The following binding options are available.
Binding Left/Right: Images on the second sides are not rotated.
Binding Top: Images on the second sides are rotated 180 degrees.
5-14
Page 94

Operation on the Machine > Copying
NOTE
NOTE
NOTE
Original Copy
Original Copy
Original Copy
Two-sided to Two-sided
Book to One-sided
Produces two-sided copies from two-sided originals. The optional duplex unit
and document processor are required.
The paper sizes supported in Two-sided to Two-sided mode are A3, B4,
A4, A4-R, B5, B5-R, A5-R, Ledger, Legal, Letter, Letter-R, Executive,
Statement-R, Oficio II, 216 × 340 mm and Folio.
Produces a 1-sided copy of a 2-sided or open book original.
The following binding options are available.
Binding Left: Originals with facing pages are copied from left to right.
Binding Right: Originals with facing pages are copied from right to left.
• The original sizes supported in Book to One-sided mode are Ledger,
Letter-R, A3, A4-R, A5-R, B4, B5-R and 8K.
• The supported paper sizes are A4, B5, Letter and 16K. You may change
paper size and reduce or enlarge copy to match that size.
Book to Two-sided
Produces two-sided copies from an open book original with facing pages.
The optional duplex unit is required.
• The original sizes supported in Book to Two-sided mode are A3, B4,
A4-R, B5-R, A5-R, Ledger, Letter-R and 8K.
• The supported paper sizes are A4, B5 and Letter.
Prints 1-sided or open book originals to 2-sided, or 2-sided or open book originals to 1-sided. Select the binding
orientation for original and finished documents.
Item Value Description
1-sided>>1-sided ― Disables the function.
1-sided>>2-sided ― Copies the original with the default setting. For the default
2-sided>>1-sided
settings, refer to Function Default on page 7-13
2-sided>>2-sided
.
Book>>1-sided
Book>>2-sided
5-15
Page 95

Operation on the Machine > Copying
Item Value Description
Advanced Duplex ― Changes the settings.
1-sided>>
2-sided
2-sided>>
1-sided
2-sided>>
2-sided
Book>>
1-sided
Finish. Binding Left/Right, Top Select the binding orientation of copies, and press the [OK]
key.
Orig. Orientation Top Edge on Top, Top
Edge on Left
Orig. Binding Left/Right, Top Select the binding orientation of originals, and press the [OK]
Orig. Orientation Top Edge on Top, Top
Edge on Left
Orig. Binding Left/Right, Top Select the binding direction of originals, and press the [OK]
Finish. Binding Left/Right, Top Select the binding orientation of copies, and press the [OK]
Orig. Orientation Top Edge on Top, Top
Edge on Left
Orig. Binding Left, Right Select the binding direction of originals, and press the [OK]
Select the orientation of the original document top edge to
scan correct direction. Choose orientation of the originals,
either [Top Edge on Top] or [Top Edge on Left]. Then press
the [OK] key.
key.
Select the orientation of the original document top edge to
scan correct direction. Choose orientation of the originals,
either [Top Edge on Top] or [Top Edge on Left]. Then press
the [OK] key.
key.
key.
Select the orientation of the original document top edge to
scan correct direction. Choose orientation of the originals,
either [Top Edge on Top] or [Top Edge on Left]. Then press
the [OK] key.
key.
Book>>
2-sided
Orig. Binding Left, Right Select the binding direction of originals, and press the [OK]
key.
When placing the original on the platen, consecutively replace each original and press the [Start] key.
After scanning all originals, press the [OK] key to start copying.
5-16
Page 96

Operation on the Machine > Copying
None Dotted LineSolid Line Positioning Mark
Combine
Combines 2 or 4 original sheets into 1 printed page. You can select the page layout and the type of boundary lines
around the pages.
The following types of the boundary lines are available.
Item Value Description
Off ― Disables the function.
2 in 1 ― Copies the original with the default setting. For the
4 in 1
default settings, refer to Function Default on page 7-
13.
Advanced Combine ― Changes the settings.
2 in 1 Layout L to R/T to B, R to L Select the page layout of scanned originals, and press
the [OK] key.
Border Line None, Solid Line, Dotted Line,
Positioning Mark
Orig. Orientation Top Edge on Top, Top Edge
on Left
4 in 1 Layout Right then Down, Down then
Right, Left then Down, Down
then Left
Border Line None, Solid Line, Dotted Line,
Positioning Mark
Orig. Orientation Top Edge on Top, Top Edge
on Left
Select the page boundary line, and press the [OK] key.
Select the orientation of the original document top
edge to scan correct direction.
Choose orientation of the originals, either [Top Edge
on Top] or [Top Edge on Left]. Then press the [OK]
key.
Select the page layout of scanned originals, and press
the [OK] key.
Select the page boundary line, and press the [OK] key.
Select the orientation of the original document top
edge to scan correct direction.
Choose orientation of the originals, either [Top Edge
on Top] or [Top Edge on Left]. Then press the [OK]
key.
5-17
Page 97

Operation on the Machine > Copying
NOTE
Layout image
Value Image
2 in 1 L to R/T to B
R to L
4 in 1 Right then Down
Down then Right
Left then Down
Down then Left
• The paper sizes supported in Combine mode are A3, A4-R, A4, A5-R, B4, B5-R, B5, Folio, 216 × 340 mm, Ledger,
Letter-R, Letter, Legal, Statement-R, Oficio II, 8K, 16K-R and 16K.
• When placing the original on the platen, be sure to copy the originals in page order.
• If the original size is not set, the screen for setting the original size is displayed. Refer to Original Size on page 5-19
.
5-18
Page 98

Operation on the Machine > Copying
NOTE
NOTE
NOTE
Collate/Offset
Offsets the output by page or set.
Value Image Description
Off ― Disables the function.
Collate Only Scans multiple originals and delivers complete sets of copies
as required according to page number.
Offset Each Page When offsetting is used, printed copies are produced after
rotating each page by 90 degrees.
To use offsetting, the same size of paper as the selected paper
tray must be loaded in a different orientation in a different
paper tray.
The paper sizes supported in Offset are A4, B5, Letter and
16K.
Offset Each Set When offsetting is used, printed copies are produced after
rotating each set by 90 degrees.
To use offsetting, the same size of paper as the selected paper
tray must be loaded in a different orientation in a different
paper tray.
The paper sizes supported in Offset are A4, B5, Letter and
16K.
Original Size
Specify the original size to be scanned.
Item Description
Auto Have the size of original detected automatically.
A3, A4-R, A4, A5-R, A5, A6-R, B4, B5-R, B5, B6-R, B6, Folio,
216 × 340 mm, Ledger, Letter-R, Letter, Legal, Statement-R,
Statement, 11 × 15", Oficio II, 8K, 16K-R, 16K, Hagaki,
Oufukuhagaki, Custom
*1 For instructions on how to specify the custom original sizes, refer to Custom Orig.Size on page 7-7.
*1
Select from standard sizes.
Be sure to always specify the original size when using custom size originals.
5-19
Page 99

Operation on the Machine > Copying
NOTE
Original Original orientation
Original Original orientation
Orig. Orientation (Original Orientation)
Select the orientation of the original document top edge to scan correct direction.
To use any of the following functions, the document's original orientation must be set.
•Duplex
• Margin
• Combine
Select original orientation from [Top Edge on Top] or [Top Edge on Left].
Item Image
Top Edge on Top
Top Edge on Left
The default setting for Original Orientation can be changed. Refer to Function Default on page 7-13 for details.
5-20
Page 100

Operation on the Machine > Copying
NOTE
Mixed Size Orig. (Mixed Size Originals)
Scans multiple sheets of the same width using the document processor.
The optional document processor is required.
Value Description
Off Disables the function.
On Enables Mixed Size Originals.
EcoPrint
EcoPrint saves toner when printing. Use this function for test prints or any other occasion when high quality print is not
required.
Value Description
Off Disables the function.
On Enables EcoPrint.
Backgrnd Density (Background Density)
Removes dark background from originals, such as newspapers.
Value Description
Off Disables the function.
On Enables Background Density.
5-21
 Loading...