

Page 1

IMPORTANT SAFETY INSTRUCTIONS
Read all warnings and instructions. Save these instructions.
EVIDENCE Sync
User Manual
TASER
For use with:
AXON® body and AXON flex® cameras
TASER CAM™ and TASER CAM HD recorders
X2™, X26™, and X26P™ conducted electrical weapons
The most up-to-date warnings and instructions are available at www.TASER.com.
MMU0051 Rev: C
Page 1 of 86
Page 2

Contents
Chapter 1: Introduction ................................................................................................................................................... 4
A Brief Look at EVIDENCE Sync ............................................................................................................................... 4
Buttons ....................................................................................................................................................................... 6
Terms and Concepts.................................................................................................................................................. 7
Download .............................................................................................................................................................. 7
Event (CEW) ......................................................................................................................................................... 7
Filter ...................................................................................................................................................................... 8
Firmware ............................................................................................................................................................... 8
Muted .................................................................................................................................................................... 8
Operating Mode .................................................................................................................................................... 8
Upload ................................................................................................................................................................... 8
EVIDENCE Sync Operating Modes ........................................................................................................................... 8
Online .................................................................................................................................................................... 8
Offline .................................................................................................................................................................... 8
MDT ...................................................................................................................................................................... 8
Chapter 2: Installing EVIDENCE Sync Software .......................................................................................................... 10
Chapter 3: EVIDENCE Sync Settings .......................................................................................................................... 11
Auto-Update ............................................................................................................................................................. 11
Changing the Destination Folder for Downloaded Files ........................................................................................... 12
Scheduling Automatic Uploads ................................................................................................................................ 14
Configuring Upload Bandwidth ................................................................................................................................ 16
Chapter 4: Connecting TASER Devices to a Computer ............................................................................................... 18
Connecting CEWs to a Computer ............................................................................................................................ 18
Connecting TASER CAM Recorders to a Computer. ............................................................................................... 18
Connecting TASER AXON Cameras to a Computer................................................................................................ 19
Chapter 5: Using EVIDENCE Sync with TASER CAM Recorders ............................................................................... 20
Viewing Records ...................................................................................................................................................... 20
Online Mode ............................................................................................................................................................ 20
Previewing TASER CAM Videos with EVIDENCE Sync Software (Online) ......................................................... 20
Uploading TASER CAM Records to EVIDENCE.com Services and Adding Categories to Videos with
EVIDENCE Sync Software (Online) .................................................................................................................... 23
Viewing Uploaded TASER CAM Videos.............................................................................................................. 26
Offline Mode ............................................................................................................................................................ 28
Previewing TASER CAM Videos with EVIDENCE Sync (Offline) ........................................................................ 28
Downloading TASER CAM Videos with EVIDENCE Sync (Offline) .................................................................... 31
Viewing Downloaded Videos (Offline) ................................................................................................................. 33
Viewing Videos in MDT Mode ............................................................................................................................. 34
Chapter 6: Using EVIDENCE Sync with TASER AXON Cameras ............................................................................... 36
Online Mode ............................................................................................................................................................ 36
Previewing TASER AXON Videos with EVIDENCE Sync (Online) ..................................................................... 36
Adding Categories to Records with EVIDENCE Sync (Online) ........................................................................... 38
Uploading Records to EVIDENCE.com with EVIDENCE Sync (Online).............................................................. 39
Offline Mode ............................................................................................................................................................ 41
Page 2 of 86
Page 3

Previewing TASER AXON Videos with EVIDENCE Sync (Offline) ..................................................................... 41
Editing the Title of a File with EVIDENCE Sync (Offline)..................................................................................... 44
Downloading TASER AXON Videos with EVIDENCE Sync (Offline) .................................................................. 45
Viewing Downloaded Videos with EVIDENCE Sync (Offline) .............................................................................. 46
Removing Videos from a TASER AXON Camera (Offline) .................................................................................. 47
MDT Mode ............................................................................................................................................................... 49
Loading Categories with EVIDENCE Sync (MDT) .............................................................................................. 49
Adding Categories (MDT) .................................................................................................................................... 50
Chapter 7: Uploading Other File Types to EVIDENCE.com ......................................................................................... 53
Chapter 8: Viewing CEW Logs ..................................................................................................................................... 56
Introduction to CEW Records .................................................................................................................................. 56
Online and Offline PDF Reports .......................................................................................................................... 56
Viewing CEW Records with EVIDENCE Sync (Online) ........................................................................................... 58
Viewing CEW Records with EVIDENCE Sync (Offline and MDT) ............................................................................ 58
Chapter 9: Configuring Your TASER CAM Recorder, TASER AXON Camera, or CEW .............................................. 60
Configuring TASER CAM Recorders and Updating the Firmware (Online) ............................................................. 60
Configuring TASER CAM Recorders and Updating the Firmware (Offline) ............................................................. 62
Configuring TASER CAM Recorders (MDT) ............................................................................................................ 64
Configuring Your CEW and Updating the Firmware (Online) ................................................................................... 64
Configuring Your CEW and Updating the Firmware (Offline) ................................................................................... 66
Configuring Your TASER AXON Camera and Updating the Firmware (Online) ...................................................... 69
Configuring Your TASER AXON Camera and Updating the Firmware (Offline and MDT) ....................................... 71
Chapter 10: Filtering Records ...................................................................................................................................... 74
Filtering CEW Logs .................................................................................................................................................. 74
Filtering TASER CAM Videos .................................................................................................................................. 77
Filtering AXON Videos ............................................................................................................................................. 80
Sorting AXON Videos .......................................................................................................................................... 84
Chapter 11: Connecting Multiple TASER Devices to EVIDENCE Sync ....................................................................... 85
Page 3 of 86
Page 4
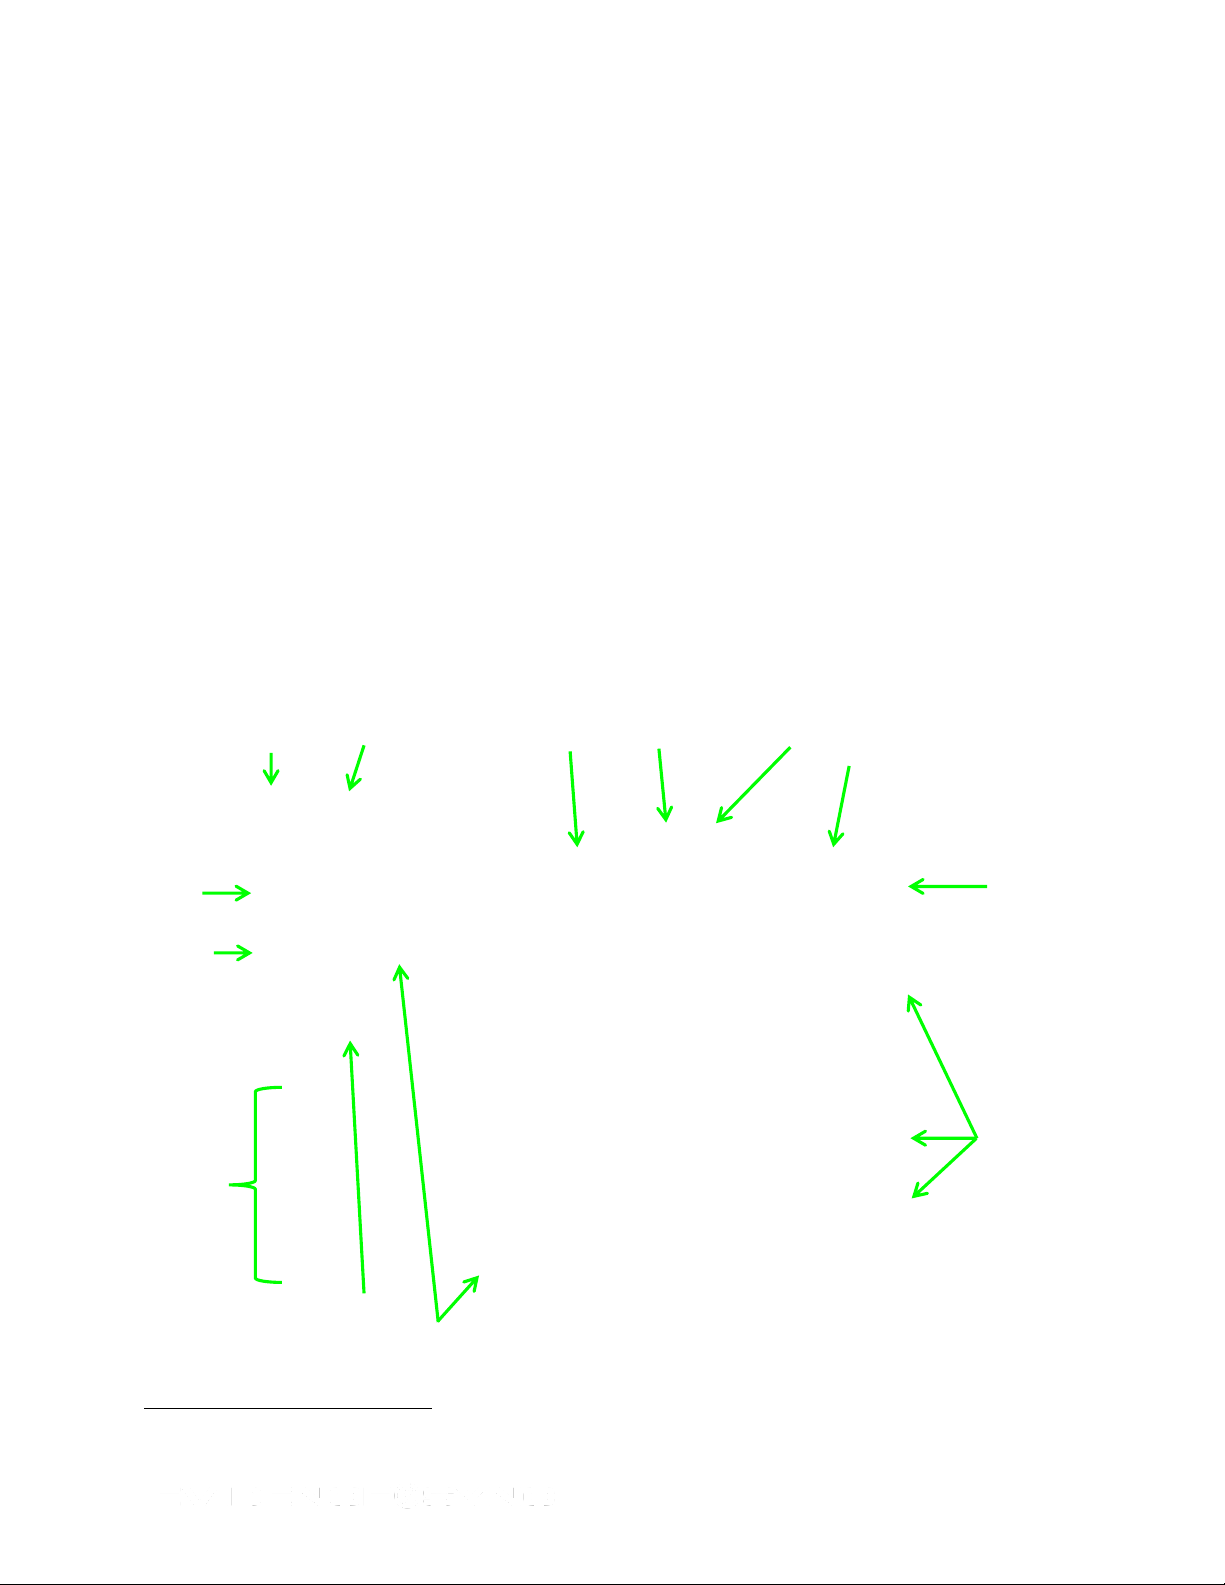
1
Operating mode selection
(online, offline, MDT)
Adjust upload performance
View device logs
Current operating mode
EVIDENCE Sync version
Configure the device
Filter the
information
displayed
on the
screen
Download
a PDF
copy of the
pulse log
graphs
(X2/X26P
CEWs)
Download a PDF copy of the CEW logs to your computer
Upload all videos
to EVIDENCE.com
Selected
device (has
a white
border
around it)
Navigation
pane for
uploading
files not
produced
by TASER
devices
Collapse/
expand
section
Chapter 1: Introduction
EVIDENCE Sync software enables you to transfer device event records and video from a
TASER X2, X26, or X26P conducted electrical weapon (CEW),1 TASER CAM or TASER
CAM HD recorder, or AXON body or AXON flex camera to a computer or the
EVIDENCE.com website. The software also enables you to adjust settings on these TASER
devices. EVIDENCE Sync is available only for use with Microsoft Windows-based computers.
This manual is intended for EVIDENCE Sync end users. For information on installing and
configuring EVIDENCE Sync for an organization, see the TASER AXON System End-to-End
Deployment Guide.
A Brief Look at EVIDENCE Sync
Figure 1 and Figure 2 show two typical EVIDENCE Sync screens. Figure 1 is an EVIDENCE
Sync screen on a computer connected to an X2 CEW equipped with a TASER CAM HD
recorder. The CEW is the selected device, meaning the CEW information is displayed on the
screen. The CEW’s firing records are available, with information such as the discharge
duration, cartridge bay activity, temperature, and CEW battery percentage. When a TASER
CEW is connected to the computer, the device’s data will be uploaded automatically into the
EVIDENCE Sync application from the CEW. The time stamp is created by the CEW in
Greenwich Mean Time (GMT), but the EVIDENCE Sync software will convert it to your
computer’s local time.
Figure 1 CEW Details of an X2 CEW and a TASER CAM HD Recorder (Online Mode)
The ADVANCED TASER® M26™ CEW is not compatible with EVIDENCE Sync or EVIDENCE.com.
Page 4 of 86
Page 5

Check boxes to select videos for upload
Filter information
displayed on the
screen
Video status—on
the recorder,
uploaded to
EVIDENCE.com,
uploading
(transferring), or
awaiting upload
Selected
device (has
a white
border)
Upload video to EVIDENCE.com
Play selected video
In Figure 2, the same CEW and recorder are connected to the computer, but the recorder is
the selected device and its details are displayed.
Figure 2 Recorder Details with a TASER CAM HD Recorder and X2 CEW (Online Mode)
Figure 3 shows an AXON flex camera connected to the computer. Some of the same buttons
appear in this screen, but the list of files is displayed differently. TASER CAM videos are
displayed in table view, while EVIDENCE Sync defaults to gallery view with TASER AXON
videos.
Page 5 of 86
Page 6
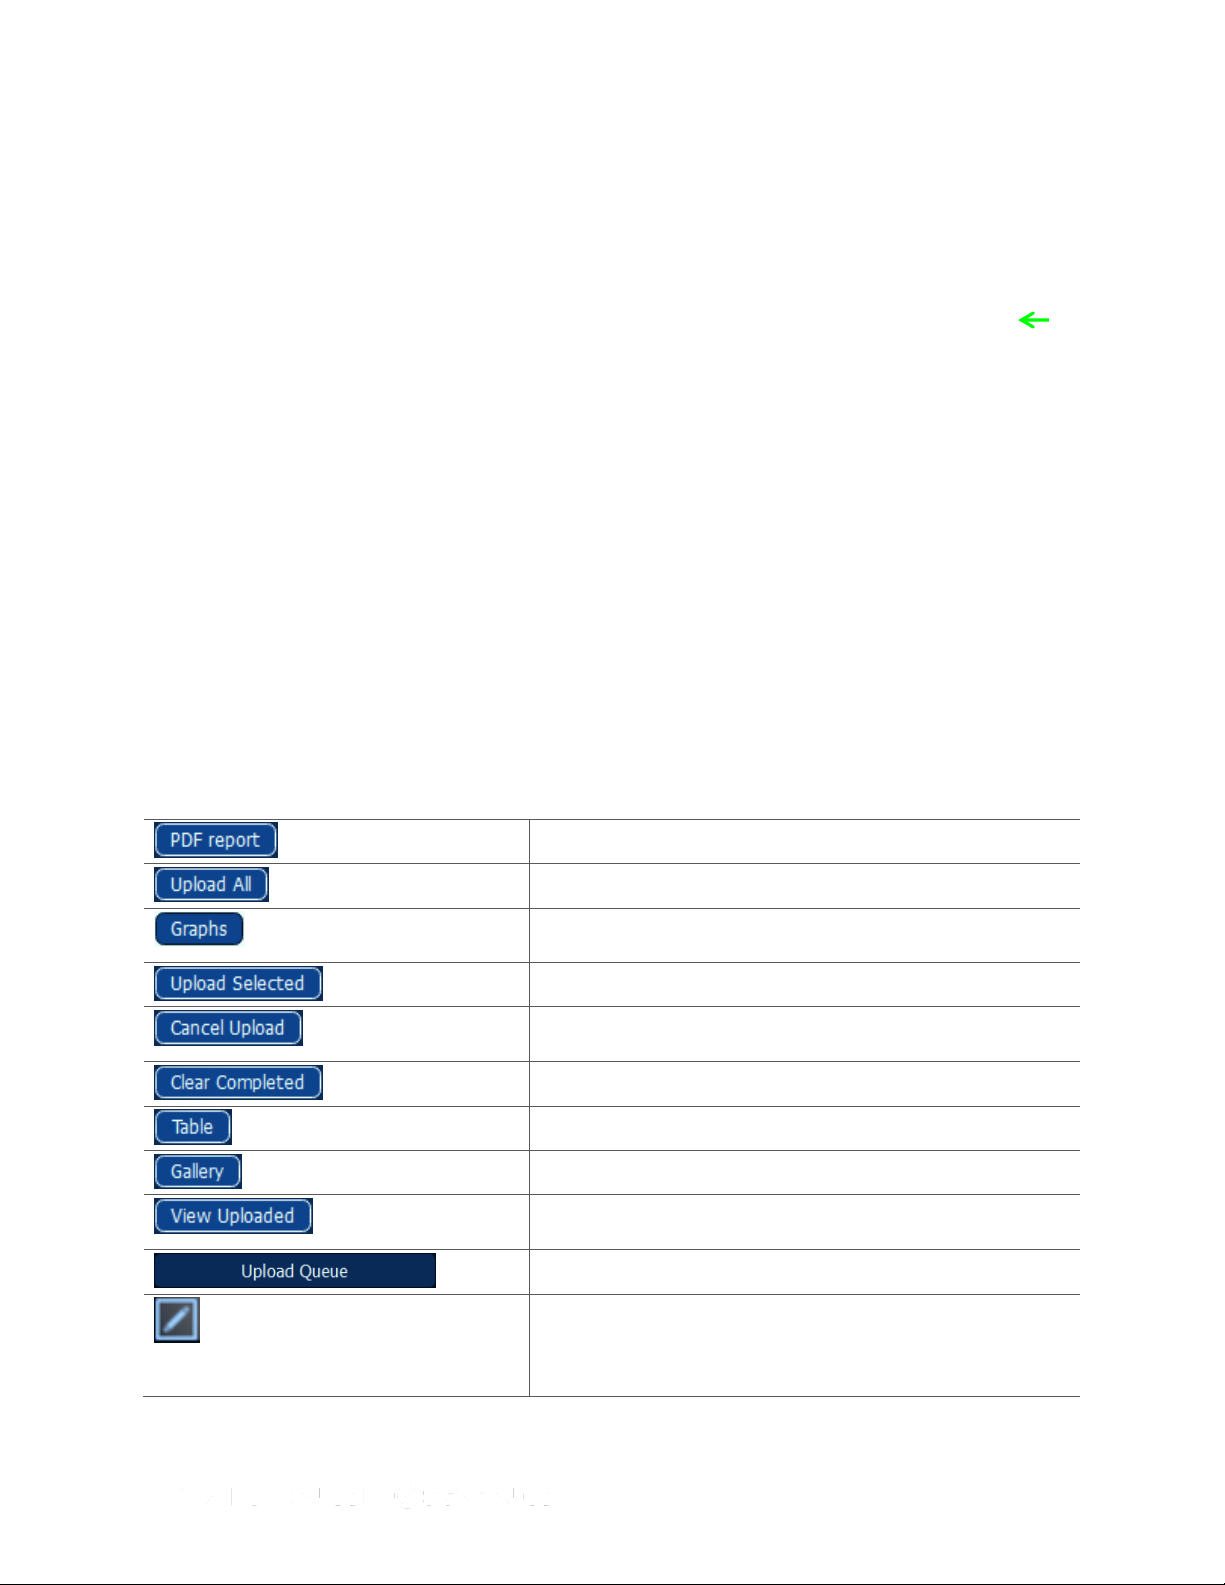
Download a copy of the CEW event logs in PDF format.
Upload all videos stored on a device.
Download a graph of the X2 or X26P pulse logs in PDF
format.
Upload the selected videos to EVIDENCE.com
Select a video that is being uploaded and then click this
button to cancel an upload to EVIDENCE.com
Remove uploaded videos from the screen.
Toggle button to display videos in table format.
Toggle button to display videos in gallery format.
Watch video that has been uploaded to the
EVIDENCE.com website.
View the progress of videos uploading to EVIDENCE.com.
Change the title, add case identification, or add case
classifications to the selected video.
Toggle button
to display the
files in table
view
Figure 3
Buttons
Screen appearance and options will vary depending on the type of TASER product you are
using with EVIDENCE Sync. These differences are explained in this manual.
Page 6 of 86
Page 7
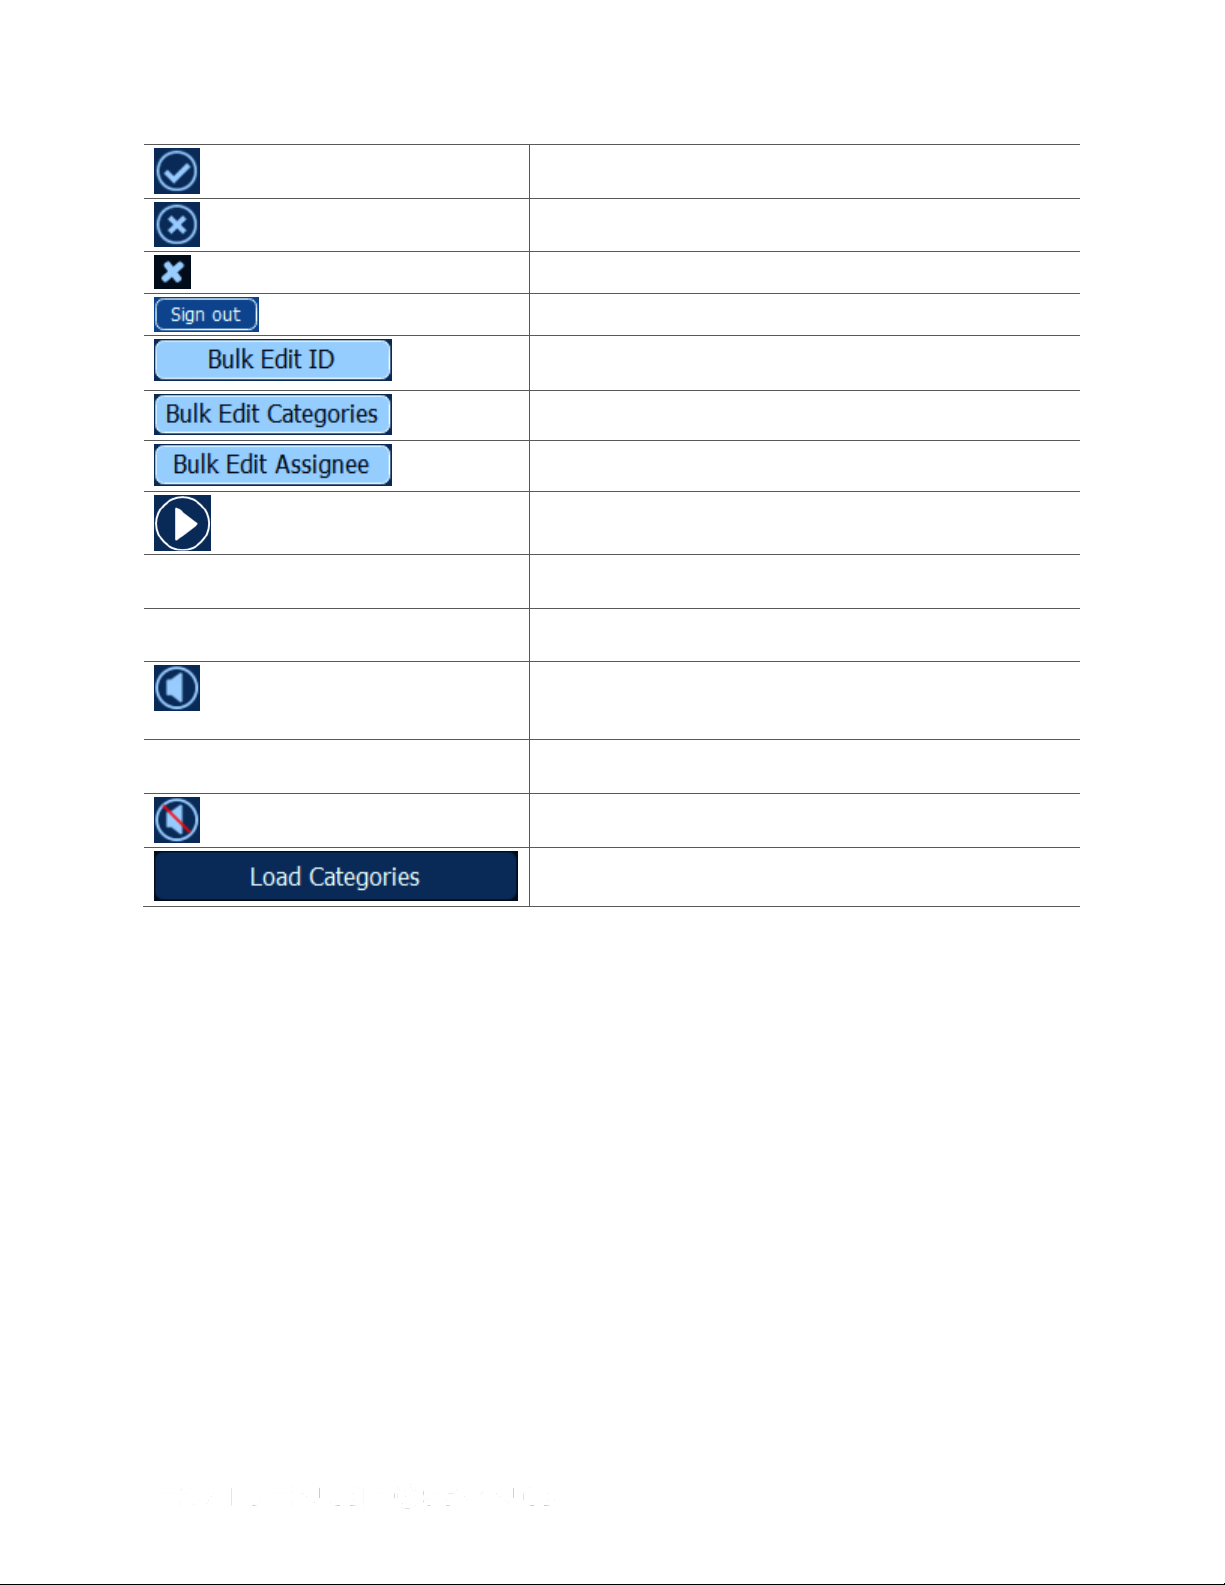
Accept edits or changes.
Cancel edits or changes.
Close a view.
Log out of online mode.
Change the ID assigned to all videos displayed in the video
list.
Assign categories to all videos displayed in the video list.
Assign someone to all videos displayed in the video list.
Play video.
Return to the previous screen.
Upload the video to the EVIDENCE.com website.
Click to adjust the video playback volume settings. You will
be able to increase or reduce the volume, or turn the sound
off.
Change the sound settings (by clicking the vertical bars on
the right or clicking the X to mute the video).
Video sound muted (turned off).
Assign categories to your videos in MDT mode.
Terms and Concepts
Download
Transferring data from a TASER device to your computer using the EVIDENCE Sync
software.
Event (CEW)
A change in a CEW that is displayed in EVIDENCE Sync. EVIDENCE Sync records X26
trigger events (when you pressed the trigger and discharged the CEW) and Sync events
(when you connected the CEW to EVIDENCE Sync).
EVIDENCE Sync records more events for the X2 and X26P CEWs: trigger pull, USB
connected, firmware update, Safe/Armed (when the safety switch’s position is changed), time
sync (the CEW is synchronized to the time displayed on your computer), and Power
Magazine Change (the battery pack is replaced). The X2 CEW also displays ARC switch
occurrences and duration, operating mode configuration, and cartridge information.
Page 7 of 86
Page 8

Online
Offline
MDT
View CEW event logs
● ● ●
2
3
4
Filter
To apply limitations to the information displayed on an EVIDENCE Sync screen. This feature
enables you to quickly find records of a specific type, or records that occurred within a range
of time.
Firmware
Computer programming that is embedded in the hardware. EVIDENCE Sync can be used to
update the firmware in TASER devices.
Muted
A state in which a TASER CAM2 or TASER CAM HD recorder or AXON flex or AXON body
camera has its microphone turned off. The device will record video but not sound when it is
muted. This feature was designed for jurisdictions in which audio recording is prohibited. The
ability to turn microphones off can be restricted to certain user roles.
Operating Mode
EVIDENCE Sync is available in three different operating modes to fit your situation: online,
offline, and MDT. See EVIDENCE Sync Operating Modes for more information.
Upload
Transferring data from a TASER device to the EVIDENCE.com website using the EVIDENCE
Sync software.
EVIDENCE Sync Operating Modes
EVIDENCE Sync operates in one of three modes: online, offline, and MDT.
Online
In the online mode, the EVIDENCE Sync software uploads data from your TASER device to
your EVIDENCE.com or EVIDENCE.com Lite3 account. CEW firing records are automatically
uploaded to EVIDENCE.com, but you have to tell EVIDENCE Sync to upload TASER CAM
and AXON videos4 to the EVIDENCE.com website.
Offline
In the offline mode, the EVIDENCE Sync software downloads data from your CEW or
recorder to your computer. If your organization does not use EVIDENCE.com, you will always
use EVIDENCE Sync in the offline mode.
MDT
Mobile data terminal, a computer used in a police car. An MDT may also be called a mobile
data computer (MDC) or mobile computer terminal (MCT). EVIDENCE Sync has an operating
mode for use with an MDT, called MDT mode.
TASER CAM recorders with a serial number lower than V13 are configured at the factory and EVIDENCE.com
cannot turn the microphone on or off with these recorders. These recorders also have limited compatibility with
EVIDENCE Sync.
EVIDENCE.com Lite does not work with AXON video.
If the AXON flex camera or body camera are docked in an ETM or EVIDENCE dock, the video will be automatically
uploaded to the EVIDENCE.com website.
Page 8 of 86
Page 9

Online
Offline
MDT
View CEW pulse graph
●
Upload to EVIDENCE.com
●
Download video to PC
●
Playback video
● ● ●
Add case ID and categories to TASER CAM video
●
Modify title of AXON video
● ● ●
Add case ID and categories to AXON video
● ●
Change device settings
● ● ●
Filter records
● ● ●
Page 9 of 86
Page 10
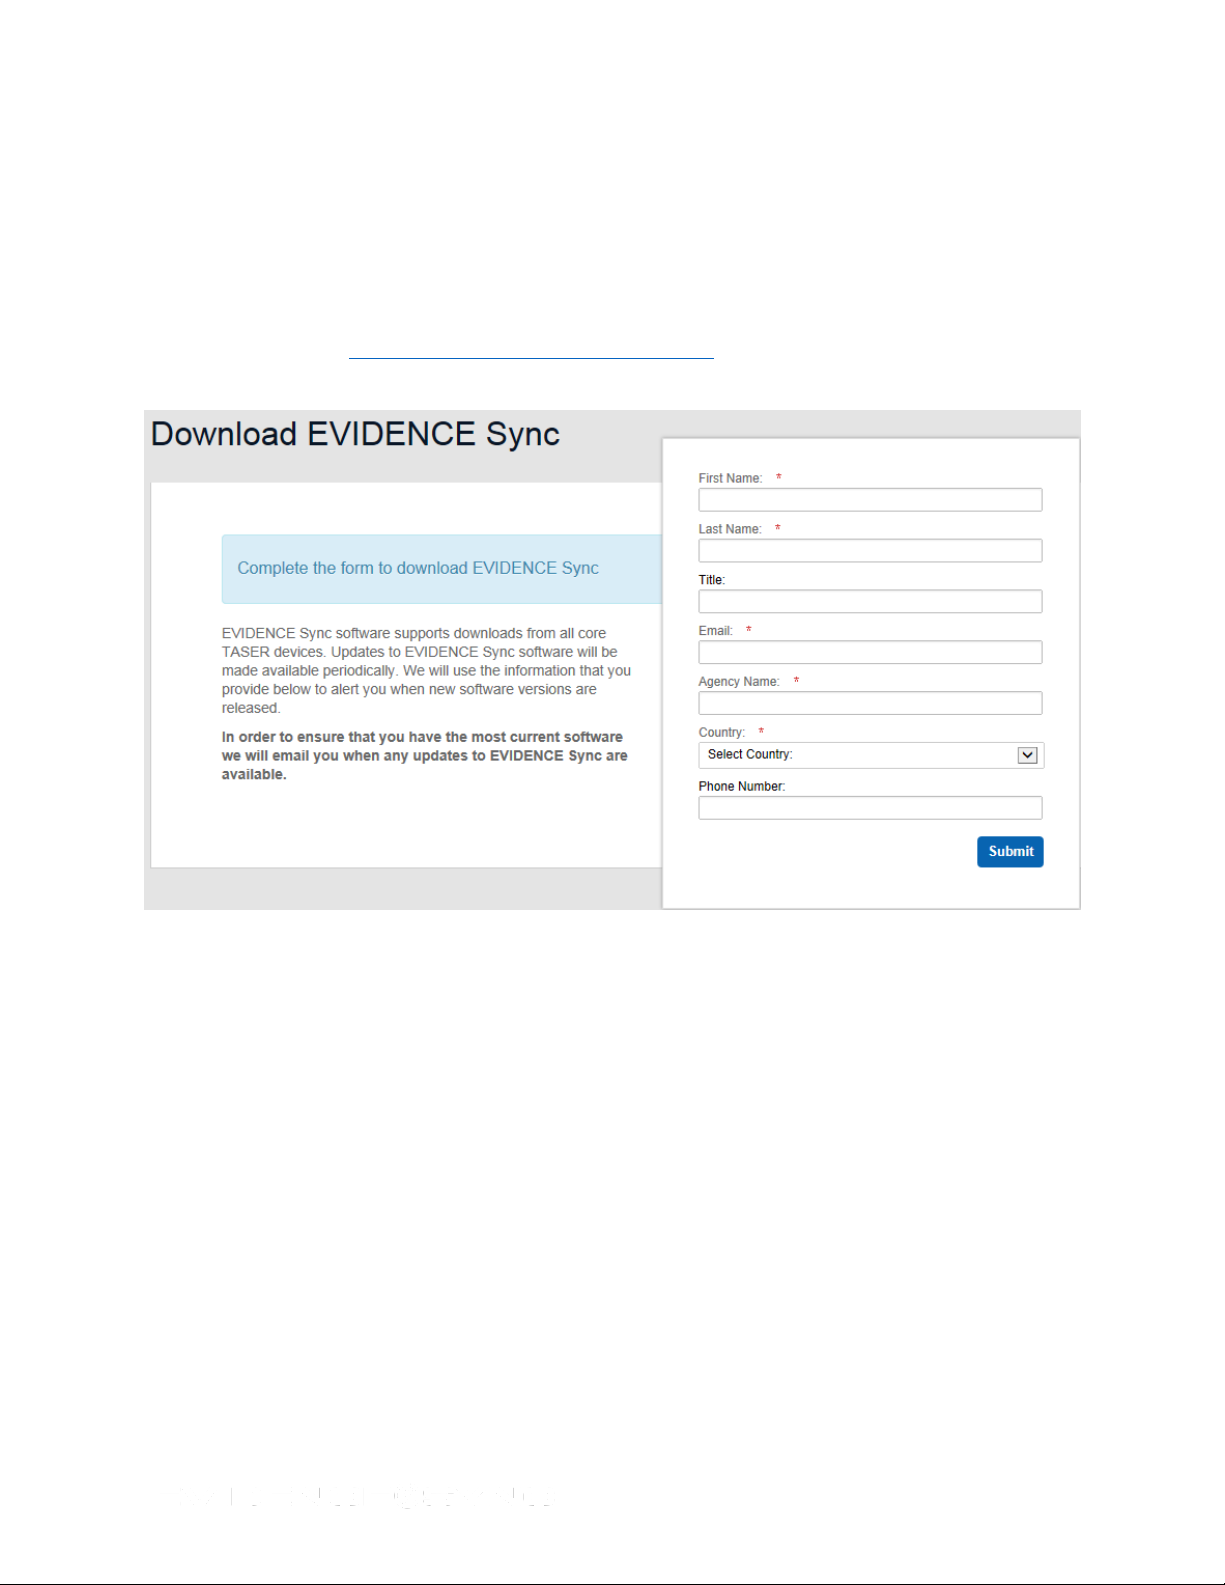
Chapter 2: Installing EVIDENCE Sync Software
Note: Do NOT connect a TASER device to your computer at this step.
1. On your computer, close all open applications.
2. Launch your Web browser.
3. Go to http://info.taser.com/syncregistration.html.
4. Fill out the information and click Submit (Figure 4).
Figure 4
You should receive a confirmation e-mail in 24–48 hours.
5. After receiving a confirmation e-mail, follow the instructions in the message.
6. Click Download EVIDENCE Sync and follow the instructions.
7. When the installation is complete, click Finish to exit.
Page 10 of 86
Page 11

Chapter 3: EVIDENCE Sync Settings
Auto-Update
When started, EVIDENCE Sync automatically installs available software updates. This
process only updates the EVIDENCE Sync software, and does not update the firmware in
any TASER devices attached to the computer.
• In online mode, automatic update occurs after you log in.
• In offline mode, it will occur when EVIDENCE Sync is launched and has an active
internet connection.
• In all modes, this EVIDENCE Sync upgrade will only occur if you do not have the most
current version of EVIDENCE Sync and you will be able cancel the upgrade.
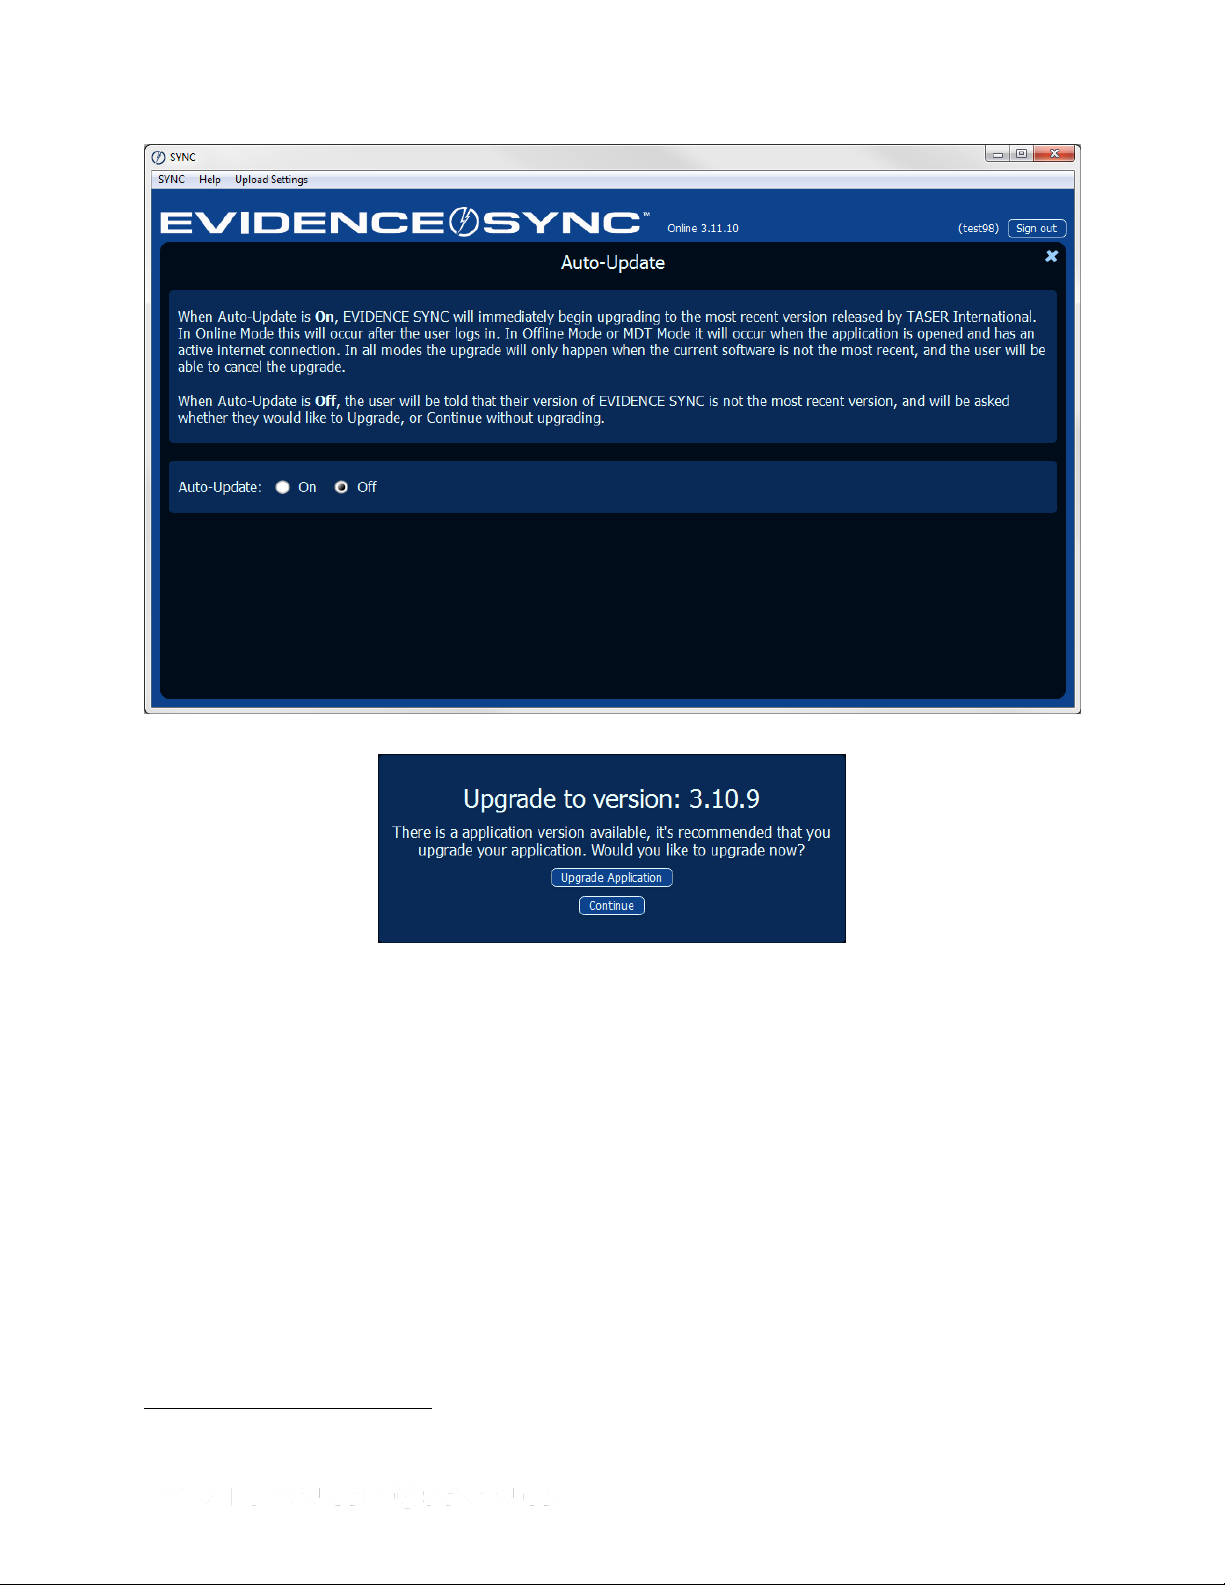
You can turn the automatic updates off by following these steps. (When automatic update is
off, the system will tell you that an upgrade is available and ask whether or not to upgrade
your software. This upgrade also requires an internet connection.)
1. Click Start and select All Programs.
2. Click SYNC and select SYNC.
3. Click SYNC, select Auto-Update, and then select Off (Figure 5).
Figure 5
If you click Learn more, you will see further explanation of how the feature works
(Figure 6).
Note: When the auto update feature is turned off, Sync will still search for updates, and
prompt you to install them when they are available (Figure 7).
Page 11 of 86
Page 12
5
Figure 6
Figure 7
Changing the Destination Folder for Downloaded Files
EVIDENCE Sync has a default folder for saving downloaded TASER CAM and AXON videos
and CEW logs.5 If you prefer to put the files in a different location, follow the steps in this
procedure.
1. Click Start and select All Programs.
2. Click SYNC and select SYNC.
3. Click SYNC, select Mode, and then select Offline (Figure 8).
The CEW logs are saved in PDF format.
Page 12 of 86
Page 13

Figure 8
4. Click SYNC, select Data Folder, and then select Change (Figure 9).
Figure 9
5. Click the Libraries folder and navigate to where you want to put the videos (Figure 10).
Page 13 of 86
Page 14

Figure 10
6. After navigating to the new location, click Select Folder (Figure 11).
Figure 11
Scheduling Automatic Uploads
The Auto-Upload feature allows you to upload files and evidence from your local directory to
your EVIDENCE.com account without having to manually do so at your computer. For this to
work, your computer must have an active Internet connection.
These uploads will occur even if you are signed out of EVIDENCE Sync, and even if you are
logged out of your Windows account.
1. Click Start and select All Programs.
2. Click SYNC and select SYNC.
3. Click SYNC, select Mode, and then select Online.
Page 14 of 86
Page 15

Navigation
pane
4. Type your login information and click Sign in.
5. In the navigation pane, navigate to the folder containing the files you want to upload.
The file path may be Computer > OSDisk (C:) > Program Files (x86) > SYNC >
Videos (Figure 12).
6. Click Schedule Auto-Uploads.
Figure 12
7. Schedule your uploads (Figure 13).
Page 15 of 86
Page 16

Figure 13
Configuring Upload Bandwidth
1. Click Start and select All Programs.
2. Click SYNC and select SYNC.
3. Click SYNC, select Mode, and then select Online.
4. Type your login information and click Sign in.
5. Click Upload Settings and select Throttle Bandwidth (Figure 14).
Page 16 of 86
Page 17

Figure 14
6. Configure your system’s bandwidth, as appropriate (Figure 15).
Figure 15
Page 17 of 86
Page 18

Chapter 4: Connecting TASER Devices to a Computer
Connecting CEWs to a Computer
The TASER X2, X26, and X26P CEWs are connected to a computer with a dataport plug that
is inserted into the weapon in place of the battery pack. The other end of the dataport cable
fits the USB port of the computer. There is one dataport plug designed for the X26 CEW and
another dataport plug design that works with both the X2 and X26P CEWs.
Figure 16 X26 (left) and X2/X26P Dataport Cables
Connecting TASER CAM Recorders to a Computer.
The TASER CAM and TASER CAM HD recorders are connected to a computer with a USB
download cable. Different cables are used for the two different recorders. The TASER CAM
HD cable has a shorter plug at the end.
Note: When inserting the power cable, it is important that the gold tabs face forward toward
the camera lens. Compare Figure 17 and Figure 18.
Figure 17 TASER CAM (left) and TASER CAM HD (right) Recorders
Page 18 of 86
Page 19

Figure 18 Do Not Insert the Plug This Way
Connecting TASER AXON Cameras to a Computer
The AXON flex and AXON body cameras use a 2.5 mm to USB cable to connect to a
computer.
DO NOT plug an AXON flex controller into a computer for registration or downloading.
Familiarize yourself with the differences between an AXON flex controller and an
AXON body camera (Figure 19, Figure 20).
Figure 19 AXON flex camera AXON flex controller AXON body camera
Figure 20 AXON flex camera, 2.5 mm to USB Cable, and Laptop Computer
Page 19 of 86
Page 20

Chapter 5: Using EVIDENCE Sync with TASER CAM Recorders
Viewing Records
The illustrations in this chapter show an X26P CEW with a TASER CAM HD recorder, but the
procedures will be the same if you are using an X2 CEW with your recorder. The procedures
also will be the same if you are using an X26 CEW and a TASER CAM recorder.
Note: You can perform these procedures without the recorder installed in a CEW. Because
video/audio records are stored in the TASER CAM recorder and firing record data are
stored in the CEW, you may prefer to keep the recorder installed in its CEW so you
can transfer both devices’ information at the same time.
Online Mode
Previewing TASER CAM Videos with EVIDENCE Sync Software (Online)
You can preview videos before uploading them.
1. Confirm that the CEW’s safety is in the down (SAFE) position.
DO NOT shift the CEW’s safety switch to the up (ARMED) position while the
TASER CAM recorder is connected to the computer.
2. Remove the cartridges from the CEW. (See the applicable CEW user manual for more
information on unloading cartridges.)
3. Connect the recorder to your computer with the USB download cable.
The LED status indicator on the TASER CAM or TASER CAM HD recorder will flash
green, then red.
If you are using a TASER CAM recorder with an X26 CEW, a “U” is displayed on the CID
when the TASER CAM recorder is plugged into a computer. While the recorder is
plugged into the computer, the CID will display the battery percentage, followed by a
letter U, and then a blank screen.
4. Click Start and select All Programs.
5. Click SYNC and select SYNC.
6. Type your login information and click Sign in (Figure 21).
Page 20 of 86
Page 21

Click the
recorder
to select it
Figure 21
7. Click the recorder so it is selected (Figure 22).
Figure 22
8. Click the title of the video you want to view.
9. Click the Click here to play button (Figure 23).
Page 21 of 86
Page 22

Figure 23
10. Click the Play button and watch the video (Figure 24).
Figure 24
If you want, you can upload the video to EVIDENCE.com by clicking the Upload
button and going to step 11. For further instructions on uploading videos, see Uploading
Page 22 of 86
Page 23

Videos
selected
for upload
Videos that
have
already
been
uploaded
TASER CAM Records to EVIDENCE.com Services and Adding Categories to Videos
with EVIDENCE Sync Software (Online).
11. Keep the recorder connected to the computer during the upload process.
12. After the uploads are completed, unplug the cable from the recorder. After unplugging
the cable from the recorder, remember to replace the dataport plug on the recorder to
prevent damage from any debris or moisture.
Uploading TASER CAM Records to EVIDENCE.com Services and Adding
Categories to Videos with EVIDENCE Sync Software (Online)
1. Perform steps 1–7 of Previewing TASER CAM Videos with EVIDENCE Sync Software
(Online).
2. Click the check boxes to select the videos you want to upload (Figure 25).
3. Click Next.
Figure 25
• If you want to update the categories, go to step 4.
• If you want to upload the files, go to step 5.
4. Add the categories.
You have several options for categorizing TASER CAM videos (Figure 26).
• Replace the system-generated title with a new one.
• Apply an appropriate ID for a video by typing it in the Edit ID box. If appropriate, you
can add the same ID to all videos on this screen by clicking Bulk Edit ID first.
• Add your agency’s case categories for a field by clicking Edit Categories and
selecting the appropriate categories from the drop-down menu.
Page 23 of 86
Page 24

• Your ID should appear in the Assignee boxes. If you need to change the person
assigned to the videos, type the appropriate ID in the boxes. If the same person will
be assigned to all videos, click the Bulk Edit Assignee box.
5. Click Upload (Figure 27).
Figure 26
Figure 27
Page 24 of 86
Page 25

Upload
status
Upload
status
6. Wait for the videos to upload (Figure 28). Keep the recorder connected to the computer
during the upload process.
Figure 28
7. If you want to remove uploaded videos from the queue, click Clear Completed (Figure
29).
Note: Videos will remain stored on the recorder (until overwritten by new footage)
whether they are uploaded or not.
Page 25 of 86
Page 26

Figure 29
8. After the uploads are completed, unplug the cable from the recorder. After unplugging
the cable from the recorder, remember to replace the dataport plug on the recorder to
prevent damage from any debris or moisture.
Viewing Uploaded TASER CAM Videos
You can view your uploaded videos by accessing the EVIDENCE.com website. You also can
access uploaded videos through EVIDENCE Sync. This procedure describes how to view
uploaded videos through EVIDENCE Sync.
1. Perform the Uploading TASER CAM Records to EVIDENCE.com Services and Adding
Categories to Videos with EVIDENCE Sync Software (Online) procedure.
2. Click the title of a previously uploaded video you want to view (Figure 30). You can tell
whether a video has been uploaded or not by reading the Status column.
3. Click View Uploaded or View on EVIDENCE.com.
Page 26 of 86
Page 27

Select
from the
uploaded
videos
Uploaded
videos
Figure 30
4. Type your EVIDENCE.com credentials and click Sign In (Figure 31).
Figure 31
You now can view your video on EVIDENCE.com (Figure 32).
Page 27 of 86
Page 28

Play
Offline Mode
Previewing TASER CAM Videos with EVIDENCE Sync (Offline)
You can preview videos before downloading them.
1. Confirm that the CEW’s safety is in the down (SAFE) position.
2. Remove the cartridges from the CEW. (See the applicable CEW user manual for more
3. Connect the recorder to your computer with the USB download cable.
4. Click Start and select All Programs.
5. Click SYNC and select SYNC.
6. Click SYNC, select Mode, and then select Offline (Figure 33).
Figure 32
DO NOT shift the CEW’s safety switch to the up (ARMED) position while the
TASER CAM recorder is connected to the computer.
information on unloading cartridges.)
Page 28 of 86
Page 29

Click the
recorder to
select it
Figure 33
7. Click the TASER CAM recorder so it is selected (Figure 34).
Figure 34
8. Click the title of a video you want to watch (Figure 35).
9. Click the Click here to play button.
Page 29 of 86
Page 30

Click file to
select it
Play
Figure 35
10. Click the Play button (Figure 36).
Figure 36
11. Keep the recorder connected to the computer during the playback process. After you are
done, unplug the cable from the recorder. After unplugging the cable from the recorder,
remember to replace the dataport plug on the recorder to prevent damage from any
debris or moisture.
Page 30 of 86
Page 31

Selected
videos
Downloading TASER CAM Videos with EVIDENCE Sync (Offline)
1. Perform steps 1–7 of Previewing TASER CAM Videos with EVIDENCE Sync (Offline).
2. Click the check boxes next to the videos you want to download (Figure 37).
Videos will remain stored on the recorder (until overwritten by new footage) whether they
are downloaded or not.
Note: When a CEW is connected, the CEW’s data will be downloaded automatically
into EVIDENCE Sync from the CEW.
Figure 37
3. Click Download Selected.
The screen displays the status of the downloads as they occur (Figure 38).
Page 31 of 86
Page 32

Download
progress
Files
waiting for
download
Status of
files
selected
for
download
Figure 38
When download is complete, the Status column will update accordingly (Figure 39).
Figure 39
4. Keep the recorder connected to the computer during the download process.
5. After the downloads are completed, unplug the cable from the recorder. After unplugging
the cable from the recorder, remember to replace the dataport plug on the recorder to
prevent damage from any debris or moisture.
Page 32 of 86
Page 33

Viewing Downloaded Videos (Offline)
Follow these steps for viewing videos that have already been downloaded. It is not necessary
to have a recorder connected to the computer to perform this procedure.
1. Click Start and select All Programs.
2. Click SYNC and select SYNC.
3. Click SYNC, select Mode, and then select Offline.
4. Click SYNC, select Data Folder, and then select Open (Figure 40).
Figure 40
5. Double-click the video file you want to watch (Figure 41).
Figure 41
Page 33 of 86
Page 34

Viewing Videos in MDT Mode
If you connect your recorder to an MDT, follow these steps. MDT mode is similar to offline
mode, but in MDT mode you cannot download video.
1. Confirm that the CEW’s safety is in the down (SAFE) position.
DO NOT shift the CEW’s safety switch to the up (ARMED) position while the
TASER CAM recorder is connected to the computer.
2. Remove the cartridges from the CEW. (See the applicable CEW user manual for more
information on unloading cartridges.)
3. Connect the recorder to your computer with the USB download cable.
The LED status indicator on the TASER CAM or TASER CAM HD recorder will flash
green, then red.
If you are using a TASER CAM recorder with an X26 CEW, a “U” is displayed on the CID
when the TASER CAM recorder is plugged into a computer. While the recorder is
plugged into the computer, the CID will display the battery percentage, followed by a
letter U, and then a blank screen.
4. Click Start and select All Programs.
5. Click SYNC and select SYNC.
6. Click SYNC, select Mode, and select MDT (Figure 42).
Figure 42
7. Click the recorder so it is selected.
8. Click the title of the video you want to watch (Figure 43).
9. Click the Click here to play button.
Page 34 of 86
Page 35

Selected
video
Figure 43
10. Keep the recorder connected to the computer while you watch the videos.
11. After you have finished watching videos, unplug the cable from the recorder. After
unplugging the cable from the recorder, remember to replace the dataport plug on the
recorder to prevent damage from any debris or moisture.
Page 35 of 86
Page 36

Chapter 6: Using EVIDENCE Sync with TASER AXON Cameras
This chapter shows an AXON flex camera used with EVIDENCE Sync, but the procedures
are the same with an AXON body camera.
Online Mode
Previewing TASER AXON Videos with EVIDENCE Sync (Online)
1. Connect the camera to your computer with the 2.5 mm to USB cable.
2. Click Start and select All Programs.
3. Click SYNC and select SYNC.
4. Type your login information and click Sign in.
Figure 44
5. Double-click the video you want to watch (Figure 45).
Page 36 of 86
Page 37

Figure 45
6. Click the Play button and watch the video.
Figure 46
Page 37 of 86
Page 38

Edit buttons
Adding Categories to Records with EVIDENCE Sync (Online)
This procedure explains how to add information to a record, one record at a time. If you need
to bulk update a record (add information to multiple records at once), read Uploading
Records to EVIDENCE.com with EVIDENCE Sync (Online).
1. Perform steps 1–4 of Previewing TASER AXON Videos with EVIDENCE Sync (Online).
2. Click the Edit button on the video you want to update (Figure 47).
Figure 47
3. Add the categories.
You have several options for categorizing AXON videos (Figure 48).
• Replace the system-generated title with a new one.
• Apply an appropriate ID for a video by typing it in the Edit ID box.
• Add your agency’s case categories for a field by clicking Edit Categories and
selecting the appropriate categories from the drop-down menu.
• Your ID should appear in the Assignee box. If you need to change the person
assigned to the videos, type the appropriate ID in the boxes.
4. Click Save.
Page 38 of 86
Page 39

Figure 48
Uploading Records to EVIDENCE.com with EVIDENCE Sync (Online)
Note: When this procedure is complete, videos uploaded to EVIDENCE.com will be
automatically removed from your TASER AXON camera.
1. Perform steps 1–4 of Previewing TASER AXON Videos with EVIDENCE Sync (Online).
2. Click the check box next to the video(s) you want to upload (Figure 49).
3. Click Next.
Page 39 of 86
Page 40

Figure 49
• If you want to update the files in bulk, go to step 4.
• If you want to upload all the files now, go to step 5.
4. Add the categories.
You have several options for categorizing TASER CAM videos (Figure 50).
• Replace the system-generated title with a new one.
• Apply an appropriate ID for a video by typing it in the Edit ID box. If appropriate, you
can add the same ID to all videos on this screen by clicking Bulk Edit ID first.
• Add your agency’s case categories for a field by clicking Edit Categories and
selecting the appropriate categories from the drop-down menu.
• Your ID should appear in the Assignee boxes. If you need to change the person
assigned to the videos, type the appropriate ID in the boxes. If the same person will
be assigned to all videos, click the Bulk Edit Assignee box first.
5. Click Upload.
Page 40 of 86
Page 41

Upload
progress
File status
(transferring to
EVIDENCE.com)
Files in
the
upload
queue
Figure 50
The screen will show progress as the system processes and completes the upload.
Figure 51
Offline Mode
Previewing TASER AXON Videos with EVIDENCE Sync (Offline)
1. Connect the camera to your computer with the 2.5 mm to USB download cable.
Page 41 of 86
Page 42

2. Click Start and select All Programs.
3. Click SYNC and select SYNC.
4. Click SYNC, select Mode, and then select Offline (Figure 52).
Figure 52
5. Click the title of the video you want to watch (Figure 53).
6. Click the Click here to play button.
Page 42 of 86
Page 43

Figure 53
7. Click the Play button (Figure 54).
Figure 54
Page 43 of 86
Page 44

Editing the Title of a File with EVIDENCE Sync (Offline)
The offline mode offers fewer options than online mode for adding notes to video. In offline
mode you can modify the title, but not the case ID. Also, you cannot add categories in offline
mode.
1. Perform steps 1–4 of Previewing TASER AXON Videos with EVIDENCE Sync (Offline).
2. Click the title of the video you want to modify (Figure 55).
3. Click the Edit button.
Figure 55
4. In the Title box, type the update to the title (Figure 56).
• If you want to reject the changes, click the Cancel button .
• If you want to accept the changes, click the Check button .
Page 44 of 86
Page 45

Figure 56
Downloading TASER AXON Videos with EVIDENCE Sync (Offline)
1. Perform steps 1–4 Previewing TASER AXON Videos with EVIDENCE Sync (Offline).
2. Click the check box(es) next to the video(s) you want to download (Figure 57).
Figure 57
3. Click Download Selected (Figure 58).
Page 45 of 86
Page 46

File
status
Downloaded
files
Figure 58
Viewing Downloaded Videos with EVIDENCE Sync (Offline)
1. Perform steps 1–4 of Previewing TASER AXON Videos with EVIDENCE Sync (Offline).
In the Status column, downloaded videos are described as Downloaded (Figure 59).
Figure 59
2. Click the title of the video you want to watch (Figure 60).
Page 46 of 86
Page 47

3. Click Click here to play and watch the video.
Figure 60
Removing Videos from a TASER AXON Camera (Offline)
When a TASER AXON camera’s memory is full (has reached its storage limit), the camera
will stop recording. To prevent this, you must either upload the videos to EVIDENCE.com or,
if you are in the offline mode, manually remove the videos after downloading them.
1. Perform the Downloading TASER AXON Videos with EVIDENCE Sync (Offline)
procedure.
2. Click the check box next to the videos you want to delete.
Downloaded videos will be described as Downloaded or In folder (Figure 61).
3. Click Delete Selected.
Page 47 of 86
Page 48

Figure 61
4. Click OK (Figure 62).
Figure 62
Page 48 of 86
Page 49

MDT Mode
Loading Categories with EVIDENCE Sync (MDT)
Notes:
• To perform this procedure, you need to be connected to the Internet.
• Your camera’s Device Mode must be set to Online for this procedure to work. See
• Unlike with online and offline modes, there is no way to remove videos from the camera
• When a TASER AXON camera’s memory is full (has reached its storage limit), the
1. Connect the camera to your computer with the 2.5 mm to USB download cable.
2. Click Start and select All Programs.
Configuring Your TASER AXON Camera and Updating the Firmware (Online) in Chapter
9: Configuring Your TASER CAM Recorder, TASER AXON Camera, or CEW for more
information.
in MDT mode.
camera will stop recording. To remove videos from the camera, the EVIDENCE Sync
software must be in the online mode or offline mode. See Removing Videos from a
TASER AXON Camera (Offline) and Uploading TASER CAM Records to
EVIDENCE.com Services and Adding Categories to Videos with EVIDENCE Sync
Software (Online).
3. Click SYNC and select SYNC.
4. Click SYNC, select Mode, and then select MDT.
5. Click Load Categories.
Figure 63
6. In the Enter agency field, type your agency’s EVIDENCE.com domain (Figure 64).
Page 49 of 86
Page 50

Figure 64
7. Click Retrieve.
The “Remote categories loaded” message is displayed (Figure 65).
Figure 65
Adding Categories (MDT)
1. Perform the Loading Categories with EVIDENCE Sync (MDT) procedure.
Page 50 of 86
Page 51

2. Click the camera so it is selected (Figure 66).
3. Click the check box next to the video you want to update and then click Next.
Figure 66
4. Type the case ID in the Edit ID box (Figure 67).
5. In the Edit Categories box, use the drop-down menu to select all applicable categories.
6. Click Save.
Page 51 of 86
Page 52

Figure 67
Page 52 of 86
Page 53

Navigation
pane
Chapter 7: Uploading Other File Types to EVIDENCE.com
EVIDENCE Sync is not limited to files produced by TASER devices. You can use EVIDENCE
Sync to add identifying information to any digital file and upload it EVIDENCE.com.
This procedure only works in the online mode.
1. Save the file to your computer.
2. Click Start and select All Programs.
3. Click SYNC and select SYNC.
4. Type your login information and click Sign in.
The main screen displays (Figure 68).
You can use the icons in the navigation pane (Figure 69) to navigate to any file you need
to upload to EVIDENCE.com.
Figure 68
Page 53 of 86
Page 54

Figure 69
5. Select the file (or files) you want to upload (Figure 70).
6. Click Next.
Figure 70
You can add details to your file (Figure 71).
6.a Type the case ID in the Edit ID box.
6.b In the Edit Categories box, use the drop-down menu to select all applicable
categories.
Page 54 of 86
Page 55

Your agency’s categories
Update the file name
Add an ID
Reassign the file
6.c Reassign the file, if appropriate.
7. Click Upload.
Figure 71
Page 55 of 86
Page 56

6
7
8
Chapter 8: Viewing CEW Logs
Introduction to CEW Records
When you are in the online mode, the logs are automatically uploaded to EVIDENCE.com.
The type of information collected depends on the type of CEW you have. Information
displayed in Figure 72, for an X26 CEW, includes:
• Sync (CEW was connected to the computer and the time was synchronized)
• Trigger pulls, with the discharge time and duration, CEW temperature, and battery
percentage.
Clicking the PDF Report button produces a copy of the event logs in PDF format and saves
the file to your computer.6
Online and Offline PDF Reports
Different information is available when you produce reports in the online or offline modes.
Both online and offline reports should display this information:
• Serial (number)
• Model
• Firmware version
• Health (the CEW’s general condition)7
• Local time zone
• Generated on (date and time)
• Local time (date and time of event)
• Event type
• Cartridge information8
• Duration (in seconds)
• Temperature (Celsius)
• Battery percentage remaining
Note: Event times in PDF reports from X2 and X26P CEWs are rounded to milliseconds.
Therefore, there may be time discrepancies when adding together time duration from
different events.
PDF files also can be generated from EVIDENCE.com. There may be time discrepancies between PDF files
generated in EVIDENCE.com and EVIDENCE Sync.
This is not available in offline reports for the X26 CEW.
This is only available for the X2 CEW.
Page 56 of 86
Page 57

Produce your CEW logs in PDF format
Event type
Event duration
Produce
pulse
graphs in
PDF format
(available
with X2
and X26P
CEWs)
Figure 72 X26 Records
The X26P and X2 CEWs include more detail than is available with the X26 CEW (Figure 73,
Figure 74). You can produce the pulse logs for your X26P and X2 CEWs by clicking the
Graphs button.
Note: Producing a graph will automatically save a PDF copy to your computer.
Figure 73 X26P Records
Page 57 of 86
Page 58

If you are using an X2 CEW, there will be additional information, such as cartridge
deployment by bay and ARC switch events (Figure 74).
Figure 74 X2 Records
Viewing CEW Records with EVIDENCE Sync (Online)
1. Confirm that the CEW’s safety is in the down (SAFE) position.
2. Remove the cartridges from the CEW. (See the applicable CEW user manual for more
information on unloading cartridges.)
3. Connect the CEW to your computer with the USB download cable.
4. Click Start and select All Programs.
5. Click SYNC and select SYNC.
6. Type your login information and click Login.
See Figure 72, Figure 73, and Figure 74, for examples of CEW data available in the
online mode.
Viewing CEW Records with EVIDENCE Sync (Offline and MDT)
1. Confirm that the CEW’s safety is in the down (SAFE) position.
2. Remove the cartridges from the CEW. (See the applicable CEW user manual for more
information on unloading cartridges.)
3. Connect the CEW to your computer with the USB download cable.
4. Click Start and select All Programs.
5. Click SYNC and select SYNC.
6. From the SYNC menu, click Mode and select Offline or MDT.
7. View the CEW data (Figure 75 for offline; Figure 76 for MDT).
Page 58 of 86
Page 59

Produce your CEW logs in PDF format
Produce your CEW logs in PDF format
Notes:
• Pulse log information is not available in the offline or MDT mode. In the offline mode,
event logs are not uploaded to EVIDENCE.com; however, you can generate event
logs in PDF format.
• Clicking PDF Report will automatically save a PDF copy to your computer.
Figure 75 Offline
Figure 76 MDT
Page 59 of 86
Page 60

9
10
Chapter 9: Configuring Your TASER CAM Recorder, TASER
AXON Camera, or CEW
Configuring TASER CAM Recorders and Updating the Firmware (Online)
Notes:
• This procedure illustrates a TASER CAM HD recorder, but the process is the same with a
TASER CAM recorder.9
• If you are an Administrator, the changes you make to the agency-level device settings will
affect all devices in your agency after the devices are connected to EVIDENCE Sync.
These settings cannot be changed by someone with non-administrative permissions.
• Your ability to adjust onscreen settings may depend on your user permissions and
agency-wide settings.
1. Perform steps 1–7 Previewing TASER CAM Videos with EVIDENCE Sync Software
(Online).
If you receive a message that your firmware needs an update, follow the onscreen
instructions.
2. Click the Device Settings tab.
3. Configure the device as appropriate (Figure 77).10
By default, the Device Name is the same as the serial number, but you can change it
after clicking the Edit button (Figure 78).
You also can change the person to whom the recorder is assigned by updating the
Assignee.
Some jurisdictions require the TASER CAM recorder to be video-only (no sound
recorded). If your organization operates in such a jurisdiction, select the Muted option.
You also can adjust the resolution and frame rate.
TASER CAM recorders with a serial number lower than V13 are configured at the factory. EVIDENCE.com cannot
turn the microphone on or off with these recorders. These recorders also have limited compatibility with EVIDENCE
Sync.
Depending on your access level, some options displayed here might not be available.
Page 60 of 86
Page 61

Edit Device
Name
Edit
Assignee
Microphone
on or off
Accept
change
Cancel
change
Figure 77
Figure 78
4. Keep the recorder connected to the computer during configuration.
5. After configuration is completed, unplug the cable from the recorder. After unplugging
the cable from the recorder, remember to replace the dataport plug on the recorder to
prevent damage from any debris or moisture.
Page 61 of 86
Page 62

Configuring TASER CAM Recorders and Updating the Firmware (Offline)
1. Perform steps 1–7 of Previewing TASER CAM Videos with EVIDENCE Sync (Offline).
2. Click Device Settings.
Some jurisdictions require the TASER CAM recorder to be video-only (no sound
recorded). If your organization operates in such a jurisdiction, select the Muted option.
You also can adjust the resolution and frame rate (Figure 79).
If you want to update the recorder’s firmware, go to step 3.
Figure 79
3. Download the latest firmware from www.TASER.com to your computer.
4. Click Program Firmware.
5. Navigate to where you saved the unzipped firmware and click Open (Figure 80).
Figure 80
6. Click OK (Figure 81).
Page 62 of 86
Page 63

Figure 81
7. Wait until the “Reconnect device to use updated firmware” message displays (Figure
82).
Figure 82
8. Un-connect the recorder and then reconnect it to the computer.
Page 63 of 86
Page 64

Microphone
on or off
Configuring TASER CAM Recorders (MDT)
1. Perform steps 1–7 of Viewing Videos in MDT Mode.
2. Click Device Settings.
Some jurisdictions require the TASER CAM recorder to be video-only (no sound
recorded). If your organization operates in such a jurisdiction, select the Muted option.
You also can adjust the resolution and frame rate (Figure 83).
Note: Resolution and frame rate are adjustable with the TASER CAM HD recorder, but
not with the TASER CAM recorder.
Figure 83
Configuring Your CEW and Updating the Firmware (Online)
Note: Depending on your access settings, some of the options described here might not be
available to you.
1. Confirm that the CEW’s safety is in the down (SAFE) position.
2. Remove the cartridges from the CEW. (See the applicable CEW user manual for more
information on unloading cartridges.)
3. Connect the CEW to your computer with the USB download cable.
4. Click Start and select All Programs.
5. Click SYNC and select SYNC.
6. Type your login information and click Login.
If you receive a message that your firmware needs an update, follow the onscreen
instructions.
7. Click Device Settings (Figure 84).
Page 64 of 86
Page 65

CEW operating
options
APPM
configuration
Upload
engineering logs
to
EVIDENCE.com
LASER with 35′
cartridge loaded
Edit device
name
Edit
assignee
8. Configure the device, as appropriate.
Whether you have an X2 (Figure 84), X26 (Figure 85), or X26P CEW (Figure 86), you
can update the Device Name and Assignee.
If your CEW is an X2, you have additional options:
• Determine whether an automatic shut-down performance power magazine (APPM)
will stop only trigger-initiated CEW discharges or both trigger and ARC switch
events. See the TASER X2 CEW User Manual for more information on APPM
functioning.
• Turn the LASER for 35-foot (10.7 m) Smart™ cartridges on or off.
If your administrator turns off the upload engineering logs option, TASER may not
be able to troubleshoot your CEW’s data remotely. It may be necessary to ship the
CEW to TASER for troubleshooting.
Figure 84 X2 Settings
Page 65 of 86
Page 66

Edit device
name
Edit
assignee
Edit device
name
Edit
assignee
Figure 85 X26 Settings
Figure 86 X26P Settings
Configuring Your CEW and Updating the Firmware (Offline)
In offline mode, you can view CEW status. You also can update the firmware of an X2 or
X26P CEW.
1. Confirm that the CEW’s safety is in the down (SAFE) position.
Page 66 of 86
Page 67

2. Remove the cartridges from the CEW. (See the applicable CEW user manual for more
information on unloading cartridges.)
3. Connect the CEW to your computer with the USB download cable.
4. Click Start and select All Programs.
5. Click SYNC and select SYNC.
6. From the SYNC menu, click Mode and select Offline.
7. Click Device Settings.
The information and options should be the same whether you have an X2 (Figure 87),
X26P (Figure 88), or X26 (Figure 89) CEW.
If you have an X2 or X26P CEW and want to update the firmware, go to step 8.
Figure 87 X2 Device Settings
Page 67 of 86
Page 68

Figure 88 X26P Device Settings
Figure 89 X26 Device Settings
8. Go to www.TASER.com and download the appropriate CEW firmware to your computer.
9. In EVIDENCE Sync, click Program Firmware.
10. Navigate to the firmware you downloaded (Figure 90).
Page 68 of 86
Page 69

Figure 90
11. Click Open.
12. Wait for the system to update your CEW’s firmware (Figure 91).
Figure 91
Configuring Your TASER AXON Camera and Updating the Firmware (Online)
Notes:
• If you are an Administrator, the changes you make to the agency-level device settings will
affect all devices in your agency after the devices are connected to EVIDENCE Sync.
These settings cannot be changed by someone with non-administrative permissions.
Page 69 of 86
Page 70

• Depending on your access settings, some of the options described here might not be
available to you.
1. Connect the camera to your computer with the 2.5 mm to USB cable.
2. Click Start and select All Programs.
3. Click SYNC and select SYNC.
4. Type your login information and click Login.
If you receive a message that your firmware needs an update (Figure 92), follow the
onscreen instructions.
Figure 92
5. Click the Device Settings tab.
6. Configure the device as appropriate:
By default, the Device Name is the same as the serial number, but you can change it
after clicking the Edit button (Figure 93) (Figure 94).
You also can change the person to whom the recorder is assigned by updating the
Assignee box.
The device can be set to operate in the online or offline modes.
By default, the AXON flex camera is intended to be worn on the right side. If you intend
to wear your camera on the left side, select the Mounted on left option or the video
might be recorded upside-down. This setting is not available for the AXON body camera.
Some jurisdictions require the AXON camera to be video-only (no sound recorded). If
your organization operates in such a jurisdiction, select the Muted option.
AXON cameras are shipped with the Balanced video quality option to give you the best
combination of image quality and recording time. Agency Administrators can change the
setting to Better Quality or Faster Upload.
AXON cameras have a 30-second buffer in which the 30 seconds of footage recorded
before you press the EVENT button is saved. This feature is intended to capture
important events that occurred before you were able to press the button. If necessary,
this feature can be turned off.
Page 70 of 86
Page 71

Figure 93 AXON flex Settings
Figure 94 AXON body Settings
Configuring Your TASER AXON Camera and Updating the Firmware (Offline and
MDT)
1. Connect the camera to your computer with the 2.5 mm to USB cable.
2. Click Start and select All Programs.
Page 71 of 86
Page 72

3. Click SYNC and select SYNC.
4. Click the Device Settings tab.
5. Click SYNC, select Mode, and then select Offline or MDT.
6. Configure the device as appropriate (Figure 95, Figure 96).
Your options are similar to those described in Configuring Your TASER AXON Camera
and Updating the Firmware (Online). However, in offline mode, the devices have no
device name or assignee.
Note: In MDT mode, you may be limited to changing the camera orientation.
If you want to update your camera’s firmware, visit www.TASER.com and download the
firmware to your computer. Click Program Firmware and navigate to the downloaded
firmware.
Note: The Program Firmware feature is not available in the MDT mode. You will
therefore need to be in online or offline mode to update your camera’s firmware.
Figure 95 AXON flex Settings
Page 72 of 86
Page 73

Figure 96 AXON body Settings
7. Go to www.TASER.com and download the appropriate AXON firmware to your
computer.
8. In EVIDENCE Sync, click Program Firmware.
9. Navigate to the firmware you downloaded (Figure 97).
Figure 97
10. Click Open.
11. Wait for your camera’s firmware to update.
Page 73 of 86
Page 74

Toggle filters on or off
Start time
Start date
Stop time
End date
Select event type
Chapter 10: Filtering Records
EVIDENCE Sync filtering tools enable you to reduce the information displayed onscreen. This
helps if you need to find specific date and time records.
Filtering CEW Logs
Note: This procedure shows the online mode and includes the login steps. Except login, the
steps will be the same in offline and MDT modes.
1. Confirm that the CEW’s safety is in the down (SAFE) position.
2. Remove the cartridges from the CEW. (See the applicable CEW user manual for more
information on unloading cartridges.)
3. Connect the CEW to your computer with the USB download cable.
4. Click Start and select All Programs.
5. Click SYNC and select SYNC.
6. Type your login information and click Login.
See Figure 98–Figure 101 for different ways to filter records.
Figure 98
Page 74 of 86
Page 75

Figure 99 Start Time
Figure 100 Start Date
Figure 101 Events
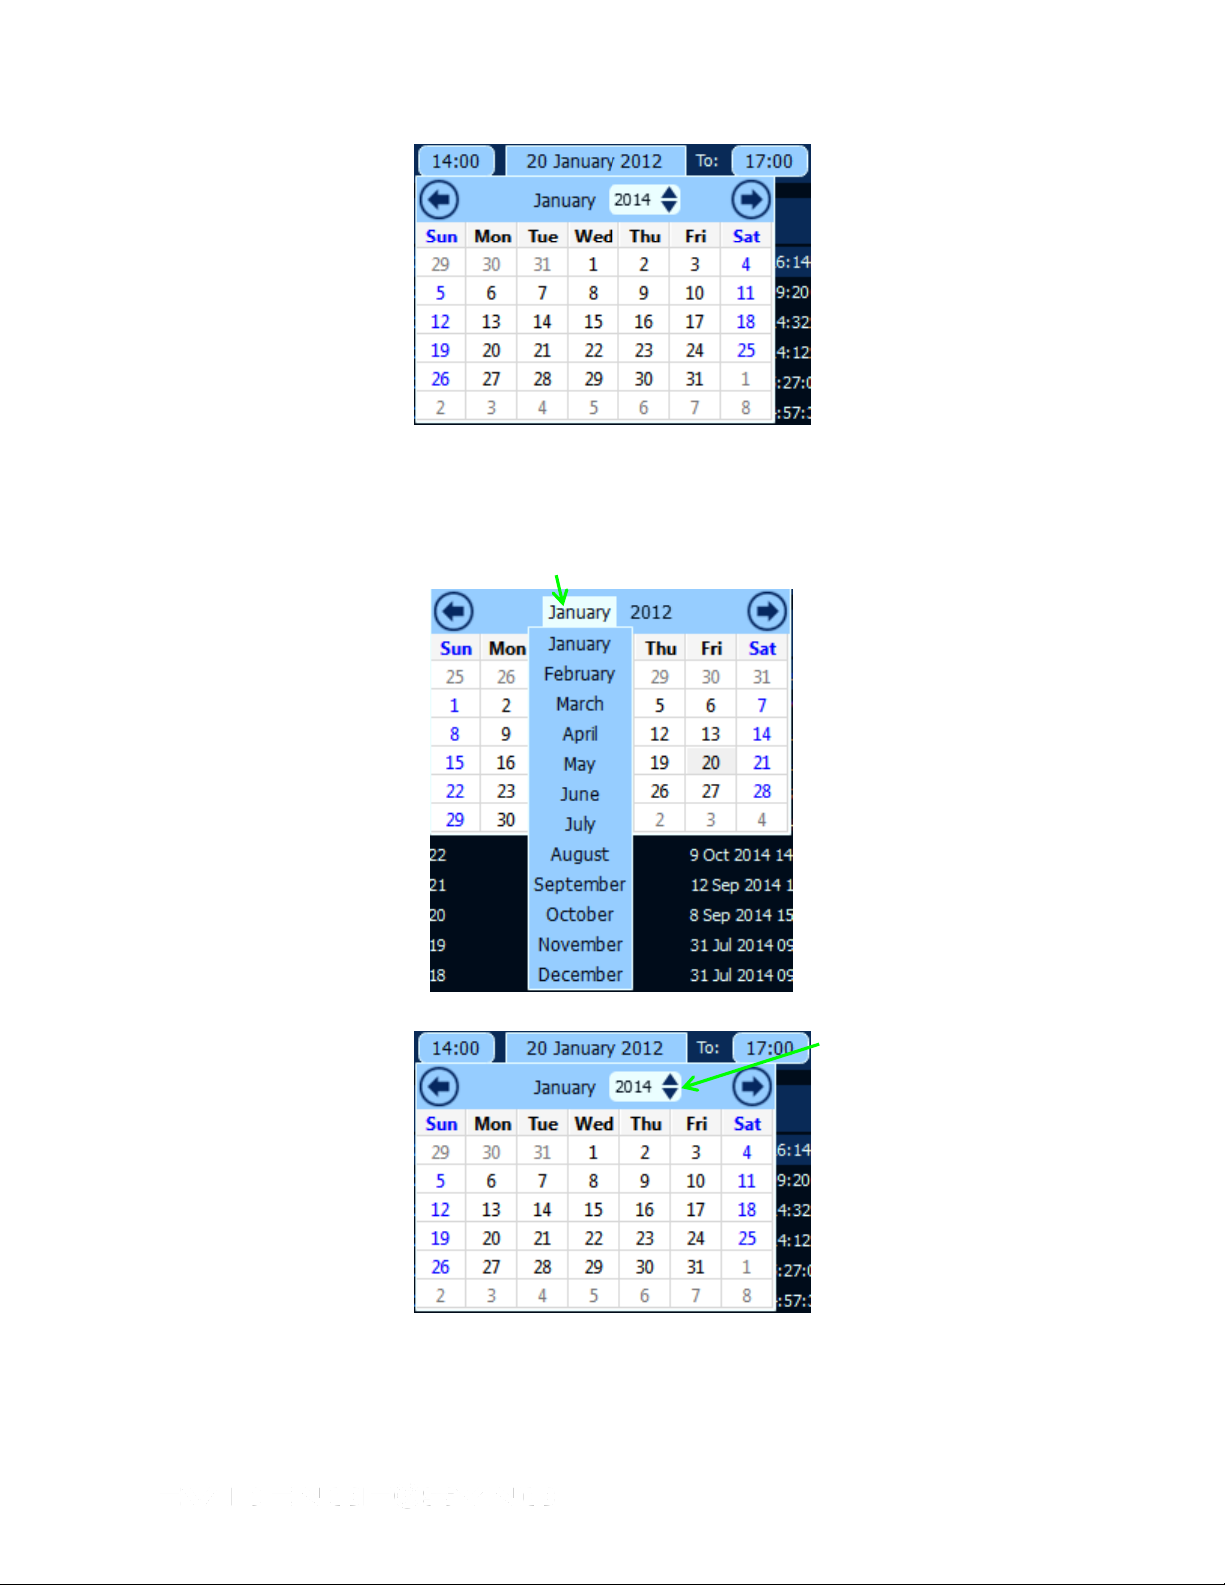
7. Select your start time, start date, end time, end date, and event type.
EVIDENCE Sync allows you to quickly specify the month (Figure 102) and year (Figure
103). You do not have to scroll through multiple months.
Page 75 of 86
Page 76

Figure 102
Figure 103
8. Filter the events as needed.
9. Click the ON button to turn the filters on.
10. The information displayed is narrowed to your requirements. In Figure 104, the
information displayed is within a specified date and time range, and only armed events
are shown (USB events are hidden from view).
Page 76 of 86
Page 77

Figure 104
Filtering TASER CAM Videos
Note: This procedure shows the online mode and includes the login steps. Except login, the
steps will be the same in offline and MDT modes.
1. Confirm that the CEW’s safety is in the down (SAFE) position.
DO NOT shift the CEW’s safety switch to the up (ARMED) position while the
TASER CAM recorder is connected to the computer.
2. Remove the cartridges from the CEW. (See the applicable CEW user manual for more
information on unloading cartridges.)
3. Connect the CEW to your computer with the USB download cable.
The LED status indicator on the TASER CAM or TASER CAM HD recorder will flash
green, then red.
If you are using a TASER CAM recorder with an X26 CEW, a “U” is displayed on the CID
when the TASER CAM recorder is plugged into a computer. While the recorder is
plugged into the computer, the CID will display the battery percentage, followed by a
letter U, and then a blank screen.
4. Click Start and select All Programs.
5. Click SYNC and select SYNC.
6. Type your login information and click Login.
7. Click the recorder to select it.
Figure 105–Figure 108 display TASER CAM records and the options for filtering.
Page 77 of 86
Page 78

Toggle filters on or off
Start time
Start date
Stop time
End date
Select event type
Figure 105
Figure 106
Figure 107
Page 78 of 86
Page 79
Click here
Click here
Figure 108
8. Select your start time, start date, end time, end date, and event type.
EVIDENCE Sync allows you to quickly specify the month (Figure 109) and year (Figure
110). You do not have to scroll through multiple months.
Figure 109
Figure 110
9. From the Status menu, use the drop-down to select whether to display all videos, videos
that are on the device (On device) or videos that have been transferred (Complete)
(Figure 111).
Page 79 of 86
Page 80

Figure 111
10. Click the ON button to turn the filter on.
The information displayed is narrowed to your requirements. In Figure 112, the
information displayed is within a specified date and time range.
11. Keep the recorder connected to the computer during this procedure.
12. After you are done looking at the records, unplug the cable from the recorder. After
unplugging the cable from the recorder, remember to replace the dataport plug on the
recorder to prevent damage from any debris or moisture.
Filtering AXON Videos
Note: This procedure shows the online mode and includes the login steps. Except login, the
steps will be the same in offline and MDT modes.
1. Connect the camera to your computer with the 2.5 mm to USB cable.
2. Click Start and select All Programs.
3. Click SYNC and select SYNC.
4. Type your login information and click Login.
Figure 113–Figure 116 Display AXON video logs and options for filtering them.
Figure 112
Page 80 of 86
Page 81

Toggle filters on or off
Start time
Start date
Stop time
End date
Select event type
Figure 113
Figure 114 Start Time
Page 81 of 86
Page 82

Click here
Figure 115 Date
Figure 116 Video Status
5. Select your start time, start date, end time, and end date.
EVIDENCE Sync allows you to quickly specify the month (Figure 117) and year (Figure
118). You do not have to scroll through multiple months.
Figure 117
Page 82 of 86
Page 83

Click here
Figure 118
6. From the Status menu, use the drop-down to select whether to display videos that are
on the device (On device) or videos that have been transferred (Complete) or all of
them (Figure 119).
Figure 119
7. Click the ON button to turn the filters on.
The information is narrowed to your requirements (Figure 120).
Figure 120
Page 83 of 86
Page 84

Sorting AXON Videos
This is a different process than that described in Filtering AXON Videos. Filtering excludes
videos from the view based on criteria. Sorting videos places them in order.
Note: This procedure shows the online mode and includes the login steps. Except login, the
steps will be the same in offline and MDT modes.
1. Connect the camera to your computer with the 2.5 mm to USB cable.
2. Click Start and select All Programs.
3. Click SYNC and select SYNC.
4. Type your login information and click Login.
5. Click the button next to Sort by and use the drop-down to select your
criteria (Figure 121).
Figure 121
Page 84 of 86
Page 85

Thick
Border
Indicates
Selected
Device
Thin Border
Indicates
CEW
Connected
to Recorder
Chapter 11: Connecting Multiple TASER Devices to EVIDENCE
Sync
If your hardware allows it, you can connect multiple TASER devices to EVIDENCE Sync at
once. There are several ways to do this:
• Use more than one USB port on your computer.
• Attach EVIDENCE.com Dock individual bays or an EVIDENCE.com Dock 6-bay to your
computer. This approach enables you to connect multiple AXON flex and/or AXON body
cameras to your computer.
Figure 122 shows an AXON flex camera, two CEWs, and a TASER CAM HD recorder
connected to the same computer. The camera is selected. The thinner border around the X2
CEW and TASER CAM HD recorder indicates these two devices are attached. Although
Figure 122 depicts EVIDENCE Sync in online mode, you can connect multiple devices in
offline and MDT mode.
To process any device through EVIDENCE Sync, select the device and follow the appropriate
procedures in this manual.
Figure 122
Page 85 of 86
Page 86

TASER
Product functions and specifications may change without notice and the actual product may vary from the illustrations in this
manual.
Windows is a trademark of Microsoft Corporation.
Smart, TASER CAM, M26, X2, X26, and X26P are trademarks of TASER International, Inc. TASER is a trademark of TASER
International, Inc. registered in the African Intellectual Property Organization (OAPI), Australia, Canada, the European Union, Hong
Kong, India, Israel, Malaysia, New Zealand, Singapore, South Africa, and the USA. AXON is a trademark of TASER International,
Inc. registered in Australia, the European Union, Hong Kong, Singapore and the USA. AXON flex is a trademark of TASER
International, Inc. registered in Australia, the European Union, Malaysia and the USA. ADVANCED TASER is a trademark of
TASER International, Inc. registered in the USA and the European Union. X2 is a trademark of TASER International, Inc. registered
in Australia, the European Union, Hong Kong and New Zealand. ® is a trademark of TASER International, Inc. registered in
Australia, Canada, the European Union, Hong Kong, India, Israel, New Zealand, Singapore, South Africa and the USA. © is a
trademark of TASER International, Inc. registered in Australia, the European Union, India, Malaysia and the USA. All rights
reserved. © 2014 TASER International, Inc.
Page 86 of 86
 Loading...