

Tascam XS-3 Owner's Manual
»
XS-3
Professional DJ Mixer
OWNER’S MANUAL/ MODE D’EMPLOI / BEDIENUNGSANLEITUNG /
MANUALE D'ISTRUZIONI / Mezclador de DJ profesional
D00675100B

English Important Safety Precautions
2 TASCAM XS-3
TO THE USER
This equipment has been tested and found to
comply with the limits for a Class B digital
device, pursuant to Part 15 of the FCC Rules.
These limits are designed to provide reasonable
protection against harmful interference in a residential installation. This equipment generates,
uses, and can radiate radio frequency energy
and, if not installed and used in accordance with
the instructions, may cause harmful interference
to radio communications.
However, there is no guarantee that interference
will not occur in a particular installation. If this
equipment does cause harmful interference to
radio or television reception, which can be determined by turning the equipment off and on, the
user is encouraged to try to correct the interference by one or more of the following measures.
a) Reorient or relocate the receiving antenna.
b) Increase the separation between the equip-
ment and receiver.
c) Connect the equipment into an outlet on a
circuit different from that to which the
receiver is connected.
d) Consult the dealer or an experienced
radio/TV technician for help.
CAUTION
Changes or modifications to this equipment not
expressly approved by TEAC CORPORATION
for compliance could void the user's authority to
operate this equipment.
For U.S.A
IMPORTANT (for U.K. Customers)
DO NOT cut off the mains plug from this
equipment. If the plug fitted is not suitable for the power
points in your home or the cable is too short to reach a power
point, then obtain an appropriate safety approved extension
lead or consult your dealer.
If nonetheless the mains plug is cut off, remove
the fuse and dispose of the plug immediately,
to avoid a possible shock hazard by inadvertent connection
to the mains supply.
If this product is not provided with a mains plug, or one has
to be fitted, then follow the instructions given below:
IMPORTANT. DO NOT make any connection to the larger
terminal which is marked with the letter E or by the safety
earth symbol ç or coloured GREEN or GREEN-and-YELLOW.
The wires in the mains lead on this product are coloured in
accordance with the following code:
BLUE : NEUTRAL
BROWN : LIVE
As these colours may not correspond with the coloured
markings identifying the terminals in your plug proceed as
follows:
The wire which is coloured BLUE must be connected to the
terminal which is marked with the letter N or coloured
BLACK.
The wire which is coloured BROWN must be connected to
the terminal which is marked with the letter L or coloured
RED.
When replacing the fuse only a correctly rated approved type
should be used and be sure to re-fit the fuse cover.
IF IN DOUBT — CONSULT A COMPETENT ELECTRICIAN.

IMPORTANT SAFETY INSTRUCTIONS English
CAUTION:
≠ Read all of these Instructions.
≠ Save these Instructions for later use.
≠ Follow all Warnings and Instructions marked on the
audio equipment.
1) Read instructions — All the safety and operating instructions
should be read before the product is operated.
2) Retain instructions — The safety and operating instructions
should be retained for future reference.
3) Heed Warnings — All warnings on the product and in the
operating instructions should be adhered to.
4) Follow instructions — All operating and use instructions
should be followed.
5) Cleaning — Unplug this product from the wall outlet before
cleaning. Do not use liquid cleaners or aerosol cleaners. Use a damp
cloth for cleaning.
6) Attachments — Do not use attachments not recommended by
the product manufacturer as they may cause hazards.
7) Water and Moisture — Do not use this product near water
for example, near a bath tub, wash bowl, kitchen sink, or laundry
tub; in a wet basement; or near a swimming pool; and the like.
8) Accessories — Do not place this product on an unstable cart,
stand, tripod, bracket, or table. The product may fall, causing serious
injury to a child or adult, and serious damage to the product. Use
only with a cart, stand, tripod, bracket, or table recommended by the
manufacturer, or sold with the product. Any mounting of the product
should follow the manufacturer’s instructions, and should use a
mounting accessory recommended by the manufacturer.
9) A product and cart combination should be moved with care.
Quick stops, excessive force, and uneven surfaces may cause the
product and cart combination to overturn.
10) Ventilation — Slots and openings in the cabinet are provided
for ventilation and to ensure reliable operation of the product and to
protect it from overheating, and these openings must not be blocked
or covered. The openings should never be blocked by placing the
product on a bed, sofa, rug, or other similar surface. This product
should not be placed in a built-in installation such as a bookcase or
rack unless proper ventilation is provided or the manufacturer’s
instructions have been adhered to.
11) Power Sources — This product should be operated only from
the type of power source indicated on the marking label. If you are
not sure of the type of power supply to your home, consult your
product dealer or local power company. For products intended to
operate from battery power, or other sources, refer to the operating
instructions.
12) Grounding or Polarization — This product may be
equipped with a polarized alternating-current line plug (a plug having one blade wider than the other). This plug will fit into the power
outlet only one way. This is a safety feature. If you are unable to
insert the plug fully into the outlet, try reversing the plug. If the plug
should still fail to fit, contact your electrician to replace your obsolete outlet. Do not defeat the safety purpose of the polarized plug.
13) Power-Cord Protection — Power-supply cords should be
routed so that they are not likely to be walked on or pinched by
items placed upon or against them, paying particular attention to
cords at plugs, convenience receptacles, and the point where they
exit from the product.
14) Outdoor Antenna Grounding — If an outside antenna or
cable system is connected to the product, be sure the antenna or
cable system is grounded so as to provide some protection against
voltage surges and built-up static charges. Article 810 of the
National Electrical Code, ANSI/NFPA 70, provides information
with regard to proper grounding of the mast and supporting structure, grounding of the lead-in wire to an antenna discharge unit, size
of grounding conductors, location of antenna-discharge unit, connection to grounding electrodes, and requirements for the grounding
electrode.
"Note to CATV system installer:
This reminder is provided to call the CATV system installer’s attention to Section 820-40 of the NEC which provides guidelines for
proper grounding and, in particular, specifies that the cable ground
shall be connected to the grounding system of the building, as close
to the point of cable entry as practical.
_
15) Lightning — For added protection for this product during a
lightning storm, or when it is left unattended and unused for long
periods of time, unplug it from the wall outlet and disconnect the
antenna or cable system. This will prevent damage to the product
due to lightning and power-line surges.
16) Power Lines — An outside antenna system should not be
located in the vicinity of overhead power lines or other electric light
or power circuits, or where it can fall into such power lines or circuits. When installing an outside antenna system, extreme care
should be taken to keep from touching such power lines or circuits
as contact with them might be fatal.
17) Overloading — Do not overload wall outlets, extension cords,
or integral convenience receptacles as this can result in risk of fire or
electric shock.
18) Object and Liquid Entry — Never push objects of any kind
into this product through openings as they may touch dangerous
voltage points or short-out parts that could result in a fire or electric
shock. Never spill liquid of any kind on the product.
19) Servicing — Do not attempt to service this product yourself as
opening or removing covers may expose you to dangerous voltage
or other hazards. Refer all servicing to qualified service personnel.
20) Damage Requiring Service — Unplug this product from the
wall outlet and refer servicing to qualified service personnel under
the following conditions:
a) when the power-supply cord or plug is damaged.
b) if liquid has been spilled, or objects have fallen into the product.
c) if the product has been exposed to rain or water.
d) if the product does not operate normally by following the operat-
ing instructions. Adjust only those controls that are covered by the
operating instructions as an improper adjustment of other controls
may result in damage and will often require extensive work by a
qualified technician to restore the product to its normal operation.
e) if the product has been dropped or damaged in any way.
f ) when the product exhibits a distinct change in performance _ this
indicates a need for service.
21) Replacement Parts — When replacement parts are required,
be sure the service technician has used replacement parts specified
by the manufacturer or have the same characteristics as the original
part. Unauthorized substitutions may result in fire, electric shock, or
other hazards.
22) Safety Check — Upon completion of any service or repairs to
this product, ask the service technician to perform safety checks to
determine that the product is in proper operating condition.
23) Wall or Ceiling Mounting — The product should be mounted to a wall or ceiling only as recommended by the manufacturer.
24) Heat — The product should be situated away from heat sources
such as radiators, heat registers, stoves, or other products (including
amplifiers) that produce heat.
TASCAM XS-3 3

English 1. Introduction
Table of contents
1. Introduction......................................................... 4
1.1. Some notes and precautions....................... 4
1.2. Serial number, etc. ..................................... 4
2. Features and controls .......................................... 5
2.1. Top panel.................................................... 6
2.2. How to replace the fader ............................ 6
2.3. Rear panel .................................................. 6
2.4. Front panel ................................................. 7
3. Specifications...................................................... 8
4. Block diagram................................................... 31
1. Introduction
The XS-3 is a sophisticated 2 channel DJ mixer which
allows the connection of many devices, and allows you
to mix in a creative way.
Following the sophisticated layout design, the XS-3
combines easy operation with a wide range of functions.
It is VERY IMPORTANT that you read this manual
before connecting the mixer in order to obtain its maximum performance.
We recommend our authorised Technical Services
whenever any maintenance task should be needed so
that optimum operation shall be achieved.
As the unit may become hot during operation, always
leave sufficient space above and around the unit for
ventilation.
Do not install this equipment in a confined space such
as a bookcase or similar unit.
You should not place the unit on a piece of equipment
generating heat, e.g. an amplifier, to avoid possible
problems with overheating.
XS-3 operates under 120, 50 Hz. Make sure that the
power cable is far away from the signal cables in order
to avoid any possible audio hum.
NOTE
When transporting the unit, always use the original packing materials or a properly-designed
equipment case. For this reason, we strongly recommend that you save all the packing materials
that came with the XS-3, in case you need to
transport it in the future.
Connections to other equipment
It is extremely important that the power is turned off
on all units when making or breaking connections to or
from the XS-3.
When turning power on, it is usually a good idea to
start with the source (turntables, CD players, etc.), then
the XS-3 and finish with the amplifier system.
Turning power off should be done in the other direction (amplifiers first, then other equipment).
1.1. Some notes and precautions
Treat the XS-3 as you would any other piece of precision equipment.
Avoid exposing it to extremes of temperature and
humidity and avoid mechanical shocks and vibration.
Keep the unit away from strong magnetic fields (TV
sets, computer monitors, large electric motors, etc.).
Environmental considerations
The XS-3 may be used in most areas, but to maintain
top performance, and prolong operating life, observe
the following environmental conditions:
The nominal temperature should be between 5°C and
35°C (41°F and 95°F).
Relative humidity should be 30 to 90 degrees non-condensing.
4 TASCAM XS-3
When turning the unit on again, wait for three seconds
or more after turning it off.
1.2. Serial number, etc.
The serial number of the XS-3 is located on a sticker at
the front of the unit on the bottom panel. Make a note
of this for future reference (warranty, etc.).
2. Features and controls English
2. Features and controls
TASCAM XS-3 5

English 2. Features and controls
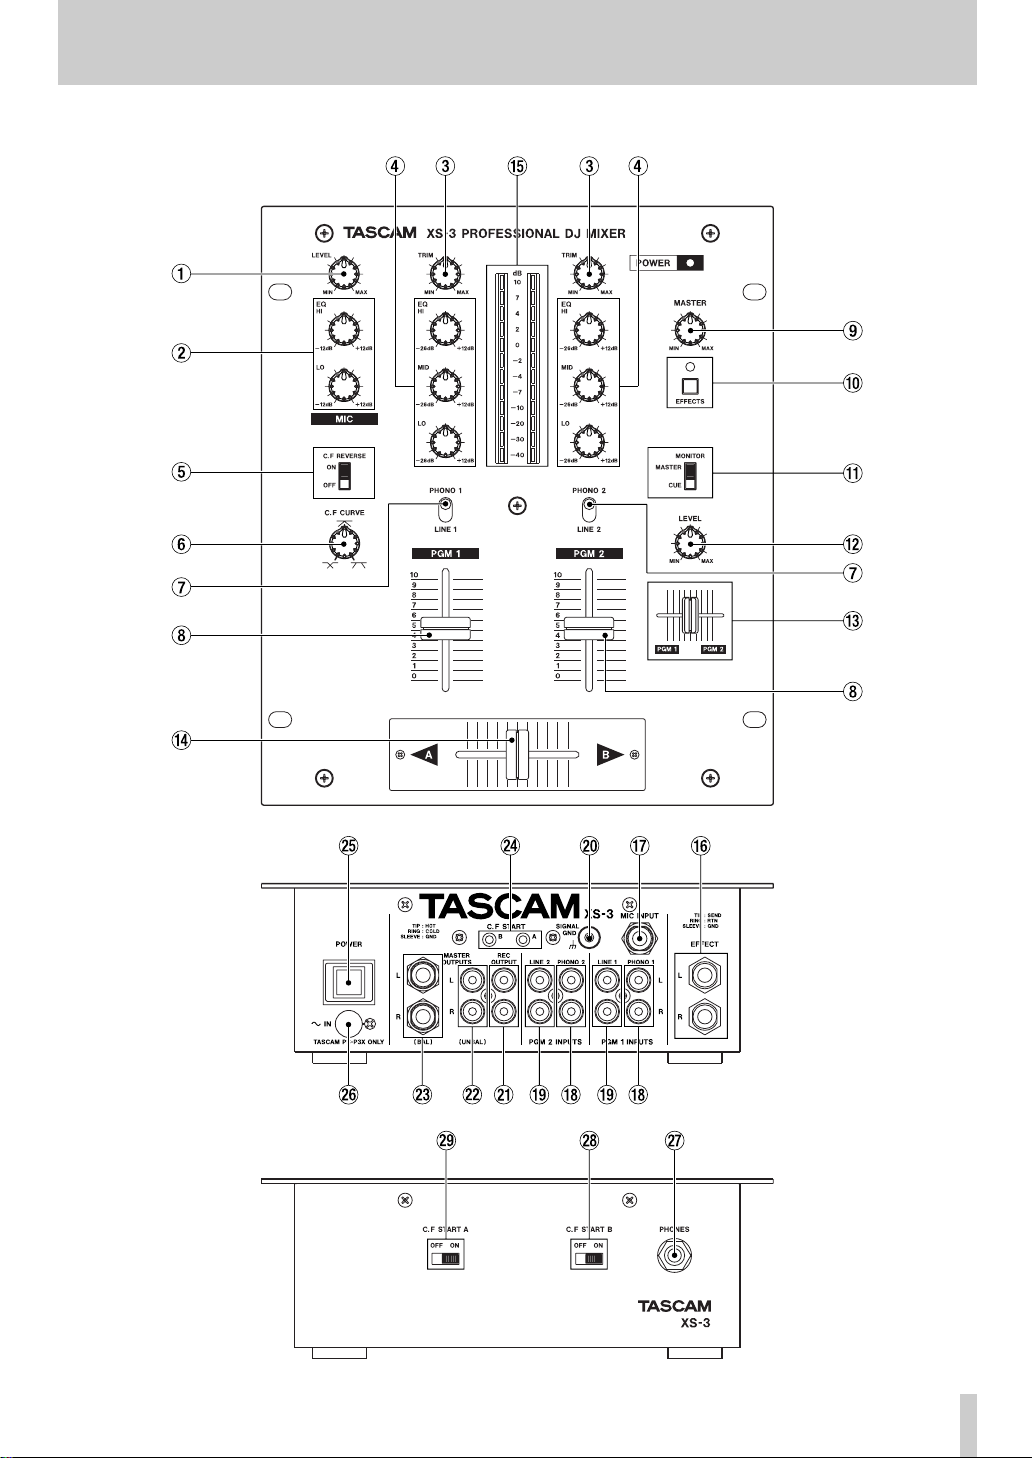
2.1. Top Panel
1 MIC LEVEL
Adjusts the MIC input signal level.
2 MIC EQ
2-band EQ for microphone input signal.
3 TRIM
Adjusts the input signal level of each PGM.
NOTE
All input sensitivity adjustment must be done by
very carefully using level meter and/or headphones as a reference and avoiding that all the
red LEDs of the level meter light up, otherwise
input could be clipped (overload).
4 PGM EQ
3-band EQ for each PGM signal.
When all EQ are set to -26 dB, the sound will be cut
fully.
5 C.F REVERSE
Sets the direction of CROSS FADER operation.
OFF: Moving the CROSS FADER toward
A makes A signal louder and moving
the CROSS FADER toward B makes
B signal louder.
REVERSE: Moving the CROSS FADER toward
A makes B signal louder and moving
the CROSS FADER toward B makes
A signal louder.
6 C.F CURVE
Allows you to adjust the PGM 2 FADER response
curve from soft (counter-clockwise) to hard (clockwise).
q MONITOR MASTER/CUE
Selects the way of monitoring in the headphones.
CUE: This way allows you to monitor the
PGM signals adjusted by cue balance
fader.
MASTER: This way allows you to monitor the
pre MASTER volume signal.
w LEVEL
Adjusts the headphone output level.
e CUE BALANCE
Adjusts the balance between PGM 1 and PGM 2 signal
in the headphones.
r CROSS FADER
Mixes the PGM 1 and PGM 2 signals.
CROSS FADER is user replaceable. It is possible to
set the CROSS FADER curve and reversal.
t INPUT LEVEL METER
Indicates the signal level of each PGM.
NOTE
LEVEL METER indicates the post PGM FADER
signals.
2.2. How to replace the fader
1. Remove the two screws from the fader panel surface.
2. Remove the fader.
3. Unplug the multi-cable connector that connected to
the fader.
4. Plug in the multi-cable connector to a new fader.
5. Replace the fader with the screws.
7 PHONO/LINE
Selects the input signal (PHONO or LINE) of each
PGM.
8 PGM FADER
Adjusts the PGM level.
9 MASTER LEVEL
Adjusts MASTER OUT 1 (balanced TRS and unbalanced RCA connectors) output level.
0 EFFECT switch and LED
Activates the external effect path of MASTER when
EFFECT switch is turned on. When effect path is activated, LED will light up.
6 TASCAM XS-3
2.3. Rear Panel
y EFFECT (unbalanced TRS jack)
Inserts the external effect in STEREO OUTPUT signal
path. Connect the external effector to this jack.
Connections are follows:
SEND: Tip
RETURN: Ring
GND: Sleeve

2. Features and controls English
u MIC INPUT (balanced TRS connector)
Connect the microphone to this connector.
Connections are as follows:
HOT: Tip
COLD: Ring
GND: Sleeve
NOTE
If you connect the unbalanced microphone to
this connector, we recommend that cold (Ring)
short-circuited to GND (Sleeve).
i PHONO INPUTS (unbalanced RCA jacks)
Connect the turntables equipped with the MM cartridge.
WARNING
Never connect any other type of equipment to
the PHONO connectors.
o LINE INPUTS (unbalanced RCA jacks)
Connect the line level equipment, such as CD players,
cassette decks, DAT, MD, etc.
p GND terminal
If the turntables are fitted with grounding wires, connect these to this GND terminal to reduce noise and
hum.
f C.F START
Connect a device which supports fader start operation.
Crossfader start function can be set to enable or disable on either side independently.
Moving the cross-fader to start and/or stop (back cue)
the PGM A or B source automatically.
NOTE
When you use this function, make sure to connect audio signal and fader start signal to the
same XS-3.
Fader start signal is output from Tip terminal.
Fader stop (back cue) signal is output from sleeve
terminal.
g POWER switch
h AC Adaptor in
Use this jack to connect the PS-P3X AC adaptor which
comes with your XS-3.
When inserting the AC adaptor into the unit, please
make sure to align the arrow mark of the AC adaptor
plug to the white dot mark on the rear panel.
WARNING
DO NOT use any adaptors with the XS-3 except
the PS-P3X adaptor which comes with the XS-3.
a REC OUTPUT (unbalanced RCA jacks)
Outputs the pre MASTER 1/2 signal.
For example, to connect the recorder to these jacks,
you can record your live performance without MASTER LEVEL control.
s MASTER OUTPUT (unbalanced RCA
jacks)
Outputs the master output signal adjusted by MASTER control.
d MASTER OUTPUT (balanced TRS connec-
tor)
Outputs the master output signal adjusted by MASTER control.
Connections are as follows:
HOT: Tip
COLD: Ring
GND: Sleeve
2.4. Front Panel
j PHONES
Connect your headphone to this jack.
k C.F START B
Sets the crossfader start B on/off.
l C.F START A
Sets the crossfader start A on/off.
NOTE
If C.F REVERSE switch is set to ON, crossfader
start operation is set to reversal.
TASCAM XS-3 7
English 3. Specifications
3. Specifications
LINE INPUT (PGM1-2): RCA, unbalanced
Input Level: -10 dBV
Input impedance: 10k ohm
PHONO INPUT (PGM1-2) RCA, unbalanced
Input Level: -54 dBV
Input impedance: 47k ohm
MIC INPUT: TRS, balanced
Input Level: -50 dBV
Input impedance: 2.8k ohm
MASTER OUTPUTS (balanced):
TRS, balanced
Nominal Output Level: +4 dBu
Output impedance: 75 ohm
MASTER OUTPUTS (unbalanced):
RCA, unbalanced
Nominal Output Level: 0 dBV
Output Impedance: 100 ohm
REC OUTPUT: RCA, unbalanced
Nominal Output Level: -10 dBV
Output Impedance: 1k ohm
EFFECT (send): TRS, unbalanced
Nominal Output Level: -4 dBV
Output Impedance: 100 ohm
EFFECT (return): TRS, unbalanced
Input Level: -4 dBV
Input Impedance: 10k ohm
PHONES:
100mW+100mW, (at 33ohm)
Frequency Response:
LINE IN: 20 Hz to 20KHz, +/-1.0 dB
PHONO IN: 30 Hz to 15KHz, +/-2.0 dB
(RIAA)
MIC IN: 30 Hz to 18KHz, +/-3.0 dB
Signal to Ratio:
LINE IN: 78 dB (IHF A WTD)
PHONO IN: 70 dB (IHF A WTD)
MIC IN: 60 dB (IHF A WTD)
Total Harmonic Distortion:
LINE IN: <0.1 %
PHONO IN: <0.2 %
MIC IN: <0.2 %
Crosstalk: >60 dB (@1KHz)
PGM EQ
HIGH: +12 dB ~ -26 dB
MID: +12 dB ~ -26 dB
LOW: +12 dB ~ -26 dB
Filter
(Cut Frequency at -6dB, slope 12dB/oct in all the
cases)
HIGH: 6 kHz
MID: 6 kHz & 200 Hz
LOW: 200 Hz
MIC EQ
HIGH: 5.5 kHz, +12 dB ~ -12 dB
LOW: 125 Hz, +12 dB ~ -12 dB
Power Requirement: 120 V (60Hz)
230 V (50Hz)
Power Consumption: 13 W
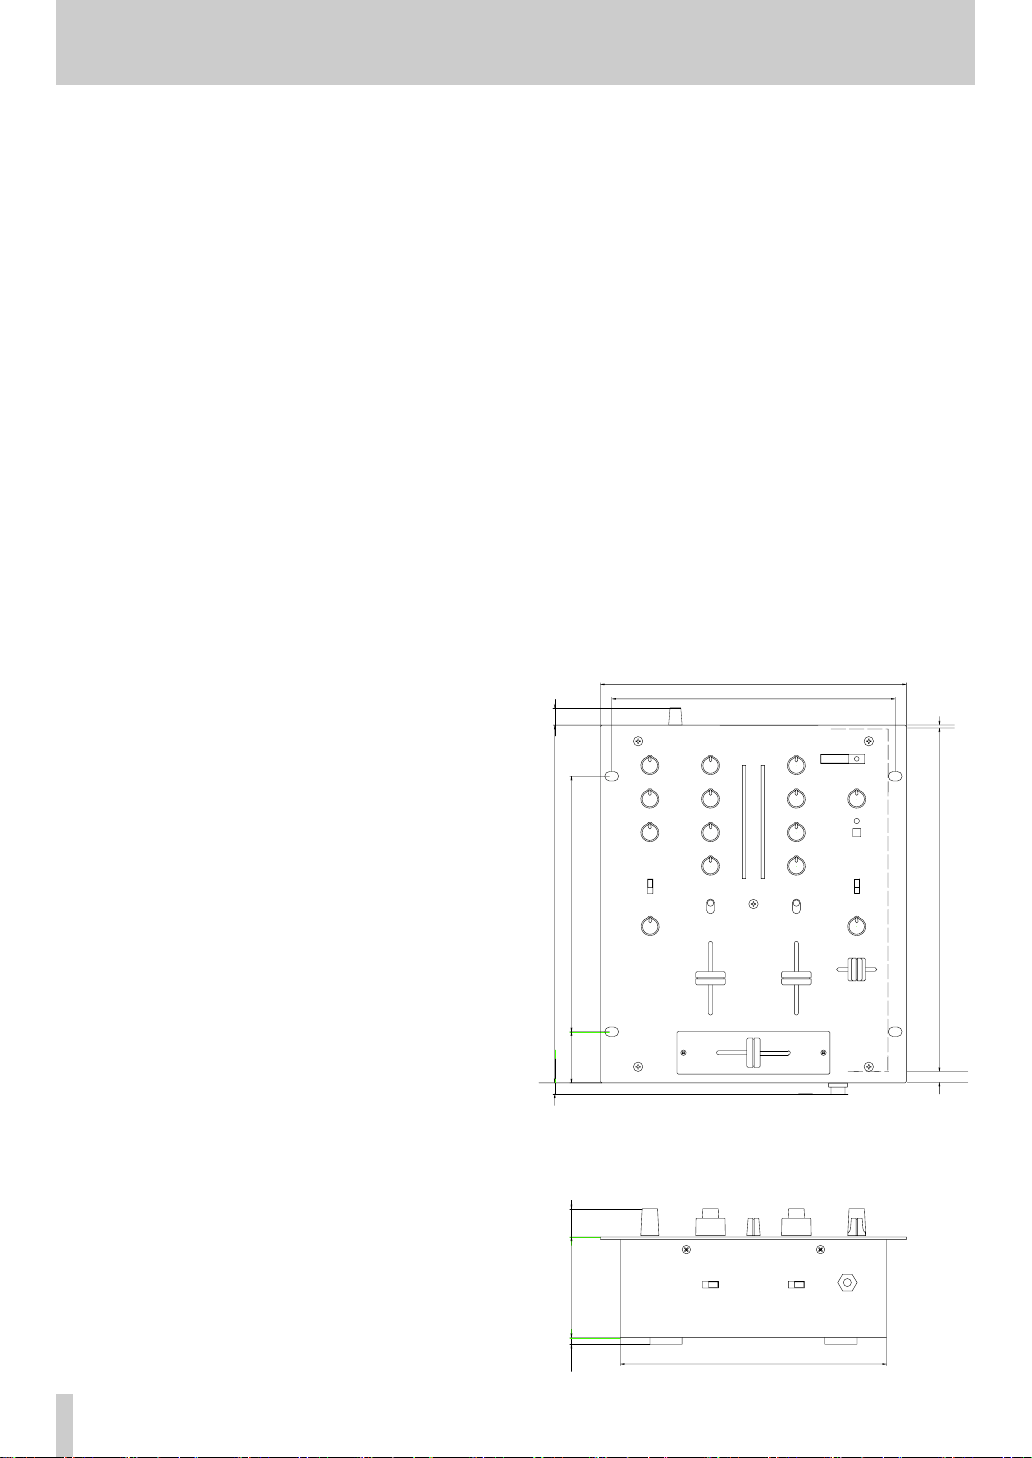
Dimension (mm): 228(W)x106(H)x267(D)
Weight: 2.6 kg (main unit)
0.6 kg (AC Adaptor)
Applicable electromagnetic environment:
E4
Peak inrush current: 5 A
All specifications subject to change without notice.
228
211
2
267
5 8
19138
(20)76
(10)
198
260
5
8 TASCAM XS-3

1. Introduction Français
Numéro de série
Face arrière
Sommaire
1. Introduction................................................. 9
1.1. Remarques et précautions ................... 9
1.2. Numéro de série, etc. .......................... 9
2. Fonctionnalités et contrôles ...................... 10
2.1. Face supérieure ................................. 11
2.2. Remplacement d’un fader ................. 11
2.3. Face arrière........................................ 11
2.4. Face avant ......................................... 12
3. Caractéristques.......................................... 13
4. Schéma synoptique ................................... 31
1. Introduction
La XS-3 est une console DJ 2 voies permettant de
brancher de nombreux appareils et de réaliser des mixages créatifs. Son ergonomie très étudiée lui permet de
combiner un accès très simple à des fonctionnalités
étendue.
Il est TRÈS IMPORTANT de lire ce manuel en totalité
et attentivement avant tout branchement pour en
exploiter au mieux les possibilités.
Nous conseillons vivement de faire réaliser les
opérations de maintenance exclusivement par des techniciens agréés TASCAM.
1.1. Remarques et précautions
Traitez votre XS-3 avec tout le soin que vous accordez
normalement à un outil de précision.
Évitez de l’exposer à des conditions extrêmes de
température ou d’humidité et évitez de la soumettre à
des chocs ou à des vibrations.
Gardez-la à l’écart des champs magnétiques intenses
(récepteurs TV, moniteurs, moteurs électriques puissants etc.).
Considérations environementales
La XS-3 peut être utilisée à peu près partout, mais
pour lui assurer des performances et une durée de vie
maximum nous vous conseillons de veiller aux points
suivants :
ménager un espace suffisant au dessus et sur les côtés
de l’appareil pour permettre sa ventilation. Ne l’installez pas dans un espace confiné, dans une bibliothèque ou un mobilier équivalent.
Pour éviter toute surchauffe , ne la placez pas audessus de sources de chaleur importantes (amplificateurs ou autres).
La XS-3 fonctionne sur un courant secteur de 100 à
240V, à 50 ou 60Hz. Vérifiez que le câble secteur
chemine à distance des câbles audio pour éviter toute
induction de ronflement ou de souffle.
REMARQUE
Veillez à ne transporter cet appareil que dans un
conditionnement approprié ou dans son emballage d’origine. Nous vous conseillons donc de
conserver celui-ci en lieu sûr à toutes fins utiles.
Connexions aux autres appareils
Il est extrêmement important que l’appareil et toutes
les unités qui lui sont reliées soient bien hors tension
avant d’effectuer quelque modification de branchement que ce soit sur la XS-3.
Lors de la mise sous tension du système, il est
habituellement préférable de commencer par les
appareils sources (platines disques, lecteurs CD etc.)
puis d’allumer la XS-3 et de finir par le système d’amplification.
La mise hors tension doit se faire dans l’ordre inverse
(amplificateur d’abord, puis autres appareils).
Après avoir éteint l’appareil, attendez toujours au
moins 3 secondes avant de le remettre éventuellement
sous tension.
1.2. Numéro de série, etc.
Le numéro de ssérie de la XS-3 se trouve sur une
étiquette placée vers l’avant à la face inférieure de
l’appareil. Notez-le à toutes fins utiles (mise en œuvre
de la garantie, etc.). Après avoir éteint l’appareil,
attendez toujours au moins 3 secondes avant de le
remettre éventuellement sous tension.
Sa température de fonctionnement doit rester comprise
entre 5°C et 35°C, avec une humidité relative située
entre 30 et 90 degrés sans condensation.
Une chauffe modérée intervenant normalement pendant son fonctionnement, nous vous conseillons de
TASCAM XS-3 9

Français 2. Fonctionnalités et contrôles
2. Fonctionnalités et contrôles
10 TASCAM XS-3
 Loading...