

Page 1
Page 1 of 38
TASCAM HS-P82 End User Guide
for Film/Video Applications v1.20
By Fred Ginsburg CAS PhD
Introduction
This Guide to the TASCAM HS-P82 and companion RC-F82 is intended to provide the new user a concise
review of the operation and setup of this portable multitrack recorder, along with explanations and a
suggested workflow for professional film/video applications.
It is not meant to replace the comprehensive Owners Manuals provided with the equipment, but rather
to supplement those documents.
Part 1 deals with the basic setup of the recorder. Part 2 (pg 17) covers recording with the unit, stand
alone, without a mixing board. Part 3 (pg 28) discusses using the recorder with an external mixer, and
Part 4 (pg 31) deals with the use of the TASCAM companion fader controller.
A helpful index (pg 37) is located at the end of this document.
Page 2
Page 2 of 38
Part 1: Basic Setup
This section is an introduction to the basic operation of the TASCAM HS-P82 recorder itself. These steps
will guide you through the initial setup of the machine and explain the primary touchscreens and
controls that you will need for film/video applications.
One of the nice features of the TASCAM is the redundancy of control settings. As you explore the layout
of the touchscreen software, you will find that many of the same settings are accessible from multiple
screens. In the field, this advantage can really streamline your workflow.
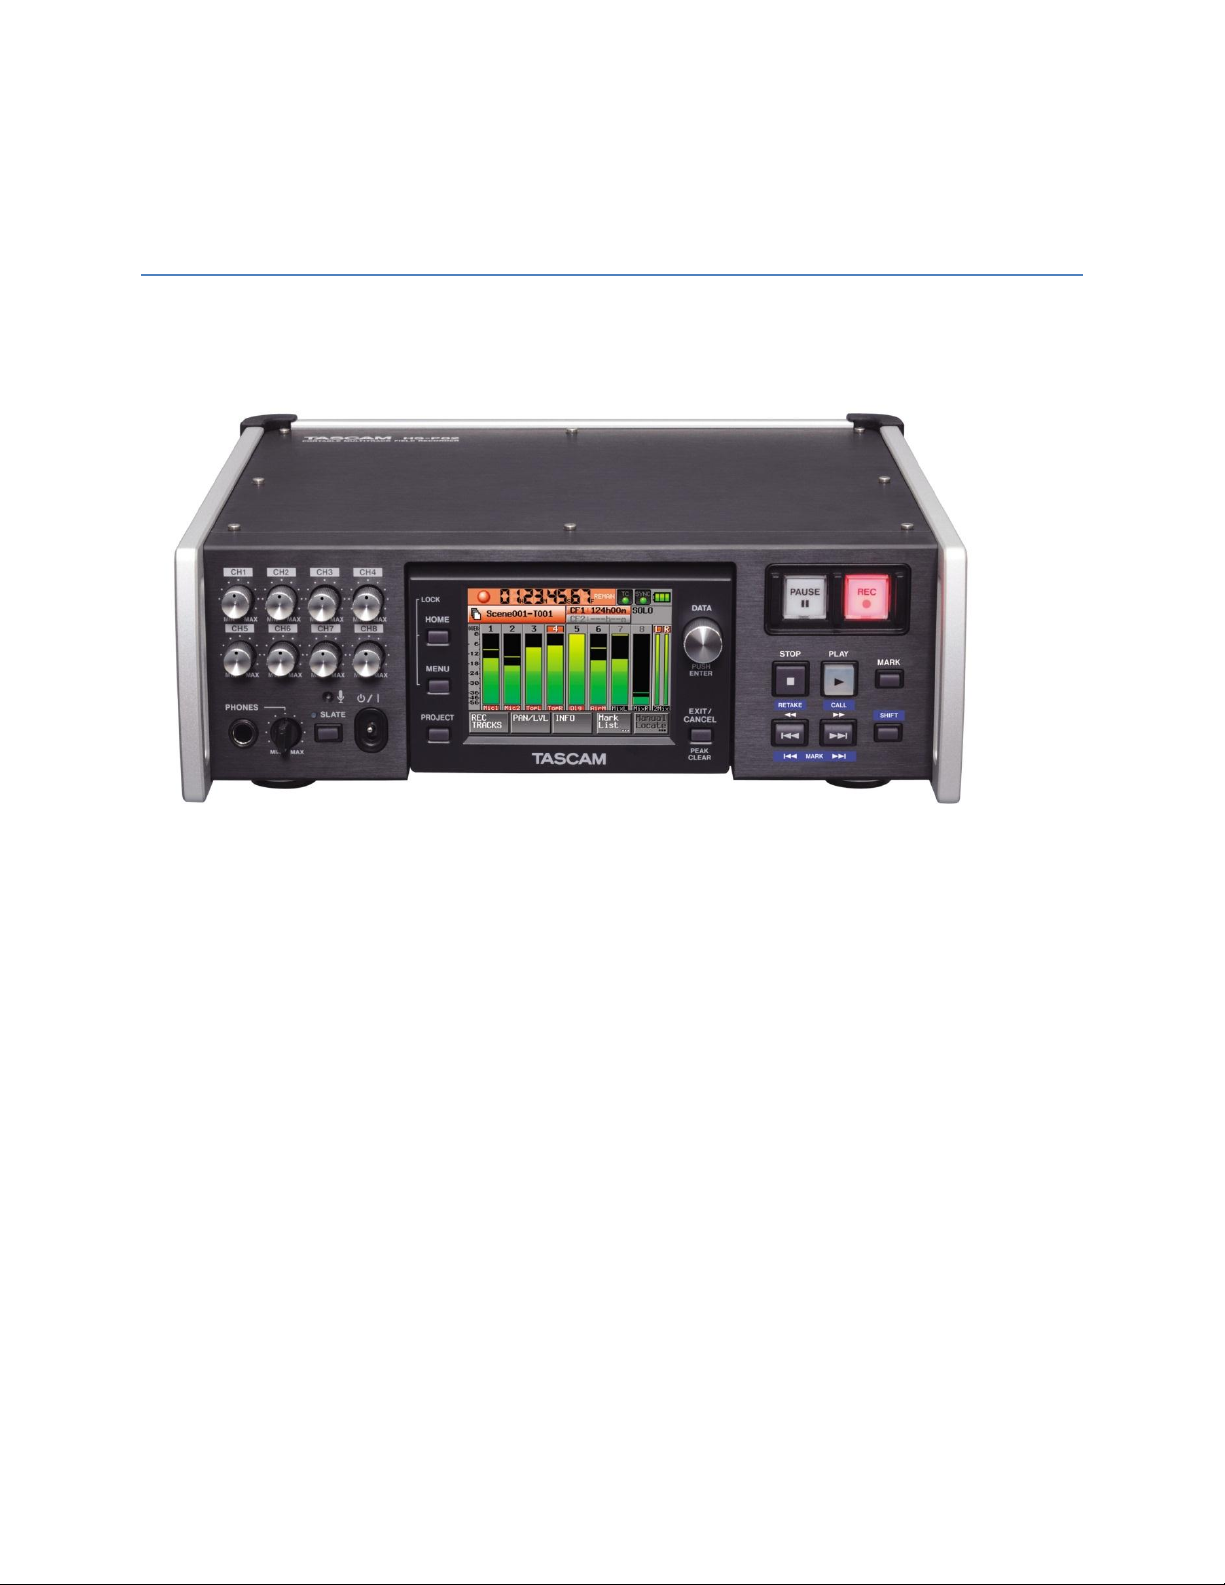
Powering Up
The TASCAM can be powered from internal batteries, AC adapter, or external 12vDC via industry
standard XLR 4-pin connector.
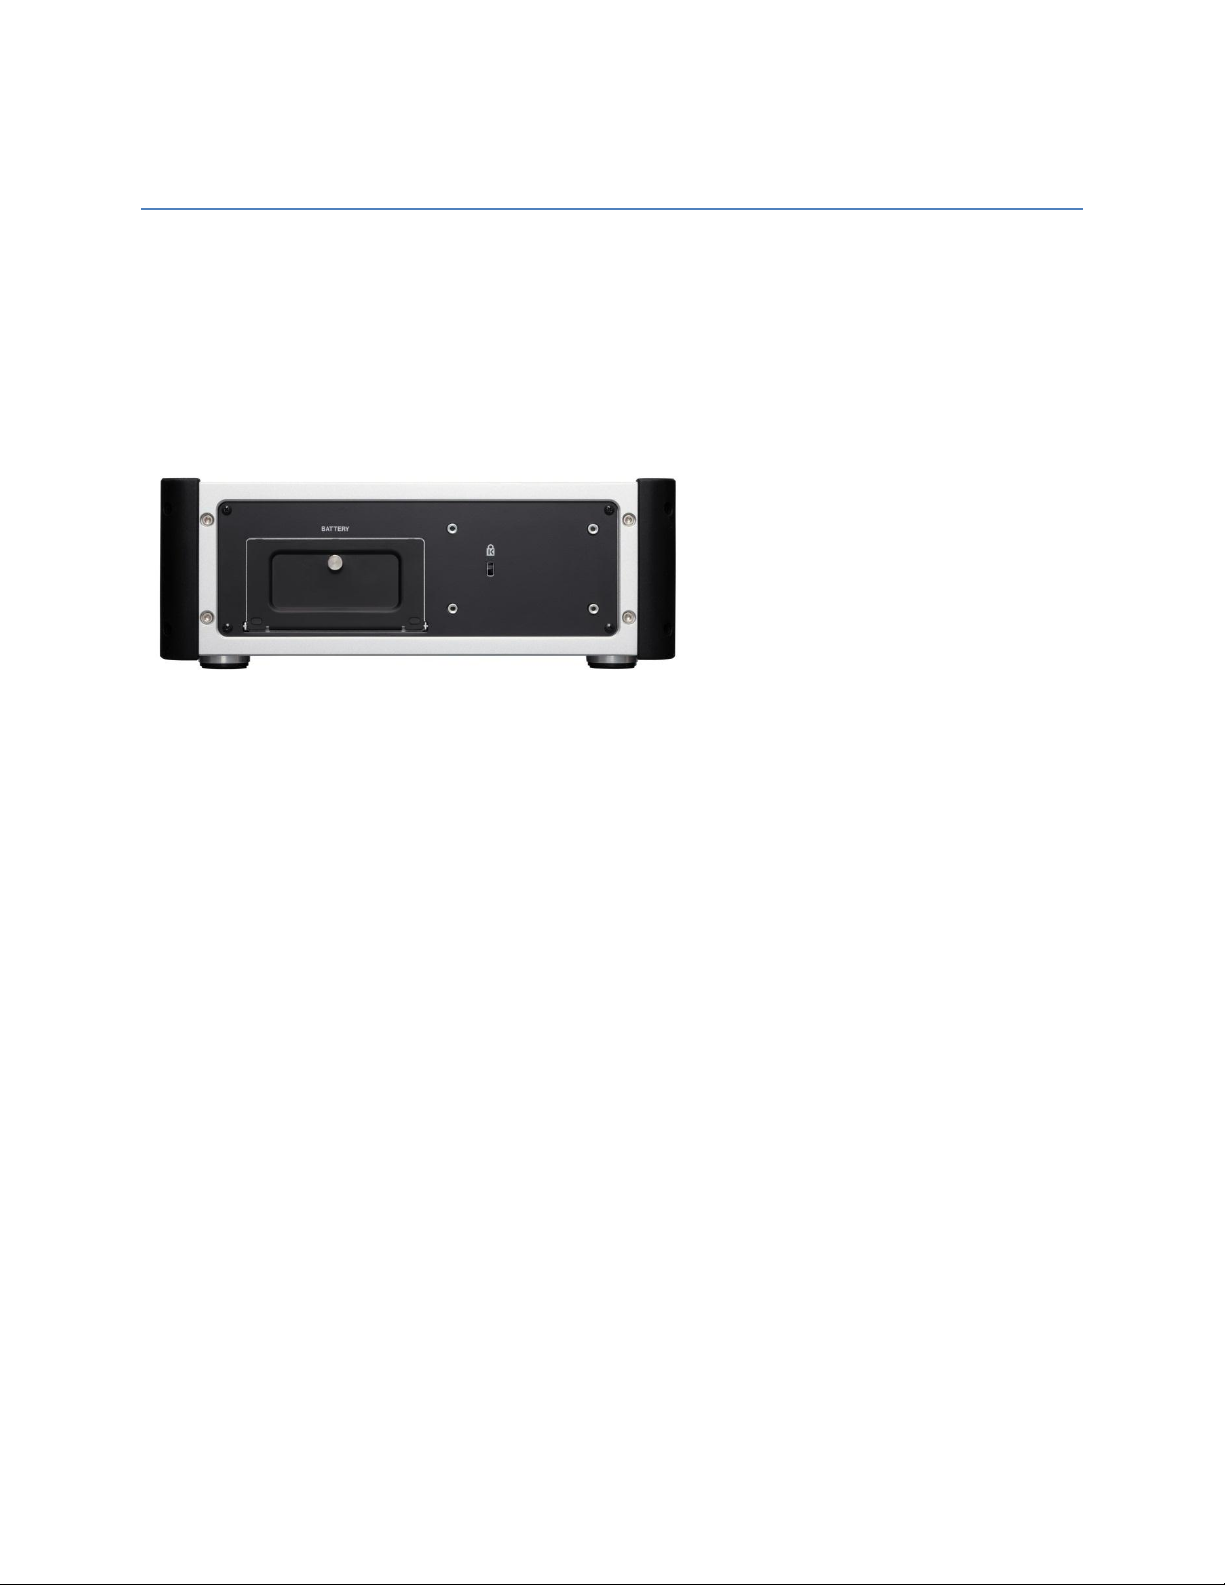
The unit comes with an NP style Battery pack that takes 10 AA alkalines. Even if you are planning to use
AC or external power, it is a good idea to load up the battery pack and install it; it will serve as a power
backup should your external power be interrupted.
If you have access to them, you could also use standard NP style, rechargeable video batteries.
Factory supplied AC adapter outputs 12vDC via its donut connector.
Owners (not renters) of this TASCAM are encouraged to have a technician replace the OEM
donut connector with an XLR 4-pin, as the XLR 4-pin is a more secure connection.
External 12v DC or battery pack equipped with standard XLR 4-pin. Note that the industry standard for
the XLR 4-pin is pin 1=positive, and pin 4=negative. Pins 2 and 3 are not used.
Page 3
Page 3 of 38
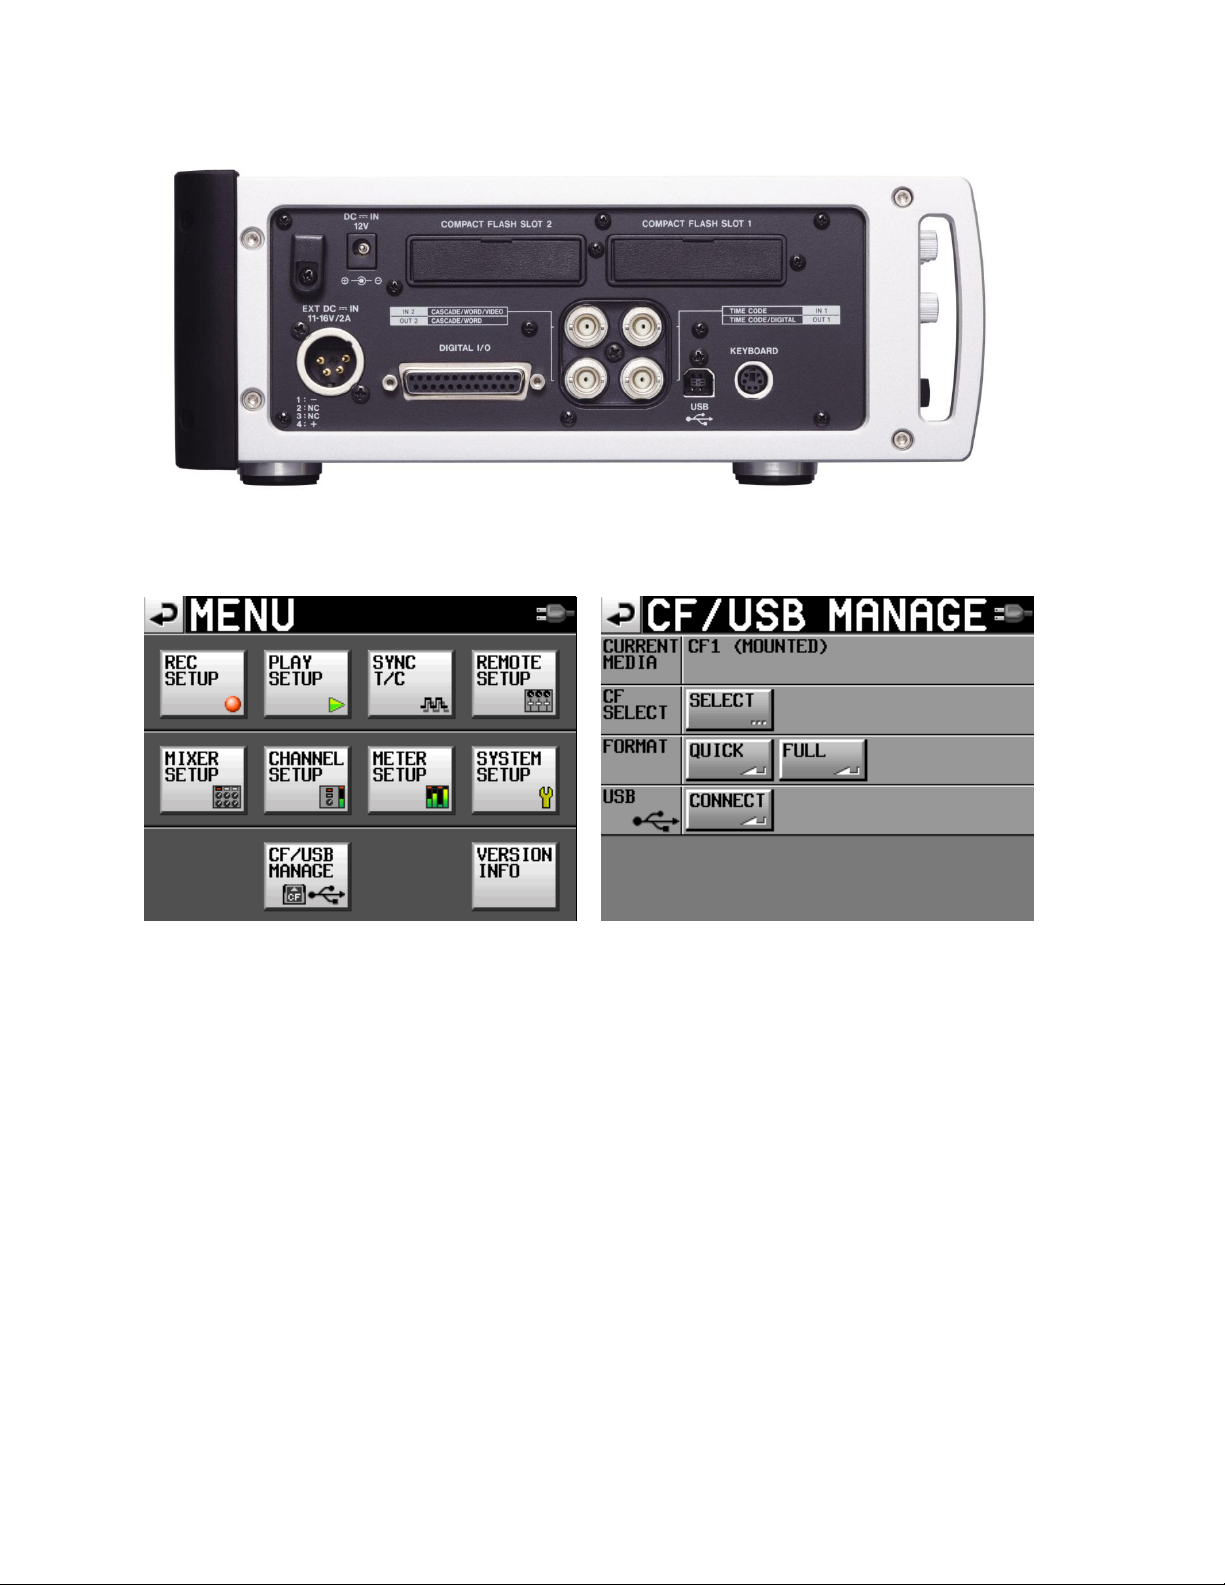
Format your CF card
After powering up the unit, press MENU button. Select CF/USB MANAGE screen. Full format the first
time you are using a new or used card. It can take a while, so do this BEFORE you arrive on set.
Subsequently, just use the quick format button.
Most mixers utilize the following workflow: Begin the project with a full formatted, fresh compact flash
card. At the end of the day, or when the card is almost full, remove the card and transfer the files over
to a laptop. As soon as the used card is removed, replace it immediately with a fresh one. Perform a
quick format, and then set up your project files, so that your recorder is good to go. (Keep a written
notepad with all of your project specs and naming conventions, so that all of your “blank” cards remain
consistent.) After transferring the files from the used card, perform a quick format and project setup on
that card, as well. In this manner, you will always have one in the machine, and another ready for a
quick change out.
New system firmware version 1.10 offered during the Fall of 2011 enables you to record to two compact
flash cards simultaneously, so that your material is still safe in the event that one CF card malfunctions
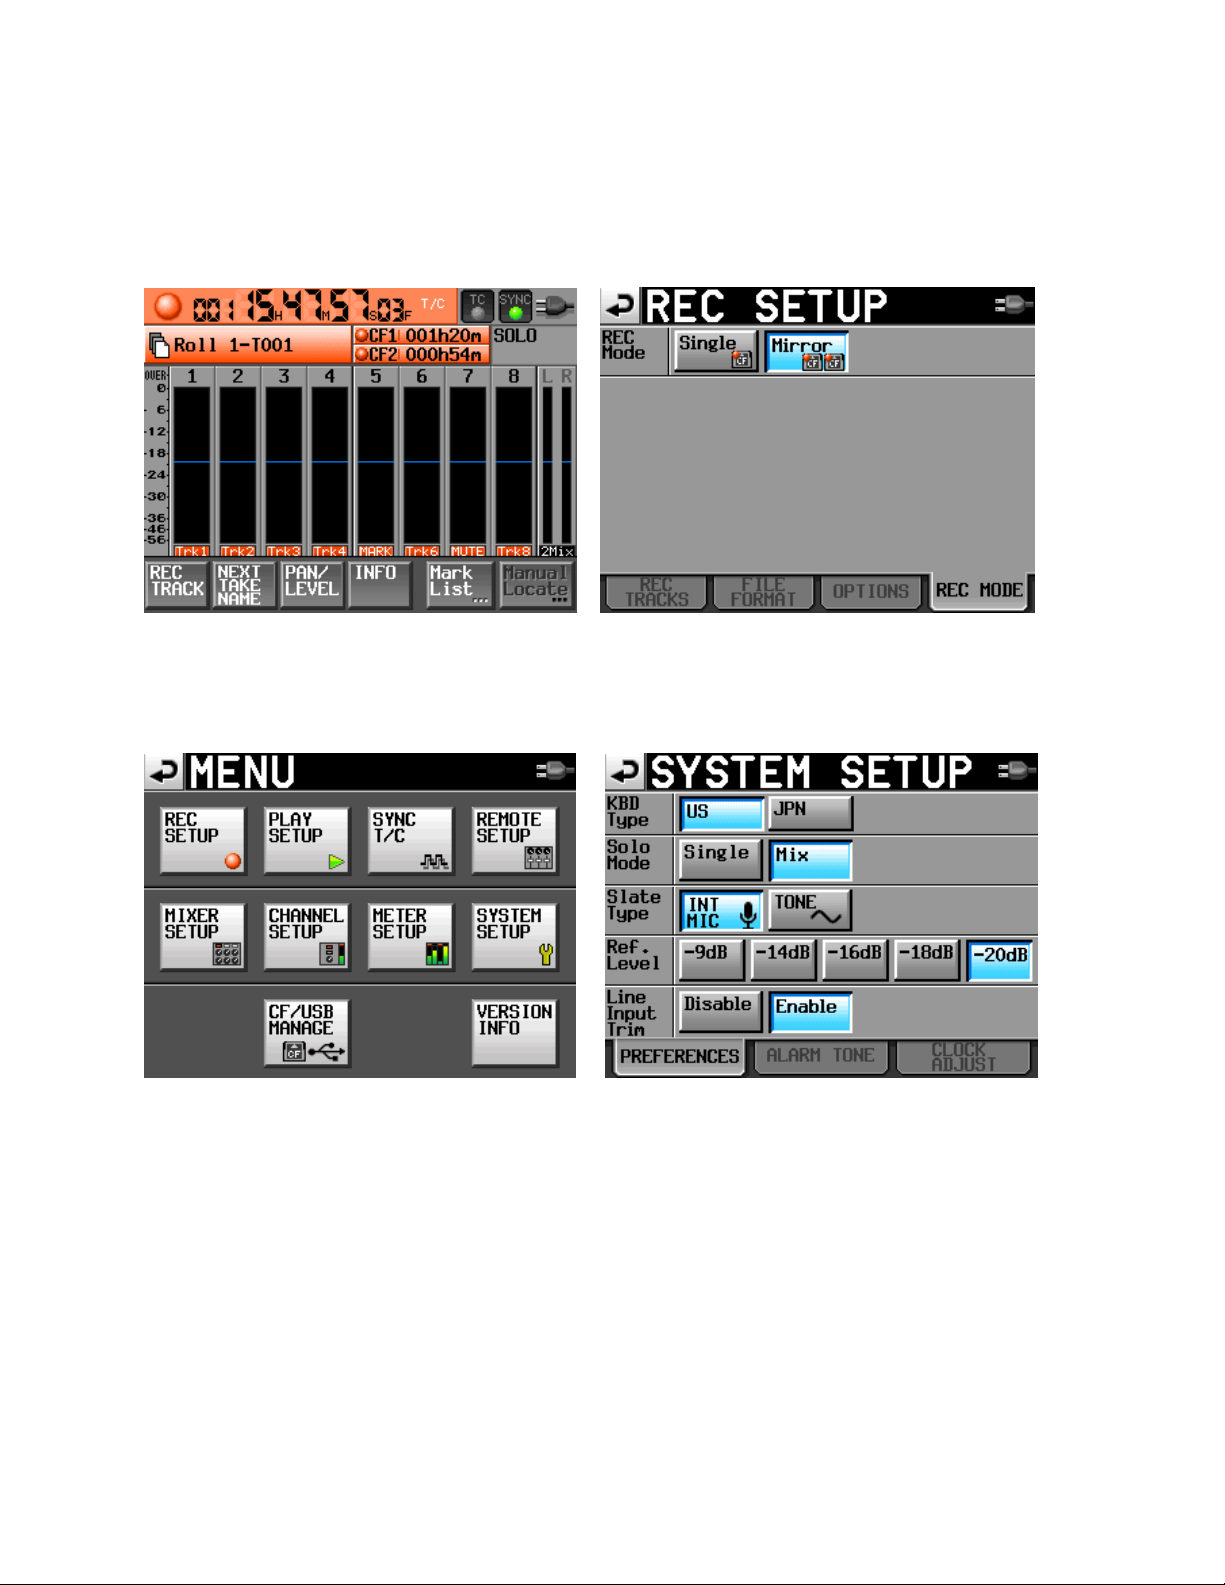
during a recording. A REC MODE tab has been added to the REC SET UP screen, which enables you to
Page 4
Page 4 of 38
activate the Mirror Record function. I recommend that you use two compact flash cards of the same
manufacture and read/write specs to insure the best results. Error messages may occur otherwise; as
well as if there is not enough memory remaining on one of the cards. The Home screen shows the status
of both CF cards.
System Setup
From the MENU button, select the SYSTEM SETUP screen.
Keyboard type: US.
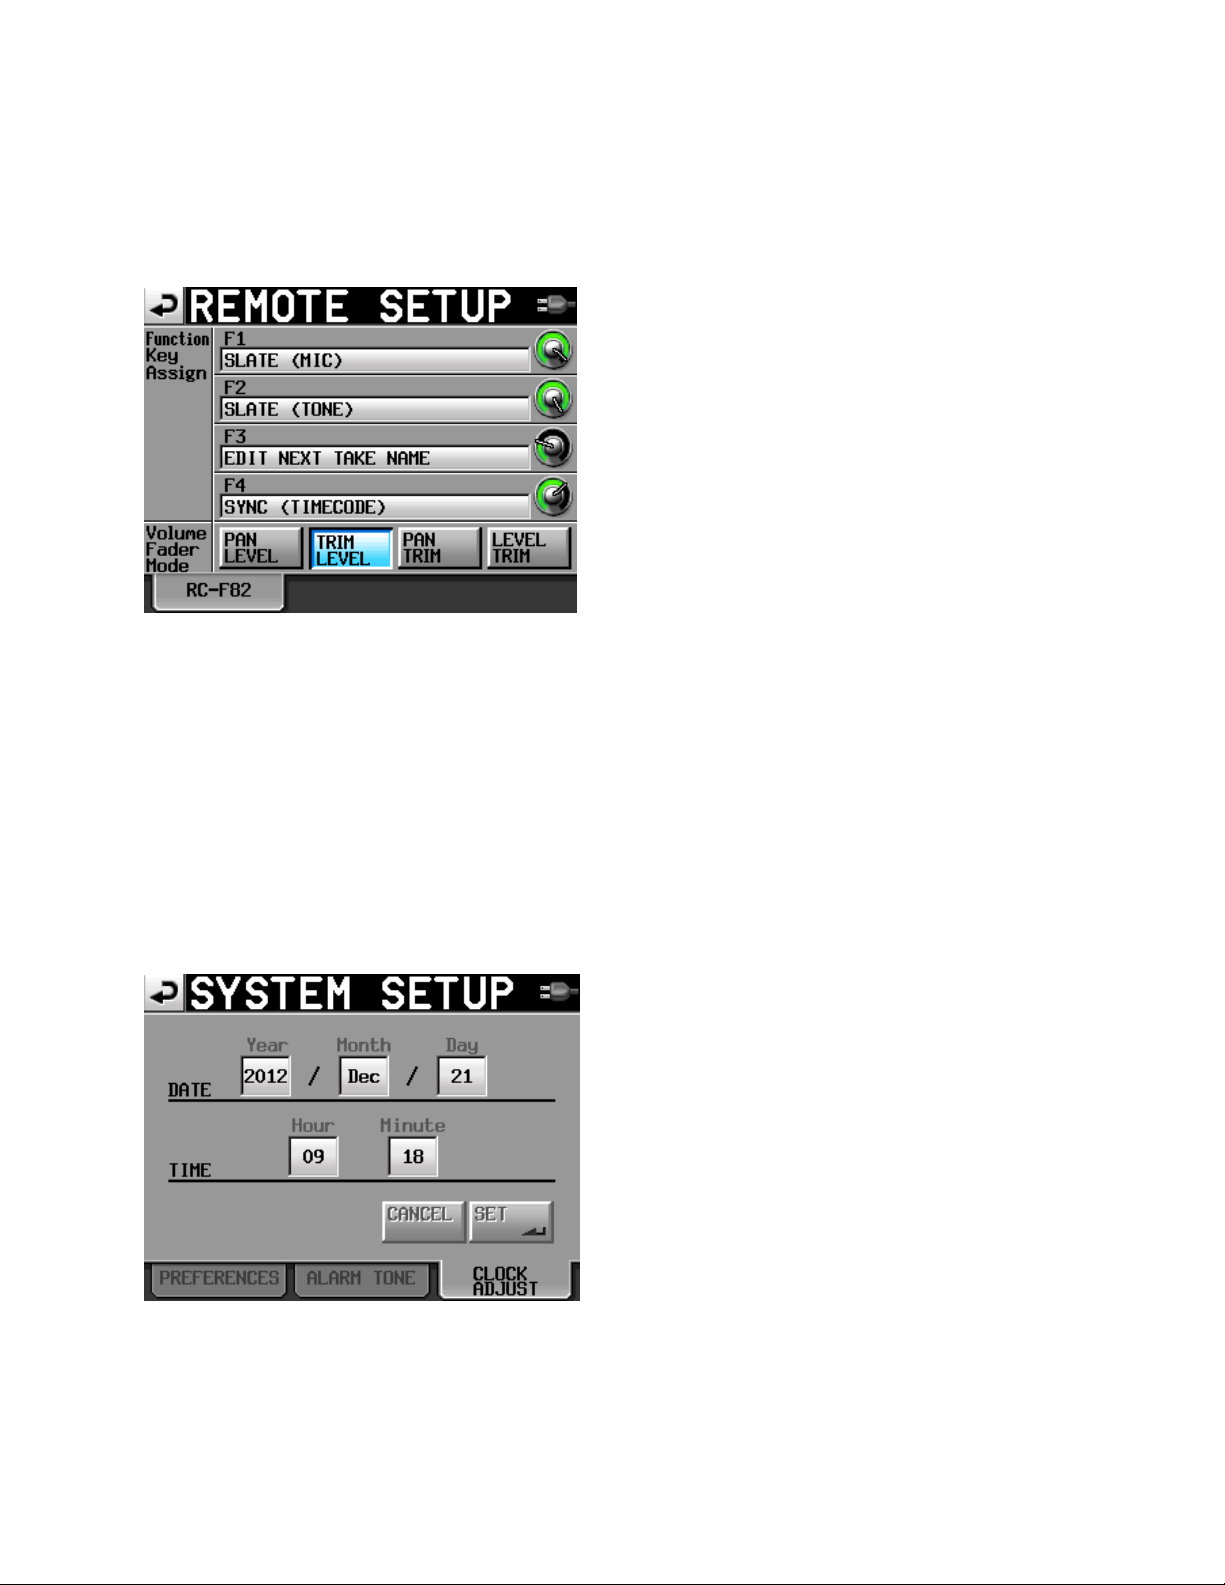
Solo mode: The default setting for SOLO is SINGLE. That means only one channel at a time can be solo
monitored. If you change the solo mode to MIX, then it is possible to highlight and monitor as many
channels simultaneously as you want to. MIX is better for film/video applications.
Slate type: you will find yourself alternating between Internal Mic for voice slating your takes, and the
TONE setting for recording a head tone at the beginning of your recording session. When you press the
SLATE button on the face of the recorder, it will activate the slate mic or tone generator, based on your
selection on this screen.
Page 5
Page 5 of 38
However, if you use an external keyboard or the TASCAM Fader Controller, you can readily switch
between Mic or Tone by pressing the (user programmed) Function buttons (example, F1 for Mic and F2
for Tone) regardless of the screen selection for Mic or Tone. This is the popular way of doing it, and is
explained in the Remote Setup Screen section in Part 4 of this guide.
Reference Level: These settings do two functions. Not only do they set the record level of the tone
generator (which is normally set to -20dB), but it also controls the level for your analog “line level input”
such as when you plug in an external mixing panel. So in practice, you would select the -20dB button for
recording tone, but later you may need to select a higher setting if you need more gain from the line
level inputs.
Note that in firmware release v1.20, you can now adjust the level of LINE INPUT by using the trim knob,
similar to adjusting Mic level inputs. This allows you to maintain a -20dB level for your reference tone.
Set the internal clock and date by selecting the tab at the bottom of the screen. Just press any of the
displays to adjust the numbers shown.
Page 6
Page 6 of 38
Create a PROJECT
A project is essentially the name of your film or video, along with the basic recording format. It is
possible to host multiple projects on the same CF card, even if those projects use different formats.
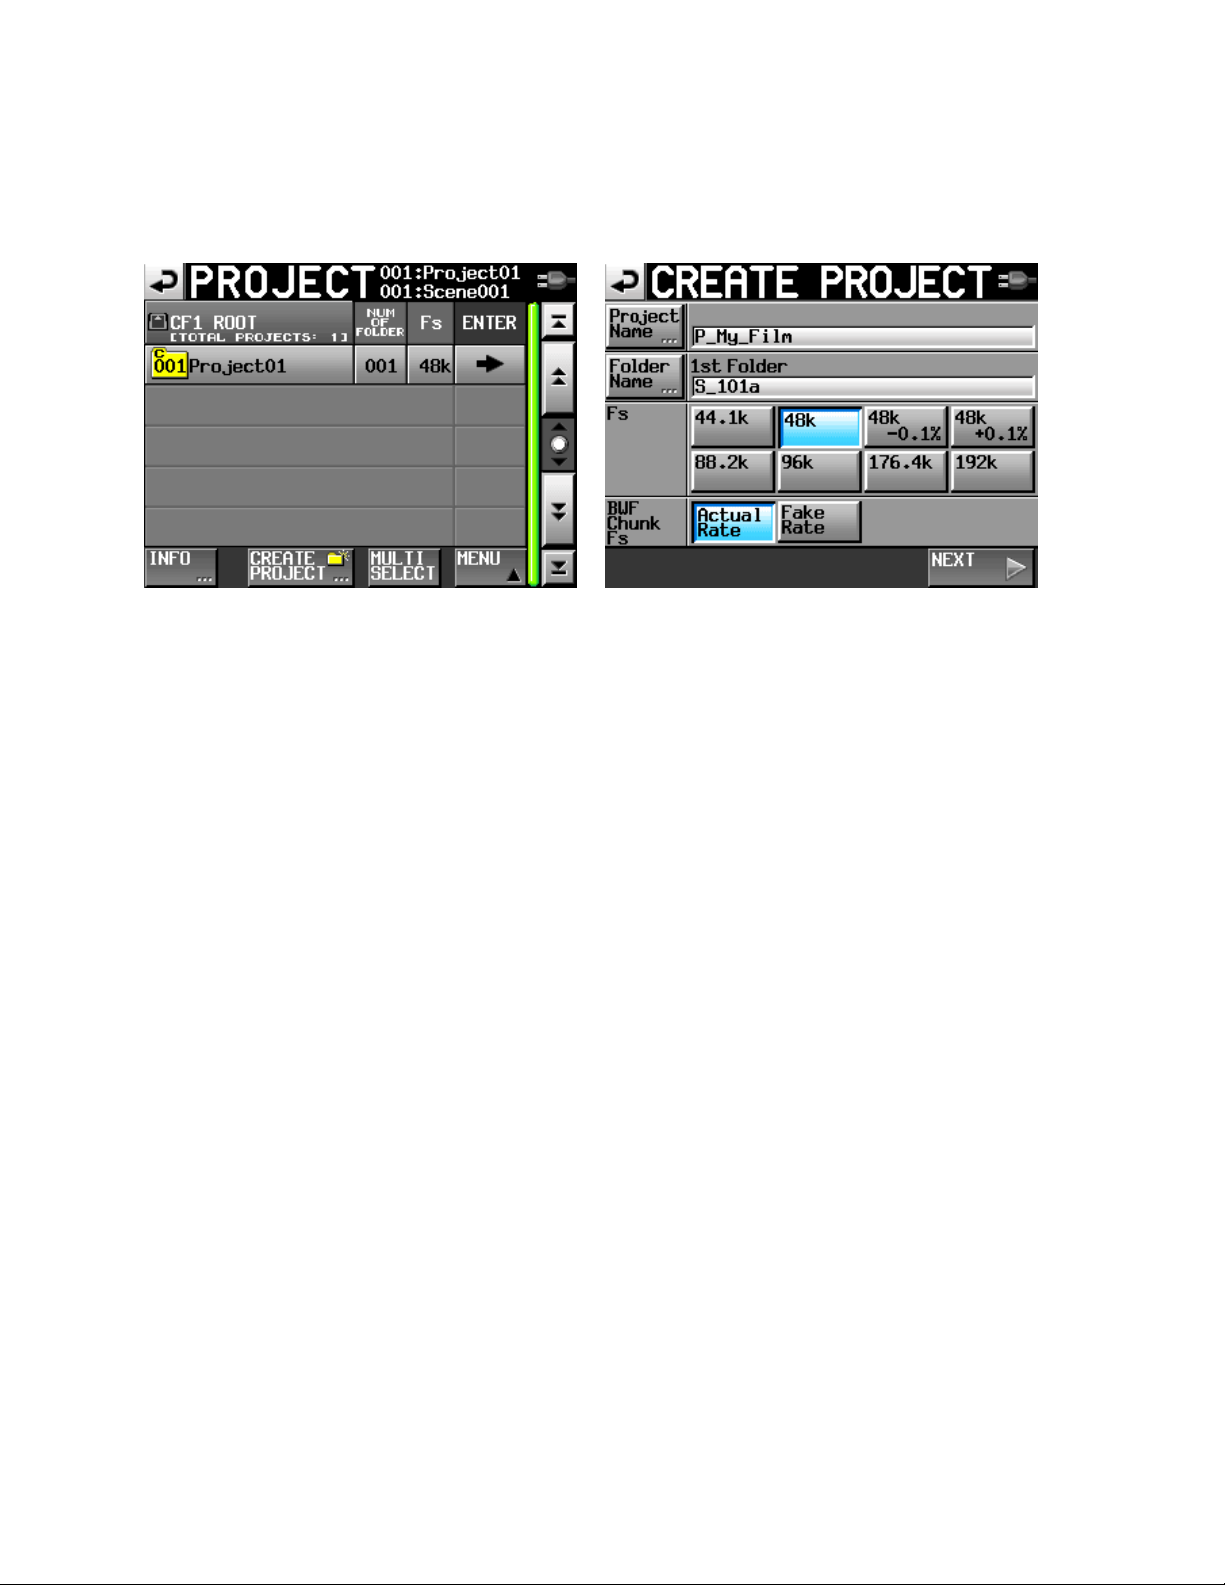
Press PROJECT button. Select Create Project tab at bottom of screen.
If you are not already in the ROOT folder, then tap the button located just under the “Project”
screen label until you back your way up to the root folder of the card.
Press the tab on the left to NAME your project. DO NOT use the whole word “project” in your new
name; it is too long and will not always be displayed! Just abbreviate it as P_ name. (letter P,
underscore, brief name or number). Example: P_My_ Film
Press the tab on the left to NAME your folder. Note that TASCAM sometimes uses the term “folder” for
what we would call “scene” in filmmaking. On the TASCAM, you can store all of your takes for each
scene inside of that scene folder. It is one of two options for keeping track of stuff!
DO NOT use the whole word “scene” in your new folder name; it is too long! Just abbreviate it as S_
number. (letter S, underscore, scene number/letter). Example: S_101A
This would create the following file tree on your CF card:
P_My_ Film (name of project)
S_101A (name of scene)
S_101A-T001 (name of each take, consisting of folder name
appended to incrementing take numbers)
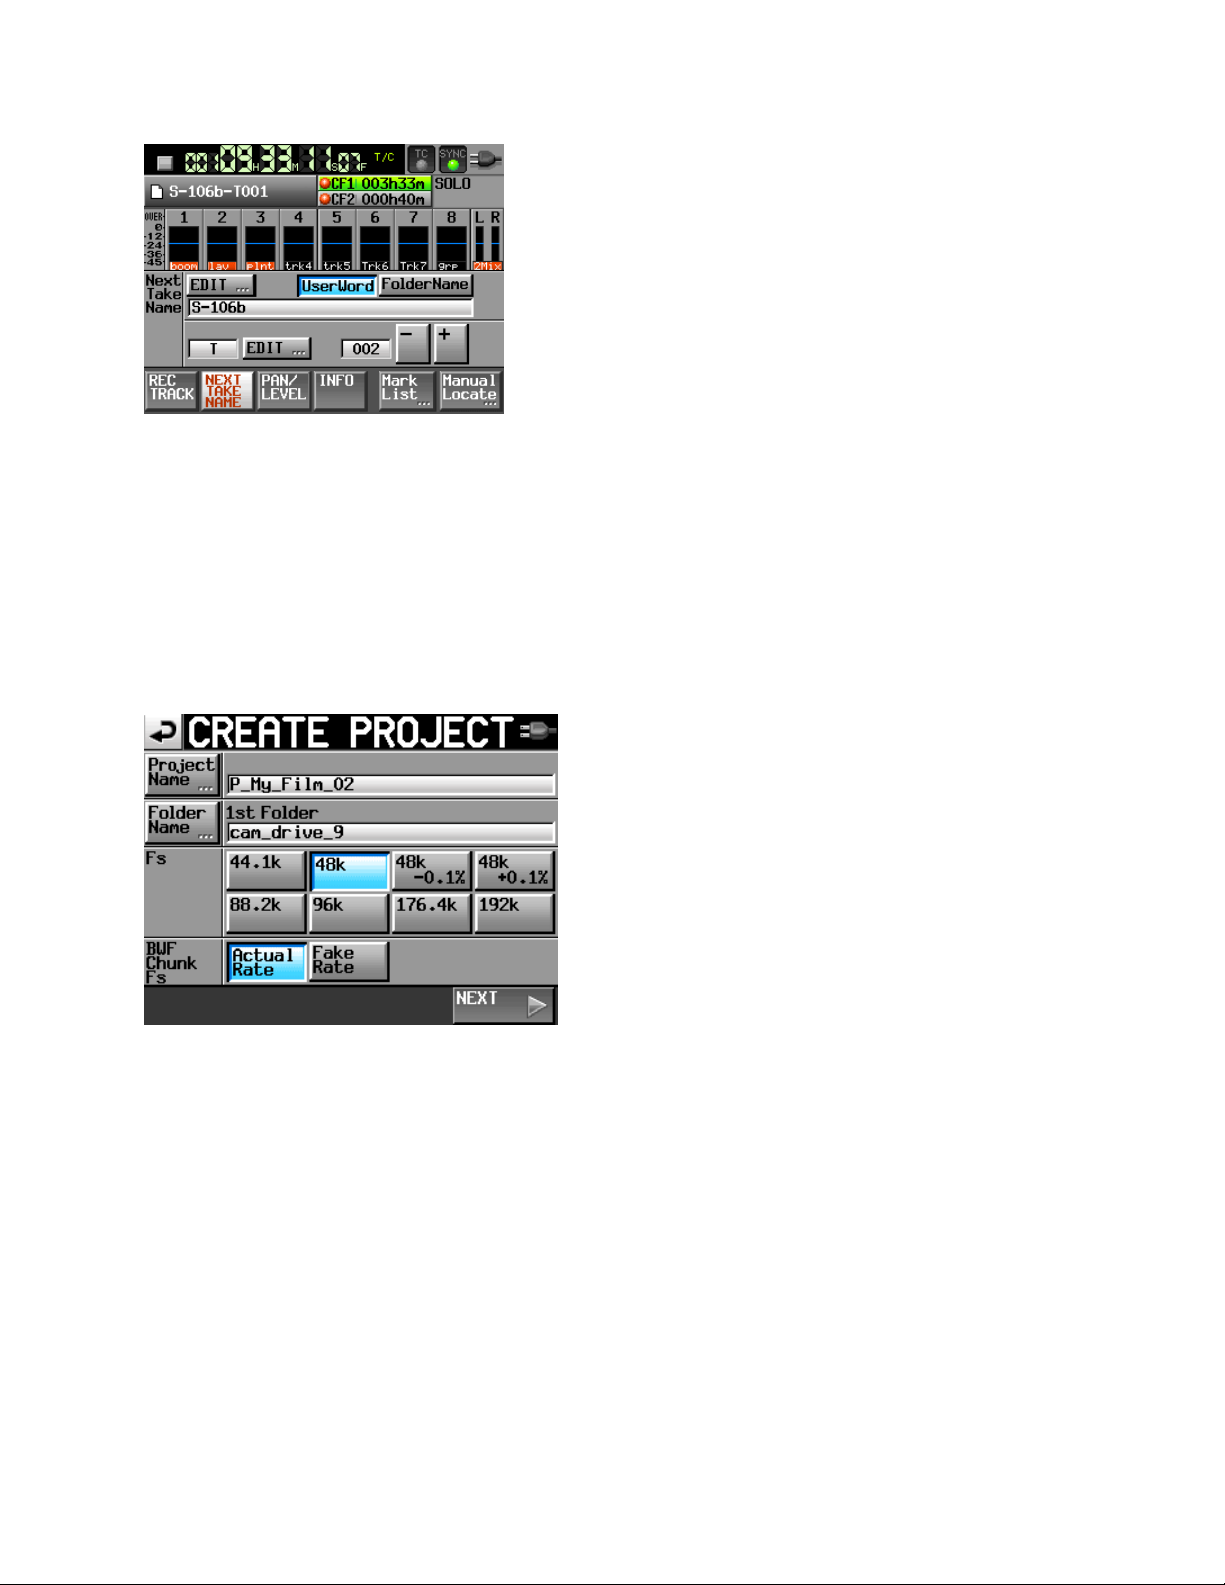
However, in v1.20 firmware, you now have a different option for file naming. Instead of using the
FOLDER NAME as the scene, you can use the folder name to designate any organizational folder, such
as the camera media drive, date, or whatever label you choose. Then you can create a scene/take
number for each take, consisting of a USERWORD (which would be the actual scene number) appended
to incrementing take numbers. This gives you one additional layer of file management, and makes
changing scene numbers faster and very user friendly.
Page 7
Page 7 of 38
Note that editing the USERWORD (aka “scene number”) takes place from the NEXT TAKE NAME tab in
the HOME screen, so it is very convenient.
Now, your file tree might look something like this:
P_My_ Film (name of project)
cam_drive_9 (name of folder, in this case the camera hard drive)
S_101A-T001 (name of each take, consisting of USERWORD scene name
appended to incrementing TAKE numbers)
Next, select the correct Fs (SAMPLING RATE) for your project. Most of the time, this will be 48k.
Sometimes, the post production people will ask for 96k. Depending on your video editing software, you
may even be asked to use 47.952 or 48.048, which are labeled as 48k +/-
It is your responsibility to make sure that you record in the correct format and frame rate, so ask the
Post Production Supervisor for the correct settings to use. NEVER GUESS. NEVER ASSUME. Different
editing houses and labs may prefer different settings according to their software and in-house workflow.
If you are selecting the pull-down or pull-up rate (48k +/-), you can select the FAKE RATE button in order
to stamp a 48k label onto a file in order to fool some recorders into performing a pull-up or pull-down in
order to sync up with some sprocketed FILM projects.
Otherwise, use the Actual Rate setting.
Page 8
Page 8 of 38
(You select the bit rate, 16 or 24, from the REC SETUP screen, File Format tab, as described further
below).
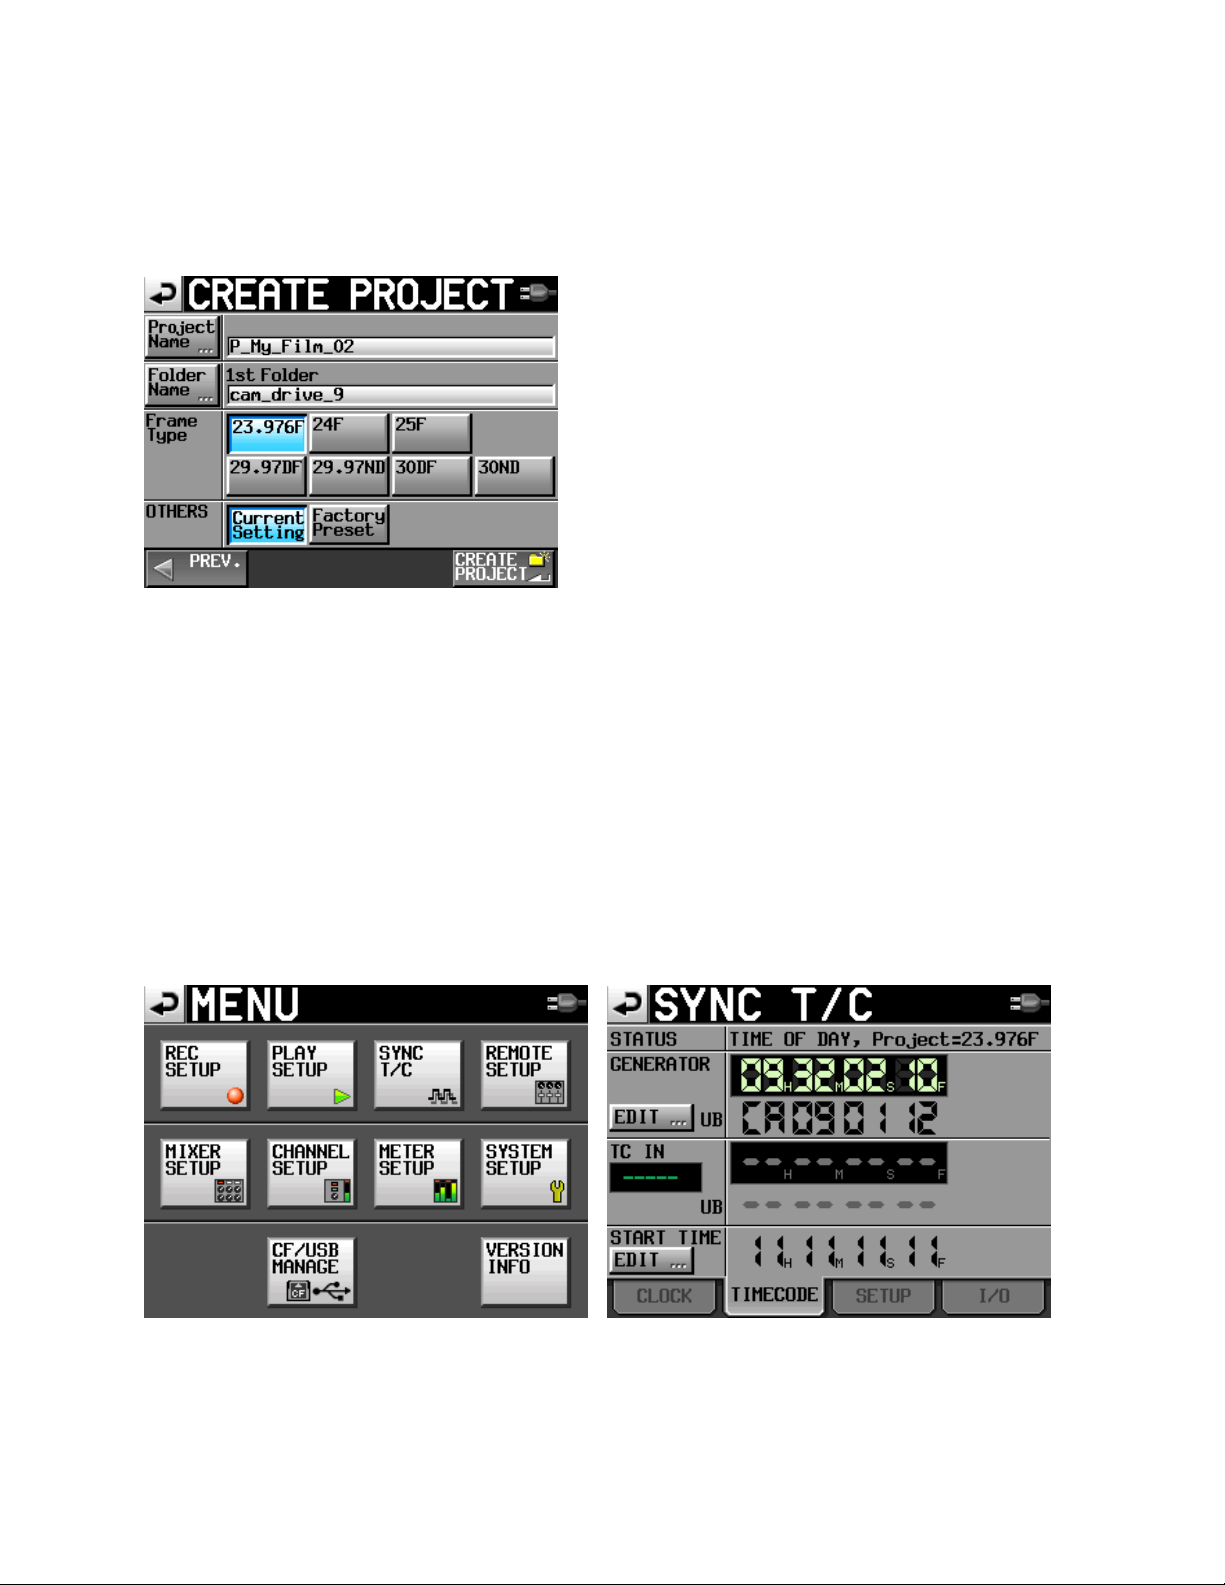
Select NEXT at the bottom of the screen…
Select the correct FRAME RATE for your project. Most so called 24 frame video and HD video is actually
23.976. Standard video is 29.97 (drop frame or non-drop frame, make sure you know which is correct).
Sprocketed or electronic FILM may require 24F or 30ND; be sure to ASK the lab or the Post Production
Supervisor.
After entering all of your parameters, you may finalize your choices by confirming the CREATE PROJECT
button at the bottom of the screen.
Sync T/C
Press the MENU button, and select Sync T/C. This is where you set your timecode details. Note that the
timecode frame rate was already set when you selected your FRAME RATE during Project creation.
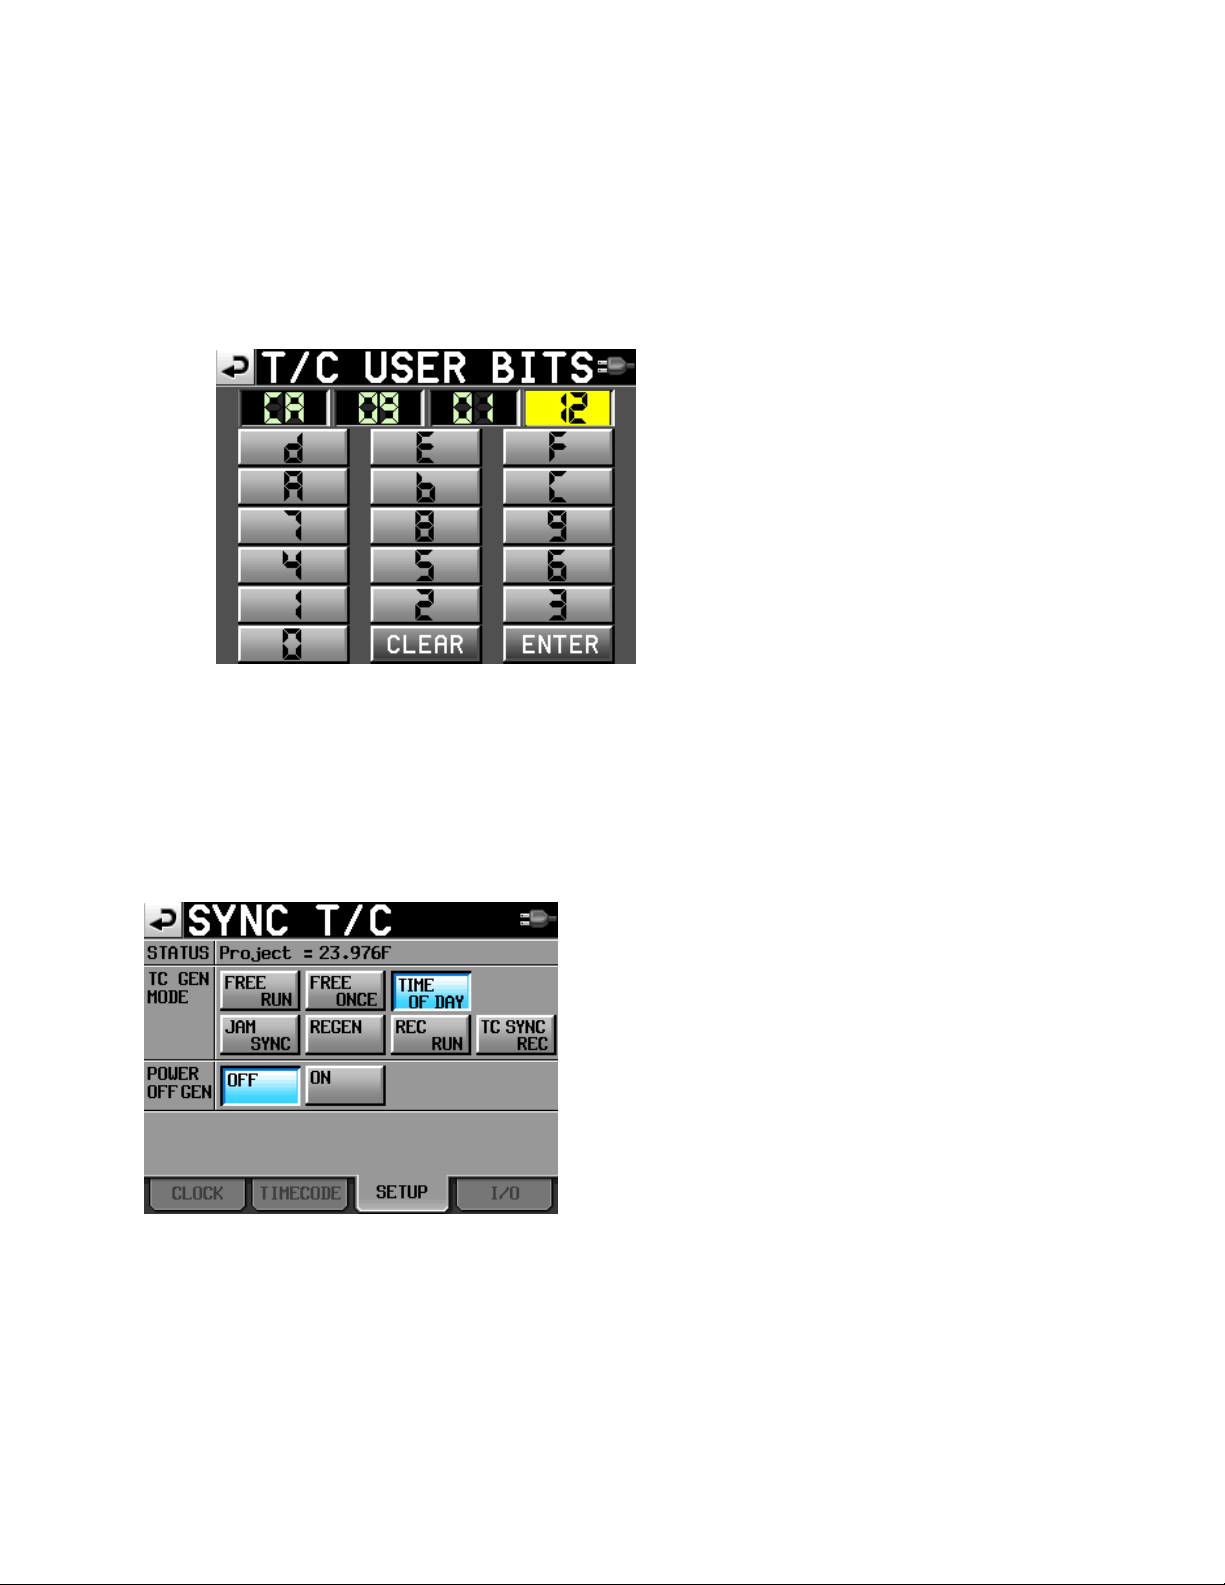
Go to the TIMECODE tab.
The STATUS window displays the frame rate that you selected for this project.
Page 9
Page 9 of 38
You can select to EDIT or manually enter User Bits. This is non-changing information that is part
of the timecode data, such as a date, production number, or other simple value. It is important
to always enter a value for the user bits, since timecode alone will eventually repeat itself after
24 hours. A unique value in the user bits area for each timecode cycle (24 hrs or less) will make
it easier for post-production computers to identify material that otherwise might have the same
timecode data.
In the above example, we have entered CA for camera, 09 for the media drive, and 01 12 for the
date.
You can also manually enter a start value for the timecode. This will begin when you select the
FREE RUN or REC RUN buttons on the setup tab.
Go to the SETUP tab.
Select a generator mode:
TIME OF DAY refers to whatever time the internal clock is set to. It will continue to generate,
even if the TASCAM is powered off, so long as there is a battery inside. Many soundmixers
prefer this setting, as it is easy for any crew member to know the correct timecode just by
looking at their watch!
Page 10

Page 10 of 38
FREE RUN means that once you manually enter a starting timecode, the generator will
continuously run.
FREE ONCE is similar to what Denecke would call a one-time jam sync. The generator will lock
onto an incoming timecode signal, sync to it once, and then continue to run on its own after the
external or master timecode has been disconnected. (default factory setting)
JAM SYNC is similar to FREE ONCE, except that the internal timecode generator will continue to
read and synchronize to the incoming signal. If the external timecode becomes disconnected,
then the TASCAM will enter a free run mode.
Note that the HS-P82 will subsequently ignore external timecode, unless you switch
modes to something else and back again. This is the main difference to JAM SYNC.
Kind of what happens when you jam sync the timecode slate to a recorder, but in this
instance the recorder jam syncs to an external master source.
Although Free Once is the factory default, JAM SYNC is the preferred mode to use by
most Sound Mixers, since it allows the TASCAM to continually update to the latest
external (jam sync) code coming in.
REGEN is what we would commonly refer to as external timecode mode. The TASCAM reads the
incoming timecode, and regenerates it as a clean signal.
REC RUN is when the timecode generator only runs during the RECORD mode. If the TASCAM is
in stop or pause, so is the generator. This will give all of your recorded files a continuous
timecode without gaps. However, cameras and timecode slates will be difficult to maintain sync
with, unless you physically cable or transmit to them at all times. Once they are disconnected
from the recorder, other devices will have no way of knowing when the TASCAM is recording or
stopped.
TC SYNC REC is a new setting that came out in v1.20 that allows the recorder to automatically
start and pause recording in response to the state of external timecode. This allows the camera
to operate in a REC RUN timecode mode and to control the start/pause of the TASCAM, so that
the final timecode on camera & audio tracks are continuous and without gap – which makes
some editors very happy, and the rest of us on the set less happy. It requires a very solid
hardwired or wireless connection between camera and sound; and inevitably that connection
will, after a time, physically fail – resulting in camera rolling without audio.
Power Off gen: the factory default setting is OFF. When the TC generator is set to TIME OF DAY, REGEN,
or REC RUN – this setting has no effect.
The power-off timecode generation requires a battery to be installed in the rear NP slot (the
HS-P82 doesn't have a secondary battery just for this purpose).
Page 11
Page 11 of 38
The I/O tab allows you to assign the BNC OUT 1 connector as timecode output or AES output; and BNC
OUT2 can be WORD sync output or WORD sync throughput. Usually just leave it as timecode out and
word out, unless you are doing something advanced (in which case you would know).
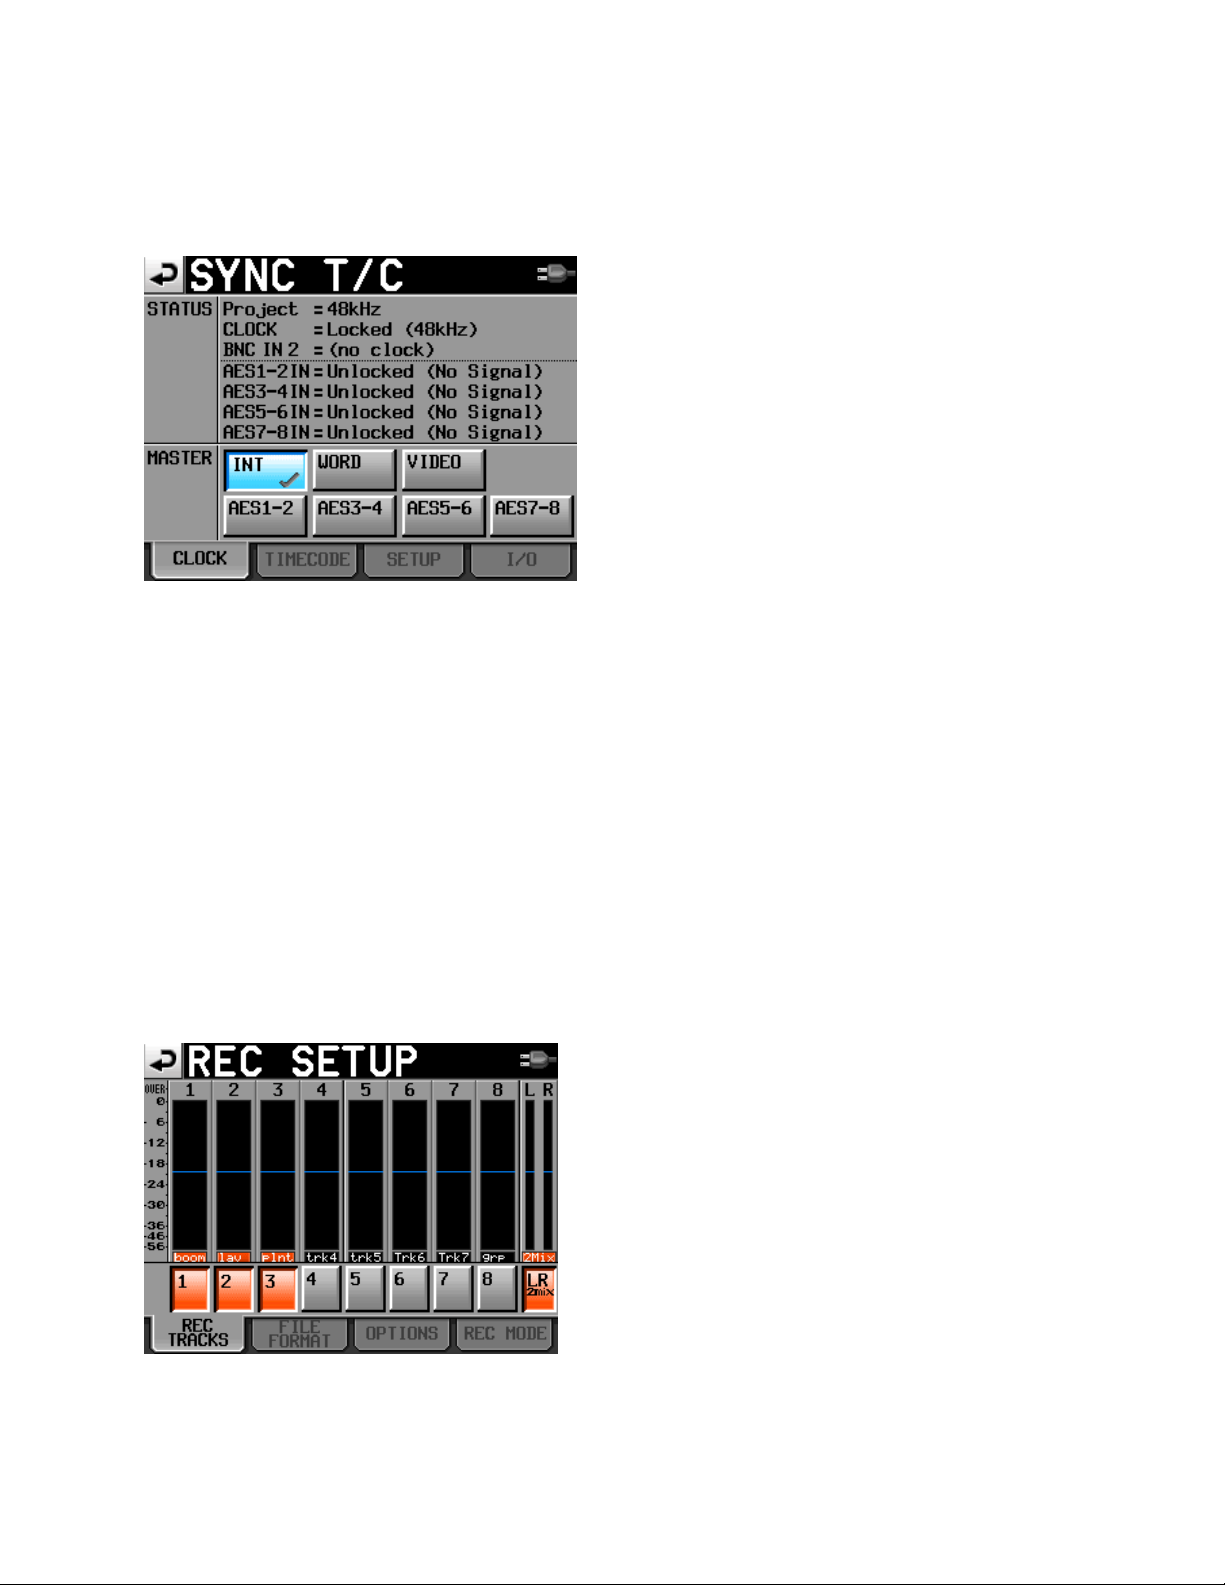
The CLOCK tab is for indicating whether the timecode signal is locking to the internal clock (default),
word or video sync, or AES. Usually, just leave it on INTERNAL clock, unless you are doing something
advanced.
Panel Lock Function
Depress the HOME button and then the MENU button while still depressing the HOME button, and the
panel LOCK/UNLOCK screen will appear. All three of the windows should say UNLOCK. It is possible to
lock groups of the controls, should the need arise.
Enable the Record Tracks
Before you can record to any tracks, you must manually “arm” them, that is, enable them ready for
recording. Otherwise, tracks are locked out and will NOT record.
From the MENU button, select the REC SETUP screen. From the REC TRACKS tab at the bottom of your
screen, simply press each of the tracks that you wish enabled. Don’t forget to also enable the LR 2mix
Page 12
Page 12 of 38
button on the end, which is the master track that you can mix all of the other tracks down to, in addition
to recording them as individual ISO’s.
Note that you can also enable/disable record tracks from the HOME screen, as well. Just select
the REC TRACK tab at the bottom of the screen. This is where you would normally access the
tracks during a production session, after the initial setting up.
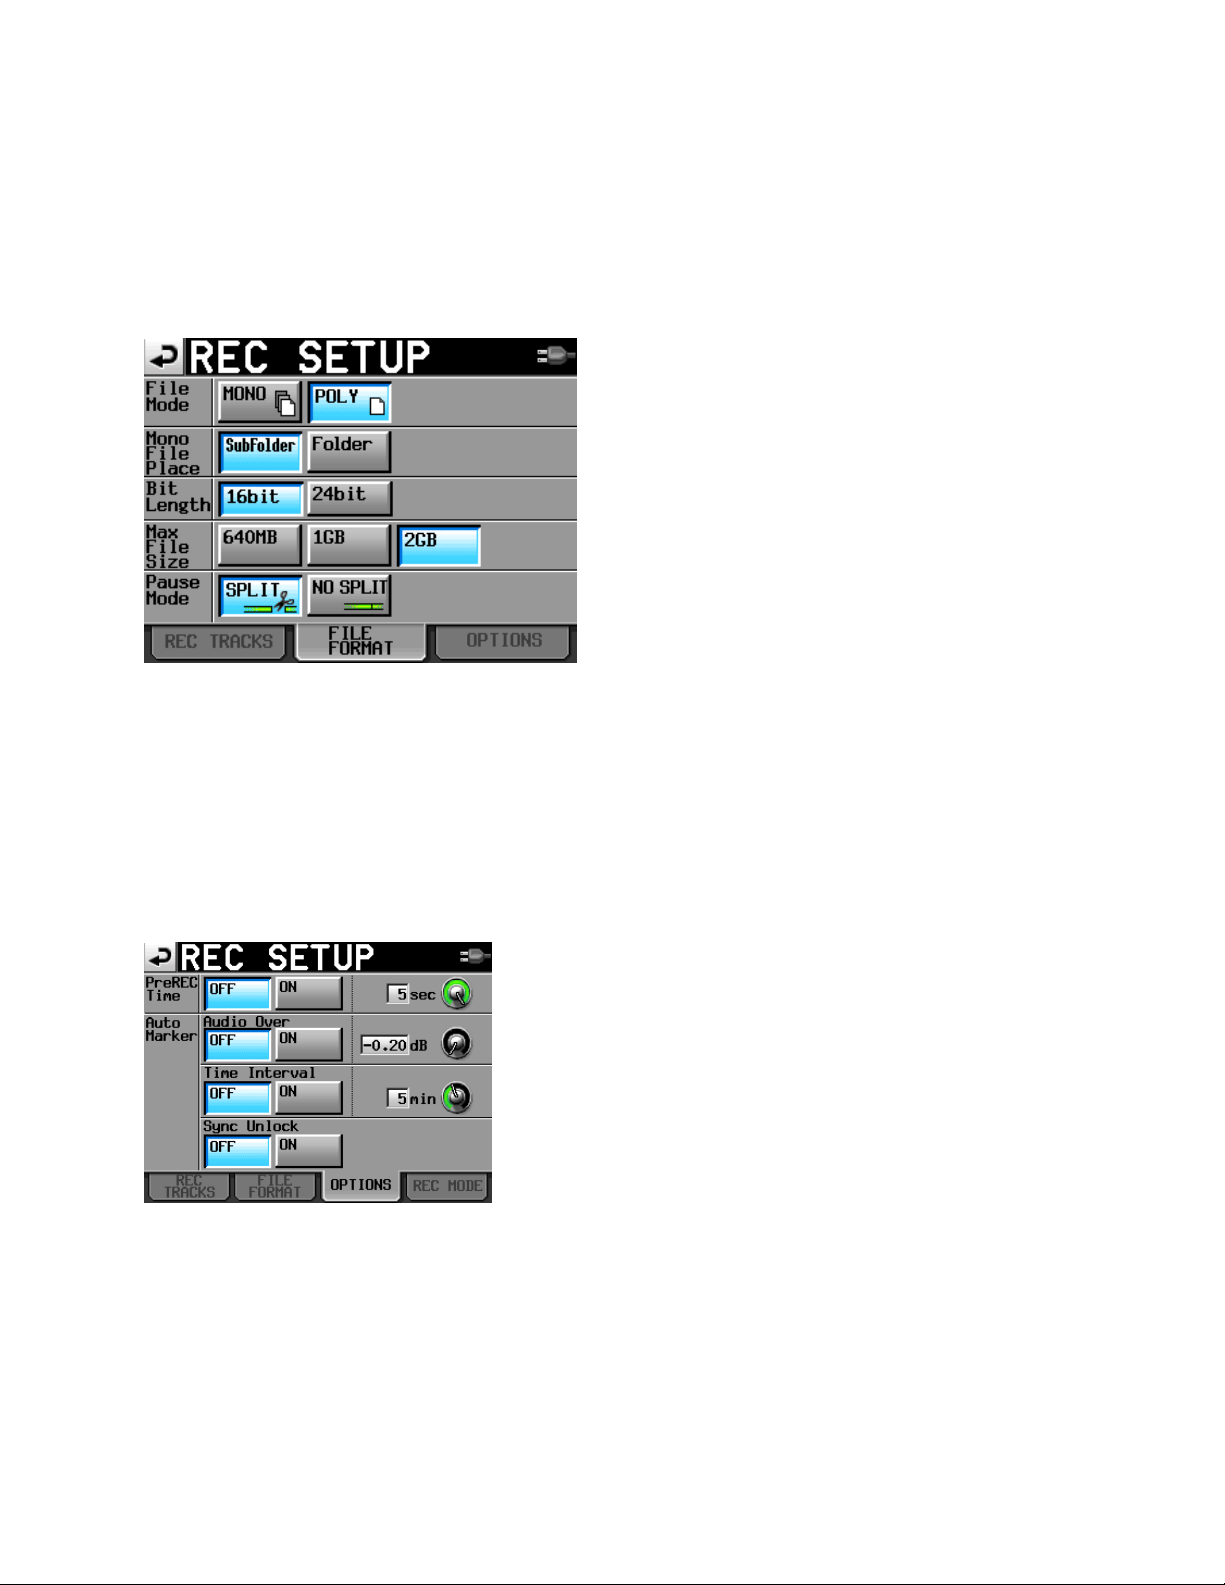
The FILE FORMAT tab allows you to select mono (default)or poly formats for your tracks, the bit rate
(16 or 24), mono file placement (subfolder is the default), max file size (2GB is default), and whether the
file is split (default) or stays intact when you hit the pause button.
Important NOTE: the default bit rate for the TASCAM is 24 bit, which would be correct for music.
However, for film/video, the 16 bit setting has been more prevalent – but some productions are
beginning to favor 24 bit. Always ASK the Post Production Supervisor what settings they
require!
The OPTIONS tab is where you will find the capability of enabling the PRE RECORD function. The default
setting is OFF, but there are some field applications where it is extremely useful to be able to record
audio that occurred a few seconds BEFORE you pressed the RECORD button! Bear in mind that if you use
the PRE RECORD mode, it does require a few seconds of processing (downtime) before you can begin
recording a new take. That may or may not be a problem for you.
Page 13

Page 13 of 38
Meter Setup
From the MENU button, select Meter Setup. You normally should not need to make adjustments to this
window. The default settings are: Peak Hold 1 sec, Release Time Normal, Over Level –0.20 dB, Ref Level
Line On.
Mixer Setup
From the MENU button, select Mixer Setup.
Start with the Setup tab.
You can assign a name to any track for your convenience. For example, you could rename
Track 1 as “Boom”
Channel Link is for linking a stereo microphone so that one set of controls spans over two input
channels. MS Mic mode is for when you are recording unprocessed mid-side tracks with an M-S
type mic.
The TRIM GROUP tab allows you to link the gain level of any input so that one track controller knob is
master over the group. For most film/video production, you would not use this feature.
Page 14

Page 14 of 38
The INPUT tab lets you select analog or digital input for each channel. If you are bringing in digital
sources, the Fs CONVERT button allows you to turn on a sampling rate converter. You can also activate
PHANTOM mic powering for each input.
The SIGNAL PROCESSING tab allows you to reverse the acoustic phase of a given channel, to engage a
low cut filter, or to engage a limiter. You can dial in the variables for the low cut settings for each
channel by pressing the main LowCut Filter button on the left of the screen.
Channel Setup
From the MENU button, select the Channel Setup window. The Channel Setup window is a fast and
convenient way to control the settings for each input channel, and is the best way to work with your
channel settings during a session.
The screen of the Channel setup window shows tabs for input channels 1-4. Selecting the arrow tab on
the right will bring up channels 5-8, and vice versa.
For each channel, you can turn Phantom power on/off; select analog or digital input; engage the phase
reversing tool; engage low cut & adjust the low cut parameters; and engage limiter. The button marked
“REC” will arm or disable the track.
Pressing on the small knob located next to the REC button will activate the (real) knob on the TASCAM
located to the right of the display, marked DATA. That virtual knob on the screen controls the output
level from the channel to the LR master mix, and is linked to the physical DATA knob on the TASCAM.
Next to the virtual output level knob is another virtual knob marked >L/>R. When this virtual knob is
depressed, it becomes linked to the DATA knob. It is the pan control for the output, and determines the
stereo mix to the master left and right tracks.
Note that for film/video production, we very seldom want to create a (seemingly) screen
balanced, stereo 2-track master for the editor to work with. Instead, there are two schools of
thought about how to utilize your 2-track master (live mix) tracks.
Page 15

Page 15 of 38
One concept is to fully pan (assign) your input channels to 100% all the way left, or all the way
right, so that there is no overlap of audio onto both tracks. During the editing process, a hard
left or hard right set of dailies can be panned to screen center as the editor desires. But starting
out with two discreet tracks will give the editor more options and better control over possible
phasing or noise issues than just a single mixed track, but will require much more effort by the
editor during the initial picture cut. Remember that the eight individual ISO tracks often will not
be utilized until after the picture edit is locked, and the workflow goes to audio post production.
The other concept, which is far more popular amongst Hollywood mixers, is to create a dualmono set of master tracks. All of the inputs are mixed (panned) to both the L and R Master
tracks, but the output to the Right track is attenuated by 10 to 15 dB. That means, instead of
centering the pan control, set it to favor the Left track by a fixed amount, so that the resulting
mix has the Right track lower than the Left. In the event of unexpected clipping by an actor or
sound effect on the primary (Left) mix track, the editor only has to cut to the non-clipped lower
volume version that is the Right mix track. That is much easier than trying to completely rebuild
the production soundtrack from the ISO tracks.
On the lower right of the Channel Setup window is a button with the track name or label, just under the
level meter. Pressing that button allows you to instantly rename the track display to something more
meaningful, such as changing “Track 2” to “Boom”, or “Track 5” to “Brad”.
Editors like consistency. Try to follow the same track assignments as much as possible; avoid changing
them from scene to scene. For example, if you assign your main boom mics to ISO’s 1 and 2; and your
main characters to ISO tracks 3 (Jim), 4 (Mary), and 5 (Bob) – then leave a track mute or blank if that
actor is not present in the shot, rather than confusing the original track assignments. Sometimes you will
Page 16

Page 16 of 38
have no choice; you need the (otherwise empty) ISO track for other purposes, and that is
understandable. But emphasize the change on your sound report log sheet.
Updating the Firmware Version
One of the best features of the TASCAM HS-P82 is the ability to update your firmware to the latest
version. The engineers are continually improving on the basic design, and adding new features as well as
shortcuts to simplify the workflow.
When you download a firmware update from TASCAM to your computer, it will be in the form of a
zipped file. Extract and save the uncompressed version of the file to your hard drive. Then, copy and
paste the uncompressed file to the root file of your compact flash card.
If your computer cannot read compact flash cards directly from one of its existing card reader
slots, then buy yourself an external card reader at your local computer store. You will need it for
copying dailies on the set, anyway.
With your recorder powered OFF, insert the compact flash card into slot 1. Depress the PAUSE and
RECORD buttons simultaneously, while you power up the unit. The display screen should show the
firmware version that it found on the CF card, and ask you if you want to upload it. If you have a
collection of firmware versions on a CF card (I store a copy of all of my firmware on a small CF card that I
do not use for audio recording), then it will allow you to select which firmware to load.
Page 17

Page 17 of 38
Part 2: Recording without a mixing panel
This section of the guide will explain how to record audio directly into the recorder, stand alone, without
a mixing device.
It is assumed that you have already performed the basic setup tasks to the recorder as described in
Part 1, and have created a Project /Scene folder, or a Project/Folder/Scene-Take file structure.
XLR Inputs
On the right side of the TASCAM are 8 XLR inputs and two XLR line level outputs. Plug your source
devices into the inputs 1-8. Alongside each input is a physical switch to select normal mic level; strongly
attenuated mic level (-25dB); or line level. Use the attenuated mic level if your microphone is putting
out very high volume, such as from some hot condenser mics, or from very loud sources.
If your input device is at line level, but you feel that the feed is still a bit on the low side according to
your meters, you can adjust the line level overall sensitivity by going to the SYSTEM SETUP screen in the
MENU, and changing the REF LEVEL. Note that with firmware v1.20, you can simply adjust the input
level with the trim pots, so long as you have enabled Line Input Trim on the System Setup screen.
Page 18

Page 18 of 38
Channel Setup
As described in Part 1, go to the Channel Setup screen in the MENU section. Select the appropriate
parameters for each input channel that you are using, such as Phantom on/off, and so on. At this stage,
you do NOT need to worry about arming the track, nor adjusting the pan and output levels. Those tasks
can be done from the HOME screen later on.
HOME screen
As you might imagine, the HOME screen is where most of your recording activity will take place. The
root HOME screen shows meters for input channels 1-8 as well as the LR master mixdown.
Page 19

Page 19 of 38
The REC TRACK tab allows you to arm/disarm any track for recording. It also allows you to name and
number each successive Take. Tracks that are armed for recording will display with red track names.
You can name each take by pressing the edit button. Most sound mixers just use the prefix “T” for take,
just as we use the prefix “S” for scene and “P” for project. But you are able to use any naming
convention that you want.
You can also enter the starting number for the next take. Generally, this would be “1”. But if you are
going back to a previous scene, you may need to enter a later number.
Each time that you hit RECORD, and then STOP on the recorder physical controls – the take number will
automatically increment.
Another way to edit the NEXT TAKE NAME is from the tab of that label. When you access the take name
from its own tab, you cannot accidently arm/disarm an input channel. Otherwise, the screen is similar.
Note that you edit or rename the USERWORD, just by selecting the appropriate button. Many mixers
prefer to use the FOLDER NAME for a broader file organization such as date, cam media drive, etc. Then
by selecting USERWORD, you can enter in a scene number that will append itself to the take number.
Page 20

Page 20 of 38
The PAN LEVEL tab is where you would normally access the OUTPUT LEVEL and PAN controls for each
input channel. Pressing the virtual knob will link it to the physical DATA knob on the recorder. An
advantage of using this screen instead of the Channel Setup screen for these functions is that the PAN
LEVEL screen shows meters for each channel as well as the master LR mix.
Note that you may want to pan each of the inputs to slightly off center, so that the Right mix is slightly
attenuated (around 10 to 15dB) lower than the Left mix, in order to provide the editor an alternate track
in the event of clipping.
To return to the root HOME screen at any time, you can either untap the tab or just press the HOME
button.
Solo mode
If you press on the meter display of any input channel, it will turn yellow, indicating that you are now in
the SOLO monitoring mode. This allows you to listen to any individual channel, rather than to the master
LR mix. Note that when solo is lit up, a virtual solo volume control appears in the upper right of the
screen. It will vanish when you exit the solo mode.
Page 21

Page 21 of 38
The default setting for SOLO, in the System Setup screen, is SINGLE. That means only one channel at a
time can be solo monitored. If you change the solo mode to MIX, then it is possible to highlight and
monitor as many channels simultaneously as you want to. MIX is more versatile for film/video
applications.
Setting your recording levels
Plug your source XLR’s into the recorder. The input level (gain) for each channel, mic or line level, is
adjusted by the 8 physical knobs to the left of the display.
To adjust a line level source, you must either increase the output level at the source, or adjust
the trim pot. You could also select a different REF LEVEL from the Setup screen, but that will
affect Tone level as well as Line Input.
Use the individual knobs to bring each microphone volume to an optimum level on its meter. For most
film/video applications, that would be approximately -20dB or -18dB. This level allows for plenty of
headroom in the event of a loud exclamation or sound effect. In the world of digital audio recording, you
never want to exceed zero!
In firmware v1.20, a function has been added that allows you to press the DATA knob on the front of
the recorder to show the MIC/LINE trim values briefly beneath the meters.
After you have set the input levels (referred to as “trim” by the audio industry), the next step is to set
the PAN and OUTPUT LEVELS.
Page 22

Page 22 of 38
Select the PAN LEVEL tab at the bottom of the HOME root screen. Using the virtual knobs, assign each
input to L100 (aka 100% left) or R100 (aka 100% right), if you are recording a discreet two-track dialogue
mix for film/video.
If you are going to mix a dual-mono (offset) live mixdown, then pan each input so that it favors the Left
track slightly over the Right track by around 10 to 15dB. Most mixers use the same pan percentage
attenuation across all of the inputs, but “difficult” actors might inspire you to increase or decrease their
pan percentage to a greater extent to protect against shouts or dropped lines.
Select the 2Mix knob and raise the output level to where you want it in the master mix.
Because the TASCAM always remembers the last control that you have highlighted, a good technique for
setting the mix level is to return to the HOME root screen and adjust the output level while watching the
larger meter displays.
You are now ready to record.
Page 23

Page 23 of 38
Recording on the HS-P82
To begin recording, depress the physical button on the right of the display marked RECORD. To end
recording, press STOP.
With firmware v1.20, you could also press F10 for RECORD; and F7 for STOP on a remote
keyboard.
To record the next take, just press RECORD again. The take number automatically increments.
To playback a take, just press PLAY. To go back to a prior take, or advance to a later take, just press the
<< BACK or FORWARD>> buttons.
If you need to search for a very distant take, either press the scene/take label box just above the meters,
or the PROJECT button. Both will take you to the Project screen, where you will see an index of scenes &
takes. Pressing the ENTER arrow button adjacent to the desired take will “load” that take into the
current location. Then just use the PLAY keys.
When it is time to roll sound for a new take, just press RECORD. The take number will automatically
increment to the correct number, regardless of the fact that you just played back an early take of that
same scene.
If you loaded a different scene to play back than the current one, when you press RECORD it will
increment to a new take number of the (just loaded) scene. So in that case, you would want to return to
the correct scene before going into RECORD. Go back to the index, and select any take from the scene
that you need to be in. Press enter to load it. Now you are ready to record the next take.
Page 24

Page 24 of 38
Head tone and header ID
Before recording any actual film takes, you should always record a header file. That file should consist of
the sound mixer reading the basic production information into the slate mic.
Go to the PROJECT button and select the MAKE FOLDER tab. Name this (scene) HEADER-TONE or
something similar.
Go to the System Setup screen and select INT MIC for slate type. Press RECORD and speak the following
information while depressing the slate button.
Note that you can press SHIFT+SLATE on the front panel of the recorder to latch the slate mic on, in
order to record longer content without having to hold the button. Push SLATE again to unlatch.
Production Title and Number
Date
Name of the sound mixer
Location
The following is being recorded with 8 tracks of iso and a 2-track Production mixdown
on the TASCAM HS-P82 digital recorder at 16bit, 48K (or whatever your format is) at
23.976 timecode (or whatever your timecode rate is).
The following reference tone will be 30 seconds recorded at negative 20dB (or whatever
your headtone reference level is).
Press STOP. Go to the System Setup screen and change the INT MIC to TONE.
Press RECORD and use the slate button to generate TONE. Capture 30 seconds of continuous tone.
The HS-P82 allows you to program "Slate (MIC)" and "Slate (TONE)" to the Function keys of the
Remote Fader Controller or an external keyboard, so that gives you a way to get quick access to
these rather than have to go to the system setup screen every time. If you use these function
keys, it is not necessary to stop recording in order to switch from Slate Mic to Tone, which
greatly simplifies the task of adding reference tone to your Header ID.
Remember to go back to the PROJECT screen and select or create an appropriate scene, and load it. You
do not want to record normal takes while in the HEADER-TONE scene.
Page 25

Page 25 of 38
New Take, New Scene
As explained before, the take numbers will increment automatically every time you RECORD and STOP.
In addition, you can manually change the number for the next take by using the tab at the bottom of the
root HOME screen.
To change to a new SCENE number, it depends on which file naming convention you have chosen to
work with. If you are using FOLDER as your scene number,
go to the PROJECT screen either by pressing the scene/take box just above the meters on the HOME
screen, or by pressing the PROJECT button. Then, just press the name of your project, and the screen
will advance to display all of the scenes within it. You will see the MAKE FOLDER tab at the bottom of the
screen.
Select the MAKE FOLDER tab, and type in the new scene number, such as S_202D (or whatever).
But if you are using FOLDER as an organizational name, and USERWORD as your scene number – then
the process is simpler. From the HOME screen, just select the NEXT TAKE NAME tab. Select
USERWORD, then press EDIT. Type in your new scene number. It is that simple!
Page 26

Page 26 of 38
Editing the Scene & Take Number
Sometimes on the set, mistakes happen. Takes can be recorded with the wrong scene & take number.
Firmware v1.20 allows you to rename a previously recorded take, so that the change also affects the
metadata as well.
Go to your list of takes, and select (highlight) the take that needs to be renamed. Press MENU, and then
press EDIT NAME. Type in the correct name (scene/take) and press Enter.
Remember that you may have to edit two entries: the stereo L/R Mixdown and the poly file ISO’s. You
will see both file entries on the take selection screen.
Using an External Keyboard
To use an external keyboard with the TASCAM HS-P82, a standard PS/2 computer connector is required.
If your keyboard is USB, then a suitable USB to PS/2 adapter needs to be obtained. Increasingly, fewer
USB keyboards work with these adapters, so the user should look for a “dual protocol” keyboard that
recognizes the purple adapter and switches the keyboard into PS/2 mode. Either the Dealer can
recommend a keyboard that they stock, or TASCAM can supply you with a list of working keyboards.
Page 27

Page 27 of 38
A new feature added in firmware v1.20 is that in addition to speeding up the process of entering text
and numbers, an external keyboard can perform some basic remote functions as well. Function keys F1
thru F4 can be programmed on the Remote Setup screen, same as the Fader Controller unit. For
example, some sound mixers will utilize F1 and F2 for slate MIC and TONE. F3 and F4 could be used as
shortcuts to enter scene numbers (USERWORD) or take numbers. Some of the more frequently used
function key shortcuts are:
F7=STOP F8=PLAY F9=PAUSE F10=RECORD F11=MARK
Page 28

Page 28 of 38
Part 3: Recording with an external mixing
panel
This section will provide practical advice for when you employ an external mixing panel in conjunction
with the TASCAM HS-P82 recorder.
It is very rare in professional filmmaking to record & mix your mics directly into a recorder – without the
enhanced control of a mixing board. It might be okay to do that if you are just capturing a simple
interview or sound effect – but the recording of high quality dialogue on a theatrical project entails a
much greater threshold of control.
(Note that some reality shows are recorded only as isolated tracks, and it is left up to the editors to sort
it all out as they build the storyline.)
During the actual production, the sound mixer relies upon one or two boom mics to pick up most of the
dialogue along with a necessary degree of background ambiance and live sound effects. When the boom
is unable to access some areas in the set, the task relies upon fixed or planted mics to cover those
difficult spots. In addition, some actors may wear hardwired or wireless lavaliers.
In a live mix, all of these mics need to be continuously adjusted in order to provide a realistic perspective
& texture, along with avoiding dropouts or echo caused by the resultant phase cancellation of multiple
mics hearing the same sound and mixing them onto the same track.
Multi-track recording allows us to capture the live mix as well as the “isolation” tracks from all of our on-
set mics. It is a way to have our cake and eat it too. During the production, live mics are faded in and out
to create one or two tracks that will serve as the production audio soundtrack for dailies/playback, and
for the editor to use during the creation of the “picture edit”. At the same time, iso tracks are laid down
that capture every important mic at optimum volume, devoid of any fader movement.
After the story sequences have been assembled, cut, and tweaked into the “picture lock”, the footage is
turned over to the sound editors to work their magic. At this point in time, elements in the production
soundtrack may be edited, enhanced, or reconstructed from “isolation” backup tracks. Failing that,
portions of the dialogue may need to be completely re-recorded in a “looping” or ADR session.
Connecting the mixing panel
When an external mixing panel (as opposed to the TASCAM Remote Fader Controller) is used with the
TASCAM, it is not practical to use the internal settings to live mix all of your inputs to the master LR
tracks. It is physically too difficult to wrangle the virtual knob that controls the output level of each
channel – quickly and conveniently!
Page 29

Page 29 of 38
Therefore, this workflow bypasses that feature. Instead, we rely upon the capabilities of the mixing
panel to produce the master mixdown.
Set the inputs of the TASCAM to LINE LEVEL. The MAIN out as well as the DIRECT OUT of the mixer are
almost always line level out. If for some reason your mixer is NOT line level out, then set the TASCAM
inputs accordingly to MIC or MIC ATTENUATED.
Connect one output from your mixer’s main output (either L or R) to Channel 1 of the TASCAM input.
Most sound mixers only take one (monaural) feed from their board; although you could opt to take a 2track (stereo or attenuated offset dual mono) feed and go into Channels 1 and 2, but that would mean
giving up one less ISO track.
Next, take feeds from the DIRECT OUT connections from your mixer of mics 1 thru 6, and plug them into
the TASCAM inputs 2 thru 7. The direct outs from your mixer need to be post trim/gain and pre-fader.
In other words, you should be able to set the initial microphone volume going into your board from the
small trim or gain knob of each module, while the faders of each module are completely closed. Opening
the faders should only control how much sound makes it to the main L/R output of the board, but
should NOT have any effect on the direct outs. If moving the sliders does effect the direct out levels,
then all of your iso tracks will share whatever good or bad mixing decisions are made during a take, and
might not be suitable for rebuilding the soundtrack during editing.
Determine if your mixing board is suitable for accessing the direct outs. You may need to step up to a
higher caliber board.
You also need to check whether or not your Direct Outs are pre or post EQ. If the directs are pre-EQ,
then it is okay to use your mixer’s settings to match up the tone of your mics. But if the EQ adjustments
show up in the Direct Outs, then be very cautious about using the EQ on the board, as that will affect
your ISO’s.
On a major production, it doesn’t take much to exceed 7 microphones total in a scene. Typically, there
will be one or two boom mics, perhaps one or two planted mics, and then lavaliers on all of the main
characters.
So if the TASCAM only has 8 inputs, and one or two of those is already being used for our Production
Mixdown, how do we “ISO” all of the other mics?
That is why we only plugged direct outs into Channels 2 thru 7, or even 2 thru 6. Utilize Channel 8 (or
Channels 7 and 8) for feeds from the Aux Out from the mixer.
Not every character wearing a lavalier needs their own ISO track all the time. As a sound mixer, you
could group a few minor characters together onto a single Aux track; or you could select characters that
never appear in the shot at the same time (example, Actor A has a line in the beginning of the shot, and
Actor B only has a line near the end of the shot) and record them onto the same audio track.
Page 30

Page 30 of 38
Use the Aux Outs as a means of grouping these “excess” microphones.
Generate reference tone in your mixer to zero VU level on an analog board, or appropriately lower on a
fully digital unit; and read the corresponding levels on the TASCAM. They should read around –20dB.
If the line level input to the TASCAM reads too low, you can adjust it using the trim knobs on the
recorder or by going to the System Setup screen and selecting a different Ref Level.
Use the Channel Setup screen to rename your TASCAM tracks for easy identification, such as: Mix,
Boom1, Boom2, Sink (location of a planted mic), Joe, Mary, and so on.
On Channel 1, which represents the live mixdown, you want to send its output over to the 2MIX master
LR tracks. If it is a dual mono mix, go ahead and adjust the pan pot so that the single track mixdown can
be recorded at slightly offset levels on both master LR tracks. If you are recording a discreet 2-track
mixdown from your mixing panel, then go ahead and send each of them respectfully to only L100 or
R100.
Otherwise, use your external mixing board as you normally would. Connect your boom operator to an
Aux Out or Comm Out, connect your wireless monitoring system (for the Director, Script, et al) to their
Aux Out, and so on.
Remember, use the trim/gain pots on your mixer to adjust the output level for the iso’s being sent to
the TASCAM. Use the faders to open, close, and adjust the levels of each mic in your live mix. Very often,
an actor’s lavalier might not be used in the mix, but will still be present in its entirety on the iso track,
should the editors want to access it in the future.
Note that it is beyond the scope of this users guide to explain to the novice all of the basic
functions of portable mixing panels and how they are used for film and video production. This
guide assumes that you are already familiar with the workings of whichever make and model of
the particular external mixing board that you intend to use with the TASCAM recorder.
Page 31

Page 31 of 38
Part 4: Recording with the TASCAM RC-F82
Fader Unit
An excellent alternative to the use of an external mixing panel is to use TASCAM’s companion RC-F82
remote Fader Unit.
The F82 is technically not a mixing panel; it is a remote controller for the recorder. That being said, for
all intents and purposes, it serves the purpose of a mixing panel for our application!
The unit allows us to control up to eight inputs and mix them down to the two master LR tracks of the
TASCAM recorder. The fader controller offers a choice of using the sliders to adjust the trim/gain of each
Page 32

Page 32 of 38
input, or to control the output to the LR tracks. A dedicated knob for each input module is also
assignable.
For film/video applications, most sound mixers prefer to utilize the sliders for the output to the master
LR tracks, and the rotary knob for adjusting the basic trim/gain of the input – as it would be on a
conventional mixing board.
This compact accessory has the same footprint (dimensions) as the recorder, thus making it ideal for use
where space is at a premium, such as on a smaller production cart, or even in a camera car.
Whereas an external mixing panel would take up one (or two) of our eight available input channels of
the recorder in order to record the live production mix, the Fader Unit allows complete control over
each input channel when mixing down to the LR master tracks. That results in 8 ISO tracks, rather than
only 6 or 7.
The downside is that there are only 8 inputs total, so we are limited to no more than 8 mics on the set.
But for the overwhelming majority of projects, 8 mics is more than sufficient.
Connecting the RC-F82 to the recorder
Cables required:
PS/2 male to PS/2 male jumper cable (supplied)
¼-inch stereo plug to ¼-inch stereo plug headphone jumper cable (supplied)
XLR 3-pin male to XLR 3-pin female short microphone cable (two, user provided)
The Fader unit draws its power from the PS/2 cable that connects it to the main recorder. Make sure
that the recorder is powered OFF before you connect the devices! Connect the cable from the
KEYBOARD socket on the recorder to the MAIN UNIT socket on the controller. Should you need to plug
in a keyboard to the setup, there is a KEYBOARD socket provided on the controller.
Next, you will want to connect the headphones out jack from the recorder to the headphones in jack on
the back panel of the Fader unit.
Finally, connect the two XLR line outputs on the side of the recorder to the XLR line inputs marked LINE
IN on the back of the Fader unit.
Page 33

Page 33 of 38
Connecting the RC-F82 to your Boom Operator
To begin with, you will need either a professional duplex “boom operator” cable (equipped with a
female XLR headphone feed at the panel end, and standard headphone jack at the operator’s end); or a
standard XLR mic cable equipped with an XLR to ¼ headphone jack adapter at the other end.
If you are mixing down to a monaural master LR track, you can plug your boom operator(s) into either
the left or right output marked LINE OUT2/TALKBACK.
If you are mixing down to a discreet 2-track or stereo master, then you would require a custom adapter
or Y-cable to merge the L-R outputs into one combined mono feed for each boomperson.
For most film/video applications recorded with multi-track ISO’s, it is customary to only provide a
monaural mixdown for dailies and picture edit, so this is normally not an issue. But if it is, then have a
technician build you an appropriate adapter.
In the event that your output to the boom operator results in audio only coming out of one side of the
headphones, then just use a simple ¼-mono to ¼-inch stereo headphone adapter to solve the problem
for the meantime, until a technician can permanently rewire the boom cable.
If your boom operator(s) need to communicate directly to the sound mixer, their talkback mics can be
plugged in to the XLR inputs marked RETURN IN on the back of the Fader unit.
Output to the Boom operator is at line output. You may want to add some sort of inline volume control
or switchable attenuator (such as a -10, -20, -30 pad) if your boom operator prefers to monitor at lower
volume.
Page 34

Page 34 of 38
Communicating to your Boom Operator
Located directly beneath the label that reads TALKBACK is a button and a sliding switch. When the
switch is in the OFF position, it means that audio from the live mix is feeding out to the Boom Operator.
When the switch is moved to the ON position, it blocks the program audio and replaces it completely
with your talkback mic. Pressing the button activates the built-in microphone located in the upper right
hand corner of the Fader unit, just above the module for Channel 8.
Another way to address your Boom Operator is to use the slate mic located on the recorder itself. Be
aware, however, that any audio from the slate mic goes onto all of the tracks and would be recorded.
In the upper right hand corner of the Fader unit is a section labeled RETURN IN. These pots control the
mix of program audio versus return audio from the boom operator’s personal mic. The SOLO buttons
allow the sound mixer to only hear the communication, without the distraction of the program audio.
Sound mixer’s Headphones
The section labeled PHONES controls the main headphone feed coming out of the PHONES jack located
at the left front of the Fader unit.
Page 35

Page 35 of 38
Master volume for the headphones is controlled by the headphone volume knob on the RECORDER. This
signal passes into the Fader unit, where the volume can be re-adjusted by the phones volume knob on
the Fader unit. Once you understand this signal flow, you can see how it could be utilized to split the
headphones feed at the recorder (say, for example, to transmit program audio to the Director or Script
Supervisor on the set), and then still have capability of re-adjusting the volume for the comfort of the
sound mixer.
The two MONO buttons allow you to monitor the Left or Right master tracks in mono with both ears.
CAUTION: Do not use the L-R Master Gain pot, located in the lower right corner to adjust the listening
volume of your headphones! Because of its closer placement on the board, some users mistake it for
their volume control, since a change to the L-R master track recording gain does result in a change of
listening volume. Any changes to that pot will affect the level of the recording.
Monitor Feed for Director/Script
It is customary on major sets to provide wireless headphones to the Director, Script Supervisor, and
other personnel as needed (such as an extra boom operator). We use what is referred to as an Assistive
Listening System, which consists of a wireless transmitter connected to one of our outputs, and multiple
wireless receivers (belt packs) to feed each set of headphones. When connecting to the TASCAM, you
either utilize Line Output 1, or you can split the signal from the main Headphone Out on the recorder
itself.
To split the signal at the Headphone Out jack, simply insert a ¼-inch stereo plug to (2) ¼-inch stereo
jack Y-cable, and raise the recorder headphone volume to near maximum (or as loud as needed).
Connect the transmitter to one leg of the Y. Connect the other leg of the Y to the headphone input jack
of the Remote Fader, as you normally would. Remember that you have a secondary headphone volume
control on the Remote Fader itself, which you would use to adjust the sound mixer’s headphone
listening level.
Remote Setup of the Fader unit
Page 36

Page 36 of 38
Before you begin recording with the Fader unit, you must set up its parameters. From the MENU button
on the recorder, go to the REMOTE SETUP screen. (If there is no remote setup screen present, you need
to update your firmware software.)
The Remote Setup screen allows you to assign values to the four Function keys to instantly open some
of the menu screens. Some sound mixers like to program F1 as Slate Mic; F2 as Tone; F3 as Next Take
Name (new scene); and F4 as Timecode/User bits. However, feel free to program the keys to your own
preferences.
Next, you need to select the functions of the slider and encoder knob of the channel modules.
For film/video applications, the slider should control the output level to the L-R master tracks,
and the encoder knob should control the trim/gain of the input signal. Select the button marked
TRIM/LEVEL. Note that the top word represents the encoder knob, and the lower word
represents the slider.
For music recording, you might want to reverse it and use the slider to control input gain, while
the encoder knob controls the output to the L-R master tracks. And for live theatre, you might
want to have the encoder knob used for instant panning, so that you could follow actors
movement across the stage.
Use of the SHIFT KEY
The SHIFT keys are located in the upper left and lower right of the Fader unit.
Their functions are labeled in blue.
Shift+F1 thru F4 gives you quick access to the menu screens that you have programmed.
Pressing the SELECT key by itself, above each channel module, opens the Channel Setup screen for that
particular channel.
Shift+SELECT will arm/disarm any channel for recording.
Pressing the SOLO button by itself, above each channel module, will instantly SOLO that channel for
monitoring. Pressing SOLO again will exit the SOLO mode.
Shift+SOLO will MUTE a particular channel.
Page 37

Page 37 of 38
Index
AC adapter, 2
analog or digital input, 14
arm/disarm any track, 19
A
B
H
Head tone and header ID, 24
Headphones, 34
Home screen, 4
HOME screen, 7, 12, 18, 20, 25
Basic Setup, 2
bit rate, 8, 12
Boom Operator, 33
C
Channel Link, 13
Channel Setup, 14, 15, 18, 20, 30, 36
clock and date, 5
CLOCK tab, 11
Communicating to your Boom Operator, 34
Connecting the mixing panel, 28
Connecting the RC-F82, 32
Create Project, 6
D
dual-mono, 15, 22
E
Editing the Scene & Take Number, 26
Enable the Record Tracks, 11
External 12v DC, 2
External Keyboard, 26
external mixing panel, 28
I
I/O tab, 11
INPUT tab, 14
ISO tracks, 15, 32
J
JAM SYNC, 10
L
limiter, 14
low cut, 14
LowCut Filter, 14
LR 2mix, 11
M
Meter Setup, 13
Mirror Record function, 4
Mixer Setup, 13
Monitor Feed for Director/Script, 35
MS Mic, 13
N
FAKE RATE, 7
FILE FORMAT tab, 12
folder, 6, 7, 17
Format your CF card, 3
FRAME RATE, 8
FREE ONCE, 10
FREE RUN, 10
Fs. See SAMPLING RATE
generator mode, 9
F
G
New Take, New Scene, 25
NEXT TAKE NAME, 7, 19, 25
NP style Battery pack, 2
O
OPTIONS tab, 12
P
pan, 14, 15, 18, 20, 22, 30
PAN LEVEL tab, 20, 22
Panel Lock Function, 11
PHANTOM mic powering, 14
Page 38

Page 38 of 38
phase reversing tool, 14
Power Off gen, 10
Powering Up, 2
PRE RECORD, 12
PROJECT, 6
R
RC-F82 Fader Unit, 31
REC RUN, 10
REC SETUP, 11
REC TRACK tab, 19
Recording on the HS-P82, 23
Recording without a mixing panel, 17
Reference Level, 5
REGEN, 10
REMOTE SETUP screen, 36
S
SAMPLING RATE, 7
Setting your recording levels, 21
SIGNAL PROCESSING tab, 14
Slate type, 4
Solo mode, 4, 20
Sync T/C, 8
System Setup, 4
T
TALKBACK, 34
TC SYNC REC, 10
TIME OF DAY, 9
timecode, 8, 9, 10, 11, 24
TIMECODE tab, 8
tone generator, 5
track name, 15
TRIM GROUP, 13
trim pots, 17
U
Updating the Firmware, 16
User Bits, 9
USERWORD, 6, 7, 19, 25, 27
X
XLR inputs, 17, 33
XLR line level outputs, 17
 Loading...