

Page 1
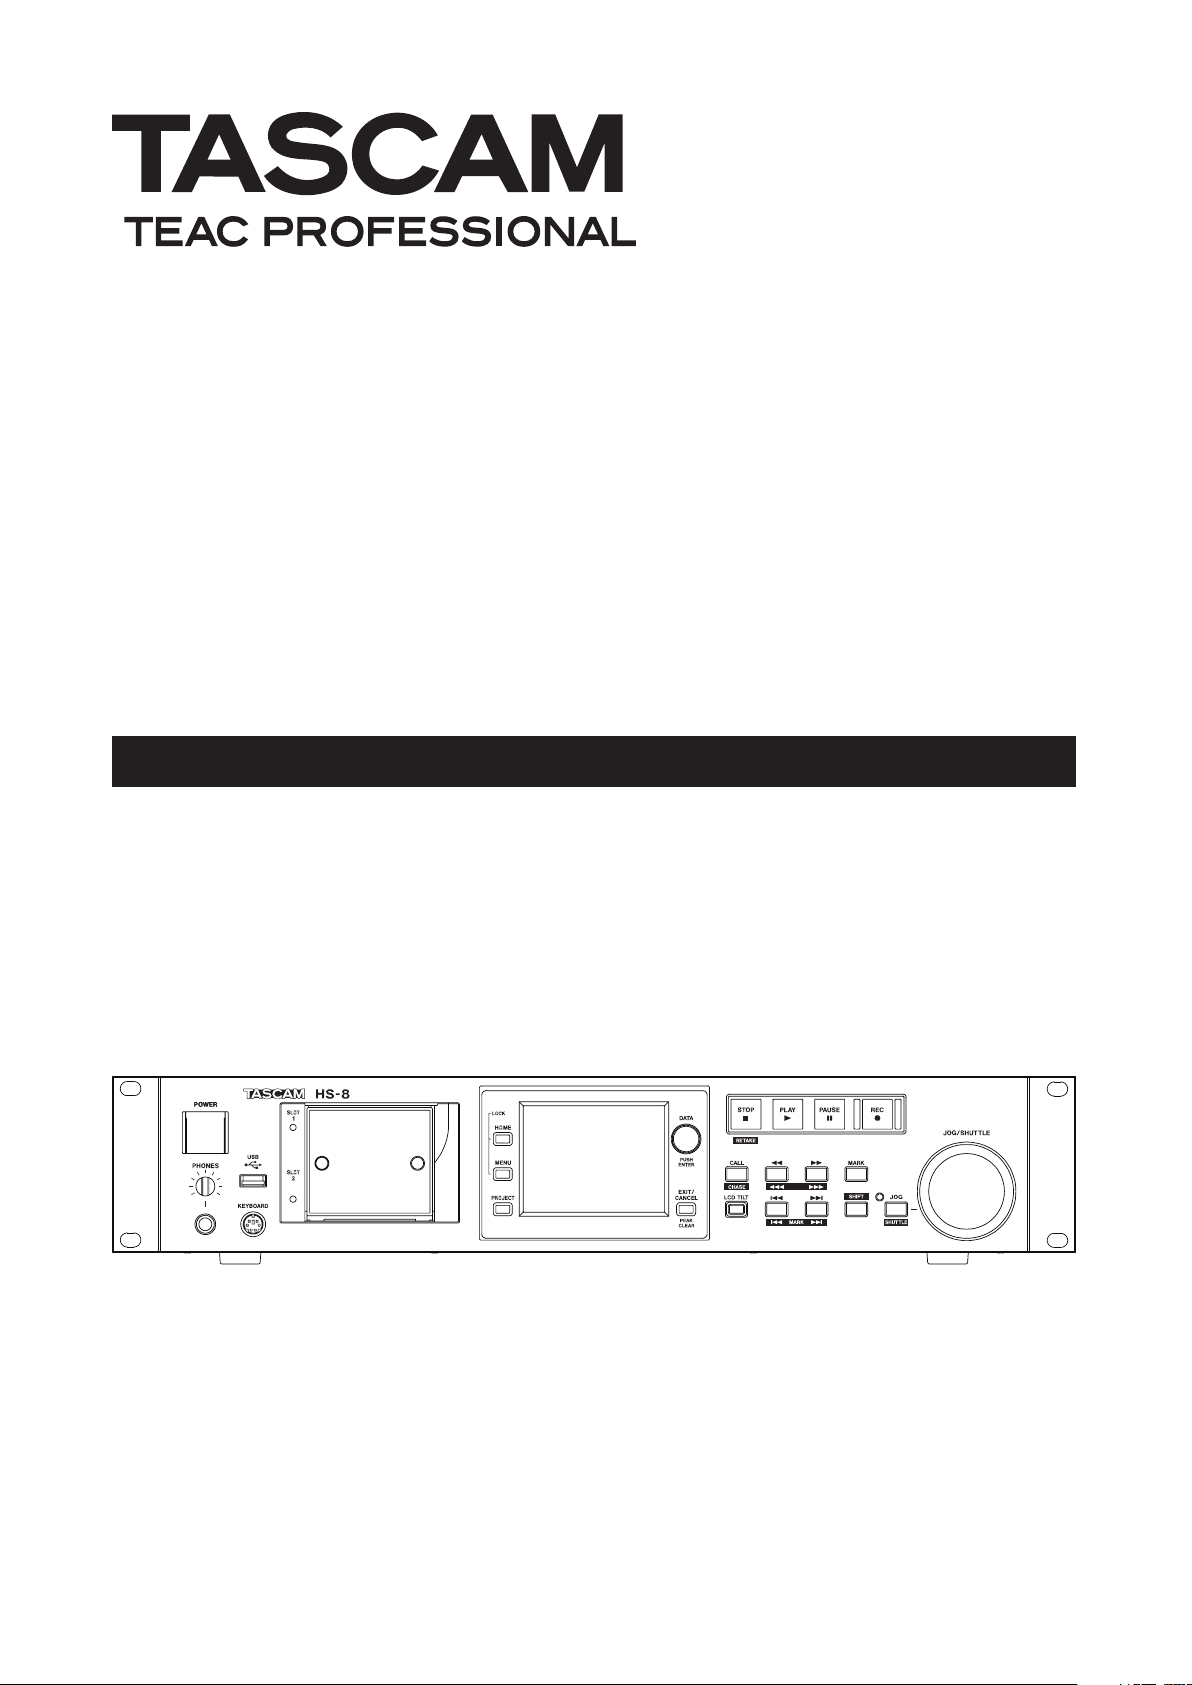
HS-8
8 Channel Audio Recorder
D01106920A
OWNER'S MANUAL
Page 2
2 TASCAM HS-8
IMPORTANT SAFETY INSTRUCTIONS
CAUTION: TO REDUCE THE RISK OF ELECTRIC SHOCK, DO NOT REMOVE COVER (OR
BACK). NO USER-SERVICEABLE PARTS INSIDE. REFER SERVICING TO QUALIFIED SERVICE
PERSONNEL.
The lightning flash with arrowhead symbol, within equilateral triangle, is intended to
alert the user to the presence of uninsulated “dangerous voltage” within the product’s
enclosure that may be of sufficient magnitude to constitute a risk of electric shock to
persons.
The exclamation point within an equilateral triangle is intended to alert the user to
the presence of important operating and maintenance (servicing) instructions in the
literature accompanying the appliance.
This appliance has a serial number located on the rear
panel. Please record the model number and serial number
and retain them for your records.
Model number
Serial number
WARNING: TO PREVENT FIRE OR
SHOCK HAZARD, DO NOT EXPOSE THIS
APPLIANCE TO RAIN OR MOISTURE.
For U.S.A.
TO THE USER
This equipment has been tested and found to comply
with the limits for a Class A digital device, pursuant to Part
15 of the FCC Rules. These limits are designed to provide
reasonable protection against harmful interference when
the equipment is operated in a commercial environment.
This equipment generates, uses, and can radiate radio
fr equ enc y en ergy and, if not installed and use d in
accordance with the inst ru ction manual, may cause
harmful interference to radio communications.
Operation of this equipment in a residential area is likely
to cause harmful interference in which case the user
will be required to correct the interference at his own
expense.
CAUTION
Changes or modifications to this equipment not expressly
approved by TEAC CORPORATION for compliance could
void the user's authority to operate this equipment.
CE Marking Information
a) Applicable electromagnetic environment: E4
b) Peak inrush current: 14 A
In North America use only on 120V supply.
Page 3
TASCAM HS-8 3
IMPORTANT SAFETY INSTRUCTIONS
1 Read these instructions.
2 Keep these instructions.
3 Heed all warnings.
4 Follow all instructions.
5 Do not use this apparatus near water.
6 Clean only with dry cloth.
7 Do not block any ventilation openings. Install in
accordance with the manufacturer's instructions.
8 Do not install near any heat sources such as radiators,
heat registers, stoves, or other apparatus (including
ampliers) that produce heat.
9 Do not defeat the safety purpose of the polarized
or grounding-type plug. A polarized plug has two
blades with one wider than the other. A grounding
type plug has two blades and a third grounding
pro n g. The w ide bla d e or t he thir d prong ar e
provided for your safety. If the provided plug does
not fit into your outlet, consult an electrician for
replacement of the obsolete outlet.
10 Protect the power cord from bein g walke d on
or pinche d partic u larly at plu g s, co nven ience
receptacles, and the point where they exit from the
apparatus.
11 Only use attachments/accessories specified by the
manufacturer.
12 Use only with the car t, stand, tripod, bracket, or
table specied by the manufacturer, or sold with the
apparatus. When a cart is used, use caution when
moving the cart/apparatus combination to avoid
injury from tip-over.
Do not expose this apparatus to drips or splashes.
•
Do not place any objects filled with liquids, such as
•
vases, on the apparatus.
Do not install this apparatus in a confined space such
•
as a book case or similar unit.
The apparatus draws nominal non-operating power
•
from the AC outlet with its POWER or STANDBY/ON
switch not in the ON position.
The apparatus should be located close enough to the
•
AC outlet so that you can easily grasp the power cord
plug at any time.
The mains plug is used as the disconnect device, the
•
disconnect device shall remain readily operable.
Products with Class I construction are equipped with a
•
power supply cord that has a grounding plug. The cord
of such a product must be plugged into an AC outlet
that has a protective grounding connection.
If the product uses batteries (including a battery pack
•
or installed batteries), they should not be exposed to
sunshine, fire or excessive heat.
CAUTION for products that use replaceable lithium
•
batteries: there is danger of explosion if a battery is
replaced with an incorrect type of battery. Replace only
with the same or equivalent type.
Caution should be taken when using earphones or
•
headphones with the product because excessive sound
pressure (volume) from earphones or headphones can
cause hearing loss.
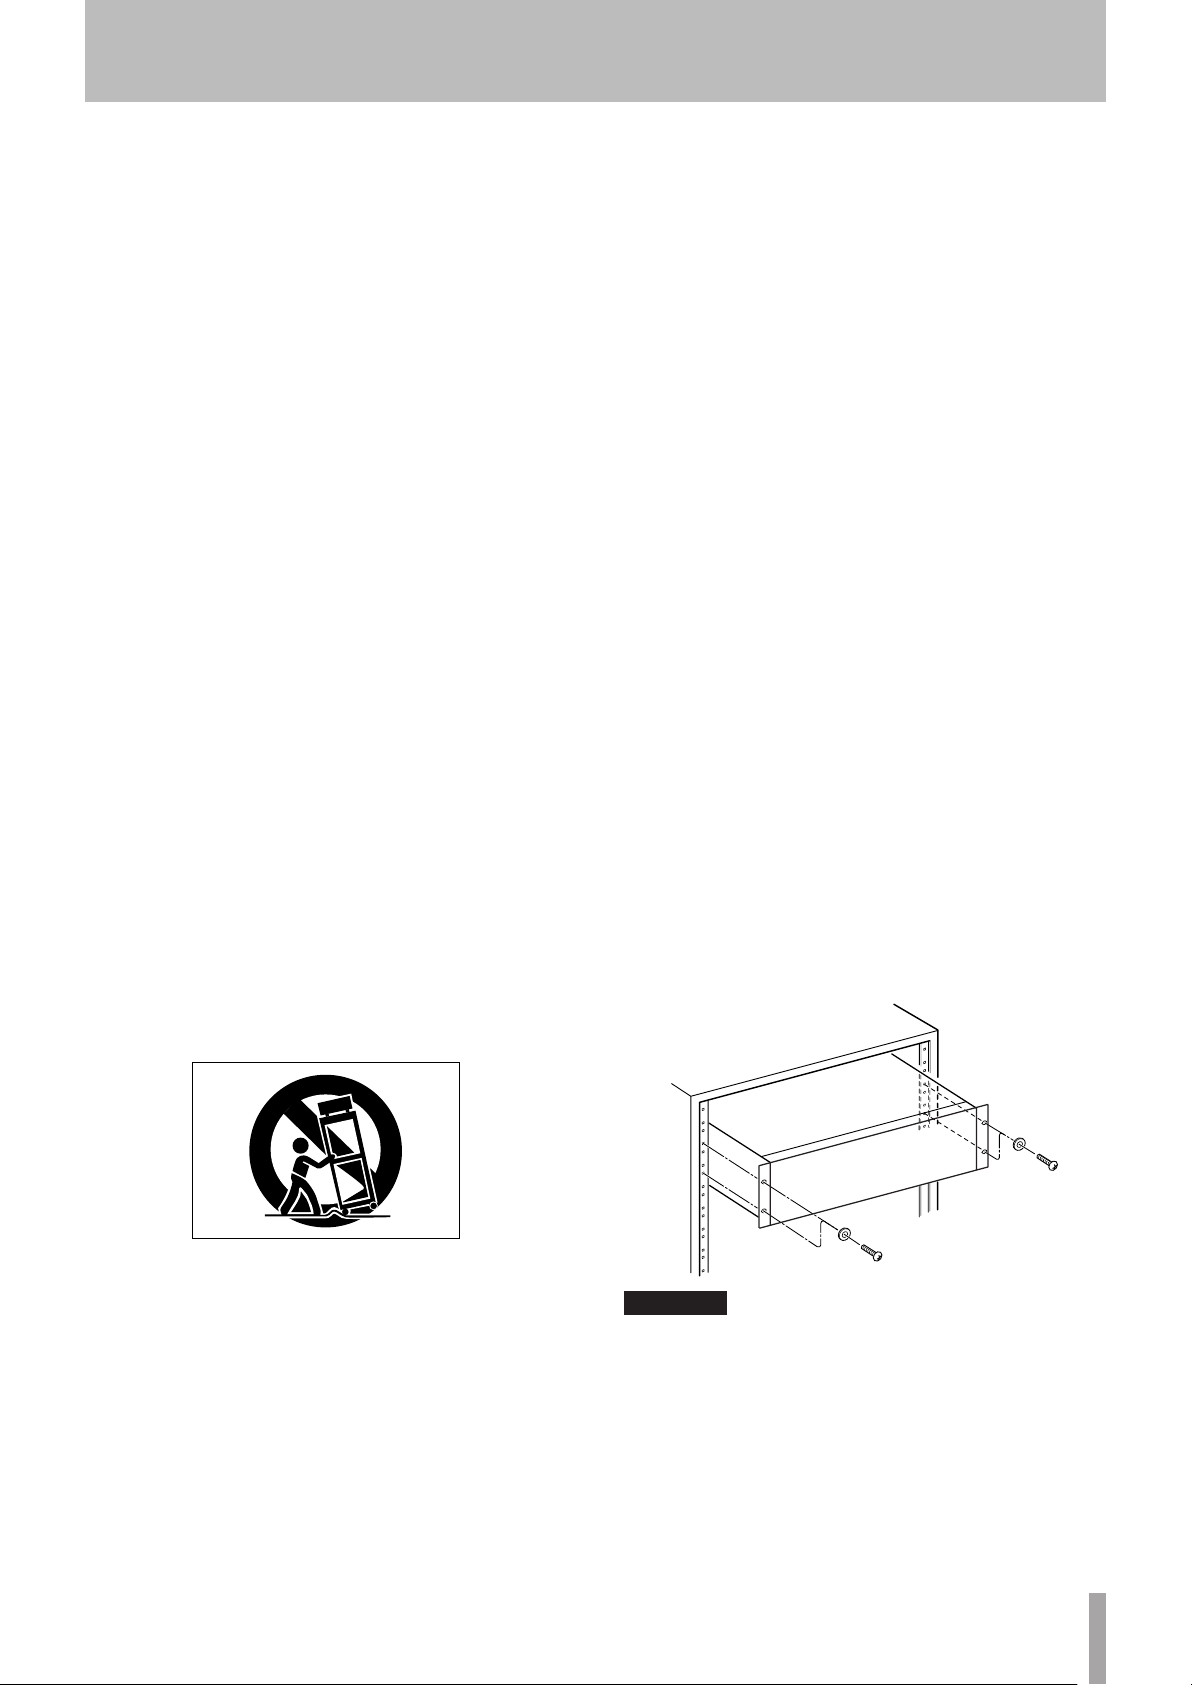
RACK-MOUNTING THE UNIT
ª
Use the supplied rack-mounting kit to mount the unit in a
standard 19-inch rack, as shown below.
Remove the feet of the unit before mounting.
13 Unplug this apparatus during lightning storms or
when unused for long periods of time.
14 Refer all servicing to qualified service personnel.
Servicing is required when the apparatus has been
damaged in any way, such as power-supply cord or
plug is damaged, liquid has been spilled or objects
have fallen into the apparatus, the apparatus has
been exposed to rain or moisture, does not operate
normally, or has been dropped.
CAUTION
Leave 1U of space above the unit for ventilation.
•
Allow at least 10 cm (4 in) at the rear of the unit for ventilation.
•
Page 4

4 TASCAM HS-8
Contents
1 − Introduction .........................................6
Features ........................................................... 6
Included items ................................................. 6
Conventions used in this manual ................... 6
Intellectual property rights ............................ 6
Precautions for placement and use ............... 7
Beware of condensation ................................ 7
Cleaning the unit ............................................ 7
Cleaning the display .................................. 7
About CF cards ................................................ 7
Precautions for use .................................... 7
2 − Names and functions of parts .............8
Front panel ...................................................... 8
Rear panel .................................................... 11
PARALLEL connector ............................... 13
RS-232C Connector .................................. 13
RS-422 connector .................................... 13
Home Screen ................................................ 14
3 − Preparation ......................................... 19
Inserting and removing CF cards ................ 19
Inserting CF cards ..................................... 19
Removing CF cards ................................... 19
Security screws ......................................... 19
About the display ........................................ 20
Adjusting the display angle .................... 20
Adjusting the display and indicator
brightness ................................................. 20
Turning the power ON and OFF .................. 20
Setting the time of the built-in clock .......... 21
Panel lock function ...................................... 21
Recording duration ....................................... 22
4 − Recording and Playback ....................23
Preparing to record....................................... 23
CF card selection ...................................... 23
Formatting a CF card .............................. 23
Create a new project .............................. 24
Set the master clock ................................. 25
Set the recording tracks .......................... 25
Set the file format ................................... 26
Make other recording settings ............... 26
Connecting headphones ........................ 27
Setting the inputs .................................... 27
Monitor the input ................................... 28
Make a recording .......................................... 28
Stop recording ......................................... 28
Retake a recording ................................. 28
Recording operation limitations ............ 29
Play a recording ............................................ 29
Select a project/folder/take ..................... 29
Disabling input monitoring ..................... 30
Start playback .......................................... 30
Mixing the playback sound ..................... 30
CALL .......................................................... 31
Flash start function ...................................... 31
Online function ............................................ 32
5 – Projects................................................33
File formats.................................................... 33
Monophonic and polyphonic modes ...... 33
Folder where files are saved in mono
mode ........................................................ 33
PROJECT screen overview ............................ 33
Project selection screen .......................... 33
Folder selection screen ........................... 34
Take selection screen ..............................34
Project operations......................................... 34
Creating new projects ............................. 34
Editing the project name ....................... 35
Changing a project name later ............... 36
Editing the name of the first folder ....... 36
Loading projects ...................................... 36
Rebuilding projects .................................. 37
Erasing a project ...................................... 37
Folder operations .......................................... 37
Creating new folders ............................... 37
Loading folders ........................................ 38
Rebuilding folders ................................... 38
Copying folders ........................................ 39
Erasing folders ......................................... 40
Take operations ............................................. 40
Loading takes ........................................... 40
Erasing takes ............................................ 40
Changing the start time of a take .......... 41
Using “@” with take names .................... 41
6 – Internal Settings ................................. 43
Menu screen ................................................. 43
Recording settings (REC SETUP) ................... 43
REC TRACKS page ................................... 43
FILE FORMAT page .................................. 43
OPTIONS page ......................................... 44
Playback settings (PLAY SETUP) ................... 45
GENERAL page ........................................ 45
CONTROL page ....................................... 45
Sync and time code settings (SYNC T/C)...... 45
CLOCK page ............................................ 45
SYNC page ................................................ 46
T/C page ................................................... 46
SETUP page ............................................. 47
I/O page ................................................... 47
Remote settings (REMOTE SETUP) .............. 48
PARALLEL TAB ......................................... 48
RS-232C page .......................................... 48
RS-422 page .............................................. 48
Mixer settings (MIXER SETUP) .....................49
INPUT page .............................................. 49
DIGITAL SOURCE page ............................. 49
Page 5

TASCAM HS-8 5
Contents
SETUP page ............................................. 49
OUTPUT page ........................................... 49
CHx NAME (button) ................................. 50
Channel settings (CHANNEL SETUP) ............ 50
When channels are linked ....................... 51
Stereo (L/R) channel ................................ 51
Digital source settings (CHx-x DIGI
SOURCE) ................................................... 51
Level meter settings (METER SETUP) ........... 51
System settings (SYSTEM SETUP) ................. 52
PREFERENCES page ................................. 52
CLOCK ADJUST page .............................. 52
Managing CF cards (CF MANAGE) ............... 52
Version display (VERSION INFO) .................. 53
Folder structure ............................................ 53
File names ................................................. 54
7 – Mark and Locate Functions ...............55
Mark functions .............................................. 55
Adding marks ........................................... 55
Using keys to locate to marks ................ 55
Mark list screen ....................................... 55
Locating to marks .................................... 56
Viewing mark information ...................... 56
Erasing marks ........................................... 56
Editing marks ........................................... 56
Renumbering marks ................................ 57
Manual locate function ............................... 57
Audio performance ...................................... 68
Other specifications ...................................... 68
Dimensional drawings .................................. 69
Blcok diagram ............................................... 70
8 – Operation using a computer
keyboard ...........................................58
Setting the keyboard type ........................... 58
Use the keyboard to input the name .......... 58
List of keyboard operations ......................... 58
9 – Online functions ................................. 59
Enabling online functions ............................ 59
Activating online playback mode ............... 59
10 – Playback synchronized with external
timecode ........................................... 60
Using synchronized playback ....................... 60
Timecode offset ............................................ 60
Rechase .......................................................... 60
11 – Troubleshooting ............................... 61
12 – Messages ..........................................62
13 – Specifications ....................................67
General .......................................................... 67
Input and output ......................................... 67
Analog audio input and output
connectors ................................................ 67
Digital audio input and output
connectors ................................................ 67
Control input and output connectors..... 68
Page 6

6 TASCAM HS-8
1 − Introduction
Thank you very much for purchasing a TASCAM HS-8
8 Channel Audio Recorder. Please read this manual
thoroughly before using the unit so that you understand
correct operating procedures and can use its functions
fully. We hope that you enjoy using this unit for many
years.
Please keep this manual so that you can read it at
any time. A digital copy of this manual can also be
downloaded from our website (http://www.tascam.com/)
Features
CF cards used as recording media (Ultra DMA
•
compatible)
Simultaneous recording of 8-channel multitrack and
•
stereo mix at 44.1/48 kHz, 16/24 bit
8-channel multitrack recording at 88.2/96 kHz, 16/24
•
bit
4-channel multitrack recording at 176.4/192 kHz, 16/24
•
bit
Broadcast Wave Format (BWF) files
•
Flash start possible using optional RC-HS20PD
•
JOG/SHUTTLE functions
•
Intuitive operation using graphical interface on TFT
•
color touch-screen
8 balanced analog inputs and outputs on 25-pin D-sub
•
connectors
8 AES/EBU digital inputs and outputs on a 25-pin D-sub
•
connector
8-channel ADAT digital input and output
•
2 channels of balanced XLR analog input and output
•
XLR AES/EBU digital input and output
•
Headphones output
•
BNC time code input and output
•
BNC video reference, as well as word clock input and
•
output/thru
USB storage media can be connected and files copied
•
(support planned in a version upgrade)
LAN (Ethernet) functions allow file transfer, remote
•
control and monitoring over a network (support
planned in a version upgrade)
Cascade function allows multiple units to be operated
•
in sync (support planned in a version upgrade)
Can be used with parallel remote control
•
Can be used with RS-232C serial remote control
•
Can be used with RS-422 (9-pin serial protocol
•
standard) serial remote control
Included items
This product includes the following items.
Take care when opening the package not to damage the
items. Keep the package materials for transportation in
the future.
Please contact the store where you purchased this unit
if any of these items are missing or have been damaged
during transportation.
Main unit (HS-8)• ........................................................................... 1
Power cord set• .............................................................................1
Rack-mounting screw kit• ......................................................... 1
Security screws• ............................................................................ 3
Warranty card• ............................................................................... 1
Owner's manual (this manual)
•
...............................................1
Conventions used in this manual
In this manual, we use the following conventions:
Keys, jacks and other parts on the main unit and
•
external devices are indicated like this: MENU
Messages on the unit’s display are shown like this:
•
“CompactFlash card” is abbreviated as “CF card.”
•
Additional information is provided as necessary as tips,
•
notes and cautions.
TIP
These are tips about how to use the unit.
NOTE
These provide additional explanations and describe special cases.
CAUTION
Failure to follow these instructions could result in injury, damage to
equipment or lost recording data, for example.
ON
Intellectual property rights
TASCAM is a trademark of TEAC Corporation, registered
•
in the U.S. and other countries.
CompactFlash is a US registered trademark of SanDisk
•
Corporation.
Other company names, product names and logos
•
in this document are the trademarks or registered
trademarks of their respective owners.
Any data, including, but not limited to information,
described herein are intended only as illustrations
of such data and/or information and not as the
specifications for such data and/or information. TEAC
Corporation disclaims any warranty that any use
of such data and/or information shall be free from
infringement of any third party’s intellectual property
rights or other proprietary rights, and further, assumes
no liability of whatsoever nature in the event of any
such infringement, or arising from or connected with
or related to the use of such data and/or information.
Page 7
TASCAM HS-8 7
1 − Introduction
This product is designed to help you record and
reproduce sound works to which you own the
copyright, or where you have obtained permission
from the copyright holder or the rightful licensor.
Unless you own the copyright, or have obtained the
appropriate permission from the copyright holder
or the rightful licensor, your unauthorized recording,
reproduction or distribution thereof may result in
severe criminal penalties under copyright laws and
international copyright treaties. If you are uncertain
about your rights, contact your legal advisor. Under no
circumstances will TEAC Corporation be responsible
for the consequences of any illegal copying performed
using the recorder.
Precautions for placement and use
The guaranteed operating temperature range of this
•
product is 5º - 35º C (41º- 95º F).
Do not install in the following types of places. Doing
•
so could degrade the sound quality and/or cause
malfunctions.
Places with significant vibrations or that are
•
otherwise unstable
Near windows or other places exposed to direct
•
sunlight
Near heaters or other extremely hot places
•
Extremely cold places
•
Places with bad ventilation or high humidity
•
Make sure that the unit is mounted in a level position
•
for correct operation.
In order to promote the emission of heat, do not place
•
anything on top of this product.
Do not place this product on top of a powered
•
amplifier or other equipment that emits heat.
Beware of condensation
If the unit is moved from a cold to a warm place, or
used immediately after a cold room has been heated or
otherwise exposed to a sudden temperature change,
condensation could occur. Should this happen, leave the
unit for one or two hours before turning the unit on.
Cleaning the display
Slightly wipe the display with a soft dry cloth that does
not shed dust (e.g. a cleaning cloth). Avoid wiping with a
stiff cloth or rubbing with force. Doing so could damage
the surface of the LCD. Do not use benzene, thinner,
manicure remover, alcohol or similar substances.
About CF cards
The capacities and performance of your HS-8 will vary
based on the speed and abilities of the Compact Flash
(CF) media used. Older and some cheaper Compact
Flash (CF) cards use slower memory components and
little internal buffering which results in poor recording
performance. Newer CF cards, particularly those made for
high-precision DSLR cameras, not only perform reading
and writing faster, but also come in larger storage size.
A list of CF cards that we have confirmed to work with this
unit is provided on our website (http://www.tascam.com).
If a CF card is used that has not been confirmed, this unit
might not operate correctly.
CAUTION
We can accept no responsibility for any loss of the data you record
using this product onto a CF card.
Precautions for use
CompactFlash cards are precision devices. To prevent
damage to the card or the slot, please observe the
following cautions.
Do not leave a CF card in an extremely hot or cold
•
location.
Do not leave a CF card in an extremely damp
•
location.
Do not allow a CF card to become wet.
•
Do not place any object on top of a CF card, or twist
•
or bend it.
Do not subject a CF card to strong impact.
•
Do not insert or remove a CF card during recording,
•
playback, data transfer or other operations that
access a card.
Cleaning the unit
Wipe the unit with a soft dry cloth to clean it. Do not use
any benzine, paint thinner, alcohol or other chemical
agents. Doing so could damage the surface of the unit or
cause fading.
Page 8
8 TASCAM HS-8
2 − Names and functions of parts
Front panel
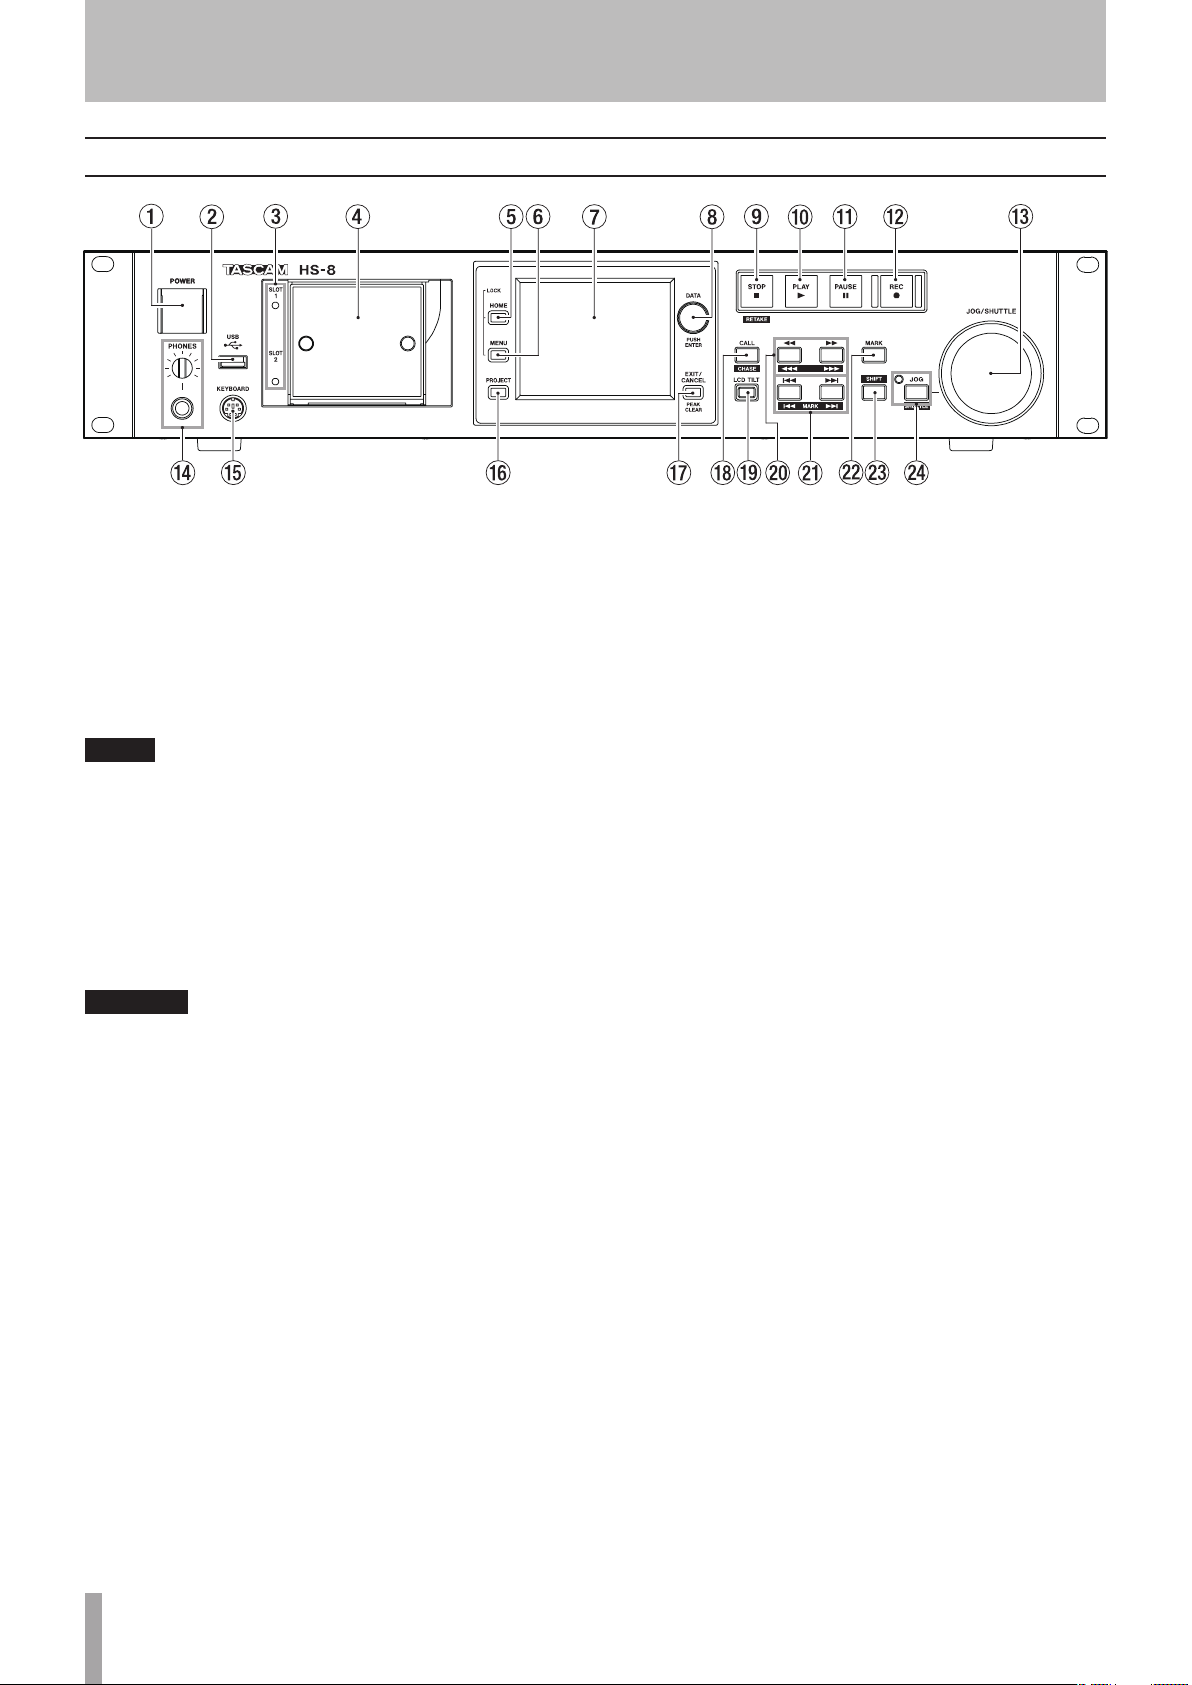
1 POWER switch
Use to turn the power on and off. This switch has a
cover to prevent misoperation. Open the cover from
below to access and operate the switch.
2 USB connector (support planned in a version
upgrade)
By connecting a USB flash drive, for example, you can
back up data from a CF card and save files to the card.
NOTE
Do not disconnect USB ash memory when using it to copy les.
You can connect and disconnect USB ash memory at all other
times. You can connect and disconnect USB keyboards at any time.
3 SLOT 1 and SLOT 2 indicators
The indicator for the currently selected card slot lights.
It rapidly blinks when recording or copying. When no
CF card is inserted in the current slot, the indicator
blinks slowly.
CAUTION
Do not remove a card from a slot when its indicator is rapidly
blinking.
4 CompactFlash card slots (SLOT 1/SLOT 2)
Insert CF cards here (see “Inserting and removing CF
cards” on page 15).
5 HOME key
Press to open the Home Screen.
Press the MENU key while pressing and holding the
HOME key to open the
lock function” on page 21.)
Turn the DATA dial while pressing and holding the
HOME key to adjust the brightness of the color display,
the JOG (SHUTTLE), SLOT 1 and SLOT 2 indicators and
the PAUS E, REC and P LAY keys.
Push and turn the DATA dial while pressing and
holding the HOME key to adjust only the brightness of
the color display.
LOCK SETUP
screen. (See “Panel
6 MENU key
Press to open the
Press the MENU key while pressing and holding the
HOME key to open the
lock function” on page 21.)
7 Color display
This 3.5-inch TFT color display with a resolution of
320 x 240 shows various types of information and
responds to touch.
8 DATA dial
Turn the DATA dial to change settings, and press it
to use it as an ENTER key. When setting parameter
values, press while turning to change them in large
increments (coarse mode). When a pop-up window is
open, this works as an OK or
Turn the DATA dial while pressing and holding the
HOME key to adjust the brightness of the color display,
the JOG (SHUTTLE), SLOT 1 and SLOT 2 indicators and
the PAUS E, REC and P LAY keys.
Push and turn the DATA dial while pressing and
holding the HOME key to adjust only the brightness of
the color display.
9 STOP (RETAKE) key
Press to stop recording or playback.
Press this while pressing and holding the SHIFT key to
retake the recording (erasing the last recorded take).
While recording, press this key to stop recording and
stop the unit at the beginning of the last recorded file.
0 PLAY key/indicator
When stopped or in playback standby, press this key
to start playback. This key lights during playback.
Press this key when in recording standby to start
recording. Both the PL AY and REC keys light during
recording.
q PAUSE key/indicator
Press this key when stopped or during playback to
put the unit in playback standby. This key lights when
in standby.
MENU
screen.
LOCK SETUP
screen. (See “Panel
CLOSE
button.
Page 9
TASCAM HS-8 9
2 − Names and functions of parts
Press this key while recording to put the unit in
recording standby. Both the PAUSE and REC keys light
during recording standby.
w REC key/indicator
When a recordable CF card is installed and the unit is
stopped, press this key to put the unit into recording
standby. Both the PAUSE and REC keys light during
recording standby.
Press this key while recording to stop recording the
current file, and continue recording to a new file.
CAUTION
If you press the REC key less than 4 seconds after beginning
•
recording, the unit will not start recording a new take.
Depending on the folder setting for mono recording les, the
required time could be even longer. (See “Folder where les are
saved in mono mode” on page 33.)
Depending on other conditions, recording of a new take
•
might not be possible when the REC button is pressed during
recording. (See “Recording operation limitations” on page 29.)
Recording is not possible if any of the following conditions
•
apply. Change the recording folder.
The folder contains 999 takes
•
The number at the end of the take name has reached 999
•
The remaining recording time indicator on the Home Screen
•
shows “Rec Limit”. (See “Recording operation limitations” on
page 29.)
e JOG/SHUTTLE dial
When in jog operation mode, turn this to change the
playback position by a corresponding amount.
When in shuttle operation mode, turn this to adjust
the playback speed according to the degree of rotation.
If you return to the original position when in shuttle
operation mode, the transport status is restored to
how it was before shuttle playback was begun.
r PHONES knob/jack
Connect stereo headphones to this standard stereo
phone jack. Use the PHONES knob to adjust the
headphones output level.
CAUTION
Before connecting headphones, turn the PHONES knob to the
minimum volume. Failure to do so could cause sudden loud noises
to occur, which might damage your hearing or equipment.
t KEYBOARD connector
Connect an IBM PC-compatible keyboard with a
PS/2 interface, and use it to input project, folder, and
channel names, for example. By default, the unit is set
to use a US keyboard. To use a Japanese keyboard,
since the key allocation is different, change the setting
on the
PREFERENCES
page of the
SYSTEM SETUP
screen.
(See “PREFERENCES page” on page 52.)
y PROJECT key
Press to open the
PROJECT
screen. (See “PROJECT
screen overview” on page 33.)
u EXIT/CANCEL (PEAK CLEAR) key
Press to cancel input or item selection. On the Home
Screen, this functions as a reset button for peak hold
marks shown on the level meters.
When the
MENU
screen or
PROJECT
screen is open,
press this to return to the Home Screen. On other
screens, press this to return to the previous screen.
When a pop-up window is open, press this to cancel
an operation.
i CALL (CHASE) key
Press to locate the call point, which is where playback
last started from playback standby, and resume
playback standby.
Press this key while pressing the SHIFT key to turn
synchronization with external timecode ON/OFF.
o LCD TILT button
Press this button to unlock the color display, so that
you can adjust its angle by pulling the bottom of the
display outward.
To put the display away, press this button to unlock it
and push the bottom inward.
p Ô ( )/ ( ) (search) keys
Use these keys to search.
Ô ( ): Search backward
( ): Search forward
Press one of these keys while pressing the SHIFT key
to search at high speed
a Â/¯ (MARK Â/¯) (SKIP) keys
Use these to skip to the previous/next take.
Press these keys while pressing the SHIFT key to move
to the previous/next mark. After moving, the same
playback state resumes (stopped/standby/playback).
s MARK key
Press this key to add a mark at the currently located
time. The maximum number of marks, including
automatic marks, possible in a single file (take) is 99.
(See “Mark functions” on page 55.)
d SHIFT key
When stopped/in playback standby/during playback:
Press the
•
 while pressing and holding this key
to move to the previous mark, and resume the same
playback state.
Press the
•
¯ key while pressing and holding this
key to move to the next mark, and resume the same
playback state.
Press a
•
Ô ( )/( ) key while pressing
and holding this key to search at high speed.
Press the
•
JOG (SHUTTLE) key while pressing and
holding this key to activate the shuttle operation
mode.
Press the
•
STOP (RETAKE) key while pressing and
holding this key to retake the recording (erasing the
last recorded take).
Page 10

10 TASCAM HS-8
2 − Names and functions of parts
f JOG (SHUTTLE) key and indicator
Use to enable use of the JOG/SHUTTLE dial. Press
this key to enable the jog operation mode of the
JOG/SHUTTLE dial. When this mode is enabled, this
indicator lights.
Press this key while pressing the SHIFT key to enable
the shuttle operation mode of the JOG/SHUTTLE dial.
When this is enabled, this indicator blinks.
Press this key again to disable either mode.
Page 11
TASCAM HS-8 11
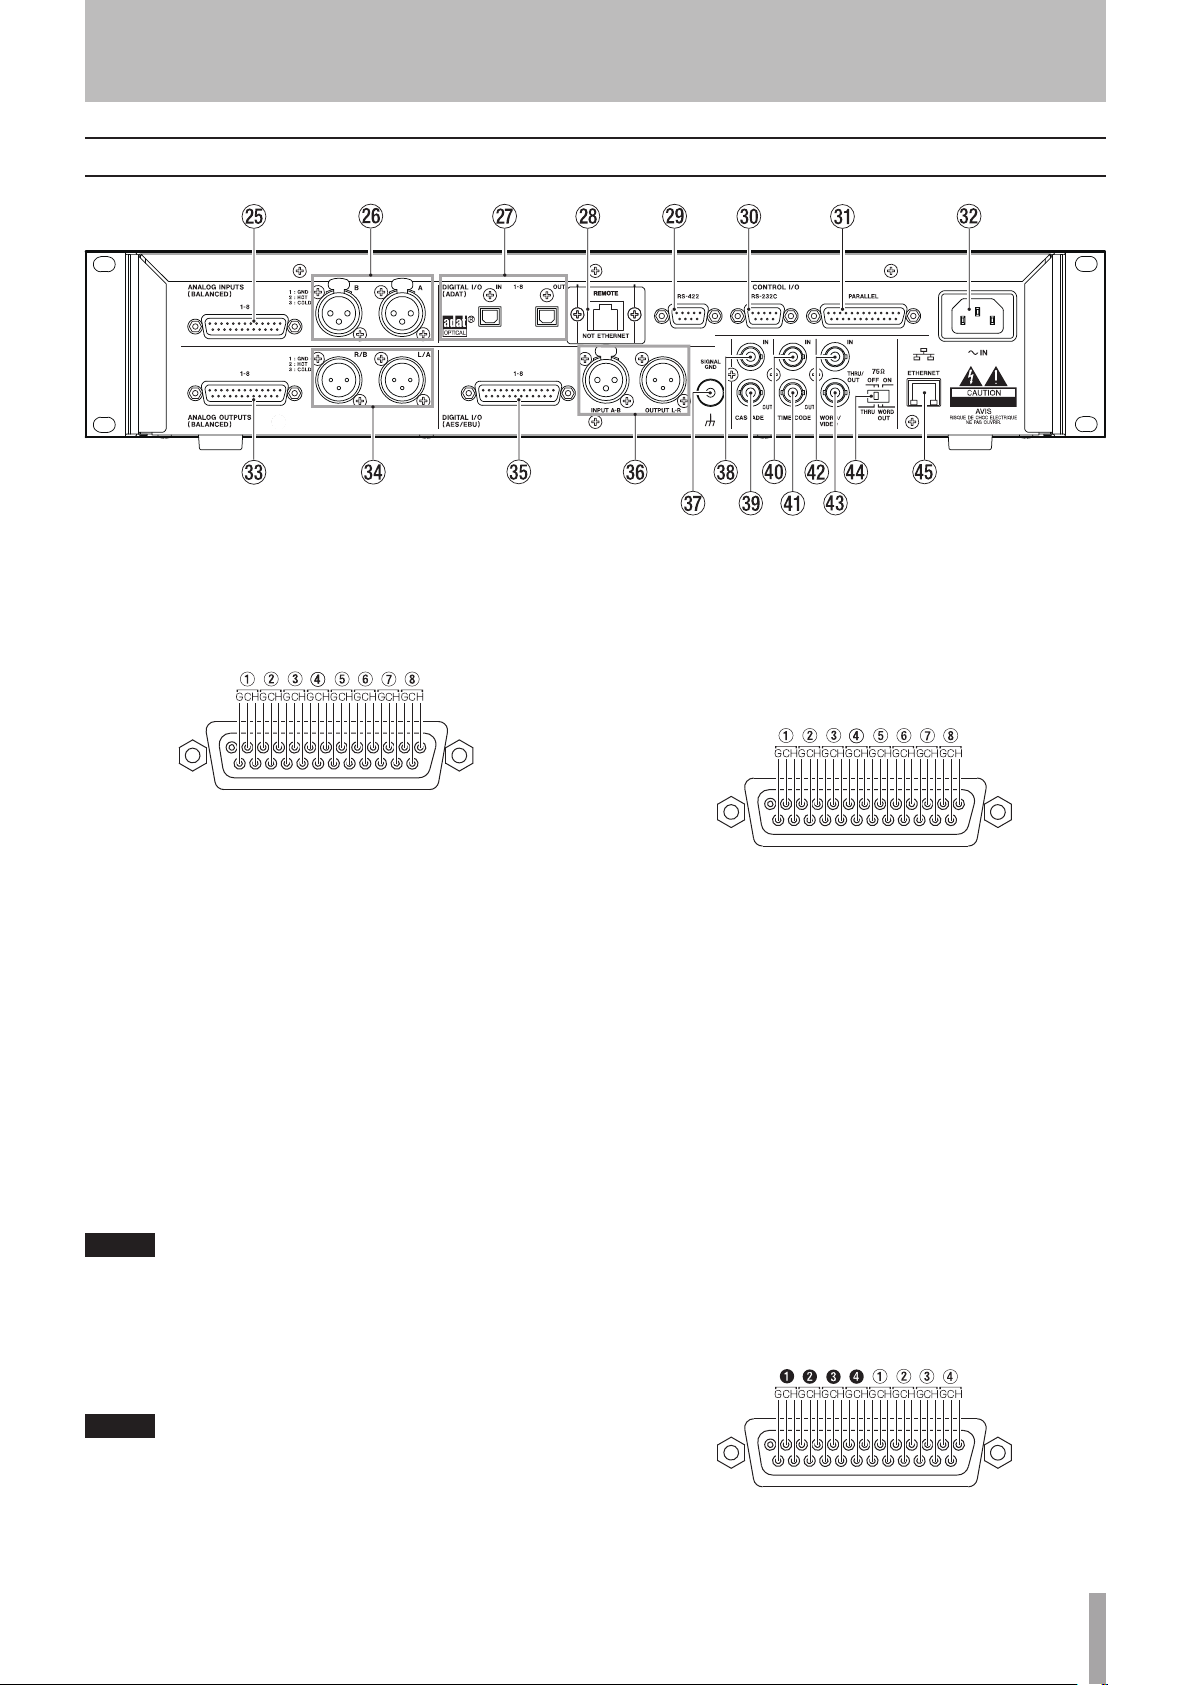
Rear panel
1
1425
13
1
1425
13
DigitalIn
DigitalOut
1
1425
13
2 − Names and functions of parts
g ANALOG INPUTS 1-8 connector
This 25-pin D-sub connector is for analog balanced
line input. The pin assignments are as follows.
h ANALOG INPUTS A and B connectors
These A/B balanced XLR connectors are for analog
balanced line inputs (1: GND, 2: HOT, 3: COLD). Set
which channels the signals input through these
connectors are recorded to using the unit settings.
j DIGITAL I/O (ADAT) 1-8 connectors
These connectors are for the input (IN) and output
(OUT) of ADAT optical format digital audio. Sampling
frequencies of 44.1 kHz and 48 kHz are supported.
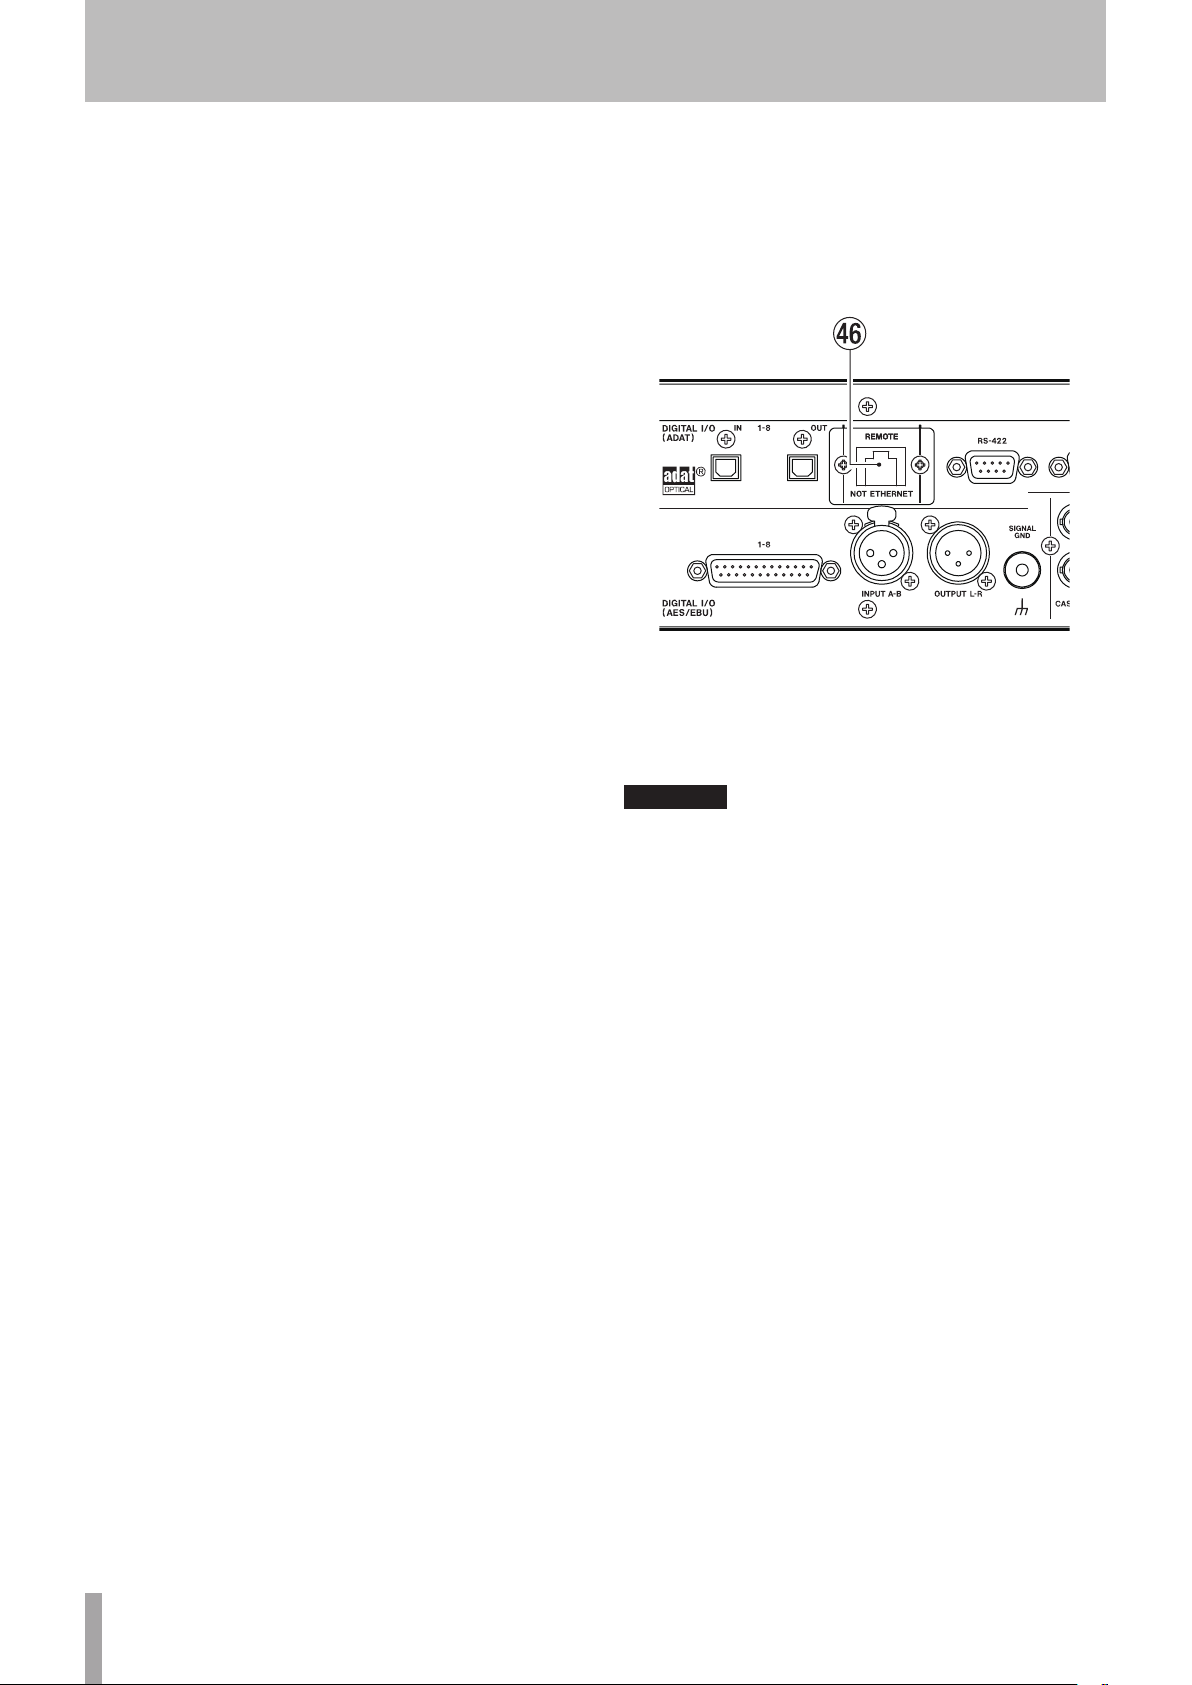
k REMOTE cover
This cover is attached when the unit is new. Remove
the two screws from the cover to access and use the
REMOTE connector.
l RS-422 connector
This 9-pin D-sub connector is for RS-422 serial control.
Connect an external controller, for example, here.
NOTE
This cannot be used at the same time as the RS-232C connector. (See
“RS-422 page” on page 48.
x AC inlet
Connect the provided AC power cord set here.
c ANALOG OUTPUTS 1-8 connector
This 25-pin D-sub connector is for analog balanced
line output. The pin assignments are as follows.
v ANALOG OUTPUTS L/A and R/B connectors
These A/B balanced XLR connectors are for analog
balanced line outputs (1: GND, 2: HOT, 3: COLD).
These output the stereo signal mixed in this unit or the
monitoring signal (the same sound output from the
PHONES jack, including soloed tracks, etc.).
b DIGITAL I/O (AES/EBU) 1-8 connector
This 25-pin D-sub connector is for digital audio input
and output in AES/EBU (AES3-2003/IEC60958-4)
format.
Transmission occurs at double speed when the
sampling frequency is 88.2 or 96 kHz and at quad
speed when 176.4 or 192 kHz.
The digital input section includes a sampling
rate converter that is compatible with sampling
frequencies between 32–216 kHz.
The pin assignments are as follows.
; RS-232C connector
This 9-pin D-sub connector is for RS-232C control.
Connect an external controller, for example, here.
NOTE
This cannot be used at the same time as the RS-422 connector (See
“RS-232C page” on page 48.)
z PARALLEL connector
This 25-pin D-sub connector is for parallel control.
Connect an external controller, for example, here.
Page 12
12 TASCAM HS-8
2 − Names and functions of parts
n DIGITAL I/O (AES/EBU) INPUT A/B and OUTPUT L/R
connectors
These XLR balanced connectors are for digital audio
input (INPUT A/B) and output (OUTPUT L/R) in AES/
EBU (AES3-2003/IEC60958-4) format.
Transmission occurs at double speed when the
sampling frequency is 88.2 and 96 kHz and at quad
speed when 176.4 and 192 kHz.
The digital input section includes a sampling
rate converter that is compatible with sampling
frequencies between 32–216 kHz
The digital output section outputs the stereo signal
mixed in this unit or the monitoring signal (the same
sound output from the PHONES jack, including soloed
tracks, etc.).
m SIGNAL GND terminal
When using a TASCAM RC-HS20PD remote control (sold
separately), depending on the operating environment,
the color display might flicker or noise might be heard
when monitoring. If this occurs, use the SIGNAL GND
terminal. (Please prepare a wire to use with the SIGNAL
GND terminal.)
,CASCADE IN connector (support planned in a
version upgrade)
This connector is for cascade connection input.
. CASCADE OUT connector (support planned in a
version upgrade)
This connector is for cascade connection output.
/ TIME CODE IN connector
This BNC-type connector is for SMPTE time code input.
! TIME CODE OUT connector
This BNC-type connector is for SMPTE time code
output.
@ WORD/VIDEO IN connector
This BNC-type connector is for word clock and video
reference signal input. You can input a word clock
signal (44.1 kHz, 48 kHz, 48 kHz pull-down, 48 kHz
pull-up, 88.2 kHz, 96 kHz, 176.4 kHz, 192 kHz) or a
video reference signal (NTSC/PAL black burst signal,
HDTV Tri-Level signal). You can also use the switch to
the right to set whether or not to terminate with 75Ω.
# WORD/VIDEO THRU, WORD OUT connector
This BNC-type connector is for word clock thru or
output and video reference signal thru. You can
output a word clock signal (thru, 44.1 kHz, 48 kHz, 48
kHz pull-down, 48 kHz pull-up, 88.2 kHz, 96 kHz, 176.4
kHz, 192 kHz) or a video reference signal (IN connector
signal thru). Use the THRU/OUT switch to set the signal
output. (OUT is only for WORD.)
$ 75Ω OFF/ON and THRU/WORD OUT switch
Use this switch to make the following settings.
Whether or not
•
resistance (75Ω)
The
WORD/VIDEO output THRU/OUT setting (OUT is
•
only for WORD)
WORD/VIDEO IN has termination
% ETHERNET connector (support planned in a version
upgrade)
Use this Ethernet connector to connect with a network
for file transfer and to control this unit from an external
source.
When the REMOTE Connector cover is removed
^ REMOTE connector
Connect a dedicated RC-HS20PD remote controller
(sold separately) here.
CAUTION
This is not an Ethernet connector (LAN, etc.). Never connect it
•
to a network using an Ethernet cable. Doing so could cause this
unit or network devices to malfunction.
When the unit is shipped from the factory, this connector has
•
a cover attached with screws in order to prevent accidental
connection to a network.
Page 13
TASCAM HS-8 13
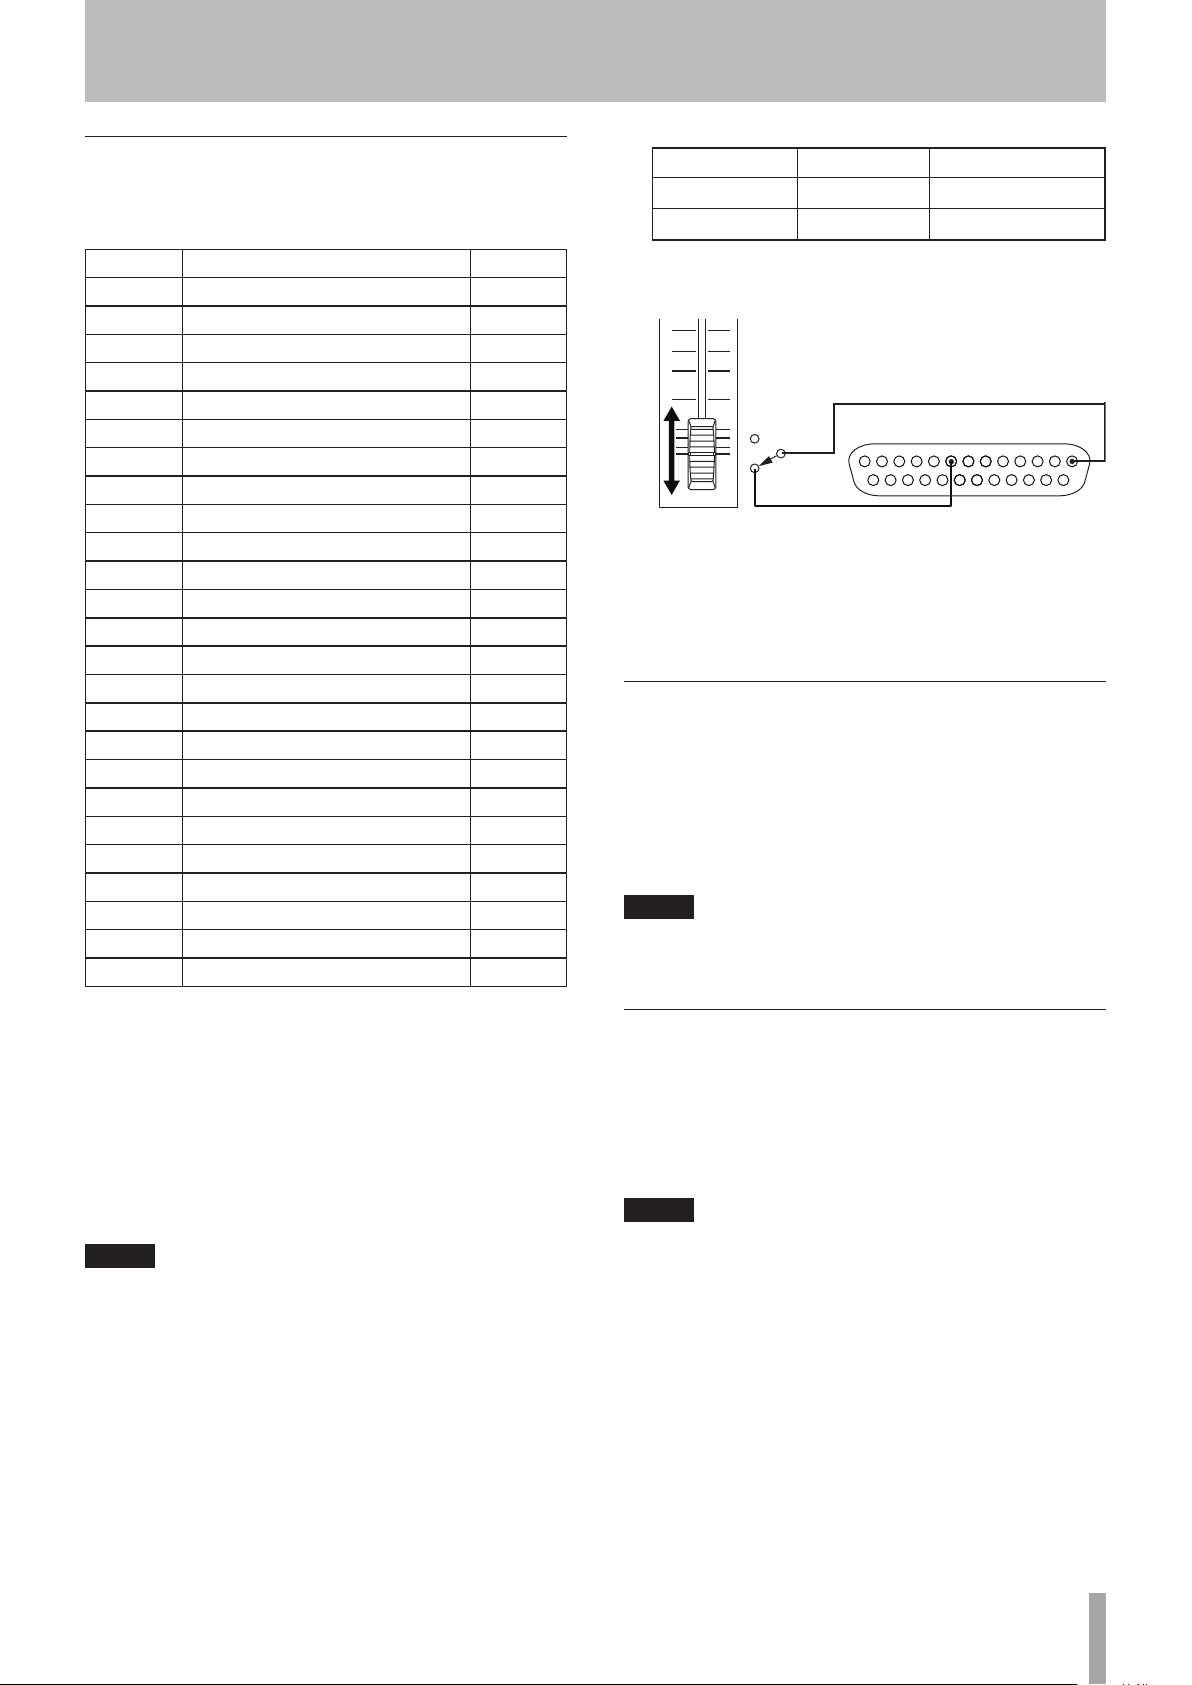
START
STOP
Pin1GND
PARALLEL
Pin8
FADERSTART
2 − Names and functions of parts
PARALLEL connector
The PARALLEL connector on the rear panel allows external
control of this unit. The pin assignments are as follows.
Pin No. Function In/Out
1 GND
2 PLAY/Flash 1 In
3 STOP/Flash 2 In
4 RECORD/Flash 3 In
5 SKIP FWD/Flash 4 In
6 SKIP BWD/Flash 5 In
7 FLASH LOAD (STOP) In
8 FADER START In
9 FLASH Tally Out
10 READY Tally Out
11 RECORD Tally Out
12 STOP Tally Out
13 PLAY Tally Out
14 REMOTE Select In
15 PAUSE/Flash 6 In
16 CALL/Flash 7 InIn
17 AUX1/Flash 8 In
18 AUX2/Flash 9 In
19 AUX3/Flash 10 In
20 Flash Page In
21 Reserved
22 CF1 Tally Out
23 ONLINE Tally Out
24 CF2 Tally Out
25 +5V*
In: Command input, for transport control
Internal circuit, +5V pull-up
Operates with low commands of 50 msec or more
Out: Command output, for tally output
The internal circuit is open collector (output
impedance 10Ω)
Low command output when operating
20 V dielectric strength, 35 mA maximum current
*
+5V: 50 mA maximum supplied current
NOTE
The FLASH LOAD (STOP) (pin 7) functions are FLASH LOAD when
•
stopped and STOP during playback and when paused.
When Remote Select (Pin 14) is high, the input pins that have
•
two commands separated by a “/” (pins 2–6 and 15–19) in the
above table will perform the rst-listed function, and can be
used as conventional parallel controllers.
When this pin is low, the above-listed input pins will function as
ash start keys. Moreover, the key assignments will be as follows
according to the high/low state of pin 20.
#14 #20 Flash-start take
Low High 1–10
Low Low 11–20
The following example is of a connection that uses a fader to
•
start and stop playback of this device.
For information about the assignment of AUX1-3 (pins
17-19) functions, see the “PARALLEL tab” of the REMOTE
SETUP screen on page 48.
RS-232C Connector
The RS-232C connector on the rear panel can be
connected to an RS-232C connector on a computer to
allow control of this unit from that computer.
Makes settings related to communication on the REMOTE
SETUP screen RS-232C page. (See “RS-232C page” on page
48.)
NOTE
Please contact TASCAM customer support for information about
this unit’s RS-232C command protocol.
RS-422 connector
You can control this unit remotely by connecting the
RS-422 connector on its rear panel to a controller or editor
compatible with SONY P2 protocol (RS-422).
Make settings related to operation on the REMOTE SETUP
screen RS-422 page. (See “RS-422 page” on page 48.)
NOTE
Please contact TASCAM customer support for information about
this unit’s protocol compatibility.
Page 14
14 TASCAM HS-8
2 − Names and functions of parts
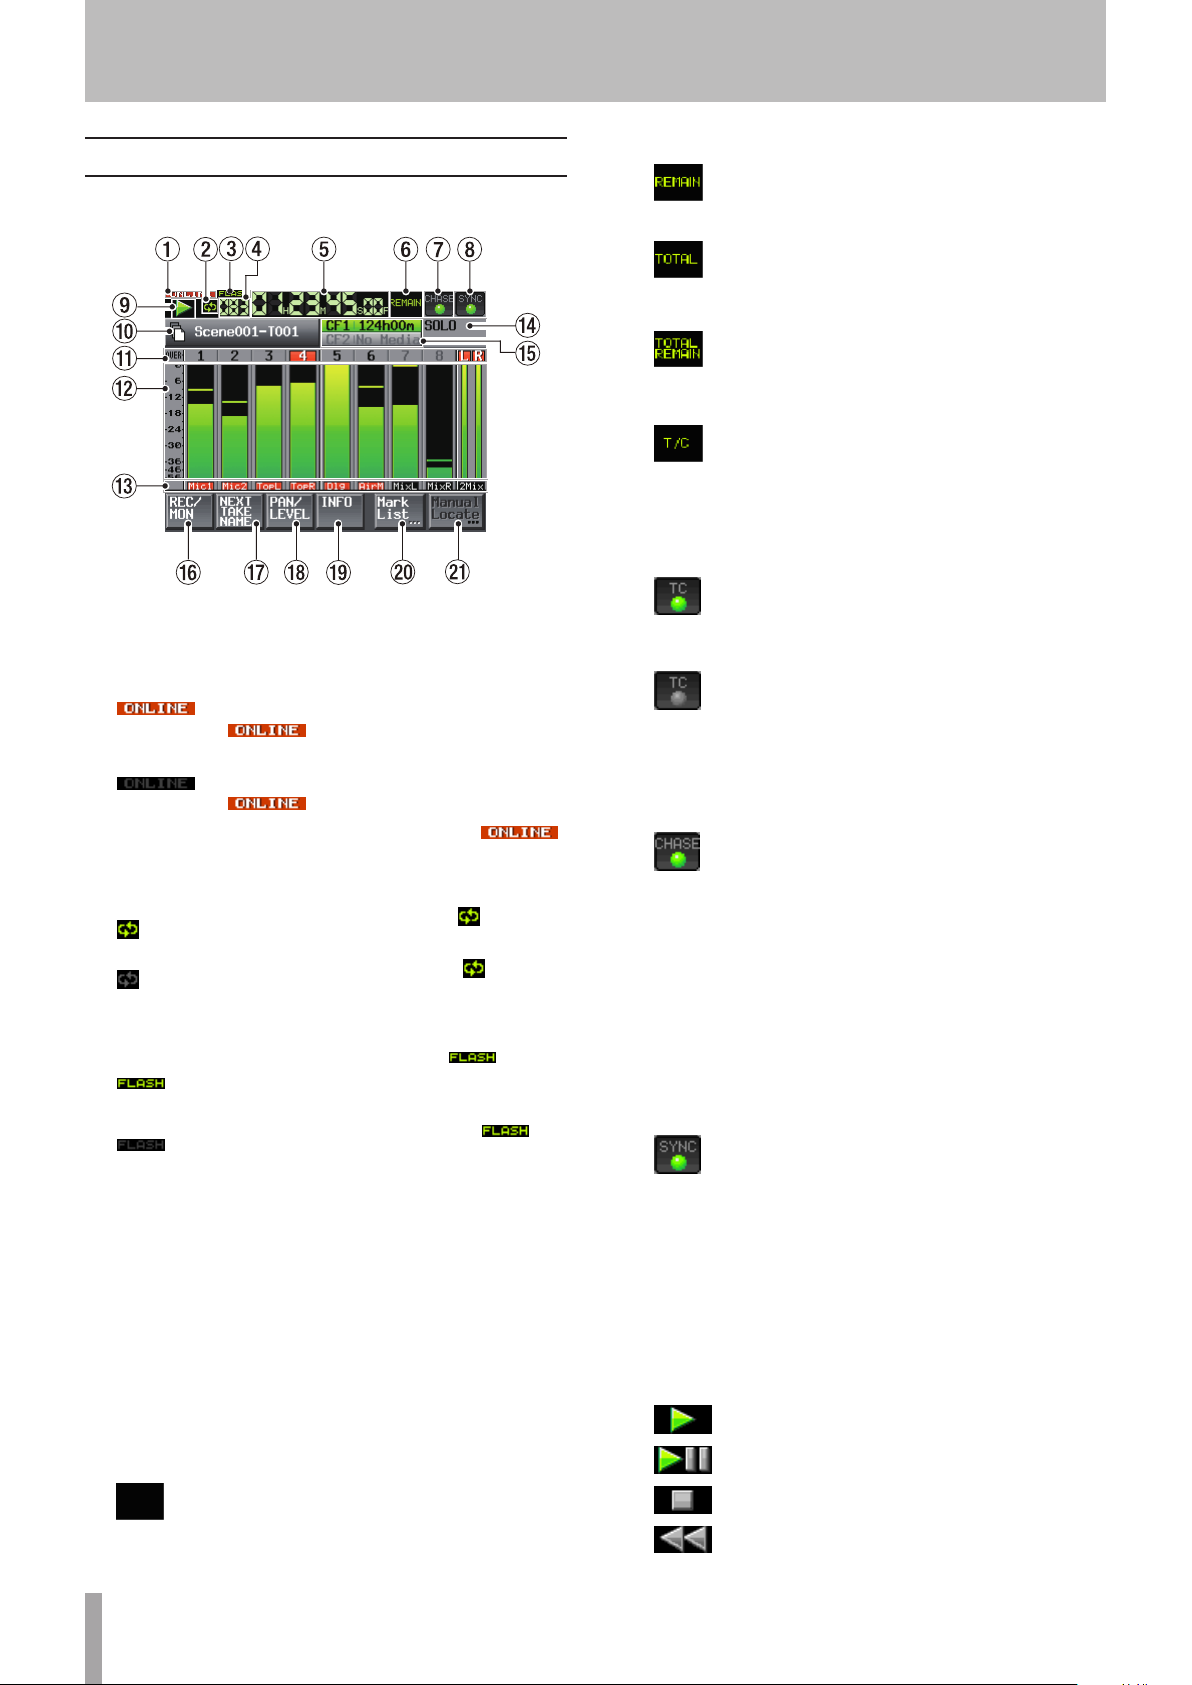
Home Screen
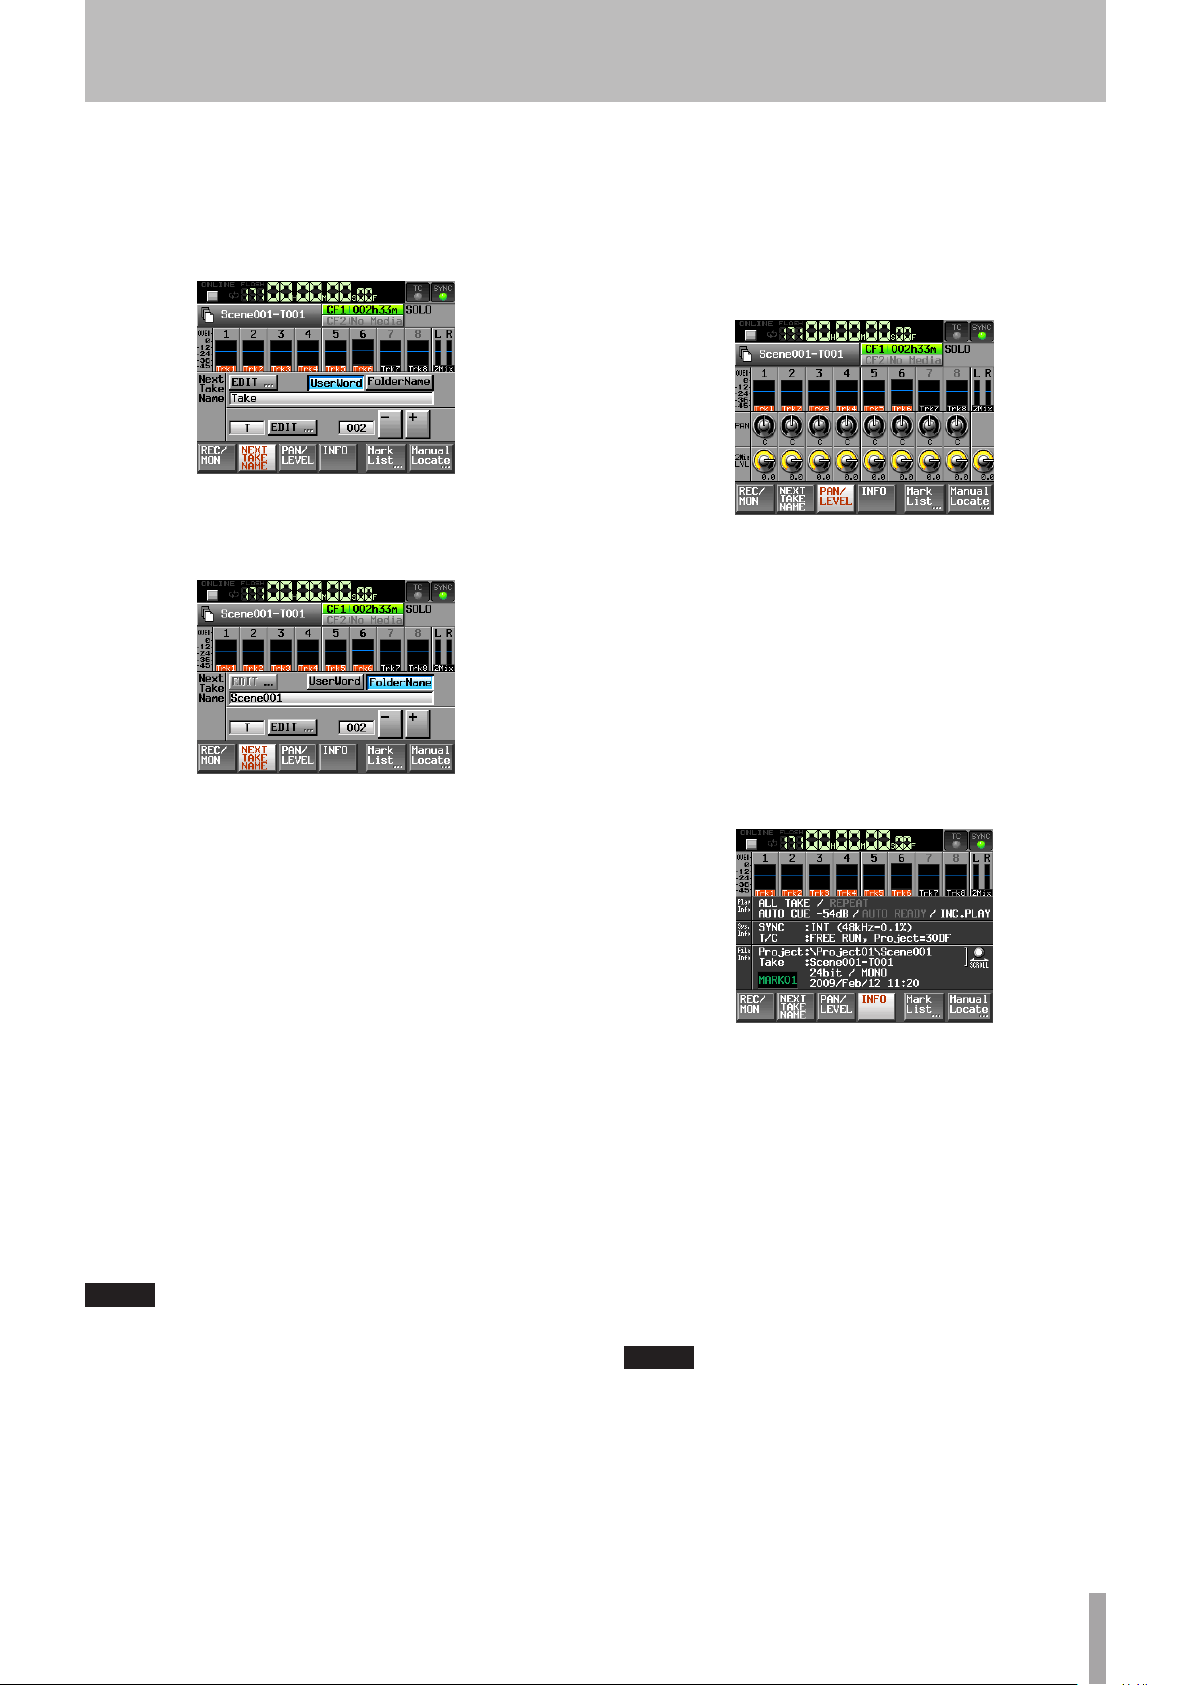
Press the HOME key to open the Home Screen.
1 ONLINE status indicator
When the ONLINE function is active
and ONLINE playback mode is ON, the
icon appears red.
When the ONLINE function is active
and ONLINE playback mode is OFF, the
icon appears unlit.
When the ONLINE function is not active, the
icon is not displayed.
2 Repeat status indicator
When repeat playback is ON, the icon
appears green.
When repeat playback is OFF, the icon
appears unlit.
3 Flash status indicator
When flash start is possible, the icon
appears green. The icon blinks when flash
start is being prepared.
When flash start is not possible, the
icon appears unlit.
4 Take number display
The number of the currently selected take is shown.
This number is assigned to a take in the order that it
was recorded within a folder.
5Time counter (button)
The current time displayed is either the elapsed time
or the remaining time. Touch this part of the screen to
change the time display mode.
6 Time mode indicator (button)
This shows the current time display mode. Touch this
part of the screen to change the time display mode.
The time remaining until the end of the take
is shown. When recording, the remaining
time until the maximum file size is reached is
shown.
The time elapsed from the beginning of the
folder is shown.
The time remaining until the end of the folder
is shown. When recording, the remaining
amount of time that can be recorded on the
currently selected CF card, which depends on
the current recording settings, is shown.
The time code for the file being recorded or
played is shown.
7 Time code status (button/indicator)
When accurate time code is input and the
input time code matches the time code
setting made on the project, this indicator
appears green.
When the input time code does not match
the time code setting made on the project,
this indicator appears unlit.
Synchronized playback status is shown when playback
is synchronized to external timecode.
The
CHASE
indicator appears green when
synchronized with the external timecode.
The
CHASE
indicator blinks when playback is not
synchronized with external timecode. This includes
when synchronization is lost during synchronized
playback
Touch this part of the screen to open the
screen. (See “Sync and time code settings (SYNC T/C)”
on page 45.)
8 Audio synchronization status (button/indicator)
When the selected Master clock is
synchronized, this indicator appears green.
This blinks when the selected Master clock is not
synchronized.
Touch this part of the screen to open the
screen. (See “Sync and time code settings (SYNC T/C)”
on page 45.)
9 Transport status indicator
This shows the current transport status.
Playing back
Playback standby
SYNC T/C
SYNC T/C
The time elapsed from the beginning of the
take is shown.
Stopped
Searching backward
Page 15
TASCAM HS-8 15
2 − Names and functions of parts
Searching forward
Searching backward (high-speed search)
Searching forward (high-speed search)
The number shown when searching
backward (shuttle operation) changes with
the current speed: x2, x4, x8, x16, x32.
The number shown when searching forward
(shuttle operation) changes with the current
speed: x2, x4, x8, x16, x32.
Recording
Recording standby
0 Take name display (button)
This shows the icon for the currently active file mode
and the take name. The two types of file mode icons
are as follows.
Monophonic mode (Single track BWF file)
Polyphonic mode (Multitrack BWF file)
Touch this part of the screen to open the
(current project/folder take list) screen. (See “Project
operations” on page 34.)
q Track number display
The track number appears black when recording is
possible and appears gray when it is not possible
(according to the sampling frequency). Moreover, the
track number area functions as an overload indicator
and appears red when there is an overload. The L/R
area appears yellow when the limiter is functioning to
control volume.
w Level meter (button)
The input signal level for a track is shown if input
monitoring for it is set to ON. The input signal level for
a track is also shown if it is armed for recording and
not playing back. During playback, the playback level
of a track is shown if input monitoring is set to OFF.
When the input source is set to a digital input, but
there is no input signal or if the input signal differs
from the internal setting, the channel meter display
area appears grey and one of the following messages
appears.
PROJECT
AESx-x NO SIGNAL
Touch a level meter to solo that channel. Yellow
highlighting appears around the level meter and the
number of a soloed channel. The level meters of the
other channels are dimmed.
The following settings can be made for the display of
the level meters in the
MENU
screen.
Peak hold time
•
Release time
•
Overload indicator peak indication level
•
Reference level line display ON/OFF
•
e Track name display, and record arming and input
METER SETUP
screen from the
monitoring status
The area beneath each level meter shows the track
name (four characters or less) and indicates whether
recording and input monitoring are enabled.
REC Off REC On
MON Off
MON On
Black Red
Blue Red/blue
r SOLO indicator (button)
If any channel is being soloed, the
appears yellow, and the
SOLO
SOLO
indicator
level knob is shown. Turn
the DATA dial when a channel is soloed to adjust its
level while soloed.
Yellow highlighting appears around the level meter
and the number of a channel that is soloed. The level
meters of the other channels are dimmed.
To choose a channel to solo, touch its level meter.
Display Description
AESx-x NO SIGNAL
ADAT NO SIGNAL
AESx-x UNLOCK
ADAT UNLOCK
AESx-x NOT AUDIO
AESx-x NOT PRO
AESx-x Cbit ERROR
If there is no input signal
If the input signal is not
synchronized with the system
If the Cbit information of the
input signal is not audio
If the Cbit information of the
input signal is not professional
If other input signal Cbit
information differs from the
actual operation mode
Home Screen during playback
Page 16
16 TASCAM HS-8
2 − Names and functions of parts
used appears green during playback and red when
recording.
If there is no media in the slot, No
the background is light grey. If the card has no projects
or folders, a
unformatted CF card is inserted in the CF card slot that
is not being used,
is inserted during recording,
Home Screen during recording
Home Screen REC/MON page
recording is stopped, the usual screen is shown.
If the total number of entries, including files and
subfolders, inside a folder exceeds about 5000,
recording becomes impossible and “Rec Limit”
is shown. For details, see “Recording operation
limitations” on page 29.
Press this part of the screen to open the CF
screen (media selection screen). (See “CF card
selection” on page 23.)
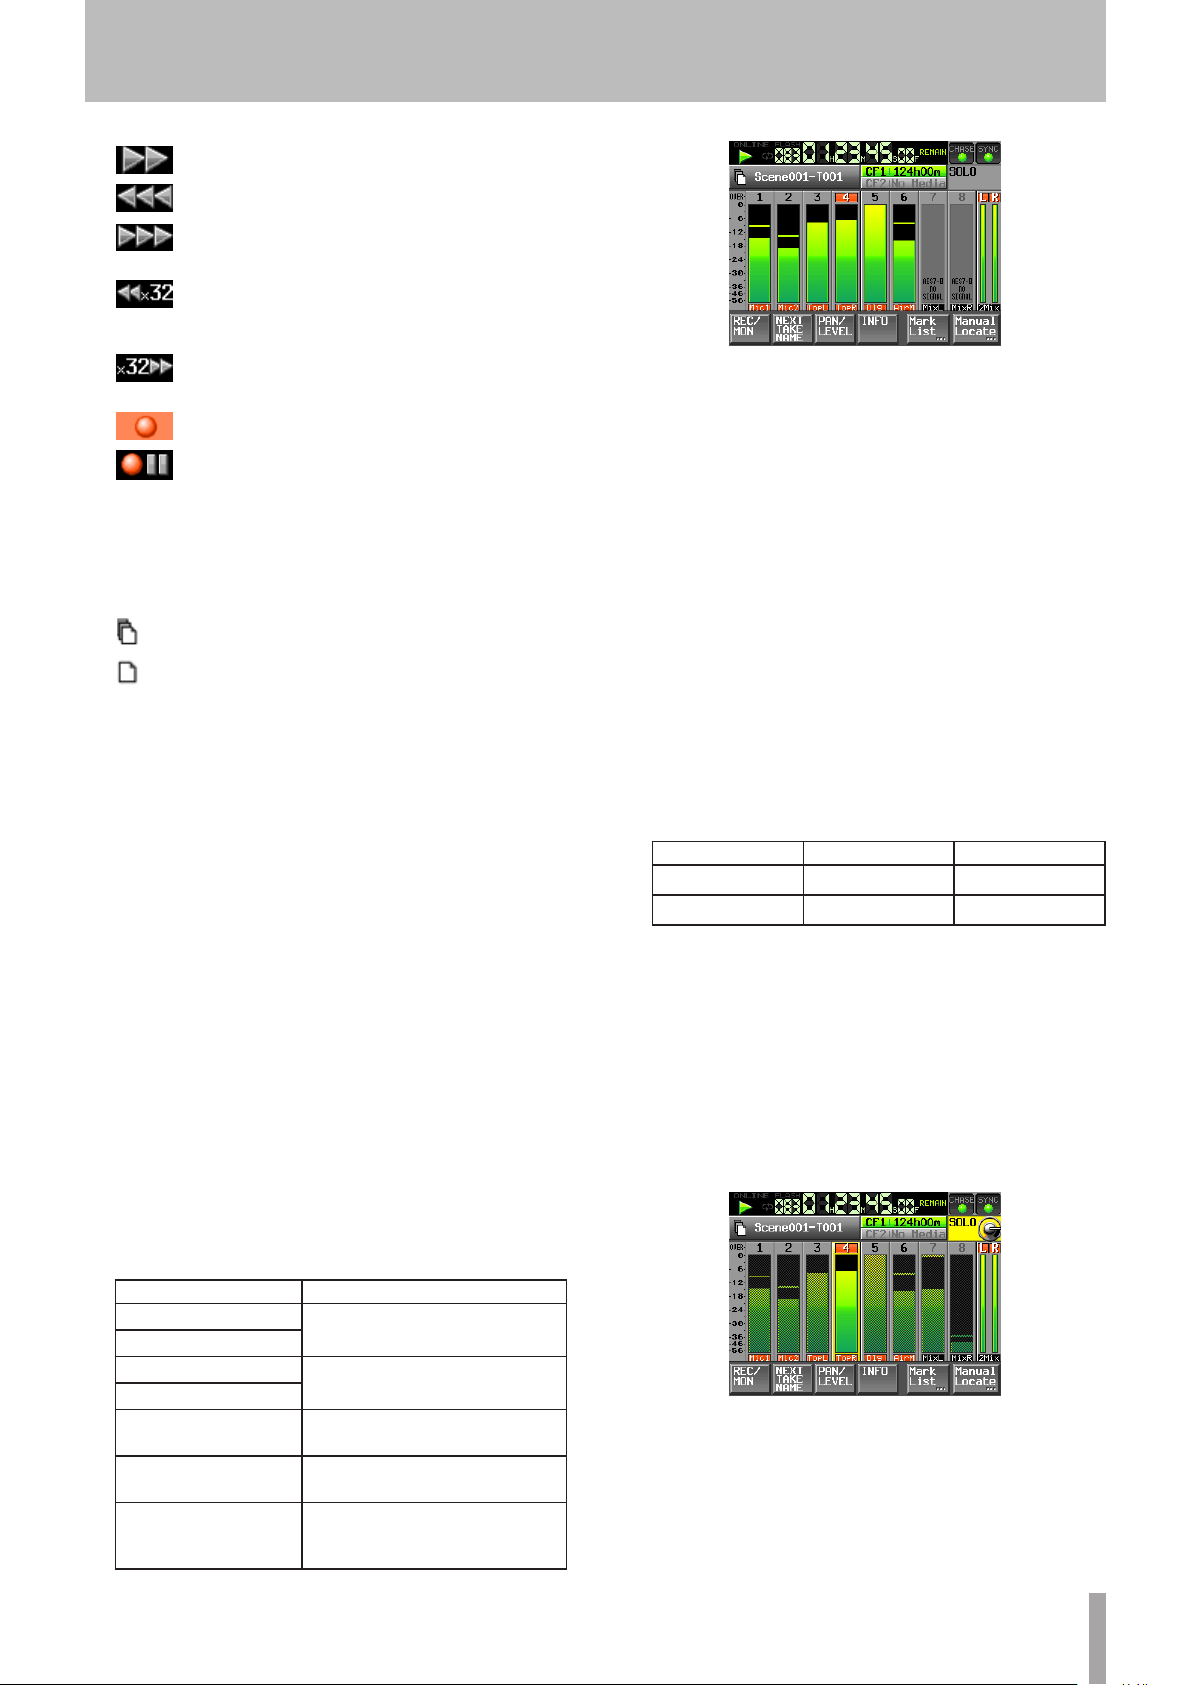
y REC/MON button
Touch this button to open the
you can make record function and input monitoring
settings.
NoProject
UNFORMAT
Media
is shown and
message appears. When an
appears. When a CF card
UNMOUNT
appears. When
REC/MON
page where
SELECT
Home Screen NEXT TAKE NAME page
Home Screen PAN/LEVEL page
Home Screen INFO page
t Recording media display (button)
This shows which of the two CF card slots is being
used, as well as its remaining recording time. The
background of the media that is currently being
<Record arm button>
Touch this to arm a track for recording. When a track
is armed, the track signal will be recorded during
recording.
When a channel is armed for recording, the signal from
the assigned input connector is input when the unit is
stopped, recording or in recording standby.
<Input monitoring button>
Touch this to enable/disable input monitoring.
When enabled for a channel, sound input through the
assigned input connector is always input.
u NEXT TAKE NAME button
Touch this button to open the “
NEXT TAKE NAME
” page
where you can set the name that will be given to takes
recorded in the future.
• First half of take names
The first half of the take name can be set to either the
“User Word” or the “Folder Name”. (Default setting:
Folder Name)
NOTE
The rst half of the take name can only be changed when the unit is
stopped.
Page 17
TASCAM HS-8 17
2 − Names and functions of parts
• “
UserWord
” mode (button)
Use the user word for the first half of the take name.
Press the EDIT button to open the screen where you
can change the user word. (This works the same as the
screen for editing project names.)
• “
Folder Name
” mode (button)
Use the folder name as the first half of the take name.
This is the default value.
• Second half of take names
The second half of the take name is comprised of one
alphabetical letter and a three-digit number.
Press the EDIT button to open the screen where you
can change the letter.
You can change the three-digit number with the + and
– buttons. You can also touch the numerical part to
highlight it in yellow and use the DATA dial to change
the number.
The numerical part cannot be selected when the track
is soloed.
In the following cases, “
---
” appears and the value
cannot be changed.
No project or folder is loaded
•
The selected CF card is unavailable
•
When the numerical part of the file name of the
•
current take is 999
NOTE
The “Next Take Name” setting is saved with each project. If you
•
change projects, the setting of the loaded project is used.
The numerical part of the second half of the take name can be
•
changed even during playback and recording. (The rst half
of the take name and the letter in the second half can only be
changed when stopped.)
If the rst half of the take name or the letter in the second half
•
are dierent, a take that has the same three-digit number in the
second half can be created.
When the unit is put in recording standby, the le name of the
•
next take to be recorded is shown above the take name button
on the Home Screen.
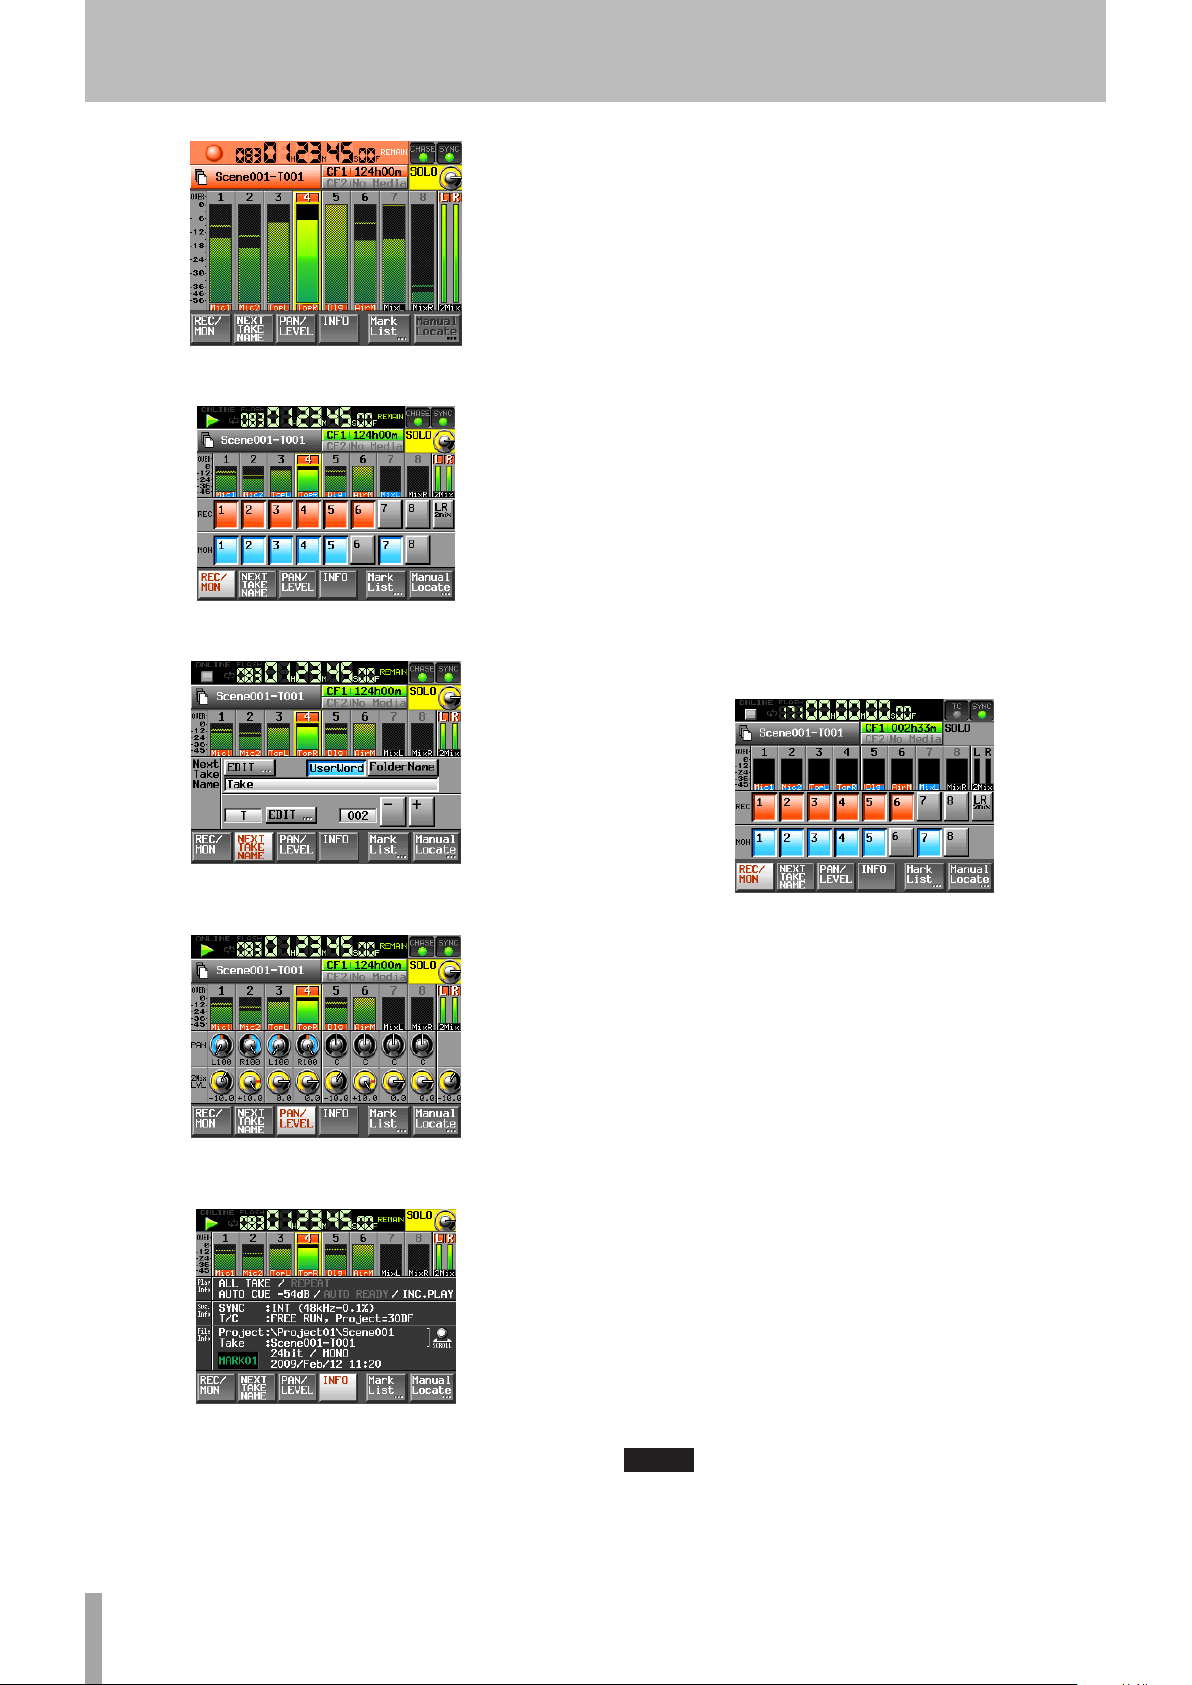
i PAN/LEVEL button
Press this button to open the
PAN/LEVEL
page where
you can adjust stereo mix recording and the 2mix
output.
Each channel has a
PAN
and
2Mix LVL
knob. If you
touch one, its background becomes white and you can
control its parameter with the DATA dial.
If two channels are linked, the
PAN
knob functions as a
balance adjustment knob.
When in solo mode,
PAN
or
2Mix LVL
knob cannot be
selected.
o INFO button
Press this button to open the
INFO
page, which shows
the current settings of the unit and information about
the loaded file.
The
Play Info
section shows information related to
current playback settings. If an item is gray, that item is
OFF.
Touch this part to open the
The
Sys. Info
section shows the current settings
PLAY SETUP
screen.
of this unit. Touch this part of the screen to open the
SYNC T/C
The
screen.
File Info
section shows information about the
currently loaded file. Touch this part of the screen to
open the
PROJECT
screen. You can also use the D ATA
dial to scroll the display of project and take names.
NOTE
On this screen only, when a track is soloed, a SOLO knob appears in
place of the TC and SYNC indicators at the top right.
p Mark List button
Press this button to open the mark list. (See “Mark list
screen” on page 55.)
Page 18

18 TASCAM HS-8
2 − Names and functions of parts
a Manual Locate button
Press this button to open the
for locating manually. (See “Manual locate function” on
page 57.)
MANUAL LOCATE
screen
Page 19
TASCAM HS-8 19
3 − Preparation
Inserting and removing CF cards
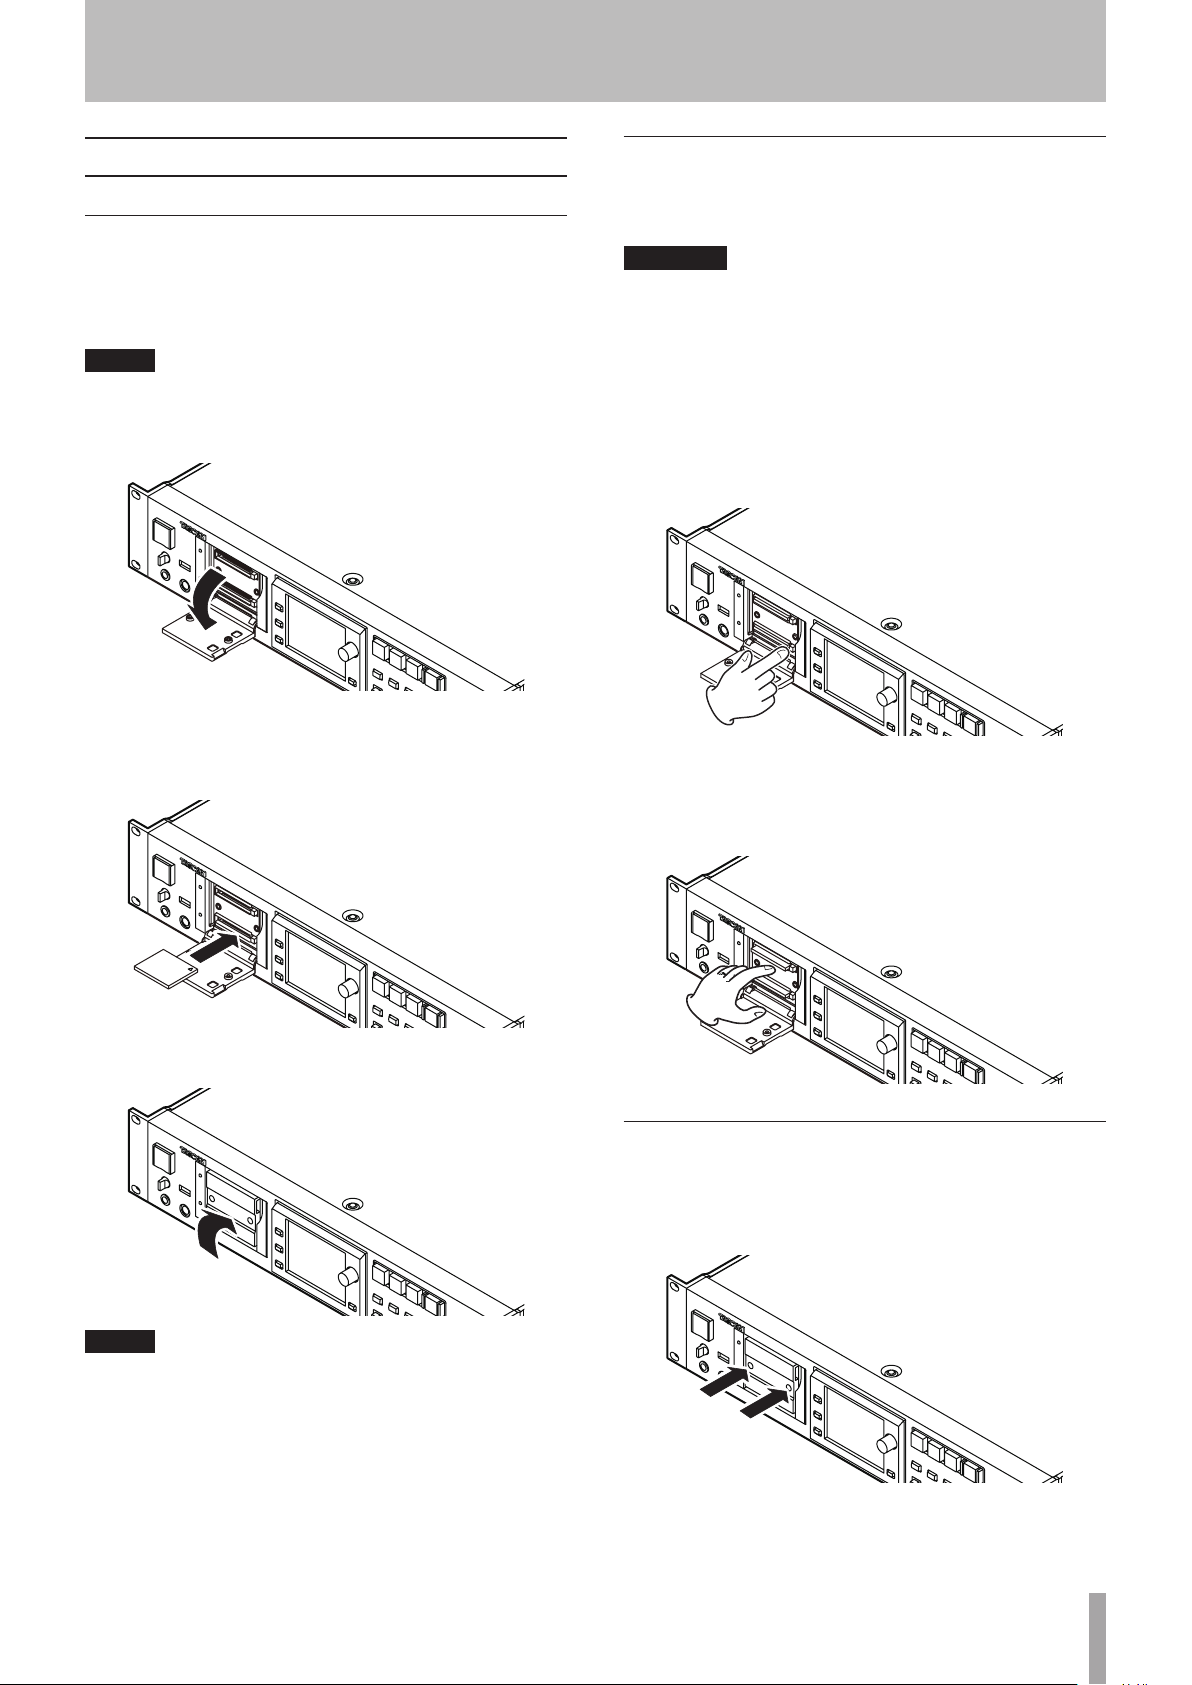
Inserting CF cards
Insert a CF card into CF card SLOT 1 or SLOT 2 on the
front panel of the unit in order to use it for recording and
playback.
NOTE
CF cards can be inserted whether the power is ON or OFF.
1 Open the CF card slot cover.
2 Insert the CF card with the correct orientation.
With the labeled side up, insert the end with the
connector completely.
Removing CF cards
Turn the unit power OFF or stop operations before
removing a CF card.
CAUTION
Never remove a CF card during recording, playback, or anything
else that accesses the CF card. Doing so could, for example, cause
recording errors, loss of recorded data, and sudden loud noises to
be output through monitoring equipment, which could result in
damaged equipment and hearing loss.
1 Pull the CF card slot cover forward.
2 Press the square button to the right of the CF card
slot to bring the button out.
3 Press the square button in again to partially eject
the CF card.
3 Close the cover.
NOTE
If you cannot close the slot cover, remove the CF card once, press the
square button to the right of the slot in and then reinsert the card.
4 Pull the CF card out by hand.
Security screws
The included security screws can be used to lock the CF
card slot covers. Use a Phillips head screwdriver to install
or remove the screws.
Page 20
20 TASCAM HS-8
3 − Preparation
About the display
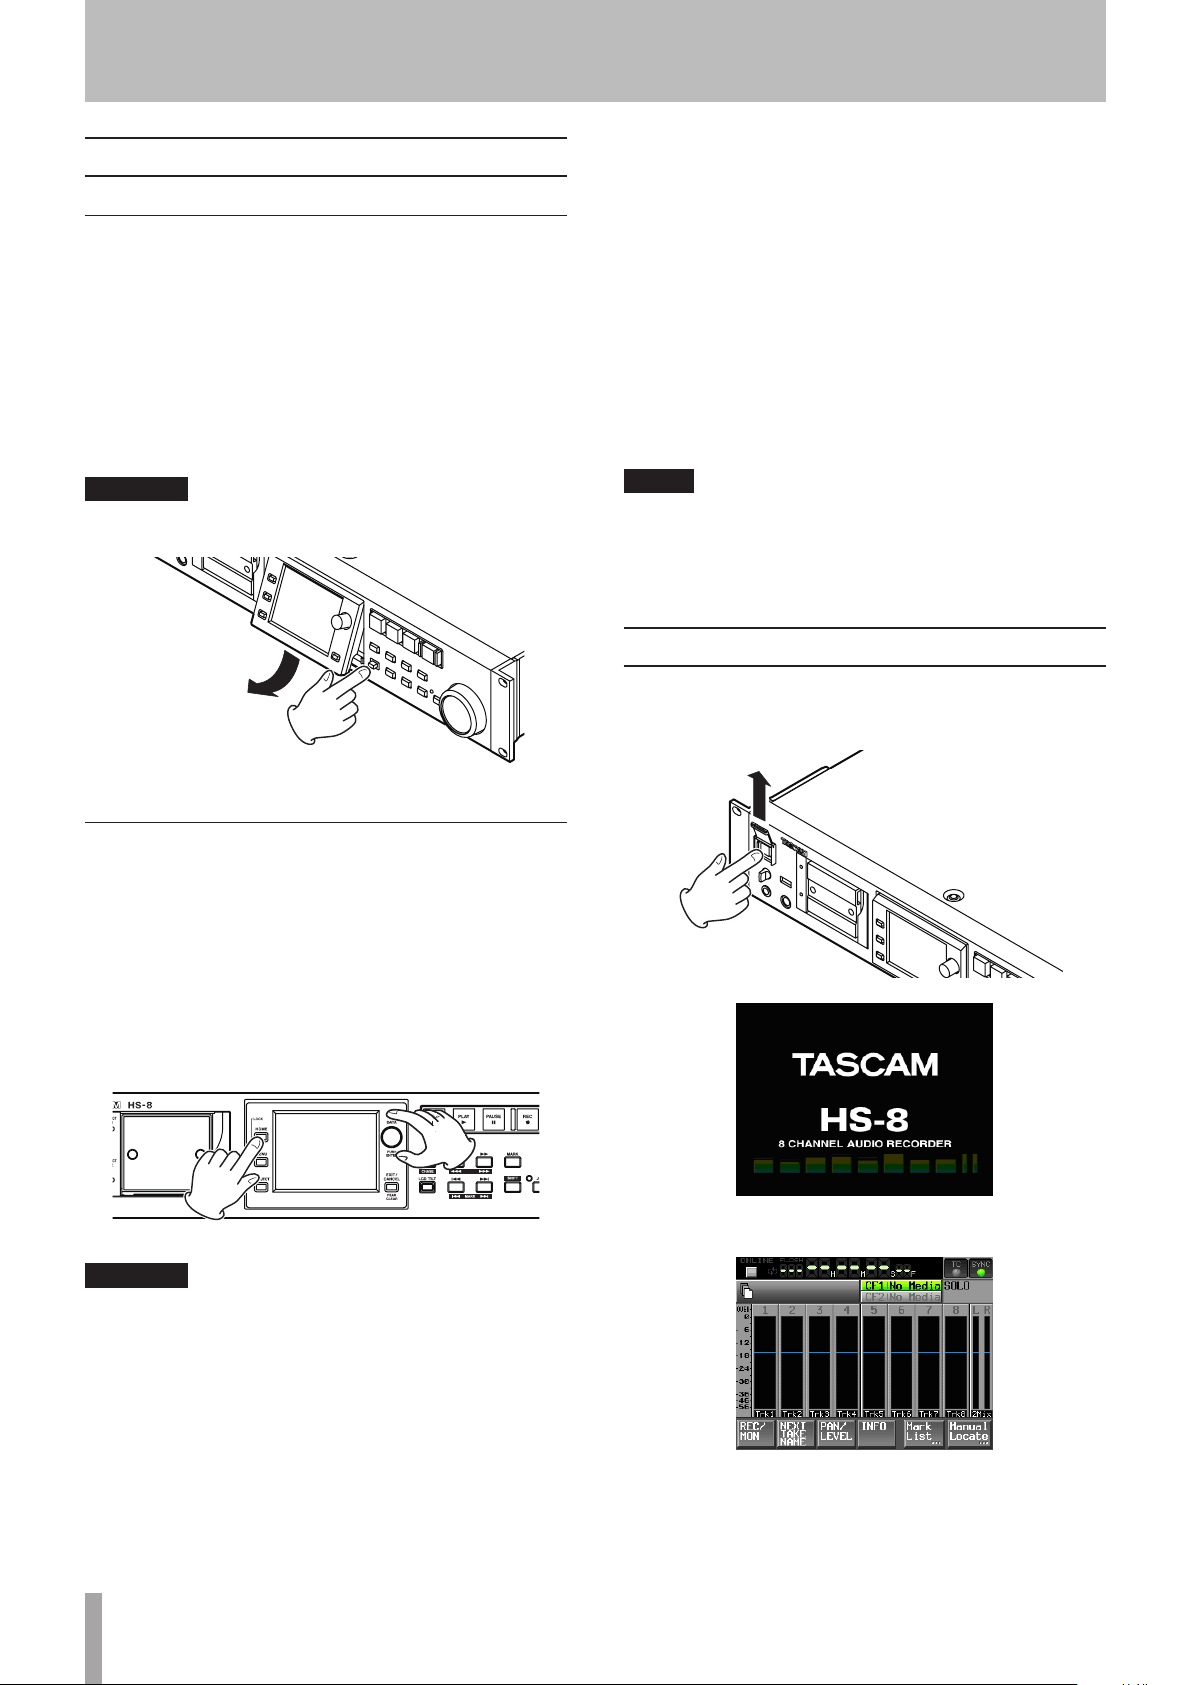
Adjusting the display angle
Push the LCD TILT btton to unlock the display, and then
pull the bottom of the display forward to adjust the angle.
Pull the bottom of the display until you hear a clicking
sound.
To restore it to its flat position, push the LCD TILT button
again to unlock the display, and push the bottom of the
display. Do not push the display surface. Push the bottom
of the display until you hear a clicking sound.
When using the display, do not put a hand on the panel or push
•
around the display forcefully. Doing so could prevent accurate
position detection.
Do not place anything on top of the display or otherwise put
•
weight on the same place for a long time. Doing so could cause
the panel to warp or result in inaccurate position detection.
Do not apply a commercially-available screen protection lm to
•
the display. Doing so could prevent normal operation.
Gently wipe the display with a soft dry cloth that does not shed
•
dust (e.g. a cleaning cloth). Avoid wiping with a sti cloth or
rubbing with force. Doing so could damage the surface of the
LCD. Do not use benzene, thinner, manicure remover, alcohol or
similar substances.
CAUTION
Do not push the display screen itself.
Adjusting the display and indicator brightness
Turn the DATA dial while pressing and holding the HOME
key to adjust the brightness of the color display, the
PAUS E, REC and P LAY keys, and the JOG (SHUTTLE), SLOT
1 and SLOT 2 indicators.
Push and turn the DATA dial while pressing and holding
the HOME key to adjust only the brightness of the color
display.
NOTE
The display is produced with extremely high-precision manufacturing technologies, and 99.99% or more of the pixels are eective,
but sometimes pixels might not appear or might appear as red or
black dots. This is not a malfunction.
Turning the power ON and OFF
Open the front panel POWER switch cover to turn the
power ON with the switch.
CAUTION
The display can easily be scratched, so do not use pointed
•
objects, including ngernail tips, to touch it. Always touch it
with your ngers.
Do not press the display forcefully with a nger or poke it with a
•
pen, toothpick or other pointed object. Doing so could scratch
the display or cause malfunction.
The display touch panel is comprised of a lm and glass. Do
•
not apply a strong force to its surface. Doing so could break the
glass.
Startup screen
Home Screen
To turn the power OFF, push the switch on the front panel
again.
Page 21
TASCAM HS-8 21
CAUTION
Never turn the power OFF during recording, playback, or anything
else that accesses the CF card. Doing so could, for example, cause
recording errors, loss of recorded data, and sudden loud noises to
be output through monitoring equipment, which could result in
damaged equipment and hearing loss.
3 − Preparation
Setting the time of the built-in clock
1 Press the MENU key on the front panel to open the
MENU
screen.
2 Touch the
SETUP
SYSTEM SETUP
screen.
button to open the
SYSTEM
5 Touch the
SET
button, or push the DATA dial to
confirm the setting.
NOTE
After purchasing this unit, set the clock before making your rst
recording. If you do not set the clock, the time stamps on recording
les will not be correct
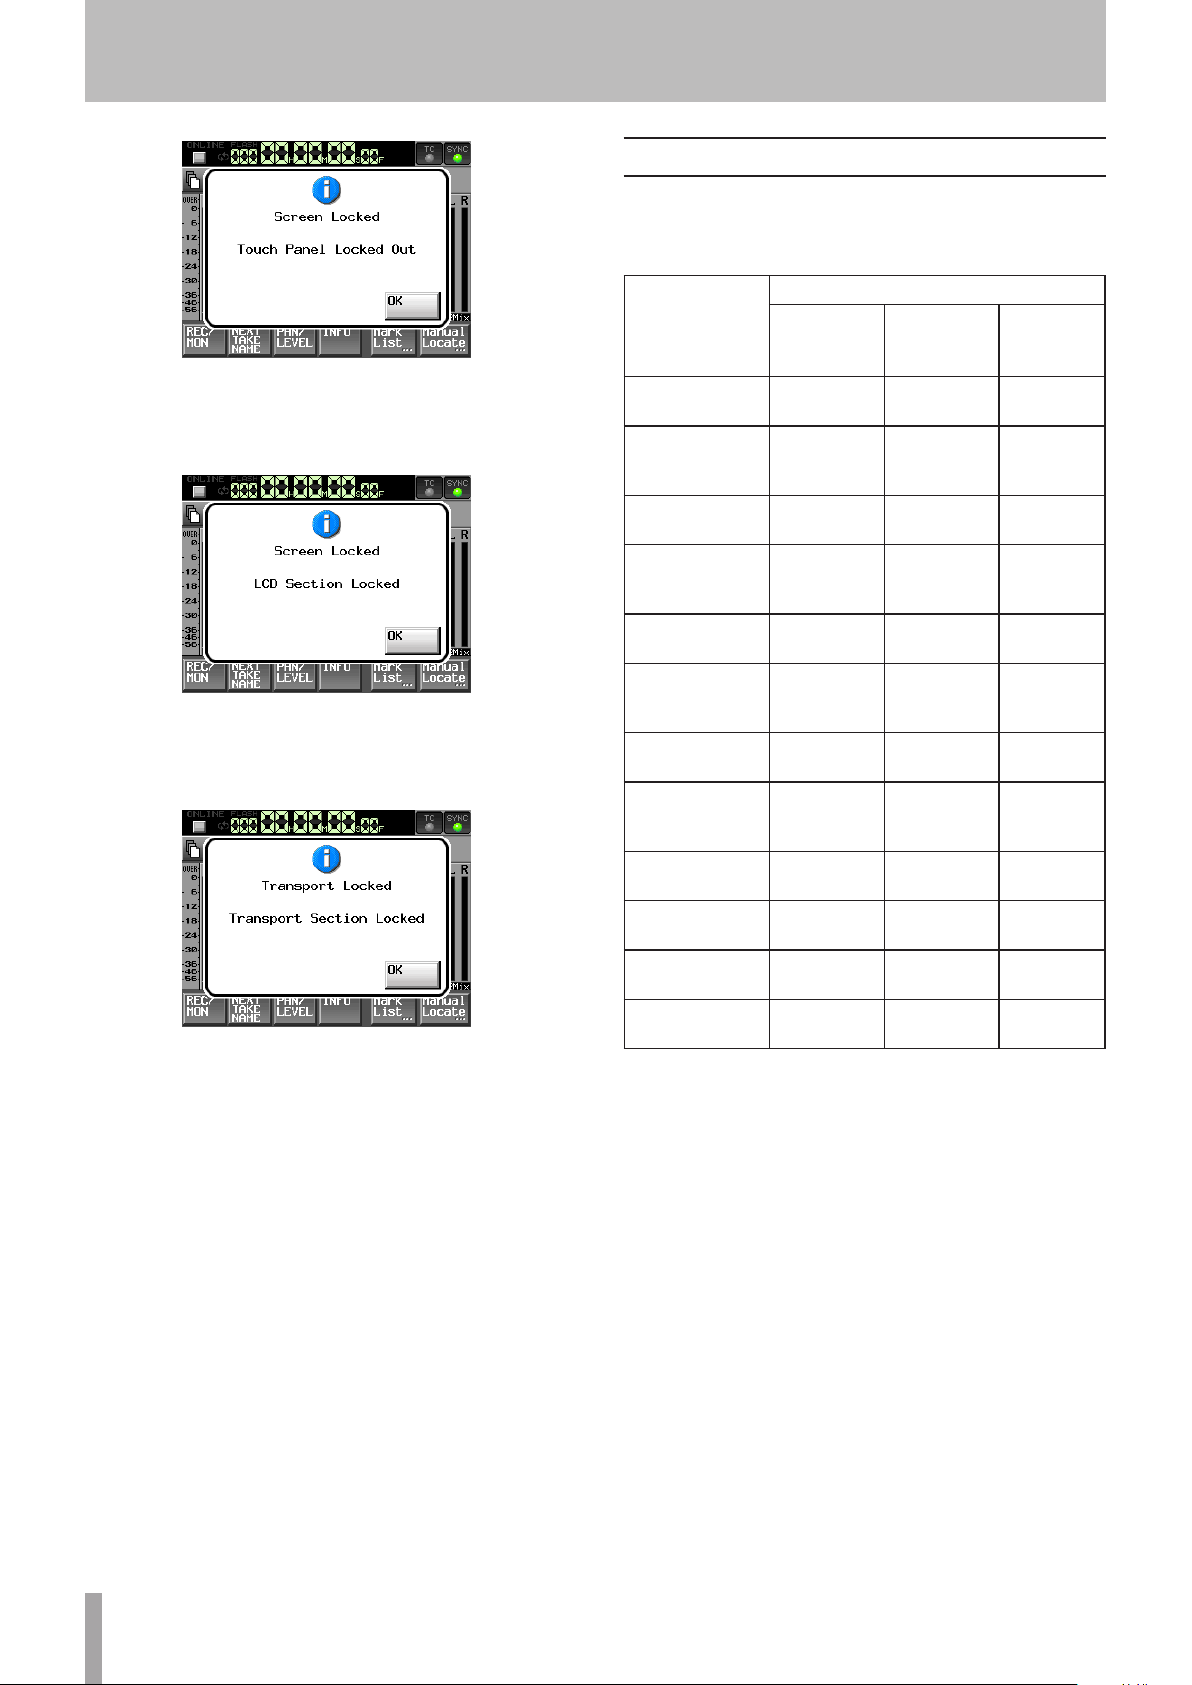
Panel lock function
Press the MENU key while pressing and holding the HOME
key on the front panel to open the
where you can disable or enable operation from the front
panel.
LOCK SETUP
screen
3 Touch the
CLOCK ADJUST
tab to open the page
where you can set the built-in clock.
4 Touch the item that you want to change, and use
the DATA dial on the front panel to change the
value.
The front panel is divided into two sections, which can be
locked and unlocked separately.
If you press the button for a section, it changes from
UNLOCK
to
LOCK
(with a yellow background) and the
locked area appears dimmed.
If the display is touched when the LCD section is locked,
the following pop-up window message appears.
Page 22
22 TASCAM HS-8
3 − Preparation
Recording duration
The table below shows the amount of recording time
possible on CF cards of various capacities for each
available recording format.
When the display (panel) is locked
If one of the keys around the display is used, the following
pop-up window message appears.
When the display (keys) is locked
If one of the transport keys is used when the Transport is
locked, the following pop-up window message appears.
When the transport is locked
File recording
format and
number of
recordable
tracks
16-bit, 44.1 kHz, 8
tracks
16-bit, 44.1 kHz,
8 tracks + stereo
mix
16-bit, 48 kHz, 8
tracks
16-bit, 48 kHz, 8
tracks + stereo
mix
24-bit, 44.1 kHz, 8
tracks
24-bit, 44.1 kHz,
8 tracks + stereo
mix
24-bit, 48 kHz, 8
tracks
24-bit, 48 kHz, 8
tracks + stereo
mix
24-bit, 88.2 kHz, 8
tracks
24-bit, 96 kHz, 8
tracks
24-bit, 176.4 kHz,
4 tracks
24-bit, 192 kHz, 4
tracks
The recording times shown above are estimates. They
•
8 GB 16 GB 32 GB
3 hours 9
minutes
2 hours 31
minutes
2 hours 54
minutes
2 hours 19
minutes
2 hours 6
minutes
1 hour 41
minutes
1 hour 56
minutes
1 hour 33
minutes
1 hour 3
minutes
58 minutes 1 hour 55
1 hour 3
minutes
58 minutes 1 hour 56
CF card capacity
6 hours 18
minutes
5 hours 2
minutes
5 hours 47
minutes
4 hours 38
minutes
4 hours 12
minutes
3 hours 22
minutes
3 hours 51
minutes
3 hours 5
minute
2 hours 6
minutes
minutes
2 hours 6
minutes
minutes
12 hours 36
minutes
10 hours 5
minutes
11 hours 34
minutes
9 hours 16
minutes
8 hours 24
minutes
6 hours 43
minutes
7 hours 43
minute
6 hours 10
minutes
4 hours 12
minutes
3 hours 51
minutes
4 hours 12
minutes
3 hours 51
minutes
might differ depending on the CF card in use.
The recording times shown above are not continuous
•
recording times, but rather they are the total possible
recording times for the CF card.
Page 23

TASCAM HS-8 23
4 − Recording and Playback
In this chapter, we explain basic procedures for recording
and playback. The display on this unit functions as a
touch-screen. Operate the unit using its keys, switches
and touch-screen display buttons.
NOTE
This unit can record a maximum of 8 separate tracks and a stereo
track (when the sampling frequency is set to 44.1 or 48 kHz). The
maximum number of input channels is 8. The stereo track records a
stereo mix of the 8 recorded tracks.
On every screen except the Home Screen, a “ ” button
appears at the top left. Touch this button to return to the
previous screen.
3 Touch the
to open the CF
SELECT
button next to the CF
SELECT
screen.
SELECT
item
Preparing to record
CF card selection
1 Press the MENU key on the front panel to open the
MENU
screen.
4 Touch the button for the CF card that you want to
use to select it. The background of the selected CF
card appears yellow.
5 Touch the
SET
button to return to the CF
MANAGE
screen.
NOTE
If you also want to format the CF card now, follow the procedures
starting with step 3 in “Formatting a CF card” below.
Formatting a CF card
CAUTION
Formatting a CF card erases all the data on it.
•
Always format CF cards in this unit before using them in it. If
•
a CF card that has been formatted by another device or PC is
used, operation might be aected.
If a CF card with a capacity of 2 GB or less that has been
•
formatted by this unit is viewed by a computer, it might not
show any open capacity and the writing of les and folders
might not be possible.
1 Press the MENU key on the front panel to open the
MENU
screen.
2 Touch the CF
screen.
MANAGE
button to open the CF
MANAGE
Page 24

24 TASCAM HS-8
4 − Recording and Playback
2 Touch the CF
MANAGE
button to open the CF
screen.
3 Touch the
QUICK
button next to the
The following pop-up message appears.
FORMAT
MANAGE
item.
When formatting completes, the following pop-up
message appears.
5 Touch the OK button on the pop-up message. The
CREATE PROJECT
screen automatically opens.
NOTE
If no CF card is inserted in that slot, the following pop-up message
appears.
4 Touch the OK button on the pop-up message.
During formatting, the following pop-up message
appears.
6 To make a new project, follow the procedures
starting with step 2 in the following “Create a new
project” section.
Create a new project
1 Press the PROJECT key on the front panel to open
the
PROJECT
screen.
Page 25

TASCAM HS-8 25
4 − Recording and Playback
2 Touch the
CREATE PROJECT
The
CREATE PROJECT
screen.
CREATE PROJECT
screen has two pages.
button to open the
On the first page, you can set the project name,
the name of the first created folder, the sampling
frequency, and the sampling frequency written to BWF
chunks.
For details about each item, see “Creating new
projects” on page 34.
Touch the
NEXT
button to open the next page.
Set the master clock
1 Press the HOME key on the front panel to open the
Home Screen.
2 Touch the
SYNC
button to open the
SYNC T/C
screen.
On this page, you can set the frame type for the
project and select the default factory preset.
For details about each item, see “Creating new
projects” on page 34.
3 After you complete making the settings touch the
CREATE PROJECT
NOTE
If a project with the same project name already exists, the CREATE
PROJECT button appears gray and you will not be able to create a
new project. If this happens, change the project name.
button.
4 Check the settings on the confirmation pop-up
message that appears, and press the okay button
to return to the Home Screen.
3 Select the master clock that you want to use from
the
MASTER
item.
Set the recording tracks
1 Press the HOME key on the front panel to open the
Home Screen.
Page 26

26 TASCAM HS-8
4 − Recording and Playback
2 Touch the
REC/MON
button to open the
REC/MON
page.
To arm tracks for recording, touch the record arm
buttons below their level meters.
When a track is armed to record, the button
background appears red.
NOTE
To record the stereo mix from the internal mixer at the same
•
time, arm LR 2MIX. (This is only possible when the sampling
frequency is 44.1 kHz or 48 kHz.)
You can also open the REC TRACKS page to arm tracks for
•
recording by pressing the MENU key to open the MENU screen
and touching the REC SETUP button.
3 Touch the
FILE FORMAT
tab to open the following
screen.
On the
FILE FORMAT
page, you can set the file mode,
mono file recording folder, bit length, maximum file
size, and behavior when a recording is paused. The
backgrounds of the selected items appear pale blue.
For details, see “FILE FORMAT page” on page 43.
Make other recording settings
Touch the
OPTIONS
tab to open the following screen.
Set the file format
1 Press the MENU key on the front panel to open the
MENU
screen.
2 Touch the
screen.
REC SETUP
button to open the
REC SETUP
On the
OPTIONS
page, you can set the pre-recording time
and the use of auto markers. For details, see “OPTIONS
page” on page 44.
Page 27

TASCAM HS-8 27
Headphones
4 − Recording and Playback
Connecting headphones
Connect headphones to the PHONES connector on
the front panel. Keep the headphones knob turned
to MIN (all the way to the left) when connecting
headphones.
CAUTION
Before connecting headphones, turn the PHONES knob to the
minimum volume. Failure to do so could cause sudden loud noises
to occur, which might damage your hearing or equipment.
On the
INPUT
page, make settings for each
channel’s input source. For details, see “INPUT
page” on page 49.
3 If necessary, open the
OUTPUT
pages to make additional settings.
For details about the
DIGITAL SOURCE, SETUP
DIGITAL SOURCE
page, see
“DIGITAL SOURCE page” on page 49.
On the
SETUP
page, you can edit channel names and
turn channel links ON and OFF. To edit channel names,
touch the buttons next to the CH
NAME
item. For details,
see “CHx NAME (button)” on page 50.
and
Setting the inputs
1 Press the MENU key on the front panel to open the
MENU
screen.
2 Touch the
SETUP
MIXER SETUP
screen.
button to open the
MIXER
Make output settings on the “OUTPUT” page. For
details, see “OUTPUT page” on page 49.
Input settings can also be changed on the
CHx SETUP
screens (“x” is the channel). These screens can be
opened in two ways.
Touch a
•
Touch a
•
SETUP
CHANNEL SETUP
CHANNEL
button at the top of the
screen.
button on the
MENU
MIXER
screen.
Page 28

28 TASCAM HS-8
4 − Recording and Playback
See “Channel Settings (CHANNEL SETUP)” on page 50
for details about making settings on
screens.
Monitor the input
Touch the PAN/LEVEL button on the Home Screen to
open the
is the channel) where you can adjust the
LVL
the mixed sound is sent to the outputs for headphones
and external speakers and can be monitored.
When in solo mode,
selected.
PAN/LEVEL
page or open a
knobs. After these adjustments to all the channels,
PAN
and
2MixLVL
Home Screen PAN/LEVEL page
CHANNEL SETUP
CHx SETUP
PAN
screen (“x”
and
2Mix
knobs cannot be
Make a recording
Press the REC key to put the unit into recording standby.
When in recording standby, press the P LAY key to start
recording.
The transport status display at the top left of the Home
Screen changes into the recording status display and part
of the background of the Home Screen becomes red,
indicating that the unit is recording. The time counter
starts at the same time.
If you press the REC key while recording, recording to the
current file stops, but recording continues on a new file.
NOTE
If you press the REC key less than 4 seconds after beginning
•
recording, the unit will not start recording a new take.
Depending on the Mono le recording folder settings, the
required time could be even longer. (See “Folder where les are
saved in mono mode” on page 33.)
Depending on other conditions, recording of a new take
•
might not be possible when the REC button is pressed during
recording. (See “Recording operation limitations” below.)
Recording is not possible if any of the following conditions
•
apply. Change the recording folder.
The folder contains 999 takes
•
The number at the end of the take name has reached 999
•
The remaining recording time indicator on the Home Screen
•
shows “Rec Limit”. (See “Recording operation limitations” on
page 29.)
Recording functions (except retaking) can also be used
•
through parallel control.
CHx SETUP screen
NOTE
If the sampling frequency is set to 44.1 or 48 kHz, you can simultaneously record the stereo mix of the channels with their levels and
pan positions adjusted.
Stop recording
Press the STOP (RETAKE) key to stop recording.
Retake a recording
Press the STOP (RETAKE) key while pressing and holding
the SHIFT key to erase the last recorded take.
If a 2Mix take was recorded simultaneously, it is also
erased.
If the REC key was pressed during recording to record
multiple consecutive takes, retaking from the beginning
of any of the recordings is possible. Each time the STOP
(RETAKE) key is pressed while pressing and holding the
SHIFT key, the previous take is selected for retaking.
Page 29

TASCAM HS-8 29
4 − Recording and Playback
Recording operation limitations
A limitation of this unit is that recording in a folder
becomes impossible when the total number of files,
subfolders and other items in it becomes large. For this
reason, the following things might occur.
When the total number of items in the folder
•
exceeds about 2000
If you press the REC key during recording, starting
the next take might not be possible. In this case, the
following pop-up message appears.
When the total number of items in the folder
•
exceeds about 5000
Recording of a new take might not be possible
even when starting recording from a stopped state.
Moreover, when a project or folder is loaded, recording
to that folder by not be possible. In these cases, the
following pop-up message appears.
Play a recording
Select a project/folder/take
1 Press the PROJECT key on the front panel to open
the
PROJECT
NOTE
Alternatively, press the folder/take name area on the Home Screen
to open the PROJECT screen.
screen.
Moreover, in these cases, the remaining recording time
indicator on the Home Screen shows “Rec Limit”.
NOTE
The total number of items inside one folder includes les and folders
not created by this unit. Moreover, management les, system les
and other les and folders that are not ordinarily visible are also
included.
2 Touch the “ ®” button next to the project that you
want to play to open the folder selection screen.
3 Touch the “ ®” button next to the folder that you
want to play to open the take selection screen.
4 Touch the “ ®” button next to the take that you
want to play.
If the take is currently in the selected project, a
selected take?
pop-up message appears.
Load
Page 30

30 TASCAM HS-8
4 − Recording and Playback
If the take is not currently in the selected project, a
Selected take is in another project
pop-up
message appears.
Message shown when the take is inside the project
Press and hold the Ô ( ) or ( ) keys to
search backward or forward during playback. While
pressing the SHIFT key, press and hold a Ô ( ) or
( ) key to search at high speed.
NOTE
On the PLAY SETUP screen, you can set whether only the
•
currently selected take is played or whether all the takes within
the current folder are played. You can also enable and disable
repeat playback. (See “Playback settings (PLAY SETUP)” on page
45.)
Playback functions can also be used through parallel control.
•
Mixing the playback sound
Use the internal mixer function to mix the recorded tracks
into stereo and output them to the ANALOG OUTPUTS L/A,
R/B (XLR), and DIGITAL OUTPUT L-R (XLR) connectors.
1 Press the HOME key on the front panel to open the
Home Screen.
Message shown when the take is outside the project
5 Touch the OK button.
When loading completes, the Home Screen reopens.
Disabling input monitoring
Turn input monitoring OFF for the channels (tracks) that
you are playing back. If input monitoring is ON for a
channel, sound will be input through the corresponding
input connector.
1 Touch the REC/MON button on the Home Screen to
open the REC/MON screen.
2 Touch the input monitoring buttons for the
channels that you want to play to turn input
monitoring OFF.
NOTE
You can also access the input monitoring buttons by pressing the
MENU key to open the MENU screen or by touching the CHANNEL
SETUP button to open the CHANNEL SETUP screen.
Start playback
Press the PLAY key.
Press the PAUSE key to pause playback.
Press the PLAY key again to resume playback.
Press the STOP (RETAKE) key to stop playback.
Press the  and ¯ keys briefly to change the take.
While pressing the SHIFT key, press the  (MARK Â)
and ¯ (MARK ¯) keys to move between marks.
2 Touch the
open the
PAN/LEVEL
PAN/LEVEL
page.
button on the Home Screen to
PAN knobs: Use these to adjust the left-right position
sent to the stereo bus. Touch a knob and then
adjust its value using the DATA dial.
2Mix LVL knob: Use these to adjust the level sent to
the stereo bus. Touch a knob and then adjust its
value using the DATA dial.
NOTE
When in solo mode, PAN or 2Mix LVL knob cannot be selected.
Page 31

TASCAM HS-8 31
4 − Recording and Playback
3 Touch the knob that you want to adjust. Use the
DATA dial on the front panel to adjust its value.
TIP
Press the DATA dial as you turn it to make adjustments in larger
increments. This is useful for making rough adjustments quickly.
CALL
Press the CALL (CHASE) key to locate to the point where
playback was last started from standby and put the unit in
playback standby mode.
Flash start function
Use the flash start function to instantly start playback
of takes that you have designated in advance. The
beginnings of up to 20 takes can be stored in the unit’s
memory beforehand so that playback can be started
immediately. Flash start can be executed using the unit’s
touch screen, a PS/2 keyboard connected to the front
panel or an external controller connected to one of the
units remote control connectors (REMOTE, RS-232C and
PARALLEL).
4 Use the DATA dial to select the page of the Flash
Start screen that contains the takes you want to
enable or flash playback.
NOTE
The Flash Start screen contains ve pages with 20 takes shown on
each.
5 Touch the “FLASH LOAD” button or press the DATA
dial to load a take. While loading, the icon
blinks. When loading has completed, the icon
appears green.
6 All of the takes shown are loaded. The “FLASH
LOAD” button changes to say “FLASH LOADED” and
its background becomes orange. Takes that have
been properly loaded have an orange flash start
indicator in the upper left.
1 Select the folder that contains the file you want to
play back. (See “Loading folders” on page 38.)
2 Press the HOME key on the front panel to open the
Home Screen.
3 When the Home Screen is open, press the HOME
key again to open the Flash Start screen.
7 Touch the button on the touch screen for a take
that shows an orange flash start indicator to start
flash playback.
Flash start playback can also be executed using a
PS/2 keyboard or an external controller connected
to one of the units remote control connectors
(REMOTE, RS-232C and PARALLEL).
NOTE
Touching the button of a take that has not been ash loaded
•
will cause it to start playback normally.
Touch the “INFO” button to open an information screen. The
•
contents of this screen are the same as shown on the information screen that opens when the Home Screen “INFO” button
is touched.
When using the ash start function, tracks cannot be soloed.
•
(Touching the the level meter will not solo the corresponding
channel. Moreover, if solo is enabled for any channels, it is
automatically turned o when the Flash Start screen is opened.
Page 32

32 TASCAM HS-8
4 − Recording and Playback
8 The following actions disable the flash start
function. Conduct one of them if you want to
disable it.
A new project or folder is loaded
•
The unit is put into recording standby or recording
•
is started
The CF card currently in use is removed
•
Online function
Turning this unit’s “Online Function” ON, allows switching
to online playback and monitor playback. For details
about the online function, see “9 – Online function” on
page 59.
Page 33

TASCAM HS-8 33
5 – Projects
This unit manages audio files in projects. A CF card
contains project folders, and each project folder contains
subfolders that hold audio files, which are called takes..
Project: Contains all the materials for one program or
work
Folder: Includes all the materials for a project
Take: An audio file of a recording
CAUTION
The sampling frequency and time code frame-type in a project are
xed.
File formats
This unit can record and play files in the following types of
formats.
File format: BWF
•
Sampling frequencies: 44.1/48/47.952/48.048/88.
•
2/96/176.4/192 kHz (47.952/48.048: 48 kHz ±0.1%
pull-down/pull-up)
Bit length: 16 or 24
•
Number of tracks:
•
1–8 tracks (at 44.1, 48, 88.2 or 96 kHz)
1–8 tracks + stereo mix (at 44.1 or 48 kHz)
1–4 tracks (at 176.4 or 192 kHz)
File mode: monophonic or polyphonic
•
is greatly reduced. (See “Recording operation limitations” on
page 29.)
During recording, you can press the REC key to start recording a
•
new take. This function can be used 4 seconds after beginning
recording in Poly and Subfolder modes, but in Folder mode, you
might have to wait more than 4 seconds.
The default setting is “SubFolder”.
•
PROJECT screen overview
Press the PROJECT key on the front panel to open the
PROJECT
(project selection, folder selection or take selection)
opens.
Project selection screen
screen. The last used
PROJECT
screen page
Monophonic and polyphonic modes
In monophonic mode, each track is recorded as an
independent monaural BWF file.
In polyphonic mode, multiple tracks are recorded
together as a single BWF file.
When transferring a file to an audio application that is
compatible with polyphonic files, multiple tracks can be
input at once.
The 2mix file is always recorded as a polyphonic (stereo)
file.
Folder where files are saved in mono mode
In mono mode, files can be saved in one of two places
(folders).
SubFolder mode
•
Subfolders are created for each take inside project
folders, and recorded audio files are saved in them.
Folder mode
•
Recorded audio files are saved directly inside the
project folder.
NOTE
Directory display: The current directory level and
number of projects is shown. (In the example above,
the root directory of CF card 1 contains 12 projects.)
NUM OF FOLDER: This shows the number of folders in
each project.
Fs: This shows the sampling frequency of the project. The
values are abbreviated as follows.
44.1 kHz:
48 kHz:
48 kHz –0.1% (pull-down):
48 kHz +0.1% (pull- up):
88.2 kHz:
96 kHz:
176.4 kHz:
192 kHz:
44k
48k
48k-
48k+
88k
96k
176k
192k
When Folder mode is selected, the number of les created is
•
large. For this reason, the number of tracks that can be recorded
ENTER: Press a project “ ®” button to show the contents
of that project.
Page 34

34 TASCAM HS-8
5 – Projects
Project name buttons: Touch to select a project or
projects. In addition, the numbers assigned in the
order of creation on the card are shown inside the
icons.
INFO button: Touch to open a pop-up window that
shows information about the project that is currently
selected.
If no project is selected, press this button to show
information about the current CF card.
CREATE PROJECT button: Touch to open the
PROJECT
screen.
CREATE
MULTI SELECT button: Touch to enable the selection of
multiple projects.
MENU button: Touch to open a pop-up menu where you
can select
LOAD, REBUILD, EDIT NAME
and
DELETE
.
Scroll buttons: Use these buttons to scroll to the
beginning or end of the project list or scroll one page
(five lines) forward or backward. You can also scroll
through the list one line at a time using the DATA dial.
Project name/folder name display at the top right of
the screen: Touch to open a screen that shows the list of
takes in the current project/folder.
Folder selection screen
Project name display: The current project name is
shown.
NUM OF TAKE: This shows the number of takes in the
folder.
TOTAL TIME: This shows the total recording time of the
takes in the folder.
ENTER: Press a folder “ ®” button to show the contents
of that folder.
Folder name buttons: Touch to select a folder or folders.
In addition, the numbers assigned in the order of
creation on the card are shown inside the icons.
INFO button: Touch to open a pop-up window that
shows information about the currently selected folder.
If no folder is selected, press this button to show
information about the current project.
MAKE FOLDER button: Touch to open the screen where
you can create a new folder.
MULTI SELECT button: Touch to enable the selection of
multiple folders.
MENU button: Touch to open a pop-up menu where you
can select
LOAD, REBUILD, COPY
, and
DELETE
.
Scroll buttons: Use these buttons to scroll to the
beginning or end of the folder list or scroll one page
(five lines) forward or backward. You can also scroll
through the list one line at a time using the DATA dial.
Project name/folder name display at the top right of
the screen: Touch to open a screen that shows the list of
takes in the current project/folder.
Take selection screen
Folder name display: The current folder name is shown.
LENGTH: This shows the length (time) of the take.
ENTER: Press a take “ ®” button to load the take.
Take name buttons: Touch to select a take or takes.
In addition, the numbers assigned in the order of
creation on the card are shown inside the icons.
INFO button: Touch to open a pop-up window that
shows information about the currently selected take.
If no take is selected, press this button to show
information about the current folder.
CIRCLE TAKE button: Touch to add or remove an @ to the
take name.
MULTI SELECT button: Touch to enable the selection of
multiple takes.
MENU button: Touch to open a pop-up menu where you
can select
LOAD, REBUILD, EDIT TC
and
DELETE
.
Scroll buttons: Use these buttons to scroll to the
beginning or end of the list or scroll one page (five
lines) forward or backward. You can also scroll through
the list one line at a time using the DATA dial.
Project operations
Creating new projects
1 Press the PROJECT key on the front panel to open
the
PROJECT
2 Touch the
screen to open the
screen has two pages.
screen.
CREATE PROJECT
CREATE PROJECT
button on the
PROJECT
screen. This
Page 35

TASCAM HS-8 35
CREATE PROJECT screen 1
You can make the following settings on this screen.
Project Name: Touch the
Project Name
button to
open the screen where you can edit the project
name.
The maximum number of characters for project
and folder names is 31. Extra characters are
discarded.
Folder Name: Touch the
Folder Name
button to open
a screen where you can change the name of the
first folder.
5 – Projects
4 Touch the OK button when the confirmation pop-up
message appears.
When creation of the project completes, the Home
Screen reopens.
NOTE
Immediately after creation, the new project becomes the
•
current (loaded) project.
The letter “C” appears on the icon to the left of the name of the
•
current project on the PROJECT screen.
NOTE
On the 1st FOLDER screens, the maximum number of characters
allowed is indicated by the yellow background.
Fs: Set that sampling frequency of the project.
48k-0.1% sampling frequency is pull-down
compatible, and 48k+0.1% is pull-up compatible.
BWF Chunk Fs: Set the sampling frequency for BWF
chunks. To use the actual sampling frequency of
the recordings, select
pull-down, select
Actual Rate
Fake Rate
. For pull-up/
to write 48k instead of
48k±0.1%.
NEXT: Open the next page.
CREATE PROJECT screen 2
You can make the following settings on this screen.
Frame Type: Set the time code frame type.
OTHERS: Use the
parameters to create a project or select
Preset
Current Settings
to use the default settings.
of other
Factory
3 After you complete making the settings, touch the
CREATE PROJECT
NOTE
If a project with the same project name already exists, the CREATE
PROJECT button appears gray and you will not be able to create a
new project. If this happens change the project name.
button.
Editing the project name
1 Touch the
PROJECT
shown below.
Date button: Touch this button to change the project
name to the date currently set for the unit in a
“yyyy-mm-dd” format.
NOTE
If the same project name or folder name already exists, an
•
underscore (“_”) followed by a number that has not been used is
added.
After pressing the “Date” button to change the name to the
•
date, you can further edit the name on this screen.
Project name display area: The input project name is
shown. The maximum number of characters allowed is
indicated by the yellow background.
Character buttons: Use these to input the project name.
BS button: Use this to erase the character to the left of
the cursor.
DEL button: Use this to erase the character to the right of
the cursor.
Shift button: Touch this to switch between numerals and
symbols and uppercase and lowercase Roman letters.
Project Name
button on the
screen to open the
CREATE
PROJECT NAME
screen as
Page 36

36 TASCAM HS-8
5 – Projects
Caps button: Use to input uppercase letters.
Space button: Use to input a space.
<– / –> buttons: Use these to move the cursor.
Enter button: Touch this to confirm the input name.
NOTE
When the “PROJECT NAME” screen is open, you can also use an
external keyboard that is connected to the KEYBOARD connector on
the front panel to input names.
2 Touch the
or press the DATA dial to confirm the project name.
Character input limitation
The maximum number of characters allowed is indicated
by the yellow background in the project name display
area. Excess characters have a grey background and are
discarded when the
Changing a project name later
1 Select the project that you want to change on the
PROJECT
The background of the selected project name appears
yellow.
Enter
screen.
button on the
Enter
button is pressed.
PROJECT NAME
screen
Follow the same procedures as in “Editing the project
name” on page 35 to change the scene name.
NOTE
The folder name cannot be changed later.
Loading projects
1 Press the PROJECT key on the front panel to open
the
PROJECT
2 Select the project that you want to load.
3 Touch the
screen.
MENU
button to open a pop-up menu.
2 Touch the
3 Touch the
open the
NOTE
When multiple projects are selected, the “EDIT NAME” button in the
pop-up menu is not available.
MENU
button to open a pop-up menu.
EDIT NAME
PROJECT NAME
button in the pop-up menu to
screen.
4 Input the project name using the procedures
described above.
5 Touch the
Enter
button on the
PROJECT NAME
screen
or press the DATA dial to confirm the project name
and return to the
PROJECT
screen.
4 Touch the
NOTE
When multiple projects are selected, the “LOAD” item is not
available.
LOAD
button in the pop-up menu.
5 Touch the OK button or press the DATA dial when
the confirmation pop-up message appears.
After loading completes the Home Screen opens.
Editing the name of the first folder
Touch the
PROJECT
shown below.
Folder Name
button on the
screen to open the
1st Folder
CREATE
screen, as
NOTE
When a project is loaded, the last loaded folder is also loaded. The
highest numbered take in that folder is also loaded.
Page 37

TASCAM HS-8 37
5 – Projects
Rebuilding projects
Rebuilding a project makes it possible to play files that
were not recorded by this unit, including files that have
been copied between folders on the unit and files that
have been copied to a CF card folder from a computer (the
audio files must be in formats that can be played by this
unit).
1 Press the PROJECT key on the front panel to open
the
PROJECT
2 Select the project that you want to rebuild.
Touch the
screen to allow the selection of multiple projects.
3 Touch the
open a pop-up menu.
screen.
MULTI SELECT
MENU
button on the
button on the
PROJECT
PROJECT
screen to
Erasing a project
1 Press the PROJECT key on the front panel to open
the
PROJECT
2 Select the project that you want to erase.
Touch the
screen to allow the selection of multiple projects.
3 Touch the
open the pop-up menu.
4 Touch the
5 Touch the OK button or press the DATA dial when a
confirmation pop-up message appears.
screen.
MULTI SELECT
MENU
button on the
DELETE
button in the pop-up menu.
button on the
PROJECT
PROJECT
screen to
One project selected
Multiple projects selected
4 Touch the
REBUILD
button in the pop-up menu.
5 Touch the OK button or press the DATA dial when a
confirmation pop-up message appears.
During erasure, a progress status pop-up appears.
When erasure completes, the pop-up disappears.
NOTE
When you erase a project, every folder and take in the project is also
erased.
Folder operations
Creating new folders
1 Touch the PROJECT key on the front panel to open
the
PROJECT
2 Touch the “®” button of the project to which you
want to add a folder to open its folder list.
screen.
During rebuilding, a progress status pop-up appears.
When rebuilding completes, the pop-up disappears.
NOTE
If you rebuild when no project has been selected in the PROJECT
screen, the selected CF card is rebuilt entirely.
Page 38

38 TASCAM HS-8
5 – Projects
2 Touch the “®” button for the project that contains
the folder that you want to load to open the folder
list.
3 Select the folder that you want to load.
3 Touch the
FOLDER
MAKE FOLDER
screen.
button to open the
MAKE
Follow the same procedures as in “Editing the project
name” on page 35 to name the folder.
NOTE
You cannot use the “@” symbol at the beginning of a folder name.
4 Touch the
Enter
button or press the DATA dial to
open a confirmation pop-up message.
5 Touch the OK button or press the DATA dial to
confirm the folder name.
4 Touch the
5 Touch the
MENU
button to open a pop-up menu.
LOAD
button in the pop-up menu.
6 Touch the OK button or press the DATA dial when a
confirmation pop-up message appears.
When loading completes, the Home Screen opens.
NOTE
The letter “C” appears on the icon to the left of the folder name
of the currently selected folder.
During the creation of a folder, a progress status
pop-up appears. When folder creation completes, the
pop-up disappears.
NOTE
Immediately after creation, the new folder becomes the current
•
(loaded) folder.
The letter “C” appears on the • icon to the left of the name of
the current folder on the PROJECT screen.
Loading folders
1 Press the PROJECT key on the front panel to open
the
PROJECT
screen.
Rebuilding folders
Rebuilding a folder makes it possible to play back files that
were not recorded by this unit, including files that have
been copied between folders on the unit and files that
have been copied to a CF card folder from a computer (the
audio files must be in formats that can be played by this
unit).
1 Press the PROJECT key on the front panel to open
the
PROJECT
2 Touch the “®” button for the project that contains
the folder that you want to rebuild to open the
folder list.
3 Select the folder that you want to rebuild. Touch
the
MULTI SELECT
multiple folders.
4 Touch the
screen.
button to enable the selection of
MENU
button to open a pop-up menu.
Page 39

TASCAM HS-8 39
5 – Projects
5 Touch the
REBUILD
button in the pop-up menu
item.
6 Touch the OK button or press the DATA dial when a
confirmation pop-up message appears.
During rebuilding, a progress status pop-up appears.
When rebuilding completes, the pop-up disappears.
NOTE
You can also rebuild a folder from that folder’s take selection screen.
Copying folders
You can copy folders between CF SLOT 1 and CF SLOT 2
(two CF cards are necessary).
If you copy a folder, the same directory structure is created
at the copy destination.
5 Touch the
COPY
button in the pop-up menu.
6 Touch the OK button or press the DATA dial when a
confirmation pop-up message appears.
During copying, a progress status pop-up appears.
When copying completes, the pop-up disappears.
NOTE
If a folder with the same name already exists on the destination
CF card, a message conrming that you want to overwrite the
existing scene appears. Touch the OK button or press the DATA dial
to overwrite the existing le and copy the selected scene to the
destination.
NOTE
To play copied folders on this unit, you must rebuild the desti-
•
nation project or the folder.
If you copy a folder with a dierent sampling frequency into a
•
project, the folder cannot be rebuilt.
1 Press the PROJECT key on the front panel to open
the
PROJECT
screen.
2 Press the “®” button for the project that contains
the folder that you want to copy to open the folder
list.
3 Select the folder that you want to copy. Touch the
MULTI SELECT
button to enable the selection of
multiple folders.
4 Touch the
MENU
button on the
PROJECT
screen to
open a pop-up menu.
Page 40

40 TASCAM HS-8
5 – Projects
Erasing folders
1 Press the PROJECT key on the front panel to open
the
PROJECT
2 Press the “®” button for the project that contains
the folder that you want to erase to open the folder
list.
3 Select the folder that you want to erase. Touch the
MULTI SELECT
multiple folders.
4 Touch the
open a pop-up menu.
screen.
button to enable the selection of
MENU
button on the
PROJECT
screen to
6 Press the
NOTE
Alternatively, press the “®” button next to the take that you want
to load.
LOAD
button in the pop-up menu.
7 Touch the OK button or press the DATA dial when a
confirmation pop-up message appears
5 Touch the
DELETE
button in the pop-up menu.
6 Touch the OK button or press the DATA dial when a
confirmation pop-up message appears.
During erasure, a progress status pop-up appears.
When erasure completes, the pop-up disappears.
CAUTION
When you erase a folder, every take in that folder is also erased.
Take operations
Loading takes
1 Press the PROJECT key on the front panel to open
the
PROJECT
2 Press the “®” button for the project that contains
the take that you want to load.
3 Press the “®” button for the folder that contains
the take that you want to load to open the take list.
4 Select the take that you want to load.
screen.
When loading completes, the Home Screen opens.
NOTE
If a take is loaded from outside the currently selected project, a
warning appears in a pop-up window: “Selected take is in another
project.”
If it is okay to change the project/folder and load the take, touch the
“OK” button or press the DATA dial to do so.
Erasing takes
1 Press the PROJECT key on the front panel to open
the
PROJECT
2 Press the “®” button for the project that contains
the take that you want to erase.
3 Press the “®” button for the folder that contains
the take that you want to erase.
screen.
5 Touch the
MENU
button to open a pop-up menu.
Page 41

TASCAM HS-8 41
5 – Projects
4 Select the take that you want to erase. Touch the
MULTI SELECT
button to enable the selection of
multiple takes.
5 Touch the
6 Touch the
MENU
button to open a pop-up menu.
DELETE
button in the pop-up menu.
7 Touch the OK button or press the DATA dial when a
confirmation pop-up message appears.
7 On the “EDIT TAKE T/C” screen, and use the “FRAME
EDIT” button to set whether or not to input the
frame value.
Frame edit on
During erasure, a progress status pop-up appears.
When erasure completes, the pop-up disappears.
Changing the start time of a take
1 Press the PROJECT key to open the PROJECT
screen.
2 Touch the “®” button for the project that contains
the take for which you want to edit the start time
to open the folder selection screen.
3 Touch the “®” button for the folder that contains
the take that you want to edit to open the take
selection screen.
4 Select the take that you want to edit.
5 Touch the “
show the pull-up menu.
MENU
” button on the “
PROJECT
” screen to
Frame edit off
8 Use the number buttons to input the take start
time.
If you begin input without selecting the digit, input
•
will start from the smallest one.
To input a specific digit, touch it and make its
•
background yellow, then use the number buttons or
the DATA dial to enter two digits at a time.
Touch the “
•
9 Touch the “
TIP
This can also be edited using a PS/2 keyboard.
•
Press the PS/2 keyboard ESC key to erase all the values.
•
CLEAR
” button to erase all entered values.
ENTER
” button to confirm the setting.
10 When the confirmation pop-up window appears,
touch the “OK” button or press the DATA dial.
Using “@” with take names
Select a take and touch the “
add “@” to the take name or remove it if it has been added
previously.
CIRCLE @ TAKE
” button to
6 Touch the “
open the “
EDIT TC
EDIT TAKE T/C
” button in the pull-up menu to
” screen.
Page 42

42 TASCAM HS-8
5 – Projects
TIP
You can use this to mark the good takes, for example.
NOTE
You cannot edit take names.
Page 43

TASCAM HS-8 43
6 – Internal Settings
In this chapter, we explain the unit’s internal settings in
detail.
Menu screen
Press the MENU key on the front panel to open the
following
• REC SETUP button
Make recording settings.
• PLAY SETUP button
Make playback settings.
• SYNC T/C button
Make synchronization and time code settings.
MENU
screen.
When a track is armed for recording, the button
background appears red. (Default setting: no tracks
armed—buttons not red)
FILE FORMAT page
Use this to make file format settings.
• REMOTE SETUP button
Make settings for external remote control.
• MIXER SETUP button
Make mixer settings.
• CHANNEL SETUP button
Make settings for each channel.
• METER SETUP button
Make level meter settings.
• SYSTEM SETUP button
Make system settings.
• CF MANAGE button
Manage CF cards.
• VERSION INFO button
Show the system version.
Recording settings (REC SETUP)
The
REC SETUP
TRACKS
bottom of the screen to open the corresponding page.
,
screen has three tabbed pages:
FILE FORMAT
and
OPTIONS
REC
. Touch the tabs at the
File Mode
Set the mode for recording files.
MONO (default value): Each track is handled as a
monophonic file.
POLY: Multiple tracks are handled as a single combined
file.
Mono File Place
When the “File Mode” is set to “MONO”, set the folder
where audio files are saved with the following buttons.
SubFolder button (default value): Audio files are saved in
subfolders created for each take within the folder.
Folder button: Audio files are saved directly in the folder.
NOTE
In both modes, a subfolder is created for each take inside the
•
folder, and management les are generated in these subfolders.
When Folder mode is selected, the maximum number of takes
•
that can be recorded in a single folder is greatly reduced from
normal. For this reason, when switching to Folder mode the
following pop-up window appears with a warning about the
reduced maximum limit to the number of takes.
REC TRACKS page
Touch the record arm buttons below the level meters to
arm the tracks that are to be recorded and disarm the
tracks that are not to be recorded.
Page 44

44 TASCAM HS-8
6 – Internal Settings and Operations
OPTIONS page
Make settings related to the pre-recording and auto
markers.
Moreover, when switching to Subfolder mode, the following
pop-up window appears explaining the restored maximum
limit to the number of takes.
PreREC Time
Turn pre-recording ON/OFF and set its time. (Default
setting: OFF)
When PreREC Time is ON, the signal input during
recording standby is captured by the built-in memory for
the set amount of time, allowing a maximum of 5 seconds
before recording is started to be recorded.
When Folder mode is selected, the number of les created is
•
large. For this reason, the number of tracks that can be recorded
is greatly reduced. (See “Recording operation limitations” on
page 29.)
During recording, you can press the REC key to start recording a
•
new take. This function can be used 4 seconds after beginning
recording in Poly and Subfolder modes, but in Folder mode, you
might have to wait more than 4 seconds.
Bit Length
Set the quantization bit rate for recording files.
Setting buttons:
16bit, 24bit
(default setting)
Max File Size
Set the maximum size for recording files.
Setting buttons:
640MB, 1GB, 2GB
(default setting)
Pause Mode
Set whether or not to divide files when a recording is
paused.
Setting buttons:
SPLIT
(default setting), NO
SPLIT
To set the pre-recording time, touch the knob, and adjust
the value using the DATA dial. The setting range is 1–5
seconds. (Default setting: 2 seconds)
Auto Marker
Make settings related to auto markers.
Audio Over: Use this to add markers when the set audio
level is detected. Turn this function ON or OFF. (Default
setting:
OFF
setting: -0.20dB).
To set the audio detection level, touch the knob,
and adjust the value using the DATA dial. The setting
options are: –0.20 dB (default setting), –0.17 dB, –0.13
dB, –0.10 dB, –0.06 dB to –0.03 dB.
Settings made here are reflected in the Over Level
setting on the
Time Interval: Use this to add marks at fixed time intervals.
Turn this function ON or OFF and set the time interval.
(Default setting:
To set the time, touch the knob, and adjust the value
using the DATA dial. The range of setting values is 1–10
minutes (default setting: 5 minutes)
Sync Unlock: Use this to add a mark when synchronization
with the master clock is lost. Turn this function ON or
OFF. (Default setting:
) and set the detection level (Default
METER SETUP
OFF
)
OFF
screen.
)
NOTE
An “audio over” occurs when the level exceeds the maximum level
(full scale) minus the value set by the user. (In the example above,
this would be when the level exceeds the maximum level minus 0.20
dB.)
Page 45

TASCAM HS-8 45
6 – Internal Settings and Operations
Playback settings (PLAY SETUP)
Use this screen to make settings related to playback.
GENERAL page
Play Mode
Set how the playback of takes is handled.
One Take: Only the currently selected take is played back.
All Take: All the takes in the currently loaded folder are
played back.
(Default setting:
One Take
)
Inc. Play
Turn the incremental play function ON or OFF. When
incremental play is ON, press the PL AY key during
playback to move to the beginning of the next take and
continue playing, or press the STOP (RETAKE) key during
playback to move to the beginning of the next take and
pause playback. (Default setting: OFF)
Sync and time code settings (SYNC T/C)
Use the
time code settings. This screen has five pages:
SYNC, T/C, SETUP
the screen to open the corresponding page.
CLOCK page
View various clock status information and select the clock
used for synchronization.
SYNC T/C
screen to make synchronization and
CLOCK
and
I/O
. Touch the tabs at the bottom of
,
Repeat Mode
Turn repeat playback ON and OFF.
(Default setting: OFF)
CONTROL page
Auto Cue
Turn the auto cue function ON or OFF (Default setting:
OFF). If auto cue is ON, whenever a take is changed or
loaded, the unit will enter playback standby at the point
where sound first starts in the take.
If no sound is detected before the end of the take, the unit
pauses at the start of the take. To set the auto cue start
point detection level, touch the knob area and use the
DATA dial to change the value.
Options: –72 dB, –66 dB, –60 dB, –54 dB (default value),
–48 dB, –42 dB, –36 dB, –30 dB, –24 dB
Auto Ready
Turn the auto ready function ON or OFF. If auto ready
is ON, when playback of a take completes the unit
automatically stops a the beginning of the next take.
(Default setting: OFF)
STATUS
The top section shows the project sampling frequency
and the clock synchronization status.
The bottom section shows digital input signal status for
pairs of channels in the format
CHx-xDIN (x-x
shows the
channels), as follows.
Digital input signal status Display
When locked
When sampling frequency
conversion (FSConvert) is
Locked (xx.xxx kHz)
Locked (xx.xxx kHz
FsCnv)
ON
When unlocked
When there is no signal
When there is no audio
Unlocked (xx.xxx kHz)
Unlocked (No signal)
Not Audio
signal
When Cbit information is
Not Professional
not professional
When other Cbit
Unmatched Cbit
information and the
actual operation mode are
different
Page 46

46 TASCAM HS-8
6 – Internal Settings and Operations
MASTER
Select the master clock to use.
INT (default value): Use this unit’s internal clock.
WORD: Synchronize with the word clock input through
the WORD/VIDEO IN connector.
VIDEO: Synchronize with the video clock input through
the WORD/VIDEO IN connector.
CH1-2DIN - CH7-8DIN: Synchronize with the clock of the
digital signal (AES1-8, AES A-B, or ADAT1-8) selected as
the digital input for CH1-2, 3-4, 5-6, or 7-8.
You cannot select an input as the master clock if the
sampling rate converter is ON for that input.
The second line of the button shows the name of the
selected digital input signal.
NOTE
A check mark appears on the button of the currently active
•
master clock.
If synchronization from an external clock is interrupted, the
•
unit’s internal clock becomes active. In this case, a check mark
appears on the INT button to show that it has become the
active clock, and an “x” appears on the button of the selected
external clock that was lost.
Depending on the combination of Project sampling
frequency and Play sampling frequency settings, the unit
will operate with the Fs shown below.
Play sampling frequency setting
Project
sampling
frequency
48 kHz 48 kHz 48 kHz – 0.1% 48 kHz + 0.1%
48 kHz pull-up 48 kHz + 0.1% 48 kHz Not possible
48 kHz pulldown
All others Project
NOTE
Set this to OFF before recording. Recording is not possible when set
to Pull-up +0.1% or Pull-down –0.1%. If you try to record when not
OFF, “Cannot REC” appears in a warning pop-up window.
OFF (Default
setting)
48 kHz – 0.1% Not possible 48 kHz
sampling
frequency
Pull-down Pull-up
Not possible Not possible
TC Chase
Use to turn playback synchronized with external timecode
ON/OFF (default value: OFF). Set it to ON, when you want
to match the timing of this unit’s audio with a timecode
master unit (audio recorder or video).
You can also set timecode offset (TC Offset) with the
timecode master device. Touch the “EDIT” button to open
the “TC Offset” screen where you can set the offset value
in a range between “−23: 59: 59.29” and “+23: 59: 59.29”
(default value: “00: 00: 00.00”).
SYNC page
Make setting related to synchronization.
STATUS
Shows the status of the currently loaded project’s
sampling frequency and clock synchronization.
Play Fs
When playing a take with a sampling frequency of 48 kHz,
48 kHz pull-up, or 48 kHz pull-down, the unit can be made
to synchronize with an external clock by setting it to play
back with pull-up or pull-down.
NOTE
TC Chase can also be turned ON/OFF by pressing the SHIFT and
CALL keys at the same time.
TC Rechase
Turn this function, which re-synchronizes when
synchronization with external timecode becomes
inaccurate, ON/OFF (default value: “OFF”). To set the
amount of inaccuracy that triggers rechase, touch the
knob and turn the DATA dial to select a value in frames of
1/3, 1, 2, 5 or 10 (default value: 2 frames).
T/C page
Make settings related to time code.
Free run mode
Page 47

TASCAM HS-8 47
6 – Internal Settings and Operations
Free once, jam sync
STATUS
This shows the time code generator mode of the unit and
the time code frame type of the current project.
GENERATOR
The top line shows the time of the current time code
generator.
The bottom line shows the user bits.
Touch the
display area to open the
When the time code generator is in Free Run mode, press
the
code generator time code.
TC IN
The top line shows the time of the input time code and
the frame type. The bottom line shows the user bits of the
input time code.
In Free Run mode, touch the
the current time code and set it as the time code of the
time code generator.
If the time code generator mode is Free Once or Jam Sync,
the capture status (
waiting for time code, and it turns off after time code is
captured.
GENERATOR
RESTART
item
EDIT
button or the user bit
T/C USER BITS
screen.
button to return to the start time of the time
WAITING
CAPTURE
) indicator lights green when
button to capture
STATUS
This area shows the unit’s current project time code frame
type.
TC GEN MODE
Set the time code generator mode.
FREE RUN: The time code generator runs on its own.
FREE ONCE (default value): After the input time code is
captured once, the unit starts free run mode.
TIME OF DAY: If you conduct any of the following
operations, the time will be captured from the internal
clock and free run mode will start.
Turn the power on
•
Set “TC GEN MODE” to this mode
•
Reset the internal clock
•
JAM SYNC: When time code is input, the unit synchronizes
to it. If time code input is interrupted, the unit enters free
run mode.
REGEN: The unit synchronizes to the input time code.
REC RUN: The time code generator only functions during
recording. At all other times, the time code generator
stops.
I/O page
Set the synchronization signal status display and time
code output.
START TIME
When you touch the
GENERATOR
item’s
RESTART
button,
the time when the time code restarts is shown. Touch the
START TIME
area to open the
item
EDIT
button or the start time display
START TIME
screen.
SETUP page
Make settings related to the time code generator.
STATUS
This shows the status of synchronization signals.
TIME CODE IN: When time code is input, the time code
•
frame rate is shown.
WORD/VIDEO IN: When a synchronization signal is
•
input, WORD, VIDEO or TriLevel is shown.
TC Out Mode
Set the time code output mode.
GenOut (default setting): Timecode is output from the
•
internal timecode generator.
PlayOut: Only during playback, output the time code
•
recorded in the file.
Page 48

48 TASCAM HS-8
6 – Internal Settings and Operations
Remote settings (REMOTE SETUP)
Make settings for PARALLE connector AUX 1-3 functions
and the RS-232C and RS-422 control connectors. The
REMOTE SETUP
page, and an
of the screen to open the corresponding page.
PARALLEL TAB
Set the AUX 1-3 functions of the PARALLE connector.
AUX Assign
Touch a knob, making the background become yellow
and turn the DATA dial to set the parameter. The
parameters that can be selected include
MARK SKIP-, MARK SKIP+
AUX1 Function: Set the function of PARALLEL connector
pin 17 (AUX1). (Default setting: MARK SKIP +)
AUX2 Function: Set the function of PARALLEL connector
pin 18 (AUX2). (Default setting: MARK SKIP –)
AUX3 Function: Set the function of PARALLEL connector
pin 19 (AUX3). (Default setting: MARK)
RS-232C page
Make RS-232C transmission settings.
screen has a
RS-422
PARALLEL
page, an
page. Touch the tabs at the bottom
F.FWD, REW, MARK
and
ONLIN E.
RS-232C
Baud Rate (bps)
Set the transmission speed. The options are 4800, 9600,
19200 and 38400 bps (default setting).
Data Length
Set the data length in bits. The options are 7 and 8 (default
setting).
Parity Bit
Set whether or not there is a parity bit. The options are
NONE
(default setting),
EVEN
and
ODD
.
Stop Bit
Set the stop bit. The options are 1 (default setting) and 2.
RS-422 page
Make communication settings for RS-422 serial control.
,
Serial Mode
Set the serial connection mode with the following
buttons.
Setting buttons: “RS-232C” (default value), “RS-422”
NOTE
The RS-232C and RS-422 connectors cannot both be used at the
same time. Only the connector selected with this setting functions.
This setting is synchronized with the “Serial Mode” item on the
RS-232C page.
Serial Mode
Set the serial connection mode with the following
buttons.
Setting buttons: “RS-232C” (default value), “RS-422”
NOTE
The RS-232C and RS-422 connectors cannot both be used at the
same time. Only the connector selected with this setting functions.
This setting is synchronized with the “Serial Mode” item on the
RS-422 page.
Video Resolve
When slaving this unit to a VCR, video sync signals might
be used instead of word sync signals for the common
standard clock. In the same way as with word sync
signals, you can select whether the video clock is followed
(synchronizing the beginning of time code frames with
video signal frame edges) or it is independent of the
frame clock. This must be turned ON to control this unit
from a video editor.
Setting buttons: “OFF”, “ON” (default value)
Page 49

TASCAM HS-8 49
6 – Internal Settings and Operations
Mixer settings (MIXER SETUP)
Make mixer settings on this screen.
The
MIXER SETUP
SOURCE, SETUP
of the screen to open the corresponding page.
INPUT page
Make input settings on this page.
CHANNEL buttons
Press a channel button to open the corresponding
SETUP
screen (“x” is the channel).
INPUT SOURCE
Set the input source for each channel
Ana 1-8: 25-pin D-sub analog input (default setting)
•
Ana A-B: XLR analog input
•
AES 1-8: 25-pin D-sub AES/EBU input
•
AES A-B: XLR AES/EBU input
•
ADAT 1-8: ADAT input
•
DIGITAL SOURCE page
Set the digital input sources.
screen has 4 pages:
and
OUTPUT
. Touch the tabs at the bottom
INPUT, DIGITAL
CHx
Fs CONVERT buttons
Turn the sampling rate converter ON or OFF for each pair
of inputs (default setting: all
OFF
).
SETUP page
Access the channel name editing screen and turn channel
links ON and OFF on this page.
CHANNEL buttons
Press a channel button to open the corresponding
SETUP
screen (“x” is the channel).
CH NAME
Touch these buttons to edit the name of the
corresponding channel.
CH Link
Touch these buttons to turn channel links ON and OFF.
(Default settings: all
OFF
)
The following parameters are shared by link channels.
2Mix LVL knob
•
Solo
•
Record arming
•
Input source
•
PAN pot (becomes balance)
•
Input monitor
•
CHx
CHANNEL buttons
Press a channel button to open the corresponding
SETUP
screen (“x” is the channel).
CHx
DIGITAL SOURCE
Set the digital input source for each pair of channels.
AES x-x (default setting): 25-pin D-sub AES/EBU input
•
AES A-B: XLR AES/EBU input
•
ADAT x-x: ADAT input
•
OUTPUT page
Make settings related to output on this page.
XLR Output Source
Set the source to be output from the ANALOG OUTPUT L/
R and DIGITAL OUTPUT L/R connectors.
L/R button (default value): Stereo mix
Page 50

50 TASCAM HS-8
6 – Internal Settings and Operations
MONITOR button: Monitoring mix (same signal output
from the PHONES connector, which includes soloed
signals, etc.)
CHx NAME (button)
Edit the name of the channel (“x” is the channel).
Use the
Shift
and
Caps
buttons to change the available
character types.
Follow the same procedures to enter names as in “Editing
the project name” on page 35, with the exception that
there is no “Date” button. A maximum of 4 characters are
allowed in channel names.
Channel settings (CHANNEL SETUP)
when the unit is stopped, recording or in recording
standby. (Default setting: disarmed—button not red)
INPUT MONITOR button: Use to turn input monitoring
ON/OFF. When ON for a channel, sound is always input
through its input connector.
Level knob: Touch the knob to adjust the level sent to the
stereo bus. When its background color turns yellow,
use the DATA dial to adjust it. Setting values range
from –∞ to +10 dB. (Default setting: 0 dB)
Pan pot: Touch the knob to adjust the stereo position of
the signal sent to the stereo bus. When its background
color turns yellow, use the DATA dial to adjust it.
Setting values range from L100 to R100 with C as the
center value. (Default setting: C)
Level meter: The input signal level is shown for a channel
when input monitoring is ON or recording is armed
and it is not being played back. The playback level is
shown during playback and for tracks that have input
monitoring OFF.
The area beneath each level meter shows the track
name (four characters or less) and indicates whether
recording and input monitoring are enabled.
Depending on whether or not recording and input
monitoring are enabled, the background color will
appear as follows.
Make settings for each channel.
Select the channel using the tabs at the bottom of the
screen.
Ana x buttons (“x” indicates the channel number): Set
analog input channel 1-8 as the input source.
Ana x buttons (“x” is “A” or “B”): Set analog input channel
A/B as the input source.
AES x/ADAT x button (“x” indicates the channel number):
Set AES/EBU digital input channel 1-8 or A/B or ADAT
input channel 1-8 as the input source.
DIGITAL SOURCE button: Touch this button to set digital
input as the input source and open the “
DIGITAL SOURCE
” screen where you can select the
CHx-x
desired digital input connector.
REC button: Arm or disarm recording. When armed, the
button background becomes red. When recording,
the signals of tracks that are enabled are recorded.
Moreover, when a channel is armed for recording,
the signal from the assigned input connector is input
REC Off REC On
MON Off
MON On
Black Red
Blue Red/blue
If the input source is set to a digital input and there
is no signal on the corresponding digital input or
the input signal differs from the unit setting, the
channel meter display appears gray and the following
messages appear. (The channels are indicated by
“
x-x
”.)
Display Description
AESx-x NO SIGNAL
ADAT NO SIGNAL
AESx-x UNLOCK
ADAT UNLOCK
AESx-x NOT AUDIO
AESx-x NOT PRO
AESx-x Cbit ERROR
If there is no input signal
If the input signal is not
synchronized with the system
If the Cbit information of the
input signal is not audio
If the Cbit information of the
input signal is not professional
If other input signal Cbit
information differs from the
actual operation mode
Channel name button: Touch this button to edit the name
of the channel.
button: Touch this button to open the next channel
setting screen.
Page 51

TASCAM HS-8 51
6 – Internal Settings and Operations
When channels are linked
When channels are linked, the screen appears as follows.
Channel setup screen when channels are linked
When channels are linked:
The input source selection button shows the pair of
•
channels.
The signal flow line is doubled.
•
A stereo meter (2 bars) is shown.
•
Touch the channel name button to show a pop-up with
•
buttons for each channel in the pair.
Digital source settings (CHx-x DIGI SOURCE)
Touch the
screen to open the following screen.
AES x-x button (“x” indicates the channel number): Set
AES A-B button: Set AES/EBU digital input channel A/B as
ADAT x-x button (“x” indicates the channel number): Set
Fs CONVERT button: Turn the sampling rate converter ON
DIGITAL SOURCE
button on the channel settings
AES/EBU digital input channel 1-8 as the input source.
the input source.
ADAT digital input channel 1-8 as the input source.
or OFF.
Stereo (L/R) channel
The stereo channel setting (L/R SETUP) screen appears as
follows.
Stereo channel setting screen
The stereo channel has a limiter function. Touch the
LIMITER
The stereo (L/R) channel does not have input source
selection buttons, a pan pot or an input monitor button.
button to turn it ON and OFF.
Level meter settings (METER SETUP)
Make level meter settings on this screen.
Peak Hold Time knob: Touch this to set the peak hold
time. Use the DATA dial to adjust the time. The setting
values are 0 sec, 1 sec (default setting), 2 sec and inf
(hold forever).
Release Time knob: Touch this to set the release time. Use
the DATA dial to adjust the time. The setting values are
Slow, Normal
Over Level knob: Touch this to set the level at which the
overload indicator lights. This is the amount in dB
below the maximum level (full scale). Use the DATA
dial to adjust the level. The setting values are
(default setting),
dB,
or
This setting is reflected in the Audio Over setting of
the
Auto Marker
SETUP
Ref. Level Line button: Touch to turn the reference level
line that appears on the level meter ON (default
setting) or OFF.
(default setting) and
–0.17 dB, –0.13 dB, –0.10 dB, –0.06
–0.03 dB
.
item on the
screen.
Fast
OPTIONS
.
–0.20 dB
page of the
REC
Page 52

52 TASCAM HS-8
6 – Internal Settings and Operations
Ref. Level
Set the reference level for analog input and output to a
number of decibels below the maximum level (full scale
utilization).
Setting buttons:
(default setting)
CLOCK ADJUST page
Reference level line display ON
NOTE
If you press the EXIT/CANCEL (PEAK CLEAR) key when the Home
Screen is open, the peak hold display resets.
System settings (SYSTEM SETUP)
Make system settings on this screen.
The
SYSTEM SETUP
CLOCK ADJUST
to open the corresponding page.
PREFERENCES page
Set system preferences on this page.
screen has 2 pages:
PREFERENCES
and
. Touch the tabs at the bottom of the screen
Set the time of the built-in clock.
Touch the item that you want to set, and use the DATA
dial to adjust the item. (See “Setting the time of the
built-in clock” on page 21.) When you finish setting the
items, touch the SET button on the
press the DATA dial to confirm the setting.
NOTE
While setting the time, the clock stops and the “:” does not blink.
When you touch the SET button, the clock starts again and the “:”
blinks.
–9dB, –14dB, –16dB, –18dB
CLOCK ADJUST
and
–20dB
page or
KBD Type
Set the connected keyboard type to either US (default
setting) for English keyboards or
JPN
for Japanese
keyboards.
Solo Mode
Set the solo mode.
Set to “
Single
or “
Mix
” to allow more than one track to be soloed at the
” (default setting) to solo one track at a time
same time.
Online Function
Set whether or not to use the online function. Set to
“Enable” to allow on line playback to be used from the
parallel connector, serial connector (RS-232C), or a
TASCAM RC-HS20PD remote controller (sold separately).
Set to “Disable” to not allow on line playback to be used
and always output the sound from all connectors. For
details, see “9 – Online functions” on page 59.
Managing CF cards (CF MANAGE)
Use this screen to manage CF cards.
CURRENT MEDIA
This shows the currently selected card slot name and its
stauts.
CF SELECT
Touch this to open the CF
choose the CF card for recording and playback.
FORMAT
Format the CF card.
QUICK: This only formats file management information.
FULL: This formats the entire disc.
SELECT
screen where you can
Page 53

TASCAM HS-8 53
ROOT
Project01
Project02
Scene001 (Example of Poly)
Scene001-T001.wav
Scene001-T002_ST.wav
Scene001-T002.wav
Scene002 (Example of MONO & Sub Folder)
Scene002-T001
:
:
Scene002-T001_1.wav
Scene002-T001_2.wav
Scene002-T001_3.wav
Scene002-T001_4.wav
Scene002-T001_5.wav
Scene002-T001_6.wav
Scene002-T001_7.wav
Scene002-T001_8.wav
Scene002-T002
Scene002-T001_ST.wav
Scene002-T002_ST.wav
Scene002-T002_1.wav
Scene002-T002_2.wav
Scene002-T002_3.wav
Scene002-T002_4.wav
Scene002-T002_5.wav
Scene002-T002_6.wav
Scene002-T002_7.wav
Scene002-T002_8.wav
Scene001-T001_ST.wav
:
:
:
:
Scene001 (Example of MONO & Folder)
Scene001-T001_1.wav
Scene001-T001_4.wav
Scene001-T001_3.wav
Scene001-T001_2.wav
Scene001-T001_5.wav
Scene001-T001_8.wav
Scene001-T001_7.wav
Scene001-T001_6.wav
Scene001-T001_ST.wav
Scene001-T002_3.wav
Scene001-T002_2.wav
Scene001-T002_1.wav
Scene001-T002_4.wav
Scene001-T002_7.wav
Scene001-T002_6.wav
Scene001-T002_5.wav
Scene001-T002_8.wav
Scene001-T002_ST.wav
Project03
6 – Internal Settings and Operations
NOTE
CF cards with capacities of 2 GB or less that have been formatted by
this unit might be seen by computers as having no open capacity,
preventing les and folders from being written.
Version display (VERSION INFO)
Show the unit’s SYSTEM version.
Touch the bottom center of the screen to show the
version of the internal device data and the version of any
TASCAM RC-HS20PD remote controller (sold separately)
connected to the unit.
Folder structure
The folder structure is as shown below. You can check the
structure of folders and files by using a computer to view
the CF card . Be aware, however, if you change or erase a
file inside a project, or change any names, the HS-8 might
not be able to play that project.
NOTE
Poly les are created directly in the folder.
With mono les, subfolders are created inside the folder for each
take. When the “Mono File Place” setting is “SubFolder”, les are
created in the take subfolders. When the setting is “Folder”, les are
created directly in the folder.
Page 54

54 TASCAM HS-8
6 – Internal Settings and Operations
CAUTION
Even when “Mono File Place” is set to “Folder”, subfolders are
•
created and management les are stored in them. Do not erase
these subfolders.
Other management les and folders are created in addition to
•
these.
File names
The format used in naming files is as follows.
1-8 track poly files
[Take name first half]-[letter][take number].wav
1-8 track mono files
[Take name first half]-[letter][take number]_[track number].wav
2mix files
[Take name first half]-[letter][take number]_ST.wav
Page 55

TASCAM HS-8 55
7 – Mark and Locate Functions
Mark functions
Adding marks
Use the following methods to create marks.
One file (take) can have a maximum of 99 marks, including
automatically-created marks.
Use the following two methods to create marks.
Push the
•
Press the MARK key to add a mark at the current
playback/recording time.
Mark names are in the format “MARK XX” with XX
being a number assigned in ascending order.
Use the auto marker function (see “OPTION page” on
•
page 44.)
MARK key on the front panel.
above, this would be when the level exceeds the maximum level
minus 0.20 dB.)
If a mark is input using parallel control, a mark is added in the
•
same manner as if the MARK key had been pushed.
Using keys to locate to marks
Press the  ( MARK) or ¯ (MAKR ¯) key
while pressing and holding the SHIFT key to locate to the
previous or next mark.
NOTE
If MARK SKIP +/- is input using parallel control, the unit will locate to
the next or previous mark.
Mark list screen
Touch the
the
Mark List
MARK LIST
button on the Home Screen to open
screen.
When the auto marker function is ON, marks can be
automatically added when audio overs occur, at regular
time intervals and when synchronization errors occur (see
“OPTION page” on page 44).
Marks are named according to how they were made.
Mark Names
Audio level
At time interval
When a synchronization
OVER XX
TIME XX
UNLK XX
error occurs
NOTE
The REC, END and PRE marks cannot be turned ON or OFF.
Recording start point
Recording end point
Pre-recordings start
REC xx
END xx
PRE xx
point
NOTE
An “audio over” occurs when the level exceeds the maximum
•
level (full scale) minus the value set by the user. (In the example
NAME button: Touch to sort by mark name in descending
or ascending order. When the mark names are sorted
in ascending order, a “” icon appears inside the
“MARK” button. When in descending order, a “” icon
appears inside this button.
TIME button: Touch to sort marks by time in descending
or ascending order. When they are sorted by time in
ascending order, a “” icon appears inside the “
TIME
”
button. When in descending order, a “” icon appears
inside this button.
Mark name buttons: Touch to select a mark.
Locate buttons (“ ”): Touch one of these to locate to
the corresponding mark.
LIST INFO button: Touch this to see a list of the number of
marks by type in the currently selected take.
RENUMBER button: Renumber the marks. Reorder marks
by time in ascending order, and change the numbers
at the ends of the mark names to reflect that order.
DELETE button: When a mark is selected, touch this
button to erase that mark.
Edit button: When a mark is selected, touch tthis button
to edit that mark.
Scroll buttons: Use these buttons to scroll to the
beginning or end of the list or scroll one page (five
lines) forward or backward. You can also scroll through
the list one line at a time using the DATA dial.
Page 56

56 TASCAM HS-8
7 – Mark and Locate Functions
Locating to marks
Touch the “ ” button to locate to that mark.
Viewing mark information
Touch the
open the
This shows a list of the number of marks by type in the
currently loaded take.
Touch the
LIST
LIST INFO
LIST INFO
LIST INFO
button on the
MARK LIST
page.
button again to return to the
screen.
LIST INFO page of the MARK LIST screen
screen to
MARK
2 Touch the
DELETE
button.
3 When a confirmation pop-up message appears,
press the OK button or the DATA dial to erase the
mark or marks.
Erasing a mark using the MARK LIST screen
NOTE
After recording, the MARK LIST screen might show a TOTAL number
of marks that is 2 or 3 greater than the sum of the MANUAL MARK,
TIME, OVER and UNLK marks. This is because the total includes REC,
END and PRE (when using prerecording) marks that are always
created during recording.
Erasing marks
1 Select the mark that you want to erase on the
LIST
screen or type of mark that you want to erase
on the
LIST INFO
page.
MARK LIST screen
MARK
Erasing marks using the LIST INFO page
Editing marks
Marks added by using the MARK key (marks with names in
the “MARK XX” format) can be edited.
NOTE
Automatically placed marks cannot be edited.
1 Select the mark that you want to edit on the
LIST
screen.
MARK
LIST INFO page
2 Touch the
screen. Touch the
Edit
button to open the
FRAME EDIT
or not the frame value can be edited.
MARK EDIT
button to set whether
Page 57

TASCAM HS-8 57
FRAME EDIT ON
FRAME EDIT OFF
7 – Mark and Locate Functions
Manual locate function
You can directly input a time and locate to it. Touch the
Manual Locate
MANUAL LOCATE
set whether or not the frame value can be edited.
button on the Home Screen to open the
screen. Touch the
FRAME EDIT
button to
FRAME EDIT ON
3 Touch a number button to edit a mark. Use the
DATA dial to change the time for the selected
number.
Press the
return to the
Touch the
TIP
You can use a PS/2 keyboard to set these values. Press the Enter key
to conrm and press the ESC key to reset the input value.
ENTER
button to confirm the setting and
MARK LIST
CLEAR
screen.
button to reset the input value.
Renumbering marks
1 Touch the
to open the following confirmation message.
RENUMBER
button on the
MARK LIST
screen
FRAME EDIT OFF
There are three locate modes.
ABS: Input an actual time and locate to it.
+: Input an amount of time to go forward from the current
time and locate to the new time.
–: Input an amount of time to go back from the current
time and locate to the new time.
Input the time using the number buttons. You can also
select a number field and use the DATA dial to adjust the
time.
Press the
LOCATE
button to locate to the new time and
return to the Home Screen.
Touch the
TIP
You can use a PS/2 keyboard to set these values. Press the enter key
on the PS/2 keyboard to conrm or press the ESC key button to clear
all input values.
CLEAR
button to clear all input values.
2 Press the OK button or the DATA dial to renumber
the marks.
Page 58

58 TASCAM HS-8
8 –
Operation using a computer keyboard
You can control this unit using an IBM-PC-compatible
keyboard with a PS/2 interface by connecting it to the
KEYBOARD connector on the front panel of this unit. A
variety of operations are possible, but using the keyboard
is especially efficient for inputting names.
Setting the keyboard type
Set the type according to the keyboard connected.
Change the setting as necessary on the “PREFERENCES”
page of the “SYSTEM SETUP” screen (on page 52.).
Use the keyboard to input the name
You can edit and input characters for the following
items in the same manner as inputting characters on a
computer.
Project names (“Editing the project name” on page 35.)
•
Folder names (“Editing the name of the first folder” on
•
page 36, “Creating new folders” on page 37.)
First half of the next take name (“NEXT TAKE NAME
•
button” on page 16.)
Letter in the second half of the next take name (“NEXT
•
TAKE NAME button” on page 16.)
Channel names (“CHx NAME (button)” on page 50.)
•
You can also use it to enter numbers in the following
operations.
Editing the T/C USER BITS (on page 47.),
•
Editing the START TIME (on page 47.),
•
Editing marks (on page 56.),
•
Using the manual locate function (on page 57.)
•
Editing the TC Chase offset (on page 46.)
•
Selecting the type of character to input
In the same manner as with a computer, use the Shift and
Caps Lock keys to select the type of character to input.
Inputting characters
You can use the number, letter and symbol keys to import
them directly.
Moving the cursor
Use the / keys.
Erasing characters
Use the Delete key to erase the character at the cursor
position.
Use the Backspace key to erase the character before the
cursor position.
NOTE
The following characters and punctuation marks cannot be
•
used in names.
\ / : ; , • ? “ < > |
Japanese katakana cannot be input.
•
The letter in the second half of the next take name can only be
•
an uppercase letter from the alphabet.
List of keyboard operations
In addition to inputting names, a keyboard can be used
to control the transport and conduct various other
operations. The following is a summary of keyboard key
functions.
Operation
F1 key
F2 key
F3 key
F4 key
F5 key
F6 key
F7 key Turn auto cue ON/OFF
F8 key
F9 key Turn auto ready ON/OFF
F10 key Turn repeat ON/OFF
F11 key Change the play mode
F12 key Flash load when stopped;
CTRL + F1 key FLASH 1
CTRL + F2 key FLASH 2
CTRL + F3 key FLASH 3
CTRL + F4 key FLASH 4
CTRL + F5 key FLASH 5
CTRL + F6 key FLASH 6
CTRL + F7 key FLASH 7
CTRL + F8 key FLASH 8
CTRL + F9 key FLASH 9
CTRL + F10 key FLASH 10
CTRL + F11 key FLASH 11
CTRL + F12 key FLASH 12
The same as the  key
The same as the ¯ key
The same as the CALL key
The same as the STOP key
The same as the PL AY key
The same as the PAUS E key
The same as the RECORD key
stop during playback or when
paused
Inserting characters
Input the character at the desired position.
Page 59

TASCAM HS-8 59
9 – Online functions
Enabling online functions
In order to use online functions, in the online function
setting must be enabled.
1 Press the MENU key on the front panel to open the
MENU
screen.
2 Touch the “SYSTEM SETUP” button to open the
“SYSTEM SETUP” screen.
3 Touch the
Enable
button of the
ONLINE Function
item to change the online function setting (default
value:
Disable
).
Activating online playback mode
When the online function is enabled, the online playback
mode can be activated by one of the following operations.
ONLINE event from connected parallel control
•
ONLINE command from connected RS-232C serial
•
control
ON LINE key pressed on connected RC-HS20PD remote
•
controller designed for use with this unit
When online playback mode is activated, the Home
Screen opens automatically, and the icon on the
screen appears red. When online playback mode is not
activated, the icon appears unlit on the screen.
Relationship between the online playback mode and
sound output is as follows.
On line playback mode Off On
Analog output (1-8)
Digital output (1-8, AES/EBU)
Digital output (1-8, ADAT)
Analog output (L/A, R/B)
Digital output (L/R)
Headphones
RC-HS20PD (Headhones, speaker)
ˆ ¨
ˆ ¨
ˆ ¨
¨* ¨**
¨* ¨**
¨*** ¨***
¨*** ¨***
* If “XLR Output Source” is set to “MONITOR”, the
monitoring mix is output.
** The signal output is according to the “XLR Output
Source” setting.
*** The monitoring mix is always output.
Moreover, when online playback mode is activated, the
buttons operate as follows.
Playback status Pause status
ONLINE ON/OFF
Play
Fader Play
Stop
Fader Stop
FLASH
PAUSE
Track Skip
Mark Skip
CALL
Search
JOG
SHUTTLE
FLASH LOAD
MARK
MENU operation
PROJECT operation
Mark List
Manual locate
ˆ ¨
ˆ ˆ
ˆ ¨
¨* ¨
¨* ¨
¨** ¨***
ˆ
ˆ ˆ
ˆ ˆ
ˆ ˆ
ˆ ˆ
ˆ ˆ
ˆ ˆ
ˆ ˆ
ˆ ˆ
ˆ ˆ
ˆ ˆ
ˆ ˆ
ˆ ˆ
–––
* If incremental play is set to ON, when you press the
stop key or lower the fader to stop playback, the unit
pauses at the beginning of the next track (Online
Ready).
** If you press a FLASH key to play a loaded take, the
take is changed to the corresponding one and flash
playback occurs. (If the take is not loaded, ordinary
playback begins.)
*** If you press a FLASH key when the unit is paused
and the fader is lowered (Fader Stop) the take is
changed and the unit stays paused. Otherwise, the
take changes and begins playing immediately (flash
playback).
NOTE
When the “ONLINE Function” item is set to “Disable” (the online
function is OFF), sound is output from all connectors.
Page 60

60 TASCAM HS-8
01:00:00.00
01:00:00.00
02:00:00.0002:50:00.00
02:00:00.00
03:00:00.00
Take 1
Take 3
Take 2
External timecode
Take’s starting time
10 – Playback synchronized with external timecode
In this chapter, we explain playback synchronization with
external timecode. The playback of all takes in one folder
on this unit can be synchronized with SMPTE timecode
input through the TIMECODE IN connector on the rear
panel. When synchronized, the timecode time stamp
in the take is used as the starting time of that take. The
playback time during playback of a take is based on that
take’s starting time.
You can check the timecode time stamp of a take by
pressing the INFO button on the take selection screen (see
“Take selection screen” on page 34). You can also freely
change the timecode time stamp of a take (see “Changing
the start time of a take” on page 41).
NOTE
Synchronized playback with external timecode can only play
•
the takes in one folder. Synchronized playback from multiple
folders is not possible.
Synchronized playback with external timecode is based on the
•
starting time of each take. For this reason, during synchronized
playback the order is not related to the take numbers (with the
following exception).
When using synchronized playback with external timecode, if
•
multiple takes have the same starting time, only the take with
the highest take number is played.
On the “SYNC” page of the “SYNC T/C” screen, set
•
“TC Chase” to “OFF”.
After doing this, playback and other unit operations
continue. Moreover, the CHASE indicator on the Home
Screen is replaced with the timecode status display.
5 Conduct one of the operations described in step 3
to restart synchronized playback.
NOTE
During synchronized playback, press the STOP key to stop
•
playback. The CHASE indicator on the home screen blinks when
synchronized playback is stopped.
When stopped, press the PLAY or PAUSE key to restart synchro-
•
nized playback.
Timecode offset
You can set an offset for external timecode
synchronization. By doing so, you can synchronize to
external timecode with a set time difference (see “SYNC
page” on page 46).
Rechase
This unit continues to monitor external timecode even
after synchronized playback starts. Should the playback
time of this unit and the external timecode become
unsynchronized for any reason, the unit can “rechase”
the timecode. You can set whether or not the unit uses
rechase and the degree of the discrepancy before
rechasing (see “SYNC page” on page 47).
Using synchronized playback
1 Load the folder to be played back (See “Loading
takes” on page 40.)
2 Either of the following operations will start
synchronized playback.
•
•
3 If there is a take that can be synchronized with
external timecode, synchronized playback starts
and the CHASE indicator on the Home Screen
appears green.
If there is no take that can be played back
synchronized with external timecode (because the
time is between takes, for example), the unit pauses at
the beginning of the next text that can be played back
and the CHASE indicator on the Home Screen blinks.
4 Either of the following operations will cancel
synchronized playback.
•
While pressing and holding the SHIFT key, press
the CALL [CHASE] key on the front panel.
On the “SYNC” page of the “SYNC T/C” screen, set
“TC Chase” to “ON”.
While pressing and holding the SHIFT key, press
the CALL [CHASE] key on the front panel.
Page 61

TASCAM HS-8 61
11 – Troubleshooting
If the operation of this unit becomes irregular, please
check the following things before requesting repair. If the
following measures do not resolve the problem, contact
the store where you purchased the device or a TEAC
Repair Center
Power does not turn on.
ª
Confirm that the power plug, for example, is connected
•
completely.
Media is not recognized.
ª
Confirm that the CF card is securely inserted into the
•
CF slot.
Pause recording or playback.
•
The unit does not function.
ª
Is the panel lock function ON?
•
Playback is not possible.
ª
Confirm that the file is of a compatible
•
sampling frequency (44.1/48/48 pull-down/48
pull-up/88.2/96/176.4/192 kHz) and bit rate (16/24).
There is no sound.
ª
Reconfirm the connections of your monitoring system
•
and check the level of your amplifier.
Confirm that the “Level” setting on the HOME (PAN/
•
LEVEL) screen is not lowered.
If you are using an RC-HS20PD, confirm that the fader is
•
not lowered.
If you cannot hear the input signal, arm recording and
•
turn input monitoring ON.
If you cannot hear the playback sound, turn input
•
monitoring OFF.
Check the online function and online playback mode
•
settings.
I hear noise.
ª
Confirm that all cable connections are secure.
•
The touch panel does not work properly.
ª
Do not use commercially-available protective film for
•
LCD screens on the touch panel.
Confirm that the panel lock function is not engaged
•
and locking the display.
I cannot create a new project.
ª
Confirm that a project with the same name does not
•
already exist.
If the amount of space remaining on the CF card is
•
too small, a new project cannot be created. Erase
unnecessary data and then try again.
Recording is not possible.
ª
Reconfirm connections.
•
Adjust the recording levels.
•
If the CF card does not have enough capacity, erase
•
unneeded data and increase the amount of open space
or change the CF card.
If the maximum number of recordable takes or the
•
maximum take number has been reached, change the
recording folder.
If the total number of items in the folder, including
•
files and subfolders is too large, change the recording
folder.
Setting changes that I made are not
ª
remembered.
This unit backs up settings whenever the CF card
•
selection is changed, a project, folder or take is loaded,
and playback or recording occurs. After startup, if none
of these actions is conducted, settings might not be
backed up even if they are changed.
Page 62

62 TASCAM HS-8
12 – Messages
The following is a list of messages that the HS-8 shows in pop-up windows in some situations. Refer to this list to learn
more about each message as well as how to respond to them.
Message
--- error --INFO WRITING
--- FORMAT --Completed.
--- FULL FORMAT --FORMAT CFn?
This will erase all data on card
Really Continue?
--- FULL FORMAT ---
Formatting CFn...
--- ONLINE Function --Changes Output Routing.
--- QUICK FORMAT --FORMAT CFn?
This will erase all data on card
Really Continue?
--- QUICK FORMAT ---
Formatting CF n ...
--- RETAKE ---
Delete last take?
""tttttttttt""
--- Shutdown -- working...
CHn-n D-In: Fs convert On
Cannot select as Master clock.
Cannot Change Now
Currently **
Cannot Copy
Not enough space on CFn
Cannot Copy.
Folder already exists on CFn.
Overwrite Folder?
Cannot create more than
100 projects.
Cannot create new mark point..
Mark point already exists
at the same timestamp.
Cannot create new project.
Media Full.
Cannot edit this mark point.
Mark point already exists
at the same timestamp.
Cannot increment Take.
Interval is too short.
Cannot increment Take.
System limit reached,
Please make new folder.
Cannot make more than
1000 scenes.
Cannot make new scene.
Medial Full.
Cannot RECORD.
(Internal state error)
Cannot RECORD.
Media Full.
Cannot RECORD
System limit reached
Please make new folder
Details and responses Remarks
An error occurred while writing information.
Format has completed.
Full format will be executed. n = 1 or 2
Full format is occurring. n = 1 or 2
Enabling and disabling the ONLINE function
changes the sound output routing.
Quick format will be executed. n = 1 or 2
Quick format is occurring. n = 1 or 2
A retake will be executed. tttttttt = the name of the take to be
deleted
The unit is shutting down.
The sampling rate converter is ON for the digital
n-n = 1-2, 3-4, 5-6, 7-8
input that you tried to set as the clock master.
This item cannot be changed during playback,
on line operation, timecode chase or recording.
There is not enough available space on the copy
** = “Playing”, “ONLINE”, “Chasing TC” or
“Recording”
n = 1 or 2
destination card.
A folder with the same name already exists at
n = 1 or 2
the copy destination. Do you want to overwrite
that scene?
The maximum number of projects has already
been reached, so a new project cannot be
created.
You tried to create a mark at a time where a
mark already exists. You cannot create a mark at
the same time as another mark.
The card does not have enough space, so you
cannot create a new project.
Since a mark already exists at the same time, the
mark cannot be edited.
Editing is possible even when time data
is the same at the frame level if the value
differs at the subframe level, which is not
visible on the screen.
The interval is not long enough to allow the unit
to increment the take.
The total number of items in the folder,
including files and folders is too large, so starting
recording of the next take is not possible.
The maximum number of folders has already
been reached, so a new folder cannot be
created.
The card does not have enough space, so you
cannot create a new folder.
Something is preventing recording.
The CF card does not have enough space, so you
cannot record.
The total number of items in the folder,
including files and folders is too large, so starting
recording of the next take is not possible.
Page 63

TASCAM HS-8 63
12 – Messages
Message
Cannot RECORD.
Take limit reached.
Please change to another Folder
Cannot RECORD
Play Fs setting is not OFF
Please change Play Fs to OFF
Cannot Retake.
No Recent Take History.
Cannot set Mark point.
Mark limit reached.
Cannot turn Fs convert On.
CHn-n D-In is already
Master Clock.
CFn DEVICE ERROR
CFn Format failed
CFn has no projects.
Please create a project.
CFn is not available.
CFn is not usable
CFn MEDIUM ERROR
CFn not recommended format
for Recording/Playing.
CFn not recommended
for Recording/Playing.
(not UltraDMA)
CFn Read Error
CFn unrecognized format
Please Format this card.
CFn unsupported type
CFn Write Error
CFn(vvvvvvvv)
NUM OF PROJECTS : p
USED SIZE : u
FREE SIZE : f
TOTAL SIZE : t
Completed
Copy N selected folder
to CFn?
Copying folder...
Create new project?
""pppppppp""
""ssssssss""
Fs:**kHz, Frame Type:**F
Create Project failed
Creating Project...
Delete all marks
of this type?
(Count:N)
Delete N selected marks?
Delete N selected project?
Delete N selected folder?
Delete N selected take?
Deleting Project...
Deletin g Folder...
Deletin g Take...
Details and responses Remarks
Since the maximum number of recordable takes
or the take number has been reached, recording
is not possible. Change the folder.
Recording is not possible because PlayFs is set
to Pull-up or Pull-down. Set PlayFs to Off.
You cannot retake.
You cannot create more than 99 marks.
You tried to turn the sampling rate converter on
n-n = 1-2, 3-4, 5-6, 7-8
for the digital input that is selected as the master
clock.
The CF card cannot be recognized. n = 1 or 2
An error occurred during formatting, and
n = 1 or 2
formatting could not be completed.
The CF card does not have even one project.
There is no CF card. n = 1 or 2
You cannot copy. n = 1 or 2
The unit failed to read the card. n = 1 or 2
The media was not formatted by this unit,
so proper recording and playback cannot be
guaranteed.
n = 1 or 2
This appears when the card is formatted
with a cluster size that is smaller than the
standard of this unit.
This card does not meet the specifications
n = 1 or 2
required by the system, so using it for recording/
playback is not recommended.
An error occurred when reading the card. n = 1 or 2
This card has been formatted in a format other
n = 1 or 2
than FAT. Format it for use with this unit.
This card does not meet the specifications
n = 1 or 2
required by the system, so it cannot be used.
An error occurred when writing to the card. n = 1 or 2
This shows information about the CF card n = 1 or 2
vvvvvvvv = volume level
p: project number, u: capacity used
f: unused capacity, t: total capacity of CF
card
The operation has completed.
Confirm that you want to copy the selected
folder(s).
N = number of selected scenes
n = 1 or 2
The folder is being copied.
Confirm that you want to create a new project. pppppppp = name of project to be
created
ssssssss = name of first folder to be
created
The creation of the project failed.
The project is being created.
Confirm the deletion of marks of the selected
type.
N = number of marks of selected mark
type
Confirm the deletion of the selected marks. N = number of marks
Confirm the deletion of the selected projects. N = number selected
Confirm the deletion of the selected folders. N = number selected
Confirm the deletion of the selected takes. N = number selected
The project is being deleted.
The folder is being deleted.
The take is being deleted.
Page 64

64 TASCAM HS-8
12 – Messages
Message
Digital Input Error
DIN1-2 (Unlocked)
DIN3- 4 (no signal)
DIN5-6 (not audio)
DIN7-8 (unmatched Cbit)
External Clock Lost,
Switched to Internal
External Clock Regained
Switch to External?
Folder Copy failed
Folder Delete failed.
Folder Load failed.
Input Volume Locked
Input Volume
is locked
Last loaded project has
no folders.
Please make new folder.
Last loaded project
cannot be found.
Please select a project.
Last loaded folder
cannot be found.
Please select a folder.
Load selected project?
""pppppppp""
Load selected Folder?
""ssssssss""
Load selected Take?
""tttttttt""
Loading Project...
Loading Folder...
Loading Take...
Make new folder?
""ssssssss""
Make Folder failed
Making Folder...
Mark Point set
New Folder Name must not
start with ""@""
No Call Point
No Mark Point
No Tracks Armed for Record
Operation failed.
Operation failed.
Internal File / Folder
limit reached.
Operation failed.
Cannot find this ***.
Please Rebuild.
Details and responses Remarks
An error occurred with the digital input selected
for the input signal.
• Unlocked:
not synchronized with system
• no signal:
no signal is being input
• not audio:
Cbit information of input signal is
not audio
• not professional:
Cbit information of input signal is
consumer
• unmatched Cbit:
other Cbit information of input signal
is different from actual operation
mode
Synchronization with an external clock was
disrupted, so the internal clock was activated.
Synchronization with an external clock became
possible again.
Copying failed.
Deletion of the folder failed.
Loading of the folder failed.
The input volume is locked to prevent accidental
operation.
The most recently loaded project does not have
any folders. Create a new folder.
The last selected project cannot be found. Select
a different project.
The last selected folder cannot be found. Select
a folder.
Confirm that you want to load the selected
pppppppp = name of project to load
project.
Confirm that you want to load the selected
ssssssss = name of scene to load
folder.
Confirm that you want to load the selected take. tttttttt = name of take to load
The project is loading.
The folder is loading.
The take is loading.
Confirm that you want you want to make a new
ssssssss = folder name
folder.
Creation of the folder failed.
The folder is being created.
The mark has been created.
The folder name is not allowed. A folder name
must not start with the "@" mark.
The call point does not exist.
The mark point does not exist. You tried to skip marks before the Mark
point was accorded. This disappears
automatically after 2 seconds.
The record function is not ON for any tracks.
The operation could not be completed for some
reason.
The maximum number of files and folders
that can be created has been reached, so the
operation could not be completed.
The selected project/folder/take could not be
*** = project, folder or take
found, so the operation could not be completed.
Rebuild the selected item.
Page 65

TASCAM HS-8 65
12 – Messages
Message
Operation failed.
Internal File / Folder
limit reached.
Operation failed.
Path Name is too long.
Play Error.
Play Error
Buffer underrun
pppppppp
FOLDERS : n
Fs : f
TIMECODE : t
Project Delete failed.
Project Load failed.
Project Rename failed
Project save failed.
Project Screen
is not available
while Recording
Project Screen
is not available
in Jog Mode
Reading Media...
Reading Data...
Rebuild all Projects?
Rebuild current Project?
Rebuild current Folder?
Rebuild failed
Rebuild selected Project?
Rebuild selected Folder?
Reb uilding All...
Rebuilding project...
Reb uilding folder...
RECORD Error
RECORD Error
Buffer overflow
RECORD stopped.
Media Full.
Renaming Project
""pppppp""
to ""nnnnnn""
Renumber marks?
Screen Locked
Touch Panel Locked Out
Screen Locked
LCD Section Locked
Details and responses Remarks
The maximum number of files or folders has
been reached, so you cannot create a new folder.
The path name has more characters than
allowed, so the operation could not be
completed.
This message appears when making a
scene or recording results in a file path
name of more than 255 characters. This
can occur if you give projects and scenes
long names using a computer.
An error occurred during playback.
Data reading could not keep up
during playback.
This shows project information pppppppp = project name
n: number of folders
f: sampling frequency
t: type of timecode frame
Deletion of the project failed.
Loading of the project failed.
Changing the name of the project failed.
An error occurred while saving the project, and
saving failed.
Use the CLOSE button to close the pop-up
window.
The FAT file system might be broken.
Format the CF card or use a different one.
Formatting will erase all data on the card.
The “Project” screen cannot be changed during
recording.
The “Project” screen cannot be changed when in
jog mode.
The media is being read.
Data is being read.
Confirm that you want to rebuild all projects.
Confirm that you want to rebuild the current
project.
Confirm that you want to rebuild the current
folder.
Rebuilding failed.
Confirm that you want to rebuild the selected
project.
Confirm that you want to rebuild the selected
folder.
All projects are being rebuilt.
The project is being rebuilt.
The folder is being rebuilt.
An error occurred during recording.
The buffer became full during recording, and
writing to the card was too late.
The CF card ran out of space, so recording
stopped
The project is being renamed. pppppp = old project name
nnnnnn = new project name
Confirm that you want to remember the marks
The touch panel has been locked to prevent
misoperation.
The LCD section has been locked to prevent
misoperation.
Page 66

66 TASCAM HS-8
12 – Messages
Message
Selected take is in
another project.
Load that project
and selected Take?
ssssssss
TAKES : n
Fs : f
TOTAL SIZE : u
TOTAL TIME : t
Starting USB
Take Delete failed.
TAKE limit back to full.
Change to Sub Folder?
TAKE limit reduced.
Change to Folder?
Take Load failed.
There is no project.
Please create a project.
There is no folder
Please make a folder.
This name already exists.
Transport Locked
Transport Section locked
tttttttt
date
fs/bit/FileMode/NumOfTracks
SIZE: u
LENGTH: *h**m**s**f
START T/C: *h**m**s**
Details and responses Remarks
The selected take belongs to a different project.
Folder information display ssssssss = folder name
n: number of takes
f: sampling frequency
u: space used
t: total time of all takes
USB mode is being enabled.
Deletion of the take failed.
If Mono File Place is set to SubFolder, the limit to
the number of takes is restored to the maximum.
If Mono File Place is set to Folder, the limit to the
number of takes is reduced.
Loading of the take failed.
There is no project so the recording cannot be
made. Please make a project.
There is no folder so the recording cannot be
made. Please make a folder.
A project, scene or take that has the same name
already exists.
The transport keys have been locked to prevent
misoperation.
Take information display tttttttt = take name
date: year/month/day hour: minutes
fs: sampling frequency
bit: bit rate
FileMode: MONO or POLY
NumOfTracks: number of tracks
u: space used
tttttttt
START T/C: **h**m**s**f
FRAME TYPE: **F
Writing System File...
Take information display tttttttt = take name
START T/C: Timecode time at the
beginning of the file
FRAME TYPE: Frame type
Recording information is being written when
recording has stopped.
Page 67

TASCAM HS-8 67
13 – Specifications
General
Recording media
CompactFlash (CF) card
File system
FAT32
File format
BWF (Monophonic, Polyphonic)
Number of channels
8 channels (44.1/48/88.2/96 kHz)
8 channels + stereo mix (44.1/48 kHz)
4 channels (176.4/192 kHz)
Quantization bit rate
16/24
Sampling frequency
44.1/47.952/48/48.048/88.2/96/176.4/192 kHz
(47.952/48.048: 48 kHz ± 0.1% pull-down/pull-up)
Reference clock
Internal, Word In, Video In, Digital In (AES 1-8 IN, AES
A-BIN, ADAT 1-8 IN)
Time code frame rate
23.976, 24, 25, 29.97DF, 29.97NDF, 30DF, 30NDF
Limiter
Attack time: 3 msec
Release time: 300 msec
Threshold: -5 dBFS
Ratio: 32:1
Input and output
Input impedance: 10 kΩ
Nominal input level:
When reference level is –9 dB: +6 dBu (1.55 Vrms)
•
When reference level is not –9 dB: +4 dBu (1.23
•
Vrms)
Maximum input level (selectable): +15 dBu (4.36 Vrms),
+18 dBu (6.16 Vrms), +20 dBu (7.75 Vrms), +22 dBu
(9.76 Vrms), +24 dBu (12.28 Vrms)
ANALOG OUTPUT (1-8)
Connector: 25-pin D-sub
Output impedance: 100 Ω
Nominal output level:
When reference level is –9 dB: +6 dBu (1.55 Vrms)
•
When reference level is not –9 dB: +4 dBu (1.23
•
Vrms)
Maximum output level (selectable): +15 dBu (4.36
Vrms), +18 dBu (6.16 Vrms), +20 dBu (7.75 Vrms),
+22 dBu (9.76 Vrms), +24 dBu (12.28 Vrms)
ANALOG OUTPUT (A/B)
Connector: XLR-3-32 (1: GND, 2: HOT, 3: COLD) output
impedance: 100 Ω
Nominal output level:
When reference level is –9 dB: +6 dBu (1.55 Vrms)
•
When reference level is not –9 dB: +4 dBu (1.23
•
Vrms)
Maximum output level (selectable): +15 dBu (4.36
Vrms), +18 dBu (6.16 Vrms), +20 dBu (7.75 Vrms),
+22 dBu (9.76 Vrms), +24 dBu (12.28 Vrms)
PHONES
Connector: standard 6.3-mm (1/4”) stereo jack
Maximum output level: 45 mW + 45 mW or more
(THD+N 0.1% or less, into 32 Ω)
Analog audio input and output connectors
The error for nominal and maximum levels is ±1 dB for all
input and output jacks except the PHONES jack.
ANALOG INPUT (1-8)
Connector: 25-pin D-sub
Input impedance: 10 kΩ
Nominal input level:
When reference level is –9 dB: +6 dBu (1.55 Vrms)
•
When reference level is not –9 dB: +4 dBu (1.23
•
Vrms)
Maximum input level (selectable): +15 dBu (4.36 Vrms),
+18 dBu (6.16 Vrms), +20 dBu (7.75 Vrms), +22 dBu
(9.76 Vrms), +24 dBu (12.28 Vrms)
ANALOG INPUT (L/A, R/B)
Connector: XLR-3-31 (1: GND, 2: HOT, 3: COLD)
Digital audio input and output connectors
DIGITAL IN/OUT (AES/EBU)
Connector: D-Sub 25-pin
Minimum input voltage: 2 Vp-p
Maximum input voltage: 7 Vp-p
Output voltage: 2–5 Vp-p
Format: AES3-2003/IEC60958-4 (AES/EBU)
DIGITAL I/O (ADAT)
Connector: optical
Format: ADAT
DIGITAL INPUT A-B
Connector: XLR-3-31
Maximum/minimum input signal voltage amplitude:
2–7 Vp-p/110Ω
Page 68

68 TASCAM HS-8
13 – Specifications
Format: AES3-2003 (AES/EBU)
DIGITAL OUTPUT L-R
Connector: XLR-3-32
Output voltage: 2–5 Vp-p/110 Ω
Format: AES3-2003 (AES/EBU)
Control input and output connectors
RS-422
Connector: D-sub9-pin
RS -232C
Connector: D-sub9-pin
PARALLEL
Connector: D-sub25-pin
CASCADE IN
Connector: BNC
Input voltage: 5V TTL equivalent
Input impedance: 75Ω ±10% Allowable frequency
deviation of external synchronization: ± 100 ppm
CASCADE OUT
Connector: BNC
Output voltage: 5V TTL equivalent
Output impedance: 75Ω ±10%
Sampling frequency: 44.1/47.952/48/48.048/88.2/96/
176.4/192 kHz (47.952/48.048 kHz: 48 kHz 0.1% pull
down/0.1% pull up)
TIME CODE IN
Connector: BNC
Input voltage: 0.5 - 5 Vp-p
Input impedance: 20 kΩ
TIME CODE OUT
Connector: BNC
Output voltage: 2 Vp-p
Output impedance: 600Ω
WORD/VIDEO IN
Connector: BNC
Input voltage: 5V TTL equivalent
Input impedance: 75Ω ±10%
Allowable frequency deviation of external
synchronization: ± 100 ppm
Includes switch for enabling termination
Sampling frequency (when using WORD): 44.1/47.952
/48/48.048/88.2/96/176.4/192 kHz (47.952/48.048:
48 kHz ± 0.1% pull-down/pull-up)
OUT/THRU switch included (OUT is only for WORD
OUT)
ETHERNET
Connector: RJ45
Keyboard
Connector: Mini-DIN (PS/2)
USB
Connector: USB A-type 4-pin
Protocol: USB2.0 HIGH SPEED (480 Mbps)
Audio performance
Frequency response
ANALOG INPUT → ANALOG OUTPUT:
20 Hz - 20 kHz ±0.5 dB (Fs = ALL)
at 40 kHz +0.5 dB/–2 dB (Fs = 88.2/96 kHz)
at 80 kHz +0.5 dB/–5 dB (Fs = 176.4/192 kHz)
Distortion
ANALOG INPUT ∑ ANALOG OUTPUT: 0.005% or less
(Reference level: When –20 dB, +23 dBu input, 1
kHz, AES-17LPF)
S/N ratio
ANALOG INPUT ∑ ANALOG OUTPUT: 100 dB or more
(22 kHz LPF A-weighted)
Other specifications
Power
AC 100-240 V, 50-60 Hz
Power consumption
26 W
External dimensions (W x H x D)
482.7 x 88 x 284.4 mm/
19 x 3.465 x 11.2 in.
Weight
4.8 kg/10.58 lb
Operating temperature range
5–35ºC/41–95ºF
WORD/VIDEO THRU/OUT
Connector: BNC
Output voltage: 5V TTL equivalent
Output impedance: 75 Ω ±10%
Page 69

TASCAM HS-8 69
Dimensional drawings
432.2 mm
482.7 mm
465.7 mm
284.4 mm
14.4 mm18.3 mm
76.2 mm
88 mm
94 mm
13 – Specifications
Illustrations in this manual may differ in part from the actual product.
•
Specifications and the external appearance may be changed without notification to improve the product.
•
Page 70

70 TASCAM HS-8
Phones
Phones level
AES/EBU output 1 to 8
Analog output L/A /R/B
-
-
L
R
XLR
XLR
AES/EBU Stereo output
Analog output 1 to 8
D-sub 25 pin
Phones output
Remote Monitor output
Interface
D/A
Meter
Analog input 1 to8
AES/EBU input 1 to8
XLR
Play Tracks
Track8
Track1
StereoTrack
CF Card
Track2
Track3
Track4
Track5
Track6
Track7
CF Card
Track 1
Track 2
Track 3
Track 4
Track 5
Track 6
Track 7
Track 8
solo
Solobuss Stereo buss
Volume
Pan
MasterLevel
StereoTrack
limiter
Clip
Clip
Record
Tracks
solo
Volume
solo
Volume
solo
Volume
solo
Volume
solo
Volume
solo
Volume
solo
Volume
Pan
Pan
Pan
Pan
Pan
Pan
Pan
solo
2mix play
limiter on
Rec func.
Recfunc.
Rec func.
Recfunc.
Recfunc.
Recfunc.
Recfunc.
Recfunc.
2mix
Rec func.
Clip
Selector
Channel 8
Channel 1
D-sub 25 pin
A
B
Analog inputA / B
SRC
D-sub 25 pin
I/F
XLR
AES/EBU Stereo input
D/A
D/A
D/A
ADAT input 1 to8
-
A/D
-
-
A/D
D/A
ADAT output 1 to 8
D-sub 25 pin
(toRemote)
Online
Fader
XLR
Output
Source
Online
Fader
SoloLevel
Meter
Online
ON /OFF
Online
ON /OFF
Meter
solo
rec/monitor
play
rec/monitor
play
rec/monitor
play
rec/monitor
play
rec/monitor
play
rec/monitor
play
rec/monitor
play
rec/monitor
play
-
13 – Specifications
Blcok diagram
Page 71

TASCAM HS-8 71
Notes
Page 72

HS-8
TEAC CORPORATION
Phone: +81-42-356-9143
1-47 Ochiai, Tama-shi, Tokyo 206-8530, Japan
TEAC AMERICA, INC. www.tascam.com
Phone: +1-323-726-0303
7733 Telegraph Road, Montebello, California 90640 USA
TEAC CANADA LTD. www.tascam.com
Phone: +1905-890-8008 Facsimile: +1905-890-9888
5939 Wallace Street, Mississauga, Ontario L4Z 1Z8, Canada
TEAC MEXICO, S.A. de C.V. www.teacmexico.net
Phone: +52-55-5010-6000
Río Churubusco 364, Colonia Del Carmen, Delegación Coyoacán, CP 04100, México DF, México
TEAC UK LIMITED www.tascam.co.uk
Phone: +44-8451-302511
Suites 19 & 20, Building 6, Croxley Green Business Park, Hatters Lane, Watford, Hertfordshire, WD18 8TE, UK
TEAC EUROPE GmbH www.tascam.de
Phone: +49-611-71580
Bahnstrasse 12, 65205 Wiesbaden-Erbenheim, Germany
www.tascam.jp
Printed in China
 Loading...