

Page 1
»
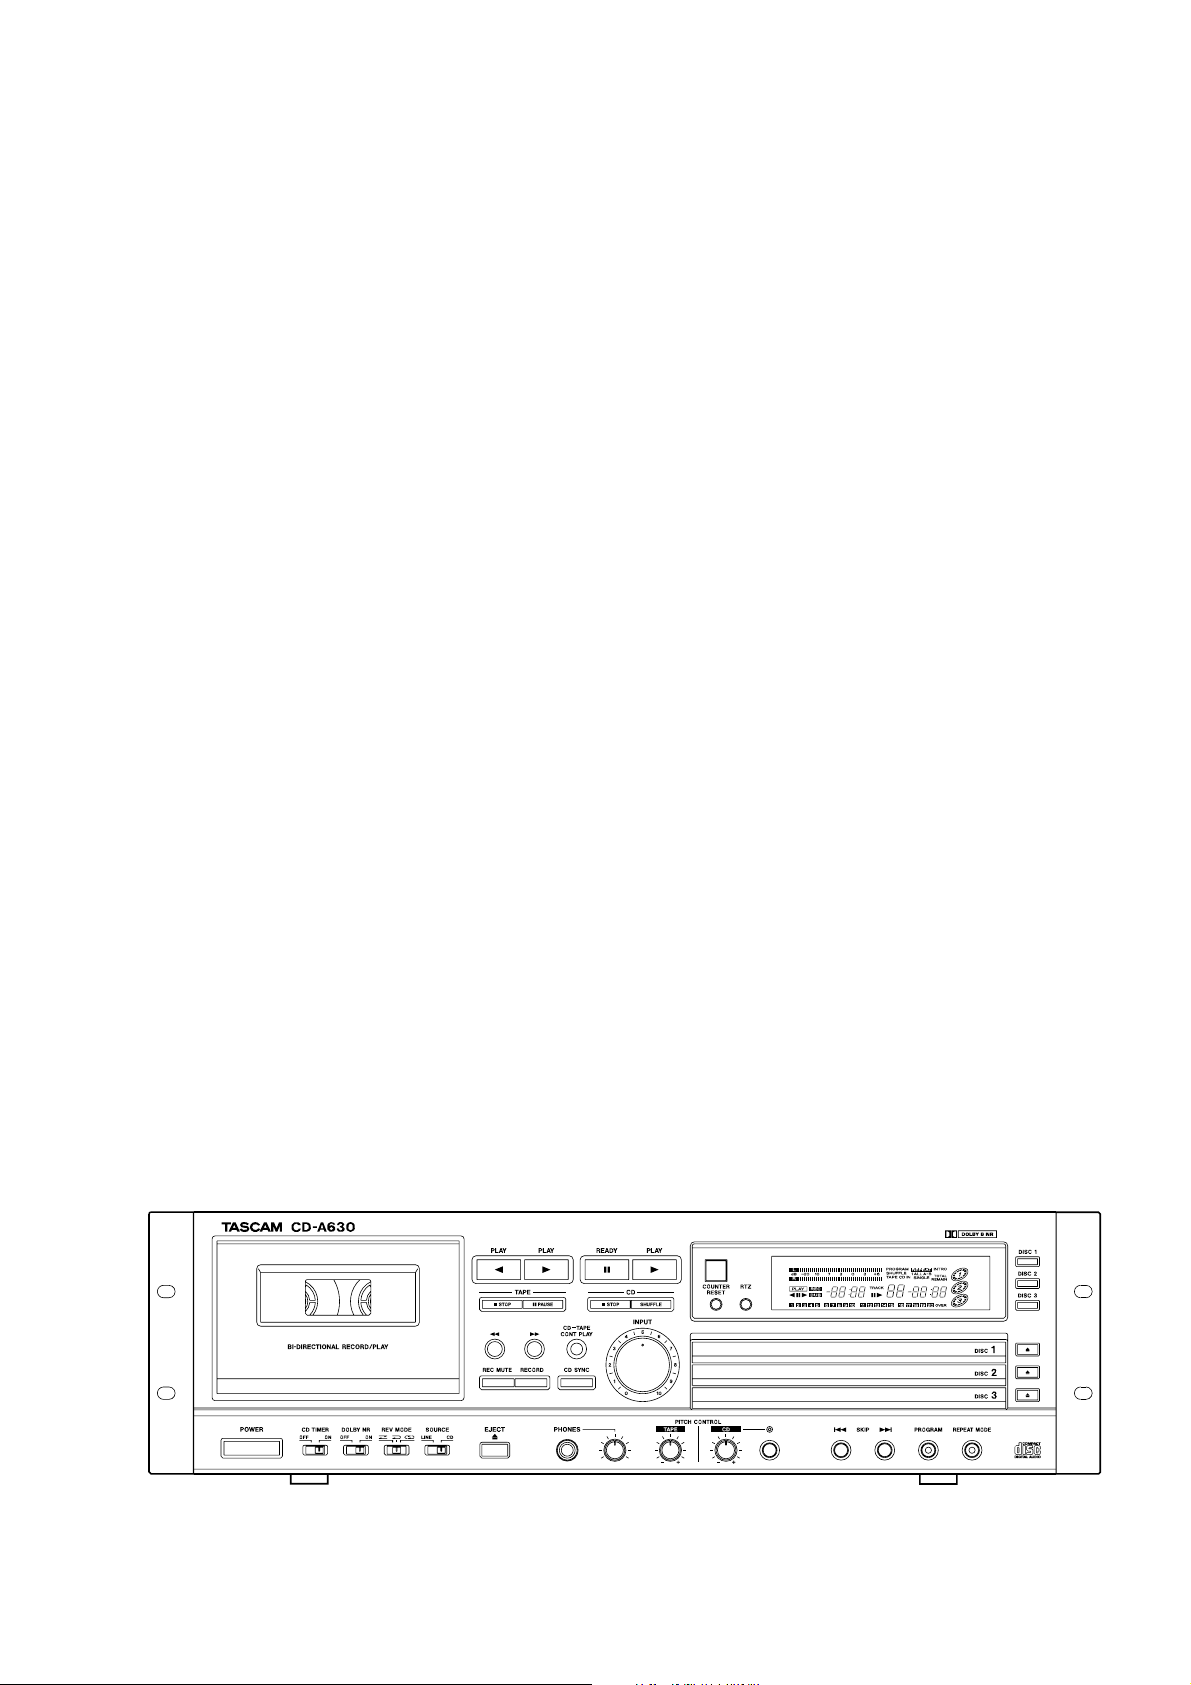
CD-A630
Compact Disc Pla yer / Reverse Cassette Dec k
3D0044700A
OWNER’S MANUAL
MANUEL DU PROPRIETAIRE
BEDIENUNGSANLEITUNG
MANUALE DI ISTRUZIONI
MANUAL DEL USUARIO
?
Page 2
2
WARNING: TO PREVENT FIRE OR SHOCK HAZARD, DO NOT EXPOSE THIS APPLIANCE TO RAIN OR MOISTURE.
CAUTION: TO REDUCE THE RISK OF ELECTRIC SHOCK, DO NOT REMOVE COVER (OR BACK). NO USERSERVICEABLE PARTS INSIDE. REFER SERVICING TO QUALIFIED SERVICE PERSONNEL.
Y
E
R
THE EXCLAMATION POINT WITHIN AN EQUILATERAL TRIANGLE IS INTENDED TO ALERT THE USER TO THE PRESENCE OF IMPORTANT
OPERATING AND MAINTENANCE (SERVICING) INSTRUCTIONS IN THE LITERATURE ACCOMPANYING THE APPLIANCE.
THE LIGHTNING FLASH WITH ARROWHEAD SYMBOL, WITHIN AN EQUILATERAL TRIANGLE, IS INTENDED TO ALERT THE USER TO THE
PRESENCE OF UNINSULATED "DANGEROUS VOLTAGE" WITHIN THE PRODUCT’S ENCLOSURE THAT MAY BE OF SUFFICIENT MAGNITUDE TO
CONSTITUTE A RISK OF ELECTRIC SHOCK TO PERSONS.
AC POWER CORD CONNECTION
CAUTION:
TO PREVENT ELECTRIC SHOCK, MATCH WIDE BLADE OF PLUG TO
WIDE SLOT, FULLY INSERT.
CORDE DE CONNEXION CA
ATTENTION:
POUR ÉVITER LES CHOCS ÉLECTRIQUES, INTRODUIRE LA LAME
LA PLUS LARGE DE LA FICHE DANS LA BORNE
CORRESPONDANTE DE LA PRISE ET POUSSER JUSQU’AU FOND.
For CANADA
Pour le CANADA
Optical pickup :
Type : LTOH96MK or GH5C105A1APK
Manufacturer : SHARP Corporation
Laser output : Less than 0.5 mW on the objective lens
Wavelength : 770 - 795 nm
CAUTION
< DO NOT REMOVE THE PROTECTIVE HOUSING USING
SCREWDRIVER.
< USE OF CONTROLS OR ADJUSTMENTS OR PERFORMANCE OF
PROCEDURES OTHER THAN THOSE SPECIFIED HEREIN MAY
RESULT IN HAZARDOUS RADIATION EXPOSURE.
< IF THIS PRODUCT DEVELOPS TROUBLE, MAKE A CONTACT
WITH OUR SERVICEMAN, AND DO NOT USE THE PRODUCT IN A
TROUBLED STATE.
TO THE USER
This equipment has been tested and found to comply with the limits for a Class B digital device, pursuant to Part 15 of the FCC Rules. These
limits are designed to provide reasonable protection against interference in a residential area. This device generates and uses radio
frequency energy and if not installed and used in accordance with the instructions, it may cause interference to radio or TV reception. If
this unit does cause interference with TV or radio reception you can try to correct the interference by one or more of the following
measures :
a) Reorient or relocate the receiving antenna.
b) Increase the separation between the equipment and the receiver.
c) Plug the equipment into a different outlet so that it is not on the same circuit as the receiver. If necessary, consult the dealer or an
experienced radio/TV technician for additional suggestions.
CAUTION
Changes or modifications to this equipment not expressly approved by TEAC CORPORATION for compliance could void the user's authority
to operate this equipment.
For U.S.A.
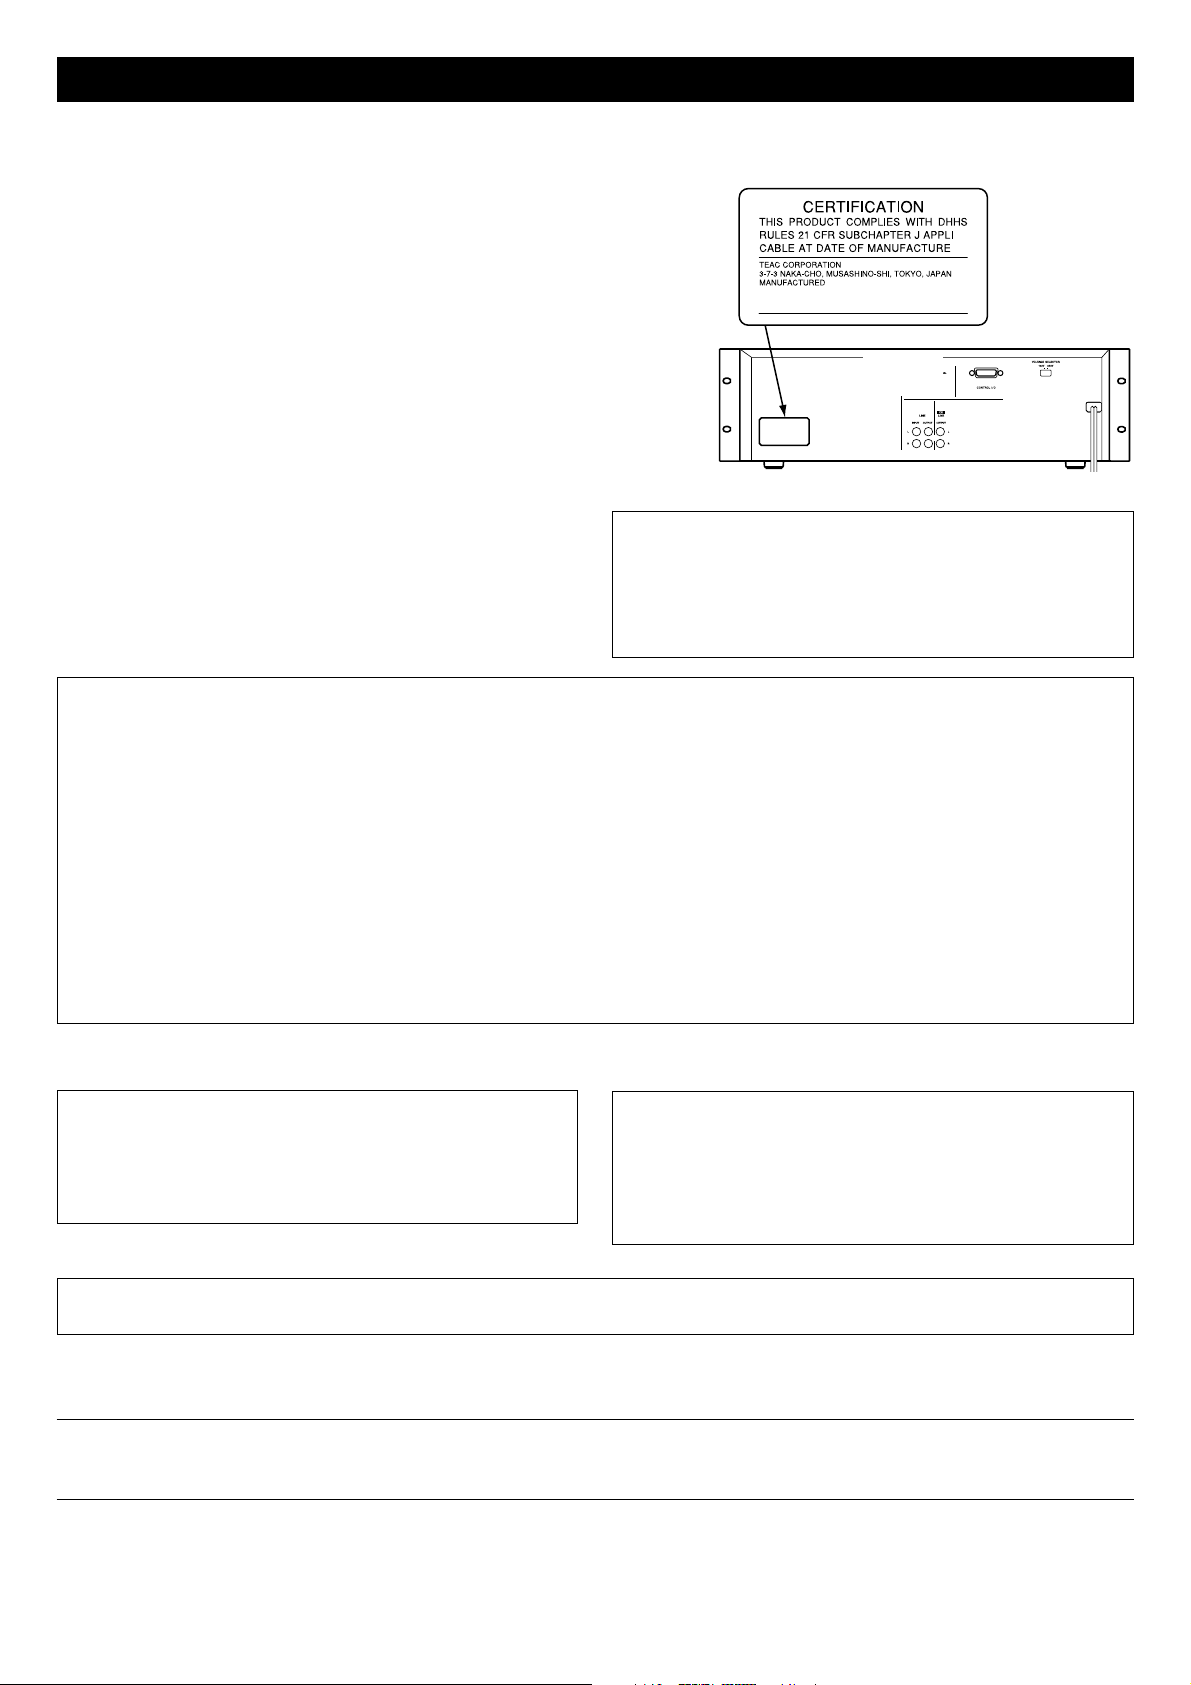
Important Safety Instructions
This product has been designed and manufactured according to
FDA regulations “title 21, CFR, chapter 1, subchapter J, based on the
Radiation Control for Health and Safety Act of 1968“, and is
classified as class 1 laser product. There is not hazardous invisible
laser radiation during operation because invisible laser radiation
emitted inside of this product is completely confined in the
protective housings.
The label required in this regulation is shown
①
.
For U.S.A.
①
Page 3
3
CAUTION
< Read all of these Instructions.
< Save these Instructions for later use.
< Follow all Warnings and Instructions marked on the audio equipment.
1) Read Instructions — All the safety and operating instructions should
be read before the product is operated.
2) Retain Instructions — The safety and operating instructions should
be retained for future reference.
3) Heed Warnings — All warnings on the product and in the operating
instructions should be adhered to.
4) Follow Instructions — All operating and use instructions should be
followed.
5) Cleaning — Unplug this product from the wall outlet before cleaning.
Do not use liquid cleaners or aerosol cleaners. Use a damp cloth for
cleaning.
6) Attachments — Do not use attachments not recommended by the
product manufacturer as they may cause hazards.
7) Water and Moisture — Do not use this product near water — for
example, near a bath tub, wash bowl, kitchen sink, or laundry tub; in a
wet basement; or near a swimming pool; and the like.
8) Accessories — Do not place this product on an unstable cart, stand,
tripod, bracket, or table. The product may fall, causing serious injury to
a child or adult, and serious damage to the product. Use only with a
cart, stand, tripod, bracket, or table recommended by the manufacturer,
or sold with the product. Any mounting of the product should follow the
manufacturer’s instructions, and should use a mounting accessory
recommended by the manufacturer.
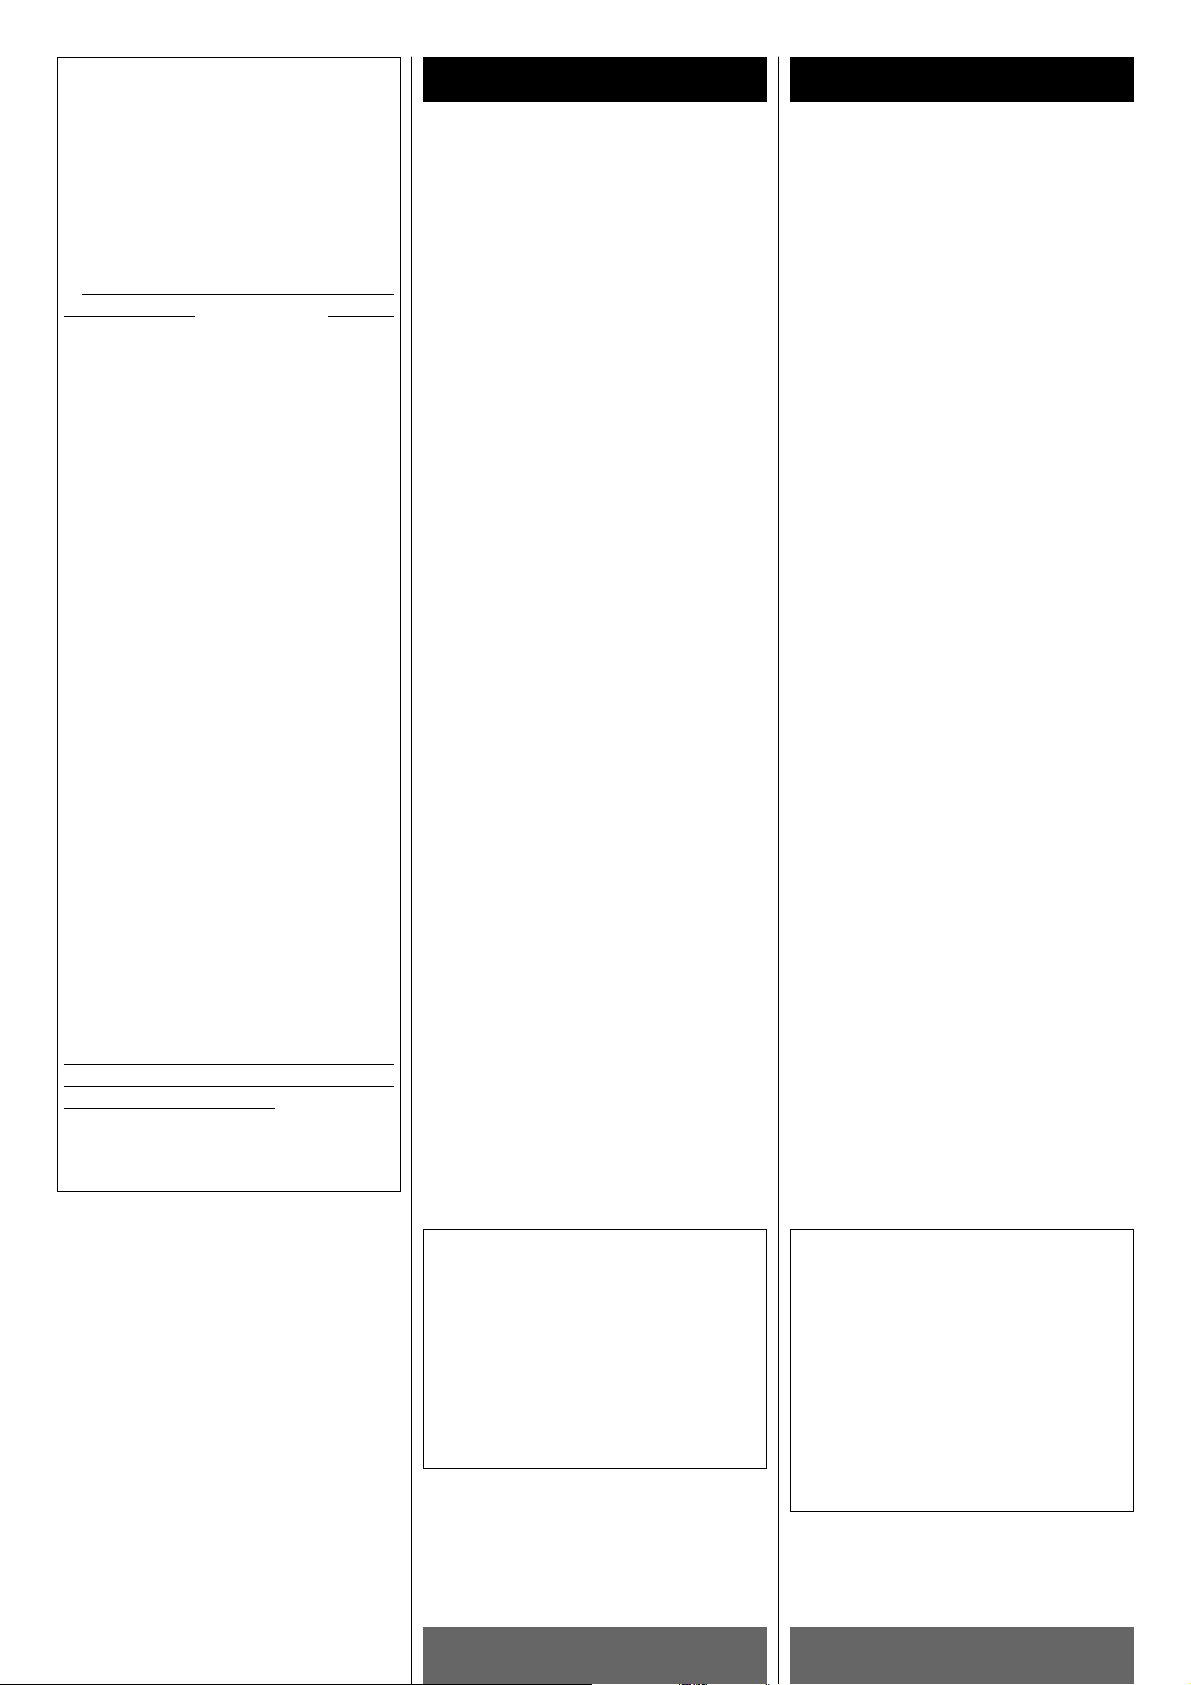
9) A product and cart combination should be moved
with care. Quick stops, excessive force, and uneven
surfaces may cause the product and cart combination
to overturn.
10) Ventilation — Slots and openings in the cabinet
are provided for ventilation and to ensure reliable operation of the
product and to protect it from overheating, and these openings must not
be blocked or covered. The openings should never be blocked by
placing the product on a bed, sofa, rug, or other similar surface. This
product should not be placed in a built-in installation such as a
bookcase or rack unless proper ventilation is provided or the
manufacturer’s instructions have been adhered to.
11) Power Sources — This product should be operated only from the
type of power source indicated on the marking label. If you are not sure
of the type of power supply to your home, consult your product dealer
or local power company. For products intended to operate from battery
power, or other sources, refer to the operating instructions.
12) Grounding or Polarization — This product may be equipped with a
polarized alternating-current line plug (a plug having one blade wider
than the other). This plug will fit into the power outlet only one way. This
is a safety feature. If you are unable to insert the plug fully into the
outlet, try reversing the plug. If the plug should still fail to fit, contact
your electrician to replace your obsolete outlet. Do not defeat the safety
purpose of the polarized plug.
13) Power-Cord Protection — Power-supply cords should be routed so
that they are not likely to be walked on or pinched by items placed upon
or against them, paying particular attention to cords at plugs,
convenience receptacles, and the point where they exit from the
product.
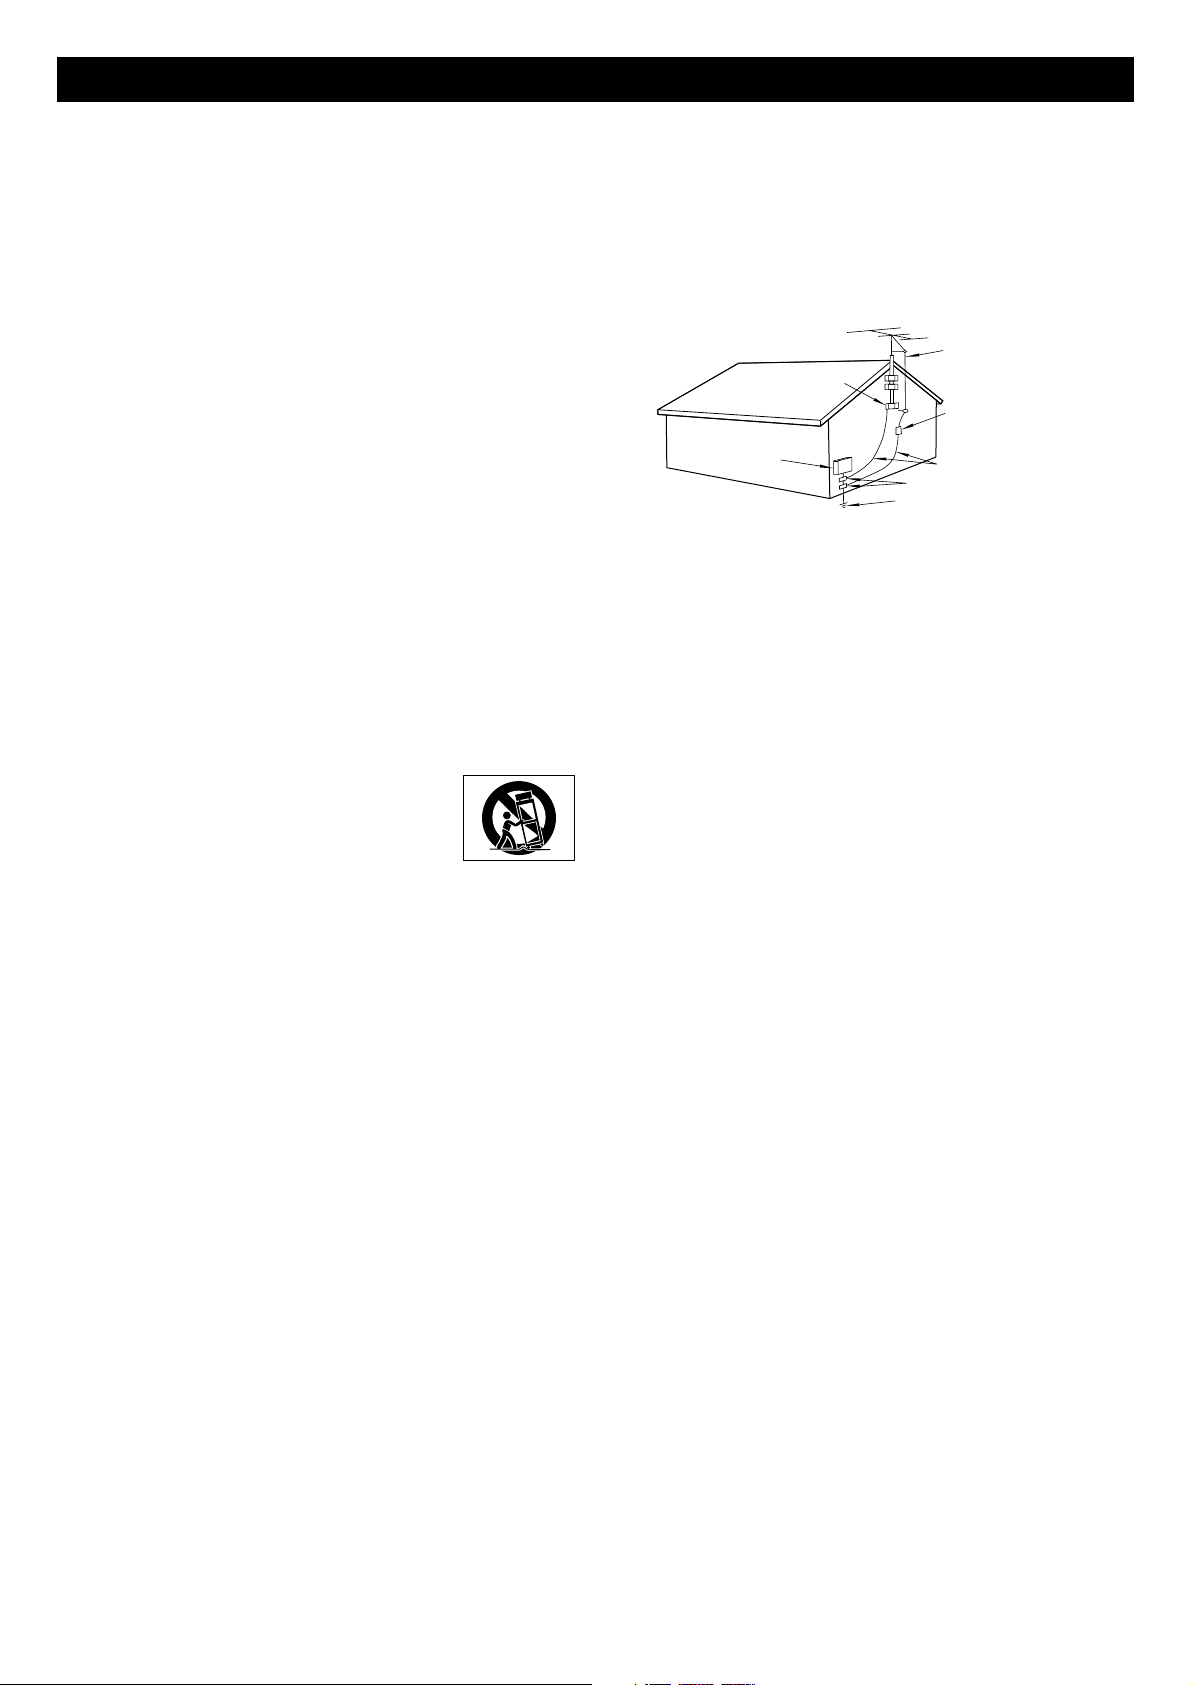
14) Outdoor Antenna Grounding — If an outside antenna or cable
system is connected to the product, be sure the antenna or cable
system is grounded so as to provide some protection against voltage
surges and built-up static charges. Article 810 of the National Electrical
Code, ANSI/NFPA 70, provides information with regard to proper
grounding of the mast and supporting structure, grounding of the leadin wire to an antenna discharge unit, size of grounding conductors,
location of antenna-discharge unit, connection to grounding electrodes,
and requirements for the grounding electrode.
Note to CATV system installer:
This reminder is provided to call the CATV system installer’s attention to
Section 820-40 of the NEC which provides guidelines for proper
grounding and, in particular, specifies that the cable ground shall be
connected to the grounding system of the building, as close to the point
of cable entry as practical."
15) Lightning — For added protection for this product during a lightning
storm, or when it is left unattended and unused for long periods of time,
unplug it from the wall outlet and disconnect the antenna or cable
system. This will prevent damage to the product due to lightning and
power-line surges.
16) Power Lines — An outside antenna system should not be located in
the vicinity of overhead power lines or other electric light or power
circuits, or where it can fall into such power lines or circuits. When
installing an outside antenna system, extreme care should be taken to
keep from touching such power lines or circuits as contact with them
might be fatal.
17) Overloading — Do not overload wall outlets, extension cords, or
integral convenience receptacles as this can result in risk of fire or
electric shock.
18) Object and Liquid Entry — Never push objects of any kind into this
product through openings as they may touch dangerous voltage points
or short-out parts that could result in a fire or electric shock. Never spill
liquid of any kind on the product.
19) Servicing — Do not attempt to service this product yourself as
opening or removing covers may expose you to dangerous voltage or
other hazards. Refer all servicing to qualified service personnel.
20) Damage Requiring Service — Unplug this product from the wall
outlet and refer servicing to qualified service personnel under the
following conditions:
a ) when the power-supply cord or plug is damaged.
b ) if liquid has been spilled, or objects have fallen into the product.
c ) if the product has been exposed to rain or water.
d)if the product does not operate normally by following the operating
instructions. Adjust only those controls that are covered by the
operating instructions as an improper adjustment of other controls may
result in damage and will often require extensive work by a qualified
technician to restore the product to its normal operation.
e) if the product has been dropped or damaged in any way.
f)when the product exhibits a distinct change in performance _ this
indicates a need for service.
21) Replacement Parts — When replacement parts are required, be
sure the service technician has used replacement parts specified by
the manufacturer or have the same characteristics as the original part.
Unauthorized substitutions may result in fire, electric shock, or other
hazards.
22) Safety Check — Upon completion of any service or repairs to this
product, ask the service technician to perform safety checks to
determine that the product is in proper operating condition.
23) Wall or Ceiling Mounting — The product should be mounted to a
wall or ceiling only as recommended by the manufacturer.
24) Heat — The product should be situated away from heat sources
such as radiators, heat registers, stoves, or other products (including
amplifiers) that produce heat.
ANTENNA
LEAD IN
WIRE
ANTENNA
DISCHARGE UNIT
(NEC SECTION 810-20)
GROUNDING CONDUCTORS
(NEC SECTION 810-21)
GROUND CLAMPS
POWER SERVICE GROUNDING
ELECTRODE SYSTEM
(NEC ART 250. PART H)
NEC - NATIONAL ELECTRICAL CODE
ELECTRIC
SERVICE
EQUIPMENT
Example of Antenna Grounding
as per National Electrical
Code, ANSI/NFPA 70
GROUND
CLAMP
Important Safety Instructions
Page 4

ENGLISH FRANÇAIS
Contents Sommaire
4
Thanks for buying a TASCAM. Read this
manual carefully to get the best
performance from this unit.
Nous vous remercions pour l’achat d’un
appareil TASCAM. Lire ce manuel avec
attention pour obtenir les meilleures
performances possibles de cet appareil.
If you need to re-attach the feet and
screws to the unit, make sure that
you use the same feet and screws that
you removed for rack mounting.
Use of any other feet or screws may
cause damage to the unit.
Si vous avez besoin de réattacher les
pieds et les vis à l’appareil, assurez-vous
d’utiliser les mêmes pieds et vis que vous
avez démontés du bâti.
L’utilisation d’autres pieds ou vis pourrait
endommager l’appareil.
Voltage Conversion
(General export models only)
Be sure to remove the power cord from
the AC outlet before repositioning the
voltage converter switch.
1. Locate the voltage selector on the rear
panel.
2. Using a flat-bladed screwdriver, set to
the appropriate 230V or 120V position
according to your area.
IN NORTH AMERICA USE ONLY ON 120 V
SUPPLY.
Changement de tension
(Modèles s'exportation générale
seulement)
Bien débrancher le cordon d'alimentation
de la prise secteur avant de repositionner
le sélecteur de changement de tension.
1. Localiser le sélecteur de tension par le
arrièle du appareil.
2. En utilisant un tournevis à lame plate,
régler sur la position appropriée 230V
ou 120V en fonction de la tension
locale.
DANS L'AMÉRIQUE DU NORD:
UTILISABLE SUR 120 V D'ALIMENTATION
UNIQUEMENT.
Before Use.................................................... 6
Compact Disc............................................... 8
Cassette Tape ............................................ 12
Dolby NR ..................................................... 14
Maintenance.............................................. 14
Connections................................................ 16
Remote Control Unit.................................. 18
Name of Each Control............................... 20
CD
Playback...................................................... 30
Intro Check ................................................. 36
Repeat Playback........................................ 38
Shuffle Playback........................................ 42
Single Playback ......................................... 44
Programmed Playback ............................. 46
Timer Playback .......................................... 50
Time Display ............................................... 52
TAPE
Playback...................................................... 54
Recording.................................................... 58
CD Synchronous Recording..................... 64
Continuous Playback ................................ 68
Troubleshooting......................................... 70
Specifications ............................................ 70
Avant Utilisation .......................................... 6
Disques Compacts....................................... 8
Bandes ........................................................ 12
Dolby NR ..................................................... 14
Entretien...................................................... 14
Connexions................................................. 16
Boîtier de télécommande......................... 18
Nomenclature ............................................ 22
CD
Lecture ........................................................ 30
Examen du début
de chaque plage musicale................. 36
Répétition de la lecture ............................ 38
Lecture au hasard ..................................... 42
Lecture d'une seule plage musicale ...... 44
Lecture programmée ................................ 46
Lecture commandée
par programmateur............................. 50
Affichage du temps................................... 52
TAPE
Lecture ........................................................ 54
Enregistrement........................................... 58
Enregistrement synchronisé d'un CD..... 64
Lecture enchaînée .................................... 68
Dépannage ................................................. 71
Caractéristiques ........................................ 71
MISE EN GARDE:
Le réenregistrement d’oeuvres
enregistrées sur cassette ou sur disque,
ou diffusées sur les ondes peut
contrevenir à la législation sur les droits
d’auteur. Renseignez-vous avant
d’effectuer un tel enregistrement.
CAUTION:
Recording pre-recorded tapes, records, or
other published or broadcast material may
infringe copyright laws. Check before
recording.
Page 5

DEUTSCH ESPAÑOL
IndiceInhalt Indice
5
ITALIANO
Vielen Dank für den Kauf dieses TASCAM Geräts. Bitte lesen Sie diese Anleitung
sorgfältig durch, um die Leistungs-fähigkeit
dieses Geräts optimal nutzen zu können.
Grazie per aver acquistato un prodotto
TASCAM. Leggere attentamente questo
manuale per ottenere le migliori prestazioni
da questo apparecchio.
Enhorabuena por la adquisición de un
TASCAM. Lea detenidamente este manual a
fin de obtener el mejor rendimiento de esta
unidad.
Previo al empleo.......................................... 7
Manipulación de discos............................. 9
Cintas........................................................... 13
Dolby NR ..................................................... 15
Mantenimiento........................................... 15
Conexión ..................................................... 17
Contador de tiempo................................... 19
Nombre de los controles.......................... 28
CD
Reproducción............................................. 31
Comprobación de preludio....................... 37
Reproducción repetida............................. 39
Reproducción aleatoria............................ 43
Reproducción simple................................ 45
Reproducción programada...................... 47
Reproducción por el temporizador......... 51
Visualización del tiempo........................... 53
TAPE
Reproducción............................................. 55
Grabación ................................................... 59
Grabación sincronizada de CD................ 65
Reproducción continua............................ 69
Solución de problemas............................. 74
Especificaciones ....................................... 74
Vor Inbetriebnahme .................................... 7
Handhabung von Compact Discs.............. 9
Kassette ...................................................... 13
Dolby NR ..................................................... 15
Pflege und Wartung.................................. 15
Anschluß..................................................... 17
Betrieb mit der Fernbedienung ............... 19
Bezeichnung der Bedienelemente......... 24
CD
Wiedergabe................................................ 31
Anspielfunktion.......................................... 37
Wiederholwiedergabe.............................. 39
Zufallsgesteuerte Wiedergabe ............... 43
Einzelwiedergabe...................................... 45
Programmgesteuerte Wiedergabe......... 47
Timergesteuerte Wiedergabe................. 51
Zeitanzeige ................................................. 53
TAPE
Wiedergabe ............................................... 55
Kassettenaufnahme.................................. 59
CD Synchron-Kopierfunktion................... 65
Fortlaufende Wiedergabe........................ 69
Fehlerbeseitigung ..................................... 72
Technische Daten ..................................... 72
Prima dell'uso............................................... 7
Come tenere i CD......................................... 9
Cassette ...................................................... 13
Dolby NR ..................................................... 15
Manutenzione ............................................ 15
Collegamento ............................................. 17
Funzionamento col telecomando............ 19
Ubicazione e denominazione dei camandi
................................................................ 26
CD
Riproduzione............................................... 31
Controllo delle introduzioni...................... 37
Riproduzione ripetuta................................ 39
Riproduzione in ordine casuale............... 43
Riproduzione singola................................. 45
Riproduzione Programmata..................... 47
Riproduzione con timer............................. 51
Visualizzazione dei tempi ......................... 53
TAPE
Riproduzione............................................... 55
Registrazione.............................................. 59
Registrazione sincronizzata da CD......... 65
Riproduzione ininterrotta.......................... 69
Ricerca guasti............................................ 73
Specifica..................................................... 73
Zum Wiederanbringen der Füße und
Schrauben müssen Sie unbedingt
dieselben Füße und Schrauben
verwenden, die bei der Gestellmontage
abgenommen worden sind.
Durch den Gebrauch anderer Füße oder
Schrauben kann die Einheit beschädigt
werden.
Se si avesse bisogno di reinstallare
piedini e viti all'unità, si raccomanda di
utilizzare gli stessi piedini e le stesse viti
rimosse al tempo di montaggio del rack.
Usare piedini e viti diversi potrebbero
danneggiare l'unità.
Se você precisar reinstalar os pés e
parafusos na unidade, certifique-se de
utilizar os mesmos pés e parafusos que
retirou para a montagem da estante.
O uso de quaisquer outros pés e
parafusos pode causar danos à unidade.
ATTENZIONE:
La registrazione di nastri preregistrati,
dischi o di altro materiale pubblicato o
trasmesso può violare le leggi relative al
copyright. Verificare prima di registrare.
PRECAUCIÓN:
La grabación de cintas y discos
pregrabados así como de otros materiales
publicados o emitidos puede infringir las
leyes sobre derechos de autor.
Compruébelo antes de proceder a la
grabación.
HINWEIS:
Durch Aufzeichnen bespielter Cassetten,
Schallplatten oder von anderweitig
veröffentlichtem oder ausgestrahltem
Material werden u.U. Urheberrechte
verletzt. Prüfen Sie dies vor der
Aufnahme.
Page 6
ENGLISH FRANÇAIS
Before Use Avant Utilisation
6
Lire ceci avant de faire fonctionner
l'appareil
< L'appareil pouvant dégager de la chaleur
lorsqu'il fonctionne, laisser un
dégagement suffisant au-dessus de
l'appareil afin de permettre une
ventilation naturelle.
< La tension d'alimentation de l'appareil
doit être celle indiquée à l'arrière de
l'appareil. En cas de doute, contacter un
électricien.
< Choisir avec soin l'endroit où vous
placerez votre appareil. Eviter de le
placer directement au soleil ou près
d'une source de chaleur. Eviter aussi les
endroits sujets à des vibrations, à de la
poussière excessive, à la chaleur, au
froid ou à l'humidité.
< Ne pas placer CD-A630 sur le dessus de
l’amplificateur/récepteur.
< Ne pas ouvrir le coffret car ceci
risquerait de provoquer des dommages
aux circuits ou des chocs électriques. Si
un objet rentre dans l'appareil, contacter
votre revendeur.
< Lors du débranchement du cordon
d'alimentation de la prise murale,
toujours tirer sur la fiche et non sur le
cordon.
< Pour garder le capteur laser propre, ne
pas y toucher et ne pas oublier de fermer
le tiroir du disque.
< Ne pas essayer de nettoyer l'appareil
avec des solvants chimiques car ceci
pourrait endommager le fini de l'appareil.
Utiliser un chiffon propre et sec.
< Garder soigneusement ce manuel
d'instructions pour une référence
ultérieure.
Read this before operation
< As the unit may become hot during
operation, always leave sufficient space
above the unit for ventilation.
< The voltage supplied to the unit should
match the voltage as printed on the rear
panel. If you are in any doubt regarding
this matter, consult an electrician.
< Choose the installation location of your
unit carefully. Avoid placing it in direct
sunlight or close to a source of heat. Also
avoid locations subject to vibrations and
excessive dust, heat, cold or moisture.
< Do not place the unit on the
amplifier/receiver.
< Do not open the cabinet as this might
result in damage to the circuitry or
electrical shock. If a foreign object
should get into the set, contact your
dealer.
< When removing the power plug from the
wall outlet, always pull directly on the
plug, never yank the cord.
< To keep the laser pickup clean, do not
touch it, and do not forget to close the
disc tray.
< Do not attempt to clean the unit with
chemical solvents as this might damage
the finish. Use a clean, dry cloth.
< Keep this manual in a safe place for
future reference.
IMPORTANT(for U.K.Customers)
DO NOT cut off the mains plug from this
equipment. If the plug fitted is not suitable
for the power points in your home or the
cable is too short to reach a power point,
then obtain an appropriate safety approved
extension lead or consult your dealer.
If nonetheless the mains plug is cut off,
remove the fuse and dispose of the plug
immediately, to avoid a possible shock
hazard by inadvertent connection to the
mains supply.
If this product is not provided with a mains
plug, or one has to be fitted, then follow the
instructions given below:
IMPORTANT. DO NOT make any
connection to the larger terminal which is
marked with the letter E or by the safety
earth symbol | or coloured GREEN or
GREEN-and-YELLOW.
The wires in the mains lead on this product
are coloured in accordance with the
following code:
BLUE : NEUTRAL
BROWN : LIVE
As these colours may not correspond with
the coloured markings identifying the
terminals in your plug proceed as follows:
The wire which is coloured BLUE must be
connected to the terminal which is marked
with the letter N or coloured BLACK.
The wire which is coloured BROWN must
be connected to the terminal which is
marked with the letter L or coloured RED.
When replacing the fuse only a correctly
rated approved type should be used and be
sure to re-fit the fuse cover.
IF IN DOUBT — CONSULT A COMPETENT
ELECTRICIAN.
When the unit is turned on, it will take
some time for the unit to initialize. The
noise during initialization doesn't indicate
a problem with the unit.
Never turn the unit off while the red disc
mark or "--:--" is blinking, namely while
initializing the unit, loading a disc, or
opening a disc tray. Or the unit might be
damaged.
Un certain temps est nécessaire pour
effectuer l'initialisation de l'appareil après
sa mise en service. Au cours de cette
opération, l'appareil émet des bruits mais
cela n'a rien d'anormal.
Ne jamais éteindre l'appareil quand le
voyant rouge ou "--:--" clignote, c'est à
dire lors de l'initialisation de la machine,
du chargement du disque ou de
l'ouverture du tiroir.
Ceci peut endomager l'appareil.
Page 7

DEUTSCH ESPAÑOL
Prima dell'usoVor Inbetriebnahme Previo al empleo
7
ITALIANO
Bitte vor Inbetriebnahme lesen
< Da sich das Gerät während des Betriebs
erwärmt, sollten Sie bei der Aufstellung
stets auf genügenden Platz achten, so
daß eine ausreichende Luftzirkulation
gewährleistet ist.
< Achten Sie stets darauf, daß die
Spannung Ihres Stromnetzes mit dem auf
der Geräterückseite angegebenen Wert
übereinstimmt. Sollten Sie dazu Fragen
haben oder im Zweifel sein, wenden Sie
sich bitte an einen Elektrofachmann.
< Wählen Sie einen geeigneten Standort
für den Receiver. Nicht geeignet sind
Standorte, die direkter
Sonneneinstrahlung, Heizquellen,
Vibrationen, Staubeinwirkung, starken
Temperaturschwankungen oder
Feuchtigkeit ausgesetzt sind.
< Stellen Sie das Gerät nicht auf einen
Verstärker oder Receiver.
< Niemals das Gehäuse öffnen, da
hierdurch Schäden an der Elektronik
und/oder elektrische Schläge verursacht
werden können. Falls ein Fremdkörper in
das Geräteinnere gelangen sollte,
wenden Sie sich bitte an Ihren
Fachhändler.
< Bei Abziehen des Netzkabels darauf
achten, das Kabel am Stecker zu halten.
Niemals am Kabel ziehen.
< Um den Laser-Tonabnehmer
sauberzuhalten, diesen nicht berühren
und den CD-Halter stets einfahren.
< Zur Gehäusereinigung niemals
Lösungsmittel verwenden, da hierdurch
die Gehäuseoberfläche beschädigt
werden kann. Ein sauberes trockenes
Tuch verwenden.
< Bewahren Sie diese
Bedienungsanleitung auf, um bei
eventuell später auftauchenden Fragen
darin nachschlagen zu können.
Leggere questo manuale prima di procedere
all'uso
< Dato che l’apparecchio può diventare
caldo durante il funzionamento,
raccomandiamo di garantire adeguate
condizioni di ventilazione, lasciando
sempre sopra di esso sufficiente spazio
libero.
< La tensione d'alimentazione c.a.
applicata all’apparecchio deve
corrispondere alla tensione stampata sul
pannello posteriore. In caso di dubbio,
chiedere consiglio a un elettricista.
< Scegliere con cura il luogo in cui
installare l'apparecchio. Evitare di
esporlo alla diretta luce del sole o ad una
sorgente di calore. Evitare inoltre luoghi
soggetti a vibrazioni o ad eccessive
accumulazioni di polvere, calore, freddo
od umidità.
< Non posare CD-A630 direttamente
sull'amplificatore /sintomizzatore.
< Non aprire la cassa dell'apparecchio. Ciò
potrebbe danneggiarne la circuitazione o
causare scariche elettriche. Se un
qualche oggetto estraneo dovesse
essere entrato nell'apparecchio stesso,
rivolgersi al rivenditore.
< Per staccare la spina dalla presa di rete,
agire direttamente sulla spina stessa,
evitando di tirare il cavo.
< Per mantenere pulito il lettore laser,
evitare di toccarlo e chiudere sempre il
vano CD.
< Evitare di pulire l'apparecchio con
solventi chimici poichè ciò potrebbe
danneggiare la rifinitura esterna. Fare
semplicemente uso di un panno pulito ed
asciuto.
< Tenere questo manuale in un luogo di
facile accesso, per ogni eventuale futuro
riferimento.
Lea lo siguiente antes de poner en
funcionamiento el aparato
< La unidad puede calentarse durante su
funcionamiento, por lo que siempre
deberá dejar espacio suficiente por
encima de ella para la ventilación.
< La tensión suministrada a la unidad
deberá coincidir con la tensión rotulada
en el panel posterior. En caso de duda,
consulte a un electricista.
< Elija con cuidado el lugar de instalación
para su aparato. No lo coloque a la luz
solar directa o cerca de fuentes que
generen calor. Evite también lugares
expuestos a vibraciones y muy
polvorientos, calurosos, fríos o húmedos.
< No coloque el CD-A630 sobre el
amplificador/receptor.
< No abra el gabinete ya que esto podría
producir daños en los circuitos o
electrochoques. Si entrara algún objeto
en el interior del aparato, póngase en
contacto con su concesionario.
< Al desenchufar el cordón del
tomacorriente, tire siempre de la clavija,
nunca del cordón.
< Para mantener limpio el fonocaptor laser,
no lo toque y no olvide cerrar la bandeja
portadisco.
< No utilice solventes químicos para
limpiar el aparato ya que podría dañar el
acabado. Use un paño seco y limpio.
< Guarde este manual en un lugar seguro
para usarlo como referencia en el futuro.
Der Initialisierungsprozeß nach dem
Einschalten des Geräts nimmt einige Zeit
in Anspruch. Das während der
Initialisierung zu vernehmende Geräusch
ist normal und kein Anzeichen für eine
Betriebsstörung.
Um Beschädigungen des Geräts zu
vermeiden, schalten Sie es nie ab, wenn
das rote CD-Zeichen oder „--:--„ blinkt.
Dies gilt insbesondere während der
Initialisierung des Geräts, beim Einlegen
einer CD oder während Sie die CD-Lade
öffnen.
Quando l'unità viene accesa, bisogna
aspettare un po' che l'inizializzazione
dell'unità venga completata. Durante
l'inizializzazione si sente un rumore
dovuta a quest'operazione, non a un
malfunzionamento.
Per evitare di danneggiare questo
apparecchio non spegnerlo mai se sul
display il simbolo rosso del disco oppure
l'indicazione "--:--" stanno lampeggiando;
in altre parole quando si stanno
compiendo le operazioni di
inizializzazione dell'apparecchio, o si sta
inserendo un disco o si sta aprendo il
vassoio di un disco.
Cuando la unidad es activada, tardará
cierto tiempo para su inicialización. El
ruido que ocurre durante la inicialización
no significa una falla.
No apague nunca la unidad mientras
parpadea el indicador rojo de disco o la
indicación "--:--", es decir, mientras se
inicializa la unidad, se carga un disco o
se abre la bandeja.
Si lo hace, la unidad podría resultar
dañada.
Page 8

ENGLISH FRANÇAIS
A
8
< Always place the disc on the disc tray
with the label side uppermost. (Compact
discs can be played or recorded only on
one side.)
< To remove a disc from its storage case,
press down on the center of the case and
lift the disc out, holding it carefully by the
edges.
How to remove the disc
How to hold the disc
< Should the disc become dirty, wipe the
surface radially with a soft, dry cloth :
C
B
A
Compact Disc 1 Disques Compacts 1
C
B
< Placer toujours le disque sur le plateau,
la face imprimée sur le dessus (les
disques compacts ne sont enregistrés
que sur une seule face.)
< Pour sortir un disque de son emballage,
appuyer sur la partie centrale de l'étui et
sortir le disque en veillant à bien le tenir
par les bords.
Comment sortir un disque de son
emballage
Comment tenir le disque.
< Si la surface du disque est sale, l'essuyer
soigneusement à l'aide d'un chiffon doux
et sec :
C
B
A
Discs which can be used with this unit:
Conventional audio CDs
Properly finalized CD-R and CD-RW discs
Note:
CD-R/CD-RW discs can be played with
this unit, provided that they have been
properly finalized.
The discs that have been recorded in the
CD-R drive of a computer may be played
on this unit, provided that they have been
properly finalized in accordance with
audio IEC 958.
Disques compatibles avec cet appareil:
Compact Disc (CD) audio conventionnel
CD-R et CD-RW qui ont été
convenablement finalisés.
Note:
Les disques CD-R et CD-RW peuvent être
joués par l'appareil sous réserve qu'ils
aient été convenablement finalisés.
Les disques qui portent des
enregistrements réalisés au moyen de
l'unité CD-R d'un ordinateur, peuvent être
joués par cet appareil sous réserve qu'ils
aient été finalisés conformément à la
norme CEI 958.
Before Use 2 Avant Utilisation 2
DO NOT MOVE THE UNIT DURING PLAYBACK
During playback, the disc rotates at high
speed. Do NOT lift or move the unit during
playback. Doing so may damage the disc.
WHEN MOVING THIS UNIT
When changing places of installation or
packing the unit for moving, be sure to
remove the disc and return the disc table
to its original position in the player. Then,
press the power switch to turn the power
off, and disconnect the power cord.
Moving this unit with the disc loaded may
result in damage to this unit.
NE DEPLACEZ PAS CET APPAREIL
PENDANT L'ECOUTE D'UN DISQUE
Pendant une écoute, le disque tourne à
grande vitesse. Ne soulevez pas cet
appareil et ne le déplacez pas pendant
l'écoute d'un disque. En effet, vous
risqueriez d'endommager ce disque.
CONSIGNES DE DEPLACEMENT DE CET
APPAREIL
Lorsque vous changez de lieu
d'installation ou lorsque vous emballez
cet appareil pour le déplacer, n'oubliez
pas de retirer le disque et de ramener le
plateau à disque à sa position d'origine
dans ce lecteur. Ensuite, appuyez sur le
bouton POWER pour couper la chaîne.
Débranchez le câble électrique. Si vous
déplacez cet appareil alors qu'il contient
un disque, vous risquez d'endommager
cet appareil.
Page 9
DEUTSCH ESPAÑOL
9
ITALIANO
Come tenere i CD 1
Handhabung von Compact Discs 1
Manipulación de discos 1
< Appoggiare il disco nell’apposito
cassetto sempre con l’etichetta rivolta
verso l’alto. (i CD si possono leggere o
registrare soltanto su un lato).
< Per estrarre un disco dalla custodia
protettiva, premere al centro
dell’astuccio e sollevare il disco
afferrandolo accuratamente solo per i
bordi
Come togliere il disco
Come afferrare il disco
< Se il disco dovesse comunque sporcarsi,
pulirlo con un panno soffice asciutto,
strofinando con movimento radiale dal
centro verso la periferia :
C
B
A
< Legen Sie die CD stets mit der Labelseite
nach oben in die CD-Schublade.
(Compact Discs können nur auf einer
Seite beschrieben und wiedergegeben
werden.)
< Um eine CD aus der CD-Hülle zu nehmen,
drücken Sie auf den mittleren Haltering
und nehmen Sie die CD vorsichtig aus
ihrer Halterung, wobei Sie diese lediglich
am Rand berühren sollten.
Entnehmen einer CD
Anfassen einer CD
< Sollte eine CD einmal verschmutzt sein,
wischen Sie diese von innen nach außen
mit einem weichen, trockenen Tuch
ab:
C
B
A
< Coloque siempre el disco en la bandeja
con la cara de la etiqueta hacia arriba.
(Los discos compactos sólo se
reproducen y graban por una cara).
< Para extraer un disco de su estuche,
presione el centro de la caja y levante
con cuidado el disco sosteniéndolo por
los bordes.
Extracción del disco
Así se sostiene el disco
< Si se ensucia el disco, pase un paño seco
y suave por la superficie, en sentido
radial :
C
B
A
Discs, die mit diesem Gerät verwendet
werden können:
konventionelle Audio-CDs
richtig verarbeitete CD-Rs und CD-RWs
Hinweis:
CD-R/CD-RW-Discs können mit diesem
Gerät abgespielt werden, vorausgesetzt,
daß sie richtig verarbeitet worden sind.
Discs, die mit dem CD-R-Laufwerk eines
Computers bespielt worden sind, können
mit diesem Gerät wiedergegeben
werden, vorausgesetzt, sie sind gemäß
Audio-IEC 958 richtig verarbeitet.
Dischi utilizzabili con questa unità:
CD audio tradizionali
CD-R e CD-RW correttamente completati
Nota:
I dischi CD-R/CD-RW possono essere
riprodotti utilizzando questa unità a patto
che siano stati correttamente completati.
I dischi che sono stati registrati nel
lettore CD-R di un computer possono
essere riprodotti su questa unità, a patto
che siano stati correttamente completati
in conformità con IEC 958 audio.
Discos que pueden utilizarse con esta
unidad:
Discos compactos de audio convencionales
CD-R y CD-RW adecuadamente terminados
Nota:
Los discos CD-R/CD-RW pueden
reproducirse con esta unidad, siempre
que estén debidamente terminados.
Los discos que han sido grabados en la
unidad de mando de CD-R de una
computadora pueden reproducirse en
esta unidad, siempre que hayan sido
adecuadamente terminados de acuerdo
con IEC 958 de audio.
Prima dell'uso 2Vor Inbetriebnahme 2 Previo al empleo 2
DAS GERÄT BEIM ABSPIELEN NICHT
BEWEGEN
Beim Abspielen dreht sich die Disc mit
Hochgeschwindigkeit. Das Gerät beim
Abspielen NICHT hochheben oder
bewegen. Ansonsten kann die Disc
beschädigt werden.
ZUM BEWEGEN DIESES GERÄTS
Wird der Einbauort des Geräts
gewechselt oder das Gerät für einen
Umzug verpackt, sicherstellen, dass die
Disc herausgenommen wurde. Den DiscTeller in seine Originalstellung im Player
zurückbringen. Schalten Sie das Gerät
ab. Dann das Netzkabel abziehen. Wird
das Gerät mit einer Disc darin bewegt,
kann das Gerät beschädigt werden.
EVITARE LO SPOSTAMENTO DELL’UNITÀ
DURANTE L’USO
Durante la riproduzione, il disco ruota a
una velocità elevata. NON sollevare o
spostare l’unità durante la riproduzione
per evitare di danneggiare il disco.
SPOSTAMENTO DELL’UNITÀ
Durante lo spostamento dell’installazione
o l’imballaggio dell’unità per il
trasferimento, assicurarsi che il disco sia
stato rimosso dall’unità e che il ripiano
del disco sia rientrato nella posizione
originale all’interno del lettore. Quindi,
premere l’interruttore POWER per
disattivare l'apparecchio. Quindi
scollegare il cavo di alimentazione. Lo
spostamento dell’unità quando il disco si
trova ancora all’interno può provocare
danni all’unità.
NO MUEVA LA UNIDAD DURANTE LA
REPRODUCCIÓN
Durante la reproducción, el disco gira a
gran velocidad. No levante ni mueva la
unidad durante la reproducción; si lo
hace, puede dañarse el disco.
AL TRASLADAR LA UNIDAD
Cuando cambie el lugar de instalación o
embale la unidad para su envío,
asegúrese de extraer el disco y volver a
colocar la bandeja del disco en su
posición original en el reproductor. A
continuación, pulse POWER para
desconectar la alimentación del sistema.
Desconecte el cable de alimentación.
La unidad puede resultar dañada si se
traslada con el disco cargado.
Page 10
ENGLISH FRANÇAIS
10
D
< Never use such chemicals as record
sprays, antistatic sprays or fluid, benzine
or thinner to clean the discs. Such
chemicals will do irreparable damage to
the disc's plastic surface.
< Discs should be returned to their cases
after use to avoid dust and scratches
that could cause the laser pickup to
"skip."
< Do not expose discs to direct sunlight or
high humidity and temperature for
extended periods. Long exposure to high
temperatures will warp the disc.
< CD-R and CD-RW discs are more
sensitive to the effects of heat and
ultraviolet rays than ordinary CDs. It is
important that they are not stored in a
location where direct sunlight will fall on
them, and which is away from sources of
heat such as radiators or heat-generating
electrical devices.
< Printable CD-R and CD-RW discs aren't
recommended, as the label side might be
sticky and damage the unit.
< Do not stick papers or protective sheets
on the discs and do not use any
protective coating spray.
< Use a soft oil-based felt-tipped pen to
write the information on the label side.
Never use a ball-point or hard-tipped
pen, as this may cause damage to the
recorded side.
< Never use a stabilizer. Using
commercially available CD stabilizers
with this unit will damage the
mechanisms and cause them to
malfunction.
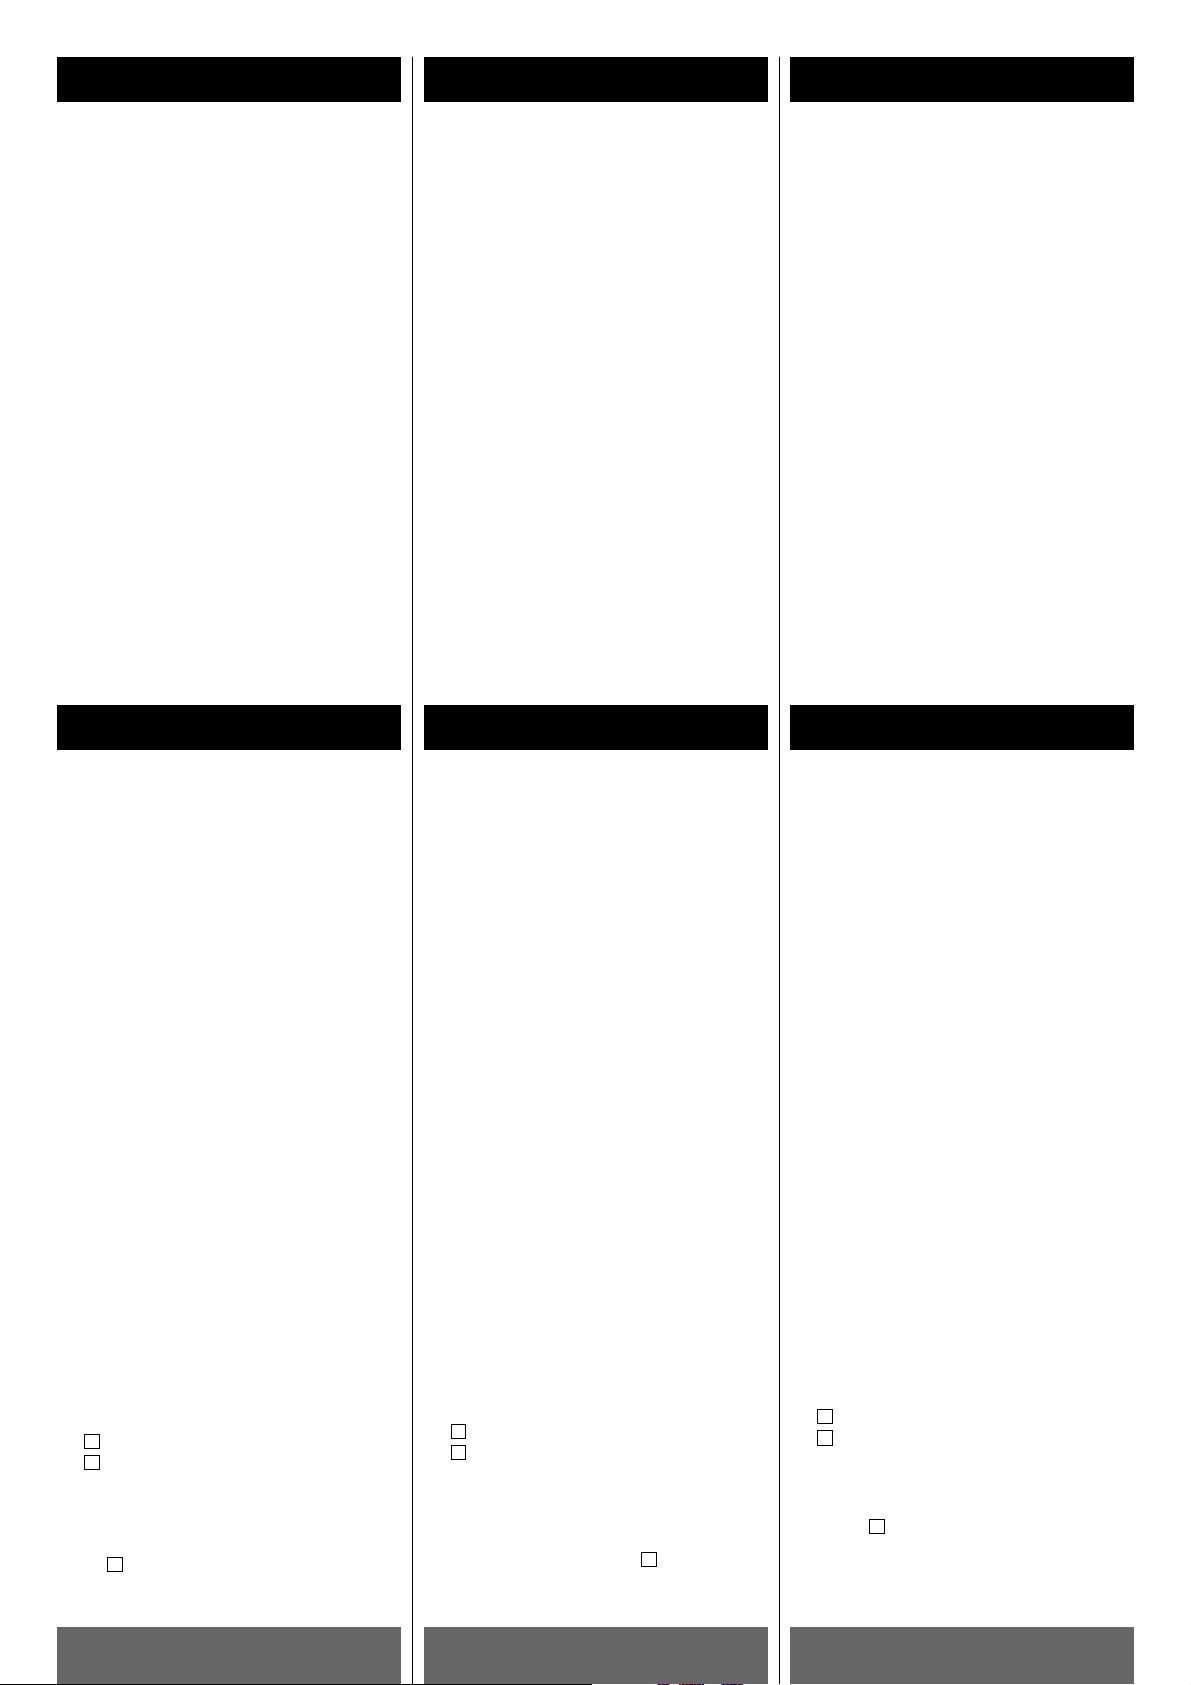
< Do not use irregular shape CDs
(octagonal, heart-shape, etc.). CDs of
this sort can damage the unit:
< If you are in any doubt as to the care and
handling of a CD-R/CD-RW disc, read the
precautions supplied with the disc, or
contact the disc manufacturer directly.
D
< Ne jamais utiliser de produits chimiques,
tels que des sprays, des liquides
antistatiques, de l'essence ou des
diluants pour nettoyer les disques. Ces
produits chimiques risquent de provoquer
des dégâts irréparables sur la surface en
plastique du disque.
< Ranger les disques dans leur étui après
utilisation afin d'éviter de les rayer ou
que de la poussière ne se dépose, ceci
pouvant compromettre la lecture par la
tête laser
< Ne pas exposer les disques à la lumière
directe du soleil, à une température
élevée ou à une humidité excessive
pendant une période prolongée. De telles
expositions risquent de provoquer une
déformation du disque.
< Les disques CD-R et CD-RW sont plus
sensibles aux effets de la chaleur et aux
rayons ultraviolets que les disques
compacts ordinaires. Il est donc
particulièrement important de les ranger
dans un endroit à l'abri de la lumière
directe du soleil et de toute source de
chaleur, telle que des radiateurs ou des
appareils électriques, susceptibles de
dégager de la chaleur.
< Il est déconseillé d'utiliser des disques
CD-R et CD-RW inscriptibles, la face
portant l'étiquette risquant d'être collante
et d'endommager l'appareil.
< Ne jamais coller d'étiquette ou de feuille
de protection sur le disque; ne pas
utiliser de spray destiné à déposer sur le
disque une couche de protection.
< Utiliser, pour écrire des informations sur
la face portant l'étiquette, un feutre
utilisant une encre à base d'huile. Ne
jamais utiliser de stylo bille ou de stylo à
pointe dure, qui risquerait d'abîmer la
surface enregistrée du disque.
< Ne jamais utiliser de stabilisateurs.
L'utilisation, avec cet appareil, de
stabilisateurs pour CD disponibles dans
le commerce, pourrait endommager les
mécanismes de l'appareil et provoquer
son dysfonctionnement.
< Ne pas utiliser de CD ayant une forme
irrégulière (octogonale, en forme de
coeur, etc.), ceux-ci risquant
d'endommager l'appareil :
< En cas de doute quant à la manipulation
des CD-R ou CD-RW, lire les instructions
fournies avec le disque ou contacter
directement le fabricant du disque.
D
Compact Disc 2 Disques Compacts 2
Page 11

DEUTSCH ESPAÑOL
11
ITALIANO
< Verwenden Sie zur Reinigung einer CD
niemals chemische Reinigungsmittel, wie
Record-Sprays, Antistatic-Sprays oder
Flüssigkeiten wie Benzin oder Verdünner,
da diese Substanzen irreparable
Schäden an einer CD anrichten.
< Zur Vermeidung von Kratzern und Staub,
die den Laser-Pickup “aus seiner Bahn
werfen” könnten, sollten CDs nach
Gebrauch stets in die jeweilige CD-Hülle
zurückgelegt werden.
< Setzen Sie Ihre CDs nicht über längere
Zeit direkter Sonneneinstrahlung,
anderen Wärmequellen sowie extrem
hoher Luftfeuchtigkeit aus, da dies zu
Verformungen führen kann.
< CD-R und CD-RW Discs sind
empfindlicher gegenüber Hitze und
ultravioletter Lichteinstrahlung als
vorbespielte CDs. Daher ist es wichtig,
daß sie nicht an einem Ort aufbewahrt
werden, an dem sie direkter
Sonneneinstrahlung, der Einwirkung von
Heizkörpern oder elektrischen Geräten
mit erhöhter Wärmeentwicklung
ausgesetzt sind.
< Bedruckbare CD-R sowie CD-RW Discs
sind nicht zu empfehlen, da deren
Labelseite mit einem Film überzogen ist,
der den Recorder beschädigen kann.
< Kleben Sie keine Papiere oder
Schutzfolien auf die CDs, und verwenden
Sie keine Sprays zum Aufbringen einer
Schutzschicht.
< Verwenden Sie einen weichen
Filzschreiber, dessen Tinte auf einer ÖlEmulsion basiert, um die Labelseite Ihrer
CDs zu beschriften. Verwenden Sie
niemals einen Kugelschreiber oder BallPenn Stift (Roller).
< Verwenden Sie keinen CD-Stabilisator.
Die Verwendung von handelsüblichen
CD-Stabilisatoren in diesem Recorder
beschädigt das Laufwerk und führt daher
zu Fehlfunktionen.
< Ungewöhnlich geformte CDs (achteckig,
herzförmig, usw.) eignen sich nicht zur
Verwendung mit diesem Recorder. Sie
können erheblichen Schaden am Gerät
verursachent:
< Falls Sie nicht sicher sind und weitere
Fragen bezüglich der Handhabung und
Umgang mit CD-R/CD-RW Discs haben,
lesen Sie bitte die Vorsichtsmaßnahmen,
die meist auf der Innenseite der CD-Hülle
abgedruckt sind oder wenden Sie sich an
den Hersteller der entsprechenden CD.
D
< Per pulire i CD non usare mai prodotti
chimici ,come spray per dischi analogici,
fluidi o spray antistatici, benzina o
solventi, che potrebbero tutti
danneggiare irreparabilmente la
superficie plastica registrata.
< Dopo l’uso, conservare sempre i dischi
entro le relative custodie, per evitare che
eventuali graffi costringano il pickup
laser a compiere spiacevoli “salti”.
< Non conservare i dischi per lunghi
periodi esposti alla luce solare diretta o
in condizioni di eccessiva umidità e
temperatura. Il calore troppo elevato può
addirittura incurvare la superficie del
disco.
< Rispetto ai normali CD, i dischi CD-R e
CD-RW sono inoltre molto più sensibili
agli effetti del calore e delle radiazioni
ultraviolette. Importante perciò non
conservarli in luoghi esposti alle luce
solare diretta e tenerli lontano da
sorgenti di calore, come radiatori o
apparecchiature elettriche in grado di
generare calore.
< Non sono consigliabili dischi CD-R e CD-
RW con etichette personalizzabili, che
possono diventare vischiose e
danneggiare il registratore.
< Non attaccare pezzi di carta sui dischi e
non spruzzarvi rivestimenti protettivi.
< Per scrivere informazioni sul lato con
l’etichetta usare solo pennarelli morbidi
non a base acquosa, evitando le penne a
sfera che possono danneggiare i dati
registrati.
< Non usare mai uno stabilizzatore. I
normali stabilizzatori per CD disponibili in
commercio potrebbero danneggiare le
parti meccaniche causando
malfunzionamenti dell’apparecchio.
< Non utilizzare CD di forma irregolare
(ottagonale, a cuore, eccetera) perché
possono danneggiare il registratore :
< In caso di dubbi sul modo di conservare e
maneggiare un disco CD-R e CD-RW,
attenersi alle istruzioni allegate al disco
stesso, oppure rivolgersi direttamente al
fabbricante.
D
< No utilice nunca productos químicos
como los aerosoles para discos de vinilo
o antiestáticos, bencina o aguarrás para
limpiar los discos. Tales sustancias
causarán daños irreparables en la
superficie de plástico del disco.
< Los discos deberán devolverse a sus
estuches después de usarlos para evitar
la acumulación de polvo y los rayados,
que podrían producir "saltos" en el lector
láser.
< No exponga los discos a la luz solar
directa ni a niveles elevados de
temperatura o humedad durante períodos
prolongados. Las altas temperaturas
deforman los discos con el tiempo.
< Los discos CD-R y CD-RW son más
sensibles a los efectos del calor y los
rayos ultravioleta que los CD normales.
No conviene guardarlos en lugares
donde puedan quedar expuestos a la luz
solar directa, y deberán mantenerse
alejados de fuentes de calor como los
radiadores o los aparatos eléctricos que
desprendan calor.
< No se recomiendan los CD-R y CD-RW
imprimibles, ya que el lado de la etiqueta
puede tener restos de adhesivo y dañar
la unidad.
< No adhiera papeles ni láminas de
protección a los discos, ni aplique ningún
tipo de aerosol de revestimiento.
< Utilice un rotulador de punta blanda para
escribir en el lado de la etiqueta. No
emplee nunca bolígrafos ni lápices de
punta dura, ya que podría dañar la cara
grabada del disco.
< No utilice nunca estabilizadores. Los
estabilizadores de CD existentes en el
mercado producirán daños en los
mecanismos y anomalías en su
funcionamiento.
< No utilice discos de diseño irregular
(octogonales, forma de corazón, etc.), ya
que pueden dañar la unidad :
< Si tiene alguna duda sobre el cuidado y
manipulación de un disco CD-R/CD-RW,
lea las instrucciones facilitadas con el
disco o póngase directamente en
contacto con el fabricante.
D
Come tenere i CD 2
Handhabung von Compact Discs 2
Manipulación de discos 2
Page 12
ENGLISH FRANÇAIS
Cassette Tape Bandes
12
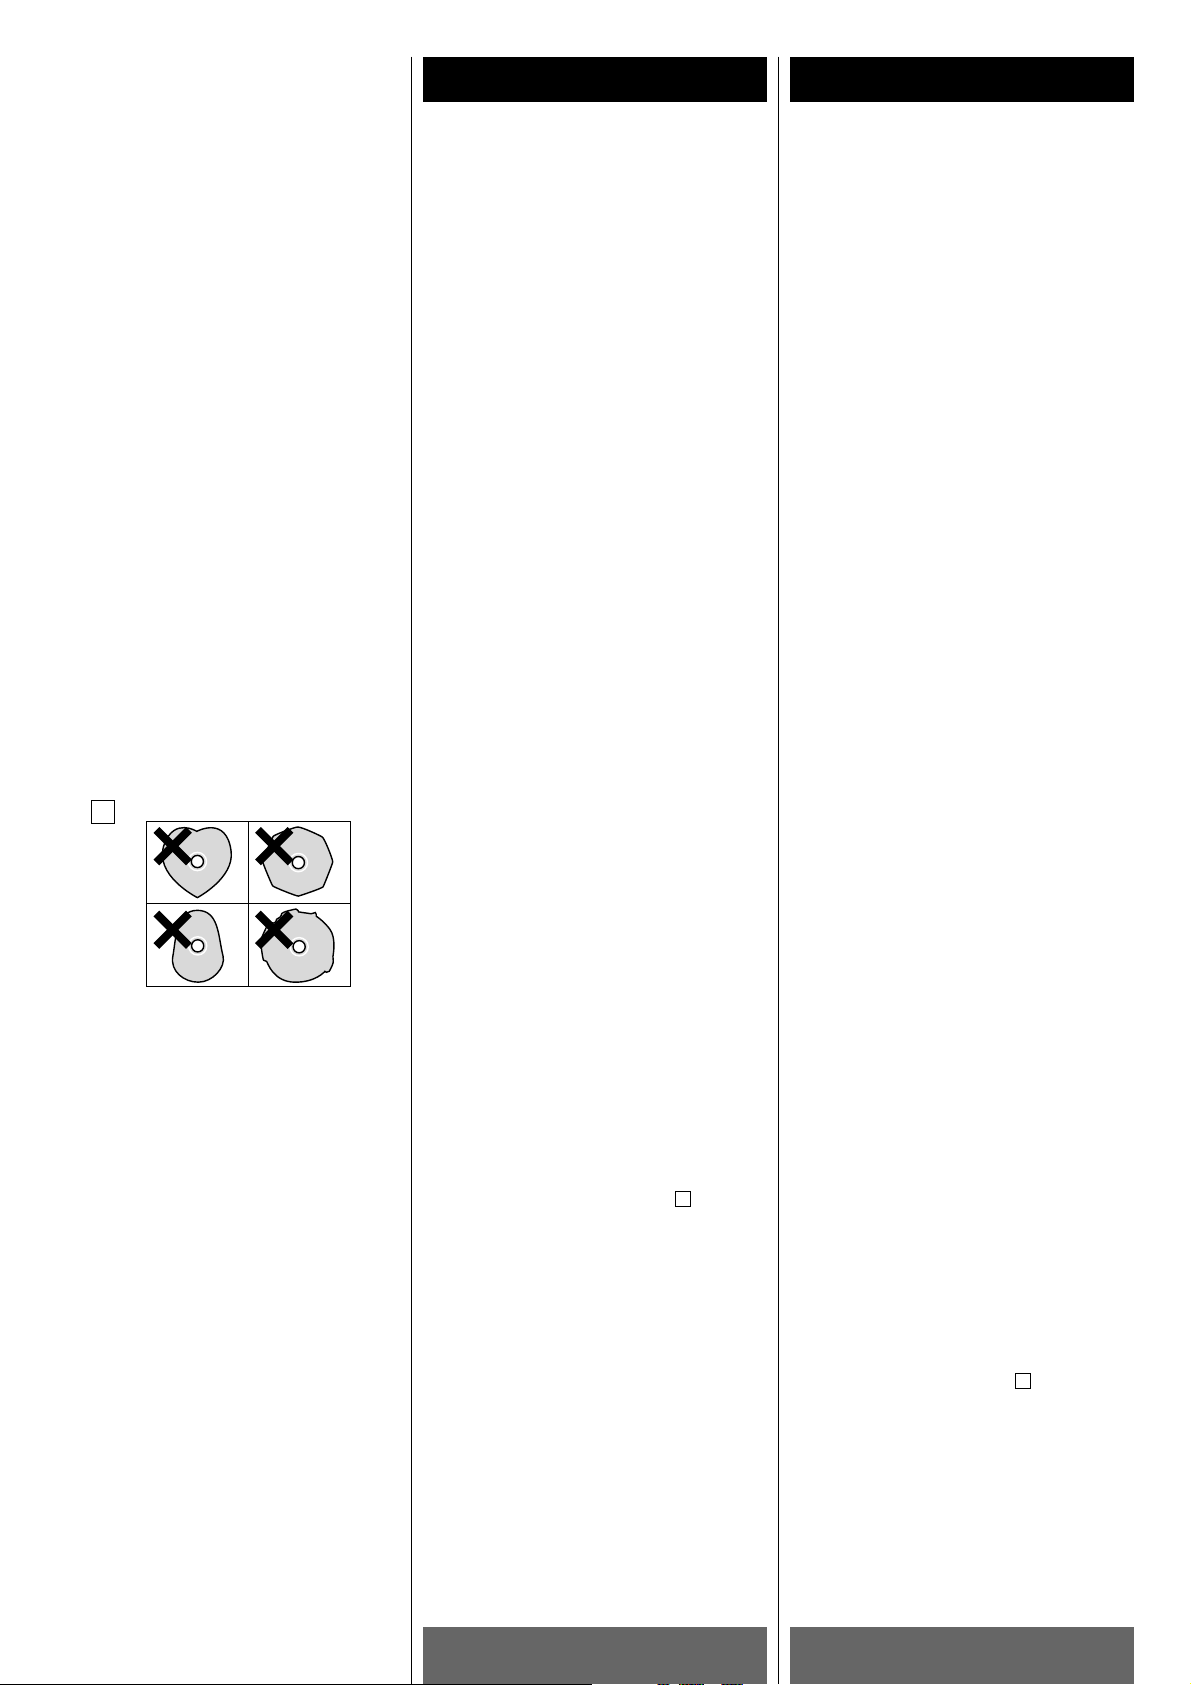
Tape Handling
Use your finger or a pencil to turn the
cassette's hub and take up any slack
tape.
< Avoid touching the tape. Fingerprints
attract dust and dirt.
Do not store tapes in the following places:
< On top of heaters, exposed to direct
sunlight or in any other places with high
temperatures.
< Near speakers, on TV sets or amplifiers or
where they would be exposed to strong
magnetic fields.
< Where humidity is high and in dirty, dusty
places.
< Avoid dropping or subjecting cassettes to
excessive shocks.
< As C-120 tapes are physically weak and
could become entangled in the transport
mechanism, do not use them.
B
b
c
a
Ne pas entreposer des bandes dans les
endroits suivants:
< Sur des radiateurs, au soleil ou dans un
endroit où la température est élevée.
< Près de haut-parleurs, sur des
téléviseurs ou amplificateurs ou encore
près de champs magnétiques puissants.
< Dans des endroits où l'humidité est
élevée ou poussiéreux et sales.
< Eviter d’échapper ou soumettre les
cassettes à des chocs excessifs.
< Comme les bandes des cassettes C120
sont physiquement faibles et peuvent
facilement se coincer dans le mécanisme
de transport, ne pas les utiliser.
Choix de bande
Pour que le choix automatique de bande
fonctionne correctement, les bandes
métals ou chromes (cobalt) doivent
posséder des trous d’identification.
< Par ailleurs, cet appareil accepte les
cassettes de type "normal"(type! ),
"chrome"(type@) ou "métal"(type!%).
Pour l'enregistrement, utilisez des
cassettes de type "normal"(type! ) ou
"chrome"(type@).
A
Manipulation des bandes
Utiliser un doigt ou un crayon pour
tourner le moyeu de la cassette et
rattraper le jeu de la bande.
< Eviter de toucher la bande. Les
empreintes digitales attirent la poussière
et les saletés.
B
Normal(Type!)
CrO
2
(Type@)
Metal(Type!%)
c
b
a
Normale(Type!)
CrO
2(Type@)
Métal(Type!%)
c
b
a
Tape Selection
Metal and chrome (cobalt) tapes have
identification holes.
< Normal, chrome and metal tapes can be
played with this unit.
For recording, please use normal(Type!)
or CrO
2(Type@) tape.
A
Page 13

DEUTSCH ESPAÑOL
CassetteKassette Cintas
13
ITALIANO
Selección de cinta:
Las cintas metal y cromo (cobalto) tienen
orificios de identificación.
< Las cintas normales(tipo! ), de
cromo(tipo@) y metal(tipo!%) pueden
reproducirse con esta unidad. Para la
grabación, sírvase utilizar una cinta
normal(tipo!) o de cromo(tipo@).
Normales(Type!)
CrO
2(Type@)
Metal(Type!%)
c
b
a
A
Bandsortenwahl
Metall und Chromdioxid (Kobalt)
Kassetten verfügen über
Identifikationsöffnungen.
< Normal(Typs! )-, Chrom(Typs@ )- und
Reineisenbänder(Typs!%) können mit
diesem Gerät abgespielt werden.
Zum Aufnehmen verwenden Sie bitte
Normal(Typs!)- oder Chrombänder(Typs@).
Normalbänder(Typs!)
CrO
2(Typs@)
Metalbänder(Typs!%)
c
b
a
A
Selezione della cassetta
Le cassette con nastro Metal e Cromo
(Cobalto) sono dotate di apposite tacche
di identificazione.
<I nastri Normal(tipo!), Chrome(tipo@) e
Metal(tipo!%). possono essere riprodotti
con questa unità.
Per registrare, usare un nastro
Normal(tipo!) o Chrome(tipo@).
Normale(Tipo!)
CrO
2(Tipo@)
Metallo(Tipo!%)
c
b
a
A
Manejo de cinta:
Utilice un dedo o un lapicero para girar el
carrete de la cinta y tensarla si es
necesario.
< Procure no tocar la cinta. Las huellas
atraen polvo y suciedad.
No guarde cintas en los siguientes lugares:
< Encima de radiadores, expuestas a la luz
solar directa o a temperaturas elevadas.
< Cerca de altavoces, televisores o
amplificadores, o en lugares expuestos a
campos magnéticos intensos.
< Lugares con un alto grado de humedad o
de suciedad.
< Evite las caídas y los impactos.
< No utilice cintas C-120, ya que podrían
atascar el mecanismo de transporte
debido a su fragilidad.
B
Maneggio delle cassette
Recuperare qualsiasi eventuale
allentamento del nastro ruotando il foro
della cassetta con un dito o una matita.
<Evitare di toccare con le mani la
superficie del nastro perché le impronte
digitali attraggono polvere e sporcizia.
Non conservare le cassette sopra
apparecchi di riscaldamento;
< in luoghi esposti alla luce solare diretta o
comunque soggetti a temperature
elevate;
< vicino ad altoparlanti, televisori,
amplificatori o dovunque possano subire
l’influsso di forti campi magnetici;
< in locali molto umidi, sporchi o polverosi.
< Evitare di far cadere le cassette o
sottoporle a violenti scosse.
< Non è consigliabile l’uso delle cassette
C-120 perché contengono nastro molto
sottile che può facilmente aggrovigliarsi
sui componenti meccanici.
B
Umgang mit Compact Cassetten
Wenn das Kassettenband nicht fest auf
dem Wickelkern aufgespult ist,
verwenden Sie einen Bleistift oder einen
Finger, um den Bandwickel wieder zu
straffen.
< Vermeiden Sie bitte grundsätzlich jede
Berührung des Kassettenbandes, da
Fingerabdrücke Staubpartikel anziehen
und dadurch die Aufnahme- und
Wiedergabequalität beeinflussen.
Vermeiden Sie das Lagern von Compact
Kassetten an den folgenden Orten:
< Auf Heizkörpern, an Orten, an denen sie
direkter Sonneneinstrahlung oder
anderen Wärmequellen ausgesetzt sind.
< In der Nähe von Lautsprecherboxen,
Fernsehgeräten, Verstärkern oder
anderen Orten, an denen sie starken
Magnetfeldern ausgesetzt sind.
< An Orten mit hoher Luftfeuchtigkeit oder
solchen, die schmutzig oder sehr staubig
sind.
< Vermeiden Sie, wenn irgend möglich,
extreme mechanische Belastungen der
Kassette; z. B. Fallenlassen, Verbiegen,
usw.
< Da das Bandmaterial von C-120 Compact
Kassetten sehr dünn ist und sich daher
leicht im Laufwerksmechanismus
verfängt, sollten Sie deren Verwendung
vermeiden.
B
Page 14
ENGLISH FRANÇAIS
Dolby NR Dolby NR
14
Les têtes et le chemin de la bande
doivent être nettoyés et démagnétisés
périodiquement.
Nettoyage du chemin de bande
< Appliquer un liquide de nettoyage de tête
sur le cotontige spécial ou sur un chiffon
doux et frotter légèrement les têtes ,
cabestans et toutes les pièces de
métal du chemin de bande.
< Nettoyer aussi le galet presseur avec
un liquide de nettoyage pour caoutchouc.
Démagnétisation des têtes
S'assurer que l’alimentation est coupée,
puis démagnétiser les têtes avec le
démagnétiseur.
Pour plus de détails sur son utilisation,
lire son manuel d’instructions.
Attention
Si la surface de l'appareil devient sale,
nettoyer celle-ci à l'aide d'un chiffon
doux ou utiliser un liquide de nettoyage
neutre. La nettoyer entièrement. Ne pas
utiliser de diluant, de benzine ou d'alcool
car ils risquent d'endommager la surface
de l'appareil.
C
B
A
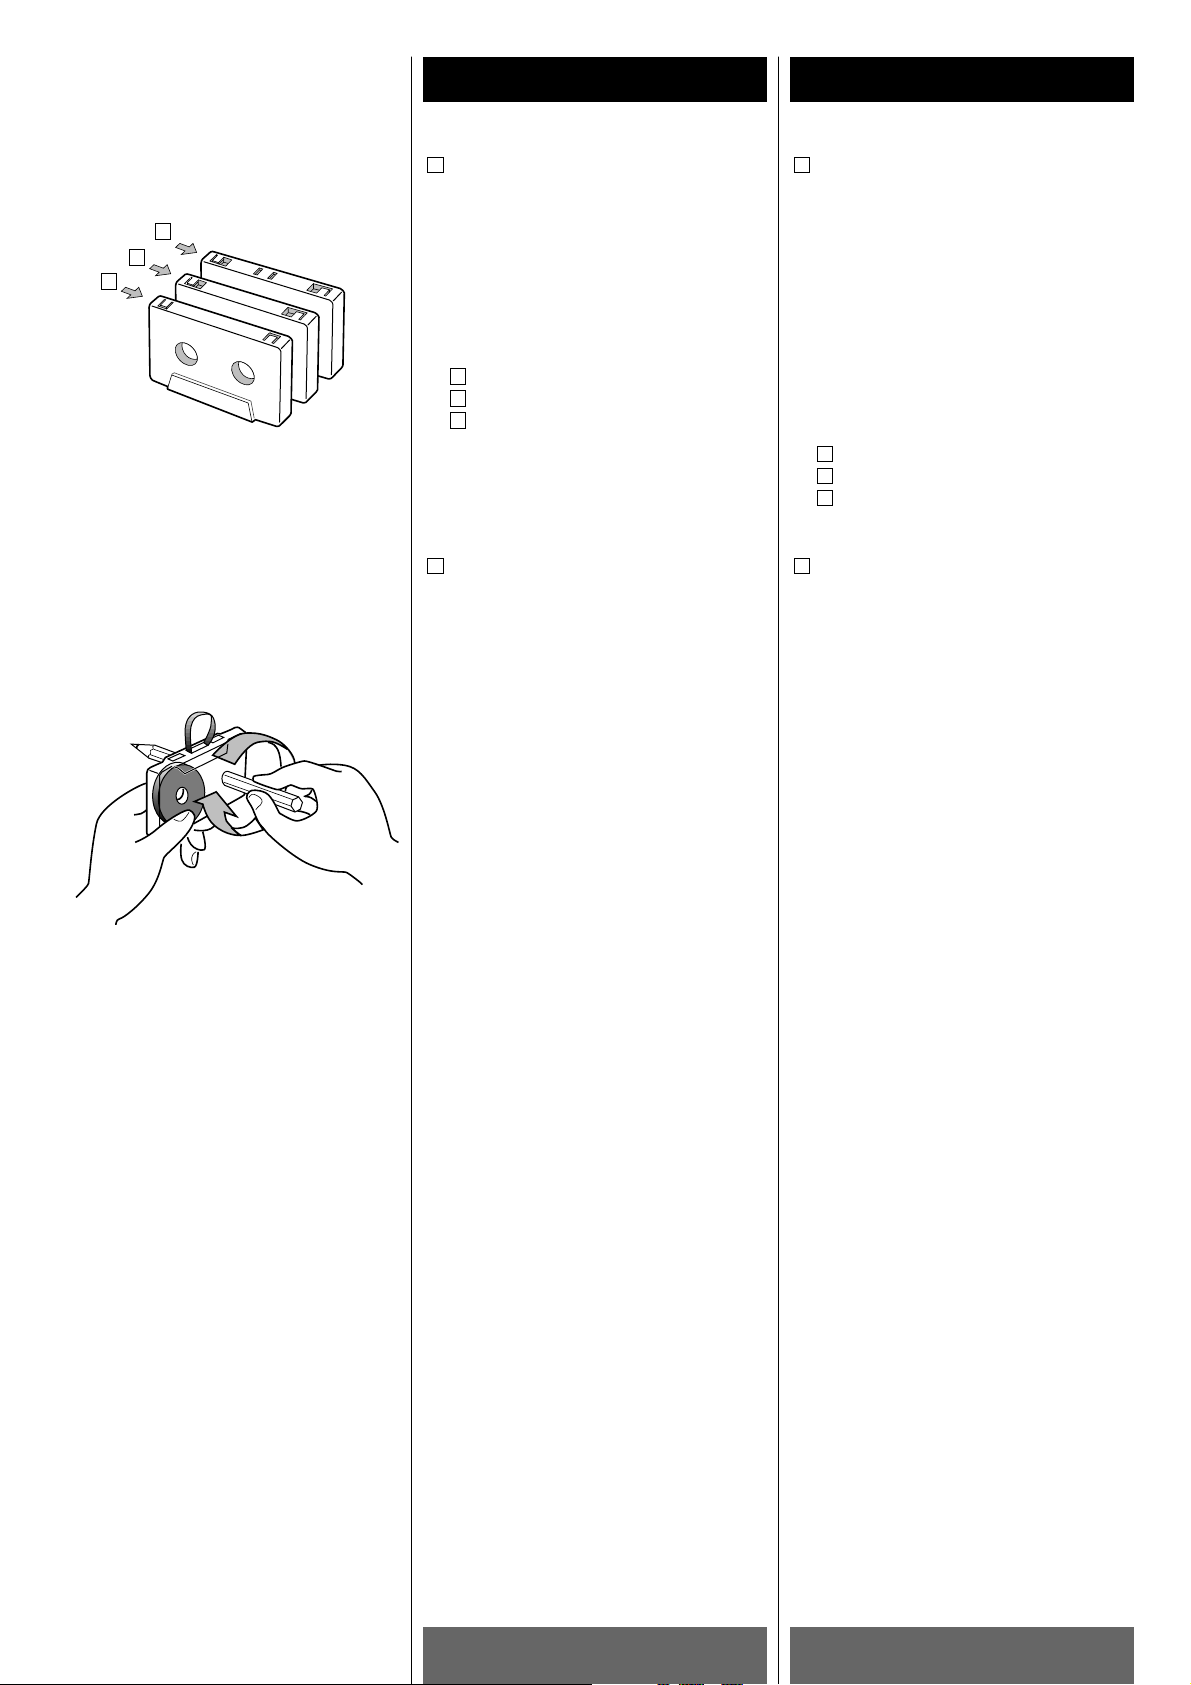
The heads and tape path should be
cleaned and demagnetized periodically.
Cleaning Tape Path
< Apply head cleaning fluid to a cotton
swab or soft cloth, and lightly rub the
heads , capstan and all metal parts
in the tape path.
< Also clean the pinch roller using
rubber cleaning fluid.
Demagnetizing Heads
Be sure that the power is off, then
demagnetize the heads using a
demagnetizer. For details of its use, read
its instructions.
Caution:
If the surface of the unit gets dirty, wipe
with a soft cloth or use diluted neutral
cleaning liquid. Be sure to remove any
fluid completely. Do not use thinner,
benzine or alcohol as they may damage
the surface of the unit.
C
BA
Basic description of Dolby NR
During low-level program material, Dolby NR
acts to boost high-frequency signals. During
playback, these signals are restored to their
original level. Any noise introduced in
between these processes (during recording)
will be reduced in playback. Dolby NR also
employs the principle of least treatment,
leaving high-level signals unprocessed
since the louder program material serves to
effectively mask any tape hiss.
Principe de fonctionnement du Dolby NR
Le dispositif de réduction de bruit Dolby NR
fonctionne en renforçant les signaux de
fréquence élevée lorsque le programme est
à un niveau faible. A la lecture, ces signaux
sont ramenés à leur niveau d’origine. Tout
bruit introduit entre ces deux processus,
c’est-à-dire pendant l’enregistrement, sera
réduit à la lecture. Le dispositif Dolby NR
obéit également au principe de traitement
minimum, c’est à dire en ne traitant pas les
signaux de niveau élevé puisqu’un niveau
sonore plus élevé a pour effet de masquer
suffisamment tout sifflement sur la bande.
Dolby noise reduction manufactured
under license from Dolby Laboratories
Licensing Corporation.
"DOLBY" and the double-D symbol U are
trademarks of Dolby Laboratories
Licensing Corporation.
Réduction de bruit Dolby fabriquée sous
licence de Dolby Laboratories Licensing
Corporation.
DOLBY et le symbole double-D U sont
des marques de Dolby Laboratories
Licensing Corporation.
Maintenance Entretien
B
A
C C
B
Page 15
DEUTSCH ESPAÑOL
Dolby NRDolby NR Dolby NR
15
ITALIANO
Köpfe und Bandpfad sollten in
regelmäßigen Abständen gereinigt und
entmagnetisiert werden.
Reinigung des Bandpfades
< Auf ein Wattestäbchen oder weiches Tuch
Kopfreinigungsflüssigkeit auftragen und
Köpfe , Capstan und alle Metallteile
des Bandpfades leicht abreiben.
< Die Andruckrolle mit
Gummireinigungsflüssigkeit reinigen.
C
BA
Entmagnetisieren der Tonköpfe
Vergewissern Sie sich, daß das Gerät
ausgeschaltet ist. Verwenden Sie zum
Entmagnetisieren der Köpfe einen Compact
Kassetten Entmagnetisierungsstab
oder eine entsprechende
EntmagnetisierungsKassette.
Einzelheiten bezüglich der korrekten
Anwendung dieser Geräte entnehmen Sie
bitte der jeweils beiliegenden
Bedienungsanleitung.
Warnung:
Wenn die Geräteoberfläche verschmutzt
sein sollte, wischen Sie diese mit einem
weichen Tuch ab oder verwenden Sie eine
verdünnte, neutrale Reinigungsflüssigkeit.
Reinigen Sie sie gründlich. Verwenden Sie
keinen Verdünner, Benzin oder Alkohol, da
dies die Geräteoberfläche beschädigen
kann.
Le testine e il percorso del nastro devono
essere puliti regolarmente.
Pulizia del percorso del nastro
< Applicare alcool denaturato su un
apposito bastoncino ovattato o su una
pezzuola soffice e pulire quindi le
testine , i cabestani e tutte le parti
metalliche sul percorso del nastro.
< Pulire pure i rulli pressori , usando un
apposito liquido per parti di gomma.
Smagnetizzazione delle testine
Quando si è sicuri che l’apparecchio sia
spento, eliminare eventuali tracce di
magnetismo dalle testine con l’apposito
smagnetizzatore; per maggiori particolari
su questa operazione, consultare il
manuale dello strumento.
Attenzione:
Se la superficie dell'apparecchio
dovesse sporcarsi, pulirla strofinandola
con uno straccio morbido, oppure usare
una soluzione blanda di detergente.
Pulire a fondo. Non usare diluenti,
benzina o alcool, in quanto potrrebbero
rovinare la superficie del mobile.
C
BA
Las cabezas y la trayectoria de la cinta
deben limpiarse y desmagnetizarse
periódicamente.
Limpieza de la trayectoria de la cinta
< Aplique el líquido de limpieza de cabezas
a un hisopo especial o paño suave y frote
ligeramente las cabezas ,
cabrestantes y todas las partes
metálicas de la trayectoria de la cinta.
< Limpie también los rodillos de presión
usando el líquido de limpieza para goma.
Desmagnetización de cabezales
Asegúrese de que la unidad está
apagada y proceda a desmagnetizar los
cabezales. Para más información,
consulte las instrucciones del
desmagnetizador.
Precaución:
Cuando la superficie de la unidad se
ensucia, límpiela con un trozo de tela
suave o use un líquido de limpieza diluido
y neutro. Límpiela por completo. No se
debe usar diluente, bencina o alcohol
pues podrían dañar la superficie de la
unidad.
C
B
A
Dolby Rauschunterdrückung ist hergestellt
unter Lizenz von Dolby Laboratories
Licensing Corporation. DOLBY und das
Doppel-D-Symbol Usind Warenzeichen
der dolby Laboratories Licensing
Corporation.
Das grundlegende Funktionsprinzip der
DOLBY Rauschunterdrückung
Das Dolby NR System hebt während der
Aufnahme den Pegel hoher Frequenzen des
Audiosignals in sehr leisen Musikpassagen an.
Bei der Wiedergabe werden die Pegel dieser
hohen Frequenzen, zusammen mit dem
Rauschpegel der sich unumgänglich bei der
Aufnahme ergibt, wieder auf ihr normales
Niveau abgesenkt, wodurch der gerade bei
leisen Passagen störende Rauschanteil stark
reduziert wird. Das Dolby-Verfahren zeichnet
sich weiterhin dadurch aus, daß es nach dem
Prinzip der geringstmöglichen Beeinflussung
arbeitet. Das heißt, laute Passagen mit hohen
Pegeln bleiben unbeeinflußt, da das Rauschen
vom menschlichen Gehör hier aus psychoakustischen Gründen nicht wahrgenommen
werden kann.
Dispositivo Dolby di riduzione del rumore
fabbricato su licenza della Dolby
Laboratories Licensing Corporation.
DOLBY e il simbolo della doppia D U
sono marchi di fabbrica della Dolby
Laboratories Licensing Corporation.
Reducción de ruido Dollby fabricado bajo
licencia de Dolby Laboratories Licensing
Corporation.
DOLBY, el símbolo de la D doble U son
marcas de Dolby Laboratories Licensing
Corporation.
Descripción básica del sistema de
reducción de ruido DOLBY
Con el material de programa de nivel
reducido, Dolby interviene para realzar las
señales de alta frecuencia. Durante la
reproducción, estas señales recuperan su
nivel original. Cualquier ruido que incida
entre ambos procesos (durante la
grabación), se reducirán en la reproducción.
Dolby también aplica el principio del mínimo
tratamiento dejando sin procesar las señales
de alto nivel, ya que el material de mayor
nivel sirve para enmascarar eficazmente
cualquier siseo de cinta.
A che cosa serve il sistema Dolby di
riduzione del rumore
Nel corso della registrazione il sistema
Dolby NR rende più profonde dei normale le
parti musicali di bassa intensità laddove è
più facile che emerga il rumore di fondo del
nastro. Quando poi il nastro cosi codificato
viene riprodotto, il circuito Dolby NR
provvede a diminuire le parti enfatizzate in
fase di registrazione. Questo processo di
codifica/decodifica svolge due
funzioni:abbassa qualsiasi rumore indotto
dal processo di registrazione e ripristina la
musica nella Sua forma originale in modo
che non risulti perso o modificato nulla,
tranne il rumore.
ManutenzionePflege und Wartung Mantenimiento
Page 16

LLRR
PLAYREC
TAPE
LR
IN
CD
ENGLISH FRANÇAIS
Connexions
16
Connections
B
LINE INPUT/OUT jacks
Connect the LINE INPUT/OUT jacks to the
amplifier with audio signal connection
cords.
LINE INPUT w TAPE REC
LINE OUTPUT w TAPE PLAY
CD LINE OUTPUT w CD IN
< Make sure to connect :
white plug w white jack(L:left)
red plug w red jack(R:right)
< Be sure to insert each plug securely. To
prevent hum and noise, do not bundle the
connection cords with the power cord or
speaker cord.
A
A
Connecteurs LINE INPUT/OUTPUT
Branchez ces prises sur l’Amplificateur à
l’aide du câble à fiches coaxiales.
LINE INPUT w TAPE REC
LINE OUTPUT w TAPE PLAY
CD LINE OUTPUT w CD IN
< Assurez vous de connecter :
Fiche blanche
w connecteur blanc (L:gauche)
Fiche rouge
w connecteur rouge (R:droit)
< Assurez-vous que chaque fiche est
enfoncée bien à fond. Pour éviter le
ronflement, éloignez les câbles de
raccordement du cordon d’alimentation
et des câbles des haut-parleurs.
A
AC Power Cord
Plug this AC power cord into an AC wall
socket.
B
Cordon d’alimentation (CA)
Branchez ce cordon d’alimentation CA
sur une prise de courant CA murale.
B
Amplifier
Amplificateur
Verstärker
Amplificatore
Amplificador
< Turn off the power of all the equipment
before making connections.
< Read instructions of each component you
intend to use with CD-A630.
< Coupez l’alimentation électrique de tout
l’équipement avant de faire les
branchements.
< Lisez les instructions de chaque appareil
que vous avez l’intention d’utiliser avec
votre lecteur-enregistreur CD-A630.
CD-A630
Page 17
DEUTSCH ESPAÑOL
Collegamento Anschluß Conexión
17
ITALIANO
LINE INPUT/OUTPUT Buchsen
Verbinden Sie diese Buchsen mit dem
Verstärker mit Hilfe des Audio Kabels.
LINE INPUT w TAPE REC
LINE OUTPUT w TAPE PLAY
CD LINE OUTPUT w CD IN
< Stellen Sie die Verbindung sicher :
Weißer Stecker wWeiße Buchse (links)
Roter Stecker w Rote Buchse (rechts)
< Stellen Sie sicher, daß alle Stecker fest
eingesteckt sind. Um Brummen und
Geräusche zu verhindern, dürfen die
Anschlußkabel nicht mit dem Strom- oder
Lautsprecherkabel gebündelt werden.
A
Prese LINE INPUT/OUTPUT
Vanno collegate, con gli appositi cavetti,
alle prese TAPE REC/PLAY e CD IN
sull'amplificatore con cavo di
connessione segnale audio.
LINE INPUT w TAPE REC
LINE OUTPUT w TAPE PLAY
CD LINE OUTPUT w CD IN
< Accertatevi che le connessioni siano
esatte:
Spinotto biancowpresa bianca(a sinistra)
Spinotto rosso w presa rossa (a destra)
< Controllare che ogni spina sia inserita a
fondo. Per evitare ronzii e rumore non
avvolgere insieme i cordoni di
collegamento con il cavo di
alimentazione o dell’altoparlante.
A
Salidas LINE INPUT/OUTPUT
Conecte estas salidas a las entradas
TAPE REC/PLAY y CD IN del amplificador
con el cable de conexión para señales de
audio.
LINE INPUT w TAPE REC
LINE OUTPUT w TAPE PLAY
CD LINE OUTPUT w CD IN
< Asegúrese conectar
Clavija blanca
w terminal blanco (izquierda)
Clavija roja
w terminal rojo (derecha)
< Compruebe que enchufa firmemente
todos los enchufes. Para evitar
interferencias y ruidos, no entrelace los
cables de conexión con el cable de
alimentación o los cables de los
altavoces.
A
Netzsteckdose
Stecken Sie den Netzstecker in eine
Netzsteckdose.
B
Uscita potenza
Inserire questo cavo in una presa di rete,
oppure nella presa AC OUTLETS.
B
Toma de corriente
Conecte este cable a una toma mural.
B
< Schalten Sie alle Geräte ab, bevor Sie
Anschlüsse vornehmen.
< Lesen Sie die Bedienungsanleitungen zu
allen Geräten, die Sie zusammen mit dem
CD-A630 verwenden wollen.
< Prima di effettuare le connessione
spegnere l’alimentazione elettrica a tutta
l’apparecchiatura.
< Leggere le istruzioni relative ad ogni
componente che si desidera usare con il
del CD-A630.
< Apague todos los equipos antes de
realizar las conexiones.
< Lea las instrucciones de todos los
componentes que prevé utilizar junto con
la pletina para CD-A630.
Page 18
ENGLISH FRANÇAIS
Remote Control Unit Boîtier de télécommande
18
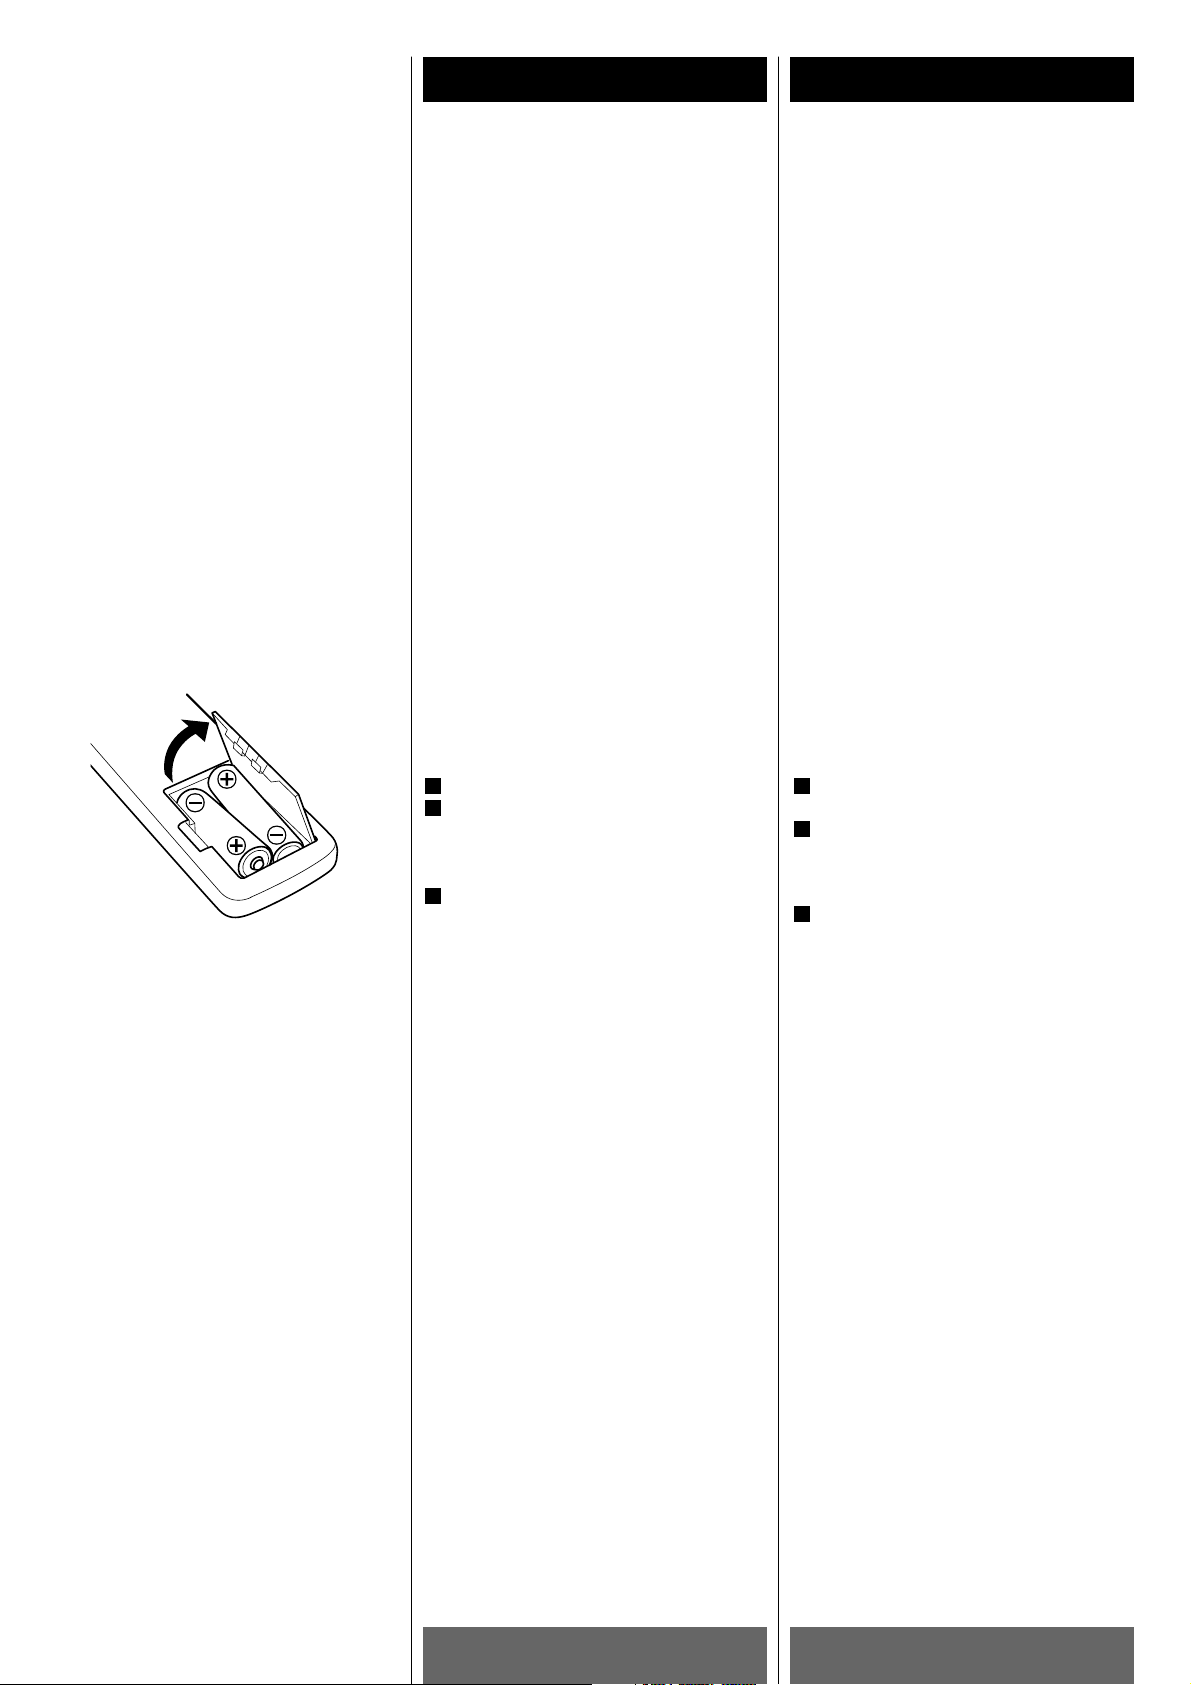
Battery Installation
Remove the battery compartment cover.
Insert two “AA“ (R6, SUM-3) dry batteries.
Make sure that the batteries are inserted
with their positive “+“ and negative “_“
poles positioned correctly.
Close the cover.
Battery Replacement
If the distance required between the remote
control unit and main unit decreases, the
batteries are exhausted. In this case replace
the batteries with new ones.
Precautions concerning batteries
< Be sure to insert the batteries with
correct positive “+“ and negative “_“
polarities.
< Use batteries of the same type. Never use
different types of batteries together.
< Rechargeable and non-rechargeable
batteries can be used. Refer to the
precautions on their labels.
< When the remote control unit is not to be
used for a long time (more than a month),
remove the batteries from the remote
control unit to prevent them from leaking.
If they leak, wipe away the liquid inside
the battery compartment and replace the
batteries with new ones.
< Do not heat or disassemble batteries and
never dispose of old batteries by throwing
them in a fire.
3
2
1
The provided Remote Control Unit allows the
unit to be operated from a distance.
When operating the remote control unit,
point it towards the REMOTE SENSOR on the
front panel of the unit.
< Even if the remote control unit is operated
within the effective range, remote control
operation may be impossible if there are
any obstacles between the unit and the
remote control.
< If the remote control unit is operated near
other appliances which generate infrared
rays, or if other remote control devices
using infrared rays are used near the unit,
it may operate incorrectly. Conversely, the
other appliances may operate incorrectly.
Mise en place des piles
Retirer le couvercle du compartiment des
piles.
Introduire deux piles “AA“ (R6, SUM-3).
S'assurer que les piles sont correctement
mises en respectant les polarités plus +
et moins _ .
Fermer le couvercle jusqu'au déclic.
Remplacement des piles
Si vous remarquez que la distance entre le
boîtier de télécommande et le lecteur
devient plus courte pour un fonctionnement
correct, ceci indique que les piles sont
usées. Dans ce cas, remplacer les piles par
des nouvelles.
Précautions à observer concernant les piles
< Bien placer les piles en respectant les
polarités plus + et moins _ .
< Utiliser des piles du même type. Ne
jamais essayer d'utiliser des types de pile
différents ensemble.
< Des piles ou des batteries peuvent être
utilisées. Se référer à leurs étiquettes
pour les précautions à respecter.
< Si le boîtier de télécommande n'est pas
utilisé pendant une longue période (pluss
d'un mois), retirer les piles du boîtier de
télécommande pour éviter des fuites de
pile. Si elles coulent, essuyer le liquide
dans le compartiment des piles et
remplacer les piles par des neuves.
< Ne pas chauffer, démonter les piles ni les
mettre au feu.
3
2
1
Le boîtier de télécommande fourni permet la
commande à distance defourni permet la
commande à distance de l'appareil. Pour
l'utilisation du boîtier de télécommande, le
diriger vers le détecteusation du boîtier de
télécommande, le diriger vers le détecteur
de télécommande du panneau avant de
l'appareil.
< Même si le boîtier de télécommande est
activé dans la zone de fonctionnement, la
commande à distance peut être
impossible s'il y a des obstacles entre le
lecteur et le boîtier de télécommande.
< Si le boîtier de télécommande fonctionne
dans le voisinage d'autres appareils
générant des rayons infrarouges, ou si
d'autres télécommandes utilisant des
rayons infrarouges sont utilisées près du
lecteur, le lecteur peut de ne pas bien
fonctionner. Dans la situation inverse, les
autres apaareils peuvent ne pas bien
fonctionner.
Page 19
DEUTSCH ESPAÑOL
Funzionamento col telecomando
Betrieb mit der Fernbedienung
Contador de tiempo
19
ITALIANO
Die mitgelieferte Fernbedienungseinheit
ermöglicht die Bedienung des Gerät bequem
vom Sitzplatz aus.
Die Fernbedienung auf den Fernbedienungs-Empfangssensor am Gerät
richten.
< Innerhalb des zulässigen
Entfernungsbereichs kann der
Signalempfang durch zwischen
Fernbedienung und Empfangssensor
befindliche Gegenstände behindert
werden.
< Bei Fernbedienbetrieb kann der Gerät
Fehlfunktionen zeigen, wenn er in der
Nähe eines Infrarotstrahlen
ausstrahlenden Geräts betrieben wird
oder wenn im gleichen Raum InfrarotFernbedienungen anderer Geräte
verwendet werden. Umgekehrt kann die
Fernbedienung dieses Geräts
Fehlfunktionen bei anderen mit
Infrarotsignalen zu bedienenden Geräten
verursachen.
Einlegen der Batterien
Die Batteriefach-Abdeckung entfernen.
Zwei Batterien “AA“ (R6, SUM-3) unter
Beachtung der Polarität (+/_) einlegen.
Die Abdeckung wieder anbringen.
Batteriewechsel
Sollte es erforderlich werden, den Abstand
zwischen Gerät und Fernbedienung zur
Funktionsauslösung zu verringern, wird ein
Batteriewechsel notwendig. Stets zwei neue
Batterien einlegen.
Batterie-Vorsichtsmaßnahmen
< Die Batterien unter Beachtung der
korrekten Polarität ( + und _) einlegen.
< Stets zwei Batterien des gleichen Typs
verwenden, niemals eine gebrauchte und
eine frische Batterie zusammen
verwenden.
< Sowohl Einweg- als auch
wiederaufladbare Batterien können
verwendet werden.
Die Sicherheitshinweise auf den
Batterien beachten.
< Bei längerem Nichtgebrauch (über einen
Monat) sollten die Batterien entnommen
werden, um ein Auslaufen im
Batteriefach zu verhindern. Ausgelaufene
Batterien entnehmen und nach Säubern
des Batteriefachs gegen frische
auswechseln.
< Batterien nicht erhitzen, zerlegen oder
verbrennen.
3
2
1
Installazione batterie
Rimuovere il coperchio del vano batterie.
Inserire due batterie “AA“ (R6, SUM-3).
Accertarsi che le batterie siano inserite
con i poli positivo + e negativo _ nelle
posizioni corrette.
Chiudere il coperchio fino a sentire uno
scatto.
Sostituzione batterie
Se si notasse che la distanza di
funzionamento diminuisce, ciò indica che le
batterie sono scariche. In tale caso
sostituire le batterie con altre di nuove.
Precauzioni riguardanti le batterie
< Accertarsi di inserire le batterie con le
polarità + e _ nella posizione corretta.
< Usare batterie dello stesso tipo. Non
usare mai tipi diversi di batterie assieme.
< Possono essere usate sia batterie
ricaricabili che batterie non ricaricabili.
Fare riferimento alle indicazioni
sull'etichetta.
< Quanddo si prevede di non utilizzare il
telecomando per un lungo periodo (più di
un mese), rimuovere le batterie per
prevenire perdite. Se si verificassero
delle perdite, pulire il vano batterie e
sostituire le batterie con altre di nuove.
< Non riscaldare o disassemblare le
batterie e non gettarle nel fuoco.
3
2
1
L'unità di telecomando in dotazione pemette
di comandare a distanza l'apparecchio.
Quando si utilizza l'unità di telecomando,
puntarla verso il sensore sul pannello
anteriore dell'apparecchio.
< Anche se l'unità di telecomando viene
utilizzata entro il campo efficace, il
comando a distanza potrebbe essere
impossibile se vi sono degli ostacoli tra il
telecomando ed il lettore.
< Se l'unità di telecomando viene utilizzata
in prossimità di altri apparecchi che
generano raggi infrarossi oppure se altri
dispositivi di comando a distanza
utilizzanti raggi infrarossi vengono
utilizzati in prossimità del lettore, esso
potrebbe funzionare in modo scorretto.
Dal punto di vista opposto anche gli altri
apparecchi potrebbero funzionare in
modo scorretto.
Instalación de las pilas
Abra la tapa del compartimiento de las
pilas.
Coloque dos pilas “AA“ (R6, SUM-3).
Asegúrese de que las pilas queden
ubicadas con sus polos positivo + y
negativo _ correctamente posicionados.
Cierre la tapa hasta que se trabe.
Cambio de pilas
Si nota que ha disminuido la distancia
necesaria para un control correcto entre el
control remoto y el reproductor, significa
que las pilas están gastadas. En este caso,
reemplácelas por nuevas.
Precauciones con las pilas
< Asegúrese de insertar las pilas con sus
polaridades positiva + y negativa _
correctas.
< Utilice el mismo tipo de pilas. Nunca
utilice diferentes tipos de pilas juntas.
< Pueden utilizarse pilas recargables y no
recargables. Refiérase a las
precauciones en sus rótulos.
< Si no va a utilizar el control remoto por
mucho tiempo (más de un mes), retire las
pilas para evitar pérdidas. Si se produce
pérdidas, limpie el líquido en el interior
del compartimiento y cambie las pilas por
nuevas.
< No caliente ni desarme las pilas y nunca
arroje pilas gastadas al fuego.
3
2
1
La unidad de control remoto suministrada le
permite controlar el aparato a distancia.
Cuando opere con el control remoto, diríjalo
hacia el sensor remoto en el panel frontal
del aparato.
< Aunque se utilice la unidad dentro del
margen de funcionamiento efectivo, es
imposible el control a distancia si hay
obstáculos entre el reproductor y el
control remoto.
< Si se utiliza la unidad cerca de otros
aparatos que generen rayos infrarrojos o
si se emplean otros aparatos de control
remoto por rayos infrarrojos cerca del
reproductor, es posible que éste no
funcione correctamente. Del mismo
modo, es posible que los otros aparatos
tampoco funcionen correctamente.
Page 20
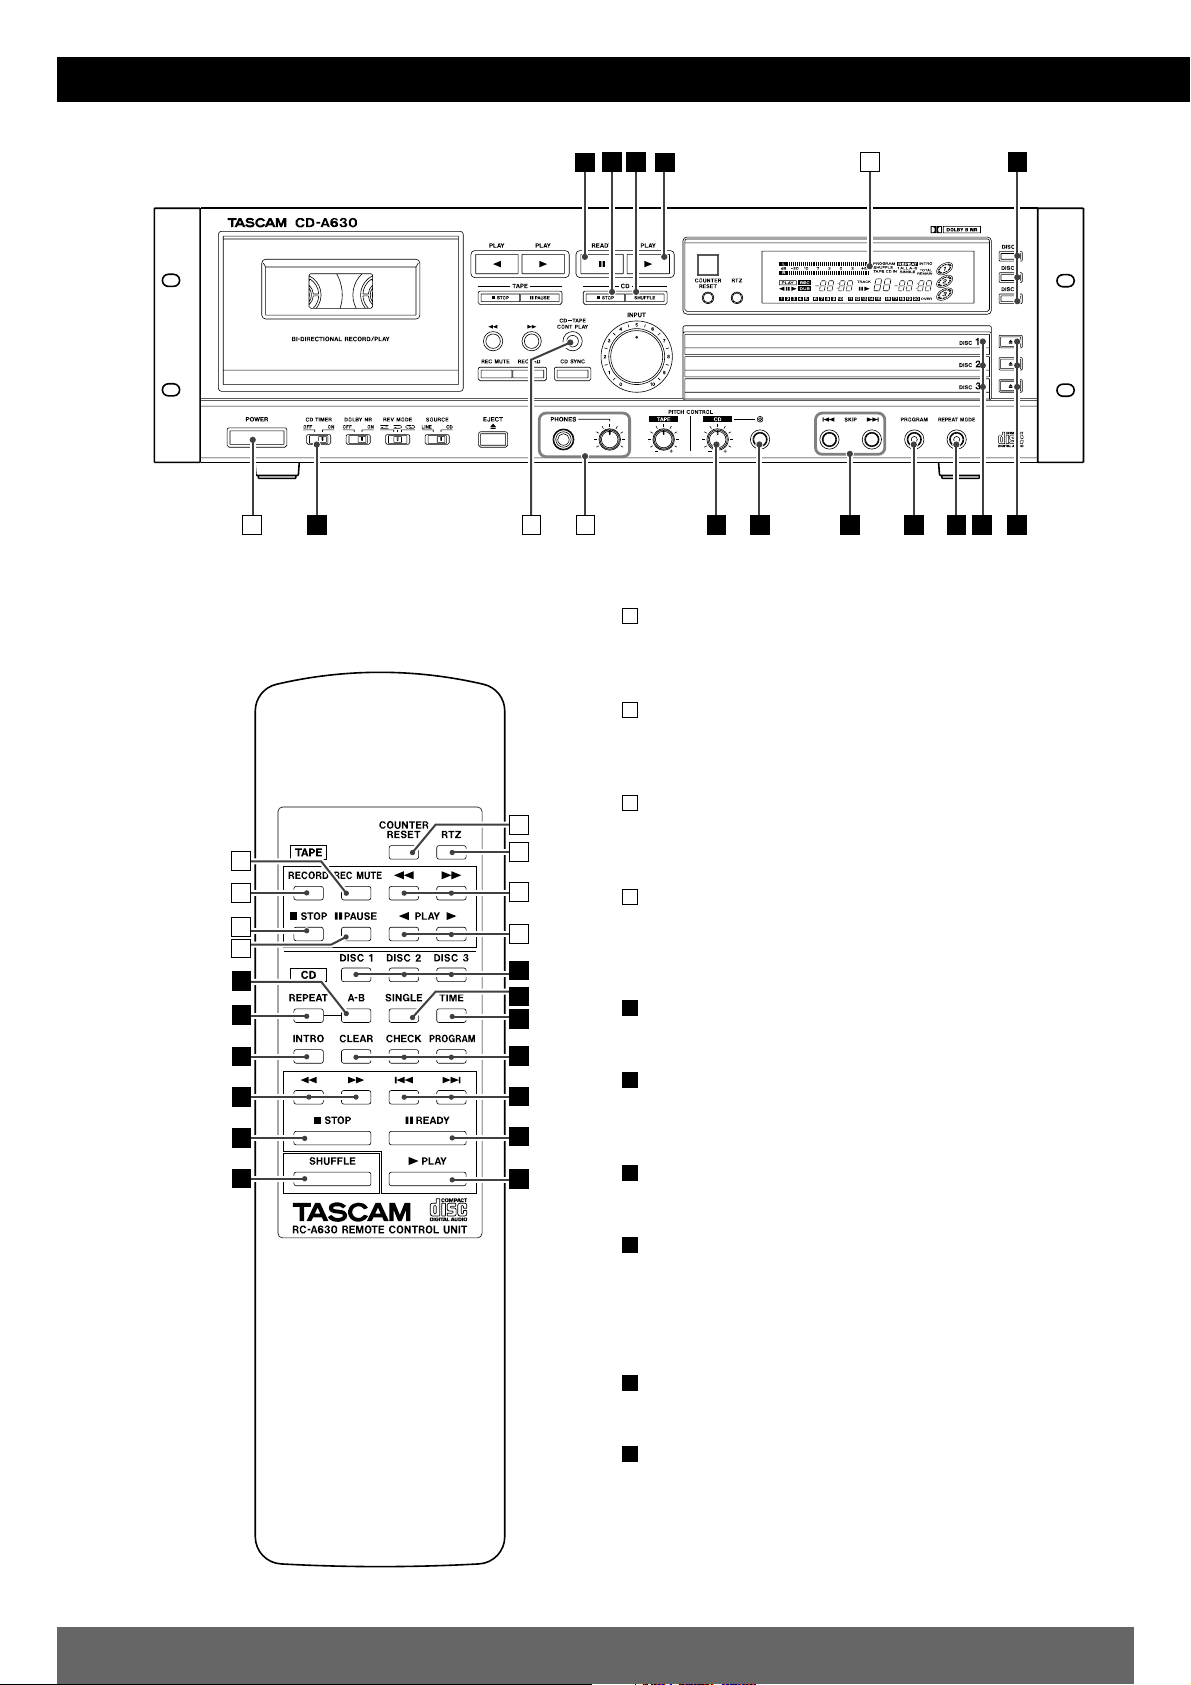
Name of Each Control
20
A
GF H I J K L M
ECB
A D
B C
D
ENGLISH
POWER switch
Press this switch to turn the unit on and
off.
CD-TAPE CONT PLAY button
This button is used for continuous
playback of a cassette tape and discs.
PHONES/Level
Insert the headphones plug into the
PHONES jack, and adjust the volume.
Display
CD
READY button
Use this button to pause playback.
STOP button
Use this button to stop playback or
synchronized recording.
SHUFFLE button
Use this button for shuffle playback.
PLAY button
Use this button to start playback of the
selected disc.
When no disc is selected, this button
won't work.
DISC 1, 2, 3 buttons
Use these buttons to select a disc.
CD TIMER switch
When an optional audio timer is
connected, timer playback of CD is
possible.
F
E
D
C
B
A
D
C
B
A
E
N
K
Q
S
B
C
O
P
R
I
A
D
f
g
b
e
c
d
m
l
Page 21

21
ENGLISH
CD PITCH CONTROL knob
CD PITCH CONTROL On/Off button
When pitch control is on, the CD PITCH
CONTROL knob is active.
Press this button in the stop mode to turn
the pitch control on and off.
SKIP buttons
Press these buttons to skip tracks.
Hold down these buttons to search for a
part of a track.
PROGRAM button
Use this button to turn the program mode
on and off.
REPEAT MODE button
Use this button to change the repeat
mode.
Disc trays
There are three disc trays.
Never place more than one disc on a
tray.
Open/Close buttons (1, 2, 3)
Use these buttons to open and close the
disc trays.
Remote Control Unit (CD)
REPEAT A-B button
This button is used for A-B repeat
function.
SINGLE button
After playback of the selected track, the
unit stops.
O
N
M
L
K
J
I
H
G
TIME button
Use this button to change the display
during CD playback.
INTRO button
Use this button for intro check function.
The beginning of each track is played for
10 seconds each.
PROGRAM,CHECK,CLEAR button
These buttons are used for programmed
playback.
SEARCH buttons
Hold down these buttons to search for a
part of a track.
TAPE
Cassette holder
SEARCH button
Use these buttons to fast-forward or
rewind the tape.
STOP button
Use this button to stop playback or
recording.
PAUSE button
Use this button to pause playback or
recording.
PLAY buttons(forward/reverse)
Use these buttons to start playback of the
tape.
COUNTER RESET button
Press this button to clear the tape
counter to 0000.
f
e
d
c
b
a
S
R
Q
P
RTZ button
Press this button to locate the "0000" point
of the tape.
DOLBY NR switch
Select ON for the tape recorded or to be
recorded with DOLBY B NR.
Select OFF for the tape recorded or to be
recorded without DOLBY B NR.
REV MODE selector
Use this switch to select the reverse
mode.
SOURCE selector
Use this switch to select the source to be
recorded.
EJECT button
Use this button to open the cassette
holder.
REC MUTE button
Use this button to insert a blank space of
about 4 seconds during recording.
RECORD button
Use this button to enter record pause
mode.
CD SYNC button
Use this button for CD synchronous
recording.
INPUT control
Use this control to adjust the recording
level.
PITCH CONTROL knob
Turn this knob to change the speed of
playback.
Usually, set the knob to the center.
p
o
n
m
l
k
j
i
h
g
h i
j
k l
m
n p
o
g
f
b c
d
e
a
Page 22
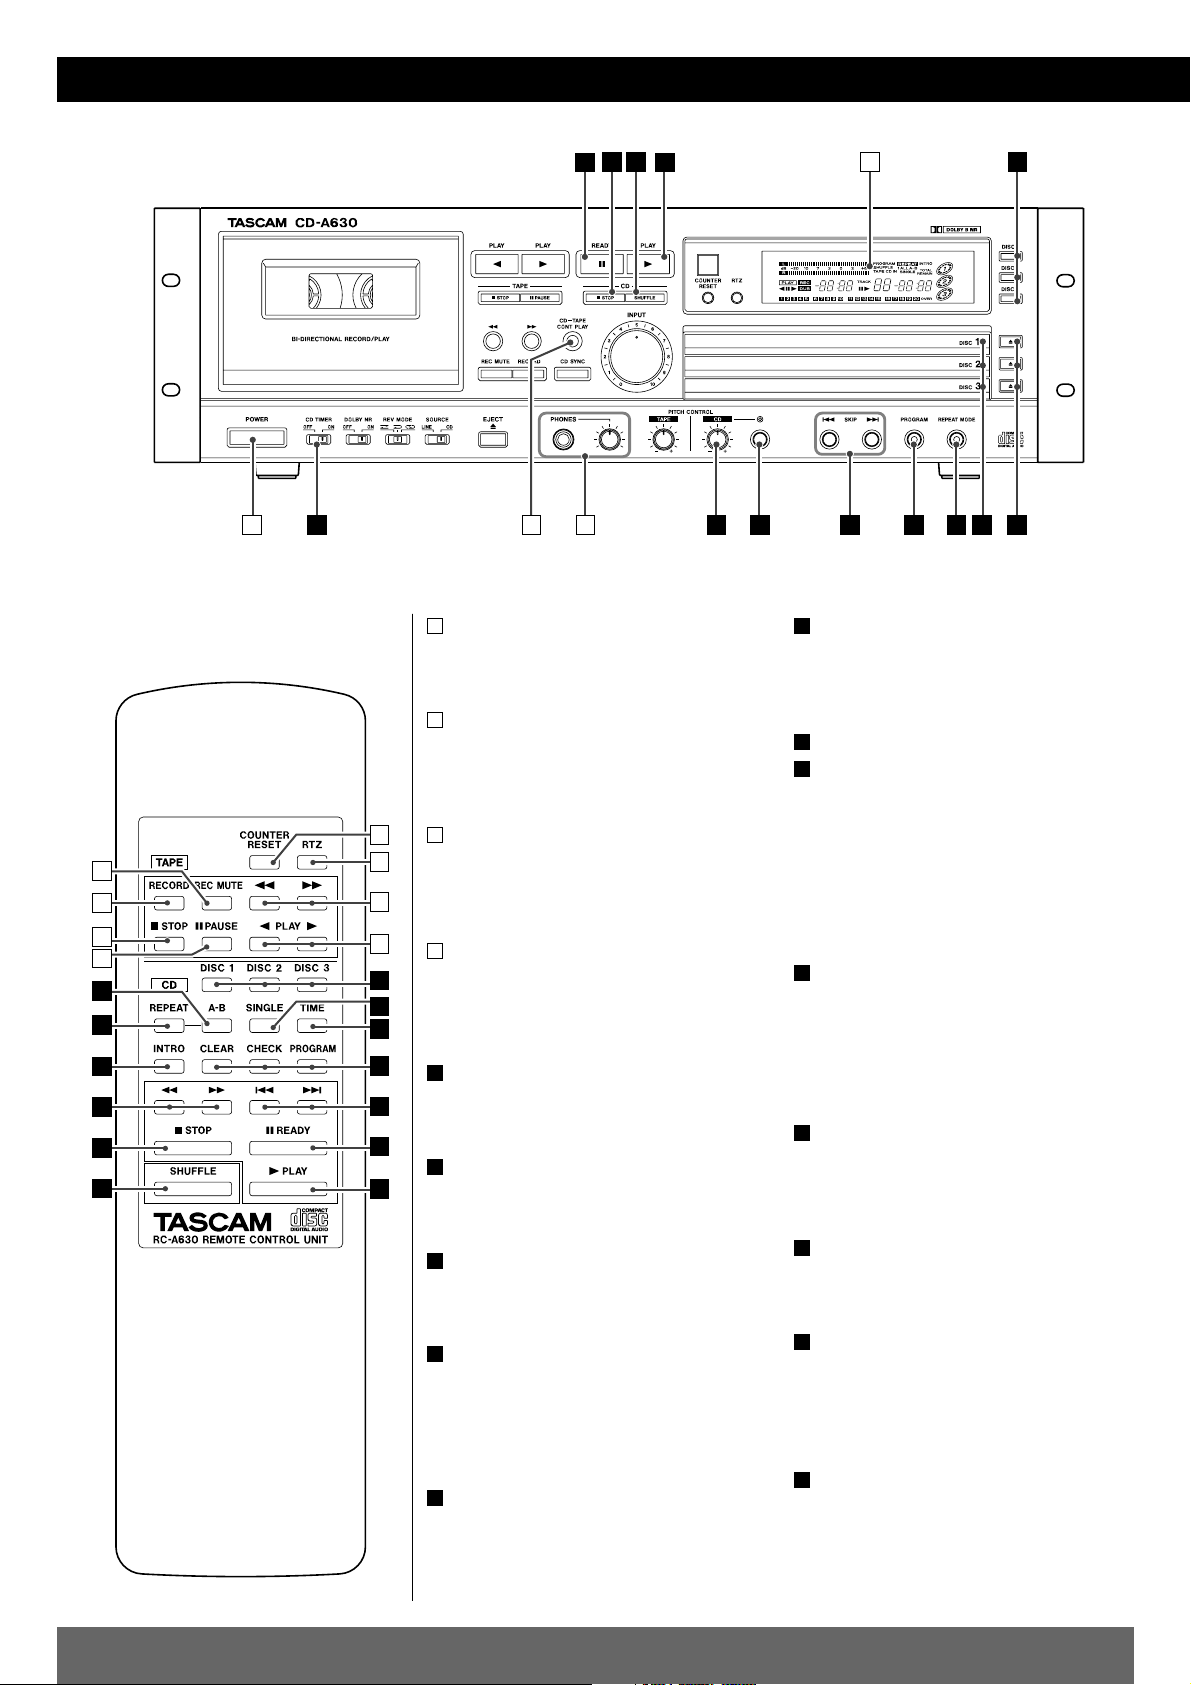
FRANÇAIS
Nomenclature
22
A
GF H I J K L M
ECB
A D
B C
D
E
N
K
Q
S
B
C
O
P
R
I
A
D
f
g
b
e
c
d
m
l
Interrupteur POWER
Appuyez sur cet interrupteur l'appareil
pour mettre en service, ou hors service.
Touche CD-TAPE CONT PLAY
Cette touche permet de commander la
lecture enchaînée d'une cassette et de
disques.
PHONES/Level
Branchez la fiche du cordon du casque
dans la prise PHONES puis réglez le
niveau d'écoute.
Afficheur à fonctions multiples
CD
Touche READY
Utilisez cette touche pour commander
une pause pendant la lecture.
Touche STOP
Utilisez cette touche pour arrêter la
lecture ou la copie synchronisée.
Touche SHUFFLE
Utilisez cette touche pour commander la
lecture au hasard.
Touche PLAY
Utilisez cette touche pour commander la
lecture du disque choisi.
Si aucun disque n'a été choisi, cette
touche est sans effet.
Touches DISC (1,2,3)
Utilisez ces touches pour choisir un
disque.
E
D
C
B
A
D
C
B
A
Interrupteur CD TIMER
La lecture d'un CD commandée par
programmateur est possible si vous
disposez d'un programmateur audio.
Bouton PITCH CONTROL
Touche PITCH CONTROL On/Off
Le bouton CD PITCH CONTROL est actif
lorsque la commande de hauteur tonale
est elle-même active.
L'appareil étant à l'arrêt, appuyez sur
cette touche pour mettre en service, ou
hors service, la commande de hauteur
tonale.
Touches SKIP
Utilisez ces touches pour passer d'une
plage musicale à une autre.
Maintenez la pression d'un doigt sur
l'une de ces touches pour rechercher un
passage musical.
Touche PROGRAM
Utilisez cette touche pour mettre en
service, ou hors service, le mode de
programmation.
Touche REPEAT MODE
Utilisez cette touche pour changer le
mode de répétition.
Tiroirs pour les disques
L'appareil comporte 3 tiroirs pour les
disques.
Ne déposez jamais plus d'un disque dans
un tiroir.
Touches Open/Close (1,2,3)
Utilisez ces touches pour ouvrir ou
fermer les tiroirs pour disque.
M
L
K
J
I
H
G
F
Page 23
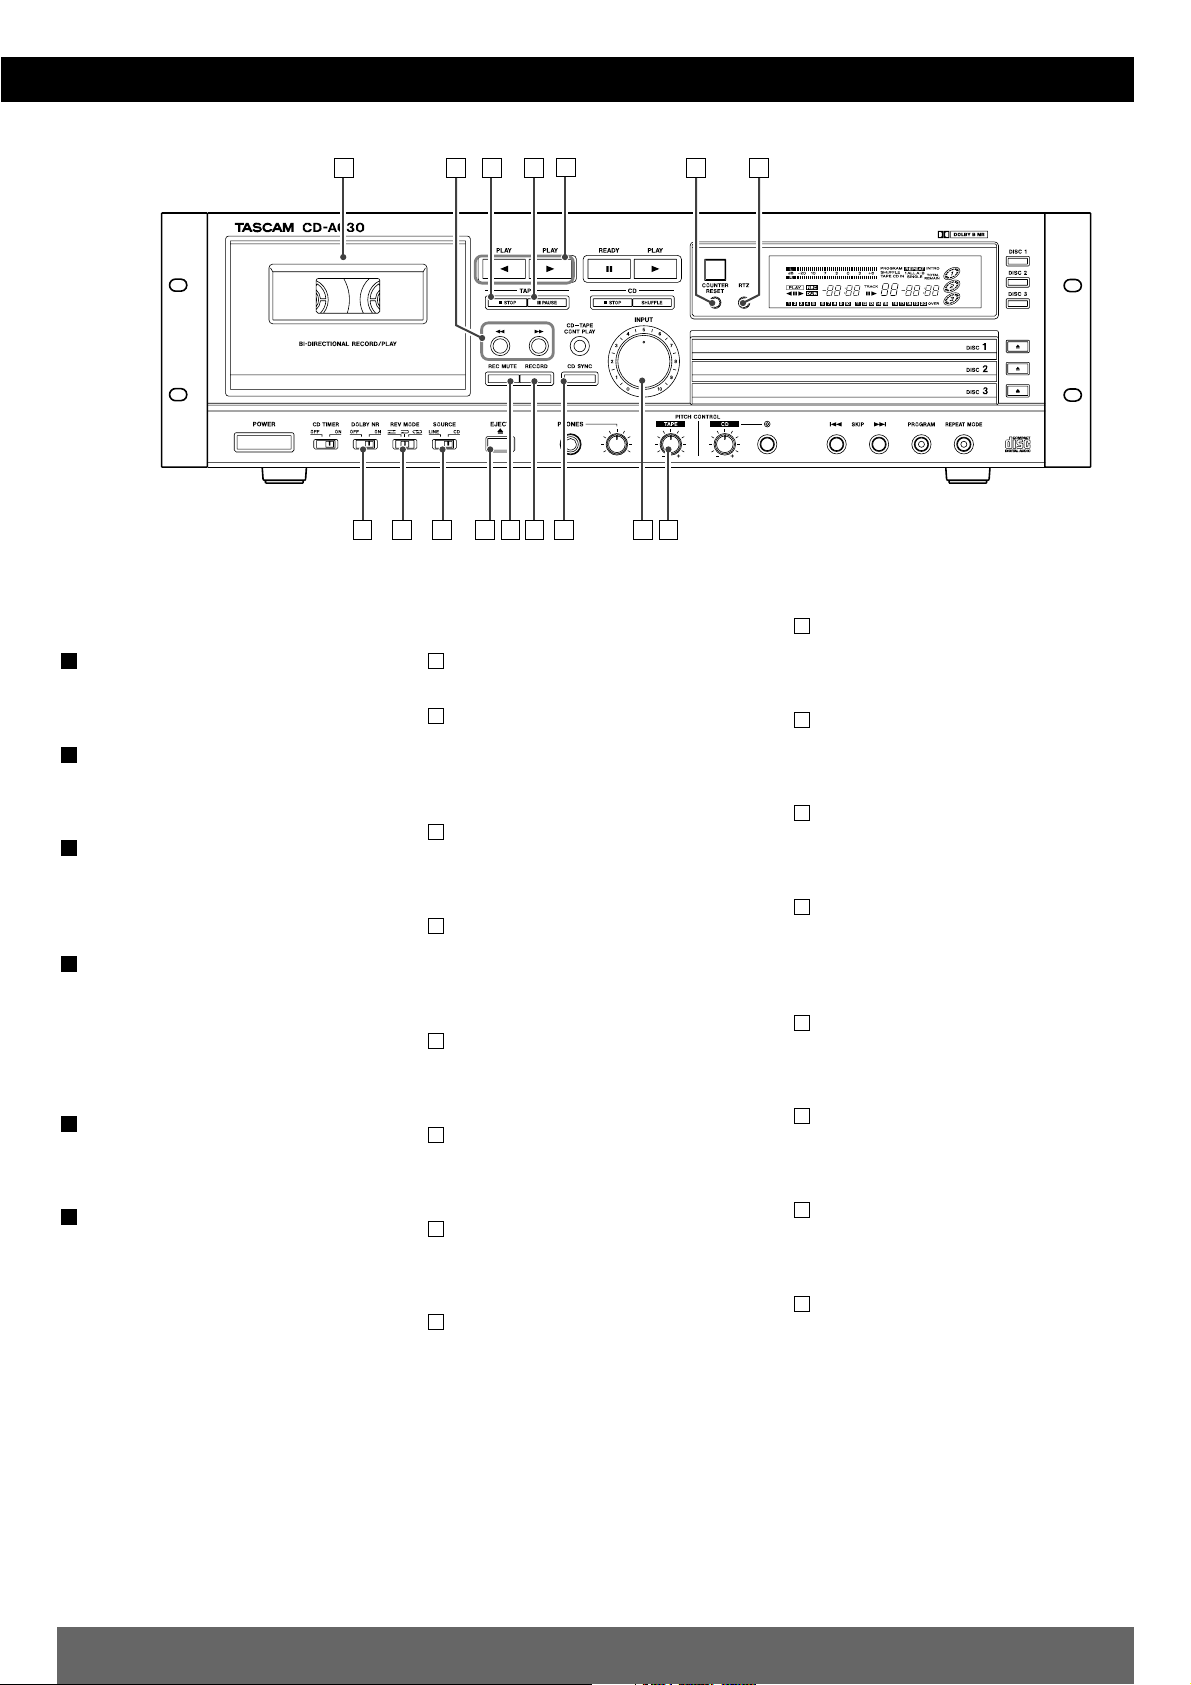
FRANÇAIS
23
Télécommande (CD)
Touche REPEAT A-B
Cette touche permet de commander la
répétition de l'intervalle A-B.
Touche SINGLE
Après lecture de la plage musicale
choisie, l'appareil s'arrête.
Touche TIME
Utilisez cette touche pour modifier les
indications affichées pendant la lecture
d'un CD.
Touche INTRO button
Utilisez cette touche pour commander la
fonction d'examen du début de chaque
plage musicale.
Les 10 premières secondes de chaque
plage musicale sont lues par l'appareil.
Touches PROGRAM, CHECK, CLEAR
Ces touches servent à la programmation
de la lecture.
Touches SEARCH
Maintenez la pression d'un doigt sur
l'une de ces touches pour rechercher un
passage musical.
S
R
Q
P
O
N
TAPE
Compartiment à cassette
Touches SEARCH
Utilisez ces touches pour bobiner
rapidement la bande dans un sens ou
dans l'autre.
Touche STOP
Utilisez cette touche pour arrêter la
lecture ou l'enregistrement.
Touche PAUSE
Utilisez cette touche pour commander
une pause de la lecture ou de
l'enregistrement.
Touches PLAY (vers la fin, vers le début)
Utilisez ces touches pour commander la
lecture d'une cassette.
Touche COUNTER RESET
Appuyez sur cette touche pour remettre à
zéro ("0000") le compteur de bande.
Touche RTZ
Appuyez sur cette touche pour revenir au
point "0000" de la bande.
Interrupteur DOLBY NR
Placez cet interrupteur sur la position ON
si la bande porte un enregistrement
effectué avec le réducteur de bruit
DOLBY B, ou si vous désirez effectuer un
enregistrement avec ce réducteur.
Placez cet interrupteur sur la position ON
si la bande porte un enregistrement
effectué sans le réducteur de bruit
DOLBY B, ou si vous désirez effectuer un
enregistrement sans ce réducteur.
h
g
f
e
d
c
b
a
Sélecteur REV MODE
Utilisez ce sélecteur pour choisir le mode
d'inversion.
Sélecteur SOURCE
Utilisez ce sélecteur pour choisir la
source dont le signal doit être enregistré.
Touche EJECT
Utilisez cette touche pour ouvrir le
compartiment à cassette.
Touche REC MUTE
Utilisez cette touche pour introduire un
silence de 4 secondes environ entre deux
enregistrements.
Touche RECORD
Utilisez cette touche pour passer en
attente d'enregistrement.
Touche CD SYNC
Utilisez cette touche pour réaliser une
copie synchronisée d'un CD.
Commande INPUT
Utilisez cette commande pour régler le
niveau d'enregistrement.
Bouton PITCH CONTROL (TAPE)
Agissez sur ce bouton pour régler la
vitesse de lecture.
En principe, ce bouton doit être au
centre.
p
o
n
m
l
k
j
i
a
b c
e
d
f
g
h i
j
k l
n p
m
o
Page 24

24
Bezeichnung der Bedienelemente
A
GF H I J K L M
ECB
A D
B C
D
DEUTSCH
Ein/Aus-Schalter (POWER)
Mit diesem Schalter wird das Gerät ein/ausgeschaltet.
Taste für fortlaufende CD-/CassettenWiedergabe (CD-TAPE CONT PLAY)
Diese Taste dient für fortlaufende
Cassetten- und Disc-Wiedergabe.
Kopfhörer/Lautstärke (PHONES/Level)
Stecken Sie den Kopfhörerstecker in die
Kopfhörerbuchse (PHONES) ein, und
stellen Sie die Lautstärke ein.
Mehrfachanzeige-Displayfeld
CD
Pausentaste (READY)
Mit dieser Taste kann die Wiedergabe
auf Pause geschaltet werden.
Stopptaste (STOP)
Durch Drücken dieser Taste wird
Wiedergabe oder synchronisierte
Aufnahme gestoppt.
Taste für zufallsgesteuerte Wiedergabe
(SHUFFLE)
Mit dieser Taste kann auf Wiedergabe
nach dem Zufallsprinzip geschaltet
werden.
Wiedergabetaste (PLAY)
Durch Drücken dieser Taste wird die
Wiedergabe der gewählten Disc
gestartet.
Wenn keine Disc gewählt ist, funktioniert
diese Taste nicht.
Disc-Nummerntasten (DISC 1, 2, 3)
Diese Tasten dienen zur Wahl einer Disc.
E
D
C
B
A
D
C
B
A
CD TIMER-Schalter
Bei Anschluß eines optionalen AudioTimers ist timergesteuerte CDWiedergabe möglich.
Tonhöhenregelknopf (PITCH CONTROL)
CD-Tonhöhenregler-Ein/Aus-Taste
(PITCH CONTROL On/Off)
Bei eingeschalteter Tonhöhenregelung
ist der Knopf CD PITCH CONTROL
wirksam.
Drücken Sie diese Taste bei auf Stopp
geschaltetem Gerät, um die
Tonhöhenregelung ein- oder
auszuschalten.
Titelsprungtasten (SKIP)
Durch Betätigen dieser Tasten können
Titel übersprungen werden.
Halten Sie diese Tasten gedrückt, um
nach einem Abschnitt eines Titels zu
suchen.
Programmtaste (PROGRAM)
Mit dieser Taste wird der ProgrammModus ein-/ausgeschaltet.
Wiederholbetriebsartentaste (REPEAT
MODE)
Mit dieser Taste kann der
Wiederholungsmodus geändert werden.
Disc-Fächer
Drei Disc-Fächer sind vorhanden.
Legen Sie jeweils nur eine Disc auf ein
Fach.
Öffnungs-/Schließtasten
(Open/Close 1, 2, 3)
Mit diesen Tasten werden die DiscFächer geöffnet/geschlossen.
M
L
K
J
I
H
G
F
E
N
K
Q
S
B
C
O
P
R
I
A
D
f
g
b
e
c
d
m
l
Page 25

DEUTSCH
25
TAPE
Cassettenfach
Suchtaste (SEARCH)
Mit diesen Tasten kann das Band schnell
umgespult werden.
Stopptaste (STOP)
Mit dieser Taste kann die Wiedergabe
oder Aufnahme gestoppt werden.
Pausentaste (PAUSE)
Mit dieser Taste kann die Wiedergabe
oder Aufnahme auf Pause geschaltet
werden.
Wiedergabetasten (PLAY)
(vorwärts/rückwärts)
Mit diesen Tasten wird die
Bandwiedergabe gestartet.
Zählwerk-Rückstelltaste (COUNTER
RESET)
Durch Drücken dieser Taste wird das
Bandzählwerk auf 0000 zurückgestellt.
Taste RTZ
Drücken Sie diese Taste, um den
Nullpunkt "0000" des Bands zu
lokalisieren.
Rauschunterdrückungsschalter (DOLBY
NR)
Für eine Cassette, die mit DOLBY B NR
bespielt ist oder bespielt werden soll,
wählen Sie die Position ON.
Für eine Cassette, die ohne DOLBY B NR
bespielt ist oder bespielt werden soll,
wählen Sie die Position OFF.
h
g
f
e
d
c
b
a
Fernbedienung (CD)
Wiederholtaste A-B (REPEAT A-B)
Diese Taste wird für die A-BWiederholfunktion eingesetzt.
Einzeltaste (SINGLE)
Nach vollständiger Wiedergabe des
gewählten Titels schaltet das Gerät auf
Stopp.
Zeittaste (TIME)
Mit dieser Taste kann die Anzeige
während CD-Wiedergabe geändert
werden.
Anspieltaste (INTRO)
Mit dieser Taste kann die Anspielfunktion
ausgelöst werden.
Der Anfang jedes Titels wird jeweils 10
Sekunden lang gespielt.
Programm-, Prüf-, Löschtaste
(PROGRAM, CHECK, CLEAR)
Diese Tasten werden für programmierte
Wiedergabe eingesetzt.
Suchtaste (SEARCH)
Halten Sie diese Tasten gedrückt, um
nach einem Abschnitt eines Titels zu
suchen.
S
R
Q
P
O
N
Reverse-Betriebsartenwähler (REV
MODE)
Mit diesem Schalter kann die ReverseBetriebsart gewählt werden.
Programmquellenwähler (SOURCE)
Mit diesem Schalter können Sie die
Aufnahme-Programmquelle wählen.
Auswurftaste (EJECT)
Mit dieser Taste kann das Cassettenfach
geöffnet werden.
Aufnahmestummschalttaste (REC MUTE)
Mit Hilfe dieser Taste kann ein
signalfreier Zwischenraum von etwa 4
Sekunden während einer Aufnahme
eingefügt werden.
Aufnahmetaste (RECORD)
Mit dieser Taste kann auf
Aufnahmepause geschaltet werden.
CD-Überspieltaste (CD SYNC)
Mit Hilfe dieser Taste können CDSynchronaufnahmen durchgeführt
werden.
Aufnahmepegelregler (INPUT)
Mit diesem Regler wird der
Aufnahmepegel eingestellt.
Tonhöhenregelknopf (PITCH CONTROL)
Durch Drehen dieses Knopfes wird die
Wiedergabegeschwindigkeit geändert.
Normalerweise wird dieser Knopf in
seiner Mittelposition belassen.
p
o
n
m
l
k
j
i
a
b c
e
d
f
g
h i
j
k l
n p
m
o
Page 26

26
Ubicazione e denominazione dei camandi
A
GF H I J K L M
ECB
A D
B C
D
ITALIANO
Interruttore di accensione e spegnimento
(POWER)
Premerlo per accendere e spegnere l'unità.
Tasto di riproduzione continua (CD-TAPE
CONT PLAY)
Usarlo per la riproduzione continua di un
nastro e dei dischi.
PHONES/Level
Inserire lo spinotto per cuffia nella presa
PHONES e regolare il volume.
Quadrante di visualizzazione, polivalente
CD
Tasto di messa in pausa (READY)
Usarlo per mettere in pausa la riproduzione.
Tasto STOP
Usarlo per fermare la riproduzione o per la
registrazione sincronizzata.
Tasto di riproduzione casuale (SHUFFLE)
Usarlo per la riproduzione in ordine casuale.
Tasto di riproduzione (PLAY)
Usarlo per avviare la riproduzione del disco
selezionato.
Se nessun disco è stato selezionato, questo
tasto non è operativo.
Tasti del numero di disco (DISC 1, 2, 3)
Usarli per selezionare un disco.
Interruttore CD TIMER
Quando è collegato un timer audio,
opzionale, è possibile la riproduzione con
timer di un CD.
Manopola di cambio velocità di
riproduzione (PITCH CONTROL)
G
F
E
D
C
B
A
D
C
B
A
E
N
K
Q
S
B
C
O
P
R
I
A
D
f
g
b
e
c
d
m
l
Page 27

27
ITALIANO
a
Tasto PITCH CONTROL On/Off
(attivazione o disattivazione)
Quando il controllo della velocità di
riproduzione è attivato, la manopola CD
PITCH CONTROL è attiva.
Premere questo tasto in modalità di
arresto per attivare o disattivare il
controllo della velocità di riproduzione.
Tasti di salto brani (SKIP)
Premerli per saltare i brani.
Tenerli premuti per cercare una parte di
un brano.
Tasto PROGRAM
Usarlo per attivare o disattivare la
modalità di programmazione.
Tasto REPEAT MODE
Usarlo per cambiare la modalità di
ripetizione.
Vassoi per disco
Ci sono tre vassoi per disco.
Non mettere mai più di un disco su un
vassoio.
Tasti di apertura e chiusura (Open/Close
1, 2, 3)
Usarli per aprire e chiudere i vassoi per
disco.
Telecomando (CD)
Tasto REPEAT A-B
Serve per la funzione di ripetizione di una
sezione A-B.
Tasto SINGLE
Dopo la riproduzione del brano
selezionato, l'unità si ferma.
Tasto TIME
Usarlo per cambiare il display durante la
riproduzione di un CD.
P
O
N
M
L
K
J
I
H
Tasto INTRO
Usarlo per la funzione Controllo delle
introduzioni.
La parte iniziale dei singoli brani viene
riprodotta per 10 secondi.
Tasti PROGRAM, CHECK, CLEAR
Servono per la riproduzione
programmata.
Tasti di ricerca (SEARCH)
Tenerli premuti per cercare una parte di
un brano.
TAPE
Vano portacassetta
Tasti di ricerca (SEARCH)
Usarli per far avanzare velocemente il
nastro, o per riavvolgerlo.
Tasto STOP
Usarlo per arrestare la riproduzione o la
registrazione.
Tasto PAUSE
Usarlo per mettere in pausa la
riproduzione o la registrazione.
Tasti di riproduzione (PLAY)
(in avanti/in inversione di movimento)
Usarli per avviare la riproduzione del
nastro.
Tasto di azzeramento contanastro
(COUNTER RESET)
Premerlo per portare il contanastro a
0000.
Tasto RTZ
Premerlo per localizzare il punto "0000"
del nastro.
g
f
e
d
c
b
a
S
R
Q
Interruttore DOLBY NR
Selezionare ON nel caso di un nastro
registrato, o da registrare, senza DOLBY
B NR.
Selettore della modalità in inversione di
movimento (REV MODE)
Usarlo per selezionare la modalità in
inversione di movimento.
Selettore della sorgente (SOURCE)
Usarlo per selezionare la sorgente da
registrare.
Tasto di espulsione (EJECT)
Usarlo per aprire il vano portacassetta.
Tasto di silenziamento durante la
registrazione (REC MUTE)
Usarlo per inserire uno spazio vuoto di 4
secondi durante la registrazione.
Tasto di pausa di registrazione (RECORD)
Usarlo per attivare la modalità di pausa di
registrazione.
Tasto di riversamento del compact disc
(CD SYNC)
Usarlo per la registrazione sincronizzata
del CD.
Controllo del volume di registrazione
(INPUT)
Usare questo comando per regolare il
volume di registrazione.
Manopola di cambio velocità di
riproduzione (PITCH CONTROL)
Girarla per cambiare la velocità di
registrazione.
Normalmente, questa manopola deve
essere in posizione centrale.
p
o
n
m
l
k
j
i
h
b c
e
d
f
g
h i
j
k l
n p
m
o
Page 28

Nombre de los controles
28
A
GF H I J K L M
ECB
A D
B C
D
ESPAÑOL
Interruptor POWER (Alimentación)
Presione este interruptor para encender
y apagar la unidad.
Botón CD-TAPE CONT PLAY
(Reproducción continua de disco
compacto-cinta)
Este botón se utiliza para la reproducción
continua de una cinta cassette y discos.
PHONES/Level (Auriculares/Nivel)
Inserte la clavija de auriculares en el jack
PHONES, y ajuste el volumen.
Indicación de múltiples funciones
Disco compacto
Botón READY (Pausa)
Use este botón para hacer una pausa
durante la reproducción o grabación.
Botón STOP (Parada)
Use este botón para detener la
reproducción o la grabación
sincronizada.
Botón SHUFFLE (Aleatorio)
Use este botón para la reproducción
aleatoria.
Botón PLAY (Reproducción)
Use este botón para iniciar la
reproducción del disco seleccionado.
Cuando no selecciona ningún disco, no
trabaja este botón.
Botones DISC 1,2,3 (No. de disco)
Use estos botones para seleccionar un
disco.
E
D
C
B
A
D
C
B
A
Interruptor CD TIMER
(Temporizador de DC)
Cuando se conecta un temporizador de
audio opcional, es posible la
reproducción de discos compactos
mediante el temporizador.
Perilla PITCH CONTROL
(Control del paso)
Botón PITCH CONTROL On/Off
(ON/OFF de control del paso)
Al poner el control del paso en ON, la
perilla CD PITCH CONTROL (Control del
paso de DC) queda activada. Presione
este botón en el modo de parada para
poner el control del paso en la posición
ON y OFF.
Botón SKIP (Salto de música)
Presione estos botones para saltar
pistas.
Mantenga presionados estos botones
para buscar una parte de la pista.
Botón PROGRAM (Programa)
Use este botón para activar y desactivar
el modo de programa.
Botón REPEAT MODE (Modo de repetición)
Use este botón para cambiar el modo de
repetición.
Bandejas de disco
Hay tres bandejas de disco.
Nunca coloque más de un disco sobre
una bandeja.
Botones Open/Close (Apertura/cierre)
(1,2,3)
Use estos botones para abrir y cerrar las
bandejas de disco.
M
L
K
J
I
H
G
F
E
N
K
Q
S
B
C
O
P
R
I
A
D
f
g
b
e
c
d
m
l
Page 29

ESPAÑOL
29
Mando a distancia (DC)
Botón REPEAT A-B (Repetición A-B)
Este botón se usa para la función de
repetición A-B.
Botón SINGLE (Simple)
Después de la reproducción de la pista
seleccionada, se detiene la cinta.
Botón TIME (Tiempo)
Use este botón para cambiar la
visualización durante la reproducción del
disco compacto.
Botón INTRO (Comprobación de
preludio)
Use este botón para la comprobación de
preludios.
El comienzo de cada pista se reproduce
durante 10 segundos.
Botón PROGRAM, CHECK, CLEAR
(Programa, comprobación, borrado)
Estos botones se usan en la
reproducción programada.
Botón SEARCH (Búsqueda)
Mantenga presionados estos botones
para buscar una parte de la pista.
S
R
Q
P
O
N
Cinta
Portacassette
Botón SEARCH (Búsqueda)
Use este botón para hacer avanzar
rápidamente o rebobinar la cinta.
Botón STOP (Parada)
Use este botón para detener la grabación
o reproducción.
Botón PAUSE (Pausa)
Use este botón para hacer una pausa
durante la grabación o reproducción
Botones PLAY (avance/inversión)
Use estos botones para comenzar la
reproducción de la cinta.
Botón COUNTER RESET (Reposición del
contador)
Presione este botón para reponer el
contador de cinta a 0000.
Botón RTZ
Presione este botón para localizar el
punto "0000" de la cinta.
Interruptor DOLBY NR (Reductor de
ruido)
Seleccione ON para la cinta grabada o a
ser grabada con DOLBY B NR.
Seleccione OFF para la cinta grabada o a
ser grabada sin DOLBY B NR.
h
g
f
e
d
c
b
a
Selector del modo de inversión (REV
MODE)
Use este interruptor para seleccionar el
modo de inversión.
Selector de la fuente (SOURCE)
Use este interruptor para seleccionar la
fuente a grabarse.
Botón de expulsión (EJECT)
Use este botón para abrir el
portacassette.
Botón sordina de grabación (REC MUTE)
Use este botón para insertar un espacio
en blanco de aproximadamente 4
segundos durante la grabación.
Botón de grabación (RECORD)
Use este botón para registrar el modo de
pausa de grabación.
Botón de regrabación de discos
compactos (CD SYNC)
Use este botón para la grabación
sincronizada de discos compactos.
Control INPUT (Nivel de grabación)
Use este control para ajustar el nivel de
grabación.
Perilla PITCH CONTROL (Control del
paso)
Gire esta perilla para cambiar la
velocidad de grabación.
Generalmente, deje la perilla en el
centro.
p
o
n
m
l
k
j
i
a
b c
e
d
f
g
h i
j
k l
n p
m
o
Page 30

ENGLISH FRANÇAIS
Playback 1 Lecture 1
30
This unit can be used to play back CDs
including CD-R and CD-RW discs that
have been recorded and finalized on a CD
recorder.
Press the POWER switch to turn the unit
ON.
When no disc is set on a tray, "no disc"
will be displayed after initializing.
Press the Open/Close button(L) of DISC
1, 2 or 3.
Place a disc on the tray with the printed
face up.
Never place more than one disc on any
one tray.
Press the Open/Close button(L) of DISC
1, 2 or 3 again to close the disc tray.
When a disc tray is closed, the red disc
mark appears on the display even if no
disc is set.
4
3
2
1
The music calendar lights to show the
available unplayed tracks. If there are
more than 20 tracks on a disc, the track
number 1-20 and OVER indicator will light.
elapsed time
track number
music calendar
temps écoulé
numéro de la plage
Affichage du Calendrier des plages
1
3
2
4
5
selected disc
Cet appareil peut être utilisé pour la
lecture des CD, y compris les disques CDR et CD-RW, qui ont été gravés et
finalisés à l'aide d'un enregistreur de CD.
Appuyez sur l'interrupteur POWER pour
mettre en service l'appareil.
Si l'appareil ne contient aucun disque, la
mention "no disc" s'affiche après
initialisation.
Appuyez sur la touche Open/Close(L)
correspondant à DISC 1, 2 ou 3.
Déposez un disque dans le tiroir, face
imprimée tournée vers le haut.
Ne déposez pas plusieurs disques dans
le même tiroir.
Appuyez une nouvelle fois sur la touche
Open/Close(L) correspondant à DISC 1,
2 ou 3 de manière à fermer le tiroir.
Lorsque le tiroir est fermé, le symbole
rouge de disque s'affiche, même si le
tiroir ne contient aucun disque.
4
3
2
1
Press the DISC 1, 2 or 3 button to start
playback.
It will take a few moments to load the
disc.
Playback starts from the first track of the
selected disc.
When the playback of the selected disc
has been finished, the unit stops
automatically.
5
disc mark
disc mark / selected disc
Le damier musical s'éclaire et indique les
plages musicales qui n'ont pas été
jouées. Si le disque porte plus de 20
plages musicales, les témoins 1-20 et
OVER sont éclairés.
Appuyez sur la touche DISC 1, 2 ou 3 pour
commander la lecture.
Le chargement du disque exige un
certain temps.
La lecture commence au début de la
première plage musicale du disque
choisi.
Lorsque la lecture du disque choisi est
terminée, l'appareil s'arrête de lui-même.
5
Symbole de disque
Disque choisi
Symbole de disque / Disque choisi
1
2
43
5
Page 31

DEUTSCH ESPAÑOL
Riproduzione 1Wiedergabe 1 Reproducción 1
31
ITALIANO
CD
tiempo transcurrido
calendario musical
Verstrichene Zeit
Der Musikkalender
tempo trascorso
calendario dei brani
Mit diesem Gerät können CDs
einschließlich CD-R- und CD-RW-Discs,
die auf einem CD-Recorder bespielt und
verarbeitet worden sind, abgespielt
werden.
Drücken Sie den Schalter POWER, um
das Gerät einzuschalten.
Wenn überhaupt keine Disc eingelegt ist,
wird "no disc" nach der Initialisierung
angezeigt.
Drücken Sie die Taste Open/Close(L) für
DISC 1, 2 oder 3.
Legen Sie eine Disc mit der bedruckten
Seite nach oben weisend auf das Fach.
Legen Sie jeweils nur eine Disc auf ein
Fach.
Drücken Sie die Taste Open/Close(L) für
DISC 1, 2 oder 3 erneut, um das DiscFach zu schließen.
Wenn ein Disc-Fach geschlossen ist,
erscheint die rote Disc-Marke im Display,
auch wenn keine Disc eingelegt ist.
4
3
2
1
Questa unità può essere utilizzata
riprodurre CD incluso i dischi CD-R e CDRW che sono stati registrati e completati
su un registratore di CD.
Premere l'interruttore POWER per
accendere l'unità (ON).
Se non c'è un disco inserito su un
vassoio, dopo l'inizializzazione appare "no
disc".
Premere il tasto Open/Close(L) di DISC
1, 2 o 3.
Mettere un disco sul vassoio con il lato
stampato rivolto verso l'alto.
Non mettere più di un disco su un
vassoio.
Premere di nuovo il tasto Open/Close(L)
di DISC 1, 2 o 3 per chiudere il vassoio
per disco.
Quando un vassoio per disco viene
chiuso, l'indicazione di disco rossa
appare sul display anche se nessun disco
è inserito.
4
3
2
1
Esta unidad puede usarse para
reproducir discos compactos incluyendo
los de CD-R y CD-RW que han sido
grabados y terminados en una grabadora
de discos compactos.
Presione el interruptor POWER para
encender la unidad.
Cuando no esté colocado ningún disco
sobre la bandeja, se visualizará "no disc"
después de la inicialización.
Presione el botón Open/Close(L ) de
DISC 1, 2 o 3.
Coloque un disco sobre la bandeja con
la cara impresa hacia arriba.
Nunca coloque más de un disco sobre
una bandeja.
Presione otra vez el botón
Open/Close(L) de DISC 1, 2 o 3 para
cerrar la bandeja del disco.
Cuando está cerrada una bandeja de
disco, aparece una marca de disco roja
sobre el visualizador aunque no esté
montado un disco.
4
3
2
1
Der Musikkalender leuchtet, um die
verfügbaren, nicht gespielten Titel
anzuzeigen. Hat eine Disc mehr als 20
Titel, leuchten Titelnummer 1-20 und
Anzeige OVER.
Il calendario musicale s'illumina a
indicare i brani disponibili non riprodotti.
Se ci sono più di 20 brani su un disco, si
illumina l'indicatore di numero di brano 120 e OVER (oltre).
La luz del calendario musical muestra las
pistas disponibles no reproducidas.
Si hay más de 20 pistas en un disco, se
encenderá el indicador del número de
pistas 1-20 y más.
Drücken Sie die Taste DISC 1, 2 oder 3,
um die Wiedergabe zu starten.
Das Laden der Disc nimmt eine gewisse
Zeit in Anspruch.
Die Wiedergabe beginnt vom ersten Titel
der gewählten Disc an.
Bei Beendigung der Wiedergabe der
gewählten Disc schaltet das Gerät
automatisch auf Stopp.
5
gewählte Disc
Disc-Marke
Titelnummer
Disc-Marke / gewählte Disc
disco selezionato / indicazione di disco
Premere il tasto DISC 1, 2 o 3 per avviare
la riproduzione.
Il caricamento di un disco richiede un
certo tempo.
La riproduzione inizia dall'ultimo brano
del disco selezionato.
Quando la riproduzione del disco
selezionato è terminata, l'unità si ferma
automaticamente.
5
indicazione di disco
disco selezionato
numero del brano
Presione el botón DISC 1, 2 o 3 para
iniciar la reproducción.
Tarda cierto tiempo para cargar el disco.
La reproducción comienza de la primera
pista del disco seleccionado. Una vez
terminada la reproducción del disco
seleccionado, la unidad se detiene
automáticamente.
5
disco seleccionado / marca de disco
número de pista
marca de disco
disco seleccionado
Page 32

ENGLISH FRANÇAIS
Playback 2 Lecture 2
32
To stop playback
Press the STOP button(H ) to stop
playback.
B
To change the disc
Press the Open/Close 1, 2 or 3 button(L)
to open the disc tray, change the disc,
and press the button again to close the
tray.
< You can change discs that aren't being
played, even if another disc is being
played.
D
To suspend playback temporarily (pause
mode)
Press the READY button(J). Playback
stops at the current position.
To resume playback, press the READY
button(J) or PLAY button(y).
C
A B C
Pour arrêter la lecture
Appuyez sur la touche STOP(H) pour
arrêter la lecture.
B
Pour interrompre la lecture (pause)
Appuyez sur la touche READY(J). La
lecture s'interrompt au point
correspondant.
Pour reprendre la lecture, appuyez sur la
touche READY(J ) ou sur la touche
PLAY(y).
C
Pour changer les disques
Appuyez sur la touche Open/Close 1, 2 ou
3 de manière à ouvrir le tiroir
correspondant, changez le disque puis
appuyez une nouvelle fois sur cette
touche pour fermer le tiroir.
< Vous pouvez changer un disque qui n'est
pas en cours de lecture, même si un
autre disque est en cours de lecture.
D
< Even when a disc is set on a tray, "no
disc" is displayed untill a disc is selected
by pressing the corresponding DISC
button.
Pour commander la lecture
Après avoir sélectionné un disque,
appuyez sur la touche PLAY(y) pour
commander la lecture. (La touche DISC
ne peut pas être utilisée pour commander
la lecture.)
La lecture commence au début de la
première plage musicale du disque
choisi. La lecture s'arrête à la fin de la
dernière plage musicale du dernier
disque (DISC 3).
< Si vous appuyez sur la touche DISC
correspondant à un tiroir ouvert, le tiroir
se ferme et la lecture du disque
commence automatiquement.
A
B
C A
D
To start playback
When a disc has already been selected,
press the PLAY button(y ) to start
playback. (The DISC button cannot be
used to start playback.)
The playback starts from the first track of
the selected disc. The playback stops
when the last track of DISC 3 is played.
< If the corresponding DISC button is
pressed when the tray is open, the tray
will close automatically and start
playback.
A
< La mention "no disc" est affichée, même
si un tiroir contient un disque, aussi
longtemps que vous n'avez pas choisi un
disque en appuyant sur la touche DISC
qui lui correspond.
D
Page 33

DEUTSCH ESPAÑOL
Riproduzione 2Wiedergabe 2 Reproducción 2
33
ITALIANO
CD
Stoppen der Wiedergabe
Um die Wiedergabe zu stoppen, drücken
Sie die Taste STOP(H).
B
Vorübergehendes Aufheben der
Wiedergabe (Pausieren)
Drücken Sie die Taste READY(J). Die
Wiedergabe stoppt an der momentanen
Position.
Zum Fortsetzen der Wiedergabe drücken
Sie die Taste READY(J) oder PLAY(y).
C
Disc-Wechsel
Drücken Sie die Taste Open/Close 1, 2
oder 3, um das Disc-Fach zu öffnen,
wechseln Sie die Disc, und drücken Sie
die Taste erneut, um das Fach zu
schließen.
< Discs, die nicht spielen, können
gewechselt werden, auch wenn gerade
eine andere Disc wiedergegeben wird.
D
Per arrestare la riproduzione
Premere il tasto STOP(H) per arrestare la
riproduzione.
B
Per interrompere la riproduzione
temporaneamente (pause mode)
Premere il tasto READY(J ). La
riproduzione si ferma nella posizione
attuale.
Per riprendere la riproduzione, premere il
tasto READY(J) o il tasto PLAY(y).
C
Per cambiare il disco
Premere il tasto Open/Close 1, 2 o 3 per
aprire il vassoio per disco, cambiare il
disco e premere di nuovo il tasto per
chiudere il vassoio.
< È possibile cambiare dischi non in corso
di riproduzione, anche se è in corso la
riproduzione di un altro disco.
D
Para detener la reproducción
Presione el botón STOP(H ) para
interrumpir la grabación.
B
Para suspender provisionalmente la
reproducción (modo de pausa)
Presione el botón READY(J ) para
detener la reproducción en la posición
actual.
Para reanudar la reproducción, presione
el botón READY(J) o el botón PLAY(y).
C
Para cambiar el disco
Presione el botón Open/Close 1, 2 o 3
para abrir la bandeja del disco, cambie el
disco, y presione otra vez el mismo botón
para cerrar la bandeja.
< Usted puede cambiar los discos que no
están siendo reproducidos, aun cuando
esté tocando un otro disco.
D
Starten der Wiedergabe
Wenn bereits eine Disc gewählt worden
ist, drücken Sie die Taste PLAY(y), um
die Wiedergabe zu starten. (Die Taste
DISC kann nicht zum Starten der
Wiedergabe verwendet werden.)
Die Wiedergabe startet vom ersten Titel
der gewählten Disc. Die Wiedergabe
stoppt, nachdem der letzte Titel von DISC
3 gespielt worden ist.
< Wird die entsprechende DISC-Taste bei
geöffnetem Fach gedrückt, so wird
dieses automatisch geschlossen, und die
Wiedergabe beginnt.
A
Per avviare la riproduzione
Quando un disco è già stato selezionato,
premere il tasto PLAY(y) per avviare la
riproduzione. (Il tasto DISC non può
essere utilizzato per avviare la
riproduzione.)
La riproduzione inizia dall'ultimo brano
del disco selezionato. La riproduzione si
ferma quando l'ultimo brano di DISC 3 è
stato riprodotto.
< Quando il vassoio è aperto, se si preme il
tasto DISC corrispondente, il vassoio si
chiude automaticamente e la
riproduzione inizia.
A
Para iniciar la reproducción
Cuando ya se haya seleccionado un
disco, presione el botón PLAY(y) para
iniciar la reproducción. (El botón DISC
puede utilizarse para iniciar la
reproducción).
La reproducción inicia desde la primera
pista del disco seleccionado. La
reproducción termina al quedar
reproducida la última pista del DISC 3.
< Si el correspondiente botón del número
de disco DISC es presionado cuando la
bandeja está abierta, la bandeja se
cerrará automáticamente y comenzará la
reproducción.
A
< Auch wenn sich eine Disc auf einem
Fach befindet, wird "no disc" angezeigt,
bis eine Disc durch Drücken der
entsprechenden DISC-Taste gewählt
wird.
< Anche quando un disco è inserito su un
vassoio, viene visualizzato "no disc" fino a
quando si seleziona un disco premendo il
corrispondente tasto DISC.
< Aun cuando esté colocado un disco
sobre la bandeja, se visualizará "no disc"
hasta que seleccione un disco
presionando el correspondiente botón de
DISC.
Page 34

ENGLISH FRANÇAIS
Playback 3
E
Lecture 3
34
To skip to the next or a previous track
Press the SKIP button (. or/ )
repeatedly until the desired track is
found. The selected track will be played
from the beginning.
< When the SKIP button(.) is pressed
once during playback, the track being
played will be played from the beginning.
To return to the beginning of the previous
track, press the SKIP button(.) twice.
< During program playback, the next or
previous track in the program is played.
< The music calendar will show the
selected track.
E
Search for a part of a track
During playback, hold down the SKIP
button(.or/) (or SEARCH button
(mor,) of the remote control unit)
and release it when the part you want to
listen to is found.
If you fast-forward to the end of the last
track, the unit returns to the beginning of
the last track.
F
Pour atteindre la plage musicale
suivante ou précédente
Appuyez sur la touche SKIP
(. ou/ ) autant de fois qu'il est
nécessaire pour atteindre la plage
musicale qui vous intéresse. La lecture
de la plage musicale ainsi choisie
commence au début de cette plage
musicale.
< Si vous appuyez sur la touche SKIP(.)
pendant la lecture d'une plage musicale,
la lecture de cette plage musicale
reprend. Pour atteindre le début de la
plage musicale précédente, appuyez
deux fois sur la touche SKIP(.).
< Pendant la lecture programmée, c'est la
plage musicale suivante, ou précédente,
qui est lue.
< La plage musicale choisie est signalée
par le damier musical.
E
Recherche d'un passage musical
Pendant la lecture, maintenez la pression
d'un doigt sur la touche
SKIP(. ou/ ) (ou sur la touche
SEARCH(m ou, ) du boîtier de
télécommande) puis relâchez la touche
lorsque le passage qui vous intéresse est
atteint.
Si vous atteignez la fin de la dernière
plage musicale, l'appareil revient au
début de cette dernière plage musicale.
F
Pitch Control
The playback speed of the CD can be
changed.
Press the PITCH CONTROL On/Off button
in the stop mode, start playback, and turn
the PITCH CONTROL knob.
By turning the PITCH CONTROL knob to
the right, the playback speed becomes
faster, resulting in higher pitch. By
turning it to the left, the playback speed
becomes slower, resulting in lower pitch.
(±12%)
< The PITCH CONTROL On/Off button
doesn't work during playback.
You must press the STOP button to stop
playback, activate the pitch control, then
start playback again.
G
Commande de la hauteur tonale
Vous pouvez changer la vitesse de
lecture du CD.
L'appareil étant à l'arrêt, appuyez sur la
touche PITCH CONTROL On/Off,
commandez la lecture puis tournez le
bouton PITCH CONTROL.
La vitesse augmente quand vous tournez
le bouton PITCH CONTROL vers la droite
et la hauteur tonale augmente également.
Inversement, la vitesse diminue quand
vous tournez le bouton PITCH CONTROL
vers la gauche et la hauteur tonale
diminue également.
< La touche PITCH CONTROL On/Off est
sans effet pendant la lecture.
G
F
G
F
E
G
Page 35

DEUTSCH ESPAÑOL
Riproduzione 3Wiedergabe 3 Reproducción 3
35
ITALIANO
CD
Ansteuern des nächsten oder eines
vorigen Titels
Drücken Sie die Taste SKIP
(.oder/) wiederholt, bis Sie den
gewünschten Titel gefunden haben. Der
gewählte Titel wird vom Anfang an
gespielt.
< Wird die Taste SKIP(. ) einmal
während Wiedergabe gedrückt, so wird
der momentane Titel vom Anfang an
wiedergegeben. Um zum Anfang des
vorigen Titels zurückzugelangen, drücken
Sie die Taste SKIP(.) zweimal.
< Bei programmgesteuerter Wiedergabe
wird der nächste oder vorige Titel im
Programm gespielt.
< Der Musikkalender zeigt den gewählten
Titel an.
E
Suchen nach einem bestimmten
Abschnitt eines Titels
Halten Sie während Wiedergabe die
Taste SKIP(. oder/ ) (oder die
Taste SEARCH(m oder, ) an der
Fernbedienung) gedrückt und lassen Sie
sie los, sobald Sie den gewünschten
Abschnitt gefunden haben.
Bei Schnellvorlauf zum Ende des letzten
Titels steuert das Gerät wieder den
Anfang des letzten Titels an.
F
Per saltare al brano successivo o a
quello precedente
Premere ripetutamente il tasto
SKIP(.o/) fino a che si trova il
brano desiderato. Il brano selezionato
viene riprodotto dall'inizio.
< Premendo una volta il tasto SKIP (.)
durante la riproduzione, il brano in corso
di riproduzione viene riprodotto dall'inizio.
Per ritornare all'inizio del brano
precedente, premere due volte il tasto
SKIP(.).
< Durante la riproduzione programmata,
viene riprodotto il brano successivo o a
quello precedente in programma.
< Il calendario musicale mostra il brano
selezionato.
E
Ricerca di una parte di un brano
Durante la riproduzione, tenere premuto il
tasto SKIP(. o/ ) (o il tasto
SEARCH(mo,) del telecomando) e
rilasciarlo quando si è trovata la parte
che si desidera ascoltare.
Se con l'avanzamento veloce si
raggiunge la fine dell'ultimo brano, l'unità
ritorna all'inizio dell'ultimo brano.
F
Para saltar a la siguiente o a la anterior
pista
Presione repetidamente el botón
SKIP(. o/ ) hasta encontrar la
pista deseada. La pista seleccionada
será reproducida desde el comienzo.
< Al presionar una vez el botón SKIP(.)
durante la reproducción, la pista que está
siendo reproducida comenzará a
reproducirse desde el principio. Para
regresar al comienzo de la pista anterior,
presione dos veces el botón SKIP(.).
< Durante la reproducción del programa,
se reproducirá la siguiente o la anterior
pista en el programa.
< El calendario musical mostrará la pista
seleccionada.
E
Busca de una parte de la pista
Durante la reproducción, mantenga
presionado el botón SKIP(.o/) (o
el botón SEARCH(m o, ) de la
unidad de control remoto) y suéltelo
cuando encuentre la parte que desea
escuchar.
Si hace avanzar rápidamente el extremo
de la última pista, la unidad regresa al
comienzo de la última pista.
F
Tonhöhenregelung
Die CD-Wiedergabegeschwindigkeit
kann geändert werden.
Drücken Sie die Taste PITCH CONTROL
On/Off bei auf Stopp geschaltetem Gerät,
starten Sie die Wiedergabe und drehen
Sie den Knopf PITCH CONTROL.
Durch Drehen des Knopfes PITCH
CONTROL nach rechts wird die
Wiedergabegeschwindigkeit und damit
die Tonlage erhöht. Durch Drehen des
Knopfes nach links, wird die
Wiedergabegeschwindigkeit und damit
die Tonlage gesenkt.
< Während Wiedergabe funktioniert die
Taste PITCH CONTROL On/Off nicht.
G
Controllo della velocità di riproduzione
È possibile cambiare la velocità di
riproduzione di un CD.
Premere il tasto PITCH CONTROL On/Off
in modalità di arresto, avviare la
riproduzione, e girare la manopola PITCH
CONTROL.
Girando la manopola PITCH CONTROL a
destra, la velocità di riproduzione
aumenta, e il parametro è più alto.
Girandola a sinistra, la velocità di
riproduzione diminuisce, e il parametro è
più basso.
< Durante la riproduzione il tasto PITCH
CONTROL On/Off non è operativo.
G
Control del paso
Puede cambiarse la velocidad de
reproducción del disco compacto.
Presione el botón PITCH CONTROL On/Off
en el modo de parada, inicie la
reproducción y gire la perilla PITCH
CONTROL.
Girando la perilla PITCH CONTROL a la
derecha, aumenta la velocidad de
reproducción, elevando así el paso.
Girándola a la izquierda, baja la velocidad
de reproducción, reduciendo el paso.
< El botón PITCH CONTROL On/Off no
trabaja durante la reproducción.
G
Page 36

ENGLISH FRANÇAIS
Intro Check
Examen du début de chaque plage musicale
36
< Si la mention "no disc" est affichée,
choisissez un disque au moyen de la
touche DISC (1, 2 ou 3) puis appuyez sur
la touche STOP pour arrêter la lecture.
L'appareil étant à l'arrêt, appuyez sur la
touche INTRO du boîtier de
télécommande. L'appareil lit les 10
premières secondes de chaque plage
musicale.
Appuyez une nouvelle fois sur la touche
INTRO lorsque se présente la plage
musicale que vous désirez écouter. La
lecture normale commence au début de
la plage musicale.
< Pendant la lecture programmée,
l'appareil lit les 10 premières secondes
de chaque plage musicale faisant partie
du programme.
< L'examen du disque cesse avec la
dernière plage musicale du dernier
disque (DISC 3).
< Si vous appuyez sur la touche INTRO
pendant la lecture, l'examen du disque
commence au début de la plage musicale
suivante.
< Si vous appuyez sur la touche INTRO
pendant la lecture des 10 premières
secondes d'une plage musicale,
l'examen du disque commence à partir
de cette plage musicale.
< If "no disc" is displayed, select any disc
by pressing the DISC button (1, 2 or 3) and
then press the STOP button to stop
playback.
Press the INTRO button of the remote
control unit in the stop mode. The
beginning of each track is played for 10
seconds.
When a track you want to listen to is
found, press the INTRO button again. The
normal playback starts from that track.
< During program playback, the
programmed tracks will be played for 10
seconds each.
< Intro check stops when the last track of
DISC 3 is checked.
< If the INTRO button is pressed during
playback, intro check will start from the
next track.
< If the INTRO button is pressed within 10
seconds from the beginning of a track,
intro check will start from that track.
INTRO
Page 37

DEUTSCH ESPAÑOL
Controllo delle introduzioniAnspielfunktion Comprobación de preludio
37
ITALIANO
CD
< Wenn "no disc" angezeigt ist, wählen Sie
eine Disc mit der Taste DISC (1, 2 oder 3),
und drücken Sie dann die Taste STOP,
um die Wiedergabe zu stoppen.
Drücken Sie die Taste INTRO an der
Fernbedienung bei auf Stopp
geschaltetem Gerät. Der Anfang jedes
Titels wird 10 Sekunden lang gespielt.
Wenn Sie einen Titel erreicht haben, den
Sie fortlaufend hören möchten, drücken
Sie die Taste INTRO erneut. Die normale
Wiedergabe beginnt von diesem Titel an.
< Bei programmgesteuerter Wiedergabe
werden die programmierten Titel jeweils
10 Sekunden lang angespielt.
< Diese Funktion stoppt, nachdem der
letzte Titel von DISC 3 angespielt worden
ist.
< Wird die Taste INTRO während
Wiedergabe gedrückt, so beginnt die
Anspielfunktion vom nächsten Titel an.
< Wenn die Taste INTRO innerhalb von 10
Sekunden vom Anfang eines Titels
gedrückt wird, beginnt die
Anspielfunktion von diesem Titel an.
< Se è visualizzato "no disc", selezionare
uno dei dischi premendo il tasto DISC (1,
2 o 3) e poi premere il tasto STOP per
arrestare la riproduzione.
Premere il tasto INTRO del telecomando
in modalità di arresto. Viene riprodotta,
per 10 secondi, la parte iniziale di ogni
brano.
Quando si è trovato un brano che si
desidera ascoltare, premere un'altra
volta il tasto INTRO. La riproduzione
normale inizia dal brano.
< Durante la riproduzione programmata, i
brani programmati vengono riprodotti per
10 secondi ognuno.
< Il controllo delle introduzioni si arresta
quando l'ultimo brano di DISC 3 è stato
controllato.
< Se si preme il tasto INTRO durante la
riproduzione, il controllo delle
introduzioni inizia dal brano successivo.
< Se il tasto INTRO viene premuto prima
che siano trascorsi 10 secondi dall'inizio
di un brano, il controllo delle introduzioni
inizia da quel brano.
< Si se visualiza "no disc', seleccione
cualquier disco presionando el botón
DISC (1, 2 o 3) y luego presione el botón
STOP para paralizar la reproducción.
Presione el botón INTRO de la unidad de
control remoto en el modo de parada. El
comienzo de cada pista se reproducirá
durante 10 segundos.
Cuando encuentre la pista que desea
escuchar, presione otra vez el botón
INTRO. La reproducción normal comienza
de esa pista.
< Durante la reproducción de programa,
las pistas programadas se reproducirán
durante 10 segundos cada una.
< La comprobación de preludio cesa
después de la comprobación de la última
pista del DISC 3.
< Si presiona el botón INTRO durante la
reproducción, la comprobación del
preludio comenzará de la siguiente pista.
< Si presiona el botón INTRO dentro de 10
segundos desde el comienzo de una
pista, la comprobación del preludio
comenzará de la misma pista.
Page 38

ENGLISH FRANÇAIS
Repeat Playback 1 Répétition de la lecture 1
38
Repeat one track
[REPEAT SINGLE]
Press the REPEAT button and select
"REPEAT SINGLE" during playback. The
track being played will be played
repeatedly. If you press the SKIP button
and select another track in REPEAT
SINGLE mode, the track you selected will
be played repeatedly.
It is also possible to select a track to be
repeated in the stop mode. Press the
REPEAT button and then select the track
number by pressing the SKIP button.
Répétition d'une seule plage
musicale [REPEAT SINGLE]
Pendant la lecture, appuyez sur la touche
REPEAT puis choisissez "REPEAT
SINGLE". La plage musicale en cours de
lecture est lue de manière répétée. Dans
cette situation (REPEAT SINGLE), si vous
appuyez sur la touche SKIP et choisissez
une autre plage musicale, cette autre
plage musicale est lue de manière
répétée.
Il est également possible de choisir,
tandis que l'appareil est à l'arrêt, la plage
musicale qui doit être répétée. Appuyez
sur la touche REPEAT puis choisissez la
plage musicale par son numéro en
utilisant la touche SKIP.
A
REPEAT SINGLE REPEAT 1
REPEAT ALL
(OFF)
All the tracks of DISC 1
All the tracks of DISC 2
All the tracks of DISC 3
Every time the REPEAT button of the remote
control unit is pressed, the mode is changed
as follows :
< During program playback, only the
programmed tracks will be played in
order repeatedly.
A
Repeat All the Discs
[REPEAT ALL]
All the tracks of the 3 discs will be played
repeatedly.
Chaque pression sur la touche REPEAT
modifie comme suit le mode de
fonctionnement :
< Pendant la lecture programmée,
l'appareil lit de manière répétée les
plages musicales faisant partie du
programme.
A
Repeat All the Tracks of a Disc
[REPEAT 1]
All the tracks of the selected disc will be
played repeatedly.
Press the REPEAT button and select
"REPEAT 1".
Répétition de tous les disques
[REPEAT ALL]
Toutes les plages musicales des 3
disques sont lues de manière répétée.
Répétition de toutes les plages
musicales d'un disque [REPEAT 1]
Toutes les plages musicales du disque
choisi sont lues de manière répétée.
Appuyez sur la touche REPEAT puis
choisissez "REPEAT 1".
Toutes les plages musicales de DISC 1
Toutes les plages musicales de DISC 2
Toutes les plages musicales de DISC 3
REPEAT SINGLE
REPEAT 1
REPEAT ALL
Page 39

DEUTSCH ESPAÑOL
Riproduzione ripetuta 1Wiederholwiedergabe 1 Reproducción repetida 1
39
ITALIANO
CD
Einzeltitel-Wiederholung
[REPEAT SINGLE]
Drücken Sie die Taste REPEAT und
wählen Sie "REPEAT SINGLE" während
Wiedergabe. Der momentane Titel wird
dann wiederholt gespielt. Durch Drücken
der Taste SKIP und Wahl eines anderen
Titels bei Einzeltitel-Wiederholung
(REPEAT SINGLE) wird der gewählte Titel
wiederholt abgespielt.
Auch bei auf Stopp geschaltetem Gerät
kann ein Titel für wiederholte
Wiedergabe ausgewählt werden.
Drücken Sie die Taste REPEAT, und
wählen Sie dann die gewünschte
Titelnummer mit der Taste SKIP.
Ripetizione di un brano
[REPEAT SINGLE]
Premere il tasto REPEAT e selezionare
"REPEAT SINGLE" durante la
riproduzione. Il brano in corso di
riproduzione viene riprodotto
ripetutamente. Se si preme il tasto SKIP e
si seleziona un altro brano in modalità
REPEAT SINGLE, il brano selezionato
viene riprodotto ripetutamente.
Un brano da ripetere può anche essere
selezionato in modalità di arresto.
Premere il tasto REPEAT e poi
selezionare il numero di brano premendo
il tasto SKIP.
Repetición de una pista
[REPEAT SINGLE]
Presione el botón REPEAT y seleccione
"REPEAT SINGLE" durante la
reproducción. La pista se reproducirá
repetidamente. Si usted presiona el botón
SKIP y selecciona otra pista en el modo
REPEAT SINGLE, la pista que usted
seleccionó se reproducirá
repetidamente.
Es también posible seleccionar una pista
que desea repetir en el modo de parada.
Presione el botón REPEAT y luego
seleccione el número de pista
presionando el botón SKIP.
Mit jedem Druck auf die Taste REPEAT an
der Fernbedienung ändert sich die
Betriebsart folgendermaßen :
< Bei programmgesteuerter Wiedergabe
werden die programmierten Titel
wiederholt abgespielt.
A
Ogni volta che si preme il tasto REPEAT del
telecomando, la modalità cambia come
segue :
< Durante la riproduzione programmata, i
brani programmati vengono riprodotti
ripetutamente.
A
Cada vez que presione el botón REPEAT de
la unidad de control remoto, el modo cambia
como sigue :
< Durante la reproducción programada, las
pistas programadas se reproducirán
repetidamente.
A
Wiederholung aller Discs
[REPEAT ALL]
Alle Titel der drei Discs werden
wiederholt abgespielt.
Ripetizione di Tutti i dischi
[REPEAT ALL]
Tutti i brani dei 3 dischi vengono
riprodotti ripetutamente.
Repetición de todos los discos
[REPEAT ALL]
Se reproducirán repetidamente todas las
pistas de los 3 discos.
Wiederholung aller Titel einer
Disc [REPEAT 1]
Alle Titel der gewählten Disc werden
wiederholt abgespielt.
Drücken Sie die Taste REPEAT und
wählen Sie "REPEAT 1".
Ripetizione di Tutti i brani di un
disco [REPEAT 1]
Tutti i brani del disco selezionato
vengono riprodotti ripetutamente.
Premere il tasto REPEAT e selezionare
"REPEAT 1".
Repetición de todas las pistas
de un disco [REPEAT 1]
Se reproducen repetidamente todas las
pistas del disco seleccionado.
Presione el botón REPEAT y seleccione
"REPEAT 1".
Alle Titel von DISC 1
Alle Titel von DISC 2
Alle Titel von DISC 3
Tutti i brani del DISC 1
Tutti i brani del DISC 2
Tutti i brani del DISC 3
Todas las pistas de DISC 1
Todas las pistas de DISC 2
Todas las pistas de DISC 3
Page 40

ENGLISH FRANÇAIS
Repeat Playback 2 Répétition de la lecture 2
40
To repeat a designated section
[A-B REPEAT]
Start playback and designate the point at
which the A-B repeat should start(point
A) by pressing the A-B button.
"REPEAT A-" appears on the display.
When the point at which repeat
playback should end(point B) is reached,
press the A-B button again.
The designated section will be played
repeatedly.
< After designating point A, SKIP button
can be used to skip or fast-forward to
point B.
< The point A and B should be selected
from the same disc.
< If one of the following buttons is pressed,
A-B repeat mode will be canceled:
A-B button
STOP button
Open/Close button
of the selected disc
POWER button
< There should be more than one second
between A and B.
< Following functions cannot be used
during A-B repeat:
REPEAT SINGLE
REPEAT 1
REPEAT ALL
PROGRAM
SHUFFLE
INTRO
CD-TAPE CONT PLAY
2
1
Pour répéter l'intervalle A-B
[A-B REPEAT]
Commandez la lecture et précisez le
début de l'intervalle A-B (le point A) en
appuyant sur la touche A-B.
La mention "REPEAT A-" s'affiche.
Lorsque la fin de l'intervalle A-B est
atteinte (le point B), appuyez une
nouvelle fois sur la touche A-B.
Le passage compris entre les deux points
est alors joué de manière répétée.
< Après avoir précisé le point A, vous
pouvez utiliser la touche SKIP pour
atteindre plus rapidement le point B.
< Les points A et B doivent être choisis sur
le même disque.
< Si vous appuyez sur l'une des touches
suivantes, la répétition de l'intervalle A-B
est annulée.
Touche A-B
Touche STOP
Touche Open/Close
correspondant au disque choisi
Interrupteur POWER
< L'intervalle A-B doit être au moins égal à
une seconde.
< Les fonctions suivantes ne sont pas
disponibles pendant la répétition de
l'intervalle A-B:
REPEAT SINGLE
REPEAT 1
REPEAT ALL
PROGRAM
SHUFFLE
INTRO
CD-TAPE CONT PLAY
2
1
REPEAT A-B
1
2
Page 41

DEUTSCH ESPAÑOL
Riproduzione ripetuta 2Wiederholwiedergabe 2 Reproducción repetida 2
41
ITALIANO
CD
Wiederholung eines bestimmten
Abschnitts [A-B REPEAT]
Starten Sie die Wiedergabe und geben
Sie den Punkt vor, an dem die A-BWiederholung starten sollte (Punkt A),
indem Sie die Taste A-B drücken.
"REPEAT A-" erscheint im Display.
Bei Erreichen des Punkts, an dem die
Wiederholwiedergabe enden sollte
(Punkt B) drücken Sie die Taste A-B
erneut.
Der vorgegebene Abschnitt wird
wiederholt wiedergegeben.
< Nach Vorgabe von Punkt A kann Punkt B
mit Hilfe der Taste SKIP angesteuert bzw.
im Schnellvorlauf erreicht werden.
< Punkte A und B sollten sich auf derselben
Disc befinden.
< Durch Drücken einer der folgenden
Tasten wird die A-B-Wiederholfunktion
aufgehoben:
Taste A-B
Stopptaste (STOP)
Taste Open/Close der gewählten Disc
Ein/Aus-Schalter (POWER)
< Das Intervall zwischen A und B muß
größer als 1 Sekunde sein.
< Während A-B-Wiedergabe können die
folgenden Funktionen nicht eingesetzt
werden:
REPEAT SINGLE
REPEAT 1
REPEAT ALL
PROGRAM
SHUFFLE
INTRO
CD-TAPE CONT PLAY
2
1
Per ripetere un determinata
sezione [A-B REPEAT]
Avviare la riproduzione e specificare il
punto da cui la ripetizione A-B deve
iniziare (punto A) premendo il tasto A-B.
"REPEAT A-" appare sul display.
Quando viene raggiunto il punto in cui la
riproduzione ripetuta deve terminare
(punto B), premere un'altra volta il tasto
A-B.
La sezione specificata viene riprodotta
ripetutamente.
< Dopo aver specificato il punto A, si può
usare il tasto SKIP per saltare o avanzare
velocemente al punto B.
< I punti A e B devono essere selezionati
all'interno dello stesso disco.
< Se si preme uno dei tasti seguenti, la
modalità di ripetizione A-B viene
annullata.
Tasto A-B
Tasto STOP
Tasto Open/Close
del disco selezionato
Interruttore POWER
< L'intervallo tra A e B deve essere più
grande di un secondo.
< Durante la ripetizione A-B non si possono
utilizzare le seguenti funzioni:
REPEAT SINGLE
REPEAT 1
REPEAT ALL
PROGRAM
SHUFFLE
INTRO
CD-TAPE CONT PLAY
2
1
Para repetir una determinada
sección [A-B REPEAT]
Comience la reproducción y señale el
punto donde la repetición A-B debe
iniciar (punto A) presionando el botón AB.
Aparece "REPEAT A-" en el visualizador.
Cuando llega el punto donde la
reproducción repetida debe terminar
(punto B), presione otra vez el botón A-B.
La sección señalada se reproducirá
repetidamente.
< Después de señalar el punto A, puede
usarse el botón SKIP para saltar o
avanzar rápidamente al punto B.
< Los puntos A y B deben seleccionarse
del mismo disco.
< Al presionar uno de los siguientes
botones, se cancelará el modo A-B.
Botón A-B
Botón STOP
Botón Open/Close
del disco seleccionado
Interruptor POWER
< Hay un espacio de más de un segundo
entre A y B.
< Las siguientes funciones no pueden
utilizarse durante la repetición de A-B:
REPEAT SINGLE
REPEAT 1
REPEAT ALL
PROGRAM
SHUFFLE
INTRO
CD-TAPE CONT PLAY
2
1
Page 42

ENGLISH FRANÇAIS
42
Shuffle Playback
1
Lecture au hasard
Press the SHUFFLE button in the stop
mode.
1
Si un disque est déjà sélectionné,
appuyez sur la touche PLAY(y).
Les numéros des plages musicales qui
ont été jouées s'effacent du damier
musical.
< Pour choisir un autre disque, appuyez sur
la touche DISC qui lui correspond.
< Si vous appuyez sur la touche SKIP(/)
pendant la lecture au hasard, la plage
musicale suivante est choisie au hasard.
Pendant la lecture au hasard, une plage
musicale ne peut être jouée qu'une fois.
< Pour interrompre la lecture au hasard,
appuyez sur la touche STOP(H) our la
touche Open/Close(L) correspondant au
disque.
< Pour arrêter la lecture au hasard,
appuyez sur la touche SHUFFLE ou sur la
touche STOP(H) alors que l'appareil est à
l'arrêt, ou encore appuyez sur
l'interrupteur POWER.
2
1
2
2
If a disc has already been selected,
press the PLAY button(y).
The played tracks disappear from the
music calendar.
< To select another disc, press the DISC
button.
< If you press the SKIP button (/) during
shuffle playback, next track will be
randomly selected and played.
A track cannot be replayed during shuffle
playback.
< To stop shuffle playback, press the STOP
button(H) or Open/Close button(L) of the
selected disc.
< To cancel the shuffle playback mode,
press the SHUFFLE button or STOP button
(H ) in the stop mode, or press the
POWER button.
2
Tracks of a disc can be played randomly. Les plages musicales d'un disque peuvent
être jouées au hasard.
L'appareil étant à l'arrêt, appuyez sur la
touche SHUFFLE.
1
Page 43

CD
DEUTSCH ESPAÑOL
43
ITALIANO
Riproduzione in ordine casualeZufallsgesteuerte Wiedergabe
Reproducción aleatoria
Wenn bereits eine Disc gewählt worden
ist, drücken Sie die Taste PLAY(y).
Gespielte Titel erlöschen im
Musikkalender.
< Um eine andere Disc zu wählen, drücken
Sie die Taste DISC.
< Durch Drücken der Taste SKIP (/ )
während zufallsgesteuerter Wiedergabe
wird der nächste Titel nach dem
Zufallsprinzip gewählt und
wiedergegeben.
Titelwiederholung ist während
zufallsgesteuerter Wiedergabe nicht
möglich.
< Zum Stoppen der zufallsgesteuerten
Wiedergabe drücken Sie die Taste
STOP(H) oder die Taste Open/Close(L)
der gewählten Disc.
< Zum Aufheben der zufallsgesteuerten
Wiedergabe drücken Sie die Taste
SHUFFLE oder die Taste STOP(H) bei auf
Stopp geschaltetem Gerät, bzw.
betätigen Sie die Taste POWER.
2
Se un disco è già stato selezionato,
premere il tasto PLAY(y).
I brani riprodotti scompaiono dal
calendario musicale.
< Per selezionare un altro disco, premere il
tasto DISC.
< Se si preme il tasto SKIP(/) durante la
riproduzione in ordine casuale, il brano
successivo viene selezionato a caso e
riprodotto.
Durante la riproduzione in ordine casuale
non è possibile ripetere la riproduzione di
un brano.
< Per arrestare la riproduzione in ordine
casuale, premere il tasto STOP(H) o il
tasto Open/Close(L ) del disco
selezionato.
< Per annullare la modalità di riproduzione
in ordine casuale, premere il tasto
SHUFFLE o il tasto STOP(H) in modalità di
arresto, o premere il tasto POWER.
2
Si ya se ha seleccionado un disco,
presione el botón PLAY(y).
Las pistas reproducidas desaparecen del
calendario musical.
< Para seleccionar otro disco, presione el
botón DISC.
< Si presiona el botón SKIP(/) durante
la reproducción aleatoria, se
seleccionará aleatoriamente la siguiente
pista y se reproducirá. Durante la
reproducción aleatoria, no puede
reproducirse una pista.
< Para cesar la reproducción aleatoria,
presione el botón STOP(H) o el botón
Open/Close(L) del disco seleccionado.
< Para cancelar el modo de reproducción
aleatoria, presione el botón SHUFFLE o el
botón STOP(H) en el modo de parada, o
presione el botón POWER.
2
Titel einer Disc können nach dem
Zufallsprinzip abgespielt werden.
Drücken Sie die Taste SHUFFLE bei auf
Stopp geschaltetem Gerät.
1
I brani di un disco possono essere riprodotti
in ordine casuale.
Premere il tasto SHUFFLE in modalità di
arresto.
1
Las pistas de un disco pueden reproducirse
aleatoriamente.
Presione el botón SHUFFLE en el modo
de parada.
1
Page 44

ENGLISH FRANÇAIS
44
Press the SINGLE button of the remote
control unit in the stop mode.
"SINGLE" appears on the display.
To cancel the single playback mode,
press the SINGLE button again.
1
Single Playback
L'appareil étant à l'arrêt, appuyez sur la
touche SINGLE de boîtier de
télécommande.
La mention "SINGLE" s'affiche.
Pour annuler la lecture d'une seule plage
musicale, appuyez une nouvelle fois sur
la touche SINGLE.
1
Lecture d'une seule plage musicale
SINGLE
SKIP
DISC 1,2,3
1
2
Select a track.
Select a disc by pressing the DISC
button, and then select a track number by
pressing the SKIP button (.//).
After the playback of the track, the unit
stops and the single playback mode is
canceled.
< If the SINGLE button is pressed during
playback, the unit stops after the
playback of the track.
< If you press the SKIP button (.//)
during single playback, another track can
be selected.
After the playback of that track, the unit
stops and the single playback mode is
canceled.
2
Choisissez la plage musicale.
Choisissez le disque au moyen de la
touche DISC puis choisissez le numéro
de la plage musicale au moyen de la
touche SKIP(.//).
Lorsque la lecture de la plage musicale
est terminée, ce mode de fonctionnement
est abandonné et l'appareil s'arrête.
< Si vous appuyez sur la touche SINGLE
pendant la lecture, l'appareil s'arrête à la
fin de la lecture de la plage musicale.
< Si vous appuyez sur la touche
SKIP(. // ) pendant la lecture
d'une seule plage musicale, une autre
plage musicale peut être sélectionnée.
2
The unit can be stopped after the playback
of a selected track.
L'appareil peut lire une seule plage musicale
puis s'arrêter.
Page 45

CD
DEUTSCH ESPAÑOL
45
ITALIANO
Drücken Sie die Taste SINGLE an der
Fernbedienung bei auf Stopp
geschaltetem Gerät.
"SINGLE" erscheint im Display.
Zum Aufheben der Einzelwiedergabe
drücken Sie die Taste SINGLE erneut.
1
Einzelwiedergabe
Premere il tasto SINGLE del
telecomando in modalità di arresto.
"SINGLE" appare sul display.
Per annullare la modalità riproduzione
singola, premere un'altra volta il tasto
SINGLE.
1
Seleccione una pista
Seleccione un disco presionando el
botón DISC, y luego seleccione un
número de pista presionando el botón
SKIP(.//).
Después de la reproducción de la pista,
la unidad se detiene y se cancela el
modo de reproducción simple.
< Al presionar el botón SINGLE durante la
reproducción, la unidad para después de
reproducir la pista.
< Si presiona el botón SKIP (.//)
durante la reproducción simple, puede
seleccionarse la otra pista.
2
Riproduzione singola Reproducción simple
Wahl eines Titels.
Wählen Sie eine Disc mit Hilfe der Taste
DISC, und wählen Sie dann eine
Titelnummer mit der Taste SKIP
(.//).
Nach Wiedergabe des Titels schaltet das
Gerät auf Stopp, und die
Einzelwiedergabe wird aufgehoben.
< Wird die Taste SINGLE während
Wiedergabe gedrückt, schaltet das Gerät
nach der Wiedergabe des Titels auf
Stopp.
< Wenn Sie die Taste SKIP (.// )
während Einzelwiedergabe drücken,
kann ein anderer Titel gewählt werden.
2
Selezionare un brano.
Selezionare un disco premendo il tasto
DISC, e poi selezionare un numero di
brano premendo il tasto SKIP
(.//).
Dopo la riproduzione del brano, l'unità si
arresta e la modalità riproduzione singola
è annullata.
< Se il tasto SINGLE viene premuto durante
la riproduzione, dopo la riproduzione del
brano l'unità si arresta.
< Se si preme il tasto SKIP (.// )
durante riproduzione singola, si può
selezionare un altro brano.
2
Nach Wiedergabe eines gewählten Titels
kann das Gerät auf Stopp geschaltet
werden.
L'unità può essere fermata dopo la
riproduzione di un brano selezionato.
La unidad puede ser paralizada después de
la reproducción de una pista seleccionada.
Presione el botón SINGLE de la unidad
de control remoto en el modo de parada.
"SINGLE" aparece en el visualizador.
Para cancelar el modo de reproducción
simple, presione otra vez el botón
SINGLE.
1
Page 46

ENGLISH FRANÇAIS
Programmed Playback 1 Lecture programmée 1
46
Up to 20 tracks from 3 discs can be
programmed in the desired order.
< Shuffle playback does not work during
program playback.
< If "no disc" is displayed, select any disc
by pressing the DISC button (1, 2 or 3) and
then press the STOP(H) button to stop
playback.
Press the PROGRAM button in the stop
mode.
"PROGRAM" and "P-00" appears on the
display, and the disc number and the
track number 01 blinks.
When the disc number and the track
number are blinking, Open/Close button
(L) doesn't work.
Select a track.
Select a disc by pressing the DISC
button, and select a track by pressing the
SKIP button(.//).
Press the PROGRAM button.
The track is programmed, and "P-01" is
displayed.
3
2
1
the track number
the program number
numéro du titre
numéro du programme
When the selection of track numbers has
been finished, press the PLAY button
(y) to start program playback.
The programmed contents is kept in
memory even after programmed playback
has been finished or stopped by pressing
the STOP button(H).
4
1
2
4
Repeat step and to program more
tracks.
When selecting the tracks from the same
disc successively, you don't have to
press the DISC button.
< You can program up to 20 tracks.
< If you made a mistake, press the CLEAR
button of the remote control unit.
< To cancel the program mode, press the
STOP button(H) and the CLEAR button.
32
Le programme de lecture peut comporter 20
numéros de plage musicale pris sur les 3
disques.
< La lecture au hasard des plages
musicales programmées n'est pas
possible.
< Si la mention "no disc" est affichée,
choisissez un disque au moyen de la
touche DISC (1, 2 ou 3) puis appuyez sur
la touche STOP(H ) pour arrêter la
lecture.
L'appareil étant à l'arrêt, appuyez sur la
touche PROGRAM.
Les mentions "PROGRAM" et "P-00"
s'affichent tandis que le numéro du
disque et le numéro de plage musicale 01
clignotent.
Lorsque le numéro du disque et le
numéro de plage musicale clignotent, la
touche Open/Close(L) est sans effet.
Choisissez une plage musicale.
Choisissez le disque au moyen de la
touche DISC puis choisissez le numéro
de la plage musicale au moyen de la
touche SKIP(.//).
Appuyez sur la touche PROGRAM.
La plage musicale fait partie du
programme et la mention "P-01" s'affiche.
3
2
1
Répétez les opérations et pour
programmer d'autres plages musicales.
Si vous choisissez les plages musicales
sur le même disque, il est inutile de
sélectionner à nouveau le disque au
moyen de la touche DISC.
< Le programme peut contenir 20 numéros
de plage musicale.
< En cas d'erreur, appuyez sur la touche
CLEAR du boîtier de télécommande.
< Pour annuler la lecture programmée,
appuyez sur la touche STOP(H) et sur la
touche CLEAR.
Lorsque la sélection des plages
musicales est terminée, appuyez sur la
touche PLAY(y) pour commander la
lecture programmée.
Le programme et son contenu sont
conservés en mémoire même après que
la lecture programmée est terminée, ou
arrêtée en appuyant sur la touche STOP
(H).
4
32
3
3
1
24
Page 47

DEUTSCH ESPAÑOL
Riproduzione Programmata 1
Programmgesteuerte Wiedergabe 1
Reproducción programada 1
47
ITALIANO
CD
numero del brano
posizione occupata nel programma
Titelnummer
jeweilige Programmnummer
número de pista
número de programa
Bis zu 20 Titel von 3 Discs können in der
gewünschten Reihenfolge programmiert
werden.
<
Während programmgesteuerter
Wiedergabe funktioniert zufallsgesteuerte
Wiedergabe nicht.
< Wenn "no disc" angezeigt ist, wählen Sie
eine Disc mit der Taste DISC (1, 2 oder 3),
und drücken Sie dann die Taste STOP(H),
um die Wiedergabe zu stoppen.
Drücken Sie die Taste PROGRAM bei auf
Stopp geschaltetem Gerät.
"PROGRAM" und "P-00" erscheinen im
Display, und Disc-Nummer sowie
Titelnummer 01 blinken.
Bei blinkender Disc-Nummer und
Titelnummer funktioniert die Taste
Open/Close(L) nicht.
Wahl eines Titels.
Wählen Sie eine Disc mit Hilfe der Taste
DISC, und wählen Sie dann einen Titel mit
der Taste SKIP (.//).
2
1
Drücken Sie die Taste PROGRAM.
Der Titel ist programmiert, und "P-01" wird
angezeigt.
Wiederholen Sie Schritt und , um
mehr Titel zu programmieren.
Um Titel von derselben Disc der Reihe
nach zu wählen, braucht die Taste DISC
nicht gedrückt zu werden.
< Bis zu 20 Titel können programmiert
werden.
< Falls Ihnen ein Fehler unterlaufen ist,
drücken Sie die Taste CLEAR an der
Fernbedienung.
< Zum Aufheben der programmgesteuerten
Wiedergabe drücken Sie die Taste
STOP(H) und die Taste CLEAR.
32
3
Wenn Sie mit der Wahl der
Titelnummern fertig sind, drücken Sie
die Taste PLAY(y ), um die
programmgesteuerte Wiedergabe zu
starten.
Der programmierte Inhalt bleibt
gespeichert, auch nachdem die
programmierte Wiedergabe zu Ende oder
durch Drücken der Taste STOP(H )
gestoppt worden ist.
4
Si possono programmare, in un ordine
desiderato, fino a 20 brani da 3 dischi.
< La riproduzione in ordine casuale non è
operativa durante la riproduzione
programmata.
< Se appare "no disc", selezionare uno dei
dischi premendo il tasto DISC (1, 2 o 3) e
poi premere il tasto STOP(H ) per
arrestare la riproduzione.
Premere il tasto PROGRAM in modalità
di arresto.
"PROGRAM" e "P-00" appaiono sul display,
e il numero di disco e il numero di brano
01 lampeggiano.
Quando il numero di disco e il numero di
brano lampeggiano, il tasto Open/Close
(L) non è operativo.
Selezionare un brano.
Selezionare un disco premendo il tasto
DISC, e selezionare un brano premendo il
tasto SKIP (.//).
2
1
Premere il tasto PROGRAM.
Il brano è programmato ed appare "P-01".
Per programmare altri brani, ripetere i
passi e .
Se si selezionano in successione brani
dello stesso disco, non c'è bisogno di
premere il tasto DISC
< Si possono programmare fino a 20 brani.
< Se ci si sbaglia, premere il tasto CLEAR
del telecomando.
< Per annullare la modalità di
programmazione, premere il tasto
STOP(H) e il tasto CLEAR.
Quando la selezione dei numeri di brano
è terminata, per avviare la riproduzione
programmata premere il tasto PLAY(y).
I contenuti programmati rimangono
memorizzati anche dopo che la
riproduzione programmata è terminata, o
è stata interrotta premendo il tasto
STOP(H).
4
32
3
Pueden programarse hasta 20 pistas de 3
discos en el orden deseado.
< La el modo de reproducción aleatoria no
se activa durante la reproducción
programada.
< Si se visualiza "no disc", seleccione
cualquier disco presionando el botón
DISC (1, 2 o 3) y luego presione el botón
STOP(H) para parar la reproducción.
Presione el botón PROGRAM en el modo
de parada.
Aparece "PROGRAM" y "P-00", y
parpadean el número del disco y el
número de la pista 01.
Cuando el número del disco y el número
de la pista están parpadeando, no opera
el botón Open/Close(L).
Seleccione una pista.
Seleccione un disco presionando el
botón DISC, y elija una pista presionando
el botón SKIP (.//).
2
1
Presione el botón PROGRAM.
Se programa la pista y se visualiza "P-01".
Repita los pasos y para programar
más pistas.
En la selección de las pistas del mismo
disco sucesivamente, no tiene que
presionar el botón DISC.
< Usted puede programar hasta 20 pistas.
< Si se equivoca, presione el botón CLEAR
de la unidad de control remoto.
< Para cancelar el modo de programa,
presione el botón STOP(H) y el botón
CLEAR.
Una vez terminada la selección de los
números de pistas, presione el botón
PLAY(y ) para comenzar la
reproducción programada.
El contenido programado se mantiene en
la memoria aun después de terminar la
reproducción programada o después
presionar el botón STOP(H).
4
32
3
Page 48

ENGLISH FRANÇAIS
Programmed Playback 2 Lecture programmée 2
48
To add a track
Repeat step and in the stop mode.
The track is added to the end of the
current program.
If "PROGRAM" indicator is off, press the
PROGRAM button once to return to the
program mode.
32
A
To repeat the programmed tracks
Press the REPEAT MODE button. The
programmed tracks will be played
repeatedly.
F
To clear program
To clear all tracks, press the Open/Close
button(L), or POWER button.
E
To delete a track
Press the CLEAR button in the stop mode.
The last track in the program is deleted.
You cannot delete a track from the middle
of the program.
C
B
D
C
To cancel the program playback mode
Press the STOP button(H) in the stop
mode. "PROGRAM" indicator goes off, but
the programmed contents aren't lost.
To return to the program mode, press the
PROGRAM button.
D
Pour ajouter une plage musicale au
programme
L'appareil étant à l'arrêt, répétez les
opérations et . Le numéro de la
plage musicale est ajouté à la fin du
programme.
Si le témoin "PROGRAM" est éteint,
appuyez une fois sur la touche
PROGRAM pour revenir au mode de
programmation.
32
A
Pour connaître le contenu du programme
L'appareil étant à l'arrêt, appuyez de
manière répétée sur la touche CHECK du
boîtier de télécommande.
Le numéro de la plage musicale et sa
position dans le programme de lecture
sont indiqués sur l'afficheur.
Pendant l'examen du programme, la
mention "P-" suivie d'un numéro de plage
musicale clignote.
B
Pour supprimer une plage musicale
L'appareil étant à l'arrêt, appuyez sur la
touche CLEAR . Le numéro de la dernière
plage musicale du programme est effacé.
La dernière plage musicale du
programme est supprimée.
C
Pour abandonner la lecture programmée
L'appareil étant à l'arrêt, appuyez sur la
touche STOP(H). Le témoin "PROGRAM"
s'éteint mais le contenu du programme
n'est pas effacé.
Pour revenir au mode de programmation,
appuyez sur la touche PROGRAM.
D
Pour effacer le contenu du programme
Pour effacer le contenu du programme,
appuyez sur la touche Open/Close(L) ou
sur l'interrupteur POWER.
E
Pour répéter le programme
Appuyez sur la touche REPEAT MODE.
Les plages musicales faisant partie du
programme sont lues de manière
répétée.
F
To check the programmed order
In the stop mode, press the CHECK button
of the remote control unit repeatedly.
The track number and program number
will be shown on the display.
During checking, "P-" and a disc number
blinks.
B
E
F
CHECK
CLEAR
D F E
Page 49

DEUTSCH ESPAÑOL
Riproduzione Programmata 2
Programmgesteuerte Wiedergabe 2
Reproducción programada 2
49
ITALIANO
CD
Hinzufügen eines Titels
Wiederholen Sie die Schritte und
bei auf Stopp geschaltetem Gerät. Der
Titel wird am Ende des momentanen
Programms hinzugefügt.
Wenn die "PROGRAM"-Anzeige aus ist,
drücken Sie die Taste PROGRAM einmal,
um auf den Programmbetrieb
zurückzuschalten.
32
A
Prüfen der Programm-Reihenfolge
Bei auf Stopp geschaltetem Gerät
drücken Sie die Taste CHECK an der
Fernbedienung wiederholt.
Titelnummer und Programmnummer
erscheinen im Display.
Während der Prüfung blinken "P-" und
eine Disc-Nummer.
B
Löschen eines Titels
Drücken Sie die Taste CLEAR bei auf
Stopp geschaltetem Gerät. Der letzte Titel
im Programm wird gelöscht.
C
Aufheben der programmgesteuerten
Wiedergabe
Drücken Sie die Taste STOP(H) bei auf
Stopp geschaltetem Gerät. Die
"PROGRAM"-Anzeige geht aus, der
Programminhalt geht jedoch nicht
verloren.
Zum Zurückschalten auf den
Programmbetrieb drücken Sie die Taste
PROGRAM.
D
Löschen des Programms
Zum Löschen aller Titel drücken Sie die
Taste Open/Close(L ) oder die Taste
POWER.
E
Wiederholung der programmierten Titel
Drücken Sie die Taste REPEAT MODE.
Die programmierten Titel werden
wiederholt wiedergegeben.
F
Per aggiungere un brano
Ripetere i passi e in modalità di
arresto. Il brano viene aggiunto alla fine
del programma corrente.
Se l'indicatore "PROGRAM" è spento,
premere una volta il tasto PROGRAM per
riattivare la modalità di programmazione.
32
A
Per controllare l'ordine programmato
In modalità di arresto, premere
ripetutamente il tasto CHECK del
telecomando.
Il numero di brano e il numero di
programma appaiono sul display.
Durante il controllo, "P-" e un numero di
disco lampeggia.
B
Per cancellare un brano
Premere il tasto CLEAR in modalità di
arresto. L'ultimo brano in programma
viene cancellato.
C
Per annullare la modalità di riproduzione
programmata
Premere il tasto STOP(H) in modalità di
arresto. l'indicatore "PROGRAM" si
spegne, ma i contenuti programmati
rimangono memorizzati.
Per riattivare la modalità di
programmazione, premere il tasto
PROGRAM.
D
Per cancellare un programma
Per cancellare tutti i brani, premere il
tasto Open/Close(L), o il tasto POWER.
E
Per ripetere i brani programmati
Premere il tasto REPEAT MODE. I brani
programmati vengono riprodotti
ripetutamente.
F
Para añadir una pista
Repita los pasos y en el modo de
parada. La pista se añade al fin del
programa actual.
Si está apagado el indicador "PROGRAM",
presione una vez el botón PROGRAM
para volver al modo de programa.
32
A
Para comprobar el orden programado
En el modo de parada, presione el botón
CHECK de la unidad de control remoto
repetidamente.
El número de pista y el de programa
aparecerán en el visualizador. Durante la
comprobación, parpadean "P-" y un
número de disco.
B
Para borrar una pista
Presione el botón CLEAR en el modo de
parada. Se borra la última pista en el
programa.
C
Para cancelar el modo de reproducción
programada
Presione el botón STOP(H) en el modo de
parada. Se apaga el indicador
"PROGRAM", pero no se pierde el
contenido programado.
Para volver al modo de programa,
presione el botón PROGRAM.
D
Para borrar el programa
Para borrar todas las pistas, presione el
botón Open/Close(L), o el botón POWER.
E
Para repetir las pistas programadas
Presione el botón REPEAT MODE. Las
pistas programadas se reproducen
repetidamente.
F
Page 50

ENGLISH FRANÇAIS
Timer Playback
A
Lecture commandée par programmateur
50
Using an optional audio timer, the playback
of CD can be started at any desired time.
Connect the unit and the amplifier to an
audio timer as shown:
Set the POWER switch of all the
components to ON.
Load a disc.
Set the CD TIMER switch to ON.
Set the audio timer.
Read instructions of the audio timer for
details.
When the timer is set, the power to all the
components will be switched off.
The unit will be turned on and start
playback at the specified time.
4
3
2
1
A
La lecture d'un CD peut commencer à
n'importe quel moment si vous utilisez un
programmateur audio.
Reliez l'appareil et le programmateur
audio de la manière illustrée:
Placez l'interrupteur POWER de chaque
appareil sur la position ON.
Déposez un disque.
Placez l'interrupteur CD TIMER sur la
position ON.
Réglez le programmateur audio.
Pour de plus amples détails concernant
cette question, reportez-vous au mode
d'emploi du programmateur audio.
Lorsque le programmateur est réglé, tous
les appareils sont mis hors service.
L'appareil est mis en service et la lecture
commence lorsque l'heure réglée sur le
programmateur est atteinte.
4
3
2
1
A
CD-A630
Amplifier / Amplificateur
Verstärker / Amplificatore
Amplificador
AC outlet
Prise secteur CA
Netzausgang
Presa di corrente
Tomacorriente de CA
Audio Timer / Minuterie audio
Timer / Timer ad uso audio
Temporizador de audio
Page 51

DEUTSCH ESPAÑOL
Riproduzione con timerTimergesteuerte Wiedergabe
Reproducción por el temporizador
51
ITALIANO
CD
Mit Hilfe eines optionalen Audio-Timers
kann CD-Wiedergabe zu jeder
gewünschten Zeit gestartet werden.
Schließen Sie das Gerät und den
Verstärker wie gezeigt an einen AudioTimer an:
Schalten Sie alle Komponenten ein.
Laden Sie eine Disc.
Stellen Sie den Schalter CD TIMER auf
ON.
Stellen Sie den Audio-Timer ein.
Einzelheiten entnehmen Sie bitte der
Anleitung für den Audio-Timer.
Durch Aktivierung des Timers werden
alle Komponenten ausgeschaltet.
Zur vorgegebenen Zeit wird das Gerät
eingeschaltet, und die Wiedergabe
startet dann.
4
3
2
1
A
Utilizzando un timer audio, opzionale, la
riproduzione di CD può essere avviata al
tempo desiderato.
Collegare l'unità e l'amplificatore a un
timer audio come mostrato:
Impostare su ON (attivazione)
l'interruttore POWER di tutti i
componenti.
Caricare un disco.
Impostare su ON (attivazione)
l'interruttore CD TIMER.
Impostare il timer audio.
Per i dettagli, leggere le istruzioni del
timer audio.
Quando il timer è impostato, tutti i
componenti vengono spenti.
L'unità verrà accesa, e la riproduzione
avviata, all'ora specificata.
4
3
2
1
A
Usando un temporizador de audio
opcional, la reproducción de discos
compactos puede comenzarse de
cualquier momento deseado.
Conecte la unidad y el amplificador a un
temporizador de audio como se muestra
a continuación:
Ponga el interruptor POWER de todos
componentes en la posición ON.
Cargue un disco.
Ponga el interruptor de CD TIMER en la
posición ON.
Ajuste el temporizador de audio.
Refiérase a las instrucciones del
temporizador de audio para los detalles.
Cuando se ajuste el temporizador, se
desconectará la alimentación de todos
los componentes.
La unidad se conectará y comenzará la
reproducción a la hora señalada.
4
3
2
1
A
Page 52

ENGLISH FRANÇAIS
Time Display
a
Affichage du temps
52
In the play/ready mode
Each time the TIME button of the remote
control unit is pressed, the display is
changed as follows:
Elapsed time of the track being played.
Remaining time of the track being played.
Total remaining play time of all
remaining tracks.
C
B
A
En mode Lecture/Ready
À chaque pression sur bouton TIME, le
mode change selon la séquence suivante :
Temps écoulé sur la piste courante.
Temps restant sur la piste courante.
Temps total restant
C
B
A
In the stop mode
The total play time and the number of
tracks of the selected disc will be
displayed.
a
En mode Arrêt
Temps total et le nombre total de pistes
a
C
B
A
TIME
Page 53

DEUTSCH ESPAÑOL
Visualizzazione dei tempiZeitanzeige Visualización del tiempo
53
ITALIANO
CD
Nel modo Play/Ready
Ogni volta che si preme il tasto TIME, i modi
vengono cambiati come segue:
Tempo trascorso del brano in corso di
riproduzione.
A
En modo de reproducción/Ready
Cada vez que se pulsa el botón TIME, el
modo cambia tal como sigue:
Tiempo de reproducción de la pista
transcurrido
A
Bei Wiedergabe/Ready
Bei jedem Drücken der Taste TIME ändert
sich die Betriebsart folgendermaßen:
Verstrichene Zeit des wiedergegebenen
Titels.
A
Bei Stop
Gesamtzahl der Titel
a
Nel modo Stop
Tempo tatale/Il numero totale di brani
a
En modo de paro
El número total de pistas
a
Restzeit des wiedergegebenen Titels.
Restzeit aller noch nicht gespielten Titel.
C
B
Tempo rimanente totale di riproduzione
dei brani.
C
Tiempo de reproducción de todas las
pistas restante.
C
Tempo rimanente sul brano in corso di
riproduzione.
B
Tiempo de reproducción de la pista
restante
B
Page 54

ENGLISH FRANÇAIS
Playback 1
1
Lecture 1
54
Press the PLAY button (hory) to start
playback.
< Adjust the volume with the amplifier's
volume control.
5
Load a pre-recorded cassette tape.
Press the EJECT(L) button to open the
cassette holder, load a cassette tape
with its exposed side facing down and
Side A facing toward you, and close the
holder.
< You can use normal(Type!), CrO
2(Type@)
or Metal(Type!%)tape.
2
Mettre une cassette dans l'appareil.
Appuyez sur la touche EJECT(L) pour
l'ouvrir; introduire une cassette, côté
visible de la bande vers le bas et la face
A dirigée vers l'extérieur, puis refermez le
compartiment cassette.
< Cet appareil permet d'utiliser des
cassettes normales (de type !), CrO
2 (de
type @) ou Métal (de type !%).
2
Appuyez sur la touche PLAY (houy)
pour lancer la lecture.
< Régler le volume avec la commande de
l’amplificateur.
5
ON:Select for the tape recorded with
DOLBY B NR.
OFF:Select for the tape recorded without
DOLBY NR.
ON:
sélectionner ce mode pour les cassettes
enregistrées en DOLBY B NR.
OFF:
sélectionner ce mode pour les cassettes
enregistrées sans DOLBY NR.
Sélectionnez ON ou OFF de DOLBY NR.
4
Select ON or OFF of DOLBY NR.
4
Press the POWER switch.
1
Mettre l’appareil sous tension.
1
2
3
4
5
1 234
5
Set the REVERSE MODE switch to the
required tape travel mode.
3
Mettre la commande REVERSE MODE sur
la position requise.
3
u: One Side Playing
j: SideA q SideB q Stop
p: qSideA q SideB
u: Lecture d'une face
j: FaceA q FaceB q Arrêt
p: qFaceA q FaceB
Page 55

DEUTSCH ESPAÑOL
Riproduzione 1Wiedergabe 1 Reproducción 1
55
ITALIANO
TAPE
Pulse el botón PLAY(hoy) para iniciar
la reproducción.
< Ajuste el volumen con el control corres-
pondiente del amplificador.
5
Legen Sie eine Compact Kassette ein.
Drücken Sie die EJECT-Taste(L), um der
Kassettenhalter zu öffnen.
Schieben Sie die Kassette mit der
Bandseite nach unten und Seite A nach
außen in die Halterung, und schließen
Sie die Abdeckung wieder.
< Sie können Normal- (Typ !), CrO
2- (Typ @)
oder Metal-Kassetten (Typ !%) verwenden.
2
Betätigen Sie die PLAY-Taste
(h odery ) um die Wiedergabe zu
starten.
< Die Lautstärke über den Lautstärkeregler
des Verstärkers einstellen.
5
Inserire una cassetta.
Premere il tasto EJECT(L) per aprire il
vano portacassette, inserire la cassetta
con il lato di esposizione del nastro
rivolto verso il basso e il Lato A rivolto
verso se stessi, e richiudere lo sportello.
< Si possono usare cassette con nastro
Normal (tipo!), CrO
2 (tipo@ ) o Metallo
(tipo!%).
2
Premere il tasto PLAY (hoy) per dare
inizio alla riproduzione.
< Regolare il volume per mezzo del
comando del volume dell’amplificatore.
5
Inserte una cinta de casete.
Pulse el botón EJECT(L) para abrir el
campartimento, inserte una casete con el
lado abierto hacia abajo y el lado A
apuntando hacia usted, y cierre el
compartimento.
< La unidad admite cintas normales (tipo!),
CrO
2 (tipo@), o Metal (tipo!%).
2
ON:Wählen Sie diese Einstellung für
Cassettenbänder, die unter
Verwendung des DOLBY B
Rauschunterdrückungs-Verfahrens
aufgezeichnet wurden.
OFF:Wählen Sie diese Einstellung für
Cassettenbänder, die ohne Dolby
Rauschunterdrückung aufgezeichnet
wurden.
Wählen Sie ON oder OFF von DOLBY NR.
4
ON:scegliere questa posizione quando il
nastro è stato registrato con il sistema
Dolby B NR.
OFF: scegliere questa posizione quando il
nastro è stato registrato senza sistema
di riduzione del rumore Dolby NR.
Selezionare ON o OFF di DOLBY NR.
4
ON: si la cinta está grabada con
DOLBY B NR.
OFF:si la cinta está grabada sin reducción
de ruido DOLBY.
Seleccione ON o OFF de DOLBY NR.
4
Das Gerät einschalten.
1
Accendere l’apparecchio.
1
Presione el interruptor POWER ubicándolo en ON.
1
Mit dem REVERSE MODE-Schalter die
Bandlaufrichtung und -umkehr
einstellen.
3
Disporre l’interruttore della modalità di
inversione (REVERSE MODE) sulla
posizione corrispondente alla direzione
desiderata.
3
Coloque el selector REVERSE MODE en
el modo requerido.
3
u: Wiedergabe einer Seite
j: SeiteA q SeiteB q Stopp
p: qSeiteA q SeiteB
u: Riproduzione di un solo lato
j: LatoA q LatoB q Arresto
p: q LatoA q LatoB
u: Reproducción de un sólo lado
j: LadoA q LadoB q parada
p: q LadoA q LadoB
Page 56

ENGLISH FRANÇAIS
Playback 2
A
Lecture 2
56
To stop playback
Press the STOP button(H ) to stop
playback.
A
To suspend playback temporarily
(pause mode)
Press the PAUSE button. Playback stops
at the current position. To resume
playback, press the PAUSE button or
PLAY button(horG).
B
Pour arrêter provisoirement la lecture du
disque en cours (mode pause)
Appuyez sur la touche PAUSE. La lecture
s'arrête à l'endroit atteint. Pour
reprendre la lecture, appuyez sur la
touche PAUSE ou sur la touche
PLAY(houG).
B
Avance rapide et rembobinage
Appuyez sur la touche mou, .
Pour arrêter l'avance rapide ou le
rembobinage, appuyez sur la touche
STOP(H).
E
Pour arrêter la lecture
Appuyez sur la touche STOP(H) pour
arrêter la lecture.
A
Fast forward and rewind
Press the mor, button.
Press the STOP button(H) to stop the fast
forward or rewind operation.
E
Tape Counter
The tape counter counts up when the
tape is moving forward and down when
the tape is being rewound. The display
can be cleared by pressing the COUNTER
RESET button, which resets the counter
index to "0000".
C
RTZ (Return To Zero) Function
By pressing the RTZ (Return To Zero)
button, the tape will locate the "0000"
point and stop.
The RTZ function does not work when the
tape counter indicates a number
between "9996" and "0004".
D
Pitch Control
You can change the tape speed during
playback, allowing you to change the
pitch of the reproduced sound.
By turning the PITCH CONTROL to the
right, the tape speed becomes faster,
resulting in higher pitch. By turning it to
the left, the tape speed becomes slower,
resulting in lower pitch.
At the fully clockwise position, the tape
speed is approx. 12% faster .
At the fully counter-clockwise position,
the tape speed is approx. 12% slower.
Returning the PITCH CONTROL to the
center position is required to set the
machine to standard 1-7/8 inch/second
speed.
F
Compteur de bande
L'indication du compteur augmente
quand la bande défile vers l'avant et elle
diminue quand la bande est rembobinée.
La touche COUNTER RESET permet de
ramener l'affichage à "0000".
C
Réglage de l'acuité du son
La vitesse de la bande pendant la lecture
peut être changée, ce qui permet de
modifier l'acuité du son.
En tournant le bouton PITCH CONTROL
vers la droite, la vitesse de la bande
augmente et le son devient plus aigu. En
le tournant vers la gauche, la vitesse
diminue et le son devient plus grave.
A l'extrême droite, la vitesse de la bande
augmente de 12% environ.
A l'extrême gauche, la vitesse de la
bande augmente de 12% environ.
F
Retour au point zéro (RTZ)
En appuyant sur la touche RTZ (retour au
point zéro), le lecteur localise le point
"0000" sur la bande.
La fonction RTZ n'agit pas quand le
compteur indique un nombre entre "9996"
et "0004".
D
A C
FE
B D
B
C
D
E
F
Page 57

DEUTSCH ESPAÑOL
Riproduzione 2Wiedergabe 2 Reproducción 2
57
ITALIANO
TAPE
Kurzzeitiges Unterbrechen der
Wiedergabe (Pause)
Betätigen Sie die PAUSE-Taste. Die
Wiedergabe wird an der momentanen
Position angehalten. Um die Wiedergabe
ab dieser Position fortzusetzen, betätigen
Sie bitte erneut die PAUSE-Taste oder die
PLAY-Taste(hoderG).
B
Per interrompere momentaneamente la
riproduzione (modo Pause)
Premere il tasto PAUSE. La lettura si
interrompe nel punto raggiunto.
Per riprenderla da quel punto, premere
PAUSE oppure PLAY (hoG).
B
Para activar una pausa
Pulse el botón PAUSE. La reproducción se
detiene en la posición actual. Para
reanudar la reproducción, pulse el botón
PAUSE o el botón PLAY(hoG).
B
Schneller Bandvor- und -rücklauf
Betätigen Sie die moder,-Taste.
Betätigen der STOP-Taste(H) bricht den
schnellen Vor- oder Rücklauf wieder ab.
E
Beenden der Wiedergabe
Zum Abbrechen der Wiedergabe
betätigen Sie die STOP-Taste(H).
A
Avvolgimento veloce e riavvolgimento
Per far avanzare velocemente il nastro o
per riavvolgerlo, premere il tasto
mo,.
Per annullare questa funzione, premere
STOP (H) .
E
Per interrompere la riproduzione
Premere il tasto STOP (H).
A
Avance rápido y rebobinado
Pulse el botón mo,. Con el botón
STOP (H) se detiene la operación de
avance rápido o rebobinado.
E
Para detener la reproducción
Pulse el botón STOP (H).
A
Bandzähler
Der Bandzähler zählt aufwärts bei
Vorwärtsrichtung und abwärts bei
Rückwärtsrichtung. Die Anzeige kann mit
Taste COUNTER RESET auf "0000"
rückgestellt werden.
C
Control de tono
Usted puede modificar la velocidad de la
cinta durante la reproducción,
cambiando de esta manera el tono del
sonido reproducido.
Al girar el mando PITCH CONTROL hacia
la derecha, aumenta la velocidad de la
cinta, resultando en tonos más altos,
girando el mando hacia la izquierda se
reduce la velocidad de la cinta
resultando en tonos más bajos.
La velocidad de la cinta es 12% más
rápida aproximadamente con el mando
girado completamente hacia la derecha.
La velocidad de la cinta es 12% más lenta
aproximadamente con el mando girado
completamente hacia la izquierda.
F
Función RTZ (reposición a cero)
Al presionar el botón RTZ (reposición a
cero), la cinta vuelve al punto "0000" y
para.
La función RTZ no funciona cuando el
contador de cinta indica un número entre
"9996" y "0004".
D
Geschwindigkeitsfeineinstellung
Bei Wiedergabe kann die Bandgeschwindigkeit feineingestellt werden, um
Klangabweichungen zu kompensieren
oder bewußt einzusetzen.
Den Regler PITCH CONTROL nach rechts
drehen, um die Bandgeschwindigkeit zu
erhöhen (höhere Tonlage). Den Regler
nach links drehen, um die
Bandgeschwin-digkeit zu verringern
(tiefere Tonlage).
Bei Anschlag im Uhrzeigersinn ist die
Bandgeschwindigkeit um ca. 12 %
erhöht.
Bei Anschlag gegen den Uhrzeigersinn
ist die Bandgeschwindigkeit um ca. 12 %
verringert.
F
Bandversetzung bis zur Zählernullanzeige (Nullrücklauf)
Durch Drücken der Taste RTZ (Return To
Zero) wird das Band bis zum Erreichen
der Zählernullanzeige "0000" umgespult.
Hierauf wechselt das Deck auf Stopp.
Die Nullrücklauf-Funktion arbeitet nicht,
wenn die Zähleranzeige im Bereich
zwischen "9996" und "0004" liegt.
D
Contanastro
Le cifre del contanastro aumentano se il
nastro si sta spostando in avanti, e
diminuiscono se il nastro si sta spostando
in direzione inversa. Agendo sul tasto
COUNTER RESET, l'indicazione del
contanastro viene riazzerata, ritornando
alla posizione "0000".
C
Contador de cinta
El contador de cinta se incrementa
cuando la cinta se está moviendo hacia
adelante y se reduce cuando la cinta
está siendo rebobinada. La indicación
puede ser borrada presionando el botón
COUNTER RESET que reposiciona la
lectura del contador a "0000".
C
Comando dell'altezza del suono
Nel corso della riproduzione si può
modificare la velocità del nastro, con la
conseguenza che anche l'altezza del
suono riprodotto risulta modificata.
Ruotando la manopola PITCH CONTROL
verso destra la velocità del nastro
aumenta, risultando in un'altezza del
suono più elevata. Ruotando la manopola
in senso antiorario, la velocità del nastro
diminuisce e l'altezza del suono anche.
In posizione completamente ruotata in
senso orario, la velocità del nastro risulta
aumentata di circa il 12% rispetto alla
velocità media normale.
In posizione completamente ruotata in
senso antiorario, la velocità del nastro
risulta diminuita di circa il 12% rispetto
alla velocità media normale.
F
Funzione di ritorno al punto zero (RTZ)
Premendo il tasto di ritorno al punto zero
(RTZ), l'apparecchio provvede ad
individuare il punto "0000", dopodiché si
arresta.
La funzione di ritorno al punto zero non
può operare se il tasto viene premuto con
il contanastro in una posizione qualunque
compresa fra "9996" e "0004".
D
Page 58

ENGLISH FRANÇAIS
Recording 1 Enregistrement 1
58
< When selecting "LINE", prepare the
source to be recorded beforehand. And
ensure that cables are connected
between your source and the LINE INPUT
jacks on the back of the CD-A630.
u:one side recording (Side A or Side B)
j/p:Side AqSideBqstop
u:Enregistrement Face A ou Face B
j/p:
Face AqFaceBqArrêt
< Quand "LINE" est sélectionné:
Apprêtez-vous à enregistrer la source.
1
2
5
4
3
Select the desired reverse mode.
4
Select ON or OFF of DOLBY NR.
3
Select the SOURCE(CD or LINE).
When selecting "CD", the built-in CD
player's output is selected as a source.
When selecting "LINE", the external
signal from "LINE INPUT" is selected as a
source.
5
Sélectionnez le mode d’inversion
souhaité.
4
Sélectionnez ON ou OFF de DOLBY NR.
3
Load a recordable cassette tape.
< You can use normal(Type! ) or
CrO
2(Type@) tape.
< If the safety tabs of the cassette tape
have been broken off, cover the holes
with adhesive tape.
2
Sélectionnez la source avec SOURCE.
Quand "CD" est sélectionné, le lecteur CD
intégré est sélectionné comme source.
Quand "LINE" est sélectionné, le signal
externe de "LINE INPUT" est sélectionné
comme source.
5
Press the POWER switch.
1
Placez une cassette vierge.
< Cet appareil permet d' utiliser des
cassettes Normales (type! ) ou CrO
2
(type@).
< Si les languettes de sécurité de la
cassette ont été cassées, couvrir le trou
à l'aide d'un ruban adhésif.
2
Mettre l’appareil sous tension.
1
1 543
2
Page 59

DEUTSCH ESPAÑOL
Registrazione 1Kassettenaufnahme 1 Grabación 1
59
ITALIANO
TAPE
u:Aufnahme einer Seite
j/p:Seite A
q
Seite qB Stopp
< Bei Vorwahl "LINE" :
Bereiten Sie vor Beginn der Aufnahme
die Aufnahmequelle vor.
< Designando come sorgente la posizione
"LINE" :
Selezione e preparate la sorgente che vi
interessa prima di inziare la
registrazione.
u:Registrazione di un solo lato
j/p:Lato AqLato BqArresto
< Al seleccionar "LINE":
Antes de comenzar a grabar prepare la
fuente que se quiere grabar.
u:Grabación de un sólo lado
j/p:Lado AqLadoBqparada
Stellen Sie die gewünschte ReverseBetriebsart ein.
4
Wählen Sie ON oder OFF von DOLBY NR.
3
Mit Schalter SOURCE die Signalquelle
bestimmen.
Bei Vorwahl "CD" gilt der eingebaute CDSpieler als Signalquelle.
Bei Vorwahl "LINE" wird die an den
Buchsen LINE INPUT anliegende Signalquelle vorgewählt.
5
Legen Sie eine unbespielte Kassette.
< Sie können sowohl Normal- (Typ !) als
auch CrO
2 (Typ @) Kassetten verwenden.
< Falls die Kopierschutzlaschen der
Compact Kassette zuvor entfernt wurden,
verschließen Sie diese erneut mittels
Klebeband.
2
Das Gerät einschalten.
1
Scegliere il modo Reverse desiderato.
4
Selezionare ON o OFF di DOLBY NR.
3
Agire sull'interruttore SOURCE per
selezionare la sorgente desiderata.
Designando come sorgente la posizione
"CD", viene automaticamente selezionata
l'uscita del lettore CD incorporato
nell'apparecchio.
Designando come sorgente la posizione
"LINE", viene selezionato come sorgente il
segnale che giunge ai terminali di
ingresso 'LINE INPUT".
5
Accendere l’apparecchio.
1
Seleccione el modo de inversión
deseado.
4
Seleccione ON o OFF de DOLBY NR.
3
Seleccione el conmutador SOURCE.
Cuando selecciona "CD" la salida
incorporada del reproductor de CD queda
seleccionada como fuente.
Al seleccionar "LINE", la señal externa
proveniente de "LINE INPUT" es
seleccionada como fuente.
5
Inserte una cinta grabable.
< La unidad admite cintas normales (tipo!)
y CrO
2 (tipo@).
< Si se han desprendido las pestañas de
seguridad de la casete, cubra los
orificios con cinta adhesiva.
2
Inserire una cassetta registrabile.
< Si possono usare cassette con nastro
Normal (tipo!) o CrO
2 (tipo@).
< Se la cassetta non ha più le alette di
protezione, coprire i fori con nastro
adesivo.
2
Presione el interruptor POWER ubicándolo en ON.
1
Page 60

ENGLISH FRANÇAIS
Recording 2 Enregistrement 2
60
Press the RECORD button.
Then the and J indicator will light
up, but the tape will not move.
6
Appuyez sur la touche RECORD.
Les voyants (enregistrement) et J
s’allument.
6
6
6 7
8 9
7
8
9
0dB
Press the PAUSE button(J ) or PLAY
button(hory) to start recording.
< To record both sides of the tape, selsect
j and press the forward PLAY
button(y). If you press the reverse play
button(h), only the back side will be
recorded.
< To stop recording temporarily, press the
PAUSE button. To restart the tape, press
the PAUSE button or PLAY button
(hory).
< To stop recording, press the STOP
button(H).
9
Appuyez sur la touche PAUSE(J) ou
PLAY(h ouy ) pour commencer
l'enregistrement.
< Sélectionnez le mode d’inversionjet
appuyez sur la touche Lecture Avant
(y)pour enregistrer sur les deux faces
de la cassette. Si vous appuyez sur la
touche de Reprise Automatique en Sens
Inverse(h), l’enregistrement ne se fera
que sur la seconde face de la cassette.
< Pour interrompre l’enregistrement, ap-
puyer sur la touche PAUSE. Appuyer une
deuxième fois pour relancer la bande.
< Pour arrêter l’enregistrement, appuyer
sur la touche STOP(H).
9
Select the recording direction by the
PLAY button(hory).
If the button whose hory indicator is
lit is pressed, recording will start;
however, if the button whose hory
indicator is not lit is pressed, only the
tape direction will change.
8
Choisissez le sens de l’enregistrement à
l’aide de la touche PLAY (houy).
L'enregistrement commence si la touche
dont l'indicateur houy est allumé est
actionnée, mais seul le sens de
défilement change si la touche dont
l'indicateur houy est éteint est
actionnée.
8
Adjust the recording level with the
INPUT control.
The loudest sound should briefly reach
around the "0 dB" point.
7
Régler le niveau d’enregistrement à l’aide
de la commande de réglage INPUT de
manière que l’indicateur de niveau
atteigne brièvement le point “0 dB” à
l’enregistrement des signaux ayant le
niveau le plus élevé.
7
Page 61

DEUTSCH ESPAÑOL
Registrazione 2Kassettenaufnahme 2 Grabación 2
61
ITALIANO
TAPE
Betätigen Sie die RECORD-Taste.
Im Display erscheint die Meldung
und J .
6
Premere il tasto RECORD sul
registratore.
Sul display apparirà eJ.
6
Pulse el botón RECORD.
En la pantalla aparecerá la indicación
y J.
6
Zum Aufnahmestart die PAUSE-Taste(J)
oder PLAY-Taste (hodery) drücken.
< Falls Sie j gewählt haben, müssen Sie,
sofern Sie beide Seiten einer Cassette
aufnehmen wollen, die WiedergabeTaste (y ) betätigen. Falls Sie die
Reverse-Wiedergabe-Taste (h )
betätigen, wird lediglich die eigentliche
B-Seite des Bandes aufgezeichnet.
< Zur kurzzeitigen Aufnahmeunterbrechung
die PAUSE-Taste drücken. Zur
Aufnahmefortsetzung die PAUSE-Taste
oder die Wiedergabetaste(hodery)
drücken.
< Zum Aufnahmestopp die STOP Taste(H)
drücken.
9
Per avviare la registrazione premere il
tasto PAUSE(J) o PLAY (hoy) .
< Quando si sceglie il modo j, bisogna
premere il tasto Forward Play (y) allo
scopo di registrare entrambi i lati della
cassetta. Se invece si preme il tasto
Reverse Play (h), verrà registrato solo il
lato posteriore.
< Per arrestare temporaneamente la
registrazione agire sul tasto PAUSE. Per
riavviare poi il nastro agire di nuovo sullo
stesso tasto PAUSE, o sui tasti di
riproduzione (hoy).
< Per arrestare la registrazione premere il
tasto STOP(H).
9
Pulse el botón PAUSE(J ) o PLAY
(hoy) para iniciar la grabación.
< Si selecciona la opción j , deberá
pulsar el botón de reproducción normal
(y) para grabar en las dos caras de una
cinta. Si pulsa el botón de reproducción
inversa (h), únicamente se grabará la
cara B.
< Para parar la grabación temporalmente,
presione el botón PAUSE. Para reiniciar
el transporte de cinta, presione el botón
PAUSE o el botón PLAY(hoy).
< Para parar la grabación, presione el
botón STOP(H).
9
Wählen Sie die Aufnahme-Laufrichtung
mit den PLAY-Tasten (hodery).
Wird die Taste gedrückt, deren Anzeige
(h odery ) leuchtet, erfolgt der
Aufnahmestart. Wird die Taste gedrückt,
deren Anzeige nicht leuchtet, wird nur
die Band-laufrichtung gewechselt.
8
Scegliere la direzione della
registrazione con il tasto Play
(hoppurey).
Premendo il tasto di riproduzione la cui
relativa indicazione h o y si trova
illuminata, la registrazione viene avviata.
Se invece si preme il tasto di riproduzione
la cui relativa indicazione h o y non si
trova illuminata, si ottiene solamente il
cambiamento di direzione del movimento
del nastro, che però rimane
fermo.
8
Seleccione el sentido de grabación con
el botón de reproducción (hoy).
Si presiona el botón cuyo indicador
hoy está encendido, se iniciará la
grabación; sin embargo si presiona el
botón cuyo indicador h oy no está
encendido, sólo cambiará el sentido de
transporte de la cinta.
8
Den Aufnahmepegel mit dem INPUTRegler so aussteuern, daß mit Normalbändern bei Pegelspitzen die 0 dB Diode
der Spitzenpegelanzeige kurz aufleuchtet.
7
Regolare il livello di registrazione per
mezzo dell’apposito comando INPUT, in
modo che il più forte suono da registrare
faccia raggiungere ai misuratori, per un
breve istante, i punti intorno al valore "0
dB" (per i nastri normali o al cromo).
7
Ajuste el nivel de grabación con el
control INPUT de tal forma que el sonido
más fuerte a grabarse haga que los
medidores lleguen brevemente al punto
"0 dB"(para cintas normales o de cromo) .
7
Page 62

ENGLISH FRANÇAIS
Recording 3 Enregistrement 3
62
Erasing
Anything previously recorded on the tape
will be automatically erased when you
make a new recording on it. It can also
be erased by "recording" on it with the
INPUT control set to "0".
Effacement
Tous les matériaux précédemment enregistrés sur une bande seront effacés
par un nouvel enregistrement. Il est
également possible d’effacer une bande
en “enregistrant” avec la commande de
réglage du niveau INPUT mise sur "0".
Record Muting Operation
Automatic spacing operation for 4-second
blanks (during recording)
Press the REC MUTE button during
recording. The tape movement continues
and a blank space of about 4 seconds is
recorded (the indicator blinks). The
deck then enters the Record-Pause mode
automatically (both the and J
indicators light).
To restart recording, press the PAUSE
button(J) (the PAUSE indicator goes off).
Automatic spacing operation for 4-second
blanks (during record-pause)
In the Record-Pause mode, pressing the
REC MUTE button will initiate the above
record-muting operation automatically.
The deck then returns to the RecordPause mode.
For a blank of more than 4 seconds
During recording, hold the REC MUTE
button depressed for longer than 4
seconds. A blank space will be left as
long as the button is pressed. Release
the button to enter the Record-Pause
mode. To restart recording, press the
PAUSE button(J).
Fonctionnement de
l'enregistrement silencieux
Insertion automatique d'espaces vierges de
4 secondes (pendant l'enregistrement)
Appuyer sur la touche REC MUTE
pendant l'enregistrement. La bande
continue de défiler et un espace
d'environ 4 secondes est enregistré
(l'indicateur clignote). L'appareil se
met ensuite automatiquement en mode
de pause d'enregistrement (les
indicateurs et J restent tous deux
allumés).
Pour poursuivre l'enregistrement,
appuyer sur la touche PAUSE(J) (l'indicateur J s'éteint).
Insertion automatique d'espaces de 4
secondes (pendant la pause
d'enregistrement)
En mode de pause d'enregistrement, le
fait d'appuyer sur la touche REC MUTE
lance automatiquement l'opération
d'enregistrement silencieux décrite cidessus. L'appareil revient ensuite au
mode de pause à d'enregistrement.
Insertion d'un espace de plus de 4
secondes
Pendant l'enregistrement, maintenir
enfoncée la touche REC MUTE plus
longtemps. Un espace est enregistré
aussi longtemps que la touche REC
MUTE est maintenue enfoncée. Relâcher
la touche pour passer au mode de pause
d'enregistrement. Pour poursuivre
l'enregistrement, appuyer sur la touche
PAUSE(J).
JPAUSE
Page 63

DEUTSCH ESPAÑOL
Registrazione 3Kassettenaufnahme 3 Grabación 3
63
ITALIANO
TAPE
Löschen
Bespieltes Material wird bei
Neuaufnahme automatisch gelöscht und
durch die neue Aufnahme ersetzt. Um ein
Band ohne Neuaufnahme zu löschen, den
INPUT Regler auf "0" stellen und
aufnehmen.
Cancellazione
Qualsiasi registrazione precedentemente
effettuata si cancella automaticamente
quando se ne effettua una nuova sullo
stesso nastro. In alternativa, il nastro può
anche essere cancellato "registrandolo"
con il comando del livello INPUT posto a
"0".
Borrado
Cualquier material previamente grabado
en la cinta será automáticamente
borrado al efectuar una nueva grabación
en la misma. También puede borrarse
una cinta "grabando" sobre ella con el
control de
nivel INPUT ubicado en la
posición "0".
Stummaufnahme
Automatische 4-SekundenLeerabschnitteeinfügung bei Aufnahme
Bei Aufnahme die Taste REC MUTE
drücken. Ohne Bandlaufunterbrechung
wird ein Leerabschnitt von ca. 4
Sekunden Dauer aufgezeichnet (die
Anzeige blinkt). Hierauf schaltet das
Deck auf Aufnahmepause (die Anzeigen
und J leuchten). Zur
Aufnahmefortsetzung erneut die Taste
PAUSE(J ) drücken (die Anzeige J
erlischt).
Automatische 4-Sekunden-Leerabschnitteanfügung bei Aufnahmepause
Bei Aufnahmepause die Taste REC MUTE
drücken. Der Bandlauf wird ausgelöst,
wobei ein Leerabschnitt wie oben
beschrieben aufgezeichnet wird. Hierauf
schaltet das Deck erneut auf
Aufnahmepause.
Herstellen eines Leerabschnittes von mehr
als 4 Sekunden Dauer
Bei Aufnahme die Taste REC MUTE
gedrückt halten. Solange diese Taste
gedrückt gehalten wird, erfolgt eine
Leerabschnitteaufzeichnung. Bei
Freigabe der Taste REC MUTE wechselt
das Deck auf Aufnahmepause. Zur
Aufnahmefortsetzung die Taste PAUSE
(J) drücken.
Funzionamento del silenziamento
della registrazione
Funzionamento per spaziatura automatica
per spazi non registrati di circa 4 secondi
(durante la registrazione)
Nel corso della registrazione premere il
tasto REC MUTE. Il movimento del nastro
continua e viene registrato uno spazio in
bianco di circa 4 secondi (mentre
l'indicazione lampeggia). Il deck
passa poi automaticamente alla
posizione di pausa della registrazione
(entrambe le indicazioni e J si
illuminano).
Per riprendere la registrazione premere
di nuovo il tasto PAUSE(J) (la relativa
indicazione si spegne).
Funzionamento per spaziatura automatica
per spazi non registrati di circa 4 secondi
(durante la pausa della registrazione)
Nella modalità di pausa della
registrazione, premendo il tasto REC
MUTE si avvia automaticamente la
suddetta operazione di spaziatura, al
termine della quale il deck ritorna alla
posizione di pausa della registrazione.
Per uno spazio non registrato superiore a 4
secondi
Nel corso della registrazione tenere
premuto il tasto REC MUTE per un
periodo più lungo. La registrazione viene
silenziata sin tanto che si tiene premuto il
tasto. Disinserendo il tasto si passa alla
modalità di pausa della registrazione. Per
riprendere la registrazione premere il
tasto PAUSE(J).
Silenciamiento de grabación
Espaciamiento automático para secciones
sin grabar de 4 segundos (durante la
grabación)
Presione el botón REC MUTE durante una
grabación. El movimiento de la cinta
continúa y queda una sección sin grabar
de unos 4 segundos (destella el indicador
). El reproductor ingresa se
establece automáticamente en el modo
de pausa de grabación (se encienden los
indicatores y J).
Para reanudar la grabación, presione el
botón PAUSE(J) (se apaga el indicador
J).
Espaciamiento automático para secciones
sin grabar de 4 segundos (durante el modo
de pausa de grabación)
En el modo de pausa de grabación, la
pulsación del botón REC MUTE iniciará
automáticamente el silenciamiento de la
grabación mencionado. El reproductor
retornará después al modo de pausa de
grabación.
Para una sección sin grabar de más de 4
segundos
Durante la grabación, mantenga
presionado el botón REC MUTE por más
tiempo. Quedará una sección sin grabar
mientras se mantenga presionado el
botón. Suelte el botón para establecer el
modo de pausa de grabación. Para
reanudar la grabación, presione el botón
PAUSE(J).
Page 64

ENGLISH FRANÇAIS
CD Synchronous Recording 1
1
Enregistrement synchronisé d'un CD 1
64
u:one side recording (Side A )
j/p:Side AqSideBqstop
u:Enregistrement Face A
j/p:
Face A
q
FaceBqArrêt
Using the CD SYNC function, a CD-to-tape
copy can be done easily and simply.
Avec la fonction CD SYNC, rien n'est plus
simple que d'enregistrer un CD sur une
cassette.
Press the CD SYNC button in the Stop
mode.
The tape is rewound to the beginning of
Side A and the counter is reset to "0000",
while the CD player is in the Pause mode
at the beginning of the first CD track.
After mute-recording for approx. 8
seconds (to avoid the leader tape), the
cassette deck drops into the Recording
mode while the CD player starts
playback.
< To stop recording, press the STOP
button(H).
6
Appuyer sur la touche CD SYNC en mode
d'arrêt.
La bande est rembobinée jusqu'au début
de la face A et le compteur revient à
"0000", tandis que le lecteur CD est en
mode de pause, au début de la première
plage du CD.
Après le défilement des 8 premières
secondes de la bande (pour éviter
d'enregistrer sur l'amorce de la bande),
la platine se met en mode
d'enregistrement et la lecture du CD
commence.
< Pour arrêter l’enregistrement, appuyer
sur la touche STOP(H).
6
To record from the beginning of
the tape
Load a compact disc.
Select a disc to be recorded.
Press the DISC button to select a disc,
and then press the STOP button to stop
the playback.
Load a recordable cassette.
Select ON/OFF of the DOLBY NR system.
Select the desired reverse mode.
5
4
3
2
1
Pour enregistrer dès le début
de la cassette
Insérer un disque compact.
Choisissez le disque au moyen de la
touche DISC puis appuyez sur la touche
STOP pour arrêter la lecture.
Insérer une cassette pouvant être
enregistrée.
Sélectionner DOLBY NR ON ou OFF pour
mettre en ou hors service le réducteur de
bruit.
Sélectionnez le mode d’inversion
souhaité.
5
4
3
2
1
15 64
3 22
2
3
4
5
6
< In the CD SYNC mode, the INPUT control
has no effect, as the recording level is
automatically adjusted internally.
< The setting of the SOURCE switch has no
effect, as the source is set to CD
automatically.
< While CD SYNC is engaged, only the
STOP buttons (CD and TAPE) are
operational.
< If Side A ends during the playback of a
track, that track will also be recorded on
Side B from the beginning.
< When the CD player finishes playback,
the CD SYNC mode is released.
< En mode de copie CD, la commande
INPUT n'agit pas sur le niveau
d'enregistrement puisque celui-ci est
automatiquement ajusté par l'appareil.
< La position du sélecteur SOURCE est
sans effet puisque le lecteur de CD est
automatiquement choisi.
< Pendant la copie du CD, seules les
touches STOP(CD et TAPE) sont
opération-nelles.
< Si la fin de la face A est atteinte pendant
la lecture d'une plage musicale, la plage
musicale est entièrement enregistrée sur
la face B.
< Quand la lecture du CD est terminée, le
mode de copie CD est annulé.
Page 65

DEUTSCH ESPAÑOL
Registrazione sincronizzata da CD 1
CD Synchron-Kopierfunktion 1
Grabación sincronizada de CD 1
65
ITALIANO
CD TAPE
Mit der CD-Kopierfunktion ist die
Überspielung von CD auf Band besonders
einfach.
Facendo uso della funzione di riversamento,
il contenuto di un compact disc può essere
molto facilmente copiato su nastro.
Empleando la función de copia de CD, es
fácil y sencillo copiar una CD en una cinta.
Im Stoppmodus die Taste CD SYNC
drücken.
Das Band wird bis zum Anfang
zurückgespult und der Zähler wird auf
"0000" rückgestellt. Der CD-Spieler
schaltet am Anfang des ersten Titels auf
Pause.
Nach einer Stummaufnahme von ca. 8
Sekunden (um den Bandvorspann zu
vermeiden) wird die Bandaufnahme
zeitgleich mit der CD-Wiedergabe
ausgelöst.
< Zum Aufnahmestopp die STOP Taste(H)
drücken.
6
In modalità di arresto premere il tasto CD
SYNC.
Il nastro viene riavvolto sino all'inizio del
lato A ed il contanastro viene riportato
alla lettura "0000", mentre il lettore CD si
dispone in posizione di pausa in
corrispondenza dell'inizio del primo brano
presente sul disco stesso.
Dopo una registrazione "in bianco" di
circa 8 secondi (per saltare la parte guida
iniziale del nastro), il deck a cassette
passa alla modalità di registrazione
mentre il lettore CD inizia la riproduzione.
< Per arrestare la registrazione premere il
tasto STOP(H).
6
Presione el botón CD SYNC con el modo
de parada activado.
La cinta es rebobinada hasta el principio
del lado A y el contador se reposiciona a
"0000", mientras que el reproductor de CD
está en el modo de pausa al principio de
la primera pista del CD.
Después de un espacio sin grabar de
aprox. 8 segundos (para pasar la parte
sin grabar al principio de la cinta), la
platina de cassette entra en el modo de
grabación y el reproductor de CD inicia la
reproducción.
< Para parar la grabación, presione el
botón STOP(H).
6
u:Aufnahme einer Seite A
j/p:Seite A
q
Seite qB Stopp
u:Registrazione di un solo lato A
j/p:Lato AqLato BqArresto
u:Grabación de un sólo lado A
j/p:Lado AqLadoBqparada
Aufnahme ab Bandanfang
Eine CD einlegen.
Wählen Sie eine Disc mit Hilfe der Taste
DISC, und drücken Sie dann die Taste
STOP, um die Wiedergabe zu stoppen.
Einen bespielbare Cassette einlegen.
Mit Schalter DOLBY NR die Rauschunterdrückung aktivieren (ON) oder
deaktivieren (OFF).
Stellen Sie die gewünschte ReverseBetriebsart ein.
5
4
3
2
1
Registrazione dall'inizio del
nastro
Inserire il compact disc che si vuole
copiare.
Selezionare un disco premendo il tasto
DISC, e poi premere il tasto STOP per
arrestare la riproduzione.
Caricare la cassetta sulla quale si vuole
registrare.
Selezionare la posizione desiderata per
il sistema di riduzione del rumore DOLBY
NR.
Scegliere il modo Reverse desiderato.
5
4
3
2
1
Grabación desde el principio de
la cinta
Coloque un disco compacto.
Seleccione un disco presionando el
botón DISC, y luego presione el botón
STOP para paralizar la reproducción.
Coloque un cassette en el que se pueda
grabar.
Ajuste ON/OFF del sistema DOLBY NR.
Seleccione el modo de inversión
deseado.
5
4
3
2
1
< Beim CD-Kopiermodus arbeitet der
Regler INPUT nicht, da der
Aufnahmepegel hierbei automatisch
ausgesteuert wird.
< Die Einstellung des Schalters SOURCE ist
bedeutungslos, da die Programmquelle
automatisch auf CD gestellt wird.
< Während der CD-Kopieraufnahme
arbeiten nur die Tasten STOP (CD und
Band).
< Wird während der Wiedergabe eines
Titels das Ende von Seite A erreicht, so
wird der Titel vom Anfang an auf Seite B
aufgenommen.
< Wenn der CD-Spieler die Wiedergabe
beendet, wird der CD-Kopieraufnahmemodus verlassen.
< In modalità di riversamento del CD, il
comando INPUT non ha alcun effetto,
perché il livello della registrazione viene
regolato automaticamente.
< L'impostazione dell'interruttore SOURCE
non ha effetto, in quanto la sorgente
viene impostata su CD automaticamente.
< Nel corso delle operazioni di riversa-
mento dal disco al nastro, solamente i
tasti STOP (CD e TAPE) sono operativi.
< Se il lato A termina durante la
riproduzione di un brano, il brano viene
registrato sul lato B dall'inizio.
< La modalità di riversamento del disco
viene automaticamente disattivata
quando il lettore CD giunge al termine
della riproduzione.
< En el modo de copia de CD, el mando REC
LEVEl no tiene efecto, ya que el nivel de
grabación es ajustado automáticamente
por la unidad.
< La fijación del interruptor SOURCE no
tiene efecto, ya que la fuente se fija al
modo CD automáticamente.
< Mientras la copia de CD SYNC está
activada, sólo los botones STOP (CD y
TAPE) están habilitados.
< Si la Cara A termina durante la
reproducción de una pista, la pista se
grabará en la Cara B desde el comienzo.
< Cuando el reproductor de CD termina la
reproducción, se desactiva el modo de
copia de CD.
Page 66

ENGLISH FRANÇAIS
CD Synchronous Recording 2
Enregistrement synchronisé d'un CD 2
66
Move the tape to the desired position
and press the STOP button(H).
< Select the recording direction by the
PLAY button(hory).
6
To record from any desired
position of the tape
Pour enregistrer à partir d'un
point donné de la cassette
u:one side recording (Side A or Side B)
j/p:Side AqSideBqstop
u:Enregistrement Face A ou Face B
j/p:
Face AqFaceBqArrêt
Faire défiler la bande jusqu'au point
souhaité et appuyer sur la touche
STOP(H).
< Choisissez le sens de l’enregistrement à
l’aide de la touche PLAY (houy).
6
5
6
7
8
5 87
6
Press the CD SYNC button.
CD-to-tape copying starts from the
current tape position.
< To stop recording, press the STOP
button(H).
8
Appuyer sur la touche CD SYNC.
La copie CD-cassette commence à partir
de la position actuelle.
< Pour arrêter l’enregistrement, appuyer
sur la touche STOP(H).
8
Press the RECORD button.
The deck enters the Record-Pause mode.
7
After step of page 64, select the
desired reverse mode.
45
Appuyer sur la touche RECORD.
La platine se met en pause
d'enregistrement.
7
Après avoir effectué l'étape de la
page 64, sélectionnez le mode
d’inversion souhaité.
45
Page 67

DEUTSCH ESPAÑOL
Registrazione sincronizzata da CD 2
CD Synchron-Kopierfunktion 2
Grabación sincronizada de CD 2
67
ITALIANO
CD TAPE
Registrazione da un punto
qualunque del nastro
Das Band bis zur gewünschten Stelle
umspulen. Dann die Taste STOP(H )
drücken.
< Wählen Sie die Aufnahme-Laufrichtung
mit den PLAY-Tasten (hodery).
6
Aufnahme ab einer beliebigen
Bandposition
Grabación desde cualquier
punto deseado en la cinta
Portare il nastro sulla posizione dalla
quale si vuole iniziare la registrazione e
premere il tasto STOP(H).
< Scegliere la direzione della registrazione
con il tasto Play (hoppurey).
6
Mueva la cinta hasta la posición
deseada y presione el botón STOP(H).
< Seleccione el sentido de grabación con
el botón de reproducción (hoy).
6
u:Aufnahme einer Seite
j/p:Seite A
q
Seite qB Stopp
u:Registrazione di un solo lato
j/p:Lato AqLato BqArresto
u:Grabación de un sólo lado
j/p:Lado AqLadoBqparada
Die Taste CD SYNC drücken.
Die CD-Kopieraufnahme wird an der
vorgesehenen Bandstelle ausgelöst.
< Zum Aufnahmestopp die STOP Taste(H)
drücken.
8
Die Taste RECORD drücken.
Das Deck schaltet auf Aufnahmepause.
7
Nach dem Durchführen von Schritt
auf der Seite 65, Stellen Sie die
gewünschte Reverse-Betriebsart ein.
45
Premere il tasto CD SYNC.
La copia dal disco al nastro inizia dalla
posizione nella quale il nastro si trova al
momento.
< Per arrestare la registrazione premere il
tasto STOP(H).
8
Presione el botón CD SYNC.
Se inicia la copia de CD a cinta desde el
punto actual de la cinta.
< Para parar la grabación, presione el
botón STOP(H).
8
Premere il tasto RECORD.
Il deck passa alla modalità di pausa della
registrazione.
7
Presione el botón RECORD.
La platina entra en el modo de pausa de
grabación.
7
Después del paso de la página 65,
seleccione el modo de inversión
deseado.
45
Dopo aver eseguito il passo della
pagina 65, scegliere il modo Reverse
desiderato.
45
Page 68

ENGLISH FRANÇAIS
Continuous Playback
1
Lecture enchaînée
68
Continuous Playback of CD and
TAPE
In the Continuous Playback mode, once CD
or TAPE finishes playback, the other starts
playback automatically.
Press the CD-TAPE CONT PLAY button in
the stop mode.
"TAPE" and "CD" blink in the display.
Press the PLAY button(y ) of CD or
TAPE.
The playback starts.
When the playback of CD or TAPE is
finished, the other starts playback.
After both CD and TAPE are played, the
playback stops, but the Continuous
Playback mode isn't canceled.
< To cancel the continuous playback mode,
press the CD-TAPE CONT PLAY button or
the POWER switch.
< During the playback of CD, "CD" blinks in
the display.
During the playback of TAPE, "TAPE"
blinks in the display.
< The disc or cassette tape can be
changed while it is not played.
< Following functions cannot be used
during continuous playback:
REPEAT
REPEAT A-B
PROGRAM
SHUFFLE
INTRO
SEARCH (CD/TAPE)
RECORD
CD SYNC
To play CD first:
Press the PLAY button or the DISCbutton
to start playback.
CD will be played from the selected disc
to DISC 3.
When the playback of CD is finished, the
playback of TAPE starts automatically.
To play TAPE first:
< When playing TAPE first, set the REV
MODE switch to u or j.
< After the playback of TAPE, DISC 1, 2 and
3 will be played.
2
1
Lecture enchaînée des CDs et
d'une cassette
Lorsque la fin du CD ou de la cassette est
atteinte, la lecture se poursuit
automatiquement avec l'autre support.
L'appareil étant à l'arrêt, appuyez sur la
touche CD-TAPE CONT PLAY.
Les témoins "TAPE" et "CD" clignotent sur
l'afficheur.
Appuyez sur la touche PLAY(y ) du
lecteur de CD ou de cassette.
La lecture commence.
Lorsque la fin du CD ou de la cassette est
atteinte, la lecture se poursuit avec
l'autre support.
Dès la fin de l’écoute du CD et de la
cassette, la lecture s’arrête sans
provoquer l’annulation du mode continu.
< Pour abandonner la lecture enchaînée,
appuyez sur la touche CD-TAPE CONT
PLAY ou POWER.
< Pendant la lecture du CD, le témoin "CD"
clignote.
Pendant la lecture de la cassette, le
témoin "TAPE" clignote.
< Le disque ou la cassette peuvent être
changés quand il ne sont pas concerné
par la lecture.
< Les fonctions suivantes ne sont pas
disponibles pendant la lecture
enchaînée:
REPEAT
REPEAT A-B
PROGRAM
SHUFFLE
INTRO
SEARCH (CD/TAPE)
RECORD
CD SYNC
Pour écouter d’abord le CD :
Appuyez sur la touche PLAY ou DISC.(1, 2
ou 3) pour commander la lecture.
Dans le cas du CD, la lecture commence
avec le disque choisi et se termine avec
le DISC 3.
Dès que la lecture du CD s’arrête, la
cassette démarre automatiquement.
Pour écouter d’abord la cassette :
< Si la lecture commence par la cassette,
le sélecteur REV MODE doit être placé
sur la position u, ou la position j.
< Dès la fin de la lecture de la cassette, les
disques 1, 2 et 3 démarrent.
2
1
2
1
22
Page 69

DEUTSCH ESPAÑOL
Riproduzione ininterrottaFortlaufende Wiedergabe Reproducción continua
69
ITALIANO
CD TAPE
Fortlaufende Wiedergabe von
CD und Cassettenband (TAPE)
In dieser Betriebsart wird bei CD- oder
TAPE-Wiedergabeende die jeweils
andere Programmquelle automatisch
gestartet.
Drücken Sie die Taste CD-TAPE CONT
PLAY bei auf Stopp geschaltetem Gerät.
"TAPE" und "CD" blinken im Display.
Drücken Sie die Taste PLAY(y) für CD
oder TAPE.
Die Wiedergabe startet.
Wenn die CD- oder TAPE-Wiedergabe zu
Ende ist, startet die jeweils andere
Programmquelle.
Wenn beide Wiedergaben beendet sind,
ist die Betriebsart „fortlaufende
Wiedergabe“ immer noch aktiviert.
< Zum Aufheben der fortlaufenden
Wiedergabe drücken Sie die Taste CDTAPE CONT PLAY oder POWER.
< Während CD-Wiedergabe blinkt "CD" im
Display.
Während TAPE-Wiedergabe blinkt "TAPE"
im Display.
< Disc oder Cassette kann gewechselt
werden, solange sie noch nicht spielt.
< Während "Fortlaufende Wiedergabe"
können die folgenden Funktionen nicht
eingesetzt werden:
REPEAT
REPEAT A-B
PROGRAM
SHUFFLE
INTRO
SEARCH (CD/TAPE)
RECORD
CD SYNC
Um zunächst die CD abzuspielen:
Drücken Sie die Taste PLAY oder DISC.(1,
2 oder 3) um die Wiedergabe zu starten.
CD-Betrieb wird von der gewählten Disc
ab bis zu DISC 3 durchgeführt.
Sobald die Wiedergabe der CD beendet
ist, startet automatisch die Wiedergabe
der Cassette
Um zunächst die Cassette abzuspielen:
< Um zuerst TAPE-Wiedergabe zu
bewirken, stellen Sie den Schalter REV
MODE auf uoder j.
< Nachdem die Wiedergabe der Cassette
beendet ist, werden nacheinander die
CD’s 1,2 und 3 abgespielt.
2
1
Riproduzione ininterrotta di CD
e TAPE
Nella modalità di riproduzione
ininterrotta, al termine della riproduzione
di CD o TAPE parte la riproduzione
dell'altra sorgente, automaticamente.
Premere il tasto CD-TAPE CONT PLAY in
modalità di arresto.
"TAPE" e "CD" lampeggiano sul display.
Premere il tasto PLAY(y) di CD o TAPE.
La riproduzione inizia.
Quando la riproduzione di CD o TAPE
termina, parte la riproduzione dell'altra
sorgente.
Una volta che sia il CD che la cassetta
sono stati riprodotti la riproduzione
termina ma la modalità di riproduzione
ininterrotta non viene cancellata.
< Per annullare la modalità di riproduzione
ininterrotta, premere il tasto CD-TAPE
CONT PLAY o POWER.
< Durante la riproduzione di CD, "CD"
lampeggia sul display.
Durante la riproduzione di TAPE, "TAPE"
lampeggia sul display.
< Il disco o la cassetta può essere
cambiata intanto che non viene
riprodotta.
< Durante la ripetizione ininterrotta non si
possono utilizzare le seguenti funzioni:
REPEAT
REPEAT A-B
PROGRAM
SHUFFLE
INTRO
SEARCH (CD/TAPE)
RECORD
CD SYNC
Per riprodurre prima il CD:
Premere il tasto PLAY o DISC (1, 2 o 3) per
avviare la riproduzione.
CD viene riprodotto a partire dal disco
selezionato al DISC 3.
La riproduzione della cassetta inizia
automaticamente dopo che la
riproduzione del CD è terminata.
Per riprodurre prima la cassetta:
< Quando si riproduce TAPE (nastro) per
primo, impostare l'interruttore REV MODE
su u o j.
< I CD 1, 2 e 3 verranno riprodotti dopo che
la riproduzione della cassetta sarà
terminata.
2
1
Reproducción continua de
DISCO COMPACTO y CINTA
En el modo de reproducción continua,
una vez que el disco compacto (CD) o
cinta (TAPE) termine la reproducción, el
otro comienza su reproducción
automáticamente.
Después que se reproduzcan tanto el
disco compacto como la cinta, termina la
reproducción, y se cancela el modo de
reproducción continua.
Presione el botón CD-TAPE CONT PLAY
en el modo de parada.
Presione el botón PLAY(y ) de CD o
TAPE.
Comienza la reproducción.
Al terminar la reproducción de CD o
TAPE, el otro comienza a reproducirse.
Despues de que se reproduzcan tanto el
disco compacto como la cinta, termina la
reproduccion pero el modo de
reproduccion continua no se cancela.
< Para cancelar el modo de reproducción
continua, presione el botón CD-TAPE
CONT PLAY o POWER.
< Durante la reproducción del disco
compacto, parpadea "CD" en el
visualizador.
Durante la reproducción de la cinta,
parpadea "TAPE" en el visualizador.
< El disco o la cinta cassette puede
cambiarse en estado inactivo.
< Las siguientes funciones no pueden
utilizarse durante la repetición continua:
REPEAT
REPEAT A-B
PROGRAM
SHUFFLE
INTRO
SEARCH (CD/TAPE)
RECORD
CD SYNC
Para reproducir discos compactos primero:
Presione el botón PLAY o DISC.(1, 2 o 3)
para iniciar la reproducción.
El disco compacto se reproducirá del
disco seleccionado al DISC 3.
Cuando la reproduccion del disco
compacto finaliza, la reproduccion de
cinta empieza automaticamente.
Para reproducir cintas primero:
< Para reproducir primero la cinta, fije el
interruptor REV MODE a uoj.
< Despues de reproducir la cinta, se
reproduciran los discos 1, 2 y 3.
2
1
Page 70

ENGLISH
70
Troubleshooting
No power
eCheck the connection to the AC wall
outlet.
No sound.
eCheck the connection to the stereo
system.
The sound is noisy.
eThe unit is too close to a TV set or
similar appliances. Install the unit
away from them, or turn them off.
The sound is strange.
eSet the PITCH CONTROL knob to the
center.
Remote control doesn't work.
eIf the batteries are dead, change the
batteries.
eUse remote control unit within the
range (5m/15ft) and point at the front
panel.
eClear obstacles between the remote
control unit and the main unit.
eIf a strong light is near the unit, turn it
off.
CD Player
Cannot play.
eLoad a disc with label side up.
eIf the disc is dirty, clean the surface of
the disc.
eA blank disc has been loaded. Load a
prerecorded disc.
eSelect a disc by pressing the DISC
button, and then press the PLAY
button.
Sound skips.
ePlace the unit on a stable place to
avoid vibration and shock.
eIf the disc is dirty, clean the surface of
the disc.
e Don't use scratched, damaged or
warped discs.
In case of trouble with the unit, please take the time to look through this chart and see if you
can solve the problem yourself before you call your dealer or TEAC service center.
If normal operation cannot be recovered,
unplug the power cord from the outlet and
plug it again.
Beware of condensation
When the unit (or a disc) is moved from a
cold to a warm place, or used after a sudden
temperature change, there is a danger of
condensation; vapor in the air could
condense on the internal mechanism,
making correct operation impossible. To
prevent this, or if this occurs, leave the unit
for one or two hours with the power turned
on. Then the unit will stabilize at the
temperature of its surroundings.
Cassette Tape Deck
The cassette holder cannot be closed.
The buttons don’t work.
eInsert a cassette tape securely.
Sound is distorted or noisy.
eClean and demagnetize the heads.
eSelect the correct DOLBY NR type
according to how the tape was
recorded.
Cannot record.
eIf the safety tabs of the cassette tape
have been broken off, cover the holes
with adhesive tape.
eClean and demagnetize the heads.
Recorded sound is not clear.
e Use Normal or Metal tape for
recording.
Specifications
< Design and specifications are subject to
change without notice.
< The illustrations may differ slightly from
production models.
CD player section
(Audio)
Number of channels . . . . . . . . . . . . . . . . . . . . 2
Frequency response. . . 10 - 20,000 Hz ± 1 dB
Signal-to-noise ratio. . . . . . . . . . 90 dB (WTD)
Dynamic range. . . . . . . . . . . . . . . . . . . . . 90 dB
Total harmonic distortion . . . . . 0.02% (1 kHz)
Wow and flutter. . . . . . . . . . . . . . . . . . . . . . . . .
Unmeasurable (quartz accuracy)
Channel separation. . . . . . . . . . . . . . . . . 70 dB
Pitch Control . . . . . . . . . . . . . . . . . . . . . . ±12 %
Output (RCA) . . . . . . . . . . . . . +6 dBV (2 Vrms)
Digital filter..8-times oversampling digital filter
(Signal format)
Sampling frequency . . . . . . . . . . . . . . 44.1 kHz
D/A converter . . . . . . . . 16-bit linear/channel
Channel bit rate. . . . . . . . . . . . 4.3218 Mb/sec.
Channel modulation code . . . . . . . . . . . . EFM
Error correction. . . . . . . . . . . . . . . . . . . . . CIRC
Cassette section
Track system . . . . . 4-track 2-channel stereo
Heads...Record/playback x 1 (rotary reverse)
erase x 1
Type of tape . . . . . . Cassette tape C-60, C-90
Tape speed. . . . . . . . . . . . . . . . . . 4.76 cm/sec.
Pitch Control . . . . . . . . . . . . . . . . . . . . . . ±12 %
Motor . . . . . . . . . . . . . . . . . DC servo motor x 1
Wow and flutter . . . . . . . . . . 0.08% (W. RMS)
Frequency response (overall) . . . . . . . . . . . . .
63 - 15,000 Hz ± 3 dB, Type@
63 - 14,000 Hz ± 3 dB, Type!
Signal-to-noise ratio (overall) . . . . . . . . 57 dB
(Dolby NR off, 3% THD level, weighted)
66 dB (DOLBY NR on, over 5 kHz)
Fast winding time. . . . . . . . . . . . . . . . . . . . . . . .
Approx. 120 sec. (with C-60)
Input . . . . . . . . . . . . . . . Line; -10 dBV (300mV)
input impedance of 50 kohms or more
Output . . . . . . . . . . . . . . Line; -10 dBV (300mV)
load impedance of 50 kohms or more
Headphones; 5mW/33 ohms
General
Power requirements . . . . . . . . . . . . . . . . . . . . .
120/230 V AC, 50-60 Hz
(U.S.A./Canada/general export model)
230 V AC, 50 Hz (Europe/U.K. model)
Power consumption. . . . . . . . . . . . . . . . . 18 W
Dimensions (W x H x D). . 483 x 133 x 270 mm
(19" x 5-1/4" x 10-5/8")
Weight. . . . . . . . . . . . . . . . . . 6.7 kg (14.77 lbs.)
Standard Accessories
Wireless remote control RC-A630 x 1
Battery (SUM-3, "AA", "R6" type) x 2
Page 71

71
FRANÇAIS
Dépannage
En cas de problème, commencer par chercher dans ce tableau pour voir si on peut trouver
soi-même la solution avant de contacter le revendeur ou le centre de service client TEAC.
Pas d'alimentation
eVérifier le raccordement de l'appareil
à la prise CA.
Aucun son ne sort des enceintes.
eVérifier le raccordement à la chaîne
stéréo.
eIl n'y a pas de disque dans l'appareil.
Placer un disque dans le tiroir.
Le son est déformé.
eL'appareil est placé à proximité d'un
téléviseur ou d'un autre appareil de
même type. Eloignez l'appareil de
ceux-ci ou débranchez les.
Son étrange.
eLe réglage du bouton PITCH CONTROL
a été changé. Le régler sur la position
centrale.
La télécommande ne fonctionne pas.
eSi les piles sont usées, changez les.
eUtilisez la télécommande à une
distance d'environ 5 m (15 ft) de
l'appareil et la diriger vers le panneau
avant de celui-ci.
eDégagez les obstacles qui se trouvent
entre la télécommande et l'unité
principale
eS'il y a une source de lumière
fluorescente à proximité de l'appareil,
la débrancher
eSi un éclairage puissant se trouve à
proximité de l'appareil, éteignez-le.
Lecteur CD
L'appareil ne lit pas le disque
ePlacer le disque dans le tiroir en
veillant à ce que l'étiquette se trouve
vers le haut.
eSi le disque est sale, nettoyer la
surface du disque.
eVous avez chargé un disque vierge
dans l'appareil. Chargez un disque
pré-enregistré
eChoisissez le disque au moyen de la
touche DISC puis appuyez sur la
touche PLAY.
Le son saute.
eMettre l'appareil sur une surface
plane de manière à éviter toute
vibration ou choc.
eSi le disque est sale, nettoyer la
surface du disque.
eNe pas utiliser de disque rayé, abîmé
ou voilé.
Platine à cassette
Impossible de fermer le compartiment
cassette. Les touches ne fonctionnent pas.
ePlacez une cassette dans l'appareil.
Son déformé ou parasité.
eNettoyez et démagnétisez les têtes de
lecture.
eLa position du commutateur DOLBY NR
nest pas correct. Le changer de
position.
Impossible d'enregistrer.
e Si les languettes de sécurité de la
cassette ont été cassées, recouvrir les
trous à l'aide d'un ruban adhésif.
eNettoyez et démagnétisez les têtes de
lecture.
Les sons enregistrés ne sont pas clairs.
e Pour l'enregistrement, utilisez des
cassettes de type "normal" ou "chrome".
Si vous ne parvenez pas à rétablir un
fonctionnement normal, débrancher le
cordon d'alimentation et le rebrancher.
Risque de condensation
En cas de déplacement de l'appareil (ou
d'un disque) d'un endroit froid vers un
endroit chaud, ou en cas d'utilisation après
un changement de température brutale, il y
a un risque de condensation. La vapeur
contenue dans l'air peut se condenser sur le
mécanisme interne et affecter le bon
fonctionnement de l'appareil. Pour éviter
ceci, ou au cas où cela venait à se produire,
laisser l'appareil sous tension pendant une
heure ou deux. Ceci lui permettra de se
stabiliser à la température ambiante.
Caractéristiques
< Des améliorations peuvent produire des
changements dans les caractéristiques
et fonctions sans préavis.
< Les illustrations peuvent différer
légèrement des modèles de production.
Section Lecteur CD
(Audio)
Nombre de canaux . . . . . . . . . . . . . . . . . . . . . 2
Réponse en fréquence . 10 à 20.000 Hz ±1 dB
Rapport signal sur bruit . . . . . . . 90 dB (WTD)
Plage dynamique. . . . . . . . . . . . . . . . . . . 90 dB
Distorsion harmonique totale . . 0,02%(1 kHz)
Pleurage et scintillement . . . . . . . . . . . . . . . . .
Non mesurable (précision quartz)
Séparation des canaux. . . . . . . . . . . . . . 70 dB
Variateur de vitesse: . . . . . . . . . . . . . . . ±12 %
Sortie (RCA) . . . . . . . . . . . . . . +6 dBV (2 Vrms)
Filtre numérique . . suréchantillonnage 8 fois
(Format du signal)
Fréquence d'échantillonnage. . . . . . 44,1 kHz
Convertisseur N/A . . . . linéairo 16 bits/canal
Débit par canal . . . . . . . . . . . . 4,3218 Mb/sec.
Code de modulation de canal . . . . . . . . . EFM
Correction d'erreur. . . . . . . . . . . . . . . . . . CIRC
Section Platine à cassette
Système d'enregistrement. . . . . . . . . . . . . . . .
4 pistes,2 canaux stéréo
Têtes. . . . . . . . . . Enregistrement/Lecture x 1
(rotatives à inversion)
effacement x 1
Type de cassette. . . . . . . Cassette C-60, C-90
Vitesse de défilement. . . . . . . . . 4,76 cm/sec.
Variateur de vitesse: . . . . . . . . . . . . . . . ±12 %
Moteur . . . . . . . . . . . . . . . Servomoteur CC x 1
Pleurage et scintillement. . . 0,08% (W. RMS)
Réponse en fréquence (d'ensemble). . . . . . .
63 - 15.000 Hz ±3 dB, Type@
63 - 14.000 Hz ±3 dB, Type!
Rapport signal sur bruit (d'ensemble) . 57 dB
(Dolby hors service, niveau DHT 3%, pondéré)
69 dB (Dolby en service, plus de 5 kHz)
Temps de rembobinage rapide . . . . . . . . . . . .
Env. 120 sec. (avec une C-60)
Entrée Ligne . . . . . . . . . . . . . -10 dBV (300 mV)
impédance d'entrée de 50 kohms ou plus
Sortie Ligne . . . . . . . . . . . . . -10 dBV (300 mV)
impédance de charge de 50 kohms ou plus)
Casque: 5mW/33 ohms
Généralités
Alimentation . . . . . . . . . . . . . . . . . . . . . . . . . . . .
Secteur 120/230 V, 50-60 Hz
(Modèle Etats-Unis/Canada/Modèle universel)
Secteur 230 V, 50 Hz
(Modèle Europe/Royaume-Uni)
Consommation . . . . . . . . . . . . . . . . . . . . . 18 W
Dimensions (L/H/P) . . . . . 483 x 133 x 270 mm
(19" x 5-1/4" x 10-5/8")
Poids . . . . . . . . . . . . . . . . . . . . . 6,7 kg (14.77 li.)
Accessoires fournis
Télécommande sans fil RC-A630 x 1
Piles (SUM-3, "AA", type "R6") x 2
Page 72

DEUTSCH
72
Fehlerbeseitigung
Keine Netzspannung
eÜberprüfen Sie die Verbindung des
Recorders zum Stromnetz.
Aus den Lautsprecherboxen kommt kein
Ton.
eÜberprüfen Sie die Verbindung zu
Ihrer Stereoanlage.
eEs wurde keine Disc eingelegt. Legen
Sie eine Disc ein.
Der Klang ist verrauscht.
eDer Aufstellungsort des Recorders ist
zu nahe an einem Fernsehgerät oder
Monitor. Wählen Sie einen weiter
entfernten Aufstellungsort, oder
schalten Sie die anderen Geräte aus.
Ungewohntes Klangbild.
eDie Geschwindigkeitsfeineinstellung
wurde verstellt. Den
Geschwindigkeitsfeinregler in die
mittlere Stellung bringen.
Die Fernbedienung funktioniert nicht.
eFalls die Batterien verbraucht sind,
ersetzen Sie diese durch neue.
eVerwenden Sie die Fernbedienung in
einem Abstand von etwa (5m/15ft) zum
Recorder. Richten Sie die
Fernbedienung auf die Frontseite des
Recorders.
eEntfernen Sie Gegenstände, die sich in
gerader Sichtlinie zwischen der
Fernbedienung und dem Recorder
befinden.
eFalls sich in der Nähe des Recorders
eine fluoreszierende Lampe befindet,
schalten Sie diese aus.
eFalls sich eine starke Lichtquelle in der
Nähe des Geräts befindet, schalten
Sie diese aus.
CD-Spieler
Keine Wiedergabe.
eLegen Sie eine Disc mit der Labelseite
nach oben in den Recorder.
eFalls die CD verschmutzt ist, reinigen
Sie diese.
eEine noch nicht beschriebene CD
befindet sich im Recorder. Legen Sie
eine bereits beschriebene CD ein.
eWählen Sie eine Disc, indem Sie die
Taste DISC drücken, und betätigen Sie
dann die Taste PLAY.
Falls Sie mit der Anlage einmal Probleme haben sollten, nehmen Sie sich bitte die Zeit, um in
der folgenden Auflistung nach einer möglichen Ursache und deren Abhilfe zu suchen. In den
meisten Fällen können Sie das Problem selbst lösen und benötigen nicht die Hilfe Ihres HiFiHändlers oder des TEAC-Servicecenters.
Die Wiedergabe “springt”.
eStellen Sie den Recorder an einen
erschü tterungssicheren,
stoßgeschützten Platz auf.
eFalls die CD verschmutzt ist, reinigen
Sie diese.
eVerwenden Sie keine verkratzten,
beschädigten oder verwellten Discs.
Cassettendeck
Die Kassettenfachabdeckung läßt sich
nicht schließen. Die
Laufwerksteuerungstasten funktionieren
nicht.
eLegen Sie die Kassette korrekt ein.
Keine Wiedergabe. Die Wiedergabe ist
verzerrt und verrauscht.
eReinigen und/oder entmagnetisieren
Sie die Tonköpfe.
e Stellen Sie, entsprechend der
Einstellung, mit der die Cassette
aufgenommen wurde, die richtige
Dolby NR Rauschunterdrückung ein.
Aufnahmen sind nicht möglich.
eFalls die Kopierschutzlaschen einer
Compact Kassette fehlen, schließen
Sie die Öffnungen mit einem Stück
Klebeband.
eReinigen und/oder entmagnetisieren
Sie die Tonköpfe.
Aufnahmeton unklar.
eVerwenden Sie Normal- oder
Reineisenband zum Aufnehmen.
Falls nach Durchführung der o. g.
Maßnahmen der normale Betrieb stets noch
nicht möglich ist, ziehen Sie den
Netzstecker und stecken Sie ihn nach ca. 20
Sekunden wieder ein.
Vermeiden Sie Kondensationsbildung
Wenn der CD-Recorder (oder eine CD)
von einer kalten in eine warme
Umgebung transportiert wird oder nach
einer Veränderung der Raumtemperatur
in Betrieb genommen wird, kann es zu
Kondensation kommen. Hierbei schlägt
sich Wasserdampf aus der Luft auf die
inneren Laufwerksteile oder die Disc
nieder. Dies kann zu einer
Beeinträchtigung der Funktion führen.
Zur Vermeidung – oder falls einmal
Kondensation auftritt – lassen Sie das
Gerät bis zum Erreichen der
Raumtemperatur – etwa für ein bis zwei
Stunden – im eingeschalteten Zustand
stehen.
Technische Daten
< Veränderungen der Ausstattung und
daraus resultierende Änderungen der
technischen Spezifikationen können ohne
vorherige Ankündigung vorgenommen
werden.
< Die Abbildungen können leicht vom
hergestellten Modell abweichen.
CD-Spieler
(Audio)
Zahl der Kanäle . . . . . . . . . . . . . . . . . . . . . . . . 2
Frequenzgang . . . . . . . . . 10 -20.000 Hz ±1 dB
Signal/Rausch-Abstand. . . . . . . 90 dB (WTD)
Dynamikbereich. . . . . . . . . . . . . . . . . . . . 90 dB
Klirrfaktor. . . . . . . . . . . . . . . . . . 0,02 % (1 kHz)
Gleichlaufschwankungen . . . . . . . . . . . . . . . .
Nicht meßbar (quarzgenau)
Kanaltrennung . . . . . . . . . . . . . . . . . . . . . 70 dB
Tonhöhe (Pitch Control): . . . . . . . . . . . . ±12 %
Ausgang (RCA) . . . . . . . . . . . . +6 dBV (2 Veff.)
Digitalfilter . . . . . . . . . . . 8fach-Oversampling
(Signalformat)
Samplingrate . . . . . . . . . . . . . . . . . . . . 44,1 kHz
D/A-Wandler . . . . . . . . . . . 16 Bit linear/Kanal
Kanal-Bit-Rate . . . . . . . . . . . . . 4,3218 Mb/Sek
Kanal-Modulationscode. . . . . . . . . . . . . . EFM
Fehlerkorrektur . . . . . . . . . . . . . . . . . . . . . CIRC
Cassettendeck
Spursystem . . . . . . . . 4-Spur/2-Kanal-Stereo
Köpfe . . . . . . . . . . . . . . . . . . . . . . . . . . . . . . . . . . .
Aufnahme/Wiedergabe x 1 (Umkehrkopf)
Löschen x 1
Cassetten . . . . . . . . . . . . . . . . . . . . . C-60, C-90
Bandgeschwindigkeit. . . . . . . . . 4,76 cm/Sek.
Tonhöhe (Pitch Control): . . . . . . . . . . . . ±12 %
Motor. . . . . . . . Gleichstrom-Servo-Motor x 1
Gleichlaufschwankungen. . . . 0,08 (W. RMS)
Frequenzgang (gesamt) . . . . . . . . . . . . . . . . . .
63 - 15.000 HZ ±3 dB, Typs@
63 - 14.000 HZ ±3 dB, Typs!
Signal/Rausch-Abstand (gesamt). . . . . 57 dB
(Dolby-Rauschunter. aus, 3% Klirrfaktor,
gewichtet)
66 dB (Dolby Rauschunter. ein, größer 5 kHz)
Umspuldauer..Ca. 120 Sek.(mit C-60 Cassette)
Eingang. . . . . . . . . . . . Line, -10 dBV (300 mV )
Mind. 50 kohm Eingangsimpedanz
Ausgang . . . . . . . . . . . Line; -10 dBV (300 mV )
Mind. 50 kohm Lastimpedanz
Kopfhörer; 5mW/33 ohm
Allgemein
Spannungsversorgung . . . . . . . . . . . . . . . . . . .
120/230 V Wechselspannung, 50/60 Hz
(USA/Kanada/Allgemeines Export-modell)
230 V Wechselspannung, 50 Hz
(Europa/Großbritannien)
Leistungsaufnahme . . . . . . . . . . . . . . . . . 18 W
Abmessungen (BxHxT) . . 483 x 133 x 270 mm
Gewicht. . . . . . . . . . . . . . . . . . . . . . . . . . . 6,7 kg
Mitgeliefertes Zubehör
Drahtlose Fernbedieneinheit RC-A630 x 1
Batterie (SUM-3, AA, R6) x 2
Page 73

< Progetto e caratteristiche tecniche sono
soggetti a modifiche senza preavviso.
< Le illustrazioni possono risultare alquanto
differenti dai modelli effettivamente in
produzione.
73
ITALIANO
Ricerca guasti
Nell’eventualità di un comportamento difettoso dell’apparecchio, prima di chiamare il
rivenditore o rivolgersi a un Centro Assistenza TEAC, verificare se il difetto è riportato
nell’elenco che segue e provare a risolverlo come consigliato.
Non arriva l’alimentazione
eVerificare il collegamento
dell’alimentazione di rete.
Non esce suono dai diffusori
eControllare il collegamento
all’impianto stereo.
eNon c’è un disco nel cassetto. Inserire
un disco.
Il suono è disturbato
eIl registratore è situato troppo vicino a
un televisore o altro elettrodomestico.
Allontanarlo, oppure spegnere gli altri
apparecchi.
Suoni strani.
eIl comando dell'altezza è stato
modificato. Riportare il punto del
comando dell'altezza sulla posizione
centrale.
Il telecomando non funziona
eLe pile sono scariche e vanno
sostituite.
eAzionare il telecomando alla distanza
di non oltre 5 metri dall’apparecchio e
puntarlo in direzione del pannello
frontale.
eEliminare qualsiasi ostacolo che
blocchi il percorso del segnale tra il
telecomando e l’apparecchio
principale.
eSe fosse accesa nelle vicinanze una
luce fluorescente, spegnerla.
eSe nelle vicinanze dell'unità c'è una
forte sorgente luminosa, spegnerla.
Lettore CD
Riproduzione impossibile
eInserire il disco con l’etichetta rivolta
verso l’alto.
ePuò darsi che il disco sia sporco:
pulire accuratamente la sua
superficie.
eÈ stato inserito un disco vuoto.
Sostituirlo con un disco preregistrato.
eSelezionare un disco premendo il tasto
DISC, e poi premere il tasto PLAY.
Nell’impossibilità di ripristinare il corretto
funzionamento, estrarre il cavo
d’alimentazione dalla presa e inserirlo di
nuovo.
L’audio evidenzia salti di traccia
eCollocare l’apparecchio su un
appoggio stabile, per evitare che
subisca urti o vibrazioni.
ePuò darsi che il disco sia sporco:
pulire accuratamente la sua
superficie.
eNon utilizzare dischi graffiati,
danneggiati o incurvati.
Deck a cassette
Impossibile chiudere lo sportello del vano
cassette. I tasti non funzionano.
eLa cassetta non è stata inserita
correttamente.
L’audio manca del tutto; oppure è
distorto/disturbato.
ePulire e smagnetizzare le testine.
eSelezionare il tipo di riduzione del
rumore Dolby uguale a quello con cui il
nastro è stato registrato.
Impossibile effettuare la registrazione
eLe alette di protezione alla ri-
registrazione della cassetta sono
staccate: coprire i fori con nastro
adesivo.
ePulire e smagnetizzare le testine.
Il suono registrato non è chiaro.
ePer registrare, usare un nastro Normal
o un nastro Metal.
Pericoli della condensa
Quando l’apparecchio (o un disco) viene
spostato da un ambiente freddo in uno
caldo, oppure viene usato dopo un
improvviso sbalzo di temperatura, può
manifestarsi un pericoloso fenomeno di
condensa: in altre parole, il vapore
acqueo presente nell’aria si condensa
sulle parti meccaniche interne, rendendo
impossibile il corretto funzionamento. Per
evitare questo pericolo, prima di usare di
nuovo l’apparecchio quando si è formata
condensa bisogna lasciarlo acceso per 1
o 2 ore, in modo che abbia il tempo di
stabilizzarsi alla nuova temperatura
ambiente.
Specifica
Sezione del lettore CD
(Audio)
Numero di canali . . . . . . . . . . . . . . . . . . . . . . . 2
Risposta in frequenzada 10 a 20.000 Hz ± 1dB
Rapporto segnale/rumore . . . . . 90 dB (WTD)
Gamma dinamica. . . . . . . . . . . . . . . . . . . 90 dB
Distorsione armonica totale . 0,02% (a 1 kHz)
Fluttuazioni e fruscii . . . . . . . .
Inferiori ai limiti
misurabili(precisione del quarzo)
Separazione dei canal . . . . . . . . . . . . . . 70 dB
Comando dell'altezza: . . . . . . . . . . . . . . ± 12%
Uscita (RCA). . . . . . . . . . . . . . +6 dBV (2 Vrms)
Filtro digitale . . . . . . . 8 sovracampionamenti
(Formato del segnale)
Frequenza di campionamento. . . . . . 44,1 kHz
Convertitore D/A (da digitale ad analogico) .
lineare, a 16 bit per canale
Rapporto bit per canale..4,3218 Mb al secondo
Codice di modulazione del canale . . . . . EFM
Correzione dell'errore. . . . . . . . sistema CIRC
Sezione del deck a cassette
Sistema delle piste . . 4 piste, 2 canali stereo
Testine. . . 1 per registrazione e riproduzione
(rotante, ad inversione);
1 per cancellazione
Tipo di nastro utilizzabile . . . . . . . . . . . . . . . . .
Nastrocassette tipo C-60 e C-90
Velocità del nastro. . . . . . . . . . . . 4,76 cm/sec
Comando dell'altezza: . . . . . . . . . . . . . . ± 12%
Motore . 1 servo motore a corrente continua
Fluttuazioni e fruscii . . . . . . . 0,08% (W. RMS)
Risposta in frequenza (media). . . . . . . . . . . . .
da 63 a 15.000 Hz ±3 dB, per nastri al Tipo@
da 63 a 14.000 Hz ±3 dB, per nastri Tipo!
Rapporto segnale/rumore (medio) . . . . . . . . .
57 dB(con sistema DOLBY NR disattivato,
livello di distorsione armonica totale del 3%,
compensato), 66 dB (con sistema DOLBY NR
attivato, ad oltre 5 kHz)
Tempo di avvolgimento veloce . . . . . . . . . . . .
Circa 120 secondi (con nastri tipo C-60)
Ingresso di linea . . . . . . . . . -10 dBV (300 mV)
con impedenza di ingresso di 50 kohm o più
Uscita di linea . . . . . . . . . . . -10 dBV (300 mV)
con impedenza di carico di 50 kohm o più
Uscita per la cuffia . . . . . . . . 5 mW, a 30 ohm
Generalità
Alimentazione. . . . . . . . . . . . . . . . . . . . . . . . . . .
A corrente alternata da 120 a 230 V, 50/60 Hz
(modello per gli U.S.A. e il Canada, e modello
generale per esportazione)
A corrente alternata a 230 V, 50 Hz
(modello per l'Europa e la Gran Bretagna)
Consumo . . . . . . . . . . . . . . . . . . . . . . . . . . 18 W
Dimensioni (largh. x alt. x prof.). . . . . . . . . . . .
483 x 133 x 270 mm
Peso. . . . . . . . . . . . . . . . . . . . . . . . . . . . . . 6,7 kg
Accessori in dotazione:
Telecomando, modello RC-A630 x 1
2 batterie (tipo "SUM-3", o "AA", o "R6")
Page 74

ESPAÑOL
74
Solución de problemas
Si surge algún problema con la unidad, consulte la siguiente tabla y pruebe a solucionarlo
antes de ponerse en contacto con su distribuidor o con el servicio técnico de TEAC.
No hay corriente
eRevise la conexión al suministro de
alimentación.
No hay sonido en los altavoces
eRevise la conexión al equipo estéreo.
eNo hay ningún disco insertado. Cargue
un disco.
El sonido presenta ruido
eLa unidad está demasiado cerca de un
televisor o equipo similar. Sitúe la
unidad alejado de tales equipos, o
apáguelos.
Sonidos extraños.
eSe ha modificado el control de tono.
Ajuste el mando de control de tono en
la posición central.
No funciona el mando a distancia.
eSi se ha agotado las pilas, sustitúyalas.
eUtilice el mando a distancia dentro del
radio de acción (5 m/15 ft) y apunte al
panel frontal.
eRetire todos los obstáculos existentes
entre el mando a distancia y la unidad
principal.
eSi hay un fluorescente cerca de la
unidad, apáguelo.
eSi una potente luz está cerca de la luz,
apáguela.
Reproductor de CD
No se puede reproducir.
eInserte un disco con la cara de la
etiqueta hacia arriba.
e Si el disco está sucio, limpie la
superficie.
eSe ha insertado un disco vacío. Utilice
un disco pregrabado.
e Seleccione un disco presionando el
botón DISC, y luego presione el botón
PLAY.
Saltos de sonido.
eColoque la unidad sobre una superficie
estable para evitar los impactos y las
vibraciones.
e Si el disco está sucio, limpie la
superficie.
e No utilice discos rayados,
deteriorados o deformados.
Si aun así la unidad no funciona
correctamente, desconecte el cable de
alimentación y vuélvalo a conectar.
Cuidado con la condensación
Si la unidad (o un disco) se traslada de un
entorno frío a otro cálido, o se utiliza
después de un cambio repentino de
temperatura, existe el riesgo de
condensación. El vapor del aire podría
condensarse en el mecanismo interno e
impedir su correcto funcionamiento. Para
evitarlo o solucionarlo, deje la unidad
encendida durante una o dos horas. Así
se estabilizará con la temperatura
ambiente.
Platina de cassette
No se puede cerrar el compartimento de
cinta. No funcionan los botones.
eInserte correctamente la cinta de
casete.
No hay sonido. Sonido distorsionado o de
poca calidad.
eLimpie y desmagnetice los cabezales.
eSeleccione el sistema de reducción de
ruido DOLBY con el que fue grabada la
cinta.
No se puede grabar.
eSi se han desprendido las pestañas de
seguridad de la casete, cubra los
orificios con cinta adhesiva.
eLimpie y desmagnetice los cabezales.
El sonido grabado no es nítido.
eUse una cinta normal o metálica para
la grabación.
Especificaciones
< Las mejoras pueden provocar
modificaciones en las funciones o
características técnicas sin previo aviso.
< Las ilustraciones pueden diferir
ligeramente de los modelos de
producción.
Sección del reproductor de CD
(Audio)
Número de canales. . . . . . . . . . . . . . . . . . . . . 2
Respuesta de frecuencia. 10-20.000 Hz ±1dB
Relación señal a ruido . . . . . . . . 90 dB (WTD)
Gama dinámica . . . . . . . . . . . . . . . . . . . . 90 dB
Distorsión armónica total . . . . . 0,02% (1 kHz)
Lloro y trémolo . . . . . . . . . . . . . . . . . . . . . . . . . .
Imposible medirlo (precisión de cuarzo)
Separación entre canales . . . . . . . . . . . 70 dB
Control de paso: . . . . . . . . . . . . . . . . . . . ± 12%
Salida (RCA). . . . . . . . . . . . . . +6 dBV (2 Vrms)
Filtro digital: . . . . . . . . . . . . 8 sobremuestreos
(Formato de señal)
Frecuencia de muestreo . . . . . . . . . . 44,1 kHz
Convertidor D/A. . . . . . . . . Lineal 16 bit/canal
Velocidad de bit de canal . . . 4,3218 Mb/seg.
Código de modulación de canal . . . . . . . EFM
Corrección de error . . . . . . . . . . . . . . . . . CIRC
Sección del cassette
Sistema de pistas . . . . . . . . . . . . . . . . . . . . . . .
4 pistas 2 canales estereofónicos
Cabezas. . . . . . . Grabación/reproducción x 1
(inversión giratoria)
borrado x 1
Tipo de cinta. . Cinta de cassette C-60 y C-90
Velocidad de la cinta . . . . . . . . . 4,76 cm/seg.
Control de paso: . . . . . . . . . . . . . . . . . . . ± 12%
Motor . . . . . . . . . . . . . . Servo motor de CC x 1
Lloro y trémolo . . . . . . . . . . . 0,08% (W. RMS)
Respuesta de frecuencia (general) . . . . . . . .
63 - 15.000 Hz ±3 dB, Type@
63 - 14.000 Hz ±3 dB, Type!
Relación señal a ruido (general). . . . . . 57 dB
(Dolby NR desconectado, 3% nivel THD,
ponderado)
66 dB (DOLBY NR conectado, más de 5 kHz)
Tiempo de bobinado rápido. . . . . . . . . . . . . . .
120 seg. aprox. (con C-60)
Entrada . . . . . . . . . . . Línea; -10 dBV (300 mV)
impedancia de entrada de 50 K ohmios o
mayor
Salida . . . . . . . . . . . . Línea; -10 dBV (300 mV)
impedancia de carga de 50 K ohmios o
mayor
Auriculares: 5 mW/30ohmios
Generalidades
Requisitos de alimentación . . . . . . . . . . . . . . .
120/230 V CA, 50-60 Hz
(EE.UU/Canadá/
modelo de exportación general)
230 V CA, 50 Hz (Modelo Europa/G.B.)
Consumo de energía . . . . . . . . . . . . . . . . 18 W
Dimensiones (AxAlt.xP). . 483 x 133 x 270 mm
Peso. . . . . . . . . . . . . . . . . . . . . . . . . . . . . . 6,7 kg
Accesorios estándar
Control remoto inalámbrico RC-A630 x 1
Pila (tipo SUM 3, "AA", "R6") x 2
Page 75

75
466mm
483mm
57.2mm
133mm
140.5mm
16mm 270mm 7mm
435mm
Pin No. Component & Signal Direction
1 TAPE PAUSE IN
2 TAPE REVERSE PLAY IN
3 TAPE FORWARD PLAY IN
4 CD REW IN
5 CD F. FWD IN
6 CD STOP IN
7 CD READY IN
8 COMMON Ground —
9 TAPE STOP IN
10 TAPE F. FWD IN
11 TAPE REW IN
12 TAPE TALLY OUT
13 CD TALLY OUT
14 +5V* OUT
15 CD PLAY IN
Use this 15-pin ‘D’-sub connector to connect the unit to suitablyequipped equipment, allowing control of the CD-A630.
Output signals are transport status tally signals (open collector).
The maximum current is 50 mA, and the maximum voltage is 15 V.
Input signals are active when low (grounded) for 100 ms or more.
* The maximum current supplied from this terminal is 50 mA.
CONTROL I/O Utiliser ce connecteur Sub ‘D’ à 15 broches pour rac-corder le CD-
A630 à des appareils correctement équipés, permettant ainsi de
commander le CD-A630.
Les signaux de sortie comportent des signaux de comptage de
l’état du transport (collecteur ouvert). Le courant maximum est de
50 mA et la tension maximale est de 15 V. Les signaux d’entrée
sont actifs quand ils sont abaissés (mis à la terre) pendant 100 ms
ou plus.
* Le courant maximum fourni par cette borne est 50 mA.
An diese 15-polige Sub-D-Buchse können Sie ent-sprechend
ausgestattete Geräte zur Steuerung des CD-A630 anschließen.
Ausgangssignale sind Transportstatus-Tally-Signale (offener
Kollektor). Maximale Stromstärke beträgt 50 mA, maximale
Spannung 15 V. Eingangssignale sind bei 100 ms oder
längerzeitiger Tiefsetzung (Erdung) aktiv.
* Der maximale Ausgangsstrom an diesem Pin beträgt 50 mA.
Questo connettore sub-D a 15 pin collega il CD-A630 a un
dispositivo di controllo adeguatamente equipaggiato.
I segnali di uscita sono segnali etichetta per stato di trasporto
(collettore aperto). Il valore massimo di corrente è 50 mA e il
valore massimo di tensione è 15 V. I segnali di ingresso sono attivi
quando sono bassi (a terra) per 100 ms o più.
* La corrente massima inviata da questo terminale è 50 mA.
Utilize este conector ’D’-sub de 15 pinos para conectar a unidade
a um equipamento adequadamente equipado, o que permitirá o
controle do CD-A630.
Os sinais de saída são sinais de indicação do estado de transporte
(coletor aberto). A corrente máxima é de 50 mA, e a voltagem
máxima é de 15 V. Os sinais de entrada são ativos quando estão
baixos (ligados à terra) durante 100 ms ou mais.
* A corrente máxima fornecida deste terminal é de 50 mA.
No.4 – 40UNC
Page 76

Printed in China 0900.MA-0422
This appliance has a serial number located on the rear panel. Please record
the model number and serial number and retain them for your records.
Model number Serial number
TEAC CORPORATION
3-7-3, Nakacho, Musashino-shi, Tokyo 180-8550, Japan Phone: (0422) 52-5081
TEAC AMERICA, INC. 7733 Telegraph Road, Montebello, California 90640 Phone: (323) 726-0303
TEAC CANADA LTD. 5939 Wallace Street, Mississauga, Ontario L4Z 1Z8, Canada Phone: (905) 890-8008
TEAC MEXICO, S.A. De C.V Campesions 184, Col.Granjas Esmeralda, 09810, Mexico Phone: (525) 581-5500
TEAC UK LIMITED 5 Marlin House, Croxley Business Park, Watford, Hertfordshire, WD18 8TE, U.K. Phone: 01923-819699
TEAC DEUTSCHLAND GmbH Bahnstrasse 12, 65205 Wiesbaden-Erbenheim, Germany Phone: 0611-71580
TEAC FRANCE S.A. 17, Rue Alexis-de-Tocqueville, CE 005 92182 Antony Cedex, France Phone: (1) 42.37.01.02
TEAC NEDERLAND BV Oeverkruid 15, NL-4941 VV Raamsdonksveer, Nederland Phone: 0162-510210
TEAC BELGIUM NV/SA c/o TEAC NEDERLAND BV, Oeverkruid 15, NL-4941 VV Raamsdonksveer, Nederland Phone: +31-162-510860
TEAC ITALIANA S.p.A. Via C. Cantù 11, 20092 Cinisello Balsamo, Milano, Italy Phone: 02-66010500
TEAC AUSTRALIA PTY., LTD. 106 Bay Street, Port Melbourne, Victoria 3207, Australia Phone: (03) 9644-2442
A.B.N. 80 005 408 462
»
CD-A630
 Loading...