

Page 1

USER GUIDE
ExpressCard
TM
Notebook
Docking Station
with Digital Video
and Audio
Page 2

Table of Contents
English
ExpressCard Universal Notebook Docking Station with Digital
Video and Audio...........................................................................2
Deutsch
Universelle ExpressCard Notebook-Dockingstation mit Digitalem
Video und Audio.........................................................................26
Español
Estación de conexión universal para ordenador portátil Express-
Card con vídeo y audio digital ...................................................50
Français
Station d'accueil universelle ExpressCard pour ordinateur
portable avec fonctions Audio et Vidéo numériques...................74
Italiano
Docking Station Universale per Notebook ExpressCard con Video
e Audio Digitale........................................................................98
Nederlands
ExpressCard Universal Notebook Docking Station met digitale
video en audio..........................................................................122
Português
ExpressCard Universal Notebook Docking Station com Digital
Vídeo e Áudio...........................................................................146
Finnish
Kannettavan Targus Expresscard -tietokoneen Telakointiasema
Digitaalisilla Kuva- Ja Äänitoiminnoilla ....................................170
1
Page 3

TARGUS EXPRESSCARD
TM
NOTEBOOK DOCKING
STATION WITH DIGITAL
VIDEO AND AUDIO
Introduction
Congratulations on your purchase of the Targus ExpressCard
Notebook Docking Station with Digital Video and Audio. This
portable expansion module allows you to connect through an
ExpressCard slot up to 4 USB devices, monitor or LCD, highspeed Gigabit Ethernet/LAN, 5.1 channel PC audio with
optical fiber S/PDIF, and a serial port for legacy device.
The docking station also offers Targus Always On technology,
Targus USB Power Ports providing twice as much power as
the standard USB spec and widely spaced to accommodate
for larger adapters. Targus Always On provides power to the
USB ports even when the notebook is shut-down, disconnected from the docking station or in hibernate/stand-by mode
which allows USB devices to keep charging.
2
Page 4

Targus ExpressCard Notebook Docking Station with Digital Video and Audio
Ergonomic Design
Ergonomic design helps increase airflow under notebook for cooler
operation. The raised platform provides a more comfortable position
for typing.
Features
• (4) High Speed USB 2.0 ports
• (1) Serial (RS232) port
• (1) 24 pin DVI-D connector
• (1) VGA (HD D-sub) HD-15 connector
• (1) ExpressCard upstream cable connection
• (1) RJ-45 Gigabit Ethernet 10/1000
• (3) 5.1 Surround sound audio jacks
• (1) Microphone In
• (1) S/PDIF digital audio out (TOSLINK Opitcal Fiber Connector)
• (2) Security Lock Slots
Package Contents
In addition to this user guide, the package contains:
• Targus ExpressCard Docking Station with Digital Video and Audio
• ExpressCard Cable and Card (with spacer card)
• AC Adapter (required to operate the dock)
• Driver CD
NOTE: TARGUS RECOMMENDS THAT YOU VISIT ITS WEBSITE AT
THE LINK BELOW TO ENSURE THAT YOU HAVE THE LATEST DRIVER
VERSION FOR A FREE DOWNLOAD. FOLLOW THE DOWNLOAD
INSTRUCTIONS AND INSTALLATION STEPS IN THIS USER GUIDE.
HTTP://WWW.TARGUS.COM/US/SUPPORT_DOWNLOADS.ASP
3
Page 5

System Requirements
Hardware
• PC with an Intel® Pentium® processor or equivalent
• CD-ROM drive
• ExpressCard 34mm or 54mm slot
Operating System
• Windows® XP - Service Pack 2 or greater
NOTE: TO DOWNLOAD THE LATEST SERVICE PACKS, PLEASE VISIT YOUR
COMPUTER MANUFACTURER’S WEBSITE OR MICROSOFT’S DOWNLOAD
CENTER:
http://support.microsoft.com/default.aspx?scid=fh%3BENUS%3Bsp
Preparing the BIOS for the ExpressCard
Before installing the ExpressCard Docking station, it is very important
that you make sure that your system BIOS has the latest BIOS update
available. A number of system vendors have released updates that fix
many issues related to the ExpressCard Slot.
Targus ExpressCard Notebook Docking Station with Digital Video and Audio
• Windows VistaTMor
4
Page 6

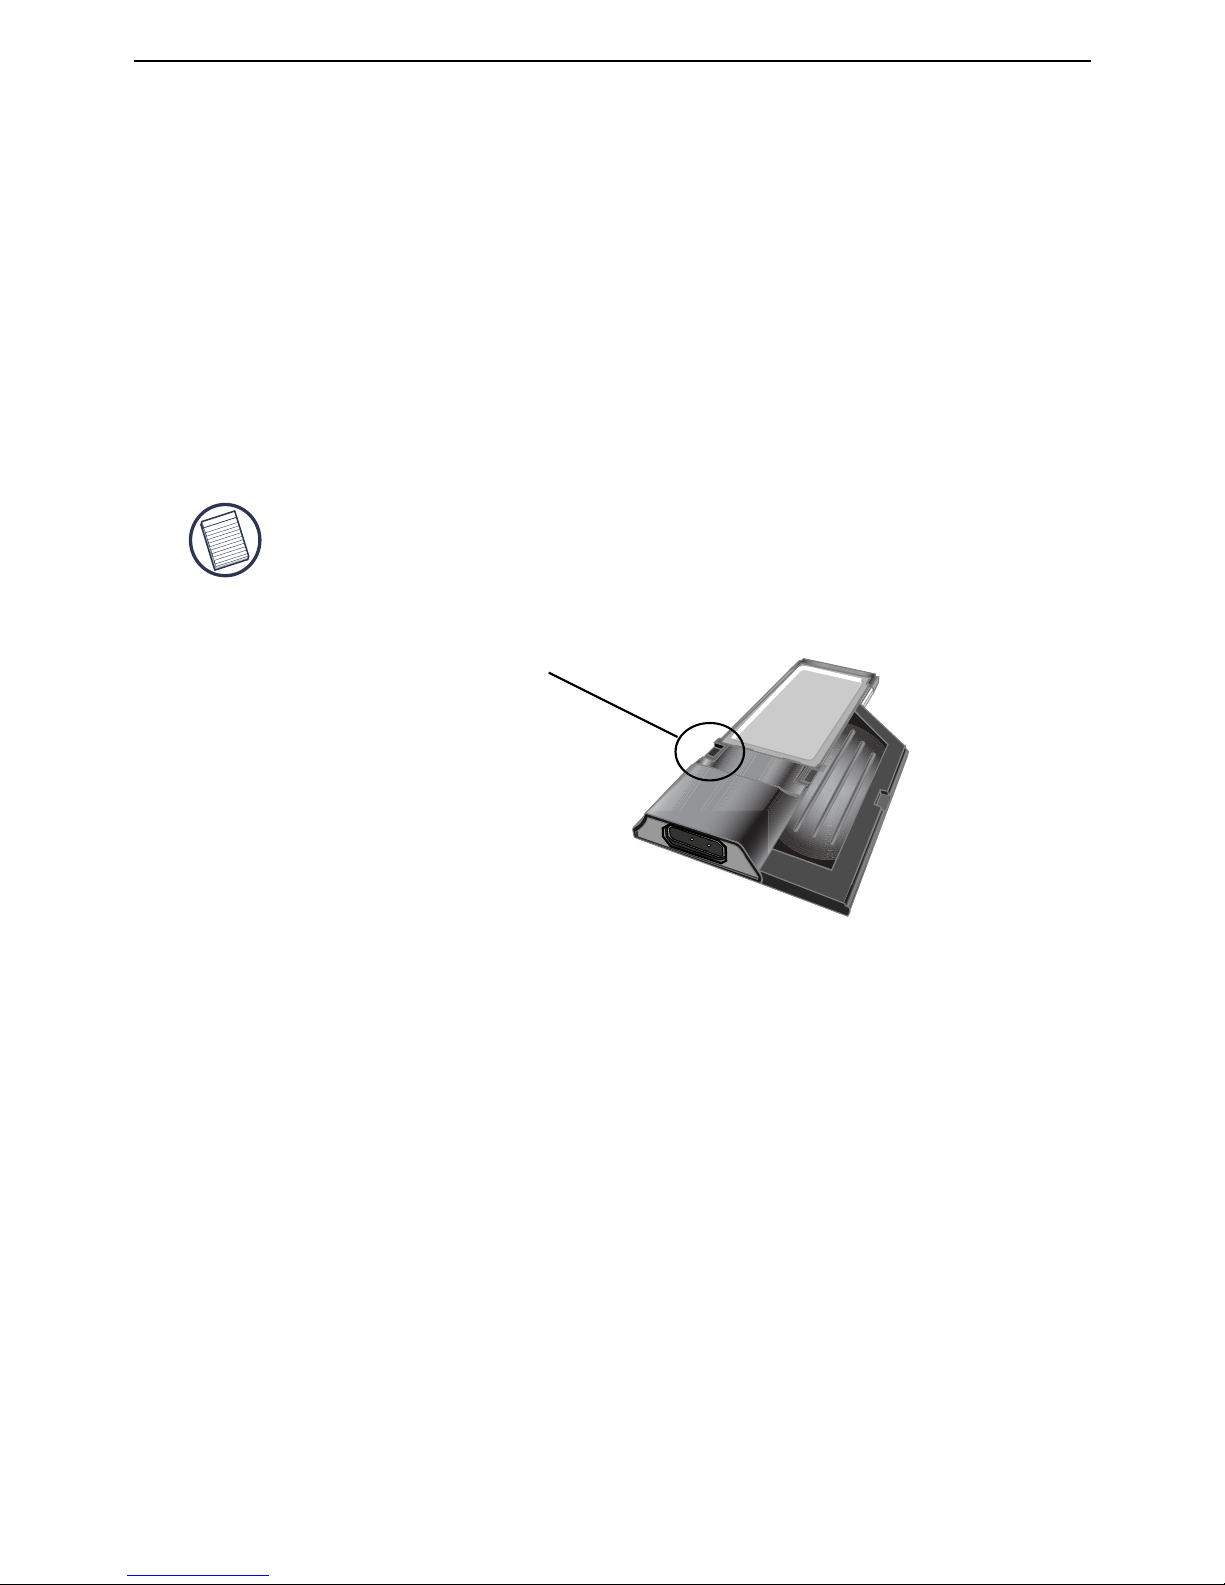
About the ExpressCard Connector Card
The ExpressCard dock comes with a cable, a spacer (see “Using the
Spacer Connector” for additional instructions) and 34mm card to
connect to an ExpressCard slot in your notebook. The cable is
removable from the card. The card can be left in your system when not
in use.
The 34mm card has a small switch located in the circular area in the
drawing below.
This switch is used to determine how the dock is recognized in the
system at boot up stage. Certain notebooks will detect the dock and not
work properly during a pre-boot mode (ie. trying to boot up on the
external VGA device, not the internal VGA of the Notebook). This was
observed in notebooks (Fujitsu, some Sony and Toshiba models) that
use a BIOS developed by Phoenix Technologies. If you experience
such issue, please turn the switch from the default "OFF" position to
"ON". You will only need to set it once.
When connecting the cable to the ExpressCard, Please make sure the cable tip is
properly and completely inserted into the cable port on the ExpressCard. Make
sure the tip is connected in the correct direction and do not force the connection
or it might break the device.
On-Pre-boot support
Off-Post-boot support (Default)
Targus ExpressCard Notebook Docking Station with Digital Video and Audio
5
Page 7
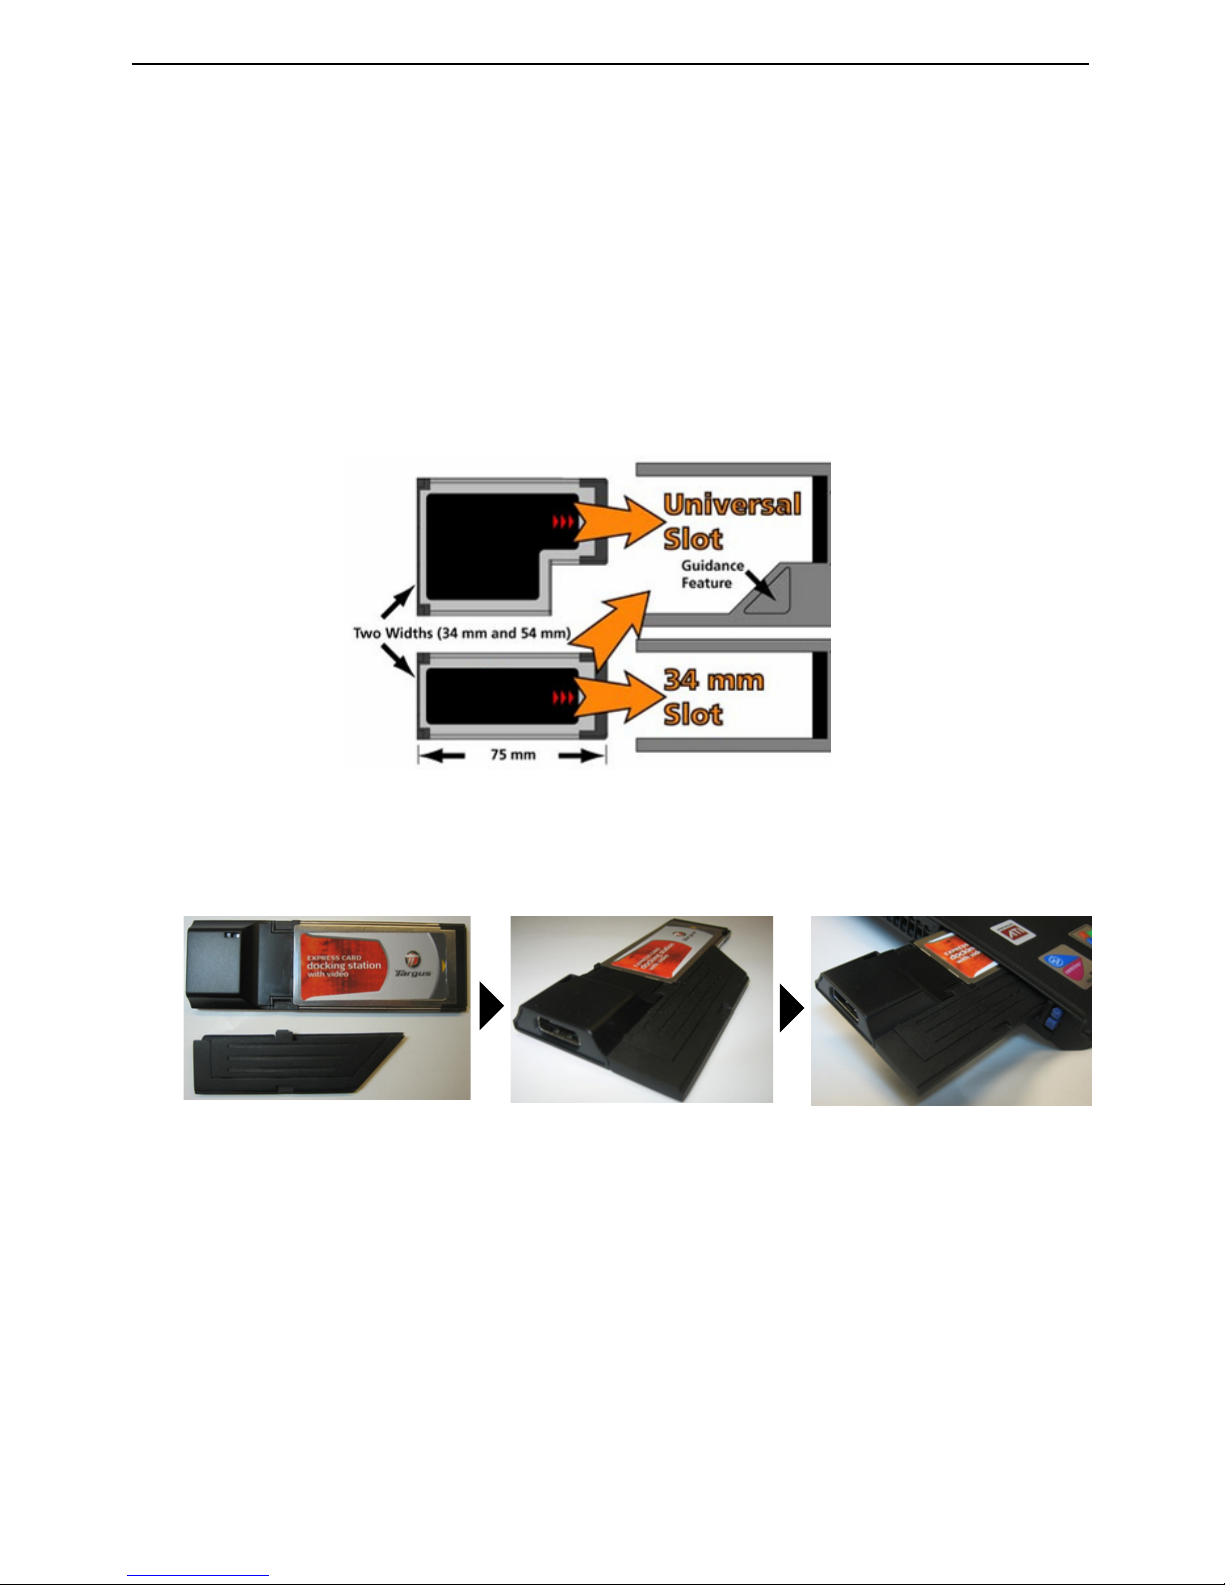
The spacer simply snaps on to the existing ExpressCard and is
inserted with the card connector into a 54mm ExpressCard slot.
A spacer is supplied to ensure the proper fitting of the 34mm ExpressCard into a 54mm slot. This spacer has no functionality other than to
prevent any movement of the card once it is inserted into the 54mm
slot. The spacer is not needed if you have a 34mm slot on your
notebook. (See the diagram below as to the two different slots that are
currently shipping in today's notebooks)
Using the Spacer Connector
Carefully align the spacer with the ExpressCard and join the two
pieces together by locking the clip in place.
Please make sure that the clip is firmly secured and no gap is in
between the two items. As shown in the diagrams above.
Targus ExpressCard Notebook Docking Station with Digital Video and Audio
6
Page 8
Targus ExpressCard Notebook Docking Station with Digital Video and Audio
Before beginning make sure the spacer and PC card are aligned as
below.
1. When attaching the spacer, ensure the spacer is at a 45 degree
angle to the PC card. Please make sure the hook on the spacer is
sitting in the slot on the PC Card. Refer Fig 1.
Fig. 1
1
2. Push down on the spacer as shown while applying firm pressure to
both the PC card and spacer.
2
When removing the spacer, pull in an upwards motion to detach.
Finally, make sure the two clips on the spacer are firmly and squarely
pushed into the slots on the PC card.
Instructions for connecting the spacer to
the ExpressCard
Attach Detach
7
Page 9

Installing the Docking Station Driver
Installing the docking station driver enables your operating system to
recognize the docking station and its ports once it’s connected.
1. Turn on your computer.
2. Insert the driver software CD into your computer’s CD-ROM drive.
If setup does not begin automatically, click Start, Run, and enter
D:\Setup.exe (where D: is the path of your CD-ROM drive) and then
click OK.
3. The Installation Wizard window of the docking station will pop up.
Follow any on-screen instructions to complete the installation.
Please connect the ExpressCard into the slot when prompted.
Connecting the Docking Station to Your Computer
Step 1. Connect the supplied AC power adapter to the AC power
jack on the docking station.
Step 2. Connect one end of the ExpressCard cable to the docking
station and the other end into the ExpressCard Card.
Step 3. Connect the ExpressCard Card into an available Express Card slot in your notebook.
WARNING: THE DOCKING STATION WILL NOT FUNCTION PROPERLY WITHOUT
THE AC ADAPTER PLUGGED INTO AN AC OUTLET.
DO NOT CONNECT ANY DEVICES TO THE DOCKING STATION UNTIL THE
SOFTWARE HAS BEEN INSTALLED AND THE AC ADAPTER PLUGGED.
Targus ExpressCard Notebook Docking Station with Digital Video and Audio
8
Page 10
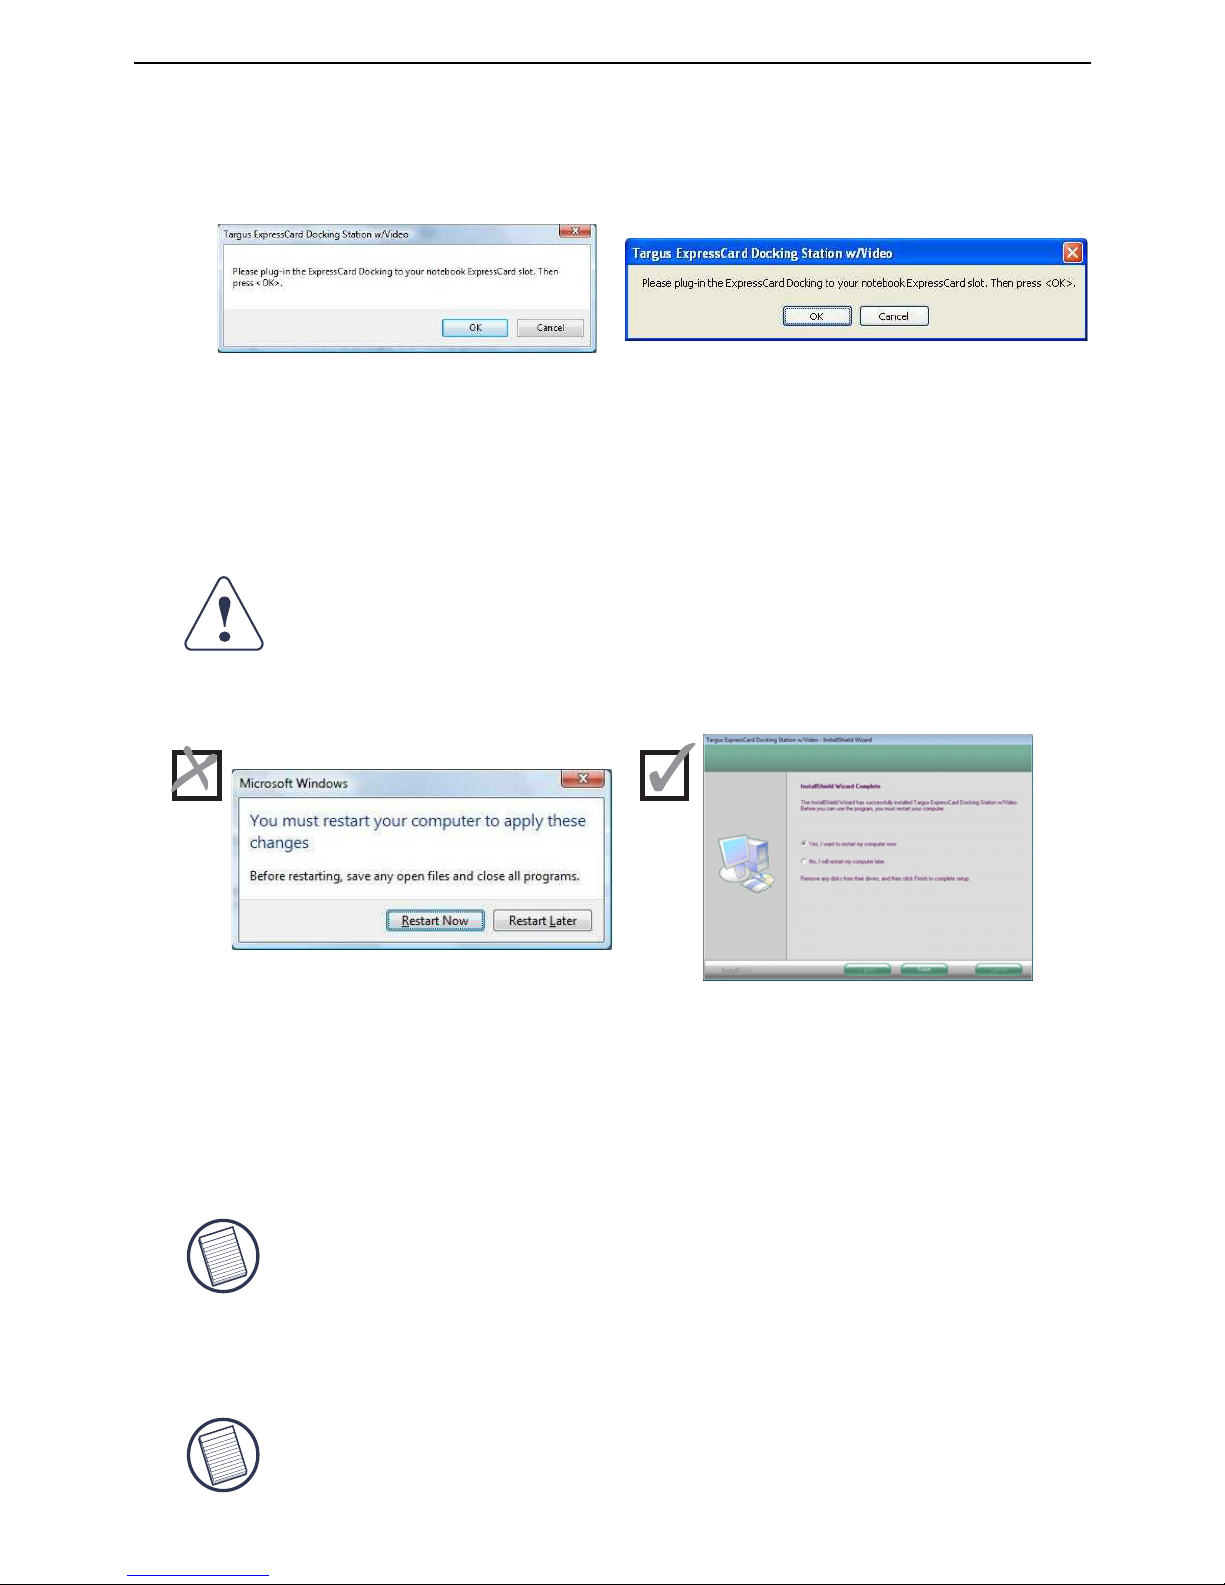
4. After connecting the ExpressCard to the computer, wait until the
computer finishes recognizing the devices before pressing OK in
the dialogue box. This process will take about 3-5 minutes.
Targus ExpressCard Notebook Docking Station with Digital Video and Audio
WINDOWS VISTA WILL PROMPT A MESSAGE BOX TO RESTART THE
COMPUTER DURING THE DRIVER INSTALLATION PROCESS. PLEASE IGNORE
THIS MESSAGE. THE DOCKING STATION’S DRIVER INSTALLATION SOFTWARE
WILL PROMPT THE RESTART MESSAGE WHEN INSTALLATION AND DRIVER
SETUP IS COMPLETED.
5. After restarting the computer, the computer will recognize the
docking station and the default drivers will finish installing for each of
the devices automatically. Please wait until this process is
completed. The screen’s resolution will adjust and refresh during this
process.
6. You will see a Targus Display logo icon located at the system tray.
The monitor mode selection can be set by right clicking on this icon.
NOTE: IT IS RECOMMEND TO SET THE MODE TO “EXPRESS CARD VGA” OFF
WHEN USING ONLY ONE MONITOR. THE DEFAULT SETTING IS “EXTENDED
MODE”.
NOTE: THIS SETUP PROCESS WILL REQUIRE SOME TIME FOR THE DRIVERS TO
INSTALL PROPERLY. IT MIGHT TAKE UP TO 5 MINUTES OR MORE DEPENDING
ON YOUR COMPUTER’S CONFIGURATION.
Click Finish and restart your computer when prompted by the
docking station’s installation software. In order to install the driver
files properly, you must make sure the installation is completed
before restarting the computer.
Window Vista - restart screen
Docking station - restart screen
Windows Vista - dailogue box
Windows XP- dailogue box
9
Page 11
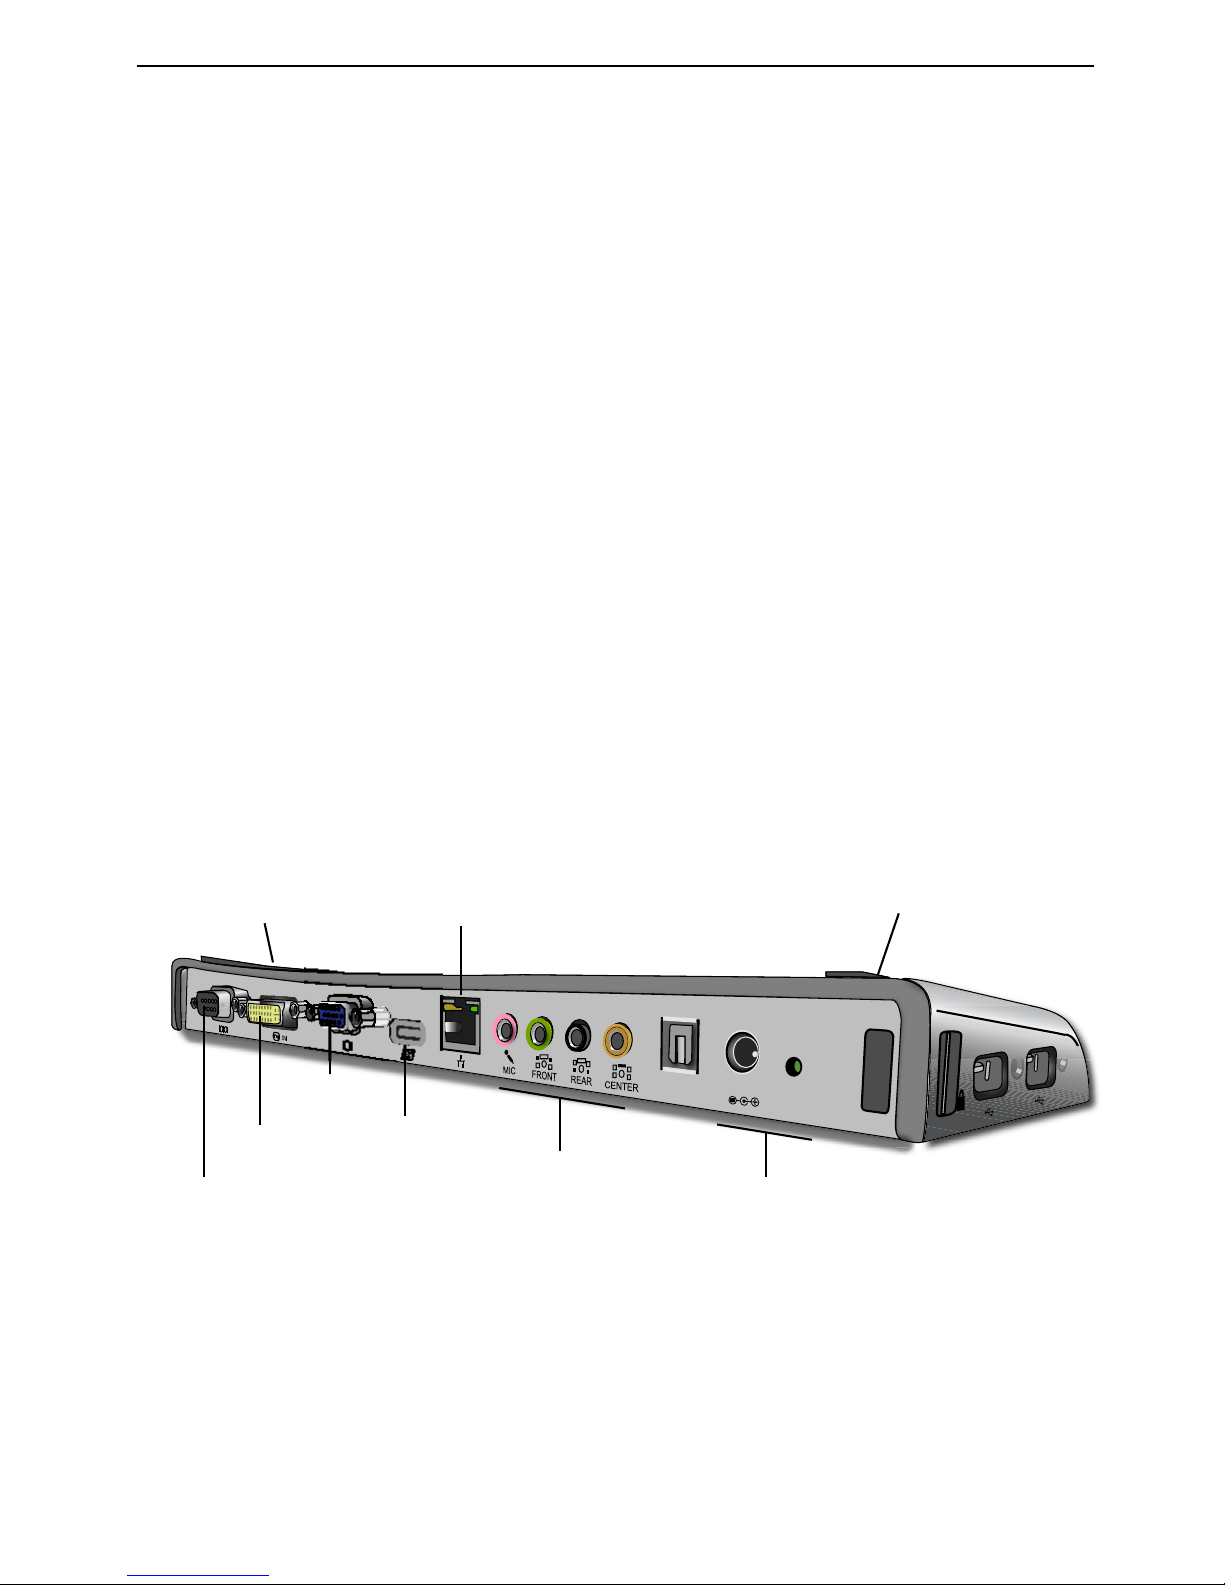
LED Status Indicator Lights
Once all device drivers are installed, the USB LED status indicator
lights on on each side of the docking station glow when you connect
devices to the docking station.
• Green Tx light illuminates when connected to a network and the
yellow Rx light flashes when data is transmitting to or from the
network.
• The Power LED will glow when the AC power cord is plugged into the
Docking station
Docking Station ports
Power and
Power LED
DC 5V
S/PDIF
Laptop Support Pad
Laptop Support Pad
5.1 Surround
Sound &
Microphone
Gigabit Ethernet
ExpressCard
upstream
cable
connection
VGA
DVI-D
Serial
Targus ExpressCard Notebook Docking Station with Digital Video and Audio
10
Page 12

“Easy Access”
High power USB
ports with
LED light indicator
Lock slot for use with
Targus locks - Models
nos. PA410U or
PA450U (not included)
Connecting New Devices
To avoid possible damage when connecting a new device, do not force
the cable connector into the port on the docking station. If the cable
connector does not attach smoothly, turn the connector over and try
attaching it again.
Connecting a Serial Mouse / Keyboard
To connect a serial mouse or keyboard, attach the cable connector to
the serial port on the docking station.
Connecting and Configuring a Serial Modem
To connect a serial modem:
1. Attach the cable connector to the serial port on the docking station.
2. Install the modem software driver according to the instructions that
come with the device.
3. When prompted to select the port, choose the Serial USB (COMx),
where x is the COM port number assigned by your operating system.
Targus ExpressCard Notebook Docking Station with Digital Video and Audio
11
Page 13

Connecting a PDA
1. Attach the cable connector to the serial port on the docking station.
2. Verify that the COM port setting, in either your HotSync® or
ActiveSync® software, matches the setting on the docking station.
To verify the COM port setting on the docking station, refer to
“Verifying Devices are Installed”. To verify the COM port setting on
your PDA, refer to the documentation that came with it.
Connecting to a Local Area Network
To connect an Ethernet cable with an RJ-45 connector, attach the
cable connector to the Ethernet/network port on the docking station.
Additional procedures to connect to an actual network depend on the
type of network you are using. Contact your network administrator for
detailed instructions.
Connecting a USB Device
To connect a USB device, plug it into a USB port on the docking station
and follow the additional instructions provided with the device. All four
USB ports meet USB High-speed requirements of a 480Mbps transfer
rate and a minimum of 500mA of power. Note that 2 out of the 4 USB
ports are designed to provide 1000mA, twice as much as standard
USB specifications. See “Targus Always On” and “Using USB Devices
That Require More Power” for more details.
NOTE: THE DOCKING STATION SUPPORTS HOT SWAPPING OF THE NETWORK
CABLE.
Targus ExpressCard Notebook Docking Station with Digital Video and Audio
12
Page 14
Connecting and Configuring an
Audio Device
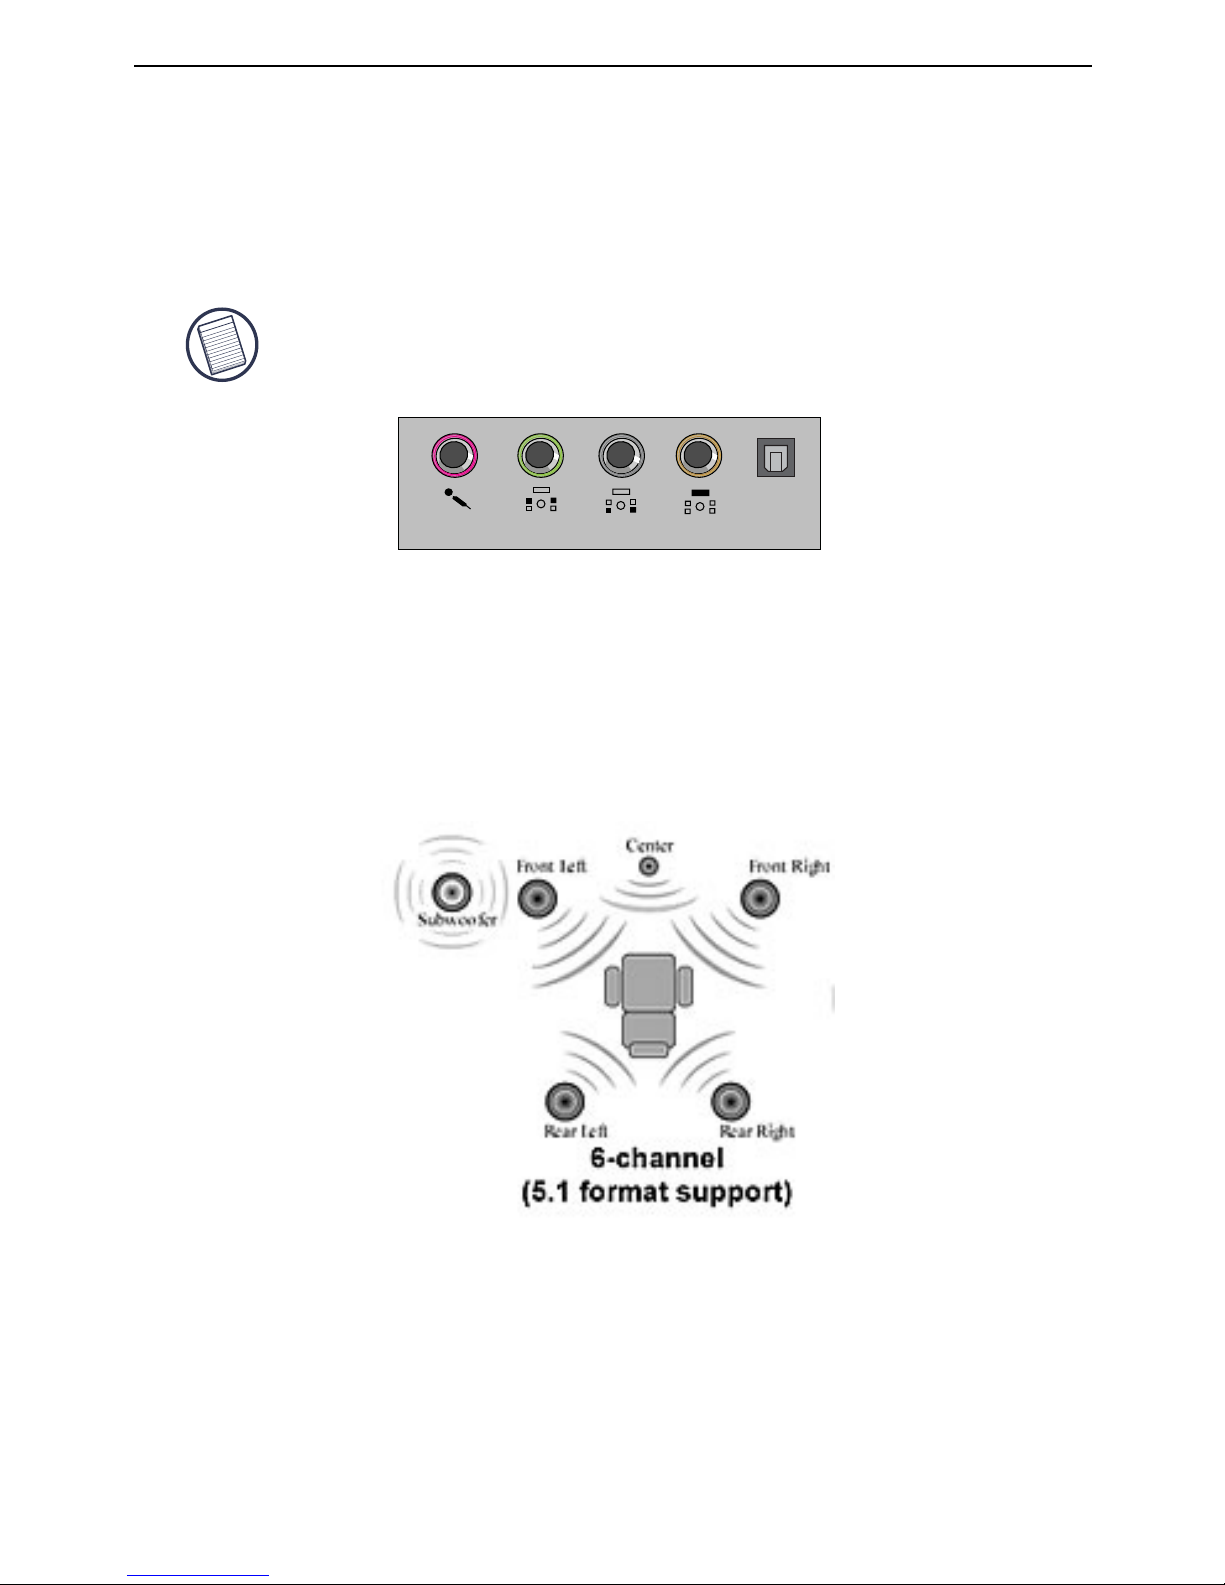
This docking station comes with a 5.1 Audio Support. The back of the
Device has 5 ports dedicated to Audio.
Microphone In – Pink
Front Channel or Line Out – Green
Rear Channel – Black
Center Channel / subwoofer– Orange
S/PDIF – Digital Audio Interface (PCM, Dolby Digital 5.1)
1. To use stereo headphones or speakers, plug them into the green
3.5mm port.
If you have a 5.1 speaker setup, connect the Front Channel Speaker
into the green 3.5mm port. Connect the Rear speaker into the Black
3.5mm port. Connect the Center Channel into the Orange 3.5mm
port.
NOTE: IF YOU ARE HAVING PROBLEMS WITH YOUR SPEAKERS AFTER
ATTACHING THE DOCKING STATION, PLEASE SEE THE TROUBLESHOOTING
SECTION FOR MORE INFORMATION.
MIC
FRONT
REAR
CENTER
S/PDIF
Targus ExpressCard Notebook Docking Station with Digital Video and Audio
13
Page 15

2. To connect a microphone, plug it into the Pink 3.5mm port.
3. To enable your headphones or speakers, you must first choose C-
Media USB Sound Device in the Properties Settings
4. For Windows® XP, go to the Control Panel and choose Sound and
Audio. Select the Audio tab. Under Sound Playback, change
Preferred Device to C-Media USB Sound Device from the drop
down list.
Click Apply, then click OK.
5. Make sure the volume is not set to MUTE.
NOTE: AUDIO DEVICES WILL NOT WORK SIMULTANEOUSLY ON THE DOCKING
STATION AND THE HOST COMPUTER.
CAUTION: ALL AUDIO OR MULTIMEDIA APPLICATIONS MUST BE TERMINATED
BEFORE SWITCHING BETWEEN THE PORT STATION AUDIO OUTPUT AND THE
HOST COMPUTER AUDIO OUTPUT.
Targus ExpressCard Notebook Docking Station with Digital Video and Audio
14
Page 16
Installing and Configuring a S/PDIF
(Sony/ Philips Digital Interface)
Device
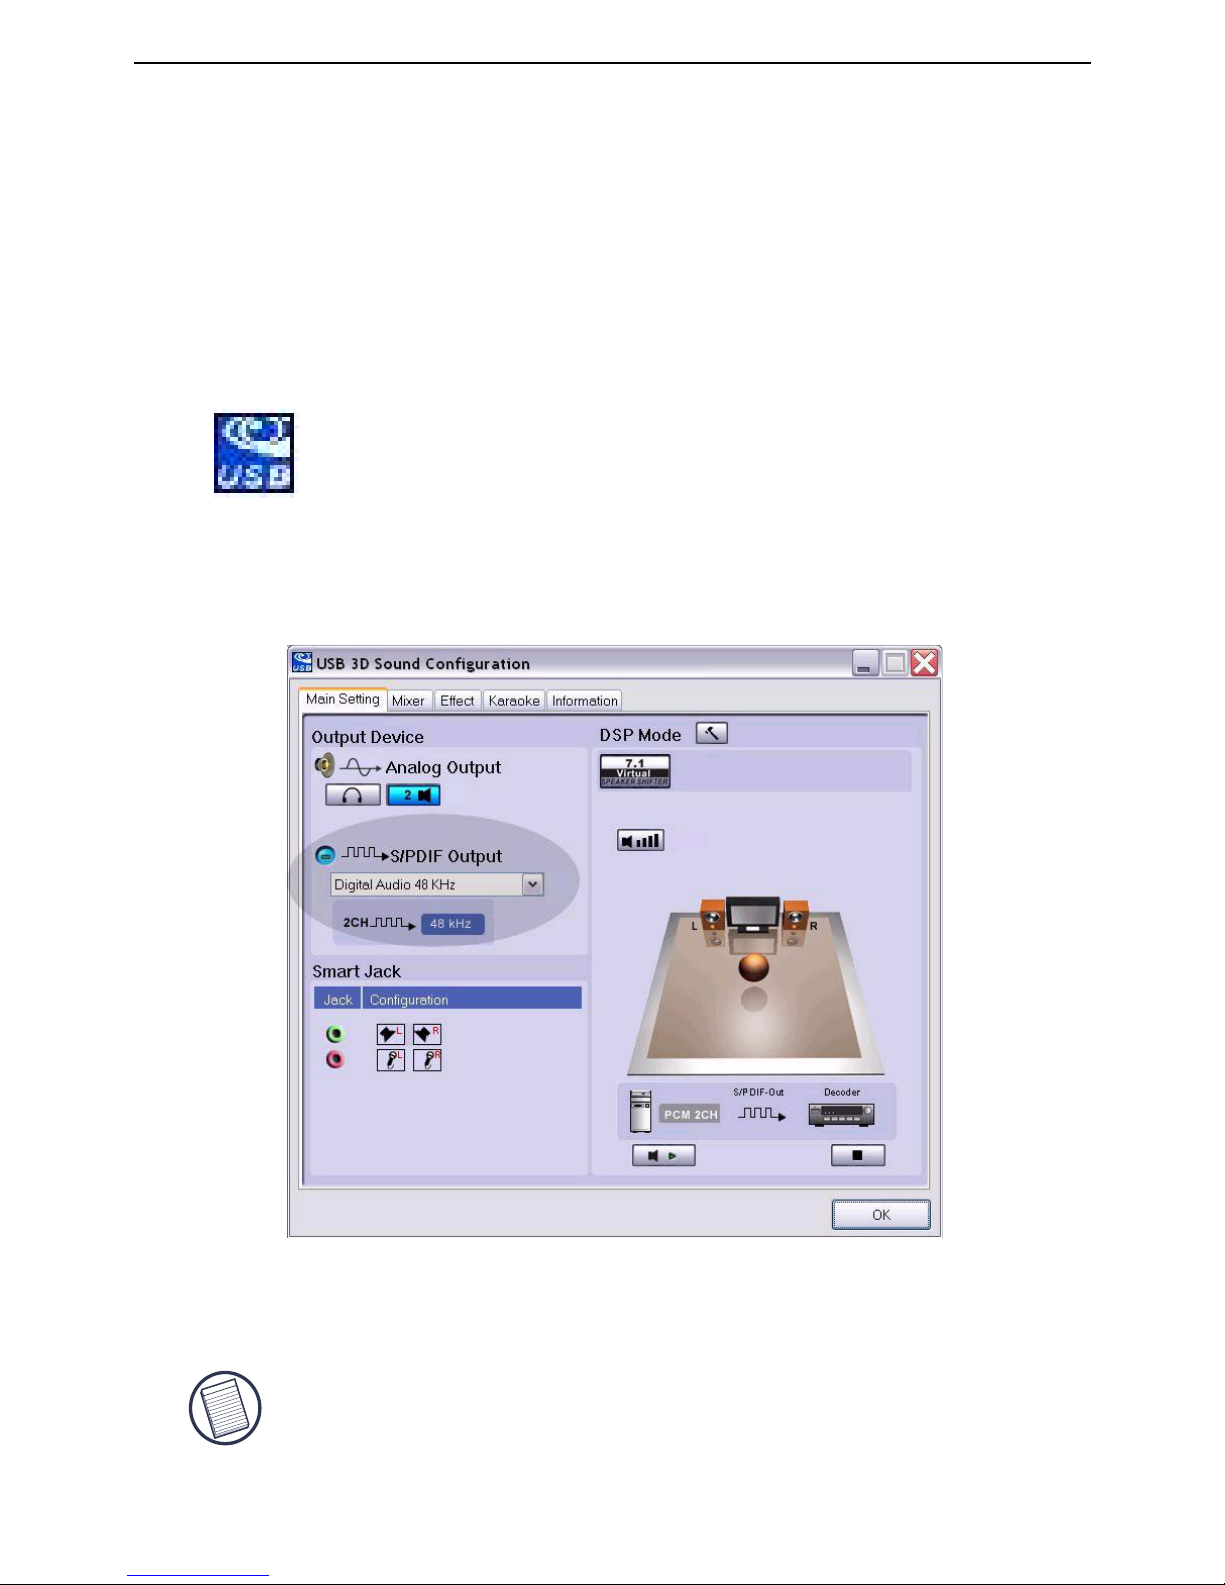
1. In order to enable S/PDIF, you have to turn it on. This can be done by
opening the USB 3D Sound Configuration applet located in your
system tray. (click on the USB icon to open up the Configuration
Screen)
2. Click on the button next to the S/PDIF Output text to enable S/PDIF
3. Set the Audio Output from the tray to digital audio
4. Plug your TOSLINK cable (not included) into the S/PDIF-Out port of
Docking Station on one end, and the S/PDIF-In port of Digital
Decoder or Speaker on the other end.
NOTE: NO NEED TO CONNECT ANY OTHER SPEAKERS CABLES IF THIS OPTION
IS SELECTED. THE OPTICAL TOSLINK CABLE IS THE ONLY CABLE REQUIRED.
5. Connect your Digital Decoder or Speaker to the Home Theater
System.
Targus ExpressCard Notebook Docking Station with Digital Video and Audio
15
Page 17

Connecting to a Monitor or LCD
Any monitor or LCD connected to the video port of the docking station
will be limited to a maximum resolution of 1600x1200, 32-bit color.
Video Menu Options
Video menu options can be accessed by right-clicking on the Targus
Display icon in the system tray or through the Windows Display Properties.
The only menu option not accessible through Windows Display Properties is Mirror. This must be accessed through the Targus Display icon.
Primary: You are using a monitor or LCD (not your notebook screen) as
your primary screen.
Extended: You are using your notebook screen as your primary display and
your monitor or LCD is a secondary screen, extending your desktop to span
both screens.
Mirror: You are using your notebook screen as your primary display and
your monitor or LCD replicates your notebook screen.
Off: You are using your notebook screen as your primary display and your
monitor or LCD is turned off.
Resolution: Changing resolution from the Targus utility will only affect the
monitor connected to the docking station video port.
To change the resolutions using the Windows Display properties:
1. Place the mouse on an empty spot on your desktop, then right click and
select properties.
2. On the Display properties screen, Click on the "settings" tab.
3. Change the screen resolution or color depth in this screen.
4. Click "OK" to close the "Display properties" screen
To Change the resolution and modes using the Targus Display icon:
1. Position the Mouse on the top of the Targus Icon and right click on it.
2. From this screen, you can change the resolutions and modes that
the Dock operates in (see below explanation of the video modes
supported).
Targus ExpressCard Notebook Docking Station with Digital Video and Audio
16
Page 18
Notebook
Screen
Secondary
Monitor or LCD
Primary: Off On
Extended: On On
Mirror: On On
Off: On Off
Video output will support the following
resolutions and color quality:
NOTE: SOME LCDS HAVE BEEN OPTIMIZED FOR A SPECIFIC RESOLUTION. IF
THE OPTIMUM RESOLUTION IS NOT 1280 X 1024, THE RESULTS MAY NOT BE
AS DESIRED.
Mode Aspect
ratio
Resolution Color
Depth
Refresh Rate
UXGA 4:3 1600x1200 16 60HZ, 65HZ,
70HZ, 75HZ,
85HZ
UXGA 4:3 1600x1200 32
60HZ, 65HZ, 70HZ
WSXGA+ 16:10 1680x1050 32
60HZ, 65HZ, 70HZ
SXGA+ 4:3 1400x1050 16 60Hz
SXGA 5:4 1280x1024 16,32
60HZ, 75HZ , 80HZ
QVGA 4:3 1280x960 16,32
60HZ, 75HZ, 85HZ
WXGA+ 16:10 1440x900 32 60Hz
WGA 15:9 1280x768 16,32 60Hz
WXGA 16:10 1280x800 16,32 60Hz
XGA 4:3 1024x768 16,32
60HZ, 70HZ,
75HZ, 85HZ, 120HZ
SVGA 4:3 800x600 16,32 60HZ , 72HZ,
75HZ , 85HZ,
120HZ , 160HZ
VGA 4:3 640x480 16,32 60HZ, 72HZ,
75HZ, 85HZ,
120HZ, 160HZ
NOTE: ALL REFRESH RATES LISTED ARE NON-INTERLACED.
Targus ExpressCard Notebook Docking Station with Digital Video and Audio
17
Page 19

Global Suspend Mode
When your computer is in suspend mode, the docking station also
enters suspend mode to avoid power consumption. When your
computer wakes up, the docking station wakes up automatically.
Using USB Devices that Require
More Power
This docking station is designed with 4 USB High Power Ports 2 of
which, providing up to 1000mA of power each. They can be used to
connect to peripherals that requires more power such as printers,
scanners, optical drives, and others.
Targus ExpressCard Notebook Docking Station with Digital Video and Audio
18
Page 20

Troubleshooting
Device Not Working
• Make sure that the device is fully inserted into the correct port on the
docking station.
• Plug the device into a different port on the docking station. If it still
doesn’t work, test the device by connecting it directly to your
computer.
• Verify that you ran the Setup or Install program for the device.
• Make sure that the device appears in Device Manager. For more
information refer to “Verifying Devices are Installed”.
• Disconnect all devices from the docking station and reconnect them,
one at a time. Check that each device works before plugging in the
next one.
• Each USB port is equipped with over-current protection. Should a
USB device draw more current than the USB port can supply, the port
will shut down. To re-enable the port, unplug the device and go to
Device Manager or to the message in the system tray and choose the
Reset option. You can then plug the device back into the USB port. If
a shut down reoccurs, check the power requirements of the device.
Verifying Devices are Installed
You can view the devices installed on the docking station from the
Device Manager window in System Properties.
Right-click My Computer, Properties, then click the Hardware tab,
and then the Device Manager button.
Targus ExpressCard Notebook Docking Station with Digital Video and Audio
19
Page 21

From the Device Manager window, expand the following:
• Display Adapters - Targus ExpressCard w/ video
• Human Interface Devices - displays keyboards and pointing devices:
mice, trackballs, and joysticks
• Network Adapters — Realtek RTL 8110SC Ethernet Adaptor
• Ports (COM & LPT) — Serial on USB [COM x]
• Sound, Video and Game Controllers — displays USB audio device
• Universal Serial Bus controllers — displays the other devices
installed for the docking station and generic hub
Verifying a Serial Modem Connection
When attaching a modem to the serial (RS232) port, verify that the port
assigned to your modem is Serial USB (COMx), where x is the number
of the COM port.
If the operating system does not detect automatically that your modem
is assigned to Serial USB (COMx), run the Hardware Wizard again and
choose Select from the list instead of Autodetect. Then, select Serial
USB (COMx) as the COM port.
Error Message on Your PDA
If the error message “Connection Not Established” appears on your
PDA, check that the COM port setting in either your HotSync or
ActiveSync software matches the setting on the docking station. See
“Verifying Devices are Installed” to verify the COM port setting on the
docking station.
Some older versions of the Palm® Desktop software are not compatible with the USB to Serial conversion. Please contact your PDA
vendor for software updates.
Targus ExpressCard Notebook Docking Station with Digital Video and Audio
20
Page 22

Video
Can I get a higher resolution on my monitor?
Movie playback is not smooth when played at 1600x1200x32 bit
resolution. It is worse when playing a media clip in full screen?
The Targus ExpressCard Docking station is not primarily designed for
playing back movie content at maximum resolution and color depth.
The best mode for displaying video content is at 1280x1024 (SXGA)
resolution or lower.
The reason for this is the large amount of display data being
transferred during movie playback. Standard DVD movies are encoded
at a resolution of 720x480 (NTSC), and 720x576 for PAL discs. Higher
resolution display of the video will result in upscaling the display to the
higher resolution, which does not gain any net affect on the playback of
the movie.
Unexpected Crashes or power state issues?
Please make sure you have upgraded your system BIOS on your
notebook. Several popular notebook vendors have released BIOS
upgrades that resolve a number of ExpressCard related issues
(Lenovo, Fujitsu).
• Highest resolution is 1600 x 1200, 32-bit color.
Ways to improve the smoothness of the movie playback are:
• Reduce the resolution of the display to 1280x1024 with lower color
depth (16 Bit Color)
• Terminate any other CPU intensive applications running on the
computer.
I cannot play a DVD using the Docking station?
DVD playback is controlled by the DVD playback software and the
hardware on your notebook. Many DVD playback software programs
are not capable of supporting DVD playback on an external or secondary monitor. If you encounter problems playing back videos in
Extended mode, try switching the Video mode on the Docking station
to Primary or Mirror mode.
Targus ExpressCard Notebook Docking Station with Digital Video and Audio
21
Page 23

My system crashes during boot up with the Card connector
installed?
Can two separate displays be connected to the ExpressCard
Docking station (VGA and DVI-D) and display two separate
images or work to extend the display across three screens
(including the Notebooks screen)?
No. The output from the VGA port and the DVI port are the same.
Try switching the Pre-boot switch to the on position and boot again.
Audio
I cannot hear anything through my Notebook's Speakers.
Some Notebooks default to the ExpressCard Docking station's
onboard USB Audio device when the Docking station is connected,
disabling your notebook's built in speakers. To enable your Notebook's
speakers, do the following:
1. Open the Control Panel, and select "sounds and Audio Devices".
2. On the "Audio" Tab under the "Sound Playback" section, select
your Notebook's internal Audio device (will be a device other than
the USB Audio device of the Docking Station).
If you still cannot get the Audio device to Play from your speakers:
1. Open the Control Panel, and select "sounds and Audio Devices".
2. On the "Audio" Tab under the "Device Volume" section, click
"Advanced".
3. Uncheck the "Mute All" box
NOTE: YOU WILL NEED TO CLOSE ANY APPLICATIONS THAT ARE USING
AUDIO AND RESTART THEM IN ORDER TO ENABLE THIS CHANGE.
Targus ExpressCard Notebook Docking Station with Digital Video and Audio
My screen becomes blank (black) when I connect the ExpressCard to my computer.
Make sure the ExpressCard is properly connected and check the
display mode in the system tray so that the setting is correct.
22
Page 24

Technical Support
For technical questions, please visit:
Internet http://www.targus.com/support.asp
English http://www.targus.com/uk/support.asp
French http://www.targus.com/fr/support.asp
German http://www.targus.com/de/support.asp
Spanish http://www.targus.com/sp/support.asp
Italian http://www.targus.com/it/support.asp
Our knowledgeable staff is also available to answer your
questions through one of the following telephone
numbers.
Austria 01 795 676 42
Belgium 02-717-2451
Denmark 45 35-25-87 51
Finland 922948016
France 01-6453-9151
Germany 0211-6579-1151
Italy 02-4827-1151
Netherlands 02 0504 0671
Norway 022577729
Portugal +351 21 415 4123
Spain 91 745 6221
Sweden 08-751-4058
Switzerland 01-212-0007
United Kingdom 020-7744-0330
Eastern Europe & others +31 0 20 5040671
Targus ExpressCard Notebook Docking Station with Digital Video and Audio
23
Page 25

Product Registration
Targus recommends that you register your Targus accessory
shortly after purchasing it. To register your Targus accessory, go
to: http://www.targus.com/registration.asp
You will need to provide your full name, email address, phone
number, and company information (if applicable).
Warranty
Targus warrants this product to be free from defects in materials
and workmanship for two years. If your Targus accessory is found
to be defective within that time, we will promptly repair or replace
it. This warranty does not cover accidental damage, wear and
tear, or consequential or incidental loss. Under no conditions is
Targus liable for loss of, or damage to a computer; nor loss of, or
damage to, programs, records, or data; nor any consequential or
incidental damages, even if Targus has been informed of their
possibility. This warranty does not affect your statutory rights.
Regulatory Compliance
This device complies with Part 15 of the FCC Rules. Operation is
subject to the following two conditions: (1) This device may not
cause harmful interference, and (2) This device must accept any
interference received, including interference that may cause
undesired operation.
FCC Statement
Tested to Comply
This equipment has been tested and found to comply with the
limits of a Class B digital device, pursuant to Part 15 of the FCC
Rules. These limits are designed to provide reasonable protection
against harmful interference in a residential installation. This
equipment generates, uses, and can radiate radio frequency
energy and if not installed and used in accordance with the
instructions, may cause harmful interference to radio
communications. However, there is no guarantee that
interference will not occur in a particular installation.
If this equipment does cause harmful interference to radio or
television reception, which can be determined by turning the
Targus ExpressCard Notebook Docking Station with Digital Video and Audio
24
Page 26

equipment off and on, the user is encouraged to try to correct the
interference by one or more of the following measures:
• Reorient or relocate the receiving antenna;
• Increase the separation between the equipment and receiver;
• Connect the equipment into an outlet on a circuit different from
that to which the receiver is connected;
• Consult the dealer or an experienced radio/TV technician for
help.
Declaration of Conformity
Hereby, Targus, declares that this device is in compliance with the
essential requirements and other relevant provisions of Directive
1999/5/EC.
Targus Recycling Directive
At the end of this product’s useful life please dispose at an
appropriate recycling collection point provided in your country.
Targus recycling policy is available for viewing at:
www.targus.com/recycling
Changes or modifications not authorized by the party responsible
for compliance could void the user’s authority to operate this
product
Targus ExpressCard Notebook Docking Station with Digital Video and Audio
Microsoft, Windows, and Windows Vista are either registered trademarks or
trademarks of Microsoft Corporation in the United States and/or other countries.
All trademarks and registered trademarks are the properties of their respective
owners. All rights reserved.
25
Page 27

UNIVERSELLE
EXPRESSCARD
TM
NOTEBOOK-
DOCKINGSTATION MIT
DIGITALEM VIDEO UND
AUDIO
Einleitung
Herzlichen Glückwunsch zum Kauf der universellen Targus
ExpressCard Notebook-Dockingstation mit Digitalem Video
und Surround Audio. Dieser tragbare Expansionsmodul bietet
die Möglichkeit über die Express-Card Schnittstelle bis zu 4
USB-Geräte, einen Monitor oder LCD,
Hochgeschwindigkeits-Gigabit-Ethernet/LAN, 5.1-Leitungen
PC Audio mit Glasleiterfaser S/PDIF und eine serielle Schnittstelle für Altgeräte anzuschliessen.
Ferner verfügt die Dockingstation über die Targus- AlwaysOn-Technologie, Targus USB-Power-Ports mit doppelt so viel
Leistungsvermögen als eine herkömmliche USBSpezifikation, und sie bietet genügend Platz für den
Anschluss größerer Adapter. Die Targus Always-OnTechnologie versorgt die USB Ports auch dann, wenn das
Notebook ausgeschaltet ist, von der Dockingstation
abgetrennt ist oder sich im Ruhezustand/Standby-Modus
befindet. So können USB-Geräte weiterhin aufgeladen
werden.
26
Page 28

Targus ExpressCard Notebook Docking Station with Digital Video and Audio
Ergonomisches Design
Das ergonomische Design fördert die Luftführung unter dem Notebook
und sorgt für einen kühleren Betrieb. Die angehobene Plattform
ermöglicht eine bequemere Handhaltung.
Merkmale
•(4) schnelle USB 2.0 Ports
•(1) Serieller Anschluss (RS232)
•(1) 24 Pin DVI-D Anschluss
•(1) VGA (HD D-Sub) HD 15 Anschluss
•(1) ExpressCard Upstream-Kabelanschluss
•(1) RJ-45 Gigabit Ethernet 10/1000-Anschluss
•(3) 5.1 Surroundton-Audioanschlüsse
•(1) Mikrofonanschluss
•(1) Digitaler S/PDIF Audioausgang
(TOSLINK Glasleitfaser-Anschluss)
•(2) Sicherheitskabelschlösser
Lieferumfang
Zusätzlich zu diesem Benutzerhandbuch umfasst die Lieferung:
• Targus Universelle EpressCard Notebook-Dockingstation mit
digitalem Video und Audio
• ExpressCard Kabel und Karte (mit abstandkarte),
• Netzstromadapter (erforderlich, um das Dock zu betreiben)
• Treibersoftware-CD
HINWEIS:TARGUS EMPFIEHLT IHNEN DIE WEBSEITE ÜBER DEN UNTEN
ANGEGEBENEN LINK ZU BESUCHEN, UM SICHER ZU STELLEN, DASS SIE DIE
NEUSTE TREIBERVERSION HABEN. DIESE KANN KOSTENLOS HERUNTERGELADEN WERDEN. FOLGEN SIE DEN DOWNLOAD-ANWEISUNGEN UND
INSTALLATIONSSCHRITTEN IN DIESER BENUTZERANLEITUNG.
HTTP://WWW.TARGUS.COM/US/SUPPORT_DOWNLOADS.ASP
27
Page 29

Systemanforderungen
Hardware
• PC mit einem Intel Pentium oder entsprechenden Prozessor
• CD-ROM-Laufwerk
• 34 mm oder 54 mm Expresscard-Slot
Betriebssystem
• Windows XP - Service Pack 2 oder höher
HINWEIS: UM DAS LETZTE SERVICE PACK HERUNTERZULADEN, BESUCHEN
SIE BITTE DIE WEBSEITE IHRES COMPUTERHERSTELLERS ODER DEN
MICROSOFT DOWNLOAD CENTER.
http://support.microsoft.com/default.aspx?scid=fh%3BENUS%3Bsp
Das BIOS für die ExpressCard vorbereiten
Bevor die ExpressCard Dockingstation installiert wird ist es wichtig zu
überprüfen, ob Ihr BIOS das neuste erhältliche BIOS-Update hat.
Zahlreiche Systemlieferanten haben Updates auf den Markt gebarcht,
die Lösungen für viele Probleme in Zusammenhang mit dem
ExpressCard-Slot bieten.
Targus ExpressCard Notebook Docking Station with Digital Video and Audio
• Windows VistaTM oder
28
Page 30
Die ExpressCard Steckkarte
Das ExpressCard Dock wird zusammen mit einem Kabel, Abstandhalter (siehe "Benutzen des Abstandhalter-Anschlusses" für zusätzliche
Information) und einer 34mm Karte für den Anschluss an die ExpressCard Schnittstelle Ihres Notebooks geliefert. Die Karte kann im System
bleiben wenn sie nicht verwendet wird.
Die 34mm Karte hat einen kleinen Schalter, der sich auf der runden
Fläche in der unteren Abbildung befindet.
Der Schalter dient zur Ermittlung, wie das Dock beim Booten vom
System identifiziert wird. Einige Notebooks identifizieren das Dock und
funktionieren nicht reibungslos im Vor-Start-Modus (z.B.Der Versuch
über das externe VGA-Gerät und nicht über das Interne VGA des
Notebooks zu booten). Dieser Schalter muss nur ein Mal eingestellt
werden und die meisten Notebooksmodelle werden reibungslos
funktionieren.
Dies wurde bei einigen Notebooks (Fujitsu, einigen Sony und Toshiba
Modellen) beobachtet, die die von Phoenix entwickelten BIOS
Technologien verwenden. Sollten Sie ähnliche Schwierigkeiten
erfahren, schalten Sie bitte von der Standardposition "OFF" auf die
Position "ON" um. Es wird nur ein Mal eingestellt.
Beim Verbinden der ExpressCard muss das Kabelende richtig und vollständig an
das Kabelport der ExpressCard angeschlossen werden. Achten Sie auf die
korrekte Richtung. Um Schäden am Gerät zu vermeiden, darf das Kabelende
nicht mit Gewalt angeschlossen werden.
Vor-Start Unterstützung An
Post-Start Unterstützung Aus
(Standard)
Targus ExpressCard Notebook Docking Station with Digital Video and Audio
29
Page 31

Der Abstandhalter hüllt die jeweilige ExpressCard ein und wird
zusammen mit ihr an den 54mm ExpressCard-Slot angeschlossen.
Der Abstandhalter dient der sicheren Einfügung der 34mm ExpressCard in die 54mm Schnittstelle. Dieser Abstandhalter hat keine andere
Funktion, außer die Karte zu stabilisieren, nachdem sie an den 54mm
Slot angeschlossen wurde. Ein Abstandhalter ist nicht erforderlich,
wenn Sie einen 34mm Slot an Ihrem Notebook haben. (Siehe das
untere Diagramm für die zwei verschiedenen Slots, die moderne
Notebooks haben.)
Abstandanschluss benutzen
Passen Sie den Abstandhalter vorsichtig an die ExpressCard an und
verbinden Sie beide, indem Sie den Clipverschluss schließen.
Achten Sie darauf, dass der Clipverschluss gut befestigt und zwischen
beiden Gegenstände kein Abstand ist. Siehe das Diagramm oben.
Targus ExpressCard Notebook Docking Station with Digital Video and Audio
30
Page 32

Targus ExpressCard Notebook Docking Station with Digital Video and Audio
Bevor Sie anfangen, vergewissern Sie sich, dass der Abstandhalter
und die PC Karte wie unten dargestellt ausgerichtet sind.
1. Achten Sie beim anbringen des Abstandhalters darauf, dass dieser
im 45 Grad Winkel zur PC Karte steht. Vergewissern Sie sich, dass der
Haken des Abstandhalters in der Öffnung der PC Karte sitzt. Siehe
Abb. 1.
Abb. 1.
1
2. Drücken Sie wie dargestellt den Abstandhalter herunter, während
Sie festen Druck auf die PC Karte und den Abstandhalter ausüben.
2
Entfernen Sie den Abstandhalter mit einer Aufwärtsbewegung.
Letztens vergewissern Sie sich, dass die zwei Klemmen am Abstandhalter fest und direkt in die Öffnungen der PC Karte gedrückt sind.
Anweisungen zum Anbringen des Abstandhalters an die ExpressCard
Befestigung Entfernen
31
Page 33

Dockingstation-Treiber installieren
Das Installieren des Dockingstation-Treibers erlaubt Ihrem Betriebssystem die Dockingstation und ihre Ports zu identifizieren, nachdem
sie angeschlossen wurde.
1. Schalten Sie Ihren Computer ein.
2. Legen Sie die Treibersoftware-CD in das CD-ROM-Laufwerk Ihres
Computers ein.
Sollte die Einrichtung nicht automatisch beginnen, klicken Sie auf
Start, Ausführen, und geben dann D:\Setup.exe ein (wobei D: der
Pfad zu Ihrem CD- ROM-Laufwerk ist) und klicken Sie dann auf OK.
3. Das Fenster mit dem Installationsassistenten für die Dockingstation
erscheint. Befolgen Sie die Hinweise auf dem Bildschirm, um die
Installation abzuschliessen. Schliessen Sie die ExpressCard an
den Slot, wenn die Aufforderung erscheint.
Dockingstation an Ihren Computer anschliessen
Schritt1. Schliessen Sie den mitgelieferten Netzstromadapter an
die Netzbuchse der Dockingstation an.
Schritt2. Schliessen Sie ein Ende des ExpressCard-Kabels an die
Dockingstation und das andere Ende an die
ExpressCard-Karte.
Schritt3. Schliessen Sie die ExpressCard-Karte an einen freien
ExpressCard-Slot an Ihrem notebook an.
WARNUNG: DIE DOCKINGSTATION FUNKTIONIERT NUR EINWANDFREI, WENN
DER NETZSTROMADAPTER AN EINER STECKDOSE ANGESCHLOSSEN IST.
SCHLIESSEN SIE ANDERE GERÄTE AN DIE DOCKINGSTATION AN, ERST WENN
DIE INSTALLATION DER SOFTWARE ABGESCHLOSSEN IST UND DER ADAPTER
ANGESCHLOSSEN IST.
Targus ExpressCard Notebook Docking Station with Digital Video and Audio
32
Page 34

Targus ExpressCard Notebook Docking Station with Digital Video and Audio
4. Nachdem die ExpressCard an den Computer angeschlossen
wurde muss kurz abgewartet werden bis der Computer das Gerät
komplett identifiziert hat. Anschliessend auf OK im Dialogfenster
klicken. Der Prozess dauert 3 - 5 Minuten.
WINDOWS VISTA WIRD WÄHREND DES TREIBERINSTALLATIONSPROZESSES EINE
AUFFORDERNDE MELDUNG SCHICKEN: "DEN COMPUTER NEU ZU STARTEN". IGNORIEREN SIE
DIESE. DIE TREIBERINSTALLATIONS-SOFTWARE DER DOCKINGSTATION WIRD DIE NEUSTARTMELDUNG NACH BEENDEN DER INSTALLATION UND EINSTELLUNG DES TREIBERS SCHICKEN.
5. Nachdem der Computer neu gestartet wurde, wird er die Docking
station identifizieren und die Standardtreiber werden die Installation
eines jeden Gerätes automatisch ausführen. Warten Sie bitte ab, bis
dieser Prozess abgeschlossen wurde. Die Bildschirmauflösung wird
währen dieses Vorganges angepasst und aktualisiert.
6. In der Systemablage befindet sich das Targus Display Logo. Der
Bildschirmmodus kann durch einen Rechtsklick auf dieses Symbol
eingestellt werden.
HINWEIS: ES WIRD EMPFOHLEN DEN MODUS "EXPRESSCARD VGA" AUSZUSCHALTEN, WENN
LEDIGLICH EIN MONITOR BENUTZT WIRD. DIE STANDARD EINSTELLUNG IST "EXTENDED
MODE" ("erweiterter Modus").
HINWEIS: DIESER EINSTELLUNGSPROZESS NIMMT EINIGE ZEIT IN ANSPRUCH,
UM DIE TREIBER KORREKT ZU INSTALLIEREN. ES KANN BIS ZU 5 MINUTEN
ODER LÄNGER DAUERN, ABHÄNGIG VON DEN KONFIGURATIONEN IHRES
COMPUTERS.
Auf Beenden klicken und Computer neu starten, wenn Sie von der
Software der Dockingstation dazu aufgefordert werden.Um die
Treiberdateien richtig zu installieren muss sicher gestellt werden,
dass die Installation komplett abgeschlossen wurde bevor der
Computer neu gestartet wird.
Windows Vista - Bildschirm neu starten
Dockingstation - Bildschirm neu starten
Windows Vista - Dialogfenster
Windows XP - Dialogfenster
33
Page 35

LED-Statusanzeigen
Nachdem Sie die Dockingstation an Ihren Computer angeschlossen
haben, werden automatisch die standardmäßigen Treiber für jeden der
Ports installiert.
• Die grüne Tx-LED leuchtet beim Anschluss an ein Netzwerk, und die
gelbe Rx-LED blinkt, wenn Daten zum oder vom Netzwerk
übertragen werden.
• Die Power-LED wird leuchten, wenn das Netzkabel an die
Dockingstation angeschlossen wird.
Ports an der Dockingstation
Netzstrom und
Power-LED
DC 5V
S/PDIF
Stützende
Laptopauflage
Stützende
Laptopauflage
5.1 Surroundton
& Mikrofon
Gigabit Ethernet
ExpressCard
UpstreamKabelverbindung
VGA
DVI-D
Serieller Port
Targus ExpressCard Notebook Docking Station with Digital Video and Audio
34
Page 36

"Easy Access"
High-Power
USB-Ports mit
LED-Statusanzeige
Lock-Slot für Targus
Locks
Anschliessen neuer Geräte
Um mögliche Schäden zu vermeiden, dürfen die Kabel neuer Geräte
nicht mit Gewalt an die Dockingstation angeschlossen werden. Sollte
sich ein Kabel nicht problemlos anschliessen lassen, drehen Sie den
Stecker um, und probieren Sie erneut.
Anschliessen einer seriellen Maus/Tastatur
Um eine serielle Maus oder Tastatur anzuschliessen, schliessen Sie
den Stecker an den seriellen Port der Dockingstation an.
Anschliessen und Konfigurieren eines
seriellen Modems
So schliessen Sie ein serielles Modem an:
1. Schliessen Sie den Stecker an den seriellen Port der Dockingstation
an.
2. Installieren Sie die Modemsoftwaretreiber gemäß den
Anweisungen, die Sie zusammen mit dem Gerät erhalten haben.
3. Wählen Sie bei entsprechender Aufforderung den seriellen
USB-Port (COMx), wobei x die von Ihrem Betriebssystem
zugewiesene COM-Port-Nummer ist.
Targus ExpressCard Notebook Docking Station with Digital Video and Audio
35
Page 37

Anschliessen eines PDA
1. Schliessen Sie den Stecker an den seriellen Port der Dockingstation
an.
2.Überprüfen Sie, ob die COM-Port-Einstellung, entweder in der
HotSync- oder ActiveSync-Software, mit den Einstellungen an der
Dockingstation übereinstimmt. Um die COM-Port-Einstellung der
Dockingstation zu überprüfen, siehe "Überprüfen angeschlossener
Geräte". Um die COM-Port-Einstellung Ihres PDA zu überprüfen,
siehe die dazu gehörige Dokumentation.
Anschliessen an ein lokales Netzwerk
Um ein Ethernet-Kabel mit einem RJ-45-Stecker anzuschliessen,
verbinden Sie das Kabel mit dem Ethernet/Netzwerk-Port der Dockingstation. Zusätzliche Maßnahmen bei einem bestimmten Netzwerk sind
von der Art des jeweiligen Netzwerks abhängig. Für ausführliche
Hinweise wenden Sie sich bitte an Ihren Netzwerkadministrator.
Anschliessen eines USB-Gerätes
Um ein USB-Gerät anzuschliessen, verbinden Sie es mit einem USBPort der Dockingstation und befolgen die mit dem Gerät gelieferten
zusätzlichen Hinweise. Alle vier USB-Ports entsprechen den USB
High-Speed Anforderungen von einer 480Mbps Übertragungsrate und
mindestens 500mA Strom. Beachten Sie, dass 2 von den 4 USB-Ports
je 1000mA Strom anbieten, doppelt soviel wie bei der standardmäßigen USB Spezifikation. Sehen Sie "Targus Always On" und "Gebrauch
von stromhungrigen USB-Geräten" für weitere Einzelheiten.
HINWEIS:DIE DOCKINGSTATION UNTERSTÜTZT EIN "HOT SWAPPING" DES
NETZWERKKABELS.
Targus ExpressCard Notebook Docking Station with Digital Video and Audio
36
Page 38

Anschliessen und Konfigurieren
eines Audiogerätes
Diese Dockingstation verfügt über eine 5.1 Audioauflage. Auf der
Rückseite der Dockingstation befinden sich 5 Audio-Ports.
Mikrofoneingang-Rosa
Front-Kanal oder Line-Out - Grün
Hinter-Kanal - Schwarz
Center-Kanal / Subwoofer (Tieftöner) - Orange
S/PDIF - Digitale Audioschnittstelle (PCM, Dolby Digital 5.1)
1. Schliessen Sie Ihre Stereokopfhörer oder Lautsprecher an den
grünen 3,5mm Port.
Wenn Sie ein 5.1 Lautsprecher-Setup haben, schliessen Sie den
Front-Lautsprecher an den grünen 3.5mm Port an. Schliessen Sie
den Hinter-Lautsprecher an den schwarzen 3.5mm Port an. Schliessen Sie den Center-Lautsprecher an den orangenen 3.5mm Port an.
SOLLTEN SIE PROBLEME MIT IHREN LAUTSPRECHERN HABEN, NACHDEM DIE
DOCKINGSTATION ANGESCHLOSSEN WURDE, SEHEN SIE FÜR WEITERE
INFORMATIONEN DEN ABSCHNITT FEHLERBEHEBUNG.
MIC
FRONT
REAR
CENTER
S/PDIF
Targus ExpressCard Notebook Docking Station with Digital Video and Audio
37
Page 39

2. Ein Mikrofon schliessen Sie an den rosanen 3.5mm Port an.
3. Um Ihre Kopfhörer oder Lautsprecher benutzen zu können, müssen
Sie zunächst in den Eigenschafteneinstellungen C-Media USB
Sound Device wählen.
4. Bei Windows® XP gehen Sie in die Systemsteuerung und wählen
Sound und Audiogeräte. Wählen Sie die Registerkarte Audio.
Ändern Sie unter Audiowiedergabe die Option Bevorzugtes Gerät
anhand der Auswahlliste zu C-Media USB Sound Device.
Klicken Sie auf Übernehmen und dann auf OK.
5. Achten Sie darauf, dass unter Lautstärke nicht Ton aus markiert ist.
HINWEIS: AUDIOGERÄTE FUNKTIONIEREN NICHT GLEICHZEITIG AN DER
DOCKINGSTATION UND DEM HOST-COMPUTER.
VORSICHT: ALLE AUDIO- ODER MULTIMEDIAANWENDUNGEN MÜSSEN
BEENDET WORDEN SEIN, BEVOR ZWISCHEN DEM AUDIOASUGANG DER
PORTSTATION UND DEM DES HOST-COMPUTERS UMGESCHALTET WERDEN
KANN.
Targus ExpressCard Notebook Docking Station with Digital Video and Audio
38
Page 40

Installieren und Konfigurieren
eines S/PDIF (Sony/Philips Digital
Interface)-Gerätes
1.Um die S/PDIF-Funktion zu aktivieren, müssen Sie sie einschalten.
Dies kann erfolgen, indem man das USB
3D-Konfigurierungsprogramm im Infofeld öffnet. (klicken Sie auf das
USB-Symbol, um den Konfigurationsbildschirm aufzurufen)
2. Klicken Sie auf die Schaltfläche neben "S/PDIF Output", um die
S/PDIF-Funktion zu aktivieren.
3. Richten Sie die Audioausgabe über das Infofeld ein.
4.Schliessen Sie das optische TOSLINK Kabel (nicht enthalten) mit
einem Ende an den S/PDIF-Ausgang der Dockingstation und dem
anderen Ende an den S/PDIF-Eingang des digitalen Decoders oder
Lautsprechers an.
HINWEIS: WENN DIESE OPTION GEWÄHLT WURDE, MÜSSEN KEINE
WEITEREN LAUTSPRECHERKABEL ANGESCHLOSSEN WERDEN. DAS EINZIG
ERFORDERLCHE KABEL IST DAS OPTISCHE TOSLINK KABEL.
5. Schliesen Sie Ihren digitalen Decoder oder Lautsprecher an das
Home-Theater-System an.
Targus ExpressCard Notebook Docking Station with Digital Video and Audio
39
Page 41

Anschliessen an einen Bildschirm
oder LCD-Bildschirm
Jeder Bildschirm oder LCD-Bildschirm, der an den Videoport der Dockingstation
angeschlossen wird, wird eine maximale Auflösung von 1600x1200, 32-Bit Farbe
haben.
Optionen im Videomenü
Auf die Optionen im Videomenü kann zugegriffen werden, indem Sie mit der
rechten Maustaste auf das Targus Display-Symbol im Infobereich klicken oder
über Windows Eigenschaften anzeigen.
Die einzige Option, die über Windows Eigenschaften anzeigen nicht zugreifbar ist
Spiegel. Auf diese muss über das Targus Display-Symbol zugegriffen werden.
Primär: Sie benutzen einen Bildschirm oder LCD-Bildschirm (nicht der Bildschirm
des Notebooks) als Ihren primäreren Bildschirm.
Erweitert: Sie benutzen den Bildschirm Ihres Notebooks als primäres Display und
Ihren Bildschirm oder LCD-Bildschirm als sekundäres Display, um Ihren Display
auf beide Bildschirme zu erweitern.
Spiegel: Spiegel: Sie benutzen den Bildschirm Ihres Notebooks als Ihr primäres
Display und Ihr Bildschirm oder LCD-Bildschirm kopiert den Bildschirm des
Notebooks.
Aus: Sie benutzen den Bildschirm Ihres Notebooks als Ihr primäres Display und
Ihr Bildschirm oder LCD-Bildschirm ist aus.
Auflösung: Das Ändern der Auflösung über das Targus Dienstprogramm wird sich
lediglich auf den Bildschirm auswirken, der an dem Videoport der Dockingstation
angeschlossen ist.
Auflösungen über Windows Eigenschaften anzeigen ändern
1. Positionieren Sie die Maus auf eine leere Fläche im Desktop, dann
klicken Sie mit der rechten Taste und wählen Sie Eigenschaften.
2. Klicken Sie im Bildschirm "Eigenschaften anzeigen" auf "Einstellungen".
3. Ändern Sie die Auflösung oder die Farbtiefe.
4. Klicken Sie auf "OK", um den Bildschirm "Eigenschaften anzeigen".
Auflösung und Modi über Targus Display-Symbol ändern.
1. Positionieren Sie die Maus auf das Targus Symbol und klicken Sie mit
der rechten Maustaste darauf.
2. Auf diesem Bildschirm können Sie die Auflösung und die Modi ändern,
mit welchen das Dock operiert (siehe die folgende Erklärung zu den
unterstützten Videomodi).
Targus ExpressCard Notebook Docking Station with Digital Video and Audio
40
Page 42

NotebookBildschirm
Zweiter Bildschirm
oder LCD-Bildschirm
Primär:
Erweitert:
Spiegel:
Aus:
Der Videoausgang wird folgende
Auflösungen und Farbqualität unterstützen:
ACHTUNG:EINIGE LCD-BILDSCHIRME WURDEN FÜR EINE SPEZIFISCHE
AUFLÖSUNG OPTIMIERT.WENN DIE OPTIMALE AUFLÖSUNG NICHT 1280 X
1024 IST, KÖNNEN DIE ERGEBNISSE NICHT WIE ERWÜNSCHT SEIN.
Modus Auflösung
Farbtiefe
Bildwiederholfrequenz
UXGA 4:3 1600x1200 16 60HZ, 65HZ,
70HZ, 75HZ,
85HZ
UXGA 4:3 1600x1200 32
60HZ, 65HZ, 70HZ
WSXGA+ 16:10 1680x1050 32
60HZ, 65HZ, 70HZ
SXGA+ 4:3 1400x1050 16 60Hz
SXGA 5:4 1280x1024 16,32
60HZ, 75HZ , 80HZ
QVGA 4:3 1280x960 16,32
60HZ, 75HZ, 85HZ
WXGA+ 16:10 1440x900 32 60Hz
WGA 15:9 1280x768 16,32 60Hz
WXGA 16:10 1280x800 16,32 60Hz
XGA 4:3 1024x768 16,32
60HZ, 70HZ,
75HZ, 85HZ, 120HZ
SVGA 4:3 800x600 16,32 60HZ , 72HZ,
75HZ , 85HZ,
120HZ , 160HZ
VGA 4:3 640x480 16,32 60HZ, 72HZ,
75HZ, 85HZ,
120HZ, 160HZ
Hinweis: Sämtliche aufgelistete Bildwiederholfrequenzen sind nicht verflochten.
Targus ExpressCard Notebook Docking Station with Digital Video and Audio
Aus
An
An An
An
An
Aus
An
Bildseiten
verhältnis
41
Page 43

Allgemeiner Ruhezustandsmodus
Wenn sich Ihr Computer im Ruhezustand befindet, wechselt auch die
Dockingstation in den Ruhezustand, um Energie zu sparen. Sobald Ihr
Computer reaktiviert wird, geschieht dies automatisch auch mit der
Dockingstation.
USB-Geräte mit höherem Leistungsbedarf
Diese Dockingstation verfügt über 4 USB High-Power Ports. Zwei
davon bieten je 1000mA Strom. Diese sind für den Anschluss von
stromhungrigeren Peripheriegeräten, wie Drucker, Scanner, optische
Treiber usw. geeignet.
Targus ExpressCard Notebook Docking Station with Digital Video and Audio
42
Page 44

Fehlerbehebung
Das Gerät funktioniert nicht
• Kontrollieren Sie, ob das Gerät vollständig am richtigen Port der
Dockingstation angeschlossen ist.
• Schliessen Sie das Gerät an einen anderen Port der Dockingstation
an. Sollte es immer noch nicht funktionieren, überprüfen Sie das
Gerät, indem Sie es direkt an Ihren Computer anschliessen.
• Achten Sie darauf, das Setup- oder Installationsprogramm für das
betreffende Gerät auszuführen.
• Kontrollieren Sie, ob das Gerät im Geräte-Manager erscheint.
Weitergehende Informationen finden Sie unter "Überprüfen
angeschlossener Geräte".
• Trennen Sie alle Geräte von der Dockingstation ab und schliessen
Sie sie einzeln nacheinander wieder an. Überprüfen Sie, ob jedes
Gerät funktioniert, bevor Sie das nächste anschliessen.
• Jeder USB-Port verfügt über einen Überstromschutz. Sollte ein
USB-Gerät mehr Strom ziehen, als der USB-Port bereitstellen kann,
wird der Port abgeschaltet. Um den Port wieder zu reaktivieren,
trennen Sie das Gerät ab und wechseln zum Geräte-Manager oder
zur entsprechenden Meldung im Infobereich und wählen die Option
zum Zurücksetzen. Anschliessend können Sie das Gerät wieder an
den USB-Port anschliessen. Sollte es erneut zu einer Abschaltung
kommen, überprüfen Sie den Leistungsbedarf des Gerätes.
Überprüfen angeschlossener
Geräte
Die an der Dockingstation angeschlossenen Geräte werden im Fenster
des Geräte-Managers in den Systemeigenschaften angezeigt.
Klicken Sie mit der rechten Maustaste auf Arbeitsplatz, Eigenschaften,
wählen Sie die Registerkarte Hardware, und klicken Sie dann auf
Geräte-Manager.
Targus ExpressCard Notebook Docking Station with Digital Video and Audio
43
Page 45

Im Fenster des Geräte-Managers können Sie folgende Elemente
erweitern:
• Grafikkarten-Targus Expresscard mit Video,
• Eingabe- und ZeigegeräteTastaturen und andere Zeigegeräte:
Mäuse, Trackballs und Joysticks,
• Netzwerkadapter-zeigt den Realtek RTL 8110SC Ethernet-Adapter,
• Anschlüsse (COM und LPT)-Serial USB [COM x],
• Audio-, Video- und Gamecontrollers-zeigt das USB Audiogerät,
• USB-Controllers-zeigt weitere an der Dockingstation
angeschlossene Geräte und den generischen Hub.
Überprüfen eines seriellen Modems
Anschluss
Beim Anschliessen eines Modems an den seriellen Port (RS232)
müssen Sie überprüfen, ob der Ihrem Modem zugeordnete Port ein
serieller USB-Port (COMx) ist, wobei x die Nummer des COM-Ports ist.
Falls das Betriebssystem nicht automatisch erkennt, dass Ihr Modem
dem seriellen USB-Port (COMx) zugeordnet ist, führen Sie den
Hardwareassistenten erneut aus und wählen anstatt Automatische
Erkennung die Option Aus einer Liste wählen. Wählen Sie anschliessend den seriellen USB-Port (COMx) als der COM-Port.
Fehlermeldung beim PDA
Sollte auf Ihrem PDA die Fehlermeldung "Connection not established"
(Keine Verbindung hergestellt) erscheinen, überprüfen Sie, ob die
COM-Port-Einstellung entweder in der HotSync- oder ActiveSyncSoftware mit der Einstellung an der Dockingstation übereinstimmt.
Siehe auch "Überprüfen angeschlossener Geräte", um zu überprüfen,
ob die COM-Port-Einstellung mit der COM-Einstellung an der Dockingstation übereinstimmt.
Einige ältere Versionen der Palm Desktop-Software sind nicht mit der
USB-zu-Seriell-Konvertierung kompatibel. Wenden Sie sich bitte an
Ihren PDA-Händler zwecks einer Softwareaktualisierung.
Targus ExpressCard Notebook Docking Station with Digital Video and Audio
44
Page 46

Video
Kann ich eine höhere Auflösung auf meinem Bildschirm erzielen?
Die Filmwiedergabe bei 1600x1200 Bit ist nicht gleichmäßig. Ist
die Auflösung noch schlechter, wenn ein Videoclip auf dem
gesamten Bildschirm wiedergeben wird?
Die ExpressCard Dockingstation von Targus ist nicht an erster Stelle
für Filmwiedergabe bei höchster Auflösung und Farbtiefe vorgesehen.
Der beste Modus für Videowiedergabe ist bei 1280x1024 (SXGA)
Auflösung oder niedriger.
Die Ursache hierfür ist die große Datenmenge, die während der
Filmwiedergabe übertragen wird. Standardmäßige DVDs sind auf eine
Auflösung von 720x480 (NTSC) und 720x576 für PAL CDs
vorprogrammiert. Die Wiedergabe bei einer höheren Auflösung wird
lediglich die Auflösung des Bildschirms erhöhen und sich nicht auf die
Filmwiedergabe auswirken.
Unerwarteter Absturz oder Probleme mit der Energieversorgung?
Achten Sie darauf das BIOS Ihres Notebooks aufzurüsten. Mehrere
bekannte Notebooklieferanten haben BIOS-Upgrades auf den Markt
gebracht, die eine Lösung für viele Probleme in Zusammenhang mit
der ExpressCard (Lenovo, Fujitsu) bieten.
• Die höchste Auflösung ist 1600x1200, 32-Bit Farbe
Die Gleichmäßigkeit der Filmwiedergabe kann auf folgende Weise
verbessert werden:
• Reduzieren Sie die Auflösung des Displays auf 1280x1024 bei
niedrigerer Farbtiefe (16 Bit Farbe),
• Beenden Sie alle anderen intensiven CPU-Anwendungen am
Computer.
Ich kann keine DVD über die Dockingstation abspielen?
Die DVD-Wiedergabe wird von der DVD-Wiedergabe-Software und
der Hardware Ihres Notebooks gesteuert. Viele DVD-WiedergabeSoftwareprogramme können keine DVD-Wiedergabe auf externen
oder sekundären Bildschirmen unterstützen. Sollten Sie Probleme bei
der Videowiedergabe im erweiterten Modus haben, versuchen Sie
den Videomodus an der Dockingstation auf Primär- oder SpiegelModus umzustellen.
Targus ExpressCard Notebook Docking Station with Digital Video and Audio
45
Page 47

Mein System stürzt beim Booten bei installierter Steckkarte ab.
Können zwei separate Displays an die ExpressCard Dockingstation (VGA und DVI-D) angeschlossen werden und zwei separate
Bilder anzeigen oder das Display auf drei Bildschirme erweitern
(inklusive Notebook-Bildschirm)?
Nein. Der Ausgang des VGA-Ports und des DVI-Ports sind gleich.
Versuchen Sie den Vor-Start-Schalter auf An und starten Sie das
System neu.
Audio
Einige Notebooks unterstützen automatisch das eingebaute USBAudiogerät der ExpressCard Dockingstation, wenn sie angeschlossen
sind und deaktivieren somit die eingebauten Lautsprecher des
Notebooks. Um die Lautsprecher des Notebooks benutzen zu können,
befolgen Sie folgende Hinweise:
1. Gehen Sie auf Systemsteuerung und wählen Sie "Ton und
Audiogeräte"
2. Unter "Audio" im Bereich "Tonwiedergabe" das interne Audiogerät
des Notebooks wählen (ein anderes als das USB-Audiogerät der
Dockingstation).
Falls das Audiogerät immer noch nicht über Ihre Lautsprecher
funktioniert:
1. Gehen Sie auf Systemsteuerung und wählen Sie "Ton und
Audiogeräte".
2. Unter "Audio" im Bereich "Lautstärke" auf "Erweitert" klicken.
3. "Alle stumm schalten" deaktivieren.
HINWEIS: Um diese Änderung zu aktivieren, müssen alle Audioanwendungen beendet und neu gestartet werden.
Targus ExpressCard Notebook Docking Station with Digital Video and Audio
Mein Bildschirm wird blank (schwarz) wenn ich die ExpressCard
an meinen Computer anschliesse.
Prüfen Sie, ob die ExpressCard korrekt angeschlossen wurde und
überprüfen Sie den Displaymodus in der Systemablage bzw. ob die
Einstellung richtig war.
Ich kann keinen Ton von den Lautsprechern des Notebooks hören.
46
Page 48

Technische Unterstützung
Wenn Sie technische Fragen haben, besuchen Sie bitte:
Internet http://www.targus.com/support.asp
Englisch http://www.targus.com/uk/support.asp
Französisch http://www.targus.com/fr/support.asp
Deutsch http://www.targus.com/de/support.asp
Spanisch http://www.targus.com/sp/support.asp
Italienisch http://www.targus.com/it/support.asp
Unser Expertenteam steht Ihnen auch telefonisch zur
Beantwortung Ihrer Fragen zur Verfügung.
Belgien 02-717-2451
Dänemark 45 35-25-87 51
Finnland 922948016
Frankreich 1-6453-9151
Deutschland 0211-6579-1151
Italien 02 4827-1151
Niederlande 02 0504 0671
Norwegen 022577729
Österreich 01 795 676 42
Portugal +351 21 415 4123
Spanien 91-745-6221
Schweden 08-751-4058
Schweiz 1-212-0007
Großbritannien 020-7744-0330
Osteuropa & sonstige Länder +31 (0) 20-5040671
Targus ExpressCard Notebook Docking Station with Digital Video and Audio
47
Page 49

Produktregistrierung
Targus empfiehlt die Registrierung des Targus-Zubehörs sofort
nach dem Kauf. Die Registrierung von Targus-Zubehör erfolgt
unter: http://www.targus.com/registration.asp
Geben Sie bitte Ihren vollständigen Namen, Ihre E-Mail-Adresse,
Telefonnummer und Firmeninformationen an (falls zutreffend).
Garantie
Targus garantiert zwei (2) Jahre lang, dass Zubehör von Targus
frei von Fehlern im Material und in der Verarbeitung ist. Erweist
sich Ihr Targus-Zubehör während dieser Zeit als fehlerhaft, wird
es umgehend repariert oder ersetzt. Diese Garantie deckt weder
zufällige oder mittelbare Schäden, noch Abnutzung oder
Verschleiß ab. Unter keinen Umständen haftet Targus für Verlust
oder Schäden an Computern bzw. für Verlust oder Schäden an
Programmen, Aufzeichnungen oder Daten. Targus haftet auch
nicht für mittelbare oder zufällige Schäden, selbst wenn Targus
über deren Möglichkeit informiert wurde. Diese Garantie hat
keinen Einfluss auf Ihre gesetzlichen Rechte.
Behördliche Genehmigungen/
Zulassungen
Dieses Gerät erfüllt die Voraussetzungen von Teil 15 der FCCRegeln. Der Betrieb unterliegt den folgenden beiden
Bedingungen: (1) Dieses Gerät darf keine störenden
Interferenzen verursachen, und (2) dieses Gerät muss alle
empfangenen Interferenzen aufnehmen, einschließlich
Interferenzen, die ein unerwünschtes Betriebsverhalten
verursachen können.
FCC-Bescheinigung
Auf Konformität getestet
Dieses Gerät wurde getestet und ist mit den Grenzwerten eines
digitalen Geräts der Klasse B (gemäß Teil 15 der FCC-Regeln)
konform. Diese Grenzwerte wurden zur Gewährleistung eines
angemessenen Schutzes gegen störende Interferenzen bei einer
Installation in Wohngebieten erstellt. Dieses Gerät erzeugt und
nutzt RF-Energie und kann diese abstrahlen. Bei
Targus ExpressCard Notebook Docking Station with Digital Video and Audio
48
Page 50

unsachgemäßer Installation und einer Verwendung, die nicht
gemäß den Anweisungen erfolgt, können störende Interferenzen
in der Radiokommunikation auftreten. Es liegt jedoch keine
Garantie vor, dass bei bestimmten Installationen keine
Interferenzen auftreten.
Falls dieses Gerät beim Radio- oder Fernsehempfang störende
Interferenzen verursacht, was durch ein Aus- und Einschalten
des Geräts festgestellt werden kann, sollte der Benutzer
versuchen, die Interferenzen anhand einer oder mehrerer der
folgenden Maßnahmen zu beseitigen:
• Die Distanz zwischen Ausrüstung und Empfänger vergrößern.
• Die Ausrüstung an eine Steckdose mit einem anderen
Stromkreis als dem des Empfängers anschließen.
• Für persönliche Unterstützung wenden Sie sich bitte an Ihren
Händler oder einen erfahrenen Radio/TV-Techniker.
Konformitätserklärung
Hiermit erklärt Targus, dass sich das Gerät in Übereinstimmung
mit den grundlegenden Anforderungen und den übrigen
einschlägigen Bestimmungen der Richtlinie 1999/5/EG befindet.
Dieses Gerät hat einen niedrigen Energiebedarf. Gerät ist nur für
Büro und häuslichen Bereich bestimmt. Dieses Produkt kann in
allen CE Ländern verwendet werden.
Targus Recycling Richtlinie
Bitte werfen Sie das Gerät nicht in den normalen Hausmüll!
Entsorgen Sie es bei denIhnen bekannten Recyclingstellen in
Ihrer Nähe. In jedem Ort werden Ihnen diese Sammelstellen zu
Verfügung gestellt. Die Targus Recycling-Richtlinien können Sie
einsehen unter: www.targus.com/recycling
• Die Empfangsantenne neu ausrichten oder an einem ande ren Ort.
Änderungen oder Modifikationen, die nicht von der für die
Konformität verantwortlichen Partei genehmigt wurden, können
zum Verlust des Benutzerbetriebsrechts führen
Targus ExpressCard Notebook Docking Station with Digital Video and Audio
Microsoft, Windows und Windows Vista sind eingetragene Marken der Microsoft
Corporation in den USA und/oder in anderen Ländern. Alle eingetragenen
Marken sind das Eigentum des jeweiligen Eigentümers. Alle Rechte vorbehalten.
49
Page 51

ESTACIÓN DE CONEXIÓN
UNIVERSAL PARA
ORDENADOR PORTÁTIL
EXPRESSCARD CON
VÍDEO Y AUDIO DIGITAL
Introducción
Felicidades por su compra de la estación de conexión universal para ordenador portátil Expresscard Targus con vídeo
digital y audio. Este módulo portátil de expansión le permite
conectar por medio de una ranura Expesscard a 4 dispositivos USB, monitor o LCD, LAN/ Gigabit Ethernet de alta velocidad, audio PC de canal 5,1 con un cable óptico S/PDIF y un
puerto serial para dispositivo de herencia.
La estación de conexión ofrece también una ultra Tecnología
Targus, Los puertos USB de Targus suministran dos veces
más potencia que los USB estándar y están ampliamente
espaciados para acomodar adaptadores más grandes. La
tecnología de Targus suministra potencia en los puertos USB
siempre cuando el ordenador portátil está apagado, desconectado de la estación de conexión o en modo de
hibernación/ espera lo que permite a los dispositivos USB
seguir cargándose.
50
Page 52

Targus ExpressCard Notebook Docking Station with Digital Video and Audio
Diseño ergonómico
El diseño ergonómico ayuda en aumentar la corriente de aire debajo
del ordenador portátil para operaciones de enfriamiento. La
plataforma más elevada ofrece una posición más cómoda para
escribir a máquina.
Características
• (4) Puertos USB 2,0 de alta velocidad
• (1) Puerto serial (RS232)
• (1) Conector DVI-D 24 pines
• (1) Conector HD-15 VGA (HD D-sub)
• (1) Conexión de cable ExpressCard
• (1) RJ-45 Gigabit Ethernet 10/1000
• (3) Jacks de sonido audio 5.1
• (1) Conexion pana micrófono
• (1) Salida de audio digital S/PDIF
(Conector de cable óptico TOSLINK )
• (2) Ranuras de bloqueo de seguridad
Contenido del paquete
Además de la presente guía de usuario, el paquete contiene:
• Estación de conexión universal Expresscard Targus con vídeo y
audio digital
• Cable y tarjeta Expresscard (con tarjeta espaciadora)
• Adaptador CA (requerido para operar la conexión)
• CD del driver
NOTA: TARGUS RECOMIENDA QUE USTED VISITE SU PÁGINA ELECTRÓNICA EN
EL SIGUIENTE ENLACE PARA ASEGURARSE DE QUE USTED TIENE LA ÚLTIMA
VERSIÓN DE DRIVER PARA DESCARGA GRATUITA. SIGA LAS INSTRUCCIONES
MÁS ABAJO Y LOS PASOS DE INSTALACIÓN EN LA GUÍA DE USUARIO.
HTTP://WWW.TARGUS.COM/US/SUPPORT_DOWNLOADS.ASP
51
Page 53

Requisitos del sistema
Hardware
• PC con un procesador Intel® Pentium® o equivalente
• Drive para CD-ROM
• Ranura Expresscard de 34mm o 54mm
Sistema operativo
• Windows® XP - Paquete de servicios 2 o superior
NOTA: PARA DESCARGAR LOS ÚLTIMOS PAQUETES DE SERVICIO, POR
FAVOR VISITE LA PÁGINA ELECTRÓNICA DE SU PRODUCTOR DE
ORDENADOR O EL CENTRO DE DESCARGA DE MICROSOFT:
http://support.microsoft.com/default.aspx?scid=fh%3BENUS%3Bsp
Preparar el BIOS para la ExpressCard
Antes de instalar la estación de conexión ExpressCard, es muy
importante asegurarse de que su sistema BIOS tiene la última
actualización disponible BIOS. Un número importante de vendedores
ponen en venta actualizaciones que solucionan muchas cuestiones
relacionadas a la ranura ExpressCard.
Targus ExpressCard Notebook Docking Station with Digital Video and Audio
• Windows VistaTM o
52
Page 54

Sobre la tarjeta conectora ExpressCard
La conexión ExpressCard se suministra con un cable, un espaciador
(vea "Usar el Conector espaciador" para instrucciones adicionales) y
una tarjeta de 34mm para conectar a una ranura ExpressCard en su
ordenador portátil. El cable es removible de la tarjeta. La tarjeta se
puede dejar en su sistema cuando no está en uso.
La tarjeta de 34mm tiene un pequeño interruptor situado en el área
circular en el siguiente dibujo.
Este interruptor se utiliza para determinar cómo el conector se
reconoce en el sistema en la etapa de arranque. Algunos ordenadores
portátiles detectarán el conector y funcionarán apropiadamente en el
modo de prearranque (por ejemplo, al tratar de arrancar el dispositivo
externo VGA, no el VGA interno del ordenador portátil). Este interruptor
necesitará configurarse sólo una vez y la mayoría de los modelos de
ordenadores portátiles no tendrán este problema.
Esto se ha observado en ordenadores portátiles (Fujitsu, algunos
modelos Sony y Toshiba) que usan un BIOS desarrollado por
Tecnologías Phoenix. Si usted tiene similar problema, por favor gire el
interruptor de la posición preestablecida "OFF" (Apagado) a "ON"
(Encendido). Usted necesitará ajustarlo sólo una vez.
Cuando conecte el cable a ExpressCard, por favor, asegúrese de que la
extremidad del cable está correctamente insertada en el puerto del cable de la
ExpressCard. Asegúrese de que la extremidad está conectada en la dirección
correcta y no fuerce la conexión porque se puede romper el dispositivo.
Soporte de prearranque
encendido
Soporte de prearranque apagado
(Preestablecido)
Targus ExpressCard Notebook Docking Station with Digital Video and Audio
53
Page 55

El espaciador simplemente parte la tarjeta Expresscard existente y
está insertado con el conector de tarjeta en una ranura de Expresscard 54 mm.
Un espaciador está suministrado para asegurar el ajuste apropiado de
Express-Card de 34 mm en una ranura de 54 mm. Este espaciador no
tiene otra funcionalidad que prevenir cualquier movimiento de la tarjeta
una vez insertada en la ranura de 54mm. Este espaciador no se
necesitará si usted tiene una ranura de 34mm en su ordenador portátil.
(Vea el siguiente diagrama en cuanto a las dos diferentes ranuras que
se están vendiendo actualmente para los ordenadores portátiles)
Usar el conector espaciador
Con cuidado alinee el espaciador con la Expresscard y junte las dos
piezas mediante el conector (clip) de bloqueo.
Por favor, asegúrese de que el clip está bien bloqueado y de que no
hay abertura entre las dos partes. Como se señala en el siguiente
diagrama.
Targus ExpressCard Notebook Docking Station with Digital Video and Audio
54
Page 56

Targus ExpressCard Notebook Docking Station with Digital Video and Audio
Antes de comenzar, asegúrese de que el espaciador y la tarjeta de PC
estén alineados como se muestra a continuación.
1. Cuando coloque el espaciador, asegúrese de que éste se encuentre
en un ángulo de 45 grados en relación con la tarjeta de PC. Asegúrese
de que el gancho del espaciador se encuentre colocado en la ranura
de la tarjeta de PC. Consulte la Fig. 1.
Fig. 1
1
2. Presione el espaciador hacia abajo, tal como se muestra, mientras
aplica presión con firmeza sobre la tarjeta de PC y el espaciador.
2
Para retirar el espaciador, sujételo y tírelo hacia arriba para que éste
se desprenda.
Finalmente, asegúrese de que los dos ganchos del espaciador hayan
encajado por completo y de manera firme dentro de las ranuras de la
tarjeta de PC.
Instrucciones para conectar el espaciador a
la tarjeta ExpressCard
conectar retirar
55
Page 57

Instalar el driver de la estación de
conexión
La instalación del driver de la estación de conexión permite que su
sistema operativo reconozca la estación de conexión y sus puertos
una vez conectada.
1. Encienda su ordenador.
2. Inserte el CD de instalaciés eu la ranura para CD -ROM.
Si la configuración no inicia automáticamente, haga clic en Start
/Iniciar/, ejecute y entre en D:\Setup.exe (donde D: es la ruta de su
drive CD-ROM) y luego haga clic en OK.
3. La ventana de Asistente de instalación de la estación de conexión
aparecerá. Siga todas las instrucciones en la pantalla para
completar la instalación. Por favor, conecte la Expresscard en la
ranura cuando esté ya listo.
Conectar la estación de conexión a su ordenador
Paso 1. Conecte el adaptador de potencia CA suministrado al jack
de potencia CA en la estación de conexión.
Paso 2. Conecte una extremidad del cable de Expresscard a la
estación de conexión y la otra a la tarjeta Expresscard.
Paso 3. Conecte la tarjeta Expresscard a una ranura disponible
Expresscard en su ordenador portátil.
AVISO: LA ESTACIÓN DE CONEXIÓN NO FUNCIONARÁ APROPIADAMENTE SIN
EL ADAPTADOR CA ENCHUFADO EN UNA SALIDA CA. NO CONECTE NINGÚN
DISPOSITIVO A LA ESTACIÓN DE CONEXIÓN HASTA QUE EL SOFTWARE NO SE
HAYA INSTALADO Y EL ADAPTADOR CA NO SE HAYA ENCHUFADO.
Targus ExpressCard Notebook Docking Station with Digital Video and Audio
56
Page 58

Targus ExpressCard Notebook Docking Station with Digital Video and Audio
4, Después de conectar la ExpressCard al ordenador, espere hasta
que el ordenador termine el reconocimiento de los dispositivos
antes de pulsar OK en la caja de diálogo. Este proceso durará
aproximadamente 3-5 minutos.
WINDOWS VISTA MOSTRARÁ UNA CAJA DE MENSAJE PARA REINICIAR EL ORDENADOR
DURANTE EL PROCESO DE INSTALACIÓN DEL DRIVER. POR FAVOR, IGNORE ESTE MENSAJE.
EL SOFTWARE DE INSTALACIÓN DEL DRIVER DE LA ESTACIÓN DE CONEXIÓN MOSTRARÁ EL
MENSAJE DE REINICIO CUANDO LA INSTAlACIÓN Y LOS AJUSTES DEL DRIVER SE HAN
REALIZADO.
5, Después del reinicio, el ordenador reconocerá la estación de
conexión y los drivers preestablecidos terminarán la instalación para
cada uno de los dispositivos automáticamente. Por favor, espere
hasta que el proceso se realice. La resolución de la pantalla se
ajustará y refrescará durante este proceso.
6, Usted verá el icono del logo de la pantalla Targus localizado en el
tray del sistema. Esta selección del modo de monitor se puede
ajustar al pulsar con lel botón derecho del ratón en este icono.
NOTA: SE RECOMIENDA AJUSTAR EL MODO A "EXPRESS CARD VSA" APAGADO CUANDO ESTÁ
USANDO SÓLO UN MONITOR. EL AJUSTE PREESTABLECIDO ES "EXTENDED MODE" (MODO
EXTENDIDO).
NOTA: ESTE PROCESO DE AJUSTE REQUERIRÁ CIERTO TIEMPO PARA LOS DRIVERS PARA
INSTALAR APROPIADAMENTE. ESTO PUEDE DURAR 5 MINUTOS O MÁS EN DEPENDENCIA DE
LA CONFIGURACIÓN DE SU ORDENADOR.
Haga clic en Finish (Terminar) y reinicie su ordenador cuando ha
aparecido el software de instalación de la estación de conexión.
Para instalar los ficheros del driver apropiadamente, usted debe
asegurarse de que la instalación se ha realizado antes del reinicio
del ordenador.
Windows Vista - pantalla de reinicio
Estación de conexión - pantalla de reinicio
Windows Vista - caja de diálogo
Windows XO - caja de diálogo
57
Page 59

El indicador del estado LED se
ilumina
Una vez todos los drivers del dispositivo instalados, el indicador del
estado de LED USB se ilumina en cada parte de la estación de
conexión cuando usted conecta los dispositivos a la estación de
conexión.
• La luz Tx verde se ilumina cuando está conectado a la red y la luz Rx
amarilla lo hace cuando los datos se transmiten a o de la red.
• El LED de potencia brillará cuando el cable de potencia CA se
enchufe a la estación de conexión
Puertos de la estación de conexión
Potencia y
LED de
potencia
DC 5V
S/PDIF
Almohadilla de
soporte del
ordenador portátil
Almohadilla de
soporte del
ordenador portátil
Sonido 5.1 &
Micrófono
Gigabit Ethernet
Conexión del
cable
ExpressCard
VGA
DVI-D
Puerto
serial
Targus ExpressCard Notebook Docking Station with Digital Video and Audio
58
Page 60

Puertos USB de
alta potencia
"Acceso fácil" con
indicador de luz
LED
Ranura de bloqueo para
uso con bloqueos
Targus
Conectar dispositivos nuevos
Para evitar daños posibles cuando conecta un nuevo dispositivo, no
fuerce el conector de cable en el puerto de la estación de conexión. Si
el conector de cable no se adjunta correctamente, ponga el conector
al revés y trate de adjuntarlo otra vez.
Conectar al Ratón de serie/ Teclado
Para conectar un ratón o el teclado serial, adjunte el conector del cable
al puerto serial en la estación de conexión.
Conectar y configurar un modem serial
Para conectar un modem serial:
1. Adjunte el conector de cable al puerto serial en la estación de
conexión.
2. Instale el driver del software del modem conforme a las
instrucciones que se ofrecen con el dispositivo.
3. Cuando está listo a seleccionar el puerto, elija el USB serial
(COMx), donde x el número del puerto COM señalado por medio de
su sistema operativo.
Targus ExpressCard Notebook Docking Station with Digital Video and Audio
59
Page 61

Conectar un PDA
1 Adjunte el conector del cable al puerto serial en la estación de
conexión.
2 Verifique si la configuración del puerto COM en cualquiera del
software HotSync® o ActiveSync® corresponde a la configuración
de la estación de conexión. Para verificar la configuración del puerto
COM en la estación de conexión, consulte “Verificar si los dispositi
vos se han instalado”. Para verificar la configuración del puerto COM
en su PDA, consulte la documentación que se adjunta.
Conectar una LAN /Red de área local/
Para conectar un cable Ethernet con un conector RJ-45, adjunte el
conector del cable al puerto Ethernet/red en la estación de conexión.
Los procedimientos adicionales para conectar a una red actual
dependen del tipo de la red que usted está usando. Contacte con su
administrador de red para instrucciones detalladas.
Conectar un dispositivo USB
Para conectar un dispositivo USB, enchúfelo en el puerto USB de la
estación de conexión y siga las instrucciones adicionales suministradas con el dispositivo. Todos los cuatro puertos USB cumplen con los
requisitos de alta velocidad de USB de la velocidad de transferencia
de 480Mbps y una mínima potencia de 500mA. Anote que 2 salidas de
los 4 puertos USB están diseñados para suministrar 1000mA, dos
veces más que las especificaciones del USB estándar. Vea "Targus
Always On" (Targus Siempre encendido) y "Using USB Devices That
Require More Power” (Usar Dispositivos USB que requeren más
energía) para más detalles.
NOTA: LA ESTACIÓN DE CONEXIÓN SOPORTA CAMBIO EN CALIENTE DEL
CABLE DE LA RED.
Targus ExpressCard Notebook Docking Station with Digital Video and Audio
60
Page 62

Conectar y configurar un dispositivo audio
La estación de conexión ofrece un soporte audio 5,1,. La parte trasera
del dispositivo tiene 5 puertos dedicados a audio.
Conector para Micrófono – rosa
Canal delantero o Línea interrumpida - verde
Canal trasero - negro
Canal central/ subwoofer– naranja
S/PDIF – Interfaz de audio digital (PCM, Dolby Digital 5.1)
1. Para usar auriculares estéreo o altavoces, enchúfelos en el puerto
verde de 3.5mm.
Si usted tiene un sistema de altavoz 5.1, conecte el altavoz del canal
delantero al puerto verde de 3.5mm. Conecte el altavoz trasero al
puerto negro de 3.5mm. Conecte el canal central al puerto naranja
de 3.5mm.
SI USTED TIENE PROBLEMAS CON SUS AURICULARES DESPUÉS DE CONECTARLOS LA ESTACIÓN DE CONEXIÓN, POR FAVOR VEA LA SECCIÓN SOLUCIÓN DE
PROBLEMAS PARA MÁS INFORMACIÓN.
MIC
FRONT
REAR
CENTER
S/PDIF
Targus ExpressCard Notebook Docking Station with Digital Video and Audio
61
Page 63

2. Para conectar un micrófono, enchúfelo en puerto rosa de 3.5mm.
3. Para conectar sus auriculares o sus altavoces, usted debe primero
elegir Dispositivo de Sonido USB C-media en las Configuraciones
de las Propiedades
4. Para Windows® XP, vaya al Panel de Control y elija Sonido y Audio.
Seleccione Tabulador audio. En la reproducción de sonido, cambie
el dispositivo preferido al Dispositivo de sonido USB C-Media de la
lista descendiente.
Haga clic en Apply /Aplicar/, luego haga clic en OK.
5. Asegúrese de que el volumen no está configurado a MUDO.
NOTA: LOS DISPOSITIVOS DE AUDIO NO FUNCIONARÁN SIMULTÁNEAMENTE EN
LA ESTACIÓN DE CONEXIÓN Y EN EL ORDENADOR.
CAUCIÓN: TODAS LAS APLICACIONES AUDIO O MULTIMEDIA CERRARSE ANTES
DE CAMBIAR ENTRE LA SALIDA AUDIO DE LA ESTACIÓN DEL PUERTO Y LA
SALIDA AUDIO DEL ORDENADOR.
Targus ExpressCard Notebook Docking Station with Digital Video and Audio
62
Page 64

Instalar y configurar un dispositivo
S/PDIF (Dispositivo de interfaz digital Sony/ Philips)
1. Para permitir S/PDIF, usted debe encenderlo. Esto se puede
realizar al abrir el applet de Configuración de Sonido 3D USB
situado en la bandeja de su sistema. (haga clic en el icono USB para
abrir la pantalla de configuración)
2. Haga clic en el botón siguiente al texto de salida S/PDIF para
permitir S/PDIF
3. Seleccione la salida audio de la bandeja al audio digital
4. Enchufe su TOSLINK cable óptico (no incluido) en el puerto
S/PDIF-out de la estación de conexión en una extremidad y el
puerto S/PDIF-in en el descodificador digital o el auricular en la otra
extremidad.
NOTA: NO NECESITA CONECTAR NINGÚN CABLE DE LOS OTROS ALTAVOCES
SI SE SELECCIONA ESTA OPCIÓN. EL TOSLINK CABLE ÓPTICO ES EL ÚNICO
CABLE REQUERIDO.
5. Conecte su descodificador digital o auricular al Sistema de Teatro en
casa.
Targus ExpressCard Notebook Docking Station with Digital Video and Audio
63
Page 65

Conectar a un Monitor o LCD
Cualquier monitor o LCD conectado al puerto de vídeo de la estación de conexión
se limitará a la resolución máxima de 1600x1200, 32-bit colores.
Opciones del menú de vídeo
Las opciones del menú de vídeo se pueden acceder al hacer clic derecho con
elratón en el icono del Display Targus en la bandeja del sistema o por medio de las
Propiedades del Display de Windows.
La opción única del menú no accesible por medio de las Propiedades del Display
de Windows es el Espejo. Este se debe acceder por medio del icono del Display
Targus.
Primary /Fundamental/: Usted está usando un monitor o un LCD (no la pantalla
de su ordenador portátil) como su pantalla principal.
Extended /Extendido/: Usted está usando la pantalla de su ordenador portátil
como display fundamental y su monitor o LCD como pantalla secundaria al
extender su desktop en el espacio de las dos pantallas.
Mirror /Espejo/: Usted está usando la pantalla de su ordenador portátil como su
display principal y su monitor o LCD duplica la pantalla de su ordenador portátil.
Off /Apagado/: Usted está usando la pantalla de su ordenador portátil como su
display fundamental y su monitor o LCD está apagado.
Resolución: Al cambiar la resolución de la utilidad Targus sólo se verá afectado
el monitor conectado al puerto de vídeo de la estación de conexión.
Para cambiar las resoluciones al usar las propiedades del Display de
Windows:
1. Coloque el ratón en un espacio vacío de su desktop, luego haga clic
con la tecla derecha y seleccione Propiedades.
2. En la pantalla de propiedades del Display, haga clic en el tabulador
Configuraciones.
3. Cambie la resolución de la pantalla o la profundidad de color de esta
pantalla.
4. Haga clic en "OK" para cerrar la pantalla Propiedades del display
Para cambiar la resolución y los modos al usar el icono del Display Targus:
1. Posicione el ratón en la parte superior del icono Targus y haga clic con
la tecla derecha.
2. De esta pantalla, usted puede cambiar la resolución y los modos que el
conector maneja (vea la siguiente aplicación de los modos de vídeo
soportados).
Targus ExpressCard Notebook Docking Station with Digital Video and Audio
64
Page 66

Pantalla del
ordenador
portátil
Monitor
secundario
o LCD
Fundamental:
Extendido:
Espejo:
Apagado:
La salida de vídeo soporta las siguientes resoluciones y calidad de color:
NOTA: ALGUNOS LCDS SE HAN OPTIMIZADO PARA UNA RESOLUCIÓN
ESPECÍFICA. SI LA RESOLUCIÓN ÓPTIMA NO ES DE 1280 X 1024, LOS
RESULTADOS PUEDEN NO SER LOS DESEADOS.
Modo Resolución Tasa de actualización
UXGA 4:3 1600x1200 16 60HZ, 65HZ,
70HZ, 75HZ,
85HZ
UXGA 4:3 1600x1200 32
60HZ, 65HZ, 70HZ
WSXGA+ 16:10 1680x1050 32
60HZ, 65HZ, 70HZ
SXGA+ 4:3 1400x1050 16 60Hz
SXGA 5:4 1280x1024 16,32
60HZ, 75HZ , 80HZ
QVGA 4:3 1280x960 16,32
60HZ, 75HZ, 85HZ
WXGA+ 16:10 1440x900 32 60Hz
WGA 15:9 1280x768 16,32 60Hz
WXGA 16:10 1280x800 16,32 60Hz
XGA 4:3 1024x768 16,32
60HZ, 70HZ,
75HZ, 85HZ, 120HZ
SVGA 4:3 800x600 16,32 60HZ , 72HZ,
75HZ , 85HZ,
120HZ , 160HZ
VGA 4:3 640x480 16,32 60HZ, 72HZ,
75HZ, 85HZ,
120HZ, 160HZ
Notas: Todas las tasas de actualización de la lista no están inter-relacionadas.
Targus ExpressCard Notebook Docking Station with Digital Video and Audio
Apagado
Encendido
Encendido
Encendido
Encendido
Encendido
Encendido
Apagado
Proporción
de aspecto
Profundidad
del color
65
Page 67

Modo de Suspensión global
Cuando su ordenador está en el modo de Suspensión, la estación de
conexión también entra en el modo de Suspensión para evitar
consumo de potencia. Cuando su ordenador se activa, la estación de
conexión se activa automáticamente.
Usar dispositivos USB que requieren más potencia
Esta estación de conexión está diseñada con 4 puertos USB de alta
potencia, dos de los cuales suministran más de 1000mA de potencia
cada uno. Ellos pueden usarse para conectar a periféricos que
requieren más potencia como impresoras, escáners, dispositivos
ópticos y otros.
Targus ExpressCard Notebook Docking Station with Digital Video and Audio
66
Page 68

Solución de problemas
El dispositivo no funciona
• Asegúrese de que el dispositivo está completamente insertado en el
puerto correcto de la estación de conexión.
• Enchufe el dispositivo en un puerto diferente de la estación de
conexión. Si todavía no funciona, pruebe el dispositivo al conectarlo
directamente a su ordenador.
• Verifique si ha ejecutado la configuración o la instalación del
programa para el dispositivo.
• Asegúrese de que el dispositivo aparece en el Administrador del
Dispositivos. Para más información, consulte "Verificar si los
dispositivos se han instalado".
• Desconecte todos los dispositivos de la estación de conexión y
vuélvalos a conectar uno a uno. Compruebe si todos los dispositivos
funcionan antes de enchufar el siguiente.
• Cada puerto USB está equipado de protección de sobrecorriente. Si
el dispositivo USB usa más corriente de la que el puerto USB puede
suministrar, el puerto se apagará. Para activar otra vez el puerto,
desenchufe el dispositivo y vaya al Administrador de Dispositivo o al
mensaje en la bandeja del sistema y elija la opción Reinicio. Usted
puede entonces enchufar el dispositivo otra vez en el puerto USB. Si
otra vez apaga, compruebe los requisitos de potencia del dispositivo.
Verificar si los dispositivos se
han instalado
Usted puede ver los dispositivos instalados en la estación de conexión
de la ventana Administrador de Dispositivo en las propiedades de
Sistema.
Haga clic con la tecla derecha en Mi ordenador, Propiedades, entonces
haga clic en el tabulador de Hardware y luego en el botón del Administrador de Dispositivos.
Targus ExpressCard Notebook Docking Station with Digital Video and Audio
67
Page 69

De la ventana de Administrador de Dispositivo, se expande lo
siguiente:
• Adaptadores de Display - Expresscard w/ vídeo Targus
• Dispositivos de Interfaz humana - visualiza teclados y dispositivos
señaladores: ratón, bola de seguimiento y palanca de mando
• Adaptadores de red — Adaptador Ethernet RTL 8110SC Realtek
• Puertos (COM & LPT) — serial en USB [COM x]
• Controladores de sonido, vídeo y juego — visualiza el dispositivo
audio USB
• Controladores universales de Bus serial — visualiza los otros
dispositivos instalados en la estación de conexión y el concentrador
genérico
Verificar la conexión de un modem
serial
Cuando adjunta un modem al puerto serial (RS232), por favor
verifique si el puerto señalado para su modem es USB serial (COMx),
donde x es el número del puerto COM.
Si el sistema operativo no detecta automáticamente que el modem
está conectado al puerto (COMx), ejecute otra vez el Asistente del
Hardware y elija Seleccionar en la lista en vez de detectar automati
camente. Luego seleccione USB serial (COMx), así como el puerto
COM.
Mensaje de error en su PDA
Si el mensaje de error "Conexión no establecida" aparece en su PDA,
compruebe si la configuración del puerto COM en cualquier software
suyo HotSync o ActiveSync corresponde a la configuración en su
estación de conexión. Vea “Verificar si los dispositivos se han
instalado” para verificar la configuración del puerto COM en la
estación de conexión.
Algunas versiones más antiguas del software Palm® desktop no son
compatibles con la conversión de USB a serial. Por favor, contacte a su
vendedor de PDA para actualizaciones del software.
Targus ExpressCard Notebook Docking Station with Digital Video and Audio
68
Page 70

Video
¿Puedo conseguir una resolución más alta de mi monitor?
La reproducción de película no es correcta cuando selecciona resolución de
1600x1200x32 bit. Será peor cuando está reproduciendo un clip media en la
pantalla completa?
La estación de conexión ExpressCard Targus no está fundamentalmente diseñada
para la reproducción del contenido de la película a la resolución máxima y
profundidad de color. El mejor modo para visualizar el contenido de vídeo es a la
resolución 1280x1024 (SXGA) o inferior.
La razón de esto es la gran cantidad de los datos del display que empiezan a
transferirse durante la reproducción de la película. Las películas estándar DVD
están codificadas en la resolución 720x480 (NTSC), y 720x576 para los discos
PAL. La visualización de una resolución más alta del vídeo puede resultar en una
modificación ascendente de la escala del display a la resolución más alta que no
mejora la reproducción de la película.
¿Choques inesperados o problemas de estado de potencia?
Por favor, asegúrese de que usted ha actualizado el sistema BIOS en su
ordenador portátil. Varios vendedores de modelos comunes de ordenadores
portátiles han puesto en venta actualizaciones de BIOS que resuelven un número
de los problemas expuestos de ExpressCard (Lenovo, Fujitsu).
• La resolución más alta es de 1600 x 1200, 32-bit colores.
Los modos de mejorar la uniformidad de la reproducción de la película son:
• Reducir la resolución del display a 1280x1024 con profundidad del color más
baja (Color 16 Bit)
• Cerrar todas aplicaciones activas en su ordenador
No puedo reproducir un DVD al usar la estación de conexión.
La reproducción de DVD está controlada por el software de reproducción de DVD
y el hardware en su ordenador portátil. Muchos programas de software de
reproducción de DVD no son capaces de soportar la reproducción de DVD en un
monitor secundario o externo. Si usted encuentra problemas al reproducir vídeos
en el Modo de Extendido, trate de cambiar el modo de Vídeo en la estación de
conexión al modo Fundamental o Espejo.
Targus ExpressCard Notebook Docking Station with Digital Video and Audio
69
Page 71

¿Mi sistema falla durante el arranque con el conector de Tarjeta
instalado?
¿Pueden dos displays separados conectarse a la estación de
conexión ExpressCard (VGA y DVI-D) y visualizar dos imágenes
separadas y funcionar para extender la visualización través de
tres pantallas (incluso la pantalla del ordenador portátil)?
No. La salida del puerto VGA y del puerto DVI es la misma.
Trate de cambiar el interruptor de prearranque a la posición de
encendido y arranque otra vez.
Audio
Algunos ordenadores portátiles preestablecen a la estación de
conexión Expresscard en el dispositivo audio USB cuando se conecta
la estación de conexión al dejar incapacitados los auriculares incorporados en el ordenador portátil. Para activar los auriculares de su
ordenador portátil, haga lo siguiente:
1. Abra el Panel de Control y seleccione "Dispositivos de audio y
vídeo".
2. En el Tabulador Audio de la sección Reproducción de sonido,
seleccione su dispositivo de audio interno de su ordenador portátil
(será un dispositivo distinto del dispositivo de audio USB en la
estación de conexión).
Si usted no puede conseguir todavía la reproducción del dispositivo
de audio de sus auriculares:
1. Abra el Panel de Control y seleccione "Dispositivos de audio y
vídeo".
2. En el Tabulador Audio en la sección Volumen del dispositivo, haga
clic en "Avanzado".
3. Desmarque la caja "Mudo todo"
NOTA: Usted necesitará cerrar toda aplicación que esté usando audio y
reiniuarla para permitir este cambio.
Targus ExpressCard Notebook Docking Station with Digital Video and Audio
Yo no puedo oír nada por medio de los auriculares del ordenador
portátil
Mi pantalla se vuelve vacía (negra) cuando conecto la ExpressCard a mi ordenador.
Asegúrese de que ExpressCard está apropiadamente conectada y
compruebe el modo de visualización en el tray del sistema, es decir
si el ajuste es correcto.
70
Page 72

Soporte técnico
Si tiene preguntas técnicas, por favor visite:
Internet http://www.targus.com/support
Inglés http://www.targus.com/uk/support.asp
Francés http://www.targus.com/fr/support.asp
Alemán http://www.targus.com/de/support.asp
Español http://www.targus.com/sp/support.asp
Italiano http://www.targus.com/it/support.asp
Nuestro personal experto también puede contestarle sus
preguntas a través de uno de los siguientes números
telefónicos.
Alemania 0211-6579-1151
Austria 01 795 676 42
Bélgica 02-717-2451
Dinamarca 45 0 35-25-87 51
España 91 745 6221
Finlandia 922948016
Francia 0 1-6453-9151
Italia 02-4827-1151
Noruega 022577729
Países Bajos 02 0504 0671
Portugal +351 21 415 4123
Suecia 08-751-4058
Suiza 01-212-0007
El Reino Unido 20-7744-0330
Europa Oriental y otros +31 0 20-5040671
Targus ExpressCard Notebook Docking Station with Digital Video and Audio
71
Page 73

Registro del producto
Targus le recomienda registrar su accesorio Targus
inmediatamente después de adquirirlo. Para registrar su
accesorio Targus, visite: http://www.targus.com/registration.asp
Quizás deba indicar su nombre completo, su dirección de correo
electrónico, su número de teléfono e información de su empresa
(si corresponde).
Garantía
Targus garantiza que este producto no tendrá defectos en los
materiales ni la mano de obra durante dos años. Si dentro de ese
lapso se determina que el accesorio Targus está defectuoso, lo
repararemos o reemplazaremos sin demora. Esta garantía no
cubre daños accidentales, el uso y desgaste natural ni las
pérdidas resultantes o incidentales. Targus no es responsable,
bajo circunstancia alguna, por pérdidas o daños al ordenador ni
por pérdida de programas, registros o datos ni daños a los
mismos, así como tampoco por daños resultantes o incidentales
algunos, incluso si a Targus se le informó de la posibilidad que
existieran. La presente garantía no afecta los derechos que la ley
le otorga.
Conformidad con las normas
Este dispositivo cumple con la Parte 15 de las Normas de FCC.
Su uso está sometido a las dos condiciones siguientes: (1) Este
dispositivo no debe causar interferencia nociva, y (2) este
dispositivo debe aceptar toda interferencia que reciba,
incluyendo aquella que ocasione un funcionamiento indeseado.
Declaración de FCC
Prueba de cumplimiento
Este equipo fue sometido a prueba y se ha determinado que
cumple los límites indicados para un dispositivo digital de Clase
B, en virtud de la Parte 15 de las Normas de FCC. Estos límites
se han impuesto para ofrecer una protección razonable contra la
interferencia nociva en una instalación en el hogar. Este equipo
genera, usa y puede irradiar energía de radiofrecuencia y, si no
se instala y usa de acuerdo a las instrucciones, puede causar
una interferencia nociva a las comunicaciones radiales. Sin
Targus ExpressCard Notebook Docking Station with Digital Video and Audio
72
Page 74

embargo, no se garantiza que en una instalación específica no se
produzca interferencia.
Si este equipo causa interferencia nociva a la recepción de radio
o de televisión, lo que se puede determinar encendiendo y
apagando el equipo, se anima al usuario a que trate de corregir la
interferencia aplicando una o más de las siguientes medidas:
• Reorientar o reubicar la antena receptora
• Aumentar la distancia que separa al equipo del receptor
• Conecte el equipo a un enchufe de circuito diferente a aquel al
que esté conectado el receptor
• Consulte al distribuidor o a un técnico de radio/televisión para
más ayuda.
Declaración de Conformidad
Por medio de la presente Targus declara que al equipo cumple
con los requisitos esenciales y cualesquiera otras disposiciones
aplicables o exigibles de la Directiva 1999/5/CE. Este dispositivo
es de baja potencia. Dispositivo diseñado para uso profesional y
domestico únicamente. Este producto puede utilizarse en
cualquier país de la CE.
Directiva de reciclaje de Targus
Al final de la vida útil de este producto le rogamos lo disponga en
un punto de recogida para reciclaje situado en su país. La política
de reciclaje de Targus está disponible para su consulta en:
www.targus.com/recycling
Los cambios o modificaciones no autorizados por la parte responsable del cumplimiento podrían anular la autoridad del usuario para
utilizar este producto.
Targus ExpressCard Notebook Docking Station with Digital Video and Audio
Microsoft, Windows y Windows Vista son marcas registradas o marcas
comerciales de Microsoft Corporation en los Estados Unidos y/o en otros países.
Todas las marcas comerciales y marcas registradas son propiedad de sus
titulares respectivos. Todos los derechos reservados.
73
Page 75

STATION D'ACCUEIL
UNIVERSELLE
EXPRESSCARD
TM
POUR
ORDINATEUR PORTABLE
AVEC FONCTIONS AUDIO
ET VIDÉO NUMÉRIQUES
Introduction
Félicitations pour votre acquisition de la Station d'accueil
universelle ExpressCard avec fonction Vidéo et son Surround
pour ordinateur portable. Ce module d'expansion d’un ordinateur portable vous permet de connecter par une prise
ExpressCard jusqu'à 4 dispositifs USB, moniteur ou écran à
cristaux liquides ; ultra-rapide Gigabit Ethernet/Réseau Local
; PC-audio à 5.1 canaux à fibre optique S/PDIF et un port
série pour un dispositif de l’époque.
La station d'accueil dispose également de la technologie
Targus Always On, d'un port d'alimentation USB Targus
fournissant deux fois la capacité USB et des ports largement
espacés pour permettre le branchement d'adaptateurs plus
grands. Targus Always On alimente les ports USB même
lorsque le portable est arrêté, déconnecté de la station
d'accueil ou en mode veille ou veille prolongée, ce qui permet
aux périphériques USB se chargeant via le port de rester
chargés en toutes circonstances.
74
Page 76

Targus ExpressCard Notebook Docking Station with Digital Video and Audio
Design Ergonomique
La conception ergonomique aide à l’augmentation du flux d'air sous
l’ordinateur portable pour l'opération de refroidissement. La plateforme levée fournit une position plus confortable pour taper au clavier.
Caractéristiques
• (4) ports USB 2.0 haute vitesse
• (1) port série (RS232)
• (1) Connecteur DVI-D 24 broches
• (1) Connecteur vidéo VGA (HD D-sub) HD-15 broches
• (1) Câble de connexion de l'ExpressCard
• (1) RJ-45 Gigabit Ethernet 10/1000
• (3) Prise jack pour son audio Surround 5.1
• (1) Entrée Microphone
• (1) Sortie audio numérique S/PDIF
(TOSLINK Connecteur à Fibre Optique)
• (2) Connecteurs sécurisés
Contenu de l'emballage
En plus de ce mode d'emploi, l'emballage contient:
• Station d'accueil Targus universelle ExpressCard avec fonction Audio
et Vidéo pour ordinateur portable
• Câble et carte Expresscard (avec entretoise de carte)
• Adaptateur secteur (exigé pour faire fonctionner la station)
• Le CD-ROM comportant le logiciel de pilote
NOTE : TARGUS VOUS RECOMMANDE DE VISITIEZ SON SITE
INTERNET AU LIEN CI-DESSOUS POUR VOUS ASSURER D’AVOIR LA
DERNIÈRE VERSION DU PILOTE. POUR UN TÉLÉCHARGEMENT
GRATUIT SUIVEZ LES INSTRUCTIONS DE TÉLÉCHARGEMENT ET
L'INSTALLATION DANS CE GUIDE D'UTILISATEUR.
HTTP://WWW.TARGUS.COM/US/SUPPORT_DOWNLOADS.ASP
75
Page 77

Configuration requise
Matériel
• PC avec microprocesseur Intel® Pentium® ou équivalant
• Lecteur de CD-ROM
• Un port Expresscard 34mm ou 54mm
Système d'exploitation
• Windows® XP - Service Pack 2 ou supérieur
NOTE : POUR TÉLÉCHARGER LES DERNIERS PACKS SERVICE, VEUILLEZ
CONSULTER LE SITE WEB DU FABRICANT DE VOTRE ORDINATEUR OU LE
CENTRE DE TÉLÉCHARGEMENT DE MICROSOFT :
http://support.microsoft.com/default.aspx?scid=fh%3BENUS%3Bsp
Préparation du BIOS pour la carte
ExpressCard
Avant d'installer la Station d'accueil ExpressCard, il est très important
de vous assurez que votre système possède la dernière version BIOS
disponible. La majorité des vendeurs de système les plus connus ont
lancé des mises à jour du BIOS qui corrige beaucoup de problèmes
liées à la carte ExpressCard.
Targus ExpressCard Notebook Docking Station with Digital Video and Audio
• Windows VistaTMou
76
Page 78

A propos du connecteur de la carte
ExpressCard
La station ExpressCard est livrée avec un câble, une adaptatrice (voir
« Utilisation de Connecteur d'adaptation »” pour des instructions
complémentaires) et une carte de 34 mm pour le branchement à la
prise ExpressCard de votre ordinateur portable. Le câble est
débranchable de la carte. Lorsqu'elle n'est pas utilisée, la carte peut
être laissée branchée à votre portable.
La carte de 34mm a un petit commutateur situé dans la zone circulaire
représentée sur le dessin ci-dessous.
Ce commutateur est utilisé pour déterminer comment le dock est
reconnu par le système lors de son lancement (amorçage). Certains
portables détecteront le dock et ne fonctionneront pas correctement
pendant la période de pré-amorce (c. à d. ils essayent de se lancer
(s'amorcer) sur le périphérique VGA externe et non sur le VGA interne
du portable). Ce commutateur doit être actionné seulement une fois. La
plupart des modèles de portables n'auront pas de problème.
Ceci avait été observé dans des ordinateurs portables (Fujitsu,
certains modèles de Sony et de Toshiba) qui utilisent le BIOS
développé par Phoenix Technologies. Si vous rencontrez un tel
problème, veuillez tourner le commutateur de la position par défaut «
OFF » à la position « ON ». Vous devrez le faire qu’une seule fois.
Lorsque vous connectez le câble à l'ExpressCard, veuillez vous assurer que la
fiche du câble est correctement et complètement insérée dans le port de
l'ExpressCard. Assurez-vous que la fiche est connectée dans le bon sens. Ne
forcez pas sur la connexion car cela pourrait endommager le périphérique.
Support "On-Pre-boot"
(pré-amorce)
Support "Off-Post-boot"
(post-amorce) (par défaut)
Targus ExpressCard Notebook Docking Station with Digital Video and Audio
77
Page 79

L'entretoise se clippe simplement sur l'ExpressCard et elle est insérée
avec le connecteur de carte dans le port de l'ExpressCard 54mm.
Une entretoise est fournie pour assurer l'adaptation correcte de la
carte de 34 mm dans la prise de 54 mm. Cette entretoise n'a aucune
autre fonction que d'empêcher le mouvement de la carte une fois
qu'elle est insérée dans le port de 54mm. L'entretoise n'est pas
nécessaire si vous avez un port de 34mm sur votre portable. (Voir le
schéma ci-dessous pour voir les deux types de connecteurs
disponibles actuellement sur les portable)
Utilisation de l'entretoise de
connecteur
Ajustez soigneusement l'entretoise sur l'ExpressCard et unissez les
deux pièces ensemble en fermant le clip.
Veuillez vous assurez que le clip est solidement fermé et qu'aucun
espace n'a été laissé entre les deux pièces comme indiqué dans les
schémas ci-dessus.
Targus ExpressCard Notebook Docking Station with Digital Video and Audio
78
Page 80

Targus ExpressCard Notebook Docking Station with Digital Video and Audio
Avant de commencer, assurez-vous que l'entretoise et la carte PC
soient alignées comme indiqué ci-dessous.
1. Lors de l’installation de l’entretoise, assurez-vous qu'elle soit à 45
degrés de la carte PC. Veuillez vérifier que le crochet sur l’entretoise
repose sur le port de la carte PC. Voir Fig 1.
Fig. 1
1
2. Appuyez vers le bas sur l’entretoise comme indiqué tout en
pressant fortement sur la carte PC et l'entretoise.
2
Lors du retrait de l’entretoise, tirez en dedans et vers le haut pour la
détacher.
Finalement, assurez-vous que les deux clips de l’entretoise sont
complètement et fermement poussés à l'intérieur des ports de la carte
PC.
Instructions pour connecter l’entretoise à la
carte Express
l’installation détacher
79
Page 81

Installation du pilote de la station
d'accueil
L'installation du pilote de la station d'accueil permettra à votre
système d'exploitation de reconnaître celle-ci ainsi que ses ports une
fois la connexion effective.
1. Mettez votre ordinateur en marche.
2. Insérez le CD-ROM du logiciel du pilote dans le lecteur de CD de
votre ordinateur.
Si l'installation ne commence pas automatiquement, cliquez sur
Démarrer, Exécuter, puis tapez D:\Setup.exe (si D: désigne votre
lecteur de CD), puis cliquez sur OK.
3. La fenêtre de l'assistant d'installation de la station d'accueil
s'ouvrira. Suivez les instructions qui s'afficheront à l'écran afin
d'achever l'installation. Veuillez connecter l'ExpressCard dans le
port lorsque l'on vous le demandera.
Branchement de la station d'accueil à votre ordinateur
Etape 1. Branchez l'adaptateur de la station d'accueil fourni dans la
prise d'alimentation sur la station d'accueil.
Etape 2. Branchez une extrémité du câble de l'ExpressCard sur la
station d'accueil et l'autre sur la carte ExpressCard.
Etape 3. Branchez l'ExpressCard sur un port disponible de votre
ordinateur portable.
ATTENTION: LA STATION D'ACCUEIL NE FONCTIONNERA PAS CORRECTEMENT
SI L'ADAPTATEUR SECTEUR N'EST PAS BRANCHE A LA PRISE SECTEUR. NE
CONNECTEZ AUCUN PERIPHERIQUE A LA STATION D'ACCUEIL TANT QUE
VOUS N'AVEZ PAS TERMINE L'INSTALLATION DU LOGICIEL ET BRANCHE
L'ADAPTATEUR SECTEUR.
Targus ExpressCard Notebook Docking Station with Digital Video and Audio
80
Page 82

Targus ExpressCard Notebook Docking Station with Digital Video and Audio
4. Après la connexion de l'ExpressCard à l'ordinateur, attendez
jusqu'à ce que l'ordinateur ai finit de reconnaître les dispositifs
avant d’appuyez sur « OK » dans la boîte de dialogue. Ce
processus prendra environ 3-5 minutes.
WINDOWS VISTA AFFICHERA UNE BOÎTE D’INVITATION AU REDEMARRAGE DE L'ORDINATEUR
PENDANT LE PROCESSUS D'INSTALLATION DU PILOTE. VEUILLEZ IGNORER CE MESSAGE. LE
LOGICIEL D'INSTALLATION DU PILOTE DE LA STATION D'ACCUEIL VOUS DEMANDERA DE
REDEMARRER QUAND L'INSTALLATION ET LA MISE AU POINT DU PILOTE SERONT ACHEVÉS.
5. Après le redémarrage, l'ordinateur reconnaîtra la station d'accueil et
les pilotes de chacun des dispositifs par défaut s'installeront automa
tiquement. Veuillez attendre jusqu'à la fin de ce processus. La
résolution de l'écran se mettra au point et l’écran se rafraîchira
pendant ce processus.
6. Vous verrez un logo Ecran Targus placé au niveau de la barre de
système. Le choix du mode moniteur peut être effectué par un clic
droit sur ce logo .
NOTE : IL EST RECOMMANDE DE METTRE LE MODE EN « CARTE VGA EXPRESS» OFF LORSQUE
VOUS UTILISEZ SEULEMENT UN ECRAN. LE REGLAGE PAR DÉFAUT EST « LE MODE ÉTENDU ».
NOTE : CE PROCESSUS D'INSTALLATION DEMANDERA UN CERTAIN TEMPS POUR UNE
INSTALLATION CORRECTE DES DRIVERS. CECI POURRAIT PRENDRE 5 MINUTES OU PLUS
SELON LA CONFIGURATION DE VOTRE ORDINATEUR.
Cliquez sur « Finish » [Fin] et redémarrez votre ordinateur quand
vous êtes invités à le faire par le logiciel d'installation de la station
d'accueil. Pour installer les fichiers pilotes correctement, vous devez
vous assurer que l'installation est achevée avant le redémarrage de
l'ordinateur.
Windows Vista – écran de redémarrage
Station d'accueil – écran de redémarrage
Windows Vista - boîte de dialogue
Windows XP - boîte de dialogue
81
Page 83

Lampes indicateurs d'état
Une fois que tous les pilotes de périphériques sont installés, les
lampes des indicateurs d'état USB situées à l'arrière de la station
d'accueil s'allument lorsque vous branchez les périphériques.
• Le témoin vert Tx s'allume lorsque la station est connectée à un
réseau et le témoin jaune Rx clignote lorsque des données sont
transmises depuis ou vers sur le réseau.
• Le témoin d'alimentation devient rouge lorsque le câble
d'alimentation électrique est branché à la station d'accueil.
Ports de la Station d'accueil
Alimentation et
Témoin
d'alimentation
DC 5V
S/PDIF
Support pour
l'ordinateur portable
Support pour
l'ordinateur portable
Son Surround
5.1 &
Microphone
Gigabit Ethernet
Câble de
connexion
d'arrivée de
l'ExpressCard
VGA
DVI-D
Port
Série
Targus ExpressCard Notebook Docking Station with Digital Video and Audio
82
Page 84

Ports USB haute
puissance "Accès
Facile" (Easy
Access) avec
témoin lumineux
Verrou de sécurité de
connexion pour
l'utilisation avec le
verrou Targus
Branchement de nouveaux
périphériques
Afin d'éviter tout dommage éventuel lors de la connexion d'un nouveau
périphérique, ne forcez pas sur le connecteur du câble lors de son
branchement dans le port de la station d'accueil. Si le connecteur du
câble ne veut pas s'insérer aisément, retournez le et essayez de
nouveau.
Branchement d'une souris /
d'un clavier sur le port série
Pour connecter une souris ou un clavier de port série, branchez le
connecteur du câble sur un port série de la station d'accueil.
Branchement et configuration d'un modem
sur le port série
Pour brancher un modem sur le port série:
1. Brancher le connecteur du câble sur le port série de la station
d'accueil.
2. Installez le pilote du modem conformément aux instructions fournies
avec ce matériel.
3. Au moment du choix du port, choisissez le port série USB (COMx),
où x est le numéro du port COM affecté par votre système
d'exploitation.
Targus ExpressCard Notebook Docking Station with Digital Video and Audio
83
Page 85

Branchement d'un assistant
personnel (PDA)
1 Branchez le connecteur du câble sur le port série de la station
d'accueil.
2 Vérifiez que l'affectation du port COM, dans votre logiciel HotSync®
ou ActiveSync®, correspond à celle de la station d'accueil. Pour
vérifier l'affectation du port COM sur la station d'accueil, reportez vous à la section "Vérification de l'installation des périphériques".
Pour vérifier l'affectation du port COM sur votre assistant personnel,
reportez-vous à la documentation fournie avec celui-ci.
Branchement à un réseau local
Pour brancher un câble Ethernet doté d'un connecteur RJ-45,
enfoncez le connecteur du câble dans le port Ethernet/réseau de la
station d'accueil. En fonction du type de réseau que vous utilisez, il se
peut que vous soyez obligé de procéder à d'autres manipulations.
Contactez votre administrateur de réseau pour obtenir des instructions
détaillées.
Branchement d'un périphérique USB
Pour connecter un périphérique USB, branchez-le sur un port USB de
la station d'accueil et suivez les instructions fournies avec le périphérique. Tous les quatre ports USB répondent aux exigences USB Ultrarapide d'un taux de transfert de 480 Mbps et un minimum de 500 mA
d’alimentation. Notez que 2 des 4 ports USB sont conçu pour fournir
1000 mA, deux fois plus que la norme USB. Voir « Targus toujours en
marche » et « Utiliser des dispositifs USB qui exigent plus de
puissance » pour plus de détails.
REMARQUE: LA STATION D'ACCUEIL SUPPORTE LE BRANCHEMENT A CHAUD
DU CABLE RESEAU
Targus ExpressCard Notebook Docking Station with Digital Video and Audio
84
Page 86

Branchement et configuration d'un
périphérique audio
Cette station d'accueil dispose d'un support Audio 5.1. L'arrière du
périphérique offre 5 ports dédiés à l'Audio.
Entrée Microphone – Rose
Canal de communication face ou ligne de sortie - Vert
Canal de communication arrière - Noir
Canal de communication centre / caisson des graves (subwoofer) - Orange
S/PDIF - Interface Audio Numérique (PCM, Dolby Numérique 5.1)
1. Pour utiliser un casque ou des haut-parleurs stéréo, branchez-les
sur le port vert 3,5mm.
Si vous avez une installation de haut-parleur 5.1, connectez le
Canal de communication face des haut-parleurs dans le port vert
3,5mm. Connectez le canal arrière des haut-parleurs dans le port
noir 3,5mm. Connectez le canal centre dans le port orange 3,5mm.
SI VOUS AVEZ DES PROBLÈMES AVEC VOS HAUT-PARLEURS APRÈS LA
CONNEXION DE LA STATION D'ACCUEIL, VEUILLEZ POUR PLUS
D'INFORMATION, VOUS RÉFÉRER À LA SECTION DE RÉSOLUTION DES
PROBLÈMES.
MIC
FRONT
REAR
CENTER
S/PDIF
Targus ExpressCard Notebook Docking Station with Digital Video and Audio
85
Page 87

2. Pour connecter un microphone, branchez-le sur le port rose 3,5mm.
3. Pour activer le casque ou les haut-parleurs, vous devez d'abord
sélectionner C-media USB Sound Device dans le réglage des
paramètres
4. Sous Windows® XP, accédez au panneau de configuration et
choisissez Sons, voix et périphériques audio. Sélectionnez l'onglet
Audio. Dans lecture audio remplacez le périphérique par défaut par
C-Media USB Sound Device en le sélectionnant dans la liste
déroulante.
Cliquez sur Apply (Appliquer), puis sur OK.
5. Assurez-vous que le volume n'est pas réglé sur Muet.
REMARQUE: LES PERIPHERIQUES AUDIO NE FONCTIONNENT PAS SIMULTANEMENT SUR LA STATION D'ACCUEIL ET SUR L'ORDINATEUR.
ATTENTION: TOUTES LES APPLICATIONS AUDIO OU MULTIMEDIA DOIVENT
ETRE ARRETEES AVANT DE BASCULER ENTRE LA SORTIE AUDIO DE LA STATION
ET LA SORTIE AUDIO DE L'ORDINATEUR.
Targus ExpressCard Notebook Docking Station with Digital Video and Audio
86
Page 88

Installation et configuration d'un
périphérique S/PDIF (Sony/ Philips
Digital Interface)
1. Pour utiliser S/PDIF, vous devez l'activer. Pour cela, ouvrez l'applet
Configuration son USB 3D situé dans la barre d'état système
(cliquez sur l'icône USB pour ouvrir l'écran de configuration)
2. Cliquez sur le bouton correspondant à S/PDIF Output pour activer le
S/PDIF
3. Régler la Sortie Audio à partir de la barre d'état
4. Branchez une extrémité de votre TOSLINK câble optique (non
inclus) sur le port Sortie S/PDIF de la station d'accueil et l'autre sur
le port Entrée S/PDIF du décodeur numérique ou des haut-parleurs.
REMARQUE : SI CETTE OPTION EST CHOISIE, PAS BESOIN DE CONNECTER
D'AUTRES CABLES DE HAUT-PARLEURS. LE TOSLINK CÂBLE OPTIQUE EST LE
SEUL CÂBLE REQUIS.
5. Branchez le décodeur numérique ou les haut-parleurs au système
Home Cinéma.
Targus ExpressCard Notebook Docking Station with Digital Video and Audio
87
Page 89

Branchement d'un moniteur ou
d'un écran à cristaux liquides
Quel que soit le moniteur ou l'écran à cristaux liquides connecté sur le
port vidéo de la station d'accueil, sa résolution maximale sera limitée à
1600x1200 pixels, couleurs 32 bits.
Menu Options Vidéo
Il est possible d'avoir accès aux options du menu vidéo avec un clic droit sur l'icône
Targus figurant sur la barre d'état système, ou en ouvrant les Propriétés
d'affichage Windows.
Mirror est la seule option du menu qui n'est pas accessible dans les Propriétés
d'affichage Windows. En revanche, vous pouvez y accéder par l'icône Targus.
Primary : vous utilisez un moniteur ou un écran à cristaux liquides (pas
l'écran de votre portable) comme écran principal.
Extended : vous utilisez l'écran de votre portable comme afficheur principal
et votre moniteur ou écran à cristaux liquides comme écran secondaire ou
étendez votre bureau sur les deux écrans.
Mirror : vous utilisez l'écran de votre portable comme afficheur principal et
votre moniteur ou écran à cristaux liquides reproduit l'écran de celui-ci.
Off : vous utilisez l'écran de votre portable comme afficheur principal et
votre moniteur ou écran à cristaux liquides est éteint.
Résolution : Lorsque vous modifiez la résolution avec programme Targus,
cela n'affectera que le moniteur connecté au port vidéo de la station
d'accueil.
Pour changer la résolution à partir du menu Propriétés d'affichage Windows:
1. Placez la souris sur un endroit vide de votre bureau et cliquez sur le bouton
droit pour choisir les propriétés.
2. Dans la fenêtre Propriétés d'affichage, cliquez sur l'onglet Settings
(Paramètres).
3. Changer la résolution d'écran ou le nombre de couleur dans cette fenêtre.
4. Cliquer "OK" pour fermer la fenêtre "Propriétés d'affichage"
Pour changer la résolution et les modes utilisés à partir de l'icône Targus:
1. Placez la souris sur l'icône Targus et cliquez avec le bouton droit.
2. Dans cette fenêtre, vous pouvez changer les résolutions et les modes
dans lesquels les ports fonctionnent (voir ci-dessous les explications
concernant les modes vidéo supportés).
Targus ExpressCard Notebook Docking Station with Digital Video and Audio
88
Page 90

Ecran du
portable
Moniteur ou
écran à cristaux
liquides secondaire
Primary:
Extended:
Mirror:
Arrêt:
La sortie vidéo peut supporter les
résolutions et les qualités de couleurs
suivantes :
NOTE : CERTAINS ECRANS A CRISTAUX LIQUIDES ONT ETE OPTIMISES POUR
UNE RESOLUTION SPECIFIQUE. SI LA RESOLUTION OPTIMALE N'EST PAS
1024 x 768, IL SE PEUT QUE LES RESULTATS NE SOIENT PAS CEUX DESIRES.
Mode Résolution
Taux de Rafraîchissement
UXGA 4:3 1600x1200 16 60HZ, 65HZ,
70HZ, 75HZ,
85HZ
UXGA 4:3 1600x1200 32
60HZ, 65HZ, 70HZ
WSXGA+ 16:10 1680x1050 32
60HZ, 65HZ, 70HZ
SXGA+ 4:3 1400x1050 16 60Hz
SXGA 5:4 1280x1024 16,32
60HZ, 75HZ , 80HZ
QVGA 4:3 1280x960 16,32
60HZ, 75HZ, 85HZ
WXGA+ 16:10 1440x900 32 60Hz
WGA 15:9 1280x768 16,32 60Hz
WXGA 16:10 1280x800 16,32 60Hz
XGA 4:3 1024x768 16,32
60HZ, 70HZ,
75HZ, 85HZ, 120HZ
SVGA 4:3 800x600 16,32 60HZ , 72HZ,
75HZ , 85HZ,
120HZ , 160HZ
VGA 4:3 640x480 16,32 60HZ, 72HZ,
75HZ, 85HZ,
120HZ, 160HZ
Profondeur
de la couleur
Remarque : Tous les taux de rafraîchissement cités sont en mode non entrelacés.
Targus ExpressCard Notebook Docking Station with Digital Video and Audio
Arrêt
Marche
Marche
Marche
Marche
Marche
Marche
Arrêt
Rapport largeur
/hauteur
(Aspect ratio)
89
Page 91

Mode Veille générale
Lorsque votre ordinateur est en mode veille, la station d'accueil se met
également en mode veille afin d'éviter de consommer de l'électricité
inutilement. Lorsque votre ordinateur revient en mode actif, la station
d'accueil en fait de même.
Utilisation de périphériques USB
qui nécessitent plus d'alimentation
Cette station d'accueil est conçue avec 4 ports USB à puissance
élevée, 2 desquels, fournissant jusqu'à 1000 mA d’alimentation
chacun. Ils peuvent être utilisés pour connecter des périphériques qui
exigent plus de puissance comme des imprimantes, des scanners, des
dispositifs optiques et d'autres.
Targus ExpressCard Notebook Docking Station with Digital Video and Audio
90
Page 92

Dépannage
Le périphérique ne marche pas
• Assurez-vous qu'il est bien inséré dans le bon port de la station
d'accueil.
• Connectez le périphérique à un autre port de la station d'accueil. S'il
ne fonctionne toujours pas, testez le périphérique en le connectant
directement à votre ordinateur.
• Vérifiez que vous avez bien suivi la procédure d'installation pour ce
périphérique.
• Assurez-vous que ce périphérique apparaît bien dans le
Gestionnaire de périphériques. Pour plus d'informations,
veuillez consulter “Vérifier que les périphériques sont bien installés”
• Débranchez l'ensemble des périphériques de la station d'accueil,
puis rebranchez-les un à la fois. Vérifiez que chaque périphérique
fonctionne avant de brancher le suivant.
• Chaque port USB est équipé d'un dispositif de protection contre la
surtension. Si un port USB consomme plus de courant que ce port
peut produire, il se fermera. Pour le réactiver, débranchez le
périphérique et allez dans le Gestionnaire de périphériques ou dans
les options de la barre d'état système et choisissez Reset. Vous
pouvez rebrancher le périphérique dans le port USB. Si une coupure
se reproduit, vérifiez la puissance nécessaire du périphérique.
Vérifier que les périphériques sont
bien installés
Vous pouvez voir les périphériques installés sur la station d'accueil à
partir de la fenêtre du Gestionnaire de périphériques dans les Propriétés système.
Faites un clic droit sur Poste de Travail, Afficher les informations
système, puis cliquez sur l'onglet Matériel, puis sur le bouton Gestionnaire de périphériques.
Targus ExpressCard Notebook Docking Station with Digital Video and Audio
91
Page 93

À partir de la fenêtre du gestionnaire de périphériques, affichez les
informations suivantes :
• Adaptateurs d’affichage — Périphérique Targus ExpressCard avec
fonction vidéo
• Périphériques interface utilisateur — Les claviers et les dispositifs
de pointage : souris, boules de commande et manettes de jeu.
• Réseau — Realtek RTL 8110SC adaptateur Ethernet
• Ports (COM & LPT) — Port série sur USB [COM x]
• Contrôleurs audio, vidéo et jeu — affiche le périphérique audio USB
• Contrôleurs de bus — affiche les autres périphériques installés sur
la station d'accueil et le concentrateur (hub).
Vérifier une connexion de modem de
port série
Lorsque vous branchez un modem de port série au port série (RS232),
vérifiez que le port assigné à votre modem est bien le port série USB,
(COMx), où x représente le numéro du port COM.
Si le système d'exploitation ne détecte pas automatiquement
l'affectation de votre modem à la prise série USB (COMx), utilisez à
nouveau l'assistant et choisissez Sélectionner dans la liste à la place
de Détection automatique. Puis, choisissez Port USB série (COMx)
comme port COM.
Message d'erreur sur votre assistant
numérique
Si le message d'erreur « Connexion non établie » apparaît sur votre
assistant numérique, vérifiez que les paramètres du port COM du
logiciel HotSync ou ActiveSync correspondent aux paramètres de la
station d'accueil. Voir le paragraphe “Vérifier que les périphériques
sont bien installés” afin de vérifier les paramètres du port COM sur la
station d'accueil.
Certaines versions anciennes du logiciel Palm® Desktop ne sont pas
compatibles avec le port USB pour la conversion en série. Veuillez
contacter le revendeur de votre assistant numérique pour vous
procurer les dernières mises à jour.
Targus ExpressCard Notebook Docking Station with Digital Video and Audio
92
Page 94

Vidéo
Puis-je obtenir une meilleure résolution sur mon moniteur ?
La lecture d'un film est-elle de plus mauvaise qualité lorsqu'elle
est réalisée en mode plein écran ?
La station d'accueil Targus ExpressCard n'est pas conçue à la base
pour lire des films en résolution et couleurs maximales. Le meilleur
mode pour afficher le contenu de la vidéo est la résolution 1280x1024
(SXGA) ou plus basse.
La raison expliquant cela est la grande quantité de données
d'affichage a transférer pendant la lecture du film. Les films DVD
standard sont codés en une résolution de 720x480 (NTSC) et 720x576
pour des disques de standard PAL. L'affichage de résolution plus
haute aboutira à un dérèglement de l'affichage et affecterait la qualité
de lecture du film.
Arrêts inattendus ou problème de perte de puissance?
Assurez-vous que votre système possède la dernière version BIOS
disponible. La majorité des vendeurs de système les plus connus ont
sorti des mises à jour du BIOS qui corrige beaucoup de problèmes liés
à la carte ExpressCard.
La lecture d'un film n'est pas régulière quand il est lu en résolution
1600x1200x32 bits.
Les moyens d'améliorer la régularité de la lecture d'un film sont :
• Réduire la résolution de l'affichage à 1280x1024 avec un nombre de
couleurs inférieur (Couleur 16 bits)
• Arrêter les autres applications fonctionnant sur l'ordinateur, qui
sollicitent fortement le microprocesseur.
Je n'arrive pas à lire un DVD lorsque j'utilise la Station d'accueil?
La lecture DVD est contrôlée par le périphérique et le logiciel de
lecture de DVD de votre portable. Beaucoup de logiciels de lecture
DVD ne sont pas capables de supporter la lecture DVD sur un
moniteur externe ou secondaire. Si vous rencontrez des problèmes en
lisant en mode Extended, essayez de basculer le commutateur de la
station d'accueil sur la position Primary ou Miror.
Targus ExpressCard Notebook Docking Station with Digital Video and Audio
93
Page 95

Assurez-vous que votre système possède la dernière version BIOS
disponible. La majorité des vendeurs de système les plus connus ont
lancé des mises à jour du BIOS qui corrige beaucoup de problèmes
liés à la carte ExpressCard.
Comment connecter deux écrans distincts à la station d'accueil
ExpresseCard (VGA et DVI-D) et afficher deux images séparées
ou étendre le poste de travail sur trois écrans (en incluant l'écran
du portable) ?
Le numéro de sortie du port VGA et du port DVI est le même.
Essayez de basculer le commutateur de lancement sur la position On
et essayez de redémarrer.
Audio
Je n'entends rien dans les Haut-parleurs de mon portable.
Quelques portables rencontrent des problèmes lorsque la Station
d'accueil Expresscard avec dispositif audio USB est connectée,
mettant hors de service les haut-parleurs intégrés. Pour faire fonctionner les haut-parleurs de votre portable, faites la chose suivante :
1. Ouvrir le Panneau de configuration et sélectionnez "Son, voix et
périphérique audio".
2. Dans l'onglet "Audio", section "Lecture audio", sélectionnez le
Dispositif interne Audio de votre portable (Qui doit être un autre
dispositif que le périphérique Audio USB de la Station d'accueil).
Si vous ne pouvez pas toujours faire fonctionner vos haut-parleurs
avec le périphérique Audio :
1. Ouvrez le panneau de configuration et sélectionnez "son, voix et
périphériques audio".
2. Dans l'onglet "Audio", section "Volume", cliquez sur "Paramètres
avancés".
3. Décochez la case "Tous muets"
REMARQUE : Vous devez fermer toutes les applications qui utilisent du
son et redémarrer votre ordinateur pour permettre ce changement.
Targus ExpressCard Notebook Docking Station with Digital Video and Audio
Mon système s'arrête pendant le lancement (boot) lorsque le
connecteur de la carte est installé ?
Mon écran devient blanc (noir) quand je connecte l'ExpressCard
à mon ordinateur.
Assurez-vous que l'ExpressCard est correctement connecté et
vérifier le mode d'affichage dans la barre de système pour un réglage
correct.
94
Page 96

Support technique
Pour les questions techniques, merci de visiter :
Internet http://www.targus.com/support
Anglais http://www.targus.com/uk/support.asp
Français http://www.targus.com/fr/support.asp
Allemand http://www.targus.com/de/support.asp
Espagnol http://www.targus.com/sp/support.asp
Italien http://www.targus.com/it/support.asp
Nos employés qualifiés sont également disponibles aux
numéros de téléphone ci-dessous pour répondre à vos
questions.
l'Autriche 01 795 676 42
Allemagne 0211-6579-1151
Belgique 02-717-2451
Danemark 45 0 35-25-87 51
Espagne 91-745-6221
Finlande 922948016
France 01-6453-9151
Italie 02-4827-1151
Hollandes 02 0504 0671
Norvège 022577729
Le Portugal +351 21 415 4123
Royaume-Uni 020-7744-0330
Suède 08-751-4058
Suisse 01-212-0007
Europe de l'Est et autres pays +31 0 20-05040671
Targus ExpressCard Notebook Docking Station with Digital Video and Audio
95
Page 97

Enregistrement du produit
Targus vous conseille vivement d'enregistrer votre accessoire
Targus dans les plus brefs délais après son achat. Pour
l'enregistrer connectez-vous à :
http://www.targus.com/registration.asp
Vous serez invité à fournir votre nom complet, votre adresse de
courriel et des renseignements sur votre entreprise (le cas
échéant).
Garantie
Targus garantit ce produit contre tout défaut de matériel ou de
fabrication pour une durée de deux ans. Si votre accessoire
Targus s'avère défectueux sous cette garantie, nous veillerons à
le remplacer ou à le réparer au plus vite. Cette garantie ne couvre
pas les dommages résultant d'accidents, l'usure normale ou les
pertes consécutives ou accessoires. En aucun cas, Targus ne
pourra être tenu responsable de la perte matérielle ou de
l'endommagement d'un ordinateur, ni de la perte de programmes,
d'enregistrements ou de données ou de leur endommagement, ni
de tout autre dommage indirect ou accidentel, même si Targus a
été préalablement informé de cette possibilité. Cette garantie n'a
aucun effet sur vos droits statutaires.
Respect de la réglementation
Cet appareil est conforme à la section 15 des règlements de la
FCC (Federal Communication Commission). Son utilisation est
soumise aux deux conditions suivantes : 1) Cet appareil ne peut
provoquer de brouillage préjudiciable. 2) Cet appareil doit
absorber toute interférence réceptionnée, même si cela provoque
des effets indésirables sur son fonctionnement.
Déclaration de la FCC
Te st é e t c onfo r me
Cet appareil a été testé et déclaré conforme aux limites des
appareils numériques de Classe B, selon la section 15 des
règlements de la FCC (Federal Communication Commission).
Ces limites sont conçues pour assurer une protection raisonnable
contre un brouillage préjudiciable lorsque l'appareil est utilisé
Targus ExpressCard Notebook Docking Station with Digital Video and Audio
96
Page 98

dans un milieu résidentiel. L'appareil génère, utilise et peut
diffuser de l'énergie sur les fréquences radio et, s'il n'est pas
installé et utilisé conformément au mode d'emploi, il peut brouiller
les communications radio. Il n'y a aucune garantie qu'un
brouillage ne se produira pas dans un milieu particulier.
Si cet appareil brouille les communications radio ou télévision,
comme cela peut être confirmé en éteignant puis en allumant
l'appareil, l'utilisateur peut tenter de corriger toute interférence en
essayant une ou plusieurs des méthodes suivantes :
• Réorienter l'antenne réceptrice ou la placer à un autre endroit;
• Éloigner davantage l'appareil du récepteur;
• Brancher l'appareil sur une autre prise de courant ou un circuit
électrique différent de celui auquel le récepteur est connecté;
• Pour toute aide, consulter le distributeur ou un technicien
expérimenté radio/TV.
Conformément à la directive
Cet appareil se situe au-dessous de la classification Class 1
conformément à la R&TTE Directive (99/5/EC). Cet appareil
fonctionne en faible puissance. L'appareil est prévu pour un
usage au bureau ou à la maison. Cet accessoire peut être utilisé
dans tous les pays européens.
Politique de recyclage TARGUS
Lorsque ces produits ne sont plus utilisables, merci de les
apporter à un centre de recyclage approprié dans votre pays. La
politique de recyclage TARGUS est consultable à l'adresse
www.targus.com/recycling
Toute modification non autorisée par les autorités responsables de
la conformité peut entraîner la révocation du droit d'utilisation de ce
produit.
Targus ExpressCard Notebook Docking Station with Digital Video and Audio
Microsoft, Windows et Windows Vista sont des marques déposées ou
commerciales de Microsoft Corporation aux États-Unis et/ou dans d'autres pays.
Toutes les marques commerciales et déposées sont les propriétés de leurs
détenteurs respectifs. Tous droits réservés.
97
Page 99

DOCKING STATION
UNIVERSALE PER
NOTEBOOK
EXPRESSCARD
TM
CON
VIDEO E AUDIO
DIGITALE
Introduzione
Congratulazioni per l'acquisto della Docking Station Universale per Notebook ExpressCard Targus con Video Digitale ed
Audio diffusione. Questo modulo di espansione portatile,
consente di connettere tramite lo slot ExpressCard fino a 4
dispositivi USB, monitor o LCD, Gigabit Ethernet/LAN ad alta
velocità, audio PC di canale 5.1 con S/PDIF in fibra ottica e
una porta seriale per i dispositivi associati.
La docking station offre anche la tecnologia Targus Always
On, le Porte di Corrente USB Targus che forniscono il doppio
della corrente rispetto alle specifiche USB standard e debitamente spaziate per adattatori più grandi. Always On Targus
fornisce corrente alle porte USB anche quando il notebook
viene spento, disconnesso dalla docking station o impostato
nella modalità standby in maniera tale da mantenere i dispositivi USB sempre in carica.
98
Page 100

Targus ExpressCard Notebook Docking Station with Digital Video and Audio
Design Ergonomico
Il design ergonomico migliora il flusso di aria sotto al notebook per
un funzionamento fresco. La piattaforma rialzata offre una posizione
più confortevole per scrivere.
Caratteristiche
• (4) porte ad Alta Velocità USB 2.0
• (1) porta Seriale (RS232)
• (1) connettore DVI-D a 24 pin
• (1) connettore HD-15 (HD D-sub) VGA
• (1) connessione cavo upstream ExpressCard
• (1) Ethernet 10/100 Gigabit RJ-45
• (3) jack per audio diffusione Surround 5.1
• (1) Microfono In
• (1 )digital audio out S/PDIF (Connettore in fibra ottica TOSLINK)
• (2) Slot per Chiusura di Sicurezza
Contenuti della Confezione
Oltre a questo manuale utente, la confezione contiene:
• Docking Station Universale per Notebook ExpressCard Targus con
Video ed Audio Digitale
• Scheda (con spaziatore) e Cavo ExpressCard
• Adattatore AC (necessario per far funzionare il dock)
• Driver del CD
NOTA: TARGUS CONSIGLIA DI VISITARE IL SITO WEB RAGGIUNGIBILE DAL LINK SOTTO PER GARANTIRE CHE ABBIATE L'ULTIMA
VERSIONE DI DRIVER DA SCARICARE GRATUITAMENTE. SEGUIRE
LE ISTRUZIONI PER IL DOWNLOAD E I PASSAGGI DI INSTALLAZIONE SULLA GUIDA UTENTE.
HTTP://WWW.TARGUS.COM/US/SUPPORT_DOWNLOADS.ASP
99
 Loading...