

Page 1
N2953
User Guide
USB 2.0
LAPTOP DOCKING
STATION WITH VIDEO
410-1896-003C / ACP51EU
©2010 Manufactured or imported by Targus Europe
Ltd., Hounslow, Middlesex, TW4 5DZ, UK. All rights
reserved. Targus is either a registered trademark or
trademark of Targus Group International, Inc. in the
United States and/or other countries. Features and
specications are subject to change without notice. All
trademarks and registered trademarks are the property
of their respective owners.
Page 2

Targus USB 2.0 Laptop Docking Station with Video
2
Targus USB 2.0 Laptop Docking Station with Video
3
Table of Contents
GB – English
USB 2.0 Laptop Docking Station With Video .................................................4
DE – Deutsch
USB 2.0 Laptop Dockstation mit Video ............................................28
DK – Dansk
USB 2.0 Dockingstation med Video .................................................52
ES – Español
Docking Station USB 2.0 con Vídeo para portátiles .......................................76
FI – Suomi
USB 2.0 kannettavan tietokoneen telakka-asema näyttö-liitännällä ...........100
FR - Français
Station d’accueil USB 2.0 avec vidéo pour ordinateur portable .....................124
IT - Italiano
Docking Station USB 2.0 per Notebook con Video .......................................148
NL - Nederlands
USB 2.0 Koppelstation voor de Laptop met videotoepassingen .................172
NO – Norsk
USB 2.0 dokkingstasjon med video for bærbare PC-er .....................196
PT - Português
Base de Ligação USB 2.0 com Vídeo para PC Portátil .............................220
SE – Svenska
USB 2.0 laptop dockningsstation med video .......................................244
Page 3

Targus USB 2.0 Laptop Docking Station with Video
4
Targus USB 2.0 Laptop Docking Station with Video
5
Package Contents
In addition to this user guide, the package contains:
• Targus USB 2.0 Laptop Docking Station with Video
• High-speed USB 2.0 upstream cable
• Driver software CD (mini CD)
• AC power adapter (required)
System Requirements
Hardware
• PC with an Intel® Pentium® processor or equivalent
• CD-ROM drive (support mini CD)
• USB version 2.0 port
• AC power source (AC adapter required)
Operating System
• Mircosoft Windows® XP with Service Pack 3
• Mircosoft Windows Vista® with Service Pack 1
• Mircosoft Windows® 7
NOTE: WHEN CONNECTED TO A USB VERSION 1.1 PORT ON YOUR COMPUTER, THE DOCKING STATION’S PERFORMANCE LEVEL WILL BE LESS THAN OPTIMAL AND THE VIDEO PORT WILL NOT FUNCTION PROPERLY. FOR BEST RESULTS, CONNECT IT TO A USB VERSION 2.0 PORT.
GB - Introduction
Congratulations on your purchase of the Targus USB 2.0 Laptop
Docking Station with Video. This portable expansion module allows
you to connect through a single USB connection up to 4 USB
devices, monitor, network (Ethernet/LAN) connection, speakers
and microphone.
The docking station also offers two, Targus Power Ports providing
twice the USB spec for high power devices, and USB ports that are
widely spaced for larger adapters.
The Docking Station provides the
following ports:
• DVI Single Link (supports up to 2048 x 1152 at 32 bit color)
• Two 3.5 mm Audio: (1) stereo out (1) microphone in
• RJ-45 Ethernet 10/100
• Two USB 2.0 (White)
• Two USB Power Ports (Black) - providing current up to 1 Ampere
Page 4

Targus USB 2.0 Laptop Docking Station with Video
6
Targus USB 2.0 Laptop Docking Station with Video
7
Installing the Device and Drivers
To use the Targus Docking Station, you must rst install the driver onto your
computer. Then, connect the docking station to your computer and Windows
plug-and-play will install the hardware drivers for each port.
WARNING: YOU MUST INSTALL THE DOCKING STATION SOFTWARE BEFORE
CONNECTING IT TO YOUR COMPUTER. OTHERWISE, THE DOCKING STATION
WILL NOT WORK PROPERLY.
Installing the Docking Station Driver
Installing the docking station driver enables your operating system to
recognize the docking station and its ports once it’s connected.
1 Turn on your computer.
2 Insert the driver software CD into your computer’s CD-ROM drive.
If setup does not begin automatically, click Start, Run, and enter D:\
Setup.exe (where D: is the path of your CD-ROM drive) and then click OK.
3 Follow any on-screen instructions to complete the installation.
4 Click Finish and restart your computer when prompted.
Connecting the Docking Station to
Your Computer
After installing the docking station software, you are ready to connect the
docking station to your computer. To do this:
1 Connect the supplied AC power adapter to the AC power jack on the docking
station.
2 Connect one end of the USB cable to the docking station and the other end
into an available USB 2.0 port on your computer.
WARNING: THE DOCKING STATION WILL NOT FUNCTION PROPERLY
WITHOUT THE AC ADAPTER PLUGGED INTO AN AC OUTLET.
DO NOT CONNECT ANY DEVICES TO THE DOCKING STATION UNTIL THE
INSTALLATION IS COMPLETED.
Page 5
Targus USB 2.0 Laptop Docking Station with Video
8
Targus USB 2.0 Laptop Docking Station with Video
9
D C 5 V
• Green Tx light illuminates when connected to a network and the yellow Rx
light ashes when data is transmitting to or from the network.
NOTE: THE DOCKING STATION SUPPORTS HOT SWAPPING OF THE NETWORK CABLE.
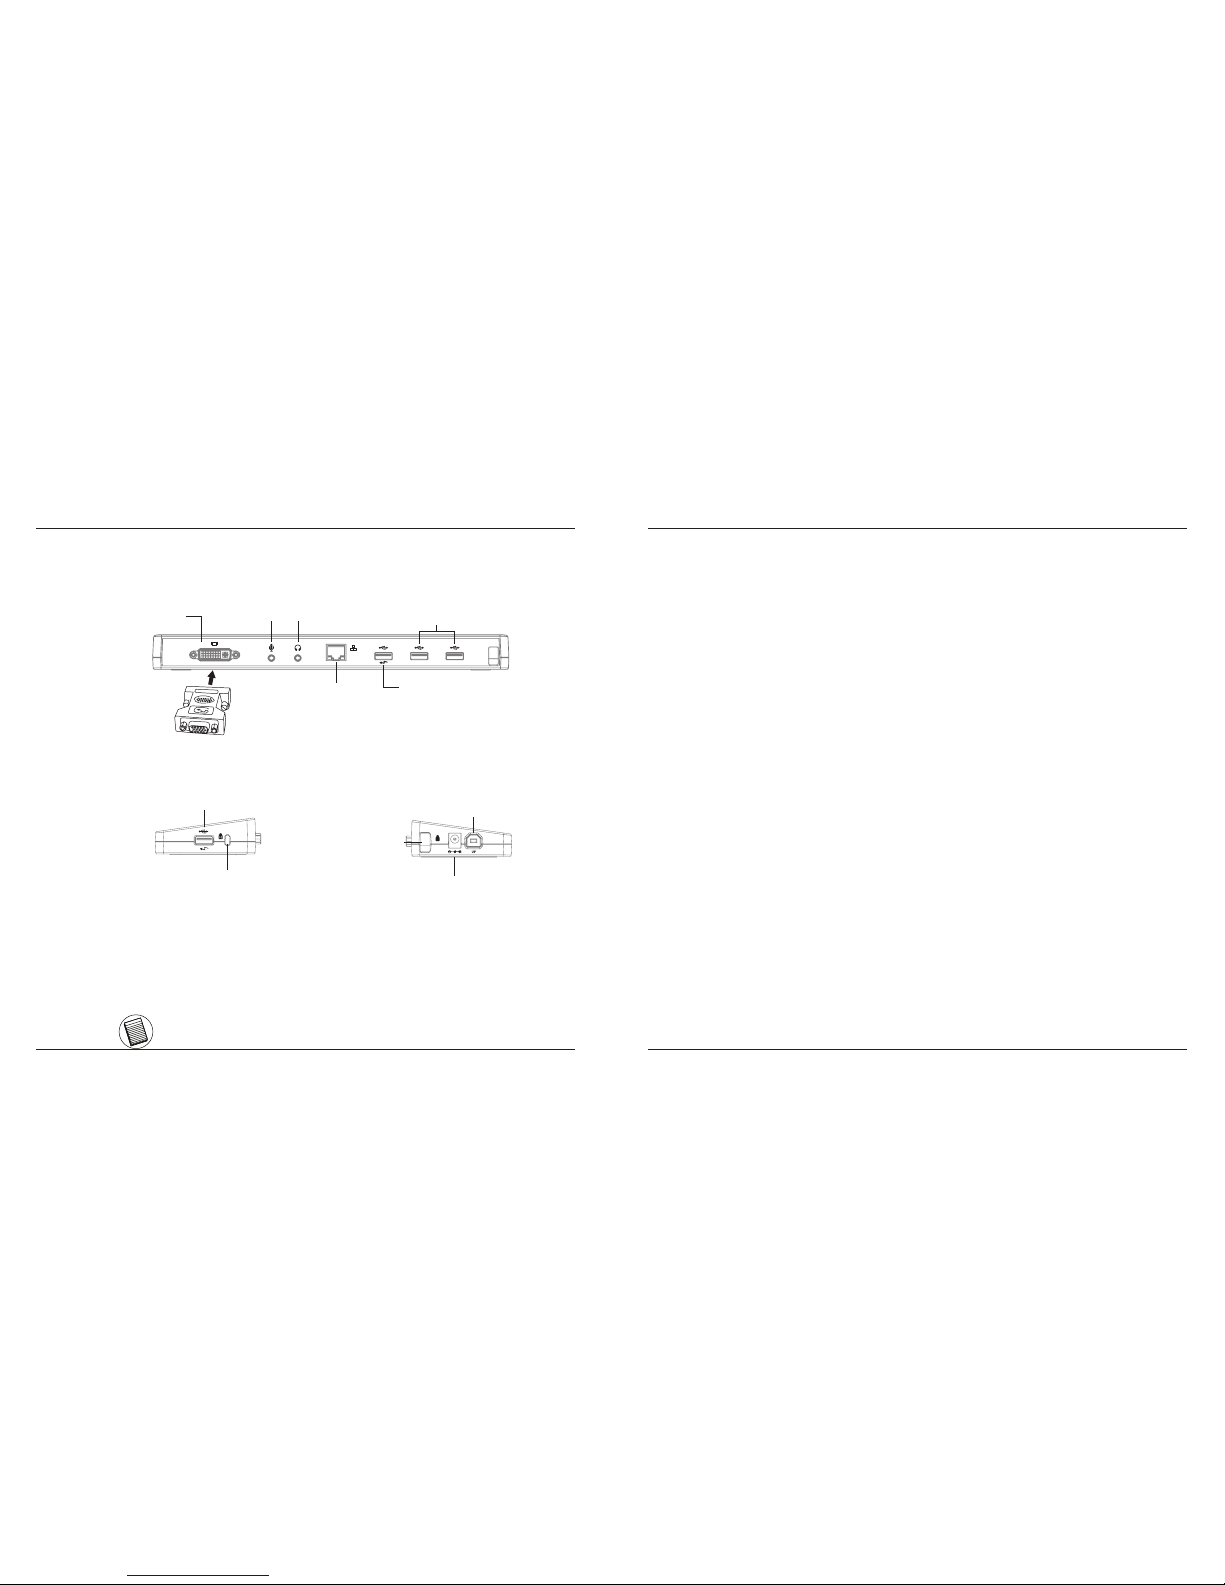
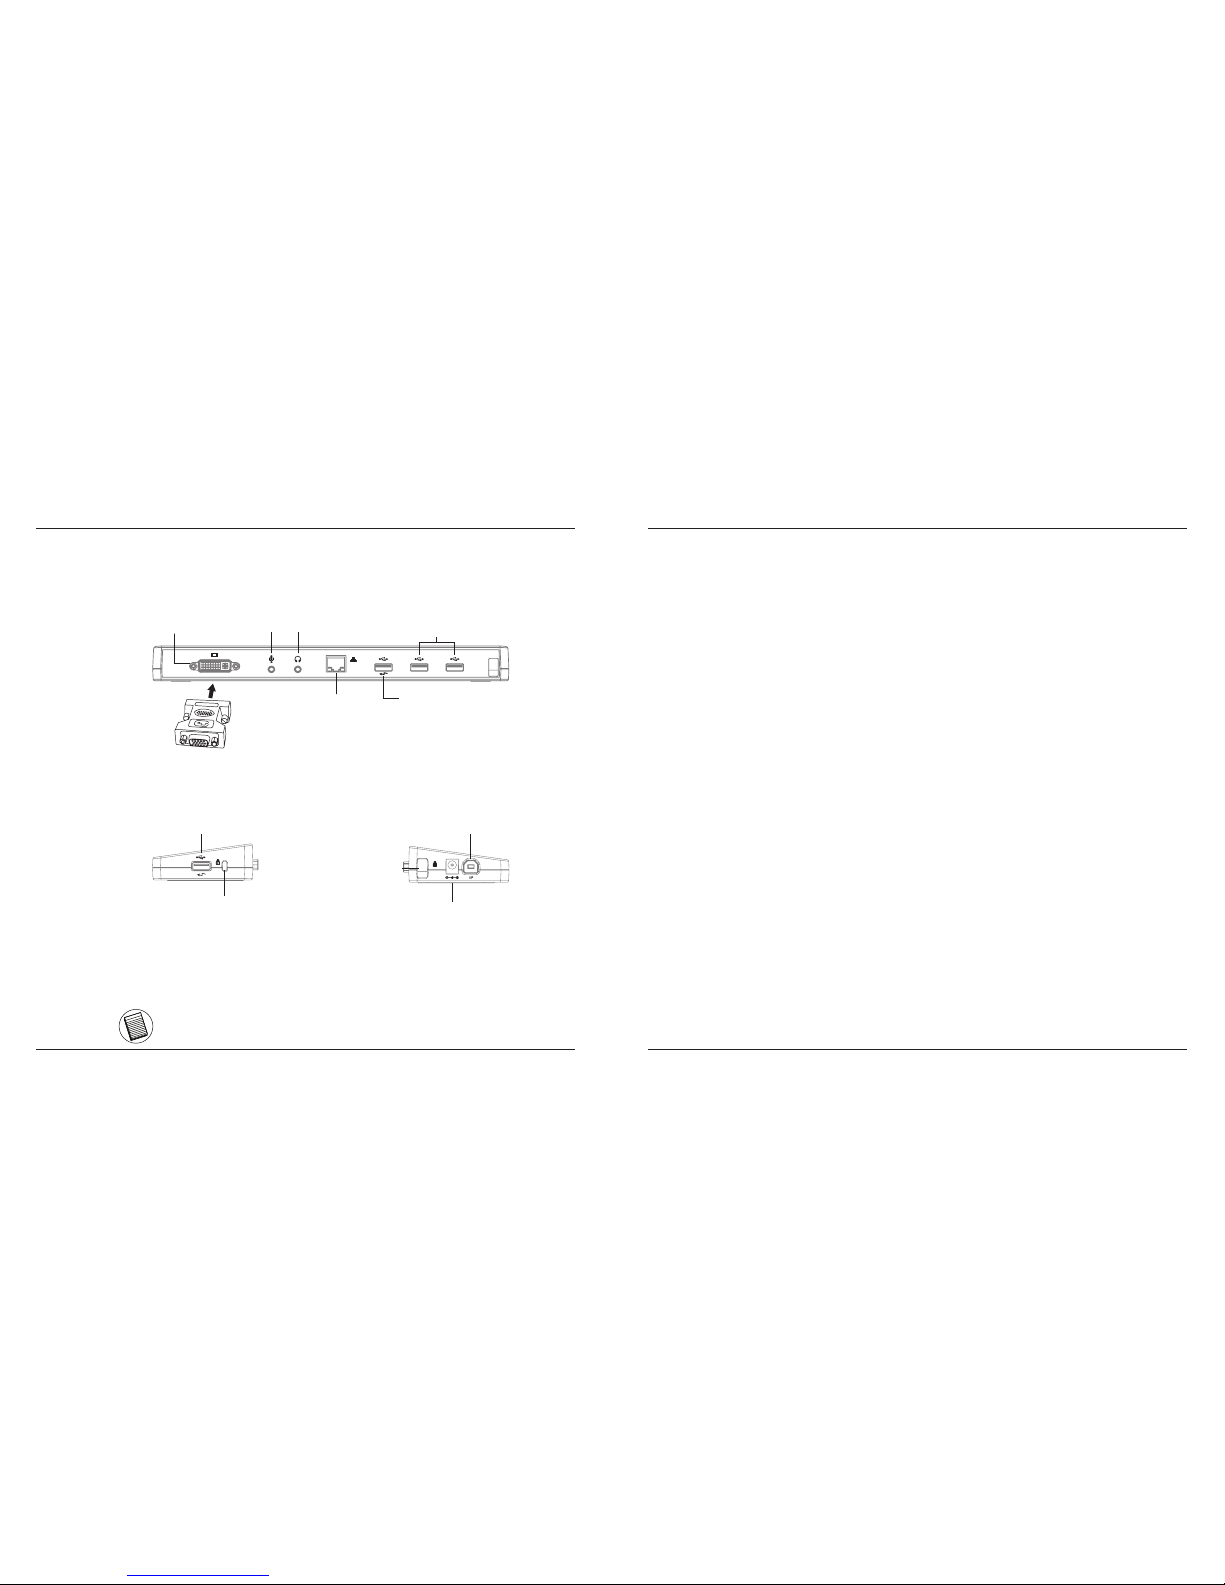
Docking Station Ports
DVI
Audio In (MIC)
Audio Out (SPK)
Network Cable
DVI to VGA adapter
USB Ports (White)
High Power USB Ports
(BLACK)
High Power USB Ports
(BLACK)
USB to PC Connection
Lock loop
AC adapter
Standard lock slot
Back View
Right side Left side
Connecting New Devices
To avoid possible damage when connecting a new device, do not force the
cable connector into the port on the docking station. If the cable connector
does not attach smoothly, turn the connector over and try attaching it again.
Connecting to a Local Area Network
To connect an ethernet cable with RJ-45 connect, attach the cable connector to the ethernet/network port on the docking station. Additional procedures to connect to an actual network depend on the type of network
you are using. Contact your network administrator for detailed instructions.
Connecting a USB Device
To connect a USB device, plug it into a USB port on the docking station
and follow the additional instructions provided with the device. All four USB
ports meet USB hi-speed requirements by providing 480Mbps through-put
and 500mA of power.
The white USB ports are high-speed ports that provide standard 500mA
of power. The black USB power ports are high-speed ports that provide
up to 1Amp.
Page 6

Targus USB 2.0 Laptop Docking Station with Video
10
Targus USB 2.0 Laptop Docking Station with Video
11
Connecting and Configuring an Audio Device
1. Plug your headphones or speakers into the green 3.5mm Audio Out port on
the docking station.
2. To connect a microphone, plug it into the mono Audio In port.
3. The sound and mic should come out automatically when you plug the dock-
ing station. Make sure that both speaker and micphone volume is not set to
MUTE.
4. To manually enable your headphones or speakers in case automatic transfer
is not possible
Go to the Control Panel and select Sound. Under the Playback tab,
check that USB Audio Device is set as the default. If it is, click OK. If it
isn’t, select it, click Set Default, then click OK.
Go to the Control Panel and choose Sound and Audio. Select the Audio
tab. Under Sound Playback, change Preferred Device to USB Multime-
dia Audio Device from the drop down list.
• Click Apply, then click OK.
For Windows XP
For Windows Vista
Go to the Control Panel and select Hardware and Sound. and choose
Sound. Under the Playback tab, check that USB Audio Device is set
as the default. If it is, click OK. If it isn’t, select it, click Set Default, then
click OK.
For Windows 7
NOTE: AUDIO DEVICES WILL NOT WORK SIMULTANEOUSLY ON THE PORT STATION AND THE HOST
COMPUTER
CAUTION: ALL AUDIO OR MULTIMEDIA APPLICATIONS MUST BE TERMINATED BEFORE SWITCHING
BETWEEN THE PORT STATION AUDIO OUTPUT AND THE HOST COMPUTER AUDIO OUTPUT.
Connecting to a Monitor or LCD
Any monitor or LCD connected to the video port of the docking station will be
limited to a maximum resolution of 2048 x 1152 at 32 bit color
NOTE: THE MAXIMUM RESOLUTION OF 2048 x 1152 IS ONLY SUPPORTED IF THE MONITOR OR LCD IS
PLUGGED INTO THE DOCKING STATION BEFORE CONNECTING THE DOCKING STATION TO THE NOTEBOOK. IF THE MONITOR OR LCD IS PLUGGED INTO THE DOCKING STATION AFTER THE DOCKING
STATION IS CONNECTED TO THE NOTEBOOK, THE RESOLUTION IS SET TO 1024 X 768.
Page 7
Targus USB 2.0 Laptop Docking Station with Video
12
Targus USB 2.0 Laptop Docking Station with Video
13
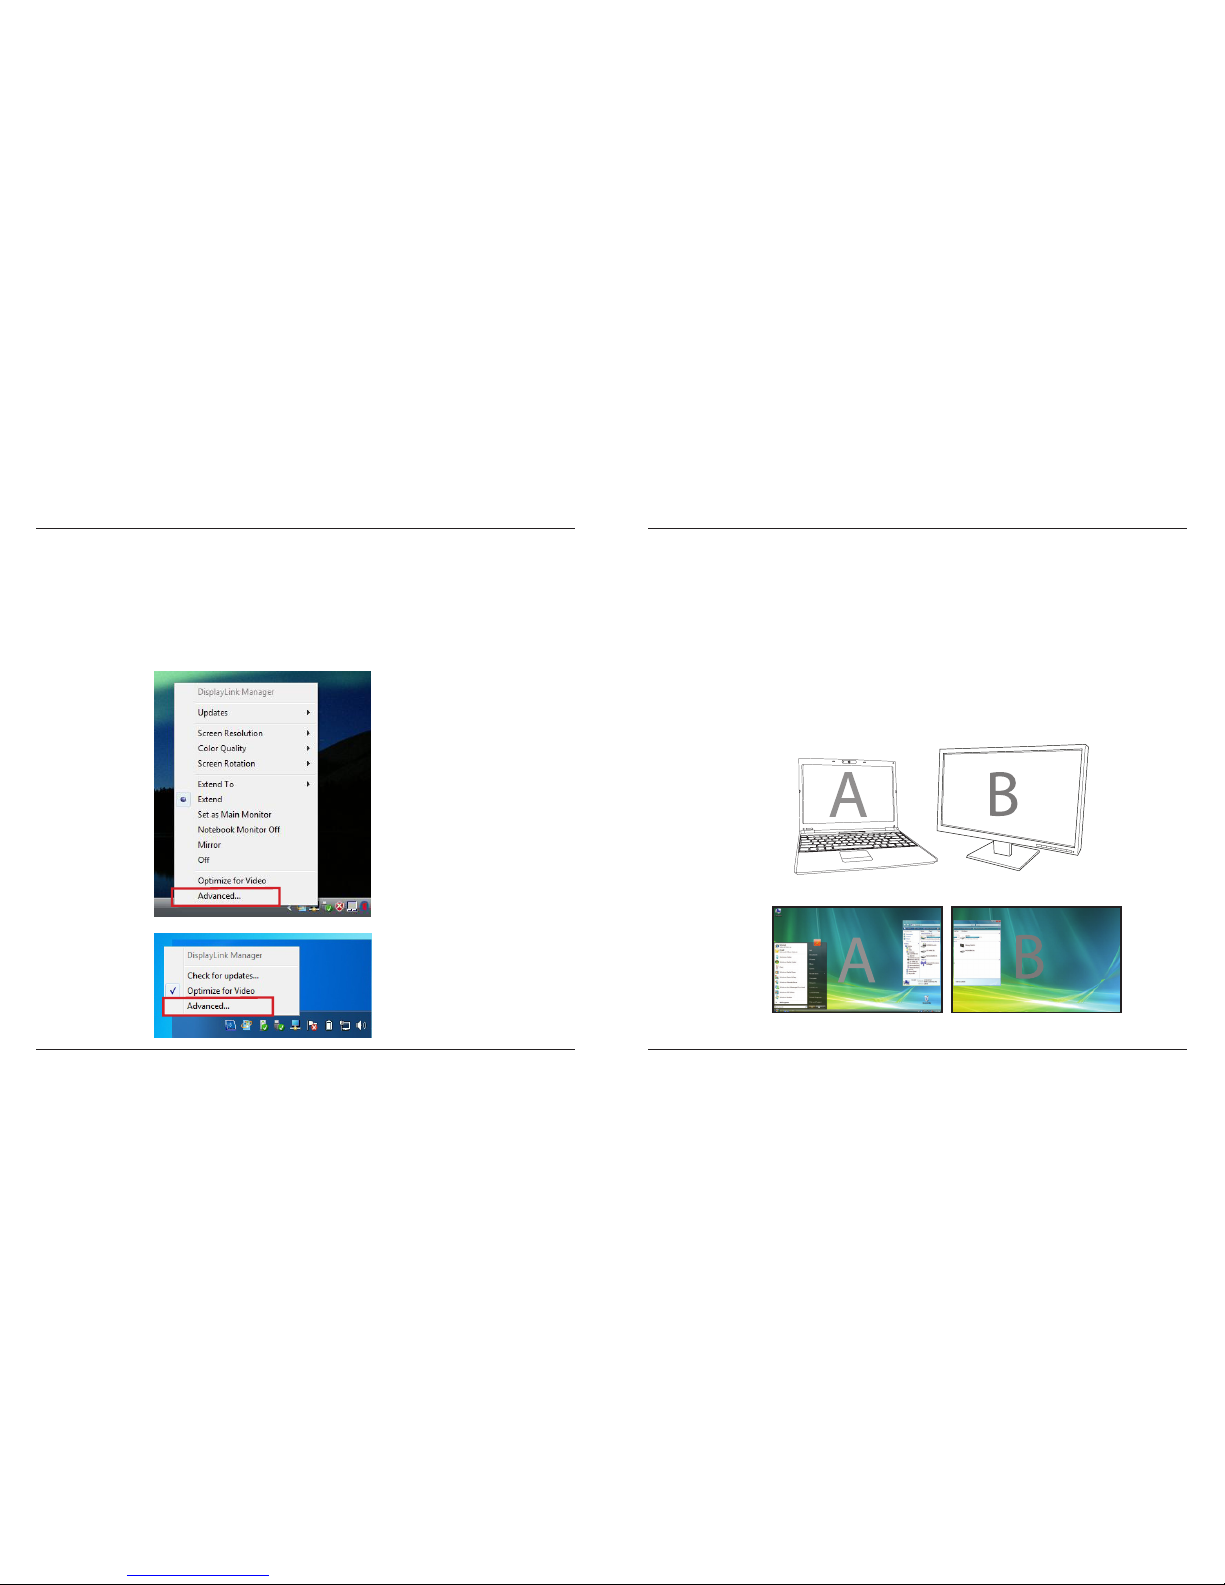
Controlling the Display using Docking
Station’s Video Menu Options
Video menu options can be accessed by right-clicking on the Docking Station icon in the system tray or through the Windows Display Properties.
Windows XP / Windows Vista
Windows 7
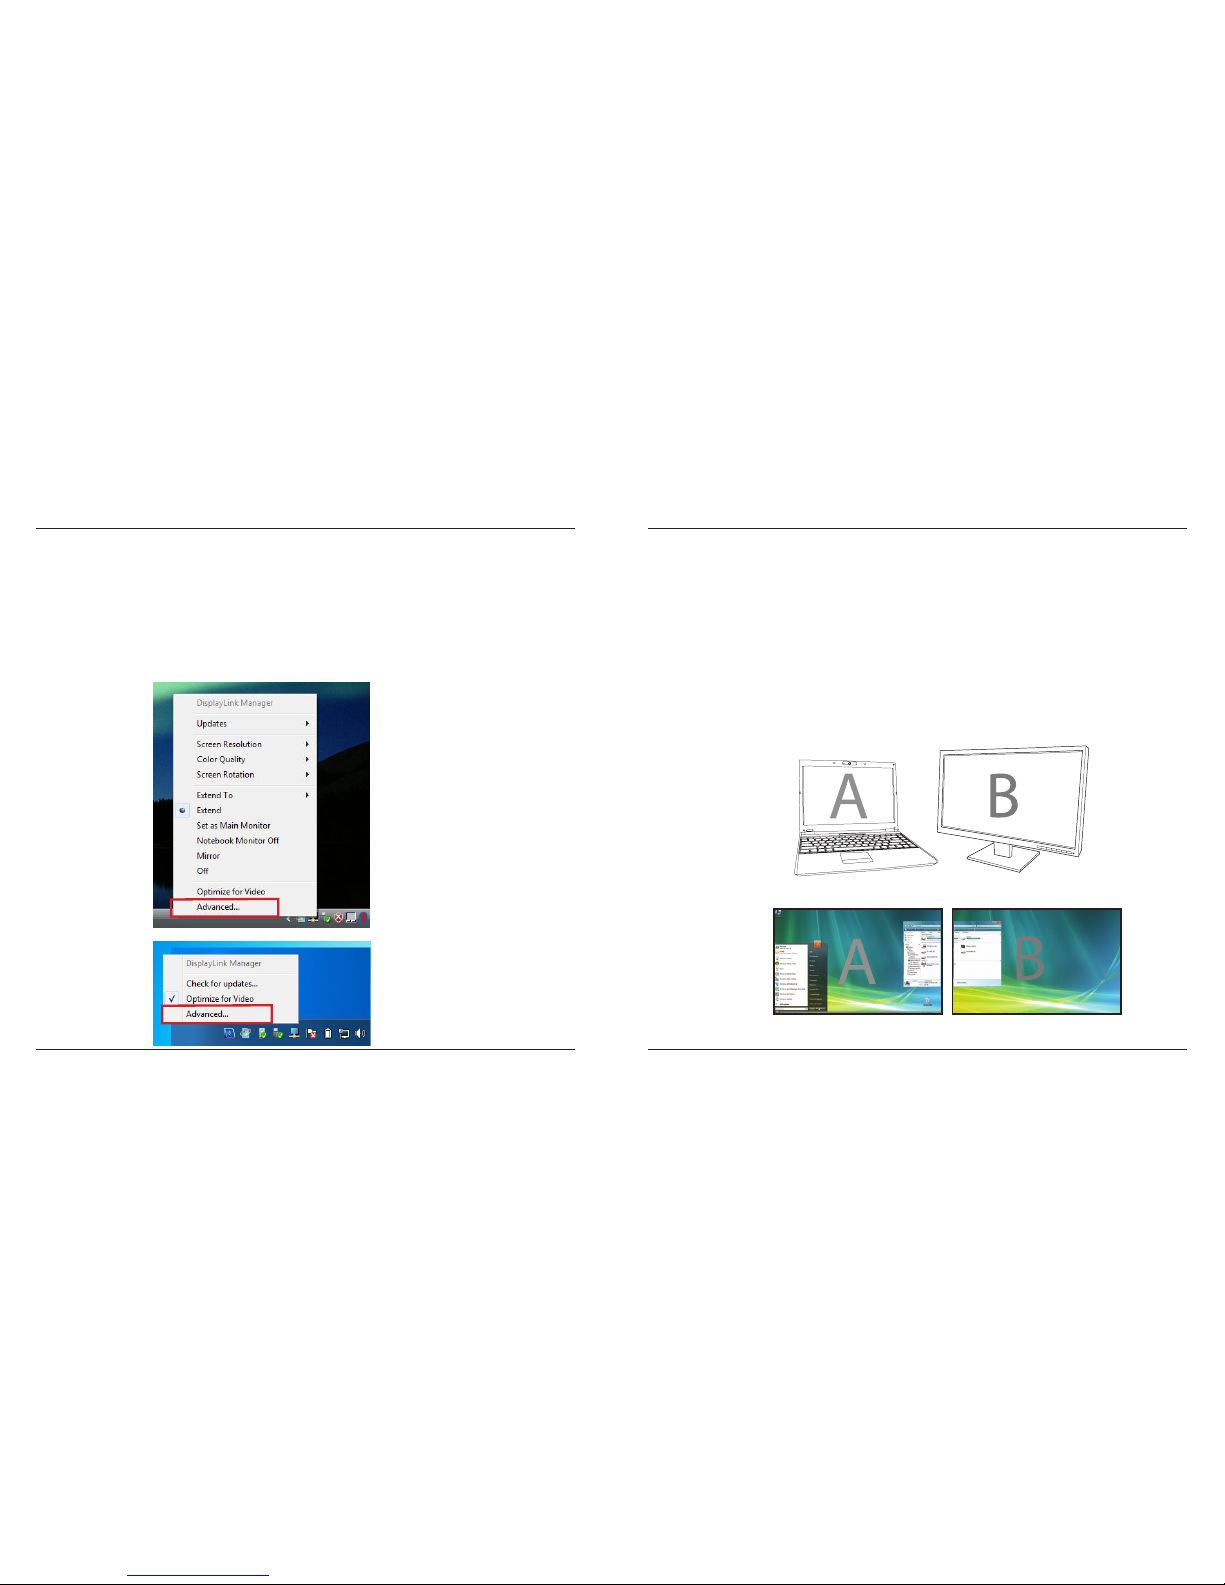
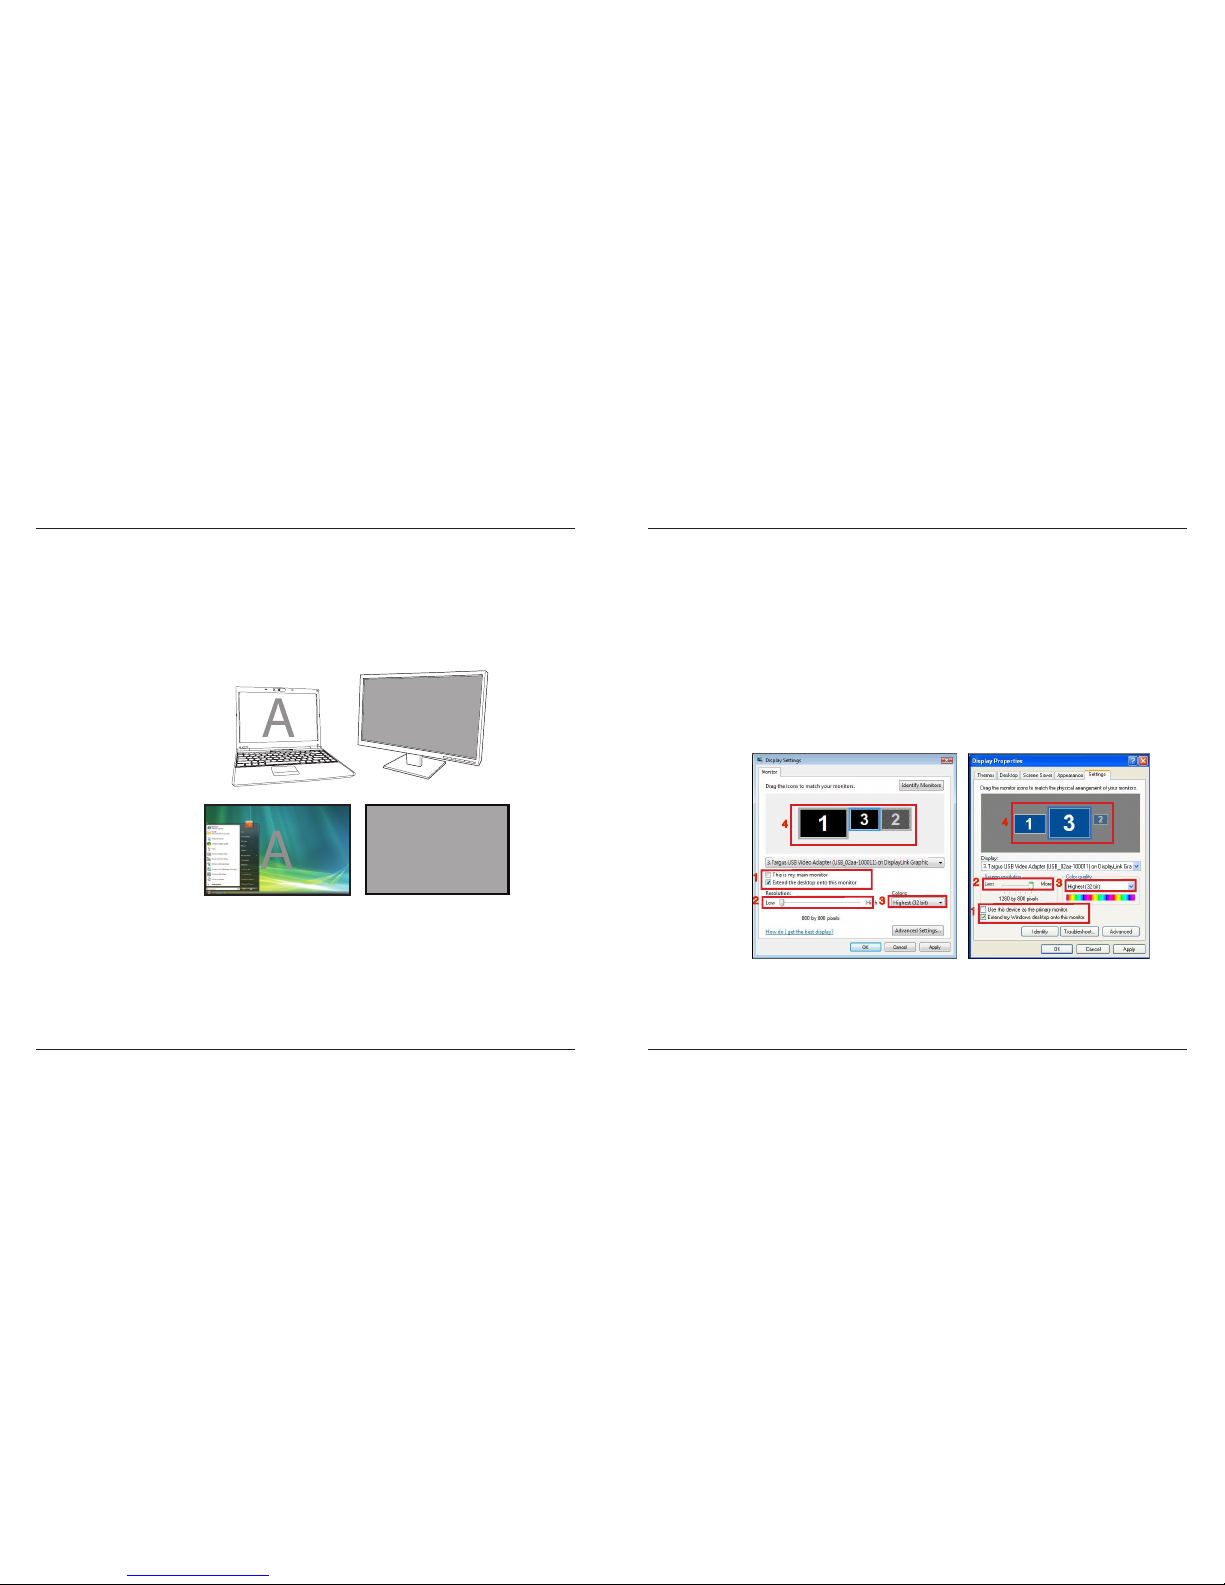
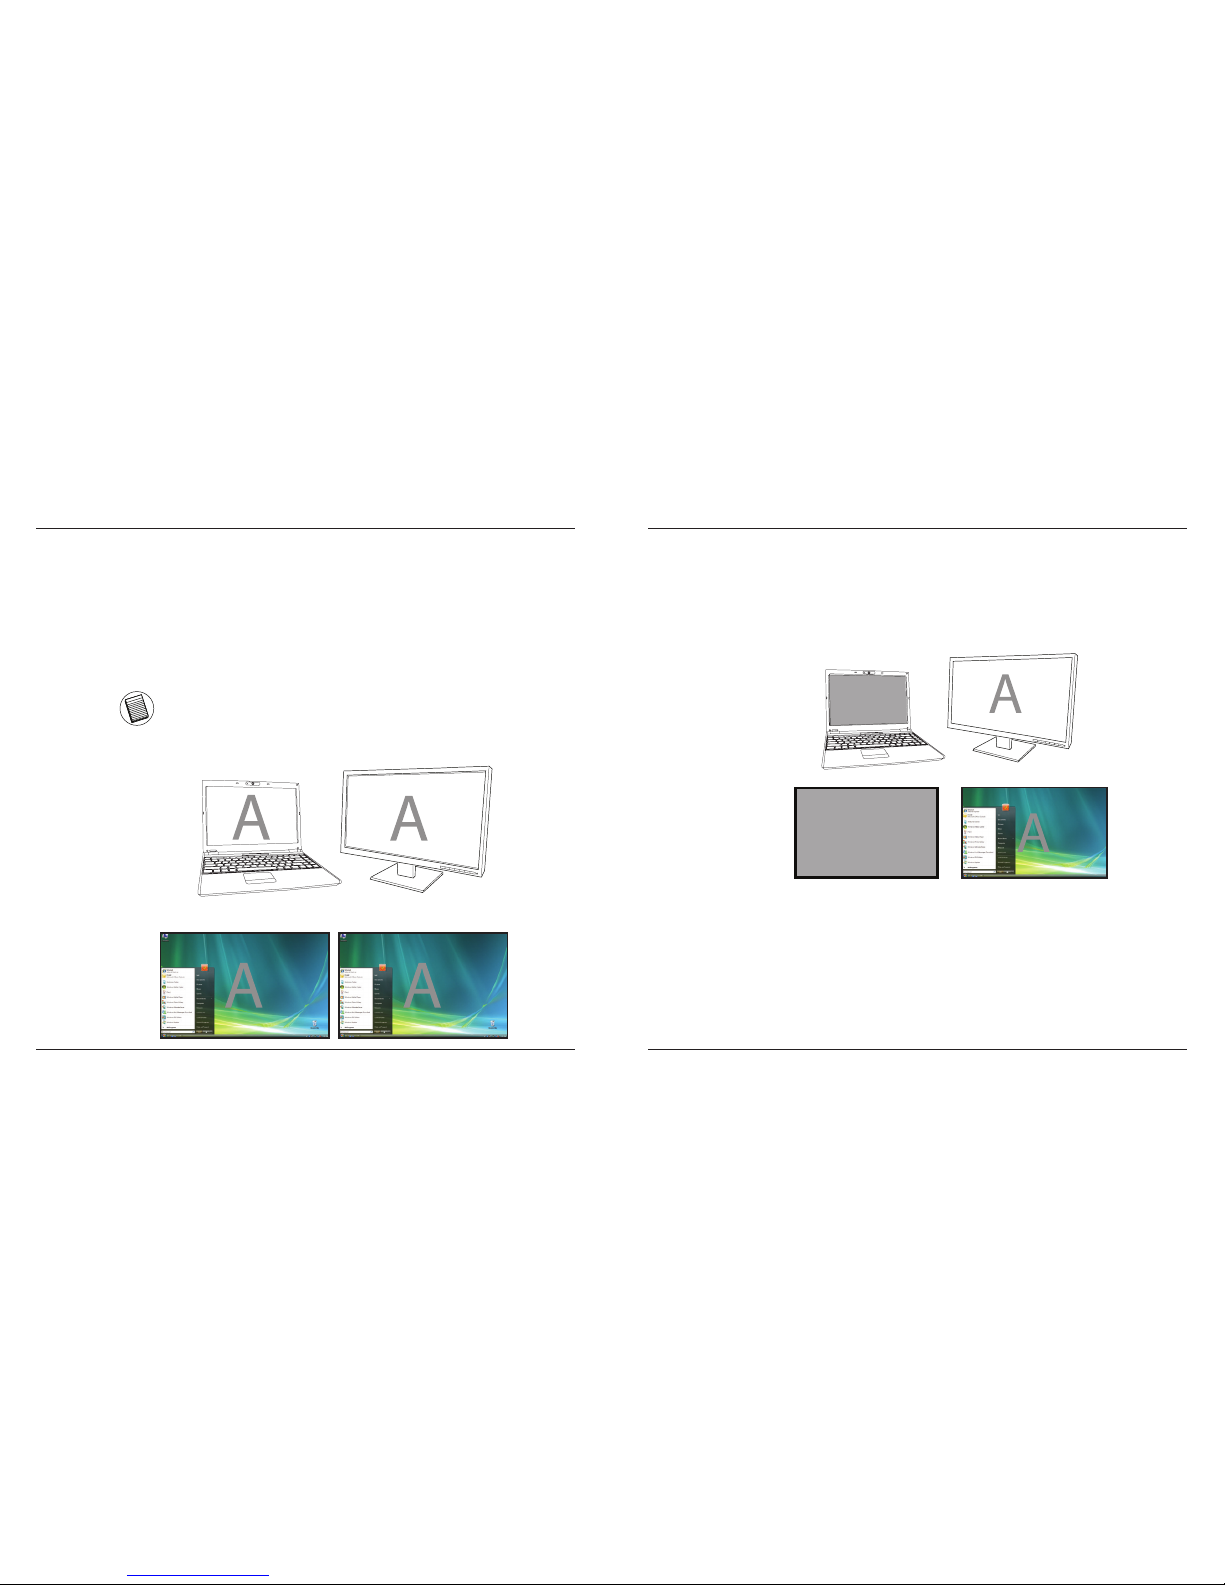
Extend: You are using your notebook screen as your primary display and
your monitor or LCD is a secondary screen.
To set the display into this mode, select ‘Extend’ in the Docking Station
Icon application menu. The device will now be extending in the direction it was the last time the display was in this mode. For more control,
navigating to the ‘Extend To’ submenu and selecting one of the options
will not only put the device into extend mode, but will also place it to the
Left/Right/Above/Below the main (primary) monitor.
Extend Mode
Page 8
Targus USB 2.0 Laptop Docking Station with Video
14
Targus USB 2.0 Laptop Docking Station with Video
15
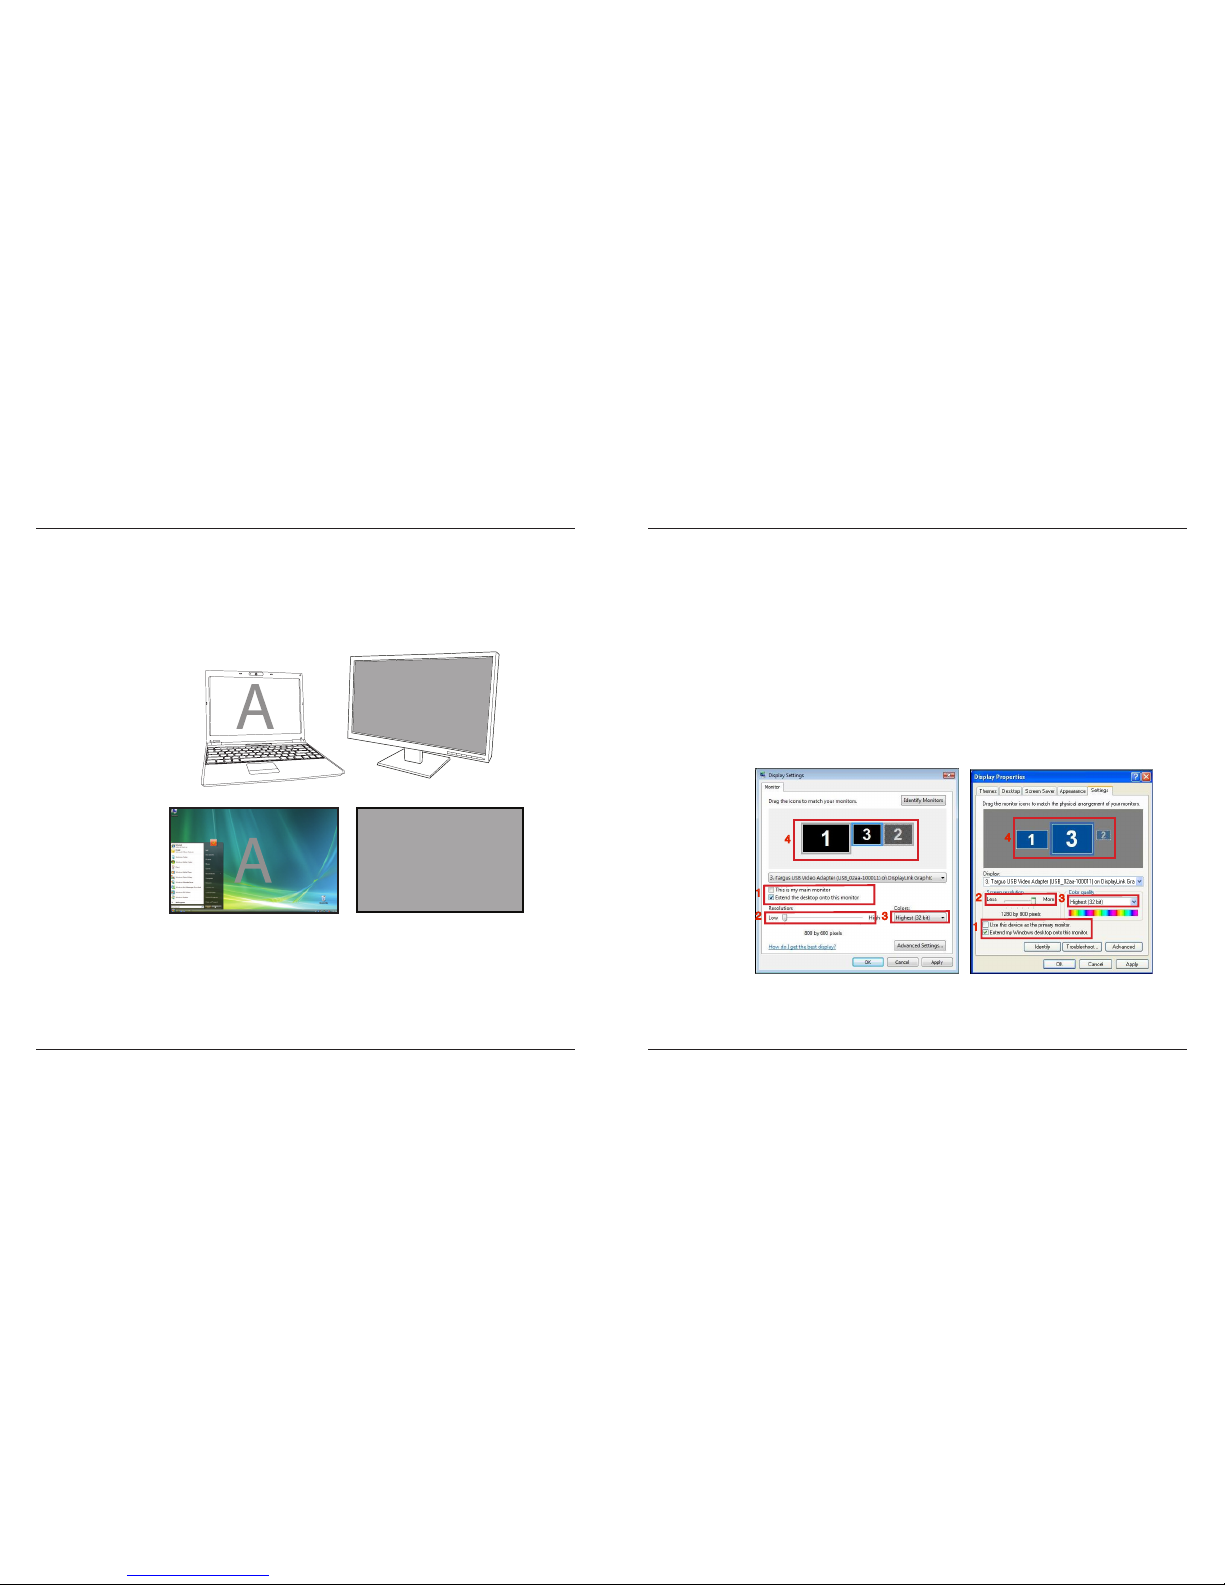
Mirror: You are using your notebook screen as your primary display and your
monitor or LCD replicates your notebook screen.
To set the display into this mode, simply select ‘mirror’ from the docking
station icon application menu. The resolution, colour depth and refresh
rate of the primary screen are replicated on the monitor connected to
the docking station graphics adapter.
NOTE: IF THE MONITOR CONNECTED TO THE DOCKING STATION SUPPORTS A LOWER RESOLUTION
THAN THE PRIMARY PICTURE FITS ON THE EXTERNAL SCREEN. WHERE THE MONITOR CONNECTED
TO THE DOCKING STATION IS OF A LARGER SIZE THAN THE PRIMARY SCREEN THE IMAGE WILL BE
LETTER-BOXED TO KEEP THE ASPECT RATIO CORRECT.
Mirror
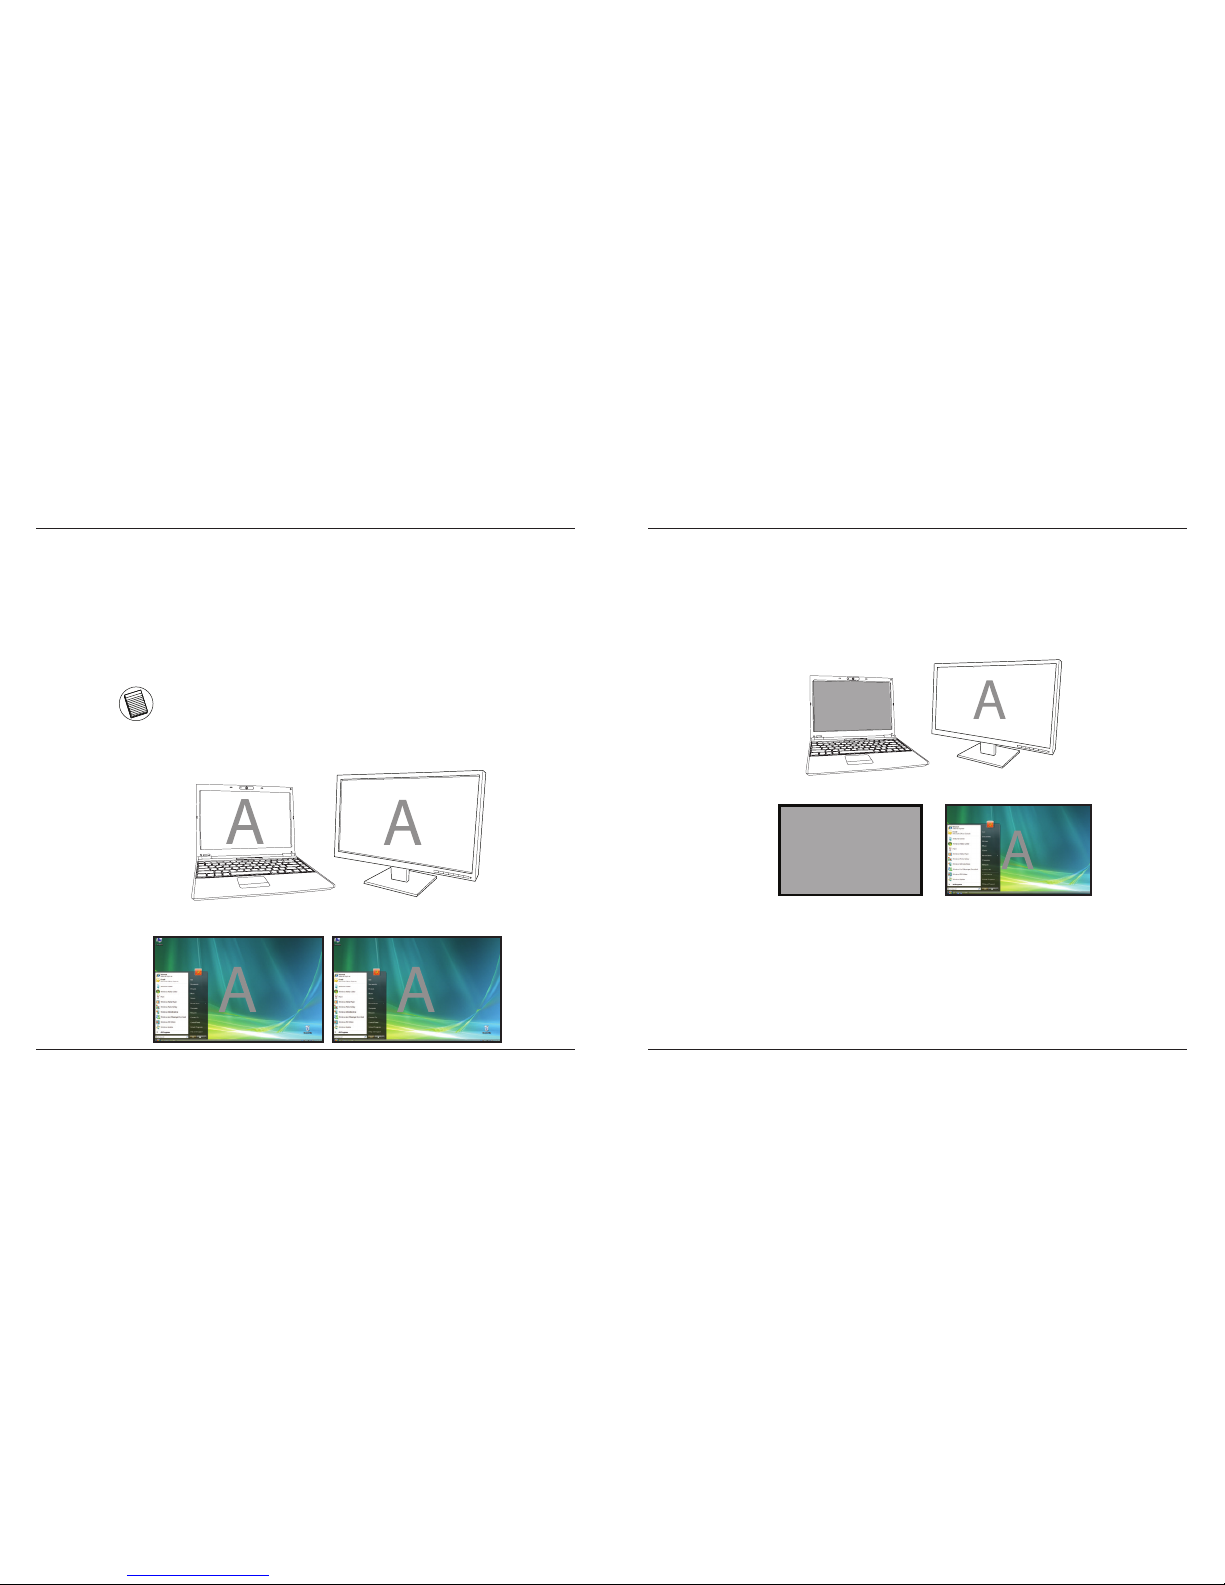
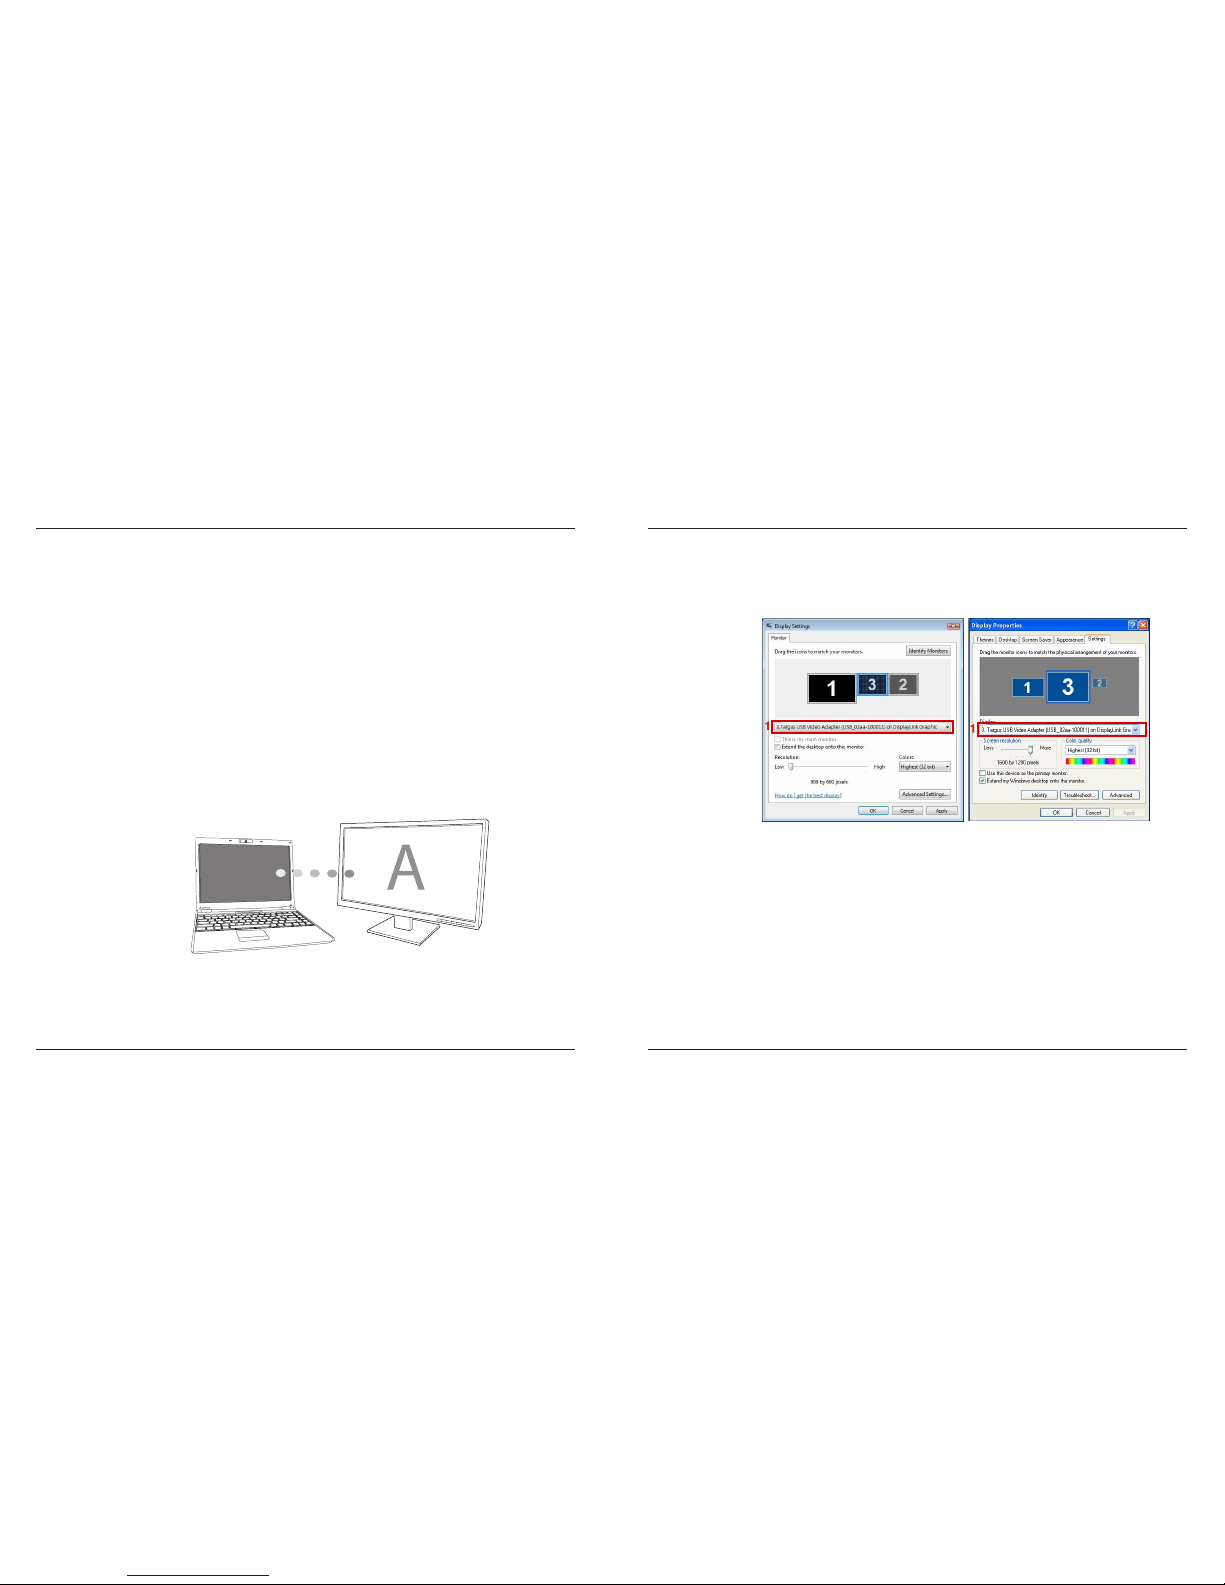
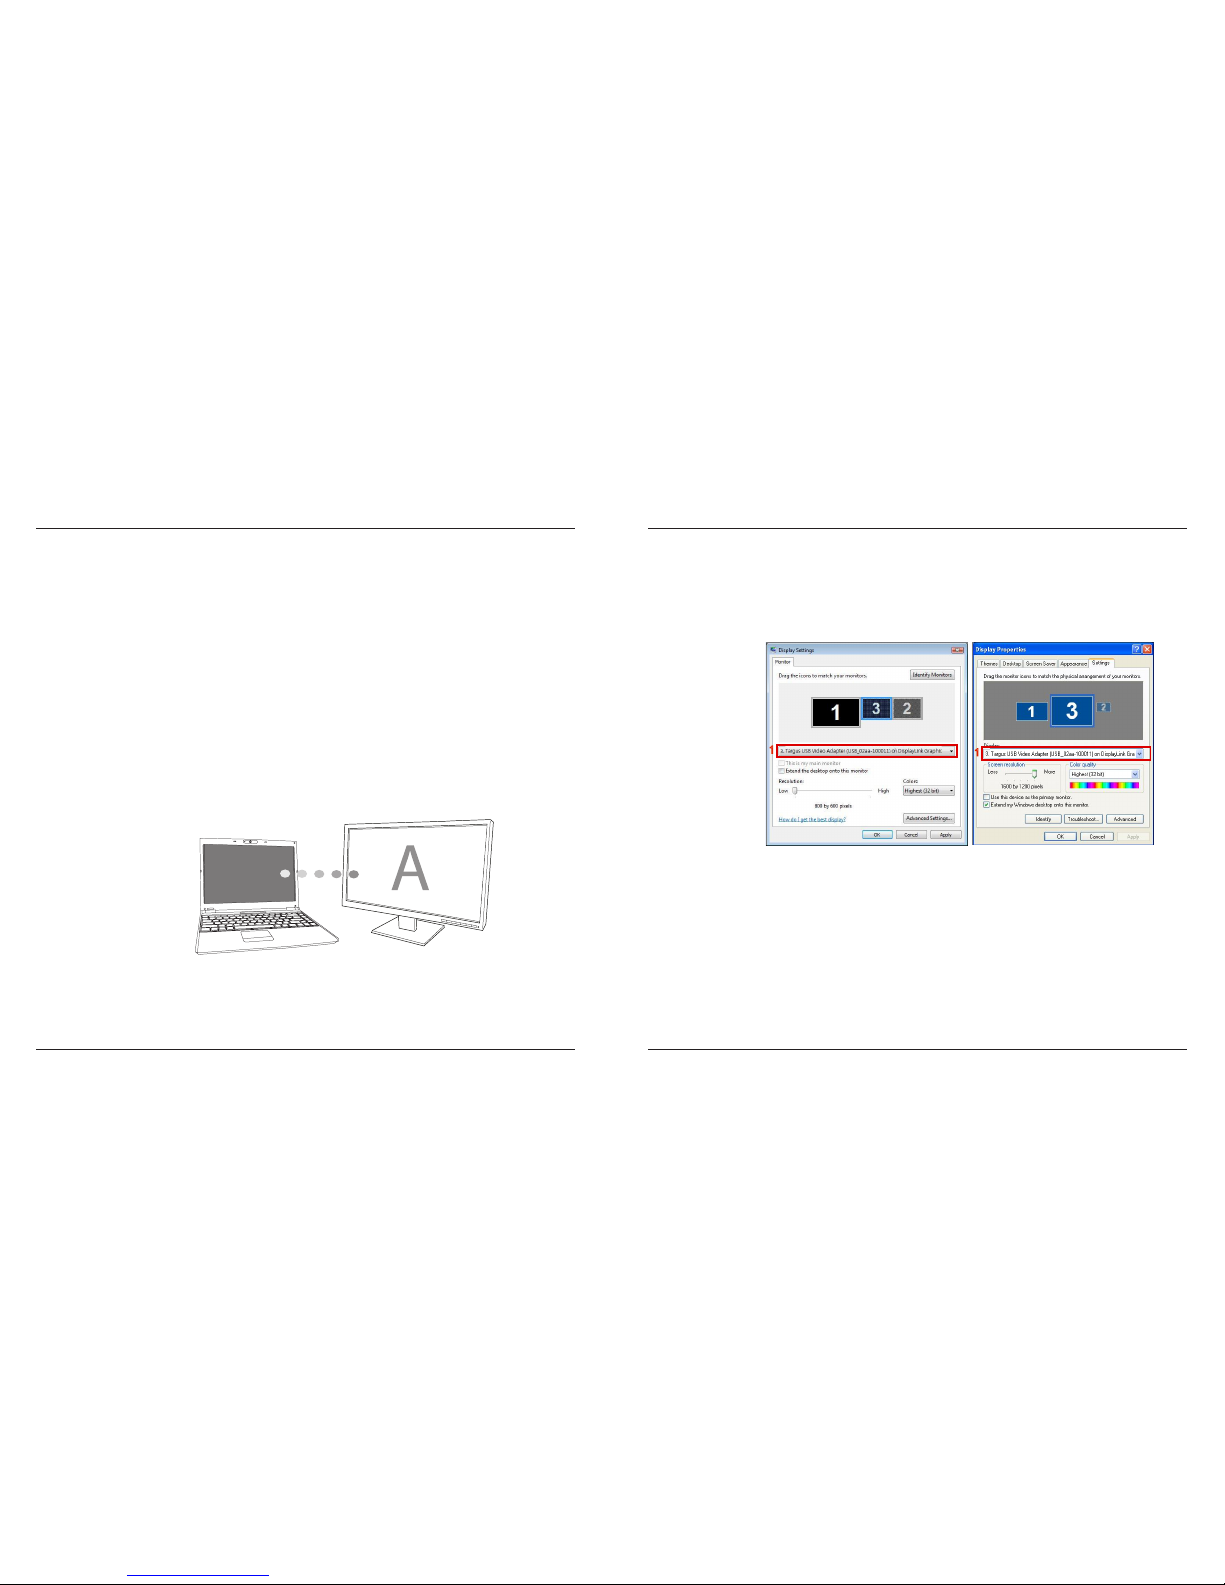
Primary (Notebook Monitor Off): You are using your monitor or LCD as
your primary display and your notebook screen is turned off. (only accessible
via windows display properties)
Primary
Page 9
Targus USB 2.0 Laptop Docking Station with Video
16
Targus USB 2.0 Laptop Docking Station with Video
17
Off: You are using your notebook screen as your primary display and your
monitor or LCD is turned off.
Off
Controlling the Display using Windows
Display Properties (for Windows XP and Vista)
Docking Station’s video setting can also be congured from the Windows
Display Properties dialog box. To do this on Windows Vista, right click on
the desktop, click on “Personalize” and then select the ‘Display Settings’ link.
The corresponding feature is available in Windows XP by right clicking on
the desktop, selecting ‘Properties’ and then navigating to the ‘Settings’ tab.
Figure 1
1
2
3
4
1
2
3
4
Windows Vista
Windows XP
Page 10
Targus USB 2.0 Laptop Docking Station with Video
18
Targus USB 2.0 Laptop Docking Station with Video
19
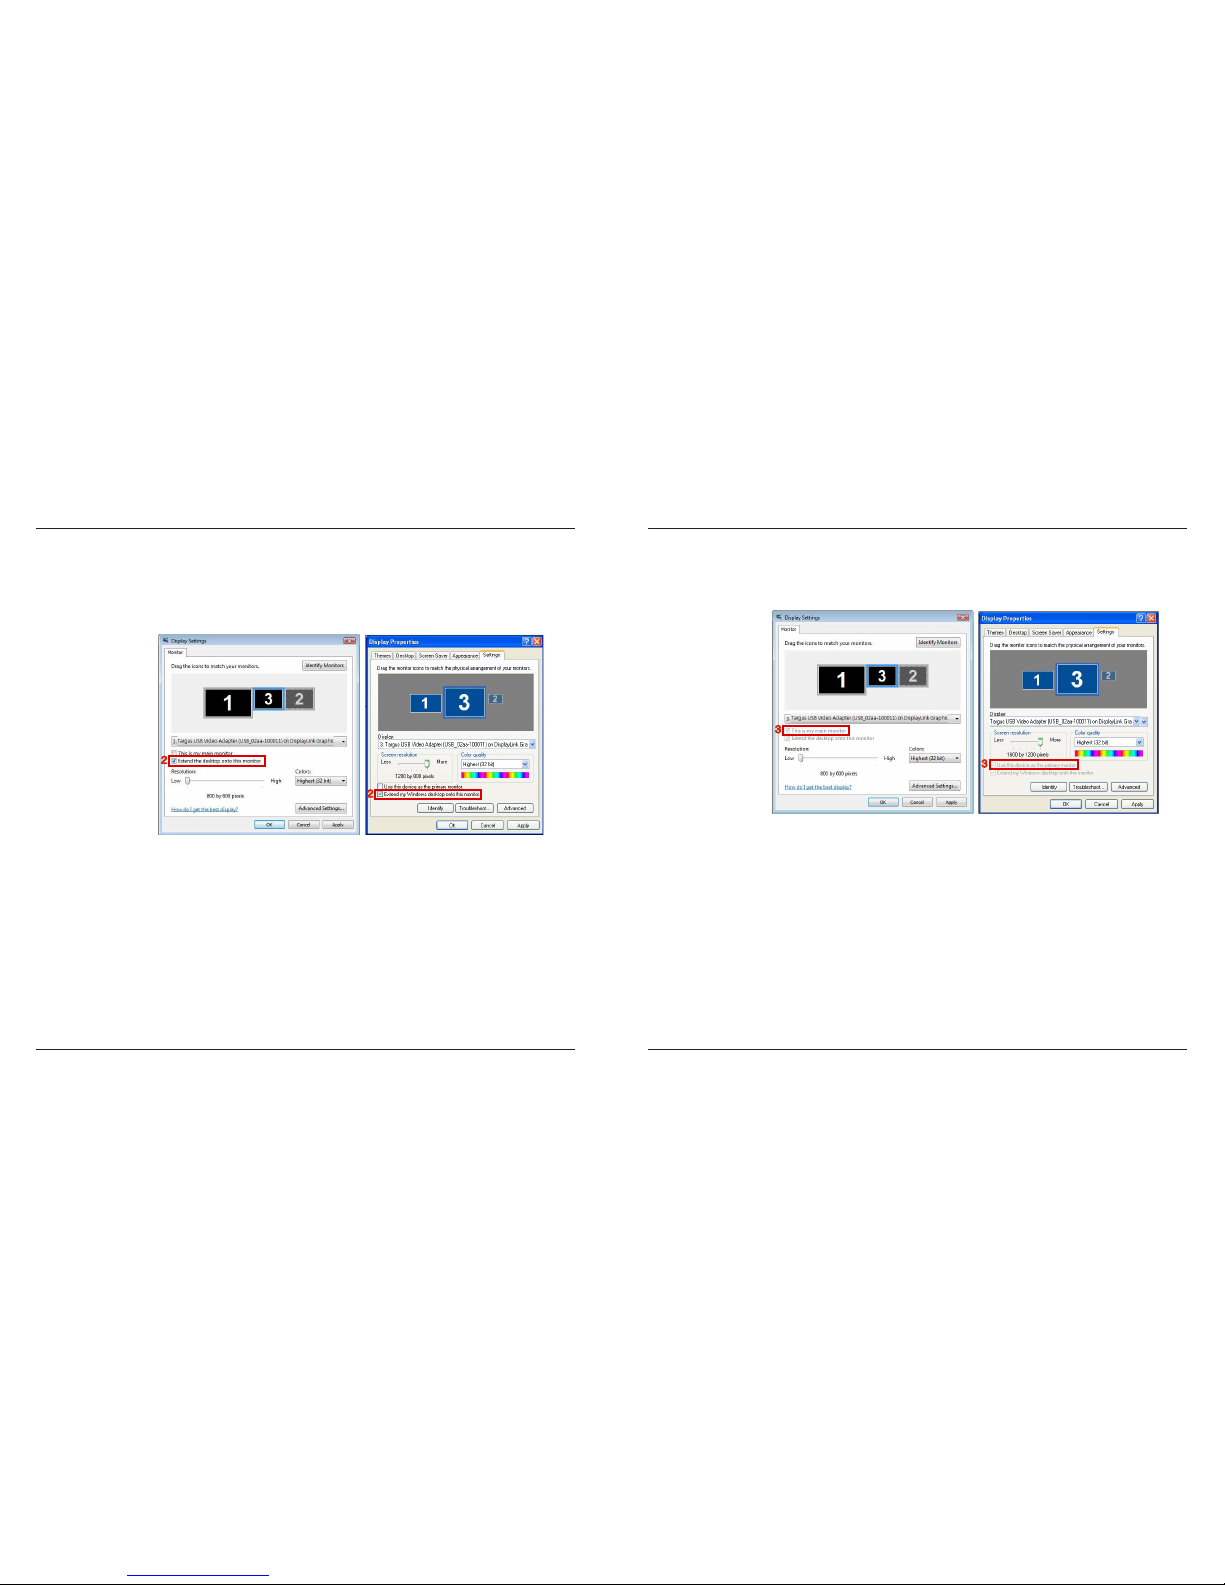
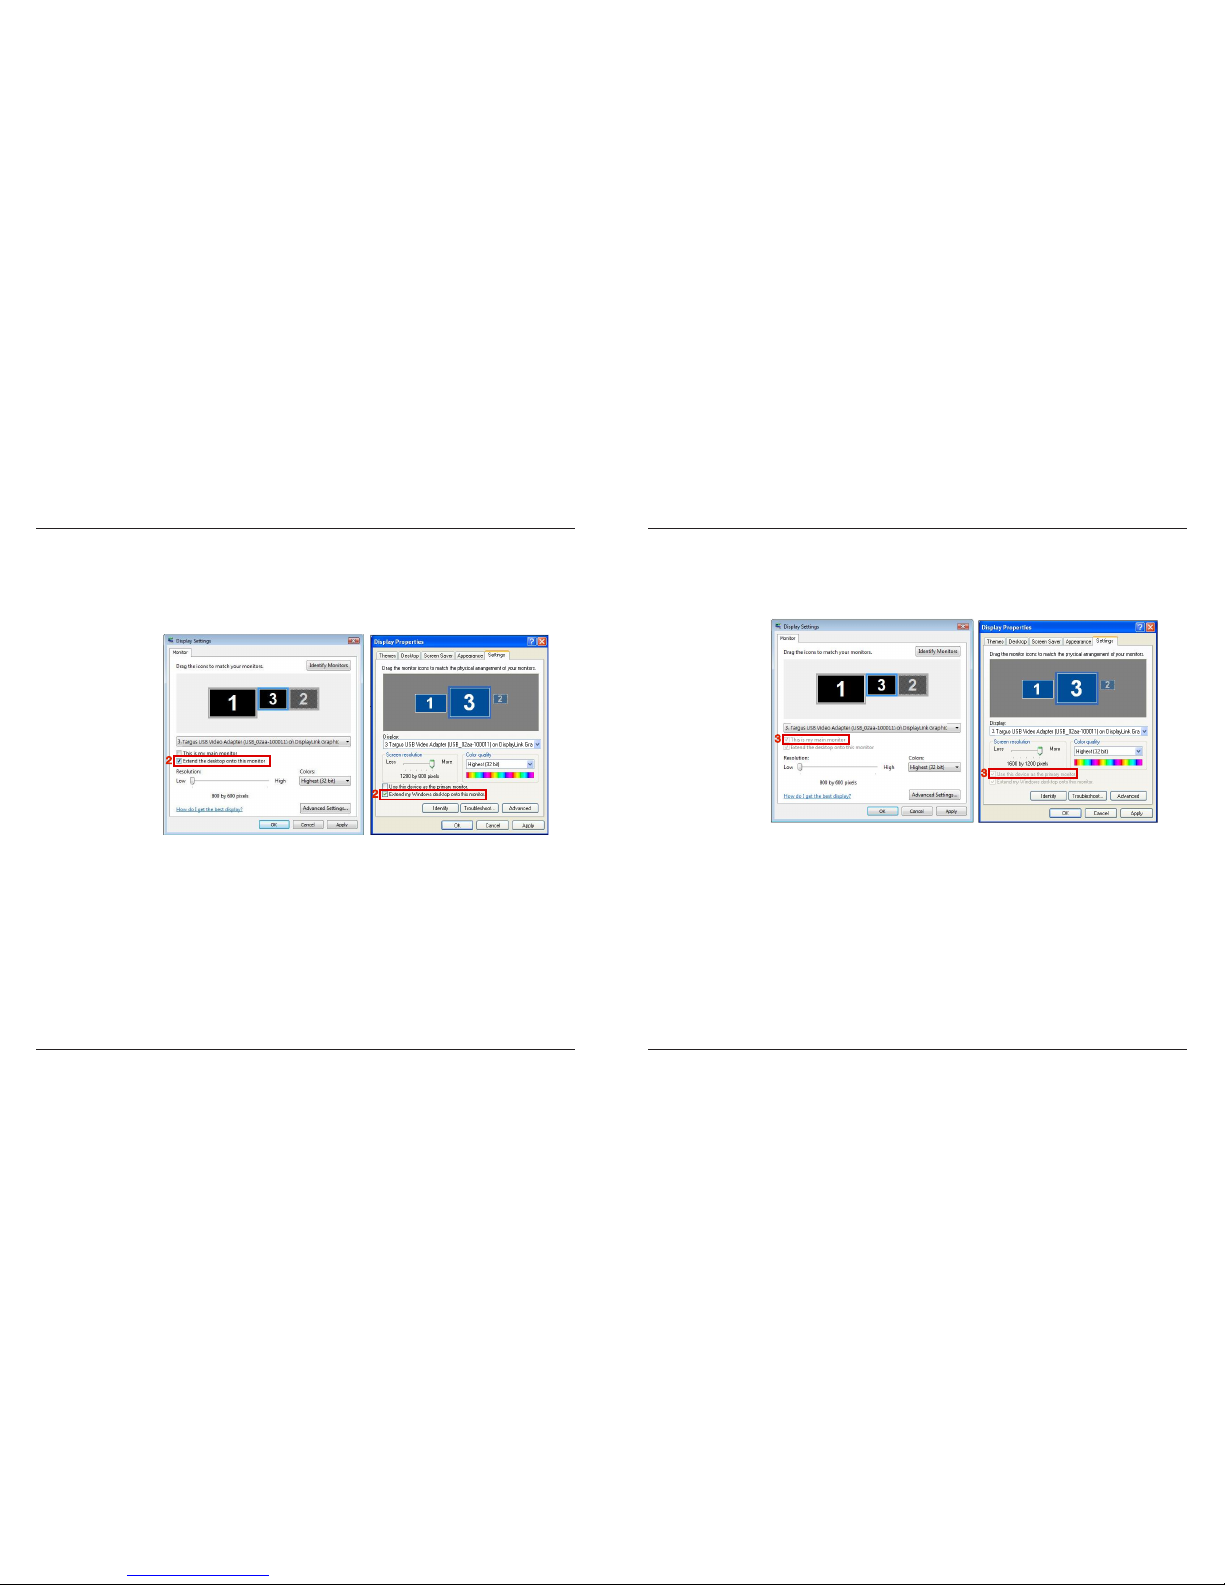
Extend Mode: To set the display into this mode, check the box marked ‘Extend my Windows desktop onto this monitor’ (1 in Figure 1). Arrange screen
resolution and colour quality using the appropriate controls (2 and 3), and arrange its position with respect to the other monitors on the extended desktop
in using the drag area (4).
Mirror Mode: To set the display into mirror mode, simply uncheck the box
marked ‘Extend the desktop onto this monitor’ (1 in Figure 1 on previous
page.).
Setting the Primary Display: To make the monitor attached to the Docking
Station as the primary display, follow the instructions below:
1. In Display Properties window, using the drop down list, select the monitor
that is attached to the Docking Station.
Windows Vista
Windows XP
1
1
Page 11
Targus USB 2.0 Laptop Docking Station with Video
20
Targus USB 2.0 Laptop Docking Station with Video
21
2. After selecting the corresponding monitor, check the box next to “extend
the desktop onto this monitor” (for Vista) or “extend my Windows desktop
onto this monitor” (for XP).
2
Windows Vista
Windows XP
2
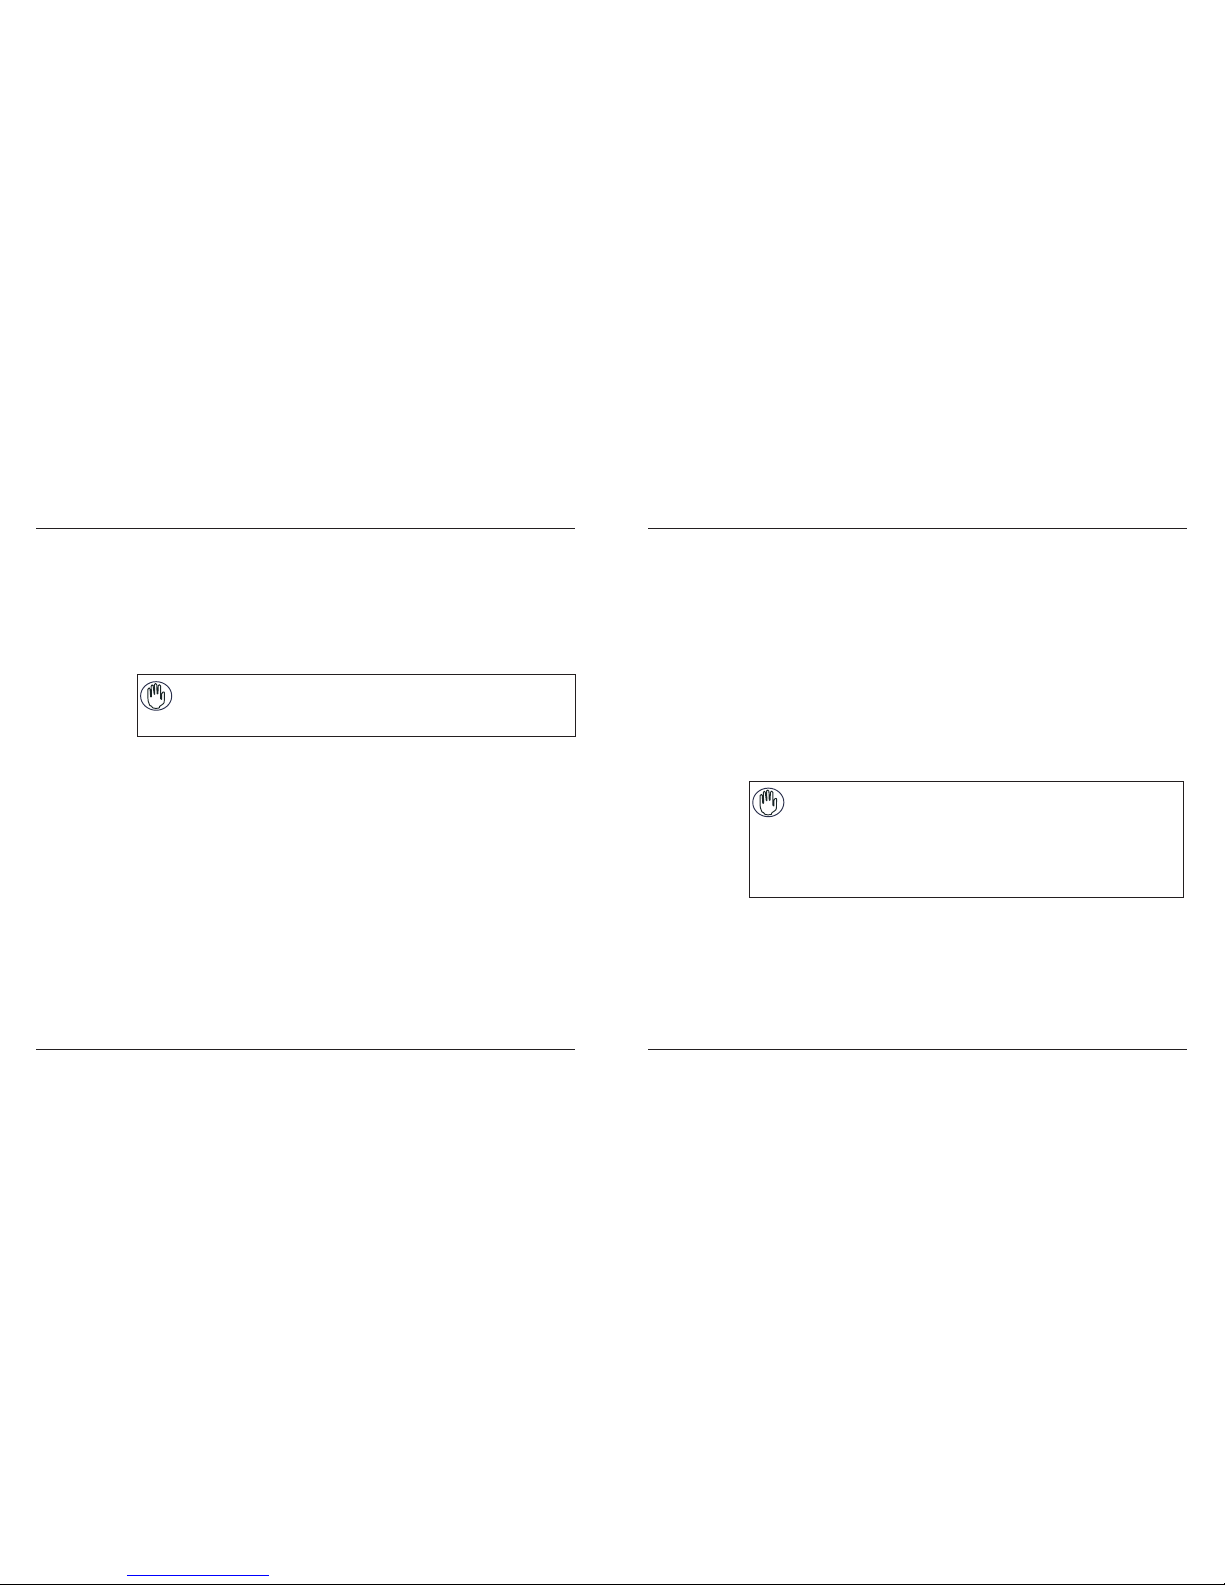
3. Then, check the box next to “This is my main monitor” (for Vista) “ Use this
device as the primary monitor” (for XP).
3
3
Windows Vista
Windows XP
4. Click “Apply”.
Page 12

Targus USB 2.0 Laptop Docking Station with Video
22
Targus USB 2.0 Laptop Docking Station with Video
23
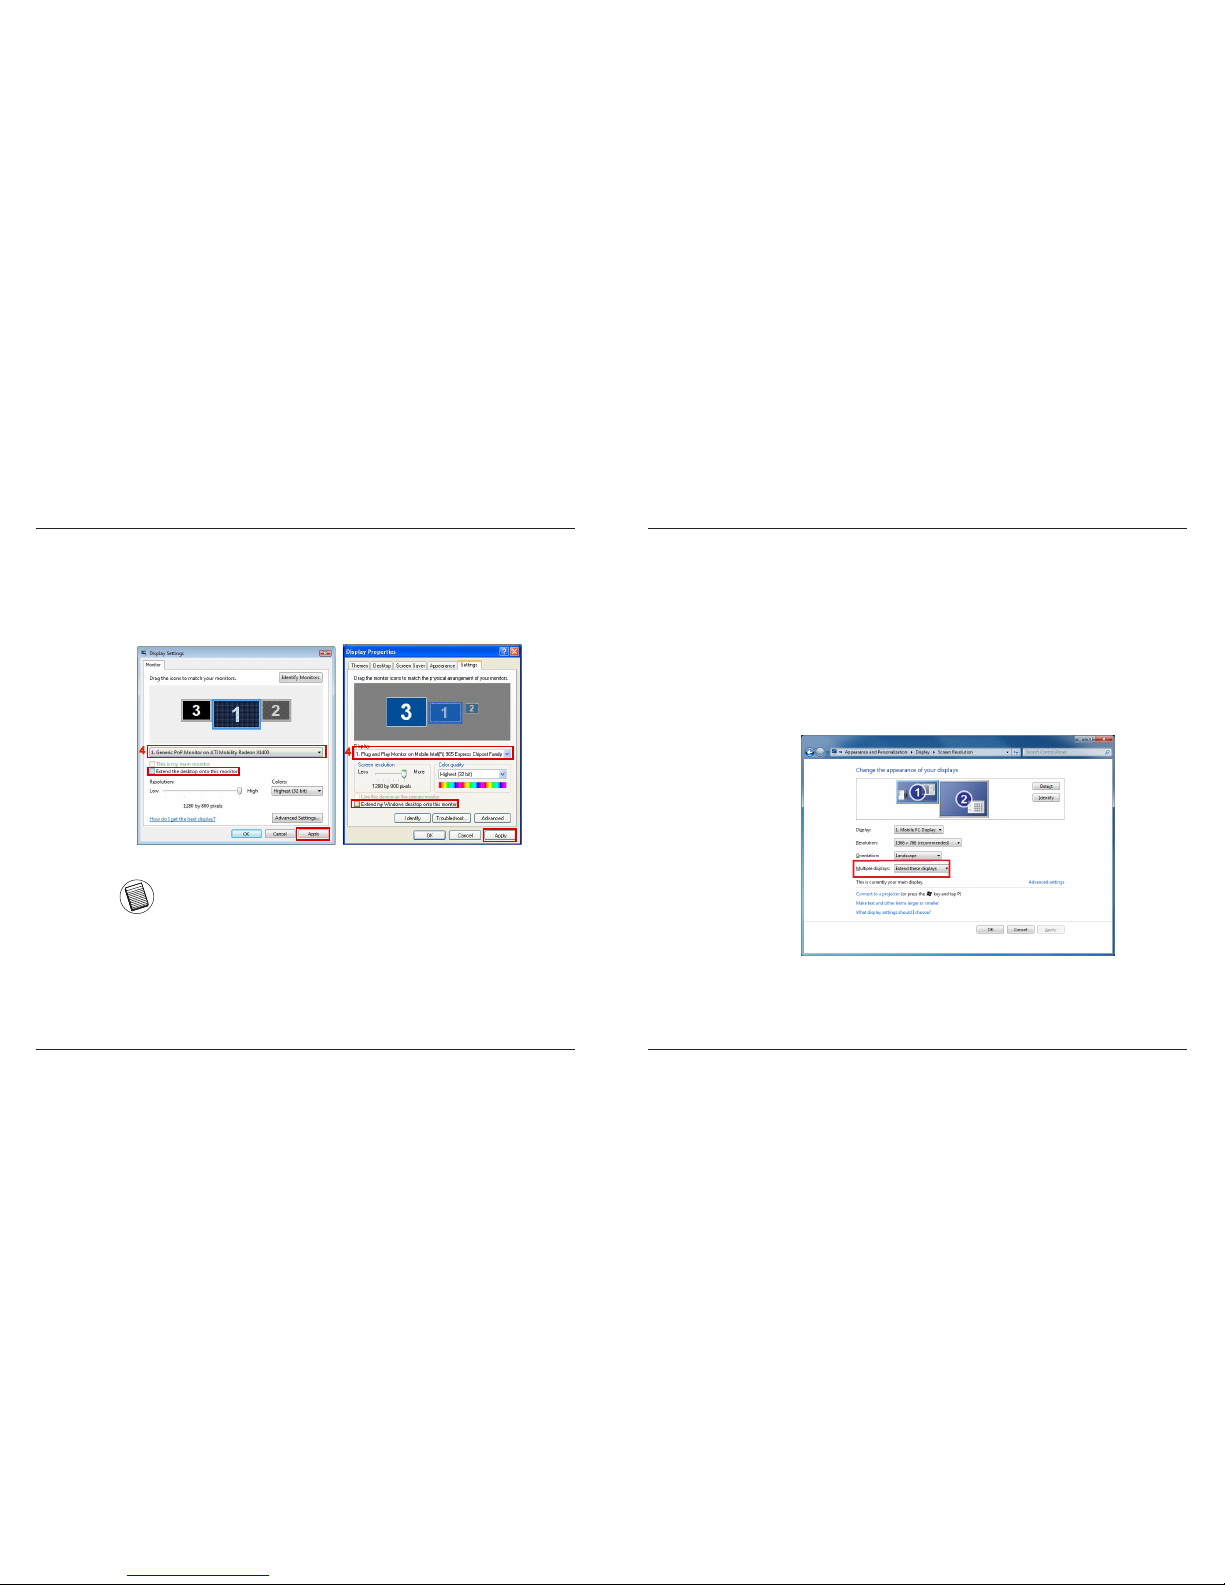
5. Select the Laptop monitor using the drop down list and uncheck the box
“extend the desktop onto this monitor” (for Vista) or “ Extend my Windows
desktop onto this monitor” (for XP) and click “Apply”
The monitor attached to the Docking Station stays primary if the PC enters
hibernate or suspend mode or is rebooted. If the Docking Station is detached, the laptop’s display becomes primary again.
NOTE: IT IS POSSIBLE TO WORK MORE CONVENIENTLY WITH A LAPTOP BY SETTING ITS ACTION
ON LID CLOSED TO ‘DO NOTHING’ AND SETTING THE DOCKING TO PRIMARY MODE. THE LAPTOP
LID CAN THEN BE CLOSED AND THE LAPTOP USED WITH THE EXTERNAL KEYBOARD AND MOUSE.
4
4
Windows Vista
Windows XP
Upon reconnection, the monitor attached to the Docking Station will return
to primary mode.
Controlling the Display using Windows
Display Properties (for Windows 7)
Docking Station’s video setting can also be congured from the Windows
Display Properties dialog box. To do this on Windows 7, right click on the
desktop, click on “Personalize” and then select the ‘Display” and then
“Change display setting’ link. Or right click on “Targus USB Video adapter”
icon in the notication area and choose “advance”.
The various display output setting can be controlled by choosing the options
provided in the “multiple display” drop-down list. Choose the desired setting
and click “apply”. The screen will refresh and conrm ok by selecting “keep
changes”.
Page 13

Targus USB 2.0 Laptop Docking Station with Video
24
Targus USB 2.0 Laptop Docking Station with Video
25
Automatic Updates
Automatic Updates is a product maintenance feature from DisplayLink. The
automatic update mechanism ensures that the Docking Station’s graphics
Adapter has the most up-to-date drivers and software, providing the user
with increased performance and stability.
Using USB Devices That Require More
Power
Some devices, which use large amounts of power, such as printers and optical drives, should be plugged into the USB Power Ports. These ports will
provide up to 1000mA of power - double the power on standard USB ports.
Disconnecting the Docking Station
If the Docking Station is powered off or the USB cable is removed from the
computer, the display blanks. All windows and icons will shift to the primary
screen.
On reconnection or powering up of the Docking Station, the display returns
to the same mode as it was before disconnection. However, windows and
icons that were previously on the screen will not be moved back.
Supported Resolution
Resolution Refresh Rates
available at 32 bit
640 x 480 60 67 72 75 85
720 x 480 50 60
768 x 576 50 60
800 x 600 56 60 72 75 85
832 x 624 75
800 x 480 60
848 x 480 60
1024 x 600 60
1024 x 768 60 70 72 85
1152 x 864 75
1152 x 870 75
1280 x 720 50 60
Actual support resolutions area depend on the support of connected monitor.
Resolution Refresh Rates
available at 32 bit
1280 x 800 60 75 85
1280 x 960 60
1280 x 1024 60 75
1360 x 768 60
1366 x 768 60 75 85
1400 x 1050 60
1440 x 900 60
1600 x 1200 60
1680 x 1050 60
1920 x 1080 50 60
1920 x 1200 60
2048 x 1152 60
Page 14

Targus USB 2.0 Laptop Docking Station with Video
26
Targus USB 2.0 Laptop Docking Station with Video
27
Troubleshooting
Device Not Working
• Make sure that the device is fully inserted into the correct port on the docking
station.
• Plug the device into a different port on the docking station. If it still doesn’t
work, test the device by connecting it directly to your computer.
• Verify that you ran the Setup or Install program for the device.
• Make sure that the device appears in Device Manager. For more information
refer to “Verifying Devices are Installed”
• Disconnect all devices from the docking station and reconnect them, one at a
time. Check that each device works before plugging in the next one.
• Each USB port is equipped with over-current protection. Should a USB device draw more current than the USB port can supply, the port will shut down.
To re-enable the port, unplug the device and go to Device Manager or to the
message in the system tray and choose the Reset option. You can then plug
the device back into the USB port. If a shut down reoccurs, check the power
requirements of the device.
Product Limitations
Some devices may halt temporarily when a high data transfer is occurring.
For example, your mouse may respond slowly while a graphic print job is
printing or while you are experiencing heavy network trafc. We recommend
the following guidelines:
• Do not transfer data to or from multiple high-speed devices, such as a
digital camera or scanner, at the same time.
• If speed degradation does occur, close other programs that use a USB
device to improve device performance.
Verifying Devices are Installed
You can view the devices installed on the docking station from the Device
Manager window in System Properties. Right-click My Computer, Proper-
ties, then click the Hardware tab, and then the Device Manager button.
From the Device Manager window, expand the following:
• Display Adapters:
- Displaylink Graphic Adapter (XP only)
- Displaylink Mirror Adapter (XP only)
• Network Adapters:
- High speed USB Ethernet Adapter
• Sound, Video and Game Controllers:
- USB Audio Device
• USB Display Adapters
- Targus USB Video Adapter
• Monitor
- Targus USB Video Adapter
FAQ - DisplayLink
http://www.displaylink.com/support/index.php
DisplayLink provides this support website to help answer questions. This may
answer any questions you may have.
Page 15

Targus USB 2.0 Laptop Docking Station with Video
28
Targus USB 2.0 Laptop Docking Station with Video
29
DE - Einführung
Vielen Dank, dass Sie sich für die Targus USB 2.0 Dockstation mit
Video entschieden haben. Dieses tragbare Erweiterungsmodul
erlaubt Ihnen, bis zu 4 USB-Geräte, Monitor, Netzwerkanschluss
(Ethernet/LAN), Lautsprecher und Mikrofon über einen einzigen
USB-Anschluss anzuschließen. Die Dockstation bietet Ihnen auch
zwei Targus Power Ports, die doppelte USB-Leistung liefern, und
USB Ports mit breiteren Zwischenräumen für größere Adapter.
Die Dockstation ist mit folgenden Ports
ausgestattet:
• DVI Single Link (unterstützt bis zu 2048 x 1152 bei 32 bit color)
• Zwei 3.5 mm Audio: (1) Stereoausgang (1) Microfoneingang
• RJ-45 Ethernet 10/100
• Zwei USB 2.0 (Weiß)
• Zwei USB Stom- Ports (Schwarz) - liefern Spannung bis zu 1Ampere
Packungsinhalt
Zusätzlich zu dieser Bedienungsanleitung enthält die Verpackung:
• Targus USB 2.0 Laptop Dockstation mit Video
• Hochgeschwindigkeits- USB 2.0 Upstream-Kabel
• Treibersoftware CD (mini CD)
• Wechselstromadapter (benötigt)
Systemanforderungen
Hardware
• PC mit Intel® Pentium® Prozessor oder gleichwertig
• CD-ROM Laufwerk (mini CD unterstützend)
• USB Port Version 2.0
• Wechselstromquelle (Wechselstromadapter nötig)
Betriebssystem
• Mircosoft Windows® XP with Service Pack 3
• Mircosoft Windows Vista® with Service Pack 1
• Mircosoft Windows® 7
HINWEIS: IST DIE DOCKSTATION AN EINEN USB-ANSCHLUSS VERSION 1.1 AN IHREM COMPUTER
ANGESCHLOSSEN, IST IHR LEISTUNGSVERMÖGEN NICHT OPTIMAL UND DER VIDEOPORT FUNKTIONIERT NICHT ORDNUNGSGEMÄSS. SCHLIESSEN SIE, UM BESTE ERGEBNISSE ZU ERZIELEN, DIE
DOCKSTATION AN EINEN USB PORT VERSION 2.0 AN.
Page 16
Targus USB 2.0 Laptop Docking Station with Video
30
Targus USB 2.0 Laptop Docking Station with Video
31
Gerät und Treiber installieren
Um die Targus Dockstation nutzen zu können, müssen Sie zuerst den
Treiber auf Ihrem Computer installieren. Schließen Sie die Dockstation an
Ihren Computer an, und Windows Plug-and-Play wird die Hardwaretreiber
für jeden Port installieren.
WARNUNG: SIE MÜSSEN DIE SOFTWARE FÜR DIE DOCKSTATION INSTALLIEREN,
BEVOR SIE SIE AN DEN COMPUTER ANSCHLIESSEN. ANDERNFALLS ARBEITET
DIE DOCKSTATION NICHT ORDNUNGSGEMÄSS.
Treiber für Dockstation installieren
Die Installation der Dockstation-Treiber ermöglicht es Ihrem
Betriebssystem, die Dockstation und ihre Ports zu erkennen, wenn
sie angeschlossen ist.
1 Schalten Sie Ihren Computer ein.
2 Legen Sie die CD mit der Treibersoftware in das CD-ROM-Laufwerk
Ihres Computers ein.
Sollte die Einrichtung nicht automatisch beginnen, klicken Sie Start,
Ausführen und und rufen Sie D:\Setup.exe auf (wenn D: der Pfad Ihres
CD-ROM-Laufwerks ist), und klicken Sie dann OK.
3 Folgen Sie den Anweisungen auf dem Bildschirm, um die Installation
fertig zu stellen.
4 Klicken Sie Fertigstellen und starten Sie den Computer neu, wenn Sie
dazu aufgefordert werden.
Anschluss der Dockstation an den
Computer
Nach der Installation der Dockstation-Software können Sie die Dockstation an den Computer anschliessen. Um das zu tun:
1 Schließen Sie den mitgelieferten Wechselstromadapter an die Wechsel-
strombuchse der Dockstation an.
2 Verbinden Sie das eine Ende des USB-Kabels mit der Dockstation, und
das andere Ende mit einem freien USB Port an Ihrem Computer.
WARNUNG: DIE DOCKSTATION WIRD NICHT ORDNUNGSGEMÄSS ARBEITEN,
WENN DER WECHSELSTROMADAPTER NICHT IN EINE WECHSELSTROMSTECKDOSE EINGESTECKT IST.
SCHLIESSEN SIE KEINE GERÄTE AN DIE DOCKSTATION AN, BEVOR DIE INSTALLATION FERTIGGESTELLT IST.
Page 17

Targus USB 2.0 Laptop Docking Station with Video
32
Targus USB 2.0 Laptop Docking Station with Video
33
D C 5 V
• Das grüne Tx-Licht leuchtet, wenn Anschluss an ein Netzwerk besteht,
und das gelbe Rx-Licht blinkt, wenn Daten vom oder zum Netzwerk
übertragen werden.
HINWEIS: DIE DOCKSTATION UNTERSTÜTZ HOT SWAPPING DES NETZWERKKABELS.
Ports der Dockstation
DVI Audioeingang
(MIC)
Audioausgang (LAUTSPRECHER)
Netzwerkkabel
USB Ports
(Weiß)
Hochleistungs-USB
Ports (SCHWARZ)
Hochleistungs-USB
Ports (SCHWARZ)
Anschluss USB
zu PC
Schloss-Öse
Wechselstromadapter
Standard Steckplaz für
ein Schloss
Rückansicht
DVI zu VGA Adapter
Rechte Seite Linke Seite
Anschluss neuer Geräte
Zwingen Sie, um mögliche Beschädigungen beim Anschluss eines neuen
Gerätes zu vermeiden, den Kabelstecker nicht mit Gewalt in den Port der Dock station. Lässt sich der Kabelstecker nicht problemlos einstecken, drehen Sie ihn
um und versuchen Sie es erneut.
Anschluss an ein Lokales Netztwerk
(Local Area Network)
Um ein Ethernetkabel mit RJ-45-Stecker anzuschließen, stecken Sie den Kabelstecker in den Ethernet/Netzwerkport der Dockstation ein. Die weiteren Schritte
zur Verbindung mit einem realen Netzwerk hängen davon ab, welche Art von
Netzwerk Sie verwenden. Wenden Sie sich an Ihren Netzwerk-Administrator, um
detaillierte Informationen zu erhalten.
Anschluss eines USB Gerätes
Um ein USB Gerät anzuschliessen, stecken Sie dieses in einen USB Port der
Dockstation ein und folgen Sie den weiteren Anweisungen für das jeweilige
Gerät. Alle vier USB Ports erfüllen die USB- Hochgeschwindigkeitsanforderungen durch Lieferung von 480Mbps
Die weißen USB Ports sind Hochgeschwindigkeitsports, die die Standardleistung
von 500mA liefern. Die schwarzen USB Power Ports sind Hochgeschwindigkeitsports, die bis zu 1Ampere liefern.
Page 18

Targus USB 2.0 Laptop Docking Station with Video
34
Targus USB 2.0 Laptop Docking Station with Video
35
Anschluss und Konfiguration eines
Audiogerätes
1. Stecken Sie Kopfhörer oder Lautsprecher in den grünen 3.5mm
Audioausgang-Port der Dockstation ein.
2. Ein Mikrofon können Sie über den Port Mono-Audioeingang anschließen.
3. Die Ausgabe von Ton und Mikrofon sollte automatisch erfolgen, wenn Sie
die Dockstation einstecken. Vergewissern Sie sich, dass die Lautstärke
für Lautsprecher und Mikrofon nicht auf STUMM steht.
4. Manuelle Aktivierung von Kopfhörern oder Lautsprechern für den Fall,
dass automatische Übertragung nicht möglich ist
Gehen Sie zu Systemsteuerung und wählen Sie Sound. Prüfen Sie unter
dem Reiter Wiedergabe, ob das USB Audiogerät voreingestellt ist. Wenn
ja, klicken Sie OK. Wenn nicht, klicken Sie “Als Standard einrichten” und
dann OK.
Gehen Sie zu Systemsteuerung und wählen Sie Sounds und Audiogeräte.
Wählen Sie den Reiter Audio. Ändern Sie unter Soundwiedergabe das
Standardgerät von der Aufklappliste zu USB Multimedia-Audiogerät.
• Klicken Sie Anwenden, dann OK.
Bei Windows XP
Bei Windows Vista
Gehen Sie zu Systemsteuerung und wählen Sie Sound und Hardware,
dann Sound. Prüfen Sie unter dem Reiter Wiedergabe, ob das USB-Audiogerät voreingestellt ist. Wenn ja, klicken Sie OK. Wenn nicht, klicken Sie
“Als Standard einrichten” und dann OK.
Bei Windows 7
HINWEIS: AUDIOGERÄTE ARBEITEN NICHT GLEICHZEIZIG MIT DER PORTSTATION UND DEM
HAUPTRECHNER.
VORSICHT: ALLE AUDIO- ODER MULTIMEDIAANWENDUNGEN MÜSSEN BEENDET WERDEN, BEVOR
ZWISCHEN AUDIOAUSGABE DER PORTSTATION UND AUDIOAUSGABE DES HAUPTRECHNERS
UMGESCHALTET WIRD:
Anschluss an einen Monitor oder LCD
Jeder Monitor oder LCD, der an den Videoport der Dockstation angeschlossen wird, ist auf eine maximale Auösung von 2048 x 1152 bei 32 bit color
begrenzt.
HINWEIS: DIE MAXIMALE AUFLÖSUNG VON 2048 x 1152 WIRD NUR DANN UNTERSTÜTZT, WENN DER
MONITOR ODER LCD IN DIE DOCKSTATION EINGESTECKT WIRD, BEVOR DIESE AN EIN NOTEBOOK
ANGESCHLOSSEN WIRD. WIRD DER MONITOR ODER LCD IN DIE DOCKSTATION EINGESTECKT,
NACHDEM DIESE AN DAS NOTEBOOK ANGESCHLOSSEN WURDE, IST DIE AUFLÖSUNG AUF 1024
X 768 EINGESTELLT.
Page 19
Targus USB 2.0 Laptop Docking Station with Video
36
Targus USB 2.0 Laptop Docking Station with Video
37
Kontrolle des Displays über die VideoMenüoptionen der Dockstation
Sie können die Video-Menüoptionen über Rechtsklick auf das Symbol Dockstation im Systemordner oder über Windows Displayeigenschaften aufrufen.
Windows XP / Windows Vista
Windows 7
Erweitert: Sie verwenden Ihren Notebookbildschirm als Primärdisplay, und
Ihr Monitor oder LCD ist ein sekundärer Bildschirm.
Wählen Sie, um die Anzeige auf diesen Modus einzustellen, “Erweitert”
im Anwendungsmenü des Dockstationssymbols. Das Gerät wird jetzt in
die Richtung, in die es das letzte Mal, als sich die Anzeige in diesem Modus befand, erweitert. Für weitere Optionen navigieren Sie zum “Erweitern
Auf”- Submenü. Die Wahl einer der Optionen dort führt das Gerät nicht nur
in den Erweiterungsmodus, sondern platziert es auch Links/Rechts/Über/
Unter dem Haupt-(Primär-) Monitor.
Erweiterungsmodus
Page 20
Targus USB 2.0 Laptop Docking Station with Video
38
Targus USB 2.0 Laptop Docking Station with Video
39
Spiegel: Sie verwenden Ihren Notebookbildschirm als Primärdisplay und Ihr
Monitor oder LCD reproduzieren den Notebookbildschirm.
Wählen Sie, um die Anzeige auf diesen Modus einzustellen, einfach
“Spiegel” im Anwendungsmenü des Dockstationssymbols. Auösung,
Farbtiefe Bildwiederholrate des Primärbildschirms werden auf dem
Monitor, der an den Grakadapter der Dockstation angecshlos ist, reproduziert.
HINWEIS: WENN DER AN DIE DOCKSTATION ANGESCHLOSSENE MONITOR EINE NIEDRIGERE AUFLÖSUNG ALS DER PRIMÄRBILDSCHIRM UNTERSTÜTZT, WIRD DIE GRÖSSE DES BILDES SO GEÄNDERT,
DASS ES AUF DEN EXTERNEN BILDSCHIRM PASST. WENN DER AN DIE DOCKSTATION ANGESCHLOSSENE MONITOR GRÖSSER ALS DER PRIMÄRBILDSCHIRM IST, WIRD DAS BILD ALS LETTERBOX-BILD
ANGEZEIGT, UM DAS RICHTIGE BILDSEITENVERHÄLTNIS ZU BEWAHREN.
Spiegel
Primär: Sie verwenden Ihren Monitor oder LCD als Ihr Primärdisplay und
Ihr Notebookbildschirm ist abgeschaltet. (Nur über die Windows Anzeigeneigenschaften zugänglich)
Primär
Page 21
Targus USB 2.0 Laptop Docking Station with Video
40
Targus USB 2.0 Laptop Docking Station with Video
41
Aus: Sie verwenden Ihren Notebookbildschirm als Primärbildschirm und
Monitor oder LCD ist abgeschaltet.
Aus
Kontrolle des Displays über Windows
Displayeigenschaften
(für Windows XP und Windows Vista)
Die Videoeinstellung der Dockstation kann auch über die Dialogfelder der
Windows Grakeigenschaften gesteuert werden. Bei Windows Vista müssen Sie auf dem Desktop rechtsklicken, “Anpassen” klicken und wählen
Sie “Grakoptionen”. Die entsprechende Möglic hkeit haben Sie bei Windows XP, indem Sie auf dem Desktop rechtsklicken, “Grakeigenschaften”
wählen und dann zum Reiter “Displayeinstellungen” navigieren.
Abbildung 1
1
2
3
4
1
2
3
4
Windows Vista
Windows XP
Page 22
Targus USB 2.0 Laptop Docking Station with Video
42
Targus USB 2.0 Laptop Docking Station with Video
43
Erweiterungsmodus: Um das Display auf diesen Modus einzustellen,
markieren Sie die Box “Windows Desktop auf diesen Monitor erweitern” (1
in Abbildung 1). Passen Sie Auösung und Farbqualität mit den entsprechenden Kontrollen an (2 und 3) und arrangieren Sie seine Position unter
Berücksichtigung der anderen Monitore in der Drag-Zone unter “Erweiterter
Desktop” (4).
Spiegelmodus: Um das Display auf Spiegelmodus einzustellen, entfernen
Sie einfach die Markierung der Box “Desktop auf diesen Monitor erweitern”
(1 in Abbildung 1 auf der vorigen Seite).
Einrichtung des Primärdisplays: Folgen Sie den Anweisungen unten, um
den an die Dockstation angeschlossenen Monitor als Primärdisplay einzurichten:
1. Wählen Sie den an die Dockstationen angeschlossenen Monitor in der
Aufklappliste im Fenster Grakeigenschaften.
Windows Vista
Windows XP
1
1
Page 23
Targus USB 2.0 Laptop Docking Station with Video
44
Targus USB 2.0 Laptop Docking Station with Video
45
2. Markieren Sie, nachdem Sie den entsprechenden Monitor gewählt haben,
die Box neben “Desktop auf diesen Monitor erweitern” (bei Vista) oder
“Windows Desktop auf diesen Monitor erweitern” (bei XP).
2
Windows Vista
Windows XP
2
3. Markieren Sie dann die Box neben “Mein Hauptmonitor” (bei Vista),
“Primärgerät” (bei XP)
3
3
Windows Vista
Windows XP
4. Klicken Sie “Anwenden”.
Page 24
Targus USB 2.0 Laptop Docking Station with Video
46
Targus USB 2.0 Laptop Docking Station with Video
47
5. Wählen Sie den Laptopmonitor in der Aufklappliste und entfernen Sie die
Markierung der Box “Desktop auf diesen Monitor erweitern” (bei Vista)
oder “Windows Desktop auf diesen Monitor erweitern” (bei XP) und klicken
Sie “Anwenden”.
Der an die Dockstation angeschlossene Monitor bleibt der Primärmonitor,
wenn er in den Ruhe- oder Schlafmodus übergeht oder neu gestartet wird.
Wird die Dockstation entfernt, wird das Display des Laptop wieder zum
Primärmonitor.
HINWEIS: SIE KÖNNEN NOCH BEQUEMER MIT EINEM LAPTOP ARBEITEN, WENN SIE SEINE AKTION
BEIM SCHLIESSEN DES DECKELS AUF “NICHTS TUN” UND DIE DOCKSTATION AUF PRIMÄRMODUS
STELLEN. DANN KÖNNEN SIE DEN LAPTOPDECKEL SCHLIESSEN UND DEN LAPTOP MIT EXTERNER
TASTAUR UND MAUS VERWENDEN.
4
4
Windows Vista
Windows XP
Bei Wiederanschluss wird der an die Dockstation angeschlossene Monitor in
den Primärmodus zurückkehren.
Kontrolle des Displays über Windows
Displayeigenschaften (für Windows 7)
Die Videoeinstellungen der Dockstation können auch über das Dialogfeld
von Windows Displayeigenschaften konguriert werden. Um dies bei Windows 7 zu tun, rechtsklicken Sie den Desktop. Klicken Sie “Anpassen”,
wählen Sie “Anzeige” und dann den Link “Displayeigenschaften ändern”.
Sie können auch das Symbol “Targus USB Video Adapter” im Mitteilungsbereich rechtsklicken und “Fortgeschritten” wählen.
Die verschiedenen Diplay-Ausgabeeinstellungen können über die Auswahl
der Optionen, die in der “Mehrfache Displays”- Auappliste enthalten sind,
gesteuert werden. Wählen Sie die gewünschte Einstellung und klicken Sie
“Anwenden”. Der Bildschirm erneuert sich und Sie bestätigen ok durch
Wählen von “Änderungen speichern”.
Page 25

Targus USB 2.0 Laptop Docking Station with Video
48
Targus USB 2.0 Laptop Docking Station with Video
49
Automatische Updates
Automatische Updates sind eine Produktwartungsfunktion von DisplayLink. Der Automatische Updates-Mechanismus stellt sicher, dass der Grakadapter der Dockstation über die modernsten Treiber und Software verfügt und dem Nutzer sich stetig verbessernde Leistung und Stabilität bietet.
Verwendung von USB-Geräten, die
mehr Energie benötigen
Einige Geräte, die einen hohen Energiebedarf haben, wie Drucker und
optische Laufwerke, sollten in die USB Power Ports eingesteckt werden.
Diese Ports liefern bis zu 1000mA Energie - die doppelte Energiemenge die
gewöhnliche USB Ports liefern.
Abtrennung der Dockstation
Wird die Dockstation abgeschaltet oder das USB-Kabel vom Computer
getrennt, wird das Display gelöscht. Alle Fenster und Symbole werden auf
den Primärbildschirm verschoben. Bei Wiederanschluss oder Einschalten
der Dockstation geht die Anzeige in den Modus, den sie vor der Abtrennung inne hatte, zurück. Allerdings werden die vorher dort bendlichlichen
Fenster und Symbole nicht zurück verschoben.
Unterstützte Auflösung
Reale unterstützte Auösungen sind von der Unterstützung des angeschlossenen Monitors abhängig.
Auösung Bildwiederholung-
srate bei 32 bit
640 x 480 60 67 72 75 85
720 x 480 50 60
768 x 576 50 60
800 x 600 56 60 72 75 85
832 x 624 75
800 x 480 60
848 x 480 60
1024 x 600 60
1024 x 768 60 70 72 85
1152 x 864 75
1152 x 870 75
1280 x 720 50 60
Auösung Bildwiederholung-
srate bei 32 bit
1280 x 800 60 75 85
1280 x 960 60
1280 x 1024 60 75
1360 x 768 60
1366 x 768 60 75 85
1400 x 1050 60
1440 x 900 60
1600 x 1200 60
1680 x 1050 60
1920 x 1080 50 60
1920 x 1200 60
2048 x 1152 60
Page 26

Targus USB 2.0 Laptop Docking Station with Video
50
Targus USB 2.0 Laptop Docking Station with Video
51
Problemlösung
Das Gerät arbeitet nicht
• Stellen Sie sicher, dass das Gerät vollständig in den korrekten Port der Dockstation
eingesteckt ist.
• Stecken Sie das Gerät in einen anderen Port der Dockstation ein. Wenn es immer
noch nicht arbeitet, testen Sie das Gerät, indem Sie es direkt an den
• Vergewissern Sie sich, dass Sie das Einrichtungs- oder Installationsprogramm für
das Gerät durchgeführt haben.
• Stellen Sie sicher, dass das Gerät im Gerätemanager gelistet ist. Weitere Informa-
tionen nden Sie unter “Sichern, dass Geräte installiert sind”
• Trennen Sie alle Geräte von der Dockstation und verbinden Sie sie dann wieder,
jeweils eins zur Zeit. Prüfen Sie, dass jedes Gerät arbeitet, bevor Sie das nächste
anschließen.
• Jeder USB Port ist mit Überstromschutz ausgerüstet. Sollte ein USB-Gerät mehr
Strom ziehen, als der USB Port liefern kann, schaltet sich der Port ab. Um den Port
zu reaktivieren, müssen Sie das Gerät trennen und den Gerätemanager oder die
Botschaft im Systemordner aufrufen und die Option Zurücksetzen wählen. Sie
können dann das Gerät wieder in den USB Port einstecken. Tritt wieder eine Abschaltung auf, überprüfen Sie die Energieanforderungen des Gerätes.
Produktlimitierungen
Einige Geräte könnten zeitweilig stocken, wenn hoher Datentransfer auftritt. Zum
Beispiel könnte Ihre Maus langsam ansprechen, während ein grascher Druckauftrag gedruckt wird oder wenn reger Betrieb im Netzwerk herrscht. Wir empfehlen
die folgenden Rich
• Übertragen Sie keine Daten von oder zu mehreren Hochgeschwindigkeitsgeräten,
wie Digitalkameras oder Scanner, zur gleichen Zeit.
• Wenn eine Verlangsamung auftritt, schließen Sie andere Programme, die ein USB-
Gerät verwenden, um die Leistung des Gerätes
Sichern, dass Geräte installiert sind
Sie können die an der Dockstation installierten Geräte im Fenster Gerätemanager unter Systemeigenschaften einsehen. Rechtsklicken Sie Systemsteuerung,
Eigenschaften, klicken Sie dann den Reiter Hardware und dann den Button
Gerätemanager.
FAQ - DisplayLink
http://www.displaylink.com/support/index.php
DisplayLink stellt diese Support-Website zur Verfügung, um Ihnen zu helfen, Ihre
Fragen zu beantworten. Die website sollte alle Ihre eventuellen Fragen beant worten.
Klappen Sie Flogendes im Fenster Gerätemanager auf:
• Displayadapter:
- Displaylink Grakadapter (nur XP)
- Displaylink Spiegeladapter (nur XP)
• Netzwerkadapter:
- Hochgeschwindigkeits- USB Ethernet Adapter
• Sound, Video und Spielkontrollen:
- USB Audiogerät
• USB Displayadapter
- Displaylink USB zu DVI Adapter
• Monitor
- Displaylink USB zu DVI Adapter
Page 27

Targus USB 2.0 Laptop Docking Station with Video
52
Targus USB 2.0 Laptop Docking Station with Video
53
DK - Introduktion
Tillykke med købet af Targus USB 2.0 Dockingstation med Video.
Denne bærbare dockingstation giver dig mulighed for at tilslutte
op til 4 USB enheder, monitor, netværksforbindelse (ethernet/
LAN), højttalere og mikrofon gennem en enkelt USB forbindelse.
Dockingstationen tilbyder også to Targus højeffekt porte, der giver
ekstra strøm til særligt strømkrævende enheder samt USB porte
placeret med ekstra mellemrum, så der er plads til større adaptere.
Dockingstationen er udstyret med
følgende porte:
• DVI Single Link (understøtter op til 2048 x 1152 og 32 bit farve)
• To stk. 3,5 mm Audio: (1) stereo ud (1) mikrofon ind
• RJ-45 Ethernet 10/100
• To USB 2.0 (Hvide)
• To USB højeffekt porte (Sorte) - der yder spænding op til 1 Ampere
Pakkens indhold
Foruden denne brugervejledning indeholder pakken:
• Targus USB 2.0 Laptop Docking Station med Video
• Højhastigheds USB 2.0 upstream-kabel
• Driver software CD (mini CD)
• AC strømadapter (nødvendig)
Systemkrav
Hardware
• PC med Intel® Pentium® processor eller tilsvarende
• CD-ROM drev (der understøtter mini CD)
• USB version 2.0 port
• AC strømkilde (AC adapter nødvendig)
Styresystem
• Mircosoft Windows® XP med Service Pack 3
• Mircosoft Windows Vista® med Service Pack 1
• Mircosoft Windows® 7
BEMÆRK: VED TILSLUTNING TIL EN USB VERSION 1.1 PORT PÅ DIN COMPUTER, VIL DOCKINGSTATIONENS YDEEVNE VÆRE MINDRE END DET OPTIMALE, OG VIDEOPORTEN VIL IKKE FUNGERE
KORREKT. FOR AT OPNÅ DET BEDSTE RESULTAT, TILSLUTTES DEN TIL EN USB VERSION 2.0 PORT.
Page 28
Targus USB 2.0 Laptop Docking Station with Video
54
Targus USB 2.0 Laptop Docking Station with Video
55
Installation af enheden og driverne
For at anvende Targus Dockingstationen er det nødvendigt først at installere
driveren på din computer. Derefter tilsluttes docking stationen til din computer
og Windows plug-and-play vil automatisk installere driverne for hver port.
ADVARSEL: DU SKAL INSTALLERE DOCKINGSTATIONENS SOFTWARE FØR
TILSLUTNING TIL DIN COMPUTER. I MODSAT FALD VIL DOCKINGSTATIONEN
IKKE FUNGERE KORREKT.
Installation af dockingstationens driver
Ved installation af dockingstationens driver er det muligt for styresystemet at
genkende dockingstationen og dens porte, når den er tilsluttet.
1 Tænd for din computer
2 Sæt driversoftware CDen i din computers CD-ROM drev.
Hvis opsætning ikke starter automatisk, klikkes på Start, Kør, og skriv D:\
Setup.exe (hvor D: er stien til dit CD-ROM drev) og klik OK.
3 Følg alle instruktionerne på skærmen for at fuldende installationen.
4 Klik på Afslut og genstart din computer, når du bliver anmodet om det.
Tilslutning af dockingstationen til
din computer
Efter at dockingstationens software er installeret, er du klar til at tilslutte dockingstationen til din computer. Det gøres sådan:
1 Tilslut den medfølgende AC strømadapter til strømindgangen på docking
stationen.
2 Tilslut den ene ende af USB-kablet til dockingstationen og den anden til en
ledig USB 2.0 port på din computer.
ADVARSEL: DOCKINGSTATIONEN VIL IKKE FUNGERE KORREKT UDEN AT AC
ADAPTEREN TILSLUTTES TIL EN STIKKONTAKT.
TISLUT IKKE NOGEN ENHED TIL DOCKINGSTATIONEN, INDTIL INSTALLATIONEN ER FULDENDT.
Page 29
Targus USB 2.0 Laptop Docking Station with Video
56
Targus USB 2.0 Laptop Docking Station with Video
57
D C 5 V
• Grønt Tx-lys tændes, når der er forbindelse til et netværk og de gule Rx-lys
blinker, når data overføres fra eller til netværket.
BEMÆRK: DOCKINGSTATIONEN UNDERSTØTTER HOT-SWAP AF NETVÆRKSKABLET.
Porte på dockingstationen
DVI
Audio ind (MIKROFON)
Audio ud (HØJTTALER)
Netværkskabel
USB porte (hvide)
Højeffekt USB porte
(sorte)
Højeffekt USB porte (sort)
USB til PC forbindelse
Låseloop
AC adapter
Standard låse-slot
Bagside
Højre side Venstre side
Tilslutning af nye enheder
For at undgå mulig skade når en ny enhed tilsluttes, må kabelstikket ikke forceres ind i porten på docking stationen. Hvis stikket ikke kan fastgøres let, vend
da stikket og prøv igen.
Tilslutning til lokalnetværk
For at forbinde et ethernet-kabel med RJ-45 stik, forbindes kabelstikket
med ethernet-/netværksporten på docking stationen. Andre fremgangsmåder
for at tilslutte til det aktuelle netværk afhænger af hvilken type netværk
du anvender. Kontakt din netværksansvarlige for detaljerede anvisninger.
Tilslutning af en USB enhed
For at forbinde en USB enhed, sættes den i en USB port på dockingstationen
og der følges de anvisninger, som medfølger enheden. Alle re USB porte
møder USB højhastighedskravene ved at levere 480Mbps gennemgang og
500mA strømstyrke.
De hvide USB porte er højhastighedsporte, der leverer standard 500mA
strømstyrke. De sorte USB effektporte er højhastighedsporte, der leverer op
til 1Amp.
adapter fra DVI til VGA
Page 30

Targus USB 2.0 Laptop Docking Station with Video
58
Targus USB 2.0 Laptop Docking Station with Video
59
Tilslutning og konfiguration af Audio-enhed
1. Sæt hovedtelefonerne eller højttalerne i den grønne 3,5mm Audio ud port på
dockingstationen.
2. For at forbinde en mikrofon, sættes den i mono Audio ind porten.
3. Lyd og mikrofon bør fungere automatisk, når dockingstationen tilsluttes.
Vær sikker på at både højttaler- og mikrofon lydstyrken ikke er sat til
MUTE(stum).
4. Manuel aktivering af hovedtelefon eller højttalere er ikke muligt i automatisk
overførsel.
Gå til kontrolpanelet og vælg Lyd. Under Afspilning checkes at USB Audioenheden er sat til Standard. Hvis det ikke er tilældet, klikkes på Standard og
derefter på OK.
Gå til kontrolpanelet og vælg Lyd og multimedie. Vælg Audio. Under lydafspilning ændres den foretrukne enhed til USB Multimedia Audio Device fra
drop-down menuen.
• Klik på Anvend, og klik derefter OK.
For Windows XP
For Windows Vista
Gå til kontrolpanelet og vælg Hardware og Lyd, og vælg Lyd igen. Under
Afspilning, checkes at USB Audio Device er sat til Standard. Hvis det er
tilfældet, klikkes på OK. Hvis det ikke er tilfældet, vælges Standard og der
klikkes på OK.
For Windows 7
BEMÆRK: AUDIO-ENHEDERNE VIRKER IKKE SAMTIDIG PÅ STATIONSPORTEN OG HOSTCOMPUTEREN
FORSIGTIG: ALLE AUDIO- ELLER MULTIMEDIE-APPLIKATIONER SKAL VÆRE LUKKEDE, FØR DER
SKIFTES MELLEM STATIONSPORTEN OG HOSTCOMPUTERENS AUDIOUDGANG.
Tilslutning af en Monitor eller LCD
En hvilken som helst monitor eller LCD tilsluttet til videoporten på dockingstationen er begrænset til en maksimum opløsning på 2048 x 1152 i 32 bit farve
BEMÆRK: DEN MAKSIMALE OPLØSNING PÅ 2048 x 1152 UNDERSTØTTES KUN, HVIS MONITOREN
ELLER LCD’EN ER SAT I DOCKINGSTATIONEN, FØR DOCKINGSTATIONEN TILSLUTTES NOTEBOOKEN.
HVIS MONITOREN ELLER LCD’EN TILSLUTTES TIL DOCKINGSTATIONEN, EFTER AT DOCKINGSTATIONEN ER TILSLUTTET NOTEBOOKEN, SÆTTES OPLØSNINGEN TIL 1024 X 768.
Page 31

Targus USB 2.0 Laptop Docking Station with Video
60
Targus USB 2.0 Laptop Docking Station with Video
61
Styring af Skærmen ved hjælp af
dockingstationens valgmuligheder i Videomenu
Videomenuens valgmuligheder er tilgængelige ved at højre-klikke på dockingstationens ikon i systembakken eller i Windows Skærmindstillinger.
Windows XP / Windows Vista
Windows 7
Udvidelse: du anvender din notebooks skærm som primær skærm og din mon-
itor eller LCD som sekundær skærm.
For at indstille visning i denne tilstand, vælges ‘Extend’ (udvid) i Dockingstationens applikationsmenu. Enheden vil nu udvide sig i den retning, den
gjorde sidst, denne funktion blev brugt. For yderligere styring, navigeres til
undermenuen “Extend to” (udvid til), og når du vælger en af mulighederne,
er den ikke kun udvidet, men også placeret til venstre/højre/over/under
hovedskærmen (den primære).
Udvidelse
Page 32

Targus USB 2.0 Laptop Docking Station with Video
62
Targus USB 2.0 Laptop Docking Station with Video
63
Spejl: du anvender din notebook som primær skærm ,og din monitor eller LCD
kopierer din notebooks skærm.
For at indstille visning i denne tilstand, vælges ‘mirror’-ikonet i Dockingstationens applikations-menu. Den primære skærms opløsning, farvedybde
og fornyelseshastighed kopieres på monitoren forbundet til dockingstationens graske adapter.
NOTE: HVIS DEN MONITOR, DER ER FORBUNDET TIL DOCKINGSTATIONEN, HAR EN LAVERE OPLØSNING END DET PRIMÆRE BILLEDE, PASSER DEN TIL DEN EKSTERNE SKÆRM. HVOR DEN MONITOR,
SOM ER FORBUNDET TIL DOCKINGSTATIONEN, HAR EN HØJERE OPLØSNING END DEN PRIMÆRE
SKÆRM, VIL BILLEDET BLIVE INDRAMMET FOR AT BIBEHOLDE BILLEDFORMATET.
Spejl
Primær: (Notebook Monitor Off (slukket)): Du anvender din monitor eller
LCD som din primære skærm og din notebook skærm er slukket. (du kan kun få
adgang via Windows Skærmindstilling).
Primær
Page 33

Targus USB 2.0 Laptop Docking Station with Video
64
Targus USB 2.0 Laptop Docking Station with Video
65
Off (Slukket): Du bruger din notebook skærm som primær skærm, og din monitor eller LCD er slukket.
Slukket
Styring af Display ved hjælp af Windows
Displayindstilling (til Windows XP og Vista)
Dockingstationens videoindstilling kan kongureres fra Windows Skærmindstilling. Ved Windows Vista, højreklikkes på skrivebordet, klik på “Personlige
Indstillinger” og vælg “Skærmindstillinger”. Den tilsvarende funktion ndes
ved Windows XP ved at højreklikke på skrivebordet, vælge “Indstillinger” og
derefter navigere til “Indstilling”.
Figur 1
1
2
3
4
1
2
3
4
Windows Vista
Windows XP
Page 34

Targus USB 2.0 Laptop Docking Station with Video
66
Targus USB 2.0 Laptop Docking Station with Video
67
Udvidelsesfunktion: Displayet indstilles til denne funktion ved at sætte kryds
i boksen “Extend my Windows desktop onto this monitor” (udvid skrivebordet
over til denne skærm) (1 i Figur 1). Indstil skærmopløsningen og farvekvaliteten
ved hjælp af knapperne (2 og 3) og placer dem i forhold til de andre monitorer på
det udbyggede skrivebord ved hjælp af træk (4).
Spejlfunktion: Displayet indstilles til denne funktion ved at fjerne krydset fra
boksen “Extend the desktop onto this monitor” (udvid skrivebordet over til denne
skærm)(1 i Figur 1 på forrige side)..
Indstilling af Primær Skærm: Monitoren forbindes til Dockingstationen som
den primære skærm ved at følge nedenstående instruktioner:
1. I vinduet Skærmindstillinger, vælges, ved hjælp af dropdownlisten, den
monitor, der er forbundet til Dockingstationen
Windows Vista
Windows XP
1
1
Page 35

Targus USB 2.0 Laptop Docking Station with Video
68
Targus USB 2.0 Laptop Docking Station with Video
69
2. Når du har valgt den tilsvarende monitor, sættes kryds i boksen ved siden
af “extend the desktop onto this monitor” (udvid skrivebordet over til denne
skærm) (for Vista) eller “Extend my Windows desktop onto this monitor” (udvid Windows skrivebordet over til denne skærm) (for XP).
2
Windows Vista
Windows XP
2
3. Derefter sættes kryds i boksen ved siden af “This is my main monitor” (dette
er den primære skærm) (for Vista) eller “Use this device as the primary
monitor”(anvend denne skærm som primær skærm) (for XP)
Windows Vista
Windows XP
4. Klik på “Apply” (anvend)
Page 36

Targus USB 2.0 Laptop Docking Station with Video
70
Targus USB 2.0 Laptop Docking Station with Video
71
5. Vælg Laptop monitoren ved hjælp af dropdownlisten og fjern krydset fra
“extend the desktop onto this monitor “ (udvid skrivebordet over til denne
skærm) eller “extend my Windows desktop onto this monitor” (Udvid Windows skrivebordet over til denne skærm) (for XP) og klik “Apply” (anvend)
Monitoren forbundet til Dockingstationen forbliver primær, hvis PCen går i
dvale, slukker eller er genstartet. Hvis Dockingstationen ikke er forbundet, vil
laptopdisplayet blive primært igen.
NOTE: DET ER MULIGT AT ARBEJDE MED EN LAPTOP VED AT INDSTILLE HANDLING VED LUKKET
LÅG TIL”DO NOTHING” (GØR INGENTING) OG INDSTILLE DOCKINGEN TIL PRIMÆR FUNKTION. LAPTOPLÅGET KAN DERVED LUKKES OG LAPTOP BRUGES MED EKSTERN TASTATUR OG MUS.
Windows Vista
Windows XP
Ved forbindelse vil monitoren, som er forbundet til Dockingstationen, igen
blive primær.
Styring af Skærm ved hjælp af Windows
Skærmindstilling (til Windows 7)
Dockingstationens videoindstilling kan også kongureres fra Windows Skærmindstillinger. Dette gøres i Windows 7 ved at klikke på “Personlige Indstillinger”, vælge “Display” og “Skift skærmindstilling”. Eller højreklik på “Targus
USB Video adapter” og vælge “advanced” (avanceret).
De forskellige skærmindstillinger kan styres ved at vælge i listen “multiple
display” (ere skærme) i dropdownlisten. Vælg den ønskede indstilling og klik
“apply” (anvend). Skærmen vil opdatere og der bekræftes ved at vælge “keep
changes” (gem ændringer)
Page 37

Targus USB 2.0 Laptop Docking Station with Video
72
Targus USB 2.0 Laptop Docking Station with Video
73
Automatiske Opdateringer
Automatiske Opdateringer er en produktvedligeholdelsesfunktion fra DisplayLink. Den automatiske opdatering sikrer, at Dockingstationens graske
adapter har den mest opdaterede driver og software, som giver brugeren den
bedste præstation og stabilitet.
Anvendelse af USB Apparater, der har
brug for mere strøm
Nogle apparater, som bruger meget strøm, så som printere og optiske drivere,
skal sættes i USB strømporten. Disse porte giver op til 1000mA, dobbelt så
meget som standard USB porte.
Frakobling af Dockingstationen
Hvis Dockingstationen er slukket eller USB kablet fjernes fra computeren, vil
displayet blive sort. All vinduer og ikoner skifter til primær skærm.
Ved forbindelse eller opstart af Dockingstationen, vil skærmen returnere til
samme funktion som før frakoblingen. Dog vil de vinduer og ikoner, som før var
på skærmen, ikke blive gendannet.
Understøttet Opløsning
Opløsning Opdateringshas-
tighed ved 32 bit
640 x 480 60 67 72 75 85
720 x 480 50 60
768 x 576 50 60
800 x 600 56 60 72 75 85
832 x 624 75
800 x 480 60
848 x 480 60
1024 x 600 60
1024 x 768 60 70 72 85
1152 x 864 75
1152 x 870 75
1280 x 720 50 60
Den aktuelle opløsningsunderstøttelse afhænger af den forbundne monitor.
Opløsning Opdateringshas-
tighed ved 32 bit
1280 x 800 60 75 85
1280 x 960 60
1280 x 1024 60 75
1360 x 768 60
1366 x 768 60 75 85
1400 x 1050 60
1440 x 900 60
1600 x 1200 60
1680 x 1050 60
1920 x 1080 50 60
1920 x 1200 60
2048 x 1152 60
Page 38

Targus USB 2.0 Laptop Docking Station with Video
74
Targus USB 2.0 Laptop Docking Station with Video
75
Problemløsning
Apparatet virker ikke
• Sørg for at apparatet er isat porten på dockingstationen.
• Sæt apparatet i en anden port på dockingstationen. Hvis det stadig ikke virk-
er, testes apparatet ved at forbinde det direkte til din computer.
• Check at du har kørt Setup (Indstilling) eller Install program (Installér pro-
gram) for apparatet.
• Check at apparatet er vist i Device Manager. Yderligere oplysninger kan ses i
“Verifying Devices are Installed” (check at apparat er installeret)
• Frakobl alle apparater fra dockingstationen og forbind dem, et ad gangen.
Check at hvert apparat virker, før du isætter det næste.
• Hver USB port er beskyttet mod overstrømning. Hvis et USB apparat trækker
mere strøm end USB porten kan levere, vil porten lukke. Porten genåbnes
ved at frakoble apparatet og gå til Device Manager eller til beskeden i systembakken og vælge Reset (nulstil). Du kan derefter isætte apparatet i USB
porten. Hvis porten lukker igen, checkes apparatets strømkrav.
Produktbegrænsninger
Nogle apparater stopper midlertidigt, hvis der forekommer høj dataoverførsel.
F.eks. kan din mus være langsom til at reagere, når du printer grak ,eller når
der er meget netværkstrak. Vi anbefaler følgende:
• Overfør ikke data til eller fra ere højhastighedsapparatet, så som digitalka-
mera eller scanner, på samme tid.
• Hvis hastigheden falder, lukkes andre programmer, der anvender et USB ap-
parat, for at forbedre apparatets præstation.
Check at Apparat er Installeret
Du kan se indstillede apparater på dockingstationen i Device Manager vinduet
i Systemindstilling. Højreklik på Min Computer, Indstillinger og klik på Hardware og derefter Device Manager
I Device Manager vinduet kan du se følgende:
• Displayadaptere:
- Displaylink Grask Adapter (kun XP)
- Displaylink Spejladapter (kun XP)
• Netværkadaptere:
- Adapter til højhastigheds-USB Ethernet
• Lyd, Video og Spil joystick:
- USB Audioapparat
• USB Displayadaptere
- Targus USB Videoadapter
• Monitor
- Targus USB Videoadapter
FAQ - DisplayLink
http://www.displaylink.com/support/index.php
DisplayLink yder assistance på denne hjemmeside ved at svare på spørgsmål.
Disse svarer forhåbentlig på alle de spørgsmål, du har
Page 39

Targus USB 2.0 Laptop Docking Station with Video
76
Targus USB 2.0 Laptop Docking Station with Video
77
ES - Introducción
Enhorabuena por su compra de la Docking Station USB 2.0 con Vídeo
para Portátiles de Targus. Este módulo portátil de expansión le permite
conectarse a través de una simple conexión USB a hasta 4 dispositivos
USB, monitor, conexión a red (Ethernet/LAN), altavoces y micrófono.
La docking station, también ofrece dos Puertos de Alimentación
Targus, facilitando el doble de alimentación USB para dispositivos de
gran potencia, y con suciente separación entre los puertos USB para
los adaptadores de mayor tamaño.
La Docking Station dispone de los
siguientes puertos:
• Conector DVI Simple (compatible con hasta 2048 x 1152 a 32 bits de color)
• Dos puertos Audio de 3.5 mm: (1) salida estéreo (1) entrada de micrófono
• RJ-45 Ethernet 10/100
• Dos USB 2.0 (Blanco)
• Dos puertos USB de Alimentación (Negro) - suministran
Contenido de la Caja
Junto con esta guía de usuario, la caja contiene:
• Docking Station USB 2.0 con Vídeo para Portátiles de Targus
• Cable de alta velocidad USB 2.0
• CD con los drivers del software (mini CD)
• Adaptador de corriente CA (necesario)
Requisitos del Sistema
Hardware
• PC con un procesador Intel® Pentium® o equivalente
• Unidad CD-ROM (compatible con mini CD)
• Puerto USB versión 2.0
• Alimentación por Corriente Alterna (requiere adaptador de CA)
Sistema Operativo
• Mircosoft Windows® XP con el paquete de Servicio 3
• Mircosoft Windows Vista® con e l Paquete de Servicio 1
• Mircosoft Windows® 7
NOTA: CUANDO SE CONECTE A UN PUERTO USB VERSIÓN 1.1 DE SU ORDENADOR, EL NIVEL DE
RENDIMIENTO DE LA DOCKING STATION SERÁ MENOR QUE EL ÓPTIMO Y EL PUERTO PARA VÍDEO
NO FUNCIONARÁ CORRECTAMENTE. PARA UN MEJOR RESULTADO, CONÉCTELO A UN PUERTO USB
VERSIÓN 2.0
Page 40

Targus USB 2.0 Laptop Docking Station with Video
78
Targus USB 2.0 Laptop Docking Station with Video
79
Instalar el Dispositivo y los Drivers
Para utilizar la Docking Station de Targus, deberá instalar primero el driver en
su ordenador. Luego conecte la docking station a su ordenador y Windows
plug-and-play instalará los drivers del hardware para cada puerto.
ADVERTENCIA: DEBE INSTALAR EL SOFTWARE DE LA DOCKING STATION ANTES DE CONECTARLA A SU ORDENADOR, DE LO CONTRARIO EL DISPOSITIVO
NO FUNCIONARÁ CORRECTAMENTE.
Instalar el Driver de la Docking Station
Instalar el driver de la Docking station permite que su sistema operativo
reconozca la docking station y sus puertos una vez sea conectada.
1 Encienda su ordenador.
2 Inserte el CD de software del driver en la unidad CD-ROM de su
ordenador.
Si la conguración no se inicia automáticamente, haga clic en Inicio,
Ejecutar y entre en D:\Setup.exe (cuando la unidad D: sea la unidad de
su CD-ROM) y haga clic en OK.
3 Siga cualquier instrucción en pantalla para completar la instalación.
4 Haga clic en Finalizar y reinicie su ordenador cuando se lo indique.
Conectar la Docking Station a su
Ordenador
Después de instalar el software de la Docking Station, estará listo para
conectarla a su ordenador. Para efectuar esta operación:
1 Enchufe el adaptador de corriente alterna suministrado al conector de
CA de la docking station.
2 Conecte un extremo del cable USB a la docking station y el otro ex-
tremo a un puerto USB 2.0 libre de su ordenador.
ADVERTENCIA: LA DOCKING STATION NO FUNCIONARÁ CORRECTAMENTE
SI EL ADAPTADOR DE CORRIENTE NO ESTÁ ENCHUFADO A UNA TOMA DE
CORRIENTE CA.
NO ENCHUFE NINGÚN DISPOSITIVO A LA DOCKING STATION HASTA QUE LA
INSTALACIÓN HAYA FINALIZADO.
Page 41

Targus USB 2.0 Laptop Docking Station with Video
80
Targus USB 2.0 Laptop Docking Station with Video
81
D C 5 V
• La luz Tx verde se ilumina cuando está conectado a la red y la luz Rx
verde parpadea cuando se está transmitiendo datos a, o desde la red.
NOTA: LA DOCKING STATION PERMITE EL CAMBIO EN CALIENTE DEL CABLE DE RED.
Puertos de la docking station
DVI
Entrada de Audio
(MIC)
Salida de Audio
(SPK/Altavoz)
Cable de
Red
Puertos USB
(Blancos)
Puertos USB de Gran Potencia
(BLACK/Negros)
Puertos USB de Gran Potencia
(BLACK/Negros)
Conexión USB a PC
Bucle de
cierre
Adaptador de Corriente Alterna
Ranura estándar de bloqueo
Lateral derecho
Vista Trasera Lateral izquierdo
Conectar Dispositivos Nuevos
Para evitar posibles daños cuando conecta un dispositivo nuevo, no fuerce
el conector del cable en el puerto de la docking station. Si el conector del
cable no encajase bien, déle la vuelta al conector y pruebe a encajarlo
otra vez.
Conectarse a una Red de Área Local
Para conectar un cable de red ethernet con conector RJ-45, introduzca el
conector del cable al puerto de red ethernet/network de la docking station.
Los procedimientos adicionales para conectar a una red dependerán del
tipo de red que esté utilizando. Contacte con su administrador de red para
instrucciones detalladas.
Conectar un Dispositivo USB
Para conectar un dispositivo USB, enchúfelo en el puerto de acoplamiento
y siga las instrucciones adicionales suministradas con el dispositivo. Los
cuatro puertos USB cumplen con los requisitos de alta velocidad para USB
ofreciendo 480 Mbps de tasa de transferencia y 500mA de potencia
Los puertos USB blancos son puertos de gran velocidad que suministran
500mA de potencia. Los puertos USB negros de potencia son puertos de
gran velocidad que suministran hasta 1Amp.
DVI > VGA -muunnin
Page 42

Targus USB 2.0 Laptop Docking Station with Video
82
Targus USB 2.0 Laptop Docking Station with Video
83
Conectar y Congurar un Dispositivo Audio
1. Enchufe los auriculares o altavoces en el puerto Salida de Audio verde de
3.5mm de la docking station.
2. Para conectar un micrófono, enchúfelo en el puerto monoaural de Entrada
de Audio.
3. El sonido y micrófono saldrá automáticamente cuando enchufe la docking
station. Asegúrese de que el volumen del altavoz y del micrófono no esté
SILENCIADO.
4. Para activar manualmente sus auriculares o altavoces, en caso de que la
transferencia automática no sea posible.
Vaya al Panel de Control y seleccione Sonido. Bajo la pestaña de reproducción, compruebe que el Dispositivo de Audio USB está congurado
como predeterminado. Si lo está, haga clic en Aceptar. De lo contrario,
selecciónelo, haga clic en Predeterminar y, a continuación, haga clic en
Aceptar.
Vaya al Panel de Control y seleccione Sonido y Audio. Seleccione la
lengüeta Audio. Bajo Reproducción de Sonido, cambie el Dispositivo
Preferido a “USB Multimedia Audio Device”( Dispositivo Audio USB Multimedia) desde el menú desplegadle.
• haga clic en Solicitud, luego haga clic en ACEPTAR.
Para Windows XP
Para Windows Vista
Vaya al Panel de Control y seleccione Hardware y Sonido. Seleccione Sonido. En la pestaña de Reproducción, compruebe que el Dispositivo USB de
Audio está establecido como el predeterminado. Si lo está, haga clic en OK.
Si no es así, selecciónelo y haga clic en Establecer como Predeterminado,
a continuación, haga clic en OK.
Para Windows 7
NOTA: LOS DISPOSITIVOS DE AUDIO NO FUNCIONARÁN SIMULTÁNEAMENTE EN LOS PUERTOS DE
LA DOCKING STATION Y EN EL ORDENADOR.
PRECAUCIÓN: TODAS LAS APLICACIONES DE AUDIO O MULTIMEDIA DEBEN CERRARSE ANTES DEL
CAMBIO ENTRE LOS PUERTOS DE SALIDA DE AUDIO DE LA DOCKING STATION Y LA SALIDA DE
AUDIO DEL ORDENADOR HUÉSPED.
Conectarse a una pantalla o monitor LCD
Cualquier monitor o pantalla LCD conectada al puerto de vídeo de la docking station se limitará a una resolución máxima de 2048 x 1152 para valores de color de 32 bits.
NOTA: LA MÁXIMA RESOLUCIÓN DE 2048 x 1152 SOLO PUEDE SER COMPATIBLE SI EL MONITOR O
PANTALLA LCD SE CONECTA A LA DOCKING STATION ANTES DE CONECTAR DICHA ESTACIÓN AL
PORTÁTIL.. SI EL MONITOR O PANTALLA LCD SE CONECTAN A LA DOCKING STATION DESPUÉS DE
CONECTAR LA ESTACIÓN BASE AL PORTÁTIL, LA RESOLUCIÓN SE ESTABLECERÁ EN 1024 X 768.
Page 43

Targus USB 2.0 Laptop Docking Station with Video
84
Targus USB 2.0 Laptop Docking Station with Video
85
Control de la Pantalla usando el menú de
opciones de video de la docking station
Para acceder al menú de opciones de vídeo se puede acceder haciendo clic
con el botón derecho sobre el icono de la docking station en la bandeja del
sistema o a través de la Propiedades de Pantalla de Windows.
Windows XP / Windows Vista
Windows 7
Extend (Ampliación): Usted está utilizando su ordenador portátil como
pantalla principal y la pantalla o monitor LCD como pantalla secundaria.
Para congurar la pantalla en este modo, seleccione “Extend”en el Icono
del menú de aplicaciones de la docking station. El dispositivo se extenderá en la dirección que la pantalla se conguró en este modo por
última vez. Para un mayor control, puede navegar al submenú “Extend
To” (Extender a) y seleccionando una de las opciones no solo pondrá el
dispositivos en modo extendido, sino que también podrá posicionar a la
Izquierda/Derecha/Arriba/Abajo el monitor principal.
Modo Extendido
Page 44

Targus USB 2.0 Laptop Docking Station with Video
86
Targus USB 2.0 Laptop Docking Station with Video
87
Espejo: Está utilizando la pantalla de su portátil como su pantalla principal y
su pantalla o monitor LCD replica la pantalla de su portátil.
Para congurar la pantalla en este modo, basta con seleccionar “mirror
(espejo)” desde el icono del menú de aplicaciones de la docking station
. La resolución, profundidad de color y la tasa de refresco de la pantalla
principal se replican en el monitor conectado al adaptador de grácos
de la docking station.
NOTA: SI EL MONITOR CONECTADO A LA DOCKING STATION PERMITE UNA RESOLUCIÓN MENOR
QUE LA PANTALLA PRIMARIA, LA IMAGEN SERÁ REAJUSTADA PARA AMOLDARSE A LA PANTALLA
EXTERNA. AQUÍ EL MONITOR CONECTADO A LA DOCKING STATION ES DE MAYOR TAMAÑO QUE LA
PANTALLA PRINCIPAL, POR LO QUE LA IMAGEN SERÁ ENTONCES ACOTADA PARA MANTENER EL
RATIO DE IMAGEN CORRECTO.
Espejo
Principal: Está utilizando su monitor o la pantalla LCD como pantalla prin-
cipal, y la pantalla de su ordenador portátil está apagada. (accesible solo
mediante las propiedades de visualización de windows)
Principal
Page 45

Targus USB 2.0 Laptop Docking Station with Video
88
Targus USB 2.0 Laptop Docking Station with Video
89
Apagado: Esta utilizando la pantalla de su ordenador como dispositivo principal y su monitor LCD se encuentra apagado.
Apagado
Administrar la pantalla utilizando
Windows Display (para Windows XP y Windows Vista)
La conguración de la docking station también puede ser administrada
desde el cuadro de diálogo de las Propiedades de Pantalla de Windows.
Para hacer esto en Windows Vista, haga clic en el botón derecho sobre el
escritorio, haga clic en “Personalizar” y luego seleccione el vinculo “Conguración de Pantalla”. La función correspondiente está disponible en Windows XP haciendo clic en el botón derecho en el escritorio, seleccionando
“Propiedades” y, a continuación, navegar a la pestaña ‘Conguración’.
Figure 1
1
2
3
4
1
2
3
4
Windows Vista
Windows XP
Page 46

Targus USB 2.0 Laptop Docking Station with Video
90
Targus USB 2.0 Laptop Docking Station with Video
91
Modo extendido: Para congurar la pantalla en este modo, verique la
casilla marcada Extender el escritorio en este monitor (1 en la Figura 1 en
la pagina anterior). Seleccione la resolución de pantalla y calidad de color
usando los controles apropiados (2 y 3), y congure su posición respectivamente, a los otros monitores en el escritorio extendido ampliado en el uso
de la zona arrastre (4).
Modo espejo: Para congurar la pantalla en el modo espejo, simplemente
quite la vericación de la casilla marcada. “Extender el escritorio a este
monitor” (1 en gura 1 de la pagina previa).
Seleccionando la Pantalla principal: Para seleccionar el monitor conectado a la docking station como pantalla principal, siga las siguientes
instrucciones:
1. En la ventana de Propiedades de Pantalla, usando la lista despegable,
seleccione el monitor conectado la docking station.
Windows Vista
Windows XP
1
1
Page 47

Targus USB 2.0 Laptop Docking Station with Video
92
Targus USB 2.0 Laptop Docking Station with Video
93
2. Después de seleccionar le correspondiente monitor, marque la siguiente
casilla junto a “extender el escritorio a este monitor” (para Vista) o “extender mi Escritorio de Windows a este monitor” (para XP).
2
Windows Vista
Windows XP
2
3. Seguidamente marque la casilla junto a “Este es mi monitor principal”
(para Vista)” Use este dispositivo como monitor principal”(para XP).
3
3
Windows Vista
4. Pulse el botón “Aplicar”.
Page 48

Targus USB 2.0 Laptop Docking Station with Video
94
Targus USB 2.0 Laptop Docking Station with Video
95
5. Seleccione el monitor del portátil usando la lista desplegadle y deseleccione la casilla “extender el escritorio a este monitor”(para Vista) o “ Extender mi Escritorio de Windows a este monitor” (para XP) y pulse el botón
“Aplicar”
El monitor conectado a la docking station se establece como primario si el
PC entra en modo de hibernación, suspenso o se reinicia. Si la docking station se desenchufa, la pantalla del portátil pasa a ser primaria.
NOTA: ES POSIBLE TRABAJAR DE FORMA MAS CÓMODA CON UN PORTÁTIL CON LA TAPA CERRADA
“NO HAGA NADA” Y PONGA LA DOCKING STATION COMO MODO PRINCIPAL. LA TAPA DEL PORTÁTIL
PUEDE ENTONCES CERRARSE Y EL PORTÁTIL SER USADO CON UN RATÓN Y TECLADO EXTERNOS.
4
4
Windows Vista
Windows XP
Al volver a conectar, el monitor enchufado a la docking station volverá a
aparecer en modo primario.
Controlar la Pantalla utilizando las Propiedades de Pantalla de Windows
(para Windows 7)
Los ajustes de vídeo de la Docking Station también pueden congurarse desde el cuadro de diálogo de Propiedades de Pantalla de Windows. Para hacerlo
en Windows 7, haga clic con el botón derecho sobre el escritorio, haga clic en
“Personalizar” y seleccione la opción “Pantalla”, y luego seleccione “Cambiar
de conguración de pantalla”. O haga clic con el botón derecho sobre el icono
“Adaptador Targus USB para Video” en el área de noticación y seleccione
“avanzar”
Las diversas conguraciones para la salida de imagen pueden ser controladas
seleccionado las opciones previstas en la lista desplegable de visualización
múltiple. Seleccione la opción deseada y haga clic en “Aplicar”. La pantalla se
actualizará y conrme seleccionando la opción “guardar cambios”.
Page 49

Targus USB 2.0 Laptop Docking Station with Video
96
Targus USB 2.0 Laptop Docking Station with Video
97
Actualizaciones Automáticas
Las actualizaciones automáticas son una característica de mantenimiento
de producto de Display-Link. El mecanismo de actualización automática
asegura que el adaptador de grácos de la docking station tiene los drivers
y software mas recientes, proporcionando al usuario un mayor rendimiento
y estabilidad.
Utilizar dispositivo USB que requieran mas
potencia
Algunos dispositivos, que utilizan grandes cantidades de potencia, como
impresoras o dispositivos ópticos, deben ser conectados a los puertos USB
de Alimentación. Estos puertos proveen de hasta 1000mA de corriente - el
doble de la corriente de un USB.
Desconectando la docking station.
Si la docking station se apaga o el cable USB se desconecta del ordenador,
la pantalla se queda en blanco. Todas las ventanas e iconos cambiaran a la
pantalla primaria. Al reconectar o al volver a encender la docking station, la
pantalla vuelve al mismo modo que se encontraba antes de la desconexión.
Sin embargo, las ventanas y los iconos que anteriormente en la pantalla no
volverán a la posición original.
Resolución Soportada
El área de resoluciones compatible depende del monitor conectado.
Resolución Tasas de refresco
a 32 bit
640 x 480 60 67 72 75 85
720 x 480 50 60
768 x 576 50 60
800 x 600 56 60 72 75 85
832 x 624 75
800 x 480 60
848 x 480 60
1024 x 600 60
1024 x 768 60 70 72 85
1152 x 864 75
1152 x 870 75
1280 x 720 50 60
Resolución Tasas de refresco
a 32 bit
1280 x 800 60 75 85
1280 x 960 60
1280 x 1024 60 75
1360 x 768 60
1366 x 768 60 75 85
1400 x 1050 60
1440 x 900 60
1600 x 1200 60
1680 x 1050 60
1920 x 1080 50 60
1920 x 1200 60
2048 x 1152 60
Page 50

Targus USB 2.0 Laptop Docking Station with Video
98
Targus USB 2.0 Laptop Docking Station with Video
99
Solución de problemas
Dispositivo no funciona
• Asegúrese de que el dispositivo esté totalmente insertado en el puerto correcto
de la Docking Station.
• Conecte el dispositivo a un puerto diferente en la docking station. Si todavía no
funciona, pruebe a conectar el dispositivo directamente al ordenador.
• Compruebe que ejecuta la instalación del programa para el dispositivo.
• Asegúrese que el dispositivo aparece en el administrador de dispositivos. Para
mas información diríjase a “Vericar Dispositivos Instalados”.
• Desconecte todos los dispositivos de la estación de la docking station y vuelva
a conectarlos de un en uno. Compruebe que cada dispositivo funciona antes de
conectar el siguiente.
• Cada puerto USB esta equipado con una protección en caso de sobrecarga de
corriente. Si un dispositivo USB requiere mas corriente de la que el puerto USB
puede proveer, el puerto se desactivará. Para reactivar el puerto, desconecte el
dispositivo y vaya a Administrador de dispositivos o a el mensaje de sistema en
la bandeja de sistema y escoja la opción Reiniciar. Puede enchufar el dispositivo
de vuelta al puerto USB. Si se vuelve a desactivar el puerto, compruebe los requisitos de alimentación del dispositivo.
Limitaciones del producto
Algunos dispositivos pueden detenerse temporalmente cuando se produce
una elevada transferencia de datos. Por ejemplo, el ratón puede responder
muy despacio, mientras que se imprime una tarea gráca, o mientras está
experimenta un tráco elevado en la red. Recomendamos las siguientes directrices:
• No transferir los datos hacia o desde múltiples dispositivos de alta velocidad,
como una cámara digital o escáner, al mismo tiempo.
• Si la velocidad de degradación se produce, cierre otros programas que usen
un dispositivo USB para mejorar el funcionamiento del dispositivo.
Verificando que los dispositivos se
encuentran instalados
Puede ver los dispositivos instalados en la docking station desde la ventana
del Administrador de dispositivos en Propiedades del sistema. Haga clic con
el botón derecho del ratón en Mi PC, Propiedades, a continuación, haga clic
en la pestaña Hardware y, a seguidamente en el botón de Administrador de
dispositivos.
Desde la ventana del Administrador de dispositivos, expanda los siguientes
dispositivos:
• Adaptadores de pantalla:
- Adaptador gráco Displaylink (XP solamente)
- Adaptador Espejo Displaylink (XP solamente)
• Adaptadores de red:
- Alta velocidad Adaptador Ethernet USB
• Dispositivo de sonido, vídeo y juegos:
- Dispositivo USB de Audio
• Adaptadores USB de Pantalla
- USB Targus a Adaptadores DVI
• Monitor
- USB Targus a Adaptadores DVI
Preguntas frecuentes - DisplayLink
http://www.displaylink.com/support/index.php
DisplayLink ofrece este sitio Web de asistencia para ayudar a resolver sus
dudas. Esta sitio Web puede responder a cualquier pregunta que usted pueda
tener.
Page 51

Targus USB 2.0 Laptop Docking Station with Video
100
Targus USB 2.0 Laptop Docking Station with Video
101
FI - Johdanto
Onnittelut hankkimasi Targus USB 2.0 videolla varustetun
kannettavan tietokoneen telakka-aseman johdosta. Tämä
kannettava lisälaite sallii jopa neljän USB-laitteen, näytön,
tietoverkkoyhteyden (Ethernet/LAN), kaiuttimen ja mikrofonin
liittämisen vain yhden USB-liitännän kautta.
Telakka-asema tarjoaa myös kaksi Targus Power -porttia, joissa
on kaksinkertainen USB-määritys korkeavirtaisille laitteille, ja kaksi
USB-porttia joiden välissä on enemmän tilaa ottaen huomioon
suurikokoisemmat sovittimet.
Telakka-asemassa on seuraavat portit:
• DVI Single Link -portti (tukee jopa 2048 x 1152 tarkkuutta 32 bitin väreillä)
• Kaksi 3,5 mm äänentoistoporttia: (1) stereo lähtöliitäntä (1) mikrofoni
tuloliitäntä
• RJ-45 Ethernet-portti 10/100
• Kaksi USB 2.0 -porttia (valkoiset)
• Kaksi Power USB-porttia (mustat) - tarjoavat jopa 1 ampeerin virran
Pakkauksen sisältö
Tämän käyttöoppaan lisäksi pakkaukseen sisältyy:
• Targus USB 2.0 kannettavan tietokoneen telakka-asema näyttö-liitännällä
• High-speed 2.0 USB-kaapeli
• Ajuriohjelmisto-CD (mini-CD)
• AC-virtasovitin (tarvitaan)
Järjestelmävaatimukset
Laitteisto
• Tietokone jossa on ® Pentium® prosessori tai vastaava
• CD-ROM asema (tukee mini CD:tä)
• USB 2.0 portti
• AC-virtalähde (AC-sovitin tarvitaan)
Käyttöjärjestelmä
• Microsoft Windows® XP jossa on Service Pack 3
• Microsoft Windows Vista® jossa on Service Pack 1
• Microsoft Windows® 7
HUOM: KUN TELAKKA-ASEMA ON YHDISTETTY TIETOKONEESI USB 1.1 PORTTIIN, TELAKKA-ASEMAN
SUORITUSTASO EI OLE TÄYSIN OPTIMAALINEN JA VIDEOPORTTI EI TOIMI KUNNOLLA. YHDISTÄ SE
USB 2.0-PORTTIIN PARHAAN TULOKSEN SAAVUTTAMISEKSI.
Page 52

Targus USB 2.0 Laptop Docking Station with Video
102
Targus USB 2.0 Laptop Docking Station with Video
103
Laitteen ja ajurien asennus
Käyttääksesi Targus telakka-asemaa, sinun täytyy ensin asentaa
ohjainohjelmisto tietokoneellesi. Yhdistä sitten telakka-asema
tietokoneeseesi ja Windowsin liitä-ja-käytä (plug-and-play) asentaa
laitteistoajurit jokaiseen porttiin.
VAROITUS: SINUN TÄYTYY ASENTAA TELAKKA-ASEMAN OHJELMISTO ENNEN
KUIN YHDISTÄT SEN TIETOKONEESEESI. MUUTOIN TELAKKA-ASEMA EI TOIMI
KUNNOLLA.
Telakka-aseman ohjelmiston asennus
Telakka-aseman ohjelmistonn asennus mahdollistaa sen, että
käyttöjärjestelmäsi tunnistaa telakka-aseman ja sen portit kun se on kytketty.
1 Käynnistä tietokoneesi.
2 Aseta ajuriohjelmisto-CD tietokoneesi CD-ROM asemaan.
Jos asennus ei ala automaattisesti, napauta Aloita (Start), Suorita (Run), ja
anna D:\Setup.exe (jossa D: on CD-ROM-asemasi polku) ja valitse sitten
Hyväksy (OK).
3 Seuraa näytöllä näkyviä ohjeita suorittaaksesi asennuksen.
4 Napauta Lopeta (Finish) ja käynnistä koneesi uudelleen saatuasi siihen
kehoituksen.
Telakka-aseman liittäminen
tietokoneeseesi
Kun olet asentanut telakka-aseman ohjelmiston, voit liittää telakka-asemasi
tietokoneeseesi. Toimi näin:
1 Yhdistä mukana tullut virtalähde telakka-asemassa sijaitsevaan virtapistok-
keeseen sekä seinäpistorasiaan.
2 Yhdistä USB-kaapelin toinen pää telakka-asemaan ja toinen pää johonkin
tietokoneessasi vapaana olevaan USB 2.0 porttiin.
VAROITUS: TELAKKA-ASEMA EI TOIMI KUNNOLLA JOS VIRTALÄHDETTÄ EI
OLE LIITETTY SEINÄPISTORASIAAN.
ÄLÄ YHDISTÄ MITÄÄN LAITETTA TELAKKA-ASEMAAN ENNEN KUIN ASENNUS ON SUORITETTU LOPPUUN.
Page 53

Targus USB 2.0 Laptop Docking Station with Video
104
Targus USB 2.0 Laptop Docking Station with Video
105
D C 5 V
• Vihreä Tx valo syttyy kun yhdistetty lähiverkkoon ja keltainen Rx valo välkkyy
kun dataa siirretään lähiverkkoon tai sieltä pois.
HUOM: TELAKKA-ASEMA MAHDOLLISTAA LÄHIVERKKOKAAPELIN VAIHDON KATKAISEMATTA
YHTEYTTÄ
Telakka-aseman portit
DVI
Mikrofoni-liitäntä
(MIC)
Kaiutin liitäntä (SPK)
Lähiverkkokaapeli
USB-portit (valkoiset)
Power USB-portit
(MUSTAT)
Power USB-portit
(MUSTAT)
USB-tietokone
-yhteys
Paikka vaijerilukolle
Virtapistoke
Standardi lukkopaikka
Takaosa
Oikea puoli Vasen puoli
Uusien laitteiden liittäminen
Välttääksesi mahdollisia vahinkoja kun liität uusia laitteita, älä työnnä kaapeliliitintä väkisin telakka-aseman porttiin. Jos kaapeliliitin ei liity helposti, käännä
liitin ylösalaisin ja yritä uudelleen.
Lähiverkkoyhteyden muodostaminen
Yhdistääksesi ethernet-kaapelin RJ-45 -liittimeen, aseta kaapeliliitin telakkaaseman
ethernet/lähiverkkoporttiin. Jatkotoimenpiteet lähiverkkoon liittämiseksi riippuvat käyttämästäsi lähiverkosta. Ota yhteyttä lähiverkkosi ylläpitäjään saadaksesi yksityiskohtaisia ohjeita.
USB-laitteen liittäminen
Liittääksesi USB-laitteen, kytke se telakka-asemassa sijaitsevaan USBporttiin ja seuraa laitteen mukana tulevia lisäohjeita. Kaikki neljä USB-porttia
vastaavat high-speed USB-vaatimuksia tarjoamalla 480Mbps nopeuden ja
500mA virran.
Valkoiset USB-portit ovat high-speed portteja jotka tarjoavat stardardin
500mA virran. Mustat Power USB-portit ovat high-speed portteja jotka tarjoavat jopa 1 ampeerin virran.
Adaptador de DVI
a VGA
Page 54

Targus USB 2.0 Laptop Docking Station with Video
106
Targus USB 2.0 Laptop Docking Station with Video
107
Äänentoistolaitteen liittäminen ja konfigurointi
1. Kytke kuulokkeesi tai kaiuttimesi telakka-aseman vihreään 3,5mm ään-
entoiston lähtöliitäntä -porttiin.
2. Liittääksesi mikrofonin, kytke se mono äänentoiston tuloliitäntä -porttiin.
3. Äänen ja mikrofonin pitäisi toimia automaattisesti kun liität telakka-ase-
man. Varmista että kaiuttimen tai mikrofonin äänenvoimakkuutta ei ole
asetettu Mykistä-asentoon.
4. Manuaalinen kuulokkeiden tai kaiuttimien asennus siltä varalta että au-
tomaattinen siirto ei toimi.
Mene Ohjauspaneeliin ja valitse Ääni. Tarkista että USB-äänentoistolaite on
asetettu oletukseksi välilehdessä Äänitoisto. Jos näin on, napauta Hyväksy
(OK). Jos näin ei ole, valitse se, valitse Aseta oletukseksi, ja napauta sitten
Hyväksy (OK).
Mene Ohjauspaneeliin ja valitse Ääni ja äänentoisto. Valitse Äänentoistovälilehti. Muuta Oletuslaite pudotusvalikosta USB-multimedia äänentoistolaitteeksi otsikon Äänitoisto alla.
• Napauta Sovella, paina sitten Hyväksy (OK).
Jos sinulla on Windows XP
Jos sinulla on Windows Vista
Mene Ohjauspaneeliin ja valitse Laitteisto ja Ääni, valitse sitten Ääni. Tarkista että USB-äänentoistolaite on asetettu oletukseksi välilehdessä Äänitoisto. Jos näin on, napauta Hyväksy (OK). Jos näin ei ole, valitse se, valitse
Aseta oletukseksi, napauta sitten Hyväksy (OK).
Jos sinulla on Windows 7
HUOM: ÄÄNENTOISTOLAITTEET EIVÄT TOIMI SAMAAN AIKAAN PORTTIASEMASSA JA ISÄNTÄTIETOKONEESSA
VAROITUS: KAIKKI ÄÄNENTOISTO- TAI MULTIMEDIASOVELLUKSET TÄYTYY SULKEA ENNEN KUIN
SIIRRYT PORTTIASEMAN JA ISÄNTÄTIETOKONEEN ÄÄNENTOISTON LÄHTÖLIITÄNTÖJEN VÄLILLÄ
Näyttöön tai LCD-näyttöön liittäminen
Missä tahansa telakka-aseman videoporttiin liitetyssä näytössä tai LCD:ssä on
maksimiresoluutio 2048 x 1152, 32-bittisillä väreillä
HUOM: 2048 x 1152 MAKSIMIRESOLUUTIOTA TUETAAN VAIN JOS NÄYTTÖ TAI LCD ON KYTKETTY
TELAKKA-ASEMAAN ENNEN KUIN TELAKKA-ASEMA KYTKETÄÄN TIETOKONEESEEN.
JOS NÄYTTÖ TAI LCD KYTKETÄÄN TELAKKA-ASEMAAN VASTA KUN TELAKKA-ASEMA ON KYTKETTY
TIETOKONEESEEN, RESOLUUTIO ON 1024 X 768.
Page 55

Targus USB 2.0 Laptop Docking Station with Video
108
Targus USB 2.0 Laptop Docking Station with Video
109
Näytön hallinta käyttämällä telakkaaseman Videovalikkovaihtoehtoja
Videovalikkovaihtoehtoihin pääsee käsiksi napauttamalla hiiren oikeaa
näppäintä Telakka-aseman kuvakkeen päällä ilmaisinalueella tai Windows
Näytön ominaisuudet-toiminnon kautta.
Windows XP / Windows Vista
Windows 7
Laajenna (Extend): Käytät kannettavasi näyttöä päänäyttönäsi ja monitoriasi
tai LCD:täsi toissijaisena näyttönä.
Asettaaksesi näytön tähän tilaan, valitse ‘Laajenna (Extend)’ telakkaaseman kuvakesovellusvalikosta. Laite laajenee nyt samaan suuntaan
kuin viimeksi näytön ollessa tässä tilassa. Paremman hallinnan saavuttamiseksi navigointi ‘Laajenna (Extend)’ alavalikkoon ja jonkun vaihtoehdon valitseminen ei ainoastaan aseta laitetta laajennustilaan vaan
se asettaa sen myös päänäytön vasemmalle/oikealle/yläpuolelle/alapuolelle.
Laajenna
Page 56

Targus USB 2.0 Laptop Docking Station with Video
110
Targus USB 2.0 Laptop Docking Station with Video
111
Peili (Mirror): Käytät kannettavasi näyttöä päänäyttönäsi ja monitorisi tai
LCD:si toistaa kannettavasi näytön.
Asettaaksesi näytön tähän tilaan, valitse ‘peili (Mirror)’ telakka-aseman
sovellusvalikosta. Päänäytön resoluutio, värin syvyys ja päivitysnopeus
toistuvat telakka-aseman graikkasovittimeen liitetyllä monitorilla.
HUOM: JOS TELAKKA-ASEMAAN LIITETTY MONITORI TUKEE ALEMPAA RESOLUUTIOTA KUIN PÄÄNÄYTTÖ, KUVA SOPII ULKOISELLE RUUDULLE. JOS TELAKKA-ASEMAAN LIITETTY MONITORI ON SUUREMPI KUIN PÄÄNÄYTTÖ, KUVA NÄKYY SITEN ETTÄ MITTASUHTEET PYSYVÄT SAMOINA.
Peili
Pääsääntöinen/Primary (Kannettavan näyttö pois päältä): Käytät moni-
toriasi tai LCD:täsi päänäyttönäsi ja kannettavasi näyttö on pois päältä. (pääset
siihen vain Windowsin näytön ominaisuuksien kautta)
Pääsääntöinen (Primary)
Page 57

Targus USB 2.0 Laptop Docking Station with Video
112
Targus USB 2.0 Laptop Docking Station with Video
113
Pois päältä (Off): Käytät kannettavasi näyttöä päänäyttönäsi ja monitorisi tai
LCD:si on pois päältä.
Pois päältä
Näytön hallinta Windowsin näytön
ominaisuuksia käyttämällä (Jos sinulla on Windows XP tai Vista)
Telakka-aseman videoasetukset voi konguroida myös Windowsin näytön
ominaisuuksien viestiruudun kautta. Tehdäksesi tämän Windows Vistalla,
napauta hiiren oikeaa nappia työpöydällä, valitse ‘Mukauta’ (Personalize) ja
valitse sitten ‘Näytön asetukset’ (Display Settings).
Vastaava ominaisuus on saatavana Windows XP:ssä napauttamalla hiiren
oikeaa nappia työpöydällä, valitsemalla ‘Ominaisuudet’ (Properties) ja sitten
navigoimalla välilehteen ‘Asetukset’ (Settings).
Kuva 1
1
2
3
4
1
2
3
4
Windows Vista
Windows XP
Page 58

Targus USB 2.0 Laptop Docking Station with Video
114
Targus USB 2.0 Laptop Docking Station with Video
115
Laajennustila (Extend Mode): Asettaaksesi näytön tähän tilaan, valitse
vaihtoehto nimeltä ‘Laajenna Windows työpöytäni tähän monitoriin (Extend
my Windows desktop onto this monitor)’ (1 kuvassa 1). Järjestä ruudun resoluutio ja värin laatu käyttämällä tarkoitukseen varattuja ohjaimia (2 ja 3), ja
järjestä sen sijainti laajennetulla työpöydällä toisiin monitoreihin nähden käyttämällä raahausaluetta (4).
Peilitila: Asettaaksesi näytön peilitilaan, yksinkertaisesti poista valinta vaihtoehdosta ‘Laajenna työpöytä tähän monitoriin (Extend the desktop onto this
monitor)’ (1 kuvassa 1 edellisellä sivulla.).
Päänäytön asettaminen: Tehdäksesi telakka-asemaan liitetystä monitorista päänäyttösi, seuraa alla olevia ohjeita:
1. Vaihtoehdossa Näytön ominaisuudet (Display Properties), käyttämällä pudotusvalikkoa, valitse se monitori joka on liitetty telakka-asemaan.
Windows Vista
Windows XP
1
1
Page 59

Targus USB 2.0 Laptop Docking Station with Video
116
Targus USB 2.0 Laptop Docking Station with Video
117
2. Kun olet valinnut vastaavan monitorin, valitse ruutu vaihtoehdolle “laajenna työpöytä tähän monitoriin (extend the desktop onto this monitor)” (Vista)
tai “laajenna Windows työpöytäni tähän monitoriin (extend my Windows
desktop onto this monitor)” (XP).
2
Windows Vista
Windows XP
2
3. Valitse sitten vaihtoehto “Tämä on päänäyttöni (This is my main monitor)”
(Vista) “Käytä tätä laitetta päänäyttönä (Use this device as the primary
monitor)” (XP).
Windows Vista
Windows XP
4. Napauta “Käytä (Apply)”.
Page 60

Targus USB 2.0 Laptop Docking Station with Video
118
Targus USB 2.0 Laptop Docking Station with Video
119
5. Valitse kannettavan monitori käyttämällä pudotusvalikkoa ja poistamalla
valinta kohdasta “laajenna työpöytä tähän monitoriin (extend the desktop
onto this monitor)” (Vista) tai “Laajenna Windows työpöytäni tähän monitoriin (Extend my Windows desktop onto this monitor)” (XP) ja napauta “Käytä
(Apply)”
Telakka-asemaan liitetty monitori pysyy päänäyttönä jos tietokone siirtyy horrostilaan tai se käynnistetään uudelleen. Jos telakka-asema irroitetaan, kannettavan näytöstä tulee jälleen päänäyttö.
HUOM: KANNETTAVALLA ON MAHDOLLISTA TYÖSKENNELLÄ MUKAVAMMIN ASETTAMALLA
SEN TOIMINTO KANSI SULJETTUNA ASENTOON ‘ÄLÄ TEE MITÄÄN’ JA ASETTAMALLA TELAKKAASEMA PÄÄTILAAN. KANNETTAVAN KANNEN VOI SITTEN SULKEA JA KANNETTAVAA VOI KÄYTTÄÄ
ULKOISELLA NÄPPÄIMISTÖLLÄ JA HIIRELLÄ.
Windows Vista
Windows XP
Uudelleen liittämisen myötä telakka-asemaan liitetty näyttö palaa päätilaan.
Näytön hallinta käyttämällä Windows
Näytön ominaisuuksia (Jos sinulla on Windows 7)
Telakka-aseman videoasetukset voi konguroida myös Windowsin Näytön
ominaisuudet -viestiruudun kautta. Tehdäksesi tämän Windows 7:llä, napauta hiiren oikeaa nappia työpöydällä, napauta “Mukauta (Personalize)” ja
valitse ‘Näyttö (Display)” ja sitten
“Muuta näytön asetuksia (Change display setting)’. Tai napauta hiiren oikeaa
nappia kuvakkeen “Targus USB Videosovitin (Targus USB Video adapter)”
kohdalla ilmoitusalueella ja valitse ”Jatka (advance)”.
Näytön eri asetuksia voi hallita valitsemalla eri vaihtoehtoja pudotusvalikossa
“usea näyttö (multiple display)”. Valitse haluttu asetus ja napauta “Käytä
(Apply)”. Näyttö päivittyy, vahvista valinta napauttamalla “säilytä muutokset
(Keep Changes)”.
Page 61

Targus USB 2.0 Laptop Docking Station with Video
120
Targus USB 2.0 Laptop Docking Station with Video
121
Automaattiset päivitykset
Automaattiset päivitykset on DisplayLinkin ylläpito-ominaisuus tuotteelle.
Automaattinen päivitysmekanismi varmistaa että telakka-aseman näytönohjaimessa on uusimmat ajurit ja ohjelmisto, tarjoten käyttäjälle parannetun
suorituskyvyn ja vakauden.
Enemmän virtaa vaativien USBlaitteiden käyttäminen
Paljon virtaa käyttävät laitteet, kuten tulostimet ja optiset asemat, kuuluu liittää Power USB -portteihin. Nämä portit tarjoavat jopa 1000mA - eli kaksinkertaisen virran verrattuna tavallisiin USB-portteihin.
Telakka-aseman irroittaminen
Jos telakka-asemasta käännetään virta pois päältä tai USB-kaapeli poistetaan tietokoneesta, näyttö pimenee. Kaikki ikkunat ja kuvakkeet siirtyvät päänäytölle.
Kun telakka-asema liitetään tai käynnistetään uudelleen, näyttö palaa liitoksen poistamista edeltävään tilaan. Näytöllä aikaisemmin olleet ikkunat ja kuvakkeet eivät kuitenkaan siirry takaisin.
Tuettu resoluutio
Resoluutio 32-bittisenä
saavutettavat
päivitysnopeudet
640 x 480 60 67 72 75 85
720 x 480 50 60
768 x 576 50 60
800 x 600 56 60 72 75 85
832 x 624 75
800 x 480 60
848 x 480 60
1024 x 600 60
1024 x 768 60 70 72 85
1152 x 864 75
1152 x 870 75
1280 x 720 50 60
Todellinen resoluution tuki riippuu liitetyn monitorin tuesta.
Resoluutio 32-bittisenä
saavutettavat
päivitysnopeudet
1280 x 800 60 75 85
1280 x 960 60
1280 x 1024 60 75
1360 x 768 60
1366 x 768 60 75 85
1400 x 1050 60
1440 x 900 60
1600 x 1200 60
1680 x 1050 60
1920 x 1080 50 60
1920 x 1200 60
2048 x 1152 60
Page 62

Targus USB 2.0 Laptop Docking Station with Video
122
Targus USB 2.0 Laptop Docking Station with Video
123
Vianetsintä
Laite ei toimi
• Varmista että laite on täysin kiinni oikeassa telakka-aseman portissa.
• Liitä laite johonkin toiseen telakka-aseman porttiin. Jos se ei vieläkään toimi,
testaa laitetta liittämällä se suoraan tietokoneeseesi.
• Varmista että asensit laitteen asennusohjelman.
• Varmista että laite ilmestyy Laitteenhallintaan. Saadaksesi lisätietoa lue
“Laitteiden asennuksen varmistaminen”
• Irrota kaikki laitteet telakka-asemasta ja liitä ne uudestaan yksi kerrallaan.
Tarkista että jokainen laite toimii ennen kuin kytket seuraavan.
• Jokainen USB-portti on varustettu liiallisen sähkövirran suojauksella. Jos
USB-laite vetää enemmän virtaa kuin USB-portti pystyy tarjoamaan, portti
sammuu. Avataksesi portin, irrota laite ja mene Laitteenhallintaan tai ilmaisinalueen viestiin ja valitse vaihtoehto Nollaa. Voit liittää laitteen takaisin
USB-porttiin. Jos tämä tapahtuu uudelleen, tarkista laitteen virtavaatimukset.
Tuotteen rajoitukset
Jotkut laitteet voivat lakata hetkellisesti toimimasta suurien datasiirtojen aikana. Esimerkiksi hiiresi voi vastata hitaasti graasen tulostuksen aikana tai kun
koet vahvaa tietoverkkoliikennettä. Suosittelemme seuraavia toimenpiteitä:
• Älä siirä dataa useaan high-speed laitteeseen tai niiltä pois samanaikaisesti,
esim. digitaalinen kamera tai skanneri.
• Jos nopeuden hidastumista tapahtuu, sulje muut ohjelmat jotka käyttävät
USB-laitetta parantaakseen laitteen suorituskykyä.
Laitteiden asennuksen varmistaminen
Voit katsella telakka-asemaan asennettuja ohjelmia Järjestelmän ominaisuuksissa sijaitsevan Laitteenhallinta-ikkunan kautta. Napauta hiiren oikeaa
nappia kuvakkeessa Minun tietokoneeni, Ominaisuudet, napauta sitten Laitteisto-välilehteä, ja sitten Laitteenhallinta-nappia.
Laitteenhallintaikkunasta voit laajentaa seuraavasti:
• Näytä sovittimet:
- Displaylink graanen sovitin (vain XP)
- Displaylink peilisovitin (vain XP)
• Lähiverkkosovittimet:
- Nopea USB Ethernet-sovitin
• Ääni-, video- ja peliohjaimet:
- USB-äänentoistolaite
• USB näytön sovittimet
- Targus USB videosovitin
• Näyttö
- Targus USB videosovitin
Usein esitetyt kysymykset - DisplayLink
http://www.displaylink.com/support/index.php
DisplayLink tarjoaa tämän tukiverkkosivun auttaakseen vastaamaan kysymyksiisi. Se saattaa pystyä vastaamaan sinulla oleviin kysymyksiin.
Page 63

Targus USB 2.0 Laptop Docking Station with Video
124
Targus USB 2.0 Laptop Docking Station with Video
125
FR - Introduction
Nous vous remercions d’avoir acheté cette station d’accueil USB
2.0 TARGUS avec vidéo pour ordinateur portable. Ce module
d’extension vous permet, via une simple connexion USB, de
connecter votre ordinateur portable à 4 périphériques USB,
un écran, un réseau (Ethernet/LAN), des haut-parleurs et un
microphone.
Votre station d’accueil vous propose
les connexions suivantes :
• une liaison DVI (pour une résolution maximale de 2048 x 1152 en mode
couleur 32 bits)
• deux connecteurs audio 3,5 mm : (1) sortie stéréo (1) entrée microphone
• RJ-45 Ethernet 10/100
• Deux ports USB 2.0 (blanc)
• Deux ports d’alimentation USB (Noir)
Contenu de la boîte
En plus de ce guide d’utilisateur, vous trouverez avec votre achat :
• Une station d’accueil USB 2.0 TARGUS avec vidéo pour ordinateur
portable
• Un câble montant USB 2.0 à grande vitesse
• Un mini CD pour les éléments logiciels
• Un adaptateu
Configuration système requise
Matériel
• Un ordinateur équipé d’un processeur Intel® Pentium® ou équivalent
• Un lecteur de CD-ROM (acceptant également les mini CD)
• Un port USB version 2.0 disponible
• Une prise secteur (adaptateur électrique CA obligatoire)
Système d’exploitation
• Mircosoft Windows® XP avec Service Pack 3
• Mircosoft Windows Vista avec Service Pack 1
• Mircosoft Windows® 7
REMARQUE : VOTRE STATION D’ACCUEIL FONCTIONNE ÉGALEMENT SUR UN PORT USB VERSION
1.1, MAIS AVEC DES PERFORMANCES MOINDRES ET SANS LA CONNEXION AU PORT VIDÉO. POUR
OBTENIR DES PERFORMANCES OPTIMALES, CONNECTEZ LA STATION À UN PORT USB VERSION 2.0.
Page 64

Targus USB 2.0 Laptop Docking Station with Video
126
Targus USB 2.0 Laptop Docking Station with Video
127
Installation de la station et de son pilote
Avant d’utiliser votre station d’accueil Targus, vous devez installer son pilote
sur l’ordinateur puis connecter la station à l’ordinateur. Windows détectera
la station et installera le pilote pour chaque port.
AVERTISSEMENT : VOUS DEVEZ INSTALLER LE PILOTE DE LA STATION D’ACCUEIL
AVANT DE CONNECTER LA STATION À L’ORDINATEUR. SINON, LA STATION RISQUE DE NE PAS FONCTIONNER CORRECTEMENT.
Installation du pilote de la station
d’accueil
Ce pilote est nécessaire au système d’exploitation pour détecter la station
d’accueil lorsque vous la connectez à l’ordinateur et installer les pilotes de
chacun des ports.
1. Allumez votre ordinateur.
2. Insérez le mini-CD fourni dans le lecteur de CD-ROM de l’ordinateur.
Si le programme d’installation du CD ne démarre pas automatiquement,
cliquez sur Démarrer, Exécuter, tapez D:\Setup.exe (si D: désigne le
lecteur de CD-ROM) et cliquez sur OK.
Connexion de la station d’accueil à
l’ordinateur
Si vous avez suivi toutes nos instructions, vous pouvez maintenant connecter la station à l’ordinateur. Pour cela :
1. Branchez l’extrémité appropriée de l’adaptateur CA sur l’entrée correspondante de la station.
2. Branchez une extrémité du câble USB sur la station et l’autre extrémité
dans l’un des ports USB 2.0 disponibles de l’ordinateur.
AVERTISSEMENT : LA STATION D’ACCUEIL NE FONCTIONNE PAS SI
L’ADAPTATEUR CA N’EST PAS BRANCHÉ SUR UNE PRISE SECTEUR. NE BRANCHEZ AUCUN APPAREIL SUR LA STATION AVANT D’AVOIR COMPLÈTEMENT
TERMINÉ D’INSTALLER CETTE DERNIÈRE.
Page 65

Targus USB 2.0 Laptop Docking Station with Video
128
Targus USB 2.0 Laptop Docking Station with Video
129
D C 5 V
• Le témoin lumineux vert Tx s’allume lorsque la base est connectée à un
réseau et le témoin lumineux jaune Rx clignote pendant l’échange de données entre la base et le réseau.
REMARQUE : LA STATION D’ACCUEIL PERMET DE CONNECTER/DÉCONNECTER “À CHAUD” LE
CÂBLE RÉSEAU.
Ports de la station d’accueil
DVI
Entrée audio
(MIC)
Sortie audio (hautparleur)
Câble
réseau
Ports USB (blanc)
Ports d’alimentation USB
(noir)
Ports d’alimentation USB (noir)
Connexion USB vers un
ordinateur
Boucle de
xation
Adaptateur CAEncoche de blocage
standard
Vue arrière
Côté droit Côté gauche
Connexion de périphériques à la base
Ne forcez jamais le connecteur du périphérique dans le port de la station.
Vous risquez d’endommager le port et/ou le connecteur. Si un branchement
s’avère difcile, sortez le connecteur du port et rebranchez-le. L’opération
doit s’effectuer très facilement.
Connexion de la base à un réseau LAN
(Local Area Network)
Pour relier la station à un réseau Éthernet, branchez le connecteur RJ-45
du câble sur le port Éthernet/réseau de la station. Conformez-vous ensuite
aux instructions spéciques au type du réseau auquel vous voulez vous
connecter. N’hésitez pas à consulter votre administrateur réseau si vous ne
connaissez pas ces instructions.
Connexion d’un périphérique de stockage USB
Pour brancher un périphérique USB sur la station, introduisez son connecteur sur l’un des ports USB de la station et conformez-vous aux instructions spéciques à ce périphérique. Les quatre ports USB disponibles travaillent à grande vitesse (débit de 480 Mbps) et peuvent fournir un courant
d’alimentation de 500 mA.
Les deux ports USB blancs sont des ports à grande vitesse fournissant un
courant d’alimentation standard de 500 mA. Les deux ports USB noirs sont
des ports à grande vitesse capables de fournir un courant d’alimentation
de 1 A.
Adaptateur DVI vers
VGA
Page 66

Targus USB 2.0 Laptop Docking Station with Video
130
Targus USB 2.0 Laptop Docking Station with Video
131
Connexion et conguration d’un périphérique audio
1. Branchez vos écouteurs ou vos haut-parleurs sur le port de sortie 3,5
mm de la station.
2. Pour brancher un microphone, utilisez l’entrée audio de la station.
3. La connexion son ou microphone est automatiquement activée à la
mise en marche de la station. Vériez que le son n’est pas désactivé
(MUTE) pour cette connexion.
4. Pour activer manuellement les écouteurs ou les haut-parleurs, le cas
échéant :
Ouvrez le Panneau de Conguration et cliquez sur Son. Ouvrez
l’onglet Lecture et vériez que USB Audio Device (Périphérique audio
USB) est le périphérique de lecture par défaut. Si c’est le cas, cliquez
simplement sur OK. Sinon, sélectionnez cette entrée dans la liste,
cliquez sur le bouton Par défaut puis sur OK.
Ouvrez le Panneau de Conguration et cliquez sur Son et Audio. Ouvrez l’onglet Audio. Dans la rubrique Lecture audio, choisissez USB
Multimedia Audio Device (Périphérique audio multimédia USB) dans
la liste Unité par défaut.
• Cliquez sur Appliquer puis sur OK.
Sous Windows XP
Pour Windows Vista
REMARQUE : LES PÉRIPHÉRIQUES AUDIO NE PEUVENT PAS FONCTIONNER À LA FOIS SUR LE
PORT DE LA STATION ET L’ORDINATEUR HÔTE.
ATTENTION : FERMEZ TOUTES VOS APPLICATIONS AUDIO ET MULTIMÉDIA AVANT DE BASCULER ENTRE LA SORTIE AUDIO DE LA STATION ET LA SORTIE AUDIO DE L’ORDINATEUR.
Connexion d’un moniteur ou d’un écran LCD
Tout moniteur et écran LCD que vous connectez est limité à une résolution
de 2048 x 1152, en mode couleur 32 bits.
REMARQUE : POUR TRAVAILLER À LA RÉSOLUTION MAXIMALE AUTORISÉE DE 2048 X 1152, CONNECTEZ LE MONITEUR OU L’ÉCRAN LCD SUR LA BASE D’ACCUEIL AVANT DE CONNECTER LA BASE
À VOTRE ORDINATEUR PORTABLE. SI VOUS CONNECTEZ LE MONITEUR OU L’ÉCRAN LCD SUR LA
BASE D’ACCUEIL APRÈS AVOIR CONNECTÉ LA BASE À VOTRE ORDINATEUR PORTABLE, LA RÉSOLUTION MAXIMALE EST RAMENÉE À 1024 X 768.
Ouvrez le Panneau de conguration, sélectionnez Hardware and
Sound (Matériel et son) puis Sound (Son). Ouvrez l’onglet Lecture et
vériez que USB Audio Device (Périphérique audio USB) est le périphérique de lecture par défaut. Si c’est le cas, cliquez simplement
sur OK. Sinon, sélectionnez cette entrée dans la liste, cliquez sur le
bouton Par défaut puis sur OK.
Pour Windows 7
Page 67

Targus USB 2.0 Laptop Docking Station with Video
132
Targus USB 2.0 Laptop Docking Station with Video
133
Contrôle de l’affichage depuis le menu
Video (Vidéo) de la station d’accueil
Pour accéder au menu Video (Vidéo), cliquez avec le bouton droit de la
souris sur l’icône de la station d’accueil, dans la barre de tâches de Windows, ou afchez la fenêtre Propriétés d’afchage de Windows.
Windows XP / Windows Vista
Windows 7
Extend (Extension) : Vous voulez utiliser l’écran de l’ordinateur comme
écran principal et le moniteur ou l’écran LCD comme écran secondaire.
Pour activer cette conguration, sélectionnez ‘Extend’ (Extension)
dans le menu de la station d’accueil. Le moniteur ou l’écran LCD étend
l’afchage de l’écran principal, dans la même direction que celle que
vous aviez choisie la dernière fois que vous avez travaillé en mode extension. Pour modier la direction d’extension par rapport à l’écran principal, choisissez l’option ‘Extend To’ (Étendre à) puis l’une des directions proposées : Left/Right/Above/ Below (Gauche/Droit/Au dessus/
En-dessous. Le mode extension est activé dans la direction choisie.
Mode extension
Page 68

Targus USB 2.0 Laptop Docking Station with Video
134
Targus USB 2.0 Laptop Docking Station with Video
135
Option Mirror (Miroir) : Vous voulez afcher le contenu exact de l’écran de
l’ordinateur sur le moniteur ou l’écran LCD.
Pour activer cette conguration, sélectionnez ‘Mirror’ (Miroir) dans le
menu de la station d’accueil. La résolution, la profondeur de la couleur
et la vitesse de rafraîchissement de l’écran primaire sont appliquées à
l’écran branché sur la station d’accueil.
SI L’ÉCRAN CONNECTÉ À LA STATION NE PEUT PAS TRAVAILLER AVEC UNE RÉSOLUTION AUSSI
GRANDE QUE CELLE DE L’ÉCRAN PRINCIPAL, LA TAILLE DE L’IMAGE EST AUTOMATIQUEMENT ADAPTÉE À SA RÉSOLUTION. SI L’ÉCRAN CONNECTÉ À LA STATION EST PLUS GRAND QUE L’ÉCRAN PRINCIPAL, L’IMAGE EST AFFICHÉE EN MODE LETTERBOX POUR NE PAS ÊTRE DÉFORMÉE.
miroir
Écran principal : vous voulez utiliser uniquement le moniteur ou l’écran
LCD et éteindre l’écran de votre ordinateur portable. (uniquement accessible par les propriétés d’afchage Wondows)
Écran principal
Page 69

Targus USB 2.0 Laptop Docking Station with Video
136
Targus USB 2.0 Laptop Docking Station with Video
137
OFF (Arrêt) : Vous voulez utiliser uniquement l’écran de l’ordinateur et éteindre le moniteur ou l’écran LCD.
arret
Contrôle de l’affichage depuis la fenêtre
Propriétés d’affichage de Windows
(pour Windows XP et Windows Vista)
Vous pouvez congurer le mode vidéo de la station d’accueil depuis la
fenêtre Propriétés d’afchage de Windows. Depuis Windows Vista, cliquez
avec le bouton droit de la souris sur le Bureau, cliquez sur l’option “Personnaliser” et sélectionnez le raccourci ‘Paramètres d’afchage’. Depuis Windows XP, cliquez avec le bouton droit de la souris sur le Bureau, cliquez sur
l’option “Propriétés” et ouvrez l’onglet ‘Paramètres’.
Figure 1
1
2
3
4
1
2
3
4
Windows Vista
Windows XP
Page 70

Targus USB 2.0 Laptop Docking Station with Video
138
Targus USB 2.0 Laptop Docking Station with Video
139
Mode extension : pour travailler en mode extension d’écran, cochez
l’option “Étendre le Bureau à ce moniteur” (1 dans la Figure 1). Sélectionnez
la résolution et la qualité de la couleur (2 et 3), puis la position de prolongement par rapport à l’écran principal (4).
Mode miroir : Pour travailler en mode miroir, cliquez sur la case de sélection de l’option “Étendre le Bureau à ce moniteur” (1 dans la Figure 1 de la
page précédente)
Sélection de l’écran principal : Pour utiliser l’écran branché sur la station
d’accueil comme écran principal pour l’ordinateur, procédez comme suit :
1. Dans la fenêtre Paramètres d’afchage, sélectionnez l’écran branché sur
la station dans la liste déroulante.
Windows Vista
Windows XP
1
1
Page 71

Targus USB 2.0 Laptop Docking Station with Video
140
Targus USB 2.0 Laptop Docking Station with Video
141
2. Cliquez sur la case de sélection “Étendre le Bureau à ce moniteur“ (pour
Vista et XP).
2
Windows Vista
Windows XP
2
3. Cliquez sur la case de sélection “Il s’agit de mon moniteur principal (pour
Vista et XP).
3
3
Windows Vista
Windows XP
4. Cliquez sur “Appliquer”.
Page 72

Targus USB 2.0 Laptop Docking Station with Video
142
Targus USB 2.0 Laptop Docking Station with Video
143
5. Sélectionnez l’écran de l’ordinateur portable dans la liste déroulante et
enlevez la sélection de l’option “Étendre le Bureau à ce moniteur” (pour
Vista et XP) et cliquez sur “Appliquer”.
L’écran connecté à la station d’accueil devient l’écran principal lorsque
l’ordinateur passe en mode veille ou déconnecté, ou redémarre. Si vous
déconnectez ou éteignez la station, l’écran de l’ordinateur portable redevient l’écran principal.
REMARQUE : POUR TRAVAILLER PLUS AISÉMENT, CONFIGUREZ LA CONDITION ÉCRAN FERMÉ DE
L’ORDINATEUR PORTABLE SUR “DO NOTHING” (NE RIEN FAIRE) ET SÉLECTIONNEZ L’ÉCRAN DE LA STATION COMME ÉCRAN PRINCIPAL. VOUS POUVEZ MAINTENANT FERMER L’ÉCRAN DE L’ORDINATEUR
PORTABLE ET TRAVAILLER AVEC UN ÉCRAN, UN CLAVIER ET UNE SOURIS EXTERNES.
4
4
Windows Vista
Windows XP
À la reconnexion ou à la remise sous tension de la station, l’écran qui lui est
connecté redevient l’écran principal.
Contrôle de l’affichage depuis la fenêtre
Propriétés d’affichage de Windows
(pour Windows 7)
Vous pouvez congurer le mode vidéo de la station d’accueil depuis la
fenêtre Propriétés d’afchage de Windows. Depuis Windows 7, cliquez
avec le bouton droit de la souris sur le Bureau, cliquez sur l’option “Personnaliser”, sélectionnez “Afchage’ puis le lien “Modier les paramètres
d’afchage”. Vous pouvez également cliquer avec le bouton droit de la
souris sur l’icône “Targus USB Video adapter” (“Adaptateur vidéo USB de
Targus”) dans la zone de notication et choisir “advance” (Avancé).
La liste déroulante “multiple display” (Afchages multiples) vous propose
diverses congurations d’afchage. Choisissez une conguration et cliquez
sur “apply” (“Appliquer”). Le contenu de l’écran est réactualisé. Sélectionnez
“keep changes” (“Conserver les modications”) pour valider vos choix.
Page 73

Targus USB 2.0 Laptop Docking Station with Video
144
Targus USB 2.0 Laptop Docking Station with Video
145
Mises à jour automatiques
DisplayLink a équipé sa station d’accueil d’une fonction de mise à jour automatique an que sa carte graphique travaille toujours avec les dernières
versions de son pilote et de son logiciel, fournissant à l’utilisateur le meilleur
de ses performances et davantage de stabilité.
Alimentation des périphériques USB
requérant davantage de puissance
Certains périphériques (par exemple les imprimantes et équipements optiques) requièrent davantage de puissance que les ports USB standards ne
peuvent en fournir. Pour ces périphériques, votre base Targus offre deux
ports USB de 1000 mA, soit le double de la puissance fournie par un port
USB standard.
Déconnexion de la station d’accueil
Lorsque vous éteignez la station d’accueil ou débranchez son câble USB de
l’ordinateur, l’écran secondaire devient blanc. Toutes les fenêtres et toutes
les icônes repassent sur l’écran principal.
À la reconnexion ou à la remise sous tension de la station, la dernière conguration d’afchage est réactivée mais aucune des fenêtres et des icônes
alors afchées ne réapparaissent.
Résolutions possibles
Les résolutions effectivement prises en charge dépendent de l’écran connecté.
Résolution Vitesses de
rafraîchissement
à 32 bits
640 x 480 60 67 72 75 85
720 x 480 50 60
768 x 576 50 60
800 x 600 56 60 72 75 85
832 x 624 75
800 x 480 60
848 x 480 60
1024 x 600 60
1024 x 768 60 70 72 85
1152 x 864 75
1152 x 870 75
1280 x 720 50 60
Résolution Vitesses de
rafraîchissement
à 32 bits
1280 x 800 60 75 85
1280 x 960 60
1280 x 1024 60 75
1360 x 768 60
1366 x 768 60 75 85
1400 x 1050 60
1440 x 900 60
1600 x 1200 60
1680 x 1050 60
1920 x 1080 50 60
1920 x 1200 60
2048 x 1152 60
Page 74

Targus USB 2.0 Laptop Docking Station with Video
146
Targus USB 2.0 Laptop Docking Station with Video
147
Guide de dépannage
Un périphérique ne fonctionne pas
• Vériez que le périphérique est correctement branché sur la station d’accueil.
• Essayez de brancher le périphérique sur un autre port de la station. Si le
périphérique ne fonctionne toujours pas, essayez de le connecter directement sur l’ordinateur.
• Vériez que vous avez correctement conguré et/ou installé le périphérique.
• Vériez que le périphérique apparaît dans le Gestionnaire de périphériques.
Pour plus d’information, reportez-vous à la section “Afchage des périphériques installés”
• Débranchez tous les périphériques de la station d’accueil puis rebranchez-
les un par un. Vériez que chaque périphérique fonctionne correctement
avant d’en rebrancher un autre.
• Chaque port USB est protégé contre les surtensions. Cette protection dis-
joncte le port dès lors qu’un périphérique USB demande plus de courant que
le port ne peut en fournir. Pour réenclencher le port, débranchez le périphéri que, ouvrez le Gestionnaire de périphériques ou le message afché dans la
barre système et choisissez l’option Reset (Réinitialiser). Vous pouvez maintenant rebrancher le périphérique sur le port USB de la station. Si le port
disjoncte à nouveau, vériez les spécications électriques du périphérique.
Limitations du produit
Certains périphériques ne fonctionnent pas normalement pendant un transfert
de données à grande vitesse. Par exemple, l’impression de graphiques ou un
trac réseau important suft pour allonger les temps de réponse de la souris.
Nous vous recommandons.
• de ne pas transférer en même temps des données vers ou depuis un péri-
phérique travaillant à grande vitesse, par exemple un appareil-photo numérique ou un numériseur (scanner).
• de fermer tous les programmes travaillant sur un périphérique USB an d’am:
Affichage des périphériques installés
Vous afchez la liste des périphériques installés sur la station d’accueil
depuis la fenêtre Gestionnaire de périphériques. Cliquez avec le bouton
droit de la souris sur Poste de travail, Propriétés. Ouvrez l’onglet Matériel
et cliquez sur le bouton Gest
Depuis la fenêtre Gestionnaire de périphériques, développez les entrées suivantes :
• Cartes graphiques :
- Displaylink Graphic Adapter (XP uniquement) (carte graphique
Displaylink)
- Displaylink Mirror Adapter (XP uniquement) (carte miroir Displaylink)
• Cartes réseau :
- High speed USB Ethernet Adapter (Carte Eternet USB à
grande vitesse)
• Contrôleurs son, vidéo et jeu :
-Périphérique audio USB
• Cartes graphiques USB
- Targus USB Video Adapter (Cartes Targus USB vers DVI)
• Écran
- Targus USB Video Adapter (Cartes Targus USB vers DVI)
Foire aux questions - DisplayLink
http://www.displaylink.com/support/index.php
DisplayLink a ouvert un site Web d’assistance pour ses clients. Si vous avez
des questions, n’hésitez pas à nous les poser.
Page 75

Targus USB 2.0 Laptop Docking Station with Video
148
Targus USB 2.0 Laptop Docking Station with Video
149
IT - Introduzione
Congratulazioni per aver acquistato la Docking Station Targus USB
2.0 con video. Questo modulo portatile d’espansione permette
di collegare, grazie a un singolo collegamento USB, no a 4
apparecchi USB, monitor, rete (Ethernet/LAN) casse e microfono.
La docking station offre anche due Targus Power Port che
forniscono due volte le caratteristiche per apparecchi USB ad alta
potenza oltre a porte USB più distanziate per adattatori più larghi.
La Docking Station fornisce le seguenti
porte:
• DVI Single Link (compatibile no a 2048 x 1152 colore a 32 bit)
• Due Audio 3,5 mm: (1) stereo out (1) microfono in
• RJ-45 Ethernet 10/100
• Due USB 2.0 (bianche)
• Due Porte USB Power (nere) - che forniscono alimentazione no a
1Ampere
Contenuto imballo
Oltre a questa guida per l’utente l’imballo contiene:
• Docking Station Targus USB 2.0 per Notebook con video
• Cavo Upstream Alta velocità USB 2.0
• CD di Software del Driver (mini CD)
• Trasformatore di alimentazione (necessario)
Requisiti necessari al sistema
Hardware
• PC con processore Intel® Pentium® o equivalente
• Drive per CD-ROM (compatibile con mini CD)
• USB versione porta 2.0
• Fonte di alimentazione (necessario trasformatore)
Sistema operativo
• Mircosoft Windows® XP con Service Pack 3
• Mircosoft Windows Vista® con Service Pack 1
• Mircosoft Windows® 7
NOTA: SE CI SI COLLEGA A UNA PORTA USB VERSIONE 1.1 SUL COMPUTER, IL LIVELLO DI
PRESTAZIONE DELLA DOCKING STATION SARÀ INFERIORE E LA PORTA VIDEO NON FUNZIONERÀ
CORRETTAMENTE. PER I MIGLIORI RISULTATI COLLEGARSI A UNA PORTA USB VERSIONE 2.0.
Page 76

Targus USB 2.0 Laptop Docking Station with Video
150
Targus USB 2.0 Laptop Docking Station with Video
151
Installare l’apparecchio e i driver.
Per usare la Docking Station Targus prima occorre installare il driver sul
computer poi collegare la docking station al computer e Windows plug-and-play
installerà i driver per ogni porta.
ATTENZIONE: OCCORRE INSTALLARE IL SOFTWARE DELLA DOCKING STATION
PRIMA DI COLLEGARLA AL COMPUTER ALTRIMENTI NON FUNZIONERÀ CORRETTAMENTE.
Installare il driver della Docking Station
Installare il driver della docking station permette al sistema operativo di
riconoscere la docking station e le sue porte una volta che viene collegata.
1 Accendere il computer.
2 Inserire il CD di software del driver nel CD-ROM drive del computer.
Se l’installazione non si avvia automaticamente fare click su Avvio,
Esegui, e inserire D:\Setup.exe (dove D: è il drive del CD-ROM) e poi fare
clic su OK.
3 Seguire le istruzioni sullo schermo per completare l’installazione.
4 Fare clic su Fine e riavviare il computer quando richiesto.
Collegare la Docking Station al
computer
Dopo aver installato il software della docking station siete pronti a collegare la docking station al computer. Per farlo:
1 Collegare il trasformatore in dotazione alla presa di corrente della dock-
ing station.
2 Collegare un’estremità del cavo USB alla docking station e l’altra es-
tremità in una porta USB 2.0 disponibile del computer.
ATTENZIONE: LA DOCKING STATION NON FUNZIONERÀ CORRETTAMENTE
SE IL TRASFORMATORE NON È INSERITO IN UNA PRESA DI CORRENTE. NON
COLLEGARE NESSUN APPARECCHIO ALLA DOCKING STATION PRIMA DI AVER
COMPLETATO L’INSTALLAZIONE.
Page 77

Targus USB 2.0 Laptop Docking Station with Video
152
Targus USB 2.0 Laptop Docking Station with Video
153
D C 5 V
• La luce Tx verde si accende se collegata a una rete e la luce Rx gialla
lampeggia mentre il computer riceve o trasmette dati
NOTA: LA DOCKING STATION È COMPATIBILE CON HOT SWAP DEL CAVO DI RETE
Porte della Docking Station
DVI
Audio in (Mic) Audio out (CASSE)
Cavo di rete
Porte USB (Bianche)
Porte High Power
USB (NERE)
Porte High Power
USB (NERE)
Collegamento USB per PC
Circuito ad
aggancio
Trasformatore
Fessura di sicurezza
standard
Visione posteriore
Lato destro Lato sinistro
Collegare nuovi apparecchi
Per evitare danni quando si collega un nuovo apparecchio non forzare il
connettore del cavo nella porta o nella docking station. Se il connettore
del cavo non si collega con facilità, girarlo e provare di nuovo a collegarlo.
Collegarsi a un LAN
Per collegare un cavo Ethernet con connettore RJ-45, collegare il connettore alla porta ethernet/di rete della docking station. Eventuali altre
procedure di connessione a una rete dipendono dal tipo di rete utilizzata.
Contattare l’amministratore di rete per istruzioni dettagliate.
Collegare un apparecchio USB
Per collegare un apparecchio USB collegarlo alla porta USB della docking station e seguire le istruzioni fornite con l’apparecchio. Tutte le quattro porte USB
corrispondono agli standard di alta velocità con 480 Mbps troughput e 500mA
di potenza.
Le porte USB bianche sono porte ad alta velocità che forniscono una potenza
standard di 500mA. Le Power Port USB nere sono porte ad alta velocità che
forniscono no a 1Amp.
Van DVI naar VGA
adapter
Page 78

Targus USB 2.0 Laptop Docking Station with Video
154
Targus USB 2.0 Laptop Docking Station with Video
155
Collegare e congurare un apparecchio audio.
1. Collegare le cufe o le casse nella porta Audio verde da 3.5 mm sulla
docking station.
2. Per collegare un microfono, inserirlo nella porta Audio in mono.
3. Il suono e il microfono si collegano automaticamente quando ci si collega alla docking station. Assicurarsi che il volume di entrambi non sia
impostato su MUTO.
4. Per attivare manualmente le cufe o le casse in caso non sia possibile
il trasferimento automatico.
Andare a Pannello di Controllo e scegliere Suono. Alla voce Riproduzione vericare che la periferica Audio USB sia impostata come
predenita. In questo caso fare clic su OK. Altrimenti selezionarla e
fare clic su impostare come predenita poi fare clic su OK.
Andare a Pannello di Controllo e scegliere Suono e Audio. Selezionare
l’opzione audio. Alla voce Riproduzione del suono cambiare la periferica preferita con Apparecchio Multimediale Audio USB dalla lista
a tendina.
• Fare clic su Applica e poi su OK.
Per Windows XP
Per Windows Vista
NOTA: GLI APPARECCHI AUDIO NON FUNZIONERANNO CONTEMPORANEAMENTE SULLA STAZIONE
E SUL COMPUTER OSPITANTE
ATTENZIONE: TUTTE LE APPLICAZIONI AUDIO O MULTIMEDIALI VANNO FERMATE PRIMA DI
SPOSTARSI TRA L’USCITA AUDIO DELLA DOCKING STATION E L’USCITA AUDIO DEL COMPUTER.
Collegarsi a un Monitor o a un LCD.
Qualsiasi monitor o LCD collegato alla porta video della docking station
avrà una risoluzione massima di 2048 x 1152 colore a 32 bit.
NOTA: LA RISOLUZIONE MASSIMA DI 2048 X 1152 È COMPATIBILE SOLO SE IL MONITOR O L’LCD
È COLLEGATO ALLA DOCKING STATION PRIMA CHE QUESTA VENGA COLLEGATA AL NOTEBOOK.
SE IL MONITOR O L’LCD SONO COLLEGATI ALLA DOCKING STATION DOPO CHE QUESTA È STATA
COLLEGATA AL COMPUTER LA RISOLUZIONE È IMPOSTATA SU 1024 X 768.
Andare su Pannello di Controllo, selezionare Hardware e Suono e scegliere Suono. Alla voce Riproduzione controllare che
l’apparecchio audio USB sia impostato come predenito. In questo
caso fare clic su OK. In caso contrario, fare clic su imposta come
predenito e poi fare clic su OK.
Per Windows 7
Page 79

Targus USB 2.0 Laptop Docking Station with Video
156
Targus USB 2.0 Laptop Docking Station with Video
157
Controllare il display usando le opzioni
video del menù della Docking Station
Si può accedere alle opzioni Video del menù facendo clic col tasto destro
sull’icona della docking station nella nestra del sistema o attraverso la visualizzazione delle Proprietà di Windows.
Windows XP / Windows Vista
Windows 7
Extend (Espandere): Si usa lo schermo del notebook come visualizzatore
principale e il monitor o l’LCD come schermo secondario.
Per impostare lo schermo in questa modalità, selezionare “Extend”
sull’icona del menù applicativo della docking station. L’apparecchio
si espanderà nella direzione in cui si trovava l’ultima volta che il display era in questa modalità. Per un controllo maggiore navigare sul
sottomenù “Espandere su” e selezionare una delle opzioni. In questo
modo l’apparecchio non verrà solo messo in modalità d’espansione ma
si potrà anche scegliere la direzione Sinistra/destra/Sopra/sotto il monitor principale (primary).
Modalità d’espansione
Page 80

Targus USB 2.0 Laptop Docking Station with Video
158
Targus USB 2.0 Laptop Docking Station with Video
159
A specchio: Si usa lo schermo del computer come visualizzatore principale
e il monitor o LCD copia esattamente lo schermo del computer.
Per impostare il display in questa modalità selezionare semplicemente
“mirror (specchio) dall’icona del menù applicativo della docking station.
La risoluzione, profondità di colore e velocità di ripristino dello schermo
principale sono esattamente copiate sul monitor collegato all’adattatore
graco della docking station.
NOTA: SE IL MONITOR COLLEGATO ALLA DOCKING STATION È COMPATIBILE CON UNA RISOLUZIONE INFERIORE A QUELLA DELL’IMMAGINE PRINCIPALE L’IMMAGINE VERRÀ RIDIMENSIONATA PER
ADATTARSI ALLO SCHERMO ESTERNO. SE IL MONITOR COLLEGATO ALLA DOCKING STATION HA DIMENSIONI SUPERIORI ALLO SCHERMO PRINCIPALE L’IMMAGINE SARÀ IN FORMATO LETTER-BOX PER
MANTENERE LE PROPORZIONI CORRETTE.
specchio
Monitor principale: Si sta usando il monitor o lo schermo LCD come moni-
tor principale e lo schermo del computer è spento.
(accessibile solo tramite le proprietà del display di windows)
Monitor principale
Page 81

Targus USB 2.0 Laptop Docking Station with Video
160
Targus USB 2.0 Laptop Docking Station with Video
161
Off: Si usa lo schermo del notebook come display principale e il monitor o
LCD è spento.
Off
Controllare il Display tramite le Proprietà di visualizzazione di Windows
(per Windows XP e Windows Vista)
Si possono congurare le impostazioni video della docking station tramite
la nestra di dialogo delle Proprietà di visualizzazione di Windows. Per farlo
con Windows Vista, fare clic col tasto destro del mouse sul desktop, fare
clic su “Personalizza” e poi selezionare “Impostazioni schermo”. La caratteristica corrispondente è disponibile in Windows XP facendo clic col tasto
destro sul desktop, selezionare “Proprietà” e poi navigare sull’opzione “Impostazioni”.
Figura 1
1
2
3
4
1
2
3
4
Windows Vista
Windows XP
Page 82

Targus USB 2.0 Laptop Docking Station with Video
162
Targus USB 2.0 Laptop Docking Station with Video
163
Modalità d’espansione: Per impostare il display in questa modalità, controllare il riquadro contrassegnato con “Espandere il desktop di windows su
questo monitor” (1 in gura 1). Organizzare la risoluzione dello schermo e la
qualità del colore selezionando i comandi appropriati (2 e 3) e organizzare
la posizione in relazione agli altri monitor sul desktop espanso usando l’area
di trascinamento (4)
Modalità a specchio: Per impostare il display in questa modalità togliere la
spunta dal riquadro contrassegnato “Espandere il desktop su questo monitor” (1 in gura 1 della pagina precedente)
Impostare il display principale: Per impostare il display collegato alla docking station come display principale, seguire le istruzioni che seguono:
1. nella nestra delle Proprietà del display, usare la lista a tendina, selezionare il monitor collegato alla Docking Station.
Windows Vista
Windows XP
1
1
Page 83

Targus USB 2.0 Laptop Docking Station with Video
164
Targus USB 2.0 Laptop Docking Station with Video
165
2. Dopo aver selezionato il monitor corrispondente, spuntare il riquadro vicino a “espandere il desktop su questo monitor” (per Vista) o “Espandere
il mio desktop di Windows su questo monitor” (per XP).
2
Windows Vista
Windows XP
2
3. Poi spuntare il riquadro vicino a “Questo è il mio monitor principale” (per
Vista) “Usare questa periferica come monitor principale” (per XP).
3
3
Windows Vista
Windows XP
4. fare clic su “Applica”
Page 84

Targus USB 2.0 Laptop Docking Station with Video
166
Targus USB 2.0 Laptop Docking Station with Video
167
5. Selezionare il monitor del computer usando la lista a tendina e togliere la
spunta da “espandere il desktop su questo monitor” (per Vista) o “Espandere il desktop di Windows su questo monitor” (per XP) e fare clic su “Applica”
Il monitor collegato alla Docking station rimane il principale se il PC va in
ibernazione o in sospensione e se viene riavviato. Se la docking Station
viene staccata, il display del computer diventa nuovamente il principale.
NOTA: È POSSIBILE LAVORARE PIÙ COMODAMENTE CON IL NOTEBOOK IMPOSTANDONE LE AZIONI
SUL COPERCHIO CHIUSO SU “NON FARE NIENTE” E IMPOSTANDO LA DOCKING STATION SULLA MODALITÀ PRINCIPALE. A QUESTO PUNTO SI PUÒ CHIUDERE IL COMPUTER E USARLO CON TASTIERA
E MOUSE ESTERNI.
4
4
Windows Vista
Windows XP
Dopo che viene ricollegata, il monitor della Docking station tornerà in modalità principale.
Controllare il Display tramite le Proprietà
di visualizzazione di Windows (per Windows 7)
Si possono anche congurare le impostazioni video della Docking Station
tramite la nestra di dialogo delle Proprietà di visualizzazione di Windows.
Per farlo con Windows 7 fare clic su “Personalizza” selezionare “Schermo” e
poi il link “Cambiare le impostazioni dello schermo”. In alternativa fare clic con
il tasto destro del mouse sull’icona “Adattatore Video Targus USB” nell’area
degli avvisi e scegliere “Avanzate”
È possibile controllare le diverse impostazioni d’uscita dello schermo
scegliendo le opzioni a disposizione nella lista a scomparsa “schermi
multipli”. Scegliere l’impostazione desiderata e fare clic su “applica”. Lo
schermo verrà aggiornato, confermare l’aggiornamento facendo clic su
“mantieni le modiche”
Page 85

Targus USB 2.0 Laptop Docking Station with Video
168
Targus USB 2.0 Laptop Docking Station with Video
169
Aggiornamenti automatici
Gli aggiornamenti automatici sono una caratteristica di manutenzione del
prodotto da Display-Link, Il meccanismo di aggiornamento automatico assicura che l’adattatore graco della Docking Station sia dotato dei driver e
del software più aggiornati, fornendo all’utente migliori prestazioni e stabilità.
Usare apparecchi USB che richiedono
maggiore alimentazione
Alcuni apparecchi, che usano molta energia, come stampanti e driver ottici,
vanno collegati alle Power Port USB. Queste porte forniscono un’energia
pari a 1000mA - il doppio delle porte USB standard.
Disconnettere la Docking Station
Se la Docking Station è spenta o se il cavo USB viene staccato dal computer, dal display scompaiono le immagini. Tutte le nestre e le icone torneranno sullo schermo principale. Quando ci si ricollega e si rialimenta la Docking Station il display torna nella stessa modalità in cui si Trovava prima della
disconnessione. Tuttavia, le nestre e le icone che si trovavano precedentemente sullo schermo non ricompariranno.
Risoluzione compatibile
L’area di risoluzione veramente disponibile dipende da quella compatibile con il monitor collegato.
Risoluzione Velocità di ripris-
tino disponibile a
32 bit
640 x 480 60 67 72 75 85
720 x 480 50 60
768 x 576 50 60
800 x 600 56 60 72 75 85
832 x 624 75
800 x 480 60
848 x 480 60
1024 x 600 60
1024 x 768 60 70 72 85
1152 x 864 75
1152 x 870 75
1280 x 720 50 60
Risoluzione Velocità di ripris-
tino disponibile a
32 bit
1280 x 800 60 75 85
1280 x 960 60
1280 x 1024 60 75
1360 x 768 60
1366 x 768 60 75 85
1400 x 1050 60
1440 x 900 60
1600 x 1200 60
1680 x 1050 60
1920 x 1080 50 60
1920 x 1200 60
2048 x 1152 60
Page 86

Targus USB 2.0 Laptop Docking Station with Video
170
Targus USB 2.0 Laptop Docking Station with Video
171
Risoluzione dei problemi
L’apparecchio non funziona
• Assicurarsi che l’apparecchio sia collegato correttamente alla porta corretta
della docking station.
• Collegare l’apparecchio a una porta differente sulla docking station. Se ancora non funziona, controllare che l’apparecchio funzioni collegandolo direttamente al computer.
• Vericare di avere eseguito il programma di Impostazione o Installazione
dell’apparecchio.
• Assicurarsi che l’apparecchio compaia in Gestione Periferiche. Per ulteriori
informazioni fare riferimento a “Vericare che le periferiche siano installate”.
• Staccare tutte le periferiche dalla docking station e ricollegarle, una alla volta.
Controllare che tutte le periferiche funzionino prima di inserire la successiva.
• Ogni porta USB è dotata di protezione da sovraccarico. Se un apparecchio
USB utilizza più corrente di quella che la porta USB gli può fornire, la porta
si chiude. Per riattivare la porta, staccare l’apparecchio e andare su Gestione
Periferiche o sul messaggio nella nestra del sistema e scegliere l’opzione
Reimposta. Adesso si può ricollegare l’apparecchio alla porta USB. Se si
richiude nuovamente, controllare il fabbisogno energetico dell’apparecchio.
Limiti del prodotto
Alcuni apparecchi possono bloccarsi temporaneamente durante il trasferimento dei dati. Ad esempio il mouse può rispondere lentamente mentre si
sta stampando un lavoro pesante e in presenza di intenso trafco di rete. Si
raccomandano le seguenti linee guida:
• Non trasferire contemporaneamente dati da apparecchi ad alta velocità,
come da una fotocamera digitale o da uno scanner.
• Se si verica una diminuzione della velocità, chiudere altri programmi che
usano un apparecchio USB per migliorare le prestazioni dell’apparecchio.
Verificare che gli apparecchi siano
installati
Si possono vedere gli apparecchi installati sulla docking station dalla nestra
di Gestione Periferiche nelle proprietà del Sistema. Fare clic col tasto destro
su Computer, Proprietà, poi fare clic su Hardware e poi sul tasto Gestione
Periferiche.
Dalla nestra Gestione Periferiche, espandere quanto segue
• Adattatori display:
- Displaylink Graphic Adapter (solo XP)
- Displaylink Mirror Adapter (solo XP)
• Adattatori di rete:
- Adattatore High speed USB Ethernet
• Controllori Audio, video e Giochi:
- Apparecchi Audio USB
• Adattatori Display USB
- Targus USB ad adattatori DVI
• Monitor
- Targus USB ad adattatori DVI
FAQ - DisplayLink
http://www.displaylink.com/support/index.php
Displaylink fornisce supporto su web in risposta alle domande. Può essere
utile per rispondere a eventuali vostre domande.
Page 87

Targus USB 2.0 Laptop Docking Station with Video
172
Targus USB 2.0 Laptop Docking Station with Video
173
NL - Introductie
Hartelijk dank voor de aanschaf van de Targus USB 2.0 Laptop Docking
Station With Video (Targus USB 2.0 Docking Station (Koppelstation) voor
de Laptop met videotoepassingen). Met deze draagbare uitbreidingsmodule
kunt u door middel van 1 USB verbinding liefst 4 USB apparaten, een monitor,
een netwerkverbinding (Ethernet/LAN), luidsprekers, en een microfoon
aansluiten. Het docking station (koppelstation) biedt ook twee Targus Power
Ports (‘Stroomuitgangen’) die twee keer zoveel stroom leveren als normale
USB uitgangen, speciaal voor apparaten die hoog stroomverbruik hebben,
en ook USB uitgangen die breed ontworpen zijn voor grotere adapters.
Hierdoor kunnen USB apparaten, die via de USB uitgang opladen, onder
elke omstandigheid opladen zolang de AC wisselstroomadapter in het
apparaat zit.
Het Docking Station (Koppelstation)
biedt de volgende uitgangen:
• DVI Single Link (ondersteunt tot 2048 x 1152 met 32 bits kleurkwaliteit)
• Twee 3.5 mm Audiouitgangen: (1) stereo-uitgang (1) microfoon-ingang
• RJ-45 Ethernet 10/100
• Twee USB 2.0 uitgangen (Wit)
• Twee USB ‘Power Ports’ (Stroomuitgangen) (Zwart) - die tot 1Ampere
stroom leveren
Inhoud verpakking
Behalve deze handleiding bevat de verpakking ook:
• Targus USB 2.0 Laptop Docking Station with Video (Targus USB 2.0
Docking Station (Koppelstation) voor de laptop met videotoepassingen.
• USB 2.0 hoge snelheidskabel voor uploaden
• cd met driver software (mini cd)
• AC wisselstroomadapter (vereist)
Systeemvereisten
Hardware
• PC met een Intel® Pentium® processor of gelijkwaardig product
• CD-ROM drive (die mini cd kan draaien)
• USB versie 2.0 uitgang
• Netvoeding (AC Wisselstroomadapter vereist)
Besturingssysteem
• Micosoft Windows® XP met Service Pack 3
• Microsoft Windows Vista® met Service Pack 1
• Mircosoft Windows® 7
OPMERKING: WANNEER HET DOCKING STATION (KOPPELSTATION) OP EEN 1.1 USB UITGANG OP
UW COMPUTER IS AANGESLOTEN, ZAL ZIJN PRESTATIENIVEAU NIET OPTIMAAL ZIJN EN ZAL DE
VIDEOUITGANG NIET CORRECT FUNCTIONEREN. SLUIT HET, VOOR DE BESTE PRESTATIES, AAN OP
EEN 2.0 USB UITGANG.
Page 88

Targus USB 2.0 Laptop Docking Station with Video
174
Targus USB 2.0 Laptop Docking Station with Video
175
Het apparaat en de drivers installeren
U moet, om het Targus Docking Station (Koppelstation) te gebruiken, eerst
de driver op uw computer installeren. Sluit het koppelstation vervolgens
aan op uw computer; Windows ‘plug-and-play’ (insteken en spelen) zal de
hardware- drivers voor elke uitgang installeren.
WAARSCHUWING: U MOET DE SOFTWARE VOOR HET DOCKING STATION (KOPPELSTATION) INSTALLEREN VOORDAT U HET OP DE COMPUTER AANSLUIT. ANDERS ZAL HET DOCKING STATION (KOPPELSTATION) NIET CORRECT WERKEN.
De driver van het docking station
(koppelstation) installeren
Als gevolg van de installatie van de driver voor het docking station
(koppelstation) zal het besturingssysteem het docking station (koppelstation)
en zijn uitgangen herkennen zodra het aangesloten is.
1. Zet uw computer aan.
2 Plaats de cd met de driver software in de CD-ROM drive van uw
computer.
Klik, als setup niet automatisch opstart, op Start, Uitvoeren en voer in:
D:\Setup.exe (waar D: het pad van uw CD-ROM drive is). Klik daarna
op OK.
3 Volg de instructies die op het scherm verschijnen om de installatie
te voltooien.
Het docking station (koppelstation) op
uw computer aansluiten
U bent, nadat u de software voor het docking station (koppelstation) hebt
geïnstalleerd, klaar om het docking station (koppelstation) op uw computer
aan te sluiten. Voer daartoe de volgende stappen uit:
1 Sluit de meegeleverde AC wisselstroomadapter aan op de AC uitgang
van het docking station (koppelstation).
2 Sluit één einde van de USB kabel aan op het docking station (koppelsta-
tion) en het andere einde op een beschikbare USB 2.0 uitgang op uw
computer.
WAARSCHUWING: HET DOCKING STATION (KOPPELSTATION) ZAL NIET CORRECT FUNCTIONEREN ALS DE AC WISSELSTROOM-ADAPTER NIET IN EEN
AC-UITGANG IS GEPLAATST. SLUIT GEEN ENKEL ANDER APPARAAT OP HET
DOCKING STATION (KOPPELSTATION) AAN TOTDAT DE INSTALLATIE VOLTOOID
IS.
Page 89

Targus USB 2.0 Laptop Docking Station with Video
176
Targus USB 2.0 Laptop Docking Station with Video
177
D C 5 V
• Groen Tx lampje licht op wanneer er een verbinding is met een netwerk en het gele Rx lampje
knippert wanneer gegevens worden overgezet naar of van het netwerk.
OPMERKING: HET DOCKING STATION (KOPPELSTATION) ONDERSTEUNT “HOT SWAPPING” VAN DE NETWERKKABEL. (HET
LOSKOPPELEN VAN DE NETWERKKABEL TIJDENS GEBRUIK).
Uitgangen van docking station (koppelstation)
DVI
Audio-ingang
(MIC)
Audio-uitgang (SPK)
(LSK)
Netwerkkabel
USB uitgangen (Wit)
High Power USB Ports (USB uitgangen voor apparaten met hoog
stroomverbruik) (ZWART)
USB uitgangen voor
hoog stroomverbruik
(ZWART)
USB naar PC
verbinding
Veiligheidslus
AC wisselstroomadapterStandaard veiligheidsuitgang
Achteraanzicht
Rechterkant Linkerkant
Nieuwe apparaten aansluiten
Gebruik, om mogelijke schade te voorkomen wanneer u een nieuw apparaat
aansluit, geen overmatige kracht om de kabelstekker in de uitgang van het docking station (koppelstation) te plaatsen. Als de kabelstekker niet soepel bevestigd
kan worden, draai de stekker dan om en probeer het opnieuw.
Aansluiten op een lokaal netwerk
Bevestig, om een ethernetkabel met RJ-45 stekker aan te sluiten, de kabelstekker in de ethernet/ netwerkuitgang op het docking station (koppelstation). Of u extra handelingen moet doen om op een bestaand netwerk aan te sluiten hangt af
van het type netwerk dat u gebruikt. Neem contact op met uw netwerkbeheerder
voor gedetailleerde instructies.
Een USB apparaat aansluiten
Steek een USB apparaat, om het aan te sluiten, in een USB uitgang op het docking station (koppelstation) en volg de specieke, voor dit USB apparaat geleverde
instructies. Alle vier USB uitgangen voldoen aan de USB hoge snelheidseisen
door 480Mbps datasnelheid en 500mA stroom te leveren.
De witte USB uitgangen zijn hoge snelheidsuitgangen die standaard 500mA
stroom leveren. De zwarte USB stroomuitgangen zijn hoge snelheidsuitgangen
die tot liefst 1Amp stroom leveren.
DVI til VGA-adapter
Page 90

Targus USB 2.0 Laptop Docking Station with Video
178
Targus USB 2.0 Laptop Docking Station with Video
179
Een audioapparaat aansluiten en congureren
1. Steek uw koptelefoon of luidsprekers in de groene 3.5mm Audio-uitgang op het
docking station (koppelstation).
2. Steek een microfoon, om het aan te sluiten, in de mono audio-ingang.
3. Het geluidsprogramma en de microfooninstellingen zouden automatisch
moeten verschijnen wanneer u de microfoon en koptelefoon op het docking
station (koppelstation) aansluit. Zorg ervoor dat het volume van zowel de luidsprekers als de microfoon niet op DEMPEN staat.
4. Stel de koptelefoon of luidsprekers handmatig in, indien automatische setup
niet uitgevoerd wordt.
Ga naar het Conguratiescherm en selecteer Geluid. Controleer onder
het tabblad “Afspelen van geluid” of het USB Audioapparaat als Standaardapparaat is ingesteld. Klik, als dit wel het geval is, op OK. Klik, als dit
niet het geval is, op ‘Als standaardapparaat instellen’, en klik dan op OK.
Ga naar het Conguratiescherm en selecteer Geluid en Audioapparaten.
Selecteer het tabblad Audio. Verander onder “Afspelen van geluid”, Standaardapparaat naar USB multimedia Audioapparaat, die in de keuzelijst
staat.
• Klik op Toepassen, en klik dan op OK.
Voor Windows XP
Voor Windows Vista
OPMERKING: AUDIOAPPARATEN ZULLEN NIET TEGELIJKERTIJD OP HET DOCKING STATION (KOPPELSTATION) EN DE HOSTCOMPUTER WERKEN.
WAARSCHUWING: ALLE AUDIO -OF MULTIMEDIA TOEPASSINGEN MOETEN UITGESCHAKELD
WORDEN VOORDAT U DE AUDIOINSTELLINGEN VAN HET DOCKING STATION (KOPPELSTATION) EN
DE HOSTCOMPUTER VERANDERT.
Aansluiten op een monitor of LCD scherm
Elke monitor of LCD scherm dat aangesloten wordt op de videouitgang van het docking station (koppelstation) zal beperkt worden tot een
maximale resolutie van 2048 x 1152 met 32 bits kleurkwaliteit.
OPMERKING: RESOLUTIE VAN 2048 x 1152 WORDT ALLEEN ONDERSTEUND INDIEN DE MONITOR OF
HET LCD SCHERM OP HET DOCKING STATION (KOPPELSTATION) IS AANGESLOTEN VOORDAT HET
DOCKING STATION (KOPPELSTATION) WORDT AANGESLOTEN OP DE LAPTOP. ALS DE MONITOR OF
HET LCD SCHERM OP HET DOCKING STATION (KOPPELSTATION) WORDEN AANGESLOTEN NADAT
HET DOCKING STATION (KOPPELSTATION) OP DE LAPTOP IS AANGESLOTEN, WORDT DE RESOLUTIE
INGESTELD OP 1024 X 768.
Ga naar het Conguratiescherm en selecteer Hardware en Geluid en
kies Geluid. Controleer onder het tabblad Afspelen of USB Geluidsapparaat als standaardapparaat is ingesteld. Als dit het geval is, klik dan op
OK. Als dit niet het geval is, selecteer het dan door op ‘Als standaardapparaat instellen’ te klikken, en klik vervolgens op OK.
Voor Windows 7
Page 91

Targus USB 2.0 Laptop Docking Station with Video
180
Targus USB 2.0 Laptop Docking Station with Video
181
Beeldschermweergave regelen met
behulp van de video-menuopties van het
docking station (koppelstation)
Video-menuopties zijn toegankelijk door met rechtermuisknop op het pictogram van het docking station (koppelstation) in de systeembalk te klikken of
door Eigenschappen voor Beeldscherm van Windows te gebruiken.
Windows XP / Windows Vista
Windows 7
Uitbreiden: u gebruikt uw laptopscherm als uw hoofdscherm en uw moni-
tor of LCD scherm als tweede scherm.
Selecteer, om de beeldschermweergave in deze modus te zetten, ‘Extend’ (‘Uitbreiden’) in het pictogrammenmenu van het docking station
(koppelstation). Het apparaat zal nu uitgebreid worden in de richting,
waarin het de vorige keer dat het in deze modus was, stond. Navigeer,
voor meer controle, naar het submenu ‘Extend to’ (‘Uitbreiden naar’)
en selecteer één van de opties. Dit zal het apparaat niet alleen in de
uitbreidmodus zetten, maar zal het ook Links/Rechts/Boven/Onder van
het hoofdmonitor plaatsen.
Uitbreidmodus
Page 92

Targus USB 2.0 Laptop Docking Station with Video
182
Targus USB 2.0 Laptop Docking Station with Video
183
Spiegel: U gebruikt uw laptopscherm als uw hoofdscherm. Uw monitor of
LCD scherm kopiëren uw laptopscherm.
Selecteer, om de beeldschermweergave in deze modus te zetten,
simpelweg ‘mirror’ (spiegel) in het pictogrammenmenu van het docking
station (koppelstation). De resolutie, kleurkwaliteit en vernieuwingsfrequentie van het hoofdscherm worden gekopieerd op de monitor die
aangesloten is op de grasche adapter van het docking station (koppelstation).
OPMERKING: ALS DE OP HET DOCKING STATION (KOPPELSTATION) AANGESLOTEN MONITOR EEN
LAGERE RESOLUTIE ONDERSTEUNT DAN DE RESOLUTIE VAN HET HOOFDSCHERM, DAN WORDT DE
GROOTTE VAN HET BEELD AANGEPAST OM HET TE KUNNEN WEERGEVEN OP DE MONITOR. WANNEER
DE OP HET DOCKING STATION (KOPPELSTATION) AANGESLOTEN MONITOR EEN GROTER FORMAAT
HEEFT DAN HET HOOFDSCHERM, ZAL HET FIGUUR KLEINER WORDEN OM ZO EEN JUISTE LENGTE/
BREEDTE VERHOUDING TE BEHOUDEN.
Spiegel
Hoofdscherm: u gebruikt uw monitor of LCD scherm als uw hoofdscherm
en uw laptopscherm is uitgeschakeld. (alleen toegankelijk via de displaykenmerken van Windows)
Hoofdscherm:
Page 93

Targus USB 2.0 Laptop Docking Station with Video
184
Targus USB 2.0 Laptop Docking Station with Video
185
Uit: U gebruikt uw laptopscherm als uw hoofdscherm en uw monitor of LCD
scherm is uitgeschakeld.
Uit
De beeldschermweergave controleren met
behulp van Eigenschappen voor Beeldscherm van Windows (voor Windows XP en Windows Vista)
De videoinstellingen van het docking station (koppelstation) kunnen ook
gecongureerd worden in het venster Eigenschappen voor Beeldscherm
(Windows). Klik, om dit voor Windows Vista te doen, met rechtermuisknop
op het bureaublad, klik dan op “Aan Persoonlijke voorkeur aanpassen” en
klik dan op de link ‘Beeldscherminstellingen’. In Windows XP is het onderdeel beschikbaar door met rechtermuisknop op het bureaublad te klikken, ‘Eigenschappen’ te selecteren en vervolgens naar het tabblad ‘Instellingen’ te navigeren.
Figuur 1
1
2
3
4
1
2
3
4
Windows Vista
Windows XP
Page 94

Targus USB 2.0 Laptop Docking Station with Video
186
Targus USB 2.0 Laptop Docking Station with Video
187
Uitbreidmodus: Vink, om de beeldschermweergave in deze modus te
zetten, het vakje ‘Het Windows-bureaublad uitbreiden naar deze monitor’ (1
in Figuur 1). Stel de schermresolutie en de kleurkwaliteit in met behulp van
de keuzelijsten (2 en 3). Bepaal vervolgens ook de positie ten opzichte van
de andere monitoren op het uitgebreide bureaublad door te slepen (4).
Spiegelmodus: Vink, om de beeldschermweergave in spiegelmodus te
zetten, simpelweg de optie ‘Het bureaublad uitbreiden naar deze monitor’ uit
(1 in Figuur 1 op de vorige pagina).
Het hoofdscherm instellen: volg de onderstaande instructies om de aan
het docking station (koppelstation) bevestigde monitor als het hoofdscherm
in te stellen.
1. Selecteer, in het venster Eigenschappen voor Beeldscherm, met behulp
van de keuzelijst, de monitor die aan het docking station (koppelstation)
is bevestigd.
Windows Vista
Windows XP
1
1
Page 95

Targus USB 2.0 Laptop Docking Station with Video
188
Targus USB 2.0 Laptop Docking Station with Video
189
2. Vink, nadat u de juiste monitor heeft geselecteerd, het vakje naast “Het bureaublad uitbreiden naar deze monitor” (voor Vista) of “Het Windows bureaublad uitbreiden naar deze monitor” (voor XP).
2
Windows Vista
Windows XP
2
3. Vink vervolgens het vakje aan naast “Dit is mijn hoofdmonitor” (voor Vista)
“Dit apparaat als hoofdmonitor gebruiken” (voor XP).
3
3
Windows Vista
Windows XP
4. Klik op “Toepassen”.
Page 96

Targus USB 2.0 Laptop Docking Station with Video
190
Targus USB 2.0 Laptop Docking Station with Video
191
5. Selecteer de laptopmonitor met behulp van de keuzelijst en vink het vakje “dit
bureaublad uitbreiden naar deze monitor” (voor Vista) of “Het Windows-bureaublad uitbreiden naar deze monitor” (voor XP) uit en klik op “Toepassen”.
De aan het docking station (koppelstation) bevestigde monitor blijft de hoofdmonitor als de pc in de slaapmodus ingaat of opnieuw opgestart wordt. Als het docking station (koppelstation) losgekoppeld wordt, wordt het laptopscherm weer het
hoofdscherm.
OPMERKING: HET IS MET EEN LAPTOP MOGELIJK COMFORTABELER TE WERKEN DOOR HET LAPTOPSCHERM TE SLUITEN EN DE STATUS ERVAN OP “NIETS DOEN” TE ZETTEN, EN VERVOLGENS
HET DOCKING STATION (KOPPELSTATION) IN HOOFDSCHERM- MODUS TE ZETTEN. DAN KAN HET
LAPTOPSCHERM GESLOTEN WORDEN EN KAN DE LAPTOP GEBRUIKT WORDEN MET HET EXTERNE
TOETSENBORD EN MUIS.
4
4
Windows Vista
Windows XP
Als de verbinding hersteld is, zal de aan het docking station (koppelstation) bevestigde monitor teruggaan naar hoofdmonitor-modus.
De beeldscherminstellingen controleren met
behulp van Windows Eigenschappen voor
Beeldscherm (voor Windows 7)
De video-instellingen van het docking station (koppelstation) kunnen ook ingesteld worden vanaf het dialoogvenster van Eigenschappen voor Beeldscherm
van Windows. Om dit in Windows 7 te doen, klikt u met rechtermuisknop op het
bureaublad. Klik dan op “Aan Persoonlijke voorkeur aanpassen” en selecteer de
link “Beeldscherminstellingen” en dan “Verander beeldscherminstelling”. Of klik
met rechtermuisknop op het “Targus USB Video adapter” pictogram in het berichtenvenster en kies “doorgaan”.
De verschillende beeldscherminstellingen kunnen geregeld worden door de
opties te kiezen die zijn voorzien in het lijstje “meerdere beeldscherminstellingen”.
Kies de gewenste instelling en klik op “toepassen”. Het scherm zal zich verversen
en bevestig uw keuze door “veranderingen behouden” te selecteren.
Page 97

Targus USB 2.0 Laptop Docking Station with Video
192
Targus USB 2.0 Laptop Docking Station with Video
193
Automatische updates
Automatische updates is een onderhoudsonderdeel van Display-Link. Het
automatische update- mechanisme zorgt ervoor dat de grasche adapter
van het docking station (koppelstation) de meest bijgewerkte drivers en software heeft, om zo de gebruiker verhoogde prestaties en stabiliteit te bieden.
USB apparaten gebruiken die meer
stroom nodig hebben
Sommige apparaten, die een groot stroomverbruik kennen, zoals printers
en optische schijven, moeten in de USB Stroomuitgangen worden geplaatst.
Deze uitgangen leveren tot maximaal 1000mA stroom - twee keer zoveel als
standaard USB uitgangen.
Het docking station (koppelstation)
loskoppelen
Als het docking station (koppelstation) uitgeschakeld is, of als de USB kabel uit de computer is verwijderd, zal het beeldscherm leeg worden. Alle
vensters en pictogrammen zullen naar het hoofdscherm verschuiven. Wanneer u het docking station (koppelstation) opnieuw aansluit of van stroom
voorziet, zal de beeldschermweergave weer naar dezelfde modus teruggaan
zoals het voor de onderbreking was. Echter, vensters en pictogrammen die
eerst op het scherm waren zullen niet teruggezet worden.
Werkelijke ondersteunde resolutie hangt af van de ondersteuning van de aangesloten monitor.
Ondersteunde resolutie
Resolutie Vernieuwing-
sfrequentie
beschikbaar op
32 bits
640 x 480 60 67 72 75 85
720 x 480 50 60
768 x 576 50 60
800 x 600 56 60 72 75 85
832 x 624 75
800 x 480 60
848 x 480 60
1024 x 600 60
1024 x 768 60 70 72 85
1152 x 864 75
1152 x 870 75
1280 x 720 50 60
Resolutie Vernieuwing-
sfrequentie
beschikbaar op
32 bits
1280 x 800 60 75 85
1280 x 960 60
1280 x 1024 60 75
1360 x 768 60
1366 x 768 60 75 85
1400 x 1050 60
1440 x 900 60
1600 x 1200 60
1680 x 1050 60
1920 x 1080 50 60
1920 x 1200 60
2048 x 1152 60
Page 98

Targus USB 2.0 Laptop Docking Station with Video
194
Targus USB 2.0 Laptop Docking Station with Video
195
Probleemoplosser
Apparaat werkt niet
• Zorg ervoor dat het apparaat volledig in het docking station (koppelstation) is
ingestoken.
• Steek het apparaat in een andere uitgang op het docking station (koppelstation).
Als dit niet helpt, test dan het apparaat door het rechtstreeks op uw computer
aan te sluiten.
• Wees er zeker van dat u de Setup of het installatieprogramma voor het apparaat
heeft uitgevoerd.
• Zorg ervoor dat het apparaat verschijnt bij Apparatenbeheer. Raadpleeg ‘Con-
troleren of de apparaten geinstalleerd zijn’ voor meer informatie.
• Koppel alle apparaten lost van het docking station (koppelstation) en sluit hen
één of voor één opnieuw aan. Controleer of elk apparaat werkt voordat u de
volgende aansluit.
• Elke USB uitgang is voorzien van een bescherming voor stroomoverbelasting.
Mocht een USB apparaat meer stroom vragen dan de USB uitgang aan kan, dan
zal de uitgang zichzelf uitschakelen. Haal, om de uitgang weer te laten functioneren, het apparaat uit het docking station (koppelstation) en ga naar Apparaatbeheer of naar het bericht in de systeembalk en kies de Reset-optie. U kunt dan het
apparaat weer in de USB uitgang steken. Als deze opnieuw zichzelf uitschakelt,
controleer dan de stroomvereisten van het apparaat.
Productbeperkingen
Sommige apparaten kunnen tijdelijk stoppen met werken wanneer een grote
verzending van gegevens aan de gang is. Uw muis kan bijvoorbeeld langzaam
reageren wanneer een grasche printopdracht aan het printen is of wanneer u
te maken heeft met veel netwerkverkeer. We raden de volgende richtlijnen aan:
• Verstuur niet op hetzelfde moment gegevens van of naar meerdere hoge snel-
heidsapparaten, zoals een digitale camera, of scanner.
• Sluit, als alles langzamer wordt, andere programma’s die een USB apparaat
gebruiken af om de prestatie van het apparaat te verbeteren.
Controleren of de apparaten geïnstalleerd zijn
U kunt de apparaten die op het docking station (koppelstation) geïnstalleerd zijn
bekijken via het venster Apparaatbeheer in systeemeigenschappen. Klik met
rechtermuisknop op Deze Computer, Eigenschappen, klik vervolgens op het tabblad Hardware, en dan o p de knop Apparaatbeheer.
Bekijk in het venster van Apparaatbeheer het volgende:
• Beeldschermadapters:
- Displaylink Grasche Adapter (alleen XP)
- Displaylink Spiegeladapter (alleen XP)
• Netwerkadapters:
- USB Ethernet Adapter met hoge snelheid
• Besturing voor geluid, video en spelletjes:
- USB Audioapparaat
• USB Beeldschermadapters
- Targus USB naar DVI Adapters
• Monitor
- Targus USB naar DVI Adapters
FAQ - DisplayLink
http://www.displaylink.com/support/index.php
DisplayLink biedt deze ondersteuningswebsite aan om vragen te beantwoorden.
Hiermee kunnen de mogelijke vragen, beantwoord worden.
Page 99

Targus USB 2.0 Laptop Docking Station with Video
196
Targus USB 2.0 Laptop Docking Station with Video
197
NO - Innledning
Gratulerer med kjøpet av en Targus USB 2.0-dokkingstasjon med
video for bærbare PC-er. Denne bærbare utvidelsesmodulen lar deg
koble til opptil 4 USB-enheter, skjerm, nettverksforbindelse (Ethernet/
LAN), høyttalere og mikrofon via én enkelt USB-forbindelse.
Dokkingstasjonen tilbyr også to Targus-kraftporter som gir to ganger
USB-spesikasjonene for svært kraftige enheter, og USB-porter med
stort mellomrom for større adaptere.
Dokkingstasjonen gir følgende porter:
• DVI singel link (støtter opptil 2048 x 1152 med 32-bits farge)
• To 3,5-mm audio: (1) stereo ut (1) mikrofon inn
• RJ-45 Ethernet 10/100
• To USB 2.0 (hvite)
• To USB-kraftporter (svarte) - gir strømstyrke opp til 1 Ampere
Pakkens innhold
I tillegg til denne brukerveiledningen inneholder pakken:
• Targus USB 2.0 dokkingstasjon med video for bærbare PC-er
• Høyhastighets USB 2.0-oppstrømskabel
• CD med driverprogramvare (mini-CD)
• Vekselstrømadapter (påkrevd)
Systemkrav
Maskinvare
• PC med en Intel® Pentium®-prosessor eller tilsvarende
• CD-ROM-stasjon (støtte for mini-CD)
• USB-versjon 2.0-port
• Vekselstrømkilde (vekselstrømadapter påkrevd)
Operativsystem
• Microsoft Windows® XP med Service Pack 3
• Microsoft Windows Vista® med Service Pack 1
• Microsoft Windows® 7
MERK: NÅR DOKKINGSTASJONEN ER KOBLET TIL EN USB-VERSJON 1.1-PORT PÅ DATAMASKINEN DIN,
VIL IKKE YTELSESNIVÅET VÆRE OPTIMALT, OG VIDEOPORTEN VIL IKKE FUNGERE ORDENTLIG. FOR
BESTE RESULTAT, KOBLE DEN TIL EN USB-VERSJON 2.0-PORT.
Page 100

Targus USB 2.0 Laptop Docking Station with Video
198
Targus USB 2.0 Laptop Docking Station with Video
199
Installere enheten og driverne
For å bruke Targus-dokkingstasjonen må du først installere driveren på
datamaskinen din. Koble deretter dokkingstasjonen til datamaskinen din, så vil
Windows plug-and-play installere maskinvaredriverne for hver port.
ADVARSEL: DU MÅ INSTALLERE PROGRAMVAREN FOR DOKKINGSTASJONEN
FØR DU KOBLER DEN TIL DATAMASKINEN. ELLERS VIL IKKE DOKKINGSTASJONEN FUNGERE ORDENTLIG.
Installere dokkingstasjonsdriveren
Ved å installere dokkingstasjonsdriveren kan operativsystemet ditt kjenne
igjen dokkingstasjonen og dens porter når den er tilkoblet.
1 Slå på datamaskinen.
2 Sett driverprogramvare-CD-en inn i datamaskinens CD-ROM-stasjon.
Hvis installasjonen ikke begynner automatisk, klikk Start, Kjør og skriv inn
D:\Setup.exe (der D: er lstien til CD-ROM-stasjonen din), og klikk deretter
OK.
3 Følg eventuelle instruksjoner på skjermen for å fullføre installasjonen.
4 Klikk Avslutt og start datamaskinen på nytt når du anmodes om det.
Koble dokkingstasjonen til
datamaskinen
Når du har installert programvaren for dokkingstasjonen, er du klar til å koble
dokkingstasjonen til datamaskinen. For å gjøre dette:
1 Koble den medfølgende vekselstrømadapteren til vekselstrømkontakten
på dokkingstasjonen.
2 Koble den ene enden av USB-kabelen til dokkingstasjonen, og den andre
enden til en tilgjengelig USB 2.0-port på datamaskinen.
ADVARSEL: DOKKINGSTASJONEN VIL IKKE FUNGERE ORDENTLIG FØR
VEKSELSTRØMADAPTEREN ER KOBLET TIL ET VEKSELSTRØMUTTAK.
IKKE KOBLE NOEN ENHETER TIL DOKKINGSTASJONEN FØR INSTALLASJONEN ER FULLFØRT.
 Loading...