


Cisco TelePresence
Management Suite
Extension
for IBM Lotus Notes
Version 11.3.1
Installation & getting started guide
D13561.16
December 2010

Contents
Contents
Table of figures.................................................................................................................... 4
Introduction ......................................................................................................................... 5
How to use this document ....................................................................................................................... 5
Requirements ...................................................................................................................... 6
Server operating system .......................................................................................................................... 6
Domino server ......................................................................................................................................... 6
Supported clients ..................................................................................................................................... 6
Cisco TMS requirements ......................................................................................................................... 6
Naming of systems in IBM Lotus Domino and Cisco TMS ............................................... 7
System IDs in Cisco TMS ........................................................................................................................ 7
Adding systems to Cisco TMS after installation of Cisco TMSXN .......................................................... 7
Installation ........................................................................................................................... 8
User Account Control (UAC) ................................................................................................................... 8
Copying the required files to the IBM Lotus Domino Server (Versions 7.x and 8.0.x) ............................ 8
Copying the required files to the IBM Lotus Domino Server (Version 8.5.x) ........................................... 9
Updating the java.policy file (all versions) ............................................................................................... 9
Editing the notes.ini file .......................................................................................................................... 10
Restarting the Domino Service .............................................................................................................. 11
Signing the templates ............................................................................................................................ 11
To sign the templates ..................................................................................................................... 11
Creating the Cisco TMS Resource Reservation Database ................................................................... 12
Creating a Service Account on the Domino Server ............................................................................... 13
Creating a service account on the Cisco TMS server ........................................................................... 15
Adjusting the web permissions on the Cisco TMS Server .................................................................... 16
Enable secure communication (Optional) ............................................................................................. 16
Enabling agents in Resource Database (IBM Lotus Notes/Domino versions 7.x and 8.0.x) ................ 17
Enabling agents in Resource Database (IBM Lotus Notes/Domino version 8.5.x) ............................... 18
Configuring the Cisco TMS settings of the Resource Database (all versions) ..................................... 21
Configuring the Domino Rooms for Cisco TMS Systems ..................................................................... 22
Starting the Synchronizer ...................................................................................................................... 23
Updating the Mail Template for Notes Users ........................................................................................ 23
Upgrading to 11.3 or 11.3.1 ................................................................................................24
Stop the Domino Server ........................................................................................................................ 24
Copy the required files to the Domino Server ....................................................................................... 24
Restart the Domino Service................................................................................................................... 24
Sign the templates ................................................................................................................................. 25
To sign the templates ..................................................................................................................... 25
Replace the Resource Template ........................................................................................................... 25
Replace the Mail template for the users ................................................................................................ 25
Enable agents in Resource Database ................................................................................................... 26
Start the Synchronizer ........................................................................................................................... 26
Post installation setup .......................................................................................................27
Calendar options in the Cisco TMS mail template ................................................................................ 27
Cisco TMS Extension for IBM Lotus Notes – Installation and getting started guide Page 2 of 45

Contents
Verification of the installation ...........................................................................................29
Testing meetings from Lotus to Cisco TMS .......................................................................................... 29
Process overview for meetings created in Lotus ................................................................................... 29
Troubleshooting .............................................................................................................................. 29
Testing meetings from Cisco TMS to Lotus .......................................................................................... 30
Process overview for meetings created in Cisco TMS ................................................................... 31
Frequently asked questions about Cisco TMSXN booking .............................................32
Technical description of Cisco TMSXN ............................................................................34
Overview ................................................................................................................................................ 34
Synchronizing changes from Cisco TMS .............................................................................................. 34
Synchronizing changes to Cisco TMS ................................................................................................... 34
Communication between Cisco TMS and IBM Lotus Domino .............................................................. 34
Troubleshooting Cisco TMSXN .........................................................................................36
Understanding log files .......................................................................................................................... 36
Changing log level ................................................................................................................................. 36
TMS Admin view is not available ........................................................................................................... 37
It is impossible to book resources after a Cisco TMSXN upgrade ........................................................ 38
Server connection problems .................................................................................................................. 38
Expired SSL certificates ........................................................................................................................ 39
Switch from HTTPS to HTTP: ........................................................................................................ 39
Checking for updates and getting help.............................................................................40
License agreement .............................................................................................................41
Cisco TMS Extension for IBM Lotus Notes – Installation and getting started guide Page 3 of 45

Table of figures
Contents
Figure 1: Turning on User Account Control ............................................................................................. 8
Figure 2: An updated java.policy file ..................................................................................................... 10
Figure 3: An updated notes.ini file ......................................................................................................... 10
Figure 4: The Files tab, with the two Cisco TMS templates highlighted ............................................... 11
Figure 5: Adding user ID to the Full Access Administrators field .......................................................... 12
Figure 6: Creating a new database ....................................................................................................... 13
Figure 7: The People > Register… item from the right pane ................................................................ 14
Figure 8: The Register Person page ..................................................................................................... 15
Figure 9: Creating a new user group having the Booking permission .................................................. 16
Figure 10: Listing the agents in Domino Designer 7.0 .......................................................................... 17
Figure 11: Configuring the run-time of the Scheduled Synchronizer agent .......................................... 18
Figure 12: Listing the Agents of the database ....................................................................................... 19
Figure 13: Configuring the run-time of the Scheduled Synchronizer agent .......................................... 20
Figure 14: The Agent Schedule window ................................................................................................ 20
Figure 15: Checking the Admin and Create Resource check boxes .................................................... 21
Figure 17: The Video Conference Advanced Options button ................................................................ 27
Figure 18: The Video Conference Advanced Options window .............................................................. 28
Figure 19: The Video Conference Resources database. ...................................................................... 36
Figure 20: Changing the log level .......................................................................................................... 37
Figure 21: Adding an Admin role ........................................................................................................... 38
Cisco TMS Extension for IBM Lotus Notes – Installation and getting started guide Page 4 of 45

Introduction
Introduction
This document describes the Cisco TelePresence Management Suite Extension for IBM Lotus Notes
(Cisco TMSXN) installation process. The software is an optional add-on component to Cisco
TelePresence Management Suite (Cisco TMS), which gives users the ability to schedule video
conferences, book meeting rooms and invite participants using their Lotus Notes client. The video
conferencing systems are registered in a resource database on the Domino server, allowing end users
to view their availability when making bookings.
The extension uses software components installed on the Lotus Domino server. Therefore, client
machines do not need to be modified. This gives system administrators a centrally deployed solution,
simplifying maintenance.
See http://www.lotus.com for more information about IBM Lotus Domino and IBM Lotus Notes.
How to use this document
The installation procedure for Cisco TelePresence Management Suite Extension for IBM Lotus Notes
depends on the version of IBM Lotus Notes/Domino that you use. Therefore, some of the subsections
will include version numbers in the heading indicating which version(s) they are valid for. Steps in
subsections without version numbers apply to all versions of IBM Lotus Notes/Domino.
Note: Users of IBM Lotus Domino/Notes 7.x should note that the menu option described in this
document as File > Application is called File > Database in the 7.x user interface.
Cisco TMS Extension for IBM Lotus Notes – Installation and getting started guide Page 5 of 45

Requirements
Requirements
Server operating system
Windows 2000 Server SP3 with Internet Explorer 5.5 or later
Windows 2003 Server with Internet Explorer 6.0 or later
Windows 2008 Server with Internet Explorer 7.0 or later
Domino server
Domino Server running version 7.0.x, 8.0.x, or 8.5.x
Completing the installation requires:
Access to Lotus Notes, Administrator, and Designer clients.
Ability to copy and move files to the Domino Server.
Access to the Domino Server to modify local files.
An account with full Administrator Access on the Domino Server.
An account with permissions to create and edit users, create and sign databases, and the ability
to edit the Server Configuration Document.
Supported clients
Tested with Cisco TelePresence Management Suite Extension for IBM Lotus Notes version 11.3.1:
IBM Lotus Notes 7.0.4
IBM Lotus Notes 8.0
IBM Lotus Notes 8.5.2
Other minor versions within these major versions of Notes and Domino may be compatible, but the
versions above have been tested for compatibility by Cisco TelePresence.
Cisco TMS requirements
Cisco TelePresence Management Suite Extension for IBM Lotus Notes package requires Cisco
TelePresence Management Suite (Cisco TMS) version 11.5 or later. Cisco TMSXN utilizes Cisco
TelePresence Management Suite Extension Booking API version 2.
Before installing Cisco TelePresence Management Suite Extension for IBM Lotus Notes, you must
add the Application Integration Package option key. Contact your Cisco TelePresence reseller to
purchase this option key. For documentation about how to install license keys in Cisco TMS, see the
Support > Documentation section of www.tandberg.com.
Cisco TMS Extension for IBM Lotus Notes – Installation and getting started guide Page 6 of 45

Naming of systems in IBM Lotus Domino and Cisco TMS
Naming of systems in IBM Lotus Domino and
Cisco TMS
The name of a system in Cisco TMS is only a label, therefore it can be changed without doing any
Lotus resource re-configuration. However, for consistency and ease of maintenance, Cisco
TelePresence recommends that all installations have consistent names in both Lotus and the Cisco
TMS web interface.
System IDs in Cisco TMS
When defining resource accounts in Domino, use Cisco TMS system IDs to link the two. In Cisco
TMS, a system’s ID will not change unless the system is completely purged from the database.
Systems should not be purged and re-added to Cisco TMS unless absolutely necessary. Doing so will
make the system appear as a completely different system in Cisco TMS, along with a new system ID.
If a system’s ID changes and the system is also represented in Lotus, you must update the ID listed
for that system in the Lotus Resource database manually
Adding systems to Cisco TMS after installation of Cisco
TMSXN
After completing the Cisco TMS Integration with Lotus, the requirements for adding new systems to
Cisco TMS change slightly. When adding systems to Cisco TMS, it is important to add them to Lotus
before the systems are made available for booking in Cisco TMS. This can be done by setting Allow
booking to No for a system in Cisco TMS until it also has been added to Lotus. If a system is booked
in Cisco TMS before it has been added to Lotus, the meetings booked prior to the system being
created in Lotus will not replicate over to the Lotus calendars.
Note: This requirement only applies after the Cisco TelePresence Management Suite Extension for
IBM Lotus Notes has been installed, and for systems you intend to make available for booking in
Lotus.
Cisco TMS Extension for IBM Lotus Notes – Installation and getting started guide Page 7 of 45
Installation
Installation
Complete the following steps to do a first-time installation and configuration of the Cisco TelePresence
Management Suite Extension for IBM Lotus Notes package with the Cisco TelePresence Management
Suite.
The term “Domino directory” is used throughout this document. The location of this directory is user
configurable during installation, and can for example be C:\Lotus\Domino\.
The integration files are included as part of the Cisco_TMSXN_v11_3_1.zip archive. The archive
includes two zip files:
TMSXN_ForDominoV85.zip for version 8.5.x of IBM Lotus Notes
TMSXN_ForDominoV70.zip for version 7.x and 8.0.x of IBM Lotus Notes
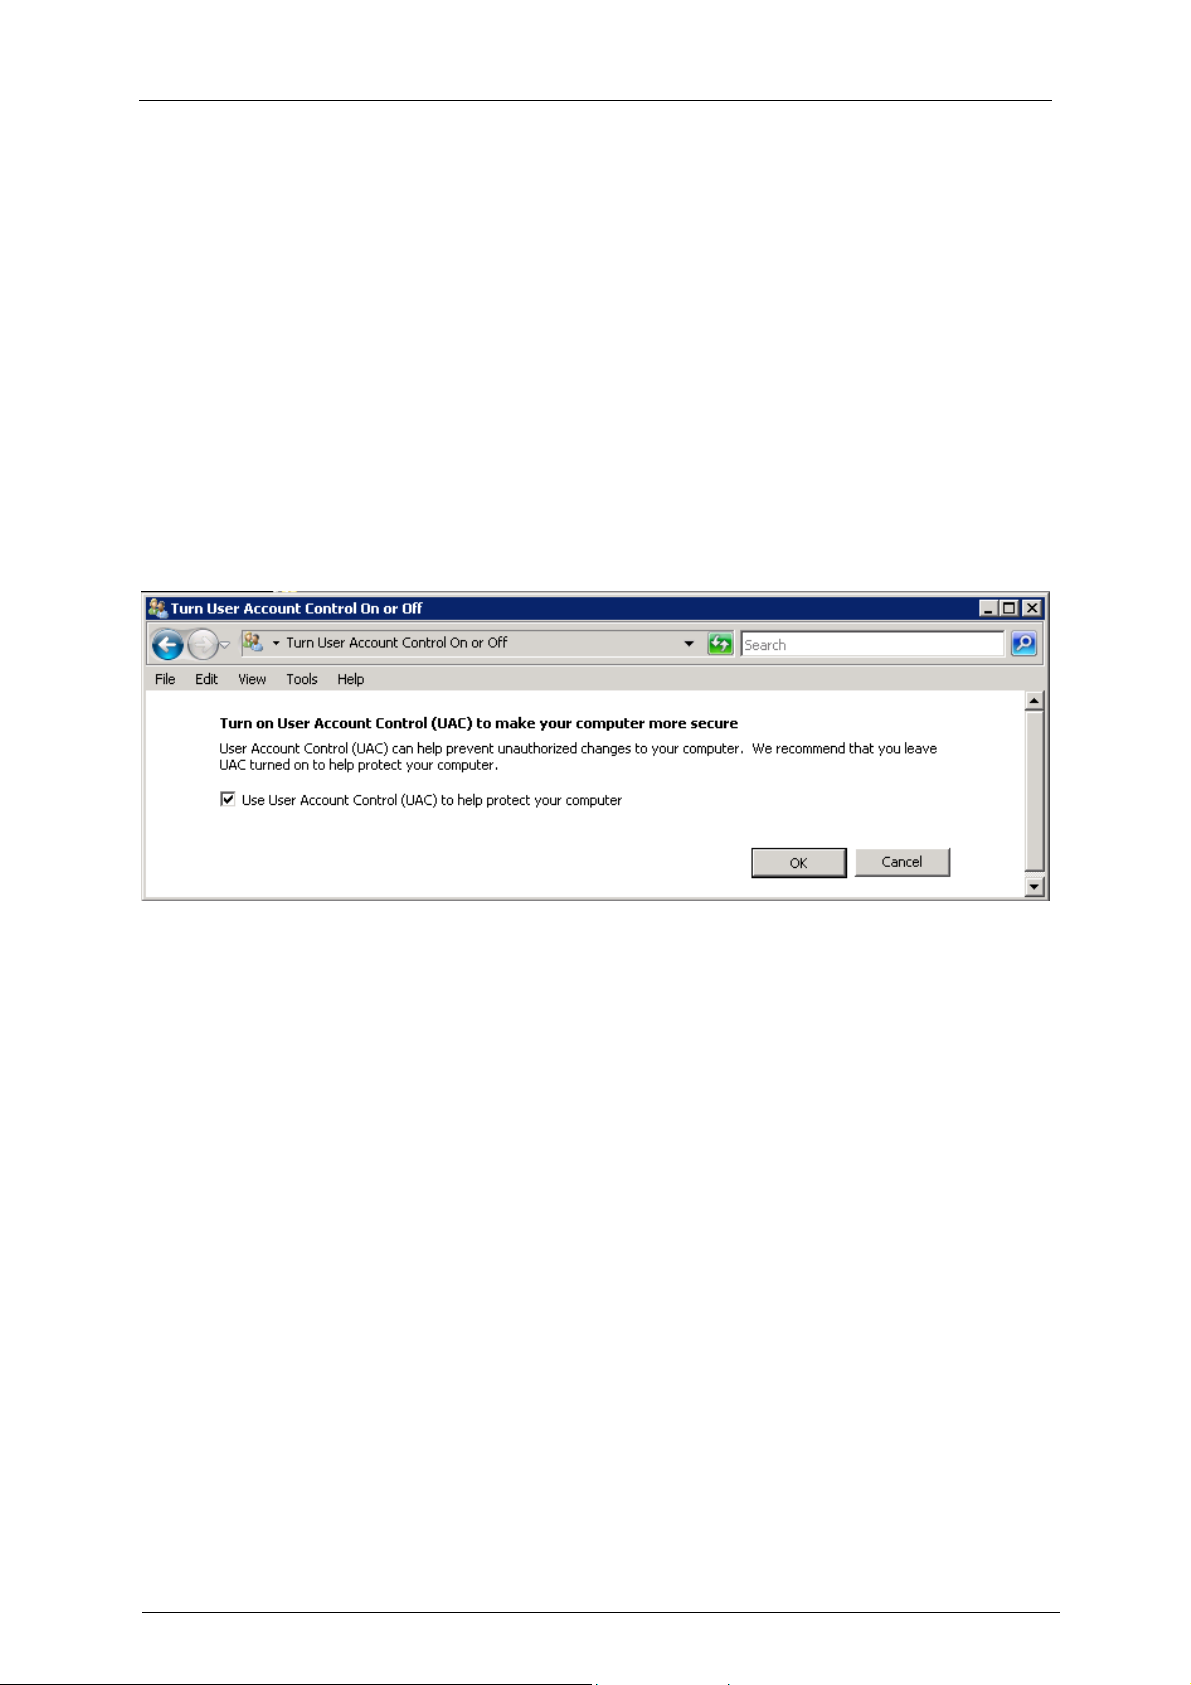
User Account Control (UAC)
Cisco TelePresence recommends that this setting is on for increased Domino server security. An
administrator can verify if UAC is on by going to Control Panel > User Accounts and clicking “Turn
User Account Control on or off”.
Figure 1: Turning on User Account Control
Copying the required files to the IBM Lotus Domino Server
(Versions 7.x and 8.0.x)
1. Copy the LotusNotesIntegrationForNotesV70.zip file to your Domino Server and extract it to a
temporary folder. If using FTP, make sure that binary mode is used.
2. Extract the LotusNotesIntegrationForNotesV70\Javafiles.zip file to a temporary directory on the
Domino server.
a. Copy TMSConference.jar (found in the bin directory of the Javafiles.zip file) to the jvm\lib\ext
directory of the Domino directory
b. Copy the files in the lib directory in the extracted Javafiles.zip archive to the same directory. If
some or all of the files are already present, do not overwrite the existing files.
3. Verify the proper file security permissions on the copied .jar files. Right-click on the copied .jar
files and select Properties. Go to the Security tab, and make sure that the Windows user
(System user) that the Domino processes run under has at least Read access.
• For Windows 7, Vista and 2008 users: If User Account Control is active on the Domino
server, right click the .jar files and click unblock.
Cisco TMS Extension for IBM Lotus Notes – Installation and getting started guide Page 8 of 45

Installation
4. Copy the template files extracted previously, tmsresrc7.ntf and tmsmail7.ntf to your Domino Data
directory1.
5. Verify the proper file security permissions on the copied template files by right-clicking on them
and selecting Properties. In the Properties dialog, make sure Read-only is cleared. Go to the
Security tab, and make sure that the Windows user (System user) that the Domino processes run
under has full access to these files.
6. Copy the TMSEventCatcher.dll file extracted previously into your Domino Program Folder.
7. Verify the proper file security permissions on the copied TMSEventCatcher.dll file by right-clicking
on it and selecting Properties. In the Properties dialog, make sure Read-only is cleared. Go to
the Security tab and make sure the Windows user (System user) that the Domino processes run
under has at least Read access.
• For Windows 7, Vista and 2008 users: If User Account Control is active on the Domino
server, right click the TMSEventCatcher.dll file and click unblock.
Copying the required files to the IBM Lotus Domino Server
(Version 8.5.x)
1. Copy the LotusNotesIntegrationForNotesV85.zip file to your Domino server and extract the files to
a temporary folder. If using FTP, use binary mode.
2. Extract the LotusNotesIntegrationForNotesV85\Javafiles.zip file to a temporary directory on the
Domino server.
a. Copy TMSConference.jar (found in the bin directory of the Javafiles.zip file) to the jvm\lib\ext
directory of the Domino directory.
b. Copy the files in the lib directory in the Javafiles.zip archive to the \jvm\lib\ext subdirectory of
the Domino directory. Do not overwrite existing files.
3. Verify that the copied .jar files have proper file security permissions by right clicking on them and
selecting Properties. Go to the Security tab and make sure that the Windows user (System user)
that the Domino processes run under has at least Read access to these files.
4. Copy the extracted template files, tmsresrc8.ntf and tmsmail85.ntf to your Domino Data directory.
5. Verify the proper file security permissions on the copied template files by right-clicking on them
and selecting Properties. In the Properties dialog, make sure the Read-only checkbox is
cleared. Go to the Security tab. Make sure that the Windows user that the Domino processes run
under (called System user) has full access to these files.
6. Copy the extractedTMSEventCatcher.dll file into your Domino directory.
7. Verify that TMSEventCatcher.dll has proper file security permissions. Right-click on it and select
Properties. In the Properties dialog, make sure Read-only is cleared. Go to the Security tab
and make that the Windows user (System user) that the Domino processes run under has at least
Read access to this file.
Updating the java.policy file (all versions)
The java.policy file must be updated to allow Cisco TMSXN to use web services. The java.policy file is
by default found in the jvm\lib\security folder of your Domino directory.
Update the policy file by opening it in a text editor and adding the following line inside an existing grant
statement (see figure belowError! Reference source not found.):
permission java.util.PropertyPermission "java.protocol.handler.pkgs",
"write";
1
The mail template is a modified Notes 7 template. The mail template is also supported in Notes 8. (See
http://www-1.ibm.com/support/docview.wss?uid=swg21264690 for additional information.)
Cisco TMS Extension for IBM Lotus Notes – Installation and getting started guide Page 9 of 45
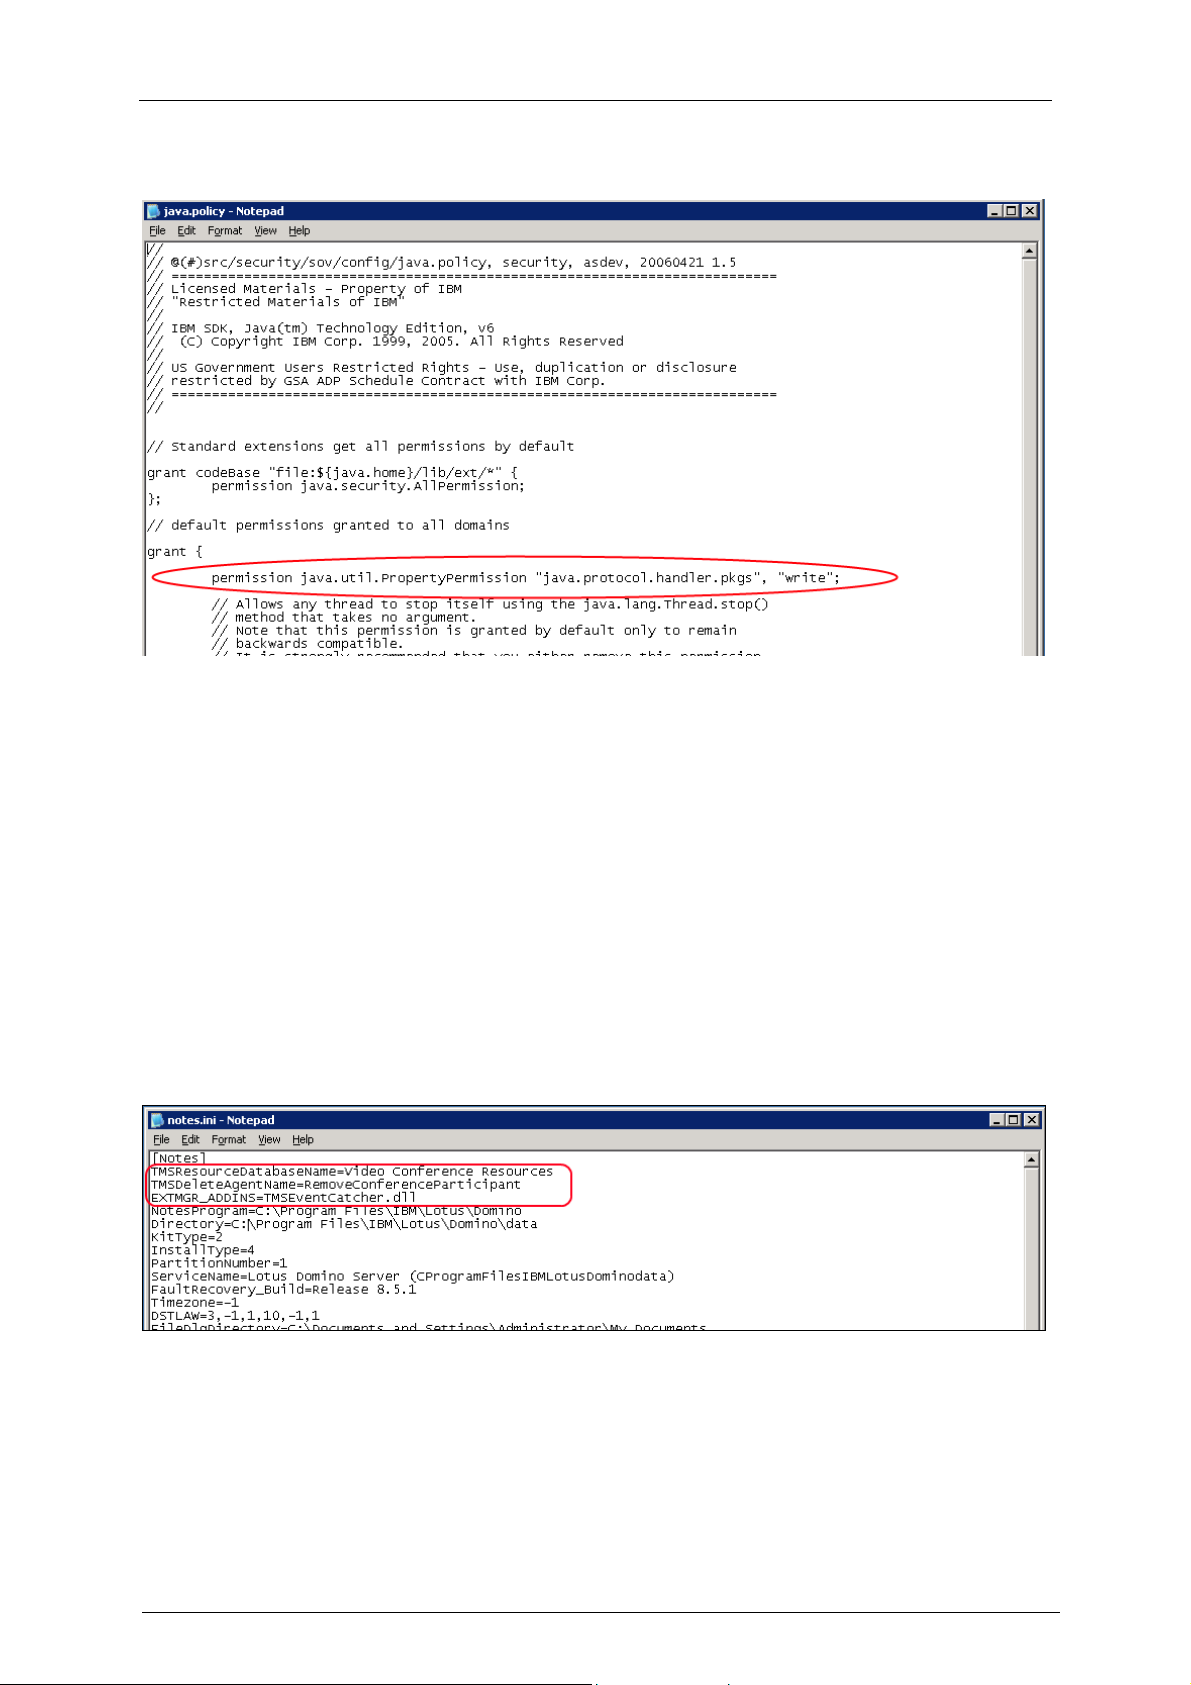
Save and close the java.policy file.
Figure 2: An updated java.policy file
Installation
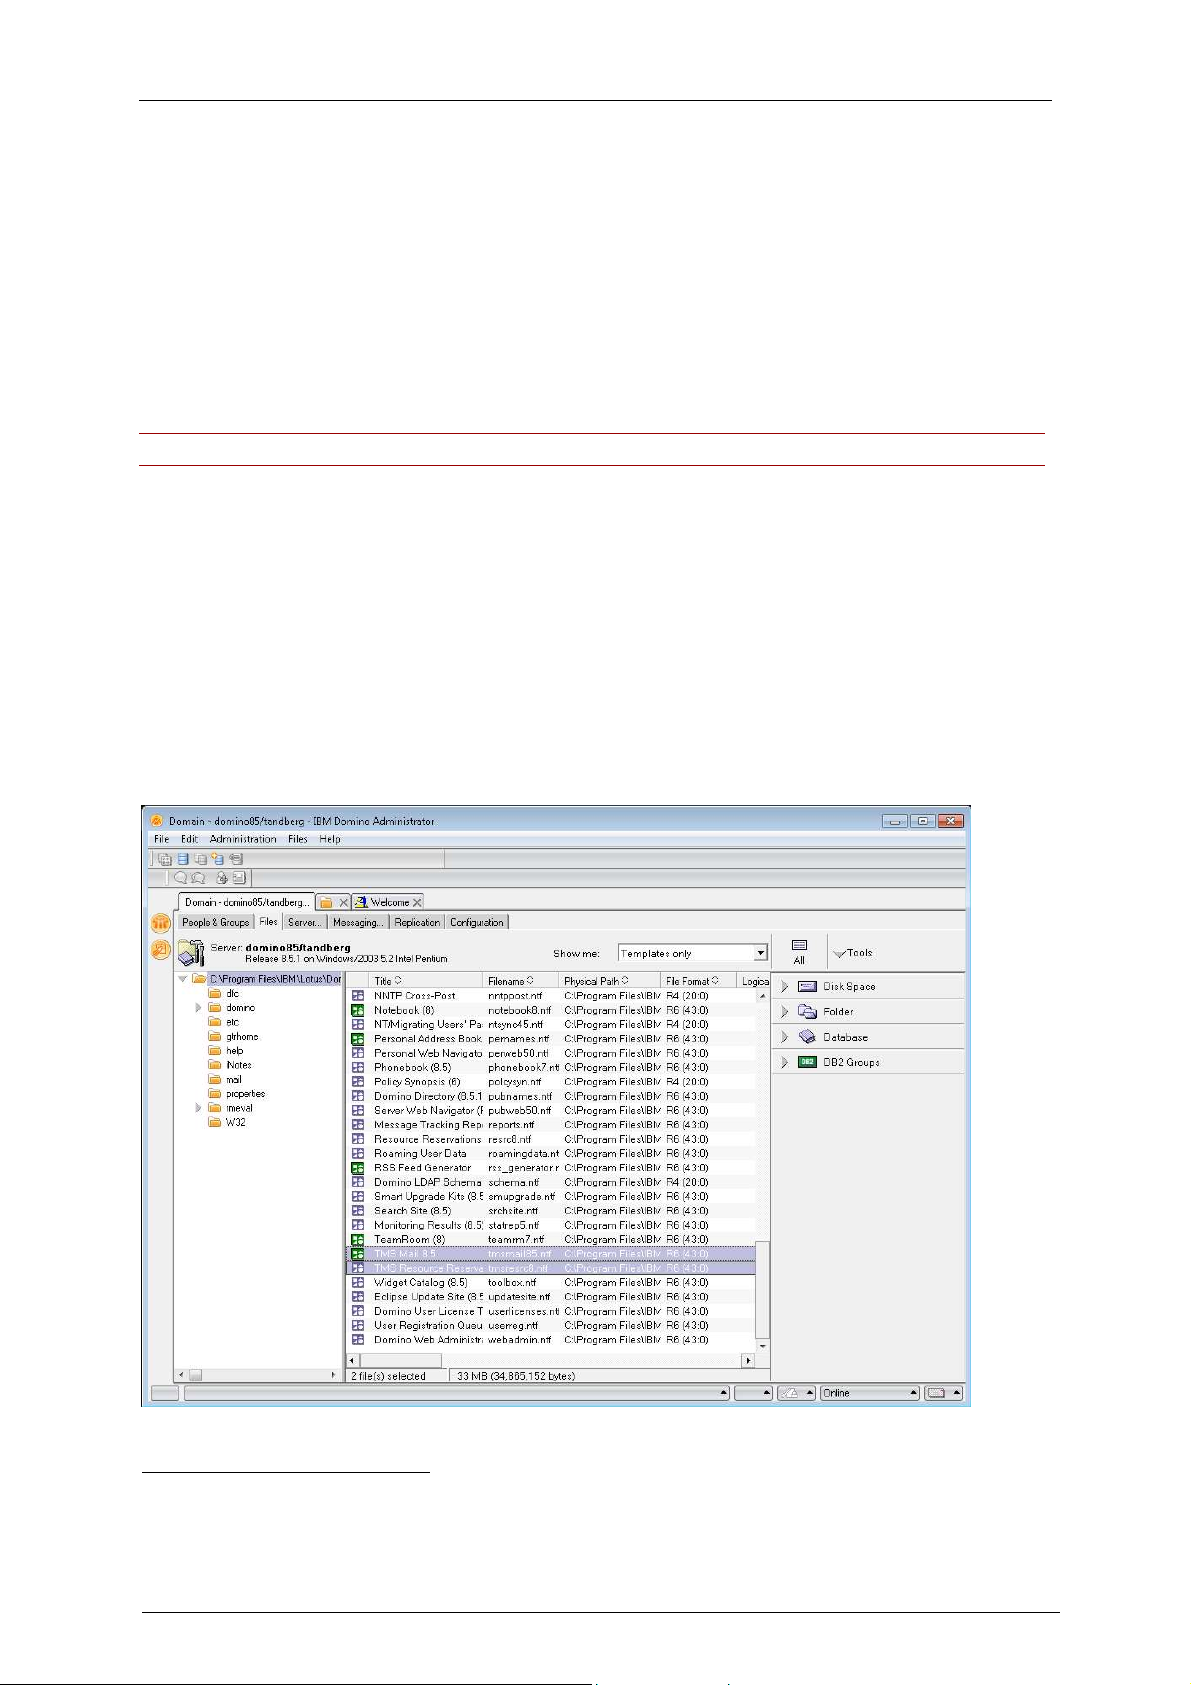
Editing the notes.ini file
The notes.ini file is by default found in the Domino directory.
Open the notes.ini file in a text editor and add these lines to the top of the file (see also the figure
below):
TMSResourceDatabaseName=Video Conference Resources
TMSDeleteAgentName=RemoveConferenceParticipant
EXTMGR_ADDINS=TMSEventCatcher.dll
It is important that only one instance of each of these statements exists in the notes.ini file. If one of
these lines already exists in the notes.ini file, you must modify the existing line to include these values.
For the TMSResourcesDatabaseName variable, the name must match the name you intend to give
the resource reservation database to be used for video conferencing rooms. This database will be
created in a later step. Cisco TelePresence recommends using the name Video Conference
Resources.
Figure 3: An updated notes.ini file
Finally, save and close the notes.ini file.
Cisco TMS Extension for IBM Lotus Notes – Installation and getting started guide Page 10 of 45
Installation
Restarting the Domino Service
Restart the Domino Service to apply the changes made either by using the restart server command in
the Domino console, or by restarting the Lotus Domino Service in the Services Console found at Start
> Administrative Tools > Services.
Signing the templates
The new template files must be signed with an appropriate ID from your organization.
Domino security requires that “new mail” agents run on the home server (mail server) of the signer.
Because the templates include “new mail” agents, the ID that signs the templates must have a mailbox
located on the server where you are installing the integration package.
Note: If you ignore this requirement, the agents are unable to run.
To sign the “new mail” agents, you must create a utility account on the Domino Server. However, you
can configure Domino to ignore this security requirement for mail agents running on the server. Note
that this will affect all “new mail” agents running on the server.
To disable the security check, modify the notes.ini file by adding the option AMgr_DisableMailLookup
= 1.
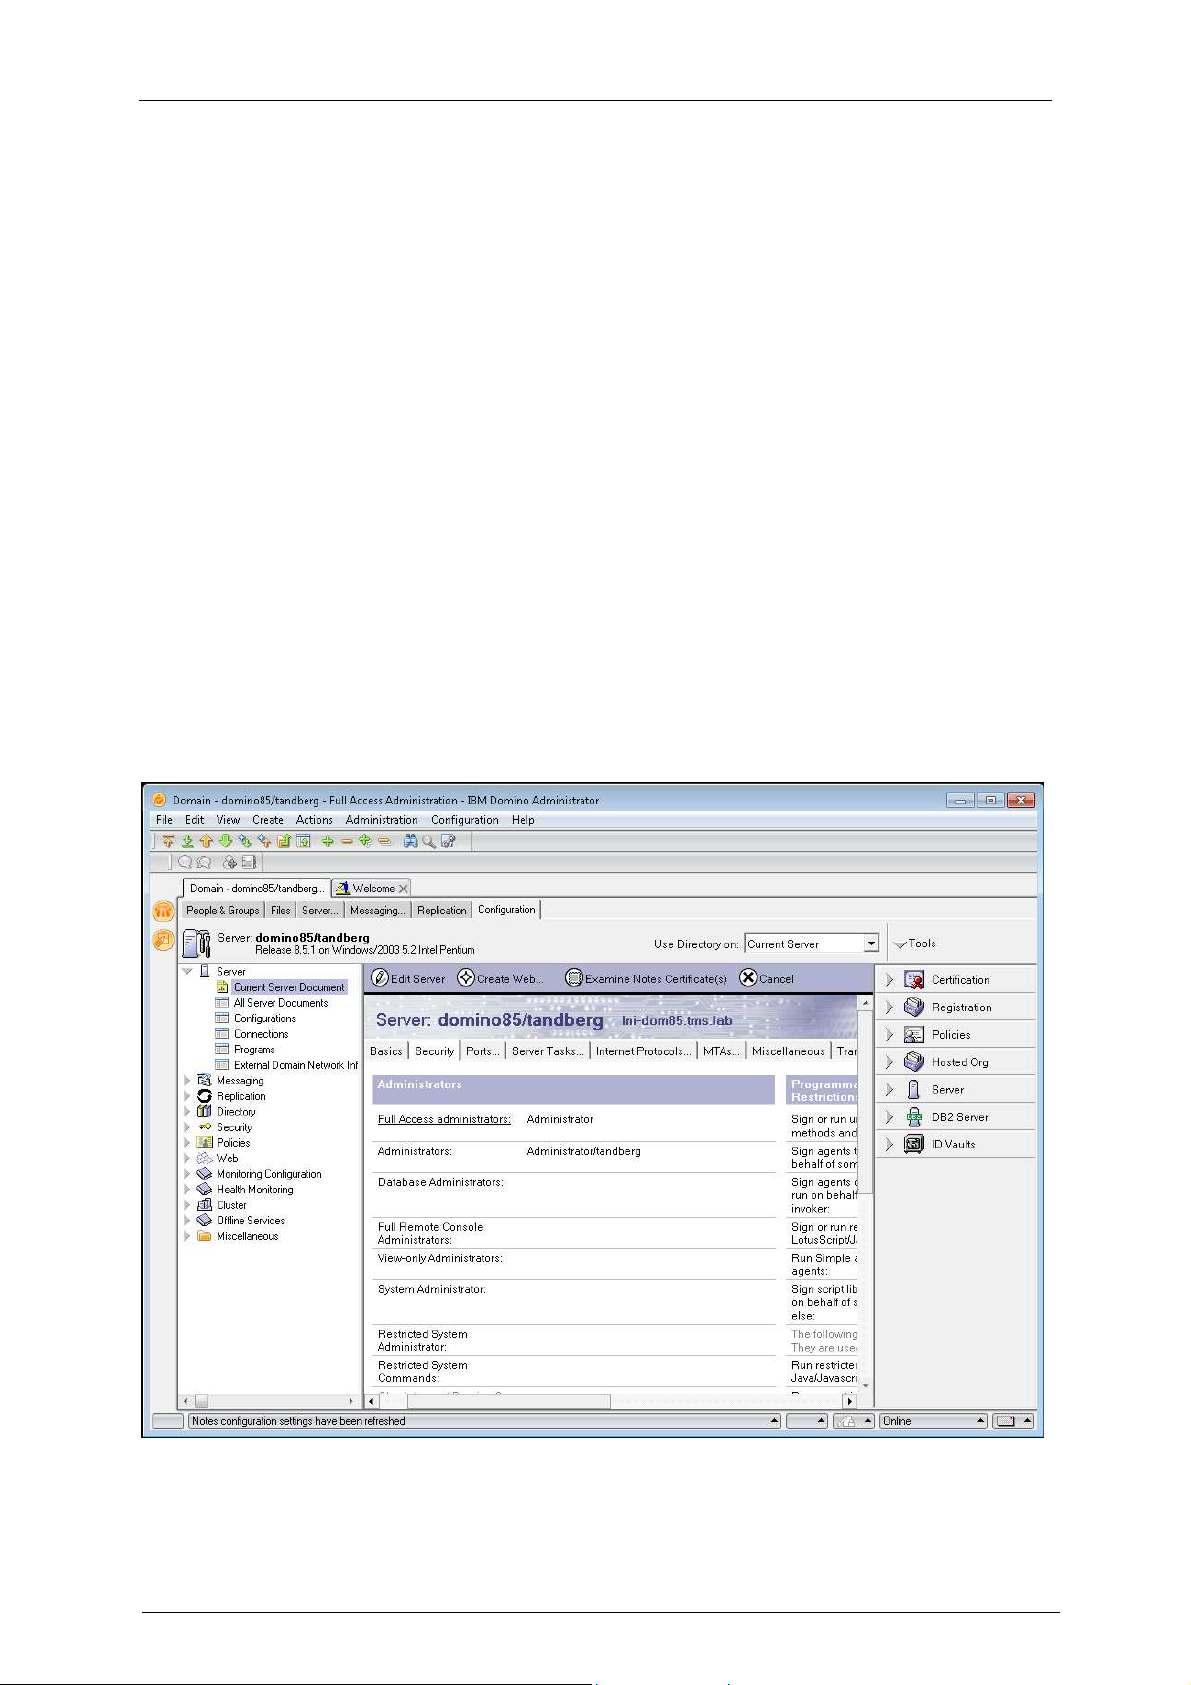
To sign the templates
1. Open Domino Administrator and select the server that you copied the template files to.
2. Go to the Files tab and select the data folder. In the Show me: drop-down list change the view to
Templates Only.
Highlight the two Cisco TMS templates, TMS Resource Reservations and TMS Mail (X2).
Figure 4: The Files tab, with the two Cisco TMS templates highlighted
2
Depending on the version of Notes, this will be 7 for V7.0.x and V8.0.x of Notes, and 8.5 for V8.5.x of
Notes.
Cisco TMS Extension for IBM Lotus Notes – Installation and getting started guide Page 11 of 45
Installation
3. Right-click on the templates and select Sign…
a. Choose Active User’s ID to sign using the current user’s ID.
b. Make sure that the user has sufficient permissions to sign templates and that the user has a
mailbox on this Domino server.
4. Select the All design documents radio button.
5. Click OK.
The status bar shows the number of databases processed and the number errors if any occurred. See
the Domino Server logs for additional information if any errors occur.
You may get a Cross Certificate Warning because your organization does not have a trust to
/TANDBERG or /Cisco. This should be handled according to your organization’s policies.
Creating the Cisco TMS Resource Reservation Database
Open Domino Administrator and select the server hosting the installation files. Go to the
Administration menu and select Full Access Administration.
If you cannot get full access, permissions can be granted to the server:
1. Go to the Configuration tab for the server and select Current Server Document.
2. In the Security tab modify the Full Access Administrators field.
3. Add the user ID of the user completing the installation
4. Save and close the server document. (You may have to close and reopen your Administrator
session to update your permissions.)
Figure 5: Adding user ID to the Full Access Administrators field
5. Once you have Full Access Administration successfully checked without any errors, open File
Menu > Application > New…
Cisco TMS Extension for IBM Lotus Notes – Installation and getting started guide Page 12 of 45
Installation
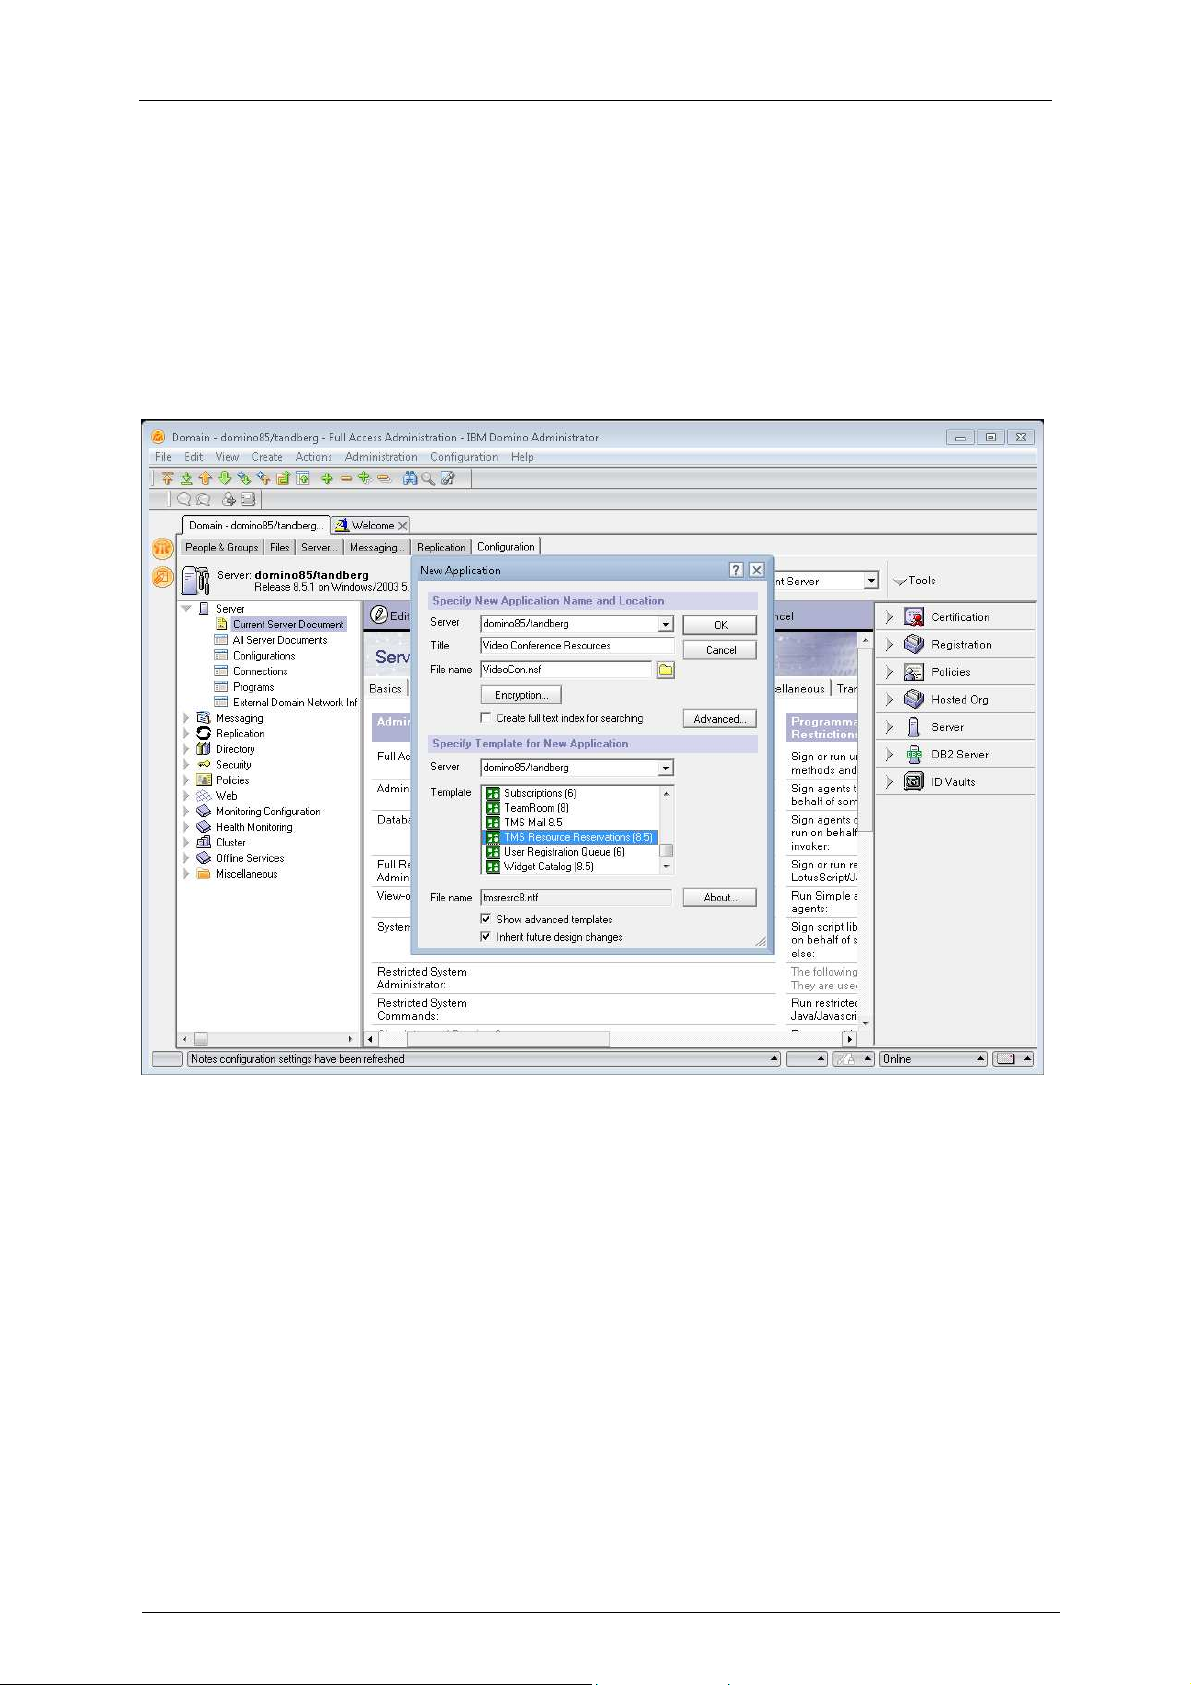
6. In the Specify New Database Name and Location section, select the server that the integration
package is being installed on.
7. Set the Title field to the value that you specified in the TMSResourceDatabaseName variable in
the notes.ini file (Video Conference Resources, if you followed the recommendation in this
document).
8. In the Specify Template for New Application section:
a. Select the server that the integration package is being installed on.
b. Select the Show advanced templates check box.
c. The template list updates. Select the TMS Resource Reservations template.
d. Click OK to create the database. The Notes status bar shows progress updates.
Figure 6: Creating a new database
Creating a Service Account on the Domino Server
This account will act as the owner of the video resources. Make this account a normal (restricted)
user.
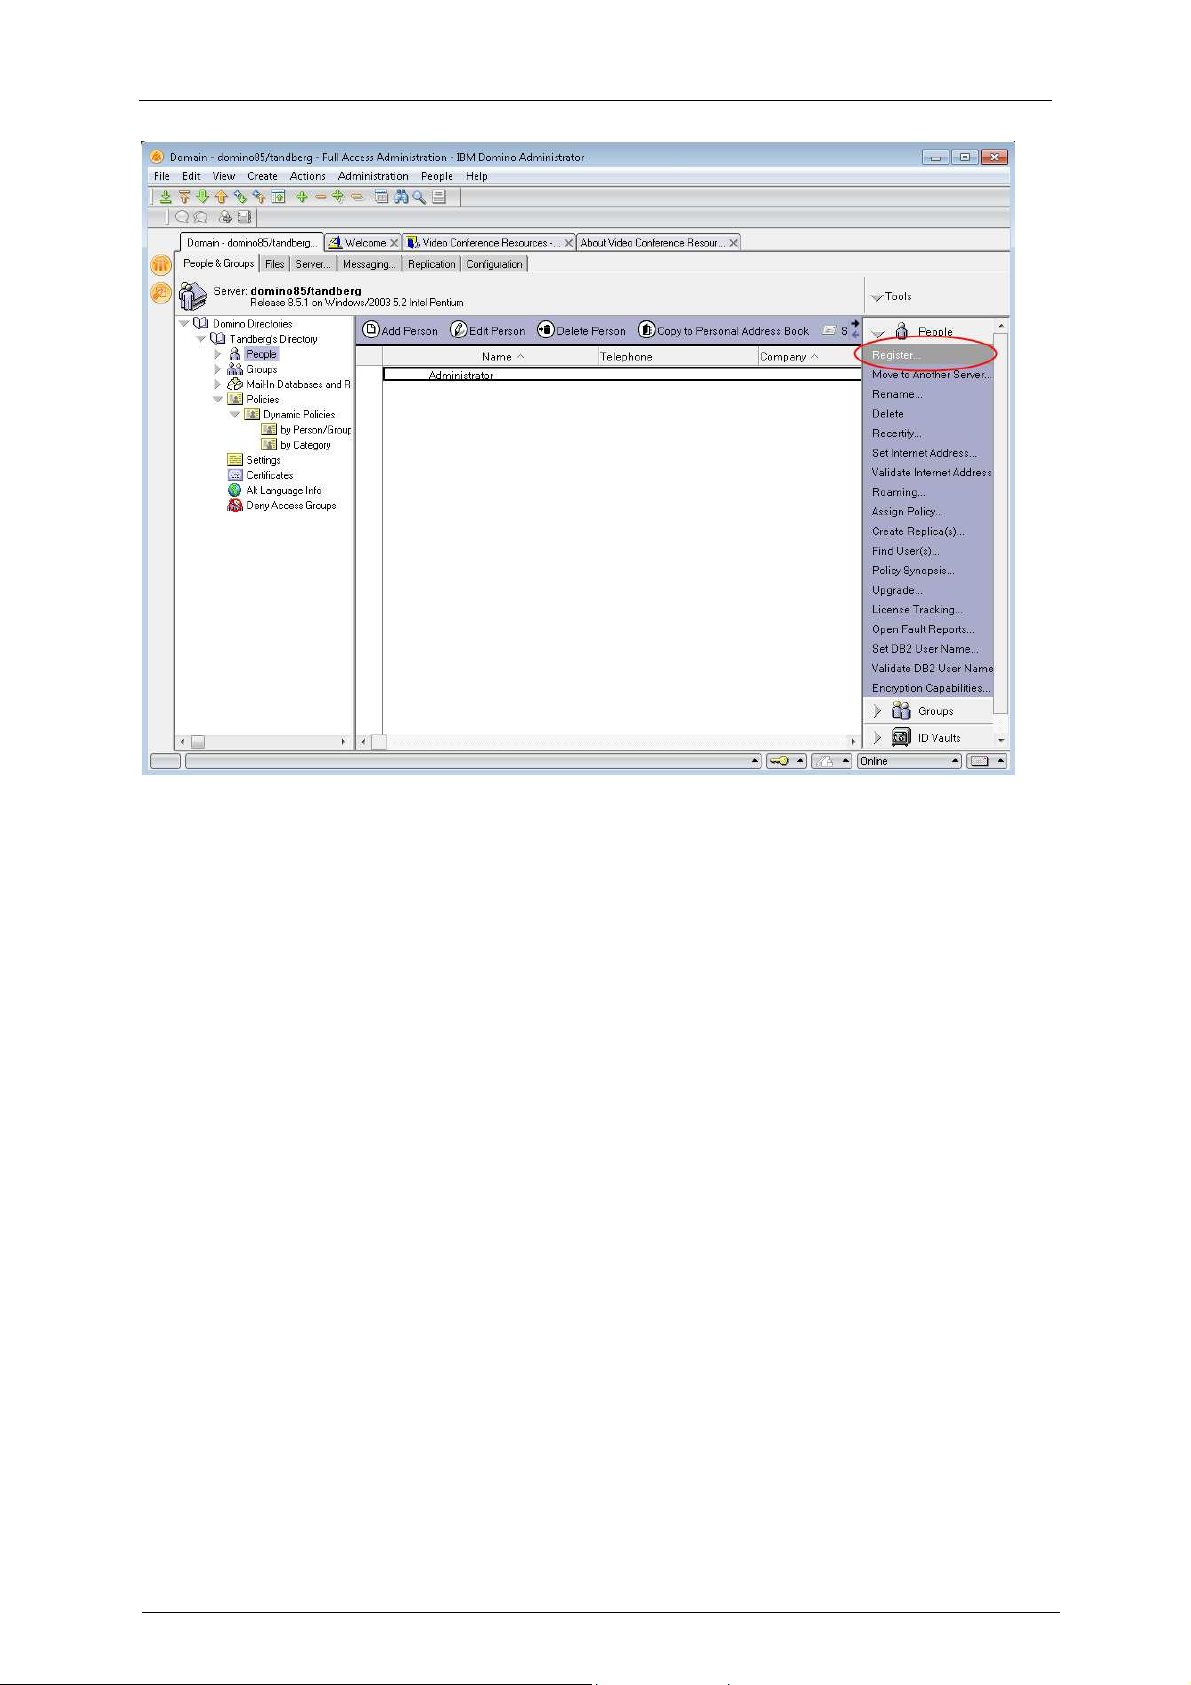
1. Open the server in Domino Administrator, for example by using File > Open Server…
2. Under People & Groups, Select the People item and select Register… from the right pane
Cisco TMS Extension for IBM Lotus Notes – Installation and getting started guide Page 13 of 45
Installation
Figure 7: The People > Register… item from the right pane
3. If prompted for a certifier, choose Supply certifier ID and password. Click Certifier ID… and
provide the associated cert.id file. Enter the certifier’s password when prompted.
4. In the Register Person page, Cisco TelePresence recommends setting the following properties:
a. First Name: TMS
b. Last Name: Service
c. Short Name: TMS-Service
d. Password: Enter a so called strong password
5. Click Register and click Yes to add person to the registration queue.
6. The background job registering the new account may take several minutes to complete. When
you see the “Person registered successfully!” message, close the Register Person window by
clicking Done.
Cisco TMS Extension for IBM Lotus Notes – Installation and getting started guide Page 14 of 45

Installation
Figure 8: The Register Person page
Creating a service account on the Cisco TMS server
A user must be specified on the Cisco TMS server to be used as the login for Cisco TMSXN. This user
must be able to log onto the Cisco TMS server and have access to all the systems you intend to make
available through Lotus Notes. This user will appear as the owner of all meetings booked through
Lotus.
Cisco TelePresence recommends creating a separate user for the integration using the username
TMSLotus for this account:
1. Create a new Windows account. This can either be a domain account, or a local account on the
Cisco TMS server. You can use any name and username for the account. The account needs no
special Windows permissions except being able to log into Cisco TMS’ IIS server. Log into Cisco
TMS using the new user account to verify the account’s settings. When prompted for user profile
information, specify a first and last name to identify the user as the Lotus Service account. The
email address can be any email address, but cannot be left blank.
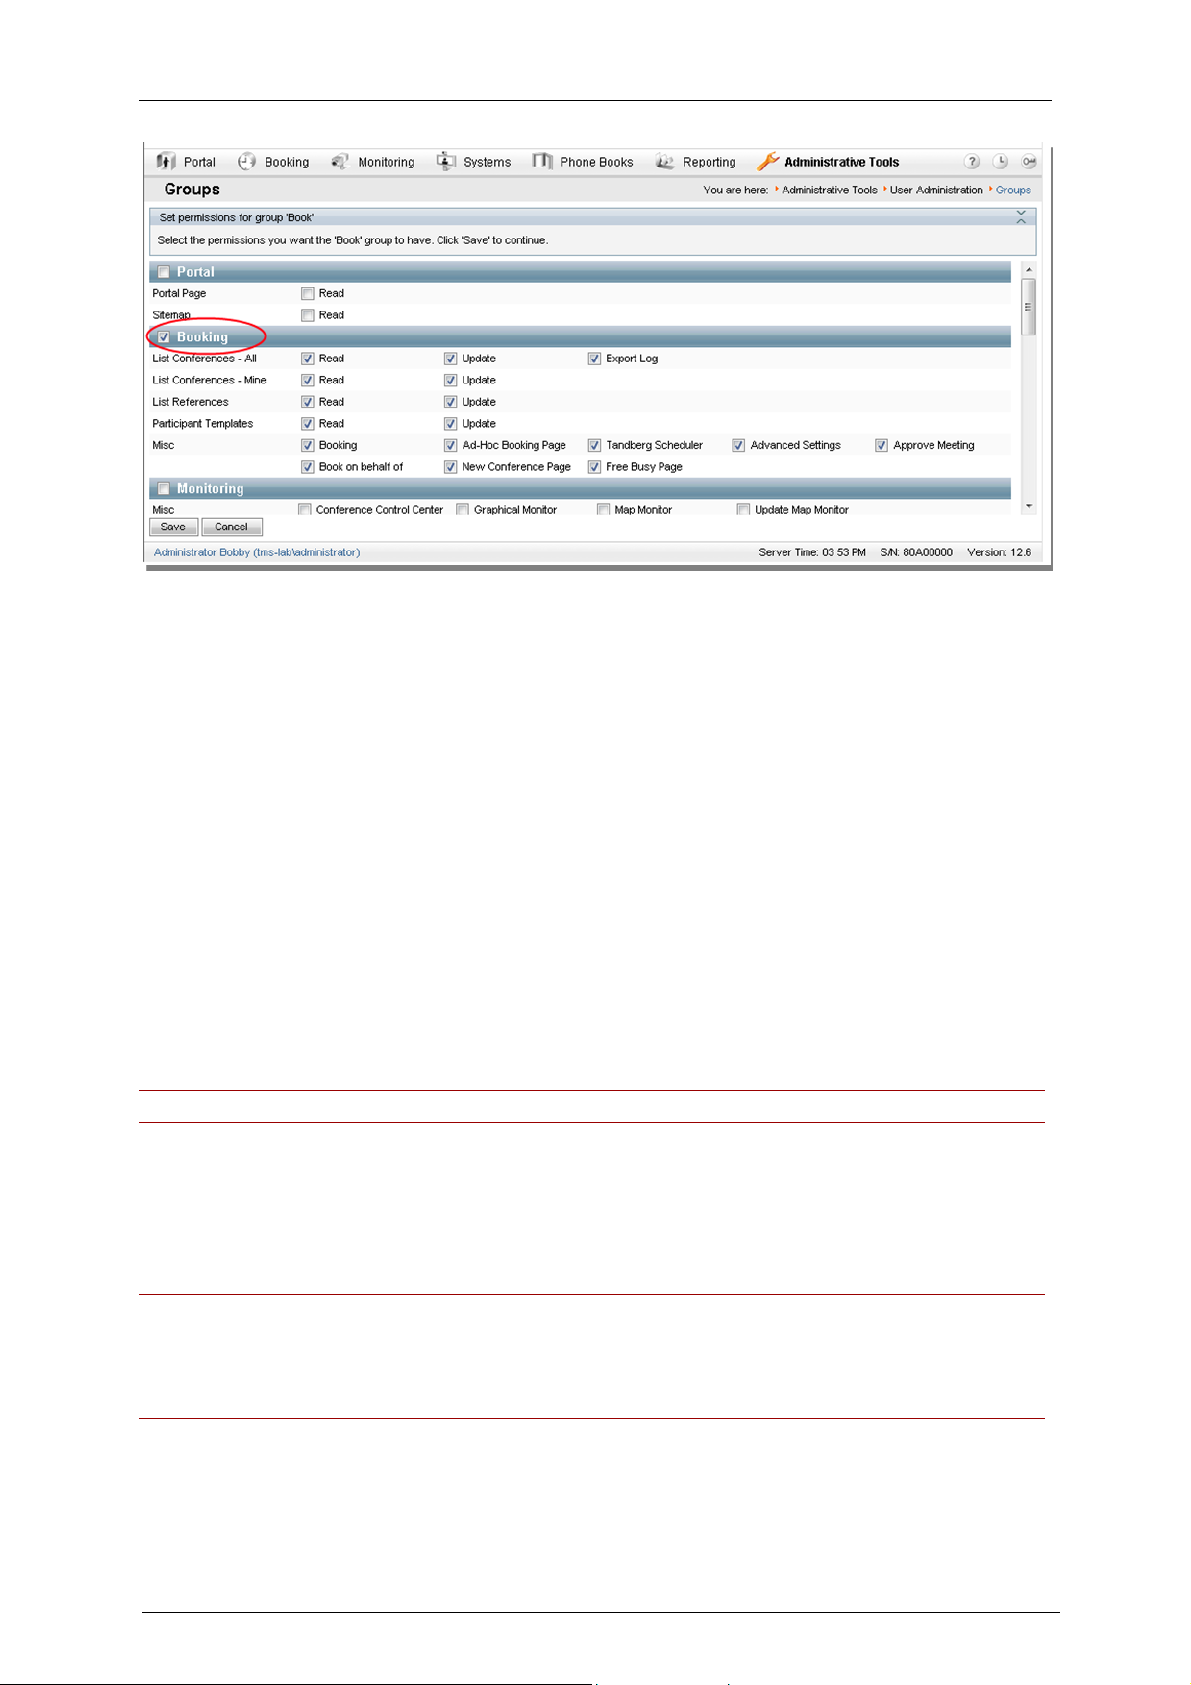
2. Log into Cisco TMS using an administrator account that has user configuration permissions.
Verify that the newly-created service account has sufficient group permissions to book all systems
intended to be made available to Lotus Notes users and Booking permission for all systems that
you wish to integrate with Lotus Notes. Navigate to Administrative Tools > User Administration
> Groups, hover the mouse over the relevant group, press the drop-down icon, and select Set
permissions.
Cisco TMS Extension for IBM Lotus Notes – Installation and getting started guide Page 15 of 45
Installation
Figure 9: Creating a new user group having the Booking permission
Adjusting the web permissions on the Cisco TMS Server
The Java implementation on the Domino Server cannot support the default Integrated Authentication
permissions set on the Cisco TMS web site. Therefore the web site must be altered to allow “Basic
Authentication” login methods:
1. Open the IIS Manager on the Cisco TMS Server.
2. Navigate through the directories to Default WebSite > TMS > external > booking.
3. Right-click on the Bookingservice.asmx file and select Properties.
4. In the Properties dialog, click the File Security tab and locate the Authentication and Access
Control panel. Click Edit….
5. Make sure both the Integrated Windows Authentication and Basic Authentication check
boxes are selected.
6. Click OK to close the Authentication Methods window, and then click OK again to close the
bookingservice.asmx Properties window. Close the IIS Manager.
Enable secure communication (Optional)
Note: HTTPS is optional, and if opting to use HTTP, this section can be skipped.
In order to use HTTPS, both the Cisco TMS server and Notes must be configured. To set up the Cisco
TMS server for HTTPS, do the following.
1. Use makecert.exe to create a self-signed certificate. Makecert.exe is available from Windows
SDK Update site, and is also included in the .NET installations. An example of makecert.exe to
generate a certificate is shown below.
Note: This is for V2.0 of .NET framework, and has not been tested with V3.5 of .NET framework.
makecert.exe -r -pe -a SHA1 -ss my -sr LocalMachine -n “CN=%ComputerName%” -b 01/01/2000 -e
01/01/2050 -eku 1.3.6.1.5.5.7.3.1 -sky exchange -sp “Microsoft RSA SChannel Cryptographic
Provider” -sy 12
Replace %ComputerName% with the name of the computer.
2. Open IIS Manager and right click on the Cisco TMS site, and select Properties.
3. Go to Directory Security > Secure communications section, and select Server certificate.
Cisco TMS Extension for IBM Lotus Notes – Installation and getting started guide Page 16 of 45

Installation
4. When the wizard pops up, click Next, and then Assign an existing certificate. You can now see
the certificate that was created in step 1, click Next to see information about the certificate, and
click Next again to complete the installation. Cisco TMS is now configured for HTTPS.
To set up the Notes server, the certificate chain must be added to the Java certificate store:
1. Export the Cisco TMS server certificate to a .cer file. Copy the file to the Domino server, for
example c:\certificates\tmscertificate.cer.
2. Log in to the Domino server.
3. Open a command prompt on the Domino server.
4. Change directory to <Domino directory>\jvm\lib\security, for example cd Program
Files\Lotus\Domino\jvm\lib\security.
5. Import the certificate by writing ..\..\bin\keytool.exe -import -trustcacerts -keystore cacerts -alias
<myname> -file <location of certificate file>\tmsserverauth.cer. It is advisable to give the certificate
a proper alias (for example TMS_server_certificate).
6. Restart the Domino server.
Enabling agents in Resource Database (IBM Lotus
Notes/Domino versions 7.x and 8.0.x)
1. Start Lotus Domino Designer and open the Resource Reservations Database that you created
earlier (normally called “Video Conference Resources”) by going to File > Application > Open…,
selecting the server where the database was created, and then selecting the database from the
list.
2. Expand the Shared Code item from the view in the left frame.
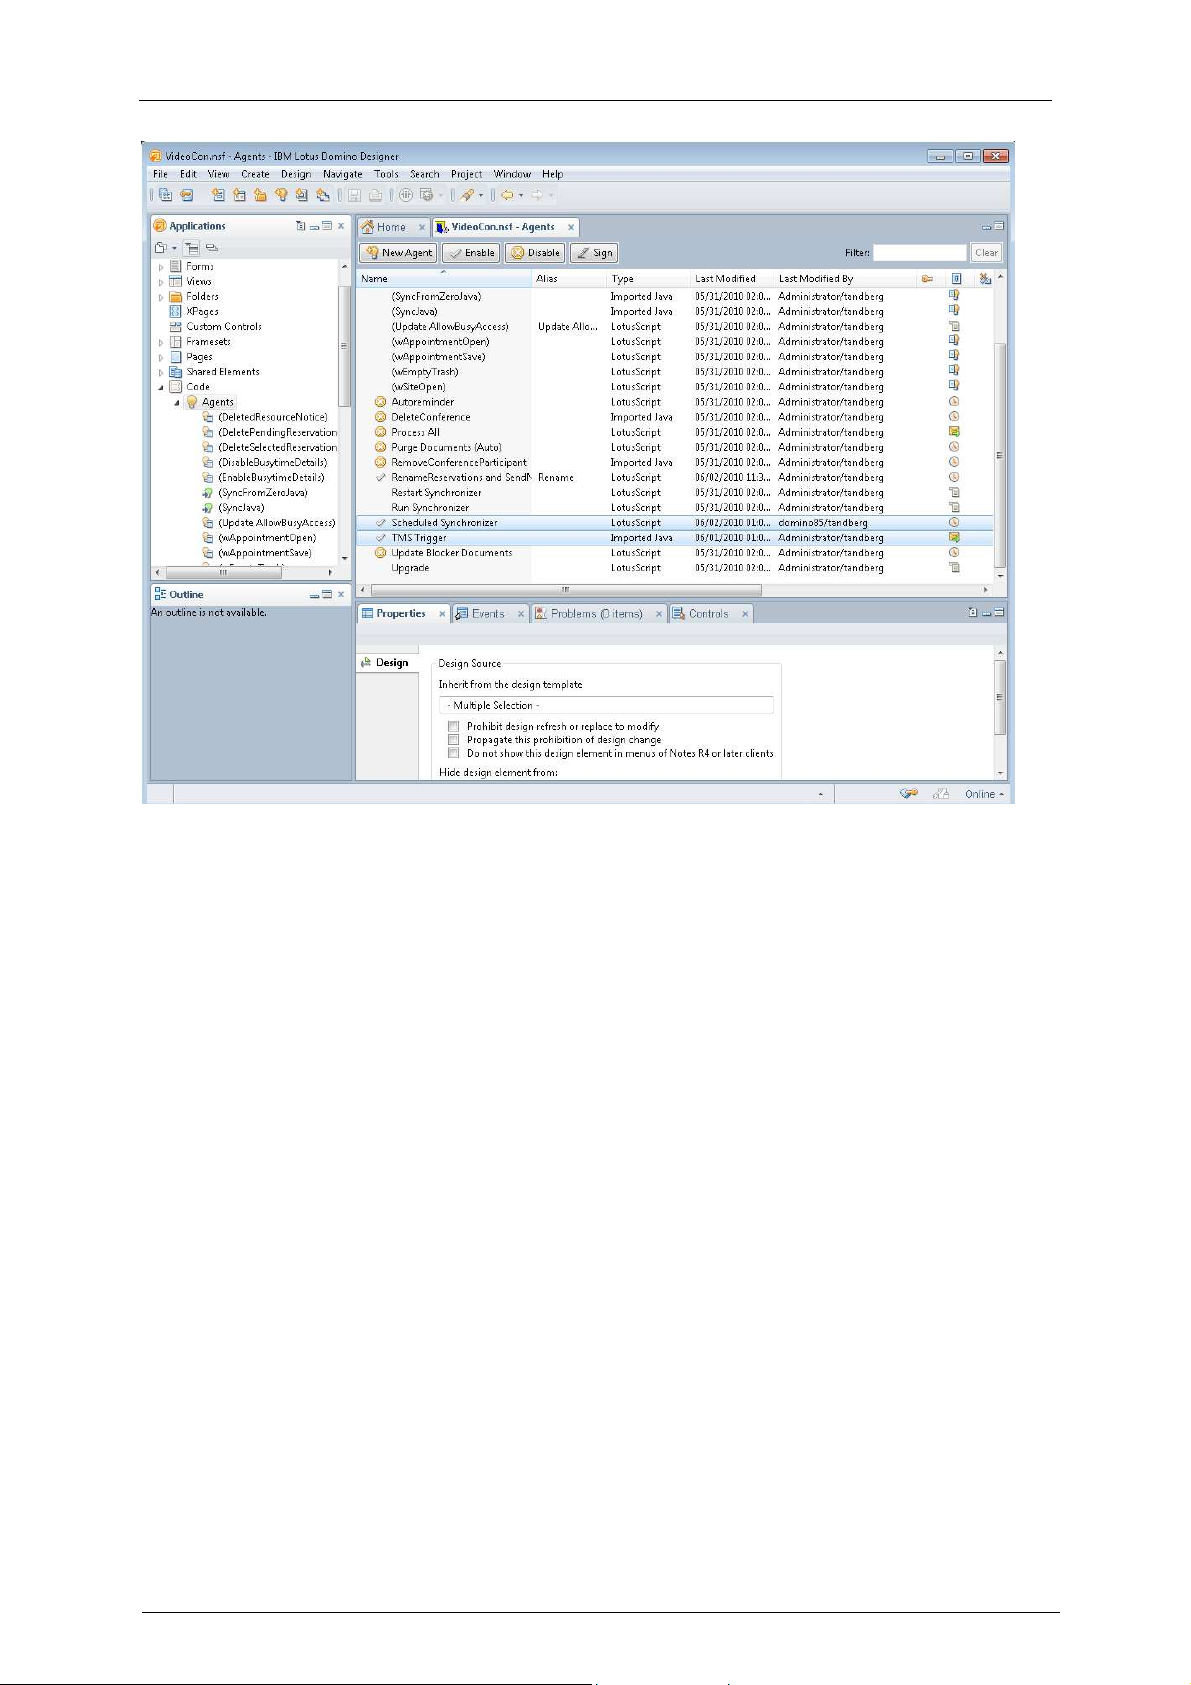
3. Click on Agents.
4. The main frame lists all the agents in the database. Five or six (depending on the Domino version)
of the agents have red and yellow icons next to them, marking them as disabled.
Figure 10: Listing the agents in Domino Designer 7.0
5. Hold down the Control (Ctrl) key, and highlight Scheduled Synchronizer and TMS Trigger.
Then click the Enable button at the top of the list. You are prompted for the server on which the
Cisco TMS Extension for IBM Lotus Notes – Installation and getting started guide Page 17 of 45
Installation
agents should run — the server on which the database is created. The database and agents must
be on the same server. Close the agent dialog.
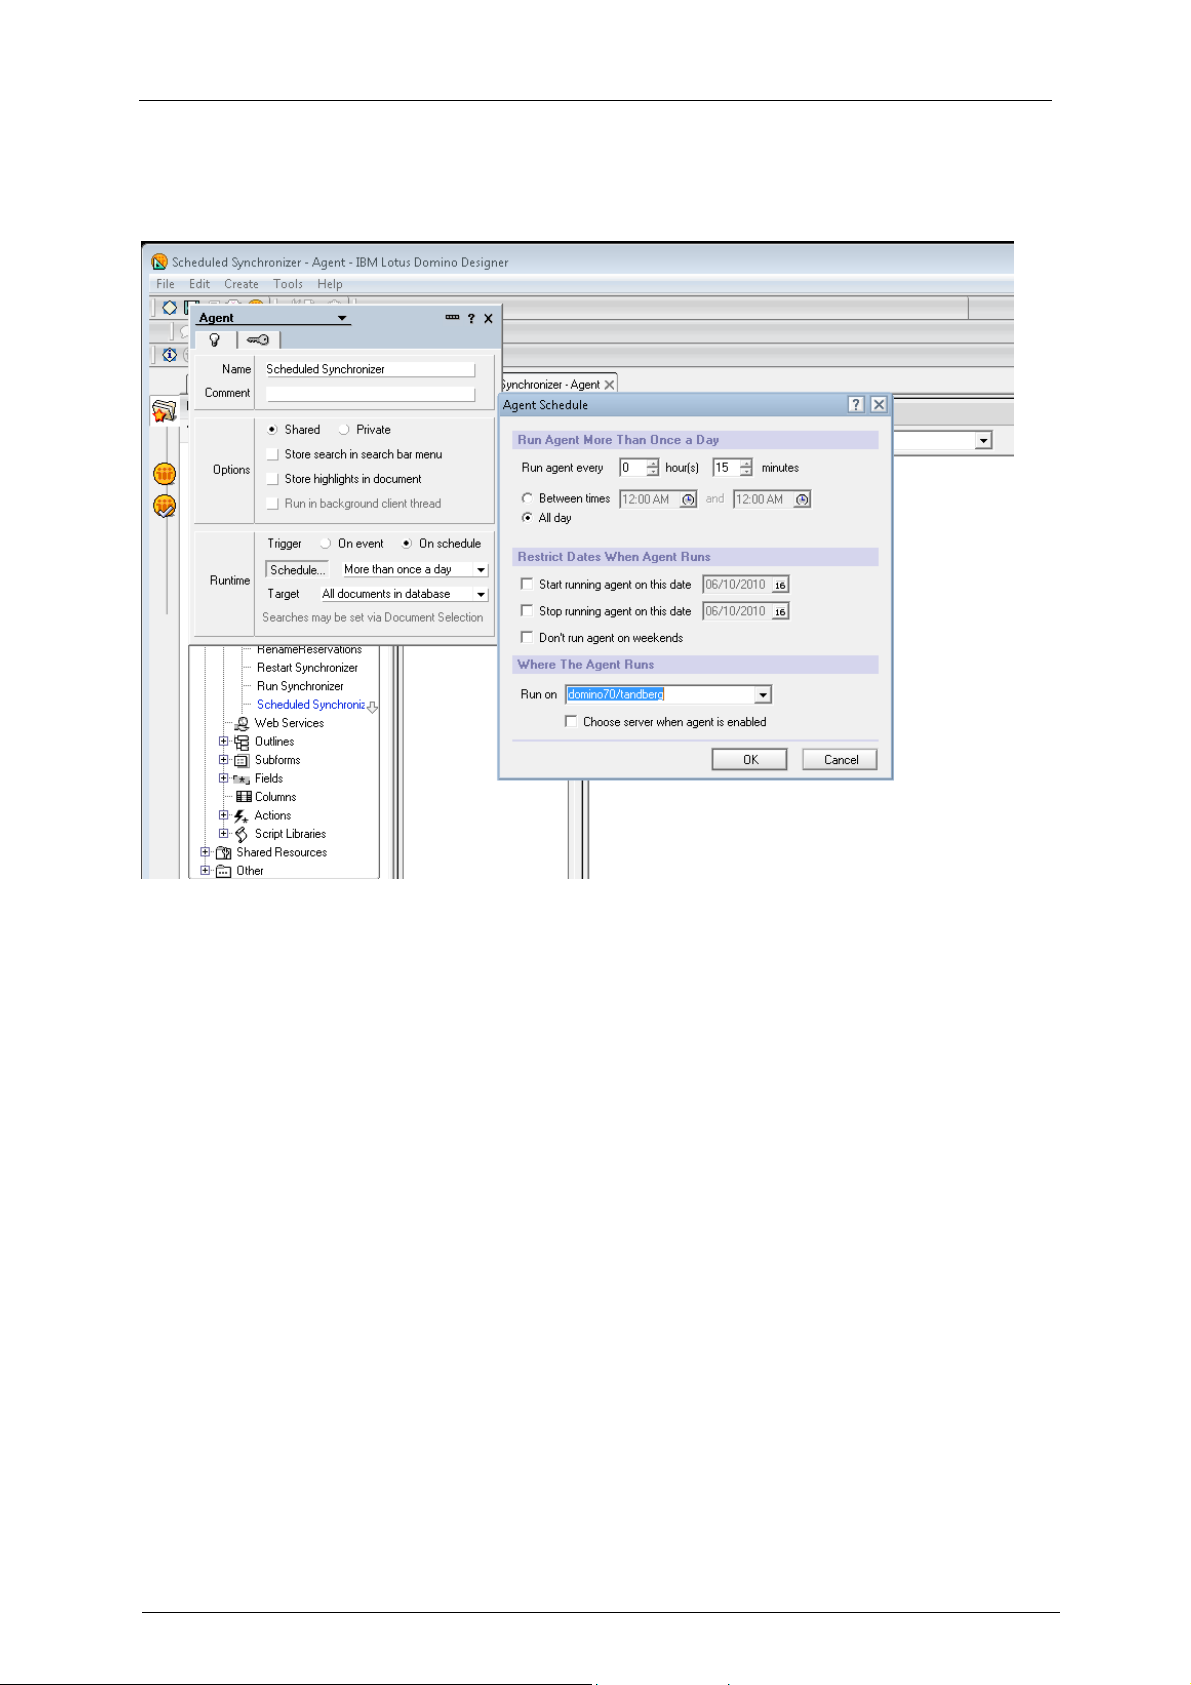
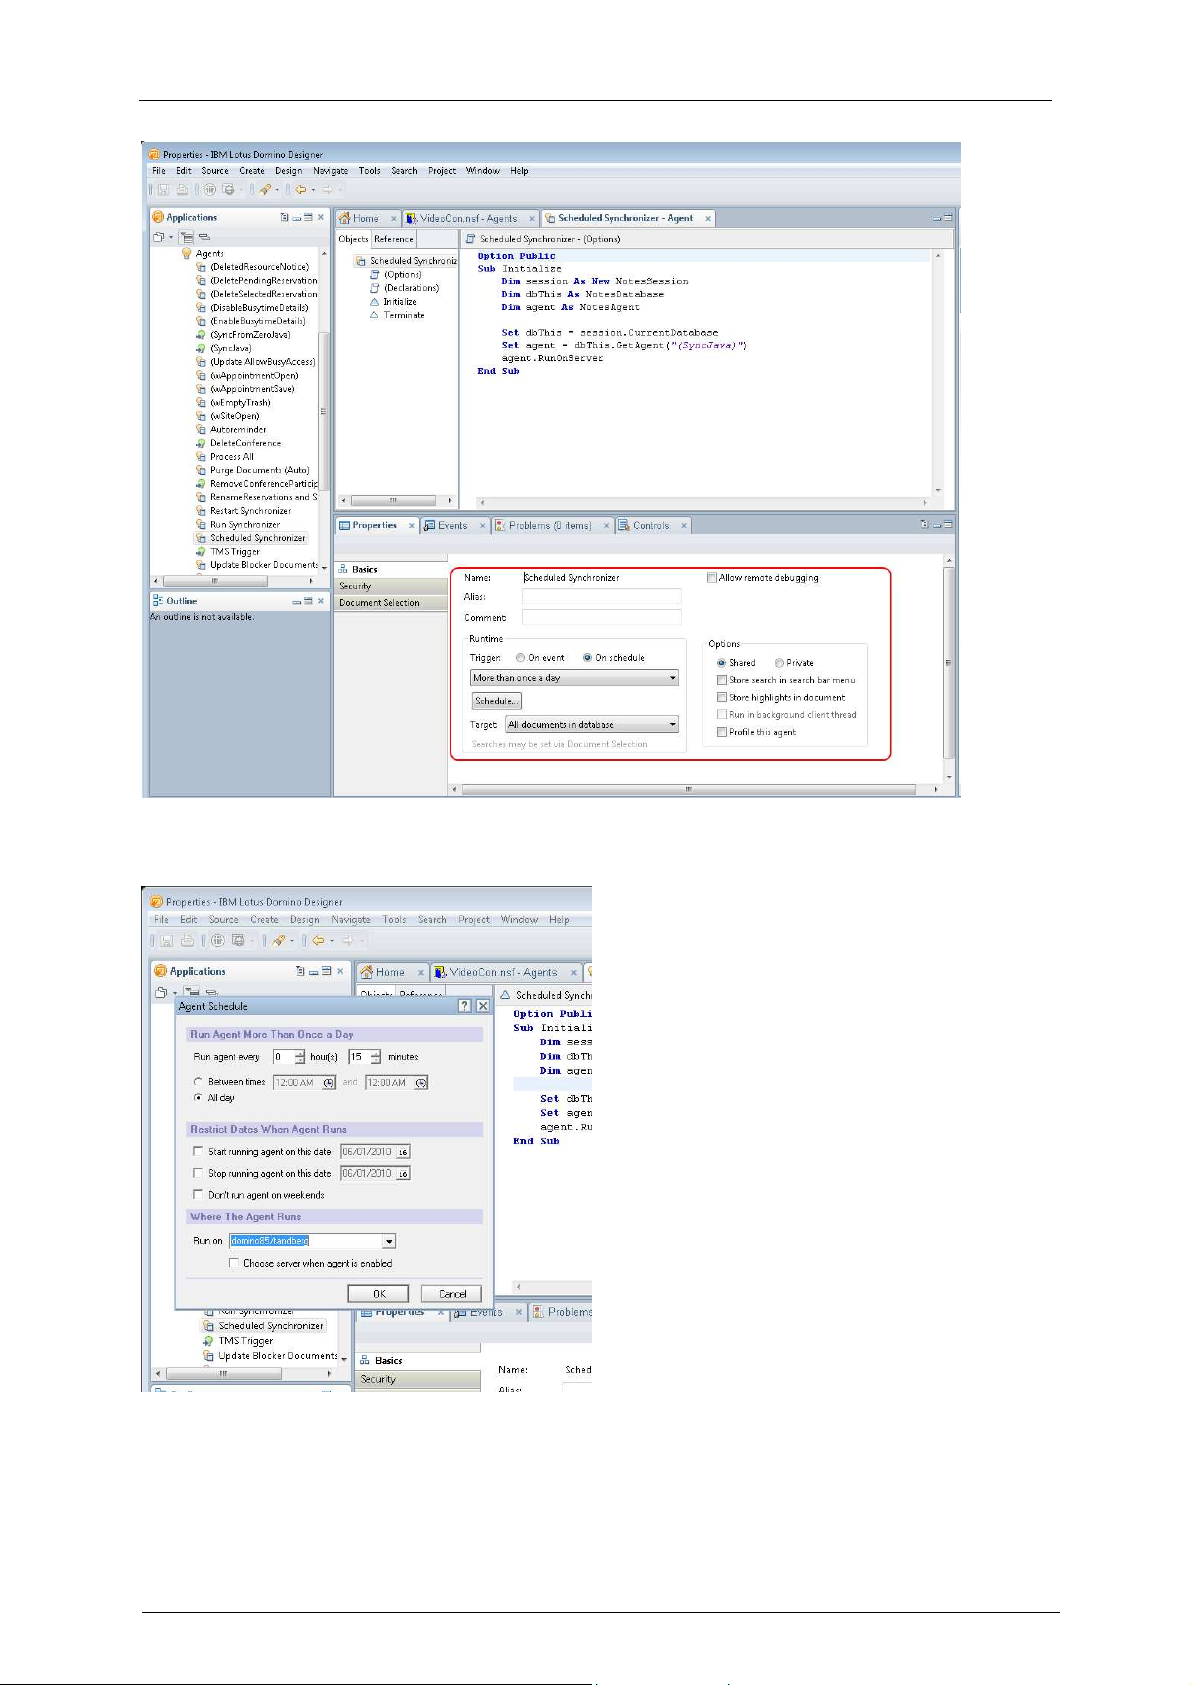
6. Double-click Scheduled Synchronizer. Make sure On schedule is selected. In the drop-down
list to the right of Schedule… select More than once a day.
Figure 11: Configuring the run-time of the Scheduled Synchronizer agent
7. Click the Schedule… button to open the Agent Schedule window. Set the interval to 0 hours and
15 minutes, and verify that the Run on drop-down list is pointing to the correct server. Click OK.
8. Save and close the Scheduled Synchronizer Agent.
9. Close the database and Domino Designer.
Enabling agents in Resource Database (IBM Lotus
Notes/Domino version 8.5.x)
1. Start Lotus Domino Designer and open the Resource Reservations Database that you created
earlier (normally called “Video Conference Resources”) by going to File > Application > Open…,
selecting the server where the database was created, and then selecting the database from the
list.
2. From the Applications pane, expand the Code item list to the left.
3. Double-click on Agents.
4. The main frame lists all the agents in the database. Approximately eight (depending on the
Domino version) of the agents have yellow icons next to them, marking them as disabled.
Cisco TMS Extension for IBM Lotus Notes – Installation and getting started guide Page 18 of 45
Installation
Figure 12: Listing the Agents of the database
5. Hold down the Ctrl key, and click on Scheduled Synchronizer and TMS Trigger. Click the
Enable button at the top of the list. The database and agents must be on the same server. Close
the agent dialog.
6. Double-click Scheduled Synchronizer. Locate the Properties section near the bottom. Select
the On Schedule radio button under Runtime > Trigger, and select More than once a day in the
drop-down list below.
Cisco TMS Extension for IBM Lotus Notes – Installation and getting started guide Page 19 of 45
Installation
Figure 13: Configuring the run-time of the Scheduled Synchronizer agent
7. Click the Schedule… button to open the Agent Schedule window. Set the interval to 0 hours and
15 minutes, and verify that the Run on drop-down list has the correct server selected. Click OK.
Figure 14: The Agent Schedule window
8. Save and close the Scheduled Synchronizer Agent.
9. Close the database and Domino Designer.
Cisco TMS Extension for IBM Lotus Notes – Installation and getting started guide Page 20 of 45
Installation
Configuring the Cisco TMS settings of the Resource Database
(all versions)
1. Open Domino Administrator using a server administrator ID.
2. Open the resource reservation database that you created in the previous steps by going to File >
Application > Open and select the server on which the database was created. Then select the
database as you named it in the notes.ini file (default name: “Video Conference Resources”), and
click Open.
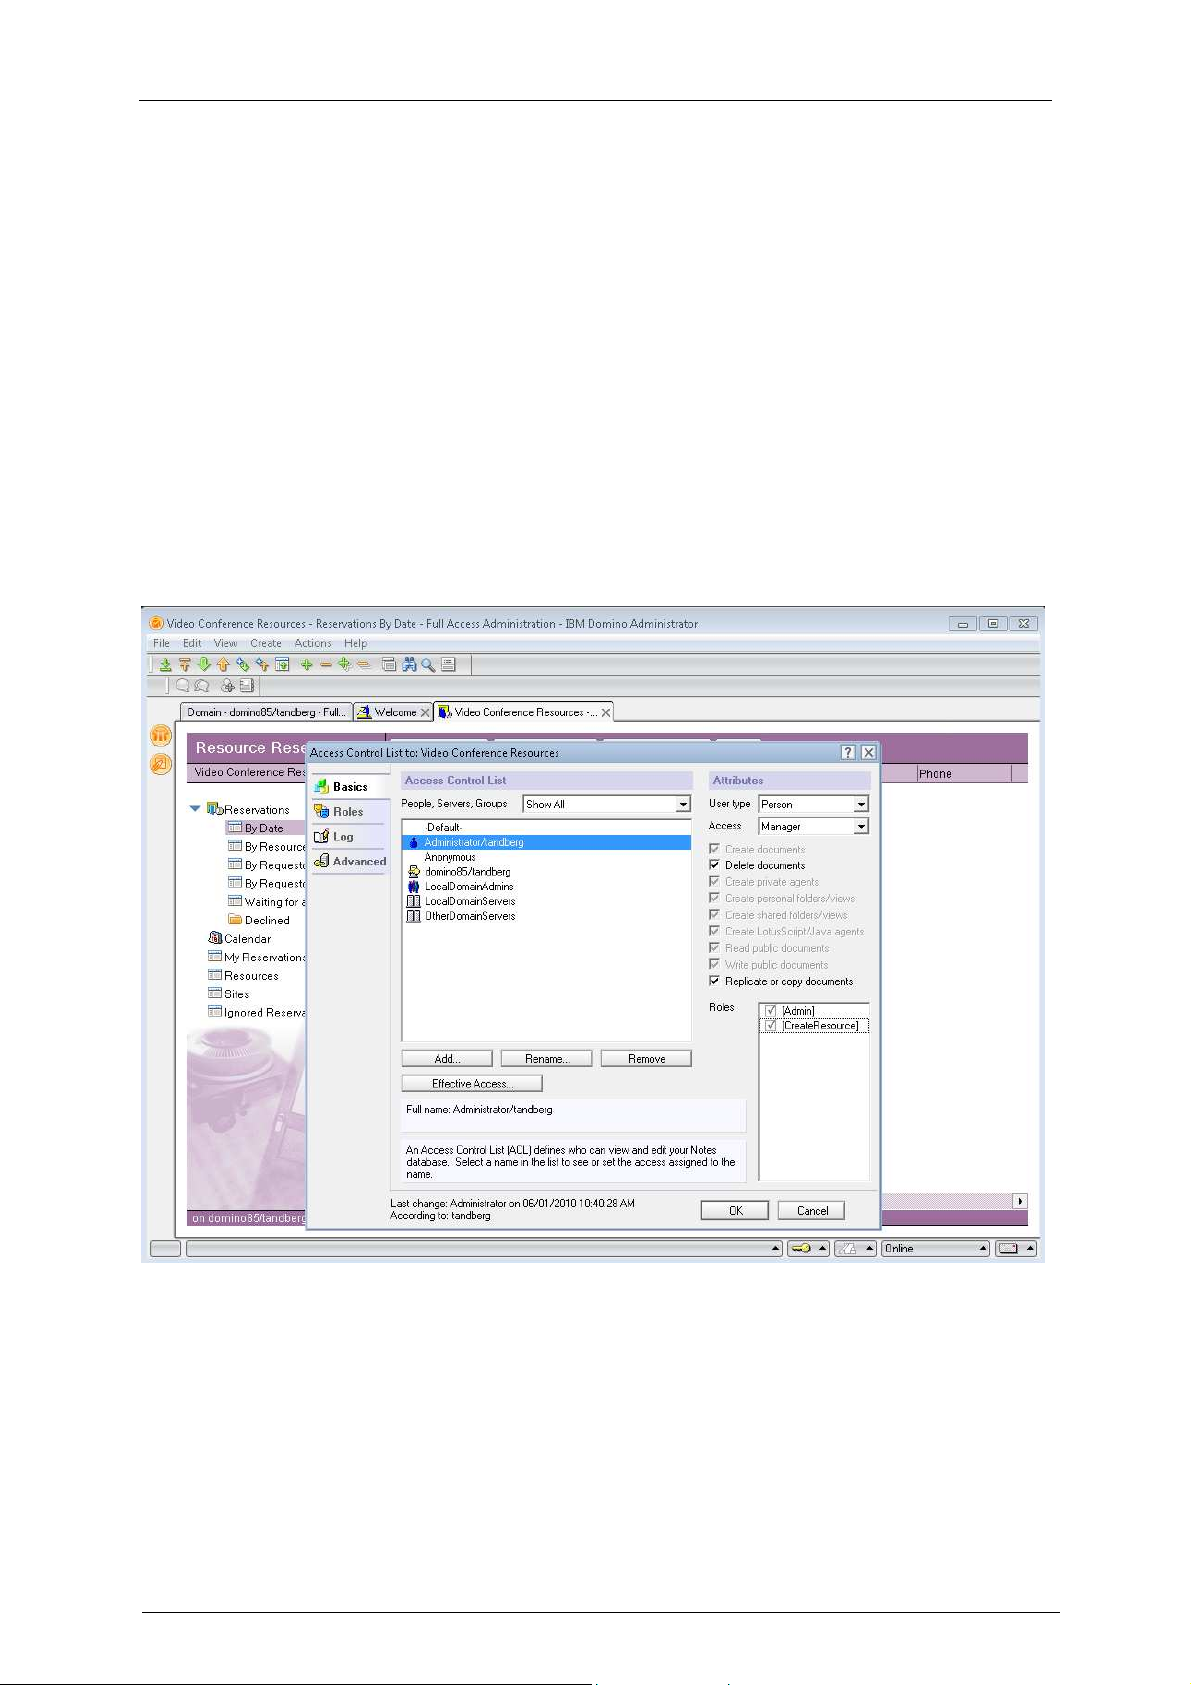
3. Go to File > Application > Access Control to open the Access Control List window.
4. Select the current user ID from the list, and select the Admin and Create Resource check boxes
to add the current user ID to these roles for the database.
Optionally, you can add additional users to these roles to enable those users to be able to modify
the configuration document and add additional resources. Adding additional user roles can also
be done post-installation.
In some installations, one or both of the check boxes might be missing. See the
TroubleshootingError! Reference source not found. chapter of this document for more
information.
Figure 15: Checking the Admin and Create Resource check boxes
5. Close the database and re-open it. You now see a TMS Admin choice on the left side of the
database.
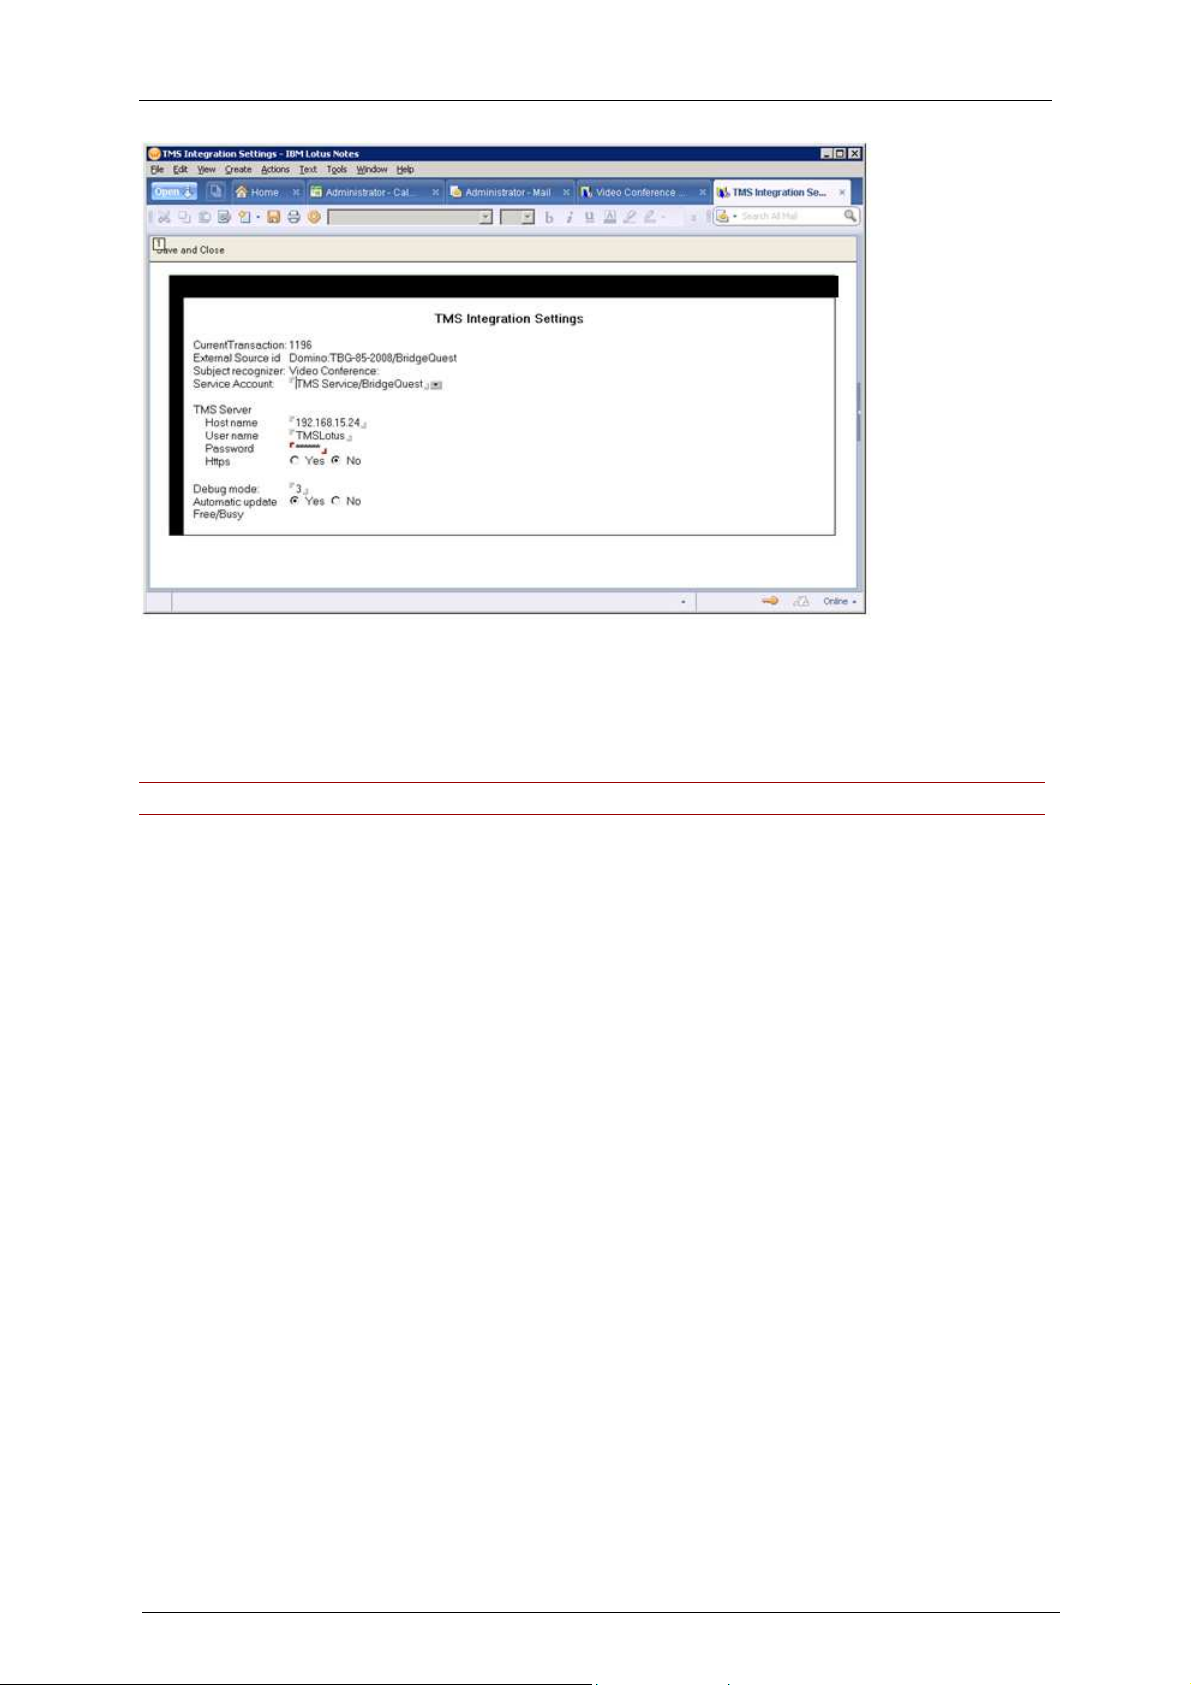
6. Open the Cisco TMS Admin document to configure the integration settings.
7. Enter the Domino service account in the Service Account field.
8. Enter the IP or DNS name of the Cisco TMS Server in the Host name field.
9. Enter the username and password of the TMS Service Windows account (including the domain, if
applicable).
Cisco TMS Extension for IBM Lotus Notes – Installation and getting started guide Page 21 of 45

Installation
10. If you have completed the Enable secure communication (Optional) section, select Yes for field
HTTPS. If not, select No.
11. An additional option titled Automatic Update is displayed. Because of a known issue with Lotus
Notes, the Free/Busy information for booked resources is not handled by the Room and
Resources Manager. As a work around for this release, you can automatically refresh the
Free/Busy information after each booking event. This is enabled by default, but if you are
experiencing severe delays, consider turning off this option.3
12. Click Save and Close to save your changes to the document.
Configuring the Domino Rooms for Cisco TMS Systems
Each system that will be bookable through Lotus Notes must be represented as a Room within
Domino. This step must be done by the userID who was added to the Reservation Database with the
role of create resource completed in the previous section.
Note: To get a consolidated list of all systems, open a web browser and enter the URL below. If you
only have one Application Integration License, you must perform this step from the Domino Server
itself. Substitute TMSADDRESS with the IP or DNS name of your Cisco TMS server.
http://[TMSAddress]/tms/external/booking/remotesetup/remotesetupservice.asmx?op-GetSystems
In the page that opens, click the Invoke button. This opens a page listing all the systems in Cisco
TMS along with their name and System IDs. Print or save this list as a reference for later steps in the
installation.
1. You must know the system ID of each system in Cisco TMS that you wish to integrate with Lotus.
This can be found on the View Settings page for each system in the System Navigator, or see the
above note.
2. Using Domino Administrator, open the resource reservation database by going to File Menu >
Application4 > Open and select the server on which the database was created and the database
as you named it in the notes.ini file.
3. At least one Site document must be defined. Sites affect how rooms are grouped in the Address
Book displayed in the Notes clients. Create a Site document by selecting Sites from the list and
clicking New Site.
4. Fill in the Site Name field with the desired name for example: Washington DC Conference
Rooms, then click the Save and Close button.
5. Create a resource for each Cisco TMS system you want to represent in Lotus Notes. Click the
New Resource button and complete the appropriate fields:
a. Name – Name to be displayed in Notes for the room (Required)
b. Site – Site Document to associate this room to (Required)
c. Description – Optional description
d. TMS-ID – System ID associated with the device in Cisco TMS that this room represents
(Required)
e. Capacity – People capacity of the room
f. Availability – Time period during which this room will be shown as bookable in Notes.
g. Owner restrictions – Make sure this is set to Autoprocessing
h. List of names – This must be set to the name of the TMS service user only.
i. Owner’s name – This must be set to the name of the TMS service user only.
3
For an in depth description of this issue, please contact your local IBM representative. The issue is
reported to IBM Quality Engineering as SPR# MMQN6QWC6K
4 In Notes 7.0.x this is called Database
Cisco TMS Extension for IBM Lotus Notes – Installation and getting started guide Page 22 of 45

Installation
6. Do not modify the remaining fields. Click Save and Close to save your changes. Repeat these
steps for each Cisco TMS system you wish to represent in Notes.
Starting the Synchronizer
After all the resources have been added to the resource database, the synchronizer process must be
started by going to Actions > Run synchronizer. This is a one-time step and does not need to be
repeated even if additional resources are added at a later time.
Updating the Mail Template for Notes Users
Video booking functionality can be offered to Lotus Notes users in several ways.
Use of an existing mail template without modification.
Adding the additional video conference functionality to the existing mail template
Pushing the provided TMS-modified standard mail template. This file is called tmsmail7.ntf for
Notes 7.0.x and 8.0.x users, and tmsmail85.ntf for Notes 8.5.x users.
The first method allows users to book rooms, but they will not have any of the additional functionality,
for example being able to set conference parameters or specific additional sites such as external dialin or dial-out sites.
The second method may be required if the organization is already using a customized mail template.
The last method is the recommended method because it provides the most video options to users in
the standard Lotus Notes mail format. The mail template that users use can be updated in several
ways, but one method is as follows:
1. Open Domino Administrator and select the Server containing the mail files of the user to be
updated.
2. Select the Files tab and then the mail folder.
3. Select the user to be updated.
4. Go to File > Application > Replace Design…
5. Select the server on which the Cisco TMS templates were installed and then select TMS Mail (7
for Notes 7.0.x/8.0.x, and 8.5 for Notes 8.5.x) and click Replace.
Cisco TMS Extension for IBM Lotus Notes – Installation and getting started guide Page 23 of 45

Upgrading to 11.3 or 11.3.1
Upgrading to 11.3 or 11.3.1
Complete the following steps to upgrade the Cisco TMS IBM Lotus Notes integration from a previous
version.
The term “Domino directory” is used throughout this document. The location of this directory is user
configurable during installation, and can for example be C:\Lotus\Domino\.
The integration files are included as part of the NotesIntegration.zip file found in the Setupfiles folder
on your Cisco TMS Installation Media. The archive includes two zip files targeted for versions
7.0.x/8.0.x, and 8.5.x of Notes/Domino:
LotusNotesIntegrationForNotesV85.zip for version 8.5.x of Notes
LotusNotesIntegrationForNotesV70.zip for version 7.0.x and 8.0.x of Notes
Complete all steps below to upgrade your installation of Cisco TMSXN.
Stop the Domino Server
Stop the Domino Server by going to Control Panel > Administrative Tools > Services. Then stop
the Lotus Domino Service.
Copy the required files to the Domino Server
1. Extract the Javafiles.zip file to a temporary directory on the Domino server. The Javafiles.zip file is
found on the installation media.
2. Copy TMSConference.jar (found in the bin directory of the Javafiles.zip file) to the jvm\lib\ext
directory of the Domino directory. This is the only file from this archive that needs to be replaced.
3. Verify the proper file security permissions on the copied .jar file by right-clicking on it and selecting
Properties. Go to the Security tab, and make sure that the Windows user (System user) that the
Domino processes run under has at least Read access to this file.
4. Delete the tmsresrc7.ntf and tmsmail7.ntf files in the Domino Data Directory.
5. The copied template file depends of the version of Notes/Domino you are using.
a. If you are running version 7.0.x/8.0.x of Notes/Domino: Copy the extracted template files,
tmsresrc7.ntf and tmsmail7.ntf to your Domino Data directory.
b. If you are running version 8.5.x of Notes/Domino: Copy the extracted template files,
tmsresrc8.ntf and tmsmail85.ntf to your Domino Data directory.
6. Verify the proper file security permissions on the copied template files by right-clicking on them
and selecting Properties. In the Properties dialog, make sure the Read-only checkbox is
cleared. Go to the Security tab. Make sure that the Windows user (System user) that the Domino
processes run under (called System user) has full access to these files.
7. Copy the extractedTMSEventCatcher.dll file into your Domino directory.
8. Verify that TMSEventCatcher.dll has proper file security permissions. Right-click on it and select
Properties. In the Properties dialog, make sure Read-only is cleared. Go to the Security tab
and make that the Windows user (System user) that the Domino processes run under has at least
Read access to this file.
Restart the Domino Service
Restart the Domino Service to apply the changes made either by using the restart server command in
the Domino console, or by restarting the Lotus Domino Service in the Services Console found at Start
> Administrative Tools > Services.
Cisco TMS Extension for IBM Lotus Notes – Installation and getting started guide Page 24 of 45

Upgrading to 11.3 or 11.3.1
Sign the templates
The new template files must be signed with an appropriate ID from your organization or “new mail”
agents will fail to run.
Domino security requires that “new mail” agents run on the home server (mail server) of the signer.
Because the templates include “new mail” agents, the ID that signs the templates must have a mailbox
located on the server where you are installing the integration package.
It is recommended you create a utility account on the Domino Server for the purpose of signing the
“new mail” agents. Alternatively, you can configure Domino to ignore this security requirement for mail
agents running on the server. Note this will affect all “new mail” agents running on the server. To
disable this security check, modify the notes.ini file by adding the option AMgr_DisableMailLookup = 1.
To sign the templates
1. Open Domino Administrator and select the server that you copied the template files to.
2. Go to the Files tab and select the data folder. In the Show me: drop-down list change the view to
Templates Only.
Highlight the two Cisco TMS templates: TMS Resource Reservations and TMS Mail. (Depending
on the version of Notes, this will be 7 for Notes 7.0.x and 8.0.x, and 8.5 for Notes 8.5.x.)
3. Right-click on the templates and select Sign…
a. Choose Active User’s ID to sign using the current user’s ID.
b. Make sure that the user has sufficient permissions to sign templates and that the user has a
mailbox on this Domino server.
4. Select the All design documents radio button.
5. Click OK.
The status bar shows the number of databases processed and the number errors if any occurred.
See the Domino Server logs for additional information if any errors occur.
You will get a Cross Certificate Warning if /TANDBERG or /Cisco is not recognized as a trusted
organization. This should be handled according to your organization policies.
Replace the Resource Template
1. From the Domino Administrator, open the Video Conference Resources
2. Go to File > Application > Replace Design…
3. Chose the template server, click Show advanced templates and choose TMS Resource
Reservations (version).ntf.
4. Click Replace.
Replace the Mail template for the users
Video booking functionality can be offered to Lotus Notes users in several ways:
Use of an existing mail template without modification.
Adding the additional video conference functionality to the existing mail template
Push the provided Cisco TMS-modified standard mail template (tmsmail7.ntf) to users
The first method allows users to book rooms, but they will not have any of the additional functionality,
for example being able to set conference parameters or specific additional sites such as external dialin or dial-out sites.
The second method may be required if the organization is already using a customized mail template.
The mail template that users use can be updated in several ways, but one method is as follows:
1. Open Domino Administrator and select the Server containing the mail files of the user you want to
update.
2. Select the Files tab and then the mail folder.
3. Select the user to be updated.
Cisco TMS Extension for IBM Lotus Notes – Installation and getting started guide Page 25 of 45

Upgrading to 11.3 or 11.3.1
4. Go to File > Application > Replace Design…
5. Select the server on which the Cisco TMS templates were installed and then select TMS Mail 7
and click Replace.
Enable agents in Resource Database
1. Start Lotus Domino Designer and open the Resource Reservations Database that you created
earlier (normally called “Video Conference Resources”) by going to File > Application > Open…,
selecting the server where the database was created, and then selecting the database from the
list.
2. From the Applications pane, expand the Code item list to the left.
3. Double-click on Agents.
4. The main frame lists all the agents in the database. Approximately 8 (depending on the Domino
version) of the agents have yellow icons next to them, marking them as disabled.
5. Hold down the Ctrl key, and click on Scheduled Synchronizer and TMS Trigger. Click the
Enable button at the top of the list. You are prompted for the server on which the agents should
run — the server on which the database is created. The database and agents must be on the
same server. Close the agent dialog.
6. Double-click Scheduled Synchronizer. Locate the Properties section near the bottom. Select
the On Schedule radio button under Runtime > Trigger, and select More than once a day in the
drop-down list below.
7. Click the Schedule… button to open the Agent Schedule window. Set the interval to 0 hours and
15 minutes, and verify that the Run on drop-down list has the correct server selected. Click OK
8. Save and close the Scheduled Synchronizer Agent.
9. Close the database and Domino Designer.
Start the Synchronizer
After all the resources have been added to the resource database, the synchronizer process must be
started by going to Actions > Run synchronizer. This is a one-time step and does not need to be
repeated even if additional resources are added at a later time.
Cisco TMS Extension for IBM Lotus Notes – Installation and getting started guide Page 26 of 45

Post installation setup
Post installation setup
Calendar options in the Cisco TMS mail template
Using the calendar to request a meeting does not change from standard Lotus Resource booking,
therefore that process is not covered in this document. Please refer to your Lotus Notes help for
information on using the Calendar and Address Book.
The mail template supplied by Cisco TelePresenceis based on the standard Lotus Mail template
(corresponding to Lotus version), but includes an additional button on the Calendar page. This button
gives access to a window in which users can:
Define external participants for the meeting (both dial-in and dial-out).
Request a web conference from Cisco TMS.
Specify conference parameters such as bandwidth and layout.
This functionality is not required to be able to book meetings from Lotus in Cisco TMS, but if you
intend to give users the ability to override the conference defaults or use one of the additional
features, you must update the user’s template.
After it has been updated, the template includes a new button Video Conference Advanced Options
in the New Calendar Entry document.
Figure 16: The Video Conference Advanced Options button
When a user clicks this button, a new pop-up window opens (see figure below) in which you can set
conference-specific parameters, or add external participants to the meeting. You can define audio or
video sites that are not defined as Integrated rooms in your setup to be External Dial-Out sites (audio
or video) and they will be called automatically when the meeting starts. In addition, you can reserve
Cisco TMS Extension for IBM Lotus Notes – Installation and getting started guide Page 27 of 45

Post installation setup
ports for people to call into the meeting, both audio and video ports, by defining them to be External
Dial-in participants.
Figure 17: The Video Conference Advanced Options window
Cisco TMS Extension for IBM Lotus Notes – Installation and getting started guide Page 28 of 45

Verification of the installation
Verification of the installation
After completing the installation, it is recommended test by verifying that meeting changes populate
both from Lotus to Cisco TMS and from Cisco TMS to Lotus.
Testing meetings from Lotus to Cisco TMS
To verify that meetings booked from Lotus are being saved in Cisco TMS, create a test meeting for a
date in the future in your calendar using two rooms in Lotus that are integrated with Cisco TMS.
Check that:
You receive a meeting request email for each room.
You receive a meeting confirmation for each room.
The meeting is shown in Cisco TMS under Booking > List Conferences.
If the tests are not successful, troubleshoot the issue using the sections below.
Process overview for meetings created in Lotus
The steps taken when booking a meeting from Lotus are described below. Use this workflow to help
you diagnose where a failure is occurring if your test meeting does not complete successfully.
1. A user creates a meeting request in their calendar and clicks send to send the invitations.
2. The Lotus Notes client sends meeting requests to participants, including each room selected for
the meeting. These are displayed in the rmeeting organizer’s Inbox.
3. The meeting requests for the rooms show up in the Reservation Database under Reservations >
Waiting for Approval.
4. The “Waiting for Approval” requests are processed by the Cisco TMS Trigger agent.
5. The Integration components log into the Cisco TMS server and try to create a meeting using the
details from the Lotus Meeting request.
6. Cisco TMS tries to book the meeting request and will accept or reject the meeting if it is not
possible to book.
7. If the meeting is accepted by Cisco TMS, the reservations requests are approved and moved out
of the Waiting for Approval view and into the Reservation Database calendar and can be seen
in the Date and By Resource views in the Reservation Database. If the meeting is rejected by
Cisco TMS, the reservation requests are denied and moved into the Declined view of the
Reservation Database.
8. The emails accepting or declining the meeting are then sent to the meeting requester by Domino
from the Reservation Database.
Troubleshooting
If the test booking is not successful and the organizer does not get an email notification of acceptance
for each room in the test meeting, you can use the list of symptoms and tips below to troubleshoot
each phase of the process listed above to help diagnose the problem.
Steps 1 and 2
Symptom: User never sees meeting request email messages after sending a meeting request.
Tip: Look at the Lotus Notes Client or User Actions. Be sure to refresh the Inbox (F9) to check for new
email.
Step 3
Symptom: Meeting requests do not show up in the Reservation Database Waiting for Approval
View.
Tips:
Make sure that the request is not in other views in the Database.
Cisco TMS Extension for IBM Lotus Notes – Installation and getting started guide Page 29 of 45

Verification of the installation
Check whether the user selected proper rooms.
Check the Domino mail system to verify that email is being delivered.
Step 4
Symptom: Requests show up in the Waiting for Approval but stay there indefinitely.
Tips:
Check the Domino Server Log of the Integration Server for signs that the Cisco TMS Trigger
Agent has run.
If you see logging activity from the Cisco TMS Trigger Agent, look for possible failure reasons in
the Domino Server log.
If you do not see logging activity from the Cisco TMS Trigger Agent, verify the installation steps
around enabling the Cisco TMS Trigger Agent.
Step 5
Symptom: Requests are rejected with 401 error messages.
Tips:
Verify that Cisco TMS Service Account login information is saved in the Cisco TMS Admin
Document of the Reservation Database.
Verify login information of the Cisco TMS Service Account by manually trying to log into Cisco
TMS’s web page using the same account information.
Verify the installation steps to change the security settings of the Cisco TMS Booking page.
Step 6
Symptom: Cisco TMS rejects the meeting request.
Tips:
Verify the rejection by trying to book the same meeting in Cisco TMS directly. If the meeting is
rejected, Lotus can be excluded as the problem and, either the conference settings are
incompatible with the systems, or the problem is permissions related.
For conference settings, make sure that all systems are available, have compatible dialing
information, and can support the conference type being requested.
For permissions-related issues, make sure that each system has their Scheduling permissions
enabled (under Navigator > Settings).
Symptom: The meeting is possible when it is booked from Cisco TMS directly, but gets rejected when
booked through IBM Lotus Domino.
Tips:
Look at the error message returned from Cisco TMS in the rejection.
A possible error is that the Cisco TMS Service Account does not have permission to book the
system.
Step 7 and 8
Symptom: The meeting is accepted in Lotus, but does not show up in Cisco TMS.
Tip: Make sure that you are not filtering out the meeting when using the List Conferences page.
Check the date range and user filters.
Testing meetings from Cisco TMS to Lotus
To verify that meetings from Cisco TMS are being saved in Lotus, create a test meeting in Cisco TMS
for a date in the future using two systems that are integrated with Lotus. For a successful replication
check that after 5 minutes, the meeting shows up in the Reservation Database under Reservations >
By Date or Reservations > By Resource.
Cisco TMS Extension for IBM Lotus Notes – Installation and getting started guide Page 30 of 45

Verification of the installation
Process overview for meetings created in Cisco TMS
The steps taken when booking a meeting from Cisco TMS are described below. Use this workflow to
help diagnose where a failure is occurring if your test meeting does not complete successfully.
1. A booking change of some type is made in Cisco TMS.
2. Cisco TMS keeps a log of all booking activity.
3. The Scheduled Synchronizer Agent is running on the Domino Server at 5 minute intervals and
keeps track of the last booking change relayed by Cisco TMS.
4. At a timed mark, the Scheduled Synchronizer Agent runs and requests changes made since the
last saved change from Cisco TMS.
5. Cisco TMS provides all the booking changes and Cisco TMSXN processes the changes which are
relevant for systems integrated with Lotus.
6. The integration package directly modifies the reservations in the Reservation Database.
7. If the test meeting does not carry through to the Domino Reservation Database, use the
symptoms and tips below to troubleshoot the issue.
Symptom: Meetings do not show up in the Reservation Database Calendar.
Tips:
Make sure that test meeting participants are integrated with Lotus – check the ID of the Resource
Document for the site and verify that it matches the system ID for the system in Cisco TMS
(Navigator > Settings).
Check the Domino Server log for signs that the Scheduled Synchronizer Agent is running and it is
running at 5 minute intervals.
Symptom: No signs in the Domino Server Log that the Scheduled Synchronizer Agent is running
Tip: Verify that the Scheduled Synchronizer Agent is enabled according to Cisco TMSXN instructions.
Cisco TMS Extension for IBM Lotus Notes – Installation and getting started guide Page 31 of 45

Frequently asked questions about Cisco TMSXN booking
Frequently asked questions about Cisco
TMSXN booking
Question: Why do I get multiple meeting requests when I book a meeting?
Answer: Lotus sends a separate meeting request for each room selected for the meeting. You will
receive an email for each request, acceptance, or denial for each room selected in the meeting
request.
Question: Do I need to keep the meeting request emails?
Answer: No, the request, accept, and reject emails are not required in order for the meeting to run
and do not include any additional information beyond that in your calendar entry. Cisco TMS will send
a separate email with call routing information for your meeting.
Question: My meeting was rejected by the rooms, but is still in my calendar. Why?
Answer: Cisco TMSXN does not touch your personal calendar. If a meeting you book is denied, your
calendar document still exists. You should update your calendar appropriately if a meeting is rejected.
Question: How long do I have to wait before I receive accept/reject emails for my reservation?
Answer: The delay before receiving the response to your requests is dependent on your specific
Lotus installation because all requests in Lotus are handled via email and are handled
asynchronously. As such, there are delays and timers built into Lotus before the requests are received
by the server and returned to you. Typically, on a default Lotus installation, you receive replies within
1-3 minutes.
Question: I booked my meeting in Lotus Notes, but it is not showing up in Cisco TMS under My
Meetings. Why?
Answer: If you received the meeting accept emails, the meeting has been booked in Cisco TMS. The
meeting is booked in Cisco TMS under the integration user, not under your username. By default,
normal users cannot see another user’s bookings in Cisco TMS. However, if you are an administrator
or a user with appropriate permissions, you will see your meeting in Cisco TMS booked by the
Integration user.
Question: Can I book a meeting in Cisco TMS and have it show up in Lotus Notes?
Answer: Yes, but Lotus Notes users are encouraged to use the Lotus Notes Calendar to book
meetings when using Cisco TMSXN. Meetings booked in Cisco TMS will automatically propagate to
Lotus Notes after the Scheduled Synchronizer Agent has run. However, the meeting will only be in the
Reservation Database Calendar, not in your own Calendar. You have to accept the booking
confirmation email to add the event to your Calendar, or create a Calendar entry manually.
Question: Using Lotus Notes can I edit my meeting that was booked using Lotus Notes in Cisco
TMS?
Answer: Yes, if you have permission to modify another user’s bookings, you can edit the meeting
booked in Cisco TMS and the Resource Database Calendars in Lotus Notes after the Scheduled
Synchronizer Agent has run. However, the meeting will only be in the Resource Database Calendars,
not your own Calendar. You must use the iCalendar attachment in your booking confirmation email to
add the event to your Calendar, or create an entry manually.
Question: Can I book a recurring meeting from my Lotus Notes client using Cisco TMS integrated
rooms?
Answer: Yes, booking recurring meetings is supported with Cisco TMSXN. All recurring patterns in
Lotus Notes are supported.
Cisco TMS Extension for IBM Lotus Notes – Installation and getting started guide Page 32 of 45

Frequently asked questions about Cisco TMSXN booking
Question: Can I use the Cisco TMS Phone books when booking from my Lotus Notes Calendar?
Answer: No, Cisco TMS Phone books are not available from Cisco TMSXN. Systems not listed in
your Lotus Notes Address Book can be added to the meeting as External Participants.
Alternatively, if there are numbers or sites that you use often that you would like to have available for
booking in Lotus, Cisco TelePresence recommends defining a room in Cisco TMS to represent the
contact and making a resource representation of that room in Cisco TMSXN. This allows a nonmanaged device to be booked in both Cisco TMS and Lotus Notes.
Question: Is resource booking via Domino Web Access (iNotes) supported?
Answer: Resources set up with Cisco TMSXN can be booked via the iNotes web interface, but the
extra Video Conference Settings button will not be available. Therefore the extra settings on that
page are also unavailable and only conference defaults will be used.
Question: In the recurrent meeting acceptance email, when I open its recurrence settings I see
strange date/time values. Why?
Answer: This means that you do not have the Cisco TMS Mail template applied to your Lotus user
settings. The described behavior appears only with the default IBM template. The actual meeting
date/time isv displayed correctly in user Calendar even with the default template. This is as a known
issue when the Cisco TMS Mail template is not used.
Cisco TMS Extension for IBM Lotus Notes – Installation and getting started guide Page 33 of 45

Technical description of Cisco TMSXN
Technical description of Cisco TMSXN
Overview
The Cisco TelePresence Management Suite Extension for IBM Lotus Notes allows Lotus Notes Client
users connected to a Domino Server to book, update and delete video conferences directly from within
their Lotus Notes client. The integration is based upon representing each system in Cisco TMS as a
room in a resource reservation database in Domino. Video conferences are scheduled by inviting the
rooms to a meeting in the Calendar, or by making reservations directly in the Resource Reservation
Database. Notes functionality such as free-time information and Address Book entries from the
Resource Reservation Database are kept intact, but reservations/cancellations in this database will
not be committed until they have been processed by the Cisco TMS server and committed in Cisco
TMS. The mail template of the Lotus Notes users can be replaced or updated to allow video
conference-specific properties to be specified when scheduling a meeting with video rooms. The Lotus
Notes client will never contact the Cisco TMS server directly.
Synchronizing changes from Cisco TMS
The Scheduled Synchronizer Agent is installed on the Domino server and propagates all the
bookings/changes/cancellations performed on Cisco TMS into the Domino Resource Reservation
Database. Cisco TMSXN tracks a transaction log kept on the Cisco TMS server to make sure that the
database is up to date. The Scheduled Synchronizer Agent polls the Cisco TMS server at a specified
time interval to retrieve changes, and updates and processes changes in the Resource Reservation
Database, as required. Activity for the Scheduled Synchronizer Agent can be viewed in the Domino
Server log.
Synchronizing changes to Cisco TMS
Bookings and updates from the Lotus Notes clients are delivered by the Domino Mail system to the
Resource Reservation Database and queued. After a request reaches the database, the
AgentManager initiates the Java agent TMSTrigger installed on the Domino Server to process the
request. This agent submits the booking or meeting update to Cisco TMS, which in turn tries to commit
the change to the Cisco TMS database. After successfully booking in Cisco TMS, this process moves
the Lotus Notes client’s request from the pending queue to the Reservations view in the Resource
Reservation Database on the Domino server, and sends a meeting acceptance email to the Notes
user who submitted the reservation, together with the information about the meeting (call route, web
conference details etc.). If the meeting could not be booked in Cisco TMS, the agent will send a
meeting reject email to the Lotus Notes user who submitted the reservation—with the reason why the
meeting could not be booked (such as system not available, no MCU to host the meeting, no gateway
available). Once booked, the meeting appears in Cisco TMS with the owner of the meeting being the
Cisco TMS Service Account created during installation. All meetings booked through Lotus are owned
by this user account in Cisco TMS.
Cancellations from the Lotus Notes client are not queued, but are performed “on the fly”. The Lotus
Notes client tries to delete the reservation in the Resource Reservation Database, and this event will
be handled by the compiled TMSEventCatcher.dll on the Domino Server that will start a java agent
that will contact the Cisco TMS server and cancel the meeting. If the meeting is active, the video
conference is ended. If the Cisco TMS server cannot be contacted, the reservation will not be deleted.
Only Resource Calendars are modified by Cisco TMSXN. User Calendars are not modified, and users
are responsible for adding/removing changes if they are not the user who is initiating the meeting
change.
Communication between Cisco TMS and IBM Lotus Domino
All communication with the Cisco TMS server is done using web services (HTTP), implemented in
Java on the Domino server. The network link between the Cisco TMS server and the Domino server
Cisco TMS Extension for IBM Lotus Notes – Installation and getting started guide Page 34 of 45

Technical description of Cisco TMSXN
should not cross a public network, because HTTPS is not currently supported in the java
communication library. The Lotus Notes clients do not communicate directly with Cisco TMS; all
communication is done through the integration installed on the Domino server.
Cisco TMS Extension for IBM Lotus Notes – Installation and getting started guide Page 35 of 45
Troubleshooting Cisco TMSXN
Troubleshooting Cisco TMSXN
This chapter guides you through typical challenges faced during installation, and shows you how to
identify and solve them.
Understanding log files
By default Lotus Domino Server logs are stored on server where Lotus Domino is installed.
For example, if the Lotus Domino Server is installed in c:\IBM\Domino\, then the log files are
located at c:\IBM\Domino\data\IBM_TECHNICAL_SUPPORT\.
If the Lotus Domino Server is running in console mode (that is, not as a Windows service), you can
also view log messages directly in the console.
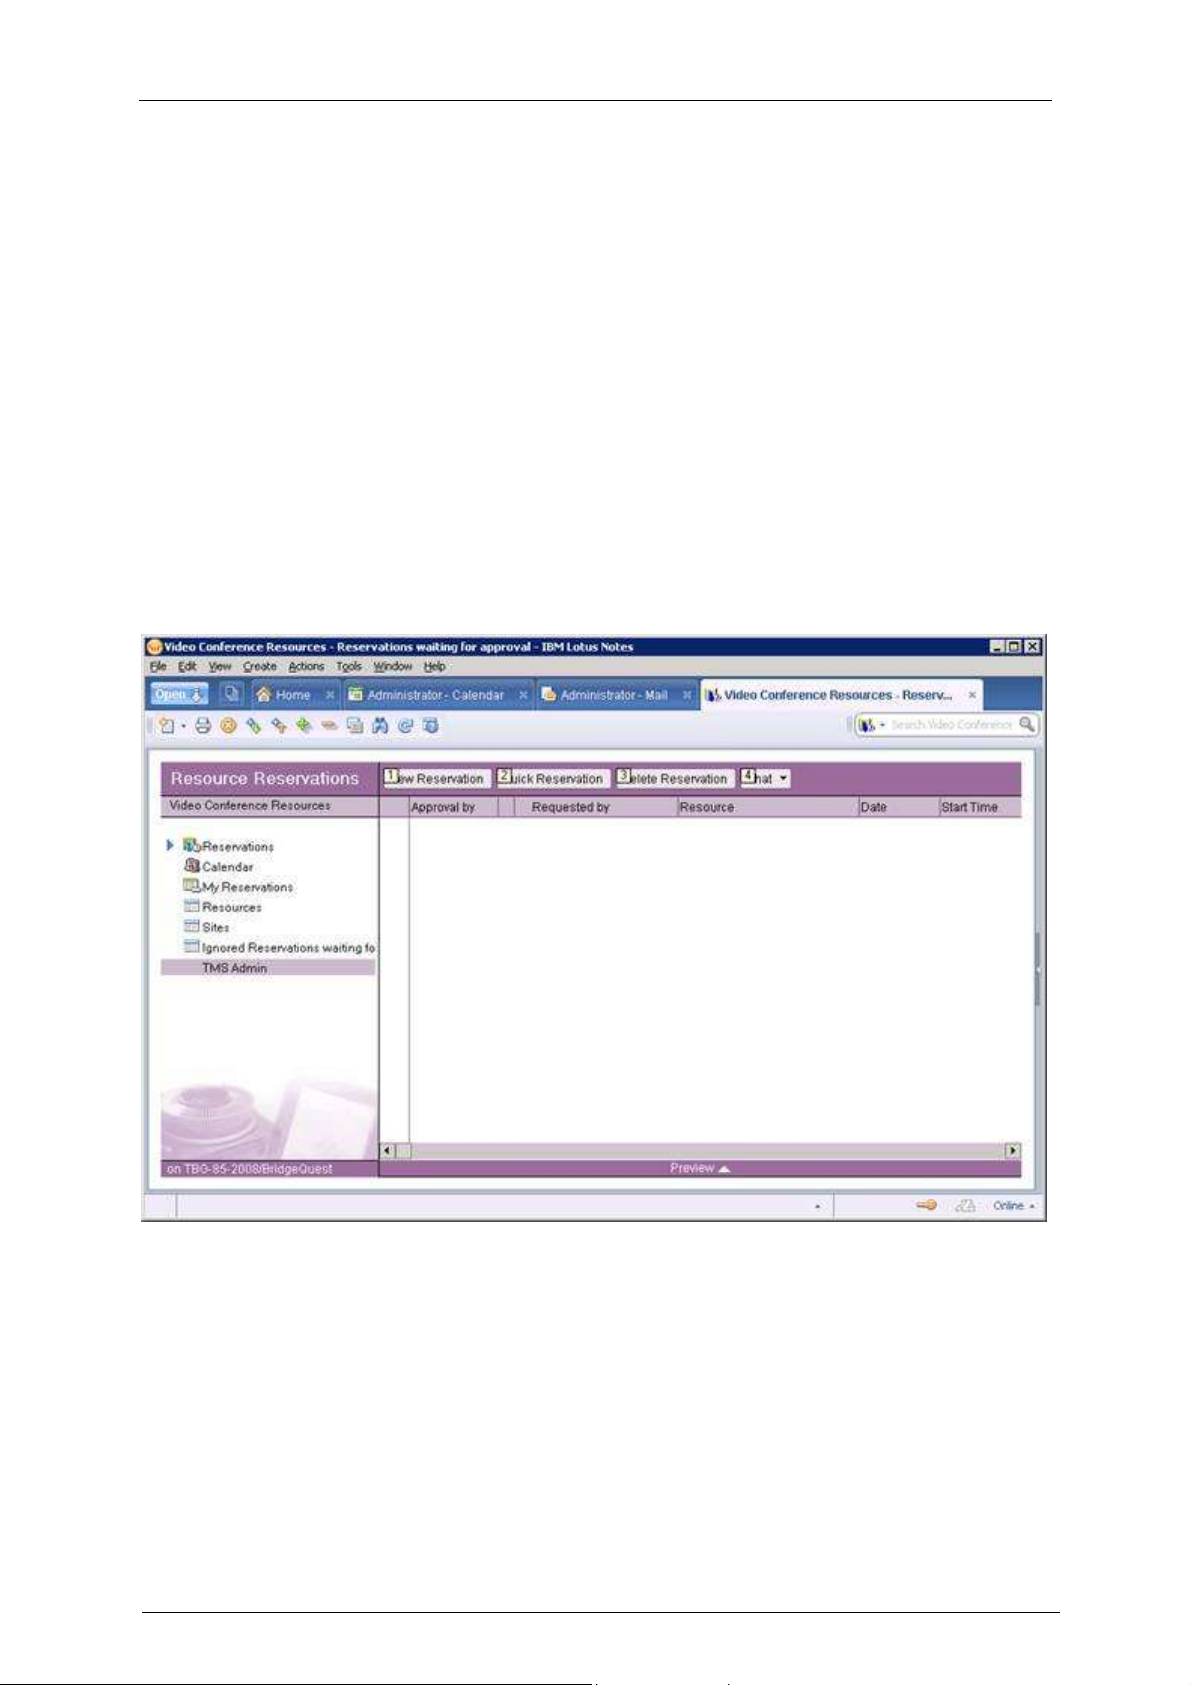
Changing log level
You can increase or decrease the number of log messages produced by the Cisco TMSXN
component. Log in to Lotus Notes as an Administrator and open the Video Conference Resources
database.
Figure 18: The Video Conference Resources database.
Open the TMS Admin view on the left-hand menu. If there is no TMS Admin option available, then
go to the TMS Admin view is not available section.
View the available settings on TMS Admin and select the Debug mode option (see figure below).
Cisco TMS Extension for IBM Lotus Notes – Installation and getting started guide Page 36 of 45
Troubleshooting Cisco TMSXN
Figure 19: Changing the log level
Currently you can set values from 0 (minimal debug) to 3 (all available debug). If you experience
problems and want to troubleshoot Cisco TMSXN, set this value to 3, click the Save and Close button
and restart the Lotus Domino Server.
Note: Increasing the log level may affect the performance of the Domino server.
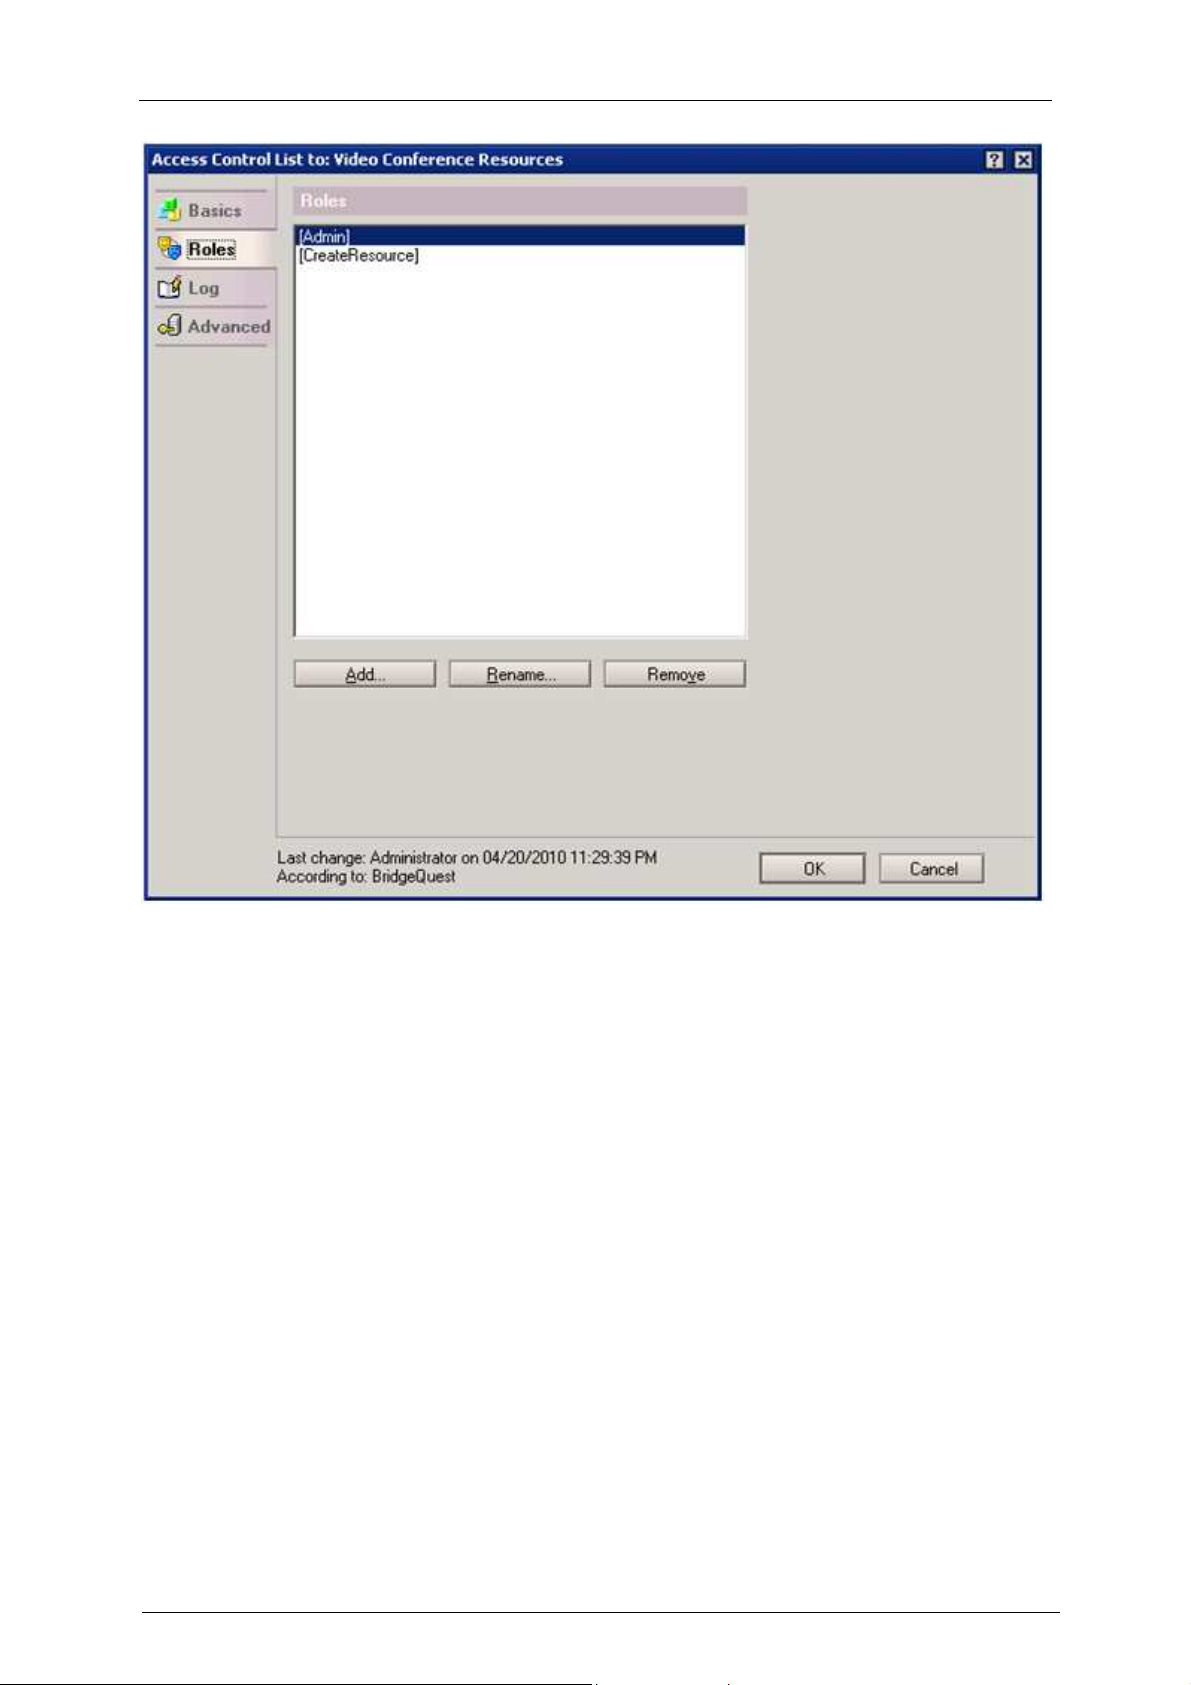
TMS Admin view is not available
After a clean Cisco TMSXN installation or upgrade, the TMS Admin view might not be available under
the administrative role. This is due to a missing installation step. Please verify the following steps:
1. Open Domino Administrator using a server administration ID.
2. Open the Resource Reservation Database Video Conference Resources.
3. Open Access Control for the database, and select File > Application > Access Control.
4. Verify that the Admin and Create Resource check boxes are selected for the current
(Administrative) user ID or for the other user you are using for the Cisco TMSXN integration.
5. If the Admin role is not available, click on the Roles tab and manually add a role called Admin
(figure below). Then return to step 4.
Cisco TMS Extension for IBM Lotus Notes – Installation and getting started guide Page 37 of 45
Troubleshooting Cisco TMSXN
Figure 20: Adding an Admin role
It is impossible to book resources after a Cisco TMSXN
upgrade
Sometimes after upgrading from a previous Cisco TMSXN version, you may experience difficulties
booking Cisco TMS resources from Lotus Clients. A typical case is:
1. You create a meeting and book a Cisco TMS resource (room).
2. You do not get an acceptance/decline email message and your meeting is not visible in Cisco
TMS after the expected time has passed (maximum 15 minutes in a default configuration).
There are two potential places to check:
First, check that both Lotus Agents TMS Trigger and Scheduled Synchronizer are enabled and
set to scheduled execution on your Domino Server (default is 5 every minute). Wait (maximum 15
minutes in a default configuration) and verify that bookings are processed.
If the booking is still not processed open Video Conference Resources database in Notes as
Administrative user, open Resources view, select all resources and execute action Run
Synchronizer from the Actions menu.
Server connection problems
If you experience Domino connection problems saying that the TCP/IP host not found, this indicates a
general Domino set up problem that is not related to the Cisco TMSXN component. However, testing
indicates that the following steps can solve this issue.
Cisco TMS Extension for IBM Lotus Notes – Installation and getting started guide Page 38 of 45

Troubleshooting Cisco TMSXN
1. Open Domino Administrator and go to the Configuration > Server-Connections view.
2. Check that the connection to your Domino Server is presented there, and if not, create it by
clicking the Add connection button.
3. Open the server connection (whether previously existing or created at step 2) and verify that the
Use the port(s) parameter is set to TCP/IP.
Expired SSL certificates
If you have enabled HTTPS communication as described in the Enable secure communication
(Optional) section of this document, and the SSL certificate has expired, users will receive decline
notices saying:
“Cannot establish SSL connection to TMS server. Underlying reason: Certificate expired. Please
contact your system administrator.”
To install a new SSL certificate to IIS and Domino, follow the steps below. For information on how to
create SSL certificates, see the Enable secure communication (Optional) section.
1. Open IIS Manager.
2. Right click on the Cisco TMS site and select Properties.
3. Select Directory Security, and select the Server certificate in the Secure communications
section.
4. In the pop-up wizard, click Next, and Assign an existing certificate.
5. Select the appropriate certificate from the Available Certificates list, click Next to see information
about the certificate, and click Next again to complete the installation.
6. Click Windows Start > Run... and type certmgr.msc to run Certificates Manager.
7. Expand Trusted Root Certification Authorities, right click Certificates and choose All Tasks >
Import.
8. When the wizard displays, click Next, and then point to the new certificate's .cer file.
9. Click Next and verify that the certificate will be stored in Trusted Root Certification Authorities,
and click Next and Finish to complete the import.
10. Copy the file to the Domino server, for example c:\certificates\tmscertificate.cer.
11. Log in to the Domino server.
12. Open a command prompt on the Domino server.
13. Change directory to <Domino directory>\jvm\lib\security.
14. Import the certificate by using the following command
..\..\bin\keytool.exe -import -trustcacerts -keystore cacerts -alias
<myname> -file <location of certificate file>\tmscertificate.cer.
Give the certificate a proper alias (for example TMS_server_certificate). Default java keystore
password is changeit.
15. Restart the Domino server.
Switch from HTTPS to HTTP:
1. Open IIS Manager, right click on the site containing the Cisco TMS applications and select
Properties.
2. On the Web Site tab, set the field IP address to (All Unassigned).
3. Select the Directory Security tab, and click Edit in the Secure communications section.
4. Select the Require secure channel (SSL) checkbox and in the Client certificates section select
Ignore client certificates.
5. Click OK twice and restart IIS.
6. Open TMS Admin in Video Conference Resources Reservation database and set the HTTPS
radio button to No.
7. Click Save and Close.
Cisco TMS Extension for IBM Lotus Notes – Installation and getting started guide Page 39 of 45

Checking for updates and getting help
Checking for updates and getting help
Cisco TelePresence recommends registering your product to automatically receive SoftCare
notifications about the latest software and security updates. If you do not register your product, it is a
good idea to regularly check for software updates on the Cisco TelePresence web site. If you
experience any difficulties or unexpected results when using this version of the Lotus integration
software package, consult the online help for information on using the product.
If the documentation does not answer your question or you have a problem with one of our products,
refer to the Support sections of the web site which are kept up to date with the latest information from
Cisco TelePresence customer support (www.tandberg.com > Support).
If the information on the web site does not help you to solve your problem, contact your reseller. Make
sure you have the following information ready:
The serial number and product model number of the unit
The software build number which can be found on the product user interface
Your contact email address or telephone number
Cisco TMS Extension for IBM Lotus Notes – Installation and getting started guide Page 40 of 45

License agreement
License agreement
Cisco TelePresence Management Suite Extension for IBM Lotus Notes
(previously known as TANDBERG Management Suite Lotus Notes Integration)
TANDBERG is now part of Cisco Systems, Inc
By installing, copying, or otherwise using the software program of TANDBERG and/or its affiliates
(“TANDBERG”), or of its Licensors, provided hereunder (“Software”), You (“Licensee”) agree to be
bound by the terms of this Shrinkwrap License Agreement (“Agreement”). If You do not agree to the
terms of this Agreement, do not install or use the Software, and return it and all related documentation
(“Documentation”) to Your place of purchase within ten (10) days for a full refund.
TANDBERG, or its licensors, owns all intellectual property rights, including patent, copyright, trade
secret, trademark and other proprietary rights, in and to the Software and Documentation.
Your rights are limited to those expressly granted in this Agreement. This Agreement grants You a
perpetual, nontransferable and non-exclusive license to use, solely for Your internal business
purposes, the Documentation and object code version of the Software, for up to the number of
licenses, users, applications, transactions, and/or CPUs, as applicable to the particular Software, all
as ordered and paid for by You and identified in the invoice for the Software, under the terms and
conditions set forth herein.
You may:
Install the Software, in the country in which Your order for the Software is placed, on a single
machine (“Designated Computer”) in the building in which the Designated Computer is located at the
time of initial installation (“Site”);
Use the Software at the Designated Computer under the scope of license granted herein;
permit third party service providers to utilize the Software at the Site on Your behalf within the
scope of license granted herein and provided such third party service provider agrees to be bound by
the terms and conditions of this Agreement;
make a copy of the Software for backup and/or archival purposes;
copy and use the Documentation as reasonably necessary in connection with Your authorized
internal use of the Software.
You may not:
Modify, adapt, decompile, disassemble, or reverse engineer the Software, except to the extent that
the foregoing restriction is expressly prohibited by applicable law;
create derivative works based on the Software;
make unauthorized copies of the Software;
allow any unauthorized third party to use or have access to the Software or Documentation
Use the Software to provide services to any third party, including affiliates or subsidiaries of
Licensee;
to the fullest extent permitted by law, use the Software as an add-in product to any third party
product without TANDBERG’s prior written consent;
use, evaluate or view the Software or Documentation for the purpose of designing, modifying, or
otherwise creating any software program, or any portion thereof, which performs functions similar to
the functions performed by the Software; or
without the prior written consent of TANDBERG, transfer or assign Your rights under this
Agreement, including an assignment by operation of law.
You acknowledge and agree that:
Cisco TMS Extension for IBM Lotus Notes – Installation and getting started guide Page 41 of 45

License agreement
You will include on permitted copies of a Software all copyright, trademark and other proprietary
rights notices included on the originals;
the Software and Documentation contain valuable proprietary information and trade secrets of
TANDBERG and You shall protect the secrecy of, and avoid disclosure and unauthorized use of, the
Software and Documentation, using at least those measures that You take to protect Your own most
highly confidential information;
Cisco TMS Extension for IBM Lotus Notes – Installation and getting started guide Page 42 of 45

License agreement
you shall comply with all applicable export control laws and regulations with respect to the
Software and Documentation;
any violation or threatened violation of this Agreement may cause irreparable injury to TANDBERG
for which injunctive relief may be appropriate, in addition to all legal remedies; and
upon violation of any of the provisions of this Agreement or the expiration of the term of Your
license, Your rights to use the Software and Documentation shall automatically terminate and You
shall return to TANDBERG or destroy all copies of the Software and Documentation.
LIMITED WARRANTY. TANDBERG warrants that for a period of ninety (90) days from the date of
delivery (“Warranty Period”), the Software will operate substantially in accordance with the
Documentation. TANDBERG does not warrant that the functions of the Software will meet Your
requirements or that operation of the Software will be uninterrupted or error free. You must inform
TANDBERG in writing during the Warranty Period if the Software does not operate as warranted and
provide to TANDBERG such information and materials as TANDBERG may reasonably request to
document and reproduce such problem and to verify whether any proposed solution corrects such
problem.
Following the receipt of such information and materials, if TANDBERG determines that the Software
does not operate as warranted, then TANDBERG will at its election, either:
(a) modify the Software so that it does operate as warranted; (b) replace the Software with other
software offering substantially similar functionality; or, (c) if neither (a) nor (b) is commercially feasible,
refund the license fee paid to TANDBERG for the Software.
EXCLUSIONS. TANDBERG will have no responsibility, warranty or other obligations whatsoever if
You:
(a) use the Software in a manner inconsistent with the Documentation or this Agreement; (b) modify
the Software; or (c) cause a failure of the Software through accident, abuse or misapplication.
NO OTHER WARRANTIES. TO THE FULLEST EXTENT ALLOWED BY LAW, THE WARRANTIES
AND REMEDIES PROVIDED IN THE LIMITED WARRANTY SECTION ARE EXCLUSIVE AND IN
LIEU OF ALL OTHER WARRANTIES, EXPRESS OR IMPLIED IN FACT OR BY OPERATION OF
LAW, STATUTORY OR OTHERWISE, INCLUDING BUT NOT LIMITED TO THE IMPLIED
WARRANTIES OF MERCHANTABILITY, FITNESS FOR A PARTICULAR PURPOSE, ACCURACY
OF INFORMATION GENERATED, SATISFACTORY QUALITY, AND NON-INFRINGEMENT, ALL OF
WHICH ARE EXPRESSLY DISCLAIMED.
THESE DISCLAIMERS OF WARRANTY CONSTITUTE AN ESSENTIAL PART OF THIS
AGREEMENT.
LIMITATION OF LIABILITY. EXCEPT FOR ANY DAMAGES ARISING FROM A BREACH OF THE
CONFIDENTIALITY OBLIGATIONS OR THE LICENSE GRANT AND RESTRICTIONS FOR THE
SOFTWARE, TO THE FULLEST EXTENT ALLOWED BY LAW, THE PARTIES EXCLUDE ANY
LIABILITY, WHETHER BASED IN CONTRACT, TORT (INCLUDING NEGLIGENCE), OR ANY
OTHER LEGAL THEORY, FOR INDIRECT, CONSEQUENTIAL, INCIDENTAL, SPECIAL OR
PUNITIVE DAMAGES OF ANY KIND, EVEN IF THE PARTY HAS BEEN ADVISED OF THE
POSSIBILITY OF SUCH DAMAGES.
TANDBERG’S MAXIMUM LIABILITY TO YOU FOR DAMAGES ARISING OUT OF OR RELATING TO
THIS AGREEMENT, WHETHER BASED IN CONTRACT, TORT (INCLUDING NEGLIGENCE), OR
ANY OTHER LEGAL THEORY, WILL NOT EXCEED THE AMOUNTS PAID BY YOU FOR THE
PARTICULAR SOFTWARE GIVING RISE TO THE CAUSE OF ACTION.
THESE DISCLAIMERS AND LIMITATIONS OF LIABILITY WILL NOT BE AFFECTED IF ANY
REMEDY PROVIDED HEREIN FAILS OF ITS ESSENTIAL PURPOSE.
Cisco TMS Extension for IBM Lotus Notes – Installation and getting started guide Page 43 of 45

License agreement
AUDIT RIGHTS. You shall maintain complete and accurate books and records relating to compliance
with the usage restrictions of the Software. TANDBERG shall have the right at its own expense, during
Your normal business hours and upon reasonable written notice, to audit your computers, books and
records to verify your compliance with the terms and conditions of this Agreement.
SURVIVABILITY. The following shall survive expiration or termination of this Agreement: License and
Confidentiality Restrictions, Limitation of Liability, Audit Rights, and General Provisions. Any perpetual
licenses shall also continue to be subject to the License Grant, and No Other Warranties.
GENERAL PROVISIONS. This Agreement represents the complete agreement concerning this
license, supersedes all prior agreements, and may be amended only by a writing executed by duly
authorized representatives of both parties. The provisions of any order document used by You shall be
of no effect (notwithstanding any provisions in such order document to the contrary), except for
license, term, and Site selection, as well as pricing and ship-to information. This Agreement is
governed by, and is to be interpreted in accordance with the laws of the State of New York, excluding
its conflict of law rules.
The United Nations Convention on Contracts for the International Sale of Goods is expressly
disclaimed. If any provision of this Agreement is held by a court of competent jurisdiction to be invalid
under any applicable statute, rule or law, the parties agree that such invalidity shall not affect the
validity of the remaining provisions of this Agreement, and further agree to substitute for the invalid
provision a valid provision which most closely approximates the intent and economic effect of the
invalid provision.
Any terms in Your order document which are inconsistent with the terms of this Agreement are not
accepted by TANDBERG and the terms of this Agreement will prevail. Headings used in this
Cisco TMS Extension for IBM Lotus Notes – Installation and getting started guide Page 44 of 45

License agreement
THE SPECIFICATIONS AND INFORMATION REGARDING THE PRODUCTS IN THIS MANUAL ARE SUBJECT TO CHANGE
WITHOUT NOTICE. ALL STATEMENTS, INFORMATION, AND RECOMMENDATIONS IN THIS MANUAL ARE BELIEVED TO
BE ACCURATE BUT ARE PRESENTED WITHOUT WARRANTY OF ANY KIND, EXPRESS OR IMPLIED. USERS MUST
TAKE FULL RESPONSIBILITY FOR THEIR APPLICATION OF ANY PRODUCTS.
THE SOFTWARE LICENSE AND LIMITED WARRANTY FOR THE ACCOMPANYING PRODUCT ARE SET FORTH IN THE
INFORMATION PACKET THAT SHIPPED WITH THE PRODUCT AND ARE INCORPORATED HEREIN BY THIS
REFERENCE. IF YOU ARE UNABLE TO LOCATE THE SOFTWARE LICENSE OR LIMITED WARRANTY, CONTACT YOUR
CISCO REPRESENTATIVE FOR A COPY.
The Cisco implementation of TCP header compression is an adaptation of a program developed by the University of California,
Berkeley (UCB) as part of UCB’s public domain version of the UNIX operating system. All rights reserved. Copyright © 1981,
Regents of the University of California.
NOTWITHSTANDING ANY OTHER WARRANTY HEREIN, ALL DOCUMENT FILES AND SOFTWARE OF THESE
SUPPLIERS ARE PROVIDED “AS IS” WITH ALL FAULTS. CISCO AND THE ABOVE-NAMED SUPPLIERS DISCLAIM ALL
WARRANTIES, EXPRESSED OR IMPLIED, INCLUDING, WITHOUT LIMITATION, THOSE OF MERCHANTABILITY, FITNESS
FOR A PARTICULAR PURPOSE AND NONINFRINGEMENT OR ARISING FROM A COURSE OF DEALING, USAGE, OR
TRADE PRACTICE.
IN NO EVENT SHALL CISCO OR ITS SUPPLIERS BE LIABLE FOR ANY INDIRECT, SPECIAL, CONSEQUENTIAL, OR
INCIDENTAL DAMAGES, INCLUDING, WITHOUT LIMITATION, LOST PROFITS OR LOSS OR DAMAGE TO DATA ARISING
OUT OF THE USE OR INABILITY TO USE THIS MANUAL, EVEN IF CISCO OR ITS SUPPLIERS HAVE BEEN ADVISED OF
THE POSSIBILITY OF SUCH DAMAGES.
Cisco and the Cisco Logo are trademarks of Cisco Systems, Inc. and/or its affiliates in the U.S. and other countries. A listing of
Cisco's trademarks can be found at www.cisco.com/go/trademarks. Third party trademarks mentioned are the property of their
respective owners. The use of the word partner does not imply a partnership relationship between Cisco and any other
company. (1005R)
Any Internet Protocol (IP) addresses and phone numbers used in this document are not intended to be actual addresses and
phone numbers. Any examples, command display output, network topology diagrams, and other figures included in the
document are shown for illustrative purposes only. Any use of actual IP addresses or phone numbers in illustrative content is
unintentional and coincidental.
Cisco TMS Extension for IBM Lotus Notes – Installation and getting started guide Page 45 of 45
 Loading...