

Page 1
Page 2

Page 3

Directive 1999/5/EC Declaration of Conformity
da Dansk
Undertegnede Tait Electronics Limited
erklærer herved, at følgende udstyr TPCB1A,
TPCH5A & TPCH6A overholder de væsentlige
krav og øvrige relevante krav i
direktiv 1999/5/EF.
Se endvidere:
de Deutsch
Hiermit erklärt Tait Electronics Limited die
http://eudocs.taitworld.com/
Übereinstimmung der Geräte TPCB1A,
TPCH5A & TPCH6A mit den grundlegenden
Anforderungen und den anderen relevanten
Festlegungen der Richtlinie 1999/5/EG.
Siehe auch:
el Ελληνικός
Με την παρουσα Tait Electronics Limited
δηλωνει οτι TPCB1A, TPCH5A & TPCH6A
συμμορφωνεται προσ τισ ουσιωδεισ
απαιτησεισ και τισ λοιπεσ σχετικεσ
διαταξεισ τησ οδηγιασ 1999/5/ΕΚ.
βλέπε και:
en English
Tait Electronics Limited declares that this
http://eudocs.taitworld.com/
http://eudocs.taitworld.com/
TPCB1A, TPCH5A & TPCH6A complies with
the essential requirements and other relevant
provisions of Directive 1999/5/EC.
See also:
http://eudocs.taitworld.com/
es Español
Por medio de la presente Tait Electronics
Limited declara que el TPCB1A, TPCH5A &
TPCH6A cumple con los requisitos esenciales
y cualesquiera otras disposiciones aplicables
o exigibles de la Directiva 1999/5/CE.
Vea también:
fi Suomi
Tait Electronics Limited vakuuttaa täten että
http://eudocs.taitworld.com/
TPCB1A, TPCH5A & TPCH6A tyyppinen laite
on direktiivin 1999/5/EY oleellisten vaatimus-
ten ja sitä koskevien direktiivin muiden
ehtojen mukainen.
Katso:
http://eudocs.taitworld.com/
fr Français
Par la présente, Tait Electronics Limited
déclare que l'appareil TPCB1A, TPCH5A &
TPCH6A est conforme aux exigences essentielles et aux autres dispositions pertinentes
de la directive 1999/5/CE.
Voir aussi:
http://eudocs.taitworld.com/
it Italiano
Con la presente Tait Electronics Limited dichiara che questo TPCB1A, TPCH5A & TPCH6A
è conforme ai requisiti essenziali ed alle altre
disposizioni pertinenti stabilite dalla direttiva
1999/5/CE.
Vedi anche:
nl Nederlands
Hierbij verklaart Tait Electronics Limited dat
http://eudocs.taitworld.com/
het toestel TPCB1A, TPCH5A & TPCH6A in
overeenstemming is met de essentiële eisen
en de andere relevante bepalingen van richtlijn 1999/5/ EG.
Zie ook:
http://eudocs.taitworld.com/
pt Português
Tait Electronics Limited declara que este
TPCB1A, TPCH5A & TPCH6A está conforme
com os requisitos essenciais e outras
provisões da Directiva 1999/5/CE.
Veja também:
sv Svensk
Härmed intygar Tait Electronics Limited att
http://eudocs.taitworld.com/
denna TPCB1A, TPCH5A & TPCH6A står I
överensstämmelse med de väsentliga egenskapskrav och övriga relevanta bestämmelser
som framgår av direktiv 1999/5/EG.
Se även:
http://eudocs.taitworld.com/
MPC-00001-01 Issue 1
© Tait Electronics Limited 2007 May 2007. All rights reserved. 3
Page 4

Chassis engraving will void warranty
Warning: Engraving the chassis of your partable radio can
significantly reduce its mechanical strength and will void any
warranty. If the chassis has been engraved, it must
be replaced.
Copyright and trademarks
All information contained in this manual is the property of
Tait Electronics Limited. All rights reserved. This manual may
not, in whole or in part, be copied, photocopied, reproduced,
translated, stored, or reduced to any electronic medium or
machine-readable form, without prior written permission
from Tait Electronics Limited.
The word TAIT and the TAIT logo are trademarks of Tait
Electronics Limited.
All trade names referenced are the service mark, trademark
or registered trademark of the respective manufacturers.
Disclaimer
There are no warranties extended or granted by this manual.
Tait Electronics Limited accepts no responsibility for damage
arising from use of the information contained in the manual
or of the equipment and software it describes. It is the
responsibility of the user to ensure that use of such information, equipment and software complies with the laws, rules
and regulations of the applicable jurisdictions.
Enquiries and comments
If you have any enquiries regarding this manual, or any
comments, suggestions and notifications of errors, please
contact Technical Support.
4
Page 5

Updates of manual and equipment
In the interests of improving the performance, reliability or
servicing of the equipment, Tait Electronics Limited reserves
the right to update the equipment or this manual or both
without prior notice.
Intellectual property rights
This product may be protected by one or more patents of Tait
Electronics Limited together with their international equivalents, pending patent applications and registered trade
marks: NZ338097, NZ508054, NZ508340, NZ508806,
NZ508807, NZ509242, NZ509640, NZ509959,
NZ510496, NZ511155, NZ511421, NZ516280/519742,
NZ519118, NZ519344, NZ520650/537902, NZ522236,
NZ524369, NZ524378, NZ524509, NZ524537, NZ524630,
NZ530819, NZ534475, NZ534692, NZ535471, NZ536945,
NZ537434, NZ546295, NZ547713, NZ521450,
AU2003281447, AU2002235062, AU2004216984,
AU2005207405, CA2439018, CA2554213,
EU03784706.8, EU02701829.0, EU04714053.8,
EU05704655.9, GB23865476, GB2386010, GB2413249,
GB0516092.4, US11,232716, US10/597339,
US 10/520827, US10/468740, US5,745,840, US10/547653,
US10/546696, US10/547964,
US10/523952, US11/572700.
To our European customers
Tait Electronics Limited is an environmentally responsible
company which supports waste minimization and material
recovery. The European Union’s Waste Electrical and Electronic Equipment Directive requires that this product be
disposed of separately from the general waste stream when
its service life is over. Please be environmentally responsible
and dispose through the original supplier, your local municipal waste “separate collection” service, or contact Tait
Electronics Limited.
5
Page 6

Disposing of Lithium-ion batteries
Discharge the Li-ion battery before disposing of it. When
disposing of the battery, be sure to do so in an
environmentally sensitive manner. If disposed of in landfills,
batteries can be very hazardous to the environment.
Please contact your radio provider for information on
recycling programs in your area.
Charger compliance information
United States
This battery charger has been tested and found to comply
with the limits for a Class B digital device, in accordance with
part 15 of the FCC Rules.
These limits are designed to provide reasonable protection against
harmful interference in a residential installation. This battery
charger generates, and can radiate, radio frequency energy. If it is
not installed and used in accordance with the instructions, it may
cause harmful interference to radio communications. However,
there is no guarantee that interference will not occur. If this
charger does cause harmful interference to radio or television
reception (which can be determined by turning the charger off
and on), try to correct the interference by:
■ Reorienting or relocating the receiving antenna.
■ Increasing the separation between the equipment and
receiver.
■ Connecting the equipment into an outlet on a circuit dif-
ferent from that to which the receiver is connected.
■ Consulting the dealer or an experienced radio/TV techni-
cian for help.
Canada
This Class B digital apparatus complies with Canadian ICES-003.
Cet appareil numérique de la classe B est conforme à la
norme NMB-003 du Canada.
6
Page 7

For your safety
Before using your radio, please read the following important
safety and compliance information.
Safety warnings used in this guide
Within this guide, the following conventions are used to alert
you to important safety information:
Warning: There is a potential risk of death or serious injury.
Caution: There is the risk of minor or moderate injury
to people.
Caution: “Caution” is used without the safety alert symbol
when there is a risk of equipment damage or malfunction.
Radio frequency exposure information
For your own safety and to ensure you comply with the
Federal Communication Commission’s (FCC) radio
frequency (RF) exposure guidelines, please read the following
information before using this radio.
Using this radio
You should use this radio only for work-related purposes (it is
not authorized for any other use) and if you are fully aware
of, and can exercise control over, your exposure to RF energy.
To prevent exceeding FCC RF exposure limits, you must
control the amount and duration of RF that you and other
people are exposed to.
It is also important that you:
■ Do not remove the RF Exposure label from the radio.
■ Ensure this RF exposure information accompanies the
radio when it is transferred to other users.
■ Do not use the radio if you do not adhere to the guide-
lines on controlling your exposure to RF.
For your safety 7
Page 8

Controlling your exposure to RF energy
This radio emits radio frequency (RF) energy or radio waves
primarily when calls are made. RF is a form of electromagnetic energy (as is sunlight), and there are recommended
levels of maximum RF exposure.
To control your exposure to RF and comply with the maximum exposure limits for occupational/controlled environments, follow these guidelines:
■ Do not talk (transmit) on the radio more than the rated
transmit duty cycle. This is important because the radio
radiates more energy when it is transmitting than when it
is receiving.
■ When listening and talking on the radio, hold it upright in
front of your face so that it is at least one inch (2.5 cm)
away from any part of your face. Keeping the radio at the
recommended distance is important because exposure to
RF decreases rapidly the further away the antenna is from
your body.
■ Keep the antenna at least one inch (2.5 cm) from your
face at all times.
■ If you wear your radio, you must always put it in a carry-
ing accessory that has been specifically approved by Tait
for this radio. Using non-approved body-worn accessories
may mean you expose yourself to higher levels of RF than
recommended by the FCC’s occupational/controlled environment RF exposure limits.
■ Ensure you only use Tait-approved antennas, batteries,
and accessories.
Website: For more information on what RF energy is
and how to control your exposure to it, go to
http://www.fcc.gov/oet/rfsafety/rf-faqs.html.
8 For your safety
Page 9

Compliance with RF energy exposure standards
This two-way radio complies with these RF energy exposure
standards and guidelines:
■ United States Federal Communications Commission,
Code of Federal Regulations; 47 CFR §§ 1.1307, 1.1310,
and 2.1093.
■ American National Standards Institute (ANSI) / Institute
of Electrical and Electronic Engineers (IEEE) C95.1-1992.
■ Institute of Electrical and Electronic Engineers (IEEE)
C95.1-1999 Edition.
This radio complies with the IEEE and ICNIRP exposure limits
for occupational/controlled RF exposure environments at
operating duty factors of up to 50% transmitting (even
though the approved batteries for this radio are rated for
a 5-5-90 duty factor (5% talk-5% listen-90% standby).
Radio frequency emissions limits in the USA
Part 15 of the FCC Rules imposes RF emission limits
on receivers.
This radio complies with Part 15 of the FCC Rules. Operation
is subject to the condition that this device does not cause
harmful interference.
Unapproved modifications or changes to radio
The radio is designed to satisfy the applicable compliance
regulations. Do not make modifications or changes to the
radio that are not expressly approved by Tait Electronics
Limited. Failure to do so could invalidate compliance requirements and void the user’s authority to operate the radio.
For your safety 9
Page 10

Health, safety and electromagnetic compatibility
in Europe
In the European Community, radio and telecommunications
equipment is regulated by Directive 1999/5/EC, also known
as the Radio and Telecommunications Terminal Equipment
(R&TTE) directive. The requirements of this directive include
protection of health and safety of users, as well as
electromagnetic compatibility.
Intended purpose of product
This product is an FM radio transceiver. It is intended for radiocommunication in the Private Mobile Radio (PMR) or Public
Access Mobile Radio (PAMR) services, to be used in all
member states of the European Union (EU) and states within
the European Economic Area (EEA).
Restrictions
This product can be programmed to transmit on frequencies
that are not harmonized throughout the EU/EEA, and will
require a licence to operate in each member state.
This product can be programmed for frequencies or emissions
that may make its use illegal. Where applicable, a license must
be obtained before this product is used. All license requirements must be observed. Limitations may apply to transmitter
power, operating frequency, channel spacing, and emission.
Declaration of conformity
Brief Declarations of Conformity appear on page 3.
Website: To download the formal declaration of
conformity, go to http://eudocs.taitworld.com/.
A signed and dated paper copy of the declaration of
conformity can be obtained from Tait Electronics Limited.
10 For your safety
Page 11

Electromagnetic compatibility in European vehicles
In the European Community, radio equipment fitted to automotive vehicles is regulated by Directive 72/245/EEC, as last
amended by 2005/83/EC. The requirements of this directive
cover the electromagnetic compatibility of electrical or electronic equipment fitted to automotive vehicles.
Interference with electronic devices
Some electronic devices may be prone to malfunction due to
the lack of protection from RF energy that is present when
your radio is transmitting.
Examples of electronic devices that may be affected by RF
energy are:
■ vehicular electronic systems such as fuel injection, anti-
skid brakes, and cruise control
■ medical devices such as hearing aids and pacemakers
■ medical equipment in hospitals or health care facilities.
Consult the manufacturer (or its representative) of the equipment to determine whether these electronic circuits will
perform normally when the radio is transmitting.
Frequency band reserved for distress beacons
Frequency band 406 to 406.1 MHz is reserved for use by
distress beacons. Transmissions should not be made within
this frequency band.
For your safety 11
Page 12

Safe radio operation
Warning: Switch off the radio:
■ At petrol filling stations or near flammable liquids
or gases.
■ In the vicinity of explosive devices and blasting zones.
■ Before boarding an aircraft. Using your radio while in the
air is not permitted.
Using a handheld microphone or a radio while driving a vehicle may violate the laws and legislation that apply in your
country or state. Please check the vehicle regulations in
your area.
12 For your safety
Page 13
Navigating your radio’s menus
The menu text on your radio display may differ from that shown here. Menu
text can be customized when the radio is programmed.
Menu map
Main Menu
Queued Calls
Select Channel
Select Bank
Send Selcall
Dial Selcall (TP8120 only)
Select Status
Send DTMF
Alpha Symbols
Send SDM [Short Data Message]
User Settings
Handset
Low Pwr
Keylock
DTMF
Economy
Squelch
Monitor
Sq Ovrd [Squelch Override]
Alert Settings
Tones
Level
Keytone
Display Settings
Night
RSSI
Adjust Contrast
Advanced Settings
Program Group
Program Signal
Program FS-Group [Flexiscan]
Version Info
FW Ver
HW Ver
Main DB
Cal DB
Page 14
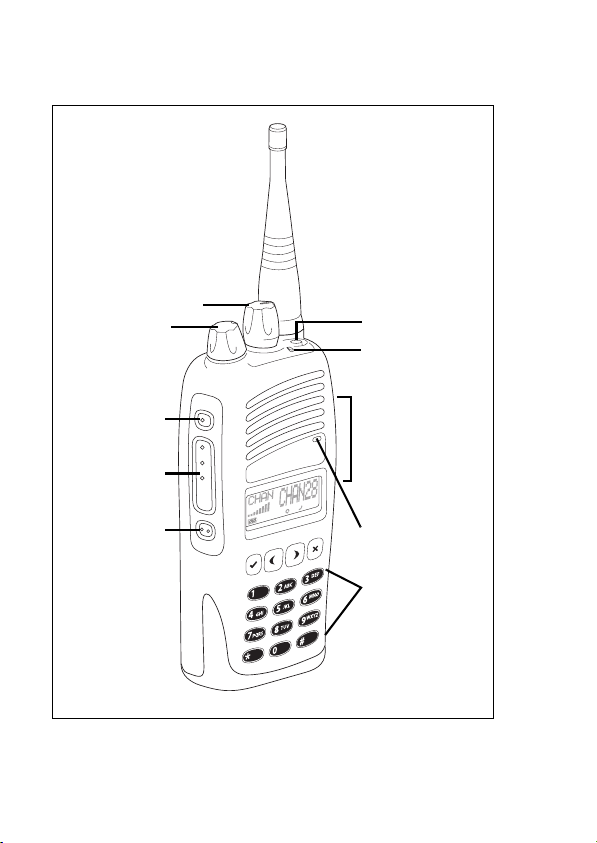
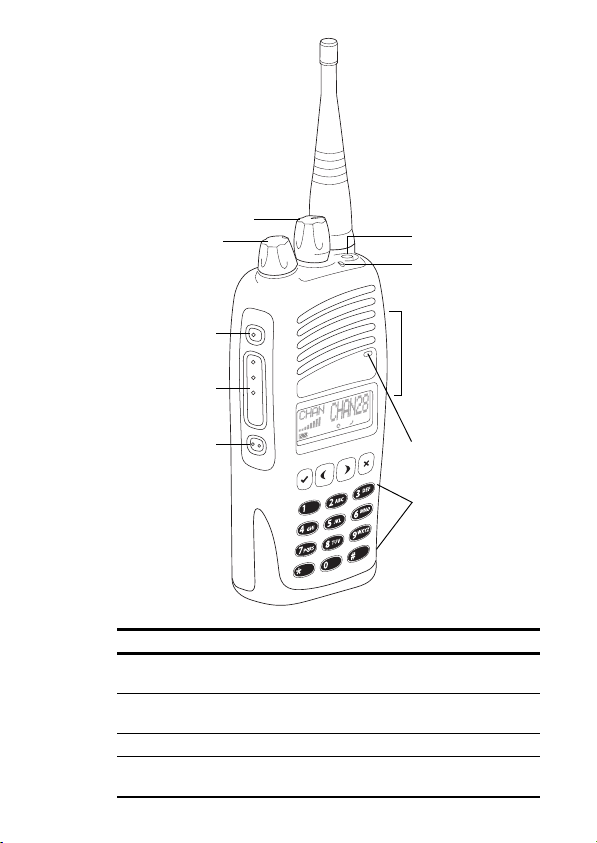
Radio controls
For more information about the radio controls, see “About the radio
controls” on page 19.
channel selector
power/
volume control
function key 1
PTT key
(press-to-talk)
function key 2
top key
status LED
accessory
connector
(out-of-sight)
speaker/
microphone
alphanumeric keys
Page 15

Contents
Directive 1999/5/EC Declaration of Conformity ............................................ 3
For your safety ............................................................................................. 7
Safety warnings used in this guide .......................................................... 7
Radio frequency exposure information .................................................... 7
Controlling your exposure to RF energy .................................................. 8
Compliance with RF energy exposure standards ..................................... 9
Radio frequency emissions limits in the USA ........................................... 9
Unapproved modifications or changes to radio ....................................... 9
Health, safety and electromagnetic compatibility in Europe ................... 10
Electromagnetic compatibility in European vehicles ............................... 11
Interference with electronic devices ...................................................... 11
Frequency band reserved for distress beacons ....................................... 11
Safe radio operation ............................................................................. 12
Navigating your radio’s menus ............................................................. 13
Before using your radio .............................................................................. 17
For your safety— battery warning ........................................................ 17
Charging the battery before first use ..................................................... 17
Attaching the battery ............................................................................ 17
Attaching the antenna .......................................................................... 18
Attaching a belt clip ............................................................................. 18
Removing the accessory cover .............................................................. 18
Getting started ........................................................................................... 19
About the radio controls ....................................................................... 19
About the keypad ................................................................................. 21
Understanding the radio display ........................................................... 22
Understanding the radio indicators ....................................................... 24
Navigating the radio menus ................................................................. 26
Basic operation .......................................................................................... 28
Turning the radio on and off ................................................................. 28
Entering your personal identification number ........................................ 28
Adjusting the volume ........................................................................... 29
About the channels and channel banks ................................................ 29
Understanding how the radio displays channels ................................... 31
Making a call ....................................................................................... 32
15
Page 16

Receiving a Call .................................................................................... 33
Scanning for channel activity ................................................................ 34
Hearing all activity on a channel ........................................................... 36
Checking that a channel is clear ........................................................... 37
Making and receiving different types of calls .............................................. 38
Making an individual or group call ....................................................... 38
Resending calls automatically ............................................................... 40
Receiving an individual or group call .................................................... 41
Responding to missed calls ................................................................... 41
Informing other radio users of your status ............................................ 42
Calling a telephone or a remote device ................................................. 43
Making an emergency call .................................................................... 44
Activating the automated emergency call feature ................................. 45
Sending and receiving text messages ................................................... 46
Changing your radio’s settings ................................................................... 48
Changing display settings (Display Settings menu) ................................ 48
Changing operational settings (User Settings menu) ............................. 50
Changing Audible Tone Settings (Alert Settings Menu) ......................... 54
Charging and caring for batteries ............................................................... 57
Radio low battery warning ................................................................... 57
Removing the battery ........................................................................... 58
Before changing the battery ................................................................. 58
Charging the battery ............................................................................ 58
Storing batteries ................................................................................... 59
Disposing of batteries ........................................................................... 60
Troubleshooting ......................................................................................... 61
When your radio won’t turn on ............................................................ 61
Removing a belt clip ............................................................................. 61
Checking the version of your radio ....................................................... 62
Troubleshooting your charger ............................................................... 62
General care ........................................................................................ 63
Cleaning the radio ................................................................................ 63
Function key options .................................................................................. 64
Common functions ............................................................................... 64
Tait general software licence agreement .................................................... 66
16
Page 17

Before using your radio
Once you have unpacked your radio, there are a few tasks
you must do before you can use it. The most important of
these is to charge your battery for the first time—allow 12
hours for this.
This section covers:
■ for your safety—battery warning
■ charging the battery before first use
■ attaching the battery
■ attaching the antenna
■ attaching a belt clip
■ removing the accessory cover.
For your safety— battery warning
Warning: Before using your battery or charger, please read
the important safety information included with your battery.
If you are using a Lithium-ion battery, special care must be
taken to avoid personal injury or property damage.
Charging the battery before first use
Before using your battery for the first time, you must
charge it. Follow the instructions included with your Tait
charger.
Note: The radio must be turned off if placed in the charger
with the battery.
Attaching the battery
To fit the battery pack to the radio:
1 Insert the bottom edge of the battery into the two slots at
the back of the radio.
2 Press down on the top of the battery to snap it into place.
Before using your radio 17
Page 18
To remove the battery pack:
1 Press the battery catch down.
2 From the sides, pull the battery away from the radio.
Attaching the antenna
Before using the radio, screw the antenna clockwise into the
antenna connector. The antenna should be screwed sufficiently tight so that it doesn’t unscrew easily. This is important as it creates a seal.
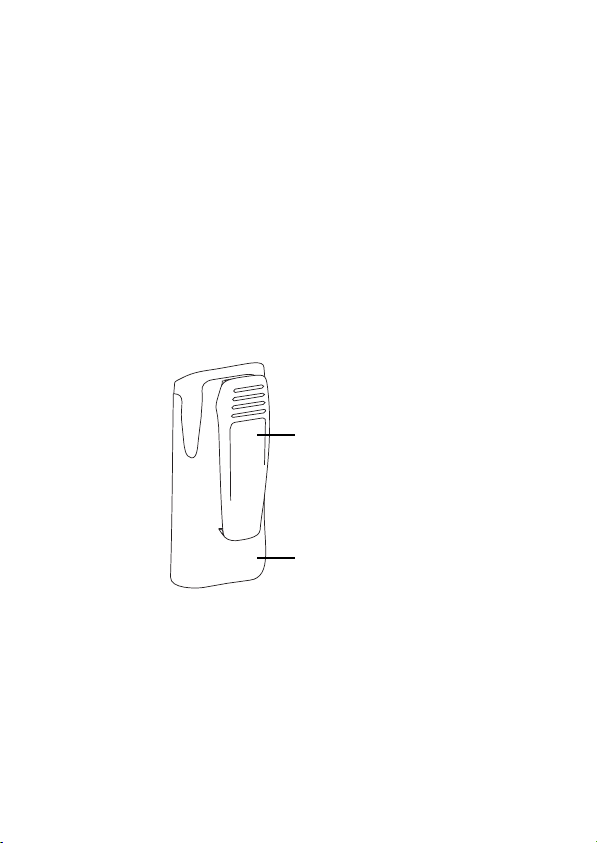
Attaching a belt clip
To attach a belt clip to your radio:
1 Slide the belt clip into the two grooves at the top of the
battery.
2 Press down on the belt clip until it snaps into place.
belt clip
battery
See also “Removing a belt clip” on page 61.
Removing the accessory cover
To fit some accessories to the radio, you will need to remove
the accessory cover, using a coin.
18 Before using your radio
Page 19

Getting started
This section provides a brief description of your radio’s
controls and indicators and explains how to use the radio’s
menus.
This section covers:
■ about the radio controls
■ about the keypad
■ understanding the radio display
■ understanding the radio indicators
■ navigating the radio menus.
About the radio controls
The radio controls are the PTT key, power/volume control,
channel selector, scroll keys, selection keys and function keys.
Some keys have functions assigned to both short and long
key presses:
■ a short key press is less than one second, and
■ a long key press is more than one second.
The radio controls and their functions are described in the
following sections.
About the function keys
The function keys provide quick access to features you use
most often. These features are assigned to the function keys
when the radio is programmed.
Some keys may have a features associated with both a short
keypress and a long keypress.
See “Function key options” on page 64 for a list of features
that may have been assigned to the function keys.
Getting started 19
Page 20
channel selector
power/
volume control
top key
status LED
function key 1
(press-to-talk)
function key 2
Symbol Name Function
20 Getting started
accessory
connector
(out-of-sight)
PTT key
speaker/
microphone
alphanumeric keys
PTT key Press and hold to transmit and release to
listen
Power/volume
control
Rotate to turn on the radio and change
the speaker volume
Channel selector Select and change channels
Top key Usually programmed as the emergency
key or for a frequently used function
Page 21
Symbol Name Function
Function keys
1 and 2
Enter Short: Select a function, toggle a function
Left arrow
Right arrow
Clear Short: Cancel or back (menu mode);
About the keypad
On radios with an alphanumeric keypad, keys 0 to 9 and
letters A to Z are used for dialling numbers and codes.
Using the keypad to enter text
When the keypad is used to enter text, the keys have special
functions. Use the alphanumeric keys to enter letters,
numbers and punctuation.
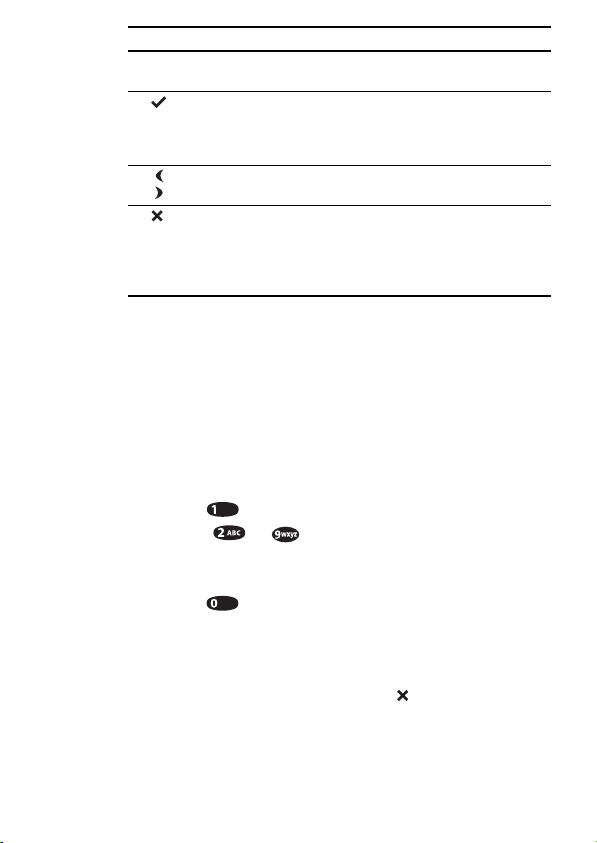
■ Key : character 1.
■ Keys to : press a key once to enter the first
letter on that key. Repeat the process to enter the other
letters and the number.
■ Key : press once to enter a space. Further
keypresses enter the following characters:
0 # * . , ! ? ‘ : ; “ @ ( ) + _ - + = / $ & ÷
■ To delete a character: use the arrow keys to select the
character and press the clear key to delete it.
Programmed for frequently used
features
on/off (menu mode); dial or send a
message
Long: Enter/exit mode or menu
Short: Scroll left
Short: Scroll right
delete single character; cancel call.
Long: Delete (menu mode); exit without
saving (menu mode); cancel call; keypad
lock off.
Getting started 21
Page 22

Understanding the radio display
The messages and symbols you see on your radio display
depend on the mode in which your radio is operating and the
way it is programmed.The following diagram shows a typical
display and explains some of the information that may
be available.
active modes
symbols
Operating modes
Your radio has a number of operating modes, such as CHAN
(channel), MENU (menu), and CONT (contrast). The active
mode appears in the upper left-hand corner of the display.
The lower left-hand corner gives additional information on
the current status of the radio. In this example,
the radio is in repeater talkaround mode.
Current operation
The panel on the right-hand side shows data for the current
radio operation. In this example,
channel the radio is currently operating on. When you enter
data for a specific function, such as dialling a call, the
information appears in this panel.
Radio display symbols
The bottom line of the display shows a series of symbols that
give additional information on the state of the radios. The
following table shows some of symbols you may see on
your display.
CHAN
RTA
CAR 2
CHAN9 indicates what
current operation
information
RTA indicates
22 Getting started
Page 23

Symbol Meaning
Flashing: recharge the battery
The battery is charged
The radio is in DTMF dialling mode
Monitor or squelch override is active
Scrolling is permitted
Steady: the radio is scanning a group of channels
for activity.
Flashing: activity has been found on a channel in
the scan group.
The radio is transmitting.
Steady: low power transmit mode is active
Flashing: the radio is transmitting at low power
Steady: an auxiliary device is operating
Flashing: lone worker mode is active
Your currently selected channel is busy
Getting started 23
Page 24

Understanding the radio indicators
The status LED indicators and the radio’s audible tones—
together with the radio display—all combine to give you
information about the state of your radio.The most common
way the indicators work is described in the following sections.
Note: The way these indicators behave may be affected by
the way your radio is programmed.
Status LED indicator
Colour Flash rate Meaning
red Steady Transmitting.
red slow Battery low. Radio will also emit low-
red medium Low power transmit mode active
red fast Radio is stunned. Radio also emits high-
red two fast
flashes
green steady Channel busy
green slow Economy mode is active
green medium Monitor or squelch override is active
amber steady Radio is scanning or voting a group of
amber slow Repeater talkaround is active
amber medium Activity detected on one of a group of
amber fast A Selcall call has been received
red/green fast Radio programmed incorrectly or faulty.
pitched beeps. Recharge or replace as
soon as possible.
pitched beeps. Contact your dispatcher.
The power-up sequence is complete.
Radio also emits two medium-pitched
beeps.
channels for activity or greatest signal
strength
channels being scanned.
Contact your radio provider.
24 Getting started
Page 25

Audible tones
The radio uses a variety of beeps and tones to supplement the
information provided by the status LED and the radio display.
Your radio may also have been programmed so that
whenever you press a key, the radio beeps to indicate
whether or not the action is permitted:
■ Permitted: Short, medium-pitched beep.
■ Not permitted: Long, low-pitched beep.
Note: Audible tones may have been disabled when your
radio was programmed, and a function key assigned to turn
audible tones on and off.
Getting started 25
Page 26

Navigating the radio menus
Your radio has a number of menus available, each containing
lists or submenus. The table below summarizes the options
that can be accessed through the main menu. The menus
available on your radio will depend on the way it was
programmed.
Note: The menu text on your radio display may differ from
that described in this section. Menu text can be customized
when the radio is programmed.
Display Operation
SELECT CHANNEL Change channels using the keypad
SELECT BANK Change channel banks using the
keypad
SEND SELCALL Select a status message for a Selcall call
SEND DTMF Make a call using the telephone
ALPHA SYMBOLS Perform single or multiple tasks with a
SEND SDM Enter and send a text message
USER SETTINGS Personalise settings for a range of
ALERT SETTINGS Disable or adjust the level of warning
DISPLAY SETTINGS Turn night operation on/off, adjust the
network
single keypress
features
beeps and tones
contrast display or turn the received
signal strength indicator on/off
26 Getting started
Page 27
Using the main menu
To enter menu mode and access the main menu:
■ Long press the menu key ; or
■ Press the right arrow key .
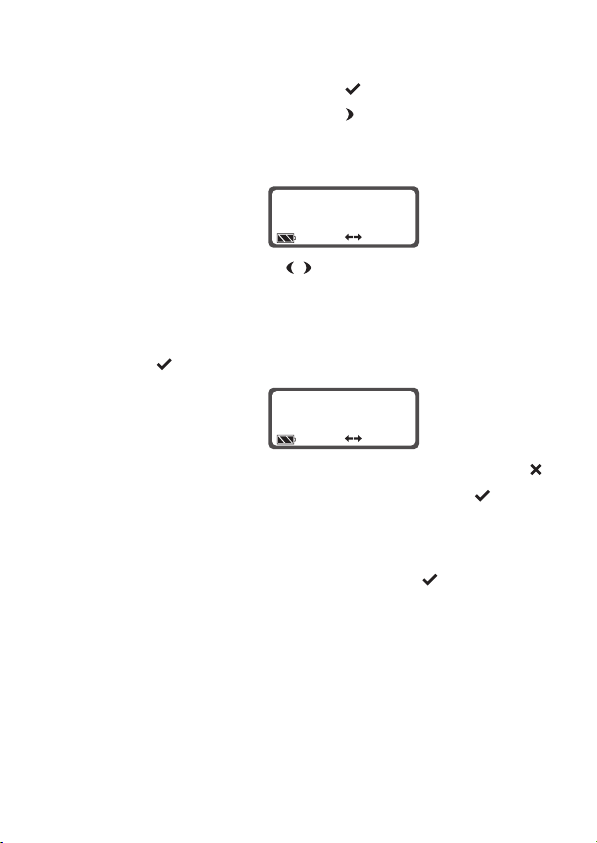
The radio displays
with the last selected menu or submenu item:
MENU in the top right of screen, together
MENU
Use the arrow keys to move through the list of menus.
Note: Press and hold the left and right arrow keys to scroll
through the menu options quickly.
When the menu you want appears, short press the menu key
to open the menu you have chosen:
MENU
■ To exit a menu or submenu option, press the clear key .
■ To exit menu mode, long press the menu key .
Changing settings
To toggle between available settings (such as high and low,
or on and off), short press the menu key .
Accessing frequently used menus
The top function key may be programmed to provide a
shortcut to up to three menu options. In this case, the top
function key will not have a short and long press option.
To access menu options using the top function key,
■ Press the top function key. Press once to access the last
selected option, and press again for the next option,
moving in a continuous loop.
SELECT
CHANNEL
CAR 1
Getting started 27
Page 28

Basic operation
This section covers:
■ turning the radio on and off
■ entering your personal identification number
■ adjusting the volume
■ about the channels and channel banks
■ understanding how the radio displays channels
■ making a call
■ receiving a call
■ scanning for channel activity
■ hearing all activity on a channel
■ checking that a channel is clear.
Turning the radio on and off
Rotate the power/volume control switch clockwise to turn
the radio on. Rotate the switch counterclockwise to turn the
radio off.
Note: The radio may not turn on if your battery is very low.
Entering your personal identification number
Note: This feature is only available for radios with an
alphanumeric keypad.
You may need to enter a personal
identification number (PIN) before
you can use your radio. If the
message ENTER CODE appears,
enter your assigned PIN and press the enter key .
Once you have entered your PIN correctly, the radio sounds
two short beeps and normal operation is now possible.
If you do not know your PIN or you receive a WRONG PIN
message, consult your radio provider or system administrator.
ENTER CODE
28 Basic operation
Page 29

Adjusting the volume
Once the radio is on, rotate the power/volume control clockwise to increase volume. To decrease volume, rotate the
control counter-clockwise. Turning the power/volume control
also adjusts the level of the audible tones.
About the channels and channel banks
In order to make and receive calls, you first need to select a
channel. The procedure for selecting a channel varies
depending on how your radio has been programmed.
Selecting a channel
Each position on the channel selector denotes a channel or
group of channels (scan group).
To select channels or groups 1 to 16:
■ Turn the channel selector to the channel or group
you want.
Using the menu to select a channel
For channels or groups other than 1 to 16:
1 Long press the menu key to enter menu mode (skip to
step 4 if the radio is already in channel mode).
2 Scroll through the main menu options using the arrow
until SELECT CHANNEL is displayed.
keys
3 Short press the menu key to enter CHAN mode.
4 Scroll through the channels to select the one you want.
OR
Key in the desired channel number using the keypad, then
short press the menu key. A low warning beep will sound
if the keyed number is not a valid channel (radios with an
alphanumeric keypad only).
5 Long press the menu key
is not the default mode.
to exit CHAN, if channel mode
Basic operation 29
Page 30

Selecting a channel bank
Channel banking is an optional feature that allows easy
access to large numbers of channels by grouping them into
‘banks’. This feature will be of benefit if you regularly access
a large number of channels, or frequently change repeaters.
If your radio is programmed for channel banking, each
position on the channel selector denotes a channel bank.
To select channel banks 1 to 16:
■ Turn the channel selector to the channel bank you want.
Using the menu to select a channel bank
For channel banks other than 1 to 16:
1 Long press the menu key
to enter menu mode.
2 Scroll through the main menu options to find SELECT
using the arrow keys .
BANK
3 Short press the menu key to enter BANK
mode.
4 Scroll through the available channel banks using the
arrow keys, then short press the menu key
to confirm
a selection.
OR
Key in the desired channel bank number using the
keypad, then short press the menu key to confirm a selection. A low warning beep will sound if the keyed number
is not a valid channel bank (radios with an alphanumeric
keypad only).
5 Long press the menu key to exit menu mode. You will not
be able to exit the bank mode until a valid channel bank
has been selected.
30 Basic operation
Page 31

Understanding how the radio displays channels
The number of channels in each bank differs according to the
radio’s configuration:
Configuration Number of channels per bank
channel selector
selects channels
channel selector
selects channel banks
When a new channel or channel bank is selected, the radio’s
channel will change to the channel number specified within
the newly selected bank, and the channel name or number
will appear in the display.
Note: The channel bank number does not appear in the
display – only the selected channel.
Up to 16 channels in each bank
Up to 32 channels in each bank
Basic operation 31
Page 32

Making a call
To make a call:
1 Select the desired channel as described in “Selecting a
2 Check that the channel is clear. If the busy symbol
3 Once the channel is clear, hold the radio so that the
4 Press the PTT key to transmit.
5 Speak clearly into the microphone, identifying yourself
6 Release the PTT key when you have finished talking.
Making a call while the channel is busy
When the busy symbol
status LED glows green, there is activity on the channel, even
though you may not be able to hear it. If you try to transmit
when the radio is busy, a low-pitched warning beep sounds.
Activate the monitor function to listen to channel activity.
See“Checking that a channel is clear” on page 37.
channel” on page 29, or “Selecting a channel bank” on
page 30.
appears in the display and the status LED is glowing
green, the channel is busy and you may not be able to
make your call.
microphone is about 2.5cm (one inch) from your mouth.
and the party you are calling using the call signs you have
been assigned.
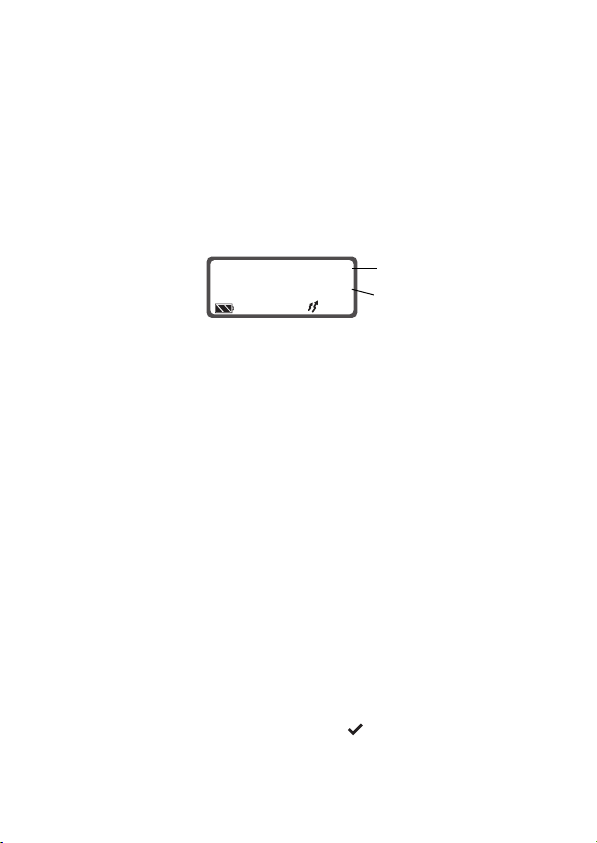
While you are transmitting, the LED glows red and the
transmit symbol
appears in the display:
CHAN
CAR 2
appears in the display and the
32 Basic operation
Page 33

Limiting call time
Your radio may limit the amount of time you can talk
(transmit) continuously. This is known as the ‘transmit timer’
or ‘time-out timer’ and allows other radio users to make calls
on that channel.
When the transmit timer is about to expire, your radio gives
three medium-pitched beeps. Finish your conversation as
soon as possible and release the PTT.
For a short time, your radio may prevent you from making
a call.
Receiving a Call
Your radio remains quiet until there is valid activity on the
channel your radio is currently on.
To receive a call:
■ Select the desired channel as described in “Selecting a
channel” on page 29, or “Selecting a channel bank” on
page 30.
To respond to a call:
■ Press the PTT key and talk.
Basic operation 33
Page 34

Scanning for channel activity
A series of channels can be grouped together so that the
radio can scan through them looking for activity
automatically. Scan groups are selected in the same way
as channels.
Scan group channels can be set up to scan in three
different ways.
They can scan for:
■ Busy channels.
■ Priority channels.
■ The strongest signal (vote).
When the radio is scanning for activity the LED glows amber
and the group name and scanning symbol
displayed, as shown below:
CHAN
GRO UP2
Scanning for a busy channel
In this setup, the radio looks for any activity on the channels
within the scan group. When valid activity is detected the
scanning icon flashes, and the radio will stop on that
channel. Scanning resumes when the channel is no longer
busy or the signalling is no longer valid.
will be
Scanning priority channels
One or two priority channels may also have been
programmed. These channels are scanned more often than
other channels, and are scanned periodically when a nonpriority or lower priority channel is busy.
34 Basic operation
Page 35

Scanning for the strongest signal (voting)
With this type of scanning the scan group’s member channels
carry the same traffic, and the radio searches for the channel
with the strongest signal.
Background scanning (Flexiscan)
The Flexiscan scanning feature allows you to communicate
on a selected channel, while a group of channels is scanned
for valid activity in the background.
A Flexiscan scan group can contain up to 15 member
channels.
To activate Flexiscan:
■ Press the assigned function key.
Your radio may be programmed so that Flexiscan is turned
off when the PTT key is released after making a call when
Flexiscan is active.
Deleting a channel from a scan group (nuisance delete)
If a channel is busy for a long time and you do not wish to
hear the conversation, you can temporarily delete it from the
scan group if one of the function key settings is programmed
for nuisance delete.
To temporarily delete a channel from a scan group:
■ Press the assigned function key. When the scan group is
next selected, the deleted channel is again part of the
scan group.
Basic operation 35
Page 36

Hearing all activity on a channel
Squelch override allows you to hear all activity on a channel
no matter how faint or noisy. This setting is useful when a
caller is very hard to hear.
To turn squelch override on and off:
■ Press the assigned function key.
OR
1 Long press the menu key
radio displays a submenu option, press the clear key to
enter the main menu).
2 Scroll through the main menu options using the arrow
until USER SETTINGS is displayed.
keys
3 Scroll through the user setting menu options until
is displayed (the radio will display OFF or ON as the
OVRD
current setting).
4 Short press the menu key to turn squelch override on
and off.
5 Long press the menu key menu to exit menu mode.
Note: Squelch override cannot be activated when a scan
group is selected, and is automatically turned off when you
change to a scan group channel.
to enter menu mode (if the
SQ
36 Basic operation
Page 37

Checking that a channel is clear
Your radio is capable of segregating individuals or groups of
users by means of audible or subaudible tones (known as
signalling). This means that in normal operation you may not
be able to hear all calls being transmitted on a channel.
However, your radio may be programmed with the monitor
function which, when activated, allows you to hear all
activity on a channel. This is useful if you want to check
whether a channel is clear before making a call.
Note: The monitor function may not have been programmed
to override all signalling.
Using the menu
To activate or deactivate the monitor function:
1 Long press the menu key
radio displays a submenu option, press the clear key
enter the main menu).
2 Scroll through the main menu options to find
SETTINGS,
3 Scroll to find
as the current setting).
4 Short press the menu key to turn monitor on and off.
5 Long press the menu key to exit menu mode.
When the Monitor is on, the Monitor symbol
the display.
and short press the menu key.
MONITOR (the radio will display OFF or ON
to enter menu mode (if the
to
USER
appears in
Basic operation 37
Page 38

Making and receiving different
types of calls
The type of calls available to your radio depends on the way
in which it is programmed.
This section covers:
■ making an individual or group call
■ resending calls automatically
■ receiving an individual or group call
■ informing other radio users of your status
■ calling a telephone or a remote device
■ making an emergency call
■ activating the automated emergency call feature
■ sending and receiving text messages.
Making an individual or group call
You can use your radio to make calls to an individual or a
specific group using Selcall (selective calling).
There are two ways to make an individual or group call:
■ Using a preset call.
■ Dialling a call.
Making a preset individual or group call
Two preset individual or group calls can be assigned to each
channel that has Selcall. A preset call may be assigned to a
function key.
To make a preset call:
1 Change to the desired channel.
2 Press the assigned function key.
38 Making and receiving different types of calls
Page 39

One-touch preset calls
A single one-touch call may also be assigned to one of the
function keys. To make a one-touch preset call, press the
assigned function key.
Dialling individual or group calls
Note: This feature is only available for radios with an
alphanumeric keypad.
To call a group or individual using dialling:
1 Select a channel that has Selcall programmed.
2 Long press the menu key to enter menu mode (if the
radio displays a submenu option, short press the clear key
to enter the main menu).
3 Scroll through the main menu options using the arrow
until SEND SELCALL is displayed.
keys
4 Short press the menu key to enter
DIAL SELCALL, and
again to enter CALL mode. The last number dialled
is displayed.
5 Short press the menu key to call the last number dialled.
OR
Dial the desired number using the keypad (press the clear
key to delete a character; press and hold to delete a
series of characters), then short press the menu key
to send.
6 Long press the menu key to exit menu mode.
Receiving an acknowledgement
When you call another radio, it may automatically generate a
tone sequence, beep or message to let you know that the
radio you have called is on and able to receive.
Making and receiving different types of calls 39
Page 40

Resending calls automatically
Your radio may have been programmed to resend individual
and group calls when they are not answered.
Your radio has two automatic callback features:
■ Deferred calling.
■ No acknowledgement retries.
Deferred calling
When you attempt to make a call on a channel that is busy,
the radio can store and send the call once the channel is free.
The radio will give a low-pitched beep if the channel is busy,
and will then give two long, medium-pitched beeps at
regular intervals until the channel is free, and the call can
be resent.
To cancel a deferred call:
■ Press any key.
No acknowledgement retries
When you send a call and there is no reply, NO
ACKNOWLEDGE
up to 15 times.
To cancel a call that is being resent:
■ Press any key.
will be displayed, and the call will be resent
40 Making and receiving different types of calls
Page 41
Receiving an individual or group call
When a call is received that contains your radio’s identity,
CALL will flash in the display and the radio gives a
ringing tone.
To accept a call:
■ Press the PTT key and begin speaking. If the call is a
group call, there is usually no need to respond.
The caller’s identity and status may also be displayed
(top right-hand corner):
CALL
The caller’s identity can be a name or a number, depending
on how your radio was programmed.
The caller’s status is displayed underneath the caller’s
identity. It can also be a name or number.
Responding to missed calls
Your radio may be programmed with ‘immediate callback’, to
help you manage missed individual and group calls.
Using immediate callback
When you miss a call the LED will flash amber at fast flash
rate, the display will flash
status may be displayed.
The immediate callback feature can only be used when the
caller’s identity is displayed.
To call back the missed caller:
■ Short press the menu key .
Making and receiving different types of calls 41
CAR 1
ON SITE
caller’s identity
caller’s status
CALL, and the caller’s identity and
Page 42

Informing other radio users of your status
You can inform other radio users of your current status by
sending them a status update, for example, ‘On site’. You
may be able to attach a status update to an individual or
group call.
About status messages
A status message contains information about your current
activity or location, which is sent to the called radio. Status
messages are defined when your radio is programmed. Each
message is assigned a number from 0 to 99, and an 8character name (for example,
Your radio may be programmed to automatically send a
status message when you send a selcall, or you may be able
to assign a status message.
Assigning a status message
To assign a status message to a call:
1 Long press the
menu key to enter menu mode (if the
radio displays a submenu option, press the clear key to
enter the main menu).
2 Scroll through the main menu options using the arrow
keys until
SEND SELCALL is displayed.
3 Short press the menu key to enter the Selcall submenu
and scroll using the arrow keys until
is displayed.
4 Select the desired status message from the available list
using the arrow keys
OR Enter a number from 0 to 99 using the keypad.
5 Long press the menu key to confirm your choice and exit.
When you next make a Selcall call, a status message will
be attached.
AT LUN CH or AT HOME).
SELECT STATUS
.
42 Making and receiving different types of calls
Page 43

Calling a telephone or a remote device
You can call a telephone or send control codes to a remote
device using a feature called DTMF (the tone-based system
used by the world telephone network).
There are two ways to make a DTMF call:
■ Using a preset call.
■ Dialling a number.
Making a preset DTMF call
A preset DTMF call may be assigned to one of the
function keys.
To make a call:
1 Select the channel the DTMF call is assigned to.
2 Press the assigned function key.
Different preset calls may be available on different channels.
One-touch preset calls
A single one-touch call may also be assigned to one of the
function keys.
To make a one-touch preset call:
■ Press the assigned function key.
Dialling a DTMF call
Note: This feature is only available for radios with an
alphanumeric keypad.
DTMF call strings can use numbers 0 to 9, letters A to D, and
the and keys.
Making and receiving different types of calls 43
Page 44

Making an emergency call
Activate emergency mode by using the function key
programmed for emergency mode.
Note: The emergency function key may be programmed for
either a short key press or long key press.
1 Press the emergency function key and an emergency call
is sent to your dispatcher, or some other predetermined
location. The radio then enters emergency mode.
While emergency mode is active, your radio may cycle
between receive and transmit, so that your dispatcher
can hear any activity near the radio.
Alternatively, your radio may appear to turn off but will
actually remain in emergency mode.
2 Reset the radio to normal operation at any time by
turning the radio off and then on.
Alternatively, emergency mode may be programmed to
end after a fixed period of time, or your dispatcher may
reset your radio to normal operation.
Using a double key press
To avoid accidental use of the emergency function, the
emergency call may have been programmed with a ‘double
keypress activation’ option.
The double keypress activation option will have been
programmed to be used with either a short or long press.
To make an emergency call using a double short press:
■ Short press the assigned function key twice within three
seconds.
To make an emergency call using a double long press:
■ Long press the assigned function key twice within
five seconds.
44 Making and receiving different types of calls
Page 45

Activating the automated emergency call feature
Your radio has an automated emergency feature called ‘lone
worker’. Lone worker enables an emergency call to be sent if
you become incapacitated while working alone.
The lone worker feature works by monitoring your activity. If
no key press is detected within a specified period, a warning
tone will sound (also for a specified period), after which an
emergency call will be made.
To turn the lone worker feature on and off:
■ Press the assigned function key.
To stop an emergency call from being sent (once the warning
tone has been activated):
■ Press any key.
Note: The time between when a key is pressed and the
warning tone is activated, and the duration of the warning
tone before an emergency call is made, vary depending on
how your radio was programmed.
Making and receiving different types of calls 45
Page 46

Sending and receiving text messages
Your radio may be able to send and receive text messages.
Reading text messages
When your radio receives a message,
message) flashes in the lower left-hand corner of the display
and the radio gives three short, medium-pitched beeps.
■ To read a message, long press the menu key . The
message appears across both rows of the display.
■ To scroll through the message, use the arrow keys .
■ To display a message from the start, hold down the PTT
key and press the left arrow key .
■ To display a message from the end, hold down PTT and
press the right arrow key .
Exiting message mode
When you have finished reading a message:
■ Long press the menu key to exit.
OR
■ Press the clear key to delete the message (the radio
reverts to the mode it was in before you viewed the
message).
Sending a text message
Note: This feature is only available for radios with an
alphanumeric keypad.
To send a message:
1 Long press the menu key
radio displays a submenu option, press the clear key
enter the main menu).
2 Scroll through the main menu options using the arrow
until SEND SDM is displayed, then short press
keys
the menu key to display ENTER SDM.
to enter menu mode (if the
SDM (short data
to
46 Making and receiving different types of calls
Page 47

3 Enter a new message using the keypad (see “Entering a
message” on page 47)
OR
Press an arrow key to begin editing an existing message,
then proceed in the same way as for entering a
new message.
4 Short press the menu key. The message,
ENTER ID will be
displayed, along with the receiver’s identity for the last
SDM transmission.
5 Short press the menu key again to send the message
using the existing ID.
OR
Enter a new ID using the keypad if you are calling a different radio (the receiver’s identity must be eight characters
long), then short press the menu key to send.
Note: Once the message has been sent, the radio will return
to the message entry mode in preparation for sending
another message.
6 Long press the menu key to exit menu mode.
Entering a message
A text messages can contain up to 32 characters. See “Using
the keypad to enter text” on page 21.
Making and receiving different types of calls 47
Page 48

Changing your radio’s settings
Your radio’s audible indicators, radio functions and display
settings can be customized to meet your requirements in the
Display Settings, User Settings and Alert Settings menus.
This section covers:
■ changing display settings (display settings menu)
■ changing operational settings (user settings menu)
■ changing audible tone settings (alert settings menu).
Changing display settings (Display Settings menu)
Note: Some display features may not be available or able to
be modified on your radio.
Display settings are changed in the display settings menu.
Individual items in the display settings menu may be
assigned to a function key.
To access the display settings menu:
1 Long press the menu key
radio displays a submenu option, press the clear key to
enter the main menu).
2 Scroll through the main menu options using the arrow
until DISPLAY SETTINGS is displayed.
keys
Activating Backlighting (Night Operation)
When backlighting is turned on, the display and keypad will
light up for a few seconds when a key is pressed, a call is
received or the channel is turned.
To turn backlighting on and off:
■ Press the assigned function key.
OR
1 Enter the display settings menu as described at the
beginning of this section.
to enter menu mode (if the
48 Changing your radio’s settings
Page 49

2 Short press the menu key , then scroll through the
available menu options until NIGHT is displayed.
3 Short press the menu key to turn backlighting on and off.
4 Long press the menu key to exit menu mode.
Adjusting contrast
If the radio’s display is too light or too dark, you can adjust
the LCD contrast using the contrast adjustment function.
The contrast can be adjusted using a function key or the
menu. After making the adjustment, the radio will
automatically return to its previous mode of operation after a
few seconds of inactivity.
To adjust the display contrast:
■ Press the assigned function key. The message CONTRAST
ADJUSTMENT
is displayed. Use the arrow keys to
adjust the contrast to the desired level.
OR
1 Enter the display settings menu as described at the
beginning of this section.
2 Short press the menu key , then scroll through the
available menu options until
ADJUST CONTRAST is
displayed.
3 Use the arrow keys
to adjust the contrast to the
desired level.
4 Long press the menu key to exit menu mode.
Resetting contrast to the default setting
Your radio may be programmed so that you can reset the
contrast to the factory’s default setting using function key 2.
To reset the contrast to the radio’s default setting:
■ Press and hold function key 2 while turning the radio off
then on again.
Changing your radio’s settings 49
Page 50

Displaying the received signal strength indicator (RSSI)
When this option is turned on, the strength of the received
signal is displayed in the lower left-hand corner of the menu
display .
To turn RSSI on and off:
1 Enter the display settings menu as described at the
beginning of this section.
2 Short press the menu key , then scroll through the
available menu options until
3 Short press the menu key to turn
RSSI is displayed.
RSSI ON and OFF.
4 Long press the menu key to exit menu mode.
Changing operational settings (User Settings menu)
Note: Some operation features may not be available or able
to be modified on your radio.
Operational settings are changed in the user settings menu.
Individual items in the user settings menu may be assigned
to a function key.
To access the user settings menu:
1 Long press the menu key
radio displays a submenu option, press the clear key
enter the main menu).
2 Scroll through the main menu options using the arrow
until USER SETTINGS is displayed.
keys
For information on modifying squelch or monitor settings,
see “Improving Your Radio’s Reception (Squelch)” on
page 36 and “Checking That a Channel Is Clear (Monitor)”
on page 37.
to enter menu mode (if the
to
Low power transmit
If you are using your radio in conditions where signal
strength is high, you can extend the shift life of your battery
50 Changing your radio’s settings
Page 51

by transmitting at low power. While low power transmit is
active, transmissions are made at low power rather than at
the preset power level.
Turning low power transmit on and off
While low power transmit mode is active, the low power
transmit icon is displayed in the icon bar.
To turn low power transmit on and off:
■ Press the assigned function key.
OR
1 Enter the user settings menu as described at the
beginning of this section.
2 Short press the menu key, then scroll through the
available menu options until
LOW PWR is displayed.
3 Short press the menu key to turn low power on and off.
4 Long press the menu key to exit menu mode.
Note: Some channels may have been programmed to always
transmit at low power.
Economy mode
Economy mode can be used when there is little or no activity
on the radio. When in economy mode, the radio cycles
between the receive state and a stand-by state, once there
has been no activity for a preset period. Receiving or sending
a call returns the radio to the fully active state.
To turn economy mode on and off:
■ Press the assigned function key.
OR
1 Enter the user settings menu as described at the
beginning of this section.
2 Short press the menu key , then scroll through the
available menu options until
ECONOMY is displayed.
Changing your radio’s settings 51
Page 52

3 Short press the menu key to turn economy mode on
and off.
4 Long press the menu key to exit menu mode.
Locking the keypad keys and the PTT key
The keypad lock and PTT lock prevents you from pressing a
key accidentally. Which keypad keys are locked depends on
how your radio was programmed, but the clear key can never
be locked.
Locking the keypad keys
To activate or deactivate the keypad lock:
■ Press the assigned function key.
OR
1 Enter the user settings menu as described at the
beginning of this section.
2 Short press the menu key , then scroll through the
available menu options until
KEYLOCK is displayed.
3 The current status (LOCKED or UNLOCKED) is displayed
underneath.
4 Short press the menu key to lock and unlock the keypad.
The keypad lock can also be deactivated by a long press
the clear key.
5 Long press the menu key to exit menu mode.
If a locked key is pressed, the radio gives a long, low-pitched
beep and displays the message
Locking the PTT key
KEYPAD LOCKED.
To activate or deactivate PTT lock:
■ Press the assigned function key.
OR
1 Enter the user settings menu as described at the
beginning of this section.
52 Changing your radio’s settings
Page 53

2 Short press the menu key , then scroll through the
available menu options until PTTLOCK is displayed.
3 The current status (
LOCKED or UNLOCKED) is displayed
underneath.
4 Short press the menu key to lock and unlock the PTT key.
5 Long press the menu key to exit menu mode.
Answering a call
If a call is received while the keypad is locked, press any key
to answer.
Choosing a DTMF Dialling Mode
Note: This setting applies to TP8120 radios only.
DTMF dialling has two modes: normal and buffered:
■ Normal: Each character in DTMF string is transmitted as
the key is pressed.
■ Buffered: The DTMF string is transmitted after all the
characters in the string have been entered.
To select normal or buffered dialling:
1 Enter the user settings menu as described at the
beginning of this section.
2 Short press the menu key , then scroll through the
available menu options until
current status (
NORMAL or UBUFFERED) is displayed
DTMF is displayed. The
underneath.
3 Short press the menu key to select normal or
buffered dialling.
4 Long press the menu key to exit menu mode.
Bypassing Repeater Stations (Communicating Directly with Other Radios)
If you are out of range of a repeater you can communicate
directly with another radio by using a feature called ‘repeater
talkaround’.
Changing your radio’s settings 53
Page 54

To activate repeater talkaround:
■ Press the assigned function key.
To deactivate repeater talkaround:
■ Press the function key again or change to another
channel.
Note: Repeater talkaround is not accessible through
the menu.
Changing Audible Tone Settings
(Alert Settings Menu)
Note: Some or all audible tone features may not be available or able to be modified on your radio.
Key tone settings can be modified using the alert settings
menu. Audible tones can be modified using the alert settings
menu or a function key (if assigned).
To access the alert settings menu:
1 Long press the menu key
radio displays a submenu option, press the clear key to
enter the main menu).
2 Scroll through the main menu options using the arrow
keys until
About Audible Tones
Your radio has two features for controlling which audible
tones you hear:
■ Key tones: This feature controls the tones you hear
when you press a function key, or a key on the keypad.
Key tones can be turned on and off.
■ Audible tones: This feature provides overall control for
all audible tones, including key tones, receive call tones,
warning tones and so on. Audible tones can be turned on
and off. If audible tones is turned off, key tones will also
be off.
ALERT SETTINGS is displayed.
to enter menu mode (if the
54 Changing your radio’s settings
Page 55

Turning Key Tones On and Off
To turn keypress tones on and off:
1 Enter the alert settings menu as described at the
beginning of this section.
2 Short press the menu key , then scroll through the
available menu options until
KEYTONES is displayed.
3 Short press the menu key to select on or off.
4 Long press the menu key to exit menu mode.
Disabling Audible Tones
Note: Audible tones may not be available or able to be
modified on your radio.
Audible tones can be turned on and off using a function key
(if assigned).
Turning Audible Tones On and Off
To turn audible tones on and off:
■ Press the assigned function key.
OR
1 Enter the user settings menu as described at the
beginning of this section.
2 Short press the menu key , then scroll through the
available menu options until
TONES is displayed.
3 Short press the menu key to turn audible tones on
and off.
4 Long press the menu key to exit menu mode.
Adjusting the Level of Audible Tones
Audible tones have two settings: high and low.
To change between the high and low setting:
1 Enter the user settings menu as described at the
beginning of this section.
Changing your radio’s settings 55
Page 56

2 Short press the menu key , then scroll through the
available menu options until LEVEL is displayed. The
current status (HIGH or LOW) is displayed underneath.
3 Short press the menu key to select high or low.
4 Long press the menu key to exit menu mode.
56 Changing your radio’s settings
Page 57

Charging and caring for batteries
This section describes how to charge your Tait radio battery
as well as care for it, to ensure safe operation, maximum
performance and prolonged battery life.
Warning: Your battery is designed and manufactured to the
highest standard. If you are using a Lithium-ion battery,
special care must be taken to avoid personal injury or property damage. For your safety, follow the instructions included
with your Tait charger and battery.
This section covers:
■ radio low battery warning
■ removing the battery
■ before changing the battery
■ charging the battery
■ storing batteries
■ disposing of batteries.
Radio low battery warning
When the battery is almost empty, your radio warns you in
the following ways:
■ The battery indicator on the radio display flashes .
■ The LED indicator slowly flashes red .
■ A low-pitched beep sounds.
You should recharge or replace the battery as soon as
possible.
When the battery is completely empty, the radio emits a
long, low-pitched beep and then stops operating. Turn off
the radio immediately
Charging and caring for batteries 57
Page 58
Removing the battery
See also “Attaching the battery” on page 17.
To remove the battery from the radio, so that the battery can
be charged or replaced:
1 Squeeze and quickly release both battery catches to
release the catch mechanism.
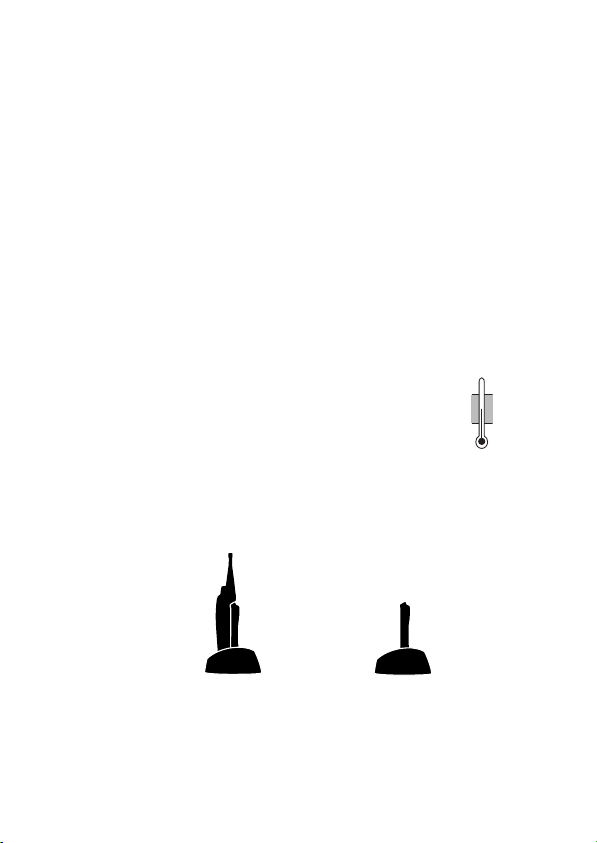
Note: Don’t push down on the battery; allow the catch
mechanism to release the battery from the radio.
2 Remove the battery from the radio.
Before changing the battery
Before you begin to charge your battery, the battery
temperature must be close to the room temperature in which
the battery is to be charged.
Note: Charging starts only when the
battery pack is between 5°C (41°F) and
40°C (104°F).
Charging the battery
Note: The radio must be turned off if placed in the charger
with the battery.
turn off your
radio while
charging
40°C
5°C
104°F
41°F
58 Charging and caring for batteries
Page 59

1 Connect the charger to the correct Tait power adaptor,
and power on the power adaptor. The three charger LEDs
all light up for about two seconds.
2 Put the battery in the charger and check that it is
correctly seated.
The red LED
charging.
When the green LED
charged.
Note:
off the power adaptor and refer to
charger” on page 62
3 Remove the battery when you are ready. The charger will
not overcharge the battery. Nor will removing the battery
early damage it.
Storing batteries
When not in use for a month or more, batteries should be
stored correctly to prolong their life.
Storing a Li-ion battery
To prepare a Li-ion battery for storage:
■ Discharge the battery by allowing the radio to turn
itself off. (The radio display flashes , the radio emits a
long, low-pitched beep and then stops operating.)
■ Remove the battery from the radio.
■ Store the battery in a cold, dry place.
lights up
If the amber LED
.
, to indicate that the battery is
lights up, the battery is fully
lights up, there is a fault. Switch
“Troubleshooting your
Charging and caring for batteries 59
Page 60

Storing a nickel metal hydride (NiMH) battery
To prepare an NiMH battery for storage:
■ Remove the battery from the radio. The battery can be
either charged or discharged.
■ Store the battery in a cold, dry place.
Using batteries after storage
Batteries that have been stored must be charged before
being used. See “Charging the battery” on page 58.
NiMH batteries that have been stored for longer than three
months may not last an entire shift. This is normal. If stored
properly, the battery’s optimal capacity should be restored
after two or three shifts (charge/discharge cycles).
Disposing of batteries
Batteries should be disposed of properly.
Discharge Li-ion batteries before disposing of them.
When disposing of a battery, be sure to do so in an
environmentally sensitive manner. If disposed of in landfills,
batteries can be very hazardous to the environment.
Please contact your radio provider for information on
recycling programs in your area.
60 Charging and caring for batteries
Page 61

Troubleshooting
If you are experiencing difficulty operating your radio, you
may find the following sections helpful. Consult your radio
provider for assistance, if necessary.
This section covers:
■ when your radio won’t turn on
■ removing a belt clip
■ checking the version of your radio
■ troubleshooting your charger
■ general care
■ cleaning the radio.
When your radio won’t turn on
If the red LED on the radio does not light up when the radio
is turned on, it is probable that power is not reaching the
radio. Check the following:
■ Is the battery firmly attached to the radio?
■ Is the battery sufficiently charged?
■ Is the battery charger working properly?
If all appears to be in order, but your radio still fails to
operate properly, contact your radio provider for further
assistance.
Removing a belt clip
The belt clip has been designed to prevent accidental
removal, but you can take it off, if required.
To remove a belt clip from a battery:
1 Insert a flat screwdriver blade or similar flat object under
the lip of the release lock (that is, between it and the
metal slider).
Troubleshooting 61
Page 62

2 Lift the release lock up (away from the metal slider) and
hold it in position.
3 Slide the belt clip out.
Checking the version of your radio
Your radio provider may ask you for the hardware and
firmware version of your radio, for troubleshooting purposes.
Troubleshooting your charger
Charger LEDs do not light up
Possible reason(s) and solution(s) include:
■ The power adaptor is not connected, or not turned on.
Remove power adaptor plug and refit.
■ The battery has not been detected. Check that the battery
contacts are clean and battery is seated correctly.
■ The charger contacts are stuck. Check that the charger
contacts move freely.
Charger amber LED lights up
Possible reason(s) and solution(s) include:
■ Charging is suspended because the battery is either too
hot or too cold. Charging will begin when the temperature of the battery is between 5°C (41°F) and 40°C
(104°F).
■ The battery is not compatible with the charger. Check
that the label on the battery charger (Li-ion or NiMH)
matches the label on the battery.
■ There is incorrect voltage to the charger. Check you are
using the correct power adaptor and it is not faulty.
■ The battery may be faulty. If problem persists consult your
radio provider for advice.
62 Troubleshooting
Page 63

General care
Your radio requires no regular maintenance other than
ensuring that the battery has sufficient charge and that no
damage has occurred to the antenna or the battery.
To prevent permanent damage to the radio case, do not
allow the radio to come into contact with detergents,
alcohol, aerosol sprays, or petroleum-based products.
For battery care, see “Charging and caring for batteries” on
page 57.
Cleaning the radio
If you need to clean the radio case, use a cloth dampened
with clean water. Do not immerse the radio in fluids.
Troubleshooting 63
Page 64

Function key options
Note: Some functions are not permitted in some countries.
The features below can be assigned to the function keys
when the radio is programmed. If you do not know which
features have been programmed for your radio, see your
system administrator.
For information on function keys, see “About the function
keys” on page 19.
Common functions
Function Description
Audible Tones
Backlighting
Channel’s DTMF Preset
Contrast Adjustment
Disable Monitor
Economy Mode
Emergency DTMF
Emergency Selcall
Keypad Lock
Lone Worker
Turns audible tones on and off.
Turns backlighting on. Backlighting will turn off
after a programmed period.
Sends the DTMF preset call assigned to the current
channel.
Allows you to adjust the display contrast.
Disables the monitor facility, if it is active.
Turns economy mode on and off.
Activates DTMF emergency mode.
Activates Selcall emergency mode.
Locks the keypad so the keys cannot be activated
accidentally; a long press of the clear key deactivates the keypad lock. What keys are locked
depends on how the radio was programmed;
however, the clear key cannot be locked.
Monitors radio activity so that an emergency call
can be sent if a worker becomes incapacitated.
64 Function key options
Page 65

Function Description
Low Power Transmit
Changes the transmit power from medium or high
to low. Pressing the key again returns the transmit
power to the programmed level. Channels can also
be programmed for low power.
Night Use
Nuisance Delete
Turns night operation mode on and off.
Temporarily deletes the current channel from the
scanning regime.
One Touch Call
Sends a preset Selcall call or DTMF call, or selects a
channel.
Preset Selcall
Sends the preset Selcall call assigned to the current
channel.
Program Flexiscan
Allows you to enter Flexiscan programming mode.
You can now change group membership and
change priority channels.
Repeater Access Tone
Sends the repeater access tone to key up the trans-
mitter.
Repeater Talkaround
Allows you to bypass normal repeater operation and
communicate directly with another radio. Pressing
the key again or change to another channel to turn
off repeater talkaround.
Squelch Override
Turns squelch override on and off, so the user can
hear all activity on a channel, including noise. The
radio may be programmed so that a long press of
the clear key turns squelch override on and off.
Toggle Flexiscan
Turns Flexiscan on and off. Your radio may be
programmed so that Flexiscan is turned off when
the PTT key is released after making a call when
Flexiscan is active.
Toggle Monitor
Toggles monitor on and off, so that the user can
hear all traffic on a channel. A short press the clear
key may also toggle monitor.
Function key options 65
Page 66

Tait general software licence agreement
This legal document is an Agreement between
you (the “Licensee”) and Tait Electronics
Limited (“Tait”). By using any of the Software
or Firmware items prior-installed in the related
Tait product, included on CD or downloaded
from the Tait website, (hereinafter referred to
as “the Software or Firmware”) you agree to
be bound by the terms of this Agreement.
If you do not agree to the terms of this Agreement, do not install and use any of the Software or Firmware. If you install and use any of
the Software or Firmware that will be deemed
to be acceptance of the terms of this
licence agreement.
The terms of this Agreement shall apply
subject only to any express written terms of
agreement to the contrary between Tait and
the Licensee.
Licence
TAIT GRANTS TO YOU AS LICENSEE THE NON-EXCLU-
SIVE RIGHT TO USE THE SOFTWARE OR FIRMWARE ON
A SINGLE MACHINE PROVIDED YOU MAY ONLY:
1
COPY THE SOFTWARE OR FIRMWARE INTO ANY
MACHINE READABLE OR PRINTED FORM FOR BACKUP
PURPOSES IN SUPPORT OF YOUR USE OF THE
PROGRAM ON THE SINGLE MACHINE (CERTAIN
PROGRAMS, HOWEVER, MAY INCLUDE MECHANISMS
TO LIMIT OR INHIBIT COPYING, THEY ARE MARKED
COPY PROTECTED”), PROVIDED THE COPYRIGHT
“
NOTICE MUST BE REPRODUCED AND INCLUDED ON
ANY SUCH COPY OF THE SOFTWARE OR FIRMWARE;
AND / OR
2 MERGE IT INTO ANOTHER PROGRAM FOR YOUR USE
ON THE SINGLE MACHINE (ANY PORTION OF ANY
SOFTWARE OR FIRMWARE MERG ED INTO ANOTHER
PROGRAM WILL CONTINUE TO BE SUBJECT TO THE
TERMS AND CONDITIONS OF THIS AGREEMENT).
THE LICENSEE MAY NOT DUPLICATE, MODIFY, REVERSE
COMPILE OR REVERSE ASSEMBLE ANY SOFTWARE OR
FIRMWARE IN WHOLE OR PART.
Important Notice
THE SOFTWARE OR FIRMWARE MAY CONTAIN OPEN
SOURCE SOFTWARE COMPONENTS (“OPEN SOURCE
COMPONENTS”). OPEN SOURCE COMPONENTS ARE
66 Tait general software licence agreement
EXCLUDED FROM THE TERMS OF THIS AGREEMENT
EXCEPT AS EXPRESSLY STATED IN THIS AGREEMENT
AND ARE COVERED BY THE TERMS OF THEIR RESPEC-
TIVE LICENCES WHICH MAY EXCLUDE OR LIMIT ANY
WARRANTY FROM OR LIABILITY OF THE DEVELOPERS
AND/OR COPYRIGHT HOLDERS OF THE OPEN SOURCE
COMPONENT FOR THE PERFORMANCE OF TH OSE OPEN
SOURCE COMPONENTS. YOU AGREE TO BE BOUND BY
THE TERMS AND CONDITIONS OF EACH SUCH LICENCE.
FOR MORE INFORMATION SEE:
http://support.taitworld.com/go/opensource
Title to Software
THIS AGREEMENT DOES NOT CONSTITUTE A CONTRACT
OF SALE IN RELATION TO THE SOFTWARE OR
FIRMWARE SUPPLIED TO THE LICENSEE. NOT WITH-
STANDING THE LICENSEE MAY OWN THE MAGNETIC
OR OTHER PHYSICAL MEDIA ON WHICH THE SOFTWARE
OR FIRMWARE WAS ORIGINALLY SUPPLIED, OR HAS
SUBSEQUENTLY BEEN RECORDED OR FIXED, IT IS A
FUNDAMENTAL TERM OF THIS AGREEMENT THAT AT
ALL TIMES TITLE AND OWNERSHIP OF THE SOFTWARE
OR FIRMWARE, WHETHER ON THE ORIGINAL MEDIA OR
OTHERWISE, SHALL REMAIN VESTED IN TAIT OR THIRD
PARTIES WHO HAVE GRANTED LICENCES TO TAIT.
Term and Termination
THIS LICENCE SHALL BE EFFECTIVE UNTIL TERMINATED
IN ACCORDANCE WITH THE PROVISIONS OF THIS
AGREEMENT. THE LICENSEE MAY TERMINATE THIS
LICENCE AT ANY TIME BY DESTROYING ALL COPIES OF
THE SOFTWARE OR FIRMWARE AND ASSOCIATED
WRITTEN MATERIALS. THIS LICENCE WILL BE TERMI-
NATED AUTOMATICALLY AND WITHOUT NOTICE FROM
TAIT IN THE EVENT THAT THE LICENSEE FAILS TO
COMPLY WITH ANY TERM OR CONDITION OF THIS
AGREEMENT. THE LICENSEE AGREES TO DESTROY ALL
COPIES OF THE SOFTWARE OR FIRMWARE AND ASSO-
CIATED WRITTEN MATERIALS IN THE EVENT OF
SUCH TERMINATION.
Limited Warranty
THE SOFTWARE OR FIRMWARE (INCLUDING OPEN
SOURCE COMPONENTS) IS SUPPLIED BY TAIT AND
ACCEPTED BY THE LICENSEE “AS IS” WITHOUT
WARRANTY OF ANY KIND EI THER EXPRESSED OR
IMPLIED, INCLUDING BUT NOT BEING LIMITED TO ANY
IMPLIED WARRANTIES AS TO MERCH ANTABILITY OR
Page 67

FITNESS FOR ANY PARTICULAR PURPOSE. THE LICEN-
SEE ACKNOWLEDGES THAT THE SOFTWARE OR
FIRMWARE (INCLUDING OPEN SOURCE COMPO-
NENTS) IS USED BY IT IN BUSINESS AND ACCORD-
INGLY TO THE MAXIMUM EXTENT PERMITTED BY LAW
NO TERMS OR WARRA NTIES WHICH ARE IMPLIED BY
LEGISLATION SHALL APPLY TO THIS AGREEMENT. TAIT
DOES NOT WARRANT THAT THE FUNCTIONS
CONTAINED IN THE SOFTWARE OR FIRMWARE
(
INCLUDING OPEN SOURCE COMPONENTS) WILL
MEET THE LICENSEE’S REQUIREMENTS OR THAT THE
OPERATION OF THE SOFTWARE OR FIRMWARE
(
INCLUDING OPEN SOURCE COMPONENTS) WILL BE
UNINTERRUPTED OR ERROR FREE.
Exclusion of Liability
IN NO CIRCUMSTANCES SHALL TAIT BE UNDER ANY
LIABILITY TO THE LICENSEE, OR ANY OTHER PERSON
WHATSOEVER, WHETHER IN TORT (INCLUDING NEGLI-
GENCE), CONTRACT (EXCEPT AS EXPRESSLY
PROVIDED IN THIS AGREEMENT), EQUITY, UNDER
ANY STATUTE, OR OTHERWISE AT LAW FOR ANY
LOSSES OR DAMAGES WHETHER GENERAL, SPECIAL,
EXEMPLARY, PUNITIVE, DIRECT, INDIRECT OR CONSE-
QUENTIAL ARISING OUT OF OR IN CONNECTION WITH
ANY USE OR INABILITY OF USING THE SOFTWARE OR
FIRMWARE (INCLUDING OPEN
SOURCE COMPONENTS).
THE LICENSEE’S SOLE REMEDY AGAINST TAIT WILL BE
LIMITED TO BREACH OF CONTRACT AND TAIT’S SOLE
AND TOTAL LIABILITY FOR ANY SUCH CLAIM SHALL
BE LIMITED AT THE OPTION OF TAIT TO THE REPAIR
OR REPLACEMENT OF THE SOFTWARE OR FIRMWARE
OR THE REFUND OF THE PURCHASE PRICE OF THE
SOFTWARE OR FIRMWARE.
General
THE LICENSEE CONFIRMS THAT IT SHALL COMPLY
WITH THE PROVISIONS OF LAW IN RELATION TO THE
SOFTWARE OR FIRMWARE.
Law and Jurisdiction
THIS AGREEMENT SHALL BE SUBJECT TO AND
CONSTRUED IN ACCORDANCE WITH NEW ZEALAND
LAW AND DISPUTES BETWEEN THE PARTIES
CONCERNING THE PROVISIONS HEREOF SHALL BE
DETERMINED BY THE NEW ZEALAND COURTS OF
LAW. PROVIDED HOWEVER TAIT MAY AT ITS ELEC-
TION BRING PROCEEDINGS FOR BREACH OF THE
TERMS HEREOF OR FOR THE ENFORCEMENT OF ANY
JUDGEMENT IN RELATION TO A BREACH OF THE
TERMS HEREOF IN ANY JURISDICTION TAIT CONSID-
ERS FIT FOR THE PURPOSE OF ENSURING COMPLI-
ANCE WITH THE TERMS HEREOF OR OBTAINING
RELIEF FOR BREACH OF THE TERMS HEREOF.
No Dealings
THE LICENSEE MAY NOT SUBLICENSE, ASSIGN OR
TRANSFER THE LICENCE OR THE PROGRAM EXCEPT
AS EXPRESSLY PROVIDED IN THIS AGREEMENT. ANY
ATTEMPT OTHERWISE TO SUBLICENSE, ASSIGN OR
TRANSFER ANY OF THE RIGHTS, DUTIES OR OBLIGA-
TIONS HEREUNDER IS VOID.
No Other Terms
THE LICENSEE ACKNOWLEDGES THAT IT HAS READ
THIS AGREEMENT, UNDERSTANDS IT AND AGREES TO
BE BOUND BY ITS TERMS AND CONDITIONS. THE
LICENSEE FURTHER AGREES THAT SUBJECT ONLY TO
ANY EXPRESS WRITTEN TERMS OF AGREEME NT TO
THE CONTRARY BETWEEN TAIT AND THE LICENSEE
THIS IS THE COMPLETE AND EXCLUSIVE STATEMENT
OF THE AGREEMENT BETWEEN IT AND TAIT IN RELA-
TION TO THE SOFTWARE OR FIRMWARE WHICH
SUPERSEDES ANY PROPOSAL OR PRIOR AGREEMENT,
ORAL OR WRITTEN AND ANY OTHER COMMUNICA-
TIONS BETWEEN THE LICENSEE AND TAIT RELATING
TO THE SOFTWARE OR FIRMWARE.
Tait general software licence agreement 67
Page 68

 Loading...