


TM9100
P25 Mobile Radios
User’s Guide
MMA-00007-12 · Issue 12 · March 2016


Contents
For your safety........................................................ 9
Menu maps............................................................ 19
1 About this guide .................................................. 21
Safety warnings used in this guide ................................. 21
Related documentation................................................... 22
2 Getting started ..................................................... 23
About P25 digital radios.................................................. 24
Lack of static noise ..................................................... 24
Coverage.................................................................... 24
About the radio controls.................................................. 25
About the keypad microphone.................................... 26
About the hand-held control head .............................. 27
Understanding the radio display ..................................... 28
Radio display icons .................................................... 28
Understanding the radio indicators................................. 29
Status indicators......................................................... 29
Audible tones.............................................................. 30
Using function keys to access frequently used features. 32
Viewing the function key settings ............................... 32
Navigating the radio’s menus ......................................... 33
Using the Main menu ................................................. 33
Accessing frequently used menus.............................. 34
3 Basic operation .................................................... 36
Turning the radio on and off ........................................... 37
Security lock on power-up feature .............................. 37
Adjusting the speaker volume ........................................ 38
Activating the external speaker ...................................... 38
Locking and unlocking the keypad ................................. 39
Selecting a zone ............................................................. 40
Selecting a channel ........................................................ 41
Limiting call time ............................................................. 41
Checking recent calls ..................................................... 42
4 Operating in conventional mode ........................ 43
Making a call................................................................... 44
Making an individual call................................................. 44
Understanding talkgroups............................................... 45
Making an emergency call.............................................. 46
Receiving calls................................................................ 47
Contents 3

Identifying the talking party ........................................ 47
Receiving a two-tone call ........................................... 48
Communicating directly with other radios....................... 49
Checking that the channel is clear ................................. 50
Turning monitor on and off ......................................... 50
Using the radio in different repeater areas ..................... 51
Selecting a voting group............................................. 51
Suspending a channel from a voting group................ 52
Hearing faint and noisy signals ...................................... 53
Turning squelch override on and off........................... 53
5 Operating in P25 trunking mode .........................54
About P25 trunking......................................................... 55
Checking that the system is available ............................ 55
Making a talkgroup call................................................... 57
Receiving a talkgroup call .............................................. 58
Making an individual call ................................................ 59
Receiving an individual call ............................................ 60
Emergency calls............................................................. 60
Making a phone call ....................................................... 61
Unconnected calls .......................................................... 62
Failsoft mode operation.................................................. 63
Radio-based failsoft ................................................... 63
Infrastructure failsoft................................................... 63
Dynamic regrouping ....................................................... 64
6 Scanning ...............................................................65
7 P25 services ..........................................................77
4 Contents
About scanning............................................................... 66
Activating standard scanning ......................................... 68
Activating background scanning..................................... 68
Changing the background scan group assigned
to the function key ...................................................... 69
Activating in-zone scanning............................................ 69
Activating talkgroup scanning......................................... 70
Making a call while scanning.......................................... 71
Suspending a channel from a scan group...................... 71
Editing a scan group....................................................... 72
Selecting a group to edit ............................................ 72
Viewing group membership........................................ 74
Adding a channel to a group ...................................... 74
Deleting a channel from a group ................................ 75
Changing a group’s transmit channel......................... 76
Changing a group’s first or second priority channel... 76
Messages....................................................................... 78

Sending a message.................................................... 78
Status update ................................................................. 80
Status request ................................................................ 81
Call alert ......................................................................... 82
Radio check.................................................................... 83
Radio unit monitor .......................................................... 84
Radio inhibit and uninhibit .............................................. 85
8 Location services ................................................ 87
About location information .............................................. 88
About location statuses .................................................. 88
Viewing location information........................................... 89
Sending location information .......................................... 90
Receiving and logging location information .................... 92
Accessing logged location information ........................... 93
9 Emergency operation .......................................... 95
About emergency calls ................................................... 96
Making a priority call....................................................... 97
Standard emergency mode ............................................ 98
Stealth and non-stealth emergency modes................ 98
What happens during an emergency call? ................. 99
Activating emergency mode ..................................... 100
About manual emergency operation............................. 101
Making a manual emergency call............................. 101
Receiving a manual emergency call......................... 102
Canceling a manual emergency call......................... 102
Accessing emergency location information .................. 104
Using the Location menu.......................................... 104
Using the Last stored menu ..................................... 105
Loneworker monitoring ................................................. 105
Activating loneworker monitoring.............................. 106
Responding to a loneworker alarm........................... 106
Delaying the emergency action
(conventional mode only) ......................................... 107
10 Encryption .......................................................... 108
About encryption........................................................... 109
About the proper key detect feature ......................... 109
Encrypting calls ............................................................ 109
Making an encrypted call.............................................. 110
Receiving an encrypted call.......................................... 110
Changing the radio’s encryption key ............................ 111
Changing the transmit encryption key ...................... 111
Changing the transmit encryption key back to
the default setting ..................................................... 112
Contents 5

Changing the encryption keyset ............................... 112
Removing encryption keys from the radio .................... 113
Deleting an encryption key....................................... 113
Deleting all encryption keys ..................................... 113
Updating encryption keys over-the-air.......................... 114
Using an encryption demonstration key ....................... 114
Activating the demo key ........................................... 114
Making an encrypted call using the demo key ......... 115
Receiving an encrypted call using the demo key ..... 115
11 Customizing radio settings ...............................116
Reducing power consumption ...................................... 117
Turning low power transmit on or off........................ 117
Changing the volume of all audible indicators.............. 118
Changing the volume of keypress tones ...................... 118
Changing to quiet operation ......................................... 119
Changing to silent operation......................................... 119
Changing the external alert option ............................... 120
Turning on backlighting ................................................ 120
Turning backlighting on momentarily ....................... 121
Adjusting the backlighting level ................................ 121
Adjusting the display contrast....................................... 122
12 Troubleshooting .................................................123
About troubleshooting .................................................. 124
System error message ................................................. 124
When your radio won’t turn on ..................................... 124
Identifying the radio’s audible tones ............................. 124
Viewing radio information............................................. 125
Changing the radio ID .................................................. 125
Running diagnostics tests ............................................ 126
Removing the microphone ........................................... 128
General care................................................................. 128
13 Glossary ..............................................................129
6 Contents
Index .....................................................................133
Directive 1999/5/CE Declaration of Conformity137
Tait Software Licence Agreement......................138

Copyright and trademarks
All information contained in this document is the property of
Tait Limited. All
whole or in part, be copied, photocopied, reproduced,
translated, stored, or reduced to any electronic medium or
machine-readable form, without prior written permission from
Tait Limited.
The word TAIT and the TAIT logo are trademarks of Tait
Limited.
All trade names referenced are the service mark, trademark
or registered trademark of the respective manufacturers.
rights reserved. This document may not, in
Disclaimer
There are no warranties extended or granted by this
document. Tait Limited accepts no responsibility for damage
arising from use of the information contained in the document
or of the equipment and software it describes. It is the
responsibility of the user to ensure that use of such
information, equipment and software complies with the laws,
rules and regulations of the applicable jurisdictions.
Enquiries and comments
If you have any enquiries regarding this document, or any
comments, suggestions and notifications of errors, please
contact your regional Tait office.
Updates of manual and equipment
In the interests of improving the performance, reliability or
servicing of the equipment, Tait Limited reserves the right to
update the equipment or this document or both without
prior
notice.
Intellectual property rights
This product may be protected by one or more patents or
designs of Tait Limited together with their international
equivalents, pending patent or design applications, and
registered trade marks: NZ
NZ
415278, NZ 508806, NZ 519742/NZ 516280, NZ 524369,
NZ
524378, NZ 524509, NZ 530819, NZ 534475, NZ 547713,
NZ
569985, NZ 577009, NZ 579051, NZ 579364, NZ 584534,
NZ
586889, NZ 592624, NZ 593888, NZ 600346, NZ 610563,
NZ
615954, NZ 629167, NZ 630718, NZ 700387, NZ 700908,
NZ
708662, NZ 710766, NZ 711325, NZ 714188,
AU
2004216984, AU 2015215962, AU 339127, AU 339391,
409837, NZ 409838, NZ 415277,
7

AU2015904806, EU 000915475-0001, EU 000915475-0002,
UK
1518031.8, US 8301682, US 13/542147, US 14/032876,
US
14/495334, US 14/725922, US 14/818712, US 14/832420,
US
62/128101, US 62/128129, US 640974, US 640977,
US
698339, US 702666, US 7758996, US 7937661,
US
8902804, US 9107231.
Environmental responsibilities
Tait Limited is an environmentally responsible company
which supports waste minimization, material recovery and
restrictions in the use of hazardous materials.
The European Union’s Waste Electrical and Electronic
Equipment (WEEE) Directive requires that this product be
disposed of separately from the general waste stream when
its service life is over. For more information about how to
dispose of your unwanted Tait product, visit the Tait WEEE
website at
environmentally responsible and dispose through the original
supplier, or contact Tait Limited.
Tait Limited also complies with the Restriction of the Use of
Certain Hazardous Substances in Electrical and Electronic
Equipment (RoHS) Directive in the European Union.
In China, we comply with the Measures for Administration of
the Pollution Control of Electronic Information Products. We
will comply with environmental requirements in other markets
as they are introduced.
www.taitradio.com/weee. Please be
8

For your safety
Before using your radio, please read the following
important safety and compliance information.
Radio frequency exposure information
For your own safety and to ensure you comply with the
radio frequency (RF) exposure guidelines of the
United States Federal Communication Commission’s
(FCC), Industry Canada, and those from other
administrations, please read the following information
before using this radio
Using this radio
You should use this radio only for work-related purposes
(it is not authorized for any other use) and if you are fully
aware of, and can exercise control over, your exposure to
RF energy. To prevent exceeding FCC RF exposure
limits, you must control the amount and duration of RF
that you and other people are exposed to.
.
It is also important that you:
■
Do not remove the RF Exposure label from the radio.
■
Ensure this RF exposure information accompanies
the radio when it is transferred to other users.
■
Do not use the radio if you do not adhere to the guidelines on controlling your exposure to RF.
Controlling your exposure to RF energy
Warning RF exposure hazard!
To comply with FCC and Industry Canada RF
exposure limits, mount the antenna at a location such
that no person or persons can come closer than 35
inches (0.9 m) to the antenna:
For radios with a transmit power >25 W:
VHF radios must be installed using an antenna
mounted centrally on the vehicle roof, with a gain of
2.15 dBi or 5.15 dBi.
UHF and 800 MHz radios must be installed using an
For your safety 9

antenna mounted either centrally on the vehicle roof
with a gain of 2.15 dBi or 5.65 dBi, or centrally
mounted on the trunk with a gain of 5.65 dBi.
900 MHz radios must be installed using an antenna
mounted either centrally on the vehicle roof or
centrally mounted on the trunk with a gain of 2.15 dBi
or 8 dBi.
For radios with a transmit power of 25 W:
The radio must be installed using an externally
mounted antenna with a gain of either 2.15 dBi or
5.15 dBi.
This radio emits radio frequency (RF) energy or radio
waves primarily when calls are made. RF is a form of
electromagnetic energy (as is sunlight), and there are
recommended levels of maximum RF exposure.
To control your exposure to RF and comply with the
maximum exposure limits for occupational/controlled
environments, follow these guidelines:
■
Do not talk (transmit) on the radio more than the rated
transmit duty cycle. This is important because the
radio radiates more energy when it is transmitting
than when it is receiving.
10 For your safety
■
While you are transmitting (talking or sending data) on
the radio, you must ensure that there is always a distance of 35 inches (0.9 m) between people and the
antenna. This is the minimum safe distance. For 110
W mobiles, the minimum safe distance is 44 inches
(1.1 m).
■
Use the radio only with Tait-approved antennas and
attachments, and make only authorized modifications
to the antenna otherwise you could damage the radio
and violate FCC regulations.
For more information on what RF energy is and how to
control your exposure to it, visit the FCC website at
www.fcc.gov/oet/rfsafety/rf-faqs.html
.

Health Canada warning statement
The installer of this radio equipment must ensure that the
antenna is located or pointed such that it does not emit an
RF field in excess of Health Canada limits for the general
population; consult Safety Code 6, obtainable from the
Health Canada’s website
http://www.hc-sc.gc.ca
Compliance with RF energy exposure standards
This two-way radio complies with these RF energy
exposure standards and guidelines:
■
United States Federal Communications Commission,
Code of Federal Regulations; 47 CFR §§ 1.1307,
1.1310, and 2.1091.
■
American National Standards Institute (ANSI) / Institute of Electrical and Electronic Engineers
(IEEE) C95.1-1992.
■
Institute of Electrical and Electronic Engineers (IEEE)
C95.1-1999 Edition.
■
European Directive 2004/40/EC on minimum health
and safety requirements regarding the exposure of
workers to the risks arising from physical agents
(electromagnetic fields).
.
This radio complies with the IEEE and ICNIRP exposure
limits for occupational/controlled RF exposure
environments at operating duty factors of up to 50% talk
to 50% listen.
Conformité aux normes d’exposition à l’énergie
RF
Cette radio émetteur-récepteur se conforme aux normes
et aux règlements d’exposition à l’énergie RF :
■
La Commission fédérale de la communication des
Etats-Unis, Code de règlements fédéraux (CFR) Titre
47 Sections 1.1307, 1.1310 et 2.1091 (radios
mobiles) ou 2.1093 (radios portatives).
■
American National Standards Institute (ANSI) / Institute of Electrical and Electronic Engineers (IEEE)
C95. 1-1992.
For your safety 11

■
Institute of Electrical and Electronic Engineers (IEEE)
C95.1-1999 Edition.
■
La directive européenne 2004/40/EC concernant les
prescriptions minimales de sécurité et de santé relatives à l'exposition des travailleurs aux risques dus
aux agents physiques (champs électromagnétiques).
Cette radio se conforme aux limites d’exposition de l’IEEE
(FCC) et ICNIRP pour les environnements d’exposition
au rayonnement RF professionnel et contrôlé aux cycles
de marche de 50% en mode transmission et 50% en
mode réception.
Radio frequency emissions limits in
the USA
Part 15 of the FCC Rules imposes RF emission limits on
receivers. This radio complies with Part 15 of the FCC
Rules. Operation is subject to the condition that this
device does not cause harmful interference.
Radio frequency emissions limits in
Canada
12 For your safety
This device complies with Industry Canada licence
exempt RSS standard(s). Operation is subject to the
following two conditions: (1) this device may not cause
interference, and (2) this device must accept any
interference, including interference that may cause
undesired operation of the device.
Le présent appareil est conforme aux CNR d'Industrie
Canada applicables aux appareils radio exempts de
licence. L'exploitation est autorisée aux deux conditions
suivantes : (1) l'appareil ne doit pas produire de
brouillage, et (2) l'utilisateur de l'appareil doit accepter tout
brouillage radioélectrique subi, même si le brouillage est
susceptible d'en compromettre le fonctionnement.

USA public safety bands
(764 –776 MHz and 794 – 806 MHz)
The Code of Federal Regulations (CFR) Title 47
Subpart R deals with the use of frequencies in the 764 to
776 MHz and 794 to 806 MHz bands.
Low-power channels
This radio complies with § 90.531 (b) (3) and
§ 90.531 (b) (4) of 47 CFR. These sections state that only
low-power transmission is permitted on the
following channels:
■
Regional Planning channels, as defined in
§ 90.531 (b) (3).
■
Itinerant channels, as defined in § 90.531 (b) (4).
Use of encryption
This radio complies with § 90.553 (a) of 47 CFR. This
states that:
■
Encryption is not permitted on the nationwide Interoperability calling channels. These channels are defined
in § 90.531 (b) (1) (ii).
■
Radios using encryption must have a readily accessible switch or control to allow the radio user to
disable encryption.
EMC regulatory compliance in
Australia
This product meets all ACMA regulatory requirements for
electromagnetic compatibility (EMC). For more
information about EMC compliance, visit the ACMA
website at
www.acma.gov.au
.
For your safety 13

Frequency band reserved for
distress beacons
Frequency band 406 to 406.1 MHz is reserved for use by
distress beacons. Transmissions should not be made
within this frequency band.
Health, safety and electromagnetic
compatibility in Europe
In the European Community, radio and
telecommunications equipment is regulated by Directive
1999/5/EC, also known as the Radio and
Telecommunications Terminal Equipment (R&TTE)
directive. The requirements of this directive include
protection of health and safety of users, as well as
electromagnetic compatibility.
Intended purpose of product
This product is an FM radio transceiver. It is intended for
radiocommunication in the Private Mobile Radio (PMR) or
Public Access Mobile Radio (PAMR) services, to be used
in all member states of the European Union (EU) and
states within the European Economic Area (EEA).
14 For your safety
Restrictions
This product can be programmed to transmit on
frequencies that are not harmonized throughout the EU/
EEA, and will require a licence to operate in each member
state.
This product can be programmed for frequencies or
emissions that may make its use illegal. Where
applicable, a license must be obtained before this product
is used. All license requirements must be observed.
Limitations may apply to transmitter power, operating
frequency, channel spacing, and emission.
Declaration of conformity
Brief Declarations of Conformity appear on
this booklet. To download the formal declaration of
conformity, go to
www.taitradio.com/eudoc
page 137
.
of

Interference with electronic devices
Warning
malfunction due to the lack of protection from RF energy
that is present when your radio is transmitting.
Examples of electronic devices that may be affected by
RF energy are:
■
aircraft electronic systems
■
vehicular electronic systems such as fuel injection,
anti-skid brakes, and cruise control
■
medical devices such as pacemakers and hearing
aids
■
medical equipment in hospitals or health care facilities.
Switch off the radio before boarding an aircraft. Using your
radio while in the air is not permitted.
Consult the manufacturer (or its representative) of any
such electronic devices to determine whether electronic
circuits in those devices will perform normally when the
radio is transmitting.
Warning
the radio if you suspect it is interfering with the pacemaker.
Some electronic devices may be prone to
If you have a pacemaker, immediately turn off
If there is interference between your hearing aid and the
radio, please discuss an alternative solution with the
hearing aid manufacturer.
Potentially explosive atmospheres and
blasting areas
Warning
in a potentially explosive atmosphere, turn off the radio
before entering such an atmosphere. An explosion could
cause serious injury or death. Examples of potentially
explosive atmospheres include filling stations, and any
environment where there are flammable liquids, gases, or
dusts.
Unless the radio is specifically certified for use
For your safety 15

Warning
caps, a blasting area, or any area where you are
instructed to turn off a two-way radio. Obey all signs and
instructions. Interference with blasting operations could
cause serious injury or death.
Turn off the radio before approaching blasting
Radio installation and operation in
vehicles
Warning
deployment areas. Do not install, charge, or place a radio
near such areas. An activated airbag can propel a
portable radio with sufficient force to cause serious injury
to vehicle occupants. An airbag may not perform to
specification if obstructed by a radio.
Warning
fuel tanks, fuel and brake lines, or battery cables, refer to
the installation guide for the radio, and to the vehicle
manufacturer’s manual, before installing electronic
equipment in the vehicle.
Using a handheld microphone or a radio while driving a
vehicle may violate the laws and legislation that apply in
your country or state. Please check the vehicle
regulations in your area.
Keep the radio away from airbags and airbag
To avoid damage to existing wiring, airbags,
Radio protection when charging the
vehicle battery
16 For your safety
Notice
cable before charging the vehicle battery, connecting a
second battery, or using power from another vehicle (e.g.
when jump-starting the vehicle).
Always remove the fuses from the radio power

Electromagnetic compatibility in
European vehicles
In the European Community, radio equipment fitted to
automotive vehicles is regulated by Directive 72/245/EEC
and its amendments. The requirements of this directive
cover the electromagnetic compatibility of electrical or
electronic equipment fitted to automotive vehicles.
To meet the requirements of Directive 72/245/EEC and its
amendments, installation of this product in a vehicle must
be performed according to the instructions provided by
the vehicle manufacturer.
Notice
the vehicle’s type-approval. The owner could be held
responsible for any damage resulting from vehicle failure
that can be attributed to RF energy interfering with the
vehicle systems.
Failure to install the product correctly may void
Unapproved modifications or changes
to radio
The radio is designed to satisfy the applicable compliance
regulations. Do not make modifications or changes to the
radio that are not expressly approved by Tait. Failure to
do so could invalidate compliance requirements and void
the user’s authority to operate the radio.
High radio surface temperatures
Caution
heatsink fins can become hot during prolonged operation.
Do not touch these parts of the radio.
EN 60950 requirements (25 watt mobiles)
This radio complies with the European Union standard
EN 60950 when operated up to the rated 33% duty cycle
of two minutes transmit and four minutes receive, and with
ambient temperatures of 30 °C or lower.
The bottom surface of the radio and the
For your safety 17

Caution
external temperature of the radio to rise higher than this
standard permits.
Operation outside these limits may cause the
110 watt mobiles
Do not place objects on the radio. The heatsink needs a
clearance of at least one inch (2.5 cm) and a free flow
of air.
18 For your safety

Menu maps
This section shows the menus and submenus that may be
programmed for your radio. Some features are controlled by
software licenses (SFEs) and may not be available with your
radio.
Main menu
Channels
Zones
Individual call
Phone call
Dial radio call
Services
Messages
Status update
Status request
Call alert
Radio check
Radio monitor
Radio inhibit
Radio uninhibit
Talkgroups
Priority call
Recent calls
Security
Encryption
Change all
Preset keys
Change keyset
OTAR
Rekey request
Advanced
Zeroize key
Zeroize all
Demo key
Trunking
Site lock
Dynamic regrouping
Band scan
Repeater
Hunt force
Hunt toggle
Repeater toggle
Repeater
Activate
Emergency
Acknowledge
Last stored
Radio settings
See detailed menus on
the following page.
Location Svs
Own Location
Team locations
Recent contacts
Send logs
Send on PTT
Diagnostics
Menu maps 19

Radio settings
Functions
Low power tx
Monitor
Lock radio
Set scan key
Squelch override
Repeater
Scanning
PA speaker
Call Settings
Ignore 2-tone
Call queuing
Extra features
Loneworker
Alert settings
Indicator level
Keypress tones
Quiet operation
Silent operation
External alert
Display settings
Backlighting
Backlight level
Contrast adjust
Talk party ID
RSSI
Radio info
Key settings
Version info
Radio FW
Radio HW
Head FW
Head HW
Radio ID
Serial number
Alias
P25 IP address
MDT IP address
Advanced
Edit groups
20 Menu maps

1 About this guide
This user’s guide provides information about TM9100
mobile radios.
The radio behavior described in this guide applies to
radios with firmware version 8.03. To check the
radio’s firmware version, see "Viewing radio
information" on page 125. If your radio does not
operate as you expect, contact your radio provider for
assistance.
Safety warnings used in this guide
Please follow exactly any instruction that appears in
the text as an ‘alert’. An alert provides necessary
safety information as well as instruction in the proper
use of the product. This user’s guide uses the
following types of alert:
Warning This alert is used when there is a hazardous
situation which, if not avoided, could result in death or
serious injury.
Caution This alert is used when there is a hazardous
situation which, if not avoided, could result in minor or
moderate injury.
Notice This alert is used to highlight information that
is required to ensure procedures are performed
correctly. Incorrectly performed procedures could
result in equipment damage or malfunction.
This icon is used to draw your attention to
information that may improve your
understanding of the equipment or procedure.
About this guide 21

Related documentation
The following documentation is also available for your
Tait radio, which you can access from the Tait
Technical Support website
(http://support.taitradio.com):
■ Safety and Compliance Information—supplied
with each radio. (The same information is included
in this user’s guide.)
■ Installation Guide—covers installing TM9100
mobile radios, microphones, antennas, emergency switches, and external alert devices.
■ Accessory installation instructions—may be sup-
plied with an accessory.
22 About this guide

2 Getting started
This section gives an overview of your P25 radio,
describes the radio’s controls and indicators, and
explains how the radio menus are organized.
This section covers:
■ About P25 digital radios
■ About the radio controls
■ Understanding the radio display
■ Understanding the radio indicators
■ Using function keys to access frequently used fea-
tures
■ Navigating the radio’s menus
Getting started 23

About P25 digital radios
Your P25 digital radio can be programmed for P25
conventional or P25 trunked operation. Analog
conventional operation is also available, with dualmode channels able to transmit and receive both
digital and analog calls.
You may notice differences between digital and
analog calls in terms of:
■ static noise in low signal areas, and
■ radio coverage in marginal reception areas.
Lack of static noise
On digital networks there is no static noise, even in
low signal areas. This lack of static is because your
digital radio removes the ‘noise’ from the call, so that
you hear only clear voice.
Coverage
24 Getting started
With digital networks, a call remains clear and then
drops off quickly at the border of a coverage area. The
reason for this is that a digital call is either received or
it isn't. With analog networks, the background noise in
a call gets progressively worse when you are in fringe
areas or even slightly outside normal coverage areas.

About the radio controls
The radio controls are the PTT key, volume control,
on / off key, scroll keys, selection keys and function
keys. Some keys have functions assigned to both
short and long key presses:
■ a short key press is less than one second, and
■ a long key press is more than one second.
The radio controls and their functions are described in
the following sections.
PTT key
(press-to-talk)
microphone
display
on/off key
volume
control
radio status
LEDs
green
red
orange
speaker
microphone
socket
emergency
Name Function
PTT key Press and hold to transmit and release to
Volume control Rotate to change the speaker volume
On/off key Turn the radio on or off with a long press
Left and right
selection keys
Scroll keys Scroll up and down through a list of menu
Emergency
key
Function keys Programmed for frequently used options
key
left selection key right selection key
listen
Action determined by the text above the
selection key
options, scroll left and right in messages,
or select the Quick Access menu
Activates emergency mode
scroll
keys
function keys
1 to 4
Getting started 25
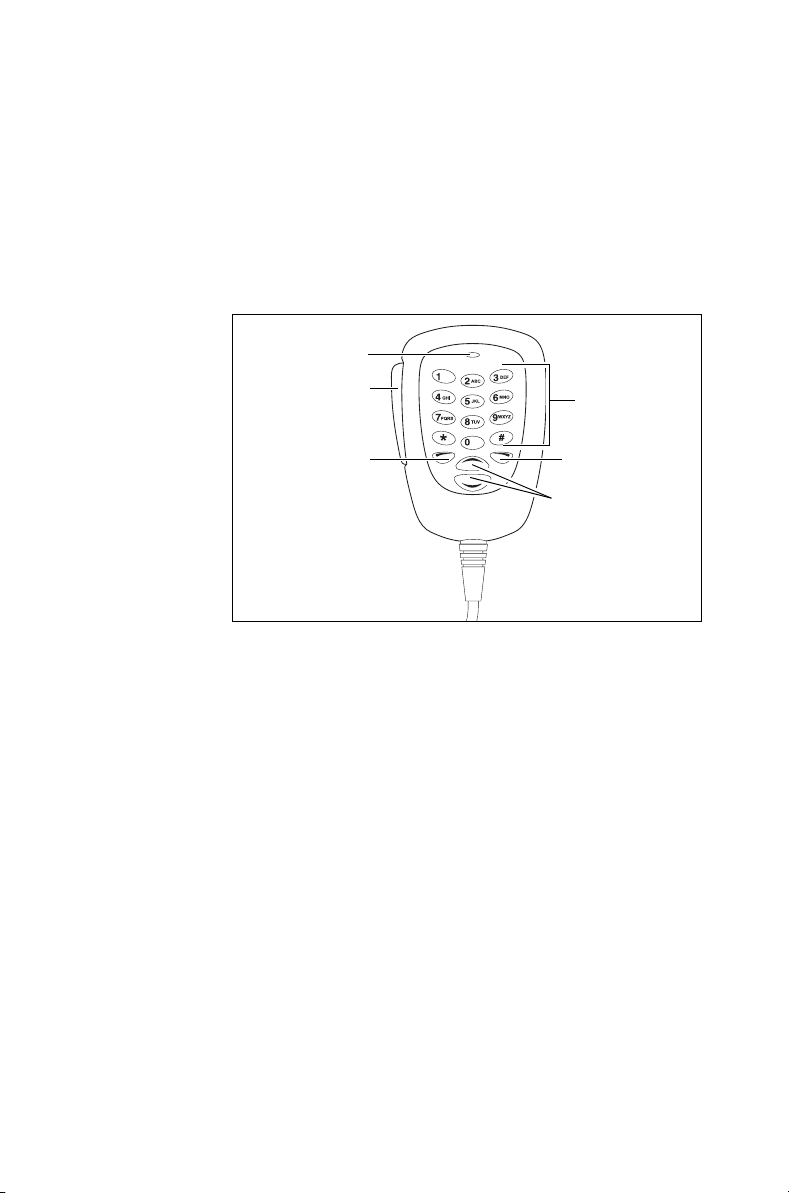
About the keypad microphone
Your radio may have a keypad microphone installed.
The keypad microphone has a PTT key as well as
alphanumeric keys, two scroll keys, and left and right
selection keys.
The PTT key, the scroll keys and the selection keys all
work in the same way as those on the radio control
head (see "About the radio controls").
microphone
PTT key
(press-to-talk)
left selection
key
alphanumeric
keys
right selection
key
scroll keys
26 Getting started
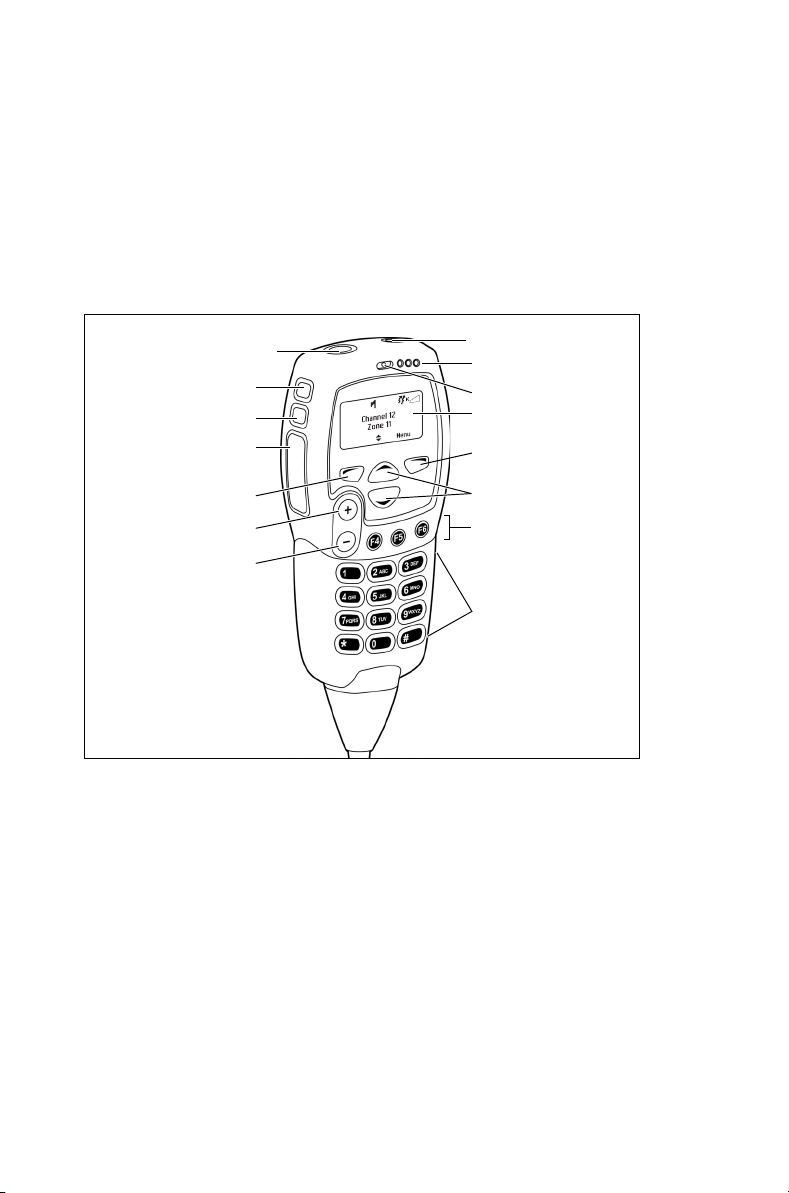
About the hand-held control head
Your radio may have a hand-held control head installed,
to enable you to operate the radio at a distance from the
radio body.
The keys and controls work in the same way as those
on the standard control head, with the exception of the
PTT and volume up and down keys. The hand-held
control head also has two additional function keys.
function key 1
function key 2
function key 3
PTT key
(press-to-talk)
left selection key
volume up
volume down
on/off key
status LEDs
microphone
display
right selection
key
scroll keys
function keys 4
to 6
alphanumeric
keys
Getting started 27
Understanding the radio display
The messages and icons you see on your radio
display depend on the mode in which your radio is
operating and the way it is programmed.
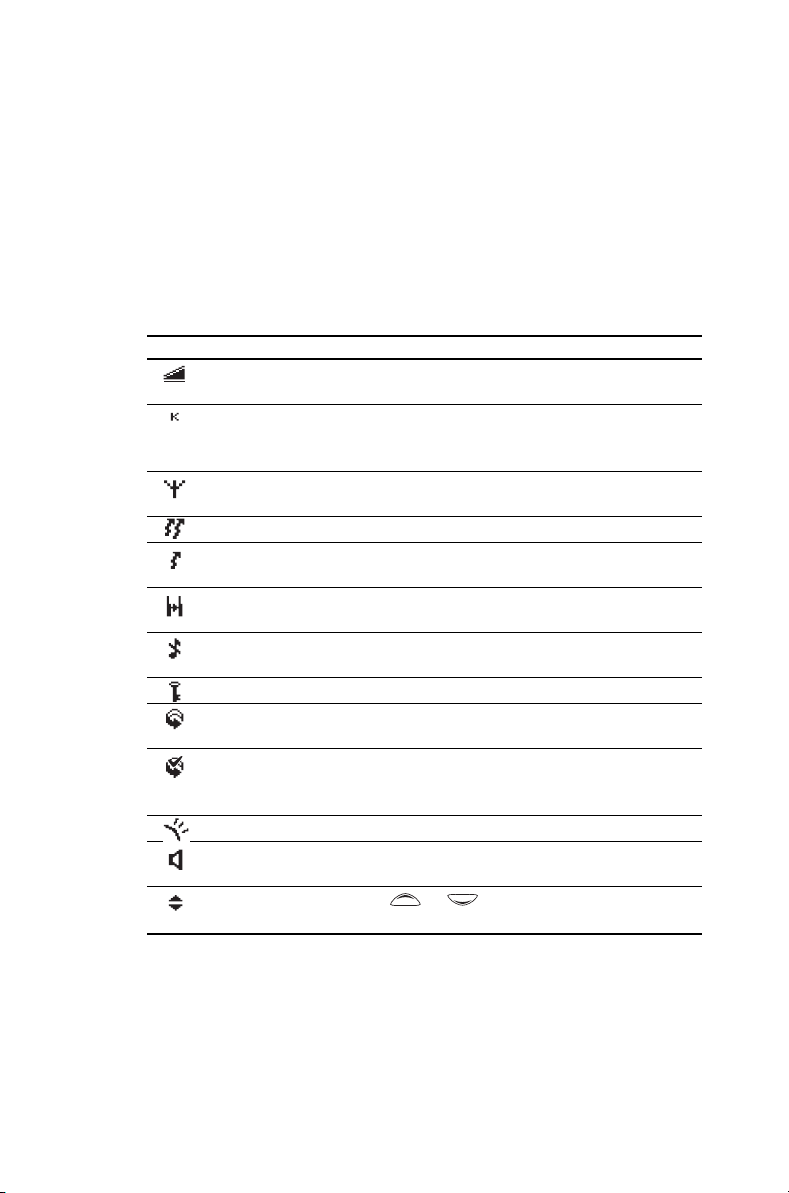
Radio display icons
These are some of the icons you may see on your
radio display:
Icon Meaning
Signal strength indicator: the more bars, the stronger the
signal being received by your radio
Zone: this letter represents the zone in which your radio is
operating, where A is zone 1, Z is zone 26 and AD is zone 30
(in the example shown, K represents zone 11)
Trunking system available: your radio is operating on a P25
trunking system
Transmit: your radio is transmitting
Low-power transmit: Low-power transmit: your radio is set to
transmit on low power
Repeater talkaround: your radio is operating in repeater
talkaround mode, or you are on a simplex channel
Silent operation: your radio’s audible tones have been
turned off
Encryption: your radio’s transmissions are encrypted
Scanning: your radio is monitoring a group of channels or
talkgroups for activity
Scanning: your radio is monitoring a group of channels or
talkgroups for activity, and the currently selected channel or
talkgroup is a member of the scan group.
External alert: external alert is turned on
Monitor or squelch override: monitor or squelch override is
active
Scrolling: you can use or
access a Quick Reference menu
to move through a list, or
28 Getting started
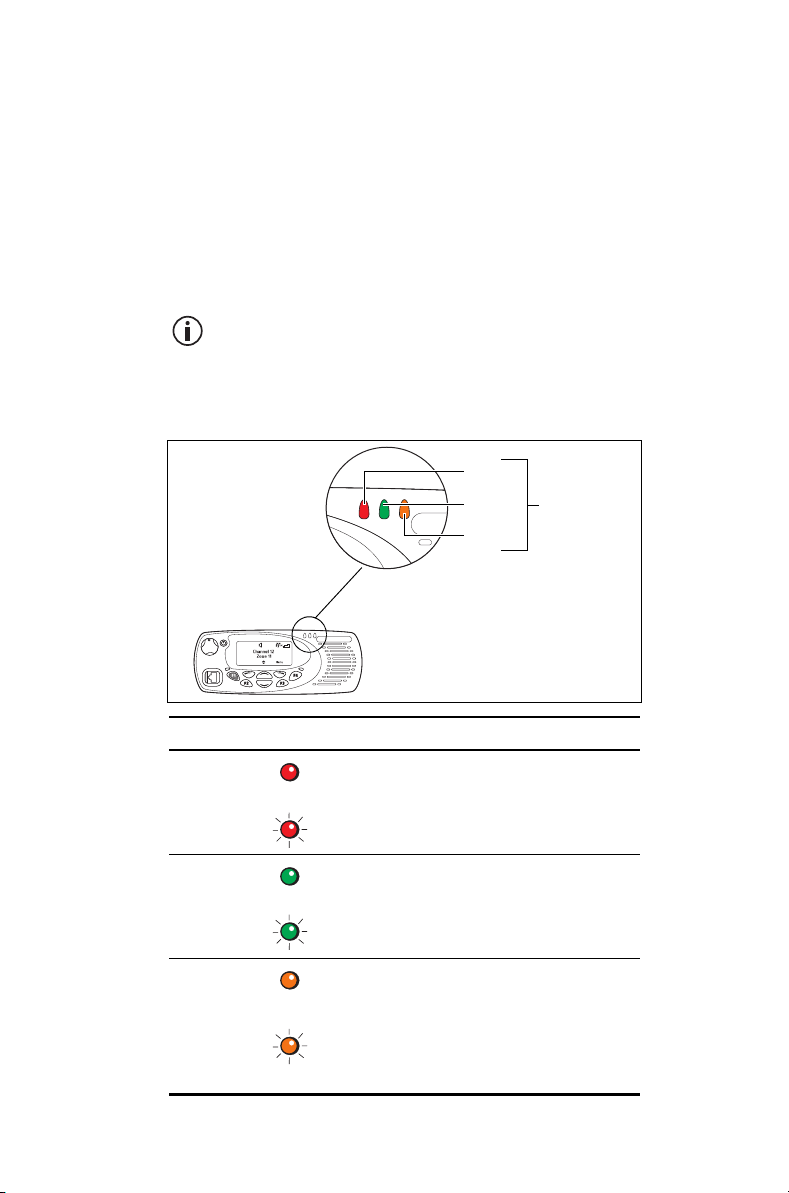
Understanding the radio indicators
The status LED indicators and the radio’s audible
tones—together with the radio display—all combine to
give you information about the state of your radio.
The most common way the indicators work is
described in the following sections.
The way these indicators behave may be
affected by the way your radio is programmed.
Status indicators
red
green
orange
status
LEDs
Color Meaning
Red
(transmit)
Green
(receive)
Orange
(scanning)
Glowing: your radio is transmitting
Flashing: your transmit timer is about to
expire
Glowing: the current channel is busy
Flashing: you have received a call or
monitor is active
Glowing: your radio is scanning a group
of channels for activity
Flashing: your radio has detected
activity on a channel, and has halted on
this channel
Getting started 29

Audible tones
The radio uses audible tones to alert you to its status:
■ Radio controls and keypress tones—the tones
and beeps you hear when you press your radio’s
keys or use the controls.
■ Incoming call tone—when the radio is receiving
a call.
■ Warning tones—when there is an error.
Warning If quiet or silent mode is turned on, you will
not hear any alert tones.
Some of the more common audible tones are
described below:
Tone Mea ning
One short
beep
One short,
low-pitched
beep
One long, lowpitched beep
Two short
beeps
One short,
high-pitched
beep
■ Valid keypress: The action you have
attempted is permitted.
■ Function activated: A function has
been turned on (using either the Main
menu or a function key).
Function deactivated: A function has been
turned off (using either the Main menu or
a function key).
■ Invalid keypress: the action you have
attempted is not permitted
■ Transmission inhibited: you have
attempted to transmit, but for some
reason you cannot make a call at
this time
■ Radio turned on: The radio is powered
on and ready to use.
■ Radio is revived: The radio has been
made operable by your service provider.
Radio is stunned: The radio has been
made inoperable by your service provider.
30 Getting started
 Loading...