

Page 1
Ultra-Sense™
Lavatory Faucet S-6080
Battery Powered, Sensor-Activated
Installation, Operation & Service Brief
Model Numbers
■ S-6080.......Sensor Faucet
S-6080-G...Sensor Faucet with
■
grid strainer drain assembly
Tools & Materials
3 mm
(included)
Plumbers
Putty
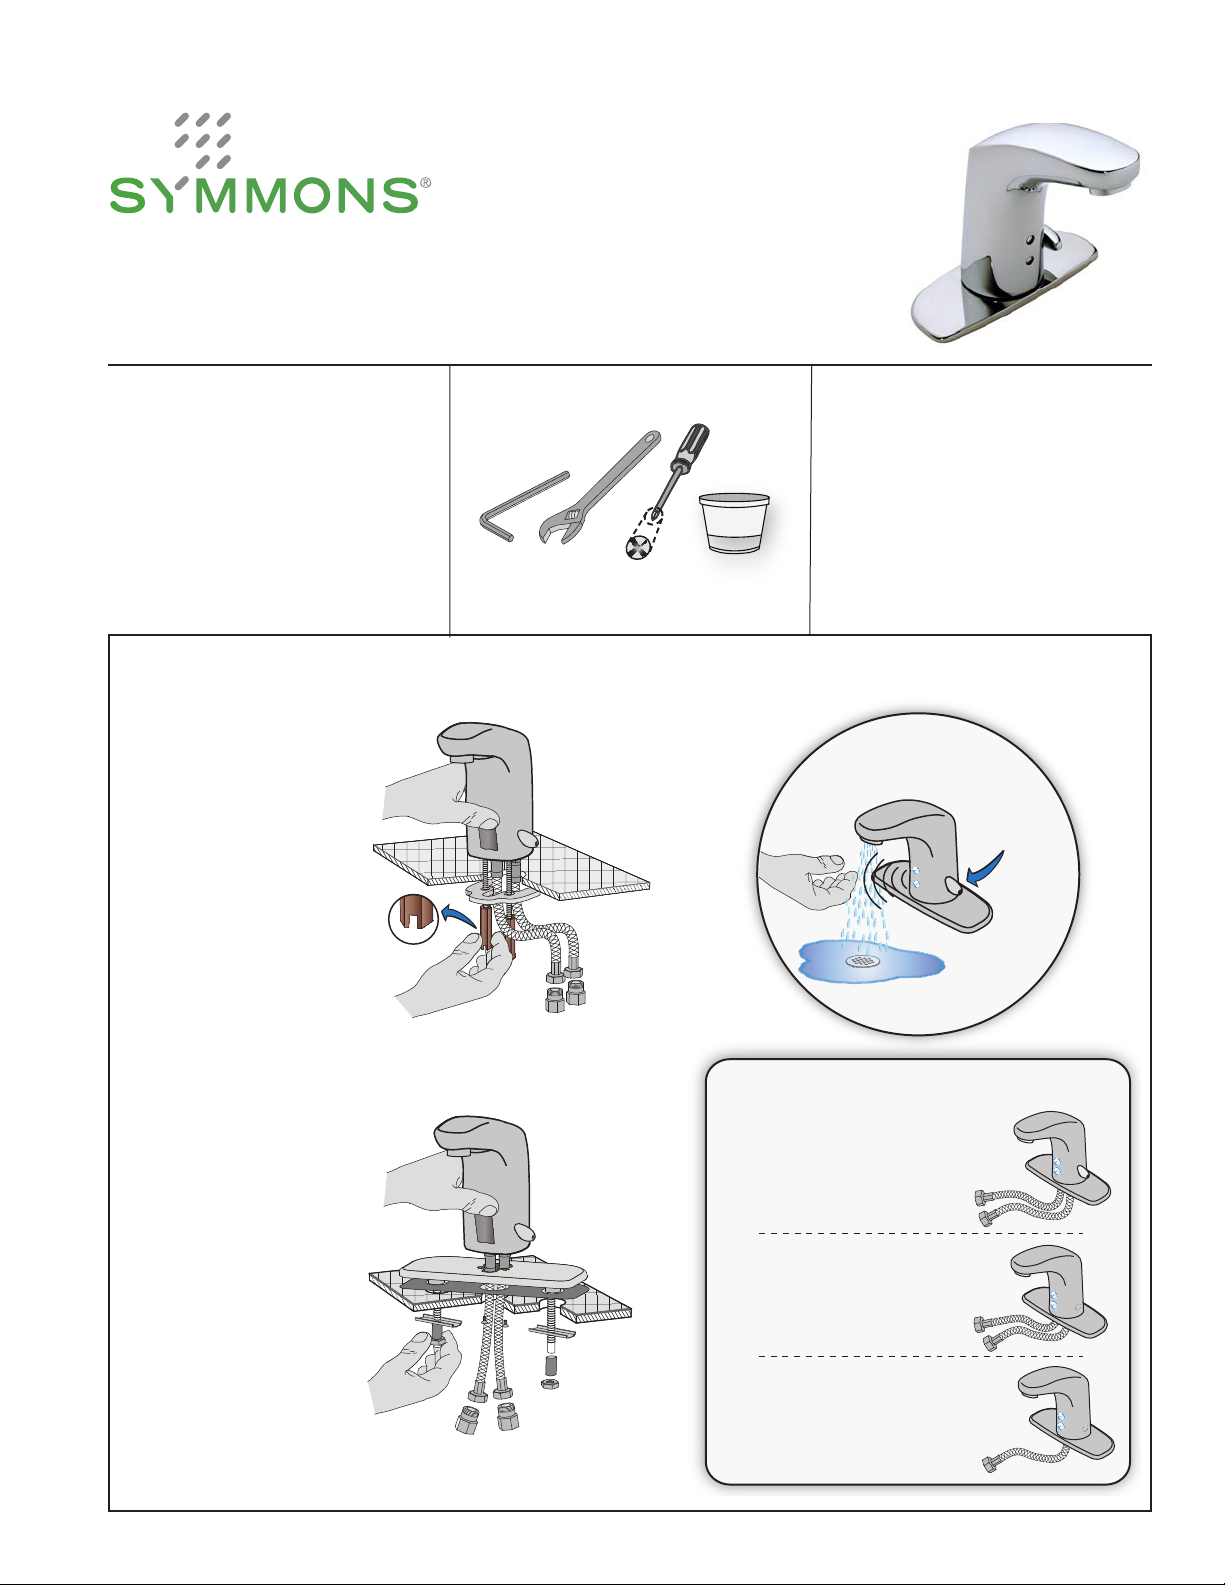
Quick Install Guide Ultra-Sense Lavatory Faucet, S-6080
Single hole mount
nished deck
Step 1
Attach faucet to deck
Step 2
Connect water
supply lines
front view
Need Help?
Symmons customer service:
(800) 796-6667, (781) 848-2250
Email: customerservice@symmons.com
Monday - Friday 7:30 am - 7:00 pm EST
www.symmons.com/service
■ Technical help
■ Product information
■ Warranty policy
Operation
(sensor activated)
Temperature
adjust
Three hole mount
Step 1
Attach faucet to deck
with deck plate
Step 2
Connect water
supply lines
Hot & Cold
supply inputs
Hot & Cold
supply inputs
nished deck
front view
Water supply configuration options
1)
Hot & Cold supply with
temperature adjust lever
handle (factory standard)
2)
Hot & Cold supply with
preset tempered water
(field configured)
3)
Single supply with
mixed tempered water
(field configured)
Page 2
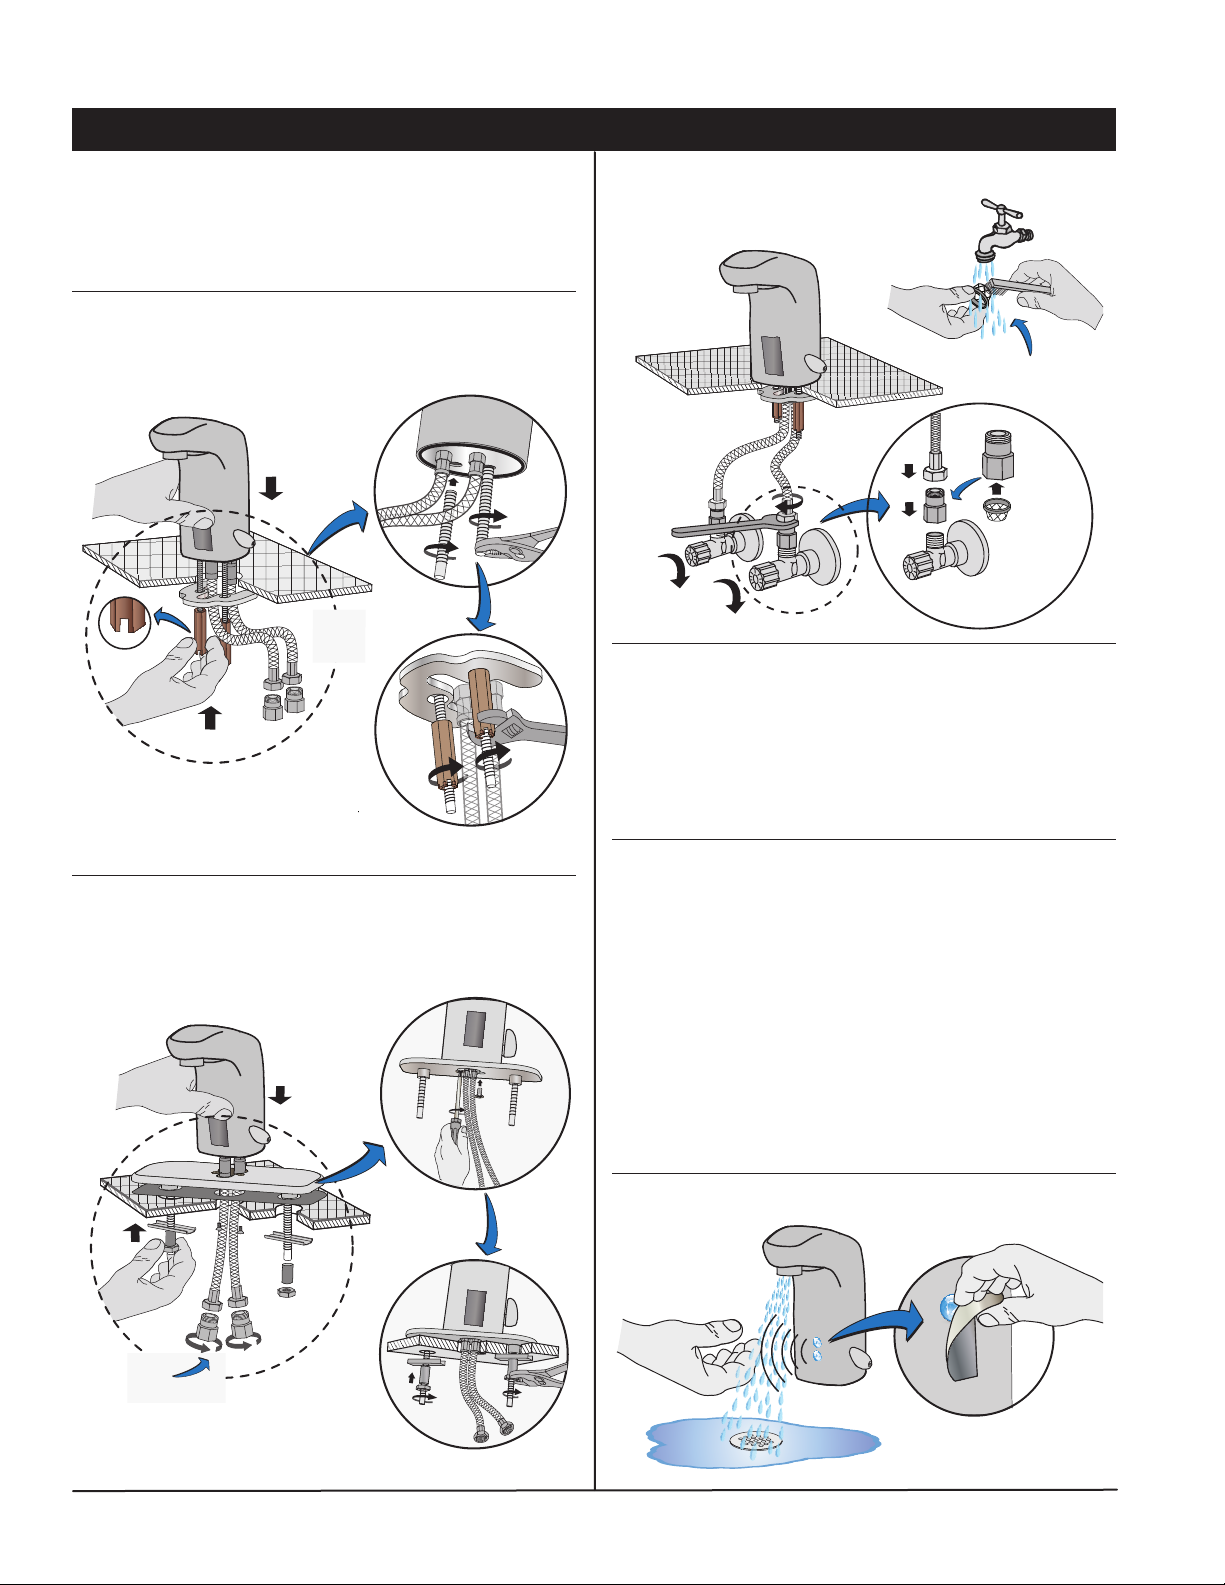
Installation Instructions
Important! Prior to connecting the water supply, ensure
supply lines are ushed. Particles can clog lter and result in
malfunction. Excessive particles from supply lines may require
installing a separate ecient lter.
Step 1 Attach faucet to deck (1 hole)
Single hole mount without deck plate
nished deck
front view
Step 2 Connect water supply line
servicing strainer
check
strainer
OFF
OFF
Step 3 Modify faucet for preset tempered hot
cold supply (Cong option #2 only)
■ Remove temperature control handle and limit stop.
■ Re-insert handle to adjust supply temperature.
Step 1 Attach faucet to deck (3 hole)
Three hole mount with deck plate
check
strainers
nished deck
front view
■ Remove handle and replace with push plug.
Step 4 Modify faucet for single supply with
pre-mixed water (Cong option #3 only)
■ Turn temperature control handle counter clockwise
to the maximum cold position.
■ Remove temperature control handle and replace
with push in plug.
■ Remove the exible hot water supply hose from
base of faucet. (Note: le hand thread)
■ Screw plug in place of supply hose into base of
faucet.
■ Attach single cold supply hose to pre-mixed supply.
Step 5 Test operation and check for leaks
Page 2Page 2
Page 3

Limiting water temperature
Troubleshooting
Using Temperature adjustment handle
■ Remove temperature adjustment handle.
■ Set maximum water temperature limit by turning handle
limit stop clockwise (CW).
■ Increase maximum water temperature by turning handle
limit stop counter clockwise (CCW).
■ Re-install temperature adjustment handle.
Adjusting preset water temperature (cong #2)
■ Remove temperature adjustment handle plug.
■ Adjust the maximum water temperature limit by inserting
handle into faucet and turning counter clockwise (CCW).
■ Increase temperature by turning handle clockwise (CW).
■ Remove handle and re-install plug.
Sensor eye is blinking
■ Indicates battery is weak and needs to be replaced.
No water flow
■ Check water supply to the faucet.
■ Clean around photo cell sensor area.
■ Check for loose battery connections.
■ Replace the solenoid valve.
■ Replace the sensor.
Water flow is weak
■ Water supply stops are not fully open.
■ Clean aerator and check strainer on end of supply line(s).
Excessive clogging may require installing of separate
ecient lter into supply line.
Water flow from spout fails to turn off
■ Sensing range may be too low. Clean around photo cell
sensor area.
■ Clean solenoid valve membrane or replace solenoid valve.
Water temperature can’t be adjusted
■ Clean the check strainer on end of supply line(s).
■ Clean or replace the mixer.
Operation
Sensor recognition range is factory
preset at 1/2 - 4 inches
Place hand under faucet, water will ow
automatically for 10 seconds and shut o.
Auto shut-off time is factory preset
at 1/2 to 1 second
Remove hands, water will stop automatically
within 1/2 to 1 second.
Security OFF after 10 seconds
Faucet will automatically shut o aer
continuous water ow for 10 seconds.
Weak or dead battery
LED will ash to signal battery is getting
weak and should be replaced soon.
Faucet care
Cleaning surface finish
■ Block sensor with plastic cleaning cover to prevent faucet from
turning on while cleaning.
■ Clean nish area by using mild soap and water or nonabrasive cleaner and then rinse immediately. A nonabrasive wax may be used to preserve nish area.
Precautions
■ Ensure sensor is not damaged through impact or scratches.
■ Ensure sensor is not blocked or disturbed by any object
with its detection range.
■ Ensure that no strong light source is aimed directly at
sensor or through a mirror.
Risk of Freezing
When installing the faucet in a location where the temperature
may fall below freezing, the entire system must be drained of
water to prevent damage in freezing weather.
■ Turn o water supply.
■ Disconnect all exible hoses.
■ Drain all parts and hoses of water.
Page 3Page 3
Page 4

Dimensions Ultra-Sense Lavatory Faucet, S-6080
6" (152 mm)
Hole diameter
1-9/16" - 1-3/8"
(33 mm - 35 mm)
1/4"-20 UNC
4" (102 mm)
3/8" compression
Note: Dimensions subject to change without notice.
spacer
1/2" (13 mm)
1-1/8" (29 mm)
without spacer
with spacer
4-13/32"
(112 mm)
2-1/2"
(64 mm)
Parts Assembly Ultra-Sense Lavatory Faucet, S-6080
Replacement Parts
faucet body
aerator
Sensor bracket
sensor
Part Number Item
SF-241
SF-2CR5
SF-240
5-7/64"
(130 mm)
0
19
20-1/2"
(521 mm)
Battery container and
red removal paddle
6v Lithium battery, 2CR5
Solenoid kit
with membrane
single hole
mounting
hardware
supply hoses
solenoid valve
mixing plug
Temperature
control
assembly
SF-245
SF-186
SF-181
SF-158
SF-125
LN-100
LN-217
Sensor kit
with mounting
brackets
Check / strainer kit
■ for ex hose
■ for copper tubing,
(option -LST)
Single hole
mounting kit
Vandal protective aerator
with removal tool #LL-60K
■ 1.5 gpm (5.7 L/min)
Vandal protective laminar
ow non-aerated spray outlet
with removal tool #LL-60K
■ 0.5 gpm (1.9 L/min)
■ 1.5 gpm (5.7 L/min)
Ordering replacement parts:
Call Symmons customer service at (800) 796-6667,
(781) 848-2250 M-F 7:30 am - 7:00 pm EST
or check our website at www.symmons.com for a
list of Symmons distributors.
Symmons Industries, Inc. ■ 31 Brooks Drive ■ Braintree, MA 02184
(800) 796-6667, (781) 848-2250
Website: www.symmons.com
©2011 Symmons Industries, Inc. Printed in U.S.A.
■ Fax (800) 961-9621, 781-664-1300
■ Email: customerservice@symmons.com
■ SF-244 ■ ZV-1017 ■ 021111
 Loading...