

Page 1

MC55
1
Quick Start Guide
Note: Remove protective shipping film that covers the touch screen, exit window and camera window
before using.
9
10
11
12
8
7
1
2
6
3
(Note 1)
4
5
FEATURES
13
14
15
16
17
18
19
Note 1: To reset the MC55, press and hold the Power button for five (5) seconds.
1 Scan/Action Button
2 Up/Down Button
3 Microphone
4 Power Button
5 I/O Connector
6 Keypad
7 Scan/Action Button
8 Touch Screen
(with screen protector)
9 Scan/Decode LED
10 Charging/Battery
Status LED
11 Radio Status LED
12 Phone Speaker
13 Handstrap
14 Battery
15 Battery Latch
16 Camera Flash (optional)
17 Camera (optional)
18 Exit Window
(see Data Capture Options)
19 Tether
20 Scan/Action Button
21 Action Button
22 Stylus
23 Speaker
23
22
21
20
3
2
3
4
1
8
10
7
Numeric Keypad
Blue Key
Use this key to access function keys shown on the keypad
in blue.
>
Press the Blue key once to activate this state, followed by
another key.
Orange Key
Use this key to access the secondary layer of characters.
>
Press the Orange key once to lock the keypad into Alpha
state.
>
Press the Orange key a second time to return to the normal
state.
3
4
3
1
10
2
2
PIM Keypad
Notifications
Scan/Decode LED:
Red: Scanning active
Green: Good Decode
Charging/Battery Status LED:
Slow blinking amber: Battery charging
Solid amber: Fully charged
Fast blinking amber: Charging error
Radio Status LED:
Green: RF active
3
3
2
2
5
1
3
4
3
4
6
9
10
8
Alpha-Numeric Keypad
Blue Key
Use this key to access function keys shown on the keypad
in blue.
>
Press the Blue key once to activate this state temporarily,
followed by another key.
>
Press the Blue key twice to lock this state.
>
Press the Blue key a third time to unlock.
Orange Key
Use this key to access the secondary layer of characters
and actions.
>
Press the Orange key once to activate this state
temporarily, followed by another key.
>
Press the Orange key twice to lock this state.
>
9
5
2
2
Press the Orange key a third time to unlock.
1 Talk
2 Navigation
3 Soft Key
4 Scan/Action Button
5 End
6 Orange Key
7 Backlight
8 Blue Key
9 OK
10 Start Menu
Scan/Decode
Charging/Battery Status
Radio Status
Insert the Battery
2
5
9
6
7
1. Insert the battery, bottom first, into the battery compartment.
2. Press down on the battery until
the battery latch snaps into
place.
3. Replace the
handstrap.
2
1
Charge the MC55
Use the Single-slot cradles (USB or
Ethernet/Modem/USB),
Four-slot cradles (Charge Only
or Ethernet) or cables to charge the
battery in the MC55.
You can also charge a spare battery
using the Single-slot cradle.
SIM Card Installation (MC5574 only)
1. Remove battery pack.
2. Lift rubber access door.
3. Slide SIM card holder up to unlock.
4. Lift card holder.
5. Insert SIM card into SIM holder.
NOTE :
The proper position of the SIM card—the card connector (i.e.,
gold area) should be facing outward with the bevelled corner
facing away.
6. Lower the SIM card holder down.
7. Slide SIM card holder down to lock into place.
8. Close rubber access door.
9. Reinstall battery pack.
Install ActiveSync
Download ActiveSync® 4.5 or higher from http://www.microsoft.com
and follow the instructions to install ActiveSync onto the host computer.
1
Communicate with Host
®
Charging/Battery Status LED
Remove the Battery
1. Press the Power button.
2. Remove handstrap.
3. Slide battery latch to the right.
The battery ejects slightly.
Slow Blinking Amber = Charging
Solid Amber = Fully charged
Fast Blinking Amber = Charging error
Enter Your PIN
After installing the SIM card activate your mobile service
connection. In most cases, SIM cards are preset with a PIN
(Personal Identity Number), provided by your service provider.
1. Press the Power button to turn on the MC55.
2. Tap Start > Phone.
3. Enter the PIN from your service provider.
4. Tap Enter.
2
4. Grasp the battery and lift from
the MC55.
CHARGING
PHONE SETUP
Charge the Battery
Use the Four-slot Battery Charger
Turn On the Phone Function
1. Launch the Wireless Manager application.
•
On the Today screen, tap the Wireless Manager icon.
or
•
On the Today screen, tap the signal icon and select
Wireless Manager.
2. On the Wireless Manager screen, tap Phone to turn on the
phone function. The signal icon (wireless off) changes to (not connected) and then to (searching)
indicating the MC55 is searching for a mobile connection. This may take a few seconds. The signal icon
then changes to once a good mobile connection is established.
COMMUNICATION
3
to charge batteries separately.
GETTING STARTED - BATTERY INSTALLATION
2
Turn Off the Phone Function
1. Launch the Wireless Manager application.
•
On the Today screen, tap the Wireless Manager icon.
or
•
On the Today screen, tap the signal icon and select Wireless Manager.
2. On the Wireless Manager screen, tap Phone to turn off phone function.
Create a Partnership
Follow the on-screen ActiveSync instructions to establish
a connection between the MC55 and the host computer.
Note: The 2400 mAh battery charges in less than four hours and the 3600 mAh battery charges in less
than six hours.
Page 2
More Information on the MC55
Visit the Motorola Web site at http://www.motorola.com/mc55
Setting up, using and troubleshooting the MC55
MC55 User Guide and Integrator Guide
Software Upgrades
Available at: http://supportcentral.motorola.com
Additional Software
Check Motorola web site for approved applications.
http://www.motorola.com/mc55
Connecting and synchronizing with the host computer
ActiveSync® Help on the host computer. To view help, start ActiveSync®,
Click Help - Microsoft ActiveSync Help.
ActiveSync software available at http://www.microsoft.com/windowsmobile
Information on using programs on the MC55
Tap Start – Help within the specific program.
Service and Warranty
MC55 Regulatory Guide
Available with MC55 and at http://supportcentral.motorola.com
Motorola, Inc.
One Motorola Plaza Holtsville, New York 11742-1300, USA
MOTOROLA, MOTO, MOTOROLA SOLUTIONS and the Stylized M Logo are trademarks or
registered trademarks of Motorola Trademark Holdings, LLC and are used under license. All
other trademarks are the property of their respective owners.
© 2010 Motorola, Inc. All rights reserved.
72-127603-02 Rev. A — October 2010
ACCESSORIES
Screen Protector
Motorola recommends the continued use of a screen protector
to minimize wear and tear. Screen protectors enhance
the usability and durability of touch screen displays.
Benefits include:
• Protection from scratches and gouges
• Durable writing and touch surface with tactile feel
• Abrasion and chemical resistance
• Glare reduction
• Keeping the device’s screen looking like new
• Quick and easy installation.
Not using a screen protector can affect your warranty coverage.
An initial screen protector is already applied to your MC55.
Contact your local account manager or Motorola, Inc. for more information
and purchasing details. Part number: KT-67525-01R Screen Protector 3/pk.
MicroSD Card Installation
1. Remove battery.
2. Lift rubber access door.
3. Slide SIM card holder up to unlock.
4. Lift SIM card holder.
5. Carefully lift microSD card holder.
6. Insert microSD card into card holder.
NOTE :
Proper position of the microSD card — the
card connector (i.e., gold contacts) should be
facing out as shown.
7. Close the microSD card holder.
8. Close the SIM card holder.
9. Slide the SIM card holder down to lock
into place.
10. Close rubber access door.
11. Replace battery.
Rubber Access Door
microSD Card Holder
SIM Card Holder
Single-slot Ethernet/Modem/USB Cradle
Four-slot Charge Only Cradle
Four-slot Ethernet Cradle
Magnetic Stripe Reader
Trigger Handle
Charge Only Cable
Auto Charge Cable
USB/Charge CableFour-slot Battery ChargerSingle-slot USB Cradle
Vehicle Cradle
Vehicle Holder
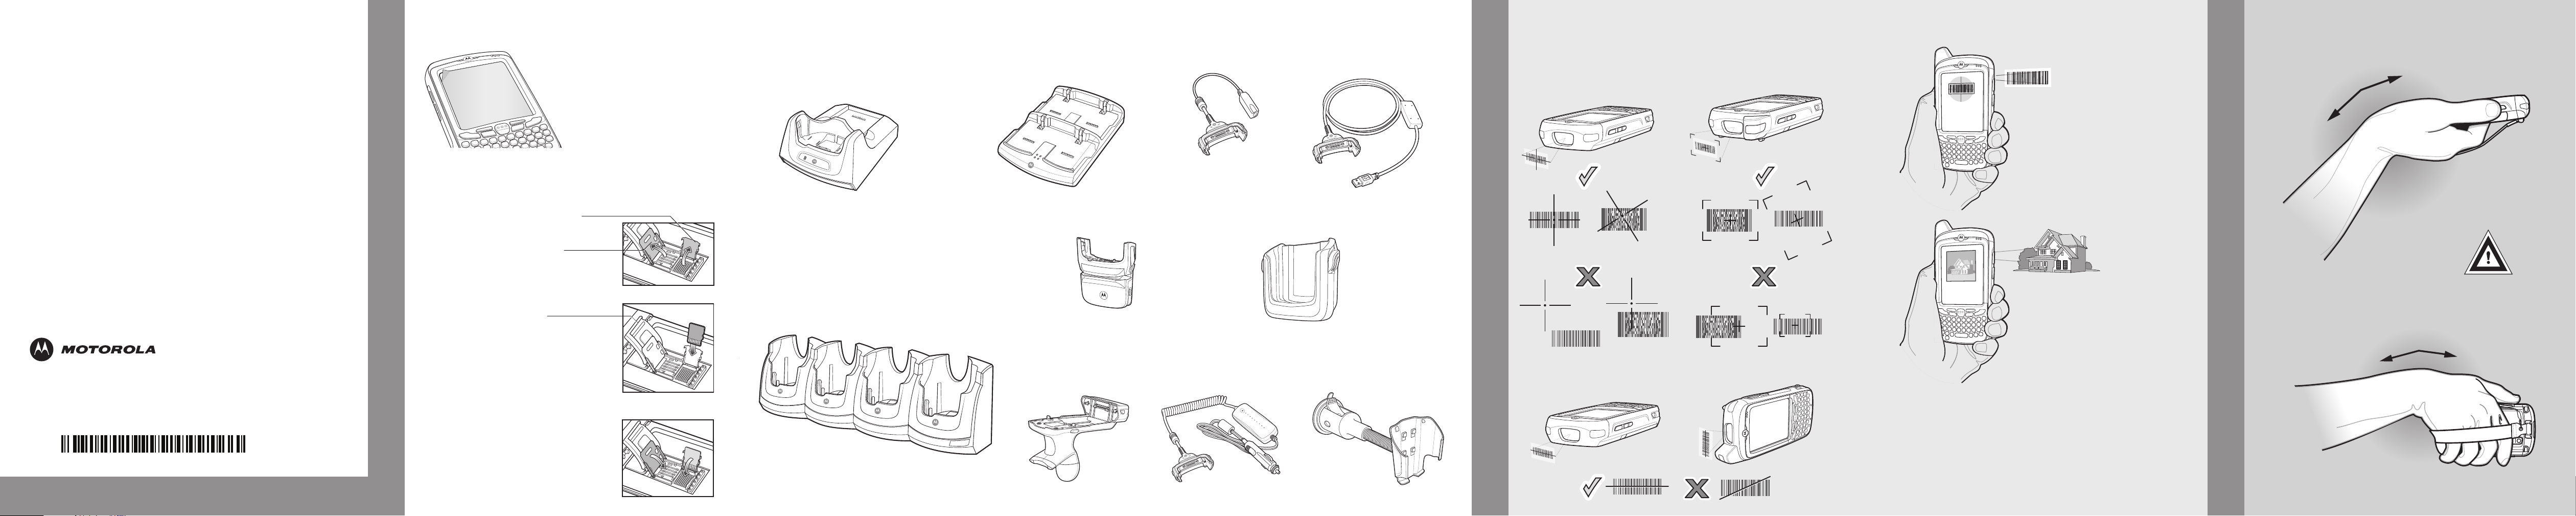
NOTE: Data Capture Options are dependent upon configurations.
• Laser Scanning only
• Laser Scanning and Camera
• Imaging only
• Imaging and Camera
Imaging
MC5590
MC55A0
DATA CAPTURE OPTIONS
Laser Scanning
MC5574
Camera Decode
1. Launch a bar code reading application on the MC55.
2. Position the MC55 toward the bar code.
3. Press the Scan button.
4. In the image window align the red target over the
bar code. When the MC55 decodes the bar code the
Scan/Decode LED light green and a beep sounds.
5. Release the Scan button.
Camera Photo
1. Tap Start > Pictures & Videos > Camera.
2. Point the MC55 at an object.
3. Press the Enter button.
4. Hold MC55 still until “Shutter Sound” is heard.
GPS Information
When using the GPS feature of the MC5574:
• Acquiring satellite signals may take a few minutes. It is best to be outside
and have a clear, unobstructed view of the sky.
• Without a clear view, acquisition takes much longer and could result in the
MC5574 being unable to compute the initial position quickly.
• Obtain a satellite fix before moving.
• Shutdown GPS application when not in use.
AVOID EXTREME WRIST ANGLESAVOID EXTREME WRIST ANGLESAVOID EXTREME WRIST ANGLES
AVOID EXTREME WRIST ANGLES
AVOID EXTREME
WRIST ANGLES
MC55
Quick Start Guide
http://www.motorola.com/MC55
 Loading...