


Chapter 3 Using GPS Navigation
DRAFT
Introduction
The MC55 includes Global Positioning System (GPS) technology using the SiRF III chipset. GPS technology is
based on a worldwide system of GPS satellites orbiting the earth that continuously transmit digital radio signals.
These radio signals contain data on the satellites’ locations and their exact clock time and are used to determine
your location on the earth.
WARNING! When using the MC55 in a vehicle, it is the user’s responsibility to place, secure and use in a
manner that will not cause accident s, personal in jury or property damag e or obstruct their view . It
is the responsibility of the driver to operate the vehicle in a safe manner, maintain observation of
all driving conditions at all times, and not become distracted by the device to the exclusion of safe
driving practices. It is unsafe to operate the controls of the device while driving.
Software Installation
Third-party GPS navigation softwar e is required. Evaluation software is available from various suppliers. For
example; VisualGPS, visit: http://www.visualgps.net/VisualGPSce/
If interested in purchasing GPS navigation software check with the GPS software vendor (before purchasing,
downloading, or installing any software) to determine that the application is compatible with the MC55. Refer to the
application’s user guide for application installation and setup information.
MC55 GPS Setup
The GPS-enabled MC55 uses Microsoft Windows Mobile 6, so the operating system automatically manages
access to the GPS receiver to allow multiple programs to simultaneously access GPS data.
Ensure that the following settings are set on the MC55 :
1. Tap Start > Settings > System > External GPS icon.
2. In the Programs tab, select None from the GPS program port drop-down list.
3. In the Hardware tab, select COM8 in the GPS hardware port drop-down list.

3 - 2 MC55 User Guide
DRAFT
4. Select 57600 from the Baud rate drop-down list.
5. Tap ok to close the Setting window.
NOTE If an application error message appears indicating that the COM port cannot be opened, ensure that a free COM
port is selected in the
Operation
Acquiring satellite signals may take a few minutes. It is best to be outside and have a clear, unobstructed view of
the sky . Without a clear view, acquisition takes much longer and could resu lt in the MC55 being unab le to compute
the initial position quickly. When operating the device indoors access to the GPS signals may be limited or
unavailable.
NOTE When using a GPS navigation application, ensure that the MC55 does not go into suspend mode. If the MC55
suspends then the power to the GPS radio is removed. Upon resume the GPS receiver must reacquire a valid GPS
signal, resulting in a a delay of positional information.
GPS Maps on microSD Cards
GPS hardware port drop-down list.
GPS navigation software vendors may sell maps on microSD cards. If using a microSD card with the GPS
navigation software:
1. Remove the Memory Card Cover on the side of the MC55.
2. Insert the microSD card into the slot.
3. Replace the Memory Card Cover.
Answering a Phone Call While Using GPS
If you receive a phone call while using your GPS navigation software:
1. Answer the phone call by pressing the Answer button.
2. Once you end the phone call, press the End Call button to resume the audio on the GPS software.
NOTE Anytime you are using GPS on the MC55 and you receive a phone call, the audio on the GPS navigation software
is muted until you finish the call.
Losing the GPS Signal While in a Vehicle
GPS performance on the MC55 may be affected if the vehicle has thermal glass windows and windshields, which
can block the MC55 from receiving a GPS signal from satellites. To improve GPS signal strength, place the MC55
where there is a clear view of the sky . A direct line of sight is required between the MC55 and the GPS satellites to
access information from the satellites.
The Global Positioning System (GPS) is a system that allows the user to track their position anywhere on the earth.
Assisted GPS
GPS can be used in stand-alone or Assisted GPS (A-GPS) modes. A Stand-alone GPS receiver downloads data
from GPS satellites. It can take several minutes to get a fix. By using GPS Location servers, A-GPS dramatically

Using GPS Navigation 3 - 3
DRAFT
improves the performance of the Time To First Fix (TTFF) of GPS receivers by providing them with data that they
would ordinarily have to download from the GPS satellites. With the A-GPS data, GPS receivers can operate faster
and more reliably.
A-GPS follows the Secure User Plane Location (S UPL) protocol which allows a mobile device to communicate with
a location server. Refer to the EMDK Help file for information on setting up SUPL on the MC55.

3 - 4 MC55 User Guide
DRAFT

Chapter 4 Using Bluetooth
DRAFT
Introduction
Bluetooth-equipped devices can communicate without wires, using frequency-hopping spread spectrum (FHSS)
radio frequency (RF) to transmit and receive data in the 2.4 GHz Industry Scientific and Medical (ISM) band
(802.15.1). Bluetooth wireless technology is specifically designed for short-range (30 feet/10 meters)
communication and low power consumption.
MC55s with Bluetooth capabilities can exchange information (e.g., files, appointments, and tasks) with other
Bluetooth enabled devices such as phones, printers, access points, an d other mobile computers. To use the MC55
as a modem, create a dial-up modem connection between a computer and MC55.
Motorola mobile computers with Bluetooth technology use the StoneStreet Bluetooth stack. To program Bluetooth
within the MC55 refer to the Enterprise Mobility Developer Kit (EMDK) Help.
Adaptive Frequency Hopping
Adaptive Frequency Hopping (AFH) is a method of avoiding fixed frequency interferers, and can be used with
Bluetooth voice. All devices in the piconet (Bluetooth network) must be AFH-capable in order for AFH to work.
There is no AFH when connecting and discovering devices. Avoid making Bluetooth connections and discoveries
during critical 802.11b communications. AFH for Bluetooth consists of four main sections:
•
Channel Classification - A method of detecting an interference on a chann el-by-channel basis, or pre-defined
channel mask.
•
Link Management - Coordinates and distributes the AFH information to the rest of the Bluetooth network.
•
Hop Sequence Modification - Avoids interference by selectively reducing the number of hopping channels.
•
Channel Maintenance - A method for periodically re-evaluating the channels.
When AFH is enabled, the Bluetooth radio “hops around” (instead of through) the 802.11b high- rate channels. AFH
coexistence allows Motorola mobile computers to operate in any infrastructure.

4 - 2 MC75 User Guide
DRAFT
The Bluetooth radio in this MC55 operates as a Class 2 device power class. The maximum output power is 2.5mW
and the expected range is 32.8 feet (10 meters). A definition of ranges based on power class is difficult to obtain
due to power and device differences, and whether one measures open space or closed office space.
NOTE It is not recommended to perform Bluetooth wireless technology inquiry when high rate 802.11b operation is
required.
Security
The current Bluetooth specification defines security at the link level. Application-level security is not specified. This
allows application developers to define security mechanisms tailored to their specific need. Link-level security
occurs between devices, not users, while applic ation-level security can be implemented on a per-user basis. The
Bluetooth specification defines security algorithms and procedures neede d to authenticate device s, and if nee ded,
encrypt the data flowing on the link between the devices. Device authentication is a mandatory feature of Bluetooth
while link encryption is optional.
Pairing of Bluetooth devices is accomplished by creating an initialization key that is used to authenticate the
devices and create a link key for them. Entering a common PIN number in the devices being paired generates the
initialization key. The PIN number is never sent over the air. By default, the Bluetooth stack responds with no key
when a key is requested (it is up to user to respond to the key request event). Authentication of Bluetooth devices
is based-upon a challenge-response transaction. Bluetooth allows for a PIN number or passkey that is used to
create other 128-bit keys used for security and encryption. The encryption key is derived from the link key used to
authenticate the pairing devices. Also worthy of note is the limited range and fast frequency hopping of the
Bluetooth radios that makes long-distance eavesdropping difficult.
Recommendations are:
•
Perform pairing in a secure environment
•
Keep PIN codes private and don't store the PIN codes in the mobile computer
•
Implement application-level security.
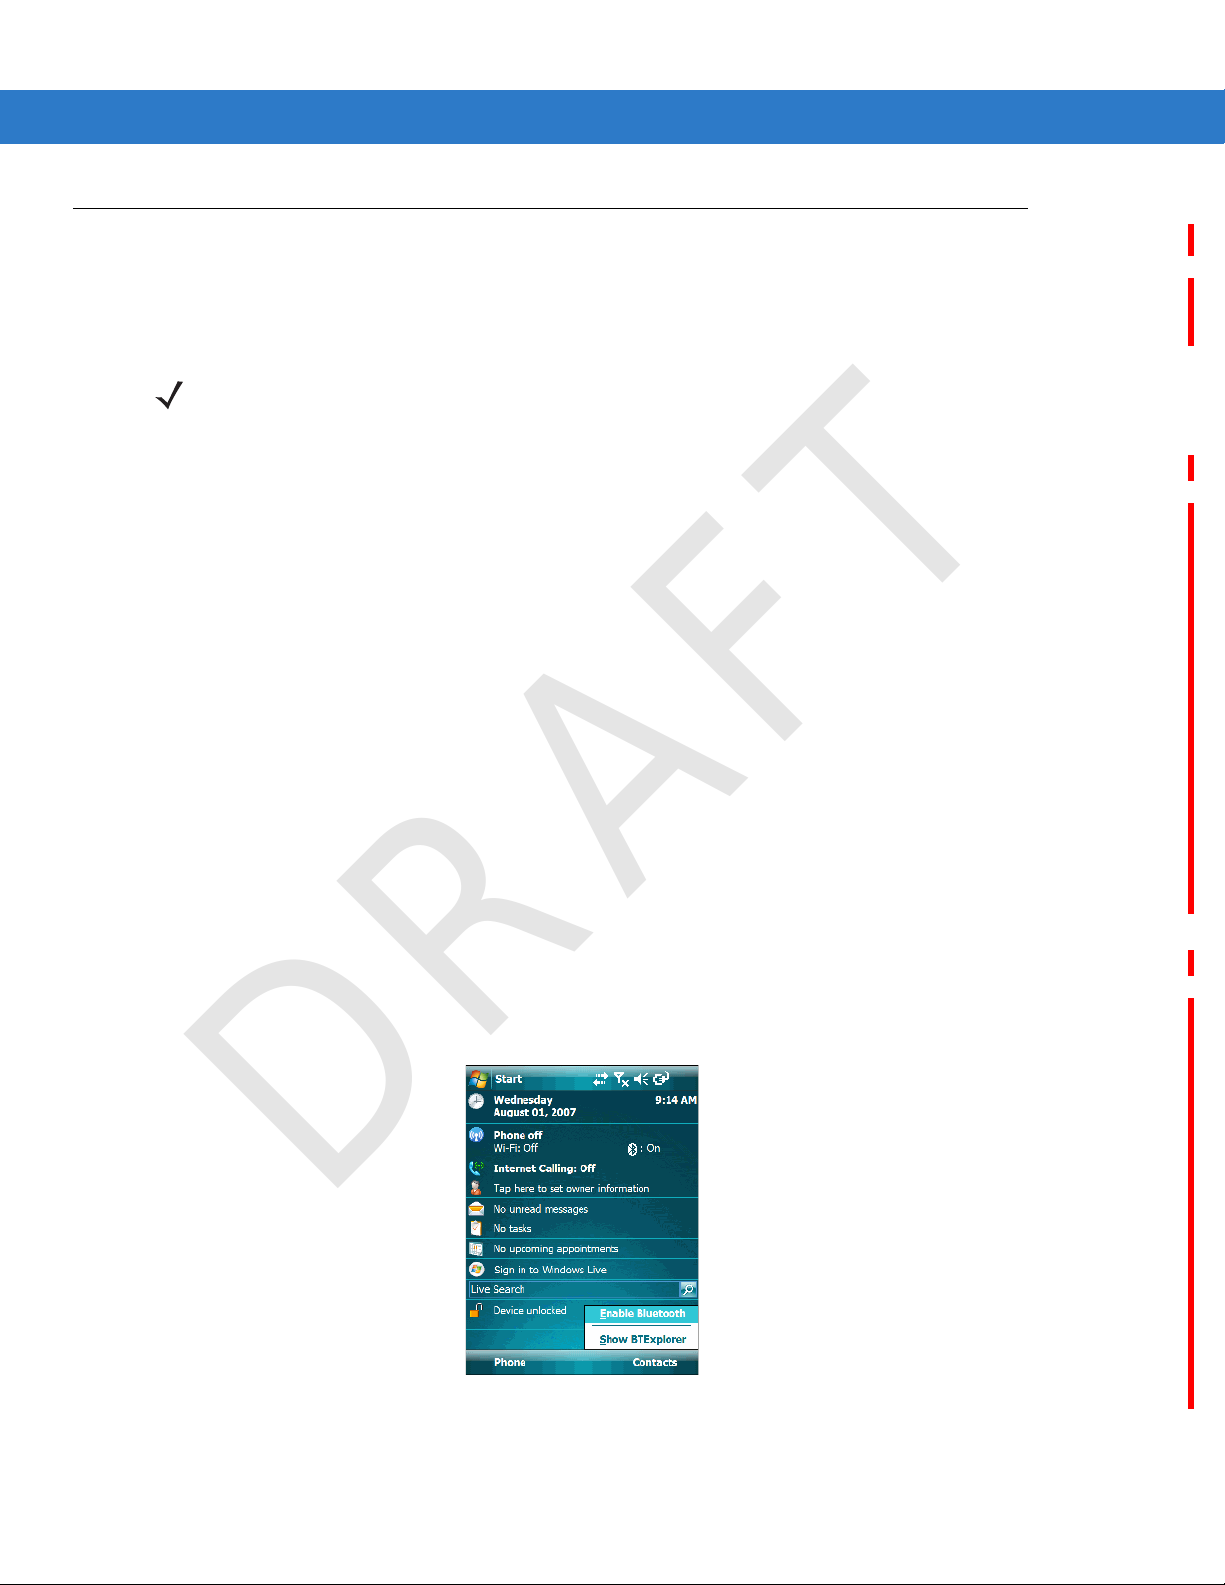
Turning the Bluetooth Radio Mode On and Off
DRAFT
Turn of f the Bluetooth radi o to save power or if entering an area with radio r estrictions (e.g ., an airplane). When th e
radio is off, other Bluetooth devices cannot see or connect to the MC55. Turn on the Bluetooth radio to exchange
information with other Bluetooth devices (within range). Communicate on ly with Bluetooth radios in close pro ximity.
NOTE To achieve the best battery life turn off radios not in use.
Disabling Bluetooth
To disable Bluetooth, tap Bluetooth icon > Disable Bluetooth. The Bluetooth icon changes to indicate that
Bluetooth is disabled.
Using Bluetooth 4 - 3
Figure 4-1
Enabling Bluetooth
To enable Bluetooth, tap Bluetooth icon > Enable Bluetooth. The Bluetooth icon changes to indicate that
Bluetooth is enabled.
Figure 4-2
Disable Bluetooth
Enable Bluetooth

4 - 4 MC75 User Guide
DRAFT
Bluetooth Power States
Cold Boot
Performing a cold boot on the MC55 turns of f Bluetooth af ter initialization (which t akes a few moments). It is no rmal
to see the Bluetooth icon appear and disappear, as well as a wait cursor , when initialization proceeds in all modes.
Warm Boot
Performing a warm boot on the MC55 returns Bluetooth to the last state after initialization.
Suspend
Suspending the MC55 turns off Bluetooth.
NOTE If there is an active Bluetooth connection between the MC55 and another Bluetooth device, the MC55 will
not suspend.
Resume
When the MC55 resumes, Bluetooth turns on if it was on prior to suspend.
Modes
The BTExplorer application has two modes for managing Bluetooth connections: Wizard Mode and Explorer Mode.
The Wizard Mode is for novice Bluetooth users and the Explorer Mode is for experienced Bluetooth users. To
switch between modes, select View > Wizard Mode or View > Explorer Mode.
Wizard Mode
Wizard Mode provides a simple process for discovering and connecting to Bluetooth devices.
Wizard Mode shows the devices and services in a simple Favorites view created by following the step-by-step
wizard.
Explorer Mode
The Explorer Mode window is easy to navigate and provides greater control to users familiar with Bluetooth. The
menu bar provides quick access to the options and tools used to connect to devices. To access Explorer Mode, tap
View > Explorer Mode.
NOTE Switching between Wizard Mode and Explorer Mode closes all active connections.

Using Bluetooth 4 - 5
DRAFT
Figure 4-3
You can also use the “tap a nd hold” tech nique to view availa ble options. Scroll bars an d view options a re similar to
those on the Windows desktop. The tree structure lists the following sub-items:
•
•
•
Explorer Mode Window
Local Device - This device
Remote Device - Other Bluetooth devices
• Trusted Devices - Bonded (paired) Bluetooth devices
• Untrusted Devices - Discovered devices that are not bonded
Favorites - Selected services that are set as Favorite for quick access.
NOTE Switching between Wizard Mode and Explorer Mode closes all active connections.

4 - 6 MC75 User Guide
DRAFT
Discovering Bluetooth Device(s)
The MC55 can receive information from discovered devices without bonding. However, once bonded, the MC55
and a bonded device exchange information automatically when you turn the Bluetooth radio on. See Bonding with
Discovered Device(s) o n page 4-17 for more information.
To find Bluetooth devices in the area:
1. Ensure that Bluetooth is enabled on both devices.
2. Ensure that the Bluetooth device to discover is in discoverable and connectable modes.
3. Ensure that the require profile is enabled on the MC55. See Profiles Tab on page 4-29 for more information.
4. Ensure that the two devices are within 30 feet (10 meters) of one another.
5. Tap the Bluetooth icon and select Show BTExplorer. The BTExplorer window appears.
NOTE If favorite connections have already been created, the Favorites screen displays. If no favorite
connections have been created, the New Connection Wizard screen displays.
6. Tap Menu > New Connection.The New Connection Wizard appears.
Figure 4-4
7. Select Explore Services on Remote Device or another from the drop-down list and tap Next.
The following actions are available in the drop-down list (actions may vary depending upon configurations):
•
•
•
•
•
•
•
•
•
BTExplorer Window
Explore Services on Remote Device
Pair with a Remote Device
Active Sync via Bluetooth
Browse Files on Remote Device
Connect to Headset
Connect to Internet using Access Point
Connect to Internet using Phone/Modem
Connect to Personal Area Network
Connect to Printer

•
DRAFT
Send or Exchange Objects
•
Associate Serial Port.
NOTE If a device discovery action has not been previously performed, a device discovery is automatically initiated. If
a device discovery has previously been performed, the device discovery process is skipped, and the
previously found list of devices displays. T o start a new device discovery , tap and hold in the window and select
Discover Devices from the pop-up menu.
8. BTExplorer searches for Bluetooth devices in the area.
Using Bluetooth 4 - 7
Figure 4-5
The discovered devices display in the Select Remote Device window.
Figure 4-6
9. Select a device from the list and tap Next. The MC55 searches for services on the selected Bluetooth device.
Discover Devices Dialog Box
Select Remote Device Window

4 - 8 MC75 User Guide
DRAFT
Figure 4-7
10. Select a service from the list and press Next. The Connection Favorite Options window appears.
Figure 4-8
11. In the Favorite Name text box, enter a name for this service that will appear in the Favorite window.
12. Tap Next. The Connection Summary window appears.
Device Services
NOTE If the MC55 discovers a service but the service is not supported, the service icon is grayed-out.
Connection Favorite Options Window
13. Tap Connect to add the service to the Favorite window and conn ec t to th e ser vice .

Using Bluetooth 4 - 9
DRAFT
Figure 4-9
Favorites Window
Available Services
NOTE Some devices might not require a PIN. This depends upon the device’s authentication.
The MC55 offers the following services:
•
File Transfer Services
•
Dial-Up Networking Services
•
OBEX Object Push Services
•
Headset Audio Gateway Services
•
Hands-Free Audio Gateway Services
•
Serial Port Services
•
Personal Area Networking Services
•
IrMC Services.
See the following sections for information on these services.
File Transfer Services
NOTE Shared folders are a security risk.
To transfer files between the MC55 and another Bluetooth enabled device:
1. Ensure the MC55 is discoverable and connectable. See Device Info Tab on page 4-20.
2. Ensure that OBEX File Transfer profile is enabled on the MC55. See Profiles Tab on page 4-29 for more
information.
NOTE If favorite connections have already been created, the Favorites screen displays. If no favorite
connections have been created, the New Connection Wizard screen displays.
3. Use the Connection Wizard to search for a Bluetooth device.

4 - 10 MC75 User Guide
DRAFT
4. Select the device and tap Next. The Select Remote Service window appears.
5. Tap Next. The Connection Favorite Options window appears.
6. Tap Next. The Connection Summary window appears.
7. Tap Connect. The remote device’s accessible folders appear.
Figure 4-10
8. Double-tap the file to copy. The Save Remote File window appears.
Figure 4-11
9. Tap and hold on the file. A pop-up menu appears.
10. Select the action to perform:
•
•
File Transfer Window
Save Remote File Window
New - create a new file or folder on the remote device
Delete - delete the selected file on the remote device.
•
Get File - copy the file from the remote device to the MC55.
•
Put File - copy a file from the MC55 to the remote device.
Creating a New File or Folder
To create a new folder or file on the remote device:
1. Ta p and hold on the screen and select New > Folder or New > File. The Create New Folder or Create New
File window appears.

Using Bluetooth 4 - 11
DRAFT
2. Enter the name for the new folder or file.
3. Tap OK to create the new folder or file on the remote device.
Deleting a File
To delete a file from the remote device:
1. Tap and hold on the file to delete and select Delete.
2. In the Delete Remote Device File dialog box tap Yes.
Getting a File
To copy a file from a remote device:
1. Double-tap or tap and hold on the file and select Get. The Save Remote File window appears.
2. Navigate to the directory to save the file.
3. Tap Save. The file is transferred from the remote device to the MC55.
Copying a File
To copy a file to a remote device:
1. Tap Action > Put. The Send Local File window appears.
2. Navigate to the directory to save the file and select a file.
3. Tap Open. The file copies from the MC55 to the remote device.
Connecting to the Internet Using an Access Point
This section explains how to access a Bluetooth-enabled LAN access point (AP) for a network connection. Use
Internet Explorer to connect to a server.
1. Ensure the MC55 is discoverable and connectable. See Device Info Tab on page 4-20.
2. Ensure that the Personal Area Networking profile is enabled on the MC55. See Profiles T ab on p age 4-29 fo r
more information.
3. Use the Connection Wizard to search for a Bluetooth AP.
NOTE If favorite connections have already been created, the Favorites screen displays. If no favorite
connections have been created, the New Connection Wizard screen displays.
4. Select the Personal Area Network or Network Access service and select Connect from the pop-up menu.
The MC55 connects with the access point.
5. Tap Start > Internet Explorer. The Internet Explorer window appears.
6. In the address field, enter an internet address and tap the Enter button. The web page loads.

4 - 12 MC75 User Guide
DRAFT
Dial-Up Networking Services
Dial-up networking allows the user to connect a PC or laptop to the MC55 and use the MC55 as a modem to
connect to an office network or ISP.
Before setting up dial-up networking, obtain dial-up information an d other necessary settings (usernam e, password
and domain name, if required) for the office network or ISP. To create a new Bluetooth connection:
1. Ensure the MC55 is discoverable and connectable. See Device Info Tab on page 4-20.
2. Ensure that the Dial-Up Networking profile is enabled on the MC55. See Profiles Tab on page 4-29 for more
information.
3. On the PC or laptop, set up Bluetooth according to the manufacturer’s instructions.
4. On the PC or laptop Bluetooth software, search for the MC55 and select the Dial-up Networking service.
5. Using dial-up software on the PC or laptop, connect to the MC55.
6. The MC55 phone function dials the ISP number and connects to the ISP.
7. To verify, on the PC or laptop, launch Internet Explorer and open a web site.
Object Exchange Push Services
Object Exchange (OBEX) is a set of protocols that allows sharing objects such as Contacts or pictures using
Bluetooth.
To exchange contact information with another Bluetooth enabled device:
1. Ensure the MC55 is discoverable and connectable. See Device Info Tab on page 4-20.
2. Ensure that the OBEX Object Push profile is enabled on th e MC55. See Profiles Tab on page 4-29 for more
information.
NOTE If favorite connections have already been created, the Favorites screen displays. If no favorite
connections have been created, the New Connection Wizard screen displays.
3. Use the Connection Wizard to search for a Bluetooth device.
4. Select the device and tap Next.
5. Select the OBEX Object Push service and select Connect. The OBEX Object Push window appears.
6. In the Action drop-down list, select one of the following options: Send Contact Information, Swap Contact
Information, Fetch Contact Information, or Send a Picture.
Sending a Contact
To send a contact to another device:
NOTE Prior to sending a contact, a default contact must be set up before attempting to send a contact.
1. Tap and hold on OBEX Object Push and select Connect. The OBEX Object Push window appears.

Using Bluetooth 4 - 13
DRAFT
Figure 4-12
2. In the Action: drop-down list, select Send Contact Information.
3. Tap . The Select Contact Entry window appears.
Figure 4-13
4. Select a contact to send to the other device.
5. Tap OK.
OBEX Object Push Window
Select Contact Entry Window
6. Tap OK to send the contact to the other device and display a confirmation dialog box on the other device to
accept the contact. A Send Contact dialog appears.
7. Tap Ok.
Sending a Picture
To send a picture to another device:

4 - 14 MC75 User Guide
DRAFT
1. Tap and hold on OBEX Object Push and select Connect. The OBEX Object Push window appears.
Figure 4-14
2. In the Action: drop-down list, select Send A Picture.
3. Tap . The Send Local Picture window appears.
Figure 4-15
4. Navigate to the picture to send to the other device.
5. Tap Open.
OBEX Object Push Window
Send Local Picture Window
6. Tap OK to send the picture to the other device and display a confirmation dialog box on the other device to
accept the picture. A Send Picture dialog appears.
7. Tap Ok.
Headset Services
To connect to a Bluetooth headset:
NOTE Bluetooth headsets are device dependant and remember the last device they connected to. If problems occur
while connecting to the headset, place the headset in discovery mode. Refer to the headset user manual for
more informaion.
1. Ensure the MC55 is discoverable and connectable. See Device Info Tab on page 4-20.
 Loading...