

Page 1
MC35 Series EDA
User Guide
MC3504/MC3574
Page 2

Page 3

User Guide
MC35 Series Enterprise Digital Assistant
Page 4

COPYRIGHT
Copyright © 2006. Symbol Technologies Inc.
All Rights Reserved.
MC35 Series User Guide
Original issue: November 2006
Symbol and the Symbol logo are registered trademarks of Symbol Technologies, Inc.
Microsoft, ActiveSync, Outlook, Pocket Outlook, Windows, Windows NT, and the
Windows logo are either registered trademarks or trademarks of Microsoft Corporation
in the United States and/or other countries. Microsoft products are licensed to OEMs by
Microsoft Licensing, Inc., a wholly owned subsidiary of Microsoft Corporation.
Other company’s product names or trademarks are used herein for identification purpose
only and belong to their respective companies.
Changes may be made periodically to the information in this publication without
obligation to notify any person of such revision or changes. Such changes will be
incorporated in new editions of this User Guide or supplementary documents and
publications.
No part of this publication may be reproduced, stored in a retrieval system, or
transmitted, in any form or by any means, electronic, mechanical, photocopy, recording,
or otherwise, without the prior written permission of Symbol Technologies.
DISCLAIMER AND LIMITATION OF LIABILITY
Symbol Technologies and its subsidiaries makes no representations or warranties, either
expressed or implied, with respect to the contents hereof and specifically disclaims the
implied warranties of merchantability or fitness for a particular purpose. Symbol
Technologies and its subsidiaries assume no responsibility for any damage or loss
resulting from the use of this MC35 Series User Guide.
NOTES
Record the serial number, purchase date, and place of purchase information in the space
provided below. The serial number is recorded on the label affixed to your device. Correspondence concerning your unit should include the serial number and purchase
information.
MC35 Series (MC3504/MC3574)
S/N: _____________________________________
Date of purchase: ____________________________
Place of Purchase: _________________________
Page 5

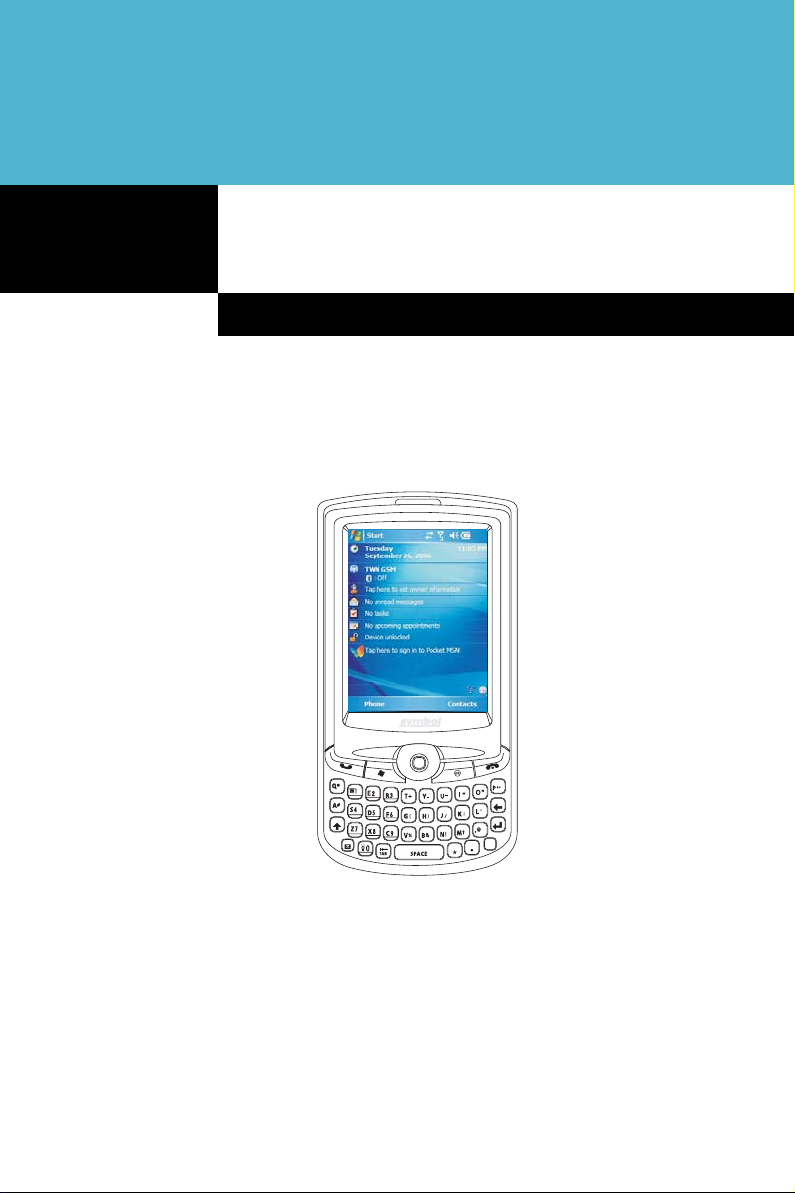
About this User Guide
About this User Guide
Thank you for making MC35 your choice for your mobile computing and communication
needs. Your new sleek MC35 is a fully integrated PDA-mobile phone device. It combines
the power of high-performance PDA applications for organizing personal and workrelated information with the functionality of a mobile phone for communication with your
contacts and a high-speed GPRS technology, you can connect to the Internet, your
corporate networks, and send and receive email while on the go. It also provides high
quality Global Positioning System (GPS) solution and features a digital camera for bar
code scanning and image capture and flexible voice and data communication with
wireless technologies for selected models.
Read through this User Guide to help you get up and running quickly with your new
Enterprise Digital Assistant (EDA). It describes all you need to know about how to use
your new EDA as well as the application programs that came with it.
iii
Page 6

About this User Guide
iv
Page 7

Contents
About this User Guide iii
1 First Things First 1
2 Getting Started 11
3 Managing Programs 25
4 Entering Data 37
Package contents. . . . . . . . . . . . . . . . . . . . . . . . . . . . . . . . . . . . . . . . . . . . . . . . . . . . . . . 1
Preparing to use your MC35 . . . . . . . . . . . . . . . . . . . . . . . . . . . . . . . . . . . . . . . . . . . . . . 1
Installing the battery pack . . . . . . . . . . . . . . . . . . . . . . . . . . . . . . . . . . . . . . . . . . . . 2
Charging the MC35 . . . . . . . . . . . . . . . . . . . . . . . . . . . . . . . . . . . . . . . . . . . . . . . . . 3
Starting up MC35 . . . . . . . . . . . . . . . . . . . . . . . . . . . . . . . . . . . . . . . . . . . . . . . . . . 4
System procedures . . . . . . . . . . . . . . . . . . . . . . . . . . . . . . . . . . . . . . . . . . . . . . . . . . . . . 4
Recalibrating the screen . . . . . . . . . . . . . . . . . . . . . . . . . . . . . . . . . . . . . . . . . . . . . 4
Creating backup files. . . . . . . . . . . . . . . . . . . . . . . . . . . . . . . . . . . . . . . . . . . . . . . . 5
Resetting the device . . . . . . . . . . . . . . . . . . . . . . . . . . . . . . . . . . . . . . . . . . . . . . . . 6
Securing your device. . . . . . . . . . . . . . . . . . . . . . . . . . . . . . . . . . . . . . . . . . . . . . . . 7
Features summary. . . . . . . . . . . . . . . . . . . . . . . . . . . . . . . . . . . . . . . . . . . . . . . . . . . . . 11
Performance . . . . . . . . . . . . . . . . . . . . . . . . . . . . . . . . . . . . . . . . . . . . . . . . . . . . . 11
Display. . . . . . . . . . . . . . . . . . . . . . . . . . . . . . . . . . . . . . . . . . . . . . . . . . . . . . . . . . 11
Audio . . . . . . . . . . . . . . . . . . . . . . . . . . . . . . . . . . . . . . . . . . . . . . . . . . . . . . . . . . . 11
Phone features . . . . . . . . . . . . . . . . . . . . . . . . . . . . . . . . . . . . . . . . . . . . . . . . . . . 11
Connectivity. . . . . . . . . . . . . . . . . . . . . . . . . . . . . . . . . . . . . . . . . . . . . . . . . . . . . . 12
GPS technology . . . . . . . . . . . . . . . . . . . . . . . . . . . . . . . . . . . . . . . . . . . . . . . . . . 12
Battery pack . . . . . . . . . . . . . . . . . . . . . . . . . . . . . . . . . . . . . . . . . . . . . . . . . . . . . 12
Design and ergonomics . . . . . . . . . . . . . . . . . . . . . . . . . . . . . . . . . . . . . . . . . . . . 12
MC35 tour . . . . . . . . . . . . . . . . . . . . . . . . . . . . . . . . . . . . . . . . . . . . . . . . . . . . . . . . . . . 13
Front view . . . . . . . . . . . . . . . . . . . . . . . . . . . . . . . . . . . . . . . . . . . . . . . . . . . . . . . 13
Rear view . . . . . . . . . . . . . . . . . . . . . . . . . . . . . . . . . . . . . . . . . . . . . . . . . . . . . . . 16
Left view . . . . . . . . . . . . . . . . . . . . . . . . . . . . . . . . . . . . . . . . . . . . . . . . . . . . . . . . 17
Right view . . . . . . . . . . . . . . . . . . . . . . . . . . . . . . . . . . . . . . . . . . . . . . . . . . . . . . . 17
Hardware and command interface. . . . . . . . . . . . . . . . . . . . . . . . . . . . . . . . . . . . . . . . . 18
Hardware interface . . . . . . . . . . . . . . . . . . . . . . . . . . . . . . . . . . . . . . . . . . . . . . . . 18
Command interface. . . . . . . . . . . . . . . . . . . . . . . . . . . . . . . . . . . . . . . . . . . . . . . . 19
Today screen. . . . . . . . . . . . . . . . . . . . . . . . . . . . . . . . . . . . . . . . . . . . . . . . . . . . . 22
Pop-up menus. . . . . . . . . . . . . . . . . . . . . . . . . . . . . . . . . . . . . . . . . . . . . . . . . . . . 23
Notifications. . . . . . . . . . . . . . . . . . . . . . . . . . . . . . . . . . . . . . . . . . . . . . . . . . . . . . 24
Accessing programs . . . . . . . . . . . . . . . . . . . . . . . . . . . . . . . . . . . . . . . . . . . . . . . . . . . 25
Opening a program . . . . . . . . . . . . . . . . . . . . . . . . . . . . . . . . . . . . . . . . . . . . . . . . 25
Switching between programs . . . . . . . . . . . . . . . . . . . . . . . . . . . . . . . . . . . . . . . . 25
Program list . . . . . . . . . . . . . . . . . . . . . . . . . . . . . . . . . . . . . . . . . . . . . . . . . . . . . . 26
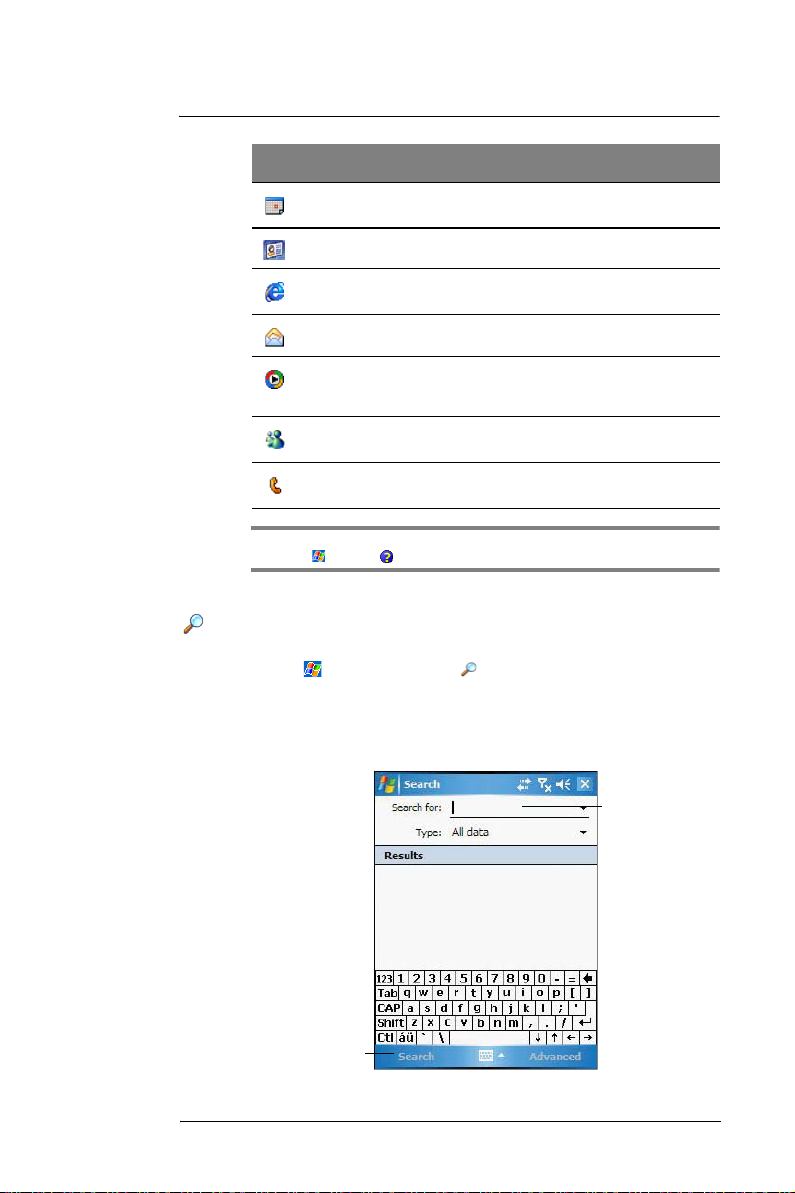
Using Search . . . . . . . . . . . . . . . . . . . . . . . . . . . . . . . . . . . . . . . . . . . . . . . . . . . . . . . . . 27
Using File Explorer. . . . . . . . . . . . . . . . . . . . . . . . . . . . . . . . . . . . . . . . . . . . . . . . . . . . . 28
Using ActiveSync . . . . . . . . . . . . . . . . . . . . . . . . . . . . . . . . . . . . . . . . . . . . . . . . . . . . . 28
Installing Microsoft ActiveSync . . . . . . . . . . . . . . . . . . . . . . . . . . . . . . . . . . . . . . . 29
Connecting the device to your computer. . . . . . . . . . . . . . . . . . . . . . . . . . . . . . . . 30
Creating a partnership (first time only) . . . . . . . . . . . . . . . . . . . . . . . . . . . . . . . . . 30
Synchronizing with your computer . . . . . . . . . . . . . . . . . . . . . . . . . . . . . . . . . . . . 31
Synchronizing with a server . . . . . . . . . . . . . . . . . . . . . . . . . . . . . . . . . . . . . . . . . 34
Synchronizing information. . . . . . . . . . . . . . . . . . . . . . . . . . . . . . . . . . . . . . . . . . . 35
Using ActiveSync to exchange files. . . . . . . . . . . . . . . . . . . . . . . . . . . . . . . . . . . . 36
ActiveSync errors . . . . . . . . . . . . . . . . . . . . . . . . . . . . . . . . . . . . . . . . . . . . . . . . . 36
Using the QWERTY keypad. . . . . . . . . . . . . . . . . . . . . . . . . . . . . . . . . . . . . . . . . . . . . . 37
Using the input panel . . . . . . . . . . . . . . . . . . . . . . . . . . . . . . . . . . . . . . . . . . . . . . . . . . . 37
Using the soft keyboard. . . . . . . . . . . . . . . . . . . . . . . . . . . . . . . . . . . . . . . . . . . . . 39
Using Block Recognizer . . . . . . . . . . . . . . . . . . . . . . . . . . . . . . . . . . . . . . . . . . . . 39
Using Letter Recognizer . . . . . . . . . . . . . . . . . . . . . . . . . . . . . . . . . . . . . . . . . . . . 40
Using Transcriber . . . . . . . . . . . . . . . . . . . . . . . . . . . . . . . . . . . . . . . . . . . . . . . . . 40
Using the Star Key. . . . . . . . . . . . . . . . . . . . . . . . . . . . . . . . . . . . . . . . . . . . . . . . . 41
Writing on the screen . . . . . . . . . . . . . . . . . . . . . . . . . . . . . . . . . . . . . . . . . . . . . . . . . . . 42
Drawing on the screen. . . . . . . . . . . . . . . . . . . . . . . . . . . . . . . . . . . . . . . . . . . . . . . . . . 44
Recording a message . . . . . . . . . . . . . . . . . . . . . . . . . . . . . . . . . . . . . . . . . . . . . . . . . . 45
v
Page 8

Using My Text . . . . . . . . . . . . . . . . . . . . . . . . . . . . . . . . . . . . . . . . . . . . . . . . . . . . . . . . .46
5 Using The Phone Function 47
6 Customizing Your MC35 83
7 Getting Connected 101
8 Microsoft Pocket Outlook 115
9 Companion Programs 127
Phone setup . . . . . . . . . . . . . . . . . . . . . . . . . . . . . . . . . . . . . . . . . . . . . . . . . . . . . . . . . .47
Installing the SIM card . . . . . . . . . . . . . . . . . . . . . . . . . . . . . . . . . . . . . . . . . . . . . .47
Entering your PIN. . . . . . . . . . . . . . . . . . . . . . . . . . . . . . . . . . . . . . . . . . . . . . . . . .49
Dialer screen . . . . . . . . . . . . . . . . . . . . . . . . . . . . . . . . . . . . . . . . . . . . . . . . . . . . . . . . .50
Dialer buttons. . . . . . . . . . . . . . . . . . . . . . . . . . . . . . . . . . . . . . . . . . . . . . . . . . . . . 50
Phone status icons. . . . . . . . . . . . . . . . . . . . . . . . . . . . . . . . . . . . . . . . . . . . . . . . .51
Phone operation . . . . . . . . . . . . . . . . . . . . . . . . . . . . . . . . . . . . . . . . . . . . . . . . . . . . . . .51
Turning the phone function on and off . . . . . . . . . . . . . . . . . . . . . . . . . . . . . . . . . .51
Erasing number input. . . . . . . . . . . . . . . . . . . . . . . . . . . . . . . . . . . . . . . . . . . . . . . 53
Answering a call. . . . . . . . . . . . . . . . . . . . . . . . . . . . . . . . . . . . . . . . . . . . . . . . . . . 53
Rejecting a call. . . . . . . . . . . . . . . . . . . . . . . . . . . . . . . . . . . . . . . . . . . . . . . . . . . .53
Ending a call . . . . . . . . . . . . . . . . . . . . . . . . . . . . . . . . . . . . . . . . . . . . . . . . . . . . .53
Adjusting the phone volume. . . . . . . . . . . . . . . . . . . . . . . . . . . . . . . . . . . . . . . . . .54
Using the speakerphone . . . . . . . . . . . . . . . . . . . . . . . . . . . . . . . . . . . . . . . . . . . .54
Muting a call. . . . . . . . . . . . . . . . . . . . . . . . . . . . . . . . . . . . . . . . . . . . . . . . . . . . . . 54
Making phone calls. . . . . . . . . . . . . . . . . . . . . . . . . . . . . . . . . . . . . . . . . . . . . . . . . . . . . 55
Phone features . . . . . . . . . . . . . . . . . . . . . . . . . . . . . . . . . . . . . . . . . . . . . . . . . . . . . . . .60
Call notification and identification. . . . . . . . . . . . . . . . . . . . . . . . . . . . . . . . . . . . . .60
Call hold . . . . . . . . . . . . . . . . . . . . . . . . . . . . . . . . . . . . . . . . . . . . . . . . . . . . . . . . .61
Conference call . . . . . . . . . . . . . . . . . . . . . . . . . . . . . . . . . . . . . . . . . . . . . . . . . . .61
Call notes . . . . . . . . . . . . . . . . . . . . . . . . . . . . . . . . . . . . . . . . . . . . . . . . . . . . . . . .62
Text messaging service . . . . . . . . . . . . . . . . . . . . . . . . . . . . . . . . . . . . . . . . . . . . .63
Voice mail. . . . . . . . . . . . . . . . . . . . . . . . . . . . . . . . . . . . . . . . . . . . . . . . . . . . . . . .67
Contacts integration . . . . . . . . . . . . . . . . . . . . . . . . . . . . . . . . . . . . . . . . . . . . . . . .68
Call History . . . . . . . . . . . . . . . . . . . . . . . . . . . . . . . . . . . . . . . . . . . . . . . . . . . . . .70
Phone profiles. . . . . . . . . . . . . . . . . . . . . . . . . . . . . . . . . . . . . . . . . . . . . . . . . . . . . . . . .73
Phone preferences . . . . . . . . . . . . . . . . . . . . . . . . . . . . . . . . . . . . . . . . . . . . . . . . . . . . .75
Phone tab. . . . . . . . . . . . . . . . . . . . . . . . . . . . . . . . . . . . . . . . . . . . . . . . . . . . . . . .76
Services tab . . . . . . . . . . . . . . . . . . . . . . . . . . . . . . . . . . . . . . . . . . . . . . . . . . . . . .77
Network tab . . . . . . . . . . . . . . . . . . . . . . . . . . . . . . . . . . . . . . . . . . . . . . . . . . . . . . 82
Adjusting settings . . . . . . . . . . . . . . . . . . . . . . . . . . . . . . . . . . . . . . . . . . . . . . . . . . . . . .83
Personal tab. . . . . . . . . . . . . . . . . . . . . . . . . . . . . . . . . . . . . . . . . . . . . . . . . . . . . . 83
System tab . . . . . . . . . . . . . . . . . . . . . . . . . . . . . . . . . . . . . . . . . . . . . . . . . . . . . . .88
Connections tab . . . . . . . . . . . . . . . . . . . . . . . . . . . . . . . . . . . . . . . . . . . . . . . . . . .94
Adding programs . . . . . . . . . . . . . . . . . . . . . . . . . . . . . . . . . . . . . . . . . . . . . . . . . . . . . .97
Adding programs to your device . . . . . . . . . . . . . . . . . . . . . . . . . . . . . . . . . . . . . .97
Adding a program to the Start menu . . . . . . . . . . . . . . . . . . . . . . . . . . . . . . . . . . . 98
Removing programs. . . . . . . . . . . . . . . . . . . . . . . . . . . . . . . . . . . . . . . . . . . . . . . .99
Infrared connection. . . . . . . . . . . . . . . . . . . . . . . . . . . . . . . . . . . . . . . . . . . . . . . . . . . . 101
Bluetooth connection . . . . . . . . . . . . . . . . . . . . . . . . . . . . . . . . . . . . . . . . . . . . . . . . . .104
WiFi connection . . . . . . . . . . . . . . . . . . . . . . . . . . . . . . . . . . . . . . . . . . . . . . . . . . . . . .109
Internet connection . . . . . . . . . . . . . . . . . . . . . . . . . . . . . . . . . . . . . . . . . . . . . . . . . . . .112
Network connection . . . . . . . . . . . . . . . . . . . . . . . . . . . . . . . . . . . . . . . . . . . . . . . . . . .112
Email server connection . . . . . . . . . . . . . . . . . . . . . . . . . . . . . . . . . . . . . . . . . . . . . . . .112
Pocket Outlook Overview . . . . . . . . . . . . . . . . . . . . . . . . . . . . . . . . . . . . . . . . . . . . . . .115
Calendar . . . . . . . . . . . . . . . . . . . . . . . . . . . . . . . . . . . . . . . . . . . . . . . . . . . . . . . . . . .115
Contacts . . . . . . . . . . . . . . . . . . . . . . . . . . . . . . . . . . . . . . . . . . . . . . . . . . . . . . . . . . .118
Tasks . . . . . . . . . . . . . . . . . . . . . . . . . . . . . . . . . . . . . . . . . . . . . . . . . . . . . . . . . . . . . .122
Notes . . . . . . . . . . . . . . . . . . . . . . . . . . . . . . . . . . . . . . . . . . . . . . . . . . . . . . . . . . . . . .124
Word Mobile. . . . . . . . . . . . . . . . . . . . . . . . . . . . . . . . . . . . . . . . . . . . . . . . . . . . . . . . .127
Excel Mobile . . . . . . . . . . . . . . . . . . . . . . . . . . . . . . . . . . . . . . . . . . . . . . . . . . . . . . . .130
PowerPoint Mobile . . . . . . . . . . . . . . . . . . . . . . . . . . . . . . . . . . . . . . . . . . . . . . . . . . . .132
Windows Media Player . . . . . . . . . . . . . . . . . . . . . . . . . . . . . . . . . . . . . . . . . . . . . . . .135
Program enhancements. . . . . . . . . . . . . . . . . . . . . . . . . . . . . . . . . . . . . . . . . . . .135
vi
Page 9

Copying files to your device. . . . . . . . . . . . . . . . . . . . . . . . . . . . . . . . . . . . . . . . . 136
The library . . . . . . . . . . . . . . . . . . . . . . . . . . . . . . . . . . . . . . . . . . . . . . . . . . . . . . 137
The playlist . . . . . . . . . . . . . . . . . . . . . . . . . . . . . . . . . . . . . . . . . . . . . . . . . . . . . 137
File Playback. . . . . . . . . . . . . . . . . . . . . . . . . . . . . . . . . . . . . . . . . . . . . . . . . . . . 139
Customizing the Player . . . . . . . . . . . . . . . . . . . . . . . . . . . . . . . . . . . . . . . . . . . . 141
10 Wireless Data Programs 147
11 Acessory Programs 163
12 User Support 187
13 Safety Information 193
Internet Explorer Mobile . . . . . . . . . . . . . . . . . . . . . . . . . . . . . . . . . . . . . . . . . . . . . . . 147
Mobile favorites . . . . . . . . . . . . . . . . . . . . . . . . . . . . . . . . . . . . . . . . . . . . . . . . . . 149
Messaging. . . . . . . . . . . . . . . . . . . . . . . . . . . . . . . . . . . . . . . . . . . . . . . . . . . . . . . . . . 151
Pocket MSN . . . . . . . . . . . . . . . . . . . . . . . . . . . . . . . . . . . . . . . . . . . . . . . . . . . . . . . . 155
MSN Hotmail. . . . . . . . . . . . . . . . . . . . . . . . . . . . . . . . . . . . . . . . . . . . . . . . . . . . . . . . 157
Viewing Hotmail Inbox. . . . . . . . . . . . . . . . . . . . . . . . . . . . . . . . . . . . . . . . . . . . . 157
MSN Messenger . . . . . . . . . . . . . . . . . . . . . . . . . . . . . . . . . . . . . . . . . . . . . . . . . . . . . 158
Terminal Services Client . . . . . . . . . . . . . . . . . . . . . . . . . . . . . . . . . . . . . . . . . . . . . . . 159
SIM Manager . . . . . . . . . . . . . . . . . . . . . . . . . . . . . . . . . . . . . . . . . . . . . . . . . . . . . . . 163
Pictures & Videos . . . . . . . . . . . . . . . . . . . . . . . . . . . . . . . . . . . . . . . . . . . . . . . . . . . . 164
Copying image files or video clips to your device . . . . . . . . . . . . . . . . . . . . . . . . 164
Organizing photos and videos. . . . . . . . . . . . . . . . . . . . . . . . . . . . . . . . . . . . . . . 164
Customizing Pictures & Videos . . . . . . . . . . . . . . . . . . . . . . . . . . . . . . . . . . . . . . 170
Camera . . . . . . . . . . . . . . . . . . . . . . . . . . . . . . . . . . . . . . . . . . . . . . . . . . . . . . . . . . . . 172
Capture mode . . . . . . . . . . . . . . . . . . . . . . . . . . . . . . . . . . . . . . . . . . . . . . . . . . . 172
Using the Camera . . . . . . . . . . . . . . . . . . . . . . . . . . . . . . . . . . . . . . . . . . . . . . . . 172
Camera settings . . . . . . . . . . . . . . . . . . . . . . . . . . . . . . . . . . . . . . . . . . . . . . . . . 174
GPS launcher. . . . . . . . . . . . . . . . . . . . . . . . . . . . . . . . . . . . . . . . . . . . . . . . . . . . . . . . 175
AirBEAM Smart . . . . . . . . . . . . . . . . . . . . . . . . . . . . . . . . . . . . . . . . . . . . . . . . . . . . . . 175
AirBEAM Package Builder. . . . . . . . . . . . . . . . . . . . . . . . . . . . . . . . . . . . . . . . . . 175
AirBEAM Smart Client. . . . . . . . . . . . . . . . . . . . . . . . . . . . . . . . . . . . . . . . . . . . . 175
AirBEAM Staging . . . . . . . . . . . . . . . . . . . . . . . . . . . . . . . . . . . . . . . . . . . . . . . . 183
Rapid Deployment Client . . . . . . . . . . . . . . . . . . . . . . . . . . . . . . . . . . . . . . . . . . . . . . . 184
Rapid Deployment Window . . . . . . . . . . . . . . . . . . . . . . . . . . . . . . . . . . . . . . . . . 184
Scanning RD Bar Codes . . . . . . . . . . . . . . . . . . . . . . . . . . . . . . . . . . . . . . . . . . . 185
Customer support . . . . . . . . . . . . . . . . . . . . . . . . . . . . . . . . . . . . . . . . . . . . . . . . . . . . 187
Troubleshooting . . . . . . . . . . . . . . . . . . . . . . . . . . . . . . . . . . . . . . . . . . . . . . . . . . . . . . 187
Troubleshooting reminders . . . . . . . . . . . . . . . . . . . . . . . . . . . . . . . . . . . . . . . . . 187
Troubleshooting procedures . . . . . . . . . . . . . . . . . . . . . . . . . . . . . . . . . . . . . . . . 187
Safety information . . . . . . . . . . . . . . . . . . . . . . . . . . . . . . . . . . . . . . . . . . . . . . . . . . . . 193
Index 195
vii
Page 10

viii
Page 11

1 First Things First
Package contents
1 First Things First
To help you use your MC35, we have designed a set of guides:
For information on: Refer to:
1
Programs on your device
Programs on your device
Additional programs that
can be installed on your
device
Last-minute updates and
detailed technical
information
Up-to-date information
regarding your device
This User Guide.
It provides online reference for using your device.
The User Guide is also available for download. Visit
http://www.symbol.com.
The MC35 Help.
To view Help, tap , then Help .
For a list of all application programs bundled with
your device, refer to page 26.
The Read Me files.
Located in the Microsoft
computer.
http://www.microsoft.com/windowsmobile/downloads/pocketpc.mspx
ActiveSync folder on your
Package contents
Your MC35 comes packed in a cardboard box. Carefully unpack the box and remove the
contents. If any of the following items are missing or damaged, contact your dealer
immediately:
• MC35 Enterprise Digital Assistant
• Stylus
• Lithium polymer battery
• AC adapter with power cord
• USB sync cable
• Stereo headset
• Single earbud headset
• Leather pouch
• MC35 Series Quick Start Guide
• MC35 Series Regulatory Guide
Preparing to use your MC35
Perform the following easy setup tasks to begin using your device:
1 Install the battery pack.
2 Charge your device.
3 Start up your device.
1
Page 12
1 First Things First
Preparing to use your MC35
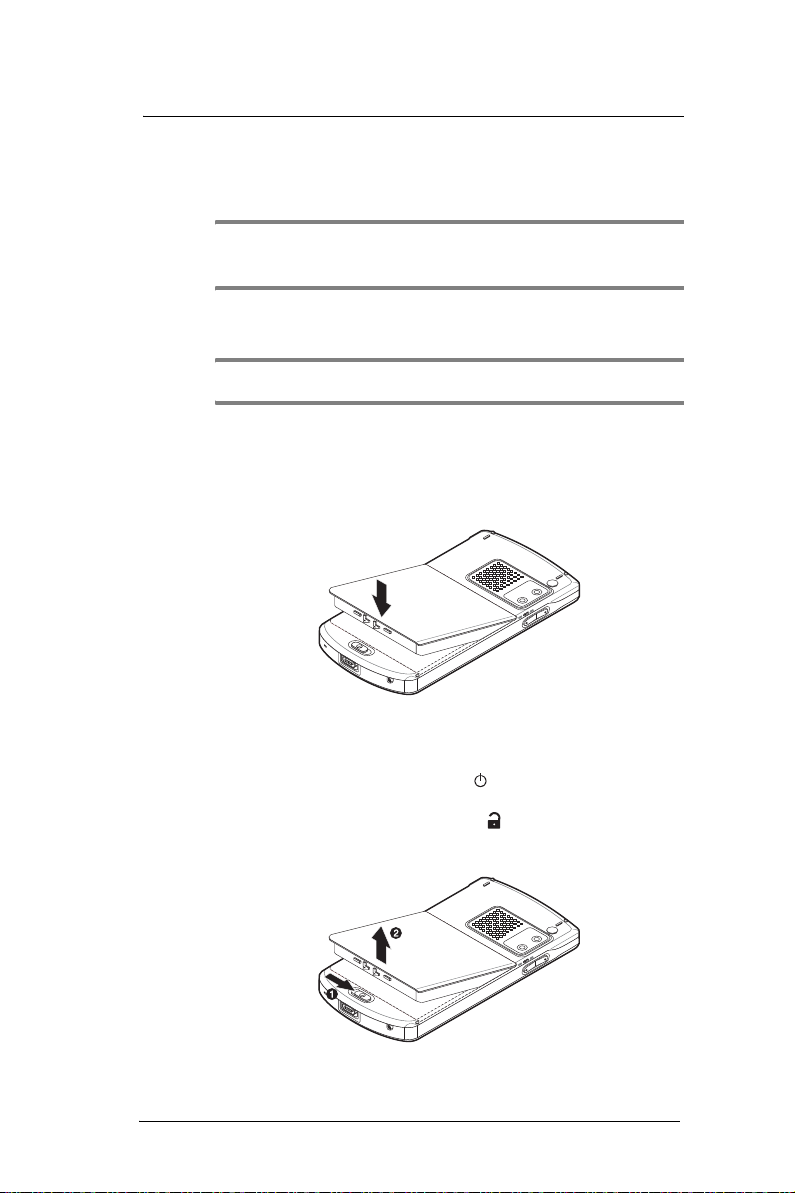
Installing the battery pack
Your MC35 uses a high-density removable and rechargeable 1350 mAH Lithium polymer
battery. Refer to the succeeding section for instructions on how to install the battery to
your device.
WARNING! There is a risk of fire and burns if the battery is handled improperly. DO NOT
disassemble, crush, puncture, short external contacts, or dispose the battery in fire or water. DO NOT
attempt to open or service the battery. Dispose of used batteries according to local recycling
guidelines in your area.
A backup battery cell is embedded into your device to prevent data loss in instances
when the removable battery is removed or completely discharged. This backup battery
cell supports the system for a maximum of thirty minutes.
NOTE: To enable the internal battery cell to provide backup power supply, charge your device with
the main battery, for at least four hours.
For information on conserving power consumption to make your battery last longer, refer
to page 187.
To install the battery pack:
Align the tabs on the battery pack with the groove on the MC35, then insert the battery
pack into the back of the device.
The battery cover locks to the chassis with an audible click.
To uninstall the battery pack:
1 If the device is on, press the Power button to turn off the device. Wait for five
(5) seconds to allow the device to completely power off.
2 Slide the battery latch toward the unlock icon . The battery pack pops up
slightly.
3 Lift the the battery pack and completely detach it from the device.
2
Page 13
1 First Things First
Preparing to use your MC35
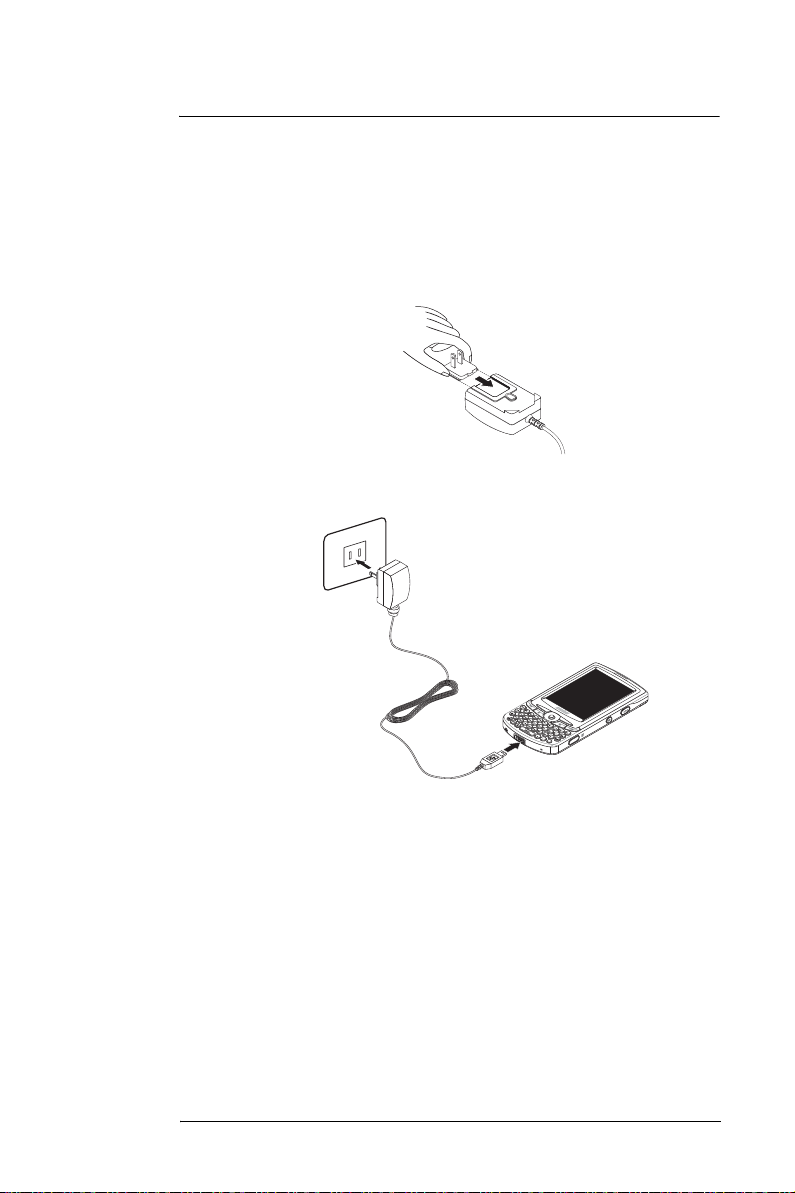
Charging the MC35
For initial use, you need to charge your device for about four hours. After that, charge it
everyday to recharge the battery to full capacity. Charge your device using the USB sync
cable, see instructions below.
To charge your device:
1 Install the replaceable clip plug to the AC adapter.
Slide the clip plug into the clip plug holder on the adapter, then snap into place. The
clip plug locks to the clip plug holder with an audible click.
2 Plug the AC adapter cable into the connector on bottom of the device.
3 Connect the AC adapter power cable into an electrical outlet.
The LED indicator on the front panel light orange when AC connection is made.
LED status during charging:
• Flashing orange: Charging
• Solid orange: Charging complete
If the battery level becomes low in the course of normal use, a status icon appears on the
device screen indicating low or very low battery status (see "Status icons" on page 23).
In both cases, perform an ActiveSync operation to back up your data, then recharge your
device as soon as possible.
If the battery level reaches low status, the device enters sleep mode; if the battery level
reaches very low status, the device enters deep sleep mode. In this case, you have about
72 hours to recharge your device after which you risk losing all data on your device’s
internal memory.
For information on how to wake up your device from sleep mode, refer to page 188.
3
Page 14
1 First Things First
System procedures
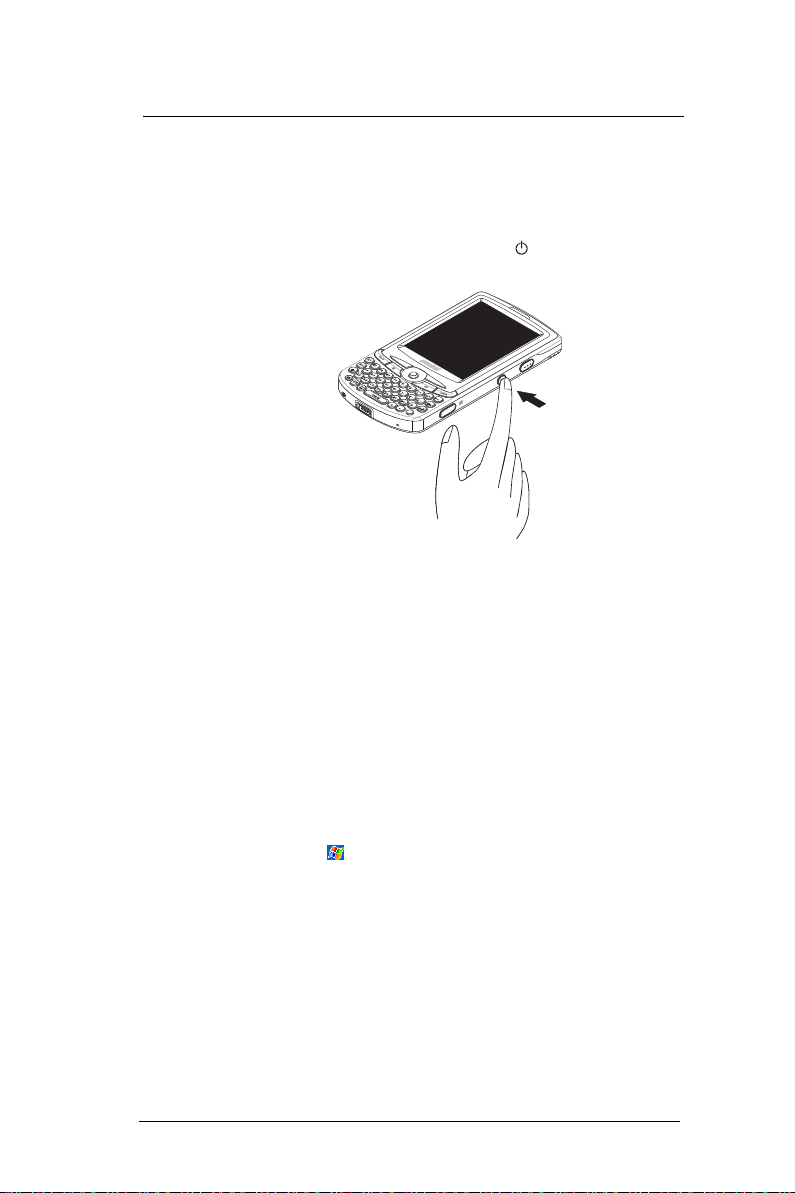
Starting up MC35
After you have initially charged your device for about four hours, the device is ready for
use. You can now start up your device where you will calibrate the display, learn some
basic stylus usage, and set up the system date and time.
To start up your MC35:
1 Turn on your device by pressing the Power button located on the right side of
the device.
2 Follow the onscreen instructions on the Welcome Screen Wizard.
System procedures
The following sections describe various system procedures that help you use the device
more efficiently.
Recalibrating the screen
When you first startup your MC35, you are asked to calibrate the screen by tapping the
center of a cross with your stylus as it moves around the screen. This process ensures
that when you tap the screen with your stylus the item tapped is activated.
If, however, while using your device, you discover tapping an item does not bring up the
appropriate response, it means your device has lost its calibration.
To recalibrate the screen:
1 Launch the Align Screen window by performing one of the following:
• Software launching
(a) Tap , then Settings.
4
Page 15
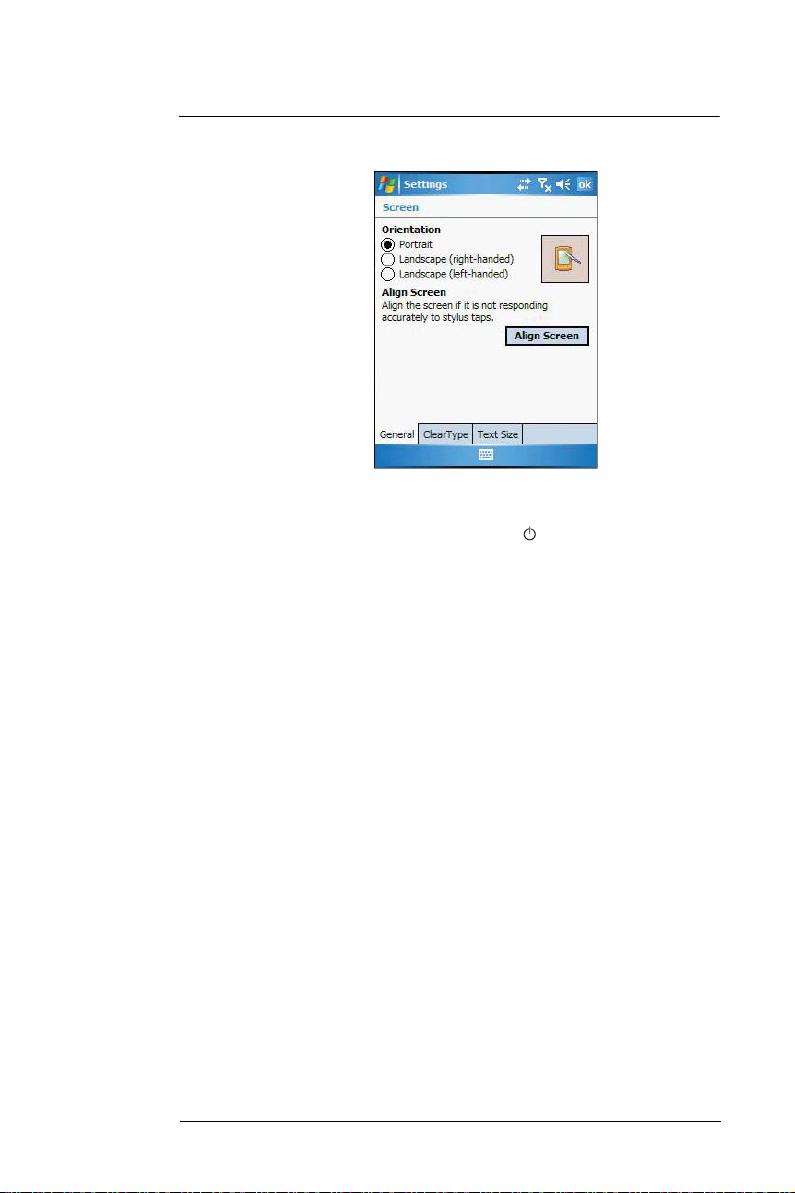
1 First Things First
System procedures
(b) On the System tab, tap the Screen.
(c) On the Screen window, tap the Align Screen button.
• Hardware launching
Simultaneously press the Power button and joystick.
2 Tap the center of the cross with your stylus as it moves around the screen.
Creating backup files
Any additional programs or new data in your device are stored in RAM (random access
memory). These items are lost if you have to perform a hard reset or your device loses all
power for any other reason. Because of this, it is imperative that you regularly back up
files to your computer via ActiveSync or to a storage card using the device’s built-in
SD/MMC slot.
If you have access to your computer, use ActiveSync to synchronize files to create
backup files of information stored on your device. Refer to page 28 for more information
on using ActiveSync.
In instances where you are unable to access your computer, you can back up files to an
SD or MMC card.
You have the following options:
• Back up individual files using the Cut and Paste commands in File Explorer.
• Back up individual Word, Excel or Notes files using the Rename/Move
command. Follow the steps below.
(1) Insert an SD or MMC card into the SD/MMC slot on the top of your device.
See page 18 for instructions on installing an SD/MMC card.
(2) Open the file you want to back up.
(3) Tap Menu, File, then Rename/Move.
(4) On the Rename/Move screen, enter a file name in the Name field.
(5) Tap the Location pick list, then select Storage Card.
(6) Tap the Folder pick list, then select the folder where you want to save the file.
(7) Tap OK.
(8) After the backup process, remove the card from the slot.
5
Page 16
1 First Things First
System procedures
Resetting the device
You may have to perform a reset if the device freezes (i.e., device no longer responds to
the buttons on the screen).
To perform a soft reset:
A soft reset allows your device to get a fresh start, similar to rebooting a computer. This
restarts your device and adjust memory allocation. All records and entries are retained
after a soft reset. Unsaved data in open programs may in some cases be lost.
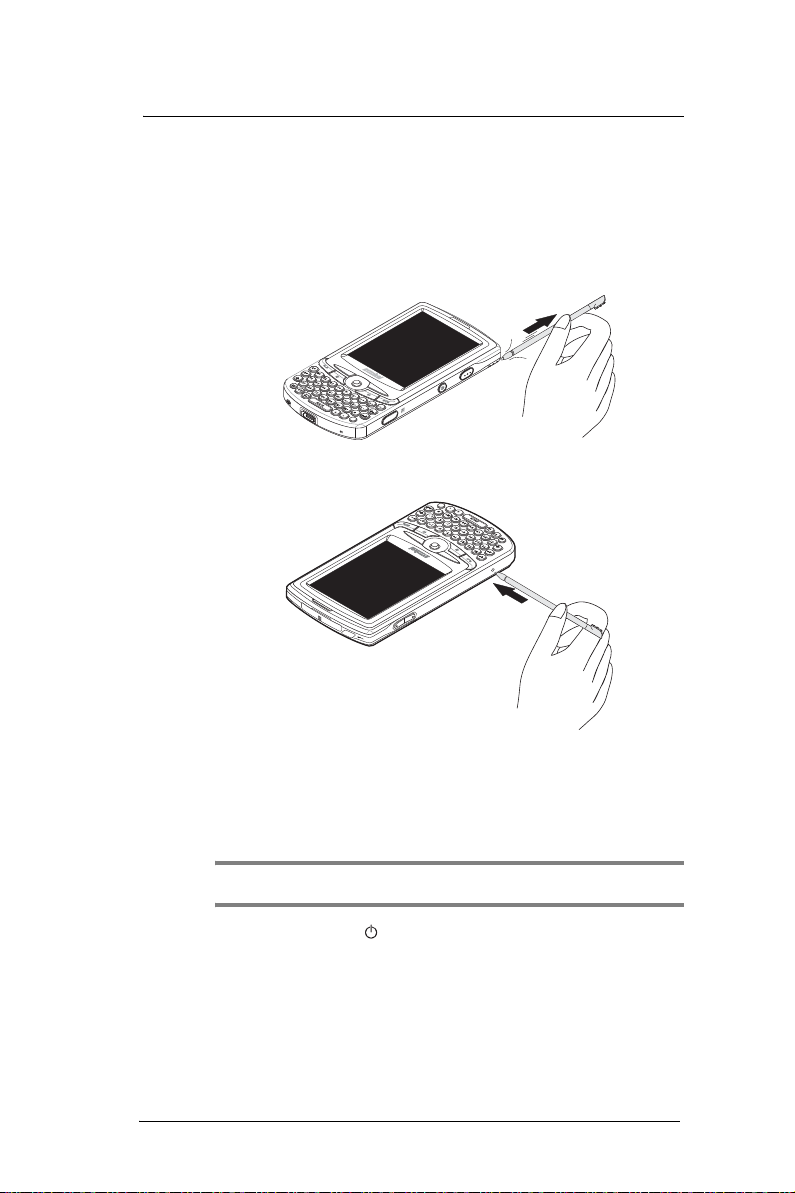
1 Remove the stylus from its holder.
2 Lightly press the tip of the stylus to the reset button located on the lower-left side of
the device.
To perform a hard reset:
A hard reset removes power to your device. This erases all records and entries, deletes
all programs you have added, and restores the device default factory settings. Never
perform a hard reset unless a soft reset does not correct your problem. When you
perform your next ActiveSync operation, you can restore any data that you previously
synchronized to your computer or you can restore data that you backed up to a storage
card.
NOTE: When you perform a hard reset, the date and time settings are not be retained. Formats,
preferences, and other settings are restored to their default factory settings.
1 Hold down the Power and Record buttons.
2 While holding down the Power and Record buttons, gently press the tip of the
stylus to the Reset button.
The message “To clear all data in the memory, press Volume Up button. To cancel
the operation, press Volume Down Button.” appears.
3 Press the Volume key up.
Another message appears requesting confirmation.
6
Page 17
1 First Things First
System procedures
Securing your device
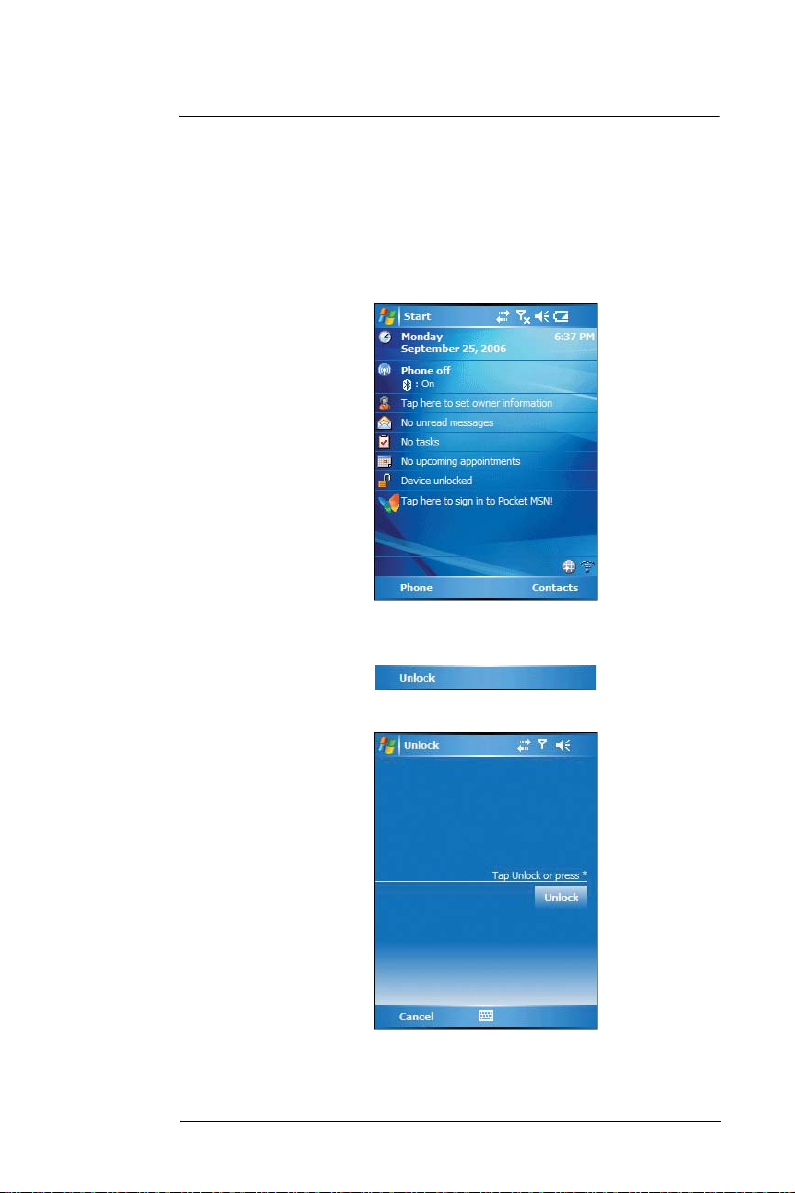
You can secure your device by locking either the keypad, screen or the device.
Locking the keypad or screen
The keypad lock feature locks the keypad to prevent accidental key presses.
To lock the keypad or screen:
• On the Today screen, tap Device unlocked. When the device is locked, the
command bar displays Unlock.
To unlock the keypad or screen:
• On the command bar, tap Unlock.
• Tap Unlock or press the orange key and Q key on the QWERTY keypad.
7
Page 18
1 First Things First
System procedures
Locking the device
Your device is not just a financial investment but a wealthy source of personal
information, some of which may be confidential so it is only logical to protect it from any
unauthorized access. The Security setting gives you the option of assigning a lock
password that is required to access your device after a set period of inactivity.
To assign a lock password:
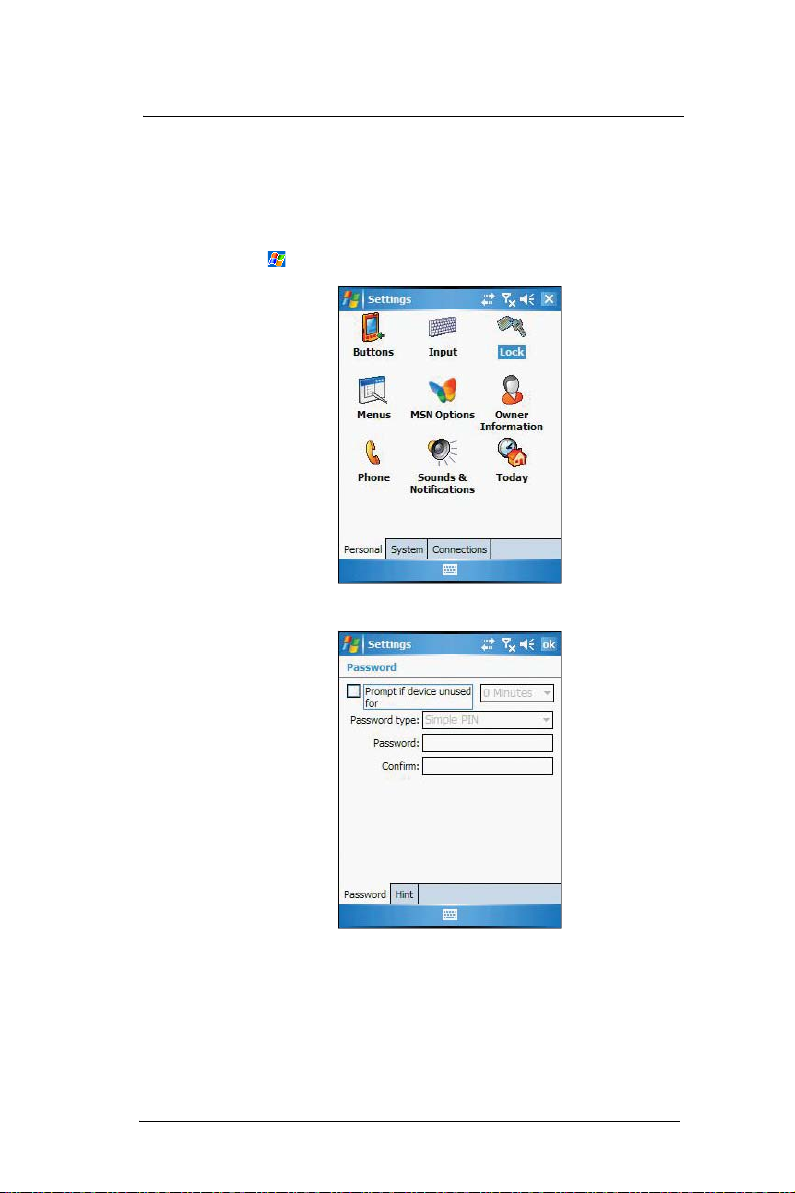
1 Tap , then Settings.
2 On the Personal tab, tap Lock.
3 On the Password tab, select the check box to enable the password function.
4 Tap the pick list to select the period of inactivity before the lock password is
required for access.
8
Page 19

1 First Things First
System procedures
5 In the Password type pick list, select the password mode you want to apply. You
have two options.
• Simple PIN
This password mode requires a 4-digit password.
• Strong alphanumeric
This password mode requires an alphanumeric password (i.e., a
combination of upper- and lower case letters, numbers, and symbols)
consisting of at least seven characters.
6 If you want to set a keyword to serve as a password reminder in case you forget it,
tap the Hint tab.
7 Tap OK.
9
Page 20

1 First Things First
System procedures
10
Page 21

2 Getting Started
This chapter explains the MC35 features. It also gives you a tour of the hardware and
software interface of your device.
• MC35 features
• MC35 device tour
• Command interface
Features summary
Listed below are the MC35 key features:
Performance
• Intel® PXA270 processor with speed of up to 520 MHz
• Integrated Intel
• System memory:
• 64 MB SDRAM for application storage
• 256 MB Flash ROM
• Microsoft Windows Mobile
Display
• 2.8" Transreflective TFT LCD (Thin Film Transistor Liquid Crystal Display)
with QVGA resolution
• 240 x 320 resolution
• 65 K color depth support
• Hardware and software control for backlight configuration settings
• Microsoft
XScaleTM Technology
ClearType technology for clearer, crisper font display
TM
5.0 software
2 Getting Started
Features summary
Audio
• Embedded AC '97 CODEC with CD-quality stereo output
• Built-in industry-standard 2.5-mm earphone jack
• Built-in speaker and microphone
• Separate volume control for system sounds and phone function volume
• Playback support for both Windows Media and MIDI sound files for
personalizing ring tones and sound notifications
Phone features
• Built-in 2.0 megapixel micro/macro dual focus camera
• Quad-band GSM broadband function (850/900/1800/1900 MHz)
• GPRS function for wireless Internet connection
• Contacts migration service using SIM Manager
• Features include Speed Dial, Caller ID, Conference Call, Call Waiting, Call
Barring, Call History, Fixed Dialing, speakerphone mode, note taking, voice
mail, and emergency number setting
• Text messages/Inbox email integration
• Seamless transition between voice and data connections
• Customizable ring tones and ringer options
• Hardware and software launch function
• Operation time:
• Talktime: 4 hours
• Standby time: 150 hours
• Typical time: Up to 12 hours of EDA usage only
11
Page 22

2 Getting Started
Features summary
• Data time:
• WMV playback time: 8 hours
• MP3 playback time: 12 hours
Connectivity
• Mini USB B connector
• Built-in SD/MMC (Standard Digital/MultiMedia Card) expansion slot (SDIO)
1
• IrDA
-standard Infrared wireless function
• Bluetooth wireless technology
• WiFi (IEEE 802.11b/g) (for MC3574 models only)
GPS technology
• GPS navigation G with over -150 dBm
• Sensitivity/support GPS, A-GPS
Battery pack
• Removable and rechargeable 1350 mAH Lithium polymer battery pack
• Embedded backup battery cell
• Charging time from empty to full capacity: 4 hours
• Operation time
• MP3 playback time (LCD off): 12 hours
• WMV playback time (LCD on, average level backlight, phone off): 8
hours
• Internet browsing time: 4 hours
NOTE: Length of battery operation depends on power consumption which in turn is based on
system resources use. For example, constantly using the backlight or using power-demanding
applications shortens the length of battery operation.
Design and ergonomics
• Stylish and sleek design
• Dimensions:
• Length: 127 mm (5 inches)
• Width: 66 mm (2.6 inches)
• Depth: 19.5mm (0.75 inches)
• Weight (approximately): 179 g (6.3 oz.) (including battery)
• User-friendly navigation features
• Joystick for one-hand operation
• Volume key for volume control
• Record button for voice recordings
• Camera or scanner mode switch for setting device to camera or
scanner mode
• Camera button for activating the Pictures & Videos application
1
Infrared Data Association
12
Page 23

MC35 tour
The following sections give you a tour of the hardware interface.
Front view
The illustration below shows the front panel of your device as well as top and bottom
edges.
2 Getting Started
MC35 tour
No. Component Description
1 SD/MMC
expansion slot
2 Infrared (IR) port Uses infrared technology to transmit and receive
3 Earpiece Listen to a phone call from here.
Accepts an SD (Secure Digital), MMC (MultiMedia
Card) or SDIO (Secure Digital Input Output) cards,
allowing you to add more memory.
Install add-on applications or use audio text files
stored in it for use with internal applications. You can
also use it to back up data from your device.
data from other IR-enabled devices.
13
Page 24
2 Getting Started
MC35 tour
No. Component Description
4 LCD touch
5Battery
screen
charging
indicator
Displays the applications and data stored on your
device. It is touch-sensitive and responds to the
stylus or your finger.
• Flashes orange to indicate the battery is
charging.
• Lights up orange to indicate the AC adapter is
connected or the battery is fully charged.
6 Joystick • Press the center of the joystick to access menu
7 Right soft button Perform the function indicated on the lower right
8 Send button • When there’s an incoming call, press to accept
9 OK button Displays the Today screen. Closes the active
10 QWERTY
keypad
11 Microphone Inputs audio into your device when receiving/making
12 Mini USB B
Connector
13 Earphone jack Connects to an audio line-out device such as
14 Today button Displays the Start menu.
options and confirm your selection.
• Move the joystick in a left, right, up or down
direction to navigate through the menu options.
corner of the display.
the call.
• During an ongoing call, press and hold to toggle
on/off the speakerphone mode.
• From Speed Dial, press to call the currently
selected number.
• From Call History, press to call the currently
selected log item.
• In mailbox, press to send a composed email/text
message or display options for a received email/
text.
• Change between an active call and call that is on
hold.
application.
Key in numbers to make a call or letters to compose
email or text messages.
a call or recording voice notes.
• Connects your device to the USB sync cable,
which in turn connects to the computer’s USB
port to perform an ActiveSync operation.
• Connects to an AC adapter to recharge your
device.
earphones or headphones.
14
Page 25

2 Getting Started
MC35 tour
No. Component Description
15 End button • When there’s an incoming call, press to reject
16 Left soft button Perform function indicated on the lower left corner of
17 GSM network
indicator
the call.
• During an ongoing call, press to end the call.
• When manually dialing a number, press to
delete the number input.
• Press and hold to toggle on/off the mobile
service connection.
the display.
Indicates the following status:
• Flashing green within 600/600 ms - No SIM card
installed, no PIN entered, network search in
progress, ongoing user authentication, or
network login in progress.
• Flashing green within 75/3000 ms - Device is
logged onto the GSM network (monitoring
control channels and user interaction) or no call
is in progress.
• Flashing green within 75/75 ms or 75/3000 ms One or more GPRS context is activated
• Flashing green within 0.5 s - Packet switched
data transfer in progress
• Flashing green approx. 5 s or within 1 s after
data packets were exchanged - Packet switched
data transfer in progress
• Solid green - Voice call or data call in progress
• Off - Device is not powered on, in sleep mode, or
in alarm mode, or battery is charging
15
Page 26

2 Getting Started
MC35 tour
Rear view
No. Component Description
1 Camera flash Illuminates for taking pictures in low light areas.
2 Camera lens Take pictures with the built-in camera. You can
3 Speaker Listen to audio media. When the speakerphone is
4 Main battery Removeable and rechargeable battery pack.
5 Battery release
latch
then send the picture file as an email or MMS
message or save it as your Today screen’s
wallpaper. Captures bar code data.
active, sounds are emitted here.
Slide to the right to unlock the battery.
16
Page 27

2 Getting Started
MC35 tour
Left view
No. Component Description
1 Volume key Press the top key to increase volume, press the
2 Mode switch Toggles the device between bar code scan or
bottom key to decrease volume.
camera mode.
3 Reset button Press the end of the stylus into the button to reset
your device.
Right view
No. Component Description
1 Camera button Press to activate the Camera application. Press and
2 Power button • If the device is off, press this button to turn it on.
3 Record button Press to start voice recordings for notes and voice
4 Stylus holder To use the stylus, remove it from its holder and hold
hold to take pictures.
• If the device is on, press this button to turn it off.
tags.
it the same way you hold a pen or pencil.
17
Page 28
2 Getting Started
Hardware and command interface
Hardware and command interface
This section describes basic hardware procedures in using your MC35. Information on
the device’s command interface is also discussed.
Hardware interface
Using the touch screen backlight button
Under some lighting conditions, viewing the information on your device may be difficult. If
this is the case, activate the backlight by tapping on the screen or pressing the Backlight
button on the QWERTY keypad to illuminate the touch screen.
Using the stylus
On your device, the stylus replaces the mouse.
• Tap - Touch the screen once with the stylus to open items and select
options.
• Drag - Hold the stylus on the screen and drag across the screen to select
text and images. Drag in a list to select multiple items.
• Tap and hold - Tap and hold the stylus on an item to see a list of actions
available for that item. In the pop-up menu that appears, tap the action you
want to perform.
Using the SD/MMC slot
Your device has an expansion slot compatible with a range of SD and MMC storage
cards, which are primarily used to back up or transfer files and data. The slot also
supports SDIO cards for added connectivity options.
To insert a storage card:
NOTE: This device comes with a protective piece in the card slot. Remove the plastic card from the
slot before trying to insert an SD, MMC or SDIO card.
1 Hold your device securely, then lift the rubber cover from the SD/MMC slot.
18
Page 29

2 Getting Started
Hardware and command interface
2 Push the card into the slot until you hear an audible system sound; this indicates
that the card is already properly seated within the slot. The card is secure when it is
not protruding from the base.
3 Insert the rubber cover back into place.
To remove a storage card:
1 Hold your device securely, then lift the rubber cover from the SD/MMC slot.
2 Push against the top of the card, as if you were pushing it further into the slot, letting
the card spring out. An audible system sound indicates that the card has been
released.
3 Gently remove the card from the slot.
4 Close the rubber cover.
Command interface
Hardware buttons
Your device has hardware buttons that control actions and scroll functions, and a stylus
for selecting items and entering information.
Using the hotkeys
On your device, the hotkeys allows you do the following:
Key Action
Orange key Use this key to access the secondary layer of characters
Backlight/ 0 key Use this key to adjust the backlight from dim to bright.
Star key Use this key to display the Star Key soft keyboard option.
Messaging Use this key to instantly display the Messaging application.
Shift key Use the Shift/Caps key to change the state of the alpha
and actions.
• Press the Orange key once to activate this mode
followed by another key.
• Press the Orange key twice to lock the mode. Press the
Orange key a third time to unlock.
When in Today screen, press this key to display the Dialer
screen.
characters from lowercase to uppercase. Pressing the key
twice, locks the state of the characters to uppercase.
19
Page 30

2 Getting Started
Hardware and command interface
Using the QWERTY keypad
The QWERTY keypad allows you to easily key in your messages, quickly access the
Messaging application, turn the soft keyboard on and off, control touch screen backlight,
dial phone numbers with the numeric keypad and special function key.
The QWERTY keypad uses an alphanumeric keypad that produces the 26-character
alphabet (A-Z, both lowercase and uppercase), numbers (0-9), and assorted characters.
The keypad is color-coded to indicate the modifier key is pressed to produce a particular
character or action. The keypad default is alphabetic, producing lowercase letters.
The QWERTY keypad is backlit and illuminates when a key is pressed and stays lit for
approximately 5 seconds.
QWERTY keypad input modes
Key Normal
Qq Q *
Ww W 1
EeE 2
Rr R 3
Tt T +
Yy Y _
Uu U -
IiI =
Oo O “
PpP áü
AaA #
Ss S 4
Dd D 5
Ff F 6
Gg G (
Hh H )
Jj J /
Kk K :
Ll L ‘
input
Keystroke combination
Shift or CAPS + Key Orange + Key
20
Page 31

2 Getting Started
Hardware and command interface
Key Normal
Backspace Delete
Shift Shift
ZzZ 7
Xx X 8
Cc C 9
Vv V %
BbB &
Nn N !
MmM ?
,,, @
Enter Enter
Mail Messaging
Brightness Brightness Brightness 0
Tab Tab
Space Space
Star Soft keyboard
input
Keystroke combination
Shift or CAPS + Key Orange + Key
21
Page 32

2 Getting Started
Hardware and command interface
Today screen
When you turn on your device for the first time each day (or after a preset period of
inactivity), you'll see the Today screen. You can also display it by pressing the OK button
or tapping , then To day .
To define a preset period of inactivity after which the Today screen is
displayed:
1 Tap , then Settings.
2 On the Personal tab, tap Today .
3 On the Items tab, select the “Today timeout“ check box.
4 Tap the pick list beside the check box to set the period of inactivity.
5 Tap OK.
Today screen provides an at-a glance view of the important reminders and details
for the day.
Start menu
The Start menu displays the active program and allows you to switch to other programs.
Tap a program icon to open it.
Tap to see more programs.
Tap to customize your device.
Tap to launch the Online Help.
22
Page 33
2 Getting Started
Hardware and command interface
Navigation bar
The navigation bar is located on the top of the screen. It shows status icons, such as
battery charge, signal level, and connection status of the device.
Status icons
The table below describes some of the status icons you may see on the navigation bar.
NOTE: For status icons related to the phone function, refer to page 51.
Icon Description
Turns all sounds on and off.
Main battery is low
No battery
Data connection is active
Synchronization error
1
Notification
Notification that one or more email/text messages were received
that one or more instant messages were received
1 If more notification icons need to be displayed than there is room to display them, the Notification icon
appears on the command bar. Tap Notification to view all notification icons.
Command bar
Use the command bar at the bottom of the screen to perform tasks in programs. The
command bar includes menu names, buttons, and the Input Panel button .
• To create a new item in the current program, tap New.
• To view a notification or an image file received on your device, tap View.
• To see the name of a button, tap and hold the stylus on the button. Drag the
stylus off the button so that the command is not carried out.
Pop-up menus
With pop-up menus, you can quickly choose an action for an item. For example, you can
use the pop-up menu in the contact list to quickly delete a contact, make a copy of a
contact, or send an email message to a contact. The actions in the pop-up menus vary
from program to program.
To access a pop-up menu:
1 Tap and hold the stylus on the item that you want to perform the action on.
2 When the menu appears, lift the stylus, then do any of the following:
• Tap the action you want to perform.
23
Page 34

2 Getting Started
Hardware and command interface
• Tap anywhere outside the menu to close the menu without performing
an action.
Tap and hold the selected item to display a
pop-up menu.
Lift the stylus and tap
the option you want.
Notifications
Your device reminds you in a variety of ways when you have something to do or receive a
message. For example, if you've set up an appointment in Calendar, a task with a due
date in Tasks, or an alarm in Clock, you'll be notified in any of the following ways:
• A message box appears on the screen.
• A sound, which you can specify, is played.
To choose reminder types and sounds for your device:
1 Tap , Settings, then Personal tab.
2 Tap the Sounds & Notifications icon .
3 On the Notifications tab, select the kind of events you want to be notified of and the
manner of notification you prefer. The options you choose here are applied globally
in your device.
4 Tap OK.
24
Page 35
3 Managing Programs
This chapter describes the procedures for launching programs. It also shows how to use
Find and File Explorer, as well as procedures for perfor ming an ActiveSync operation.
• Accessing programs
• Using Search
• Using File Explorer
• Using ActiveSync
Accessing programs
Opening a program
You can open programs in the following ways:
• Tap a program name from the menu.
You can select which programs are displayed on the menu. For
instructions, see "Adding a program to the Start menu" on page 98.
• Tap , then Programs to see more programs.
3 Managing Programs
Accessing programs
Switching between programs
• Select another program from the menu.
NOTE: Some programs have abbreviated labels for check boxes and drop-down menus. To see the full
spelling of an abbreviated label, tap and hold the stylus on the label. Drag the stylus off the label so that
the command is not carried out.
25
Page 36

3 Managing Programs
Accessing programs
Program list
The following table contains a partial list of programs that are available on your device.
Icon Program Usage
ActiveSync Synchronize information between your device and your
Calculator Peform basic arithmetic calculations.
computer.
Download
Agent
Excel Mobile Create new workbooks or view and edit Excel
File Explorer Browse contents of folders on your device.
Internet
Sharing
AirBEAM Allows specially designed software packages to be
RDClient Facilitates software downloads to a wearable terminal
Notes Create handwritten or typed notes, drawings, and
Pictures &
Videos
Pocket MSN Subscribe to popular MSN services.
PowerPoint
Mobile
Search Locates specific files on your device.
SIM
Manager
Tasks Keep track of your tasks.
Manages the download and installation of additional
programs.
workbooks created on your computer.
Synchronize information between your device and your
computer using a USB or Bluetooth connection.
transferred between a host server and Symbol wireless
handheld devices.
from a Mobility Services Platform Console’s FTP
server.
recordings.
Access and organize your picture and video files.
View slide show presentations.
Loads the contents of your SIM card to your device and
transfer it to Contacts.
Terminal
Services
Client
Word Mobile Create new documents or view and edit Word
26
Log onto a Windows NT server type PC that is running
Terminal Services software and use all of the programs
that are available on that PC from your device.
documents created on your computer.
Page 37
3 Managing Programs
Icon Program Usage
Calendar Keep track of your appointments and create meeting
Contacts Keep track of your friends and colleagues.
requests.
Using Search
Internet
Explorer
Browse Web and WAP sites, and download new
programs and files from the Internet.
Messaging Send and receive text and email messages.
Windows
TM
Media
Player
®
MSN
Messenger
Phone Send and receive local and international calls and text
NOTE: To get detailed information on using any of the applications listed in this section, open the
program, tap , then Help .
Play digital audio and video files that are on stored on
your device or on a network.
Send and receive instant messages with your MSN
Messenger contacts.
messages in your device.
Using Search
The Search function helps you quickly locate specific files.
1 Tap , Programs, then Search .
2 Enter the text you want to find, then select a data type.
To quickly find information that is taking up storage space on your device, select the
“Larger than 64 KB” option from the Type drop-down box.
3 Tap Search .
Type text you
want to find.
Tap to start the
search.
27
Page 38

3 Managing Programs
Using File Explorer
Using File Explorer
Use File Explorer to locate files on your device and to organize these files into folders.
• Tap , Programs, then File Explorer .
Using ActiveSync
Use Microsoft® ActiveSync® technology to synchronize information between your MC35
and your computer and/or a server so you always have the most up-to-date information
wherever you are.
Tap here to select a
sort order for the list.
Tap and hold a blank
area to display the New
Folder
command.
Tap Menu to display a
pop-up menu.
NOTE: You can only synchronize information with a server if your company is running Microsoft
Exchange Server with Exchange ActiveSync.
Each time you synchronize, ActiveSync compares the information on your device with
the information on your computer and/or the server and updates all locations. This
means you’ll always have the most recent information at all times. Use ActiveSync to:
• Keep Pocket Outlook data up-to-date by synchronizing your device with the
Microsoft Outlook data, including the Outlook contact’s picture, on your
computer.
• Synchronize Inbox, Calendar, and Contacts with a server so that you have
the latest information, even when you don’t have access to your computer.
• Open and edit your Microsoft Word and Microsoft Excel files in your device
and synchronize it back to your computer. Files are automatically converted
to the correct format.
• Copy (rather than synchronize) files between your device and your
computer.
• Control when synchronization occurs by selecting a synchronization
schedule. For example, you can synchronize continually while connected to
your computer or only when you select the synchronize command.
If you choose continuous synchronization, changes made on the computer
or device are duplicated immediately. To recover a sudden loss of data, you
can configure ActiveSync to back up data on your device. Choose whether
to copy all information in the internal storage on your device, or just the
information that has changed since the last backup.
28
Page 39

3 Managing Programs
Using ActiveSync
• Select which information types are synchronized and control how much
information is synchronized. To illustrate, when synchronizing Calendar, you
can set ActiveSync to synchronize appointments within a certain date range
and for specific categories only. For example business appointments from
the past two weeks only.
• Synchronize data with your computer over a Bluetooth connection.
• Synchronize Internet Explorer Mobile favorites on your computer.
Installing Microsoft ActiveSync
ActiveSync is already installed on your MC35; you only need to install it on your
computer.
Minimum PC computer requirements
• Microsoft Windows® XP, 2000, ME, NT Workstation 4.0 with Service Pack 6
or later, or 98
• Microsoft Outlook
• Microsoft Internet Explorer 4.01 with Service Pack 1 or later
• Hard disk drive with 12 to 65 MB of available hard disk space (actual
requirements vary based on selection of features and user’s current system
configuration)
• Available Bluetooth, infrared or USB port
• CD-ROM drive
• VGA graphics card or compatible video graphics adapter at 256 color or
higher
• Keyboard and mouse
To install Microsoft ActiveSync on your computer:
1 Close all open programs, including those that run at startup, and disable any virus-
scanning software.
2 Download the ActiveSync software from the Microsoft ActiveSync Download page
at http://www.microsoft.com/windowsmobile/downloads/activesync42.mspx
3 Install the ActiveSync setup software to your computer by clicking the appropriate
language.
4Select Run this program from its current location and click OK.
5 Follow all onscreen instructions to complete installation.
After installation, a grayed out ActiveSync icon appears on your computer’s system
tray (on the lower right-hand corner of the screen).
®
98 or later required for synchronization
NOTE: If the wizard does not automatically appear, launch ActiveSync on your computer by clicking on
its icon from Start, then Programs.
For detailed information about using ActiveSync on your computer, star t ActiveSync on
your computer, click Help, then Microsoft ActiveSync Help.
29
Page 40
3 Managing Programs
Using ActiveSync
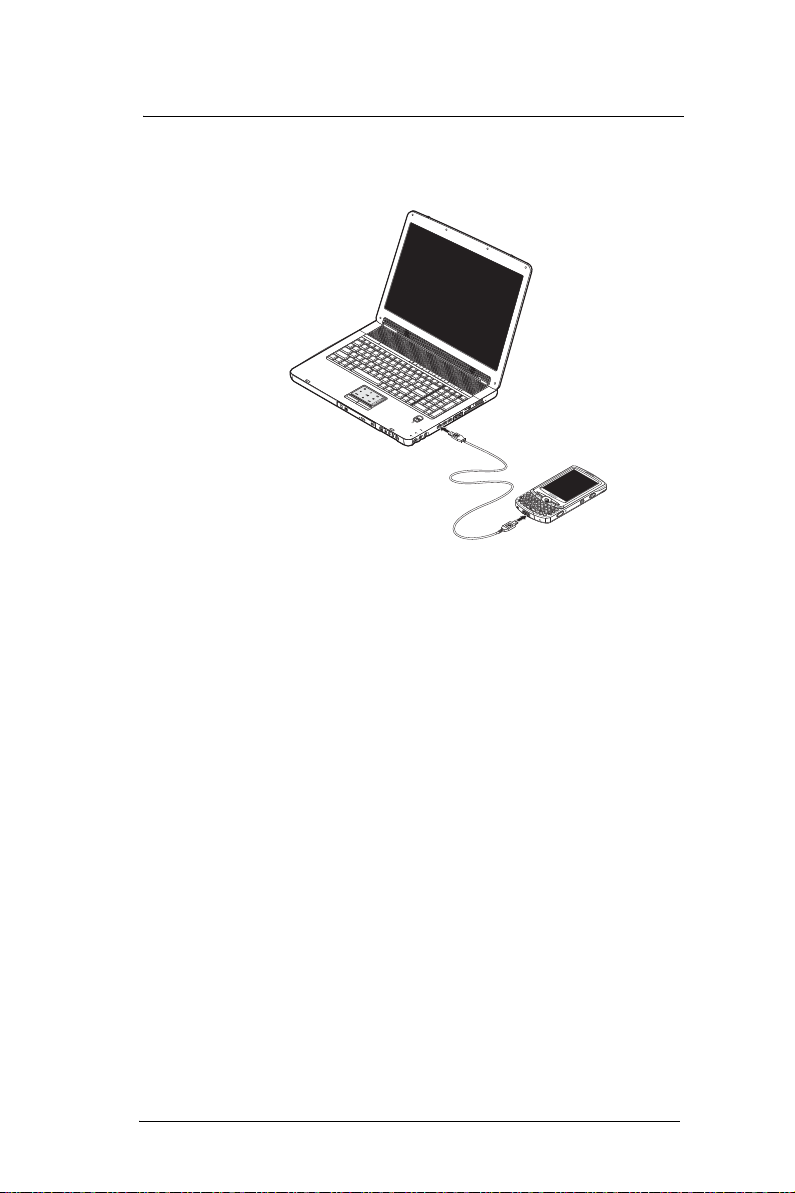
Connecting the device to your computer
1 After ActiveSync has been installed, connect the USB sync cable to the USB
connector on the bottom of your device. If necessary, connect an adapter.
ActiveSync automatically starts on your computer screen.
2 Follow the onscreen instructions.
3 When the configuration process is completed, the ActiveSync window appears.
If ActiveSync doesn’t start automatically, do the following on your computer:
(a) On the Windows taskbar, click Start, Programs, then Microsoft
ActiveSync.
(b) Click File, Connection Settings, then click Connect.
(c) Click OK.
Creating a partnership (first time only)
After completing the installation procedures you can now set up a partnership between
your MC35 and your computer and/or a server with the help of the New Partnership
setup wizard. This wizard helps you:
• Set up a partnership so you can synchronize information between your
device and your computer
• Customize your synchronization settings
To create a partnership:
1 Plug the USB sync cable into a USB port on your computer.
The New Partnership setup wizard automatically starts on your computer screen.
2 Follow the onscreen instructions.
To prevent synchronization problems, select the “Synchronize with Microsoft
Mobile Information Server and/or this desktop computer” option in the New
Partnership setup wizard only if you are certain that your company is running
Microsoft Exchange Server with Exchange ActiveSync and you know the server
name. Otherwise, select the “Synchronize with this desktop computer” option. For
more information, contact your corporate network administrator or service provider.
30
Page 41

3 Managing Programs
Using ActiveSync
The initial synchronization process automatically begins when you finish using the
wizard. During the synchronization process the Connectivity icon appears on your
device’s navigation bar.
Displays detailed
connection status
Displays connection
status
Tap to connect
and synchronize.
After the initial synchronization, take a look at Calendar, Contacts, and Tasks on
your device. You'll notice that information you've stored in Microsoft Outlook on your
computer has been copied to your device, and you didn't have to type a word.
Disconnect your device from your computer and you're ready to go!
The next time you connect your device, your computer recognizes it automatically.
You don’t need to set up the partnership again.
Synchronizing with your computer
You can set remote synchronization with your computer using the following connection
options:
• USB connection
• Infrared connection
• Bluetooth connection
• WiFi connection
You can also set a mobile schedule during wireless synchronization.
NOTE: To synchronize remotely with your computer, it must be turned on.
USB connection
1 Perform the steps below on your computer:
(a) Open ActiveSync .
(b) Click the Allow USB connection with this desktop computer check box.
(c) Click OK.
2 Connect your device to your computer using the USB sync cable. Follow
instructions on page 30.
31
Page 42
3 Managing Programs
Using ActiveSync
3 Perform the steps below on your device:
You can connect to your device using the ActiveSync or the Internet Sharing
application.
Using ActiveSync to synchronize with your computer:
(a) Initiate connection by tapping , Programs, then ActiveSync .
(b) Tap Menu, then Connections.
(c) Select the “Synchronize all PCs using this connection” check box.
(d) Select USB.
(e) Tap OK.
Using Internet Sharing to synchronize with your computer:
(a) Tap , Programs, then Internet Sharing .
(b) Under the “PC Connection” list, select USB.
(c) Tap Connect.
Infrared connection
The IrDA-standard infrared port allows you to synchronize information with an infraredenabled computer. Simply align the infrared port of your device with that on the
computer. This method is ideal for quickly switching between multiple devices since there
are no cables or adapters to change.
1 Perform the steps below on your computer:
(a) Configure an infrared port on your computer following the manufacturer’s
instructions.
(b) Once your computer’s IR port
(c) Click File, then Connection Settings.
(d) Under the “In the Allow serial cable or infrared connection to this COM port”
list, select Infrared Port (IR).
(e) Click OK.
2 Perform the steps below on your device:
(a) Align the IR port
are unobstructed and within close range.
is ready, open ActiveSync .
of your device with that on your computer so that they
(b) Initiate connection by tapping , ActiveSync, Menu, then Connect via IR.
(c) Tap Sync.
32
Page 43

3 Managing Programs
Using ActiveSync
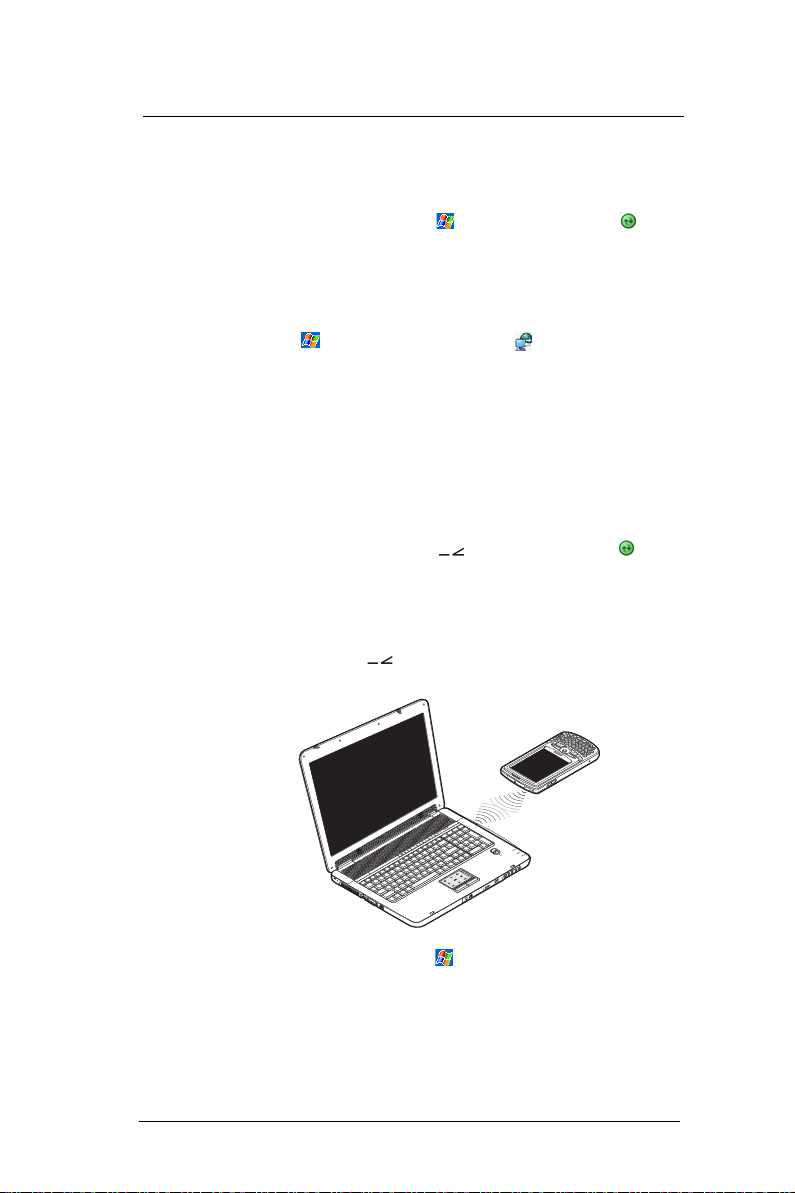
Bluetooth connection
Your device is equipped with Bluetooth wireless technology that you can use to
synchronize information with a computer equipped with a Bluetooth adapter or access
point. Bluetooth wireless technology allows you to communicate with the computer
whenever it is within range.
NOTE: The instructions below are for computers that support the Windows XP SP2 or later version
operating system.
1 Perform the steps below on your computer:
IMPORTANT: Connect the device to the computer using the USB sync cable to establish a
synchronization relationship before connecting via Bluetooth.
(a) On the Windows taskbar, click Start, Settings, then Control Panel.
(b) On the Options tab, select the “Turn discovery on” and “Allow Bluetooth
devices to connect to this computer” options.
(c) On the COM Port tab, click Add.
(d) Select “Incoming (device initiates the connection)”, then click OK.
Note the number of COM port that was added. The COM port must not be
higher that 20.
(e) Click OK.
(f) In the ActiveSync window, click File menu, then Connection Settings.
(g) Under the “In Allow serial cable or infrared connection to this COM port” list,
select the COM port with the number you noted in step 4.
(h) Click OK.
2 Perform the steps below on your device:
Make sure that the device and computer are within close range.
Do either of the following:
Using ActiveSync to sychronize with your computer:
(a) Initiate connection by tapping , Programs, then ActiveSync .
(b) Tap Menu, then Connect via Bluetooth.
(c) Tap Sync.
Using Internet Sharing to synchronize with your computer:
(a) Tap , Programs, then Internet Sharing .
(b) Under the “PC Connection” list, select USB.
(c) Tap Connect.
NOTE: Media (audio and video) files can only be synchronized when using a USB sync cable
connection.
33
Page 44

3 Managing Programs
Using ActiveSync
WiFi connection
Windows Mobile supports the standard Network Protocol (TCP/IP) that allows you to
easily connect to the Internet by modem or high frequency wireless LAN technology.
With the device’s integrated WiFi (available for MC3574 models only), you can scan for
existing wireless network access point or hot spot. The wireless network access points or
hot spots can be found in homes and offices. Using WiFi networking, you can connect to
a computer and send and receive files.
A wireless network can be added either when the network is detected or by manually
entering settings information. For more information on how to set up a wireless network
connection, see "Setting up a wireless network connection" on page 111.
Setting mobile schedule during synchronization with your
computer
You can set two separate mobile schedules when wirelessly synchronizing your device
with your computer.
• Peak time schedule - to synchronize during work hours or other times you
receive higher mail volumes
• Off-peak schedule - to synchronize during times when you receive lower mail
volumes
NOTE: When you are in roaming mode, you can synchronize manually to reduce roaming charges, or
you can use the mobile schedule you’ve set.
1 On your device tap , Programs, then ActiveSync .
2 Tap Menu, then Schedule.
3 Select the frequency of synchronization for the three conditions—during peak
times, off-peak times, and when roaming.
4 Tap Peak Times to set the days and hours of your peak time schedule.
5 Tap OK.
Once you have completed the first synchronization process, you can initiate
synchronization from your device anytime, using either the USB sync cable, via infrared
or via Bluetooth.
Synchronizing with a server
The option to synchronize your device with a server is available when you first create a
partnership. Before you can begin to synchronize information with a server, you need to
request the following server configuration information, either from your service provider
or from your corporate network administrator:
• Your user name and password in your corporate network
• The name of the Microsoft Exchange server
To set up synchronization with a Microsoft Exchange server:
1 On your device tap , Programs, then ActiveSync .
2 Tap Menu, then Add Server Source.
3 In the “Server address” box, enter the name of the Microsoft Exchange server to
which you want to connect.
Select the “This server requires an ecrypted (SSL) connection” check box if it’s
applicable to your corporate network.
4 Tap Next.
5 Enter your user name, password, and domain name.
If you intend to enable automatic synchronization, select the “Save password” check
box.
6 Tap Advanced.
Define the rules for resolving conflicts if items change on both your device and on
the server.
7 Tap Next.
34
Page 45

3 Managing Programs
Using ActiveSync
8 Select the check box opposite the types of information that you want to synchronize
with the server.
Define the synchronization settings for each information type by tapping the type of
information, then tap Settings.
9 Tap Finish.
To stop synchronizing with a server:
You can stop synchronizing an information type with a ser ver, and instead synchronize it
with your computer.
1 On your device tap , Programs, then ActiveSync .
2 Tap Menu, then Options.
3 Deselect the check box opposite the types of Information that you no longer want to
synchronize with the server.
4 Tap OK.
Synchronizing information
By default, ActiveSync does not enable automatic synchronization of all types of
information. To select the types of information you want synchronized, on either your
device or your computer, go to Menu, then Options. This section gives you an over view
of the types of Outlook information you can synchronize.
Synchronizing Inbox
When you select E-mail for synchronization in ActiveSync, email messages are
synchronized as part of the general synchronization process. During synchronization,
the following events occur:
• Messages are copied from the Outlook Inbox folder on your computer, or
from a Microsoft Exchange server, to the Inbox folder (under the ActiveSync
account) on your device.
• By default, when synchronizing Inbox information with your computer, you
receive only messages from the last three days and the first 0.5 KB of each
new message. You can also choose to download file attachments.
• The messages on your device and on your computer are linked. When you
delete a message on your device, it is also deleted from your computer the
next time you synchronize and vice versa.
• Messages in subfolders in other email folders in Outlook are synchronized
only if the folders have been selected for synchronization in Inbox on your
device.
NOTE: Text messages are not received in Inbox through synchronization. Instead, they are sent to your
device by way of your mobile service provider.
Synchronizing Calendar
• Calendar items created on your device are copied to your computer and/or
on a Microsoft Exchange server during synchronization, and vice versa. By
default, Calendar items from the last two weeks are synchronized.
• Similarly, Calendar items that are deleted from your device are deleted from
your computer and/or server during synchronization, and vice versa.
Synchronizing Contacts
• Contacts created on your device are copied to your computer or on a
Microsoft Exchange server during synchronization, and vice versa. By
default, all of your contacts are synchronized.
• Similarly, contacts that are deleted from your device are deleted from your
computer and/or server during synchronization, and vice versa.
Synchronizing Tasks
• Task synchronization is, by default, automatically selected in ActiveSync.
• Tasks can only be synchronized with your computer; they cannot be
synchronized with a server.
35
Page 46

3 Managing Programs
Using ActiveSync
• Tasks created on your device are copied to your computer during
synchronization, and vice versa. By default, only incomplete tasks are
synchronized.
• Similarly, tasks that are deleted from your device are deleted from your
computer during synchronization, and vice versa.
Using ActiveSync to exchange files
You can use ActiveSync to exchange information from your device your computer and
vice versa. Changes you make to the information on one location does not affect the
information on the other one. If you want to automatically update information on both
your device and computer, synchronize the information instead.
You can copy two types of information to your device: files and Pocket Access Windows
CE Store information.
The procedure below only applies to copying files. Refer to the ActiveSync Help on your
computer for instructions on how to copy Pocket Access Windows CE Store information.
NOTE: Files created on your computer may need to be converted by ActiveSync so that they can be
viewed and edited on your device, and vice versa.
To copy files:
1 Connect your device to your computer.
2 In ActiveSync on your computer, click Explore .
Windows Explorer opens the Mobile Device window for your device.
3 Locate the file that you want to copy on your device or computer.
4 Do either one of the following:
• To copy the file to your device, right-click the file and click Copy. Place
the cursor in the desired folder for your device, right-click, then click
Paste.
• To copy the file to your computer, right-click the file and click Copy.
Place the cursor in the desired folder for your computer, right-click, then
click Paste.
ActiveSync errors
Whenever ActiveSync cannot successfully synchronize infor mation, it displays an Error
link on the ActiveSync window on your device. Tap the link to display more information
about the error that occurred.
Some types of errors can interfere with automatic synchronization. If you suspect that a
scheduled automatic synchronization has not occurred, you should try to manually
synchronize your information. Successfully completing manual synchronization resets
automatic synchronization.
36
Page 47

4 Entering Data
This chapter describes how to use the different text entry methods on your device.
• Using the QWERTY keypad
• Using the input panel
• Using the soft keyboard
• Using the Block Recognizer
• Using the Letter Recognizer
• Using the Transcriber
• Using the Star key
• Writing on the screen
• Drawing on the screen
• Recording a message
Using the QWERTY keypad
Use the QWERTY keypad to key in text messages, email, and other data. The QWERTY
keypad uses an alphanumeric keypad that produces the 26-character alphabet (A-Z,
both lowercase and uppercase), numbers (0-9), and assorted characters. The keypad is
color-coded and performs additional functions when pressed in combination with the
orange key. The orange key located on the right side of the keypad is a function key. The
orange symbols on the keys when used simultaneously with the orange key enters
characters printed on the upper right of the keys.
4 Entering Data
Using the QWERTY keypad
Using the input panel
Use the input panel to enter information in any program on your device. You can either
type using the soft keyboard or write using Letter Recognizer, Block Recognizer, or
Transcriber. In either case, the characters appear as typed text on the screen.
To show or hide the input panel:
1 Tap the Input Panel button .
37
Page 48

4 Entering Data
Using the input panel
2 Tap the arrow next to the Input Panel button to see your choices.
When you use the input panel, your device anticipates the word you are typing or writing
and displays it above the input panel. When you tap the displayed word, it is inserted into
your text at the insertion point. The more you use your device, the more words it learns to
anticipate.
To change word suggestion options:
To set word suggestion options such as the number of words suggested at one time:
1 Tap , then Settings, then Personal tab.
2 Tap Input .
3 On the Word Completion tab, define the word suggestion settings.
4Tap OK.
38
Page 49
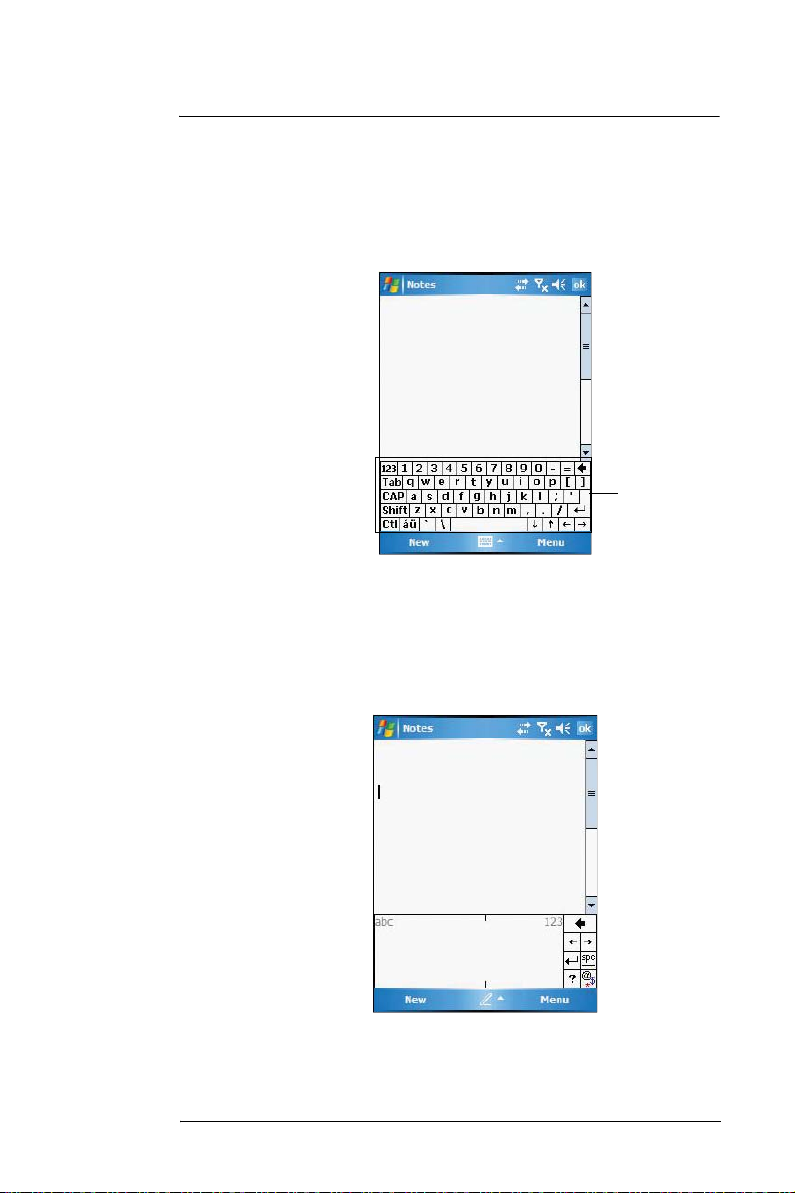
4 Entering Data
Using the input panel
Using the soft keyboard
The soft keyboard allows you to “type” information just like in a regular keyboard, by
tapping the onscreen keys.
To use the soft keyboard:
1 Tap the arrow next to the Input Panel button, then tap Keyboard.
2 On the soft keyboard that is displayed, tap the keys with your stylus.
Tap the onscreen
keys with your
stylus.
Using Block Recognizer
With Block Recognizer you can input character strokes using the stylus that are similar to
those used on other devices.
To use the Block Recognizer:
1 Tap the arrow next to the Input Panel button, then tap Block Recognizer.
2 Write a letter in the box.
When you write a letter, it is converted to typed text that appears on the screen.
39
Page 50

4 Entering Data
Using the input panel
Using Letter Recognizer
With Letter Recognizer you can write letters using the stylus just as you would on paper.
To use the Letter Recognizer:
1 Tap the arrow next to the Input Panel button, then tap Letter Recognizer.
2 Write a letter in the box.
When you write a letter, it is converted to typed text that appears on the screen.
For specific instructions on using Letter Recognizer, with Letter Recognizer open,
tap the question mark next to the writing area.
Using Transcriber
Transcriber allows you to write anywhere on the screen using the stylus just as you would
on paper.
To use the Transcriber:
1 Tap the arrow next to the Input Panel button, then tap Transcriber.
2 Write anywhere on the screen.
Pause and let transcriber change the written characters to typed text.
For specific instructions on using the Transcriber, with Transcriber open, tap the
question mark on the toolbar.
Tap to see how to
write letters or
characters.
40
Page 51

4 Entering Data
Using the input panel
To learn how to write a letter in Transcriber:
1 Tap the letter shapes icon on the toolbar.
2 In the screen that appears, select the letter you want to learn about, then tap one of
the examples.
To punctuate in Transcriber:
1 Tap the keyboard icon on the toolbar.
2 Tap the punctuation mark you need.
Using the Star Key
With Star Key you can enter special characters such as ¿ and £.
To use the Star Key:
1 Tap the arrow next to the Input Panel button, then tap Star Key.
2 On the soft keyboard that is displayed, tap the keys with your stylus.
41
Page 52

4 Entering Data
Writing on the screen
Writing on the screen
In any program that accepts writing, such as Notes, and in the Notes tab of Calendar,
Contacts, Tasks, and Phone, you can use your stylus to write directly on the screen.
Write the way you do on paper. You can edit and format what you've written and convert
the information to text at a later time.
To write on the screen:
1 In the Notes window, tap Menu, then Draw.
This action displays lines on the screen to help you write.
To select and edit written text:
If you want to edit or format written text, you must select it first.
1 Tap and hold the stylus next to the text you want to select until the insertion point
appears.
2 Without lifting, drag the stylus across the text you want to select.
If you accidentally write on the screen, tap Menu, then Undo Ink, and try again.
-or-
Tap the text to deselect it .
3 You can cut, copy, and paste written text in the same way you work with typed text:
(a) Tap and hold the selected words.
42
Page 53

4 Entering Data
Writing on the screen
(b) Tap an editing command on the pop-up menu.
To convert writing to text:
• Tap Menu, Tools, then Recognize.
If you want to convert only certain words, select them before tapping
Recognize on the Tools menu (or tap and hold the selected word, then tap
Recognize on the pop-up menu). If a word is not recognized, it is left as
writing.
Select the text you want to convert, then tap
Recognize on the pop-up menu.
If the conversion is incorrect, you can select different words from a list of
alternates or return to the original writing. To do so:
(a) Tap and hold the incorrect word (tap one word at a time).
(b) In the pop-up menu, tap Alternates.
A menu with a list of alternate words appear.
(c) Do either of the following:
• Tap the word you want to use.
• Tap the writing at the top of the menu to return to the original writing.
The writing is turned into text.
43
Page 54

4 Entering Data
Drawing on the screen
Conversion Reminders
• Hyphenated and foreign words that use special characters such as accents
and some punctuation cannot be converted.
• If you add writing to a word to change it (such as changing a "3" to an "8")
after you attempt to recognize the word, the writing you add is not included if
you attempt to recognize the writing again.
Tips for getting good recognition
• Write neatly.
• Write on the lines. Write the cross of the "t" and apostrophes below the top
line so that they are not confused with the word above. Write periods and
commas above the line.
• For better recognition, try increasing the zoom level to 300% using the Tools
menu.
• Write the letters of a word closely and leave big gaps between words so that
your device can easily tell where words begin and end.
Drawing on the screen
You can draw on the screen in the same way that you write on the screen. The difference
between writing and drawing on the screen is how you select items and how they can be
edited. For example, selected drawings can be resized, while writing cannot.
To create a drawing:
1 Draw a triangle on the screen.
A drawing box appears.
2 Subsequent strokes in or touching the drawing box become part of the drawing.
Drawings that do not cross three ruled lines are treated as writing.
The drawing box
indicates the boundaries of
the drawing.
You may want to change the zoom level so that it is easier to work on or view your
drawing. Tap Menu, then Zoom and select a zoom level.
To select a drawing:
If you want to edit or format a drawing, you must select it first.
• Tap and hold the stylus on the drawing until the selection handle appears.
• To select multiple drawings, tap and hold the stylus on the drawing, then
drag to select the drawings you want.
To edit a drawing:
1 Tap and hold the selected drawing.
44
Page 55

2 Tap an editing command on the pop-up menu, or tap Menu, then select an Edit
command.
Recording a message
In any program where you can write or draw on the screen, you can also quickly capture
thoughts, reminders, and phone numbers by recording a message.
• In Calendar, Tasks, and Contacts, you can include a recording in an item.
• In Notes, you can either create a stand-alone recording or include a
recording in a written note.
• In Phone, you can create a recording during a call.
• In Messaging, you can add a recording to an email message.
To create a recording in Notes:
1 Tap , Programs, then Notes .
If you want to include the recording in a note, open the note first.
2 Tap Menu, then View Recording Toolbar.
3 Position your device's built-in microphone near your mouth or other source of
sound.
You can also use the microphone in the stereo headset/single earbud headset
bundled with your device to create a recording.
4 On the Recording toolbar, tap .
5 Tap to stop recording.
The new recording appears in the note list or as an embedded icon.
To play a recording:
• Tap it in the list or tap its icon in the Notes.
4 Entering Data
Recording a message
45
Page 56
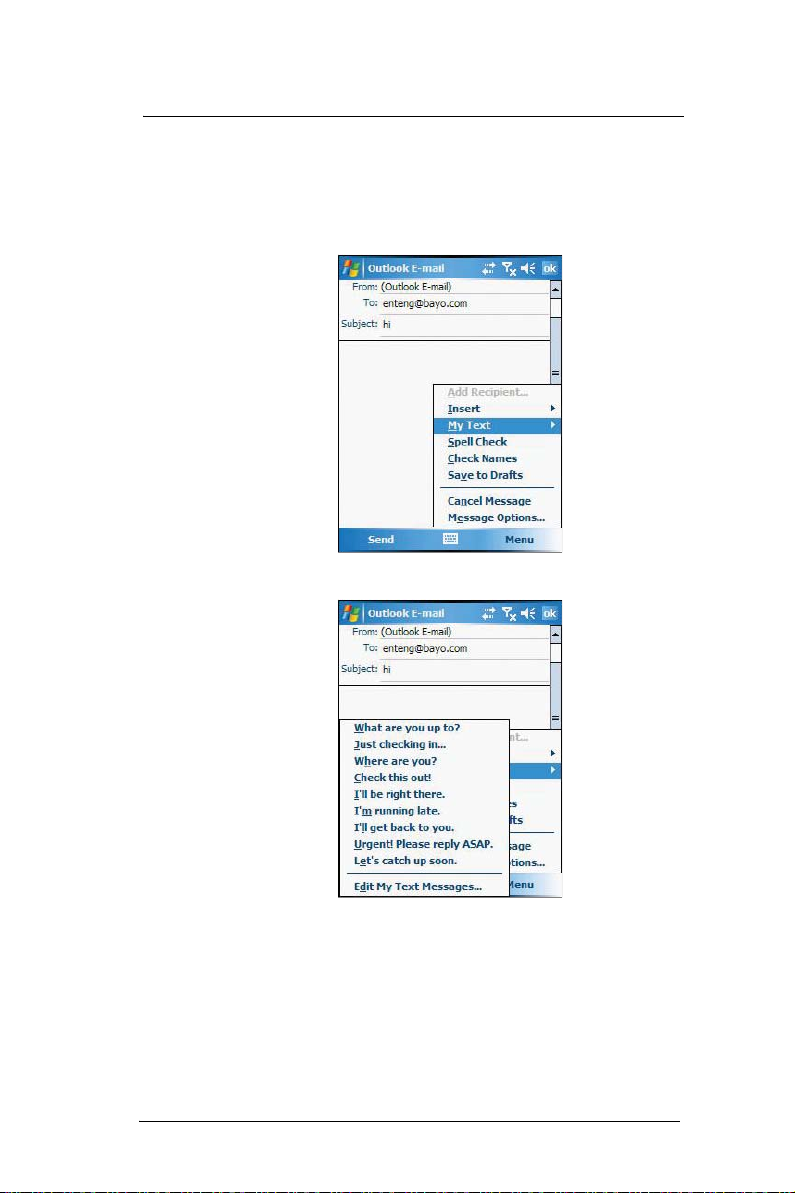
4 Entering Data
Using My Text
Using My Text
When using Messaging or MSN Messenger, use My Text to quickly insert preset
messages into the text entry area.
To insert a My Text message:
1 Tap Menu, then My Text.
2 Tap a message.
3 Tap OK.
46
Page 57

5 Using The Phone
Function
The phone function of your MC35 EDA boasts of standard cell phone features—such as
mailbox and text messages—as well as several handy call features including Speed Dial,
Caller ID, Conference Call, Call Forwarding, Call Waiting, Voice Mail and Text messages,
Fixed Dialing, Call Barring, Call History, speakerphone, note taking, voice mail, and
emergency number setting.
The Phone program is integrated with both Microsoft Contacts and Messaging. This
means you can make a call and send email/text messages from any of these three
programs. This fully integrated functionality of Phone also makes sharing contact
information between programs an easier task.
This chapter shows you how to install a SIM (Subscriber Identity Module) card on your
device. It also describes basic phone operations and features, as well as ways of
customizing the phone function based on your preferences.
• Phone setup
• Dialer screen
• Phone operation
• Making phone calls
• Phone features
• Phone profiles
• Phone preferences
Phone setup
5 Using The Phone Function
Phone setup
Installing the SIM card
If you wish to use the phone function, you need to first install a valid SIM card.
A SIM card is a small printed circuit board that must be installed when signing on as a
subscriber in a GSM-based mobile phone like your MC35. It contains subscriber details,
security information and memory for a personal directory of numbers.
To install the SIM card:
1 If the device is switched on:
(a) Press the Power button to turn off the device.
(b) Wait five (5) seconds to allow the device to completely enter sleep mode.
2 Remove the battery pack. See page 12 for instructions.
3 Perform the following steps with the open rear panel facing you:
47
Page 58

5 Using The Phone Function
Phone setup
(a) Slide the SIM card holder to the right (1).
(b) Lift the holder halfway from the recess area (2).
(c) Insert the SIM card into SIM card holder (3).
Note the proper position of the SIM card—the card connector (i.e., gold area)
should be facing downward with the bevelled corner fitting the lower-left
corner of the recess area.
(d) Press the SIM card holder down (4).
(e) Slide the SIM card holder to the left to lock it into place (5).
4 Reinstall the battery pack. See page 2 for instructions.
The default settings for your device are programmed on the assumption that you’ll
be using the phone function once you’ve properly installed a SIM card (and in some
cases, entered a PIN), you can then proceed to establishing a connection to your
mobile service provider’s network.
NOTE: If you’re not going to install a SIM card on your device, keep the Phone program closed to
minimize power consumption.
48
Page 59

5 Using The Phone Function
Phone setup
Entering your PIN
After you have installed the SIM card you’ll be able to activate your mobile service
connection. In most cases, SIM cards are preset with a PIN (Personal Identity Number),
provided by your mobile service provider, which you need to enter to establish mobile
service connection.
To enter your PIN:
1 Tap , then Phone .
2 On the Dialer screen, enter the preset PIN from your mobile phone service provider.
3 Tap Enter .
If you consecutively enter a wrong PIN for three times, the SIM card is blocked. If
that happens, you can unblock it with the PIN Unblocking Key also provided by your
mobile phone service provider.
49
Page 60
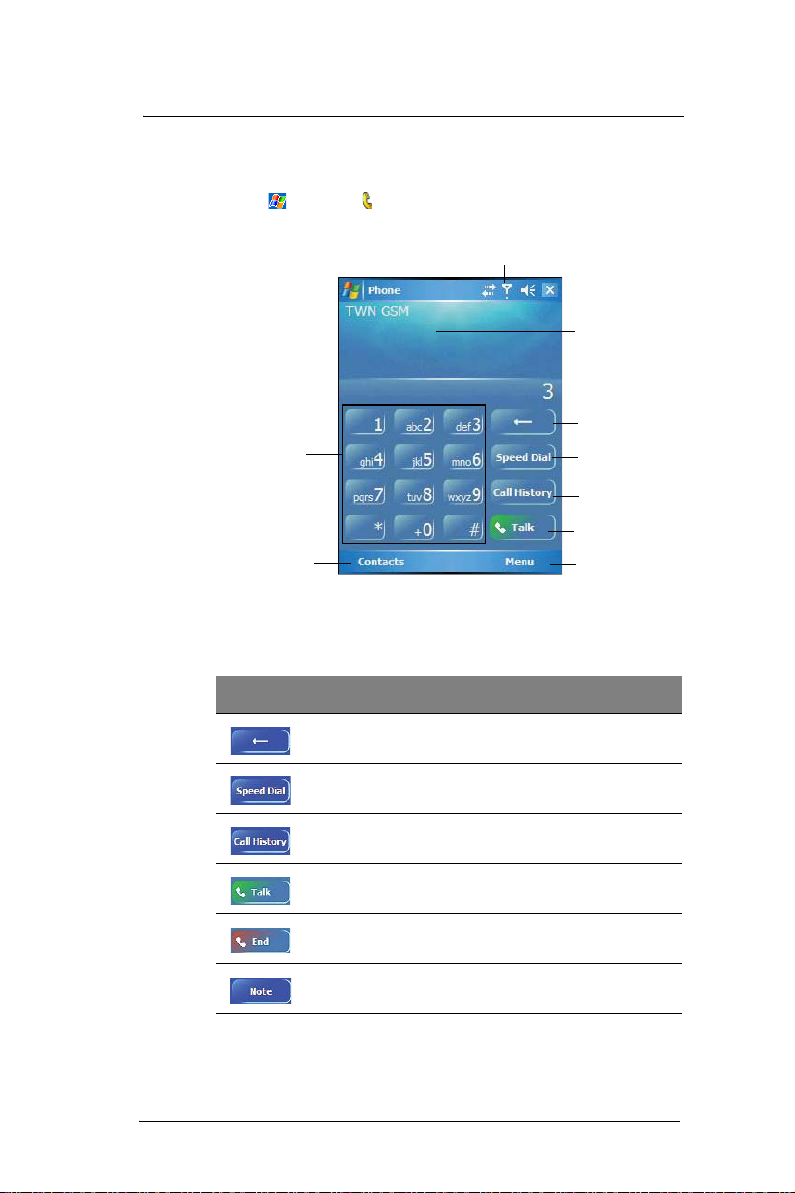
5 Using The Phone Function
Dialer screen
Dialer screen
Launching Phone opens the Dialer screen. To do this you can do either of the following:
• Tap , then Phone .
• On your device’s front panel, press the Send button.
Soft keypad for
inputting.
Tap to view the
Contact list.
Dialer buttons
The list below shows the actions of the Dialer screen buttons.
This icon indicates the status of
the mobile service connection.
Last number called
is displayed here.
Tap to back space
over individual
numbers.
Tap to view the
Speed Dial list.
Tap to view the Call
History entries.
Tap call the currently
displayed number.
Tap Menu, then
Options to view
Phone Settings.
Icon Description
Tap to erase the number you entered.
Tap to view the Speed Dial list.
Tap to see all received, made, and missed calls.
Tap to call the displayed number.
Tap to end a call.
Tap during a call to create a a note for that particular call.
50
 Loading...