

Page 1
MC35
Quick Start Guide
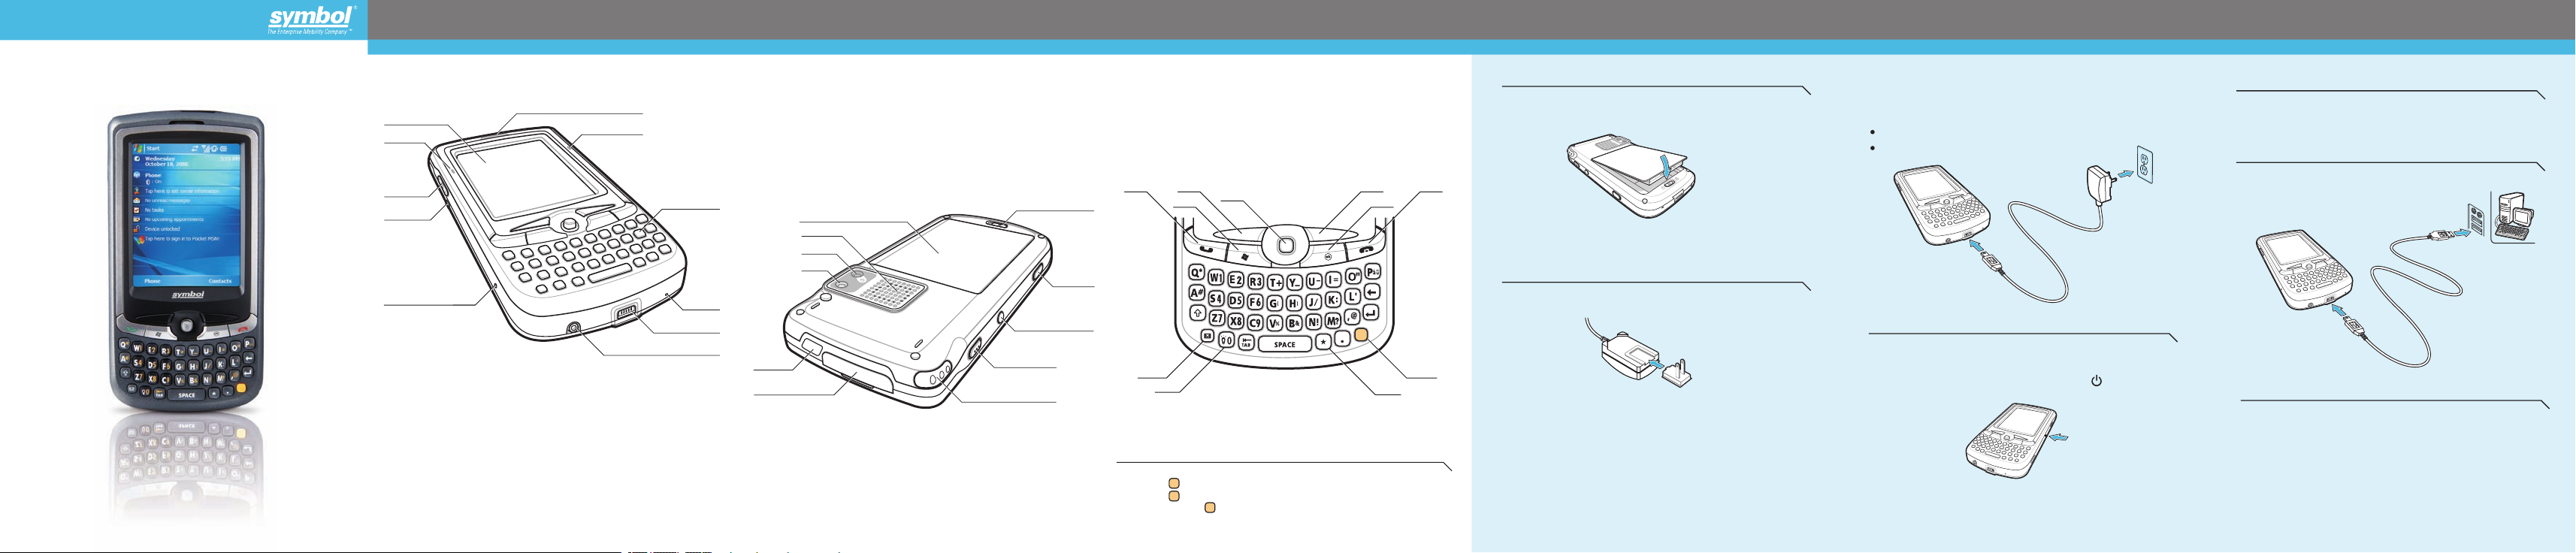
FEATURES
12
Main Battery
13
Speaker
14
1
2
11
10
Camera Lens (Optional)
15
Camera Flash (Optional)
16
Infrared (IR) Port
17
SD/MMC Expansion Slot
18
Stylus
19
Push To Talk Button
20
Power Button
21
Camera Button*
22
Battery Release Latch
1
Send Button
2
Start Button
3
Left Soft Button
4
Joystick
5
Right Soft Button
6
OK Button
KEYPADS
7
End Button
8
Orange Key
9
Star Key
10
Backlight/0 Key
11
Messaging Button
1
GETTING STARTED
Install the Battery Pack
Align the tabs on the battery pack with the groves on the MC35, then
inse
rt the battery pack into the back of the device.
After the AC connection is made, the charging LED indicator on the front
panel lights orange.
LED status during charging:
Flashing orange: Charging
Solid orange: Charging complete
Install ActiveSync
4
Download ActiveSync 4.0 or higher from http://www.microsoft.com and
follow the instructions to install ActiveSync onto the host computer.
Connect the MC35 to a Host Computer
5
3
4
5
1
LCD Touch Screen
GSM Status/Notification LED
2
Volume Up/Down Button
3
Camera/Bar Code Switch
4
Reset Button
5
Earphone Jack
6
NOTE : To reset the MC35, press the reset button with the tip of the stylus.
Connector
7
Microphone
8
Keypad
9
Charging LED
10
Phone Speaker
11
1
9
12
13
14
15
8
7
6
16
17
22
21
20
19
18
Orange Key
Use this key to access the secondary layer of characters and actions.* Programmable on no-camera versions.
> Press the key once to activate this mode followed by another key.
> Press the key twice to lock this mode. Press the key a third time to unlock.
Press and hold the key while entering characters or actions.
>
3
2
11
10
4
5
6
7
The battery pack locks to the chassis with an audible click.
2
Charge the MC35
NOTE:
Use the clip plug applicable in your country.
Start the MC35
3
After you have initially charged the MC35 for approximately eight hours,
ce is ready for use.
8
9
1
Install the replaceable clip plug to the AC adapter. Slide the clip
plug i
nto the clip plug holder and snap into place. The clip plug
to the clip plug holder with an audible click.
locks
2
Plug the AC adapter cable into the connector on the bottom of the
MC35.
Connect the AC adapter power cable into an electrical outlet.
3
the devi
1 Turn on the MC35 by pressing the Power button located on
right side of the device.
the
2 Follow the onscreen instructions on the Welcome Screen Wizard.
Create a Partnership
6
Follow the onscreen ActiveSync instructions to establish a connection
between the MC35 and the computer.
IMPORTANT:
For initial use, charge the MC35 for approximately eight hours. Thereafter,
charge the MC35 everyday to recharge the battery to full capacity. Charge
the MC35 using the USB sync cable.
Page 2
SUPPO
More information on the MC35
Visit the Symbol Web site at http://www.symbol.com/mc35
Setting up and using the MC35
MC35 User Guide
Available at: http://www.symbol.com/mc35
Product Video Tutorial
Visit the Symbol Web site at http://www.symbol.com/mc35
Connecting and synchronizing with the host computer
ActiveSync® Help on the host computer. To view help, start ActiveSync®,
click Help -
Information on using programs on the MC35
Tap Start – Help within the specific program.
Service and Warranty
MC35 Regulatory Guide
Accessories
Vehicle Kit
- Auto Mounting Kit
- Auto Charger
- Hands-free Headset
Leather Case
USB Charge/Sync Cable
2006 Sy mbol Techno logies, Inc . ©
72-93873-01
Rev A - December 2006
MC35
RT INFORMATION
Microsoft ActiveSync Help.
Travel Charger
Hands-free Headset
Protective Boot
Stylus 3-pack
Standard Life Battery
Extended Life Battery
Quick Start Guide
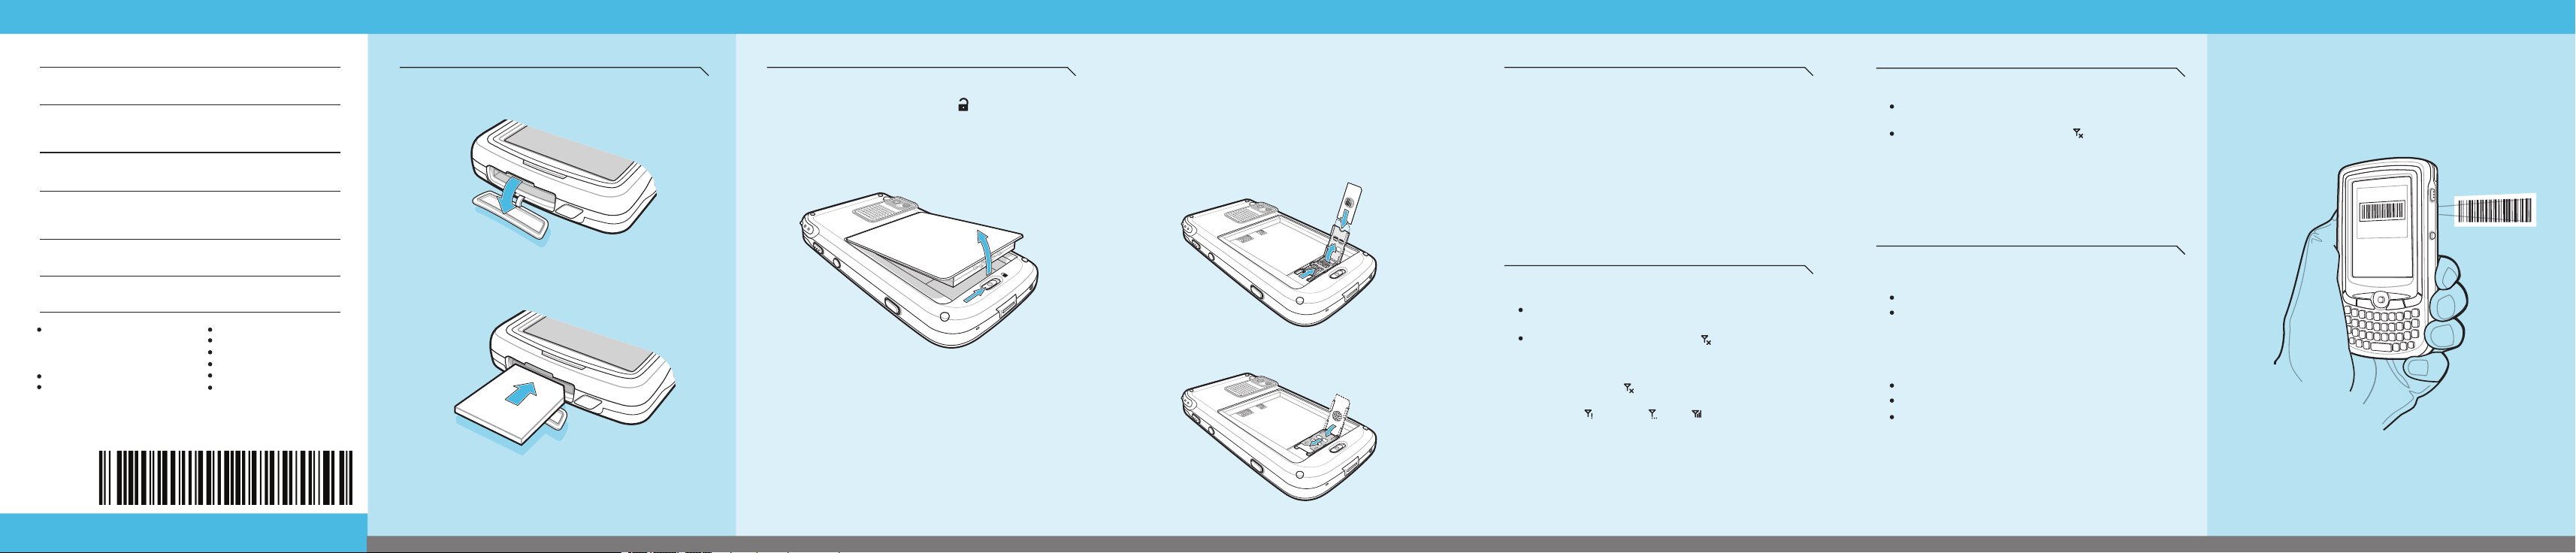
Install the Memory Card
1 Open the expansion slot cover.
1
2 Slide the SD/MMC card into the slot and push in until it locks into place.
2
3 To remove the SD/MMC card, push down on the card and release.
The card ejects from the slot.
http://www.symbol.com/mc35
SYMBOL TECHNOLOGIES, INC. One Symbol Plaza Holtsville, New York 11742-1300
PHONE SETUPACCESSORIES
Install the SIM Card
1
1 Press the Power button to turn off the MC35.
1
Slide the battery latch to the unlock icon to remove the battery.
2
The battery pack ejects slightly.
Remove the battery pack from the MC35.
3
2
1
3 With rear panel facing you, slide the SIM card holder to the right.
4 Lift the holder halfway from the recess area.
5 Insert the SIM card into SIM card holder.
NOTE :
The proper position of the SIM card—the card connector (i.e., gold
area) should be facing downward with the bevelled corner fitting the
lower left corner of the recess area.
5
4
3
6 Press the SIM card holder down.
7 Slide the SIM card holder to the left to lock it into place.
6
7
8 Reinstall the battery pack.
Enter Your PIN
2
After installing the SIM card activate your mobile service connection.
In most cases, SIM cards are preset with a PIN (Personal Identity
Number), provided by your service provider.
1
Press the Power button to turn on the MC35.
Tap Start > Phone.
2
Enter the PIN from your service provider.
3
Tap Enter.
4
Turn On the Phone Function
3
1 Launch the Wireless Manager application.
Today screen, tap the Wireless Manager icon.
On the
or
On the
Today screen, tap the signal icon and select
Wireless Manager.
2 On the Wireless Manager screen, tap Phone to turn on the phone
function.
The signal icon changes indicating the MC35 is searching
for a mobile connection. This may take a few seconds.
The signal icon changes to and to on
is established.
ce a mobile connection
BAR CODE READING
1
Turn Off the Phone Function
4
1 Launch the Wireless Manager application.
Today screen, tap the Wireless Manager icon.
On the
or
On the
Today screen, tap the signal icon and
select Wireless Manager.
2 On the Wireless Manager screen, tap Phone to turn off phone
function.
Notifications
Charging LED:
Flashing orange: Battery charging
Solid orange: Charging complete
GSM Status/Notification LED:
Fast flashing green: GSM activity
Solid green: Voice call in progress
Flashing red: System notification
Place the Camera/Bar Code switch to the Bar Code position.
Launch a bar code reading application on MC35.
2
Point the MC35 toward the bar code
3
Press the Camera button to read the bar code data.
4
and align if necessary.
 Loading...