

Page 1
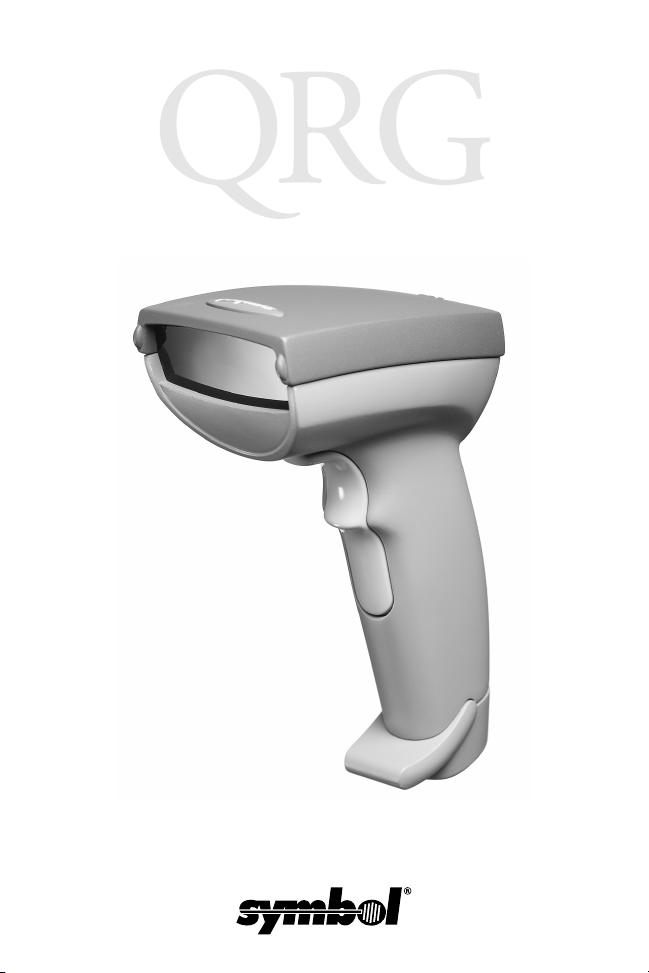
LS 4000P Series
Scanners
Page 2

LS 4000P Series
Scanners
1999 SYMBOL TECHNOLOGIES, INC. All rights reserved.
Symbol reserves the right to make changes to any product to improve reliability,
function, or design.
Symbol does not assume any product liability arising out of, or in connection with, the
application or use of any product, circuit, or application described herein.
No license is granted, either expressly or by implication, estoppel, or otherwise under
any patent right or patent, covering or relating to any combination, system, apparatus,
machine, material, method, or process in which Symbol products might be used. An
implied license only exists for equipment, circuits, and subsystems contained in Symbol
products.
Symbol is a registered trademark of Symbol Technologies, Inc. Other product names
mentioned in this manual may be trademarks or registered trademarks of their
respective companies and are hereby acknowledged.
Symbol Technologies, Inc.
One Symbol Plaza
Holtsville, N.Y. 11742-1300
http://www.symbol.com
Patents
This product is covered by one or more of the following U.S. and foreign Patents:
U.S. Patent No.4,360,798; 4,369,361; 4,387,297; 4,460,120; 4,496,831; 4,593,186;
4,603,262; 4,607,156; 4,652,750; 4,673,805; 4,736,095; 4,758,717; 4,816,660;
4,845,350; 4,896,026; 4,897,532; 4,923,281; 4,933,538; 4,992,717; 5,015,833;
5,017,765; 5,021,641; 5,029,183; 5,047,617; 5,103,461; 5,113,445; 5,130,520;
5,140,144; 5,142,550; 5,149,950; 5,157,687; 5,168,148; 5,168,149; 5,180,904;
5,229,591; 5,230,088; 5,235,167; 5,243,655; 5,247,162; 5,250,791; 5,250,792;
5,262,627; 5,262,628; 5,266,787; 5,278,398; 5,280,162; 5,280,163; 5,280,164;
5,280,498; 5,304,786; 5,304,788; 5,306,900; 5,321,246; 5,324,924; 5,337,361;
5,367,151; 5,373,148; 5,378,882; 5,396,053; 5,396,055; 5,399,846; 5,408,081;
5,410,139; 5,410,140; 5,412,198; 5,418,812; 5,420,411; 5,436,440; 5,444,231;
5,449,891; 5,449,893; 5,468,949; 5,471,042; 5,478,998; 5,479,000; 5,479,002;
5,479,441; 5,504,322; 5,519,577; 5,528,621; 5,532,469; 5,543,610; 5,545,889;
5,552,592; 5,578,810; 5,581,070; 5,589,679; 5,589,680; 5,608,202; 5,612,531;
5,619,028; 5,664,229; 5,668,803; 5,675,139; 5,693,929; 5,698,835; 5,705,800;
5,714,746; 5,723,851; 5,734,152; 5,734,153; 5,745,794; 5,754,587; 5,762,516;
5,763,863; 5,767,500; 5,789,728; 5,808,287; 5,811,785; 5,811,787; 5,815,811;
5,821,519; 5,821,520; 5,823,812; 5,828,050; 5,850,078; 5,861,615; 5,874,720;
5,875,415; 5,900,617; 5,902,989; 5,907,146; 5,912,450; 5,914,478; 5,917,173;
5,920,059; 5,923,025;D305,885; D341,584; D344,501; D359,483; D362,453;
D363,700; D363,918; D370,478; D383,124; D391,250; D405,077; D406,581.
Invention No. 55,358; 62,539; 69,060; 69,187 (Taiwan); No. 1,601,796; 1,907,875;
1,955,269 (Japan).
European Patent 367,299; 414,281; 367,300; 367,298; UK 2,072,832; France 81/
03938; Italy 1,138,713.
rev. 7/99
Page 3

Quick Reference
Introduction
The LS 4000P Series hand-held laser scanner offers the best
performance for low volume, price sensitive PDF417 scanning in
retail, office and light industrial applications. It uses a 650nm laser
diode for improved scan-line visibility, and has a scan rate of
approximately 200 scans/second. These factors make the LS 4000P
Series scanner appropriate for PDF scanning while retaining all
capabilities for 1-D scanning.
This Quick Reference Guide provides basic instruction on the
following topics:
Setting Up the Scanner
•
Scanning
•
What Does The Beep Mean?
•
What If...
•
on page 4
on page 8
on page 2
on page 7
1
Page 4

LS 4000P Series
Scanners
Setting Up the Scanner
Installing the Cable
1. Switch off all devices connected to the LS 4000P.
2. Pull the boot up over the cable until just the connector is protruding.
3. Plug the modular connector on the cable into the receptacle in
the bottom of the LS 4000P handle. Listen for a click.
4. Gently tug the cable to ensure the connector is properly secured.
2
Page 5

Quick Reference
5. Slide the boot up while observing its orientation until it is securely in place.
6. Make certain the semi-circular key on the boot slides inside
the handle assembly, and that the boot snaps into place.
7. Gently pull the boot to be sure it is properly seated.
Switching Cables
Different cables are required for different hosts. To change the
scanner cable:
1. Slide the boot down over the cable.
2. Unplug the modular connector by depressing the connector
clip (through the access hole), and remove the existing cable.
3. Follow the steps for
Installing the Cable
on page 2.
3
Page 6

LS 4000P Series
Scanners
Scanning
Scanning 1-D Bar Codes
To scan a 1-D bar code:
1. Make sure all connections are secure, and the symbol you
want to scan is within the scanning range.
2. Aim the scanner at the symbol and press the trigger. The scanning beam remains on for approximately 3.0 seconds (default)
or until a successful decode.
The scanner has read the symbol when:
• You hear a short, high tone beep (if the beeper is enabled).
• The yellow LED on the rear of the scanner turns green.
The green LED stays lit for two seconds or until the next trigger
pull.
Scanning PDF417 (2-D) Bar Codes
The PDF417 bar code type is enabled by default; to disable it, scan
this bar code:
DISABLE PDF417
To enable PDF scanning, scan the bar code below. (These bar codes
can also be found in the
70-37631-xx.
LS 4000P Product Reference Guide
ENABLE PDF417
4
, p/n
Page 7

Quick Reference
To scan a PDF417 bar code:
1. Aim the scanner at the PDF bar code and press the trigger.
2. Hold the trigger down and keep the scan line parallel to the
rows
of the symbol.
3. Manually raster the scan line by slowly moving the scanner up
and down so it scans the entire bar code at a rate of one inch
per second.
When PDF Decode Feedback is enabled, a clicking noise lets you
know the bar code is being decoded. If this parameter is enabled but
there’s no clicking noise when you’re scanning the bar code, it’s not
being scanned properly.
To improve PDF decoding:
• Check that PDF417 scanning is enabled.
• Make sure the scan line extends at least 1/2” past the left and
right edges of the bar code.
• Hold the scanner closer for denser symbols, farther away for
larger symbols.
• Make sure you scan the top and bottom rows of the symbol.
• Be patient - it may take a few swipes to decode the symbol.
The bar code has been completely decoded when you hear a tone,
followed by a short, high tone beep. The yellow LED on the rear of
the scanner turns green. The green LED stays lit for two seconds or
until the next trigger pull.
1/2”
1/2”
5
Page 8
LS 4000P Series
Scanners
Aiming
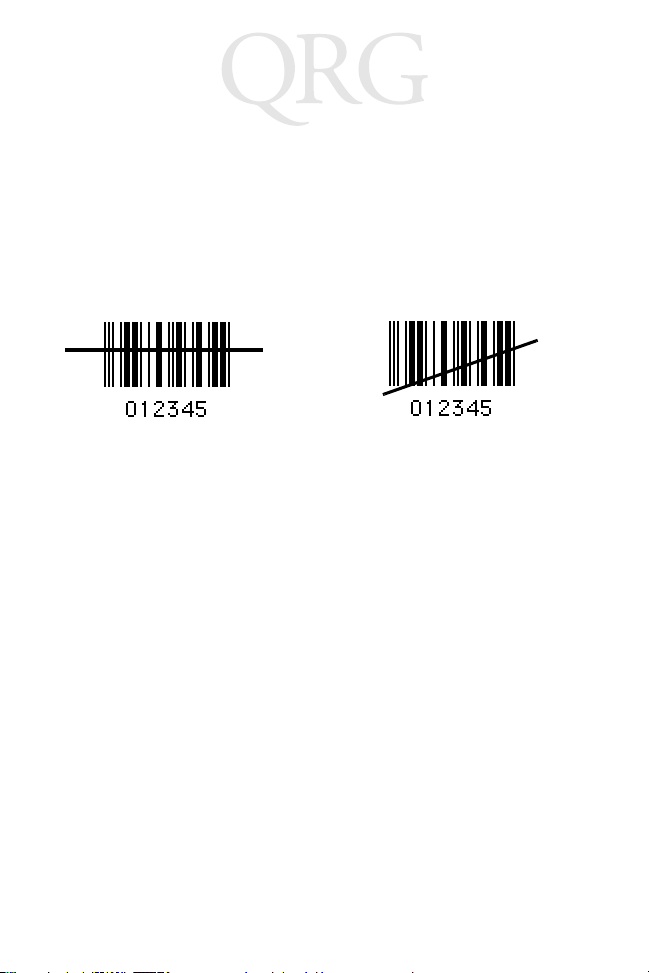
Scan the Entire Symbol
• Cross every bar and space of the symbol with the scan beam.
• Hold the scanner further away for larger bar codes.
• Hold the scanner closer for symbols with bars that are close
together.
Right Wrong
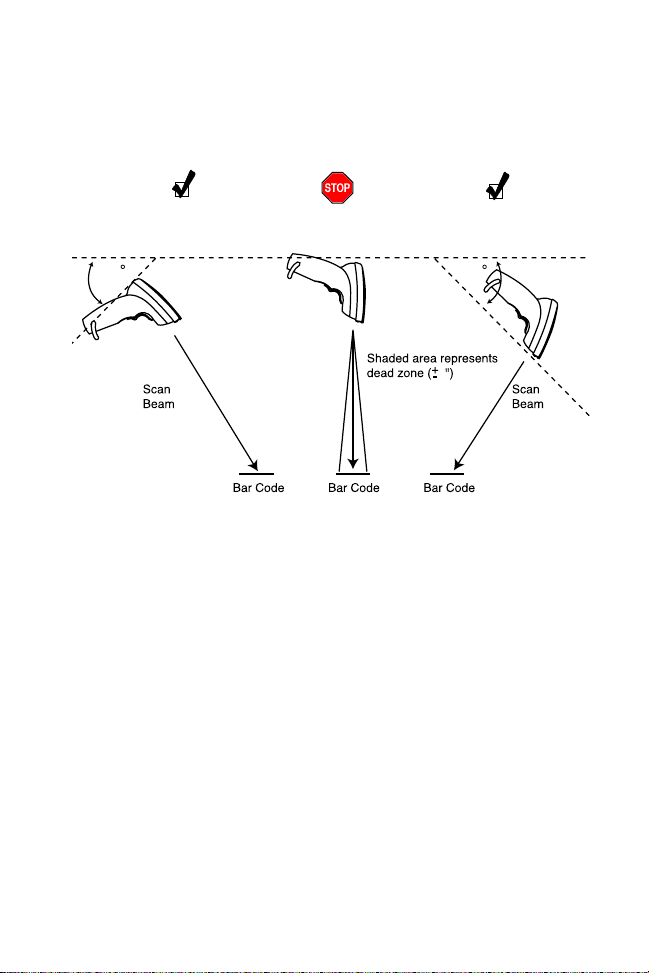
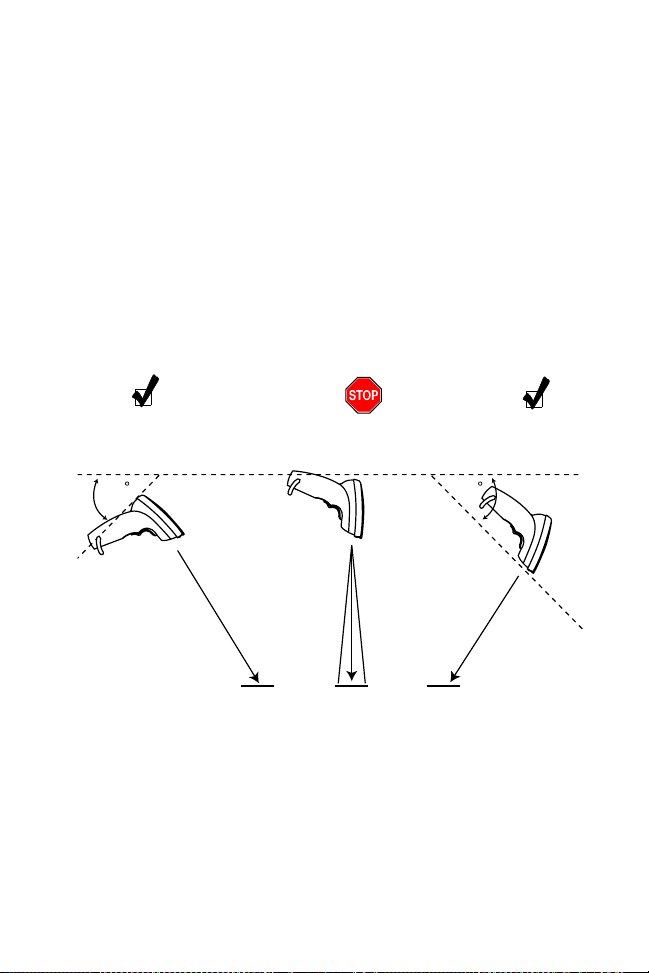
Hold at an Angle
Do not hold the scanner directly over the bar code. Laser light
reflecting
as specular reflection. This strong light can “blind” the scanner and
make decoding difficult. The area where specular reflection occurs
is known as a “dead zone.”
directly
back into the scanner from the bar code is known
6
Page 9
Quick Reference
You can tilt the scanner up to 65° forward or back and still achieve
a successful decode. Simple practice quickly shows what tolerances
to work within
Successful
Scanning
65
4
65
Successful
Scanning
Possible Specular
Reflection
What Does The Beep Mean?
When you hear a short, high tone beep, it means data has been
decoded successfully. If any other beeps are heard, contact the
technical person in charge of scanning.
7
Page 10

LS 4000P Series
Scanners
What If...
Nothing happens when you follow the operating instructions?
You Sho u l d
• Check the system power. Is there a battery in the battery box?
• Be sure the scanner is programmed for the terminal in use.
• Make sure the scanner is programmed to read the type of bar
code you are scanning.
• Check for loose cable connections.
• Check the symbol to make sure it is not defaced.
• Try scanning test symbols of the same code type.
8
Page 11

Guide utilisateur
Présentation
Le lecteur laser portable de la série LS 4000P offre des performances
optimales pour un volume réduit en lecture PDF417 Efficace en
termes de coût, il est destiné à des applications de distribution, de
bureau et d'industrie légère. Doté d'une diode laser de 650 nm qui
améliore la visibilité de ligne de lecture, il possède une cadence de
balayage d'environ 200 balayages par seconde. Grâce à ces
éléments, le lecteur de la série LS 4000P est adapté à la lecture PDF
tout en conservant toutes les possibilités de lecture
monodimensionnelle.
Ce Guide utilisateur fournit des instructions de base sur les sujets
suivants :
Préparation du lecteur
•
Lecture
•
•
•
en page 12
Signification du bip
Dépannage
en page 16.
en page 10
en page 15
9
Page 12

Lecteur LS 4000P
Préparation du lecteur
Installation du câble
1. Mettez hors tension tous les périphériques connectés au
LS 4000P.
2. Faites coulisser l’embase le long du câble jusqu’à ce que le
connecteur dépasse.
3. Enfoncez le connecteur modulaire du câble dans la prise située
à la base de la poignée du LS 4000P jusqu’à ce qu’un déclic se
produise.
4. Tirez délicatement le câble pour vous assurer que le
connecteur est bien enfiché.
10
Page 13

Guide utilisateur
5. Faites coulisser l’embase vers le haut en l’alignant
correctement.
6. Assurez-vous que la touche semi-circulaire de l’embase
coulisse dans la poignée et s’enclenche correctement.
7. Tirez délicatement l’embase pour vous assurer qu’elle est bien
en place.
Changement de câble
Les câbles changent en fonction de l'ordinateur central. Pour
changer le câble du lecteur :
1. Faites coulisser l’embase vers le bas le long du câble.
2. Débranchez le connecteur modulaire en appuyant sur son clip
(dans l’orifice d’accès), puis retirez le câble.
3. Suivez les étapes indiquées dans la section
câble
à la page 10.
Installation du
11
Page 14

Lecteur LS 4000P
Lecture
Lecture des codes à barres unidimensionnels
Procédure :
1. Vérifiez tous les branchements, puis placez le code à portée de
lecture.
2. Pointez le lecteur sur le code, puis pressez la gâchette. Le
faisceau de lecture reste activé environ 3 secondes (par défaut)
ou jusqu’à ce qu’il parvienne à déchiffrer le code.
Le décodage est effectif quand :
• Vous entendez un bip aigu et bref (si le beeper est activé).
• Le témoin jaune à l’arrière du lecteur vire au vert.
Le témoin vert reste allumé pendant deux secondes ou jusqu’au
prochain actionnement de la gâchette.
Lecture de codes à barres PDF417 (bidimensionnels)
Le code à barres de type PDF417 est activé par défaut ; pour le
désactiver, lisez ce code à barres.
Désactivez PDF417
Pour activer la lecture PDF, lisez le code à barres ci-dessous. (On
peut également trouver ces codes à barres dans
produit LS 4000P
, référence 70-37631-xx.)
Activez PDF417
12
le Guide de référence
Page 15

Guide utilisateur
Pour lire un code à barres PDF417:
1. Pointez le lecteur sur le code à barres PDF, puis appuyez sur la
gâchette.
2. Maintenez la gâchette enfoncée en tenant la ligne de lecture
parallèle aux
lignes
qui composent le code.
3. Balayez lentement le code (2 cm par seconde) en opérant un
mouvement vertical jusqu’à ce que le faisceau l’ait lu dans son
intégralité.
Lorsque la confirmation de décodage PDF est activée, un déclic
confirme le décodage. Si ce paramètre est activé, mais qu’aucun
déclic ne retentit lorsque vous lisez le code, cela signifie qu’il n’a pas
été décodé.
Pour améliorer le déchiffrage des codes PDF :
• Vérifiez que la lecture PDF417 est activée.
• Vérifiez que la ligne de lecture dépasse d’au moins 1 cm de
chaque côté du code à barres.
• Rapprochez le lecteur pour les codes denses et éloignez-le pour
les codes grand format.
• Vérifiez que vous avez bien lu les lignes supérieures et
inférieures qui composent le code.
• Faites preuve de patience, il faut parfois plusieurs balayages
pour déchiffrer le code.
Le code à barres est intégralement décodé lorsque le lecteur émet
une tonalité suivie d’un bip aigu. Le témoin jaune sur l’arrière du
lecteur vire au vert. Le témoin vert reste allumé pendant deux
secondes ou jusqu’à ce que la gâchette soit à nouveau actionnée.
1/2 po.
1/2 po.
13
Page 16

Lecteur LS 4000P
Visée
Lisez le code dans son intégralité
• Recouvrez toutes les lignes et tous les espaces composant le
code avec le faisceau de lecture.
• Eloignez le lecteur pour les codes à barres grand format.
• Rapprochez le lecteur pour les codes plus denses.
Correct Incorrect
Inclinez le lecteur
Ne tenez pas le lecteur directement au dessus du code à barres. Le
faisceau laser renvoyé
phénomène appelé réflexion spéculaire. L’intensité du faisceau
risque « d’aveugler » le lecteur et de rendre le décodage délicat. La
réflexion spéculaire se produit dans « l’angle mort ».
Vous pouvez incliner le lecteur jusqu’à 65º vers l’avant ou l’arrière
sans compromettre le décodage. Il suffit d’un peu de pratique pour
se familiariser avec les angles de lecture.
directement
dans le lecteur provoque le
14
Page 17

Guide utilisateur
Décodage
réussi
65 65
Faisceau
de lumière
Code à barres
Risque de réflexion
spéculaire
Zone grisée qui
représente
l’angle mort
Code à barres
Code à barres
Décodage
réussi
Faisceau
de
lumière
Signification du bip
Lorsqu’un bip retentit (bref signal sonore aigu), cela signifie que les
données ont été correctement décodées. Si vous entendez un « clic »
lorsque vous lisez un code à barres PDF, cela signifie que les données
ont été correctement décodées. Si le lecteur émet d’autres bips,
contactez le technicien.
15
Page 18

Lecteur LS 4000P
Dépannage
Si rien ne se produit lorsque vous suivez les instructions de mise en route
Procédez comme suit :
• Vérifiez l’alimentation du système. Une batterie est-elle insérée
dans son logement ?
• Vérifiez que le lecteur est programmé pour le terminal utilisé.
• Vérifiez que le lecteur est programmé pour lire le type de code
à barres en question.
• Vérifiez les branchements.
• Vérifiez que le code est en bon état.
• Essayez de lire d’autres codes du même type.
16
Page 19

Kurzübersicht
Einführung
Der Handlaserscanner der Serie LS 4000P bietet optimale Leistung
bei kleinvolumigem, kostengünstigem PDF417-Scannen in
Anwendungen für Einzelhandel, Büro und Kleinindustrie. Um eine
verbesserte Sichtbarkeit der Scanzeilen zu ermöglichen, verwendet
er eine 650nm Laserdiode, und hat eine Lesegeschwindigkeit von
ungefähr 200 Scans pro Sekunde. Dadurch eignet sich der Scanner
der Serie LS 4000P zum PDF-Scannen, während die Fähigkeiten
zum 1-D-Scannen erhalten bleiben.
Diese Kurzübersicht gibt Anleitungen zu folgenden Themen:
Einrichten des Scanners
•
Scannen
•
Was bedeutet der Piepton?
•
Was wäre, wenn ...
•
auf Seite 20
auf Seite 18
auf Seite 23
auf Seite 24.
17
Page 20

Scanner LS 4000P
Einrichten des Scanners
Installieren des Kabels
1. Schalten Sie alle mit dem LS 4000P verbundenen Geräte ab.
2. Ziehen Sie die Steckerabdeckung nach oben über das Kabel, so
daß nur noch der Stecker übersteht.
3. Stecken Sie den modularen Stecker am Kabel in die Buchse
unten am Griff des Scanners bis er hörbar einrastet.
4. Ziehen Sie vorsichtig am Kabel, um sich zu vergewissern, daß
der Stecker fest eingesteckt ist.
18
Page 21

Kurzübersicht
5. Schieben Sie die Steckerabdeckung nach oben, und achten Sie
dabei auf deren Ausrichtung, so daß sie fest eingesteckt ist.
6. Vergewissern Sie sich, daß der halbrunde Schlüssel auf der
Steckerabdeckung in die Griffvorrichtung gleitet und daß die
Steckerabdeckung einrastet.
7. Ziehen Sie vorsichtig an der Abdeckung, um sicherzustellen,
daß sie fest eingesteckt ist.
Austauschen von Kabeln
Für verschiedene Host-Computer sind unterschiedliche Kabel
erforderlich. So wechseln Sie das Scanner-Kabel aus:
1. Schieben Sie die Steckerabdeckung nach unten über das Kabel.
2. Lösen Sie den modularen Stecker, indem Sie die
Anschlußklemme (über die Zugangsöffnung)
herunterdrücken, und entfernen Sie das vorhandene Kabel.
3. Befolgen Sie die Anweisungen unter
auf Seite 18.
Installieren des Kabels
19
Page 22

Scanner LS 4000P
Scannen
Scannen von eindimensionalen Strichcodes
So scannen Sie einen eindimensionalen Strichcode:
1. Achten Sie darauf, daß alle Anschlüsse fest eingesteckt sind
und daß das von Ihnen zu scannende Symbol sich in Reichweite des Scanners befindet.
2. Richten Sie den Scanner auf das Symbol, und betätigen Sie den
Auslöser. Der Scanstrahl bleibt ca. 3 Sekunden eingeschaltet
(Standard) oder bis zu einer erfolgreichen Decodierung.
Der Scanner hat das Symbol gelesen, wenn:
• Sie einen kurzen, hohen Piepton hören (falls der Piepton
aktivert ist).
• Die gelbe LED-Anzeige auf der Rückseite des Scanners grün
wird.
• Die grüne LED-Anzeige zwei Sekunden lang aktiviert bleibt
oder bis der Auslöser das nächste Mal betätigt wird.
PDF417 (2-D) Strichcodes scannen
Der Strichcode des Typs PDF417 ist standardmäßig aktiviert. Um
ihn zu deaktivieren, scannen Sie diesen Strichcode:
PDF417 deaktivieren
Um PDF-Scannen zu aktivieren, scannen Sie den Strichcode unten.
(Diese Strichcodes finden Sie auch im
p/n 70-37631-xx).
PDF417 aktivieren
LS4000P Produktleitfaden
20
Page 23

Kurzübersicht
Um einen PDF417-Strichcode zu scannen:
1. Richten Sie den Scanner auf den PDF-Strichcode, und
betätigen Sie den Auslöser.
2. Halten Sie den Auslöser gedrückt, und halten Sie die
Abtastlinie parallel zu den
3. Rastern Sie die Abtastlinie manuell, indem Sie den Scanner
langsam nach oben und nach unten bewegen, so daß der
gesamte Strichcode mit einer Geschwindigkeit von einem Zoll
pro Sekunde gescannt wird.
Wenn die Feedbackfunktion für die PDF-Dekodierung aktiviert ist,
signalisiert ein Klicken, daß gerade ein Strichcode decodiert wird.
Wenn dieser Parameter aktiviert ist, jedoch beim Scannen des
Strichcodes kein Klicken zu hören ist, wird er nicht richtig gelesen.
So verbessern Sie die PDF-Decodierung:
• Überprüfen Sie, ob der PDF417-Scanmodus aktiviert ist.
• Achten Sie darauf, daß die Abtastlinie mindestens 12 mm über
das linke und das rechte Ende des Strichcodes hinausgeht.
• Halten Sie den Scanner bei kleineren, dichteren Symbolen
näher an das Objekt, bei größeren Symbolen weiter weg vom
Objekt.
• Achten Sie darauf, die obere und untere Reihe des Symbols zu
scannen.
• Haben Sie Geduld - es sind möglicherweise mehrere Versuche
notwendig, um das Symbol zu decodieren.
Zeilen
des Symbols.
21
Page 24

Scanner LS 4000P
Der Strichcode wurde vollständig decodiert, wenn Sie einen Ton
hören, gefolgt von einem kurzen, hohen Piepton. Die gelbe LEDAnzeige auf der Rückseite des Scanners wird grün. Die grüne LEDAnzeige leuchtet zwei Sekunden bzw. bis zum nächsten Betätigen
des Auslösers.
12 mm 12 mm
Zielen
Gesamtes Symbol scannen
• Ziehen Sie den Scanstrahl über alle Striche und Zwischenräume des Symbols.
• Halten Sie den Scanner bei größeren Strichcodes weiter vom
Objekt entfernt.
• Halten Sie den Scanner bei Symbolen mit dichtstehenden
Strichen näher an das Objekt.
Richtig Falsch
22
Page 25

Kurzübersicht
Halten Sie den Scanner in einem Winkel zum Objekt
Halten Sie den Scanner nicht direkt über den Strichcode. Wenn
Laserlicht
direkt
vom Strichcode zum Scanner zurückreflektiert
wird, handelt es sich um eine Spiegelreflexion. Dieses starke Licht
kann den Scanner „blenden" und die Decodierung erschweren. Der
Bereich, in dem die Spiegelreflexion auftritt, wird auch als „toter
Bereich“ bezeichnet.
Sie können den Scanner bis zu 65 Grad nach vorne oder nach hinten
neigen und immer noch eine erfolgreiche Decodierung erzielen.
Durch Übung wird schnell deutlich, in welchen Toleranzen
gearbeitet werden kann.
Erfolgreiches
Scannen
65 65
Scanstrahl
Mögliche Spiegel-
reflextion
Schattierter Bereich
stellt toten Bereich dar
(±2°)
StrichcodeStrichcodeStrichcode
Erfolgreiches
Scannen
Scanstrahl
Was bedeutet der Piepton?
Wenn ein Piepton (kurzer hoher Ton) zu hören ist, bedeutet dies,
daß Daten erfolgreich decodiert wurden. Wenn während des
Scannens eines PDF-Strichcodes ein „Klicken“ zu hören ist, wurden
die Daten ebenfalls erfolgreich decodiert. Wenn andere Pieptöne zu
hören sind, wenden Sie sich an den für das Scannen zuständigen
Te ch ni ke r.
23
Page 26

Scanner LS 4000P
Was wäre, wenn ...
nichts geschieht, wenn Sie die Bedienungsanleitung befolgen?
Sie sollten
• die Stromzufuhr des Systems überprüfen. Befindet sich eine
Batterie im Batteriefach?
• prüfen, ob der Scanner für das verwendete Terminal
programmiert wurde.
• prüfen, ob der Scanner zum Lesen des von Ihnen
gescannten Strichcodetyps programmiert ist.
• prüfen, ob sich Kabelanschlüsse gelöst haben.
• prüfen, ob das Symbol deformiert ist.
• versuchen, Testsymbole desselben Codetyps zu scannen.
24
Page 27

Guida Rapida
Introduzione
I lettori portatili LS 4000P offrono prestazioni elevate per la lettura
di codici PDF417 a basso volume e a costi contenuti in ambienti
retail, uffici e applicazioni nel settore dell'industria leggera. I lettori
LS 4000P utilizzano un diodo laser da 650nm che consente di
aumentare la visibilità della linea di scansione e hanno una velocità
di lettura di circa 200 scansioni al secondo. Grazie a queste
caratteristiche i lettori LS 4000P offrono prestazioni elevate nella
lettura dei codici PDF pur mantenendo le capacità di lettura dei
codici 1D.
Questa Guida rapida contiene istruzioni sui seguenti argomenti:
Impostazione dello scanner
•
Scansione
•
Cosa indica il segnale acustico?
•
Come comportarsi se ...
•
a pagina 28
a pagina 26
a pagina 31
a pagina 32.
25
Page 28

Scanner LS 4000P
Impostazione dello scanner
Installazione del cavo
1. Spegnere tutti i dispositivi collegati allo scanner LS 4000P.
2. Far scorrere il rinforzo lungo il cavo fino a far fuoriuscire
solamente il connettore.
3. Inserire il connettore modulare del cavo nella presa situata
nella parte inferiore del manico dello scanner LS 4000P, fino a
quando non si avverte un clic.
4. Tirare delicatamente il cavo per verificare che il connettore sia
fissato correttamente.
26
Page 29

Guida Rapida
5. Far scorrere verso l’alto il rinforzo tenendone sotto controllo
l’orientamento fino a fissarlo correttamente.
6. Assicurarsi che il tasto semicircolare del rinforzo venga
inserito nel gruppo manico e che il rinforzo venga inserito fino
allo scatto in posizione.
7. Tirare delicatamente il rinforzo in modo da assicurarsi che sia
inserito correttamente.
Sostituzione di cavi
Ogni host richiede un cavo diverso. Per cambiare il cavo dello
scanner:
1. Far scorrere il rinforzo lungo il cavo.
2. Disinserire il connettore modulare premendo il fermaglio del
connettore (attraverso il foro di accesso) e rimuovere il cavo
esistente.
3. Effettuare le operazioni indicate nella sezione
cavo
a pagina 26.
Installazione del
27
Page 30

Scanner LS 4000P
Scansione
Scansione di codici a barre 1-D
Per decodificare un codice a barre 1-D:
1. Assicurarsi che tutti i connettori siano fissati correttamente e
che il simbolo da decodificare rientri nel campo di scansione.
2. Mirare il simbolo con lo scanner e premere il grilletto. Il fascio
di scansione rimane attivo per circa 3 secondi (impostazione
predefinita) o fin quando la decodifica non ha esito positivo.
Vengono di seguito descritti i segnali che indicano l’avvenuta lettura
del simbolo.
• Se il segnale acustico è attivato, viene emesso un breve tono
alto.
• Il LED giallo sul retro dello scanner assume il colore verde.
Il LED verde rimane acceso per due secondi o fino alla successiva
attivazione del grilletto.
Scansione dei codici a barre PDF417 (2-D)
Il codice PDF417 è attivato come valore predefinito, per disattivarlo
leggere il codice a barre seguente.
Disattivazione del codice PDF417
Per attivare la lettura PDF, leggere il codice a barre seguente. (È
possibile trovare questo e altri codici a barre nel manuale di
riferimento per i lettori LS 4000P (
Guide
, p/n 70-37631-xx).
Abilitazione del codice PDF417
LS 4000P Product Reference
28
Page 31

Guida Rapida
Per leggere un codice PDF417:
1. Mirare il codice a barre PDF con lo scanner e premere il
grilletto.
2. Tenere premuto il grilletto e mantenere la linea di scansione
parallela alle
3. Per la copertura completa della linea di scansione spostare
lentamente lo scanner verso l’alto e il basso, in modo da
decodificare l’intero codice a barre ad una velocità di circa
2 cm al secondo.
Se PDF Decode Feedback (Segnale di decodifica PDF) è attivo,
l’emissione di un clic consente all’utente di comprendere che la
decodifica del codice è in atto. Durante la scansione di un codice a
barre, la mancata emissione di questo segnale quando questo
parametro è attivo indica che la scansione non viene effettuata
correttamente.
Per migliorare la decodifica PDF:
• Assicurarsi che la scansione PDF417 sia attiva.
• Assicurarsi che la linea di scansione oltrepassi di almeno
10 mm il bordo destro e sinistro del codice a barre.
• Nel caso di simboli particolarmente densi, avvicinare lo
scanner ai simboli, aumentando la distanza per quelli con una
densità inferiore.
• Assicurarsi di leggere anche le righe nella parte superiore e
inferiore del simbolo.
• Attenzione: la decodifica del simbolo potrebbe richiedere
alcuni tentativi ripetuti di scansione.
L’emissione di un segnale acustico seguito da un breve tono alto
indica che la decodifica del codice a barre è stata completata. Il LED
giallo sul retro dello scanner diventa verde. Il LED verde rimane
righe
del simbolo.
29
Page 32

Scanner LS 4000P
acceso per due secondi o fino alla successiva attivazione del
grilletto.
10 mm 10 mm
Mira
Scansione dell’intero simbolo
• Incrociare con il fascio di scansione tutti gli spazi e le barre del
simbolo.
• Per i codici a barre di dimensioni maggiori, mantenere lo
scanner ad una maggiore distanza.
• Per i simboli contenenti barre particolarmente ravvicinate tra
loro, mantenere lo scanner a una minore distanza.
Corretto Errato
30
Page 33

Guida Rapida
Tenere ad un angolo
Non puntare il lettore ad angolo retto sul codice a barre. La
riflessione
diretta
della luce del laser dal codice a barre verso lo
scanner, nota come riflessione speculare, può “schermare” lo
scanner rendendo difficile la decodifica. L’area in cui si verifica una
riflessione speculare viene indicata con il nome di “area cieca”.
È possibile inclinare lo scanner fino a 65° in avanti o indietro e
continuare ad ottenere ottime decodifiche. Con un po’ di pratica
diventerà naturale posizionare il lettore entro i limiti di tolleranza
previsti.
Scansione con
esito positivo
65 65
Fascio
di
scansione
Codice a barre Codice a barre Codice a barre
Possibile riflessione
speculare
L’area ombreggiata
rappresenta l’area
cieca (±2°)
Scansione con
esito positivo
Fascio
di
scansione
Cosa indica il segnale acustico?
L’emissione di un segnale acustico (breve tono alto) indica che la
decodifica ha avuto esito positivo. L’emissione di una serie di “clic”
durante la scansione di un codice a barre PDF indica che la
decodifica dei dati avviene correttamente. Per qualsiasi altro segnale
acustico emesso, rivolgersi al tecnico responsabile della scansione.
31
Page 34

Scanner LS 4000P
Come comportarsi se ...
Lo scanner non funziona nonostante siano state seguite le istruzioni d’uso?
È opportuno effettuare le operazioni descritte di seguito.
• Controllare l’alimentazione del sistema. Assicurarsi che la
batteria sia stata inserita nell’apposito scomparto.
• Assicurarsi che lo scanner sia programmato per il terminale
utilizzato.
• Assicurarsi che lo scanner sia programmato per leggere il tipo
di codice a barre che si desidera decodificare.
• Assicurarsi che non vi siano connessioni difettose dei cavi.
• Assicurarsi che il simbolo non sia cancellato.
• Effettuare una scansione su simboli di prova dello stesso tipo
di codice.
32
Page 35

Guía Rápida
Introducción
El scanner láser de mano de la serie LS 4000P ofrece el mejor
rendimiento para una lectura PDF417 económica y de bajo
volumen en aplicaciones industriales, de ventas al por menor y de
oficina. Utiliza un diodo láser de 650 nm para una mejor visibilidad
de la línea de lectura y tiene una velocidad de lectura de
aproximadamente 200 lecturas por segundo. Estos factores hacen
del scanner de la serie LS 4000P el instrumento adecuado para la
lectura PDF mientras retiene todas las capacidades para la lectura
unidimensional.
Esta Guía de referencia rápida proporciona instrucciones básicas
sobre los siguientes tópicos:
Configuración del scanner
•
Lectura
•
•
•
en la página 36
¿Qué significa la señal sonora?
¿Qué pasa si...
en la página 40.
en la página 34
en la página 39
33
Page 36

Scanner LS 4000P
Configuración del scanner
Instalación del cable
1. Apague todos los dispositivos conectados al LS 4000P.
2. Tire de la goma situada encima del cable hasta que sólo sobre-
salga el conector.
3. Enchufe el conector modular del cable al receptáculo que hay
en el fondo del mango del LS 4000P. Presione hasta escuchar
un clic.
4. Tire suavemente del cable para asegurarse de que el conector
esté fijado correctamente.
34
Page 37

Guía Rápida
5. Deslice la goma observando su orientación, hasta que esté fijada en su sitio.
6. Asegúrese de que la cerradura semicircular de la goma se
deslice dentro del conjunto del mango y de que la goma encaje
en su lugar.
7. Tire de la goma suavemente para asegurarse de que esté acoplada correctamente.
Cables de conexión
Se necesitan diferentes cables para los distintos ordenadores
centrales. Para cambiar el cable del scanner:
1. Deslice la goma a lo largo del cable.
2. Desconecte el conector modular presionando el gancho del
conector (a través del orificio de acceso) y quite el cable que
haya.
3. Siga los pasos para la
Instalación del cable
en la página 34.
35
Page 38

Scanner LS 4000P
Lectura
Lectura de códigos de barras unidimensionales
Para leer un código de barras unidimensional:
1. Asegúrese de que todas las conexiones estén fijadas y de que
el código que usted quiere leer esté dentro del rango de lectura.
2. Apunte el scanner hacia el código y apriete el gatillo. El haz de
lectura se mantiene durante 3 segundos (por defecto), aproximadamente, o hasta que se logre una decodificación satisfactoria.
El scanner ha leído el símbolo cuando:
• Se oye una señal sonora corta y de tono alto (si el aparato de
emisión de señales sonoras está conectado).
• El LED amarillo de la parte posterior del scanner se enciende
en verde.
El LED verde permanece encendido durante dos segundos o hasta
que se apriete otra vez el gatillo.
Lectura de códigos de barras PDF417 (bidimensional)
El tipo de código de barras PDF417 se encuentra activado por
defecto. Para desactivarlo, lea este código de barras:
Desactivar PDF417
Para activar la lectura PDF, lea el código de barras que se encuentra
a continuación. (Estos códigos de barras también pueden
36
Page 39

Guía Rápida
encontrarse en
la Guía de referencia del producto LS 4000P
,
n/r 70-37631-xx).
Activar PDF417
Para leer un código de barras PDF417:
1. Apunte el scanner hacia el código de barras PDF y apriete el
gatillo.
2. Continúe con el gatillo apretado y mantenga la línea de lectura
paralela a las
filas
del código.
3. Recorra manualmente la línea de lectura moviendo lentamente el scanner hacia arriba y hacia abajo, de forma que lea
todo el código de barras a una velocidad de unos 3 cm por
segundo.
Cuando esté activada la Retroalimentación de decodificación PDF,
un sonido corto y repetido le permite saber que se está decodificando el código de barras. Si este parámetro está activado pero no
hay ningún sonido corto y repetido cuando está leyendo el código
de barras, esto significa que no se está leyendo correctamente.
Para mejorar la decodificación PDF:
• Compruebe que la lectura PDF417 esté activada.
• Asegúrese de que la línea de lectura se extiende como mínimo
2 centímetros más allá de los bordes izquierdo y derecho del
código de barras.
• Mantenga el scanner cerca para los códigos más densos y más
alejado para los códigos más grandes.
• Asegúrese de leer las filas superior e inferior del código.
• Tenga paciencia, pueden ser necesarias varias pasadas para
decodificar el código.
37
Page 40

Scanner LS 4000P
El código de barras ha sido decodificado completamente cuando
oye un tono, seguido de una señal sonora corta y de tono alto. El
LED amarillo de la parte posterior del scanner se enciende en verde.
El LED verde permanece encendido durante dos segundos o hasta
que se apriete otra vez el gatillo.
2 centímetros
2 centímetros
Apuntado
Leer el símbolo entero
• Cruce todas las barras y espacios del código con el haz de
lectura.
• Mantenga el scanner más alejado para códigos de barras más
grandes.
• Mantenga el scanner más cerca para códigos de barras que
estén muy juntas.
Correcto Incorrecto
38
Page 41
Guía Rápida
Sujetar desde un ángulo
No mantenga el scanner
directamente
sobre el código de barras. El
fenómeno que se produce cuando la luz del láser se refleja de nuevo
directamente en el scanner desde el código de barras se conoce como
reflexión especular. Esta luz tan fuerte puede “cegar” al scanner y
dificultar la decodificación. El área donde se produce la reflexión se
conoce como “zona muerta”.
Puede inclinar el scanner hasta 65° hacia delante o hacia atrás y aún
así conseguir una decodificación satisfactoria. La simple práctica le
mostrará en seguida dentro de qué tolerancias puede trabajar.
Lectura
satisfactoria
65 65
Haz de
lectura
Código de
barras
Posible reflexión
especular
El área sombreada
representa la zona
muerto (±2°)
Código de
barras
Código de
barras
Lectura
satisfactoria
Haz de
lectura
¿Qué significa la señal sonora?
Cuando oiga una señal sonora (tono alto y corto) significa que los
datos se han decodificado de forma satisfactoria. Si oye sonidos
cortos y repetidos durante la lectura de un código de barras PDF,
significa que los datos se están decodificando de forma satisfactoria.
Si se oye cualquier otra señal sonora póngase en contacto con el
técnico encargado de la lectura.
39
Page 42

Scanner LS 4000P
¿Qué pasa si...
...no ocurre nada a pesar de seguir las instrucciones de funcionamiento?
Entonces deberá
• Comprobar la potencia del sistema. ¿Hay una batería en el
compartimento de baterías?
• Comprobar que el scanner esté programado para el terminal
en uso.
• Comprobar que el scanner esté programado para leer el tipo
de código de barras que usted está leyendo.
• Comprobar si está floja alguna conexión de cables.
• Comprobar el código para asegurarse de que no esté
desfigurado.
• Intentar leer los códigos de prueba del mismo tipo de código.
40
Page 43

Quick Reference
Regulatory Information
Radio Frequency Interference Requirements
This device has been tested and found to comply with the limits for a Class B digital
device pursuant to Part 15 of the Federal Communications Commissions Rules and
Regulation. These limits are designed to provide reasonable protection against harmful
interference when the equipment is operated in a commercial environment. This
equipment generates, uses, and can radiate radio frequency energy and, if not installed
and used in accordance with the instruction manual, may cause harmful interference to
radio communications. Operation of this equipment in a residential area is likely to
cause harmful interference in which case the user will be required to correct the
interference at his own expense.
However, there is no guarantee that interference will not occur in a particular
installation. If the equipment does cause harmful interference to radio or television
reception, which can be determined by turning the equipment off and on, the user is
encouraged to try to correct the interference by one or more of the following measures:
• Re-orient or relocate the receiving antenna.
• Increase the separation between the equipment and receiver.
• Connect the equipment into an outlet on a circuit different from that which the
receiver is connected.
• Consult the dealer or an experienced radio/TV technician for help.
This device complies with FCC Part 15. Operation is subject to the following two
conditions: (1) this device may not cause harmful interference and (2) this device must
accept any interference received, including interference that may cause undesired
operation.
Radio Frequency Interference Requirements - Canada
This device complies with RSS 210 of Industry & Science Canada. Operation is subject
to the following two conditions: (1) this device may not cause harmful interference and
(2) this device must accept any interference received, including interference that may
cause undesired operation.
This Class B digital apparatus complies with Industry Canada Standard ICES-003.
Cet appareil numérique de la classe B est conform à la norme NMB-003 d’Industrie
Canada.
CE Marking and European Union Compliance
Products intended for sale within the European Union are marked with the
CE Mark which indicates compliance to applicable Directives and
European Normes (EN), as follows. Amendments to these Directives or
ENs are included:
Applicable Directives
• Electromagnetic Compatibility Directive 89/336/EEC
• Low Voltage Directive 73/23/EEC
41
Page 44

LS 4000P Series
Scanners
Applicable Standards
• EN 55022:1998, Limits and Methods of Measurement of Radio Disturbance
Characteristics of Information Technology Equipment
• EN 55024:1998; Information Technology equipment - Immunity characteristics Limits and methods of measurement
• IEC 1000-4-2:1995; Electromagnetic compatibility (EMC);Part 4:Testing and
measurement techniquies;Section 4.2:Electrostatic discharge immunity test
• IEC 1000-4-3:1997; Electromagnetic Compatibility (EMC);Part 4:Testing and
measurement techniques; Section 3. Radiated, radio frequency, electomagnetic
field immunity test.
• IEC 1000-4-4:1995; Electomagnetic compatibility (EMC); Part 4: Testing and
measurement techniques;Section 4:Testing electrical fast transient,/Burst immunity.
• IEC1000-4-5:1995; Electromagnetic compatibility (EMC), Part 4: Testing and
measurement techniques;Section 5: Surge Immunity
• IEC 1000-4-6:1996; Electromagnetic compatibility (EMC), Part 4:Testing and
measurement techniques; Section 6: Immunity to conducted disturbances,
induced by radio frequency fields.
• IEC 1000-4-11:1994; Electromagnetic compatibility (EMC), Part 4: Testing and
measurement techniques; Section 11: Voltage Dips, Short Interruptions, and Voltage Variations.
• EN 60 950 + A1+A2+A3+A4+A11 - Safety of Information Technology Equipment Including Electrical Business Equipment
• EN 60 825-1 (EN 60 825) - Safety of Devices Containing Lasers
Laser Devices
Symbol products using lasers comply with US 21CFR1040.10, and IEC825-1:1993,
EN60825-1:1994+A11:1996. The laser classification is marked on one of the labels on
the product.
Class 1 Laser devices are not considered to be hazardous when used for their intended
purpose. The following statement is required to comply with US and international
regulations:
Caution: Use of controls, adjustments or performance of procedures other than those
specified herein may result in hazardous laser light exposure.
Class 2 laser scanners use a low power, visible light diode. As with any very bright light
source, such as the sun, the user should avoid staring directly into the light beam.
Momentary exposure to a Class 2 laser is not known to be harmful.
42
Page 45

Quick Reference
Scanner Labeling
AVOID EXPOSURE - LASER LIGHT IS
EMITTED FROM THIS APERTURE
ÉVITER TOUTE EXPOSITION -
LUMIÈRE LASER ÉMIS PAR CETTE OUVERTURE
CAUTION
LASER LIGHT-
DO NOT STARE INTO BEAM
630nm-680 nm LASER
1.0 MILLIWATT MAX OUTPUT
CLASS II LASER PRODUCT
COMPLIES WITH US DHHS 21CFR1040.10 SUBCHAPTER J AND IEC 825-1:1993/EN 60825-1:1994
ATTENTION - LUMÌERE LASER EN CAS D'OUVERTURE. EXPOSITION DANGEREUSE AU FAISCEAU
VORSICHT! LASERSTRAHLUNG TRITT AUS, WENN DECKEL (ODER KLAPPE)
CAUTION - LASER LIGHT WHEN OPEN. AVOID DIRECT EYE EXPOSURE
GEOEFFNET IST! NICHT IN DEN STRAHL BLICKEN!
ACHTUNG LASERSTRAHL. LASERKLASSE 2. NICHT IN DEN
STRAHL BLICKEN. LUMIERE LASER-NE PAS REGARDER
DANS LE FAISCEAU APPAREIL A LASER DE CLASSE 2.
CAUTION-LASER LIGHT. DO NOT STARE INTO BEAM. IEC
CLASS 2 LASER PRODUCT 630 nm-680nm, 1.0 mW LASER.
SEE QUICK REFERENCE
GUIDE FOR PATENT
COVERAGE AND LISTING
In accordance with Clause 5, IEC 0825 and EN60825, the following information is
provided to the user:
ENGLISH HEBREW
CLASS 1 CLASS 1 LASER PRODUCT
CLASS 2 LASER LIGHT
DO NOT STARE INTO BEAM
CLASS 2 LASER PRODUCT
43
Page 46

LS 4000P Series
Scanners
DANISH
KLASSE 1 KLASSE 1 LASERPRODUKT
KLASSE 2 LASERLYF CLASSE 1 PRODOTTO AL LASER DI CLASS E 1
SE IKKE IND I STRÅLEN CLASSE 2 LUCE LASER
KLASSE 2 LASERPRODUKT NON FISSARE IL RAGGIOPRODOTTO
AL LASER DI CLASSE 2
DUTCH
KLASSE 1 KLASSE-1 LASERPRODUKT
KLASSE 2 LASERLICHT KLASSE 1 LASERPRODUKT, KLASSE 1
NIET IN STRAAL STAREN KLASSE 2 LASERLYS IKKE STIRR INN I LYSSTRÅLEN
KLASSE-2 LASERPRODUKT LASERPRODUKT, KLASSE 2
FINNISH PORTUGUESE
LUOKKA 1 LUOKKA 1 LASERTUOTE CLASSE 1 PRODUTO LASER DA CLASSE 1
LUOKKA 2 LASERVALO
ÄLÄ TUIJOTA SÄDETTÄ CLASSE 2 LUZ DE LASER NÃO FIXAR O RAIO LUMINOSO
LUOKKA 2 LASERTUOTE PRODUTO LASER DA CLASSE 2
FRENCH SPANISH
CLASSE 1 PRODUIT LASER DE CLASSE 1 CLASE 1 PRODUCTO LASER DE LA CLASE 1
CLASSE 2 LUMIERE LASER CLASE 2 LUZ LASER
NE PAS REGARDER LE RAYON FIXEMENT NO MIRE FIJAMENTE EL HAZ
PRODUIT LASER DE CLASSE 2 PRODUCTO LASER DE LA CLASE 2
GERMAN SWEDISH
KLASSE 1 LASERPRODUKT DER KLASSE 1 KLASS 1 LASERPRODUKT KLASS 1
KLASSE 2 LASERSTRAHLEN KLASS 2 LASERLJUS STIRRA INTE MOT STRÅLEN
NICHT DIREKT IN DEN LASERSTRAHL SCHAUEN LASERPRODUKT KLASS 2
LASERPRODUKT DER KLASSE 2
ITALIAN
NORWEGIAN
Ergonomic Recommendations
Caution:
In order to avoid or minimize the potential risk of ergonomic injury follow the
recommendations below. Consult with your local Health & Safety Manager to ensure that you are
meeting with your company’s safety programs to prevent employee injury.
• Reduce or eliminate repetitive motion
• Maintain a natural position
• Reduce or eliminate excessive force
• Keep objects that are used frequently within easy reach
• Perform tasks at correct heights
• Reduce or eliminate vibration
• Reduce or eliminate direct pressure
• Provide adjustable workstations
• Provide adequate clearance
• Provide a suitable working environment
• Improve work procedures.
44
Page 47

Quick Reference
Service Information
Before you use the unit, it must be configured to operate in your facility’s network and
run your applications.
If you have a problem running your unit or using your equipment, contact your
facility’s Technical or Systems Support. If there is a problem with the equipment, they
will contact the Symbol Support Center:
United States 1-800-653-5350 Canada 905-629-7226
United Kingdom 0800 328 2424 Asia/Pacific 337-6588
Australia 1-800-672-906 Austria 1-505-5794
Denmark 7020-1718 Finland 9 5407 580
France 01-40-96-52-21 Germany 6074-49020
Italy 2-484441 Mexico 5-520-1835
Netherlands 315-271700 Norway 66810600
South Africa 11-4405668 Spain 9-1-320-39-09
Sweden 84452900
Latin America Sales Support 1-800-347-0178 Inside US
Europe/Mid-East Distributor Operations Contact local distributor or call
+1-561-483-1275 Outside US
+44 118 945 7360
Warranty
Symbol Technologies, Inc. (“Symbol”) manufactures its hardware products in
accordance with industry-standard practices. Symbol warrants that for a period of
twelve (12) months from date of shipment, products will be free from defects in
materials and workmanship.
This warranty is provided to the origin al owner only and is not transferable to any third
party. It shall not apply to any product (i) which has been repaired or altered unless
done or approved by Symbol, (ii) which has not been maintained in accordance with
any operating or handling instructions supplied by Symbol, (iii) which has been
subjected to unusual physical or electrical stress, misuse, abuse, power shortage,
negligence or accident or (iv) which has been used other than in accordance with the
product operating and handling instructions. Preventive maintenance is the
responsibility of customer and is not covered under this warranty.
Wear items and accessories having a Symbol serial number, will carry a 90-day limited
warranty. Non-serialized items will carry a 30-day limited warranty.
45
Page 48

Warranty Coverage and Procedure
During the warranty period, Symbol will repair or replace defective products returned
to Symbol’s manufacturing plant in the US. For warranty service in North America, call
the Symbol Support Center at 1-800-653-5350. Inte rnational customers should contact
the local Symbol office or support center. If warranty service is required, Symbol will
issue a Return Material Authorization Number. Products must be shipped in the
original or comparable packaging, shipping and insurance charges prepaid. Symbol
will ship the repaired or replacement product freight and insurance prepaid in North
America. Shipments from the US or other locations will be made F.O.B. Symbol’s
manufacturing plant.
Symbol will use new or refurbished parts at its discretion and will own all parts
removed from repaired products. Customer will pay for the replacement product in
case it does not return the replaced product to Symbol within 3 days of receipt of the
replacement product. The process for return and customer’s charges will be in
accordance with Symbol’s Exchange Policy in effect at the time of the exchange.
Customer accepts full responsibility for its software and data including the appropriate
backup thereof.
Repair or replacement of a product during warranty will not extend the original
warranty term.
Symbol’s Customer Service organization offers an array of service plans, such as on-site,
depot, or phone support, that can be implemented to meet customer’s special
operational requirements and are available at a substantial discount during warranty
period.
General
Except for the warranties stated above, Symbol disclaims all warranties, express or
implied, on products furnished hereunder, including without limitation implied
warranties of merchantability and fitness for a particular purpose. The stated express
warranties are in lieu of all obligations or liabilities on part of Symbol for damages,
including without limitation, special, indirect, or consequential damages arising out of
or in connection with the use or performance of the product.
Seller’s liability for damages to buyer or others resulting from the use of any product,
shall in no way exceed the purchase price of said product, except in instances of injury
to persons or property.
Some states (or jurisdictions) do not allow the exclusion or limitation of incidental or
consequential damages, so the proceeding exclusion or limitation may not apply to you.
70-37632-01
Revision A — September 1999
Symbol Technologies, Inc. One Symbol Plaza Holtsville, NY 11742-1300
 Loading...