

Page 1

LS 3603
Product Reference Guide
Page 2

LS 3063 Product Reference Guide
70-13584-01
Revision C — June 1999
2
Symbol Technologies, Inc. One Symbol Plaza, Holtsville N.Y. 11742
Page 3

LS 3603
Product Reference Guide
70-13584-01
Revision C
June 1999
Page 4

©1999
by Symbol Technologies, Inc. All rights reserved.
No part of this publication may be reproduced or used in any form, or by any electrical or mechanical
means, without permission in writing from Symbol. This includes electronic or mechanical means, such
as photocopying, recording, or information storage and retrieval systems. The material in this manual
is subject to change without notice.
The software is provided strictly on an “as is” basis. All software, including firmware, furnished to the
user is on a licensed basis. Symbol grants to the user a non-transferable and non-exclusive license to use
each software or firmware program delivered hereunder (licensed program). Except as noted below,
such license may not be assigned, sublicensed, or otherwise transferred by the user without prior written
consent of Symbol. No right to copy a licensed program in whole or in part is granted, except as
permitted under copyright law. The user shall not modify, merge, or incorporate any form or portion of
a licensed program with other program material, create a derivative work from a licensed program, or
use a licensed program in a network without written permission from Symbol. The user agrees to
maintain Symbol’s copyright notice on the licensed programs delivered hereunder, and to include the
same on any authorized copies it makes, in whole or in part. The user agrees not to decompile,
disassemble, decode, or reverse engineer any licensed program delivered to the user or any portion
thereof.
Symbol reserves the right to make changes to any software or product to improve reliability, function,
or design.
Symbol does not assume any product liability arising out of, or in connection with, the application or
use of any product, circuit, or application described herein.
No license is granted, either expressly or by implication, estoppel, or otherwise under any Symbol
Technologies, Inc., intellectual property rights. An implied license only exists for equipment, circuits,
and subsystems contained in Symbol products.
Symbol, Spectrum One, and Spectrum24 are registered trademarks of Symbol Technologies, Inc. Other
product names mentioned in this manual may be trademarks or registered trademarks of their respective
companies and are hereby acknowledged.
Symbol Technologies, Inc.
One Symbol Plaza
Holtsville, New York 11742-1300
http://www.symbol.com
Patents
This product is covered by one or more of the following U.S. and foreign Patents:
U.S. Patent No.4,360,798; 4,369,361; 4,387,297; 4,460,120; 4,496,831; 4,593,186; 4,603,262; 4,607,156; 4,652,750; 4,673,805; 4,736,095; 4,758,717;
4,816,660; 4,845,350; 4,896,026; 4,897,532; 4,923,281; 4,933,538; 4,992,717; 5,015,833; 5,017,765; 5,021,641; 5,029,183; 5,047,617; 5,103,461;
5,113,445; 5,130,520 5,140,144; 5,142,550; 5,149,950; 5,157,687; 5,168,148; 5,168,149; 5,180,904; 5,229,591; 5,230,088; 5,235,167; 5,243,655;
5,247,162; 5,250,791; 5,250,792; 5,262,627; 5,262,628; 5,266,787; 5,278,398; 5,280,162; 5,280,163; 5,280,164; 5,280,498; 5,304,786; 5,304,788;
5,306,900; 5,321,246; 5,324,924; 5,337,361; 5,367,151; 5,373,148; 5,378,882; 5,396,053; 5,396,055; 5,399,846; 5,408,081; 5,410,139; 5,410,140;
5,412,198; 5,418,812; 5,420,411; 5,436,440; 5,444,231; 5,449,891; 5,449,893; 5,468,949; 5,471,042; 5,478,998; 5,479,000; 5,479,002; 5,479,441;
5,504,322; 5,519,577; 5,528,621; 5,532,469; 5,543,610; 5,545,889; 5,552,592; 5,578,810; 5,581,070; 5,589,679; 5,589,680; 5,608,202; 5,612,531;
5,619,028; 5,664,229; 5,668,803; 5,675,139; 5,693,929; 5,698,835; 5,705,800; 5,714,746; 5,723,851; 5,734,152; 5,734,153; 5,745,794; 5,754,587;
5,762,516; 5,763,863; 5,767,500; 5,789,728; 5,808,287; 5,811,785; 5,811,787; 5,815,811; 5,821,519; 5,821,520; 5,823,812; 5,828,050; 5,850,078;
5,861,615; 5,874,720; 5,875,415; D305,885; D341,584; D344,501; D359,483; D362,453; D363,700; D363,918; D370,478; D383,124; D391,250;
D405,077; D406,581.
Invention No. 55,358; 62,539; 69,060; 69,187 (Taiwan); No. 1,601,796; 1,907,875; 1,955,269 (Japan).
European Patent 367,299; 414,281; 367,300; 367,298; UK 2,072,832; France 81/03938; Italy 1,138,713.
rev. 4/99
ii
Page 5

Contents
Chapter 1. User’s Guide
Scanning Made Easy . . . . . . . . . . . . . . . . . . . . . . . . . . . . . . . . . . . . . . . . . . . . . . . . . . . . . . . . . . . . . . 1-1
Set Up. . . . . . . . . . . . . . . . . . . . . . . . . . . . . . . . . . . . . . . . . . . . . . . . . . . . . . . . . . . . . . . . . . . . . . . . . . . 1-2
Unpacking. . . . . . . . . . . . . . . . . . . . . . . . . . . . . . . . . . . . . . . . . . . . . . . . . . . . . . . . . . . . . . . . . . . 1-2
Switching Cables . . . . . . . . . . . . . . . . . . . . . . . . . . . . . . . . . . . . . . . . . . . . . . . . . . . . . . . . . . . . . 1-2
Power Options . . . . . . . . . . . . . . . . . . . . . . . . . . . . . . . . . . . . . . . . . . . . . . . . . . . . . . . . . . . . . . . 1-2
Connecting Your Scanner. . . . . . . . . . . . . . . . . . . . . . . . . . . . . . . . . . . . . . . . . . . . . . . . . . . . . . 1-2
RS-232C . . . . . . . . . . . . . . . . . . . . . . . . . . . . . . . . . . . . . . . . . . . . . . . . . . . . . . . . . . . . . . . . . . . . . 1-3
For external power operation with single-piece cable . . . . . . . . . . . . . . . . . . . . . . . . . . 1-3
For direct host power operation:. . . . . . . . . . . . . . . . . . . . . . . . . . . . . . . . . . . . . . . . . . . . 1-3
For battery operation: . . . . . . . . . . . . . . . . . . . . . . . . . . . . . . . . . . . . . . . . . . . . . . . . . . . . . 1-4
Wand Emulation . . . . . . . . . . . . . . . . . . . . . . . . . . . . . . . . . . . . . . . . . . . . . . . . . . . . . . . . . . . . . 1-5
For external power operation: . . . . . . . . . . . . . . . . . . . . . . . . . . . . . . . . . . . . . . . . . . . . . . 1-5
For direct host power operation:. . . . . . . . . . . . . . . . . . . . . . . . . . . . . . . . . . . . . . . . . . . . 1-5
For battery operation: . . . . . . . . . . . . . . . . . . . . . . . . . . . . . . . . . . . . . . . . . . . . . . . . . . . . . 1-5
OCIA, OCR, IBM 4683, Keyboard Wedges . . . . . . . . . . . . . . . . . . . . . . . . . . . . . . . . . . . . . . . 1-6
Ready, Test, Scan . . . . . . . . . . . . . . . . . . . . . . . . . . . . . . . . . . . . . . . . . . . . . . . . . . . . . . . . . . . . . . . . . 1-7
Aim and press the trigger. . . . . . . . . . . . . . . . . . . . . . . . . . . . . . . . . . . . . . . . . . . . . . . . . . . . . . 1-7
Aiming. . . . . . . . . . . . . . . . . . . . . . . . . . . . . . . . . . . . . . . . . . . . . . . . . . . . . . . . . . . . . . . . . . . . . . . . . . 1-8
Scan the Entire Symbol . . . . . . . . . . . . . . . . . . . . . . . . . . . . . . . . . . . . . . . . . . . . . . . . . . . . . . . . 1-8
Hold at an Angle . . . . . . . . . . . . . . . . . . . . . . . . . . . . . . . . . . . . . . . . . . . . . . . . . . . . . . . . . . . . . 1-8
Problems . . . . . . . . . . . . . . . . . . . . . . . . . . . . . . . . . . . . . . . . . . . . . . . . . . . . . . . . . . . . . . . . . . . . . . . . 1-8
Beeper Definitions . . . . . . . . . . . . . . . . . . . . . . . . . . . . . . . . . . . . . . . . . . . . . . . . . . . . . . . . . . . . . . . . 1-8
Programming the System . . . . . . . . . . . . . . . . . . . . . . . . . . . . . . . . . . . . . . . . . . . . . . . . . . . . . . . . . . 1-8
Hands Free . . . . . . . . . . . . . . . . . . . . . . . . . . . . . . . . . . . . . . . . . . . . . . . . . . . . . . . . . . . . . . . . . . . . . . 1-9
Scanstand Plus Operation. . . . . . . . . . . . . . . . . . . . . . . . . . . . . . . . . . . . . . . . . . . . . . . . . . . . . . 1-9
IntelliStand Operation. . . . . . . . . . . . . . . . . . . . . . . . . . . . . . . . . . . . . . . . . . . . . . . . . . . . . . . . . 1-9
Battery Box Operation. . . . . . . . . . . . . . . . . . . . . . . . . . . . . . . . . . . . . . . . . . . . . . . . . . . . . . . . . . . . 1-10
Changing the Battery. . . . . . . . . . . . . . . . . . . . . . . . . . . . . . . . . . . . . . . . . . . . . . . . . . . . . . . . . 1-10
Recharging a Nickel-Cadmium Battery . . . . . . . . . . . . . . . . . . . . . . . . . . . . . . . . . . . . . . . . . 1-10
LS 3603 Decode Zone . . . . . . . . . . . . . . . . . . . . . . . . . . . . . . . . . . . . . . . . . . . . . . . . . . . . . . . . . . . . 1-11
Maintenance . . . . . . . . . . . . . . . . . . . . . . . . . . . . . . . . . . . . . . . . . . . . . . . . . . . . . . . . . . . . . . . . . . . . 1-12
What If... . . . . . . . . . . . . . . . . . . . . . . . . . . . . . . . . . . . . . . . . . . . . . . . . . . . . . . . . . . . . . . . . . . . . . . . 1-13
Factory Service. . . . . . . . . . . . . . . . . . . . . . . . . . . . . . . . . . . . . . . . . . . . . . . . . . . . . . . . . . . . . . . . . . 1-14
Symbol Support Center. . . . . . . . . . . . . . . . . . . . . . . . . . . . . . . . . . . . . . . . . . . . . . . . . . . . . . . . . . . 1-15
Accessories . . . . . . . . . . . . . . . . . . . . . . . . . . . . . . . . . . . . . . . . . . . . . . . . . . . . . . . . . . . . . . . . . . . . . 1-16
Required Accessories. . . . . . . . . . . . . . . . . . . . . . . . . . . . . . . . . . . . . . . . . . . . . . . . . . . . . . . . . 1-16
Optional Accessories. . . . . . . . . . . . . . . . . . . . . . . . . . . . . . . . . . . . . . . . . . . . . . . . . . . . . . . . . 1-16
Technical Specifictions . . . . . . . . . . . . . . . . . . . . . . . . . . . . . . . . . . . . . . . . . . . . . . . . . . . . . . . . . . . 1-17
Pin-outs . . . . . . . . . . . . . . . . . . . . . . . . . . . . . . . . . . . . . . . . . . . . . . . . . . . . . . . . . . . . . . . . . . . . . . . . 1-19
iii
Page 6

Chapter 2. Programming
Overview. . . . . . . . . . . . . . . . . . . . . . . . . . . . . . . . . . . . . . . . . . . . . . . . . . . . . . . . . . . . . . . . . . . . . . . . 2-1
Scanning Sequence Examples . . . . . . . . . . . . . . . . . . . . . . . . . . . . . . . . . . . . . . . . . . . . . . . . . . 2-2
Errors While Scanning. . . . . . . . . . . . . . . . . . . . . . . . . . . . . . . . . . . . . . . . . . . . . . . . . . . . . . . . . 2-2
Parameter Descriptions. . . . . . . . . . . . . . . . . . . . . . . . . . . . . . . . . . . . . . . . . . . . . . . . . . . . . . . . . . . . 2-4
• Set Parameter Defaults. . . . . . . . . . . . . . . . . . . . . . . . . . . . . . . . . . . . . . . . . . . . . . . . . . . . . . . 2-4
• Host Interface Code . . . . . . . . . . . . . . . . . . . . . . . . . . . . . . . . . . . . . . . . . . . . . . . . . . . . . . . . . 2-4
• Code Types . . . . . . . . . . . . . . . . . . . . . . . . . . . . . . . . . . . . . . . . . . . . . . . . . . . . . . . . . . . . . . . . 2-4
• Code Lengths . . . . . . . . . . . . . . . . . . . . . . . . . . . . . . . . . . . . . . . . . . . . . . . . . . . . . . . . . . . . . . 2-4
• Code 39 Full ASCII. . . . . . . . . . . . . . . . . . . . . . . . . . . . . . . . . . . . . . . . . . . . . . . . . . . . . . . . . . 2-5
• Decode Options . . . . . . . . . . . . . . . . . . . . . . . . . . . . . . . . . . . . . . . . . . . . . . . . . . . . . . . . . . . . 2-5
Transmit UPC-E/UPC-A Check Digit . . . . . . . . . . . . . . . . . . . . . . . . . . . . . . . . . . . . . . . 2-5
Convert UPC-E to UPC-A. . . . . . . . . . . . . . . . . . . . . . . . . . . . . . . . . . . . . . . . . . . . . . . . . . 2-5
EAN Zero Extend. . . . . . . . . . . . . . . . . . . . . . . . . . . . . . . . . . . . . . . . . . . . . . . . . . . . . . . . . 2-5
Transmit “No Decode” Message . . . . . . . . . . . . . . . . . . . . . . . . . . . . . . . . . . . . . . . . . . . . 2-5
Decode UPC/EAN Supplemental. . . . . . . . . . . . . . . . . . . . . . . . . . . . . . . . . . . . . . . . . . . 2-6
Code 39 Check Digit . . . . . . . . . . . . . . . . . . . . . . . . . . . . . . . . . . . . . . . . . . . . . . . . . . . . . . 2-6
ITF-14/EAN-13 Conversion. . . . . . . . . . . . . . . . . . . . . . . . . . . . . . . . . . . . . . . . . . . . . . . . 2-6
MSI Plessey Check Digit. . . . . . . . . . . . . . . . . . . . . . . . . . . . . . . . . . . . . . . . . . . . . . . . . . . 2-6
MSI/Plessey 2 Check Digit Algorithm. . . . . . . . . . . . . . . . . . . . . . . . . . . . . . . . . . . . . . . 2-6
Code 39 Buffering (Scan & Store) . . . . . . . . . . . . . . . . . . . . . . . . . . . . . . . . . . . . . . . . . . . 2-7
Beep After Good Decode . . . . . . . . . . . . . . . . . . . . . . . . . . . . . . . . . . . . . . . . . . . . . . . . . . 2-7
CLSI Editing . . . . . . . . . . . . . . . . . . . . . . . . . . . . . . . . . . . . . . . . . . . . . . . . . . . . . . . . . . . . . 2-7
NOTIS Editing . . . . . . . . . . . . . . . . . . . . . . . . . . . . . . . . . . . . . . . . . . . . . . . . . . . . . . . . . . . 2-7
UPC/EAN Security Level. . . . . . . . . . . . . . . . . . . . . . . . . . . . . . . . . . . . . . . . . . . . . . . . . . 2-8
Decode Redundancy for Codabar. . . . . . . . . . . . . . . . . . . . . . . . . . . . . . . . . . . . . . . . . . . 2-8
• UPC A and E Preamble . . . . . . . . . . . . . . . . . . . . . . . . . . . . . . . . . . . . . . . . . . . . . . . . . . . . . . 2-9
• Data Transmission Formats . . . . . . . . . . . . . . . . . . . . . . . . . . . . . . . . . . . . . . . . . . . . . . . . . . 2-9
• Prefix/Suffix Values. . . . . . . . . . . . . . . . . . . . . . . . . . . . . . . . . . . . . . . . . . . . . . . . . . . . . . . . . 2-9
• Laser On Time-out . . . . . . . . . . . . . . . . . . . . . . . . . . . . . . . . . . . . . . . . . . . . . . . . . . . . . . . . . . 2-9
•RS-232C Options . . . . . . . . . . . . . . . . . . . . . . . . . . . . . . . . . . . . . . . . . . . . . . . . . . . . . . . . . . . 2-10
Baud Rate . . . . . . . . . . . . . . . . . . . . . . . . . . . . . . . . . . . . . . . . . . . . . . . . . . . . . . . . . . . . . . 2-10
Parity . . . . . . . . . . . . . . . . . . . . . . . . . . . . . . . . . . . . . . . . . . . . . . . . . . . . . . . . . . . . . . . . . . 2-10
Beep on BEL . . . . . . . . . . . . . . . . . . . . . . . . . . . . . . . . . . . . . . . . . . . . . . . . . . . . . . . . . . . . 2-10
Hardware Handshaking. . . . . . . . . . . . . . . . . . . . . . . . . . . . . . . . . . . . . . . . . . . . . . . . . . 2-10
Software Handshaking . . . . . . . . . . . . . . . . . . . . . . . . . . . . . . . . . . . . . . . . . . . . . . . . . . . 2-13
Stop Bit Select. . . . . . . . . . . . . . . . . . . . . . . . . . . . . . . . . . . . . . . . . . . . . . . . . . . . . . . . . . . 2-15
ASCII Format . . . . . . . . . . . . . . . . . . . . . . . . . . . . . . . . . . . . . . . . . . . . . . . . . . . . . . . . . . . 2-15
• Intercharacter Delay. . . . . . . . . . . . . . . . . . . . . . . . . . . . . . . . . . . . . . . . . . . . . . . . . . . . . . . . 2-15
• Transmit Code ID Character. . . . . . . . . . . . . . . . . . . . . . . . . . . . . . . . . . . . . . . . . . . . . . . . . 2-15
• Transmit AIM ID Character . . . . . . . . . . . . . . . . . . . . . . . . . . . . . . . . . . . . . . . . . . . . . . . . . 2-15
• Power Mode . . . . . . . . . . . . . . . . . . . . . . . . . . . . . . . . . . . . . . . . . . . . . . . . . . . . . . . . . . . . . . 2-16
• Scanstand/IntelliStand Time-out. . . . . . . . . . . . . . . . . . . . . . . . . . . . . . . . . . . . . . . . . . . . . 2-16
iv
Page 7

•Wand Emulator Options . . . . . . . . . . . . . . . . . . . . . . . . . . . . . . . . . . . . . . . . . . . . . . . . . . . . 2-16
Wand Emulator Bar Output. . . . . . . . . . . . . . . . . . . . . . . . . . . . . . . . . . . . . . . . . . . . . . . 2-16
Variable Leading Margin . . . . . . . . . . . . . . . . . . . . . . . . . . . . . . . . . . . . . . . . . . . . . . . . . 2-16
Convert All to Code 39 . . . . . . . . . . . . . . . . . . . . . . . . . . . . . . . . . . . . . . . . . . . . . . . . . . . 2-16
Supported Features By Host Type . . . . . . . . . . . . . . . . . . . . . . . . . . . . . . . . . . . . . . . . . . . . . . . . . 2-17
Beeper Indications . . . . . . . . . . . . . . . . . . . . . . . . . . . . . . . . . . . . . . . . . . . . . . . . . . . . . . . . . . . . . . . 2-19
Code 39 Buffering . . . . . . . . . . . . . . . . . . . . . . . . . . . . . . . . . . . . . . . . . . . . . . . . . . . . . . . . . . . . . . . 2-21
Buffer Data . . . . . . . . . . . . . . . . . . . . . . . . . . . . . . . . . . . . . . . . . . . . . . . . . . . . . . . . . . . . . . . . . 2-21
Clear Transmission Buffer . . . . . . . . . . . . . . . . . . . . . . . . . . . . . . . . . . . . . . . . . . . . . . . . . . . . 2-21
Transmit Buffer . . . . . . . . . . . . . . . . . . . . . . . . . . . . . . . . . . . . . . . . . . . . . . . . . . . . . . . . . . . . . 2-22
Overfilling Transmission Buffer . . . . . . . . . . . . . . . . . . . . . . . . . . . . . . . . . . . . . . . . . . . . . . . 2-22
Attempt to Transmit an Empty Buffer . . . . . . . . . . . . . . . . . . . . . . . . . . . . . . . . . . . . . . . . . . 2-22
ASCII Character Set. . . . . . . . . . . . . . . . . . . . . . . . . . . . . . . . . . . . . . . . . . . . . . . . . . . . . . . . . . . . . . 2-23
Default Table . . . . . . . . . . . . . . . . . . . . . . . . . . . . . . . . . . . . . . . . . . . . . . . . . . . . . . . . . . . . . . . . . . . 2-29
Terminal Specific RS-232C . . . . . . . . . . . . . . . . . . . . . . . . . . . . . . . . . . . . . . . . . . . . . . . . . . . . . . . . 2-31
Chapter 3. Parameter Menus
Set Default Parameters . . . . . . . . . . . . . . . . . . . . . . . . . . . . . . . . . . . . . . . . . . . . . . . . . . . . . . . . . . . . 3-3
Host Interface Select . . . . . . . . . . . . . . . . . . . . . . . . . . . . . . . . . . . . . . . . . . . . . . . . . . . . . . . . . . . . . . 3-4
RS-232 Host. . . . . . . . . . . . . . . . . . . . . . . . . . . . . . . . . . . . . . . . . . . . . . . . . . . . . . . . . . . . . . . . . . . . . . 3-5
Fixed Format Options . . . . . . . . . . . . . . . . . . . . . . . . . . . . . . . . . . . . . . . . . . . . . . . . . . . . . . . . . 3-5
Code Type. . . . . . . . . . . . . . . . . . . . . . . . . . . . . . . . . . . . . . . . . . . . . . . . . . . . . . . . . . . . . . . . . . . 3-6
Code 2 of 5 Lengths. . . . . . . . . . . . . . . . . . . . . . . . . . . . . . . . . . . . . . . . . . . . . . . . . . . . . . . . . . . 3-9
RS-232 Host. . . . . . . . . . . . . . . . . . . . . . . . . . . . . . . . . . . . . . . . . . . . . . . . . . . . . . . . . . . . . . . . . . . . . 3-11
Decode Options . . . . . . . . . . . . . . . . . . . . . . . . . . . . . . . . . . . . . . . . . . . . . . . . . . . . . . . . . . . . . 3-11
UPC-A Preamble . . . . . . . . . . . . . . . . . . . . . . . . . . . . . . . . . . . . . . . . . . . . . . . . . . . . . . . . . . . . 3-17
UPC-E Preamble. . . . . . . . . . . . . . . . . . . . . . . . . . . . . . . . . . . . . . . . . . . . . . . . . . . . . . . . . . . . . 3-18
Intercharacter Delay . . . . . . . . . . . . . . . . . . . . . . . . . . . . . . . . . . . . . . . . . . . . . . . . . . . . . . . . . 3-19
Data Transmission Formats . . . . . . . . . . . . . . . . . . . . . . . . . . . . . . . . . . . . . . . . . . . . . . . . . . . 3-21
Prefix/Suffix Values . . . . . . . . . . . . . . . . . . . . . . . . . . . . . . . . . . . . . . . . . . . . . . . . . . . . . . . . . 3-22
Transmit Code ID Character . . . . . . . . . . . . . . . . . . . . . . . . . . . . . . . . . . . . . . . . . . . . . . . . . . 3-24
Transmit AIM ID Character . . . . . . . . . . . . . . . . . . . . . . . . . . . . . . . . . . . . . . . . . . . . . . . . . . . 3-25
Laser On Time-out. . . . . . . . . . . . . . . . . . . . . . . . . . . . . . . . . . . . . . . . . . . . . . . . . . . . . . . . . . . 3-26
Scanstand/IntelliStand Time-out . . . . . . . . . . . . . . . . . . . . . . . . . . . . . . . . . . . . . . . . . . . . . . 3-28
Baud Rate . . . . . . . . . . . . . . . . . . . . . . . . . . . . . . . . . . . . . . . . . . . . . . . . . . . . . . . . . . . . . . . . . . 3-29
Parity . . . . . . . . . . . . . . . . . . . . . . . . . . . . . . . . . . . . . . . . . . . . . . . . . . . . . . . . . . . . . . . . . . . . . . 3-30
Beep on BEL . . . . . . . . . . . . . . . . . . . . . . . . . . . . . . . . . . . . . . . . . . . . . . . . . . . . . . . . . . . . . . . . 3-31
Hardware Handshaking. . . . . . . . . . . . . . . . . . . . . . . . . . . . . . . . . . . . . . . . . . . . . . . . . . . . . . 3-32
Software Handshaking . . . . . . . . . . . . . . . . . . . . . . . . . . . . . . . . . . . . . . . . . . . . . . . . . . . . . . . 3-33
Stop Bit Select. . . . . . . . . . . . . . . . . . . . . . . . . . . . . . . . . . . . . . . . . . . . . . . . . . . . . . . . . . . . . . . 3-34
ASCII Data Format . . . . . . . . . . . . . . . . . . . . . . . . . . . . . . . . . . . . . . . . . . . . . . . . . . . . . . . . . . 3-35
Power Mode . . . . . . . . . . . . . . . . . . . . . . . . . . . . . . . . . . . . . . . . . . . . . . . . . . . . . . . . . . . . . . . . 3-36
v
Page 8

Wand Host Interface . . . . . . . . . . . . . . . . . . . . . . . . . . . . . . . . . . . . . . . . . . . . . . . . . . . . . . . . . . . . . 3-37
Wand Host . . . . . . . . . . . . . . . . . . . . . . . . . . . . . . . . . . . . . . . . . . . . . . . . . . . . . . . . . . . . . . . . . . . . . 3-38
Code Type. . . . . . . . . . . . . . . . . . . . . . . . . . . . . . . . . . . . . . . . . . . . . . . . . . . . . . . . . . . . . . . . . . 3-38
Code 2 of 5 Lengths. . . . . . . . . . . . . . . . . . . . . . . . . . . . . . . . . . . . . . . . . . . . . . . . . . . . . . . . . . 3-41
Laser On Time-out. . . . . . . . . . . . . . . . . . . . . . . . . . . . . . . . . . . . . . . . . . . . . . . . . . . . . . . . . . . 3-45
Scanstand/IntelliStand Time-out . . . . . . . . . . . . . . . . . . . . . . . . . . . . . . . . . . . . . . . . . . . . . . 3-47
Power Mode . . . . . . . . . . . . . . . . . . . . . . . . . . . . . . . . . . . . . . . . . . . . . . . . . . . . . . . . . . . . . . . . 3-48
Wand Emulator Bar Output. . . . . . . . . . . . . . . . . . . . . . . . . . . . . . . . . . . . . . . . . . . . . . . . . . . 3-49
Variable Leading Margin . . . . . . . . . . . . . . . . . . . . . . . . . . . . . . . . . . . . . . . . . . . . . . . . . . . . . 3-50
Convert All to Code 39 . . . . . . . . . . . . . . . . . . . . . . . . . . . . . . . . . . . . . . . . . . . . . . . . . . . . . . . 3-52
Synapse . . . . . . . . . . . . . . . . . . . . . . . . . . . . . . . . . . . . . . . . . . . . . . . . . . . . . . . . . . . . . . . . . . . . . . . . 3-53
Code Type. . . . . . . . . . . . . . . . . . . . . . . . . . . . . . . . . . . . . . . . . . . . . . . . . . . . . . . . . . . . . . . . . . 3-53
Code 2 of 5 Lengths. . . . . . . . . . . . . . . . . . . . . . . . . . . . . . . . . . . . . . . . . . . . . . . . . . . . . . . . . . 3-56
Decode Options . . . . . . . . . . . . . . . . . . . . . . . . . . . . . . . . . . . . . . . . . . . . . . . . . . . . . . . . . . . . . 3-58
UPC-A Preamble . . . . . . . . . . . . . . . . . . . . . . . . . . . . . . . . . . . . . . . . . . . . . . . . . . . . . . . . . . . . 3-64
UPC-E Preamble. . . . . . . . . . . . . . . . . . . . . . . . . . . . . . . . . . . . . . . . . . . . . . . . . . . . . . . . . . . . . 3-65
Data Transmission Formats . . . . . . . . . . . . . . . . . . . . . . . . . . . . . . . . . . . . . . . . . . . . . . . . . . . 3-66
Prefix/Suffix Values . . . . . . . . . . . . . . . . . . . . . . . . . . . . . . . . . . . . . . . . . . . . . . . . . . . . . . . . . 3-67
Transmit Code ID Character . . . . . . . . . . . . . . . . . . . . . . . . . . . . . . . . . . . . . . . . . . . . . . . . . . 3-69
Transmit AIM ID Character . . . . . . . . . . . . . . . . . . . . . . . . . . . . . . . . . . . . . . . . . . . . . . . . . . . 3-70
Laser On Time-out. . . . . . . . . . . . . . . . . . . . . . . . . . . . . . . . . . . . . . . . . . . . . . . . . . . . . . . . . . . 3-71
Scanstand/IntelliStand Time-out . . . . . . . . . . . . . . . . . . . . . . . . . . . . . . . . . . . . . . . . . . . . . . 3-73
Power Mode . . . . . . . . . . . . . . . . . . . . . . . . . . . . . . . . . . . . . . . . . . . . . . . . . . . . . . . . . . . . . . . . 3-74
Chapter 4. Glossary
vi
Page 9

Chapter 1 User’s Guide
Scanning Made Easy
The LS 3603 features Symbol Technologies’ patented “fuzzy logic” tec hnology.
This innovation provides artificial intelligence that compensates for poor
quality bar codes and gives the LS 3603 the best first-time r e ad rate anywher e.
This scanner successfully reads most code symbologies, densities, and colors,
produced by a wide range of printing techniques. See the
on page 1-11.
With a simple cable change, the LS 3603 is compatible with:
•
RS-232C asynchronous terminals.
•
Wand based systems and most Batch and RF portable data collection
terminals that support a digital wand input.
•
Synapse™ “Smart Cables” which allow you to connect to:
- IBM 4683/4, 4693/4 series of terminals.
- All leading OCIA terminals, including NCR, Nixdorf, and ICL.
LS 3603 Decode Zone
- Terminals using an XT, AT or PS/2-style keyboard. (When used as a
keyboard wedge, all scanned data is entered into your terminal in the
form of keystrokes. No software changes to your host system are
necessary.)
- Popular OCR terminals, such as Fujitsu and ICL.
The LS 3603 scans automatically at the rate of 36 scans per second. For decode
capability, see
Technical Specifications
beginning on page 1-17
1-1
Page 10

LS 3603 Product Reference Guide
Set Up
Unpacking
Remove the scanner from its packi ng and i ns pect it f or dama ge. If the scanner
was damaged in transit, call the Symbol Support Center at one of the telephone
numbers listed on page 1-15. KEEP THE PACKING. It is the approved shipping
container and should be used if you ever need to return your equipment for
servicing.
Switching Cables
Different cables are required for different hosts. To change the scanner cable:
•
Slide collar down over cable
•
Plug in modular connector
•
Slide collar up into keys
•
Twist to snap in place
Power Options
Three power options are available:
•
External power supply
•
Battery Box
•
Direct Host Power
Available power options are host dependent.
Connecting Your Scanner
With some terminal types, the LS 3603 is unable to answer host terminal polls
until the appropriate host type is sel ected. This may re sult in an e rro r messag e
generated by the host. To correct this situation, select the pr oper parameter s et
and initi alize the h ost term inal. See Chapter 2 for more information.
1-2
Page 11

RS-232C
For external power operation with single-piece cable
•
Plug the scanner into the appropriate port on the host device.
•
Connect the power supply to the input receptacle located near the host
end of the cable.*
Typical Host
Connector
Figure 1-1. RS-232C External Power Connection
User’s Guide
For direct host power operation:
•
Plug the scanner directly into the scanner input port of the host device.
*Coil cables that terminate in a 25-pin D-type connector have a power receptacle on the side of
the connector assembly.
1-3
Page 12
LS 3603 Product Reference Guide
RS-232C (Contd)
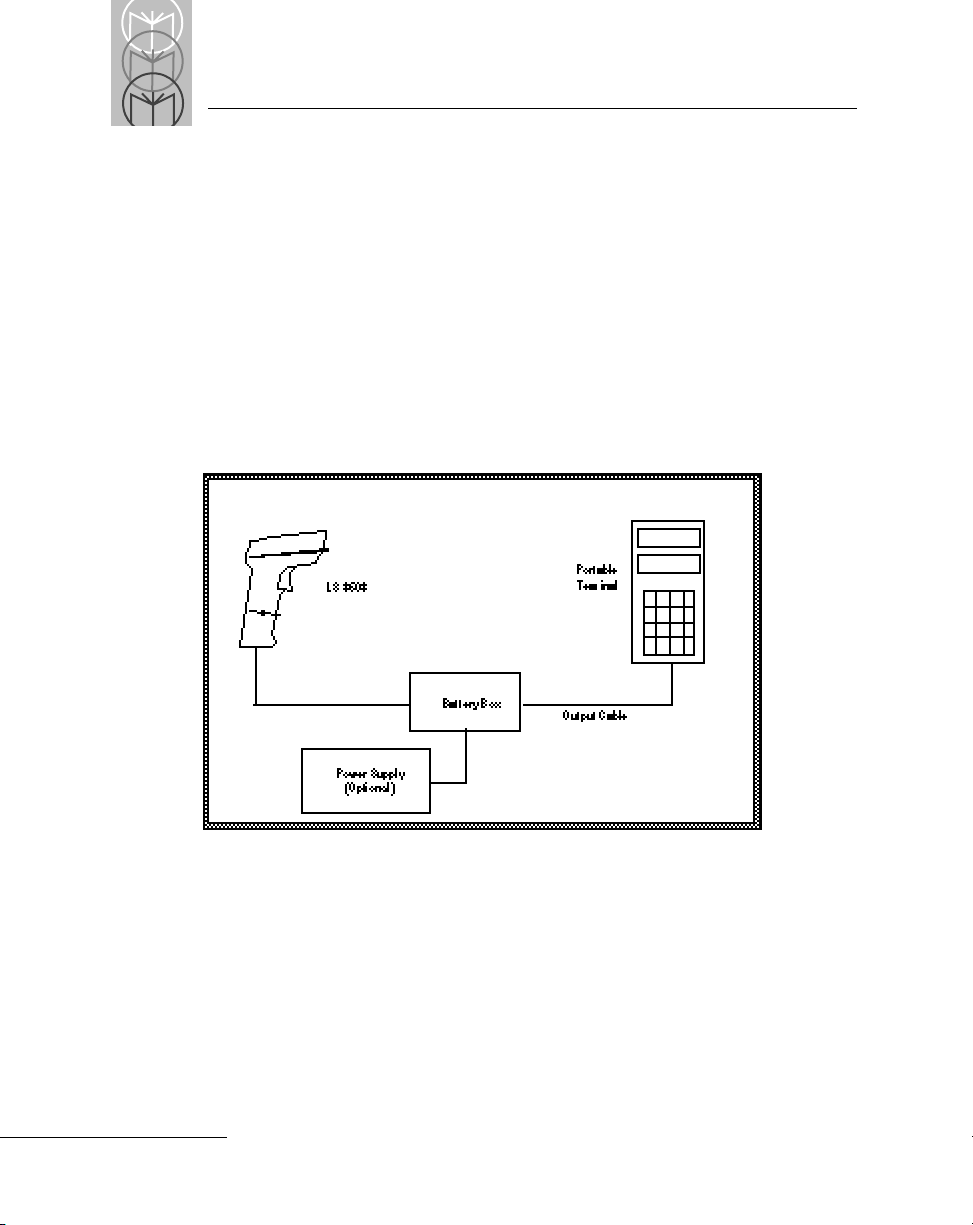
For battery operation:
•
Insert a 9-volt battery into the battery box. See the
Operation
•
Plug the sc anne r's 9-pin con nec tor at th e end o f the co il co rd into o ne
section on page 1-10.
Battery Box
end of the battery box.
•
An output c ab le from th e bat tery box c onn ects th e LS 36 03 to th e
RS-232C input device. Connect one end of this c able to the battery bo x
and the other to the appropriate port on the host device.
1-4
Figure 1-2. RS-232C Operation
Page 13

User’s Guide
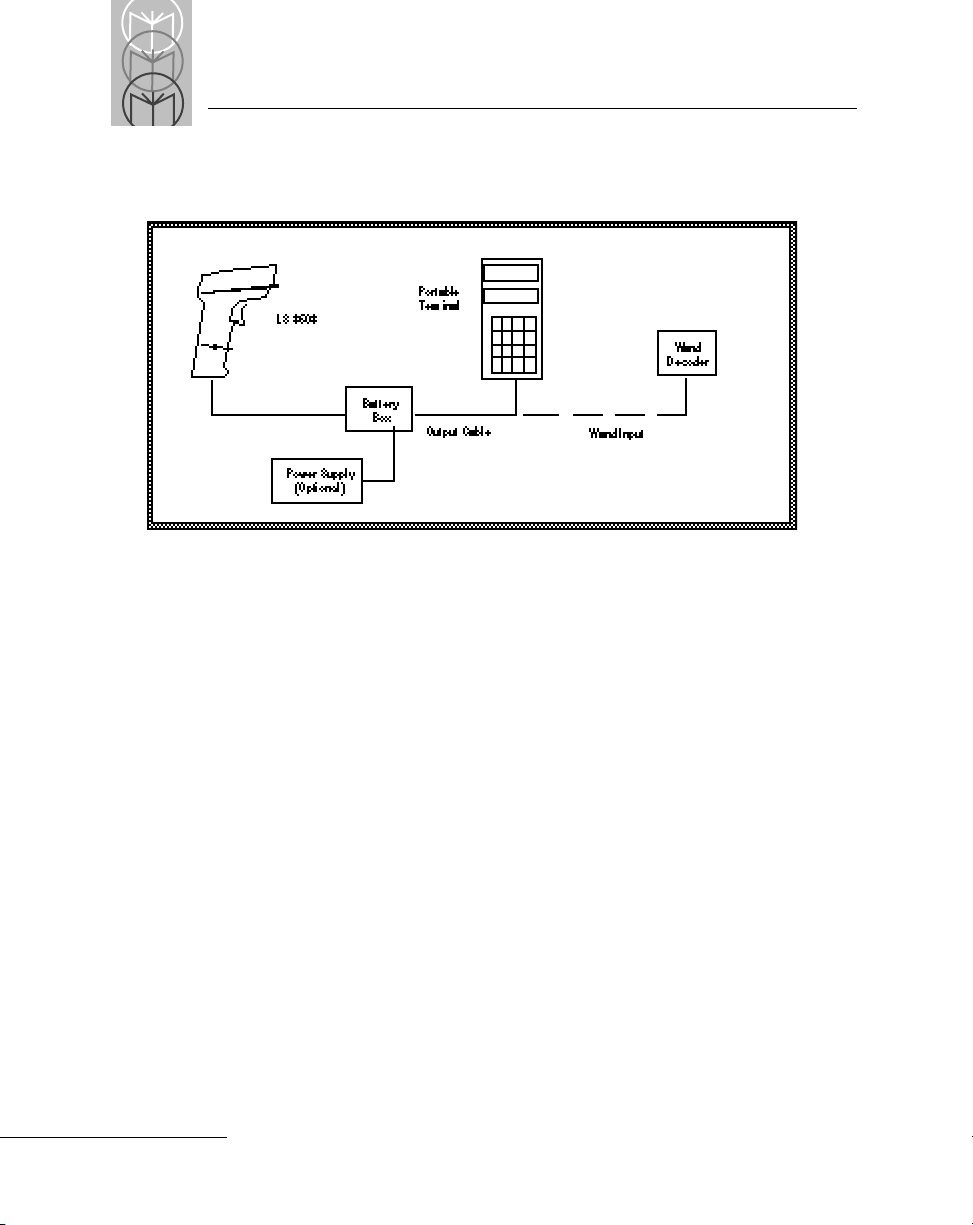
Wand Emulation
For external power operation:
•
Plug the 9-pin connector at the end of the scanner's coil cord into one
end of the battery box.
•
Use the appropriate output cable from the battery box to connect the
LS 3603 to the host device.
•
Connect one end of this cable to the battery box and the other to the
appropriate port on the host device.
•
Plug the power supply connector into the receptacle on the s id e of the
battery box. Connect the power supply plug into an AC outlet.
For direct host power operation:
Plug the scanner directly into the scanner input port of the host device.
For battery operation:
•
Insert a 9-volt battery into the battery box. See the
Operation
•
Plug the scanner's 9-pin connector at the end of the coil cor d in to one end
section on page 1-10.
Battery Box
of the battery box.
•
An output cable from the battery box connects the LS 3603 to the host
device. Connect one end of this cable to the battery box and the other to
the appropriate port on the host device.
1-5
Page 14
LS 3603 Product Reference Guide
Wand Emulation (Contd)
Figure 1-3. Wand Emulation
OCIA, OCR, IBM 4683, Keyboard Wedges
See the instructions packed with the appropriate Synapse cable.
1-6
Page 15

User’s Guide
Ready, Test, Scan
1. Ready
Make sure connections are secure.
2. Test
Aim the sca nne r awa y from you and p ress the tri gger. When you press
the trigger, the scanning beam is energized for approximately 3.0
seconds (def ault ).
3. Scan
Make sure the symbol you want to scan is within the scanning range. See
LS 3603 Decode Zone
the
Aim and press the trigger.
The scan beam and red SCAN LED will light for about 3.0 seconds, or until a
successful decode.
The scanner has read the symbol when:
diagram on page 1-11.
•
You hear a short, high tone beep (if the beeper is enabled).
•
The green DECODE LED lights.
The DECODE LED stays lit until the next tri gger pull, unless Low Power Mode
is selected. In this case, the DECODE LED is extinguished following the decode
beep.
1-7
Page 16
LS 3603 Product Reference Guide
Aiming
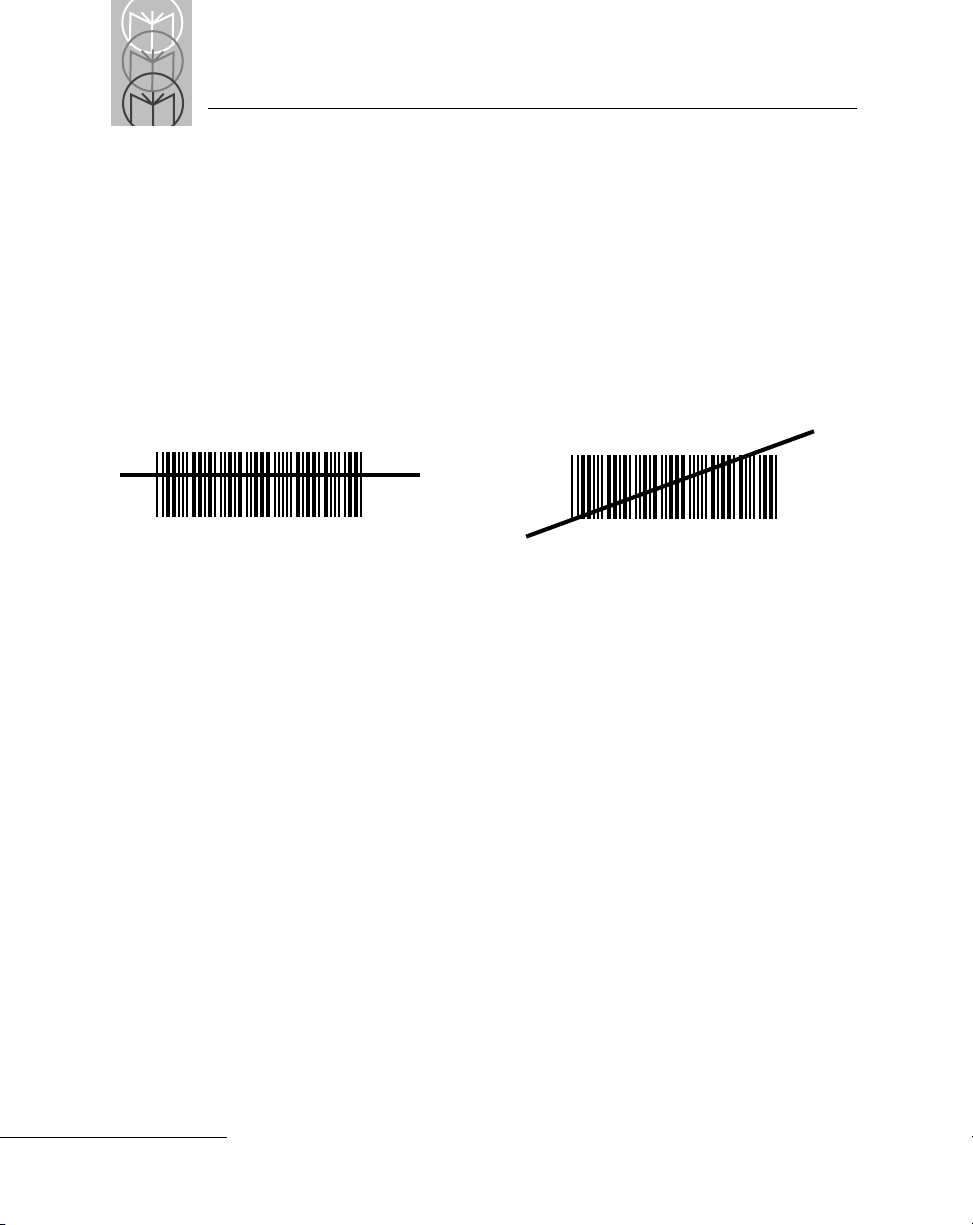
Scan the Entire Symbol
•
You r scan beam must cross every bar and space on the symbol.
•
The larger the symbol, the farther away you should hold the scanner.
•
Hold the scanner closer for symbols with bars that are close together.
•
A short, high tone beep indicates a good decode.
RIGHT
012345
WRONG
012345
Hold at an Angle
Do not hold the scanner directly over the bar code. In this position, light can
bounce back into the scanner's exit window and prevent a successful decode.
Problems
What If...
See
on page 1-13.
Beeper Definitions
The beeper in the unit provides a variety of messages. See
beginning on page 2-19
Beeper Indications
Programming the System
An LS 3603 is programmed by scanning sequences of bar codes; consult
Chapter 2.
1-8
Page 17

User’s Guide
Hands Free
The LS 3603 can be used as a fixed-mount scanner with the Scanstand Plus or
IntelliStand model stands.
Scanstand Plus Operation
The Scanstand Plus may be used for all host interfaces except wand emulation
with Norand terminals. Place the LS 3603 in the Scan stand Plus with the nose
pointing toward the target bar code, and pull the trigger. The scanner will
operate in a continuous-on mode, decoding any bar code placed over the
target bar code. The LS 3603 reads the target bar code between decode
attempts to prevent accidental double reads.
To enter continuous-on mode, pull the trigger once with the scanner in the
Scanstand Plus.
To exit continuous-on mode, pull the trigger once while the scanner is still in
the Scanstand Plus.
IntelliStand Operation
The IntelliStand can be used in a number of different mounting arrangements.
Place the LS 3603 in the stand, and it automatically turns on in a blinking,
hands-free mode. Any symbol passed over the red scan line will be decoded.
To conserve power, after a short period of time of non-use, the scanner will
operate in a reduced power mode. See the IntelliStand
for full details.
Quick Reference G ui de
1-9
Page 18

LS 3603 Product Reference Guide
Battery Box Operation
When using the LS 3603 with a battery box, you can use either an alkaline
battery (recommended), or a nickel-cadmium rechargeable battery. Low
battery power is signaled by four short, high tone beeps, coupled with
scanning interruptions. If this occurs, change or recharge the battery as soon as
possible.
Changing the Battery
•
To open the battery box, push up on the flanges at one end of the pack.
•
Remove the old battery.
•
Insert the new or recharged 9-volt battery into the battery box. Match the
positive (+) and negative (-) terminals on the battery with the
corresponding terminals in the battery box.
Recharging a Nickel-Cadmium Battery
•
Remove the battery from the battery box and place it in the recharging
unit (not supplied by Symbol).
•
To recharge the battery, follow the instructions supplied with the
recharging unit.
1-10
Page 19
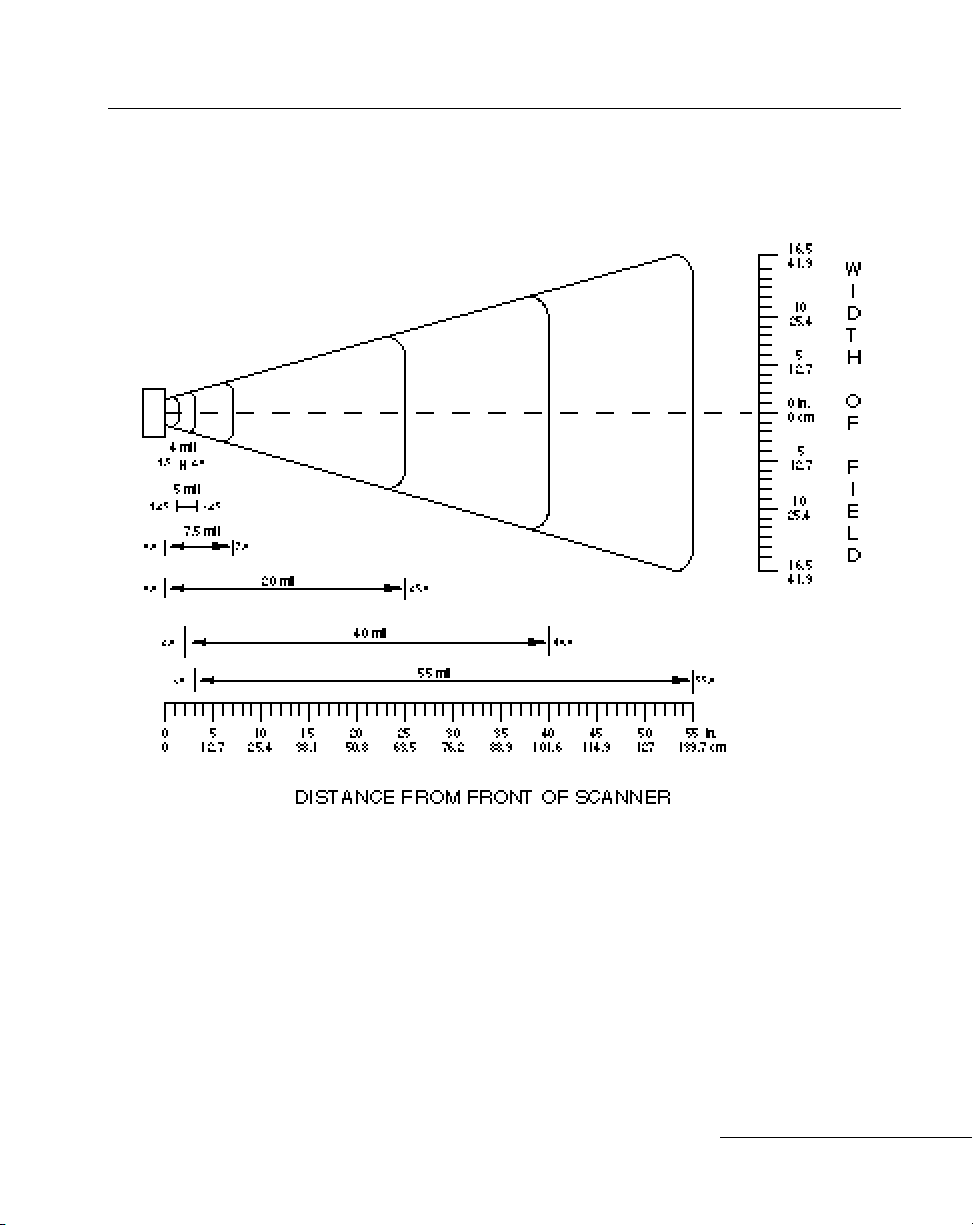
LS 3603 Decode Zone
User’s Guide
Figure 1-4. LS 3603 Decode Zone
1-11
Page 20

LS 3603 Product Reference Guide
Maintenance
Cleaning the exit window is the only maintenance required.
•
Do not allow any abrasive material to touch the window.
•
Remove any dirt particles with a damp cloth.
•
Wi pe the window using a damp cloth, and i f necessary, a non-ammoni a
based detergent.
•
Do not spray water or other cleaning liquids directly into the window.
1-12
Page 21

User’s Guide
What If...
Nothing happens when you follow the operating
instructions?
You Should
•
Check the system power; is there a battery in the battery box?
•
Be sure the scanner is programmed for the terminal in use.
•
Make sure the scanner is programmed to read the type of bar code you
are scanning.
•
Check for loose cable connections.
•
Check the symbol to make sure it is not defaced.
•
Try scanning test symbols of the same code type.
Symbol is decoded, but not transmitted to the host
terminal?
You Should
•
Be sure the proper host type is selected (See Chapter 2).
•
Make sure the appropriate parameter set (RS-232, Wand, Synapse) is
selected.
Scanned data is incorrectly displayed on the terminal?
You Should
•
Make sure the system is programmed for the correct keyboard type.
•
Make sure the CAPS LOCK key is off.
•
Be sure the proper host is selected.
•
Be sure editing options (e.g. UPC-E to UPC-A Conversion) are properly
programmed.
Note: If after performing these checks the symbol still
does not scan, contact your distributor or call the
Symbol Support Center. See page 1-15 for the
telephone number.
1-13
Page 22

LS 3603 Product Reference Guide
Factory Service
If you have a problem, contact the Symbol Support Center at the telephone
number on page 1-15.
Before calling, have the model number and several of your bar code symbols
at hand.
Call the Support Center from a phone near the scanning equipment so that the
service person can try to talk you through your problem. If the equipment is
found to be working properly and the problem is symbol reada bil ity, Support
will request samples of your bar codes for analysis at our plant.
If your problem cannot be sol ved over the phone, you may need t o return your
equipment for servicing. If that is necessary, you will be given specific
directions.
Note: Symbol Technologies is not responsible for any
damages incurred during shipment if the approved
shipping container is not used. Shipping the units
improperly can possibly void the warranty. If the
original shipping container was not kept, contact
Symbol to have another sent to you.
1-14
Page 23

User’s Guide
Symbol Support Center
In the U.S.A., for service information, warranty information or tec hnical
assistance call:
SYMBOL SUPPORT CENTER
1-800-653-5350
If you purchased your Symbol product from a Symbol Business Partner,
contact that Business Partner for service.
Canada
Mississauga, Ontario
Canadian Headquarters
(905) 629-7226
Europe
Wokingham, England
European Headquarters
01734-771-222 (Inside UK)
+44-1734-771222 (Outside UK)
Asia
Singapore
Symbol Technologies Asia, Inc.
337-6588 (Inside Singapore)
+65-337-6588 (Outside Singapore)
1-15
Page 24

LS 3603 Product Reference Guide
Accessories
Required Accessories
LS 3603 scanners are sent as a package with required accessories, listed in the
Product Ordering Guide
Optional Accessories
. Optional accessories are available at extra cost.
Optional accessories, listed in the
stands and holders, which are supplied at extra cost. Additional units of
standard accessories may also be purchased at extra cost.
Product Ordering Guide
, include various
1-16
Page 25

Technical Specifictions
Table 1-1. Technical Specifications
ITEM DESCRIPTION
Power Requirements*
Wand
RS-232C
Synapse
Decode Capability
Beeper Operation
Scan Repetition Rate
Roll (Skew) Tolerance
Pitch
Yaw
Decode Depth of Field
Print Contrast Minimum
Ambient Light Immunity
Artificial Lighting
Sunlight
4.8 (min) to 14.0 VDC (max)
150 mA @ 5V typical
150 mA @ 5V typical
150 mA @ 5V typical
The LS 3603 can be programmed to decode the following
code types: UPC/EAN, Code 39, Code 39 Full ASCII,
Codabar, Interleaved 2 of 5, Code 128, EAN 128,
Discrete 2 of 5, Code 93, and MSI/Plessey . Set code length(s)
for any 2 of 5 code type. The LS 3603 can autodiscriminate
between all of the above code types ex cept fo r Cod e 3 9 and
Code 39 Full ASCII. Transmission of decoded information
will depend on the capabilities of the attached terminal.
User-selectable: Enabled, Disabled.
36 (± 3) scans/sec (bidirectional)
± 10° from normal
± 50° from normal
± 60° from normal
See Decode Zone
25% absolute dark/light differential, measured at 675 nm.
200 ft. candles 2153 lux
8000 ft. candle s 86112 lux
User’s Guide
(@8 in. (20 cm) on low density bar
codes)
1-17
Page 26
LS 3603 Product Reference Guide
Table 1-1. (Continued) Technical Specifications
ITEM DESCRIPTION
Operating Temperature
Storage Temperature
Humidity
Coil Cable Length
Durability
Dimensions
Height
Length
Width
Laser Classifications
-22° to 122°F -30° to 50°C
-40° to 140°F -40° to 60°C
5% to 95% (non-c ondensing)
9-12 ft. 274-365 cm (depending on host)
6-ft. drop to concrete 1.8 m
6.3 in. 16 cm
5 in. 12.7 cm
2.8 in. 7.1 cm
CDRH Class II
IEC 825 Class 2
*For direct host power connection, make sure the host terminal supplies
sufficient power for the specified operation. Symbol is not responsible for
damage to host equipment or system mis-operation due to an insufficient
power condition.
1-18
Page 27

Pin-outs
Table 1-2. Pin-outs
PIN RS-232 Wand Synapse
1 Not Used Not Used Not Used
User’s Guide
2V
3
4
5
6Not Used
7
8
9
10
4.8-14.0V
BAT
V
4.8-14.0V V
BAT
Ground Ground Ground
RTS Output RTS Output
RxD Input Not Used Not Used
Not Used
DTR Output Not Used
TxD Output DBP Output Not Used
CTS Input CTS Input Not Used
Not Used Not Used
4.8-14.0V
BAT
Not Used
ZIF_CLOCK
Not Used
ZIF_DATA
1-19
Page 28

LS 3603 Product Reference Guide
1-20
Page 29

Chapter 2 Programming
Overview
Before programming, follow the instructions beginning on page 1-2
The LS 3603 is programmed b y scanning appropriate bar codes. The bar codes
are arranged in RS-232C, Wand and Synapse sections. Not all of the available
parameters necessarily apply to your specific host systems. If, f or example, the
selected host is a wand emulator, and you enable Baud Rate, the parameter
will be ignored until such time as a h ost rec ognizing that par ameter is selec ted.
You can program any parameter, regardless of the mode you're in. For
example, if you are in the Wand mode, you can still program Synapse and
RS-232C parameters. When you switch from one mode to another, stored
parameters remain unchanged. That means you can switch back and forth
between RS-232C, Wand and Synapse modes without having to r e -program
the scanner.
Consult the Parameter Descriptions section beginning on page 2-3 for
explanations of parameter types. A table of features supported by each host
type begins on page 2-17.
There are separate defaults for each mode, and one for All Defaults. If the
default values suit your requirements, all you need to do is scan the
appropriate Set Default bar code. Parameters other than default values can
be set by scanning sequences of bar codes. Parameter Menus contain all the
bar codes necessary to program the scanner for each parameter selection.
Regardless of whether or not you change defaults, if you select RS-232C or Wand
mode, you must t hen se lect a host type .
the host type will automatically be selected for you when you plug in the
cable.
Remember to look at the top of the page to see whether the bar codes apply t o
RS-232C, Wand or Synapse parameters.
If you are using a Synapse Smart Cabl e,
2-1
Page 30

LS 3603 Product Reference Guide
Scanning Sequence Examples
In most cases you need only scan one bar code to set a specific parameter.
For example, if you want to add Code 39 to the Wand parameters, simply
scan the Add Code 39 bar code in the Wand Code Types section. The LS 3603
will issue a warble tone, signifying a successful parameter entry.
If you want to add or change prefixes and suffixes you will have to scan several
bar codes. This procedure is described in
Parameter Descriptions
.
Errors While Scanning
Don't worry if you make an error during a scanning sequence. Merely reenter
the correct parameter.
2-2
Page 31

Programming
Set Default Parameter 2-4
Host Interface Code 2-4
Code Types 2-4
Code Lengths 2-4
Code 39 Full ASCI 2-5
Decode Options
UPC-E/UPC-A Check Digit 2-5
Convert UPC-E to UPC-A 2-5
EAN Zero Extend 2-5
Transmit No Decode Message 2-5
UPC/EAN Supplemental 2-6
Code 39 Check Digit 2-6
ITF-14/EAN-13 Conversion 2-6
MSI/Plessey Check Digit 2-6
MSI/Plessey Check Digit Alg. 2-6
Buffer Code 39 2-7
Beep After Good Decode 2-7
CLSI Editing 2-7
NOTIS Editing 2-7
UPC/EAN Security Level 2-8
Codabar Decode Redundancy 2-8
UPC-E/UPC-A Preamble 2-9
Data Transmission Formats 2-9
Prefix/Suffix Values 2-9
Laser On Time-out 2-9
RS-232C Options
Baud Rat e 2-10
Parity 2-10
Beep on BEL 2-10
Hardware Handshaking 2-10
Software Handshaking 2-13
Stop Bit Select 2-15
ASCII Data Format 2-15
Intercharacter Delay 2-15
Transmit Code ID Character 2-15
Transmit AIM ID Character 2-15
Power Mode 2-16
Scanstand/IntelliStand 2-16
Wand Emulator Options
Wand Bar Output 2-16
Variable Leading Margin 2-16
Convert All to Code 39 2-16
For a listing of corresponding bar codes, see page 3-1.
2-3
Page 32

LS 3603 Product Reference Guide
Parameter Descriptions
• Set Parameter Defaults
Scanning the SET ALL DEF AUL TS bar code on page 3-3 ret urns all parameters
to the values listed in the
• Host Interface Code
Scan the bar code corresponding to your host type. You must select a host type
when you first set up the scanner and whenever you change host types.
• Code Types
The bar code menu selections enable the scanner to decode any or all of the
following symbologies.
•
UPC Versions A and E (EAN 8 and 13)
•
Codabar
•
Code 39
•
Code 39 Full ASCII
•
Discrete 2 of 5
•
Interleaved 2 of 5
•
Code 128
•
MSI Plessey
•
EAN 128
•
Code 93
Default Table
. (See page 2-29.)
The scanner will autodiscriminate between all of the above symbologies,
except for Code 39 and Code 39 Full ASCII.
• Code Lengths
Select one or two lengths for the Interleaved or Discrete 2 of 5 codes. Determine
the number of characters represented in the Discrete 2 of 5 or Interleaved 2 of
5 bar codes by counting the number of printed (i.e., human readable) digits
beneath the bar code. Set one or both lengths, one per scanning sequence. For
D 2 of 5, LENGTH 1 may range from 02-55 and LENGTH 2 from 00-55. For
I 2 of 5, LENGTH 1 may range from 02-54 and LENGTH 2 from 00-54.
2-4
Page 33

Programming
• Code 39 Full ASCII
The ASCII character set assigns a code to letters, punctuation marks, numerals,
and most control keystrokes on the keyboard.
The first 32 codes are non-printable and are assigned to keyboard control
characters su ch as BA CKSPACE and RETURN. The other 96 are call ed
printable codes because all but SPACE and DELETE produce visible
characters. See the tables beginning on page 2-23
Code 39 Full ASCII interprets the bar code control character ($ + % /)
preceding a Code 39 symbol and assigns an ASCII character value. For
example, when C ode 39 F ull AS CII i s en able d and a +B is sc an ned, it wil l
be interpreted as b, %J as ?, and $H emulates the keystroke BACKSPACE.
Scanning ABC$M will output the keystroke equivalent of ABC ENTER.
The LS 3603 will not autodiscriminate between Code 39 and Code 39 Full
ASCII.
• Decode Options
Transmit UPC-E/UPC-A Check Digit
Select if decoded UPC symbols are transmitted with or without a check digit.
Convert UPC-E to UPC-A
Use this parameter to convert UPC-E (zero suppressed) decoded data to
UPC-A format before transmission. After conversion, data will follow UPC
format and be affected by UPC-A programming selections (e.g., Preamble,
Check Digit).
EAN Zero Extend
This parameter adds five leading zeros to decoded EAN-8 symbols to make
them compatible in format to EAN-13 symbols.
Transmit “No Decode” Message
This feature gives you the option to transmit “NR” when a symbol does not
decode. Prefixes and suffixes enabled will be appended around this message.
2-5
Page 34

LS 3603 Product Reference Guide
• Decode Options (Continued)
Decode UPC/EAN Supplemental
Select whether UPC/EAN is decoded with or without supplemental
characters. Supplementals are additionally appended characters (2 or 5)
according to specific code format conventions (e.g., UPC A+2, UPC E+2, EAN
8+2). If UPC/EAN with supplemental characters is selected, UPC/EAN
symbols without supplemental characters won't be decoded. If UPC/EAN
without supplemental characters is selected and the scanner is presented with
a UPC/EAN plus supplemental symbol, the UPC/EAN will be decoded and
the supplemental characters ignored. If autodiscrimination is chosen, the
LS 3603 will, after additional processing to ensure a good decode, transmit
either. (NOTE: In order to minimize the risk of invalid data transmission, it
is recommended that you select whether to read or ignore supplemental
characters.)
Code 39 Check Digit
When enabled, this parameter checks the integrity of a Code 39 symbol to
ensure it complies with the modulo 43 check digit algorithm.
ITF-14/EAN-13 Conversion
If your terminal supports EAN-13, this feature converts a 14 character I 2 of 5
code into EAN-13, and transmits to t he host as EAN-13. In or der to accompl ish
this, the I 2 of 5 code must be enabled, one length (either LENGTH 1 or
LENGTH 2) must be set to 14, the code must have a leading zero and a valid
EAN-13 check digit.
MSI Plessey Check Digit
One or two digits at the end of the b ar code that check the integrity of the data.
At least one check digit (default) is always required. Check digits are not
transmitted with the data.
MSI/Plessey 2 Check Digit Algorithm
When the two MSI/Plessey check digits option is selected, an additional
verification is required to ensure integrity. Either of two algorithms may be
selected; Mod10 - Mod10 (default), or Mod11 - Mod10.
2-6
Page 35

Programming
• Decode Options (Continued)
Code 39 Buffering (Scan & Store)
When you select the scan and store option, all Code 39 symbols having a
leading space as a first character are temporarily buffered in the unit to be
transmitted later. The leading space is not buffered.
Decode of a valid Code 39 symbol with no leading space causes transmission
in sequence of all buffered data in a first-in first -out f ormat, pl us transmis sion
of the “triggering” symbol. See page 2-21 for further details.
When the scan and transmit option is selected, decoded Code 39 symbols
without leading spaces are transmitted without being stored in the buffer.
Scan and Store affects Code 39 decodes only. If you select scan and store, it is
recommended that you configure the scanner to decode Code 39 symbology
only.
Beep After Good Decode
Determi ne if the unit beeper will sound during normal scanning. Usually it is
desirable to operate the unit with the beeper enabled. In all cases, the beeper
operates during parameter menu scanning and indicates error conditions.
Beeper indications begin on page 2-19.
CLSI Editing
This parameter strips the start and stop characters, then inserts a space after the
1st, 5th, and 10th characters of a 14-characte r Coda bar symb ol. Symb ol le ngth
does not include start and stop characters.
NOTIS Editing
This option strips the start and stop characters from decoded Codabar
symbols.
2-7
Page 36

LS 3603 Product Reference Guide
• Decode Options (Continued)
UPC/EAN Security Level
The LS 3603 offers four levels of decode security for UPC/EAN bar codes.
Increasing levels of security are provided for decreasing levels of bar code
quality. There is an inverse relationship between security and scanner
aggressiveness, so be sure to choose only that level of security necessary for
any given application.
•
Security Level 0
operate in its most aggressi ve state, while providing suffici ent security
in decoding “in spec” UPC/EAN bar codes.
•
Security Level 1
become prone to mis-decodes before others (i.e., 1, 2, 7, 8). If you are
experiencing mis-decodes of poorly printed bar codes, and the misdecodes are limited to these characters, select this security level.
•
Security Level 2
bar codes, and the mis-decodes ar e not limited to c haracters 1, 2, 7 and 8,
select this security level.
•
Security Level 3
experiencing mis-decodes, select this se curity level. Be advised, select ing
this option is an extreme measure against mis-decoding severely out of
spec bar codes. Selection of this level will significantly impair the
decoding aggressiveness of the scanner.
- This is the default setting which allows the scanner to
- As bar code quality levels diminish, certain characters
- If you are experiencing mis-decodes of poorly printed
- If you have tried Security Level 2, and are still
Decode Redundancy for Codabar
When enabled, a Codabar symbol must be decoded in both directions before
being accepted as a successful decode.
2-8
Page 37

Programming
• UPC A and E Preamble
Three options are given for the lead-in characters of decoded UPC-A or
UPC-E symbols transmitted to the host device. Select one preamble for UPC-A
decodes and one for UPC-E decodes. These lead-in characters are considered
part of the symbol itself. The three options are:
•
a system character only
•
the country code and system character
•
no preamble
The system character is the digit printed to the extreme left of a UPC symbol.
The country code for UPC is always zero, and it c annot be transmitted without
the system character.
• Data Transmission Formats
Select the desired scan data format from one of the following:
<data>
<PREFIX> <data>
<PREFIX> <data> <SUFFIX>
<data> <SUFFIX>
<data> = Scanned bar code data
<PREFIX> <SUFFIX> as selected by the user
• Prefix/Suffix Values
A prefix/suffix may be appended to scan data for use in data editing. These
values are set by scanning a four digit number (i.e., four bar codes) that
correspond to keycodes for various terminals. An ASCII table begins on
page 2-23.
• Laser On Time-out
The maximum time the laser will remain on or decode processi ng will continue
during a trigger pull. Programmable in .5 sec increments from 0.5 to 5.0 sec.
2-9
Page 38

LS 3603 Product Reference Guide
•RS-232C Options
Baud Rate
Baud rate is the number of bits of data transmitted per second. The scanner's
baud rate setting must match the data rate setting of the host device. If not, data
will not reach the host device or may reach it in distorted form.
Parity
A parity check bit is the most significant bit of each ASCII coded character. If
you select ODD parity, the parity bit will have a value 0 or 1, based on data, to
ensure that an odd number of 1 bits are contained in the coded character.
If you select EVEN parity, the parity bit will have a value 0 or 1, to ensure that
an even number of 1 bits are contained in the coded character. Select MARK
parity and the parity bit will always be 1. Select SPACE parity and the parity
bit will always be 0. Select the parity type according to host device
requirements.
Beep on BEL
When this parameter is enabled, the scanner will issue a beep when a <BEL>
character is detected on the RS-232C serial line. <BEL> is issued to gain a user’s
attention to indicate an illegal entry or other important event. When the
scanner is configured for low power operation, it will not respond to BEL
characters in between decode attempts.
Hardware Handshaking
Hardware hand shaking checks the readines s of the receiving devi ce before
data is transmitted. If the receiving device is periodically occupied with other
tasks, hardware handshaking is needed to prevent loss of transmitted data.
Hardware hand shaking may not b e used in conjunction with software handshaking. Refer to the flow chart on the following page.
RS-232C communications are designed to operate either with or without
hardware handshaking lines, RTS,
2-10
Request to Send
, and CTS,
Clear to Send
.
Page 39

Programming
RS-232C Options (Continued)
Hardware Handshaking
If RTS/CTS handshaking is selected, scan data is transmitted with the
following sequence: (Note that the DTR signal is hard wired active.)
•
The scanner reads the CTS line for activity. If CTS is asserted, the scanner
will wait up to two seconds for the host to negate the CTS line. If, after
one second the CTS line is still asserted, t he scanner will sound a transmit
error and any scanned data will be lost.
•
When the CTS line is negated, the scanner asserts the RTS line and waits
for two seconds for the host to assert CTS. When the host asserts CTS,
data is transmitted.
•
When data transmission is complete, the scanner will negate RTS after
sending the last character.
•
The host should respond by negating CTS. The scanner will check for a
negated CTS upon the next transmission of data.
During the transmission of data, the CTS line should be asserted.
•
If the above communications sequence should fail, the scanner will issue
a transmit error. In this case, the data is lost and must be rescanned.
2-11
Page 40

LS 3603 Product Reference Guide
RS-232C Options (Continued)
2-12
Figure 2-1. Hardware Handshaking
Page 41

Programming
RS-232C Options (Continued)
Software Handshaking
This parameter controls the data transmission pr oce ss. It may b e used instead
of, but not in conjunction with, hardware handshaking.
The scanner provides five sof tware handshaking options, l isted below. Refer to
the flow chart on the following page.
1. None
2. ACK/NAK Only
The ACK/NAK option checks the result of a transmission. The scanner
expects one of the following host responses after a data transmission:
<ACK> - Acknowledges a valid and successful transmission.
<NAK> - Indicates a problem with the transmission.
Whenever a <NAK> is received, the unit retransmits the same data and
awaits an ACK/NAK response. After three unsuccessful attempts to
transmit the same data, the scanner aborts any further communication
attempts on that message. Transmission error is indicated by the unit
sounding 4 short beeps.
3. ENQ ONLY
The ENQ option needs the host to request data before it is transmitted to
the host. This ensures that data transmission occurs only when the host is
ready to receive.
When you select the ENQ option, the scanner waits for an ENQ, Enquire
character, from the host before it transmits data; otherwise the unit
transmits data without waiting for an ENQ character from the host. With
ENQ enabled, the scanner must receive an ENQ from the host within a 2
second period after the last activity or 4 short beeps are sounded to indicate
a transmission error; the unit is now ready to scan again.
4. ACK/NAK with ENQ
This combines both handshaking options.
2-13
Page 42

LS 3603 Product Reference Guide
RS-232C Options (Continued)
Software Handshaking
5. XON/XOFF
When enabled, the scanner assumes an XON for the first transmi ssion, and
transmits scanned data until an XOFF is received. Transmission continues
when an XON character is received. This option is automatically disabled
when the unit is in Low Power mode.
2-14
Figure 2-2. Software Handshaking
Page 43

Programming
RS-232C Options (Continued)
Stop Bit Select
The stop bit(s) at the end of each transmitted character marks the end of
transmission of one character and prepares the receiving device for the next
character in the serial data stream. The number of stop bits (one or two)
selected depends on the number the receiving terminal is programmed to
accommodate. Set the number of stop bits to match host device requirements.
ASCII Format
When enabled, this parameter transmits data in an 8-bit ASCII format. This
allows the scanner to interface with devices requiring that protocol. The
default is 7-bit ASCII.
• Intercharacter Delay
Select the intercharacter delay option matching host device requirements. The
intercharacter delay gives the host system time to service its receiver and
perform other tasks between characters. Select from no delay to a 99 msec
delay between the transmission of each character.
• Transmit Code ID Character
A code ID character identifi es the code type of a sc anned bar code. This may
be useful when the sc anner is decoding mor e t han one code t ype. If a prefix
is selected, the code ID character is sent after the prefix. Code ID characters
are: A = UPC-A, UPC-E, EAN-13, or EAN-8; B = Code 39; C = Codabar;
D = Code 128; E = Code 93; F = In terleav ed 2 of 5; G = Discrete 2 of 5;
K = EAN 128; J = MSI Plessey.
• Transmit AIM ID Character
Enabling this parameter, with the Transmit Code ID Character parameter
enabled allows you to send the AIM code identifier in lieu of the Symbol
identifiers listed above. The identifier will be sent as a three character prefix, in
accordance with AIM specifications for symbology identifiers. See
Guidelines on Symbology Identifiers
for full details.
AIM’s
2-15
Page 44

LS 3603 Product Reference Guide
• Power Mode
This parameter determines whether or not power remains on after a decode
attempt. When in low power mode, the scanner powers down after each
decode attempt. When in continuous power mode, power remains on after
each decode attempt. To ensure the integrity and proper operation of this
product, it is recommended that the low power mode be set for RS-232C and
Wand modes, and continuous power mode for Synapse mode.
• Scanstand/IntelliStand Time-out
Scanstand/IntelliStand operation can be programmed to shut down if no bar
code is detected within the specified time. Duration is programmable in 15
minute increments from 15 minutes to 90 minutes.
•Wand Emulator Options
Wand Emulator Bar Output
The polarity of the wand emulator output is set automatically when the
Wand Host type is selected. This parameter can be used to change the default
polarity settin g to ma tch the type of sig nal ( bar = l ogic hi gh, or b ar = logic
low) expected by the receiving system
Variable Leading Margin
This parameter allows the selection of a variable leadin g margin, rangin g from
80 msec to 200 msec, in 10 msec increments.
Convert All to Code 39
This parameter converts the output of all data to Code 39 format. Any coded
character not in the Code 39 character set is replaced by a Code 39 blank.
2-16
Page 45

Supported Features By Host Type
Table 2-1. Supported Features by Host Type
DECODE PARAMETERS RS-232C Wand Synapse
Add Codes to be Decoded X X X
ASCII Format X
Bar High/ Bar Low X
Baud Rate X
Beep After Good Decode X X X
Beep on BEL X
Code 39 Buffering X X
Code 39 Check Digit X X
Convert All to Code 39 X
Convert UPC-E to A X X
D 2 of 5 Lengths X X X
Data Transmission Formats X X
Programming
Decode Redundancy for Codabar X X X
EAN Zero Extend X X
Hardware Handshaking X
Host Interface Select XXX
Intercharacter Delay X
I 2 of 5 Lengths XXX
ITF-14/EAN-13 Conversion X X
Laser On Time-out X X X
MSI Plessey 2 Check Digit Alg. X X X
Number of Stop Bits X
Parity X
Prefix/Suffix X X
Power Mode XXX
2-17
Page 46

LS 3603 Product Reference Guide
Table 2-1. (Continued) Supported Features by Host Type
DECODE PARAMETERS RS-232C Wand Synapse
Scanstand/Intellistand X X X
Software Handshakin g X
Transmit AIM ID Character X X
Transmit Code ID Character X X
Transmit MSI Check Digit X X
Transmit No Decode Message X X
Transmit UPC-A Check Digit X X
Transmit UPC-E Check Digit X X
UPC/EAN Security Level XXX
UPC/EAN Supplemental X X X
UPC-E/UPC-A Preamble X X
Wand Bar Outp ut X
Wand Leading Margin X
2-18
Page 47

Beeper Indications
Table 2-2. Beeper Indications
Standard Use
Beeper Sequence Indication
Programming
1 Beep - short high tone
4 Beeps - short high tone
4 Beeps - long low tone
Parameter Menu Scanning
1 Beep - short high tone
1 Beep - lo/hi tone
1 Beep - hi/lo tone
1 Beep - hi/lo/hi/lo tone
A bar code symbol was decoded (if decode beeper
is enabled).
Low battery power.
A format or transmission error has been detected in
a scanned symbol. The data is ignored. This will
occur if a unit is not properly configured. Check
option settings.
Correct entry scanned or correct menu sequence
performed.
Input error, incorrect bar code or “Cancel”
scanned, wrong entry, incorrect bar co de
programming sequence; remain in program mode.
Keyboard parameter selected. Enter value using
bar code keypad.
Successful program exit with change in the
parameter setting.
2-19
Page 48

LS 3603 Product Reference Guide
Table 2-2. (Continued) Beeper Indications
Code 39 Buffering
Beeper Sequence Indication
1 Beep - hi/lo tone
3 Beeps - long high tone
1 Beep - lo/hi/lo tone
New Code 39 data was entered into the buffer.
Code 39 buffer is full.
The buffer w a s er a se d, or t h ere was an att e mpt to
transmit an empty buffer. When the Code 39 buffer
was empty, the scanner re ad a comm and to clea r or
to transmit a Code 39 b uffer.
2 Beeps - long high tone
1Beep - lo/hi tone
Error in data transmissi on.
A successful transmission of buffered data.
2-20
Page 49

Programming
Code 39 Buffering
While there i s data in the transm iss ion buffer, deleting Code 39 buffering
capability via the parameter menu is not allowed. The buffer will hold 250
bytes of information.
To allow disabling of Code 39 buffering, first for ce the buf fer transmission (see
Transmit Buffer
) or clear the buffer.
Buffer Data
To buffer data, Code 39 buffering must be enab led, and a symbol must be read
with a space immediately following the start pattern.
• Unless symbol overflows the transmission buffer, unit gives hi/lo beep to indicate
successful decode and buffering. See
• Unit adds the message, excluding the leading space to the transmission buffer.
• No transmission will occur.
Overfilling Transmission Buffer
.
Clear Transmission Buffer
To clear the transmission buffer, read a symbol which contains only a start
character, a dash (minus), and a stop character.
• Unit issues a short hi/lo/hi beep to signal that the transmission buffer has been erased,
and no transmission has occurred.
• Unit erases the transmission buffer.
• No transmission will occur.
CLEAR BUFFER
2-21
Page 50

LS 3603 Product Reference Guide
Transmit Buffer
To transmit the buffer, read a symbol containing either the first or second
condition:
1. Only a start character, a plus (+), and a stop character.
• The unit signals that the transmission buffer has been sent (a hi/lo beep).
• Unit sends the buffer.
• Unit clears the buffer.
TRANSMIT BUFFER
2. A Code 39 bar code with leading character other than a space.
• The unit signals a good decode and buffering of that decode has occurred by giving
a hi/lo beep.
• Unit transmits the buffer.
• Unit signals that the buffer has been transmitted with a lo/hi beep.
Overfilling Transmission Buffer
If the symbol just read will result in an overflow of the transmission buffer:
• Unit indicates that the symbol has been rejected by issuing three long, high beeps.
• No transmission will occur. Data in buffer is not affected.
Attempt to Transmit an Empty Buffer
If the symbol just read was the transmit buffer symbol and the Code 39 buffe r
is empty:
• A short lo/hi/lo beep signals that the buffer is empty.
• No transmission occurs.
• The buffer remains empty.
2-22
Page 51

ASCII Character Set
Table 2-3. ASCII Character Set
Programming
ASCII
Val ue
1000 %U CTRL 2 1024 $X CTRL X
1001 $A CTRL A 1025 $Y CTRL Y
1002 $B CTRL B 1026 $Z CTRL Z
1003 $C CTRL C 1027 %A CTRL [
1004 $D CTRL D 1028 %B CTRL \
1005 $E CTRL E 1029 %C CTRL ]
1006 $F CTRL F 1030 %D CTRL 6
1007 $G CTRL G 1031 %E CTRL 1008 $H CTRL H 1032 Space Space
1009 $I CTRL I 1033 /A !
1010 $J CTRL J 1034 /B ‘
101 1 $K CTRL K 1035 /C #
1012 $L CTRL L 1036 /D $
1013 $M CTRL M 1037 /E %
1014 $N CTRL N 1038 /F &
1015 $O CTRL O 1039 /G ‘
1016 $P CTRL P 1040 /H (
1017 $Q CTRL Q 1041 /I )
1018 $R CTRL R 1042 /J *
1019 $S CTRL S 1043 /K +
1020 $T CTRL T 1044 /L ,
1021 $U CTRL U 1045 - 1022 $V CTRL V 1046 . .
1023 $W CTRL W 1047 / /
Full ASCII
Code 39
Encode Char.
Keystroke ASCII
Val ue
Full ASCII
Code 39
Encode Char
Keystroke
2-23
Page 52

LS 3603 Product Reference Guide
Table 2-3. (Continued) ASCII Character Set
ASCII
Val ue
1048 0 0 1073 I I
1049 1 1 1074 J J
1050 2 2 1075 K K
1051 3 3 1076 L L
1052 4 4 1077 M M
1053 5 5 1078 N N
1054 6 6 1079 O O
1055 7 7 1080 P P
1056 8 8 1081 Q Q
1057 9 9 1082 R R
1058 /Z : 1083 S S
1059 %F ; 1084 T T
1060 %G < 1085 U U
1061 %H = 1086 V V
1062 %I > 1087 W W
1063 %J ? 1088 X X
1064 %V @ 1089 Y Y
1065 A A 1090 Z Z
1066 B B 1091 %K [
1067 C C 1092 %L \
1068 D D 1093 %M ]
1069 E E 1094 %N ^
1070 F F 1095 %O _
1071 G G 1096 %W ‘
1072 H H 1097 +A a
Full ASCII
Code 39
Encode Char.
Keystroke ASCII
Val ue
Full ASCII
Code 39
Encode Char
Keystroke
2-24
Page 53

Table 2-3. (Continued) ASCII Character Set
Programming
ASCII
Val ue
1098 +B b 1113 +Q q
1099 +C c 1114 +R r
1100 +D d 1115 +S s
1101 +E e 1116 +T t
1102 +F f 1117 +U u
1103 +G g 1118 +V v
1104 +H h 1119 +W w
1105 +I i 1120 +X x
1106 +J j 1121 +Y y
1107 +K k 1122 +Z z
1108 +L l 1123 %P {
1109 +M m 1124 %Q |
1110 +N n 1125 %R }
1111 +O o 1126 %S ~
1112 +P p 1127 Undefined
Full ASCII
Code 39
Encode Char.
Keystroke ASCII
Val ue
Full ASCII
Code 39
Encode Char
Keystroke
2-25
Page 54

LS 3603 Product Reference Guide
Table 2-3. (Continued) ASCII Character Set
ALT Keys Keystroke ALT Keys Keystroke ALT Keys Keystroke
2064 ALT 2 2075 ALT K 2086 ALT V
2065 ALT A 2076 ALT L 2087 ALT W
2066 ALT B 20 77 ALT M 2088 ALT X
2067 ALT C 2078 ALT N 2089 ALT Y
2068 ALT D 2079 ALT O 2090 ALT Z
2069 ALT E 20 80 ALT P 2091 A LT [
2070 ALT F 2081 ALT Q 2092 ALT \
2071 ALT G 2082 ALT R 2093 ALT ]
2072 ALT H 2083 ALT S 20 94 ALT 6
2073 ALT I 2084 ALT T 2095 ALT 2074 ALT J 2085 ALT U
Misc. Key Keystroke Misc. Key Keystroke Misc. Key Keystroke
3001 PA 1 3009 CMD 7 3017 °
3002 PA 2 3010 CMD 8 3018 1/2
3003 CMD 1 3011 CMD 9 3019 ¶
3004 CMD 2 3012 CMD 10 3020 §
3005 CMD 3 3013 ¥ 3021 |
3006 CMD 4 3014 £ 3022 0/00
3007 CMD 5 3015 ¤
3008 CMD 6 3016 ¬
2-26
Page 55

Programming
Table 2-3. (Continued) ASCII Character Set
PF Keys Keystroke PF Keys Keystroke PF Keys Keystroke
4001PF 14009PF 94017PF 17
4002 PF 2 4010 PF 10 4018 PF 18
4003 PF 3 4011 PF 11 4019 PF 19
4004 PF 4 4012 PF 12 4020 PF 20
4005 PF 5 4013 PF 13 4021 PF 21
4006 PF 6 4014 PF 14 4022 PF 22
4007 PF 7 4015 PF 15 4023 PF 23
4008 PF 8 4016 PF 16 4024 PF 24
F Keys Keystroke F Keys Keystroke F Keys Keystroke
5001 F 1 5014 F 14 5027 F 27
5002 F 2 5015 F 15 5028 F 28
5003 F 3 5016 F 16 5029 F 29
5004 F 4 5017 F 17 5030 F 30
5005 F 5 5018 F 18 5031 F 31
5006 F 6 5019 F 19 5032 F 32
5007 F 7 5020 F 20 5033 F 33
5008 F 8 5021 F 21 5034 F 34
5009 F 9 5022 F 22 5035 F 35
5010 F 10 5023 F 23 5036 F 36
5011 F 11 5024 F 24 5037 F 37
5012 F 12 5025 F 25 5038 F 38
5013 F 13 5026 F 26 5039 F 39
2-27
Page 56

LS 3603 Product Reference Guide
Table 2-3. (Continued) ASCII Character Set
Numeric
Keypad
6042*6049160568
6043+6050260579
6044 Undefined 6051 3 6058 Enter
6045 - 6062 4 6059 Num Lock
6046 . 6063 5 6060 00
6047 / 6064 6
6048060657
Extended
Keypad
7001 Break 7008 Backspace 7015 Up Arrow
7002 Delete 7009 Tab 7016 Dn Arrow
7003 Pg Up 7010 Print Screen 7017 Left Arrow
7004 End 7011 Insert 7018 Right Arrow
7005 Pg Dn 7012 Home 70 19 Back Tab
7006 Pause 7013 Enter
7007 Sc roll Lock 7014 Escape
Keystroke Numeric
Keypad
Keystroke Extended
Keypad
Keystroke Numeric
Keypad
Keystroke Extended
Keypad
Keystroke
Keystroke
2-28
Page 57

Default Table
Table 2-4. Default Table
Parameter Default
Host Interface
Code Types
Code Length
I 2 of 5
D 2 of 5
Decode Options
Transmit UPC-A Check Digit
Tran smit UPC-E Check Digit
Convert UPC-E to UPC-A
EAN Zero Extend
Transmit No Decode Message
Decode UPC/EAN Supplemental
ITF-14/EAN-13 Conversion
Tra n smit Code 39 Check Digit
MSI Plessey Check Digit
MSI Plessey 2 Check Digit Algorithm
Buffer Code 39
Beep After Good Decode
CLSI Editing
NOTIS Editing
UPC/EAN Security Level
Codabar Decode Redundancy
UPC-A Preamble
UPC-E Preamble
Programming
RS-232C
All
14
12
Enabled
Enabled
Disabled
Disabled
Disabled
Disabled
Disabled
Disabled
One
Mod 10 - Mod 10
Disabled
Enabled
Disabled
Disabled
0
Disabled
System Character
System Character
Data Transmission Format
RS-232C
Wand
Synapse
Prefix/Suffix Values
Suffix Only
N/A
Data As Is
7013 (<Enter > for wedges,
<CR/LF> for serial devices)
2-29
Page 58

LS 3603 Product Reference Guide
Table 2-4. (Continued) Default Table
Parameter Default
Laser On Time-out
Power Mode
Scanstand/Intellistand Time-out
RS-232C Options
Baud Rate
Parity
Beep on BEL
Hardware Handshaking
Software Handshaking
Stop Bit Select
ASCII Data Format
Terminal Specific Defaults
Intercharacter Delay
Transmit Code ID Character
Transmit AIM ID Character
Wand Emulator Bar Output
Variable Leading Margin
Convert All to Code 39
3 Sec
Low Power (Continuous for Synapse only)
60 minutes
9600
Even
Disabled
None
None
Two
7 Bit
Standard RS-232C Defaults
0
Disabled
Disabled
Bar High
80 msec.
Disabled
2-30
Page 59

Programming
Terminal Specific RS-232C
Three RS-232C hosts are set up with their own fixed format options. Selecting
the ICL, Fujitsu or Nixdorf RS-232C terminal will set t he defaults li sted below.
Table 2-5. Terminal Specific Defaults
Parameter Standard ICL FUJITSU NIXDORF
Transmit Code ID
Data Transmission Format
Suffix
Baud Rate
Parity
Hardware Handshaking
Software Handshaking
Stop Bit Select
ASCII Format
Beep On <BEL>
RTS Line State
RS-232C UPC-A Code ID
RS-232C UPC-E Code ID
RS-232C EAN-8 Code ID
RS-232C EAN-13 Code ID
RS-232C Code 39 Code ID
RS-232C Codabar Code ID
RS-232C Code 128 Code ID
RS-232C I 2 of 5 Code ID
RS-232C MSI/Plessey Code ID
No Yes Yes Yes
Data as is Data/Suffix Data/Suffix Data/Suffix
CR/LF (7013) CR (1013) CR (1013) CR (1013)
9600 9600 9600 9600
Even Even None Odd
None None None None
None None None None
Two One One One
7-Bit 8-Bit 8-Bit 8-Bit
Disabled Disabled Disabled Disabled
Low High Low Low
“A” “A” “A” “A”
“A” “E” “E” “C0”
“A” “FF” “FF” “B”
“A” “F” “F” “A”
“B” “C” None “M”
“C” “N” None “N”
“D” None None “K”
“F” “I” None “I”
“J” None None “O”
2-31
Page 60

LS 3603 Product Reference Guide
2-32
Page 61

Chapter 3 Parameter Menus
Set Default Parameter page 3-3
Host Interface Select page 3-4
RS-232C Parameters
Fixed Format Options page 3-5
Code Types page 3-6
Code 2 of 5 Lengths page 3-9
Decode Options page 3-11
UPC-A Preamble page 3-17
UPC-E Preamble page 3-18
Intercharacter Delay page 3-19
Data Transmission Formats page 3-21
Prefix/Suffix Values page 3-22
Transmit Code ID Character page 3-24
Transmit AIM ID Charac ter page 3-25
Laser On Time-out page 3-26
Scanstand/IntelliStand Time-out page 3-28
Baud Rate page 3-29
Parity page 3-30
Beep on BEL page 3-31
Hardware Handshaking page 3-32
Software Handshaking page 3-33
Stop Bit Select page 3-34
ASCII Format page 3-35
Power Mode page 3-36
3-1
Page 62

LS 3603 Product Reference Guide
Wand Host Parameters
Wand Host Interface page 3-37
Code Types page 3-38
Code 2 of 5 Lengths page 3-41
Decode Options page 3-43
Laser On Time-out page 3-45
Scanstand/IntelliStand Time-out page 3-47
Power Mode page 3-48
Wand Emulator Bar Output page 3-49
Variable Leading Margin page 3-50
Convert All To Code 39 page 3-52
Synapse Parameters
Code Types page 3-53
Code 2 of 5 Lengths page 3-56
Decode Options page 3-58
UPC-A Preamble page 3-64
UPC-E Preamble page 3-65
Data Transmission Formats page 3-66
Prefix/Suffix Values page 3-67
Transmit Code ID Character page 3-69
Transmit AIM ID Character page 3-70
Laser On Time-out page 3-71
Scanstand/IntelliStand Time-out page 3-73
Power Mode page 3-74
For an explanation of these parameters, see page 2-3.
3-2
Page 63

Parameter Menus
Set Default Parameters
Refer to the Default Table on page 2-29
To set defaults for any or all host types, scan the appropriate bar code below.
Then select a specific host interface on the next page.
SET RS-232C DEFAULTS
SET WAND DEFAULTS
SET SYNAPSE DEFAULTS
SET ALL DEFAULTS
3-3
Page 64

LS 3603 Product Reference Guide
Host Interface Select
To select a host interface, scan the appropriate bar code below.
SET RS-232C HOST
SET WAND HOST
3-4
SET SYNAPSE HOST
Page 65

RS-232 Host
Fixed Format Options
Select fixed format options for the terminals listed below.
SET NIXDORF
RS-232C FORMATS
Parameter Menus
SET FUJITSU
RS-232C FORMATS
SET ICL
RS-232C FORMATS
3-5
Page 66

LS 3603 Product Reference Guide
RS-232 Host
Code Type
Add or delete specific code types by scanning the appropriate bar code(s).
ADD CODE 39
ADD UPC-A
ADD UPC-E
DELETE CODE 39
DELETE UPC-A
DELETE UPC-E
ADD CODABAR
3-6
DELETE CODABAR
Page 67

RS-232 Host
Code Type
Parameter Menus
DELETE EAN-8ADD EAN-8
ADD EAN-13
ADD I 2 OF 5
DELETE EAN-13
DELETE I 2 OF 5
DELETE D 2 OF 5ADD D 2 OF 5
3-7
Page 68

LS 3603 Product Reference Guide
RS-232 Host
Code Type
ADD CODE 128
ADD MSI/Plessey
ADD CODE 93
DELETE CODE 128
DELETE MSI/Plessey
DELETE CODE
3-8
DELETE EAN 128ADD EAN 128
Page 69

Parameter Menus
RS-232 Host
Code 2 of 5 Lengths
To set the lengths for each code type:
1. Scan the desired option.
2. Scan two bar codes on page 3-10 for each desired length. For example, for
a length of “12”, scan “1” then “2”. For a length of “3”, scan “0”, then “3”.
You must always scan two bar codes for each length.
3. If you make an error, or wish to change your selection, scan CANCEL.
D 2 of 5 LENGTH 1
(RANGE 02-55)
I 2 of 5 LENGTH 1
(RANGE 02-54)
D 2 of 5 LENGTH 2
(RANGE 00-55)
I 2 of 5 LENGTH 2
(RANGE 00-54)
3-9
Page 70

LS 3603 Product Reference Guide
RS-232 Host
Code Lengths
0
2
4
6
8
1
3
5
7
9
3-10
CANCEL
Page 71

RS-232 Host
Decode Options
Parameter Menus
TRANSMIT UPC-A
CHECK DIGIT
TRANSMIT UPC-E
CHECK DIGIT
DO NOT
TRANSMIT UPC-A CHECK DIGIT
DO NOT
TRANSMIT UPC-E CHECK DIGIT
CONVERT
UPC-E TO UPC-A
DO NOT
CONVERT UPC-E TO UPC-A
3-11
Page 72

LS 3603 Product Reference Guide
RS-232 Host
Decode Options
DECODE UPC/EAN
WITH SUPPLEMENTALS
ENABLE EAN ZERO EXTEND
IGNORE UPC/EAN
WITH SUPPLEMENTALS
AUTODISCRIMINATE UPC/EAN
WITH SUPPLEMENTALS
DISABLE EAN ZERO EXTEND
TRANSMIT “NO DECODE”
MESSAGE
3-12
DO NOT TRANSMIT
“NO DECODE” MESSAGE
Page 73

RS-232 Host
Decode Options
Parameter Menus
ENABLE CLSI EDITING
ENABLE NOTIS EDITING
ENABLE CODE 39
FULL ASCII
DISABLE CLSI EDITING
DISABLE NOTIS EDITING
DISABLE CODE 39
FULL ASCII
VERIFTY CODE 39
CHECK DIGIT
DO NOT VERIFY CODE 39
CHECK DIGIT
3-13
Page 74

LS 3603 Product Reference Guide
RS-232 Host
Decode Options
ITF-14/EAN-13 CONVERSION
ENABLED
BEEP AFTER GOOD DECODE
ITF-14/EAN-13 CONVERSION
DISABLED
DO NOT
BEEP AFTER GOOD DECODE
3-14
BUFFER CODE 39
DO NOT
BUFFER CODE 39
Page 75

RS-232 Host
Decode Options
Parameter Menus
UPC/EAN SECURITY LEVEL 0
UPC/EAN SECURITY LEVEL 1
UPC/EAN SECURITY LEVEL 2
UPC/EAN SECURITY LEVEL 3
3-15
Page 76

LS 3603 Product Reference Guide
RS-232 Host
Decode Options
ENABLE 1 MSI/Plessey
CHECK DIGIT
MSI 2 CHECK DIGITS
MOD 10 - MOD 10
ENABLE 2 MSI/Plessey
CHECK DIGITS
MSI 2 CHECK DIGITS
MOD 11 - MOD 10
ENABLE CODABAR
DECODE REDUNDANCY
3-16
DISABLE CODABAR
DECODE REDUNDANCY
Page 77

Parameter Menus
RS-232 Host
UPC-A Preamble
Select one option for UPC-A preamble by scanning the appropriate bar code.
NONE
SYSTEM CHARACTER
SYSTEM CHARACTER
&
COUNTRY CODE
3-17
Page 78

LS 3603 Product Reference Guide
RS-232 Host
UPC-E Preamble
Select one option for UPC-E preamble by scanning the appropriate bar code.
NONE
SYSTEM CHARACTER
3-18
SYSTEM CHARACTER
&
COUNTRY CODE
Page 79

Parameter Menus
RS-232 Host
Intercharacter Delay
To set a host communications intercharacter delay:
1. Scan the INTERCHARACTER DELAY bar c ode below.
2. Scan two bar codes on the next page which represent the desired delay
(from 00 to 99 msec). You must always scan two bar codes.
3. If you make an error, or wish to change your selection, scan CANCEL
INTERCHARACTER DELAY
3-19
Page 80

LS 3603 Product Reference Guide
RS-232 Host
Intercharacter Delay
0
2
4
6
8
1
3
5
7
9
3-20
CANCEL
Page 81

RS-232 Host
Data Transmission Formats
Scan the option you wish to set.
DATA AS IS
<PREFIX> <DATA>
Parameter Menus
<DATA> <SUFFIX>
<PREFIX> <DATA> <SUFFIX>
3-21
Page 82

LS 3603 Product Reference Guide
RS-232 Host
Prefix/Suffix Values
To set a PREFIX/SUFFIX value:
1. Scan the option bar code you wish to set.
2. Scan four bar codes on the next page which correspond to the ASCII value
or keystroke you wish to assign. The ENTER key is the default for all
options.
3. If you make an error, or wish to change your selection, scan CANCEL
PREFIX
3-22
SUFFIX
Page 83

RS-232 Host
Prefix/Suffix Values
Parameter Menus
0
2
4
6
8
1
3
5
7
9
CANCEL
3-23
Page 84

LS 3603 Product Reference Guide
RS-232 Host
Transmit Code ID Character
Select whether to enable or disable this parameter.
TRANSMIT CODE ID CHARACTER
DO NOT
TRANSMIT CODE ID CHARACTER
3-24
Page 85

RS-232 Host
Transmit AIM ID Character
Select whether to enable or disable this parameter.
TRANSMIT AIM ID CHARACTER
DO NOT
TRANSMIT AIM ID CHARACTER
Parameter Menus
3-25
Page 86

LS 3603 Product Reference Guide
RS-232 Host
Laser On Time-out
To select a laser on time-out, scan the bar code below or on the next page
corresponding to the desired time.
0.5 SECONDS
1.5 SECONDS
2.5 SECONDS
1.0 SECONDS
2.0 SECONDS
3.0 SECONDS
3-26
Page 87

RS-232 Host
Laser On Time-out
Parameter Menus
3.5 SECONDS
4.5 SECONDS
4.0 SECONDS
5.0 SECONDS
3-27
Page 88

LS 3603 Product Reference Guide
RS-232 Host
Scanstand/IntelliStand Time-out
To select a Scanstand/IntelliStand time-out, scan the bar code below
corresponding to the desired time-out.
15 MINUTES
30 MINUTES
45 MINUTES
60 MINUTES
75 MINUTES
90 MINUTES
3-28
Page 89

RS-232 Host
Baud Rate
Set the baud rate for RS-232C transmission.
Parameter Menus
600
1200
4800
9600
2400
19200
3-29
Page 90

LS 3603 Product Reference Guide
RS-232 Host
Parity
Set the type of parity for RS-232C transmission.
ODD
MARK SPACE
EVEN
3-30
NONE
Page 91

RS-232 Host
Beep on BEL
Select whether or not enable this parameter.
BEEP ON BEL
DO NOT BEEP ON BEL
Parameter Menus
3-31
Page 92

LS 3603 Product Reference Guide
RS-232 Host
Hardware Handshaking
Select the type of RS-232C hardware handshaking protocol.
NONE
RTS/CTS
3-32
Page 93

RS-232 Host
Software Handshaking
Select the type of RS-232C software handshaking protocol.
NONE
ACK/NAK
Parameter Menus
ENQ ONLY
ACK/NAK with ENQ
XON/XOFF
3-33
Page 94

LS 3603 Product Reference Guide
RS-232 Host
Stop Bit Select
Select the desired number of stop bits for RS-232C communications.
1 STOP BIT
3-34
2 STOP BITS
Page 95

Parameter Menus
RS-232 Host
ASCII Data Format
Select either 7-bit or 8-bit ASCII format for RS-232C communications.
7-BIT
8-BIT
3-35
Page 96

LS 3603 Product Reference Guide
RS-232 Host
Power Mode
Select whether the laser remains on continuously, or turns off after a decode
attempt (Low Power).
CONTINUOUS ON
3-36
LOW POWER
Page 97

Parameter Menus
Wand Host Interface
Select the appropriate host by scanning one of the bar codes below.
SYMBOLLINK CONTROLLER
SYMBOL PORTABLE TERMINAL
NORAND TERMINAL
3-37
Page 98

LS 3603 Product Reference Guide
Wand Host
Code Type
Add or delete specific code types by scanning the appropriate bar code(s).
ADD CODE 39
ADD UPC-E
DELETE CODE 39
DELETE UPC-AADD UPC-A
DELETE UPC-E
ADD CODABAR
3-38
DELETE CODABAR
Page 99

Wand Host
Code Type
Parameter Menus
ADD EAN-8
ADD EAN-13
ADD I 2 OF 5
DELETE EAN-8
DELETE EAN-13
DELETE I 2 OF 5
ADD D 2 OF 5
DELETE D 2 OF 5
3-39
Page 100

LS 3603 Product Reference Guide
Wand Host
Code Type
ADD CODE 128
ADD CODE 93
DELETE CODE 128
DELETE MSI/PlesseyADD MSI/Plessey
DELETE CODE
3-40
ADD EAN 128
DELETE EAN 128
 Loading...