

Page 1

WaveWorks
Portable Shopping System
Integration Guide
February 1, 2000
Version 1.10
Integration Ser vic es Gr oup
Pittsburgh, Pennsylvan ia
USA
Page 2

e
Revision History
Revision Date Author Comments
1.00 December 31, 1999 Mary Wroniak
Garry Simmons
Brian Reed
Tom Pike
Mike Tierney
Luke Petro zza
1.10 February, 1, 2000 Luke Petrozza Added PST 008 and PST 038
Initial version
transactions
Copyright 1999, 2000 by Symbol Technologies, Inc. All rights reserved.
No part of this document may be reproduced or used in any form, or by any electrical or mechanical means, without
permission in writing from Symbol. This includes electronic or mechanical means, such as photocopying,
recording, or information storage and retrieval systems The material in this document is subject to change with
notice.
Symbol does not assume any product liability arising out of, or in connection with, the application or use of any
product, circuit, or application described herein.
No license is granted, either expressly or by implication, estoppel, or otherwise under any Symbol Technologies,
Inc., intellectual property rights. An implied license only exists for equipment, circuits, and subsystems contained in
Symbol products.
Symbol, Spectrum24, WaveWorks, and WaveWorks NT are registered trademarks of Symbol Technologies, Inc.
Other product names mentioned in this document may be trademarks or registered trademarks of their respective
companies and are hereby acknowledged.
Decemb
Page 3

Table of Contents
1. Introduction ............................................................................................................1
1.1 PURPOSE OF DOCUMENT .................................................................................................................................1
1.2 A
1.3 R
2. Architecture Overview...........................................................................................2
2.1 INTRODUCTION TO WAVEWORKS.................................................................................................................... 2
2.2 PSS S
2.3 M
2.4 PSS O
2.5 PSS C
3. Hardware Requirements......................................................................................11
3.1 WINDOWS NT COMPUTER............................................................................................................................. 11
3.2 H
3.3 T
3.4 S
4. PSS Software Installation....................................................................................13
4.1 INSTALL NT 4.0 SERVER............................................................................................................................... 14
4.2 I
4.3 I
4.4 NT O
4.5 I
4.6 C
4.7 D
4.8 I
4.9 C
4.10 I
4.11 I
4.12 I
4.13 I
4.14 I
4.15 I
4.16 TFTP C
4.17 DHCP C
4.18 C
SSUMPTIONS .................................................................................................................................................1
EFERENCE DOCUMENTS ................................................................................................................................1
2.1.1 WaveWorks Design Objectives..............................................................................................................3
2.1.2 WaveWorks Components....................................................................................................................... 4
OFTWARE OVERVIEW............................................................................................................................. 6
AJOR SUBSYSTEMS....................................................................................................................................... 6
2.3.1 Unit Management Subsystem ................................................................................................................ 6
2.3.2 Shopping Trip Subsystem.....................................................................................................................6
2.3.3 Quick Order Subsystem......................................................................................................................... 7
2.3.4 Queue Busting Subsystem......................................................................................................................7
2.3.5 Express Shopper Subsystem..................................................................................................................7
2.3.6 Electronic Marketing Subsystem........................................................................................................... 7
2.3.7 User Messaging.....................................................................................................................................8
2.3.8 Transaction Ticket Printing .................................................................................................................. 8
2.3.9 POS Interface........................................................................................................................................ 8
2.3.10 System Administration........................................................................................................................... 8
VERVIEW DIAGRAM ..............................................................................................................................8
OMPONENT DIAGRAM.......................................................................................................................... 10
AND HELD TERMINALS............................................................................................................................... 11
ERMINAL DISPENSER/ENTRANCE UNIT ....................................................................................................... 12
PECTRUM 24 RADIO NETWORK................................................................................................................ 12
NSTALL THE NT 4 SERVICE PACK ................................................................................................................19
NSTALL INTERNET EXPLORER 4.01 SERVICE PACK 2 ...................................................................................20
PTION PACK INSTALL............................................................................................................................ 22
NSTALL THE VIDEO DRIVER......................................................................................................................... 23
REATE AND FORMAT THE DATABASE PARTITION ........................................................................................ 25
ESKTOP CLEANUP (OPTIONAL)....................................................................................................................26
NSTALL MICROSOFT SQL SERVER 7............................................................................................................ 27
REATE AND CONFIGURE THE PSS DATABASE ............................................................................................. 28
4.9.1 Create the (blank) PSS Database........................................................................................................28
4.9.2 Configure SQL Server......................................................................................................................... 29
4.9.3 Configure the Clear Transaction Log job........................................................................................... 30
4.9.4 Configure the Extensive Database Check and Backup job ................................................................. 31
4.9.5 Configure the Nightly Database Check and Backup job.....................................................................33
NSTALL MICROSOFT ACCESS................................................................................................................... 35
NTERNET EXPLORER 5.0 WITH TASK SCHEDULER INSTALL..................................................................... 35
NSTALL WAVEWORKS............................................................................................................................. 36
NSTALL PSS R UNTIME SYSTEM............................................................................................................... 37
NSTALL WAVEWORKS DEVELOPMENT STUDIO........................................................................................ 38
NSTALL PSS DEVELOPMENT SYSTEM...................................................................................................... 38
ONFIGURATION ............................................................................................................................39
4.16.1 Create STEP hex images for the terminals to download..................................................................... 40
ONFIGURATION ...........................................................................................................................41
REATE AN ODBC DATA SOURCE ...........................................................................................................42
WaveWorks PSS, Integration Guide, 1.10 Page ii
© 2000, Symbol Technologies, Inc. February 1, 2000
Page 4

4.19 LOAD INITIAL DATA................................................................................................................................. 43
4.20 MS IIS C
4.21 O
4.22 C
4.23 C
4.24 C
4.25 C
4.26 S
BTAINING ACCESS TO PSS SYSTEM ADMINISTRATION SCREENS ........................................................... 46
ONFIGURE TASK SCHEDULER................................................................................................................. 47
ONFIGURE UNIT MANAGEMENT............................................................................................................. 48
ONFIGURE LICENSING.............................................................................................................................50
ONFIGURE THE NBQMAIN SERVICE (IBM 4690 POS ONLY)............................................................... 51
ETUP NT SYSTEM LOG ........................................................................................................................... 52
ONFIGURATION ..........................................................................................................................45
5. Configuration of the PSS System .......................................................................53
5.1 SET UP SYSTEM SETTING CONSTANTS .......................................................................................................... 53
5.2 P
ERFORM INITIAL LOADING OF CUSTOMER AND ITEM DATA ........................................................................ 56
6. Validation of System Operation..........................................................................57
6.1 TESTING AN INSTALLATION........................................................................................................................... 57
6.2 O
BTAINING SYSTEM STATUS INFORMATION.................................................................................................. 58
6.2.1 Viewing The System Log..................................................................................................................... 58
6.2.2 Viewing POS Status.............................................................................................................................59
7. Directory Listing of PSS Folders/Files...............................................................60
D:\ (database repository)...............................................................................................................................66
CHEDULED TASKS .......................................................................................................................................67
7.1 S
8. Software Description ...........................................................................................68
8.1 PSS TRANSACTION IDS / COM OBJECT METHOD LISTING ...........................................................................68
8.2 U
NIT MANAGEMENT SUBSYSTEM.................................................................................................................. 76
8.2.1 Hardware Overview............................................................................................................................ 76
8.2.2 Software Components..........................................................................................................................77
8.2.3 Database Access..................................................................................................................................78
8.3 S
HOPPING TRIP SUBSYSTEM..........................................................................................................................79
8.3.1 Start of Shopping Trip Processing ...................................................................................................... 79
8.3.2 Shopping Trip Processing................................................................................................................... 79
8.3.3 End of Shopping Trip Processing........................................................................................................ 82
8.3.4 Shopping Trip Message Log Entries...................................................................................................83
8.3.5 Fatal Messages:.................................................................................................................................. 84
8.3.6 Error Messages:.................................................................................................................................. 84
8.3.7 Informational Messages...................................................................................................................... 86
8.3.8 Debug Messages:................................................................................................................................ 87
8.3.9 Rescan Messages.................................................................................................................................87
8.4 Q
8.5 Q
8.6 E
8.7 U
8.8 POS I
UICK ORDER SUBSYSTEM...........................................................................................................................89
UEUE BUSTING SUBSYSTEM........................................................................................................................ 89
LECTRONIC MARKETING SUBSYSTEM .........................................................................................................90
SER MESSAGING SUBSYSTEM ..................................................................................................................... 90
NTERFACE SUBSYSTEM ........................................................................................................................91
8.8.1 POS Interface Files............................................................................................................................. 92
8.8.2 POS Interface Software Entities.......................................................................................................... 92
8.8.3 POS Interface Configuration..............................................................................................................94
8.8.4 PSSTransactionFile Processing.......................................................................................................... 99
8.8.5 POS Transaction File Processing.....................................................................................................100
8.8.6 Item Record File Processing.............................................................................................................101
8.8.7 Customer Update File Processing ................................................................................................... 102
8.9 PSS S
ERVICES............................................................................................................................................. 102
9. Customizing the PSS System Software............................................................104
9.1 CUSTOM DISPLAYSERVER SCRIPTS ............................................................................................................. 104
9.2 C
9.3 C
9.4 U
USTOM SERVICES...................................................................................................................................... 104
USTOM BUSINESS OBJECTS .......................................................................................................................104
SER EXIT DLL .......................................................................................................................................... 105
9.4.1 Common Information........................................................................................................................ 105
9.4.2 Return and Message Codes............................................................................................................... 106
WaveWorks PSS, Integration Guide, 1.10 Page iii
© 2000, Symbol Technologies, Inc. February 1, 2000
Page 5

9.4.3 Using the CPssMsgLog Class ........................................................................................................... 106
9.5 A
VAILABLE USER EXIT FUNCTIONS ............................................................................................................108
9.5.1 UE_PreProcessItemFile....................................................................................................................108
9.5.2 UE_PreProcessItemRecord .............................................................................................................. 108
9.5.3 UE_PostProcessItemRecord............................................................................................................. 109
9.5.4 UE_PostProcessItemFile.................................................................................................................. 109
9.5.5 UE_PreProcessTaxFile.....................................................................................................................109
9.5.6 UE_PostProcessTaxFile...................................................................................................................110
9.5.7 UE_PreProcessPOSTransFile.......................................................................................................... 110
9.5.8 UE_PreProcessPOSTransRecord..................................................................................................... 110
9.5.9 UE_PostProcessPOSTransRecord.................................................................................................... 111
9.5.10 UE_ProcessEODRecord...................................................................................................................111
9.5.11 UE_PostProcessPOSTransFile......................................................................................................... 111
9.5.12 UE_PreProcessPSSTransFile........................................................................................................... 111
9.5.13 UE_PreProcessPSSTransRecord...................................................................................................... 112
9.5.14 UE_PostProcessPSSTransFile.......................................................................................................... 112
9.5.15 UE_CalculateItemPrice_Method10to20........................................................................................... 112
9.5.16 UE_RescanLevelCalculation ............................................................................................................112
9.5.17 UE_Pre-RescanDetermination.......................................................................................................... 112
9.5.18 UE_PostRescanDetermination.......................................................................................................... 113
9.5.19 UE_PreProcessMarketingMessage...................................................................................................113
9.5.20 UE_LoginAuthorization....................................................................................................................113
10. System Administration Interface ...................................................................... 114
10.1 CONFIGURING THE BROWSER SOFTWARE............................................................................................... 114
10.2 E
10.3 U
10.4 C
STABLISH USER ACCOUNTS ON THE SERVICE TERMINAL ..................................................................... 114
NDERSTANDING USER ACCESS TO ADMINISTRATIVE PAGES AND ACTIONS.........................................115
HANGING SCREEN TEXT ON THE SERVICE TERMINAL...........................................................................116
10.4.1 Service Terminal System Settings...................................................................................................... 117
11. Specific Features................................................................................................120
11.1 MULTIPLE LANGUAGE SUPPORT............................................................................................................. 120
11.2 P
11.3 C
11.4 C
RICING METHODS ................................................................................................................................. 120
URRENCY CONVERSIONS ......................................................................................................................120
ONTROL TICKET PRINTING ...................................................................................................................120
Appendix A Database Layout Diagram...................................................................121
Appendix B Database Tables / Physical Properties..............................................125
B.1 TABLE NAME: PSS_ADMIN_ACTION..........................................................................................................125
B.2 T
B.3 T
B.4 T
B.5 T
B.6 T
B.7 T
B.8 T
B.9 T
B.10 T
B.11 T
B.12 T
B.13 T
B.14 T
B.15 T
B.16 T
B.17 T
B.18 T
B.19 T
B.20 T
ABLE NAME: PSS_ADMIN_MENU............................................................................................................. 125
ABLE NAME: PSS_ADMIN_PAGE..............................................................................................................126
ABLE NAME: PSS_ADMIN_USER ..............................................................................................................126
ABLE NAME: PSS_BARCODE_VARIABLE_W EIGHT .................................................................................. 127
ABLE NAME: PSS_CURRENCY ..................................................................................................................128
ABLE NAME: PSS_CUSTOMER .................................................................................................................. 128
ABLE NAME: PSS_CUSTOMER_MESSAGE.................................................................................................130
ABLE NAME: PSS_CUSTOMER_SUSPEND_REASON ..................................................................................130
ABLE NAME: PSS_DEPARTMENT ......................................................................................................... 131
ABLE NAME: PSS_EOD.......................................................................................................................131
ABLE NAME: PSS_ITEM .......................................................................................................................132
ABLE NAME: PSS_LANGUAGE ............................................................................................................. 133
ABLE NAME: PSS_MANUFACTURER .................................................................................................... 133
ABLE NAME: PSS_MARKETING_DEPARTMENT....................................................................................133
ABLE NAME: PSS_MARKETING_ITEM .................................................................................................134
ABLE NAME: PSS_MARKETING_MFG.................................................................................................. 134
ABLE NAME: PSS_MARKETING_SENT................................................................................................. 135
ABLE NAME: PSS_MESSAGE_LOG....................................................................................................... 135
ABLE NAME: PSS_OPENING_MESSAGE............................................................................................... 136
WaveWorks PSS, Integration Guide, 1.10 Page iv
© 2000, Symbol Technologies, Inc. February 1, 2000
Page 6

B.21 T ABLE NAME: PSS_ORDER_LIST........................................................................................................... 136
B.22 T
B.23 T
B.24 T
B.25 T
B.26 T
B.27 T
B.28 T
B.29 T
B.30 T
B.31 T
B.32 T
B.33 T
B.34 T
B.35 T
B.36 T
B.37 T
B.38 T
B.39 T
B.40 T
B.41 T
B.42 T
B.43 T
B.44 T
B.45 T
B.46 T
B.47 T
B.48 T
B.49 T
B.50 T
B.51 T
B.52 T
B.53 T
ABLE NAME: PSS_ORDER_LIST_ITEM................................................................................................. 136
ABLE NAME: PSS_ORDER_STATUS ..................................................................................................... 137
ABLE NAME: PSS_POS_STATUS.......................................................................................................... 137
ABLE NAME: PSS_RESCAN_DIFFERENCE ............................................................................................ 138
ABLE NAME: PSS_RESCAN_LEVEL...................................................................................................... 138
ABLE NAME: PSS_SESSION.................................................................................................................. 139
ABLE NAME: PSS_SHOPPING_ACTIVITY.............................................................................................. 139
ABLE NAME: PSS_SHOPPING_HISTORY_ACTIVITY .............................................................................140
ABLE NAME: PSS_SHOPPING_HISTORY_ITEM .....................................................................................141
ABLE NAME: PSS_SHOPPING_HISTORY_LIST......................................................................................142
ABLE NAME: PSS_SHOPPING_HISTORY_RESCAN................................................................................ 143
ABLE NAME: PSS_SHOPPING_INCOMPLETE_LIST................................................................................ 143
ABLE NAME: PSS_SHOPPING_ITEM .....................................................................................................145
ABLE NAME: PSS_SHOPPING_LIST ...................................................................................................... 146
ABLE NAME: PSS_SHOPPING_LIST_STATUS........................................................................................ 146
ABLE NAME: PSS_SHOPPING_TAX ......................................................................................................147
ABLE NAME: PSS_SPECIAL_BARCODE................................................................................................147
ABLE NAME: PSS_SYSTEM_MESSAGE................................................................................................. 148
ABLE NAME: PSS_SYSTEM_SETTING................................................................................................... 149
ABLE NAME: PSS_TAX_TABLE ........................................................................................................... 149
ABLE NAME: PSS_TAX_TABLE_ENTRY .............................................................................................. 150
ABLE NAME: PSS_TEXT....................................................................................................................... 150
ABLE NAME: PSS_UNKNOWN_ITEM ....................................................................................................150
ABLE NAME: UMS_CARD_READER_TYPE .......................................................................................... 151
ABLE NAME: UMS_CRADLE................................................................................................................ 152
ABLE NAME: UMS_DISPENSER............................................................................................................ 152
ABLE NAME: UMS_ENTRANCE............................................................................................................ 153
ABLE NAME: UMS_POWER.................................................................................................................. 154
ABLE NAME: UMS_PRINTER................................................................................................................ 155
ABLE NAME: UMS_STATUS_CODES.................................................................................................... 156
ABLE NAME: UMS_TERMINAL ............................................................................................................ 156
ABLE NAME: UMS_TERMINAL_TYPES ................................................................................................ 157
Appendix C Price Calculation Algorithms..............................................................158
C.1 PRICING METHODS...................................................................................................................................... 158
C.2 S
PLIT PACKAGE PRICING............................................................................................................................. 15 9
C.3 U
C.4 B
C.5 G
C.6 G
C.7 U
C.8 M
C.9 P
C.10 R
NIT PRICING.............................................................................................................................................. 159
Unit Pricing Example
ASE PLUS ONE PRICING.............................................................................................................................161
ROUP THRESHOLD PRICING.......................................................................................................................162
Group Threshold Pricing Example
ROUP ADJUSTED PRICING .........................................................................................................................166
NIT ADJUSTED PRICING.............................................................................................................................167
Unit Adjusted Threshold Pricing Example 2
IX AN D MATCH GROUPINGS..................................................................................................................... 169
RICING METHOD APPLICATION RULES ......................................................................................................169
OUNDING METHODS .............................................................................................................................170
...........................................................................................................................161
................................................................................................164
............................................................................169
Appendix D POS Interface File Descriptions.........................................................171
D.1 PSS TRANSACTION FILE.............................................................................................................................. 172
D.2 POS T
D.3 I
D.4 T
D.5 C
RANSACTION FILE .............................................................................................................................174
TEM RECORD FILE......................................................................................................................................176
AX TABLE FILE.......................................................................................................................................... 177
USTOMER INFORMATION FILE ................................................................................................................... 178
WaveWorks PSS, Integration Guide, 1.10 Page v
© 2000, Symbol Technologies, Inc. February 1, 2000
Page 7

Introduction
______________________________________________________________________________
1. Introduction
1.1 Purpose of Document
This document is an aid to be used in the configuration, customization and installation of the
WaveWorks Portable Shopping System (PSS).
1.2 Assumptions
This document assumes that the reader is familiar with the functionality of Symbol’s
WaveWorks architecture, the WaveWorks Client, and the Server Enabler. In addition, the r eader
should be familiar with the Windows NT Operating System, and third-party “browser” software.
1.3 Reference Documents
• Portable Shopping System Functional Specification
• Portable Shopping System Design Document
• Portable Shopping System Users Reference Guide
• ScreenMaker Users Reference Guide
WaveWorks PSS, Integration Guide, 1.10 Page 1
© 2000, Symbol Technologies, Inc. February 1, 2000
Page 8

Architecture Overview
______________________________________________________________________________
2. Architecture Overview
The Portable Shopping System utilizes Symbol Technologies’ proprietary WaveWorks threetiered architecture, which provides clear separation of the user interface, business logic and
database portions of the system. For the PSS, WaveWorks provides application messaging
functions and manages distributed objects on the Microsoft Windows NT platform.
2.1 Introduction to WaveWorks
WaveWorks is a light weight, high performance, three-tiered, application messaging and
distributed object management architecture which is designed to run on the Windows NT system
platform. As a horizontal system component, WaveWorks can serve as the backbone
architecture for a wide variety of multitiered client/server applications.
The WaveWorks system provides the following application services:
• Thin client radio terminal environment (reduces system administration costs)
• Radio Terminal display and client state management
• Client-to-Server and Client-to-Client messaging service
• Business Service object broker
• Configurable Business Servers
• Distributed business service objects
• Load-based object instancing
• Load balancing
• Service based instancing
• DBMS connection sharing
• Client specific object instancing
• Web-based system administration.
• Application user password validation and security service
WaveWorks PSS, Integration Guide, 1.10 Page 2
© 2000, Symbol Technologies, Inc. February 1, 2000
Page 9

Architecture Overview
______________________________________________________________________________
2.1.1 WaveWorks Design Objectives
Three-tiered ArchitectureWaveWorks provides a platform for implementing applications that
maintain a clear separation between the user interface, business logic, and database layers.
Light WeightWaveWorks is designed to run on P200 systems or better.
AdaptableCOM object-based design allows easy addition of new business service objects to
support new applications. The encapsulation of data access inside business objects makes it eas y
to change data sources in the future, without rewriting the entire application.
Business Object ReuseCOM object-based design allows easy reuse of existing business service
objects to support new applications.
ScaleableA distributed-object architecture makes it easy to add additional business service
capacity, based on changing business demands.
DistributedWaveWorks system components are designed so they can be de ployed across LAN
or WAN networks. Network utilization can be optimized by placing the WaveWorks Business
Server components near or on the DBMS server, while running the Display Server / Message
Server components near or on the client connection point server.
High PerformanceMultithreaded business service execution, avoidance of p ersistent message
queues, event driven implementation (no polling), and automatic load balancing permit message
rates of up to 500 per second (on a single system configuration).
ReliableWaveWorks supports the ability to configure multiply redundant parallel Business
Server components. In addition to load sharing, the redundant servers will automaticall y hotswap / load-shift to the remaining servers if one or more server systems suffer a complete or
partial failure.
Platform IndependenceDependency on NT specific features are minimal and are internally
well isolated.
Minimum Dependency on Third-party ComponentsTo improve platform portability and reduce
licensing costs, WaveWorks depends on only generally available add-on components, such as: an
ODBC compliant DBMS, Winsock 1.1, an http server, and a third-generation (or better) Web
browser. A suitable version of all of these components is included with NT 4.0 server.
WaveWorks PSS, Integration Guide, 1.10 Page 3
© 2000, Symbol Technologies, Inc. February 1, 2000
Page 10
Architecture Overview
______________________________________________________________________________
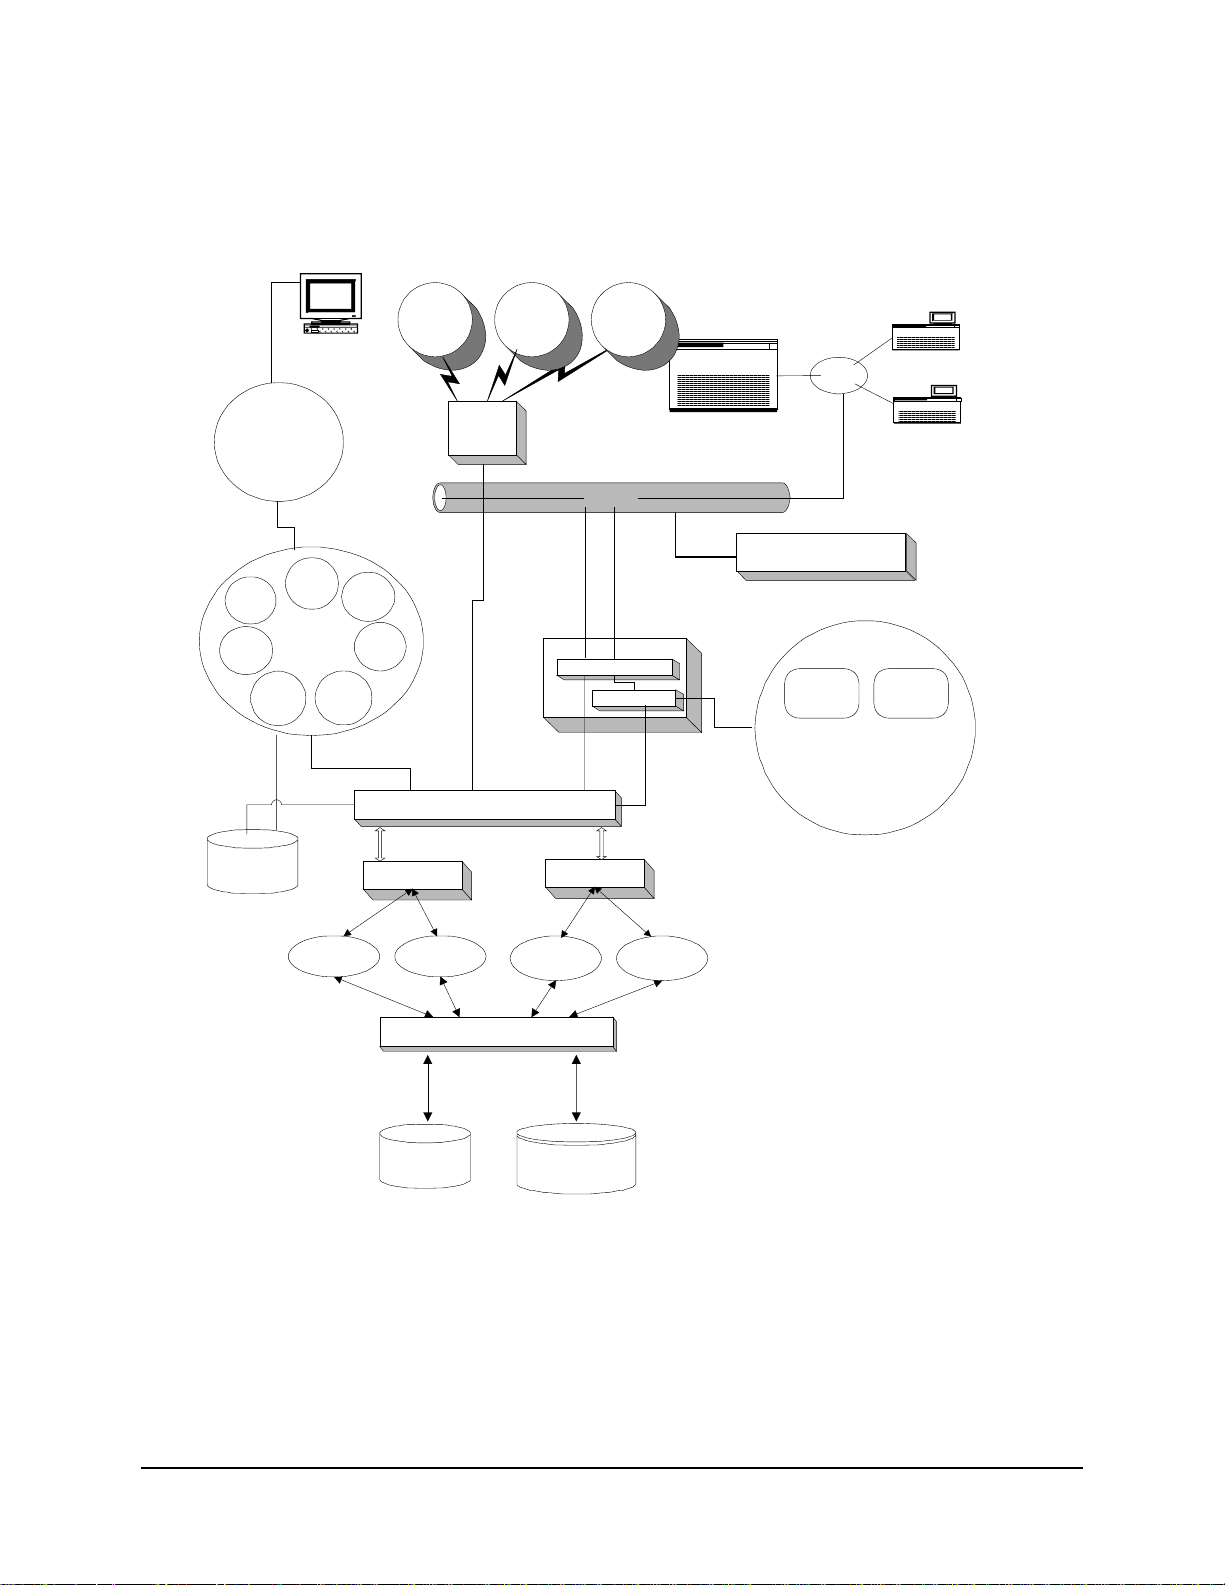
2.1.2 WaveWorks Components
The WaveWorks components are shown in the following diagram and described below.
User Interface Tier
Desktop GUI
Clients
Web Clients
(CGI)
WaveWorks
Business Object
Servers
Business
Service
Objects
Thin
Thin
Thin
Radio
Radio
Clients
Clients
Clients
Spectrum 24 Network
Symbol Enabler
WaveWorks
Radio Display
Servers
E
t
h
e
r
n
e
t
ODBC (or other)
Application Data
Sources
WaveWorks Message Server
WaveWorks
Business Object
Servers
DBMS Device Drivers POS API
?
Radio
Clients
Business Logic Tier
WaveWorks
Config
Business
Service
Objects
Thin
Radio
Desktop GUI
Clients
Web Clients
(CGI)
Business Logic TierBusiness Logic Tier
W
A
WaveWorks
N
Business Object
Servers
Business
Service
Objects
Data Access Tier
WaveWorks Message (TCP)
COM
API / Other
Display ServerManages the user interface and screen flow for radio-based, thin client
applications. Maintains client data variables to record the state of the client application. Invokes
business services via WaveWorks messages.
Message ServerProvides light weight message routing and load bal ancing services between
the various WaveWorks system components. Supports Command / Response style
communication for the execution of business services, and unsolicited client-to-client messaging.
Business Server (Object Broker)Manages the creation, destruction, and invocation of COM-
based business service objects. Automatically creates and destroys object instances based on
system demand. Permits sharing of database connections by multiple clients. The WaveWorks
architecture supports multiple Business Servers, running on either local or remote systems.
WaveWorks PSS, Integration Guide, 1.10 Page 4
© 2000, Symbol Technologies, Inc. February 1, 2000
Page 11

Architecture Overview
______________________________________________________________________________
WaveWorks MessagesThe WaveWorks messaging service uses a common message format
for all WaveWorks messages. This format contai ns a fixed header, followed by zero or more
application dependent data fields. TCP is used as the transport protocol for all WaveWorks
messages. This permits the business logic tier to reside on a remote system, if desired. The
messages form the "glue" that cements the client interface tier of the application to the business
logic tier. The messaging service can also be used to implement direct "client-to-client"
messaging.
Business Service ObjectsContain the vertical business application logic, implemented as
Microsoft COM automation server objects. The ter m "Service Object" is used to describe the
COM interface subset to which all WaveWorks-managed objects must adhere.
Transaction ModelWaveWorks uses a transaction Id scheme to provide namespace s ervices
for purposes of automatically routing request messages to a capable Business Server for
execution.
Development Tools (Optional Component)An application interface development tool (Screen
Maker) supports rapid development of thin client radio applications. A radio terminal simulation
tool (Screen Runner) permits testing of Screen Maker applications without the need for an actual
radio network. A WaveWorks C++ foundation class library is also available, which includes
classes that support ODBC data access, WaveWorks messaging, INI file access, Date / Time
manipulation,and more.
WaveWorks PSS, Integration Guide, 1.10 Page 5
© 2000, Symbol Technologies, Inc. February 1, 2000
Page 12

Architecture Overview
______________________________________________________________________________
2.2 PSS Software Overview
Built upon the WaveWorks core software, the PSS software consists of
• COM Objects
• NT Services
• Display Server Scripts
• Database
The COM Objects and NT Services perform the business logic. That is, they are responsible for
the data manipulation and system sequencing that makes the system a portable shopping system.
The methods contained in the COM Objects and the NT Services are invoked vi a WaveWorks
transactions. The COM Objects are dynamically created and deleted by the Business Server. The
NT Services are started at system startup and remain resident in the system.
The Display Server scripts provide the user interface mechanism for the hand held terminals and
entrance units. The scripts define the screen layout and provide the handling of user actions for
those devices. When necessary, the scripts invoke business methods via WaveWorks
transactions.
The database contains all of the persistent data of the system. The database is used to store all
information about the devices, shoppers, items, and system configuration as required.
2.3 Major Subsystems
2.3.1 Unit Management Subsystem
The Unit Management Subsystem (UMS) manages the Symbol hardware devices that comprise
the PSS system. Those devices include hand held terminals, cradles, entrance unit devices, ticket
printers, and power supplies. UMS ensures that the devices work in concert with one another to
provide a seamless integrated system.
2.3.2 Shopping Trip Subsystem
Once the shopper retrieves the proper hand held terminal f rom the dispenser, the Shopping Trip
application allows the shopper to add and delete items from their basket and view the “totals”
information for their current shopping trip. Shopping trips can be ended by returning the hand
held terminal to an empty dispenser slot or by scanning an “End of Trip” barcode. Each act ivit y
during the shopping trip is logged and available for review from the Service Terminal.
WaveWorks PSS, Integration Guide, 1.10 Page 6
© 2000, Symbol Technologies, Inc. February 1, 2000
Page 13

Architecture Overview
______________________________________________________________________________
2.3.3 Quick Order Subsystem
While shopping, a user may choose to place a quick order through the optional Quick Order
subsystem provided. The shopper identifies, through the quick order mechanism, the products
and the quantities/weights of those products they wish to order. The quick order can then be sent
to the appropriate department, where a web screen displa ys to store personnel the orders placed
by shoppers. After they have finished processing the order, store personnel can send a m essage
to the shopper that their order is ready to be picked up.
2.3.4 Queue Busting Subsystem
The Queue Busting subsystem allows the PSS System to be used in a slightly different manner
than normal, but also helps retailers and shoppers reduce the amount of checkout time. Any
hand held terminal which has been released can be used for queue busting. This is normall y
done by store personnel to alleviate long checkout lines which may have formed.
Transactions in this mode are initiated by scanning a special (configurable) barcode. More than
one barcode can be configured for use in this manner. This barcode is expected to be on a plastic
token. Once the special barcode has been scanned, the items in the customer b asket ar e scanned.
A PSS transaction is created in the same manner as a normal PSS transaction. After all items in
the basket have been scanned, the special barcode, which began this mode, is scanned again.
This transaction is sent to the POS System. The plastic token containing the barcode is then
handed to the customer with instructions to give it to the cashier at the checkout register. When
the customer reaches the register, they present the token and t heir loyalty card (if used) to the
cashier who then performs a standard non-audit self scan checkout. A fter the customer checks
out, the token can be re-used for other customers.
2.3.5 Express Shopper Subsystem
The Express Shopper subsystem also allows the PSS System to be used in a slightly different
manner than normal, and also helps retailers and shoppers reduce the amount of checkout time.
A self-scanning kiosk is installed near the express checkout lanes in the store. A customer picks
up a terminal, scans their items, and replaces t he terminal into the dispenser sl ot. The customer
then proceeds to the PSS checkout lanes and presents their ticket or loyalty card to the cashier
who then performs a standard non-audit self scan checkout.
2.3.6 Electronic Marketing Subsystem
The PSS system also allows for a basic electronic marketing facility through the Electronic
Marketing subsystem. This application allows a retailer to send messages to a shopper’s hand
held terminal anytime that a given item is scanned.
WaveWorks PSS, Integration Guide, 1.10 Page 7
© 2000, Symbol Technologies, Inc. February 1, 2000
Page 14

Architecture Overview
______________________________________________________________________________
2.3.7 User Messaging
Also, through the User Messaging application, the store has the option to send messages to
shopper’s hand held terminals. The messages can be any text, and can be made to be repeated, to
be displayed at fixed times during the day, and/or to be directed to any set of shoppers currently
in the store. In addition, messages can be "pre-loaded" such that they are displayed to the us er
the next time they enter the store and use the PSS system.
2.3.8 Transaction Ticket Printing
The Transaction Ticket Printing application prints a transaction ticket for the shopper at the
conclusion of their self-scan shopping trip. The ticket is used to direct the shopper to the selfscan or quick pay lanes. The ticket also provides a mechanism, when scanned, for notifying the
POS System that this is a PSS transaction. Using a transaction ticket is optional.
2.3.9 POS Interface
The POS Interface application provides the mechanism by which the PSS System can be fully
integrated into a store’s environment. It handles price file updates and Scan-In/ Scan-Out file
mechanisms.
2.3.10 System Administration
Further, a system administration application is provided which allows store personnel to adjust
and monitor the PSS system and data.
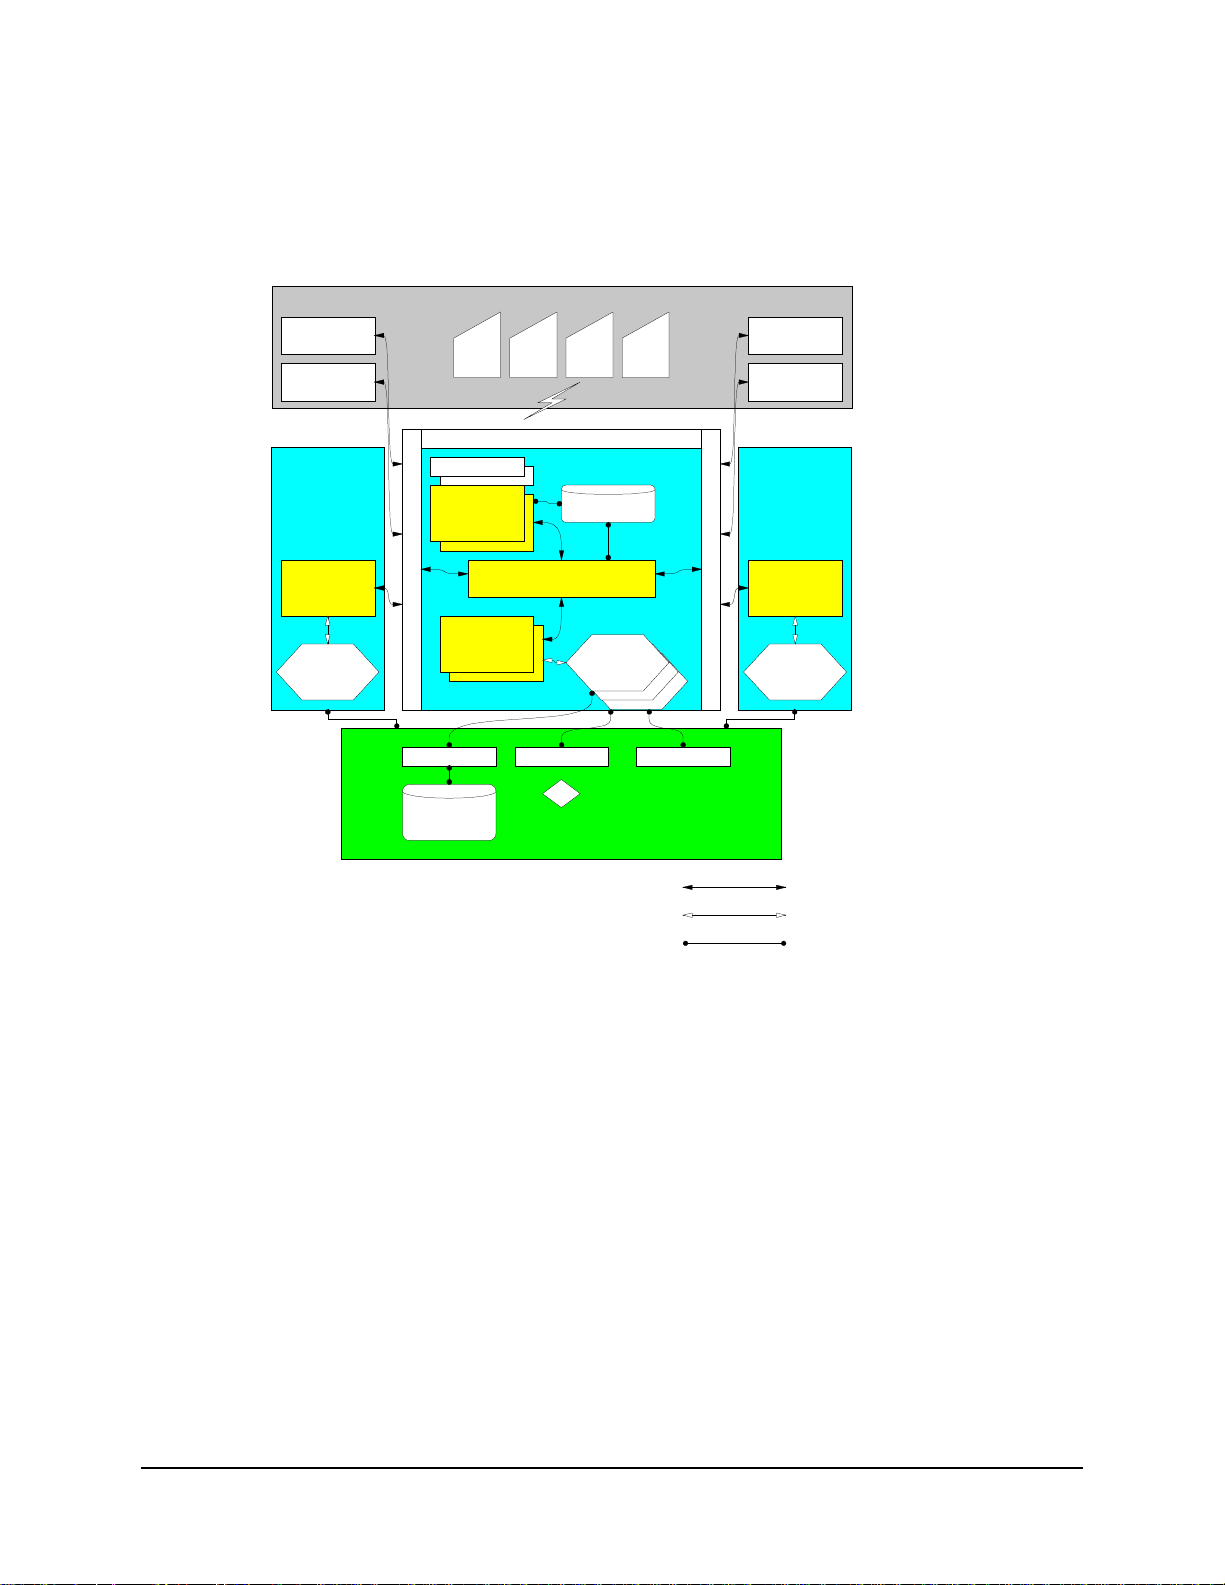
2.4 PSS Overview Diagram
The following diagram depicts the PSS Software in the context of a WaveWorks system. The
system hardware interfaces occur via the Spectrum 24 network. The hand-held terminal user
interfaces are managed as shown in the Application User Int erfaces. The Web screens used at the
Service Desk Terminal interface via the Web Server. The Message Server routes messages
through the Business Server to COM objects that perform the PSS business logic and provide
any necessary database manipulations.
WaveWorks PSS, Integration Guide, 1.10 Page 8
© 2000, Symbol Technologies, Inc. February 1, 2000
Page 15
Architecture Overview
______________________________________________________________________________
Native
POS System
Controller
Checkouts
Service Desk
Entrance
Station
Ticket
Printer
Asterix
Terminals
PSS
Web
Server
Web
API
Customer
Management
System
Configuration
Data
Management
(Reports and
Queries)
Configuration
Files
System
Management
PSS Web
Server
Applets
Transaction
Maintenance
UMS COM
Object
Hand held
terminal
management
System
Status
Sockets
Message Server
Business Server
Shopping
Trip COM
Object
Spectrum 24
Network
Sockets
Threads
Ethernet
Comm Manager
Comm Interface
Display Server
Business Server
Other COM
Objects
Sockets
Sockets
Future COM
Objects
ObjectWave/OpenView
Wireless Network
Management
Shopping
Trip
Module
Application User
Application User Interfaces
Unit
Managem
ent
Module
Interfaces
ODBC - Database Interface & System
Interface Drivers
Configuration
Files
Data Base
WaveWorks PSS, Integration Guide, 1.10 Page 9
© 2000, Symbol Technologies, Inc. February 1, 2000
Page 16
Architecture Overview
______________________________________________________________________________
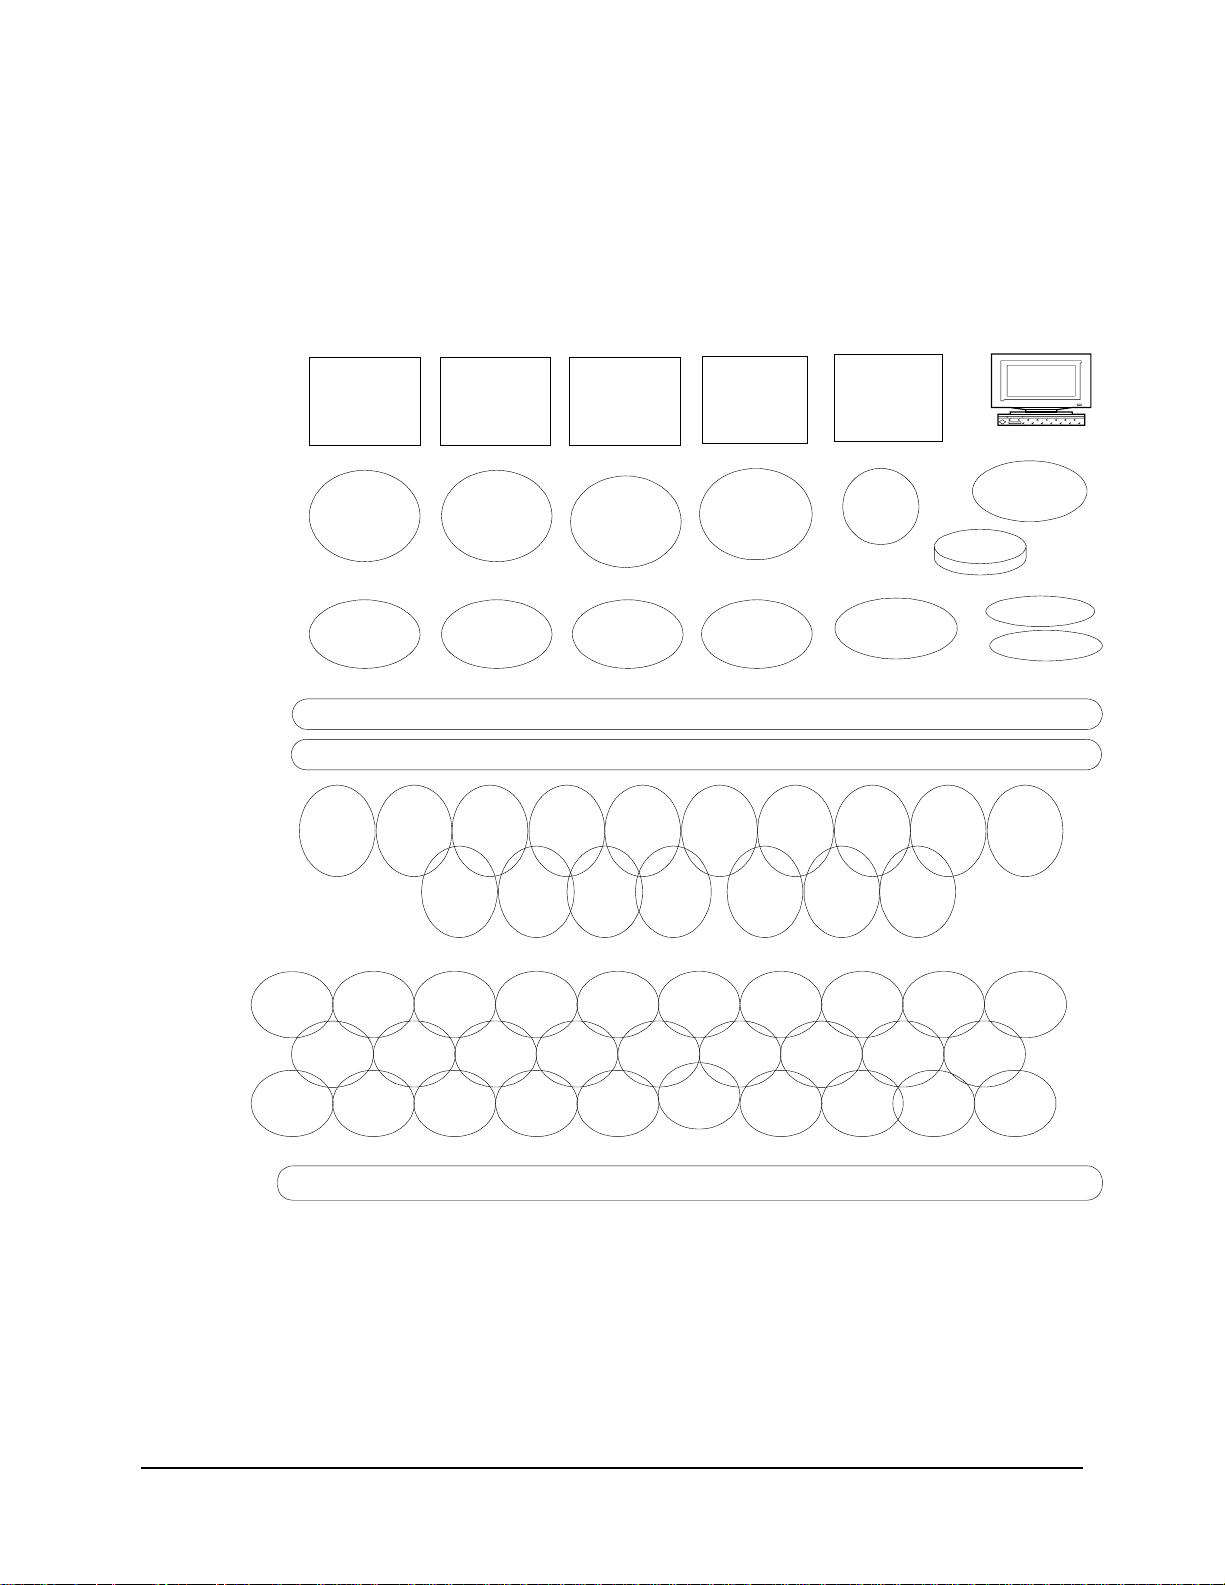
2.5 PSS Component Diagram
The following diagram gives a more complete listing of the software components included in the
WaveWorks PSS system. Further details of these components are provided in subsequent
chapters.
HARDWARE
HARDWARE
INTERFACE
SOFTWARE
CLIENT
SOFTWARE
MESSAGING
BUSINESS
OBJECTS
BUSINESS
SERVICES
Managemen
Unit
t
Lib
PSS
Shopping
Trip Lib
Hand-Held
Terminals
Enabler
Display
Unit
Manage-
ment
COM
POS Status
STEP/
Server
POS Events
PSS
Import
Lib
POS
Interface
COM
PSS
Customer
Rank Lib
PSS DB
Cleanup
COM
PSS
Rescan
Lib
PSS
Barcode
Lib
Card
Reader
Hardware
Interface
Layer
Entrance
Service
PSS
Activity
COM
PSS Activity
PSS
Quick Order
Lib
Customer
POS File
Transfer
COM
Log Lib
PSS Utility
Lib
Entrance
Display
Hardware
Interface
Layer
Entrance
Service
Message Server
Business Server
PSS Item
Maint
COM
PSS
Pricing
PSS
Configura-
tion Lib
Lib
PSS
Quick
Order
Barcode
COM
Session
Transactio
n Files
PSS
PSS
Rank
COM
PSS Item
Lib
PSS
COM
Marketing
Message
System
Messaging
Shopping
PSS
Lib
PSS
Lib
Ticket
Printer
Hardware
Interface
Layer
Printer
Service
PSS
Trip
COM
PSS History
Shopping
Trip
Lib
PSS
Customer
Maint
COM
PSS
NLS Lib
(Language
Support)
POS
Configuratio
n Lib
PSS
Special
Barcode
COM
PSS Web
Utility COM
PSS
Activity
Lib
POS
Interface
Service
PSS
System
Messages
COM
PSS
Message
Log
PSS
Variable
Weight
Barcode
Store
POS
File
Monitor
Service
PSS File
Maintenan
ce COM
PSS
Customer
Lib
Local POS Files
PSS
Transaction
Ticket
COM
PSS
Transaction
Ticket
Lib
PSS Db
Cleanup Lib
Service Terminal
Browser
ComClientTx
PSS
Utilities
COM
POS
Ascii
File
Lib
PSS
Special
Barcode
Lib
PSS File
Utils Lib
IIS
DATA
STORAGE
ODBC Database
WaveWorks PSS, Integration Guide, 1.10 Page 10
© 2000, Symbol Technologies, Inc. February 1, 2000
Page 17

Hardware Requirements
______________________________________________________________________________
3. Hardware Requirements
3.1 Windows NT Computer
A Windows NT Machine is required with approximately the following configuration:
• Intel-based PC (minimum 233 MHz Pentium)
• Windows NT Server version 4.0 (NT Server needed to perform DHCP functionality; if
some other host in store is a DHCP server where PSS files can be written, NT Workstation
is sufficient.)
• VGA monitor
• Mouse
• xx Mb of free space on the hard diskdisk sizing is dependent on length of time historical
data is to be stored in database
• minimum 128 Mb RAM
• CD drive
• Ethernet adapter card
• Token ring adapter card (optional)
The build environment expected is:
• IBM RCO Version 2.3 NT Client Support
• ODBC-compliant database (SQL Server is recommended)
3.2 Hand Held Terminals
• Symbol Technologies’ CST 2040
• Asterix 2 RF; 5-key model
• Asterix 3, RF
Note: See Symbol product literature for available terminal types and options.
WaveWorks PSS, Integration Guide, 1.10 Page 11
© 2000, Symbol Technologies, Inc. February 1, 2000
Page 18

Hardware Requirements
______________________________________________________________________________
3.3 Terminal Dispenser/Entrance Unit
• Symbol Technologies’ CPD 20XX Dispenser - 96, 64, or 32 slot (for Asterix 2 terminals)
• Symbol Technologies' Asterix 3 Standard Charging Cradle
• Entry Station barcode reader or magnetic stripe reader
• Standard furniture
• Optional ticket printer
Note: See Symbol product literature for available dispenser types and options.
3.4 Spectrum 24
Radio Network
The hand held terminals communicate to the Windows NT computer via Symbol’s wireless radio
system. The terminals send and receive radio messages via multiple “access points” located
throughout the store.
WaveWorks PSS, Integration Guide, 1.10 Page 12
© 2000, Symbol Technologies, Inc. February 1, 2000
Page 19

PSS Software Installation
______________________________________________________________________________
4. PSS Software Installation
This installation guide is intended to provide a roadmap for installing and configuring the PSS
system and all supporting software. The reader should be familiar with the Wi ndows interface
and installing software.
This guide assumes the software is being installed on a new machine. It is strongly
recommended that the target computer be dedicated to running PSS and that you install the
software onto a freshly formatted disk.
Before Starting
The following media will be needed during the installation process:
- Bootable Microsoft NT Server Version 4.0 Installation CD
- NT “Getting Started” book (with the Certificate of Authenticity on the front)
- NT 4.0 Service Pack 5 CD
- NT 4.0 Option Pack CD
- Video and Network Card drivers
- Microsoft SQL Server 7.0 (Standard) CD
- Microsoft Access CD or Microsoft Office 97 Professional Edition CD
- Symbol PSS Setup CD (includes WaveWorks, PSS, and customer changes)
The following information will be needed during the install:
- Administrative account and password for the computer
- The IP address and hostname of the target computer. (It is suggested that the target
computer use a private IP subnet. The 172.16.N.N addresses are typically used with a
subnet mask of 255.255.255.0; this allows for 256 hosts on the subnet).
- The range of IP add resses to al loc ate for DHC P use. If you need to have th e tar get computer
on the office/store network, make sure that there are no other DHCP servers on the same
subnet. If that is not possible, then install a second network adapter and use it to connect to
the outside world, leaving the private IP subnet for PSS use.
- Access Point ESS ID (aka Net ID)
WaveWorks PSS, Integration Guide, 1.10 Page 13
© 2000, Symbol Technologies, Inc. February 1, 2000
Page 20

PSS Software Installation
______________________________________________________________________________
4.1 Install NT 4.0 Server
The first step in the installation process is to install the NT 4.0 Server operating system. It is
strongly recommended that you do a clean installation of the entire system. Many of the more
expensive server PCs come with customized installation programs that walk the user thru the NT
installation process. If your PC comes with a special installation CD, you should use it, but re ad
this section first to identify the places where you will have to change settings from the default
values. This section describes the NT installation process using the standard Microsoft NT
Server installation CD.
Below are the specific steps to follow:
Turn the computer on. During the boot-up process, enter the CMOS setuphowever that
process occurs on your machine. Look for a message that says which key to press to enter Setup
(Delete and F2 are popular choices).
- Set the CMOS to boot from the CD-ROM drive.
- Insert the NT Server CD Installation in the CD-ROM drive, then exit from the CMOS
settings. The system should now boot from the CD.
- The blue “Windows NT Setup” screen is displayed. Wait while various system files and
drivers are loaded.
- The blue NT boot screen is displa yed, then it goes back to the “Windows NT Server Setup”
screen.
- Press Enter to install Windows NT now.
- The Mass Storage screen is now displa yed. This section of the setup process is hardware
specific. Most corporate PCs do not have SCS I interfaces installed in them. Many server
PCs do come with SCSI interfaces, so you’ll need to know what kind of hard disks your
system has before continuing. Press Enter to skip searching for SCSI devices. Press “S” to
check for them.
- The Licensing Agreement is displa yed. Read the Agreement (press the Page Down ke y to
advance to the next page) until end of End User License Agreement (EULA) verbiage is
reached.
- Press F8 to accept the Licensing Agreement.
- The Server Setup screen is displayed which lists any previous installations of NT. Select
“N” to install a fresh copy of NT Server.
WaveWorks PSS, Integration Guide, 1.10 Page 14
© 2000, Symbol Technologies, Inc. February 1, 2000
Page 21

PSS Software Installation
______________________________________________________________________________
- The Components list is displayed. Press Enter to accept the list of standard
hardware/software components.
- The Partition options screen is displayed. It is very important to pay attention to what you
are doing here. This section is also hardware specific.
- Start off b y deleting all existing disk partitions. Select each ex isting partition (use the ar row
key to move the highlighted partition) and following the on-screen instructions.
- The screen should now onl y show “Unpartitioned space” since you just deleted all ex isting
partitions. The next step is to create a partition that NT will be installed onto. Depending on
the size of your hard drive, you’ll want to select a value between 2GB (2047 MB) and 4GB
(4095 MB). You will now create a system (C:) partition. Move the highlight to
“Unpartitioned Space” with the arrow keys. Press “C” to create a new partition and then
enter the partition size (a number between 2047 and 4095, consult your system administrator
if you need help).
- If your disk is 8GB or smaller, you can create a D: partition here. If your disk is greater than
8GB in size, the NT setup program can’t access all of it, so it’s best to wait until later to
create the D: partition. To create a D: partition, follow the same steps as for the C: partition,
with the exception that the size will be all the remaining space on the drive (the number is
already filled in for you by default). Typical installations might evenly divide a 6 or 8 GB
disk between the C and D partitions. If you expect the database to be quite large, then give
the D: parition more space than the C partition (but give C at least 2GB!).
- Put the highlight on the C: partition and press Enter to install NT on the C: drive
- The File System selection screen is displayed. The FAT file system is the default, but FAT
partitions are limited to a maximum size of 2GB and are not as efficient as the NT File
System (NTFS). Select the NTFS file system and press Enter.
- Wait while the system formats the C: drive. Note that the D: partition (if you created one)
does NOT get formatted at this step. Formatting a 4GB partition can take a while (10
minutes perhaps).
- The File location screen displays. Press Enter to accept installing NT in the \WINNT folder.
- The Hard disk examination screen displays. Press ESC to skip the exhaustive hard disk
check. The exhaustive check physically checks the entire hard disk surface and can take a
very long time, so we skip it.
- Wait while setup does a quick disk check.
- Wait while setup copies files to the disk.
- The Setup Successful screen is displayed. Remove the CD from CD-ROM drive.
WaveWorks PSS, Integration Guide, 1.10 Page 15
© 2000, Symbol Technologies, Inc. February 1, 2000
Page 22

PSS Software Installation
______________________________________________________________________________
- Press Enter to restart the computer.
- Wait while the system reboots and prepares to continue the installation. You will be
prompted to insert the NT server CD when it is ready to continue. Note that the PC is now
using the mouse and is displaying graphical screens.
- Wait while more files are copied.
- The Windows NT Setup Wizard is displayed. Click the Next button to gather information
about your computer.
- The Name screen displays. Enter a name and organization in the fields provided, then click
on the Next button.
- Enter the Product ID (use the tab key to jump between fields) then click on the Next button.
The Product ID code is found on the cover of the NT Server “Getting Started” book with the
“Certificate of Authenticity” on it.
- The Licensing Modes screen is displayed. Select “Per Seat”, then click on Next.
- The Computer Name screen is displayed. Enter the name of the computer. Note the name
must be unique to avoid confusion within your network domain. Then click on Next.
Contact your network administrator if you need help selecting a Name.
- The Server Type screen is displayed. Select the “Stand Alone Server” option, then click on
Next.
- The Administrator Account screen is displayed. Enter the Administrator Account password
(and the confirmation to ensure you typed it correctly), then click on Next.
- The Emergency Repair Disk screen is displayed. Select “No”, since one will be created later
(once the the system is completely configured). Click on Next to continue.
- The Select Components screen is displayed. In general, we try not load any “fluff” on the
server, so we will limit the amount of extra software we install.
- De-select all the options (no check mark) except for the “Accessories” and
“Communications” options.
- Highlight the Accessories option and click the Details button. Select all the components
listed. Select the OK button.
- Highlight the Communications option. Click on the Details button. Deselect the Chat
and PhoneDialer options. Hyperterminal should be the only component selected. Click
on the OK button.
WaveWorks PSS, Integration Guide, 1.10 Page 16
© 2000, Symbol Technologies, Inc. February 1, 2000
Page 23

PSS Software Installation
______________________________________________________________________________
- Click on the Next button on the Select Components screen to continue.
- The Windows NT Setup screen displays again, click Next to Install Networking.
- The Networking screen is displayed. The “will participate” and “wired to the network”
options should be checked by default, click Next to continue.
- The Microsoft Internet Info Server (IIS) screen is displayed. The “Install” MS IIS box is
checked by default. Uncheck the box since we will be installing a newer version of IIS later
in the procedure. Click Next to continue.
- The Network Adapter screen is displayed. Click on the “Start Search” to look for network
cards. Depending on the type of PC you have, the search may or may not find the network
interface in your computer. The procedure assumes the search does NO T find the network
card in the PC or built into the motherboard.
- Click on the “Select from list“ button, then Click on the “Have disk…” button.
- Insert the floppy disk containing the NT drivers for your network card then click on OK to
search the disk.
- Select the proper driver from the list, then click OK to copy the driver files to the hard disk.
- The network card you just installed the drivers for should now be listed. Click Next to
continue.
- The Network Protocols screen is now displayed. Deselect the “NWLINK IPX/SPX”
protocol. Select the NETBui protocol. TCP/IP is required by the PSS system. NETBUI is
used by NT to access disk drives on other computers. Click Next to continue.
- The Network Services screen displays. Click on the “Select from list..“ button.
- Select the “Microsoft DHCP Server” service from the list, then click OK. The DHCP service
is a central resource that gives out IP addresses to other computers on the same network. The
terminals do not store IP addresses, so they ask DHCP for an IP address when they first
connect to the system.
- Note that DHCP Server is now added to the list of Network Services to install. Click Next.
- Click Next again to install the networking components.
- Wait while files are copied. Click OK on any status boxes that display.
- The TCP/IP Setup dialog box displays and asks “Do you wish to use DHCP?” Click the
“No” button. Just to clarify, this dialog box is asking if we want to assign a hard-coded IP
WaveWorks PSS, Integration Guide, 1.10 Page 17
© 2000, Symbol Technologies, Inc. February 1, 2000
Page 24

PSS Software Installation
______________________________________________________________________________
address to the computer or to let the computer use DHCP (running on some other computer)
to supply us with an IP address. We do NOT want to use DHCP to get an IP address.
- The TCP/IP Properties dialog is now displayed. Enter the following information in the fields
provided, then click OK:
- IP address
- Subnet mask
- Gateway
- The following entry may or may not display: “At least one of the adapter cards has an empty
primary WINS address. Do you want to continue?” Answer “Yes.”
- The Bindings screen is displayed. Click Next to skip past Bindings screen.
- The Network Start screen is displayed. Click Next to start the network.
- The Computer Name screen is displayed. Click Next to accept the computer name and
workgroup selection.
- Click Finish to complete the network setup.
- The Time screen displays. Select the appropriate time zone and system date and time, and
then click on Close.
- A Message box is displayed concerning the video adapter. Click OK. Then click OK on the
Display Properties dialog box. These selections just confirm that you are using the default
640x480 VGA video driver. We will update the video driver later in this procedure.
- Wait while Setup copies files.
- The Windows NT Successfully Installed message is displayed. Remove CD and floppy,
then click “Restart Computer” button.
Congratulations! Windows NT Server is now installed.
WaveWorks PSS, Integration Guide, 1.10 Page 18
© 2000, Symbol Technologies, Inc. February 1, 2000
Page 25

PSS Software Installation
______________________________________________________________________________
4.2 Install the NT 4 Service Pack
NT has bugs, just like any other software. Microsoft releases “service packs” to add new
features and fix bugs on your NT installation. This section of the installation guide documents
how to install Service Pack 5.
- Log in as Administrator (using the password you defined in section 1).
- Close the “Welcome to Windows NT” window.
- Insert the NT Service Pack 5 CD. Service Pack 5 will autostart in a few seconds.
- Click on the “Install Service Pack 5” link (on the left).
- The screen jumps to the Service Pack 5 options. Click on the “Install Service Pack 5 for
Intel-based processors” link.
- A message box asks how to open the file. Click on “Open” to run the setup program.
- The License window displays. Select the “Accept License “ option, deselect the “Backup
files” option, then click on “Install” to continue.
- Wait while files are copied.
- Click on the “Restart” button to reboot the PC.
WaveWorks PSS, Integration Guide, 1.10 Page 19
© 2000, Symbol Technologies, Inc. February 1, 2000
Page 26

PSS Software Installation
______________________________________________________________________________
4.3 Install Internet Explorer 4.01 Service Pack 2
The PSS system uses the Internet Explorer web browser by default. Installing IE4 also provides
some useful desktop updates. We will upgrade our IE4 installation to IE5 later in the procedure
(primarily to install the Task Scheduler that comes with IE5), but we install IE4 here to get the
desktop update and other Windows enhancements.
- Log in as Administrator.
- The “Welcome to Window NT” Screen is displayed. Uncheck the “Show Welcome Scr een
Next Time“ option, then click “Close.”
- Open, then close, the CD drive to restart the Service Pack 5 installation program.
- Click on the “Internet Explorer 4.01 Service Pack 2” link on the left (scroll down if
necessary).
- Click on the “Install IE4.01 SP2 for Intel-based Systems” link.
- Click Open on the security message.
- The Internet Explorer 4.01 Service Pack 2 screen is displayed. Click Next.
- The License screen is displayed. Select the “I accept” option, then click Next.
- The Installation Option screen is displayed. Click Next to accept a “Standard Installation”.
- The Windows Desktop Update screen is displayed. Click Next to install the desktop update.
- The Active Channel Selection screen displays. Click “Next”.
- The Destination folder screen displays. Click “Next” to accept the default destination folder.
- Wait while files are copied.
- Click OK to complete the install.
- Wait while the system is configured.
- Click OK to restart the PC.
- Wait while the PC reboots.
- Log in as Administrator again.
WaveWorks PSS, Integration Guide, 1.10 Page 20
© 2000, Symbol Technologies, Inc. February 1, 2000
Page 27

PSS Software Installation
______________________________________________________________________________
- The IE4.01 setup program automatically starts when you log in and finishes configuring the
system.
- Wait for the desktop to appear.
- Close the Active Desktop Window (click the “x”)
- Click on Start button, then Settings, then Active Desktop and uncheck the “View as Web
Page” option.
WaveWorks PSS, Integration Guide, 1.10 Page 21
© 2000, Symbol Technologies, Inc. February 1, 2000
Page 28

PSS Software Installation
______________________________________________________________________________
4.4 NT Option Pack Install
The NT Option Pack installs software that is not part of the standard NT installation. Our
purpose for installing the Option Pack is to install the Microsoft Internet Information Server
(IIS). IIS is the web server used by PSS for the Service Terminal screens.
- Insert the Option Pack CD, click Install
- Click on Step 5, Install the Windows NT Option Pack.
- Select the “Run this program from current location” option, then click the OK button.
- Click “Yes” on the security warning screen.
- The message “Not tested with Service Pack 4 or great er. Do you wish t o pro ceed? ” message
displays. Click Yes.
- The NT Option Pack Setup screen is displayed. Click Next to continue.
- The License Agreement displays. Click on the “Accept” button.
- The Options screen is displayed. Click on the “Typical” button.
- Click on the Next button to confirm the default file locations.
- Click on the Next button to confirm the default “mailroot” location.
- Wait while files are installed.
- Click “Finish” to complete the setup.
- Click “Yes” to restart the computer.
WaveWorks PSS, Integration Guide, 1.10 Page 22
© 2000, Symbol Technologies, Inc. February 1, 2000
Page 29

PSS Software Installation
______________________________________________________________________________
4.5 Install the Video Driver
The normal NT installation uses a generic video driver. This section leads you through the steps
to installing a video driver for the specific video card in your computer. Installing the correct
video driver for your hardware allows the system to run at higher resolutions, refresh rates and
numbers of colors. You will need the floppy disk containing the video drivers in this section.
- Right Click on the desktop and select the Properties option from the menu.
- The Display Properties window is displayed. Select the Settings tab. Click on the “Display
Type” button.
- Click the “Change…” button.
- Click on the “Have Disk…” button.
- Insert the floppy disk containing the NT video drivers. Click OK.
- Select the appropriate driver from the list, then click OK.
- A third party driver message is displayed. Select the “Yes” button.
- Wait while files are copied from the floppy disk to the hard drive.
- The “Successful Installation” message is displayed. Click OK.
- Select the Close button on Display Type window.
- Select the Close button on Display Properties window.
- Remove the floppy disk from the drive.
- Click “Yes” to reboot the computer.
- Wait while the computer reboots.
- Log in as Administrator.
- A message about a new graphics driver is displayed. Click OK.
- Set the Desktop Area to 1024 x 768 (suggested value)
- Set Color Palette to 65536 colors (suggested value)
WaveWorks PSS, Integration Guide, 1.10 Page 23
© 2000, Symbol Technologies, Inc. February 1, 2000
Page 30

PSS Software Installation
______________________________________________________________________________
- Set Refresh Frequency to 85Hz (or the highest refresh rate offered)
- Click the “Test” button, then the OK button to view the test pattern.
- The test ends after 15 seconds. Click “Yes” if you saw the test patten properly.
- Click OK to exit the Display Properties window.
- Click on the Start button, then Control Panel, then System, then Performance tab. Set the
Virtual Memory min and max sizes to twice the RAM installed in the computer, then click
the “Set” button. Click OK. Select Start Up/Shutdown tab. Change time in “Show list
for…” option to 3 seconds. Click OK.
WaveWorks PSS, Integration Guide, 1.10 Page 24
© 2000, Symbol Technologies, Inc. February 1, 2000
Page 31

PSS Software Installation
______________________________________________________________________________
4.6 Create and Format the Database partition
You may remember the discussion about the creation of a D: partition on the hard drive from the
early steps of this procedure. If you created a D: partition then, you may skip to the Format
steps. If you did not create a D: partition earlier, we will create (and then format) one here. The
D: partition is where we store all the database data files. Run the Disk Administrator utility to
create and format the D: partition:
• Click on the Start button, then Programs, then Admin Tools, then Disk Administrator
• Click OK to update the configuration
Creating the D: partition
<< TO DO: add steps on creating a Logical drive in an Extended partition. Include info about
possibly needing to move the CD-ROM drive l etter to E first, so that you can m ake the new
partition the D: drive>>
Formatting the D: partition
- Click on the D: drive to select it (make it the active partition)
- Right click on then D: drive, then select “Format”
- Change the file system to NTFS (NTFS is more efficient than FAT)
- Change the Volume label to “Database”
- Select the “Quick Format” option
- Click on the “Start” button
- A warning message about losing data displays. Click OK.
- A “Format complete” message displays. Click OK.
- Click on “Close” to exit the Format window.
- Close “Disk Admin” window (click on the “X” in the upper right corner of the screen).
WaveWorks PSS, Integration Guide, 1.10 Page 25
© 2000, Symbol Technologies, Inc. February 1, 2000
Page 32

PSS Software Installation
______________________________________________________________________________
4.7 Desktop Cleanup (optional)
This section includes OPTIONAL changes to the desktop environment. We’ve found that these
changes make life a little easier. The intent is clean up the desktop and to set up the Explorer
window to show the data we want to see.
- Delete the Outlook Express, My Briefcase, Internet Explorer, and Inbox Shortcuts by right-
clicking on the desktop icon and then selecting the Delete option.
- Right click on the “Recycle Bin” icon. Select Properties. Select the “Do not move files… “
option. Click OK. This step basically turns off the Recycle Bin and causes all files to be
deleted immediately. We find ourselves creating (and later deleting) large log files. If the
Recycle Bin is active, you won’t actually delete the file (and free up the disk space) until you
empty the Recycle Bin. So we turn it Off.
- Right click on the Recycle Bin icon. Select the “Empty Recycle Bin” option, then click
“Yes”. This step cleans out any files that were previously deleted and moved to the Recycle
Bin.
- Right click on the desktop and select the Arrange Icons submenu. Select the Auto A rrange
option. This step makes the icons arrange themselves automatically (top to bottom, left to
right). You may want to skip this step if you prefer to group desktop shortcuts all over the
place.
- Click the Start button. Select Settings, then Taskbar, then Small Icons, then OK. This step
keeps the Start menu smaller.
- Click the Start button, then Programs, then Windows NT Explorer. Select View Menu,
Folder Options, View Tab. These changes maximize the amount of information displayed in
the Explorer window.
- Select Display full path in the title bar.
- Select “Show Attributes” in Detail View.
- Select “Show Map Network Drive” button in toolbar.
- Uncheck Hide file extensions for known file types.
- Click on “Show All Files”
WaveWorks PSS, Integration Guide, 1.10 Page 26
© 2000, Symbol Technologies, Inc. February 1, 2000
Page 33

PSS Software Installation
______________________________________________________________________________
4.8 Install Microsoft SQL Server 7
This section installs Microsoft SQL Server 7, the database application used to store PSS data.
This section only installs the software, it does not configure SS7, or create the PSS database.
Those steps are in the next section.
- Insert the MS SQL Server 7 (Standard Edition, not Enterprise) CD. The setup program will
autostart.
- Click on the Install SQL Server 7.0 Components link.
- Click on the “Database Server- Standard Edition” link.
- Click on Next to accept “Local Install”
- The Welcome screen is displayed. Click on Next to continue.
- The License screen displays. Click on Yes to accept.
- Click on Next to accept the default Name and Company.
- Enter CD key at window
- The Setup Type screen is displayed. Select “Typical” install (default). Click “Browse”
button for Data files. We want to put the SS7 data files on a different disk than the
application itself. Change C:\ to D:\, then click OK. Click on Next to continue.
- The Services Accounts window displays. Select “Use the Local System Account,” then click
on Next.
- Select Next (again) to continue.
- The Choose Licensing Mode screen displays. Select “Per Seat” then “Continue”
- The Licensing screen displays. Check the “I agree that..” box, then OK.
- Click on “Continue” again (screen change might be sluggish)
- Wait while files are installed (several minutes)
- The Setup complete screen is displayed. Click Finish.
- Click “Exit” to exit SQL Server 7 install program.
WaveWorks PSS, Integration Guide, 1.10 Page 27
© 2000, Symbol Technologies, Inc. February 1, 2000
Page 34

PSS Software Installation
______________________________________________________________________________
- Reboot the PC manually. (Start | Shutdown | Restart)
4.9 Create and Configure the PSS Database
The PSS database is stored in a few large files. This section creates the (empty) PSS data files.
We will still have to create database tables and populate them (later in the procedure). After
creating the PSS database, we will configure SQL Server and set up the automated database
maintenance tasks.
4.9.1 Create the (blank) PSS Database
This step will create the initial storage for the PSS database.
- Select Start button, then Programs, then Microsoft SQL Server 7.0 Enterprise Manager.
- Expand the “MS SQL Server” branch.
- Expand the “SQL Server Group” branch.
- Expand the <local machine name> branch.
- Under the <local machine name> branch, right click on “Databases.” Select “New
Database.”
- Enter “Name” as “PSS”. WARNING: If you enter a different name, various PSS database
scripts will no longer work. It is strongly recommended that you use the default database
name of “PSS”. Use something else at your own risk!
- Set the initial database size to 512MB.
- Click on the Transaction Log tab.
- Set the initial size transaction log to 512MB.
- Click OK to create and prepare the database
- Wait while the database is created (about 5 minutes)
WaveWorks PSS, Integration Guide, 1.10 Page 28
© 2000, Symbol Technologies, Inc. February 1, 2000
Page 35

PSS Software Installation
______________________________________________________________________________
4.9.2 Configure SQL Server
This step will configure SQL Server to function properly, and allow sufficient security access to
the database.
- Expand the “MS SQL Server” branch.
- Expand the “SQL Server Group” branch.
- Expand the <local machine name> branch.
- Right-click on the local machine name. Select “Properties”
- In the General tab, at the bottom, make sure that in the AutoStart policies, both
‘Autostart SQL Server’ and ‘Autostart SQL Server Agent’ are checked.
- Press OK.
- Expand the security branch
- Right click on “Logins” and select “New Login”
- Select SQL Server authentication
- In the “Name” field, type: IUSR_<machine name>
- Click on Database Access tab
- Click on Pss database “Permit” column
- Select db_datareader and db_datawriter
- Click on OK
- Under the local machine name icon, drop down and expand ‘Management’ and then expand
‘SQL Server Agent’.
- On the SQL Server Agent icon, if a green arrow does not appear, right-click on the SQL
Server Agent icon, and select Start.
WaveWorks PSS, Integration Guide, 1.10 Page 29
© 2000, Symbol Technologies, Inc. February 1, 2000
Page 36

PSS Software Installation
______________________________________________________________________________
4.9.3 Configure the Clear Transaction Log job
This step will schedule a clearing of the SQL Server Transaction Log, which provides temporary
space for all data modification activities in the database. The Transaction Log must be cleared
occasionally to remove old inactive database transaction entries.
- Under SQL Server Agent, click on ‘Jobs’.
- In the right pane, right-click, and select ‘New Job...’
- General tab:
- In Name, enter 'Clear Transaction Log'.
- Under Category, select 'Database Maintenance'.
- Steps tab:
- Click New...
- In Step name, enter 'Clear Transaction Log'.
- Under Database, select the name of the PSS database.
- In Command, enter 'BACKUP TRANSACTION <dbname> WITH
TRUNCATE_ONLY, where <dbname> is the name selected under the D atabase
field.
- Press OK.
- Schedules tab:
- Press New Schedule...
- In Name, enter 'Every 2 hours' (or if you decide to use a differ ent recurrence, a
similarly descriptive name)
- Make sure Recurring is selected, and press Change...
- In Occurs, press Daily.
- In Daily Frequency, select O ccurs Every, and change the val ue to the right to
2.
WaveWorks PSS, Integration Guide, 1.10 Page 30
© 2000, Symbol Technologies, Inc. February 1, 2000
Page 37

PSS Software Installation
______________________________________________________________________________
- In Starting At, change the time to 1:55am (or 5 minutes before backups will
be scheduled to start below).
- Press OK.
- Press OK.
- Press OK.
4.9.4 Configure the Extensive Database Check and Backup job
This step will configure a database backup, and an extensive check of the integrity of all of the
structures in the database, including tables and table indexes, which will run once a week. The
integrity check takes a relatively long time because the structure of all of the table indexes must
be verified, and because of this, this activity must be scheduled for the time of the week with the
least shopping activity.
- Under ‘Management’, click on ‘Database Maintenance Plans’.
- In the right pane, right-click, and select ‘New Maintenance Plan...’, and the Database
Maintenance Plan Wizard should appear. Click “Next.”
- This maintenance plan will include an exhaustive optimization and validation of the
database, as well as a backup. It should run once a week when the system is unused, or
lightly used. The default schedule for these activities is Sunday in the early morning
hours. You should change this schedule only if necessary.
- On the Select Databases page, make sure ‘These databases’ is selected, and check the box
next to the PSS database name. Click ‘Next’.
- On the ‘Update Data Optimization Information’ page, click on ‘Reorganize data and
index pages’, and click on ‘Remove unused space from database files’.
- This operation may take some time, and slow down the system, so if you have a
reason to use a different schedule, then next to ‘Schedule’ press the ‘Change’ button,
and make the appropriate changes.
- Click ‘Next’.
- On the ‘Database Integrity Check’ page, click on ‘Check database integrity’. Click on
‘Perform these tests before doing backups’.
- If you have a reason to use a different schedule, you can change it by pressing the
‘Change’ button next to ‘Schedule’. Make any changes, and press ‘OK”.
WaveWorks PSS, Integration Guide, 1.10 Page 31
© 2000, Symbol Technologies, Inc. February 1, 2000
Page 38

PSS Software Installation
______________________________________________________________________________
- Click ‘Next’.
- On the ‘Specify the Database Backup Plan’ page, make sure the ‘Back up the database’
and ‘Verify the integrity’ options are selected, and under the ‘Location to store’, that
‘Disk’ is selected.
- If you have a reason to use a different schedule, you can change it by pressing the
‘Change’ button next to ‘Schedule’. Make any changes, and press ‘OK”.
- Click ‘Next’.
- On the ‘Specify Backup Disk Directory’ page, make sure ‘Use this directory’ is selected,
and enter the location where your backups should go (usually a different physical drive
than the drive on which the database resides). The default directory is the ‘Backup’
directory under your SQL Server 7 installation directory, such as C:\MSSQL7\BACKUP.
In any case, you should make sure that the specified directory exists in Windows
Explorer, and create it if it does not (using File, New, Folder). Through normal
operation, the database, and therefore the backups, can ev entually grow to be very large,
so make sure the space available will be sufficient.
- Click on ‘Remove files older than’, and change the data to the right to ‘2’ ‘Days’.
This value can be varied based on the amount of space available, and the number of
days of backups you wish to keep.
- Click ‘Next’.
- When the ‘Specify the Transaction Log Backup Plan’ page appears, click ‘Next’.
- When the ‘Reports to Generate’ page appears, click ‘Next’.
- When the ‘Maintenance History’ page appears, click ‘Next’.
- When the ‘Completing the Database Maintenance Plan Wizard’ page appears, select the
entire contents of the ‘Plan Name’ field, and type over it: ‘DB Extensive Check and
Backup’. This may not paint correctly, but your changes should appear in the list once
you are finished with this step. Click ‘Finish’.
- Click OK.
WaveWorks PSS, Integration Guide, 1.10 Page 32
© 2000, Symbol Technologies, Inc. February 1, 2000
Page 39

PSS Software Installation
______________________________________________________________________________
4.9.5 Configure the Nightly Database Check and Backup job
This step will configure a database backup and a brief check of the integrity of all of the tables in
the database, which will run every day of the week, except for the night on which the extensive
check and backup is run. This activity should be scheduled for the time of the day with the least
shopping activity.
- Once again, in the right pane, right-click, and select ‘New Maintenance Plan...’, and the
Database Maintenance Plan Wizard should appear. Click ‘Next’.
- This maintenance plan will include a quick validation of the database, and a backup. It
should run once a night (except for the night on which the exhaustive checks are
scheduled) when the system is unused, or lightly used. The default schedule for these
activities is each day in the early morning hours. You should change this schedule only if
necessary.
- On the Select Databases page, make sure ‘These databases’ is selected, and check the box
next to the PSS database name. Click ‘Next’.
- When the ‘Update Data Optimization Information’ page appears, click ‘Next’.
- On the ‘Database Integrity Check’ page, click on ‘Check database integrity’, and then
click on ‘Exclude indexes’. Click on ‘Perform these tests before doing backups’. Next to
‘Schedule’ press the ‘Change’ button.
- Unless you have a reason to use a different schedule, make sure ‘Weekly’ is selected,
and to the right, check ever y day except for the day on which the exhausti ve backup
is scheduled. If the default, Sunday, is used for exhaustive backups, only every other
day from Monday to Saturday should be checked. Press “OK”.
- Click ‘Next’.
- On the ‘Specify the Database Backup Plan’ page, make sure the ‘Back up the database’
and ‘Verify the integrity’ options are selected, and under the ‘Location to store’, that
‘Disk’ is selected. Next to ‘Schedule’ press the ‘Change’ button.
- Unless you have a reason to use a different schedule, make sure ‘Weekly’ is selected,
and to the right, check ever y day except for the day on which the exhausti ve backup
is scheduled. If the default, Sunday, is used for exhaustive backups, only every other
day from Monday to Saturday should be checked. Press ‘OK”.
- Click ‘Next’.
WaveWorks PSS, Integration Guide, 1.10 Page 33
© 2000, Symbol Technologies, Inc. February 1, 2000
Page 40

PSS Software Installation
______________________________________________________________________________
- On the ‘Specify Backup Disk Directory’ page, make sure ‘Use this directory’ is selected,
and enter the location where your backups should go (usually a different physical drive
than the drive on which the database resides). The default directory is the ‘Backup’
directory under your SQL Server 7 installation directory, such as C:\MSSQL7\BACKUP.
In any case, you should make sure that the specified directory exists in Windows
Explorer, and create it if it does not (using File, New, Folder). Through normal
operation, the database, and therefore the backups, can ev entually grow to be very large,
so make sure the space available will be sufficient.
- Click on ‘Remove files older than’, and change the data to the right to ‘2’ ‘Days’.
This value can be varied based on the amount of space available, and the number of
days of backups you wish to keep.
- Click ‘Next’.
- When the ‘Specify the Transaction Log Backup Plan’ page appears, click ‘Next’.
- When the ‘Reports to Generate’ page appears, click ‘Next’.
- When the ‘Maintenance History’ page appears, click ‘Next’.
- When the ‘Completing the Database Maintenance Plan Wizard’ page appears, select the
entire contents of the ‘Plan Name’ field, and type over it: ‘DB Backup’. This may not
paint correctly, but your changes should appear in the list once you are finished with this
step. Click ‘Finish’.
-
- Click OK.
- Exit Enterprise Manager.
WaveWorks PSS, Integration Guide, 1.10 Page 34
© 2000, Symbol Technologies, Inc. February 1, 2000
Page 41

PSS Software Installation
______________________________________________________________________________
4.10 Install Microsoft Access
There are times that you may want direct access to the WaveWorks database. You do not need
to install the whole MS Office Suite or even any of the Access extras, just Access. This
procedure assumes you are using the Office 97 Professional CD.
- Insert the Microsoft Office Professional CD.
- Click on Install MS Office.
- The Welcome screen is displayed. Click on the Continue button.
- Enter Name and Organization. Click OK.
- The default install folder is displayed. Click OK to accept the default location.
- The installation type window is displayed. Select “Custom”.
- Deselect everything except Microsoft Access, the click Continue to install
- A success message is displayed. Click OK to complete the setup.
- Click on the “X” to exit setup.
4.11 Internet Explorer 5.0 with Task Scheduler install
This section installs the latest version of the Internet Explorer browser. The main reason we
install IE5 is to also install the new Task Schedule program. PSS uses the Task Scheduler to
periodically trigger transactions. We will configure the periodic tasks later in this procedure.
- Insert the PSS CD.
- Open an NT Explorer window.
- Double click on the “symie5.exe” icon in the root folder of the CD.
- Wait while lots of files are copied to the disk (takes a while). The PC will automatically
reboot when done.
WaveWorks PSS, Integration Guide, 1.10 Page 35
© 2000, Symbol Technologies, Inc. February 1, 2000
Page 42

PSS Software Installation
______________________________________________________________________________
- Log on as Administrator.
- The final setup of IE5 will continue. The normal desktop will be displayed when setup is
complete.
4.12 Install WaveWorks
ObjectWave has been renamed “WaveWorks.” The name ch ange is only partially complete, so
you may still see references to “Objectwave” on the system. WaveWorks is the foundation that
the PSS system is built on.
- Insert the PSS CD (if it’s not still in the CD-ROM drive from the previous step)
- Run the WaveWorksSetup.exe file via Explorer to install WaveWorks.
- The Welcome Screen is displayed. Click on the “Install” button.
- The Components Screen is displayed. Click on the “Next” button.
- The Destination Directory is displayed. Click Next to accept the default location. NOTE:
You will break several PSS scripts and will have to perform extra configuration steps to
correct these problems, if you install to a non-default location.
- Click Next to accept the default network parameters.
- Uncheck the “Autostart Services” option. You will need to make the WaveWorks services
autostart before placing the system into production, but it MUST be unchecked until you
have completed the entire PSS installation and verified that things are working properly.
Click Next to continue.
- You may accept the default value of 35 days to retain logs, but if you are installing on a
test/lab system, then perhaps you’ll want to change this value to 7 days to avoid using large
amounts of disk space. Click Next to continue.
- Enter Domain (If part of a larger network). Select Next.
- The Install screen is displayed. Click Install, then OK.
- Wait while files are copied.
- The install is completed.
WaveWorks PSS, Integration Guide, 1.10 Page 36
© 2000, Symbol Technologies, Inc. February 1, 2000
Page 43

PSS Software Installation
______________________________________________________________________________
- Click Finish
- Reboot the PC to make new environment variables and registry changes take effect
4.13 Install PSS Runtime System
This section installs the PSS software. It is strongly recommended that you use the default folder
for the files. This section installs the generic/base system.
- Run the PssWaveworksSetup.exe file to install the PSS system.
- PSS requires several Microsoft and WaveWorks components. If you have skipped any steps
in this installation guide, then you will be notified by a dialog box of any missing
components which may be required. The installation process may stop if a missing
component is required. Please note the missing component name and follow the instructions
in this document for installing that component.
- The Welcome screen displays. Click Next
- The PSS Components dialog displays. Choose the appropriate type of handheld terminal,
entrance unit, printer and POS (Point of Sale) system interface which you will be using.
Click Next.
- Select Destination Directory dialog displays. Click Install. Do NOT change the default
installation directory for PSS. The current installation script will not be able to successfully
complete the installation if this directory is changed.
- Wait while files install.
- Several DOS windows will be displayed as various batch file scripts are run. Most of these
scripts are updating various WaveWorks and PSS database tables. Be sure to read the
messages in the windows. If you see any error messages, write them down. After each s cript
completes, the message “Press any key to continue” displays. Press a key to allow the install
procedure to continue.
- The supplied PSS COM objects are registered at the end of the installation process. For a
first time installation, you may get errors indicating that some Microsoft dll files are missing.
These files have been delivered, but are not yet active, so the system reports errors. In
subsequent installations, these messages should not appear.
- The Limited License Notice screen displays. Read its instructions and then press OK.
- The Installation Completed screen displays. Press the Finish button. The installation process
is now completed
WaveWorks PSS, Integration Guide, 1.10 Page 37
© 2000, Symbol Technologies, Inc. February 1, 2000
Page 44

PSS Software Installation
______________________________________________________________________________
- Reboot the PC to make PSS environment variables and registry changes take effect.
4.14 Install Waveworks Development Studio
This section installs the Waveworks Development Studio system used for modifying the scripts
that drive the handheld terminal applications and that link terminal actions to WaveWorks
transactions. It is strongly recommended that you use the default folder for the files.
- Run the ScreenMakerSetup.exe file on the root directory of the CD..
- The Welcome screen displays. Click Next if you have installed the base WaveWorks s ystem,
or click Cancel and install that component first.
- The Select Components dialog displays. It defaults selection to the most likely components
to be used. If you will be modifying handheld terminal displays, the ScreenMaker and
Hardlock components must be checked. If you will be modifying Pss User Exit routines, the
C++ Development Toolkit must be selected.
- The Select Destination directory dialog displays. Click Next.
- The Ready to Install dialog displays. If you are sure of your selections, click Next.
- The installation progress bar now displays showing the progress of the installation.
- If all goes well, the Installation Completed dialog box displays. Click Finish.
This installation delivers the ScreenMaker application which is used for development of
applications that run on Step compliant terminal devices. It also delivers WaveWorks libra ries
and header files and sets up environment variables needed to compile and link C or C++
WaveWorks transaction components.
4.15 Install PSS Development System
This section installs the PSS Development system software required for modifying handheld
terminal displays and providing other client-specific customizations. It is strongly recommended
that you use the default folder for the files.
- Run the PssDeveloperSetup.exe file.
- The “PSS Development System Installation” screen displays identifying the prerequisite
WaveWorks and PSS components. Click Next if you have installed these components, or
click Cancel and install those components first.
WaveWorks PSS, Integration Guide, 1.10 Page 38
© 2000, Symbol Technologies, Inc. February 1, 2000
Page 45

PSS Software Installation
______________________________________________________________________________
- The PSS Development System requires several Microsoft and WaveWorks components. If
you have skipped any steps in this integration guide, then you will be notified by a dialog box
of any missing components which may be required. The installation process may stop if a
missing component is required. Please note the missing component name and follow the
instructions in this document for installing that component.
- The “Install New User Exit Sources” dialog displays. It defaults to installing the sources. If
this is a first time installation you should just click the Next button. If this is not the first
time installation and you have modified the User Exit sources, you may choose to skip this
step. Before choosing, please read the release notes to see if any existing User Exit call
formats have changed or if any new User Exi ts are supplied in thi s release before you decide
on whether or not to install the User Exit sources. If you choose to install the User Exits, the
files in the User Exit directory will be moved to a backup directory before the new files are
installed. After making your selection, click Next.
- “Select Destination Directory” dialog displays. Click Install.
- Wait while files install.
- The “Installation Completed” dialog displays. The installation process has finished. Click
Finish.
This installation delivers PSS libraries and header files and sets up environment variables needed
to compile and link the User Exit sources into a dll. It also contains a project file for version 6 of
Microsoft Developer Studio. If you are using that development platform, you may use that file
to build the dll. If you are using another development platform, you will need to develop your
own make file or equivalent project file. Once you have built a new dll file, copy it to the
Pss\Bin directory to make it part of the PSS runtime system.
4.16 TFTP Configuration
TFTP (Trivial File Transfer Protocol) is the mechanism that is used to transfer files between the
host and the terminal when the terminal boots up and connects to the host. This section explains
how to install the Symbol TFTP service.
- Click on Start button, then Programs, then Command Prompt to open a command window.
- Type cd c:\tftpserver to change to the "TftpServer" folder.
- Type tftpsvr install c:\tftpserver\tftp.ini to install the TFTP server as a service.
WaveWorks PSS, Integration Guide, 1.10 Page 39
© 2000, Symbol Technologies, Inc. February 1, 2000
Page 46

PSS Software Installation
______________________________________________________________________________
- Type Exit to close command window.
4.16.1 Create STEP hex images for the terminals to download
This section explains how to create the hex image files that are transferred to the terminal.
Asterix2 terminals have a somewhat different procedure than Asterix3 terminals, so follow the
steps for the type of terminals you have. The net result of these steps is that new hex image and
configuration files will be created and copied under the C:\TftpBoot folder for use by the
terminals.
Asterix2 Terminals
- Go to Start | Programs | Command Prompt to open a command prompt window.
- Change to the C:\Asterix2Step\Control folder
- Edit the “hosts.x” file. The file should have a single line with the IP address and hostname
and port id of the DHCP server (typically the target computer). Save the file and exit.
- Change to the Asterix2Step\Hex1 folder
- Edit the “Net.cfg” file. Change the "net_id" to match the net ID of the access point(s) the
PSS system is using. Close and save the file.
- Change to the Asterix2 folder.
- Run MakeStep.bat to create/copy terminal files to the TftpBoot folder
- Exit the command window.
Asterix3 Terminals
- Go to Start | Programs | Command Prompt to open a command prompt window.
- Change to the C:\Asterix3Step\Control folder
- Edit the “hosts.x” file. The file should have a single line with the IP address and hostname
and port id of the DHCP server (typically the target computer). Save the file and exit.
- Change to the Asterix3 folder.
- Run SetupStp.bat to create/copy terminal files to the TftpBoot folder
- Exit the command window.
WaveWorks PSS, Integration Guide, 1.10 Page 40
© 2000, Symbol Technologies, Inc. February 1, 2000
Page 47

PSS Software Installation
______________________________________________________________________________
4.17 DHCP Configuration
DHCP is the service that gives out IP addresses to Asterix terminals when they boot up. The
DHCP service is allocated a r ange of IP addresses that it can give out. This secti on describes
how to set up that range of addresses and make them active.
- Run the "DHCP Manager" program by selecting Start button, then Programs, then
Administrative Tools.
- Select "Local Machine" (double click)
- Run Scope | Create... to create the range of IP addresses to manage.
- Enter the start and end addresses, and subnet mask.
- Change Lease Duration to Unlimited. In Name field at bottom of screen, enter description of
terminals. Select "Yes" when asked to activate the addresses.
- Acknowledge status message.
- Close DHCP window (x at top).
WaveWorks PSS, Integration Guide, 1.10 Page 41
© 2000, Symbol Technologies, Inc. February 1, 2000
Page 48

PSS Software Installation
______________________________________________________________________________
4.18 Create an ODBC Data Source
This section creates the ODBC data source that is used by the PSS software to access the
database. It is strongly recommended that you use the default name “PSS” for the data source.
Using a different name will require you to manually edit the PSS.INI file. The PSS software
uses the data source name in the PSS.INI file and if a matching data source is not found, then
nothing will work.
- Run the ODBC32 control panel applet (Select Start button, then Settings, then Control Panel,
then ODBC)
- Click on the "System DSN" tab
- Click on the "Add..." button
- Select the SQL Server driver, then click the Finish button.
- Enter the following DSN information, then click on the Next button:
- Name: PSS
- Description: PSS Data
- Server: (local)
- Enter the following information on user IDs, then click the Next button:
- Select the "With SQL Server authentication..." radio button
- Change the Login ID: to "sa". Leave the Password blank. Click on Next.
- The Create New Data Source window is displayed.
- Change the default database to “PSS”, then click the Next button.
- Select the "Use regional settings" checkbox.
- Click the Finish button
- Click on the "Test Data Source..." button to verify everything is OK.
- Click on the OK button to return to the System DSN tab.
- Click OK to close ODBC Data Source Administration.
WaveWorks PSS, Integration Guide, 1.10 Page 42
© 2000, Symbol Technologies, Inc. February 1, 2000
Page 49

PSS Software Installation
______________________________________________________________________________
4.19 Load Initial Data
This step will populate the PSS database with the initial data needed for the system to run. The
PSS system is very much a data-driven system. It is CRITICAL that these scripts be run
correctly if you want the system to run properly. You can run a batch file that will run all the
scripts for you (the “Automatic” method), but it requires that the database is named “PSS”. If
you chose to use a different name for the database, you will have to run each script manually
using the Query Analyzer program or edit the BAT file to use the database name you used. The
Automatic method is the preferred method.
Automatic Method
- Open a command window (Start | Programs | Command Prompt)
- Change to the Pss\Database folder
- Run the Pss_Create_And_Init.bat file to create the PSS tables and fill them with data.
- Exit the command window
Manual Method
- Run the Query Analyzer program (Start | Programs | Microsoft SQL Server 7.0|Query
Analyzer)
- Connect to SQLServer (click on the “…” button).
- Select the “Start SQLServer if stopped” button, then click OK.
- Select the PSS database from the dropdown list.
- Run the following SQL files, IN ORDER, by opening them (File | Open), then executing
them by clicking on the green triangle. Pay attention to the status messages at the bottom of
the window. The message should read “Query completed without errors” if the script was
successfully executed. The following SQL files are found in the C:\Pss\Database folder (by
default):
- Pss_Drop_Db.sql (deletes all existing PSS tables, so backup any existing data first)
- Pss_Create_Db.sql (creates empty database tables)
- Pss_Init_Data.sql (loads default data)
- PosInterface_Dbinit.sql (loads POS interface settings)
- PosInterface_Text_Engus.sql (loads POS text strings in US English, the default language)
WaveWorks PSS, Integration Guide, 1.10 Page 43
© 2000, Symbol Technologies, Inc. February 1, 2000
Page 50

PSS Software Installation
______________________________________________________________________________
- Ums_System_Settings.sql (loads Unit Management settings)
- Ums_Text.sql (loads Unit Management settings in US English)
- Exit Query Analyzer.
WaveWorks PSS, Integration Guide, 1.10 Page 44
© 2000, Symbol Technologies, Inc. February 1, 2000
Page 51

PSS Software Installation
________________________________________________________________________
______
4.20 MS IIS Configuration
This step will configure the web server to recognize the PSS Service Terminal as a valid
Active Server Page application, and will allow access to the system from a web browser.
- Select Start button, then Programs, then Win NT Option Pack, then Microsoft
Internet Information Server, then Internet Service Manager.
- Expand Internet Information Server.
- Expand <your machine name>
- Expand default Web Site
- Right click on PSS Interface - Properties. In the Virtual Directory tab, click on
Create button.
- Click OK.
- Exit
- Save console setting message displays. Click No.
WaveWorks PSS, Integration Guide, 1.10 Page 45
© 2000, Symbol Technologies, Inc. February 1, 2000
Page 52

PSS Software Installation
________________________________________________________________________
______
4.21 Obtaining Access to PSS System Administration Screens
This step will configure Internet Explorer for easy access to the Portable Shopping
System Service Terminal.
- Open Internet Explorer (double-click on the icon on the desktop)
- If the Internet Explorer connection Wizard displays, select the “connect through
Local Area Network” option.
- When the browser window displays, select Tools, Internet Options. In the ‘General’
tab, in the ‘Home page’ box, next to ‘Address:’ type in the address:
http://localhost/pssinterface/index.asp, and press OK. Press the ‘Home’ button,
which has an icon that looks like a house.
- The System Administration Main Menu screen displays. Login with the default
username ADMIN, password ADMIN.
- You can then access the System User account screen and setup user accounts specific
to your store, as described in the PSS User Reference Guide.
WaveWorks PSS, Integration Guide, 1.10 Page 46
© 2000, Symbol Technologies, Inc. February 1, 2000
Page 53

PSS Software Installation
________________________________________________________________________
______
4.22 Configure Task Scheduler
This step creates processes that must run autom aticall y at various intervals for the proper
function of the Portable Shopping System. If these tasks are not configured correctly,
certain features of the system, such as timed messaging, will not work, and the system
will eventually cease functioning.
- Double-click "My Computer" on the Windows Desktop. Once the "My Computer"
window appears, locate and double-click "Scheduled Tasks".
- There should be several tasks listed in the window ("Add Scheduled T ask" is not a
task, but will allow you to add tasks to the scheduler, if desired).
- For each task:
- Double-click the task, and the task dialog should appear. Make sure the Task tab
is selected.
- In the "Run:" and "Start in:" fields, scroll across and make sure that all of the path
names that appear point to the correct PSS installation directory (C:\Pss).
- In the "Run as:" field, enter the local Administrator account (e.g.
MyMachineName\Administrator). Click the Set Password button, enter the
Administrator password in each of the two fields, and press OK.
- Press OK on the task dialog.
- To verify that the scheduled task can run correctly, right-click on the task, and
select Run. Scroll to the right in the Scheduled Tasks window, and make sure that
under the Last Run Time column, the current time appears, and that under the
Status column, no error messages appear. The task can th en run successfully as
scheduled.
- Once the procedure above has been run on all scheduled tasks, close the window.
WaveWorks PSS, Integration Guide, 1.10 Page 47
© 2000, Symbol Technologies, Inc. February 1, 2000
Page 54

PSS Software Installation
________________________________________________________________________
______
4.23 Configure Unit Management
This step establishes the configuration of the hardware needed for PSS. The exact
number of entries is specific for each installation, so you’ll need to know what your
hardware set up is. Use the Service Terminal screens to add entries or just directly type
them into the database using the SQL Server Enterprise Manager. If the hardware
configuration is a “standard” setup, then perhaps it would be wise to have an SQL file
that can be run from the Query Profiler instead of manually entering the data at each
store. Follow the order of data entry as shown. There are relationships between the
tables that require this order of creation:
- Create Power Supplies
- Each power supply can handle about a dozen devices. The Unit Management
logic uses the relationship between cradles and power supplies to prevent
unlocking more than one cradle per power supply. Enter one row for e ach power
supply in the PSS system.
- Create Entrances
- Create a row in the UMS_Entrance table for each entr y station. The Entrance ID
is just a sequential number that is used to identify the Entry Station once it has
logged in. The Entry Station logs in using its MAC address (RF Entry stations) or
its service name (Ex. PssEntrance01) for serial entry stations. The MAC address
(or service name) needs to be entered in the Hardware ID field. If you have
multiple entrances you can set the backup entrance. The system will
automatically failover to the backup entrance when the entrance is set to Out of
Service.
- Create Printers
- Create a row in the UMS_Printer table for each printer in the system. The Printer
ID is just a sequential number that is used to identify the Printer once it has
logged in. The Printer logs in using its MAC address (RF printers) or its service
name (ex. PssPrinter01) for serial pri nters. The MAC address (or service name)
needs to be entered in the Hardware ID field. The system will automatically
failover to the backup printer when the printer is set to Out of Service.
- Create Dispensers
- Create a row in the UMS_Dispenser table for each dispenser in the system.
Dispensers are simply a logical group of cradles that are (usually) physically close
to each other. A dispenser is NOT a piece of hardware, although all the cradles
mounted on a particular piece of furniture may be called a dispenser. It is up to
the discretion of the integrator on how to best group cradles into dispensers. You
WaveWorks PSS, Integration Guide, 1.10 Page 48
© 2000, Symbol Technologies, Inc. February 1, 2000
Page 55

PSS Software Installation
________________________________________________________________________
______
want at least one dispenser per entry station, but you may have multiple
dispensers per entry station. Customers are directed to a dispenser, so keep this in
mind when deciding how to group cradles into dispensers. Each dispenser is
controlled by a single entrance.
- Create Cradles
- Finally, create a row in the UMS_Cradle table for each cradl e in the s ystem. This
can be a time consuming process if you have 100 or more terminals and is a fine
reason to have a standard SQL script for configuring the UMS tables. Each cradle
has a location barcode sticker. Make sure that the cradle ID's you enter match the
barcodes exactly (i.e. if the barcode is a "0100", the cradle ID entered must be
0100). The stickers MUST be unique, but they do not need to be sequential. Be
careful to assign the correct power supply to each cradle.
Note: you do not need to create rows in the UMS_Terminal table for the hand-held
terminals. As terminals login to the system, rows are automatically created.
WaveWorks PSS, Integration Guide, 1.10 Page 49
© 2000, Symbol Technologies, Inc. February 1, 2000
Page 56

PSS Software Installation
________________________________________________________________________
______
4.24 Configure Licensing
This step makes the number of licenses bought for specific Microsoft products known to
the system, to avoid warnings in the NT Event Log about violations of software licenses.
To do this, perform the following:
- Select Start, Programs, Administrative Tools, License Manager. The License
Manager window should appear.
- From the License Manager menu, select License, New License.
- Next to Product, select “Microsoft SQL Server 7.0”.
- Next to Quantity, enter the number of licenses you have purchased.
- Press OK.
- Read the license agreement, and click on 'I agree that'.
- Press OK.
- From the menu, select License, New License.
- Next to Product, select “Windows NT Server”.
- Next to Quantity, enter the number of licenses you have purchased.
- Press OK.
- Read the license agreement, and click on 'I agree that'.
- Press OK.
- Close the License Manager.
WaveWorks PSS, Integration Guide, 1.10 Page 50
© 2000, Symbol Technologies, Inc. February 1, 2000
Page 57

PSS Software Installation
________________________________________________________________________
______
4.25 Configure the NBQMAIN Service (IBM 4690 POS Only)
If you chose the IBM4690 POS as your Point of Sale system, NBQMAIN service, which
is part of IBM’s Retail Connectivity Option(RCO), is a critical link between the PSS
system and the POS. The NBQMAIN service should be configured to startup
automatically when WindowsNT starts up. It is NOT controlled by the WaveWorks
System Controller. This section explains how to set up the service to automatically start
and how to configure the service.
You will need to make the NBQMAIN service auto-start at bootup. Go to
StartSettingsControl PanelServices and click on the “nbqmain” entry in the list.
Now click on the “Startup…” button (NOT the “Start” button). Select the Automatic
startup option and click on the OK button. Close the Services window.
The startup parameters, such as the POS controller name, LANA number and heartbeat
interval are contained in the NBQMAIN.CFG file in the PSS\Bin folder. You will need
to edit the NBQMAIN.CFG file to set these parameters to match your specific
installation. Default values are provided in the file.
The most likely parameter to be modified is the LANA number, which is specified with
the –a switch in the NBQMAIN parameters list. This number identifies which netbios
port to use for communication to the IBM4690 POS. The correct value for this parameter
is determined as follows:
From the Windows NT Start button follow the path
StartSettingsControlPanelNetwork.
Select the Services tab, then double-click the NetBIOS Interface
Note the lana number for the “Nbf” entry for the network card connected to the POS
network.
For more information on configuring parameters for the NBQMAIN service, start a D OS
command prompt session, set your path to C:\Pss\Bin and type the command:
nbqmain -?
Additional information is also available in the document Retail Connectivity Option
Version 2.2 , IBM product reference 5764-054.
WaveWorks PSS, Integration Guide, 1.10 Page 51
© 2000, Symbol Technologies, Inc. February 1, 2000
Page 58

PSS Software Installation
______________________________________________________________________________
4.26 Setup NT System Log
Select Start, Program, Administrative Tools, Event Viewer.
Click on "Log" tab.
Select "Log Settings" from pulldown
Chnage settings for "System"
In the "Event Log Settings" Window, in the event Log Wrapping Area, select "Overwrite events
as needed"
Click OK
Click on Log Tab
Select Exit
WaveWorks PSS, Integration Guide, 1.10 Page 52
© 2000, Symbol Technologies, Inc. February 1, 2000
Page 59

Configuration of the PSS System
______________________________________________________________________________
5. Configuration of the P SS Syste m
5.1 Set Up System Setting Constants
All system configuration data is stored in the database. A System Administration screen is
included to provide you with the ability to adjust the configuration data for the system. You can
navigate to this screen by selecting System Settings under the System Management heading
on the main System Administration screen.
The Name of each configur ati on item rel ates this particula r confi gurat ion it em to a subs ystem of
the PSS System. The Subname provides a descriptive name for this particular item. The Value
field displays the current setting for this field. The Description provides all the pertinent
information explaining the use and/or settings for this item. The Unit gives the allowable range
of values. The Default Value is the value used if no changes have been made to this item. And
the Actions field limits the allowable actions for this particular item.
Name – Subname
4POSSinterface – CopyTaxTables
4POSSInterface – NumberPriceBytes
4POSSInterface – POSTransFileVersion
Activity – InactiveTime
DisplaySize – ItemPrice
Display Size – Total Price
ImportItemData – CheckDigitExists
Import Item Data – ValidateCheckDigit
POSInterface – ExcludedDepartments
POSInterface – LanAdapterNumber
POSInterface – Local_TransferArea.
POSInterface – POSControllerName
POSInterface – POSControllerType
POSInterface – ProcessedFileArea
POSInterface – PSSItemBarcodeLength
POSInterface – PSSTransactionType
POSInterface –Remote_TransferArea
POSInterface – Trace_Level
POSInterface – UsePSSPrice
POSItemFile – AddItemChkDigit
POSItemFile – FileFormatVersion
POSItemFile – FileName
POSItemFile – FullItemFileName
POSItemFile – MonitorInterval
WaveWorks PSS, Integration Guide, 1.10 Page 53
© 2000, Symbol Technologies, Inc. February 1, 2000
Page 60

Configuration of the PSS System
______________________________________________________________________________
Name – Subname
POSItemFile – ProcessTX
POSItemFile – PSSExpansionLength
POSItemFile – RemoveItemChkDigit
POSItemFile – TransferEnabled
POSItemFile – TransferTime
POSItemFile – TransferTX
POSItemFile – TransferType
POSItemFile – UserExpansionLength
POSItemUpdate – MonitorInterval
POSTaxFile – FileFormatVersion
POSTaxFile – FileName
POSTaxFile – MonitorInterval
POSTaxFile – ProcessTX
POSTaxFile – TransferEnabled
POSTaxFile – TransferTime
POSTaxFile – TransferTX
POSTaxFile – TransferType
POSTransFile – AddCustChkdig
POSTransFile – AddItemChkdigit
POSTransFile – FileFormatVersion
POSTransFile – FileName
POSTransFile – MonitorInterva
POSTransFile – ProcessTX
POSTransFile – PSSExpansionLength
POSTransFile – RemoveCustChkdigit
POSTransFile – RemoveItemChkdigit
POSTransFile – TransferEnabled
POSTransFile – TransferTime
POSTransFile – TransferTX
POSTransFile – TransferType
POSTransFile – UserExpansionLength
PSS_Global – Barcode_Type
PSS Globar – Default Currency
PSS_Global – Default_Language
PSS_Global – LoyaltyCardLength
PSS Global – PssVersion
PSS_Global – PSS_Name
PSS Global – Store Name
PSS Global – Store Number
PSS Global – Trace Level
PSS Global – Transaction ID
PSS File Monitor – Report Startup Configuration
PSS File Monitor – Trace Level
PSS TransFile – AddCustCheckDigit
PSSTransFile – AddItemCheckDigit
WaveWorks PSS, Integration Guide, 1.10 Page 54
© 2000, Symbol Technologies, Inc. February 1, 2000
Page 61

Configuration of the PSS System
______________________________________________________________________________
Name – Subname
PSSTransFile – FileFormatVersion
PSSTransFile - File Name
PSSTransFile – Monitor Interval
PSSTransFile – ProcessEvent
PSSTransFile – PSSExpansionLength
PSSTransFile – Transfer Enabled
PSSTransFile – TransferTime
PSSTransFile – TransferTX
PSSTransFile – TransferType
PSSTransfile – UserExpansionLength
RESCAN – ConsecNExcptBelowLvl
RESCAN – DefaultDiffUnit
RESCAN – DefaultInitLvl
RESCAN – GlobalAllTimeoutl
RESCAN – GlobalNoneTimeout
RESCAN – GlobalRescan
RESCAN – IgnoreScanTooMuch
RESCAN – MaxTripAmt
RESCAN – MaxWeeksWithout
RESCAN – MinIt emCnt
RESCAN – MinTripAmt
RESCAN – MinItemCntNoRescan
RESCAN – NewUserNeverNumTrips
RESCAN – NewUserNeverSecond
RESCAN – NewUserRescan
RESCAN – OptionsChangeData
RESCAN – UseConsecNever
RESCAN – UseConsecNeverExcept
RESCAN – UseGlobalAllTimeout
RESCAN – UseGlobalNoneTimeout
RESCAN – Use GlobalRescanOpts
RESCAN – UseMaxTripAmt
RESCAN – UseMaxWeeksWithout
RESCAN – UseMinItemCnt
RESCAN – UseMinItemCntNoRescan
RESCAN – UseMinTripAmt
RESCAN – UseNewUserOpts
SHOPPING TRIP – CreateScanIn
SHOPPING TRIP – FS SUPPORT
SHOPPING TRIP – FX TAXED
SHOPPING TRIP – LOYALTY
SHOPPING TRIP – MAXIMUM ITEMS
SHOPPING TRIP – MAXIMUM VALUE
SHOPPI NG TRIP – PR INT TICK ET
SHOPPING TRIP – ROUNDING METHOD
SHOPPING TRIP – SYSTEM CURRENCY
SHOPPING TRIP – SYSTEM LANGUAGE
SHOPPING TRIP - Trace Level.
SHOPPING TRIP – TRANSACTION BARCODE
WaveWorks PSS, Integration Guide, 1.10 Page 55
© 2000, Symbol Technologies, Inc. February 1, 2000
Page 62

Configuration of the PSS System
______________________________________________________________________________
Name – Subname
SHOPPING TRIP – TRANSACTION TYPE
SPECIAL BARCODE – CUSTOMERENDOFTRIP
SVCTERMINAl – Card Prefix
SVCTERMINAL – CustomStatusString
SVCTERMINAL – UsePrinters
SVCTERMINAL – UseQuickOrder
TRANSTICKET – DefaultDir
TRANSTICKET –DefaultPrinter
TRANSTICKET – PrinterColumnWidth
TRANSTICKET - Ticket Cut Type
UMS – BadScanFactor
UMS – BaseFactor
UMS – ChargingFactor
UMS – GoodScanFactor
UMS – LaserOnFactor
UMS – MaxBat t eryLevel
UMS – MinBatt eryLevel
UMS – PopupTimeout
UMS – QueryTimeout
UMS – RadioXmtFactor
5.2 Perform Initial Loading of Customer and Item Data
Both the IBM 4690 POS and the FileBased POS interfaces require the creation of flat ASCII
files of information for PSS to process. The formats and default filenames for the Item and
Customer files are documented in Appendix D of this document. Ultimately the POS should
create both of these file types for PSS to process. An Example Customer file and Item file are
provided in the PSS\PosTools directory for reference. See the readme.txt file in the directory for
more information on the files provided in that directory.
After other configuration steps have been completed and the PSS System has been started, a set
of test Customers and test items can be loaded i nto the system b y placing the example C ustomer
and Item files into the configured Transfer directory(C:\Pss\Transfer). The PssFileMonitor
service will detect them and trigger the WaveWorks transaction to process them and load the
information into the PSS database.
WaveWorks PSS, Integration Guide, 1.10 Page 56
© 2000, Symbol Technologies, Inc. February 1, 2000
Page 63

Validation of System Operation
______________________________________________________________________________
6. Validation of System Operation
6.1 Testing an Installation
Tests Notes
On Windows NT Controller:
Start ObjectWave System Controller Services or check that they are running.
Selecting /opening browser software displays PSS Main menu.
Valid username / password allows login and PSS Main Menu is displayed.
System Summary screen shows system available and correct hardware status.
Physically check that terminals are in “ready to shop” state.
Physically check that Entrance Station displays “Welcome to PSS / insert card.”
Valid shopper card can check out terminal (note location terminal taken from).
System Admin / Terminals screen shows that location as “empty.”
System Admin / View Current Shoppers screen displays that shopper name / card
number.
Begin Shopping Trip:
Scanner Welcome screen displayed for n seconds.
Opening messages display if defined.
Press “+” button and scan a normal item that exists in Item File. Item should be
successfully added and the Item Entry Screen displayed.
Displays correct item description / quantity / price.
Increments total quantity and dollar amount of all items.
View Shopping List Screen.
Add normal item that exists in Item File (Scan barcode while pressing “+” key). UPC #2
Add price-embedded item that exists in Item File. UPC #3
Add normal item that exists in Item File. UPC #4
View Shopping List Screen.
On Shopping List Screen, scroll up and down through list.
Delete normal item just added. UPC #4
Add Item not in Item File (Exception Item). (Scan barcode while pressing “+” key)
Displays “Exception Item” screen for n seconds, then Item Entry screen is redisp layed.
Add “restricted” item that exists in Item File. UPC #7
View Shopping List Screen.
Add multiple quantities of the same normal item that exists in Item File. UPC #8
End Shopping Trip; verify on scanner.
total value of all items
total number of items
Return scanner to cradle.
Verify that scanner reads barcode location and that System Admin / Terminal screen
updates that terminal status / location.
If using tickets, verify ticket total matches display on scanner.
Check System Administration Screens for shopper’s Item List and Activity List; verify
that lists are correct.
Check customer trip through POS registe r.
Check System Administration Screens that shopper’s trip moves from Current to
Historical Status.
UPC #1
UPC #5
WaveWorks PSS, Integration Guide, 1.10 Page 57
© 2000, Symbol Technologies, Inc. February 1, 2000
Page 64

Validation of System Operation
______________________________________________________________________________
6.2 Obtaining System Status Information
6.2.1 Viewing The System Log
The System Log screen allows you to view detailed information on event s that hav e occurred i n
the system; for example, to determine the cause when the system is down.
From the Main Menu, select System / Settings / Status / System Log.
This screen displays the following information:
• The dates and times that events occurred. The pages are ordered from the most current
event to the least current.
• The facility (part of the software) that performs a function. Examples are Unit
Management, Transaction Ticket, PSS File Processor, etc.
• Actions performed that are specifically related to the facility, such as Terminal Returned,
Print Receipt / Stub, POS transFile, etc.
• Severity code from 1-4 and 10, in ascending order of severity.
• Messages.
This System Log screen has several filter options for limiting the data display as follows:
• Display all events in a particular date / time range.
• Display all events associated with a particular facility within a date / time range.
• Display all events associated with a particular action and date / time range.
• Display all events with a particular severity code and date / time range.
• Display all events with messages containing typed-in words or phrases.
• You can also display data with all of the above filter options or select a date / range and
any other one or more of these options.
Note: The data in the log can be limited or expanded by setting the “trace level” of a particular
system facility (function) to a particular level. Trace levels are set in the PSS Settings screen. If
the trace level for the Quick Order function is set to 2, for example, the system will save
information at level 2 and above, but will not save errors to the log that are beneath that level.
The lower the trace level, the more details on the function are saved in the log.
Trace levels are displayed on the log under the title Severity Level. If problems occur with a
facility of the system, you can view the severity level for that facility and decide to lower the
trace level so that future events relating to that facility will be saved in the log.
WaveWorks PSS, Integration Guide, 1.10 Page 58
© 2000, Symbol Technologies, Inc. February 1, 2000
Page 65

Validation of System Operation
______________________________________________________________________________
6.2.2 Viewing POS Status
The POS Interface screen displays POS status messages and activities. These can be sorted by
item name or start date.
To access the POS Status screen, from the Main Menu, select Hardwa re / POS Interface. The
following information is displayed:
• Item name (i. e., customer file, item file, etc.)
• Instance name
• Detection time
• Start and end time
• Instance value(online, restarting, open, etc.)
• Instance description(errors while processing, successfully processed, etc.)
WaveWorks PSS, Integration Guide, 1.10 Page 59
© 2000, Symbol Technologies, Inc. February 1, 2000
Page 66

Directory Listing of PSS Folders/Files
______________________________________________________________________________
7. Directory Listing of PSS Folders/Files
This section provides a detailed listing and description of the Folders and Files that are created as
a result of the PSS installation process.
C:\
Folders SubFolder Files Description
Asterix2Step This folder contains the software that is
loaded on the Asterix 2 hand held scanne rs
and the batch files which place those files into
the tftpBoot directory for retrieval by the
scanners during initial introduction to the
system or during reboot of the terminal.
Bios236.hex Bios hex file used for manual download.
Makebios.bat Used by makestep.bat to create .bin version of
bios.
Makectrl.bat Used by makestep.bat to copy files to tftpboot
directory.
Makehex1.bat Used by make st ep.bat to create hex1 hex and
.bin files.
Makehex2.bat Creates hex2 .hex and .bin files.
Makestep.bat Transfers A2 files to the tftpBoot directory.
Romdisk1.hex Hex1 .hex file used for manual download.
Romdisk2.hex Hex2 .hex file used for manual download.
Sendbios.bat Manual download batch file for bios.
Sendhex1.bat Manua l download batch file for hex1.
Sendhex2.bat Manua l download batch file for hex2.
Astdiag Contains diagnostic files for A2.
Bldtools Contains .exes used by batch files.
Control Host.x file Defines which host the terminal connects to.
Hex1 Contains all files associated .hex1 files.
Hex2 Net.cfg Contains access point id number and other
files part of .hex2 files.
Asterix3Step This folder contains the software that is
loaded on the Asterix 3 hand held scanne rs
and the batch files which place those files into
the tftpBoot directory for retrieval by the
scanners during initial introduction to the
system or during reboot of the terminal.
MakeRFLD.bat Batch file to create .LD file from .hex.
RFburn.hex hex file for RF loader (Ver 1.4) (obsolete)
SendRF.bat Manual download of RF loader.
Setupstp.bat Transfers A3 files to the tftpBoot folder.
Bldtools Executables used by batch files.
WaveWorks PSS, Integration Guide, 1.10 Page 60
© 2000, Symbol Technologies, Inc. February 1, 2000
Page 67

Directory Listing of PSS Folders/Files
______________________________________________________________________________
Folders SubFolder Files Description
Control Host.x Defines which host the terminal connects to.
ObjectWave Location of all ObjectWave-related
architecture files (Refer to WaveWorks
product documentation.)
PSS The Master directory for the PSS software.
Install.log Created by installation program to document
the placement of files.
Prs_tags.000
Prs_tags.001
Pss.ini Initialization file which defines the path the
Backup varies Directory used by the installation process to
Bin
EhtService.exe STEP translator for RF entrance units.
EntryStationService.exe Controls serial entrance units.
nbq.bat 4690 POS install script.
nbqmain.cfg 4690 POS configuration file.
nbqmain.exe 4690 POS NT service.
nxg.cfg Library used by IBM 4690 POSService.
Nxgco.dll Library used by IBM 4690 POSService.
Nxghil.dll Library used by IBM 4690 POSService.
Nxgue.dll Library used by IBM 4690 POSService.
posapi.dll Library used by IBM 4690 POSService.
POSInterFaceCOM.exe COM object – processes POS item,
PosService.exe 4690 POS – NT service that transfers
PrinterService.exe Controls serial ticket printers.
PssActivityCom.exe Adds shopping trip activities to activity table.
PssCustomerMaintCom.exe COM object – processes POS customer file.
PSSCustomerRankCom.exe COM object – performs customer ranking
PssDBCleanupCom.exe COM object – performs database data
PssFileMaintCom.exe COM object – performs file housekeeping
PSSFileMonitorSvc.exe File monitor service.
PssQOBarCodeCom.exe Processes quick order barcodes.
PssShoppingTripCom.exe Performs shopping trip functions.
PssSpecialBarCodeCom.exe Performs special barcode lookups.
PSSSystemMessage Com.exe COM object – provides PSS System
When tickets are printed to serial printers,
these files convert the software commands
into printer commands.
database, as well as the login authorization.
keep previous versions of files (in the event
that regression is needed).
transaction files.
information between POS and PSS.
based on amount spent over a specified
number of shopping trips.
maintenanc e functio ns, such as removing old
shopping trips, or message log data.
functions.
Messaging functionality for sending messages
at specified times.
WaveWorks PSS, Integration Guide, 1.10 Page 61
© 2000, Symbol Technologies, Inc. February 1, 2000
Page 68

Directory Listing of PSS Folders/Files
______________________________________________________________________________
PssTransactionTicket Com.exe COM object – provides PSS transaction ticket
printing services, in conjunction with the
PrinterService.
PSSUserExits.dll Stub user exit routines.
PssUtilsCom.exe COM object – contains PSS utility functions.
PssWebUtilityCom.dll COM object – provides WaveWorks / PSS
utility services for the Service Terminal.
Qexec.exe “Quietly” executes a command (no command
window).
UnitMgmtCom.exe Provides uni t management business services.
Database
InsertA2EntranceServices.sql Adds serial entrance services to the WW
daemon table.
InsertA2PrinterServices.sql Adds serial printer services to the WW
daemon table.
InsertA3EntranceServices.sql Adds RF entrance service to the WW daemon
table.
InsertAdmProcesse s.sql Adds startup / shutdown e ntries to the WW
process table.
InsertPssServices.sql Adds standard PSS services to the WW
daemon table.
InsertServiceTerminalPrinter
Service.sql
POSINTERFACE_DBINIT.SQL Initializes POS interface system settings.
POSINTERFACE_TEXT_ENGU
K.SQL
POSINTERFACE_TEXT_ENGU
SA.SQL
pss_count.sql SQL script that lists a count of record s for
PSS_Create_And_Init.bat Batch file that runs all of the scripts necessary
pss_create_db.sql SQL script to create the PSS database tables.
pss_delete.sql SQL script to delete all of the data from the
PSS_Delete_And_Init.bat Batch file that runs all of the scripts necessary
pss_drop_db.sql SQL script to delete all of the PSS database
pss_init_data.sql SQL script to initialize most of the necessary
pss_init_text_2.sql SQL script containing text for the English –
pss_init_text_3.sql SQL script containing text for the French
pss_init_text_4.sql SQL script containing text for the Dutch
PSS_SYMBOL.ER1 ERwin database model of the PSS database.
UMS_System_Settin gs.sql Adds UMS constants to system settings.
UMS_Text.sql Adds UMS text strings to text table in US
Adds the service terminal printer service to
the WW daemon table.
UK English version of messages written by
the POS interface to the system log (loads
tables PSS Text).
USA English version of messages written to
system log by POS interface.
each table in the PSS database.
to create and initialize the database for a
generic PSS sys t em.
PSS database tables.
to delete the existing data and reinitialize the
database for a generic PSS system.
tables.
settings and text for the generic PSS system.
UK language.
language.
language.
English.
WaveWorks PSS, Integration Guide, 1.10 Page 62
© 2000, Symbol Technologies, Inc. February 1, 2000
Page 69

Directory Listing of PSS Folders/Files
______________________________________________________________________________
Folders SubFolder Files Description
UmsCleanup.sql Sets all UMS devices to “logged out” at
startup / shut down.
UpdateOwave.bat Generic update batch file that runs an SQL
script on WaveWorks database.
Logs
Ess01.tr1 Trace file for entrance units which use serial
communications.
Prs01.tr2 Trace file for printers which use serial
communications.
Print Temporary holding location for transaction
ticket print files.
Processed Holding directory for files received from POS
after processing by PSS. (Note: this directory
name and the filenames identified below are
configurable to accommodate POS systems;
the names listed are the default entries.)
Shopping transaction f iles:
cardnumber_yyyymmddtttt_PSS completed
where yyyy = year, mm = month, dd = day and
tttt = time; this is the PSS shopping
transaction as scanned by the customer.
cardnumber_yyyymmddtttt_POS.
completed
where yyyy = year, mm = month, dd = day and
tttt = time; this is the POS shopping
transaction as completed at the register.
Item files:
PLUNW.PSS - a full item (price look up) file
transfer.
PLUMTnn.PSS – a partial (maintenance) item
file update, where nn is a sequential number
reset each day.
Customer files:
CUSTMTnn.DAT – a maintenance update to
the customer data file.
StepDev Files with an .sws extension are links between
COM Objects and transaction Ids. Files with
an .swv extension are ScreenMaker interface
files.
DiManager.swv Display interface manager interface.
EHT.swv RF entrance interface.
ExpressShopper.swv Interface for express shopper.
WaveWorks PSS, Integration Guide, 1.10 Page 63
© 2000, Symbol Technologies, Inc. February 1, 2000
Page 70

Directory Listing of PSS Folders/Files
______________________________________________________________________________
install.bat Batch file run to install scripts to (base)
WaveWorks database.
MainMenu.swv Initial interface that launches either UMS or
shopping trip.
PosInterface.sws Associates WaveWork transactions with COM
methods that perform POS interface functions.
Pss.swp Used by ScreenMaker.
PssActivityCom.sws
PssCustomerMaintCom.sws
PssCustomerRank.sws
PSSDbCleanup.sws
PssFileMaintCom.sws
PssQOBarcodeCom.sws
PssShoppingTripCom.sws
PssSpecialBarcodeCom.sws
PssSystemMessage.sws
PssTimerCom.sws Debug tool for shopping trip.
PssTransactionTicket.sws
PssUtilsCom.sws
QuickOrder.swv Quick order interface.
release.ini List of multiple .sws and .swv files to install.
ShoppingTrip.swv Shopping trip interface.
sminstall.exe Installs .sws and .swv files.
UMS.sws
UMS.swv UMS interface.
update.bat (customer specific
data)
update.ini (customer specific
data)
Transfer The holding location used by the PSS and
Trans ID
Trans ID
Trans ID
Trans ID
Trans ID
housekeeping.
Trans ID
Trans ID
Trans ID
Trans ID
Trans ID
Trans ID
Trans ID
Batch file used to change base script or add
new ones.
List of files to update for a customer.
POS for exchanging files (i.e. both systems
read from and write to this directory). Under
normal conditions, files reside here only
temporarily.
shopping activity log functions.
customer download function.
customer ranking function.
database cleanup function.
COM methods that perform file
quick order barcode func tions.
shopping trip functions.
special barcode functions.
process system messages function.
transaction ticket printing function.
utility function.
UMS COM methods.
Web All *.asp files are Active Server Pages.
admincradles.asp Administer cradle hardware.
admindispensers.asp Administer dispenser hardware.
admineditterminal.asp Edit terminal settings / status.
adminentrances.asp Administer entrance unit hardware.
administer.asp Presents the service terminal menuing system.
adminpageactions.asp Administers authenticated service terminal
page actions.
adminpages.asp Administers authenticated service terminal
pages.
adminpos.asp View and administer point-of-sale system
status.
adminpowersupplies.asp Administer power supply hardware.
adminprinters.asp Administer printer hardware.
adminservices.asp Administer PSS NT service components.
adminterminals.asp Administer termina l hardware.
adminusers.asp Administer service terminal users.
WaveWorks PSS, Integration Guide, 1.10 Page 64
© 2000, Symbol Technologies, Inc. February 1, 2000
Page 71

Directory Listing of PSS Folders/Files
______________________________________________________________________________
Folders SubFolder Files Description
fielddate.inc Script file to present a standard date input
field.
fieldtime.inc Script file to present a standard time input
field.
global.asa Active Server Page application file that sets
up database connections for the PSS service
terminal.
index.asp Redirects the service terminal to the
appropriate first page.
index.html Redirects the service terminal to the
appropriate first page.
issueterminal.asp Issues a hand-held terminal to a customer and
displays the location of the terminal.
keyboard.asp Displays an on-screen keyboard for use with
terminals without keyboards (currently
unused).
login.asp Presents a user login prompt and performs
user authentication.
lookupuser.asp Looks up a customer by account details.
pss.css Cascading Style Sheet file to create consistent
positioning and font formatting throughout the
PSS service terminal.
pssdatatableend.inc Active Ser ver Pages script file to manage the
portion of a data table after the data is
displayed.
pssdatatablestart.inc Active Server Pages script file to manage the
header and retrieval of data for a data table.
pssfunction s .inc Active Server Page s script file containing
numerous functions for use throughout the
service terminal.
psstatus.inc. Active Server Pages script file to calculate the
current status of the Portable Shopping
System.
quickorder.asp Displays an individual quick order in the
quick order frames page.
quickorderframes.asp Displays multiple quick orders.
quickorderheader.asp Manages display of multiple orders on the
quick order frames page.
registeruser.asp Creates or administers PSS customers.
sendmessage.asp Sends ad hoc messages to PSS customers, or
defines and schedules system messages.
systemproblems.asp Views any current problems with PSS.
systemsummary.asp View an operational summary of PSS.
unabletoissue.asp Displays errors in issuing a terminal to a
customer.
viewdepartments.asp View the configured item departments.
viewitemdetails.asp View the details of a particular item.
viewitems.asp View the currently configured items.
viewmarketing.asp View and administer the currently configured
marketing messa ges.
WaveWorks PSS, Integration Guide, 1.10 Page 65
© 2000, Symbol Technologies, Inc. February 1, 2000
Page 72

Directory Listing of PSS Folders/Files
______________________________________________________________________________
viewmessagelist.asp View the currently configured system
messages.
viewmessagelog.asp View the PSS system log.
viewnlstext.asp View the currently configured language-
dependent text.
viewopeningmessages.asp View the currently configure d opening
messages.
vieworderitems.asp View the items selected for a particular quick
order.
vieworders.asp View the currently entered quick orders.
viewreportrescan.asp View the Shopper Rescan Report.
viewreportsales.asp View the Sales Rep ort.
viewreportshoppersummary.asp View the Shopper Summary Report.
viewreportterminals.asp View the Hand-Held Terminal Report.
viewreportunknownitems.asp View the Unknown Item Report.
viewrescanresults.asp View the results of rescans in a particular
customer’s historical shopping trips.
viewrescansettings.asp Administer the PSS Rescan system
configuration.
viewshoppers.asp View and administer the customers currently
using PSS.
viewshoppingactivities.asp View the activities that occurred during a
particular customer’s current or historical
shopping trip.
viewshoppingitems.asp View the items selected for purchase during a
particular customer’s current or historical
shopping trip.
viewshoppinglists.asp View the list of a particular customer’s
current, historical, and incomplete shopping
trips.
viewsystemsettings.asp View and administer PSS system settings.
viewtaxtableentries.asp View the entries for a particular PSS tax table.
viewtaxtables.asp View the list of PSS tax tables.
viewterminallist.asp View a terminal issue list of termi nals
available by dispenser.
viewusersummary.asp View a particular customer account summary.
Web – Images various Contains graphics files that are used
throughout the Service Terminal application
(e.g., the red, yellow and green traffic light on
the Main Menu.)
Working Where files reside while the PSS software is
processing them.
TftpBoot Location of software files which are
downloaded to hand held terminals when they
boot.
TftpServer Service that provides for file transfers.
D:\ (database repository)
WaveWorks PSS, Integration Guide, 1.10 Page 66
© 2000, Symbol Technologies, Inc. February 1, 2000
Page 73

Directory Listing of PSS Folders/Files
______________________________________________________________________________
Folders SubFolder Files Description
Mssql7 varies Location of all database tables, in Microsoft SQL
Server format.
7.1 Scheduled Tasks
Folders SubFolder Files Description
C:\Winnt\Tasks Repository for time-based tasks to be defined and
scheduled.
WaveWorks PSS, Integration Guide, 1.10 Page 67
© 2000, Symbol Technologies, Inc. February 1, 2000
Page 74

Software Description
______________________________________________________________________________
8. Software Description
The subsystems included in the WaveWorks PSS system may consist of any combination of the
following:
COM Object s Contain methods invo ked via WaveWorks transactions. Managed
by the Message Server.
NT Services Contain methods invo ked via WaveWorks transactions. Usuall y
started at system startup.
StepServer Scripts Manage the user interface and screen flow for the hand held
terminals. Maintain client data variables. Invoke business services
(COM object methods) via WaveWorks transactions.
8.1 PSS Transaction IDs / COM Object Method Listing
The following tables list the transactions used to perform business logic, the methods which are
invoked, and the input and output parameters.
POSInterface
Transaction ID Method Name Input Parameters Return Parameters
P2P002 LoadPOSTransaction FilePath Result
P2P003 LoadPOSItemFile FilePath Result
P2P005 LoadTaxTable FilePath Result
POS100 POSstartup Result
P2P103 POSSItemFileTransfer Result
P2P199 FileTransferNoOP Result
P2P304 EnableItemUpdates
P2P404 DisableItemUpdates
POS300 POSLogin PosVersion
TransactionCheckInterval
ItemUpdatesCheckInterval
CopyTaxTablesWithItems
PSSTransactionType
NumberPriceBytes
LoyaltyCardnumLength
LANAdapterNumber
TransferAreaPath
POSControllerName
Result
POS301 SetCommLinkStatus LinkStatus Result
WaveWorks PSS, Integration Guide, 1.10 Page 68
© 2000, Symbol Technologies, Inc. February 1, 2000
Page 75

Software Description
______________________________________________________________________________
PSSActivity
Transaction ID Method Name Input Parameters Return Parameters
PSA010 PssActivityAdd CustomerId
ShoppingListId
ActivityId
DetailText
RetValue
PSSSpecialBarcode
Transaction ID Method Name Input Parameters Return Parameters
PSP001 Refresh RetValue
PSP010 PssGetBarCodeType InputBarcode
TerminalId
ItemId
Action
BarcodeType
RetValue
PSSQOBarcode
Transaction ID Method Name Input Parameters Return Parameters
PSQ010 GetMaxQONumber CustomerId
ShoppingListId
PSQ020 PssQOBarCode CustomerId
ShoppingListId
PreviousQONumber
PreviousItemId
CurrentBarcode
Action
PreviousDepartmentId
PSQ030 PssQOSend CustomerId
ShoppingListId
QONumber
PSQ031 PssQOQuit CustomerId
ShoppingListId
QONumber
PSQ040 PssQOGetTotalQty CustomerId
ShoppingListId
QONumber
PSQ050 PssQOListItems CustomerId
ShoppingListId
QONumber
QONumber
RetValue
ThisItemId
This ItemName
ThisItemUnit
ThisItemDepartmentId
ThisItemQty
ThisQONumber
RetValue
RetValue
RetValue
TotalQuantity
RetValue
ItemNames
ItemUnits
ItemQty
RetValue
WaveWorks PSS, Integration Guide, 1.10 Page 69
© 2000, Symbol Technologies, Inc. February 1, 2000
Page 76

Software Description
______________________________________________________________________________
PSSShoppingTrip
Transaction ID Method Name Input Parameters Return Parameters
PST001 CreateShoppingList TerminalId
CustomerId
PST003 SwapTerminal TerminalId
CustomerId
PST004 ValidateCustomer CardNumber Output
PST005 PssSessionSwitch TerminalId
InputBarcode
Customer Id
ShoppingListId
PST007 GetSessionData TerminalId
CustomerId
ShoppingListId
PST008 GetShoppingTripType TerminalId
TripType
PST010 StartShoppingTrip TerminalId CustomerId
PST020 AdjustShoppingItemData InputBarcode
CustomerId
ShoppingListId
ItemQuantity
ListValue
Action
CustomerCurrencyId
TerminalId
CMSName
CMSApplication
TerminalGroup
PST025 SetShoppingListStatus CustomerId
ShoppingListId
ShoppingListStatus
PST030 GetShoppingList CustomerId
ShoppingListId
CustomerCurrencyId
RetValue
RetValue
CustomerName
LanguageId
Greeting
CustomerId
Result
NewCustomerId
NewShoppingListId
SessionStatus
RetValue
Result
RetValue
ShoppingListId
CustomerName
CustomerLanguageId
CustomerCurrencyId
RescanLevel
StoreNumber
RetValue
ItemDescription
ItemPrice
ItemCount
TotalValue
TotalCount
Msg
EmbeddedPriceItem
RetValue
RetValue
ItemPrice
ItemQuantity
ItemDescription
ItemId
EmbeddedPrice
TotalValueString
TotalValueInt
ItemCount
RetValue
WaveWorks PSS, Integration Guide, 1.10 Page 70
© 2000, Symbol Technologies, Inc. February 1, 2000
Page 77

Software Description
______________________________________________________________________________
PST035 GetDisplayTotalB yCurrency CustomerId
ShoppingListId
CustomerCurrencyId
CurrencyIndex
PST038 AdjustShoppingList ItemId
CsutomerId
ShoppingListId
ItemQty
Action
TerminalId
CmsApplication
StartIndex
NumberOfItems
PST040 GetStoreInformational
Message
PST041 GetCustomerMessage CustomerId
PST042 GetElectronicMarketingMes CustomerId
PST043 GetCustomerCardNumber CustomerID CardNumber
PST100 EndShoppingTrip CustomerId
PST102 DeleteShoppingList TerminalId RetValue
PST104 DetermineEndShoppingTrip CustomerId
PST200 GetExpressCustomer CustomerId
PST999 Refresh
CustomerId
ShoppingListId
ShoppingListId
ShoppingListId
ItemId
TerminalId
CMSName
CMSApplication
TerminalGroup
ShoppingListId
TerminalId
TerminalLocation
RescanLevel
ShoppingListId
TerminalId
TerminalLocation
RescanLevel
CurrencyIndex
DisplayTotal
Result
ItemDescription
ItemPrice
ItemCount
TotalValue
TotalCount
Msg
EmbeddedPriceItem
ItemId
MsgFlags
RetValue
Text Message
RetValue
Text Message
RetVal
TextMessage
Result
Result
Rescan
RetValue
Rescan
Result
Result
TransactionTicket
Transaction ID Method Name Input Parameters Return Parameters
PST101 PrintTicket CustomerID
ShoppingTripID
TransactionType
PrinterService
RetValue
PSSSystemMessage
WaveWorks PSS, Integration Guide, 1.10 Page 71
© 2000, Symbol Technologies, Inc. February 1, 2000
Page 78

Software Description
______________________________________________________________________________
Transaction ID Method Name Input Parameters Return Parameters
PST103 ProcessMessages RetValue
WaveWorks PSS, Integration Guide, 1.10 Page 72
© 2000, Symbol Technologies, Inc. February 1, 2000
Page 79

Software Description
______________________________________________________________________________
PSSUtils
Transaction ID Method Name Input Parameters Return Parameters
PSU001 GetText TextId
CustomerLanguageId
PSU002 GetTextWithParms TextId
CustomerLanguageId
TextParameters
PSU003 GetInActivityTimeoutString InactivityIndex InactivityString
TextMsg
RetValue
Text
Result
Result
UnitMgmt
Transaction ID Method Name Input Parameters Return Parameters
UMS001 ReserveBestTerminal EntranceId TerminalId
DispenserId
CradleId
DispenserName
Result
UMS002 TerminalIssued TerminalId Result
UMS003 TerminalReturned TerminalId
Location
IssueTime
ReturnTime
PlusScans
MinusScans
FailedScans
UMS004 TerminalTimeout TerminalId Result
UMS005 TerminalLogin TerminalId
Location
TerminalType
UMS006 TerminalLogout TerminalId Result
UMS007 GetTerminalStatus TerminalId StatusCode
UMS008 SetTerminalStatus TerminalId
StatusCode
Reason
UMS009 ResetTerminalStatistics TerminalId Result
UMS010 GetTerminalTypeInfo T erminalType TerminalClass
UMS011 GetCurrentInterface TerminalId InterfaceName
UMS012 SetCurrentInterface TerminalId
InterfaceName
UMS013 UpdateBatteryLevels Result
Result
Result
StatusText
StatusTimestamp
Result
Result
DefaultInterface
DisplayRows
DisplayColumns
KeypadType
Result
Result
Result
WaveWorks PSS, Integration Guide, 1.10 Page 73
© 2000, Symbol Technologies, Inc. February 1, 2000
Page 80

Software Description
______________________________________________________________________________
UMS014 SetBatteryStatus TerminalId
BatteryStatus
UMS020 ReleaseTerminal TerminalId Result
UMS021 RebootTerminal TerminalId
BootType
UMS022 UnlockTerminal TerminalId Result
UMS023 QueryTerminal TerminalId Location
UMS024 ResetTerminalSession TerminalId Result
UMS025 SetTerminalUnlockMode TerminalId
UnlockMode
UMS026 TestCardReader EntranceId CardData
UMS027 ReportBatteryCondition TerminalId
BatteryCondition
UMS028 UpdateTerminalLocation TerminalId
Location
UMS100 EntranceLogin HardwareId
StatusCode
UMS101 EntranceLogout EntranceId Result
UMS103 SetEntranceStatus EntranceId
StatusCode
UMS104 GetEntranceMode EntranceId Mode
UMS105 UpdateEntranceModes Return
UMS106 GetEntranceConfig EntranceId ReaderType
UMS107 ProcessCardData EntranceId
RawData
UMS108 GetDispenserCounts DispenserId TotalCount
UMS200 PrinterLogin HardwareId
PrinterStatus
UMS201 SetPrinterStatus PrinterId
PrinterStatus
Reason
UMS202 GetPrinterConfig HardwareId PrinterType
UMS999 Refresh N / A Return
Result
Result
Result
Result
Result
Result
Result
EntranceId
Mode
Result
Result
Return
ReaderPort
DisplayType
DisplayPort
PopupTimeout
CardLength
Return
CardNumber
CardStatus
Return
IssueCount
ChargingCount
UnavailCount
OtherCount
Return
PrinterId
Result
Result
PrinterPort
Return
PSSCustomerMaint
WaveWorks PSS, Integration Guide, 1.10 Page 74
© 2000, Symbol Technologies, Inc. February 1, 2000
Page 81

Software Description
______________________________________________________________________________
Transaction ID Method Name Input Parameters Return Parameters
P2P006 LoadFromFile
PSSFileMaintenance
Transaction ID Method Name Input Parameters Return Parameters
P2P201 CleanupPssTransFile
P2P298 CleanupArchiveArea
P2P299 ConvertSltoSO
PSSDbCleanup
Transaction ID Method Name Input Parameters Return Parameters
PST105 PerformDBCleanup
PSSCustomerRank
Transaction ID Method Name Input Parameters Return Parameters
PST106 RankCustomers
WaveWorks PSS, Integration Guide, 1.10 Page 75
© 2000, Symbol Technologies, Inc. February 1, 2000
Page 82

Software Description
______________________________________________________________________________
8.2 Unit Management Subsystem
The Unit Management Subsystem (UMS) manages the Symbol hardware devices that comprise
the PSS system. Those devices include hand held terminals, cradles, entrance unit devices, ticket
printers, and power supplies. Since UMS manages hardware, it is important to understand each
of the devices being managed in both the Asterix2 and Asterix3 versions of PSS.
8.2.1 Hardware Overview
Terminals
The PSS system only uses RF terminals. PSS can use either Asterix2 or Asterix3 terminals. The
Asterix2 terminal has five buttons and a 4 x 20 display. The Asterix3 terminal has four buttons
and a trigger (in lieu of the “+” key on the Asterix2), and an 8 x 20 display. Both terminal t ypes
charge their batteries while in the cradle, but since the Asterix3 uses a newer lithium battery, the
battery-related constants are different for the two terminals.
Cradles
The cradles are completely differ ent between the Asterix2 and Asterix3 systems. The Asterix2
terminals are placed into an integrated eight-slot rack, and as a result, the entire system is
comprised of terminals in multiples of eight. When the Asterix2 is unlocked, a small light on the
face of the terminal is lit. The Asterix3 cradles are individual units, and the entire s ystem can
include any desired number of terminals. When the Asterix3 is unlocked, the cradle housing
lights up. The Asterix2 cradle locks the terminal tightly against the contacts. The Asterix3
cradle does not--which causes a number of issues, since the terminal can be lifted off the contacts
before the latch stops it.
Dispensers
In a typical Asterix2 system a module was a lar ge plast ic devic e th at had ei ght in te grated c radles.
Four modules were a unit. A dispenser in the Asterix2 world consisted of one or more modules.
The Asterix3 system uses individual cradles that can be physically arranged however the
customer wishes. An Asterix3 dispenser is simply a logical group of cradles (that are usually
physically adjacent to each other).
The concept of a dispenser being a logical group of cradles also works for Asterix2 systems as
long as the cradles in the same module are part of the same dispenser (to avoid confusing the
customer). So, in this document, a dispenser is really a collection of cradles, not a physical
device.
WaveWorks PSS, Integration Guide, 1.10 Page 76
© 2000, Symbol Technologies, Inc. February 1, 2000
Page 83

Software Description
______________________________________________________________________________
Entrances
There are two types of entrance stations: serial and RF. Either type can be used with either
terminal type, but the older serial entrance units are typicall y used on Asterix2 systems and the
newer RF entrances are used with the Asterix3 terminals. The primar y difference between t hem
is how they are controlled from the host.
The serial entrance units are control led by NT Services (one service per entran ce unit). These
services are named “PssEntrance01,” “PssEntrance02,”, etc. These services are WaveWorks
clients and directly control the entrance display and process input. The RF entrance units
communicate with a single instance of an NT service (EhtService) that translates STEP
commands into low-level commands the hardware can understand. DisplayServer scripts handle
the screen display and input processing.
Printers
Transaction tickets are (optionally) printed at the conclusion of a self-scan shopping trip. The
ticket is used to direct the shopper to a quick pay or rescan lane and also as a means of
identifying the shopper to the POS system. Transaction tickets are an optional feature of the PSS
system. PSS supports three types of ticket printers: RF rack, serial rack, and serial service
terminal. For installations that do print tickets, a printer is needed at the return rack and at the
service terminal.
Power Supplies
The PSS system also manages power supplies. There isn’t much to manage aside from ensuring
that only one terminal per power supply is unlocked at a time. Unlocking more than one
terminal at a time could cause the power supply to fail. Power supplies normally have a status of
Ready (status code = 0). If a terminal that is powered by the power supply is being unlocked, the
status is set to Reserved (status code = 1). If all the terminals attached to a power supply report
that they are on battery power, then the power supply status is set to “Check Hardware” (status
code = 6) to indicate that perhaps the power supply has failed or is unplugged.
8.2.2 Software Components
The Unit Management subsystem consists of the following software:
Unit Management COM objectprovides all the UMS business services. The services
maintain data on hardware status, battery level, and terminal location. The services also send
commands to the hand held terminals while they are in the dispenser. The UMS transaction
model (description of all UMS transactions) is found in the Appendix.
Entry Station Serviceuses PSA’s Hardware Isolation Library (HIL) to communicate with the
Entrance Station hardware devices (serial entrance stations only).
WaveWorks PSS, Integration Guide, 1.10 Page 77
© 2000, Symbol Technologies, Inc. February 1, 2000
Page 84

Software Description
______________________________________________________________________________
Printer ServiceUses PSA’s H ardware Isolation Librar y (HIL) to communicate with serially
connected printers.
UMS DisplayServer Interfacecontrols the display on the hand held terminal and also
provides procedures for handling input from the terminal and commands the UMS COM object.
EHT DisplayServer Interfacecontrols the display on RF entrance units and provides
procedures for handling input from the entrance.
8.2.3 Database Access
The Unit Management COM object maintains the following database tables. Refer to the Data
Dictionary in the Appendix for a description of the tables:
UMS_Entrancemaintains state information on entrance unit devices
UMS_Printermaintains information on printer devices
UMS_Terminalmaintains information on hand held terminals
UMS_Dispensermaintains information on dispensers (groups of cradles)
UMS_Status_Codelist of valid status codes for UMS devices
UMS_Terminal_Typeslist of valid terminal types
UMS_Cradlemaintains information on terminal cradles
UMS_Powermaintains information on power supplies
UMS_Card_Reader_Typemaintains a list of supported card reader types and properties
WaveWorks PSS, Integration Guide, 1.10 Page 78
© 2000, Symbol Technologies, Inc. February 1, 2000
Page 85

Software Description
______________________________________________________________________________
8.3 Shopping Trip Subsystem
Once the shopper retrieves the proper hand held terminal f rom the dispenser, the Shopping Trip
Subsystem allows the shopper to add and delete items from their basket and view the total
amount and number of items scanned during their current shopping trip. Shopping trips can be
ended by returning the hand held terminal to an empty dispenser slot or by scanning an “End of
Trip” barcode. Each activity during the shopping trip is logged and available for review from the
Service Terminal.
8.3.1 Start of Shopping Trip Processing
When a customer “swipes” their card to reserve a scanner to go shopping, the system will
perform the following:
1. ValidateCustomerverifies the following:
• that the customer is in the Pss_Customer database table and is not suspended;
• that the customer has no outstanding transactions (in the Pss_Shopping_List table), and
• that the card has no current shopping trips (in the Pss_Session table).
2. CreatShoppingListinitializes the tables Pss_Shopping_List, Pss_Session, and
Pss_Shopping_Activity.
3. StartShoppingTripoccurs at removal of the scanner from the dispenser.
4. GetTextretrieves all text necessary for display to the shopper (in the shopper's language).
8.3.2 Shopping Trip Processing
For Asterix 2 terminals, the "+" key is a physical key on the scanner; for the Asterix 3 terminals,
the "+" key is the trigger. The "-" key is a physical key on either terminal.
After the shopper scans a barcode, the following steps are taken in the StepServer Script
procedure ProcessInputData to process the barcode:
1. Parse the barcode
• A call to PssSpecialBarcode to break up the scanned input field into its disparate parts
• Modifications to the barcode from what was reported as scanned to what is needed to
compare into the item table
• Determination of whether a barcode is a “special” barcode that requires special handling
(e.g. the End of Trip barcode)
2. If, in the output from the above method, a “special” barcode is encountered, it is specifically
handled
WaveWorks PSS, Integration Guide, 1.10 Page 79
© 2000, Symbol Technologies, Inc. February 1, 2000
Page 86

Software Description
______________________________________________________________________________
3. If, in the output from the above method, an item barcode is scanned, then the
AdjustShoppingList method is called to add or delete the scanned barcode from the customer's
shopping list. Any anomalous output from this method is handled via error screen displays (i.e.,
exception items, invalid barcodes).
The following is the database activity for a "+" or "-" key event:
1. Retrieve customer data from Pss_Customer table.
2. Verify input barcode.
3. Determine if it is a variable weight barcode using the Pss_Barcode_Variable_Weight
- if variable weight, get the price and item Id
- else use the scanned barcode and data from the Pss_Item table to execute t he pricing
algorithm
4. Add the item to the shopping list ("+") or remove the last scanned match for this item id ("-") in
the Pss_Shopping_Item.
5. Calculate the total tax from the Pss_Tax_Table and Pss_Tax_Table_Entry and write the value to
Pss_Shopping_Tax.
6. Read for marketing messages from the Pss_Marketing_Item, Pss_Marketing_Department, and
the Pss_Marketing_Mfg tables and write to the Pss_Marketing_Sent table any messages sent to
the shopper.
7. Convert pricing values using the Pss_Currency table.
8. Write the to ta l to the Pss_Sh opping_List table.
9. Record the ev ent into the Pss_Shopp ing _Activity table.
Anomalous conditions encountered in this process will be logged to the Pss_Message_Log table.
If the scanned item Id is not in the Pss_Item table, then record this in the Pss_Uknown_Item
table.
All text used throughout the shopping trip is stored in the Pss_Text table and is accessed through
a language Id associated with the customer or store.
WaveWorks PSS, Integration Guide, 1.10 Page 80
© 2000, Symbol Technologies, Inc. February 1, 2000
Page 87

Software Description
______________________________________________________________________________
Describe what happens when a customer presses the “=” key to view the summary.
The shopper presses the "=" key, and in the StepServer script procedure ProcessInputData, a call
to one of the ShoppingTripList functions is made. This will return character strings with item
Ids, descriptions, and prices (see COM object definitions for full parameter list). These strings
will contain all items currently in the customer's basket in a pipe-separated format. The lists are
controlled through the pss_system_setting database table. Based on these settings, display field
size, list order (ascending or descending), and contents of the list are established for consistent
display to the shoppers. All database access is “read only,” with the exception of an insert into
the Pss_Shopping_Activity table to record the event.
The following libraries and COM Objects are available for the shopping trip subsystem to use:
PssActivityCom COM object interface that allows activities to be added to the
Pss_Shopping_Activity database table to record shopper key presses and any other
event.
PSS ActivityLib This library handles the database insert, deletion, and retrieval of
Pss_Shopping_Activity database table rows.
PssBarcodeLib Library that interprets the barcodes scanned by the shopper. Has methods to
calculate and strip off check digits, determine barcode type (i.e., UPC, EAN13),
etc.
PssConfigurationLib Library used to access the database table Pss_System_Settings that contains the
client-selected configuration options.
PssPricingLib This library provides the core of the pricing method algorithms as defined in the
appendices.
PssShoppingTripLib Library that handles the database insert, deletion, and retrieval of
Pss_Shopping_List and Pss_Shopping_Item database table rows.
PssShoppingTripCom This is the COM object interface allowing
• shopping trips to be started,
• items to be added and removed from shopper’s lists,
• lists to be formatted for shopper review,
• shopping trips to be ended,
• as well as a series of general support functions (such as validating the
customer, retrieving shopper messages of various sorts, and
maintaining the status of the current shopping trips).
PssSpecialBarcodeCom This is the COM object interface to allow access to the special barcode functions,
determining if the scanned barcode requires modification or requires special
handling methods.
PssSpecialBarcodeLib Library to access the Pss_special_Barcode table that contains definitions of all
special barcodes, descriptions, and return types for StepServer script statement
handling.
In general, the COM Objects handle the interface to the StepServer Scripts and perform the
business logic and the libraries provide access to the persistent data.
WaveWorks PSS, Integration Guide, 1.10 Page 81
© 2000, Symbol Technologies, Inc. February 1, 2000
Page 88

Software Description
______________________________________________________________________________
The following user exits are called during shopping trips:
UE_PreRescanDetermination Allows modification of the rescan calculation data prior to the
calculation, or allows wholesale replacement of standard rescan
calculation with a customized algorithm
UE_PostRescanDetermination Allows modi fication of the result of a standard rescan calculation
UE_PreProcessMarketingMessage Allows additional item marketing messages to be allowed /
disallowed prior to the standard method’s retrieval
UE_PrintReceipt On End of Trip, allows modification to the receipt file to be printed
on the ticket
UE_PostProcessIsVariableWeight After an item has been determined to be an embedded price / weight
item (or not), custom code can be added here to modify the decision.
If using the End of Trip barcode feature, configure any type of barcode with a ch eck digit to be
the End of Trip barcode. The Pss_Special_Barcode table should contain the End of Trip value.
8.3.3 End of Shopping Trip Processing
This can happen in one of two ways depending upon the Pss_system_Settings database table
values. Either the shopper scans a predetermined End of Trip barcode (as specified in the
Pss_Special_Barcode table) or places the scanner back into the dispenser.
If an End of Trip input is recognized (either an “E” from the dispenser, or and End of Trip
barcode), the StepServer script procedure EndOfTrip is executed. This simply calls the
PssShoppingTripCOM object method EndShoppingTrip and then handles the resetting of the
shopping list status (if the scanner was in Queue Buster mode), then proceeds to the final Thank
You screen.
Within the EndShoppingtrip method, the following is done:
1. The customer data and shopping trip data are examined to determine if the trip is to be rescanned
or not.
2. The transac tion bar code is ca lcu lat ed.
3. If enabled, the PssTransferFile is written with the list of items scanned by the shopper.
4. If enabled, the printer is requested to print the transaction ticket.
5. Customer and Shopping Trip data and status are updated.
6. Session data is deleted or modified if in queue buster mode.
7. Data in the database tables related to the shopping trip are deleted, such as Pss_Order_List_Item,
Pss_Order_List, Pss_Marketing_Sent and Pss_Shopping_Tax.
WaveWorks PSS, Integration Guide, 1.10 Page 82
© 2000, Symbol Technologies, Inc. February 1, 2000
Page 89

Software Description
______________________________________________________________________________
Database tables associated with the shopping trip are:
Pss_Currency
Pss_Customer
Pss_Language
Pss_Text
Pss_Shopping_List
Pss_Session
Pss_Shopping_Item
Pss_Shopping_Activity
Pss_Shopping_Tax
Pss_Tax_Table
Pss_Tax_Table_Entry
Pss_Unknown_Item
Pss_Item
Pss_System_Setting
Pss_Message_Log
Other objects such as classes need to be defined:
PssStoreInformation
PssSpecialBarcode
Session
Language Text
Activity
Customer
Customer Rescan
Event Scheduler
8.3.4 Shopping Trip Message Log Entries
This describes the log messages found in the Pss_Message_Log table that originated within the
Shopping Trip. The text shown here is in English, since the inclusion of all language text for all
messages would be excessive. This text is configurable in the database table Pss_Text, so if a
message is not here or not exactly as stated here, then the d atabase table probably h as changed.
All text is accessed through the GetText method, which accepts the Text_Id as an input
parameter.
WaveWorks PSS, Integration Guide, 1.10 Page 83
© 2000, Symbol Technologies, Inc. February 1, 2000
Page 90

Software Description
______________________________________________________________________________
8.3.5 Fatal Messages:
“No Session for this Terminal (%s)”
ST_TEXT_NOSESSION
“No Cus tomer Da ta”
ST_TEXT_NOCUSTOMER
“Initialization FAILED(%s)”
ST_TEXT_INITFAILED
“No Express Customers Available”
ST_TEXT_NO_XCUSTOMERS
“Unable To Access Express Customers Data”
ST_TEXT_NO_ACCESS_XCUSTOMERS
- Attempted to start the Shopping trip without associating a
customer with a terminal. Verify that CreateShoppingList
completed successfully prior to calling StartShoppingTrip.
- Customer's card does not exist in the database.
- Could not initialize Pss_System_Setting configuration data from
database – Methods may not be executing along desired paths.
- No more Express Shopper customers available for express
shopper to use. Add more to the database.
- Database error accessing Express Shopper customers.
8.3.6 Error Messages:
“Activity Add”
ST_TEXT_ACTIVITY_ADD
“Invalid Customer Data associated with terminal (%s)”
ST_TEXT_INVALIDCUSTOMER
“Invalid Get Rescan data for customer (%s)”
ST_TEXT_INVALIDRESCANDATA
“Invalid Sub Total for Customer (%s)”
ST_TEXT_INVALIDSUBTOTAL
“Invalid Customer (%s) Save Recalced Prices”
ST_TEXT_BADSAVEPRICES
"UE_PreRescanDetermination
GENERATED TRAP!!!do NOT rescan”
ST_TEXT_USEREXITERROR
“Invalid Rescan Determination for Customer (%s)”
ST_TEXT_RESCANDETERMINATION
"UE_PostProcessRescanDetermination
GENERATED TRAP!!! – do NOT rescan"
ST_TEXT_USEREXITERROR
“UE Post CalculateRescan”
ST_TEXT_USEREXITERROR
“UE Pre CalculateRescan”
ST_TEXT_USEREXITERROR
“Invalid Customer (%s) Rescan Update”
ST_TEXT_UPDATERESCAN
“Invalid Calculate Transaction Id for Customer (%s)”
ST_TEXT_TRANSACTIONID
“Invalid Saving End of Trip Data for Customer (%s)”
ST_TEXT_SAVE_EOT
- Failure to add an activity to the Pss_Shopping_Activity
table. Generally when the shopping trip does not start
properly, there is an invalid key constraint problem.
- Invalid Customer Id, not found in database. Verify
customer exists in database.
- Failure getting customer rescan data. Verify customer
exists in the database and has valid rescan level and
accurate trip counters and rescan counters in the
Pss_Customer table .
- Had an error calculating total for customer”s shopping
trip. Verify values for this customer in the database.
- Database error saving pricing data to the customer”s
shopping list.
- Error in the user exit for determination of rescan.
Rewrite the user exit without the problem causing the
abnormal execution.
- Error in determining whether to rescan a customer.
Verify customer rescan data in Pss_Customer and
Pss_rescan tables are consistent.
-Error in the user exit for determination of rescan.
Rewrite the user exit without the problem causing the
abnormal execution.
- Error in the user exit for determination of rescan.
Rewrite the user exit without the problem causing the
abnormal execution.
- Error in the user exit for determination of rescan.
Rewrite the user exit without the problem causing the
abnormal execution.
- On end of trip, could not update customer”s rescan
data in the Pss_Customer table with latest data.
- Could not calculate correct transaction Id. Verify
Pss_System_Settings (for Shopping_Trip Loyalty Card
and Transaction barcode) are proper for this customer.
- Error saving shopping trip and/or customer data for
end of trip.
WaveWorks PSS, Integration Guide, 1.10 Page 84
© 2000, Symbol Technologies, Inc. February 1, 2000
Page 91

Software Description
______________________________________________________________________________
“Invalid Writing SCAN-IN %d”
ST_TEXT_WRITESCANIN
“Cannot unload list items for Customer (%s)”
ST_TEXT_UNLOAD
“Invalid Getting Printer CMSID ReturnCode, Customer
%s”
ST_TEXT_INVALIDPRINT
“Could Not delete Shopping Tax Table %d”
ST_TEXT_BADDELETETRIP
“Could not format item list (%s)”
ST_TEXT_INVALIDFORMAT
“Customer (%s) Could not get Qty”
ST_TEXT_GETQTY
“Customer (%s) ha s less than zero items !!”
ST_TEXT_LESSZEROITEMS
“Customer (%s) BAD Saving Item To Shopping List”
ST_TEXT_BADSAVEITEM
“UE_PreProcessMarketingMessage”
ST_TEXT_USEREXITERROR
“Customer (%s) Could not set Total Value”
ST_TEXT_TOTALVALUE
“No Session for this Terminal (%s)”
ST_TEXT_NOSESSIONCUSTOMER
“No Cus tomer Da ta”
ST_TEXT_NOCUSTOMER
“No New Shopping List for this card (%s)”
ST_TEXT_NOSHOPPINGLIST
“Could Not initialize For card number (%s)”
ST_TEXT_SESSIONBAD
“Could not Get Queue Buster session Data (%s)”
ST_TEXT_QUEUEBUSTER
“Could not Swapping queue buster session for card
(%s)”
ST_TEXT_SWAPQUEUEBUSTER
“Could not delete shopping list just created for (%s)”
ST_TEXT_BADDELETE
“Error Retrieving Customer Message for (%s)”
ST_TEXT_NOCUSTOMERMESSAGE.
“Customer (%s) Could not create session”
ST_TEXT_NOSESSIONSTART
“Customer (%s) Could not delete shopping list”
ST_TEXT_DELETESHOPPINGLIST
“Customer (%s) could not Set Shopping Status”
ST_TEXT_SETSHOPPINGSTATUS
- Error writing scanIn (PssTransferFile). Check for disk
space availability, existance of proper directories and
permissions to create files there.
- Error-freeing memory used to store local copyof
shopping list.
- Error printing transaction ticket. Verify printer and
connections.
- Error as specified in text deleting shopping data on end
of trip
- Error formatting shopping trip data for list display.
- Error retrieving shopping trip data for item barcode.
- Deleting of an item from a customer”s list yielded a
less-than-zero number of items in the list. Ooops.
- Could not save a item to the Pss_Shopping_Item table
for a customer”s shopping list. Verify that the
Pss_Session and Pss_Shopping_list tables have rows for
this customer.
- Error value returned from user exit code. Fix the code.
- Error saving total value to Pss_Shopping_List table.
Verify that the customer is valid
- Attempted to queue bust shopper without an associated
exployee with a terminal. Verify that
CreateShoppingList completed successfully prior to
calling StartShoppingTrip.
- The customer barcode scanned by the employee for
queue busting does not exist in the Pss_Customer table.
- Could not get Pss_session table data for the terminal
trying to do the queue busting
- Could not exchange from employee to shopper for the
terminal trying to do the queue busting.
- Could not find queue buster Pss_ session table entry for
the shopper.
- Could not exchange from shopper to initiating
employee for the terminal trying to do the queue busting
- Error deleting shopping data Pss_Session table after an
error. Attempting cleanup
- Database error retrieving message for this customer.
Verify existance of customer and message in
PSS_Customer_Message table.
- On starting a shopping trip, added a row to
Pss_Shopping_List but could not add to the Pss_Session
TABLE. Check for already existing row for this
terminal in the Pss_Session table.
- Database error trying to cleanup after some other error
the Pss_Session, Pss_Shopping_List and
Pss_Shopping_Activity tables.
- Error setting the Pss_Shopping_List table status.
Verify the customer has a valid row in this table.
WaveWorks PSS, Integration Guide, 1.10 Page 85
© 2000, Symbol Technologies, Inc. February 1, 2000
Page 92

Software Description
______________________________________________________________________________
“SwapTerminal Error for customer (%s)”
ST_TEXT_SWAPTERMINALERROR
“Customer, Card Number (%s) is suspended”
ST_TEXT_CUSTOMERSUSPENDED
“Customer for card is not found (%s)”
ST_TEXT_NOCUSTOMERFORCARD
“Error Validating Card; Customer (%s) has a Session”
ST_TEXT_HASSESSION
“Error Validating Customer (%s)”
ST_TEXT_VALIDATECUSTOMERERROR
8.3.7 Informational Messages
“No Session, or Swapped terminal (%s) - No trip to
end”
ST_TEXT_NOTRIP
“Scanner Abandoned by Customer (%s)”
ST_TEXT_SCANNERABANDONDED
“Done with special Customer (%s)”
ST_TEXT_SPECIALCUSTOMER
“User Exit Returned Done %s”
ST_TEXT_USEREXITDONE
“For Customer, Error on Terminal Finding Item (%s)”
ST_TEXT_NOITEM
“For Customer, Error on Terminal Invalid Barcode %s”
ST_TEXT_INVALIDBARCODE
“No New Shopping List for this customer (%s)”
ST_TEXT_NOCUSTOMERLIST
“Could not Get trip data to delete for terminal (%s)”
ST_TEXT_DELETECUSTOMERSESSION
“Customer (%s) Could not delete session”
ST_TEXT_DELETETERMINALSESSION
“Customer (%s) has scanned an exception item”
ST_TEXT_EXCEPTIONITEM
- Error updating the Pss_Session and/or
Pss_Shopping_List tables while attempting a swap
terminal command.
- Logging the fact that a suspended customer has tried
to release a scanner. From ValidateCustomer on card
swipe.
- Logging the fact that a nonexistant customer (as per
Pss_Customer database table) has tried to release a
scanner. From ValidateCustomer on card swipe.
- Logging the fact that this customer already has a
scanner currently issued to them. From
ValidateCustomer on card swipe.
- There was a Bad database problem on a card swipe
trying to validate a customer.
- EndOfTrip method was executed, but there is no
customer or terminal data to end. Check the
Pss_Session table or the Pss_Shopping_List table for an
entry.
- A scanner that was detected as abandoned is being run
through EndOfTrip. This will delete all information
about the trip, saving nothing to history, and not sending
any data to the POS.
- Logs that a store employee has completed a shopping
trip and EndOfTrip has run, deleting all information
about the trip and saving nothing to history and not
sending any data to the POS.
- After user exit calls, to specify NOT using the standard
algorithms that follow the user exit calls.
- An error trying to find the item scanned in the
Pss_Item table.
- Logs that an invalid barcode was scanned or that the
shopping trip was incorrectly started. Verify that data
for the customer exists in the Pss_Session and
Pss_Shopping_List tables
- No data in Pss_Shopping_Item table to list for this
customer.
Error trying to clean up Pss_session and
Pss_shopping_List tables after unsuccessful release of
scanner.
- Error tryi ng to clean up Pss_session and
Pss_shopping_List tables after unsuccessful release of
scanner.
- Logs the scanning of an exception item by a customer.
WaveWorks PSS, Integration Guide, 1.10 Page 86
© 2000, Symbol Technologies, Inc. February 1, 2000
Page 93

Software Description
______________________________________________________________________________
8.3.8 Debug Messages:
The following are messages logged in the End Of Trip method to track progress through that
method.
"EOT Done totals" - Completed calculation of trip totals
"EOT Done Rescan" - Completed Rescan calculation
"EOT Written to files" - Completed writing Pss Transfer File
"EOT Done" - End of trip completed successfully
8.3.9 Rescan Messages
These Information messages are specific to determine if a shopper gets rescanned or not.
"Into Resca nLevel lOldLevel=%d, l POSItemCount=%d,
lPSAItemCount=%d, lBothItemCount=%d,
lPOSItemValue=%d, IPSAItemValue=%d,
1BothItemValue=%d”
“Rescan by Currency” - Employs the rescan calculation by absolute value
“IgnoreScanTooMuch” Ignore overscans by customer in rescan determination.
“NOT IgnoreScanTooMuch” - Do not ignor e overscans by customer in rescan
“Level diff RescanLevel Diff=%d, levelMod=%d” - Displays the calculated difference and specified level
“Rescan by Percentage” Employs the rescan calculation by percentage difference.
“new Level (%d) old(%d) modifier(%d)” - Displays the shoppers new and previous rescan levels,
“Check new Level (%d ) vs min (%d max( %d ) ” - Disp la ys new level and minimu m and max i mu m
“Leave alone ret=%d” - No change in shopper”s level.
“Customer (%s) rescan is FALSE - Gold Customer”
ST_TEXT_RESCAN_GOLD
“Customer (%s) rescan is FALSE - Rescan Nobody, by
date”
ST_TEXT_RESCAN_NOBODYDATE
“Customer (%s) rescan is FALSE - Rescan Nobody”
ST_TEXT_RESCAN_NOBODY
“Customer (%s) rescan is TRUE - Rescan Everybody,
by date”
ST_TEXT_RESCAN_EVERYBODYDATE
“Customer (%s) rescan is TRUE - Rescan Everybody”
ST_TEXT_RESCAN_EVERYBODY
“Customer (%s) rescan is TRUE - Always First Trip”
ST_TEXT_RESCAN_YESFIRSTTRIP
“Customer (%s) rescan is FALSE - Never First Trip”
ST_TEXT_RESCAN_NOFIRSTTRIP
- Displays inputs into rescan calculation.
difference in prices.
determination.
change.
and specified level change.
allowed levels.
This customer will never be rescanned.
- During the current time period, nobody should be
rescanned. This is selected from the rescan screen on
the administrative service terminal.
- Nobody is to be rescanned. This is selected from the
rescan screen on the administrative service terminal.
- During the current time period, everybody should be
rescanned. This is selected from the rescan screen on
the administrative service terminal.
- Everybody should be rescanned. This is e- Nobody is
to be scanned. This is elected from the rescan screen on
the administrative service terminal.
- This is the shopper”s first trip, rescan them.
- This is the shopper”s first trip, do NOT rescan them.
WaveWorks PSS, Integration Guide, 1.10 Page 87
© 2000, Symbol Technologies, Inc. February 1, 2000
Page 94

Software Description
______________________________________________________________________________
“Customer (%s) rescan is FALSE - Never Second”
ST_TEXT_RESCAN_NOSECONDTRIP
“Customer (%s) rescan is FALSE - Below Item Count”
ST_TEXT_RESCAN_BELOWCOUNT
“Customer (%s) rescan is FALSE - Below Value”
ST_TEXT_RESCAN_BELOWVALUE
“Customer (%s) rescan is FALSE - Above Amount”
ST_TEXT_RESCAN_ABOVEVALUE
“Customer (%s) rescan is FALSE - Above Item Count”
ST_TEXT_RESCAN_ABOVECOUNT
“Customer (%s) rescan is TRUE - Too long between
trips”
ST_TEXT_RESCAN_TOOLONG
“Customer (%s) rescan is TRUE - Too long since last
rescan”
ST_TEXT_RESCAN_TOOLONGLASTRESCAN
“Customer (%s) rescan is FALSE - Too soon since last
rescan”
ST_TEXT_RESCAN_TOOSOONLASTRESCAN
“Customer (%s) rescan is FALSE - Never Consecutive”
ST_TEXT_RESCAN_NO2INAROW
“Time Window populations: QPCust = %d,%d,%d,%d;
RSCust = %d,%d,%d,%d; QPItem = %d,%d,%d,%d;
RSItem = %d,%d,%d,%d”
“Item Count Load Balance Average process time / PSS
Lane = %.2 f”
“HeadCount Load Balance #Rescan = %.1f, #QuickPay
= %.1f”
“Customer (%s) rescan is FALSE - Load Balance
headcount too big”
ST_TEXT_RESCAN_QUEUEHEADCOUNTTOOBIG
“Customer (%) rescan checking REDUCED – Load
balance reduced checking”
ST_TEXT_RESCAN_REDUCEDCHECKING
“Customer (%s) rescan is TRUE - Load balance cashier
IS available”
ST_TEXT_RESCAN_CASHIERAVAILABLE
“Customer (%s) rescan is FALSE - Load balance cashier
NOT available”
ST_TEXT_RESCAN_CASHIERNOTAVAILABLE
“TRUE - On max trip number since last rescan (%d)” - Shopper is at maximum trip since last rescan for their
“Customer <%s> rescan is TRUE - Level=%d Pct=%d
value=%d”
“Customer <%s> rescan is FALSE - Level=%d Pct=%d
value=%d”
“Customer (%s) rescan had Error retrieving Rescan
Data”
ST_TEXT_RESCAN_DATA
.
- This is the shopper”s second trip, do NOT rescan them.
- This shopper”s trip is below the specified item count,
do NOT rescan them.
- This shopper”s trip is below the specified basket value,
do NOT rescan them.
- This shopper”s trip is above the specified basket value,
do NOT rescan them.
- This shopper”s trip is above the specified item count,
do NOT rescan them.
- This shopper”s last PSS trip was too long ago, rescan
them.
- This shopper”s last rescanned trip was too long ago,
rescan them.
- This shopper”s last rescanned trip was too short ago, do
NOT rescan them.
- Never rescan a shopper twice in a row, do NOT rescan.
- Display data for load balance algorithm.
- Display data for load balance algorithm.
- Display data for load balance algorithm.
- Do not rescan this customer, head count too large.
- Entering reduced rescan level due to load balancing.
- Rescan this customer since load balancing cashier is
available.
- Do NOT Rescan this customer since load balancing
cashier is not available
rescan level, rescan them.
- Randomly calculated result yields a rescan for this
shopper.
- Randomly calculated result yields a NO rescan for this
shopper.
- Error in reading this customer”s rescan data. Check
the Pss_Customer table for valid data.
WaveWorks PSS, Integration Guide, 1.10 Page 88
© 2000, Symbol Technologies, Inc. February 1, 2000
Page 95

Software Description
______________________________________________________________________________
8.4 Quick Order Subsystem
While shopping, a user may choose to place a quick order through the Quick Order subsystem.
The shopper identifies, through the quick order mechanism, the products and the
quantities/weights of those products they wish to order. The quick order can then be sent to the
appropriate department, where a web screen displays to store personnel the orders placed by
shoppers. After they have finished processing the order, store personnel can send a message to
the shopper that their order is ready. This is an optional feature.
PssQuickOrderBarcodeCom – Com object associated with quick order
PssQuickOrder – Class associated with quick order
Database tables associated with quick order are:
Pss_Order_List
Pss_Order_Status
Pss_Order_List_Item
Pss_Department
8.5 Queue Busting Subsystem
The Queue Busting application allows the PSS System to be used in a slightly different manner
than normal, but also helps retailers and shoppers reduce the amount of check–out time. An y
hand held terminal which has been released can be used for queue busting. This is normall y
done by store personnel to alleviate long check out lines which may have formed.
Transactions in this mode are initiated by scanning a special (configurable) barcode. More than
one barcode can be configured for use in this manner. This barcode is expected to be on a plastic
token. Once the special barcode has been scanned, the items in the customer b asket ar e scanned.
A PSS transaction is created in the same manner as a normal PSS transaction. After all items in
the basket have been scanned, the special barcode, which began this mode, is scanned again.
This transaction is sent to the POS System. The plastic token containing the barcode is then
handed to the customer with instructions to give it to th e cashier at th e check-out r egister. When
the customer reaches the register, they present the token and t heir loyalty card (if used) to the
cashier who then performs a standard non-audit self scan check out. After the customer checks
out, the token can be reused for other customers.
There are no methods written specifically for queue busting. The hand held application
differentiates between a normal shopping trip and a queue busting session.
PssSpecialBarcodeCom – Com object associated with queue busting
PssSpecialBarcodeLib – Library associated with queue busting
Associated database tables are:
Pss_Session
Pss_Special_Barcode
WaveWorks PSS, Integration Guide, 1.10 Page 89
© 2000, Symbol Technologies, Inc. February 1, 2000
Page 96

Software Description
______________________________________________________________________________
8.6 Electronic Marketing Subsystem
The PSS system also allows for a basic electronic marketing facility through the Electronic
Marketing application. This application allows a retailer to send messages to a shopper’s hand
held terminal anytime that a given item is scanned. This is an optional feature.
PssEMarketingMessage - Class associated with electronic messages
ElectronicMarketing – Library associated with marketing
Database tables associated with marketing messages:
PSS_Marketing_Item
PSS_Marketing_Sent
PSS_Marketing_Mfg
PSS_Marketing_Department
8.7 User Messaging Subsystem
Also, through the User Messaging application, the store has the option to send messages to
shopper’s hand held terminals. The messages can be any text, and can be made to be rep eated,
be displayed at fixed times during the day, and/or can be directed to any set of shoppers currently
in the store. In addition, messages for a particular customer can be preloaded and are delivered
to them the next time they shop with the WaveWorks PSS system.
PssSystemMessageCom - Com object associated with system messages
Pss_System_Message – Database table associated with system messages
WaveWorks PSS, Integration Guide, 1.10 Page 90
© 2000, Symbol Technologies, Inc. February 1, 2000
Page 97

Software Description
r
______________________________________________________________________________
8.8 POS Interface Subsystem
The WaveWorks PSS POS Interface is a file-based mechanism that provides communication
between the PSS system and the store POS system by the exchange of files.
Transfe
Area
inbound inbound
Working
Area
Processed Files
Area
outbound
PSS software monitors and deposits files into a directory referenced as the Transfer Area.
Inbound files (created by the POS) are detected in the Transfer Are a and moved into the workin g
area where a processing transaction processes the information in the file. When processing
completes, the file is then moved into the Processed Files Area. Outbound files (created by PSS)
are initially created in the working area and, when completed, are moved into the Transfer Area
to be processed by the POS system.
Under normal operating conditions, files should only exist in the Transfer and Working areas
temporarily. If files begin to accumulate in either of those areas, it is a sign of a system
malfunction. Files moved into the Processed Files Area remain there until a File Housekeeping
job deletes them. Files which are processed correctly are renamed with filetype "COMPLETED"
and files which could not be processed are renamed with filetype "ERR".
The directory location of the Transfer Area and the Process ed Files Area may be configured in
the PSS System Settings, but they default to the "Transfer" and "Processed" subfolders of the
folder where PSS was installed: (C:\Pss\Transfer and C:\Pss\Processed). This Transfer Area
folder location is identified by System Setting value POSINTERFACE/Local_TransferArea.
If the POS system supports network file paths and WindowsNT can be configured to map a
directory on the POS, then PSS can be configured to retrieve and send files to a directory area on
the POS system. The Processed Files Area is identified by a System Setting value
POSINTERFACE/ ProcessedFileArea. Since this folder can accumulate large numbers of files
depending on how frequently File Housekeeping is configured to run, this directory may be
configured to be on a different disk device than the disk on which PSS is installed. This would
be done to avoid filling up that disk and causing a Disk Full problem.
WaveWorks PSS, Integration Guide, 1.10 Page 91
© 2000, Symbol Technologies, Inc. February 1, 2000
Page 98

Software Description
______________________________________________________________________________
8.8.1 POS Interface Files
The files defined are:
• PSS Transaction filesent from PSS to POS to identify a shopper and the items they have
scanned.
• POS Transaction filesent from POS to PSS to identify that a shopper has paid for their
trip and allows for sending the items scanned by the POS system.
• Item Record filesent from POS to PSS and contains all of the items in the POS database
such that the PSS database can be updated to reflect the items contained in the POS
database.
• Price Changes filesubset of the Item Record file, processing is the same.
• Tax Table filessent from the POS to PSS and contain tax information used by PSS to
perform transaction tax calculations.
• Customer Update Filesent from POS to PSS to update the PSS database with
information about valid PSS shoppers.
The following sections describe the file layout for each of the file types.
(File layouts unchangedskipping to next section)
8.8.2 POS Interface Software Entities
The following software components are included to process the files listed above. A service
exists which monitors a specific folder for the arrival of these files. Files created by PSS are,
when detected, transferred to the POS system using the configured “transfer” tra nsaction. Files
created by the POS system are, when detected, “processed” on the PSS system using the
configured “processing” transaction.
8.8.2.1 PSSFileMonitorSvc
PSSFileMonitorSvc is the service which monitors Transfer Area for the arrival of files from the
POS system and for files generated by the PSS system. It moves inbound files into the Working
Area and, when appropriate, initiates WaveWorks transactions for performing file-processing
functions. It can also be configured to initiate transfer transactions when it detects outbound
files. Release 1 of PSS provides no transfer transactions for sending files to a POS system.
8.8.2.2 PssPosService(IBM 4690 POS only)
This is an NT Service specifically developed for information exchange with IBM 4680/90 POS
systems running the Supermarket Application(SA). This service handles the transfer function for
all of the file types listed above.
WaveWorks PSS, Integration Guide, 1.10 Page 92
© 2000, Symbol Technologies, Inc. February 1, 2000
Page 99

Software Description
______________________________________________________________________________
8.8.2.3 IBM RCO for 4680/90 POS
PssPosService makes use of the IBM RCO (Retail Connectivity Option) product for the 4680/90
POS. Release 1 of PSS WaveWorks used IBM RCO release 2.4.1. This product supplies a
client access service that communicates with a Server application on the 4680/90 POS. For this
mechanism to work, the IBM POS must be running the adxsrvnl.286 application as a background
application. The client application nbqmain.exe that runs as a WindowsNT service is
automatically installed by the PSS installation procedure, but it must be configured by placing
configuration information into file nbqmain.cfg in the Pss\bin directory. This file is delivered
with a set of preconfigured values that are typical of a PSS/4690 POS installation, but may need
to be changed to allow PSS to communicate with the POS. See the IBM RCO User's Guide for
parameter values which can be placed in this file.
8.8.2.4 POSInterfaceCOM
This COM object contains the software methods used to perform the processing of transaction
files, item files, and tax table files described earlier. In release 1 of PSS, it also contains the
transactions which initialize the PssPosService. It contains the following functions to handle the
associated transaction:
Function Transaction Activator
LoadPOSItemFile P2P003 PssFileMonitorSvc
LoadTaxTable P2P005 PssFileMonitorSvc
LoadPOSTransaction P2P002 PssFileMonitorSvc
EnableItemUpdates P2P304 PosInterfaceCOM/LoadPOSItemFile
DisableItemUpdates P2P404 PosInterfaceCOM/POSSItemFileTransfer
POSSItemFileTransfer P2P103 PssFileMonitorSvc
POSstartup POS100 PssFileMonitorSvc
SetCommLinkStatus POS301 PssPosService
POSLogin POS300 PssPosService
8.8.2.5 PssCustomerMaintCOM
This COM object handles processing of the Customer Information File (CUSTMTxx.DAT) and
updates the PSS database tables with information from that file.
It contains the following functions:
Function Transaction Activator
LoadFromFile P2P006 PssFileMonitorSvc
WaveWorks PSS, Integration Guide, 1.10 Page 93
© 2000, Symbol Technologies, Inc. February 1, 2000
Page 100

Software Description
______________________________________________________________________________
8.8.2.6 PssFileMaintCOM
This COM object handles general file housekeeping functions. It contains the transaction used
by the POSInterface to purge files from the Processed File Area, the transaction to move the
PssTransactionFile from the Transfer are a after t he POS has pro cessed i t, and th e t ransa cti on that
emulates the POS (Converts PSSTransactionFile to POSTransactionFile)
It contains the following functions:
Function Transaction Activator
CleanupPssTransFile P2P201 PssFileMonitorSvc
CleanupArchiveArea P2P298 WindowsNT Scheduler/WaveWorks
SENDTX
ConvertSItoSO P2P299 PssFileMonitorSvc
8.8.2.7 Windows NT Scheduler
PSS uses the native scheduler inWindowNT to schedule a purge of files from the
ProcessedFileArea area. During PSS installation, a scheduled task named PurgeFiles is placed
in the Windows NT \Tasks folder which is scheduled to activate transaction P2P298 daily to
purge the files. The FileHouseKeeping system settings are used to control the purge activity.
8.8.3 POS Interface Configuration
Configuration of the POS Interface for a sp ecific store environment is achieved by modification
of PSS System Settings and by implementation of User Exit routines supported by the POS
Interface Applications. Changes to configuration items are made using the System Settings page
on the System Administration Terminal. That page contains a detailed description of each
system setting item with information that identifies valid values for the item. The page also
contains a default value for each item.
The settings for the POS interface are divided into the following four areas
• settings that apply subsystem-wide to the POS interface
• settings that apply to the processing of specific file types
• settings that affect the operation of the NT Services used by the POS Interface
• settings that apply to a specific POS system (IBM 4680/90).
After modifying a system setting value, the link at the bottom of the system-setting page,
Re-Initialize PSS System, must be activated to cause the modified setting to be recognized by the
PSS software. The PssPosService must be stopped and restarted after changing any
4POSSINTERFACE settings.
WaveWorks PSS, Integration Guide, 1.10 Page 94
© 2000, Symbol Technologies, Inc. February 1, 2000
 Loading...