


Preface
iii
TABLE OF CONTENTS
CHAPTER 1: INTRODUCTION ..................................... 1
1.1 Package Contents ............................................................. 1
1.2 Overview ......................................................................... 1
1.3 P
1.4 SD Card Installation .......................................................... 4
1.5 Charging the Battery ......................................................... 6
hysical Details ................................................................. 2
CHAPTER 2: CONTENT ............................................ 7
2.1 File Transfer ..................................................................... 7
2.2 Adobe Reader ................................................................... 8
CHAPTER 3: HOMEPAGE ......................................... 11
3.1 Favorite .......................................................................... 13
3.2 Library............................................................................ 16
3.2.1 Filter ............................................................................................. 17
3.2.2 Sort .............................................................................................. 18
3.2.3 View ............................................................................................. 19
3.2.4 Search .......................................................................................... 20
3.3 Music ............................................................................. 21
3.4 File Explorer .................................................................... 22
3.5 Reading Record ............................................................... 22
3.6 Game ............................................................................. 22
3.7 Dictionary ....................................................................... 22
3.8 Picture ............................................................................ 23
3.9 Settings .......................................................................... 24
CHAPTER 4: WHAT YOU CAN DO WITH EBOOK READER .... 25
4.1 Reading eBooks ............................................................... 25
4.1.1 Bookmark ...................................................................................... 28
4.1.2 Turn Page ...................................................................................... 30
4.1.3 Search .......................................................................................... 31
4.1.4 Font .............................................................................................. 32
4.1.5 Screen Adjustment ......................................................................... 34
4.2 Watching Pictures and Comics ........................................... 36
4.3 Playing Game .................................................................. 39
4.4 Listening to Music ............................................................ 42
APPENDIX ......................................................... 44
Appendix A: Reset ....................................................................... 44
Appendix B: Cleaning and Safety .................................................. 45
Appendix C: Specifications ........................................................... 46
Chapter 1: Introduction
1
Downloaded
eBooks…
…and then transfer!
Chapter 1: Introduction
Thank you for purchasing the product. Read this chapter to know about your eBook
Reader including features, components, and capabilities.
1.1 Package Contents
Before using eBook Reader, please check your package contents to ensure that all items have
been included. If any of the listed items are missing, please contact your reseller from where you
purchased eBook Reader for assistance.
The package includes:
1 x eBook Reader
1 x Power adapter
1 x USB cable
1 x Quick intallation guide
1.2 O
Lightweight and super-portable, this eBook Reader can hold hundreds of electronic books inside.
Just like carrying a portable library, you can enjoy reading at anytime and anywhere!
Our eBook Reader is integrated with the E-Ink display to bring rich text and picture without
needing a backlight and is easy to read in bright environments. The high-contrast screen is as
close to actual ink on paper. It is natural, anti-glare and easy on the eyes. Furthermore, it is very
power-saving, capable running up to 30 hours, 8000 pages available with a full single charged.
eBook Reader displays .txt, .rtf, .pdf, .fb2, .epub, .html/chm, and .prc files as well as bmp, .jpg,
and .gif. It is also able to display books in a number of the world's most popular languages
including English, Deutsch, French, Españ ol, Russian, Dutch, Portuguese and Polish.
With the function of turn page, add bookmark, screen orientation, and zoom in, zoom out, eBook
Reader is suitable from young to old.
No more paper, no more heavy books, with this eBook Reader, you can bring lots of books with
you without increasing the heaviness on your backpack, and reduce the burden on your wrist.
Reading becomes more comfortable than ever!
verview
2
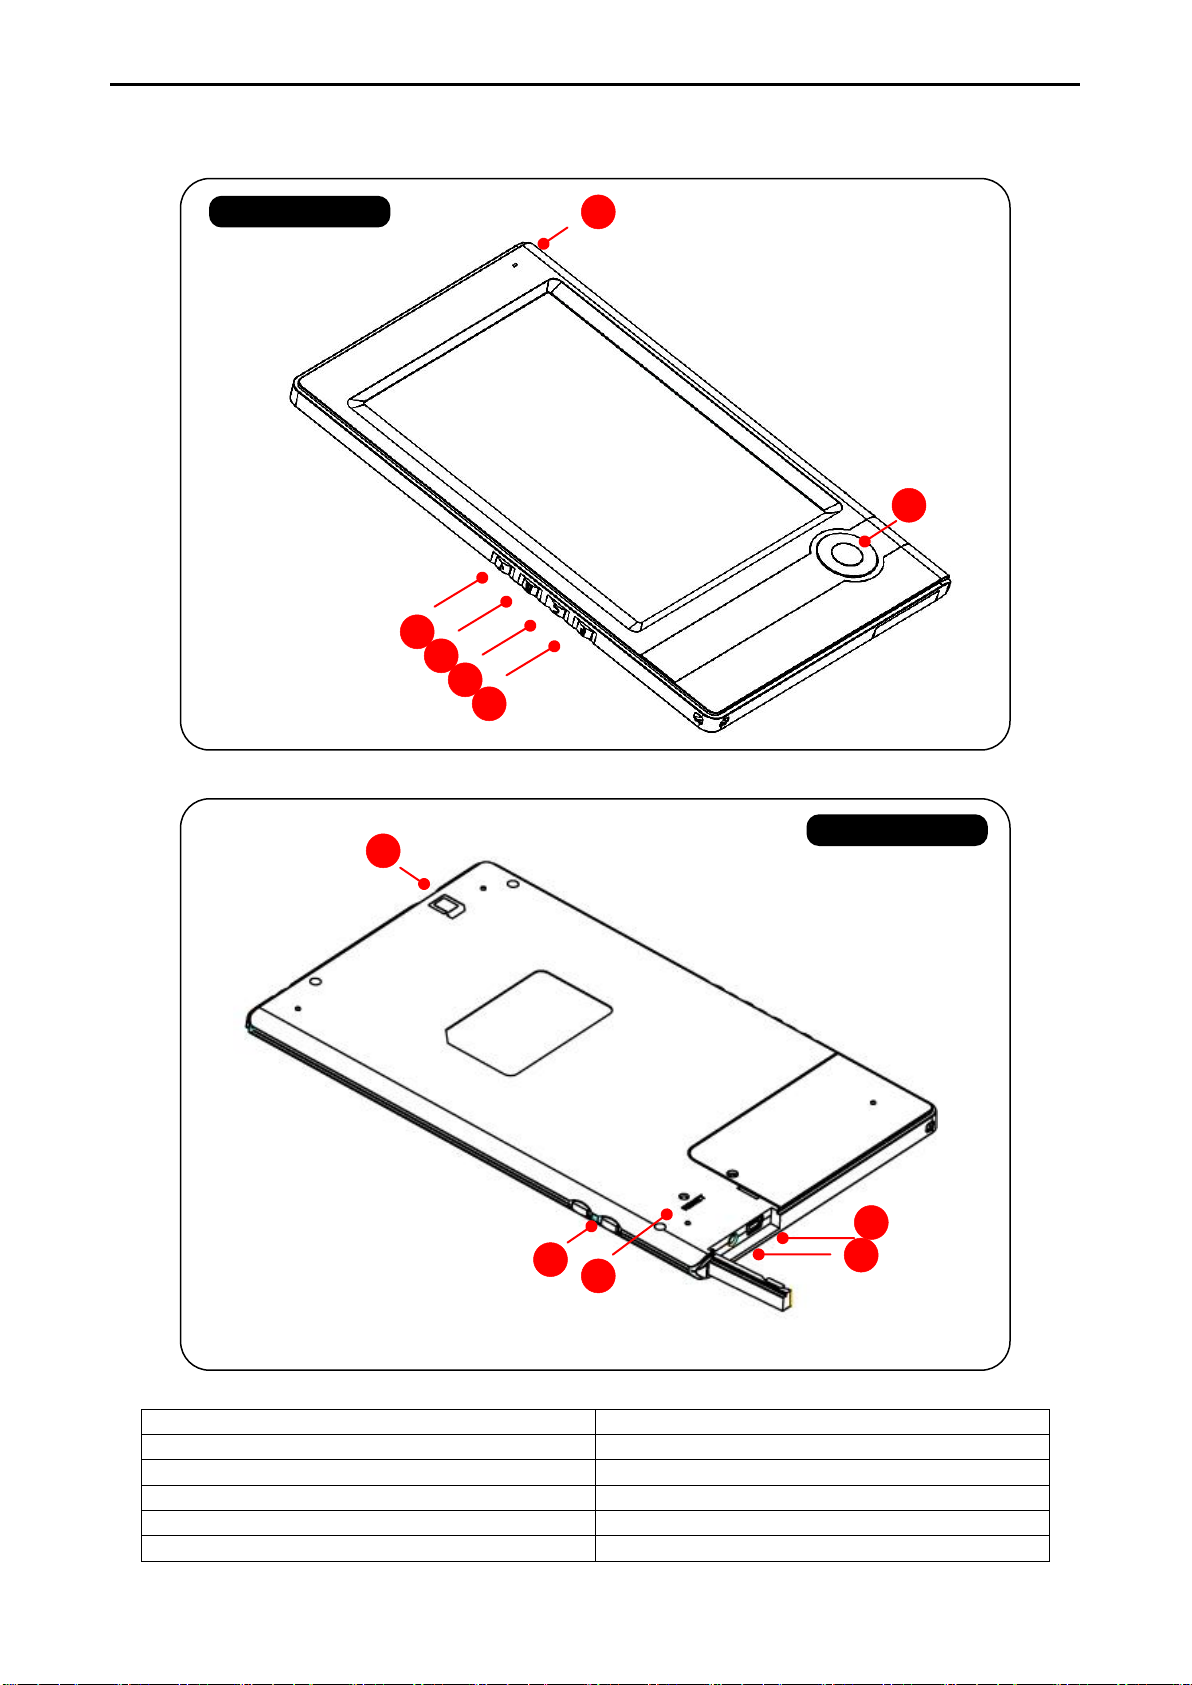
1. Power Button
7. SD card slot
2. Multimedia Button
8. Volume/Font Adjust Button
3. Rotate Button
9. Reset Button
4. Return Button
10. Headphone port (optional)
5. Menu Button
11. USB port & AC Power Adapter port
6. Cursor key and Select Button port
2 3 4 5 6
1
7 8 9
10
11
FRONT VIEW
BACK VIEW
1.3 Physical Details
Chapter 1: Introduction

Chapter 1: Introduction
3
1. Power Button
Turn the device on and off. To activate the device, press this “Power Button” for two seconds.
To power off, press and hold the button for five seconds.
2. Multimedia Button
Quick access to music folder
Add files to favorite or delete file from favorite list
Add/delete bookmark
3. Rotate Button
Press this button to rotate the image to vertical or horizontal.
4. Return Button
Return to the main menu at any environment.
5. Menu Button
Press this button to show pop out menu including bookmark, status options, library setting,
general setting, etc.
6. Cursor key and Select Button
Press these buttons to highlight up, down, left or right; and then press ENTER in the
middle to confirm. While reading, you can use “Cursor Key” to turn page, and “Select Button”
to show pop out menu.
7. SD card slot
To insert an SD card.
8. Volume/Font Adjust Buttons
While listening to music: buttons are used to adjust volume.
While reading: buttons are used to zoom in or zoom out font size.
9. Reset Button
To reset device if no operation is possible
10. Headphone Port (optional)
To connect headphones.
11. USB port and AC power adapter port
To connect the USB cable or AC power adapter.
Chapter 1: Introduction
4
BACK VIEW
BACK VIEW
Insert til CLICK!
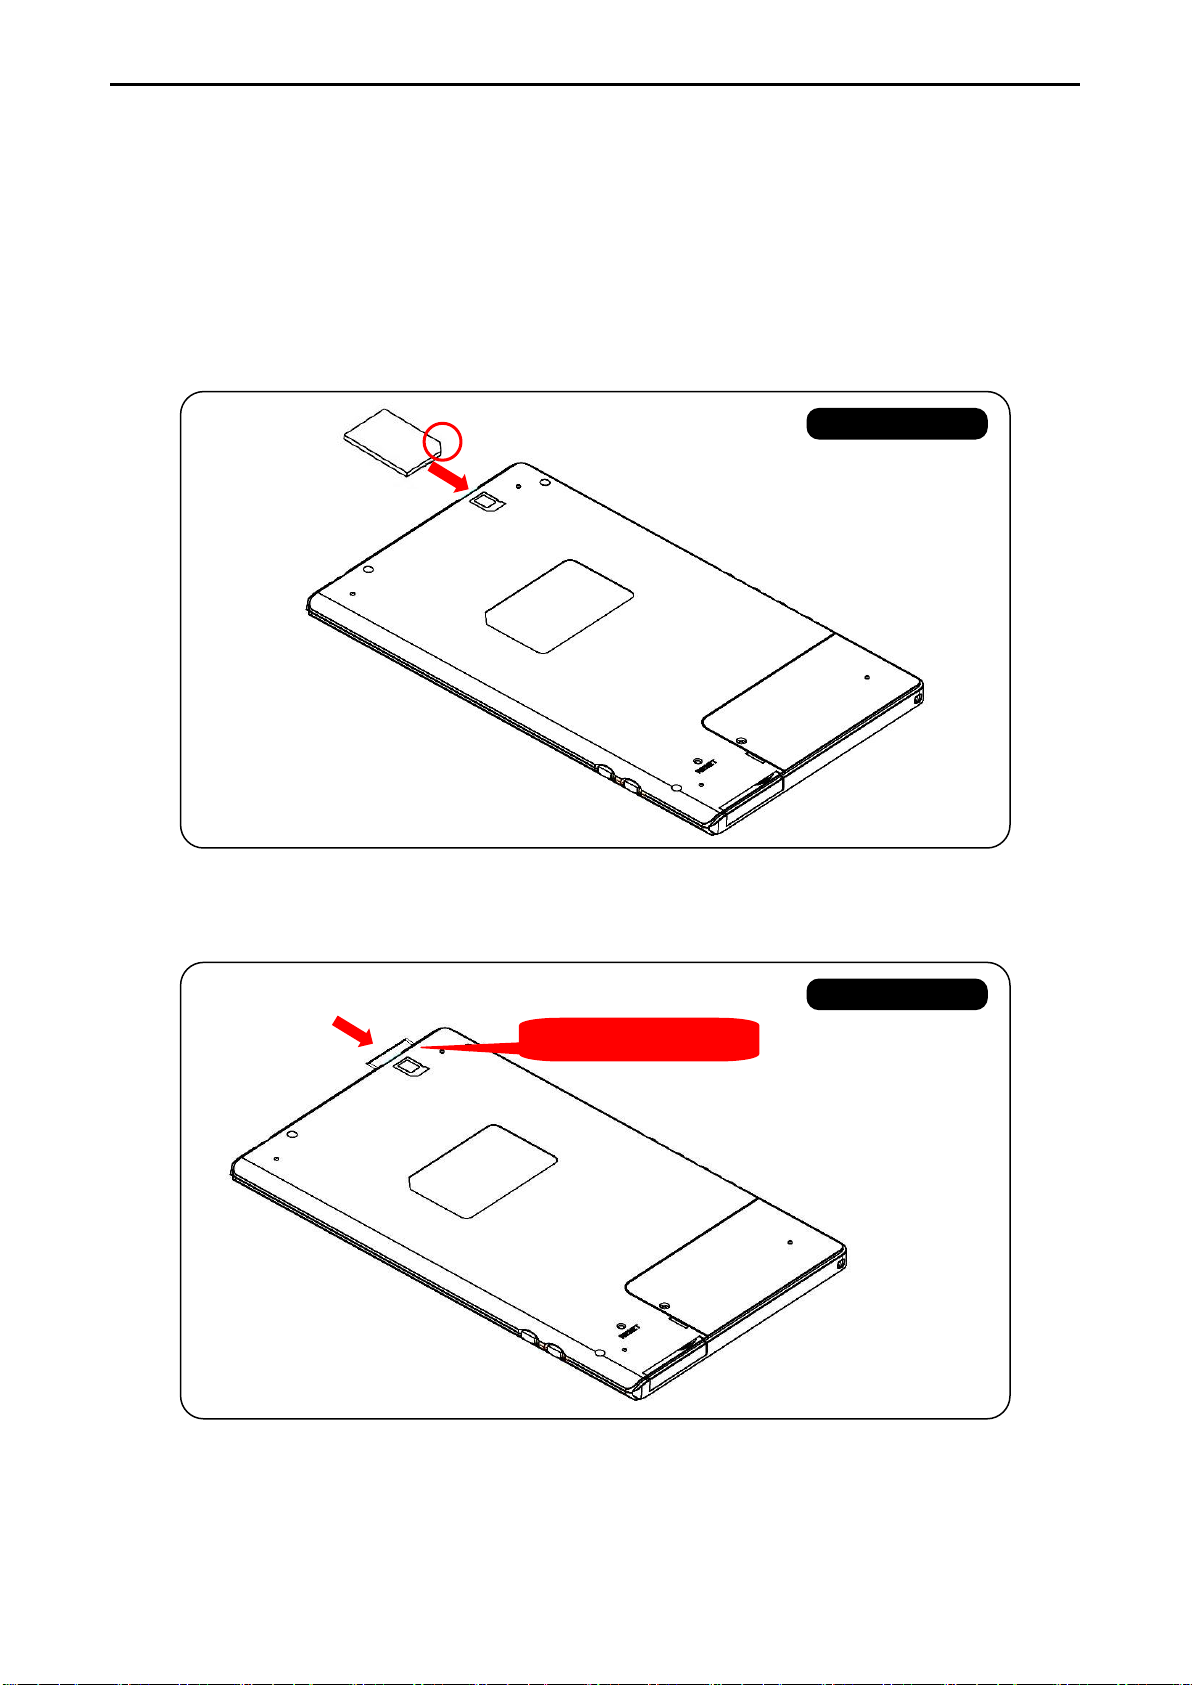
1.4 SD Card Installation
eBook Reader supports SD Memory Card. Please follow the steps to properly install/uninstall the
SD card to the device.
INSERTING CARD
1. Insert the SD card into the device as the picture shown. Be aware to the SD card direction!
2. Insert the SD card until it clicks into place.
5
BACK VIEW
The card
jumps out!
BACK VIEW
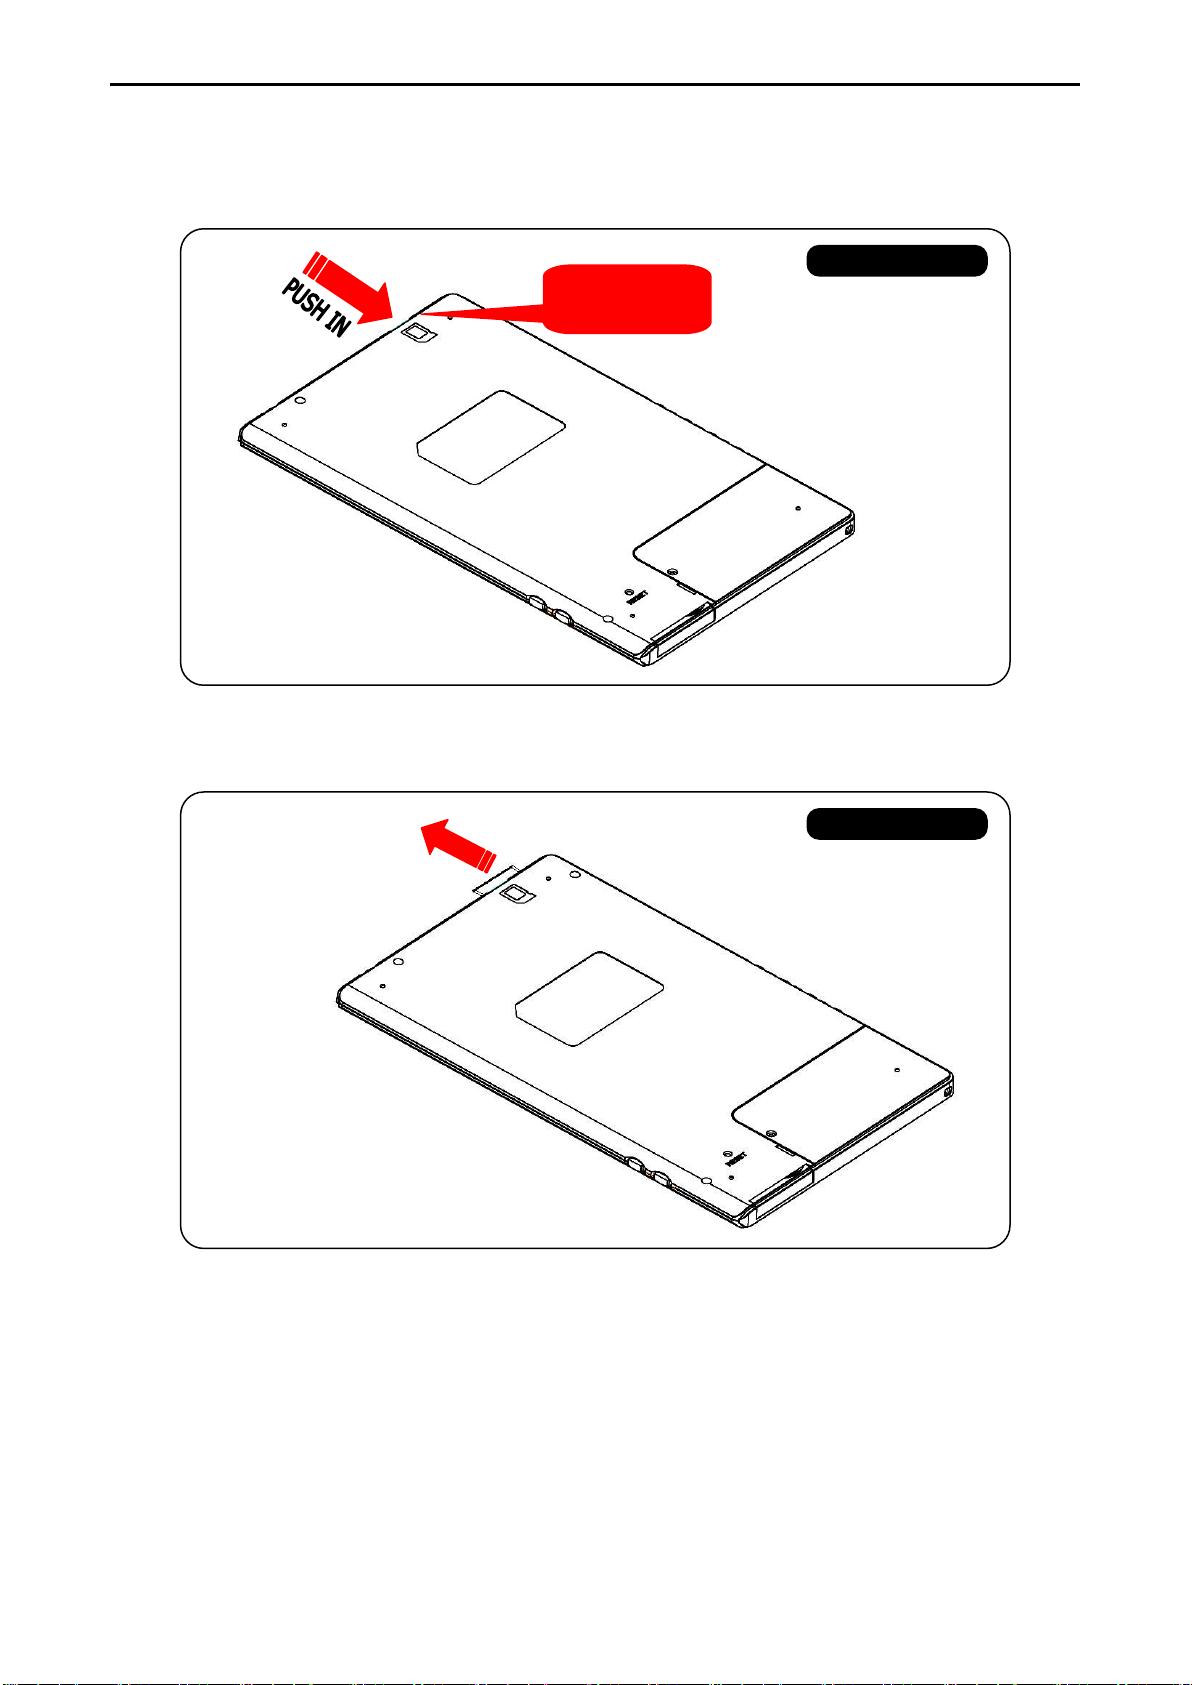
REMOVING CARD
1. Gently push in the SD card.
Chapter 1: Introduction
2. Remove the SD card carefully from the slot.
Chapter 2: Content
6
1.5 Charging the Battery
eBook Reader has an internal, nonremovable battery. The battery is 80-percent charged in about
two hours, and fully charged in about four hours. If you charge eBook reader by connecting it to
your computer, it may take longer to charge.
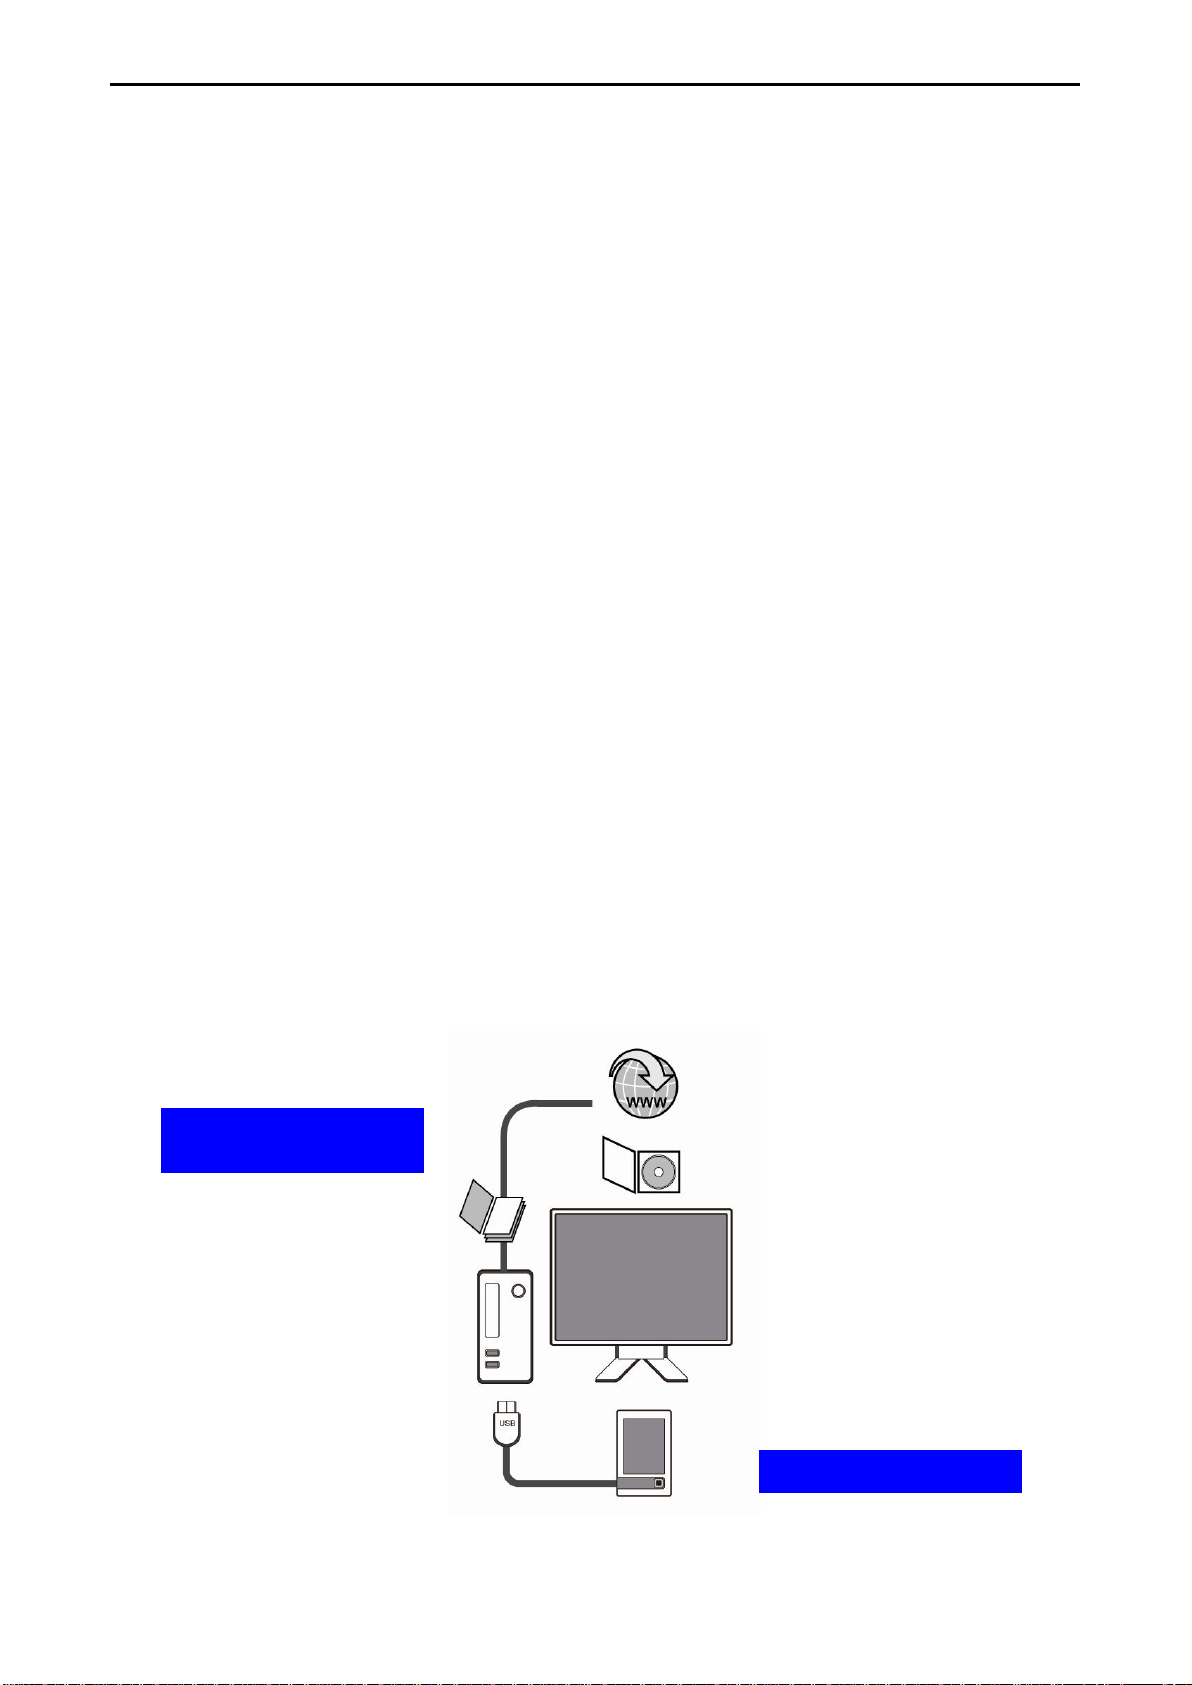
To charge the battery using your computer
Connect eBook Reader to your computer using the USB cable in the
package. Once connected, the device power on automatically and
the screen shows USB link status. The computer must be turned on
and not in sleep mode during charging.
To charge the battery using the power adapter
Use the power adapter in the package. Insert the mini USB end of
the cable to the device, and then plug the power adapter in to a
working electrical outlet. Once connect eBook Reader to the power
outlet, the device power on automatically. If the battery icon in the
upper-right corner of the eBook screen shows a plug, the battery is
charging.
Battery State
When the device is not connected to a power source, a battery icon in the top-right corner of the
eBook screen shows about how much charge is left.
Battery about halfway charged
If the device is connected to a power source, the battery icon animates to show that the battery
is charging.
Battery charging
You can disconnect and use the device before it is fully charged.

Chapter 2: Content
7
Chapter 2: Content
This chapter provides information to install the content to the eBook Reader Device.
2.1 File Transfer
When connecting to PC, the eBook Reader Device is recognized as a mass storage device with the
storage name “Sweex eBook Reader 6 inch”.
Simply copy the eBook folders or files bought/downloaded from the internet to the disk
“Sweex eBook Reader 6 inch”, and then disconnect the eBook Reader Device to start reading.
copy the eBook folders/files to a SD card, and plug the SD card to the device to read from
Or
directly.
Important A
It is recommended to make regular backups of the content of your eBook reader to prevent the
total loss of your books in cases of physical damage, failure, loss or theft.
dvise:
Chapter 2: Content
8
Click to start, and then
follow the process to
finish the appplication
Click to start
installation
2.2 Adobe Reader
This eBook Reader is embedded with Adobe Reader Mobile 9. The Reader Mobile 9 enables eBook
Reader devices to easily acquire, manage and display encrypted and unencrypted PDF and EPUB
content. Users can adopt Adobe Digital Editions as eBook management Utility between PC and
this eBook Reader.
Adobe® Digital Editions (ADE) software offers an engaging way to view and manage eBooks and
other digital publications. Use it to download and purchase digital content, which can be read both
online and offline. Transfer copy-protected eBooks from your personal computer to other
computers or devices. Organize your eBooks into a custom library and annotate pages. Digital
Editions also supports industry-standard eBook formats, including PDF/A and EPUB.
Installing ADE, following the authorization process to start reading and transfer Digital Rights
Management (DRM) content to your eBook Reader, and you are ready to enjoy over hundreds of
books in just a few grams.
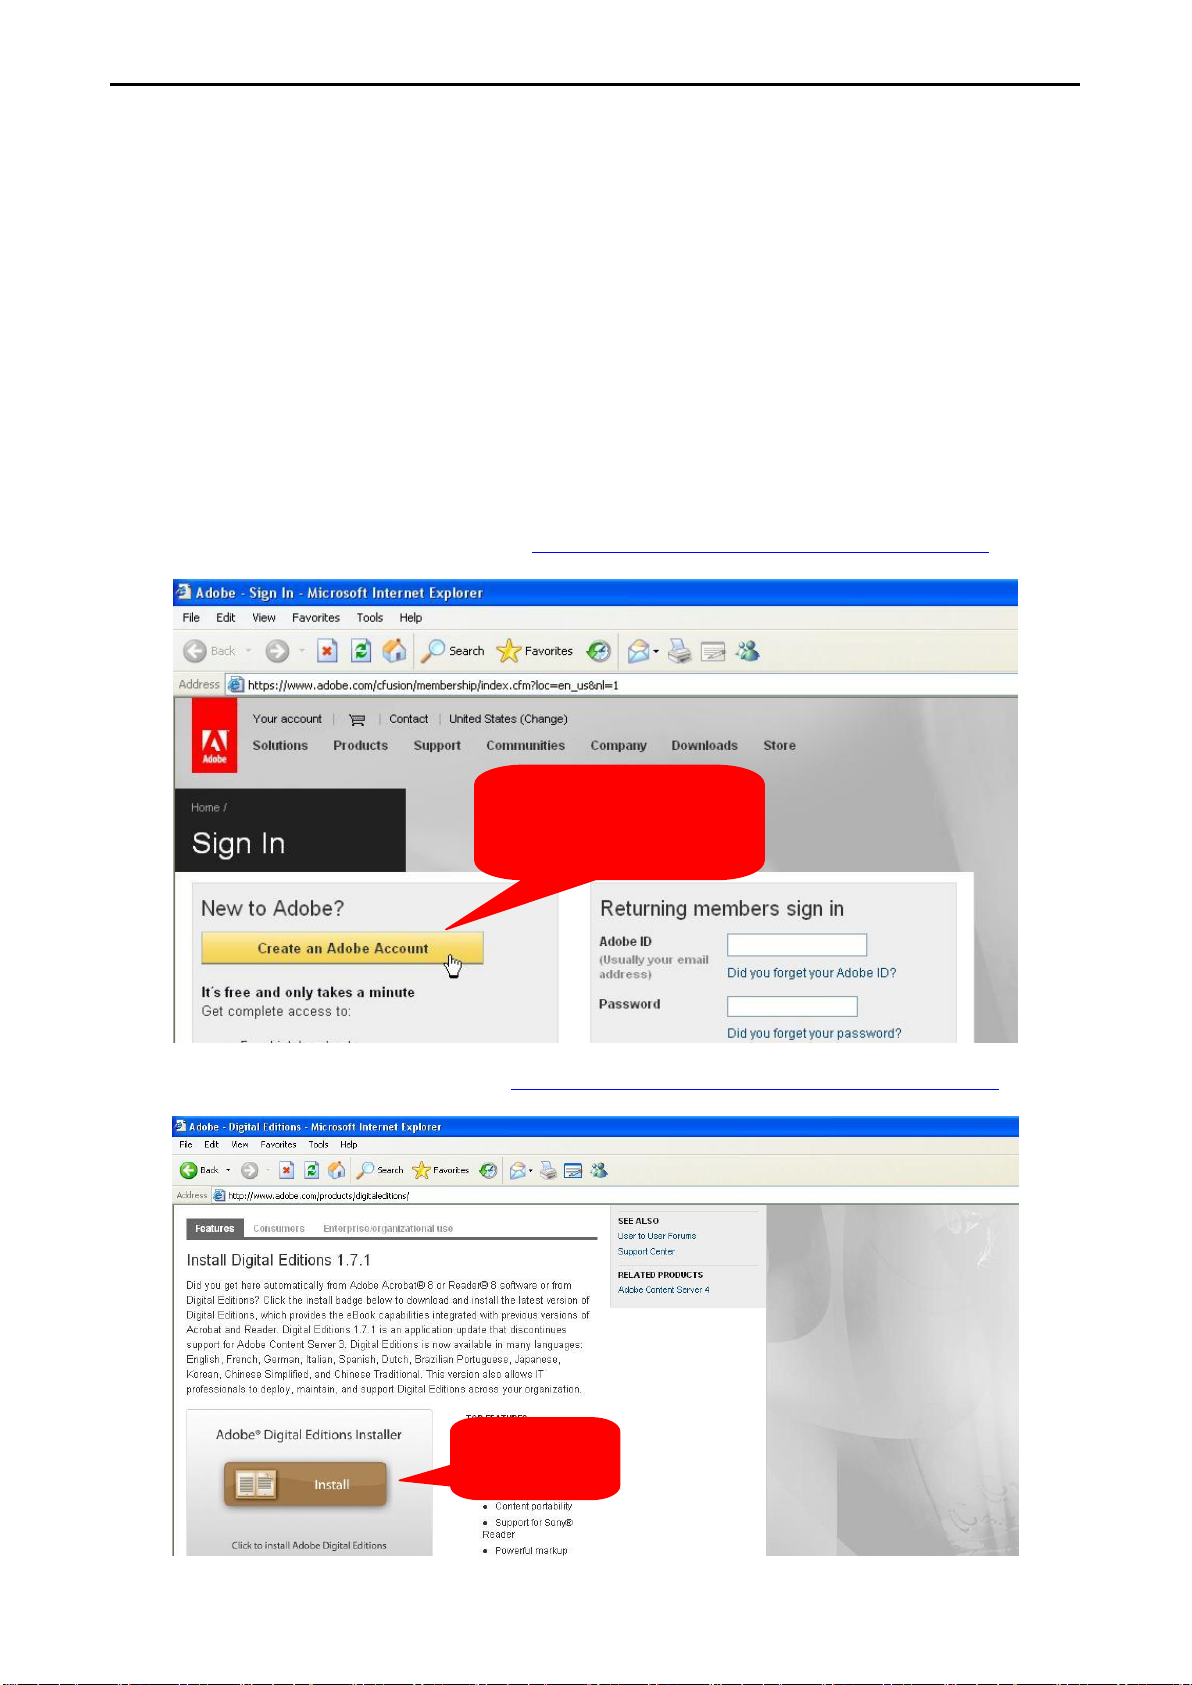
1. Apply an Adobe ID on Adobe Website http://www.adobe.com/cfusion/membership/
2. Download ADE from Adobe website http://www.adobe.com/products/digitaleditions/
Chapter 2: Content
9
Type in your Adobe
Accont and Password
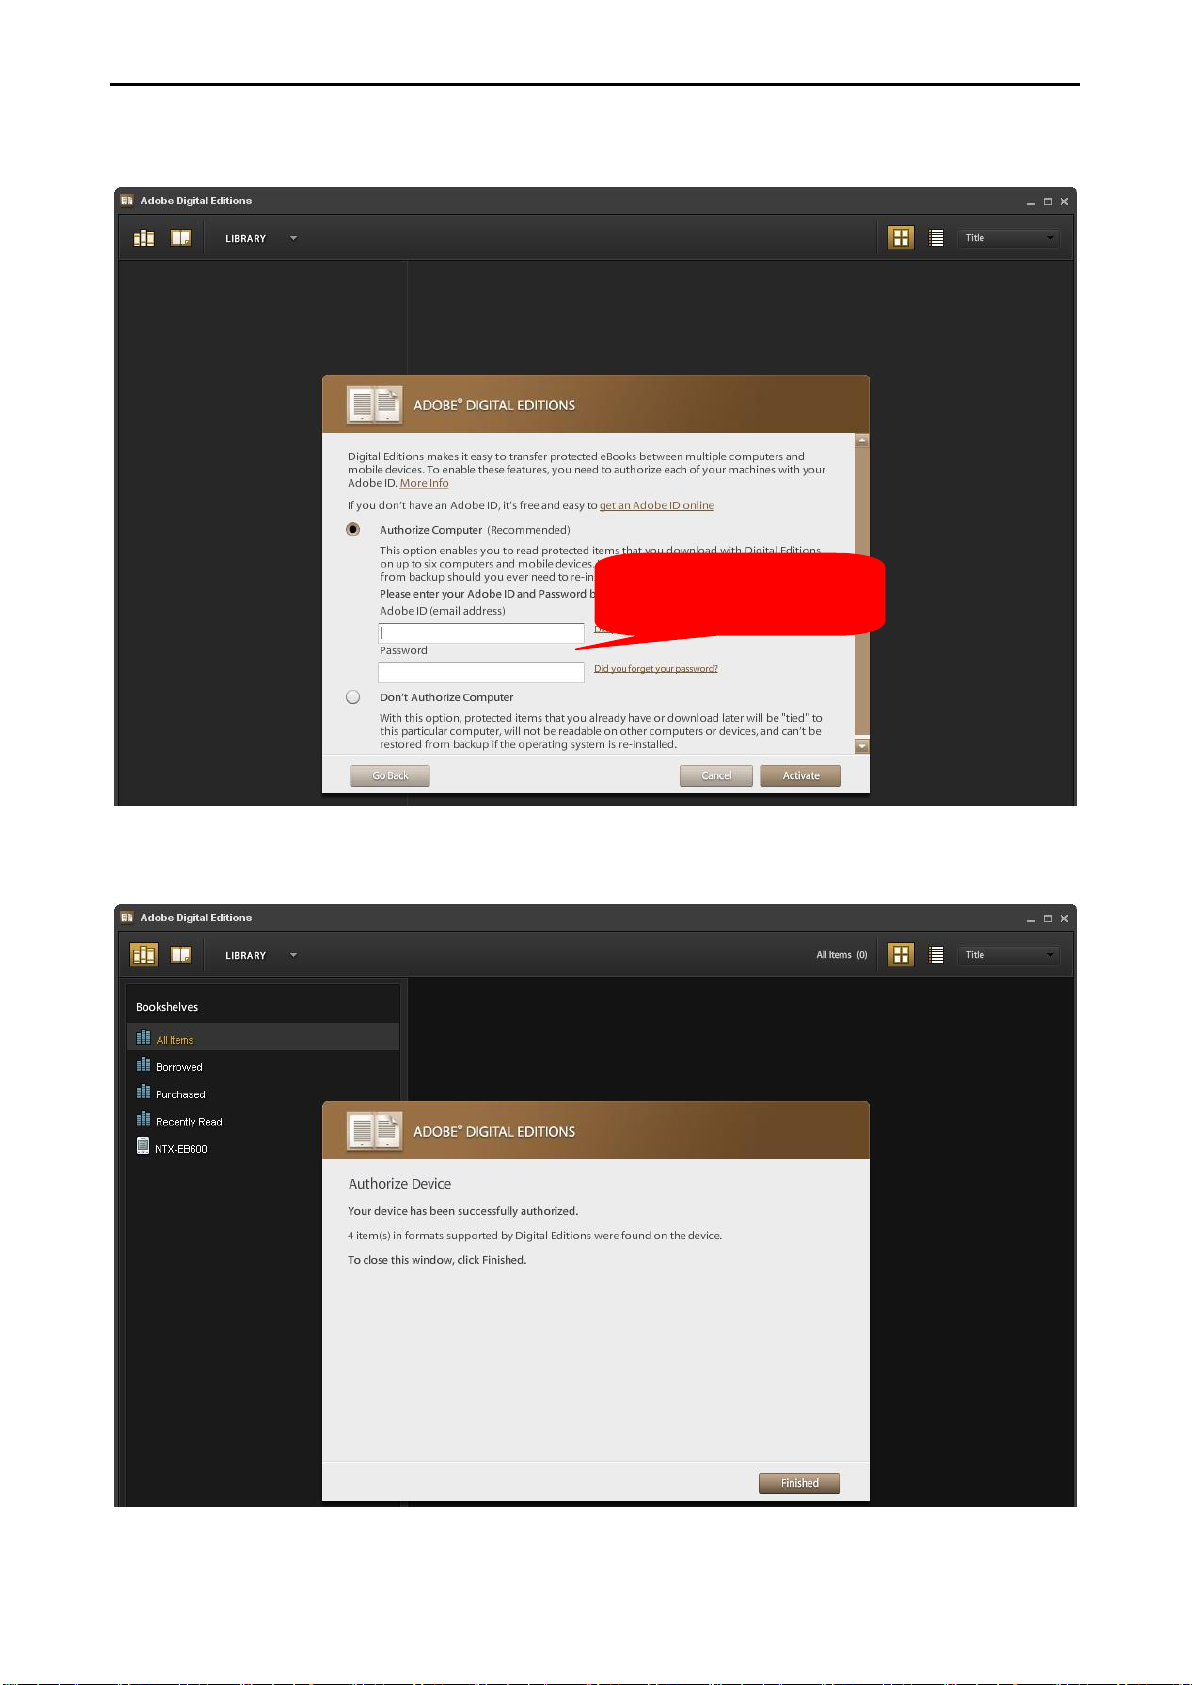
3. After installation, ADE activates automatically, and asks for authorizing the PC. Please type in
your account and password.
4. After authorizing your PC, please connect the eBook Reader to your PC, and use the same
Adobe account and password to authorize the device.
Chapter 2: Content
10
Click to open file!
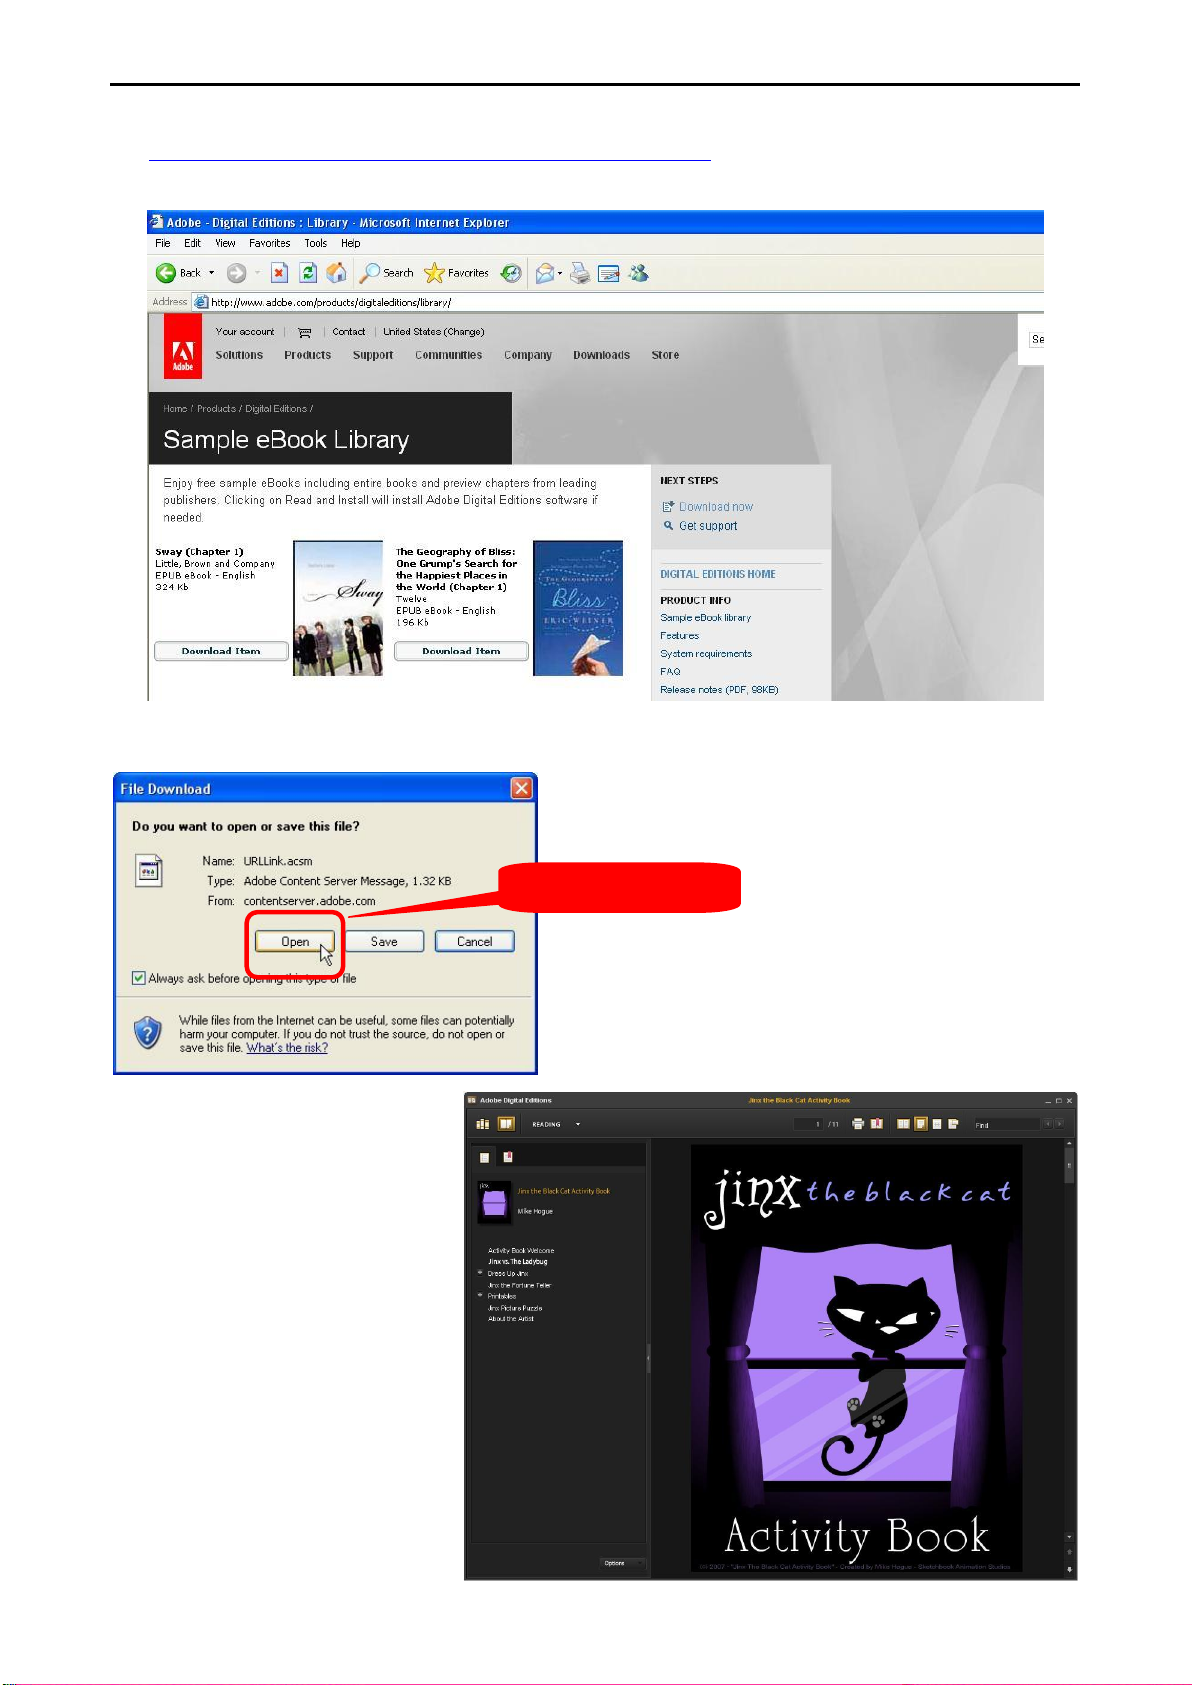
5. After authorizing the eBook Reader, please go to Adobe sample eBook library
http://www.adobe.com/products/digitaleditions/library/ to download free DRM eBooks to
test.
6. While finished download, select “Open” to import the file on ADE directly.
7. The result appears like below.

Chapter 3: Homepage
11
Chapter 3: Homepage
This chapter introduces the main page information.
The homepage shows on the device as the main page. You can always get back to this page by
pressing the “Return Button” on the left side of the device. The following table lists the
information and items that on the page. For detail instruction, please refer to the corresponding
chapters.
Chapter 3: Homepage
12
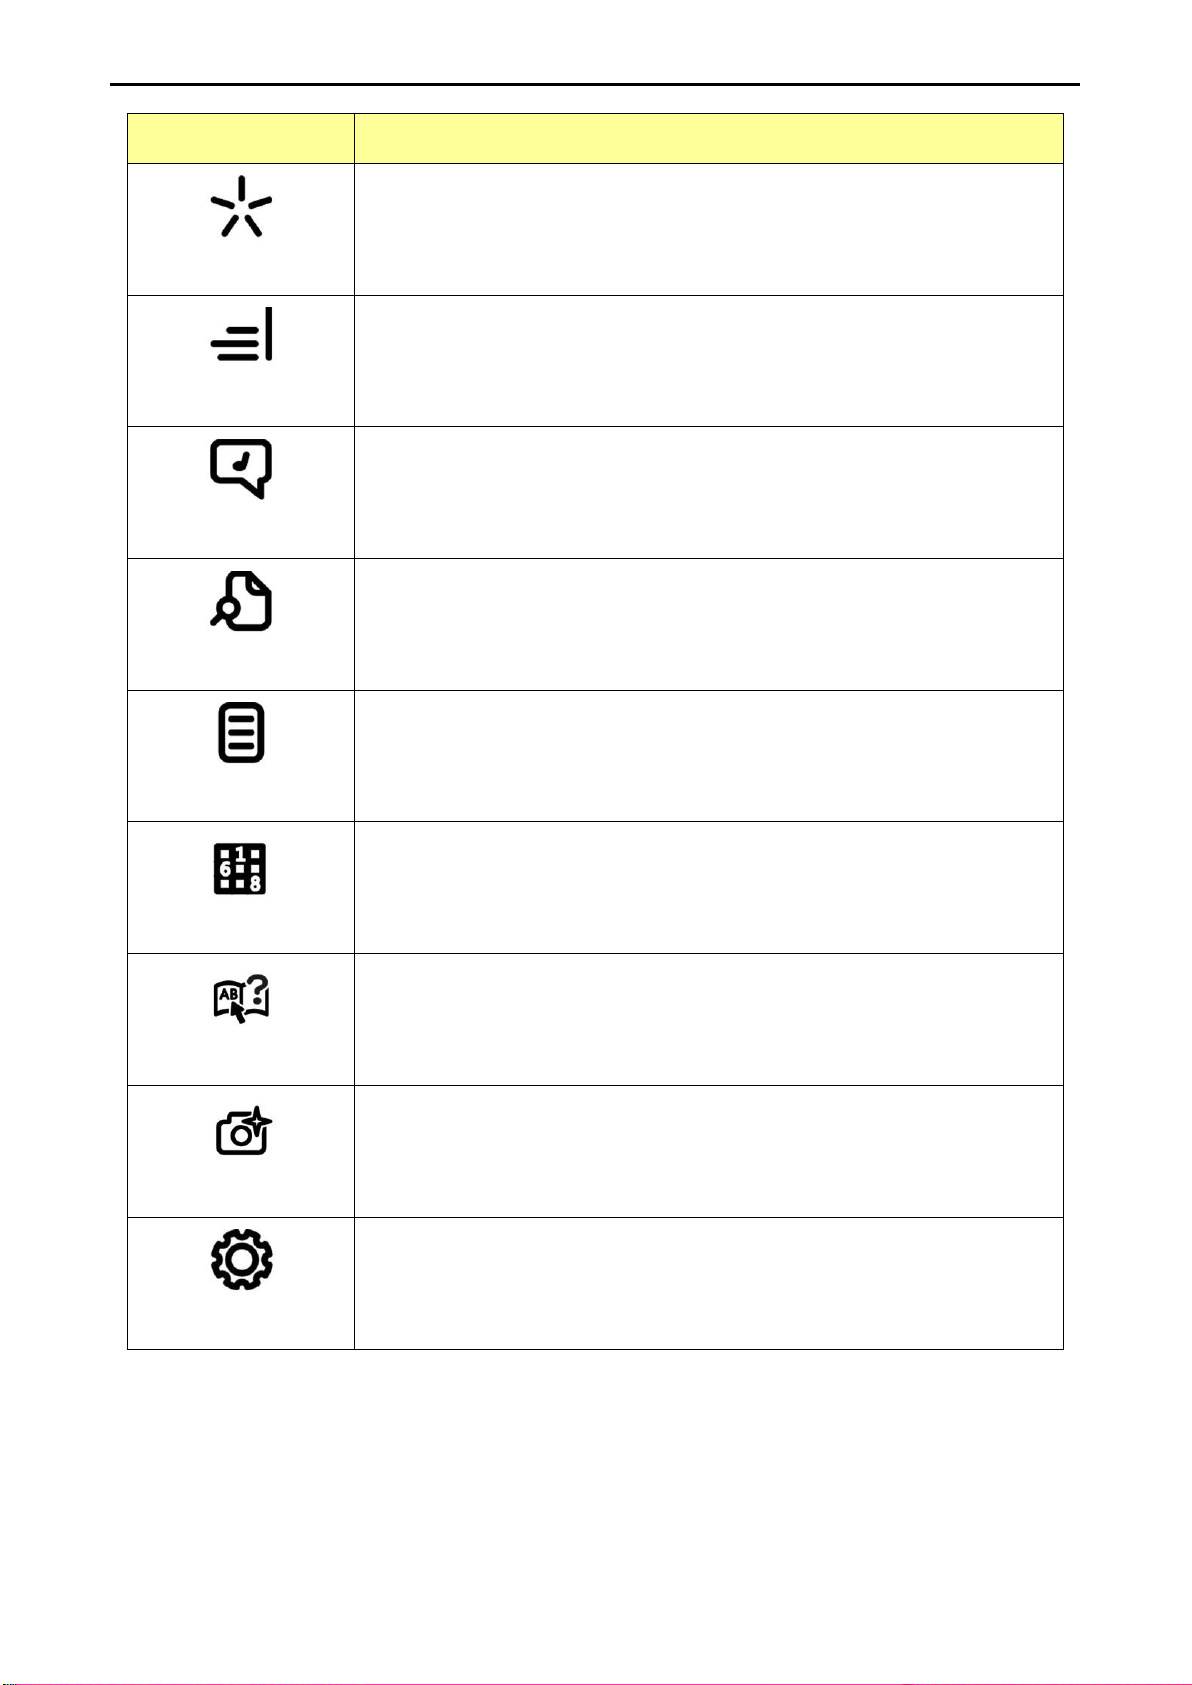
Category
Information
Favorite
Lists your favorite files.
Library
Lists all the available files inside the device and SD card.
Music
Lists all the available MP3 files inside the device and SD card. (This
version does not support this function yet)
Explorer
Lists all the available files inside the device and SD card separately.
Reading Record
Records files that you have read recently.
Game
Sudoku Game.
Dictionary
Look up vocabulary in dictionary. (This version does not support this
function yet)
Picture
Lists all the image files inside the device and SD card.
Settings
Configure settings including language, date and time, power off
mode, user’s name etc.
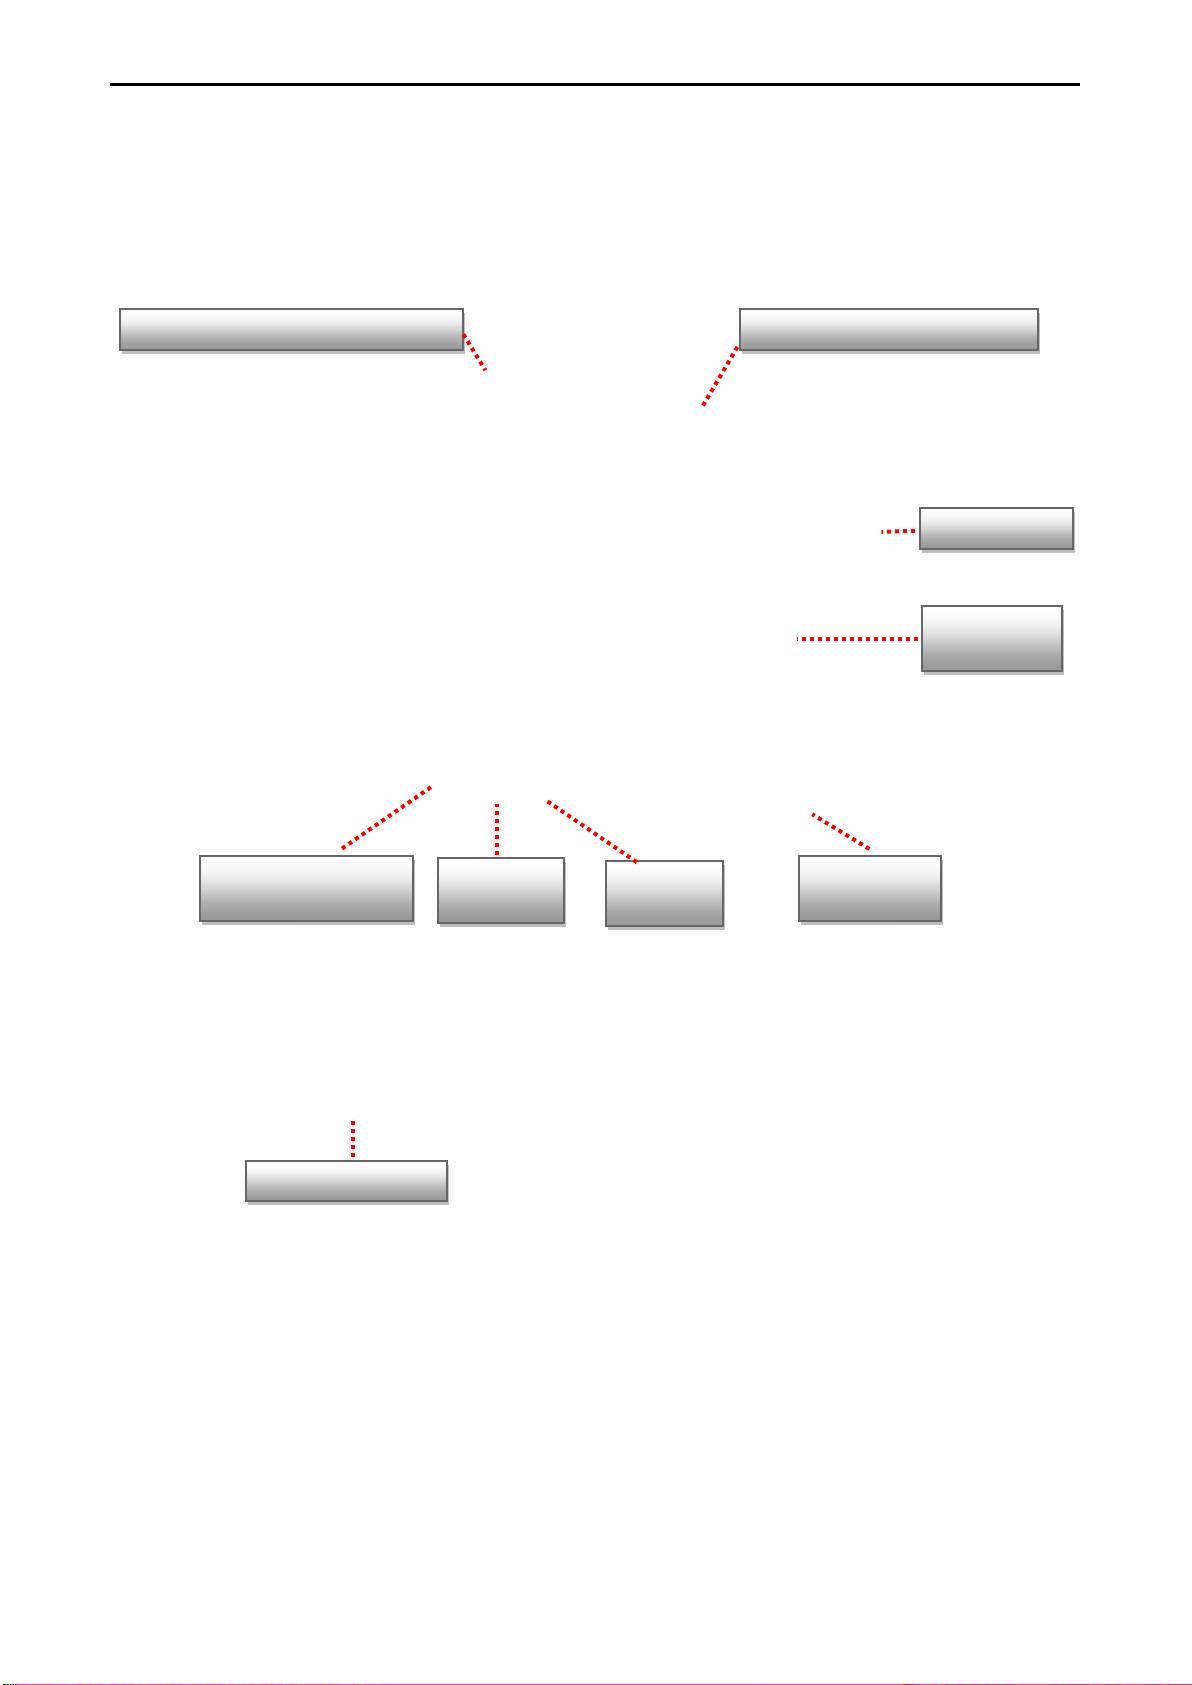
Chapter 3: Homepage
13
User Defined Name/Date, Battery
Progress Bar of Page
Reading Mode:
Horizontal or Vertical
Favorite Mark
Progress Bar
of Reading
Note
Numbers
Bookmark
Numbers
Size and
Publish Date
Page Position and Sorting Type
3.1 Favorite
Favorite lets you keep track of your favorite files. To designate any file as a favorite, just tag the
file no matter you are browsing in library page or in reading statement.

Chapter 3: Homepage
14
ENTER!
TAG!
Two ways to add/delete favorites in library page,
Simply press on the Multimedia Button
On library list, first select to the file and then press on the “Multimedia Button” on the left
side of the device. The file has been tagged.
Via on Screen Library Menu
1. On library list, first select to the file and then press on the “Menu Button” on the left side of
the device.
2. The “LIBRARY MENU” pops up. Select “Favorite” and press enter.
3. The file has been tagged.
 Loading...