

Page 1
1
Wi-Fi Security Camera
INSTRUCTION MANUAL
EN
Pan & Tilt
Page 2

1
Limited Warranty Terms & Conditions
Swann Communications warrants this product against defects in workmanship and material for a period of one
(1) year from its original purchase date. You must present your receipt as proof of date of purchase for warranty
validation. Any unit which proves defective during the stated period will be repaired without charge for parts or
labour or replaced at the sole discretion of Swann. The end user is responsible for all freight charges incurred
to send the product to Swann’s repair centres. The end user is responsible for all shipping costs incurred when
shipping from and to any country other than the country of origin.
The warranty does not cover any incidental, accidental or consequential damages arising from the use of or the
inability to use this product. Any costs associated with the fitting or removal of this product by a tradesman or other
person or any other costs associated with its use are the responsibility of the end user. This warranty applies to the
original purchaser of the product only and is not transferable to any third party. Unauthorized end user or third
party modifications to any component or evidence of misuse or abuse of the device will render all warranties void.
By law some countries do not allow limitations on certain exclusions in this warranty. Where applicable by local
laws, regulations and legal rights will take precedence.
For Australia: Our goods come with guarantees which cannot be excluded under Australian Consumer Law. You are
entitled to a replacement or refund for a major failure and for compensation for any other reasonably foreseeable
loss or damage. You are also entitled to have the goods repaired or replaced if the goods fail to be of acceptable
quality and the failure does not amount to major failure.
FCC Verification
NOTE: This equipment has been tested and found to comply with the limits for Class B digital device, pursuant to part
15 of the FCC Rules. These limits are designed to provide reasonable protection against harmful inter ference in a
residential installation. This equipment generates, uses and can radiate radio frequency energy and, if not installed
and used in accordance with the instructions, may cause harmful interference to radio or television reception, which
can be determined by turning the equipment off and on, the user is encouraged to try to correct the interference by
one or more of the following measures:
• Reorient or relocate the receiving antenna
• Increase the separation between the equipment and the receiver
• Connect the equipment into an outlet on a circuit different from that to which the receiver is connected
• Consult the dealer or an experienced radio/ TV technician for help
These devices comply with part 15 of the FCC Rules. Operation is subject to the following two conditions:
• These devices may not cause harmful interference, and
• These devices must accept any interference received, including interference that may cause undesired
operation.
Important Note:
All jurisdictions have specific laws and regulations relating to the use of cameras. Before using any camera for any
purpose, it is the buyer’s responsibility to be aware of all applicable laws and regulations that prohibit or limit the use
of cameras and to comply with the applicable laws and regulations.
WARNING
Modifications not approved by the party responsible for compliance could void user’s authority to
operate the equipment.
IMPORTANT SAFETY INSTRUCTIONS
• Make sure product is fixed correctly and stable if fastened in place.
• Do not operate if wires and terminals are exposed.
Before You Begin
Page 3

2
Contents
Quick Reference
Before You Begin ........................................................................................................... 1
Contents ......................................................................................................................... 2
Introduction ................................................................................................................... 3
Layout of the Camera ................................................................................................... 3
Connection Guide .......................................................................................................... 4
SwannEye Plus Software ............................................................................................. 5
SwannEye Plus Live View Interface ............................................................................ 6
Camera Wi-Fi Setup ..................................................................................................... 8
Camera Wi-Fi Settings ................................................................................................. 9
Have an iPhone or Android Smartphone? ............................................................... 10
SwannEye Plus App Camera Setup ...........................................................................11
Using SwannEye Plus App ..........................................................................................12
Accessing the Camera via Web Browser ................................................................. 14
Setting up Email Alerts via Web Browser ................................................................ 15
Default Camera Username and Password Information
Username: admin
Password: 123456
Notice
The information printed in this instruction manual is correct at the time of publication.
As we’re constantly making improvements to our products, firmware, software and user
manuals, we reserve the right to change the information without prior notice.
Remember to check the Swann website for updates and more information:
www.swann.com
Page 4
3
Introduction
Layout of the Camera
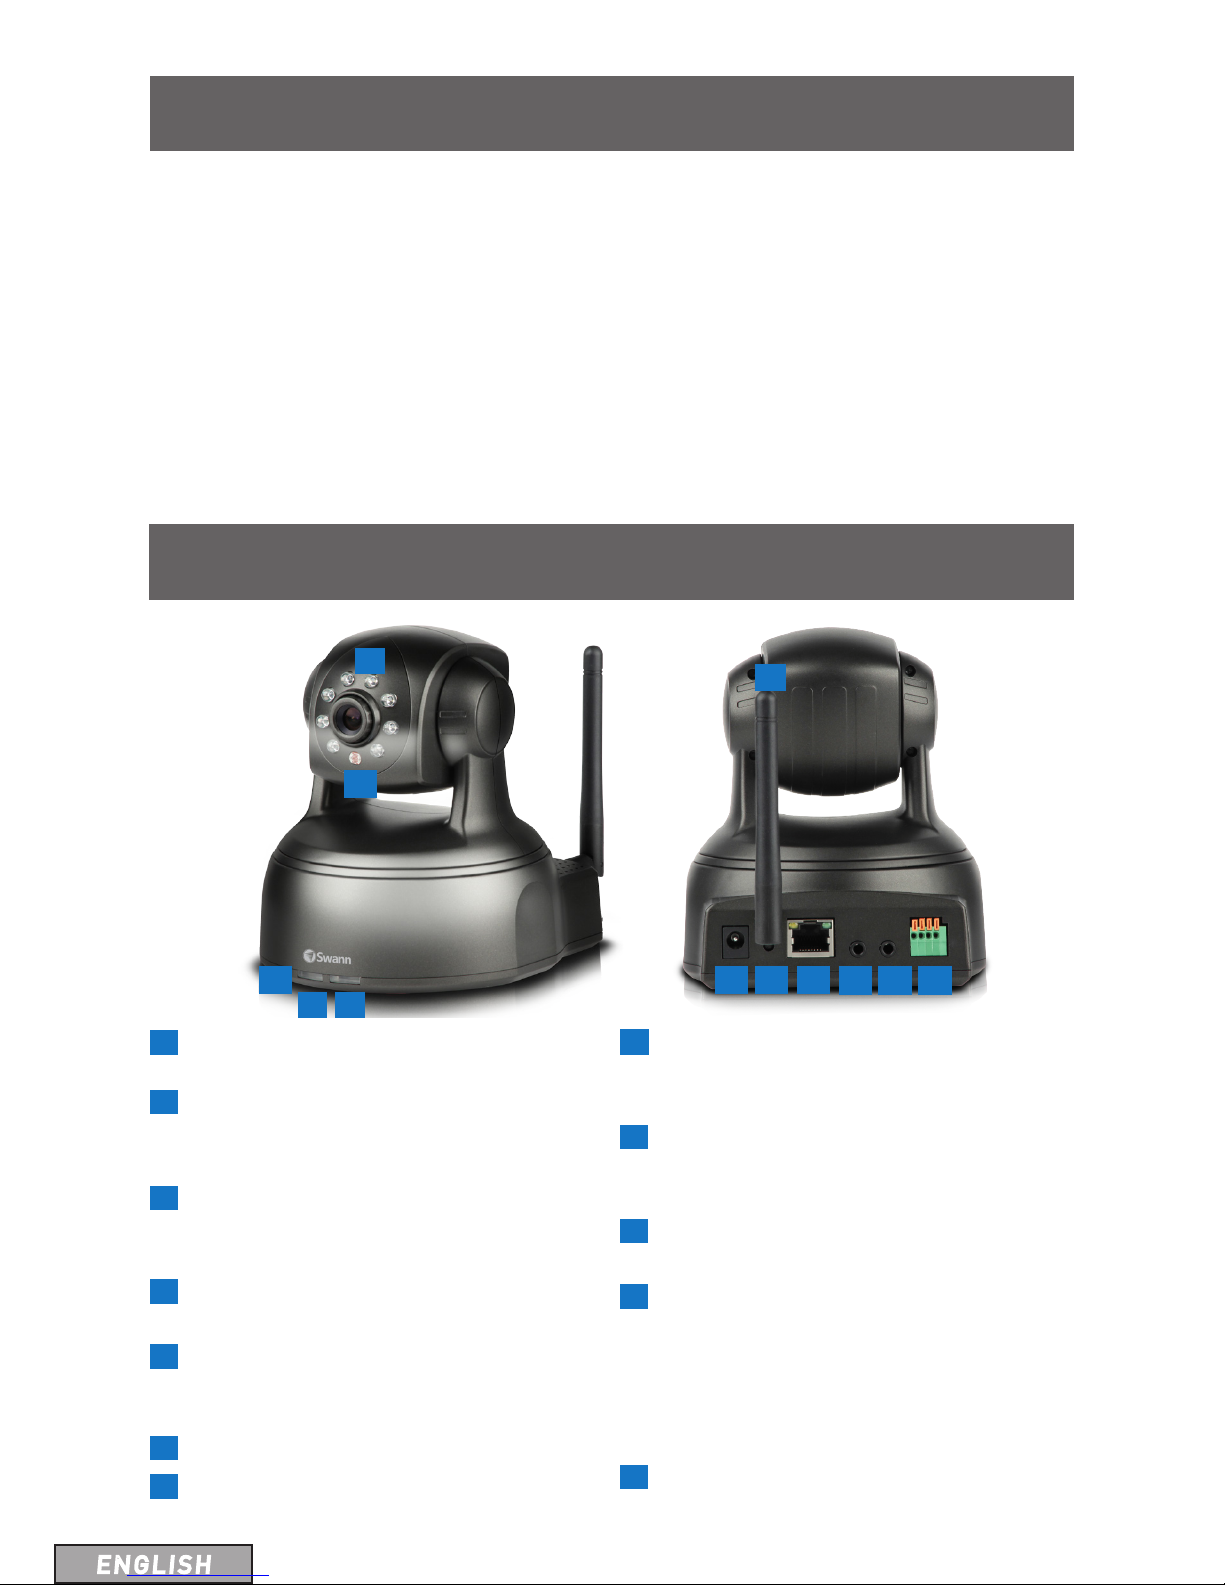
1
Infrared LEDs: Illuminates targeted
areas when in near-total darkness.
2
Illumination Sensor: Detects the amount
of incoming light and turns on the IR
LEDs for night vision when necessary.
3
Microphone: Allows the camera to hear
nearby sounds and stream them with
video.
4
Power LED: Solid red indicates camera
is powered.
5
Network LED: Blinks when there is
communication between the camera
and network.
6
DC In Power: To connect power adapter.
7
Antenna Connector: To attach Wi-Fi
antenna.
8
Reset Button: Press and hold for a few
seconds to reset all camera settings
back to the factory defaults.
9
Network (LAN) Port: To connect
Ethernet cable to a router for wired
connections.
10
Audio In: To connect an external
microphone.
11
Audio Out: To use the intercom function,
connect speakers to the audio output.
Using SwannEye Plus, you can talk to
your mobile device and your voice will be
heard on the speakers connected to the
camera.
12
Alarm I/O Block: For connecting
external alarms and sensors.
Congratulations on your purchase of this Swann Pan & Tilt
IP Camera! This camera is versatile, easy to set up and
packs some nifty features like built-in microphone for 2-way
conversations and infrared night vision. Best of all, it can
be totally wireless - if there’s a Wi-Fi network your camera
can connect to the Internet through, then just connect the
camera to power and you’re good to go.
1
2
3
4 5
6
7
11 12
10
98
Page 5
4
Connection Guide
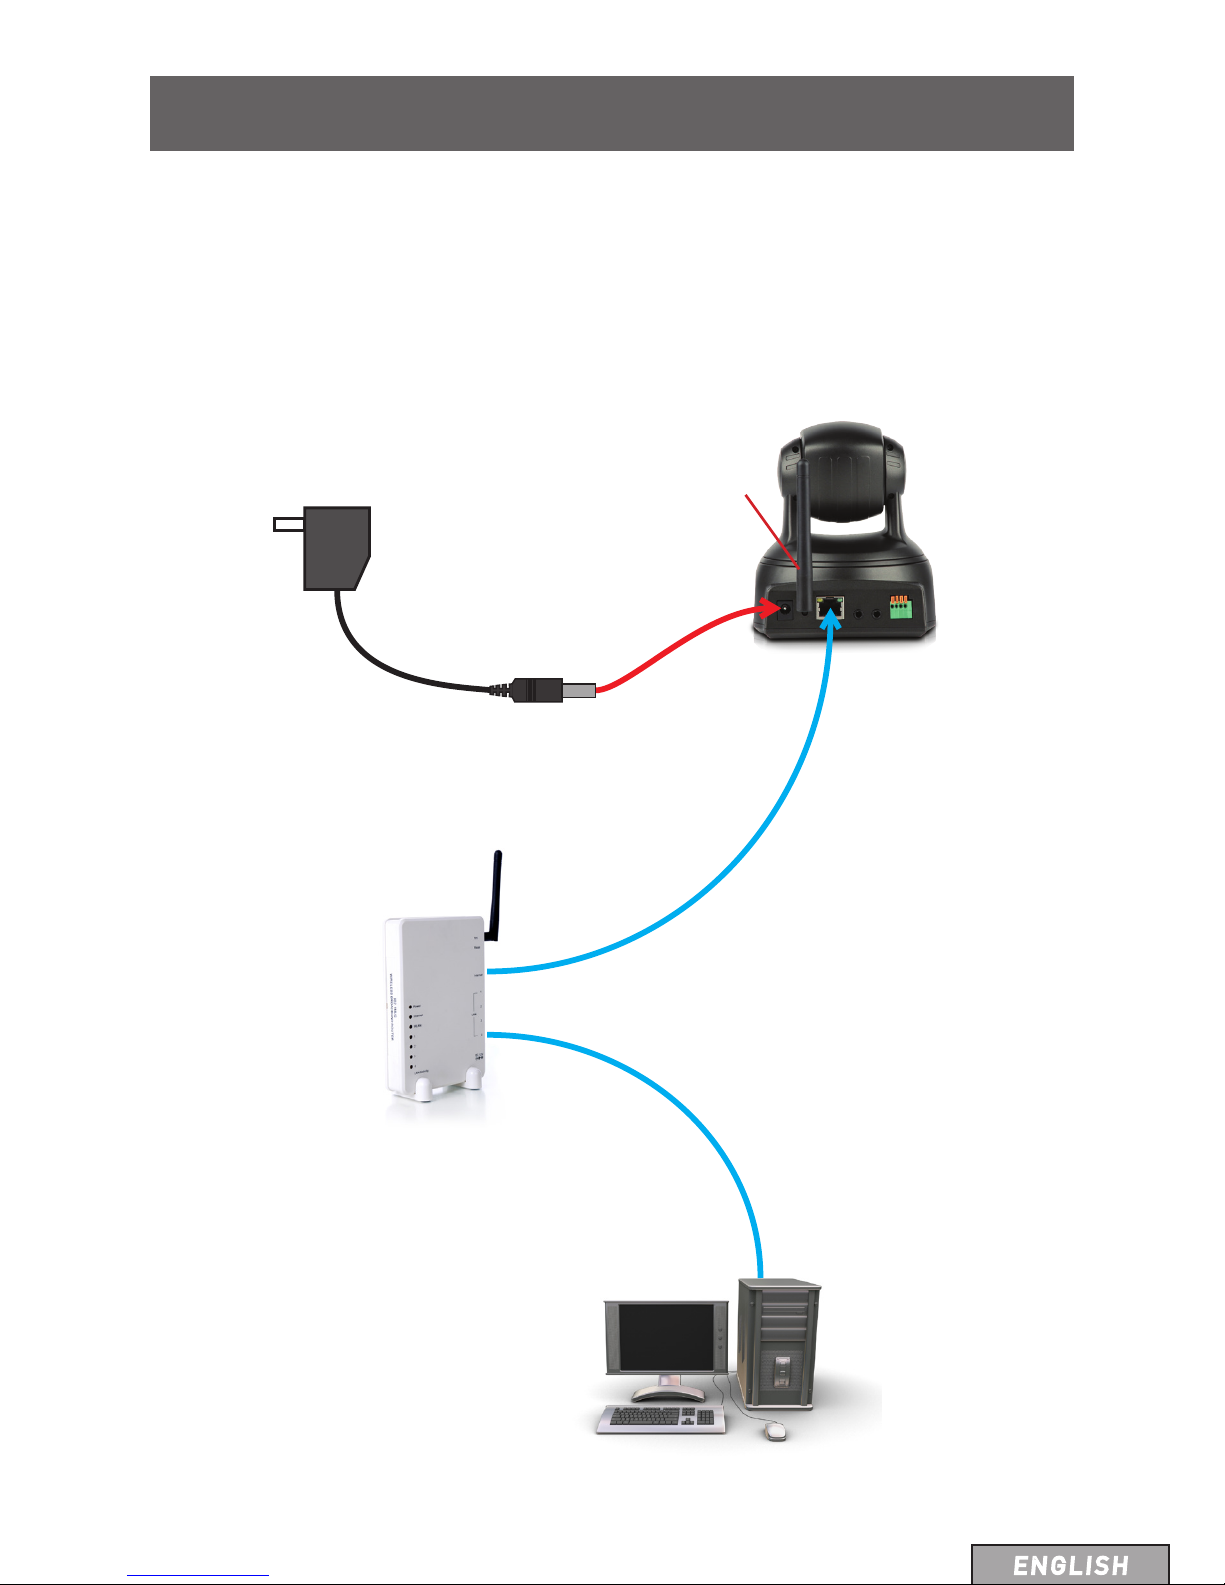
To install the camera, connect it to your router or network switch/hub using the included
Ethernet cable. The camera is also Wi-Fi capable - but because this is the first time you’re
setting it up, we recommend physically connecting it to your home network through the
Ethernet cable and configuring it properly before you go wireless.
2 Connect the power supply to
the camera’s DC In port and
plug the power adapter to an
electrical outlet.
3 Connect the camera’s
Network port to any
available port on your
wireless router using the
supplied Ethernet cable.
4 Make sure the computer that you
want to use to configure and/or
access the camera is connected to the
same router.
1 Screw the Wi-Fi antenna
onto the Gold connector on
the back of the camera.
Page 6

5
SwannEye Plus Software
Included with the camera is the SwannEye Plus software for Windows.
SwannEye Plus is an easy to use software which enables you to set up and control the
camera that’s connected on your home network from your computer. In addition to watching
live video feeds from multiple cameras, SwannEye Plus also allows you to simultaneously
record and playback videos you have just taken while your current recordings continue
uninterrupted.
A mobile app version of this software is also available for Android and iPhone smartphones.
The SwannEye Plus app can be downloaded for free from the Apple App Store or Google Play
Store. See “Have an iPhone or Android Smartphone?” on page 10 for more details.
Installing SwannEye Plus on your Windows PC
Follow the instructions below to install SwannEye Plus onto your computer.
Windows Users
1 Insert the software CD into your PC’s optical disc tray and wait for the AutoPlay window
to appear.
2 When prompted, select AUTORUN and allow the installer menu to open. From here,
read the onscreen instructions for installing the software and opening the manuals.
If the AutoPlay window isn’t enabled on your system, you can access the optical disc
tray from “My Computer”, then select the amplayer file on the CD and run the installer
directly.
From the CD you can install the SwannEye Plus PC monitoring software to view and record
from your camera and numerous other functions.
Page 7

6
SwannEye Plus Live View Interface
When you launch SwannEye Plus software, you will see the following screen:
The SwannEye Plus Live View interface allows you to monitor camera feeds from up to
sixteen (16) cameras at once (assuming sufficient bandwidth). From here, you are also
able to record videos, take snapshots, configure Wi-Fi settings, engage in 2-way audio
conversation remotely and do much more.
Many of the functions and buttons in the Live View interface are self-explanatory. In fact,
pointing the mouse cursor at a button will reveal a tool-tip telling you what the button does.
Adding to the Camera List
The camera contains a Unique IDentifier code that’s embedded on a QR sticker (it’s a
sticker with lots of little black squares that form a larger black and white square). The UID
helps you to connect your PC or SmartPhone to the camera in just a few simple steps using
Swann’s Peer-to-Peer (P2P) network technology. P2P cuts out all of the messy networking
stuff that you used to have to do to get connected!
Before you perform the following steps, look for the QR sticker on the bottom side of the
camera and write down the UID code:
1 Click the button. This displays the Add Device Information window.
2 Click Search. Your computer will scan for connected cameras and display them as a list.
3 Double-click the UID code that matches your camera. This populates the UID box at the
bottom of the window automatically.
At this point, you may want to write down your camera’s IP address as this will be helpful
when you want to access the camera using a web browser. See “Accessing the Camera
through a Browser” on page 14 for more details.
Camera List
Play/
Stop All
Cameras
Connection
status
Camera
Operation
Screen Modes
Configure cameras
Set recording
folder and
view images &
video clips
Page 8

7
4 Click in the Device Name box and then enter a unique name for the camera. We suggest
calling it something that can help you identify it easily.
5 Click in the Device Password box, enter the default camera password (“123456”) and
then click Save. The camera you’ve just added will appear in the camera list in the Live
View interface. Since it’s the first camera added, it will occupy the number 1 row in the
list. If you add more cameras, these cameras will be listed in the order they are added.
6 Double-click on the camera name (no.1) to start watching live video on the
corresponding channel number (channel 1).
Here’s a quick summary of what you need to do:
SwannEye Plus Live View Interface
6
Double-click the newly
added camera to start
streaming live video
on the corresponding
channel.
1
5
3
4
2
Search for camera.
You can also open an
Internet browser and
enter the IP address of
the camera to access
the camera’s live view.
Name
camera.
Enter
default
password.
Save the information.
Double-click
the UID
matching
your camera.
Page 9

8
So, you’ve got the camera installed and successfully accessed it via the network but you
don’t want that cable running down the hallway? Time to enjoy the flexibility of wireless.
Setting up the camera with your Wi-Fi network is easier than you might think!
Before starting, ensure the camera has the Wi-Fi antenna attached and is within range of your
wireless home network. Also, it’ll be good to have your network name and password ready.
Connecting to the Wi-Fi Network
1 On the Live View interface, select the camera that you want to access wirelessly and
then click the Camera Settings button. This displays the Edit Device Information
window.
2 Click Remote Settings. Wait a few seconds for your PC to establish connection with the
camera and display the Remote Settings window.
3 Click Manage WiFi Network. In the Manage WiFi Network window that appears,
you will see a list (WiFi SSID) of available wireless networks which the camera has
automatically detected. When you select a wireless network, you can see its encryption
type and signal strength.
4 In the list of available wireless networks (WiFi SSID), select a network, enter the Wi-Fi
password (also commonly known as network security key) and then click OK. If there’s
any other wireless networks in your area that you want the camera to connect to,
simply repeat steps 3 and 4.
Camera Wi-Fi Setup
Page 10

9
Camera Wi-Fi Setup
Now unplug the camera from the router and enjoy the convenience of putting the camera
whereever you want (as long as it’s within range of your home Wi-Fi network!). Next, If
you have a smartphone, download the SwannEye Plus mobile app and start watching live
streaming video anywhere with your smartphone through Wi-Fi.
If your camera is experiencing constant dropouts, this could mean that it’s too far away from
your router. Check the Wi-Fi signal strength using the SwannEye Plus software or app. Low
signal strength can sometimes affect the performance of the camera. Try moving the camera
around to get an idea of the range of the wireless signal and the best place to use it. If that’s
not possible, you could consider buying and installing a Wi-Fi Range Extender in your home to
boost the Wi-Fi signal.
In the Remote Settings window, you can change the camera’s default password and
adjust various video settings for the camera. The settings here will affect the quality and
performance of the video stream when you view the camera wirelessly from the SwannEye
Plus software, app or web browser.
Device Password Settings: Here you can change the default camera password to something
of your choosing. Always choose a strong password (e.g., a mixture of uppercase/lowercase
letters and numbers) to help prevent unauthorized people from watching live video on your
camera. It is highly recommended that you change the password after installing the camera.
Keep your password somewhere safe. If you lose or forget your password, you will have to
“reset” your camera to its original factory configuration and set up your camera again.
Video Quality: How much information will be sent per-pixel. High quality settings look great,
but the bandwidth required to send the image will be much higher. This is also going to
depend on the speed of your network connection. Adjusting video quality to a lower setting
may produce a smoother looking image. Video quality setting also determines the resolution
of the video stream. The highest video quality (Max) will display video size at 640 x 480
resolution while the lowest video quality (Min) will display video size at 160 x 120 resolution.
Video Flip: You can choose to flip the video horizontally, vertically or both. This setting is
useful when the camera needs to be installed upside down. Default setting is Normal.
Environment Mode: Change the light environment setting of the camera. Some devices
(such as TV screens and fluorescent lights) will flicker if this is not set correctly. For USA and
Canada, set this to Indoor 60Hz. For Australia and the UK, set this to Indoor 50Hz. Outdoor
and Night modes are also available.
Camera Settings
Page 11

10
Have an iPhone or Android Smartphone?
Then head to the respective Apple App Store or Google Play, download the SwannEye Plus
app for free and start watching live camera videos from your mobile device.
Please note, make sure you download the PLUS version of the SwannEye app! The following
images are captured from the iOS version of the mobile app. You may notice a slight layout
difference in the Android version of the app but otherwise they both behave in the same manner.
Installing the SwannEye Plus Smartphone App
iOS:
1 Tap App Store.
2 Tap and find SwannEye Plus.
3 Tap to download.
Android:
1 Tap > Play Store.
2 Tap and find SwannEye Plus.
3 Tap to download.
Running the App
Locate the SwannEye Plus app and tap the icon to run. The app will load and take you
directly to the main screen.
App Interface
1
Camera: Shows a list of cameras registered with
the app. The is also the first screen that appears
each time you run the app.
2
Add Camera: Here you can register cameras with
your app.
3
Info: Displays information about the app.
4
Camera List area: This is where all your registered
cameras are listed.
5
Find: Search for a specific camera by name. Useful
when you have multiple cameras registered with
the app.
6
Edit: Allows you to remove cameras from the
Camera List.
1
4
5
6
2
3
Page 12

11
SwannEye Plus App Camera Setup
The SwannEye Plus app is great for on-the-fly monitoring, but before you can actually start
watching anything, you need to first register the camera with the app.
The SwannEye Plus app has some limitations - you can’t record videos and there isn’t any split
screen display. For these, you have to use the Windows software.
Registering the Camera
1 Tap to display the Add Camera screen.
2 If you are connected to the same network as your
camera (typically if your phone or tablet is connected to
your Wi-Fi at home and so is your camera) you will see
“Camera Found! (1)” as shown on the right. Simply tap
the UID of the discovered camera and finish the details
as per steps 4 and 5 below. Note if you have more than
one camera on your network you see more camera
UIDs in this list, set each one up separately.
3 If the camera is on a different network such as the
mobile network or the auto search did not find it, simply
tap and use your smartphone’s camera to
scan the QR code sticker which you will find on the
bottom of the camera. This automatically populates the
UID box with the camera’s UID, then just follow steps 4
and 5 to finish off.
Or if you prefer to do it manually, tap and
type the camera’s UID in the UID box carefully. Note
that the UID is case sensitive so make sure you use the
correct types of letters and number or it won’t connect.
4 Enter the camera’s password (default is 123456 but we
recommend you change this using the software on your
PC as soon as possible) in the Password box.
5 Tap the Name box and then enter a unique name for the
camera. We suggest calling it something that can help
you identify it easily. When you’re finished, tap to
return to the Camera List screen.
Page 13

12
Using SwannEye Plus App
Tap to display the Edit Camera
screen where you can manage
camera settings such as name,
password, video & Wi-Fi and
reconnect the camera if it’s not
online.
Camera name
Connection details
To pan camera view,
swipe left or right
Mute video
Current Audio mode
Close Audio Mode menu
Hear what’s going on
near the camera
Talk to people near
the camera using
your smartphone’s
microphone
Tap to watch camera
on Live View
Take a snapshot
To tilt camera view,
swipe up or down
View and manage
snapshots
Connection status
The Camera List Screen
The Live View Screen
Page 14

13
Using SwannEye Plus App
The Advanced Setting Screen
Tap to modify the camera’s
current password. The next
time you use SwannEye
Plus on your PC or another
smartphone, you will
need to re-enter the new
password for the camera.
Adjust light environment
mode to Indoor (50Hz),
Indoor(60Hz), Outdoor or
Night.
See model & version
number and other
information about the
camera.
Your currently connected
Wi-Fi network.
Tap to connect to a diferrent
Wi-Fi network (if available).
Adjust video quality to Min,
Low, Medium, High or Max.
Higher settings offer better
quality, but require more
bandwidth to stream.
Adjust video orientation
to Normal, Vertical Flip,
Horizontal Flip or Vertical
and Horizontal Flip.
Tap to change camera name
Show Advanced Setting screen
Tap to attempt re-connecting the
camera if it’s no longer online or has
timed out.
The Edit Camera Screen
Page 15

14
The Live View Interface
• Open a web browser such as Internet Explorer (IE), Chrome, Firefox or Safari
and enter the IP address of your camera in the address bar. Make sure your
camera is connected to the network, otherwise nothing will show up.
To find out the IP address of your camera, refer to the quick summary in “Adding to
the Camera List” on page 7.
• Log in using the current username and password of your camera (the default is
admin / 123456).
• Next, select your viewing mode - Mode 1 for Internet Explorer or Mode 2 for
Chrome, Firefox and Safari. Note that certain functions are only available in
Internet Explorer.
• If you’re using IE and connecting to a camera for the first time, you will need to
download and install a plug-in first. The IE browser plug-in is quite small and
installation does not take long. Your operating system and/or virus protection
program may ask you for permission to run the file. Select the relevant options
available to complete installation. Restart your browser after installation.
Accessing the Camera via Web Browser
The Live View interface on the web browser is almost exactly the same as the main
interface for the SwannEye Plus software on the computer - it just looks slightly
different but operates in the same manner with a few additional features such as
vertical & horizontal patrolling and brightness & contrast adjustments.
Page 16

15
Setting up Email Alerts via Web Browser
Your camera can send alerts and snapshots to an email address when motion events occur.
You must first configure your email account details and set up motion detection via the
camera’s web interface.
To set up email alerts:
1. Click the button at the bottom of the Live View interface on the web browser to
bring up the Advanced Settings page.
Configure Email
2. Click Mail Service Settings on the left navigation bar.
3. Enter your email account details into the appropriate fields.
• Sender: The email address that you want your camera to send alerts from. For
example, your_email@gmail.com
• SMTP Server: Select the SMTP address of your email server from the dropdown list.
If you want to use an email server other than the ones provided, manually enter it into
the field.
• SMTP Port: The SMTP port of your email server. This field will automatically self-
populate if you use any of the preset email servers.
• Need Authentication: If the SMTP server requires authentication, check this box and
then enter the username (for example, your_email@gmail.com) and password for your
email account.
• SSL: Whether the email server you’re using requires a secure link. If you’re not sure
what settings to use, check with your email service provider.
• Receiver: The email address(es) that your alerts will be sent to. You can specify up to
four (4) different email receipients.
• Test: Click to send a test email to the “Receiver” email address(es) specified above.
Page 17

16
Setting up Email Alerts via Web Browser
4. When you have completed the email configuration, click the Setup button to save your
settings.
Enable Motion Detection, Email Notifications and Schedules
5. Now that your email account has been set up, it’s time to configure the motion
detection settings of your camera. Click Alarm Service Settings on the left navigation
bar.
6. Tick the Motion Detect Armed box to enable the motion detection function and then
adjust the sensitivity of the motion detection. The lower the value, the more sensitive
the motion detection will be.
7. Tick the Send Mail Notification When Alarm box. If you want a small snapshot to be
included with each email alert, tick the Upload Image When Alarm box. You can also
specify how frequently email alerts with snapshots are sent to you during a motion
detection event via the Upload Interval (in seconds) field.
8. Tick the Time Schedule box to display a timetable showing a 24-hour timeline for each
day of the week. Each box in the timeline represents 15 minutes in the 24-hour period.
The timetable allows you to choose the specific times and days to receive email alerts.
If you want to always receive email alerts, tick the Select All box.
9. To save the motion detection settings, click the Submit button.
Page 18

© Swann Communications 2014
Helpdesk / Technical Support Details
Swann Technical Support
All Countries E-mail: tech@swann.com
Telephone Helpdesk
USA Toll Free 1-800-627-2799
USA Exchange & Repairs 1-800-627-2799 (Option 1)
(M-F, 9am-5pm US PT)
AUSTRALIA 1300 138 324
NEW ZEALAND Toll Free 0800 479 266
UK 0203 027 0979
M440U160414E
 Loading...