

Page 1

QH_7085H201213E © Swann 2013 |
1
EN
3
4 6
7 8 9
Introduction
4/8 CHANNEL NVR
What does this mean?
Step One a - Connect the NVR to your HDTV Step Two - Connect your cameras
Step Three - Connect to your network Step Four - Connect the mouse Step Five - Connect the power adapters
Connecting up the NVR and Cameras is really easy. On this side of the guide we have a step by
step guide to show you what goes where. On the other side you will find the connection map
with a more detailed images of the various connectors. Use these to assist with your NVR and
Camera connections to get you started in the shortest possible time. We recommend that you
connect everything up and give it a try before you actually install anything just to make sure
nothing was damaged during shipping.
Connect to your HDTV using HDMI
The NVR connects to your HDTV just like a game console or digital set top/cable/satellite box.
Connect to a TV or Monitor using the VGA connection
The NVR can also connect to a TV or Monitor using the blue VGA socket. All of the same output
resolutions are available over VGA as you get with HDMI, even 1080p*!
Connect your cameras to the NVR
To connect your cameras to the NVR simply connect the supplied cable in to the socket of the
small cable coming from the camera then plug the other end of this cable into one of the ports
on the back of the NVR. It doesn’t really matter which port you use as they are quite versatile and
we will configure them in a later step. Note that the cable is the same at both ends so it doesn’t
matter which end plugs into the camera or NVR.
Once all of the connections are done and you power up your NVR the TV should show the NVR
screen. Sometimes you will have to select the correct HDMI input on your TV to see the NVR
using your TV’s remote. Check out your TV’s user guide for this information.
The connections are now complete. Check the wizard guide for instructions on setting your NVR up.
The DC power socket shown above is not needed unless you decide not to use the NVR’s built in
POE power, consult the manual for more information.
The easiest way to see what is happening on your NVR is to
use the HDMI cable we supplied to connect the NVR to your
HDTV that has an HDMI input on the back or side. Just plug
one end in to the HDMI socket on the rear of the NVR and the
other end in to a spare HDMI port on your TV.
Here are some explanations for the various bits and bobs included.
VGA - Connect to your TV or Computer monitor with VGA port
HDMI - Connect to your HDTV or Computer monitor with an HDMI port
LAN - This is for connection to your home network so you can connect from the internet
USB - For connecting your USB mouse to control the NVR
POE CAMERA Ports - These ports are for both power and video and are where you plug in your
camera cables
Power - This is where you connect the NVR’s DC power supply
Power LED - You’ve got the power
HDD LED - Hard drive is working
LAN LED - Network connection is active
2
Getting to know your NVR
1. VGA
2. HDMI
3. LAN
4. USB
5. POE CAMERA Ports
6. POWER
1. POWER LED
2. HDD LED
3. LAN LED
Welcome!
Let’s get started.
TV
HDMI Cable
Ethernet
Cable
NVR
Camera
Video and Power Cable
NVR
Router
NVR
Mouse
NVR
Power adapter
This is how you will connect to your NVR from your Mobile/Cell phone, Tablet, PC or Mac over
the internet or even your home network. The NVR will also use the internet to update its internal
clock so that the time it shows on the video is always accurate. If you don’t connect the NVR to
the Internet it will still work, it is just that some of its functions and features may be affected.
The USB mouse supplied with your NVR can be connected to either of the two rear USB ports.
Just plug it in just like plugging a mouse in to a PC or Laptop.
Now all of the main connections are done it is time to power the NVR up. Your NVR kit will
have come with a number of cables that will connect to the NVR and Cameras. First connect
all of your camera cables, than as shown below simply connect the NVR power adapter to your
NVR directly and the NVR will automatically supply power to the POE Camera Ports as well as
running the NVR itself.
123
4
5
6
123
If you have a spare TV or PC monitor that doesn’t have an
HDMI port but it has VGA, great! Use the VGA cable that came
with your monitor to connect it to the NVR’s VGA port. If you
can’t find the VGA cable supplied with your Monitor or TV they
can be bought at most electronics stores pretty cheaply.
NVR
NVR
Monitor
5
Step One b - Connect the NVR to a Monitor or TV
If you have already connected your NVR using HDMI you don’t need to do it again using the VGA
port. The VGA port is to support older TVs and Monitors that don’t have an HDMI port.
* Note: Your monitor must support the set resolution or you won’t see anything on screen. Like HDMI, most TVs will require
you to “select” the appropriate input using the TV’s remote control
Why do I have to use a mouse and not a remote control?
We think that although the NVR is similar to a VCR in some ways, it is more like a very specialised
computer in reality. Can you imagine using a remote to operate your PC at home? We designed the
NVR to work well with the mouse we include in our kit!
VGA Cable (not supplied)
Hardware Quick Start Guide
Hardware Quick Start Guide | Page 1
Hardware Quick Start Guide | Page 3
Hardware Quick Start Guide | Page 6
Hardware Quick Start Guide | Page 2
Hardware Quick Start Guide | Page 4
Hardware Quick Start Guide | Page 7
Hardware Quick Start Guide | Page 5
Hardware Quick Start Guide | Page 8
Page 2
QH_7085H201213E © Swann 2013 |
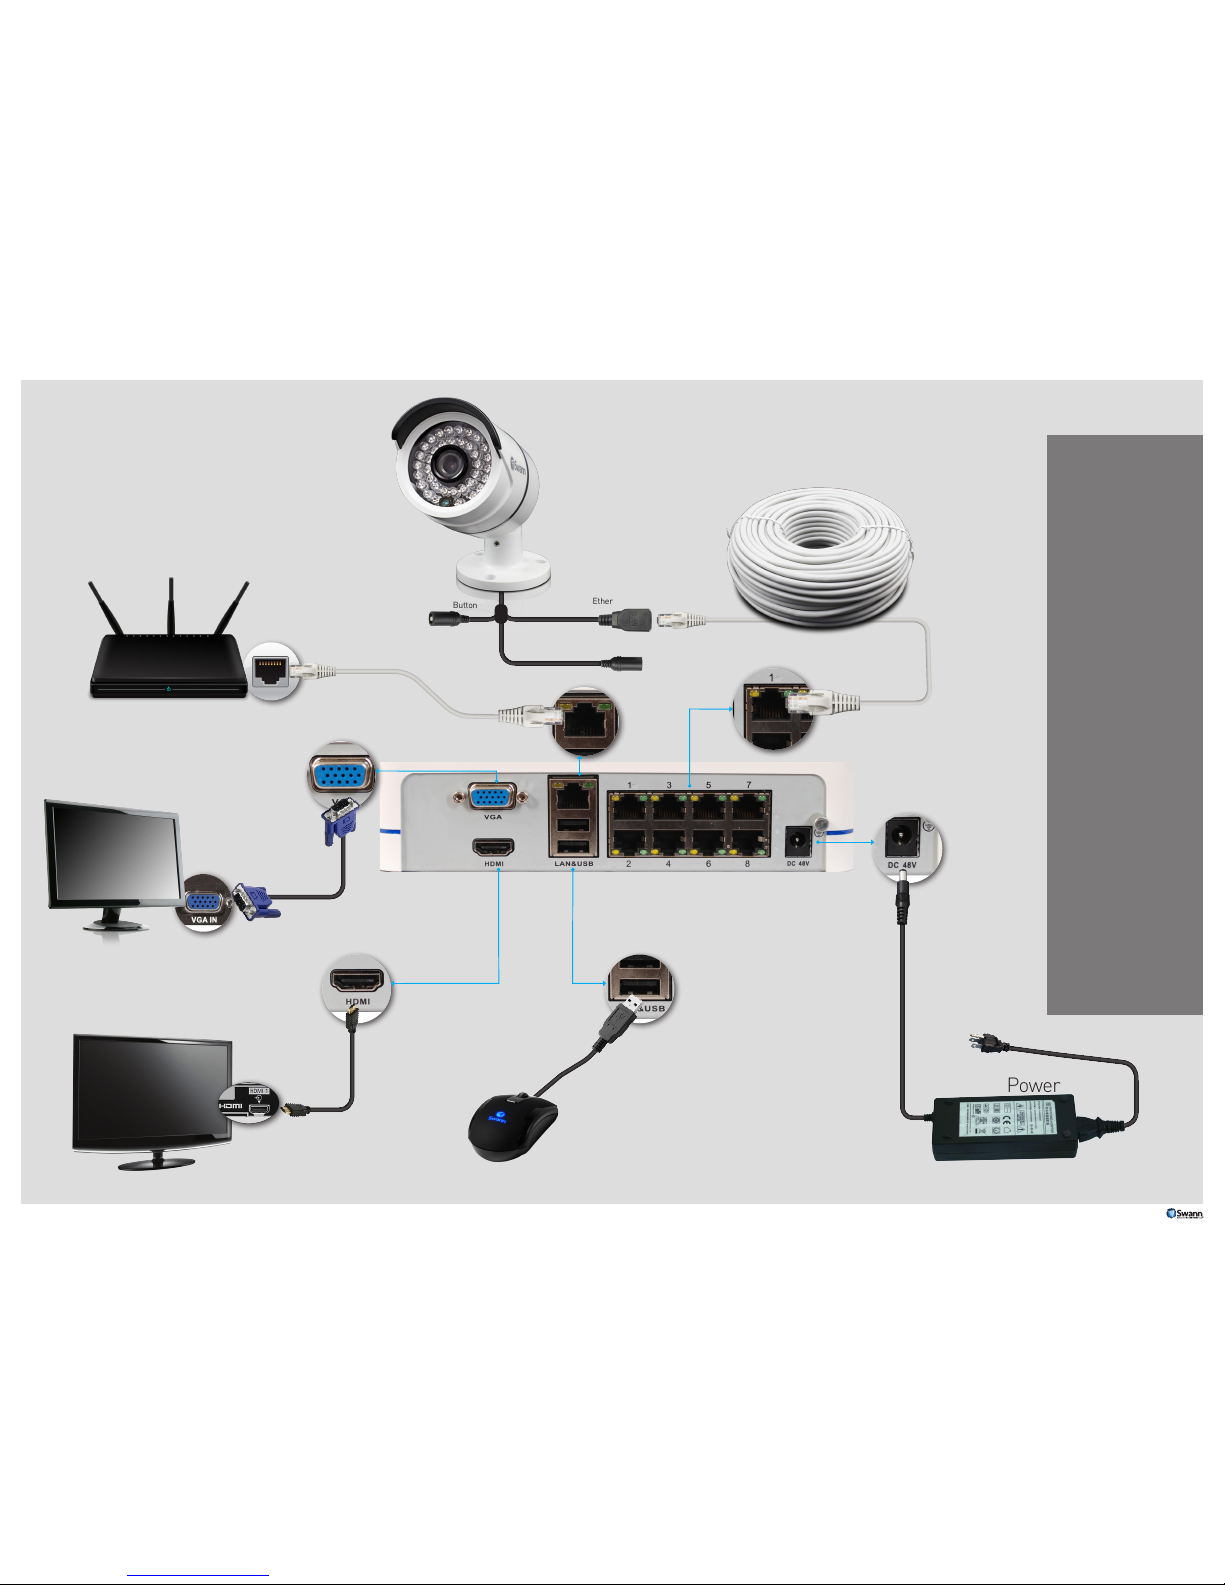
What are the
additional
connections for?
NVR:
VGA - Connect a TV or
Computer Monitor that has a
VGA port
POE - POE is a technology
built in to our POE NVRs and
Cameras that supplies both
power and video in the one
cable, both NVR and Camera
must support POE for this to
work.
USB - As well as the mouse
you can plug in a USB
memory stick or USB HDD
so you can copy a video of an
incedent recording to give to
the Police etc.
Camera:
Reset Button - Push this and
plug in the power to reset
the camera’s password to
12345 if you forget it.
Power Socket (optional) Note: Do not plug the 48Volt
NVR power adapter directly
into your camera as the
camera will be permanently
damaged. If for some reason
you cannot use the POE
power via direct connection
to the NVR then you can plug
a 12v 1A power adapter (not
supplied) in to this socket to
power the camera.
NVR Power
Camera
Video and POE Power
Cable
VGA Cable
(not supplied)
Ethernet
Cable
USB Cable
Reset Button
Power Socket (optional)
Ethernet Socket
Mouse
TV
Monitor
Your Internet Router/
Wireless Router
HDMI
Cable
Hardware Quick Start Guide
 Loading...