

Page 1

Page 2

WEbEDIIEI
We
would
liketo
express
pianohasbeendesigned to
binedwithanelegantblacklacquer
Someofthefeatures yournewpianois
You
willfind many more
thelatest
endless
MIDI
features thatallowyouto
musical
possibilities.
ourappreciation and
provide
*
weighted,
*a
dynamic
*
twelve
*twotrack
*
built
in
*
digital
*
transpose
*
complete
features
youwithyearsof
upright
hammer
sound
realistic
sequencer/music
metronome
effects
function
MIDI
and
functions
congratulate
cabinet,
equipped
action
delivery
sampled
with
to further
that
controls
interface
musical
addbeautyand
with
include:
keyboard
system
keyboard
recorder
range
from
enhance
allows
listed
with
playinany
within
your
youfor
purchasing
enjoyment.
sophistication
foran
with
voices
authentic
EO
with a stereo
controls
40 to 240 BPM
the
keyboard
piano
this
owners
personal
computer orother
this
Stateofthe art
acoustic
voices
key
manual.
This
Suzuki
toanyhome
digital
electronics
piano
grand
piano
digital
piano alsohas
MIDI
equipment for
piano.
environment.
This
com-
feel
voice
Inordertofullyappreciate allthe
following
warranty
pianopackagefromthe
ensembles,
pagesof
information
instruction
plustheelegant
and
and
general
Suzuki
digital
unique
Keyboard
features
precaution.
precautions.
grand
ofthis
digital
We'll
cover
Thankyouagainand
Product
ensemble.
Uneof
piano,
assembly,
portable
please
the
congratulations
keyboards,
takea few
function
ofeach
home
minutestoread
control
for
choosing
digital
pianos
button,
this
digital
and
the
Page 3

LL
CAUTION: TO REDUCE THE RISK OF ELECTRIC SHOCK,
REFER SERVICING TO QUAUFIED SERVICE PERSONNEL
i
RISK
OF
ELECTRIC SHOCK
DO NOT OPEN
................................
DONOTREMOVECOVER(ORBAC~
NO USER-SERVICEABLE PARTS INSIDE
~~~~------I
.t
INSTRUCTIONS
TM
lightning
presenceofuninsulated
magnitude
The
operating
1.
2.
to
exclamation
and
CAUTION:
by
the
party
NOTE:
pursuant
harmtul
generates,
wiHl
the
equipment
required
PERTAINING
flash
with
constitute a risk
point
maintenance
Any
changes
responsible
Ttus
equipment
to part 15 of
interference
uses,
and
lnstruciton
in a
residential
to
correct
arrowhead
"dangerous
of
within
an
(servicing)
or
for
has
the
FCC
when
the
can
radiate
manual
area
the
interference
TO ARISK
symbol.
voltage"
electric
shock
equilateral
modification
compliance
been
rules.
equipment
may
is
triangle is
instructions in
tested
These
radio
frequency
cause
harmful
likely
to
at
!ClIS
OF
FIRE,
within
an
equilateral
within
the
product's
to
persons.
&
intended
the
&
in
construction
could
void
the
and
foundtocomply
limits
are
designed
is
operated
cause
own
in a
energy
interferencetoradio
harmful
expense.
ELECTRIC
instruction
of this
user's
non-commercial
and
interference
SHOCK,
triangle, isintendedtoalert
enclosure
to
alert
authority
with
to
if not
device
that
the
user
manual
wluch
to
the
limitfora
provide
installed
communications.
in
which
OR
INJURY:
maybeof
to
the
accompanying
are
operate
reasonable
environment.
and
case
sufficient
presence
nor
expressly
the
equipment.
ClassAdigital
protection
used
in
Operation
the
user
the
usertothe
of
important
the
product
approved
device.
aqainst
This
equipment
accordance
oftnis
will
be
Page 4

This Suzuki digital piano will supply you with years of musical enjoyment if you follow the
simple rules listed below:
LOCATION
Donotexposethe
following
conditions to avoid
discoloration,
•
Direct
sunlight
• Hightemperatures
outside,
•
Excessive
or in a car
instrument
or more
(e.g.
humidity.
serious
neara
(e.g.
during
tothe
deformation,
damage.
window).
neara heat
the
daytime)
• Excessive dust.
Strong
•
vibration.
AC POWERCORD
•
Turn
thepower
switch
offwhenthe
instrument
is not in use.
Unplug
•
theAC powercord
duringanelectrical
storm.
•
Avoid
plugging theACadaptorintothesame
AC outletas appliances with
consumption, suchas
electric
high
heaters
power
ovens.
TURN POWEROFFWHENMAKING
CONNECllONS
source,
or
CLEANING
•
Clean
the
a drysoft
maybe
you
will
find
will
usually
cabinet
and
cloth. Awaxed
used
onthe
that
rubbing
suffice.
Do not use thinner's or
panel
based
cabinet,
with
petro-chemical-based polishes.
•
Avoid
placing
instrument
vinyl
objects
(vinyl
can stickto and
ontopofthe
surface).
• To
maintain
wipe
with aclean,
andthen
ELECTRICAL
• This
instrument
may,
to
radioortelevision
movethe
affected
• Donot
succession,
electronic
the
the
polish
cause
interference ifplaced
instrument
equipment.
switch
luster
ofthe
lightly
dampened
witha softdry
INTERFERENCE
contains
digital
receivers.
further
theunitonandoffin
asthis
placesanundue
components
with
polish
although
a soft
discolor
keys
and
cloth.
circuitry
too
Ifthis
away
cloth
buttons
cloth,
close
occurs,
from
quick
load
the
and
the
on
•
To
avoid
damagetothe
devicesto which it is
switches
connecting or
of all
related
disconnecting
instrument
connected,
devices
HANDLING AND TRANSPORT
• Neverapply
excessive
connectors or other
•
Always
not by
unplug
pulling
• Disconnect all
cables
on the
cables
forcetothe
parts
ofthe
by
gripping
cable.
before
moving
instrument.
•
Physical
or
result
shocks
placing
caused bydropping,
heavy
objects
inscratches andmore
onthe
andother
tum the power
off priorto
MIDI
cable.
controls,
instrument.
the
plug
the
bumping,
instrument
serious
damage.
firmly,
can
SERVICE
•
Opening
Digital
age.
Please
factory
this
instrument.
AND
and
Piano
before
MODIFICATION
tampering
can
lead
call
the
attempting
with
to
irreparable
local
music
to
service
the
dam-
dealer
or
or
modify
Page 5

EASYSETAND QUICK
Easysetupand
HP-8and HP-9
HP-1 0 Assembly
Quickplay
quick
Assembly
guide
PLAY
play
GUIDE
steps
page
6
7
8
13
BASIC
RECORDING
FUNCTION
MIDI
FUNCTIONS
Panel
Demo 17
Digital
Spirt
Dual
Transpose
Lesson
Value
Metronome
Music
Touch
Tuning
What is
Basic
Setting
MIDI
Controls
Effects
Feature
Feature
Buttons
recorder
Sensitivity
FUNCTIONS
MIIJI
the
Implementation
(Reverb/Chorus)
ONTHIS
CONTROLS
MIIJI?
set ups 29
various
SUZUKI
AND
FEATURES
functions
Chart
PIANO
, 28
14
17
19
20
20
21
22
23
24
26
27
30
33
BACK
PEDALS 34
SPECIRCATIONS 35
WARRANTY 36
ACCESSORIES 37
PANEL
AND
CONNECTORS
AND CONTROLS
...
34
Page 6

EASY SET UP AND QUICK PLAY IN FOUR SIMPLE STEPS
CHECK THE
ASSEMBLE THE
PACKAGE
1
CONTENTS
PIANO STAND
(/
PLACE THE
ON
AND PLUG
AC CORD INTO
THE AC OUTLET
IT'S
STAND SWITCH ON, 4
PIANO~'"'"
THE,
(~T-URN
1
I
ADJUST THE
":-HE
POWE-R-~
I VOLUME AND
I BEGIN TO PLAY
,
•
Page 7

'
MAKE SURE THAT YOUR PACKAGE
l
5 CONTAINS THE FOLLOWING ITEMS:
1. PIANO
2. MUSIC
3. RIGHT PIANO STAND LEG
4. LEFT PIANO STAND LEG
CROSSPIECE
5.
6. PEDAL
RACK
BOARD
7.
OWNERS
8. AC POWER
CROSSPIECE
9.
10. LEG
11. LEG
12. HAI\ID BOLTS
MANUAL
CORD
SCREWS
SCREW
SCREWS
(4)
COVERS (4)
(4)
(4
8.AC
POWER
I
CORD
-4.
LEFT
LEG
I
6.
PEDAL
BOARD
•
Page 8

2 ASSEMBLE THE PIANO STAND AS SHOWN BELOW
9.
The
complete
Please
assembly.
follow
assembly is
stepsA-Ctothe
shown
below.
piano
CROSSPIECE
10. LEG
11.
12. HAND
LEG
SCREWS
SCREW
BOLTS
SCREWS
COVERS
A)
9
~9
DOALL
YOUR
FINAL
TIGHTENING
ONLY
AFrER THE
•
ASSEMBLY
PROCEDURE
HAS
BEEN
COMPLETED
.
Page 9

•..
/ ASSEMBLE THE PIANO STAND AS SHOWN BELOW
.
2
DO ALL
(CQNTlNUED)
YOUR
FINAL
TIGHTENING
ONLY
AFTER
THE
ASSEMBLY
PROCEDURE
B)
-,
HAS
BEEN
COMPLETED.
~"'''
~~
~~
,'"
'>.
-,
" "-
-+
'"
9
-+
YOU
MAY
NOWDO
NEEDED.
'!t-
ONTHE
PLUG
BOTTOM
CAN
YOUR
FINAL
RIGHT
ONLYBEINSERTED
PORTION
TIGHTENING
OFTHE
ONE
WAY,
PIANO,
MAKE
ONTHE
PLUG
SUREITIS
PIANO
THE
STAND
PEDAL
PROPERLY
AND
CABLE
PLACE
INTO
ALIGNED
THE
SCREW
ITS
RECEPTACLE.
BEFORE
CAPS
WHERE
(THE
INSERTION.)
Page 10

~
~
,
111-10
MAKE SURE THAT YOUR PACKAGE
1
CONTAINS THE FOLLOWING ITEMS:
PARTS
1.
PIANO
2.
PEDAL
3.
RIGHT
4.
LEFT
STAND
5.
HORIZONTAL
6.
POWER
I\S8elllll.
LIST
ASSEMBLY
STAND
LEG
SUPPORT
CORD
LEG
(not
Please
shown)
make
sure
you
have
all
the
parts
prior
7.CRSPSC&PANELSCREWS
8.
LEG
SCREWS
9.
BACK PANEL SKIRT
----------------""7'"'?;:--
10.
LEG
11.
SCREW
HAND
COVERS
BOLTS
to
assembly.
PIECES
4
PIECES
4
PIECES
4
PIECES
1. PIANO
~
~
nllmiil!IDbpi>
4. LEFT LEG
3. RIGHT LEG
•
Page 11

2 ASSEMBLE THE PIANO STAND AS SHOWN BELOW
Follow
A)
DOALL
steps
Attach
Usethefour
the
YOUR
A-Cto
complete
horizontal
pedal
FINAL
TIGHTENING
piano
pedal
assembly,
assembly
assembly.
screws
ONLY
tothetwo
(#8)
AFTER
located
-+
THE
ASSEMBLY
legs.
inthe
pedal
assembly
PROCEDURE
crosspiece
HAS
BEEN
itself
COMPLETED.
B)
Assemble
screws
(#8).
'li-
DOALL
YOUR
the
Horizontal
"'-,7
FINAL
Support
TIGHTENING
ONLY
board
,
<~,:
AFTER
to
1
1
1
1
1
1
1
1
-,
both
THE
rig~lt
andleftlegs. Usethefour
-+
ASSEMBLY
PROCEDURE
HAS
Crspsc.&Panel
BEEN
COMPLETED.
Page 12

2 ASSEMBLE THE PIANO STAND AS SHOWN BELOW (continued)
C) Attach
Screws (#7).
the
Back
Panel Skirt
(#9)
to the piano legs as shown below with Crspsc &Panel
3 ASSEMBLE THE PIANO STAND AS SHOWN BELOW
Attach the piano to the stand using the four hand bolts (#11).
Position the Music Stand into the upright position.
Plug the Pedal cable (located
under the Pedal Assembly
into its receptacle on the bottom
of This Suzuki Piano
#2)
llii~ltiiiit
The Pedal Cable can only be inserted
one way. Please make sure that it is
properly aligned before you insert
The Pedal Cable travels up the back of
the leg, not in the center of the leg as
shown.
'!ex
IYoU
many now tighten all the piano assembly hardware and insert the leg screw covers (#10) on the
each
loutside of
leg. •
it.
Page 13

After
3
following
steps
oneandtwo
listed
for
assembly
procedures
continue
with
steps3 and4.
PLUG THE AC CORD INTO THE PIANO AND THEN INTO THE
NEAREST POWER
OUTLET
(CONTINUED)
~
O
€]~'.o
.
A1...
...
§)
Plug
the
Ale
jack
located
the
piano.
TURN THE POWER SWITCH ON, SET THE VOLUME AND
,
~
,
LlANCE CONTROLS TO YOUR DESIRED SETTING AND BEGIN
4
, TO PLAY
....
ON
"OFF
O
POWER
r-
[}>.
0
[j
CIN
power
onthe
bottom
MIN
1111111111111111111111111
<€aID
MASTER VOLUME
~
4
\ .c.::;
cord
intothe
.•
receptacle
backleft
MAX
~._.
portion
»
EADPHONEJACKS
@@
You
otherinthe
headphones
of
11
ets,
leftsideofthe
phones
Turn
ofthe
voice
comfortable
can
playintotal
located
maybe
onthe
control
will
tum
silence
same
room byplugging
intooneofthe
directly
power
panel.
on.
level.
underthe
instrument.
used.
switch
TheLED
Adjust
without
appropriate
Two
located
above
the
volume
disturbing
asetof
keyboard
setsof
onleft
the
control
sock-
on the
head-
BRIL-
portion
Piano
to a
1
MIN
1111111111111111111111111
<€aID
BRILLIANCE
LOCATED ON THE BACK PANEL OF THIS PIANO
MAX
®
21
©©
BASS
TREBLE
31
----l
\
,
J
.:
You
can
adjust
control
instruments.
Thereare
theback
offer
tone
system.
NOTE:
selected
controls,
system.
tone
Begin
panel tochange
additional
panel
theuser
quality
Depending
andthe
it is
Ifthis
contrls
to playthe
the
ofthe
even
from
the
setting
possible
happens
toa
proper
piano.
Brilliance
thetoneofyour
Bassand
piano.
more
control
piano's
onthe
instrument
oftheBassand
to
overdrive
adjust
setting.
control
These
sound
onthe
Treble
EO
oftheoverall
delivery
sound
your
selected
selected
controls on
knobs
voice(s)
Treble
delivery
Page 14

This
brief
Suzuki
description
Piano's
control
ofallthe
panel
features
is
simple
located
and
onthe
elegant.
control
The
following
panel.
is a
'-
ON
"OFF
O
POWER
I
1
LEFTPORTIONOF THE
MIN
1111111111111111111111111
MIN
~
'-
"OFF
O
POWER
1111111111111111111111111
MASTER VOLUME BRILLIANCE
ON
~
MASTER
MIN
1111111111111111111111111
VOLUME
~
BRILLIANCE
MAX
»
I I
2
CONTROL
MIN
~
PANEL
1111111111111111111111111
1
MAX
21
»
MAX
»
3
MAX
»
3
Press
theON/OFF
off.
Whenyoutumthe
power
ondsto tum the powerbackon sothatthe
can be
This
volume
The
backon
properly
sliding
ofthe
Brilliance
piano.
move
basstothe
liance
and
To
the
slider
Treble
make
Brilliance
control
selected
control
controls
switch
immediately.
reset.
button
selected
control
the
slider
tothe
onthe back
CJ
DEMO
I
4
totumthepoweronand
power
keyboard
will
selected
keyboard
off,
donotturnthe
Waitatleast5sec-
simply
adjust
control
left.
adjusts
voice(s).
the
keyboard
to the
voice
TherearealsoBass
panel
0
CJ
CHORUS
-EFFECTS-
the
overall
voice
right.
movethe
ofthis
0
CJ
REVERB
I
5
circuit
overall
toneofthe
brighter
To
add
Bril-
piano.
o 0
CJ
CHORUS
-EFFECTS-
CJ
DEMO
CJ
REVERB
Thereare
4
thatcan be
instrument
musical
style.
Press
songs
This
5
processor
to your
effects
simulates
where
ceiling.
nessto the
The
youto
_ applytothe
•
thirteen
selected
voice
buttons.
passage
theDemo
from
Suzuki
(DSP)
selected
are
offered:
the
the
sound
The
selected
Value Uparrow
control
inthe
button
playing.
Piano
thatcanadd
keyboard
effectofplaying
reverberates
Chorus
the
amount ofReverb
selected
diIferent
by
features
Reverb
effect
keyboard
and
demonstration
pressing
Each
selected
tostartorstopthedemo
sound.
adds
Down
instrument
an on
realism
and
Chorus.
ina big
offthe
voice.
arrow
the
song
instrument
board
Two
depth
and
voice.
songs
individual
offers
a
voice's
digital
and
typesof
room orhall
walls
and
buttons
(See
signal
presence
Reverb
and
spacious-
allow
Chorus
#12)
you
Page 15
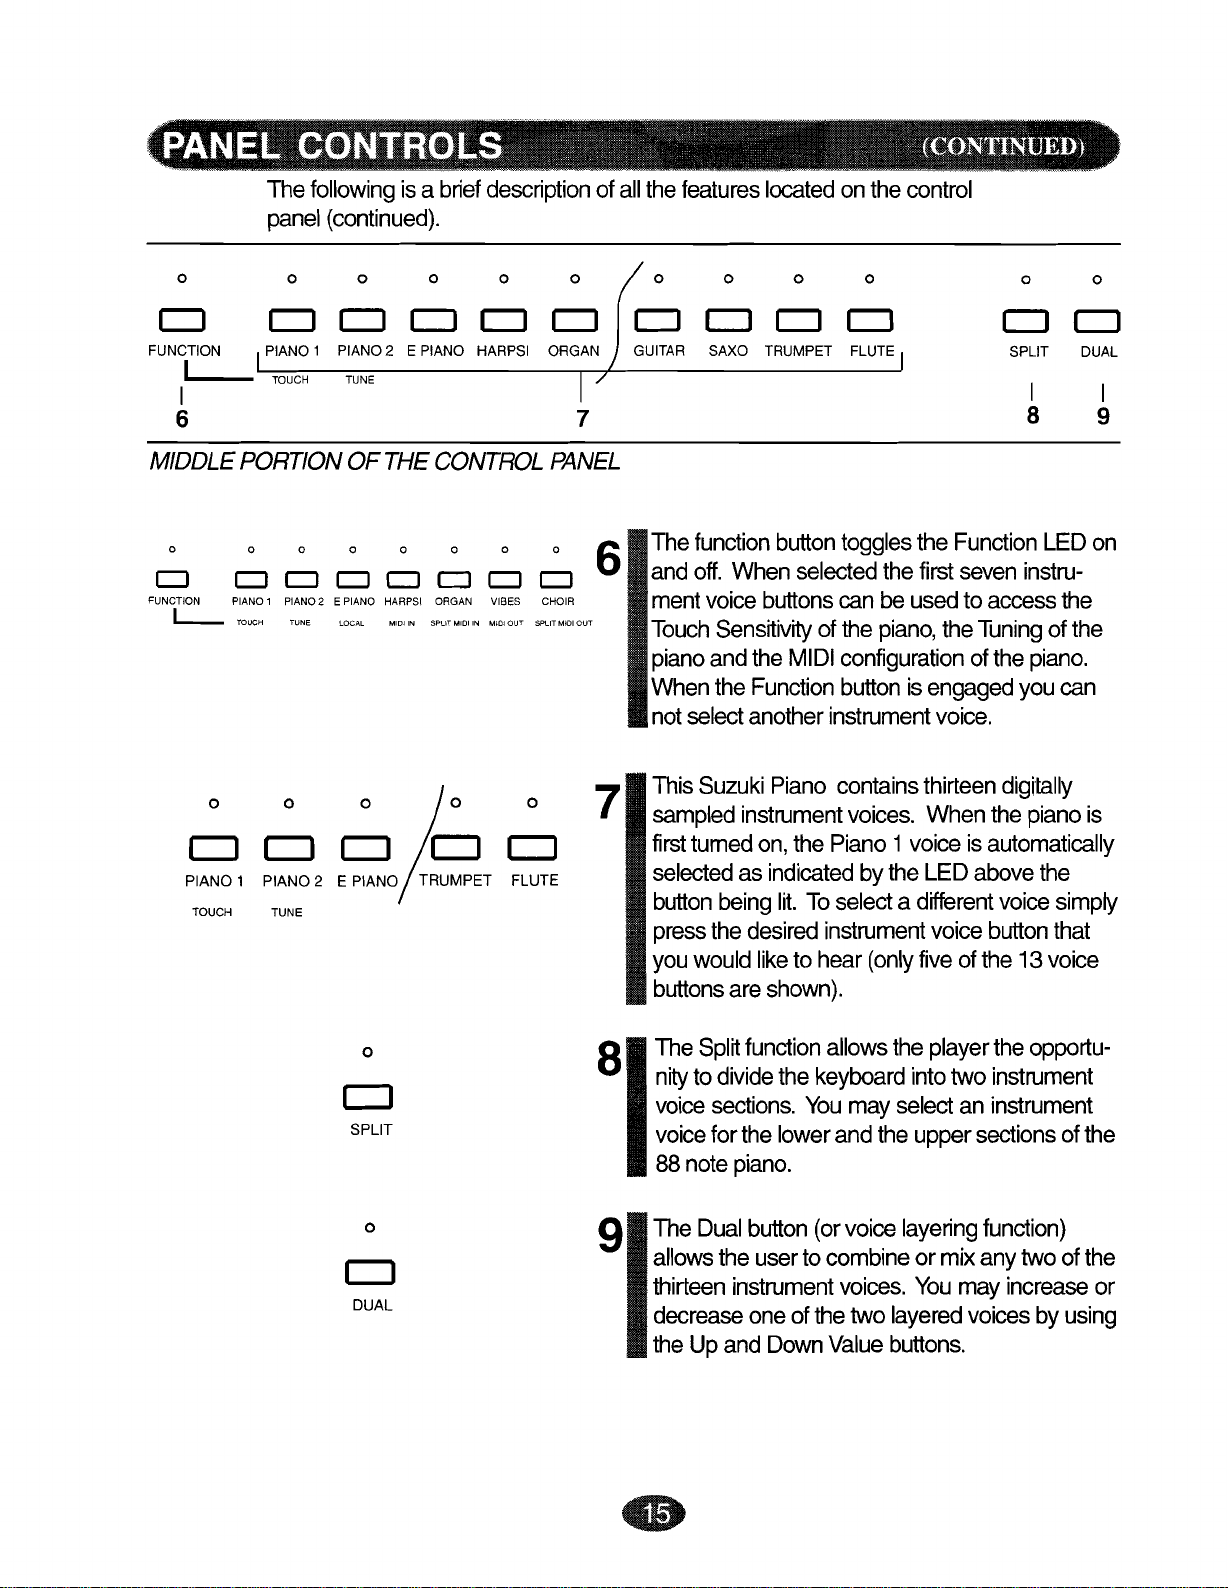
The
panel
following
isa
(continued).
brief
description
ofallthe
features
located
onthe
control
0
0 0 0 0 0 0 0
FUNCTION
I
I
6
MIDDLE
0
CJ
FUNCTION
L..-
0
CJ
PIANO 1
TOUCH
0 0 0 0 0 0 0
o
~
0
0
IPIANO 1
TOUCH TUNE
PORTION
0 0 0 0 0
CJ
PIANO 1 PIANO 2 E PIANO HARPSI ORGAN VIBES CHOIR
TOUCH TUNE
:22
TUNE
PIANO 2 E PIANO HARPSI
OFTHE
CJ
CJ CJ CJ CJ
MIDI IN
LOCAL
o
0)0
S20
CONTROL
SPUT
1.4101
IN
T:2T
!2:2
PANEL
0
0
CJ
1.1101
OUT
SPLIT MIDI OUT
0
S;
I '
7
6
7
SAXO TRUMPET FLUTE
The
function
off.
and
ment
Touch
piano
When
not
This
sampled
first
selected asindicated
button
press
you
buttons
When
voice
Sensitivity
andthe
the
select
Suzuki
tumed
being
the
would
are
instrument
desired
button
selected
buttons
ofthe
MIDI
Function
another
Piano
on,the
lit.
To
like
to hear
shown).
instrument
Piano 1voice isautomatically
instrument
I
toggles
canbe usedto
configuration
button
contains
voices.
select a different
the
Function
thefirst
piano,
bythe LED
(only
the
is
engaged
voice.
thirteen
Whenthe
voice
fiveofthe 13
seven
Tuning
ofthe
above
0 0
0
SPLIT DUAL
I
8
LEDon
instru-
access
ofthe
piano.
you can
digitally
piano
the
voice
simply
button
that
voice
CJ
I
9
the
is
0
CJ
SPLIT
0
CJ
DUAL
81
The
nityto
voice
voice
88 note
91
The
Dual
allows
thirteen
decrease
the Up and
Spl~
function
divide
sections.
forthe lowerandtheupper
piano.
button
theuserto
instrument
oneofthetwo
the
keyboard
You
(or
Down
allows
may
the
select
voice
combine
voices.
layered
Value
buttons.
player
intotwo
layering
ormixanytwoofthe
You
the
opportu-
instrument
an
instrument
sections
ofthe
function)
may
increase
voicesbyusing
or
Page 16

The
following
panel
ina
(continued).
brief
description
ofallthe
features
located
onthe
control
0 0 V b. o 0 0 0
LJ
TRANSPOSE LESSON
10
RIGHTPORTIONOFTHE
LJ
11
LJ
o
CJ
TRANSPOSE
o
CJ
LESSON
V b.
LJ
CJ
VALUE
LJ
VALUE
I
12
CONTROL
LJ
IMETRONOME
PANEL
1
01
11
This
the
12
4 3 2 6
LJ LJ
MEASURE
I
I
0
RECORD 1 PLAY 1 RECORD 2 PLAY 2
0 0 0
CJ CJ CJ
RECORDER
13 14
The
transposition
transposeorchange
piano
tothekeyofyour
button
44note
piano.
The
TheseUpor
varietyoffunctionsorparameters.
depth
single
adjust,
buttons
users
split
control
voices
and
pianos.
would
point
to
change
feature
actually
Thisis
liketoperform
occurs
Down
ofthe
on the
control
function
parameters.
the
choice.
splits
useful
at the F
Value
Reverb
Spltt
allows
overall
the88note
buttons
and
theuserto
pitch
for
a duetonthe
above
and
Chorus,
Dual
buttons
I
ofthe
piano
instruction
Middle
areto
adjust
For
example,
volume
functions,
utilize
the
into2
orif
C.
a
for
Tempo
Value
o 0 0 0
4 3 2 6
CJ
METRONOME MEASURE
0 0 0
LJ
RECORD 1 PLAY 1 RECORD 2 PLAY 2
CJ
RECORDER
CJ
CJ
0
CJ
13
14
•
This
piano's
performance.
2/4,
Music
two
listen
much
adjusted
button
6/8,
Recorder
track
record
to the
likea bum-in
BPMand
Measure
4,
3/4,
The
built-in
theuserto
then
ates
built-in
The
selects
or
fixed).
real-time
playback
Metronome
tempo
viathe
uptotwo
range
Value
theMeterofyour
buttons
sequencer.
musical
simultaneously.
two
track
aids
is
buttons.
onthis
tape
wtth
from
40 to 240
piano
This
passages
recorder.
practice
The
choice
feature
allows
and
It
oper-
or
(4/
a
Page 17

This
piano
sampled
The
following
Digital
offers 13di"fferent
voices
Piano.
thatare
available.
IDE~
instructions
demonstration
explain
theeasytouse
songs
thatare
11
Press
begintoflash
begin
features
designedtoshowcase
the
Demo
andthe
to
play.
ofthis
button.
Piano
Suzuki
The
the
different
Piano
1demosong
1LED
will
will
CJ
PIANO 1
TOUCH TUNE
The
digital
TO
ENGAGE
0
o
~'AN~
effects
THE
CHORUS REVER \ \
-EFFECTS-
0)0
TS2T
offer
theuser
REVERB
o 0
CJ~'
added
EFFECT
0
~
realism
UPON
Press
the
instrument
2
like
toheara
the
piano
sequence
tion
songs.
Press
stration
and
presence
THE
11
the
Demo
song
tothe
This
Suzuki
effects:
The
playing
reverberates orbounces
ceiling.
SELECTED
With
Reverb
Play
effect.
Reverb
Reverb
ina big
the
Piano 1 voice
button.
the
piano
voice
button
demonstration
through
button
feature
selected
Piano
and
effect
room orhall
KEYBOARD
The
keysandyouwillhearthe
off.
offers
Chorus
gives
Reverb
again
keyboard
twotypesof
the
offthe
selected,
thatyou
song
for,
allthe
impression
where
VOICE
demonstra-
totumthe
voice.
the
walls
press
LEDwillturnon.
would
orjustlet
Demon-
digital
of
sound
and
the
Reverb
~
TheUpor
of
advised
minimum
II'
. i
ft
these
effectsinsmall
thatifyouwantto
Down
offive
v
CJ
VAlU~
.<::
Value
times.
buttons
increments
(-
1::..
~
forthe
moderately
To
buttonatleast
21
inthe
press
Reverb
sothattheusercan
adjust
and
the
Chorus
selected
•
increase
Reverb
the
down
effects
customize
effect
the
Reverb
five
effect. Toreduce
Value
increaseordecrease
their
thatyou
times
sound
press
effect
toheara
button
with
the
presstheup
large
the
Reverb
at
least
five
theamount
precision.
Value
button
Value
increase
depth
times.
Itis
a
Page 18

The
CHORUS
Thechoruscan particularly
Experiment withthe
settings.
TO
ENGAGE
effect
THE
offers
various
CHORUS
varying
enrich
effects ondifferent
degrees
the
soundsofStrings,
EFFECT
UPON
of
rate,
depth,
voices
THE
phase
Electric
sothatyou
SELECTED
and
Piano,
delay
settings.
Organ
discover
KEYBOARD
yourmost
and
VOICE
Vibes.
desirable
o 0 The
11
21
CJ~
VALUE
~
Chorus
explained
With
the
button
the
piano
TO
increase
Value
noticeable
TheUp or
and
Chorus
amount
thattheusercan
precision.
ately
adjust
Value
NOTE:
Ifyou
engage
instrument
effectitwill besaved
until
the
effect
once
again
Thistime
doesn't
every
operates
on the
Vibes
should
keys
button
difference
of
these
button a minimum
power
settings
saving
have
timethe
previous
button
be
automatically
and
the
Chorus
at
least
Down
Itis
Value
effects
effects
customize
advised
the
selected
the
Reverb orChorus
voice
and/oralterthe
istumedoffor
forthatparticular
altered.
memory
to
re-eonfigure
instrument's
exactly
selected,
will
hearthe
five
inthe
increase
thatifyouwantto
forthatparticular
like
the
page.
the
selected.
Chorus
effect
press
timesto heara
Chorus
buttons
in
effect
of
forthe
or
decrease
small
increments
their
sound
thatyou
five
times.
depth
until
voice
feature
issothe user
digital
voice ischanged.
Reverb
Chorus
the Up
effect.
Reverb
with
press
foran
of the
voice,
the
digital
has
effect
Play
effect.
large
the
so
moder-
the
been
settings
rt:
Ifyou
thesametimethe
selected
original
•
1c
press
theUpand
instrument
default
digital
voice
(power
Down
effects
up)
Value
settings forthe
will
be
reset
setting
.
buttons
to
it's
at
Page 19
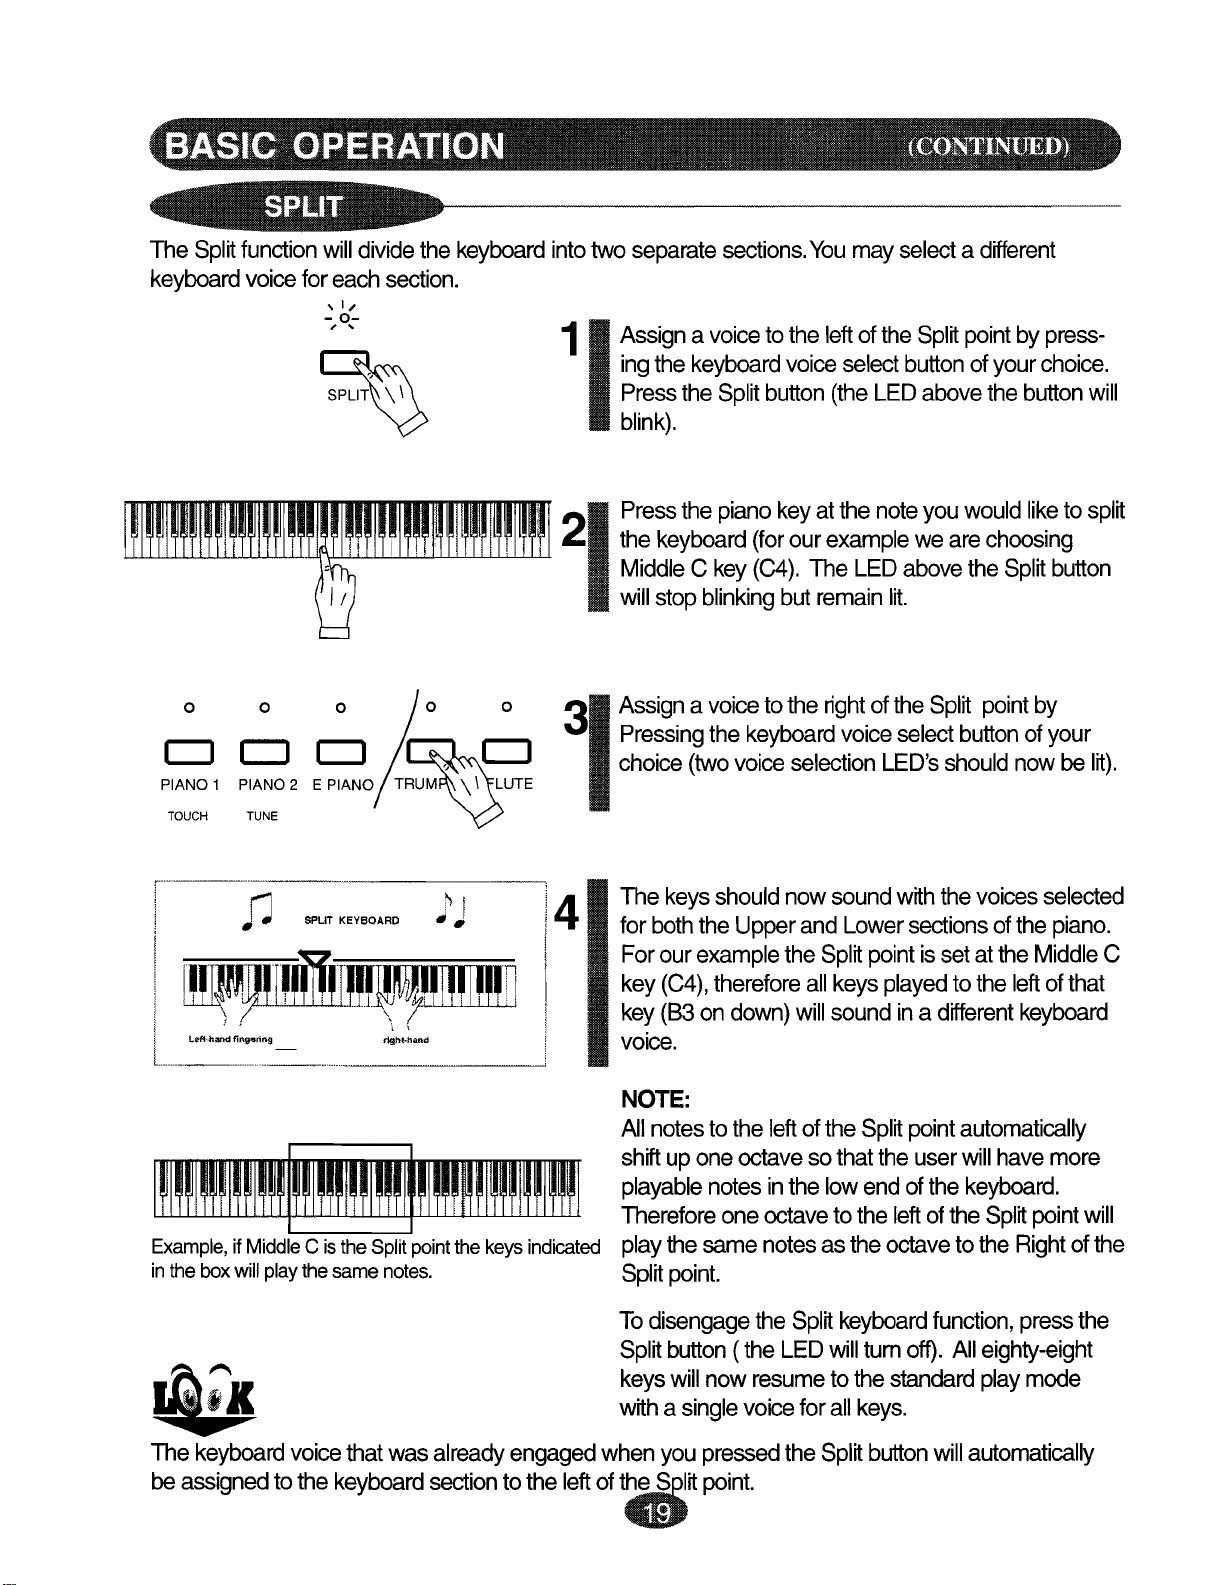
The
keyboard
I I I I I I I I I I I
Split
1'1
function
voice
for
I I ! I I I I
1.Ll\~
will
divide
the
each
section.
, I
....
-
0-
; ,
ISPL~
keyboard
intotwo
11
Assign a voice
ingthe
Press
blink).
II
21
Press
the
MiddleCkey
will
separate
keyboard
the
the
keyboard
stop
sections.
to the leftof the
Split
button
piano
(forour
(C4).
blinking
You
may
voice
select
(the
keyatthe
example
TheLED
but
remain
selectadifferent
Split
point
button
LED
note
above
lit.
above
you
would
weare
ofyour
the
choosing
the
by
press-
choice.
button
liketosplit
Split
button
will
0
CJ
PIANO 1
TOUCH
i
o
CJCJ
PIANO 2 E PIANO
TUNE
r1
J"J
0)0
T~UTE
i
I
J
I
I Lefl-hiSOdfingering rigl\t·haftd
I -
l. ..
1
11,,nmm'1,nTI~~nTllTlnn
~~
Lll! ,
')
;
rlR:V
..
_--_.
_._____
~111'Lill1JJ
\ (
_
__
....
Example, ifMiddle
inthe boxwillplaythe same
C istheSplitpointthe keys
notes.
,CJ
~
I
" • Ispur KEYBOARD
0
14
indicated
31
Assign a voice
Pressing
choice
The
for
both
Forour
key
key
voice.
NOTE:
All
notes
shift
playable
Therefore
playthesame
Split
to the
the
keyboard
(two
voice
selection
keys
should
theUpperand Lower
example
(C4),
therefore
(83 on
totheleftofthe
upone
notes
one
point.
now
the
allkeys
down)
will
octave
sothattheuser
inthelowendofthe
octave
notes
right
of the
voice
sound
Split
point
sound
Split
tothe
asthe
Split
select
LED's
withthe
sections
issetatthe
played
ina
different
point
left
ofthe
octave
point
by
button
should
tothe
automatically
will
tothe
of your
now be
voices
keyboard.
ofthe
left
keyboard
have
Split
Right
selected
Middle
ofthat
more
point
lit).
piano.
C
will
ofthe
lii'1I'
• A witha
The
keyboard
be
assigned
voice
to the
thatwas
keyboard
already
section
engaged
to the leftof
To
disengage
Split
button
keys
win
single
whenyou
the~plit
the
(theLED
now
resume
voce forall
pressed
point.
Split
the
keyboard
will
tum
tothe
keys.
Split
button
function,
off).
All
standard
will
press
the
eighty-eight
play
mode
automatically
Page 20

0
~
This
mixtwo
sametime
11
feature
Press
allows
separate
across
the
Dual
theuserto
instrument
the
entire
button
anditsLED
combine,
voices
keyboard
to playatthe
will
layeror
range.
light.
0 0
0 0
CJ CJ
PIANO 1 PIANO 2
TOUCH TUNE
o
)0
S:o
T~T
)0
o
S:o
T~T
0
~
0
~
Select
their
21
played
both
To
button
keys
voice.
NOTE:
BALANCII\JG
LAYERED
To
voices
button.
The
volume
it's
reached
Inour
the
the two
LED's
you
instrument
disengage
(theLED
will
increase
volume,
selected
eachtimeyoupressortap
instrument
example
Flute
desired
will
tum on. Nowwhenthe
should
voices.
the
now play witha
THE
VOICES.
oneofthe
tap on that
instrument
voice
afterfive
weare
voice
inthe
voice
be ableto heara
Dual
function,
will
tum
VOLUMES
layered
button
taps).
increasing
Dual
selection
press
off).
All
eighty-eight
single
voice
instrument
OF THE
instrument
instruments'
will
(max.
volume
mode.
buttons,
keys
mixture
the
voice
increase
the
volume
are
of
Dual
in
is
of
(Continued
TR~
onnext
page)
o
--------------------------
The
Transpose
easierto
the
keyboard
familiar
Withthe
Value
semitone
can lowerthe
11
Press
the
with.
button
the
button
•
feature isdesignedtomake
play
difficutt
to playinthe keythatyouare
Transpose
can
steps
pitch
Transpose
will
tum on.
raise
(+6)
key
signaturesbyadjusting
function
andthe
(-5).
button.
the
engaged
pitch
of the
Down
The LED
theUp
piano
Value
above
it
in
button
Page 21

"
..
(Continued)
V .6.
CJ~
VALUE
V .6.
'~
~ALU~
Press
2
3
Transpose
to
semitone
Value
For
six
button)
Or ifyouwantto
piano
Value
To
pressthe Up and
neously.
The"C"
note.
button
ofthepianobyone
sernitones).
example, totranspose
semitones
byfive
button
reset
~
The
Transpose
button
dedicated
be
If theUpand
the
Transpose
the
Transpose
buttons
theUp
the
(upto6
eacht\me'lou
and
press
semitones
five
the
piano
piano
engaged
to the
Value
to
button
pitch
sernitones).
semitone
(C=F#),
theUp
Transpose
times.
backto
Down
keywillnowonce
button
fortheUp or
Transpose
Down
Value
function,
button.
Transpose
each
of the
\Nant
upthe
(engage
Value
down
(C=G)
it's
Value
mustbethe last
control.
buttons
disengage
This
will
feature.
tirne
piano
Up one
Press
to
\o\Ner
(down
pitch
the
Transpose
button
the
press
standard
button
again
Down
Value
arenot
and
dedicate
thatyouwant
the
Down
thepitch
to-5
ofthe
piano
six
times.
pitch
ofthe
the
Down
A440
pitch,
simulta-
playa "C"
control
reengage
buttons
alterinq
the
Value
panel
to
This
Suzuki
mance.
The
Lesson
TheSplitpointis
TO
E~GAG~."W~""hFSS0t'J".J:lUl1~
Piano
feature
fixed
offers
actually
atF4
o
an
exclusive
splits
(MiddleCbeing
f!2N
(Continued
onthenext
page)
feature
the88notepiano
that
C4).
Press
1
TheLEDabovethe
Thepianoisnow
boards.
I
•
will
into
Left
aid
Teacher/Student
two44
Middle
the
note
C isC2and
Lesson
button,
divided
pianos.
itsLED
Split
button
into
activity
or for duet
Right
Middle
will
will
two44note
C isC6.
tumon.
alsotum
key-
perfor-
on.
Page 22
TO
SELECT
o 0 0
;ji;,
[Jo'~~:
DIFFERENT
S22
TUNE
S20f~T
INSTRUMENT
/,.0
0
,
21
VOICES
3
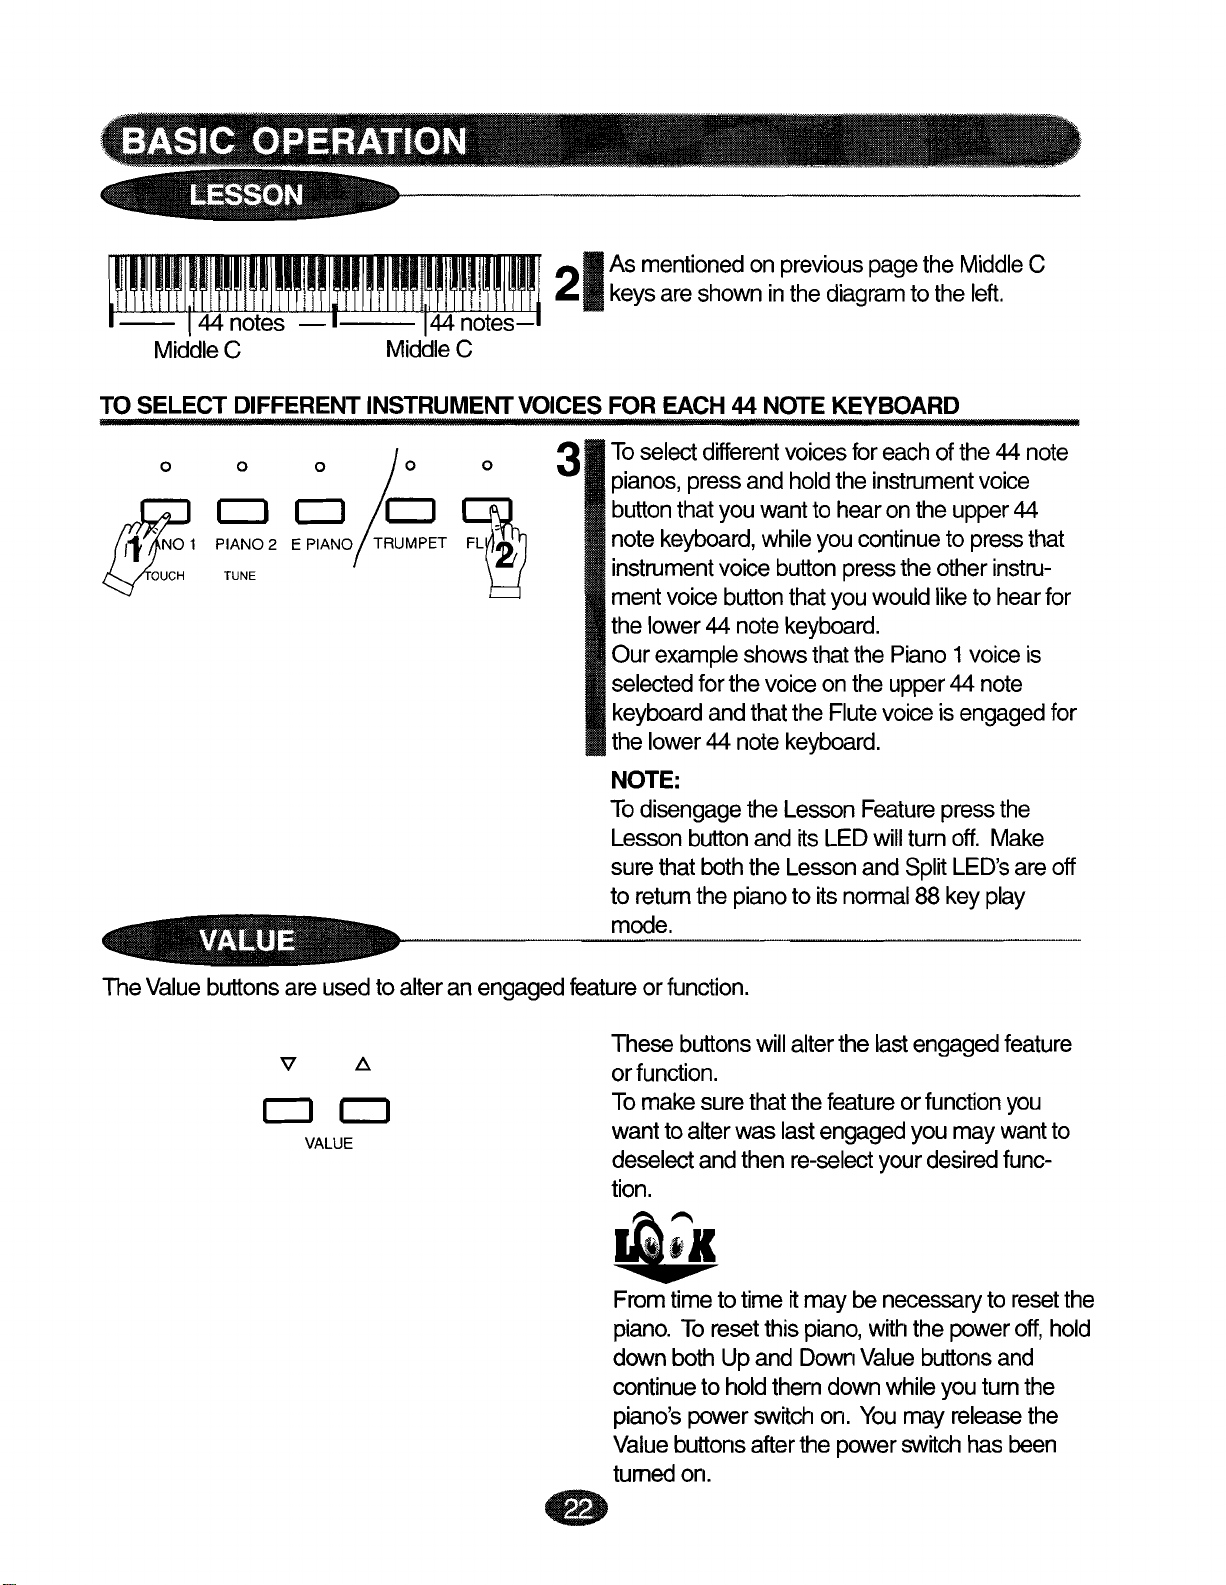
As
mentioned onprevious
keysare
FOR
To
pianos,
button
note
instrument
ment
the lower
Our
selected
keyboard
the lower
NOTE:
To
Lesson
surethatboththe
to
return
mode.
shown
EACH
select
disengage
different
pressand holdthe
thatyouwantto hearontheupper44
keyboard,
voice
44 note
example
forthevoiceonthe
44 note
button
the
inthe
44
NOTE
voices
while
voice
button
button
andthatthe
thatyou
keyboard.
showsthatthe
keyboard.
the
Lesson
anditsLED
Lesson
piano
pagethe
diagram
KEYBOARD
for
instrument
you
continue
press
would
Flute
Feature
will
and
to its
normal
Middle
tothe
each
ofthe 44 note
to
theother
like
Piano 1 voice
upper
voice isengaged
44
pressthe
turn
off.
Split
LED's
88 keyplay
C
left.
voice
press
that
instru-
tohearfor
is
note
Make
areoff
for
The
Value
buttons areusedto alteran
V .6.
CJ
CJ
VALUE
engaged
e
feature orfunction.
These
or
Tomakesurethatthe
wanttoalterwaslast
deselect andthen
tion.
buttons
function.
Ji:1c
Fromtimetotime
piano.
downbothUpand
continue
piano's
Value
turned
To
reset
to holdthemdown
power
buttons
on.
will
alterthe last
feature orfunction
engaged
re-select
tt
maybe
this
piano,
Down
switch
afterthe power
on.
your
necessary
with
Value
You
engaged
youmaywantto
desired
the
buttons
while
youturnthe
may
switch
feature
you
func-
to
power
and
release
has
been
reset
off,
hold
the
the
Page 23

This
Suzuki
ranging
TO
SELECT
Piano
offersabuilt-in
from
40BPMto 240
ANDADJUSTTHE
Metronome
BPM.
METRONOME
thatcanbesetto
FEATURE
various
Meters
(beats)
and
Tempos
ME~
v
CJ~
VALUE
o 0 0 0
4 3 2 6
11
MS?eE
2
~
~
Press
the
the
To
To
Down
Value
the
You
selecting
Up or
the
Metronome
Measure
selected
increase
decrease
Value
button
Tempo
may
adjust
the
Down
1c
rt:
To
reset
the
to 120BPM
Value
buttons
Button
Button
beat.
the
the
button.
is
by5
measure
Value
Tempo
press
will
Default
Tempo,
Tempo
Every
pressed
BPM.
the
Tempo
buttons.
ofthe
both
simultaneously
andthe
sequence
Tempo
press
theUp
ofthe
it
button
theUpand
Metronome
timetheUpor
will
increase
with
the
andthen
Metronome
LEOs
tothe
is120
Value
or
sound
back
Down
above
tempo
BPM.
button.
press
Down
decrease
offby
pressing
of
the
the
TO
CHANGE
THE
BEAT
CJ
METRONOME
SELECTION
o 0 0 0
4 3 2 6
M~
OFTHE
11
METRONOME
Press
the
Measure
selected
press
time
the
signature
measure
~
The
choice
and
''basic
ThelitLED
been
The
"basic
LED's
oftime
beaf'(no
will
selected.
beaf'
engaged
•
Button
will
buttontoselect
signatures
down
indicate
selection
.
which
andtheLEDofthe
tumon.
are
beat
time
is
indicated
Continue
the
desired
4/4,
314,
accent).
signature
by
2/4,
having
to
beat.
6/8
has
no
Page 24

This
Suzuki
record
Piano
allnote
hasa
events
built-in
exactly
twotracksequencerto
astheywere
performed.
record
your
musical
performance. Itwill
"I.;
-,0-
,
o
o o
R~Y~R~2S2
RECORDER
o o o o
R~LAY~
R~2
RECORDER
------------
S2
----------
Press
1
button
sound.
To
tumthe
Metronome
continuetoflash
sound.
21
Begintoplay
above
begintosequence
Time
Signature.
Press
3
TheLED
Measure
button
has
reached
the
Record 1 button.
will
tumonandthe
Metronome
button.
butthe
your
the
Measure
the
Record 1buttontostop
above
LEOs.
turnsoffby
the
IftheLED
its
capacity.
sound
The
Metronome
Metronome
musical
button
inthe
button
itselt,
then
The
LED
Metronome
off
press
selection.
will
stop
flashing
selected
will
above
Tempo
recording.
turnoffas
the
Track 1memory
above
will
the
LEOs
will
not
The
Record
the
will
LEOs
and
and
will
the
1
o
CJ CJ
RECORD 1
o
R~,lp};,f£2
(Howto usethe
"I.;
-0-
, ,
o
R~=
Music
o o
PLAY2
o
o
~
Recorderiscontinued
Press
1
button
youjust
playback
The
Measure
21
Follow
Record2,Play2buttons
1
buttons.
onthenext
•
the
Play1button.
will
turn
entered
justas ttwas
Metronome
LEOs
the
steps
page)
on.
into
beat
will
The
the
will
blink
listed
TheLED
musical
musical
preformed.
notbe
in
above,
passage
recorder
heard
sequence.
substituting
forthe
above
Record 1,Play
the
that
will
butthe
Page 25

While
listening
wishto
on
different
record
Track2.Whatever
musical
, I
....
-
0-
....
,
(lA'
o o o o
toyour
a songby
o o o
IpLAY~
RECORDER
performance onTrack
recording achord
your
desire
possibilities.
R~2
----
is,
the
S2
1youmay
progression
flexibility
11
21
simultaneously
ora bass
ofa two
Follow
inghowto
After
Track
the
track
the
youhave
1,
press
Play 1 button.
record onTrack
lineonTrack
sequencer
steps
listed
Record onTrack
recorded amusical
the
Record 2 button
will
on the
1anda
supply
previous
1.
2.
You
melody
you
with
page
passage
and
then
may
line
many
regard-
into
press
o
CJ
RECOR I /
, I
....
-0-
....
,
~LAY
RECORDER
CJ
1
RECORD 2
!
\
o
, I
....
-0
-
....
,
~
PLAY' \ \
Asthe
toplayyoumay
31
would
To
playback
1
press
time.
the
Measure
the
previously
'i:
To
Erase
Record
The
Music
the
power
musical
like
both
The LED
to
both
Play
record
LED's
passage
begin
into
tracks
1and
above
will
selected
toplayyour
simultaneously
Play 2 buttons
each
begin
Record
1c
Track
1 or
Track 2 simply
button
forthetrackthatyou wantto
Recorder isautomatically
on the
piano
istumed off.
recorded onTrack 1begins
piece
thatyou
Track
2
simply
atthe same
button
will
to
sequence
Tempo.
press
tum on and
with
the
erase.
erased
when
•
Page 26
I
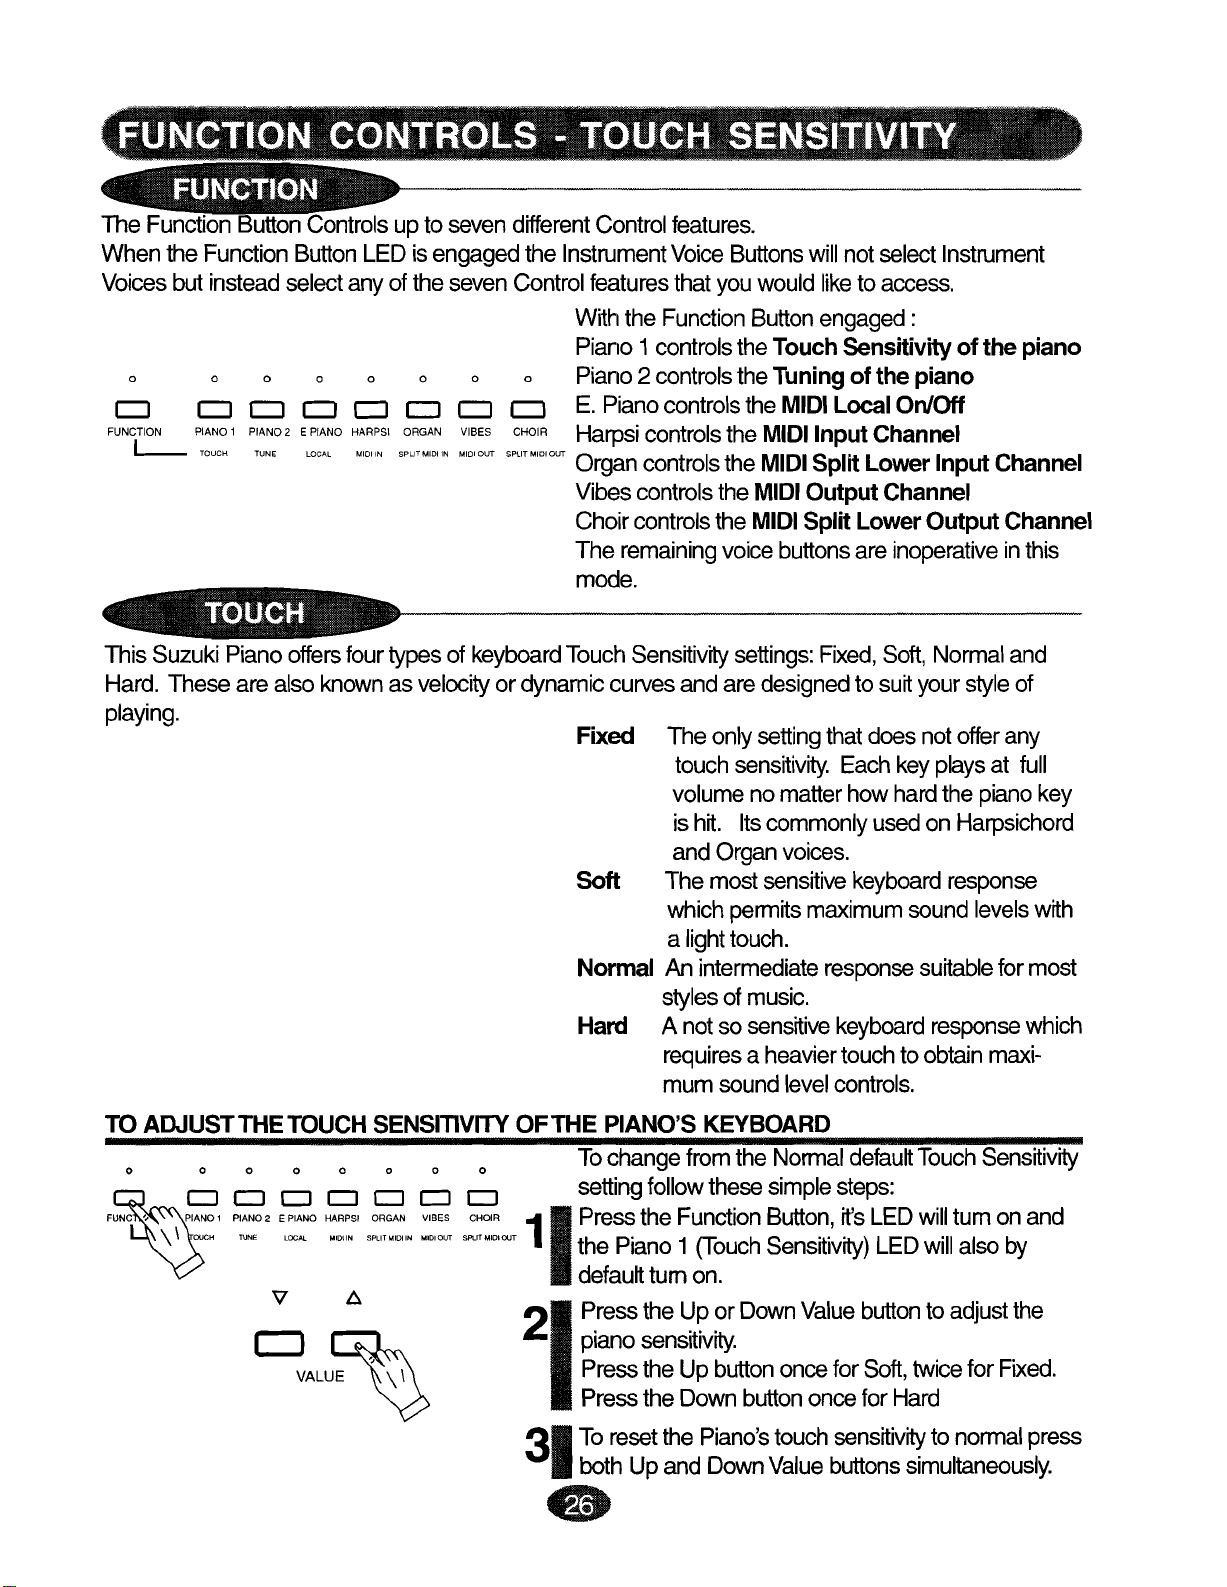
The
Function
Whenthe
Voices
but
o 0 0 0 0 0 0 0
CJ CJ CJ
FUNCTION PIANO 1
l.-
Button
Function
instead
TOUCH TUNE LOCAL MIDIIN SPLITMIOIiN
Controls
Button
select
CJ
PIAN02
EPIANO HARPSI ORGAN VIBES CHOIR
up to
LEDis
anyofthe
CJ
CJ CJ
engaged
seven
seven
MID'OUT
different
the
Instrument
Control
CJ
SPUTMloloUT
Control
features
With
Piano 1controls
Piano 2 controls
E.
Piano
Harpsi
Organ
features.
Voice
the
Function
controls
controls
controls
thatyou
Buttons
would
Button
the
Touch
the
Tuning
the
MIDI
the MIDI
the
MIDI
will
not
select
liketoaccess.
engaged:
Sensitivity
ofthe
Local
Input
Split
piano
On/Off
Channel
Lower
Instrument
ofthe
Input
piano
Channel
This
Suzuki
Hard.
playing.
Thesearealso
Piano
offers
four
types
of
keyboard
knownasvelocityordynamic
Vibes
Choir
The
Touch
controls
controls
remaining
mode.
Sensitivity
curves
Fixed
Soft The most
Normal
Hard
the
the
voice
andare
The only
touch
volume
is
hit.
and
Organ
which
a
light
An
intermediate
styles
of
Anotso
requires a heavier
mum
sound
MIDI
Output
MIDI
Split
buttons
settings:
designed
setting
sensitivity.
no
matter
Its
commonly
voices.
sensitive
permits
touch.
maximum
music.
sensitive
level
Channel
Lower
are
inoperative
Fixed,
Soft,
tosuit
that
doesnot
Each
how
hard
used
keyboard
response
keyboard
touch
controls.
Output
Normal
your
key
plays
the
on
sound
suitable
response
to
obtain
response
Channel
inthis
and
style
of
offer
any
at
full
piano
key
Harpsichord
levels
with
formost
which
maxi-
TO ADJUSTTHE
o 0 0 0 0 0 0 0 To
FUNC',
PIANO' PIAN02 EPIANO
\ \ TUNE COCAL
TOUCH
0
CJ CJ CJ
SENSITIVITY
HARPSI
ORGAN
"""'N
SPLlT"'OilN
CJ
CJ
VIBES CHOiR
"'D,oUT
SROMIO'OUT
OFTHE
11
~
v t:.
~
VALU~
''''
~
21
31
•
PIANO'S
change
setting
Press
the
Piano 1 (Touch
defau~
Press
piano
Press
Press
To
reset
both Up and
fromthe
follow
the
Function
tum on.
the Up or
sensitivity.
the Up
the
Down
the
KEYBOARD
Normal
these
simple
Button,
Sensitivity)
Down
button
Piano's
Down
oncefor
button
touch
Value
Value
oncefor
default
steps:
it's
LED
LED
button
Soft,
Hard
sensitivity
buttons
simultaneously
Touch
will
tum on and
will
alsoby OUCH
to
adjust
twice
for
to
normal
Sensitivity
the
Fixed.
press
.
Page 27
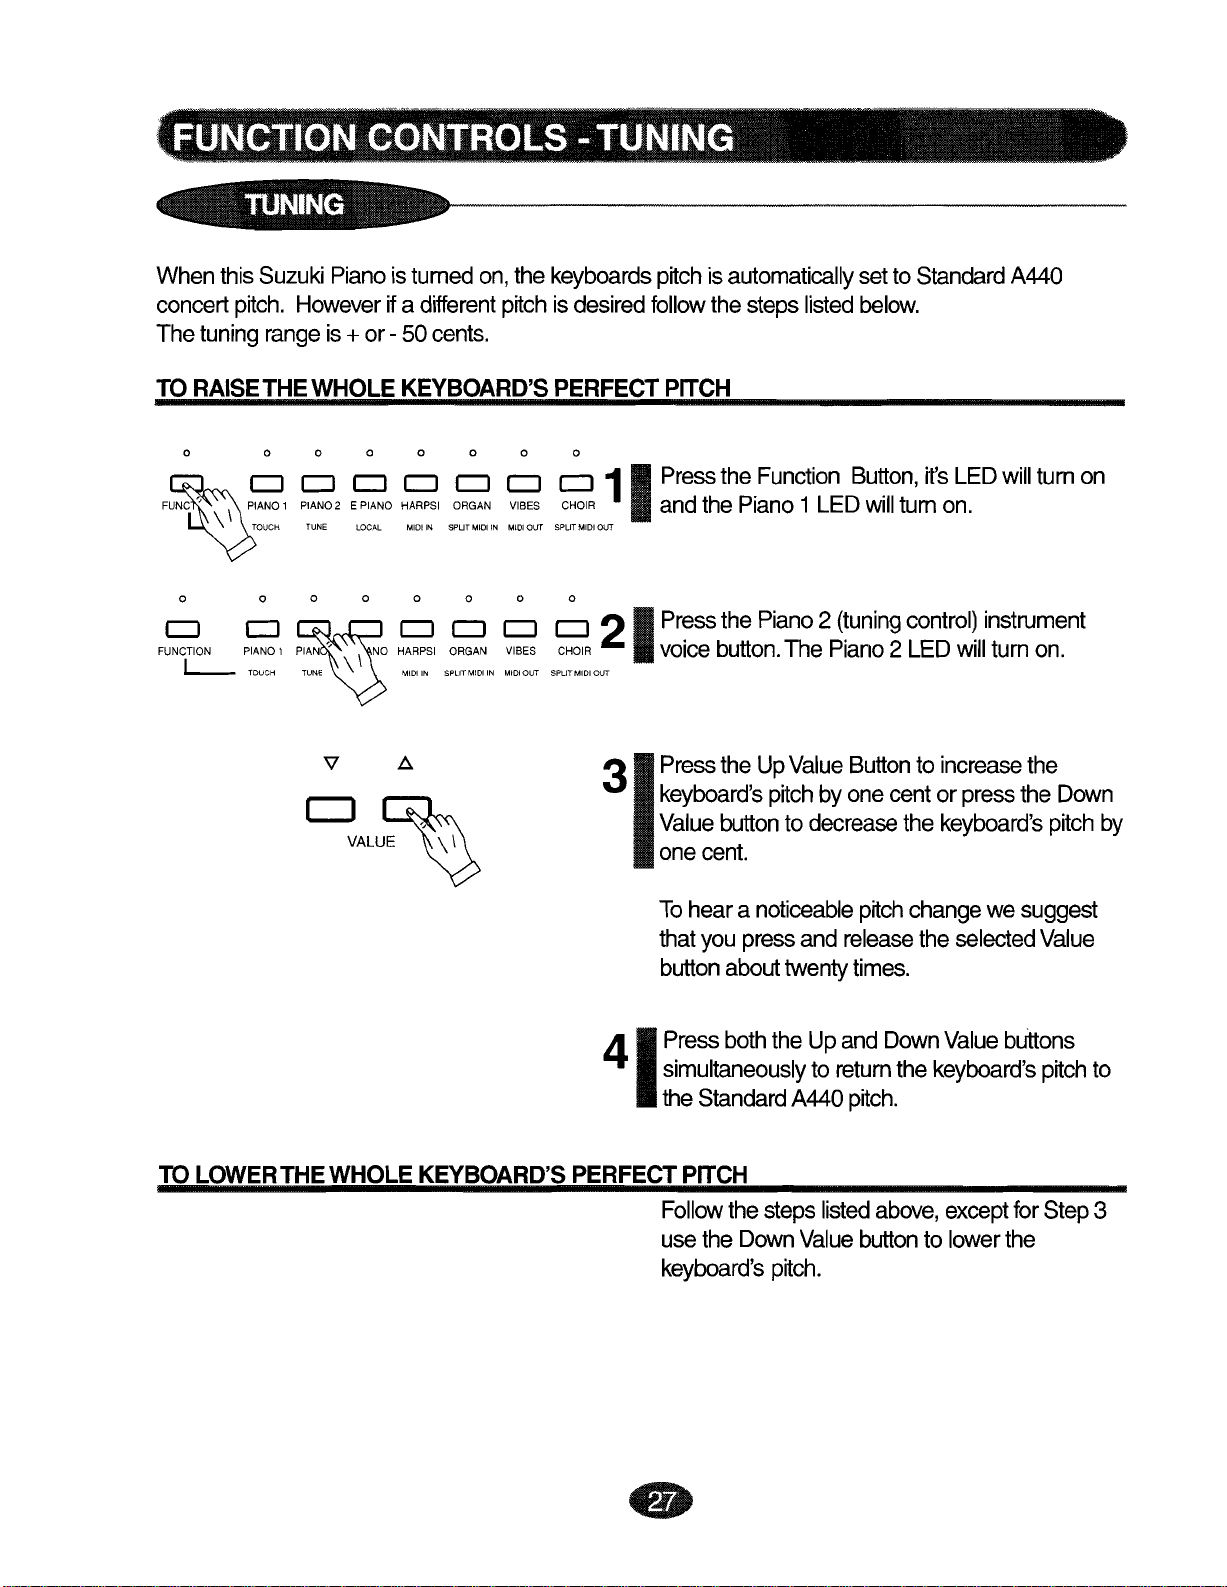
Whenthis
concert
The
TO
pitch,
tuning
RAISE
Suzuki
However
range
THE
WHOLE
Pianoistumed
if a
different
is+ or-50
cents.
KEYBOARD'S
on,
the
pitch
keyboards
is
desired
PERFECT
pitch isautomatically
follow
the
steps
listed
PITCH
setto
Standard
below.
A440
o
FUNC"
000
CJ
CJ CJ CJ
\
\ TOUCH TUNE LOCAL MIDI IN SPUT MIDI IN MIDI OUT SPUT MIDI OUT
PIAN02
o o 0
CJ
CJ
HARPSI VIBES andthe
o
D
~
o
CJ
FUNCTION PIANO 1 ORGAN VIBES CHOIR
L..-..
0000000
CJ CJ
TOUCH MIDI IN SPLIT MIDI IN MIDI OUT SPLIT MIDI OUT
v
~
CJ
CJ CJ
CJ~
VALUE
~
11
Press
21
Press
voice
31
Press
keyboard's
Value
one
To
thatyou
button
the
Piano
the
button.
theUp
button
cent.
heara
about
Function
Piano 2 (tuning
The
Value
pitch
to
noticeable
press
twenty
Button,
1LED
Piano2LED
Buttontoincrease
byonecentor
decrease
pitch
and
release
times.
rt's
LED
will
tumon. PIANO 1 EPIANO ORGAN CHOIR
control)
the
changewesuggest
the
instrument
will
turnon.
press
keyboard's
selected
will
the
the
tum on
Down
pitch
Value
by
TO
LOWER
THE
WHOLE
KEYBOARD'S
41
PERFECT
Press
simultaneously
the
Follow
usethe
keyboard's
•
both
Standard
PITCH
the
Down
theUp
A440
steps
Value
pitch
and
Down
to
return
pitch.
listed
above,
button tolower
.
Value
the
keyboard's
except
buttons
pitch
forStep3
the
to
Page 28

WHAT IS MIDI?
MIDI
stands
interface
instructions
to
createa"system"ofMIDI
control
computers,
hanced.
local
Suzuki
THE
MIDI
SUZUKI
HP-8
MIDI
for
Musical
thatenables
andotherdatacan
thanwhat
Forfurther
TERMINALS ARE
PIANO.
TERMINALS
wouldbeavailable
sequencers,
informationonMIDI
music
store.
Instrument
musical
instruments
expanders
Digital
instruments
pass
between
and
with
orother
and
LOCATED
Interface.
(ofall
them.
equipment
just
isolated
keyboards
MIDI
ONTHE BACK
Thisisa
brands)
This
instruments.
your
equipment
world
wide
standard
and
computerstocommunicate
exchangeofinformation
that
offer
musical
thatis
BOARD
greater
CONNECTOR
musical
Whether
horizons
available
you
please
communication
sothat
makesitpossible
versatility
interface
will begreatly
PANEL
with
contact
and
en-
your
OFTHE
1.The
control
2. TheMIDIOUT
andvelocity data
HP-9,
MIDITERMINALS ALSO
A
MIDI
this
HP-10,
MIDI
THRU PORT
INconnector
Suzuki
Piano.
connector
produced byplaying
HP-11 & HG-411
IN
OUT
o~
~ ~
1 2
receives
INCLUDE
IN OUT
MIDI
data
fromanextemal
transmits
I I
MIDI
the
keyboard.
data
generated
MIDI
MIDI
byThis
device
Suzuki
THRU
which
Piano.
canbe
Therefore
used
to
note
3.The MIDITHRU
MIDIINconnector
~~~
~ ~
1
(for
models
directly
HP-9,
totheother
HP-10
MIDI
2
,HP-11 &HG-411)
devices
thatare
~
connector
connected
•
3
transfers
tothe
MIDI
THRUport.
data
from
the
Page 29
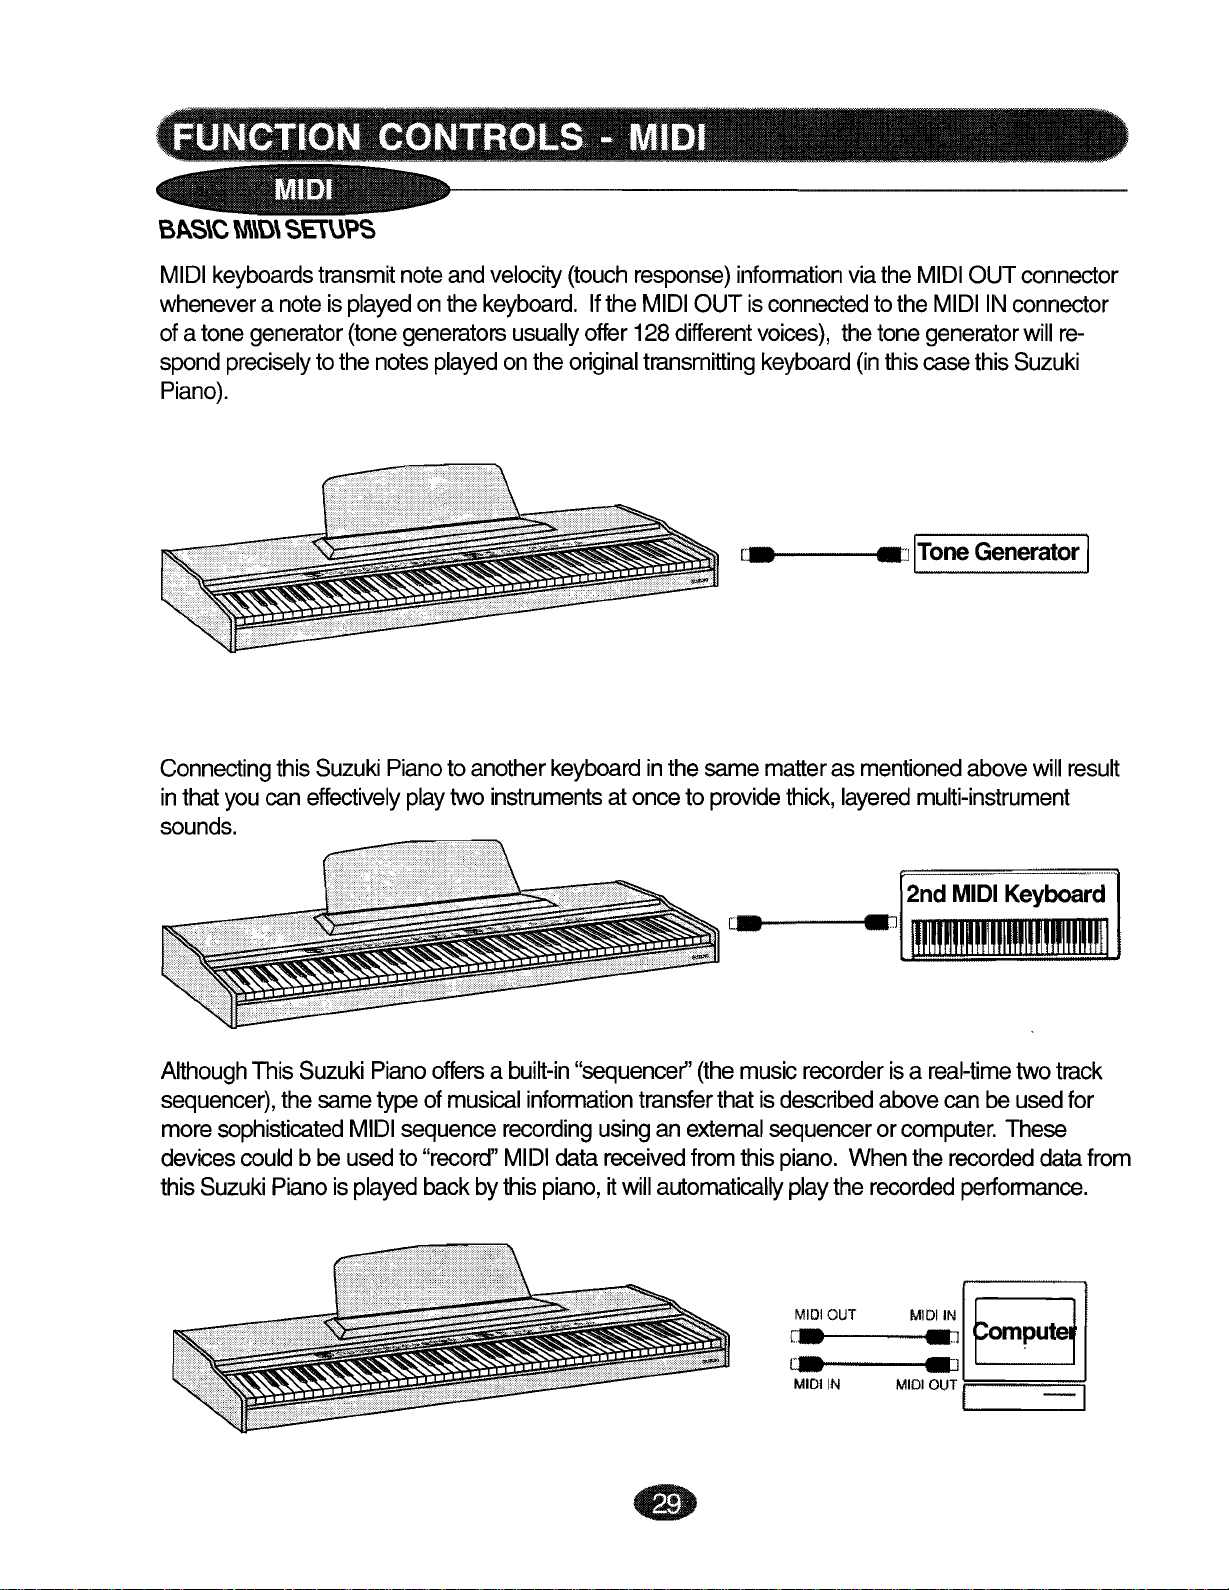
B~S\C
MIDI
whenever
ofatone
spond
Piano).
M\O\
keyboards
precisely
SElUPS
transmit
anoteis
generator
tothe
played
(tone
notes
noteand
onthe
generators
keyboard.
played
velocity
usually
onthe
(touch
Ifthe
offer
original
response)
MIDI
OUTis
128
different
transmitting
information
connected
voices),
keyboard
viathe
tothe
thetone
(in
thiscasethis
MIDI
OUTconnector
MIDIII\J
generator
connector
will
re-
Suzuki
Connecting
inthat
sounds.
Although
sequencer),
more
devices
this
you
can
This
sophisticated
could
Suzuki
this
Suzuki
effectively
Suzuki
the
same
bbe
Pianoisplayed
Pianotoanother
play
Piano
typeof
MIDI
sequence
usedto"record"
two
instruments
offersabuilt-in
musical
backbythis
information
recording
MIDI
keyboard
atonceto
"sequencer"
usinganextemal
data
received
piano,
it
will
c-. a
inthesame
matterasmentioned
provide
c-.-----!
(the
music
transferthatis
from
this
automatically
ITone
thick,
layered
recorder
described
sequencerorcomputer.
piano.
playthe
isa
above
When
recorded
the
Generator
above
multi-instrument
real-time
canbe usedfor
recorded
performance.
will
two
These
data
I
result
track
from
6)
MIDI OUT
~
MOil"
a
c-. a
MIDI IN MIDI OUT
IE
ompute
II
1:====_=-=1
Page 30
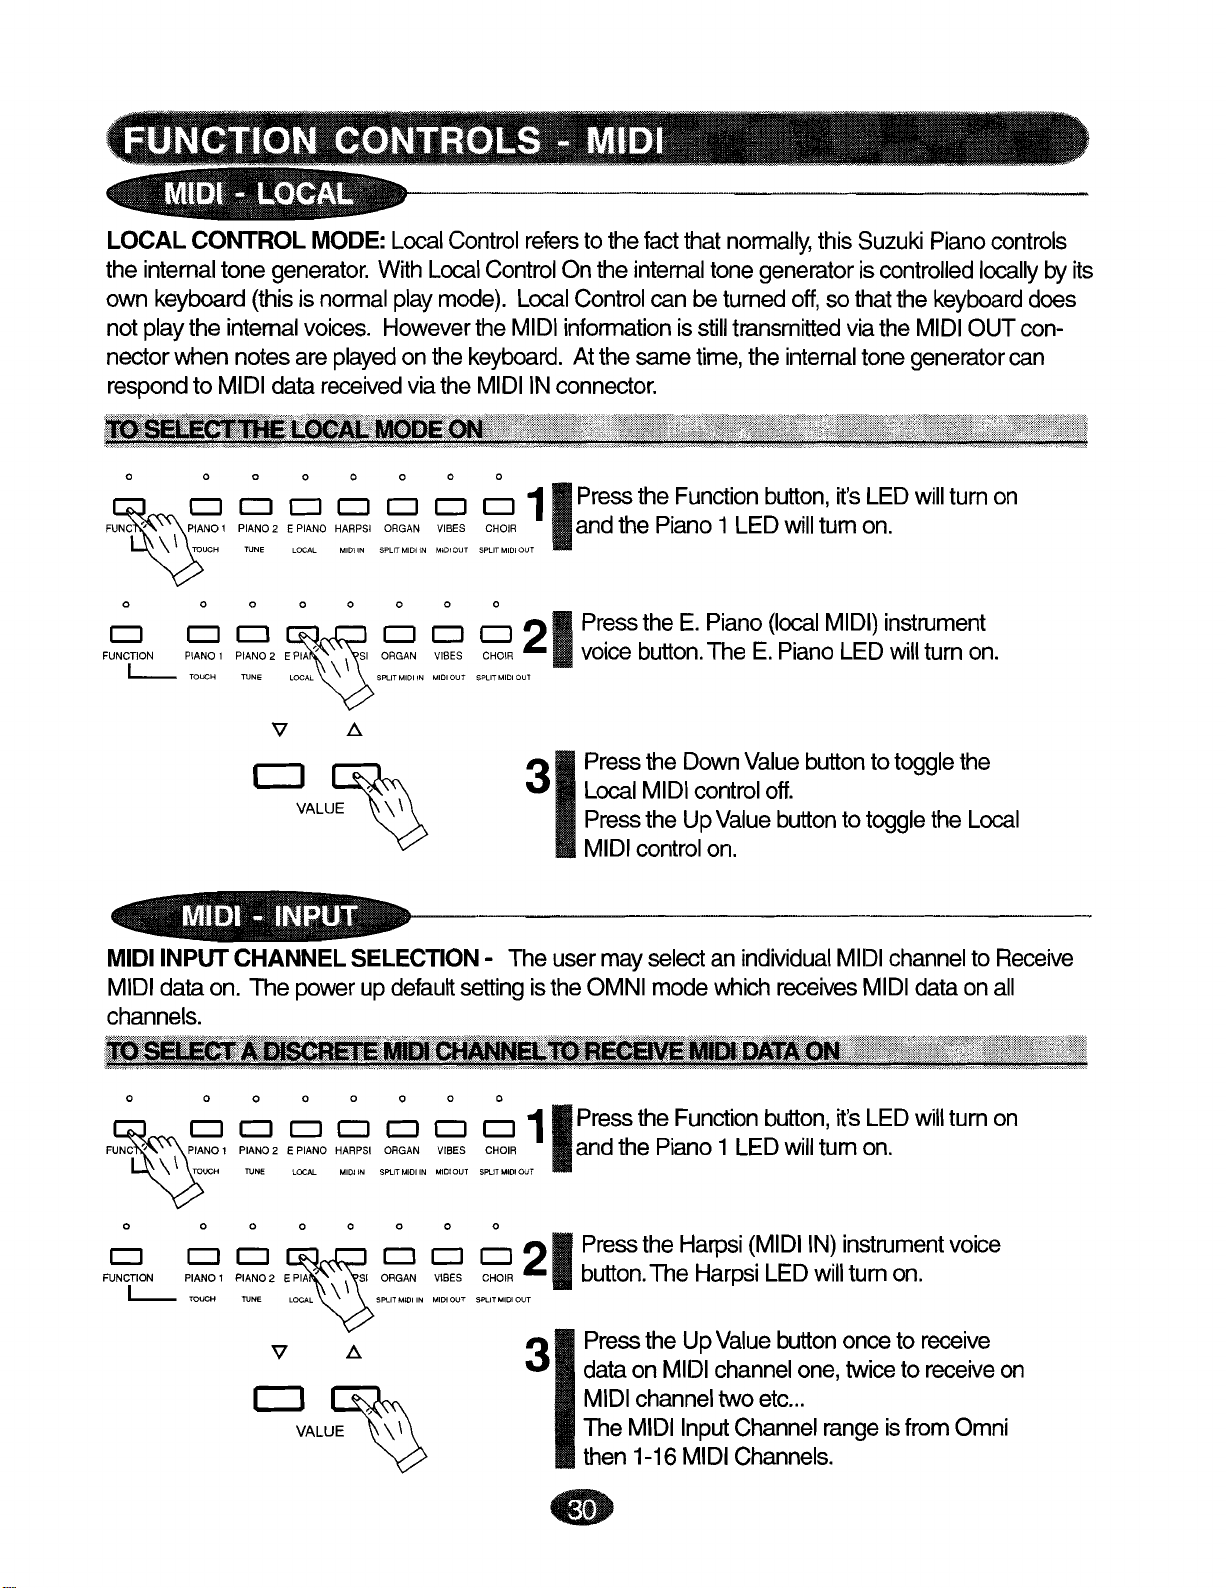
LOCAL
the
own
notplaythe
nectorwhennotesare
respond
CONTROL
internal
keyboard
to MIDIdata
tone
generator.
(thisisnormal
internal
voices.
MODE:
Local
With
play
However
played
received
Control
Local
mode).
onthe
viathe
refers
tothe
Control
the
keyboard.
MIDI INconnector.
Onthe
Local
Control
MIDI
informationisstill
Atthesame
fact
that
internal
canbe
normally,
tone
turned
transmitted
time,
the
this
Suzuki
generatoriscontrolled
off,
sothatthe
viathe
internal
tone
Piano
keyboard
MIDI
generator
controls
locally
does
OUTcon-
can
byits
o 0
\ \ TOUCH
~.
o 0
o
FUNCTiON PIANO 1 ORGAN VIBES CHOIR
L--.
CJ
TOUCH
000
CJ
0 0 0 0 0
PIANO 2 E PIANO HARPSI ORGAN VIBES CHOIR andthe
TUNE LOCAL
o o
10.410\
000
IN SPLITMIDIIN MIDIOUT SPLITMIDIOUT
o 0 0 0
o 0 0
SPLITMIDI IN MIDIOUT SPLITMIDI OUT
V .6.
CJ~
MIDIINPUT
MIDI
dataon. The
channels.
VALUE
CHANNEL
powerupdefault
~
SELECTION
setting
- Theusermay
11
Press
the
Function
Piano
21
Press
voice
31
istheOMNImode
Press
Local
Press
MIDI
the E.
button.
the
MIDI
theUp
control
selectanindividual
1LED
Piano
The E.
Down
control
Value
on.
which
button,
(local
Value
off.
it's
will
tumon.
MIDI)
Piano
buttontotoggle
receives
LED
button
MIDI
LED
will
tumon
instrument
will
turn
on.
to
toggle
channeltoReceive
MIDI
the
the
Local
dataonall
o 0 0 0
o
PIAN02
EPIANO HARPSI ORGAN VIBES CHOIR and the
TUNE lOCAL MIDI IN SPLITMIDI IN MIDIOUT SPLITMIDI OUT
o 0 0 0 0
CJ
FUNCL:...-
CJ
CJ
PIANO 1 ORGAN VIBES CHOIR
TOUCH TUNE SPliT MIDIIN MIDIOUT SPLITMIDIOUT
V .6.
CJ~
VALUE
0
0
0 0 0
0 0 0
~
000
000
11
Press
21
3
Press
button.
Press
dataon
MIDI
The
then 1-16
•
the
Function
Piano
the
Harpsi
The
theUp
MIDI
channel
MIDI
Input
MIDI
1 LED
Harpsi
Value
channel
two etc
Channel
Channels
button,
will
(MIDI
LED
button
...
it's
LED
tum
on.
IN)
instrument
will
turnon.
onceto
one,
twicetoreceive
range isfrom
.
will
turn on
voice
receive
Omni
on
Page 31
'''.
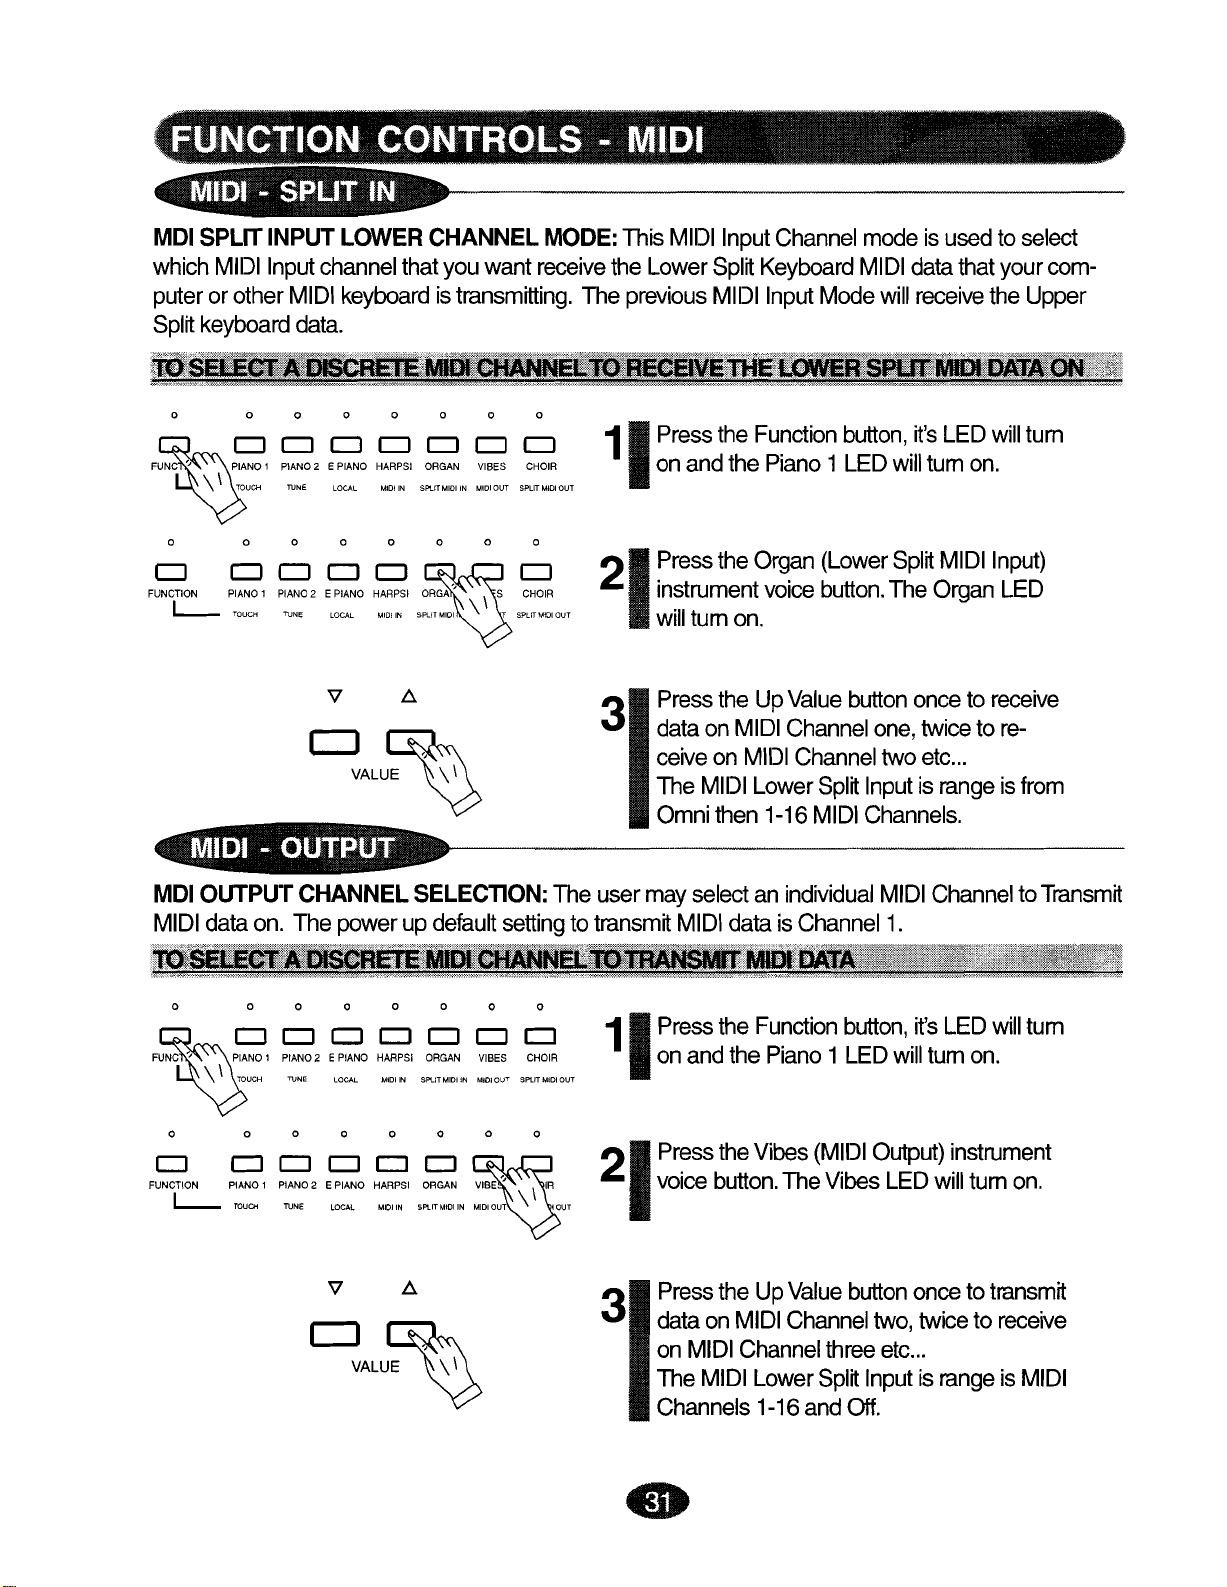
MDI
SPLIT
which
puterorother
Split
keyboard
MIDI
INPUT
Input
channel
MIDI
data.
LOWER
thatyouwant
keyboard
CHANNEL
is
transm~ing.
MODE:
receive
The
This
the
Lower
previous
MIDI
Input
Spl~
MIDI
Channel
Keyboard
Input
Mode
mode
MIDI
isusedto
datathatyourcom-
will
receive
select
the Upper
~~E",!gy~!~~~~~~~"~_~~~~~l~tlt
o
0000000
PIANO1 PIANO2 E PIANO HARPSI ORGAN VIBES CHOIR
\ \ \ TOUCH TUNE. LOCAL MIDI IN SPlIT MIDI IN MtDlOUT SPLIT MIDIOUT
11
Press
onandthe
the
Function
Piano
button,
1LED
will
it's
LED
tum
on.
will
tum
o
CJ CJ
FUNCTION
L-.-
MDI
MIDI
0000000
CJ
PIANO1 PIANO2 E PIANO HARPSI CHOIR
TOUCH TUNE LOCAL MIDI IN
CJ CJ CJ
V f!.
CJ~
OUTPUT
dataon. The
CHANNEL
VALUE
powerupdefault
~
SELEC1l0N: Theusermay
21
Press
instrument
will
Press
3
dataon
ceive
The
Omni
settingtotransmit
the
Organ
tum on.
theUp
MIDI
on
MIDI
MIDI
Lower
then1-16
selectanindividual
MIDI
datais
voice
Value
Channel
Channel
Channel
(Lower
button.
Spl~
MIDI
Spl~
MIDI
Input)
The
Organ
button
onceto
one,
twicetore-
two etc
Inputisrange isfrom
Channels.
MIDI
ChanneltoTransmit
1.
LED
receive
...
t~!'i~;~,~~~~!I!I~!~~!!~4'!"!!!!!II'~'!'::'1!!!!!!!!!!!!!'~~~~1!!!"~1!'!11~~1
o
~
U \ \\TOUCH TUNE LOCAL MIDI IN spur MIDI tN MIDIOUT SPLITMIDI OUT
0000000
CJ CJ CJ CJ
~IANO
1 PIANO2 E PIANO HARPSI ORGAN VIBES CHOIR
CJ
CJ
CJ
11
Press
onandthe
the
Function
Piano1LED
button,
will
it's
LED
tumon.
will
tum
000
CJ CJ CJ
FUNCTION
PIANO1 PIANO2 E PIANO HARPSI
L-.-
TOUCH TUNE LOCAL MIDI IN SPliT MIOIIN MIDIOUT \ tOUT
0
000
CJ
CJ
CJ
ORGAN
V f!.
CJ~
VALUE
~
0
VISE-- \ IR
21
Press
voice
Press
3
dataon
on
MIDI
The
MIDI
Channels
•
the
Vibes
button.
theUp
MIDI
Channel
Lower
1-16
(MIDI
The
Vibes
Value
Channel
button
three
spm
andOff.
Output)
LED
two,
etc
Input
instrument
will
onceto
twicetoreceive
...
is
range
tum
transrnlt
is
on.
MIDI
Page 32

MOlSPLrr OUTPUT
which
MIDIdatacan
Transmit
MIDIOutput
be sent
the Upper
channel
Split
LOWER
CHANNEL
MODE:
thatyouwanttransmit onforthe
separately
keyboard
ona
data.
discrete
The
MIDI
default
This
MIDI
Channel.
setting
Output
Lower
The
Channel
Split
previous
forthismode
modeisusedto
Keyboard
MIDI
MIDI
Input
data.
Mode
transmitsonChannel
select
This
will
two.
0000000
\ \PIANO 1
\ TOUCH
o 0
CJ CJ
FUNCTION PIANO1
L-
TOUCH TUNE LOCAL MIDI IN SPLITMIDIIN MIDI OUT SPL I I
0
CJ
CJ CJ
PIANO2 E PIANO HARPSI ORGAN VIBES CHOiR andthe
ruNE
LOCAL MIDI IN SPliT MIDI iN MIDIOUT
000
CJ
CJ
PIAN02
EPIANO HARPSI ORGAN VIBES
V .6.
~~
VALUE
CJ
CJ
0 0 0
CJ CJ CJ
~
CJ
11
SPliT
MIDIOUT
~21
CHo
3
Pressthe
Press
voice
button.
Press
dataon
on
MIDI
The
MIDI
Channels
Function
Piano
1LED
the Choir
TheChoir
the Up
MIDI
Value
Channel
Channel
Lower
1-16and Off.
button,
will
(MIDI
button
fouretc
Split
it's
tum
Split
LED
onceto
three,
...
output
LED
on.
Output)
will
turn
twice
range
will
turnon
instrument
on.
transmit
to
receive
is
MIDI
•
Page 33

MIDI
IMPLEMENTATION
by
this
Suzuki
MIDI IMPLEMENTATION CHART
Piano.
CHART:
This
chart
lists
the
actual
data
that
is
transmitted
and
recognized
FUNCTION TRANSMITTED RECOGNIZED
Basic Default
Channel
Mode
Note
Number
Velocity Note On *1
After
Touch
Pitch Bender
Prog
Change True
System Exclusive
System
Common
System
Real Time
Aux
Messages
Channel
Default X mode 3
Messages
Altered
True Voice
Note OFF X X
Key's
Ch's
1
5
6,38
7
64
66
67
91
93
96,97
98,99
100,101
:Song Pos
:Song Sel
:Tune
:Clock
:Commands
:Local ON/OFF
:Active Sense
1,2,3
off
1-16,
X X
---------
15-114 0-127
---------
X
X 0
*1
X
X
0 0
0 0
0
0
0 0 Soft
0
0 0 Effect Level
0
0
0
0
---------
X
X
X
X
0
0
X X
0
0-12
omni
omni,I-16
21-109
0
X
0
0
0
0
0
0
0
0
0
0
X
X
X
X
X
0
0
0-12
0-12
REMARKS
Modulation
Portamento Time
Data Entry
Volume
Damper
Sostenuto
Reverb Level
Data InclDec
NRPN LSB, MSB
RPN LSB, MSB
Notes
X: NO
*1 Can be selected
•
Page 34

1
2
3
4 MIDI
AUDIO
BASS & TREBLE
r "
-,
rOUT
-,
000000000
1.
BASS & TREBLE
Thesetone
delivery
NOTE: Depending onthe
and
Treble
selected
2.
AUDIO
Thesejacksconnect the
this
piano.
3.
AUDIO
These
4.
MIDI
MIDI
ofthis
TheHP-8piano
controls
system.Thesetone
controls,
tone
IN
OUT
stereo
jacksallow
RCA
manual
CONTROLS
allow
itis
controls
for
to a
audio
communication
further
contains
theusertoaddor
controls
instrument
possibletooverdrive
proper
output
outputjacks
details.
only
setting.
ofother
withother
MIDI
Inand
arein
voice(s)
electronic
supply
remove
addition
selected,
thesound
your
piano's
products
MIDI
Output
Bassand
tothe
Brilliance
the
selected
delivery
instruments
output
equipped
ports.
r
iN OUT
Treble
from
the
control
effects
system.
tothe
signaltoexternal
with
MIDI
found
andthe
Ifthis
intemal
interfaces.
piano's
onthe
happens
amplifier
amplification.
audio
Control
setting
adjustyour
and
speakers
Seethe
1
THRU
sound
panel.
ofthe Bass
within
MIDI
section
HEADPHONE
JACKS
@@
THE
HEADPHONE
You
can
playintotal
phones
the
PEDALS
HP-8
Sustain
engaged
withagradual
down
intooneofthe
instrument.
AND
HP-9
Pedal
allthe
the
pedal.
Two
(Right):
keys
decay
JACKS
silence
setsof
that
foras
without
appropriate
headphones
The
(Left):
gaged
volume
ndthe
_
slightlyattered.
2 1 2 3
when
the
are
longasyou
Soft
when
the
sustain
played
disturbing
sockets,
maybe
Pedal
en-
keyboard
is
reduced
timbre
pedal
will
sustain
hold
other
inthe
located
directly
used.
PEDALS
HP-10
is The
Sostenuto
keyboard
piano
pedalisengaged
keythatis
same
under
AND
sustains
room byplugging
HP-11
Pedal
asetof
the
keyboard
(Middle):
anykeytotheleftofthe
depressed
.
onthe
when
immediately
left
engaged
head-
side
Middle
before
of
the
C
the
•
Page 35
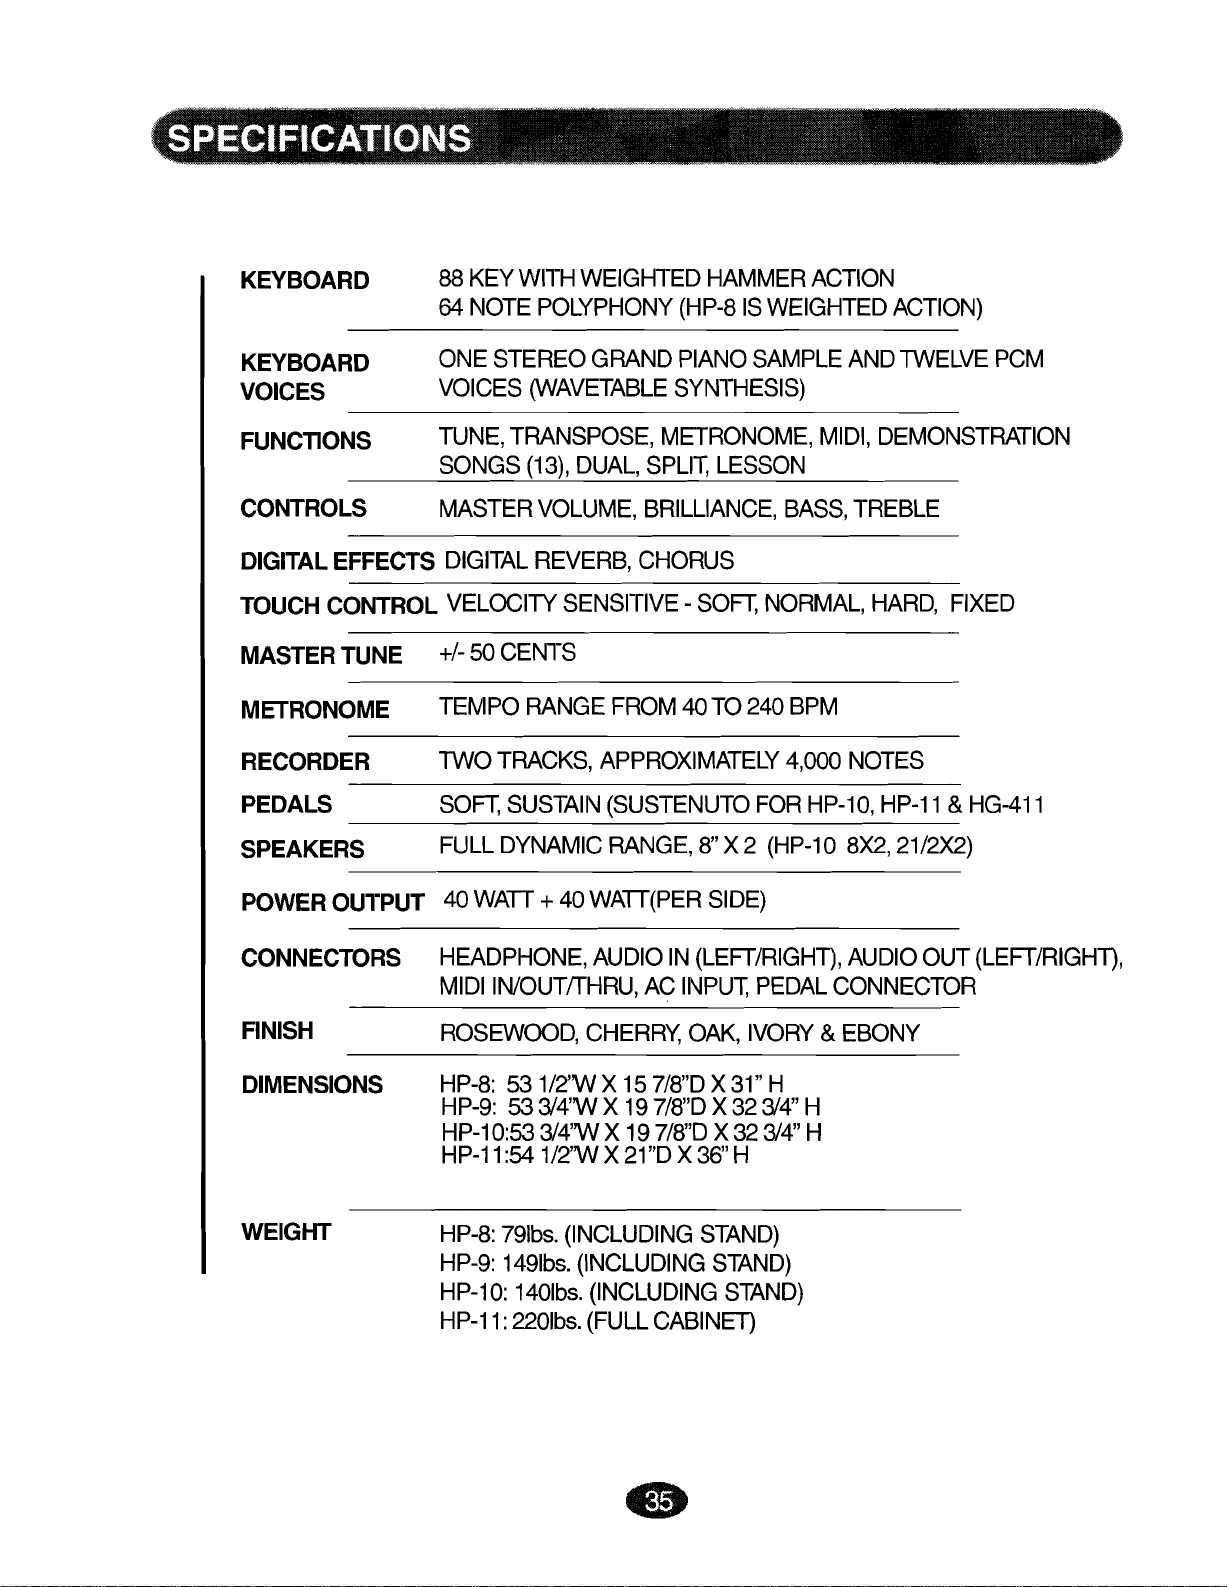
KEYBOARD
KEYBOARD
VOICES
88 KEY
64
!\IOTE
ONE
STEREO
VOICES
WITH
WEIGHTED
POLYPHONY
GRAND
(WAVETABLE
HAMMER
(HP-8 ISWEIGHTED
PIANO
SYNTHESIS)
ACTION
SAMPLE
AND
ACTION)
TWELVE
PCM
FUNCTIONS
CONTROLS
DIGITAL
TOUCH
MASTER
METRONOME
RECORDER
PEDALS
SPEAKERS
POWER
CONNECTORS
EFFECTS
CONTROL
TUNE
-------
OUTPUT
TUNE,
SONGS
MASTER
DIGITAL
VELOCITY
+1-50
TEMPO
TWO
SOFT,
FULL
40 WATI + 40 WATI(PER
HEADPHONE,
MIDI
TRANSPOSE,
(13),
DUAL,
VOLUME,
REVERB,
SENSITIVE -SOFT,
CENTS
RANGE
TRACKS,
SUSTAIN
DYNAMIC
INiOUTITHRU,
FROM
APPROXIMATELY
(SUSTENUTO
RANGE,
AUDIO IN(LEFT/RIGHT),
METRONOME,
SPLIT,
BRILLIANCE,
CHORUS
AC
LESSON
NORMAL,
40TO240
FOR
8"X2
II\JPUT,
(HP-10
SIDE)
PEDAL
MIDI,
BASS,
BPM
4,000
TREBLE
HARD,
NOTES
HP-10,
8X2,
AUDIO
CONNECTOR
DEMONSTRATION
FIXED
HP-11 & HG-411
21/2X2)
OUT
(LEFT/RIGHT),
FINISH
DIMENSIONS
WEIGHT
ROSEWOOD,
HP-8:
HP-9:
HP-1
HP-11:54
HP-8:
HP-9:
HP-10:
HP-11:
531/ZW X 15
53 3I4'W X 19
0:533I4'W X 19
1/2'W X
791bs.
1491bs.
(INCLUDING
1401bs.
220Ibs.
CHERRY,
21"D
(INCLUDING
(INCLUDING
(FULL
OAK,
7/8"D
7/8"D
7/8"D
X 36"H
CABINET)
•
IVORY & EBONY
X 31"H
X 32
314"
H
X 32
314"
H
STAND)
STAND)
STAND)
Page 36
This product, except the exterior cosmetic parts, is warranted
by the Suzuki Corporation to the original purchaser to be free
from defects in materials and workmanship under normal use
as follows:
1. For a period of one year from the date of purchase, the Suzuki Corporation will pay the labor charges to repair the
defective product. After this one year period, you must pay
all labor charges.
2. In addition, the Suzuki Corporation will supply, at no charge,
new or rebuilt for defective parts for a period of one year
from the date of purchase.
In the event repairs are needed, the original purchaser will
return the product to an Authorized Suzuki Retail Center with
the dated proof of purchase. The dealer will then repair the prod-
uct or return it to the Suzuki distribution center in San Diego, California for repairs. Upon completion of the repair, the unit will be returned to the dealer freight prepaid. This warranty will not apply to
this product if it has been misused, abused, or altered. This warranty is void if the product is opened. Without limiting the foregoing,
bending, dropping of unit, or visible cracks and/or scratches are
presumed to be defects resulting form misuse or abuse.
Neither this warranty nor any other warranty expressed or implied,
including implied warranties of merchantability, shall extend beyond
the warranty period.
or consequential damages.
In the United States Contact: Suzuki Corporation
San Diego Distribution Center,
92196
All Other Countries Contact: Original retailer where product was
purchased for additional warranty details.
No responsibility is assumed for any incidental
P.O.
Box 261030, San Diego, CA
•
Page 37
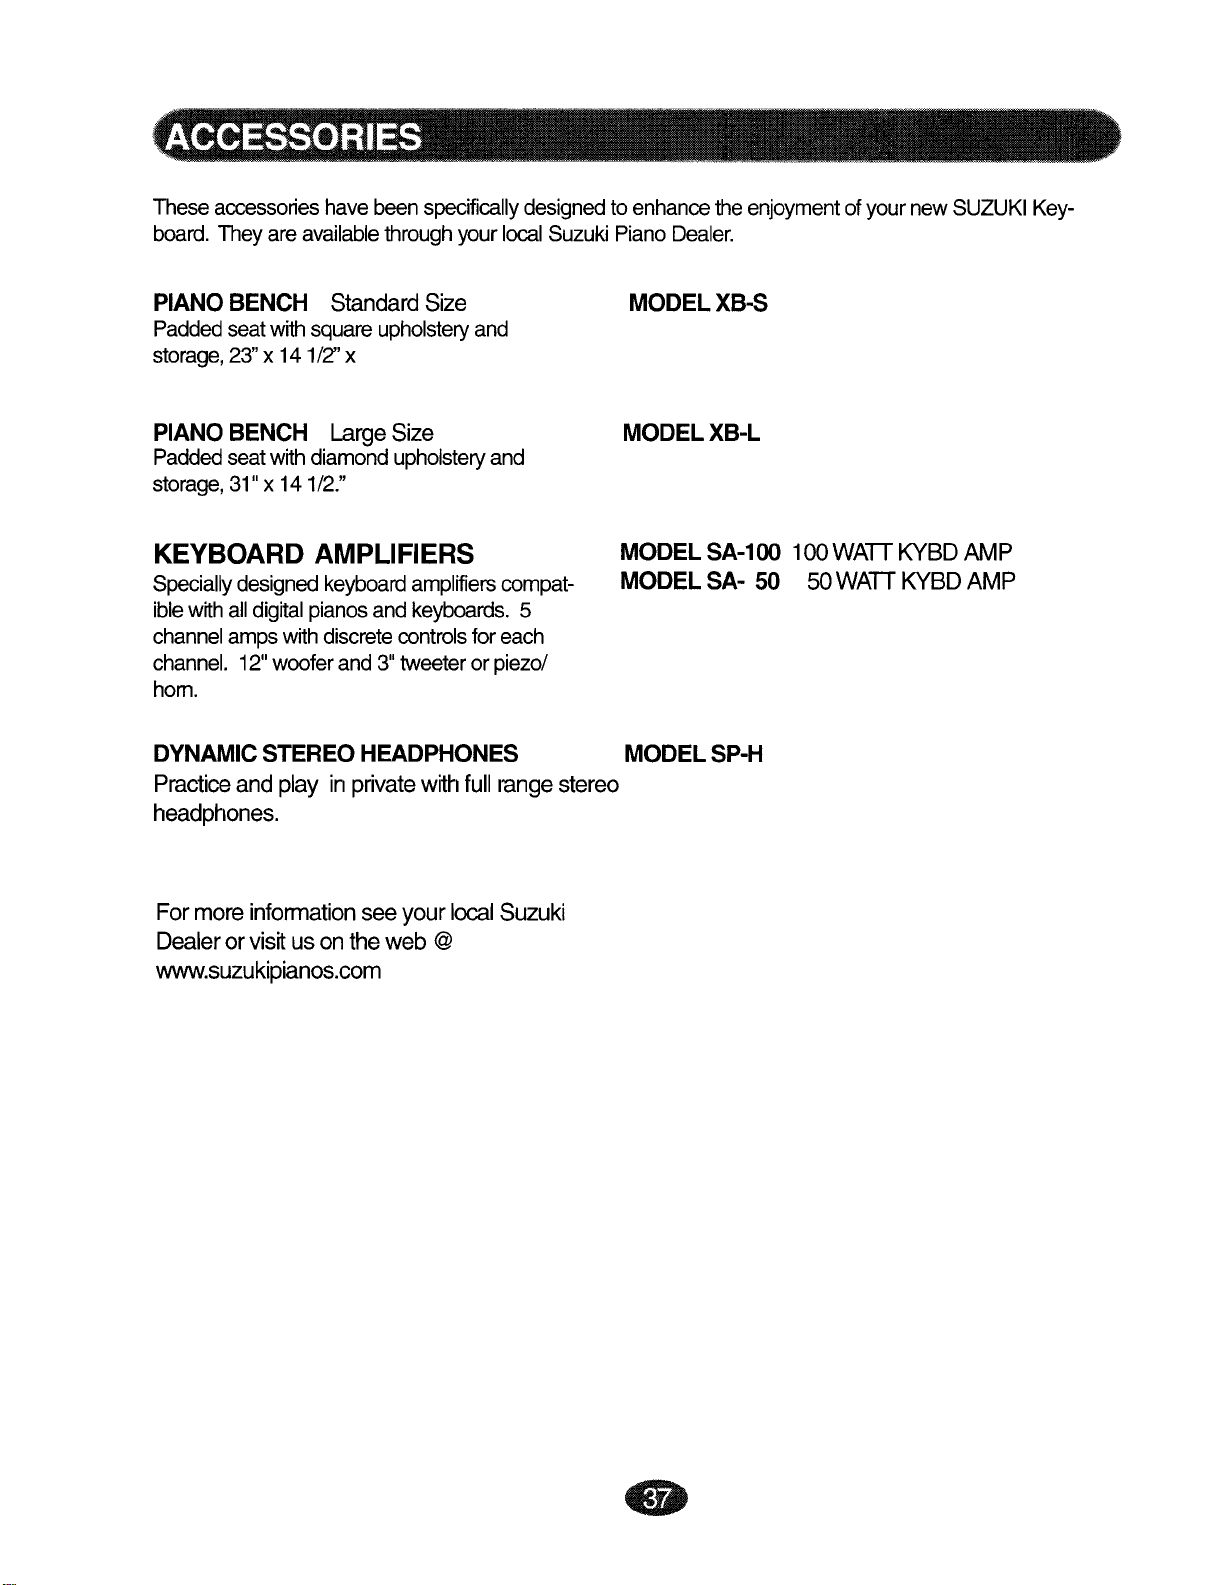
These
board.
accessories
Theyare
available
have
been
through
specifically
your
designedtoenhance
local
Suzuki
Piano
the
Dealer.
enjoyment
ofyournew
SUZUKI
Key-
PIANO BENCH
Padded
storage,
PIANO BENCH
Padded
storage,
seatwith
23"x 141/2" x
seatwith
31"x 141/2."
KEYBOARD AMPLIFIERS
Specially
ible
channel
channel.
hom.
DYNAMIC STEREO HEADPHONES MODEL SP-H
Practice
designed
with
all
digital
amps
12"wooferand3"
andplay in
square
diamond
pianos
with
Standard
upholstery
Large
keyboard
discrete
Size
and
private
Size
and
upholstery
amplifiers
keyboards.
controls
tweeter
with
foreach
orpiezo/
full
and
compat-
5
range
stereo
MODELXB-S
MODELXB-L
MODEL
MODEL SA- 50 50
SA-1oo
headphones.
100
WAn
WAn
KYBD AMP
KYBD AMP
For
more
information
Dealerorvisit
usontheweb @
seeyour
www.suzukipianos.com
local
Suzuki
•
Page 38

HP-8
HP-88F
HP-8F
HP-9
HP-10
HP-11
1-800-854-1594
HP-95
HP-105W
 Loading...