

Page 1
EN | FR | DE | ES | IT | NL | FI | SV
Page 2

CUSTOMER SERVICE CONTACTS
Suunto Oy Phone +358 9 875870
Fax +358 9 87587301
Suunto USA Phone 1 (800) 543-9124
Canada Phone 1 (800) 776-7770
European Call Center Phone +358 2 284 11 60
Suunto Website www.suunto.com
EN
1
Page 3

TABLE OF CONTENTS
1. INTRODUCTION TO SUUNTO TEAM POD .........................................................5
2. SUUNTO TEAM POD IN ACTION ........................................................................5
3. ASSEMBLING SUUNTO TEAM POD ...................................................................9
4. ATTACHING SUUNTO TEAM POD TO A TRIPOD ............................................10
5. POSITIONING SUUNTO TEAM POD .................................................................12
6. PUTTING ON THE HEART RATE TRANSMITTER BELT ..................................13
7. OPERATION .......................................................................................................14
8. SUUNTO SOFTWARE .......................................................................................15
8.1. REAL-TIME ANALYSIS - SUUNTO MONITOR SOFTWARE ................... 15
8.2. DEEPER ANALYSIS - SUUNTO TEAM MANAGER SOFTWARE............ 16
9. INSTALLING SUUNTO SOFTWARE ..................................................................17
9.1. INSTALLING THE SOFTWARE ................................................................ 17
9.2. INSTALLING THE USB DRIVERS ............................................................ 17
9.3. INSTALLING SUUNT O SPORTS INSTRUMENT ON WIN DO WS 2000/XP ... 17
10. TECHNICAL SPECIFICATIONS .......................................................................18
11. INTELLECTUAL PROPERTY ...........................................................................18
11.1. COPYRIGHT............................................................................................ 18
11.2. TRADEMARK .......................................................................................... 18
11.3. PATENT................................................................................................... 18
12. DISCLAIMERS .................................................................................................19
12.1. USER’S RESPONSIBILITY .................................................................... 19
12.2. CE.......................................................................................................... 19
Page 4

12.3. FCC COMPLIANCE............................................................................... 19
12.4. LIMITS OF LIABILITY AND ISO 9001 COMPLIANCE........................... 19
12.5. AFTER SALES SERVICE...................................................................... 20
13. DISPOSAL OF THE DEVICE ..........................................................................21
Page 5

1. INTRODUCTION TO SUUNTO TEAM POD
Suunto Team Pod is a Peripheral Observation Device designed to increase the effectiveness of group training. It includes an antenna-equipped receiver, a USB cable, and PC software.
Suunto Team Pod enables coaches to receive real-time heart ra te (HR) data via wireless
transmission from their athl etes’ HR belts stra ight to a PC scre en, from a distance of up to
100 meters/330 feet.
This allows the coach to e nsure that each and every athlet e is training at their optimum
heart rate. Data is sent directly fr om the at hletes ’ hea rt rat e transm itt er belts to the coac h's
PC, via wireless transmission to Suunto Team Pod's digital receiver.
The athletes’ heart rate transmitter belts are all individually coded, allowing the coach to
see which data is coming from which athlete and advise accordingly. The coach can then
use the supplied PC software to analyze the ath letes’ individual pe rformances and furthe r
refine their training for optimum results.
2. SUUNTO TEAM POD IN ACTION
Before we see how to assemble, position, and operate Suunto Team Pod, or use the PC
software, it might be helpful to follow a real example of how a coach starts to use his device
for the first time.
We will see what is required prior to any training, how to make the mos t of the real time
monitoring during training, and what kind of analysis can be performed with the software
after the training is complete.
Before training
In our example, Coach has bought Suunto Team Pod to improve the effectiveness of his
team’s training sessions. The evening before the first session with Suunto Team Pod,
Coach begins to prepare. Suunto Team Pod uses two different PC programs, Suunto Monitor and Suunto Team Manager. The first thing Coach needs to do is install the software on
his laptop (see Section 9).
5
Page 6

After installing the software, Coach logs into Suu nto Team Manager by creating his own
coach profile. From the Team dropdown list in the menu bar, he selects Create Team and
adds the name of his team. The ne wly created te am then appears i n the My Training window. He right clicks the newly created team and chooses Create Athlete. A new window
opens and Coach fills in the team captain’s details, such as name, date of birth, height,
weight, and an activity level figure (d es crip t ions of whi ch can be fou nd in t he wind ow) . This
information is needed to calculat e the at hl ete’s maxi mum hear t r ate, per for man ce capacit y,
and other values required for ana lysis. When the captain’s details are complete, Coach
clicks the Create Athlete button and repeats the process for the other members of the team.
When the team is complete, Coach highlights each team member’s name in turn and clicks
the Personal button in the Athl etes window to further customize their prof ile. Coach fine
tunes his athletes’ data by adding the real max HR that they recorded during a recent performance test.
Having finished creating his team and all the athletes’ profiles, Coach closes Suunto Team
Manager and turns his attention to Suun to Team Pod itself. He assembles the device (as
described in Section 3) an d connects it to his laptop . He then needs to tes t the sys tem, by
placing a heart rate transmitter be lt on himself and watchi ng the monitor for his own heart
rate. Satisfied that everything is working correctly, Coach turns off his laptop and then
unplugs Suunto Team Pod.
He then takes out his team’s heart rate transmitter belts and sticks a team member’s name
to each one. On a piece of paper, he writes the last fiv e digits of the first number on the
back of the belt next to the name of the athlete who will receive it.
Coach is at the training fi eld bright and ea rly. He positions Suunto Team Pod correctly, so
that it covers the whole field (see Section 5) and connec ts Suunto Team Pod to his laptop.
He then opens Suunto Monitor. When the team arrives, he hands out their heart rate transmitter belts and tells them how to put them on properly (see section 6).
The Belts window of Suunto Monitor shows the ID n umber s of all the h eart ra te tra nsmit ter
belts that Suunto Team Pod is receiving a signal from. Coach takes out his piece of paper
and starts to check the box next t o each belt in turn. When he checks the box, a popup
appears and in the drop down menu all the memb er s of th e te am that he created in Suunto
6
Page 7

Team Manager the evening before appear. He selects the name that goes with each belt
and also adds the athlete’s maximum heart rate. If the real maximum heart rate is not
known, it can be calculated using the formula 220 minus the athlete’s age.
When all the belts have been alloca ted to th e team, the list o f number s has been r eplace d
by a list of names in the Athlet es windo w. In the same window, Coach puts a mark into the
box next to the name of each athlete he wants to monitor.
One of the team members has brought a fr iend to try out for the team. Because Coach
didn’t add his details in Suunto Team manager the evening before, Coach giv es him a
spare HR belt to put on and adds him straight to Suunto Monitor. Coach selects Athletes
and Edit in the main menu, and then clicks Add. Here he adds the name of the newcomer,
his maximum heart rate, and the ID number of the belt. The training session can now begin.
NOTE: If you suspect that the HR belts may have been misallocated, the best way to ma ke
sure that each belt is correctly named is to collect all the belts back and then give them out
again one at a time. As each team memb er puts on hi s b elt, a nd Suu nt o Mo nito r d etec ts it,
name the belt before giving out the next one.
During Training
The heart rate data of all the monito red a thlet es app ears on the sc reen e ither as bea ts per
minute or as a percentage of their maximum heart ra te. The color s represent the athletes ’
heart rates in relation to the target heart rate zone - red means the monitored athlete’s heart
rate is above the target zone, g reen with in the zo ne, and blue b elow the z one. Co ach sets
the target zone to match the purpos e of the session. Using the colors, he can easily see
which athletes are training too hard - or not hard enough.
At the start of the session, Coach clicks the Record Session button and Suunto Monitor
starts recording the data received from each athlete’s belt. During the session, Coach clicks
the View Session Graph button to see a graphical representation of the athletes ’ real-time
heart rates and offers specific adv ice to each athlet e based on the data. A t the end of the
training session, Coach clicks the Stop Session button, a pop-up appears and he names
the session with, for example, the date and activity. He then clicks Save, closes Suunto
Monitor, unplu gs S uunt o Team Pod, and foll ows his tea m off the field for some post-training
refreshments.
7
Page 8

After Training
Once back at home, Coach logs in to Su unto Team Manager to perform in -depth anal ysis of
his team’s performance. From the Actions menu, he chooses Log Analyze and a dropdown
list of all the athletes who took part in the mornin g’s sessio n is di spla yed. He h ighl ights the
athletes whose dat a he w ants to analyze. In the tree view of th e My Training window, under
each athlete’s name, is an analyzed log from the rec orded session. Ea ch log can be analyzed in detail by clicking it. Information such as duration, training effect, heart rate, ventilation, and a number of other body parame ters valuab le for assessing training effectiv eness
is available.
Coach uses the analyzed data to refine the training program of each athlete.
For more information on the f unctionality of Suunto Team Manager and Suunto Monitor
software, Coach refers to the Help file s of the software. Using Suunt o Team Pod, and the
associated programs, encourage s Coach to find out more about issues suc h as training
effect and EPOC, so he downloads Suunto Training Guidebook from www.suunto.com.
After a season of training with Suunto Team Pod, Coach’s athletes are among the fittest in
the league!
8
Page 9
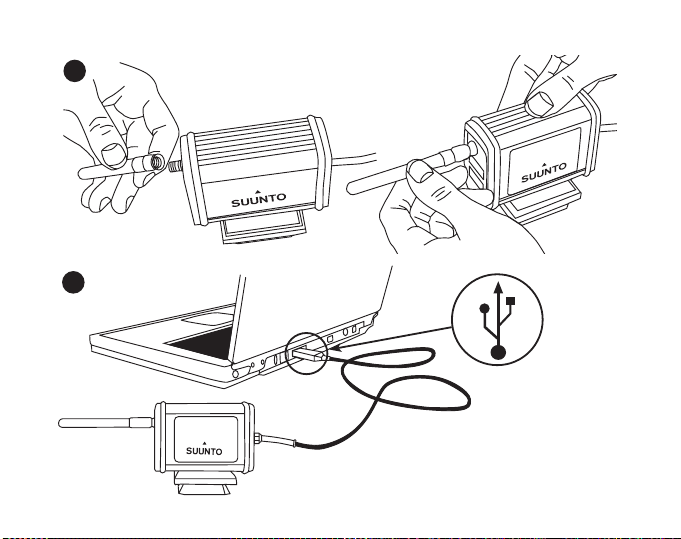
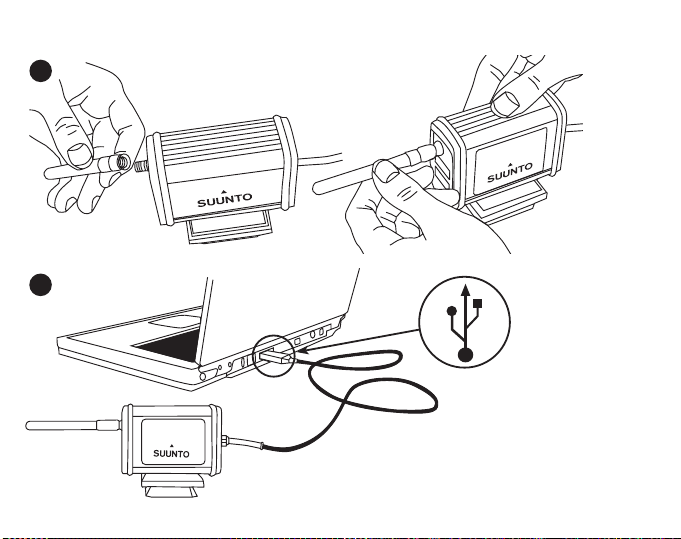
3. ASSEMBLING SUUNTO TEAM POD
1.
2.
9
Page 10
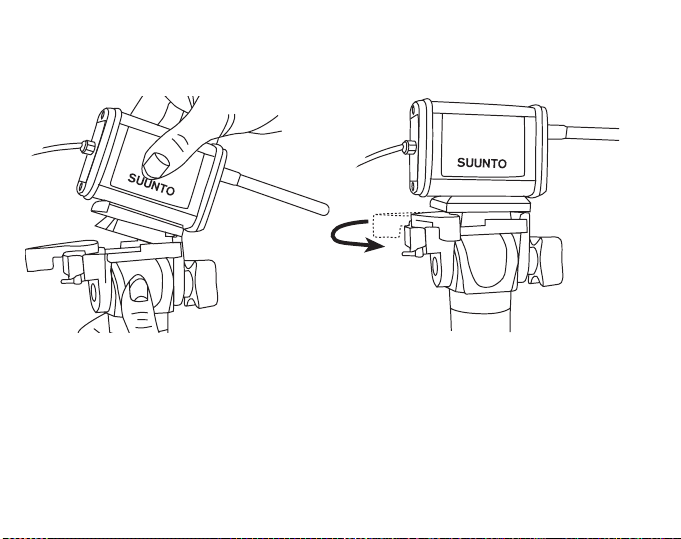
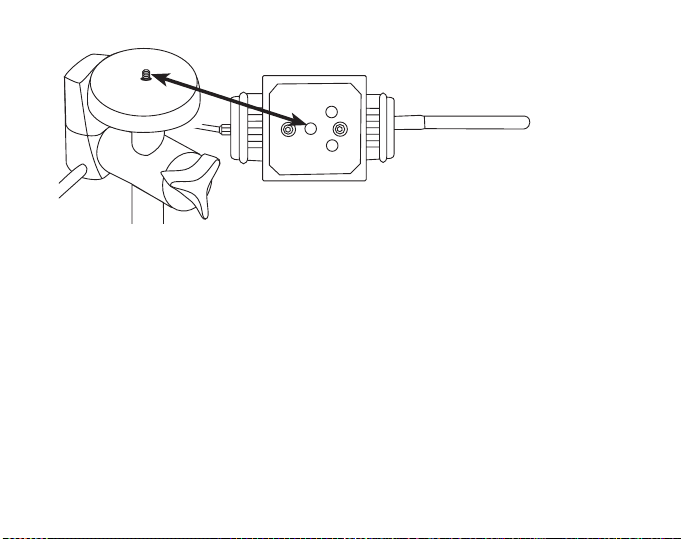
4. ATTACHING SUUNTO TEAM POD TO A TRIPOD
Suunto Team Pod has a quick-release system so that it can be conveniently mounted on
a camera tripod.
Alternatively, Suunto Team Pod can be lock ed in place with the 6 mm-diameter thread
located on the bottom of the d evice.
10
Page 11
NOTE! In addition to placing the Suunto Team Pod on a tripod, you can place it on a table,
bench or other raised surface.
11
Page 12

5. POSITIONING SUUNTO TEAM POD
To achieve the best results, it is important to position the Suunto Team Pod correctly.
It should be placed on a camera tripod or similar raised surface and positioned so that the
antenna is parallel to the area that is to be monitored.
The figure below illustrates factors that may hinder the reception from HR belts and therefore affect the accuracy of the heart rate recording.
Athlete number 1: Facing away from the Suunt o Team Pod
Athlete number 2: Standing directly in front of the antenn a
Athlete number 3: Standing outside the reception range
12
Page 13

NOTE: Though water resistant, the Suunto Team Pod should be protected from rain when
training outside.
6. PUTTING ON THE HEART RATE TRANSMITTER BELT
The heart rate transmitter belt should be put on as shown in the figure below.
We recommend that you wear the transmitter against your bare skin to ensure flawless
operation.
The electrodes must be wet dur ing th e exe rc is e. Rai se t he tr ansmi tt er a li ttl e o ff your ch es t
and moisten the grooved electrode area on the side in contact with your skin.
Check that the wet electrode areas are firmly against your skin and that the logo is in a central upright position.
WARNING
People who have a pacemaker, defibrillator, or other implanted electronic de vice use the
transmitter belt at their own risk . Before starting the initial use of the tran smitter belt, we
recommend an exercise test under a doctor ’s supervision. This will e nsure the safety and
reliability of the pacemaker and transmitter belt when being used simultaneously.
13
Page 14
Exercise may include some risk, especially for those who have been sedentary. We
strongly advise you to consult your doctor prior to beginning a regular exercise program.
7. OPERATION
Under normal circumstances, the rece iver has a ran ge of 100 meters /330 feet, but factors
that interfere with transmissio n from the HR belts - such as humidity and obstacles like
trees, other athletes, and walls - can affect the range.
As a 2.4 GHz signal does not go through water, and
therefore neither through t he human body, the transmission from the HR belt is hindered if the monitor ed athlete
is facing away from the Suunto Team Pod. In this case,
there may be disruptions in the reco rding of the HR signal. For the same reason, the Suunto Team Pod is not
suitable for water-based activities. In indoor sports the
reception is more continuous than outside thanks to signals reflected from walls and ceiling.
For information on alternative HR recording products,
such as Suunto t6, please contact your l ocal Suunto r epresentative.
14
Page 15
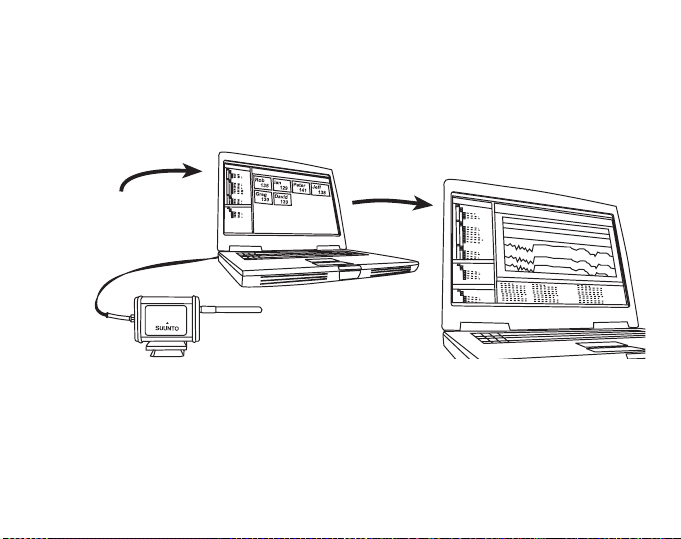
8. SUUNTO SOFTWARE
Suunto Team Pod’s functi onality is maximized when it is us ed in conjunction with Suunto
Monitor and Suunto Team Manager PC software. The figure below illustra tes the relation ship between Suunto Team Pod and the software.
Suunto Team Manager
Stores athlete profiles and analyses
logs recorded by Suunto Monitor.
Suunto Team Pod
Receives real-time data
from the HR belts of up
to 30 athletes.
Suunto Monitor
Displays and records the
HR data received by the
Team POD.
8.1. REAL-TIME ANALYSIS - SUUNTO MONITOR SOFTWARE
Suunto Monitor PC software is an in tegral part of Suunto Team Pod's functionality. It displays and records the heart rate data of up to 30 athletes, in real time during training. With
illustrative color coding, th e software gives an ov erview of each te am member's heart r ate
status within, below, or above the target heart rate zone o f the se ssion. Suunto Monitor also
links athlete names and hea rt rate belt ID numbers for automatic detection of active athletes.
15
Page 16

Suunto Monitor PC software offers three ways of displa ying the h eart r ate durin g exercis e.
It shows the value as beats per minute, as a percen tage of maximum heart rate, or as
a continuous graph . The logs that Suunto Monitor software records can be analyzed in
more detail with Suunto Team Manager software.
The latest update of Suunto Monitor software can be downloaded from www.suunto.com.
8.2. DEEPER ANALYSIS - SUUNTO TEAM MANAGER SOFTWARE
Although Suunto Team Manager software doesn’t function directly with the Suunto Team
Pod, it provides extended post-training analysis possibilities and is therefore an excellent
addition to Suunto Monitor so ftware. With Suunto Team Manager software, the coach can
create profiles of each member of the team or group, including information such as height,
weight, age and maximum heart rat e, that the software uses for analyzing the r ecorded
beat-to-beat heart rate data. This anal ysis provides graphs of traini ng effect, training load
EPOC, oxygen consumption (VO2), energy consumption, ventilation, respiratory rate, and
heart rate.
If an athlete with a profile in Suunto Team Manager is active, Suunto Monitor will identify
him and display his name and profile instead of his belt ID number. The data from the
recorded session is then automatically stored from the Suunto Monitor software under
the athlete’s profil e in Suunto Team Manager.
The latest update of Suunto Team Manager software can be downloaded from
www.suunto.com.
16
Page 17

9. INSTALLING SUUNTO SOFTWARE
9.1. INSTALLING THE SOFTWARE
1. Insert the Suunto software CD-ROM into the drive.
2. Wait for the installation to begin and follow th e ins tallation instructions.
NOTE: If the installation does not start automatically, click Start --> Run, and type
D:\setup.exe.
9.2. INSTALLING THE USB DRIVERS
These instructions assume that you are installing Suunto Sports Instrument drivers on
a clean system, i.e. one that does not already contain any Suunto Sports Instrument drivers. If this is not the case, uninstall th e previously installed dr ivers before procee ding with
the installation.
9.3. INSTALLING SUUNTO SPORTS INSTRUMENT ON WINDOWS 2000/XP
1. Insert the Suunto software CD-ROM into the drive.
2. Attach the S uunto Sports Instrument PC interface cable to your comp uter's USB port.
The Wizard is automatically activated.
3. Click Next.
4. Search for a suitable driver on your system and click Next. If you are using Windows XP,
select Install the software automaticall y in the Wizard and click Next. If an installation
warning is displayed, click Continue Anyway.
5. Browse for the driver folder on the CD-ROM and click Next.
6. Click Next to install the located driver.
7. Click Finish to end the installation.
17
Page 18

10.TECHNICAL SPECIFICATIONS
Suunto Team Pod
• width 50mm/2.0", length 171mm/6.7", height 75mm/3.0"
• weight 180 g/6.35 oz (including the tripod adapter and antenna)
• operation range up to 100 m/ 330 ft
• frequency 2.4 GHz, ANT compatible
• USB-powered, power consumption approximately 50 mA. Depending on the laptop’s
battery capacity, Suunto Team Pod will reduce the battery life by only a few minutes.
11.INTELLECTUAL PROPERTY
11.1. COPYRIGHT
This publication and its conte nts are proprietary to Suunto Oy and are intended solely for
the use of its clients to obtain knowledge and information regarding the operation of Suunto
products.
Its contents shall not be used or distributed for any other purpose and/or otherwise communicated, disclosed or reproduced without the prior written consent of Suunto Oy.
While we have taken great care to ensure that inf ormati on contained in this doc umentati on
is both comprehensive and accurate , no warranty of accuracy is expressed or implied.
Its content is subjec t to change at any time witho ut notice. Th e latest ver sion of this doc umentation can always be downloaded from w w w.suunto.com.
© Suunto Oy 03/2006
11.2. TRADEMARK
Suunto and Replacing Luck are reg istered trademar ks of Suunto Oy. Suunto product, feature, and content names are registered or unregistered trademarks of Suunto Oy. Other
product and company names are trademarks of their respective owners.
11.3. PATENT
This product is protected by the followin g patents or patent applic ations: WO2004016 173,
WO03099114 and US 11/169712. Other patents have been applied for.
18
Page 19

12. DISCLAIMERS
12.1. USER’S RESPONSIBILITY
This instrument is intended for recreational use only. Suunto Team Pod must no t be used
as a substitute for obtaining measurements that require professional precision and must not
be used to obtain measurements that require laborator y-quality measurements.
12.2. CE
The CE mark is used to mark conformity with the Europe an Union EMC directi ves 89/336/
EEC and 99/5/EEC.
12.3. FCC COMPLIANCE
This device complies with Part 15 of the FCC limits for class B digital devices. This equipment generates, uses, and can radiat e radio fre quency energy and, i f not installed or used
in accordance with the inst ructions, may cause harmfu l interference to radi o communications. There is no guarantee that interference will not occur in a particular instance. If this
equipment does cause harmful in terference to ot her equipment, try to correct t he problem
by relocating the equipment.
Consult an authorized Suunt o representative or other qualified service techni cian if you
cannot correct the problem. Operation is subject to the following conditions:
(1) This device cannot cause harm ful interference.
(2) This device must accept any interference received, including interference that may
cause undesired operation.
Repairs should be made by authorized Suunto service personnel. Unauthorized repairs will
void warranty.
Tested to comply with FCC standards. For home or office use.
FCC WARNING: Changes or modif ications not expressly app roved by Suunto Oy could
void your authority to operate this device under FCC regulations.
12.4. LIMITS OF LIABILITY AND ISO 9001 COMPLIANCE
If this product should fail due to defects in materials or workmanship, Suunto Oy will, at its
sole option, repair or replace it with new or rebuilt parts, free of charge, for two (2) years
19
Page 20

from the date of its purchase . This war ranty is only extend ed to the origin al purc haser and
only covers failures due to def ects in materials a nd workmansh ip that occu r during n ormal
use while in the period of the warranty.
It does not cover damage or failures resulting from accident, misuse, neglect, mishandling,
alteration or modifications of t he pr oduct, or any failure cau sed b y op eratio n of t he p roduct
outside the scope of its published sp ecifications, or any causes not covered by this warranty.
There are no express warranties except as listed above.
The client can exercise the right to repair under the warranty by contacting Suunto Oy’s
Customer Service department to obtain a repair authorization.
Suunto Oy and its subsidiaries shall in no event be liable for any incidental or consequential
damages arising from the use of or inability to use the product. Suunto Oy and its subsidiaries do not assume any responsibi lity for losses or claims by third parties that ma y arise
through the use of this device.
Suunto's Quality Assurance Syst em is certified by Det Norske Veritas to be ISO 9001 compliant in all Suunto Oy's operatio ns (Quality Certificate No. 96-HEL-AQ-220).
12.5. AFTER SALES SERVICE
If a claim under warranty appe ars to be necessary, return t he product, freight prepaid,
to your Suunto representative who is responsible for having your product repaired or
replaced. Include your nam e, address, proof of purchase and/or ser vice registration card,
as required in your country. The claim will be honored and the pr oduct repaired or replaced
at no charge and returned in what your Suunto representative determ ines a reasonable
amount of time, provided that al l necessary parts are in stock. All r epairs that are n ot covered under the terms of this warranty will be made at the owne r's expen se. Thi s warr anty is
non-transferable from the original owner.
You can locate your local Suunto representative at www.suunto.com.
20
Page 21

13. DISPOSAL OF THE DEVICE
Please dispose of the device in an appropriate wa y, treating it as electronic
waste. Do not throw it in the garbage. If you wish, you may retur n the dev ice
to your nearest Suunto representat ive.
21
Page 22

COORDONNÉES DU SERVICE CLIENTÈLE
Suunto Oy Tél. +358 9 875870
Fax +358 9 87587301
Suunto USA Tél. 1 (800) 543-9124
Canada Tél. 1 (800) 776-7770
Centre d'appels pour l'Europe Tél. +358 2 284 11 60
Site Web Suunto www.suunto.com
FR
1
Page 23

TABLE DES MATIÈRES
1. PRÉSENTATION DU SUUNTO TEAM POD ........................................................5
2. SUUNTO TEAM POD EN ACTION .......................................................................5
3. ASSEMBLAGE DU SUUNTO TEAM POD ..........................................................10
4. MONTAGE DU SUUNTO TEAM POD SUR UN TRÉPIED .................................11
5. POSITIONNEMENT DU SUUNTO TEAM POD ..................................................13
6. ACTIVATION DE LA CEINTURE ÉMETTEUR ...................................................14
7. FONCTIONNEMENT ..........................................................................................15
8. LOGICIELS SUUNTO .........................................................................................16
8.1. ANALYSE EN TEMPS RÉEL AVEC SUUNTO MONITOR........................ 16
8.2. ANALYSE APPROFONDIE AVEC SUUNTO TEAM MANAGER.............. 17
9. INSTALLATION D'UN LOGICIEL SUUNTO ........................................................18
9.1. INSTALLATION DU LOGICIEL.................................................................. 18
9.2. INSTALLATION DES PILOTES USB ........................................................ 18
9.3. INSTALLATION DE L'INSTRUMENT DE SPORT SUUNTO SOUS
WINDOWS 98/2000/XP .......................................................................................... 18
10. CARACTÉRISTIQUES TECHNIQUES .............................................................19
11. PROPRIÉTÉ INTELLECTUELLE ......................................................................19
11.1. COPYRIGHT............................................................................................ 19
11.2. MARQUES............................................................................................... 19
11.3. BREVETS................................................................................................ 20
12. AVERTISSEMENTS .........................................................................................20
12.1. RESPONSABILITÉ DE L’UTILISATEUR................................................ 20
Page 24

12.2. MARQUAGE EUROPÉEN CE .............................................................. 20
12.3. CONFORMITÉ FCC............................................................................... 20
12.4. LIMITES DE RESPONSABILITÉ ET CONFORMITÉ ISO 9001 ............ 21
12.5. SERVICE APRÈS-VENTE..................................................................... 21
13. MISE AU REBUT DE VOTRE INSTRUMENT .................................................22
Page 25

1. PRÉSENTATION DU SUUNTO TEAM POD
Suunto Team Pod est un instrument d'observation périphérique conçu pour améliorer
l'efficacité d'un entraînement col lectif. L'ensemble Team Pod se compose d'un récepteur
équipé d'une antenne, d'un câble USB et d'un logiciel informatique.
Suunto Team Pod permet aux entraîneurs de recevoir en temps réel des données de
fréquence cardiaque (FC), grâce à une transmission sa ns fil (portée jusqu'à 100 mètres)
entre les ceintures émette ur de leurs athlètes et un écran d'ordinateur.
Un tel système permet à un entraîneur de s'assurer que les membres de son équipe
s'entraînent à un rythme cardiaque optimal. Les données collectées par les ceintures
émetteurs sont directement t ransférées à l 'ordinateur de l'entraîne ur, via une transmission
sans fil, grâce au récepteur numérique du Suunto Team Pod.
Chaque ceinture émetteur disposant d'un code d'identification individuel, l'entr aîneur peut
savoir à qui appartiennent le s données qu'il reçoit, et agir en con séquence. L'entraîneur
peut ensuite utiliser le logiciel fourni pour analyser les performances individuelles de
chaque athlète et ajuster son effort , pour qu'il tire le meilleur parti de son entraînement.
2. SUUNTO TEAM POD EN ACTION
Avant d'apprendre comment assembler, positionner e t utiliser le Suunto Team Pod ou le
logiciel associé, découvrez dans la section suivante un exemple concret de première
utilisation de l'appareil par un entraîneur.
Vous découvrirez ainsi quels sont les éléments requ is avant un entraînement, comment
tirer le meilleur parti du co ntr ôl e e n te mps rée l du ra nt l' entr aî ne men t et qu el t y pe d'an al yse
le logiciel permet d'effectuer un e fo is l'e ntraînement terminé.
Avant l'entraînement
Dans notre exemple, l'entraîneu r a fait l'acquisition du Suunt o Team Pod afin d'amé liorer
l'efficacité des sessions d'e ntraînement de son équipe. La veille de sa première session
avec le Suunto Team Pod, l'entraîneur commence à se préparer. Le Suunto Team Pod
5
Page 26

utilise deux logiciels différents : Suunto Monitor et Suunto Team Manager. La première
chose à faire pour l'entraîneur est donc d'installer ces logiciels sur son ordinateur portable
(voir Section 9).
Après l'installation, l'entraîn eur se connecte à Suunto Team Manager et crée son propre
profil d'entraîneur. Dans la liste déroulante Équipe de la barre de menu, il sélectionne Créer
une équipe et donne un nom à l'équi pe nouvellement créée . Celle-ci apparaît main tenant
dans la fenêtre Mon entraînement. Il clique e nsuite avec l e bouton droi t de la souri s sur la
nouvelle équipe et sélectionne Créer un athlète. Une nouvelle fenêtre s'ouvre et
l'entraîneur saisit les informations personnelles sur le capitaine de l'équipe, notamment le
nom, la date de naissance, la taille, le poids et les chiffres de niveau d'activité (une
description de ces paramètres figure dans la fenêtre). Ces informat ions sont nécessaires
pour calculer la fréquence cardiaque maximum de l'athlète, sa capacité de performances et
les autres valeurs requises pour l'analyse. Lorsque le profil du capitaine est complété,
l'entraîneur clique sur le bouton Créer un athlète et répète la procédure pour tous les autres
membres de l'équipe.
Lorsque l'équipe est au complet, l'entraîneur sélectionne successivement le nom de
chaque membre et clique sur le bouton Personnel, dans la fenêtre Athlètes, afin de
personnaliser chaque profil. L'en traîneur affine les don nées de chaque at hlète en ajoutant
la FC max enregistrée lors du dernier test de performances.
L'équipe est maintenant créée , de même que tous les profils d'athl ète. L'entraîneur peut
donc fermer Suunto Team Manager et reporter son attention sur le Suunto Team Pod luimême. Il assemble l'appareil (comme indiqué dans la Section 3) et le branche sur son
ordinateur portable. Il do it ensuite te ster le s ystème, en plaçant un e ceinture é metteur sur
lui-même et en contrôlant son propre rythme cardiaque sur l'écran. Si tout fonctionne
correctement, l'entraîneur peut éteindre son ordinateur portable et dé brancher le Suunto
Tea m Pod.
Il déballe ensuite les ceintures émetteurs de son équipe et leur attribue à chacune une
étiquette portant le nom de l'athlète qui l'utilisera. Sur une feuille de papier, il inscrit à côté
du nom de l'athlète les cinq derniers chiffres du premier numéro situé à l'arrière de la
ceinture qui lui reviendra.
6
Page 27

Le lendamein, l'entraîneur se rend sur le terrain plus tôt que son équipe. I l positionne le
Suunto Team Pod correctement, afin que celui-ci couvre l'en sembl e du terr ai n (voir Secti on
5), puis branche l'appareil su r son ordinateur portable. Il ouvre ensuite Suunto Moni tor.
Lorsque l'équipe arrive, il reme t à chaque athlète la ceinture ém etteur correspondante et
leur explique comment la porter (voir section 6).
La fenêtre Ceintures de Suunto Monitor indique le code d'identification de toutes les
ceintures émetteurs dont le Suunto Team Pod capte le signal. L'entraîneur reprend le
papier écrit précédemment et coche la case située à côté de chaque ceinture détectée. À
chaque fois qu'il coche une case, une fenêtre contextuelle apparaît ; le menu déroulant qui
y figure contient tous les membre s de l'équi pe créée la veille da ns Suunto Team Manager.
Il sélectionne le nom corresponda nt à chaque ceinture et ajoute la fréquence cardiaqu e
maximum de chaque athlète. Si la fréqu ence cardia que maxi mum réel le n'e st pas conn ue,
elle peut être calculée à l'aid e de la formule suivante : 220 moins l'âge de l'athlèt e.
Lorsque toutes les ceintures ont été affectées à un membre de l'équipe, la liste de numéros
a été remplacée par une liste de noms, dan s la fenê tr e Athlètes. Dans cette même fenêtre,
l'entraîneur coche la case située à côté de chaque athlète qu'il souhaite contrôler.
L'un des membres de l'équipe a inv ité un ami à s e join dre à l'e ntra îneme nt. L' entra îneu r n'a
bien entendu pas pu saisir la veill e les données personnelles de cet ami, dans Suunto
T eam manager ; il lui donne donc une ceinture FC restante et l'ajoute directement à Suunto
Monitor. L'entraîneur sélectionne Athlète et Éditer dan s le menu principal, puis clique sur
Ajouter. Il ajoute le nom de l'invité, sa fréquence cardiaque maximum et le code
d'identification de sa ceinture. La session d'entraînement peut à présent commencer.
REMARQUE : Si vous pensez que les cein tures FC ont pu être mélangées, le meilleur
moyen de vous en assurer est de récupérer toutes le s ceintures et de le s réaffecter, une
par une. Lorsque chaque membre de l'équipe met sa ceinture en place et que Suunto
Monitor le détecte, nommez la ceinture avant de donner la suivante.
7
Page 28

Pendant l'entraînement
Les données de fréquence cardiaque de tous les athlètes contrôlés apparaissent sur
l'écran de l'ordinateur, soit sous forme de battements par minute soit sous forme de
pourcentage de la fréquence cardiaque maximum. Les couleurs représentent les
battements cardiaques de l'athlète par rapport à la zone de fréquence cardiaque ciblée ; le
rouge signifie que le rythme card iaque de l'athlète est au-dessus de cette zone, le vert
signifie qu'il est dans c ett e zon e et l e bl eu qu' il es t en dess ous. L'ent raî neur dé fin it la zone
cible en fonction des objectifs de la session. L'utilisation de ces couleurs permet de savoir
d'un coup d'œil quel athlète force trop ou pas assez.
Au début de la session, l'ent raîneur clique sur le bo uton Enregistrer la s ession et Suunto
Monitor commence l'enregistr ement des données transmises par les ceintures. Lor s de la
session, l'entraîneur peut cliq uer sur le bouton Afficher le graphique de la session pour
obtenir une représentation graphique en temps réel de la fréquence cardiaque des
athlètes, ce qui lui permet de do nner des consei ls spéci fique s à chaqu e athl ète, en fon ctio n
de son rythme cardiaque. À la fin de la sess ion d'entraînement, l'entraîneur clique sur le
bouton Arrêter la session ; une fenêtre contextuelle apparaît, dans laquelle il peut affecter
un nom, une date et une activité pour la sessi on. Il clique ensuite sur Enregistrer, ferme
Suunto Monitor, débranche le Suunto Team Pod et quitte le terrain avec son équipe.
Après l'entraînement
Une fois de retour chez lui, l'entraîneur se connecte à Suunto Team Manager pour effectuer
une analyse approfondie des performances de son équipe. Dans le menu Actions, il
sélectionne Analyser un journal ; une liste déroulante de tous les athlètes qui ont pris part à
l'entraînement du matin s'affiche. Il s électionne les athlètes dont il souhaite ana lyser les
données. Dans la vue arborescente de la fenêtre Mon entraînement, sous le nom de
chaque athlète se trouve un journal analysé de la session enregistrée. Chaque journal peut
être analysé en détail en cliquant des sus. Différente s informatio ns sont dis ponibles, tel les
que la durée, l'effet d'entraîneme nt, la fréquence cardiaq ue, la ventilation et divers autres
paramètres corporels utiles pour évaluer l'efficacité de l'entraînement.
L'entraîneur utilise les donnée s analysées pour affiner le programme d'entraînement de
chaque athlète.
8
Page 29

Pour plus d'informations sur le fonctionnement des logiciels Suunto Team Manager et
Suunto Monitor, l'entraîneur peut se référe r aux fi chier s d' aide co rres pondants. L'uti lisat ion
du Suunto Team Pod et des log iciels associés a incité l'entra îneur à en savoir plus l'effet
d'entraînement et la dette d'O 2 ; il décide donc de télécharger le Guide d'entraî nement
Suunto sur le site www.suunto.com.
Après une saison d'entraînement avec le Suunto Team Pod, les athlètes de notre
entraîneur sont parmi les plus perf ormants de la ligue !
9
Page 30
3. ASSEMBLAGE DU SUUNTO TEAM POD
1.
2.
10
Page 31

4. MONTAGE DU SUUNTO TEAM POD SUR UN TRÉPIED
Le Suunto Team Pod est doté d'un adaptateur à blocage rapide qui permet de le monter
facilement sur un pied d'appareil photo.
Une autre méthode de montage consiste à visser le Suunto Team Pod sur un trépied grâce
à l'orifice fileté (6 mm) situé sous l'appareil.
11
Page 32

REMARQUE ! Outre un montage sur trépied, vous pouvez placer le Suunto Team Pod sur
une table, sur un banc, etc.
12
Page 33

5. POSITIONNEMENT DU SUUNTO TEAM POD
Pour obtenir des résultats optimal s, il est important de positionner le Su unto Team Pod
correctement. Qu'il soit monté sur un trépied o u posé sur une table, il doit toujours être
positionné de sorte que l'antenne soit parallèle à la zone qu'il est censé couvrir.
La figure ci-dessous illus tre les situations pouvant empêcher la communication avec les
ceintures émetteur et donc diminuer la précision des mesures de fréquence cardiaque.
Situation athlète numéro 1 : s'éloigne du Suunto Team Pod.
Situation athlète numéro 2 : se tr ouve exactement en face de l'antenne.
Situation athlète numéro 3 : se trouve en dehors de la zone de couverture.
13
Page 34

REMARQUE : Bien qu'étant étanche, le Suunto Team Pod doit être protégé de la pluie
pour les entraînements en plein air.
6. ACTIVATION DE LA CEINTURE ÉMETTEUR
La ceinture émetteur doit être positionnée comme indiqué dans la figure ci-dessous.
Pour que votre ceinture émetteur fonctionne parfaitement, nous vous recomman dons de la
porter contre votre peau nue.
Les électrodes doivent être mouillées pendant l’entraînement. Décollez légèrement
l’émetteur de votre poitrine et humidifiez la zone des électrodes (zone rainurée) qui sera en
contact avec la peau.
Vérifiez que la zone des électrodes humidifié e colle bi en à votre peau et qu e le log o de la
ceinture est en position centrale et orienté vers le haut.
MISE EN GARDE
Les personnes qui portent un pacemaker, un défibrillateur ou tout autre appareil
électronique intra-corporel utilisent la ceinture émetteur à leurs risques et périls. Avant
d’utiliser la ceinture émet teur po ur la pr emière fo is, il es t cons eillé d'e ff ectuer un test d'ef for t
14
Page 35

sous surveillance médicale. Ce t est gar antira la sécu rité et la fia bilité d u p acemaker et de la
ceinture émetteur, s'ils sont utilisés en même temps.
Les activités sportives peuvent comporter certains risques, surtout pour les personnes
sédentaires. Nous vous recommandons fortement de consulter un médecin avant de
commencer un programme d'entraînement ré gulier.
7. FONCTIONNEMENT
Dans des conditions normales, le récepteur a une portée de 100 mètres, mais certains
facteurs peuvent affaiblir la trans mission des si gnaux des ceintu res émetteur et raccourcir
cette portée (humidité, obs tacles tels que des arbres, autres personnes, murs, etc.).
Étant donné qu'un signal de 2,4 GHz ne peut traverser
l'eau, et ne peut donc pas passer à travers le corps
humain, la transmission des signaux provenant de la
ceinture émetteur est impossi ble si la personn e observée
ne fait pas face au Suunto Team Pod. Dans ce cas,
l'enregistrement des données de fréquence cardiaque
peut être perturbé. Pour la même raison, le Suunto Team
Pod ne convient pas à des activités aquatiqu es. Pour les
sports en intérieur, la réception est plus cont inue qu'en
extérieur car les signaux se réfl échissent sur les murs et
les plafonds.
Pour en savoir plus sur les autres instruments Suunto
capable d'enregistrer de s fréquen ces cardiaqu es, tels qu e
le Suunto t6, veuillez contacter votre représentant
Suunto.
15
Page 36

8. LOGICIELS SUUNTO
Pour un fonctionnement optim al, le Suunto Team Pod doit être uti lisé avec les logiciels
Suunto Monitor et Suunto Team Manager. La figure ci-dessous illustre la relation ent re le
Suunto Team Pod et ces l ogiciels.
Suunto Team Manager
Stocke le profil des sportifs et analyse les
journaux enregistrés par Suunto Monitor.
Suunto Team Pod
Reçoit en temps réel des
données provenant des
ceintures émetteur des
sportifs (30 max.).
Suunto Monitor
Affiche et enregistre les
données de FC reçues
par le Team POD.
8.1. ANALYSE EN TEMPS RÉEL AVEC SUUNTO MONITOR
Le logiciel Suunto Monitor fait partie intégrante de l'ensemble Suunto Team Pod. Il affiche
et enregistre en temps réel les don nées de fréquence cardiaque des athlète s (30 max.)
pendant leur entraînement. Grâ ce à différentes couleurs, le logiciel donne un ape rçu de
l'état de la fréquence cardiaque de chaq ue membr e de l'éq uipe , en indi quan t qui se tr ouve
en-deçà, dans ou au-dessus de la zone de FC cible définie pour la session d'entraînement
en cours. Suunto Monitor indiqu e égalem ent le nom de s athlèt es et le co de d'id entifi cation
16
Page 37

des ceintures émetteur pour une dét ection automatique des athlètes en activité.
Le logiciel Suunto Monitor permet d'afficher la fréquence cardiaque en cours
d'entraînement de trois façons différentes. Il indique la FC en batteme nts par minute, en
pourcentage de la FC maximale ou sous la forme d'un graphe continu. Les journaux
enregistrés par Suunt o Mo nitor peuvent être analysés plus en détail av ec le logiciel Suunto
Team Manager.
Les dernières mises à jour du logiciel Suunto Monitor peuvent être téléchargées sur
www.suunto.com.
8.2. ANALYSE APPROFONDIE AVEC SUUNTO TEAM MANAGER
Même si le logiciel Suunto Team Manager peut fonctionner indépendamment du Suunto
Team Pod, il offre des possibilités d'analyse post-entraînemen t avancées et constitue donc
un supplément idéal au logiciel Suunto Monitor. Grâce à Suunto Team Manager,
l'entraîneur peut créer des profils pour chaque membre de son équipe ; ces profils
comprenant des informatio ns (taille, poids, âge, FC maximu m, etc.) que le logiciel util ise
pour analyser les données de FC enregistrées. Cette analyse permet d'obtenir des graphes
sur l'effet d'entraînement, la dette d'oxygène, la consommation d'oxygène (VO2), la
consommation d'énergie, la fréquence respiratoire et bien sûr la fréquence cardiaque.
Si un athlète ayant un pro fil dans Suunto Team Manager est en activité, Suunto Monitor
l'identifie et affiche son nom et son prof il au lieu du code d'identification de sa ceinture
émetteur. Les données de la session d'entraînement enregistrée sont ensuite
automatiquement récupérées d ans le logiciel Suunt o Monitor et stock ées dans le profil de
l'athlète dans Suunto Team Manager .
Les dernières mises à jour du logiciel Suunto Team Manager peuvent être téléchargées sur
www.suunto.com.
17
Page 38

9. INSTALLATION D'UN LOGICIEL SUUNTO
9.1. INSTALLATION DU LOGICIEL
1. Insérez le cédérom du logiciel Suunto dans le lecteur.
2. Attendez que le programme d'installation se lance et observez les instructions qui
s'affichent.
REMARQUE : Si le programme d’installa tion ne démarre pas automatiquement, cliquez
sur Démarrer --> Exécuter et entrez D:\setup.exe.
9.2. INSTALLATION DES PILOTES USB
Ces instructions sont valables si vous installez les pilotes pour instruments de sport Suunto
sur un système propre, c'est à dire un système sur lequel aucun autre pilote pour
instrument de sport Suunto n'est déjà installé. Dans le cas contraire, désinstallez les pilotes
existants avant de procéder à l’installation.
9.3. INSTALLATION DE L'INSTRUMENT DE SPORT SUUNTO SOUS WINDOWS
98/2000/XP
1. Insérez le cédérom du logiciel Suunto dans le lecteur.
2. Branchez le câble d’interface PC de votre instrument de sport Suunto sur le port USB de
l’ordinateur. L’Assistant apparaît automatiquement.
3. Cliquez sur Suivant.
4. Cherchez dans votre système un pilote adap té et cliquez sur Suivant. Si v ous utilisez
Windows XP, sélect ionnez Installer l ogiciel auto matiquement dans l’Assistant et cliquez
sur Suivant. Si un avertissement d’installation apparaît, cliquez sur Continuer quand
même.
5. Cherchez le dossier du pilote sur le cédérom et cliquez sur Suivant.
6. Cliquez sur Suivant pour installer ce pilote.
7. Cliquez sur Terminer pour terminer l'installation.
18
Page 39

10.CARACTÉRISTIQUES TECHNIQUES
Suunto Team Pod
• largeur 50 mm, longueur 171 mm, hauteur 75 mm
• poids 180 g (adaptateur pour trépied et antenne compris)
• portée jusqu'à 100 m
• fréquence 2,4 GHz, compatibilité ANT
• alimentation USB, consommation d'environ 50 mA. Selon la capacité de batterie de
l'ordinateur portable, Suun to Team Pod réd uira l'autonomie de la bat terie de quelques
minutes seulement.
11.PROPRIÉTÉ INTELLECTUELLE
11.1. COPYRIGHT
Cette publication et son contenu sont la propriété de Suunto Oy et sont fournis uniquement
pour permettre à ses clients de mieux c onnaître les caractérist iques et le fonctionne ment
des produits Suunto.
Son contenu ne doit être en aucu n cas être utili sé ou distribué à quelque autre fi n que ce
soit et/ou ne doit pas être communiqué, d ivulgué o u reprod uit sans l ’accord éc rit préa lable
de Suunto Oy.
Bien que nous ayons pris soin d'inclure dans cette documentation des informations
complètes et précises, aucune garantie d'exactitude n'est expresse ou implicite.
Son contenu peut être mo difié à tout momen t, sans préavis. La version la plu s récente de
cette documentation peut être téléchargée à tout moment sur www.suunto.com.
© Suunto Oy 03/2006
11.2. MARQUES
Suunto et Replacing Luck sont des marques déposées de Suunto Oy. Les noms des
produits, fonctions et contenus Suunto son t des marque s déposé es ou non de Suunto Oy.
Les noms des autres produits et entreprises sont des marques de leurs propriétaires
respectifs.
19
Page 40

11.3. BREVETS
Ce produit est protégé par des brevets ou les demandes de brevet suivants :
WO2004016173, WO03099114 et US 11/169712. D'autres brevets ont été demandés.
12. AVERTISSEMENTS
12.1. RESPONSABILITÉ DE L’UTILISATEUR
Cet appareil est destiné unique ment à un u sage ré créatif . Le Suun to Team Pod ne doit en
aucun cas être utilisé comme substitut pour l'obtention de mesures de précision
professionnelle ou exigeant une qualité de laboratoire.
12.2. MARQUAGE EUROPÉEN CE
Le symbole CE est utilisé pour i ndi quer l a conf ormité de c e pr odu it a vec les dire ctive s MCE
89/336/CEE et 99/5/CEE.
12.3. CONFORMITÉ FCC
Cet appareil est conforme à la section 15 des règlements FCC sur les appareils
numériques de classe B. Cet ap pareil génère et utilise un rayonnement de fréquence radio
et peut causer des interférences nuis ibles aux communications ra dio s'il n'est pas installé
ou utilisé conformément aux instructions. Rien ne permet de garantir quand ces
interférences peuvent se produire. Si cet appareil cause des interférences nuisibles à
d'autres équipements, essayez de réso udre le problème en changeant l'équipement de
place.
Consultez un représentant Suunto agréé ou tout autre technicien d’entretien habilité si
vous ne parvenez pas à éliminer ce problème. Fonctionnement soumis aux conditions
suivantes :
(1) Cet appareil ne doit pas causer d'inter férences nuisibles.
(2) Cet appareil doit accepter to ute autre interférence reçue, y comp ris les interférences
pouvant entraîner un fonctionnement non désiré.
Les réparations doivent être effectuées par un personnel de maintenance agréé par
20
Page 41

Suunto. Les réparations non autorisées annulent la garantie.
Testé conforme aux normes FCC. Pour usage domestique ou sur le lieu de travail.
AVERTISSEMENT FCC : Les changements ou modifications non expressément
approuvés par Suunto Oy peuvent annuler votr e droi t d’ uti lis er cet appareil aux term es des
réglementations FCC.
12.4. LIMITES DE RESPONSABILITÉ ET CONFORMITÉ ISO 9001
Si ce produit présente des défauts causés par des vices de matériau ou de fabrication,
Suunto Oy, à sa seule discrétion, réparera ou remplacera gratuitement l e produit av ec des
pièces neuves ou réparées, pendant une période de deux (2) ans à compter de la date
d’achat. Cette garantie ne s’applique qu’au propriétaire d’origine et ne couvre que les
défauts causés par des vices de matériau et de f abricat ion surv enus suit e à une utili sation
normale du produit pendant la pé riode de garantie.
Cette garantie ne couvre pas les dommages ou pannes cons écutifs à un accident, une
utilisation inappropriée, une négligence, une mauvaise manipulation ou une modification
du produit, ni les pannes causées par l’utilisation du produit pour une application non
spécifiée dans cette documentation , ni les causes non couvertes par cette garantie.
Il n'existe aucune autre garantie expresse que celles précitées.
Le client exerce son droit de réparati on sous gar antie en contactant le s ervice clie ntèle de
Suunto Oy afin d’obtenir une auto risation de réparation.
Suunto Oy et ses filiales ne doivent en aucu n cas êtr e tenus re spon sables de s dommage s
accessoires ou indirects résultant de l’utilisation ou de l’incapacité d’utiliser ce produit.
Suunto Oy et ses filiales déclinent toute responsabi lité en cas de pertes ou de recours de
tiers pouvant survenir suit e à l’utilisation de cet appareil.
Le Système d’assurance qualité de Suunto est certifié conforme à la norme ISO 9001 pour
toutes les opérations de Suunto Oy p ar D et Nor ske Veritas (certificat de qualité Nº 96 -HELAQ-220).
12.5. SERVICE APRÈS-VENTE
Si vous jugez nécessaire de retourner ce produit sous garantie, renvoyez-le port payé
au revendeur Suunto responsable de la réparation ou du remplacement du produit.
21
Page 42

Indiquez votre nom et ad resse et joignez une preuve d'acha t et/ou la carte d'inscription
d'entretien, si celle-ci est ut ilisée dans votre pays. La garantie ser a honorée et le produit
remplacé ou réparé gratuitement et renvoyé dans un délai jugé raisonnable par votre
représentant Suunto, à condition que toutes les pièces nécessaires soient en stock. Toutes
les réparations non couvertes par les termes de cette garantie seront effectuées et
facturées au propriétaire. Cette garantie ne peut pas être cédée par le propriétaire
d’origine.
Pour connaître les coordonnées de votre représentant Suunto, consultez notre site
(www.suunto.com).
13. MISE AU REBUT DE VOTRE INSTRUMENT
Veuillez suivre les recommandations en vigueur pour la mise au rebut de cet
instrument, considéré comme u n déchet électronique. Ne le jetez pas avec
les ordures ménagères. Si vous le désirez, vous pouvez retourner cet
instrument au représentant Suunto le plus proche de chez vous.
22
Page 43

KUNDENDIENSTE
Suunto Oy Tel. +358 9 875870
Fax +358 9 87587301
Suunto USA Tel. 1 (800) 543-9124
Canada Tel. 1 (800) 776-7770
Europaweites Call Center Tel. +358 2 284 11 60
Suunto im Internet www.suunto.com
1
DE
Page 44

INHALTSVERZEICHNIS
1. ÜBER DEN SUUNTO TEAM POD ........................................................................5
2. DER SUUNTO TEAM POD IM EINSATZ ..............................................................5
3. DER ZUSAMMENBAU DES SUUNTO TEAM POD .............................................9
4. BEFESTIGUNG AUF EINEM STATIV ................................................................10
5. DIE POSITION DES SUUNTO TEAM POD ........................................................12
6. ANLEGEN DES HERZFREQUENZ-SENDERGURTS .......................................13
7. VERWENDUNG ..................................................................................................14
8. DIE SUUNTO-SOFTWARE .................................................................................15
8.1. ECHTZEITANALYSE MIT SUUNTO MONITOR ....................................... 15
8.2. DETAILANALYSE MIT SUUNTO TEAM MANAGER ................................ 16
9. INSTALLATION DER SUUNTO-SOFTWARE ....................................................17
9.1. INSTALLATION DER SOFTWARE ........................................................... 17
9.2. INSTALLATION DER USB-TREIBER........................................................ 17
9.3. SO INSTALLIEREN SIE DEN SUUNTO-TREIBER IN WINDOWS 2000/XP:.. 17
10. TECHNISCHE DATEN ......................................................................................18
11. GEISTIGES EIGENTUM ...................................................................................18
11.1. COPYRIGHT............................................................................................ 18
11.2. WARENZEICHEN.................................................................................... 18
11.3. PATENT................................................................................................... 19
12. HAFTUNGSAUSSCHLÜSSE ...........................................................................19
12.1. VERANTWORTUNG DES BENUTZERS ............................................... 19
12.2. CE-KONFORMITÄT............................................................................... 19
Page 45

12.3. FCC-KONFORMITÄT............................................................................. 19
12.4. GARANTIEEINSCHRÄNKUNGEN UND ISO 9001-KONFORMITÄT.... 20
12.5. KUNDENDIENST................................................................................... 21
13. ENTSORGUNG DES GERÄTS .......................................................................21
Page 46

1. ÜBER DEN SUUNTO TEAM POD
Der Suunto Team POD (Peripheral Observation Device) ist ein Zusatzgerät, das die
Effizienz des Gruppentrainings fördert. Es handelt sich um einen Empfänger mit Antenne.
Mitgeliefert wird außerdem ein USB-Kabel und ein PC-Softwareprogramm.
Der Suunto Team Pod überträgt die vom Herzfrequenzgurt (HF-Gurt) der SportlerInnen
gemessenen Herzfrequenzwerte in Echtzeit an einen PC bzw. Laptop innerhalb einer
Reichweite von 100 m (330 ft).
Somit können Sie als Trainer/-in jederzeit auf einen Blick feststellen, ob alle Mitglieder Ihres
T e ams bei o ptimal er Herz freque nz trai nieren . Die Date nübert ragung zwisch en HF-G urt und
PC erfolgt drahtlos an den Digitalempfänger des Team Pod.
Alle HF-Gurte sind individ uell codiert, damit Sie sofort sehen, welche Daten z u welcher
Person gehören, und entsprechende Trainingsratschläge geben können. Die im
Lieferumfang enthaltene PC-Software hilft Ihnen bei der Analyse der persönlichen
Leistungen und dadurch bei der Optimierung des Trainings.
2. DER SUUNTO TEAM POD IM EINSATZ
Betrachten wir zunächst die Verwendung des Suun to Team Pod im Trainingseinsatz. In
unserem Beispiel verwendet ein Trainer das Gerät zum erst en Mal.
Es veranschaulicht die Vorbereitungsphase, die Überwachung des Trainings und die
nachträgliche Auswertung der aufgezeichneten Daten am PC.
Vor dem Training
Der Trainer in unserem Beispiel hat einen Suunto Team Pod gekauft, um die
Trainingssessions seines Teams effektiver zu gestalten. Vor dem ersten Einsatz des neuen
Geräts ist jedoch etwas Vorarbeit am Computer er ford erlic h. Der Suunt o Team Pod wird in
Kombination mit zwei Softwareprogra mmen verwendet: Su unto Monitor und Suu nto Team
Manager. Der Trainer muss daher als erstes die Software auf s einem Laptop installieren
(siehe Abschnitt 9)
5
Page 47

Nach der Installation öffnet er Suunto Team Manager, loggt sich ein und erstellt sein
eigenes Trainerprofil. Aus der Dropdown-List e "Team" in der Menüleiste wählt er "Team
erstellen" und gibt den Namen seines Teams ein. Das Team wird im Trainingsfenster
angezeigt. Der Trainer klickt mit der rechten Maustaste auf den Nmen des Teams und wählt
die Option "Sportler erstellen". Ein neues Fenster öffnet sich. B eginnend mit dem Kapitä n,
gibt der Trainer persönliche Details ein: Name, Geburtsdatum, Größe, Gewicht und
Aktivitätsniveau (die Niveaus werden in dem Fenster beschrieben). Die Angaben sind
wichtig für die spätere Analy se der Trainingswerte, z.B. maximale Herzfrequenz und d ie
Leistungskapazität. Nach Einga be aller Dat en für den Kapitän kli ckt der Trainer erneut auf
"Sportler erstellen", trägt das nächste Mitgli ed des Teams ein usw.
Nach Eingbe des gesamten Teams markiert der Trainer nacheinander die einzelnen
Mitglieder und klickt im Sportlerfenster auf "Pers önlich", um di e Profile weit er anzupassen.
Für die Mitglieder unseres Beispielteams wurden erst vor kurzem in einem Leistungstest
die maximalen HF-Werte ermittelt. Der Trainer gibt diese aktuellen Werte ein.
Nach dem Erstellen der Sportlerprofile schließt er das Programm und nimmt seinen ne uen
Suunto Team Pod zur Hand. Er schraubt die Antenne auf das Gerät (siehe Abschnit t 3)
und verbindet es über das USB-Kabel mit seinem Laptop. Danach legt er probeweise einen
Herzfrequenz-Sendergurt an und vergewissert sich, dass seine Herzfrequenz auf dem
Monitor erscheint. Nachdem er auf diese Weise die Funktion des Systems überprüft hat,
schaltet der Trainer den Laptop aus und zieht den USB-Stecker.
Zum Schluss kennzeichnet er die HF- Se nder gur te mi t d en Na men de r Teammitglieder und
schreibt sich für jedes Mitglied die letzten fünf Ziffern der ersten Nummer auf der
Gurtrückseite auf.
Am nächsten Tag ist der T rainer pünktlich auf dem Übungsplatz. Er stellt den Suunto Team
Pod so auf, dass der gesamte Sportplatz im Empfangsbereich liegt (siehe Abschnitt 5), und
schließt ihn an den Laptop an. Da nach schaltet er den Computer ein und öffnet Suun to
Monitor. Er gibt jedem Teammitglied dessen namentlich gekennzeicheten HF-Sendergurt
und achtet darauf, dass alle den Gurt richtig anlegen (siehe Abschnitt 6).
Im Gurte-Fenster Suunto Monitor erscheinen die Kennziffern aller Gurte, von dene n der
6
Page 48

Team Pod ein Signal empfängt. Der Trainer vergleicht d ie Angaben mit sein em Zettel, um
sicherzugehen, dass alle Mit glieder des Teams erfasst werden. Er markiert nacheinande r
die Kontrollkästchen im Gurtfenster, und die Namen der am Abend zuvor angelegten
Sportler erscheinen im Dropdown-Menü. Der Trainer ordnet jeder Gurtkennziffer den
Namen des entsprechenden Sportlers zu und fügt dessen maximale Herzfrequenz hinzu .
Falls der genaue Wert nicht bekannt ist, kann stattdess en der Näherungswert 220 – Alter
der Person verwendet werden.
Nach Zuordnung aller Gurte st ehen im Sportlerfenste r die Na men der Teammitglieder. Der
Trainer markiert die Kästchen neben den Namen der z u beobachtenden Teammitglieder.
Es ist ohne weiteres möglich, zu di esem Zeit pu nkt wei ter e Pe rs onen hin zu zufü ge n. Gehe n
wir für unser Beispiel davon aus, das s ein potentielles künftige s Teammitglied zum ersten
Mal probeweise mittrainiert . Der Trainer gibt dem Neuankömmling einen überzähligen Gurt
und gibt seine Daten direkt in Suunto Monitor ein. Dazu wählt er im Hauptmenü " Sportler"
und "Bearbeiten", klickt auf "Hinzufügen" und gibt Namen, maximale Herzfrequenz und
Gurtkennziffer des neuen Sportlers ein. Nun kann das Training beginnen.
HINWEIS: Falls Sie vermuten, dass die Gurte Ihres Teams vertauscht wurden, sammeln
Sie sie sicherheitshalber wieder ein und geben Sie jedem Mitglied dessen namentlich
gekennzeichneten Gurt. Ordne n Sie dabei jedem ausgehändigten Gurt sofort in Suunto
Monitor den Namen der betreffenden Person zu.
Während des Trainings
Die Herzfrequenzdaten der überwachten Sportler erscheinen auf dem Monitor als
Herzschläge pro Minute oder a ls Prozentsatz der maximalen Herzfrequenz. Die Farben
signalisieren die tatsächlichen HF-Werte im Verhältnis zum angestrebten HF-Bereich: grün
bedeutet im Zielbereich, rot darüber und blau darunter. Der Trainer kann diesen Zielbereich
für jedes Training individuell anpassen. An hand der Farben erkennt er sofo rt, ob jemand
sich zu sehr anstrengt - oder nicht genug.
Zu Beginn des Trainings klickt er auf die Aufzeichnungsschaltfläche. Suunto Monitor
zeichnet nun die von den Senderg urten empfangenen Daten auf. Währe nd des Trainings
kann der Trainer die HF-Kurven der Sportler in Echtzeit auf dem Bildschirm betrachten und
entsprechende Trainingsratschläge geben. Am Ende des Trainings klickt er auf die
7
Page 49

Stoppschaltfläche. Ein Fenster öffnet sich, in dem er z.B. Datum und Trainingsaktivität
eingibt. Danach klickt er auf Speichern, schli eßt das Programm, fährt den PC herunter,
packt den Suunto Team Pod ein und verlässt gemeinsam mit dem Team den Sportplatz.
Nach dem Training
Daheim angekommen, schaltet unser Trainer seinen Laptop wieder ein, um das Training
mit Suunto Team Manager zu analysieren. Er wählt die Protokollanalyse aus dem
Aktionsmenü und erhält eine Liste all er Sportler, die an der Trainingseinheit teilgenommen
haben. Aus der Liste wählt er die Teammitglieder aus, deren Daten er näher untersuchen
möchte. In der Baumansicht des Trainingsfensters erscheint unter jedem Sportlernamen
das während des Trainings aufgezeichnet e Protokoll. Beim Anklichken eines Protokolls
erscheinen detaillierte Informatio nen zu Dauer und Wirkung des Trainings, Herzfrequenz,
Ventilation und diversen anderen Trainingsparametern.
Der Trainer wertet diese Daten aus, um das Trainingsprogramm für jedes Teammitglied
individuell anpassen zu können.
Ausführlichere Informatione n zu den Funktionen von Suunto Team Manager und Suunto
Monitor können über die Hilfe des jeweiligen Programms aufgerufen werden. Das unter
www.suunto.com zum Download bereitstehende Suunto-Trainingshandbuch enthält viele
wissenswerte Hintergrundinfos zu Trainingseffekt, EPOC und anderen trainingsrelevanten
Faktoren.
Im Verlauf der Saison wird der Trainer erfreut feststellen, dass sein gesamtes Team vom
Training mit dem Suunto Team Pod profitiert!
8
Page 50

3. DER ZUSAMMENBAU DES SUUNTO TEAM POD
1.
2.
9
Page 51

4. BEFESTIGUNG AUF EINEM STATIV
Die Schnellbefestigung des Suunto Team Pod erlaubt die bequeme Anbringung des Geräts
auf einem Kamerastativ.
Für eine stabilere Befestigung befindet sich auf der Unterseite des Geräts ein 6 mmGewinde.
10
Page 52

HINWEIS! Falls Sie kein Stativ zur Hand haben, könne n Sie den Suunto Team Pod auch
auf einem Tisch, einer Bank oder einer an de re n er höhten Fläche positionieren.
11
Page 53

5. DIE POSITION DES SUUNTO TEAM POD
Voraussetzung für optimale Ergebnisse ist eine günstige P ositionierung des Suunto Team
Pod. Er sollte sich in einiger Höh e über dem Boden befinden (Stativ o.ä. verwenden) und
die Antenne sollte parallel zum Überwac hungsbereich ausgerichtet sein.
Die Abbildung zeigt Situati onen, in denen die Datenüb ertragung vom HF-Gurt zum Team
Pod behindert ist und die Genauigkeit der HF-Aufzeichnung beeinträchtigt werden kann.
Spieler 1: Vom Suunto Team abgewandt
Spieler 2: Direkt vor der Antenne
Spieler 3: Außerhalb des Empfangsbereichs
12
Page 54

HINWEIS:Der Suunto Team Pod ist zwar wasserdicht, sollte jedoch vor Regen geschützt
werden.
6. ANLEGEN DES HERZFREQUENZ-SENDERGURTS
Der Herzfrequenz-Sendergurt wird so angelegt, wie in der Abbildung gezeigt.
Wir empfehlen Ihnen, den Sender direkt auf der Haut zu tragen, um seine korrekte
Funktion zu gewährleisten.
Die Elektroden müssen währe nd des Trainings feucht sein. Heben Sie den Se nder etwas
an und befeuchten Sie vor sichtig die geriffelten Elektrodenbereiche au f der Seite, die au f
Ihrer Haut aufliegt.
Achten Sie darauf, dass die feucht en Elek tro den be re iche fe st auf Ihre r Hau t au fli egen . Der
Gurt hat die richtige Position, wenn da s Suunto- Logo in der Kör permitte ist und nach obe n
zeigt.
ACHTUNG
Die Verwendung des Sendergurts durch Personen mit Herzschrittmacher, Defibrillator oder
anderen implantierten elekt ronischen Geräten erfolgt auf eigene Gefahr. Vor der ersten
13
Page 55

Benutzung des Sendergurts empfehlen wir ein probeweises Training unter ärztlicher
Aufsicht, um sicherzustellen, dass Schrittmacher und Gurt zusammen sicher und
zuverlässig funktionieren.
Sportliches Training kann bestimmte Gesundheitsrisiken bergen, insbesondere für
untrainierte Personen mit sitzendem Lebensstil. Vor der Aufnahme eines regelmäßigen
Trainingsprogramms empfehlen wir ärztliche Beratung.
7. VERWENDUNG
Im Normalfall liegt der Empfangsradius des Geräts bei 100 m (330 ft). Feuchte Witterung
und Hindernisse wie z.B. Bäume, Maue rn und andere Personen kö nnen die Übertragung
des HF-Signals beeinträchtigen .
Wegen seiner hohen Frequenz (2,4 GHz) kann das
Funksignal Wasser - und somit auch den menschlichen
Körper - nicht durchdringen. Da her werden die HF- Daten
nicht korrekt übertragen, wenn die betreffende Person
vom Empfänger abgewandt steht. In diesem Fa ll kann es
zu Störungen bei der Aufzeichnung des Signals kommen.
Aus diesem Grund eignet sich der Suunto Team Pod
auch nicht für Wassersportaktivitäten. In der Halle ist das
Signal stabiler als im Freien, wo es nicht von Wänden und
Decke reflektiert wird.
Informationen zu anderen HF -Messinstru menten w ie z.B.
dem Suunto t6 erhalten Sie bei Ihrem SuuntoFachhändler.
14
Page 56

8. DIE SUUNTO-SOFTWARE
Um die Funktionen Ihres S uunto Team Pod optional nutzen zu können, müssen Sie ihn
gemeinsam mit den PC-Programmen Suunto Monitor und Suunto Team Manager
verwenden. Die Abbildung zeigt die Beziehung zwischen dem T eam Pod und der Software.
Suunto Team Manager
Speichert Sportlerprofile und analysiert die von
Suunto Monitor aufgezeichneten Trainingsprotokolle.
Suunto Team Pod
Empfängt die Daten der
HF-Sendegurte von
bis zu 30 Sportlern.
Suunto Monitor
Zeichnet die vom Team Pod
empfangenen Daten auf und
stellt sie auf dem Bildschirm dar.
8.1. ECHTZEITANALYSE MIT SUUNTO MONITOR
Die Suunto Monitor-Software ist ein integraler Bestandteil des Funktionskomplexes Ihres
Suunto Team Pod. Sie zeichnet während des Trainings die Herzfrequenzdaten v on bis zu
30 Personen in Echtzeit auf. Di e anschauliche Farbcodierung zeigt d en HF-Status jedes
Teammitglieds, d.h. ob sich dessen Herzfrequenz im Zielbereich der Trainingseinheit
befindet, darunter oder d arüber. Suunto Monitor verknü pft die Kennung der e inzelnen HF Gurte mit den Sportlernamen, so as die Namen der Trainierenden automatisch erscheinen.
15
Page 57

Suunto Monitor bietet drei alternative HF-Ansichten während des Trainings: als
Herzschläge pro Minute, als Prozentsatz der maximalen Herzfrequenz oder
als fortlaufende Ku rv e. Di e v on Su unto Mo ni tor au fg ezei ch ne ten Pr otok ol le kön ne n mi t d er
Suunto Team Manager-Software im Detail ausgewertet werden.
Die aktuellste Version der Software steht Ihnen jederzeit unter www.suunto.com zum
Download zur Verfügung.
8.2. DETAILANALYSE MIT SUUNTO TEAM MANAGER
Suunto Team Manager be zieht die Auswer tungsdaten nicht direkt vom Suunto Team Pod,
sondern ist ein komplementäres Programm zu Suunto Monitor, das der nachträglichen
Auswertung des Trainings dient. In diesem Softwareprogramm können Sie Profile des
Teams und seiner Mitglieder erstellen. Ein Sportlerprofil enthält für die HF-Analyse
relevante Daten wie Größe, Gewicht, Alter und maximale Herzfrequenz. Die Analyse liefert
Ihnen Kurven zu Trainingseffekt und -belastung (EPOC), Sauerstoffverbrauch (VO2),
Energieverbrauch, Lungenven tilation und Herzfrequenz.
Personen, für die in Suunto Team Manager ein Profil erstellt wurde, werden anhand der
Kennung ihres HF-Gurts identifiziert und in der Bildschirmansicht namentlich
gekennzeichnet. Die Date n der aufg ezeich nete n T r ainin gsein heit werd en von S uunt o Team
Manager automatisch aus Suunto Monitor übernommen und unter dem Profil
des Sportlers/der Sportlerin gespeichert.
Die aktuellste Version der Software steht Ihnen jederzeit unter www.suunto.com zum
Download zur Verfügung.
16
Page 58

9. INSTALLATION DER SUUNTO-SOFTWARE
9.1. INSTALLATION DER SOFTWARE
1. Legen Si e die Suunto-CD in das CD-ROM-Laufwerk Ihres PCs ein.
2. Warten Sie, bis die automatische Installation beginnt, und folgen Sie den Anweisungen
HINWEIS: Falls die Installation nicht automatisch beginnt, klicken Sie auf Start -->
Ausführen und geben Sie den Befe hl D:\setup.exe ein (D ist die Kennung de s CD-RomLaufwerks).
9.2. INSTALLATION DER USB-TREIBER
Die folgende Anleitung geht davon aus, dass sich auf Ihrem PC bisher noch keine
Gerätetreiber für Suunto-Sportinstrumente befinden. Falls Sie bereits ältere
Treiberversionen installiert haben, müssen Sie diese zuerst deinstallier en.
9.3. SO INSTALLIEREN SIE DEN SUUNTO-TREIBER IN WINDOWS 2000/XP:
1. Legen Si e die Suunto-CD in das CD-ROM-Laufwerk Ihres PCs ein.
2. Schließe n Sie das Schnittstellenkabel des Suunto-Sportinstruments an den USB-Por t
Ihres PCs an. Der Installationsassistent wird automatisch aktiviert.
3. Klicken Sie auf "Weiter".
4. Suchen Sie nach einem geeignetem Treiber für d as Gerät und klicken Sie auf "Weiter".
Falls Sie Windows XP benutzen, wählen Sie die empfohlene Option (Software
automatisch installieren) und klicken Sie auf "Weiter". Falls ein Warnfenster erscheint,
klicken Sie auf "Trot zd em for tfahren".
5. Suchen Si e nach dem Treiberordner der CD-ROM und klicken Sie auf "Weiter".
6. Klicke n Sie auf "Weiter", um den Treiber zu installieren.
7. Klicken Sie auf "Fertigstellen", um die Installation zu v ervollständigen.
17
Page 59

10.TECHNISCHE DATEN
Suunto Team Pod
• Breite 50mm/2,0", Länge 171mm/6,7", Höhe 75mm/3,0"
• Gewicht 180 g/6,35 oz (inkl.Stativadapter und Antenne)
• Sendebereich bis zu 100 m/(330 ft).
• Frequenz 2,4 GHz, ANT-kompatibel
• USB-gespeist, Stromverbrauch ca. 50 mA. Die Be triebsdauer des Laptop-Akkus wird
durch den Anschluss des Suunto Team Pod nur unwesentlich verkürzt.
11.GEISTIGES EIGENTUM
11.1. COPYRIGHT
Diese Veröffentlichung und ihr Inhalt sind von Suu nto Oy urheberrechtlich geschüt zt und
ausschließlich für den Kundengebrauch bestimmt, um Kenntnisse und Informationen
bezüglich der Handhabung von Suunto-Produkten zu vermitteln.
Der Inhalt dieser Publikatio n darf nicht ohne di e schriftliche Genehmig ung der Suunto Oy
für einen anderen Gebrauch verwendet oder weitergegeben oder in anderer Form
verbreitet, veröffentlicht oder vervielfältigt werden.
Obwohl wir großen Wert auf die Exaktheit und Aus führlichkeit der Informationen gelegt
haben, können wir keine allumfassende Garantie für ihre Genauigkeit geben.
Hinsichtlich des I nhalts behalten wir uns das R echt auf unangekündigte Änder ungen vor.
Die aktuellste Version dieser Dokumentation steht Ihnen jederzeit unter www.suunto.com
zum Download zur Verfügung.
© Suunto Oy 03/2006
11.2. WARENZEICHEN
Suunto und Replacing Luck sind eingetragene Warenzeichen der Suunto Oy. Die
Produktnamen, Eigenschafts- und Inhaltsbezeichnungen von Suunto sind eingetragene
oder nicht eingetragene Warenzeichen der Suun to Oy. Andere Produkt- und Firmenna men
sind Warenzeichen ihrer jeweiligen Eigentüme r.
18
Page 60

11.3. PATENT
Dieses Produkt ist durch folgende Patente oder Patentanmeldungen geschützt:
WO2004016173, WO03099114 und US 11/169712. Weitere Patente wurden angemeldet.
12. HAFTUNGSAUSSCHLÜSSE
12.1. VERANTWORTUNG DES BENUTZERS
Dieses Instrument ist nur für den F reizeitgebrauch bestimmt. Der Suunt o Team Pod darf
nicht als Ersatzinstrument benutzt werden, um Messungen durchzuführen, die
professionelle Präzision oder laborgenaue Angaben erfordern.
12.2. CE-KONFORMITÄT
Das CE-Siegel bestätigt die Übereinstimm ung mit den EMC-Richtlinien 89/336/EEC und
99/5/EEC der Europäischen Union.
12.3. FCC-KONFORMITÄT
Dieses Gerät entspricht den Vorschriften in Part 15 der FCC-Grenzwe rte (U.S. Federal
Communications Commission) für digitale Geräte der Klasse B. Dieses I nstrum ent erze ugt
und verwendet Funkfrequenzen und kann diese auch ausstrahlen. Deshalb kann es bei
unsachgemäßer Installation oder Verwendung den Funkve rk ehr s t ör en. I n manc he n F äl len
können Interferenzen auftreten. Wenn dieses Instrument bei anderen Einrichtungen
störende Interferenzen verursacht, versuchen Sie das Problem zu beheben, indem Sie den
Standort dieser Einrichtungen verlegen.
Sollte das Problem weiterhin besteh en, wenden Sie s ich bitte an eine au torisierte Su untoVertretung oder an einen anderen qualifizierten Servicetechniker. Der Betrieb des
Instruments unterliegt den folgenden Bedingungen:
(1) Das Gerät kann keine schädlic hen Interferenzen verursachen.
(2) Das Gerät toleriert sämtlic he empfangenen Inter ferenzen, einsch ließlich Inter ferenzen,
die seinen Betrieb stören können.
Reparaturen sollten nur von autorisiertem Suunto-Servicepersonal durchgeführt werden.
19
Page 61

Unauthorisierte Reparatur hat den Verfall des Garantieanspruchs zur Folge.
Auf Konformität mit FCC-Standards geprüft. Für Haus- und Bürogebrauch.
FCC-WARNUNG: Änderungen oder Modifikationen ohne ausdrückliche Genehmigung
der Fa. Suunto Oy können Ihr Nutzung srecht für dieses Gerät nach den Vorschriften der
FCC nichtig machen.
12.4. GARANTIEEINSCHRÄNKUNGEN UND ISO 9001-KONFORMITÄT
Falls dieses Produkt Material- oder Herstellungsfehler aufweist, wird Suunto Oy das
Produkt zwei (2) Jahre lang ab Kaufdatum nach einzig eigenem Ermessen kostenlos
reparieren oder mit neuen oder wiederhergestellten Bauteilen ausstatten. Diese Garantie
besteht ausschließlich gegenüber dem Erstkäufer und deckt nur Material- oder
Herstellungsfehler ab, die während des normalen Gebrauchs innerhalb der Garantiezeit
auftreten.
Die Garantie erstreckt sich nicht auf Beschädigungen oder Fehler, die auf Grund von
Unfällen, Missbrauch, Fahrlä ssigkeit, Handhabungsfehlern oder e igenhändig am Produkt
vorgenommenen Veränderungen auftreten, ebensowenig auf Funkt ionsstörungen, die aus
dem den Angaben in der Produktdokumentation zuwiderlaufenden Gebrauch oder anderen
nicht unter die Garantie fallenden Ursachen resultieren.
Es gibt keine weiteren Garantieleistungen als die oben genannten.
Der Kunde kann sich bei Fragen zum Recht auf Reparatur innerhalb der Garantiezeit mit
unserem Kundendienst in Verbindung setzen, der auch die Vollmachten für externe
Reparaturleistungen erteilt.
Die Fa. Suunto Oy und ihre Tochterfirmen haften unter keinen Umständen für dir ekte oder
indirekte Schäden, die aus dem Gebrauch oder der Unfähigkeit zum Gebrauch des
Produkts herrühren. Keinesfalls übernimmt die Suunto Oy oder eine ihrer Tochterfirmen die
Verantwortung für Verluste oder Ansprüche Dritter, die durch den Gebrauch dieses
Produkts auftreten könnten.
Das Qualitätssicherungssystem der Suunt o Oy erhielt durch Det Norske Veritas das ISO
9001-Zertifikat, welches be sagt, dass Suu nto Oy in al len Operati onsber eich en die se Nor m
erfüllt (Qualitätszertifikat No. 96-HEL-AQ-220).
20
Page 62

12.5. KUNDENDIENST
Zur Geltendmachung eines Gewähr leistungsanspruchs ist es erforderlich, dass Sie das
Produkt zwecks Reparatur oder Ersetzung gegen Vorauszahlung der Versandkosten
an Ihre örtliche Suunto-Vertretung zurücksenden. Legen Sie der Sendung Ihren Namen,
Ihre Adresse sowie den in Ihrem Land gül tigen Bestimmungen entsprechend Kaufbeleg
und/oder Garantiekarte bei. Die Reparatur oder Ersetzung im Rahmen des
Gewährleistungsanspruchs erfolgt im von der örtlichen Suunto-Vertretung als angemessen
erachteten Zeitraum, vorausgesetzt, dass alle erforderlichen Teile auf Lager sind. Alle über
den Gewährleistungsanspruch hinausgehenden Reparaturen erfolgen auf Kosten des
Eigentümers. Diese Garantie g ilt nur gegenüber dem Erstk äufer des Geräts und ist nicht
übertragbar.
Die Adresse Ihrer örtlichen Suun to-Suunto-Vertretung finden Sie unter www.suunto.com.
13. ENTSORGUNG DES GERÄTS
Nach Ablauf seiner Lebensdauer ist muss das Gerät vorschriftsmäßig als
Elektroschrott entsorgt werden. Es darf nicht in den Hausmüll gegeben
werden. Sie können das Gerät auch bei Ihrer örtlichen Suunto-Vertretung
abliefern.
21
Page 63

DATOS DE CONTACTO DE ATENCION AL CLIENTE
Suunto Oy Tel. +358 9 875870
Fax +358 9 87587301
Suunto USA Tel. 1 (800) 543-9124
Canadá Tel. 1 (800) 776-7770
Europa Tel. +358 2 284 11 60
Sitio web de Suunto www.suunto.com
ES
1
Page 64

CONTENIDO
1. INTRODUCCIÓN AL SUUNTO TEAM POD .........................................................5
2. SUUNTO TEAM POD EN ACCIÓN ......................................................................5
3. MONTAJE DEL SUUNTO TEAM POD ...............................................................10
4. FIJACIÓN DEL SUUNTO TEAM POD A UN TRÍPODE .....................................11
5. POSICIONAMIENTO DEL SUUNTO TEAM POD ..............................................13
6. COLOCACIÓN DE LA CORREA TRANSMISORA DE LA FRECUENCIA
CARDÍACA ..............................................................................................................14
7. MANEJO .............................................................................................................15
8. SOFTWARE DE SUUNTO ..................................................................................16
8.1. ANÁLISIS EN TIEMPO REAL - SOFTWARE SUUNTO MONITOR.......... 16
8.2. ANÁLISIS MÁS DETALLADO - SOFTWA R E SU U NTO TE AM MANAGER.... 17
9. INSTALACIÓN DEL SOFTWARE DE SUUNTO .................................................18
9.1. INSTALACIÓN DEL SOFTWARE.............................................................. 18
9.2. INSTALACIÓN DE LOS CONTROLADORES USB................................... 18
9.3. INSTALACIÓN DE INSTRUMENTOS DEPORTIVOS SUUNTO EN
WINDOWS 2000/XP ............................................................................................... 18
10. ESPECIFICACIONES TÉCNICAS ....................................................................19
11. PROPIEDAD INTELECTUAL ............................................................................19
11.1. COPYRIGHT............................................................................................ 19
11.2. MARCA REGISTRADA............................................................................ 19
11.3. PATENTE ................................................................................................ 20
12. DESCARGOS DE RESPONSABILIDAD .........................................................20
Page 65

12.1. RESPONSABILIDAD DEL USUARIO.................................................... 20
12.2. CONFORMIDAD CE ............................................................................. 20
12.3. CONFORMIDAD CON LA FCC ............................................................. 20
12.4. LIMITACIONES DE RESPONSABILIDAD Y CUMPLIMIENTO DE LA
NORMA ISO 9001.................................................................................................. 21
12.5. SERVICIO POSVENTA.......................................................................... 22
13. ELIMINACIÓN DEL DISPOSITIVO ................................................................. 22
Page 66

1. INTRODUCCIÓN AL SUUNTO TEAM POD
El Team Pod es un dispositivo de observación periférica diseñado para aumentar la
efectividad de los entrenamientos en grupo. Incluye un receptor dotado de una antena, un
cable USB y software para PC.
El Suunto Team Pod permite a los entrenadores recibir datos de frecuencia cardíaca (FC)
mediante una transmisión inalámbrica de las correas de FC de los deportistas del equipo y
consultar estos datos en una p ant alla de PC a una di stanc ia de ha sta 10 0 metros/3 30 pies.
De esta forma, el entrenador pued e asegur arse de q ue cada d eportis ta se entre ne con su
frecuencia cardíaca óptima. Los datos se envían directamente desde las correas
transmisoras de frecuencia cardí aca de los deportistas al PC del entrenador, mediante
transmisión inalámbrica a través del receptor digital del Suunto Team Pod.
La correa transmisora de frecuencia cardíaca de cada deportista tiene un código individual,
lo que permite al entrenador c omprobar qué datos provienen de ca da deportista y hacer
las recomendaciones oportuna s. A continua ción, el entrenado r puede usar el sof tware p ara
PC incluido, para analizar el rendimiento individual de cada deportista y ajustar sus
entrenamientos para conseguir los resultados óptimos.
2. SUUNTO TEAM POD EN ACCIÓN
Antes de describir el montaje, colocación y func ionamiento de Suu nto Team Pod, o el uso
del software para PC, podría ser útil poner un ejemplo real de cómo un entrenador
comienza a utilizar el dispositivo por prim er a ve z.
Veremos qué hace falta antes de cada entrenamiento, cómo aprovechar al máximo la
monitorización en tiempo real durante el entrenamiento y qué tipo de análisis pueden
realizarse con el software una vez finalizado el entrenamiento.
Antes del entrenamiento
En nuestro ejemplo, el entre nador ha comprado Suunto Team Pod para mejorar la eficacia
de las sesiones de entren amien to de s u equ ipo. La noche a nter i or a la p rim era se sión co n
5
Page 67

Suunto Team Pod, el entrenador comienza los preparativos. Suunto Team pod utiliza dos
programas para PC diferentes, Suunto Monitor y Suunto Team Manager. Lo primero que
debe hacer el entrenador es instalar el software en su portátil (ver Sección 9).
Tras instalar el software, el entrenador accede a Suunto Team Manager, creando
previamente su propio perfil de entrenador. De la lista desplegab le Equipo, de l a barra de
menús, selecciona Crear equipo e in troduce el nombre de su equipo. El equipo recién
creado aparece en la ventana Mi entrenamiento. Hace clic con el botón de la derecha en el
equipo recién creado y escoge Crear deportista. Se abre una ventana nueva y el
entrenador introduce los datos del capitán del equipo, como nombre, fecha de nacimiento,
altura, peso y el nivel de actividad (cuya descripción figura en la ventana). Esta información
es necesaria para calcular la fre cuencia cardí aca máxima del de portista, su capaci dad de
rendimiento y otros valores que intervienen en el análisis. Una vez introducidos los datos
del capitán, el entrenador hace cl ic en el b ot ón C rear de po rti sta y r epi te el pro ce so para el
resto de miembros del equipo.
Una vez completado el equipo, el entrenador selecciona sucesivamente el nombre de cada
miembro del equipo, y hace clic en el botón Personal para introducir más detalles en cada
perfil. El entrenador ada pta al máximo los datos de cada deportista introduciendo su F C
máxima real, registrada en alguna prueba de rendimiento reciente.
Después de crear el equipo y todos los perfiles de los deportistas, el entrenador cierra
Suunto Team Manager y observa el Suunto Team Pod propiamente dicho. Monta el
dispositivo (según describ e la Sección 3) y lo conecta al portátil. En ese momento, es
necesario probar el sistema, para lo que debe c olocarse él mis mo una c orrea tr ansmiso ra
de frecuencia cardíaca y observar el registro de sus propias pulsaciones. Una vez
comprobado el correcto funcionamiento del sistema, el entrenador apaga el portátil y
desconecta el Suunto Team Pod.
Finalmente, saca las correas transmisoras de frecuencia cardíaca del equipo y adhiere el
nombre de un miembro a cada una d e ellas. En una hoja de papel, escribe los cinco
últimos dígitos del primer número que se encuentra al dorso de la correa, junto con el
nombre del deportista que la llevará.
6
Page 68

El entrenador acude al lugar de entr enamiento con antelación. Ubica correctamente el
Suunto Team Pod, para que cubra todo el campo (ver Sección 5) y conecta el Suunto Team
Pod al portátil. Inicia el programa Suunto Mon itor. Cuando llega el equipo, distribuye las
correas transmisoras de fre cuencia cardíaca y les indica cómo po nérselas correc tamente
(ver Sección 6).
La ventana Correas de Suunto Monitor refleja l os números de ID de todas las correas
transmisoras de frecuencia card íaca cuya señal reciba Suunto Team Pod. El entrenador
saca su hoja de papel y comienza a marcar sucesivamente las casillas de verificación que
hay junto a cada correa. Al marcar l a casilla, a parece una ven tana emergent e y aparecen
en el menú desplegable todos los miembros de equipo que se habían cread o en Suunto
Team Manager la noch e anterior. Selecciona el nombre correspondie nte a cada correa y
también introduce la frecuencia cardíaca máxima del deportista. Si no se conoce la
frecuencia cardíaca máxima real, puede calcularse restando a 220 la edad del deportista.
Una vez asignadas todas las correas entre los miembros del equipo, la lista de números es
reemplazada por una lista con los nombres re cogidos en la ventana Deportistas. En la
misma ventana, el entrenador activa la casilla de verificación situ ada junto al nombre de
cada deportista para controlar su actividad.
Uno de los miembros del equipo ha traído a un amig o para que haga una prueba. Como el
entrenador no introdujo sus datos en Suunto Team Manager la noche anterior, le
proporciona una correa de las no utilizadas y le añade directamente a Suunto Monitor. El
entrenador selecciona Deporti stas y Editar en el menú prin cipal, y hace clic e n Añadir. En
este punto, introduce el nomb re del recién llegado, su frecuencia card íaca máxima y el
número de ID de la correa. Ya puede comenzar la sesión de entrenamiento.
NOTA: Si sospecha que las correas de FC no están b ien asignadas, el mejor modo de
asegurarse de que cada correa l leve el nombre correcto es recoger todas l as correas y
volverlas a repartir una a una. Cuan do cada miembro del equ ipo se coloque su corre a, y
Suunto Monitor la detecte, nombrar dicha correa antes de dar la siguiente.
7
Page 69

Durante el entrenamiento
Los datos de frecuencia cardíaca de todos los deportistas monitorizados aparecen en
pantalla como pulsaciones por minuto o como porcentaje de la frecuencia cardíaca
máxima. Los colores representan la fr ec ue ncia car dí aca d e l os de por t istas en r ela ci ón con
la zona de frecuencia cardíaca (e l rojo indic a qu e la fr ec uenc ia ca rdía ca de l dep ortis t a est á
por encima de su zona de frecuencia cardíaca, el verde dentro de sus límites y el azul por
debajo de la misma). El e ntrenador es tablece la zona de frecue ncia cardíac a que más se
adapte a los objetivos del entrenamiento. Mediante los colores, puede identificar fácilmente
qué deportistas están entrenando demasiado, o demasiado poco.
Al inicio de la sesión, el entrenador hace clic en el botón Grabar sesión y Suunto Monitor
comienza a grabar los datos recibidos de la correa de cada deportista. Durante la sesión,
el entrenador hace clic en el b otón Ver gráfico de sesión, para ver una representación
gráfica de las frecuencias ca rdíacas d e los deport istas a tiempo rea l, de form a que puede
dar consejos específicos a cada uno de ellos basados en los datos. Al final de la sesión de
entrenamiento, el entrenador hace clic en el botón Parar sesión y aparece una ventana
emergente, en la que pondrá n ombre a la sesión, por ejemplo, c on la fecha y el tipo de
actividad. Después hace cl ic en Guardar, cierra Suun to Monitor, desconecta el Su unto
Team Pod y sale del campo con su equipo a tomar un refrigerio.
Después del entrenamiento
Una vez en casa, el entr enador accede a Suunto Team Manager para realizar un anális is
en profundidad del rendimiento de su equipo . En el menú Acciones, escoge la opción
Analizar registro y se muestra u na lista desplegable con todos los deportistas que han
participado en la sesión de esa mañana . Selecciona los deportistas cuyos datos desea
analizar. En la vista de árbol de la ventana Mi entrenamie nto, bajo el nombre de cada
deportista, encuentra un registro ana lizado de la sesión registrada . Cada registro deberá
analizarse detalladamente haciendo clic sobre él. En su interior está disponible información
como duración, efecto del entrenamiento, frecuencia cardíaca y otros parámetros útiles
para evaluar la eficacia del entrenamiento.
El entrenador utiliza los datos analizados para adaptar el programa de entrenamiento a
cada deportista.
8
Page 70

Para más información sobre el funcionamiento del software Suunto Team Manager y
Suunto Monitor, el entrenador acude a los a rchivos de ayuda inclui dos en el mi smo. Usar
Suunto Team Pod y sus programas asociados motiva al entrenador para aprender más
sobre temas como el efecto del entrenamiento y el ECOP, así que descarga la Guía de
Entrenamiento Suunto del sitio de Internet www.suunto.com.
Después de una temporada de entren amientos con Suun to Team Pod, los deportistas del
entrenador ¡son de los que están más en forma de su liga!
9
Page 71

3. MONTAJE DEL SUUNTO TEAM POD
1.
2.
10
Page 72

4. FIJACIÓN DEL SUUNTO TEAM POD A UN TRÍPODE
El Suunto Team Pod cuenta con un sistema de liberación rápida que permite montarlo
cómodamente sobre un tr ípode para cámara.
Como alternativa, el Suunto Team Pod también puede fijarse con la rosca de 6 mm de
diámetro situada en la parte inferior del dispositivo.
11
Page 73

¡ATENCIÓN! Además de colocar el Suunto Team Pod sobre un trípode, puede colocarlo
sobre una mesa, un banco u otra superficie elevada.
12
Page 74

5. POSICIONAMIENTO DEL SUUNTO TEAM POD
Para conseguir los mejores resultados, resulta importante posicionar correctamente el
Suunto Team Pod. Debe situarse sobre un trípode para cámara o una superficie ele vada
similar y posicionarse de for ma que la antena qu ede situada en paralelo con la zona que
se desea monitorizar.
En la figura siguiente se muestran los factores que pueden afectar a la recepción desde las
correas de FC y con ello a la exactitud del registro de la frecuencia cardíaca.
Deportista número 1: Orientado en el sentido contrario al Suunto Team Pod.
Deportista número 2: Situado dire ctamente delante de la antena.
Deportista número 3: Situado fuera del alcance de recepción.
13
Page 75

NOTA: A pesar de que es resistente al agua, el Suun to Team Pod debe protegerse de la
lluvia durante los entrenamient os al aire libre.
6. COLOCACIÓN DE LA CORREA TRANSMISORA DE LA
FRECUENCIA CARDÍACA
La correa transmisora de fr ecuencia cardíaca d ebe coloc arse segú n se indica en la figu ra
siguiente.
Es aconsejable que mantenga el t ransmisor en con tacto directo con l a piel para asegurar
una operación sin problemas.
Los electrodos deben estar húmedos durante el ejercicio. Eleve el transmisor un poco
sobre su pecho y humedezca el área ranurada alrededor de los electrodos, situ ada en la
parte que está en contacto con la piel.
Verifique que las áreas humedecidas alrededor de los electrodos queden firmemente
colocadas contra la piel y que el logotipo es té en una po sic ión central y vertical.
ADVERTENCIA
Las personas con reguladores cardíacos (marcapasos) o desfibri ladores, o las personas
que tienen algún otro tipo de aparato electrónico implantado, se deben responsabilizar del
14
Page 76

uso de la correa transmisora. Antes de usar la correa transmisora, recomendamos
encarecidamente un examen, bajo supervisión médica, de su forma física. Esto asegurará
la seguridad y la fiabilidad del uso simultáneo del regulador cardíaco y la correa
transmisora.
El ejercicio siempre puede encerrar ciertos riesgos, especialmente en el caso de personas
sedentarias. Aconsejamos que consulte su médico antes de iniciar un programa regular de
ejercicio.
7. MANEJO
En circunstancias normales, el receptor tiene un alcance de 100 metros/330 pies, pero hay
factores que interfieren en la transmisión desde las correas de FC y pueden afectar al
alcance, por ejemplo la humedad, obstáculos como árboles, otros deportistas y paredes.
Dado que las señales de 2,4 GHz no atraviesan el agua y
por tanto tampoco el cuerpo humano, la transmisión
desde la correa de FC se obstaculiza si el deportista
monitorizado está mirando en el sentido contrario al
Suunto Team Pod. En este caso, puede haber
interrupciones en la grabación de la señal de FC. Por el
mismo motivo, el Suunto Team Pod no es adecuado para
las actividades acuáticas. En los deportes de interior, la
recepción es más continua que al ai re libr e, graci as a l as
señales reflejadas por las paredes y el techo.
Para obtener más información so bre otros productos de
grabación de FC, como el Suunto t6, póngase en
contacto con su representante local de Suunto.
15
Page 77

8. SOFTWARE DE SUUNTO
Disfrutará de la máxima funcionalidad del Suunto Team Pod si lo utiliza junto con Suunto
Monitor y el software para PC Suunto Team Manager. La figura siguiente ilustra la relación
existente entre el Suunto Team Pod y el software.
Suunto Team Manager
Almacena perfiles de deportistas y analiza
los registros grabados por Suunto Monitor.
Suunto Team Pod
Recibe datos en tiempo
real de las correas de FC
de hasta 30 deportistas.
Suunto Monitor
Muestra y registra los
datos de FC recibidos
por el Team POD.
8.1. ANÁLISIS EN TIEMPO REAL - SOFTWARE SUUNTO MONITOR
El software para PC Suunto Monitor es parte inte grante de la funcionalidad del Suunto
Team Pod. Muestra y registra los datos de frecuencia cardíaca de hasta 30 deportistas, en
tiempo real durante el entrenamiento. Con una ilustrativa codificación con colores, el
software muestra una representación general del estado de la frecuencia cardíaca de cada
miembro del equipo, ya esté dent ro de la zona de frecuencia cardíaca de l a sesión o bien
por debajo o por encima de ésta. Suunto Monitor también vincula los nombres de los
16
Page 78

deportistas y los números de ID de las correas de frecuencia cardíaca, para la detección
automática de los deportistas activos.
El software para PC Suunto Monitor ofrece tres formas de mostrar la frecuencia cardíaca
durante los ejercicios. Muestra el valor como pu lsaciones po r minuto como po rcent aje de la
frecuencia cardíaca máxima o como un gráfico cont inuo. Los registros grabados po r el
software Suunto Monitor pueden anal izarse co n más detalle con e l software Suunto Team
Manager.
Puede descargar la versión más reciente del software Suunto Monitor desde
www.suunto.com.
8.2. ANÁLISIS MÁS DETALLADO - SOFTWARE SUUNTO TEAM MANAGER
A pesar de que el software Su un to Team Manager no funciona directamente con el Suunto
Team Pod, proporciona unas amplias posibilidades de análisis detallado tras el
entrenamiento y por tanto es un c omplemento exce lente para el software S uunto Monito r.
Con el software Suunto Team Manager, el entrenador puede crear perfiles de cada
miembro del equipo o el grupo, con dato s como la altura, el p eso, la edad y la frecuen cia
cardíaca máxima. El software uti liz a esta información para analizar los datos de frec uencia
cardíaca grabados con una exacti tud de una pulsación. Este análisis gen era gráficos de
efecto de entrenamiento, carga de ECOP del entrenamiento, consumo de oxígeno (VO2),
consumo de energía, ventilación , frecuencia respiratoria y frecuencia cardíaca.
Si un deportista que tiene un perfil en Suunto T eam Manager está activo, Suunto Monitor lo
identificará y mostrará su nombre y perfil en lugar del número de ID de su correa. A partir
de ese momento, los datos de la sesión grabada se almacenan automáticamente desde el
software Suunto Monitor en el perfil del deportista de Suunto Team Manager.
Puede descargar la versión más reciente del software Suunto Team Manager desde
www.suunto.com.
17
Page 79

9. INSTALACIÓN DEL SOFTWARE DE SUUNTO
9.1. INSTALACIÓN DEL SOFTWARE
1. Inserte el CD-ROM del software de Suunto en la unidad correspondiente.
2. Espere a que comience la instalación y siga las instrucciones de instalación.
NOTA: Si la instalación no comienza automáticamente, haga clic en Inicio --> Ejecutar y
escriba D:\setup.exe.
9.2. INSTALACIÓN DE LOS CONTROLADORES USB
En estas instrucciones se supone que instalará los controladores para instrumentos
deportivos Suunto en un sistema "limpio", es decir, que no contiene aún ningún
controlador para instrumentos deportivos Suunto. Si no es el caso, desinstale los
controladores que tenía instalados antes de continuar con la instalación.
9.3. INSTALACIÓN DE INSTRUMENTOS DEPORTIVOS SUUNTO EN WINDOWS
2000/XP
1. Inserte el CD-ROM del software de Suunto en la unidad correspondiente.
2. Conecte e l cable de inte rfaz de PC para ins trumentos dep ortivos Suun to al puerto US B
de su ordenador. El Asistente se activa automáticamente.
3. Haga clic en Siguiente.
4. Busque un controlador adecuado en su sistema y haga clic en Siguiente. Si utiliza
Windows XP , seleccione Instalar el software automáticamente en el Asistente y haga clic
en Siguiente. Si aparece una adverten cia de instalación, haga clic en Continuar.
5. Busque la carpeta del controlador en el CD-ROM y haga clic en Siguiente.
6. Haga clic en Siguiente para instalar el controlador encontrado.
7. Haga clic en Finalizar para completar la instalación.
18
Page 80

10.ESPECIFICACIONES TÉCNICAS
Suunto Team Pod
• Anchura 50 mm/2,0 pulg., longitud 171 mm/6,7 pulg., altura 75 mm/3 ,0 pulg.
• Peso 180 g/6,35 onza s (con el adaptador de trípode y la antena)
• Alcance de funcionamiento hasta 100 m/330 pies
• Frecuencia 2,4 GHz, compatible con ANT
• Alimentado por USB, cons umo de p otencia de aproximad amente 50 mA. En f unción d e
la capacidad de la batería del ordenador portátil, el Suunto Team Pod reducirá la
duración de la batería sólo unos pocos minutos.
11.PROPIEDAD INTELECTUAL
11.1. COPYRIGHT
Esta publicación y su contenido son propiedad de Suunto Oy y han sido creados para el
uso exclusivo de sus clientes a la hora de conocer y obtener información sobre el
funcionamiento de los productos Suunto.
Su contenido no debe ser usado ni distribuido para ningún otro propósito, ni ser
comunicado, revelado ni reproducido sin el consentimiento previo de Suunto Oy.
A pesar de que hemos puesto todo el empeño para garantizar que la información
contenida en este manual sea a la vez co mpleta y exacta, no of recemos n inguna gar antía
expresa o implícita sobre su exactitud . Puesto que su contenido está sujeto a cambi os en
cualquier momento sin previo av iso. La vers ión más recient e de esta documentación e stá
siempre disponible para su descarga en www.suunto.com.
© Suunto Oy 03/2006
11.2. MARCA REGISTRADA
Suunto y Replacing Luck son marcas registradas de Suunto Oy. Suunto y los nombres de
productos, funciones y contenidos de Suunto son marcas registradas o no registradas de
Suunto Oy. Los demás nombres de productos o empresas son marcas de sus pr op ie tarios
respectivos.
19
Page 81

11.3. PATENTE
Este producto está protegido por las patentes o solicitudes de patente siguientes:
WO2004016173, WO03099114 y US 11/169712. Se han solicitado otras patentes.
12. DESCARGOS DE RESPONSABILIDAD
12.1. RESPONSABILIDAD DEL USUARIO
Este instrumento está destinado excl usivamente a usos recrea tivos. El Suunto Team Pod
no debe utilizarse en susti tución de otros instrumentos a la hora de obtener mediciones
que requieran una exactitud p rofesional y no debe utilizar se para obtener mediciones que
requieran una calidad de labora torio.
12.2. CONFORMIDAD CE
El distintivo CE se utiliza para indicar la conformidad con las directivas de compatibilidad
electromagnética 89/336/CEE y 99/5/CEE de la Unión Europea.
12.3. CONFORMIDAD CON LA FCC
Este dispositivo cumple la pa rte 15 de los límites de la FCC p ara dispos itivos d igit ales de la
clase B. Este equipo gener a, usa y puede radiar energía de radi ofrecuencia y, si no se
instala o usa de acuerdo con las instrucciones, puede ocasionar interferencias
perjudiciales en las comunicaciones de radio. No existe garantía de que dichas
interferencias no tengan lugar en un caso determinado. Si este equipo ocasiona
interferencias perjudiciales para otro equipo, intente solucionar el problema reubicando el
equipo.
Consulte con un representante autorizad o de Suunto o con otro técnico cualificado si el
problema no se soluciona. El funcionamiento está sujeto a las siguientes condiciones:
(1) Este dispositivo no puede ocasionar interferencias perjudiciales.
(2) Este dispositivo debe aceptar cualquier interferencia recibida, incluidas las
interferencias que puedan ocasionar un funcionamiento no deseado.
Cualquier reparación debe ser realiz ada por personal de servicio técnico autori zado por
20
Page 82

Suunto. Cualquier reparación no au torizada supondrá la anulación de la garantía.
Verificado para cumplir con las normas de la FCC. Para uso doméstico o empresarial.
ADVERTENCIA DE LA FCC: Cualquier cambio o modificación no aprobado
expresamente por Suunto Oy podría anular el derecho del usuario a usar este dispositivo
según las normas de FCC.
12.4. LIMITACIONES DE RESPONSABILIDAD Y CUMPLIMIENTO DE LA NORMA
ISO 9001
Si este producto fallara deb ido a de fect os d e mate ri ales o ma no d e ob ra, S uun to O y po drá,
según considere oportuno, r epararlo o sustituirlo con piezas nuevas o re generadas, sin
cargo alguno y durante un pe riodo de dos (2) años a partir de l a fecha de compra. Esta
garantía se extiende sólo al comprador original y cubre únicamente los fallos debidos a
materiales o mano de obra que hayan aparecido durante su uso normal durante el período
de garantía.
No cubre los daños o fallos causados por un accidente, uso inadecuado, negligencia,
utilización incorrecta, alteración o modificación del producto, a cualquier daño causado por
el funcionamiento del produc to más allá de las especificaciones publicadas, o en cualquier
causa no cubierta en esta garantía.
No se ofrece ninguna garantía expresa excepto las enumeradas anteriormente.
Para ejercer su derecho de reparación en virtud de la garantía, el cliente debe ponerse en
contacto con el departamento de Servicio al cliente de Suunto Oy para obtener una
autorización de reparación.
Ni Suunto Oy ni sus subsidiarias asumen responsabilidad alguna por cualquier daño
accidental o consecuente que resulte del uso o de la incapacidad de uso de este producto.
Ni Suunto Oy ni sus subsidiarias asumen ninguna responsabilidad por pérdidas o
reclamaciones de terceras part es que puedan derivarse del uso de este dispositiv o.
El sistema de garantía de ca lidad de Suunto ha sid o certif icado po r Det No rske Veritas en
cuanto a su cumplimiento con la norma ISO 90 01 en todas las instala cion es de Suu nto Oy
(certificado de calidad nº 96-HEL-AQ-220).
21
Page 83

12.5. SERVICIO POSVENTA
Si fuera necesario realizar un a recla mación e n virtud d e la garan tía, d evuelva el artícul o a
portes pagados a su representante de Suunto, quien se responsabilizará de la reparación
o sustitución de su producto. Incluya su nombre, dirección, prueba de compra y/o tarjeta de
registro de servicio, según se requiera en su país. La reclamación se aceptará y el
producto se reparará o sustituirá sin coste alguno, tras lo cual la devolución se realizará en
el tiempo determinado por e l repr esentante de Suu nto, s iempre y cua ndo t odas l as pi ezas
necesarias estén disponibles e n el almacén. Todas las reparaciones no cubiertas bajo los
términos de esta garantía correrán a cargo del propietario del producto. El propietario
original no puede transferir esta garantía.
Para encontrar los datos de contacto de su representante local de Suunto, visite
www.suunto.com.
13. ELIMINACIÓN DEL DISPOSITIVO
Elimine el dispositivo de la forma adecuada, tratándolo como residuos
electrónicos. No lo arroje a la basura. Si lo desea, puede devolver el
dispositivo a su representante de Suunto más cercano.
22
Page 84

NUMERI UTILI PER IL SERVIZIO CLIENTI
Suunto Oy Tel. +358 9 875870
Fax +358 9 87587301
Suunto USA Tel. 1 (800) 543-9124
Canada Tel. 1 (800) 776-7770
Call Center Europeo Tel. +358 2 284 11 60
Sito Internet Suunto www.suunto.com
IT
1
Page 85

INDICE
1. PRESENTAZIONE DI SUUNTO TEAM POD .......................................................5
2. FUNZIONAMENTO DI SUUNTO TEAM POD ......................................................5
3. ASSEMBLAGGIO DI SUUNTO TEAM POD .......................................................10
4. COLLEGAMENTO DI SUUNTO TEAM POD SU UN TREPPIEDE ....................11
5. POSIZIONAMENTO DI SUUNTO TEAM POD ...................................................13
6. COME INDOSSARE LA CINTURA DI TRASMISSIONE DELLA FREQUENZA
CARDIACA ..............................................................................................................14
7. FUNZIONAMENTO .............................................................................................15
8. SOFTWARE SUUNTO ........................................................................................16
8.1. ANALISI IN TEMPO REALE - SOFTWARE SUUNTO MONITOR ............ 16
8.2. ANALISI PIÙ APPROFONDITE - SOFTWARE SUUNTO TEAM MANAGER. 17
9. INSTALLAZIONE DEL SOFTWARE SUUNTO ...................................................18
9.1. INSTALLAZIONE DEL SOFTWARE.......................................................... 18
9.2. INSTALLAZIONE DEI DRIVER USB......................................................... 18
9.3. INSTALLAZIONE DELLO STRUMENTO SUUNTO SPORTS SU WINDOWS
2000/XP................................................................................................................... 18
10. SPECIFICHE TECNICHE .................................................................................19
11. PROPRIETÀ INTELLETTUALE ........................................................................19
11.1. COPYRIGHT............................................................................................ 19
11.2. MARCHI COMMERCIALI ........................................................................ 19
11.3. BREVETTO.............................................................................................. 20
12. LIBERATORIE ..................................................................................................20
Page 86

12.1. RESPONSABILITÀ DELL?UTENTE...................................................... 20
12.2. CE ......................................................................................................... 20
12.3. CONFORMITÀ FCC............................................................................... 20
12.4. LIMITI DI RESPONSABILITÀ E CONFORMITÀ ISO 9001.................... 21
12.5. ASSISTENZA POST-VENDITA ............................................................. 21
13. SMALTIMENTO DEL DISPOSITIVO ...............................................................22
Page 87

1. PRESENTAZIONE DI SUUNTO TEAM POD
Suunto Team Pod è un Dispositivo Periferico ideato per aumentare l'efficacia degli
allenamenti di gruppo. E' costitu ito da un ricevitore dotato di antenn a, un cavo USB e un
software per PC.
Con Suunto Team Pod gli allenatori possono ricevere, in tempo reale e in modalità
wireless, i dati riguardanti la frequenza cardiaca (HR) dalle cinture trasmettitori dei loro
atleti direttamente su uno schermo di PC da un a distanza fino a 100 metri/330 piedi.
In questo modo, l'allenatore può assicurarsi che ciascun atleta si stia allenando alla
frequenza cardiaca ottimale. Attraverso il ricevitore digitale Suunto Team Pod, i dati
vengono inviati in modalità wireless al PC dell'allenatore direttamente dalle cinture di
trasmissione della frequenza cardiaca degli atleti.
Ciascuna cintura di trasmissione della frequenza cardiaca degli atleti è dotata di un proprio
codice, il che consente al l'alle natore di dist inguere d a quale atleta arri vano i d ati e di agire
di conseguenza. A questo punto, l'allenatore può utilizzare il software per PC in dotazione
per analizzare le prestazioni individuali degli atleti e perfezionarne l'allenamento per
ottenere i risultati migliori.
2. FUNZIONAMENTO DI SUUNTO TEAM POD
Prima di spiegare come assemblare, posizionare e attivare Suunto Team Pod o di utilizzare
il software per PC, sarà utile fornire un esempio concreto del modo in cui un allenatore può
utilizzare il dispositivo per la prima volta.
Analizzeremo le azioni preparatorie da compiersi prima dell'allenamento, il modo per
effettuare il monitoraggio ottimale in tempo reale durante l'allenamento e il tipo di analisi
che si può effettuare con il software al termine dell'allenamento.
Prima dell'allenamento
In questo esempio, l'allenator e ha con sè Suunto Team Pod per migliorare l'efficacia delle
sessioni di allenamento della sua squadra. La sera precedente alla prima session e con
5
Page 88

Suunto Team Pod, l' allenatore inizia i preparativi. Suunto Team Pod utilizza due diversi
programmi per PC, Suunto Monitor e Su unto Team Manager. Per prima cos a, l'allenatore
deve installare il software sul suo portatile (vedere la Sezione 9).
Dopo aver installato il software, l 'allenat ore si regi stra in Su unto Team Manager creando il
proprio profilo di allenatore. Dall'elenco a tendina Team nella barra del menù seleziona
Create Team e aggiu nge il n ome d el la p ro pria sq uadra . A qu esto pun t o la s qua dra a pp ena
creata compare nella finestra My Training. Con il pulsante destro clicca sulla squadra
appena creata e sceglie Create Athlete. Si apre una nuova finestra in cui l'allenatore
inserisce i dettagli sul capitano, qual i il nome, la data di nascita, l'altezza, il peso e un
numero di livello attività (la cui descrizione si può trovare nella finestra stessa). Queste
informazioni sono necess arie per calcolare la frequenza ca rdiaca massima dell'atleta, le
sue prestazioni e altri valori necessari per l'analisi. Dopo aver terminato l'inserimento dei
dettagli riguardanti il capitano, l' allenatore clicca sul pulsante Create Athlete e ripe te lo
stesso procedimento per gli altri membri della squadra.
A squadra terminata, l'allenator e evidenzia uno dopo l'altro tutti i no mi dei membri della
squadra e clicca sul pulsante Personal nella finestra Athletes per personalizzarne
ulteriormente il profilo. L'allenatore completa in modo ottimale i dati dei suoi atleti
aggiungendo la frequenza cardiaca (HR) massima da essi registrata in una recente
prestazione di prova.
Dopo aver creato la sua squadra e i prof ili di ciascun atleta, l'allenatore chiude Suunto
Team Manager e rivolge la sua attenzione a Suunto Team Pod. Assembl a il dispositivo
(come descritto nella Sezione 3) e lo co llega al proprio la ptop. A q uesto pu nto, per test are il
sistema, indossa una cintura di trasmissione della frequenza cardiaca e osserva sul
monitor la propria frequenza cardiaca. Se tutto funziona come dovrebbe, l'allenatore
spegne il proprio laptop e scolle ga Suunto Team Pod.
A questo punto prende le cinture di trasmissione della frequenza cardiaca della squadra e
su ciascuna di esse attacca il nome di un memb ro della squadra. Su un pezzo di carta
scrive le ultime cinque cifre del primo numero sul retro della cintura vicino al nome
dell'atleta a cui sarà assegnata.
6
Page 89

L'allenatore arriva presto sul campo di allenamento. Posiziona correttamente Suunto Team
Pod, in modo che copra l'intero campo (vedere la Sezion e 5) e colleg a Suunt o Team Pod al
proprio laptop. Poi apre Suunto Monitor. Quando arriva la squadra, distribuisce a ciascun
membro la propria cintura di trasmissione della frequenza cardiaca e spiega come
indossarla correttamente (vedere la Sezione 6).
La finestra Belts di Suunto Monitor mostra i numeri ID di tutte le cinture t rasmettitori dall e
quali Suunto Team Pod sta ricevendo un segnale. L'allenatore prende il suo pezzo di carta
e inizia a spuntare, uno alla volta, i ri quadri vicino a ciascuna cintura. Qu ando spunta la
casella, compare un messaggio popup e nel menù a tendina compaiono tutti i membri della
squadra da lui creati la s era precedente in Suunto Team Manager. Seleziona il nome da
assegnare a ciascuna cintura e poi aggiunge la frequenza cardiaca massima dell'atleta. Se
non si conosce l'effettiva freque nza cardiaca massima, la si può calcolare con la for mula
220 meno l'età dell'atleta.
Quando alla squadra sono state assegnat e tutt e le cint ure, ne lla finest ra Athl etes la lista di
numeri è stata sostituita da un elenco di nomi. Nella st essa finestra l'allenato re spunta la
casella vicino al nome di ciascun atleta che desidera monitorare.
Uno degli atleti ha portato un candidato ad entrare nella squadra che deve essere valutato.
Poichè la sera precedente l 'allenatore non aveva agg iunto i suoi dettagli in Suun to Team
Manager, gli assegna una cintura HR di scorta e lo aggiunge direttamente nel Suunto
Monitor. L'allenatore seleziona Athletes e Edi t nel menù principale e poi clicca Add. Qui
aggiunge il nome del nuovo arrivato, la sua frequenza cardiaca massima e il numero ID
della sua cintura. Ora la session e di allenamento può incominciare.
NOTA: Se si sospetta che le cinture HR siano state assegnate in modo non corretto, per
essere sicuri che ciascuna cintura abbia il nome esatto, il miglior modo è quello di
raccogliere tutte le cinture e con segn arle nuovame nte un a ad un a. Quando il membro della
squadra indossa la cintura e Suunto Monitor la rileva, bisogna assegnare il nome alla
cintura prima di consegnare quella successiva.
7
Page 90

Durante l'allenamento
I dati della frequenza cardiaca di tutti gli atleti monitorati sono visualizzati come battiti al
minuto o come percentuale della loro frequenza cardiaca massima. I colori rappresentano
le frequenze cardiache degli atleti rispetto alla zona obiettivo di frequenza cardiaca: il rosso
indica che la frequenza cardiaca dell'atleta monitorato è superiore rispetto alla zona
obiettivo, il verde indica che r ientra nella zona e il blu che è inferior e alla zona obiettivo.
L'allenatore imposta la zona obiettivo a seconda dello scopo della sessione. Tramite i colori
può vedere chiaramente quale atleta si sta allenando a ritmo troppo o troppo poco
sostenuto.
All'inizio della sessione, l'allenatore clicca sul pulsante Record Session e Suunto Monitor
inizia a registrare i dati ricevuti dalla cintura di ciascun atleta. Durante la sessione,
l'allenatore clicca sul pulsante View Session Graph per vedere una rappresentazione
grafica delle frequenze cardiache in tempo reale degli atleti e, in base ai dati visualizzati, dà
loro consigli specifici. Al termine della sessione di allenamento, l'allenatore clicca sul
pulsante Stop Session, compare un messaggio popup in cui assegna un nome alla
sessione, ad esempio corrispondent e alla data e al tipo di attività. A questo punto clicca
Save, chiude Suunto Monitor, scollega Suunto Team Pod e segue la squadra fuori dal
campo per il riposo post allenament o.
Dopo l'allenamento
Tornato a casa, l'allenatore entra in Suunto Team Manager per effettuare l'analisi
approfondita della prestazione della sua squadra. Dal menù Actions seleziona Log Analyze
e compare un elenco a tendina di tutti gli atleti che hanno partecipato alla sessione della
mattina. Evidenzia gli atle ti dei quali desidera analizzare i dat i. Nella visualizzazione ad
albero della finestra My Window, sotto ciascun nome di atleta, c'è una registrazione
analizzata dalla sessione regis trata. Ogni registrazione può essere analizzata in dettaglio
cliccandoci sopra. Sono di spon ib i li i nfo rma zi oni qu ali la d urata, l' effett o d ell 'al le nament o , la
frequenza cardiaca, la respirazione e un certo numero di parametri corporei utili per
valutare l'efficacia dell'allenamento effettuato.
L'allenatore si serve dei dati analizzati per perfezionare il progra mma di allenamento di
ciascun atleta.
8
Page 91

Per ulteriori informazioni sul la funzionalità dei software Suunto Team Manager e Suunto
Monitor, l'allenatore ricorrerà ai file Help del software. Utilizzando Suunto Team Pod e i
programmi associati, l'allenatore desidera sapere di più su argomenti quali l'effetto
dell'allenamento o EPOC, di conseguenza scaricherà la guida di allenamento Suunto
Training Guidebook dal sito www.suunto.com.
Dopo una stagione di allenamenti con Suunto Team Pod, i suoi atleti risulteranno tra i
migliori del campionato.
9
Page 92

3. ASSEMBLAGGIO DI SUUNTO TEAM POD
1.
2.
10
Page 93

4. COLLEGAMENTO DI SUUNTO TEAM POD SU UN TREPPIEDE
Suunto Team Pod è dotato di un sistema di attacco rapido che ne consente l'adeguato
montaggio su un treppiede per fotocamera.
In alternativa, Suunto Team Pod può essere montato avvitando la filettatura del diametro di
6 mm che si trova nella parte inferiore del dispositivo.
11
Page 94

NOTA! Oltre che su un treppiede, Suunto Team Pod può essere posizionato su un tavolo,
una panca o altre superfici rialza te.
12
Page 95

5. POSIZIONAMENTO DI SUUNTO TEAM POD
Per ottenere i risultati migliori è importante posizionare correttamente Suunto Team Pod,
Questo dovrà esse re posto su un treppiede o an aloga superficie rialzata e pos izionato in
modo che l'antenna sia parallela all' area da monitorare.
La figura sottostante illustra i fattori che possono ostacolare la ricezione dalle cinture in
cardiofrequenza e quindi pregiudicare la precisione della registrazione della frequenza
cardiaca.
Atleta numero 1: In posizione opposta rispetto al Suunto Team Pod
Atleta numero 2: Posizionato esattamente di fronte all'antenna
Atleta numero 3: Posizionato fuori dal campo di ricezione
13
Page 96

NOTA: Sebbene resistente all'acqua, si dovrà provvedere a proteg gere Suunto Team Pod
dalla pioggia durante gli allen a m en ti all'esterno.
6. COME INDOSSARE LA CINTURA DI TRASMISSIONE DELLA
FREQUENZA CARDIACA
La cintura di trasmissione della fr equenza cardiac a deve essere in dossata come mostrato
nella figura sottostante.
Si consiglia di indossare il trasmettitore sulla pelle nuda, per garantire risultati ottimali.
E? importante che gli elettrodi siano inumiditi durante l?allenamento. Sollevare
leggermente il trasmettitore sul torace ed inumidire la superficie scanalata degli elettrodi sul
lato a contatto con la pelle.
Controllare che la superficie inumidita degli elettrodi sia a stretto contatto con la pelle e che
il logo si trovi in posizione centrale e sia rivolto verso l?alto.
ATTENZIONE
I portatori di pacemaker, defibrillatore o alt ri disposit ivi elettron ici interni possono u tilizzare
la cintura di trasmissione a proprio rischio e pericolo. Si consi glia di effettuare un test di
14
Page 97

resistenza fisica in presenza del medico prima di utilizzare la cintura di trasmissione. In tal
modo è possibile verificare i l corretto e sic uro funzioname nto simultaneo del pacemaker e
del trasmettitore.
L?esercizio fisico può comp ortare rischi, in particolare per le persone più sedentarie. Si
raccomanda pertanto di consultare il prop rio medico prima di iniziare un programma di
allenamento regolare.
7. FUNZIONAMENTO
In circostanze normali, il ricevitor e ha un campo di ricezione di 100 metri/330 piedi, che
però può essere ridotto da fattori che interferi scono con la trasmissio ne delle cinture HR,
quali ad esempio l'umidità e ostacol i come alberi, altri atleti, pareti, ecc.
Poiché un segnale da 2.4 GHz non può attraversare
l'acqua e tantomeno un corpo umano, la trasmissione
dalla cintura HR risulta ostacolata quando l'atleta
monitorato si trova in posizione op posta al Suunto Team
Pod. In questo caso, la registrazione del segnale in
cardiofrequenza potrebbe risultare frammentaria. Per lo
stesso motivo, Suunto Team Pod non è adatto alle attività
acquatiche. Grazie al fatto che le pareti e il soffitto
riflettono i segnali, la ric ezione risulta più continua negli
sport indoor che in quelli praticati all'e st ern o .
Per informazioni su prodotti di registrazione della
frequenza cardiaca alternativi, come Suunto t6, contattare
il rivenditore di zona Suunto.
15
Page 98

8. SOFTWARE SUUNTO
La funzionalità ottimale d i Suunto Team Pod si ottiene in combinazione con i software per
PC Suunto Monitor e Suunto Team Manger. La figura seguente illustra la relazione tra
Suunto Team Pod e i suddet ti software.
Suunto Team Manager
Memorizza i profili degli atleti e analizza le
registrazioni effettuate dal Suunto Monitor.
Suunto Team Pod
Riceve in tempo reale
i dati trasmessi dalle
cinture HR di fino a
30 atleti.
Suunto Monitor
Visualizza e registra i dati
ricevuti in cardiofrequenza
dal Team POD.
8.1. ANALISI IN TEMPO REALE - SOFTWARE SUUNTO MONITOR
Il software per PC Suunto Monitor costi tuisce una parte integrante per la funzionalità di
Suunto Team Pod. Durant e l'allenamen to, visuali zza e registr a in tempo reale i dati relativi
alla frequenza cardiaca fino a 30 atleti. Con un pratico codice colori, tale software consente
di avere una panoramica sulla co ndizione della frequenza cardiaca di cias cun elemento
della squadra entro, sotto o oltre la target zone di frequenza cardiaca della sessione. Inoltre
Suunto Monitor collega i nomi degli atleti ai numeri identificativi delle cinture di trasmissione
16
Page 99

della frequenza cardiaca per consentire l'individuazione automatica degli atleti attivi.
Il software per PC Suunto Monitor dispone di tre modalità di visualizzazione della
frequenza cardiaca durante l'esercizio: Il valore è visualizzato come battiti al minuto,
percentuale della frequenza cardiaca massima, o grafico continuo. Le registrazioni
effettuate dal software Suunto Monitor possono essere analizzate in maniera più dettagliata
con il software Suunto Team Manager.
La versione aggiornata del software Suunto Monitor può essere scaricata dal sito
www.suunto.com.
8.2. ANALISI PIÙ APPROFONDITE - SOFTWARE SUUNTO TEAM MANAGER
Sebbene il software Suunto Team Manager non costituisca parte integrante di Suunto
Team Pod, offre ulteriori possibilità di analisi post-allenamento e quindi rappresenta
un'ottima integrazione al software Suunto Monitor. Con il software Suunto Team Manager,
l'allenatore può creare i profili di ciascun membro della squadra o del gruppo, comprendenti
informazioni quali l'altezz a, il peso, l'età e la frequenza cardiaca massi ma, che saranno
utilizzati dal software per ana lizzare i dati re lativi al la frequ enza c ardiac a regist rat a in batt iti.
Questa analisi fornisce grafici sull'e ffetto di allenamento, sui valori EPOC e sul carico di
allenamento, sul consumo di ossigeno (VO2), sul consumo di energia, sulla ventilazione,
sulla frequenza respiratoria e sulla frequenza cardiaca.
Se un atleta con un profilo registrato in Suunto Team Manager è attivo, Suunto Monitor lo
identificherà e ne visualizzer à il nome e il profilo anzichè il numero identificat ivo della sua
cintura. Successivamente i dati proven ienti dal la sessione registrata v engono memori zzati
automaticamente dal software Su unto Monitor sotto il profilo dell'atleta ne l Suunto Team
Manager.
La versione aggiornata del software Suunt o Team Manager può ess ere scaricata dal sito
www.suunto.com.
17
Page 100

9. INSTALLAZIONE DEL SOFTWARE SUUNTO
9.1. INSTALLAZIONE DEL SOFTWARE
1. Inserire il CD-ROM del software Suunto nell?apposito drive.
2. Attendere l?inizializzazione dell?installazione e seguire le istruzioni.
NOTA: Se l?installazione non dovesse avviarsi automaticamente, cliccare su Start -->
Esegui e digitare D:\setup.exe.
9.2. INSTALLAZIONE DEI DRIVER USB
Le presenti istruzioni si basano sull?ipotesi che i driver degli strumenti Suunto Sports
vengano installati su un sistema pulito ovvero un sistema ch e non contiene ancora alcun
driver di strumento Suunto Sports. In caso contrario, prima di procedere alla nuova
installazione, occorre rimuovere i driver installati precedentemente.
9.3. INSTALLAZIONE DELLO STRUMENTO SUUNTO SPORTS SU WINDOWS
2000/XP
1. Inserire il CD-ROM del software Suunto nell?apposito drive.
2. Collega re il cavo di interfaccia PC dello strumento Suun to Sports alla porta USB d el
computer. Il Wizard o installazione guidata è attivato automaticamente.
3. Cliccare su Avanti.
4. Ricercare il driver desiderato sul proprio sistema e cliccare Avanti. Gli utenti che
utilizzano Windows XP devo no selezion are ?Install the software au tomaticall y? (Installa
il programma automaticamente) nel Wizard e cliccare Avanti. Se compare un
avvertimento di installazione, cliccare Continue Anyway (Continua comunque).
5. Sfogliare la cartella del driver sul CD-ROM d?installazion e e cli cc ar e Avanti.
6. Cliccare Avanti per installare il driver trovato.
7. Cliccare Finire per terminare l'installazione.
18
 Loading...