

Page 1

1
SUUNTO AMBIT3 PEAK
USER GUIDE
Page 2

2
Contents
SUUNTO AMBIT3 PEAK............................................................................ 1
1 SAFETY .............................................................................................. 6
2 USING BUTTONS ............................................................................... 8
3.1 Using backlight and button lock ......................................................... 10
3 GETTING STARTED ......................................................................... 11
4 CUSTOMIZING YOUR SUUNTO AMBIT3 PEAK .............................. 14
5.1Connecting to Movescount ................................................................... 14
5.2Updating your Suunto Ambit3 Peak ..................................................... 15
5.3Custom sport modes ............................................................................ 16
5.4Suunto Apps ........................................................................................ 18
5.5Inverting display ................................................................................... 19
5.6Adjusting display contrast .................................................................... 20
5.7Using Movescount mobile app ............................................................. 21
6 USING TIME MODE .......................................................................... 23
6.1Changing time settings......................................................................... 23
6.2Timekeeping ........................................................................................ 28
7 TIMERS ............................................................................................. 30
7.1Activating stopwatch ............................................................................ 30
7.2Using stopwatch .................................................................................. 31
7.3Countdown timer .................................................................................. 32
Page 3

3
8 NAVIGATION .................................................................................... 34
8.1Using GPS ........................................................................................... 34
8.2Checking your location ......................................................................... 37
8.3POI navigation ..................................................................................... 38
8.4Route navigation ................................ .................................................. 46
9 USING ALTI & BARO MODE ............................................................ 54
9.1How Alti & Baro works.......................................................................... 54
9.2Getting correct readings ....................................................................... 55
9.3Getting incorrect readings .................................................................... 56
9.4Matching profile to activity .................................................................... 57
9.5Using Altimeter profile .......................................................................... 59
9.6Using Barometer profile ....................................................................... 60
9.7Using Automatic profile ........................................................................ 62
9.8FusedAlti .............................................................................................. 63
9.9Weather indicators ............................................................................... 66
10 USING 3D COMPASS ................................................................. 69
10.1 Calibrating compass..................................................................... 69
10.2 Setting declination value .............................................................. 71
10.3 Setting bearing lock ..................................................................... 72
11 USING SPORT MODES .............................................................. 74
11.1 Sport modes ................................................................................ 74
11.2 Additional options in sport modes ................................................. 75
11.3 Using heart rate belt ..................................................................... 77
11.4 Putting on heart rate belt .............................................................. 78
11.5 Starting exercise .......................................................................... 79
11.6 During exercise ............................................................................ 82
11.7 Viewing logbook after exercise ........................................................ 94
Page 4

4
11.8 Using planned moves ..................................................................... 99
12 Activity monitoring .................................................................. 101
13 MULTISPORT TRAINING .......................................................... 102
13.1 Switching sport modes manually during exercise ....................... 102
13.2 Using preconfigured multisport mode ......................................... 103
14 SWIMMING ................................................................................ 105
14.1 Pool swimming ........................................................................... 105
14.2 Openwater swimming ................................................................. 106
14.3 Teaching swimming styles to Suunto Ambit3 Peak..................... 108
14.4 Swimming drills .......................................................................... 110
15 FUSEDSPEED........................................................................... 112
16 ADJUSTING SETTINGS............................................................ 115
15.1 Service menu ................................................................................ 120
17 PAIRING POD/HEART RATE BELT ......................................... 122
16.1 Using Foot POD ......................................................................... 124
16.2 Calibrating power PODs and slope ............................................ 126
17 ICONS ............................................................................................. 128
18 CARE AND MAINTENANCE ..................................................... 132
18.1 Water resistance ........................................................................ 132
18.2 Charging the battery................................................................... 133
19 TECHNICAL SPECIFICATION .................................................. 136
General ............................................................................................... 136
Memory .............................................................................................. 136
Radio receiver..................................................................................... 136
Barometer ........................................................................................... 136
Altimeter ............................................................................................. 136
Thermometer ...................................................................................... 137
Page 5

5
Chronograph ....................................................................................... 137
Compass ............................................................................................ 137
GPS .................................................................................................... 137
19.1 Trademark ................................................................................. 137
19.2 FCC compliance ........................................................................ 137
19.3 IC ............................................................................................... 138
19.4 CE ............................................................................................. 138
19.5 Copyright ................................................................................... 138
19.6 Patent notice .............................................................................. 138
19.7 Warranty .................................................................................... 139
Warranty Period .................................................................................. 139
Exclusions and Limitations .................................................................. 140
Access to Suunto warranty service ..................................................... 140
Limitation of Liability ............................................................................ 141
SUUNTO CUSTOMER SUPPORT ..................................................... 143
Page 6
6
1 SAFETY
Types of safety precautions
WARNING: - is used in connection with a procedure or situation
that may result in serious injury or death.
CAUTION: - is used in connection with a procedure or situation
that will result in damage to the product.
NOTE: - is used to emphasize important information.
TIP: - is used for extra tips on how to utilize the features and
functions of the device.
Safety precautions
IRRITATIONS MAY OCCUR WHEN PRODUCT IS IN CONTACT
WITH SKIN, EVEN THOUGH OUR PRODUCTS COMPLY WITH
INDUSTRY STANDARDS. IN SUCH EVENT, STOP USE
IMMEDIATELY AND CONSULT A DOCTOR.
BEGINNING AN EXERCISE PROGRAM. OVEREXERTION MAY
CAUSE SERIOUS INJURY.
WARNING: ALLERGIC REACTIONS OR SKIN
WARNING: ALWAYS CONSULT YOUR DOCTOR BEFORE
Page 7
7
WARNING: ONLY FOR RECREATIONAL USE.
BATTERY
MATERIAL TO ENSURE YOUR SAFETY.
THE
PRODUCT, AS IT MAY DAMAGE THE SURFACE.
TREAT IT AS ELECTRONIC WASTE TO PRESERVE THE
ENVIRONMENT.
MAY BE DAMAGED.
WARNING: DO NOT ENTIRELY RELY ON THE GPS OR
LIFETIME, ALWAYS USE MAPS AND OTHER BACKUP
CAUTION: DO NOT APPLY SOLVENT OF ANY KIND TO
PRODUCT, AS IT MAY DAMAGE THE SURFACE.
CAUTION: DO NOT APPLY INSECT REPELLENT ON THE
CAUTION: DO NOT THROW THE PRODUCT AWAY, BUT
CAUTION: DO NOT KNOCK OR DROP THE DEVICE, AS IT
Page 8
8
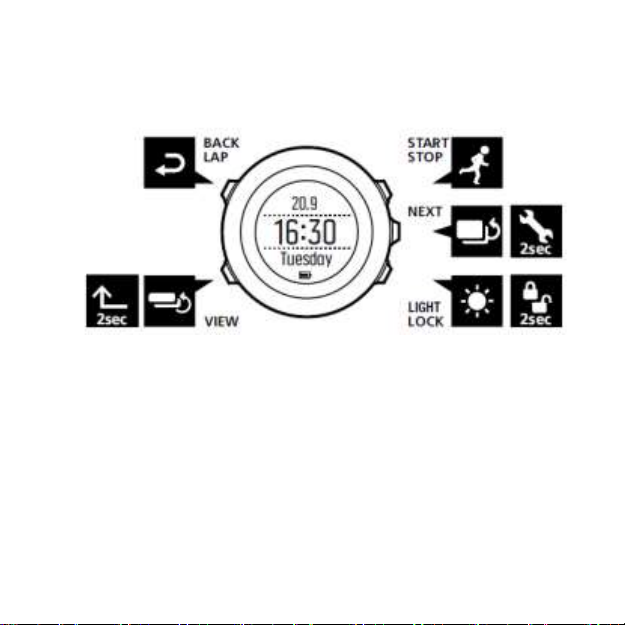
2 USING BUTTONS
Suunto Ambit3 Peak has five buttons which allow you to access all the
features.
2sec
2sec
[Start Stop]:
•
access the start menu
•
pause or resume an exercise or timer
•
keep pressed to stop and save an exercise
•
increase a value or move up in the settings
[Next]:
•
change between displays
•
keep pressed to access/exit the options menu
•
keep pressed to access/exit the options menu in sport modes
•
accept a setting
[Light Lock]:
Page 9

9
•
activate the backlight
•
keep pressed to lock/unlock the buttons
•
decrease a value or move down in the settings
[View]:
•
change views in TIME mode and during exercise
•
keep pressed to toggle the display between light and dark
•
keep pressed to access context-sensitive shortcuts (see below)
[Back Lap]:
•
return to the previous step
•
add a lap during exercise
TIP: When changing the values, you can increase the speed by
keeping [Start Stop] or [Light Lock] pressed until the values start to
faster.
Defining shortcuts
By default, when you keep [View] pressed in TIME mode, you toggle the
display between light and dark. This button push can be changed to
instead access a specific menu option.
To define a shortcut:
1. Keep [Next] pressed to enter the options menu.
2. Browse to the menu item to which you want create a shortcut.
3. Keep [View] to create the shortcut.
NOTE: Shortcuts cannot be created to all possible menu items,
such as individual logs.
In other modes, keeping [View] pressed accesses predefined shortcuts.
scroll
Page 10
10
For example, when the compass is active, you can access the compass
settings by keeping [View] pressed.
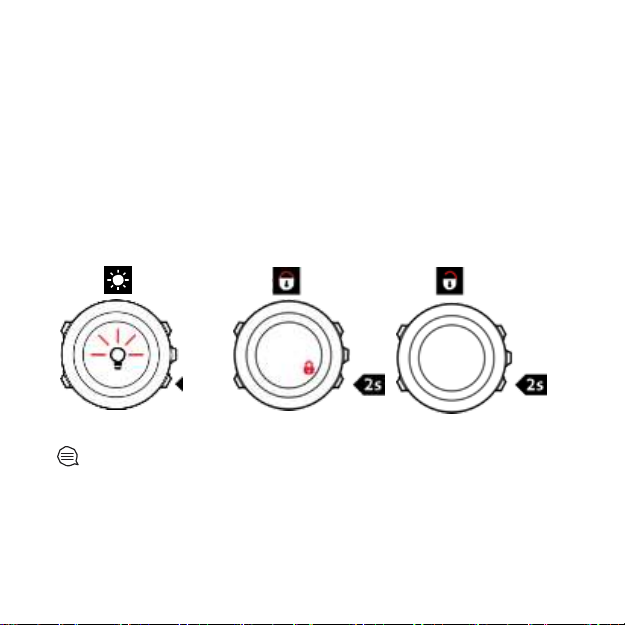
3.1 Using backlight and button lock
Pressing [Light Lock] activates the backlight. You can change the
backlight behavior in the watch settings under GENERAL / Tones/
display / Backlight.
Keeping [Light Lock] locks and unlocks buttons. You can change the
button lock behavior in the watch settings under GENERAL / Tones/
display / Button lock.
modes to avoid accidentally starting or stopping your log. When the
[Back Lap] and [Start Stop] buttons are locked, you can still activate the
backlight by pressing [Light Lock], change between the displays by
pressing [Next] and views by pressing [View].
TIP: Select the Actions only button lock setting for sport
Page 11

11
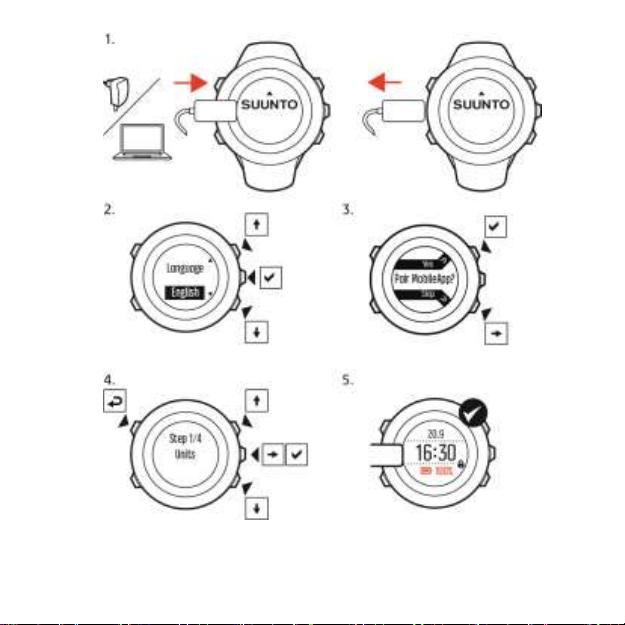
3 GETTING STARTED
Your Suunto Ambit3 Peak wakes up automatically when you attach it to
your computer or a USB charger using the supplied USB cable.
To start using your watch:
1. Wake up your sports watch by shortly connecting it to your
computer or other power source with the supplied USB cable.
2. Press [Start Stop] or [Light Lock] to scroll to the desired language
and press [Next] to select.
3. Pair with Movescount mobile app by pressing [Start Stop] or skip to
next step by pressing [Light Lock].
4. Follow the startup wizard to complete initial settings. Set values with
[Start Stop] or [Light Lock] and press [Next] to accept and go to the
next step.
5. Reconnect USB cable and charge until battery indicator is 100%.
Page 12
12
Fully charging an empty battery takes about 2-3 hours. Buttons are
locked while the USB cable is attached and connected to a
Page 13

13
computer.
pressed.
You can exit the startup wizard at any time by keeping [Next]
The startup wizard takes you through the following settings:
Units
Time
Date
Personal settings (gender, age, weight)
NOTE: If you pair with the mobile app, some initial settings
are skipped. Values are retrieved from the app.
Page 14

14
4 CUSTOMIZING YOUR SUUNTO
AMBIT3 PEAK
5.1 Connecting to Movescount
Movescount.com is your free personal diary and online sports
community that offers you a rich set of tools to manage your daily
activities and create engaging stories about your experiences.
Movescount allows you to transfer your recorded exercise logs from
your Suunto Ambit3 Peak to Movescount and customize the watch to
best meet your needs.
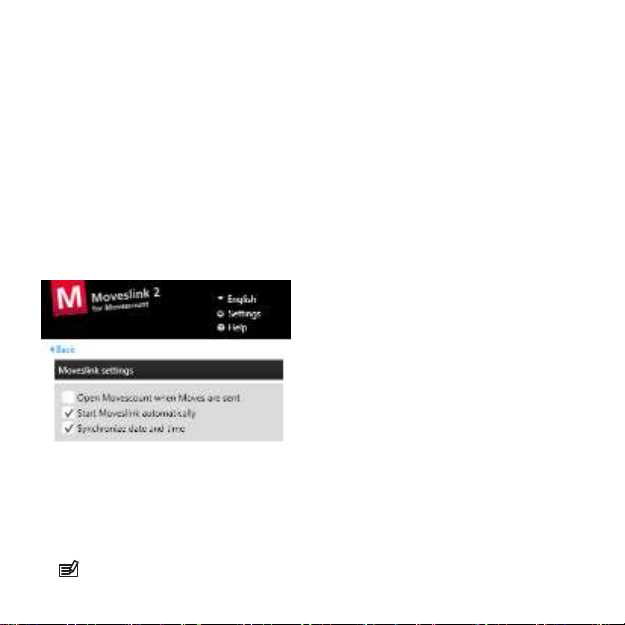
There are two ways to connect to Movescount: with Moveslink (USB
cable) and the Suunto Movescount mobile app (Bluetooth® Smart).
software for your Suunto Ambit3 Peak.
Start by installing Moveslink:
1. Go to www.movescount.com/moveslink.
2. Download, install and activate the latest version of Moveslink.
TIP: Connect to Movescount with Moveslink to get the latest
Page 15

15
when Moveslink is active.
To connect with the moble app:
1. If you have a compatible mobile phone, install the Movescount mobile
from the App Store.
2. On your watch, keep [Next] pressed to enter the options menu.
3. Press [Light Lock] to scroll to Connectivity and press [Next].
4. Press [Start Stop] to pair with the mobile app.
5. Activate the mobile app if it is not already.
6. Enter the passkey shown your watch in the app and tap Pair.
To register to Movescount:
1. Go to www.movescount.com.
2. Create your account.
NOTE: The first time your Suunto Ambit3 Peak is connected
NOTE: A Moveslink icon is visible on your computer's display
to
Movescount all information (including the watch settings) is
transferred from the watch to your Movescount account. The next time
you connect your Suunto Ambit3 Peak to your Movescount account,
changes in settings and sport modes you made in Movescount and in
the watch will be synchronized.
5.2 Updating your Suunto Ambit3 Peak
You can update your Suunto Ambit3 Peak software automatically in
Movescount.
the
Page 16

16
NOTE: When you update your Suunto Ambit3 Peak software,
all the
deleted from the watch.
To update your Suunto Ambit3 Peak software:
1. Go to www.movescount.com/moveslink and install the
2. Connect your Suunto Ambit3 Peak to your computer with the
existing logs are automatically moved to Movescount and
Moveslink application.
Suunto USB cable. The Moveslink application will automatically
check for software updates. If an update is available, your watch will
be updated.
NOTE: You can use the Moveslink application without registering
to Movescount. However, Movescount greatly extends the usability,
personalization and settings options of your Suunto
Ambit3 Peak . It
also visualizes recorded tracks and other data from your
Therefore, it is recommended to create a Movescount
utilize the full potential of the watch.
account in order to
5.3 Custom sport modes
In addition to the default sport modes stored in the watch, you can create
and edit custom sport modes in Movescount.
A custom sport mode can contain 1 to 8 different sport mode displays.
You can choose which data appears on each display from a
comprehensive list. You can customize, for example, sports-specific heart
rate limits, autolap distance, or the recording rate to optimize accuracy
and battery duration.
activities.
Page 17

17
Any sport mode with GPS activated can also use the Quick Navigation
option. By default, this option is off. When you select POI or Route,
you get a pop-up list of the POIs or routes you have defined in your
watch at the start of your exercise.
You can transfer up to 10 different sport modes created in
Movescount to your Suunto Ambit3 Peak. Only one sport mode can
be active at a time.
TIP: You can also edit the default sport modes in Movescount.
You can set your watch to automatically scroll through your sport
mode displays using Autoscroll. Activate the feature and define how
long the displays are shown on your custom sport mode in
Movescount. You can turn Autoscroll on or off during exercise
without any effect on your Movescount settings.
To set Autoscroll on/off during exercise:
1. While you are in a sport mode, keep [Next] pressed to access the
options menu.
2. Scroll to ACTIVATE with [Light Lock] and select with [Next].
3. Scroll to Autoscroll with [Start Stop] and select with [Next].
4. Press [Start Stop] or [Light Lock] to set AutoscrollOn/Off
and accept with [Next].
Page 18
18
5.4 Suunto Apps
Suunto Apps allow you to further customize your Suunto Ambit3 Peak .
Visit Suunto App Zone in Movescount to find Apps, such as various
timers and counters, available for your use. If you cannot find what you
need, create your own App with Suunto App Designer. You can create
Apps, for example, for calculating your estimated marathon result, or
the slope grade of your skiing route.
To add Suunto Apps to your Suunto Ambit3 Peak:
1. Go to the PLAN & CREATE section in Movescount community and
select App Zone to browse existing Suunto Apps. To create your
own App, go to the PLAN & CREATE section of your profile and
select App Designer.
Page 19

19
2. Add Suunto App to a sport mode. Connect your Suunto Ambit3
Peak to your Movescount account to synchronize Suunto App to
the watch. The added Suunto App will show the result of its
calculation while you exercise.
NOTE: You can add up to five Suunto Apps to each sport mode.
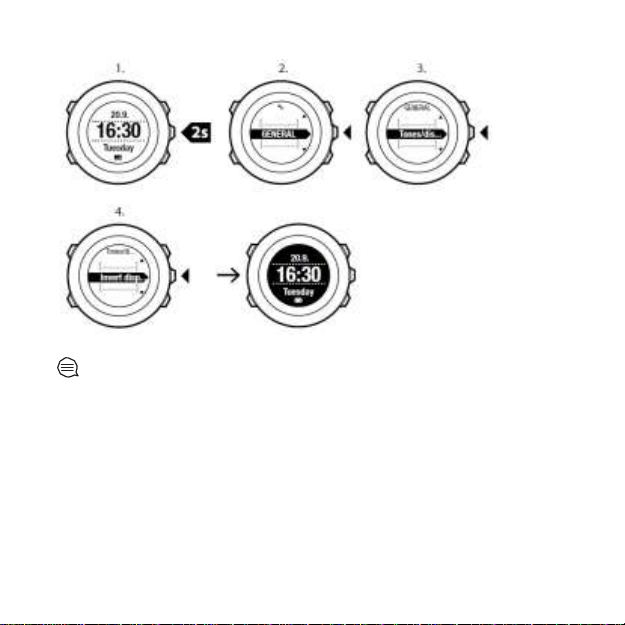
5.5 Inverting display
You can invert the display of your Suunto Ambit3 Peak from light to
dark or vice versa.
To invert the display in the settings:
1. Keep [Next] pressed to enter the options menu.
2. Press [Next] to enter the GENERAL settings.
3. Press [Next] to enter Tones/display.
4. Scroll to Invert display with [Start Stop] and accept with [Next].
Page 20
20
TIP: You can also invert the display of your Suunto Ambit3
Peak by keeping [View] pressed while you are in TIME mode, a sport
mode,
navigating, or using the stopwatch and timers.
5.6 Adjusting display contrast
You can increase or decrease the display contrast of your Suunto
Ambit3 Peak.
To adjust the display contrast in the settings:
1. Keep [Next] pressed to enter the options menu.
2. Press [Next] to enter the GENERAL settings.
Page 21
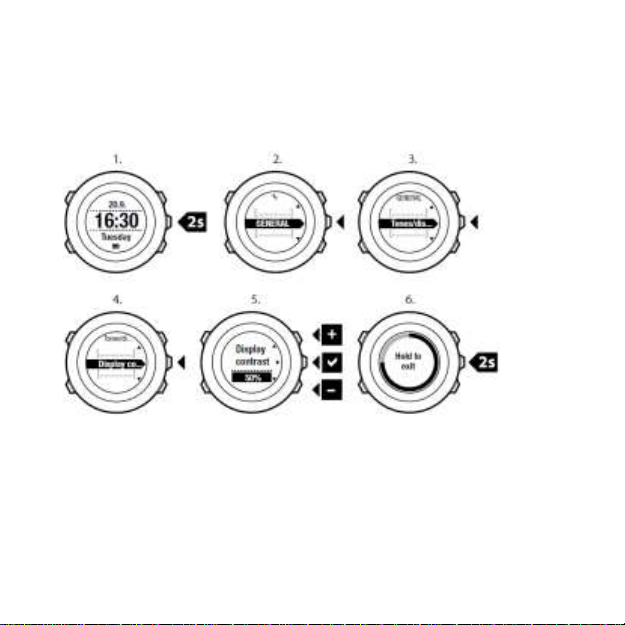
21
3. Press [Next] to enter Tones/display.
4. Scroll to Display contrast with [Light Lock] and enter with [Next].
5. Increase the contrast with [Start Stop], or decrease it with [Light
Lock].
6. Go back to the settings with [Back Lap], or keep [Next] pressed to
exit the options menu.
5.7 Using Movescount mobile app
With the Suunto Movescount mobile app, you further enrich your
Ambit3 Peak. Pair with the mobile app to get notifications on your
Ambit3 Peak, change settings on the go, and take pictures with data
from your move as wells as create Suunto Movies of your moves.
Page 22

22
To get notification on your watch:
1 If you haven’t already, go to the App Store and install the mobile
app on your phone.
2 Pair your Suunto Ambit3 Peak with the mobile app.
3 Enter options menu and go to CONNECTIVITY.
4 Got to Settings and select Notifications.
5 Toggle Notifications On/Off with [View] and press [Next]
6 Exit by keeping [Next] pressed.
When your Suunto Ambit3 Peak is paired with the mobile app, you
can change settings as well as create or modify sport modes in the
app. The app sync changes with your watch and your
Movescount.com account.
With any move that is stored in Movescount.com, you can add
pictures as well as create a Suunto Movie of the move using
Movescount app. For more information, please refer to the
Movescount app user guide.
Page 23
23
6 USING TIME MODE
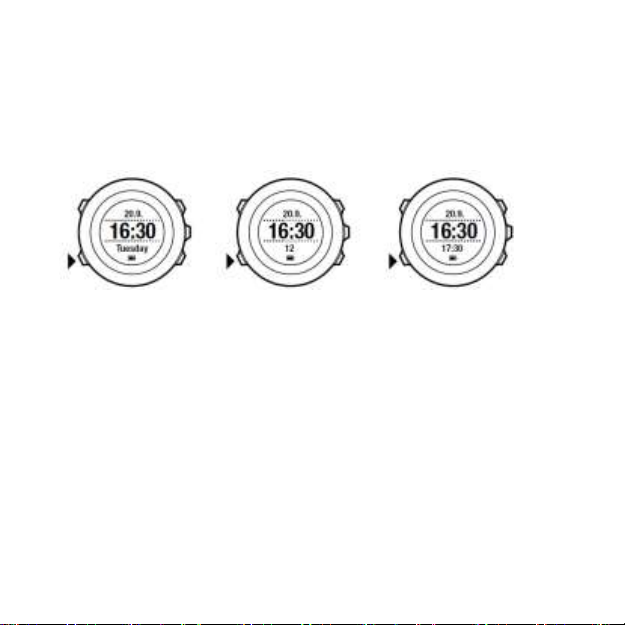
TIME mode shows you the following information:
•
top row: date
•
middle row: time
•
bottom row: toggle between weekday, seconds, dual time and
other information with [View].
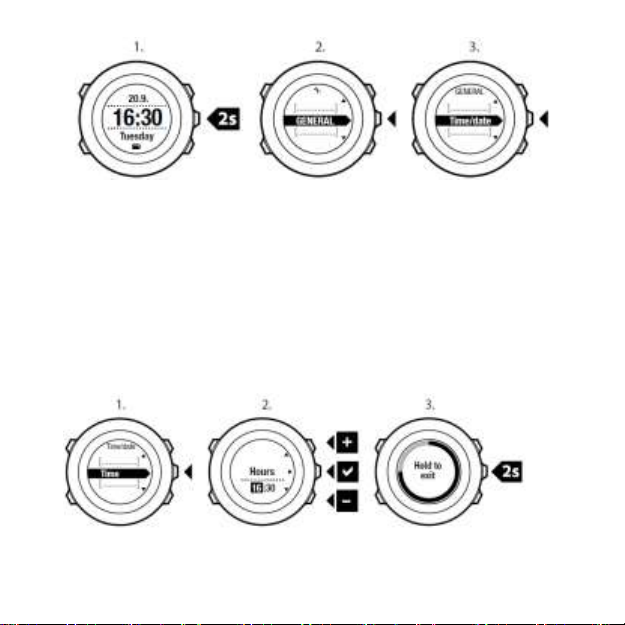
6.1 Changing time settings
To access the time settings:
1. Keep [Next] pressed to enter the options menu.
2. Press [Next] to enter GENERAL.
3. Scroll to Time/date using [Start Stop] and enter with [Next].
Page 24
24
Setting time
The current time is shown in the middle row of the TIME mode
display.
To set the time:
1. In the options menu, go to GENERAL, then to Time/date and
Time.
2. Change the hour and minute values with [Start Stop] and [Light
Lock]. Accept with [Next].
3. Go back to the settings with [Back Lap], or keep [Next] pressed to
exit the options menu.
Page 25
25
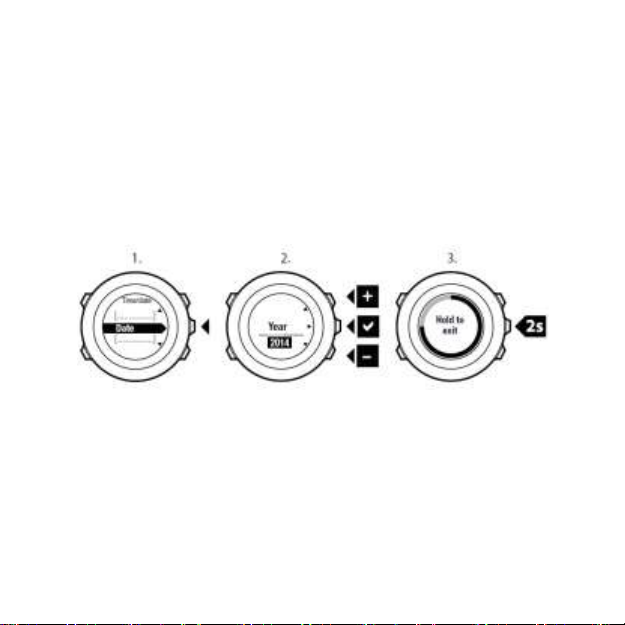
Setting date
The current date is shown on the top row of the TIME mode display. To
set the date:
1. In the options menu, go to GENERAL, then to Time/date and
Date.
2. Change the year, month and day values with [Start Stop] and
[Light Lock]. Accept with [Next].
3. Go back to the settings with [Back Lap], or keep [Next] pressed to
exit the options menu.
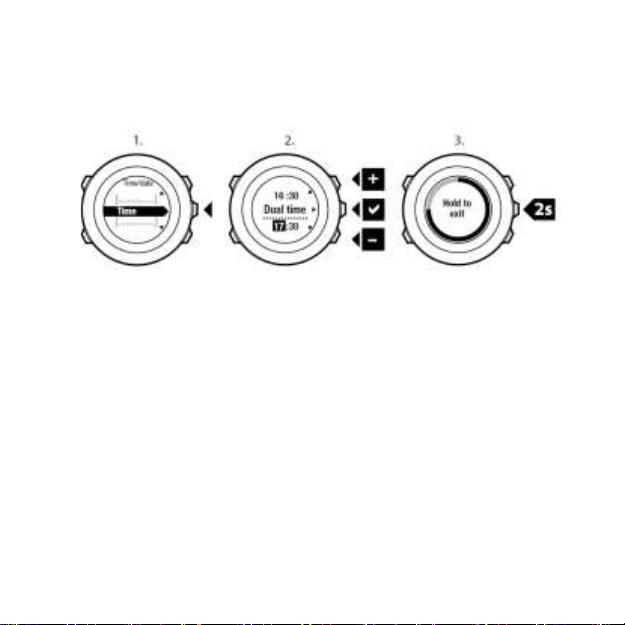
Setting dual time
Dual time allows you to keep track of the current time in a second
time zone, for example, when travelling. Dual time is displayed on the
bottom row of the TIME mode display and you can access it by
pressing [View].
To set the dual time:
1. In the options menu, go to GENERAL, then to Time/date and
Dual time.
Page 26
26
2. Change the hour and minute values with [Start Stop] and [Light
Lock]. Accept with [Next].
3. Go back to the settings with [Back Lap], or keep [Next] pressed to
exit the options menu.
Setting alarm
You can use your Suunto Ambit3 Peak as an alarm
clock. To access the alarm clock and set the alarm:
1. In the options menu, go to GENERAL, then to Time/date and
Alarm.
2. Set the alarm on or off with [Start Stop] or [Light Lock]. Accept
with [Next].
3. Set the hours and minutes with [Start Stop] and [Light Lock].
Accept with [Next].
4. Go back to the settings with [Back Lap], or keep [Next] pressed to
exit the options menu.
Page 27
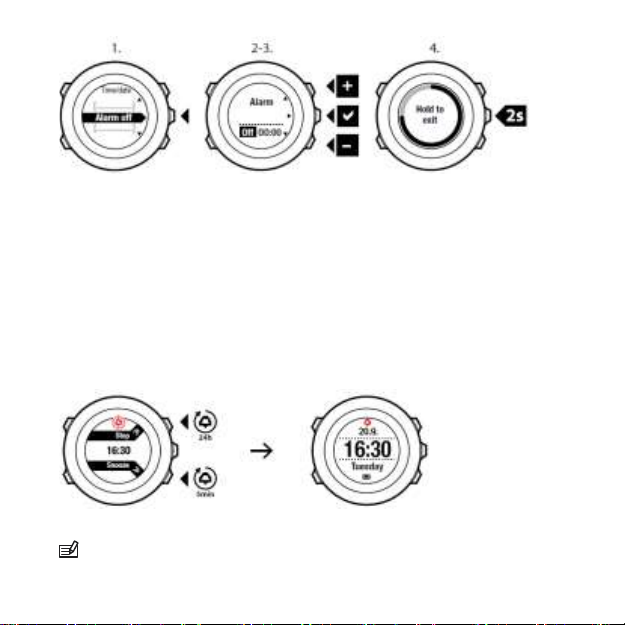
27
When the alarm is switched on, the alarm symbol is shown on most of
the displays.
When the alarm sounds, you can:
•
Select Snooze by pressing [Light Lock]. The alarm stops and
restarts every 5 minutes until you stop it. You can snooze up to 12
times for a total of 1 hour.
•
Select Stop by pressing [Start Stop]. The alarm stops and restarts
the same time the following day, unless you switch the alarm off in
the settings.
NOTE: When snoozing, the alarm icon blinks in TIME mode.
Page 28
28
6.2 Timekeeping
You Ambit3 Peak time can be updated through your mobile phone,
computer (Moveslink) or GPS time.
If you have paired your watch with the Movescount mobile app, time
and time zone are automatically synced with that of your mobile
phone.
When you connect your watch to the computer with the USB cable,
Moveslink by default updates your watch time according to the
computer clock. This feature can be turned off in the Moveslink
settings.
GPS timekeeping
GPS timekeeping makes sure your clock remains accurate by
adjusting minutes and seconds using GPS satellite time. This
happens every time the GPS signal is received.
NOTE:
If the
watch time
is more than 7.5 minutes off, GPS
Page 29
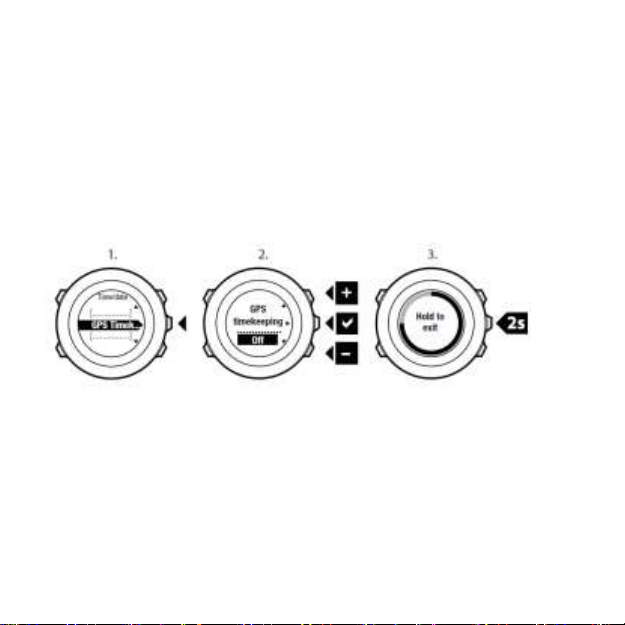
29
timekeeping corrects it to the closest quarter hour.
zone is not changed.
Your time
GPS timekeeping is activated by default. To deactivate it:
1. In the options menu, go to GENERAL, then to Time/date and
GPS timekeeping.
2. Set the GPS timekeeping on or off with [Start Stop] and [Light
Lock]. Accept with [Next].
3. Go back to the settings with [Back Lap], or keep [Next] pressed
to exit the options menu.
Page 30
30
7 TIMERS
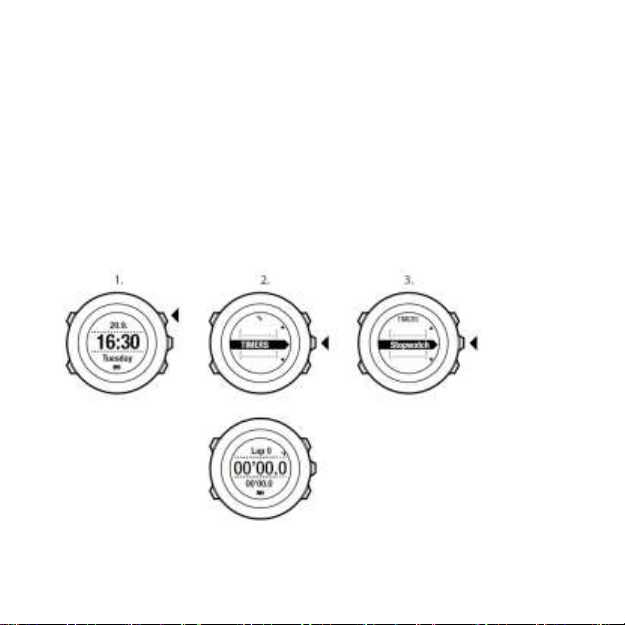
7.1 Activating stopwatch
The stopwatch allows you to measure time without starting an exercise.
After you have activated the stopwatch, it is shown as an additional
display in TIME mode.
To activate/deactivate the stopwatch:
1. Press [Start Stop] to enter the start menu.
2. Scroll to TIMERS with [Light Lock] and enter with [Next].
3. Press [Next] to select Stopwatch.
Page 31

31
7.2 Using stopwatch
To use the stopwatch:
1. In the activated stopwatch display, press [Start Stop] to start
measuring time.
2. Press [Back Lap] to make a lap, or press [Start Stop] to pause the
stopwatch. To view the lap times, press [Back Lap] when the
stopwatch is paused.
3. Press [Start Stop] to continue.
4. To reset the time, keep [Start Stop] pressed when the stopwatch is
paused.
Page 32

32
While the stopwatch is running, you can:
•
press [View] to switch between the time and lap time shown on the
bottom row of the display.
•
switch to TIME mode with [Next].
•
enter the options menu by keeping [Next] pressed.
7.3 Countdown timer
You can set the countdown timer to count down from a preset time to
zero. After you have activated the countdown timer, it is shown as an
additional display after the TIME mode.
The timer makes a short sound every second during the last 10
seconds and sounds an alarm when zero is reached.
To set the countdown time:
1. Press [Start Stop] to enter the start menu.
2. Scroll to TIMERS with [Light Lock] and select with [Next].
3. Scroll to Countdown with [Light Lock] and select with [Next].
4. Press [View] to adjust the countdown time.
5. Set the hours and minutes with [Start Stop] and [Light Lock].
Accept with [Next].
6. Press [Start Stop] start the countdown.
Page 33

33
After the countdown has stopped, the countdown timer display
disappears after a one-hour timeout.
To deactivate the timer, go to TIMERS in the start menu and select
END countdown.
TIP: You can pause/continue the countdown by pressing
[Start
Stop].
Page 34

34
8 NAVIGATION
8.1 Using GPS
Suunto Ambit3 Peak uses Global Positioning System (GPS) in
determining your current position. GPS incorporates a set of satellites
that orbit the Earth at an altitude of 20,000 km at the speed of 4 km/s.
The built-in GPS receiver in Suunto Ambit3 Peak is optimized for wrist
use and receives data from a very wide angle.
8.1.1 Getting GPS signal
Suunto Ambit3 Peak activates GPS automatically when you select a
sport mode with the GPS functionality, determine your location, or start
navigating.
Page 35

35
used it for a long time, it might take longer than usual to get a GPS fix.
NOTE: When you activate GPS for the first time, or have not
Subsequent GPS starts will take less time.
TIP: To minimize GPS initiation time, hold the watch steady
with GPS facing up and make sure you are in an open area so that the
watch has a clear view of the sky.
Troubleshooting: No GPS signal
•
For an optimal signal, point the GPS part of the watch upwards. The
best signal can be received in an open area with a clear view of the
sky.
•
The GPS receiver usually works well inside tents and other thin
covers. However, objects, buildings, dense vegetation or cloudy
weather can reduce the GPS signal reception quality.
•
GPS signal does not penetrate any solid constructions or water.
Therefore do not try to activate GPS for example inside buildings,
caves, or under water.
8.1.2 GPS grids and position formats
Grids are lines on a map that define the coordinate system used on the
map.
Position format is the way the GPS receiver's position is displayed on the
watch. All the formats relate to the same location, they only express it in a
different way. You can change the position format in the watch settings
under GENERAL / Format / Position format.
Page 36

36
You can select the format from the following grids:
•
latitude/longitude is the most commonly used grid and has three
different formats:
o
WGS84 Hd.d°
o
WGS84 Hd°m.m'
o
WGS84 Hd°m's.s
•
UTM (Universal Transverse Mercator) gives a two-dimensional
horizontal position presentation.
•
MGRS (Military Grid Reference System) is an extension of UTM
and consists of a grid zone designator, 100,000-meter square
identifier and a numerical location.
Suunto Ambit3 Peak also supports the following local grids:
•
British (BNG)
•
Finnish (ETRS-TM35FIN)
•
Finnish (KKJ)
•
Irish (IG)
•
Swedish (RT90)
•
Swiss (CH1903)
•
UTM NAD27 Alaska
•
UTM NAD27 Conus
•
UTM NAD83
•
New Zealand (NZTM2000)
NOTE: Some grids cannot be used in the areas north of 84°N
and south of 80°S, or outside the countries that they are intended for.
Page 37

37
8.1.3 GPS accuracy and power saving
When customizing sport modes, you can define the GPS fix interval
using the GPS accuracy setting in Movescount. The shorter the
interval, the better the accuracy during exercise.
By increasing the interval and lowering the accuracy, you can
extend the battery life.
The GPS accuracy options are:
•
Best: ~ 1 sec fix interval, highest power consumption
•
Good: ~ 5 sec fix interval, moderate power consumption
•
OK: ~ 60 sec fix interval, lowest power consumption
•
Off: no GPS fix
8.2 Checking your location
Suunto Ambit3 Peak allows you to check the coordinates of your
current location using GPS.
To check your location:
1. Press [Start Stop] to enter the start menu.
2. Scroll to NAVIGATION using [Start Stop] and enter with [Next].
3. Press [Next] to select Location.
4. Press [Next] to select Current.
5. The watch starts searching for a GPS signal and displays GPS
found after acquiring the signal. After that your current
coordinates are shown on the display.
Page 38

38
TIP: You can also check your location while you are recording
an
exercise by keeping [Next] pressed to access the options menu.
8.3 POI navigation
8.3.1 Adding your location as a point of interest (POI)
Suunto Ambit3 Peak allows you to save your current location or define
a location as a POI. You can navigate to a saved POI anytime, for
example, during your exercise.
Page 39

39
You can store up to 100 POIs in the watch. Note that also routes take
up this quota. For example, if you have a route with 60 waypoints, you
can additionally store 40 POIs in the watch.
You can select a POI type (icon) and POI name from a pre-defined list,
or freely name the POIs in Movescount.
To save a location as a POI:
1. Press [Start Stop] to enter the start menu.
2. Scroll to NAVIGATION using [Start Stop] and enter with [Next].
3. Press [Next] to select Location.
4. Select CURRENT or DEFINE to manually change longitude and
latitude values.
5. Press [Start Stop] to save the location.
6. Select a suitable POI type for the location. Scroll through the POI
types with [Start Stop] or [Light Lock]. Select a POI type with [Next].
7. Select a suitable name for the location. Scroll through the name
options with [Start Stop] or [Light Lock]. Select a name with [Next].
8. Press [Start Stop] to save the POI.
Page 40

40
location on a map or inserting the coordinates. POIs in your Suunto
Ambit3 Peak
TIP: You can create POIs in Movescount by selecting a
and in Movescount are always synchronized when you
Page 41

41
connect the watch to Movescount.
8.3.2 Navigating to a point of interest (POI)
Suunto Ambit3 Peak includes GPS navigation which allows you to
navigate to a pre-defined destination stored as a POI.
NOTE: You can also navigate when you are recording an
exercise, see 11.6.7 Navigating during exercise.
To navigate to a POI:
1. Press [Start Stop] to enter the start menu.
2. Scroll to NAVIGATION using [Start Stop] and enter with [Next].
3. Scroll to POIs (Points of interest) using [Light Lock] and select
with [Next].
The watch displays the number of saved POIs and free space
available for new POIs.
4. Scroll to the POI you wish to navigate to with [Start Stop] or
[Light Lock] and select with [Next].
5. Press [Next] to select Navigate.
If you are using the compass for the first time, you need to calibrate
it. For more information, see 10.1 Calibrating compass. After
activating the compass, the watch starts searching for a GPS
signal and displays GPS found after acquiring the signal.
Page 42

42
6. Start navigating to the POI. The watch displays the following
information:
•
indicator showing the direction to your target (see further
explanation below)
•
your distance from the target
7. The watch informs you that you have arrived at your target.
Page 43

43
When stationary or moving slowly (<4 km/h), the watch shows you the
direction to the POI (or waypoint if navigating a route) based on the
compass bearing.
Page 44

44
While moving (>4 km/h), the watch shows you the direction to the
POI (or waypoint if navigating a route) based on GPS.
The direction to your target, or bearing, is shown with the empty
triangle. Your direction of travel, or heading, is indicated by the solid
lines at the top of the display. Aligning these two ensures you are
moving in the correct direction.
8.3.3 Deleting a point of interest (POI)
To delete a POI:
1. Press [Start Stop] to enter the start menu.
2. Scroll to NAVIGATION using [Start Stop] and enter with [Next].
3. Scroll to POIs (Points of interest) using [Light Lock] and
Page 45

45
select with [Next].
The watch displays the number of saved POIs and free space
available for new POIs.
4. Scroll to the POI you wish to delete with [Start Stop] or [Light Lock]
and select with [Next].
5. Scroll to Delete with [Start Stop]. Select with [Next].
6. Press [Start Stop] to confirm
Page 46

46
NOTE: When you delete a POI in Movescount and
synchronize
the watch but only
your Suunto Ambit3 Peak, the POI is deleted from
disabled in Movescount.
8.4 Route navigation
8.4.1 Adding a route
You can create a route in Movescount, or import a route created with
another watch from your computer to Movescount. You can also record
a route with your Suunto Ambit3 Peak and upload it to Movescount, see
11.6.1 Recording tracks.
To add a route:
1. Go to www.movescount.com. Follow the instructions on how to
import or create a route.
2. Activate Moveslink and connect your Suunto Ambit3 Peak to
your computer with the Suunto USB cable. The route is
transferred automatically to the watch.
NOTE: Make sure that the route you want to transfer to
Suunto Ambit3 Peak has been selected in Movescount.
your
Page 47

47
8.4.2 Navigating a route
You can navigate a route you have downloaded to your Suunto Ambit3
Peak from Movescount, see 8.4.1 Adding a route.
NOTE: You can also navigate as a sport mode, see
11.6.7 Navigating during exercise.
To navigate a route:
1. Press [Start Stop] to enter the start menu.
2. Scroll to NAVIGATION with [Start Stop] and enter with [Next].
3. Scroll to Routes with [Start Stop] and enter with [Next].
The watch displays the number of saved routes and after that a
list of all your routes.
4. Scroll to the route you want to navigate with [Start Stop] or
[Light Lock]. Select with [Next].
5. The watch displays all the waypoints on the selected route. Scroll
to the waypoint you want to use as the starting point with [Start
Stop] or [Light Lock]. Accept with [Next].
Page 48

48
6. Press [Next] to select Navigate.
7. If you selected a waypoint in the middle of the route, Suunto
Ambit3 Peak prompts you to select the direction of the
navigation. Press [Start Stop] to select Forwards or [Light Lock]
to select Backwards.
If you selected the first waypoint as the starting point, Suunto
Ambit3 Peak navigates the route forward (from the first to the last
waypoint). If you selected the last waypoint as the starting point,
Suunto Ambit3 Peak navigates the route backwards (from the last
to the first waypoint).
8. If you are using the compass for the first time, you need to calibrate
it. For more information, see 10.1 Calibrating compass. After
activating the compass, the watch starts searching for a GPS
signal and displays GPS found after acquiring the signal.
9. Start navigating to the first waypoint on the route. The watch
informs you when you are approaching the waypoint and
automatically starts navigating to the next waypoint on the route.
10. Before the last waypoint on the route the watch informs you
that you have arrived at your destination.
Page 49

49
Page 50

50
To skip a waypoint on a route:
1. While you are navigating a route, keep [Next] pressed to access
the options menu.
Page 51

51
2. Press [Next] to select NAVIGATION.
3. Scroll to Skip waypoint with [Start Stop] and select with [Next].
The watch skips the waypoint and starts navigating directly to the
next waypoint on the route.
8.4.3 During navigation
During navigation, press [View] to scroll the following views:
1. the full track view showing the whole route
2. zoomed-in view of the route. By default, the zoomed-in view is
scaled to a 200 m/0.125 mi scale, or larger if you are far away
from the route. You can change the map orientation in the watch
settings under GENERAL / Map.
3. waypoint navigation view
Page 52

52
Full track view
The full track view shows you the following information:
•
(1) arrow indicating your location and pointing to the direction of
your heading.
•
(2) the next waypoint on the route
•
(3) the first and last waypoint on the route
•
(4) The closest POI is shown as an icon.
•
(5) scale on which the full track view is shown
NOTE: In the full track view the north is always upwards.
Page 53

53
Waypoint navigation view
The waypoint navigation view shows you the following information:
•
(1) arrow pointing to the direction of the next waypoint
•
(2) your distance to the next waypoint
•
(3) the next waypoint you are headed towards
8.4.4 Deleting a route
You can delete and disable routes in Movescount. To
delete a route:
1. Go to www.movescount.com and follow the instructions on how to
delete or disable a route.
2. Activate Moveslink and connect your Suunto Ambit3 Peak to
your computer with the Suunto USB cable. While the settings
are synchronized, the route is removed automatically from the
watch.
Page 54

54
9 USING ALTI & BARO MODE
In ALTI & BARO mode you can view the current altitude or barometric
pressure. It offers three profiles: Automatic, Barometer and
Altimeter. For information on setting profiles, see 9.4.1 Setting
profiles.
You can access different views depending on which profile is activated
when you are in ALTI & BARO mode.
Sunrise and sunset time views are available when GPS has been
activated. If GPS is not active, sunrise and sunset times are based on
the last recorded GPS data.
9.1 How Alti & Baro works
To get correct readings with ALTI & BARO mode, it is important to
understand how Suunto Ambit3 Peak calculates altitude and sea level
air pressure. Suunto Ambit3 Peak constantly measures absolute air
pressure. Based on this measurement and reference values, it
calculates altitude or sea level air pressure.
sand. Never insert any objects into the sensor openings.
CAUTION: Keep the area around the sensor free of dirt and
Page 55

55
9.2 Getting correct readings
If you are engaged in an outdoor activity that requires accurate sea level
air pressure or altitude, you will first need to calibrate your Suunto
Ambit3 Peak by entering either your current altitude or the current sea
level air pressure.
The altitude of your location can be found from most topographic maps
or Google Earth. A sea level air pressure reference for your location can
be found using the websites of national weather services.
If FusedAlti
automatically using FusedAlti together with altitude and sea level pressure
calibration. For more information, see 9.8 FusedAlti.
Absolute air pressure is measured constantly
Absolute air pressure and known altitude reference = Sea level air
pressure
TM
is activated, the altitude reading will be corrected
Page 56

56
Absolute air pressure and known sea level air pressure = Altitude
Changes in local weather conditions will affect altitude readings. If local
weather changes often, it is advisable to reset the current
altitude reference value frequently, preferably before starting your
journey when the reference values are available. As long as the local
weather stays stable, you do not need to set reference values.
9.3 Getting incorrect readings
ALTIMETER profile + standing still + weather change
If your Altimeter profile is on for an extended period of time with the
device in a fixed location while the local weather changes, the device
will give incorrect altitude readings.
ALTIMETER profile + altitude moving + weather change
If your Altimeter profile is on and the weather changes frequently while
you climb in altitude or go down in altitude, the device will give you
incorrect readings.
BAROMETER profile + altitude moving
If the Barometer profile is on for an extended period of time as you
climb in altitude or go down in altitude, the device assumes that you are
standing still and interprets your changes in altitude as changes in sea
level air pressure. It will therefore give you incorrect sea level air
pressure readings.
Page 57

57
Use example: Setting the altitude reference value
You’re on the second day of your two-day hike. You realize that you
forgot to switch from the Barometer profile to the Altimeter profile
when you started moving in the morning.You know that the current
altitude readings given by your Suunto Ambit3 Peak are wrong. So, you
hike to the nearest location shown on your topographic map for which
an altitude reference value is provided. You correct your Suunto Ambit3
Peak altitude reference value accordingly and switch from Barometer
to Altimeter profile. Your altitude readings are correct again.
9.4 Matching profile to activity
The Altimeter profile should be selected when your outdoor activity
involves changes in altitude (e.g. hiking in hilly terrain).
The Barometer profile should be selected when your outdoor activity
does not involve changes in altitude (e.g. soccer, sailing, canoeing).
To get correct readings, you need to match the profile to your activity.
You can either let Suunto Ambit3 Peak decide a suitable profile for the
activity, or choose a profile yourself.
settings in Movescount, or in your Suunto Ambit3 Peak .
9.4.1 Setting profiles
To set the ALTI & BARO profile:
NOTE: You can define the profile as part of the sport mode
Page 58

58
1. Keep [Next] pressed to enter the options menu.
2. Scroll to ALTI-BARO with [Light Lock] and enter with [Next].
3. Press [Next] to select Profile.
4. Scroll the profile options (Automatic, Altimeter, Barometer) with
[Start Stop] or [Light Lock]. Select a profile with [Next].
9.4.2 Setting reference values
To set the sea level pressure and altitude reference values:
1. Keep [Next] pressed to enter the options menu.
2. Scroll to ALTI-BARO with [Light Lock] and enter with [Next].
3. Scroll to Reference with [Light Lock] and enter with [Next].
4. The following setting options are available:
•
FusedAlti: GPS is switched on and the device starts calculating
altitude based on FusedAlti. For more information, see
9.8 FusedAlti
•
Manual altitude: Set your altitude manually.
•
Sea level pressure: Set the sea level pressure reference value
5. Set the reference value using [Start Stop] and [Light Lock].
manually.
.
Page 59

59
Accept the setting with [Next].
TIP: You can access the Reference setting by keeping [View]
pressed when in ALTI & BARO mode.
You can also set your altitude during your exercise, see
11.6.4 Setting altitude during exercise
.
9.5 Using Altimeter profile
The Altimeter profile calculates altitude based on reference values.
The reference value can either be sea level air pressure value or
altitude reference value. When the Altimeter profile is activated,
Page 60

60
the altimeter icon is shown on the display. For information on setting the
profile, see 9.4.1 Setting profiles.
When the Altimeter profile is activated, you can access the following
views:
•
top row: your current altitude
•
middle row: altitude information on a 12-hour timeline in graph form
•
bottom row: toggle between time and temperature with [View]
NOTE: If you are wearing your Suunto Ambit3 Peak on your
wrist, you will need to take it off in order to get an accurate temperature
reading because your body temperature will affect the initial
9.6 Using Barometer profile
The Barometer profile shows the current sea level air pressure. This is
based on the reference values added in the settings and the constantly
measured absolute air pressure. For information on setting the
reference values, see 9.4.2 Setting reference values.
Changes in the sea level air pressure are presented graphically in the
middle row of the display. The display shows the recording of the last
26 hours with a recording interval of 15 minutes.
reading.
Page 61

61
When the Barometer profile is activated, the barometer icon is shown
on the display. For information on setting the ALTI & BARO profile, see
9.4.1 Setting profiles.
When the Barometer profile is activated, Suunto Ambit3 Peak shows you
the following barometric information:
•
top row: the current sea level air pressure
•
middle row: a graph displaying sea level pressure data from the
past 27 hours (1h recording interval)
•
bottom row: toggle between temperature, time and altitude
reference value with [View]
Altitude reference is the latest altitude used in ALTI & BARO mode. It
can be:
•
the altitude you have set as altitude reference in the Barometer
profile, or
•
the latest altitude logged in the Automatic profile before
changing to the Barometer profile.
Page 62

62
NOTE: If you are wearing your Suunto Ambit3 Peak on your
wrist, you will need to take it off in order to get an accurate temperature
reading because your body temperature will affect the initial
reading.
9.7 Using Automatic profile
The Automatic profile switches between the Altimeter and Barometer
profiles according to your movements. When the Automatic profile is
active, the device will automatically switch between interpreting changes
in air pressure as changes in altitude or changes in weather.
It is not possible to measure weather and altitude changes at the same
time, as both cause a change in the surrounding air pressure. Suunto
Ambit3 Peak senses vertical movement and switches to measuring
altitude, when needed. When altitude is shown, it is updated with a
maximum delay of 10 seconds.
If you are at a constant altitude (less than 5 meters of vertical
movement within 12 minutes), Suunto Ambit3 Peak interprets all
pressure changes as weather changes. The measurement interval is
10 seconds. The altitude reading remains steady and if the weather
changes, you will see changes in the sea level air pressure reading.
Page 63

63
If you are moving in altitude (more than 5 meters of vertical movement
within 3 minutes), Suunto Ambit3 Peak interprets all pressure changes
as movements in altitude.
Depending on which profile is active, you can access the Altimeter
or Barometer profile views with [View].
NOTE: When you are using the Automatic profile, barometer
or
altimeter icons are not shown on the display.
9.8 FusedAlti
FusedAlti
GPS and barometric altitude. It minimizes the effect of temporary and
offset errors in the final altitude reading.
exercises that use GPS and during navigation. When GPS is switched
altitude is measured with the barometric sensor.
If you do not want to use FusedAlti in altitude measurement, you can
disable it in the options menu.
To disable FusedAlti:
1. Keep [Next] pressed to access the options menu.
2. Scroll to ALTI-BARO with [Light Lock] and enter with [Next].
TM
provides an altitude reading that is a combination of
NOTE: By default, altitude is measured with FusedAlti during
off,
Page 64

64
3. Scroll to FusedAlti with [Start Stop] and select with [Next].
4. Set FusedAlti Off with [Start Stop] or [Light Lock] and accept with
[Next].
When the device is in TIME mode, you can search a new reference for
barometric altitude with FusedAlti. This activates the GPS for a
maximum of 15 minutes.
To search a new reference for barometric altitude with FusedAlti:
1. Keep [Next] pressed to enter the options menu.
2. Scroll to ALTI-BARO with [Light Lock] and enter with [Next].
Page 65

65
3. Scroll to Reference with [Light Lock] and enter with [Next].
4. Scroll to FusedAlti with [Start Stop] and select with [Next].
GPS is switched on and the device starts calculating altitude based
on FusedAlti.
NOTE: In good conditions it takes 4 – 12 minutes for the
FusedAlti to activate. During that time, Suunto Ambit3 Peak shows
barometric altitude and ~ is shown with the altitude reading to indicate
that the altitude may not be correct.
Page 66

66
9.9 Weather indicators
In addition to the barometer graph (see 9.6 Using Barometer
Suunto Ambit3 Peak has two weather indicators: weather trend and storm
alarm.
The weather trend indicator is displayed as a view in TIME mode,
providing you a quick way to check weather changes.
The weather trend indicator is comprised of two lines forming an arrow.
Each line represents a 3-hour period. A change in barometric pressure
greater than 2 hPa / 0.59 inHg over three hours triggers a change the
direction of the arrow. For example:
pressure dropping heavily over the last six hours
pressure was steady, but rising heavily over the last three hours
pressure was rising heavily, but dropping heavily over the last
three hours
Storm alarm
profile),
Page 67

67
A significant drop in barometric pressure typically means a storm is
coming and you should take cover. When the storm alarm is active,
Suunto Ambit3 Peak sounds an alarm and flashes a storm symbol
when the pressure drops 4 hPa / 0.12 inHg or more during a 3-hour
period.
NOTE: The storm alarm does not work if you have altimeter
profile activated. See 9.4.1 Setting profiles.
To activate Storm alarm:
1. Keep [Next] pressed to enter the options menu.
2. Scroll to ALTI-BARO with [Light Lock] and enter with [Next].
3. Press [Next] to select Storm alarm.
4. Set the storm alarm On or Off with with [Start Stop] or [Light
Lock] and accept with [Next].
Page 68

68
When a storm alarm occurs, pressing any button ends the alarm. If no
button is pressed, the alarm repeats once after five minutes. The storm
symbol remains on the display until the weather conditions stabilize
(pressure drop slows down).
A special lap (called 'storm alarm') is generated when a storm alarm
occurs while recording an exercise.
TIP: You can also activate or deactivate the storm alarm
through the options menu in a sport mode.
Page 69

69
10 USING 3D COMPASS
Suunto Ambit3 Peak has a 3D compass that allows you to orient
yourself in relation to magnetic north. The tilt-compensated compass
gives you accurate readings even if the compass is not horizontally
level.
COMPASS mode includes the following information:
•
middle row: compass heading in degrees
•
bottom row: toggle between the current heading in cardinal (N, S,
W, E) and half-cardinal (NE, NW, SE, SW) points, time and empty
view with [View]
The compass will switch itself to power saving mode after one
minute. Reactivate it with [Start Stop].
For information on using compass during exercise, see 11.6.5 Using
compass during exercise
.
10.1 Calibrating compass
COMPASS mode asks you to calibrate the compass before you start
using it. If you have already calibrated the compass and want to recalibrate it, you can access the calibration option in the options menu.
Page 70

70
To calibrate the compass:
1. Keep [Next] pressed to enter the options menu.
2. Scroll to GENERAL using [Light Lock] and enter with [Next].
3. Scroll to Compass using [Start Stop] or [Light Lock] and enter
with [Next].
4. Press [Next] to select Calibration.
5. Turn and tilt the watch in multiple directions until the watch
beeps, indicated calibration is complete.
If the calibration is successful, the text CALIBRATION SUCCESSFUL
is displayed. If the calibration does not succeed, the text
CALIBRATION FAILED is displayed. To retry the calibration, press
[Start Stop].
Page 71

71
10.2 Setting declination value
To ensure correct compass readings, set an accurate declination
value.
Paper maps point to true north. Compasses, however, point to
magnetic north – a region above the Earth where the Earth’s magnetic
fields pull. Because magnetic North and true North are not at the
same location, you must set the declination on your compass. The
angle in between magnetic and true north is your declination.
The declination value appears on most maps. The location of magnetic
north changes yearly, so the most accurate and up-to-date declination
value can be obtained from the internet (for example www.magneticdeclination.com).
Orienteering maps, however, are drawn in relation to magnetic north.
This means that when you are using orienteering maps you need to
turn the declination correction off by setting the declination value to 0
degrees.
To set the declination value:
1. Keep [Next] pressed to enter the options menu.
2. Press [Next] to enter GENERAL.
3. Scroll to Compass using [Light Lock] and select with [Next].
4. Scroll to Declination with [Light Lock] and select with [Next].
5. Turn the declination off by selecting --, or select W (west) or E
(east).
6. Set the declination value with [Start Stop] or [Light Lock].
7. Press [Next] to accept the setting.
Page 72

72
TIP: You can also enter the compass settings by keeping
pressed in COMPASS mode.
[View]
10.3 Setting bearing lock
You can mark the direction to your target in relation to North with the
bearing lock feature.
To lock a bearing:
1. With the compass active, hold the watch in front of you and turn
yourself towards your target.
Page 73

73
2. Press [Back Lap] to lock the current degree displayed on the
watch as your bearing.
3. An empty triangle indicates the locked bearing in relation to the
North indicator (solid triangle).
4. Press [Back Lap] to clear the bearing lock.
NOTE: While using the compass in an exercise mode, the [Back
Lap] button only locks and clears the bearing. Exit the compass view to
make a lap with [Back Lap].
Page 74

74
11 USING SPORT MODES
Use the sport modes to record exercise logs and view various
information during your exercise.
You can access the sport modes by pressing [Start Stop] in the TIME
or ALTI & BARO mode, or in the COMPASS mode after the compass
has been calibrated.
11.1 Sport modes
You can select a suitable sport mode from the predefined sport modes.
Depending on the sport, different information is shown on the display
during exercise. For example, the sport mode specifies whether
FusedSpeed
see 14 FusedSpeed.) The selected sport mode also affects exercise
settings, such as HR limits, autolap distance, ALTI & BARO mode and
recording rate.
In Movescount you can create more custom sport modes, edit the
predefined sport modes and download them to your device.
During exercise the predefined sport modes give you information that
is useful for that particular sport:
TM
or plain GPS speed is used. (For more information,
Page 75

75
•
Cycling: speed, distance, cadence and heart rate related
information
•
Mountaineering: altitude, distance and speed related
information (60 sec GPS fix)
•
Alpine skiing: altitude, descent and time related information
•
Trekking: distance, altitude, heart rate and chronograph related
information (60 sec GPS fix)
•
Triathlon: combination of outdoor swimming, cycling and
running related information
•
Running: pace, heart rate and chronograph related information
•
Pool swimming: average stroke rate, max. pace, average SWOLF
•
Openwater swim: average stroke rate, max. pace
•
Other sports: speed, heart rate and altitude related information
•
Indoor training : heart rate related information (without GPS)
NOTE: SWOLF is used to calculate swimming efficiency.
It is a combination of swim time and number of strokes over a
specific
pool length.
11.2 Additional options in sport modes
When a sport mode is selected, keep [Next] pressed to access
additional options to be used during your exercise:
Page 76

76
•
Select NAVIGATION to access the following options:
•
Select Track back to retrace your route at any point of your
exercise.
•
Select Find back to navigate back to the starting point of
your exercise.
•
Select Location to check the coordinates of your current
location, or save it as a POI.
•
Select POIs (Points of interest) to navigate to a POI.
•
Select Routes to navigate a route.
•
Select Logbook to navigate a route of one of your saved logs
with GPS data.
•
Select ACTIVATE to set the following features on or off:
•
Select Interval off/on to activate/deactivate interval timer. The
interval timer can be added to custom sport modes in
Movescount. For more information, see 11.6.6 Using interval
timer.
•
Select Autopause off/on to activate/deactivate autopause.
•
Select Autoscroll off/on to activate/deactivate autoscroll.
Page 77

77
•
Select HR limits off/on to set the HR limits on or off. The
heart rate limit values can be specified in Movescount.
•
Select Compass off/on to activate/deactivate the compass.
When the compass is activated during exercise, it is shown as
an additional display after the sport mode.
11.3 Using heart rate belt
A heart rate belt can be used during exercise. When you use a heart rate
belt, Suunto Ambit3 Peak gives you more information about your
activities.
Using a heart rate belt enables the following additional information
during exercise:
•
heart rate in real time
•
average heart rate in real time
•
heart rate in graph form
•
calories burned during exercise
•
guidance to exercise within defined heart rate limits
•
Peak Training Effect
Using a heart rate belt enables the following additional information
after exercise:
•
calories burned during exercise
•
average heart rate
•
peak heart rate
•
recovery time
Page 78

78
11.4 Putting on heart rate belt
NOTE: Suunto Ambit3 Peak is compatible with Suunto Smart Belt
and other Bluetooth Smart compatible heart rate sensors
To start using the Suunto Smart Belt:
1. Snap the sensor firmly into the strap connector.
2. Adjust the strap length as needed.
3. Moisten the belt contact areas with water or electrode gel.
4. Put the strap on so that it fits snugly and the Suunto logo is facing
up.
.
Page 79

79
other
risk. Before starting the initial use of the heart rate belt, we recommend
an exercise test under a doctor’s supervision. This ensures the safety
and reliability of the pacemaker and heart rate belt when being
simultaneously. Exercise may include some risk, especially for
who have been inactive. We strongly advise you to consult
prior to beginning a regular exercise program.
WARNING: People who have a pacemaker, defibrillator, or
implanted electronic device use the heart rate belt at their own
NOTE: Suunto Ambit3 Peak cannot receive the heart rate belt
signal under water.
TIP: Machine-wash the heart rate belt regularly after use to
avoid unpleasant odor and to ensure good data quality and
Only wash the textile strap.
Suunto Ambit3 Peak supports Bluetooth® Smart compatible heart rate
belts and certain PODs. Visit www.suunto.com for a list of compatible
products.
11.5 Starting exercise
To start exercising:
1. Moisten the contact areas and put on the heart rate belt
(optional).
2. Press [Start Stop] to enter the start menu.
3. Press [Next] to enter EXERCISE.
used
those
your doctor
functionality.
Page 80

80
4. Scroll the sport mode options with [Start Stop] or [Light Lock] and
select a suitable mode with [Next]
5. The watch automatically starts searching for a heart rate belt signal,
if the selected sport mode uses a heart rate belt. Wait for the watch
to notify that the heart rate and/or GPS signal have been found, or
press [Start Stop] to select Later. The watch continues to search the
heart rate/GPS signal.
Once the heart rate/GPS signal has been found, the watch starts
showing and recording heart rate/GPS data.
6. Press [Start Stop] to start recording your exercise. To access the
options menu, keep [Next] pressed (see 11.2 Additional options
sport modes
).
in
Page 81

81
Page 82

82
11.6 During exercise
Suunto Ambit3 Peak gives you additional information during your
exercise. The additional information varies depending on the sport
mode you have selected, see . You will also get more information, if you
use a heart rate belt and GPS during exercise.
Suunto Ambit3 Peak allows you to define what information you want to
see on the display.
Here are some ideas on how to use the watch during exercise:
•
Press [Next] to see additional displays.
•
Press [View] to see additional views.
•
To avoid accidentally stopping your log recording or making
unwanted laps, lock the buttons by keeping [Light Lock] pressed.
•
Press [Start Stop] to pause recording. The pause will be shown in
your log as a lap mark. To resume recording, press [Start Stop]
again.
11.6.1 Second display on phone
If you are using the Suunto Movescount mobile app, you can use your
mobile phone as a second display for your watch.
To use your mobile phone as a second display:
1. Open the Movescount app and tap Move.
2. Select Ambit3 from the list of sport modes and tap Next.
3. Tap on each of the display areas – middle, upper left, upper right – to
select what values you want displayed.
Page 83

83
4. Start your exercise in your watch.
11.6.2 Recording tracks
Depending on the sport mode you have selected, your Suunto Ambit3
Peak records various information during exercise.
If you are using GPS while recording a log, Suunto Ambit3 Peak will also
record your track and you can view it in Movescount. When you are
recording your track, the recording icon and the GPS icon are shown on the
upper part of the display.
11.6.3 Making laps
During your exercise, you can make laps either manually or automatically
by setting the autolap interval in Movescount. When you are making laps
automatically, Suunto Ambit3 Peak records the laps based on the distance
you have specified in Movescount.
To make laps manually, press [Back Lap] during the exercise. Suunto
Ambit3 Peak shows you the following information:
•
top row: split time (duration from the start of the log)
•
middle row: lap number
•
bottom row: lap time
Page 84

84
NOTE: The exercise summary always shows at least one lap,
your exercise from start to finish. The laps you have made during the
exercise are shown as additional laps.
11.6.4 Recording altitude
Your Suunto Ambit3 Peak stores all your movements in altitude
between the start and stop time of the log. If you are engaged in an
activity in which your altitude changes, you can record the altitude
changes and view the stored information later.
NOTE: By default, altitude measurement is based on FusedAlti.
For more information, see 9.8 FusedAlti.
To record altitude:
1. Make sure that the Altimeter profile is activated.
2. Press [Start Stop] to enter the start menu.
3. Press [Next] to select EXERCISE.
4. Scroll the sport modes with [Start Stop] or [Light Lock] and select a
suitable mode with [Next].
Page 85

85
5. Wait for the device to notify that the heart rate and/or GPS signal
have been found, or press [Start Stop] to select Later. The device
continues to search the heart rate/GPS signal. Press [Start Stop] to
start recording the log.
Page 86

86
11.6.5 Setting altitude during exercise
Most of the sport modes allow you to set your altitude manually during
exercise.
To set your altitude during exercise:
1. While you are in a sport mode, keep [Next] pressed to access the
options menu.
2. Scroll to ALTITUDE with [Start Stop] and select with [Next].
3. Set your altitude using [Start Stop] and [Light Lock].
4. Accept with [Next].
11.6.6 Using compass during exercise
You can activate the compass and add it to a custom sport mode during
your exercise.
To use the compass during exercise:
1. While you are in a sport mode, keep [Next] pressed to access the
Page 87

87
options menu.
2. Scroll to ACTIVATE with [Light Lock] and select with [Next].
3. Scroll to Compass with [Light Lock] and select with [Next].
4. The compass is shown as the last display on the custom sport
mode.
To deactivate the compass, go back to ACTIVATE in the options menu
and select End compass.
11.6.7 Using interval timer
You can add an interval timer to each custom sport mode in
Movescount. To add the interval timer to a sport mode, select the
Page 88

88
sport mode and go to Advanced settings. The next time you connect
your Suunto Ambit3 Peak to your Movescount account, the interval
timer will be synchronized to the watch.
You can specify the following information in the interval timer:
•
interval types (HIGH and LOW interval)
•
the duration or distance for both interval types
•
the number of times the intervals are repeated
NOTE: If you do not set the number of repetitions for the
intervals in Movescount, the interval timer will continue until it has
repeated 99 times.
To activate/deactivate the interval timer:
1. While you are in a sport mode, keep [Next] pressed to access the
options menu.
2. Scroll to ACTIVATE with [Light Lock] and select with [Next].
3. Scroll to Interval with [Start Stop] and select with [Next].
4. Press [Start Stop] or [Light Lock] to set the interval timer On/Off
and accept with [Next].
When the interval timer is active, the interval icon is shown on the
top of the display.
been
Page 89

89
11.6.8 Navigating during exercise
If you want to run a route or to a point of interest (POI), you can
select the respective default sport mode (Run a Route, Run a POI)
from the EXERCISE menu to begin navigating immediately.
You can also navigate a route or to a POI during your exercise in
other sport modes that have GPS activated.
To navigate during exercise:
1. While you are in a sport mode with GPS activated, keep [Next]
pressed to access the options menu.
2. Press [Next] to select NAVIGATION.
Page 90

90
3. Scroll to POIs (Points of interest) or Routes with [Light Lock] and
select with [Next].
The navigation guidance is shown as the last display on the selected
sport mode.
To deactivate navigation, go back to NAVIGATION in the options menu
and select End navigation.
11.6.9 Finding back during exercise
Suunto Ambit3 Peak automatically saves the starting point of your
exercise, if you are using GPS. During exercise, Suunto Ambit3 Peak
guides you back to the starting point (or to the location where the GPS
Page 91

91
fix was established) with the Find back functionality.
To find back to the starting point during exercise:
1. While you are in a sport mode, keep [Next] pressed to access the
options menu.
2. Press [Next] to select NAVIGATION.
3. Scroll to Find back with [Start Stop] and select with [Next].
The navigation guidance is shown as the last display on the selected
sport mode.
11.6.10 Using Track back
Page 92

92
With Track back, you can retrace your route at any point during an
exercise. Suunto Ambit3 Peak creates temporary waypoints to guide
you back to your starting point.
To track back during exercise:
1. While you are in a sport mode, keep [Next] pressed to access the
options menu.
2. Press [Next] to select NAVIGATION.
3. Scroll to Track back with [Start Stop] and select with [Next].
You can now start navigating your way back the same way as during
route navigation. For more information about route navigation, see
8.4.3 During navigation .
Track back can also be used from the logbook with exercises that
include GPS data. Follow the same procedure as in 8.4.2 Navigating
route. Scroll to LOGBOOK instead of Routes, and select a log to start
navigating.
11.6.11 Autopause
Autopause pauses the recording of your exercise when your speed is less
than 2 km/h. When your speed increases to more than 3 km/h, the
a
Page 93

93
recording continues automatically.
You can set autopause to on/off for each sport mode in Movescount.
Alternatively, you can activate autopause during exercise.
To set autopause on/off during exercise:
1. While you are in a sport mode, keep [Next] pressed to access the
options menu.
2. Scroll to ACTIVATE with [Light Lock] and select with [Next].
3. Scroll to Autopause with [Start Stop] and select with [Next].
4. Press [Start Stop] or [Light Lock] to set autopause On/Off and
accept with [Next].
Page 94

94
11.7 Viewing logbook after exercise
You can view the summary of your exercise after you have stopped
recording.
To stop recording and view the summary information:
1. Keep [Start Stop] pressed to stop and save the exercise.
Alternatively, you can press [Start Stop] to pause the recording.
After pausing the log, confirm stopping by pressing [Back Lap], or
continue recording by pressing [Light Lock]. After stopping the
exercise, save the log by pressing [Start Stop]. If you do not want to
save the log, press [Light Lock].
2. Press [Next] to view the exercise summary.
You can also view the summaries of all your saved exercises in the
logbook. In the logbook the exercises are listed according to time and
the latest exercise is shown first. The logbook can store approximately
15 hours of exercises with the best GPS accuracy and 1 second
recording interval.
To view the summary of your exercise in the logbook:
1. Press [Start Stop] to enter the start menu.
Page 95

95
2. Scroll to LOGBOOK with [Light Lock] and enter with [Next]. Your
current recovery time is shown.
3. Scroll the exercise logs with [Start Stop] or [Light Lock] and select a
log with [Next].
4. Browse the summary views of the log with [Next].
11.7.1 Memory left indicator
If more than 50 % of the watch memory has not been synchronized,
Suunto Ambit3 Peak displays a reminder when you enter the logbook.
Page 96

96
The reminder is not displayed once the unsynced memory is full and
Suunto Ambit3 Peak begins overwriting old logs.
NOTE: If paired with Movescount mobile app, your move are
synced automatically wit Movescount with the move is saved.
Automatic syncing can be turned off under CONNECTIVITY settings.
11.7.2 Dynamic exercise summary
The dynamic exercise summary shows the active fields from your
exercise as a summary. You can browse the summary views with
[Next].
The information shown on the summary depends on the sport mode
you used, and whether you used a heart rate belt or GPS.
By default, all the sport modes include the following information:
•
sport mode name
•
time
•
date
•
duration
Page 97

97
•
laps
Page 98

10
option,
the data will only be shown if you have also selected best GPS
accuracy. For more information about GPS accuracy, see 8.1.3 GPS
NOTE: If you select cumulative ascent/decent as a display
accuracy and power saving.
TIP: You can access more detailed data in Movescount.
11.7.3 Recovery time
Suunto Ambit3 Peak always shows your current cumulative recovery
time from all your saved exercises. The recovery time indicates how
long it takes for you to fully recover and be ready to exercise with full
intensity. As your recovery time decreases or increases, the watch
updates it in real time.
To view your current recovery time:
1. Press [Start Stop] to enter the start menu.
2. Scroll to LOGBOOK with [Light Lock] and select with [Next].
3. The recovery time is shown on the display.
Page 99

10
NOTE: The recovery time is shown only if it is longer than 30
minutes.
11.8 Using planned moves
You can plan individual moves or use training programs and download
them to your Suunto Ambit3 Peak. With planned moves, your Suunto
Ambit3 Peak guides you to reach your training targets. Store up to 60
planned moves in your watch.
To use a planned move:
1. Plan individual moves under MY MOVES or use (or create) a
training program under PLAN & CREATE in Movescount.com and
add the program to your planned moves.
2. Resync with Movescount.com to download planned moves to
your watch.
3. Follow daily guidance as well as the guidance during your
planned moves to reach your targets.
To start a planned move:
1. Press [Next] to check your watch to see if you have a planned
target for the day.
2. If you have multiple planned moves for the day, press [View] to see
each move target.
Page 100

10
3. Press [Start Stop] to start a planned move or press [Next] again to
return to TIME mode.
During a planned move, your Suunto Ambit3 Peak provides guidance
based on speed or heart rate:
Your Suunto Ambit3 Peak also indicates when 50% and 100% of your
planned target is complete.
When your target is complete or you have a rest day, future targets are
indicated by weekday if the next planned move is within a week or by
date of it is more than a week away:
 Loading...