

Page 1

CoreStation Setup Manager
USER GUIDE
Version 1.00
English
EN 102.00.CS40 V1.00A
Page 2

Contents
Introduction ...................................................................................................... 3
Initial Setup ...................................................................................................... 4
Configuration .................................................................................................... 6
Slave Device Search and Registration ........................................................................................................... 6
Rebooting the Device ..................................................................................................................................... 7
Editing Device Settings and Informaion ....................................................................................................... 8
Information ............................................................................................................................................... 8
Network .................................................................................................................................................... 9
Authentication........................................................................................................................................ 10
Advanced ................................................................................................................................................ 11
Monitoring ..................................................................................................... 12
Input Port Status .................................................................................................................................... 12
Output Port Status ................................................................................................................................. 12
Wiegand Port Status ............................................................................................................................... 13
Settings ........................................................................................................... 14
Admin Accounts .......................................................................................................................................... 14
Adding Adimi n Accounts ........................................................................................................................ 14
Editing Admin Accounts ......................................................................................................................... 15
Deleting Admin Accounts ....................................................................................................................... 15
Web Server Network .................................................................................................................................... 16
Appendices ..................................................................................................... 17
Disclaimers ................................................................................................................................................... 17
Copyright notice .......................................................................................................................................... 17
2
Page 3

Introduction
NOTE
The CoreStation Setup Manager is a web server that allows users to view or manage the network
settings of CoreStation and monitor the status of slave devices, input and output ports, and
Wiegand ports. The CoreStation Setup Manager allows users to check the status of the network
and wiring in the field without going to the location of the BioStar 2 server when configuring the
access control system using CoreStation.
• CoreStation Setup Manager is supported with CoreStation firmware version 1.3.1 or later. If you are
using a firmware version lower than 1.3.1, upgrade the CoreStation firmware on the BioStar 2.
• For more information on how to install and connect the CoreStation, refer to the installation guide.
To download the installation guide, visit the Suprema website (https://www.supremainc.com).
• For any inquires or technical support concerning CoreStation and CoreStation Setup Manager,
please contact the Suprema Technical Support Team (http://support.supremainc.com).
CoreStation Setup Manager allows the users to:
• Configure the IP address
• View CoreStation informations
• Set the administrator levels
• Check the connection status of the slave devices
• Monitor the status of Input, Output, and Wiegand ports
• Restore all settings or settings without network
• Factory Default
3
Page 4
Initial Setup
NOTE
https://169.254.0.1:3001
Download https certification
cs40_client.crt
Open File-Security Warning
Open
Install Certificate…
Certificate details
Certificate Import Wizard
Next
Next
Finish
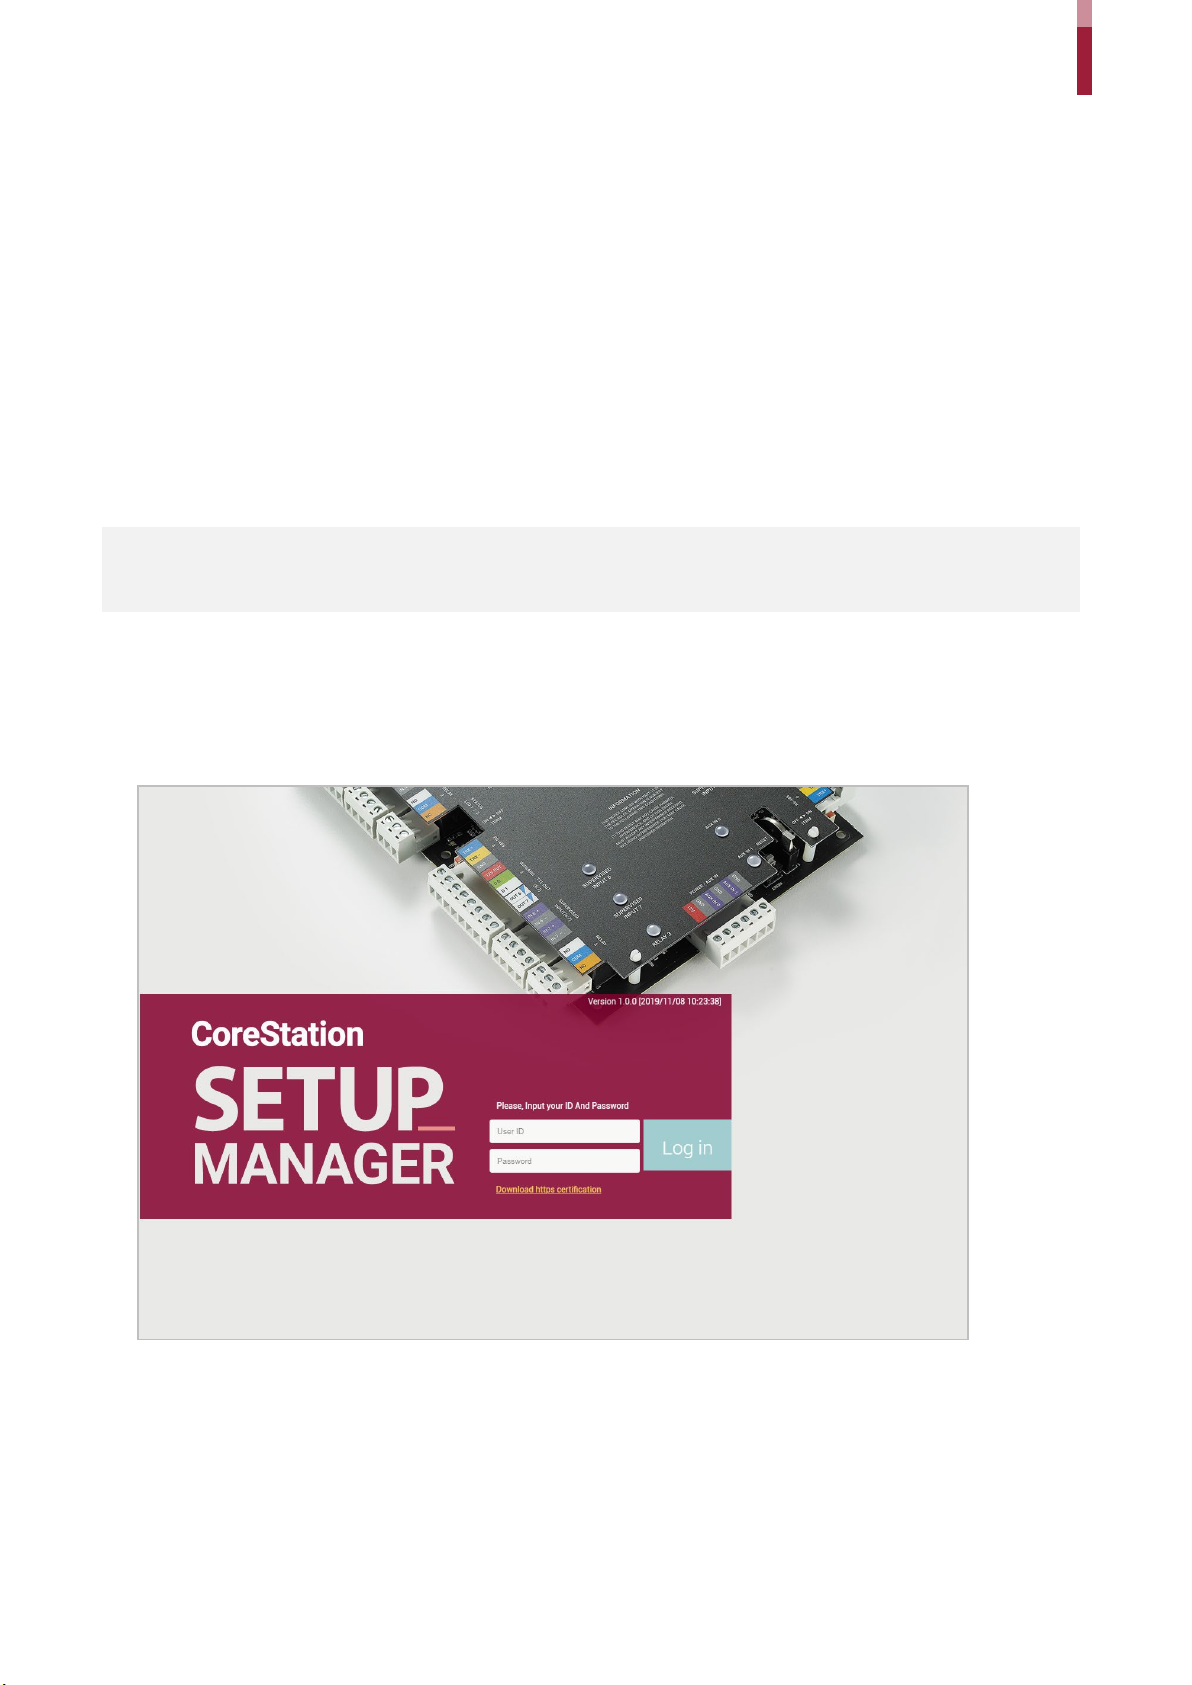
Initial Setup
The CoreStation Setup Manager provides web-based services. Therefore, when configuring the
centralized access control system using the CoreStation, you can access the CoreStation Setup
Manager through a web browser and check the connection status of the CoreStation from
anywhere after the wiring is completed.
If you are using the CoreStation Setup Manager for the first time, connect the CoreStation and
proceed with the initial setup.
1 Complete the CoreStation wiring.
2 Run your web browser.
• We recommend that you use Google Chrome 75 or later.
3 Enter the default IP address (
browser.
4 Click
CoreStation Setup Manager, you must install the certificate to use HTTPS properly.
on the login screen. The first time you log in to the
) in the address input field of the web
5 Run
6 When the
7 Click
8 Click
appears.
to continue.
file.
in the
9 Select the certificate store and click
window appears, click
window. The
>
> OK.
4
.
will
Page 5
Initial Setup
admin
Add
NOTE
10 Enter your User ID and Password. The user ID and password are both ‘
connected.
11 Set the Level 1 administrator by referring to Adding Admin Accounts and click
’ when first
.
• After adding the Level 1 administrator, you cannot use the default User ID and Password that used
when you first connected.
5
Page 6
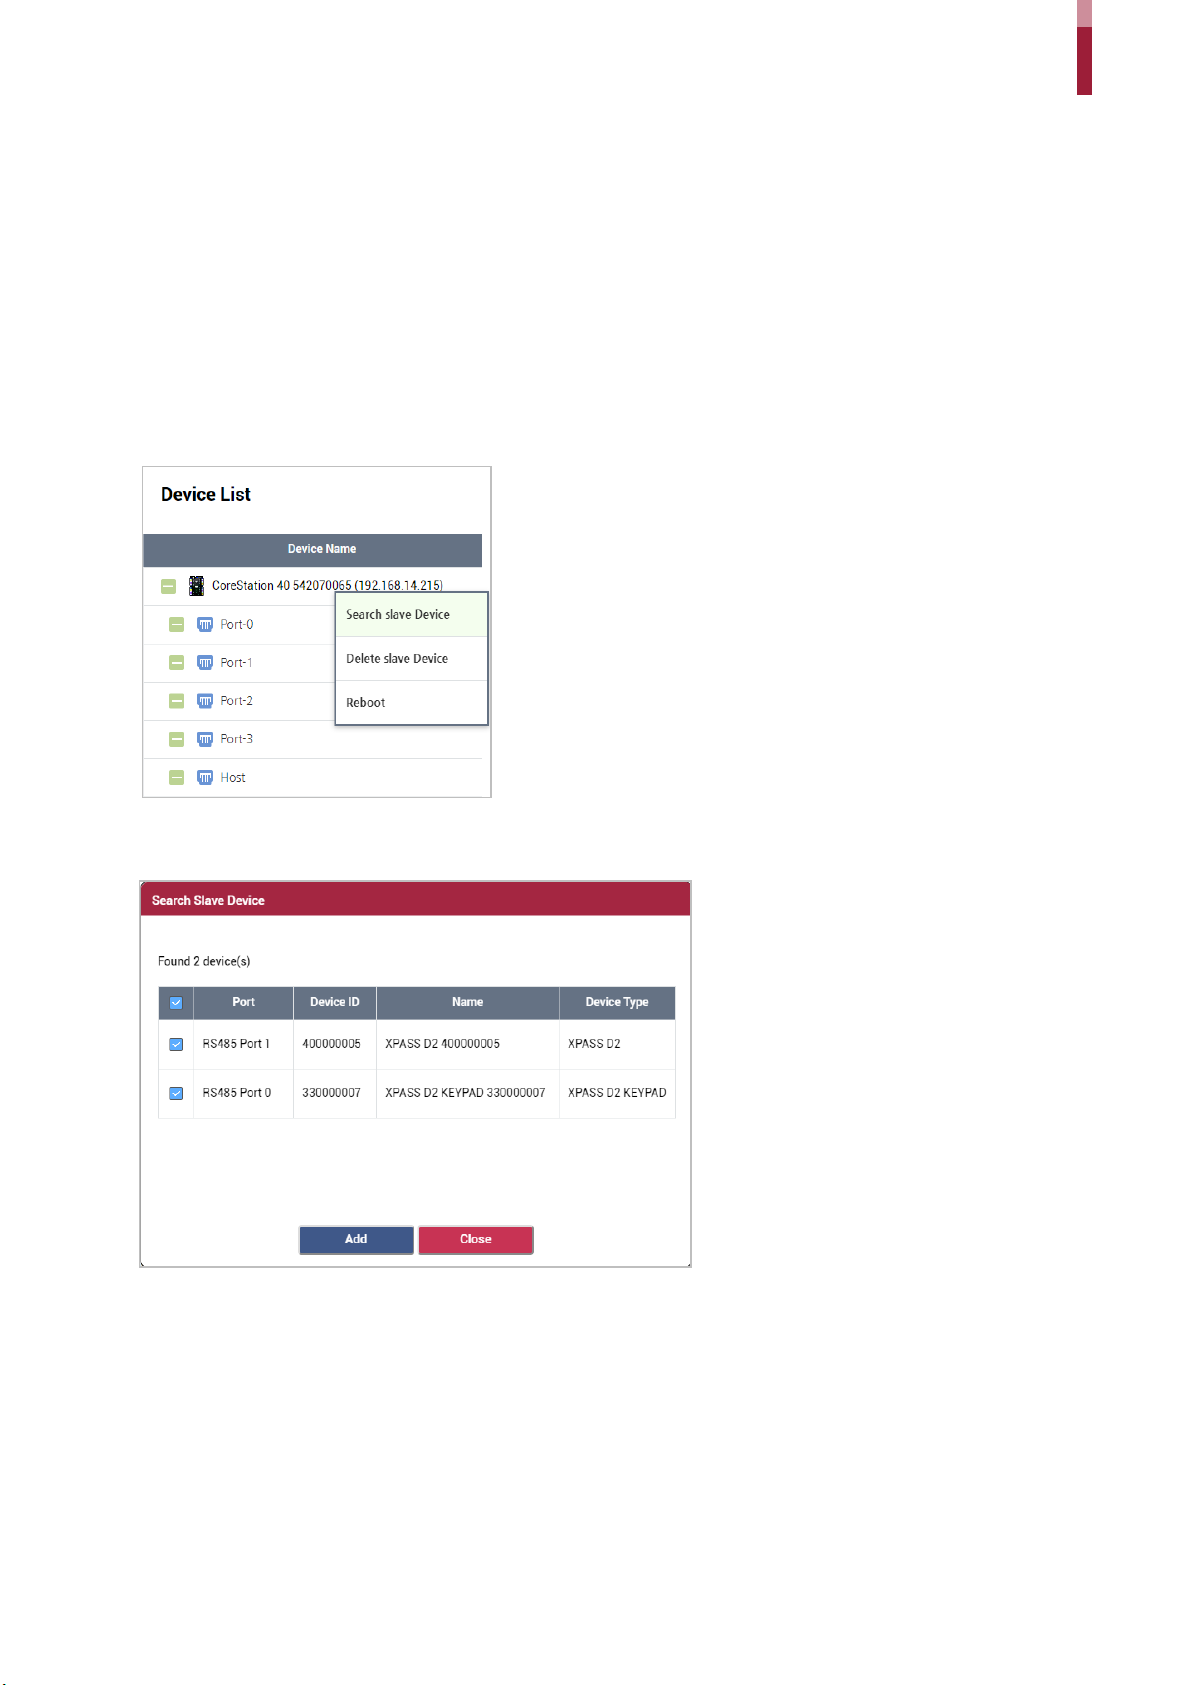
Configuration
Slave Device Search and Registration
CONFIGURE
Search slave Device
Add
Configuration
You can easily expand your access control system network by adding slave devices to the
CoreStation. CoreStation (master device) and slave devices can be connected together via RS-485.
Besides regular devices, additional devices such as Secure I/O can be connected.
1 Click
.
2 Right-click CoreStation in the Device List and click
connected to the CoreStation is shown.
3 Select the device to register as a slave and click
selecting each port.
. Otherwise, you can add slave devices by
. The list of slave devices
6
Page 7

Rebooting the Device
CONFIGURE
Reboot
You can reboot the device.
Configuration
1 Click
.
2 Right-click CoreStation in the Device List and click
.
7
Page 8

Editing Device Settings and Informaion
CONFIGURE
Information
No.
Item
Description
1
2
3
4
Firmware Upgrade
5
6
7
8
ALL
without Network
9
Unlock
You can edit detailed settings of CoreStation.
Configuration
1 Click
.
2 Edit the necessary items.
1
2
3
4
5
6
7
8
9
10
11
Name
Device ID
Device Type View the device type.
Firmware Version Click
Kernel Version View the kernel version.
Hardware Version View the hardware version.
Factory Default Delete all the information saved in the device and the root certificate and
Restore to Default
View the device name.
View the device ID.
to install a new firmware version.
restore default settings.
Reset the settings of the device.
•
: Reset all settings.
Locked
•
Action.
: Reset all settings excluding the network settings.
button will be available when the device is disabled via Trigger &
8
Page 9

10
Time Zone Set the time zone of device.
11
Get time
Set time
NOTE
Factory Default, All
Unlock
Network
No.
Item
Description
1
2
Set the date and time manually.
Configuration
Display Date
• The
administrator account.
1
2
3
•
•
to the device.
, and
: Click the button to fetch the time set in the device.
: Click the button to apply the time in CoreStation Setup Manager
buttons are enabled only when logged in with a Level 1
4
5
6
7
8
Use DHCP
IP Address
Select this option to allow the device to use a dynamic IP address. If this
option is selected, network settings cannot be entered.
View the IP address of the device.
9
Page 10

3
Gateway View the gateway of the device.
4
5
6
7
Master
8
Authentication
No.
Item
Description
1
2
Auto
3
DNS Server Address Set the DSN server address.
Subnet Mask View the subnet mask of the device.
Device Port Enter a port to be used by the device.
Configuration
RS485 You can only use
Baud Rate Set a baud rate of the RS-485 connection.
1
2
3
.
You can set a security level to use for fingerprint. The higher the security level
1:N Security Level
1:N Fast Mode
Template Format You can view the fingerprint template format.
is set, the false rejection rate (FRR) gets higher, but the false acceptance rate
(FAR) gets lower.
You can set the fingerprint authentication speed. Select
authentication speed configured according to the total amount of
fingerprint templates registered within the device.
to have the
10
Page 11

Advanced
No.
Item
Description
1
2
3
4
Apply
1
2
3
Configuration
4
Tamper You can set the AUX port where the tamper is connected.
AC Fail You can set the AUX port that monitors the power input signal.
Configuration
Secure Tamper
3 Click
to save the settings.
You can set the supervised input port of CoreStation to be used as TTL input
port and set a resistance value to be used for supervised input. 1㏀, 2.2㏀, 4.7㏀
and 10㏀ can be set for the resistance value.
You can set the secure tamper to delete the entire user information, the
entire log, and the security key stored on the device when a tamper event
occurs on the device.
11
Page 12

Monitoring
Input Port Status
Output Port Status
Monitoring
After completing the wiring, you can check the status of the Input and Output in the CoreStation in
real time. You can also view the card ID read by the connected Wiegand reader.
The connection status of the Input 0~7, Aux Input 0~1 ports is displayed. After completing the
wiring, you can check the connection status of the Input port directly in the field.
The connection status of the Relay 0~3, Output 0~7 ports is displayed. You can also select the item
and click the switch to control the relay and output ports.
12
Page 13

Monitoring
Wiegand Port Status
Status
When you scan a card on the Wiegand reader connected to a Wiegand 0~3 port, the card ID is
displayed in the
column.
13
Page 14

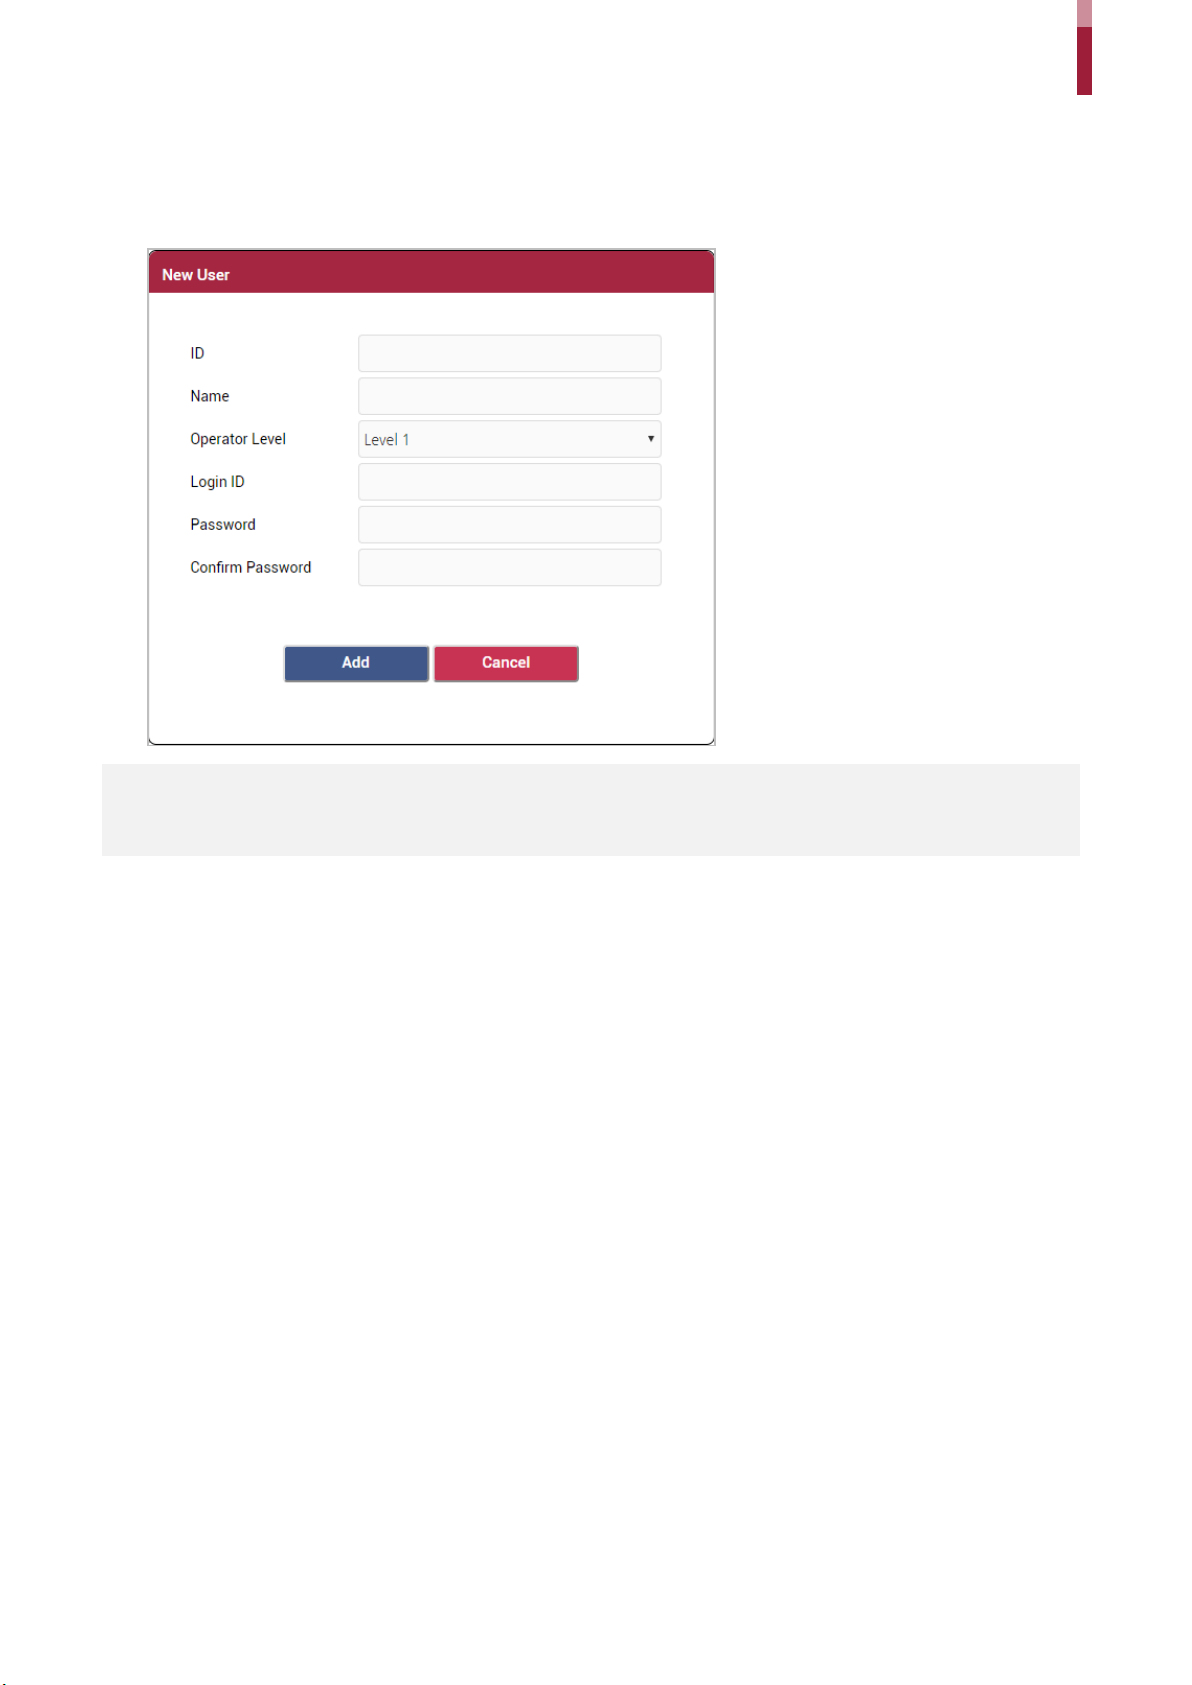
Settings
Admin Accounts
Adding Adimin Accounts
NOTE
SETTINGS
+ New User
No.
Item
Description
1
2
You can assign and manage administrators of the CoreStation Setup Manager.
• You can add and manage up to 10 administrators.
Settings
1 Click
2 Click
.
.
3 Edit the necessary items.
1
2
3
4
5
6
Enter the unique ID of the administrator.
ID
• Only numbers from 0 to 9 can be entered.
Enter the administrator's name.
Name
• Up to 48 characters may be entered for a name.
14
Page 15

3
Operator Level
4
5
6
Apply
Editing Admin Accounts
SETTINGS
Edit
OK
Apply
Deleting Admin Accounts
SETTINGS
Del
Delete
Apply
Settings
Set the operator level.
• Each operator level has the following permissions:
- Level 1: The assigned administrators can read or write all settings,
including Factory Default. In addition, the level 1 administrator can
modify the information of all administrators, and can also delete level
2 and 3 administrators.
- Level 2: The assigned administrators can read or write all settings
except Factory Default, Reset All, and Unlock. The level 2
administrators can also modify their own information.
- Level 3: The assigned administrators can only read.
• The level 1 administrator can only be set up when connecting the
CoreStation Setup Manager for the first time, and only one user can be
assigned.
• You cannot delete the level 1 administrator.
Login ID
Password
Confirm Password Enter the login password again to confirm.
4 Click
to save the settings.
Enter the login ID.
• Up to 32 characters may be entered for a login ID.
Enter the login password.
• A combination of characters, numbers, and symbols from 7 to 32
characters can be entered for the password.
1 Click
2 Click
on the administrator you want to edit.
.
3 Edit the necessary items by referring to the Adding Admin Accounts, and click
4 Click
to save the settings.
.
1 Click
2 Click
3 Click
4 Click
.
on the administrator you want to delete.
.
to save the settings.
15
Page 16

Web Server Network
SETTINGS
No.
Item
Description
1
2
3
Apply
You can change the network information of the CoreStation Setup Manager.
Settings
1 Click
.
2 Edit the necessary information.
1
2
3
IP Address
Gateway Edit the gateway of the CoreStation Setup Manager.
Subnet Mask Edit the subnet mask of the CoreStation Setup Manager.
Edit the IP address of the CoreStation Setup Manager.
• Only static IP is available. DHCP is not supported.
3 Click
to save the settings. The device will be restarted.
16
Page 17

Appendices
Disclaimers
Copyright notice
Appendices
• The information in this manual is provided with regard to the Suprema's products.
• The right to use is acknowledged only for products included in the terms and conditions of the
sales agreement guaranteed by Suprema. The right of license to other intellectual property
rights not discussed in this manual is not acknowledged.
• Suprema does not guarantee or hold responsibility for the suitability and commerciality of the
product for a specific purpose, or the infringement of patent, copyright, or other intellectual
property rights with regard to sales or usage of Suprema's products.
• Do not use a Suprema product in situations related to medical, rescue of human lives, or
maintenance of life, as a person may get injured or lose his/her life due to product malfunction.
If an accident occurs while a consumer is using the product under the situations described as
examples above, employees, subsidiaries, branches, affiliated companies and distributors of
Suprema do not accept responsibility nor will they reimburse for all related direct and indirect
expenses or expenditure including attorney fees even if the consumer has discovered any
shortcomings in the product design or manufacturing process and claims this as a significant
fault.
• Suprema may modify the product size and specifications at any time without proper notice in
order to improve the safety, function and design of the product. Designers must keep in mind
that functions or descriptions indicated as "to be implemented" or "undefined" may change at
any time. Suprema will implement or define such functions or descriptions in the near future
and Suprema accepts no responsibility for compatibility issues and any other problems arising
from such compatibility issues.
• If you wish to obtain the newest specifications before ordering the product, contact Suprema
through a Sales Representative or local distributor of Suprema.
The copyright of this document is vested in Suprema. The rights of other product names,
trademarks and registered trademarks are vested in each individual or organization that owns such
rights.
17
Page 18

Suprema Inc.
17F Parkview Tower, 248, Jeongjail-ro, Bundang- gu, Seongnam-si, Gyeonggi-do, 13554, Rep. of KOREA
Tel: +82 31 783 4502 I Fax: +82 31 783 4503 I Inquiry: sales_sys@supremainc.com
©2019
Suprema Inc. Suprema and identifying product names and numbers herein are registered trade marks of Suprema, Inc. All non-Suprema brands and product names are
trademarks or registered trademarks of their respective companies. Product appearance, build status and/or specifications are subject to change without notice.
 Loading...