

Page 1

保固服务
Sup erlux舒 伯乐针对在 符合使用手 册上所载明 之使用方法 ,给予自购 买日期起一 年的所有材 质及制造质 量的保证期 限。此
保证期 限将依据在 不同国家或 地区而有所 调整。请联 络当地的经 销商以或得 更多的信息 。在有效期 限内,若发 现任何材质
或生产 质量,或是 任何功能无 法正常使用 ,Super lux将进行 维修或更换 零件。此保 证条款只针 对经由Sup erlux所 授权的代
理商或 经销商所卖 出的产品, 然而以下的 状况将不在 保证条款内:
由于意 外、错误的 使用、不正 当的使用、 自行修改或 维修,运送 过程中造成 的损害,不 遵守说明书 上所载明之 使用方法、
未经由S uperl ux所授权的 公司执行维 修的动作, 由非授权的 经销商所提 出的要求, 或任何Sup erlux产 品其上的序 号贴纸巳
经无法 辨识或巳经 修改或被移 除者。Sup erlux产 品的维修只 能由原厂所 授权的维修 中心或是授 权的代理商 或经销商为 之。
未经授 权的维修、 保养或修改 将无法获取 相关的保证 ,并且排除 在保证条款 之外。在保 证条款下的 维修保证, 必须在提出
当地授 权代理商或 经销商的销 货收据下, 才能获得保 障。而且必 须在提出采 买日期才能 决定你的Su perlu x产品是否在 保证
期限内 。要获得原 厂授权的维 修保固,请 联络业经授 权的代理商 、经销商或 经由电邮su pport _cn@s uperl ux.co m.tw与我
们联络 。
本产品 符合 FCC法规B类 型第15章的规 范。在满足 以下两个条 件才允许操 作本产品:( 1)本产品不 会产生干扰 ,并且(2)本
产品必 须能够接受 接收到的包 括可能导致 装置意外操 作的任何干 扰。适合使 用的场所为 家庭或办公 室。
中国地区行销和业务
021-69223756
shsales@superlux.com.tw
support_cn@superlux.com.tw
国际行销和业务
+886-2-26931323
sales@superlux.com.tw
support@superlux.com.tw
P/N: LB10E205U0102 2012 Dec
Made in china
E205U
USB CONDENSER MICROPHONE
简体中文详见P.15
System Requirements
USB
USB 1.1 or 2.0, powered
RAM
64MB RAM (minimum)
Operating System
Microsoft Windows 2000 Professional Edition
Microsoft Windows XP Home/Professional Edition
(service pack 1.0 or later, or use the USB audio
driver update from Microsoft)
Microsoft Windows Vista™ Business Edition
Apple Computer Mac OS X 10.0 or later Edition
Apple Computer Mac OS X 10.1 or later Edition
www.superlux.com.tw
Page 2

SAFETY PRECAUTIONS
Safety symbols-“WARNING” AND “CAUTION”- and messages described below are used in this manual to
prevent bodily injury and property damage which could result from mishandling. Before operating your
product, read this manual first and understand the safety symbols and messages so you are thoroughly
aware of the potential safety hazards.
WARNING: Indicates a potentially hazardous situation which, if mishandled, could result in death
or serious personal injury.
CAUTION: Indicates a potentially hazardous situation which, if mishandled, could result in
moderate or minor personal injury, and/or property damage.
WARNING
Do not ex pos e the uni t to ra in or an en vir onmen t whe re it may b e spl ashed b y wat er or oth er
liqui ds, a s doing s o may r esult i n fir e or elec tri c shock .
Do not at tem pt to mod ify t his pro duc t. Doin g so co uld res ult i n perso nal i njury a nd/ or prod uct
failu re.
CAUTION
Do not su bje ct to ext rem e force a nd do n ot pull o n the c able or f ail ures ma y res ult.
Keep th e dev ice dry a nd av oid exp osu re to ext rem e tempe rat ures an d hum idity.
GENERAL DESCRIPTION
The E205U is a high quality condenser microphone with an advanced A/D and USB interface which
gives you digital recording capabilities instantly with no external digital interface or software driver
required. It is USB compatible with Mac, Windows, and most DAW software programs, including
GarageBand. The E205U offers premium quality audio recording with ease and mobility, and with its
pivoting stand mount and 9.8 ft. (3-meter) USB cable, the E205U is a valuable kit for any project
studio.
FEATURES
Smooth, flat frequency response
Plug in and start recording, no drivers required
Up to 16 bit / 48 kHz sampling
Powered by USB power, no external power required
Headphone output and volume control
Includes pivoting stand mount, threaded adapter, and USB cable
2
3
Page 3
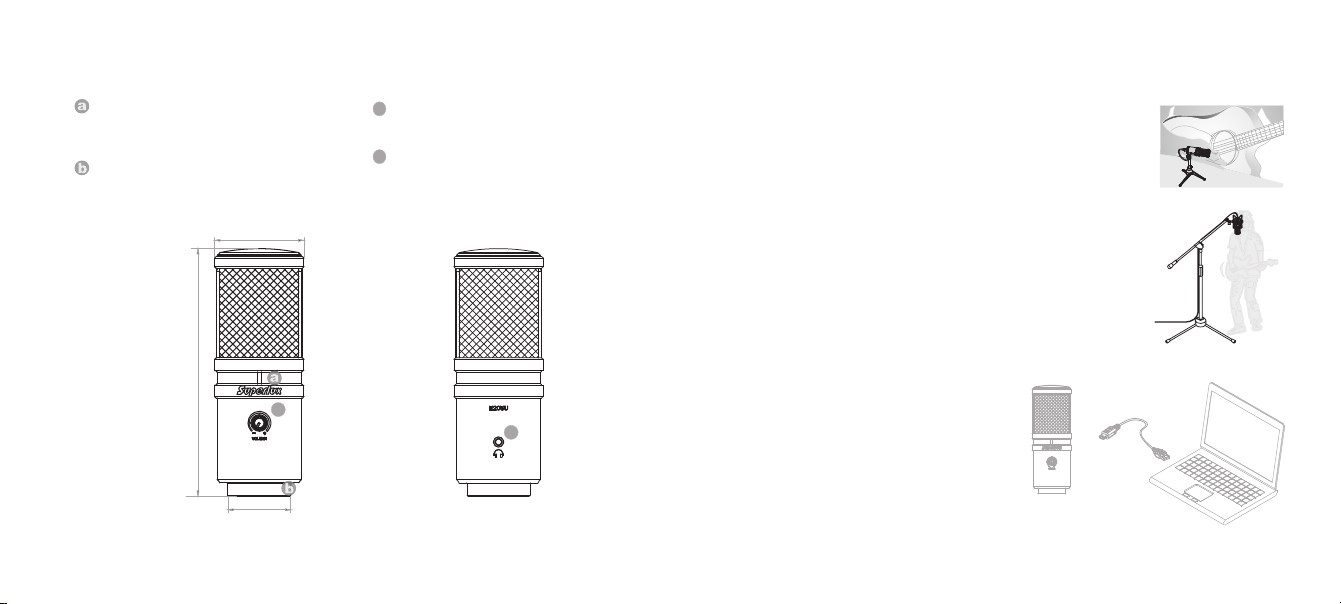
LAYOUT
USB indicator: When it is lit up, it means the
USB connection is done and E205U get the
power from USB interface.
USB connector: E205U involves a USB B-type
connector, and it is allowed to connect to any
device with USB interface.
Ø54 ( Ø2.13 ”)
150 m m (5.9" )
c
Volume control: Pop-out level control to adjust
c
the overall volume of the Headphone output.
Headphone out connector: 1/8-inch (3.5mm)
d
stereo jack for connecting headphones or
studio monitors.
d
MOUNTING
ON A TABLE
Through optional table stand HM6, You may put the E205U on a table and do
recording.
ON A STAND
By using a microphone stand, the E205U can be mounted on it
for recording.
CONNECTIONS
USB Con nec tor
A separated 3-meter cable with USB A-type connector allowed to be
connected to a computer with USB port.
Note: Make sure to use a powered USB prot.
Ø38 ( Ø1.5” )
Unit: mm/ in ch
4
5
Page 4

QUICK START
1. You can position the E205U on an optional stand by using included accessories.
2. Be sure to position the side of grille net to the sound source and keep the Superlux logo and LED indicator face the
direction of sound source.
3. Plug the B type connector of the included USB cable into the USB socket on the bottom of the E205U.
4. Now, plug the other end of the USB cable into an available powered USB port on your computer.
Note: Be sure to check the USB audio device driver setup for Windows and Mac OS to confirm your computer has
recognized the E205U.
5. Next, launch your DAW, turn down the main output level and select the E205U for the input.
6. Set up a mono record track in your DAW.
7. Now, setup the level of the E205U and there are few ways to do this depending on your computer system. You can set
the microphone's input level in the Sound playback in Windows or in the Sound dialog box in the System Preferences if
you are using the MAC OS.
8. Set level of the microphone by raising the Input level control in your DAW or system to about half way up.
9. Next, put on your headphones that is connected to the headphone output of E205U, position the E205U to the sound
source then adjust the volume control until you reach a comfortable listening level.
Now, follow the instructions of your DAW software to enable the track for recording and you're ready to record.
Note: if the microphone level of E205U are too loud or not enough, please check your DAW software or refer to
Troubleshooting page in this manual to adjust the level in Windows and Mac computer system:
USB AUDIO DEVICE DRIVER
If you encounter problems, make sure the driver was properly installed.
Windows Operating Systems
From the Control Panel, open
Sounds and Audio Devices.
In the Audio tab, look for Superlux
E205U in the drop-down menus for
superlux E205U
superlux E205U
Sound playback and Sound recording.
6
7
Page 5
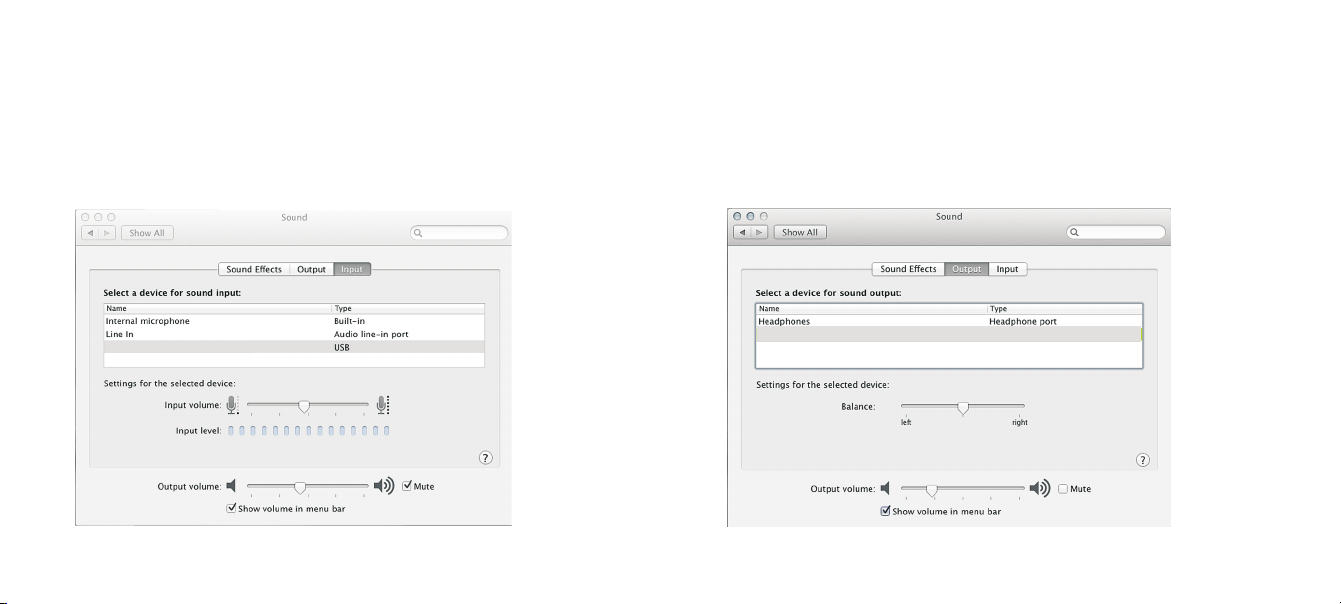
MACINTOSH OSX OPERATING SYSTEMS
Open the Sound Preference window from System Preferences.
Select Superlux E205U from both the Input and Output tabs.
Note: Garage Band users:
open Garage Band before plugging in the microphone to automatically select the
USB device.
Superlux E205U
Superlux E205U USB
8
9
Page 6

Using the Direct Monitor
1.To turn direct monitoring on or off, open the Setup utility located
in the folder inside the Applications folder.
Utility
Audio/MIDI
2. Now click the checkbox in the column in Setup.Thru Audio/MIDI
Superlux E205U
Superlux E205U
Superlux E205U
Superlux E205U
10
11
Page 7

TROUBLESHOOTING
Problem Solution
No sound in headphones
Microphone sound is too
week or distorted
Headphones are not loud
enough
Check the headphone volume control and microphone gain at
computer control panel
Windows:
Audio tab, click Volume under Record and turn up Microphone Gain Control.
Mac: From System Preferences, Choose Sound, Select Input tab and turn
up Input gain
Windows:
Audio tab, click Volume under Sound playback and turn up Volume Control.
Mac: From System Preferences, Choose Sound, Select Output tab and turn
up Output volume
From Control Panel, choose Sound and Audio Devices, select
From Control Panel, choose Sound and Audio Devices, select
12
SPECIFICATIONS
Type
Pol ar Patt ern
Fre quenc y Respo nse
Sen sitiv ity (at 1 ,000 Hz
Ope n Circu it Volta ge)
Max . SPL
Pow er Requ ireme nts
Res oluti on
Fin ish
Con necto rs
Dim ensio ns
Net Wei ght
Not e: spec ifica tions a re subj ect to ch ange.
Up to 1 6 bit/4 8k Hz sam pling r ate
USB B -TYPE , 1/8"( 3.5mm ) phone c onnec tor
Bac k Elect ed cond enser
Sup ercar dioid
30- 18,00 0 Hz
-38 d BV/Pa ( 12.6 mV )
>13 5 dB SPL
USB 5 V, 30 mA
Cha mpagn e silve r
Ø54 × 1 50 mm (Ø2 .13" × 5. 9")
422 g ( 14.9 oz )
13
ACCESSORIES FURNISHED
HM85 pivoting
stand mount
OPTIONAL ITEMS
HM56 spider shockmount
Page 8

LIMITED WARRANTY
Superlux Enterprise warrants all materials and workmanship under use as instructed by the user’s manual
of this product for a period of one year from the original date of purchase. Warranty period might be
different by each area. Please contact your local dealer for more information. If any defects are found in
the materials or workmanship or if the product fails to function properly during the applicable warranty
period, Superlux Enterprise, at its option, will repair or replace the product. This warranty applies only to
equipment sold and delivered by Superlux Enterprise’s authorized distributors or dealers. However, the
following are not covered:
Damage caused by accident, misuse, abuse, product modification or neglect; damage occurring during
shipment; damage resulting from failure to follow instructions contained in your Instruction manual;
damage resulting from the performance of repairs by someone not authorized by Superlux; claims based
upon any misrepresentations by the seller; any Superlux product on which the serial number has been
defaced, modified or removed.
Service and repairs of Superlux products are to be performed only at a factory-authorized facility or
authorized distributors or dealers. Unauthorized service, repairs, or modification will void this warranty. To
obtain repairs under warranty, you must have a copy of your sales receipt from the authorized Superlux
dealer where you purchased the product. It is necessary to establish purchase date and determine
whether your Superlux product is within the warranty period. To obtain factory authorized service, please
contact authorized distributors, dealers or mail to support@superlux.com.tw.
THIS DEVICE COMPLIES WITH PART 15 OF THE FCC RULES CLASS B. OPERATION IS SUBJECT
TO THE FOLLOWING TWO CONDITIONS: (1) THIS DEVICE MUST NOT CAUSE HARMFUL
INTERFERENCE, AND (2) THIS DEVICE MUST ACCEPT ANY INTERFERENCE RECEIVED
INCLUDING INTERFERENCE THAT MAY CAUSE UNDESIRED OPERATION. SUITABLE FOR HOME
OR OFFICE USE.
Contact Us
Marketing and sales
Superlux,T aiwan
+886-2-26931323
sales@superlux.com,tw
support@superlux.com.tw
Manufacturing & logistics
Superlux Enterprise
Development(Shanghai)
Co., Ltd.
14
P/N: LB10E205U0102 2012 Dec
Made in china
系统要求
USB
USB 1.1 或 2.0,含5V供电
内存
64MB 内存(最低要求)
操作系统
Microsoft Windows 2000 专业中文版
Microsoft Windows XP 家庭/专业中文版(Service Pack 1.0 或以上
版本,或使用 Microsoft 的 USB 音频驱动更新)
Microsoft Windows Vista™ 企业中文版
Apple Computer Mac OS X 10.0 或以上中文版
Apple Computer Mac OS X 10.1 或以上中文版(对于 Mac OS X
10.0 中文版,不适用即插即用功能)
www.superlux.com.tw
15
E205U
USB电容麦克风
Page 9

安全事项
“警告”和“小心”的标志及以下的讯息,是用来提醒使用者避免不正确使用下,可能导致的伤害
与后果。
概述
高质量电容麦克风,再加上USB接口,整合在一支麦克风上,让你立即实现数字录音。E205U兼容于
Mac或Windows,及大部份的DAW数字录音工作站软件。E205U优越的录音质量,及其容易使用和便
利的移动性,再加上麦克风夹、USB线,使E205U是任何录音室超值的选择。
警告:若未遵循相关的警告事项,当操作不当时,可能会导致严重的人身伤亡事故。
小心:若未遵循相关的小心事项,当操作不当时,可能会导致常见的人身伤害或财产损
失。
警告
• 请勿曝露此产品在雨中或可能被水弄湿的环境中,可能会导致起火或触电事故。
• 请勿尝试修改本产品,可能会导致人身伤害和/或产品故障。
小心
• 不要用力过大,不要拉扯线缆,否则会导致故障。
• 应让本产品及一起应用的设备保持干燥,并避免暴露在很高的温度和湿度下。
16
特征
平顺且平坦的频率响应
即插即用,不需要额外的设备,只需要一部计算机
USB供电
含耳机输出接口及音量控制
分辨率16位/48k Hz
随附USB线、HM85旋转接头及转换螺母
17
Page 10

功能说明
USB连接指示灯
确连接,且 巳由U SB接口取得 供电。
此灯亮表示 ,US B巳正
:
c
音量控制
耳机的音量 。
按压弹出音 量控 制钮可调整
:
安装
置于桌上
透过选购桌架HM6桌架,可将E205U置于桌面使用。
: USB B -T YPE 接 口,可连接至
USB接口
任何含USB接口之设备进行录 音。
Ø54 ( Ø2.13 ”)
150 m m (5.9" )
c
Ø38 ( Ø1.5” )
d
耳机输出
至耳机或是 有源 监听音箱。
尺寸单位:毫米/英吋
18
: 3.5 mm耳机输山接口 ,可接
置于立架上
可将E205U安装在麦克风立架上,进行录音之用。
连接
USB 连接
随货附的1.5米USB线,可连接在USB话筒及计算机之。USB
mini B型接头接在USB话筒上,而另一端A型接头连接于一般
含电源的USB接口上。
注意: 计算机上的USB接口,必须有5V的供电。
d
19
Page 11

快速启用
1 透过随附的配件及选购的立架,可将E205U放在立架上使用。
2 将此侧向拾音麦克风有Superlux商标及指示灯的那一边面向音源,并将网头部份对准音源。
3 取随附的USB线,将USB B-型接头连接至E205U底端的USB接口。
4 将另一端的USB接头,接至计算机的USB接口。
注意: 请确认计算机上的操作系统(苹果MAC OS 或 Windows微软)巳发出讯息窗口,通知巳找到
USB音频硬件。
5 下一步,请打开你的应用软件或是音乐录音软件。先将总输出音量关至静音,然后选择Superlux
E205U为输入埠。
6 设立一个MONO单音的录音轨在录音软件上
7 设定使用E205U所需的音量。可在DAW录音软件中执行或是在Windows 微软的操作系统里,请到
控制面板/声音/播放Sound playback中找到Superlux E205U; 若是苹果计算机,请到系统偏好设定
/声音System Preferences/Sound dialog box,设定录音输入的音量大小。
8 先将录音输入的音量大小调至50%的位置。
9 可将耳机接入E205U之耳机输出接口,然后将E205U对着音源,适当的提升音量,至舒适的大小。
如果有听到失真,就代表过载,请调低音量至没有失真为止。
现在,依录音软件的操作方式,开始你的录音工作或是依其它网上对谈应用软件的指示,开始使用
E205U。
注意: 如果麦克风的音量太大或不足,请检查你的录音软件或是参考在本使用手册"问题排除"的页
面说明,进行问题排除。
USB 音频设备驱动
如果遇到问题,请检查并驱动程序是否巳安装完成。
Windows操作系统
从控制面板,开启声音和音讯设备。
在“音频”卷标中,找出播放和录音
下拉菜单中的Superlux E205U
superlux E205U
superlux E205U
20
21
Page 12

Macintosh OSX 操作系统
从系统设置打开声音设置窗口。
从输入和输出两个标签选择Superlux 。E205U
注意: Garage Band 用户:
接通话筒前,先开启 Garage Band 以自动选择 USB 设备。
Superlux E205U
Superlux E205U USB
22
23
Page 13

“直接监听的使用”—苹果计算机
1、请至功能Utility下的音频/MIDI Audio/MIDI Setup 页面,可开启
或关闭"直接监听Direct Monitor” 功能。
2、在选项中,勾选”Thru直达”。
Superlux E205U
Superlux E205U
Superlux E205U
Superlux E205U
24
25
Page 14

故障排除
问题 解决方案
耳机无输出 检查耳机音量及麦克风的音量控制。
麦克风音量
太小
耳机音量不足
微软操作系统Windows:
从控制面板Control Panel, 选择音讯设备Sound and Audio Devices, 选择
音讯Audio tab, 在录音Record下点击音量,然后调整麦克风的增益值gain。
苹果计算机操作系统Mac: 从系统参考System Preferences, 选音讯Sound, 选输入
Input tab,然后调整输入增益值gain。
先调整耳机音量控制键,若还是不够,请依照以下指示进行。
微软窗口操作系统Windows: 从控制面板Control Panel, 选择音讯设备Sound and Audio
Devices, 选择音讯Audio tab, 在喇叭Sound Playback下点击音量,然后调整耳机输出音量。
苹果计算机操作系统Mac:
从系统偏好设定System Preferences, 选声音Sound, 选输出Output tab,然后调整输出音量。
规格
音头
指向性
频率响 应
灵敏度
(1 kH z,开路电压)
最大音 压
电源需 求
分辨率
表面涂 装
接头
尺寸
净重
注意: 技 术规格可能 有所更 动
电容背 驻极
超心型
30- 18,00 0 Hz
-38 d BV/Pa ( 12.6m V)
>13 5 dB SPL
USB 5 V,<30 m A
最高达1 6位/48k Hz
香槟银
USB B -Type及3 .5耳机接口
Ø54×15 0 mm (Ø2.13 "×5.9")
422 g ( 14.9 oz )
随货附件
YA2转换螺母
HM85
可旋转脚架转接件
拉链皮袋
3米USB线
选购附件
HM56避震架
26
27
 Loading...