

Page 1
C905 Camera guide
This is the Internet version of the User guide. © Print only for private use.
Page 2

Take a picture
Your Cyber-shot™ phone does everything to get you the best shots
possible. Open the lens cover to activate the camera, and press
the camera key halfway down to use auto focus. Press the camera
key fully down when the dot and focus frame are green to take your
picture. Your picture is automatically saved on the memory card and
can be found in Media.
Photo images displayed in this leafl et may be simulated or enhanced.
This is the Internet version of the User guide. © Print only for private use.
Page 3

Face detection
With Face detection the face
is detected and the focus is
set to the face. The camera
will automatically detect up
to three faces which will be
surrounded by white frames.
When the camera selects the
closest face, the surrounding
frame turns green and the face
is captured in sharp detail.
This is the Internet version of the User guide. © Print only for private use.
Page 4
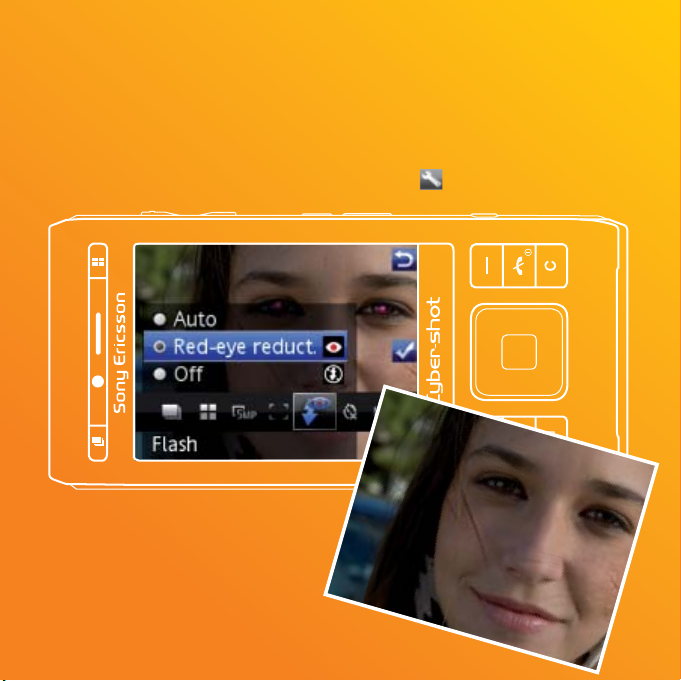
Red-eye reduction
Reduce red-eye effect by making the fl ash fi re before the shot is
taken and again during the shot.
To set red-eye reduction
From standby select Menu > Cyber-shot™ >
Red-eye reduct.
> Flash >
This is the Internet version of the User guide. © Print only for private use.
Page 5

Smart contrast
Taking images of scenes with
bright parts and dark shadows
is a problem in photography.
Smart contrast improves your
photo by automatically balancing
the contrast between the bright
and dark parts of your photo.
To use Smart contrast
When you use the camera,
select.
> Smart contrast .
.> Settings > Red-eye reduct.
Viewing photos on a map
Location data is included when you
take photos. This allows you to view
the approximate location of where a
photo was taken.
To turn on location data
From standby select Menu > Cybershot™ >
> Settings > Add position .
This is the Internet version of the User guide. © Print only for private use.
Page 6

Tips when using the camera
Rule of thirds
Don’t place your subject in the middle of the frame. By placing it a third
of the way in, you will achieve a better result.
Hold it steady
Avoid blurry pictures by holding the camera steady. Try to steady your
hand by leaning it against a solid object.
Get closer
By getting as close as possible to your subject you won’t have to rely on
the zoom. Try to fi ll your viewfi nder with your subject.
Stay within the fl ash range
Pictures taken beyond the maximum fl ash range will be too dark.
The maximum fl ash range is about four steps away.
This is the Internet version of the User guide. © Print only for private use.
Page 7

Consider variety
Think different angles, move towards the object. Take some
vertical pictures. Try different positions.
Use a plain background
A plain background will help to highlight your subject.
Keep your lens clean
Mobile phones are used in all manner of weather and places
and carried in pockets and bags. This results in the camera
lens becoming dirty and covered with fi ngerprints. Use a soft
cloth to clean the lens.
This is the Internet version of the User guide. © Print only for private use.
Page 8

How to adapt the camera to the
current situation
Auto – automatic settings suitable for
most situations.
Twilight landsc. – landscape mode to be used
at night or in poorly lit environments.
Twilight portrait – portrait mode to be used at
night or in poorly lit environments.
Landscape – this setting allows the focus to
prioritise distant objects.
Portrait – use for portrait photos. Emphasis on
fl esh tones and slightly softer appearance.
Beach/Snow – use in bright environments to
ensure a more proper exposure.
Sports – use when shooting
fast-moving objects.
Document – use when shooting text
or drawings.
To change scenes:
1. From standby select Menu > Cyber-shot™ >
2. Select a scene.
This is the Internet version of the User guide. © Print only for private use.
> Scenes .
Page 9

How to get the most natural colours
Use the white balance setting to adjust the photo colour balance
according to the lighting conditions.
To set white balance
1. From camera select
2. Select an option.
> White balance .
This is the Internet version of the User guide. © Print only for private use.
Page 10

Pick the best with BestPic™
How many great moments have you
missed because you didn’t take the
picture in time or your subject moved?
BestPic™ buffers images while your
camera is focusing and gives you
several shots in one burst and with
one press on the camera key. You
can even pick a BestPic™ speed.
Pick the best and simply delete
the rest.
This is the Internet version of the User guide. © Print only for private use.
Page 11

Photo fi x
Photo fi x adjusts contrast, colour and light balance in one click to make
your picture as good as it can get.
If you take a picture and it is too dark select Options > Photo fi x .
The picture is automatically adjusted to improve brightness, colours
and contrast. To enable Photo fi x, check the camera settings to make
sure Review is set to On .
This is the Internet version of the User guide. © Print only for private use.
Page 12

UG: 1215-5299.3, Printed in XXXX
Sony Ericsson Mobile Communications AB, SE-221 88 Lund, Sweden
www.sonyericsson.com
This is the Internet version of the User guide. © Print only for private use.
 Loading...