

Page 1

Contents
Contents
Getting started . . . . . . . . . . . . . . . . . . 4
Assembling the phone, SIM card, battery, making a call.
Getting to know your phone . . . . . . . . 8
Phone overview, using the menus, entering letters,
file manager.
Calling . . . . . . . . . . . . . . . . . . . . . . . . 17
Calls, phonebook, voice control, call options.
Messaging . . . . . . . . . . . . . . . . . . . . . 36
Text messaging, picture messaging, email, My Friends,
messaging glossary.
Imaging . . . . . . . . . . . . . . . . . . . . . . . 51
Camera, video recorder, pictures, screen saver.
Entertainment . . . . . . . . . . . . . . . . . . 57
Media player, sounds, themes, games.
This is the Internet version of the user's guide. © Print only for private use.
Sony Ericsson K700i
Connectivity . . . . . . . . . . . . . . . . . . . . 63
Internet and email settings, synchronizing,
Bluetooth™ wireless technology, infrared.
More features . . . . . . . . . . . . . . . . . . . 72
Time and date, alarm clock, calendar, tasks,
SIM card lock, etc.
Troubleshooting . . . . . . . . . . . . . . . . . 81
Why doesn’t the phone work the way I want?
Additional information . . . . . . . . . . . . 84
Sony Ericsson Web site, safe and efficient use,
warranty, declaration of conformity.
Icons . . . . . . . . . . . . . . . . . . . . . . . . . . 91
Icon descriptions.
Index . . . . . . . . . . . . . . . . . . . . . . . . . 93
1
Page 2

Sony Ericsson
GSM 900/1800/1900
First edition (March 2004)
This manual is published by Sony Ericsson
Mobile Communications AB, without any
warranty. Improvements and changes to this
manual necessitated by typographical errors,
inaccuracies of current information, or improvements to programs and/or equipment, may be
made by Sony Ericsson Mobile Communications
AB at any time and without notice. Such changes
will, however, be incorporated into new editions
of this manual.
All rights reserved.
©
Sony Ericsson Mobile Communications AB, 2004
Publication number: AE/LZT 108 6824 R1A
Please note:
Some of the services in this manual are not
supported by all networks. This also applies
to the GSM International Emergency
Number 112.
Please contact your service provider if you are
in doubt whether you can use a particular service
or not.
Please read the Guidelines for safe and efficient
use and the Limited warranty chapters before you
use your mobile phone.
The Bluetooth word mark and logos are owned
by the Bluetooth SIG, Inc. and any use of such
marks by Sony Ericsson is under license.
T9™ Text Input is a trademark or a registered
trademark of Tegic Communications.
T9™ Text Input is licensed under one or more
of the following: U.S. Pat. Nos. 5,818,437,
5,953,541, 5,187,480, 5,945,928, and 6,011,554;
Canadian Pat. No. 1,331,057; United Kingdom
Pat. No. 2238414B; Hong Kong Standard Pat.
No. HK0940329; Republic of Singapore Pat.
No. 51383; Euro. Pat. No. 0 842 463 (96927260.8)
DE/DK, FI, FR, IT, NL, PT, ES, SE, GB; and
additional patents are pending worldwide.
Java and all Java based trademarks and logos
are trademarks or registered trademarks of
Sun Microsystems, Inc. in the U.S. and other
countries.
End-user license agreement for Sun™ Java™
J2ME™.
1 Restrictions: Software is confidential copyrighted
information of Sun and title to all copies is
retained by Sun and/or its licensors. Customer
shall not modify, decompile, disassemble,
decrypt, extract, or otherwise reverse engineer
Software. Software may not be leased,
assigned, or sublicensed, in whole or in part.
2
This is the Internet version of the user's guide. © Print only for private use.
Page 3

2 Export Regulations: Software, including
technical data, is subject to U.S. export control
laws, including the U.S. Export Administration
Act and its associated regulations, and may be
subject to export or import regulations in other
countries. Customer agrees to comply strictly
with all such regulations and acknowledges
that it has the responsibility to obtain licenses
to export, re-export, or import Software.
Software may not be downloaded, or otherwise
exported or re-exported (i) into, or to a national
or resident of, Cuba, Iraq, Iran, North Korea,
Libya, Sudan, Syria (as such listing may be
revised from time to time) or any country to
which the U.S. has embargoed goods; or (ii)
to anyone on the U.S. Treasury Department’s
list of Specially Designated Nations or the
U.S. Commerce Department’s Table of Denial
Orders.
3 Restricted Rights: Use, duplication or disclosure
by the United States government is subject
to the restrictions as set forth in the Rights
in Technical Data and Computer Software
Clauses in DFARS 252.227-7013(c) (1) (ii)
and FAR 52.227-19(c) (2) as applicable.
Part of the software in this product is copyright
© SyncML initiative Ltd. (1999-2002).
All rights reserved.
Other product and company names mentioned
herein may be the trademarks of their respective
owners.
Any rights not expressly granted herein are
reserved.
This is the Internet version of the user's guide. © Print only for private use.
3
Page 4

Getting started
Getting started
Assembling the phone, SIM card, battery,
makingacall.
More information and downloads are available
at www.SonyEricsson.com.
Instruction icons
The following instruction icons appear in this
user guide:
} Use the selection keys or the navigation
key to scroll and select.
the menus.
See also page ...
%
Important
Note
Contact your service provider for details.
% 6 Available services.
Assembly
Before you can use your phone you need to:
• Insert the SIM card.
• Attach and charge the battery.
4
This is the Internet version of the user's guide. © Print only for private use.
% 10 Navigating
SIM card
When you register as a subscriber with a service
provider, you get a SIM (Subscriber Identity
Module) card. The SIM card contains a computer
chip that keeps track of your phone number, the
services included in your subscription, and your
phonebook information, among other things.
If you have been using a SIM card in another phone,
make sure that your information is saved to the
SIM card before you remove it from the other phone.
For example, contacts may have been saved in the
phone memory
% 19 Phonebook.
SIM card and battery
information
Always turn off the phone and detach the charger
before you insert or remove a SIM card.
It may take up to 30 minutes before the battery icon
appears when charging.
Page 5
Getting started
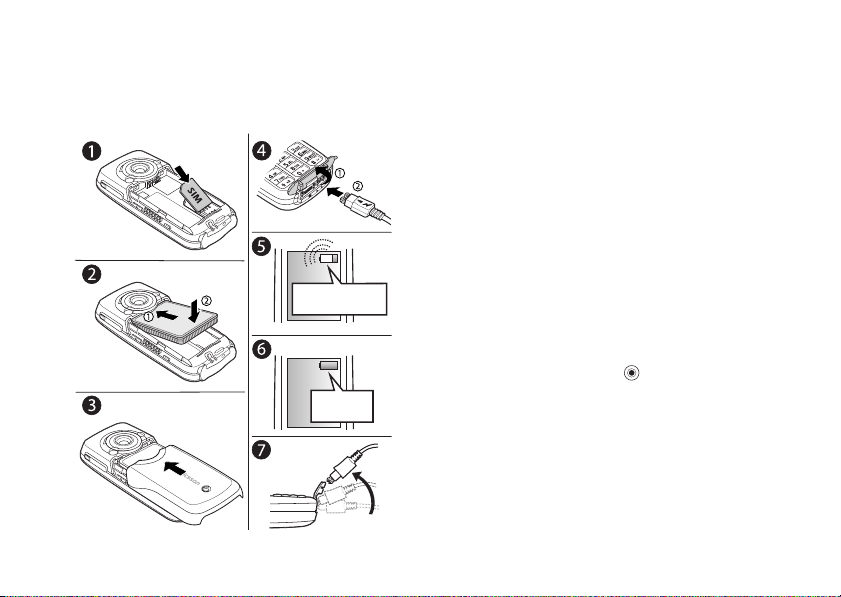
To insert the SIM card and charge
the battery
≈ 30 min.
≈ 4 h.
This is the Internet version of the user's guide. © Print only for private use.
1 Insert the SIM card. Make sure the SIM card
is placed under the silvery holders.
2 Place the battery on the back of the phone with
the label side up and the connectors facing
each other.
3 Place the back cover as shown in the picture
and slide it into place.
4 Open the connector cover and connect
the charger to the phone at the flash symbol.
The flash symbol on the charger plug must
face upwards.
5 It may take up to 30 minutes before the battery
icon appears on the screen.
6 Wait approximately 4 hours or until the battery
icon indicates that the battery is fully charged.
If you do not see the battery icon after this
time, press any key or to activate the screen.
7 Remove the charger by tilting the plug upwards.
PIN (Personal Identity Number)
You may need a PIN (Personal Identity Number)
to activate the services in your phone. Your PIN
is provided by your service provider. When you
enter your PIN, the digits are hidden with an *,
unless your PIN starts with the same digits
as an emergency number, for example 112.
5
Page 6

Getting started
This is so that you can see and call an emergency
number without entering a PIN
% 19 Emergency calls.
If you make a mistake while entering your PIN,
delete the number by pressing .
If you enter the wrong PIN three times in a row,
the SIM card is blocked and the message PIN blocked
appears. To unblock it, you need to enter your PUK
(Personal Unblocking Key),
% 78 SIM card lock.
Available services
Some services and functions described in this user
guide are network- or subscription-dependent.
Because of this, all menus may not be available
in your phone.
This symbol indicates that a service or function
is network- or subscription-dependent.
Please consult your service provider for more
information about your subscription.
6
This is the Internet version of the user's guide. © Print only for private use.
Turning on the phone and
making calls
Make sure that the phone is charged before you turn
it on. When you have turned the phone on, you can
use a setup wizard to quickly and easily prepare
your phone for use.
Setup wizard
You can use the setup wizard to help you get started
with the basic settings in your phone. If you do not
want help the first time you turn on your phone,
you can select to use the wizard later. You can also
select to start the wizard from the menu system at
any time. The wizard gives you tips on how to use
the keypad and guides you through the following
settings:
• Time and time format.
• Date and date format.
• Copying names and numbers from your
SIM card to Contacts in the phonebook.
To start the setup wizard from the
menu system
1 } Settings } the General tab } Setup Wizard.
2 Select language for your phone.
3 To use the wizard } Yes and follow the
instructions that appear.
Page 7
Getting started
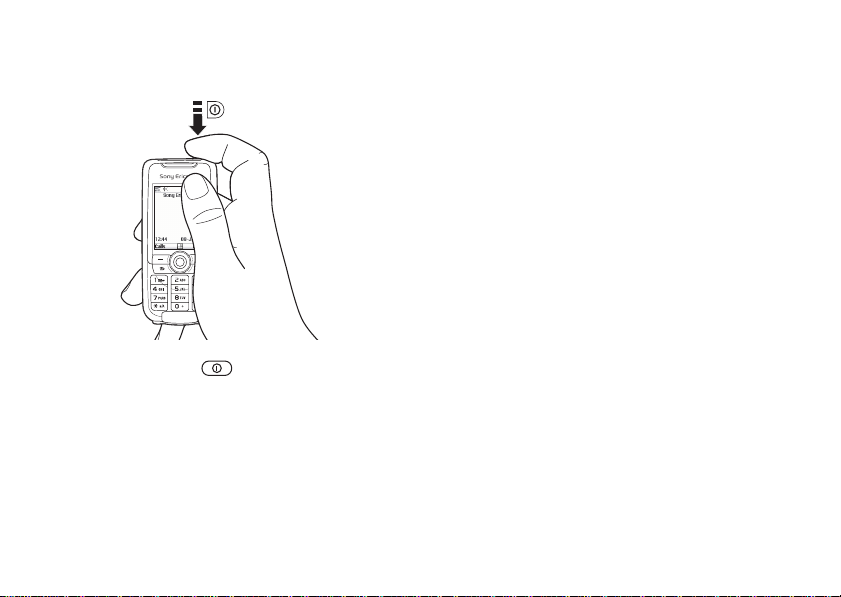
To turn on the phone
1 Press and hold .
2 Enter your PIN if you have one for your
SIM card.
3 At first start-up, select the language you
want for your phone, that is, the language
for the menus.
4 } Yes if you want the setup wizard to help
you get started, and follow the instructions
that appear.
This is the Internet version of the user's guide. © Print only for private use.
To make and receive calls
• Enter the area code and phone number } Call
to make the call. } End Call to end the call.
• When the phone rings } Yes.
7
Page 8

Getting to know your phone
Getting to know your
phone
Phone overview, using the menus, entering letters,
file manager.
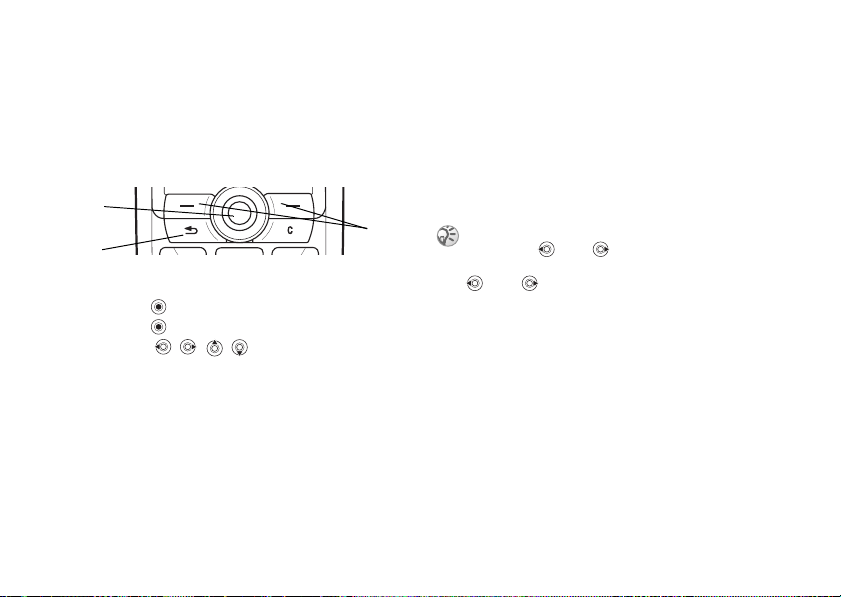
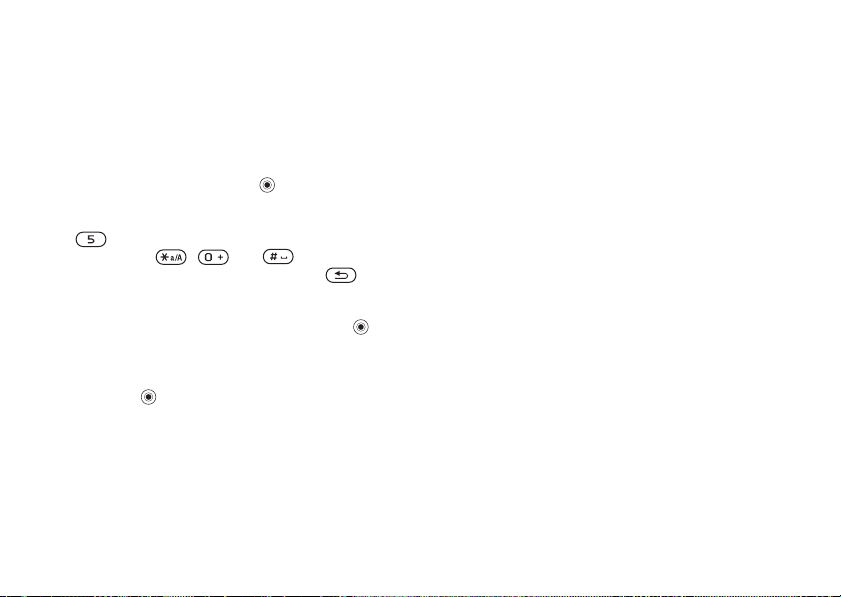
Phone overview
1
2
3
4
5
6
7
8
This is the Internet version of the user's guide. © Print only for private use.
1
2
Infrared port.
Press and hold to activate the camera
and video recorder.
3
8
9
10
4
5, 11
6
7
Volume buttons.
Screen.
Selection keys.
Press once to go back one level in the menus.
Press and hold to return to standby.
Stereo headset and charger connector.
Connector cover.
11
12
13
8
9
10
12
13
Press and hold to turn the phone on/off.
Speaker.
Internet button.
Navigation key. Press to enter the desktop
menu. Move through menus, lists and texts.
Delete numbers, letters or an item from
alist.
14
14
Microphone.
Page 9
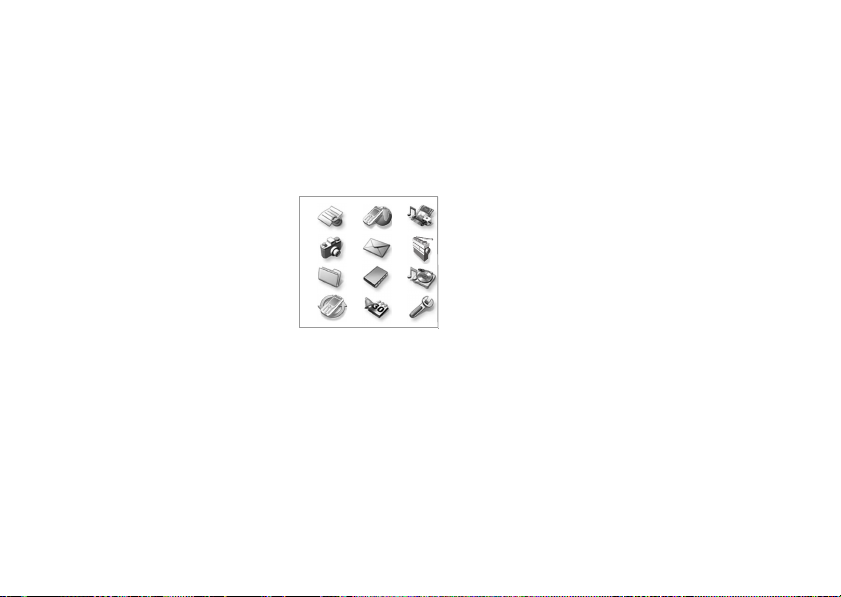
Overview, menu
Getting to know your phone
1. Sony Ericsson* 2. Internet Services* 3. Entertainment 4. Camera 5. Messages
Games
MusicDJ™
Record Sound
7. File Manager 8. Phonebook** 8. Phonebook** 9. Media Player
Pictures
Sounds
Videos
Themes
Games
Applications
Other
Contacts
Options:
Speed Dial
My Business Card
Groups
SIM Numbers
Special Numbers
Advanced
1 2 3
4 5 6
7 8 9
10 11 12
SIM Numbers
Options:
Speed Dial
My Business Card
Contacts
Special Numbers
Advanced
Write New
Inbox
My Friends
Call Voicemail
Email
Drafts
Templates
Outbox
Sent Items
Saved Items
Settings
6. Radio
10. Connect 11. Organizer 12. Settings
Online Services
Bluetooth
Infrared Port
Synchronization
Mobile Networks
Data Comm.
Internet Settings
Streaming Setting
Accessories
Calendar
Tasks
Notes
Applications
Alarm Signal
Timer
Stopwatch
Calculator
Code Memo
General
Profiles
Time & Date
Language
Voice Control
Phone Status
Shortcuts
Locks
Setup Wizard
Master Reset
Sounds & Alerts
Ring Volume
Ringtone
Silent Mode
Vibrating Alert
Message Alert
Key Sound
Display
Wallpaper
Themes
Startup Screen
Screen Saver
Light
Calls
Forward Calls
Manage Calls
Time & Cost
Show or Hide No.
Handsfree
*Please note that some menus are provider- network- and subscription-dependent.
**The menu depends on which phonebook is selected as default.
This is the Internet version of the user's guide. © Print only for private use.
9
Page 10
Getting to know your phone
Navigating the menus
The main menus are shown as icons on the desktop.
Some submenus include tabs that appear on the
screen. Scroll to a tab with the navigation key and
select an option.
1
2
1 Press to go to the desktop.
Press to select highlighted items.
Move , , , through menus and tabs.
2 Press to go back one level in the menus.
Press and hold to return to standby.
3 Press to select the options shown immediately
above these keys on the screen.
10
This is the Internet version of the user's guide. © Print only for private use.
Phone language
Most SIM cards automatically set the language
used in the menu to the language of the country
where you bought your SIM card. If this is not the
case, the predefined language is English. If you use
the setup wizard to help you get started with your
phone, you will be asked to select phone language,
% 6 Setup wizard.
3
You can always choose Automatic language
by pressing 8888 in standby.
You can always choose English by pressing
0000 in standby.
To change the phone language
1 } Settings } the General tab } Language
} Phone Language.
2 Select a language.
Help texts
More information, explanations or tips about
selected features, menus or functions are available
in your phone.
To get help
Scroll to the menu item } Info.
Page 11
Getting to know your phone
Shortcuts
A quicker way to move through the menus is to use
shortcuts. You can use keypad shortcuts or you can
create your own shortcuts from standby.
Using keypad shortcuts
Enter the menus by pressing and then enter
the number of the menu to which you want to go.
For example, to reach the fifth menu item, press
. To reach the tenth, eleventh and twelfth menu
items, press , and respectively.
To get back to standby, press and hold .
Creating standby shortcuts
You can create your own shortcuts and use
to go directly to that function.
To create a standby shortcut
1 Press in a direction for which there is no
predefined shortcut. } Yes when you are asked
if you want to create a shortcut.
2 Scroll to a function that you want to create
a shortcut to } Shortcut.
This is the Internet version of the user's guide. © Print only for private use.
To edit a standby shortcut
1 } Settings } the General tab } Shortcuts and
select which shortcut you want to edit } Edit.
2 Scroll to a function that you want to create
a new shortcut to } Shortcut.
More options
} More to enter a list of options. There are different
alternatives in the list of options depending on
where you are in the menus.
Entering letters
There are two ways of entering letters, for example,
when writing a message or writing a name in the
phonebook:
• Multitap text input
You press each key as many times as needed
to show the letter you want.
• T9™ Text Input
The T9 Text Input method uses a built-in dictionary
to recognize the most commonly used word for
each sequence of key presses. This way you press
each key only once, even if the letter you want is
not the first letter on the key.
11
Page 12
Getting to know your phone
Writing languages
Before you start entering letters, you need to select
the languages that you want to use when writing.
When writing, you can switch to one of your
selected languages by pressing and holding .
To select writing language
1 } Settings } the General tab } Language
} Writing Language.
2 Scroll to the language that you want to use for
entering letters and mark each language you
want. } OK to exit the menu.
To enter letters using multitap
text input
1 To enter text, you have to be in a function
where text input is possible, for example
} Messages } Write New } Text Message.
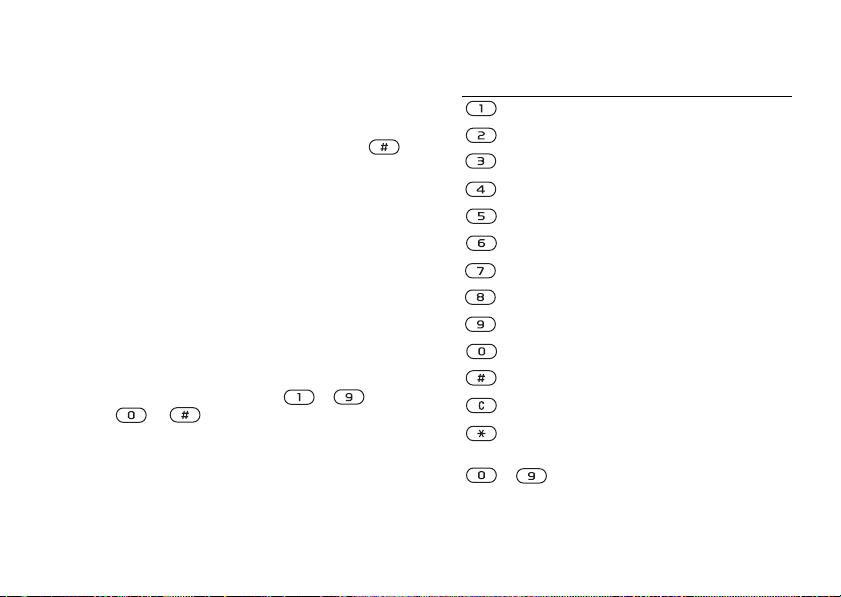
2 Press the appropriate key, – ,
or , repeatedly until the character
you want appears on the screen.
12
This is the Internet version of the user's guide. © Print only for private use.
Press… to get…
. , - ? ! ' @ : ; / ( ) 1
A B C Å Ä Æ à Ç 2 Γ
D E F è É 3 ∆ Φ
G H I ì 4
J K L 5 Λ
M N O Ñ Ö Ø ò 6
P Q R S ß 7 Π Σ
T U V Ü ù 8
W X Y Z 9
+ 0 Θ Ξ Ψ Ω
space ↵ 
to delete letters and numbers
to shift between upper- and lowercase letters
–
press and hold to enter numbers
Page 13
Getting to know your phone
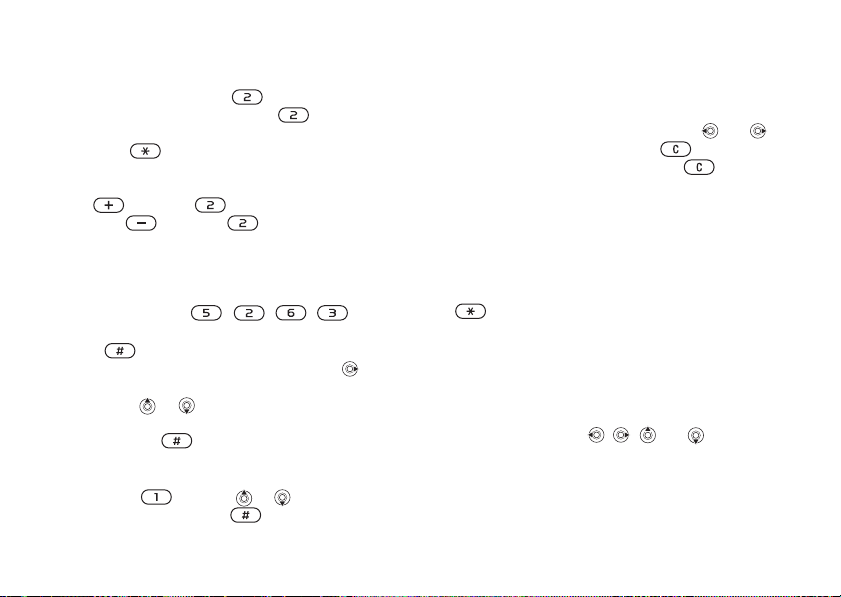
Example:
• To enter an ‘A’, press once.
• To enter a ‘B’, quickly press twice.
• To shift between upper- and lower-case letters,
press , then enter the letter.
• You can use the volume buttons as a shortcut
to certain letters: To enter a ‘B’, press and hold
and press . To enter a ‘C’, press and
hold and press .
To enter letters using T9 Text Input
1 } Messages } Write New } Text Message.
2 For example, if you want to write the word
“Jane”, press , , , .
3 If the word shown is the one you want, press
4 Continue writing your message. To enter
to accept and add a space. To accept
a word without adding a space, press .
If the word shown is not the one you want:
or repeatedly to view alternative
press
words. Accept a word and add a space by
pressing .
a period or other punctuation marks,
press and then or repeatedly.
Accept by pressing .
This is the Internet version of the user's guide. © Print only for private use.
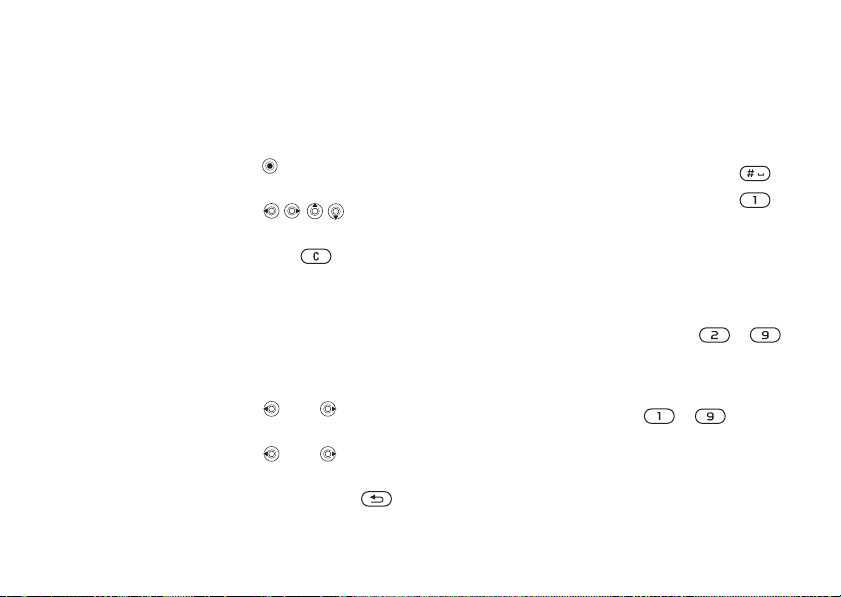
To add words to the T9 dictionary
1 While entering letters } More } Spell Word.
2 Edit the word by using multitap input.
Navigate between the letters with and .
To delete a character, press . To delete
the entire word, press and hold .
3 When you have edited the word } Insert.
The word is added to the T9 dictionary.
Next time you enter this word using T9,
it will appear as one of the alternative words.
To select another writing method
Before, or while entering letters, press and hold
to select another writing method.
Options when entering letters
} More to view a list of options. The list may
contain some or all of the following:
• Add Symbol – symbols and punctuation marks
such as ? and , are shown. Move between the
symbols by using , , and .
• Add Item – pictures, melodies and sounds.
• Spell Word – for T9 Text Input only. Edit the
suggested word by using multitap text input.
• Text Format – change style, size and alignment.
13
Page 14

Getting to know your phone
• Writing Language – a list of available languages
is shown.
• Writing Method – a list of methods available
for the current language is shown.
• Dictionary (T9) – turn T9 text input on or off.
• Word Suggestions – select to view, or not,
word suggestions when writing a word.
• My Words – manage the words that you have
added to the dictionary.
• National Chars. – turn off language-specific
characters to save space. This option appears
only for some writing languages.
File manager
Items such as pictures, videos, sounds, themes
and games are saved as files in folders. All files
that the phone cannot recognize are saved in the
Other folder. The phone has several predefined
folders. You can create your own subfolders
in the predefined folders to which you can move
your saved files.
When handling files, you can select several files
at the same time to delete, send or move to a folder.
14
This is the Internet version of the user's guide. © Print only for private use.
To move a file to a folder
1 } File Manager and select a folder.
2 Scroll to a file, for example, a picture that
you want to move } More } Manage Files
} Move to Folder.
3 Select the folder you want to move the file to,
or select New folder and name the folder } OK.
To create a subfolder
1 } File Manager and select a folder.
2 } More } Manage Files } New Folder and enter
a name for the folder.
3 } OK to save the folder.
To select several files
1 } File Manager and select a file } More
} Mark Several.
2 Scroll and select more files by pressing Mark
or Unmark.
File information
Items that are downloaded or received using
Bluetooth wireless technology, the infrared port,
text or picture messages may be copyright-protected.
If a file is protected, you may not be able to copy
or send that file – a message will appear to inform
you about this. You can also select to view
information for the file.
Page 15
Getting to know your phone
Quick keys
Useful key combinations are described below.
Navigating menus
Enter the main menu
and select menu items
Navigate in the menu
and lists
Delete an item press when
Enter a list of options } More
Enter the status menu
to see, for example, date,
profile, free memory
and model name
Change the language
to Automatic
Change the language
to English
Go back to standby press and hold
This is the Internet version of the user's guide. © Print only for private use.
in lists
press a volume button
once
8888
0000
Making and receiving calls
Make an emergency call enter the international
Set the phone to silent press and hold
Call your voicemail press and hold
Enter call list } Calls
Voice dial press and hold
Reach a contact
beginning with
a specific letter
Speed dial press any of the
Reject a call quickly press
emergency number
} Call
a volume button or
say your magic word
press and hold any of
the keys –
number keys
–
and } Call
a volum e button twice
when receiving a call
or } No
15
Page 16
Getting to know your phone
Turn off the ringtone
when receiving a call
Put a call on hold } Hold
Retrieve a call } Retrieve
Turn off the microphone press and hold
Enter a list of options } More
Entering letters
Shift between upperand lower-case letters
Delete letters and
numbers
Shift between multitap
or T9 Text input methods
Shift between writing
languages
Enter numbers press and hold any
Enter the + sign press and hold
16
This is the Internet version of the user's guide. © Print only for private use.
press a volume button
once or press
press ,
then the letter
press
press and hold
press and hold
of the number keys
Enter a p (pause) press and hold
Using multitap text input
Reach the second letter
or character of a key
Reach the third letter
or character of a key
Enter a space press
Using T9 Text Input
View alternative words or
Accept a word and add
aspace
Enter a full stop press
View alternative
punctuation marks
when entering
numbers or saving
codes
press and hold
and press any of the
number keys
press and hold
and press any of the
number keys
press
press , then
repeatedly
or
Page 17

Calling
Calling
Calls, phonebook, voice control, call options.
Making calls
Before you can make or receive any calls, you must
turn on the phone and be within range of a network.
% 6 Turning on the phone and making calls.
Networks
When you turn on the phone, it automatically selects
your home network if this is within range. If it is not
within range, you may use another network, provided
your service provider has an agreement that allows
you to do so. This is called roaming.
You can select the network you want to use,
or you can add a network to your list of preferred
networks. You can also change the order in which
networks are selected during an automatic search.
For all such options } Connect } Mobile Networks.
You can call numbers from the call list and the
phonebook,
You can also use your voice to make calls,
% 24 Voice control.
% 23 Call list, and % 19 Phonebook.
This is the Internet version of the user's guide. © Print only for private use.
To make a call
1 Enter the area code and the phone number.
2 } Call to make the call.
3 } End Call to end the call.
To change the speaker volume during
a call
Use the volume buttons on the side of the phone
to increase or decrease the speaker volume during
acall.
To turn off the microphone during
acall
1 Press } Mute Microphone, or press and hold
until the icon for muted microphone is
displayed.
2 } Replace?, or press and hold again
to resume the conversation.
Receiving calls
When you receive a call, the phone rings and
Answer? is displayed.
If your subscription includes the Caller ID
service and the caller’s number is identified,
the number is displayed.
17
Page 18

Calling
If you have saved the number in the phonebook,
the name and number are displayed. If you have
assigned a picture to a contact, the picture is also
displayed. If the number is a restricted number,
Withheld is displayed.
To answer a call
} Yes.
To reject a call
} No or quickly press a volume button twice.
Missed calls
If you have missed a call, Missed Calls: appears
in standby indicating the number of missed calls.
} Yes to view the missed calls in the call list.
If you want to view the missed calls later } No.
Use , , and to scroll between the tabs.
To check your missed calls
1 From standby } Calls and scroll to the missed
calls tab.
2 To call a number from the list, scroll to the
number } Call.
18
This is the Internet version of the user's guide. © Print only for private use.
Automatic redialing
The phone redials the number up to ten times
or until:
• The call is connected
•You press Cancel
• You receive a call
Automatic redialing is not available for data calls.
Do not hold the phone to your ear while waiting.
When the call is connected, the phone gives
a loud signal.
To redial a number
If the connection of the call failed and Retry?
is displayed } Yes.
Making international calls
When you make an international call, the +
replaces the international prefix number of the
country from which you are calling.
To make international calls
1 Press and hold until a + sign appears
on the screen.
2 Enter the country code, area code (without
the leading zero) and phone number } Call.
Page 19

Calling
Emergency calls
Your phone supports the international emergency
numbers 112, 911 and 08. This means that these
numbers can normally be used to make an emergency
call in any country, with or without a SIM card
inserted if a GSM network is within range.
In some countries, other emergency numbers may also
be promoted. Your service provider may therefore have
saved additional local emergency numbers on the
SIM card.
To make an emergency call
Enter, for example, 112 (the international
emergency number) } Call.
To view your local emergency
numbers
} Phonebook } Options } Special Numbers
} Emergency Nos.
Phonebook
You can save your phonebook information in the
phone memory as contacts or on the SIM card
as names and numbers. You can choose which
phonebook – contacts or SIM numbers – is shown
as default.
For useful information and settings in either
of these phonebooks } Options.
This is the Internet version of the user's guide. © Print only for private use.
Contacts
You can save up to 510 numbers in your contacts.
You can also add pictures, ringtones and personal
information, such as email, Web and street
addresses, to the contacts.
When you add information to a contact, the
information is organized under five tabs. Use ,
, and to scroll between the tabs and their
information fields.
SIM numbers
On your SIM card, you can save entries as a name
with a single number. The number of entries you
can save depends on the amount of memory available
on the SIM card, see Phonebook } Options
} Advanced } Memory Status.
Contact your service provider for more
information.
Contacts or SIM numbers as default
phonebook
If you select to use contacts as default,
your phonebook will show all information saved
in contacts. If you select SIM numbers as default,
the phonebook will only show names and numbers
saved on the SIM card.
19
Page 20

Calling
To select contacts or SIM numbers
as your phonebook
1 } Phonebook } Options } Advanced
} My Phonebook.
2 Select Contacts or SIM Numbers.
To add a contact
1 } Phonebook } New Contact } Add.
2 Enter the name directly or press Add and enter
the name } OK.
3 Enter the number directly or press Add and
enter the number } OK.
4 Select a number type.
5 Scroll between the tabs and select fields
to enter more information. To enter symbols,
for example, @ in an email address } Symbols
and select a symbol } Insert.
6 When you have entered the information you
want for your contact } Save.
To add a SIM number
If SIM numbers is your default phonebook,
follow the same steps as for adding a contact.
You can add only name and number to the SIM
numbers phonebook.
20
This is the Internet version of the user's guide. © Print only for private use.
Pictures and personal ringtones
You can add a picture and a personal ringtone
to a phonebook contact. When that person calls,
the picture is displayed (provided your subscription
supports the Caller ID service) and the ringtone
is played.
To add a picture or a personal
ringtone to a contact
1 } Phonebook and select the contact you
want to add a picture or ringtone to } More
} View & Edit.
2 Scroll to the relevant tab and select Picture:
or Ringtone: } Edit. This takes you to Pictures
or Sounds in the File Manager menu.
3 Select a picture or sound. } Save to save the
picture or sound.
Calling from the phonebook
You can call one of the numbers saved for one
of your contacts, or a number on your SIM card.
If contacts is the default phonebook, you can
choose to call from contacts or from the SIM card.
If SIM numbers is the default phonebook, you
can only call the numbers on the SIM card.
Page 21

Calling
To call a contact
1 } Phonebook. Scroll to or enter the first letters
of the contact you want to call.
2 When the contact you want to call is highlighted,
press or to select a number } Call.
To call a SIM number
1 } Phonebook. If SIM numbers is the default
phonebook, select the name and number you
want to call from the list } Call.
2 If Contacts is the default phonebook
} Phonebook } Options } SIM Numbers and
select the name and number you want to call
from the list } Call.
Ask to save
When you end a call, the phone can prompt you
to add a phone number or email address to your
contacts.
To activate ask to save in contacts
} Phonebook } Options } Advanced
} Ask To Save } On.
This is the Internet version of the user's guide. © Print only for private use.
Updating the phonebook
When needed, you can easily update and edit any
information in your phonebook.
To edit a contact
1 } Phonebook and select a contact } More
} View & Edit.
2 Scroll to the relevant tab and edit the
information you want to edit } Save.
To edit SIM numbers
1 If SIM numbers is your default phonebook
} Phonebook and the number you want to
edit. If contacts is your default phonebook
} Phonebook } Options } SIM Numbers.
Select the name and number you want to edit.
2 } More } Edit and edit the name and number.
To delete a contact or a SIM number
} Phonebook and scroll to the contact or SIM
number you want to delete, press .
21
Page 22

Ca lling
To delete all contacts
1 } Phonebook } Options } Advanced
} Delete All Contacts.
2 } Yes and enter the phone lock code } OK.
The default phone lock code is 0000.
Names and numbers that are saved on the
SIM card are not deleted.
Default items for contacts
You can choose which item – a phone number,
email address or a Web address – that is displayed
first for each contact.
To set the default item for a contact
1 } Phonebook and scroll to a contact } More
} Default.
2 Select the phone number, email address
or Web address that you want as default item.
Copying contacts
You can copy SIM numbers to and from your
contacts and the SIM card. Choose if you want
to copy all SIM numbers, or a SIM number.
When you copy from the phone, all existing
information on the SIM card will be replaced.
22
This is the Internet version of the user's guide. © Print only for private use.
To copy names and numbers to the
SIM card
1 } Phonebook } Options } Advanced
} Copy to SIM.
2 Select Copy All or Copy a Number.
To copy SIM numbers to contacts
1 } Phonebook } Options } Advanced
} Copy from SIM.
2 Select Copy All or Copy a Number.
Sending contacts
You can send contacts using Bluetooth wireless
technology, the infrared port or a text or picture
message.
To send a contact
1 } Phonebook and select a contact } More
} Send Contact.
2 Select a transfer method.
To send all contacts
} Phonebook } Options } Advanced
} Send All Contacts and select a transfer method.
Page 23

Calling
Checking the memory
With the memory status function in your phonebook,
you can check how many positions you have left
in the phone memory and SIM memory.
To check the memory
} Phonebook } Options } Advanced
} Memory Status.
Synchronizing contacts
You can back up and synchronize your contacts with
a phonebook on the Web. For more information
about a phonebook on the web, please contact your
service provider.
1 } Phonebook } Options } Sync. Contacts
} Select.
2 If you have more than one account, select
which account to use } Select. If you do not
have an account in the phone,
the remote synchronization settings.
This is the Internet version of the user's guide. © Print only for private use.
% 67 To enter
Call list
The numbers of the last 30 calls that you have
made are saved in the call list. If your subscription
includes the Caller ID service and the caller’s
number is identified, the call list also shows
the numbers of answered and missed calls.
In addition to the call list with all numbers,
there are also separate lists for dialed, answered
and missed calls, organized under tabs.
To call a number from the call list
1 } Calls from standby and select a tab.
2 Scroll to the name or number you want to call
} Call.
To clear the call list
} Calls and scroll to the tab with all calls } More
} Delete all.
Speed dialing
You can save the phone numbers that you want
to reach easily in positions 1-9 in your phone
and on your SIM card. To speed dial with contacts
as default phonebook, numbers have to be saved
as contacts, and to speed dial with SIM numbers
as default phonebook, numbers have to be saved
on your SIM card.
23
Page 24

Calling
To speed dial
From standby, enter the position number and } Call.
To set the position number for speed
dialing
1 } Phonebook } Options } Speed Dial and
scroll to the position to which you want
to add a phone number } Add.
2 Select a number.
To replace a number in the speed
dial list
1 } Phonebook } Options } Speed Dial.
2 Scroll to the number } Replace. Select a new
number for the position.
Voicemail
If your subscription includes an answering service,
callers can leave a voicemail message when you
cannot answer a call.
Receiving a voicemail message
Depending on your service provider, you are
informed that someone has left a message by a text
message or by a voicemail icon. Press Yes to read
the text message and call the voicemail service
to listen to the message.
24
This is the Internet version of the user's guide. © Print only for private use.
Calling your voicemail service
You can easily call your voicemail service by
pressing and holding . If you have not set your
voicemail number, you will be asked if you want
to enter the number. } Yes to enter the number.
You get the number from your service provider.
To enter the number to your
voicemail service
} Messages } Settings } Voicemail Number.
Voice control
With your phone, you can use your voice to:
• Voice dial – call someone by saying the name.
• Activate voice control by saying a “magic word”.
• Answer and reject calls when using
a handsfree kit.
You can save approximately 30 recorded words
as voice commands in the phone. Voice commands
cannot be saved on the SIM card. There are
25 seconds available for voice commands.
When recording, make sure that you are in a quiet
environment and try to use names that are distinct
from each other
using voice commands.
% 27 Tips when recording and
Page 25

Calling
Before voice dialing
You must first activate the voice dialing function
and record your voice commands. An icon appears
next to a phone number that has a voice command.
To activate voice dialing and
record names
1 } Settings } the General tab } Voice Control
} Voice Dialing } Activate } New Voice Cmd.
and select a contact.
2 If the contact has more than one number,
use and to view the numbers. Select
the phone number to which you want to add
the voice command. Now you are going to
record a voice command such as “John mobile”
for the phone number you selected.
3 Instructions appear. Lift the phone to your ear,
wait for the tone and say the command that you
want to record. The voice command is played
back to you.
4 If the recording sounds ok } Yes. If not } No
and repeat step 3.
5 To record another voice command for a contact
} New Voice Cmd. again and repeat steps 2-5
above.
This is the Internet version of the user's guide. © Print only for private use.
Caller name
You can choose whether you want to hear the
recorded contact name when you receive a call
from that contact.
To turn the caller name On or Off
} Settings } the General tab } Voice Control
} Play Caller Name.
Voice dialing
You can voice dial by saying a prerecorded voice
command. Start voice dialing from standby using
the phone, a portable handsfree, a Bluetooth
headset or by saying your magic word.
To make a call from the phone
1 From standby, press and hold one of the
volume buttons.
2 Lift the phone to your ear, wait for the tone and
say the name you recorded earlier, for example
“John mobile”. The name is played back to
you and the call is connected.
To make a call with a handsfree
From standby, press the handsfree button,
or Bluetooth headset button.
25
Page 26

Calling
The magic word
You can record a magic word and use it as a voice
command to allow totally handsfree access to voice
dialing. Instead of pressing and holding a volume
button to voice dial, you say the magic word and
then one of your recorded voice commands.
The magic word is especially suitable when using
a car handsfree kit.
Choose a long, unusual word or phrase that can easily
be distinguished from ordinary background speech.
To activate and record the
magic word
1 } Settings } the General tab } Voice Control
} Magic Word } Activate.
2 Instructions appear. } Continue and lift the
phone to your ear. Wait for the tone and say
the magic word.
3 Instructions appear. } Continue and select the
environments in which you want your magic
word to be activated. You can select several
alternatives.
26
This is the Internet version of the user's guide. © Print only for private use.
Voice answering
You can answer or reject incoming calls by using
your voice when using a portable handsfree or a car
handsfree kit.
You cannot use voice answering if you have selected
an MP3 file as ringtone.
To activate voice answering and
record voice answer commands
1 } Settings } the General tab } Voice Control
} Voice Answer } Activate.
2 Instructions appear. } Continue and lift the
phone to your ear. Wait for the tone and say
“Answer”, or another word. If the recording
sounds ok } Yes. If not } No and repeat step 2.
3 Say “Busy”, or another word } Yes.
4 Instructions appear. } Continue and select
the environments in which you want voice
answering to be activated. You can select
several alternatives.
To answer a call using voice
commands
When the phone rings, say “Answer” and the call
is connected.
Page 27

Calling
To reject a call using voice
commands
When the phone rings, say “Busy”.
The call is rejected. The caller is forwarded
to voicemail, if activated, or hears a busy tone.
Editing your voice commands
You can keep all your voice commands up to date
by rerecording them or deleting the ones you do not
use. You can also edit a voice command for a phone
number in the phonebook. Select the contact you
want to edit a voice command for } More
} View & Edit. Scroll to the relevant tab and edit
your voice command.
To rerecord a voice command
1 } Settings } the General tab } Voice control
} Voice Dialing } Edit Names.
2 Select a voice command } More
} Replace Voice.
3 Lift the phone to your ear, wait for the tone
and say the command.
This is the Internet version of the user's guide. © Print only for private use.
Tips when recording and using voice
commands
If your phone cannot detect speech, one of the
following might have happened:
• You spoke too softly – try speaking louder.
• You held the phone too far away – hold it as you
do during a call.
• The voice command was too short – it should
be around one second long and more than one
syllable.
• You spoke too late or too soon – speak
immediately after the tone.
• You did not record the voice command when the
handsfree was attached – for voice control with
a handsfree kit, record when the handsfree
is attached.
• You used another intonation – use the same
intonation as you did when recording the voice
command.
27
Page 28

Calling
Forwarding calls
If you cannot answer incoming calls, you can
forward them to another number, for example,
your answering service.
When the Restrict calls function is activated,
some Forward calls options are not available.
You can choose between the following forward
options:
• Always Forward – forward all calls.
• When Busy – forward calls if you are already
on the phone.
• Not Reachable – forward calls if your phone
is turned off or if you are unreachable.
• No Reply – forward calls that you do not answer
within a specified time limit (service providerdependent).
To activate call forwarding
1 } Settings } the Calls tab } Forward Calls.
2 Select a call type and then one of the forward
options } Activate.
3 Enter the phone number to which you want your
calls to be forwarded, or } Lookup to find the
contact in your phonebook } OK.
28
This is the Internet version of the user's guide. © Print only for private use.
To deactivate call forwarding
Scroll to the forward option } Deactivate.
To check all forwarding options
} Settings } the Calls tab } Forward Calls
} Check All.
More than one call
You can handle more than one call simultaneously.
For example, you can put an ongoing call on hold,
while you make or answer a second call, and then
switch between the two calls.
Call waiting service
If the call waiting service is activated, you hear
a beep if you receive a second call during
an ongoing call.
To activate or deactivate the call
waiting service
} Settings } the Calls tab } Manage Calls
} Call Waiting.
To make a second call
1 } Hold to put the ongoing call on hold.
2 Enter the number you want to call } Call.
Page 29

Calling
Receiving a second call
When you receive a second call, you can do the
following:
• } Answer to answer the second call and put the
ongoing call on hold.
• } Busy to reject the second call and continue the
ongoing call.
• } Replace Active Call to answer the second call
and to end the ongoing call.
Handling two calls
When you have one ongoing call and one call
on hold, you can do the following:
• } Switch to switch between the two calls.
•Press } Join Calls to join the two calls into
a conference call.
•Press } Transfer Call to connect the two calls.
You are disconnected from both calls.
• } End Call to end the ongoing call, then press
Yes to retrieve the held call.
• } End Call twice to end both calls.
• You cannot answer a third call without ending
one of the first two calls or joining them into
a conference call.
This is the Internet version of the user's guide. © Print only for private use.
Conference calls
In a conference call, you can have a joint
conversation with up to five other people.
You can also put a conference call on hold
and make another call.
There may be additional charges for calls involving
multiple parties. Contact your service provider for
more information.
Creating a conference call
To create a conference call, you must first have one
ongoing call and one call on hold. In a conference
call you can can have a private conversation with
one of the participants or release a participant.
To join the two calls into
a conference call
Press } Join Calls.
To add a new participant
1 } Hold
2 Press } Add Call and call the next person
3 Press } Join Calls.
4 Repeat steps 1-3 to include more participants.
to put the joined calls on hold.
you want to include in the conference call.
29
Page 30

Calling
To release a participant
Press } Release Part. and select the participant
that you want to release from the conference call.
To have a private conversation
1 Press } Talk To and select the participant
that you want to talk to.
2 } Join Calls to resume the conference call.
Two voice lines
If you have a subscription that supports alternate
line service, your phone may have two voice lines
with different phone numbers.
This may be useful if, for example, you want to
keep business calls and private calls on separate
lines. You select which line you want to use for
outgoing calls. All outgoing calls are made on this
line until you change it. Incoming calls can still
be received on either line.
You can change the names of the lines, and have
different settings for each line, for example,
different ringtones.
30
This is the Internet version of the user's guide. © Print only for private use.
To select a line
} Settings } the Calls tab and select line 1 or 2.
To change the name of a line
} Settings } the Display tab } Edit Line Names
and select one of the lines to edit the name.
My numbers
You can view, add and edit your own phone
numbers.
To check your phone numbers
} Phonebook } Options } Special Numbers
} My Numbers and select one of the options.
Accept calls
With the accept calls service, you can choose
to receive calls only from certain phone numbers.
Other calls are automatically rejected by a busy
tone. If the call forward option When Busy is
activated, calls are forwarded instead of rejected
by a busy tone. The phone numbers of calls you
have rejected are saved in the call list.
Page 31

Calling
To add numbers to the accepted
callers list
1 } Settings } the Calls tab } Manage Calls
} Accept Calls } Only From List.
2 } Edit } New } Add. This takes you to
phonebook look up. Select numbers from
your phonebook.
To accept all calls
} Settings } the Calls tab } Manage Calls
} Accept Calls } From All.
Restricted dialing
You can use the restrict calls service to restrict
outgoing and incoming calls. This may be useful,
for example, when you are abroad. To use this
service, you need a password which you get from
your service provider
If you forward incoming calls, you cannot activate
some Restrict calls options.
The following calls can be restricted:
• All outgoing calls – All Outgoing.
• All outgoing international calls – Outgoing Intl.
This is the Internet version of the user's guide. © Print only for private use.
• All outgoing international calls except to your
home country – Outgoing Intl Roam.
• All incoming calls – All Incoming.
• All incoming calls when you are abroad (when
roaming) – Inc. When Roaming.
To activate or deactivate a call
restriction
1 } Settings } the Calls tab } Manage Calls
} Restrict Calls and select an option.
2 Select Activate or Deactivate.
3 Enter your password } OK.
Fixed dialing
The fixed dialing function allows calls to be made
only to certain numbers saved on the SIM card.
Fixed dialing requires a SIM card that allows fixed
numbers to be saved. The fixed numbers are
protected by your PIN2.
Calls to the international emergency number 112 can
still be made even when the fixed dialing function
is activated.
Partial numbers can be saved. For example, saving
0123456 allows calls to be made to all numbers
starting with 0123456.
31
Page 32

Calling
To activate or deactivate fixed
dialing
1 } Phonebook } Options } Special Numbers
} Fixed Dialing and select Activate
or Deactivate.
2 Enter your PIN2 } OK and then } OK again
to confirm.
To save a fixed number
} Phonebook } Options } Special Numbers
} Fixed Dialing } Fixed Numbers } New Number
and enter the information.
Call time and cost
During a call, the duration of the call is shown on
the screen. If you subscribe to cost information,
you can check the duration of your last call,
outgoing calls and the total time.You can also
check the cost of your last call and the total cost
of your calls.
If you subscribe to cost information, you must enter
your PIN2 to reset the cost or time counter.
32
This is the Internet version of the user's guide. © Print only for private use.
To check the call time
} Settings } the Calls tab } Time & Cost
} Call Timers.
To reset the call time meter
} Settings } the Calls tab } Time & Cost
} Call Timers } More and select Reset total
or Reset Outgoing.
To check the call cost
} Settings } the Calls tab } Time & Cost
} Call Costs.
To reset the call cost meter
} Settings } the Calls tab } Time & Cost
} Call Costs } More } Clear Total Cost.
Setting the call cost
You can use the tariff function to specify the price
per call unit. If you do not specify a price per call
unit, the number of call units appears.
Page 33

Calling
To enter the price per call unit
1 } Settings } the Calls tab } Time & Cost
} Call Costs } More } Set Rate.
2 Enter your PIN2 } OK.
3 } Currency and enter the code for the currency
you want (for example USD for US Dollars)
} OK.
4 } Units and enter the price per call unit } OK.
To enter a decimal point, press .
Credit limit for calls
You can enter a total amount of money that can
be used for making calls. When the amount reaches
zero, no more calls can be made. Please note that
the credit limit is only an estimated value.
To set a credit limit
1 } Settings } the Calls tab } Time & Cost
} Call Costs } More } Set Credit and enter
your PIN2 } OK.
2 Select Limited or Unlimited. If you select
Limited, enter an amount } OK.
This is the Internet version of the user's guide. © Print only for private use.
Call priority service
You can request a certain priority when you make
a call, if your subscription supports the call priority
service.
The priority levels are defined by your service
provider and are normally within the range of 0-4,
where 0 is the highest priority.
To check or change your standard
priority level
1 } Settings } the Calls tab } Manage Calls
} Default Priority.
2 The network sends available priority levels.
Select a priority level.
To change the priority for one call
1 Enter the phone number you want to call.
2 } More } Call Priority and select a priority.
The number is called.
33
Page 34

Calling
Closed user groups
The closed user group function is a way of lowering
call costs. If you subscribe to closed user groups
it is cheaper on some networks to make calls within
a call group. You can save ten groups.
To add a group
1 } Settings } the Calls tab } Manage Calls
} Closed Groups } Edit List } New Group
} Add.
2 Enter the name of the user group } Continue.
3 Enter the index number } Save. You get the
index number from your service provider.
To call outside a closed user group
} Settings } the Calls tab } Manage Calls
} Closed Groups } Open Calls } On. When Off is
selected, it is only possible to call within the group.
Additional calling functions
Tone signals
You can use telephone banking services or control
an answering machine by sending tone signals (also
known as DTMF tones or touch tones) during a call.
34
This is the Internet version of the user's guide. © Print only for private use.
• To send the tones, press the keys – ,
or .
• To clear the screen after the call is finished,
press .
• To turn the tones on or off during a call
} More in standby and select Turn Off Tones
or Turn On Tones.
Notepad
You can use the phone to make a note of a phone
number during a call. When you end the call,
the number remains on the screen. } Call to call
the number. } More } Save Number and select
a contact to save the number. If you want to create
a new contact and save the number } New Contact.
Showing or hiding your number
If your subscription supports the Caller ID
Restriction service, you can hide your phone
number when making a call. You can do this per
call, or select this as a default setting. } More
in standby to quickly change this default setting.
To show or hide your phone number
1 Enter the phone number you want to call.
2 } More and select Hide Number
or Show Number.
Page 35

Calling
To always show or hide your phone
number
1 } Settings } the Calls tab } Show or Hide No.
2 Select Show Number, Hide Number
or Network Default.
Groups
You can create a group of numbers. By doing so,
you can send text messages and picture messages
to several recipients at the same time
% 36 Messaging.
To create a group of numbers
1 } Phonebook } Options } Groups
} Send DTMF Tones } Add.
2 Enter a name for the group } Continue.
3 } New Number } Add to find the contact
in your phonebook.
4 Select a number from the contact.
5 Repeat steps 3-4 to add more numbers to the
group. } Done to save the group.
This is the Internet version of the user's guide. © Print only for private use.
Business cards
You can add your own business card to the
phonebook. You can exchange business cards
between your phone and another similar phone,
a PDA or a PC using Bluetooth wireless
technology, the infrared port, cable or a text
or picture message.
To add your own business card
} Phonebook } Options } My Business Card
and enter the information for your business card
} Save.
To send your business card
} Phonebook } Options } My Business Card
} Send My Card and select a transfer method.
To receive a business card
When you receive the business card } Yes } Save
to save the business card in the phonebook.
35
Page 36

Messaging
Messaging
Text messaging, picture messaging, email,
My Friends, messaging glossary.
Your phone supports various messaging services –
text messaging, picture messaging, email and
My Friends. Please contact your service provider
for details on which services you can use.
Text messaging
Text messages are sent via SMS (Short Message
Service). Text messages can contain pictures,
animations, melodies and sound effects.
Text messages can be sent to one person, several
recipients or to a group of recipients that you have
saved in the phonebook
If you send a text message to a group, you are charged
for each member of that group.
Before you start
First make sure that the number of your service
center is set. The number is supplied by your service
provider and is usually saved on the SIM card.
36
This is the Internet version of the user's guide. © Print only for private use.
% 35 Groups.
To set the service center number
1 } Messages } Settings } Text Message
} Service Center. If the service center number
is saved on the SIM card, it is shown in the list.
2 If there is no number in the list } Add and enter
the number, including the international “+”
sign and country code } Save.
Sending text messages
For information about entering letters
% 11 Entering letters.
Some language-specific characters use more space.
For some languages you can deactivate
to save space.
To write and send a text message
1 } Messages } Write New } Text Message.
2 Write your message } Continue. If you want
3 } Phone Number and enter the recipient’s
% 13 Options when entering letters.
to save the message for later, press } Yes
to save it in Drafts.
phone number, or } Phonebook LookUp
to retrieve a number or a group from the
phonebook. To enter an email address
} Enter Email Addr. A list below the send
options shows the last 10 recipients. You can
also select a recipient from this list. } Send.
National Chars.
Page 37

Messaging
To insert an item in a text message
1 } Messages } Write New } Text Message.
2 While writing your message } More
} Add Item.
3 Select Picture, Sound Effect, Melody,
Animation, Templates or Picture (other).
4 Select an item.
Formatting text
You can change the style, size and alignment of the
text, and create new paragraphs.
To format the text in a text message
1 } Messages } Write New } Text Message.
2 While writing your message } More
} Text Format. Then select Text Size,
Text Style, Alignment or New Paragraph.
3 Select a text format.
Receiving text messages
When you receive a text message, a message alert
sounds and a text is displayed that informs you that
a text message has been received.
} Yes to read the text message or } No if you
want to read the message later.
This is the Internet version of the user's guide. © Print only for private use.
While reading the text message you can,
for example, go to a Web address found in the text
message, save a picture found in the text message
or listen to a sound inserted in the text message.
When you have read the text message } More
to view a list of options. Press to close the
text message.
Calling a number in a text message
You can call a phone number that appears in a text
message.
To call a number in a text message
Select the phone number } Call
.
Saving received text messages
Received text messages are saved in the phone
memory. When the phone memory is full, you must
delete messages or move them to the SIM card to
be able to receive new messages. Messages that
you have saved on the SIM card remain there until
you delete them.
To save a message to the SIM card
} Messages } Inbox } More } Save Message } SIM.
37
Page 38

Messaging
To save an item from a text message
1 Select the phone number, Web address, picture
or sound that you want to save in the message
} More.
2 If you have selected to save a phone number
} Use } Save Number. If you have selected
a Web address } Save Bookmark, a picture
} Save Picture, a sound } Save Sound.
Long messages
The number of characters that a text message can
contain depends on the language you are writing in.
You can send a longer message by linking two or
more messages. Please note that you are charged
for each of the messages linked in a long message.
You may not receive all parts of a long message
at the same time.
Check with your service provider for the maximum
number of messages that can be linked.
To turn long messages on
} Messages } Settings } Text Message
} Max. Msg Length } Max. Available.
38
This is the Internet version of the user's guide. © Print only for private use.
Templates
If you have one or more messages that you send
often, you can save these as templates. There are
predefined templates in your phone, but you can
also create your own templates.
To create a template
1 } Messages } Templates } New Template
} Add } Text.
2 Write the message } OK.
3 Enter a title for the message } OK.
Message options
You can set a default value for several message
options or choose the settings each time you send
a message. You can, for example, select to request
a reply to a sent message, select what type of text
message you want to send or set how long a message
should be valid. For details about the message
% 49 Messaging glossary.
options
To set a default text message option
} Messages } Settings } Text Message and select
an option.
Page 39

Messaging
To set a message option for
a specific message
1 When you have selected a recipient to send
your text message to } More } Advanced.
2 Select the option that you want to change
} Edit and select a new setting.
3 } Done when you have changed the options.
To check the status of a sent
message
} Messages } Sent Items and select a text message
} View } More } View Status.
Picture messages
Picture messages can contain text, pictures,
video clips, camera pictures, and sound recordings
and are sent via MMS (Multimedia Messaging
Service). You must have a subscription that supports
MMS, and the receiver of the picture message must
also have support for MMS. Picture messages can
be sent to a mobile phone and an email account.
You can send your business card as an attachment
in a picture message.
This is the Internet version of the user's guide. © Print only for private use.
Before you start
Before sending a picture message, make sure that:
1 The address to your message server is set
} Messages } Settings } Picture Msg.
} Message Server.
2 You have entered the correct settings
} Messages } Settings } Picture Msg.
} Internet Profile. Select a profile
or New Profile. To create an Internet profile,
% 63 Setting up Internet and email. You
can also download all the settings you need
automatically from your service provider.
Writing and sending picture
messages
When composing a picture message, you select
from different items to format your message.
The different items are: Picture, Text, Sound, Video,
Camera Picture, Video Clip and Sound Recording.
Before sending a picture message, you can select
from different options to adjust and enhance your
message. You can, for example, preview the entire
message or a single page in the message, change
the timing for items in the message and add or
replace items to be sent in the message. For details
about options
% 49 Messaging glossary.
39
Page 40

Messaging
To write and send a picture message
1 } Messages } Write New } Picture Msg. } Add
to view a list of items to add to your message.
Select an item.
2 } Add to add more items to the message.
You can view and select options to enhance
the message by highlighting items in the
message and pressing the left selection key.
3 When you have finished writing your message
} More } Send.
4 } Phone Number and enter the recipient’s
phone number, or } Phonebook LookUp
to retrieve a number or a group from the
phonebook. To enter an email address
} Enter Email Addr. A list below the send
options shows the last 10 recipients. You can
also select a recipient from this list. } Send.
To make a call while writing a picture
message
1 While writing your message } More.
2 } Make a Call and enter or retrieve a phone
number } Call. You return to the message.
3 To end the call } More } End Call.
40
This is the Internet version of the user's guide. © Print only for private use.
To set a default message option
} Messages } Settings } Picture Msg. and select
one of the options.
Additional send options
You can request a read receipt, a delivery report
and set a priority for a specific message. You can
also add more recipients to the message. For details
about the additional send options
glossary.
To select additional send options
1 When you have entered the recipient’s phone
number } More.
2 Select Add Recipient or Recipients to add more
recipients, or Advanced to select an additional
send option.
Receiving picture messages
When you receive a picture message, a message
alert sounds and a text is displayed that informs
you that a message has been received.
% 49 Messaging
Page 41

Messaging
} Yes to read or play the message. Press any key
to stop. When you have read the message } Reply
to reply immediately or } More to view a list of
options. Press to close the message.
You can select a message from the list of messages and
press to delete the entire message.
Save items from a picture message
When you have viewed a picture message, you can
save items from the message. } More } Save Items
and select an item from the list that appears.
Templates
You can base your message on one of the
predefined templates. You can also add new
templates.
To use a predefined template for
a picture message
1 } Messages } Templates and select a template.
2 } Use } Picture Msg. } Add to make changes
or add new items.
3 } More } Send to send the message.
This is the Internet version of the user's guide. © Print only for private use.
Automatic download
You can select how you want your picture
messages to be downloaded.
} Messages } Settings } Picture Msg.
} Auto Download to view the following:
• Always – your phone automatically downloads
messages to your phone as soon as they come
to your service provider’s server. This is default.
• Ask in Roaming – you will be asked if you want
to download messages when you are using
another network than your service provider’s.
• Never in Roam – the messages are never
downloaded when you are using a network other
than your service provider’s.
• Always Ask – you will always be asked if you
want to download messages regardless of the
network being used.
• Off – new messages appear in the inbox as icons.
Select the message } View } Yes to download.
41
Page 42

Messaging
Postcard
You can have a message with picture and text
delivered as a postcard to a street address.
This service is not available in all countries.
Another way of sending a postcard is to use the
phonebook by selecting a contact,
Message
} Postcard. You can also create a postcard
by selecting
}
More } Send } As Postcard.
File Manager } Pictures. Select a picture
To send a postcard
1 } Messages } Write New } Postcard } Add.
2 Select Picture or Camera Picture to add
a picture to your message.
3 } Add } Text to add a message to accompany
the picture.
4 Write your message } OK.
5 } Send } Street Address to enter name and
address, or you can either select Phonebook
LookUp to retrieve a contact, or select
a recipient from the list of previous recipients.
6 When you have entered name and address
} OK } Send. The picture and message will
be printed on a postcard and sent to the address
you choose.
42
This is the Internet version of the user's guide. © Print only for private use.
More } Send
To view a sent postcard
} Messages } Sent Items and highlight the message
} View.
Email
You can use your phone to send and receive email
messages. Please note that you need a subscription
that supports data transmission. For more
information, contact your service provider.
Before you start
First make sure that:
• You have set up a data account,
Internet and email settings.
• You have set up and selected an email account.
Email account settings
An email account specifies, for example, the server
that is used for your email messages. There are
three ways to create an email account:
• Download settings from Internet
• Send a request in a text message
• Create an email account manually
% 63 Entering
Page 43

Messaging
Receiving settings
At www.SonyEricsson.com you can get support
on how to enter your email settings. Some service
providers provide a service with which you can
request settings in a text message. Contact your
service provider for information about your settings.
To request settings in a text message
} Messages } Email } Settings } Auto Configure.
To create an email account manually
1 } Messages } Email } Settings } New Account.
2 Enter a name for the account, for example
“Home” or “Office” } Connect Using.
3 Select the data account that you want to use
with this email account.
4 Enter the rest of the settings, some of which
are optional. To enter the settings, scroll to the
setting } Select. Enter the information } OK to
confirm. Repeat this for each required setting.
You use the same email settings in your phone
as in your PC email program. If you do not have
an email service, contact your service provider
to get all the necessary settings. For details
about the settings
% 49 Messaging glossary.
This is the Internet version of the user's guide. © Print only for private use.
Default email account
If you have both an office and a home email account,
you can set one of them as default: } Messages
} Email } Settings and select an account.
Writing and sending email messages
When writing and sending your email message,
you can select from several options to accompany
your message. For details about the options
% 49 Messaging glossary.
} Messages } Email } Inbox } More
} Send & Receive offers the fastest way to check
for new email messages.
The number of email messages that can be saved
depends on memory left in the phone. All email
messages are also saved on your email server, and you
can view both older and newer messages on the server.
To write and send an email message
1 } Messages } Email } Write New.
2 Write the subject for your message } OK and
then the text } OK.
3 } Enter Email Addr. to enter an email address
or } Phonebook LookUp to retrieve an address
from your phonebook.
4 } Send to send your email message or } More
to view a list of options for your message.
43
Page 44

Messaging
To receive and read email messages
1 } Messages } Email } Inbox } More
} Send & Receive to download new messages.
2 Select a message to read it.
To reply to an email message
1 Open the email message } Reply.
2 Write your message. } More to view options
for the message.
3 } Send to send the message.
To save an email address or a phone
number in an email message
1 Select the email address or phone number that
you want to save } More.
2 If you have selected to save an email address
} Use } Save Email. If you have selected to
save a phone number } Save Number.
To save an email message
1 Open the email message } More
} Save Message.
2 The message is saved in Saved Items in the
Email menu.
44
This is the Internet version of the user's guide. © Print only for private use.
To delete an email message
(POP3 users)
1 } Messages } Email } Inbox and select the
message } More.
2 Select Mark for Deletion. The message
is deleted the next time you connect to your
email server.
To delete an email message
(IMAP4 users)
1 } Messages } Email } Inbox and select the
message } More.
2 } Mark for Deletion. The message is marked
for deletion on the server.
3 } More } Clear Inbox. The message is deleted
the next time you connect to your email server.
Page 45

Messaging
My Friends
The My Friends function gives you more options
when messaging. You can create a list of favorite
contacts either from the phonebook or from the
My Friends server. You can see which of your
contacts are online and what mood they are in.
To see contacts online, they have to be connected
to the My Friends server. You can also send and
receive instant messages and join community chats.
Please contact your service provider for information
about your subscription and My Friends settings.
My Friends contacts
You can add contacts from the phonebook to a list
of contacts in My Friends, even if you do not have
a My Friends account and are not connected to the
My Friends server. You can then quickly access
your favorite contacts and choose how you want
to communicate with them.
This is the Internet version of the user's guide. © Print only for private use.
Log in to the My Friends server
You can select to log in to your My Friends server
each time you want to send or receive instant
messages, or you can be logged in automatically
when you turn on your phone. You can edit the
settings for your My Friends account. To set
automatic log in and edit your account settings you
have to be logged out from the My Friends server.
To log in to your My Friends server
} Messages } My Friends } Myself } Log In.
To set automatic log in
} Messages } Myself } More } Accounts } Edit
} Auto-Login } On.
To edit the My Friends account
} Messages } Myself } More } Accounts } Edit
and edit your settings.
List of contacts
You can create a list of contacts – people you want
to send messages to on a regular basis. You can add
contacts from your phonebook or from your
My Friends server.
45
Page 46

Messaging
To add a contact from the phonebook
1 } Messages } My Friends } More
} Add Contact } From Contacts.
2 Enter the first letters of the contact and then
select a contact.
3 When you have selected a contact, you can
choose to subscribe to status information for
that contact. To subscribe } Yes and follow the
instructions that appear. } No if you do not
want to subscribe.
To add a contact from a network
server
} Messages } My Friends } More } Add Contact
} From Server and follow the instructions
that appear.
Status
You can view the status of your contacts and choose
to show your own status to others. You can also
change your own status with the help of the
following options:
• Picture – select a picture from Pictures or take
a picture with the camera. You can change,
update or remove pictures.
• About Me – write a short text about yourself.
46
This is the Internet version of the user's guide. © Print only for private use.
• Availability – select what to show others
when you are online, Available, Busy, Away,
or Invisible. If you select Invisible, you will
appear as offline to others.
• Mood – select a mood from the list.
• Show My Status – } To All if you want to show
full status to friends but limited status to others,
and } Only To contacts if you want to show full
status to friends but nothing to others.
• Username: – view your username.
To view the status of a contact
} Messages } My Friends and select a contact
} More } View Status.
To change your own status
} Messages } My F riends } Myself } Change Status
and edit your status according to the options.
To send a message from My Friends
1 } Messages } My Friends and select a contact.
2 If the contact is linked to your phonebook
} More } Send Instant Msg. } Send. If not,
select the contact } Send IM.
Page 47

Messaging
Receiving a message
When you receive a message, a message alert
sounds or an icon appears in the status bar.
Contact list
You can create nicknames for the contacts in your
list that are connected to the My Friends server.
You can also link a contact to the phonebook and
get access to all information saved in the
phonebook.
To enter a nickname
1 } Messages } My Friends, and select a contact.
2 } More } Manage Contact } Edit Nickname.
3 Enter the nickname for that contact } Save.
To link a contact to the phonebook
1 } Messages } My Friends and select a contact.
2 } More } Manage Contact } Link to Contacts
and select the contact in phonebook that you
want to create a link to.
This is the Internet version of the user's guide. © Print only for private use.
Strangers
A stranger is someone that is not in your list
of contacts. An icon indicates a message from
a stranger. You can add the stranger to your list
of contacts, or you can block the stranger. If you
do not perform any action, the stranger disappears
when you log out from the My Friends server.
To add a stranger to the list of
contacts
} Messages } My Friends and select the stranger
} More } Add As Contact.
Blocking contacts and strangers
You can block a contact or stranger so that they
cannot view your status or send you messages.
To block or unblock a contact
1 } Messages } My Friends and select a contact.
2 } More } Manage Contact.
Select Block Contact or Unblock Contact.
To block a stranger
} Messages } My Friends and select the stranger
} More } Block User.
47
Page 48

Messaging
Chatroom
A chatroom can be started by your service provider,
by an individual My Friends user or by yourself.
You can save chatrooms either by saving a chat
invitation or by searching for a specific chatroom.
To join a chatroom
Messages } My Friends and select a chatroom
} Join Chat.
To receive a chat invitation
1 When a message alert sounds and the message
New chat invitation received. is displayed select
View to view the invitation or Discard to
discard the invitation.
2 If you have selected to view the invitation and
want to join the chat } Join Chat. If you want
to discard the invitation now } More
} Discard Invitation.
To save a chat invitation
When you receive an invitation } View } More
} Save Chatroom.
48
This is the Internet version of the user's guide. © Print only for private use.
To search for a chatroom
1 } Messages } My Friends } More
} Add chatroom } No.
2 Enter your search criteria in one or several
of the fields } Search.
3 When you have found the chatroom you want
to save } Add.
To start a chatroom
1 } Messages } My Friends } More
} Start chatroom.
2 Select contacts to invite to the chatroom from
your list of contacts } Continue.
3 Enter a short invitation text to the chatroom
} Continue } Send.
Online contact alert
You can select to be notified when a contact comes
online. The notification is indicated by an icon.
When you log off or when the contact has come
online, the notification is cleared.
To set an online contact alert
} Messages } My Friends and select a contact
} More } Manage Contact } Alert Me.
Page 49

Messaging
Area information
Area information is a type of text message
(for example, a local traffic report) that is sent
to all subscribers within a certain network area.
When you receive an area information message,
the message automatically appears on the screen.
Press Save to save the message in your inbox,
or Discard to delete the message.
Please consult your service provider for more
information about area information.
To turn area information on or off
} Messages } Settings } Area Info } Reception.
Cell information
The cell information channel is used by some
service providers to send messages about a certain
network area to their subscribers within that area.
To turn on the cell information
channel
} Messages } Settings } Area Info
} Cell Information.
This is the Internet version of the user's guide. © Print only for private use.
Messaging glossary
Options and settings for text, picture and email
messages are listed below:
• Accept Messages – select which messages you
want to accept and download.
• Add Attachment – add, for example, pictures,
sounds, themes, video clips, business cards
or recordings to a message.
• Check Interval – select how often you want the
phone to connect to your email server and check
for incoming email messages.
• Connect Using – select which data account to use
when connecting to a specific email account.
• Copy Outgoing – select if you want email
messages sent from your phone also to be sent
to an email address of your choice. This way,
your sent messages are copied and can be saved
for future reference.
• Creation Mode – select settings for what to allow
in picture messages. Some content in picture
messages might be difficult for the recipient
to view.
• Delivery Report – request a status report to verify
whether a message has been delivered.
• Download – select whether to receive headers
and text or headers only in email messages.
49
Page 50

Messaging
• Incoming Port – if needed, change the number
of the port used by the protocol you are using.
• Incoming Server – enter the name or IP address
of the service provider for incoming email
messages. For example, mail.server.com
or 10.1.1.1.
• Mailbox – enter a username for your email
account.
• Outgoing Port – if needed, change the number
of the port used by the SMTP protocol.
• Outgoing Server – enter the name or IP address
of the SMTP server to be able to send email
messages.
• Password – enter a password for your email
account. Your service provider may alternatively
request a password on connection.
• Picture – add a picture, or replace with
an alternative from the Pictures folder.
• Preview – view the entire picture message
before sending it.
• Preview Page – view a specific page in the
picture message without having to play the
entire message
• Protocol – select POP3 or IMAP4.
• Request Reply – include a reply request if you
want the recipient of your message to reply.
50
This is the Internet version of the user's guide. © Print only for private use.
• Saved in Drafts. – save the email message
in the Drafts folder.
• Save in Outbox – save the email message
in the Outbox folder.
• Set Priority – set the message priority,
select High, Normal or Low.
• Signature – select if you want to add your
business card to your email messages.
• SMS Type – the phone supports different types
of messages. Your service provider may offer
the facility of converting a text message into
a format (email or fax, for example) that suits the
equipment that is going to receive the message.
• Sound – add a sound, or replace with
an alternative, from the Sounds folder.
• Status Request – request a status report to verify
whether a message has been delivered.
• Subject: – write a title for your message.
• Timing – set how many seconds you want
an item in a message to be displayed.
• Validity Period – if your message cannot
be delivered, for example, if the recipient has
turned off the phone, your service center can
save the message to send it later.
• Video – add a video clip, or replace with
an alternative, from the Videos folder.
Page 51

Imaging
Imaging
Camera, video recorder, pictures, screen saver.
Camera and video recorder
Your phone has a digital camera and a digital video
recorder. You can easily switch between the camera
and the video recorder by pressing
You can also press More and select Switch to Video
or Switch to Photo
You can take pictures, record video clips,
view them and send them as email attachments
or in picture messages via MMS (Multimedia
Messaging Service). To do this, you need
a subscription that supports these services.
Please check with your service provider.
You can also use a picture as a screen saver or as
wallpaper, or save it together with a contact in your
phonebook so that the picture appears when that
person calls
ringtone to a contact.
Before you start
The phone that you are sending the picture or video
clip to needs to support data transmission and
picture messaging in order to receive and show the
picture or video clip.
.
% 20 To add a picture or a personal
This is the Internet version of the user's guide. © Print only for private use.
or .
Before you send a picture or video clip using MMS
make sure that:
• You have set the service center number for MMS
and that Internet settings are entered in your
% 63 Setting up Internet and email.
phone,
Before you send a picture or video clip using email
make sure that:
• You have entered settings for a data account and
for an email account in your phone.
To take pictures
1 Press and hold to activate the camera
or } Camera. You can take pictures with the
phone held in a vertical or horizontal position.
2 Press to switch to camera if video recorder
is activated. } Capture
to take a picture.
51
Page 52

Imaging
To record video clips
1 Press and hold to activate the video
recorder or } Camera. You record video clips
with the phone held in a vertical position.
2 Press to switch to video recorder if the
camera is activated. } Record to start the
recording.
To use the zoom
Press to zoom in on the subject.
To adjust brightness
Use the volume buttons on the side of the phone
to increase or decrease brightness.
52
This is the Internet version of the user's guide. © Print only for private use.
Rotate pictures
If a picture is taken in landscape format, it can
be rotated. To send pictures in a picture message,
the picture must be in portrait format.
To rotate a picture
When the picture is taken } Rotate and repeat
if necessary.
Camera options
When the camera is activated press } More to view
more options.
All phones that support pictures can receive the picture
size 160x120. Some phones that support pictures
cannot receive the picture sizes 640x480 and 320x240.
The best picture size to view on a PC is 640x480.
Options before you take a picture:
• View All – view all your pictures.
• Switch to Video – switch to video recorder
to record video clips.
• Picture Size – choose between 640x480,
320x240 and 160x120 pixels.
• Night Mode – enhance picture quality with longer
exposure time.
• Effects – select different effects for your picture
or create a panorama picture.
Page 53

Imaging
• Frames – add a frame to your picture.
• Picture Quality – select quality for your picture.
• Light – turn on to enhance lighting conditions.
• Self-Timer – the picture is taken a few
seconds later.
• Default Name – change the default name for your
pictures. When changed, all pictures taken will
have the new default name.
Video options
When the video recorder is activated } More
to view more options.
• View All – view all your video clips.
• Switch to Photo – switch to the camera to take
pictures.
• Video Size – choose between 176x144 and
128x96 pixels.
• Night Mode – enhance picture quality with longer
exposure time.
• Effects – select different effects for your
video clip.
• Video Length – set the length for your video clip.
• Light – turn on to enhance lighting conditions.
• Default Name – change the default name for your
video clips. When changed, all video clips
recorded will get the new default name.
This is the Internet version of the user's guide. © Print only for private use.
Take a self-portrait
1 Hold the phone as shown in the illustration.
You can see your reflection in the mirror
provided.
2 Press and hold on the side of the phone
to activate the camera. Press again to take
the picture.
Saving pictures and video clips
When you have taken a picture or recorded a video
clip, the phone automatically saves it in a folder
in File Manager in the phone.
Sending pictures and video clips
When you have taken a picture or recorded a video
clip, you can send them instantly in a picture
message. To exchange pictures and video clips
using other transfer methods
pictures.
% 55 Exchanging
53
Page 54

Imaging
To take and send a picture
1 Activate the camera. Press to switch
to camera if the video recorder is activated.
2 } Capture } Send
and create your picture
message.
To record and send video clips
1 Activate the camera. Press to switch
to video recorder if the camera is activated.
2 } Record to start the video recording } Stop
to end the recording.
3 When you have finished your recording select
Play to view the video clip or Send and create
your picture message to send the video clip.
Creating a panorama picture
You can create a panorama picture by taking
a series of three pictures that are merged into
one picture.
For best result when creating a panorama picture,
make sure that the pictures you take overlap.
54
This is the Internet version of the user's guide. © Print only for private use.
To create a panorama picture
1 } Camera } More } Effects } Panorama.
2 } Capture
to take the first picture for the
panorama picture.
3 Move the camera to the next part of the subject
and } Capture again to take the next picture.
4 } Done and the picture is created.
Pictures
Your phone comes with a number of pictures.
You can delete the pictures that comes with your
phone if you, for example, want to free memory.
All pictures are saved in File Manager } Pictures.
You can:
• Have a picture as wallpaper and as screen saver.
• Assign a picture to a contact in the phonebook.
% 20 To add a picture or a personal ringtone to
a contact.
• Exchange pictures using Bluetooth wireless
technology, the infrared port, cable, picture
messages or email.
Animations
You can save animations in your phone.
Animations are handled like pictures.
Page 55

Imaging
Handling pictures
You can add, edit, or delete pictures in File Manager.
The number of pictures that you can save depends
on the size of the pictures. File types supported are
GIF, JPEG, WBMP, PNG and BMP.
To view your pictures
1 } File Manager } Pictures.
2 The pictures are shown in thumbnail view.
To get a full view } View.
Editing pictures
When editing pictures press , , , or use
the keys as follows:
exit the picture editor undo
left up up right up
left activate
tool
left down down right down
select tool select
right
colour
This is the Internet version of the user's guide. © Print only for private use.
To edit and save a picture
1 } File Manager } Pictures and scroll to the
picture you want } More.
2 } Use } Edit. You can now start to edit the
picture. To edit pictures taken with the camera,
you must select 160x120 as picture size.
} More } Save Picture to save the picture.
Exchanging pictures
You can exchange pictures using Bluetooth
wireless technology, the infrared port, cable,
picture messages or email. Please note that you
are not allowed to exchange copyright-protected
material. For more information on sending pictures
in messages
% 36 Messaging.
To send a picture
1 } File Manager } Pictures and scroll to the
picture you want } More } Send.
2 Select a transfer method.
55
Page 56

Imaging
To receive and save a picture
1 Open the message you received the picture in,
or turn on Bluetooth or the infrared port if these
transfer methods are being used to send the
picture.
2 If you received the picture in a message } More
} Save Picture. If you received the picture via
Bluetooth or Infrared, follow the instructions
that appear on the screen.
Remote screen
You can view your pictures on a remote screen,
for example, a TV, using Bluetooth wireless
technology and an adaptor. You can then use the
phone to control the screen. Use the slide show
function to show several pictures in a row.
To connect to a remote screen
1 } File manager } Pictures } More
} Remote screen.
2 The phone searches for other Bluetooth
devices and a list of available devices is
displayed. Select the device you want to use.
For more information about connecting using
Bluetooth,
technology.
56
% 68 Bluetooth™ wireless
This is the Internet version of the user's guide. © Print only for private use.
Screen saver and wallpaper
The phone has a screen saver which is activated
automatically when the phone has been in idle
mode for a few seconds. After a few more seconds,
the screen saver changes to sleep mode to save
power. If you have a picture as wallpaper,
this picture is shown in standby mode.
To use a picture as screen saver
1 } Settings } the Display tab } Screen Saver
} Picture.
2 Select the picture you want to use
as screen saver.
To set a picture as wallpaper
} Settings } the Display tab } Wallpaper } Picture
and select the picture you want to use as wallpaper.
Page 57

Entertainment
Entertainment
Media player, sounds, themes, games.
Media player
The media player works as a music player and video
player all in one. You can play music and video
clips that you receive in a picture message, or that
you download to your phone. The following are
supported by the media player: MP3, MP4, 3GP
and WAV (with 16 kHz as maximum sample rate).
You can also stream music and videos from
Web sites. When streaming, links have to be 3GPP
compatible.
Music and video clips
You can listen to music and view video clips that
you have saved in your phone. The music list keeps
on playing until you press Stop.
To play music
} Media Player and select a file } Play.
To view a video clip
} Media Player } More } Play Video and select the
video clip you want to view.
This is the Internet version of the user's guide. © Print only for private use.
Media player control
• } Pause to pause the playback.
• Press and hold and to rewind and fast
forward when playing music tracks.
• Press and to move between music tracks.
• Press and
Media player options
} More to view the following options:
• Play Video – play videos.
• Play Music – play music.
• Information – view information about the current
track or video.
• Delete Song/Delete Video – delete the file from
the phone.
• Equalizer – change the settings of the treble and
bass when playing music.
• Minimize – minimize the media player and return
to standby. The music continues to play and you
can use other applications and functions
in the phone.
• Send Song/Send Video – send a sound or video
file using Bluetooth wireless technology, the
infrared port, text or picture messages or email.
• Random – change the playback order of songs,
in order or randomized.
to scroll through the music list.
57
Page 58

Entertainment
Online music and videos
You can view videos and listen to music that you
find on a Web site by streaming them to your
phone. When browsing and when you have found
a link for streaming, the media player will open
automatically when the link is selected. Links for
streaming can be saved as bookmarks in the phone.
To stream saved music and videos
1 } Internet Services } More } Bookmarks.
2 Select a link to stream. The media player will
open and play the streaming music or video.
Ringtones and melodies
Your phone comes with a number of standard and
polyphonic melodies which can be used as ringtones.
You can exchange melodies via Bluetooth wireless
technology, the infrared port or cable. Please note
that you are not allowed to exchange copyrightprotected material.
If you select an MP3 file as ringtone, you cannot use
voice answering
type other than MP3 to be able to use voice
answering.
58
% 26 Voice answering. Select a file
This is the Internet version of the user's guide. © Print only for private use.
To select a ringtone
} Settings } the Sounds & Alerts tab } Ringtone.
To turn the ringtone on or off
Press and hold from standby. All signals
except the alarm signal are turned on or off.
To set the ringtone volume
1 } Settings } the Sounds & Alerts tab
} Ring Volume and press or to decrease
or increase the volume.
2 } Save to save the setting.
Specific ringtones for personal calls
If your subscription includes the Caller ID service,
you can assign a personal ringtone to up to ten
% 20 To add a picture or a personal
callers,
ringtone to a contact.
Vibrating alert
You can choose to be notified of an incoming call
by the buzzing of the vibrating alert. You can set:
• On – all the time.
• On if in Silent – on when the ring volume
is turned off or when you have set the phone
to silent.
• Off – all the time.
Page 59

Entertainment
To set the vibrating alert
} Settings } the Sounds & Alerts tab
} Vibrating Alert and select the setting you want.
Sounds and alerts options
From Settings } the Sounds & Alerts tab,
you can set:
• Message Alert – select how you want
to be notified of an incoming message.
• Key Sound – select what sound you want
the keys to make when you press them.
Composing
You can compose and edit melodies to use
as ringtones using the MusicDJ
™
. A melody
consists of four tracks – Drums, Basses, Chords
and Accents. A track contains a number of music
blocks. The blocks consist of pre-arranged sounds
with different characteristics. The blocks are
grouped into Intro, Verse, Chorus, and Break.
You compose a melody by adding music blocks
to the tracks.
This is the Internet version of the user's guide. © Print only for private use.
To compose a melody
1 } Entertainment } MusicDJ™.
2 Choose to Insert, Copy and Paste blocks to
compose your melody. Use , , or
to move between the blocks. Press to
delete a block. } More
to view more options.
To edit a previously created melody
} File Manager } Sounds and select the melody
} More } Use } Edit.
Sending and receiving
You can send and receive melodies in several
ways, for example using Bluetooth wireless
technology, the infrared port, email or text
or picture messages.
You cannot send a polyphonic melody or an MP3 file
in a text message.
To send a melody
1 } File Manager } Sounds and select a melody.
2 } More } Send and select a transfer method.
59
Page 60

Entertainment
To receive a melody
1 Open the message you received the melody
in, or turn on Bluetooth or the infrared port
if these transfer methods are being used
to send the melody.
2 When you receive the melody, follow the
instructions that appear on the screen.
Sound recorder
With the sound recorder, you can record either
your own memos or calls. When recording a call
conversation, the recording is stopped if any
participant ends the call. When recording a sound,
the recording stops automatically if you receive
a call. Recordings are automatically saved
in the phone.
In some countries or states it is required by law that
you inform the other person before recording the call.
To start a sound recording
1 } Entertainment } Record Sound.
2 Wait until you hear a tone. When the recording
starts, Recording is displayed together with the
time of the current recording (increasing).
60
This is the Internet version of the user's guide. © Print only for private use.
To end and play a sound recording
to end the recording, and } Play to listen
} Save
to the recording.
Recording options
} More to view the following options:
Record New, Send, Rename, Delete,
Recorded Sounds.
Listening to recordings
You can listen to your recordings at any time,
even during a call.
To listen to your recordings
1 } File Manager } Sounds and select the
recording you want to hear.
2 } Play
to listen to the recording. Press
and to go to the previous or next recording.
} Stop to stop playback.
Page 61

Entertainment
Radio
Your phone features an FM radio. To use the radio,
you must connect the portable handsfree.
The handsfree functions as an antenna.
You must switch your phone on to use the FM radio.
Do not switch the phone on in areas where mobile
phones are prohibited,
Efficient Use.
To listen to the radio
Connect the portable handsfree to the phone
} Radio.
Radio control
When the radio is on:
• } Search or press and hold or to find the
next channel on the FM band.
•Press or to move 0.1 MHz along the
FM band.
• Press or for the next preset channel.
This is the Internet version of the user's guide. © Print only for private use.
% 84 Guidelines for Safe and
Saving radio channels
You can save up to 20 of your favorite radio
channels.
To save channels quickly in positions 1 to 10, press
and hold 0–9, (where 0 represents the number 10).
To select a channel you have saved in positions
1 to 10, press 0–9.
To save a radio channel
} Radio } More } Save } Insert. The channel
is saved in a list.
More options
} More for the following options:
• Minimize – return to standby to use other
functions with the radio still playing.
• Save – save the current frequency in a list
of channels.
• Channels – select, add, edit or delete saved
channels.
• Turn On Speaker – send the sound through the
loudspeaker.
• Set Frequency – enter a frequency manually.
The figures you enter will be automatically
adjusted to valid frequencies. Press
to go directly to Set Frequency.
61
Page 62

Entertainment
• Auto-Save – automatically search for and save
channels in a list of channels. Previously saved
channels will be replaced.
• Turn On Mono – turn mono sound on.
While listening to the radio
If you minimize the radio display, you can listen
to the radio and use other functionality at the same
time. For example, you can make and receive calls,
send messages and play games.
To minimize the radio display
} Radio } More } Minimize.
To adjust the volume
Press the volume buttons on the side of the phone.
Themes
You can change the appearance of the screen,
for example, the colours and wallpaper, by using
themes. Your phone comes with some predefined
themes. You cannot delete these, but you can create
new themes and download them to your phone. For
more information, visit www.SonyEricsson.com.
62
This is the Internet version of the user's guide. © Print only for private use.
To select or change a theme
} File Manager } Themes and select a theme.
Exchanging themes
You can exchange themes using Bluetooth wireless
technology, the infrared port or email. Please note
that you are not allowed to exchange copyrightprotected material.
To send a theme
1 } File Manager } Themes and select a theme
} More } Send.
2 Select a transfer method.
To receive and save a theme
1 Open the message you received the theme in,
or turn on Bluetooth or the infrared port if
these transfer methods are being used to send
the theme.
2 When you receive the item, follow the
instructions that appear on the screen.
To download a theme
} File Manager } Themes and scroll to a direct link
} Go To.
Page 63

Connectivity
Games
Your phone has several entertaining games.
You can also download games and applications
directly to your phone. Help texts are available
for most games.
To start and end a game
1 } Entertainment } Games and select a game
} Start.
2 } More to read help texts. Press to end
the game.
To download a game
} Entertainment } Games and scroll to a direct link
} Go To.
This is the Internet version of the user's guide. © Print only for private use.
Connectivity
Internet and email settings, synchronizing,
Bluetooth™ wireless technology, infrared.
Internet
Setting up Internet and email
In order to use the Internet, and send and receive
picture and email messages, you need the following:
• A phone subscription that supports data
transmission.
• Settings entered in your phone.
• You may also have to register as an Internet
and email user with your service provider.
Entering Internet and email settings
Settings may already be entered when you buy
your phone. If not, you can enter the settings
in three different ways:
• You can receive settings in a text message from
your service provider. Settings are also available
at www.SonyEricsson.com.
• You can enter settings by using the setup wizard.
• You can enter or edit settings manually.
63
Page 64

Connectivity
Some settings are not mandatory. Please consult
your service provider for more information.
Receiving settings in a text message
Your service provider or Internet service provider
may be able to send the required data account,
Internet and email settings direct to your phone
in a text message.
Requesting settings from
Sony Ericsson
Use a PC to go to www.SonyEricsson.com
to request that a text message be sent to your
phone with the settings you need.
Setting up with the wizard
If your phone is not set up for Internet, you can ask
your service provider to provide you with Internet
settings information. Then you can simply use the
wizard in your phone to help guide you through the
relevant settings.
The wizard is automatically turned on if no Internet
settings exist in your phone and you start the browser.
64
This is the Internet version of the user's guide. © Print only for private use.
Using Internet
Your phone has a browser that uses WAP
(Wireless Application Protocol) or HTTP (Hyper
Text Transfer Protocol) to bring Internet to your
mobile phone.
To select an Internet profile
} Connect } Internet Settings } Internet Profiles
and select the profile you want to use.
To start browsing
Scroll to your online service or service provider
menu and select a service.
To stop browsing
} More } Exit Browser.
Options when browsing
} More to view different browsing options.
The options may vary depending on which site
you are visiting.
If you select an email address when browsing a Web
site, you can send a text message to that address.
Page 65

Connectivity
The options menu always contains the following:
• Exit Browser – disconnect and go to standby.
• Go to the homepage set for the current Internet
profile, for example, Sony Ericsson.
• Bookmarks – add the site you are currently
browsing to your list of bookmarks or folders,
or view the list of bookmarks and folders for the
current profile. Select to stream music or videos.
• Enter Address – enter the Web page address of
a site you want to visit. } New Address to enter
a new Web page address or select one of the
10 most recently entered addreses. When you
enter a Web page address, the normal http://
prefix is not needed.
• History – list of previously visited sites.
• Refresh Page – refresh the contents of the
Web page.
• Save Picture – save a picture from the site.
• Send Link – send a link to the current site
to another phone.
• Status – display current status information,
for example, profile, access type, connection
time, data rate, security, address.
• Make a Call/End Call – if your subscription
supports it, you can make a call while browsing
the Internet by selecting Make a Call. } End Call
to end the call and continue browsing.
This is the Internet version of the user's guide. © Print only for private use.
Using bookmarks
You use bookmarks in your mobile phone just as
you do with a PC Internet browser. You can create
and edit bookmarks.
To work with bookmarks
1 } Internet Services } More } Bookmarks
and select a bookmark } More.
2 Select an option.
Downloading
You can download, for example, pictures, themes,
games and ringtones, from Web sites directly to
your phone.
Contact your service provider for more information
if menu options are not available.
To download from
wap.sonyericsson.com
1 } Internet Services } More } Bookmarks
} Sony Ericsson.
2 Select what you want to download and follow
the instructions that appear.
65
Page 66

Connectivity
Stored information
When browsing, you can save information
in your phone.
It is advisable to clear any sensitive information about
previously visited Internet services. This is to avoid
a security risk if your phone is misplaced, lost or stolen.
The following information can be saved:
• Cookies – improve site access efficiency.
• Passwords – improve server access efficiency.
To allow or clear cookies
in your phone
} Connect } Internet Settings } Cookies and select
an option and confirm.
To clear the password list
} Connect } Internet Settings } Clear Passwords
and } Yes to confirm.
Internet security
Your phone has support for both WAP and HTTP
secure browsing. To activate a secure connection
to the WAP gateway, you need to turn on security
in your Internet profile. If your Internet profile
is a HTTP profile, the connection will be secure
if the URL starts with https://.
66
This is the Internet version of the user's guide. © Print only for private use.
Security for a connection between a WAP gateway and
a WAP service provider is the responsibility of the
WAP service provider.
To turn on a secure connection (WAP)
1 } Connect } Internet Settings } Internet
Profiles and select a profile } More } Settings.
2 Turn on security.
Trusted certificates
To establish a secure connection when using
certain Internet services, for example, banking,
you need certificates in your phone.
Trusted certificates are used to verify the WAP
gateway or the HTTP server that you are trying to
connect to. Your phone may already contain trusted
certificates when you buy it. You can also download
new certificates using the browser.
To check the certificates
in your phone
} Connect } Internet Settings } Security
} Trusted Cert.
Page 67

Connectivity
Synchronizing
You can synchronize your mobile phone contacts,
appointments, tasks and notes with similar
programs in, for example, a PC, PDA or mobile
phone using Bluetooth wireless technology, the
infrared port or a cable, and with similar programs
on the Internet using WAP or HTTP.
To select sync order for names
} Phonebook } Options } Advanced } Sync. Order
to select which order first and last name appear
in the phone when you synchronize contacts.
Synchronization with nearby devices
Install the synchronization program from the CD
that comes with your phone or download it from
www.SonyEricsson.com.
For more information, please refer to the
synchronization software online help.
Remote synchronization with
Internet programs
Contact your service provider for more information
about the programs on the Internet with which you
can synchronize, and to receive username, password
and addresses for the different programs. You must
also have a Internet profile set in your mobile
% 63 Setting up Internet and email.
phone
This is the Internet version of the user's guide. © Print only for private use.
To enter the remote synchronization
settings
1 } Connect } Synchronization } New Account.
If you do not have an account, you will be
asked if you want to create an account.
} Yes to create a new account.
2 Enter a name for the new account } Continue.
A list of options to enter will appear. Add the
server address of the synchronization server,
a server username and a server password.
} OK when you have entered each setting.
3 Select New Account and select the WAP
or HTTP profile that you want to use for the
synchronization.
4 Select Applications and select the applications
that you want to synchronize, for example,
Phonebook } OK.
5 Select Application Settings and select
application. Enter the name of the database
and, if required, your username and password
} OK.
6 Press } Save to save your new account.
To start the remote synchronization
} Connect } Synchronization and select a remote
account } Start.
67
Page 68

Connectivity
Bluetooth™ wireless
technology
Your phone has built-in Bluetooth wireless
technology which makes it possible for you to
connect your phone wirelessly to other Bluetooth
devices such as a handsfree, PC, a remote screen
or other phones.
You can, for example, have a conversation via
a cordless Bluetooth handsfree or browse the
Internet, wirelessly connected via a mobile phone.
You can automatically synchronize information in
your phone and your PC and use the remote control
functionality to control applications on your PC.
You can also exchange, for example, business
cards, calendar items and pictures. To use a remote
% 56 Remote screen.
screen,
We recommend that your phone and the Bluetooth
device you are communicating with be within a range
of 10 meters. The connection may be improved if there
are no solid objects in between your phone and the
other Bluetooth device.
Before you start
To communicate with another Bluetooth device,
you first need to turn Bluetooth on and add the
device to the list of devices in your phone.
68
This is the Internet version of the user's guide. © Print only for private use.
You can exchange items, use a remote screen and
play games without adding the device to the list.
To synchronize with your PC, and to browse the
Internet, you also need to install software on your
PC from the CD that comes with your phone,
or download it from www.SonyEricsson.com.
To turn Bluetooth on
} Connect } Bluetooth } Turn On.
To add a device to your phone
1 } Connect } Bluetooth } My Devices
} New Device. The Bluetooth function of the
other device must also be on.
2 } Add and your phone will search for all types
of available Bluetooth devices. } More if you
want to select a specific type of device to
search for.
3 The phone searches for Bluetooth devices.
A list of available devices of the type you
selected is then displayed. Select a device.
4 If the device you are adding to your phone has
its own passcode, enter this passcode in your
phone. If not, create a passcode of digits
yourself and enter it in both devices.
Page 69

Connectivity
To organize your list of devices
1 } Connect } Bluetooth } My Devices and select
a device from the list.
2 } More to view a list of options.
Phone name
You can choose a name for your phone. This name
is shown in other devices when your phone is found,
and it is also used for the infrared port. In order for
your phone to be found when searched for by other
Bluetooth devices, you must make sure that
Bluetooth is turned on and your phone is visible
to other devices.
To enter a phone name
} Connect } Bluetooth } Options } Edit Phone
Name. When Bluetooth is turned on, the name
is shown in other devices and your phone is visible
to other devices.
To hide or show your phone when
using Bluetooth
} Connect } Bluetooth } Options } Visibility and
select Show Phone or Hide Phone.
This is the Internet version of the user's guide. © Print only for private use.
To add a Bluetooth handsfree
to your phone
1 } Connect } Bluetooth } Handsfree.
The first time you add a handsfree,
Add a handsfree device to use with the phone?
is displayed } Yes.
2 If you already have a handsfree in your list of
devices } Connect } Bluetooth } Handsfree
} My Handsfree } New Handsfree } Add.
Transferring sound
When you are using a Bluetooth handsfree with
your phone, you can choose where the sound
should be transferred during a call. You can also
select where the sound should be handled when
answering an incoming call with the keypad.
To transfer sound when using
a handsfree
1 During a call, press the navigation key
} Transfer Sound.
2 Select to transfer sound either to the phone
or to other handsfree devices that have been
added to your phone.
69
Page 70

Connectivity
To direct sound when answering
a call with a handsfree
} Connect } Bluetooth } Handsfree } Incoming Call
and select Place in Phone or Place in H-free.
Sending and receiving
To send or receive an item, for example, a contact
from the phonebook or a picture taken with the
camera, using Bluetooth wireless technology,
you need to make sure that the devices are
within range.
After you select Bluetooth as the transfer method
for sending, a list of possible receiving devices
is presented. First in the list will be the last device
you were in contact with and devices that have
been previously added to your phone. The phone
also searches for other devices that are shown
in the list.
To send an item
1 Select the item that you want to send,
for example, a phonebook contact
} Phonebook and select a contact
} More } Send Contact } Via Bluetooth.
2 The phone searches for devices. Select the
device you want to send the item to } Send.
70
This is the Internet version of the user's guide. © Print only for private use.
To receive an item
1 } Connect } Bluetooth } Turn On.
2 Make sure that your phone is visible to other
devices. When you receive the item, follow the
instructions that appear on the screen.
Remote control
You can use your phone as a remote control device
to control applications on a PC. For example,
you can control a media player or power point
presentations.
To select remote control
} Connect } Bluetooth } Remote Control. Select
the configuration file you want to use and the PC
you want to connect to.
File transfer
You can use a PC to view and transfer content
contained in the File Manager. You can use the
drag-and-drop functionality in your PC to:
• Transfer files from the phone to the PC.
• Transfer files from the PC to the phone.
• Delete files from the phone.
Page 71

Connectivity
File browsing
You can browse and retrieve the files contained
in other devices that support the server role of the
file transfer profile. To do this, you must first add
the other device to your list of My Devices.
To check whether the device has support for this
specific functionality, please refer to the list of
Bluetooth services available in the other device.
To browse files
1 } Connect } Bluetooth } My Devices.
2 Select a device } Browse.
Infrared port
You can use the infrared port to establish contact
between your phone and a PC or another device
equipped with an infrared port. You can,
for example, synchronize calendar items,
% 67 Synchronizing, and send items such
as pictures and contacts.
If you are connecting to a PC, please refer to the user
documentation for your PC.
This is the Internet version of the user's guide. © Print only for private use.
To turn the infrared port on
} Connect } Infrared Port } On } 10 Minutes to turn
on infrared for 10 minutes only.
To connect two devices
1 Position your phone as shown in the picture.
The infrared port on the phone must face the
infrared port on the other device.
2 Your phone now establishes contact with the
other device.
To send an item using the infrared
port (example: a contact)
1 Make sure that the infrared port of both devices
is on. } Phonebook and select a contact,
when contacts is default phonebook.
2 } More } Send Contact } Via Infrared.
71
Page 72

More features
More features
Time and date, alarm clock, calendar, tasks,
SIM card lock, etc.
Time and date
The time is always displayed in standby.
• To set the time } Settings } the General tab
} Time & Date } Time. Enter the time } Save.
• To set the time format (12-hour or 24-hour
clock) } Format and select an option.
Date
You can set the date and date format in Settings
} the General tab } Time & Date } Date.
Advanced time settings
In Settings } the General tab } Time & Date you
can set time zone and daylight saving time.
If you have activated Auto Time Zone, you are
asked whether you want to update the time when
your phone changes network. If you press Yes,
the time is updated automatically.
72
This is the Internet version of the user's guide. © Print only for private use.
Alarm clock
The alarm can be set to ring at a specific time
within 24 hours, or recurrently at a specific time
on several days. You can have both these alarms
set at the same time. The alarm signal rings even
if the phone is set to silent or turned off.
To set an alarm
} Organizer } Alarm Signal } Alarm and enter the
time } Save.
Using the alarm
• To change the alarm time, } Organizer
} Alarm Signal } Alarm and enter a new time.
• To turn the alarm signal off when it rings,
press any key. If you do not want the alarm
to be repeated } Turn Off.
• To cancel the alarm } Organizer } Alarm Signal
} Alarm } Turn Off.
• To set a recurrent alarm } Organizer
} Alarm Signal } Recurrent Alarm. Enter the time
and select the days that you want the alarm to
recur by scrolling and pressing Mark. } Done
to exit the menu.
• To select an alarm signal } Organizer
} Alarm Signal } Alarm Signal.
Page 73

More features
Calendar
You can use the calendar to keep track of important
meetings that you need to attend. The calendar can
be synchronized with a PC calendar or with
a calendar on the Web
Appointments
You can save up to 300 appointments depending
on the size of each item. You can choose to add
a new appointment or use an old one as a template
by copying and editing it. You can also set
a reminder for an appointment.
To add a new appointment
1 } Organizer } Calendar and select the date for
the appointment } New Appointment } Add.
2 Enter date, subject, location and reminder.
Confirm each entry.
To set reminders options
} Organizer } Calendar } More } Advanced
} Reminders.
This is the Internet version of the user's guide. © Print only for private use.
% 67 Synchronizing.
Reminders options
} Always if you want the reminder to sound even
though the phone is turned off. When the reminder
sounds } Yes to read the appointment. } No to turn
off the reminder.
A reminder set in the calendar affects a reminder set
for the same time in tasks.
To view an appointment
1 Organizer } Calendar and select a day on which
you have an appointment (marked in bold).
2 Scroll to the appointment } View.
Viewing your calendar
To view your calendar content } Organizer
} Calendar. Days on which you have appointments
are marked in bold. } More } View Week to view
a certain week.
73
Page 74

More features
Navigating in your calendar
Use the navigation key to move between days or
weeks. In the monthly and weekly views, you can
also use the keypad as follows
Back a week Next week
Back a month Next month
Back a year Next year
Tod ay ’s d ate
.
Calendar settings
} Organizer } Calendar } More and select one
of the options:
• View Week – select, add, edit or delete
appointments.
• New Appointment – add a new appointment.
• Change Date – change the date of your calendar.
• Advanced – for options to find, delete all, set
reminders or select a start day for the week.
Find an appointment
You can search for appointments that contain
a specific text.
74
This is the Internet version of the user's guide. © Print only for private use.
To search for appointments
1 } Organizer } Calendar } More } Advanced
} Find.
2 Enter the text you want to search for } OK.
Appointments that match your search are shown.
} View to view your appointments or } More
for options to reschedule, edit, send, copy
or delete.
Exchanging appointments
You can send and receive appointments using
Bluetooth wireless technology, the infrared port
or picture messaging.
To send an appointment
In the list of appointments for a certain day, select
the item you want to send } More } Send and select
a transfer method.
Receiving an appointment
When Add appointment? is displayed } Yes to save
the appointment.
Page 75

More features
Tasks
You can keep track of phone calls you need to make
or tasks that you need to do. You can save up to
80 tasks depending on the size of each item.
You can choose to add a new task or use an old
one as a template by copying and editing it.
You can also set a reminder for a task.
To add a new task
1 } Organizer } Tasks } New Task } Add.
2 Select a category. If the category is a phone
call, enter the phone number } Continue.
3 Enter a subject } Continue.
4 If you want to set a reminder for your task
} Yes.
To set reminders
} Organizer } Tasks and select a task } More
} Reminders.
Reminders options
} Always if you want the reminder to sound even
though the phone is turned off. When the reminder
sounds press Yes to read the task, or to call the
phone number in a phone task. } No to turn off
the reminder.
This is the Internet version of the user's guide. © Print only for private use.
A reminder set in tasks affects a reminder set for the
same time in the calendar.
To view a task
} Organizer } Tasks and select a task } View.
Exchanging tasks
You can send and receive tasks using Bluetooth
wireless technology, the infrared port or picture
messaging.
To send a task
1 In the list of tasks for a certain day, select
the item you want to send } More } Send.
2 Select a transfer method.
Receiving a task
When Add task? is displayed } Yes to save the
appointment or task.
Notes
If you need to remember something, you can make
a note of it in your phone. You can save up
to 10 notes.
75
Page 76

More features
To add a note
} Organizer } Notes } New Note } Add and enter
the note } Save.
To handle the notes
1 } Organizer } Notes and a list of notes appears.
2 Select the note that you want to handle. } More
to edit, show a note in standby (or hide it),
send or delete a note.
Exchanging notes
You can send and receive notes using Bluetooth
wireless technology, the infrared port or picture
messaging. You can also synchronize notes with
% 67 Synchronizing.
aPC
To send a note
} Organizer } Notes and select the note that you
want to send } More } Send and select a transfer
method.
To receive a note
Add note? appears } Yes to save the note among
your other notes.
76
This is the Internet version of the user's guide. © Print only for private use.
Profiles
Your phone has a number of predefined profiles
which are set to suit a certain environment. You can
add accessories to, rename or change these profiles.
For example, when you go to a meeting, you can
simply choose the Meeting profile and a number
of settings are changed, for example, the ringtone
is turned off.
You can reset all profile settings to the way they
were set when you bought your phone.
Automatic activation
Some profiles, for example In Car,
are automatically activated when used with
a specific accessory. When the accessory
is disconnected, the profile is changed back.
To select a profile
} Settings } the General tab } Profiles
} Select Profile.
To change a profile setting
1 } Settings } the General tab } Profiles
} Edit Profile and select a setting.
2 Change the profile settings } Save to confirm.
Page 77

More features
To rename a profile
} Settings } the General tab } Profiles } Edit Profile
} Profile Name:.
To reset all profile settings
} Settings } the General tab } Profiles
} Reset Profiles.
Stopwatch
Your phone has a stopwatch that can save several
laps. The stopwatch continues to run when you
answer an incoming call.
To use the stopwatch
1 } Organizer } Stopwatch } Start.
2 } Stop or } New Lap if you want a lap time.
3 To reset the stopwatch } Reset.
Timer
Your phone has a built-in timer. When the signal
rings, press any key to turn it off.
To set the timer
} Organizer } Timer and enter the hours, minutes
and seconds after which you want the timer
to go off.
This is the Internet version of the user's guide. © Print only for private use.
Display light
The display light can be set to automatic, off or on.
In automatic mode, the display light is turned off
a few seconds after you last press a key.
To set the display light
} Settings } the Display tab } Light.
Start-up screen
When you turn your phone on or off,
the Sony Ericsson start-up screen appears. Your
service provider’s own start-up screen may appear
instead. You can also set your own start-up screen.
To select a start-up screen
} Settings } the Display tab } Startup Screen and
select a file for the start-up screen.
Calculator
The phone has a calculator, which can add,
subtract, divide and multiply.
To use the calculator
} Organizer }Calculator.
• Press or to select ÷ x - + % =.
• Press to delete the figure.
• Press to enter a decimal point.
77
Page 78

More features
SIM card lock
The SIM card lock protects your subscription,
but not your phone itself, from unauthorized use.
If you change SIM cards, the phone still works
with the new SIM card.
Most SIM cards are locked at the time of purchase.
If the SIM card lock is on, you have to enter a PIN
(Personal Identity Number) every time you turn
on your phone.
If you enter your PIN incorrectly three times
in a row, the SIM card is blocked. This is indicated
by the message PIN blocked. To unblock it you
need to enter your PUK (Personal Unblocking
Key). Your PIN and PUK are supplied by your
service provider.
If the message Codes do not match. appears, you entered
the new PIN incorrectly. If the message
appears, followed by
PIN incorrectly.
Old PIN:, you entered your old
To unblock your SIM card
1 When PIN blocked. is displayed, enter your
PUK } OK.
2 Enter a new four- to eight-digit PIN } OK.
3 Re-enter the new PIN to confirm } OK.
78
This is the Internet version of the user's guide. © Print only for private use.
Wrong PIN.
To edit your PIN
} Settings } the General tab } Locks } SIM Lock
} Change PIN.
To turn the SIM card lock on or off
1 } Settings } the General tab } Locks } SIM
Lock } Protection and select On or Off.
2 Enter your PIN } OK.
Keypad lock
You can lock the keypad to avoid dialing a number
by accident.
Calls to the international emergency number 112 can
still be made, even when the keypad is locked.
Automatic keylock
Automatic keylock means the keypad is locked
a short while after you last press a key.
To set the automatic keylock
} Settings } the General tab } Locks
} Automatic Keylock.
To lock the keypad manually
Press } Lock Keys.
Page 79

More features
You can still answer an incoming call and the
keypad locks again after it. The keypad remains
locked until you unlock it manually.
To unlock the keypad, press } Unlock.
Phone lock
The phone lock protects the phone against
unauthorized use if it is stolen and the SIM card
is exchanged. It is not on when you buy the phone.
You can change the phone lock code (0000) to any
four- to eight-digit personal code.
Phone lock on
If the phone lock is on, the message Phone locked.
appears each time you turn on the phone. You have
to enter your code followed by Yes to use
your phone.
Automatic phone lock
If the phone lock is set to automatic, you do not
need to enter your phone lock code until a different
SIM card is inserted in the phone.
It is important that you remember your new code.
If you should forget it, you will need to bring your
phone in to your local Sony Ericsson retailer.
This is the Internet version of the user's guide. © Print only for private use.
To set the phone lock
1 } Settings } the General tab } Locks
} Phonelock } Protection and select
an alternative.
2 Enter the phone lock code } OK.
To edit your phone lock code
} Settings } the General tab } Locks } Phonelock
} Change Code.
Code memo
Instead of having to remember all the different
security codes for credit cards, for example,
you can save them in the code memo in your
phone. Then all you need to remember is the
passcode to open the code memo. You can save
a maximum of 10 codes in the code memo.
Checkword and security
To confirm that you have entered the correct
passcode for the code memo and to prevent
unauthorized access to your codes, you must
enter a checkword.
79
Page 80

More features
When you enter your passcode to open the code
memo, the checkword is shown for a short time.
If the passcode is correct, the correct codes are
shown. If you enter the incorrect passcode,
the checkword and the codes that are shown are
also incorrect.
Factors strengthening the security of the code
memo function are:
• You get no feedback about whether the passcode
is correct, except for the checkword, and only
you know the checkword.
• All codes are encrypted in the phone.
• When you access your codes, they are shown for
a limited time only.
To open code memo for the first time
1 } Organizer } Code Memo. A message with
instructions is displayed } Continue.
2 Enter a four-digit passcode to open code memo
} Continue.
3 Re-enter the new passcode to confirm.
4 Enter a checkword (maximum 15 characters)
} Done. The checkword can consist of both
letters and numbers. The next time you open
the code memo, your checkword appears after
you enter the passcode, and then your added
codes are shown.
80
This is the Internet version of the user's guide. © Print only for private use.
To add a new code
1 } Organizer } Code Memo and enter your
passcode } New Code } Add.
2 Enter a name associated with the code,
for example, the name of the credit card
company } Continue.
3 Enter the code } Done.
To change the passcode
1 Open code memo as described above } More
} Change Passcode.
2 Enter your new passcode } Continue.
3 Re-enter the new passcode } Continue.
4 Enter a checkword } Done.
Forgot your passcode?
If you forget your passcode, just enter any passcode
to access the code memo function. The checkword
and codes that are then shown are incorrect.
You must now reset the code memo.
Page 81

Troubleshooting
To reset code memo
1 } More } Reset.
2 Reset code memo? is displayed } Yes.
The code memo is reset and all entries are
cleared. The next time you enter the code
memo, you must start at
memo for the first time.
% 80 To open code
Online services
Online services are customized services offered
by service providers independently of mobile
phones and mobile phone manufacturers.
A SIM card which supports online services
works in the same way as a normal SIM card.
When you have inserted your SIM card and turned
on your phone, your service provider can download
data to your SIM card. When you restart your
phone after the first data download, a new submenu
appears under the menu.
This menu only appears if your SIM card supports
this service. Your phone may not support all of the
services offered.
To enter your new menu system
Select the service provider menu on the desktop.
This is the Internet version of the user's guide. © Print only for private use.
Troubleshooting
Why doesn’t the phone work the way I want?
This chapter lists some problems that you might
encounter while using your phone. Some problems
require that you call your service provider,
but most of the problems you can easily correct
yourself.
However, if you need to bring your phone in for
repair, please note that you may lose information
and content that you have saved in your phone.
You are advised to make a copy of such information
before bringing your phone in for repair.
Master reset
You can return the phone to its original state by
deleting the changes that you have made to settings
and the content that you have added or edited.
• If you select Reset Settings, the changes that
you have made to settings will be deleted.
• If you select Reset All, in addition to your
changes to settings, all contacts, messages,
personal data, and content that you have
downloaded, received or edited will also
be deleted.
81
Page 82

Troubleshooting
To reset the phone
1 } Settings } the General tab } Master Reset.
2 } Reset Settings } Reset All.
3 Enter the phone lock code (0000 or the new
code if you have changed it) } OK.
If you select Reset All, content such as melodies and
pictures that you have downloaded, received or edited
are also deleted.
The phone cannot be switched on
Recharge or replace the battery.
% 5 To insert the
SIM card and charge the battery.
No indication of charging
When you start charging a battery that is empty
or a battery that has not been used for a long time,
it may take up to 30 minutes before the battery icon
appears in the display.
Menu language
If the display shows a language that you do not
understand, you can always choose Automatic
(determined by your SIM card) by pressing
8888 in standby. You can always choose
English by pressing 0000 in standby.
82
This is the Internet version of the user's guide. © Print only for private use.
Grey menu options
Grey text indicates a function that is temporarily
unavailable, for example, if a service is not activated,
or if your subscription does not support the function.
Since you cannot send themes, pictures and sounds
that are copyright-protected, the Send menu is
sometimes unavailable.
Insert SIM
There is no SIM card in the phone or you may
have inserted it incorrectly. Insert a SIM card.
% 5 To insert the SIM card and charge the battery.
Insert correct SIM card
The phone is set to work only with certain
SIM cards. Insert the correct SIM card.
SOS calls only
You are within range of a network, but you are not
allowed to use it. However, in an emergency, some
service providers allow you to call the international
emergency number 112.
% 19 Emergency calls.
No network
There is no network within range or the received
signal is too weak. You have to move to get a signal
that is strong enough.
Page 83

Troubleshooting
Wrong PIN/Wrong PIN2
You have entered your PIN or PIN2 incorrectly.
Enter the correct PIN or PIN2 } Yes.
% 78 SIM card lock.
Codes do not match
When you want to change a security code (for
example your PIN) you have to confirm the new
code by entering it again. The two codes that you
have entered do not match.
PIN blocked/PIN2 blocked
You have entered your PIN or PIN2 incorrectly
three times in a row. To unblock,
% 78 SIM card lock.
% 78 SIM card lock.
PUK blocked
You entered your personal unblocking key code
(PUK) incorrectly 10 times in a row. Contact your
service provider.
Phone locked
The phone is locked. To unlock the phone,
% 79 Phone lock.
This is the Internet version of the user's guide. © Print only for private use.
Phone lock code
Your phone comes with the phone lock code, 0000.
You can change it to any four- to eight-digit code.
% 79 Phone lock.
Number not permitted
The fixed dialing function is activated and the
number you have dialed is not on your fixed
numbers list.
Charging, alien battery
The battery you are using is not a Sony Ericssonapproved battery,
% 31 Fixed dialing.
% 87 Battery use and care.
83
Page 84

Additional information
Additional information
Sony Ericsson Web site, safe and efficient use,
warranty, declaration of conformity.
Sony Ericsson Consumer Web site
At www.SonyEricsson.com there is a support
section where help and tips are only a few clicks
away. Here you find the latest software updates,
tips on how to use your product more efficiently,
and function guides for some of the products.
Guidelines for Safe and
Efficient Use
Please read this information before using
your mobile phone.
Recommendations
• Always treat your product with care
and keep it in a clean and dust-free place.
• Do not expose your product to liquid
or moisture or humidity.
• Do not expose your product to
extreme high or low temperatures.
84
This is the Internet version of the user's guide. © Print only for private use.
• Do not expose your product to open
flames or lit tobacco products.
• Do not drop, throw or try to bend
your product.
• Do not paint your product.
• Do not use your product near medical equipment
without requesting permission.
• Do not use your product when in, or around aircraft,
or areas posted “turn off two-way radio”.
• Do not use your product in an area where a
potentially explosive atmosphere exists.
• Do not place your product or install wireless
equipment in the area above your car’s air bag.
• Do not attempt to disassemble your
product. Only Sony Ericsson-authorized
personnel should perform service.
Antenna
Only use an antenna that has been specifically
designed by Sony Ericsson for your mobile phone.
Use of unauthorized or modified antennas could
damage your mobile phone and may violate
regulations, causing loss of performance and SAR
levels above the recommended limits (see below).
Page 85

Additional information
Efficient use
Hold your mobile phone as you would any other
phone. Do not cover the top of the phone when
in use, as this affects call quality and may cause
the phone to operate at a higher power level than
needed, thus shortening talk and standby times.
Radio frequency (RF) exposure
and SAR
Your mobile phone is a low-power radio transmitter
and receiver. When it is turned on, it emits low levels
of radio frequency energy (also known as radio waves
or radio frequency fields).
Governments around the world have adopted
comprehensive international safety guidelines,
developed by scientific organizations, e.g. ICNIRP
(International Commission on Non-Ionizing Radiation
Protection) and IEEE (The Institute of Electrical and
Electronics Engineers Inc.) through periodic and
thorough evaluation of scientific studies. These
guidelines establish permitted levels of radio wave
exposure for the general population. The levels include
a safety margin designed to assure the safety of all
persons, regardless of age and health, and to
account for any variations in measurements.
Specific Absorption Rate (SAR) is the unit of
measurement for the amount of radio frequency
energy absorbed by the body when using a mobile
phone. The SAR value is determined at the highest
certified power level in laboratory conditions, but the
This is the Internet version of the user's guide. © Print only for private use.
actual SAR level of the mobile phone while operating
can be well below this value. This is because the
mobile phone is designed to use the minimum power
required to reach the network.
Variations in SAR below the radio frequency exposure
guidelines do not mean that there are variations in
safety. While there may be differences in SAR levels
among mobile phones, all Sony Ericsson mobile
phone models are designed to meet radio frequency
exposure guidelines.
Before a phone model is available for sale to the public,
it must be tested and certified to the FCC that it does
not exceed the limit established by the governmentadopted requirement for safe exposure. The tests are
performed in positions and locations (that is, at the ear
and worn on the body) as required by the FCC for
each model. For body worn operation, this phone has
been tested and meets FCC RF exposure guidelines
when the handset is positioned a minimum of 15 mm
from the body without any metal parts in the vicinity of
the phone or when used with the original Sony Ericsson
body worn accessory intended for this phone. Use of
other accessories may not ensure compliance with
FCC RF exposure guidelines.
A separate leaflet with SAR information for this mobile
phone model is included with the material that comes
with this mobile phone. This information can also be
found, together with more information on radio
frequency exposure and SAR,
on www.SonyEricsson.com.
85
Page 86

Additional information
Driving
Please check if local laws and regulations restrict the
use of mobile phones while driving or require drivers
to use handsfree solutions. We recommend that you
use only Ericsson or Sony Ericsson handsfree
solutions intended for use with your product. Please
note that because of possible interference to
electronic equipment, some vehicle manufacturers
forbid the use of mobile phones in their vehicles
unless a handsfree kit with an external antenna
supports the installation.
Always give full attention to driving and pull off the
road and park before making or answering a call
if driving conditions so require.
Personal medical devices
Mobile phones may affect the operation of cardiac
pacemakers and other implanted equipment. Please
avoid placing the mobile phone over the pacemaker,
e.g. in your breast pocket. When using the mobile
phone, place it at the ear opposite the pacemaker.
If a minimum distance of 15 cm (6 inches) is kept
between the mobile phone and the pacemaker,
the risk of interference is limited. If you have any
reason to suspect that interference is taking place,
immediately turn off your mobile phone. Contact your
cardiologist for more information.
For other medical devices, please consult the
manufacturer of the device.
86
This is the Internet version of the user's guide. © Print only for private use.
CHILDREN
DO NOT ALLOW CHILDREN TO PLAY
WITH YOUR MOBILE PHONE OR ITS
ACCESSORIES. THEY COULD HURT
THEMSELVES OR OTHERS, OR COULD
ACCIDENTALLY DAMAGE THE MOBILE PHONE
OR ACCESSORY. YOUR MOBILE PHONE OR ITS
ACCESSORY MAY CONTAIN SMALL PARTS THAT
COULD BE DETACHED AND CREATE A CHOKING
HAZARD.
Disposing of the product
Your mobile phone should not be placed
in municipal waste. Please check local
regulations for disposal of electronic
products.
Power supply
Connect the AC power adapter only to designated
power sources as marked on the product. Make sure
the cord is positioned so that it will not be subjected
to damage or stress. To reduce risk of electric shock,
unplug the unit from any power source before
attempting to clean it. The AC power adapter must
not be used outdoors or in damp areas. Never alter
the cord or plug. If the plug will not fit into the outlet,
have a proper outlet installed by a qualified
electrician.
Page 87

Additional information
Emergency calls
Mobile phones operate using radio signals, which
cannot guarantee connection under all conditions.
Therefore you should never rely solely upon any
mobile phone for essential communications
(e.g. medical emergencies).
Emergency calls may not be possible on all cellular
networks or when certain network services and/or
mobile phone features are in use. Check with your
local service provider.
Battery use and care
We recommend that you fully charge the battery
before you use your mobile phone for the first time.
The battery should only be charged in temperatures
between +5°C (+41°F) and +45°C (+113°F).
A new battery or one that has not been used for
a long time could have reduced capacity the first
few times it is used.
The talk and standby times depend on the actual
transmission conditions when using the mobile
phone. If the mobile phone is used near a base
station, less power is required and talk and standby
times are prolonged.
• Warning! May explode if disposed of in fire.
• Use only Sony Ericsson branded original batteries
and chargers intended for use with your mobile phone.
Other chargers may not charge sufficiently or may
This is the Internet version of the user's guide. © Print only for private use.
produce excessive heat. Using other batteries and
chargers could be dangerous.
• Do not expose the battery to liquid.
• Do not let the metal contacts on the battery touch
another metal object. This could short-circuit and
damage the battery.
• Do not disassemble or modify the battery.
• Do not expose the battery to extreme
temperatures, never above +60°C
(+140°F). For maximum battery capacity,
use the battery in room temperature.
• Turn off your mobile phone before
removing the battery.
• Keep out of children’s reach.
• Use the battery for the intended
purpose only.
• Do not allow the battery to be put into
the mouth. Battery electrolytes may be
toxic if swallowed.
Disposing of the battery
Please check local regulations for
disposal of batteries or call your local
Sony Ericsson Customer Care Center
for information.
The battery should never be placed in municipal
waste. Use a battery disposal facility if available.
87
Page 88

Additional information
Limited Warranty
Sony Ericsson Mobile Communications AB, S-221 88
Lund, Sweden, (Sony Ericsson), provides this Limited
Warranty for your mobile phone and original accessory
delivered with your mobile phone (hereinafter
referred to as “Product”).
Should your Product need warranty service, please
return it to the dealer from whom it was purchased,
or contact your local Sony Ericsson Customer
Care Center (national rates may apply) or visit
www.SonyEricsson.com to get further information.
Our warranty
Subject to the conditions of this Limited Warranty,
Sony Ericsson warrants this Product to be free from
defects in design, material and workmanship at the
time of its original purchase by a consumer, and for
a subsequent period of one (1) year.
What we will do
If, during the warranty period, this Product fails to
operate under normal use and service, due to defects
in design, materials or workmanship, Sony Ericsson
authorized distributors or service partners, in the
country/region* where you purchased the Product,
will, at their option, either repair or replace the
Product in accordance with the terms and conditions
stipulated herein.
88
This is the Internet version of the user's guide. © Print only for private use.
Sony Ericsson and its service partners reserve the
right to charge a handling fee if a returned Product
is found not to be under warranty according to the
conditions below.
Please note that your personal settings/downloads
might be lost when the Product is repaired or replaced.
Conditions
1 The warranty is valid only if the original proof of
purchase issued to the original purchaser by an,
for this Product, Sony Ericsson authorized dealer,
specifying the date of purchase and serial number**,
is presented with the Product to be repaired
or replaced. Sony Ericsson reserves the right
to refuse warranty service if this information
has been removed or changed after the original
purchase of the Product from the dealer.
2 If Sony Ericsson repairs or replaces the Product,
the repaired or replaced Product shall be
warranted for the remaining time of the original
warranty period or for ninety (90) days from the
date of repair, whichever is longer. Repair or
replacement may involve the use of functionally
equivalent reconditioned units. Replaced parts
or components will become the property
of Sony Ericsson.
3 This warranty does not cover any failure of the
Product due to normal wear and tear, or due to
misuse, including but not limited to use in other
Page 89

Additional information
than the normal and customary manner,
in accordance with the Sony Ericsson instructions
for use and maintenance of the Product. Nor does
this warranty cover any failure of the Product due
to accident, software or hardware modification or
adjustment, acts of God or damage resulting from
liquid. A rechargeable battery can be charged and
discharged hundreds of times. However, it will
eventually wear out – this is not a defect. When
the talk-time or standby time is noticeably shorter,
it is time to replace your battery. Sony Ericsson
recommends that you use only batteries and
chargers approved by Sony Ericsson.
4 Since the cellular system on which the Product
is to operate is provided by a carrier independent
from Sony Ericsson, Sony Ericsson will not be
responsible for the operation, availability,
coverage, services or range of that system.
5 This warranty does not cover Product failures
caused by installations, modifications, or repair
or opening of the Product performed by a nonSony Ericsson authorized person.
6 The warranty does not cover Product failures
which have been caused by use of accessories
or other peripheral devices which are not Ericsson
or Sony Ericsson branded original accessories
intended for use with the Product.
7 Tampering with any of the seals on the Product
will void the warranty.
This is the Internet version of the user's guide. © Print only for private use.
THERE ARE NO EXPRESS WARRANTIES,
WHETHER WRITTEN OR ORAL, OTHER THAN
THIS PRINTED LIMITED WARRANTY. ALL
IMPLIED WARRANTIES, INCLUDING WITHOUT
LIMITATION THE IMPLIED WARRANTIES OF
MERCHANTABILITY OR FITNESS FOR
A PARTICULAR PURPOSE, ARE LIMITED TO
THE DURATION OF THIS LIMITED WARRANTY.
IN NO EVENT SHALL SONY ERICSSON OR ITS
LICENSORS BE LIABLE FOR INCIDENTAL OR
CONSEQUENTIAL DAMAGES OF ANY NATURE
WHATSOEVER, INCLUDING BUT NOT LIMITED
TO LOST PROFITS OR COMMERCIAL LOSS;
TO THE FULL EXTENT THOSE DAMAGES CAN
BE DISCLAIMED BY LAW.
Some countries/states do not allow the exclusion
or limitation of incidental or consequential damages,
or limitation of the duration of implied warranties,
so the preceding limitations or exclusions may not
apply to you.
The warranty provided does not affect the consumer’s
statutory rights under applicable legislation in force,
nor the consumer’s rights against the dealer arising
from their sales / purchase contract.
*EUROPEAN UNION (EU)
If you have purchased your Product in an EU country
you can have your Product serviced, under the
conditions set out above, within the warranty period
in any EU country where an identical Product is sold
89
Page 90

Additional information
by an authorized Sony Ericsson distributor. To find
out if your Product is sold in the EU country you are
in, please call the local Sony Ericsson Customer
Care Center. Please observe that certain services
may not be possible elsewhere than in the country
of original purchase, for example due to the fact that
your Product may have an interior or exterior which
is different from equivalent models sold in other EU
countries. It may not be possible to repair SIM-locked
Products.
** In some countries/regions additional information
is requested. If so, this is clearly shown on the valid
proof of purchase.
FCC Statement
This device complies with Part 15 of the
FCC rules. Operation is subject to the
following two conditions: (1) This device may not
cause harmful interference, and (2) This device
must accept any interference received, including
interference that may cause undesired operation.
90
This is the Internet version of the user's guide. © Print only for private use.
Declaration of Conformity
We, Sony Ericsson Mobile Communications AB of
Nya Vattentornet
S-221 88 Lund, Sweden
declare under our sole responsibility that our product
Sony Ericsson type AAB-1021041-BV
and in combination with our accessories, to which
this declaration relates is in conformity with the
appropriate standards 3GPP TS 51.010-1, NATWG03,
EN 301489-7, EN 300328, EN 301489-17 and
EN 60950, following the provisions of, Radio
Equipment and Telecommunication Terminal
Equipment directive 99/5/EC with requirements
covering EMC directive 89/336/EEC, and Low
Voltage directive 73/23/EEC.
Lund, March 2004
0682
Hiroshi Yoshioka, Head of Product Business Unit
GSM/UMTS
We fulfill the requirements of the R&TTE Directive
(99/5/EC).
Page 91

Icons
Icons
Icon descriptions.
The table below describes the icons which appear
on the desktop and in standby.
Icon Description
Desktop
Your personal phonebook
Handling of text, picture, email, instant and
voice messages
Camera and video recorder functions
Handling of pictures, sounds, video and
themes
Personal settings, including display, time and
date, language, sounds, alerts and specific
settings for calls
Gives you access to Internet services
Calendar, alarm clock and other extras
Settings for Bluetooth, infrared, networks,
Internet, streaming, accessories
This is the Internet version of the user's guide. © Print only for private use.
Icon Description
Service provider services
Games, MusicDJ™, sound recorder
Audio and video player, streaming
FM Radio
Standby
Desktop icon
Tells you the strength of the GSM network
signal
GPRS is within range
GPRS is within range and can be used
Tells you are in a premium charge zone
Tells you the status of the battery
You cannot receive any incoming calls
You have missed an incoming call
91
Page 92

Icons
Icon Description
All incoming calls are forwarded
to a defined number
No calls or only certain calls from numbers
in a list are received
All signals are off, except the alarm
and timer
The alarm clock has been set and is on
The timer has been set and is on
A profile other than Normal has been chosen
The card lock or phone lock is on
A secure Internet connection is established
You have received a text message
You have received an email message
You have received a picture message
You have received a voice message
You have received a WAP push message
You have received a message via cell
broadcast
92
This is the Internet version of the user's guide. © Print only for private use.
Icon Description
The infrared port is on
Infrared communication is in progress
Bluetooth is on
A GPRS session is in progress
Line 1 is in use for outgoing calls
Line 2 is in use for outgoing calls
Ciphering is currently not being provided
by the network
An ongoing call
A chat session is in progress
My Friends status icon
The media player is running
Data is being downloaded to the phone
A Java™ application is running
Page 93

Index
Index
A
accept calls 30
account settings, email 42
alarm clock 72
alerts 58
animations 54
answering
calls 17
using voice control 26
answering service 24
appointments 73–74
area information 49
ask to save 21
assembling, phone 5
automatic redialing 18
B
battery
alien 83
charging 5
inserting 5
use and care 87
This is the Internet version of the user's guide. © Print only for private use.
block
contacts 47
strangers 47
Bluetooth 68–70
bookmarks, Internet 64
business cards 35
buttons 8
C
calculator 77
calendar 73–74
call costs 32–33
call list 23
call priority 33
call time 32
call waiting 28
calling
from call list 23
from phonebook 20
numbers in message 37
using voice dialing 25
calls
accepting 30
answering 18
automatic redialing 18
emergency 19
fixed dialing 31
forwarding 28
handling two calls 29
international 18
making 7, 17
making notes during 34
missed 18
putting on hold 28
receiving 7, 17
recording 60
rejecting 18
restricting 31
speed dialing 23
camera 51–54
cell information 49
certificates, Internet security 66
charging, battery 5
93
Page 94

Index
closed user groups 34
code memo 79
codes
PIN 5
PUK 6, 83
conference calls 29
connectors 8
contacts 19
as default phonebook 19
groups of 35
My Friends 45
synchronizing 67
cookies 66
copying
to/from SIM card 22
cost information 32
credit limit 33
D
date, setting 72
declaration of conformity 90
display
icons 91
light 76
94
This is the Internet version of the user's guide. © Print only for private use.
E
email
receiving settings 64
using 42–44
wizard 64
emergency calls 19
emergency numbers 19
F
file manager 14
fixed dialing 31
formatting text, in messages 37
forwarding calls 28
G
games 63
glossary, messaging 49
groups 35
H
handsfree 69
help texts, in phone 10
hiding number 34
I
icons, in display 91
infrared port 71
instant messaging See My
Friends 45
international calls 18
Internet
cookies 66
security 66
settings 63–64
wizard 64
K
key sound 59
keypad lock 78
keys 8
L
language
changing 10
in phone 10, 82
letters
entering 11–13
quick keys 16
Page 95

Index
light
camera 53
display 76
video recorder 53
locks
phone lock 83
SIM card 78
long messages 38
M
magic word 26
making calls 15
media player 57–58
melodies 58–59
menu language 82
menus 10, 15
message alert 59
messages
area information 49
cell information 49
email 42
glossary 49
instant 45
This is the Internet version of the user's guide. © Print only for private use.
picture 39
postcard 42
text 36
microphone, turning off/on 17
missed calls 18
MMS See picture messages 39
model name 15
multitap text input
entering 12
quick keys 16
music, playing 57
MusicDJ™ 59
My Friends 45–47
N
networks, selecting 17
night mode
camera 52
video 53
notepad 34
notes 75–76
number
hiding 34
my own 30
O
on if silent 58
online services 81
P
passcodes
Bluetooth 68
code memo 79
passwords, Internet 66
pause 16
personal ringtones 58
phone language 10
phone lock 79, 83
phone overview 8
phonebook
adding contacts 20
checking memory 23
synchronizing 67
picture messages 39–41
picture sizes 52
pictures 54–56
PIN code
changing 78
entering 7
95
Page 96

Index
postcard 42
priority, when calling 33
profiles 76
PUK 78, 83
Q
quick keys 15
R
radio 61
recording
calls 60
sounds 60
video clips 51
voice commands 25–27
redialing 18
resetting phone 81
restricted dialing 31
ringtones 58–59
roaming 17
96
This is the Internet version of the user's guide. © Print only for private use.
S
safety guidelines 84
saving
from picture messages 41
from text messages 38
radio channels 61
screen 76
screen saver 56
security
code memo 79
Internet 66
SIM card lock 78
self-portrait 53
sending
appointments 74, 75
business cards 35
contacts 22
melodies and ringtones 59
notes 76
pictures 55
tasks 74, 75
themes 62
service provider services 81
setup wizard 6
shortcuts 11, 15–16
SIM card
copying to/from 22
inserting 5
lock 78
phonebook 19
saving numbers on 19
unblocking 78
SIM numbers 19–21
SMS See text messages 36
sound recorder 60
speaker volume 17
speed dialing 23
start-up screen 77
Stopwatch 77
strangers 47
streaming media 58
synchronizing 67
Page 97

Index
T
T9 text input
entering letters 13
quick keys 16
tasks 75
templates
for picture messages 41
for text messages 38
text input, quick keys 16
text messages 36–39
themes 62
time, setting 72
timer 77
turning on/off
Bluetooth 68
infrared port 71
key sound 59
phone 7
phone lock 79
ringtones, melodies 58
SIM lock protection 78
two voice lines 30
This is the Internet version of the user's guide. © Print only for private use.
U
unblocking
contacts 47
PIN 6
SIM card 78
V
vibrating alert 58
video clips 57
video recorder 51–54
voice answering 26–27
voice control 24–27
voice dialing 25–26
voicemail 24
volume
changing 17
setting ringtone 58
vibrating alert 58
W
WAP See Internet 63
warranty 88
wizard
for Internet or email settings 64
setup 6
writing
using multitap input 12
using T9 text input 13
writing languages 12
Z
zoom 52
97
 Loading...