

Page 1
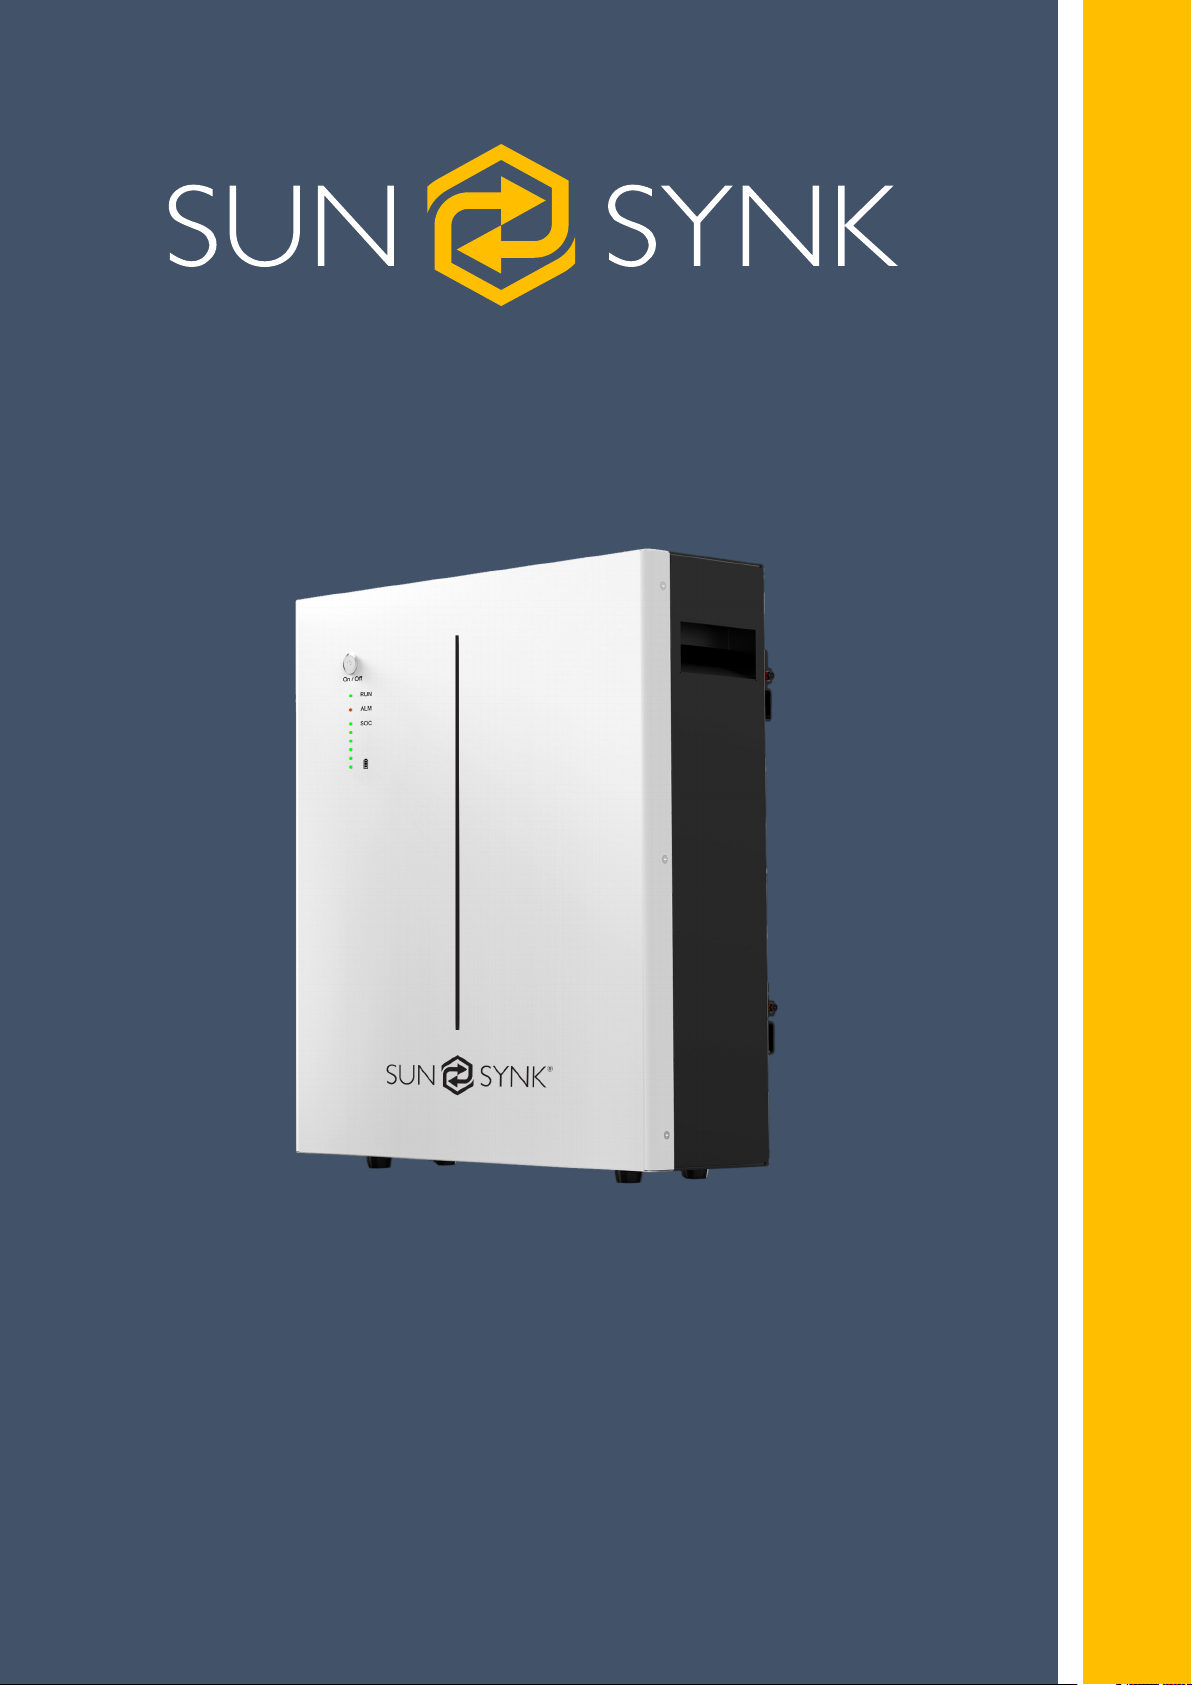
SUN-BATT-5.12
PRODUCT DESCRIPTION
Global Tech China Ltd, 3 Floor, Wai Yip Industrial Building.
171 Wai Yip Street, Kwun Tong, Kowloon, Hong Kong.
Tel: +852 2884 4318 Fax: +8522884 4816
www.sunsynk.com / [email protected]
v.1 (03/20/22)
Page 2

Table of Contents
1. TECHNICAL DATA ........................................................................................ 3
2. PRODUCT OVERVIEW .................................................................................5
2.1. Brief Introduction .......................................................................................................5
2.2. Interface Introduction .................................................................................................5
2.2.1. Switch ON/OFF .....................................................................................................6
2.2.2. LED Indicator Definition .........................................................................................6
2.2.3. CAN / RS485 Port .................................................................................................7
2.2.4. RS232 Port ..........................................................................................................8
3. INSTALLATION GUIDE ................................................................................. 9
3.1. Checking Before Installation .....................................................................................9
3.1.1. Checking Outer Packing Materials .........................................................................9
3.1.2. Checking Deliverables ..........................................................................................9
3.2. Tools ..........................................................................................................................11
3.3. Installation Requirements ........................................................................................11
3.3.1. Installation Environment Requirements ...............................................................11
3.3.2. Installation Carrier Requirements .......................................................................11
3.4. Installation Instructions ............................................................................................11
3.4.1. Dimensions .......................................................................................................12
3.4.2. Installation Procedure ..........................................................................................13
4. BATTERY POWER AND COMMUNICATION CONNECTIONS .................. 16
4.1. Parallel Cascade Connection ..................................................................................16
4.1.1. Power Cable Wiring Instructions ..........................................................................16
4.2. Busbar Connection ..................................................................................................18
4.3. Parallel Cascade Connection ..................................................................................19
5. MAINTENANCE .......................................................................................... 20
5.1. Recharge Requirements During Normal Storage ...................................................20
5.2. Recharge Requirements When Over Discharged ...................................................20
Hybrid Inverter | Installer Manual
Page 3
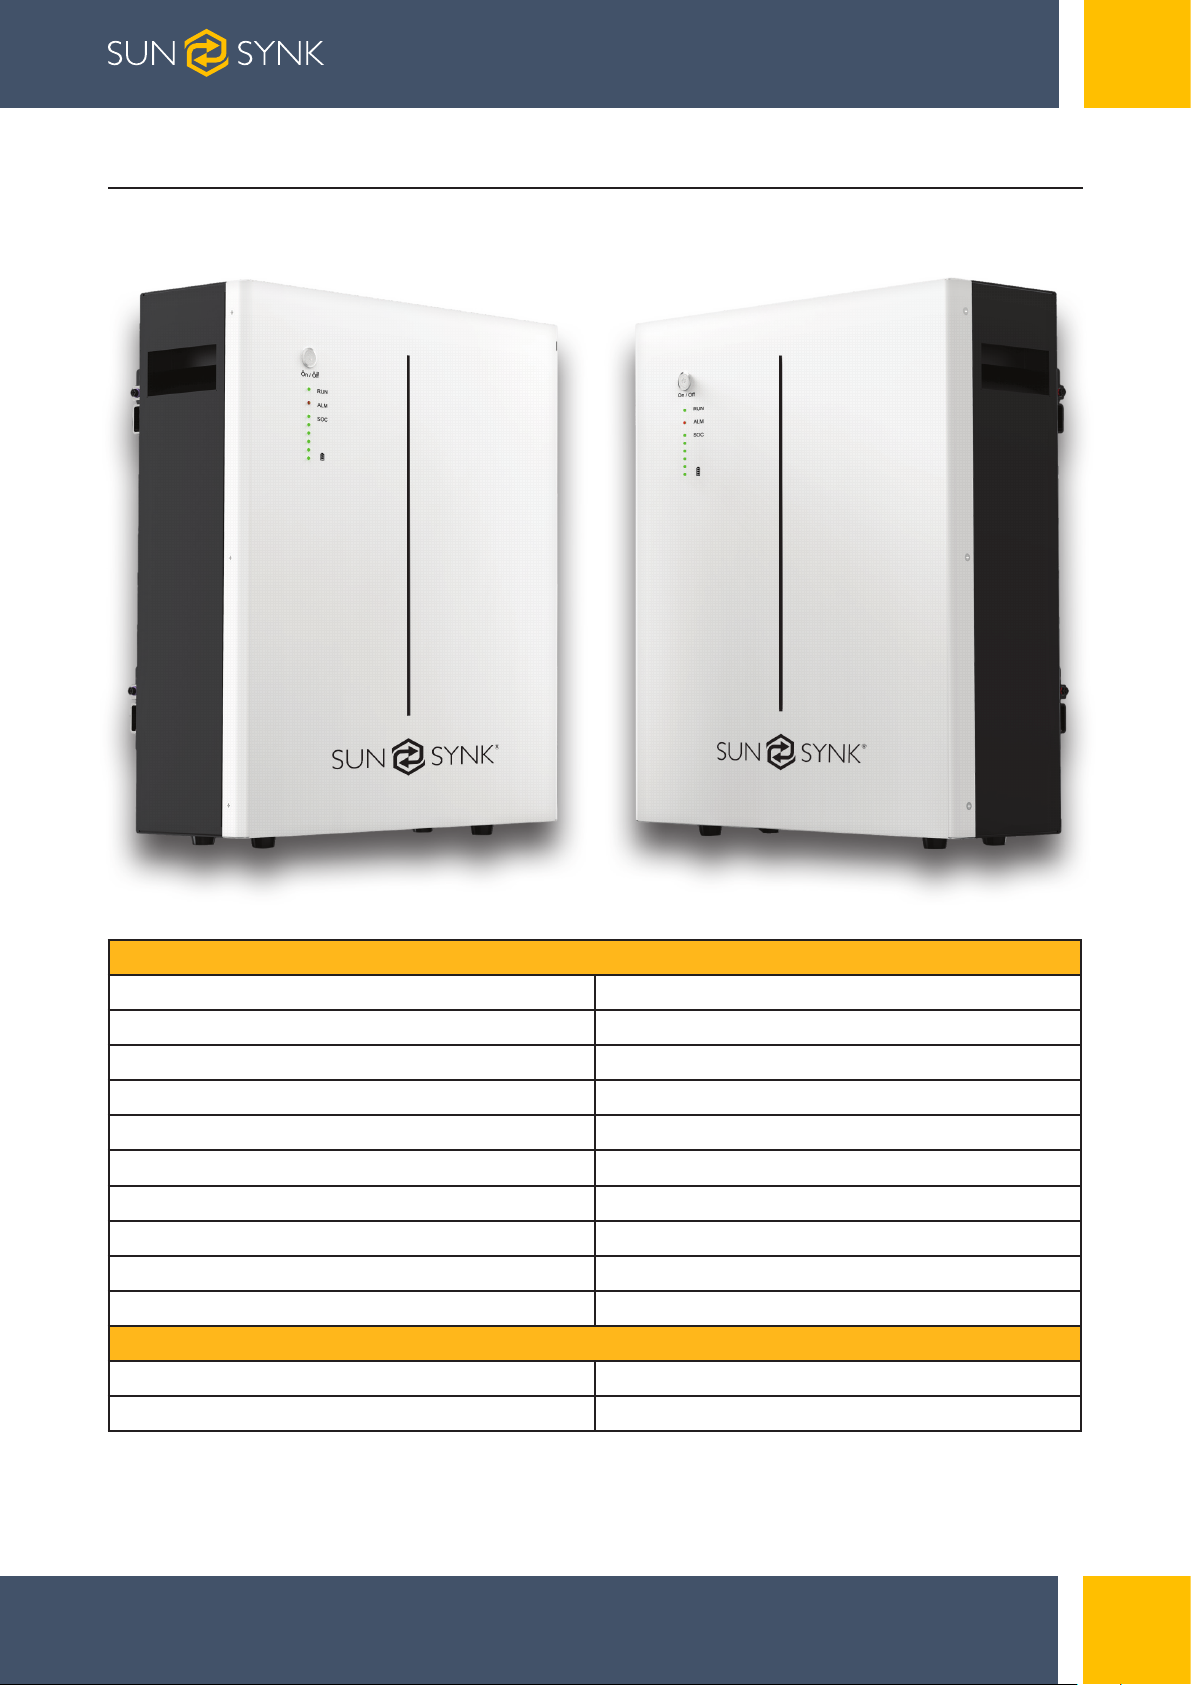
1. TECHNICAL DATA
Performance
Nominal Voltage 51.2 Vdc
Nominal Capacity 100Ah
Battery Energy1 5120 Wh
Charge Voltage 55.68~56.16Vdc
Discharge Voltage 45.6-56.16 Vdc
Nominal Charge/Discharge Current 50A
Nominal Charge/Discharge Power 2500W
Max Charge / Discharge Current 100A
Max Charge / Discharge Power 5000W
Short Circuit Current 350A
Communication
Display SOC status indicator, LED indicator
Communication RS232, RS485, CAN
Page | 3 Hybrid Inverter | Installer Manual
Page 4
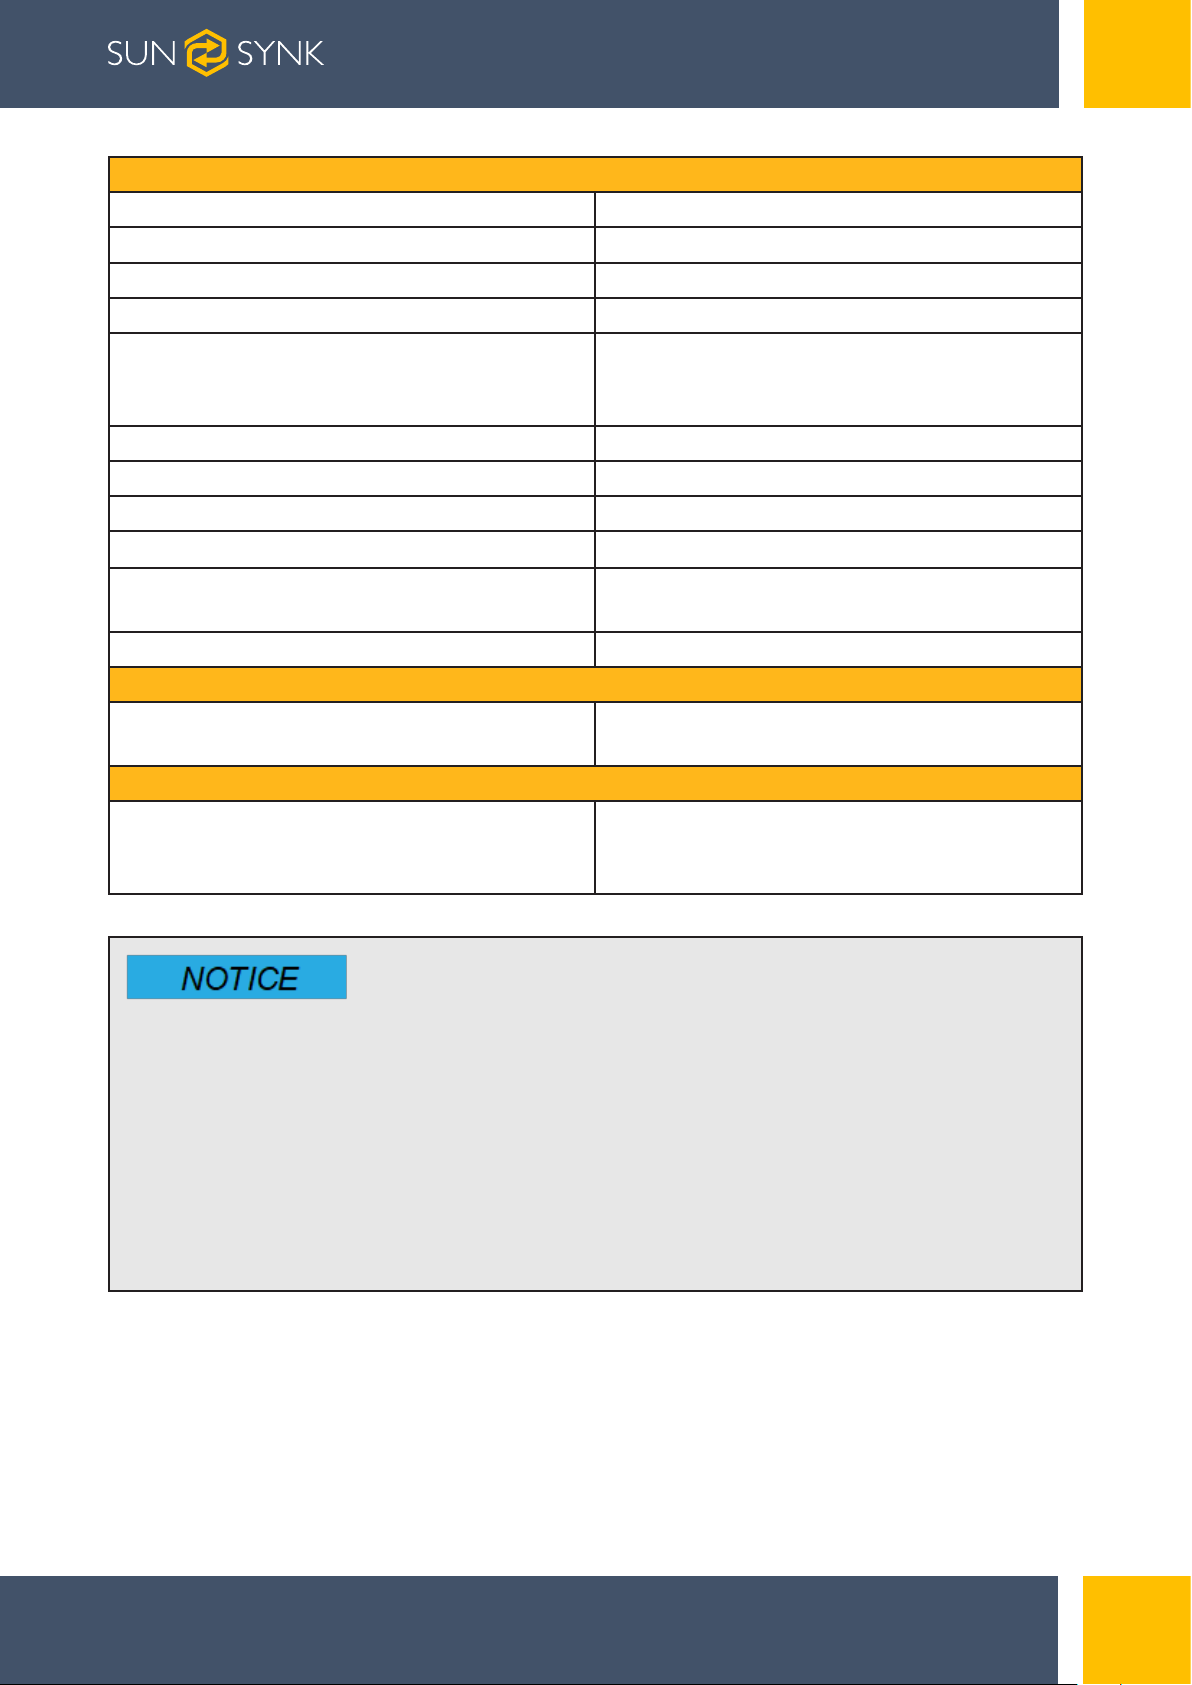
General Specification
Dimension( W×D×H mm ) 450×150×533mm
Weight (Kg) 47kg
Installation Floor stand or Wall mounted
Working Temperature2 -20ºC ~ 60ºC
≤25ºC, 12 months
Storage Temperature
≤35ºC, 6 months
≤45ºC, 3 months
Operating / Storage / humidity ≤ 95%RH
Max Operating Altitude ≤2000m
IP Rating IP20
Cell Technology LiFePO4, Lithium Iron Phosphate
Cycle life3
6000 Cycles @ 80% DOD / 25ºC / 0.5C,
60% EOL
Scalability Max 8 batteries in parallel
Standard Compliance
Certification
UN38.3, IEC62619, IEC62040-1
(more available upon request)
Ordering and Deliverable Part
SUN-BATT-5.12 battery
Product ordering part
SUN-BATT-5.12 parallel cable
SUN-BATT-5.12 to PCS cable
Operating current derating according to cell voltage and battery temperature.
1. Test conditions: 100% depth of discharge (DoD), 0.2C rate charge & discharge
at 25ºC;
2. Charge/discharge derating occurs when the operating temperature from -10ºC
to 5 ºC & 45ºC to 55ºC.
3. Condition apply. Refer to SUN-BATT-5.12 Warranty Letter
Page | 4Hybrid Inverter | Installer Manual
Page 5
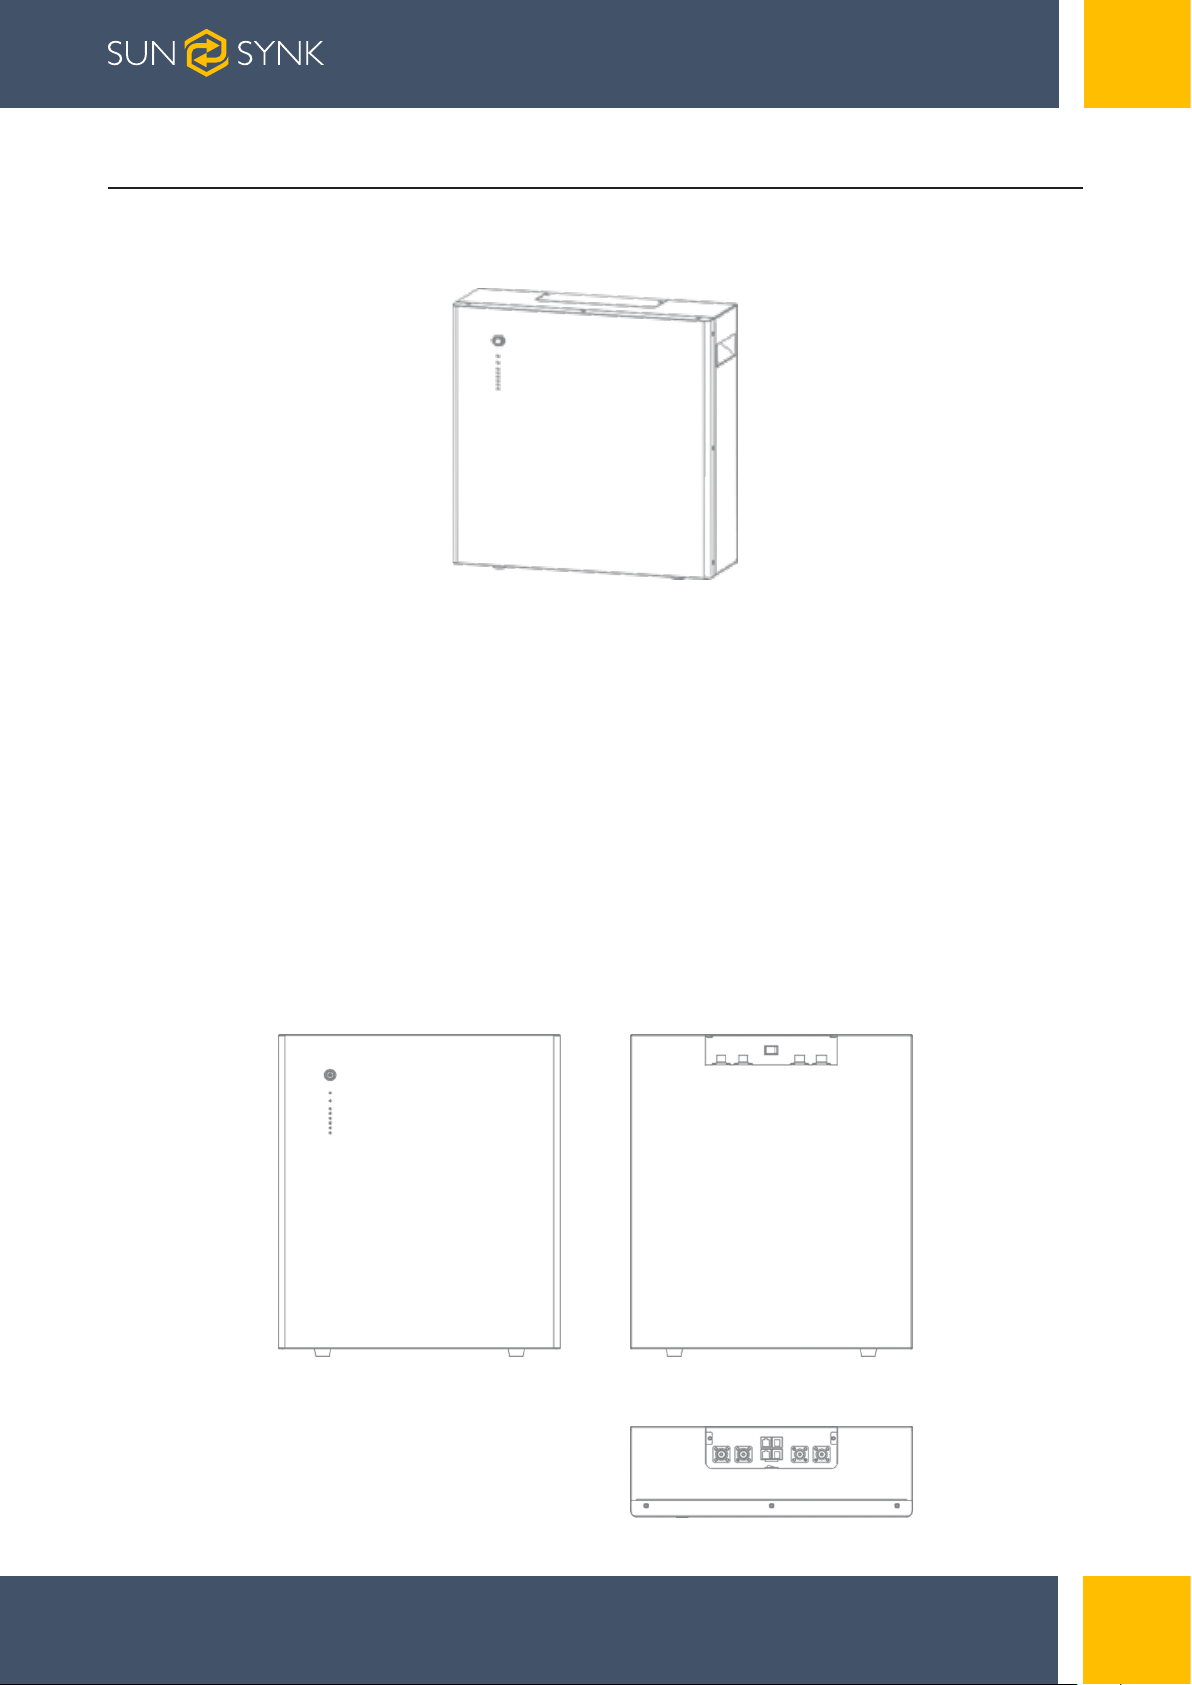
2. PRODUCT OVERVIEW
2.1. Brief Introduction
SUN-BATT-5.12 is a lithium battery with an operating voltage range between 45.6~56.16V. It
is designed for residential energy storage applications and works together with a 48v battery
hybrid inverter. SUN-BATT-5.12 is not suitable for supporting life-sustaining medical devices.
SUN-BATT-5.12 has built-in BMS (Battery Management System), which can manage and monitor cells information including voltage, current and temperature. Besides that, BMS can balance
cells charging to extend cycle life. BMS has protection functions including over-dis- charge,
over-charge, over-current and high/low temperature; the system can automatically manage
charge state, discharge state and balance state.
Multiple SUN-BATT-5.12 can be connected in parallel to expand capacity and power, 8 SUNBATT-5.12 can be connected in parallel at most.
2.2. Interface Introduction
Page | 5 Hybrid Inverter | Installer Manual
Page 6
2.2.1. Switch ON/OFF
Switch ON
For 1 pc SUN-BATT-5.12, switch ON rocker switch (near positive/negative connector), then
long press (more than 3 seconds) ON/OFF button on front panel, LED will flash then battery will
operate normally. L1 to L6 shows battery SoC, L7/L8 shows battery status.
For multiple SUN-BATT-5.12 in parallel, switch ON rocker switch on all batteries, long press
(more than 3 seconds) ON/OFF button of MASTER battery, LED will flash, battery system will automatically encode and assign ID to each slave battery, then battery system will operate normally
Switch OFF
For 1 pc SUN-BATT-5.12, switch OFF rocker switch (near positive/negative connector). For multiple SUN-BATT-5.12 in parallel, switch OFF rocker switch on MASTER battery first. Then switch
OFF rocker switch on all slave batteries.
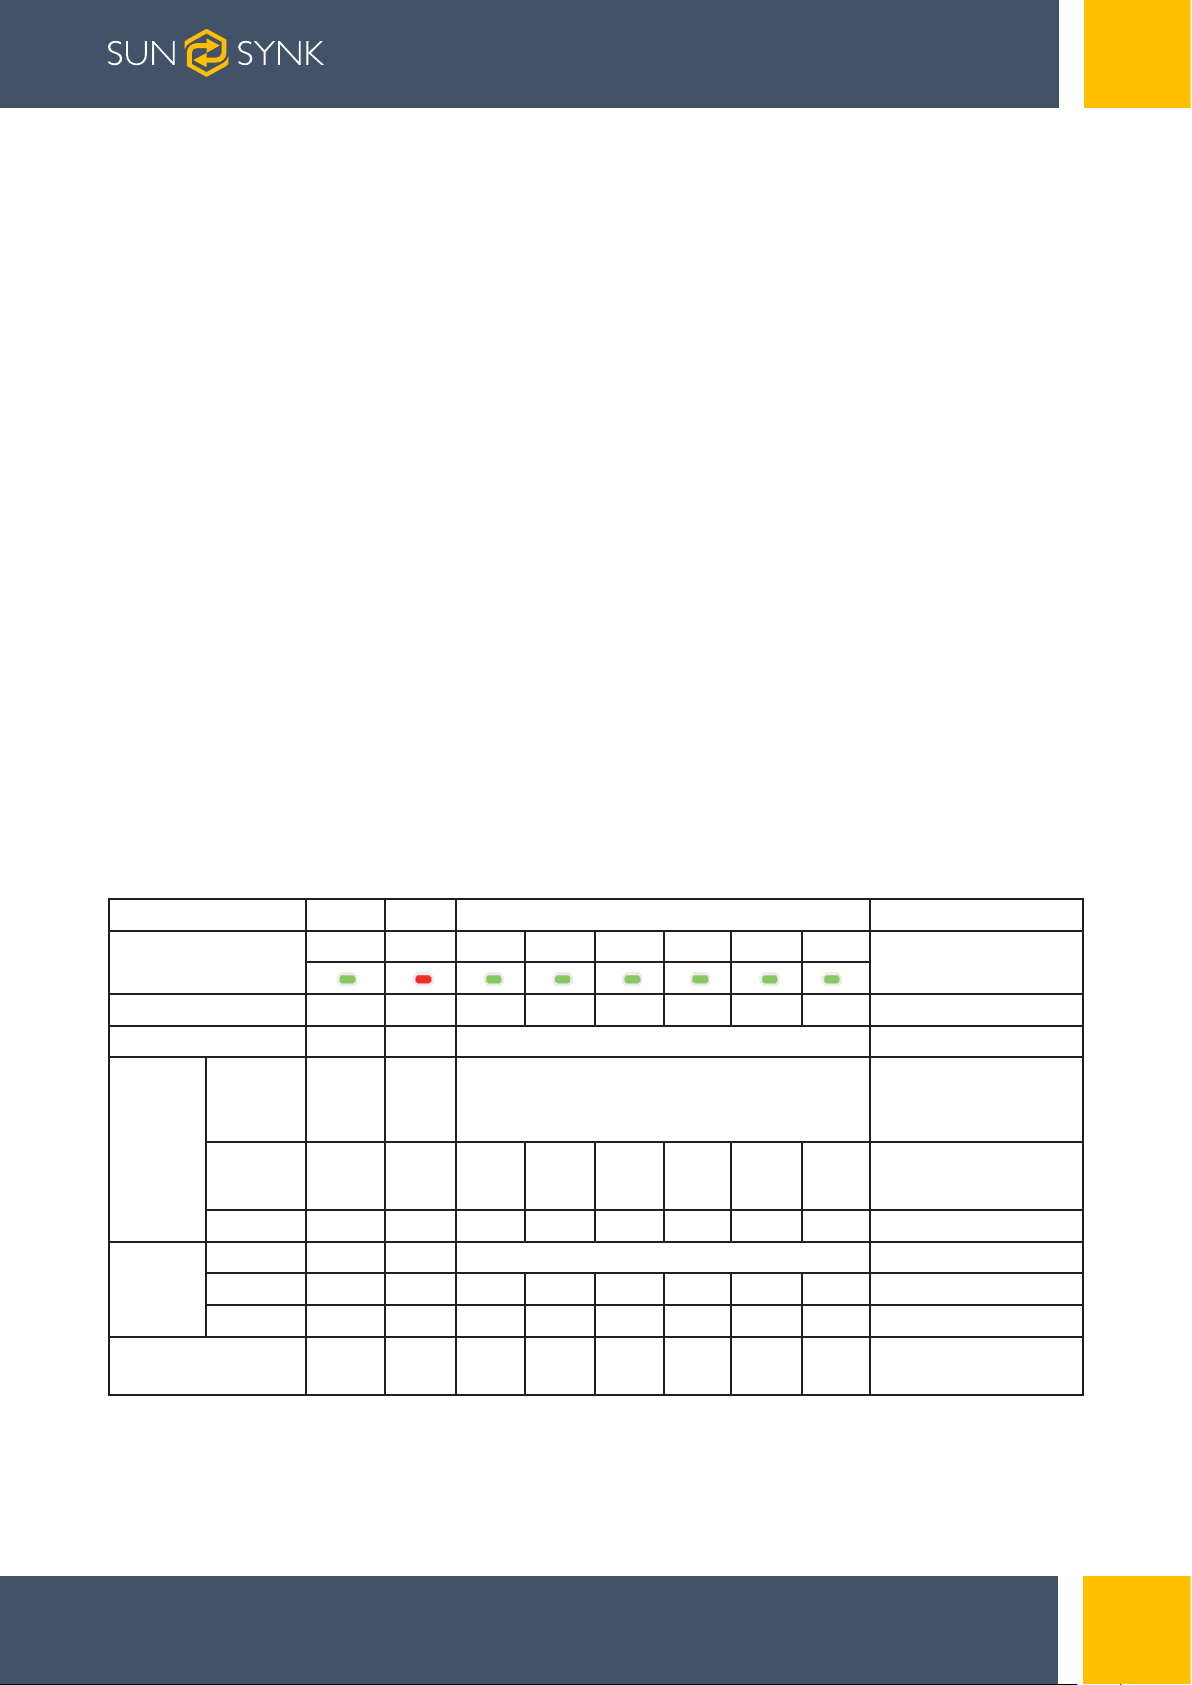
2.2.2. LED Indicator Definition
Note:
• flash 1 - 0.25s light / 3.75s off
• flash 2 - 0.5s light / 0.5s off
• flash 3 - 0.5s light / 1.5s off
RUN ALM Battery Level Indicator
Status
Shut down OFF OFF OFF OFF OFF OFF OFF OFF All OFF
Standby Flash 1 OFF According to the battery level Indicates Standby
Normal Light OFF According to the battery level
Charging
Discharge
Full
Charged
Protection OFF Light OFF OFF OFF OFF OFF OFF Stop charging
Normal Flash 3 OFF According to the battery level
UVP OFF OFF OFF OFF OFF OFF OFF OFF Stop charging
Protection OFF Light OFF OFF OFF OFF OFF OFF Stop discharge
Fault OFF Light OFF OFF OFF OFF OFF OFF
L8 L7 L6 L5 L4 L3 L2 L1L1
(flash 2),others lighting
Light OFF Light Light Light Light Light Light
Discriptions
The highest capacity
indicator LED flashes
Turn to standby status
when charger off
Stop charging and
Discharge
Page | 6Hybrid Inverter | Installer Manual
Page 7
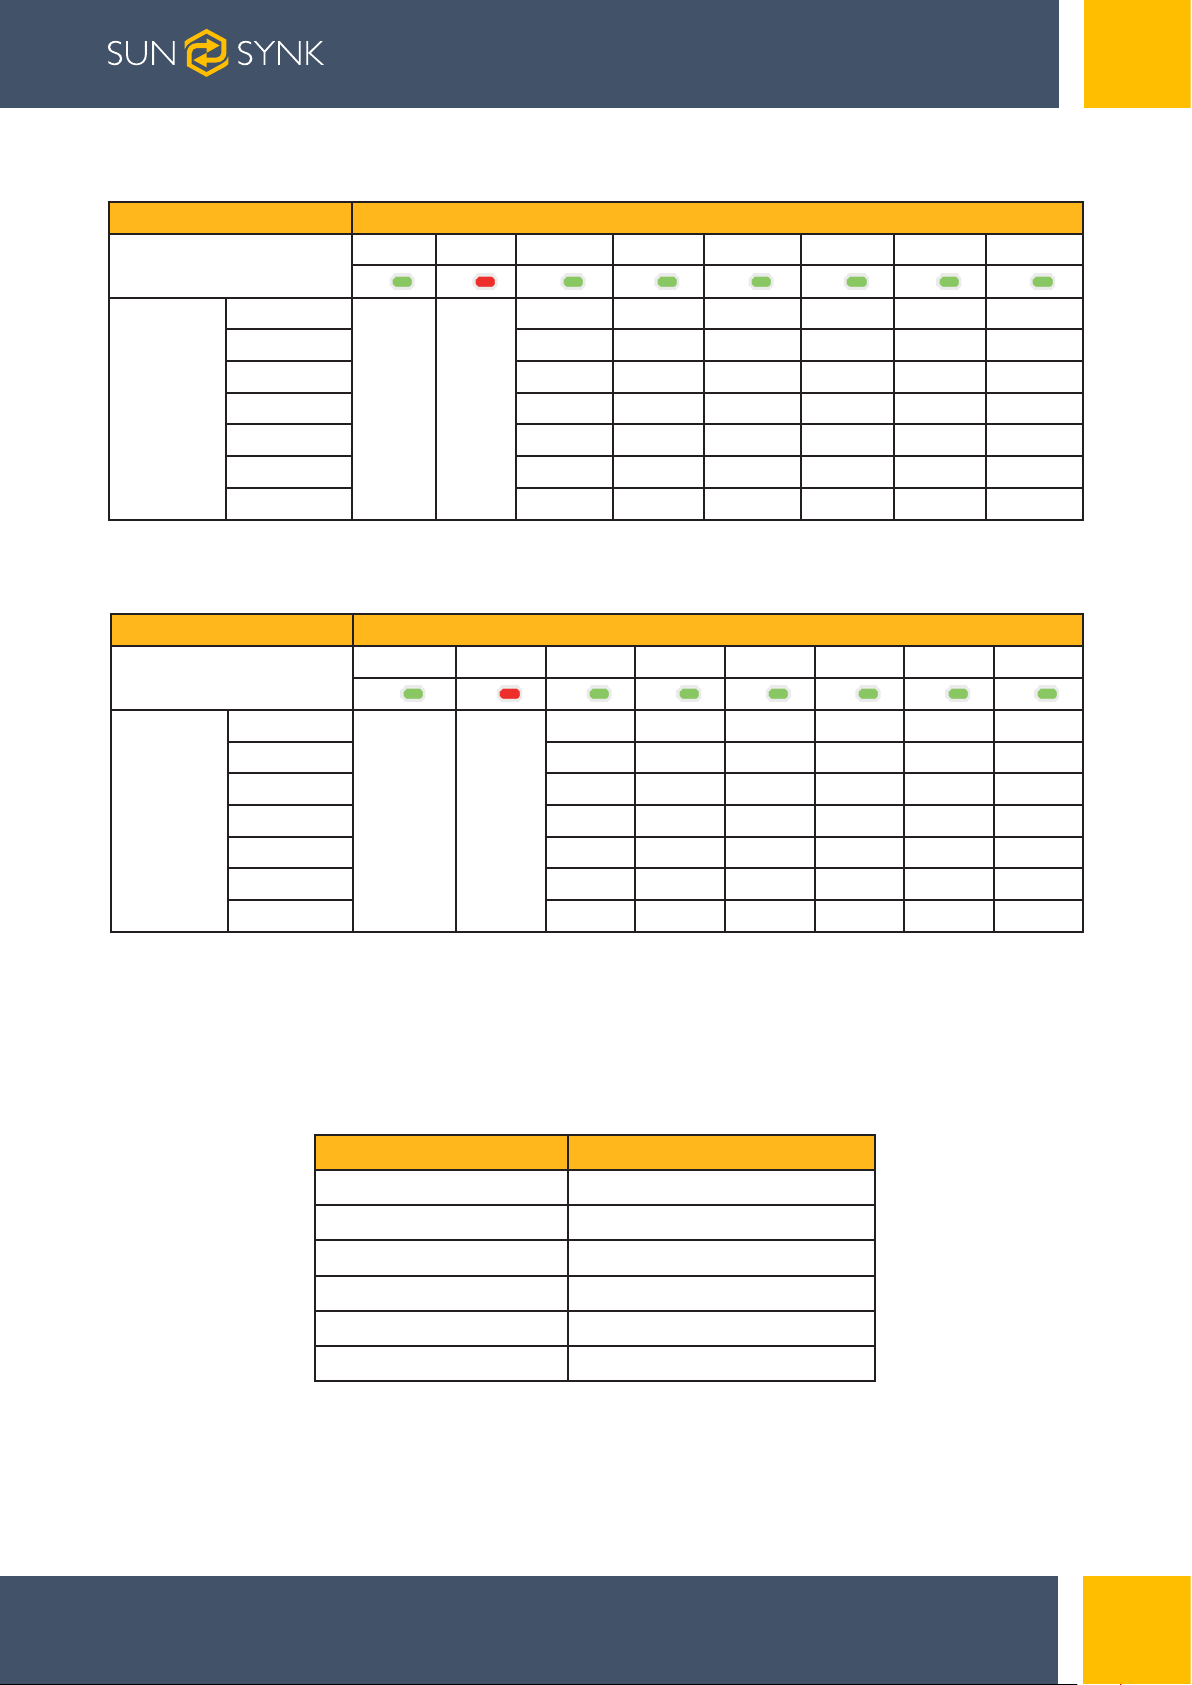
Charging Battery Level Indicators Instructions:
Status Charging
Battery Level Indicator
L8 L7 L6 L5 L4 L3 L2 L1
Battery
Level
(
%)
0 ~17%
18~33% OFF OFF OFF OFF
34 ~50% OFF OFF OFF
51 ~66% OFF OFF
67 ~83% OFF
84 ~100%
Full Charged
Light OFF
OFF OFF OFF OFF OFF
Flash 2
Light Light Light Light Light Light
Discharging Battery Level Indicators Instructions:
Status Discharge
Battery Level Indicator
0 ~17%
18~33% OFF OFF OFF OFF
Battery
Level
(
%)
34 ~50% OFF OFF OFF
51 ~66% OFF OFF
67 ~83% OFF
84 ~100%
Full Charged
L8 L7 L6 L5 L4 L3 L2 L1
OFF OFF OFF OFF OFF
Flash 3 OFF
Light
Light Light Light Light Light Light
Flash 2
Flash 2
Flash 2
Flash 2
Flash 2
Light Light Light Light Light
Light
Light Light Light Light Light
Light Light Light Light
Light
Light Light Light Light
Light Light Light
Light
Light Light Light
Light Light
Light
Light Light
Light
Light
Light
2.2.3. CAN / RS485 Port
CAN / RS485 Communication Terminal (RJ45 port), connect to inverter, follow CAN / RS485
protocol.
PIN Definition
Pin 1, Pin 8
Pin 2, Pin 7
Pin 3
Pin 4 CANH ( to PCS )
Pin 5 CANL ( to PCS )
Pin 6
RS485-B ( to PCS, reserved )
RS485-A ( to PCS, reserved )
NC
GND
Page | 7 Hybrid Inverter | Installer Manual
Page 8
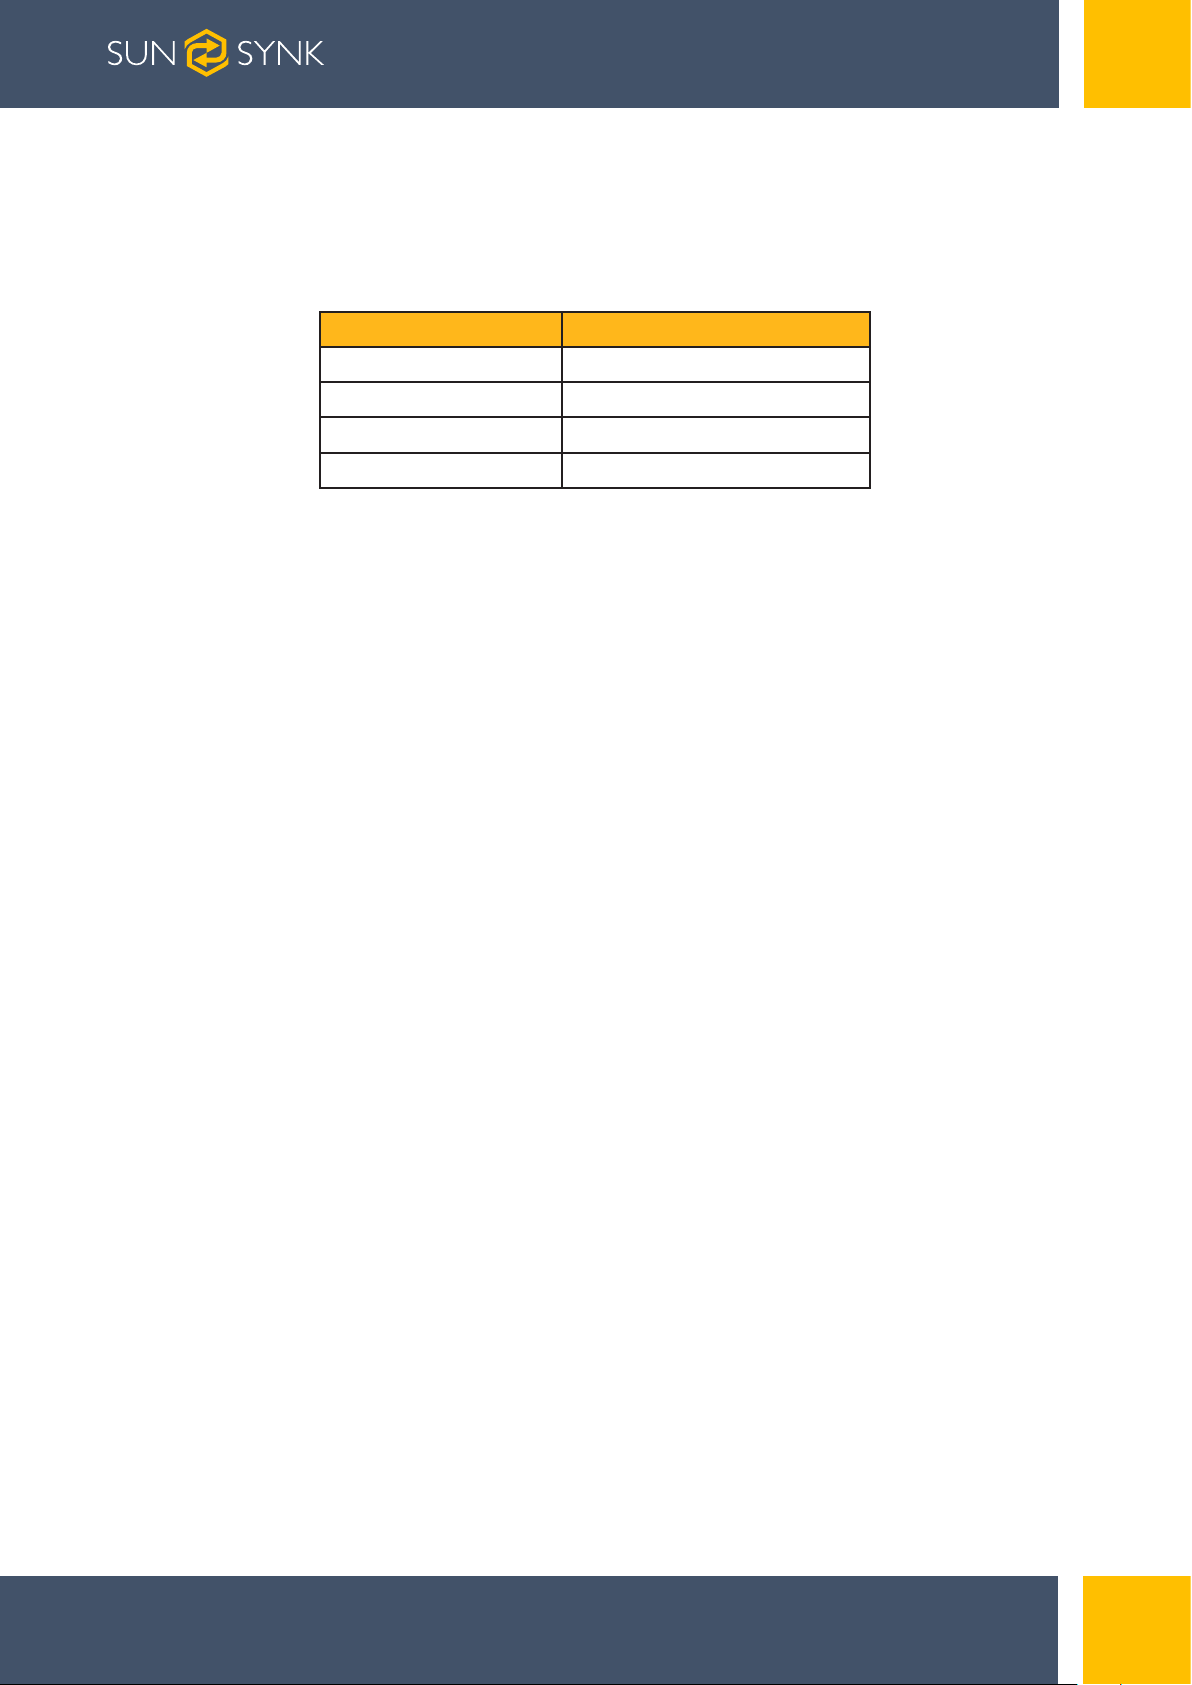
2.2.4. RS232 Port
RS232 Communication Terminal (RJ45 port) follow RS232 protocol, for manufacturer or professional engineer to debug or service.
PIN Definition
Pin 1, Pin 8
Pin 2, Pin 7
Pin 3, Pin 6
GND
RS232_TX
RS232_RX
Pin 4, Pin 5 NC
Page | 8Hybrid Inverter | Installer Manual
Page 9
3. INSTALLATION GUIDE
Start
END
Check Before
Installation
Electrical
Connection
Prepare
Installation Tools
Install Battery
Determine The
Installation Position
Install Wall
Bracket
3.1. Checking Before Installation
3.1.1. Checking Outer Packing Materials
Packing materials and components may be damaged during transportation. Therefore, check
the outer packing materials before installing the battery. Checking the surface of packing materials for damage, such as holes and cracks. If any damage is found, do not unpack the battery
and contact the dealer as soon as possible. You are advised to remove the packing materials
within 24 hours before installing the battery.
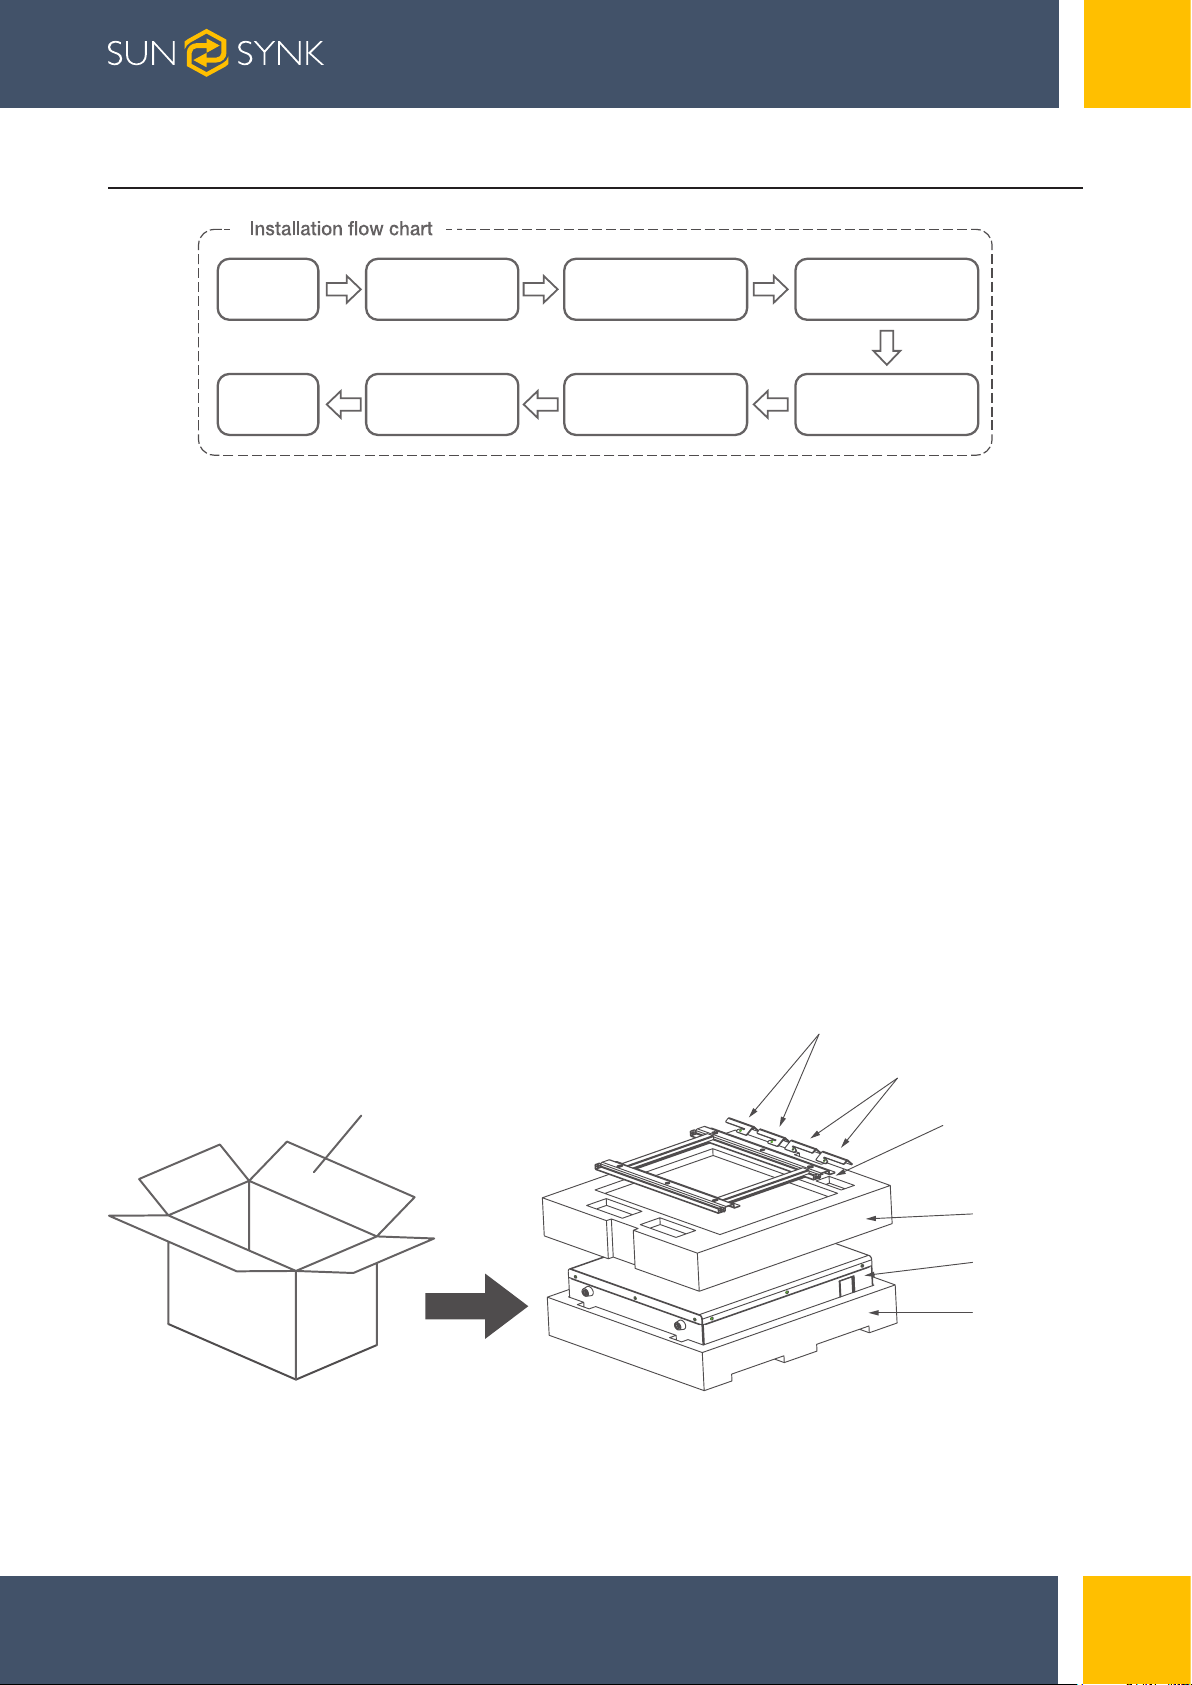
3.1.2. Checking Deliverables
After unpacking the battery, check whether deliverables are intact and complete. If any damage
is found or any component is missed, contact the dealer.
The below table shows the components and mechanical parts that should be delivered.
Hanging bracket
1 Hanging bracket
Carton
2W all bracket
Pearl wool
Battery
Pearl wool
Page | 9 Hybrid Inverter | Installer Manual
Page 10
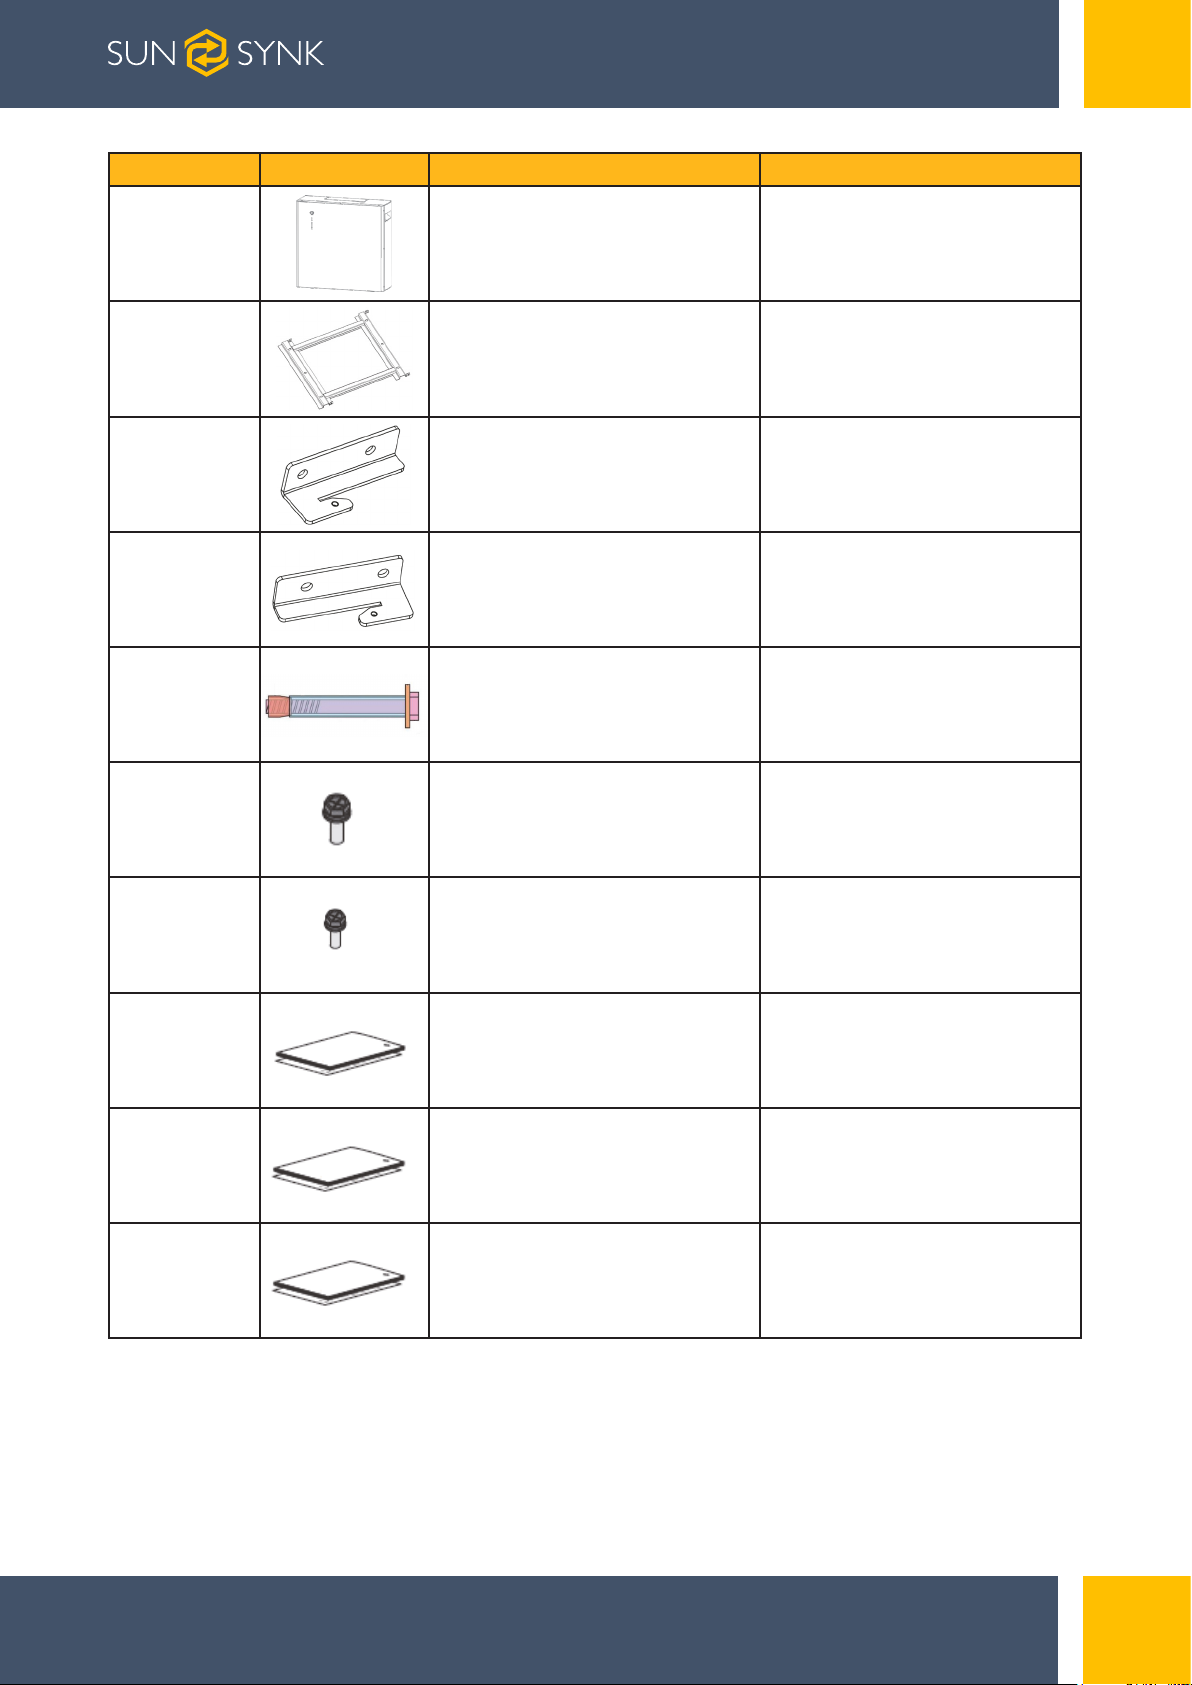
NO. Pictures Quantity Description
1
2
3
4
5
6
1PCS Battery
1PCS Wall bracket
2PCS Hanging bracket 1
2PCS Hanging bracket 2
6PCS M8*60
8PCS M6*16
7
8
9
4PCS M4*20
1PCS M4*20
1PCS Manual
10 1PCS
Test report
Page | 10Hybrid Inverter | Installer Manual
Page 11
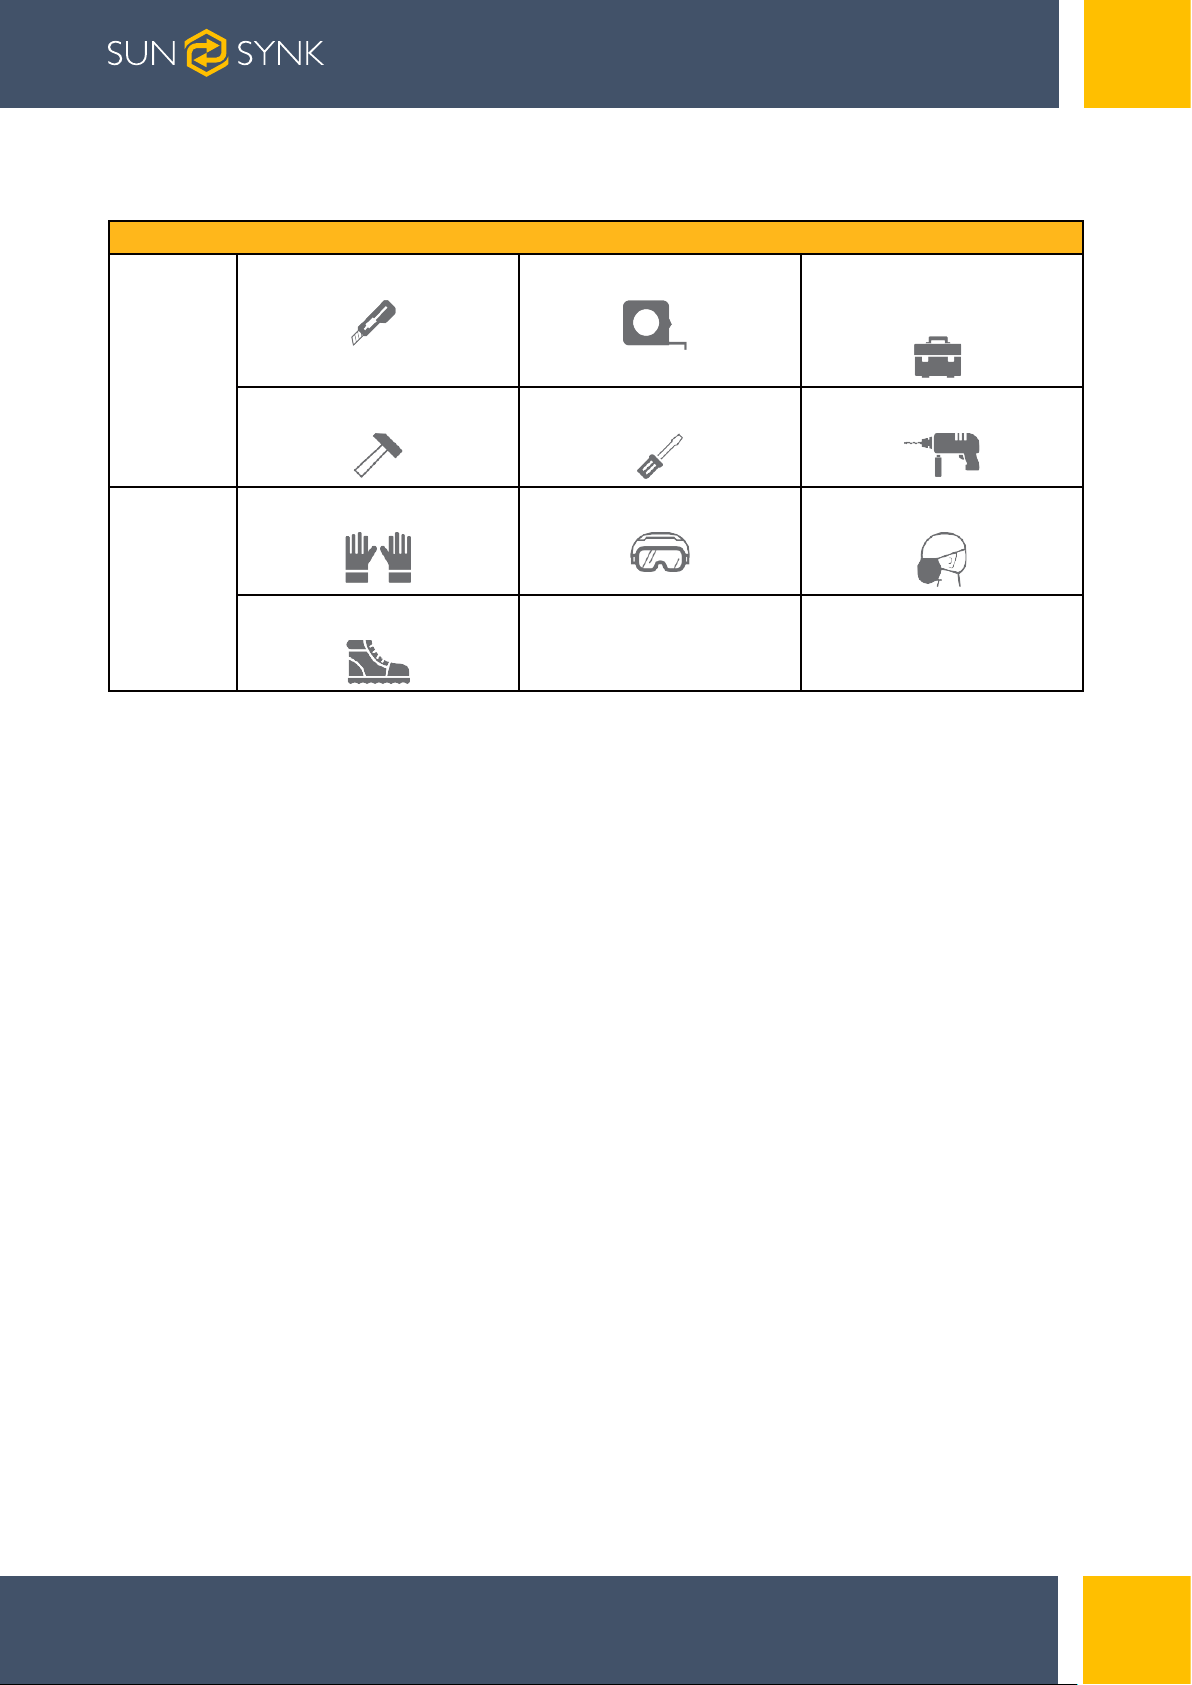
3.2. Tools
Installation
Tools
Knife Measuring tape Socket wrench
(10/16mm)
Rubber mallet Cross Screwdriver Hammer drill (8mm)
ESD gloves Safety goggles Anti-dust respirator
Protection
Safety shoes
3.3. Installation Requirements
3.3.1. Installation Environment Requirements
Install the battery in the indoor environment.
Place battery in secure location away from children and animals.
Do not place the battery near any heat sources and avoid sparks.
Do not expose the battery to moisture or liquids.
Do not expose the battery to direct sunlight.
3.3.2. Installation Carrier Requirements
Only mount battery on fire resistant building. Do not install batteries on flammable buildings.
Battery is quite heavy, make sure the wall/ground can meet the load bearing requirements.
3.4. Installation Instructions
Page | 11 Hybrid Inverter | Installer Manual
Page 12
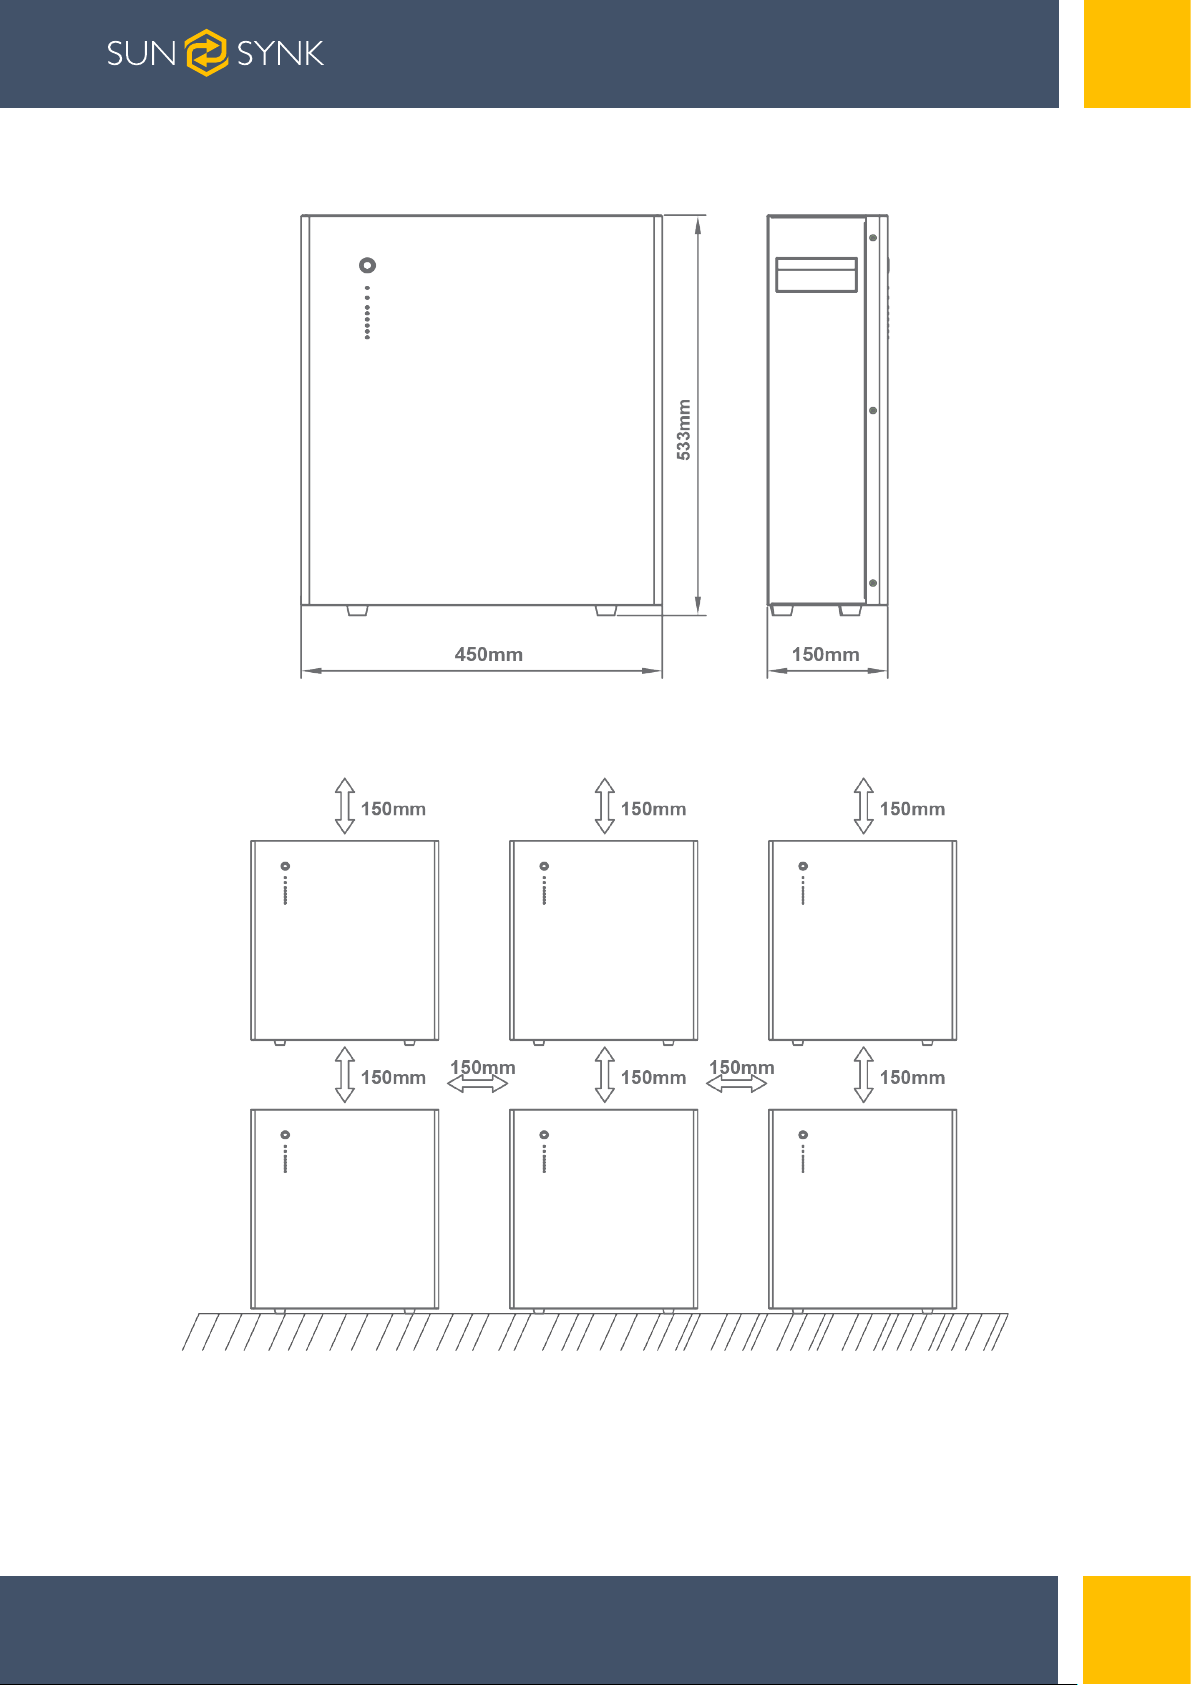
3.4.1. Dimensions
Minimum mounting distance between battery pack and equipment:
Page | 12Hybrid Inverter | Installer Manual
Page 13
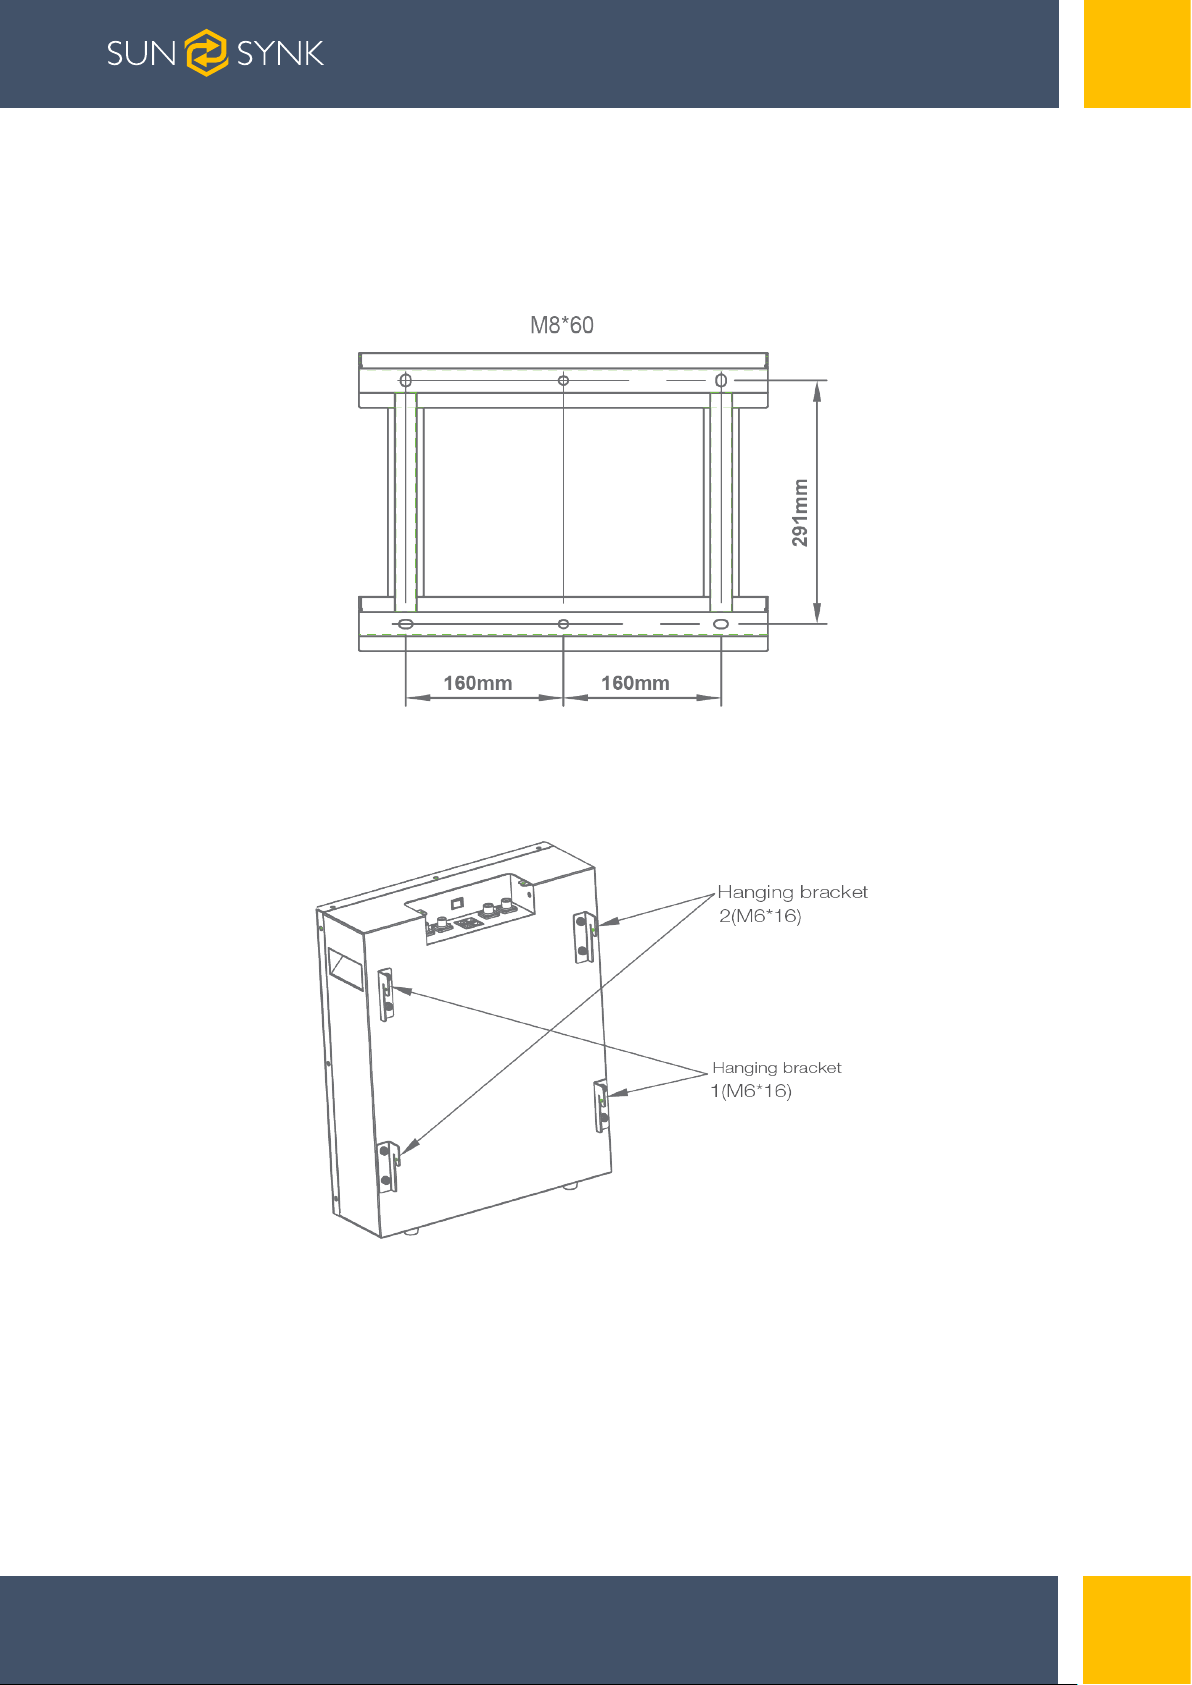
3.4.2. Installation Procedure
STEP 1
Drill the hole with an 10mm drill bit as follows and fix the wall bracket to the wall.
STEP 2
Install the hanging bracket.
Page | 13 Hybrid Inverter | Installer Manual
Page 14
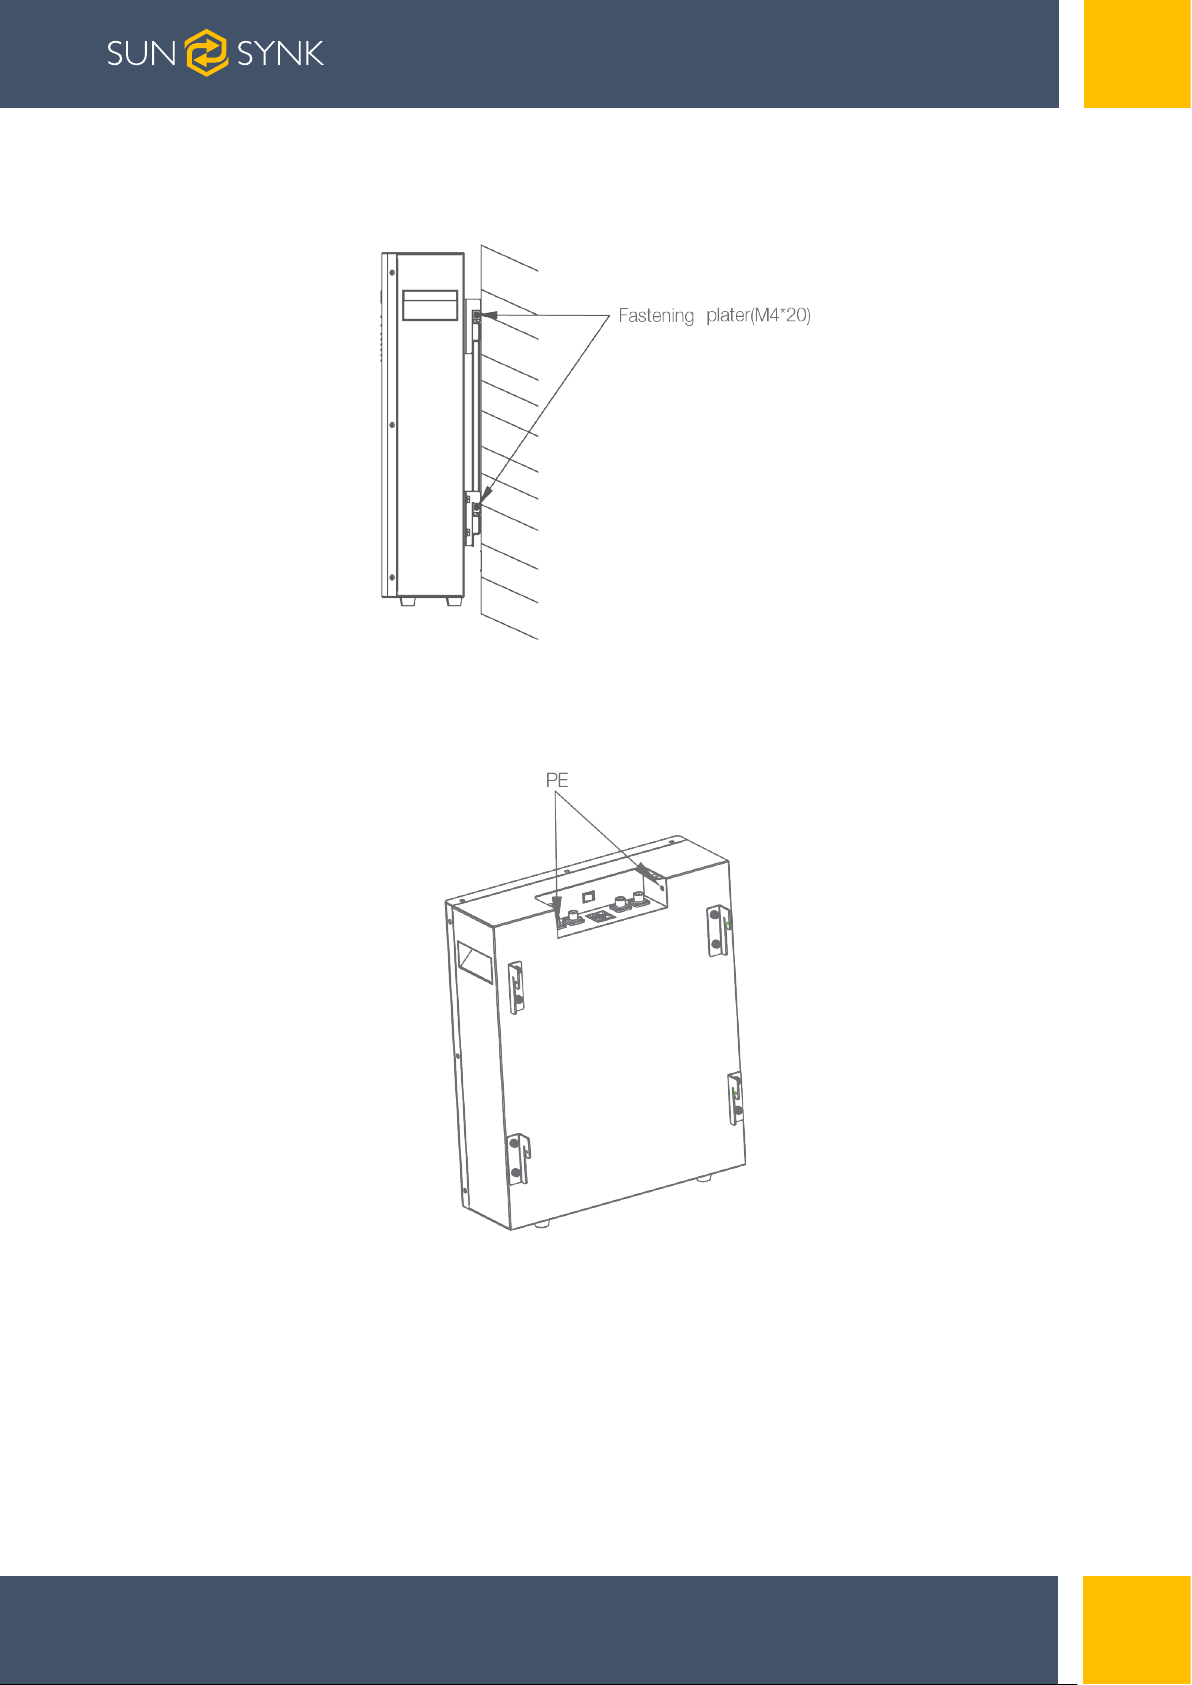
STEP 3
Hang SUN-BATT-5.12 on the wall bracket and tighten it.
STEP 4
Connect to ground.
Page | 14Hybrid Inverter | Installer Manual
Page 15
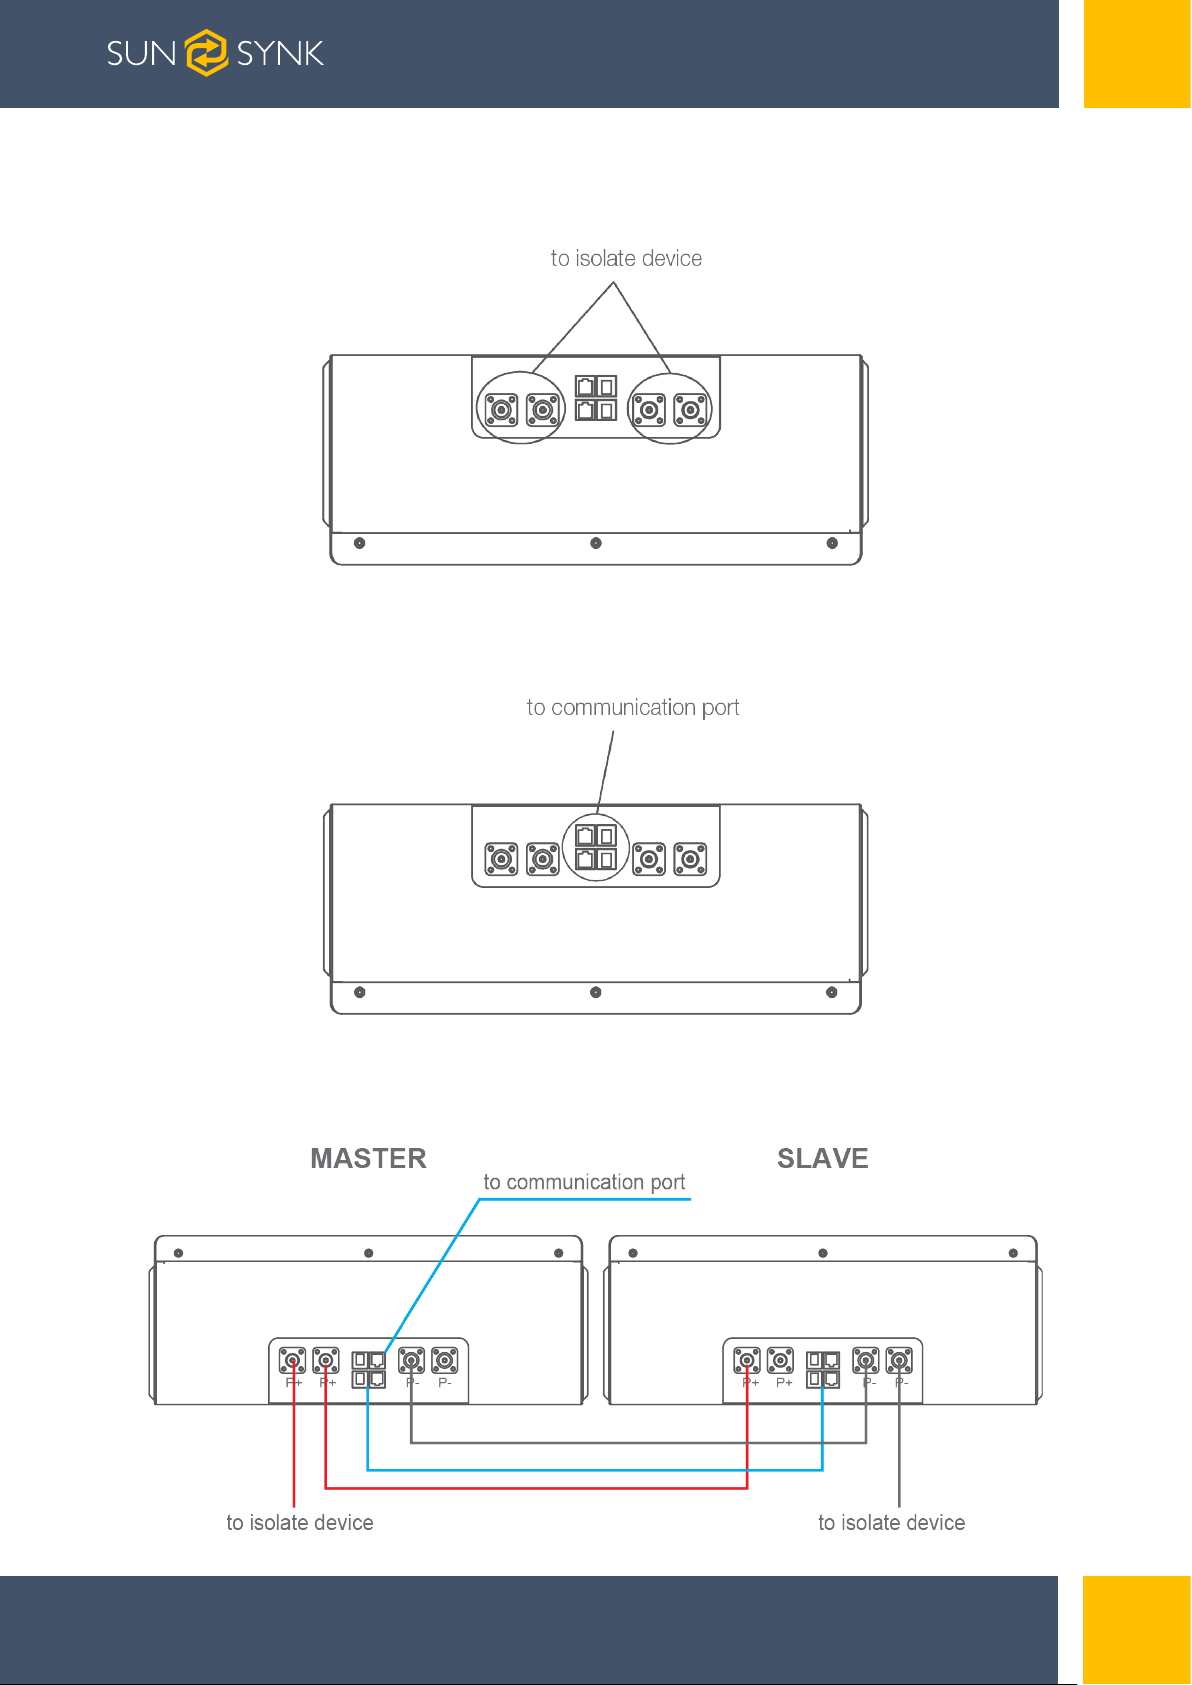
STEP 5
Connect power cable.
STEP 6
Connect communication cable.
STEP 6
Connect communication cable.
Page | 15 Hybrid Inverter | Installer Manual
Page 16
4. BATTERY POWER AND COMMUNICATION CONNECTIONS
4.1. Parallel Cascade Connection
Applicable scenario:
PCS with 100A charge/discharge current connect to SUN-BATT-5.12.
4.1.1. Power Cable Wiring Instructions
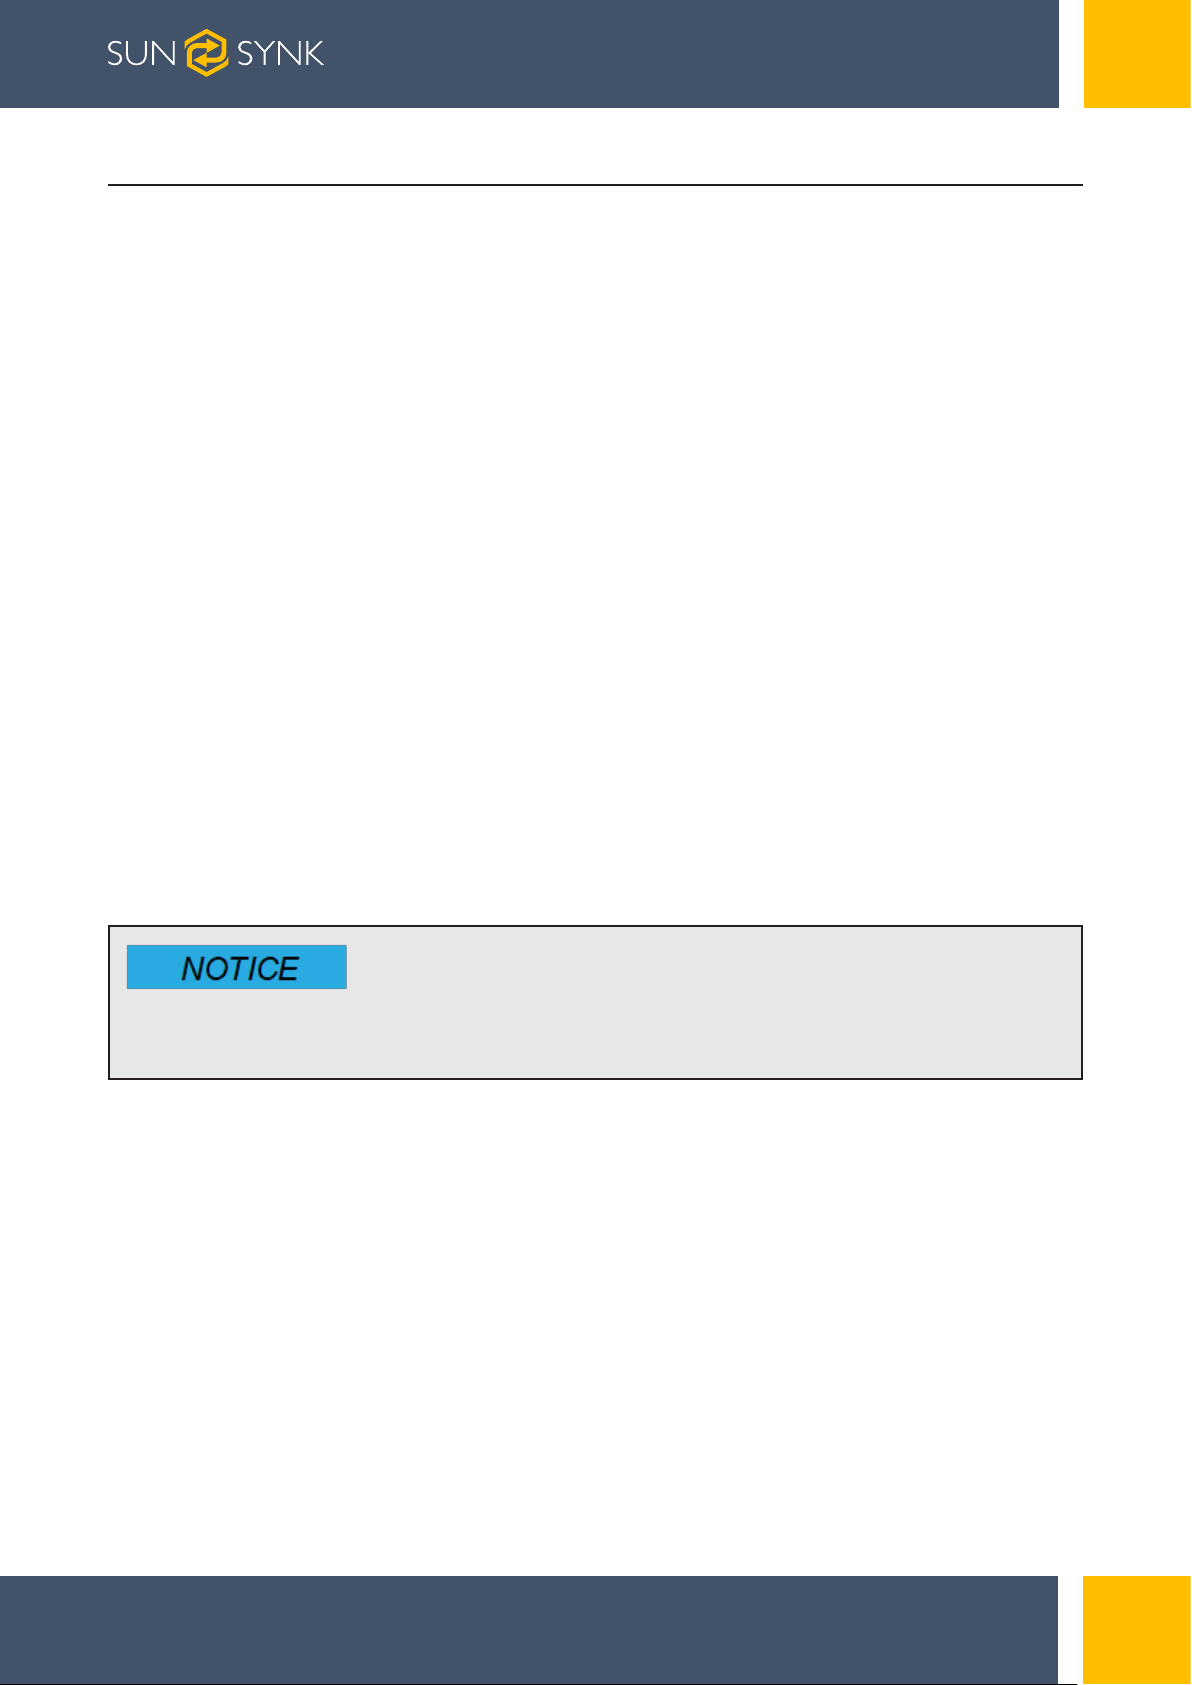
Each SUN-BATT-5.12 has two pairs of power cable terminals, two P+, and two P-. The connection terminals of each pair have the same function.
Single Module
In a single module application, any of the terminals of each pair can be used.
Parallel System
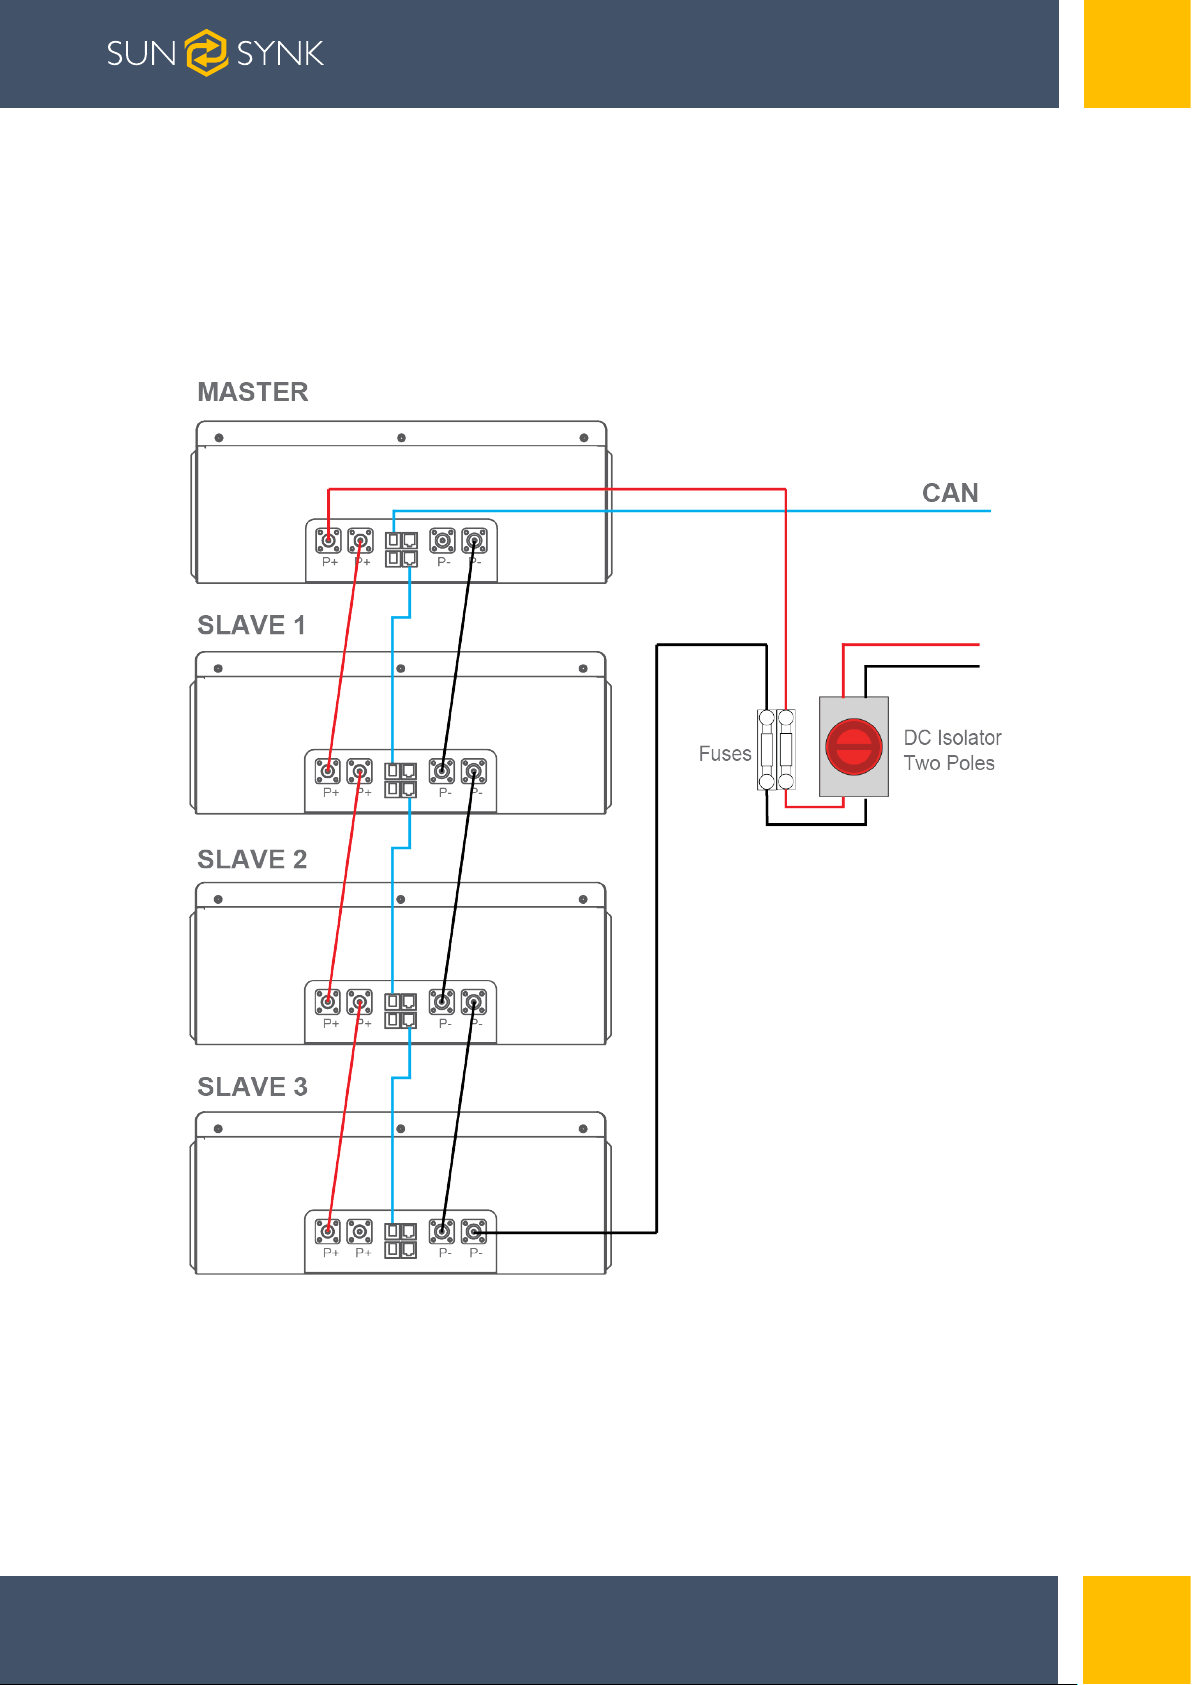
Multiple batteries can be connected in parallel to expand the capacity and power. When using
multiple batteries in parallel, one will operate as a master and the others as slaves. One of the
Master pack P+ terminals should connect to the PCS, and the other should connect to another
battery for capacity expansion.
One of the P- terminals of the last Slave pack should connect to PCS, and the other should
connect to another battery for capacity expansion.
For the other Slave packs, each P terminal should be connected to another battery's terminal.
The connection to the protection devices should use the P+ terminal from the Master pack and the P- terminal from the last Slave pack.
Page | 16Hybrid Inverter | Installer Manual
Page | 16
Page 17
Page | 17 Hybrid Inverter | Installer Manual
Page 18
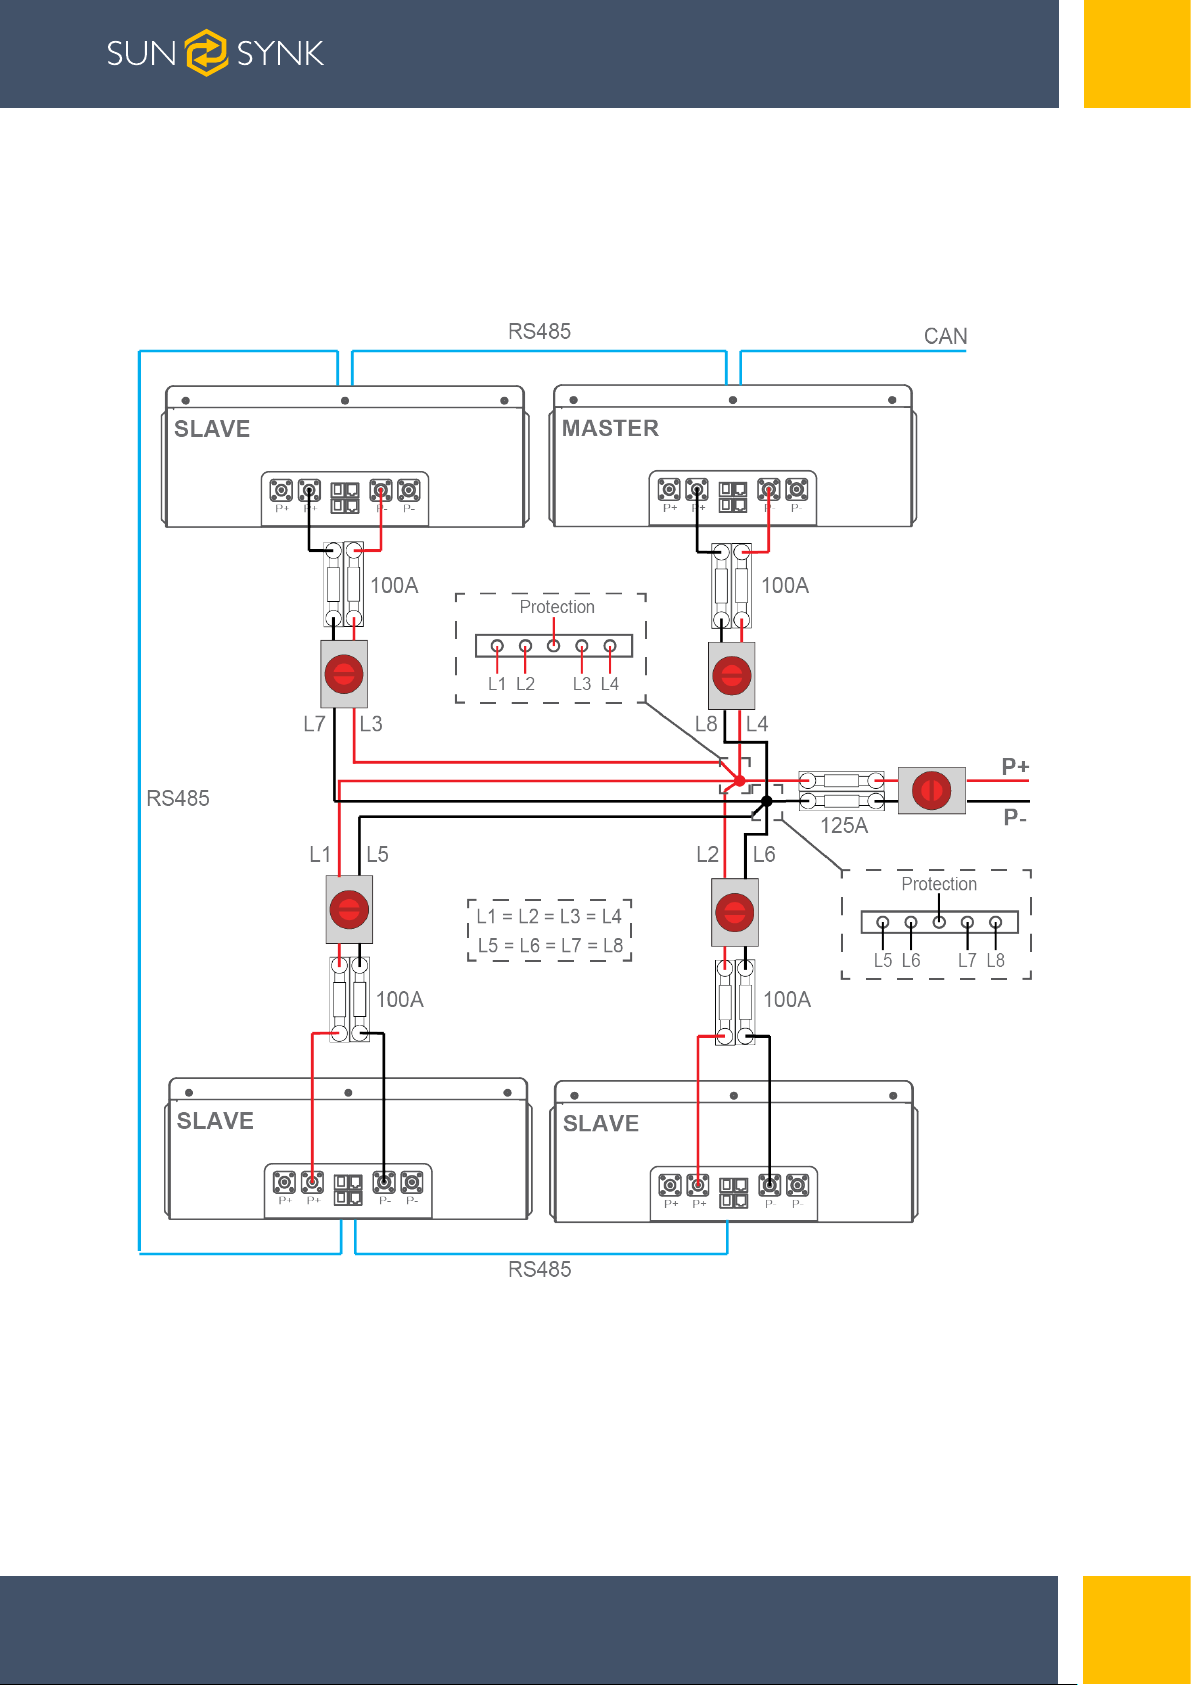
4.2. Busbar Connection
Applicable scenario:
PCS with 200A charge/discharge current connect to SUN-BATT-5.12.
Page | 18Hybrid Inverter | Installer Manual
Page 19
All parallel power cables should be of the same length:
(L1 = L2 = L3 = L4 = L5 = L6 = L7 = L8)
You are advised to use the EV power cables with minimal size of 25 mm2 or 3AWG
(600V, 125A) and length min.1500mm.
The P+ and P- power line between the busbar and the PCS should be able to
support 200A rated current, You are advised to use the EV power cable with size
min. 50 mm2 or 0AWG (600V, 210A).
Before assembling Power cable, label the cable polarities correctly to ensure
correct cable connections and identification.
The power cables installation and connection must be carried out by trained
professionals.
4.3. Parallel Cascade Connection
The Master battery can automatically identify the Slaves batteries connected in parallel using
its internal software control. The communication terminals Port In and Port Out (RJ45 port) are
integrated with the signal for automatic coding function.
All parallel power cables should be of the same length.
The parallel system supports an operation with up to 4 parallel connections. The following describes the connections of a system with four batteries packs, one Master, and three Slaves.
The CAN communication port of the Master pack should connect to PCS;
Port In from the Master pack should not be connected;
The Port Out from the master PACK should connect the Port In of the first slave PACK using
a parallel communication wire;
The Port Out of the first Slave pack should connect to the Port In of the second Slave PACK;
Following the same pattern, the Port Out of the second Slave pack should connect to the
Port In of the third Slave PACK;
The Port Out of the third and last slave PACK should not be connected.
Page | 19 Hybrid Inverter | Installer Manual
Page 20
5. MAINTENANCE
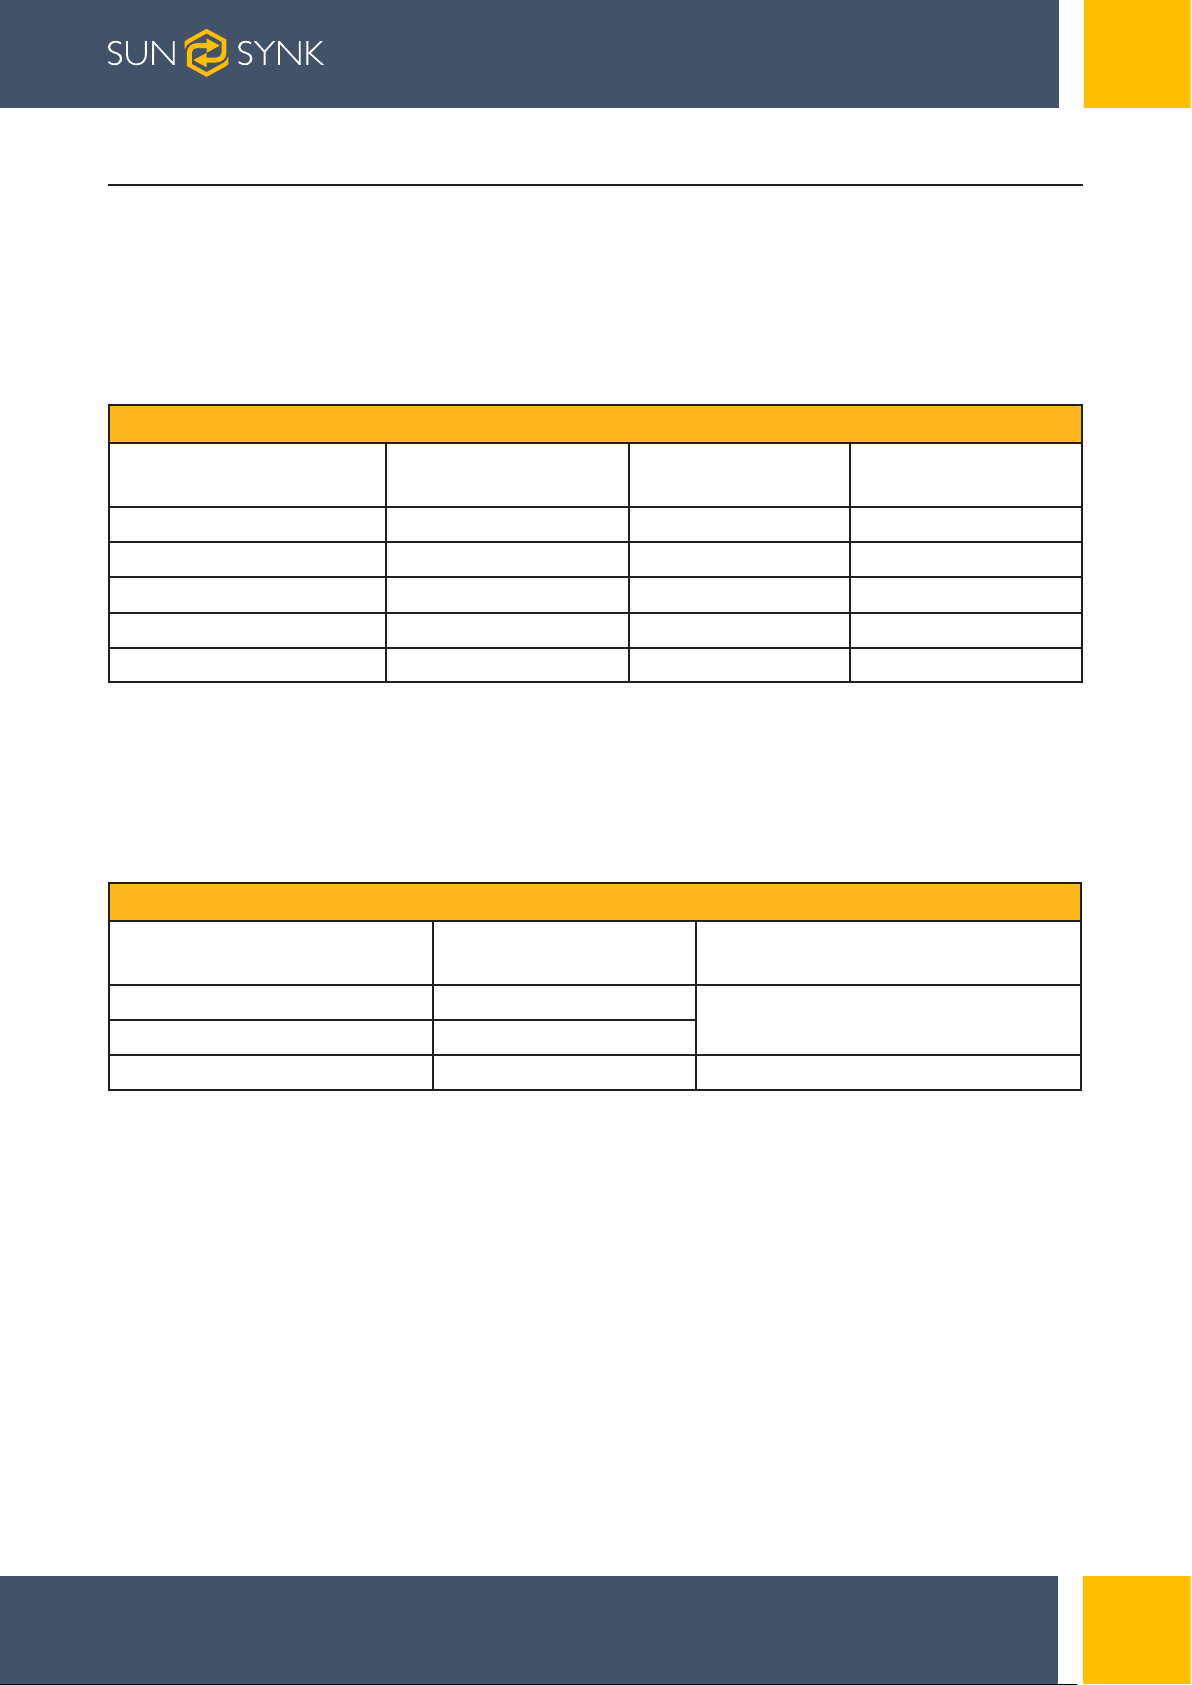
5.1. Recharge Requirements During Normal Storage
Battery should be stored in an environment with temperature range between -10°C ~ +45°C,
and maintained regularly according to following table with 0.5C (25A) current till 40% SoC after
long storage time.
Recharge Conditions When In Storage
Storage Environment
Temperature
Below -10ºC
-10~25
25~35
35~45
Above 45ºC
ºC
ºC
ºC
Relative Humidity of
Storage Environment
/
5%~70%
5%~70%
5%~70%
/
Storage Time
prohibit
≤12 months
≤6 months
≤3 months
prohibit
SOC
/
30%≤SOC≤60%
30%≤SOC≤60%
30%≤SOC≤60%
/
5.2. Recharge Requirements When Over Discharged
Over discharged (90% DoD) battery should be recharged according to following table, otherwise
over discharged battery will be damaged.
Recharge conditions when battery is over discharged
Storage Environment
Temperature
-10~25
25~35
ºC
ºC
Storage Time
≤15 days
≤7 days
Note
Battery Pack disconnected from PCS
35~45
ºC
<12 hours
Battery Pack connected to PCS
Page | 20Hybrid Inverter | Installer Manual
Page 21

Sunsynk Limited & Global Tech China Ltd,
3 Floor, Wai Yip Industrial Building.
171 Wai Yip Street, Kwun Tong,
Kowloon, Hong Kong.
Tel. HK +852 2884 4318 Fax: +852 2884 4816
Tel. UK +44 151 528 9945
Tel. SA +27 1108 39837
Audio Training manuals on Apple Pod Cast and Spotify.
Full training support, manuals and videos on www.sunsynk.com
 Loading...