

Page 1
User Manual
uSUN250
Page 2

Page 3

Contents
1 . APPEARANCE AND KEYPAD OPERATIONS ................................................. 2
USING MEMORY CARD AS U DISK ........................................................... 2
2.
3.WIFI ................................................................................................... 4
BLUETOOTH ......................................................................................... 5
4.
AIL ................................................................................................... 7
5.M
IALLING ............................................................................................. 8
6.D
MESSAGING .......................................................................................12
7.
CONTACTS .........................................................................................15
8.
INTERNET EXPLORER ............................................................................18
9.
RECORDER .......................................................................................19
10.
LOCK ..............................................................................................19
11. C
ACULATOR ......................................................................................20
12.C
AMERA ...........................................................................................21
13.C
IMAGES ............................................................................................23
14.
MUSIC .............................................................................................26
15.
CALENDAR .......................................................................................27
16.
RADIO ........................................................................................29
17.FM
ETTINGS ..........................................................................................29
18.S
NOTICES FOR THE USE OF PHONE .........................................................34
19.
1
Page 4
1 . Appearance and Keypad Operations
Keys Functions
z Press this button to return home from any
home
menu
back
power
up
down z Press it to decrease the volume.
P-Serson
front
camera
application or interface.
z Press it to open recently opened applications
window.
z Press it to start the menu,which allows you to
perform actions in the current interface or options’
menu.
z Press it to return to the previous interface,or to
close dialog box 、options’ menu、notification panel
or the keypad.
z Press it to open the phone’s menu,then you
could choose to lock the screen、turn off the phone,
or put it to the silent mode.
z Press it to increase the volume
z Press it to put the phone in vibration mode from
silent mode.
z Cover it, and then the phone’s backlight will turn
off
z Entering the camera interface, switched to the
front camera can take a photo of yourself.
2. Using Memory Card as U Disk
If you want to send music, pictures or other files to the phone’s
memory card from the computer,you should set memory card as u
disk first.
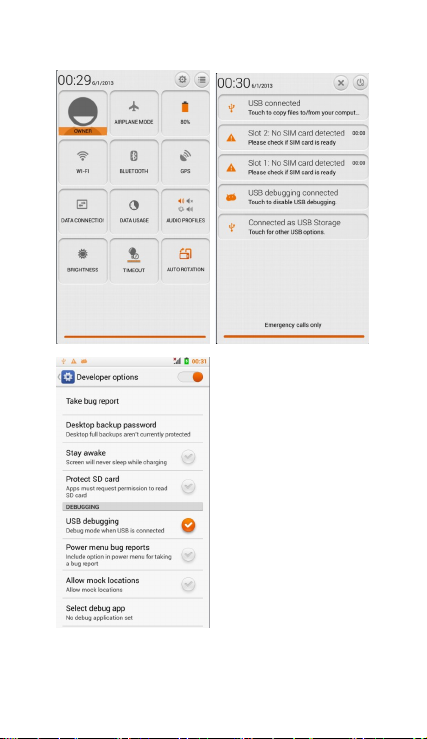
Set memory card as u disk
1) Connect the phone to the computer with USB cable. The
notification icon will appear in the status box.
2) Use USB mobile transmission line will connected to the
computer
3) In the notification panel, touch USB is connected ,then touch
“Open the USB Storage Device”
2
Page 5
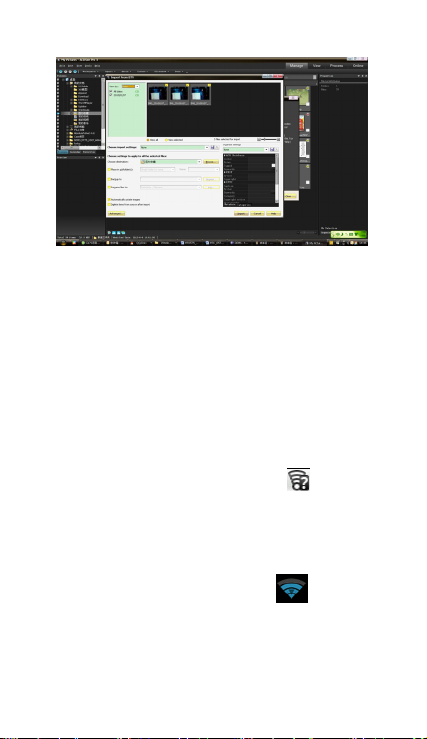
2)After connecting the phone to a PC you can check images taken
by the camera.
3
Page 6
• Notice: Different PC operating systems and how to use the U
disk.
1) WIN7 Can be use directly.
2) XP update Windows media player to the latest vers ion.
3) Install wpdmtp.inf driver
• Notice :On the PC operation assistant tool such as mobile phone,
Must be open the USB debugging.
3.WIFI
Open Wi-fi and to connect to the wireless network
1) Press home>menu,then touch settings>wifi and internet
2) Select the wi-fi box,to open Wi-Fi. Phone will automatically scan
for available wireless networks.
3) Touch Wi-Fi settings. Then a list of Wi-Fi network will show the
founded network name and security settings. (open network or
WEP、WPA/WPA2 with password).If you enable the notification in
Wi-Fi settings, The status box will show this icon (
available wireless network founded.
4) Touch one of the Wi-Fi choices to connect the network. When
you choose open network, phone will connect to it automatically. If
you choose WEP、WPA/WPA2 with password, you should type the
password first, then touch to connect it.
• Notices:when the phone is connected to the wireless network,
The status box will show this Wi-Fi icon(
approximate
signal strengthen (the number of lit bars).If touch the connected
network,will display the name of Wi—Fi network, status, speed,
signal,
strength, security, information and IP address.
) when open
), and the
4
Page 7
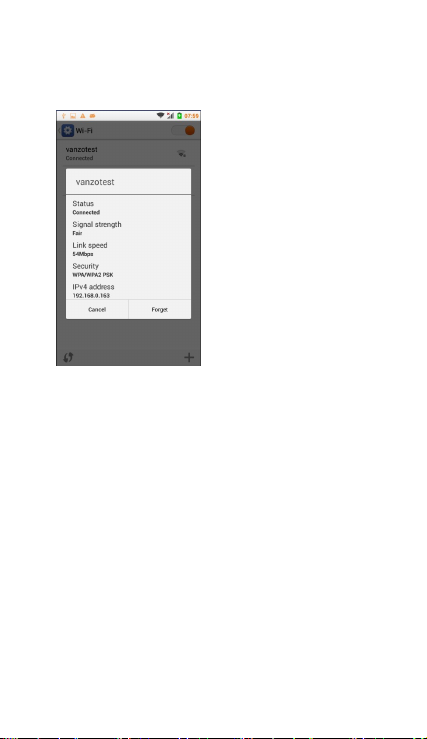
If you want to delete the wireless settings, please touch “not
reserve”
as in the right picture. If you want to connect to this network, you
should re-enter these settings.
• Notices:
Unless you choose not to reserve the network, otherwise, there is no
need to re-enter the corresponding password when next time
connecting to the previously encrypted wireless network. Wi-Fi will
search automatically, that is, phone doesn’t need to perform
additional steps to connect Wi-Fi networks.
• Notices:
Unless you choose not to reserve the network with password,
otherwise, there is no need to re-enter the corresponding password
when next time connecting to the previously encrypted wireless
network. Wi-Fi will search automatically, that is, phone needn’t to
perform additional steps to connect Wi-Fi networks.
• Connect to other Wi-Fi networks
1) In the interface of wireless and network, touch Wi-Fi settings. The
founded Wi-Fi networks will show on the Wi-Fi network list.
2) Touch other Wi-Fi networks, and then you can connect to this
network.
• Notices:In addition, you can surf the internet via GPRS. We
default that the GPRS in SIM1 is opened after started, users can
select manually ,the specific location is “settings>wireless and
internet>data connection ”, touch “ SIM1 、 SIM2 、 no data
connection”,when the dot turns green, it’s already opened.
4. Bluetooth
5
Page 8
Turn on Bluetooth or set the phone so that it can be detected
1) Press home>menu,/settings.
2) Touch wireless and internet, then choose Bluetooth box to open
the Bluetooth function. After started, the status box will show this
icon (
). Touch “scan for devices”then it will starts to scan for all
devices within range.
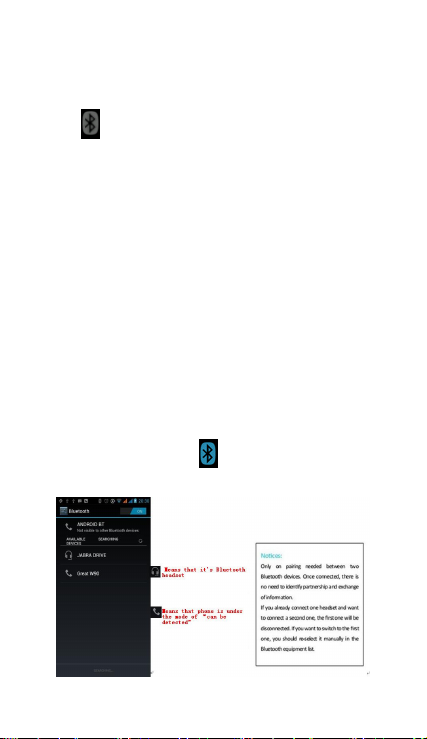
3) Touch Bluetooth settings, all the devices found will display in the
list under the icon.
(select the box “can be detected”, set it to be detected, the other
Bluetooth devices will be able to find the phone.)
important:the maximum detecting time of the phone is 2 minutes.
• Pairing and connection of Bluetooth headset
1) Press home>menu, then touch settings.
2)Touch wireless and internet>Bluetooth settings, then select
Bluetooth box, then your phone will scan for the Bluetooth devices
within range ,and show the founded devices in the list under the
icon.
• Tips:
a. If the list can’t find your equipment, touch scanning equipment
to re-scan it.
b. Make sure that the devices wanted are under the detected
mode.
3) Touch headset in the equipment list to finish the connection.
• Notices:Generally Bluetooth devices need a password to be
paired, often use「0000」as the default password.4)The pairing and
connecting status will show under the headset in the Bluetooth
devices list. When The headset is connected to your phone, the
status box will show. This icon(
you can use the headset to make or receive calls.
)means you are connected. Then
6
Page 9

• End the Bluetooth connection.
1) Press home>menu>settings>wireless and internet>Bluetooth
settings.
2) In the list of Bluetooth equipment, touch or tap and hold the
connected hand-free headset.
3) Press and select “cancel the pairing”.
• Bluetooth proximity sensor
After pairing the two devices,you can see if the signal is strong or
weak by the Bluetooth proximity sensor device
5.Mail
5.1 Gmail
• Create an electronic mail account
Select mail> settings. You can activate or edit existing e-mail
accounts as well as create a new e-mail account.
a. Select mail, Google account setting interface appears. Then
touch‘next step’> create account>enter name,last name and
e-mail account.
b. Google servers determine whether the name can be used, if so,
new interface appears prompting enter password, then judge the
password’ security, users who doesn’t meet the requirements need
to re-enter the password.
c. Successfully register a new Gmail account, a messenger created
automatically for testing.
• Loading mail account
a. Open Gmail skip introduction screen>loading interface
appears >select load
b. Enter name, password then load
E-mail account initialization ,prompting “login successful” All Google
accounts will be synchronized.
• Creating and sending ,mails
When creating mails, select mail > creating mails. Enter the
address(recipient)、 theme and contents. Press MENU you can
‘append’、‘Add Cc/Bcc’, select send or discarded.
• Receive mails
There is tone for new mails, in the status box will show this button
, Press Menu >‘refre sh’,refresh and update the number
of the unread mails in a proper way.
• Delete mails
When loading a mail account,if you want to delete it ,you need to
restore factory settings . When loading a second one,you could
7
Page 10
press the menu button to delete it.
Notices:many functions depend on Gmail Account,for example:
Electronic Market、Google Talk、Sync Contact and Calendar.
5.2 Email
• Load Email.
a. Open network connection,
b. In setting the account interface, input the correct email address
and password and click next mobile phone automatically complete
the sending and receiving server Settings. Pop-up mail find
frequency, and user Settings interface, complete Settings, click next.
c. For account creation name, enter the email user name, and click
next. Complete set, synchronize mailbox.
• Create and send Email
When creating mails, select mails > create mails. Enter the
address(recipient)、theme and contents. Press MENU you could
‘append’、‘Add Cc/Bcc’, select send or discarded or save as draft.
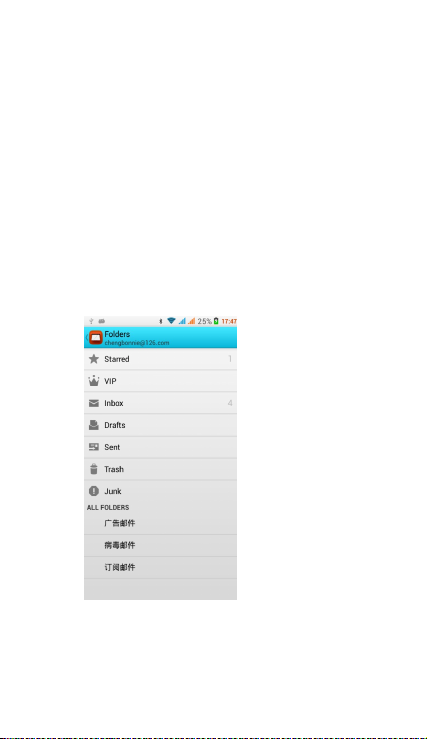
• Check the Email files
Click on the bottom folder options, list all folder options
6.Dialling
When the icon of internet server appears in the screen, you could
dial or receive callings. The signal bar on the top right corner show
the strength of network signal (the maximum with 4 signal bars) .
8
Page 11
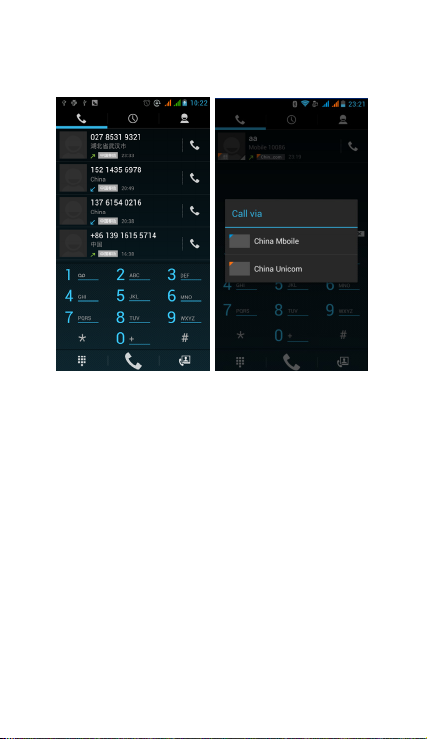
• Start dialing
Open application’s main menu>dial. You could choose SIM1 or SIM2
to do the dialing.
Dialling
At the dialing Keboard ,enter the phone number,and then click
the dialing key , after that,you should choose one SIM card or
internet call. If needed to call the extension,you could click the “dial
pad” in the bottom of the screen to open the interface or press
menu key to select “delay 2 seconds”,and then enter the number of
the extension.
The dialup keyboard input number, click Menu can IP dial-up or
speed dial
• Video call: video call usually refers to the Internet and mobile
Internet based on (3 G Internet) end, through the phone between
the speech of the real-time transmission and image (user of bust,
photographs, items, etc.) of a way to communicate. Only 3 G to
support this function. Input a number click video dial-up, each other
answers the phone after both can through camera for video calls.
• Telephone calls in the call log
Every telephone number called and received in“SIM1、SIM2”will be
reserved in phone’s menu of call log. On the top left of every call
record will show“SIM1 or SIM2”
All numbers in the call log can be dialed by clicking the button ”dial”
on the right side of the screen.
When number list appearing,click it to catch details;press it for
9
Page 12
long you could dial via “SIM1 or SIM 2”,meanwhile you can edit,
delete, save the number or do other operations.
• Receive callings
When calling comes(top left will show from which SIM card)press
“Answer”and slide towards right until the middle button, then you
can receive callings.
• Proximity sensor
According to the distance between phone and human body,it will
adjust automatically the switch of the backlight.
During the call, close the phone to the ear, the backlight will turn off
automatically,which could save batteries and prevent inadvertently
touching.
• Refuse to answer the phone
a. When standby, calling comes,press “refuse”button and slide
towards left side until the middle button, then you could refuse the
calling.
b. When using,calling comes,click on the “refuse”button to refuse
the calling.
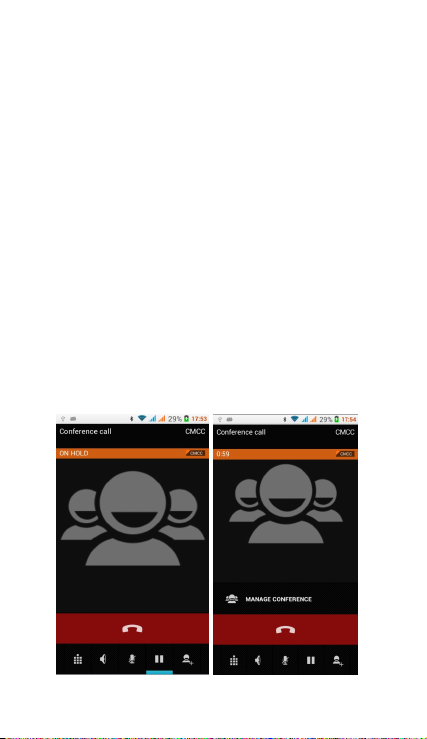
• Two-way call/multiparty call(conference call)
• Notices:this function needs that SIM card open multiparty call
features.
1) Already exist a call in the phone
2) Click“Add calls”,dial another call(or receive another call,phone
default open ”call waiting”(settings–dialing settings–other dialing
settings),after both connected,could view the status of calling.
10
Page 13
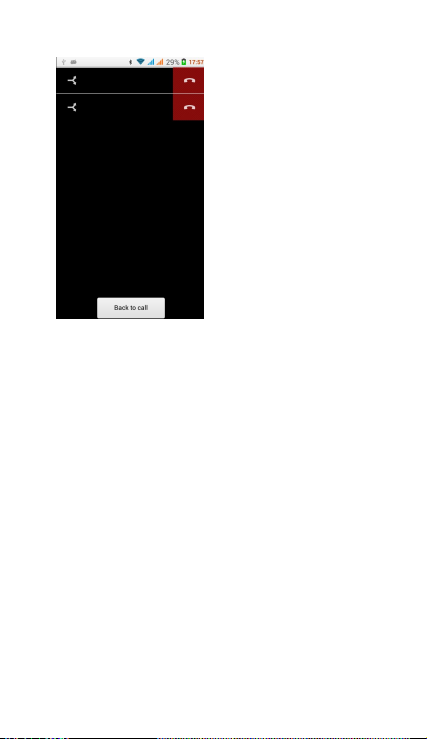
3)select“combine call”– you can combine two calls into one way.
4)after multiparty call connected ,you could separate the calls or
hang up one of them via“the small arrow of conference call”.
• Telephone recording
During the call,more>start record,you could record the dialog of
the call.
1)settings>set other functions of the call in the dialing settings,for
example:Call Transfer– after all the settings finished and turned on,
you could transfer the call to a certain number.
2)In settings>dialing settings >other dialing settings,open “call
waiting”.After turned on,you can receive another call when your
already on the line,The answering and rejecting functions are just
like ordinary phones
• Call settings
Voice Call
1)Voice Mail:The voice mailbox in setting in the input voicemail
number.
2) IP prefix number:Setting the different of SIM cards IP prefix
numbers
3)Call forwarding:Can set respectively 2 a SIM card, the line is busy,
and no one has to receive, not be connect four connecting way
3) Call barring: Can set respectively two to the SIM card call
restrictions
4) Additional Settings:a.My phone number b.Call waitting。
11
Page 14

Video Ca ll
1)Local video replacement:Set a picture to display when camera off
use.
2) Display peer video:Display picture for replacing peer video when
it is unavailable.
3)Peer video replacement:Set a picture to display when peer video
unavailable.
4)Enable back camera:Available to switch cameras if turn on.
5) Bigger Peer video:Turn on to make peer video bigger than local
video.
6)Auto drop back:Drop back to voice call connecting automatically
7)Outgoing video call:Display local video when make a video call.
8) Incoming video call:Display local video when accept an incoming
video call.
9) Other settings: a. Call forwarding b.Call barring c.Additional
settings
Internet call
1) Account
2) Use Internet calling
Other Settings
1) Fixed Dialing Numbers
2) Minute Reminder:Turn on minute reminder at 50s of every
minute.
3) Quick Response:Can edit the text messages rejected by the
information when content.
7. Messaging
• To Send SMS.
1) Press home>messaging,touch“new messages”.
2) In the interface of “edit”:
a. Click “recipient”box to start input method,you can also click
“enter”box to start input method,in that way you can enter
characters.
b. Click “send from SiM1 or SIM2”to send.
• To Send MMS.
When creating message,it was defaulted as SMS,it will be turned to
MMS when following operations were done. You can send MMS via
clicking “send” after editing.
1) In the interface of “edit”,Click the button of “Menu”:
2) Click “append”,you can send the following attachments,then
it will be turned to MMS automatically.
12
Page 15

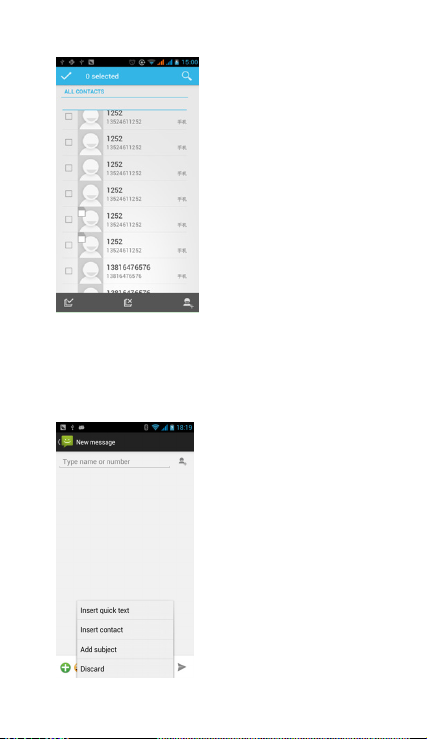
• Send messages to multiple numbers
Enter multiple numbers in the box of entering,each number is
separate with a comma.
Click on the right side of the head with the receiver plus icon, can
choose contact group in the address book
Notices:
a, If you want send MMS with
many pages, you should
select “append PPT” in the
“append” interface.
b, You can append 10
pictures, with the form of GIF,
JPEG.
c, Click “adding themes”, the
box of “theme” will appear
under the box of “recipient”,
meanwhile it is turned to
MMS automatically.
13
Page 16
• Notices:For now this phone can send messages , you can only
enter 312 characters in the box “recipient”.
When a message is sent or sent again,a small yellow letter will
appear. The number 1 or 2 on the letter refers to SIM1 or SIM2.
When message sending fails,a red triangle with an exclamation
point will appear.
When editing information other functions of Menu button
14
Page 17
8. Contacts
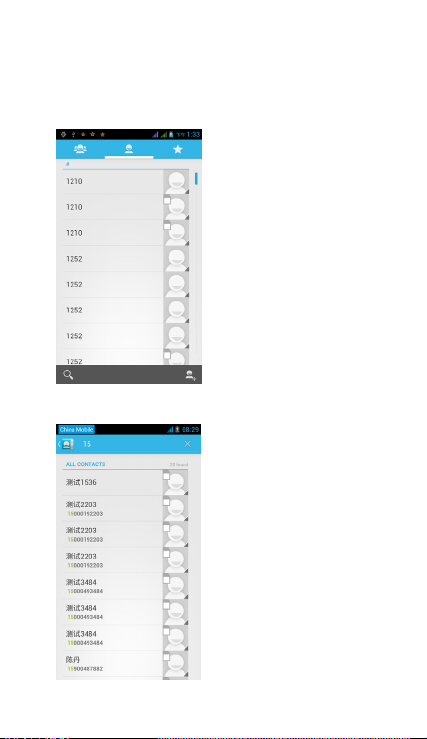
• Open the menu of applications>contacts
Default display phone contacts and SIM card contacts, sort contacts
by the first letter of the alphabet.
2)Click Search Icons,You can enter the contact search interface.
a.To enter the Numbers or letters and the list of names of the
phonebook, which will be shown in the search results.
15
Page 18
b.If the search didn’t fine the contact, the interface will say contact
not found.
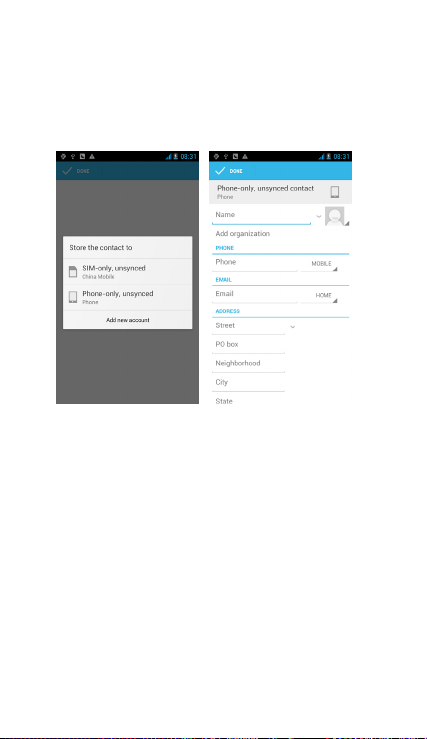
3)Click“Add Contact” Icons,Can create New Contacts
Select save contacts to phone or a SIM card, enter in the contact
editing interface.
You can edit contact head, name, telephone number, group, save to
and more, and then click "finish".
4)In contact interface, click on the Menu button
a. Menu >Delete contacts
Can “All” Icons checked, click the delete button, delete all the
contacts, including cell phone and SIM card of contact.
Can separate check one or more contacts, click delete to select the
contact you want to delete .
b. Menu> To display a contact
You can choose all contacts, SIM card of contacts or mobile phone
contacts
c. Choose the option also on the SIM card and cell phone whether
or not to show all contacts.
d. Menu >Import/export
In the mobile phone you can choose, SIM card or SD card three
parties to find contact information and import or export contacts.
First choose the "copy source" and then select the next step,
selecting copy contact to, can complete the contact's copy.
e. Menu >Accounts
Account and synchronization set routine synchronization Settings.
f. Menu >Share visible contacts
All contacts can be imported into the SD card, or through bluetooth,
16
Page 19
email, text message or MMS.
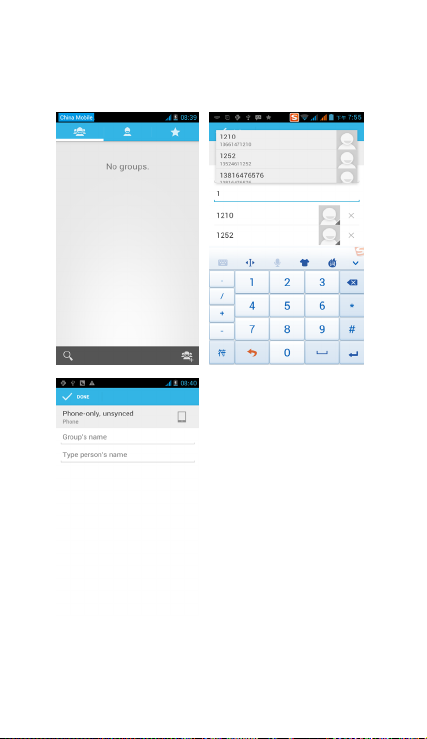
• Open the application interface >Contact , change to the
group.
1)Click“Add group” to create a new group .
2)In "the group name" column input group name, in "type in the
contact's name" column input contact key word, the phone will
search all contacts and you can add a contact to the group. Finally
17
Page 20

click "finish".
3) In a group, click on the Menu button, Menu functions
a. Menu>Upd ate
You can modify the group name, delete or add group of contacts
b. Menu >Delete
You can delete the group but, you will not delete the contact from
the phone.
c. Menu >Sending a group message .
Select the group and it will be added to the recipient bar.
d. Menu >Send Email by grou p
If contact of a group have the same email address, the automatic
new mail, and E-mail address will be in the address bar add to the
receiver
9. Internet Explorer
Internet explorer
1)In the interface of internet explorer,touch address filed and enter
the URL.
2)Use keypad to enter URL. The appropriate web sites will appear on
the screen. You can touch it directly go to the page or continue to
enter URL.
• Homepage
Select “homepage”,you can load in the set homepage. If you do
not set it, you will use the vendor’s preset homepage.
• Functions of menu
1) Menu>Backward
After browsing through multiple pages, the browser will return to
the previous page before the current page.
2) Menu>Forward
After browsing through multiple pages, will move to a web page
after the current page.
3) Menu>Windows
You can view all open windows to the current.
4) Menu>Bookmarks
a. Click the “Bookmarks”to make the current URL as a bookmark
saved.
b. Click the bookmark under the bookmarks list,will open the URL.
5) Menu>More
a. Add bookmarks,save the current URL as bookmark.
b. Find on page,search what you need in current page.
c. Select text,in the text, click and drag to select a piece of text.
d. Page info,display page address and other information of the
current browsing.
e. Share page,select the Bluetooth or SMS to share the current
page.
f. Downloads,show all the content downloaded.
18
Page 21
g. History, Show your browsing history, and view the most visited
pages of information.
h. Setting, contains a variety of browser settings.
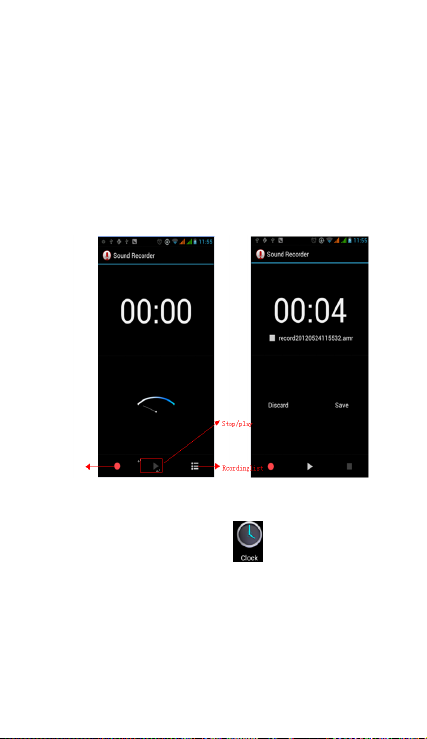
10. Recorder
Recorder can record voice, and send it quickly via Bluetooth or MMS
as well as make it as ring tone.
• Notices:recorder can only save the audio files as AMR format.
1) Click the recorder application.
2) Keep the phone’s microphone near the voice source.
3) Click recorder to re cord voices ,and click to stop or Re cordinglist.
All recordings save in my recording folder in the default music
program.
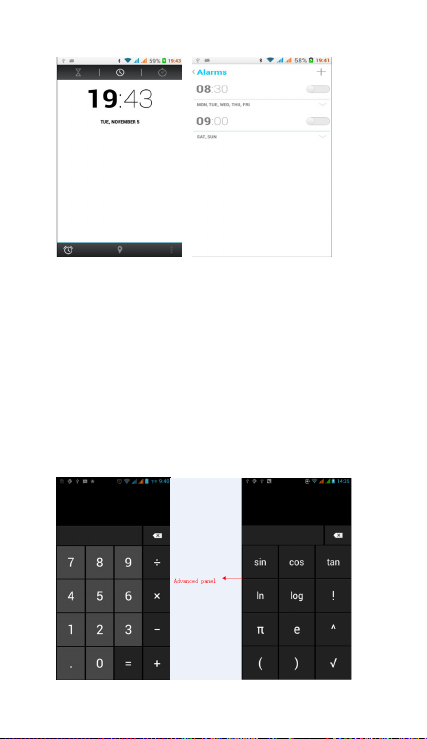
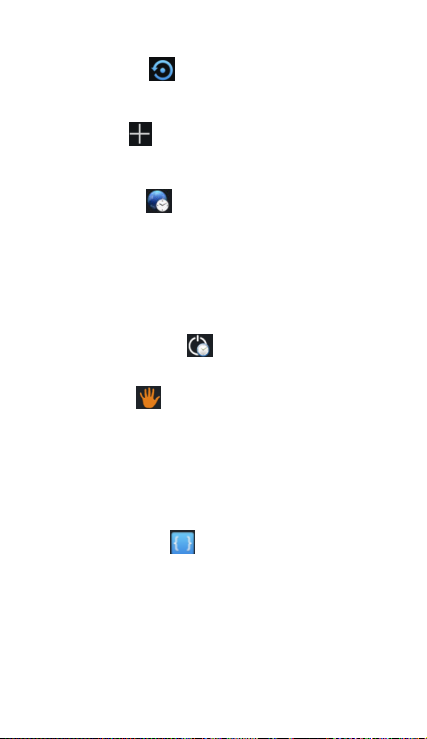
11. Clo ck
1) Open the menu of application, click
2) Click screen except the alarm at any position, screens, black, time
with white shows, this time the standby time to screen will not turn
off the screen. Click the screen again to restore normal clock
interface.
3) Click screen set alarm button and enter the alarm clock mode
19
Page 22
• Alarm
After setting the alarm when the time you have entered arrives you
will be alerted by ringing or vibrating to activate this function. Press
Menu to add alarm,you can also add it from the adding interface.
You could set the alarm according to your needs. In the interface of
alarm will show three alarms which are not set.
Edit
You can edit the current alarm,edit time、ringing tones、vibration、
repeat form and tabs.
12.Caculator
calculator
This function can convert your phone into a calculator, it can do
simple calculations.
·In the calculator interface , press MENU or hold down the screen to
the left, then the advanced panel appears.
20
Page 23
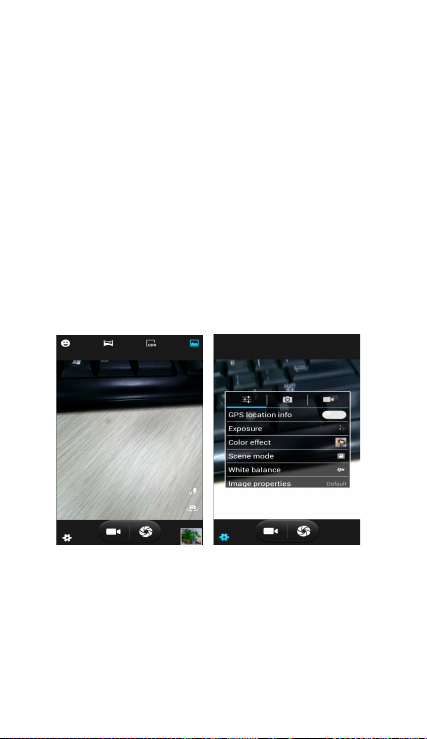
13.Camera
13.1 camera
• Prior preparation
Install memory card before using the camera or video camera. All
your photos or videos taken by the phone are stored in memory
card.
• Open camera
Press home, touch menu, select camera. To take a photo.
1) Find the object you would like to take a photo of by looking at
the screen.
2)Touch the “shutter” button on the screen.
3)After taking the photo will be saved to the camera’s galley folder.
4)You can view the photos by touching the preview box button.
5)Camera settings
Touch “setting Menu” in the inter face of the camera to adjust the
settings
Under camera viewfinder mode, press Menu,you can switch to
video or photo gallery.
On the top right of the cameras viewfinder mode you can see a
preview of the previous picture. Touch preview box, the photo
display on full screen and you can enlarge it to view details.
• Shared Settings of Camera and Video cam era
1)Flash mode:Au to、On、off.
2)White balance:Auto、Incandescent、Daylight、Fluorescent、
Cloudy、Twili ght、Shade、War m fluore scent.
3)Color effect :None、Mono、Sepia、Negative、Aqu a、Blackboard、
21
Page 24
Whiteboard.
4)Scene mode,Auto、Night、Sunset、Party 、Por trait、Landscape、
Night portrait、Theatre、Beach、Snow、Steady Photo、Fireworks、
Sport、Candle light.
5)Other settings:store location ,exposure,image properties,
anti-flicker
• Camera Settings
1) Capture mode:normal、HDR、Fac e beau ty、Panor ama
2) Self timer:off ,2 seconds ,10 seconds
3) Continuous shot:40 shots ,90 shots
4) Picture si ze:QVGA,VGA,1M pixels,1.3M pixels,2M pixels,
3M pixels,5M pixels
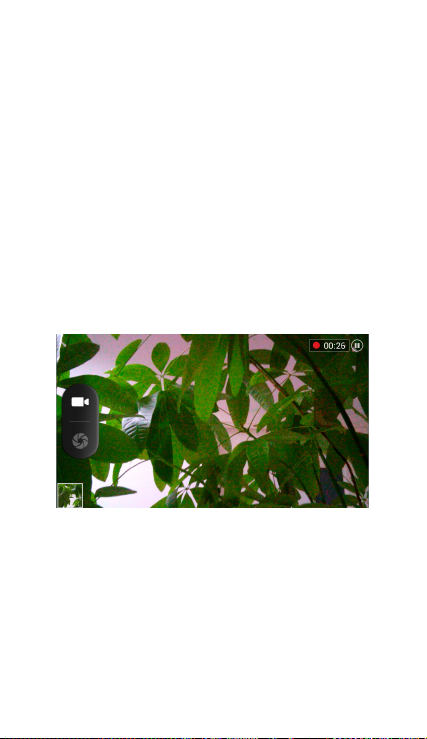
13.2 Video camera
• Prior preparation
Install memory card before using the camera or video camera. All
your photos or videos taken by the phone are stored in the memory
card.
• Take vid eo
1)Aim the screen at what you would like to capture.
2)Touch the “shutter” button on the screen.
3)After recording ,videos will saved to the camera’s galley folder .
4)You can view the videos by touching the preview box button.
5) Video camera settings
Touch “set” in the camera interface to edit video camera settings
Under camera viewfinder mode, press Menu,you can switch to
video or photos’ gallery.
On the top right of camera viewfinder mode, display the preview of
the previous video. Touch preview box, the video will display in full
screen and you can touch the play button to view it.
22
Page 25
• Shared Settings of Camera and Video cam era
1)Flash mode:Au to、On、off.
2)White balance:Auto、Incandescent、Daylight、Fluorescent、
Cloudy、Twili ght、Shade、War m fluore scent.
3)Color effect :None、Mono、Sepia、Negative、Aqu a、Blackboard、
Whiteboard.
4)Scene mode,Auto、Night、Sunset、Party 、Por trait、Landscape、
Night portrait、Theatre、Beach、Snow、Steady Photo、Fireworks、
Sport、Candle light.
• Videos settings
1)Microphone:off,on
2)audio mode:meeting,normal
3)time lapse interval
4)video quality:low,medium,high,fine
:off,1s,1.5s,2s,2.5s,3s,5s,10s
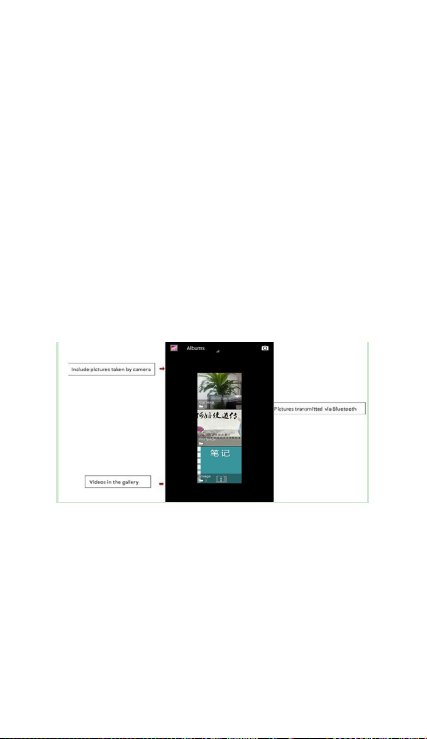
14. Images
• Open images
Press home,touch label of applications,then touch photo gallery.
In the camera interface ,Press menu to open the menu.
1) Files I nterface
a. In the library the interface, upper right a slide show the play
button, click on the way to the slide circulation play all image files.
b. Click on the images, enter the picture to see interface.
c. Choose a long press image files, pop-up corresponding
operation.
23
Page 26
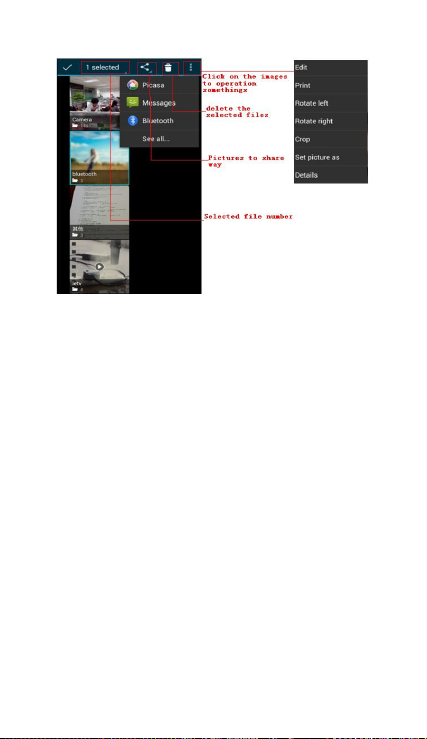
2) Use images
After taking pictures, you can view them and share them with your
friends.
a. Use E-mail to send pictures : choose Gmail or E-mail,
pictures will be automatically added to an E-mail. Write your
information, click send.
b. Use Messaging to send pictures:Select the information, pictures
will be additional to the MMS. Write your information, click
send.
C. Use Bluetooth:Bluetooth list, select already pairing of bluetooth
equipment, you can through Bluetooth send a picture.
4)Check pictures
In the photo view interface, you can drag or can forward to view the
photos
5) Edit picture.
a. Edit light:Fill Light Highlights Shadows Auto-Fix.
b. Edit image effects : Cross-process, Posterize Lomo
Documentary and so on.
c. Color Effects:Warmth Saturation B &W Sepia Negative Tint
Duo-tone Doodle.
d. Crop: Crop Red Eye Straighten Rotate Flip Sharpen.
24
Page 27
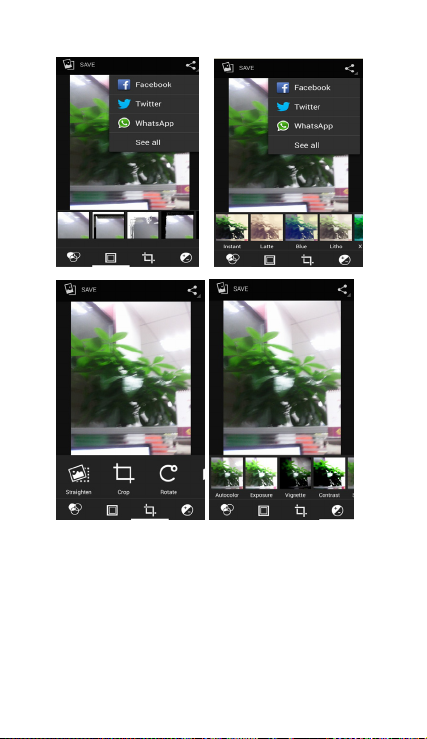
6)Crop pictures:
a. If you want to adjust the size of the clip, please hold the edge of
the cutting tools. The arrow appears clip, can adjust its size.
b. If you want to adjust in the clip that keep proportion, please hold
down any of the four corners of the one.
c. If you want move to the clip of the picture area , please hold
cutting and then move to drag in to the position.
• View images
1) In the picture interface, touch the photo album to view the
images.
2) Touch the thumbnail to view pictures on full screen.
25
Page 28

You can choose to display small or large thumbnails. Hold down the
screen towards the left side to view the next photo or towards right
to view the previous one.
In the photo album , press and hold down the picture towards left
to view the next picture, or towards right to view the previous one.
15. Music
The phone can play the digital audio files in memory card.: AMR
M4A、MIDI、MP3、WAV、OGG.
• Open Music
Press home icon and search the app music . Then the interface of
Music Media appears.
• Music Media
Your music files are classified according to the following four
categories:Artists, albums, songs and play lists. Touch one of these
categories; you can view the list inside.
Continue the operations, until your wanted music appears. Such as,
if you choose Artists a list of artists sorted by the numbers will
appear. Choose any on to open the list,then all the albums and
songs will appear. Select one album, then the songs in it will be
played.
、
26
Page 29

• Tips: You can play all of the songs in the interface of music
media, in random sequence . Press Menu, and then touch the
Party Shuffle. Then will start playing the first song randomly
selected . To close the Party Shuffle, press Menu, then touch to turn
off the Party Shuffle.
16. Calendar
Enter in the app calendar.
Load Googles accounts, enter the application, In the interface of
month or week , your will use gray to highlight the day. Display
default the date on the current month.
In the interface,press menu,4 display modes will appear:
27
Page 30
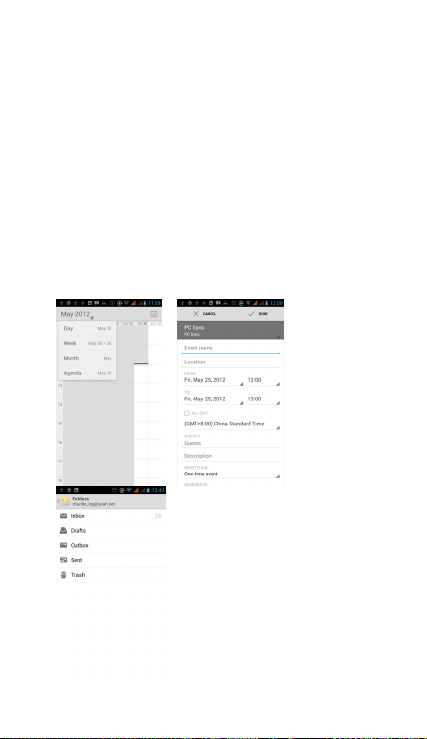
1) Schedule Interface shows a certain schedule(click on the initial
time and view forward,click the final time to view backwards )
2) Day Interface displays a day's schedule (last clicked date),
slide around to turn page according day.
3) Week Interface displays a week's schedule (last clicked
date), slide around to turn page according week.
4) Today Interface displays a day's schedule , In the interface of
month or week use gray to highlight the day.
5) Month interface displays a month's schedule (last clicked date)
Slide around to turn page according month.
• New activities
1) Press menu, more < touch new activities.
2) Enter the name of activity in the activities’ box.
Notices:Such as special occasions such as birthday or a day with
events, set the all-day option to Yes. If the activity is at a certain time
period, select the start time and end time.
3)Enter the event location, description, guests, repeat, re mind time.
4) Click finish to return to calendar.
28
Page 31

17.FM Radio
FM Radio
Through this app, you may listen to FM radio on the device, to use
the FM radio is necessary connect a wired headset this also serves as
an antenna to have a better reception, before opening this
program ,you can install the original equipment-headphones,
when listening, you can switch it manually to speakers or the
mode with wired headphones.
• Open FM radio
Touch this app
radio.
1) Click on the "search", automatic scanning search FM channel,
and channel in list interface, list all channels
2) Click "FM recording", when you listening to the radio can be
recorded. The recording name is to default and can be arbitrary.
3) Click "exit" to turn off the FM radio .
4) Must be insert a headphones to a better reception, select a
speaker and you can listening the radio through of the speaker.
5) Click in the five-pointed star icon to add the channel as favorite.
• Listen to FM radio background
Click to return to key, the radio program moved to the background,
right now you can still continue to listen to the show, and can also
carry out any other program.
to open the application of FM
18.Settings
29
Page 32
Your service provider may can default some device settings, so you
is not possible be able to change these settings.
• SIM management
1) Touch it to choose or to disable the SIM card, the card is grey
when disabled.
2) The default SIM card ,you can choose Voice call,Video
call,Messaging,Data connection.
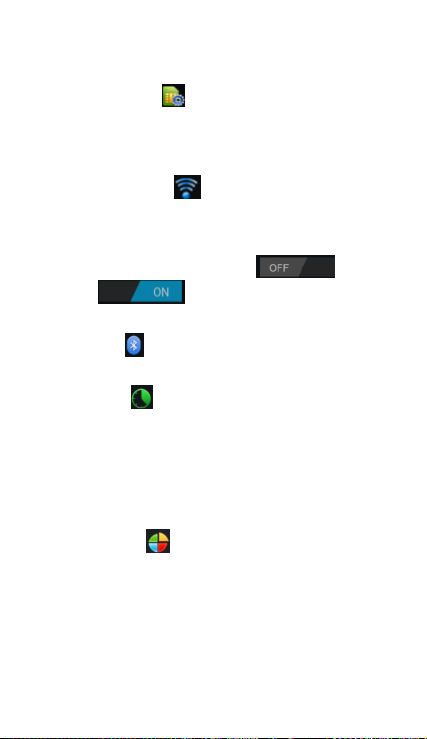
• Wireless and internet
Flight mode Touch to open or close.
When you turn On the flight mode the Wi-Fi function will close
automatically;turn off the flight mode then connect Wi-Fi,it can be
used normally.
1) Wi-Fi and Wi-Fi settings Touch Wi-Fi
activate
networks automatically,networks without password can be used
directly, others need to enter the password first.
• Bluetooth
Bluetooth switch turn ON will automatically and search nearby the
other device with bluetooth.
• Data usage
1. Data usage set up mobile data traffic limit, flow more than limit
will be close mobile data services.
2. More
Wireless & networks
a. Airplane mode
b. VPN
c. Tethering&portable hotspot
d. Mobile networks
e. GPRS transfer mode
• Audion profiles
This option gives the phone tones’ settings under the status of
receiving calls or notification. Including:Vibration, volume, ring
tones, ring tones notification and feedback(Button operation tone,
select Sound, screen lock tone, touch).To adapt every environment.
1) Select “Standard / Mute / Conference / Outdoor,Touch the spot
on the right, when turns green ,it opens.
2)Volume:Including the ring volume and alarm clock settings, you
can manually slide to select.
to
. Open Wi-Fi ,it can search for available
30
Page 33

• Displays
a. Brightness Adjust the brightness b. Auto rotating screen
Rotate phone to change direction
c. Animation Choose to display animations d. Screen Timeout
Adjust the delay before the screen automatically locks
• Storage
a. Can view the SD card and cell phone memory usage.
b. Can Unmount SD card or Erase SD card.
c. Can choose the default memory.
• Battery
Boot time, the use in each module to use power in general
• Applications
1) Unknown sources allow to install non-electronic market
applications
2) Manage applications manage and delete the installed
applications.
3) Running services touch any of the services listed in> pop up 'to
stop the service? 'two-button operation box, touch the 'Stop 'the
service is stopped, and disappear from the "running services" list.
4)Storage use you can view the all program downloaded on Sd card
or running or how many memory space they occupy
5)Battery use you can see the power situation.
6) Development . USB debug:USB debug only apply in the develop
process. This function allows copy data in computer and mobile
devices.
• Location access
1) Use wireless Use wireless to find locations in the application
(Google map).
Touch it to open or close
2) When using the GPS satellite positioning, set accuracy to street
level(cancel it to save battery).
Touch it to open or close
3) GPS EPO assistance,use GPS assistance data(EPO)to speed uo
GPS poditioning
4) A-GPS Use auxiliary data can accelerate the process of GPS
positioning.
Open it and remind you“it produce GPRS flows when using A—
GPS”.
• Security
1) Set up screen locks Use images、PIN or password to lock the
31
Page 34

screen.
a. Touch“images”, the first time there will be a simple unlock
instructions and examples, click “next step” to continue the step
“
make the unlocking image”。
b. Touch PIN Enter PIN numbers to unlock the screen.
c. Touch password Set password to unlock the screen.
d. Touch “no” Stop this application.
2) Set up SIM card lock Enter(4-8numbers)PIN to set the lock
of SIM.
SIM card PIN (Personal Identification Number) is to prevent
unauthorized use of SIM cards.PIN code provided with SIM. The
service provider gives the initial value.
Change a blocked PIN code, you need to open the "SIM Lock ", then
go to Change Password screen, the phone will automatically
prompt enter the old PIN code and asked to enter a new PIN code
twice,finally the phone will prompt that change the code
successfully. If you enter the PIN with error for three times, SIM card
PIN codes will be automatically locked, PUK codes is usually
supplied with SIM card. If no, you should go to the service provider
for the codes.
If you enter 10 times wrong PUK code, the SIM card will be
permanently locked.
3) Password visible Password visible when enter it
4) Select device administration Add or delete device manager.
5) Use security credentials Allow application visit security
credentials or other credentials.
6) Install from SD card Install the encrypted certificate from SD
card.
7) set password Set or change Certificate store password
8) clear storage Clear all the contents of the certificate store
and reset their passwords.
• Languages and keyboard
1) Selecting Language Country Include many languages on the
phone .
2) Custom Dictionary Add words to custom dictionary or
delete.
3) Keyboard Settings Vibrating when buttons are pressed,
Playing sound when
buttons are pressed, Capitalizing automatically, Speech Input(by
microphone on the
keyboard), Inputting words(speech can be altered by sliding finger
on space key), Displaying
tips(activate predictive function when you input words);
Auto-Text(Automatically input certain
words when press space key or specified keys)
4) Input method you can select Android keyboard or google
input method.
32
Page 35
• Backup & reset
1) Backup I data will application data, WLAN password and other
Settings backup to Google's servers
2) Resetting to Factory Settings, Clear all data stored on the phone.
• Add account
a. Corpor ate
b. Email
c. Google
• Date and Time
1) Automation Use date and time provided by Network.
2) Setting Date Touch “+” and ”-” to set date.
3) Selecting Time Zone Select Time Zone according to where
you are.
4) Setting Time Touch “+” and ”-” to set time.
5) Use 24 Hour Time Format ON/OFF
6) Select Date Format There are 3 kinds of formats you can
choose from: Month-Day-Year, Day-Month-Year and Year-Month-Day,
among which Year-Month-Day is the default setting.
• Schedule power on/off
You can set time of boot or shutdown by touching it. You may also
select to repeat it or a certain day during a week.
• Accessibility
1) Large text
2) Power button ends call: According to the "power" button to end
the call to open, call, press the "power" will end the call and not shut
down the screen
3) Auto-rotate screen
4) Speak passwords
5) Touch & hold delay
6) Install web scripts
7) Quick boot
• Developer options
a. USB Debugging: USB debugging only for development and USB
disk.
b. Stay awake :Screen will never sleep while charging.
c. Allow mock locations
d. Desktop backup password
e. Strict mode enabled
f. Pointer location
g. Show touches
h. Show screen updates
33
Page 36

i. Show CPU usage
j. Force GPU rendering
k. Window animation scale:
l. Transition animation scale
m. Don’t keep activities
n. Background process limit
o. Show all APRs
• About phone
You can check the information on status bar and remaining power.
19. Notices for the use of phone
Your phone is a product of superior design and craftsmanship and
should be treated with care. The following suggestions can help you
comply with the terms of repair kits, to extend the life of mobile
phone.
1) Place the mobile phone and their parts and components out of
reach of small children.
1) Keep the phone dry, rain, humidity and all types of liquids which
contain minerals will corrode electronic circuits.
2) Don’t touch the phone with wet hands when charging, it will
cause electric shock or damage the phone.
3) Avoid place the device in high temperature environment.
Temperatures will shorten the life of electronic devices, damage
batteries, and warp or melt certain plastics.
4) Avoid place the device in too low temperature environment.
When the temperature rises, the phone will produce water vapor
that may damage electronic circuit.
5) Avoid place the phone in dusty, dirty places, otherwise parts may
be damaged.
6) To avoid the phone in a lit cigarette, near open flame or any heat
source.
7) Do not open the device, non-professional approach will do
damage to the phone.
8) Do not throw it from height, knock or shake the phone, rough
handling can damage internal circuit boards.
9) Do not paint the phone, because the paint will block
headphones, microphones or other removable parts, and lead it not
work.
10) Use clean, soft, dry cloth to clean the camera, light sensor
lenses. Prohibit the use of harmful chemicals and cleaning agents,
cleaning fluids to clean the phone
11) If mobile phone, battery, charger, or mobile phone
accessories are defective, send to the nearest qualified service
center for inspection.
12) I f is necessary, Service Centre staff will assist you and will
arrange for phone repairs.
34
Page 37

-Recovery mode uSUN250
How to enter in Recovery Mode.
Please, follow these steps.
1-To enter in the recovery mode first you should power off the
device,
Then first press the “ON-OFF” key for one second and then press
“VOL +” Key at the same time, until the appears the Android doll.
After appears another Android doll.
1-Push the “Power” and appears the Internal menu.
35
Page 38

2-Push “VOL –“ key and select “wipe data / factory reset” th en
press “VOL +” .
3- Select “ Yes delete all user data ” with the “VOL–“ Key and then
press
“VOL +” to sel ec t.
Android-appeared.
4- When it finishes select “reboot system now” press the “VOL
+ "button and the unit will re-start itself. (this process may last for a
few minutes)
36
Page 39

How to download the software using the unit.
IMPORTANT: When you download the software, all data will be
deleted as photos, videos and Apps that you have been
installed.
Do not interrupt this process please make sure the battery is fully
charged.
Please, follow these steps.
1- Open browser and search and open this link:
www.sunstech.es/download/
2- Select the model of the tablet that you have and download the
software.(This software is installed In the INTERNAL SD).
3- When it finished the download, select the App " Wireless update
" in your unit.
4-Select the software and wait until the process is finished.
Made in China
37
Page 40

1. General
This warranty is granted without prejudice and in addition to the
recognized rights for the consumer vis-à-vis the seller provided in
the Royal Legislative Decree of 16 November, approving the
restated text of the General Law for the Protection of Consumers
and Users and other complementary legislation. Therefore, the
recognized legal rights for the consumer are not limited or excluded
according to the relevan t Regional, National or European legi slation.
This warranty shall be valid in all the European Union Member
States with the limitations that legally correspond in the country in
which they are intended to be implemented in accordance with
their implementing legislation.
Notwithstanding the foregoing, SUNSTECH shall respect the rights
and limitations related to the product warranty that legally
correspond in each of the States listed in the Attachment in
accordance with their implementing legislation for any product
provided that it is intended for the EU market and has been
purchased or used by the consumer or user within the EEA.
2. Legal Warranty
This SUSTECH product has a two (2) year warranty counting from
the date of delivery and/or purchase. During the above timeframe,
SUNSTECH shall be held responsible for any lack of conformity of
the product in relation to the contract in accordance with the
provisions of the Law for the Protection of Consumers and Users,
that shall entitle the consumer to request the repair or replacement
of the product, unless one of these options is objectively impossible
or disproportionate.
Accordingly, the remedy (i.e. the repair or replacement) shall be
deemed to be disproportionate if it imposes unreasonable costs on
the seller. In order to determine this, the following shall be
considered: (i) the value of the product if there were no lack of
conformity; (ii) the relevance of the lack of conformity; and (iii) if the
other form of remedy could be carried out without major
inconvenience to the consumer and user.
To determine whether the costs are unreasonable, the costs
incurred by one form of remedy must be significantly higher than
the costs corresponding to the other form of remedy.
In addition, the consumer may choose between requesting a
reduction in the price or terminating the contract, if he is not
entitled to demand the repair or replacement of the product and
whenever these actions would not be completed within a
reasonable timeframe and would cause more inconvenience to the
consumer and user. However, the termination shall not take place
where the lack of conformity is minor.
EUROPEAN WARRANTY
38
Page 41

Both the repair and the replacement of the product as result of the
product’s lack of conformity shall be free of charge for the consumer
and user, including labour and materials.
In any case, repairs under warranty shall be carried out by
SUNSTECH’s Official Technical Assistance Service or its authorized
distributors.
3. Conditions for the warranty to be exercised
To exercise the legal and commercial warranty, it is necessary to
submit documentary evidence showing the delivery and/or
purchase date of the product, whether the invoice, receipt, delivery
slip or sealed and dated warranty card. Documents which have been
tampered with or falsified will not be accepted.
The consumer shall contact SUNSTECH’s Customer Service Team
using the website (under the support section) and will be informed
about what action to take. At that time, the consumer shall have to
provide a clear description of the malfunction or the lack of
conformity of the product with the contract.
In any case, repairs under the warranty shall be carried out by
SUNSTECH’s Official Technical Assistance Services or its authorized
distributors so that SUNSTECH can be held responsible under the
legal and/or commercial warranty.
4. Exceptions
The warranty does not foresee or include periodic maintenance or
product installation revisions.
In addition, the product will not be considered as lacking
conformity in relation to the contract and therefore, it will not be
covered by the legal or commercial warranty when:
• The lack of conformity corresponds to a discrepancy with the
safety standards or the local or national techniques of a different
country to the one it was originally designed and produced in;
• This product or any of its identification features (number of series,
etc.) have been partially or completely opened, assembled,
unassembled, handled and/or repaired by a person not part of
SUNSTECH’s Official Technical Assistance Services team or its
authorized distributors
• The lack of conformity is a result of an incorrect installation
(except if the installation has been carried out by one of SUNSTECH’s
authorized sellers or under its responsibility, or by the consumer
following SUNSTECH’s installation instructions) or an abusive or
inadequate use of the product, including but not limited to, a usage
that is not in accordance to the normal purpose of the product or
the directions for use and maintenance, as defined by SUNSTECH;
39
Page 42

• The lack of conformity has been caused by a computer virus, an
action or a manipulation of passwords, software installation,
manipulation or reinstallation, etc.;
• The lack of conformity is due to the use of accessories, chargers
or consumables that are not SUNSTECH originals and therefore are
not designed for that product;
• The lack of conformity is due to the use of any third party
software or application that modifies, changes or adapts the
software that was approved and/or included by SUNSTECH in the
product;
• The lack of conformity is a result of downloading or using third
party multimedia services and/or contents available or accessible
through the product;
• Damages in or through the battery, which are due to it being
overcharged, are produced;
• Any of the box seals or battery cells have been damaged, or
there is clear evidence that shows these were handled; and/or
• The product damages are caused by any unforeseeable or force
majeur circumstances, especially, lightning, water, fire, applying
incorrect voltage or any other cause that is not due to the product
manufacturing or design.
Under no circumstances will SUNSTECH be held responsible for the
loss of any data stored in the product. The consumer will be held
responsible for any back-up copies and the protection of any data
from loss, damage or destruction.
None of the warranties included here cover the replacement of
parts, due to ware or rupture of mechanisms, rubber, boxes and/or
plastic, as well as any aesthetic damage resulting from the normal
use of the product, for example, if the screen loses its shine with the
use of the product. In the same way, the warranties do not cover any
type of damage produced during the transportation of the product
(including but not limited to aesthetic damage, blows, lines,
scratches, stains, dents, etc.) in which case the applicable provisions
under SUNSTECH’s general contract conditions will apply.
For further information go to www.sunstech.es
You can also contact:
AFEX SUNS, S.A.
Pallars, 189-191
08005 BARCELONA
40
Page 43

SAFETY AND PRECAUTION WARNINGS
www.sar-tick.com
This device offers communication and enter tainment services that
follow SUNSTECH’s high standards and technological experience.
• The content may differ from the final product of the software
provided by the suppliers of services or transmitters and it is subject
to alteration without prior notice.
• The elements that come with the device and any available
accessory may vary according to the region or supplier of the
services.
• The elements provided are designed uniquely for this device and
may not be compatible with other devices.
• You may purchase additional accessories at your local SUNSTECH
distributor. Ensure that they are compatible with the device before
you purchase th em.
• Other accessories may not be compatible with the device.
• SUNSTECH is not held responsible for problems of insufficient
return or any change to the operating system’s software. Any
attempt to personalize the operating system may cause the device
or the applications to function incorrectly.
Instruction icons
Copyright
Copyright
This guide is protected by international copyright laws.
This product can be adjusted to the SAR
national limits of 2 W/Kg. The specific SAR
maximum values are in the information
section of this guide.
When you hold the product or use it on
your body, maintain a distance of 1.5 cm
from your body to ensure the
radiofrequency exposure standards.
Warn ing: Situations that can cause injuries to
yourself or third parties.
Precaution: Situations that can cause
damages to the device or other equipment.
Note: Notes, recommendations of use or
additional information.
2013 Afex suns, S. A.
41
Page 44

Reproduction, distribution, translation or transmission of any part of
this guide is not allowed under any circumstances or through any
means, be it electronic or mechanic. This includes photocopies,
records or storage in any information retrieval and storage systems,
without previous written authorization from Afex Suns, S. A.
Safety informati on
This section contains safety information for mobile devices.
Some of the content may not apply to your device. In order to
avoid injury to yourself or third parties or damage to the device,
read the devi ce’s safety inform ation before you use i t.
War ning
If you do not comply with these safety regulations and
warnings, you may suffer serious injury or even death.
Do not use damaged power cords or connectors or loose
sockets.
Unsafe connections may cause an electric discharge or a fire.
Do not touch the power cord if your hands are wet and do not
pull the cord to disconnect the charger.
If you do so, you may be electrocuted.
Do not bend or damage the power cord.
If you so do, this may cause an electric discharge.
Do not cause a short-circuit in the charger or the device.
If you do so, this may cause an electric discharge or the device may
not function correctly.
Use batteries, chargers, accessories and supplies that have been
approved by the manufacturer.
• The use of generic batteries or chargers may shorten the useful
life of the device or cause incorrect functioning. It may also cause a
fire or the battery may explode.
• Only use batteries or chargers that have been approved by
SUNSTECH, specifically designed for the device. Any non compatible
batteries and chargers may cause serious physical injuries or
damage the device.
• SUNSTECH will not be held responsible for the safety of the user
whenever accessories or supplies that have not been approved by
the brand are used.
Do not cut or drop the charger or the device.
When handling or disposing of the device and charger do so
with caution.
• Never throw the battery or the device into the fire. Never place
the battery or the device on any sources of heat, such as, ovens,
microwaves, glasshouses or radiators, etc. If it overheats, the device
may explode. Follow all local regulations with regards to disposing
42
Page 45

of the used battery or device.
• Do not squash the device or make holes in it.
• Avoid exposing the device to high pressure because this may
cause an internal short-circuit and overheating.
Protect the device, battery and charger in order to stop them
from getting damaged.
• Avoid exposing the device and battery to very high or very low
temperatures.
• Extreme temperatures may damage the device and reduce the
charging capacity and the duration of the device and battery.
• Avoid the battery entering into contact with metal objects
because this may cause a connection between the positive and
negative terminals of the battery and damage it temporarily or
permanently.
• Never use damaged chargers or batteries.
Do not store the device in or near heaters, microwaves, heated
kitchen equipment or high pressure containers.
• The battery may have leakages.
• The device may overheat and cause a fire.
Do not use or store the device in places with a lot of dust or
material transported by air.
Dust or foreign materials may cause the device to malfunction and
may result in a fire or an electric discharge.
Safety informati on
Do not bite or suck the device or the battery.
• This may damage the device or cause an explosion or a fire.
• Children and animals may choke on small pieces.
• When children use the device, ensure that they do so correctly.
Do not insert the device or the accessories provided into your
eyes, ears or mouth.
If you do so, you make choke or suffer serious injuries.
Do not handle damaged lithium-ion batteries or batteries that
show evidence of leakage.
To dispose of lithium-ion batteries safely, contact your closest
authorized service centre.
Precaution
If you do not comply with these regulations and warnings, you
may suffer injuries or cause material damage.
Do not use the device near other electronic devices.
• Most electronic devices use radiofrequency signals. The device
may interfere with other electronic devices.
• If you use a LTE data connection, this may cause an interference
with other devices, such as audio equipment and telephones.
43
Page 46

Do not use the device in a hospital, plane or car that may be
affected by interference caused by radiofrequency.
• If possible, avoid using the device at any distance lower than 15
cm from a pacemaker, because the device may cause interferences
with it.
• To minimize any possible interference with a pacemaker, use the
device only on the opposite side of the body in relation to the
position of the pacemaker.
• If you use medical equipment, contact the manufacturer of the
equipment before using the device in order to ascertain whether
the equipment will be affected by the radiofrequency emitted by
the device.
• If electronic devices are used on a plane, these may interfere with
the electronic navigation instruments. Ensure that the device is
turned off during take-off and landing. After take-off you may use
the device on “airplane mode” as long as this is allowed by the cabin
crew.
• The electronic devices in your car may malfunction due to the
radio interference of the device. Contact the manufacturer for
further information.
Do not expose the device to smoke or strong emanations.
If you do so, you may damage the outside part of the device or
cause its malfunctioning.
If you use hearing devices, contact the manufacturer for further
information about radio interference.
The radiofrequency that the device emits may interfere with some
hearing devices. Before using the device, contact the manufacturer
in order to ascertain whether the hearing device will be affected by
the radiofrequency emitted by the device.
Do not use the device near other devices or apparatuses that
emit radiofrequency, such as sound systems or radio towers.
Radiofrequency may cause the malfunctioning of the device.
Turn off the device in potentially explosive atmospheres.
• Turn off the device instead of removing the battery in potentially
explosive atmospheres.
• Always respect the standards, instructions and warning signs in
potentially explosive atmospheres.
• Do not use the device in petrol stations or near fuel or chemicals
or in demolition areas.
• Do not store or transport flammable liquids, gases or explosive
material in the same compartment in which the device, its parts or
accessories are.
If you become aware of the device or the battery letting off
strange odours or sounds or if you see smoke or liquid coming
out of the device or battery, stop using the device immediately
and take it to an authorized service Centre.
44
Page 47

If you do not do so, this may cause a fire or an explosion.
Comply with all the safety regulations and warnings related to
the use of mobile devices when driving a vehicle.
When driving, your main responsibility is to control the vehicle
safely. If the law does not allow mobile phone use when driving, do
not use the mobile device. For your and others’ safety use your
common sense and remember the following advice:
• Get to know the device and its operating functions, like speed
dialling and recall system. These functions allow the time necessary
to make and receive calls to be reduced.
• Put the device in a place where it is easy to reach. Make sure that
you can access the wireless device without taking your eyes off the
road. If you receive a telephone call at an inconvenient time, let
voice-mail answer it.
• Stop phone calls when there is heavy traffic or when there are
adverse climate conditions. Rain, sleet, snow, ice and heavy traffic
can be very dangerous.
• Do not jot down or look for telephone numbers. Jotting down a
task or looking at your calendar may distract you from your main
responsibility, which is to drive safely.
• Dial carefully and assess the state of the traffic. Make phone calls
when you are not moving or before hitting traffic. Try to schedule
phone calls when the car is parked.
• Do not have very stressful or emotional phone calls that may
distract you. Tell the person that you are speaking to that you are
driving and end any conversations that may take away your
attention from the road.
Correct use and maintenance of the mobile device.
Keep the device dry.
• Humidity and liquids may damage the parts or the electronic
circuits of the device.
• Do not turn on the device if it is wet. If it is already turned on,
turn it off and take the battery out immediately (if you cannot turn it
off or take the battery out, just leave it as it is). After this, dry the
device with a towel and take it to the service centre.
• Liquids will change the colour of the label which indicates the
damage caused by the water inside the device. The damage caused
by the water in the device may cancel the manufacturer’s warranty.
Place the device only on flat surfaces.
If it drops, the device may get damaged.
Do not store the device in very hot or cold places. It is
recommended that you use the device at temperatures between
5º and 35º.
• Do not store the device in places with very high temperatures,
such as inside a car in the summer. If you do so, you may cause the
screen to malfunction, the device may get damaged or the battery
45
Page 48

may explode.
• Do not expose the device to direct sunlight for long periods of
time (for example, on the dashboard of a car).
• Store the battery at temperatures between 0º and 45º.
Do not store the device with metal objects, such as coins, keys
and necklaces.
• The device may get scratches or stop working properly.
• If the battery terminals come into contact with metal objects, a
fire may occur.
Do not store the device near magnetic fields.
• It is possible for the device to start malfunctioning and for the
battery to lose power due to being exposed to these fields.
• Cards with magnetic stripe, such as credit cards, telephone cards,
travel passes may get damaged due to the magnetic fields.
If the device overheats, stop using it and its applications for a
while.
Prolonged skin exposure to a hot device may cause symptoms of
burning with low temperature, such as red spots and pigmentation.
Do not use the device if the back cover is not in place.
The battery may come out of the device, which can cause damage
or malfunctioning.
If the device has a lamp or a camera flash, do not use it near
people’s or animal’s eyes.
This may cause a temporary loss of vision or damage the eyes.
Be careful when exposing yourself to intermittent light.
• When you use the device, leave some lights turned on in the
bedroom and do not have the screen too close to your eyes.
• Convulsions or fainting may occur due to exposure to
intermittent light when looking at videos or playing games with
intermittent lights for prolonged periods of time. If you feel unwell,
stop using the device immediately.
• If anyone close to you suffered from convulsions or fainting
when using a similar device, visit a doctor before using the device.
• If you feel discomfort, such as muscle cramps or you feel
disoriented, stop using the device immediately and visit a doctor.
• To avoid eye fatigue, have frequents breaks when using the
device.
Reduce the risk of injury caused by repetitive movements.
When you carry out repeated actions, such as pressing keys,
drawing characters on the touch screen or playing a game, you may
feel discomfort in your hands, neck, shoulders or other parts of the
body. When you use the device during prolonged periods of time,
hold it with relaxed hands, touch the keys lightly and rest frequently.
If you continue feeling discomfort during or after taking these steps,
stop using the device and visit a doctor.
When you use earphones, protect your hearing and your ears.
46
Page 49

• Excessive exposure to loud sounds can cause
damage to hearing.
• Exposure to loud sounds while you are walking
• Always lower the sound before connecting the earphones to an
audio source and use the minimum amount of volume necessary to
listen to music or have a conversation.
• In dry environments, static electricity may accumulate in the
earphones. Avoid using earphones in dry environments or touch
metal objects to discharge the static electricity before connecting
the earphones to the device.
• Do not use an earphone while you are driving or riding a vehicle.
If you do so you may get distracted and cause an accident or you
may be subject to legal action, depending on the area where you
are driving.
Use the device with caution while you are walking or moving.
• Always pay attention to what is happening around you to avoid
physical injury to yourself and others.
• Make sure the earphone cord does not get entangled round your
arms or nearby objects.
Do not take devices in your front pockets or round your waist.
You may get injured or damage the device if it falls.
Do not paint your device or put any stickers on it.
• Paint and stickers can obstruct the mobile parts and stop the
device from working properly.
• If you are allergic to paint or to the metal parts of the device, you
may get a stingy feeling, eczema or swelling. If this happens, stop
using the device and visit a doctor.
Do not use the device if the screen is cracked or broken.
The broken glass can cause hand and face injuries. Take the device
to an authorized service centre to get it repaired.
Install the mobile devices and the equipment with caution.
• Make sure that the whole mobile device or related equipment
that is installed in your vehicle is assembled safely.
• Avoid placing the device and the accessories where the airbag is
or next to it. Any wireless equipment installed incorrectly can cause
serious injuries when the airbags inflate quickly.
Do not allow the product to fall or to be subject to strong
impacts.
• The device may get damaged or malfunction.
• If you bend or deform it the device may get damaged and its
parts may malfunction.
Guarantee of the maximum duration of the battery and charger.
• Avoid charging the device for over a week, because overcharging
can reduce the battery’s service life.
may distract you and cause an accident.
47
Page 50

• With time, the device will run out of battery (even when it is not
being used) and you will need to recharge it to use it again.
• Disconnect the charger from the power sources when it is not
being used.
• Use the battery only for the purpose for which it was designed.
• If you do not use the battery for a long time, you may reduce its
service life and performance. You may also cause the
malfunctioning or explosion of the battery or a fire.
• Follow all the instructions in this manual to guarantee the
longest service life possible for your device and battery. Any
damage or operating problems caused by not complying with the
warnings and instructions may cancel the manufacturer’s warranty.
• With time, the device may wear out. Some parts and repairs are
covered under the warranty during the validity period; however, the
damages or deterioration caused by the use of accessories not
approved by the brand are not covered.
Take the following information into account when using the device.
• Use it in a vertical position, as you would a traditional telephone.
• Speak directly into the microphone.
• Do not cover the antenna area with your hands or other objects.
This may cause connection problems or cause the battery to run
down.
Do not unassembled, change or repair the device.
• Any alteration or change to the device may cancel the
manufacturer’s warranty. If you need to repair the device, take it to
an authorized service centre.
• Do not disassemble or make holes in the battery, this may cause
an explosion or a fire.
• Turn off the device before removing the battery. If you remove
the battery while the device is still turned on, this may cause
malfunctioning.
Take the following information into account when cleaning the
device.
• Use a towel or a rubber cloth to clean the device and the charger.
• Clean the battery terminals with cotton or with a towel.
• Do not use chemical substances or detergents. If you do so, you
may cause discoloration or corrosion of the outside part of the
device or you may cause an electric discharge or a fire.
Do not use it for any other purpose other than the one it was
designed for.
The device may malfunction.
When you use the device in public, try not to disturb others.
Only allow qualified professionals to carry out the maintenance
of your device.
It is possible for damages to occur and the manufacturer’s warranty
is cancelled if you allow non qualified personnel to carry out the
48
Page 51

maintenance of the device.
Be careful when handling SIM cards, memory cards or cables.
• When inserting a card or connecting a cable to the device, make
sure the card is inserted correctly or that the cable is connected on
the right side.
• Do not take the card out when the device is transferring
information or it has access to it, because you may lose data and
damage the card or the device.
• Protect the cards from strong discharges, static electricity and
noise generated from other electronic devices.
• Do not touch the contacts or the gold terminals with your fingers
or with metal objects. If the card is dirty clean it with a soft cloth.
• If you insert a card or connect a cable forcefully or incorrectly you
may cause damage to the multifunctional socket or other parts of
the device.
Make sure you have access to emergency services.
It is possible that in some areas or circumstances you may not be
able to make emergency phone calls. Before travelling to remote
areas or developing countries, plan an alternative form of
communicating with the emergency services.
Protect your personal data and avoid confidential information
from being spread or used incorrectly.
• When you use the device, make sure you make back-up copies of
important data. SUNSTECH will not be held responsible for any loss
of data.
• When you dispose of the device, make a back-up copy of all the
data and after re-establish the device to avoid personal information
from being used inappropriately.
• Read the licenses screen carefully when you download
applications. Be especially careful with applications that have access
to various functions or a significant amount of your personal
information.
• Control your accounts frequently to avoid any suspicious or
non-authorized use. If you find any indication of your personal
information not being used appropriately, contact your services
supplier to delete or change the information in your account.
• If you lose the device or it is stolen, change the passwords of
your accounts to protect your personal information.
• Avoid using applications from unknown sources and block the
device with a pattern, a password or a PIN.
Do not distribute material protected with copyright.
Do not distribute material protected with copyright without the
authorization of the content owners. If you do so, you may violate
copyright laws. The manufacturer will not be held responsible for
any legal problem caused by illegal use of material protected by the
user.
49
Page 52

Malware and virus
Follow these suggestions to protect the device against malware
and virus. If you do not do so, you may cause damages or loss of
data that may not be covered under the warranty.
• Do not download unknown applications.
• Do not use unreliable websites.
• Delete any suspicious text messages or emails from unknown
senders.
• Create a password and change it regularly.
• Deactivate the wireless functions, such as Bluetooth, when you
are not using them.
• If the device behaves strangely, execute an antivirus program to
detect a possible infection.
• Execute an antivirus program on the device before starting
applications and files that you just downloaded.
• Install anti-virus programs on your computer and execute them
regularly to detect any possible infections.
• Do not edit the registration adjustments or change the device’s
operating system.
Information about the certification of the Specific Absorption
Rate (SAR).
THIS DEVICE FOLLOWS INTERNATIONAL STANDARDS OF
EXPOSURE TO RADIO WAVES.
Your mobile device is a radio transmitter and receiver. It was
designed to not exceed the limits of exposure to radio waves
(electromagnetic fields of radiofrequency) recommended by
international standards. The standards were developed by an
independent scientific organization (ICNIRP) and include a
substantial safety margin designed to ensure the safety of all people,
regardless of their age or state of health.
The exposure to radio wave standards use a measurement unit
known as the Specific Absorption Rate, SAR. The SAR limit for mobile
devices is 2 W/Kg. The SAR tests are carried out using standard
operation positions with the device transmitting at its maximum
certified energy level in all frequency bands. The highest SAR
amounts under the ICNIRP standards for this device model are:
Maximum SAR for this model and conditions under which it
registered
SAR for positions near the head.
SAR for positions near the body.
During the use, the real SAR values for this device are usually a lot
lower from the values indicated previously. This is due to
maximizing the system’s efficiency and to minimize the interference
with the network, the operation capacity of your mobile device
reduces automatically when the maximum power is not needed for
0.285 W/Kg
0.0399 W/Kg
50
Page 53

the call. The lower the amount of energy leaving the device, the
lower the SAR amount will be.
A SAR test was carried out with the device on the body with a
distance of 1.5 cm. To comply with the radiofrequency exposure
requirements, while using the device on the body, the device shall
have to be at least 1.5 cm away from the body.
Some organizations, like the World Health Organization or the Food
and Drug Administration of the United States suggest that if users
want to reduce exposure, they can use a hands free accessory to
main the wireless device far away from the head and body when in
use, or reduce the amount of time spent using the device.
Correct disposal of this product.
To avoid any possible damage to the environment or human health
caused by uncontrolled disposal of waste, separate these products
from other waste and recycle them. This way, you are promoting the
sustainable reuse of material resources.
Individual users can contact the establishment where they
purchased the product or the relevant local authorities to get
information about where and when they can take it in order to
submit it to ecological and safe recycling.
Business users can contact their supplier and check the purchase
contract conditions. This product and its electronic accessories
should not be disposed of with other commercial waste.
Correct disposal of this product’s batteries
If the batteries are not disposed of correctly, these substances may
cause personal injury or damage the environment.
(Electronic device waste)
(This applies in countries where recollection
systems happen separately).
The presence of this symbol on the product,
accessories or information material indicates
that neither the product nor its electronic
accessories (such as, the charger, helmets, USB
cable) should be disposed of with other
household waste.
(This applies in countries where recollection
systems happen separately).
The presence of this mark on the batteries,
manual or product packaging indicates that
when the service life of the batteries has ended
they should not be disposed of with other
household waste. The chemical symbols Hg, Cd
and Pb indicate that the battery has mercury,
cadmium or lead at levels a lot higher than the
reference values admitted by the 2006/6
Directive of the Eu ropean Union.
51
Page 54

To protect natural resources and promote recycling, separate the
batteries from other waste and recycle them through the free
collection service in your area.
Exemption from responsibility clause
Part of the content and services to which you obtain access through
this device belong to third parties and are protected under
copyright, patent, registered trademark and/or other intellectual
property laws. This content and services are only for personal use
and not commercial use. It is possible that the content or the
services cannot be used if not authorized by the content owner or
the supplier of the services. Without prejudice to the
aforementioned information, except when expressly authorized by
the content owner or service supplier, you cannot change, copy,
reedit, charge, publish, transmit, translate, sell, create derivative
works, explore or distribute in any way or by any means the content
or the services shown through this device.
“THE CONTENT AND THE SERVICES OF THIRD PARTIES ARE
PROVIDED “AS IS”. SUNSTECH DOES NOT GUARANTEE THE CONTENT
OR THE SERVICES PROVIDED, EITHER EXPRESSLY OR IMPLICITLY, FOR
NO PURPOSE. SUNSTECH EXPRESSLY RENOUNCES ANY IMPLICIT
GUARANTEES, INCLUDING BUT NOT LIMITED TO, MERCHANTABILITY
OR SUITABILITY GUARANTEES FOR A PURPOSE IN PARTICULAR.
SUNSTECH DOES NOT GUARANTEE THE VERACITY, VALIDITY,
REPRODUCTION, LEGALITY OR INTEGRITY OF ANY TYPE OF
CONTENT OR SERVICE PROVIDED THROUGH THIS DEVICE AND
UNDER NO CIRCUMSTANCES, INCLUDING NEGLIGENCE, WILL
SUNSTECH BE HELD RESPONSIBLE. BOTH IN TERMS OF CONTRACT
OR PREJUDICE TO ANY DIRECT OR INDIRECT, ACCIDENTAL, SPECIAL
OR CONSEQUENTIAL DAMAGES, LAWYERS’ FEES, EXPENSES OR ANY
OTHER TYPE OF DAMAGE FROM OR IN RELATION TO ANY TYPE OF
INFORMATION INCLUDED IN OR AS A RESULT OF THE USE OF ANY
TYPE OF CONTENT OR SERVICE BY YOURSELF OR A THIRD PARTY, THE
POSSIBILITY OF THE REFERRED DAMAGES IS KNOWN.”
The services of third parties may cease or be interrupted at any time
and SUNSTECH does not carry out representations or guarantees in
relation to the availability of content or service for any period of
time. The content and services are transmitted by third parties
through networks and transmission locations over which SUNSTECH
has no control. Without limiting the generality of this clause,
SUNSTECH expressly renounces any responsibility for any
interruption or suspension of content or service provided through
this device.
SUNSTECH is not responsible for customer service regarding
content and services. Any question or request for service regarding
content or services should be sent directly to the services and
content suppliers.
52
Page 55

uSUN250
53
Page 56

Manual del usuario
uSUN250
54
Page 57

Índice
1 . APARIENCIA Y OPERACIONES DEL TECLADO ...................................56
CÓMO USAR LA TARJETA DE MEMORIA COMO DISCO U ...............................56
2.
3.WIFI ..................................................................................................58
BLUETOOTH ........................................................................................60
4.
ORREO .............................................................................................61
5.C
ARCADO ..........................................................................................63
6.M
MENSAJERÍA .......................................................................................67
7.
CONTACTOS .......................................................................................69
8.
INTERNET EXPLORER ............................................................................72
9.
GRABADORA ....................................................................................73
10.
ELOJ ...............................................................................................74
11. R
ACULADORA ...................................................................................75
12.C
ÁMARA ...........................................................................................75
13.C
IMÁGENES ........................................................................................78
14.
MÚSICA ...........................................................................................81
15.
CALENDARIO ....................................................................................82
16.
ADIO FM ........................................................................................84
17.R
ONFIGURACIÓN ...............................................................................85
18.C
AVISOS PARA EL USO DEL TELÉFONO .....................................................90
19.
55
Page 58

1 . Apariencia y operaciones del teclado
Teclas Funciones
z Pulse esta tecla para volver al inicio desde
home (inicio)
menu (menú)
back (volver)
power
(encendido)
up (subir)
down (bajar) z Pulse esta tecla para bajar el volumen.
P-Serson z Cúbralo y luego la luz del fondo del
front camera
(cámara frontal)
cualquier aplicación o interfaz.
z Pulse esta tecla para abrir la ventana de
aplicaciones abiertas recientemente.
z Pulse esta tecla para iniciar el menú, lo
cual le permite realizar acciones en la interfaz
actual o el menú de opciones.
z Pulse está tecla para volver a la interfaz
anterior o para cerrar el cuadro de diálogo, las
opciones del menú, el panel de notificaciones
o el teclado.
z Pulse esta opción para abrir el menú del
teléfono, luego puede optar por bloquear la
pantalla, apagar el teléfono o dejarlo en modo
silencioso.
z Pulse esta tecla para subir el volumen.
z Pulse esta tecla para poner el teléfono y
en modo vibrador desde el modo silencioso.
teléfono se pagará.
z Al acceder a la interfaz de la cámara,
cambiada a cámara frontal, puede tomar una
fotografía de sí mismo.
2. Cómo usar la tarjeta de memoria como disco U
Si desea enviar música, imágenes u otros archivos a la tarjeta de
memoria del teléfono desde la computadora, primero debe
configurar la tarjeta de memoria como el disco u.
Para configurar la tarjeta de memoria como el disco u:
1) Conecte el teléfono a la computadora con el cable USB.
Aparecerá el icono de notificación en el cuadro de estado.
2) Use la línea de transmisión móvil USB conectada a la
computadora.
3) En el panel de notificaciones, toque el USB conectado, luego
toque“Abrir el dispositivo de almacenamiento USB”.
56
Page 59

2) Después de conectar el teléfono a una PC, puede verificar las
imágenes tomadas con la cámara.
57
Page 60
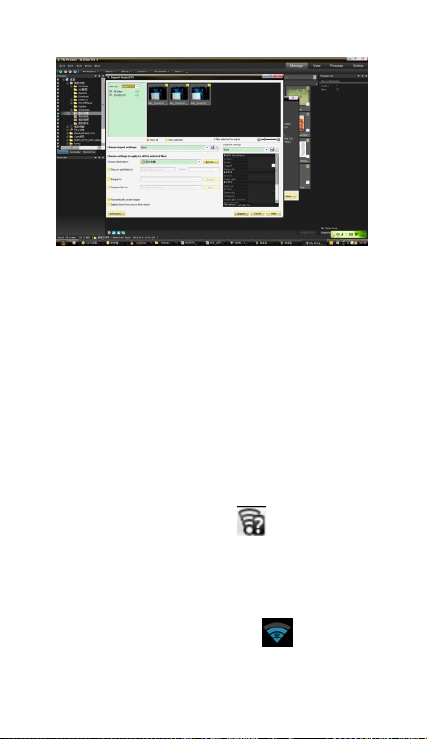
• Aviso: Diferentes sistemas operativos de PC y cómo usar el disco
u.
1) WIN7 puede usarse directamente.
2) Actualiza el reproductor de medios de Windows XP a la
versión más recie nte.
3) Instale controlador wpdmtp.in.
• Aviso: en la herramienta de asistente de operación de PC como
teléfono móvil, debe abrirse la depuración del USB.
3.WIFI
Cómo abrir Wi-fi y conectarse a la red inalámbrica
1) Presione home (inicio)>menu (menú),luego toque settings
(configuración)>wifi and internet
2) Seleccione el casillero de wi-fi para abrir el Wi-Fi. El teléfono
automáticamente buscará las redes inalámbricas disponibles.
3) Toque la configuración de Wi-Fi. Luego, la lista de redes de Wi-Fi
mostrará la configuración de seguridad y el nombre de la red
encontrada. (Abra la red o WEP、WPA/WPA2 con contraseña). si
habilita la notificación en la configuración de Wi-Fi settings, el
cuadro de estado mostrará este icono (
una red inalámbrica disponible.
4) Toque una de las opciones de Wi-Fi para conectarse a la red.
Cuando escoja la red abierta, el teléfono se conectará
automáticamente. Si escoge WEP、WPA/WPA2 con contraseña,
debe escribir primero la contraseña y luego pulsar para conectarse.
• Avisos:Cuando el teléfono esté conectado a la red inalámbrica,
el cuadro de dado mostrará este ícono de(
aproximada
de la señal ( cantidad de barra Iluminadas). Si se toca la
) cuando se encuentre
), y la potencia
58
Page 61
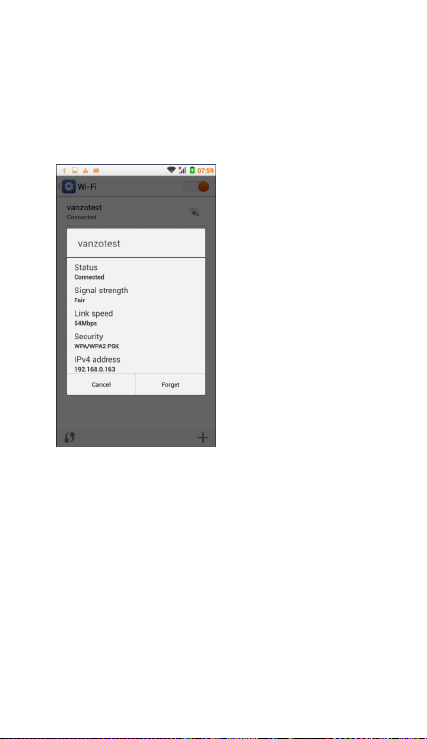
red conectada,aparecerá el nombre de la red Wi—Fi , el estado, la
velocidad, la señal,
la potencia, la información de seguridad y la dirección IP.
Si desea borrar la configuración inalámbrica, toque “not reserve” (no
reservar)
como en la imagen de la derecha. Si desea conectarse a esta red,
debe
volver a introducir estos parámetros de configuración.
• Avisos
A menos que opte por no reservar la red, no hay necesidad de
volver a introducir la contraseña correspondiente la próxima vez
que se conecte a la red inalámbrica encriptada anteriormente. Wi-Fi
realizará la búsqueda de forma automática, es decir que el teléfono
no necesita realizar pasos adicionales para conectarse a redes de
Wi-Fi.
• Avisos:
A menos que opte por no reservar la red con contraseña, no hay
necesidad de volver a introducir la contraseña correspondiente la
próxima vez que se conecte a la red inalámbrica encriptada
anteriormente. Wi-Fi realizará la búsqueda de forma automática, es
decir que el teléfono no necesita realizar pasos adicionales para
conectarse a redes de Wi-Fi.
• Conectarse a otras redes de Wi-Fi
1) En la interfaz de redes inalámbricas en Internet, toque la
configuración de Wi-Fi. Las redes de Wi-Fi encontradas aparecerán
59
Page 62

en la lista de redes de Wi-Fi.
2) Toque otras redes de Wi-Fi y luego podrá conectarse a esta red.
• Avisos:Además, puede navegar por Internet por medio de
GPRS. De forma predeterminada, el GPRS en SIM1 se abre después
del encendido; los usuarios pueden seleccionarlo manualmente. La
ubicación específica es“settings>wireless and internet>data
connection,toque “SIM1、SIM2、no data connection”. Cuando el
punto se pone tarde, ya esta abierto.
4. Bluetooth
Encienda el Bluetooth o configure el teléfono para que éste pueda
detectarse
1) Presione home>menu,/settings.
2) Toque “wireless and internet”, luego seleccione la casilla de
Bluetooth para abrir la función Bluetooth. Después de iniciar la
función, el cuadro de estado mostrará este icono (
3) Toque “scan for devices”(buscar dispositivos) para comenzar a
buscar todos los dispositivos dentro del alcance.Toque la
configuración de Bluetooth; aparecerán todos los dispositivos
encontrados en la lista debajo del icono.
(Seleccione la casilla “can be detected” (puede detectarse),
configúrela para puede detectarse el dispositivo y los otros
dispositivos con Bluetooth podrán detectar el teléfono.)
Importante: el tiempo de detección máximo del teléfono es de dos
minutos.
• Acoplamiento y conexión de los auriculares de Bluetooth
1) Presione home>menu, luego toque settings (configuración).
2)Toque wireless and internet>Bluetooth settings, luego seleccione
la casilla de Bluetooth. Entonces, su teléfono para los dispositivos
con Bluetooth dentro del alcance y mostrará los dispositivos
encontrados en la lista debajo del icono.
• Sugerencias
a. Si la lista no puede detectar su equipo, toque “scanning
equipment” (buscando equipo) para volver a buscarlo.
b. Asegúrese de que los dispositivos que desea detectar estén en el
modo de detección.
3) Toque los auriculares en la lista de equipos para poner fin a la
conexión.
• Avisos: Por lo general, los dispositivos con Bluetooth nCuando
el auricularecesitan una contraseña para acoplarse. A menudo se
utiliza「0000」como la contraseña predeterminada. 4) El
acoplamiento y el estado de conexión aparecerán debajo de los
auriculares en la lista de dispositivos con Bluetooth. Cuando los
auriculares estén conectados a su teléfono, aparecerá la casilla de
).
60
Page 63

estado. Este ícono( )significa que está conectado. Luego,
puede utilizar los auriculares para hacer o recibir llamadas.
• Cómo poner fin a la conexión de Bluetooth.
1) Presione home>menu>settings>wireless and
internet>Bluetooth settings.
2) En la lista de equipos con Bluetooth, toque o pulse y mantenga
presionados los auriculares manos libres conectados.
3) Presione y seleccione “cancel the pairing” (cancelar el
acoplamiento).
• Sensor de proximidad de Bluetooth
Después de acoplar los dos dispositivos, puede ver si la señal es
fuerte o débil por medio del dispositivo sensor de proximidad de
Bluetooth.
5.Correo
5.1 Gmail
• Crear una cuenta de correo electrónico
Seleccione mail> settings. Puede activar o editar las cuentas de
correo electrónico existentes así como crear una nueva cuenta de
correo electrónico.
a. Seleccione mail (correo) aparecerá la interfaz de configuración
de cuenta de Google. Luego, toque‘next step’(siguiente paso) >
create account (crear cuenta)>enter name,last name and e-mail
account (introducir nombre, apellido y cuenta de correo
electrónico).
b. Los servidores de Google determina si el nombre puede
utilizarse. De ser así, aparece una nueva interfaz que le indica
introducir una contraseña y luego determina la seguridad de la
contraseña. Los usuarios que no cumplen los requisitos deben
volver a introducir la contraseña.
c. Registre con éxito una nueva cuenta de Gmail, un mensaje
creado automáticamente para realizar la comprobación.
61
Page 64

• Carga de la cuenta de correo
a. Abra Gmail, sáltese la pantalla de introducción>aparece en la
interfaz de carga >seleccione load (cargar)
b. Introduzca nombre y contraseña y luego cargue.
En la inicialización de la cuenta de correo electrónico, con la
indicación “login successful” (inicio de sesión correcto),
sincronizarán todas las cuentas de Google.
• Creación y envío de correos electrónicos
Al componer correos electrónicos, seleccione select mail > creating
mails. Introduzca la dirección (destinatario), el asunto y el contenido.
Presione MENU para poder‘append’ (agregar adjuntos) 、 ‘Add
Cc/Bcc’(Agregar Cc/Bcc), sel eccionar enviar o descartar.
• Recibir correos
Cuando se perciba el tono para correos electrónicos, la casilla de
estado mostrará este botón
(actualizar). Actualice para ver la cantidad de correos no leídos de
manera adecuada.
• Eliminar correos
Al cargar una cuenta de correo, si desea eliminar la, debe
restaurar la configuración de fábrica. Al cargar una segunda
cuenta, debe presionar el botón de menú para eliminarla.
Avisos : Muchas funciones dependen de Gmail Account, Por
ejemplo:Electronic Market、Google Talk、Sync Contact y Calendario.
5.2 Email
• Cargar correo electrónico
c. Abra la conexión de red.
d. En la configuración de la interfaz de cuenta, introduzca la
dirección y la contraseña de correo electrónico correctas y luego
haga clic en next (siguiente). El teléfono móvil automáticamente
completa la configuración del servidor de envío y recepción.
Frecuencia de detección de correo emergente e interfaz de
configuración de usuario, complete Settings, haga clic en
“siguiente”.
e. Para el nombre de creación de cuenta, introduzca el nombre de
usuario de correo electrónico y haga clic en “siguiente”. Complete la
configuración, sincronice la casilla de correo.
• Crear y enviar correo electrónico
Al componer correos electrónicos, seleccione select mail > creating
mails. Introduzca la dirección (destinatario), el asunto y el contenido.
Presione MENU para poder‘append’ (agregar adjuntos)、seleccionar
enviar o descartar o guardar como borrador.
• Verifique los arvhivos de correo electrónico.
. Presione Menu >‘refresh’
62
Page 65

Haga clic en las opciones de la carpeta inferiores, la lista de
opciones de todas las carpetas.
6.Marcado
Cuando aparezca el icono del servidor de Internet en la pantalla,
puede marcar o recibir llamadas. La barra de señal en la esquina
superior derecha muestra la potencia de la señal de red (la potencia
máxima es de 4 barras de señal).
• Comenzar a marcar
Abra el menú principal de la aplicación>marque. Puede seleccionar
SIM1 o SIM2 para marcar.
63
Page 66

Marcado
En el teclado de marcado, introduzca el número telefónico y luego
haga clic en la tecla de mercado. Después, debe seleccionar una
tarjeta SIM o llamada por Internet. Si debe llamar a una extensión,
puede hacer clic en el “tablero de marcado” en la parte inferior de la
pantalla para abrir la interfaz o presione la tecla de menú para
seleccionar “delay 2 seconds” (retrasar 2 segundos), y luego
introduzca el número de la extensión.
Introduzca el número en el teclado de marcado, haga clic en Menu y
podrá marcar o usar marcado rápido.
• Videollamda: La videollamada por lo general se refiere a la
Internet y la Internet móvil basada en final (Internet 3 G) a través del
teléfono entre la voz de la transmisión y la imagen en tiempo real
(usuario de fotografías, elementos, etc.) de una manera de
comunicarse. Solo 3 G admite esta función. Introduzca un número,
haga clic en marcado por video. Ambos interlocutores contestan el
teléfono después de que ambos pueden verse por cámara para
videollamadas.
• Llamadas por teléfono en el registro de llamadas
Todos los números a los que se llame y de las cuales se reciban
llamadas en“SIM1、SIM2”se conservarán en el registro de llamadas
del menú de teléfono. En la parte superior izquierda de cada
registro de llamada aparecerá“SIM1 o SIM2.
Todos los números en el registro de llamadas pueden marcarse
haciendo clic en el botón “marcar” al lado derecho de la pantalla.
Cuando aparezca la lista de números, haga clic en ella para obtener
detalles. Pulse de manera prolongada para poder estar por medio
de “SIM1 o SIM 2”. Mientras tanto puede editar, eliminar, guardar el
número o hacer otras operaciones.
• Recibir llamadas
Cuando entre una llamada (la parte superior izquierda mostrará a
qué tarjeta SIM corresponde), presione “contestar” y deslice el botón
del medio hacia la derecha. Entonces, puede recibir llamadas.
• Sensor de proximidad
De acuerdo con la distancia entre el teléfono y el cuerpo humano, el
interruptor de la luz de fondo se ajustará automáticamente.
Durante la llamada, acerque el teléfono a la oreja y la luz de fondo se
apagará automáticamente, lo que podría ahorrar energía de la
batería y evitar tocarlo accidentalmente.
• Rechazar la llamada
a. En el modo de espera, cuando ingrese una llamada, prima el
botón “rechazar” y deslice el botón del medio hacia la izquierda para
rechazar la llamada.
b. Mientras esté utilizando el teléfono e ingrese una llamada, haga
clic en el botón “rechazar” para rechazar la llamada.
• Llamada bidireccional/llamada en conferencia
64
Page 67

• Aviso:Esta función necesita que la tarjeta de SIM active las
características de llamada en conferencia.
1) Ya existe una llamada en el teléfono.
2) Haga clic en“Add calls” (Agregar llamadas),marque otra llamada
(o reciba otra llamada). De manera predeterminada, el teléfono
activa ”call waiting” (llamada en espera)(settings–dialing
settings–other dialing settings). Después de que ambos estén
conectados, se puede ver el estado de la llamada.
3)Seleccione“combine call”(combinar llamada)– se pueden
combinar dos llamadas en una manera.
4)Después de conectada a la llamada en conferencia,puede
65
Page 68

separar las llamadas o colgar una de ellas por medio de“la pequeña
flecha en la llamada conferencia”.
• Grabación telefónica
Durante la llamada, usando more>start record (más>iniciar
grabación), se puede grabar el diálogo de la llamada.
1)Se pueden configurar otras funciones de la llamada en settings
(configuración)>set other functions of the call en la configuración
del marcado,por ejemplo:Transferencia de llamada– después de
terminar la configuración y activarla,se puede transferir la llamada a
un número determinado.
2)En settings>dialing settings >other dialing settings,obra “call
waiting”(llamada en espera). Después de activar esta función, puede
recibir otra llamada cuando ya esté en línea. Las funciones para
contestar y rechazar llamadas son iguales a las de cualquier otro
teléfono.
• Configuración de llamada
Llamada de voz
1)Correo de voz: Introduzca de coreeo de voz en la configuración
de correo de voz.
2) Número de prefijo de IP:configuración de los números de
prefijo de las tarjetas SIM.
3)Reenvío de llamadas:Se pueden configurar 2 respectivamente
a una tarjeta SIM si la línea está ocupada y nadie puede atender.
3) Prohibición de llamada: Se pueden configurar restricciones de
llamada a las dos tarjetas de SIM respectivamente.
4) Configuraciones adicionales:a.Mi número de teléfono b.
Llamada en espera。
Videollamda:
1)Sustitución de video local:configurar una imagen para que se
muestre cuando la cámara no se utiliza.
2) Mostrar video de par:mostrar imagen para reemplazar el video
de par cuando no está disponible.
3)Sustitución de video de par:Configure una imagen para que se
muestre cuando el video de par no está disponible.
4)Habilitar cámara trasera:al activar esta opción se puede
cambiar la cámara.
5) Agrandar video de par:active esta opción para hacer que el
video del par sea más grande que el video local.
6)Llamada interrumpida automática:Conexión de llamada
interrumpida a llamada de voz de forma automática.
7)Videollamada saliente:Mostrar video local cuando se realiza
una video llamada.
8)Videollamada entrante min:Mostrar video local cuando se
acepta una video llamada entrante.
9) Otra configuración: a. Reenvío de llamada b.Prohíbición lo
66
Page 69

llamada c.Configuración adicional
Llamada de Internet
1) Cuenta
2) Usar llamada de Internet
Otra configuración
1) Números de marcado fijo
2) Recordatorio de minutos: Active el recordatorio de mi nutos a
los 50 s de cada minuto.
3) Respuesta rápida:Se puede edicar el contenido de la
información del texto de mensajes rechazados.
7. Mensajería
• Para enviar SMS.
1) Presione home>messaging,toque“new messages”(nuevos
mensajes).
2) En la interfaz de “editar”:
a. Haga clic en el casillero de “destinatario” para iniciar el método
introducción. También se puede hacer clic en el casillero “introducir”
para iniciar el método de introducción. De esa manera se pueden
introducir caracteres.
b. Haga clic en“send from SiM1 or SIM2”(enviar de SiM1 o SIM2)
para enviar.
• Para enviar MMS.
Al crear el mensaje,predeterminado como SMS,se lo cambiará a
MMS cuando se completen las siguientes operaciones. Se pueden
enviar MMS haciendo clic en “send” (enviar) después de editar.
1) En la interfaz de “editar”,haga clic en el botón de “Menu”:
2) Haga clic en “append” para agregar adjuntos. Luego, se cambiará
a MMS automáticamente.
67
Page 70

Aviso:
a, Si desea enviar MMS con
muchas páginas, debe
seleccionar “append PPT” en la
interfaz “append” (agregar
adjuntos).
b, Puede an exar 10 imágenes
con el formato GIF, JPEG.
c, Haga clic en “adding themes”
(agregar temas), aparecerá el
cuadro de “tema” debajo del
cuadro de “destinatario”;
mientras tanto, el mensaje se
convierte en MMS
automáticamente.
• Enviar mensajes a múltiples números
Introduzca múltiples números en el cuadro de introducción; cada
número está separado con una coma.
Haga clic en el lado derecho de la cabeza con el receptor más el
ícono. Puede coger el grupo de contacto en la libreta de
direcciones.
• Aviso: Por el momento, este teléfono puede enviar mensajes,
puede introducir los caracteres 312 en el
cuadro“recipient”(destinatario).
Cuando un mensaje es enviado o reenviado, aparece una letra
amarilla pequeña. El número 1 o 2 en la letra se refiere al SIM1 o al
SIM2.
Cuando falla el envío de mensajes, aparece un triángulo rojo con un
68
Page 71

signo de exclamación.
Edición de información de otras funciones del botón Menú
8. Contactos
• Abra el menú de applications>contacts
De manera predeterminada se muestran los contactos de teléfono y
los contactos de la tarjeta SIM, se ordenan los contactos desde la
primera letra del abecedario.
2) Haga clic en el icono de búsqueda. Puede acceder a la interfaz de
búsqueda de contactos.
69
Page 72

a. Introduzca los numerosos o las letras y la lista de nombres en la
libreta de teléfonos, que aparecerán en los resultados de la
búsqueda.
b. Si la búsqueda no encontró el contacto, la interfaz mostrará que
el contacto no fue encontrado.
3)Haga clic en el icono“Agregar contacto” para crear nuevos
contratos.
Seleccione guardar contactos en el teléfono o una tarjeta SIM,
ingreso en la interfaz de edición de contactos.
Puede editar el encabezado del contacto, el nombre, el número de
del vehículo, un grupo, “guardar en” y luego haga clic en “terminar”.
70
Page 73

4)En la interfaz de contactos, haga clic en el botón Menú.
a. Menu >Delete contacts (Eliminar contactos).
Con el ícono “Todos” seleccionado, haga clic en “eliminar”, elinine
todos los contactos, incluido el número de telédono y la tarjeta SIM
del contacto.
Para separara uno o más contactos, haga clic en “eliminar” para
seleccionar el contacto que desea eliminar.
b. Menu> mostrar un contacto
Se pueden escoger todos los contactos, la tarjeta SIM de contactos o
los contactos del teléfono móvil.
c. También escoja la opción en la tarjeta SIM y el teléfono celular si
desea o no mostrar todos los contactos.
d. Menu >Importar/exportar
En el teléfono móvil pueden escoger tres partes de la tarjeta SIM o la
tarjeta SD para encontrar información de contacto e importar y
exportar contactos.
Primero escoja “copiar fuente” y luego seleccione el próximo paso,
seleccionando “copiar contacto a” para completar la copia del
contacto.
e. Menu >Accounts (Cuentas)
Configuración de sincronización de rutina, configuración de cuenta
y sincronización
f. Menu >Share visible contacts (compartir contacto visibles)
Todos los contactos pueden importarse a la tarjeta SD, a través
debluetooth, email, mensaje de texto o MMS.
• Abra la interfaz de aplicaciones >Contac t,cambiar al grupo.
1)Haga clic en“Agregar grupo”para crear un nuevo grupo.
71
Page 74

2)La inicial en la columna "nombre del grupo", introduzca el
nombre de contactos, en "excrbir el nombre del contacto" escriba la
palabra clave del contacto. El teléfono buscará todos los contactos y
usted podrá agregar un contacto al grupo. Finalmente, haga clic
en "terminar”.
3) En un grupo, al en el botón menú, funciones del menú
a. Menu>Upd ate (actualizar)
Se puede modificar el nombre del grupo, eliminar o agregar grupo
de contactos.
b. Menu >Delete (Eliminar)
Puede eliminar el grupo pero no eliminará el contacto del teléfono.
c. Menu >Sending a group message (enviar un mensaje grupal).
Seleccione el grupo y este será agregado a la barra de destinatarios.
d. Menu >Send Email by group (Enviar correo electrónico por grupo)
El contrato de un grupo tiene la misma dirección de correo
electrónico, el nuevo correo Automático en la dirección de correos
electrónico estarán en la barra de direcciones agregados para el
receptor.
9. Internet Explorer
Internet Explorer
1)En la interfaz de Internet explorer,toque la dirección introducida
e introduzca la URL.
2) Toque el teclado para introducir la URL. Aparecerán en la pantalla
los sitios web apropiados. Puede tocarlos directamente para ir a la
página o continuar introduciendo la URL.
• Página de inicio
72
Page 75

Seleccione “homepage” (página de inicio),para poder cargar la
página de inicio. Si no la configura, utilizará la página de inicio
preestablecida por el distribuidor.
• Funciones del menú
1) Menu>Backward (atrás)
Después de examinar varias páginas, el navegador volverá la
página anterior antes de la página actual.
2) Menu>Forward (adelante)
Después de examinar varias páginas, el navegador pasará a una
página web después de la página actual.
3) Menu>Windows
Puede ver todas las páginas abiertas.
4) Menu>Bookmarks (Marcadores)
a. Haga clic en “Marcadores” para marcar la URL actual como
marcador guardado.
b. Haga clic en el marcador debajo de la lista de marcadores para
abrir la URL.
5) Menu>More (Más)
a. Agregar marcadores, guardar la URL como marcador.
b. Encontrar en la página, buscar lo que necesita en la página
actual.
c. Seleccionar texto, en el texto, hacer clic y arrastrar para
seleccionar una parte del texto.
d. Información de la página, mostrar dirección de página y otra
información de la página actual.
e. Compartir página, compartir la página actual por Bluetooth o
SMS.
f. Descargas, mostrar todo el contenido descargado.
g. Historial, muestra su historial de navegación y visualiza las
páginas más visitadas de información.
h. Configuración, contiene una variedad de configuraciones del
navegador.
10. Grabadora
La grabadora puede grabar voz y enviarla rápidamente por
Bluetooth o MMS y también puede convertirla en tono de llamada.
• Aviso: la grabadora solo puede guardar los archivos de audio
como formato AMR.
1) Haga clic en la aplicación de la grabadora.
2) Mantenga el micrófono del teléfono cerca de la fuente de voz.
3) Haga clic en la grabadora pa ra grabar voces y haga clic en
“detener” o Recordinglist (Lista de grabación).
Todas las grabaciones se guardan en la carpeta Mis grabaciones en
el programa de música predeterminado.
73
Page 76
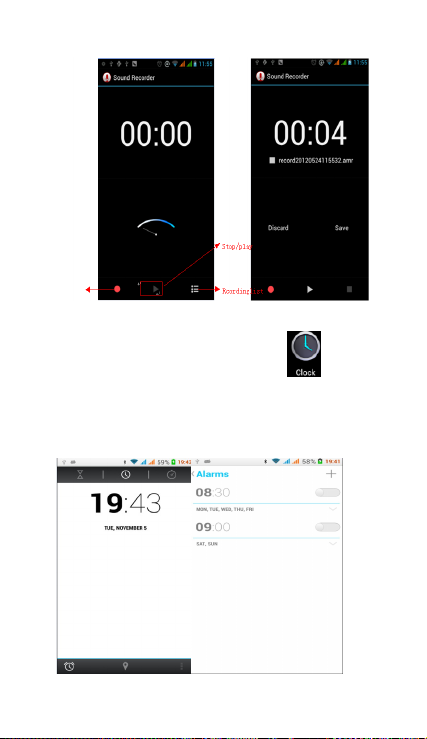
11. Rel oj
1) Abra el menú de la aplicación haciendo clic en
2) Haga clic en la pantalla. Se muestra la posición, las pantallas, la
hora en blanco con negro, excepto la alarma. Esta vez el modo de
espera de la pantalla no apagará la pantalla. Vuelva a hacer clic en la
pantalla para restaurar la interfaz normal del reloj.
3) Haga clic en la pantalla en el botón de configuración de alarma y
acceda al modo de reloj de alarma.
74
Page 77

• Alarma
Después de configurar la alarma, cuando llegue la hora
configurada, recibirá una alerta mediante llamada o violador.
Presione Menu para agregar una alarma. También puede agregarla
desde la interfaz para agregar. Puede configurar la alarma de
acuerdo con sus necesidades. En la interfaz de la alarma, aparecerán
tres alarmas que no están configuradas.
Editar
Puede editar la alarma actual, editar la hora, los tonos de llamada, el
dictador, la forma de repetición y las pestañas.
12.Caculadora
calculadora
Esta función puede convertir su teléfono en una calculadora; puede
hacer cálculos simples.
·En la interfaz de la calculadora , presione MENU o mantenga
presionado en la pantalla a la izquierda; aparecerá el panel
avanzado,
13.Cámara
13.1 cámaras
• Preparación previa
Instale la tarjeta de memoria antes de usar la cámara o la
videocámara. Todas las fotografías o los videos tomados por el
teléfono están almacenados en la tarjeta de memoria.
• Abra la cámara.
Presione inicio, toque el menú, seleccione la cámara. Para tomar una
fotografía:
1) Encuentre el objeto que desea fotografiar mirando la pantalla.
75
Page 78

2)Toque el botón de obturador en la pantalla.
3)Después de tomar la fotografía, esta se guardará en la carpeta de
la galería de la cámara.
4) Puede ver las fotografías tocando el botón del cuadro de
previsualización.
5)Configuración de la cámara
Toque “setting Menu”(menú de configuración) en la interfaz de la
cámara para ajustar la configuración.
En el modo de visor de la cámara, presione Menú, para poder
cambiar a video o galería de fotos.
En la parte superior derecha del modo el visor de la cámara, se
puede ver una previsualización de la imagen anterior. Toque el
cuadro del previsualización, la fotografía se mostrará en pantalla
completa puede agrandarla para dar los detalles
• Configuración compartida de cámara y videocámara
1)Modo del flash:Auto、On (encendido)、off (apagado).
2)Balance de blancos :Auto 、Incandescent (incandescente)、
Daylight (Luz de día)、Fluorescent (fluorescente)、Cloudy (nublado)、
Twilight (crepúsculo) 、 Shade ( sombra) 、 Wa rm fluo rescent
(fluorescente cálido)
3)Efecto de color:None、Mono、Sepia、Negativo、Aqua、Pizarra
negra、Pizarra blanca.
4)Modo de escena,Auto、Night (Noche)、Sunset (puesta de sol)、
Party (fiesta) 、Portrait ( retrato)、Landscape (paisaje)、Night portrait
(retrato nocturno)、Theatre (teatro)、Beach (playa)、Snow (nieve)、
Steady Photo (foto fija)、 Fireworks (fuegos artificiales)、 Sport
(deporte)、Candle light (luz de vela).
5)Otra configuración:ubicación de almacenamiento, exposición,
76
Page 79

propiedades de imagen,antiparpadeo
• Configuración de la cámara
1) Modo de captura:normal、HDR、Face beauty (belleza facial)、
Panoram a
2) Temporizador automático:apagado ,2 segundos ,10
segundos
3) Disparó continúa:40 disparos ,90 disparos
4) Tam año d e im age n:QVGA,VGA,1M píxeless,1.3M píxeles,
2M píxeles,3M píxeles,5M píxeles
13.2 Videocámara
• Preparación previa
Instale la tarjeta de memoria antes de usar la cámara o la
videocámara. Todas las fotografías o los videos tomados por el
teléfono están almacenados en la tarjeta de memoria.
• Captar video
1)Apunte la pantalla hacia aquello que desea captar.
2)Toque el botón de obturador en la pantalla.
3)Después de grabar, los videos guardarán en la carpeta de la
galería de la cámara.
4 ) Puede ver los videos tocando el botón del cuadro de
previsualización.
5) Configuración de la videocámara
Toque “set” (configurar) en la interfaz de la Ccámara para editar la
configuración de la videocámara.
En el modo de visor de la cáara, presione Menú, para poder cambiar
a video o galería de fotos.
En la parte superior derecha del modo de visor de la Cámara, se
muestra la previsualización del video anterior. Toque el cuadro de
previsualización y el video se mostrará en pantalla completa; puede
tocar el botón de reproducción para verlo.
• Configuración compartida de cámara y videocámara
77
Page 80

1)Modo del flash:Auto、On (encendido)、off (apagado).
2)Balance de blancos :Auto 、Incandescent (incandescente)、
Daylight (Luz de día)、Fluorescent (fluorescente)、Cloudy (nublado)、
Twilight (crepúsculo) 、 Shade ( sombra) 、 Wa rm fluo rescent
(fluorescente cálido)
3)Efecto de color:None、Mono、Sepia、Negativo、Aqua、Pizarra
negra、Pizarra blanca.
4)Modo de escena,Auto、Night (Noche)、Sunset (puesta de sol)、
Party (fiesta) 、Portrait ( retrato)、Landscape (paisaje)、Night portrait
(retrato nocturno)、Theatre (teatro)、Beach (playa)、Snow (nieve)、
Steady Photo (foto fija)、 Fireworks (fuegos artificiales)、 Sport
(deporte)、Candle light (luz de vela).
• Configuración de videos
1)Micrófono: apagado, encendido
2)modo de audio:meeting (reunión),normal
3)intervalo de tiempo:off,1s,
4)calidad de video:baja, media, alta, fina
1.5s,2s,2.5s,3s,5s,10s
14. Imágenes
• Abra imágenes
Presione home, toque la etiqueta de aplicaciones, luego toque en la
galería de fotografías.
En la interfaz de la cámara, presione el menú para abrirlo.
1) Interfaz de archivos
a. En la interfaz de la biblioteca, arriba a la derecha una diapositiva
muestra el botón de reproducción. Haga clic en la diapositiva para
que comience la reproducción de todos los archivos de imágenes.
b. Haga clic en las imágenes; acceda a la imagen para ver la interfaz.
c. Presione de forma prolongada sobre los archivos, aparece la
operación correspondiente.
78
Page 81

• Usar imágenes
Después de tomar imágenes puede verlas y compartirlas con sus
amigos.
a. Use el correo electrónico para enviar imágenes : seleccione
Gmail o E-mail, las imágenes se agregarán automáticamente a un
correo electrónico. Escriba su información, haga clic en
enviar.
b. Use Mesnsajería para enviar imágenes:seleccione la información,
las imágenes se agregarán al MMS. Escriba su información, haga
clic en enviar.
C. Use Bluetooth:En la lista de Bluetooth, seleccione el equipo de
bluetooth ya acoplado. Puede enviar una imagen por medio de
Bluetooth.
4) Marcar imágenes
En la interfaz de visualización de fotografías, puede arrastrar o
puede reenviar para ver las fotografías.
Editar imagen.
a. Editar luz:Fill Light (luz de relleno), Highlights (luces altas)
Shadows (sombras) Auto-Fix (fijar automáticamente).
b. evitar efectos de imagen: Cross-process (proceso cruzado),
Posterize (posterización) Lomo Documentary (documental), etc.
c. Efectos de color:Warmth (Calidez) Saturation (Saturación) B &W
(B y N) Sepia Negative (Negativo) Tint (Tinte) Duo-tone (Dos tonos)
Doodle (Garabato).
d. Recortar: Crop (Recortar) Red Eye (Ojos rojos) Straighten
(Enderezar) Rotate (Rotar) Flip (Girar) Sharpen (Intensificar).
79
Page 82

6)Recortar imágenes:
a. Si desea ajustar el tamaño del clip, presione el borde de las
herramientas de recorte. Aparece la flecha para ajustar el tamaño.
b. Si desea ajustar en el clip para mantener la proporción, mantenga
presionada cualquiera de las cuatro esquinas.
c. Si desea moverse al clip del área de la imagen, presione el recorte
y luego mueva para arrastrar a la posición.
• Ver imágenes
1) En la interfaz de imágenes, toque el álbum de fotografías para ver
80
Page 83

las imágenes.
2) Toque la imagen en miniatura para ver la imagen en pantalla
completa.
Puede optar por mostrar las imágenes en tamaño pequeño o
grande. Mantenga presionada la pantalla hacia el lado izquierdo
para ver la siguiente fotografía o hacia la derecha para ver la
anterior.
En el álbum de fotografías, presione y mantenga presionado en la
imagen hacia la izquierda para ver la siguiente imagen o hacia la
derecha para ver la anterior.
15. Música
El teléfono puede reproducir los archivos de audio digital en la
tarjeta de memoria: AMR、M4A、MIDI、MP3、WAV、OGG.
• Abrir Música
Presione el icono de inicio y buque la aplicación de música. Luego,
aparecerá la interfaz de Medios de música.
• Medios de música
Sus archivos de música están clasificados de acuerdo con las
siguientes cuatro categorías: Artists (artistas), albums (álbumes),
songs (canciones) y play lists (listas de reproducción). Toque una de
las categorías para ver la lista que contiene.
Continúe las operaciones hasta que aparezca su música deseada.
Por ejemplo, si escoge Artistas, aparecerá una lista enumerada de
artistas almacenados. Escoja cualquiera para abrir la lista; luego,
aparecerán todos los álbumes y las canciones. Seleccione un álbum;
luego, aparecerán canciones contenidas en el mismo.
81
Page 84

• Sugerencias: Puede reproducir todas las canciones en la
interfaz de medios de música en secuencia aleatoria. Presione Menu,
y luego toque Party Shuffle (Mezcla para fiestas). Luego, comenzará
la reproducción de la primera canción seleccionada aleatoriamente.
Para cerrar la Party Shuffle, presione Menu, y toque para apagar la
Party Shuffle.
16. Calendario
Acceda a la aplicación de calendario.
Cargue cuentas de Googles, acceda a la aplicación. En la interfaz de
82
Page 85

días o semana, utilizará el gris para resaltar el día. Se muestra la
fecha predeterminada en el mes actual.
En la interfaz, presione el menú y aparecerán 4 modos de
visualización:
1) La interfaz de programación muestra una programación
determinada (haga clic en la hora inicial y vea hacia adelante, haga
clic en la hora final para ver hacia atrás).
2) La interfaz del día muestra el programa para un día (la última
fecha sobre la que se hizo clic), continúe deslizando para poner la
página en el día correspondiente.
3) La interfaz de la semana muestra el programa para un semana (la
última fecha sobre la que se hizo clic), continúe deslizando para
poner la página en la semana correspondiente.
4) La interfaz de hoy muestra un programa para un día; en la interfaz
de mes o semana use el gris para resaltar el día.
5) La interfaz del mes muestra el programa para un mes (la última
fecha sobre la que se hizo clic), continúe deslizando para poner la
página en el mes correspondiente.
• Nuevas actividades
1) Presione menú, más < toque nuevas actividades.
2) Introduzca el nombre de la actividad en el cuadro de actividades.
Aviso:Para ocasiones especiales como cumpleaños o un día con
eventos, configure la opción “all-day” en Yes (Sí). Si la actividad es
en un período de tiempo determinado, seleccione el tiempo de
inicio y el tiempo de finalización.
3) Introduzca la ubicación del evento, la descripción, los invitados, la
repetición, el tiempo de recordatorio.
4) Haga clic en “terminar” para volver al calendario.
83
Page 86
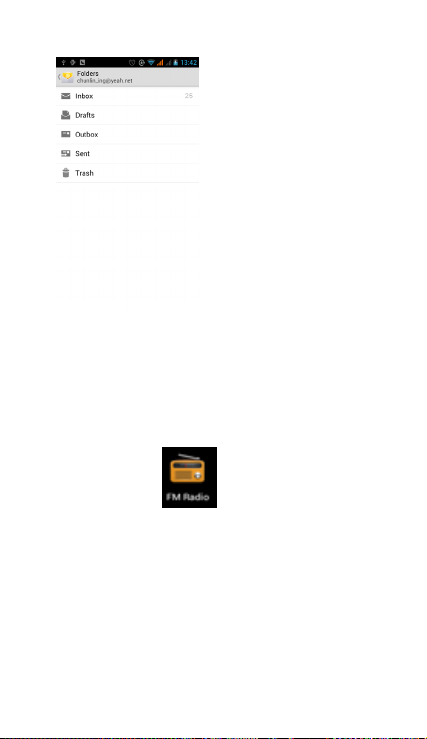
17.Radio FM
Radio FM
A través de esta aplicación, se puede escuchar la radio FM en el
dispositivo. Para usar la radio FM, es necesario conectar auriculares
cableados. Estos también sirven como antena para tener una mejor
recepción. Antes de abrir este programa, puede instalar los
auriculares del equipo original. Cuando escuche, puede cambiar
manualmente a altavoces o el modo con auriculares cableados.
• Abrir radio FM.
Toque esta aplicación
FM.
1) Haga clic en “search” (buscar). La búsqueda automática buscará
el canal de FM, y el canal en la interfaz de la lista muestra todos los
canales.
2) Haga clic en "FM recording" (grabación de FM), para grabar la
radio mientras está escuchándola. El nombre de la grabación es
predeterminado y puede ser arbitrario.
3) Haga clic en "exit" (salir) para apagar la radio FM.
4) Deben insertarse los auriculares para tener una mejor recepción;
seleccione un altavoz y puede escuchar la radio a través del altavoz.
5) Haga clic en el ícono de de flecha de cinco estrellas para agregar
el canal como favorito.
para abrir la aplicacion de radio
84
Page 87

• Escuche la radio FM de fondo
Haga clic para volver a la tecla, el programa de radio pasa al fondo.
Puede seguir escuchando elprograma y puede realizar cualquier
otro programa.
18.Configuración
Su proveedor de servicio puede establecer algunas configuraciones
deldispositivo de forma predeterminada, de modo que no se puede
cambiar estas configuraciones.
• Administrador de SIM
1) Toque esta opción para seleccionar o desactivar la tarjeta SIM. La
tarjeta se ve gris cuando se la desactiva.
2) En tarjeta SIM predeterminada, puede escoger Voice call (llamada
de voz), Video call (videollamada), Messaging, (Mensajería) o Data
connection (Conexión de datos).
• Redes inalámbricas e internet
Toque el modo de vuelo para abrirlo o cerrarlo.
Al activar el modo de modo, la función de Wi-Fi se cerrará
automáticamente;descative el modo de vuelo, luego conecte
Wi-Fi. Puede utilizarse con normalidad.
1) Wi-Fi y Configuración de Wi-Fi Toque Wi-Fi
para activar
disponibles automáticamente. Pueden usarse redes sin contraseña
dirctamente; las demás necesitan que se introduzca la contraseña
primero.
. Abra Wi-Fi para buscar redes
85
Page 88

• Bluetooth
Al activar Bluetooth, se buscarán automáticamente otro dispositivo
cercano con Bluetooth.
• Uso de datos
1. El uso de datos configura el límite de tráfico de datos móviles; el
flujo que exceda el límite cerrará los servicios de datos móviles.
2. Más
Wireless & networks (Redes inalámbricas y redes)
a. Modo Airplane (Avión)
b. VPN
c. Punto caliente portátil y anclado
d. Redes móviles
e. Modo de transferencia de GPRS
• Perfiles de audio
Esta opción permite configurar los tonos del teléfono bajo el estado
de recepción de llamadas o de notificación. Incluye: vibrador,
volumen, tonos de llamada, notificación de tono de llamada y
feedback (tono de operación de botones, seleccionar Sonido, tono
de bloqueo de pantalla)para adaptarse a todos los ambientes.
1) Seleccione“Standard (estánda) / Mute (silencio) / Conference
(Conferencia) / Outdoor (Afuera)”. Toque el lugar a la derecha.
Cuando se pone verde, se abre.
2) Volumen : puede deslizar manualmente esta opción para
configurar el volumen de tono y del reloj de alarma.
• Pantallas
a. Brillo ajusta el brillo b. Rotación automática de la pabtalla Gire la
pantalla para cambiar la dirección
c. Animación Escoja esta opción para mostrar animaciones d.
Tiempo de inactividad de la pantalla Ajuste la demora antes de que
la pantalla se bloquee automáticamente
• Almacenamiento
a. Se puede ver la tarjeta SD y el uso de la memoria del teléfono.
b. Se puede extraer la tarjeta SD o borrar la tarjeta SD.
c. Se puede escoger la memoria predeterminada.
• Batería
Tiempo de arranque, el uso en cada módulo de energía en
generalAplicaciones
1) Fuentes desconocidas permiten instalar aplicaciones no
86
Page 89

electrónicas del mercado.
2) Administrar aplicaciones administra y elimina las aplicaciones
instaladas.
3) Servicio en ejecución, toque cualquiera de los servicios de la lista
en > aparece el mensaje emergente “detener el servicio? casilla de
operación de dos botones, toque “Stop” para detener el servicio y
que desaparezca de la lista de “Servicios en ejecución”.
4) En el pulso de almacenamiento se pueden ver todos los
programas descargados en la tarjeta SD puede ejecución o cuánto
espacio de memoria ocupan.
5) En el uso de batería se puede el estado de la energía.
6) Desarrollo. Depuración de USB:La depuración del USB solo se
aplica en el proceso de desarrollo. Esta función permite copiar datos
en la computadora y dispositivos móviles.
• Acceso a ubicación
1) Usar red inalámbrica Usar red inalámbrica para encontrar
ubicaciones en la aplicación(Google map).
Tóquelo para abrir o cerrar.
2) Cuando utilice el posicionamiento de satélite de GPS, configure
la precisión a nivel de calles (cancélelo para ahorrar batería).
Tóquelo para abrir o cerrar.
3) Asistencia EPO de GPS EPO, utilice los datos de asistencia (EPO)
de GPS para acelerar el posicionamiento del GPS.
4) A-GPS El uso de datos auxliares puede acelerar el proceso de
posicionamiento del GPS.
Hablan de recuerde que“se producen flujos de GPRS cuando se
utiliza A—GPS”.
• Seguridad
1) Configurar bloqueos de pantallas Use imágenes 、 PIN o
contraseña para bloquear la pantalla.
a. Toque“imágenes”; la primera vez aparecerán instrucciones
sencillas para desbloquear y ejemplos; haga clic en “next
step”(siguiente paso) para pasar al paso“make the unlocking
image”(crear imagen de desbloqueo).
b. Toque PIN Entroduzca los números de PIN para desbloquear la
pantalla.
c. Toque contraseña Configure la contraseña para desbloquear la
pantalla.
d. Toque“no” Detiene esta aplicación.
2) Configurar bloqueo de tarjeta SIM Introduzca el PIN (4-8 números)
para establecer el bloqueo de SIM.
El PIN (Número de identificación personal) de la tarjeta SIM es para
evitar el uso no autorizado de las tarjetas SIM. El código PIN se
proporciona con la tarjeta SIM. El proveedor de servicio le da el valor
inicial.
Para cambiar un código de PIN bloqueado, es necesario abrir "SIM
87
Page 90

Lock " (bloqueo de SIM). Luego vaya a la pantalla Cambiar
contraseña, el teléfono y le indicará automáticamente que
introduzca el código PIN anterior y le pedirá que ingrese un nuevo
código PIN 12; finalmente, el teléfono indicará que cambió el
código correctamente. Si introduce el PIN con error tres veces, los
códigos PIN de la tarjeta SIM bloquearán automáticamente. Los
códigos PUK generalmente son suministrados con la tarjeta SIM. De
lo contrario, debe comunicarse con el proveedor del servicio para
obtener los códigos.
Si introduce 10 veces un código PUK incorrecto, la tarjeta SIM se
bloqueará permanentemente.
3) Contraseña visible La contraseña es visible cuando se la
introduce.
4) Seleccionar administración de dispositivos Agregue o elimine
administrador de dispositivos.
5) Usar credenciales de seguridad Habilite credenciales de
seguridad para visitas de la aplicación y otras credenciales.
6) Instalar este tarjeta SD Instale el certificado encriptado desde la
tarjeta SD.
7) Configurar contraseña Configure o cambie la contraseña de
almacenamiento de certificado
8) borrar almacenamiento Borra todo el contenido del
almacenamiento de certificado y resetea las contraseñas.
• Idiomas y teclado
1) Seleccionar país del idioma Incluye muchos idiomas en el
teléfono.
2) Diccionario predeterminado Agrega palabras al diccionario
predeterminados o elimina palabras.
3) Del teclado Vibrador cuando los botones de presionan, emisión
de sonidos cuando se
presiona los botones, mayúscula automática, introducción por voz
(por micrófono en el
teclado), introducción de palabras (la voz puede alterarse
deslizando el dedo en la tecla de espacio), mostrar
sugerencias (activar la función predictiva cuando se introducen
palabras); Auto-texto (se introducen automáticamente
determinadas palabras
cuando se presiona la tecla de espacio o teclas específicas).
4) Método de introducción se puede seleccionar el método de
introducción de teclado Android o Google.
• Copias de seguridad y reseteo
1) Hacer copias de seguridad de datos de aplicación, contraseña de
WLAN y otras copias de seguridad de configuraciones en los
servidores de Google.
2) El reseteo a la configuración de fábrica, borra todos los datos
almacenados en el teléfono.
88
Page 91
• Agregar cuenta
a. Corpor ativa
b. Email
c. Google
• Fecha y h ora
1) Automatización Use la fecha y la hora suministradas por la red.
2) Configuración de la fecha Toque “+” y ”-” para configurar la fecha.
3) Selección de la zona horaria Seleccione la zona horaria de
acuerdo al lugar donde se encuentra.
4) Configuración de la hora Toque “+” y ”-” para configurar la hora.
5) Uso del formato de 24 horas ENCENDIDO/APAGADO
6) Seleccione el formato de la fecha Existen tres tipos de formato
entre los cuales seleccionar: Mes-día-año, Día-mes-año y Año-mesdía, de los cuales Año-mes-día es la configuración predeterminada.
• Programar encendido/apagado
Puede configurar la hora de arranque o cierre tocando esta opción.
También puede seleccionar repetirlo o que se produzca un día
determinado durante una semana.
• Accesibilidad
1) Texto grande
2) El botón de encendido termina la llamada: Configure el botón de
"encendido" para terminar la llamada; si se presiona "encendido"
determinará la llamada y no se apagará la pantalla.
3) Autogirar pantalla
4) Introducir contraseñas por voz
5) Tocar y mantener presionada demora
6) Instalar scripts de web
7) Arranque rápido
• Opciones de desarrollador
a. Depuración de USB: La depuración de USB solo para desarrollo y
disco USB.
b. Permanecer activado: la pantalla nunca entrará en supervisión
durante la carga
c. Admitir ubicaciones simuladas
d. Contraseña de seguridad del escritorio
e. Modo estricto habilitado
f. Ubicación del puntero
g. Mostrar toques
h. Mostrar actualizaciones de pantalla
i. Mostrar uso de CPU
j. Forzar renderización de GPU
k. Escala de animación de ventana
89
Page 92

l. Escala de animación de transición
m. No conservar actividades
n. Límite de procesos de fondo
o. Mostrar todas las APR
• Acerca del teléfono
Puede verificar la información en la barra de estado y la energía
restante.
19. Avisos para el uso del teléfono
Su teléfono es un producto de diseño y mano de obra excelentes y
debe ser tratado con cuidado. Las siguientes sugerencias pueden
ayudarle a cumplir las condiciones de los kits de reparación para
extender la vida útil del teléfono móvil.
1) Coloque el teléfono móvil y sus partes y componentes fuera del
alcance de los niños pequeños.
1) Mantenga el teléfono seco. La lluvia, la humedad y todo tipo de
líquidos que contienen materiales corroen los circuitos electrónicos.
2) No toque el teléfono con las manos húmedas cuando realice la
carga. Puede ocasionar choques eléctricos y daños al teléfono.
3) Evite colocar el dispositivo en un ambiente con alta temperatura.
Las altas temperaturas acortarán la vida útil de los dispositivos
electrónicos, dañarán las baterías y torcerán o derretirán ciertos
plásticos.
4) Evite colocar el dispositivo en un ambiente con temperatura
demasiado baja. Cuando la temperatura sube, el teléfono produce
vapor de agua que puede dañar el circuito electrónico.
5) Evite colocar el teléfono en lugares polvorientos o sucios; de lo
contrario, las piezas pueden dañarse.
6) Evite colocar el teléfono cerca de un cigarrillo encendido, cerca
de una llama o cualquier fuente de calor.
7) No abra el dispositivo; el abordaje no profesional causará daño al
teléfono.
8) No lo arroje desde la altura, no lo golpee ni lo sacuda. La
manipulación indebida puede dañar los circuitos internos.
9) No pinte el teléfono ya que la pintura bloqueará los auriculares,
los micrófonos y otras partes extraíbles y es posible que no
funcionen.
10) Use un paño limpio, suave y seco para limpiar la cámara y los
lentes sensores de luz. Prohíba el uso de productos químicos,
agentes de limpieza dañinos y líquidos de limpieza para limpiar el
teléfono.
11) Si el teléfono móvil, la batería, el cargador o los accesorios
del teléfono móvil tienen defectos, envíelos al centro de servicio
autorizado más cercano para su inspección.
12) De ser necesario, el personal del Centro de servicio le
ayudará y dispondrá las reparaciones del teléfono.
90
Page 93

- Modo de recuperación de uSUN250
Cómo acceder en Recovery Mode (Modo de recuperación)
Siga estos pasos.
1- Para acceder en el modo de recuperación, primero debe apagar
el dispositivo. Luego, presione la tecla “ON-OFF” por un s eg undo y
luego presione la tecla “VOL +” al mi smo ti em po . hasta que
aparezca la imagen de Android.
Después aparece otra imagen de Android.
1- Presione “Power” (Encendido) y aparece el menú interno.
91
Page 94

2-Pulse la tecla “VOL –“ y seleccione “wipe data / factory reset”
(borrar datos/configuración predeterminada de fábrica) y luego
presione “VOL +” .
3- Seleccione “ Yes delete all user data ” (Sí, borrar todos los datos
de usuario) con la tecla “Vol –“ y luego presione
“VOL +” para realizar la selección.
Apareció Android.
4- Cuando termine, seleccione “reboot system now” (re in iciar
sistema ahora) y presione el botón “VOL + " y la unidad se reiniciará.
(Este proceso puede tardar algunos minutos)
92
Page 95

Cómo descargar el software usando la unidad
IMPORTANTE: Cuando descargue el software, todos los datos serán
eliminados como fotografías, videos y aplicaciones que haya
instalado.
No interrumpa este proceso; asegúrese de que la baterría esté
totalmente cargada.
Siga estos pasos.
1- Abra el navegador y busque y abra este enlace:
www.sunstech.es/download/
2- Seleccione el modelo de la tablet que tiene y descargue el
software. (Este software está instalado en la tarjeta SD INTERNA).
3- Cuando la descarga esté completa, seleccione la
aplicación " Wireless update " (Actualizar sistema) en su unidad.
4-Seleccione el software y espere hasta que se complete el proceso.
Hecho en China
93
Page 96

1. General
La presente garantía se otorga sin perjuicio y además de los
derechos reconocidos al consumidor frente al vendedor por el Real
Decreto Legislativo 1/2007 de 16 de noviembre por el que se
aprueba el texto refundido de la Ley General para la Defensa de
Consumidores y Usuarios (la “LCU”) y demás legislación
complementaria. Por lo tanto, no se excluyen, ni limitan los
derechos legales reconocidos al consumidor en virtud de la
legislación autonómica, nacional o europea aplicable.
La presente garantía será válida en todos los Estados Miembros de
la Unión Europea con las limitaciones que correspondan legalmente
en el país en que se pretendan ejercitar de conformidad con su
normativa de aplicación.
Sin perjuicio de lo anterior, SUNSTECH respetará los derechos y
limitaciones en materia de garantía de producto que correspondan
legalmente en cada uno de los estados enumerados en el Anexo de
conformidad con su normativa de aplicación para cualquier
producto siempre que el mismo esté destinado al mercado de la UE
y fuera adquirido y usado por un consumidor o usuario dentro del
EEE.
2. Garantía Legal
Este producto SUNSTECH está garantizado por un plazo de dos (2)
años a partir de la fecha de entrega y/o compra. Durante dicho
plazo, SUNSTECH responderá de las faltas de conformidad del
producto con el contrato de acuerdo con lo dispuesto en la LCU, lo
que dará derecho al consumidor a solicitar la reparación o
sustitución del producto, salvo que una de estas dos opciones
resulte objetivamente imposible o desproporcionada.
En este sentido, se considerará desproporcionada la forma de
saneamiento, es decir, la reparación o sustitución, cuando ésta
imponga al vendedor costes que no sean razonables. Para
determinar esto, se tendrá en cuenta lo siguiente: (i) el valor del
producto si no hubiera falta de conformidad; (ii) la relevancia de la
falta de conformidad; y (iii) si la forma de saneamiento alternativa se
pudiese realizar sin inconvenientes mayores para el consumidor y
usuario.
Para determinar si los costes no son razonables, los gastos
correspondientes a una forma de saneamiento deben ser, además,
considerablemente más elevados que los gastos correspondientes a
la otra forma de saneamiento.
Adicionalmente, el consumidor podrá optar entre solicitar la rebaja
del precio o la resolución del contrato, cuando no pudiera exigir la
reparación o la sustitución y en los casos en que éstas no se
hubieran llevado a cabo en plazo razonable o si mayores
inconvenientes para el consumidor y usuario. No obstante, la
GARANTÍA EUROPEA
94
Page 97

resolución no procederá cuando la falta de conformidad sea de
escasa importancia.
Tanto la reparación como la sustitución del producto como
consecuencia de la falta de conformidad del producto serán
gratuitas para el consumidor y usuario, incluyendo mano de obra y
materiales.
En todo caso, las reparaciones en garantía deben ser efectuadas por
Servicio de Asistencia Técnica Oficial de SUNSTECH o distribuidores
autorizados.
3. Condiciones para el ejercicio de la Garantía
Para ejercer tanto la garantía legal como la garantía comercial, es
indispensable presentar justificación documental que acredite la
fecha de entrega y/o compra del producto, ya sea la factura, ticket
de compra, albarán de entrega o tarjeta de garantía sellada y
fechada. No se aceptarán aquellos documentos que hayan sido
manipulados o falsificados.
El consumidor deberá ponerse en contacto con el Servicio de
Atención al Cliente de SUNSTECH accediendo a la pagina web
apartado soporte, donde se le informará del proceso a seguir. En ese
momento, el consumidor deberá proporcionar una descripción clara
de la avería o de la falta de conformidad del producto con el
contrato.
En todo caso, las reparaciones en garantía deberán ser efectuadas
por Servicios de Asistencia Técnica Oficial de SUNSTECH o
distribuidores autorizados para que SUNSTECH responda por la
garantía legal y/o la garantía comercial.
4. Exclusiones
La garantía no prevé, ni incluye las revisiones periódicas , de
mantenimiento o la instalación del producto.
Además, no podrá entenderse que existe falta de conformidad del
producto con el contrato y, por lo tanto, éste no estará cubierto ni
por la garantía legal, ni por la comercial cuando:
• la falta de conformidad corresponda a una discrepancia con las
normas de seguridad o técnicas locales o nacionales de un país
distinto al cual originalmente fue diseñado y producido;
• dicho producto o cualquiera de sus identificativos (número de
serie, etc) hayan sido, total o parcialmente, abiertos, montados,
desmontados, manipulados y/o reparados por persona ajena a los
Servicios de Asistencia Técnica Oficial o distribuidores autorizados
de SUNSTECH
• la falta de conformidad sea consecuencia de una instalación
incorrecta (salvo que la instalación haya sido realizada por el
vendedor autorizado de SUNSTECH o bajo su responsabilidad, o por
el consumidor siguiendo las instrucciones de instalación de
SUNSTECH) o de un uso abusivo o indebido del producto,
95
Page 98

incluyéndose, a título enunciativo y no limitativo, un uso que no se
ajuste a las finalidades normales del producto o que no sea acorde
con las instrucciones de uso y mantenimiento y definidas por
SUNSTECH;
• la falta de conformidad haya sido causada por un virus
informático, una acción o una manipulación de contraseñas, una
instalación, manipulación o reinstalación de software, etc;
• la falta de conformidad se deba al uso de accesorios, cargadores
o consumibles que no sean originales de SUNSTECH y diseñados
para el producto;
• la falta de conformidad se deba al uso de cualquier software o
aplicación de terceros que modifique, altere o adapte el software
aprobado y/o incluido en el producto por SUNSTECH;
• la falta de conformidad sea consecuencia de la descarga o el uso
de servicios multimedia de terceros y/o contenidos de terceros
disponibles o accesibles a través del producto;
• se produzcan daños en o por la batería cuya causa sea una
sobrecarga de la misma;
• haya rotura de cualquiera de los sellos de la carcasa o celdas de
la batería, o bien, indicios evidentes de manipulación en los mismos;
y/o
• los daños que se produjeran en el producto fueran causados por
cualquier causa de fuerza mayor o caso fortuito, en especial, por
rayos, agua, fuego, aplicación del voltaje incorrecto, ventilación
incorrecta o cualquier otra causa no atribuible a la fabricación y al
diseño del mismo.
SUNSTECH no será responsable, bajo ningún concepto, por la
pérdida de cualesquiera datos almacenados en el producto. El
consumidor será responsable por las copias de seguridad y la
protección de sus datos frente a pérdidas, daños y destrucción de
los mismos.
Ninguna de las garantías aquí recogidas cubre la sustitución de
piezas, debido al desgaste o rotura de mecanismos, gomas, carcasas
y/o plásticos, así como los deterioros estéticos, debidos al uso
normal del producto, a efectos aclarativos, la pantalla pierde el brillo
con el uso del propio producto. Del mismo modo, las garantías no
cubren ningún tipo de daño producido durante el transporte del
producto (incluyendo, a título enunciativo y no limitativo, daños
estéticos, golpes, rayas, arañazos, manchas, abolladuras, etc), en
cuyo caso serán de aplicación las disposiciones recogidas en las
condiciones generales de contratación de SUNSTECH que sean
aplicables.
Para más información visite www.sunstech.es
También puede ponerse en contacto con:
AFEX SUNS, S.A.
Pallars, 189-191
08005 BARCELONA
96
Page 99

ADVERTENCIAS DE SEGURIDAD Y PRECAUCIÓN
Este producto se ajusta a los límites
nacionales de SAR de 2,0W/Kg. Los valores
máximos específicos de SAR figuran en la
sección de información de esta guía.
Cuando sostenga el producto o lo utilice
sobre el cuerpo, mantenga una distancia de
1,5 cm del cuerpo para asegurar el
cumplimiento con los requisitos de
exposición a radiofrecuencia.
Advertencia: Situaciones que pueden
provocarle lesiones a usted o a otras
personas.
Precaución: Situaciones que pueden
provocar daños al dispositivo o a otros
equipos.
Nota: Notas, consejos de uso o información
adicional
2013 Afex suns, S. A.
www.sar-tick.com
Este dispositivo ofrece servicios de comunicación y entretenimiento
bajo los altos estándares y la experiencia tecnológica de SUNSTECH.
• El contenido puede diferir del producto final del software
proporcionado por los proveedores de servicios o transmisores y se
encuentra sujeto a cambio sin previo aviso.
• Los elementos que vienen con el dispositivo y cualquier
accesorio disponible pueden variar según la región o el proveedor
de servicios.
• Los elementos suministrados están diseñados sólo para este
dispositivo y podrían no ser compatibles con otros.
• Podrá comprar accesorios adicionales en su distribuidor local de
SUNSTECH. Asegúrese de que sean compatibles con el dispositivo
antes de comprarlos.
• Otros accesorios podrían no ser compatibles con el dispositivo.
• SUNSTECH no se hace responsable de los problemas de
rendimiento o la alteración del software del sistema operativo. El
intento de personalizar el sistema operativo puede provocar que el
dispositivo o las aplicaciones funcionen de forma incorrecta.
Iconos instructivos
Copyright
Copyright
Esta guía se encuentra protegida por las leyes internacionales de
derechos de autor.
97
Page 100

No está permitido reproducir, distribuir, traducir o transmitir
ninguna parte de esta guía de ningún modo o por ningún medio, ya
sea electrónico o mecánico, incluyendo fotocopias, grabaciones o
almacenamiento en cualquier sistema de almacenamiento y
recuperación de información, sin el permiso previo por escrito de
Afex Suns, S. A.
Información sobre seguridad
Esta sección contiene información sobre seguridad para
dispositivos móviles. Algunos de los contenidos podrían no
aplicarse a su dispositivo. A fin de evitar lesiones a usted mismo
y a otras personas o daños al dispositivo, lea la información
sobre seguridad del dispositivo antes de utilizarlo.
Adver tencia
En caso de no cumplir con estas normas y advertencias de
seguridad, el usuario podría sufrir lesiones graves o muerte.
No utilice cables de alimentación o conectores dañados ni
enchufes sueltos
Las conexiones inseguras pueden provocar una descarga eléctrica o
incendio
No toque el cable de alimentación con las manos mojadas ni tire
del cable para desconectar el cargador
Si lo hace, podría resultar electrocutado.
No doble ni dañe el cable de alimentación
Si lo hace, podría provocar una descarga eléctrica
No cause un cortocircuito en el cargador ni en el dispositivo
Si lo hace, podría provocar una descarga eléctrica, o el dispositivo
podría no funcionar correctamente.
Use baterías, cargadores, accesorios y suministros aprobados
por el fabricante
• El uso de baterías o cargadores genéricos puede acortar la vida
útil del dispositivo o provocar el funcionamiento incorrecto.
También puede provocar un incendio o la explosión de la batería.
• Use sólo baterías y cargadores aprobados por SUNSTECH,
específicamente diseñados para el dispositivo. Las baterías y
cargadores no compatibles pueden causarle lesiones físicas graves o
dañar el dispositivo.
• SUNSTECH no se hace responsable de la seguridad del usuario
en casos en que se utilicen accesorios o suministros que no estén
aprobados por la marca.
No golpee ni deje caer el cargador o el dispositivo
Manipule y deseche el dispositivo y el cargador con precaución
• Nunca arroje la batería o el dispositivo al fuego. No coloque
nunca la batería o el dispositivo sobre aparatos de calor, como
hornos, microondas, estufas o radiadores. Si se sobrecalienta, el
98
 Loading...