

Page 1
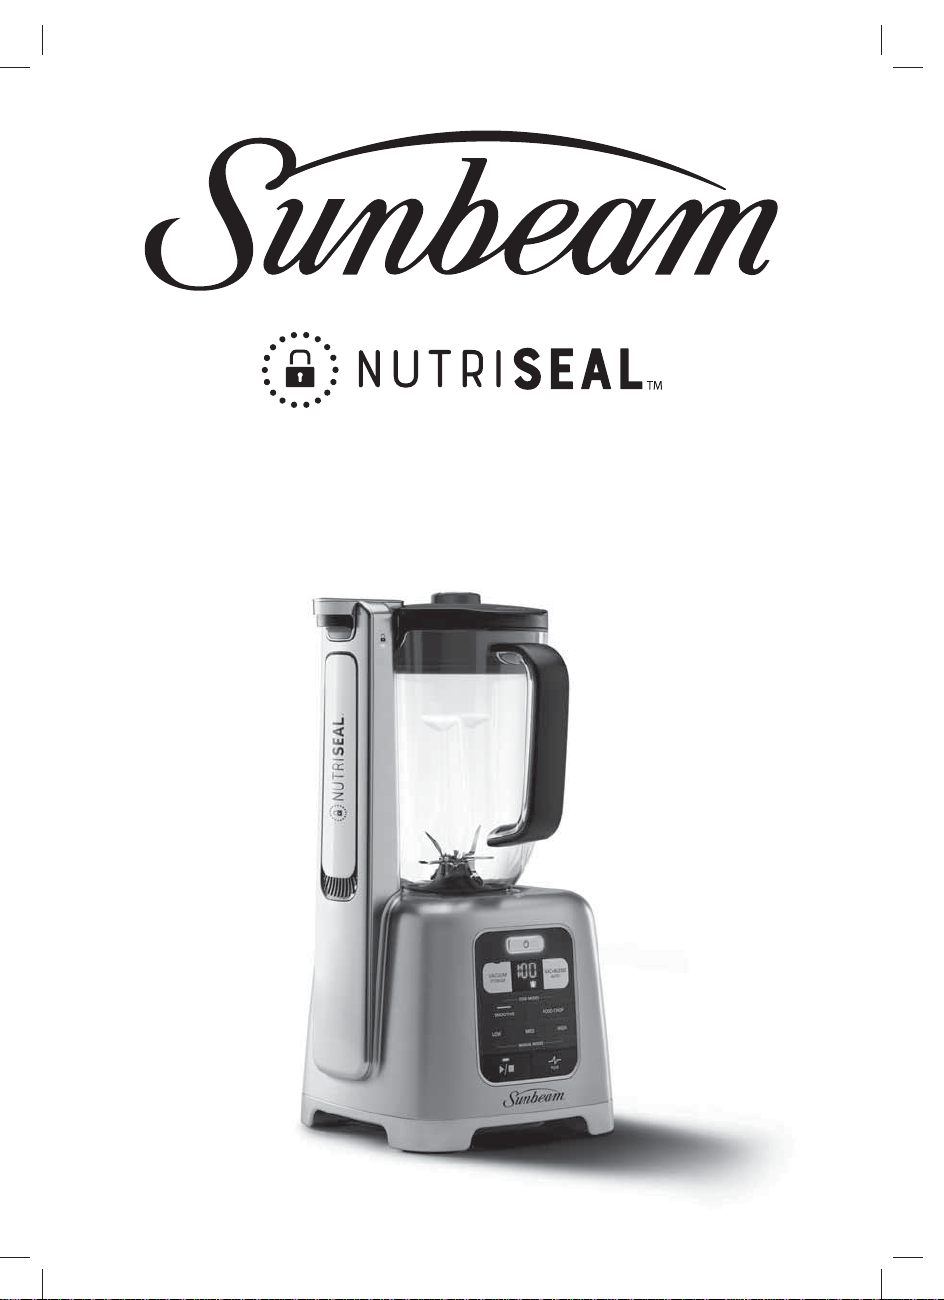
VACUUM BLENDER
User Guide
PBT7200SS
Page 2

Contents
Sunbeam’s Safety Precautions 1
Welcome 2
Features of your Sunbeam Vacuum Blender 3
Vacuum Seal Cup Accessory 4
Before Using your Vacuum Blender 5
Using your Sunbeam Vacuum Blender 6-8
Using your Vacuum Seal Cup Accessory 9
Care And Cleaning 10
Handy Blending Tips 11
Frequently Asked Questions 11
Recipes 12-19
Important Instructions - Retain For Future Use
Page 3

Sunbeam’s Safety Precautions
SAFETY PRECAUTIONS FOR YOUR SUNBEAM
VACUUM BLENDER
• Ensure fingers are kept well away from the
blades when in use.
• Do not blend warm/hot ingredients. Always
cool ingredients to room temperature before
processing.
• Always operate on a flat surface.
• Take care when removing the Jug from the
base or emptying the Jug as blades are
extremely sharp.
• Switch off the appliance and disconnect
from supply before changing accessories or
approaching parts that move in use.
Sunbeam is very safety conscious when designing and manufacturing consumer products,
but it is essential that the product user also exercise care when using an electrical appliance.
Listed below are precautions which are essential for the safe use of an electrical appliance:
• Read carefully and save all the instructions
provided with an appliance.
• Always turn the power off at the power outlet
before you insert or remove a plug. Remove by
grasping the plug - do not pull on the cord.
• Turn the power off and remove the plug when
the appliance is not in use and before cleaning.
• Do not use your appliance with an extension
cord unless this cord has been checked and
tested by a qualified technician or service
person.
• Always use your appliance from a power
outlet of the voltage (A.C. only) marked on the
appliance.
• This appliance is not intended for use by
persons (including children) with reduced
physical, sensory or mental capabilities, or
lack of experience and knowledge, unless they
have been given supervision or instruction
concerning use of the appliance by a person
responsible for their safety.
• Children should be supervised to ensure that
they do not play with the appliance.
• The temperature of accessible surfaces may be
high when the appliance is operating.
• Never leave an appliance unattended while in
use.
• Do not use an appliance for any purpose
other than its intended use. Misuse will cause
potential injury.
• Do not place an appliance on or near a hot gas
flame, electric element or on a heated oven.
• Do not place on top of any other appliance.
• Do not let the power cord of an appliance hang
over the edge of a table or bench top or touch
any hot surface.
• Do not operate any electrical appliance with
a damaged cord or after the appliance has
been damaged in any manner. If damage
is suspected, return the appliance to the
nearest Sunbeam Appointed Service Centre for
examination, repair or adjustment.
• For additional protection, appliance should
be supplied through a residual current device
(RCD) having a rated residual operating current
not exceeding 30 mA in the electrical circuit
supplying power to your appliances.
• Do not immerse the appliance in water or any
other liquid unless recommended.
• Appliances are not intended to be operated by
means of an external timer or separate remote
control system.
• This appliance is intended to be used in
household and similar applications such
as: staff kitchen areas in shops, offices and
other working environments; farm houses; by
clients in hotels, motels and other residential
type environments; bed and breakfast type
environments.
If you have any concerns regarding the performance and use of your appliance,
please visit the Sunbeam Website or contact Sunbeam Consumer Care -
details are on the back page. Ensure the above safety precautions are understood.
1
Page 4

Welcome
Congratulations on your new Sunbeam blender with vacuum technology. Your blender will allow
you to create delicious smoothies, milkshakes, salsas and much more every day!
Your product includes the following features and benefits:
• The ability to remove oxygen from the blending Jug or Vacuum Storage Cup with vacuum
technology. Blending without air present means less oxidation will occur in your drinks and
meals, resulting in vitamins preservation, prolonged freshness, richer colors, smoother
textures and less separating than with traditional blending.
• The choice to blend only, vacuum only or vacuum and blend all your drinks and meals.
• A user-friendly control panel which gives you the flexibility of blending with Manual Modes or
pre-programmed Food Mode settings.
• A Digital Timer so you always know how long you’ll be blending.
• A Vacuum Storage Cup with a drinking lid so you can conveniently take drinks on the go or
store them for later.
2
Page 5
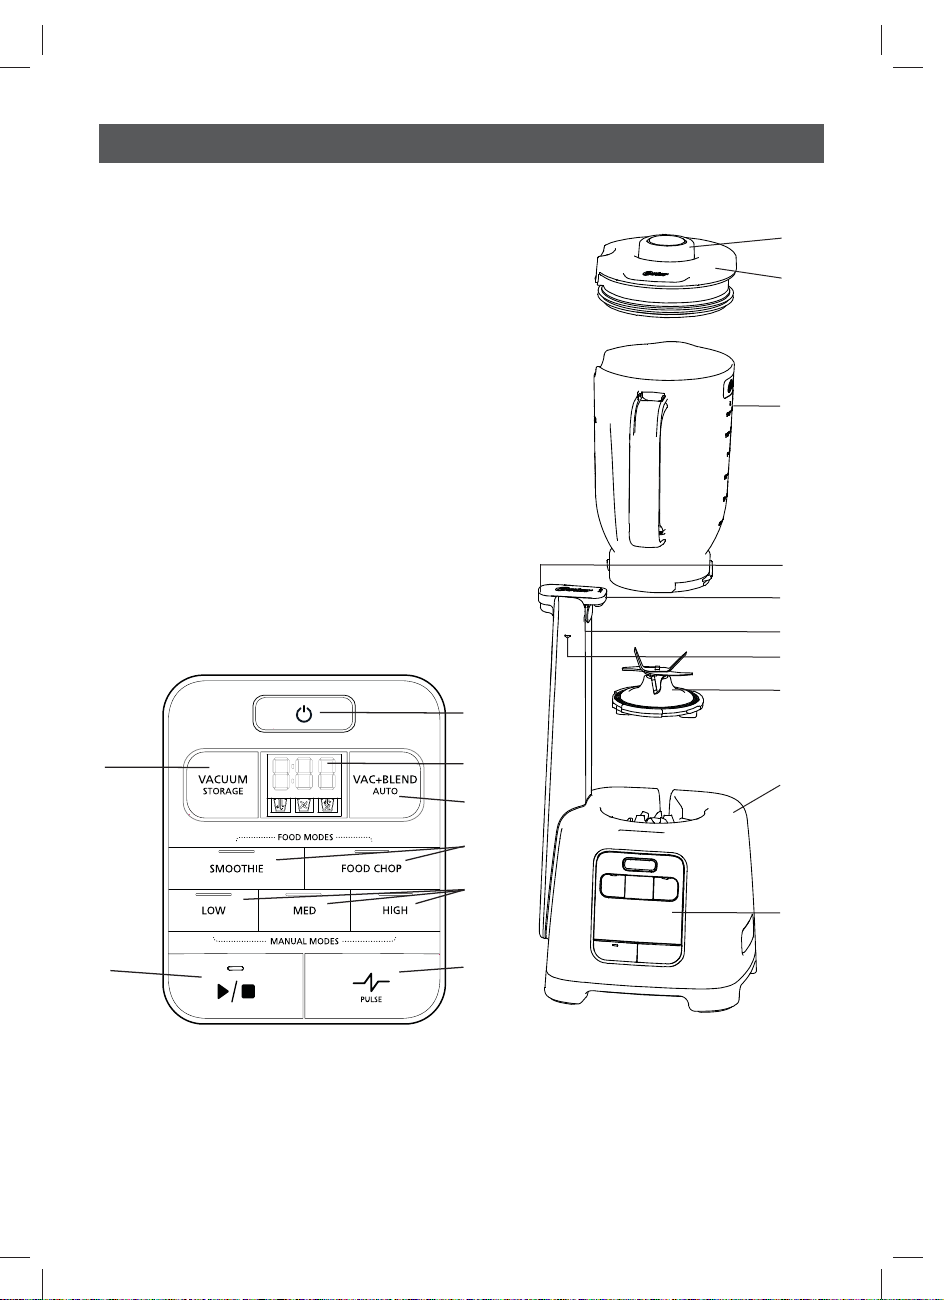
Features of your Sunbeam Vacuum Blender
1. Seal Selector (cap)
2. Jug Lid
3. 1.5L BPA-Free Tritan™ Jug
4. Arm Release Button
5. Arm Lock
6. NutriSeal
7. Vacuum Arm Indicator Light
8. 6-Point Blade Assembly
9. Motor Base
10. Control Panel
a. Power Button
b. Digital Timer
c. Vacuum (Storage) Button
d. Vac + Blend (Auto) Button
e. Food Modes
f. Manual Modes
g. Start/Stop Button
h. Pulse Button
TM
Vacuum Arm
a
1
2
3
4
5
6
7
8
c
b
d
9
e
f
10
g
h
3
Page 6
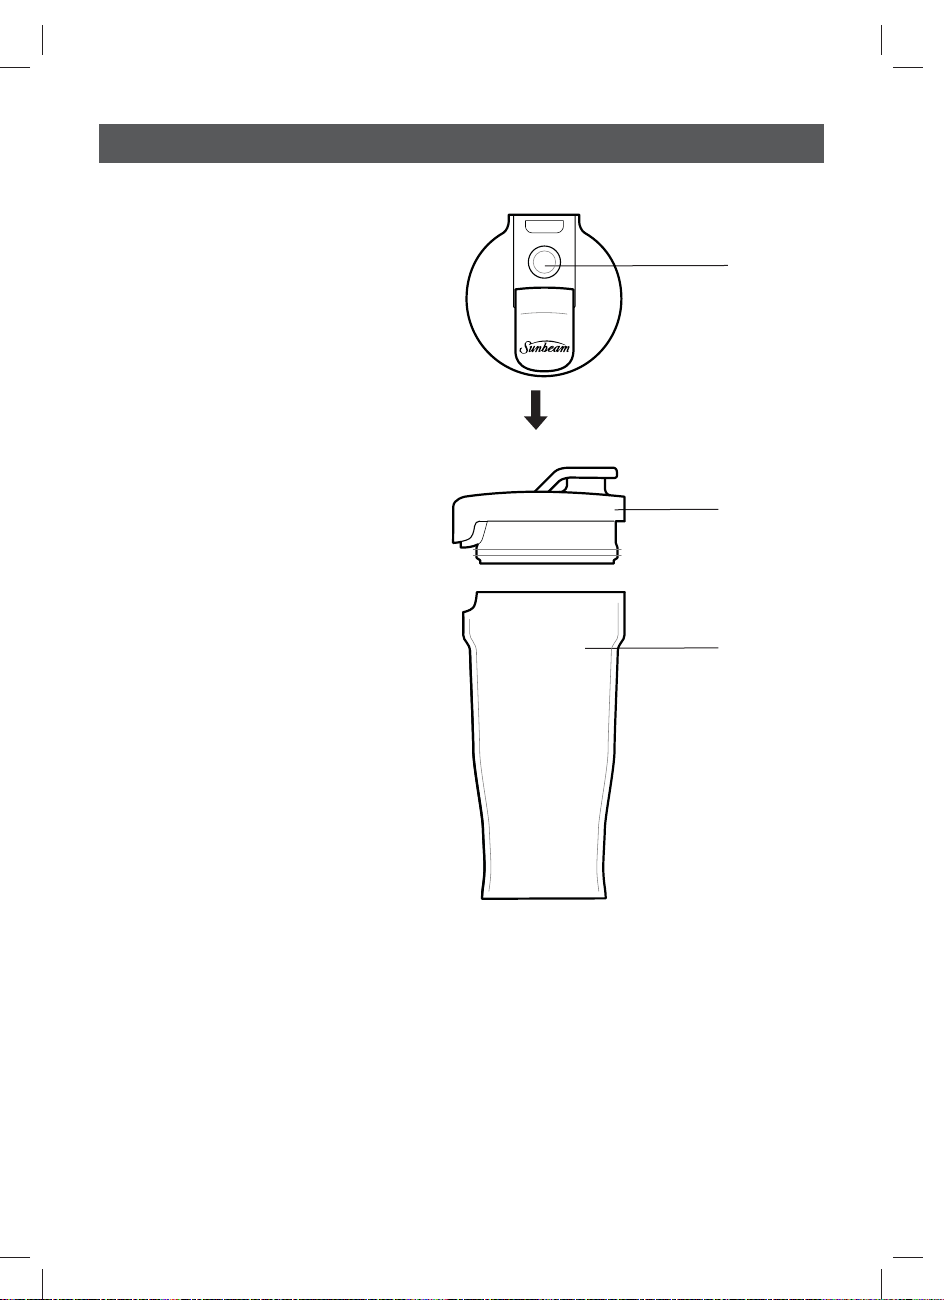
Vacuum Seal Cup Accessory
1. Cup Lid
2. Break Resistant, 700mL BPA-Free
Tritan™ Cup
3. Vacuum Release Button
3
1
2
4
Page 7
Before Using your Vacuum Blender
Step 1. Remove Packaging
Ensure all packaging has been removed
carefully.
Important: Always ensure your blender is
unplugged from the power outlet before fitting
or removing the Blade Assembly. Always
handle the Blade Assembly with caution, as the
blades are extremely sharp.
Step 2. Wash and Dry Parts
Note: Before using your Vacuum Blender,
we recommend removing the 6-Point Blade
Assembly for thorough cleaning.
1. Remove carefully the Blade Assembly
from the Tritan
TM
Jug by holding the Jug
upright and turning the Blade Assembly
clockwise.
2. Wash the parts listed below in warm
soapy water:
- Blade Assembly
- 1.5L blending Jug
- Jug Lid
- 700mL Vacuum Storage Cup
- Cup Lid
- Seal Selector (cap)
3. Rinse and allow thorough air drying.
Step 3. Re-assemble the 6-Point Blade
Assembly in the Tritan
TM
Jug
Place carefully the Blade Assembly in the
TM
Tritan
Jug. Ensure that the Blade Assembly is
firmly in place by turning it anti-clockwise from
bottom of the Jug.
Do not remove the stainless steel blades from
the Blade Assembly.
The blender Jug will leak if the 6-Point Blade
Assembly is not assembled correctly.
Note: When removing the Blade Assembly from
the Jug you may need to slightly tilt the blade
assembly so that it slides out easily.
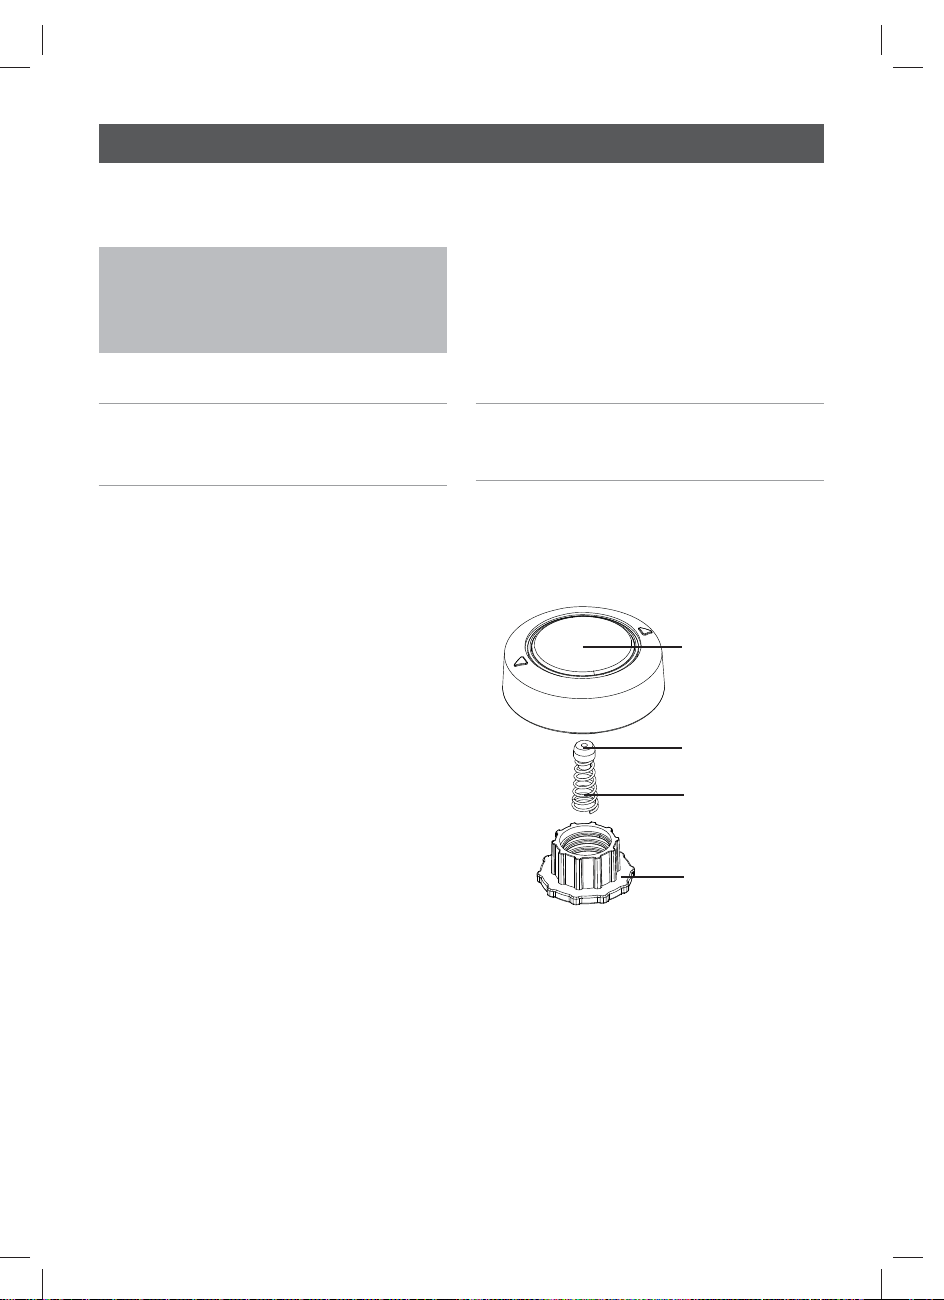
Step 4. Secure the Seal Selector (cap)
Ensure the Seal Selector (cap) is tightly locked
in to avoid it falling off when blending.
Seal Selector Top
Silicone Cap
Spring
Screw Cap
5
Page 8
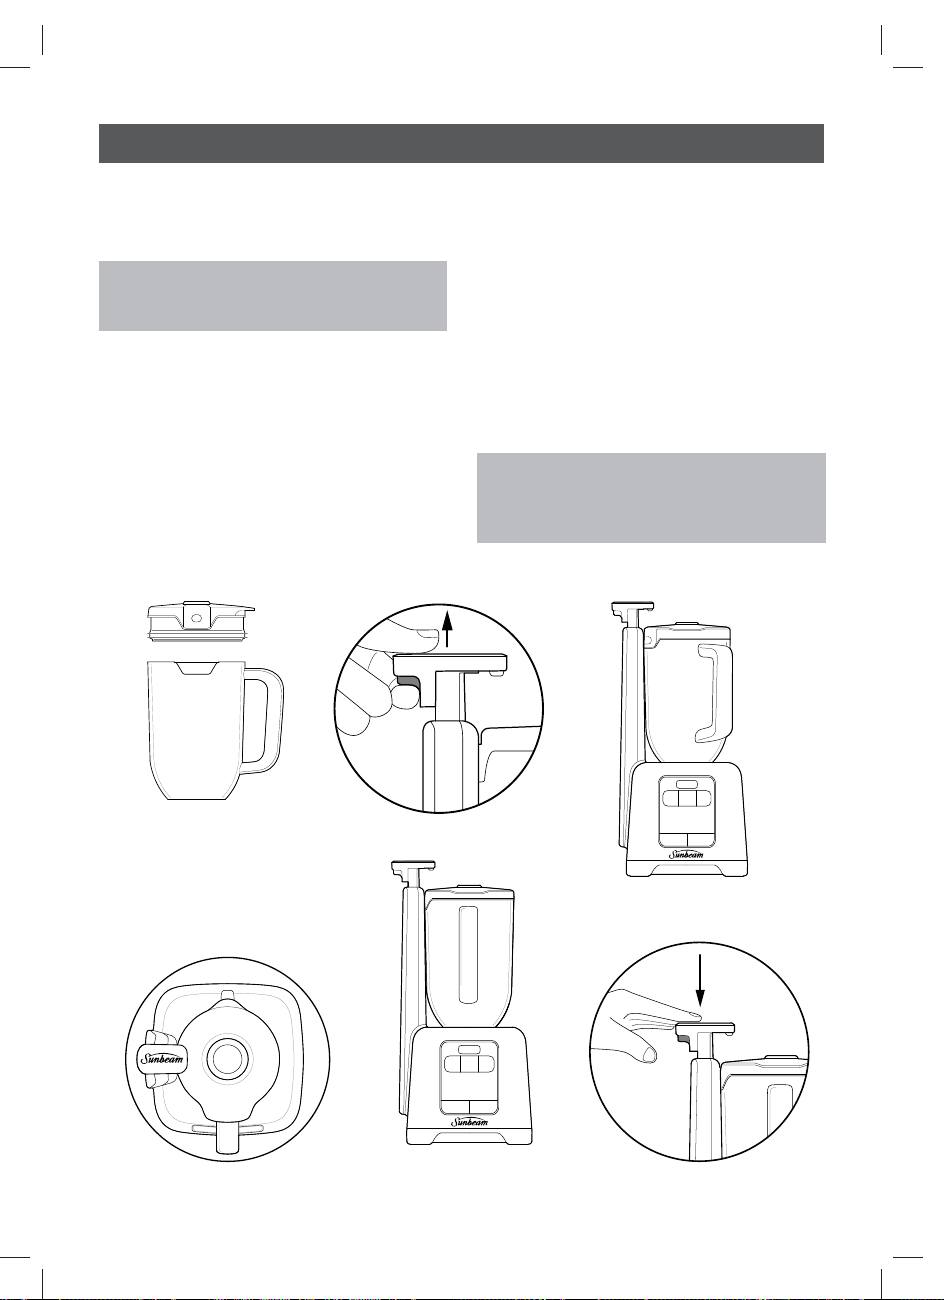
Using your Sunbeam Vacuum Blender
Setting up your blender
1. Place your ingredients into the blending
Jug.
Important: Do not overfill the blending
Jug past the MAX fill line. Overfilling may
create a hazard and damage the blender.
2. Secure the Jug Lid onto the blending Jug
by aligning the notch in the Jug to the tab
on the Jar Lid (Figure 1).
3. Press the Arm Release Button to lift the
Arm Lock on the NutriSeal™ Vacuum
Arm (Figure 2).
4. Place the blending Jug on the Motor Base
(Figure 3).
5. Turn the blending Jug clockwise until the
vacuum ports (Figure 4a) align (Figure
4b).
6. Plug the power cord into a standard
household 230/240V AC outlet.
7. Press the Power Button to turn the
blender on. The NutriSeal™ Vacuum Arm
Light Indicator will light up.
8. Push the Arm Lock on the NutriSeal™
Vacuum Arm down (Figure 5). The
NutriSeal™ Vacuum Arm Light Indicator
will turn off.
Important: Make sure the Arm Lock
is correctly fixed on the Jug Lid. If
incorrectly sealed, the Vacuum setting
might not work properly.
The blender is ready to use.
Figure 1
Figure 4a
Figure 2
Figure 4b
Figure 3
Figure 5
6
Page 9

Using your Sunbeam Vacuum Blender
Blending with the Food Modes
(Smoothie, Food Chop)
Why use the Food Modes (Preprogrammed Functions) ?
Using these functions provides total ease
of use. By selecting Smoothie or Food Chop
your blender knows exactly what speed to
select and how long to blend for, so you
don’t need to worry. This ensures that
you get the best consistency whether you
are blending a green smoothie or a milk
shake (Smoothie Function) or preparing a
hummus dip or salsa (Food Chop Function).
The digital timer will indicate how long until
the blending is finished.
Important: Do not overfill the blending Jug
past the MAX fill line. Overfilling may create
a hazard and damage the blender.
1. Press the Power button to turn the
blender on.
The Vacuum Arm Light Indicator will
light up.
2. Turn the Seal Selector (cap) (Figure
6) on the Jug Lid to the appropriate
selection:
- Blend only
- Vac/Vac+Blend
Vac/Vac+Blend
Blend Only
Remove Cap
Figure 6
3. (Optional) To vacuum blend, press the
Vac + Blend (Auto) Button.
4. Press one of the below buttons to select
a pre-programmed setting:
- Smoothie
- Food Chop
5. When ready to begin, press the Start/
Stop button. The blender will stop
automatically when blending is
complete.
Note: Press the Start/Stop to cancel the
program at any time.
6. Once the pre-programmed function has
ended, press the Power button to turn
the blender off.
Note: This appliance is pre-
programmed to turn off automatically if
not used for a period of several minutes.
All lights will turn off when the unit
automatically powers down.
7. Press the Arm Release button to lift
the Arm Lock Up on the NutriSeal
Vacuum Arm (Figure 7).
TM
Figure 7
8. Holding the handle, turn the blending
Jug counter-clockwise.
9. Lift the blending Jug up and away from
the Motor Base.
10. Push the Arm Lock on the NutriSeal
Vacuum Arm down.
11. Push down on the Seal Selector (cap)
to release the vacuum seal (if Vacuum
function used).
12. Turn the Seal Selector (cap) (Figure
6) on the Jug Lid to the Remove Cap
position and remove the Seal Selector
(cap) from the Jug lid.
13. Take the Jug Lid off the blending Jug.
Important: Pushing down on the Seal
Selector (cap) or turning the Seal
Selector (cap) away from the Vac/
Vac+Blend position introduces air to
your drink/meal.
TM
7
Page 10

Using your Sunbeam Vacuum Blender
Blending with the Manual Modes
(High, Medium, Low)
Why use the Manual Modes?
The Manual Modes are perfect if you want
to take control. Depending on your desired
result, whether that is thick, thin, chunky or
super smooth, you can use slower or faster
blending to suit.
Guide:
Low : • Whipping cream
• Pureeing vegetables and fruit
Med : • Mayonnaise/Salad dressings
• Cake batters
High : • Hummus
• Soups
PULSE : • Ice cubes
• Meat
• Breadcrumbs
• Biscuits
• Finely ground nuts
• Chocolate
• Self cleaning the unit
Important: Do not overfill the blending Jug
past the MAX fill line. Overfilling may create
a hazard and damage the blender.
1. Press the Power button to turn the
blender on.
The Vacuum Arm Light Indicator will
light up.
2. Turn the Seal Selector (cap) (Figure
6) on the Jug Lid to the appropriate
selection:
- Blend only
- Vac/Vac+Blend
Vac/Vac+Blend
Blend Only
Remove Cap
Figure 6
3. (Optional) To vacuum blend, press the
Vac + Blend (Auto) Button.
4. Press one of the below buttons to select
a manual mode.
- Low
- Med
- High
5. When ready to begin, press the Start/
Stop button.
6. To stop blending, press the Start/Stop
button.
Note: This appliance is pre-
programmed to turn off automatically if
not used for a period of several minutes.
All lights will turn off when the unit
automatically powers down.
7. Press the Power button to turn the
blender off.
8. Press the Arm Release button to lift
the Arm Lock Up on the NutriSeal
Vacuum Arm (figure 7).
TM
Figure 7
9. Holding the handle, turn the blending
Jug counter-clockwise.
10. Lift the blending Jug up and away from
the Motor Base.
11. Push the Arm Lock on the NutriSeal
Vacuum Arm down.
12. Push down on the Seal Selector (cap)
to release the vacuum seal (if Vacuum
function used).
13. Turn the Seal Selector (cap) (Figure
6) on the Jug Lid to the Remove Cap
position and remove the Seal Selector
(cap) from the Jug lid.
14. Take the Jug Lid off the blending Jug.
Important: Pushing down on the Seal
Selector (cap) or turning the Seal Selector
(cap) away from the Vac/Vac+Blend
position introduces air to your drink/meal.
8
TM
Page 11

Using your Vacuum Seal Cup Accessory
Why use your Vacuum Seal Cup ?
This function is most useful for vacuuming
your blended smoothie in the Vacuum Seal
Cup.
After you have blended in the 1.5L Tritan
jug, decant the smoothie into your Vacuum
seal Cup, and use the Vacuum Storage option.
Your smoothie will stay nutrient rich and fresh
for up to 24 hours allowing you to blend the
night before and enjoy fresh in the morning.
Note: You cannot blend in the Vacuum Seal
Cup.
1. Pour your blended drink or meal into
the Cup.
2. Secure the Cup Lid onto the Cup by
aligning the notch in the Cup to the tab
on the Cup Lid (Figure 1).
3. Press the Arm Release Button to lift the
Arm Lock on the NutriSeal™ Vacuum
Arm (Figure 2).
4. Place the Vacuum & Seal Cup on
the Motor Base so that the Cup Lid's
vacuum port aligns with the NutriSeal™
Vacuum Arm’s vacuum port.
5. Press the Power button to turn the
blender on.
The NutriSeal™ Vacuum Arm Light
Indicator will light up.
TM
6. Push the Arm Lock on the NutriSeal™
Vacuum Arm down (Figure 3).
7. Press the Vacuum (Storage) button.
8. When ready to begin, press the Start/
Stop button. The blender will stop
automatically when vacuuming is
complete.
Note: Press the Start/Stop button to
cancel the program at any time.
9. Press the Power button to turn the
blender off.
Note: This appliance is pre-
programmed to turn off automatically if
not used for a period of several minutes.
All lights will turn off when the unit
automatically powers down.
10. Lift the Arm Lock on the NutriSeal™
Vacuum Arm up.
11. Lift the Vacuum Seal Cup up and away
from the Motor Base.
12. Push the Arm Lock on the NutriSeal™
Vacuum Arm down.
13. To drink from the Vacuum Seal Cup,
press the Vacuum Release Button on
the Cup Lid.
Note: Pressing the Vacuum Release Button
introduces air to your drink/meal.
Figure 1
Figure 2
Figure 3
9
Page 12

Care And Cleaning
Cleaning
Caution: Blades are sharp. Handle
carefully.
• Empty the blending Jug. If necessary, use a
rubber spatula to scrape foods away from
the sides of the jar.
• CAREFULLY remove the Blade Assembly
from the blending Jug by turning the Blade
Assembly counter-clockwise.
• All parts (except for the NutriSeal™
Vacuum Arm and the Motor Base) are
dishwasher safe. Use the top rack of the
dishwasher for the Jug Lid, Seal Selector
(cap), Seal Selector Top, Cup Lid, Cup and
Blade Assembly. Place the blending Jug
into the bottom basket of dishwasher.
• If necessary, the Seal Selector can be
disassembled for a more thorough clean.
To disassemble, hold the Seal Selector
with the Seal Selector Top facing upwards
and turn the screw cap counterclockwise.
All parts of the Seal Selector should be
hand washed with warm, soapy water. To
reassemble, hold the Seal Selector with
the seal selector top facing upwards. With
the spring (the silicone cap facing upwards)
between the seal selector top and screw
cap, turn the screw cap clockwise.
• The blending Jug, Jug Lid, Seal Selector
(cap), Seal Selector Top, Cup Lid, Cup and
Blade Assembly can also be hand washed
with warm, soapy water. Rinse well and
dry.
Note:
• Check the parts as you put them back
• Wipe the NutriSeal™ Vacuum Arm and the
It is recommended to hand wash the
Blade Assembly for longer usage.
together.
Motor Base with a soft, damp cloth to clean.
Never submerge the NutriSeal™ Vacuum
Arm and the Motor Base in a liquid.
Tip: Run the blender with soapy water for
20-30 seconds on Manual Mode of Low
or Med for cleaning without disassembly.
Follow with a clean water rinse.
Storing
• Reassemble the blender for storage. Leave
the Jug Lid open so no odors are retained.
Caution:
Vacuum Seal Cup or any other parts, in a
microwave oven.
Never put the blending Jug,
NOTE: To correctly reassemble the Seal
Selector, the silicone cap of the spring
must be touching the seal selector top.
Failure to do so will stop the blender’s
ability to vacuum.
Seal Selector Top
Silicone Cap
Spring
Screw Cap
10
Page 13

Handy Blending Tips
Blending Tips
• Do not operate for more than 10 minutes at
a time.
• Repeated use of the blender in a short
amount of time may result in error. Open
the blending Jug and check the contents.
Wait 30 seconds or unplug then plug in the
unit, then blend.
• Jug should be at least 25% full at all times
for optimal performance.
• Use High speeds as much as possible for
whole food juices, shakes, frozen mixtures,
making purées and nut butters. High speed
provides the best quality of refinement,
breaking down ice, frozen fruit, whole
fruits or vegetables to a smooth lump-free
consistency.
• Use only the amount of food suggested in
the recipes. If you want greater amounts,
prepare in batches. Using larger amounts
may overload and strain the motor.
• Use the PULSE button when mixture is
too thick or coarse to circulate within the
blender Jug.
• If on High speed the food is not circulating,
try using a spatula. If this is also not
working, try using a slower speed. Once
the food begins to circulate again, you can
switch back to a High speed.
• Due to the power of the machine, it is
normal for it to be fairly loud during
operation. Through the blending cycle, the
noises may change, but there is no need to
be concerned.
• Ice Crushing: For optimal ice crushing,
fill the Jug with preferred amount of ice.
Then fill with water just above where the
ice stops. Use the speed dial to blend on
High for a few seconds. Then drain out the
excess water and you are left with a Jug
filled with great consistent ice!
Add Ingredients While Blending
You can only add ingredients while
blending if you’re blending on the Manual
Mode of Low and not vacuum blending.
To add ingredients while blending,
remove the Seal Selector (cap) by turning
it to the Remove Cap position and lifting
up. Add in ingredients as desired, then
put the Seal Selector (cap) back into
the Jar Lid and turn it to the blend only
position.
Important:
LIQUIDS.
DO NOT BLEND HOT
Frequently Asked Questions
Why doesn’t the blender turn on?
• Make sure the Motor Base is plugged into
an active power receptacle.
• Verify the blinking blue light is active after
pushing the Power button.
• Make sure the Arm Lock on the
NutriSeal
position.
Why did the blender’s timer reset?
• The blender will reset its timer if the
blender is not active for a considerate
amount of time.
TM
Vacuum Arm is in the down
Why did my blender stop blending?
• The blender is programmed to run a
maximum of seven continuous minutes
before stopping. If you need to blend
longer than seven minutes, wait 30
seconds before blending again.
11
Page 14

Recipes
STRAWBERRY SMOOTHIE
16 strawberries, hulled
1/3 cup raw cashews, unsalted
1 Tablespoon honey
1/2 teaspoon vanilla extract
1 cup coconut milk
1 cup ice
1. Place all ingredients into the blender
Jug. Secure the Lid.
2. Place the blending Jug on the Motor
Base and push the Arm Lock down.
3. Press the Power button to turn the
blender on.
4. Turn the Seal Selector (cap) on the Jug
Lid to Vac/Vac+Blend position
5. Press the Vac + Blend (Auto) Button.
6. Press the Smoothie Function.
7. When ready to begin, press the
Start/Stop button. The blender will
stop automatically when blending
is complete. If you want a smoother
consistency, you can either blend a few
more seconds on Med setting.
8. Once complete, lift the Arm Lock and
push down on the Seal Selector (cap) to
release the air.
9. Turn the Seal Selector (cap) to the
Remove Cap position to take the Lid off
the Jug.
10. Pour into a glass. Serve.
SPINACH AND APPLE SMOOTHIE
1 cup Coconut Water
1 Kiwi, peeled and halved
1/2 medium sized Cucumber, chopped
1 Green Apple, cored and quartered
1 cup Spinach
1 frozen Banana, chopped
1 Tablespoon Chia Seeds
1. Place all ingredients into the blender
Jug. Secure the Lid.
2. Place the blending Jug on the Motor
Base and push the Arm Lock down.
3. Press the Power button to turn the
blender on.
4. Turn the Seal Selector (cap) on the Jug
Lid to Vac/Vac+Blend position
5. Press the Vac + Blend (Auto) Button.
6. Press the Smoothie Function.
7. When ready to begin, press the
Start/Stop button. The blender will
stop automatically when blending
is complete. If you want a smoother
consistency, you can either blend a few
more seconds on Med setting.
8. Once complete, lift the Arm Lock and
push down on the Seal Selector (cap) to
release the air.
9. Turn the Seal Selector (cap) to the
Remove Cap position to take the Lid off
the Jug.
10. Pour into a glass. Serve.
12
Page 15

Recipes
BANANA MILKSHKE
Makes 2
2 Bananas, halved
1/2 cup thickened cream
1 1/2 cups milk
1/3 cup milo
2 scoops vanilla icecream
1. Place all ingredients into the blender
Jug. Secure the Lid.
2. Place the blending Jug on the Motor
Base and push the Arm Lock down.
3. Press the Power button to turn the
blender on.
4. Turn the Seal Selector (cap) on the Jug
Lid to Vac/Vac+Blend position
5. Press the Vac + Blend (Auto) Button.
6. Press the Smoothie Function.
7. When ready to begin, press the
Start/Stop button. The blender will
stop automatically when blending is
complete.
8. Once complete, lift the Arm Lock and
push down on the Seal Selector (cap) to
release the air.
9. Turn the Seal Selector (cap) to the
Remove Cap position to take the Lid off
the Jug.
10. Pour into a glass. Serve.
EGGPLANT DIP
2 medium eggplants, roasted and diced
Zest and juice of 1/2 lemon
2 cloves garlic
1/3 cup olive oil
1/3 cup grated parmesan cheese
1/2 teaspoon salt
1/2 teaspoon cracked black pepper
Pinch of nutmeg
1. Place all ingredients into the blender
Jug. Secure the Lid.
2. Place the blending Jug on the Motor
Base and push the Arm Lock down.
3. Press the Power button to turn the
blender on.
4. Turn the Seal Selector (cap) on the Jug
Lid to Vac/Vac+Blend position
5. Press the Vac + Blend (Auto) Button.
6. Press the Food Chop Function.
7. When ready to begin, press the
Start/Stop button. The blender will
stop automatically when blending
is complete. If you want a smoother
consistency, you can either blend a few
more seconds on Med setting.
8. Once complete, lift the Arm Lock and
push down on the Seal Selector (cap) to
release the air.
9. Turn the Seal Selector (cap) to the
Remove Cap position to take the Lid off
the Jug.
10. Pour into a glass. Serve.
13
Page 16

Recipes
PEA and FENNEL PESTO
1 ½ cups packed basil
1 fennel bulb
1 cup green frozen peas, thawed
4 cloves garlic
1/2 cup toasted pine nuts
1 medium lemon, juiced
5 Tablespoons Olive Oil
Salt & Pepper
1. Slice the fennel bulb and stalks, set the
leaves aside
2. Place fennel slices and garlic on an
oven tray and drizzle with olive oil.
Bake in a 200°C oven for 10-12 min.
Remove from tray and cool.
3. Place all ingredients into the blender
Jug. Secure the Lid.
4. Place the blending Jug on the Motor
Base and push the Arm Lock down.
5. Press the Power button to turn the
blender on.
6. Turn the Seal Selector (cap) on the Jug
Lid to Vac/Vac+Blend position
7. Press the Vac + Blend (Auto) Button.
8. Press the Food Chop Function.
9. When ready to begin, press the
Start/Stop button. The blender will
stop automatically when blending
is complete. If you want a smoother
consistency, you can either blend a few
more seconds on Med setting.
10. Once complete, lift the Arm Lock and
push down on the Seal Selector (cap) to
release the air.
11. Turn the Seal Selector (cap) to the
Remove Cap position to take the Lid off
the Jug.
12. Place into a screw top jar and store in
the refrigerator.
MEXICAN DIP
2 Avocados, flesh removed
1 sprig coriander
1/2 spanish onion, peeled, quartered
1 Jalapeno (optional)
Juice and zest of 1 lime
1 Tomato, cored and cut into quarters
Salt and pepper to taste
1. Place all ingredients into the blender
Jug. Secure the Lid.
2. Place the blending Jug on the Motor
Base and push the Arm Lock down.
3. Press the Power button to turn the
blender on.
4. Turn the Seal Selector (cap) on the Jug
Lid to Vac/Vac+Blend position
5. Press the Vac + Blend (Auto) Button.
6. Press the Food Chop Function.
7. When ready to begin, press the
Start/Stop button. The blender will
stop automatically when blending
is complete. If you want a smoother
consistency, you can either blend a few
more seconds on Med setting.
8. Once complete, lift the Arm Lock and
push down on the Seal Selector (cap) to
release the air.
9. Turn the Seal Selector (cap) to the
Remove Cap position to take the Lid off
the Jug.
10. Place into serving bowl or storage
container, cover and refrigerate.
14
Page 17

Recipes
COFFEE AND COCONUT BODY SCRUB
1 cup coffee beans
1 cup sea salt flakes
1/2 cup coconut flakes
1/2 cup organic coconut oil
1/2 Tablespoon cinnamon
1 Tablespoon vanilla bean paste
1. Place all ingredients into the blender
Jug. Secure the Lid.
2. Place the blending Jug on the Motor
Base and push the Arm Lock down.
3. Press the Power button to turn the
blender on.
4. Turn the Seal Selector (cap) on the Jug
Lid to Vac/Vac+Blend position
5. Press the Vac + Blend (Auto) Button.
6. Press the Food Chop Function.
7. When ready to begin, press the
Start/Stop button. The blender will
stop automatically when blending is
complete.
8. Once complete, lift the Arm Lock and
push down on the Seal Selector (cap) to
release the air.
9. Turn the Seal Selector (cap) to the
Remove Cap position to take the Lid off
the Jug.
10. Place into serving bowl or storage
container, cover and refrigerate.
VEGGIE SMOOTHIE BOWL (Blend only)
2 cups chopped cos lettuce
1/2 cup coriander, stems removed
2 cups chopped tomatoes
2 cups peeled and chopped cucumber
1/2 cup sliced red capsicum
Juice of 1/2 lemon
Pinch of salt
1. Place all ingredients into the blender
Jug. Secure the Lid.
2. Place the blending Jug on the Motor
Base and push the Arm Lock down.
3. Press the Power button to turn the
blender on.
4. Turn the Seal Selector (cap) on the Jug
Lid to Blend Only position
5. Press the Food Chop Function.
6. When ready to begin, press the
Start/Stop button. The blender will
stop automatically when blending
is complete. If you want a smoother
consistency, you can either blend a few
more seconds on Med setting.
7. Once complete, lift the Arm Lock.
8. Turn the Seal Selector (cap) to the
Remove Cap position to take the Lid off
the Jug.
9. Pour into a serving bowl. Serve with
raw vegetables, breads or crackers.
15
Page 18

Recipes
FLAT TUMMY SMOOTHIE
1 cup frozen pineapple
1 frozen banana.
1/4 English cucumber, cubed.
1 tablespoon pure matcha powder (Green
Tea powder)
2cm piece ginger root, peeled and roughly
chopped
1 1/4 cups coconut water
1. Place all ingredients into the blender
Jug. Secure the Lid.
2. Place the blending Jug on the Motor
Base and push the Arm Lock down.
3. Press the Power button to turn the
blender on.
4. Turn the Seal Selector (cap) on the Jug
Lid to Vac/Vac+Blend position
5. Press the Vac + Blend (Auto) Button.
6. Select HIGH speed.
7. When ready to begin, press the Start/
Stop button.
8. Blend until smooth, approximately 40
seconds.
9. Once complete, lift the Arm Lock and
push down on the Seal Selector (cap) to
release the air.
10. Turn the Seal Selector (cap) to the
Remove Cap position to take the Lid off
the Jug.
11. Pour into a glass. Serve.
MIDDAY SMOOTHIE
Serves 1
1 small pear (cored and cubed)
3/4 cup purple cabbage (roughly chopped)
1/2 cup frozen berries
1 tablespoon chia seeds
1/2 cup coconut water or regular water
1. Place all ingredients into the blender
Jug. Secure the Lid.
2. Place the blending Jug on the Motor
Base and push the Arm Lock down.
3. Press the Power button to turn the
blender on.
4. Turn the Seal Selector (cap) on the Jug
Lid to Vac/Vac+Blend position
5. Press the Vac + Blend (Auto) Button.
6. Select HIGH speed.
7. When ready to begin, press the Start/
Stop button.
8. Blend until smooth approximately 1
minute.
9. Once complete, lift the Arm Lock and
push down on the Seal Selector (cap) to
release the air.
10. Turn the Seal Selector (cap) to the
Remove Cap position to take the Lid off
the Jug.
11. Pour into a glass. Serve.
16
Page 19

Recipes
KICK STARTER
Serves 1
1 cup baby spinach leaves, firmly packed
1/2 cup kale, roughly chopped, firmly
packed
1/2 avocado, flesh removed
1 small green apple, cored
1 banana, peeled
1 teaspoon chia seeds
3/4 cup orange juice
1 cup ice
1. Place all ingredients into the blender
Jug. Secure the Lid.
2. Place the blending Jug on the Motor
Base and push the Arm Lock down.
3. Press the Power button to turn the
blender on.
4. Turn the Seal Selector (cap) on the Jug
Lid to Vac/Vac+Blend position
5. Press the Vac + Blend (Auto) Button.
6. Select HIGH speed.
7. When ready to begin, press the Start/
Stop button.
8. Blend until smooth, approximately 45
seconds.
9. Once complete, lift the Arm Lock and
push down on the Seal Selector (cap) to
release the air.
10. Turn the Seal Selector (cap) to the
Remove Cap position to take the Lid off
the Jug.
11. Pour into a glass. Serve.
AFTERNOON SLUMP BUSTER
Serves 1
1/2 cup orange juice
2 cups baby spinach
1/2 teaspoon vanilla extract
1 teaspoon spirulina powder
1 scoop vanilla protein powder
1 cup unsweetened almond milk
1 cup ice
1. Place all ingredients into the blender
Jug. Secure the Lid.
2. Place the blending Jug on the Motor
Base and push the Arm Lock down.
3. Press the Power button to turn the
blender on.
4. Turn the Seal Selector (cap) on the Jug
Lid to Vac/Vac+Blend position
5. Press the Vac + Blend (Auto) Button.
6. Select MED speed.
7. When ready to begin, press the Start/
Stop button.
8. Blend until smooth, approximately 45
seconds.
9. Once complete, lift the Arm Lock and
push down on the Seal Selector (cap) to
release the air.
10. Turn the Seal Selector (cap) to the
Remove Cap position to take the Lid off
the Jug.
11. Pour into a glass. Serve.
17
Page 20

Recipes
DETOX ME
Serves 1
1 cup coconut water
1 medium green apple, skin on, cored and
chopped
1 small raw red beet, peeled and chopped
1 cup strawberries, cut in half
1 cup frozen pineapple
1/2 small avocado, pitted and peeled
1 cup baby spinach
1 tablespoon fresh lemon juice
1 tablespoon coconut flakes
1/2 cup ice
1. Place all ingredients into the blender
Jug. Secure the Lid.
2. Place the blending Jug on the Motor
Base and push the Arm Lock down.
3. Press the Power button to turn the
blender on.
4. Turn the Seal Selector (cap) on the Jug
Lid to Vac/Vac+Blend position
5. Press the Vac + Blend (Auto) Button.
6. Select HIGH speed.
7. When ready to begin, press the Start/
Stop button.
8. Blend until smooth approximately 45
seconds.
9. Once complete, lift the Arm Lock and
push down on the Seal Selector (cap) to
release the air.
10. Turn the Seal Selector (cap) to the
Remove Cap position to take the Lid off
the Jug.
11. Pour into a glass. Serve.
SLUMBER TIME SMOOTHIE
Serves 1
1 cup almond milk or regular milk
2 Tablespoons peanut butter
1 banana
1 Tablespoon honey
Pinch nutmeg
1 teaspoon flax seed for sprinkling on top
1. Place all ingredients into the blender
Jug. Secure the Lid.
2. Place the blending Jug on the Motor
Base and push the Arm Lock down.
3. Press the Power button to turn the
blender on.
4. Turn the Seal Selector (cap) on the Jug
Lid to Vac/Vac+Blend position
5. Press the Vac + Blend (Auto) Button.
6. Select LOW speed.
7. When ready to begin, press the Start/
Stop button.
8. Blend until smooth approximately 20
seconds.
9. Once complete, lift the Arm Lock and
push down on the Seal Selector (cap) to
release the air.
10. Turn the Seal Selector (cap) to the
Remove Cap position to take the Lid off
the Jug.
11. Pour into a glass. Serve.
18
Page 21

Recipes
CLEAR FACE SMOOTHIE
Serves 2
1/2 cup frozen blueberries
1 cup strawberries
1 cup pomegranate juice
1/2 cup Greek yogurt
2 teaspoons chia or flaxseeds
1 Tablespoon honey
1/2 cup coconut water
1. Place all ingredients into the blender
Jug. Secure the Lid.
2. Place the blending Jug on the Motor
Base and push the Arm Lock down.
3. Press the Power button to turn the
blender on.
4. Turn the Seal Selector (cap) on the Jug
Lid to Vac/Vac+Blend position
5. Press the Vac + Blend (Auto) Button.
6. Select MED speed.
7. When ready to begin, press the Start/
Stop button.
8. Blend until smooth approximately 45
seconds.
9. Once complete, lift the Arm Lock and
push down on the Seal Selector (cap) to
release the air.
10. Turn the Seal Selector (cap) to the
Remove Cap position to take the Lid off
the Jug.
11. Pour into a glass. Serve.
CHAI SLUSHY (blend only)
Serves 4
2 cups of strong chai tea, chilled
1 cup sweetened condensed milk
4 cups ice
splash vanilla extract
cinnamon, for garnish
1. Place all ingredients into the blender
Jug. Secure the Lid.
2. Place the blending Jug on the Motor
Base and push the Arm Lock down.
3. Press the Power button to turn the
blender on.
4. Turn the Seal Selector (cap) on the Jug
Lid to Blend Only position
5. Select HIGH speed approximately 20
seconds.
6. When ready to begin, press the Start/
Stop button.
7. Blend until ice is crushed.
8. Once complete, lift the Arm Lock.
9. Turn the Seal Selector (cap) to the
Remove Cap position to take the Lid off
the Jug.
10. Scoop into serving bowls and garnish
with a sprinkling of cinnamon.
19
Page 22

The Sunbeam Vacuum Blender
5 Year Motor Guarantee
Sunbeam has built its reputation on
manufacturing quality electrical appliances.
Our High Performance Blender is constructed
from the highest quality materials. So much
so, we guarantee our Blender motor for
five (5) years against faulty materials or
manufacture. This guarantee is just another
expression of our confidence in the way we
make appliances at Sunbeam. In order to be
eligible for this guarantee, you must retain
your receipt as proof of purchase.
Your High Performance Blender is covered
for the first year against faulty material or
manufacture by the Sunbeam 12 Month
Replacement Guarantee. Should you
experience any difficulties with your appliance
within this 12 Month period, please phone
our customer service line for advice on 1300
881 861 in Australia, or 0800 786 232 in New
Zealand. The Sunbeam (5) five year motor
guarantee begins from date of purchase and
extends for four years beyond the 12 Month
Replacement Guarantee. It covers only the
motor, guaranteeing it against faulty materials
or manufacture. It does not cover damage
caused by accident, misuse or being used in a
manner not in accordance with the Instruction
Book. Similarly, this motor guarantee does
not cover freight or any other costs incurred in
making a claim.
If a fault should develop with the motor
after the period covered by the 12 Month
Replacement Guarantee, please call Sunbeam
Customer Service on the number listed below
or send a written claim to Sunbeam at the
address listed below. On receipt of your claim,
Sunbeam will advise you on how to obtain a
replacement motor if your motor is defective.
Alternatively, you can return the Sunbeam
High Performance Blender to any of
Sunbeam’s authorised service centres,
together with your receipt. The service centre
will examine the motor and if it is faulty or
defective, the motor will be replaced free of
charge.
For a complete list of Sunbeam’s authorised
service centres visit our website or call:
Australia
1300 881 861
www.sunbeam.com.au
Units 5 & 6, 13 Lord Street
Botany NSW 2019 Australia
New Zealand
0800 786 232 26
www.sunbeam.co.nz
Level 6, Building 5, Central Park
660-670 Great South Road
Greenlane, Auckland
The benefits given to you by this guarantee are
in addition to your other rights and remedies
under any laws which relate to the appliance.
Our goods come with guarantees that cannot
be excluded under the Australian Consumer
Law and under the New Zealand Consumer
Guarantees Act. In Australia you are entitled
to a replacement or refund for a major
failure and for compensation for any other
reasonably foreseeable loss or damage. You
are also entitled to have the goods repaired or
replaced if the goods fail to be of acceptable
quality and the failure does not amount to a
major failure.
IMPORTANT NOTE
Sunbeam agrees to replace the motor in
the event of the motor developing a fault
or defect, within the four years after the 12
Month Replacement Guarantee. As your
High Performance Blender needs to be
assessed at a Sunbeam authorised service
centre, it will not be accepted through
retail stores. If using the Sunbeam High
Performance Blender for commercial
use this motor guarantee is limited to 12
months from the date of purchase.
20
Page 23

Warranty
Should you experience
any difficulties with
your product during the
warranty period,
please contact
Sunbeam Customer Care:
Level 6, Building 5,
Central Park,
660–670 Great South Road
Greenlane, Auckland
New Zealand
:
21
Page 24

Need help with your appliance?
Contact our Customer Care Team or
visit our website for information and tips
on getting the most from your appliance.
AUSTRALIA
Visit:
Phone:
Mail:
NEW ZEALAND
Visit:
Phone:
Mail:
MADE IN CHINA TO
SUNBEAM’S
SPECIFICATION
www.sunbeam.com.au
1300 881 861
Units 5 & 6, 13 Lord Street,
Botany NSW 2019
www.sunbeam.co.nz
0800 786 232
Level 6, Building 5, Central Park,
660–670 Great South Road,
Greenlane, Auckland
APPROVED BY
APPROPRIATE
ELECTRICAL REGULATORY
AUTHORITIES
Sunbeam Corporation PTY LTD | ACN 000 006 771
Sunbeam is a division of Newell Brands
Due to continued product improvements,
product illustrations and photographs in this User Guide
may differ slightly from the actual product.
Printed in China
PBT7200SS_19EM1 (ANZ)
GCDS-SUN600164-SL
 Loading...