

Page 1
Instruction &
Recipe Booklet
Please read these instructions carefully
and retain for future reference
PB9800
Page 2

Important instructions – retain for
future use.
Page 3

Contents
Sunbeam’s Safety Precautions for your
Café Series
Features of your Café Series
Speed Dial, Pre-Programmed Functions
and Pulse Button 8
Lid assembly 9
Operating your Café Series
Blade Assembly 11
Processing Baton 12
Care and Cleaning 13
Helpful Blending Hints 14
Recipes 15
Smoothies, Milkshakes and Frappes 15
Cocktails 18
Soups 20
Dressings, Sauces and Dips 23
Baby food 28
®
Blender 4
®
Blender 6
®
Blender
10
3
Page 4

Sunbeam’s Safety Precautions
SAFETY PRECAUTIONS FOR YOUR
SUNBEAM CAFÉ SERIES BLENDER
PB9800.
• Ensure fingers are kept well away from the
blades when in use. The processing baton
may be used while the motor is running with
the main part of the lid in place.
• Always operate on a flat level surface.
• Ensure the control dial is in the “OFF”
position and the jug is in place before
plugging into the power outlet.
• Do not operate on low speed for more than
30 seconds at a time when blending heavy
loads.
• Always remove the plug from the power
outlet when the blender is not in use, before
disassembling, putting on or taking off parts,
and before cleaning other than washing the
jug.
• Blade is sharp, handle carefully.
• Always operate the blender with the lid in
place.
• When using heavy loads, the blender should
not be operated for more than 15 seconds.
This does not apply to any of the recipes
detailed in this instruction booklet.
• Do not place the blade assembly onto the
motor base without it being correctly fitted to
the jug.
• The maximum load capacity of the jug is
2 litres, and substantially less with thick
mixtures.
• When making peanut butter (or other nut
butters, or oil based foods) do not process
for more than one minute after mixture
starts circulating. Over-processing will cause
the mixture in the jug to overheat. Do not
process more than 500g of nuts at a time.
• Jug should not be more than 2/3 full when
the processing baton is left in place while
blending. Do not exceed 30 seconds of
continuous blending with processing baton in
place.
• The blender is fitted with a safety switch to
prevent the motor operating unless the jug is
in place.
• Do not blend warm/hot ingredients. Allow
ingredients to cool to room temperature
before placing in jug.
4
Page 5

Sunbeam’s Safety Precautions
Sunbeam is very safety conscious when
designing and manufacturing consumer products,
but it is essential that the product user also
exercise care when using an electrical appliance.
Listed below are precautions which are essential
for the safe use of an electrical appliance:
• Read carefully and save all the instructions
provided with an appliance.
• Always turn the power off at the power outlet
before you insert or remove a plug. Remove
by grasping the plug - do not pull on the cord.
• Turn the power off and remove the plug
when the appliance is not in use and
before cleaning.
• Do not use your appliance with an extension
cord unless this cord has been checked
and tested by a qualified technician or
service person.
• Always use your appliance from a power
outlet of the voltage (A.C. only) marked
on the appliance.
• This appliance is not intended for use by
persons (including children) with reduced
physical, sensory or mental capabilities, or
lack of experience and knowledge, unless they
have been given supervision or instruction
concerning use of the appliance by a person
responsible for their safety.
• Children should be supervised to ensure that
they do not play with the appliance.
• The temperature of accessible surfaces may be
high when the appliance is operating.
• Never leave an appliance unattended while
in use.
• Do not use an appliance for any purpose
other than its intended use.
• Do not place an appliance on or near a hot gas
flame, electric element or on a heated oven.
• Do not place on top of any other appliance.
• Do not let the power cord of an appliance hang
over the edge of a table or bench top or touch
any hot surface.
• Do not operate any electrical appliance with
a damaged cord or after the appliance has
been damaged in any manner. If damage is
suspected, return the appliance to the nearest
Sunbeam Appointed Service Centre
for examination, repair or adjustment.
• For additional protection, Sunbeam
recommend the use of a residual current
device (RCD) with a tripping current not
exceeding 30mA in the electrical circuit
supplying power to your appliances.
• Do not immerse the appliance in water
or any other liquid unless recommended.
• Appliances are not intended to be operated
by means of an external timer or separate
remote control system.
• This appliance is intended to be used in
household and similar applications such
as: staff kitchen areas in shops, offices and
other working environments; farm houses; by
clients in hotels, motels and other residential
type environments; bed and breakfast type
environments.
If you have any concerns regarding the performance and use of your appliance,
please visit www.sunbeam.com.au or contact the Sunbeam Consumer Service Line.
Ensure the above safety precautions are understood.
5
Page 6
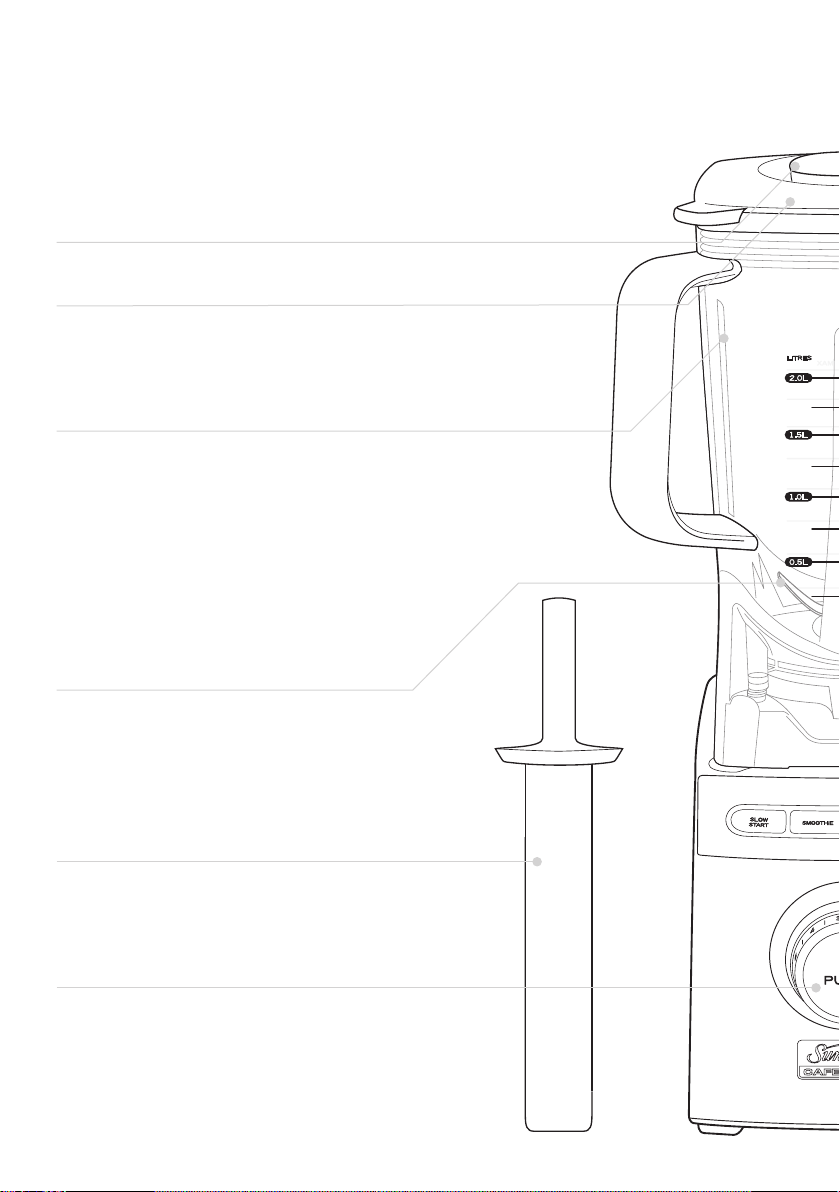
Features of your Sunbeam
®
Café Series
Ingredient measuring cap
Handy 60ml removable measuring cap.
Jug lid with ingredient measuring cap
To provide the necessary safety, the lid
seals tightly to the jug and features a
pouring hole, that allows you to add
ingredients during blending.
2 litre capacity square BPA-free
DURALITE™ jug
Inherent with superior blending
performance the square jug design has
a large 2 litre capacity. It is constructed
utilising an ultra-durable BPA free
material that is impact resistant and
withstands cracking in the dishwasher for
hundreds of cycles. Additional benefits
include heat, stain and scratch resistance
and its lightweight composition.
Blender
Stainless steel blade
Configured to optimise all processing
tasks and provide the ultimate
performance, the precision cut and
sharpened stainless steel blade assembly
is mounted on a sealed bearing for faster
speed and longer life.
Processing baton
Specially designed to assist during
demanding processing tasks, the baton
allows you to safely push food into the
blades while the blender is operating.
Pulse button
The ‘Pulse’ feature provides short bursts
of power. To activate, depress the ‘Pulse’
button and hold down as long as needed.
Ideal for preparing breadcrumbs, nuts
and biscuits.
6
Page 7
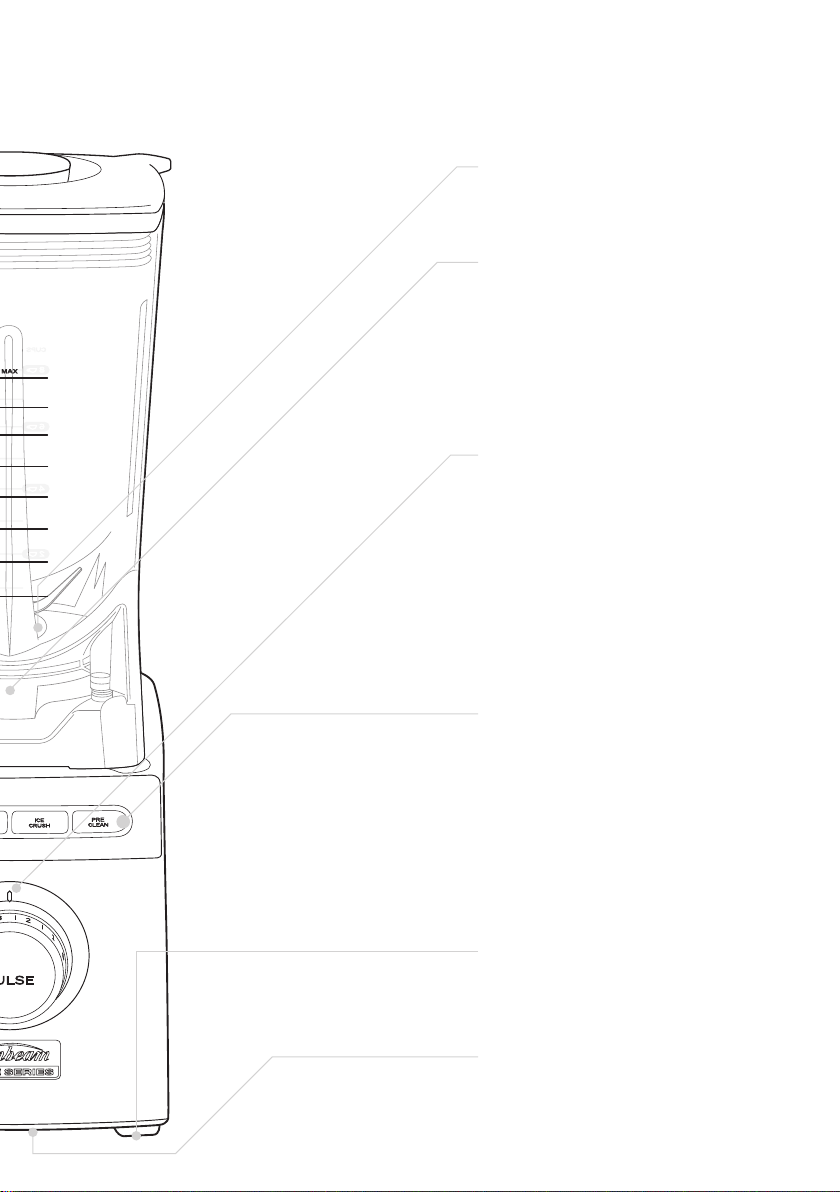
Removable blade assembly
Blade assembly is removable for
thorough cleaning.
Heavy-duty 2000 watt motor
Enables blade speeds to reach up to
20,000 revolutions per minute (RPM)
delivering the power to uniformly
blend small or large quantities of
ingredients regardless of the load. Its
high performance and reliability are
backed by a 5 year motor guarantee.
Variable speed dial
The control dial allows you to select
a speed depending on the blending
task and texture of ingredients.
Turn the speed control dial in a
clockwise direction and the blender
automatically starts. The variable
speed dial allows you to select
continuously variable motor speeds
ranging from 4,000 to 15,000
revolutions per minute (free load).
Pre-programmed functions
Pre-programmed functions make
blending even easier. The 'Slow
Start' button will slowly ramp up the
speed selected on the control dial,
while popular blending functions like
'Smoothie' and 'Ice-Crush' will be
performed at the touch of a button.
To make cleaning a breeze, use the
'Pre-Clean' function.
Non-slip feet
Heavy-duty non-slip feet ensure the
blender remains stable and prevents
slipping on the bench top during use.
Cord wrap
Cord wraps away to keep bench top
clean.
7
Page 8

Speed Dial, Pre-Programmed
Functions and Pulse Button
Variable speed dial
Turn the speed control dial in a clockwise
direction and the blender automatically
starts. The variable speed dial allows you to
select continuously variable motor speeds
ranging from 4,000 to 15,000 revolutions
per minute (free load).
Pulse button
The ‘Pulse’ feature provides short bursts of
power. To activate, depress the ‘Pulse’ button
and hold down as long as needed. Ideal for
preparing breadcrumbs, nuts and biscuits.
Pre-programmed functions
Pre-programmed functions make blending
easy as they perform a blending task at
the touch of a button. Select the required
function by pressing the corresponding
function button. The blender will start to
operate and only the selected function button
will illuminate. On completion of the task,
the motor will stop and all function buttons
will illuminate indicating that these are now
available for use.
Slow Start – The motor will slowly ramp up
its speed to the speed setting chosen on the
variable speed dial.
Smoothie – Perfect for blending smoothies.
The Smoothie function is programmed to
blend the denser ingredients at a lower
speed setting, then increases as ingredients
thicken.
Ice Crush – Ideal for ice-crushing or
ingredients that require short bursts of power.
Pre-Clean – An easy and quick way to
rinse the DURALITE™ blending jug after
the processing task is complete. For more
information, please refer to the “Operating
your Café Series® Blender” or the “Care and
Cleaning” section in this booklet on pages 10
and 13.
The selection can be changed at any time
during the blending process. Press the
currently illuminated button to stop the
cycle. Then select a new function. The button
will stay illuminated and the new function
will start.
8
Page 9

Lid assembly
The lid is easy to position on or remove, and
to clean, see Figure 1.
1. Simply push lid down firmly to seal.
2. To secure the measuring cap, slide it into
the top of the rubber lid and rotate to lock.
3. The measuring cap can be removed when
using the processing baton or when adding
ingredients.
Note: As there is no locking design we advise
that you place your hand on the lid as you
initially start processing.
Figure 1
9
Page 10

Operating your Café Series®
Blender
1. Place the DURALITE™ jug on the motor
base by locating it over the four non-slip
rubber jug mounts. The jug can be
placed on the motor base in four different
positions.
2. Place ingredients into the DURALITE™
jug.
Note: Do not operate the blender when the
jug is empty.
3. Place the lid firmly into position on the
DURALITE™ jug. Always ensure the
measuring cap is in place when processing,
except when the processing baton is
inserted through the opening in the lid; or
when adding ingredients through the hole
in the lid.
Note: Always have the lid in position during
processing.
4. a) Using the speed dial:
Using the variable speed dial, select the
desired processing speed from 1 – 5 and
this will provide continuous processing until
the dial is turned anti-clockwise to the ‘0’
position.
Due to the high processing speed of the
Café Series® Blender, processing times are
significantly reduced over those of standard
blenders. Therefore we advise that until
you are familiar with the speed of the Café
Series® Blender that you keep a close watch
on ingredients being processed.
Tip: Use the ‘Slow Start’ feature to combine
ingredients at the start of blending. To do
so, press the ‘Slow Start’ function button
first, then turn the speed dial to the desired
speed. The blender will slowly ramp up its
speed to this chosen speed setting.
10
Tip: Once processing has commenced, further
ingredients can be added by removing the
measuring cap and pouring ingredients
through the hole in the lid.
Note: Wait until blade comes to a complete
stop before removing the lid or jug.
4. b) Using a pre-programmed function:
Select the desired function by pressing
the appropriate function button. The
blender will start to operate and only the
selected function button will illuminate.
On completion of the task, the motor will
stop and all function buttons will illuminate
indicating that these are now available again.
Note: The ‘Slow Start’ must be used in
combination with the variable speed dial.
Please refer to 4.a.
Before a new function can be selected, the
previous function must be stopped.
To stop blending at any time, press the
selected function button.
Tip: Once processing has commenced, further
ingredients can be added by removing the
measuring cap and pouring ingredients
through the hole in the lid.
Note: Wait until blade comes to a complete
stop and all function buttons illuminate
before removing the lid or jug.
Page 11

Blade Assembly
Important: Always ensure the blender is
unplugged from the power outlet before
fitting or removing the blade assembly.
Always handle the blade assembly with
caution, as the blades are extremely sharp.
➀
➁
Figure 2
To assemble the blade assembly, follow these
steps and refer to Figure 2;
1. Ensure the flat sides of the blade assembly
are aligned with the corresponding flat
sides of the opening in the bottom of the
jug (refer to Figure 3). Once the blade is
aligned, push the blade assembly firmly
into the opening.
Ensure the assembly is pushed all the way
to seat the seal.
2. Place the locking nut on the underside
of the jug and tighten by rotating in a
clockwise direction.
Figure 3
11
Page 12

Processing Baton
Specially designed to assist during
demanding processing tasks, the baton allows
you to safely push food down into the blades
while the blender is operating. See Figure 4.
Uses for the processing baton:
• The processing baton can be used as a
scraper or spatula to easily remove thick
mixtures such as batters and sauces from
the jug.
• Use the processing baton to encourage
hard to process ingredients into the blades.
• Using the processing baton reduces
blending times.
Figure 4
Important: When using the processing
baton, ensure the lid is firmly in place and
the measuring cap is removed. For safety
purposes, do not insert the processing baton
into the jug with the lid removed.
12
Page 13

Care and Cleaning
Note: Ensure that the blender is unplugged
from the power outlet prior to cleaning.
Washing
For best results, wash all blender
components, excluding the base (motor
housing), in hot soapy water.
The DURALITE™ blending jug and lid
(excluding the measuring cap) can be washed
in the dishwasher. It is recommended to
remove the blade assembly from the jug as
this part is not dishwasher safe.
Quick clean
Half fill the blender with lukewarm water and
a small amount of detergent. Position the jug
on the motor base and press the ‘Pre-Clean’
function button. When the task is completed,
the motor will stop and all function buttons
will illuminate. Now remove the jug, rinse it
under running water and then allow to air dry.
Thorough cleaning
After completing the quick clean, should
any ingredients remain, remove the blade
assembly and wash both the jug and blade
assembly in warm soapy water. Rinse well
and dry. Rinse the lid, ingredient cap and
processing baton under running water and
wash with warm soapy water. Rinse well and
dry.
To clean the motor base
Use a damp, soft sponge with mild detergent
and wipe over the motor base.
Note: Never immerse the motor base in water
or other liquid.
13
Page 14

Helpful Blending Hints
• Use the processing baton to remove thick
mixtures from the blending jug.
• Make caster sugar or pure icing sugar from
regular sugar. Simply place up to 2 cups
of sugar into the jug and continue to pulse
mixture for caster sugar or blend on speed
4 for icing sugar.
• Place up to 1 tray (12) large ice cubes into
the jug. Use the ‘Ice Crush’ function to
make fluffy snow cones.
• Freezing fresh fruit will ensure you always
have fruit on hand and ready to blend.
• Peel and chop fruit as necessary before
freezing.
• Frozen bananas add “creaminess” to
smoothies.
• Freeze passionfruit pulp in ice cube trays
for easy portion control.
• When chopping ingredients such as nuts or
biscuits use the ‘Pulse’ button. This helps
you to achieve a perfect result without
overprocessing.
• Thickened cream can be whipped in
seconds. Blend on speed 4 until the
mixture thickens then use the processing
baton to check the cream for the desired
texture.
• Ensure all fruit juices are chilled before
blending as this will help to keep drinks
cold for longer.
• When making thick shakes, don’t use
hard ice cream straight from the freezer.
Leave ice cream out for approximately 5
minutes before blending, this time may
vary depending on how cold your freezer
is. If using ice cream with a higher cream
content you may need a little extra milk.
Always place ice cream in the jug in small
pieces, never in large chunks.
• Never blend warm/hot ingredients.
Always allow ingredients to cool to room
temperature before blending.
• Never fill above the maximum level
indicator of 2 litres.
• Ensure the lid is firmly and securely
placed on the jug and do not operate the
blender without the lid on. If you wish to
add any additional ingredients remove the
measuring cap and add as necessary.
• In the smoothie and milkshake recipes in
this booklet, soy, skim, light or full cream
milk can be used.
• When making cocktails or other drinks with
more than 6 ice cubes, use the ‘Ice Crush’
function.
14
Page 15

Recipes - Smoothies, Milkshakes
and Frappes
Traditional Milkshake
Serves: 3-4. Makes approximately 1 litre
500ml (2 cups) milk
4 scoops (180g) vanilla ice cream
2 teaspoons vanilla extract
1. Place ingredients into blender jug. Place
the lid securely onto the jug.
2. Press SMOOTHIE button. When the cycle
is complete, the motor will stop. Remove
the lid and pour into serving glasses.
Variations:
Chocolate Milkshake: replace vanilla ice
cream with chocolate ice cream, and replace
vanilla extract with 2 tablespoons chocolate
topping or syrup.
Snickers Milkshake: replace vanilla ice cream
with chocolate ice cream, and replace vanilla
extract with ½ cup smooth peanut butter.
Choc-mint Milkshake: replace vanilla ice
cream with chocolate ice cream, and replace
vanilla extract with peppermint essence.
Strawberry Milkshake: replace vanilla extract
with 250g fresh strawberries. Alternatively
you could use 2 tablespoons strawberry
topping.
Peanut Butter Smoothie: replace vanilla extract
with ½ cup smooth peanut butter.
Tim Tam Smoothie
Serves: 2-3. Makes approximately 750mls
5 Arnott’s Original Tim Tams
4 scoops (180g) vanilla ice cream
400ml milk
1 Arnott’s Original Tim Tam, extra, crumbled
to garnish
1. Place ingredients into blender jug. Place
the lid securely onto the jug.
2. Press SMOOTHIE button. When the cycle
is complete, the motor will stop. Remove
the lid and pour into serving glasses.
3. Garnish with the extra Tim Tam.
Bubblegum Blast
Serves: 2-3. Makes approximately 750mls
500ml (2 cups) apple juice
1 ½ cups (200g) frozen blueberries
½ cup vanilla yoghurt
1. Place ingredients into blender jug. Place
the lid securely onto the jug.
2. Press SMOOTHIE button. When the cycle
is complete, the motor will stop. Remove
the lid and pour into serving glasses.
15
Page 16

Recipes - Smoothies, Milkshakes and Frappes (continued)
Watermelon and Mint Frappe
Serves: 2
6 ice cubes
¹⁄³ cup fresh mint leaves
500g watermelon pieces
Extra mint leaves, to garnish
1. Place ingredients into blender jug in the
order listed. Place the lid securely onto
the jug.
2. Press ICE CRUSH button. When the cycle
is complete, the motor will stop. Remove
the lid.
3. Pour into serving glasses and garnish with
extra mint to serve.
Tip: Serve immediately, as the mint will cause
the Frappe to go brown on standing.
Mixed Berry Frappe
Serves: 2-3. Makes approximately 850mls
500mls (2 cups) orange juice
300g frozen mixed berries
1 tablespoon caster sugar
1. Place ingredients into blender jug. Place
the lid securely onto the jug.
2. Press SMOOTHIE button. When the cycle
is complete, the motor will stop. Remove
the lid and pour into serving glasses.
Coconut Dream
Serves: 2-3. Makes approximately 850mls
500ml (2 cups) apple juice
125mls (½ cup) light coconut milk
250g frozen strawberries
1 scoop (45g) vanilla ice cream
1. Place ingredients into blender jug. Place
the lid securely onto the jug.
2. Press SMOOTHIE button. When the cycle
is complete, the motor will stop. Remove
the lid and pour into 2 glasses.
3. Garnish glass with a strawberry if desired.
Classic Banana Smoothie
Serves: 3-4. Makes approximately 1 litre
500ml (2 cups) milk
2 medium ripe bananas, roughly chopped
2 scoops (90g) vanilla ice cream
1 tablespoon honey
4 ice cubes
1. Place ingredients into blender jug. Place
the lid securely onto the jug.
2. Press SMOOTHIE button. When the cycle
is complete, the motor will stop. Remove
the lid and pour into serving glasses.
3. Garnish with a pinch of cinnamon.
16
Page 17

Recipes - Smoothies, Milkshakes and Frappes (continued)
Coffee and Banana Thickshake
Serves: 2-3. Makes approximately 750mls
1 ripe banana, peeled, chopped
30mls espresso, cold
250mls (1 cup) milk
2 scoops (90g) vanilla ice cream
4 ice cubes
1. Place ingredients into blender jug. Place
the lid securely onto the jug.
2. Press SMOOTHIE button. When the cycle
is complete, the motor will stop. Remove
the lid and pour into serving glasses.
Tip: If you don’t have access to a coffee
machine, use 2 teaspoons instant coffee
dissolved in 1 ½ tablespoons boiling water.
Refrigerate until cold.
Iced Coffee
Serves: 3. Makes approximately 900mls
60mls espresso, cold
500mls (2 cups) milk
2 scoops (90g) vanilla ice cream
4 ice cubes
Whipped cream and cocoa powder, to serve
1. Place ingredients into blender jug. Place
the lid securely onto the jug.
2. Press SMOOTHIE button. When the cycle
is complete, the motor will stop. Remove
the lid and pour into serving glasses.
3. Top with whipped cream and dust with
cocoa powder.
Tip: If you don’t have access to a coffee
machine, use 1 tablespoon instant coffee
dissolved in ¼ cup boiling water. Refrigerate
until cold.
Mango Lassi
Serves: 4-6. Makes 1.25 litres
450g mango pieces
1 cup vanilla yoghurt
6 ice cubes
325mls milk
Chopped pistachios and ground cardamom,
to garnish
1. Place ingredients into blender jug. Place
the lid securely onto the jug.
2. Press SMOOTHIE button. When the cycle
is complete, the motor will stop. Remove
the lid and pour into serving glasses.
3. Garnish with pistachios and dust with
ground cardamom.
Passionfruit and Mint Iced tea
Serves: 4. Makes 1.25 litres
500mls cold tea
¼ cup icing sugar
½ cup fresh mint leaves
170ml can passionfruit pulp
Extra mint leaves, to garnish
1. Place tea, sugar and mint into blender jug.
Place the lid securely onto the jug.
2. Blend on speed 1 for 10 seconds. Remove
the lid and pour into a serving jug. Stir
through passionfruit pulp.
3. Garnish with extra mint leaves. Serve on
ice.
Tip: To make tea, use tea bag or tea leaves to
make tea to your desired strength. Refrigerate
overnight or until cold.
17
Page 18

Recipes - Cocktails
Tip: To make sugar syrup, place 1 cup caster
sugar in a small saucepan with 1 cup water.
Stir over low heat until dissolved. Bring to
boil, remove from heat and cool to room
temperature. Refrigerate until cold. Syrup
can be kept in a clean, airtight container or
jar in the fridge until needed. It's a good idea
to have some ready on hand for anytime you
want to make cocktails.
Frozen Lime Margarita
Serves: 2
12 ice cubes
80ml tequila
30ml fresh lime juice
60ml Cointreau or triple sec
30ml sugar syrup
Lime slices, to garnish
1. Place ingredients into blender jug in the
order listed. Place the lid securely onto
the jug.
2. Press ICE CRUSH button. When the cycle
is complete, the motor will stop. Remove
the lid.
3. Pour into 2 cocktail glasses and garnish
with lime slice to serve.
Strawberry Daiquiri
Serves: 2
6 ice cubes
90ml Bacardi rum
60ml fresh lime juice
60ml sugar syrup
125g strawberries, quartered
Extra strawberries, to garnish
1. Place ingredients into blender jug in the
order listed. Place the lid securely onto
the jug.
2. Press ICE CRUSH button. When the cycle
is complete, the motor will stop. Remove
the lid.
3. Pour into 2 cocktail glasses and garnish
with extra strawberries to serve.
Pina Colada
Serves: 4
10 ice cubes
125ml Bacardi rum
600ml pineapple juice
400ml can light coconut cream
125ml Malibu
2 tablespoons caster sugar
Mint, to garnish
1. Place ingredients into blender jug in the
order listed. Place the lid securely onto the
jug.
2. Press ICE CRUSH button. When the cycle
is complete, the motor will stop. Remove
the lid.
3. Pour into tall glasses to serve. Garnish with
a sprig of mint if desired.
18
Page 19

Recipes - Cocktails (continued)
Splice
Serves: 2
6 ice cubes
60ml Midori
60ml Malibu
120ml pineapple juice
80ml cream
Pineapple wedge, to garnish
1. Place ingredients into blender jug in the
order listed. Place the lid securely onto the
jug.
2. Press ICE CRUSH button. When the cycle
is complete, the motor will stop. Remove
the lid.
3. Pour into 2 glasses to serve. Garnish with a
wedge of pineapple if desired.
Choc Heaven
Serves 3-4
6 ice cubes
2 scoops (90g) chocolate ice cream
60mls Amaretto
60mls Coffee liqueur
60mls Irish cream liqueur
2 cups milk
Chocolate flakes, to garnish
1. Place ingredients into blender jug in the
order listed. Place the lid securely onto
the jug.
2. Press ICE CRUSH button. When the cycle
is complete, the motor will stop. Remove
the lid.
3. Pour into tall glasses and garnish with
chocolate flakes to serve.
Frozen Cosmopolitan
Serves 3
90ml vodka
90ml Cointreau
200ml cranberry juice
2 teaspoons lime juice
4 ice cubes
Lime slices, to garnish
1. Place ingredients into blender jug in the
order listed. Place the lid securely onto
the jug.
2. Press ICE CRUSH button. When the cycle
is complete, the motor will stop. Remove
the lid.
3. Pour into 2 cocktail glasses and garnish
with lime slice to serve.
19
Page 20

Recipes - Soups
Mixed Mushroom & Thyme Soup
Serves: 4-6
1 tablespoon olive oil
20g butter, chopped
1 large brown onion, finely chopped
2 garlic cloves, crushed
1kg button mushrooms, sliced
200g Swiss brown mushrooms, sliced
150g oyster mushrooms, sliced
2 cups chicken stock
2 cups water
1 tablespoon chopped fresh thyme leaves
½ cup thickened cream
Crusty bread, to serve
1. Heat oil and butter in a large saucepan
over medium heat. Add onion and cook,
stirring until soft.
2. Stir in garlic and mushrooms and cook,
stirring occasionally, for 5 minutes or until
mushrooms soften.
3. Add stock, water and thyme; bring to the
boil. Reduce heat to medium-low and
simmer, uncovered, stirring occasionally,
for 10 minutes or until liquid reduces
slightly.
4. Remove from heat. Set aside and cool to
room temperature.
5. Using the SLOW START button, blend
soup, in 2 batches, on speed 2-3 until
smooth. Place in a clean saucepan. Stir in
cream.
6. Stir over low-medium heat until hot.
Season with salt and pepper. Serve with
crusty bread.
Tip: You can use vegetable stock instead of
chicken stock if you would like this recipe to
be vegetarian.
Potato and Leek Soup
Serves: 4-6
1 tablespoon olive oil
2 small rashers bacon, chopped
3 medium leeks, sliced
1 kg potatoes, peeled, chopped
2 cups chicken stock
2 cups water
½ cup grated Parmesan and chives, to serve
1. Heat oil in a large saucepan; add bacon
and cook, stirring occasionally, until brown.
2. Add leeks to same pan and cook, stirring
for about 5 minutes or until leeks are
tender. Add potatoes, stock and water;
bring to the boil, reduce heat and simmer,
uncovered, for about 20 minutes or until
potatoes are tender.
3. Remove from heat; cool to room
temperature.
4. Using the SLOW START button, blend
soup, in 2 batches, on speed 2-3 until
smooth. Place in a clean saucepan.
5. Stir over low-medium heat until hot.
Season with salt and pepper.
6. Serve soup topped with parmesan cheese
and chives.
Tip: You can use vegetable stock instead of
chicken stock if you would like this recipe to
be vegetarian.
20
Page 21

Recipes - Soups (continued)
Gazpacho with Herb Crumb Topping
Serves: 4-6
3 cups tomato juice
1 Lebanese cucumber, coarsely chopped
¼ cup fresh coriander leaves
270g jar char-grilled capsicum, drained
½ small red onion, halved
1 garlic clove
1 teaspoon balsamic vinegar
1 teaspoon Tabasco
Topping
2 slices bread, quartered
1 tablespoon finely chopped coriander
½ small red onion, finely chopped
1. To make gazpacho, place all ingredients
into the blender jug. Place the lid securely
onto the jug.
2. Using the SLOW START button, blend
soup, on speed 3 for about 10 seconds or
until smooth. Transfer to a bowl. Cover with
plastic wrap and place in the fridge for 3
hours or until cold. Season with salt and
pepper.
3. Meanwhile, to make topping, place bread
into the clean, dry blender jug. Place the
lid securely onto the jug. Pulse until bread
becomes coarse breadcrumbs. Transfer
bread crumbs onto a baking tray. Place
until a hot grill for 1 minute or until crisp
and golden. Transfer to a bowl and stir
through coriander and onion.
4. Serve chilled Gazpacho topped with crumb
mixture.
Creamy Corn Soup
Serves: 6
6 fresh corn cobs, husks removed
2 teaspoons olive oil
1 onion, chopped
2 celery stalks, chopped
1 carrot, chopped
1 garlic clove, crushed
3 potatoes (500g), peeled, chopped
2 cups chicken stock
2 cups water
Chopped parsley, to garnish
1. Cut the kernels from the corn cobs; reserve
both kernels and cobs.
2. Heat oil in a large saucepan; add onion,
celery, carrot and garlic. Cook, stirring
occasionally, until brown.
3. Add potatoes, stock, water, kernels and
cobs to the same pan; bring to the boil,
reduce heat and simmer, uncovered, for
about 20 minutes or until potatoes are
tender.
4. Remove from heat; cool to room
temperature. Remove and discard corn
cobs.
5. Using the SLOW START button, blend
soup, in 2 batches, on speed 2-3 until
smooth. Pour soup through a coarse sieve
into a clean saucepan (you may need a
spoon to help you push the soup through).
6. Stir over low-medium heat until hot.
Season with salt and pepper.
7. Serve soup topped with parsley to garnish.
Tip: You can use vegetable stock instead of
chicken stock if you would like this recipe to
be vegetarian.
21
Page 22

Recipes - Soups (continued)
Cauliflower and Pea Soup
Serves: 6
2 teaspoons oil
1 onion, chopped
1 celery stalk, chopped
3 potatoes (500g), peeled, chopped
500g cauliflower florets
1.5 litres water
½ cup frozen peas
1. Heat oil in a large saucepan; add onion
and celery. Cook, stirring occasionally, until
brown.
2. Add potatoes, cauliflower and water to
the same pan; bring to the boil, reduce
heat and simmer, uncovered, for about 20
minutes or until potatoes and cauliflower
are tender.
3. Remove from heat; cool to room
temperature.
4. Using the SLOW START button, blend
soup, in 2 batches, on speed 2-3 until
smooth. Place soup and peas in a clean
saucepan.
5. Stir over low-medium heat until soup is hot
and peas are cooked. Season well with salt
and pepper.
22
Page 23

Recipes - Dressings, Sauces
and Dips
Whole Egg Mayonnaise
Makes: approximately 1 ½ cups
1 egg
1 egg yolk
1 tablespoon lemon juice
1 tablespoon Dijon mustard
½ teaspoon salt
²⁄³ cup vegetable oil
²⁄³ cup olive oil
1. Place egg, yolk, juice, mustard and salt
in the blender jug. Place the lid securely
onto the jug. Blend on speed 1 for 10
seconds or until combined.
2. With the motor operating, remove the
measuring cup and gradually add the oil
in a slow, thin stream; as the mixture
thickens, increase speed gradually up to
speed 3 until the mixture is creamy and
all the oil has been added. Season with
pepper.
3. Transfer to a clean container. Keeps in the
refrigerator for 1 week.
Variations:
Garlic Aioli: Stir through 3 cloves crushed
garlic. This goes well on burgers!
Tartare Sauce: Stir through 1/4 cup finely
chopped gherkins. Great for fried or fresh
seafood!
Lemon/Lime mayonnaise: Stir through
2 teaspoons finely grated rind and 2
tablespoons of fresh juice. A great dipping
sauce for chicken!
Caesar Dressing
Makes: approximately 1 ½ cups
1 egg
1 egg yolk
1 tablespoon lemon juice
1 tablespoon Dijon mustard
½ teaspoon salt
²⁄³ cup vegetable oil
²⁄³ cup olive oil
1 garlic clove
1 anchovy fillet
1 teaspoon Worcestershire sauce
2 tablespoons extra lemon juice
1. Place egg, yolk, juice, mustard and salt in
the blender jug. Place the lid securely onto
the jug. Blend on speed 1 for 10 seconds
or until combined.
2. With the motor operating on speed 1,
remove the measuring cap and gradually
add the oil in a slow, thin stream; as the
mixture thickens, increase speed gradually
up to speed 3 until the mixture is creamy
and all the oil has been added.
3. Add garlic, anchovy, worcestershire
sauce and extra lemon juice. Replace the
measuring cap. Pulse until combined.
Season with pepper.
4. Transfer to a clean container. Keeps in the
refrigerator for 1 week.
Tip: If you would like a thinner dressing, thin
out with a little warm water.
23
Page 24

Recipes - Dressings, Sauces and Dips (continued)
Satay Sauce
Makes: approximately 1 ½ cups
1 cup toasted unsalted peanuts
½ cup peanut oil
½ cup warm water
2 tablespoons soy sauce
2 garlic cloves
1. Place all ingredients into the blender jug.
Place the lid securely onto the jug.
2. Blend on speed 2 until smooth. Transfer to
a small saucepan; cook, stirring over low
heat until hot.
3. Serve as a dipping sauce for chicken
skewers.
Tip: You can also use this as a basting sauce,
and brush over chicken or meat before
grilling.
Hollandaise Sauce
Makes: approximately 1 cup
3 egg yolks
2 tablespoons freshly squeezed lemon juice
250g unsalted butter, melted
1. Place egg yolks in a heatproof bowl over a
saucepan of simmering water (do not let
bowl touch water). Whisk egg yolks for 1-2
minutes or until pale. Add juice and whisk
until combined.
2. Transfer egg mixture to the jug of a
blender. Place the lid securely onto the
jug.
3. With the motor operating on speed 1,
remove the measuring cap and gradually
add the butter in a slow, thin stream until
combined and sauce thickens.
4. Season with salt and pepper.
Tip: Hollandaise sauce goes well with salmon
and asparagus. Or, simply serve over poached
eggs on toast.
24
Page 25

Recipes - Dressings, Sauces and Dips (continued)
Raspberry Coulis
Makes: 1 cup
300g frozen raspberries, thawed
¼ cup caster sugar
2 teaspoons lemon juice
1. Place all ingredients into the blender jug.
Place the lid securely onto the jug.
2. Blend on speed 1 for about 10 seconds or
until smooth.
3. Strain mixture through a fine sieve (you
may need to use the back of a spoon to
push the mixture through).
Tip: Serve with chocolate cake, waffles or on
ice cream.
Italian Dressing/Marinade
Makes: approximately 200mls
A very versatile recipe that can be used on
almost anything!
2 cloves garlic
¹⁄³ cup white vinegar
¹⁄³ cup olive oil
½ cup basil leaves
1. Place all ingredients into the blender jug.
Place the lid securely onto the jug.
2. Blend on speed 1 for about 10 seconds or
until smooth.
3. Season to taste with salt and pepper.
Tip: Excellent for grilled fish or chicken
skewers. Marinate meat over night or baste
during cooking. This recipe also makes a
great salad dressing. Try over a warm grilled
vegetable salad, or simply pour over leafy
greens.
25
Page 26

Recipes - Dressings, Sauces and Dips (continued)
Spicy Herb Dressing/Marinade
¹⁄³ cup flat leaf parsley
¼ cup mint leaves
2 cloves garlic
1 fresh chilli, seeded
¼ cup lemon juice
2 tablespoons white vinegar
1 ½ tablespoons olive oil
1 teaspoon Dijon mustard
1. Place all ingredients into the blender jug.
Place the lid securely onto the jug.
2. Blend on speed 1 for about 10 seconds or
until smooth.
3. Season to taste with salt and pepper.
Tip: Excellent for grilled vegetable kebabs.
Place a selection of vegetables pieces onto
skewers; coat with marinade for 2-3 hours.
Cook on a grill plate or barbecue brushing
with marinade during cooking. Or, pour over a
salad for a fresh twist.
Eggplant Dip
Makes: 4 cups
3 large eggplant
1 tablespoon lemon juice
¹⁄³ cup greek-style yoghurt
1 clove garlic
1 tablespoon parsley
1 tablespoon olive oil
1. Preheat oven or grill to Very Hot
(240°C/220°C fan-forced).
2. Place whole eggplant on a baking
tray. Cook in preheated oven turning
occasionally until skin has blackened and
flesh is soft.
3. Remove from oven and allow to cool.
Gently peel away skin. Discard skin; place
eggplant flesh into the blender jug. Add
lemon juice, yoghurt, garlic, parsley and
olive oil. Place the lid securely onto the
jug.
4. Blend on speed 2 until smooth.
5. Season to taste with salt and pepper.
Tip: Serve dip with pita crisps or toasted
Turkish bread.
26
Page 27

Recipes - Dressings, Sauces and Dips (continued)
Cheesy Spinach Dip
Makes: 3 cups
250 frozen spinach, thawed
250g Philadelphia cream cheese, softened to
room temperature, chopped
300g light sour cream
¹⁄³ cup grated parmesan cheese
2 green spring onions
1. Place all ingredients into the blender jug.
Place the lid securely onto the jug.
2. Pulse a few times until ingredients begin to
combine. Then, blend on speed 1 for about
10 seconds or until smooth.
3. Season to taste with salt and pepper. Serve
with crackers or corn chips.
Roasted Beetroot Dip
Makes: 3 cups
4 large (600g) fresh beetroot, trimmed,
washed
½ cup (200g) natural yogurt
½ cup (120g) light sour cream
½ teaspoon ground cumin
1 tablespoon horseradish cream
1. Preheat oven to Moderately Hot
(200°C/180°C fan-forced). Wrap each
beetroot individually in aluminium foil.
2. Place beetroot on a baking tray and bake
in oven for about 1- 1 ¼ hours or until
tender.
3. Remove beetroot from oven; open foil and
allow beetroot to cool for 15 minutes.
Using a sharp knife, remove stems and
peel away skin. Cut beetroot into quarters.
4. Place beetroot and remaining ingredients
into the blender jug. Place the lid securely
onto the jug.
5. Pulse a few times until ingredients begin to
combine. Then, blend on speed 2 for about
10 seconds or until smooth.
6. Season to taste with salt and pepper. Serve
with crackers or sliced Turkish bread.
27
Page 28

Recipes - Baby Food
Baby food can be made using the Blender by simply processing fresh fruit or vegetables that
have been boiled, steamed or microwaved until tender.
Baby food/puree can be frozen in a clean ice cube tray in portions, covered, and once frozen,
transferred to a resealable bag. Portions can then be thawed as you need them.
Try some of the following combinations:
• Apple and pear
• Banana and papaya
• Pear and banana
• Pumpkin and corn
• Peas and zucchini
• Potato and pumpkin
• Broccoli and cauliflower
• Pumpkin, sweet potato and zucchini
• Zucchini, squash and carrot
• Beans, peas and zucchini
28
Page 29

Notes
Page 30

The Sunbeam
5 Year Motor
Guarantee
Sunbeam has built its reputation
on manufacturing quality electrical
appliances. Our Cafe Series
constructed from the highest quality
is
materials. So much so, we guarantee our
Blender motor for five (5) years against
faulty materials or manufacture. This
guarantee is just another expression of our
confidence in the way we make appliances
at Sunbeam. In order to be eligible for this
guarantee, you must retain your receipt as
proof of purchase.
Your Cafe Series
for the first year against faulty material
or manufacture by the Sunbeam 12
Month Replacement Guarantee. Should
you experience any difficulties with your
appliance within this 12 Month period,
please phone our customer service line for
advice on 1300 881 861 in Australia, or
0800 786 232 in New Zealand.
The Sunbeam (5) five year motor guarantee
begins from date of purchase and extends
for four years beyond the 12 Month
Replacement Guarantee. It covers only
the motor, guaranteeing it against faulty
materials or manufacture. It does not cover
damage caused by accident, misuse or
being used in a manner not in accordance
with the Instruction Book. Similarly, this
motor guarantee does not cover freight or
any other costs incurred in making a claim.
®
Blender
®
Blender is covered
If a fault should develop with the motor
after the period covered by the 12 Month
Replacement Guarantee, please call
Sunbeam Customer Service on the number
listed below or send a written claim to
Sunbeam at the address listed below.
On receipt of your claim, Sunbeam will
advise you on how to obtain a replacement
motor if your motor is defective.
Alternatively, you can return the Cafe
®
Series
Blender to any of Sunbeam’s
authorised service centres, together with
your receipt. The service centre will examine
the motor and if it is faulty or defective, the
motor will be replaced free of charge.
For a complete list of Sunbeam’s authorised
service centres visit our website or call:
Sunbeam Corporation Ltd.
Australia
www.sunbeam.com.au
1300 881 861
Units 5 & 6, 13 Lord Street
Botany NSW 2019 Australia
Sunbeam Corporation Ltd.
New Zealand
www.sunbeam.co.nz
0800 786 232
26 Vestey Drive, Mt Wellington
Auckland, New Zealand
The benefits given to you by this guarantee
are in addition to your other rights and
remedies under any laws which relate to
the appliance.
Our goods come with guarantees that
cannot be excluded under the Australian
Consumer Law and under the New Zealand
Consumer Guarantees Act. In Australia you
are entitled to a replacement or refund for
a major failure and for compensation for
any other reasonably foreseeable loss or
damage. You are also entitled to have the
goods repaired or replaced if the goods fail
to be of acceptable quality and the failure
does not amount to a major failure.
IMPORTANT NOTE
Sunbeam agrees to replace the motor in
the event of the motor developing a fault or
defect, within the four years after the
12 Month Replacement Guarantee.
As your Cafe Series
assessed at a Sunbeam authorised service
centre, it will not be accepted through retail
stores.
If using the Cafe Series
commercial use this motor guarantee is
limited to 12 months from the date of
purchase.
®
Blender needs to be
®
Blender for
Page 31

12 Month Replacement Guarantee
In the unlikely event that this appliance develops any malfunction
within 12 months of purchase (3 months commercial use) due
to faulty materials or manufacture, we will replace it for you free
of charge.
Should you experience any difficulties with
your appliance, please phone our customer
service line for advice on 1300 881 861 in
Australia, or 0800 786 232 in New Zealand.
Alternatively, you can send a written claim
to Sunbeam at the address listed below.
On receipt of your claim, Sunbeam will
seek to resolve your difficulties or, if the
appliance is defective, advise you on how
to obtain a replacement or refund.
Your Sunbeam 12 Month Replacement
Guarantee naturally does not cover misuse
or negligent handling and normal wear and
tear.
Similarly your 12 Month Replacement
Guarantee does not cover freight or any other
costs incurred in making a claim. Please
retain your receipt as proof of purchase.
The benefits given to you by this guarantee
are in addition to your other rights and
remedies under any laws which relate to the
appliance.
Our goods come with guarantees that cannot
be excluded under the Australian Consumer
Law and under the New Zealand Consumer
Guarantees Act.
In Australia you are entitled to a
replacement or refund for a major failure and
for compensation for any other reasonably
foreseeable loss or damage. You are also
entitled to have the goods repaired or
replaced if the goods fail to be of acceptable
quality and the failure does not amount to
a major failure.
Should your appliance require repair or
service after the guarantee period, contact
your nearest Sunbeam service centre.
For a complete list of Sunbeam’s authorised
service centres visit our website or call:
Australia
www.sunbeam.com.au
1300 881 861
Units 5 & 6, 13 Lord Street
Botany NSW 2019 Australia
New Zealand
www.sunbeam.co.nz
0800 786 232
26 Vestey Drive, Mt Wellington
Auckland, New Zealand
Page 32

Need help with your appliance?
Contact our customer service team or visit
our website for information and tips on
getting the most from your appliance.
In Australia
Visit www.sunbeam.com.au
Or call 1300 881 861
In New Zealand
Visit www.sunbeam.co.nz
Or call 0800 786 232
is a registered trademark.
‘Café Series’ is a registered trademark of Sunbeam Corporation.
Made in China.
Due to minor changes in design or otherwise,
the product may differ from the one shown in this leaflet.
© Copyright.
is a registered trademark.
ABN 45 000 006 771
Units 5 & 6, 13 Lord Street
Botany NSW 2019 Australia
Unit 3, Building D
26 Vestey Drive
Mt Wellington Auckland
New Zealand
Sunbeam Corporation is a division of GUD Holdings Ltd.
Sunbeam Corporation Limited 2011.
10/11
 Loading...