

Page 1
MASTER
SERIES
PB8100
Soup & Smoothie
Blender
User Guide
SM8650 featured
Page 2

Contents
Sunbeam’s Safety Precautions 1
Features of your Soup & Smoothie Blender 3
Using your Soup & Smoothie Blender 5
Auto Modes 6
Expert or Manual Mode 10
Care and Cleaning 11
Troubleshooting 12
Recipes 13
Important instructions –
retain for future use.
Page 3

Sunbeam’s Safety Precautions
SAFETY PRECAUTIONS FOR YOUR SOUP &
SMOOTHIE PB8100 BLENDER.
• Always operate on a flat level surface.
• Ensure the control dial is “OFF” and the jug is
in place before plugging into the power outlet.
• Always remove the plug from the power
outlet when the blender is not in use, before
disassembling, putting on or taking off parts,
and before cleaning other than washing the
jug.
• Do not use appliance for other than intended
household use.
• Do not let cord hang over the edge of table or
counter or touch hot surface.
• Blade is sharp, handle carefully.
• Ensure fingers are kept well away from the
blades when in use.
• Be careful when handling the sharp cutting
blades, emptying the bowl and during cleaning.
• Always operate the blender with the lid in
place.
• The blender is fitted with a safety switch to
prevent the motor operating unless the lid is in
place.
• Lift and open the lid or removable measuring
cup carefully to avoid high temperature steam.
• The maximum load capacity of the jug is 1.75
litres
• This appliance shall not be used by children.
Keep the appliance and its cord out of reach of
children.
• Never move your appliance if it contains
anything hot.
• The glass bowl contains hot liquid, pour it out
carefully.
• Be careful if hot liquid is poured into the
blender as it can be ejected out of the
appliance due to a sudden steaming.
• Switch off the appliance and disconnect
from supply before changing accessories or
approaching parts that move in use.
• Do not touch surfaces of steam compartments.
It is hot.
• Do not operate the appliance near wall or
cabinet to prevent damage from steam.
• Do not operate the appliance (heating,
blending functions or programmes) when the
bowl is empty.
• Do not immerse in water or put it in the
dishwasher.
• Do not remove the measuring cup or add
ingredients when the appliance is blending.
• Do not insert a spatula or spoon by the hole of
the measuring cup on the lid, during a heating
or blending cycle.
• Do not add cool or cold water in the bowl after
a warm cycle, to avoid thermal shock.
• Do not use chemical descaler or coffee
machine descaler on the bowl non stickheating plate.
• The temperature of accessible surfaces is
high when the appliance is operating. Do not
touch the surfaces of marked with this symbol
during use. It is hot!
1
Page 4

Sunbeam’s Safety Precautions
Sunbeam is very safety conscious when designing
and manufacturing consumer products, but it is
essential that the product user also exercise care
when using an electrical appliance. Listed below
are precautions which are essential for the safe
use of an electrical appliance:
• Read carefully and save all the instructions
provided with an appliance.
• Always turn the power off at the power outlet
before you insert or remove a plug. Remove by
grasping the plug - do not pull on the cord.
• Turn the power off and remove the plug when
the appliance unattended, before assembling,
disassembling or cleaning.
• Do not use your appliance with an extension
cord unless this cord has been checked and
tested by a qualified technician or service
person.
• Always use your appliance from a power
outlet of the voltage (A.C. only) marked on the
appliance.
• This appliance is not intended for use by
persons (including children) with reduced
physical, sensory or mental capabilities, or
lack of experience and knowledge, unless they
have been given supervision or instruction
concerning use of the appliance by a person
responsible for their safety.
• Children should be supervised to ensure that
they do not play with the appliance.
• The temperature of accessible surfaces may be
high when the appliance is operating.
• Never leave an appliance unattended while
in use.
• Do not use an appliance for any purpose other
than its intended use.
• Do not place an appliance on or near a hot gas
flame, electric element or on a heated oven.
• Do not place on top of any other appliance.
• Do not let the power cord of an appliance hang
over the edge of a table or bench top or touch
any hot surface.
• Do not operate any electrical appliance with
a damaged cord or after the appliance has
been damaged in any manner. If damage is
suspected, return the appliance to the nearest
Sunbeam Appointed Service Centre
for examination, repair or adjustment.
• For additional protection, Sunbeam
recommend the use of a residual current
device (RCD) with a tripping current not
exceeding 30mA in the electrical circuit
supplying power to your appliances.
• Do not immerse the appliance in water or any
other liquid unless recommended.
• Appliances are not intended to be operated by
means of an external timer or separate remote
control system.
• This appliance is intended to be used in
household and similar applications such
as: staff kitchen areas in shops, offices and
other working environments; farm houses; by
clients in hotels, motels and other residential
type environments; bed and breakfast type
environments.
If you have any concerns regarding the performance and use of your appliance,
please visit www.sunbeam.com.au or contact the Sunbeam Consumer Service Line.
Ensure the above safety precautions are understood.
22
Page 5

Features of your Soup
& Smoothie Blender
Removable measuring cup
Allows steam to be released, or add
ingredients during blending.
Lid
Lid must be attached to operate the blender.
Glass Jug
The glass jug allows you to monitor
ingredients & blending process.
Blade
Non-stick heating plate
On/Off button
Control panel
The control panel illuminates once the
blender is powered On.
Cord storage
Non-slip rubber feet
3
3
Page 6
Features of your Soup & Smoothie Blender continued
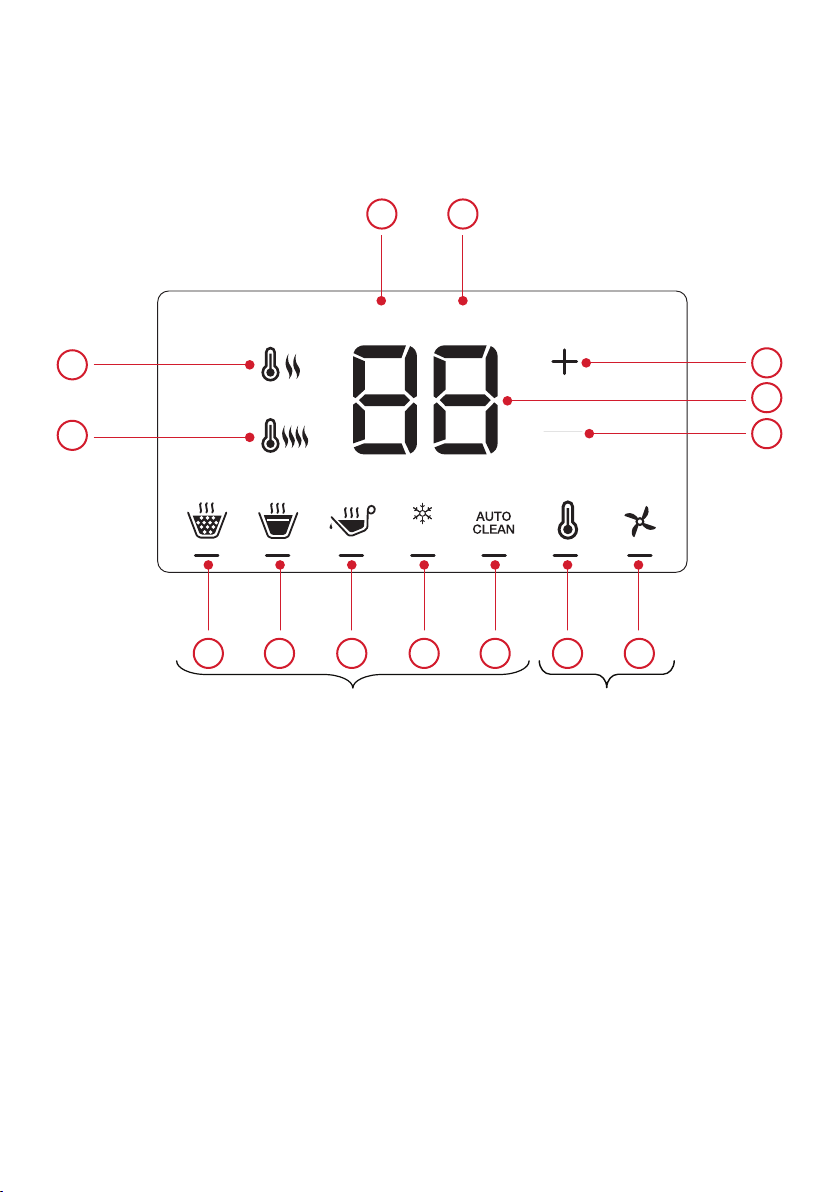
Control Panel
13
14
1 2 3 4 5 6 7
AUTO Mode
1. Chunky/Thick soup
2. Veloute/Fine soup
3. Sauce key
4. Ice crushing/Smoothie
5. Auto clean key
8. Time indicator
9. Speed indicator
10. Increase or decrease
11. Display
12. Start/Stop
13. Low temperature indicator
14. High temperature indicator
8 9
Time Speed
ICE
EXPERT Mode
6. Temperature set
7. Blend key
Start
Stop
EXPERT ModeAUTO Mode
10
11
12
4
Page 7
Using your Soup
& Smoothie Blender
BEFORE USING FOR THE FIRST TIME
1. Remove the appliance and all accessories
from the packaging.
2. Peel off any labels, point of sale and the
protection cover on control panel of the
blender.
3. Thoroughly clean the parts which come
into contact with food before using the
blender for the first time. Dry thoroughly
before assembling.
USING YOUR SOUP & SMOOTHIE BLENDER
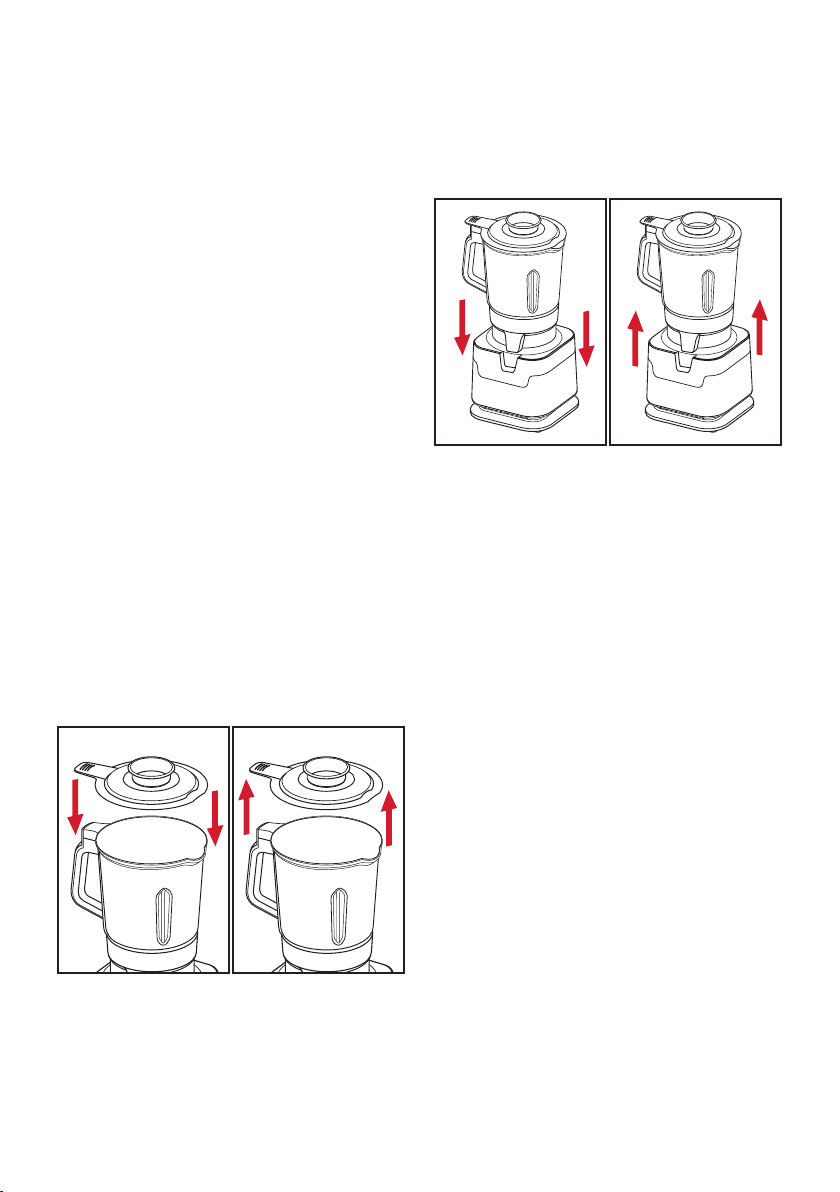
1. Place the blender on a firm, stable & flat
surface, allowing sufficient ventilation.
2. Place ingredients inside the glass jug
3. Place the lid on the glass jug and press it
down firmly & properly.
4. Place the measuring cup into the opening
on the lid.
5. Position the glass jug on to the motor base
housing unit by using guided grooves and
make sure glass jug fits properly on motor
base housing unit.
6. Connect the appliance to a suitable mains
supply outlet.
7. Press the ON/OFF button to turn on the
blender and the display panel.
8. Select the desired programme and start the
process by pressing Start/Stop button.
WARNING: Do not touch the bottom of glass
jug and glass jug during cooking, as it
becomes very hot.
If the glass jug contains hot liquid, pour it
out carefully.
Note:
1. During the programme, press Start/Stop
button to pause the process. Re-press the
Start/Stop button again and the programme
continues.
2. After completion of the programme, if
no button is pressed for 10 minutes the
appliance will shut down automatically.
3. To turn off the appliance at any time,
press ON/OFF button.
9. At the end of the programme the LCD
displays “00” and the appliance will sound
an alert (5 beeps).
10.Disconnect the appliance from mains
supply and let it to cool down completely
once finished cooking.
5
Page 8
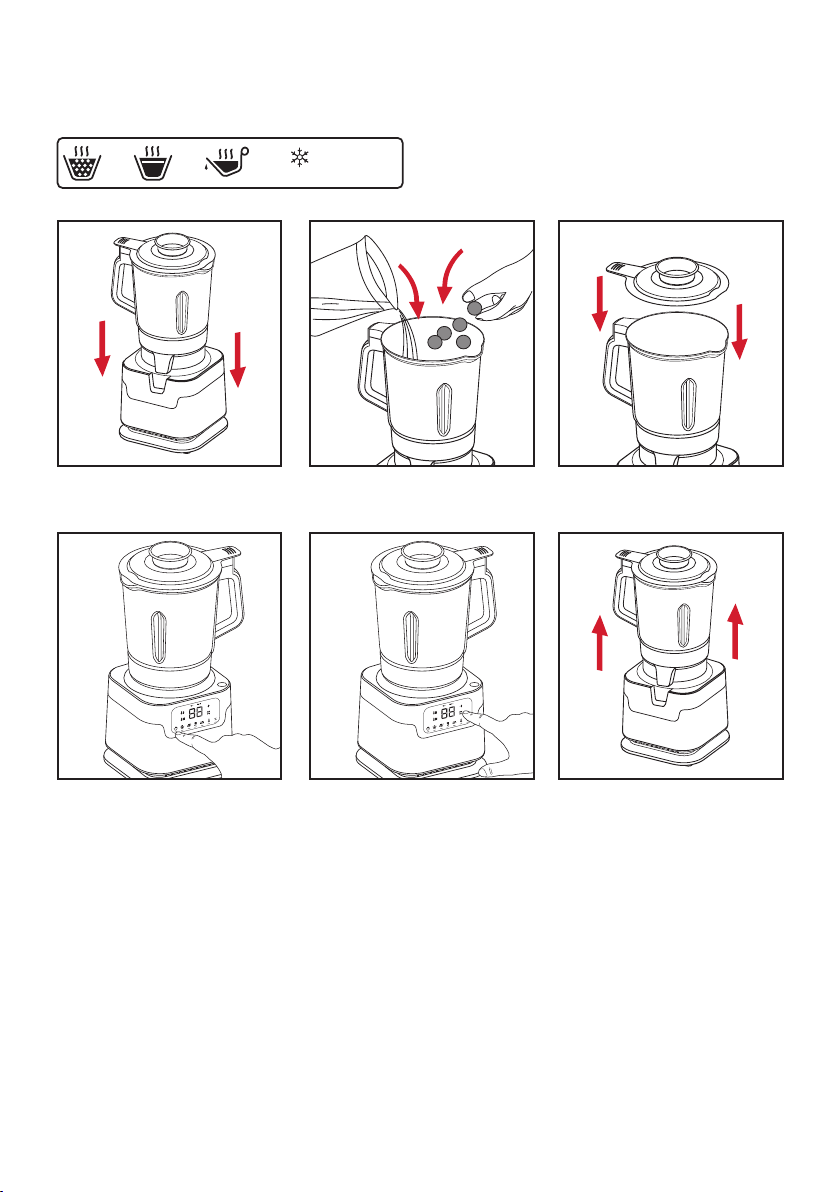
AUTO MODES (5 Automatic programmes)
AUTO
ICE
1. Place the jug on base unit. 3. Add lid. 2. Put in ingredients
CLEAN
and liquid.
4. Select the programme. 6. Lift up the jug
6
5. Start the programme.
after finished.
Page 9
AUTO MODES (5 Automatic programmes) continued
CHUNKY / THICK SOUP
(Semi blended soup)
1. Place the blender base on a firm, stable
& flat surface.
2. Assemble the glass jug correctly and
plug in the appliance to a suitable main
supply outlet.
3. Place the ingredients into the glass jug
and add liquid as per your desired recipe,
replace the lid.
4. Press the ON/OFF button. The control
panel will turn on, and go into 'standby'
mode.
Note: The Maximum fill for hot ingredients is
1400ml. During the cooking process, you can
add more ingredients by lifting the measuring
cup and dropping them through the opening in
the lid.
5. Press the
programme. The selected programme is
highlighted and the Start/Stop button will
flash.
6. Press the Start/Stop to start the process.
The Start/Stop will stop flashing and the
colour will change from white to red.
7. The cooking time will count down during
the cooking & blending process.
8. The appliance will begin cooking the
ingredients in a few minutes.
The appliance will then automatically
start to occasionally stir ingredients.
Note: During the cooking process, you can stir
at any time by pressing
9. After stirring, the appliance will continue
the cooking process.
10. At the last minute of the programme,
the appliance will automatically start to
blend the ingredients until the end of the
programme.
to select the Chunky Soup
on control panel.
11. Once the cooking time has ended the
appliance will sound an alert (5 beeps),
then it will automatically switch to keep
warm mode and the LCD will display
12. Your soup will keep warm at a low
temperature for 20 minutes.
13. After 20 minutes on the keep warm
function, the appliance will sound
an alert (5 beeps) and then it will
automatically go into standby mode.
VELOUTÉ / FINE SOUP FUNCTION
(Fully blended soup)
1. Place the blender base on a firm, stable
& flat surface.
2. Assemble the glass jug correctly and
plug in the appliance to a suitable main
supply outlet.
3. Place the ingredients into the glass jug
and add liquid as per your desired recipe,
replace the lid.
4. Press the ON/OFF button. The control
panel will turn on, and go into 'standby'
mode.
Note: The Maximum fill for hot ingredients is
1400ml. During the cooking process, you can
add more ingredients by lifting the measuring
cup and dropping them through the opening in
the lid.
5. Press the
programme. The selected programme is
highlighted and the Start/Stop button will
flash.
6. Press the Start/Stop to start the process.
The Start/Stop will stop flashing and the
colour will change from white to red.
7. The cooking time will count down during
the cooking & blending process.
to select the Fine Soup
7
Page 10

AUTO MODES (5 Automatic programmes) continued
8. The appliance will begin cooking the
ingredients in a few minutes.
The appliance will then automatically
start to occasionally stir ingredients.
Note: During the cooking process, you can stir
at any time by pressing
on control panel.
9. After stirring, the appliance will continue
the cooking process.
10. At the last minute of the programme,
the appliance will automatically start to
blend the ingredients until the end of the
programme.
11. Once the cooking time has ended the
appliance will sound an alert (5 beeps),
then it will automatically switch to keep
warm mode and the LCD will display
12. Your soup will keep warm at a low
temperature for 20 minutes.
13. After 20 minutes on the keep warm
function, the appliance will sound
an alert (5 beeps) and then it will
automatically go into standby mode.
SAUCE FUNCTION
(Fully blended sauce)
1. Place the blender base on a firm, stable
& flat surface.
2. Assemble the glass jug correctly and
plug in the appliance to a suitable main
supply outlet.
3. Place the ingredients into the glass jug
and add liquid as per your desired recipe,
replace the lid.
4. Press the ON/OFF button. The control
panel will turn on, and go into 'standby'
mode.
Note: The Maximum fill for hot ingredients is
1400ml. During the cooking process, you can
add more ingredients by lifting the measuring
cup and dropping them through the opening in
the lid.
5. Press the
to select the Sauce
Function programme. The selected
programme is highlighted and the Start/
Stop button will flash.
6. Press the Start/Stop to start the process.
The Start/Stop will stop flashing and the
colour will change from white to red.
7. The cooking time will count down during
the cooking & blending process.
8. The appliance will begin cooking the
ingredients in a few minutes.
The appliance will then automatically
start to occasionally stir ingredients.
Note: During the cooking process, you can stir
at any time by pressing
on control panel.
9. After stirring, the appliance will continue
the cooking process.
Note: In Auto mode, the time duration and
blending speed will be automatically selected
according to below table.
Programme Cooking
CHUNKY/
THICK
SOUP
VELOUTÉ/
FINE SOUP
SAUCE
Time
30mins 20mins
30mins 20mins
20mins
Keep
warm
Blending
Medium
Speed
Speed
--- Low
Speed
High
8
Page 11

AUTO MODES (5 Automatic programmes) continued
ICE
ICE
BLENDING COLD INGREDIENTS
ICE CRUSHING/SMOOTHIE FUNCTION
1. Place the blender base on a firm, stable
& flat surface.
2. Place the glass jug onto base unit and
plug in the appliance to suitable main
supply outlet.
3. Fill the glass jug with all necessary
ingredients or ice cubes and replace the
lid.
4. Press the ON/OFF button. The control
panel will turn on, and go into 'standby'
mode.
Note: The maximum fill for cold ingredients/ice
cubes is 1750ml.
5. Press
process.
6. In this mode, the blades rotate at a high
speed alternatively, for up to 1 minute.
7. The appliance will sound an alert (5
beeps) to indicate the crushing/smoothie
process is completed.
then Start/Stop key to start the
9
Page 12

EXPERT OR MANUAL MODE
COOKING FUNCTION
MAKING SOUP
1. Place the base housing unit on a firm,
stable & flat surface.
2. Assemble the glass jug correctly and
plug in the appliance to a suitable main
supply outlet.
3. Put the ingredients into the glass jug and
add liquid, then replace the lid.
4. Press the ON/OFF button. The control
panel will turn on, and go into 'standby'
mode.
5. Press
high temperature
6. A default cooking time of 30 minutes will
be selected.
7. To change the cooking temperature
press
- low temperature (75ºC~85ºC)
- high temperature (90ºC~100ºC)
8. Adjust the cooking time by using
from 1 minute to 60 minutes. The default
setting is 30 minutes.
Note: Holding down the
time at a faster rate.
9. After selecting the cooking temperature
and cooking time, select Start/Stop to
start the process.
Note: During the cooking process, you can stir
at any time by pressing
10. Once the cooking time has ended the
appliance will sound an alert (5 beeps),
then it will automatically switch to keep
warm mode and the LCD displays
ingredients at low temperature for 20
minutes.
on control panel. By default the
will be selected.
+
+ will increase the
on control panel.
, which will keep your
11. After 20 minutes of the keep warm
function, the appliance will sound
an alert (5 beeps) and then it will
automatically switch into standby mode.
Note: The maximum load capacity for making
soup is 1.4L.
BLENDING FUNCTION
BLENDING/MIXING
1. To blend the ingredients according to
your preference, press the
panel. The default setting, Medium (2)
speed, will be selected.
2. Press
3. In the blending mode, it is possible to
4. Place the ingredients into glass jug,
5. Once the blending speed is selected,
Note: For safety reasons, the blending function
in manual operation will stop automatically
after few seconds.
Note: The maximum load capacity for making
soup is 1.75L.
+ to adjust the speed of the
blending function.
select three different speeds. LOW (1),
MEDIUM (2) or HIGH (3).
attach the lid, ensuring it fits properly.
press
the finger on this key, the blending will
continue. When you remove your finger,
blending will stop.
to start blending. If you keep
on control
10
Page 13

Care and Cleaning
AUTO CLEAN FUNCTION
1. Never immerse the base, glass jug, power
cord or mains plug into water.
2. Fill the glass bowl with 1200ml of water
with 3 or 4 drops of washing-up liquid.
3. Rinse inside of the bowl using the
cleaning brush, to remove residue
sticking on glass jug.
4. Wash the lid in water with washing up
liquid and rinse it using the cleaning
brush, then cover the glass jug with the
lid.
5. Select auto cleaning function by pressing
the
6. Press Start/Stop key to start the cleaning
process.
7. The appliance will start to blend the
liquid at the beginning of the cleaning
process, and it will heat the water for
up to 2 minutes. Blending will then
commence to help release any food that
may be on the underside of the blades.
8. Once the programme is complete, unplug
the appliance.
9. Lift the glass jug from base housing unit
and place it on flat surface.
10. Remove the lid and finish cleaning the
glass bowl with a sponge, and dry them
thoroughly.
11. Clean the base housing unit with moist
damp soft cloth.
on control panel.
Note: This function will facilitate the cleaning of
the glass jug.
Warning:
1. Do not clean glass jug, interface and base
housing with abrasive side of a sponge or
pad, only use a soft or damp cloth to clean.
2. Do not use any harsh abrasives or strong
household cleaners or any abrasive tools
as these may damage the non-stick coating
surface.
3. Handle the blades inside the glass jug
carefully when cleaning them; they are very
sharp.
4. Do not put the glass jug in the dishwasher.
11
Page 14

Troubleshooting
Problem Possible Cause
The appliance does
not work.
No response or
the sensitivity of
control panel is
getting low by
pressing several
times on function
keys.
The ingredients
have not blended
well.
The food is burnt. Selected wrong program. Select another program
The appliance is not plugged in.
The glass jug is not placed on
base unit.
The lid is not placed/fitted well
onto the glass jug.
Appliance is under
Electromagnetic Interference.
Dirt on control panel.
The ingredients exceeded the
Max indication in the glass jug.
The water or cooking liquid is
not enough to blend well.
The water or cooking liquid is
not enough.
Check the appliance mains
plug is connected in the socket
properly.
Place the glass jug properly with
guided grooves on the base unit.
Place a lid properly onto the
glass jug and make sure it fits
properly.
Unplug the appliance from power
socket. Restart after few minutes.
Clean the panel with soft cloth.
Remove some of the ingredients
and ensure the ingredients are
placed evenly over the bottom
of the glass jug.
Make sure the water/liquid level
is correct as mentioned in the
recipe booklet.
(Refer the Recipe booklet).
Make sure the water/cooking
liquid level is correct as
mentioned in the recipe booklet.
Solution
12
Page 15

Recipes
THAI PUMPKIN SOUP
Serves 4 to 6
1kg butternut pumpkin, peeled, cut into 2cm
pieces
2 tablespoons red curry paste
1¼ cups coconut cream
¼ cup fresh coriander, roughly chopped
Salt and freshly ground black pepper, to taste
1. Place all ingredients into the jug and
secure lid.
2. Select VELOUTE function on the soup
maker. Press START.
3. When soup has finished season with salt
and pepper. Serve.
NOTE: If you prefer a smoother soup press the
PUREE button until desired consistency is
reached.
POTATO AND LEEK SOUP
Serves 4 to 6
2 tablespoons olive oil
1 leek, trimmed, finely sliced
2 cloves garlic, sliced
500g potatoes, peeled, roughly chopped
3½ cups chicken stock
1½ cups thickened cream
Fresh chives, to serve
Salt and freshly ground black pepper, to taste
1. Add all of the ingredients into the jug,
except the chives, and secure lid.
2. Select the VELOUTE soup function.
Press START.
3. When the soup is finished, season to taste
with salt and pepper. Serve with fresh
chives.
NOTE: If you prefer a smoother soup press the
PUREE button until desired consistency is
reached.
13
Page 16

Recipes - continued
TOMATO BASIL SOUP
Serves 4 to 6
1kg vine-ripened tomatoes, halved length ways
3 cloves garlic, peeled, sliced
1 tablespoons olive oil
1 cup fresh basil leaves
1 large brown onion, quartered
¹⁄³ cup tomato paste
2 cups chicken stock
Salt and freshly ground black pepper, to taste
1. Preheat oven to 180°C. Line a tray with
baking paper.
2. Place tomatoes and garlic on to the
prepared tray. Drizzle with the oil and
season with salt and pepper.
3. Roast for 40 minutes or until tomatoes are
tender. Set aside to cool slightly.
4. Place all ingredients into the soup jug and
secure lid.
5. Select the VELOUTE soup function.
Press START.
6. When soup is finished, season to taste with
salt and pepper. Serve.
NOTE: If you prefer a smoother soup press the
PUREE button until desired consistency is
reached.
MINESTRONE SOUP
Serves 4 to 6
2 carrots, peeled, chopped
2 celery stalks, sliced
2 cloves garlic, sliced
1 leek, sliced
1 zucchini, sliced
400g canned chopped tomatoes
3½ cups vegetable stock
1 tablespoon tomato paste
200g potatoes, peeled, cut into 1cm cubes
1 cup spinach, roughly chopped
¹⁄³ cup macaroni pasta
Salt and freshly ground black pepper, to taste
Basil pesto and grated parmesan cheese, to
serve
1. Add the carrots, celery, garlic, leek,
zucchini, tomato, stock and tomato paste
into the jug and secure lid.
2. Select the CHUNKY soup function.
Press START.
3. After 10 minutes of cooking, add the
potatoes, spinach and pasta through the
hole in the lid.
4. When the soup is finished, season to taste
with salt and pepper. Serve with pesto and
grated parmesan cheese.
14
Page 17

Recipes - continued
MOROCCAN SPICED LENTIL SOUP
Serves 4 to 6
1 onion, quartered
1 celery stalk, chopped
1 carrot, peeled and chopped
3 garlic cloves, sliced
2 teaspoons ground coriander
1 teaspoon ground cumin
1 teaspoon ground turmeric
½ teaspoon sweet paprika
¼ teaspoon ground cinnamon
½ teaspoon sea salt
4 cups vegetable stock
410g can crushed tomatoes
1 cup red lentils, washed and rinsed until
water runs clean
1 lemon, juiced
Pinch of chilli flakes
4 tablespoons fresh flat-leaf parsley, chopped
1 tablespoon fresh coriander, chopped
Salt and freshly ground black pepper, to taste
1. Add all of the ingredients into the jug,
except parsley and coriander, and secure
lid.
2. Select the CHUNKY soup function.
Press START.
3. When the soup is finished, season to taste
with salt and pepper. Serve with parsley
and coriander.
NOTE: If you prefer a smoother soup press the
PUREE button until desired consistency is
reached.
CREAMY CORN CHOWDER
Serves 4 to 6
200g chicken breast, finely sliced
2 slices bacon, finely chopped
½ red capsicum, seeds removed, diced
1 onion, diced
1 jalapeno, seeded for less heat if desired,
finely chopped
2 cloves garlic, sliced
3 cups chicken stock
200g potatoes, peeled, diced
Salt and freshly ground black pepper, to taste
1 cups fresh or frozen corn
½ cup thickened cream
Salt and freshly ground black pepper, to taste
Finely sliced shallots, to serve
1. Add all of the ingredients into the jug,
except the shallots, and secure the lid.
2. Select the CHUNKY soup function.
Press START.
3. When the soup is finished, season to taste
with salt and pepper. Serve with shallots.
NOTE: If you prefer a smoother soup press the
PUREE button until desired consistency is
reached.
15
Page 18

Recipes - continued
HOLLANDAISE SAUCE
Makes: 1.5 Litres
6 egg yolks
2 tablespoons lemon juice
1 teaspoon Tabasco or other hot sauce
½ teaspoon Dijon mustard
250g butter, chopped
Salt and freshly ground black pepper, to taste
1. Place egg yolks, lemon juice, Tabasco and
Dijon mustard into the jug and secure the
lid.
2. Select the SAUCE function. Press START.
3. After 5 minutes, add the butter through
the hole in the lid.
4. When the sauce is finished, season to taste
with salt and pepper. Serve immediately.
CREAM ANALGISE
Makes: 1 Litre
5 egg yolks
1 cup milk
1 cup thickened cream
½ cup caster sugar
1 teaspoon vanilla extract
1. Place all ingredients into the jug and
secure the lid.
2. Select the SAUCE function. Press START.
3. Serve.
CHOCOLATE GANACHE
Makes: 1½ cups
300g chocolate (milk, white or dark), broken
into pieces
¾ cup thickened cream
1. Place all ingredients into the jug and
secure the lid.
2. Select the SAUCE function. Press START.
3. Serve.
TOMATO AND BASIL SAUCE
Makes: 5 cups
800g vine-ripened tomatoes, quartered
3 garlic cloves, thinly sliced
1 red onion, quartered
¼ cup fresh basil leaves, torn
1 tablespoon fresh oregano leaves
1 tablespoon fresh thyme leaves
1 teaspoon caster sugar
½ teaspoon chilli flakes
Salt and freshly ground black pepper, to taste
1. Place all ingredients into the jug and
secure the lid.
2. Select the SAUCE function. Press START.
3. Season to taste with salt and pepper.
Serve.
16
Page 19

Recipes - continued
SATAY SAUCE
Makes: 2½ cups
1 garlic clove, sliced
1 red chilli, sliced
2 cups unsalted peanuts
1¾ cups coconut milk
2 tablespoons soy sauce
1 tablespoon brown sugar
1 tablespoon kecapmanis (sweet soy sauce)
1. Place all ingredients into the jug and
secure the lid. Select the SAUCE function.
Press START.
2. Season to taste with salt and pepper.
Serve.
MUSHROOM SAUCE
Makes: 2 cups
300g button mushrooms
2 cloves of garlic, thinly sliced
1½ cups thickened cream
1 tablespoon olive oil or butter
Salt and freshly ground black pepper, to taste
1. Place all ingredients into the jug and
secure the lid. Select the SAUCE function.
Press START.
2. Season to taste with salt and pepper.
Serve.
GREEN SMOOTHIE
Makes: 1 serving
1 banana, peeled
½ red grapefruit, peeled, roughly chopped
¼ avocado, skin and stone removed
1 cup baby spinach
½ cup ice
½ cup water
1 teaspoon freshly grated ginger
1. Place all ingredients into the jug and
secure the lid.
2. Place onto speed HIGH. Process for 30
seconds or until smooth.
3. Serve in tall glass.
BREAKFAST SMOOTHIE
Makes: 1 serving
2 peaches, stones removed
1 cup milk
¹⁄³ cup rolled oats
1 tablespoon honey
1. Place all ingredients into the jug and
secure the lid.
2. Place onto speed HIGH. Process for 30
seconds or until smooth.
3. Serve in tall glass.
17
Page 20

Recipes - continued
GYM TIME
Makes: 1 large serving
1 banana, peeled
1 cup mango, roughly chopped
1 cup milk
1 tablespoon coconut oil
1 teaspoon chia seeds
½ teaspoon ground cinnamon
½ teaspoon ground ginger
½ teaspoon ground turmeric
1. Place all ingredients into the jug and
secure the lid.
2. Place onto speed HIGH. Process for 30
seconds or until smooth.
3. Serve in tall glass.
DAIRY FREE BANANA SMOOTHIE
Makes: 1 serving
1 banana, peeled
1 cup almond milk
2 tablespoons peanut butter
2 teaspoons honey
1 teaspoon vanilla extract
½ teaspoon ground cinnamon
1. Place all ingredients into the jug and
secure the lid.
2. Place onto speed HIGH. Process for 30
seconds or until smooth.
3. Serve in tall glass.
SALTED CARAMEL BLISS
Makes: Approx. 4 serves
½ cup caramel sauce
1 teaspoon sea salt flakes
6 scoops good quality vanilla ice cream
2 cups milk
1. Place all ingredients into the jug and
secure the lid.
2. Place onto speed HIGH. Process for 30
seconds or until smooth.
3. Serve in tall glass.
EXTRA THICK CHOCOLATE THICKSHAKE
Makes: Approx. 4 servings
¼ cup chocolate sauce
4 scoops chocolate ice cream
2 cups chocolate milk
Grated chocolate, to serve
1. Place all ingredients into the jug and
secure the lid.
2. Place onto speed HIGH. Process for 30
seconds or until smooth.
3. Serve in tall glass.
18
Page 21

Recipes - continued
BERRY NICE
Makes: Approx. 3 servings
2 cups frozen raspberries
1 cup milk
½ cup Greek yoghurt
1 tablespoon honey
½ teaspoon vanilla extract
1. Place all ingredients into the jug and
secure the lid.
2. Place onto speed HIGH. Process for 30
seconds or until smooth.
3. Serve in tall glass.
FROZEN MARGARITA
Makes: 6-8
4 cups ice cubes
²⁄³ cup tequila
¼ cup Cointreau liqueur
¼ cup fresh lime juice
Lime wedges and salt, to garnish
1. Rub a cut lime around the rim of 4
margarita glasses. Place the salt onto a flat
surface and dip the glasses upside down
into the salt until the entire rim is coated.
Chill for 5 minutes
2. Place all ingredients into the jug and
secure the lid.
3. Select the ICE CRUSH function. Press
START.
4. Press STOP when all ingredients are
blended.
5. Serve.
FROZEN MOJITO
Makes: 4
4 cups crushed ice
1 cup white rum
½ cup simple syrup (equal parts sugar and
water boiled together until sugar melts)
¼ cup fresh lime juice
24 fresh mint leaves, plus mint sprigs for
garnish
1. Place all ingredients into the jug and
secure the lid.
2. Select the ICE CRUSH function. Press
START.
3. Press STOP when all ingredients are
blended.
4. Serve.
MUDSLIDE
Makes: 4
8 scoops chocolate ice-cream
1 cup ice
1 cup pouring cream
1 cup Baileys Original Irish Cream liqueur
¼ cup chilled vodka
¼ cup Kahlua liqueur
1. Place all ingredients into the jug and
secure the lid.
2. Select the ICE CRUSH function. Press
START.
3. Press STOP when all ingredients are
blended.
4. Serve.
19
Page 22

Recipes - continued
PINA COLADA
Makes: 4
2 cups ice
1½ cups chilled pineapple juice
1 cup coconut milk
¹⁄³ cup Malibu coconut liqueur
¼ cup fresh lime juice
¼ cup Midori liqueur
1. Place all ingredients into the jug and
secure the lid.
2. Select the ICE CRUSH function. Press
START.
3. Press STOP when all ingredients are
blended.
4. Serve.
PASSIONFRUIT DAIQUIRI WITH COCONUT
Makes: 4
3 cups crushed ice
1 cup fresh lime juice
1 cup coconut cream
½ cup tequila
²⁄³ cup Malibu coconut liqueur
¼ cup caster sugar
²⁄³ cup passionfruit pulp, to serve
1. Place all ingredients into the jug and
secure the lid.
2. Select the ICE CRUSH function. Press
START.
3. Press STOP when all ingredients are
blended.
4. Pour into glasses and top with passionfruit
pulp to serve.
20
Page 23

12
Month
Replacement
Guarantee
This Sunbeam product is covered by a
12 month replacement or repair warranty,
which is in addition to your rights under the
Australian Consumer Law (if your product
was purchased in Australia) or New Zealand
Consumer Guarantees Act (if your product
was purchased in New Zealand).
Should you experience any
difficulties with your product
during the warranty period,
please contact our customer
service line for advice on 1300
881 861 in Australia, or 0800
786 232 in New Zealand.
Australia
www.sunbeam.com.au
1300 881 861
Units 5 & 6,
13 Lord Street,
Botany NSW 2019
Australia
New Zealand
www.sunbeam.co.nz
0800 786 232
Level 6, Building 5,
Central Park,
660-670 Great South Road,
Greenlane, Auckland
New Zealand
Upon receipt of your claim, Sunbeam will
seek to resolve your difficulties or, if the
product is defective, advise you on how to
obtain a replacement or refund.
To assist us in managing warranty claims,
we recommend you register your product
as soon as practicable after purchase by
creating a MySunbeam account on our
website and uploading a copy of your
original receipt.
In order to make a claim under our
warranty, you must have the original proof
of purchase documentation for the
product and present it when requested (if
not already uploaded to our website).
Should your product develop any defect
within 12 months of purchase because of
faulty materials or workmanship, we will
replace or repair it, at our discretion, free
of charge. A product presented for repair
may be replaced by a refurbished product
of the same type rather than being
repaired. Refurbished parts may be used
to repair the product.
Our replacement or repair warranty only
applies where a defect arises as a result
of faulty material or workmanship during
the warranty period. Your warranty does
not cover misuse or negligent handling
(including damage caused by failing to use
the product in accordance with this
instruction booklet), accidental damage,
or normal wear and tear.
Your warranty does not:
• cover freight or any other costs incurred
in making a claim, consumable items,
accessories that by their nature and
limited lifespan require periodic renewal
(such as filters and seals) or any
consequential loss or damage; or
• cover damage caused by:
- power surges, power dips, voltage
supply problems, or use of the product
on incorrect voltage;
- servicing or modification of the
product other than by Sunbeam or an
authorised Sunbeam service centre;
- use of the product with other
accessories, attachments, product
supplies, parts or devices that do not
conform to Sunbeam specifications; or
- exposure of the product to
abnormally corrosive conditions; or
• extend beyond 3 months if the product
is used in commercial, industrial,
educational or rental applications.
The benefits given to you by our
warranty are in addition to other rights
and remedies under law in relation to
the product.
In Australia our goods come with
guarantees that cannot be excluded
under the Australian Consumer Law. You
are entitled to a replacement or refund
for a major failure and for compensation
for any other foreseeable loss or
damage. You are also entitled to have the
goods repaired or replaced if the goods
fail to be of acceptable quality and the
failure does not amount to a major
failure.
Our goods also come with guarantees
that cannot be excluded under the New
Zealand Consumer Guarantees Act.
If your warranty claim is not accepted, we
will inform you and if requested to do so
by you, repair the product provided you
pay the usual charges for such repair.
You will also be responsible for all freight
and other costs.
Should your product require repair or
service after the warranty period, contact
your nearest Sunbeam service centre.
For a complete list of Sunbeam’s service
centres, visit our website or call our
customer service line for advice on 1300
881 861 in Australia, or 0800 786 232 in
New Zealand.
21
Page 24

Need help with your appliance?
Contact our customer service team
or visit our website for information
and tips on getting the most from
your appliance.
Australia | visit www.sunbeam.com.au
phone 1300 881 861
mail Units 5 & 6, 13 Lord Street,
Botany NSW 2019 Australia.
New Zealand | visit www.sunbeam.co.nz
phone 0800 786 232
mail Level 6, Building 5, Central Park,
600-670 Great South Road,
Greenlane, Auckland, New Zealand.
Sunbeam Corporation Limited | ABN 45 000 006 771
Sunbeam Corporation is a division of GUD Holdings Limited.
Sunbeam is a registered trademark.
Made in China to Sunbeam’s specification.
Due to minor changes in design or otherwise,
the product you buy may differ slightly from the one shown here.
Approved by the appropriate electrical regulatory authorities.
©Copyright Sunbeam 2014.
12/14
 Loading...