

Page 1

VersaCook™
Multi Cooker X5
User Guide
MU2000
Page 2

Page 3

Contents
Sunbeam’s Safety Precautions 2
Features of your VersaCookTM Multi Cooker 4
The Control Panel 6
Cooking Modes settings 7
Cooking Modes settings table 8
Using your VersaCookTM in the Slow Cooker mode 9
Using your VersaCookTM in the Cook mode
(saucepan and food steamer) 10
Using your VersaCookTM in the Frypan mode 11
Using your VersaCookTM in the Deep Fryer mode 12
Hints for Perfect Deep Frying 14
Deep Frying Times and Temperatures Guide 15
The Perfect Chip 17
Care and Cleaning 18
Hints and Tips 19
Troubleshooting 22
Recipes 23
Important instructions – retain for
future use.
Page 4

Sunbeam’s Safety Precautions
SAFETY PRECAUTIONS FOR YOUR
MULTI COOKER
• Do not plug in or switch on the unit without
having the aluminium pan inside the multi
cooker unit.
• Do not operate the unit without food or
liquid in the pan.
• For the deep fryer function, if using solid
fat, remove the lid and the basket, cut the
fat into pieces and place them directly into
the pan. Do not melt solid fat in the frying
basket as it may damage the appliance.
• Never operate the deep fryer with oil level
below the minimum mark or above the
maximum mark.
• Remove excess moisture and ice particles
from food before deep frying.
• Never decant oil from deep fryer while still
hot.
• Only use the oils recommended in this
instruction booklet.
• Avoid spillage on the connector.
• The heating element surface is subject to
residual heat after use.
• Do not touch any metal surfaces of the
product while it is in use as they will be hot.
• Be careful when lifting lid during and after
cooking. Steam can result in serious burns.
Never place face over multi cooker.
• Do not operate the unit on an inclined or
uneven surface.
• Do not move or cover the unit whilst in
operation.
• Do not immerse the base of the unit in water
or any other liquid.
• Use your unit well away from walls and
curtains, and don’t use in confined spaces.
• Use handles and oven mitts to move the
unit, the pan and the lid when hot.
• When lifting the lid, always tilt the lid away
from you as steam is hot.
• Do not operate the unit when placed directly
onto a bench top. Place a heat proof mat or
chopping board underneath to protect the
surface.
2
Page 5

Sunbeam’s Safety Precautions
Sunbeam is very safety conscious when
designing and manufacturing consumer products,
but it is essential that the product user also
exercise care when using an electrical appliance.
Listed below are precautions which are essential
for the safe use of an electrical appliance:
• Read carefully and save all the instructions
provided with an appliance.
• Always turn the power off at the power outlet
before you insert or remove a plug. Remove
by grasping the plug - do not pull on the cord.
• Turn the power off and remove the plug
when the appliance is not in use and
before cleaning.
• Do not use your appliance with an extension
cord unless this cord has been checked
and tested by a qualified technician or
service person.
• Always use your appliance from a power
outlet of the voltage (A.C. only) marked
on the appliance.
• This appliance is not intended for use by
persons (including children) with reduced
physical, sensory or mental capabilities, or
lack of experience and knowledge, unless they
have been given supervision or instruction
concerning use of the appliance by a person
responsible for their safety.
• Children should be supervised to ensure that
they do not play with the appliance.
• The temperature of accessible surfaces may be
high when the appliance is operating.
• Never leave an appliance unattended while
in use.
• Do not use an appliance for any purpose
other than its intended use. Misuse may result
in injury.
• Do not place an appliance on or near a hot gas
flame, electric element or on a heated oven.
• Do not place on top of any other appliance.
• Do not let the power cord of an appliance hang
over the edge of a table or bench top or touch
any hot surface.
• Do not operate any electrical appliance with
a damaged cord or after the appliance has
been damaged in any manner. If damage is
suspected, return the appliance to the nearest
Sunbeam Appointed Service Centre
for examination, repair or adjustment.
• For additional protection, Sunbeam
recommend the use of a residual current
device (RCD) with a tripping current not
exceeding 30mA in the electrical circuit
supplying power to your appliances.
• Do not immerse the appliance in water
or any other liquid unless recommended.
• Appliances are not intended to be operated
by means of an external timer or separate
remote control system.
• This appliance is intended to be used in
household and similar applications such
as: staff kitchen areas in shops, offices and
other working environments; farm houses; by
clients in hotels, motels and other residential
type environments; bed and breakfast type
environments.
If you have any concerns regarding the performance and use of your appliance,
please visit www.sunbeam.com.au or contact the Sunbeam Consumer Service Line.
Ensure the above safety precautions are understood.
3
Page 6
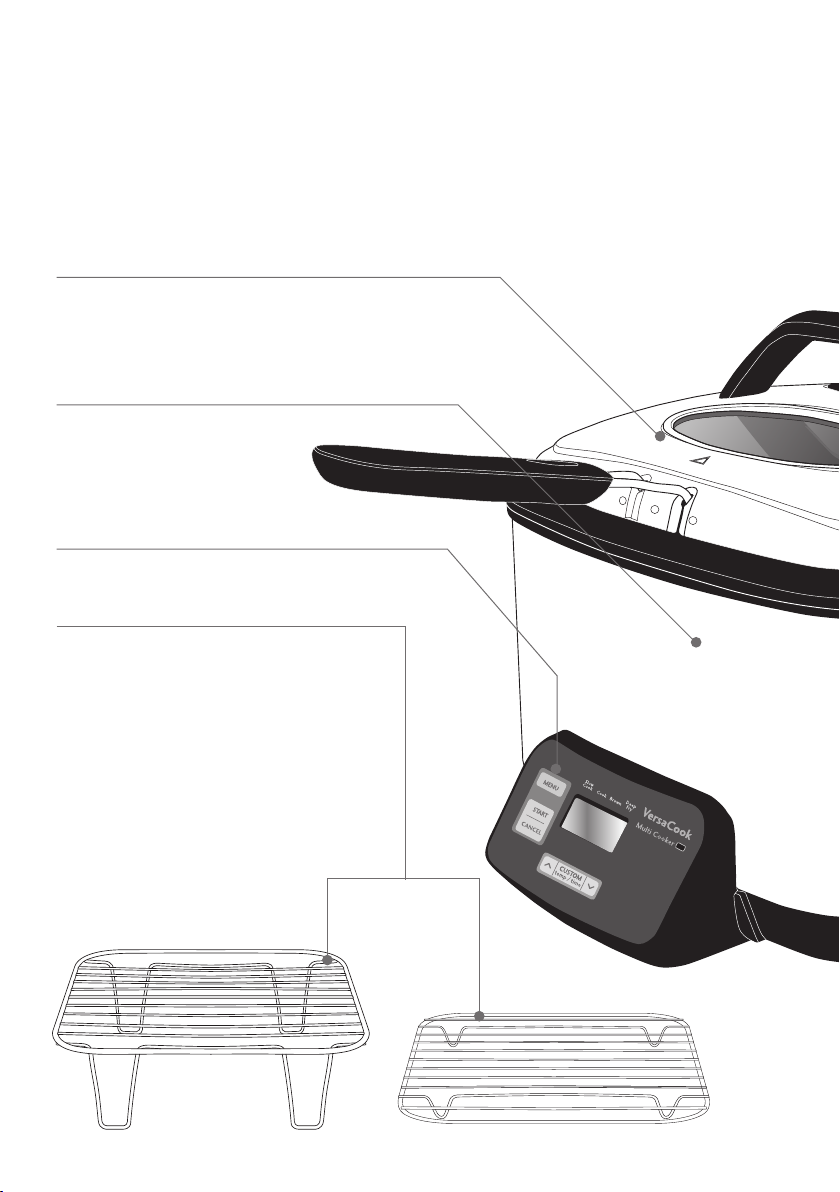
Features of your
VersaCook™ Multi Cooker
Lid
The lid has a viewing window to monitor your
cooking. Remove the lid whilst deep frying.
Min and Max Markings inside the pan
The MIN and MAX markings
inside the pan are for oil used
in the Deep Fryer mode only.
Control Panel
Low and High Racks
The racks allow air to circulate under the
food for even cooking, and allows food to sit
above fats and juices which may accumulate
at the bottom of the pan. The high rack
is suitable for steaming. The low rack is
suitable for roasting.
4
Page 7
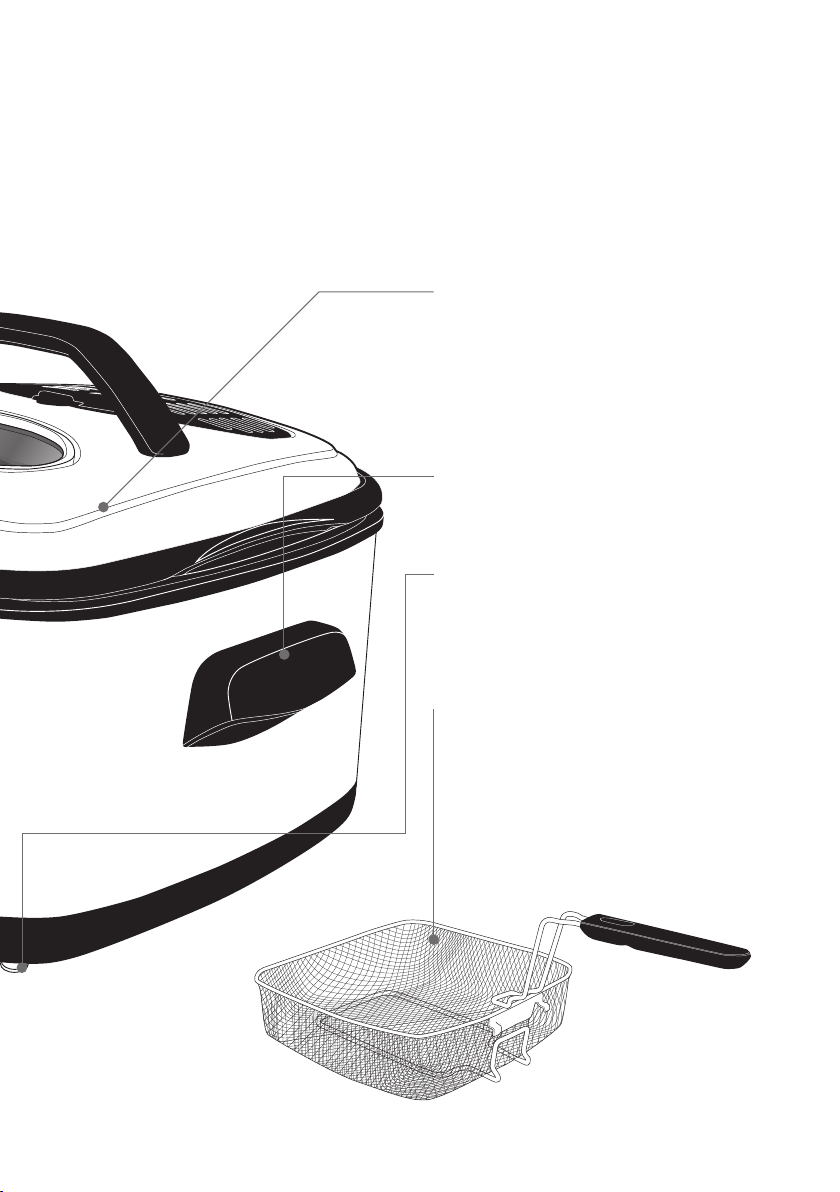
Non-stick Aluminium Pan
The pan is to be used inside the unit for all
cooking modes. Dishwasher safe for easy
cleaning. When empty the pan sits in a
slightly raised position above the base of
the unit.
Easy Grip Pan Handles
For safe use.
Non-slip feet
Keeps the unit secure on the bench top
during use and prevents scratching of bench
top surfaces.
Basket
The removable mesh cooking basket is to
be used for Deep Frying and can also be
used when boiling pasta. The basket has a
cool touch handle which folds away for easy
storage.
5
Page 8

The Control Panel
2
1
5
The control panel on the VersaCook Multi
Cooker X5 is designed to ensure easy use and
to make cooking a pleasure. Choose from the 4
cooking menus – Slow Cook, Cook (for Boiling
water, Dry Roasting and Food Steaming)
Browning and Deep Frying. Choose your
cooking menu, customise your temperature and
time setting and you’re cooking.
1. Menu Button
Scroll through the Cooking menus
available by pressing the MENU button.
2. Cooking Menu indicator
A line will display in the LCD screen
under the various cooking menus, when
the MENU button is pressed.
Slow Cook Menu
The Slow Cook menu has three
convenient heat settings – LOW, HIGH
and AUTO KEEP WARM.
Cook Menu
Use the Cook menu when using as a
Saucepan for soups, boiling pasta etc.
Also use the Cook menu with the high
rack when using as a Food Steamer.
There are two heat settings, LOW and
HIGH. When using as a Food Steamer,
use HIGH only.
Brown Menu
Use the Brown menu when using as a
Frypan. The Browning menu has five heat
settings 130°C, 150°C, 170°C, 190°C
and 210°C.
6
3
4
Deep Fryer Menu
The Deep Fryer menu has four heat
settings 130°C, 150°C, 170°C and
190°C.
3. Cooking Light
The light will illuminate red when the
VersaCook is cooking.
4. Custom Button
Use this button to customise the
temperature and the time.
5. Start/ Cancel button
Press the START button to begin the
selected cooking mode once all settings
have been chosen. Press and hold the
CANCEL button if you wish to change
your setting.
Page 9

Cooking Menu Settings
The VersaCook Multi Cooker X5 has 5 cooking
menus.
Slow Cooking
Slow Cooking achieves flavour filled meals
and tender moist meats cooked to perfection.
As the name suggests, meals are cooked over
a long period of time. Slow cooking provides
healthy, simple and economical cooking.
It requires minimal supervision, short
preparation times and quick clean up times.
LOW Setting. This is suitable for simmering
and slow cooking.
HIGH Setting. This is for faster cooking.
Typically 1 hour on HIGH = approximately
2 - 2.5 hours on LOW.
AUTO KEEP WARM Setting. When
cooking time is completed, the VersaCook
automatically switches to the Keep Warm
setting to prevent overcooking and to keep
your cooked food warm until serving - perfect
for busy families, those on the run and those
who need flexible meal times. This setting is
not hot enough to cook and is used to keep
hot, cooked food warm for serving. The Keep
Warm setting is an automatic function. for
safety it can not be manually set to cook or
warm up food.
When used as a Slow Cooker, the VersaCook
has a capacity of 6.5L.
Cooking (Saucepan and Food Steamer)
The Cook menu can be used when cooking
soups, boiling pasta and when steaming food.
It can also cook rice dishes and be used for
dry roasting. Cook is an all-round cooking
menu and can be used to cook various foods.
There are two heat settings, LOW and HIGH.
When using as a Food Steamer, use HIGH
only.
When used to boil water, the VersaCook
has a maximum capacity of 5L. This takes
approximately 18 minutes on HIGH.
Browning
The Brown or Frypan menu has five heat
settings 130°C, 150°C, 170°C, 190°C
and 210°C, making the VersaCook an ideal
everyday multifunctional cooker. On the
Brown menu you can change the heat setting
depending on the food that you are cooking
and your style of cooking. Use it to shallow
fry, stir fry, sauté and of course even sear.
Browning meat prior to slow cooking not only
gives your food great colour, it also seals in
the juices and flavours and keeps the meat
tender.
Deep Frying
The VersaCook is an ideal deep fryer as it has
a wide basket and deep pan. The Deep Fryer
menu has four heat settings 130°C, 150°C,
170°C and 190°C. The VersaCook is perfect
for making donuts, tempura, classic fish and
chips and more.
When used as a Deep Fryer, the VersaCook
has a food capacity of 1.2kg, and an oil
capacity of 2.5L. Inside the cooking pan are
MIN and MAX markings. These are to be
used for the Deep Fryer mode only.
7
Page 10

Cooking Mode Settings Table
Cooking
Mode
Menu Slow Cook Cook Cook Brown Deep Fryer
Maximum
Programmable
Cooking Time
Minimum
Programmable
Cooking Time
Default Cooking
Time
Time Increments 30 mins 5 mins 5 mins 5 mins 5 mins
Temperature
Setting
Capacity 6.5L 5L NA NA
Slow
Cooker
9 hours 2 hours 2 hours 2 hours 2 hours
30 mins 5 mins 5 mins 5 mins 5 mins
High – 4 hours
Low – 8 hours
(Warm) – 4 hours
High
Low
(Warm)
Saucepan Food
Frypan Deep
Steamer
2 hours 2 hours 2 hours 2 hours
130°C
High
Low
High
150°C
170°C
190°C
210°C
Fryer
130°C
150°C
170°C
190°C
Food - 1.2kg
Oil – 2.5L
8
Page 11

Using your VersaCook™ in the
Slow Cook mode
Before using your VersaCook for the first
time, remove the aluminium pan and lid and
wash them in warm soapy water.
Place the VersaCook on a flat, level surface.
Plug in the unit. The unit will beep. The
VersaCook will default to the Slow Cook menu
on the LOW setting. The display will show a
line underneath ‘Slow Cook’ on the panel and
the display will show LO.
1. Place your food inside the pan.
2. If the menu is not set to Slow Cook, set
the cooking mode by scrolling through
the MENU button until a line appears in
the display under Slow Cook.
3. To select the time, press the CUSTOM
button and then press the and
buttons until your desired time appears
in the panel. Each button press will
adjust the time by 30 minutes.
4. To select the temperature/ heat setting of
HIGH or LOW, press the CUSTOM button,
and then Press the and buttons,
until HI or LO appears in the panel.
Note: the minimum cooking time is 30
minutes, and the maximum cooking time is
9 hours.
5. Once you have set the desired TIME and
TEMP (heat) settings, press START. The
cooking light will illuminate red. The
time will immediately display and will
begin to count down.
6. After the set time has elapsed the unit
will automatically switch to the KEEP
WARM mode. The unit will beep and the
panel will display CF (Cooking Finished).
The VersaCook can stay in the Keep
Warm mode for 4 hours.
TIP: The Slow Cooking mode settings are in
the Mode Settings Table on page 8.
To Cancel a Program
To cancel or change your setting, hold the
CANCEL button. The unit will beep. If the
unit had already started cooking, the Cooking
Light will turn off to indicate the unit is not
cooking.
Slow Cooking Display
Display Setting
LO Low
HI High
CF Keep Warm
(Cooking Finished)
9
Page 12

Using your VersaCook™ in the
Cook mode
Use the Cook mode to use the VersaCook as
a Saucepan, Dry Roasting Pan or as a Food
Steamer.
Before using your VersaCook for the first
time, remove the aluminium pan and lid and
wash them in warm soapy water.
Place the VersaCook on a flat, level surface.
Plug in the unit. The unit will beep. The
VersaCook will default to the Slow Cook menu
on the LOW setting. The display will show a
line underneath ‘Slow Cook’ on the panel and
the display will show LO.
• To use as a Saucepan to make soup,
it’s often best to heat the water before
carefully placing in the food. Refer to
your recipe instructions
• To use as a Food Steamer, before
programming the VersaCook place the
desired water quantity in the bottom of
the pan and then insert the high rack.
1. To set the menu to use the Cook mode,
press the MENU button and scroll
through the cooking options until a line
appears in the display under Cook.
2. To select the time, press the CUSTOM
button, and then press the and
buttons, until your desired time
appears in the panel. Each button press
will adjust the time by 5 minutes. The
default cooking time is 2 hours.
3. To select the temperature/ heat setting of
HIGH or LOW, press the CUSTOM button,
and then press the and buttons,
until the heat settings appears in the
panel. The default temperature setting is
LOW. When using as a Food Steamer, use
HIGH only.
Note: the minimum cooking time is 5
minutes, and the maximum cooking time is
2 hours.
4. Once you have set the desired TIME
and TEMP settings, press START. The
Cooking Light will illuminate red.
5. The VersaCook will begin to heat to your
desired temperature.
6. After the set time has elapsed, the unit
will beep and the panel will display 0:00.
TIP: The Cook mode settings are in the Mode
Settings Table on page 8.
To Cancel a Program
To cancel or change your setting, hold the
CANCEL button. The unit will beep. If the
unit had already started cooking, the Cooking
Light will turn off to indicate the unit is not
cooking.
10
Page 13

Using your VersaCook™ in the
Brown (Frypan) mode
Before using your VersaCook for the first
time, remove the aluminium pan and lid and
wash them in warm soapy water.
Place the VersaCook on a flat, level surface.
Plug in the unit. The unit will beep. The
VersaCook will default to the Slow Cook menu
on the LOW setting. The display will show a
line underneath ‘Slow Cook’ on the panel and
the display will show LO.
1. To set the menu to use the Frypan or
Browning menu, press the MENU button
and scroll through the cooking options
until a line appears in the display under
Brown.
2. To select the time, press the CUSTOM
button, and then press the and
buttons until your desired time
appears in the panel. Each button press
will adjust the time by 5 minutes. The
default cooking time is 2 hours.
Note: the minimum cooking time is 5 minutes
and the maximum cooking time is 2 hours.
3. To select the temperature setting of
130°C, 150°C, 170°C, 190°C or 210°C,
press the and buttons, until
the desired temperature appears in the
panel.
4. Once you have set the desired TIME and
TEMP settings press START. The Cooking
Light will illuminate red.
5. The VersaCook will begin to heat to your
desired temperature. The time will flash
until the temperature has been reached.
When the temperature has been reached
the time will stop flashing and the timer
will begin to countdown.
6. After the set time has elapsed the unit
will beep and the panel will display the
selected menu.
TIP: The Frypan mode settings are in the
Mode Settings Table on page 8.
To Cancel a Program
To cancel or change your setting, hold the
CANCEL button. The unit will beep. If the
unit had already started cooking, the Cooking
Light will turn off to indicate the unit is not
cooking.
11
Page 14
Using your VersaCook™ in the
Deep Fryer mode
Before using your VersaCook for the first
time, remove the aluminium pan, lid and
basket and wash them in warm soapy water.
Place the VersaCook on a flat, level surface
away from any heating source and where it
cannot be splashed with water.
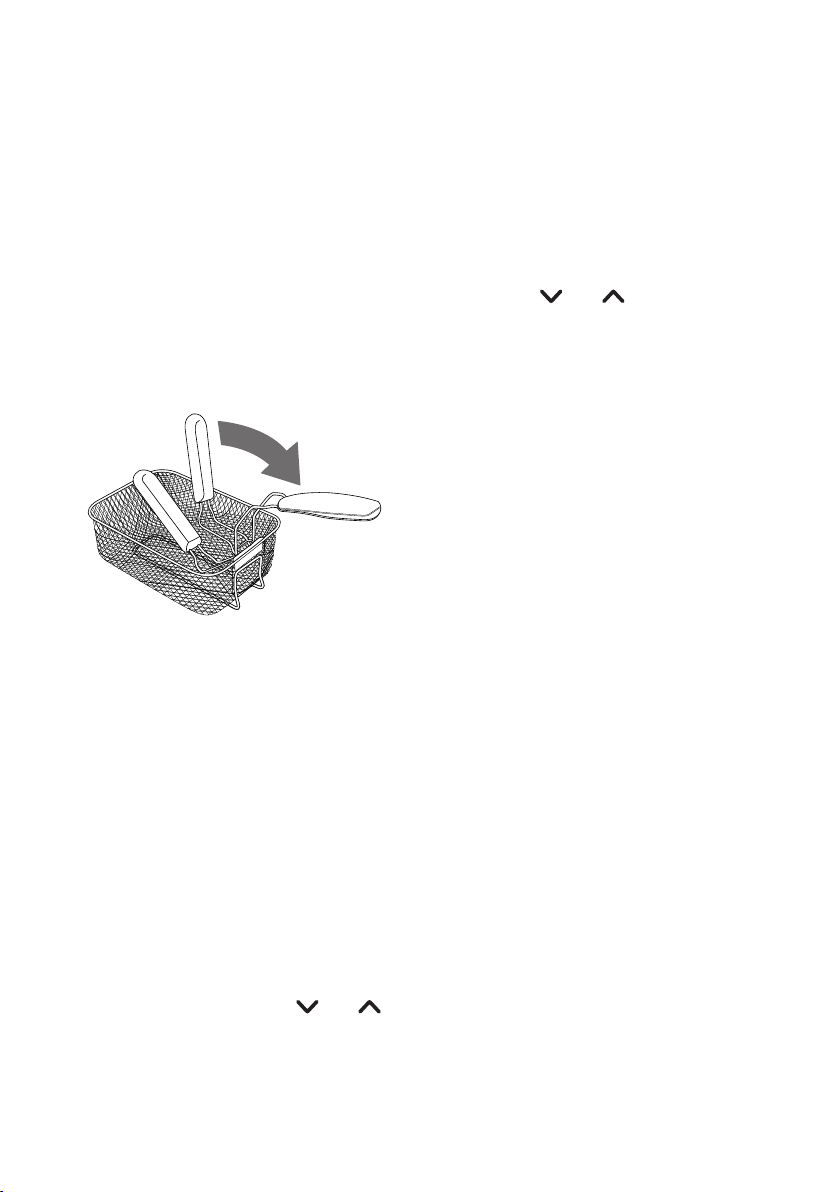
1. Remove the lid and take out the deep
frying basket. Pull the handle backwards
(1) until the handle locks into position.
1.
2. Pour good quality vegetable, nut or
seed oil into the oil tank until it reaches
between the ‘MIN’ and ‘MAX” markings
on the inside of the pan. Never use the
Deep Fryer without oil or with insufficient
oil in the tank.
Note: Do not mix different types of oil.
3. Lower the basket into the oil
4. Replace the lid.
5. Plug in the VersaCook into a 230 – 240
volt power outlet.
6. To use the Deep Fryer mode, press the
MENU button and scroll through the
cooking options until a line appears in
the display under Deep Fryer.
7. To select the time, press the CUSTOM
button, and then press the and
buttons until your desired time appears
in the panel. Each button press will
adjust the time by 5 minutes. The
default cooking time is 2 hours.
Note: the minimum cooking time is 5 minutes
and the maximum cooking time is
2 hours.
8. To select the temperature/ heat setting
press the and buttons, until the
heat settings appears in the panel.
9. Once you have set the desired TEMP and
TIME settings, press START. The Cooking
Light will illuminate red.
10. The VersaCook will begin to heat to your
desired temperature. The time will flash
until the temperature has been reached.
When the temperature has been reached
the time will stop flashing and the timer
will begin to countdown. Next, follow the
instructions in the ‘Cooking in the Deep
Fryer’ section below.
11. After the set time has elapsed the unit
will beep and the panel will display 0:00.
TIP: The Deep Fryer mode settings are in the
Mode Settings Table on page 15.
To Cancel a Program
To cancel or change your setting hold the
CANCEL button. The unit will beep. If the
unit had already started cooking the Cooking
Light will turn off to indicate the unit is not
cooking.
Cooking in the Deep Fryer
There are two methods of cooking in your
fryer; one general method for most foodstuffs
and another for home battered products.
Note: During cooking, steam will build up in
the fryer, so when lifting the lid use a kitchen
glove or mitt to protect your hand.
12
Page 15

Using your VersaCook™ in the Deep Fryer mode - continued
General cooking method
(For pre-cooked, crumbed, floured or wrapped
food.)
1. Ensure the oil has reached the required
temperature. Remove the lid, lift the
basket and put it on the rest (3) so that
it is not in contact with the oil.
2. Basket rest for raised position
Place the food, (should be as dry as possible)
into the raised basket.
Note: The basket should always be in the
raised position when it is to be filled with
food.
3. Lower the basket into the pan.
4. Do not cook food with the lid on.
5. Once the food is cooked (see Deep Fryer
Frying Times and Temperatures guide
chart on page 8), place the basket on
its raised position to drain for a few
seconds.
6. Remove the basket and put the fried food
on a plate covered with absorbent paper
or kitchen towel.
7. When finished with the deep fryer,
remove the plug from mains power.
8. Clean the fryer only after the oil is
completely cooled down.
Cooking home battered food
This method allows for the fact that if
wet batter is placed in the basket prior to
cooking, the food may stick to the basket.
This method of cooking requires extreme
care.
1. Ensure the oil has reached the required
temperature.
Note: Leave the basket in the down position.
2. Remove the lid of the fryer.
3. Coat the food in batter and allow it to
drain slightly to get rid of the excess
coating.
4. Very carefully, slowly lower the coated
food into the hot oil, using a suitable
implement or tongs. This allows the
batter to become solid and prevents it
sealing to the mesh of the basket.
Note: Remember to take care as the oil may
spit as the food is added.
You can now follow the instructions as given
in the general cooking method, steps 4 - 8.
13
Page 16

Hints for perfect deep frying
1. Never use the fryer without oil.
2. Always use the best quality oil possible.
We recommend corn, nut, seed or light
olive oil. Never use butter, margarine or
regular olive oil or extra virgin olive oil.
3. Avoid mixing oils of different qualities or
types.
4. Change the oil when it becomes brown or
milky in colour.
5. Take into account the food to be
cooked before setting the deep frying
temperature. As a general guide
precooked food will need a higher
temperature than raw food, and the
larger the individual items the lower the
temperature should be.
6. Large pieces of food should not be deep
fried as they take too long to cook and
thereby absorb too much oil.
7. Fry small amounts at a time. Adding
too much at a time will decrease the oil
temperature and increase the chance
that food will stick together and reduce
the crispiness.
8. Make sure that food is dry before frying.
Wet food will splatter.
9. Always dry or roll wet food in flour before
coating in a batter. Otherwise the extra
steam created will separate the coating
from the food.
10. Preheat the oil with the lid on.
11. Remove lid whilst cooking.
12. Never sprinkle salt or seasoning over the
cooked product in the basket when it is
in the raised position above the oil. This
will contaminate the oil.
Hot Surfaces
Do Not Touch
This symbol indicates, temperature of
accessible surfaces may be high when the
appliance is operating and for some time
after use.
14
Page 17

Deep Frying times and
temperatures guide
FISH AND SEAFOOD
TYPE MAXIMUM TEMPERATURE APPROX. TIME SUGGESTIONS
QTY °C (MIN)
PRAWNS
Fresh 600g 170C 5-7 Crumb/batter
Frozen 600g 190C 3-5 Fry frozen
FISH
Small pieces 400g 170C 3-5 Crumb / batter
Fresh fillets 600g 150C 7-10 Crumb / batter
Frozen fillets 600g 150C 5-7 Fry frozen
CALAMARI
Fresh 500g 170C 5-7 Crumb / batter
Frozen 500g 170C 3-5 Fry frozen
MEAT AND POULTRY
TYPE MAXIMUM TEMPERATURE APPROX. TIME SUGGESTIONS
QTY °C (MIN)
FRESH CHICKEN PORTIONS
Small 400g 170C 10-15 Crumb or batter
Large 600g 170C 15-20 Crumb or batter
CHICKEN OR VEAL SCHNITZEL
Fresh 250g 170C 5-10 Crumb
Frozen 250g 190C 3-8 Crumb
15
Page 18

Deep Frying times and temperatures guide - continued
VEGETABLES
TYPE MAXIMUM TEMPERATURE APPROX. TIME SUGGESTIONS
QTY °C (MIN)
VEGETABLES
Beans 200g 170C 2-4 Tempura
Broccoli /Cauliflower 250g 170C 3-5 Tempura or batter
Eggplant (slices) 150g 170C 4-6 Batter
Mushrooms whole button 200g 170C 3-5 Batter
Onion Rings 150g 170C 3-5 Batter
POTATOES
French fries 500g 170C 4-6
Chips 500g 170C 5-10
Wedges 500g 190C 10-15
16
Page 19

The Perfect Chip
• For perfect fries and wedges, old potatoes
are ideal. The potato should be of a low
starch, waxy variety i.e. Sebago, Russet
Burbank, Spunta, King Edward, Bintje.
• Make sure that the chips are cut to even
size to guarantee even cooking.
• The cut chips should be rinsed under
running water until the water runs clear.
This removes excess starch from the
potatoes as the starch burns at high
temperatures.
• Dry on kitchen towel before frying.
• Remove the lid whilst cooking.
• Shake the basket at short intervals to
encourage even browning and to stop
chips sticking together.
• Homemade fries are double cooked.
The first fry blanches the chips so that
they cook through. The second fry colours
the chips and gives them a crisp crust.
Use the table below as a guide.
1ST FRY (BLANCH) 2ND FRY
Thin fries - french fries 130°C 5 min 190°C 5 min
Thick chips 130°C 7-8 min 190°C 7-8 min
Wedges 130°C 10 min 180°C 10 min
• Cooking times will vary depending on the
size of your fries or chips and the variety
of the potato used.
Hints for cooking the perfect frozen chip.
• Do not defrost frozen, pre-cooked chips.
For the best results they should be taken
directly from the freezer to the fryer.
• Heat oil to the maximum setting, 190°C.
• For best results for frozen chips refer to
chip packet.
• Allow chips to drain for a moment before
removing from the basket and seasoning.
Allow oil to heat up to 2nd temperature before re-immersing the basket in the hot oil.
17
Page 20

Care and Cleaning
Cleaning should only be carried out when
the VersaCook is switched off and the plug
removed from the socket. Allow the unit to
completely cool before cleaning.
Do not use the aluminium pan on the
stovetop, inside a microwave oven or inside
an oven. Use the pan only inside the
VersaCook unit.
Wash the aluminium pan and lid in hot soapy
water. To remove food that is cooked onto the
bottom, soak the pan in warm water before
cleaning. Rinse well and dry.
The aluminium cooking pan and the lid are
dishwasher safe for added convenience.
Wipe the exterior of the VersaCook with a
damp cloth and polish dry. DO NOT use harsh
abrasives, scourers or chemicals to clean any
part of the VersaCook as these will damage
the surfaces.
Lid and permanent filter
Your VersaCook features a permanent filter
that we advise you to clean at regular
intervals. Either put the entire lid into the
dishwasher or into hot soapy water and let
it soak there for 5-10 minutes. Shake the
remaining water out of the lid and let it dry.
Ensure the filter is completely dry before you
re-use the lid.
Basket and handle
The basket and its handle can be hand
washed in warm soapy water. It should be
thoroughly dried afterwards.
Cleaning after Deep Frying
When the oil has completely cooled, the
pan can be removed for cleaning. Drain the
oil through a funnel and fine sieve into a
suitable container.
Note: Never pour used oil down sink.
Always make sure that the pan is completely dry
before you put it back into your unit.
18
Page 21

Hints and Tips
Don’t be scared to experiment with your
VersaCook. With your VersaCook, there is a
myriad of possibilities.
Slow Cooker
• Slow cooking is perfect for the cheaper,
tough cuts of meats as the lengthy
cooking process tenderises these cuts.
• When in slow cooker mode, the VersaCook
does not recover lost heat quickly. Only lift
the lid if necessary or if instructed to do
so in the recipe.
• When in slow cooker mode food will be
brought to a simmer on both LOW and
HIGH setting. The setting determines how
long it will take to reach this point.
• It is not uncommon for meat to cook
faster than root vegetables. It is for this
reason that we recommend chopping all
vegetables to a similar small size. Meat
can be cut into in larger chunks because
if it is cut too small, it will break up once
cooked and tenderised.
• Slow cooking prevents evaporation
resulting in the flavours and juices being
maintained. Keep this in mind when
creating your own recipes. You may not
require as much liquid as you would when
using other cooking methods.
• To thicken a casserole at the end of slow
cooking, change the menu to Brown
function and stir through a little cornflour
combined with water. Allow to simmer,
stirring until thickened.
Saucepan
• To boil water, use the Cook function set to
HIGH, with the lid on.
• The VersaCook can safely boil up to 5
litres of water.
Steamer
• You can steam many foods in the
VersaCook. Anything from dumplings to
vegetables , fish and poultry.
• Use the Cook function and place foods on
the provided low or high rack. Use the lid
to cover the VersaCook and create steam.
• Be sure to keep an eye on the liquid
level and add as you need. Don’t let the
VersaCook boil dry.
• For more delicate foods you may need to
place a sheet of baking paper over the
rack.
• When removing delicate foods after
steaming you may find it easier to remove
the whole rack with the food on it.
Frypan
• Use the Brown function to sear meats
before slow cooking.
Deep fryer
• Always ensure the oil is pre-heated to
temperature before adding the food. The
oil should sizzle as the food is entering
the oil.
• Oil and water don’t mix! This can cause
significant spitting and splattering of hot
oil. When frying wet foods such as fish,
pat the surface dry with absorbent paper
towel before frying.
• Deep fry food in batches to prevent
overcrowding and food joining together.
This will also ensure the oil maintains the
temperature.
• Sunflower oil or rice bran oil have a
higher burning point than most other
oils. This means they can reach a higher
temperature – perfect for deep frying.
19
Page 22

Hints and Tips - continued
Roasts
• With your VersaCook, you can roast a
whole chicken as well as whole pieces of
meat. Try lamb, beef, veal and pork by
simply using the Slow Cook function.
• Roasts can be cooked without the addition
of liquid. However they will release juices
while cooking. These juices are perfect for
making sauces and gravies.
• To make a sauce or gravy with the roast
juices, remove the meat and cover with
foil to keep warm. Set the Brown function
to 210°C and stir through some cornflour
mixed with a little water. Allow to simmer,
stirring until thickened. You can also add
some stock or wine to stretch the gravy a
little further and add great flavour.
• Do not use oven bags in the VersaCook.
• Roasting in the slow cooker will not brown
your meat or chicken, as roasting in an
oven does. If you want your roast to be
golden, we recommend using the Brown
function to sear the meat first.
• Leftover roast makes great sandwiches
the next day. Try the caramelised onion or
tomato chutney recipe and make burgers
with the leftovers!
Roasting Meat (such as beef, lamb and veal)
To get the best roasting results, we
recommend sealing your meat first. Trim
away any excess fat. Rub the meat with a
little oil and season with salt and pepper
(or any other flavourings or spices you wish
to use). Set the Brown function to 210°C,
and when pre-heated, cook meat for a few
minutes on each side. Set the slow cooker
function to LOW or HIGH and cook for the
appropriate time.
Approximate cooking times for well done:
LOW 2 hours per 500g
HIGH 1 hour per 500g
Note: Unlike roasting in your oven, meat
cooked to well done in the slow cooker will
still be very tender.
Roasting Chicken
Wash the chicken in cold running water and
pat dry with absorbent paper towel. Rub
with a little olive oil and season all over with
salt and pepper (or any other spices you
wish). Set the brown function to 210°C and
when pre-heated, cook the chicken for a few
minutes on each side until golden. Set the
slow cooker function to LOW or HIGH and
cook for the appropriate time.
20
Approximate cooking times for well done:
LOW 2 hours per 500g
HIGH 1 hour per 500g
Note: Ensure chicken is cooked all the way
through by inserting a skewer or knife into
the meatiest part of the chicken. The juices
will be clear when the chicken is cooked
through. If the juices are pink, a little more
cooking is required.
Page 23

Hints and Tips - continued
Stocks
• Many recipes use stock as part of the
ingredients. A good stock is also the base
of a great soup. Stocks can be bought at
supermarkets; however, nothing beats the
flavour of a homemade stock.
• Making your own stock is a great way to
use up bones or carcasses that would
normally be thrown away.
• There is no need to peel your vegetables
when making a stock. Just ensure you
wash them well before use.
• Fresh made stock will keep in the
refrigerator for up to 4 days, but can be
frozen for up to 3 months.
• Always label and date your stock before
storing. It’s a good idea to freeze stock
in portioned sizes. So for example if you
generally use stocks in stews, casseroles,
curries etc, then freeze your stock in 1
cup portions. If you tend to use your stock
more for gravies and sauces, then freezer
it in smaller ¼ cup portions or even in
ice cube trays, so that you don’t need to
defrost large quantities at a time.
• To remove the excess fat, cool the stock
in the fridge overnight, then skim the
solidified fat from the surface.
21
Page 24

Troubleshooting
PROBLEM POSSIBLE CAUSE SOLUTION
Strong smell Oil has gone bad. Replace oil.
The correct oil is not being used. Use only high quality oil.
Do not mix oils of a
different quality or type.
Oil overflowing Fryer is filled above the Check oil level on the inside
maximum level. of fryer.
Wet food placed in hot oil. Dry food first.
Stated quantities exceeded. Do not fry food above the
weight indicated.
Food is not browning Cooking temperature is too low. Adjust the dial to the correct
cooking temperature.
Basket is overloaded. Do not fry food above the
stated quantities and
weights.
Oil is not hot enough. Faulty thermostat.
Consult Service Centre.
Chips are sticking together Food not washed thoroughly Wash potatoes thoroughly
before placed in the oil. and dry before frying.
Appliance not working Appliance has been turned on Allow the fryer to cool down,
without fat or oil. fill with oil and press the
reset button that is
concealed at the back of
the fryer.
Temperature control dial not Choose cooking temperature.
at correct setting.
2222
Page 25

Recipes
All the recipes have been specifically created and tested by the Sunbeam Test Kitchen for the
VersaCook Multi Cooker X5. We hope you enjoy your Sunbeam VersaCook.
Chicken Stock Makes: 2.5 litres
2 chicken carcases
2 onions, chopped
2 celery stalks, chopped
2 carrots, chopped
4 bay leaves
2 teaspoons black peppercorns
1 bunch parsley stems
2.5 litres water
Salt to taste
1. Place all ingredients in the pan. Cover with
lid. Using the Slow Cook function, cook on
LOW for 8 hours or HIGH for 4 hours.
2. Strain and discard solids. Add salt to taste.
Cool and store in an airtight container in
the fridge or freezer.
Fish Stock Makes: 2.5 litres
1kg fish bones
1 onion, chopped
1 celery stalk, chopped
2 bay leaves
1 teaspoon black peppercorns
2.5 litres water
Salt to taste
1. Place all ingredients in the pan. Cover with
lid. Using the Slow Cook function, cook on
LOW for 8 hours or HIGH for 4 hours.
2. Strain and discard solids. Add salt to taste.
Cool and store in an airtight container in
the fridge or freezer.
23
Page 26

Recipes continued
Beef Stock Makes: 2.5 litres
1 tablespoon oil
1.5kg meaty beef bones
1 onion, chopped
1 celery stalk, chopped
1 carrot, chopped
2 bay leaves
1 teaspoon black peppercorns
2.5 litres water
Salt to taste
1. Using the Brown function, heat the oil on
210°C. When pre-heated, cook the beef
bones in batches until browned. Add the
remaining ingredients to pan.
2. Cover with lid. Using the Slow Cook
function, cook on LOW for 8 hours or HIGH
for 4 hours.
3. Strain and discard solids. Add salt to taste.
Cool and store in an airtight container in
the fridge or freezer.
Vegetable Stock Makes: 2.5 litres
4 onions, chopped
2 carrots, chopped
2 parsnips, chopped
5 celery stalks, chopped
1 bunch parsley
4 bay leaves
2 teaspoons black peppercorns
2.5 litres water
Salt to taste
1. Place all ingredients in the pan. Cover with
lid. Using the Slow Cook function, cook on
LOW for 6 hours or HIGH for 3 hours.
2. Strain and discard solids. Add salt to taste.
Cool and store in an airtight container in
the fridge or freezer.
24
Page 27

Recipes continued
Pea and Ham Soup Serves: 4-6
2 onions, finely chopped
2 celery stalks, finely chopped
1 large potato, peeled, finely chopped
500g split green peas, well rinsed, drained
1kg smoked ham hock
2 bay leaves
3 thyme sprigs
5 cups water
Salt and pepper, to taste
Crusty bread, to serve
1. Place all ingredients in the pan. Cover with
lid. Using the Slow Cook function, cook on
LOW for 8 hours or HIGH for 4 hours.
2. Remove the ham hock from the soup.
Discard skin. Remove meat from bone,
chop and return to soup. Add salt and
pepper to taste. Serve with crusty bread.
Minestrone Serves: 6-8
2 teaspoons olive oil
1 clove garlic, crushed
200g prosciutto, chopped
1 celery stalk, finely chopped
1 carrot, peeled, finely chopped
1 zucchini, finely chopped
2 potatoes, peeled, cut into 2cm cubes
300g pumpkin, peeled, cut into 2cm cubes
800g can crushed tomatoes
6 cups chicken stock
1 cup Italian-style soup mix, well rinsed,
drained
1 cup shredded cabbage
1 cup macaroni or similar small pasta
Shredded basil and parmesan cheese, to
serve
1. Using the Brown function, heat oil on
150°C. When pre-heated, add garlic,
prosciutto, celery and carrot. Cook, stirring,
for about 15 minutes or until soft. Add the
zucchini, potatoes, pumpkin, tomatoes,
stock and soup mix.
2. Cover with lid. Using the Slow Cook
function cook on LOW for 8 hours or HIGH
for 4 hours. Add the cabbage and pasta in
the final 30 minutes of cooking.
3. Serve minestrone topped with shaved
parmesan and basil.
Note: Italian-style soup mix is a mixed bag
of dried peas, beans and lentils. It can be
bought from supermarkets.
25
Page 28

Recipes continued
American Pork Ribs Serves: 6
1 tablespoon olive oil
2kg American-style pork ribs
Pepper, to taste
2 ¼ cups tomato sauce
1 ½ cups apple cider vinegar
½ cup Worcestershire sauce
¾ cup brown sugar
¹⁄³ cup American mustard
3 cloves garlic
¼ cup lemon juice
2 tablespoons cornflour
¼ cup water
Salt and pepper, to taste
1. Using the Brown function, heat oil on
210°C. When pre-heated, cook the ribs in
batches until brown, seasoning well with
pepper while cooking. Remove from pan.
2. Combine remaining ingredients except
cornflour in the pan. Bring to a simmer.
Add the ribs ensuring they are thoroughly
coated in the sauce.
3. Cover with lid. Using the Slow Cook
function, cook on LOW for 8 hours or HIGH
for 4 hours.
4. Remove ribs from sauce and cover with
foil to keep warm. Combine cornflour with
¼ cup water to form a smooth paste.
Stir through the sauce. Using the Brown
function set on 210°C, stir until mixture
boils and thickens. Season to taste with
salt and pepper.
5. Serve ribs with sauce and coleslaw or
potato salad.
Meatballs in Tomato Sauce Serves: 4-6
2 tablespoon olive oil
2 onions, finely chopped
1 clove garlic, crushed
500g pork mince
500g veal mince
½ cup fresh breadcrumbs
1 egg
1 teaspoon chopped fresh oregano
1 teaspoon chopped fresh thyme
400g can cherry tomatoes
1 tablespoon brown sugar
1 tablespoon tomato paste
½ cup chicken stock
700g tomato passata
Salt and pepper, to taste
Spaghetti, to serve
1. Using the Brown function, heat half the
oil on 190°C. When pre-heated add onion
and garlic. Cook, stirring until soft. Remove
from pan.
2. Transfer half the onion mixture to a large
bowl. Add mince, breadcrumbs, egg and
herbs. Season with salt and pepper and
mix to combine. Divide into 12 equal
portions and roll into balls.
3. Using the Brown function, heat remaining
oil on 210°C. Cook the meatballs in
batches until browned. Return remaining
onion to the pan with tomatoes, sugar,
tomato paste, stock and passata.
4. Cover with lid. Using the slow cooker
function, cook on LOW for 6 hours or HIGH
for 3 hours. Serve on spaghetti.
26
Page 29

Recipes continued
Beer Batter
1 ¼ cups self-raising flour
pinch of salt
375ml cold beer
1. Place flour and salt in a bowl. Gradually
whisk in beer until smooth. Rest for 1
hour.
2. Heat oil to 190ºC.
3. Dip the desired food into the batter and
allow excess batter to drip away.
4. Deep fry until golden. Drain on absorbent
paper towel.
Tip: Seafood is great for beer batter. Try
making a fisherman’s basket using calamari,
prawns, fish fillets and scallops. You could
also try dipping sliced potatoes to make
potato scallops (potato cakes).
Sweet Fritter Batter
1 cup self-raising flour
1 tablespoon sugar
1 egg
²⁄³ cup milk
1 tablespoon melted butter
1. Place flour and sugar in a bowl. Gradually
whisk in egg, milk and butter until smooth.
2. Heat oil to 190ºC.
3. Dip the desired food into the batter and
allow excess batter to drip away.
4. Deep fry until golden. Drain on absorbent
paper towel.
Tip: Dip whole, peeled bananas in this batter
to make banana fritters. Dust with icing sugar
and serve warm with ice-cream.
Tempura Batter
1 egg yolk, lightly beaten
1 cup cold water or soda water
½ cup plain flour
½ cup cornflour
1. Combine egg and water in a bowl. Add
flours and stir until just combined.
Note: Do not over mix; mixture should still
have lumps in it.
2. Heat oil to 190ºC.
3. Dip the desired food into the batter and
allow excess batter to drip away.
4. Deep fry until crisp. Drain on absorbent
paper towel.
Tip: This batter is perfect for chicken,
boneless salmon pieces, prawns or
vegetables.
Easy Crispy Coating
1 egg
1 tablespoon milk
1 cup rice flour
Salt and pepper
1. Whisk egg and milk until combined.
Combine flour with salt and pepper to
taste.
2. Heat oil to 190ºC.
3. Dip food in egg mixture and then coat with
flour.
4. Deep fry until crisp. Drain on absorbent
paper towel.
Note: This coating is great on almost
anything!
27
Page 30

Recipes continued
Curry Puffs Makes: 24
2 teaspoons vegetable oil
1 small onion, finely chopped
400g beef mince
1 clove garlic, crushed
2 teaspoons curry powder
¼ cup mango chutney
24 wonton wrappers
1 egg white, lightly beaten
1. Using the Brown function, heat the oil on
170°C. Cook onion until softened. Add
mince and garlic, and brown until cooked.
2. Stir in curry powder and cook until
fragrant. Stir in mango chutney. Transfer
mixture to a medium bowl. Cool slightly.
3. Place a heaped teaspoon of mixture into
the centre of wrappers. Brush edges with a
little egg white. Fold wrappers in half and
pinch edges together to seal.
4. Using the Deep Fry function heat oil to
180°C. Fry in batches until golden brown,
about 4 – 5 minutes.
5. Drain on absorbent paper towel and serve
with minted yoghurt if desired.
Spring Rolls Makes: approx. 24
Boiling water
20g rice vermicelli
2 teaspoons peanut oil
1 small brown onion, finely chopped
150g pork mince
1 clove garlic, crushed
2 teaspoons fresh ginger, finely grated
125g fresh shiitake mushrooms, roughly
chopped
1 carrot, peeled, grated
150g shelled, deveined, cooked prawns,
chopped
2 tablespoons soy sauce
1 teaspoon caster sugar
1 tablespoon fresh coriander, chopped
12 x 12cm spring roll wrappers
1 teaspoon cornflour
2 teaspoons water
1. Place vermicelli in a heatproof bowl. Cover
with boiling water and stand until tender.
Drain and roughly cut vermicelli with
scissors.
2. Using the Brown function heat oil to
170°C. Add onion, mince, garlic and
ginger. Cook, stirring until browned. Add
mushrooms, carrot, prawn, soy sauce and
sugar. Cook until vegetables soften and
mixture is dry. Transfer to a bowl. Stir in
vermicelli and coriander. Cool.
3. Combine cornflour with 2 teaspoons of
water. Place 2 tablespoons of the filling
mixture in the corner of a spring roll
wrapper. Lightly brush the edges with
cornflour mixture. Roll the wrapper, folding
in the sides to encase the filling.
28
Page 31

Recipes continued
4. Using the Deep Fry function heat the oil
to 180°C. Deep fry in batches until golden
brown, about 4 – 5 minutes.
5. Drain on absorbent paper towel and serve
with soy sauce or sweet chilli sauce if
desired.
Southern Fried Chicken Serves: 4-6
½ cup plain flour
½ teaspoon salt
½ teaspoon hot paprika (optional)
750g chicken drumettes and chicken wings
1 egg, beaten with 2 tablespoons water
1 cup dried breadcrumbs
1. Mix flour with salt and paprika. Dry
chicken and coat in seasoned flour.
2. Dip chicken into egg mixture then coat in
breadcrumbs.
3. Using the Deep Fry function heat oil to
170°C. Deep fry in batches until golden
brown and cooked through, about 15
minutes.
4. Drain on absorbent paper towel. Serve with
ranch dressing as a dipping sauce.
Felafel
1½ cups dried chickpeas, washed
1 onion, chopped finely
½ teaspoon chilli powder
1 teaspoon ground cumin
½ teaspoon ground coriander
2 cloves garlic, crushed
3 teaspoons lemon juice
¼ cup finely chopped fresh parsley
½ cup besan (chickpea) flour
1 egg
1. Soak chickpeas in a large bowl of water
overnight. Drain and rinse well.
2. Place chickpeas and 3L of water into the
Multi Cooker. Using the Cook function set
to HIGH, bring to a simmer and cook for
1 ¼ hours or until tender. Drain well.
3. Blend the chickpeas with remaining
ingredients in a food processor. Refrigerate
mixture until cold.
4. Roll heaped tablespoons of mixture into
4cm balls.
5. Using the Deep Fry function heat oil
to 160°C. Deep fry in batches for 3-4
minutes or until golden.
6. Drain on absorbent paper towel. Sever hot
or cold with hummus and Lebanese bread.
29
Page 32

Recipes continued
Buttermilk Donuts Makes: approx. 15
2 teaspoons dry yeast
1 ¼ cups buttermilk, warmed
¼ cup caster sugar
4 cups plain flour
1 teaspoon salt
¼ cup light olive oil
2 eggs, lightly beaten
1. In a small bowl, whisk the yeast into the
warmed buttermilk with 1 tablespoon of
the sugar. Mix well and stand in a warm
place for 10 minutes or until the mixture
begins to froth.
2. Place the remaining sugar, flour and salt
into a large bowl. Make a well in the
centre and stir through oil, eggs and yeast
mixture. Mix until a soft dough forms.
3. Place mixture onto a floured surface and
knead for about 10 minutes or until dough
is smooth and elastic.
4. Place dough in a bowl. Cover and stand in
a warm place for about 40 minutes or until
dough has doubled in size.
5. Turn dough onto a lightly floured surface
and knead again for about 5 minutes or
until smooth and elastic. Roll dough out to
about 1 ½ cm thick. Use a 9cm cutter to
cut rounds and a 3cm cutter to cut holes
from the centre. Place donuts onto a tray
lined with baking paper and cover with
plastic wrap. Stand in a warm place for
about 40 minutes.
6. Using the Deep Fry function heat oil to
170ºC. Cook donuts in batches, turning
once during cooking, until golden in colour.
7. Drain donuts on absorbent paper. While
hot, toss in cinnamon sugar.
Tip: To make your own cinnamon sugar,
combine 1 cup caster sugar with 2 teaspoons
ground cinnamon.
30
Tip: Don’t forget to cook the ‘donut holes’ for
extra mini-treats.
Prawn Cutlets
1kg medium green king prawns, peeled,
deveined, tails intact
¾ cup plain flour
Salt and pepper, to taste
1 cup panko bread crumbs
2 eggs, lightly whisked
1. Wash prawns and pat dry with paper towel.
2. Use a small, sharp knife to cut a slit along
the back of each prawn (don’t cut all the
way through). Open and flatten gently.
3. Place the flour in a bowl and season with
salt and pepper. Place the breadcrumbs
and eggs in 2 separate bowls.
4. Toss the prawns in flour and shake off any
excess. Dip one prawn at a time into the
egg then the breadcrumbs. Press firmly to
coat.
5. Heat oil to 190°C. Cook prawns in batches
until golden.
6. Drain on absorbent paper towel. Serve with
lemon wedges and tartare sauce.
Page 33

Recipes continued
Wedges
1. Cut unpeeled potatoes into thick wedges.
Soak in cold water for 1 hour, changing the
water regularly to remove excess starch.
Drain and pat dry with paper towel.
2. Heat oil to 170°C. Deep fry potatoes in
batches until soft (but not coloured).
3. Heat oil to 190°C. Return the wedges to
the oil in batches and cook until crisp and
golden.
4. Place in a bowl. Sprinkle with salt, pepper
and paprika to taste. Toss to coat.
5. Serve with sour cream and sweet chilli
sauce.
Perfect chips
1. Cut peeled potatoes into 1cm batons. Soak
in cold water for 1 hour, changing the
water regularly to remove excess starch.
Drain and pat dry with paper towel.
2. Heat oil to 170°C. Deep fry potatoes in
batches until soft (but not coloured).
3. Heat oil to 190°C. Return the chips to the
oil in batches and cook until crisp and
golden.
4. Drain on paper towel. Sprinkle with salt to
serve.
Salt and Pepper Squid Serves: 4
6 medium squid hoods, cleaned
¼ cup sea salt flakes
1 tablespoon cracked pepper blend
1 ½ cups tapioca (or arrowroot) flour
2 egg whites, lightly beaten
1. Halve the squid lengthways. Pat dry with
paper towel. Using a sharp knife, score the
inside in a criss-cross pattern. Cut each
half into about 4 pieces.
2. Combine salt, pepper and flour in a shallow
dish. Dip squid into the egg white then in
the flour mixture. Shake off excess.
3. Heat oil to 190°C. Deep fry squid in
batches for about 2 minutes or until crisp.
Serve with lemon wedges.
31
Page 34

Recipes continued
Deep Fried Ice Cream Serves: 6
1 litre vanilla ice-cream
250g digestive biscuits
2 eggs
2 tablespoons milk
Caramel sauce, to serve
1. Working quickly, roll ice cream into 6
round balls and place in the freezer on a
metal tray lined with baking paper. Freeze
until very firm, about 2 hours or overnight.
2. Use a food processor to crush biscuits to
fine crumbs. Place in a shallow bowl. Work
quickly and roll balls in the crumbs to
coat. Return to the freezer for 1 hour.
3. Combine milk and eggs in a small bowl.
Again, working quickly, coat each ball in
egg mixture and allow excess to drip off.
Coat again in biscuit crumbs. Return to the
freezer until firm.
4. Heat oil to 190°C. Deep fry in 2 batches
for 10-15 seconds or until golden. Briefly
drain on absorbent paper towel. Serve
immediately drizzled with caramel sauce.
Tip: If you’re having trouble rolling the ice
cream into balls, spoon 6 portions onto a
tray and freeze until firm. Then quickly roll
in your hands to make balls and return to the
freezer.
Tomato Chutney Makes: approx 3 cups
10 (1.5kg) ripe tomatoes, peeled, finely
chopped
1 large onion, finely chopped
¼ cup sultanas
1 ½ cups apple cider vinegar
¼ teaspoon chilli powder
½ teaspoon ground cumin
½ teaspoon ground coriander
1 teaspoon mustard powder
Salt and pepper, to taste
1. Using the Brown function, heat the oil on
150°C. When heated, set timer for 1 hour
and press START. Add all ingredients to
the pan. Allow to cook uncovered, stirring
occasionally until thick and most of the
liquid has evaporated.
2. Season well with salt and pepper. Pour
chutney into hot sterilised glass jars and
seal with preserving or plastic lids.
Note:
• To peel tomatoes: use a sharp knife to
remove the stem and place a small cross
on the base of the tomato. Place in boiling
water for 1 minute or until the skin just
begins to peel away. Immediately remove
from the boiling water and place in a bowl
of ice cold water. You will then be able to
easily pull the skin off with your fingers.
• To sterilise jars: place clean, glass jars
without any chips or cracks in a large
saucepan and cover with cold water. Cover
with lid and bring to boil. Boil for 20
minutes. Carefully remove the jars and
stand upright on a heat-proof board. Allow
to air dry.
32
Page 35

Recipes continued
Caramelised Onions Makes: 2 cups
1 tablespoon olive oil
1.5kg brown onions, thinly sliced
¼ cup brown sugar
¼ cup balsamic sugar
Salt and pepper, to taste
1. Using the Brown function, heat oil on
150°C. When heated, set timer for 1 hour
and press START.
2. Add onion to pan and cook, stirring
occasionally until very soft (about 50
minutes). Add sugar and vinegar and cook
for a further 10 minutes. Season.
Note: Caramelised onions taste great on
steak, roasts and burgers.
Stuffed Capsicums
2 teaspoons oil
1 small onion, finely chopped
400g lamb mince
2 cloves garlic, crushed
1 teaspoon ground cumin
1 teaspoon ground coriander
1 tablespoon finely grated lemon rind
¼ cup pine nuts
1 cup cooked white rice
3 long green onions, sliced
½ cup chopped fresh coriander
1 tablespoon lemon juice
Salt and pepper, to taste
4 small red capsicums
1. Using the Brown function, heat oil to
170°C. When pre-heated add onion and
cook until softened. Add mince and cook
until browned and cooked through.
2. Stir in garlic, cumin and coriander and
cook until fragrant. Transfer to a large
bowl. Stir through all remaining ingredients
except capsicum.
3. Cut tops from capsicum and remove seeds.
Spoon mixture into capsicums. Place filled
capsicum cut side up onto rack in the
cleaned pan. Cover with lid.
4. Using the Cook function set to HIGH, cook
for 40 minutes or until capsicums are just
tender. Serve with yoghurt if desired.
Tip: You may need to trim the bottoms very
slightly so your capsicums sit flat. Be careful
not to cut too far or the filling may seep
through.
33
Page 36

Recipes continued
San Choy Bow Serves: 2-3
1 tablespoon peanut oil
500g pork mince
4 coriander roots and stems, finely chopped
1 long red chilli, sliced
4 cloves garlic, crushed
¹⁄³ cup brown sugar
2 tablespoons fish sauce
2 kaffir lime leaves, finely shredded
¹⁄³ cup fried shallots
¹⁄³ cup roasted peanuts, roughly chopped
Salt and pepper, to taste
¼ cup fresh coriander leaves
1 tablespoon lemon juice
Iceberg lettuce leaf cups, to serve
1. Using the Brown function, heat oil to
190°C. When heated add pork and cook,
stirring until lightly browned. Add coriander
roots and stems, chilli and garlic. Cook
until fragrant. Add sugar, fish sauce and
lime leaves. Simmer until mixture thickens.
Season with salt and pepper.
2. Stir through all ingredients except lettuce.
3. Serve in lettuce cups.
Note: To easily separate iceberg lettuce leaves
without tearing them, remove the core from
the lettuce using a small sharp knife. Hold
under cold running water, cut side up and
allow the water to weigh down and separate
the leaves. Gently remove the leaves and pat
dry with absorbent paper towel.
Crispy Skinned Salmon Fillets Serves: 4
with Pea and Potato Salad
500g baby potatoes, washed
4 tablespoons oil
1 large onion, finely sliced
1 cup peas
2 long green onions, sliced
¼ cup gherkins, chopped
¼ cup plain Greek yoghurt
2 tablespoons mayonnaise
1 tablespoon lemon juice
1 tablespoon apple cider vinegar
Salt and black pepper, to taste
4 150g salmon fillets, skin on
1. Using the Cook function on HIGH add 3
litres of water and potatoes to the pan.
Cook for 15 minutes or until potatoes are
tender. Drain. Roughly chop and set aside.
2. Using the Brown function heat half the oil
at 180ºC. When heated add onions and
peas and cook until golden. Transfer into a
large bowl. Add potatoes, green onions and
gherkins.
3. In a small bowl whisk together yoghurt,
mayonnaise, lemon juice and vinegar.
Season with salt and pepper and pour over
potato mixture. Stir gently to combine.
4. Season the salmon skin generously with
salt and pepper.
5. Using the Brown function heat remaining
oil to 210ºC. When heated add salmon,
skin side down. Use a spatula to press
the salmon firmly to base of the pan so
the salmon doesn’t curl up. Cook for two
minutes. Turn over and cook for a further 2
minutes. Remove from pan.
6. Serve with potato salad.
34
Page 37

Recipes continued
Bechamel Sauce Makes: approx. 2 cups
80g butter
¹⁄³ cup plain flour
1 litre milk, warmed
½ teaspoon salt
Pepper, to taste
½ cup grated parmesan
1. Using the Brown function, melt butter on
190°C. Add the flour and stir vigorously for
30 seconds. Do not allow the mixture to
brown.
2. Add half of the milk and whisk until
smooth. Gradually whisk in remaining milk.
Continuing whisking until sauce thickens
and comes to a boil.
3. Stir through salt, pepper and parmesan.
Note: This sauce is great over vegetables or
chicken. Also great in lasagne or poured over
broccoli.
Lamb Rack with Garlic Serves: 4
and Parmesan Crust
2 x 6 Rib lamb rack roast, French trimmed
(= approx. 450g each)
4 slices day old bread, crust removed
2 cloves garlic, chopped
2 tablespoons fresh parmesan, grated
1 tablespoon fresh rosemary, chopped
2 tablespoons seeded mustard
Olive oil spray
Mashed potatoes, to serve
1. Combine bread, garlic, parmesan and
rosemary in a food processor. Process until
mixture resembles fine breadcrumbs.
2. Place lamb racks on a chopping board,
interlocking the bones of both racks.
Spread mustard evenly over the outside of
the lamb racks. Press the bread mixture
over the mustard and spray well with olive
oil spray.
3. Place lamb racks in the Multi Cooker.
Set to Cook function on HIGH. Cover with
lid and cook for about 40-45 minutes
for medium or until cooked as desired.
Remove from pan and cover with foil.
Allow to rest 5-10 minutes.
4. Cut lamb into individual cutlets and serve
with mashed potatoes.
35
Page 38

Recipes continued
Mussels in Green Curry Sauce Serves: 4-6
2 x 400mls cans coconut milk
2 teaspoons green curry paste
1 cup fish stock
½ cup chopped fresh basil
1 stalk lemongrass, finely chopped
¼ cup lime juice
2 tablespoons fish sauce
2 teaspoons lime rind
2 tablespoons oil
1.5kg mussels, cleaned
½ cup chopped fresh coriander
1. Using the Cook function set to HIGH, bring
coconut milk to a boil. Add curry paste,
stirring until combined.
2. Add stock, basil, lemon grass, lime juice,
fish sauce, lime rind and oil then bring
back to a simmer. Cook for 10 minutes.
Strain and return to pan. Add mussels.
3. Cover with lid. Cook for 5 minutes or
until mussels have opened. Discard any
mussels that remain closed. Sprinkle with
coriander. Serve.
Fettuccine Boscaiola Serves: 4-6
500g fettuccine
2 teaspoons olive oil
1 small brown onion, finely chopped
4 bacon rashers, finely chopped
150g button mushrooms, sliced
1 clove garlic, crushed
3 long green spring onions, thinly sliced
600mls thickened cream
¹⁄³ cup parmesan, finely grated
¼ cup fresh parsley, chopped
Salt and pepper, to taste
1. Using the Cook function set to HIGH, bring
5 litres of water to boil. Add fettuccine
and cook, stirring occasionally until tender.
Drain.
2. Using the Brown function, heat oil to
150°C. When heated add onion, bacon,
mushrooms and garlic. Cook, stirring
occasionally for about 20 minutes or until
lightly browned. Add the green onions and
cook for a further minute.
3. Add the cream and bring to a simmer.
Cook, stirring until mixture reduces and
thickens slightly. Add the cooked pasta
and stir until coated in sauce and heated
through.
4. Stir through parmesan and parsley. Season
with salt and pepper.
36
Page 39

Recipes continued
Traditional Vanilla Custard
2 cups milk
2 cups thickened cream
1 vanilla bean
8 egg yolks
2 tablespoons cornflour
½ cup caster sugar
1. Using the Cook function on LOW add milk
and cream to the pan.
2. Use a sharp knife to split vanilla bean in
half lengthways. Scrape out seeds and
add to milk. Cook, stirring constantly until
hot. Add remaining ingredients and whisk
constantly until mixture is thickened, about
15 minutes.
Tip: Cover the custard directly with plastic
wrap if you aren’t using straight away. This
will prevent a thick skin forming.
Steamed Chicken Dumplings
Makes: approx. 20-25
300g chicken mince
4 long green onions, chopped
1 bunch fresh coriander, including stalks,
chopped
1 small green chilli, finely chopped
2 cups Chinese cabbage, finely sliced
¼ cup water chestnuts, chopped
1 tablespoon lime juice
1 tablespoon mirin
1 tablespoon soy sauce
2 teaspoons sesame oil
2cm piece fresh ginger, peeled, grated
1 pack egg wonton wrappers
1. Line a baking tray with baking paper.
2. Combine all ingredients expect wonton
wrappers in large bowl, mix well.
3. Place a heaped tablespoon of mixture
in the centre of each wonton wrapper.
Moisten the edges of wrapper with water.
Pleat one side of the wrapper and join
to the other. Gently press to seal. Place
on prepared baking tray. Repeat with
remaining wrappers.
4. With the high steaming rack in place, use
the Cook function set on HIGH to bring
5cm of water to boil. Reduce setting to
LOW. Place a sheet of baking paper over
the rack. Place 10 wontons on the rack.
5. Cover with lid. Steam for about 20
minutes or until cooked. Repeat with
remaining dumplings.
37
Page 40

Recipes continued
Spicy Steamed Lamb Shanks Serves: 4
8 dried ancho chillies
2 long red chilli’s, finely chopped
1 teapsoon dried cumin
½ teaspoon dried oregano
½ teaspoon dried thyme
4 cloves
2 bay leaves
4 cloves garlic, peeled
2 tablespoons white vinegar
4 lamb shanks
1 375ml can beer
1. Wash chilies. Remove stems, veins, and
seeds. Place in a large bowl and cover with
boiling water. Soak for 1 hour. Drain and
reserve a ¼ cup of the liquid.
2. Combine chillies, cumin, oregano, thyme,
cloves, bay leaves, garlic, vinegar and
reserved chilli water in a food processor.
Process to a smooth paste. Coat lamb
shanks in paste, cover and refrigerate
overnight.
3. Place each shank in the centre of a piece
of baking paper. Bring corners of baking
paper together to form a seal.
4. With high steaming rack in place, use
the Cook function on HIGH to bring 5 cm
water and beer to a boil. Place lamb on
rack.
5. Cover with lid. Steam for approximately 2
hours or until meat falls off the bone.
Steamed Chinese Broccoli Serves: 3-4
2 bunches Chinese broccoli
¼ cup oyster sauce
1 clove garlic, crushed
2 tablespoons light soy sauce
1 teaspoon caster sugar
2 teaspoons sesame oil
2 teaspoons lime juice
1. Remove broccoli leaves from stems. Cut
stems in half and roughly chop leaves.
2. Combine remaining ingredients in a small
bowl to make a sauce.
3. Place broccoli in the centre of a large
piece of baking paper. Pour over sauce.
Bring corners of baking paper together to
form a seal.
4. With the high steaming rack in place, use
the Cook function on HIGH to bring 5cm of
water to boil. Place parcel on rack.
5. Cover with lid. Steam for 15 minutes or
until broccoli is tender.
38
Page 41

Recipes continued
Steamed Lemon Thyme Chicken Serves: 4
2 lemons, finely sliced
1 bunch thyme
2 garlic cloves, crushed
4 chicken breasts
Salt and pepper, to taste
1. With the steamer rack in place, use the
Cook function on HIGH to bring 5cm of
water to the boil. Place a sheet of baking
paper over the rack.
2. Scatter half the lemons and thyme over the
baking paper. Top with chicken and scatter
with remaining ingredients.
3. Cover with lid. Steam for about 20 minutes
or until chicken is cooked.
Soy and Ginger Steamed Salmon Serves: 4
with Bok Choy
4 bok choy, halved
4 x 150g salmon fillets
1 small red chilli, seeded, finely sliced
1 clove garlic, crushed
4cm piece ginger, peeled, grated
2 tablespoons soy sauce
¹⁄³ cup Chinese rice wine
2 tablespoons sesame seeds, toasted
1 teaspoon sesame oil
Salt and pepper, to taste
1. Cut 4 x 30cm squares of baking paper.
2. Place two pieces of bok choy in centre
of each square. Top with salmon. Divide
chilli, garlic, ginger, soy and rice wine
evenly between parcels. Bring corners of
baking paper together to form a seal.
3. With high steamer rack in place, use the
Cook function on high to bring 5cm of
water to the boil. Place parcels on rack.
4. Cover with lid. Cook for 15 minutes or until
bok choy is tender and salmon is cooked.
Tip: To tell if salmon is cooked white flecks of
protein should be visible.
39
Page 42

Recipes continued
Chinese Steamed Pork
and Cabbage Rolls
300g pork mince
50g fresh shiitake mushrooms, chopped
3 long green onions, finely chopped
2cm piece ginger, peeled, grated
1 egg, lightly beaten
½ bunch fresh coriander, finely chopped
2 tablespoons soy sauce
1 tablespoon rice wine
1 teaspoon caster sugar
1 teaspoon sesame oil
1 Chinese cabbage, leaves separated
Salt and pepper, to taste
1. Combine all ingredients expect cabbage in
a large bowl. Mix well. Cover and place in
refrigerator.
2. Using the outer cabbage leaves cut out the
hard white centre rib.
3. Using the Cook function set to HIGH,
bring 5 litres of water to the boil. Add
the cabbage in batches and cook for 2
minutes. Run cabbage leaves under cold
water. Dry and set aside.
4. Place a heaped tablespoon of pork mixture
in the middle of cabbage leaf. Fold the
ends in and roll to form a secure parcel.
Repeat until mixture is used.
5. With high steaming rack in place, use the
Cook function on HIGH to bring 5cm of
water to the boil. Place a sheet of baking
paper over the rack. Place cabbage rolls on
rack.
6. Cover with lid. Steam for about 20 minutes
or until cooked.
Steamed Fish Parcels (En Papiote) Serves: 4
2 small fennel bulbs, finely sliced
1 lemon finely sliced
4 firm white fish fillets
4 tablespoons butter
½ cup white wine
Salt and pepper, to taste
1. Cut 4 x 30cm squares of baking paper.
2. Place an equal amount of fennel and
lemon in the centre of each piece of paper.
Top with fish and butter. Season with salt
and pepper.
3. Bring opposite edges of paper together to
form a parcel. Pour in quarter of the white
wine and seal. Repeat.
4. With high steaming rack in place, use the
Cook function on HIGH to bring 5cm of
water to the boil. Place fish parcels on
rack.
5. Cover with lid. Steam for 15 minutes or
until fish is fully cooked.
40
Page 43

Page 44

Need help with your appliance?
Contact our customer service team or visit our
website for information and tips on getting the
most from your appliance.
Australia | visit www.sunbeam.com.au
phone 1300 881 861
mail Units 5 & 6, 13 Lord Street,
Botany NSW 2019 Australia.
New Zealand | visit www.sunbeam.co.nz
phone 0800 786 232
mail Level 6, Building 5, Central
Park, 660–670 Great South
Road, Greenlane, Auckland.
Sunbeam Corporation PTY LTD | ACN 000 006 771
Sunbeam is a registered trade mark.
VersaCook is a trade mark of Sunbeam corporation.
Made in China to Sunbeam’s specification.
Due to minor changes in design or otherwise,
the product you buy may differ slightly from the one shown here.
Approved by the appropriate electrical regulatory authorities.
©Copyright Sunbeam 2017.
03/17
MU2000_17EM2
GCDS-SUN51612-SL
 Loading...