

Page 1
— — —
FOLD
— — —
— — —
FOLD
— — —
— — —
FOLD
— — —
— — —
FOLD
— — —
— — —
FOLD
— — —
— — —
FOLD
— — —
— — —
FOLD
— — —— — —
FOLD
— — —
Visit us at www.sunbe am.com P.N.115028-REV F
MODELS /
MODELO S
Us er Man ual
Mixmaster®Stand Mixer
Man ual de Instr ucci ones
Batidora de Pedestal Mixmaster
®
2370, 2371, 2395, 239 7
DO NOT RETURN THIS PRODUCT TO THE PLACE OF PURCHASE
For productquestions:
Jarden ConsumerSolutions Consumer Service
USA :1.800.458.8407
Canada :1.800.667.8623
www.sunbeam.com
© 2008Sunbeam Products, Inc.doing business as JardenConsumer Solutions. All rightsreserved.
Distributed bySunbeam Products, Inc.doing business as JardenConsumer Solutions,
Boca Raton,Florida 33431.
SPR-102108
NO RETORNE ESTE PRODUCTO AL LUGAR DONDE LO COMPRÓ
Para preguntassobre los productos:
Jarden ConsumerSolutions Consumer Service
EE.UU. :1.800.458.8407
Canadá :1.800.667.8623
www.sunbeam.com
© 2008Sunbeam Products, Inc.operando bajo el nombrede Jarden Consumer Solutions.
Todoslos derechos reservados.Distribuido por SunbeamProducts,Inc. operandobajo elnombre de
Jarden ConsumerSolutions, Boca Raton,Florida 33431.
Printed inChina Impreso enChina
2-Year Limited Warranty
SunbeamProducts,Inc.doing businessas JardenConsumerSolutionsor ifinCanada, SunbeamCorporation
(Canada) Limiteddoing business as Jarden ConsumerSolutions (collectively “JCS”)warrants thatfor a
period oftwo years fromthe date of purchase,this product willbe free fromdefects in materialand
workmanship. JCS,at its option,will repair or replacethis product or anycomponent of theproduct
found to be defective during the warranty period. Replacement will be made with a new or
remanufacturedproduct orcomponent. Ifthe productis no longeravailable, replacement maybe made
with asimilar productof equal orgreater value. Thisis your exclusive warranty.Do NOT attempt to
repair oradjust anyelectrical or mechanicalfunctions on thisproduct. Doingso willvoid thiswarranty.
This warrantyis validfor theoriginal retailpurchaser fromthe date ofinitial retailpurchase andis not
transferable. Keep the original sales receipt. Proof of purchase is required to obtain warranty
performance. JCSdealers, servicecenters, or retailstores selling JCSproducts do nothave theright to
alter,modify or anyway change theterms and conditions ofthis warranty.
This warranty does not cover normal wear of parts ordamage resulting from any ofthe following:
negligentuse ormisuse ofthe product,use on impropervoltage orcurrent, usecontrary tothe operating
instructions, disassembly, repairor alteration byanyone other than JCS or anauthorized JCS service
center.Further, thewarranty doesnot cover:Acts ofGod, suchas fire,flood, hurricanesand tornadoes.
What arethe limits onJCS’s Liability?
JCS shallnot beliable forany incidentalor consequentialdamages causedby thebreach ofany express,
implied orstatutory warranty orcondition.
Except tothe extentprohibited byapplicable law, any implied warranty or conditionof merchantability
or fitnessfor aparticularpurpose islimited in durationto thedurationof theabove warranty.
JCS disclaims allother warranties,conditions orrepresentations,express, implied,statutory orotherwise.
JCS shallnot be liablefor any damagesof any kindresulting from thepurchase, use ormisuse of, or
inability touse the product including incidental, special,consequential or similar damages or loss of
profits, or for any breach of contract, fundamental or otherwise, or for any claimbrought against
purchaser byany other party.
Some provinces, states or jurisdictions do not allow the exclusion or limitation of incidental or
consequential damagesor limitationson how longan impliedwarranty lasts, so theabove limitations
or exclusionmay not applyto you.
This warranty gives you specific legal rights, and you may also have other rights that vary from
province toprovince, state tostate or jurisdiction tojurisdiction.
How toObtain WarrantyService
In theU.S.A.
If youhave anyquestion regarding thiswarranty or wouldlike to obtainwarranty service, pleasecall
1-800-458-8407and a convenientservice center addresswill be providedto you.
In Canada
If youhave anyquestion regarding thiswarranty or wouldlike to obtainwarranty service, pleasecall
1-800-667-8623and a convenientservice center addresswill be providedto you.
In theU.S.A., this warrantyis offered bySunbeam Products, Inc.doing business asJarden Consumer
Solutions located in Boca Raton, Florida 33431. In Canada, this warranty is offered by Sunbeam
Corporation (Canada)Limited doingbusiness asJarden ConsumerSolutions, locatedat 20B Hereford
Street, Brampton,Ontario L6Y 0M1.If you haveany other problemor claim inconnection with this
product, pleasewrite our ConsumerService Department.
PLEASE DO NOTRETURN THIS PRODUCT TO ANY OF THESE
ADDRESSES OR TOTHE PLACE OF PURCHASE.
Garantía Limitada de 2 Años
Sunbeam Products, Inc. operando bajo el nombre de Jarden Consumer Solutions, o en Canadá,
Sunbeam Corporation(Canada) Limitedoperando bajo elnombre de JardenConsumer Solutions,(en
forma conjunta,“JCS”), garantizaque porun períodode dos añosa partirde la fechade compra,este
producto estará libre de defectos de materiales y mano de obra. JCS, a su elección, reparará o
reemplazaráeste productoo cualquiercomponente delmismo quepresente defectosdurante elperíodo
de garantía.El reemplazose realizarápor unproducto ocomponente nuevoo reparado.Si elproducto
ya noestuviera disponible,se lo reemplazarápor unproducto similarde valorigual o superior. Éstaes
su garantía exclusiva. No intente reparar o ajustar ninguna función eléctrica o mecánica de este
producto. Alhacerlo elimínaráésta garantía.
La garantíaes válida para elcomprador minorista originala partir de lafecha de comprainicial y la
misma noes transferible. Conserveel recibo decompra original.Para solicitar servicioen garantía se
requiere presentar un recibo de compra. Los agentes y centros de servicio de JCS o las tiendas
minoristas quevenden productos deJCS no tienenderecho a alterar,modificar ni cambiarde ningún
otro modolos términos ylas condiciones de estagarantía.
Esta garantíano cubreel desgaste normalde las piezasni los dañosque se produzcancomo resultado
de uso negligente o mal uso del producto, uso de voltaje incorrecto o corriente inapropiada, uso
contrario a las instrucciones operativas,y desarme, reparación oalteración por parte deun tercero
ajeno a JCS o a un Centro de Servicio autorizado por JCS. Asimismo, la garantíano cubre actos
fortuitos talescomo incendios, inundaciones,huracanes y tornados.
¿Cuál esel límite deresponsabilidad de JCS?
JCS noserá responsablede dañosincidentales o emergentescausados porel incumplimientode alguna
garantía ocondición expresa, implícitao legal.
Excepto enla medida enque lo prohíba laley aplicable, cualquier garantíao condición implícita de
comerciabilidad oaptitud para unfin determinado selimita, en cuantoa su duración,al plazo dela
garantía antesmencionada.
JCS quedaexenta detoda otragarantías, condiciones omanifestaciones, expresa,implícita, legalo de
cualquier otranaturaleza.
JCS noserá responsablede ningún tipode dañoque resulte dela compra,uso o maluso delproducto,
o porla imposibilidad deusar el producto,incluidos los dañosincidentales, especiales, emergentes o
similares, ola pérdida deganancias, ni deningún incumplimiento contractual,sea de unaobligación
esencial ode otra naturaleza,ni de ningún reclamoiniciado contra el compradorpor un tercero.
Algunas provincias, estados o jurisdicciones no permiten la exclusión o limitación de los daños
incidentales oemergentes nilas limitaciones ala duraciónde las garantíasimplícitas, demodo que es
posible quela exclusión olas limitaciones antes mencionadasno se apliquen ensu caso.
Esta garantía le otorga derechoslegales específicos y esposible que usted tengaotros derechos que
varían deun estado, provinciao jurisdicción a otro.
Cómo solicitarel servicio engarantía
En losEstados Unidos
Si tienealgunapregunta sobreesta garantía odesea recibirservicio degarantía, llameal 1-800-458-8407
y podráobtener la direccióndel centro de servicioque le resulte másconveniente.
En Canadá
Si tienealguna preguntasobre estagarantía odesea recibir serviciode garantía,llame al1-800-667-8623
y podráobtener la direccióndel centro de servicioque le resulte másconveniente.
En losEstados Unidos, estagarantía esofrecida por SunbeamProducts, Inc.operando bajo elnombre
de JardenConsumer Solutions, BocaRatón, Florida 33431. EnCanadá, esta garantía esofrecida por
Sunbeam Corporation (Canada) Limited operando bajo elnombre de Jarden Consumer Solutions,
20 BHereford Street,Brampton, Ontario L6Y0M1. Siusted tieneotro problemao reclamoen conexión
con esteproducto, por favorescriba al Departamento deServicio al Consumidor.
POR FAVOR NO DEVUELVA ESTE PRODUCTO A NINGUNA DE
ESTAS DIRECCIONES NI AL LUGAR DE COMPRA.
IMPORTANT SAFEGUARDS
When using electrical appliances, basic safety precautions should always befol lowed
including the following:
READ ALL INSTRUCTIONS BEFORE USE
KEEP THESEINSTRUCTIONS
1. Toprotect againstrisk of electricalshock, do notput mixer inwater orother liquid. Thismay cause
personal injuryor damage tothe product.
2
. Closesupervision is necessarywhen mixeris used byor near childrenor incapacitated persons.
3. Unplugfrom outlet whilenot inuse, before puttingon or takingoff parts, andbefore cleaning.
4. Avoidcontacting moving parts.Keep hands, hair,clothing, as wellas spatulas and otherutensils away
from beatersduring operation toreduce the risk ofinjury to persons and/ordamage to the mixer.
5.
Do not operatemixer with a damagedcord or plug orafter the appliance malfunctions,or is dropped
or
damaged inany manner.If the mixerbecomes damaged please contactConsumer Services for assistance.
(1-800-458-8407 in theU.S. or 1-800-667-8623in Canada)
6.
The useof attachments notrecommended or sold byJarden Consumer Solutions maycause fire,
electrical shockor injury.
7. Donot use outdoors orfor commercial purposes.
8
. Donot let cord hangover edge of tableor countertop or touchhot surfaces, including thestove.
9. Removebeaters from mixerbefore washing.
10.
Do not placemixer & bowls onor near a hotgas or electric burner, in aheated oven
(microwave, convention, convection,etc.) or onany other heatedsurface.
11. Do not usemixer for otherthan intended use.
12. Do not leavemixer unattendedwhile it isoperating.
13. Any servicing,other than cleaningand usermaintenance should beperformed by any
authorized servicerepresentative.
14. When mixingliquids, especially hotliquids, usea tall containeror make smallquantities at atime
to reducespillage.
15. Don’tAbuse Cord. Nevercarry the mixerby the cordor yankit to disconnectfrom an outlet;
i
nstead, graspthe plug andpull to disconnect.
SAFE TY
THIS UNIT IS FOR HOUSEHO LD USE ONLY
The motorof your
MIXMASTER®Mixer
is protectedby a heatcured insulation.
This isa standard
p
rocess. Dueto the heatcuring of theinsulation, you mayexperien ceanodor andpossibly a
slight wispof smoke fromyour mixer’smotor. Thiseffect will disappearafter the firstfew uses.
SPECIAL INSTRUCTIONS
F
OR PRODUCTS PURCHASED IN THE U.S. AND CANADA ONLY
Toreduce the riskof electrical shock,this appliance isequipped witha polarized plug(one bladeis
wider than theother). This plugfits a polarizedoutlet only one way;if the plug doesnot fit fully
i
nto theoutlet, reverse theplug. If it stilldoes not fit, contacta qualified electrician. Donot attempt
to defeatthis safety feature.Also, do not pull,twist or otherwise abusethe power cord; instead,
grasp theplug and pullto remove from theoutlet.
I
f theuse of anextension cord is necessary, pleasefollow theseguidelines:
•
Use onlyextension cords havingan electrical rating notless than the ratingof the mixer.
•
Examine theextension cord beforeusing and do notuse if the extensioncord is damaged.
• Do not abusethe extension cord anddo not yank onany cord to disconnect.
•
Keep extensioncord away fromheat and sharp edges.
SAVE THESE INSTRUCTIONS
WELCO ME
C
ongratu lations on your purchase of aS UNBEAM
®
M
IXMASTE R
®
S
tand Mixer!
To learn more about SUNBEAM
®
product s, please visit us at www.sunbeam. com.
CARING FOR YOUR MIXER
CLEANING YOUR MIXER
Toclean the mixer, turnoff, unplug,wipe themixer head,stand and turntablewith a dampcloth,
then dry.
DO NOTIMMERSE THE STANDMIXER INWATER.
Avoid theuse of
abrasive cleaners,as they maydamage the finish ofthe mixer.Wash thebeaters and bowlsin hot,
soapy waterafter each use.Rinse thoroughly and dry. Beatersand bowlsmay also bewashed in an
automatic dishwasher.
If mixingbowls are scratchedor chipped, do notuse mixer.
STORING YOUR MIXER
Store themixer in adry location, such ason a countertop ortable top, or ina closet or cupboard.
I
nsert thebeaters into theproper sockets. Place thedough hooks and otherattachments in the
mixing bowl.
Storethe bowl(s)on theturntable.Windthe electriccord into acoil, thensecureit witha twistfastener.
MAINTENANCE
T
he motorof your standmixer has been carefullylubricated at the factoryand does not require
any additionallubricant. Other thanthe recommended cleaning, nofurther user maintenance
should benecessary.
For servicingor repairs pleasecontact Consumer Services forassistance. (1-800-458-8407
in the U.S.
or 1-800-667-8623 inCanada)
HELPFUL HINTS
• When mixing liquids,especially hot liquids,use the largemixing bowl ormake small quantities
at atime to reducespillage.
• Ingredients shouldbe added tothe mixing bowlas they arespecified inthe recipe.
• Use the mixingspeed that is recommendedin the recipe. Usethe mixing guide onthe speed
control dialof the mixerto help you findthe correct speed touse.
• If times arespecified in the recipe,use them! BE CAREFULNOT TO OVER MIX.
Over mixingcan cause themixture to become verytough.
• Should an object,such as a spatula,fall into the bowlwhile the mixer isoperating,
turn themixer OFF immediatelythen remove the object.
• For easier cleanupremove beaters and rinseimmediately with warm water.
• Before beginning, makesure the bowl leveris in the correctposition for the sizebowl you are
using, suchas for thelarge bowl or thesmall bowl.
• Mixer is designedto be off-center whenthe large bowl isused for best performance.
PRECAUCIONES IMPORTANTES
Cuando usealgún aparato eléctricosiempre deben seguirseprecauciones básicas dese guridad
incluyendo lassiguientes:
LEA TODAS LAS INSTRUCCIONES ANTES DE USAR
GUARDE ESTAS INSTRUCCIONES
1.
Para protegersecontra peligros deelectricidad no sumerja labatidora en agua uotros líquidos
ya quepodría ocasionar lesionespersonales o daños alproducto.
2. Esnecesario contar con supervisióncontinua cuando la Batidoraes usada o estácerca de niños
o personasincapacitadas.
3. Desconectela batidora del tomacorrientecuando el aparato noestá en uso, antesde poner
o
quitar partesy antes delimpiarla.
4. Eviteel contacto conlas partes enmovimiento. Mantenga las manos,cabello, ropa, así como
también espátulasy otros utensilioslejos de los batidoresdurante el funcionamiento delaparato,
para reducirel riesgo delesiones personales o dañosa la batidora.
5.
No operela batidora quetenga el cable oenchufe dañado, ni despuésde haber detectado
un mal
funcionamiento osi se caeo está dañada demodo alguno. Si labatidora está dañada,
comuníquese
con Serviciosal Consumidor parasolicitar asistencia. (1-800-458-8407en EE.UU.
ó 1-800-667-8623 enCanadá)
6. Eluso de accesoriosno recomendados ovendidos por Jarden ConsumerSolutions puede causar
i
ncendios, descargaseléctricas o lesiones.
7. Nouse la tostadoraal aire libreo para propósitos comerciales
8. Nodeje el cablecolgado sobre elborde de la mesani que toquesuperficies calientes,incluyendo
el horno.
9. Quitelos batidores dela batidora antesde lavarlos.
10.
No coloquela batidora yel tazón sobre ocerca de quemadores deestufas de gas ode quemadores
eléctricos, odentro de unhorno caliente.
11. Nouse la Batidoramás que para loque ha sidodiseñada.
12. Noopere la batidorasin continua supervisión.
1
3. Labatidora tiene unaseguridad interna que evitael sobrecalentamiento. Si labatidora deja
de funcionarpor sobrecalentamiento, lleveel disco de controlde velocidades a laposición OFF
y desenchufela batidora. Espere1 minuto y vuelvaa enchufarla. No lohaga si la velocidadno ha
sido seleccionadacomo OFF.
14.
Cualquier reparación,que no sealimpieza y mantenimiento deusuario, lo debe realizar
un representantetécnico autorizado.
15. Al mezclarliquidos, especialmente calientes,utilize eltazón de fuenteque se mezclagrande o hace
antidades pequeñasa la vezpara reducir derramamiento.
16.
No Abusedel Cordón. Nuncajale el mezclador porla cuerda ni détirones para desenchufar
d
el tomacorriente;
m
ás bien,agarre del enchufepara jalar y desenchufar.
SEGURIDAD
ESTA UNIDAD ES SÓL O PARA USO DOMÉSTICO
El motord esu batidora MIXMASTER®está protegido con un aislante curadopor calor.
É
ste esun proceso estándar. Debido al curado por calor del aislante, esposible que perciba
un olory posiblemente unpoco de humo saliendodel motor de labatidora. Estos inconvenientes
desaparecerán despuésde las primerasveces que utilice labatidora.
INSTRUCCIONES ESPECIALES
P
ARA PRODUCTOS ADQUIRIDOS ENLOS EE.UU. Y CANADÁ ÚNICAMENTE
Para reducirel riesgo dechoque eléctrico, este electrodomésticoestá equipado con unenchufe
polarizado (unalámina esmás ancha quela otra). Esteenchufe calza en untomacorriente polarizado
sólo deuna manera; siel enchufe no cabetotalmente en el tomacorriente,gire el enchufe. Siaun así no
calza, consultea un electricistacalificado. No intente anularesta característica deseguridad. Además,
no hale,tuerza ni maltrateel cordón de alimentación;en su lugar,tome el enchufey hálelo para
retirarlo deltomacorriente.
S
i esnecesario el usode un cable deextensión, siga estas instrucciones:
• Utilice únicamente cablesde extensión quetengan unaclasificación eléctrica noinferior a la
clasificación dela batidora.
• Examine el cablede extensión antesde utilizarloy no loutilice si estádañado.
• No maltrate elcable de extensióny notire de ningúncable para desconectarlo.
• Mantenga el cablede extensión lejosdel calory de bordescon filo.
GUARDE ESTAS INSTRUCCIONES
BIENV ENIDOS
¡Felicitaciones porsu compra deuna Batidora SUNBEAM®MIXMASTER®Stand Mixer!
Para aprendermás sobre productosSUNBEAM
®
, porfavor visítenos enwww.sunbeam.com
CÓMO CUIDAR SU BATIDORA
CÓMO LIMPIAR SU BATIDORA
Limpie elcabezal de labatidora,
apagar,desenchufar
la basey la plataformagiratoria con un
paño húmedo;después,
séquelos. NOSUMERJA LA BATIDORAEN AGUA.Evite el usode
limpiadores abrasivosporque
pueden dañarel acabado dela batidora. Lave losbatidores y
tazones enagua caliente yjabonosa después de cadauso. Enjuague bien ydeje secar.También
puede lavarlosen el lavaplatos.
Si lostazones de mezclarse rasguñan o sedesportillan,
no usemás la mezcladora.
DÓNDE GUARDAR LA BATIDORA
Guarde labatidora en unlugar seco, como porejemplo sobre la mesao superficie de trabajo,
en ungabinete. Inserte losbatidores en los receptáculoscorrespondientes. Coloque los ganchospara
amasar ydemás accesorios enel tazón de mezclado.
Guarde el(los)tazón(tazones) en lasuperficie giratoria. Enrolleel cable eléctricoen una bobina;
después, fíjeloal portacables.
MANTENIMIENTO
El motor desu batidoraha sidocuidadosamentelubricadoen lafábricay nonecesitalubricaciónadicional.
No esnecesariorealizarninguna tarea demantenimiento además dela limpiezarecomendada.
Si necesitaservicio técnico oreparaciones, comuníquese con Serviciosal Consumidor para recibir
asistencia. (1-800-458-8407en EE.UU. o1-800-667-8623 en Canadá)
CONSEJOS ÚTILES
•
Al mezclarlíquidos, especialmente calientes,utilize el tazónde fuente quese mezcla grande
o hacecantidades pequeñas ala vez para reducirderramamiento.
• Debe agregar losingredientes al tazónde mezcladosegún lo especificadoen la receta.
• Use la velocidadde mezclado recomendadaen lareceta. Utilice laguía de mezcladodel dial
de controlde velocidades dela batidora para ayudarloa encontrar la velocidadcorrecta.
• Si se especificantiempos en lareceta, ¡úselos!TENGA CUIDADO DENO MEZCLAR
EN EXCESO,pues podría endurecerla mezcla.
• En caso deque un objeto,como porejemplo una espátula,caiga en eltazón con labatidora
en funcionamiento,apague ésta deinmediato para retirar elobjeto.
•Pa
ra unalimpieza más fácil,retire los batidores yenjuáguelos inmediatamente con aguatibia.
• Antes de empezar, asegúrese deque palanca del tazónestá en la posicióncorrecta para el tamaño
del tazónque va autilizar, yasea para el tazóngrande o el pequeño.
• La batidora estádiseñada para no quedarcentrada cuando se utilizael tazón grande conel fin de
obtener mejorrendimiento.
Page 2
— — —
FOLD
— — —
— — —
FOLD
— — —
— — —
FOLD
— — —
— — —
FOLD
— — —
— — —
FOLD
— — —
— — —
FOLD
— — —
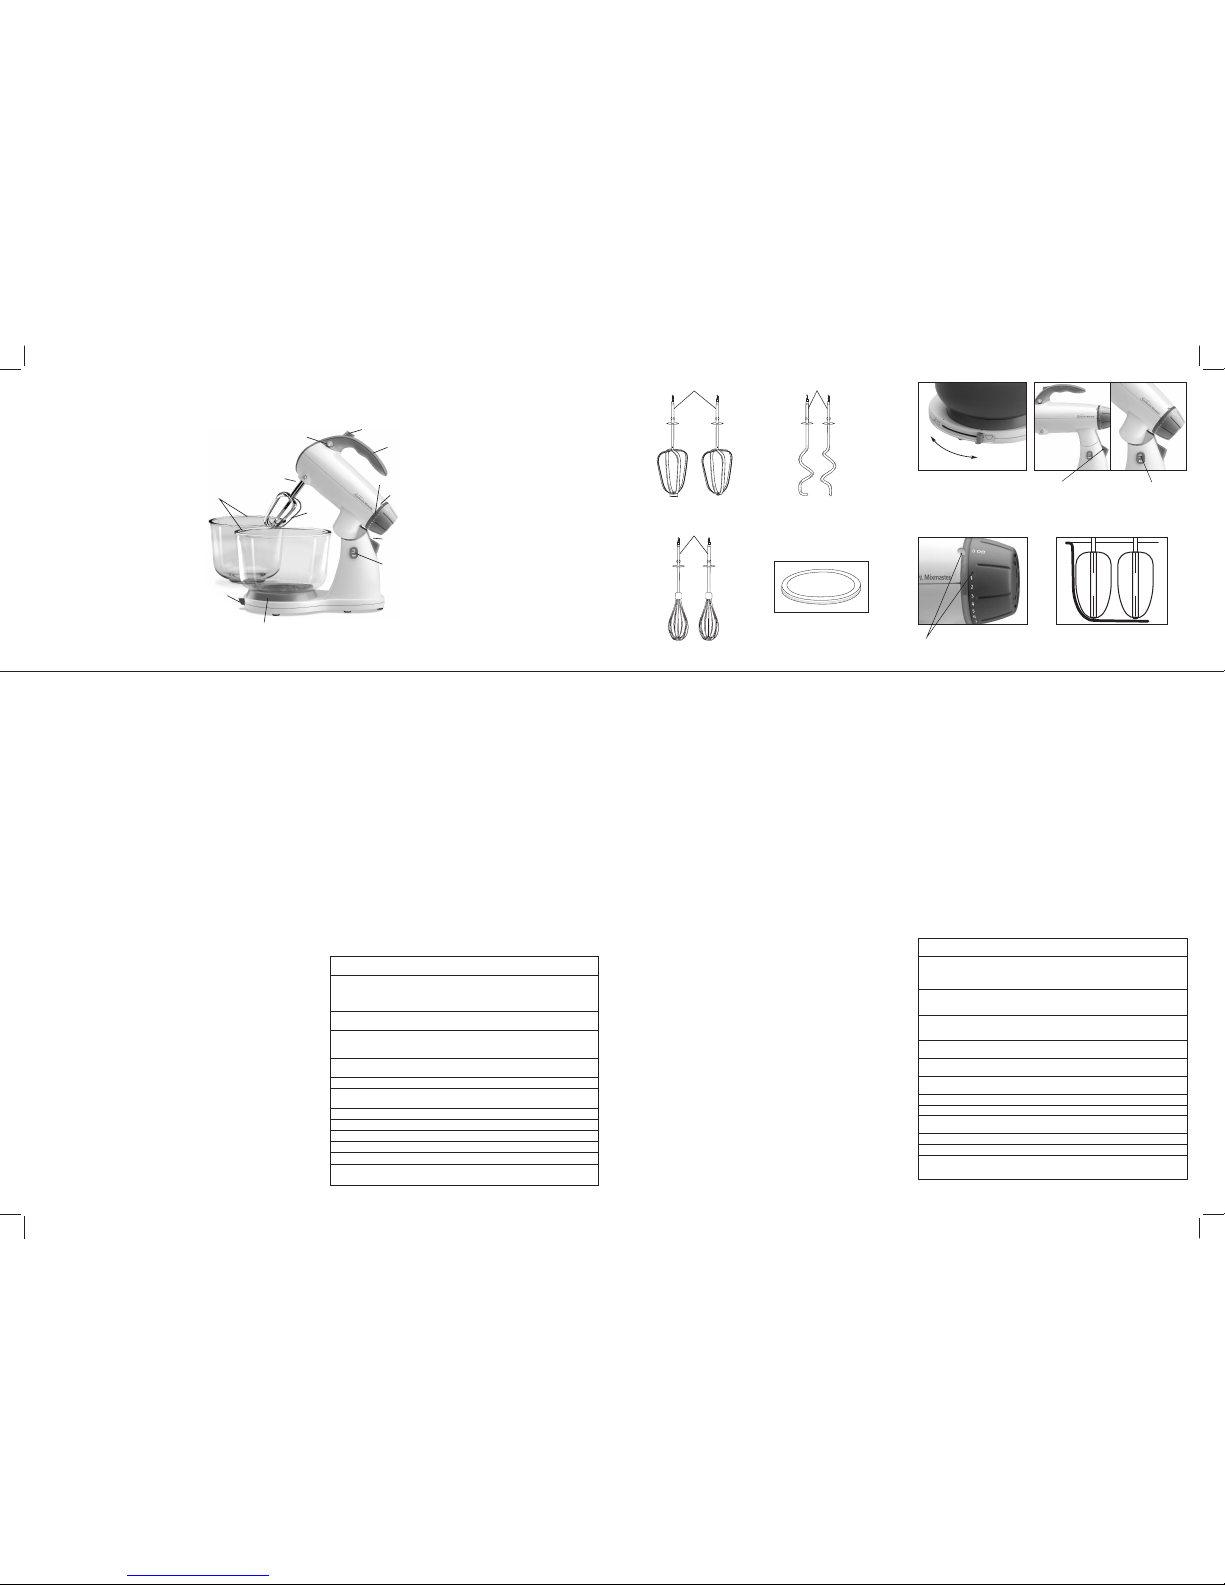
SPEED CONTROLDIAL
DISCO DECONTROL DE VELOCIDADES
POWER/SPEED INDICATORLIGHT
LUZ INDICADORADE CORRIENTE/VELOCIDAD
FIGURE/
F
IGURA 2
FI
GURE
/FI
GURA
3
FI
GURE
/FI
GURA
1
A. BOTÓN DE EXPULSIÓN DE ACCESORIOS:
El botónde expulsión, ubicadoen
la partesuperior de laagarradera, liberalas paletas olos ganchosde amasar
para poderlimpiarlos fácilmente.
B. PALETAS Y CABEZAL LATERALES:
El cabezalde la batidorade pedestal
MIXMASTER®y laspaletas están colocadosa unlado del bolpara facilitar
la colocaciónde los ingredientesdurante lamezcla.
C. BO
LS DEVIDRIO
:
Dos bolsde 2,202 cm3y de4,404 cm3son idealespara
mezclar pequeñaso grandes cantidadesde ingredientes.(Modelos 2370
y 2371)
(Modelo 2395incluye solamente unbol decolor rojo de4,404
cm3y)
(Modelo 2397incluye solamente unrecipiente devidrio de 4,404
cm3y)
D. S E
LECTOR DEBOL DELPLATOGIRATORIO
:
Simplemente deslicela palanca
selectora delbol hacia laizquierda cuandoutilice el bolpequeño yhacia
la derechacuando utilice elbol grande.
E. PLATOGIRATORIO:
Diseñadopara ajustarsetanto aboles pequeñoscomo
grandes,el platogiratoriopermite queel bolgire mientrasmezcla losingredientes.
F. BO
TÓN DELCABEZAL DEBLOQUEO DEINCLINACIÓNTRASERA
:
El cabezalde la batidorade pedestalMIXMASTER®se inclinahacia atrás
y secalza en formasegura ensu lugar parapermitir quelos boles y
los accesoriosse extraigan fácilmente.
G. G A
TILLO DELIBERACIÓN DE LABATIDORA
:
Retire elcabezal de labase
de labatidora para limpiarlay guardarlaen forma conveniente.
H. LUZ INDIC ADORA DE CORRIENTE/VELOCIDAD:
La luzde ON/OFF
(encendido/apagado)también seutiliza paraindicar elajuste develocidad.
I.
12 VELOCIDADES VARIABLES:
Las 12velocidades variables conarranque
suave aseguranun control superiorde lamezcla y mantienenla velocidad
independientemente dela carga dela mezcla.
J. AGARRADERA CON ASA SUAVE:
La agarraderamoldeada con asasuave
le brindacomodidad y uncontrol másfirme mientras utilizala batidora.
K. BURST OF POWER®BOTÓN O CARACTERÍSTICA:
Presione elbotón para
aumentar automáticamentela velocidad dela batidoray obtener
inmediatamente unavelocidad máxima.
L. BATIDORAS DE CROMO:
Para batirmanteca y azúcar, tambiénpara mezclas
densas detortas.
M. BATIDORES PARA MASA DE CROMO:
Estos batidoresfacilitan el trabajo
de amasary batir mezclasdensas.
(Están solamentedisponibles para el
Modelo
2371
)
N. BATIDORAS DE MANO:
Lasbatidoras demano sonpara montarmezclas
comoclaras dehuevo, yemaso crema.
(Están solamentedisponibles para el
Modelo
2371
)
A. ATTACHMENT EJECT BUTTON –
The ejectbutton, located onthe top
of thehandle, releases thebeaters ordough hooks foreasy cleaning.
B. OFF-CENTER HEAD AND BEATERS –
The headof the MIXMASTER
®
Stand Mixerand beaters ispositioned off-centerto the bowlto make
it easierto add ingredientsduring mixing.
C. GL
ASSMIXINGBOWLS
–
2.0 and4.0 quart mixingbowls
are idealfor mixing largeor smallquantities of ingredients.
(Models 2370and 2371) (Model2395 includesone 4 quartRed Mixing
Bowl) (Model2397 includes one4 quartClear Mixing Bowlonly)
D. TURNTABLE BOWL SELECTOR –
Simply slidethe bowl selector
lever tothe left whenusing thesmall bowl andto theright when
using thelarge bowl.
E. TURNTABLE –
Designed tofit both thelarge andsmall bowl,
the turntableallows the bowlto turnwhile mixing.
F. TILTBACKLO
CKINGHEADBUTTON
–
The headof the
MIXMASTER®Stand Mixertilts back andlocks securelyinto
position toallow easy removalof mixingbowls and attachments.
G. MIXER RELEASE TRIGGER –
Remove themixer head fromthe base
for convenientcleaning and storage.
H. POWER/SPEED INDICATOR LIGHT –
The ON/OFFlight is also
used toindicate speed setting.
I. 12 VA
RIABLESPEEDS
–
The 12variable speeds withsoft-start
ensure superiormixing control andmaintain speedregardless
of themixing load.
J. SOFT GRIP HANDLE –
The softgrip molded handlegives you
comfort anda firmer gripwhile mixing.
K. BURST OF POWER®BUTTON OR FEATURE –
Press downon button to
automatically increasethe beater speedfor animmediate burst ofpower.
L. CH
ROMEBEATERS
–
For creamingbutter and sugar, plusmixing
heavy cakemixes.
M.CHROME DOU GHHO OKS –
Dough hookstake the hardwork
out ofkneading dough andother heavymixtures.
(Available onModels 2371only)
N. WHISKS–
The whisksare used tobeat airinto mixtures suchas
egg whites,yolks or cream.(Available onModels 2371only)
M
L
A
B
F
C
D
G
J
H
E
K
L
FEATURES OF YOUR STAND MIXER CARACTERÍSTICAS DE SU BATIDORA DE PEDESTAL
PREPARING THE STAND MIXER FOR USE
Before preparingthe mixerfor use,be surethe speedcontrol dialis inthe OFFposition and
the electric cordis unplugged. Besure to washbowls and attachmentsbefore initialuse.
ATTACHING THE TURNTABLE
Place therevolving turntable into thebase of the stand by pressing the turntableinto the
center holeof the adjustable slotuntil it snaps into place.
ADJUSTING THE TURNTABLE
The turntablemust be adjusted dependingupon which bowl size is being used. To adjust,
press downon the TurntableBowl Selector Switch andslide the switch to the proper icon.
(See Figure 1)
ATTACHING AND REMOVING THE MIXING HEAD
To attachthe mixing head, press in on the mixer-releasetrigger, locatedat the rear of the
stand. Place themixer head onthe stand so thatthe metal pivoton the bottomof the mixer
head goesinto the latched openingon top of the stand. As you releasepressure from the
mixer-release trigger,the top of thelatch should clamp around the metal pivot. Oncethe
mixing headis lowered into position,it will lock into place. (See Figure 2A)
RAISING AND LOWERING THE MIXING HEAD
Press thehead lock button, locatedon the neck of the stand mixer. While the button is
depressed, holdthe handle and easethe head of the stand mixer back. TheMIXMASTER
®
Stand Mixerhead willlock intothis position.To lowerthe mixinghead, pressthe headlock
button. Whilethe buttonis depressed, hold thehandle andease thehead ofthe standmixer
down. A“click” sound will indicatewhen the mixer head has locked into position.
(See Figure 2B) Be sure the mixerhead is securely in position before using. NOTE: This
mixer isNOT intended for useaway from the stand.
INSTALLING THE ATTACHMENTS
Be surethe speed control dialis in the OFF position and unplug electriccord from the
electrical outlet. Liftmixer head up andback to pull it out of the wayof the bowl.
(See Figure 2B)
NOTE: It is importantthat the beaters, dough hooks or whisks go into the correct
sockets, otherwise themixer willnot giveyou the propermixing action. Do not risk
ruining a recipeor damaging your mixer. Read the following instructions carefully.
Insert thebeaters, dough hooks orwhisks one at a time, using a combinationpressing and
twisting motion,until they snap intoposition. Ifan attachment doesnot properlysnap into
place, pullit out of thesocket and rotate it one quarter turn. Reinsertthe attachment into
the socketuntil it snaps intoposition.
BEATERS
One ofthe beaters is shapedlike a cone and has a nylon buttonon the bottom. It goes
into thesocket on the sideof the mixer nearest the side of thebowl. The other beater goes
into thesocket nearest the centerof the bowl. (See Figure 4) See beatersymbols located on
the bottomof the mixer head.
D
OUGH HOOKS
The dough hookwith the smaller footgoes into thesocket onthe sideof the mixernearest the
side of thebowl. Theother doughhook goesinto thesocket nearest the centerof thebowl.
See the doughhook symbols locatedon the bottomof themixer head.
W
HISKS
The whisksare designed to fitinto either socket. Insert as instructed above.
PREPARATION
ADDING THE MIXING BOWL
Once youhave selectedthe bowlyou wishto use,move theturntable bowlselector switch to
the propersetting –the largebowl iconif youare usingthe largebowl, andthe smallbowl
icon ifyou are using thesmall bowl. Place the desired mixing bowl ontothe turntable.
NOTE: Mixingbowls shouldNEVER beused ina conventional oven, ontop ofthe rangeor
on any otherheated surface. If mixingbowls arescratched or chipped,do notuse themixer.
Bowl onlycan be usedin microwave.
OPERATING INSTRUCTIONS
AB
OUT THESPEEDCONTROLDIAL
The speedcontrol dial is usedfor turning the mixer ON and OFF andfor selecting its
12 mixingspeeds. (See Figure 3)
Rotate thespeed control dial ina clockwise direction to increase mixing speed, andin
a counterclockwisedirection to decrease mixingspeed.
As yourotate the speed controldial, notice that a numbered speed is alignedwith the
indicator lighton the side ofthe mixer head. This numbered speed indicates thespeed
a
t whichthe mixer is operating.
Rotatethe speed controldial untilthe indicatoris oppositethe numbered speed youwish touse.
Hint: Duringnormaloperation,the mixer mayautomaticallyadjust speedsas the consistency
changesof yourdough or mixture:This is foroptimum performance. Itis not recommendedto
operatethe mixerwithoutcontents inthe bowl.
MIXING GUI DE
Please keepin mind that thevarious mixing tasks and related speeds listed inthe
following tablemay vary slightly fromrecipe to recipe.
For mostrecipes, it is betterto begin your mixing on a slower speeduntil the ingredients
begin combining,then move to theappropriate speed range for the particular task.
When mixinglarger quantities you mayneed to increase the speed due to theamount of
mixing requiredand the larger loadon the machine.
When buildingup a recipe thatrequires the addition of dry ingredients, such asflour,
slow thespeed down while theseingredients are being added to avoid a snowstorm effect.
Once theextra ingredients begin combining,slowly increase to the appropriate speed for
the particularmixing task.
Use thechart belowto determinethe best setting touse whenpreparingyour favoriterecipes.
MONTAJE DE LA BATIDOR A DE PEDESTAL
Antes de montar la batidora, asegúrese que la perilla de control deve locidad esté
en la posición “OFF” (apagado) y que el cable de alimentación esté desenchufado.
Asegúrese de lavar los boles y los accesorios antes deut ilizarlos por primera vez.
COLOCACIÓ N DEL PLATO GIRATORIO
Ponga el plato giratorio enla base del pedestal presionándolo en elor ificio central
de la ranura deaj uste hasta que se acomode en su lugar.
AJUSTE DEL PLATO GIRATORIO
El platogiratorio se puede ajustardependiendo del tamaño de recipiente que se esté
utilizando. Paraajustarlo presione hacia abajoel selector del bol del plato giratorio y
deslícelo hastael icono que corresponda.(Vea laFigura 1)
COLOCACIÓ N Y RETIRADA DEL CABEZ AL DE LA BATIDORA
Para colocarel cabezal de labatidora, presione el gatillo de liberación ubicado enla parte
trasera delpedestal. Ponga el cabezalde la batidora sobre el pedestal de modoque el
pivote demetal de la parteinferior del cabezal de la batidora se inserteen el orificio con
traba quese encuentra en laparte superior del pedestal. Al soltar el gatillopara retirar la
batidora, laparte superior de latraba debe cerrarse alrededor del pivote de metal.Al bajar
el cabezalde la batidora asu posición, el cabezal se traba en sulugar. (Vea la Figura 2A)
ELEVACIÓN Y DESCENSO DEL CABEZA L DE LA BATIDORA
Presioneel botónde seguro delcabezal queestá ubicadoen elcuello dela batidora depedestal.
Mientraspresiona el botón,sostenga la agarradera ymueva hacia atrásel cabezalde labatidora
de pedestal. El cabezal deMIXMASTER®Stand Mixerse bloquearáen sulugar. Parabajar el
cabezalde labatidora, presioneel botónde segurodel cabezal.Mientras presionael botón,
sostengael asay bajeel cabezal de labatidora de pedestal. Escuchará un“clic”, elcual
indicarácuándo elcabezal de labatidora se encuentre trabadoen suposición. (Vea laFigura
2B) Asegúrese queel cabezalde labatidora estéfirmemente asentadoen suposición antesde
usar labatidora. NOTA:Esta batidoraNO puedeusarse fuera delpedestal.
INSTALACIÓN DE LOS ACCESO RIOS
Asegúrese quela perilla de controlde velocidad esté en posición “OFF” (APAGADA)
y desenchufeel cable de alimentacióndel tomacorriente. Levante el cabezal de la batidora
hacia arribay hacia
atrás pararetirarla del bol. (Vea la Figura 2B)
NOTA:Es importanteque los batidores oganchos para amasar esténinsertadosen los
conectores
apropiados, delo contrariola batidora nofuncionará correctamente. Nose
arriesgue a arruinar
una receta o dañarsu batidora. Lea cuidadosamente las
siguientes instrucciones.
Inserte laspaletas o ganchospara amasar, deuno enuno, usando un movimiento combinado
de presión
y rotación, hastaque se acomodenen suposición. Siun accesoriono seacomoda
correctamente
en sulugar, retírelodel conector y gíreloun cuarto. Vuelva acolocar la
paleta ogancho para amasar enel conector hasta que quede acomodado en suposición.
PALETAS
Una delas paletas tiene formade cono y tiene un botón de nylonen la parte inferior.
Debe insertarseen el conector dellado de la batidora que está más cercadel costado del
bol. Laotra paleta tiene formacuadrada y debe insertarse en el conector queestá más
cerca delcentro del bol. (Vea la Figura 4) Vealos símbolos de las paletas queestán
ubicados enla parte inferior delcabezal de la batidora.
GANCHOS PARA AMASAR
El gancho paraamasar con la arandelay el soportepequeño debeinsertarse en elconector
del lado de labatidora que estámás cerca delcostado del bol.El otro ganchopara amasar
con la arandelagrande debe insertarseen el conectorque está máscerca del centrodel bol.
Vea lossímbolos de losganchos para amasaren la parteinferior del cabezalde la batidora.
ESCOBILL AS DE ALAMBRE DE ACERO INOXI DABLE
Las ecobillas estan diseñados para insertarse en cualquiera conector.
PREPARACIÓN
COLOCACIÓN DEL BOL
Una vezque haya seleccionado elbol que desea utilizar,mueva el selector del bol delplato
giratorioal ajusteapropiado, elicono delbol grande siestá utilizandoel bolgrande yel icono
del bolpequeño siestá utilizandoel bol pequeño. Pongael bol deseado sobreel plato giratorio.
Los bolsde acero inoxidables seajustan ala plataformagiratoria (Modelos 2379y 2593).
NOTA:
NUNCA sedeben usar los bolesde la batidora en un horno convencional, horno
de microondas,sobre la cocina oen cualquier otra superficie caliente. Si los bolesestán
rayados oastillados, no use labatidora. Solo el tazón puede usarse en elmicroondas.
INST RUCCI ONES DE OP ERACI ÓN
AC
ERCA DE LAPERILLA DECONTROL DEVELOCIDAD
La perillade control de velocidadse usa para encender “ON” y apagar “OFF”la batidora,
y paraseleccionar sus 12 velocidadesde batido. (Vea laFigura 3)
Gire laperilla de control develocidad hacia la derecha para aumentar la velocidadde mezcla
y haciala izquierda para reducirla velocidad de mezcla.
A medidaque gira la perillade control de velocidad, observe que una velocidadnumerada
s
e alineacon la luz indicadoraque está a un lado del cabezal dela batidora. Esta velocidad
numerada indicala velocidad a lacual está funcionando la batidora.
Gire laperilla de control develocidad hasta que el indicador esté frente ala velocidad
que deseeusar.
Sugerencia: Duranteel funcionamiento normal, labatidora puede ajustar la velocidad, de
m
anera automática,a medida que laconsistencia de la masa o mezcla cambia. Estoes para
óptimo rendimiento.No se recomienda usarla batidora con el tazón vacío.
GUÍA DE BATIDO
No olvideque las diversas tareasde batido y velocidades relacionadas que aparecen
en lasiguiente tabla pueden variarligeramente de una receta a otra.
Para lamayoría de recetas, esmejor comenzar a batir a una velocidad lentahasta que
los ingredientes semezclen y luego cambiaral rango de velocidad adecuado para esa
tarea específica.
Cuando mezclecantidades más grandes, esposible que tenga que aumentar la velocidad
debido ala cantidad de mezclarequerida y a la carga mayor de labatidora.
Cuando realiceuna receta que requiereañadir ingredientes secos, como harina, reduzca la
velocidad mientrasestos ingredientes se agreganpara evitar un efecto de tormenta de nieve.
Una vezque los ingredientes adicionalescomienzan a mezclarse, aumente lentamente
la velocidada una apropiada parala tarea de batido específica.
Utilice latabla que aparece acontinuación para determinar el mejor ajuste que seutilizará
en elmomento de preparar susrecetas favoritas.
TILT BACK LOCKING HEAD BUTTON
BO
TÓN DELCABEZAL DEBLOQUEO DE
INCLINACIÓN TRASERA
TURNTABLE BO WL SELECTOR
Slidethe bowl selectorlever tothe leftwhen usingthe
s
mallbowl and tothe rightwhen usingthe largebowl.
SE
LECTOR DELBOL DELPLATOGIRATORIO
D
eslicela palanca selectoradel bolhacia laizquierda
cuandoutilice el bolpequeño yhacia laderecha
c
uandoutilice el bolgrande.
MIXER RELEASE TRIGGER
GA
TILLO DELIBERACIÓN DE
LA
BATIDORA
SPEED
SETTING MIXING GUIDE EXAMPLE
1 Fold-Knead Use whenmixing dry ingredients orwhen folding two
portions ofa recipe together, such as a beaten egg white
into abatter or when directionscall for LOW speed.
Use forkneading bread.
2 Stir Use whenstirring liquidingredients orwhen gentleaction
is neededto moisten dry ingredients.
3 Blend Use whenquick breadsrequire a briskaction, justenough
to blendingredients but not enoughto develop
a smoothbatter.
4 Mix Use when mixing dry ingredients and liquid ingredients
together alternately ina recipe.
5 Combine Use whenrecipe calls for combiningingredients together.
6 Cake Mixes Usewhen preparing packaged cake mixes orwhen
directions callfor MEDIUM speed.
7 Cream Usewhen creaming sugar and butter together.
8 Whip Use to whip potatoesor to develop a smooth batter.
9 Whip/Cream Use towhip cream or todevelop a light, fluffy texture.
10 Desserts Use to beat airinto whipped desserts.
11 Frostings Use when preparing light, fluffy frostingsand candies.
12 Egg Whites Use when aerating eggs and egg whites.
Use whendirections call for HIGHspeed.
N
OTE
:
Due tovariations in ingredienttemperatures and quantities, theMixing Guide speeds are
only suggestions.If necessary,adjust speeds asneeded to achievedesired results.
2.0qt.
4.0qt.
(
A) (B)
Ajuste de
Velocidad Guíade Batido Ejemplo
1 Amasar-Mezclar Para batiringredientes secos o cuandomezcle dos
partes deuna receta, como clarasde huevo batidas
en unapaleta o cuando seespecifica que se utilice
velocidad BAJA.Para amasar pan.
2 Revolver Para revolver ingredientes líquidos o cuando
se requiereuna acción suave parahumedecer
los ingredientes secos.
3 Mezclar Para panesrápidos que requieren una acción rápida,
justo losuficiente para mezclar ingredientespero
no paraamasar una mezcla homogénea.
4 Batir Para mezclar ingredientes secos e ingredientes líquidos
a lavez en una solareceta.
5 Revolver Cuando una receta requiere que se revuelvan
los ingredientes.
6 Mezclas para Pasteles Para preparar pasteles con mezclas empacadas
o cuandolas instrucciones indiquen velocidadMEDIA.
7 Crema Para haceruna crema con azúcar y mantequilla.
8 Batir Parabatir papas o preparar una masahomogénea.
9 Batir/Crema Parabatir cremas o preparar una textura ligera
y esponjosa.
10 Postres Para incorporar aire en postres batidos.
11 Baños Para prepararbaños o dulces ligeros y esponjosos.
12 Claras de Huevo Para incorporar aire cuando se baten huevoso claras
de huevo.Utilícela cuando las instruccionesindiquen
velocidad ALTA.
NOTA:
Debido alas variacionesen las temperaturasy a lascantidades de ingredientes,las velocidades
de laGuía deBatido son sólosugerencias. En casonecesario, ajuste lavelocidad paralograr los
resultados deseados.
2.0 GLASS MIXING BOWL
2.0 BOLDE VID RIO
(Models2370 and2371 Only)
(Modelos2370 y2371 Solamente)
(Available forModels 2371only
Están solamentedisponibles para
el Modelo
2371)
Left Right
Izquierda Derecha
Left Right
Izquierda Derecha
I
— — —
FOLD
— — — — — —
FOLD
— — —
SNAP-ON BOWLLID
F
itson the largebowl foreasy storage.
TA
PA DELTAZON QUE AJUSTA
S
eadapta al tazóngrande parafácil almacenamiento.
FI
GURE
/FI
GURA
4
CONE BEATER
BATIDORCÓNICO
N
(Available forModels 2371only
Están solamentedisponibles para
el Modelo
2371)
(Available forModels 2397only
Están solamentedisponibles para
el Modelo
2397)
 Loading...