

Page 1
PORTABLE AIR CONDITIONER
CLIMATISEUR MOBILE
AIRE ACONDICIONADO PORTATIL
USER MANUAL GUIDE
GUIDE D’UTILISATION
MODO DE EMPLEO
9,000BTU
9,000BTU
Model #KY-25/Y:
9000 BTU PORTABLE
DIGITAL AIR CONDITIONER
WHITE METAL
METAL BLANC
METAL BLANCO
Model #KY-25/Y:
9000 BTU PORTABLE
DIGITAL AIR CONDITIONER
STAINLESS STEEL
ACIER INOXYDABLE
ACERO INOXIDABLE
Page 2

TABLE OF CONTENTS
1
USE AND CARE GUIDE AND INSTALLATION INSTRUCTIONS...................................................1
SECTION 1
IMPORTANT SAFETY INSTRUCTIONS
1.1 PORTABLE AIR CONDITIONER SAFETY... ...................................................................................................2
1.2 DANGER AND WARNING...........................................................................................................................2
1.3 SAVE INSTRUCTIONS FOR FUTURE REFERENCE............................................................................................2-3
1.4 SPECIAL RECOMMENDATIONS..................................................................................................................4
1.5 ELECTRICAL REQUIREMENTS .....................................................................................................................4
1.6 RECOMMENDED GROUNDING METHOD..................................................................................................5
1.7 LCDI PLUG (US ONLY) ................................................................................................................................5
1.8 UNPACKING YOUR PRODUCT PARTS........................................................................................................6
1.9 TECHNICAL SPECIFICATIONS......................................................................................................................6
SECTION 2
A NOTE TO YOU
USER’S RECORD OF MODEL AND SERIAL NUMBER INFORMATION .................................................................7
SECTION 3
GETTING STARTED
3.1 TOOLS NEEDED ..........................................................................................................................................8
3.2 ACCESSORIES..............................................................................................................................................8
3.3 POWER SUPPLY CORD AND RECEPTACLE.................................................................................................9
3.4 KNOWING YOUR PORTABLE AIR CONDITIONER......................................................................................9
SECTION 4
INSTALLATION INSTRUCTIONS
4.1 PORTABLE AIR CONDITIONER INSTALLATION........................................................................................10
4.2 ASSEMBLING THE AIR-EXHAUST DUCT..................................................................................................10
4.3 INSTALLING THE DUCTS IN THE WALL ...................................................................................................11
SECTION 5
OPERATING YOUR PORTABLE AIR CONDITIONER
5.1 CONTROL PANEL AND OPERATING FUNCTIONS ...............................................................................12-13
5.2 LCD DISPLAY PANEL .................................................................................................................................13
5.3 OPERATING REMOTE CONTROL (MODEL KY-25Y ONLY).................................................................14-16
5.4 WATER FULL INDICATION AND DRAINING........................................................................................16-17
SECTION 6
CARING FOR YOUR PORTABLE AIR CONDITIONER
6.1 MAINTENANCE.........................................................................................................................................18
6.2 CLEANING OR REPLACING THE AIR FILTER.............................................................................................18
6.3 EXTERNAL PLASTIC PARTS.......................................................................................................................18
6.4 STORAGE AT THE END OF THE COOLING SEASON................................................................................18
SECTION 7
TROUBLESHOOTING
7.1 PORTABLE AIR CONDITIONER DOES NOT WORK AT ALL......................................................................19
7.2 LOW COOLING EFFICIENCY................................................................................................................19-20
7.3 NOISE AND VIBRATION............................................................................................................................20
7.4 THE UNIT TURNS ON AND OFF FREQUENTLY........................................................................................20
SECTION 8
ELECTRICAL DIAGRAM...............................................................................................................................21
SECTION 9
WARRANTY
..........................................................................................................................................22-23
NOTES ..........................................................................................................................................70-71
Page 3

2
TABLE DES MATIÈRES
GUIDE D’UTILISATION ET D’ENTRETIEN ET
INSTRUCTIONS D’INSTALLION
...............................................................................................................24
SECTION 1
INSTRUCTIONS IMPORTANTES DE SÉCURITÉ
1.1 SÉCURITÉ DU CLIMATISEUR MOBILE... ...............................................................................25
1.2 DANGER ET MISE EN GARDE...............................................................................................25
1.3 CONSERVEZ CES INSTRUCTIONS.........................................................................................25-26
1.4 RECOMMANDATIONS SPÉCIALES .......................................................................................27
1.5 NORMES ÉLECTRIQUES ........................................................................................................27
1.6 MÉTHODE DE MISE À LA TERRE RECOMMANDÉ ..................................................................................28
1.7 TECHNOLOGIE DE FICHE LCDI (É-U SEULEMENT) ..................................................................................28
1.8 DÉBALLAGE DE VOS PIÈCES DE PRODUIT ..............................................................................................29
1.9 SPÉCIFICATIONS TECHNIQUES.................................................................................................................29
SECTION 2
MESSAGE À VOTRE INTENTION
INFORMATION, NUMÉRO DE MODÈLE ET SÉRIE .............................................................................................30
SECTION 3
PRÉPARATION
3.1 OUTILS NÉCESSAIRES...............................................................................................................................31
3.2 ACCESSOIRES............................................................................................................................................31
3.3 CORDON D'ALIMENTATION ET PRISE DE COURANT..............................................................................32
3.4 CONNAÎTRE VOTRE CLIMATISEUR MOBILE............................................................................................32
SECTION 4
INSTRUCTIONS D’INSTALLATION
4.1 INSTALLATION DU CLIMATISEUR MOBILE..............................................................................................33
4.2 INSTALLATION DES BOYAUX DANS UNE FENÊTRE/PORTE COULISSANTE...........................................33
4.3 INSTALLATION DES BOYAUX DANS LE MUR..........................................................................................34
SECTION 5
FONCTIONNEMENT DU CLIMATISEUR MOBILE
5.1 PANNEAU DE COMMANDE ET FONCTIONS DE COMMANDE..........................................................35-36
5.2 AFFICHAGE LCD ........................................................................................................................................36
5.3 FONCTIONNEMENT DE LA TÉLÉCOMMANDE (MODÈLE KY-25Y SEULEMENT) ........................................37-39
5.4 INDICATION DE PLEIN D’EAU ET VIDANGER...................................................................................................39-40
SECTION 6
ENTRETIEN DU CLIMATISEUR MOBILE
6.1 MAINTENANCE.........................................................................................................................................41
6.2 NETTOYAGE OU REMPLACEMENT DU FILTRE À AIR .............................................................................41
6.3 PIÈCES EN PLASTIQUE EXTERNES ...........................................................................................................41
6.4 ENTREPOSAGE À LA FIN DE LA SAISON DE REFROIDISSEMENT ..........................................................41
SECTION 7
DÉPANNAGE
7.1 LE CLIMATISEUR MOBILE NE FONCTIONNE PAS ....................................................................................42
7.2 FAIBLE RENDEMENT DE REFROIDISSEMENT.....................................................................................42-43
7.3 BRUIT ET VIBRATION................................................................................................................................43
7.4 LE CLIMATISEUR MOBILE DÉMARE ET ARRÊTER RAPIDEMENT...................................................................43
SECTION 8
SCHÉMA ÉLECTRIQUE ................................................................................................................................44
SECTION 9
GARANTIE
..........................................................................................................................................45-46
NOTER ..........................................................................................................................................70-71
Page 4

ÍNDICE
GUÌA DE USO Y CUIDADO E
INSTRUCCIONES DE INSTALACIÓN......................................................................................................47
SECCIÓN 1
INSTRUCCIONES IMPORTANTES SOBRE SEGURIDAD
1.1 SEGURIDAD DEL ACONDICIONADOR DE AIRE.......................................................................................48
1.2 PELIGRO Y ADVERTENCIA .......................................................................................................................48
1.3 INSTRUCCIONES IMPORTANTES SOBRE SEGURIDAD...............................................................................48-49
1.4 RECOMENDACIONES PARTICULARES .....................................................................................................50
1.5 REQUISTOS ELECTRICOS..........................................................................................................................50
1.6 MÉTODO RECOMENDADO DE PUESTA A TIERRA .................................................................................51
1.7 TECNOLOGÍA DE ENCHUFE LCDI.............................................................................................................51
1.8 DESEMPACADO DE LAS PIEZAS DE SU PRODUCTO ..............................................................................52
1.9 ESPECIFICACIONES TÉCNICAS (EE.UU. ÚNICAMENTE)...........................................................................52
SECCIÓN 2
UN MENSAJE PARA USTED
.....................................................................................................................53
SECCIÓN 3
PREPARACIÓN
3.1 HERRAMIENTAS NECESARIAS .................................................................................................................54
3.2 ACCESSORIOS...........................................................................................................................................54
3.3 CABLE DE ALMIMENTACIÓN Y TOMA DE CORRIENTE..........................................................................55
3.4 CARACTERÍSTICAS DE SU ACONDICIONADOR DE AIRE PORTATIL .......................................................55
SECCIÓN 4
INSTALACIÓN DEL ACONDICIONADOR DE AIRE PORTATIL
4.1 INSTALACIÓN DEL ACONDICIONADOR DE AIRE PORTÁTIL ..................................................................56
4.2 INSTALACIÓN DE LOS DUCTOS EN UNA VENTANA / PUERTA CORREDIZA..........................................56
4.3 INSTALACIÓN DE LOS DUCTOS EN LA PARED.......................................................................................57
SECCIÓN 5
CÓMO HACER FUNCIONAR EL ACONDICIONADOR DE AIRE PORTATIL
5.1 PANEL DE CONTROL Y FUNCIONES DE OPERACIÓN .......................................................................58-59
5.2 VISUALIZACIÓN EN CRISTAL LÍQUIDO (VCL)..........................................................................................59
5.3 OPERACIÓN CON CONTROL REMOTO (MODELO KY-25Y ÚNICAMENTE).................................................60-62
5.4 INDICAOR DE LLENADO DE AGUA Y DRENAJE .............................................................................................62-63
SECCIÓN 6
CÓMO CUIDAR EL ACONDICIONADOR DE AIRE PORTATIL
6.1 MANTENIMIENTO.....................................................................................................................................64
6.2 LIMPIEZA O REMPLAZO DEL FILTRO DE AIRE ........................................................................................64
6.3 PIEZAS EXTERNAS DE PLASTICO.............................................................................................................64
6.4 ALMACENAMIENTO AL FINAL DE TEMPORADA DE CALOR .................................................................64
SECCIÓN 7
DETECCIÓN DE FALLAS
7.1 EL ACONDICIONADOR DE AIRE PORTATIL NO FUNCIONA....................................................................65
7.2 BAJO RENDEMIENTO DE ENFRIADO .................................................................................................65-66
7.3 RUIDO Y VIBRACIÓN................................................................................................................................66
7.4 EL ACONDICIONADOR DE AIRE PORTATIL SE PRENDE Y SE PARA RÁPDAMENTE..............................66
SECCIÓN 8
DIAGRAMA ELÉCTRICO .............................................................................................................................67
SECCIÓN 9
GARANTÎA ..........................................................................................................................................68-69
NOTAS ..........................................................................................................................................70-71
Page 5

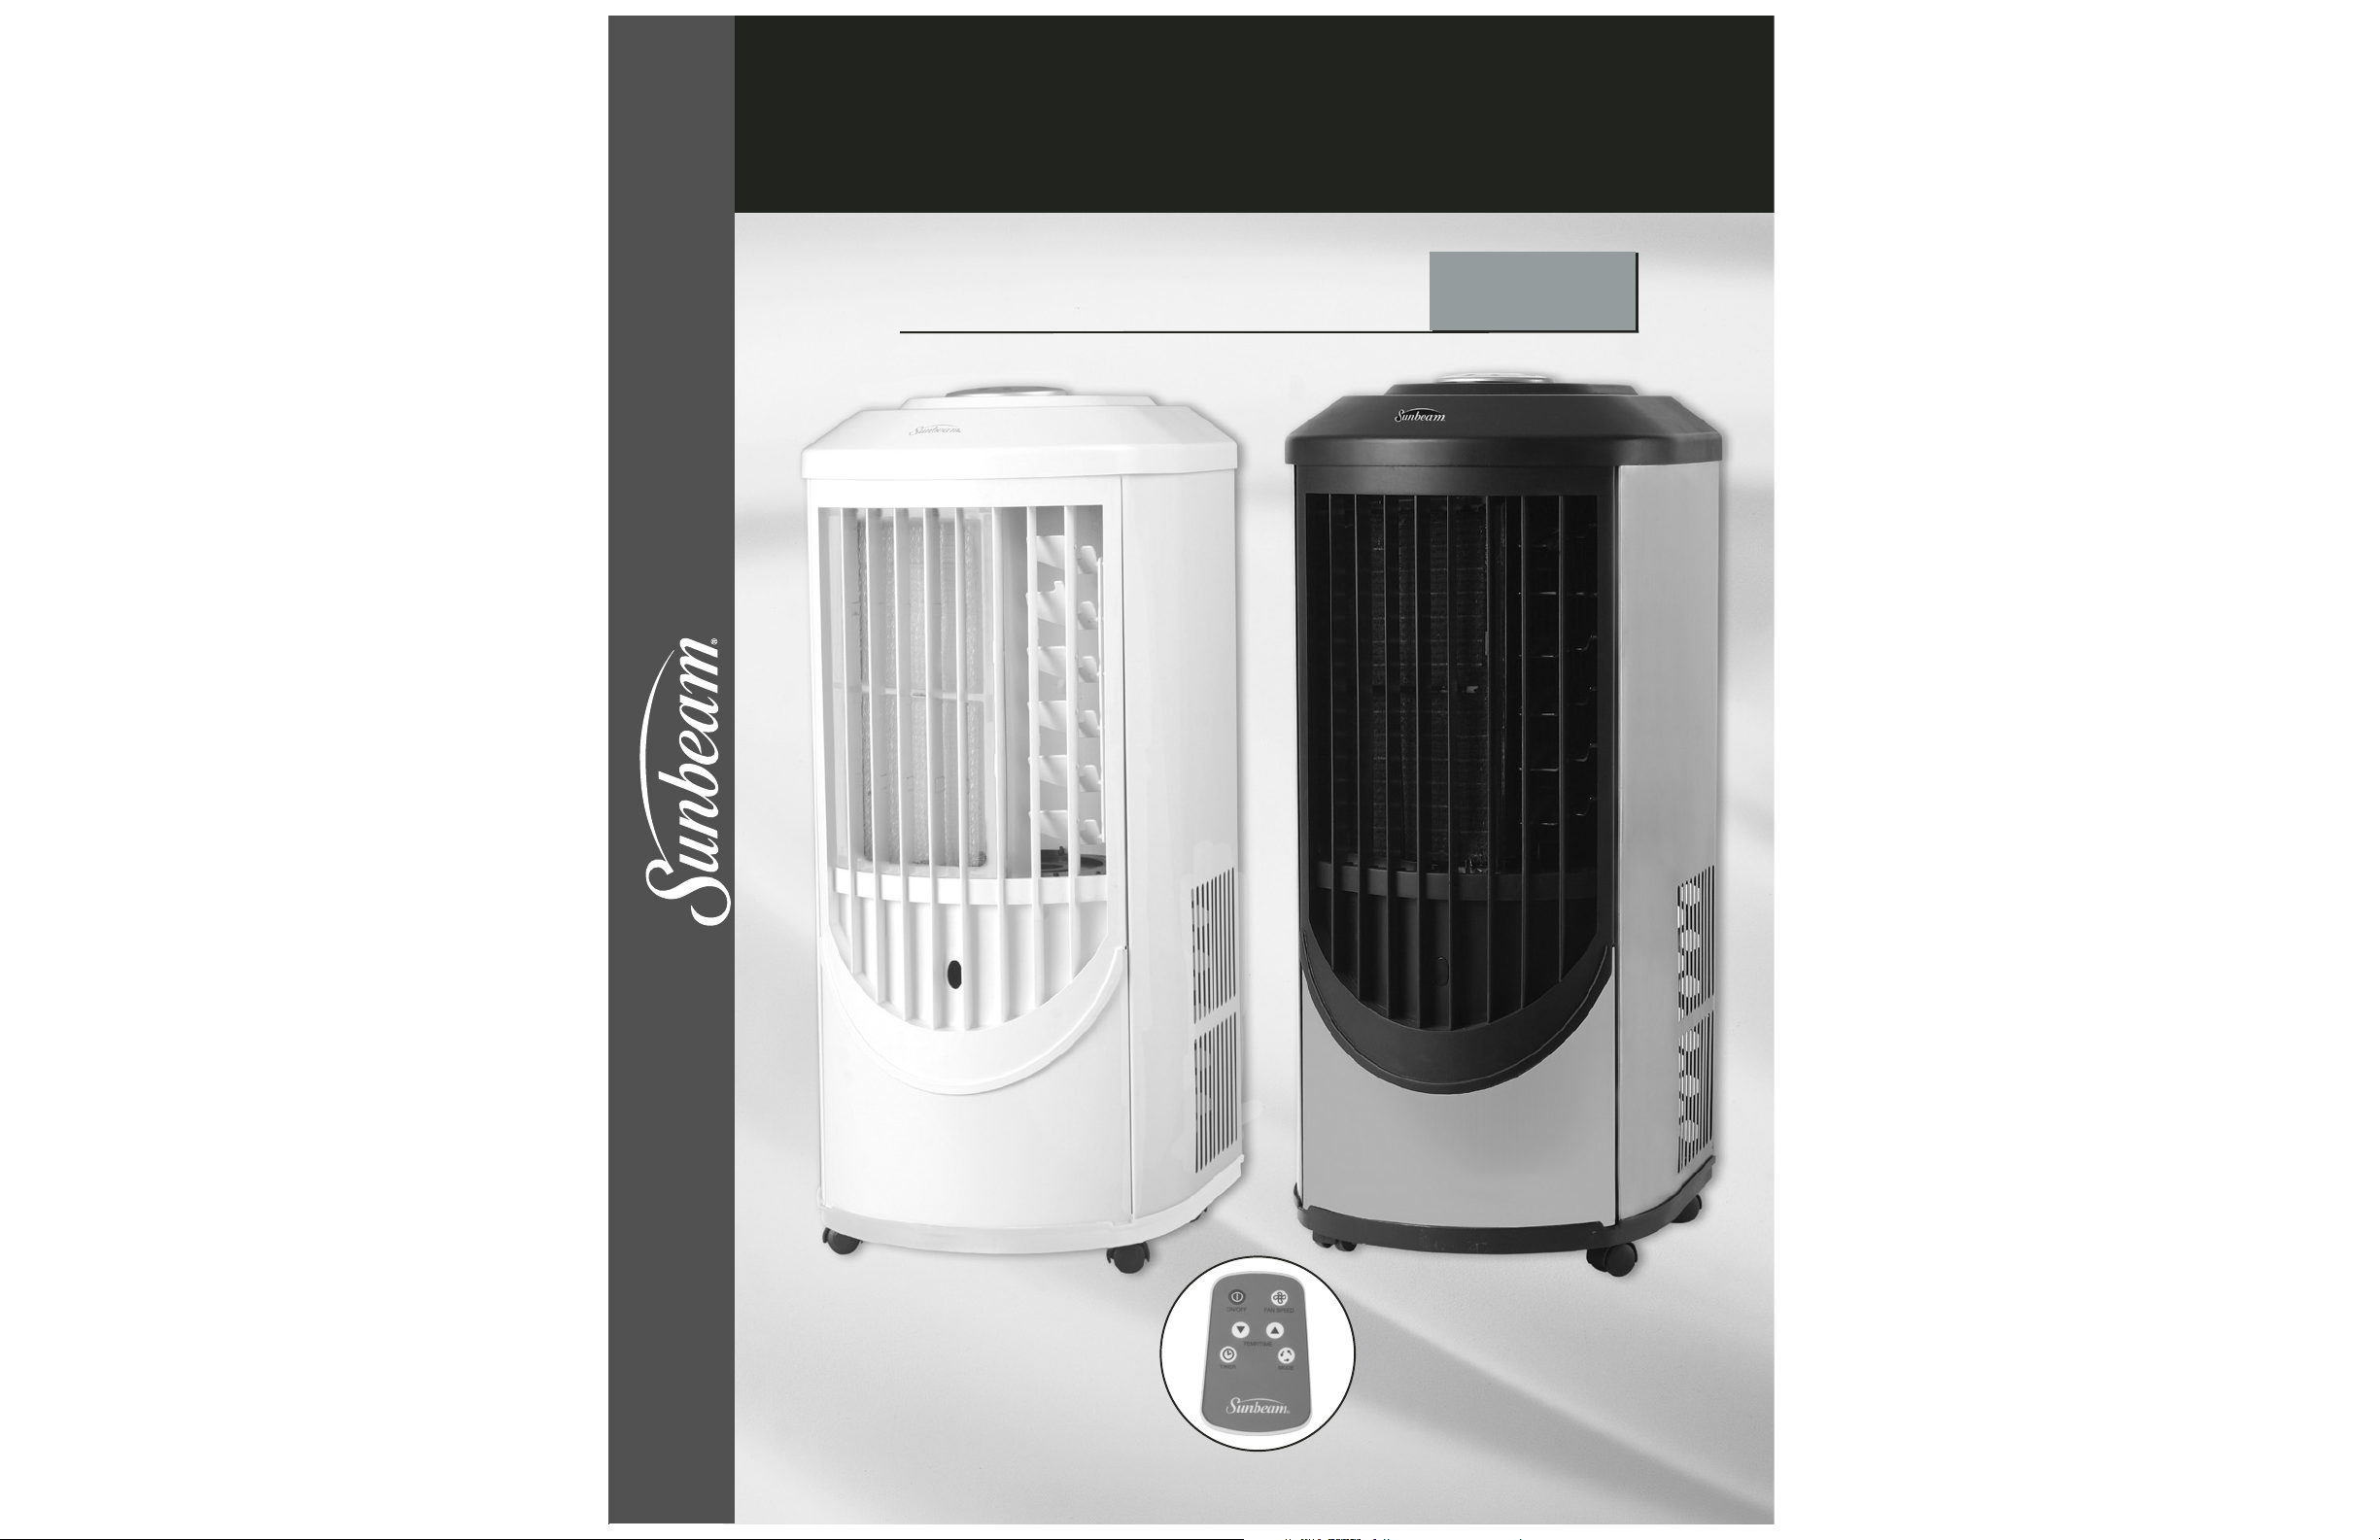
9000 BTU Portable Digital Air
Conditioner with/without Remote White Metal
USE AND CARE GUIDE AND
INSTALLATION INSTRUCTIONS
1
9000 BTU Portable Digital Air Conditioner
with/without Remote - Stainless Steel
Page 6

SECTION 1 IMPORTANT SAFETY INSTRUCTIONS
Your safety and the safety of others are very important.
We have provided many important safety messages in this manual and on your appliance.
Always read and obey all safety messages.
This is the safety alert symbol.
This symbol alerts you to potential hazards that can kill or hurt you and others.
All safety messages will follow the safety alert symbol and either the word “DANGER” or
“WARNING”.
These words mean:
You can be killed or seriously injured if you don’t immediately
follow instructions.
All safety messages will tell you what the potential hazard is, tell you how to reduce the chance
of injury, and tell you what can happen if the instructions are not followed.
1.1 PORTABLE AIR CONDITIONER SAFETY
1.2 DANGER AND WARNING
DANGER
WARNING
2
WARNING – To reduce the risk of fire, electrical shock, injury, or sickness when using
your portable air conditioner, follow these basic precautions:
• Plug into an exclusive grounded 3-prong outlet.
• Do not remove ground prong.
• Do not use an adapter.
• Use two or more people to move or install portable air conditioner.
• Do not drink the water collected inside the cabinet.
• Follow the instructions in this manual for cleaning the unit.
• Do not insert any objects into the unit.
• Always turn off the unit before unplugging it.
• Turn off and unplug the unit before cleaning or any other kind of servicing.
• Never repair the unit or change the cord by yourself. Any repair or manipulation to the unit
carried out by a non qualified individual will void the guarantee.
• Do not place objects inside the air outlet or inlet grids. Do not block air outlet and/or inlet grids.
• Do not use this unit inside closets, cabinets and/or cramped spaces between furniture.
• Do not use this unit in proximity of inflammable and/or explosive substances.
• Do not operate this unit without filters. Keep the filters clean.
• Always turn this unit on and off using the ON/OFF switch.
1.3 SAVE THESE INSTRUCTIONS FOR FUTURE REFERENCE
Page 7

SECTION 1 IMPORTANT SAFETY INSTRUCTIONS
3
• Make sure that your electric power voltage corresponds with the voltage on the nameplate of
the unit.
• Keep children away from the unit.
• Check the electric cord periodically. Do not use a damaged electric cord.
• The cord length of this portable air conditioner is properly selected to reduce risk of danger.
Do not use an extension cord.
• The unit should be located in a dry area.
• The unit is for indoor use only. Do not use outdoors.
• Only use the accessories supplied by the supplier. Using accessories from any source other than the
supplier is dangerous and may damage the unit.
• Keep the unit away from any kind of heat source and direct sunlight - keep blinds/curtains closed during
sunniest part of the day.
• Do not immerse the unit into water or any kind of liquid.
• Keep the unit away from any areas that have a chance of splashing water.
• To avoid the risk of shock, the unit should never be used in bathrooms, shower rooms or in any other
steamy or wet areas.
• Do not use this unit at a slope - the unit is supported by four castors.
• In the event of fire, use Carbon Dioxide (CO2) extinguishers. Do not use water or powder extinguishers.
Please help us to help you:
This portable air conditioner has been designed to create ideal climate in your room. Use it only
for this specific purpose and according to the instructions in this manual.
This unit is intended for household consumer use only, and is not for commercial use.
Please use the unit in the recommended room size (refer to “Technical Specifications”).
Do not place the air conditioner where furniture or other objects can obstruct the cooling airflow.
Set the unit to maximum cooling and high fan initially, then adjust the unit to a
comfortable setting.
Note: It is recommended to turn on the air conditioner when the room temperature is
around 75°F/23.9°C. Do not wait until the room is excessively hot.
Note: This unit is equipped with a thermostat, and should automatically turn on when the pre-
set temperature is reached, but only if set in the Cooling Mode. If it is set in Soft-Dry or
Fan Only, the compressor will not turn on.
A
BC D
Figure 1
Do not insert
any objects.
Keep children and
pets away.
Do not use wet cloth to
clean - only damp cloths.
Be cautious of where
cord is placed.
Page 8
SECTION 1 IMPORTANT SAFETY INSTRUCTIONS
4
1.4 SPECIAL RECOMMENDATIONS
• Place the portable air conditioner in a level spot. Leave at least 20" (50.8 cm) between the
unit and the wall.
• The plug should always be accessible after the unit is settled.
• In order to let the compressor work properly, always keep the portable air conditioner in
a vertical position.
• Do not place the portable air conditioner near gas or any flammable liquids.
• Keep the unit far away from TVs or radios in order to avoid electromagnetic interference.
• Do not use any chemical sprays such as insecticides, painting or any flammable products near the unit.
These chemical substances may interact with the plastic cabinet and warp it and cause
electric interference.
1.5 ELECTRICAL REQUIREMENTS
WARNING
Electrical Shock Hazard
Plug into a grounded (3-prong) outlet.
Do not remove ground prong.
Do not use an extension cord.
Failure to follow these instructions can result in death,
fire, or electrical shock.
In the U.S. only: If codes permit and a separate ground wire is used, it is mandatory that the
ground path is adequate.
Check with a qualified electrician if you are not sure if the portable air conditioner is grounded.
A three-wire, single-phase, 60Hz AC only, electrical supply is required on a separate circuit. See model
and serial label for circuit amperage required for your specific model.
If the portable air conditioner has a serial plate rating 115 Volts and up to and including 7.5 Amps,
the unit may conflict with a fuse or circuit breaker with other devices.
HOWEVER, THE MAXIMUM AMPS OF ALL DEVICES ON THAT FUSE OR CIRCUIT BREAKER CAN NOT
EXCEED THE AMPS OF THE FUSE OR CIRCUIT BREAKER.
If the portable air conditioner has a serial plate rating of 115 Volts and greater than 7.5 Amps it
must have its own fuse or circuit breaker, and no other device or unit should be operated on that
fuse or circuit breaker.
NOTE: The label lists the BTU capacity, amperage, voltage and refrigerant charge requirements.
Page 9

For your personal safety, this portable air conditioner must be grounded. The portable air conditioner is
equipped with a power supply cord with a 3-prong grounding plug. To minimize possible electrical shock
hazard, the cord must be plugged into a mating 3-prong grounding type outlet, grounded in accordance
with all local codes and ordinances. If a mating 3-prong type outlet is not available, it is the consumer's
responsibility to have a properly grounded, 3-prong outlet installed by a licensed installer.
It is the customer's responsibility:
• To contact a qualified electrical installer.
• To assure that the electrical installation is adequate and in conformance with National Electrical Code,
ANSI/NFPA 70 – latest edition, and all local codes and ordinances.
Copies of the standards listed may be obtained from:
National Fire Protection Association
Batterymatch Park
Quincy, Massachusetts 02269.
Or your state board of electricity.
1.6 RECOMMENDED GROUNDING METHOD
SECTION 1 IMPORTANT SAFETY INSTRUCTIONS
5
A Leakage-Current Detect and Interrupt (LCDI) is a device that senses leakage current flowing between or
fom the power conductors in an appliance cord and interrupts the circuit as a predetermined level of leakage
current. Since an LCDI specifically can detect a current leakage flowing to ground, it provides ground fault
protection from arcing and other problems, which arise due to leakage between conductors.
LCDIs are covered under the UL 1699 standard for ARC Fault Current Interrupts, which was first published in
June of 2002. LCDI devices have been mandated by the National Electric Code and Underwritten Laboratories
for the cordsets on room air conditioners beginning in August 2004. Other classes of appliances will require
LCDI protection in the near future.
TESTING
1. Press test button, unit should trip.
2. Press reset button for use.
NOTE: DO NOT USE IF ABOVE TEST FAILS.
In the event this device trips, the cause of the malfunction is to be corrected before use of the device.
CAUTION
The conductors inside this cord are surrounded by shields, which monitor leakage current. THESE SHIELDS ARE
NOT GROUNDED. Periodically examine the cord for any damage. DO NOT USE this product in the event the
shields become exposed.
WARNING
This product contains chemicals, including lead, known to the State of California to cause cancer, and birth
defects or other reproductive harm.
Wash hands after handling.
1.7 LCDI PLUG TECHNOLOGY (US ONLY)
Page 10
SECTION 1 IMPORTANT SAFETY INSTRUCTIONS
6
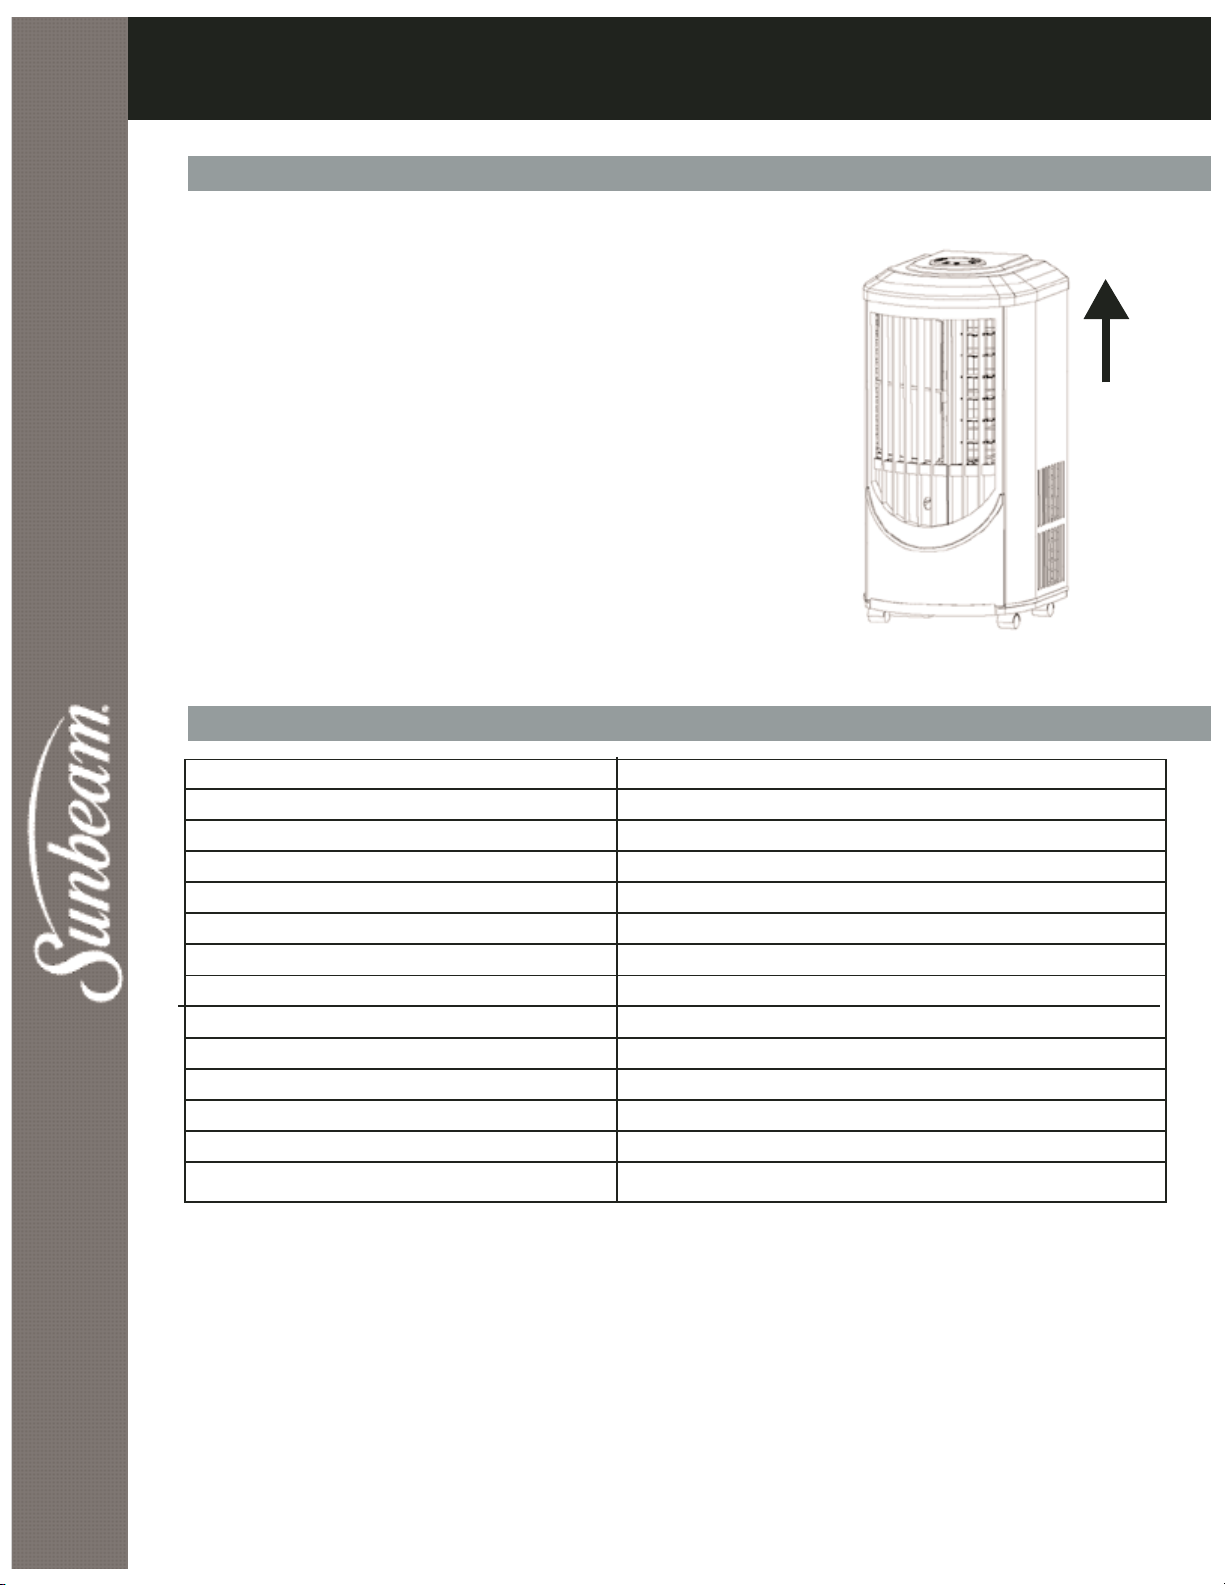
When you get this unit, please transport the product in an upright
position only, and place the product on an even surface. Remove the
cardboard box without turning it upside down, or laying it on its side.
Please note: If this unit is transported, it must be left in the
normal up right position for at least 8 hours before using, to
allow the coolant and compressor oil to settle.
a. Remove the adhesive tape on the top of the cardboard box.
b. Open the cardboard box.
c. Remove the Styrofoam packing and angle-protection board.
d. Lift and hold the unit from the Styrofoam packing base by using two
people, so as not to tilt the unit.
e. Remove the plastic bag.
f. Wipe it clean if necessary.
g. Then install hot air exhaust duct for condenser side according to the
installation instructions.
1.8 UNPACKING YOUR PRODUCT PARTS
Keep
upright
Figure 2
1.9 TECHNICAL SPECIFICATIONS
Model #
Color
Rate Cooling Capacity
Voltage, Frequency, Phase
Rated Current
Design Pressure
Refrigerant, Quantity
Plug Capacity
Plug Type
Cord Length
Dehumidifying Amount
Air Circulation Volume
Net Weight (Unit only)
Dimensions
KY-25/Y
Stainless Steel/White Metal
9000 BTU/hr
AC~115V/60Hz/1 PH
8.2A
Max/High 370 psi, Min/Low 150psi
R22/500g (17.6oz)
125V/15A
5-15P
6.43ft/1.96M
25.4oz/h / 0.75L/hour
5.67CMM/200CFM
24.75 kgs/54.56 lbs
13.8”L x 14”W x 31.42”H / 35.1cmL x 35.6cmW x 79.8cm H
NOTE:
The above data are obtained under the following conditions:
Cooling condition: Dry bulb/Wet bulb: 95°F/83°F (35°C/28.3°C) according to American standard
128-2001.
Operating Limits During Cooling
Maximum condition: Dry bulb/Wet bulb: 104°F/80°F (40°C/26.7°C)
Minimum condtion: Dry bulb/Wet bulb: 64.4°F/57.2°F (18°C/14°C)
Page 11

Thank you for buying this high quality Sunbeam®portable air conditioner. To ensure you enjoy
years of trouble-free operation, we developed the Use and Care Guide. It contains valuable
information about how to operate and maintain your appliance properly and safely. Please read
it carefully.
Please record your model's information.
Whenever you call to request service on your appliance, you need to know your complete model
number and serial number. You can find this information on the model and serial number label.
Please record the model and serial number information below. Also, record the purchase date of
your appliance.
Model Number
Serial Number
Purchase Date
Company Name
Address
Telephone
KEEP THIS BOOK AND
THE ORIGINAL PROOF OF PURCHASE TOGETHER IN A SAFE PLACE FOR FUTURE REFERENCE.
The label is placed
on right side of unit
Star Elite, a subsidiary of Elite Group
1175 Place du Frère-André, Montréal, Québec H3B 3X9
1-877-383-6399 (8:30am-5:30pm E.S.T.)
PLACE LABEL HERE
Figure 3
SECTION 2 A NOTE TO YOU
7
Back:
Technical data
Service call number and label
Back:
Warning label
Page 12

SECTION 3 GETTING STARTED
3.1 TOOLS NEEDED
3.2 ACCESSORIES
1. Flat-blade and Phillips screwdrivers
2. Gloves
3. Tape measure
4. Utility knife
8
Figure 5
1. Indoor terminal end
2. Exhaust duct
3. Window assembly kit
4. Main piece
5. Window kit adapter
6. Drain hose (2)
Figure 4
Page 13

SECTION 3 GETTING STARTED
3.3 POWER SUPPLY CORD AND RECEPTACLE
115 volt (103.5 min. - 126.5 max.) 0-12 amperes
15-amp time-delay fuse or circuit breaker
14 gauge copper wiring
Figure 6
3.4 KNOWING YOUR PORTABLE AIR CONDITIONER
• The plug should be well fixed and not damaged.
• Do not plug the unit with an adapter.
• Be sure the plug is fully inserted into the receptacle.
• The power cable must not come into contact with liquid of
any kind; do not handle with damp or wet hands.
• Do not squeeze the cable or let it come into contact with
a sharp surface.
• Do not use the power cables to drag the unit.
• Do not leave the cable in a tangled coil when it is working.
• Do not let the power cable come into contact with a hot surface.
• Do not leave the power cable in a high traffic area that will be more
likely to lead to a damaged cord.
9
Figure 7
1. Air inlet
2. Air filter
3. Castor
4. Operation panel
5. Air outlet
6. Control signal receptor
1
2
3
4
5
6
7
8
9
10
7. Air inlet for condensor side
8. Hot air discharging port
(Use to connect air hose)
9. Pump Drain
10. Lower drain port
Front
Back
Page 14

4.1 PORTABLE AIR CONDITIONER INSTALLATION
SECTION 4 INSTALLATION INSTRUCTIONS
Figure 8
• Find a proper place for the portable air conditioner.
Leave at least 20” (50.8cm) space around the unit (Fig. 8).
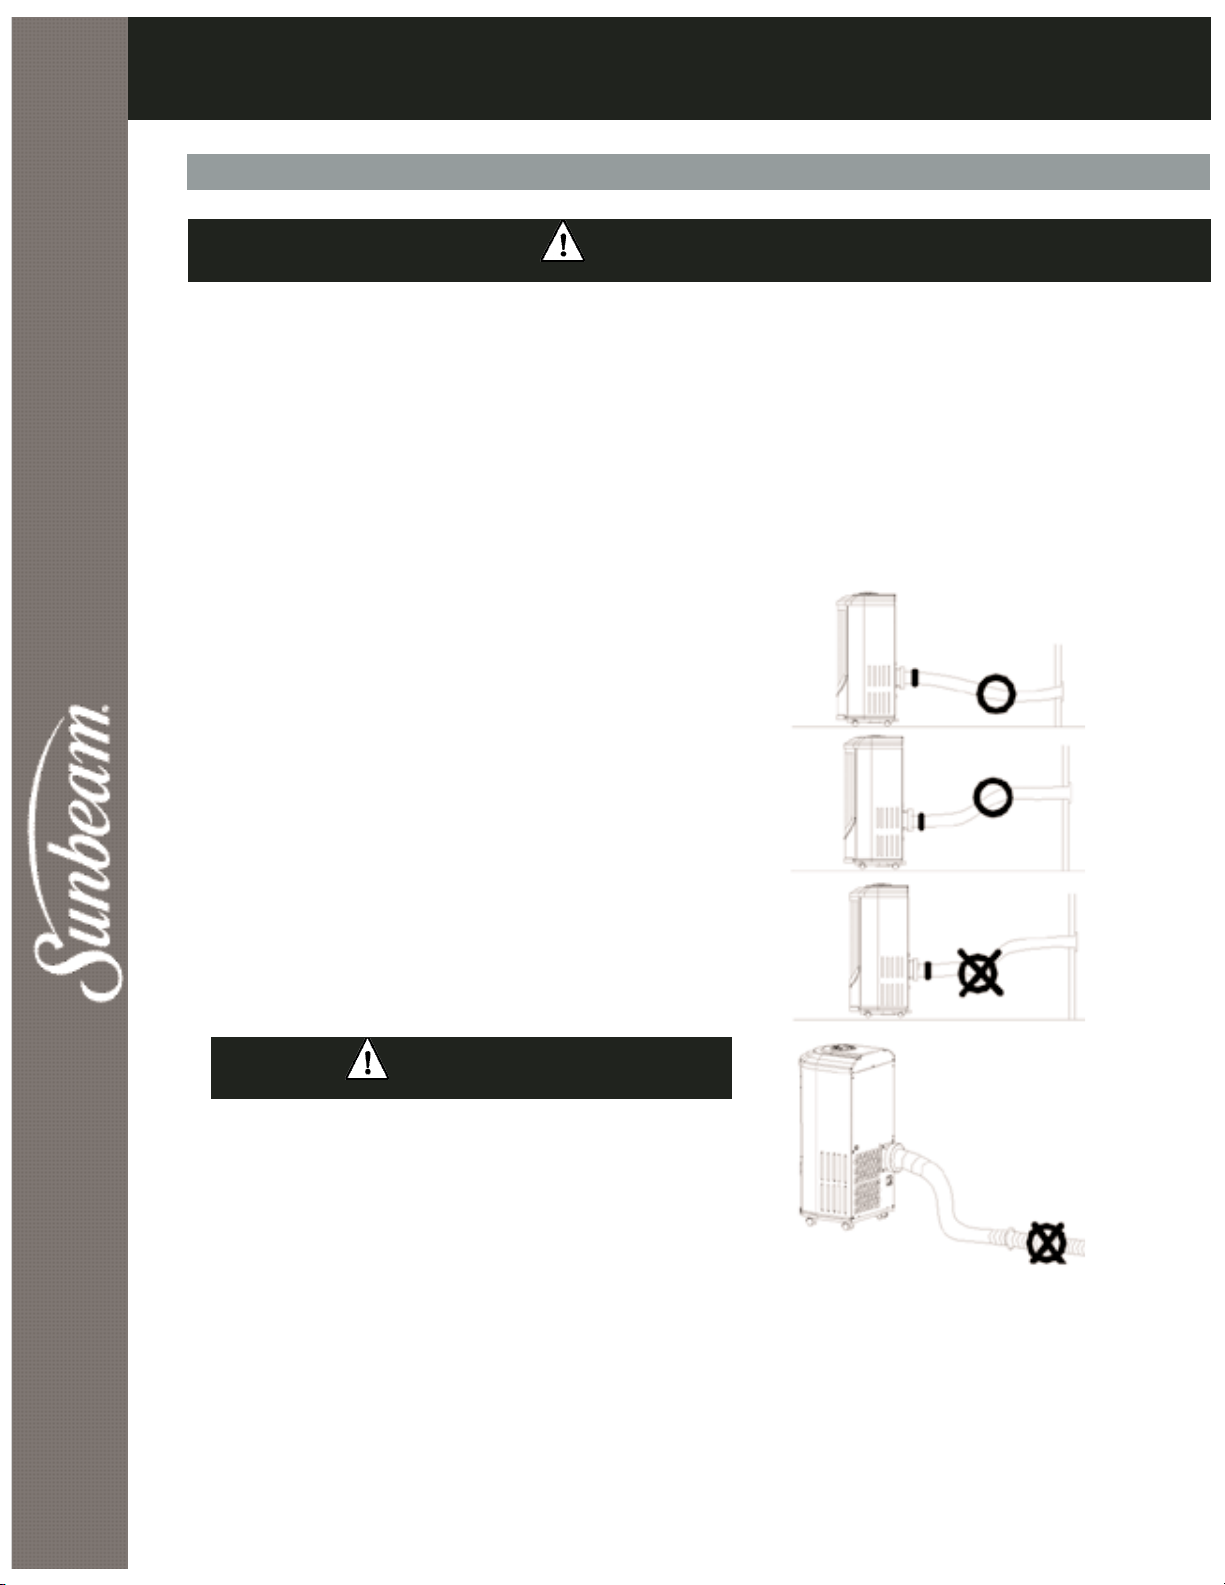
4.2 INSTALLING THE DUCTS IN A WINDOW/SLIDING DOOR
A) Pull out both ends of the hot air exhaust ducts for approximately 6”/15.24cm.
B) Screw the exhaust ducts clockwise with one end to the terminal end of the back of the unit and
the other end to the window kit adapter.
C) Mount the terminal end of the exhaust duct to the back of the unit.
D) Open window or sliding door for approximately 5”/12.7cm.
E) Adjust the length of the window kit to the same length of the window or the sliding door. Use
all of the panels if necessary. Cut the window piece as needed to fit the length of your window
or sliding door. Make sure that the hole on the main piece is not covered by other pieces.
F) Place the window kit in the window or sliding door. Close the window or door as far as it goes.
G) Adjust the length of exhaust duct and affix the window kit adapter onto the holes on the
window kit.
NOTE: When using the window kit on a window or sliding door it will cause the window or sliding
door to not be properly closed and/or locked. Additional security measurements should
be taken.
10
When you use the unit as an air conditioner or a
dehumidifier, the hot air must be exhausted out of
the room to complete the air exchange of the
condenser. When the unit is operating on fan, no
outdoor air exchange takes place. You do not need
to hookup the window kits and hot air exhaust
ducts when you use the unit as a fan.
Figure 9
Page 15
SECTION 4 INSTALLATION INSTRUCTIONS
11
4.3 INSTALLING THE DUCTS IN THE WALL
Figure 11
A) You do not need to use window kit adapter. Mount one end of the exhaust duct into a hole
of 5.6”/14.22cm in diameter in the wall; attach the other end to the back of the unit (same
as above).
B) Use the exhaust outlet wall covers to cover the holes in the wall when the unit is not in use.
NOTE:
Mounting the exhaust pipe
• The supplied exhaust hose can extend from 5.75”
to 63” / 40cm to 160cm for mounting. It is
recommended that you use the shortest possible
length of hose.
• Take care to prevent any kind of bend in the
middle of the exhaust hose, as this will trap hot
exhaust air, which will radiate back into the
room and affect the cooling function of the unit
(Fig. 10).
The length of the exhaust pipe is specially designed
according to the specification of this product. Do not
replace or extend it with your own hose as this could
cause the unit to malfunction (Fig. 11).
C) After installing the ducts, plug in the unit and turn the unit on.
Figure 10
MANUFACTURER’S RECOMMENDATION.
BEFORE UNDERTAKING ANY INSTALLATION OF DUCTS INTO WALL, WE
RECOMMEND THAT YOU CONSULT A KNOWLEDGABLE PROFESSIONAL.
CAUTION
WARNING
Page 16

SECTION 5 OPERATING YOUR PORTABLE AIR CONDITIONER
5.1 CONTROL PANEL AND OPERATING FUNCTIONS
If the unit is turned off during operation please wait at least
three minutes before starting it again.
Figure 12
1) On/Off Button: Use to Start or Stop the unit.
2) Operation Mode Selection Button: Use to select the operation mode:
Auto Mode, Fan-Only Mode, Soft-Dry Mode, and Cooling Mode.
3) Fan Speed Selection Button: Use to Select the fan speed:
High speed or Low speed.
4) “Up” or “Down”: Temperature or Time Changing Button: Use these two buttons to
set to your desired temperature. The temperature unit can be on Fahrenheit or Centigrade. Press the
ON/OFF Button for more than 20 seconds, then release. The temperature unit will be changed from
Fahrenheit to Centigrade or vice versa. During the timer set-up, these buttons are also used to
change the time.
5) Timer Setting or Cancel Button: Use to set or cancel TIMER-ON or TIMER-OFF timer. When
the unit is on, the unit can be set with Timer-OFF. When the unit is off, the unit can be set with
Timer-ON.
12
WARNING
Page 17

SECTION 5 OPERATING YOUR PORTABLE AIR CONDITIONER
13
5.1 CONTROL PANEL AND OPERATING FUNCTIONS CONT’D
HOW TO SET:
When the unit is ON, press the Timer button, “ “ will flash in Timer Set Display Window and the
Timer Indicator will be on in the control panel. Pressing the “Up” or the “Down” button will
change the time accordingly; the flashing digits will change accordingly, until your desired delay time appears.
Your desired time delay will flash for ten (10) seconds. After these ten (10) seconds the digits will change to
display your selected time delay. Time displayed will decrease in ten (6) minute increments.
When the unit is OFF, if it hasn’t been set on Time Delay, press the Timer button. The unit enters Timer
Program. Also, the “ “ will flash in Timer Set Display Window and the Timer Indicator will be on in the
control panel. Press the “Up” or the “Down” button to set to your desired time. When you are
setting the time, the other settings like Operation Mode, Fan Mode, or Set Temperature, will also display.
Ten (10) seconds later, these modes will disappear but be remembered by the Main Controller.
HOW TO CANCEL:
When the unit is set with the TIMER-OFF or the TIMER-ON procedures, press the Timer button to check
the Timer set time, then press within ten (10) seconds to cancel the timer setting.
5.2 LCD DISPLAY PANEL
Auto mode
Soft-dry mode
Cooling mode
Fan-only mode
Fahrenheit mode
Centigrade mode
Figure 13
Page 18

SECTION 5 OPERATING YOUR PORTABLE AIR CONDITIONER
5.3 OPERATING REMOTE CONTROL (MODEL KY-25Y ONLY)
14
The functionality of the six (6) buttons on the Remote
Control are identical to the functionality of the buttons
on the Control Panel. Icons for certain buttons may differ
slightly. The Remote Control uses the lithium batteries,
Model: CR2025 (Included). Install the batteries before
using the Remote Control.
You can operate the unit either on the Control Panel or
with the Remote Control.
COOLING OPERATION:
1) Plug the Power Cord into the power outlet.
2) Turn on the unit by pressing the ON/OFF Button
on the control panel or the remote control.
3) Press the Mode Button on the remote control or
the control panel until the symbol appears on
the display.
4) Set the room temperature to your desired room
temperature with the temperature ranges from 64°F90°F/18°C-32°C. Recommended temperatures are 80°F84°F/27°C-29°C.
5) Select the fan speed by pressing the Fan Button on
either the remote control or the control panel .
SOFT-DRY OPERATION:
1) Plug the Power Cord into the power outlet.
2) Turn on the unit by pressing the ON/OFF Button on the control panel or the remote control.
3) Press the Mode Button on the remote control or the control panel until the symbol
appears on the display.
4) Set the room temperature to an appropriate temperature.
5) Keep the windows and the doors closed to aid the effectiveness of the unit in removing the
moisture from the room.
NOTE: The unit will not perform its dehumidifying function when the room temperature is lower
than 64°F/18°C. Soft-Dry Mode is a very gentle cooling operation consisting primarily of
dehumidifying. It will not lower the room temperature very much. The indoor unit Fan
always runs at Low speed.
Figure 14
Page 19

SECTION 5 OPERATING YOUR PORTABLE AIR CONDITIONER
15
5.3 OPERATING REMOTE CONTROL (MODEL KY-25Y ONLY) CONT’D...
FAN-ONLY OPERATION:
1) Plug the Power Cord into the power outlet.
2) Turn on the unit by pressing the ON/OFF Button on the control panel or the remote control.
3) Press the Mode Button on the remote control or the control panel until the symbol
appears on the display.
4) Select the fan speed by pressing the Fan Button on either the remote control or the control
panel .
When in Fan-Only Mode, the exhaust duct is not needed, and the compressor and condenser side fan
motor will not work. Temperature setting has no meaning and no controlling action.
AUTO OPERATION:
1) Plug the Power Cord into the power outlet.
2) Turn on the unit by pressing the ON/OFF Button on the control panel or the remote control.
3) Press the Mode Button on the remote control or the control panel until the symbol
appears on the display.
4) Set the room temperature to your desired room temperature with “Down” or “Up”
Temperature Changing Buttons.
5) Select the fan speed by using the FAN Speed button on either the remote control or the
control panel .
When in the AUTO mode, the unit will be in Fan-Only Mode when the room temperature is below
81°F/27°C. It will operate in Cooling Mode when the room temperature is above 81°F/27°C.
TIMER-ON PROGRAM SETTING:
How to set:
When the unit is off, you can set the timer to let the unit automatically turn on.
1) Press the Timer Set Button on the control panel or on the remote control . The “ “ will
flash in Timer Set Display Window, and the Timer Indicator, on the control panel, will turn on. The
other mode settings like Operation Mode, Fan Mode, Set Temperature Mode, will also be
displayed, allowing you to change or set them as well.
2) Press the “Down” button or the “Up” button to change the Timer delay time to your
desired time.
3 After a ten (10) second delay (not pressing on any buttons), the digit will change to display, and
the other setting modes will disappear. Now the Timer Setting Process is complete. Once some
time has passed, the digits will decrease in 6 minute increments.
When the digits decrease to ZERO and disappear, the unit will start to run automatically
according to your setting.
How to cancel:
When the unit is set with TIMER-ON while it’s off, press the Timer Button on the control panel or
on the remote control to check the Timer setting and the Time digits will flash. Press the
TIMER button again; this will cancel the timed setting. The Timer Indicator on the control panel will
then turn off.
Page 20

SECTION 5 OPERATING YOUR PORTABLE AIR CONDITIONER
16
TIMER-OFF PROGRAM SETTING:
How to set:
When the unit is on, after being set with the TIMER-OFF, the unit will stop after your set delay time.
1) Press the Timer Button on the control panel or on the remote control . Now the TIMER
INDICATOR “ “ will flash in the Timer Set Display Window, and the Timer Indicator on the
control panel will be on.
2) Press the “Down” button or the “Up” button to change the delay time to your desired time.
3) After a 10 second delay (not pressing on any buttons), the digits will change to display. The Timer
Setting Process is complete. Once some time has passed, the digits will decrease in 10 minute
increments.
How to cancel:
When the unit is set with TIMER-OFF, while the unit is on, first press Timer Button on the control
panel or on the remote control to check the Timer setting and the Time digits will flash. Press
the TIMER button again and the Timer Setting will be cancelled. The Timer Indicator on the control
panel will then turn off.
WATER FULL INDICATION:
Under normal temperatures, water will evaporate without the need to drain it from the unit.
The WATER FULL indicator light will turn on during days of extreme humidity, when in Cooling Mode
or Soft-Dry Mode. When the WATER FULL indicator light turns on, it means that the water reservoir is
full. The compressor will stop working, but both of the two fan motors will continue working. The unit
will drain excess water once a Drain Hose or Garden Hose is connected to it. When the WATER FULL
indicator light disappears, the compressor will start to work again.
5.3 OPERATING REMOTE CONTROL (MODEL KY-25Y ONLY) CONT’D...
5.4 WATER FULL INDICATION AND DRAINING
DRAINING:
Only in extreme humidity
1) To add a Drain Hose or Garden Hose you must first stop the unit by turning it OFF. You must then
unscrew the Drain Cap on the Pump Drain before inserting the white Drain Hose (5’3”/1.61m)
provided with your unit. (Attention: there may be some water behind the Drain Cap. Have a bowl
or receptacle ready to catch any runoff).
After connecting the Drain Hose to the inner spout (Fig.15) of the Pump Drain, ensure that the
other end is placed in a bucket or receptacle for gathering the excess water. Check the water level
in the receptacle to avoid any possibilities of leaking.
Instead of the Drain Hose provided with your unit, you may also use a Garden Hose (in cases where
you require a distance longer than that provided by the Drain Hose). In this case screw the female
end of a Garden Hose to the outer threaded spout of the Pump Drain (Fig.16). After connecting the
Garden Hose, place the outer end outside of the house or in a convenient area where the excess
water can be safely expelled.
2) Now, turn the unit ON and back to its previous setting (either COOLING or SOFT-DRY mode). The
Pump Drain will begin to pump water out of the unit. (If using a water bucket, please check the
expelled water level to ensure that it does not over flow.) Once the WATER FULL light indicator
turns off … the DRAIN cycle is complete. At this point, turn OFF the unit, remove the Drain Hose or
Garden Hose and then turn the unit back ON and to its previous setting (COOLING or SOFT-DRY
mode).
Page 21

SECTION 5 OPERATING YOUR PORTABLE AIR CONDITIONER
17
1
2
3
1. Pump Drain
2. Drain Hose
3. Water bucket
Figure 15
Figure 16
5.4 WATER FULL INDICATION AND DRAINING CONT’D...
NOTE: The cooling efficiency of your unit will be affected if the Drain Hose or the Garden Hose is
always attached to it. The Drain Hose or Garden Hose must be used only when the WATER
FULL indicator is on.
MAKE SURE THAT THE DRAIN CAP IS REINSTALLED PROPERLY TO PREVENT LEAKING.
Page 22

6.2 CLEANING OR REPLACING THE AIR FILTER
If the air filter is blocked with a lot of dust, the volume of airflow will be reduced and the cooling
effect will be lower. It is recommended to clean the filter once every two weeks or as needed.
A) Pull out the filter from the filter compartment in front of the unit.
B) Wash the air filter by immersing it gently into warm (about 104°F/40°C) water with a gentle
detergent. Rinse the filter and dry it thoroughly in a shaded place.
C) Place the filter back into the filter compartment after it is thoroughly dried.
D) If the filter is torn or unusable, order a new filter by calling the Sunbeam Customer Service
department at 1-877-383-6399 (8:30am-5:30pm E.S.T.).
SECTION 6
CARING FOR YOUR PORTABLE AIR CONDITIONER
18
6.3 EXTERNAL PLASTIC PARTS
A) Keep the unit from being exposed directly to the sun.
B) Clean the surface with a damp cloth.
C) For the Stainless Steel finished models, a good quality stainless steel cleaner should be used.
6.4 STORAGE AT THE END OF THE COOLING SEASON
A) On a warm day, turn the unit on in the FAN-ONLY
Mode for a couple of hours so that the inside can dry
out completely.
B) Turn off the unit and unplug the unit.
C) Empty the residual condensated water by unplugging
the LOWER WATER DRAINAGE CAP at the back
towards the bottom of the unit.
After connecting the
12’/3.65m white Drain Hose, ensure that the other end is
in a bucket or receptacle for gathering the water.
D) Discharge the Hot air duct and shorten it and pack it
in the box.
E) Clean the filter and dry it completely before fitting
back in place.
F) Cover the appliance to protect it from dust. It is
recommended that the unit be put back into its
original box and package.
G) The unit should be stored in a cool dry place. Do not
stack heavy objects on the top of the unit.
Figure 17
Lower drain port
6.1 MAINTENANCE
WARNING
• Make sure the power supply is switched off and the plug is pulled out of the power outlet
before performing any maintenance activities.
• Do not immerse the unit in water or other liquids.
• Do not pour liquids into the unit.
• Take special precaution to avoid the sharp cutting edges of some parts.
• Do not use any kind of chemical solvents to clean the unit, as they may deform the
unit cabinet.
Page 23
SECTION 7 TROUBLESHOOTING
19
You can solve many common portable air conditioner problems easily, saving you the cost of a
service call. Try the suggestions below to see if you can solve your problem without outside help.
Check if... Then...
Wait until local power is restored.
The local power
has failed.
The plug is loose.
Firmly insert the plug into the wall socket.
Drain out the water (see page 16).
Set the proper time.
The power fuse
is burned.
Replace the fuse. Make sure the portable air conditioner is plugged
into an exclusive properly grounded outlet as described in the
Installation Instructions.
The water tank is full.
LCDI plug has tripped.
Press the RESET button on the LCDI plug.
The time is set properly.
Check if... Then...
Open the air inlet and outlet.
The air inlet or
outlet is closed.
There is a heat source
in the room.
Move the heat source away.
Set the cooling temperature at a proper level.
The air filter is dirty.
Clean the air filter, referring to "Cleaning the Air Filter" section.
The cooling temperature
is set properly.
7.1 PORTABLE AIR CONDITIONER DOES NOT WORK AT ALL
7.2 LOW COOLING EFFICIENCY
The indoor fan is
set at a low speed.
Set the indoor fan speed higher.
Water-Full Indicator
is displayed.
Empty the water inside the unit (see page 16). Wait 1 hour to let
the condenser side fan blow out the water.
Page 24

SECTION 7 TROUBLESHOOTING
20
Check if... Then...
The unit is vibrating
while working.
The unit is not on a flat place. Put the unit on a solid, flat place.
7.3 NOISE AND VIBRATION
There is noise from the
unit.
If the sound is not too high and comes from the compressor, the
evaporator or the condenser, it is normal.
Check if... Then...
Wait until the local power is normal.
The voltage of the local
power is normal.
The hot air discharging
port is properly installed.
Install the hot air discharging port properly as instructed in this
manual.
7.4 THE UNIT TURNS ON AND OFF FREQUENTLY
The outside temperature
is extremely hot.
Set the fan on high speed to let air pass cooling coils faster.
Check if... Then...
7.2 LOW COOLING CONT’D
The outside temperature
is lower than 64
o
F (18oC).
Do not operate your portable air conditioner in cooling mode when
the outside temperature is lower than 64
o
F (18oC).
Windows and doors are
open.
Close all doors and windows.
Unit is set at
dehumidifying mode.
Set unit at cooling mode.
Page 25

SECTION 8 ELECTRICAL DIAGRAM
21
Figure 17
C1: Running capacitor for Fan Motor of condensor side
C2: Running capacitor for compressor
C3: Running capacitor for Fan Motor of evaporator side
1. LCD Display
2. Operation Panel PCB
3. Receptor PCB
4. Power Supply
5. Room temperature sensor
6. Main Control PCB
7. Water level detector
8. Microchip processor
9. Main controller PCB
10. Transformer
11. Fan motor for condensor side
12. Cut-off
13. Water pump
14. Motor for evaporator side
15. Cut-off
16. Compressor
17. Protector
2
3
4
5
6
7
8
9
11
13
14
16
10
17
1
12
15
Page 26

22
SECTION 9 WARRANTY
STAR ELITE/ELITE GROUP
LIMITED ONE-YEAR WARRANTY POLICY
EFFECTIVE: APRIL 2005
LIMITED WARRANTY
Star Elite/Elite Group, Inc. (hereinafter referred to as SE/EG) hereby warrants, subject to the conditions herein stated in the
paragraphs below, that should this product become defective by reason of improper workmanship or material defect during
the specified warranty period, SE/EG will repair or refund the same effecting all necessary parts replacements.
Transportation charges on parts submitted for repair or refund, under this warranty, must be borne by the purchaser.
THERE IS NO OTHER EXPRESS WARRANTY. IMPLIED WARRANTIES, INCLUDING THOSE OF MERCHANTABILITY AND FITNESS
FOR A PARTICULAR PURPOSE, ARE LIMITED TO THE TIME PERIOD SPECIFIED, OR TO THE EXTENT PERMITTED BY LAW. ANY
AND ALL IMPLIED WARRANTIES ARE EXCLUDED. LIABILITY FOR CONSEQUENTIAL DAMAGES UNDER ANY AND ALL
WARRANTIES ARE EXCLUDED TO THE EXTENT EXCLUSION IS PERMITTED BY LAW.
WARRANTY PERIOD
SE/EG warrants that from the date of purchase, this product will be free from mechanical defects for a period of one (1)
year and a period of ninety (90) days on parts and labor. SE/EG, at its option, will repair or refund this product found to be
defective during the warranty period. If the product is no longer available, SE/EG may refund your purchase (at a
depreciated value), with an original proof of purchase. This is yourexclusive warranty.
CONDITIONS
ORIGINAL SALES RECEIPT: This warranty is valid for the original retail purchaser from the date of initial retail purchase and
is not transferable. Keep the original sales receipt. Proof of purchase is required to obtain warranty service and/or refund.
SE/EG dealers, service centers, or retail stores selling SE/EG products do not have the right to alter, modify or in any way,
change the terms and conditions of this warranty.
…. Continued on Next Page…
is a registered trademark of Sunbeam Products, Inc. used under license.
Product Consumer/Residential Use Only
Air Conditioner 1 Year
Dehumidifier 1 Year
Wine Cooler/Beverage Center 1 Year
Ice Maker 1 Year
Mini & 16L Thermoelectric Cooler/Warmers 1 Year
Electric Fireplace/Heater 1 Year
Parts & Labor 90 Days
Page 27

23
SECTION 9 WARRANTY
WARRANTY REGISTRATION IS NOT NECESSARY TO OBTAIN WARRANTY ON SE/EG PRODUCTS. SAVE YOUR PROOF OF
PURCHASE RECEIPT. IF YOU DO NOT PROVIDE PROOF OF THE INITIAL PURCHASE DATE AT THE TIME WARRANTY SERVICE
IS REQUESTED, THE MANUFACTURING DATE OF THE PRODUCT WILL BE USED TO DETERMINE THE WARRANTY
DEPRECIATION: Any unit being diagnosed as non-functional and warranting an exchange, during the existing warranty
period, will be subject to an appropriate depreciation or user fee.
ABOUT YOUR PRODUCT WARRANTY: We welcome warranty repair and apologize to you for being inconvenienced. Any
Authorized service dealer may perform warranty repairs. Most warranty repairs are handled routinely, but sometimes
requests for warranty service may not be appropriate. For example, warranty service would NOT apply if the product
damage occurred because of misuse, lack of routine maintenance, shipping, handling, warehousing or improper installation.
Similarly, the warranty is void if the manufacturing date or the serial number on the product has been removed or the
equipment has been altered or modified. During the warranty period, the Authorized service dealer, at its option, will
repair or refund any part that, upon examination, is found to be defective under normal use and service.
NORMAL WEAR: This warranty does not cover normal wear of parts or damage resulting from any of the following:
Negligent use or misuse of the product; Improper voltage or current; Use contrary to the operating instructions; Deviation
from instructions regarding storage and transportation; Disassembly; Repair or alteration by anyone other than SE/EGor a
SE/EG Authorized service center. Further, the warranty does not cover Acts of God, such as fire, flood, hurricanes and
tornadoes.
SE/EG shall not be liable for any incidental or consequential damages caused by the breach of any express or implied
warranty. Except to the extent prohibited by applicable law, any implied warranty of merchantability or fitness for a
particular purpose is limited in duration to the duration of the above warranty. Some states, provinces or jurisdictions do
not allow the exclusion or limitation of incidental or consequential damages or limitations on how long an implied warranty
lasts, so the above limitations or exclusion may not apply to you. This warranty gives you specific legal rights, and you may
also have other rights that vary from state to state or province to province.
HOW TO OBTAIN WARRANTY SERVICE: You must contact SE/EG Customer Service/Technical Support at our toll-free number
1-877-383-6399. A Customer Service/Technical Support representative will attempt to resolve warranty issues over the
phone. If telephone resolution is not possible, the Customer Service/Technical Support representative will require your
assistance in performing routine diagnostic procedures. This warranty is effective for the time periods listed above and
subject to the conditions provided for in this policy. For warranty service, find the nearest Authorized Service Dealer by
calling 1-877-383-6399. Warranty service may only be performed by a Star Elite, Inc./Elite Group, Inc. Authorized Service
Dealer.
is a registered trademark of Sunbeam Products, Inc. used under license.
Page 28

24
Climatiseur numérique portable 9000 BTU
avec télécommande – Metal blanc
GUIDE D'UTILISATION ET D'ENTRETIEN ET
INSTRUCTIONS D'INSTALLATION
Climatiseur numérique portable 9000 BTU
avec/sans télécommande – Acier inoxydable
Page 29

SECTION 1 INSTRUCTIONS IMPORTANTES DE SÉCURITÉ
25
Votre sécurité et la sécurité des autres sont très importantes.
Nous avons inclus de nombreux messages importants de sécurité dans ce guide et sur votre
appareil.Lisez toujours tous ces messages, et conformez-vous-y.
Symbole d'alerte de sécurité.
Ce symbole vous signale des dangers possibles pour votre vie ou votre santé, et celles des autres.
Ces mots signifient :
Vous pouvez perdre la vie ou être gravement blessé si vous ne suivez pas
immédiatement les instructions.
Tous les messages de sécurité indiquent le danger éventuel, comment réduire les risques de blessure
et ce qui peut survenir si vous ne suivez pas les instructions.
DANGER
MISE EN GARDE
1.1 SÉCURITÉ DU CLIMATISEUR MOBILE
1.2 DANGER ET MISE EN GARDE
AVERTISSEMENT - Afin de réduire le risque d’incendie, de décharge électrique, de blessure,
ou de maladie lors de l’utilisation de votre climatiseur portable, suivez ces
précautions de base:
• Branchez uniquement l’unité dans une prise enfichable à 3 broches avec mise à la terre.• Ne
pas enlever la broche de mise à la terre.
• Ne pas utiliser un adaptateur.
• Utiliser deux personnes ou plus afin de déplacer ou d’installer le climatiseur portable.
• Ne pas boire l’eau accumulée à l’intérieur du boîtier.
• Suivre les instructions dans ce guide pour nettoyer l’unité.
• Ne pas insérez d’objets dans l’unité.
• Toujours arrêter l’unité avant de la débrancher.
• Arrêter et débrancher l’unité avant de la nettoyer ou d’effectuer tout type de service.
• Ne jamais réparer l’unité ou changer le fil de branchement vous-même. Toute réparation ou
manipulation de l’unité effectuée par une personne non qualifiée annulera la garantie.
• Ne pas placer d’objets à l’intérieur des bouches d’air ou des grilles d’entrée. Ne pas bloquer les
bouches d’air et/ou les grilles d’entrée.
• Ne pas utiliser cette unité à l’intérieur d’armoires, de placards et/ou d’espaces restreints entre
des meubles.
• Ne pas utiliser cette unité à proximité de substances inflammables et/ou explosives.
• Ne pas opérer cette unité sans les filtres. Gardez les filtres propres.
• Toujours mettre l’unité en marche et l’arrêter au moyen du commutateur
Marche/Arrêt « ON/OFF ».
1.3 CONSERVEZ CES INSTRUCTIONS
Page 30

SECTION 1 INSTRUCTIONS IMPORTANTES DE SÉCURITÉ
26
Veuillez nous aidez à vous aider :
• Assurez-vous que votre tension d'énergie électrique correspond à la tension sur la plaque signalétique
de l'unité.
• Gardez les enfants éloignés de l'unité.
• Vérifiez le fil électrique périodiquement. N'employez pas un fil électrique endommagé.
• La longueur de fil de branchement de ce climatiseur portable a été correctement sélectionnée en fonction
de réduire le risque de danger.
• N'employez pas une rallonge de raccordement.
• L'unité doit être placée dans un endroit sec.
• L'unité est conçue pour un usage intérieur seulement. N'employez pas à l’extérieur.
• Utilisez seulement les accessoires fournis par le fournisseur. L'utilisation d’accessoires de toute source autre
que le fournisseur est dangereuse et peut endommager l'unité.
• Gardez l'unité éloignée de tout type de source de chaleur et de la lumière du soleil directe
• Laissez les stores/rideaux fermés pendant la partie la plus ensoleillée du jour.
• N'immergez pas l'unité dans l'eau ni aucun genre de liquide.
• Maintenez l'unité éloignée de tous les secteurs qui présentent une chance d'éclabousser l’unité d'eau.
• Pour éviter le risque de décharges électriques, l'unité ne doit jamais être employée dans les salles de bains,
salles de douche ou dans tous autres secteurs humides ou embués.
• N'employez pas cette unité sur une pente - l'unité est soutenue par quatre roulettes.
• En cas d’incendie, utilisez des extincteurs à neige carbonique (CO2). N'utilisez pas les extincteurs à eau ou
à poudre.
Ce climatiseur portable a été conçu pour créer un climat idéal dans votre pièce. Employez-le seulement dans
ce but spécifique et selon les instructions dans ce guide.
Cette unité est prévue pour un usage du consommateur ménager seulement, et non pour un usage
commercial.
Veuillez employer l’unité dans une pièce de la taille recommandée. (Référez-vous aux
”Spécifications Techniques”)
Ne placez pas le climatiseur où des meubles ou d'autres objets pourraient obstruer le flux d'air de
refroidissement.
Au départ, réglez l'unité au degré de refroidissement et à la vitesse du ventilateur les plus élevés, puis, ajustez
l'unité à un réglage confortable.
Nota: Nous vous recommandons de mettre le climatiseur en marche lorsque la température ambiante
est autour de 75°F/23.9°C. N'attendez pas jusqu'à ce que la pièce soit excessivement chaude.
Nota: Cette unité est équipée d'un thermostat, et devrait automatiquement se mettre en marche quand
la température préréglée est atteinte, mais seulement si elle est réglée au mode de
refroidissement. Si elle est réglée au modes Sec-Doux « SOFT-DRY » ou Ventilateur seulement
« FAN-ONLY », le compresseur ne s’activera pas.
A
BC D
Figure 1
N’insérez aucun objet.
Gardez les enfants et
les animaux
domestiques éloignés.
N'employez pas un tissu mouillé
pour nettoyer - employez
seulement les tissus humides.
Soyez prudent d'où la
cordon est placée.
Page 31

SECTION 1 INSTRUCTIONS IMPORTANTES DE SÉCURITÉ
27
1.4 RECOMMANDATIONS SPÉCIALES
• Placez le climatiseur mobile portable à un endroit égal.
Laissez au moins 20 po (50,8 cm) entre l’unité et le mur.
• La prise de courant doit toujours être accessible une fois que l’unité est installée.
• Afin d’assurer le fonctionnement adéquat du compresseur, gardez toujours le climatiseur mobile à la verticale.
• Ne placez pas le climatiseur mobile à proximité d’une source de gaz ou de toute matière inflammable.
• Gardez l’unité à l’écart des téléviseurs ou des appareils radio afin d’éviter l’interférence électromagnétique.
• Ne vaporisez pas de produits chimiques comme des insecticides, de la peinture ou tout autre produit
inflammable près de l’unité. Ces substances chimiques peuvent interagir avec le cabinet en plastique et le
déformer ou entraîner une interférence électromagnétique.
Aux États-Unis seulement : Si les codes le permettent et qu'on utilise un fil de
mise à la terre distinct, on recommande d'utiliser le parcours de mise à la terre.
Renseignez-vous auprès d'un électricien compétent si vous n'êtes pas certain que le
climatiseur mobile est mis à la terre.
Il faut utiliser une alimentation électrique à trois fils et à phase simple de 60 Hz c.a. seulement sur
un circuit distinct. Voir la plaque des numéros de modèle et de série pour l'ampérage de circuit requis
pour votre modèle particulier.
Si la plaque de numéro de série du climatiseur mobile indique 115 volts et jusqu'à 7,5 ampères inclusivement,
l'appareil peut être raccordé à un fusible ou à un disjoncteur avec d'autres appareils.
TOUTEFOIS, L'AMPÉRAGE MAXIMAL DE TOUS LES APPAREILS RACCORDÉS À CE FUSIBLE OU DISJONCTEUR NE
PEUT DÉPASSER LES AMPÉRAGES DU FUSIBLE OU DU DISJONCTEUR.
Si la plaque de numéro de série du climatiseur mobile indique 115 volts et plus de 7,5 ampères,
le climatiseur mobile doit être raccordé à son propre fusible ou disjoncteur, et aucun autre appareil ne
doit être raccordé à ce fusible ou disjoncteur.
La plaque signalétique indique la capacité de B.T.U., l'ampérage, la tension et les
normes en matière de charge frigorigène.
MISE EN GARDE
Danger de choc électrique
Branchez l'appareil dans une prise de courant mise à la terre à 3 broches.
Ne retirez pas la broche de mise à la terre. N'utilisez pas de cordon prolongateur.
Le non-respect de ces instructions peut entraîner la mort, un incendie ou un choc électrique.
1.5 NORMES ÉLECTRIQUES
Page 32

SECTION 1 INSTRUCTIONS IMPORTANTES DE SÉCURITÉ
28
Pour votre sécurité personnelle ce climatiseur mobile doit être mis à la terre. Le climatiseur mobile est
équipé d'un cordon d'alimentation à fiche de mise à la terre à 3 broches. Afin de réduire les risques de
choc électrique, il faut brancher le cordon dans une prise de courant à 3 broches de type mise à la terre,
conformément à tous les codes et règlements locaux en vigueur. Si une prise à 3 broches n'est pas
disponible, il incombe au consommateur de faire installer une prise appropriée à 3 broches mise à la terre
par un installateur compétent.
Il incombe au client :
• De communiquer avec un installateur-électricien compétent
• D'assurer que l'installation électrique est adéquate et conforme au Code national de l'électricité,
ANSI / NF PA 70 – dernière édition,* et tous les codes et règlements locaux.
Ces exemplaires des normes peuvent être obtenus de:
National Fire Protection Association
Batterymatch Park
Quincy Massachusetts 02269.
Ou de votre conseil de l'électricité local.
1.6 MÉTHODE DE MISE À LA TERRE RECOMMANDÉ
Un détecteur interrupteur de fuites de courant (LCDI) est un appareil qui détecte les fuites de courant
passant entre ou à partir des conducteurs électriques dans le fil d’alimentation d’un appareil électrique, et
interrompt le circuit à un niveau prédéterminé de fuite de courant. Puisque un LCDI peut spécifiquement
détecter une fuite de courant s’écoulant vers la terre, il fournit une protection de mise à la terre contre les
arcs de courant et autres problèmes qui peuvent survenir, attribuables à une fuite entre les conducteurs.
Les LCDI sont couverts sous le standard UL 1699 pour interrupteurs de fautes de courant causées par les
ARCS, qui a été publié pour la première fois en juin 2002. Les appareils LCDI ont été mandatés par le
National Electric Code et par Underwriters Laboratories pour les fils d’alimentation sur les climatiseurs
individuels depuis le mois d’août 2004. D’autres classes d’appareils exigeront une protection LCDI dans un
futur rapproché.
ESSAI:
1. Appuyez sur le bouton d’essai « TEST », l’unité devrait déclencher.
2. Appuyez sur le bouton de remise en circuit « RESET » pour mettre en marche.
NOTA: NE PAS UTILISER SI L’ESSAI CI-DESSUS ÉCHOUE.
Si l’appareil déclenche, la cause du mauvais fonctionnement doit être corrigée avant d’utiliser l’appareil.
ATTENTION:
Les conducteurs à l’intérieur de ce fil de branchement sont entourés par des blindages qui perçoivent les
fuites de courant. CES BLINDAGES NE SONT PAS MIS À LA TERRE. Examinez périodiquement le fil de
branchement pour y déceler tout dommage. N’UTILISEZ PAS ce produit si les blindages deviennent exposés.
AVERTISSEMENT:
Ce produit comporte des produits chimiques, y compris du plomb, reconnu par l’état de Californie comme
cause de cancer et d’anomalies congénitales ou autres problèmes reproductifs.
Lavez vos mains après toute manutention.
1.7 TECHNOLOGIE DE FICHE LCDI (E.U. SEULEMENT)
Page 33

SECTION 1 INSTRUCTIONS IMPORTANTES DE SÉCURITÉ
29
1.8 DÉBALLAGE DE VOS PIÈCES DE PRODUIT
Gardez
l’unité
debout
Figure 2
1.9 SPÉCIFICATIONS TECHNIQUES
Modèle #
Couleur
Capacité de refroidissement
Tension, rendement fréquence, phase
Puissance nominale
Pression de service maximale
Réfrigérant, quantité
Tension à la prise
Type de prise
Longeur du cordon d'alimentation
Élimination de l'humidité
Volume de circulation de l'air
Poids net (unité seulement)
Dimensions
KY-25/Y
Acier Inoxydable/Blanc
9000 BTU/hr
AC~115V/60Hz/1 PH
8.2A
Max/High 370 psi, Min/Low 150psi
R22/500g (17.6oz)
125V/15A
5-15P
6.43ft/1.96M
25.4oz/h / 0.75L/hour
5.67CMM/200CFM
24.75 kgs/54.56 lbs
13.8”L x 14”W x 31.42”H / 35.1cmL x 35.6cmW x 79.8cm H
NOTA
Les données ci-dessus sont obtenues sous les conditions suivantes:
Conditions de refroidissement: Thermomètre sec / Thermomètre humide: 35°C/28.3°C (95°F/83°F) selon le
standard Américain 128-2001.
Limites d’opération pendant le refroidissement
Conditions Maximum: Thermomètre sec / Thermomètre humide: 40°C/26.7°C (104°F/80°F)
Conditions Minimum: Thermomètre sec / Thermomètre humide: 18°C/14°C (64.4°F/57.2°F)
Lorsque vous obtenez cette unité, veuillez transporter le produit en position
debout seulement, et placer le produit sur une surface plane. Enlevez la
boîte de carton sans tourner l’unité à l'envers, ou l'étendre de son côté.
Veuillez noter : Si cette unité est transportée, elle doit être laissée
dans la position debout normale pendant au moins 8 heures avant
l’utilisation, pour permettre à l'huile du compresseur et au liquide
réfrigérant de se reposer en place
a. Enlevez le ruban adhésif situé sur le dessus de la boîte de carton.
b. Ouvrez la boîte de carton.
c. Enlevez les panneaux d'emballage et de protection d'angle
en styromousse.
d. Soulevez et tenez l'unité de la base d'emballage de styromousse en
employant deux personnes, afin de ne pas incliner l'unité.
e. Enlevez le sac en plastique.
f. Essuyez l’unité au besoin.
g. Installez alors le boyau d'échappement d'air chaud pour le côté du
condensateur selon les instructions d'installation.
Page 34

SECTION 2 MESSAGE À VOTRE INTENTION
30
Merci d'avoir acheté cet appareil de haute qualité Sunbeam®.
Nous avons rédigé ce Guide d'utilisation et d'entretien pour vous aider à profiter pleinement
de votre appareil pendant de nombreuses années. Vous y trouverez de précieux renseignements
sur la façon d'utiliser et d'entretenir correctement et en toute sécurité votre appareil.
Veuillez le lire attentivement.
Veuillez également consigner l'information sur le modèle.
Lorsque vous appellerez pour demander une réparation, vous devrez indiquer le numéro de
modèle et le numéro de série de votre appareil. Vous trouverez ces renseignements sur la plaque
de numéros de modèle et de série.
Veuillez inscrire les numéros de modèle et de série ci-dessous. Inscrivez également la date d'achat
de votre appareil, de même que le nom, l'adresse et le numéro de téléphone du magasin.
Numéro de modèle
Numéro de série
Date d'achat
Nom de compagnie
Adresse
Téléphone
CONSERVEZ CE GUIDE ET
LE PREUVE D'ACHAT ENSEMBLE DANS UN ENDROIT SÛR POUR RÉFÉRENCE ULTÉRIEURE.
L'étiquette est placée sur le
côté droit de l'unité
Star Elite, une filiale de Elite Group
1175 Place du Frère-André, Montréal, Québec H3B 3X9
1-877-383-6399 (8:30am-5:30pm E.S.T)
PLACEZ L'ÉTIQUETTE
ICI
Figure 3
À l'arrière de l'unité:
Données techniques
Numéro d’appel de service et
étiquette
À l'arrière de l'unité:
Étiquette d’avertissement
Page 35

SECTION 3 PRÉPARATION
31
3.1 OUTILS NÉCESSAIRES
Figure 4
Figure 5
3.2 ACCESSORIES
1. Embout intérieur
2. Boyau d’échappement
3. Trousse d’assemblage pour la fenêtre
4. Pièce principale
5. Adaptateur de trousse de fenêtre
6. Boyau de décharge (2)
1. Tournevis à lame plate et à pointe cruciforme
2. Gants
3. Ruban à mesurer
4. Couteau tout usage
Page 36

SECTION 3 PRÉPARATION
32
3.3 CORDON D'ALIMENTATION ET PRISE DE COURANT
Figure 6
3.4 CONNAÎTRE VOTRE CLIMATISEUR MOBILE
• La prise doit être bien fixée et non endommagée.
• Ne branchez pas l'unité à l’aide d’un adaptateur.
• Assurez-vous que la prise est entièrement insérée dans le réceptacle.
• Le fil électrique ne doit pas entrer en contact avec quelque type de
liquide; ne manipulez pas avec des mains humides ou mouillées.
• Ne compressez pas le fil d’alimentation et ne le laissez pas entrer en
contact avec une surface tranchante.
• N'utilisez pas les fils d’alimentation électriques pour traîner l'unité.
• Ne laissez pas le fil d’alimentation enroulé ou emmêlé pendant le
fonctionnement.
• Ne laissez pas le fil d’alimentation électrique entrer en contact avec
une surface chaude.
• Ne laissez pas le fil d’alimentation électrique dans un endroit de trafic
élevé qui pourrait mener à un fil d’alimentation endommagé.
115 volt (103.5 min. - 126.5 max.) 0-12 ampères
Fusible temporisé ou disjoncteur 15-amp
Fils de cuivre de calibre14
Figure 7
1. Entrée d’air
2. Filtre à air
3. Roulette
4. Panneau de commande
5. Sortie d’air
6. Capteur de signal de
contrôle
1
2
3
4
5
6
7
8
9
10
7. Entrée d’air – côté condenseur
8. Raccord de décharge d’air chaud
(Utiliser pour connecter le boyau
d’air)
9. Raccord de vidange
10. Raccord de décharge inférieur
Devant
Arrière
Page 37

SECTION 4 INSTRUCTIONS D’INSTALLATION
33
4.1 INSTALLATION DU CLIMATISEUR PORTABLE
Figure 8
4.2 INSTALLATION DES BOYAUX DANS UNE
FENÊTRE/PORTE COULISSANTE
A) Tirez sur les deux bouts des boyaux d'échappement d'air chaud pour atteindre une longueur
d’approximativement 6 po/15.24cm.
B) Vissez les boyaux d'échappement dans le sens des aiguilles d'une montre avec une extrémité à
l'embout du dos de l'unité et l'autre extrémité à l'adaptateur de trousse de fenêtre.
C) Installez l'embout du boyau d'échappement au dos de l'unité.
D) Ouvrez la fenêtre ou la porte coulissante d’approximativement 5po/12.7cm.
E) Ajustez la longueur de la trousse de fenêtre à la même longueur que la fenêtre ou la porte
coulissante. Employez tous les panneaux au besoin. Coupez la pièce de fenêtre de façon à
l’ajuster à la longueur de votre fenêtre ou porte coulissante. Assurez-vous que le trou sur la
pièce principale n'est pas couvert par d'autres pièces.
F) Placez la trousse de fenêtre dans la fenêtre ou la porte coulissante. Fermez la fenêtre ou la
porte aussi fermement que possible.
G) Ajustez la longueur du boyau d'échappement et apposez l'adaptateur de trousse de fenêtre sur
les trous sur la trousse de fenêtre.
NOTA: Lors de l’utilisation de la trousse de fenêtre sur une fenêtre ou une porte coulissante,
celle-ci ne permettra pas à la fenêtre ou la porte coulissante de se fermer ou d’être
verrouillée correctement. Des mesures additionnelles de sécurité devraient être prises.
• Trouvez un endroit approprié pour le climatiseur
portable. Laissez un espace d’au moins 20po. (50.8cm)
autour de l'unité (fig. 8).
Lorsque vous employez l'unité comme climatiseur ou
déshumidificateur, l'air chaud doit être évacué hors de la
pièce pour compléter l'échange d'air du condenseur.
Lorsque l'unité fonctionne en mode de ventilateur, aucun
échange d'air extérieur n’a lieu. Il n’est pas nécessaire de
connecter les trousses de fenêtre et les boyaux
d'échappement d'air chaud lorsque vous employez l'unité
comme ventilateur.
Figure 9
LE MUR
LE MUR
Page 38

SECTION 4 INSTRUCTIONS D’INSTALLATION
34
4.3 INSTALLATION DES BOYAUX DANS LE MUR
Figure 11
A) Il n’est pas nécessaire d'utiliser l'adaptateur de la trousse de fenêtre. Installez une extrémité
du boyau d'échappement dans un trou de 5.6po/14.22cm de diamètre dans le mur ; attachez
l'autre extrémité au dos de l'unité (même que ci-dessus).
B) Utilisez les plaques murales de la sortie d'échappement pour couvrir les trous dans le mur
quand l'unité n'est pas en service.
NOTA:
Installation du boyau d'échappement
• Le boyau d'échappement fourni peut s'étendre
de 5.75po à 63po/40cm à 160cm aux fins
d’installation. Nous recommandons que vous
employiez la longueur la plus courte possible de
boyau.
• Faites attention d’empêcher tout type de
courbure au milieu du boyau d'échappement, car
ceci emprisonnera l'air d'échappement chaud,
qui retournera dans la pièce et affectera la
fonction de refroidissement de l'unité (Fig. 10).
La longueur du boyau d'échappement est
spécialement conçue selon les spécifications de ce
produit. Ne remplacez pas ou n’allonger pas celui-ci
au moyen de votre propre boyau car ceci pourrait
faire mal fonctionner l'unité (Fig. 11).
C) Après l’installation des boyaux, branchez le fil d'alimentation électrique
et mettez l'unité en marche.
Figure 10
RECOMMANDATION DU MANUFACTURIER.
AVANT D'ENTREPRENDRE TOUTE INSTALLATION DE CONDUITS DANS LE
MUR, NOUS RECOMMANDONS QUE VOUS CONSULTIEZ UN
PROFESSIONNEL BIEN INFORMÉ
ATTENTION
AVERTISSEMENT!
Page 39

SECTION 5 FONCTIONNEMENT DU CLIMATISEUR MOBILE
35
5.1 PANNEAU DE COMMANDE ET FONCTIONS D’OPÉRATION
Si l'unité est arrêtée pendant qu’elle fonctionne, attendez au
moins trois minutes avant de la repartir.
1) Bouton Marche/Arrêt [ON/OFF] : Utiliser pour activer ou arrêter l'unité.
2) Bouton de sélection de mode d'opération [Mode] : Utiliser pour choisir le mode
d'opération : Mode automatique, mode Ventilation seulement «FAN ONLY», mode Sec-Doux
«SOFT-DRY», et mode de Refroidissement «COOL».
3) Bouton de sélection de vitesse [Fan] : Utiliser pour choisir la vitesse de ventilateur :
Haute vitesse ou basse vitesse.
4) Bouton vers le haut ou bouton vers le bas: Bouton de changement de la
température ou de sélection de délai de temps [Temp/Time] : Utilisez ces deux boutons pour
sélectionner la température désirée. L'unité de température peut être en modes Fahrenheit ou
centigrade. Appuyez sur le bouton Marche/Arrêt « ON/OFF» pour plus de 20 secondes, et puis
relâcher. L'unité de température sera changée de Fahrenheit à centigrade ou vice versa. Pendant le
réglage de la minuterie, ces boutons sont également utilisés pour changer le délai de temps.
5) Bouton de réglage de la minuterie ou bouton d'annulation [Timer] : Utiliser pour
régler ou décommander la minuterie TIMER-ON ou TIMER-OFF. Lorsque l'unité est en fonction,
l'unité peut être réglée au moyen de TIMER-OFF. Lorsque l'unité est éteinte, l'unité peut être
réglée avec TIMER-ON.
AVERTISSEMENT
Figure 12
Bouton
Panneau de support
Affichage LCD
Mode
Ventilateur
Réglage de la
minuterie
Minuterie
Alimentation électrique
Niveau de l’eau
Marche/Arrêt
Température/Temps
Page 40

SECTION 5 FONCTIONNEMENT DU CLIMATISEUR MOBILE
36
5.1 PANNEAU DE COMMANDE ET FONCTIONS D’OPÉRATION (SUITE)
RÉGLAGE DE L’APPAREIL:
Lorsque l'unité est en fonction [ON], appuyez sur le bouton de réglage de la minuterie [TIMER] , vous
verrez “ “ clignoter dans l’afficheur de réglage de la minuterie et l'indicateur de réglage sera activé dans
le panneau de commande. Appuyer sur le bouton vers le bas ou vers le haut pour changer le délai de
temps; les chiffres clignotants changeront en conséquence, jusqu'à ce que vos délais de temps désirés
apparaissent. Le temps de délai désiré clignotera pendant dix (10) secondes. Après ces dix (6) secondes, les
chiffres changeront pour montrer le délai de temps sélectionné. Par après, le délai de temps affiché diminuera
par tranches de dix (10) minutes.
Lorsque l'unité est éteinte [OFF], si elle n’a pas été réglée au mode Délai de temps [TIME DELAY], appuyez sur
le bouton Minuterie [TIMER] . L'unité entre dans le mode de programmation de la minuterie. Vous verrez
“ “ clignoter dans l’affichage de réglage, et l'indicateur de réglage sera activé dans le panneau de
commande. Appuyer sur le bouton vers le bas ou vers le haut pour régler le temps de délai désiré.
Lorsque vous réglez le temps de délai, les autres réglages comme le mode d'opération [Operation Mode],
le mode ventilation [Fan Mode], ou le réglage de la température [Set Temperature], apparaîtront
également. Dix (10) secondes plus tard, ces modes disparaîtront mais seront retenus en mémoire par le
contrôleur principal.
COMMENT DÉCOMMANDER :
Lorsque l'unité est réglée à l’aide des fonctions TIMER-OFF ou TIMER-ON, appuyez sur le bouton de réglage
de la minuterie [TIMER] et vous verrez le temps de délai sélectionné, appuyez alors dans les dix (10)
secondes pour décommander le réglage de la minuterie.
5.2 AFFICHAGE LCD
Mode automatique [Auto mode]
Mode SEC-DOUX [Soft-dry mode]
Mode de refroidissement [Cooling mode]
Mode Ventilateur seulement [Fan-only mode]
Mode Fahrenheit [Fahrenheit mode]
Mode Centigrade [Centigrade mode]
Figure 13
Page 41

SECTION 5 FONCTIONNEMENT DU CLIMATISEUR MOBILE
37
5.3 FONCTIONNEMENT DE LA TÉLÉCOMMANDE (MODÈLE KY-25Y SEULEMENT)
La fonctionnalité des six (6) boutons sur la
télécommande est identique à celle des boutons
sur le panneau de commande. Les icônes pour
certains boutons peuvent légèrement différer.
La télécommande utilise des batteries de lithium,
de modèle : CR2025 (Inclus). Installez les
batteries avant d'employer la télécommande.
Vous pouvez actionner l'unité au moyen du
panneau de commande ou de la télécommande.
OPÉRATION DE
REFROIDISSEMENT:
1) Branchez le fil d’alimentation à la prise de
courant.
2) Activez l'unité en appuyant sur le bouton
Marche/Arrêt [ON/OFF] sur le panneau
de commande ou sur la télécommande.
3) Appuyez sur le bouton Mode sur le
panneau de commande ou sur la
télécommande . jusqu'à ce que le symbole
approprié apparaisse sur l'affichage.
4) Réglez la température à votre température
ambiante désirée au moyen de l’échelle de
température de 18°C-32°C/64°F-90°F. Les
températures recommandées sont
27-29°C/80-84°F.
5) Sélectionnez la vitesse du ventilateur en
appuyant sur le bouton de ventilateur
[FAN] sur le panneau de commande ou
sur la télécommande .
OPÉRATION EN MODE SEC-DOUX «SOFT-DRY»:
1) Branchez le fil d’alimentation à la prise de courant.
2) Activez l'unité en appuyant sur le bouton Marche/Arrêt [ON/OFF] sur le panneau de
commande ou sur la télécommande.
3) Appuyez sur le bouton Mode sur le panneau de commande ou sur la télécommande .
jusqu'à ce que le symbole approprié apparaisse sur l'affichage.
4) Réglez la température ambiante à une température appropriée.
5) Maintenez les fenêtres et les portes fermées pour permettre à l'unité de réduire l'humidité de la
pièce de façon efficace.
NOTA : L'unité n'effectuera pas sa fonction de déshumidification quand la température ambiante
est inférieure à 18°C/64°F. Le mode Sec-Doux est une opération de refroidissement très
douce consistant principalement à déshumidifier. Il n'abaissera pas la température ambiante
de beaucoup. Le ventilateur de l’unité intérieure fonctionne toujours à basse vitesse.
Figure 14
MARCHE/ARRÊT
VITESSE DU
VENTILATEUR
TEMP/HEURE
MINUTERIE
MODE
Page 42

OPÉRATION EN MODE VENTILATEUR SEULEMENT «FAN-ONLY» :
1) Branchez le fil d’alimentation à la prise de courant.
2) Activez l'unité en appuyant sur le bouton Marche/Arrêt [ON/OFF] sur le panneau de
commande ou sur la télécommande.
3) Appuyez sur le bouton Mode sur le panneau de commande ou sur la télécommande
jusqu'à ce que le symbole approprié apparaisse sur l'affichage.
4) Choisissez la vitesse du ventilateur en appuyant sur le bouton de vitesse de ventilateur [Fan]
sur le panneau de commande ou sur la télécommande .
Lorsqu’en mode Ventilateur seulement «FAN-ONLY», le boyau d'échappement n'est pas nécessaire, et
le moteur du côté du compresseur et du ventilateur de condenseur ne fonctionnera pas. Dans ce mode,
le réglage de la température n'a aucune signification et ne contrôle aucune action.
OPÉRATION EN MODE AUTOMATIQUE «AUTO»:
1) Branchez le fil d’alimentation à la prise de courant.
2) Activez l'unité en appuyant sur le bouton Marche/Arrêt [ON/OFF] sur le panneau de
commande ou sur la télécommande.
3) Appuyez sur le bouton Mode sur le panneau de commande ou sur la télécommande
jusqu'à ce que le symbole approprié apparaisse sur l'affichage.
4) Réglez la température ambiante à une température appropriée à l’aide des boutons changement
de température vers le bas ou vers le haut.
5) Sélectionnez la vitesse du ventilateur en utilisant le bouton de vitesse du ventilateur [FAN
SPEED] sur le panneau de commande ou sur la télécommande .
Lorsqu’en mode Automatique «AUTO», l'unité opère en mode Ventilateur seulement quand la
température ambiante est en dessous de 27°C/81°F. Elle opère en mode de refroidissement quand la
température ambiante est au-dessus de 27°C/81°F.
RÉGLAGE DE LA FONCTION DE MINUTERIE «TIMER-ON»:
Comment régler:
Quand l'unité est éteinte, vous pouvez régler la minuterie afin que l’unité s’active automatiquement.
1) Appuyer sur le bouton réglage de la minuterie [TIMER SET] sur le panneau de commande ou
sur la télécommande . Vous verrez “ “ clignoter dans la fenêtre de réglage de la minuterie, et
l'indicateur de minuterie apparaîtra sur le panneau de commande. Les autres modes de réglage tels
le mode d'opération [Operation Mode], de Ventilateur [Fan Mode], le réglage de la
température [Set Temperature Mode] apparaîtront également, vous permettant de les changer
ou de les régler.
2) Appuyer sur le bouton vers le bas ou vers le haut pour changer le réglage du délai de temps
au délai de temps désiré.
3) Après un délai de dix (10) secondes (n’ayant pas appuyé sur aucun bouton), le chiffre changera en
affichage, et les autres modes de réglage disparaîtront. Le processus de réglage de la minuterie est
maintenant complété. Par après, le délai de temps affiché diminuera par tranches de six (6) minutes.
Lorsque le décompte de temps diminuera à ZÉRO et disparaîtra, l'unité s’activera
automatiquement selon votre réglage.
Pour annuler:
Lorsque l’unité est réglée en mode «TIMER-ON», pendant que l’unité est fermée, commencez par
appuyer sur le bouton TIMER sur le panneau de commande ou sur la télécommande afin de
visualiser le réglage de la minuterie, les chiffres de Temps clignoteront alors. Appuyer à nouveau sur le
bouton TIMER et le réglage de la minuterie sera annulé. L’indicateur de minuterie sur le panneau de
commande s’éteindra alors.
SECTION 5 FONCTIONNEMENT DU CLIMATISEUR MOBILE
38
5.3 FONCTIONNEMENT DE LA TÉLÉCOMMANDE (MODÈLE KY-25Y SEULEMENT) SUITE
Page 43

SECTION 5 FONCTIONNEMENT DU CLIMATISEUR MOBILE
39
RÉGLAGE DE LA FONCTION DE MINUTERIE «TIMER-OFF»:
Comment régler :
Lorsque l'unité est en fonction, après avoir été réglée en mode «TIMER-OFF», l'unité s'arrêtera à la fin
de votre délai de temps sélectionné.
1) Appuyer sur le bouton réglage de la minuterie [TIMER] sur le panneau de commande ou
sur la télécommande . Vous verrez l’indicateur de minuterie “ “ clignoter dans la fenêtre de
réglage de la minuterie, et l'indicateur de minuterie apparaîtra sur le panneau de commande.
2) Appuyer sur le bouton vers le bas ou vers le haut pour changer le réglage du délai de temps
au délai de temps désiré.
3) Après un délai de dix (10) secondes (n’ayant pas appuyé sur aucun bouton), le chiffre changera en
affichage. Le processus de réglage de la minuterie est maintenant complété. Par après, le délai de
temps affiché diminuera par tranches de 10 minutes.
Pour annuler:
Lorsque l’unité est réglée en mode «TIMER-OFF», pendant que l’unité est en marche, commencez par
appuyer sur le bouton TIMER afin de visualiser le réglage de la minuterie, les chiffres de Temps
clignoteront alors. Appuyer à nouveau sur le bouton TIMER et le réglage de la minuterie sera annulé.
L’indicateur de minuterie sur le panneau de commande s’éteindra alors.
INDICATION DE PLEIN D’EAU «WATER FULL»:
Sous des conditions de température normales, l’eau s’évaporera sans que vous soyez obligé de
vidanger l’unité.
L’indicateur de PLEIN D’EAU s’allumera lors de journées d’extrême humidité, lorsqu’en mode de
refroidissement ou en mode de déshumidification légère (soft-dry). Lorsque l’indicateur de PLEIN
D’EAU s’allume, cela signifie que le réservoir d’eau est plein. Le compresseur arrête alors de
fonctionner, mais les deux moteurs de ventilateur continuent de fonctionner. L’unité vidange l’eau
excédentaire une fois qu’un boyau de vidange ou un boyau d’arrosage y est connecté. Lorsque
l’indication de PLEIN D’EAU s’éteint, le compresseur se remet en marche.
5.3 FONCTIONNEMENT DE LA TÉLÉCOMMANDE (MODÈLE KY-25Y SEULEMENT) SUITE
5.4 INDICATION DE PLEIN D’EAU ET VIDANGER
POUR VIDANGER:
Seulement dans des conditions d’extrême humidité
1) Pour installer un boyau de vidange ou un boyau d’arrosage, vous devez d’abord éteindre l’unité en
la mettant en position d’arrêt « OFF ». ensuite, vous devez dévisser le capuchon de vidange sur le
raccord de vidange avant d’insérer le boyau de vidange blanc (5’3”/1.16m.) fourni avec votre unité.
(Attention: Il peut y avoir de l’eau derrière le capuchon de vidange. Ayez une cuvette ou un
récipient prêt à attrape l’écoulement potentiel). Après avoir relié le boyau de vidange à l’intérieur
du raccord de vidange (Fig.15), assurez-vous de placer l’autre extrémité du boyau dans un seau ou
un récipient pour y recueillir l’eau excédentaire. Vérifiez régulièrement le niveau d’eau dans le
récipient pour éviter tout débordement.
Au lieu du boyau de vidange fourni avec votre unité, vous pouvez aussi utiliser un boyau
d’arrosage (dans le cas où vous avez besoin d’une plus longue distance que celle fournie par le
boyau de vidange).Dans ce cas, vissez l’extrémité femelle d’un boyau d’arrosage au filetage
extérieur du raccord de vidange (Fig.16). Une fois le boyau d’arrosage relié, placez l’autre extrémité
du boyau à l’extérieur de la maison ou à tout autre endroit où l’eau excédentaire peut être
vidangée en toute sécurité.
Veuillez noter que l’efficacité de refroidissement de votre unité sera affectée si le boyau de vidange
ou le boyau d’arrosage y reste toujours relié. Le boyau de vidange ou le boyau d’arrosage ne doit
être utilisé que lorsque l’indicateur de PLEIN D’EAU est allumé.
Page 44

SECTION 6
ENTRETIEN DU CLIMATISEUR MOBILE
40
2) Maintenant, mettez l'unité en position de marche ON et réglez-la à nouveau à son réglage
précédent (mode de REFROIDISSEMENT ou de DÉSHUMIDIFICATION LÉGÈRE « SOFT-DRY »). La
pompe de vidange commencera à pomper l'eau hors de l'unité. (si vous utilisez un seau d'eau,
veuillez vérifiez le niveau d'eau expulsé pour vous assurer qu'il n’y ait pas de débordement.) Une
fois que le voyant indicateur de plein d’eau « WATER FULL » s'éteint... le cycle de VIDANGE est
complété. Alors, arrêtez l'unité, enlevez le boyau de vidange ou le boyau d’arrosage, et remettez
l'unité en marche « ON » et à son réglage précédent (mode de REFROIDISSEMENT ou de
DÉSHUMIDIFICATION LÉGÈRE « SOFT-DRY »).
NOTE: L'efficacité de refroidissement de votre unité sera affectée si le boyau de vidange ou le
boyau d’arrosage y est toujours raccordé. Le boyau de vidange ou le boyau d’arrosage doit
être utilisé seulement quand l’indicateur de plein d’eau « WATER FULL » est allumé.
ASSUREZ-VOUS QUE LE CAPUCHON DE DRAIN SOIT RÉINSTALLÉ CORRECTEMENT
AFIN D’EMPÊCHER LES FUITES.
1
2
3
1. Raccord de vidange
2. Boyau de vidange
3. Seau d’eau
Figure 15
Figure 16
5.3 INDICATION DE PLEIN D’EAU ET VIDANGER SUITE
Page 45

A) Par une journée chaude, mettez l'unité en marche en mode
Ventilation seulement « FAN-ONLY » pour quelques heures
de sorte que l'intérieur puisse se dessécher complètement.
B) Arrêtez l'unité et retirez la prise d'alimentation électrique.
C) Videz l'eau condensée résiduelle en débranchant le
capuchon de raccord de décharge inférieur situé à l’arrière
vers le bas de l'unité. Après avoir relié le boyau de vidange
blanc de 12'/3.65m, assurez-vous que l'autre extrémité est
placée dans un seau ou un récipient pour recueillir l'eau.
D) Débranchez le boyau d'air chaud, raccourcissez-le et
empaquetez-le dans la boîte.
E) Nettoyez le filtre et séchez-le complètement avant de le
remettre en place.
F) Couvrez l'appareil pour le protéger contre la poussière.
Nous recommandons que l'unité soit remise dans sa boîte
et ses emballages originaux.
G) L'unité devrait être entreposée dans un endroit sec frais.
N'empilez pas d’objets lourds sur le dessus de l'unité.
SECTION 6
ENTRETIEN DU CLIMATISEUR MOBILE
41
6.2 NETTOYAGE OU REMPLACEMENT DU FILTRE À AIR
Si le filtre à air à air est bloqué par beaucoup de poussière, le volume du flux d'air sera réduit et
l'effet de refroidissement sera inférieur. Nous vous recommandons de nettoyer le filtre une fois
toutes les deux semaines ou tel que nécessaire.
A) Retirez le filtre du compartiment de filtre à l’avant de l'unité.
B) Lavez le filtre à air en l'immergeant doucement dans de l'eau tiède (environ 40°C/104°F) avec
un détergent doux. Rincez le filtre et séchez-le complètement dans un endroit ombragé.
C) Remettez le filtre dans le compartiment de filtre après qu'il soit complètement séché.
D) Si le filtre est déchiré ou inutilisable, commandez un nouveau filtre en appelant le
département de service à la clientèle de Sunbeam au 1-877-383-6399 (8h30-17h30 H.N.E).
6.3 PIÈCES EN PLASTIQUE EXTERNES
A) Évitez d’exposer l'unité au soleil direct.
B) Nettoyez la surface avec un tissu humide.
C) Pour les modèles finis en acier inoxydable, un décapant d'acier inoxydable de bonne qualité
devraient être employé.
6.4 ENTREPOSAGE À LA FIN DE LA SAISON DE REFROIDISSEMENT
Figure 17
Raccord de décharge inférieur
6.1 MAINTENANCE
AVERTISSEMENT
• Assurez-vous de couper l'alimentation électrique et de retirer la fiche de la prise de courant
avant d'effectuer toute activité d'entretien.
• N'immergez pas l'unité dans l'eau ou autres liquides.
• Ne versez pas de liquides dans l'unité.
• Prenez des précautions spéciales pour éviter les rebords tranchants ou pointus de quelques
pièces.
• N'employez aucun type de dissolvant chimique pour nettoyer l'unité, puisque ceux-ci peuvent
déformer le boîtier de l’unité.
Page 46

SECTION 7
DÉPANNAGE
42
Vérifiez si... Puis...
Vidangez l’eau (voir page 38).
Vidangez l’eau à l’intérieur de l’unité (voir page 38). Attendez 1 heure
pour permettre au ventilateur côté condenseur d’expulser l’eau
vers l’extérieur.
Le réservoir d’eau
est plein.
La prise LCDI a déclenché.
Appuyez sur le bouton de Remise en circuit «RESET» sur la
prise LCDI.
L’indicateur de bac plein
« Water-Full » est affiché.
Vérifiez si... Puis...
Ouvrez l’entrée ou la sortie d’air.
L’entrée ou la sortie
d’air est fermée.
Une source de chaleur se
trouve dans la pièce.
Déplacez la source de chaleur.
Réglez la température de refroidissement au niveau qui convient
Le filtre à air est souillé.
Nettoyez le filtre à air selon la section « Nettoyage du filtre à air ».
La température de
refroidissement est
bien réglée.
7.1 LE CLIMATISEUR MOBILE NE FONCTIONNE PAS
7.2 FAIBLE RENDEMENT DE REFROIDISSEMENT
Le ventilateur intérieur est
réglé à une faible vitesse
Augmentez la vitesse du ventilateur intérieur.
Le cordon d'alimentation
est débranché.
Branchez solidement le cordon d'alimentation dans une prise de
courant de tension appropriée.
Attendez que le courant soit rétabli.
Un fusible domestique a
été grillé ou un disjoncteur
a été déclenché.
Remplacez le fusible ou réenclenchez le disjoncteur. Assurez-vous que le
climatiseur mobile est branché dans une prise de courant exclusive mise
à la terre, tel que décrit dans les instructions d'installation.
Panne de courant locale.
L’heure est réglée
correctement.
Réglez l’heure.
Vous pouvez régler facilement de nombreux problèmes courants du climatiseur mobile et ainsi
économiser les frais d'appel de service. Essayez les suggestions ci-dessous pour déterminer si vous
pouvez régler le problème sans aide extérieure.
Page 47

SECTION 7
DÉPANNAGE
43
Vérifiez si... Puis...
L’unité vibre lorsqu’elle
fonctionne.
L’endroit où l’unité est placée n’est pas égal.
Trouvez un endroit égal et solide.
7.3 BRUIT ET VIBRATION
L’unité émet un bruit.
Si le bruit n’est pas très élevé et provient du compresseur, de
l’évaporateur ou du condensateur, c’est normal.
Vérifiez si... Puis...
Attendez jusqu’à ce que le courant soit rétabli.
La tension de
l’alimentation locale
est normale.
Le raccord de
déchargement d’air chaud
n’est pas correctement
installé.
Installez le raccord de déchargement d’air chaud correctement tel
qu’élaboré dans ce guide.
7.4 LE CLIMATISEUR MOBILE DÉMARE ET ARRÊTER RAPIDEMENT
La température extérieure
est extrêmement chaude.
Réglez le ventilateur à la vitesse élevée afin de laisser l’air circuler
plus rapidement sur les serpentins de refroidissement.
Vérifiez si... Puis...
7.2 FAIBLE RENDEMENT DE REFROIDISSEMENT
La température extérieure
est inférieure à 64 °F (18 °C).
Ne tentez pas de faire fonctionner le climatiseur mobile en mode de
refroidissement si la température extérieure est inférieure à 18 °C/64 °F.
Fermez toutes les portes et les fenêtres.
Les portes et les
fenêtres sont ouvertes.
L’unité est réglée
en mode de
déshumidification.
Réglez l’unité en mode de refroidissement.
Page 48

SECTION 8 SCHÉMA ÉLECTRIQUE
44
C1: Condensateur de marche pour le moteur de ventilateur côté condenseur
C2: Condensateur de marche pour le compresseur
C3: Condensateur de marche pour le moteur de ventilateur côté évaporateur
1. Afficheur LCD
2. Circuit imprimé - Panneau de commande
3. Circuit imprimé - Récepteur
4. Alimentation électrique
5. Capteur de température ambiante
6. Circuit imprimé - Contrôleur principal
7. Détecteur du niveau d’eau
8. Processeur à puce
9. Circuit imprimé – Contrôleur principal
10. Transformateur
11. Moteur de ventilateur côté condenseur
12. Mise hors circuit
13. Pompe à eau
14. Moteur côté évaporateur
15. Mise hors circuit
16. Compresseur
17. Protecteur
Figure 17
2
3
4
5
6
7
8
9
11
13
14
16
10
17
1
12
15
Page 49

SECTION 9 GUARANTIE
45
GROUPE STAR ELITE/ELITE
POLICE DE GARANTIE LIMITÉE D’UNE ANNÉE
EFFICACE: AVRIL 2005
GARANTIE LIMITÉE
Star Elite/Elite Group, Inc. (ci-après désigné sous le nom SE/EG)., garantit par la présente et sujet aux conditions spécifiées
dans les paragraphes ci-après que si ce produit présente un vice matériel ou de fabrication durant la période spécifiée de
couverture de la garantie, SE/EG, à sa discrétion, réparera ou remboursera ce produit effectuant tout remplacement de
pièces nécessaire. Les frais de transport sur les pièces soumises pour la réparation ou le remboursement, sous cette
garantie, doivent être soutenus par l'acheteur.
AUCUNE AUTRE GARANTIE EXPRESSE N’EST CONSENTIE. LES GARANTIES IMPLICITES, Y COMPRIS CELLES DE LA VALEUR
MARCHANDE ET DE CONVENANCE À UNE FIN PARTICULIÈRE, SONT LIMITÉES À LA PÉRIODE DE TEMPS SPÉCIFIÉE, OU DANS
LA MESURE AUTORISÉE PAR LA LOI. TOUTES LES GARANTIES IMPLICITES SONT EXCLUES. LA RESPONSABILITÉ POUR LES
DOMMAGES INDIRECTS EN VERTU DE TOUTES LES GARANTIES EST EXCLUE DANS LA MESURE OU CETTE EXCLUSION EST
AUTORISÉE PAR LA LOI.
PÉRIODE DE GARANTIE
SE/EG garantit qu’à compter de la date d’achat, ce produit ne présentera aucun vice mécanique pour une période d’un (1)
an, et pour une période de quatre-vingt dix (90) jours pour les pièces et la main d’œuvre. À sa discrétion, SE/EG réparera
ou remboursera ce produit s’il le juge défectueux, durant la période de couverture de la garantie. Si le produit n’est plus
disponible, SE/EG peut choisir de rembourser votre achat, (à sa valeur dépréciée) sous preuve d’achat originale. Ceci est
votre garantie exclusive.
CONDITIONS
REÇU DE CAISSE ORIGINAL: Cette garantie est valable pour l’acheteur original à partir de la date d’achat initiale et ne
peut être transférée. Veuillez conserver le reçu original. Une preuve d’achat est requise pour obtenir une application de la
garantie et/ou un remboursement. Les distributeurs de SE/EG, centres de service ou magasins de revente de produits SE/EG,
n’ont pas le droit de transformer, modifier ou changer de quelque façon les termes et les conditions de cette garantie.
…. Suite à la prochaine page…
est une marque déposée de Sunbeam Products, Inc. utilisée en vertu d'une autorisation.
Produit Usage Consommateur/Résidentiel seulement
Climatiseur 1 Année
Déshumidificateur 1 Année
Rafraîchisseur de vin/Centre de boissons 1 Année
Appareil à glaçons
Refroidisseurs/Réchauffeurs 1 Année
Thermoélectriques Mini & de 16L 1 Année
Foyer/Chaufferette électrique 1 Année
Pièces & Main d’oeuvre 90 jours
Page 50

46
SECTION 9 GUARANTIE
L'ENREGISTREMENT DE GARANTIE N'EST PAS NÉCESSAIRE POUR OBTENIR LA GARANTIE SUR LES PRODUITS SE/EG.
CONSERVEZ VOTRE REÇU DE CAISSE COMME PREUVE DE D'ACHAT. SI VOUS NE FOURNISSEZ PAS LA PREUVE DE LA DATE
D'ACHAT INITIALE LORSQUE LE SERVICE DE GARANTIE EST DEMANDÉ, LA DATE DE FABRICATION DU PRODUIT SERA
EMPLOYÉE POUR DÉTERMINER LA GARANTIE.
DÉPRÉCIATION: Toute unité étant diagnostiquée comme non fonctionnelle et justifiant un échange, pendant la période
existante de garantie, sera sujette à des honoraires de dépréciation ou d'utilisateur appropriés.
À PROPOS DE VOTRE GARANTIE DE PRODUIT: Nous encourageons la réparation sous garantie et nous excusons de tout
inconvénient. Tout marchand de service autorisé peut effectuer des réparations sous garantie. La plupart des réparations
sous garantie sont effectuées systématiquement, mais parfois les demandes de service sous garantie peuvent ne pas être
appropriées. Par exemple, le service sous garantie ne s'appliquerait pas si les dommages au produit se produisaient en
raison de l'abus, du manque d'entretien de routine, de l'expédition, de la manipulation, de l'entreposage ou d’une
mauvaise installation. De même, la garantie est nulle si la date de fabrication ou le numéro de série sur le produit a été
enlevé ou l'équipement a été changé ou modifié. Pendant la période de garantie, le marchand de service autorisé, à son
option, réparera ou remboursera toute partie qui, sur examen, s'avère défectueuse sous une utilisation et un service
normaux.
USURE NORMALE: Cette garantie ne couvre pas l’usure normale des pièces ni les dommages attribuables aux suivantes : la
négligence, l’utilisation abusive du produit, le branchement sur un circuit de tension ou courant inapproprié, le nonrespect du mode d’emploi ou une utilisation contraire aux instructions d’utilisation, la déviation des instructions
concernant le stockage et le transport; le démontage; la réparation ou l’altération par quiconque, sauf par SE/EG ou un
Centre de service agréé de SE/EG. De plus, cette garantie ne couvre pas les cas de force majeure, tels les incendies,
inondations, ouragans et tornades
SE/EG ne pourra être tenu responsable des dommages indirects ou imprévus qui résulteraient de toute rupture de garantie
expresse ou implicite. Sauf dans le cas où la loi applicable l’interdit, toute garantie implicite de valeur marchande ou de
convenance à une fin particulière est limitée à la durée de la présente garantie. Certaines provinces ou juridictions et
certains états ne permettent pas l’exclusion ou la restriction des dommages imprévus ou indirects et n’admettent pas de
limites quant à la durée d’une garantie implicite, de sorte que les exclusions/restrictions exprimées ci-dessus, peuvent ne
pas s’appliquer. Cette garantie vous donne des droits spécifiques et vous pouvez en avoir d’autres qui varient selon la
province ou l’état.
COMMENT OBTENIR LE SERVICE DE GARANTIE: Vous devez entrer en contact avec le Service à la clientèle/Soutien
technique de SE/EG à notre numéro en service libre appel 1-877-383-6399. Un représentant du Service à la clientèle/Soutien
technique essayera de résoudre les problèmes couverts par la garantie par téléphone. Si la résolution par téléphone n'est
pas possible, le représentant du Service à la clientèle/Soutien technique exigera votre aide pour effectuer des procédures
de diagnostic de routine. Cette garantie est en vigueur pour les périodes de temps énumérées ci-dessus et sujet aux
conditions prévues dans cette police. Pour le service de garantie, trouvez le marchand autorisé de service le plus proche en
appelant au 1-877-383-6399. Le service de garantie peut seulement être effectué par un marchand de service autorisé de
Star Elite, Inc./Elite Group, Inc.
est une marque déposée de Sunbeam Products, Inc. utilisée en vertu d'une autorisation.
Page 51

GUÌA DE USO Y CUIDADO E
INSTRUCCIONES DE INSTALACIÓN
47
Acondicionador de aire digital 9000 BTU
con control remoto - Metal blanco
Acondicionador de aire digital 9000 BTU
con/sin control remoto - Acero inoxidable
Page 52

SECCIÓN 1 INSTRUCCIONES IMPORTANTES SOBRE SEGURIDAD
48
Su seguridad y la de los demás son muy importantes.
En el aparato y en este manual encontrará muchos mensajes importantes sobre seguridad.
Siempre lea y haga todo lo que indican los mensajes de seguridad.
Este símbolo indica los posibles peligros que pueden ser fatales o causar heridas graves.
Estas palabras significan:
Si no sigue inmediatamente las instrucciones, puede tener un accidente
fatal o una herida grave.
Todos los mensajes de seguridad indicarán los posibles peligros, la manera de reducir la posibilidad de
lesión y las consecuencias posibles, si no se siguen las instrucciones.
PELIGRO
ADVERTENCIA
1.1 SEGURIDAD DEL ACONDICIONADOR DE AIRE
1.2 PELIGRO Y ADVERTENCIA
ADVERTENCIA - Para reducir el riesgo de incendios, electrocución, lesiones o enfermedad al
usar su acondicionador de aire portátil, observe estas precauciones básicas:
• Enchúfelo en una toma de corriente exclusiva puesta a tierra para 3 patas.
• No retire la pata de puesta a tierra.
• No use un adaptador.
• Cuente con dos o más personas para mover o instalar el acondicionador de aire portátil.
• No tome el agua recogida dentro del gabinete.
• Siga las instrucciones de este manual para limpiar la unidad.
• No inserte ningún objeto dentro de la unidad.
• Apague siempre la unidad antes de desenchufarla.
• Apague y desenchufe la unidad antes de limpiarla o antes de hacerle cualquier mantenimiento.
• Nunca repare la unidad ni cambiarle los cordones por su propia cuenta. Cualquier reparación o
manipulación de la unidad llevada a cabo por una persona no calificada podrá anular la
garantía.
• No coloque ningún objeto dentro de las rejillas de salida o de entrada de aire. No obstruya las
rejillas de salida o de entrada de aire.
• No use esta unidad dentro de armarios, gabinetes y/o espacios apretujados entre muebles.
• No use esta unidad cerca de sustancias inflamables y/o explosivas.
• No opere esta unidad sin filtros. Mantenga los filtros limpios.
• Encienda y apague la unidad siempre con el interruptor ON/OFF.
1.3 INSTRUCCIONES IMPORTANTES SOBRE SEGURIDAD
Page 53

SECCIÓN 1 INSTRUCCIONES IMPORTANTES SOBRE SEGURIDAD
49
Ayúdenos a ayudarlo:
• Asegúrese que el voltaje de su corriente eléctrica corresponda al voltaje en la placa de datos de la unidad.
• Mantenga los niños lejos de la unidad.
• Verifique el cordón eléctrico periódicamente. No use cordones eléctricos dañados.
• La longitud del cordón del acondicionador de aire portátil ha sido seleccionada correctamente para reducir
el riesgo de peligros.
• No use cordones de extensión.
• La unidad debe estar ubicada en un área seca.
• La unidad es para usar en interiores únicamente. No la use en exteriores.
• Use únicamente los accesorios suministrados por el proveedor. El uso de accesorios provenientes de fuentes
distintas al proveedor es peligroso y puede dañar la unidad.
• Mantenga la unidad alejada de cualquier tipo de fuente de calor y de los rayos directos del sol; mantenga
las persianas y cortinas cerradas durante la parte más asoleada del día.
• No sumerja la unidad en agua ni en ningún otro líquido.
• Mantenga la unidad alejada de áreas donde corre el riesgo de ser salpicada con agua.
• Para evitar el riesgo de electrocución, nunca se debe usar la unidad en baños ni en ninguna otra área
húmeda o con vapores.
• Nunca use esta unidad en una pendiente – La unidad está apoyada sobre cuatro rueditas.
• En caso de incendio, use extintores de dióxido de carbono (CO2). No use extintores de agua o polvo.
Este acondicionador de aire portátil ha sido diseñado para crear un clima ideal dentro de su
habitación. Úselo únicamente para el fin específico para el cual ha sido diseñado y de
conformidad con las instrucciones de este manual.
Esta unidad está destinada al uso doméstico únicamente, y no para usos comerciales.
Use esta unidad en el tamaño de habitación recomendado. (Consulte “Especificaciones Técnicas”).
No coloque el acondicionador de aire en sitios donde muebles u otros objetos puedan obstruir el
flujo de aire fresco.
Coloque la unidad en enfriamiento máximo y el ventilador en alto inicialmente, luego coloque la
unidad en un ajuste cómodo.
Nota: Se recomienda encender el acondicionador de aire cuando la temperatura de la
habitación esté en 75°F/23.9°C. No espere hasta que la habitación esté
excesivamente caliente.
Nota: Esta unidad está equipada con un termostato y deberá encenderse automáticamente
cuando se alcance la temperatura pretedeterminada, pero sólo si está fijada en modo
enfriamiento. Si está fijada en suave-seco o ventilador únicamente, el compresor
no se encenderá.
A
BC D
Illus. 1
No inserte ningún
objeto.
Mantenga los niños y
las mascotas alejados.
No utilice el paño mojado
para limpiar - utilice
solamente los paños
húmedos.
Sea cauteloso de
donde se coloca el
enchufe.
Page 54

SECCIÓN 1 INSTRUCCIONES IMPORTANTES SOBRE SEGURIDAD
50
1.4 RECOMENDACIONES PARTICULARES
• Coloque el climatizador portátil en una superficie nivelada y a 20 pulgadas (50,8 cm) como
mínimo de la pared.
• La toma de corriente debe quedar siempre accesible una vez instalado el aparato.
• El climatizador debe estar siempre vertical para un adecuado funcionamiento del compresor.
• Nunca coloque el climatizador cerca de una fuente de gas ni de ninguna otra materia inflamable.
• Mantenga alejado el aparato de la televisión y de la radio para evitar interferencias electromagnéticas.
• No vaporice productos químicos como insecticidas, pintura ni ningún otro producto inflamable cerca del
aparato para evitar toda interacción que pueda deformar el exterior de plástico del aparato o provocar
interferencias electromagnéticas.
Estados Unidos únicamente: si los códigos permiten un cable de conexión a tierra separado,
se recomienda seguir el recorrido a tierra adecuado, cuando se use.
Consulte a un electricista acreditado, si no está seguro de que el acondicionador de aire portatil
esté conectado a tierra.
Se requiere un circuito de alimentación exclusivo, trifilar, monofásico, de 60Hz C.A. solamente. Para el
amperaje del circuito necesario para su modelo en particular, vea la placa con el modelo y la serie.
Si en la placa dice 115 voltios y un máximo de 7,5 amperios, el aparato puede conectarse a un fusible o
disyuntor con otros aparatos.
NO OBSTANTE, EL AMPERAJE MÁXIMO DE TODOS LOS DISPOSITIVOS CONECTADOS A ESE FUSIBLE O
DISYUNTOR NO PUEDE EXCEDER EL AMPERAJE DEL FUSIBLE O DISYUNTOR.
Si en la placa dice 115 voltios y más de 7,5 amperios, el aparato deberá tener su propio fusible o
disyuntor, y no se debería conectar ningún otro dispositivo o aparato en ese fusible o disyuntor.
La placa da la capacidad de BTU, el amperaje, el voltaje y la carga de fluido frigorígeno exigidos.
ADVERTENCIA
Peligro de choque eléctrico
Enchufe en un tomacorriente de 3 espigas con conexión a tierra.
No elimine la espiga de conexión a tierra.
No use una extensión.
El no seguir estas instrucciones puede producir la muerte, incendios o choques eléctricos.
1.5 REQUISTOS ELECTRICOS
Page 55

SECCIÓN 1 INSTRUCCIONES IMPORTANTES SOBRE SEGURIDAD
51
Para su seguridad personal, este acondicionador de aire portatil debe conectarse a tierra. El
acondicionador de aire portatil viene con un cable de alimentación que tiene un enchufe de tres
espigas. Para reducir al mínimo el posible peligro de choque eléctrico, el cable deberá enchufarse en un
tomacorriente de tres espigas, conectado a tierra conforme a todos los códigos y ordenanzas locales. Si
no se cuenta con este tipo de tomacorriente, el consumidor deberá hacer instalar uno por un electricista
acreditado.
El cliente debe:
• Contratar un electricista acreditado
• Asegurarse de que la instalación eléctrica es adecuada y cumple con el Código Nacional de
Electricidad, ANSI / NFPA 70 – última versión,* y con todos los códigos y ordenanzas locales.
Copias de las normas vigentes pueden solicitarse a:
National Fire Protection Association
Batterymatch Park
Quincy Massachusetts 02269.
O a su Dirección Estatal de Electricidad.
1.6 MÉTODO RECOMENDADO DE PUESTA A TIERRA
Un detector e interruptor de fuga de corriente (LCDI) es un dispositivo que detecta la fuga de corriente entre
o desde los conductores de corriente en el cordón de un aparato e interrumpe el circuito en un nivel predeterminado de fuga de corriente. Como un LCDI puede detectar específicamente una fuga de corriente que
fluye a tierra, proporciona protección contra fuga a tierra para evitar la formación de arco eléctrico y otros
problemas, que surgen como resultado de fuga entre conductores.
Los LCDI están cubiertos bajo la UL 1699 standard for ARC Fault Current Interrupts (norma U.L. de 1699 para
interrupción de fuga de corriente de arco), que fue publicado en junio de 2002. Los dispositivos LCDI han sido
autorizados por el Código eléctrico nacional y Underwriters Laboratories para los cordones eléctricos en
acondicionador de aire de habitación a partir de agosto de 2004. Otras clases de aparatos requerirán
protección LCDI en el cercano futuro.
PRUEBA
1. Presione el botón de prueba, la unidad debe interrumpirse.
2. Presione el botón de reinicialización para ponerlo en uso.
NOTA: NO LO USE SI FALLA LA PRUEBA INDICADA ARRIBA.
En caso que se interrumpe este dispositivo, se debe corregir la causa del mal funcionamiento antes de usar
el dispositivo.
PRECAUCIÓN
Los conductores dentro de este cordón están rodeados de blindajes, que monitorean las fugas de corriente.
ESTOS BLINDAJES NO ESTÁN PUESTOS A TIERRA. Examine periódicamente los cordones por cualquier daño.
NO USE este producto si el blindaje está expuesto.
ADVERTENCIA
Este producto contiene químicos, incluyendo plomo, conocidos en el estado de California como causantes de
cáncer, defectos congénitos u otros daños reproductivos.
Lávese las manos después de manipularlos.
1.7 TECNOLOGÍA DE ENCHUFE LCDI (E.E.UU UNICAMENTE)
Page 56

SECCIÓN 1 INSTRUCCIONES IMPORTANTES SOBRE SEGURIDAD
52
Al recibir esta unidad, transpórtela en posición vertical únicamente y
coloque la unidad sobre una superficie uniforme. Retire la caja de cartón
sin voltearla bocabajo, ni colocarla de costado.
Sírvase observar: Si esta unidad es transportada, se debe dejar en
una posición vertical normal por lo menos durante 8 horas antes
del uso, para permitir que el líquido refrigerante y el aceite del
compresor se asienten.
a. Retire la cinta adhesiva en la parte superior de la caja de cartón.
b. Abra la caja de cartón.
c. Retire el empaque de espuma de poliestireno y las tablas esquineras
de protección.
d. Levante y sostenga la unidad arriba de la base del empaque de
espuma de poliestireno con dos personas, para no inclinar la unidad.
e. Retire la bolsa plástica.
f. Pase un paño sobre la unidad para limpiarla si se necesita.
g. Luego instale el ducto de escape de aire caliente para el lado del
condensador de acuerdo con las instrucciones de instalación.
1.8 DESEMPACADO DE LAS PIEZAS DE SU PRODUCTO
Mantén
galo en
posición
vertical
Illus. 2
1.9 ESPECIFICACIONES TÉCNICAS
Modelo #
Colór
Capacidad del indice de entfriamiento
Voltaje, frecuencia, fase
Corriente estimada
Presion diseñada
Refrigerante, cantidad
Capacidad del enchufe
Tipo de enchufe
Largo del cordón
Eliminación de humedad
Volumen de circulation de aire
Peso net (unidad solamente)
Dimensiones
KY-25/Y
Acero Inoxidable/Blanco
9000 BTU/hr
AC~115V/60Hz/1 PH
8.2A
Max/High 370 psi, Min/Low 150psi
R22/500g (17.6oz)
125V/15A
5-15P
6.43ft/1.96M
25.4oz/h / 0.75L/hour
5.67CMM/200CFM
24.75 kgs/54.56 lbs
13.8”L x 14”W x 31.42”H / 35.1cmL x 35.6cmW x 79.8cm H
NOTA
Los datos arriba se obtienen según las siguientes condiciones:
Condición de enfriamiento: Bulbo seco / Bulbo húmedo: 95°F/83°F (35°C/28.3°C) de acuerdo con la Norma
americana 128-2001.
Límites de operación durante el enfriamiento
Condición máxima: Bulbo seco / Bulbo húmedo: 104°F/80°F (40°C/26.7°C)
Condición mínima: Bulbo seco / Bulbo húmedo: 64.4°F/57.2°F (18°C/14°C)
Page 57

SECCIÓN 2
UN MENSAJE PARA USTED
53
Le agradecemos que haya comprado este aparato de Sunbeam®de alta calidad.
Para que usted goce de un funcionamiento sin problemas durante años, creamos la Guía de
empleo y cuidados, que contiene información valiosa sobre el funcionamiento y el
mantenimiento adecuado y seguro de su aparato. Sírvase leerla atentamente.
Sírvase registrar la información sobre su modelo.
Cuando llame para hacer el servicio, deberá tener a mano el número completo del modelo y el
número de serie. Esta información se encuentra en la placa con el número de modelo y de serie.
Sírvase escribir a continuación ambos números. Escriba también la fecha de compra del aparato y
el nombre, la dirección y el número de teléfono de la tienda donde lo compró.
Número de modelo
Número de serie
Fecha de compra
Nombre de la tienda
Dirección de la tienda
Teléfono de la tienda
GUARDE ESTE MANUAL Y
LA FACTURA, JUNTOS Y EN UN LUGAR SEGURO, POR SI LOS NECESITA EN EL FUTURO.
La etiqueta se pone sobre el
lado derecho de unidad
Star Elite, una subsidiaria de Elite Group
1175 Place du Frère-André, Montréal, Québec H3B 3X9
1-877-383-6399 (8:30am-5:30pm E.S.T)
PONGA LA
ETIQUETA AQUÍ
Illus. 3
Parte trasera de la unidad:
Datos técnicos
Número para llamada de
servicio y etiqueta
Parte trasera de la unidad:
Etiqueta de advertencia
Page 58

SECCIÓN 3 PREPARACIÓN
54
3.1 HERRAMIENTAS NECESARIAS
1. Destornilladores Phillips y
de cabeza plana
2. Gafas de proteccion
3. Guantes
4. Cinta métrica
5. Cuchillo utilitario
Illus. 4
3.2 ACCESSORIOS
Illus. 5
1. Extremo del terminal interior
2. Ducto de escape
3. Kit de unidad de ventana
4. Pieza principal
5. Adaptador de kit de ventana
6. Manguera de desagüe (2)
Page 59

SECCIÓN 3 PREPARACIÓN
55
3.3 CABLE DE ALIMENTACIÓN Y TOMA DE CORRIENTE
Illus. 6
3.4 CARACTERÍSTICAS DE SU ACONDICIONADOR DE AIRE PORTATIL
• El enchufe debe estar bien fijado y no dañado.
• No enchufe la unidad con un adaptador.
• Asegúrese de que el enchufe esté bien insertado dentro
del receptáculo.
• El cordón de corriente no debe entrar en contacto con ningún tipo
de líquido; no lo manipule con las manos mojadas o húmedas.
• No oprima el cable ni deje que entre en contacto con una
superficie filosa.
• No use el cordón de corriente para arrastrar la unidad
• No deje el cordón en una pila de enredo cuando la unidad
está funcionando.
• No deje que el cordón de corriente entre en contacto con
superficies calientes.
• No deje el cordón de corriente en un área de mucho tráfico, lo que
expondrá el cordón a mayor posibilidad de daños
115 voltios (103.5 mín. - 126.5 máx.) 0-12 amperios
Fusible retardadora o cortacircuitos de 15 amperios
Cables de cobre calibre 14
Illus. 7
1. Entrada de aire
2. Filtro de aire
3. Ruedita
4. Panel de operación
5. Salida de aire
6. Receptor de señal de control
1
2
3
4
5
6
7
8
9
10
7. Entrada de aire para el lado del
condensador
8. Puerto de descarga de aire caliente
(Usar para conectar la manguera de aire)
9. Bomba de drenaje
10. Puerto de desagüe inferior
Delante
Detrás
Page 60

SECCIÓN 4
INSTALACIÓN DEL ACONDICIONADOR DE AIRE PORTATIL
56
4.1 INSTALACIÓN DEL ACONDICIONADOR DE AIRE PORTÁTIL
Illus. 8
• Encuentre el lugar adecuado para el acondicionador de
aire portátil. Deje al menos 20” (50.8cm) de espacio
alrededor de la unidad (Illus. 8).
Cuando usa la unidad como un acondicionador de aire o un
deshumidificador, el aire caliente debe descargarse fuera de
la habitación para completar el intercambio de aire del
condensador. Cuando la unidad está funcionando en
ventilador, no se lleva a cabo ningún intercambio de aire al
exterior. Usted no necesita colgar los kits de la ventana y los
ductos de escape de aire caliente cuando usa la unidad
como ventilador.
4.2 INSTALACIÓN DE LOS DUCTOS EN UNA
VENTANA / PUERTA CORREDIZA
A) Saque ambos extremos de los ductos de escape de aire caliente hasta aproximadamente 6”
/15,24cm.
B) Enrosque los ductos de escape en el sentido de las manecillas del reloj con un extremo en el
extremo del terminal en la parte posterior de la unidad y el otro extremo en el adaptador del
kit de la ventana.
C) Conecte el extremo terminal del ducto de escape a la parte posterior de la unidad.
D) Abra la ventana o la puerta corrediza en aproximadamente 5” /12,7cm.
E) Ajuste la longitud del kit de la ventana a la misma longitud de la ventana o de la puerta
corrediza. Use todos los paneles si es necesario. Corte la pieza para la ventana según la
necesidad para que se ajuste a la longitud de la ventana o puerta corrediza. Asegúrese que el
orificio en la pieza principal no esté cubierto con otras piezas.
F) Coloque el kit de la ventana en la ventana o la puerta corrediza. Cierre la ventana o la puerta
corrediza. Cierre la ventana o puerta hasta donde llegue.
G) Ajuste la longitud del ducto de escape y fije el adaptador del kit de ventana en los orificios en
el kit de la ventana.
NOTE: Al usar un kit de ventana en una ventana o una puerta corrediza, dicha ventana o puerta
no se cerrará ni se bloqueará correctamente. Se deberá tomar medidas de seguridad
adicionales.
Illus. 9
LA PARED
LA PARED
Page 61

SECCIÓN 4
INSTALACIÓN DEL ACONDICIONADOR DE AIRE PORTATIL
57
4.3 INSTALACIÓN DE LOS DUCTOS EN LA PARED
Illus. 11
A) Ud. no necesita usar el adaptador del kit de ventana. Conecte un extremo del ducto de escape en
un orificio de 5.6”/14,22cm de diámetro en la pared; fije el otro extremo a la parte posterior de la
unidad (igual que arriba).
B) Use las tapas de ductos de escape de pared para tapar los orificios en la pared cuando la unidad no
está en uso.
NOTA:
CONEXIÓN DEL TUBO DE ESCAPE
• La manguera de escape suministrada puede
extenderse desde 5,75” hasta 63” / 40cm hasta
160cm para hacer la conexión. Se recomienda
usar la longitud más corta posible de manguera.
• Preste atención para evitar cualquier tipo de
doblez en el medio de la manguera de escape,
puesto que esto retendrá el aire caliente de
escape que de se devolverá a la habitación
afectando la función enfriadora de la unidad
(Illus. 10).
La longitud del tubo de escape está determinada
especialmente de conformidad con las
especificaciones de este producto. No lo remplace ni
lo extienda con su propia manguera puesto que esto
podría hacer que la unidad funcione mal (Illus. 11).
C) Después de instalar los ductos, enchufe la unidad y enciéndala.
Illus. 10
RECOMENDACIONES DEL FABRICANTE.
ANTES DE EMPRENDER CUALQUIER INSTALACIÓN DE DUCTOS EN LA
PARED, RECOMENDAMOS QUE CONSULTE CON UN PROFESIONAL
CALIFICADO.
¡PRECAUCIÓN!
¡ADVERTENCIA!
Page 62

SECCIÓN 5
CÓMO HACER FUNCIONAR EL ACONDICIONADOR DE AIRE PORTATIL
58
5.1 PANEL DE CONTROL Y FUNCIONES DE OPERACIÓN
Si la unidad se apaga durante la operación, espere al menos tres
minutos antes de encenderla de nuevo.
Illus. 12
1) El botón encendido/apagado [On/Off]: Se usa para encender y apagar la unidad.
2) Botón selector de modo de operación [Mode]: Se usa para seleccionar el modo de
operación: Modo auto, Modo ventilador sólo, Modo suave-seco, y Modo enfriamiento.
3) Botón selector de velocidad del ventilador [Fan}: Se usa para seleccionar la velocidad del
ventilador: velocidad alta o velocidad baja.
4) Botón dirección arriba o botón dirección abajo: Botón de cambio de temperatura o
tiempo [Temp/Time]: Estos dos botones se usan para fijar la temperatura deseada. La unidad de
temperatura puede ser en Fahrenheit o centígrados. Presione el botón ON/OFF durante más de 20
segundos, luego suéltelo. La unidad de temperatura cambiará de Fahrenheit a centígrados o
viceversa. Durante el ajuste del temporizador, estos botones se usan también para cambiar
el tiempo.
5) Botón de ajuste de temporizador o de cancelar [Timer]: Se usa para fijar o cancelar la
función TEMPORIZADOR-ENCENDIDO o TEMPORIZADOR APAGADO. Cuando la unidad está
encendida, la unidad se puede ajustar con Temporizador-APAGADO. Cuando la unidad está
apagada, la la unidad se puede ajustar con Temporizador-ENCENDIDO.
¡ADVERTENCIA!
Botón
Placa de base
Visualización en cristal líquido (VCL)
Modo
Ventilador
Ajuste de
temporizador
Temporizador
Encendido
Nivel del agua
Encendido/apagado
Temperatura o tiempo
Page 63

SECCIÓN 5
CÓMO HACER FUNCIONAR EL ACONDICIONADOR DE AIRE PORTATIL
59
5.1 PANEL DE CONTROL Y FUNCIONES DE OPERACIÓN (CONTINUADO)
CÓMO AJUSTAR:
Cuando la unidad está encendida [ON], presione el botón Temporizador [Timer] , “ “ parpadeará en
la ventana de visualización de ajuste de temporizador y el indicador del temporizador estará en el panel de
control. Al presionar el botón dirección abajo o el botón dirección arriba se cambiara el tiempo en
consecuencia; los dígitos que parpadean cambiarán en consecuencia, hasta que aparezca el tiempo de retardo
deseado. Su tiempo de retardo deseado parpadeará durante diez (10) segundos. Después de estos diez (10)
segundos los dígitos cambiarán para mostrar su tiempo de retardo deseado. El tiempo mostrado disminuirá en
lapsos de diez (6) minutos.
Cuando la unidad está apagada [OFF], si no ha sido colocada en tiempo de retardo, presione el botón
Temporizador . La unidad entra en programa de temporizador. También “ “ parpadeará en la
ventana de visualización de ajuste de temporizador y el indicador de temporizador estarán en el panel de
control. Presione el botón dirección abajo o el botón dirección arriba para ajustar a su tiempo
deseado. Al ajustar el tiempo, los otros ajustes como modo de operación [Operation Mode], modo
ventilador [Fan Mode] o ajuste de temperatura también [Set Temperature] estarán en la pantalla de
visualización. Diez (10) segundos después, estos modos desaparecerán pero quedarán en la memoria del
Controlador principal.
CÓMO CANCELAR:
Cuando la unidad se ajusta con los procedimientos de TEMPORIZADOR-APAGADO o TEMPORIZADORENCENDIDO, presione el botón Temporizador [Timer] para verificar el tiempo de ajuste del
temporizador, luego presione dentro de los diez (10) segundos para cancelar el ajuste del temporizador.
5.2 VISUALIZACIÓN EN CRISTAL LÍQUIDO (VCL)
Modo auto [Auto mode]
Modo suave-seco [Soft-dry mode]
Modo enfriamiento [Cooling mode]
Modo ventilador sólo [Fan-only mode]
Modo Fahrenheit [Fahrenheit mode]
Mode Centigrade [Centigrade mode]
Illus. 13
Page 64

SECCIÓN 5
CÓMO HACER FUNCIONAR EL ACONDICIONADOR DE AIRE PORTATIL
60
5.3 OPERACIÓN CON CONTROL REMOTO (MODELO KY-25Y ÚNICAMENTE)
La funcionalidad de los seis (6) botones en el
control remoto es idéntica a la del panel de
control. Los iconos de ciertos botones pueden
diferir ligeramente. El control remoto usa pilas de
litio, modelo: CR2025 (Incluye). Instale las pilas
antes de usar el control remoto.
Ud. puede operar la unidad sea a partir del panel
de control o con el control remoto.
OPERACIÓN DE ENFRIAMIENTO:
1) Enchufe el cordón de corriente en la toma de
corriente.
2) Encienda la unidad presionando el botón
ON/OFF en el panel de control.
3) Presione el botón Modo [Mode] en el
panel de control o en el control remoto
hasta que el símbolo aparezca en la
pantalla de visualización.
4) Ajuste la temperatura de la habitación a la
temperatura deseada dentro de la gama de
temperatura entre 64°F-90°F/18°C-32°C. Las
temperaturas recomendadas son
80-84°F/27-29°C.
5) Seleccione la velocidad del ventilador
presionando el botón Ventilador [Fan] en el
panel de control o en el control remoto .
OPERACIÓN SUAVE-SECO:
1) Enchufe el cordón de corriente en la toma de corriente.
2) Encienda la unidad presionando el botón ON/OFF en el panel de control.
3) Presione el botón Modo [Mode] en el panel de control o en el control remoto hasta que
el símbolo aparezca en la pantalla de visualización.
4) Ajuste la temperatura ambiente en una temperatura adecuada.
5) Mantenga las ventanas y puertas cerradas para ayudar con la efectividad de la unidad eliminando
la humedad de la habitación.
NOTA: La unidad no efectuará su función de deshumidificación cuando la temperatura ambiente
está en menos de 64°F/18°C. El Modo suave-seco [Soft Dry] es una operación muy fresca
que consiste básicamente en deshumidificar. La disminuirá mucho la temperatura ambiente.
El ventilador interno de la unidad funciona siempre en velocidad baja.
Illus. 14
ENCENDIDO/
APAGADO
VELOCIDAD DEL
VENTILADOR
TEMP/TIEMPO
TEMPORIZADOR
MODO
Page 65

OPERACIÓN DEL VENTILADOR SÓLO:
1) Enchufe el cordón de corriente en la toma de corriente.
2) Encienda la unidad presionando el botón ON/OFF en el panel de control.
3) Presione el botón Modo [Mode] en el panel de control o en el control remoto hasta que
el símbolo aparezca en la pantalla de visualización.
4) Seleccione la velocidad del VENTILADOR presionando el botón velocidad del ventilador [Fan] en el
panel de control o en el control remoto .
Al estar en Modo ventilador sólo [Fan-Only Mode], el ducto de escape no se necesita, y el
compresor y el ventilador del lado del compresor no funcionarán. El ajuste de temperatura no tiene
ninguna importancia ni ninguna acción de control.
OPERACIÓN EN AUTO:
1) Enchufe el cordón de corriente en la toma de corriente.
2) Encienda la unidad presionando el botón ON/OFF en el panel de control.
3) Presione el botón Modo [Mode] en el panel de control o en el control remoto hasta que el
símbolo aparezca en la pantalla de visualización.
4) Coloque la temperatura ambiente a la temperatura deseada con el botón de cambio de
temperatura [Temperature Changing] de dirección abajo o de dirección arriba.
5) Seleccione la velocidad del ventilador con el botón de velocidad del ventilador [Fan] en el panel
de control o en el control remoto .
Al estar en modo AUTO, la unidad estará en Modo ventilador [Fan-Only Mode] cuando la temperatura
ambiente está por debajo de 81°F/27°C. Operará en Modo enfriamiento cuando la temperatura
ambiente está por encima de 81°F/27°C.
AJUSTE DEL PROGRAMA TEMPORIZADOR ENCENDIDO:
Cómo ajustar:
Cuando la unidad está apagada, Ud. puede ajustar el temporizador para permitir que la unidad se
encienda automáticamente.
1) Presione el botón de ajuste del temporizador [Timer] en el panel de control o en el control
remoto . “ “ en la ventana de visualización de ajuste de temporizador, y el indicador del
temporizador en el panel de control se encenderá. Los otros ajustes de modos como modo de
operación [Operation Mode], modo ventilador [Fan Mode], modo ajuste de temperatura
[Set Temperature Mode], también serán visualizados para permitirle ajustarlos igualmente.
2) Presione el botón de dirección abajo o el botón dirección arriba para cambiar el tiempo de
retardo del temporizador a su tiempo deseada.
3) Después de una demora de diez (10) segundos (sin presionar ningún botón), el dígito cambiará a
visualización, y los otros modos de ajuste desaparecerán. Ahora el proceso de ajuste del
temporizador está completo. El tiempo mostrado disminuirá en lapsos de 6 minutos.
Cuando los dígitos disminuyan a CERO y desaparezcan, la unidad empezará a funcionar
automáticamente de acuerdo con los ajustes hechos.
Cómo cancelar:
Cuando la unidad se ajusta con TEMPORIZADOR-ENCENDIDO cuando está apagada, presione el botón
TEMPORIZADOR [Timer] en el panel de control o en el control remoto para verificar el tiempo de
ajuste del temporizador y los dígitos del tiempo parpadearán. Presione el botón TEMPORIZADOR
[Timer] otra vez; esto cancelará el ajuste del temporizador. El indicador del temporizador en el panel
de control se apagará entonces.
SECCIÓN 5
CÓMO HACER FUNCIONAR EL ACONDICIONADOR DE AIRE PORTATIL
61
5.3 OPERACIÓN CON CONTROL REMOTO (MODELO KY-25Y ÚNICAMENTE) CONTINUADO
Page 66

SECCIÓN 5
CÓMO HACER FUNCIONAR EL ACONDICIONADOR DE AIRE PORTATIL
62
AJUSTE DEL PROGRAMA TEMPORIZADOR APAGADO:
Cómo ajustar
Cuando la unidad está encendida, después de haber sido ajustada con TEMPORIZADOR-APAGADO, la
unidad se apagará después de transcurrido el tiempo de retardo.
1) Presione el botón TEMPORIZADOR [Timer] en el panel de control o en el control remoto .
Ahora el INDICADOR DE TEMPORIZADOR “ “ parpadeará en la ventana de visualización de
ajuste de temporizador, y el indicador de temporizador en el panel de control estará encendido.
2) Presione el botón DIRECCIÓN ARRIBA o el botón DIRECCIÓN ABAJO para cambiar el tiempo
de retardo al tiempo deseado.
3) Después de una demora de diez (10) segundos (sin presionar ningún botón), el dígito cambiará a
visualización. El proceso de ajuste del temporizador está completo. El tiempo mostrado disminuirá en
lapsos de 10 minutos.
Cómo cancelar:
Cuando la unidad se ajusta con TEMPORIZADOR-APAGADO, cuando está encendida, primero presione
el botón TEMPORIZADOR [Timer] en el panel de control o en el control remoto para verificar
el tiempo de ajuste del temporizador y los dígitos del tiempo parpadearán. Presione el botón
TEMPORIZADOR [Timer] otra vez y el ajuste del temporizador se cancelará. El indicador del
temporizador en el panel de control se apagará entonces.
INDICADOR DE LLENADO DE AGUA:
Bajo condiciones normales de temperatura, el agua se evaporará sin necesidad de drenarla de la
unidad. El indicador de LLENADO DE AGUA se encenderá en días de extrema humedad, cuando está en
Modo enfriamiento o Modo Suave-seco. Cuando el indicador de LLENADO DE AGUA se enciende,
significa que el depósito de agua está lleno. El compresor dejará de funcionar, pero ambos motores de
los ventiladores seguirán funcionando. La unidad drenará el exceso de agua una vez que se le conecte
una manguera de drenaje o una manguera de jardinería. Cuando el indicador de LLENADO DE AGUA
se apague, el compresor comenzará a funcionar de nuevo.
5.3 OPERACIÓN CON CONTROL REMOTO (MODELO KY-25Y ÚNICAMENTE) CONTINUADO
5.4 INDICADOR DE LLENADO DE AGUA Y DRENAJE
DRENAJE:
Únicamente durante humedad extrema
1) Para conectar una manguera de drenaje o una manguera de jardinería, primero hay de detener la
unidad apagándola [OFF]. Luego debe desenroscar el tapón de drenaje en la bomba antes de insertar la
manguera de drenaje blanca (5’3” /1.16 m) suministrada con la unidad. (Atención: Es posible que haya
algo de agua detrás del tapón de drenaje. Tenga listo un tazón u otro recipiente para recoger cualquier
residuo de agua). Después de conectar la manguera de drenaje a la boquilla interna (Illus.15) del Bomba
de drenaje, asegúrese que el otro extremo esté colocado en un cubo o recipiente para recoger el exceso
de agua. Verifique el nivel en agua en el recipiente para evitar la posibilidad de desbordamiento.
En vez de la manguera de drenaje suministrada con la unidad, también puede usar una manguera de
jardinería (en los casos de se requiera una distancia mayor a la provista por la manguera de drenaje). En
este caso, enrosque el extremo hembra de la manguera de jardinería a la boquilla exterior roscada de la
bomba de drenaje, coloque el otro extremo fuera de la casa o en un área conveniente donde se pueda
vaciar el exceso de agua (Illus.16).
Hay que tener en cuenta que la eficiencia de enfriamiento de la unidad se afectará si la manguera de
drenaje o la manguera de jardinería siempre está conectada a ésta. La manguera de drenaje o la
manguera de jardinería se debe usar únicamente cuando está encendido el indicador de LLENADO DE
AGUA.
Page 67

SECCIÓN 5
CÓMO HACER FUNCIONAR EL ACONDICIONADOR DE AIRE PORTATIL
63
5.4 INDICADOR DE LLENADO DE AGUA Y DRENAJE CONTINUADO
2) Ahora, coloque la unidad en ON [Encendido] y nuevamente en su ajuste anterior (sea en modo
COOLING [Enfriamiento] o SOFT-DRY [Suave seco]). El sistema de drenaje de la bomba empezará a
bombear el agua de la unidad. (Si se usa un recipiente para recibir el agua, verifique el nivel del
agua bombeada para evitar que rebose.) Cuando se encienda la luz indicadora de WATER FULL
[Llenado de agua] se apague… el ciclo de DRENAJE está completo. En este punto, coloque la
unidad en OFF [Apagado], quite la manguera de drenaje o la manguera de jardinería y luego
vuelva a colocar la unidad en ON [Encendido] y en su ajuste anterior (Modo COOLING
[Enfriamiento] o SOFT-DRY [Suave seco]).
NOTA: La eficiencia de la unidad será afectada si la manguera de drenaje o la manguera de
jardinería siempre está conectada a ella. La manguera de drenaje o la manguera de
jardinería se debe usar únicamente cuando el indicador de WATER FULL [Llenado de agua]
está encendido.
ASEGÚRESE DE QUE LA TAPA DEL ORIFICIO DE DESGÜE ESTÉ CORRECTAMENTE
REINSTALADA PARA EVITAR FUGA.
1
2
3
1. Bomba de drenaje
2. Manguera de drenaje
3. Cubo para el agua
Figure 15
Figure 16
Page 68

A) En un día caluroso, encienda la unidad en Modo
VENTILADOR SÓLO durante unas cuantas horas para que la
parte interna pueda secarse completamente.
B) Apague la unidad y retire el enchufe de suministro de
corriente.
C) Vacíe el agua condensada residual quitando el TAPÓN DEL
ORIFICIO DE DESAGÜE INFERIOR en la parte posterior
hacia la parte de debajo de la unidad. Después de conectar
la manguera de drenaje blanca de
12’ /3.65 m, asegúrese
que el otro extremo esté en el cubo o recipiente para
recoger el agua.
D) Descargue el ducto de aire caliente, comprímalo y
empáquelo en la caja.
E) Limpie el filtro y séquelo completamente antes de volver a
colocarlo en su sitio.
F) Cubra el aparato para protegerlo del polvo. Se recomienda
volver a colocar la unidad en su caja y empaques originales.
G) Se debe guardar la unidad en un lugar fresco y seco. No
apile objetos pesados encima de la unidad.
SECCIÓN 6
CÓMO CUIDAR EL ACONDICIONADOR DE AIRE PORTATIL
64
6.2 LIMPIEZA O REMPLAZO DEL FILTRO DE AIRE
Si el filtro de aire está obstruido con mucho polvo, el volumen del flujo de aire se reducirá y el efecto
del enfriamiento será menor. Se recomienda limpiar el filtro una vez cada dos semanas o según la
necesidad.
A) Saque el filtro del compartimiento del filtro en la parte delantera de la unidad.
B) Lave el filtro de aire sumergiéndolo ligeramente en agua tibia (cerca de 104°F/40°C) con un
detergente suave. Enjuague el filtro y séquelo completamente en un lugar a la sombra.
C) Coloque el filtro nuevamente en el compartimiento del filtro después de que esté completamente
seco.
D) Si el filtro está roto o inutilizable, compre un nuevo filtro llamando a al Departamento de servicio al
cliente de Sunbeam en el 1-877-383-6399 (8:30am-5:30pm ESTE.).
6.3 PIEZAS EXTERNAS DE PLASTICO
A) Mantenga la unidad lejos de la exposición directa de los rayos solares.
B) Limpie la superficie con un paño húmedo.
C) Para los modelos con acabado de acero inoxidable, se debe usar un limpiador de buena calidad
para acero inoxidable.
6.4 ALMACENAMIENTO AL FINAL DE TEMPORADA DE CALOR
Puerto de desagüe inferior
Illus. 17
6.1 MANTENIMIENTO
¡ADVERTENCIA!
• Asegúrese de apagar el acondicionador de aire y desconecte también el cordón de corriente de
la toma de corriente de la pared antes de efectuar toda actividad de mantenimiento.
• No sumerja la unidad en agua ni en otros líquidos.
• No vierta agua en la unidad.
• Tome precauciones especiales para evitar contacto con los bordes afilados de ciertas partes.
• No use ningún tipo de disolventes químicos para limpiar la unidad, ya que pueden deformar el
caparazón protector de la unidad.
Page 69

SECCIÓN 7 DETECCIÓN DE FALLAS
65
7.1 EL ACONDICIONADOR DE AIRE PORTATIL NO FUNCIONA
Usted puede resolver fácilmente muchos problemas corrientes del acondicionador de aire y
acondicionador de aire portatil ahorrarse así el costo de una llamada de servicio. Siga las siguientes
sugerencias para ver si usted mismo puede solucionar el problema sin ayuda de otra persona.
Vea si... Y después...
Vacié el agua (vea la página 60).
Ajuste la hora.
El depósito de agua
está lleno.
El enchufe LCDI
ha saltado.
Presione el botón REIINICIALIZAR [RESET] de LCDI.
La hora es correcta.
Vea si... Y después...
Abra la entrada o la salida del aire.
La entrada o la salida
del aire está cerrada.
Hay una fuente de calor
en la habitación.
Aleje la fuente de calor.
Ajuste la temperatura de refrigeración al nivel que convenga.
El filtro del aire
está sucio.
Limpie el filtro de aire; consulte con la sección “Limpieza del filtro
de aire".
La temperatura de
refrigeración está
bien ajustada.
7.2 BAJO RENDEMIENTO DE ENFRIADO
Se cortó la corriente.
Espere que vuelva.
El cable de alimentación
está desenchufado.
Enchufe bien el cable de alimentación en un tomacorriente de la
tensión adecuada.
Se quemó un fusible o
saltó un disyuntor
Cambie el fusible o reconecte el disyuntor. Asegúrese de que el acondicionador de
aire portatil esté enchufado en un circuito eléctrico exclusivo y conectado a tierra
como corresponde, tal como se indica en las "Instrucciones de instalación".
Vacíe el agua que está dentro de la unidad (vea página 60). Espere
1 hora para permitir que el ventilador del lado del condensador
sople el agua hacia afuera.
El indicador de llenado
de agua está en la
pantalla de visualización.
Page 70

SECCIÓN 7 DETECCIÓN DE FALLAS
66
Vea si... Y después...
El aparato vibra
cuando funciona.
El aparato emite
un ruido.
El lugar donde está el aparato no está nivelado. Colóquelo en un
lugar lo más nivelado y sólido posible.
7.3 RUIDO Y VIBRACIÓN
Si el ruido no es muy fuerte y procede del compresor,
del evaporador o del condensador, es normal.
Espere a que vuelva la corriente.
La corriente local
es normal.
El puerto de descarga de
aire caliente no está
correctamente instalado.
Instale el puerto de descarga de aire caliente según las
instrucciones en este manual.
Ha añadido un conducto
de salida del aire por sí
mismo.
Quite el conducto de salida del aire.
7.4 EL ACONDICIONADOR DE AIRE PORTATIL SE PRENDE Y
SE PARA RÁPIDAMENTE
La temperatura exterior
es extremadamente
elevada.
Ajuste el ventilador a velocidad máxima para permitir que el aire
circule con mayor rapidez por los serpentines de enfriado.
Vea si... Y después...
Vea si... Y después...
7.2 BAJO RENDEMIENTO DE ENFRIADO
La velocidad del ventilador
interior es demasiado débil.
Aumente la velocidad del ventilador interior.
No trate de hacer funcionar el acondicionador de aire portatil en el
modo de enfriamiento cuando la temperatura exterior está por
debajo de 64°F (18°C).
La temperatura exterior
está por debajo de 64° F
(18°C).
Cierre todas las puertas y ventanas.
Las puertas y ventanas
están abiertas.
Ajuste la unidad en modo enfriamiento.
La unidad está en modo
deshumidificación.
Page 71

SECCIÓN 8 DIAGRAMA ELÉCTRICO
67
C1: Capacitor de funcionamiento para motor del ventilador del lado del condensador
C2: Capacitor de funcionamiento para el compresor
C3: Capacitor de funcionamiento para el motor del ventilador del lado del evaporador
1. Pantalla de visualización de cristal líquido
2. PCB del panel de operación
3. PCB del receptor
4. Suministro de corriente
5. Sensor de temperatura ambiente
6. PCB de control principal
7. Detector de nivel de agua
8. Procesador de microchip
9. PCB de control principal
10. Transformador
11. Motor de ventilador para el lado del condensador
12. Cut-off
13. Water pump
14. Motor for evaporator side
15. Circuito de corte
16. Compresor
17. Protector
Illus. 17
2
3
4
5
6
7
8
9
11
13
14
16
10
17
1
12
15
Page 72

68
SECCIÓN 9 GARANTÍA
STAR ELITE/ELITE GROUP
PÓLIZA DE GARANTÍA LIMITADA DE UN AÑO
EFICAZ: ABRIL DE 2005
GARANTÍA LIMITADA
Star Elite/Elite Group, Inc. (en lo sucesivo denominado SE/EG) garantiza mediante la presente, sujeto a las condiciones
estipuladas en los párrafos que aparecen a continuación, que en caso que este producto resultara defectuoso debido a
mano de obra inadecuada o defectos en el material durante el periodo especificado de la garantía, SE/EG lo reparará o
efectuará todos los reemplazos de piezas o reembolsará el costo. Los costos de transporte por piezas enviadas para
reparación o reembolso, bajo esta garantía, serán asumidos por el comprador.
NO HAY NINGUNA OTRA GARANTÍA EXPRESA. LAS GARANTÍAS IMPLÍCITAS, INCLUYENDO AQUELLAS DE MERCABILIDAD
O CONVENIENCIA PARA UN FIN PARTICULAR, ESTÁN LIMITADAS AL PERIODO DE TIEMPO ESPECIFICADO, O HASTA EL
ALCANCE PERMITIDO POR LA LEY. CUALQUIERA Y TODAS LAS GARANTÍAS IMPLÍCITAS ESTÁN EXCLUIDAS. LA
RESPONSABILIDAD POR DAÑOS RESULTANTES BAJO CUALQUIERA Y TODAS LAS GARANTÍAS ESTÁN EXCLUIDAS HASTA EL
ALCANCE DONDE LA EXCLUSIÓN ESTÉ PERMITIDA POR LA LEY.
PERIODO DE GARANTÍA
SE/EG garantiza que a partir de la fecha de compra, este producto estará libre de defectos mecanicos por un periodo de
un (1) año, mano de obra y partes y piezas por un periodo de noventa (90) días. SE/EG, a su sola discreción, reparará el
producto que resulte defectuoso durante el periodo de garantía o reembolsará el costo respectivo. Si el producto ya no
está disponible, podrá rembolsar el costo de compra (a un valor con depreciación), con la presentación de una prueba de
compra original. Esta es su garantía exclusiva.
CONDICIONES
RECIBO DE VENTA ORIGINAL: Esta garantía es válida para el comprador original al detal y no es transferible. Conserve el
recibo original de compra. Se requiere la prueba de compra para obtener servicios de garantía y/o reembolso. Los
vendedores, centros de servicios o ventas al detal de productos SE/EG no tienen el derecho de alterar, modificar o cambiar
de ninguna manera los términos y condiciones de esta garantía.
…Continúa en la página siguiente …
es una marca registrada de Sunbeam Products, Inc. uso bajo licencia.
Producto Consumidor/uso residencial únicamente
Acondicionador de aire 1 año
Deshumidificador 1 año
Enfriador de vino/ centro para bebidas 1 año
Máquina para hacer hielo 1 año
Enfriador / calentador termoeléctrico Mini & 16L 1 año
Chimenea eléctrica/Calentador 1 año
Mano de obra y Partes 90 días
Page 73

69
SECCIÓN 9 GARANTÍA
EL REGISTRO DE LA GARANTÍA NO ES NECESARIO PARA OBTENER GARANTÍA PARA LOS PRODUCTOS DE SE/EG. CONSERVE
SU RECIBO COMO PRUEBA DE COMPRA. SI UD. NO SUMINISTRA PRUEBA DE LA PRUEBA DE COMPRA INICIAL CUANDO
SOLICITA SERVICIOS BAJO GARANTÍA, LA FECHA DE FABRICACIÓN DEL PRODUCTO SERÁ USADA PARA DETERMINAR LA
GARANTÍA
DEPRECIACIÓN: Cualquier unidad diagnosticada como no funcional y que deba ser cambiada bajo la garantía, durante el
periodo de garantía existente, estará sujeta a la correspondiente depreciación o costos de usuario.
ACERCA DE LA GARANTÍA DE SU PRODUCTO: Aceptamos complacidos toda reparación bajo garantía y nos excusamos por
la incomodidad causada. Cualquier vendedor autorizado puede realizar reparaciones bajo garantía. La mayoría de
reparaciones bajo garantía se realiza habitualmente, pero muchas veces las solicitudes de servicios bajo garantía pueden
no ser adecuadas. Por ejemplo, el servicio de garantía NO se aplicará si el producto de daña por el uso inapropiado, falta
de mantenimiento de rutina, embarque, manejo, almacenamiento o instalación incorrecta. Igualmente, la garantía será
nula si la fecha de fabricación o el número de serie en el producto ha sido retirado o si el equipo ha sido alterado o
modificado. Durante el periodo de garantía, el proveedor de servicio autorizado, a su discreción, reparará o rembolsará el
costo de cualquier pieza que, luego de un examen, resulte ser defectuoso bajo uso y servicio normal.
DESGASTE NORMAL: Esta garantía no cubre el desgaste normal de piezas ni daños resultantes de cualquiera de los
siguientes aspectos: uso negligente o uso incorrecto del producto; voltaje o corriente inadecuada; uso contrario a las
instrucciones de operación; desvío de las instrucciones respecto a almacenamiento y transporte; desmontaje; reparación o
alteración por personas distintas de aquellas de SE/EG o del personal de centros servicio autorizados de SE/EG. Además,
esta garantía no cubre Actos de Dios, como incendios, inundaciones, huracanes y tornados.
SE/EG no será responsable de ningún daño inherente ni resultante causado por el incumplimiento de ninguna garantía
expresa o implícita. Excepto hasta el alcance prohibido por la ley vigente, cualquier garantía implícita de mercabilidad o
conveniencia para un fin particular está limitada en duración a la duración de la garantía estipulada arriba. Algunos
estados, provincias o jurisdicciones no permiten la exclusión o limitación de daños inherentes o resultantes o limitaciones
sobre cuánto tiempo dura una garantía implícita, de modo que puede que las limitaciones o la excusión estipuladas arriba
no se apliquen a su caso. Esta garantía le da derechos legales específicos, y Ud. Puede tener otros derechos que varían de
un estado a otro o de una provincia a otra.
CÓMO OBTENER SERVICIO BAJO GARANTÍA: Ud. Debe ponerse en contacto con el Servicio al cliente/Soporte técnico de
SE/EG en nuestro número 1-877-383-6399. Un representante de Servicio al cliente/Soporte técnico tratará de resolver los
problemas de garantía por teléfono. Si no se puede resolver por teléfono, el representante de Servicio al cliente/Soporte
técnico pedirá su colaboración para realizar procedimientos de diagnóstico de rutina. Esta garantía es válida por los
periodos de tiempo indicados arriba y está sujeta a las condiciones estipuladas en esta póliza. Para servicios bajo garantía,
busque el centro de servicio autorizado más cercano llamando al 1-877-383-6399. El servicio de garantía sólo se puede
efectuar por un proveedor de servicio autorizado de Star Elite, Inc./Elite Group, Inc.
es una marca registrada de Sunbeam Products, Inc. uso bajo licencia.
Page 74

NOTES / NOTER / NOTAS
70
Page 75

NOTES / NOTER / NOTAS
71
Page 76

© 2006 Sunbeam Products, Inc., doing business as Jarden Consumer Solutions.
All rights reserved.
is a registered trademark of Sunbeam Products, Inc.,
Manufactured in China for Star Elite, a division of the Elite Group, Inc., Quebec, Canada, H3B 3X9.
© 2006 Sunbeam Products, Inc., exploitée sous la raison sociale Jarden Consumer Solutions.
Tout droits réservés.
est une marque déposée de Sunbeam Products, Inc., utilisée sous licence.
Fabriqué en Chine pour Star Elite, une division de Elite Group, Inc., Quebec, Canada, H3B 3X9.
©2006 Sunbeam Products, Inc., funcionando bajo el nombre de Jarden Consumer Solutions.
Todos los derechos reservados.
es una marca registrada de Sunbeam Products, Inc., usa bajo licencia.
Fabricado por Star Elite, una subsidiaria de Elite Group Inc., Montréal, Canada H3B 3X9.
Star Elite
1175 Place du Frère André
Montreal, Quebec,Canada
H3B 3X9
Toll Free Tel / Tél. sans frais / Tel sin cargo:
1-877-383-6399
(8:30am-5:30pm E.S.T)
(8h30-17h30 H.N.E)
(8:30am-5:30pm E.S.T.E.)
 Loading...