

Page 1
POPCORN MAKER
User Guide
CP4600
CP4600_17EM2.indd 1 5/10/17 10:26
Page 2

Contents
Sunbeam’s Safety Precautions
Sunbeam’s Safety Precautions 1
Features of your Sunbeam Popcorn Maker 2
Using your Sunbeam Popcorn Maker 4
Popping Corn Measurements 6
Care and Cleaning 6
Recipes 7
Important instructions – retain for
future use.
SAFETY PRECAUTIONS FOR YOUR
SUNBEAM POPCORN MAKER.
• This appliance is not a toy.
• Do not place any part of this appliance in a
dishwasher.
Sunbeam is very safety conscious when
designing and manufacturing consumer products,
but it is essential that the product user also
exercise care when using an electrical appliance.
Listed below are precautions which are essential
for the safe use of an electrical appliance:
• Read carefully and save all the instructions
provided with an appliance.
• Always turn the power off at the power outlet
before you insert or remove a plug. Remove
by grasping the plug - do not pull on the cord.
• Turn the power off and remove the plug
when the appliance is not in use and
before cleaning.
• Do not use your appliance with an extension
cord unless this cord has been checked
and tested by a qualified technician or
service person.
• Always use your appliance from a power
outlet of the voltage (A.C. only) marked
on the appliance.
• This appliance is not intended for use by
persons (including children) with reduced
physical, sensory or mental capabilities, or
lack of experience and knowledge, unless they
have been given supervision or instruction
concerning use of the appliance by a person
responsible for their safety.
• Children should be supervised to ensure that
they do not play with the appliance.
• The temperature of accessible surfaces may be
high when the appliance is operating.
• Operate the popcorn maker on a flat level
surface.
• Do not leave your popcorn maker unattended.
• Lid and body will become extremely hot during
use. Allow the unit to cool down for 5 minutes
before handling.
• Never leave an appliance unattended while
in use.
• Do not use an appliance for any purpose
other than its intended use.
• Do not place an appliance on or near a hot gas
flame, electric element or on a heated oven.
• Do not place on top of any other appliance.
• Do not let the power cord of an appliance hang
over the edge of a table or bench top or touch
any hot surface.
• Do not operate any electrical appliance with
a damaged cord or after the appliance has
been damaged in any manner. If damage is
suspected, return the appliance to the nearest
Sunbeam Appointed Service Centre
for examination, repair or adjustment.
• For additional protection, Sunbeam
recommend the use of a residual current
device (RCD) with a tripping current not
exceeding 30mA in the electrical circuit
supplying power to your appliances.
• Do not immerse the appliance in water
or any other liquid unless recommended.
• Appliances are not intended to be operated
by means of an external timer or separate
remote control system.
• This appliance is intended to be used in
household and similar applications such
as: staff kitchen areas in shops, offices and
other working environments; farm houses; by
clients in hotels, motels and other residential
type environments; bed and breakfast type
environments.
If you have any concerns regarding the performance and use of your appliance,
please visit www.sunbeam.com.au or contact the Sunbeam Consumer Service Line on 1300 881 861.
Ensure the above safety precautions are understood.
1
CP4600_17EM2.indd 2-1 5/10/17 10:26
Page 3
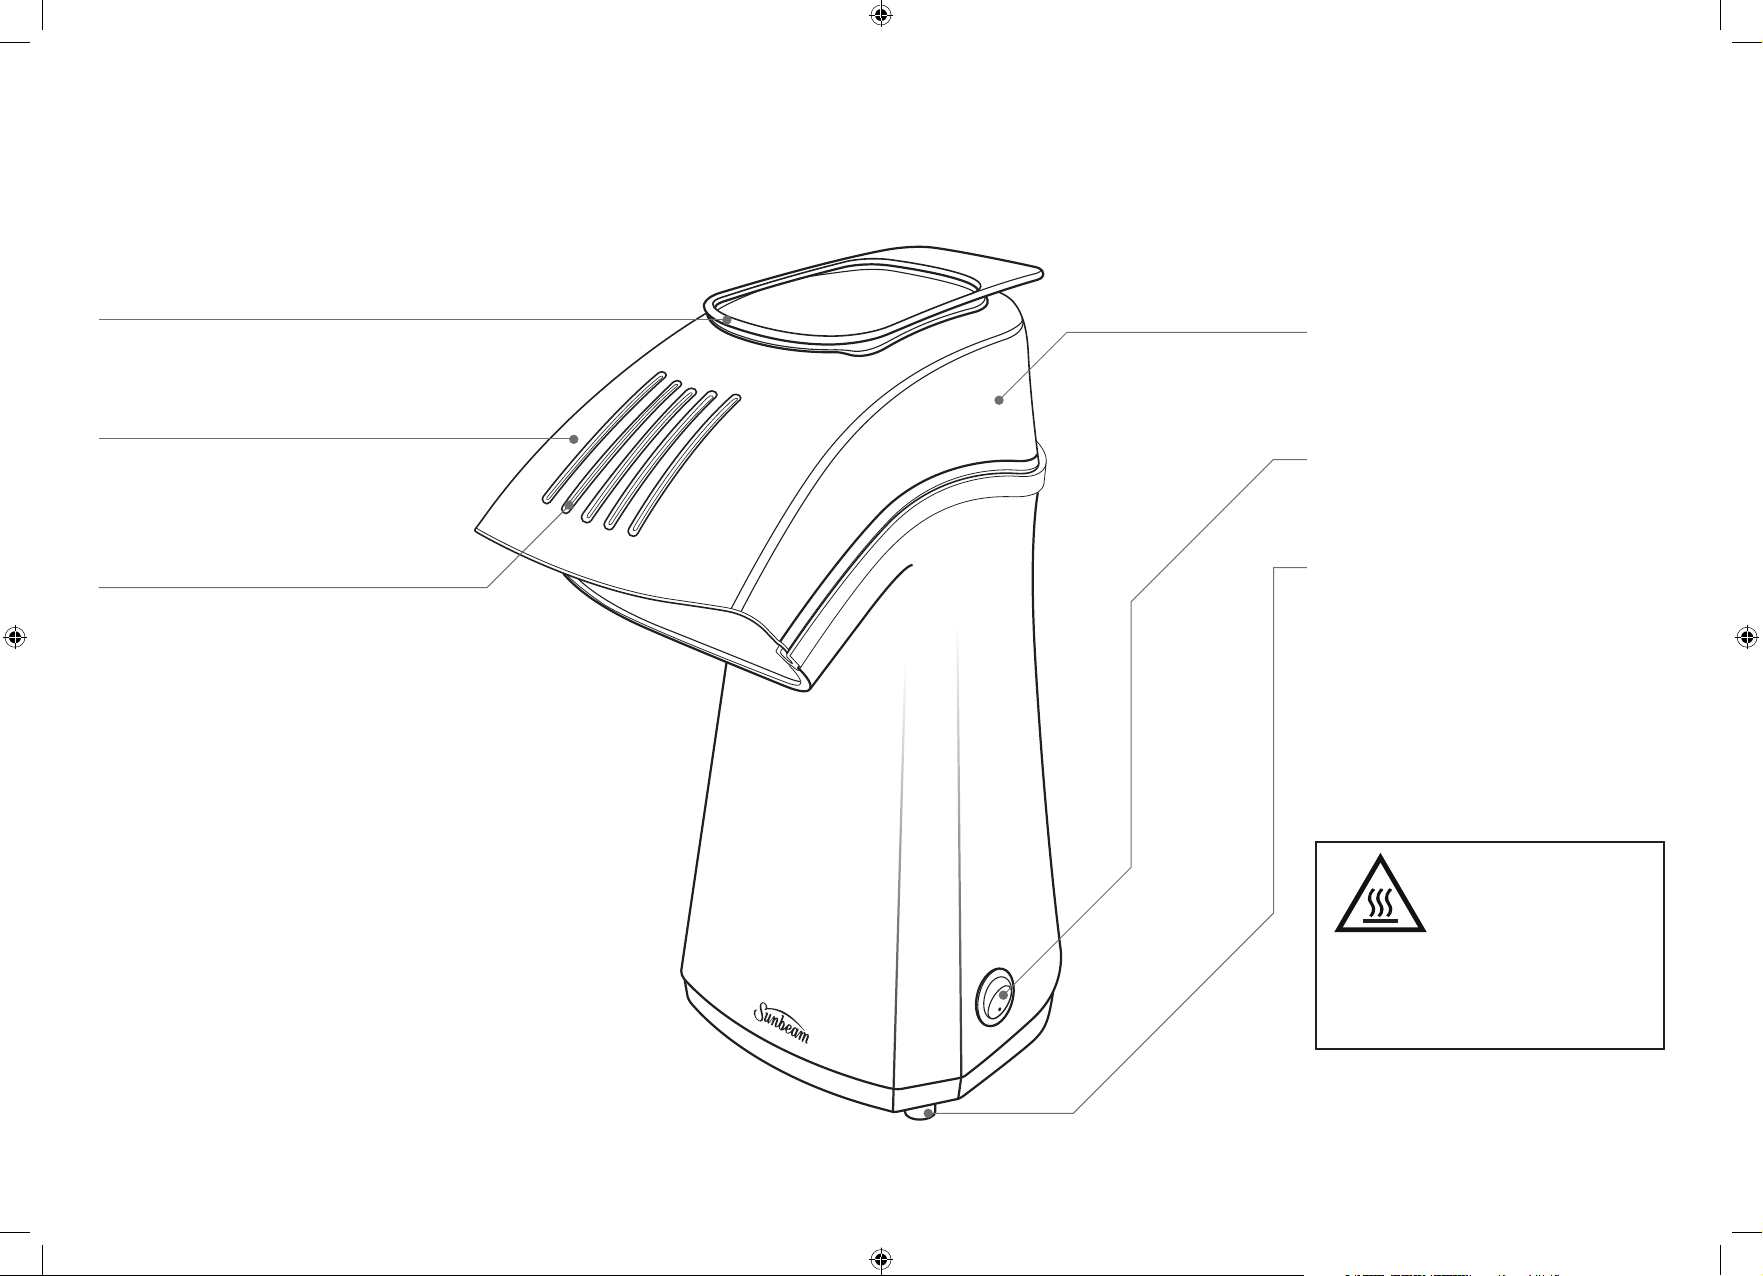
Features of your Sunbeam
Popcorn Maker
Butter melting tray
Melt butter for your popcorn as it cooks.
Transparent cover with popping chute
Allows you to view the popcorn making
process.
Ventilation holes
Allows heat to escape.
Popping chamber
Kernels are placed into the popping chamber
and popcorn is released.
On/Off switch
Indicates when the unit is switched on/off.
Non slip feet
Non slip rubber feet provide extra stability.
Hot Surfaces
Do Not Touch
This symbol indicates, temperature of
accessible surfaces may be high when the
appliance is operating and for some time
after use.
32
CP4600_17EM2.indd 2-3 5/10/17 10:26
Page 4

Using your Sunbeam
Popcorn Maker
Popping Corn Measurements
1. Place the appliance on a flat level surface.
2. Remove the transparent lid and pour the
desired amount of popping corn into the
popping chamber (see the measurements
on page 5). DO NOT PLACE BUTTER IN THE
POPPING CHAMBER.
3. Replace the transparent lid so that it sits
securely onto the body of the unit.
4. If butter is required place a maximum of
2 tablespoons in a single layer in the
butter melting tray. Place on top of the
transparent cover and watch. When
popping has stopped switch the unit off
and allow a further 3 minutes for the
butter to melt on top of the unit. For best
results we recommend using room
temperature butter or margarine.
5. Place a large bowl underneath the popcorn
maker to catch the popped corn.
6. Insert the plug into a 230-240V power
outlet and turn the power on.
7. Turn the on/off switch to the on position
(I). Do not touch the lid of the popcorn
maker as it becomes extremely hot.
You may wish to use oven mitts when
handling this part.
Continuous popping action will occur in the
popping chamber and shoot out popped
corn into your bowl.
WARNING: DO NOT USE THE APPLIANCE FOR
MORE THAN 5 MINUTES AT A TIME. IF
ADDITIONAL POPCORN IS REQUIRED ENSURE A
10 MINUTE BREAK BETWEEN POPPING CYCLES.
ENSURE THE MACHINE IS SWITCHED OFF
DURING THIS PERIOD.
8. When popping has stopped, turn the on/off
switch to off (O). There may be a small
amount (10 to 20 kernels) of popping corn
left in the popping chamber at the end of
the popping cycle.
WARNING: DO NOT OPEN THE LID FOR A
FURTHER 2 MINUTES AFTER THE POPPING
CYCLE HAS STOPPED. AS KERNELS MAY
CONTINUE TO POP WHEN POWER IS TURNED
OFF.
9. Ensure that the appliance is turned off
after use. Allow the appliance to cool
before storing or reusing.
WARNING: This appliance is not a toy. Please
do not leave children unattended near the
appliance while in use, or while it is cooling
after use. Never operate without the lid
during the popping cycle.
Minimum amount of popping corn
= 75 grams or ¹⁄³ cup
Maximum amount of popping corn
= 120 grams or ½ cup
AMOUNT OF CORN MAKES
¹⁄³ cup (75g) 7 cups
½ cup (120g) 12 cups
Care and Cleaning
To clean your popcorn maker ensure that the
power has been switched off and the plug
removed from the power outlet. Allow the
product to cool down before cleaning.
Wipe the outside of your popcorn maker with
a slightly dampened cloth and wipe dry.
To clean the inside of your unit remove the
transparent lid and wipe down with a damp
cloth.
DO NOT use less than the minimum amount
of popping corn specified. This will not pop
the kernels correctly and may cause damage
to the appliance.
DO NOT use more than the maximum amount
of popping corn specified. Using more than
the maximum amount of popping corn may
activate the auto shut-off feature.
If this occurs, switch off and unplug the unit.
Allow the unit to cool for 20 minutes before
clearing the popping chamber.
It is recommended that the unit be left to
cool for an additional 20 minutes prior to
next use.
To remove any unpopped corn from your unit,
simply invert your machine holding the lid in
place to avoid damage.
WARNING: Do not immerse the body (motor
housing) of the popcorn maker in water or
any other liquid.
Do not place any part of this appliance in a
dishwasher, including the butter melting tray.
4
CP4600_17EM2.indd 4-5 5/10/17 10:26
5
Page 5

Recipes
Recipes continued
Chewy Caramel Pecan Popcorn
¹⁄³ cup un-popped popping corn
200g condensed milk
¹⁄³ cup soft brown sugar
¹⁄³ cup caster sugar
65g butter, chopped
1 cup pecans, toasted, roughly chopped
1. Preheat oven to 180°C. Line a large
baking tray with baking paper.
2. Cook popcorn according to directions in
the popcorn maker.
3. In a small saucepan combine the
condensed milk, sugars and butter. Cook,
stirring constantly, over a medium heat
until the butter has melted. Cook, stirring,
for a further 3 minutes.
4. Combine the caramel mixture and popcorn
together; spread out onto baking tray.
Bake in oven for 3 minutes; stir then bake
for a further 2 minutes. Remove from
oven, stir. Allow to cool.
5. Break into chunks and enjoy!
Makes approximately 8 cups
Choc Chewy Popcorn
¹⁄³ cup un-popped popping corn
4 x 60g MARS® Bar
90g butter
1. Preheat oven to 180°C. Line a large
baking tray with baking paper.
2. Cook popcorn according to directions in
the popcorn maker.
3. Chop MARS® bar and butter; place in a
medium saucepan and cook, stirring over
a low heat until melted.
4. Combine the chocolate mixture and
popcorn together; spread out onto baking
tray. Bake for 4 minutes; stir. Bake for a
further 2 minutes then remove from oven,
stir and allow to cool.
5. Break into chunks and enjoy!
Makes approximately 8 cups
Toffee Popcorn Crunch
¹⁄³ cup un-popped popping corn
½ cup firmly packed brown sugar
60g butter or margarine
1 ½ tablespoons honey
¼ teaspoon bicarbonate of soda
¼ teaspoon vanilla essence
½ cup macadamia nuts, toasted
1. Preheat oven to 160°C. Line a large
baking tray with baking paper.
2. Cook popcorn according to directions in
the popcorn maker. Place popcorn onto
baking tray.
3. In a small saucepan, combine sugar,
butter and honey; cook, stirring until
mixture boils. Reduce heat; simmer for 3
minutes. Remove from heat and stir
through soda and vanilla. Pour mixture
over popcorn; add nuts and stir through to
coat evenly.
4. Bake in oven for 3 minutes; stir then bake
for a further 2 minutes. Remove from
oven, stir. Allow to cool.
5. Break into chunks and enjoy!
Makes approximately 8 cups
Rocky Poppy Road
¹⁄³ cup un-popped popping corn
2 x 375g milk chocolate melts
100g pink & white mini marshmallows
¾ cup shredded coconut
1. Grease and line a 20cm x 30cm lamington
pan. Line base and sides with baking
paper, extending 5cm along long edges of
the pan.
2. Cook popcorn according to directions in
the popcorn maker.
3. Stir chocolate in a heatproof bowl over a
small saucepan of simmering water until
smooth; cool slightly.
4. Combine popcorn, marshmallows, coconut
together in a large bowl. Pour over melted
chocolate; mix well to combine.
5. Spoon mixture into the prepared pan;
pressing down gently. Allow to cool to
room temperature.
6. Cut into pieces and enjoy!
Makes 48 pieces
76
CP4600_17EM2.indd 6-7 5/10/17 10:26
Page 6

Recipes continued
Cinnamon Munch
You will need a candy
thermometer for this recipe
¹⁄³ cup un-popped popcorn
120g butter, chopped
300g soft brown sugar
½ cup maple syrup
½ cup water
2 ½ teaspoons cinnamon
1 teaspoon salt
1. Cook popcorn according to directions in
the popcorn maker.
2. Line a large baking tray with baking paper;
spread popcorn evenly over tray.
3. Combine butter, sugar, syrup, water,
cinnamon and salt in a medium saucepan.
Cook, stirring, on a medium heat until the
butter has melted and the sugar has
dissolved. Using a pastry brush and hot
water, brush down the sides of the
saucepan to remove any sugar. Increase
heat and bring to the boil. Boil,
uncovered, without stirring until the
temperature reaches 150°C on a candy
thermometer.
4. Pour the hot toffee mixture over the
popcorn and carefully stir through. Allow
to cool to room temperature.
5. Break or cut into chunks and enjoy!
Makes approximately 8 cups
Pina Colada Popcorn
For best results, make the Pina Colada
Syrup just before popping the popcorn.
2 tablespoons coconut powder
1 tablespoon water
1 tablespoon caster sugar
1 tablespoon shredded coconut
60g Sunbeam Foods Dried Pineapple, chopped
¹⁄³ cup un-popped popping corn
1. Combine coconut powder, water and sugar
in a small saucepan. Cook, stirring until
the mixture has combined and started to
bubble. Remove from heat and stir
through the shredded coconut and dried
pineapple. Stand while making popcorn.
2. Cook popcorn according to directions in
the popcorn maker.
3. Pour the Pina Colada mixture over the
popcorn; mix well.
4. Enjoy!
Makes approximately 8 cups
8
CP4600_17EM2.indd 8-9 5/10/17 10:26
Page 7

Need help with your appliance?
Contact our customer service team or visit our
website for information and tips on getting the
most from your appliance.
Australia | visit www.sunbeam.com.au
phone 1300 881 861
mail Units 5 & 6, 13 Lord Street,
Botany NSW 2019 Australia.
New Zealand | visit www.sunbeam.co.nz
phone 0800 786 232
mail Level 6, Building 5, Central
Park, 660–670 Great South
Road, Greenlane, Auckland.
Sunbeam Corporation PTY LTD | ACN 000 006 771
Sunbeam is a registered trade mark.
Made in China to Sunbeam’s specification.
Due to minor changes in design or otherwise,
the product you buy may differ slightly from the one shown here.
Approved by the appropriate electrical regulatory authorities.
©Copyright Sunbeam 2017.
03/17
CP4600_17EM2
GCDS-SUN51613-JC
CP4600_17EM2.indd 10 5/10/17 10:26
 Loading...