

Sunbeam COM7000SS User Manual
22L 12-IN-1 DIGITAL
MULTI FUNCTIONAL AIR FRYER OVEN
User Guide
COM7000SS

Contents
Sunbeam’s Safety Precautions
Sunbeam’s Safety Precautions 2
Features of your Sunbeam 12-in-1 Digital Multifunctional Air Fryer Oven 3
Control Panel 4
Parts & Accessories 5
Usage Instructions 6
Care & Cleaning 7
Temperature Guide 8
Cooking Guide 9-16
Recipes
SAFETY PRECAUTIONS FOR YOUR
SUNBEAM AIR FRYER OVEN
• Use your air fryer oven at least 200mm away
from walls and curtains.
• Avoid using on metal surfaces e.g. sink.
• Do not use in confined spaces.
• Do not immerse the unit in water or any other
liquid.
• Always operate on a flat surface.
• Avoid contact with oven surfaces, including oven
door, during and after use, as they willbe hot.
Sunbeam is very safety conscious when designing
and manufacturing consumer products, but it is
essential that the product user also exercise care
when using an electrical appliance. Listed below
are precautions which are essential for the safe
use of an electrical appliance:
• Read carefully and save all the instructions
provided with an appliance.
• Always turn the power off at the power outlet
before you insert or remove a plug. Remove by
grasping the plug - do not pull on the cord.
• Turn the power off and remove the plug when
the appliance is not in use and before cleaning.
• Do not use your appliance with an extension cord
unless this cord has been checked and tested by
a qualified technician or service person.
• Always use your appliance from a power outlet of
the voltage (A.C. only) marked on the appliance.
• Children should be supervised to ensure that
they do not play with the appliance.
• Use well away from walls and curtains.
• Never leave an appliance unattended while in
use.
• Do not use an appliance for any purpose other
than its intended use.
• Do not place an appliance on or near a hot gas
flame, electric element or on a heated oven.
• Do not place on top of any other appliance.
• Do not let the power cord of an appliance hang
over the edge of a table or bench top or touch
any hot surface.
Hot Surface
Do Not Touch
This symbol indicates that the temperature
of accessible surfaces may be high when the
appliance is operating and for some time
after use.
• Use well away from walls and curtains.
• Do not place items on top of the oven while in
use.
• Do not block or cover the air vents on the top,
back or side of the oven.
• Do not use in confined spaces or cavities.
• Do not immerse the unit in water.
• Do not place items on top of oven.
• The temperature of accessible surfaces may be
high when the appliance is operating.
• Do not block or cover the air vents on the back
and sides of the sandwich maker
• The temperature of accessible surfaces may be
high when the appliance is operating.
• Do not operate any electrical appliance with a
damaged cord or after the appliance has been
damaged in any manner. If damage is suspected,
return the appliance to the nearest Sunbeam
Appointed Service Centre for examination, repair
or adjustment.
• For additional protection, Sunbeam recommend
the use of a residual current device (RCD)
with a tripping current not exceeding 30mA in
the electrical circuit supplying power to your
appliances.
• Do not immerse the appliance in water or any
other liquid unless recommended.
• Appliances are not intended to be operated by
means of an external timer or separate remote
control system.
• This appliance is intended to be used in
household and similar applications such as: staff
kitchen areas in shops, offices and other working
environments; farm houses; by clients in hotels,
motels and other residential type environments;
bed and breakfast type environments.
• Refer to “Care and Cleaning” section for details
concerning precautions during use maintenance.
• Cleaning and user maintenance shall not be
made by children unless they are older than 8
and supervised.
• Keep the appliance and its cord out of reach of
children less than 8 years old.
• This appliance is not intended for use by persons
(including children) with reduced physical,
sensory or mental capabilities, or lack of
experience and knowledge, unless they have
been given supervision or instruction concerning
use of the appliance by a person responsible for
their safety.
If you have any concerns regarding the performance and use of your appliance, please visit
www.sunbeam.com.au or contact the Sunbeam Consumer Service Line. Ensure the above safety
precautions are understood.
2
12-in-1 Digital Multifunctional Air
Fryer Oven
1 5
2
6
3
4
7
8
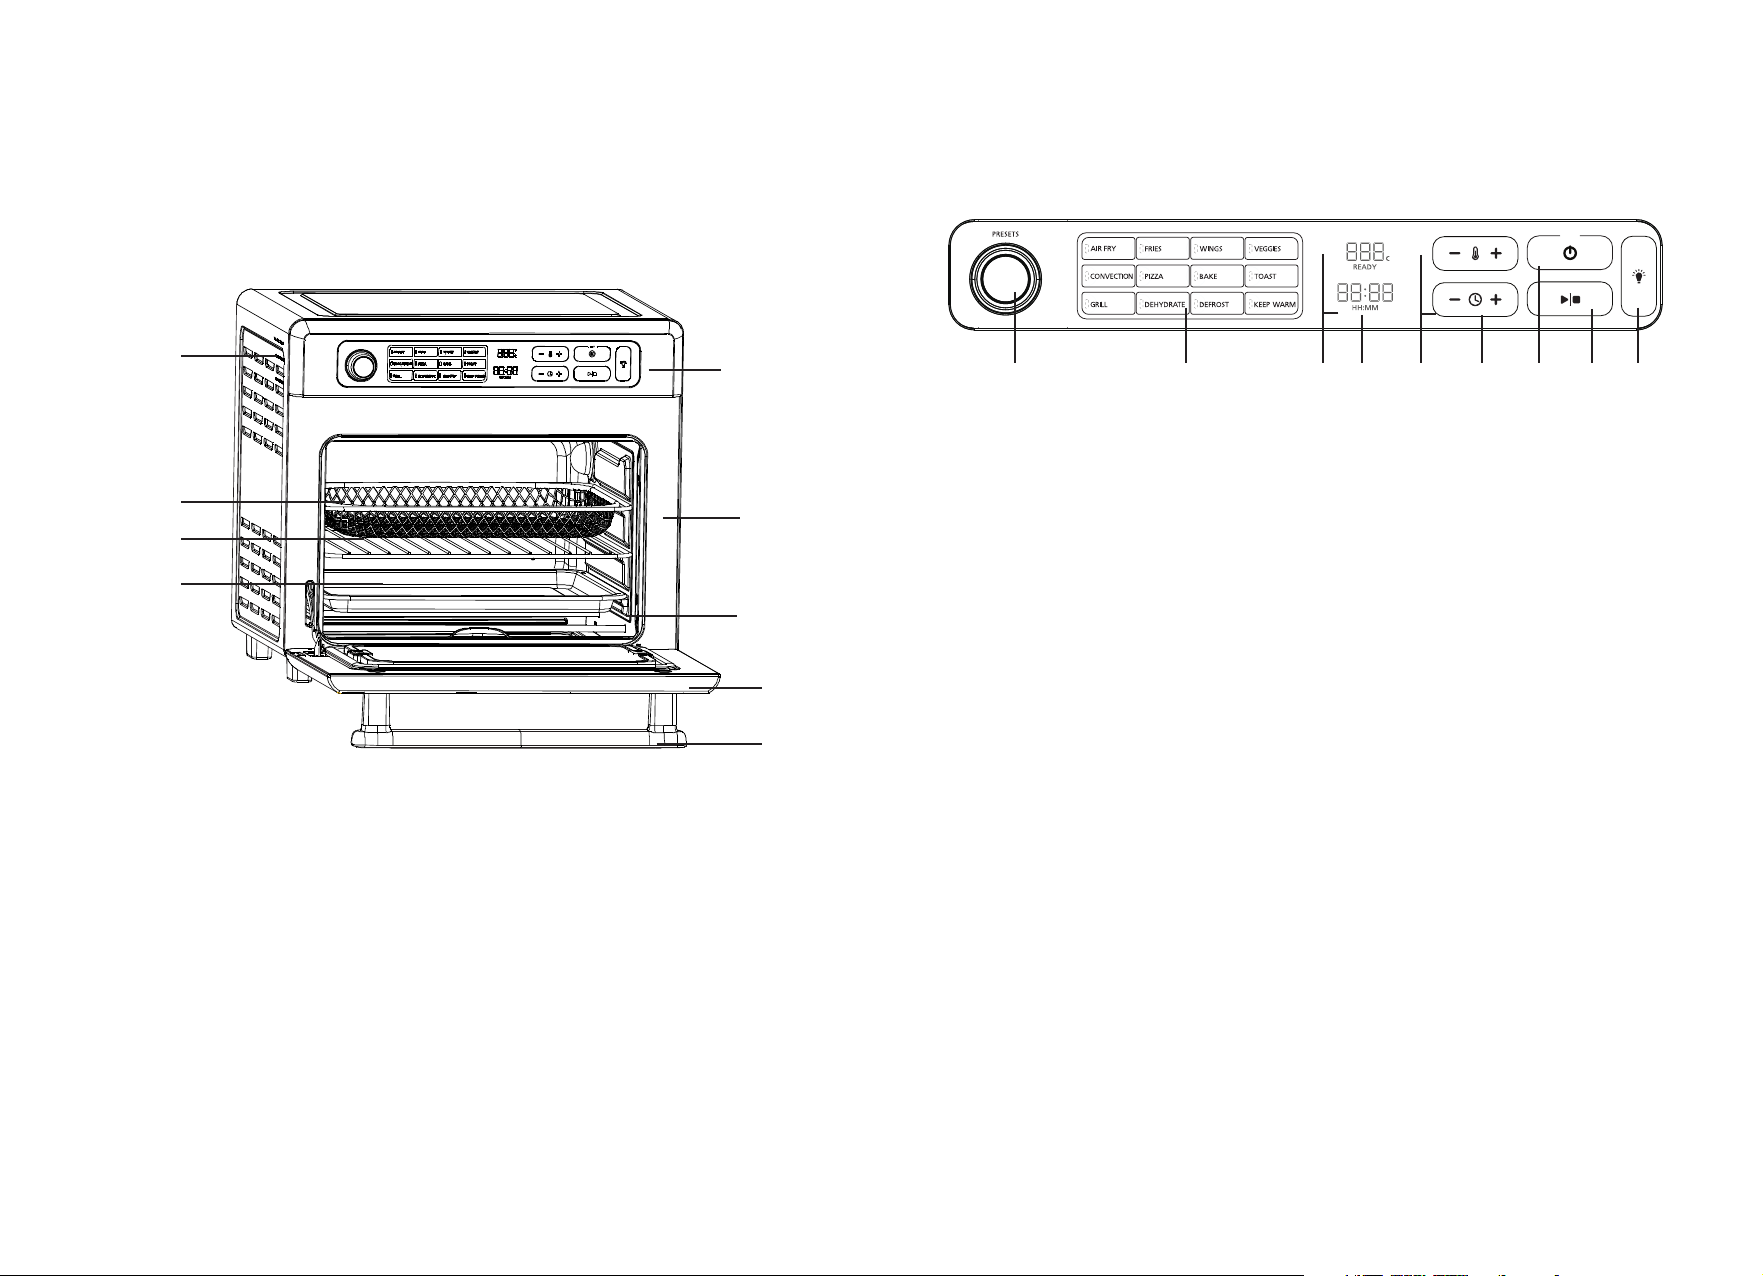
Control PanelFeatures of your Sunbeam
1 2 3 4 5 6 7 8
1. Preset knob: Choose from 12 cooking functions by turning the knob to
desired setting.
2. Function settings: Choose from 3 Air Fryer presets (Fries, Wings, Veggies)
or 9 cooking functions (Air Fry, Convection, Pizza, Bake, Toast, Grill,
Dehydrate, Defrost, Keep Warm)
3. Temperature digital display: Temperature displayed is in Celsius
4. Timer digital display: Time displayed is in Minutes: Seconds. When
dehydrating, this will automatically change to HOURS:MINUTES
5. Temperature setting: Manually adjust temperature
6. Timer setting: Manually adjust time
7. Power
8. Start/Pause
9. Oven light
9
9
1. Air vents
Air vents allow smoke to come out during cooking process. Please do not block or
cover this area.
2. Air fryer basket
Use for all your air frying or dehydrating needs.
3. Wire rack
Use for pizza, bake, grill or toast functions
4. Baking pan
Used to accommodate a wide variety of foods or use to sit your cake tin when
baking.
5. Control panel
Choose from 12 cooking functions by turning the knob to desired setting.
6. Three rack positions
7. Crumb tray
Use to catch oil and crumbs throughout the cooking cycle.
8. Glass Door
Allows you to see food cooking.
9. Door handle
Pull down the door to open the air fryer oven.
3 4
Usage InstructionsParts & Accessories
Before for use
Heating Elements
Your Air Fryer Oven is powered by 2 heating elements, an extra air fryer heater and a
powerful fan to experience the ultimate air fryer performance. Make sure you check on the
cooking progress of your food from time to time to avoid burning and overcooking.
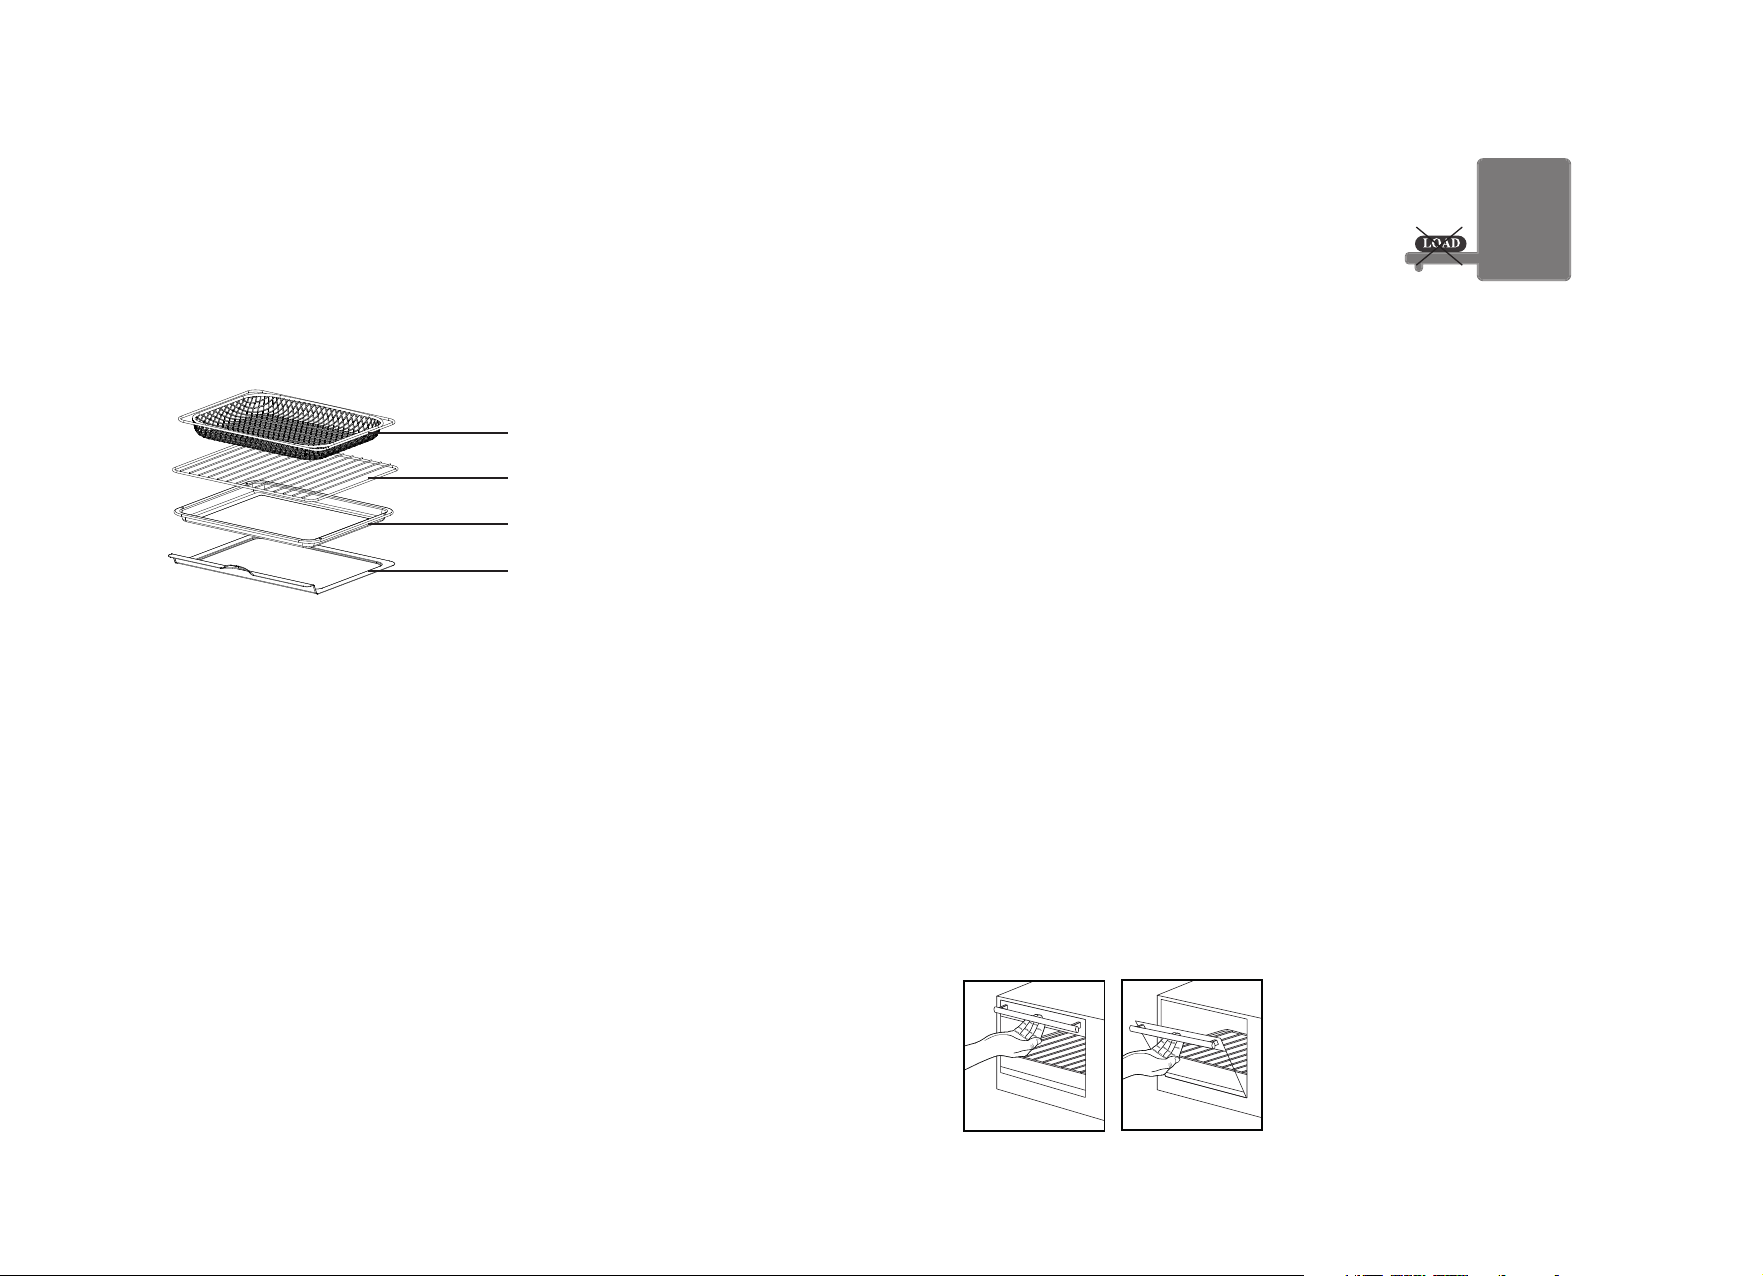
Accessories
To accommodate a wide variety of foods, the oven has 3 rack positions. The position of the
rack will depend on the size of the food and desired browning.
Before removing the accessories, allow the unit to cool.
1. Air fryer basket
2. Wire rack
3. Non-stick baking tray
4. Crumb tray
1. Air Fryer Basket
• Ideal for cooking a variety of foods such as fries, wings, veggies, chicken, fish or steak
• Use for air frying or dehydrating
• Place the basket on the top slot for more crisp results
• When using the basket with food that has a high sugar content, you may find that
lining each rack with a sheet of baking paper can be helpful
2. Wire Rack
• Use for pizza, bake, grill or toast functions
• The wire rack can fit a 12” pizza
3. Non-stick Baking Tray
• The baking tray is 28cm wide x 26cm deep
• Place your cake tin on top of the baking tray. This can fit up to 24cm cake tins
• The baking tray is coated with a durable non-stick coating for easy cleaning. When
cooking with cheese or sticky sauces, this may stick on the baking tray. Use a heatresistant spatula or wooden spoon to remove residues. Never use a sharp or metal
object, as this will damage the non-stick surface.
4. Crumb tray
• Use to catch oil and crumbs throughout the cooking cycle
• Place drip tray at the bottom of the unit before beginning the cooking cycle
• Be sure to wash the crumb tray after every use
For best results:
• For best air frying results, position the air fryer basket on top rack, just below the
internal light bulb.
• For best grilling ,toasting and pizza results, position the baking pan in the middle rack
position.
• For best baking results, position the baking pan in the bottom rack position.
5 6
Before using your Air Fryer for the first
time, unpack the appliance and remove
all packaging, promotional materials
and stickers from the product. Remove
any plastic or cardboard and all printed
documents.
Clean the accessories with a small amount
of dishwashing liquid and a non-abrasive
cleaning pad. Dry thoroughly with a soft
cloth.
Note: When using your Air Fryer Oven for
the first time you may notice a slight smell
and/or fine smoke haze being emitted from
the unit. This is normal. It is due to the
initial heating of internal components.
Note: Your Air Fryer Oven does not require
pre-heating.
Using your Air Fryer Oven
1. Place your Air Fryer Oven on a flat, level,
heat-resistant surface, where the plug
will reach an outlet.
WARNING: When the Air Fryer Oven is
in use or cooling down, please be sure
there is a 6-inch clearance between the
Air Fryer Oven and any other surface
including cords. Be sure the cord is not
resting against the back of the air fryer
oven.
2. Plug the power cord into a 230-240 volt
AC power outlet.
3. You will hear a beep sound and the
POWER light will start blinking.
This means the air fryer oven was
successfully plugged in.
4. To open the unit, grab the center of the
handle underhanded with fingertips and
gently pull down the oven door.
W
ARNING: Do not force open the oven door
beyond its limit or let the door drop open
as this will distort the door and hinder the
oven’s ability to maintain a proper seal.
CAUTION: Do not place any load on the oven
door, in an open condition.
1. Place your food on the accessories and
slide the accessories on your desired
rack.
2. Press POWER to turn on the air fryer
oven.
3. Turn the PRESET knob to set to the
desired function. Turn clockwise to
choose presets from top to bottom. Turn
counter-clockwise to return to previous
preset. You can choose from 3 air frying
presets or 9 cooking modes.
4. When you are ready to start cooking,
press START/PAUSE button.
Note: T
o quickly pause the cooking cycle
to check on your food, press PAUSE and
gently pull the handle out. Using oven mitts,
carefully slide the tray out. Alternatively,
you can press LIGHT button to see the food
from inside without opening the oven. The
oven light will automatically turn off after 60
seconds.
Note: Without pressing PAUSE, the oven will
continue cooking even if you open the door.
Manual Modes
1. To manually set the time, press the
Timer Setting and use the PLUS and
MINUS signs. You will see the time
reading in the Time Indicator next to the
Function Settings.
2. To manually set the temperature, press
the Temperature Setting and use the
PLUS and MINUS signs. You will see the
temperature reading in the Temperature
Indicator next to the Function Settings.
Auto-Switch Off
The air fry
off after 2 minutes when it is not running.
To wake up the appliance, press the POWER
button.
Caution: Do not touch the outside or top of
the unit when in use, as these surfaces may
be hot. Ensure you use the handle to open
and close the air fryer oven. Avoid touching
hot surfaces. The oven may generate steam
while food is cooking and when the door is
opened. Take care when removing food from
the oven.
er oven will automatically switch
 Loading...