

Page 1
DEEP FRYER
Owner’s Manual with Recipes
MODELS 3242 & 3247
Page 2

R
EAD AND
S
AVE
T
HESEINSTRUCTIONS
IMPORTANT SAFEGUARDS
When using electrical appliances, basic safety precautions should always be followed
including the following:
1 Read all instructions, product labels and warnings before using the Deep Fryer.
2 This appliance uses hot oil; it is very important to make sure the unit is placed
in a safe place while in use or while the oil is still hot. Make sure the cord
is not loose nor presents the possibility of someone tripping over it.
3 DO NOT MOVE THE DEEP FRYER WHEN OIL IS HOT OR DURING COOKING.
Extreme caution must be used when moving an appliance containing hot oil.
4 CLOSE SUPERVISION IS NECESSARY WHEN THE APPLIANCE IS IN USE OR WHEN
THE OIL IS HOT.
5 Do not touch hot surfaces. Always use oven mitts when handling hot surfaces;
and allow metal parts to cool before cleaning. Allow the unit to cool thoroughly
before adding or removing parts.
6 Disconnect the Deep Fryer from the wall outlet when the unit is not in use
and before cleaning.
NOTE: To disconnect, turn the control to the OFF “Ø”
then remove plug from wall unit.
7 To protect against risk of electrical shock, do not immerse the appliance or plug
in water or other liquids.
8 This appliance should not be used by children. Close supervision is always
necessary when this or any other appliance is used near children.
9 Do not operate this or any appliance with a frayed or damaged cord or plug.
10 If the power supply cord of this appliance is damaged, it must only be replaced
in a repair shop appointed by the manufacturer because special tools are required.
11 Do not use attachments not recommended by the manufacturer. They may cause
fire, electrical shock or injury.
12 Do not use outdoors or for commercial purposes. Do not use this appliance
for other than the intended use.
13
Do not let the cord hang over the edge of a table or counter, or touch
hot surfaces.
14
Do not place the appliance near a hot gas or electric burner or in a heated oven.
15 Do not place any items on top or next to this appliance at any time. To prevent a
fire, keep this appliance clear of contact with any flammable materials including
curtains, draperies, walls, plastic materials, etc., at all times.
16 Do not place any flammable materials in or close to the Deep Fryer,
such as paper, cardboard or plastic.
17 Oversized foods must not be inserted into the Deep Fryer as they may create
a fire.
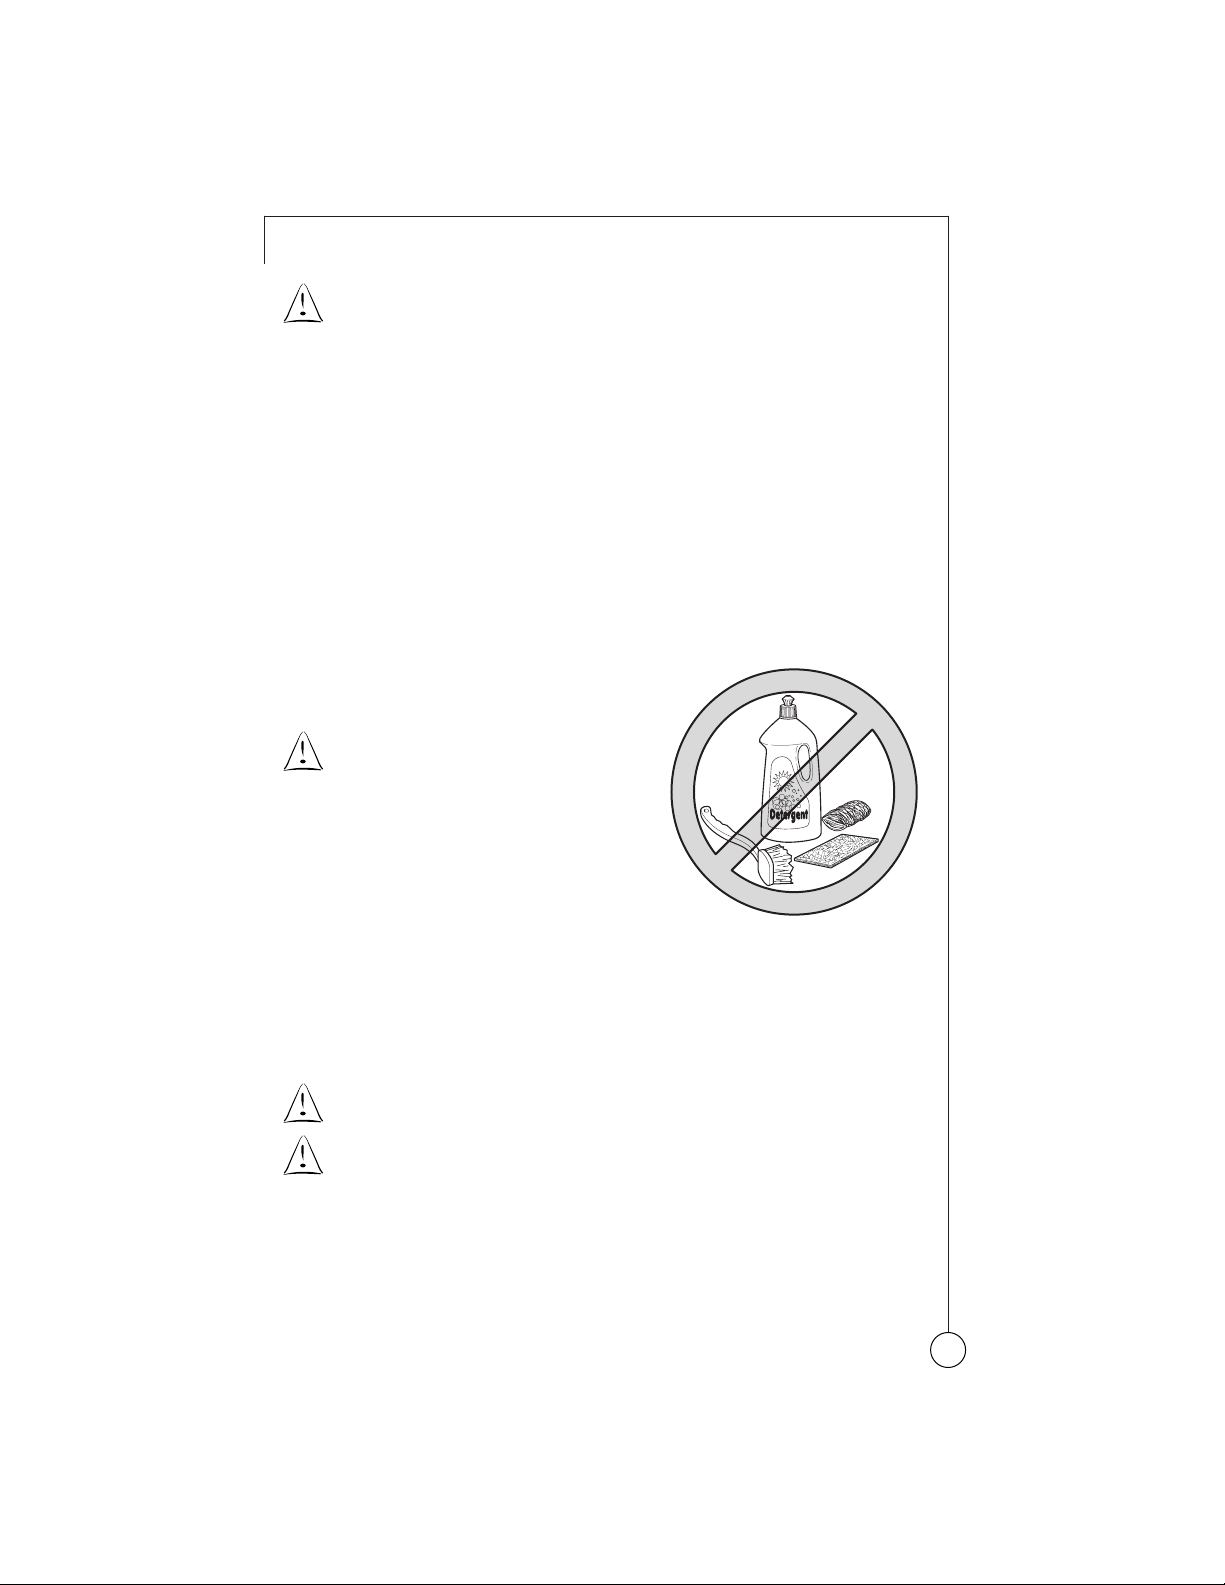
18 Do not clean with metal scouring pads or any abrasive materials. (Pieces can
break off the pad and touch electrical parts resulting in a risk of electrical shock).
19 DO NOT USE WITH AN EXTENSION CORD.
20 Be sure handles are properly assembled to basket and locked in place.
See detailed instructions.
THIS UNIT IS INTENDED FOR HOUSEHOLD USE ONLY
Page 3

TABLE OF CONTENTS
IMPORTANT SAFEGUARDS . . . . . . . . . . . . INSIDE FRONT COVER
GETTING STARTED. . . . . . . . . . . . . . . . . . . . . . . . . . . . . 2
D
EEP FRYER FEATURES . . . . . . . . . . . . . . . . . . . . . . . . . 4
L
ET’S FRY. . . . . . . . . . . . . . . . . . . . . . . . . . . . . . . . . . 5
D
EEP FRIED CHICKEN. . . . . . . . . . . . . . . . . . . . . . . . . 5
A
FTER THE FOOD IS FRIED . . . . . . . . . . . . . . . . . . . . . 7
C
OOKING GUIDE. . . . . . . . . . . . . . . . . . . . . . . . . . . . . . 9
HINTS . . . . . . . . . . . . . . . . . . . . . . . . . . . . . . . . . . . 9
T
AKING CARE OF YOUR DEEP FRYER . . . . . . . . . . . . . . . . 10
HOW TO REPLACE THE FILTERS . . . . . . . . . . . . . . . . . . . 10
C
LEANING THE DEEP FRYER. . . . . . . . . . . . . . . . . . . . . 11
CLEANING THE LID . . . . . . . . . . . . . . . . . . . . . . . . . . . 11
S
TORING THE DEEP FRYER . . . . . . . . . . . . . . . . . . . . . 12
TROUBLESHOOTING – PROBLEMS . . . . . . . . . . . . . . . . . . . 12
R
ECIPES . . . . . . . . . . . . . . . . . . . . . . . . . . . . . . . . . . . 13
DEEP FRIED CHICKEN. . . . . . . . . . . . . . . . . . . . . . . . . 13
F
RENCH FRIED ONION RINGS OR SHOESTRING ONIONS . . . 14
D
EEP FRIED SWEET POTATOES . . . . . . . . . . . . . . . . . . . 14
P
OTATO PUFFS . . . . . . . . . . . . . . . . . . . . . . . . . . . . . 15
POTATO CHIPS . . . . . . . . . . . . . . . . . . . . . . . . . . . . . 16
F
RIED POTATO BALLS. . . . . . . . . . . . . . . . . . . . . . . . . 17
DEEP FRIED FISH . . . . . . . . . . . . . . . . . . . . . . . . . . . 18
M
ARINATED DEEP FRIED FISH. . . . . . . . . . . . . . . . . . . . 19
FISH AND CHIPS . . . . . . . . . . . . . . . . . . . . . . . . . . . . 20
D
EEP FRIED OYSTERS . . . . . . . . . . . . . . . . . . . . . . . . 21
D
EEP FRIED STUFFED SHRIMP . . . . . . . . . . . . . . . . . . . 22
PURÉED VEGETABLE FRITTERS . . . . . . . . . . . . . . . . . . . 23
SHRIMP FRITTERS . . . . . . . . . . . . . . . . . . . . . . . . . . . 24
E
GGPLANT FRITTERS . . . . . . . . . . . . . . . . . . . . . . . . . 25
FRITTER BATTER FOR VEGETABLES, MEAT AND FISH. . . . . . 26
B
OUND BREADING. . . . . . . . . . . . . . . . . . . . . . . . . . . 26
S
WEET MILK DOUGHNUT HOLES . . . . . . . . . . . . . . . . . . 27
SWEET AND SOUR MEATBALLS . . . . . . . . . . . . . . . . . . . 28
W
ARRANTY . . . . . . . . . . . . . . . . . . . . . . . . . . . . . . . . . 29
Page 4
2
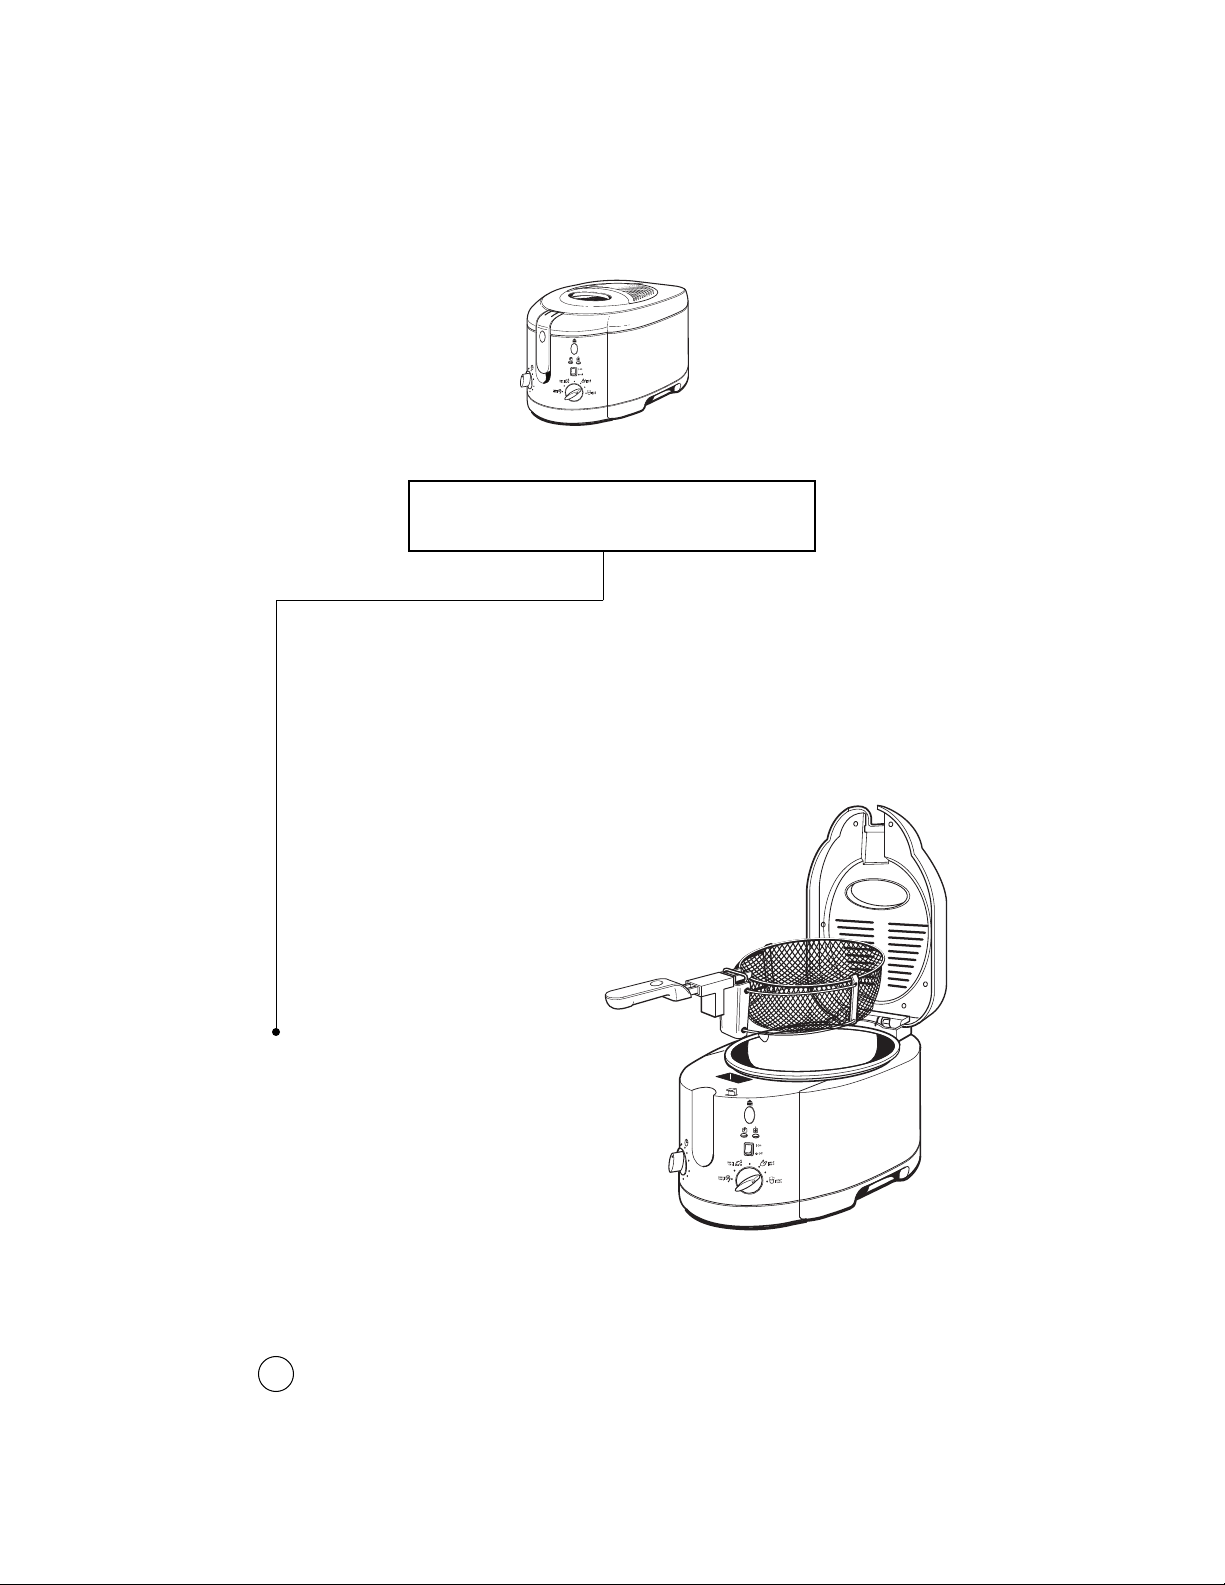
1
Remove the deep fryer from the box and
remove the large peel-away illustrated
label on the front and side of the unit.
2
Place the fryer on a counter where the plug
will reach an outlet. DO NOT plug the
machine into the wall outlet yet.
3
Raise the basket handle to the highest,
horizontal position (a click
sound will be heard).
Open the lid and lift the basket
out of the fryer. Remove all
printed documents and any
documents from the basket.
Getting Started
Page 5

3
4
Clean the frying basket and cooking pot with hot water,
a small amount of dishwashing liquid and a non-abrasive
sponge or cleaning pad.
5
Never immerse the body of the unit in water. Wipe the inside
of the lid and outer housing with a clean, damp cloth.
6
Dry the unit thoroughly before using. Set the basket aside.
DO NOT yet place the basket into the fryer.
You’re Ready to Start!
Page 6
4
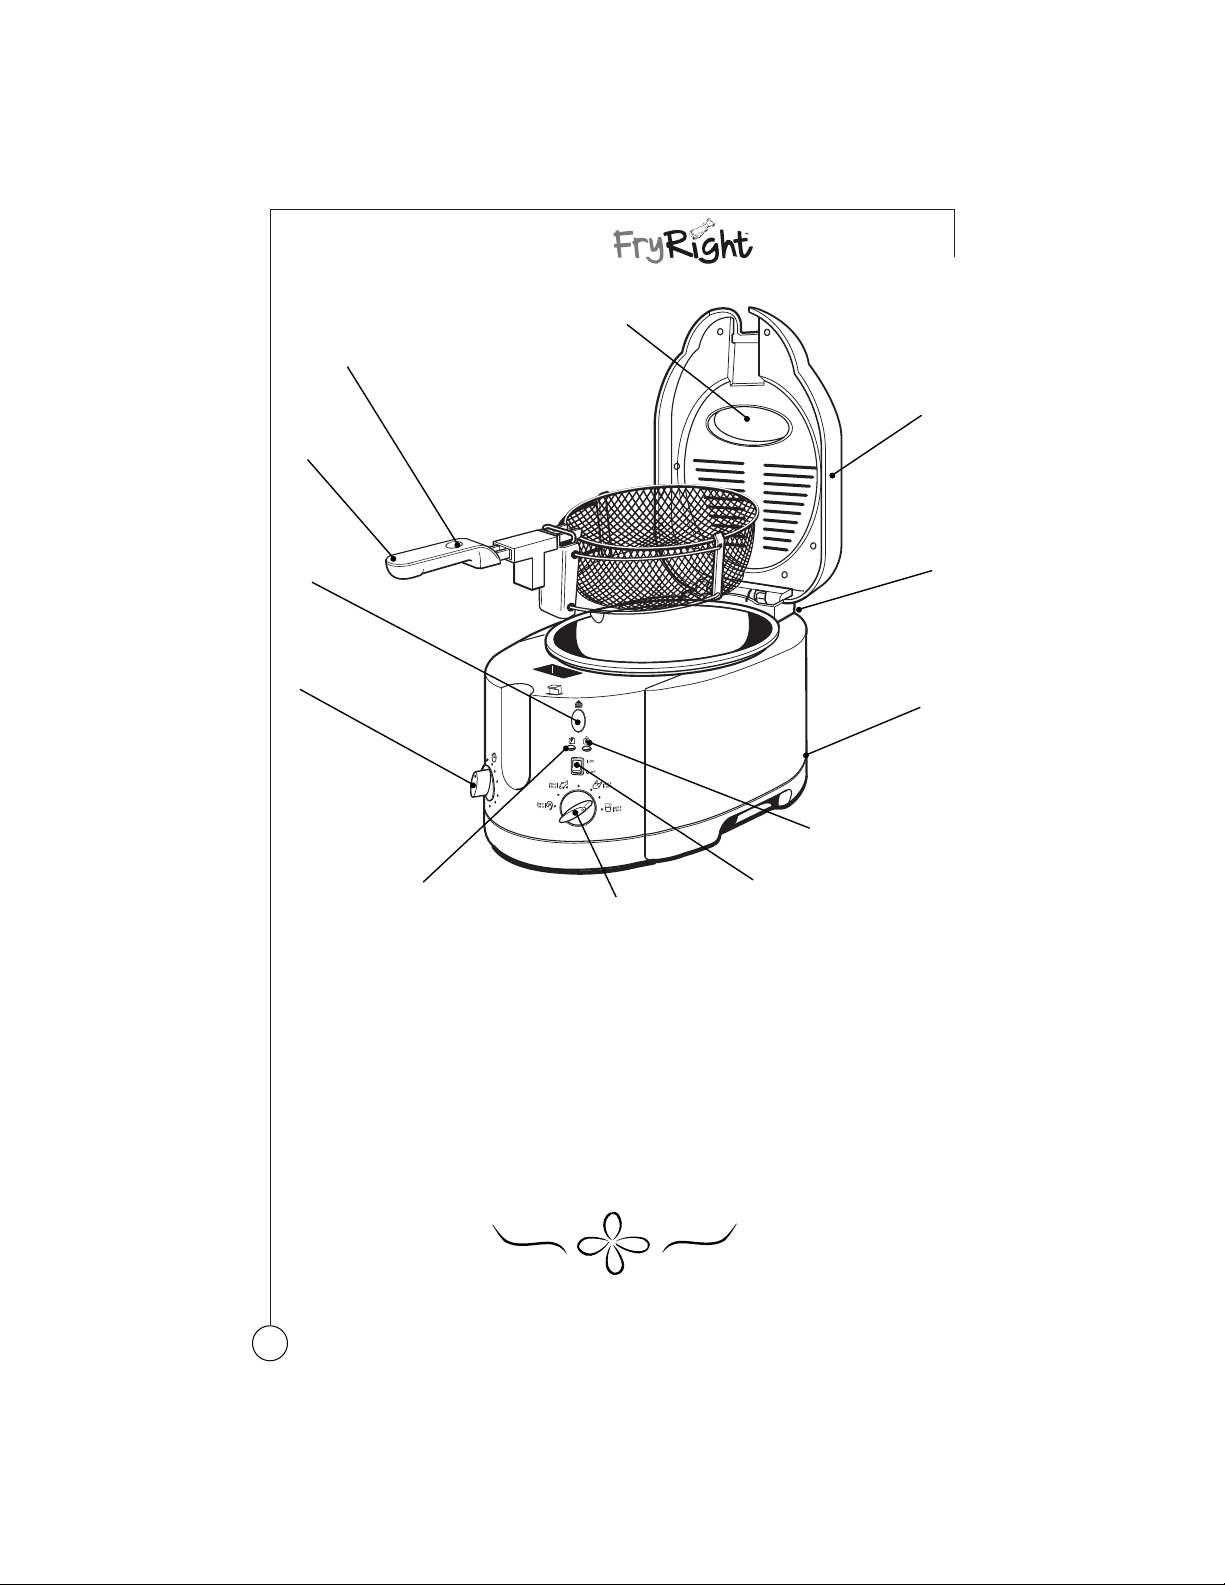
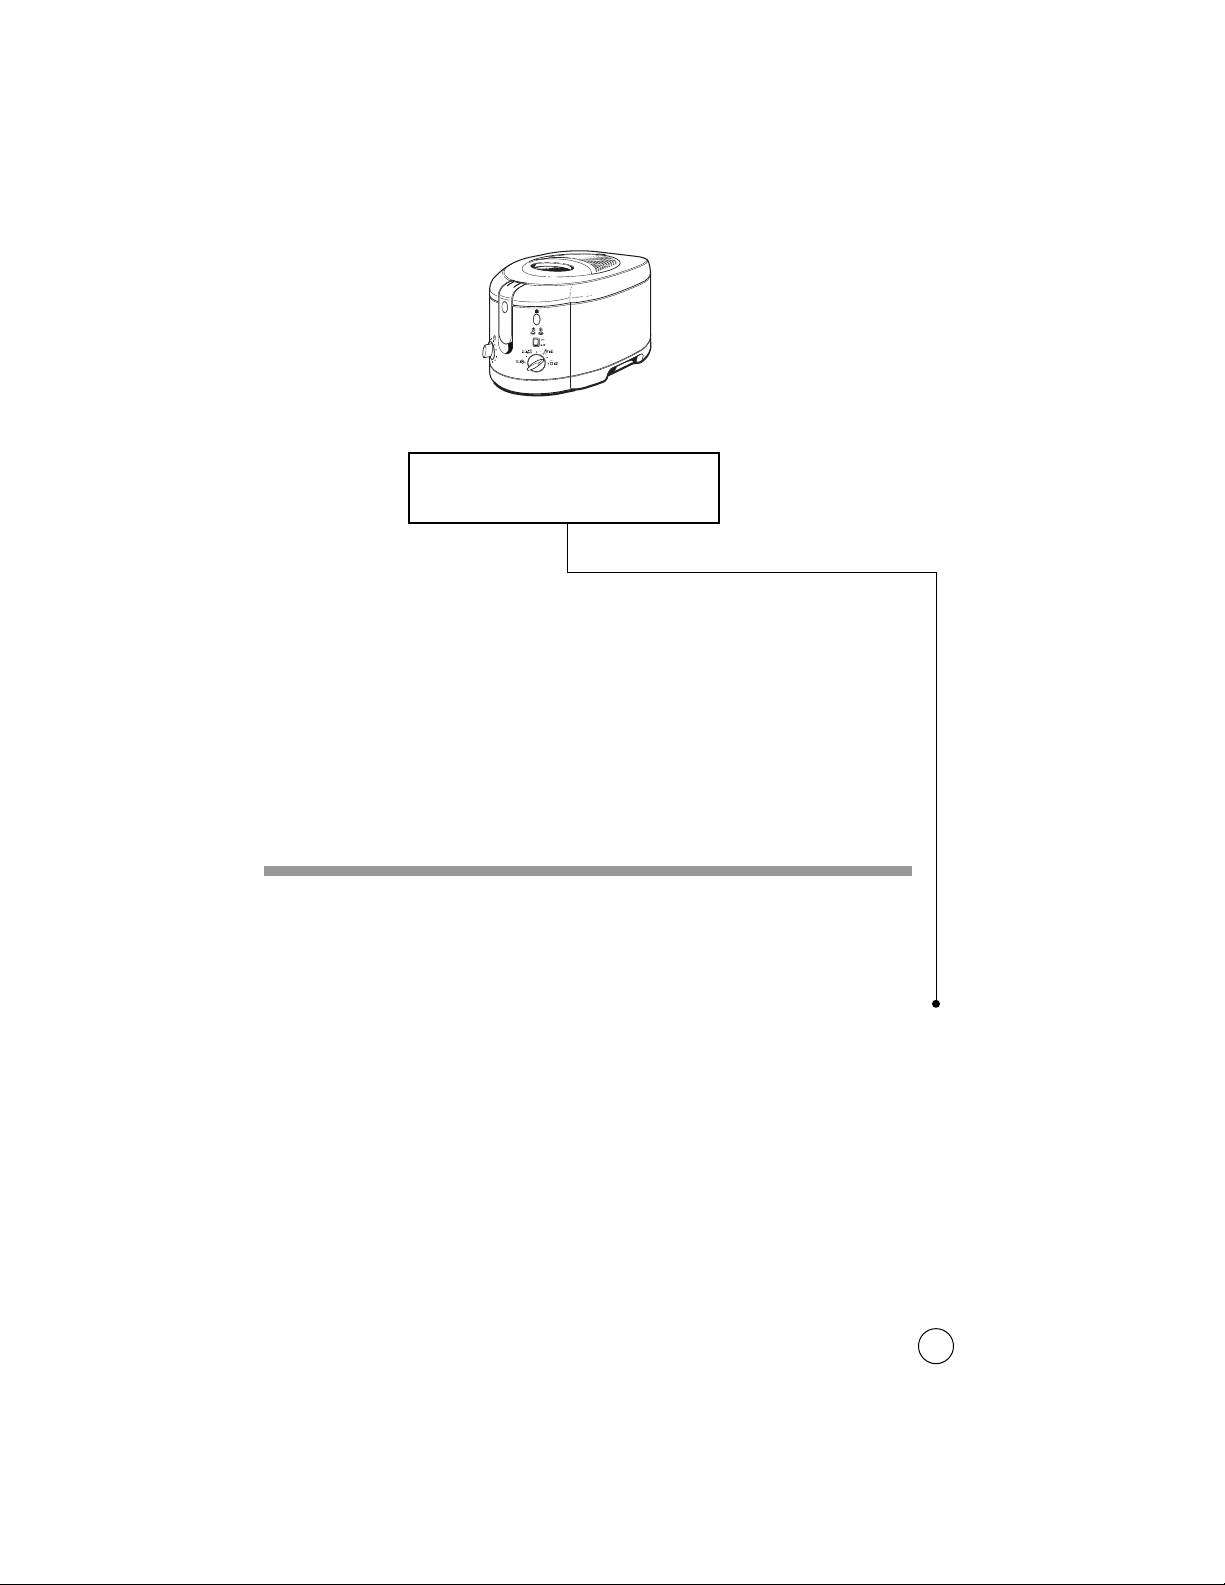
Know Your Sunbeam®FryRight™Deep Fryer
A. Double Filtration System
B. Condensation Drip Tray
(on reverse side of unit)
C. Viewing Window
D.Basket Lowering Button
(push button when handle is in horizontal,
locked position to lower basket)
E. Basket Control Handle
(lift up to raise basket)
F. Timer (Model 3247 Only)
G. Adjustable Thermostat
H. Cord Storage (on reverse side
of unit)
I
. Temperature Indicator Light
J. Power “On” Light
K. On/Off Switch
L. Lid Release Button
A
C
D
E
F
L
B
J
G
H
K
I
Page 7
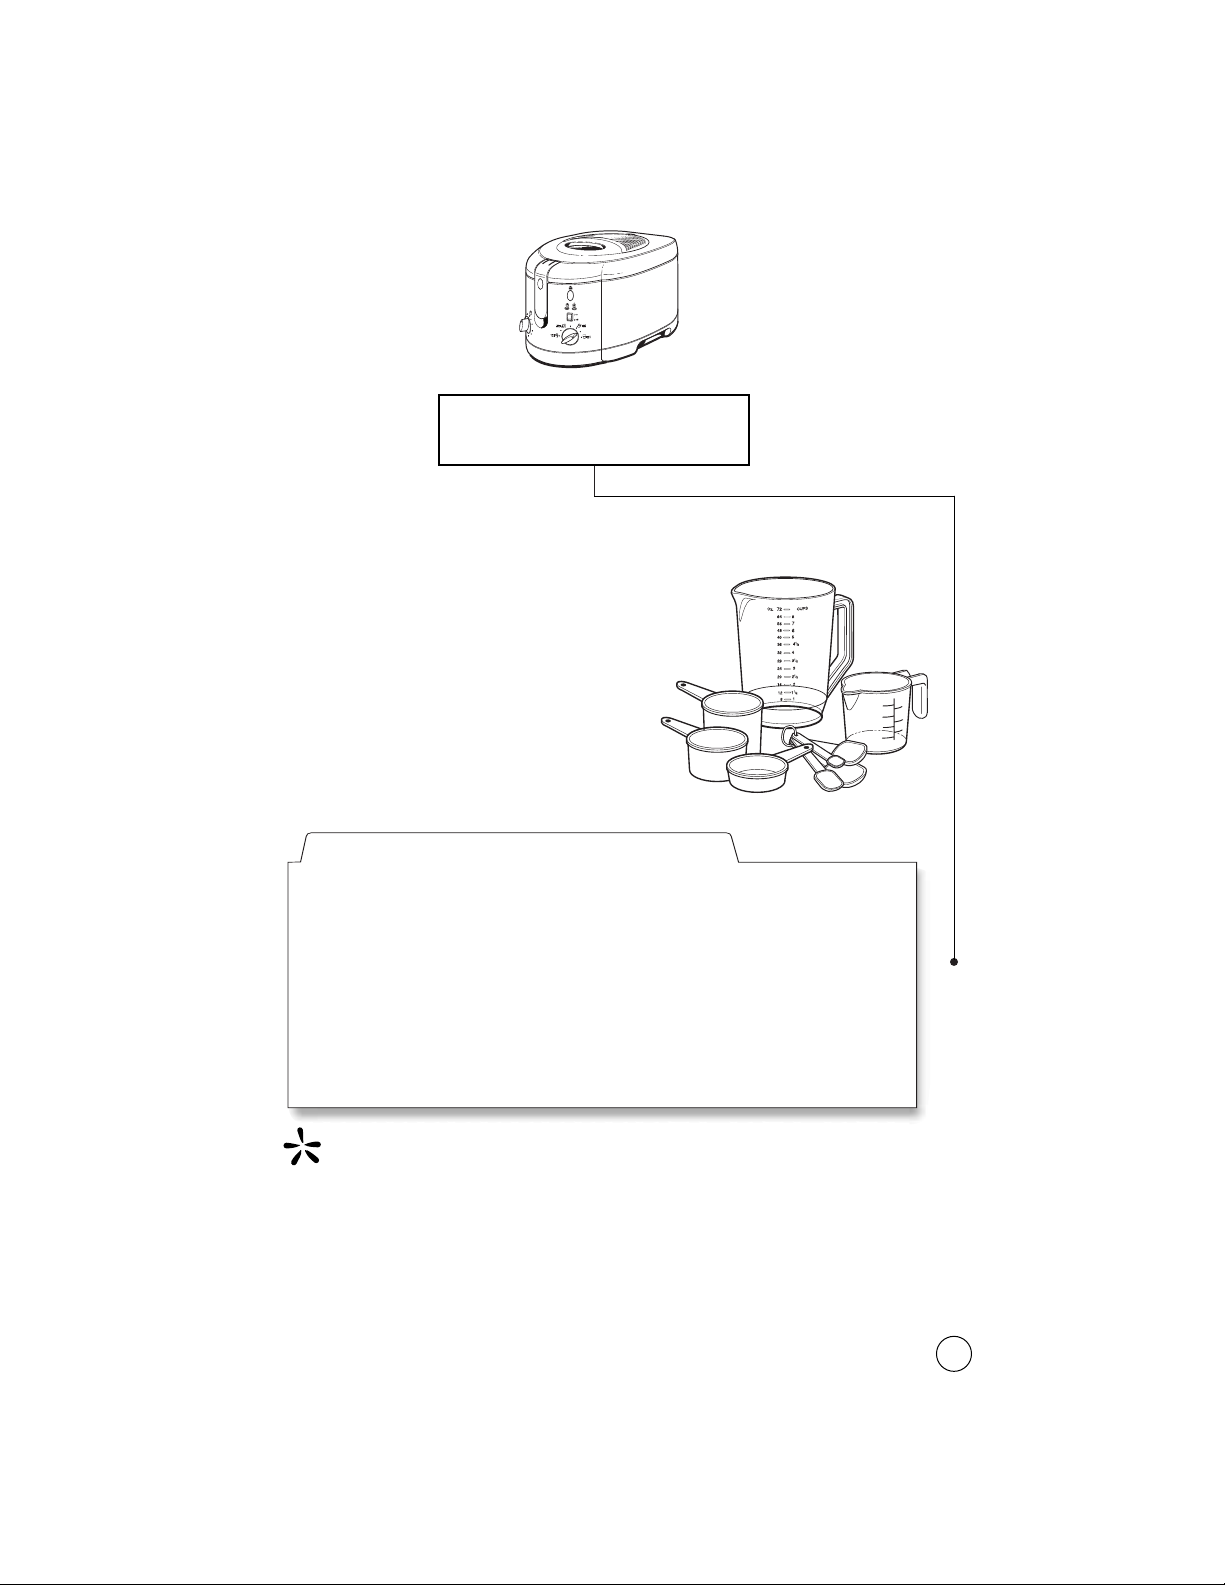
The simplest way to learn how to fry foods is to follow a basic
recipe. The following recipe is easy and delicious.
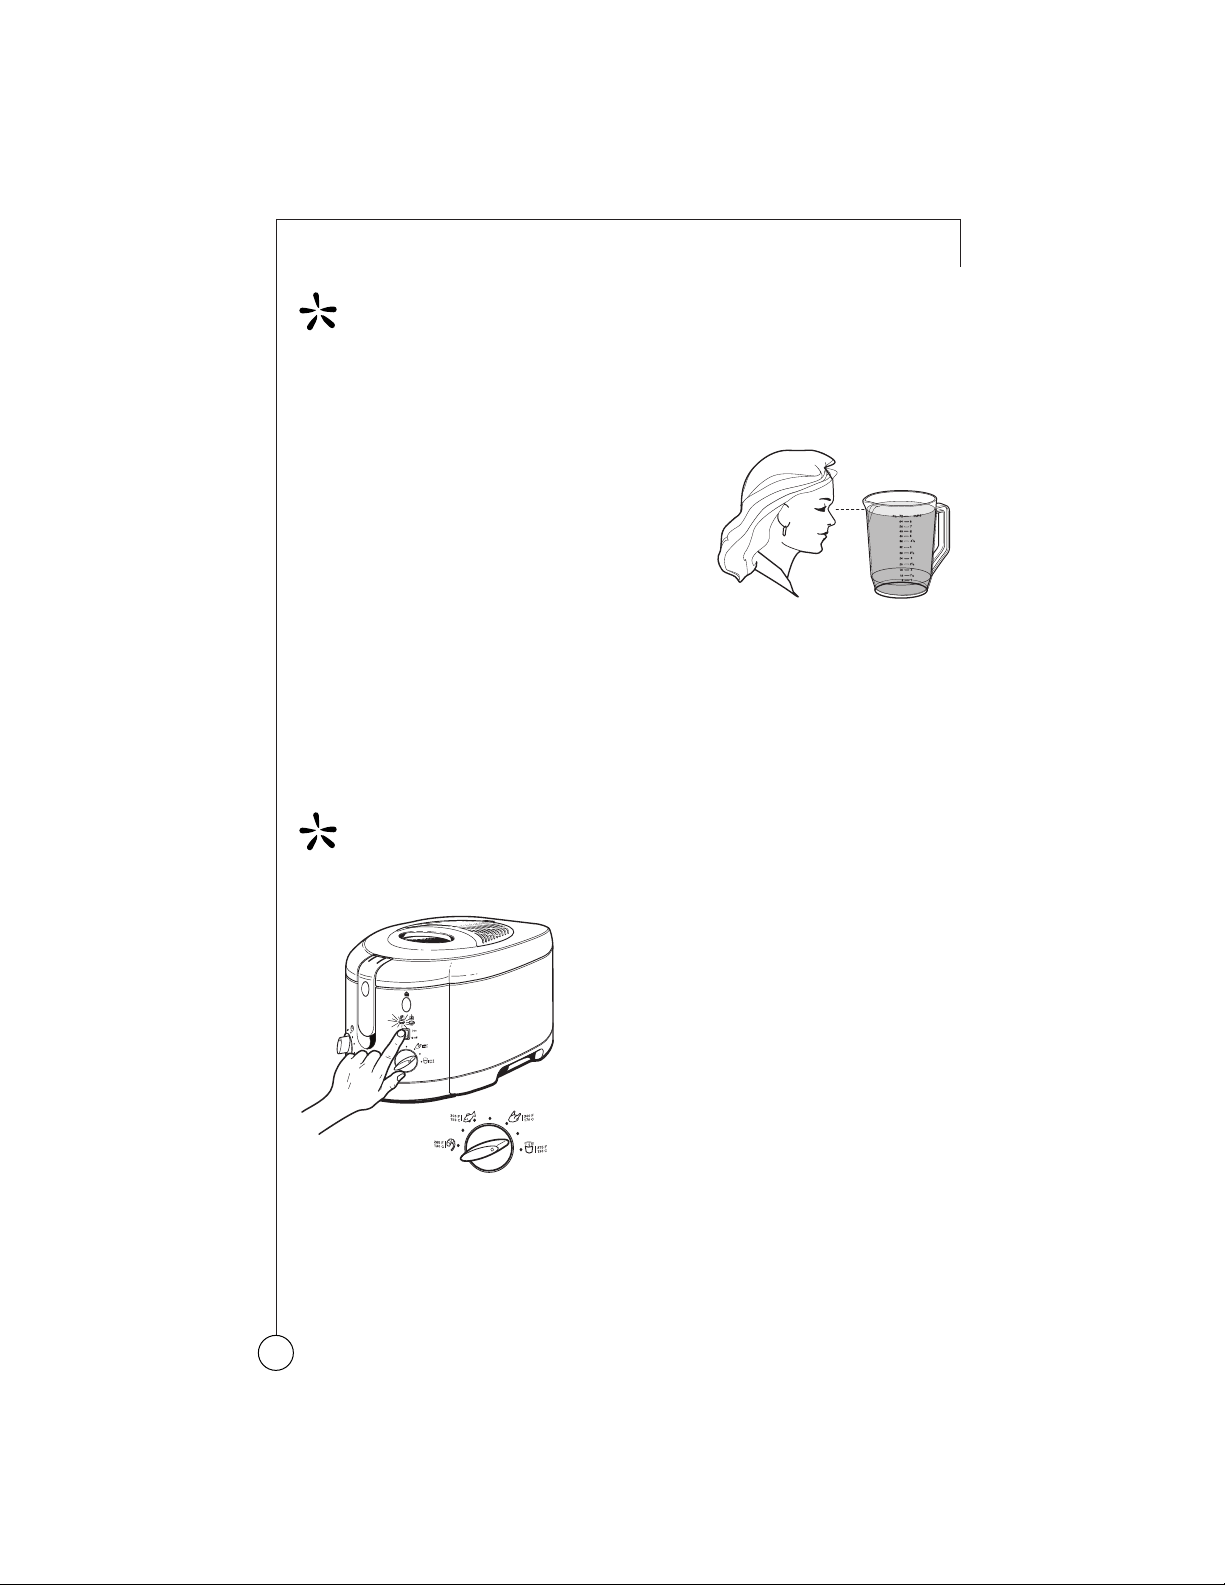
Before you begin, make sure you have
the following measuring equipment:
✓ Liquid measuring cups
✓ Dry measuring cups
✓ Measuring spoons
You will need the following ingredients:
I
MPORTANT
:
Use a good quality vegetable oil, pure corn or
light olive oil. We do not recommend using oils that deteriorate
quickly like sunflower oil, lard or drippings. Deep frying foods
in butter or margarine is not recommended because of lower
smoking temperatures.
Now let’s try a simple, but delicious recipe.
Let’s Fry
1 chicken,
cut into pieces
2 cups flour
9 cups oil
1 teaspoon chicken
seasoning
1 tablespoon salt
1 teaspoon pepper
Deep Fried Chicken
9
5
Page 8
6
Deep Fried Chicken
IMPORTANT:
Never fill the basket more than 2/3 full of food
(1/2 is best), since this will cause the temperature of the oil
to decrease below the optimal frying temperature and
result
in foods that are not as light or crispy as they can be.
1. Pour 9 cups oil into the pot.
2.Wipe the inside of the viewing window
with a little oil to prevent condensation.
3.Season the chicken with salt and pepper.
In a plastic bag, pour the flour, chicken
seasoning and 1 teaspoon salt.
4. Place 5 pieces of chicken into the bag and shake until the pieces
are well covered. Repeat this step until all the pieces are well covered.
5.Place chicken into the basket. Place the bigger pieces of chicken
in the basket first, followed by the smaller pieces.
6.Make sure the food is as dry as possible, water will cause the oil to
splatter. Place the basket back into the pot and gently close the lid.
IMPORTANT:
DO NOT lower the basket yet.
7. Plug the power cord into the wall outlet.
8. Turn the Main Power to “ON.”
Both the red power and yellow
temperature lights will turn on.
Adjust the dial thermostat to
the desired temperature 350°F.
9. You need to pre-heat the oil in the
deep fryer for 15 minutes before
the first batch of food is cooked.
You do not need to pre-heat for
consecutive uses. When the desired
temperature is reached, the yellow
temperature light will turn off.
10.
Press the button on the handle and gently begin to lower the basket.
Cook the chicken for 15 – 21 minutes or until chicken is cooked
and is
golden brown.
9
Page 9
7
IMPORTANT:
During cooking, you may see steam rising through
the filter vent openings in the top of the lid, this is normal;
however, avoid this area while frying.
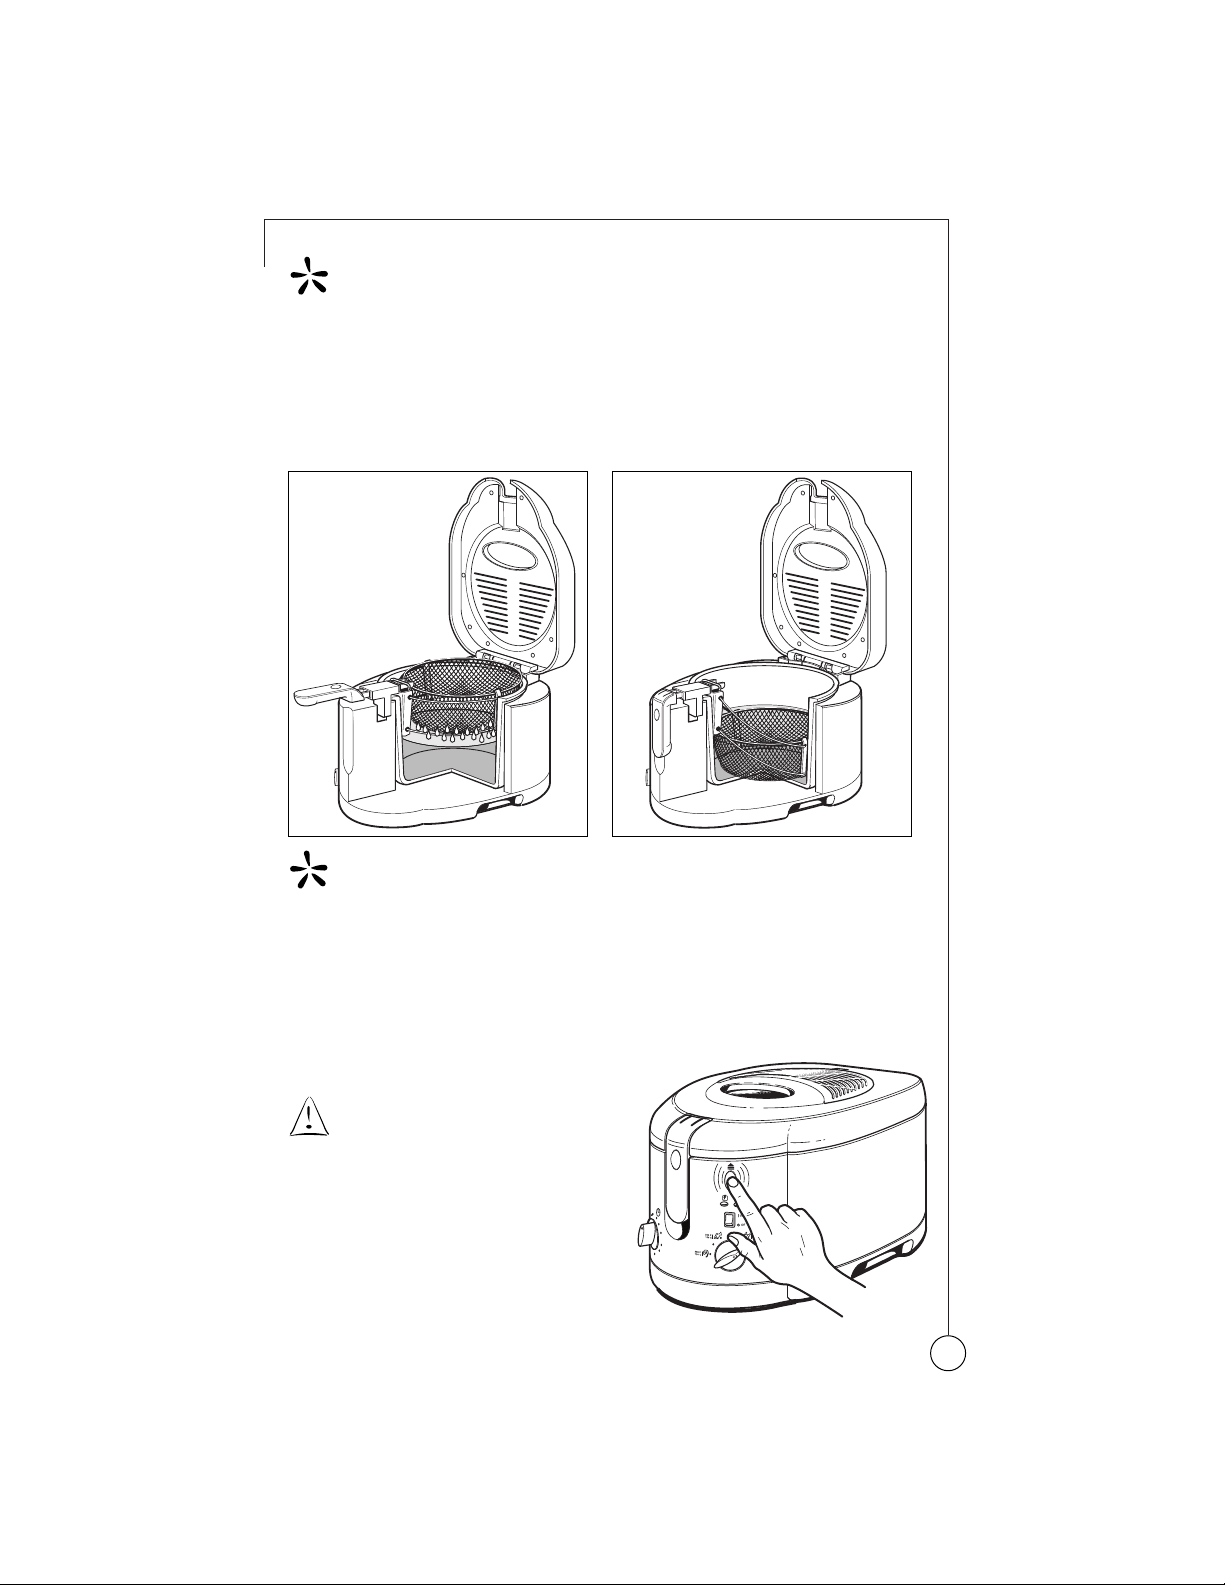
11. Raise the basket handle to its highest horizontal position
(raise the handle until a “click” sound is heard). This will allow
straining the oil out of the food, keeping the food in the
warming chamber until you are ready to enjoy it.
IMPORTANT:
You do not need to open the lid to raise the basket.
AFTER THE FOOD IS FRIED . . .
1. Make sure to turn the unit to the OFF position and unplug
the deep fryer.
2. Once you are ready to enjoy the food, press the
Lid Release Button to open the lid.
C
AUTION
:
By pressing the
Lid Release Button the
unit will release hot steam
and de-pressurize the container.
Extreme care should be used
to ensure hands and face
are clear of the appliance
when steam is released.
Page 10
8
3. Take out the basket and place the food on dishes (or first place
on a paper towel to help absorb any excess oil that may remain
on the outside of the food).
C
AUTION
:
The basket is very hot. Only carry the basket from the
basket handle.
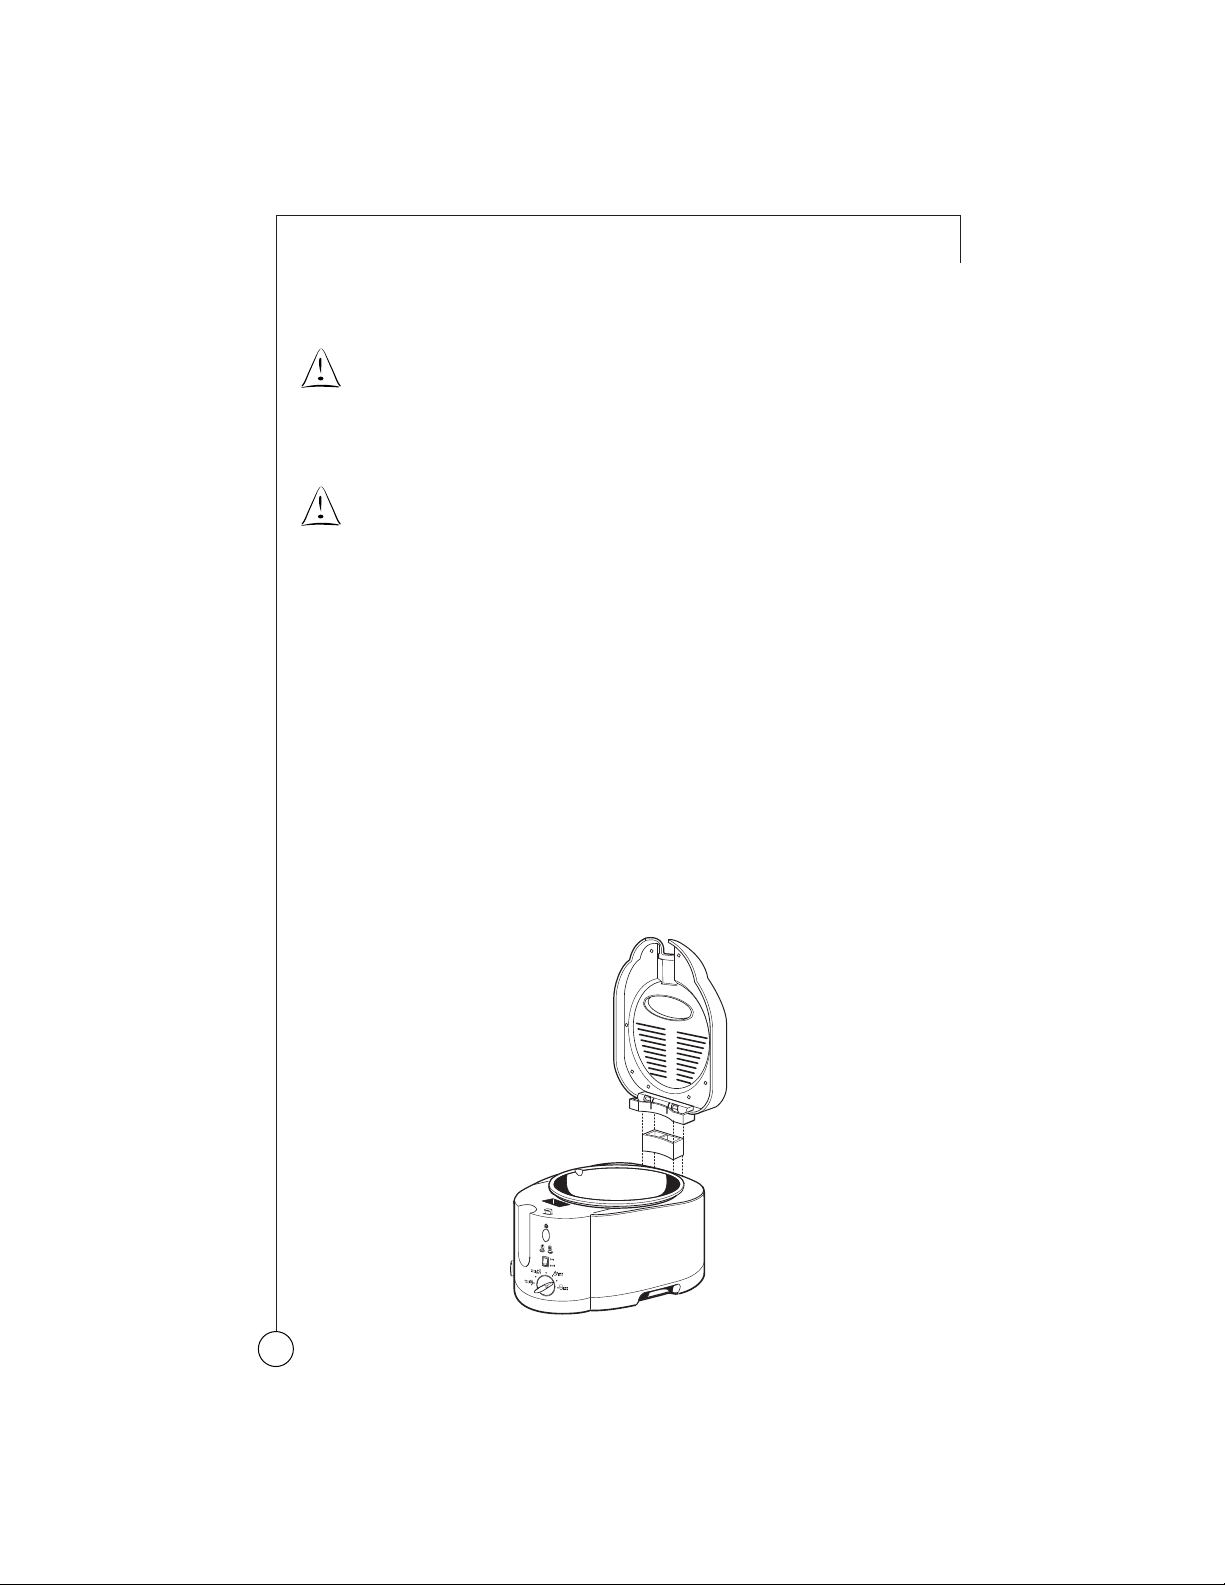
4. Press the lid release button to fully open the lid. With one hand,
gently lift one side and pull up to remove the lid.
C
AUTION
:
Before cleaning the Deep Fryer, always make sure
that it is in the OFF position and disconnected from the outlet.
Make sure the unit and the oil are completely cool. Oil retains
its temperature for a long period of time after use.
Do not attempt to move or carry the fryer while it is hot.
5. Oil can be poured out and strained when the fryer has cooled
(you may choose to use the frying basket to hold a strainer/
filter above your storage container as you pour the oil through it).
Make sure to snap the lid back in place and close it.
6.
A Condensation Drip Tray has been designed into the deep fryer
and is located on the backside of the unit just below the lid.
The lid has been designed to channel condensation that
accumulates on the inside of the lid to the back of the unit
and into the Condensation Drip Tray. To empty,
simply remove
the Condensation Drip Tray and dispose of the water inside.
Page 11

9
C
OOKING GUIDE
The frying times given in this chart are only a guide and
should be adjusted accordingly to suit the quantity fried.
A
PPROXIMATE
COOKING TIME
FOOD TEMPERATURE (MINUTES
)
Mushrooms 302°F / 150°C 3 – 4
Breaded Chicken 350°F / 176°C 15 – 21
Chicken Strips 356°F / 180°C 3 – 4
Shrimp 266°F / 130°C 4 – 5
Fish Cakes or Balls 302°F / 150°C 4 – 6
Fish Fillets 370°F / 188°C 6 – 7
Fish Fillet in batter 370°F / 188°C 4 – 6
French Fries, thin 375°F / 190°C 4 – 6
French Fries, thick 338°F / 164°C 8 – 10
HINTS . . .
• Select the temperature for frying by taking into account the type
and food to be cooked.
• As a general guide, foods that have been pre-cooked in some way
do not require as much cooking time than those foods that are
completely raw.
Page 12
10
How to Replace the Filters
Your carbon filters should last about 5 months. After this time,
you’ll need to replace them. To order additional filters, please call
our Customer Service Line at 800-597-5978. Please ask for Model 4990.
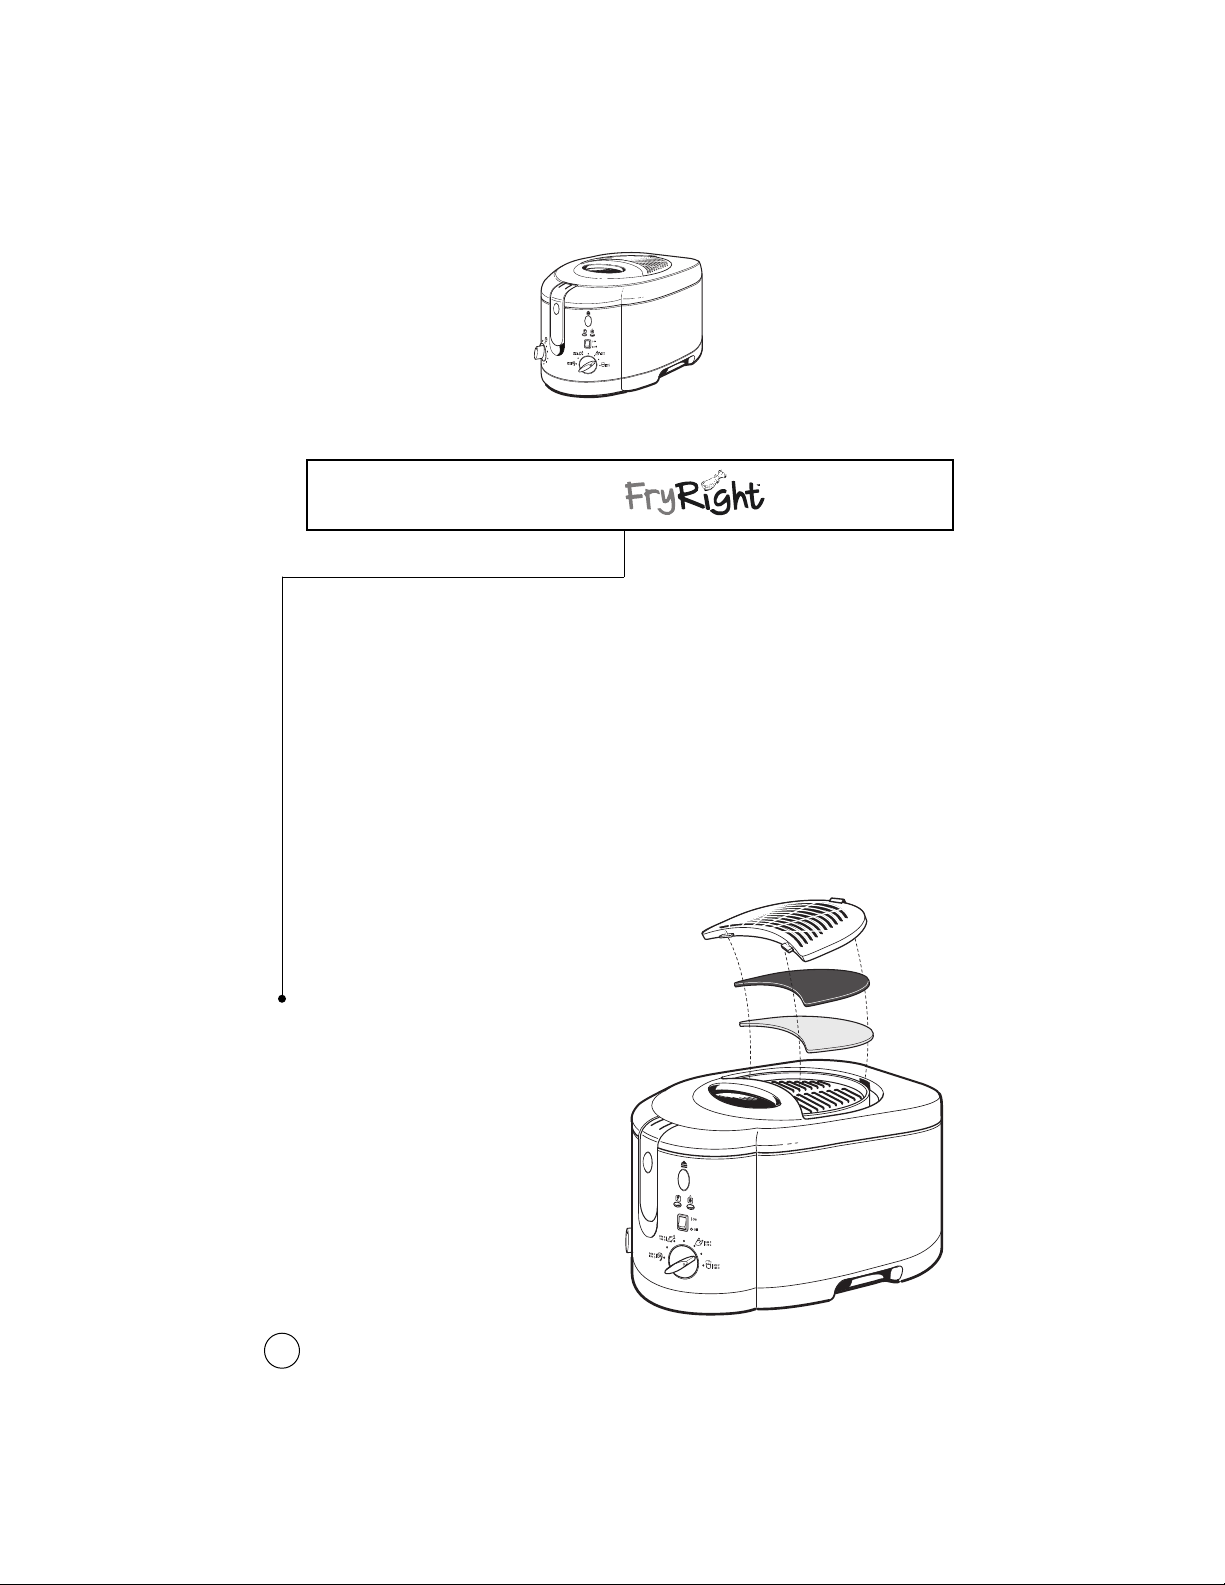
1. Unclip and remove the filter cover.
2. Take out both white and black filters and dispose of them.
3. Place the new filters in, always
making sure that the white oil filter
rests on the metal surface below the
carbon activated filter (black filter).
The replacement filter package will
include 2 carbon activated filters
(black filter) and 1 white oil filter.
You will only need one of the
carbon activated filters at a time;
make sure that you keep the
second filter inside the plastic bag
closed. The carbon activated filter
needs replacement more often
than the white filter.
Taking Care of Your Fry
Right
™ Deep Fryer
Page 13
11
Cleaning the Deep Fryer
C
AUTION
:
Before cleaning the Deep Fryer, always make sure
that it is in the OFF position and disconnected from the outlet.
Make sure the unit and the oil are completely cool. Oil retains
its temperature for a long period of time after use.
Do not attempt to move or carry the fryer while it is hot.
Empty and clean the condensation tray. Oil can be used several times.
Oil should be filtered after each use, however. After removing the oil,
the fryer should first be wiped down with absorbent paper.
Then use a damp cloth and a little mild soap.
Finally, use a dry cloth. Do not immerse the fryer in water
under any circumstances.
Remove the basket and wash with warm water.
C
AUTION
:
Do not use scrubbing
brushes, chemical cleaners or any
abrasive materials to clean the unit.
Cleaning the Lid
Press the lid release button to fully open the lid. With one hand,
gently lift one side and pull up to remove the lid. The lid can be
cleaned in warm soapy water.
C
AUTION
:
Be sure to remove both filters before cleaning the lid.
C
AUTION
:
Do not wash the lid in a dishwasher.
After drying the lid, make sure to snap it back in place
and close it.
Page 14

12
TROUBLESHOOTING
P
ROBLEM
P
OTENTIALCAUSES
S
OLUTION
Release of unpleasant
odors
Release of steam
from under the edge
of the lid
Food remains soft and
is not crispy on outside
The charcoal filter
is saturated.
The oil is deteriorated.
The oil is unsuitable
for deep frying.
A little steam release
is normal. If there
is excessive steam
escaping, then the lid
is not closed properly.
Too much food has
been fried at the
same time.
Replace the filter
(see Page 10 on How
to Replace the Filter)
Change the oil every
10 to 12 fryings.
Use a good quality
vegetable oil,
sunflower oil,
canola oil
or corn oil.
Make sure the lid
is fully closed.
Fry food in smaller
quantities (especially
frozen food).
Storing the Deep Fryer
Allow the appliance to cool completely before storing. Store the
Deep Fryer in a dry location. The cord can be stored away in the
Cord Storage Compartment located in the back of the unit.
Keep cord out of reach of children.
If you experience difficulties when operating the Deep Fryer,
review the Troubleshooting information in this section to find a solution.
If you are unable to find a solution, please call our Customer Service
Line at 800-597-5978.
Page 15
13
Recipes
DEEP FRIED CHICKEN
1 chicken cut into pieces
2 cups flour
9 cups oil
1 teaspoon chicken seasoning
1 tablespoon salt
1 teaspoon pepper
1. Pour 9 cups of oil into deep fryer.
2. Preheat deep fryer to 350°F.
3. Season the chicken with salt and pepper.
4. In a plastic bag, pour the flour, chicken seasoning,
salt and pepper.
5. Place 4 to 5 pieces of chicken into the bag and shake
until the pieces are well coated.
6.
Place the bigger pieces of chicken in the deep fryer basket,
followed by
the smaller pieces. With the lid closed,
lower the basket into the oil.
7. Cook the chicken for 15 – 21 minutes or until golden brown,
lift the handle up to remove basket from oil and let drip
to remove excess oil.
YIELD: 4 SERVINGS
Page 16

14
FRENCH FRIED ONION RINGS OR
SHOESTRING ONIONS
2 large onions
2 cups milk
2 cups water
7 cups oil
1. Skin the onions and cut crosswise into 1/4-inch slices.
2. Combine 1 cup of milk and 1 cup of water.
3. Soak the onions in the milk and water mixture for 1/2 hour.
4. Pour 7 cups of oil into deep fryer.
5. Preheat deep fryer to 350°F.
6. Drain them, spread them on absorbent paper and spread Fritter
Batter for Vegetables on the onions. (Recipe on Page 26)
7. Fry in deep fryer for 5 minutes or until light brown.
8. Drain on absorbent paper.
YIELD: 4 SERVINGS
DEEP FRIED SWEET POTATOES
6 large sweet potatoes
7 cups oil
1 tablespoon brown sugar
1 tablespoon salt
1 tablespoon freshly grated nutmeg (optional)
1. Wash the sweet potatoes, then parboil for 15 minutes.
2. Pare and cut them into strips.
3. Pour 7 cups of oil into deep fryer.
4. Preheat the deep fryer to 350°F.
5. Fry the sweet potato strips in the deep fryer for 15 minutes or until
they are golden brown.
6. Drain them on absorbent paper.
7. Sprinkle with salt, brown sugar or freshly ground nutmeg.
Page 17

15
YIELD: 6 SERVINGS
POTATO PUFFS
1 cup mashed potatoes (soft at room temperature)
1/2 cup sifted flour
1 teaspoon double-acting baking powder
1/4 teaspoon salt
1 slightly beaten egg
1 teaspoon minced parsley
7 cups oil
1. Pour 7 cups of oil into deep fryer.
2. Preheat the deep fryer to 385°F.
3. Combine 1/2 cup sifted flour, 1 teaspoon double acting baking
powder and 1/4 teaspoon salt.
4. Mix in 1 cup mashed potatoes. The potatoes should be soft
at room
temperature. If they are not, then add a little hot milk
or water and beat.
5. Add 1 slightly beaten egg and 1 teaspoon minced parsley.
6. Drop by the spoonfuls into hot oil.
7. Fry for 4 minutes or until golden brown.
8. Drain on absorbent paper.
YIELD: 4 SERVINGS
Page 18

16
POTATO CHIPS
6 peeled Idaho potatoes
7 cups peanut or corn oil
1. Pour 7 cups of oil into deep fryer.
2. Preheat the deep fryer to 380°F.
3. Using a vegetable slicer, slice the potatoes as thin as possible.
4. Soak the slices in cold water, changing the water twice.
5. Drain and dry well.
6. Divide potato slices into 3 separate portions.
7. Drop the separated slices into the hot oil in a frying basket.
8. With the lid closed, gently shake the basket several times to
prevent the chips from sticking together.
9. Cook for 19 – 20 minutes or until they are golden brown.
10. Drain and place on absorbent paper to get rid of any excess oil.
YIELD: 6 SERVINGS
Page 19

17
FRIED POTATO BALLS
4 medium size potatoes
1/2 cup grated Cheddar cheese
1 teaspoon salt
1/2 teaspoon cayenne pepper
1/2 cup sifted bread crumbs
7 cups oil
Flour
2 tablespoons cream
2 tablespoons butter
2 beaten egg yolks
1/2 teaspoon baking powder
1 egg beaten
2 tablespoons water
1. Pour 7 cups of oil into deep fryer.
2. Preheat the deep fryer to 380°F.
3. Peel and mash 4 medium size potatoes.
4. Add the following to the mashed potatoes: 2 tablespoons butter,
2 tablespoons cream, 1/2 cup grated Cheddar cheese,
2 beaten yolks, 1 teaspoon salt, 1/2 teaspoon baking powder
and 1/2 teaspoon cayenne pepper.
5. Whip these ingredients until they are light.
6. Shape them into 1 inch balls.
7. Mix together 1 beaten egg and 2 tablespoons of water. Set aside.
8. Roll the balls in flour, then cover in the egg and water mixture.
9. Roll the balls in sifted bread crumbs.
10. Fry for 6 minutes.
11. Drain them on absorbent paper and serve at once.
YIELD: 4 SERVINGS
Page 20

18
DEEP FRIED FISH
32 small pieces of fish (1 inch x 1 inch)
Fritter Batter for Fish (see recipe in Fritter section)
7 cups oil
Tartar Sauce
4 lemon wedges
1.
Pour 7 cups of oil into deep fryer.
2. Preheat the deep fryer to 370°F.
3. Clean and prepare small pieces of fish (1 inch x 1 inch).
4.
Dip the fish in Fritter Batter for Fish.
5. Deep fry for 4 – 6 minutes, or until a golden brown.
The fish will rise to the surface when done.
6.
Drain on absorbent paper. Serve hot with lemon wedges
and tartar sauce.
YIELD: 4 SERVINGS
Page 21

19
MARINATED DEEP FRIED FISH
1 and 1/2 lb. fish steaks
6 tablespoons dry white wine
7 cups oil
6 tablespoons half and half
1/2 cup flour
1/2 teaspoon salt
1/2 teaspoon pepper
Tartar sauce
1. Skin and cut fish into pieces.
2. Marinate for 30 minutes in dry white wine or lemon juice.
3. Pour 7 cups of oil into deep fryer.
4. Preheat deep fryer to 370°F.
5.
Drain, dry and dip each piece separately in the cream, then in flour.
6. Combine flour, salt and pepper and dip each piece separately
in mixture.
7. Fry the fish in deep fryer for approximately 7 minutes.
Serve with tartar sauce.
YIELD: 3 SERVINGS
Page 22

20
FISH AND CHIPS
1 and 1/2 lb. fillet of flounder
1 and 1/2 lb. baking potatoes
7 cups oil
1/2 cup hot cider vinegar
Fritter Batter for Fish (see recipe in Fritter section)
1. Cut the baking potatoes into thick uniform strips, slightly larger
than for French fries.
2. Soak the potatoes strips in cold water for 1/2 hour.
3. Drain and dry thoroughly.
4. Pour 7 cups of oil into deep fryer.
5. Preheat deep fryer to 300°F.
6. Cut fillet of flounder into uniform pieces.
7. Coat with Fritter Batter for Fish.
8. Deep fry the breaded fish for 5 minutes or until golden brown.
Remove and keep warm.
9. Change temperature of oil into deep fryer to 375°F.
10. Fry the potatoes in the hot oil for 7 minutes or until golden brown.
11. Arrange the potatoes and fish on a platter.
12. Serve the hot cider vinegar as a dip. YIELD: 4 SERVINGS
Page 23

21
DEEP FRIED OYSTERS
12 large shucked oysters
1 egg
2 tablespoons of water
1/2 cup crushed seasoned bread crumbs
7 cups oil
1. Drain the shucked oysters and dry them well between towels.
2. Beat together the egg and 2 tablespoons of water.
3. Insert a fork into the tough muscle of the oysters, dip them in the
water and egg mix; then in seasoned bread crumbs; in the egg
again and once more in the bread crumbs.
4. Let the oysters dry on a rack for 1/2 hour.
5. Pour 7 cups of oil into deep fryer.
6. Preheat deep fryer to 375°F.
7. Fry them for approximately 4 minutes. YIELD: 2 SERVINGS
Page 24

22
DEEP FRIED STUFFED SHRIMP
24 jumbo shrimp
6 water chestnuts
Thin julienne Prosciutto or Westphalian ham
1 beaten egg
2 cups flour
7 cups oil
1. Shell and de-vein 10 jumbo shrimp and chop into a pulp.
Set aside.
2. Finely chop and smash the 6 water chestnuts. Set aside.
3. Shell and de-vein the 14 jumbo shrimps leaving the
tails intact,
4. Split the 14 shrimp lengthwise along the de-veined edge
but far enough to separate.
5. Spread them flat and lay along each crevice a thin julienne
of Prosciutto or Westphalian ham.
6. Spread the shrimp and chestnut mixture into the crevices
above the ham and mold it into the form of a wide beveled
edge when you partially re-close the shrimp for breading.
7. Dip the shrimp into the beaten egg, then into flour.
8. Allow to dry on a rack 15 to 20 minutes.
9. Pour 7 cups of oil into deep fryer.
10. Preheat the deep fryer to 266°F.
11. Lift the shrimp by the tails and slide them gently into the
heated oil.
12. Fry for approximately 5 minutes or until golden brown.
13. Drain on absorbent paper and serve at once.
YIELD: 4 SERVINGS
Page 25

23
PURÉED VEGETABLE FRITTERS
1 egg
1 cup cooked mashed carrots
1/4 teaspoon salt
1 and 1/2 teaspoons flour
6 tablespoons buttermilk
1 teaspoon Worcestershire sauce
2 tablespoons chopped parsley
7 cups oil
Bound Breading
(recipe found at end of section)
1. Beat the egg until light.
2. Add and beat well the cup of cooked mashed carrots
3. Stir in the salt, flour, buttermilk, Worcestershire sauce
and the parsley.
4. Spread these ingredients on a greased platter.
5. Refrigerate for 3 hours.
6. When they are cold, shape them into 1 inch balls.
7. Pour 7 cups of oil into deep fryer.
8. Preheat deep fryer to 375°F.
9. Flour and roll in Bound Breading.
10. Fry the balls in oil for 4 minutes.
YIELD: 3 SERVINGS
Page 26

24
SHRIMP FRITTERS
1 large ear of fresh corn, husked
6 oz. uncooked large shrimp
(peeled, de-veined and chopped)
1/2 cup alfalfa sprouts
2 garlic cloves, minced
1/2 teaspoon salt
1/2 teaspoon ground black pepper
1/4 cup grated carrots
3 tablespoons canned unsweetened coconut milk
1 large egg
2 tablespoons all-purpose flour
3 tablespoons vegetable oil
7 cups oil
1. Pour 7 cups of oil into deep fryer.
2. Preheat deep fryer to 325°F.
3. Cook corn in boiling water until crisp and tender
(approximately 3 minutes).
4. Drain and then cut kernels from the cob.
5. Transfer kernels to large bowl.
6. Mix in shrimp, alfalfa sprouts, garlic cloves, salt, black pepper
and grated carrots.
7. Whisk coconut milk, vegetable oil and egg together.
8. Stir into corn mixture.
9. Mix in flour.
10. Working in batches, flatten 1/4 cup of mixture into 3-inch
rounds and lower into oil.
11. Cook until gold (approximately 5 minutes).
12. Transfer to absorbent paper and drain.
13. Serve hot.
YIELD: 8 SERVINGS
*
Note: Add extra flour for a thicker batter
Page 27

25
EGGPLANT FRITTERS
1 small eggplant
1 teaspoon vinegar
1 egg
3 tablespoons flour
1/2 teaspoon salt
1/2 teaspoon any baking powder
7 cups oil
1. Pour 7 cups of oil into deep fryer.
2. Preheat deep fryer to 365°F.
3. Pare and slice eggplant.
4. Cook it until tender in boiling water to cover.
5. Add vinegar.
6. Drain the eggplant and mash it.
7. Beat in the egg, flour, salt and baking powder.
8. Place in deep fryer and cook for 3 – 4 minutes or until light
golden brown.
YIELD: 6 SERVINGS
Page 28

26
FRITTER BATTER FOR VEGETABLES, MEAT AND FISH
1 and 1/3 cups all-purpose flour
1 tablespoon melted butter
1 teaspoon salt
2 beaten egg yolks
1/4 teaspoon pepper
3/4 cup flat beer
2 stiffly beaten egg whites
1. Put in a bowl and mix well the flour, butter, salt, beaten egg yolks
and pepper.
2. Gradually add the flat beer, stirring constantly.
3. Cover and refrigerate 3 to 12 hours.
4. Just before using, you may add 2 stiffly beaten egg whites.
BOUND BREADING
1 cup all-purpose flour, finely sifted dry bread crumbs
or finely crushed corn flakes
1 teaspoon salt
1/4 teaspoon pepper or 1/2 teaspoon paprika
1. Mix all ingredients.
YIELD: ENOUGH TO COAT ABOUT 2 CUPS OF FOOD
Page 29

27
SWEET MILK DOUGHNUT HOLES
2 eggs
1 cup sugar
1 cup milk
5 teaspoons melted shortening
4 cups all-purpose flour
4 teaspoons double-acting baking powder
1/4 teaspoon cinnamon
1/2 teaspoon salt
1/4 teaspoon nutmeg
7 cups oil
powdered sugar for garnish
1. Pour 7 cups of oil into deep fryer.
2.Preheat deep fryer to 370°F.
3.Beat the 2 eggs.
4.Add in 1 cup sugar, continuing to beat slowly.
5.Stir in milk and melted shortening.
6.Add in 4 cups sifted flour.
7.Mix in the double-acting baking powder, cinnamon, salt and nutmeg.
8.Roll into small balls.
9.Fry for 3 minutes.
10.Sprinkle powdered sugar over the doughnuts.
YIELD: 36 DOUGHNUTS
Page 30

28
SWEET AND SOUR MEATBALLS
1 lb. ground beef
1 medium onion
2 tablespoons Sherry
2 tablespoons soy sauce
1 teaspoon salt
1 egg yolk
1 cup of corn starch
7 cups oil
SAUCE
1 small can of pineapple chunks
1/2 can of pineapple juice
5 tablespoons vinegar
1 tablespoon soy sauce
3 tablespoons sugar
1 tablespoon corn starch
1. Pour 7 cups of oil into deep fryer.
2. Preheat deep fryer to 350°F.
3. Cut the meat into 1-inch pieces and then grind with your
SUNBEAM®Food Processor.
4. Chop the onion into very fine pieces.
5. In a bowl, mix the meat, onion, sherry, soy sauce, salt and egg yolk.
6. Form little meatballs and then roll them in the corn starch.
7.
Fry for 5 minutes or until golden brown (do not over-fry the meatballs;
they will finish cooking with the sauce).
8. Place the meatballs in a casserole and add the pineapple chunks,
pineapple juice and the remaining sauce ingredients.
9. Mix in the corn starch.
10. Bake in oven at 350°F for 10 minutes.
11. Accompany meatballs with white rice made in the
OSTER®Rice Cooker.
YIELD: 4 SERVINGS
Page 31

29
2-Y
EAR
L
IMITED
W
ARRANTY
Sunbeam Products, Inc. (“Sunbeam”) warrants that for a period of two years from
the date of purchase, this product will be free from defects in material and
workmanship. Sunbeam, at its option, will repair or replace this product or any
component of the product found to be defective during this warranty period.
Replacement will be made with a new or remanufactured product or component.
If the product is no longer available, replacement may be made with a similar
product of equal or greater value. This is your exclusive warranty.
This warranty is valid for the original retail purchaser from the date of initial retail
purchase and is not transferable. Keep the original sales receipt. Proof of
purchase is required to obtain warranty performance. Sunbeam dealers, service
centers or retail stores selling Sunbeam products do not have the right to alter,
modify or any way change the terms and conditions of this warranty.
This warranty does not cover normal wear of parts or damage resulting from any of
the following:
negligent use or misuse of the product, use on improper voltage or
current, use contrary to the operating instructions, disassembly, repair or alteration
by anyone other than Sunbeam or an authorized service center. Further, the
warranty does not cover Acts of God, such as fire, flood, hurricanes and tornadoes.
Sunbeam shall not be liable for any incidental or consequential damages caused
by the breach
of any express or implied warranty. Except to the extent prohibited
by applicable law, any implied
warranty of merchantability or fitness for a particular
purpose is limited in duration to the duration
of the above warranty. Some states,
provinces or jurisdictions do not allow the exclusion or
limitation of incidental or
consequential damages or limitations on how long an implied warranty
lasts, so the
above limitations of exclusion may not apply to you. This warranty gives you
specific
legal rights, and you may also have other rights that vary from state to state
or province to province.
How to Obtain Warranty Service
Take the product to an authorized Sunbeam service center. You can find the
nearest authorized Sunbeam service center by calling 1-800-597-5978. If a service
center is not conveniently located, attach a tag to the product that includes your
name, address, daytime telephone number and description of the problem.
Include a copy of the original sales receipt. Carefully package the product
and send either by UPS or Parcel Post with shipping and insurance prepaid to:
For products purchased in the United States:
SUNBEAM APPLIANCE SERVICE STATION
Attention: Service Department
117 Central Industrial Row
Purvis, MS 39475
For products purchased in Canada:
SUNBEAM CANADA CORP., LTD.
Please call or email us
1-800-663-8623
consumeraffairs@consumer.sunbeam.com
DO NOT RETURN THIS PRODUCT TO THE PLACE OF PURCHASE.
If you have any questions regarding this warranty please call 1-800-597-5978.
Page 32

30
©1999 Sunbeam Corporation or its affiliated companies.
All rights reserved.
SUNBEAM®and OSTER® are registered trademarks of
Sunbeam Corporation
or its affiliated companies.
FRYRIGHT
™
is a trademark of Sunbeam Corporation
or its affiliated companies.
Distributed by Sunbeam Products, Inc.
Boca Raton, FL 33431
DEEP FRYER
P.N. 102782
Page 33

FREIDORA
Manuel de Instrucciones con Recetas
MODELOS 3242 & 3247
Page 34

L
EA Y
C
ONSERVEESTASINSTRUCCIONES
PRECAUCIONES IMPORTANTES
Al utilizar aparatos electrodomésticos, es conveniente mantener ciertas
precauciones relacionadas con la seguridad, entre otras las siguientes:
1 Lea todas las instrucciones, las etiquetas en el producto y las advertencias
antes de usar la Freidora.
2 Este aparato usa aceite caliente; es muy importante verificar que la unidad esté
colocada sobre un lugar seguro mientras está en uso o mientras el aceite está
aun caliente. Asegúrese de que el cable eléctrico no esté suelto y no presente
la posibilidad de que alguien se tropiece con él.
3 NO MUEVA LA FREIDORA CUANDO EL ACEITE ESTÉ CALIENTE O DURANTE
EL PROCESO DE COCCIÓN.
4 SUPERVISIÓN CERCANA ES NECESARIA CUANDO EL APARATO ESTÉ EN USO
O CUANDO EL ACEITE ESTÉ CALIENTE.
5 No toque las superficies calientes. Siempre use guantes cuando maneje
superficies calientes y permita que las partes metálicas se enfríen antes de limpiar.
Permita que la unidad se enfríe bien antes de poner o quitar partes.
6 Desconecte la Freidora de la toma de corriente de la pared cuando no esté en uso
y antes de limpiarla. Nota: asegúrese de que la Freidora esté apagada en la posición
"Ø" antes de desconectar el enchufe.
7 Para protegerse contra el riesgo de una descarga eléctrica, no sumerja el aparato
o el enchufe en agua o en ningún otro líquido.
8 Este aparato no debe ser usado por niños. Supervisión cercana es siempre
necesaria cuando este o cualquier otro aparato es usado cerca de niños.
9
No opere éste o ningún otro aparato con un cordón o un enchufe dañado o quemado.
10
Si el cable eléctrico de este aparato se ha dañado, solamente debe ser reemplazado
en un taller de reparaciones señalado por el fabricante, ya que herramientas especiales
son necesarias.
11 No use accesorios no recomendados por el fabricante del aparato.
Éstos pueden causar incendios, descargas eléctricas o lesiones personales.
12 No se use en exteriores o con propósitos comerciales. No use este aparato
más que para lo que ha sido diseñado.
13 No permita que el cordón cuelgue sobre la orilla de la mesa o del mostrador
o toque superficies calientes.
14 No coloque el aparato sobre o cerca de quemadores de estufas de gas o eléctricas
o dentro de un horno caliente.
15 No coloque ningún objeto sobre o cerca de este aparato en ningún momento.
Para prevenir un incendio, mantenga en todo momento este aparato libre
de contacto con cualquier material inflamable, incluyendo cortinas, tapicería,
paredes, materiales plásticos, etc.
16 No coloque dentro o cerca de la Freidora ningún material inflamable tal como papel,
cartón o plástico.
17 Alimentos demasiado grandes no deben ser introducidos dentro de la Freidora
ya que pueden causar in incendio.
18 No limpie con una fibra de metal o con ningún limpiador abrasivo.
(Pequeños residuos pueden desprenderse de la fibra metálica y tocar partes
eléctricas resultando en el riesgo de descargas eléctricas).
19 NO USE CON UN CABLE DE EXTENSIÓN.
20Asegúrese de que las asas estén correctamente ensambladas y fijas en su lugar.
Observe las instrucciones referentes a las asas del aparato.
E
STA
U
NIDADES PARAUSODOMÉSTICOSOLAMENTE
Page 35

ÍNDICE
PRECAUCIONES IMPORTANTES . . . . . . . DENTRO DE LA PORTADA
EMPEZANDO . . . . . . . . . . . . . . . . . . . . . . . . . . . . . . . . 2
CARACTERÍSTICAS DE LA FREIDORA . . . . . . . . . . . . . . . . . 4
P
ARA FREÍR ALIMENTOS . . . . . . . . . . . . . . . . . . . . . . . . . 5
P
OLLO FRITO . . . . . . . . . . . . . . . . . . . . . . . . . . . . . . 5
D
ESPUÉS DE QUE LOS ALIMENTOS
ESTÉN FRITOS. . . . . . . 7
G
UÍA DE COCCIÓN . . . . . . . . . . . . . . . . . . . . . . . . . . . . 9
C
ONSEJOS . . . . . . . . . . . . . . . . . . . . . . . . . . . . . . . . 9
CUIDANDO SU FREIDORA . . . . . . . . . . . . . . . . . . . . . . . . 10
C
OMO REMPLAZAR LOS FILTROS . . . . . . . . . . . . . . . . . . 10
LIMPIANDO LA FREIDORA. . . . . . . . . . . . . . . . . . . . . . . 11
L
IMPIANDO LA TAPA . . . . . . . . . . . . . . . . . . . . . . . . . . 11
ALMACENANDO LA FREIDORA . . . . . . . . . . . . . . . . . . . . 12
S
OLUCIONANDO PROBLEMAS. . . . . . . . . . . . . . . . . . . . . . 12
R
ECETAS. . . . . . . . . . . . . . . . . . . . . . . . . . . . . . . . . . . 13
P
OLLO FRITO . . . . . . . . . . . . . . . . . . . . . . . . . . . . . . 13
AROS DE CEBOLLA . . . . . . . . . . . . . . . . . . . . . . . . . . 14
B
ATATA DULCE
FRITA . . . . . . . . . . . . . . . . . . . . . . . . . 14
F
RITURAS DE PAPA. . . . . . . . . . . . . . . . . . . . . . . . . . . 15
P
APAS FRITAS . . . . . . . . . . . . . . . . . . . . . . . . . . . . . . 16
B
OLITAS DE PAPA FRITAS . . . . . . . . . . . . . . . . . . . . . . 17
P
ESCADO FRITO . . . . . . . . . . . . . . . . . . . . . . . . . . . . 18
PESCADO FRITO MARINADO . . . . . . . . . . . . . . . . . . . . . 19
P
ESCADO Y PAPAS. . . . . . . . . . . . . . . . . . . . . . . . . . . 20
OSTRAS FRITAS. . . . . . . . . . . . . . . . . . . . . . . . . . . . . 21
C
AMARÓN RELLENO FRITO . . . . . . . . . . . . . . . . . . . . . . 22
FRITURAS DE PURÉ DE VERDURAS. . . . . . . . . . . . . . . . . 23
F
RITURAS DE CAMARÓN. . . . . . . . . . . . . . . . . . . . . . . . 24
FRITURAS DE BERENJENA . . . . . . . . . . . . . . . . . . . . . . 25
P
ASTA PARA FREÍR VERDURAS, CARNE Y PESCADO . . . . . . 26
PASTA PARA UNIR . . . . . . . . . . . . . . . . . . . . . . . . . . . 26
D
ONAS DE LECHE ENDULZADAS . . . . . . . . . . . . . . . . . . 27
ALBÓNDIGAS AGRIDULCES. . . . . . . . . . . . . . . . . . . . . . 28
G
ARANTÍA . . . . . . . . . . . . . . . . . . . . . . . . . . . . . . . . . . 29
Page 36

2
1
Saque la Freidora de la caja y remueva
la etiqueta ilustrada que se encuentra
en el frente y al lado de la unidad.
2
Coloque la Freidora sobre el mostrador
donde el enchufe alcance la toma de
corriente eléctrica. NO enchufe la unidad
a la toma de corriente todavía.
3
Levante el asa de la
canasta a su posición
horizontal más alta (escuchará
un sonido de clic). Abra la tapa
y saque la canasta de la Freidora.
Saque todos los documentos
impresos y cualquier documento
que esté dentro de la canasta.
EMPEZANDO
Page 37

3
4
Limpie la canasta para freír alimentos y la olla de cocción
con agua caliente y una pequeña cantidad de detergente
líquido para platos, usando una esponja suave.
5
Nunca sumerja el cuerpo de la unidad en agua.
Limpie el interior de la tapa y el exterior del cuerpo
del aparato con un paño limpio y húmedo.
6
Seque muy bien el aparato antes de usarlo.
Coloque la canasta a un lado. Aún NO coloque
la canasta dentro de la Freidora.
¡U
STED
E
STÁ
L
ISTO
P
ARA
E
MPEZAR
!
Page 38

A. Sistema de Doble Filtración
B.
Recipiente de Goteo y Condensación
(en el lado posterior de la unidad)
C. Ventana de Visibilidad
D. Botón para Bajar la Canasta
(para bajar la canasta, presione el
botón cuando el asa esta en posición
horizontal)
E. Asa para el Control de la Canasta
(levante para subir la canasta)
F. Reloj (Modelo 3247 Únicamente)
4
Conozca Su Freidora Sunbeam
®
FryRight
™
G.Termostato Ajustable
H. Guarda Cable (en el lado
posterior de la unidad)
I. Luz Indicadora de la
Temperatura
J. Luz de Encendido “On”
K. Interruptor de Apagado/
Encendido On/Off
L. Botón para Abrir la Tapa
A
C
D
E
F
L
B
J
G
H
K
I
Page 39

5
La manera más simple de aprender a freír alimentos es seguir una
receta fácil. La siguiente receta es fácil y deliciosa. Antes de que
usted comience, asegúrese de que tiene el
siguiente equipo para medir ingredientes:
✓
Tazas para medir ingredientes líquidos
✓
Tazas para medir ingredientes secos
✓
Cucharas para medir
Usted necesitará los siguientes ingredientes:
I
MPORTANTE
:
Use aceite vegetal, aceite puro de maíz o aceite
de oliva de buena calidad. No recomendamos usar aceites
que se deterioran rápidamente como el aceite de girasol,
mantecas o grasa de alimentos. No se recomienda freír
alimentos en mantequilla o margarina ya que al calentarse
generan mucho humo.
Ahora intente esta simple, pero deliciosa receta.
PARA FREÍR ALIMENTOS
1 pollo entero cortado
en piezas
2 tazas de harina
9 tazas de aceite
1 cucharadita de
sazonador de pollo
1 cucharada de sal
1 cucharadita de pimienta
POLLO FRITO
9
Page 40

6
POLLO FRITO
IMPORTANTE:
Nunca llene la canasta con alimentos a más de
2/3 de su capacidad (a la mitad es mejor), ya que esto puede
causar que la temperatura del aceite descienda por debajo de
la temperatura optima para freír y el resultado sean alimentos que
no tienen una consistencia ligera y crujiente como deben de ser.
1. Vierta 9 tazas de aceite dentro de la olla.
2.Limpie el interior de la ventana de
visibilidad con un poco de aceite para
prevenir la condensación.
3.Sazone el pollo con sal y pimienta.
En una bolsa de plástico, vierta la harina,
el sazonador de pollo y 1 cucharadita de sal.
4. Coloque 5 piezas de pollo dentro de la bolsa y agite hasta que
las piezas estén bien cubiertas. Repita este paso hasta que
todas las piezas de pollo estén cubiertas.
5.Coloque el pollo dentro de la canasta. Coloque primero las piezas
más grandes en la canasta, después coloque las piezas más
pequeñas.
6.Asegúrese de que la comida esté tan seca como sea posible,
el agua podría causar que el aceite salpique. Coloque la canasta
dentro de la olla y cierre la tapa suavemente.
IMPORTANTE:
Aún NO baje la canasta.
7. Enchufe el cable eléctrico en la toma de corriente de la pared.
8. Encienda el interruptor principal en
“ON.” Ambas luces, la amarilla y la
roja se iluminarán. Ajuste el disco
del termostato seleccionando la
temperatura de 350°F.
9. Usted debe calentar previamente
el aceite en la Freidora durante
15 minutos antes de que cocine
la primera cantidad de alimentos.
Para las siguientes porciones,
no necesitará calentarlo previamente.
Cuando la temperatura deseada
se ha alcanzado, la luz amarilla
de temperatura se apagará.
10.
Presione el botón del asa y suavemente empiece a bajar la canasta.
Cocine el pollo durante 15 – 21 minutos o hasta que esté cocido
y de un color dorado.
9
Page 41

7
IMPORTANTE:
Durante la cocción, usted puede notar vapor
saliendo por la abertura del filtro en la parte superior de la tapa,
esto es normal; sin embargo evite estar en contacto con esta
área mientras esté friendo.
11. Levante el asa de la canasta a su posición horizontal más alta
(levante el asa hasta que escuche un "clic"). Esto permitirá escurrir
el aceite de los alimentos, manteniéndolos en la cámara de
calentamiento hasta que usted esté listo para disfrutarlos.
IMPORTANTE:
Usted no necesita abrir la tapa para elevar
la canasta.
Después de que los Alimentos Estén Fritos . . .
1.
Asegúrese de apagar la unidad en la posición “OFF”
y desconectar la Freidora.
2. Una vez que usted esté listo para disfrutar los alimentos,
presione el Botón Para Abrir la Tapa y abra la
tapa.
C
UIDADO
:
Al presionar el Botón
Para Abrir la Tapa, la unidad
dejara escapar vapor caliente
y el contenedor se despresurizará.
Tenga cuidado de que las manos
y cara estén lejos del aparato
cuando se libere este vapor.
Page 42

8
3. Saque la canasta y coloque los alimentos en platos
(o primero
coloque sobre toallas de papel para ayudar a absorber cualquier
exceso de aceite que haya quedado en el exterior de los alimentos).
CUIDADO:
La canasta está muy caliente. Solamente mueva
la canasta tomándola del asa.
4. Presione el Botón Para Abrir la Tapa para abrir completamente la
tapa. Con una mano, levante suavemente un lado de la tapa
y jale hacia arriba para quitarla.
C
UIDADO
:
Antes de limpiar la Freidora, siempre verifique que
esté en posición de apagado “OFF” y desconectada de la toma
de corriente. Asegúrese de que la unidad y el aceite estén
completamente fríos. El aceite mantiene su temperatura por un
periodo de tiempo largo después de ser usado. No intente mover
o cargar la Freidora mientras está caliente.
5. El aceite puede vaciarse y colarse cuando la Freidora se haya
enfriado (usted puede usar la canasta para freír, para sostener
un colador o un filtro sobre su contenedor para almacenar
a medida que vierte el aceite por él). Revise de que la tapa
se fije en su lugar después y ciérrela.
6. Un Recipiente de Condensación y Goteo ha sido diseñado en
la Freidora y está localizado en la parte posterior de la unidad
justo abajo de la tapa. La tapa ha sido diseñada para canalizar
la condensación que se acumula dentro de ésta, hacia la parte
posterior de la unidad. Para vaciar el Recipiente de Condensación
y Goteo, simplemente quítelo y deseche el agua.
Page 43

9
GUÍA DE COCCIÓN
Los tiempos de cocción que se proporcionan en este cuadro,
son solamente una guía y deben ajustarse de acuerdo a la cantidad
que se va a freír.
TIEMPO DE
COCCIÓN
APROXIMADO
ALIMENTO TEMPERATURA (MINUTES)
Champiñones 302°F / 150°C 3 – 4
Pollo Empanizado 350°F / 176°C 15 –21
Tiras de Pollo 356°F / 180°C 3 – 4
Camarones 266°F / 130°C 4 – 5
Trozos de Pescado 302°F / 150°C 4 – 6
Filetes de Pescado 370°F / 188°C 6 – 7
Filetes de Pescado Recubierto 370°F / 188°C 4 – 6
Papas a la Francesa, delgadas 375°F / 190°C 4 – 6
Papas a la Francesa, gruesas 338°F / 164°C 8 – 10
CONSEJOS . . .
• Seleccione la temperatura para freír tomando en cuenta el tipo
de alimento que va a cocinar.
• Como guía general, los alimentos que han sido cocinados
previamente, de alguna manera no requieren tanto tiempo
de cocción como aquellos alimentos que están completamente
crudos.
Page 44

10
Como Remplazar los Filtros
Su filtro de carbón debe durar aproximadamente 5 meses.
Después de este tiempo usted debe remplazarlos. Para ordenar filtros
adicionales, por favor llame a nuestra Línea de Servicio al Cliente
al 800-597-5978. Por favor pida por el Modelo 4990.
1. Abra y jale la cubierta del filtro.
2. Saque ambos filtros el blanco y el negro y deséchelos.
3. Coloque nuevos filtros, siempre
asegurándose de que el filtro blanco
para aceite quede sobre la superficie
metálica, abajo del filtro activado por
carbón (filtro negro).
El paquete de repuesto de filtros incluye
2 filtros activados por carbón (filtro negro)
y 1 filtro blanco para aceite.
Usted sólo necesitará un filtro
activado por carbón a la vez;
asegúrese de guardar el segundo
filtro dentro de la bolsa de
plástico. El filtro activado por
carbón necesita ser reemplazado
más a menudo que el filtro blanco.
C
UIDANDO SUFREIDORA
FRYR
IGHT
Page 45

11
Limpiando la Freidora
C
UIDADO
:
Antes de limpiar la Freidora, siempre verifique que
esté en posición de apagado “OFF” y desconectada de la toma
de corriente. Asegúrese de que la unidad y el aceite estén
completamente fríos. El aceite mantiene su temperatura por un
periodo de tiempo largo después de ser usado. No intente
mover o cargar la Freidora mientras está caliente.
Vacíe y limpie el Recipiente de Condensación. El aceite puede ser
usado varias veces. Sin embargo, éste debe filtrarse después de
cada uso. Después de sacar el aceite, la Freidora debe limpiarse
primero con papel absorbente. Después use un paño húmedo y un
poco de jabón suave.
Finalmente, use un paño seco. No sumerja la Freidora en agua bajo
ninguna circumstancia. Saque la canasta y lávela
con agua tibia.
C
UIDADO
:
No use cepillos para
tallar, limpiadores químicos o
ningún material abrasivo para
limpiar la unidad.
Limpiando la Tapa
Presione el botón para abrir la tapa para abrirla completamente.
Con una mano, levante suavemente un lado y jale hacia arriba para
quitar la tapa. La tapa puede limpiarse con agua tibia y jabón.
C
UIDADO
:
Asegúrese de remover ambos filtros antes de lavar
la tapa
C
UIDADO
:
No lave la tapa en una máquina lavavajillas.
Después de secar la tapa, asegúrese de colocarla en su lugar
y ciérrela.
Page 46

12
SOLUCIONANDO PROBLEMAS
P
ROBLEMA
P
OSIBLECAUSA
S
OLUCIÓN
Almacenando la Freidora
Permita que el aparato se enfríe completamente antes de almacenarlo.
Guarde la Freidora en un lugar seco. El cable eléctrico debe colocarse
en el compartimiento guarda cable, éste se localiza en la parte trasera
de la unidad. Mantenga el cable lejos del alcance de los niños.
Si usted tiene dificultad al operar la Freidora, revise la información
que se ofrece en la sección para Solucionar Problemas. Si usted
no puede encontrar una solución, por favor llame a nuestra Línea
de Servicio al Cliente al 800-597-5978.
Salen olores
desagradables.
Sale vapor por debajo
de la orilla de la tapa.
Los alimentos quedan
suaves y no crujientes
en el exterior.
El filtro de carbón está
saturado.
El aceite está
deteriorado.
El aceite no es el
adecuado para freír.
La liberación de
un poco de vapor es
normal. Si se escapa
vapor en exceso,
entonces la tapa
no está cerrada
correctamente.
Demasiados alimentos
han sido fritos al
mismo tiempo.
Reemplace el filtro
(observe la Página 10
en Como Remplazar
el Filtro).
Cambie el aceite cada
10 a 12 veces que fría.
Use un aceite vegetal,
de girasol o de maíz
de buena calidad.
Asegúrese de que
la tapa esté
completamente
cerrada.
Fría alimentos en
pequeñas cantidades
(especialmente
alimentos
congelados).
Page 47

13
Recetas
POLLO FRITO
1 pollo entero cortado en piezas
2 tazas de harina
9 tazas de aceite
1 cucharadita de sazonador de pollo
1 cucharada de sal
1 cucharadita de pimienta
1. Vierta 9 tazas de aceite en la Freidora.
2. Caliente previamente la Freidora a 350°F.
3. Condimente el pollo con sal y pimienta
4. En una bolsa de plástico, vacíe la harina,
el sazonador de pollo, la sal y la pimienta.
5. Coloque de 4 a 5 piezas dentro de la bolsa de plástico
y agite hasta que las piezas estén bien cubiertas.
6. Coloque las piezas más grandes de pollo dentro de
la canasta para freír, después coloque las piezas más
pequeñas. Con la tapa cerrada, baje la canasta y sumérjala
en el aceite.
7. Cocine el pollo durante 15 a 21 minutos o hasta que esté
dorado, levante el asa y saque la canasta del aceite,
permita que escurra el exceso de aceite.
RINDE: 4 PORCIONES
Page 48

AROS DE CEBOLLA
2 cebollas grandes
2 tazas de leche
2 tazas de agua
7 tazas de aceite
1. Pele la piel de las cebollas y corte a lo ancho en rebanadas
de 1/4 de pulgada (6 mm).
2. Combine 1 taza de leche con 1 taza de agua.
3. Remoje las cebollas en la mezcla de leche y agua durante
1/2 hora.
4. Vierta 7 tazas de aceite en la Freidora.
5. Caliente previamente la Freidora a 350°F.
6. Escurra las cebollas, colóquelas sobre un papel absorbente,
pase a un plato y esparza sobre ellas la Pasta para Freír
Verduras. (Receta en la Página 26).
7. Fría durante 5 minutos o hasta que estén doradas.
8. Escurra sobre un papel absorbente.
RINDE: 4 PORCIONES
BATATA DULCE FRITA
6 batatas dulces grandes
7 tazas de aceite
1 cucharada de azúcar morena
1 cucharada de sal
1 cucharada de nuez moscada recién molida (opcional)
1. Lave las batatas dulces y sancoche durante 15 minutos.
2. Pele y córtelas en tiras.
3. Vierta 7 tazas de aceite en la Freidora.
4. Caliente previamente la Freidora a 350°F.
5. Fría las tiras de batata dulce en la Freidora durante
15 minutos o hasta que estén doradas.
6. Escúrralas sobre un papel absorbente.
7. Espolvoree la sal, el azúcar morena y la nuez moscada.
RINDE: 6 PORCIONES
14
Page 49

15
FRITURAS DE PAPA
1 taza de puré de papa (suave y a temperatura ambiente)
1/2 taza de harina cernida
1 cucharadita de polvo para hornear
1/4 cucharadita de sal
1 huevo ligeramente batido
1 cucharadita de perejil picado
7 tazas de aceite
1. Vierta 7 tazas de aceite en la Freidora.
2. Caliente previamente la Freidora a 385°F.
3. Combine 1/2 taza de harina cernida, 1 cucharadita de polvo
para hornear y 1/4 de cucharadita de sal.
4. Agregue 1 taza de puré de papas. El puré debe estar suave
y a temperatura ambiente. Si no lo está, agregue un poco
de leche o agua caliente y bata.
5. Agregue 1 huevo ligeramente batido y 1 cucharadita
de perejil picado.
6. Usando una cuchara, tome un poco de esta mezcla
y deje caer dentro del aceite.
7. Fría durante 4 minutos o hasta que estén doradas.
8. Escúrralas sobre un papel absorbente.
RINDE: 4 PORCIONES
Page 50

16
PAPAS FRITAS
6 papas Idaho peladas
7 tazas de aceite de maní o de maíz
1. Vierta 7 tazas de aceite en la Freidora.
2.Caliente previamente la Freidora a 380°F.
3.Utilizando un rebanador de verduras, corte las papas
en rebanadas tan delgadas como sea posible.
4.Remoje las rebanadas en agua fría, cambie el agua
dos veces.
5.Escurra y seque bien.
6.Divida las rebanadas en 3 porciones diferentes.
7.Deje caer las rebanadas por separado dentro del
aceite caliente en la canasta para freír.
8.Con la tapa cerrada, sacuda suavemente la canasta
varias veces para prevenir que las papas se peguen.
9.Cocine durante 15 minutos o hasta que estén doradas.
10.Escurra y coloque sobre papel absorbente para eliminar
el exceso de aceite.
RINDE: 6 PORCIONES
Page 51

17
BOLITAS DE PAPA FRITAS
4 papas medianas
1/2 taza de queso Cheddar rayado
1 cucharadita de sal
1/2 cucharadita de pimienta de Cayena
1/2 taza de migas de pan cernidas
7 tazas de aceite
Harina
2 cucharadas de crema
2 cucharadas de mantequilla
2 yemas de huevo batidas
1/2 cucharadita de polvo para hornear
1 huevo batido
2 cucharadas de agua
1. Vierta 7 tazas de aceite en la Freidora.
2.Caliente previamente la Freidora a 380°F.
3.Pele las cuatro papas medianas y hágalas puré.
4.Agregue los siguientes ingredientes al puré de papa:
2 cucharadas de mantequilla, 2 cucharadas de crema,
1/2 taza de queso Cheddar rayado, 2 yemas de huevo
batidas, 1 cucharadita de sal, 1/2 cucharadita de polvo
para hornear y 1/2 cucharadita de pimienta de Cayena.
5.Bata estos ingredientes hasta que tengan
una consistencia ligera.
6.Forme bolitas de 1 pulgada / 2.5 cm
7.Mezcle 1 huevo batido con 2 cucharadas de agua.
Coloque a un lado.
8.Ruede las bolitas en harina, cubra con la mezcla de huevo
y agua.
9.Ruede las bolitas sobre las migas de pan cernidas.
10.Fría durante 6 minutos.
11. Escúrralas sobre papel absorbente y sirva inmediatamente.
RINDE: 4 PORCIONES
Page 52

18
PESCADO FRITO
32 piezas pequeñas de pescado (1 pulgada x 1 pulgada) /
(2.5 cm x 2.5 cm)
Pasta para Freír Pescado (vea la receta en la sección de Frituras)
7 tazas de aceite
Salsa Tártara
4 rodajas de limón
1. Vierta 7 tazas de aceite en la Freidora.
2. Caliente previamente la Freidora a 370°F.
3. Limpie el pescado y corte en piezas pequeñas
(1 pulgada x 1 pulgada ) / (2.5 cm x 2.5 cm).
4. Recubra las piezas de pescado en la Pasta para Freír
Pescado.
5. Fría durante 4 a 6 minutos o hasta que esté dorado.
El pescado flotará a la superficie cuando esté listo.
6. Escúrralas sobre papel absorbente. Sirva caliente
adornando con las rodajas de limón y la salsa tártara.
RINDE: 4 PORCIONES
Page 53

19
PESCADO FRITO MARINADO
1-1/2 libra / 700 g de filete de pescado
6 cucharadas de vino blanco seco
7 tazas de aceite
6 cucharadas de media crema
1/2 taza de harina
1/2 cucharadita de sal
1/2 cucharadita de pimienta
Salsa Tártara
1. Quite la piel al pescado y corte en piezas.
2. Marine el pescado durante 30 minutos con el vino blanco
seco y limón.
3. Vierta 7 tazas de aceite en la Freidora.
4. Caliente previamente la Freidora a 370°F.
5. Escurra, seque y cubra cada pieza con crema y después
con harina.
6. Combine la harina, la sal y la pimienta y recubra cada pieza
con esta mezcla.
7. Fría el pescado aproximadamente durante 7 minutos.
Sirva con la salsa tártara.
RINDE: 3 PORCIONES
Page 54

20
PESCADO Y PAPAS
1-1/2 libra / 700 g de filete de lenguado
1-1/2 libra / 700 g de papas para hornear
7 tazas de aceite
1/2 taza de vinagre de cidra
Pasta para Freír Pescado
(vea la receta en la sección de Frituras)
1. Corte las papas para hornear en tiras gruesas y uniformes,
un poco más grandes que las papas a la francesa.
2.Remoje las tiras de papa en agua fría durante 1/2 hora.
3.Escurra y seque bien.
4.Vierta 7 tazas de aceite en la Freidora.
5.Caliente previamente la Freidora a 300°F.
6.Corte el filete de lenguado en trozos uniformes.
7.Recubra con la Pasta para Freír Pescado.
8.Fría los trozos de pescado recubiertos durante 5 minutos
o hasta que estén dorados. Saque del aceite
y mantenga caliente.
9.Cambie la temperatura de la Freidora a 375°F.
10.Fría las papas en aceite caliente durante 7 minutos o hasta
que estén doradas.
11. En un plato coloque el pescado y decore con las papas.
12.Sirva el vinagre de cidra como aderezo.
RINDE: 4 PORCIONES
Page 55

21
OSTRAS FRITAS
12 ostras grandes en su concha
1 huevo
2 cucharadas de agua
1/2 taza de migas de pan condimentadas
7 tazas de aceite
1. Escurra las ostras y seque sobre toallas de papel.
2. Bata el huevo y 2 cucharadas de agua.
3. Inserte un tenedor en el músculo de las ostras,
recubra con la mezcla de agua y huevo;
después con las migas de pan sazonadas,
vuelva a recubrir con el huevo otra vez y una vez más
con las migas de pan.
4. Permita que las ostras se sequen sobre una rejilla
durante 1/2 hora.
5. Vierta 7 tazas de aceite en la Freidora.
6. Caliente previamente la Freidora a 375°F.
7. Fría durante aproximadamente 4 minutos.
RINDE: 2 PORCIONES
Page 56

22
CAMARÓN RELLENO FRITO
24 camarones gigantes
6 castañas
Prosciutto o Jamón Alemán cortado en rebanadas
delgadas
1 huevo batido
2 tazas de harina
7 tazas de aceite
1. Pele y quite la vena de 10 camarones gigantes,
pique finamente haciéndolos puré. Coloque a un lado.
2.Pique finamente y haga puré las 6 castañas.
Coloque a un lado.
3.Pele y quite la vena de 14 camarones gigantes,
dejando los rabos intactos.
4.Corte los 14 camarones gigantes a lo largo de la orilla
sin venda, lo suficiente como para separarlos.
5.Ábralos y coloque sobre ellos una rebanada delgada
de Prosciutto o Jamón Alemán.
6.Unte la mezcla de castañas y camarones picados sobre
la rebanada de jamón y cierre parcialmente el camarón
para empanizarlo.
7.Recubra el camarón con huevo batido, después con harina.
8.Permita que seque sobre una rejilla durante 15 a 20 minutos.
9.Vierta 7 tazas de aceite en la Freidora.
10.Caliente previamente la Freidora a 266°F.
11. Levante el camarón por los rabos y deslícelos suavemente
dentro del aceite caliente.
12.Fría durante aproximadamente 5 minutos o hasta que
estén dorados.
13.Escurra sobre papel absorbente y sirva inmediatamente.
RINDE: 4 PORCIONES
Page 57

23
FRITURAS DE PURÉ DE VERDURAS
1 huevo
1 taza de puré cocido de zanahorias
1/4 cucharadita de sal
1-1/2 cucharadita de harina
6 cucharadas de suero de leche
1 cucharadita de Salsa Inglesa
2 cucharadas de perejil picado
7 tazas de aceite
Pasta para Unir
(la receta se encuentra al final de la sección)
1. Bata el huevo hasta que tenga una consistencia ligera.
2.Agregue y bata bien la taza de puré cocido de zanahorias.
3.Agregue la sal, la harina, el suero de leche, la salsa Inglesa
y el perejil.
4.Esparza los ingredientes sobre un plato engrasado.
5.Refrigere durante 3 horas.
6.Cuando estén fríos, haga bolitas de 1 pulgada (2.5 cm).
7.Vierta 7 tazas de aceite en la Freidora.
8.Caliente previamente la Freidora a 375°F.
9.Enharine y ruede sobre la Pasta para Unir.
10.Fría las bolitas en aceite durante 4 minutos.
RINDE: 3 PORCIONES
Page 58

24
FRITURAS DE CAMARÓN
1 mazorca de maíz
6 oz. de camarón crudo
(pelado, sin vena y picado)
1/2 taza de alfalfa
2 dientes de ajo molido
1/2 cucharadita de sal
1/2 cucharadita de pimienta negra molida
1/4 de taza de zanahoria rayada
3 cucharadas de leche de coco sin endulzar
1 huevo grande
2 cucharadas de harina
3 cucharadas de aceite vegetal
7 tazas de aceite
1. Vierta 7 tazas de aceite en la Freidora.
2. Caliente previamente la Freidora a 325°F.
3. Cocine la mazorca de maíz en agua hirviendo hasta que esté
tierna y crujiente
(aproximadamente 3 minutos).
4. Escurra y desgrane la mazorca.
5. Ponga los granos de maíz en un tazón grande.
6. Mezcle el camarón, alfalfa, los dientes de ajo,
la pimienta molida y la zanahoria rayada.
7. Bata la leche de coco, el aceite vegetal y el huevo.
8. Agregue a la mezcla de los granos de maíz.
9. Mezcle con la harina.
10. Trabaje en porciones, aplanando 1/4 de taza de la mezcla
en ruedas de 3 pulgadas y sumérjalas en el aceite.
11. Cocine hasta que estén doradas
(aproximadamente 5 minutos).
12. Pase a un papel absorbente y escurra.
13. Sirva caliente.
RINDE: 8 PORCIONES
*
N
OTA
:
Agregue más harina para una consistencia más espesa
Page 59

25
FRITURAS DE BERENJENA
1 berenjena pequeña
1 cucharadita de vinagre
1 huevo
3 cucharadas de harina
1/2 cucharadita de sal
1/2 cucharadita de polvo para hornear
7 tazas de aceite
1. Vierta 7 tazas de aceite en la Freidora.
2.
Caliente previamente la Freidora a 365°F.
3. Pele y rebane la berenjena.
4. Cocínela en agua hirviendo hasta que esté suave.
5.
Agregue el vinagre.
6.
Escurra la berenjena y hágala puré.
7. Bata el huevo, la harina, la sal y el polvo para hornear.
8.
Coloque en la Freidora y cocine durante 3 a 4 minutos
o hasta que esté ligeramente dorada.
RINDE: 6 PORCIONES
Page 60

26
PASTA PARA FREÍR VERDURAS,
CARNE Y PESCADO
1 y 1/3 tazas de harina
1 cucharada de mantequilla derretida
1 cucharadita de sal
2 yemas de huevo batidas
1/4 cucharaditas de pimienta
3/4 taza de cerveza
2 claras de huevo batidas a punto de turrón
1.
En un tazón mezcle la harina, la mantequilla,
la sal, las yemas de huevo batidas y la pimienta.
2. Gradualmente agregue la cerveza, revolviendo
constantemente.
3. Tape y refrigere durante 3 a 12 horas.
4. Justo antes de usar la pasta, agregue 2 claras de huevo
batidas a punto de turrón.
PASTA PARA UNIR
1 taza de harina, migas de pan u hojuelas de maíz molidas,
finamente cernidas
1 cucharadita de sal
1/4 cucharadita de pimienta o 1/2 cucharadita de pimentón
1. Mezcle todos los ingredientes.
RINDE: SUFICIENTE PARA RECUBRIR
APROXIMADAMENTE 2TAZAS DE ALIMENTOS
Page 61

27
DONAS DE LECHE ENDULZADAS
2 huevos
1 taza de azúcar
1 taza de leche
5 cucharaditas de manteca derretida
4 tazas de harina
4 cucharaditas de polvo para hornear
1/4 cucharadita de canela
1/2 cucharadita de sal
1/4 cucharadita de nuez moscada
7 tazas de aceite
azúcar pulverizada para adornar
1. Vierta 7 tazas de aceite en la Freidora.
2.Caliente previamente la Freidora a 370°F.
3.Bata los 2 huevos.
4.Agregue 1 taza de azúcar, continúe batiendo lentamente.
5.Revuelva con la leche y la manteca derretida.
6.Agregue 4 tazas de harina cernida.
7.Agregue el polvo para hornear, la canela, la sal
y la nuez moscada.
8.Forme las donas.
9.Fría durante 3 minutos.
10.Espolvoree el azúcar sobre las donas.
RINDE: 36 DONAS
Page 62

28
ALBÓNDIGAS AGRIDULCES
1 lb. / 500 g de carne molida
1 cebolla mediana
2 cucharadas de jerez
2 cucharadas de salsa soya
1 cucharadita de sal
1 yema de huevo
1 taza de maicena
7 tazas de aceite
SALSA
1 lata pequeña de trozos de piña
1/2 lata de jugo de piña
5 cucharadas de vinagre
1 cucharada de salsa de soya
3 cucharadas de azúcar
1 cucharada de maicena
1. Vierta 7 tazas de aceite en la Freidora.
2.Caliente previamente la Freidora a 350°F.
3.Corte la car ne en trozos de 1 pulgada (2.5 cm) y muélala
en su Procesador de Alimentos Sunbeam
®
.
4.Corte la cebolla en trozos muy pequeños.
5.En un tazón, mezcle la car ne, la cebolla, el jerez,
la salsa soya, la sal y la yema de huevo.
6.Forme pequeñas albóndigas y ruédelas en la maicena.
7.Fría durante 5 minutos o hasta que estén doradas
(no fría demasiado, ya que terminarán de cocinarse con la salsa).
8.Coloque las albóndigas en una olla y agregue los trozos
de piña, el jugo de piña y los demás ingredientes
para preparar la salsa.
9.Agregue la maicena.
10.Hornee a 350°F durante 10 minutos.
11. Acompañe las albóndigas con arroz blanco hecho
en la Arrocera Oster
®
.
RINDE: 4 PORCIONES
Page 63

29
G
ARANTÍA
L
IMITADA DE
2 A
ÑOS
Sunbeam Products Inc. (“Sunbeam”) garantiza que, por un período de dos año a
partir de la fecha de compra, este producto estará libre de defectos en el material
y en su fabricación. Bajo la opinión de Sunbeam, reparará o repondrá este
producto o cualquier componente del mismo si se encuentra defectuoso durante el
periodo de garantía. La reposición se hará con un producto o un componente
nuevo o refabricado. Si el producto ya no está disponible, la reposición se hará
con un producto similar de igual o mayor valor. Esta es su garantía exclusiva.
Esta garantía es válida para el comprador original a partir de la fecha de compra
inicial y no es transferible. Guarde el recibo de compra original. La prueba de
compra es requerida para obtener los servicios de garantía. Los vendedores de
productos Sunbeam, los centros de servicio o tiendas que vendan productos
Sunbeam no tienen el derecho de alterar, modificar o realizar ningún otro cambio a
los términos y condiciones de esta garantía.
Esta garantía no cubre el desgaste por uso normal o daños de partes como
resultado de lo siguiente: uso negligente o mala utilización del producto, uso con
una corriente eléctrica o un voltaje inadecuados, uso contrario a las instrucciones
de operación, desensambles, reparaciones o alteraciones que no sean hechas por
Sunbeam o por un centro de servicio autorizado. Además, la garantía no cubre
Actos de Dios tales como incendios, inundaciones, huracanes y tornados.
Sunbeam Products Inc. no se hace responsable por ningún daño emergente o
incidental causado por el rompimiento de cualquier garantía expresa o implícita.
Excepto al alcance prohibido por la ley aplicable, cualquier garantía implícita de
comercialización o arreglo para un propósito particular, está limitada en duración
de la garantía antes mencionada. Algunos estados, provincias o jurisdicciones no
permiten la exclusión o limitación de daños emergentes o incidentales, o
limitaciones en la duración de una garantía implícita, así que las limitaciones o
exclusiones pueden no ser aplicables para usted. Esta garantía le da a usted
derechos legales específicos y puede también tener otros derechos que pueden
variar de estado a estado o de provincia a provincia.
Cómo Obtener los Servicios de la Garantía
Lleve este producto a un centro de servicio autorizado Sunbeam. Usted puede
encontrar el centro de servicio autorizado Sunbeam más cercano llamando al
1-800-597-5978. Si un centro de servicio no se encuentra convenientemente
localizado cerca de usted, pegue una etiqueta al producto que incluya su nombre,
dirección, teléfono donde se encuentra durante el día y descripción del problema.
Incluya una copia del recibo original de compra. Empaque cuidadosamente el
producto y envíelo por UPS o por servicio de paquetería, gastos de envío y seguro
prepagados a:
Para productos comprados en Estados Unidos:
SUNBEAM APPLIANCE SERVICE STATION
Attention: Service Department
117 Central Industrial Row
Purvis, MS 39475
Para productos comprados en Canadá:
SUNBEAM CANADA CORP., LTD.
Por favor llamenos or envienos un email
1-800-663-8623
consumeraffairs@consumer.sunbeam.com
NO REGRESE ESTE PRODUCTO AL LUGAR DE COMPRA
Si usted tiene alguna pregunta referente a esta garantía, por favor llame
al 1-800-597-5978.
Page 64

30
©1999 Sunbeam Products Inc. o sus corporaciones afiliadas.
Todos los derechos reservados.
SUNBEAM®y OSTER® son
marcas registradas de
Sunbeam Corporation o de sus compañías afiliadas.
FRYRIGHT
™
es una marca de Sunbeam Corporation
o de sus compañías afiliadas.
Distribuido por Sunbeam Products Inc.
Boca Raton, FL 33431, o de sus compañías afiliadas.
FREIDORA
N.P. 102782
 Loading...