

Page 1

1
Wall Ov
e
n
ctric
Ele
In
Safety Instructions .......................... 2-4
Operating Instructions
Clock and Timer .................................. 8
Convection ........................................ 15
Oven Controls ................................ 5-19
Sabbath Feature ................................. 12
Steam Clean ....................................... 21
Special Features .......................... 10, 11
Thermostat ........................................ 20
Timed Baking and Roasting ................ 9
Timed Convection ........................ 18-19
Using the Probe ................................. 14
Owner's Manual
and Installation Instructions
SEW24115
LWOE241
EWOS241
Built-
Care and Cleaning
Control Panel ..................................... 24
Glass Surfaces ................................... 24
Heating Element ................................ 24
Lift-Off Oven Door ........................... 22
Light .................................................. 25
Oven Interior ..................................... 25
Painted Surfaces ................................ 24
Racks ................................................. 23
Stainless Steel Surfaces ..................... 24
Installation Instructions ...................... 26-30
Troubleshooting Tips .................. 31-33
Consumer Support
Accessories ....................................... 34
Consumer Support .............. Back Cover
Warranty ........................................... 35
Write the model and serial numbers here:
Model #
Serial #
You can find them on a label on the
front of the oven behind the oven door.
222D9114P002
Page 2
Instructions
Safety
Instructions
Operating
Instructions
Care
Installation
Troubleshooting
Consumer
IMPORTANT SAFETY INFORMATION.
READ ALL INSTRUCTIONS BEFORE USING.
and Cleaning
Tips
Support
2
WARNING!
For your safety, the information in this manual must be followed to minimize the risk of fire or explosion,
electric shock, or to prevent property damage, personal injury, or loss of life.
SAFETY PRECAUTIONS
When using electrical appliances, basic safety precautions should be followed, including the following:
Use this appliance only for its intended purpose
as described in this Owner's Manual.
Be sure your appliance is properly installed and
grounded by a qualified technician in
accordance with the provided installation
instructions.
Do not attempt to repair or replace any part of
your oven unless it is specifically recommended
in this manual. All other servicing should be
referred to a qualified technician.
Have the installer show you the location of the
circuit breaker or fuse. Mark it for easy
reference.
Before performing any service, disconnect the
oven power supply at the household distribution
panel by removing the fuse or switching off the
circuit breaker.
Do not leave children alone-children should not
be left alone or unattended in an area where an
appliance is in use. They should never be
allowed to sit or stand on any part of the
appliance.
Do not allow anyone to climb, stand or hang on
the door. They could damage the oven, or cause
severe personal injury.
Be sure the oven is securely installed in a
cabinet that is firmly attached to the house
structure. Never allow anyone to climb, sit,
stand or hang on the oven door.
Never leave the oven door open when you are
not watching the oven.
Always keep combustible wall covering,
curtains or drapes a safe distance from your
oven.
Always keep dish towels, dish cloths, pot
holders and other linens a safe distance from
your oven.
Always keep wooden and plastic utensils and
canned food a safe distance away from your
oven.
Teach children not to play with the controls or
any other part of the oven.
Large scratches or impacts to glass doors can
lead to broken or shattered glass.
Page 3
Instructions
Operating
Installation
WARNING!
Safety Instructions
SAFETY PRECAUTIONS
Do not store flammable materials in an
oven.
CAUTION: Items of interest to children
should not be stored in cabinets above an oven;
children climbing on the oven to reach items
could be seriously injured.
Never wear loose-fitting or hanging garments
while using the appliance. Be careful when
reaching for items stored in cabinets over the
oven. Flammable material could be ignited if
brought in contact with hot surfaces or heating
elements and may cause severe burns.
Use only dry pot holders-moist or damp pot
holders on hot surfaces may result in burns from
steam. Do not let pot holders touch hot heating
elements. Do not use a towel or other bulky
cloth.
For your safety, never use your appliance for
warming or heating the room.
Do not let cooking grease or other flammable
materials accumulate in or near the oven.
Do not use water on grease fires. Never pick up
a flaming pan. Turn the controls off.
Flame in the oven can be smothered completely
by closing the oven door and turning the oven
off by using a multi-purpose dry chemical or
foam-type fire extinguisher.
Never leave jars or cans of fat drippings in or
near your oven.
Do not store or use combustible materials,
gasoline or other flammable vapors and liquids
in the vicinity of this or any other appliance.
Stand away from the oven when opening the
oven door. Hot air or steam which escapes can
cause burns to hands, face and/or eyes.
Do not heat unopened food containers. Pressure
could build up and the container could burst,
causing an injury.
Keep the oven vent unobstructed.
Keep the oven free from grease buildup.
Place the oven rack in the desired position
while the oven is cool. If racks must be handled
when hot, do not let pot holder contact the
heating elements.
When using cooking or roasting bags in the
oven, follow the manufacturer's directions.
Do not touch the heating elements or the
interior surface of the oven. These surfaces may
be hot enough to burn even though they are
dark in color. During and after use, do not
touch, or let clothing or other flammable
materials contact any interior area of the oven;
allow sufficient time for cooling first.
Potentially hot surfaces include oven vent
openings, surfaces near the openings, crevices
around the oven door, the edges of the window
and metal trim parts above the door.
REMEMBER: The inside surface of the oven may
be hot when the door is opened.
Instructions
Care and Cleaning
Troubleshooting Tips
Consumer Support
3
Page 4
SAVE THESE INSTRUCTIONS
INTERNAL temperature of 180 °F Cooking to these temperatures usually protects against foodbome illness.
Instructions
Safety
Instructions
Operating
Instructions
Care
Installation
Troubleshooting
Consumer
IMPORTANT SAFETY INFORMATION.
READ ALL INSTRUCTIONS BEFORE USING.
WARNING!
SAFETY PRECAUTIONS
Pulling out the rack to the stop-lock is a
convenience in lifting heavy foods. It is also a
precaution against burns from touching hot
surfaces of the door or oven walls.
Do not use the oven to dry newspapers. If
overheated, they can catch on fire.
Do not use the oven for a storage area. Items
stored in an oven can ignite.
Do not leave paper products, cooking utensils or
food in the oven when not in use.
and Cleaning
Tips
Support
COOK MEAT AND POULTRY THOROUGHLY...
Cook meat and poultry thoroughly-meat to at least an INTERNAL temperature of 160°F and poultry to at least an
READ AND FOLLOW THIS SAFETY INFORMATION CAREFULLY.
After broiling, always take any broiler pan out
of the oven and clean it. Leftover grease in a
broiler pan can catch fire next time you use the
pan.
Clean only parts listed in this Owner's Manual.
Do not use aluminum foil to line oven bottoms.
Improper installation of aluminum foil may
result in a risk of electric shock or fire.
4
Page 5
2
3 4 5 6 8
9
10
11
12
13
14
15
16
Instructions
Operating
Installation
Using the oven controls.
Throughout this manual, features and appearance may vary from your model.
Safety Instructions
Instructions
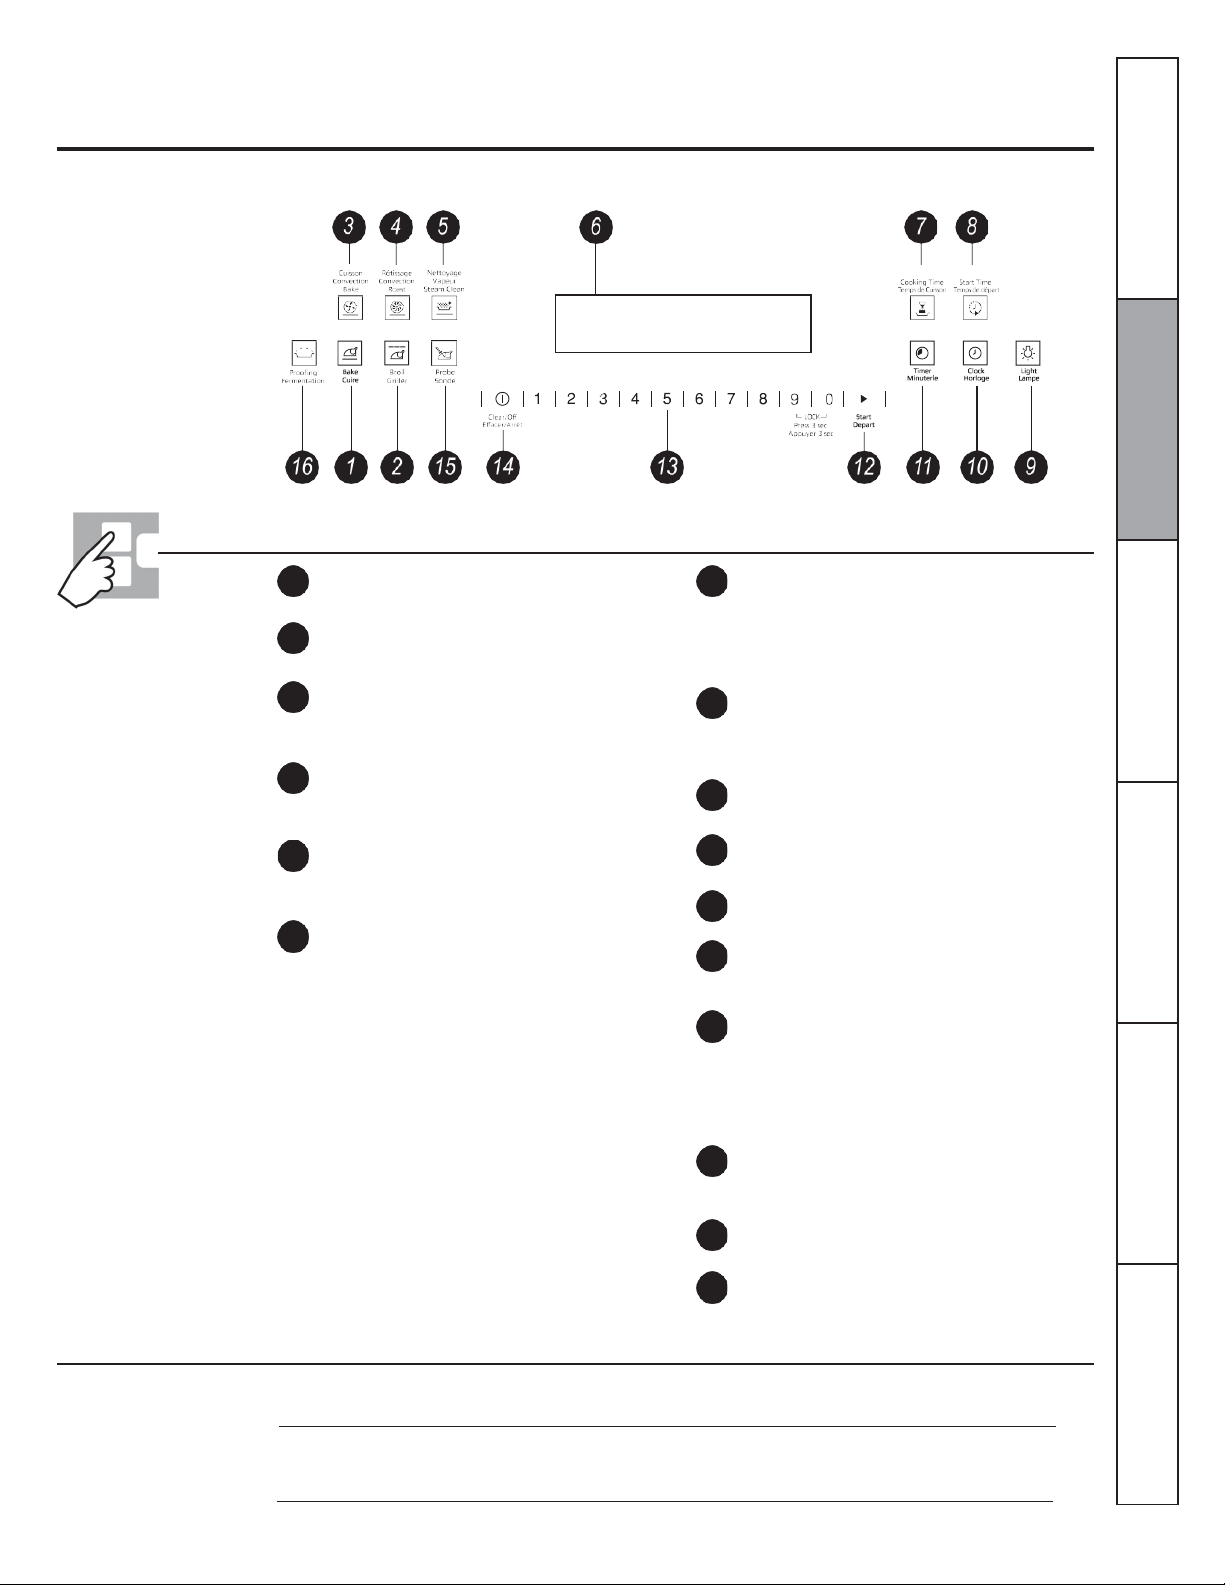
BAKE Pad
1
Touch to select the bake function.
BROIL Pad
Touch to select the broil function.
CONVECTION BAKE Pad
Touch to select baking with the convection
function.
CONVECTION ROAST Pad
Touch to select roasting with the convection
function.
STEAM CLEAN Pad
Touch to select steam clean function. See the
Using the steam-clean oven section.
Display
Shows the time of day, oven temperature
whether the oven is in the bake, broil or Steam
Clean mode and the times set for the timer or
automatic oven operations.
If "F-and a number or letter" flash in the display
and the oven control signals, this indicates a
function error code. Touch the OFF pad. Allow the
oven to cool for one hour. Put the oven back into
operation. If the function error code repeats,
disconnect the power to the oven and call for
service. If your oven was set for a timed oven
operation and a power outage occurred, the clock
and all programmed functions must be reset. The
time of day will flash in the display when there has
been a power outage.
COOKING TIME Pad
7
Touch and then touch the number pads to set
the amount of time you want your food to
cook. The oven will shut off when the cooking
time has run out.
START TIME Pad
Use along with COOKING TIME pad to set the
oven to start and stop automatically at a time you
set.
LIGHT Pad
Touch to turn the oven light on or off.
CLOCK Pad
Touch before setting the clock.
TIMER Pad
Touch to select the timer feature.
START Pad
Must be touched to start any cooking or cleaning
function.
Number Pads
Use to set any function requiring numbers such
as the time of day on the clock, the timer, the
oven temperature, the internal food temperature,
the delay start and length of operation for timed
baking.
CLEAR/OFF Pad
Touch to cancel ALL oven operations except the
clock and timer.
PROBE Pad
Touch to select sensor cooking temperature.
PROOFING Pad
Touch to select a warm environment, useful for
rising yeast-leavened products.
Care and Cleaning
Troubleshooting Tips
Consumer Support
Oven Control, Clock and Timer Features and Settings
Temperature Conversions
140
150
170
200
250
120
275
135
Fahrenheit°
Celsius°
60
65
75
95
300
150
325
160
350
175
375
190
400
205
425
220
450
230
475
245
500
260
525
275
550
290
5
Page 6
2 3 4
5
Instructions
Safety
Instructions
Operating
Instructions
Care
Installation
Troubleshooting
Consumer
Using the oven controls.
To avoid possible burns, place the racks in the desired position before you turn the oven on.
Before you begin...
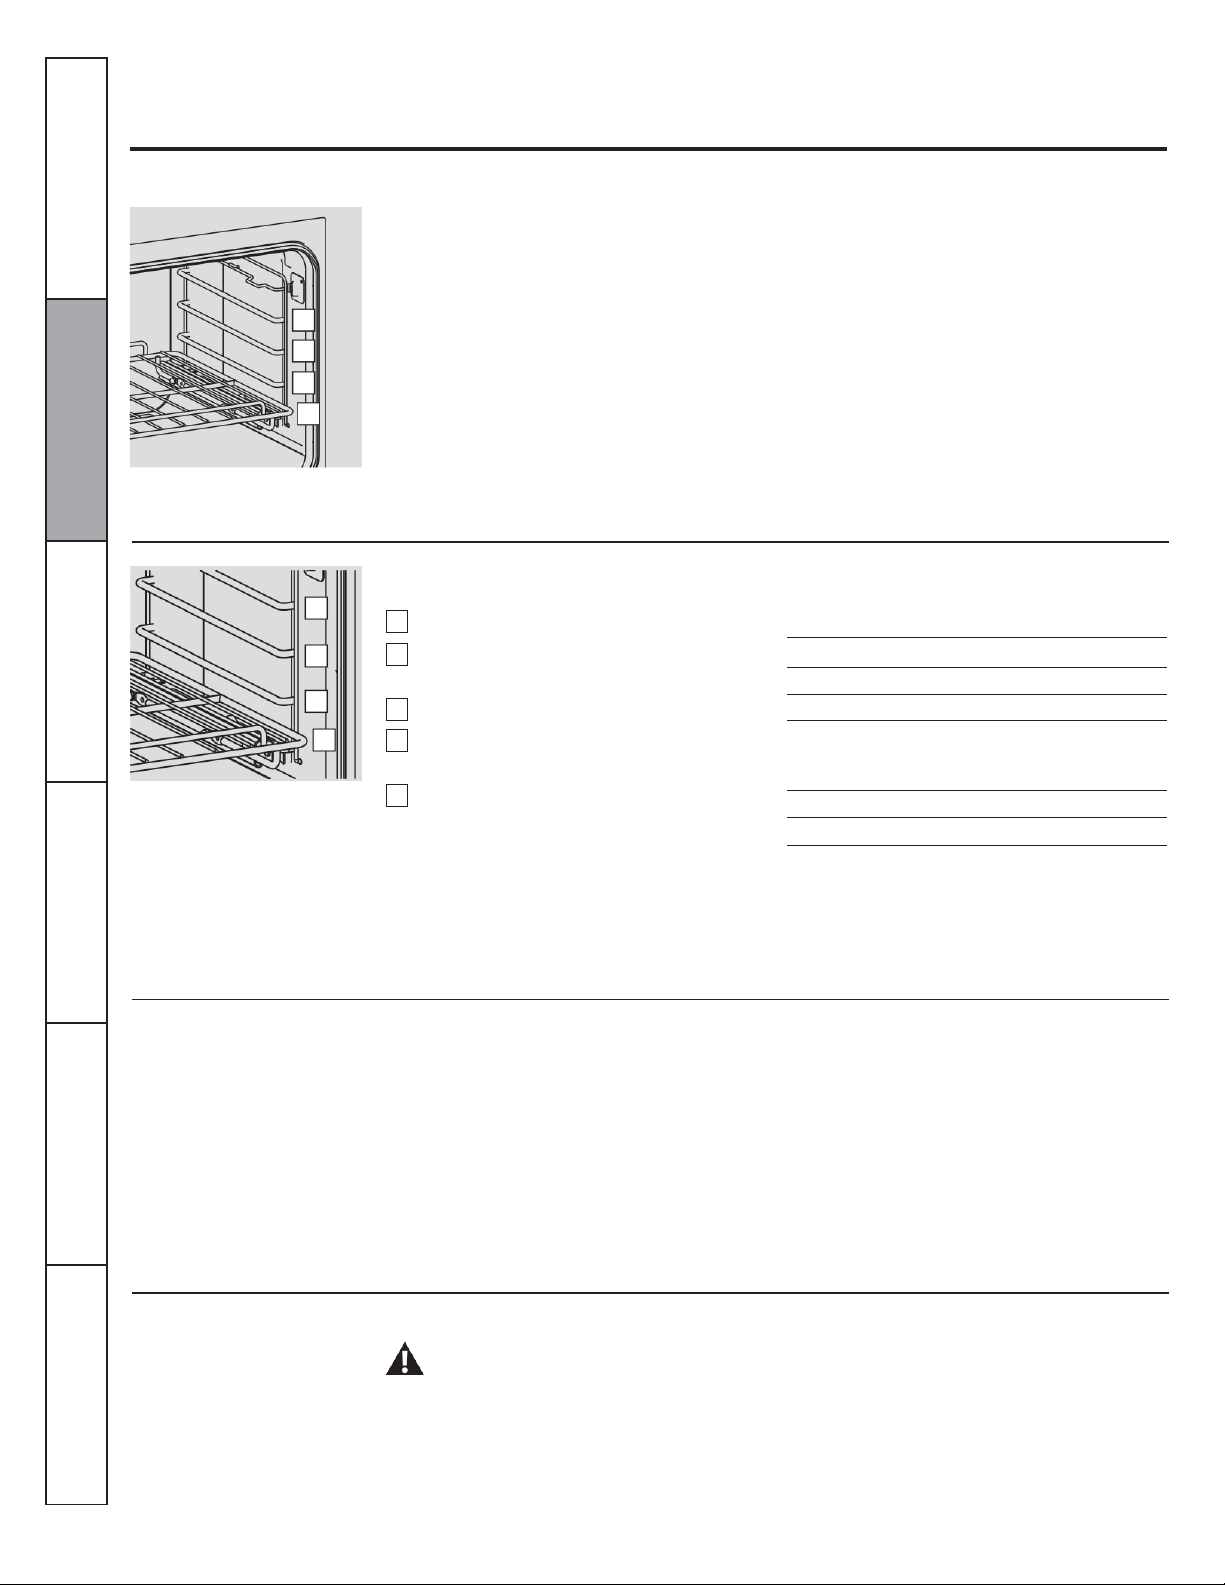
The oven has 4 rack positions.
D
C
B
A
D
C
and Cleaning
B
A
The racks have stop-locks, so that when
placed correctly on the supports, they will
stop before coming completely out, and will
not tilt. When placing and removing
cookware, pull the rack out to the bump on
To remove a rack, pull it toward you, tilt
the front end up and pull it out.
To replace, place the end of the rack
(stoplocks) on the support, tilt up the front
and push the rack in.
the rack support.
How to Set the Oven for Baking or Roasting
Touch the BAKE pad.
1
Touch the number pads to set the desired
temperature.
Touch the START pad.
Check food for doneness at minimum
time on recipe. Cook longer if necessary.
Touch the OFF pad when cooking is
complete.
Type of Food
Frozen pies (on cookie sheet)
Angel food cake
Bundt or pound cakes
Biscuits, muffins, brownies,
cookies, cupcakes, layer
cakes, pies
Casseroles
Turkey
Rack Position
D
A
B or C
C or D
C or D
A
NOTE: A cooling fan may automatically turn on
and off to cool internal parts. This is normal, and
the fan may continue to run even after the oven is
turned off.
Baking results will be better if baking pans
are centered in the oven as much as possible.
Pans should not touch each other or the
walls of the oven. If you need to use two
racks, stagger the pans so one is not directly
Tips
Preheating and Pan Placement
Preheat the oven if the recipe calls for it. To
preheat, set the oven at the correct
temperature. Preheating is necessary for
good results when baking cakes, cookies,
pastry and breads.
above the other, and leave approximately
1½" between pans, from the front, back and
sides of the wall.
Aluminum Foil
Support
6
WARNING!
Do not use aluminum foil on the bottom of the
oven.
Never entirely cover a rack with aluminum
foil. This will disturb the heat circulation
and result in poor baking.
A smaller sheet of foil may be used to catch
a spillover by placing it on a lower rack
several inches below the food.
Page 7
1
4
5 2 3
Instructions
Operating
Installation
Leave the door closed in broil function
to better cooking results.
How to Set the Oven for Broiling
Place the meat or fish on a broiler grid in
a broiler pan designed for broiling.
Close the oven door.
Touch the BROIL pad once for HI Broil.
To change to LO Broil, touch the
BROIL pad again.
Touch the START pad.
When broiling is finished, touch the
CLEAR/OFF pad.
Safety Instructions
Instructions
Care and Cleaning
Troubleshooting Tips
Consumer Support
7
Page 8
1
2
3
4
Instructions
Safety
Instructions
Operating
Instructions
Care
Installation
Troubleshooting
Consumer
Using the clock and timer.
Make sure the clock is set to the correct
time of day.
The Timer is a minute timer only.
The Timer does not control oven
operations. The maximum setting on
the Timer is 9 hours and 59 minutes.
and Cleaning
Tips
Support
To Set the Clock
The clock must be set to the correct time of
day for the automatic oven timing functions
to work properly. The time of day cannot be
changed during a timed baking or cleaning
cycle.
To Set the Timer
Touch the TIMER pad.
Touch the number pads until the amount
of time you want shows in the display.
For example, to set 2 hours and 45
minutes, touch 2, 4 and 5 in that order. If
you make a mistake, touch the TIMER
pad and begin again.
Touch the START pad.
After touching the START pad, SET disappears;
this tells you the time is counting down, although
the display does not change until one minute has
passed. Seconds will not be shown in the display
until the last minute is counting down.
To Cancel the Timer
Touch the TIMER pad twice.
Touch the CLOCK pad.
1
Touch the number pads.
2
Touch the START pad.
3
When the Timer reaches :00, the control
will beep 3 times followed by one beep
every 6 seconds until the TIMER pad is
touched.
The 6-second tone can be canceled by following
the steps in the Special features of your oven
control section under Tones at the End of a Timed
Cycle.
8
Page 9
2
3 4 5
6
1
2
3 4 5
6
Instructions
Operating
Installation
Using the timed baking and roasting features.
NOTE: Foods that spoil easily, such as milk, eggs, fish, stuffing, poultry, and pork should not be allowed to sit for more than 1 hour
before or after cooking. Room temperature promotes the growth of harmful bacteria. 8e sure that the oven light is off because heat from
the bulb will speed harmful bacteria growth.
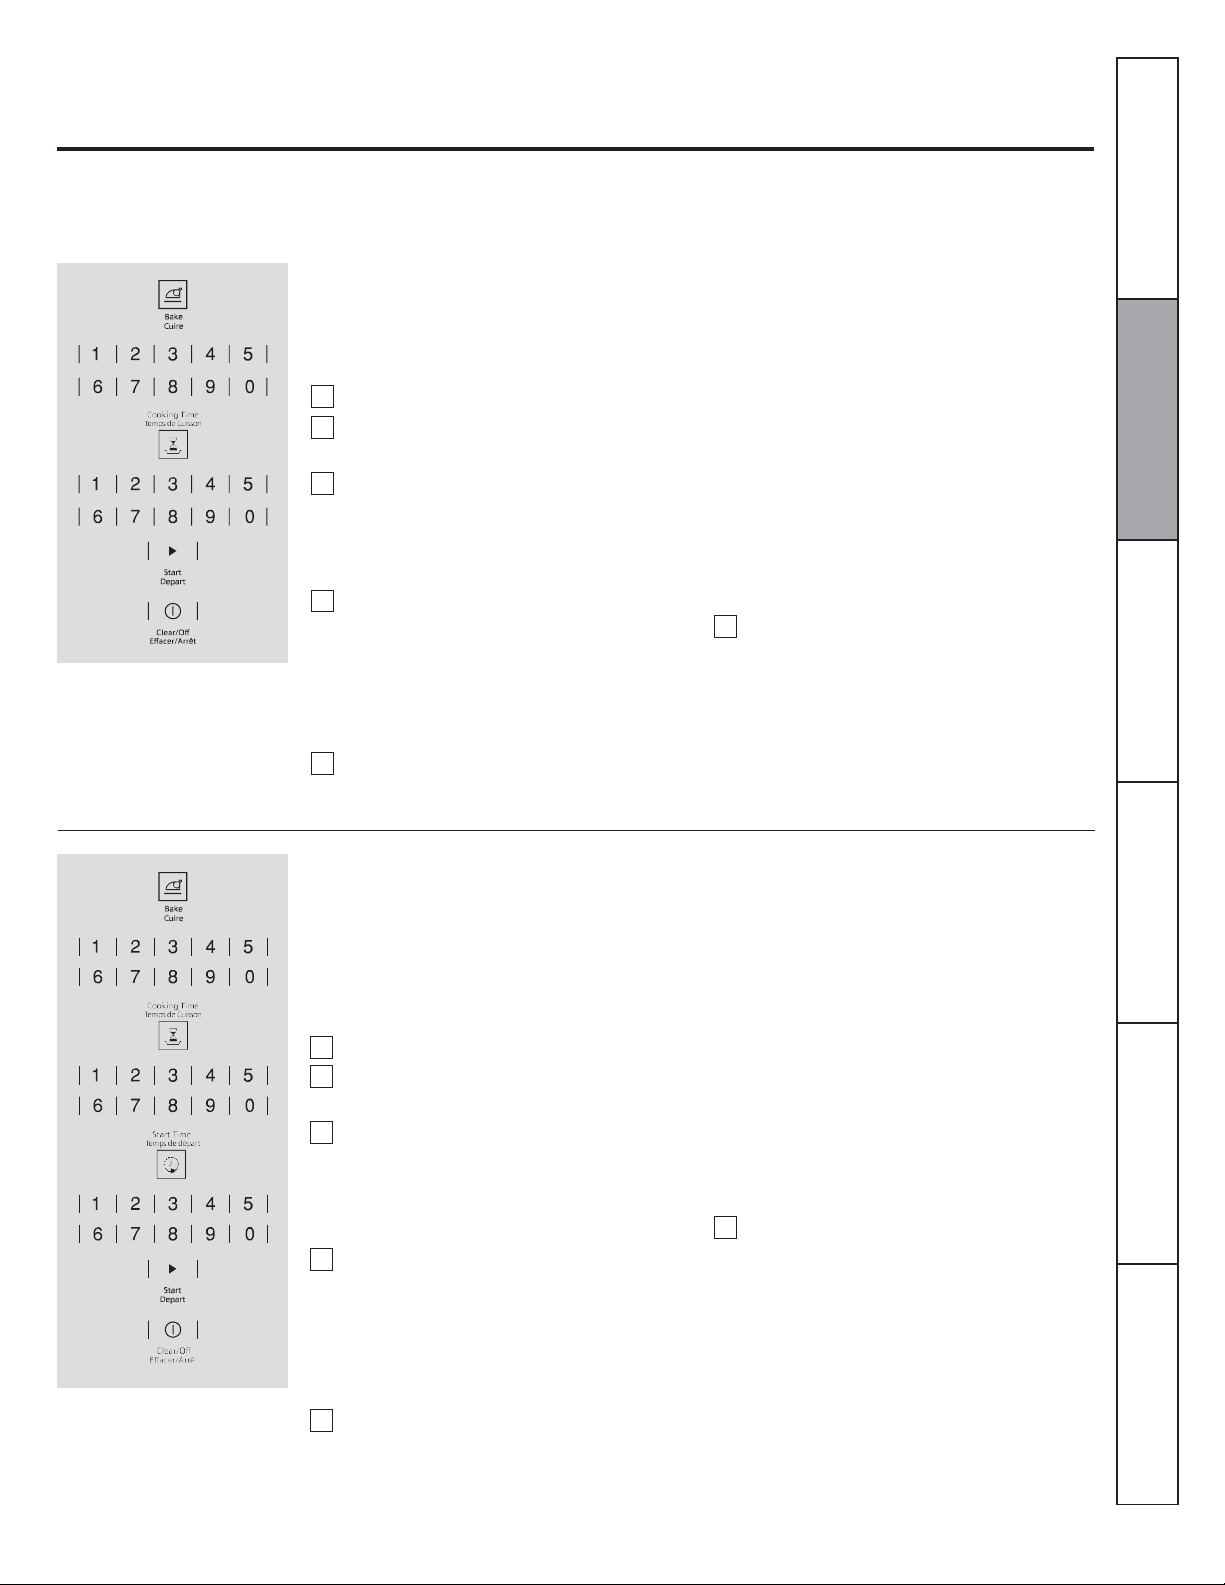
How to Set an Immediate Start and Automatic Stop
The oven will turn on immediately and cook for a
selected length of time. At the end of the cooking
time the oven will turn off automatically.
Touch the BAKE pad.
1
Touch the number pads to set the desired
oven temperature.
Touch the COOKING TIME pad.
NOTE: If your recipe requires preheating, you
may need to add additional time to the length of
the cooking time.
Touch the number pads to set the desired
length of cooking time. The minimum
cooking time you can set is 1 minute.
The oven temperature that you set and
the cooking time that you entered will be
in the display.
Touch the START pad.
NOTE: An attention tone will sound if you are
using timed baking and do not touch the START
pad.
The oven will turn ON, and the display will show
the cooking time countdown and the changing
temperature starting at 37.8 °C (100 °F). (The
temperature display will start to change once the
oven temperature reaches 37.8 °C [100 °F]).
When the oven reaches the temperature you set,
3 beeps will sound. The oven will continue to
cook for the set amount of time, then turn off
automatically.
Touch the OFF pad to clear the display if
necessary. Remove the food from the
oven. Remember, even though the oven
turns off automatically, food left in the
oven will continue cooking after the
oven turns off.
How to Set a Delayed Start and Automatic Stop
The oven will turn on at the time of day you set,
cook for a specific length of time an then turn off
automatically.
Make sure the clock shows the correct time of
day.
Touch the BAKE pad.
Touch the number pads to set the desired
oven temperature.
Touch the COOKING TIME pad.
NOTE: If your receipe requires preheating, you
may need to add additional time to the length of
the cooking time.
Touch the number pads to set the desired
length of cooking time. The minimum
cooking time you can set is 1 minute.
The oven temperature that you set and
the cooking time that you entered will be
in the display.
Touch the START TIME pad.
NOTE: An attention tone will sound if you are
using timed baking and do not touch the START
pad.
When the oven turns ON at the time of day you
set, the display will show the cooking time
countdown and the changing temperature
starting at 37.8 °C (100 °F). (The temperature
display will start to change once the oven
temperature reaches 37.8 °C [100°F]). When the
oven reaches the temperature you set, 3 beeps
will sound. The oven will continue to cook for the
set amount of time, then it turns off automatically.
Touch the OFF pad to clear the display if
necessary. Remove the food from the
oven. Remember, even though the oven
turns off automatically, food left in the
oven will continue cooking after the
oven turns off.
Safety Instructions
Instructions
Care and Cleaning
Troubleshooting Tips
Consumer Support
9
Page 10
1
2
3
1 2 3 4 1 2 3 1 2
Instructions
Safety
Instructions
Operating
Instructions
Care
Installation
Troubleshooting
Consumer
Special features of your oven control.
Your new touch pad control has additional features that you may choose to use. The following are the features and how you may
activate them.
The special feature modes can only be activated while the display is showing the time of day. They remain in the control's memory until
the steps are repeated.
When the display shows your choice, touch the START pad. The special features will remain in memory after a power failure, except for
the Sabbath feature, which will have to be reset.
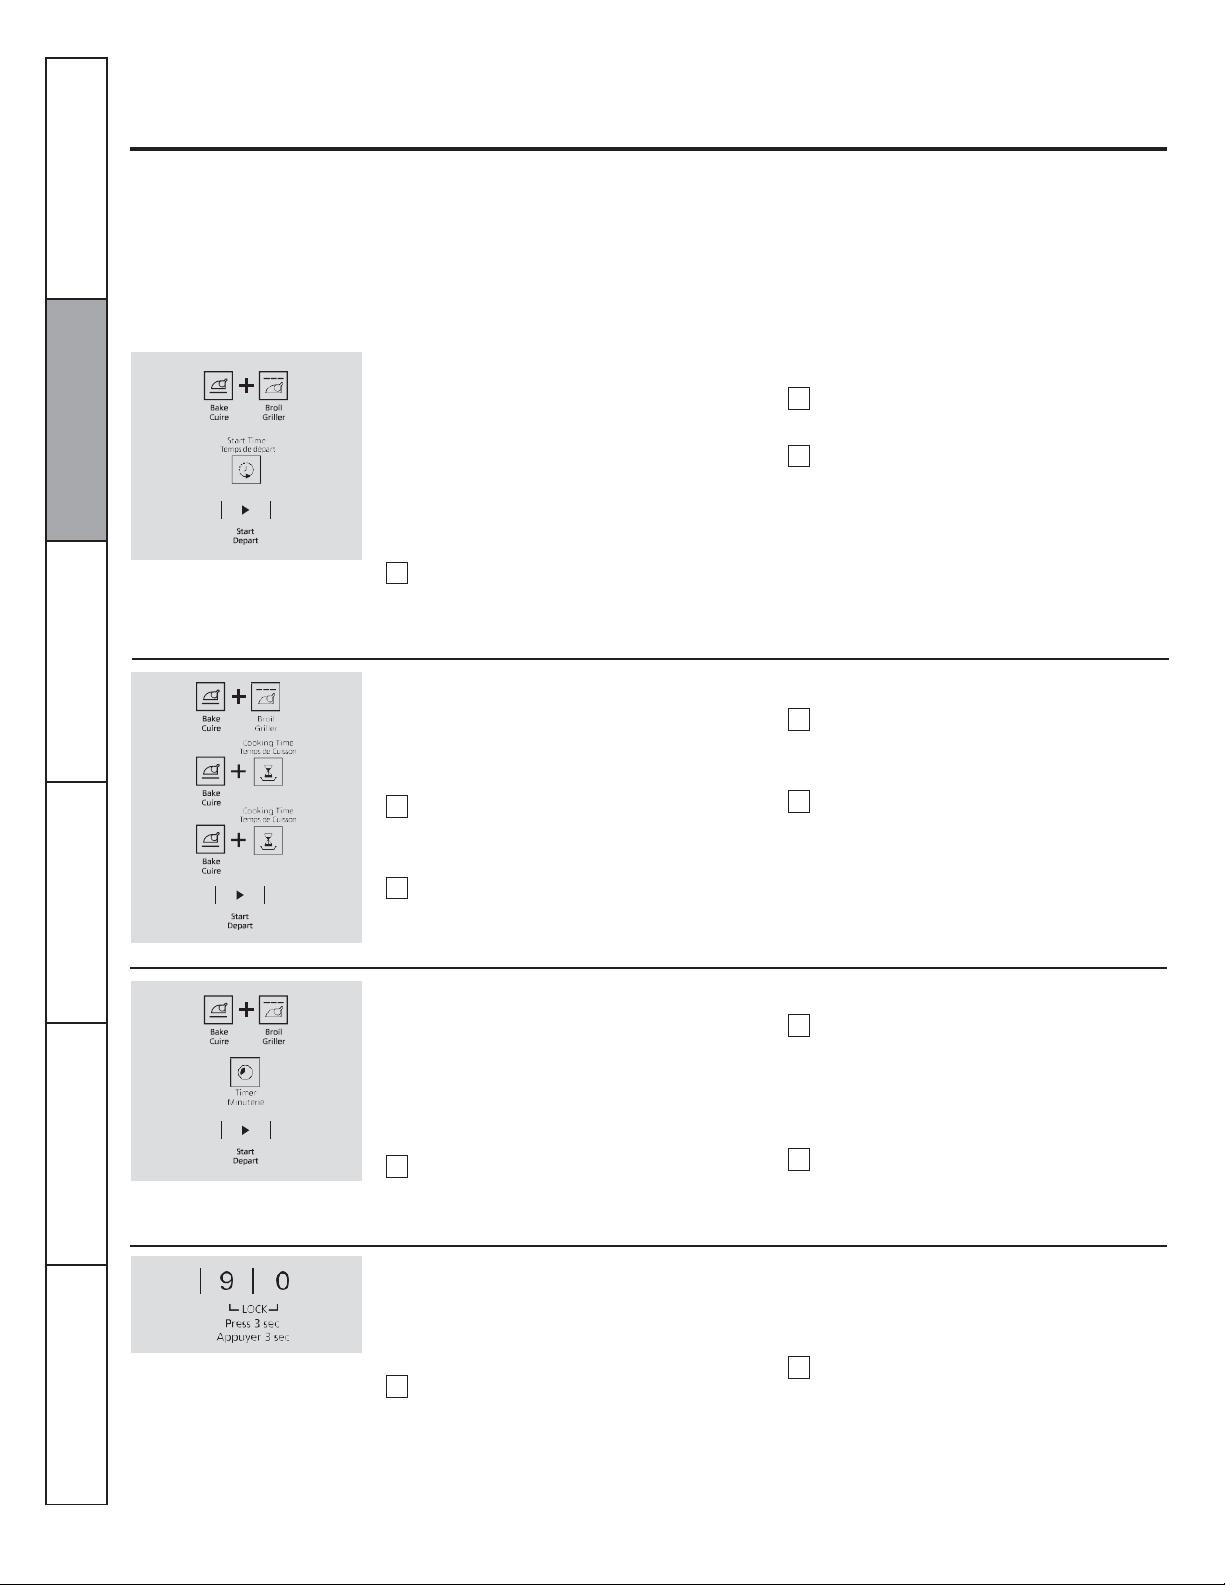
12-Hour Shutdown
With this feature, should you forget and leave the
oven on, the control will automatically turn off the
oven after 12 hours during baking functions or
after 3 hours during a broil function.
If you wish to turn OFF this feature, follow
the steps below.
Touch the BROIL and BAKE pads at the
same time for 3 seconds until the display
shows SF.
Fahrenheit or Celsius Temperature Selection
and Cleaning
Your oven control is set to use the Fahrenheit
temperature selections but you may change this
to use the Celsius selections.
Touch the BROIL and BAKE pads at the
same time for 3 seconds until the display
shows SF.
Touch the BROIL and COOKING TIME
pads. The display will show F
(Fahrenheit).
Tones at the End of a Timed Cycle
At the end of a timed cycle, 3 short beeps will
sound followed by one beep every 6 seconds
Tips
until the OFF pad is touched. This continual 6
second beep may be canceled.
To cancel the 6-second beep:
Touch the BROIL and BAKE pads at the
same time for 3 seconds until the display
shows SF.
Control Lockout
Your control will allow you to lock out the touch
pads so they cannot be activated when touched.
Support
10
To activate this feature:
Touch the 9 and 0 pads at the same time
for 3 seconds until the control beeps
twice. The display will show LOC
continuously and the time of day, if not
blacked out.
Touch the START TIME pad until no
shdn (no shut-off) appears in the display.
Touch the START pad to activate the no
shut-off and leave the control set in this
special features mode.
Touch the BROIL and COOKING TIME
pads again. The display will show C
(Celsius).
Touch the START pad.
Touch the TIMER pad. The display
shows CON BEEP (continuous beep).
Touch the TIMER pad again. The display
shows BEEP. (This cancels the one beep
every 6 seconds.)
Touch the START pad.
NOTE: All cooking and timing functions will be
cancelled when locking out the control.
To unlock the control, touch the 9 and 0
pads at the same time for 3 seconds until
the control beeps twice and LOC is
removed from the display.
Page 11
1 2 3 1 2 3 4
Instructions
Operating
Installation
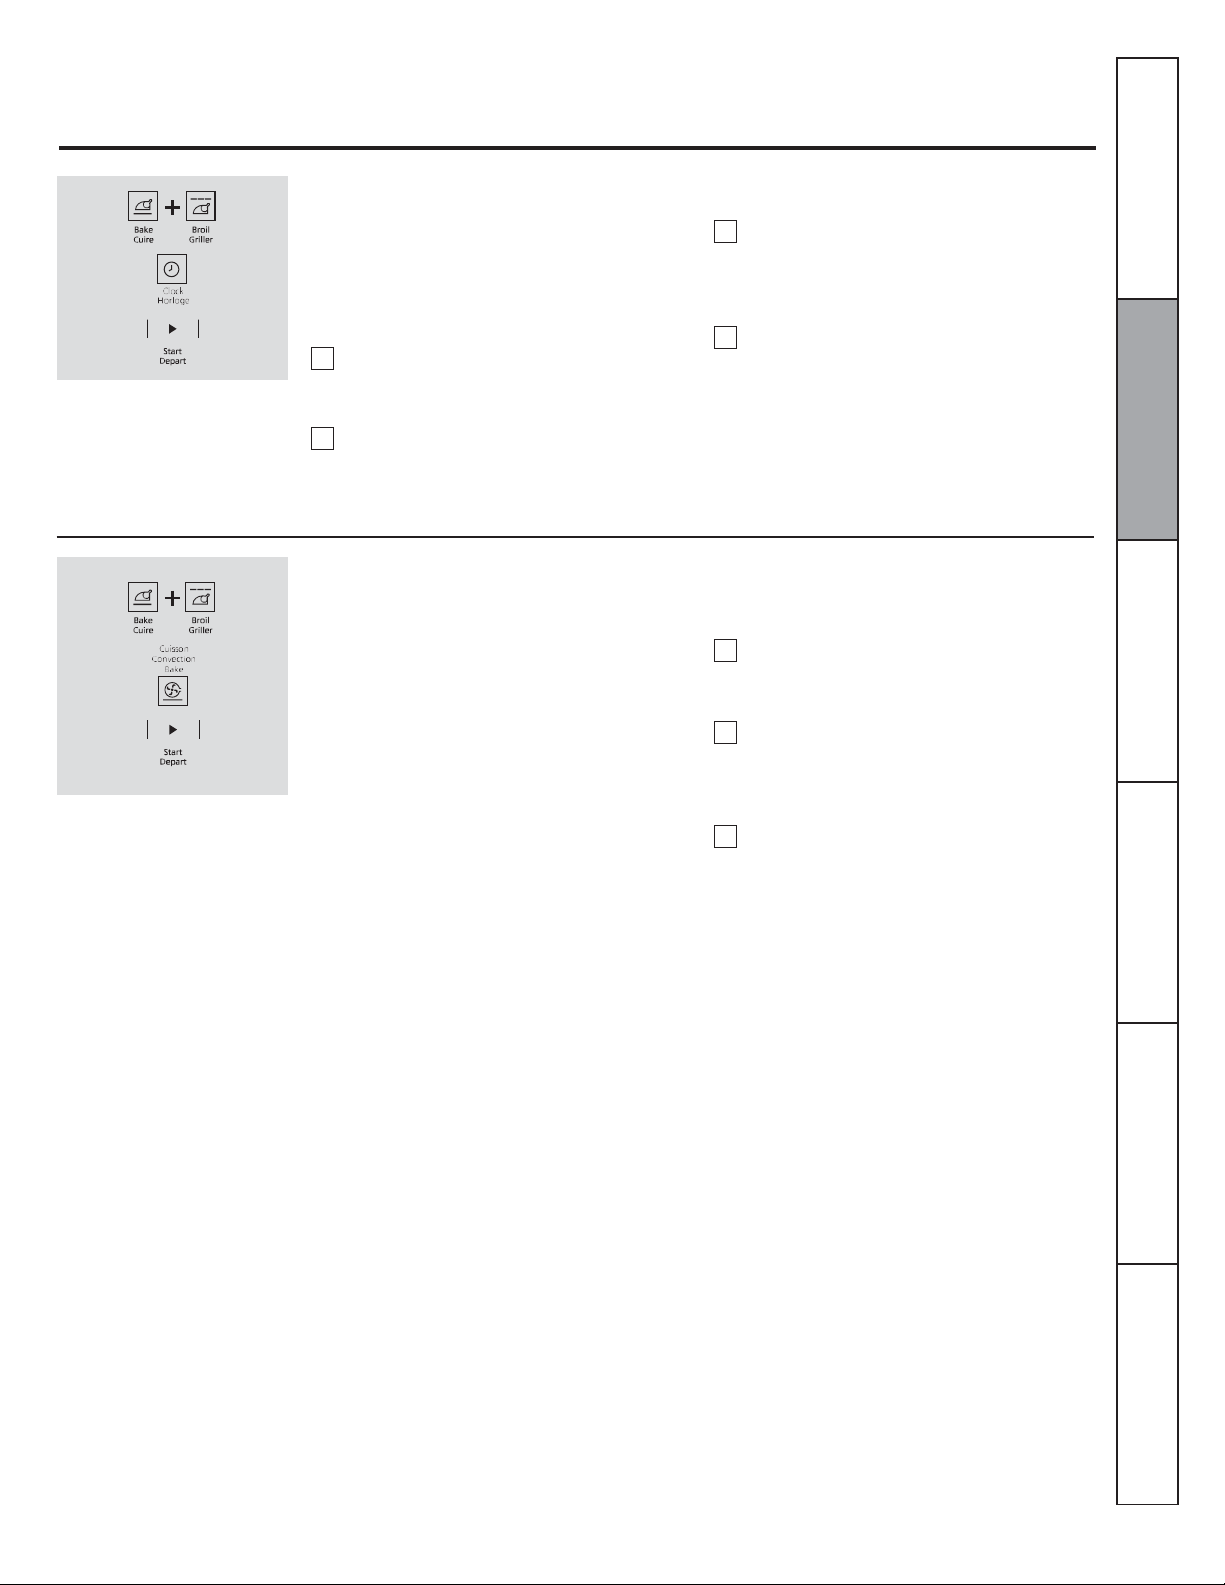
12-Hour, 24-Hour or Clock Blackout
Your control is set to use a 12-hour clock.
If you would prefer to have a 24-hour
military time clock or black out the clock
display, follow the steps below.
Touch the BROIL and BAKE pads at the
same time for 3 seconds until the display
shows SF.
Touch the CLOCK pad once. The display
will show 12 hr. If this is the choice you
want, touch the START pad.
Auto Recipe™ Conversion
Touch the CLOCK pad again to change
to the 24 hour military time clock. The
display will show 24 hr. If this is the
choice you want, touch the START pad.
Touch the CLOCK pad again to black
out the clock display. The display will
show OFF. If this is the choice you want,
touch the START pad.
NOTE: If the clock is in the black-out mode you
will not be able to use the Start Time function.
Safety Instructions
Instructions
Care and Cleaning
When using convection bake, the Auto Recipe™
Conversion feature will automatically convert
entered regular baking temperatures to
convection baking temperatures.
This feature is activated so that the display will
show the actual converted (reduced)
temperature. For example, if you enter a regular
recipe temperature of 176.7 °C (350 °F) and
touch the START pad, the display will show CON
and the converted temperature of 162.8 °C
(325 °F).
To deactivate the feature:
Touch the oven BAKE and BROIL pads
at the same time until the display shows
SF.
Touch the CONVECTION BAKE pad.
The display will show CON ON. Touch
the CONVECTION BAKE pad again.
The display will show CON OFF.
Touch the START pad.
To reactivate the feature, repeat steps 1-3
above but touch the START pad when CON
ON is in the display.
Troubleshooting Tips
Consumer Support
11
Page 12
1 2 3 4 5
6
7
Instructions
Safety
Instructions
Operating
Instructions
Care
Installation
Troubleshooting
Consumer
Using the Sabbath feature.
(Designed for use on the Jewish Sabbath and Holidays)
The Sabbath feature can be used for baking/roasting only. It cannot be used for convection, broiling or Delay Start cooking.
NOTE: The oven light comes on automatically when the door is opened and goes off when the door is closed. The bulb may be
removed. See the Oven Light Replacement section. On models with a light switch on the control panel, the oven light may be turned on
and left on.
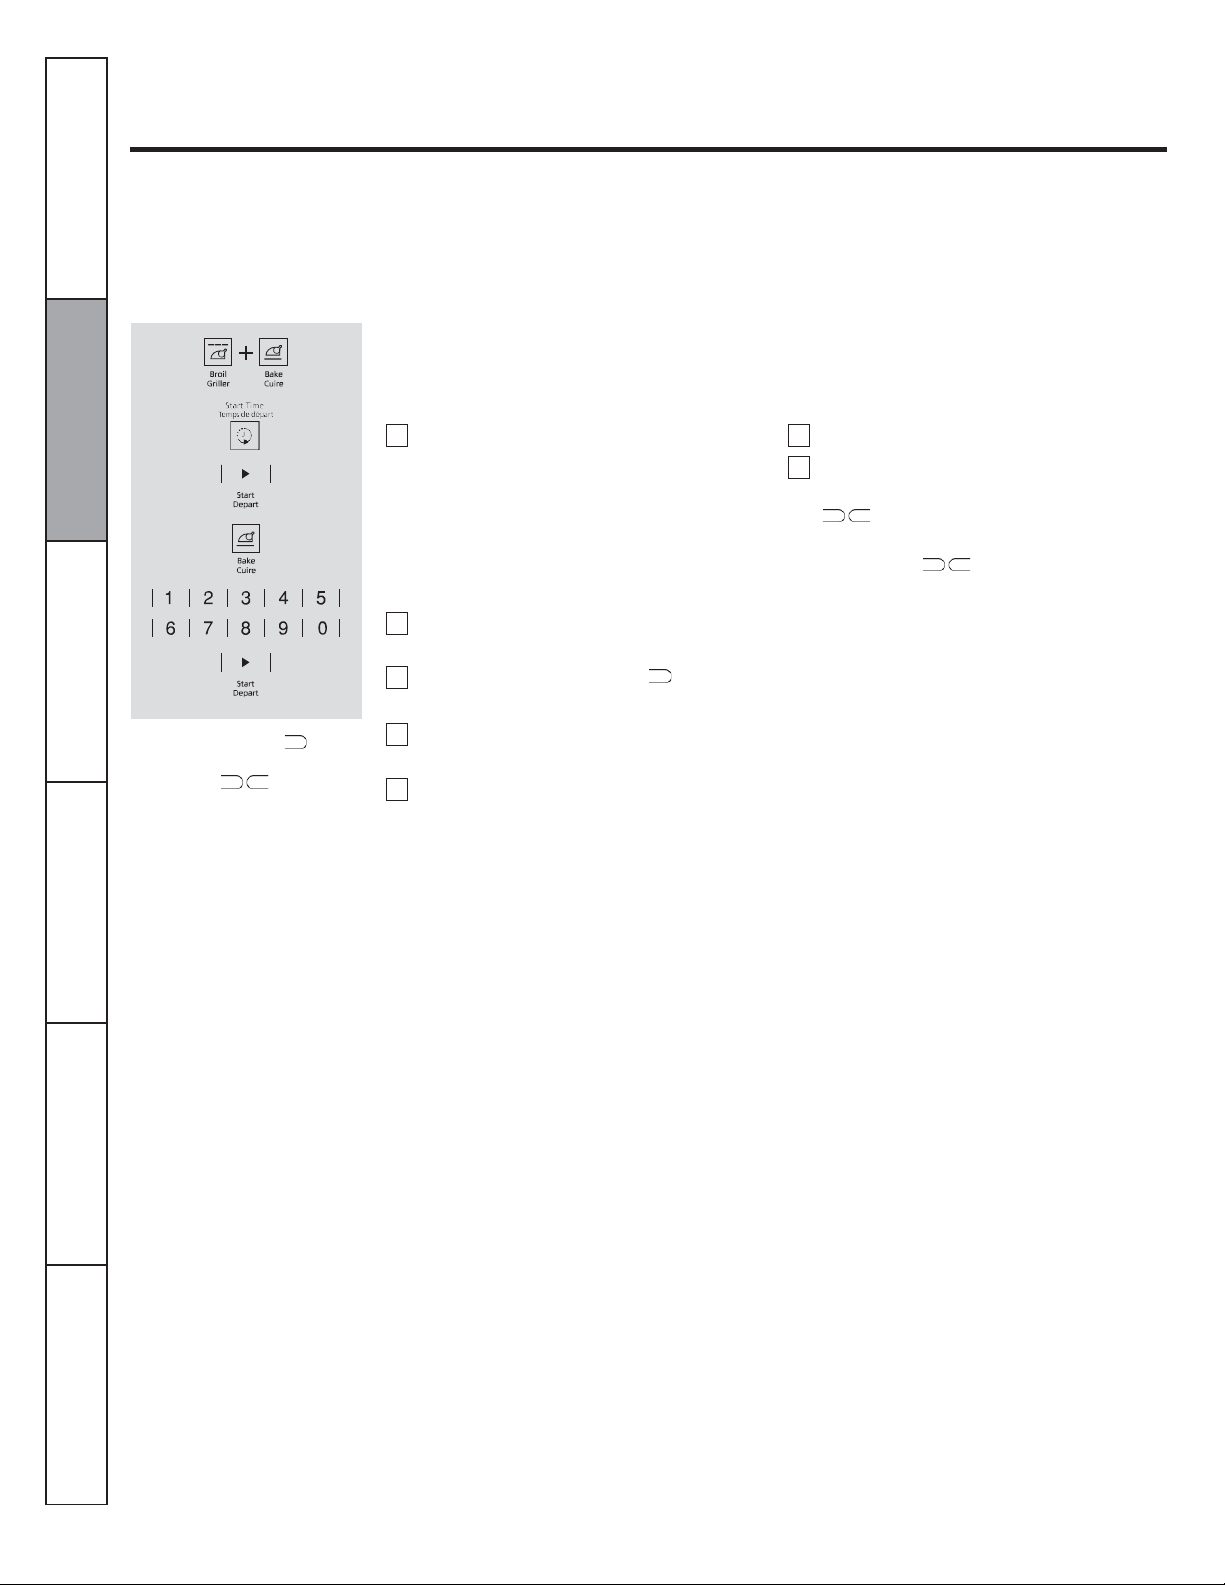
How to Set for Regular Baking/Roasting
Make sure the clock shows the correct time of
day and the oven is off.
Touch and hold both the BROIL and
BAKE pads, at the same time, until the
display shows SF.
NOTE: If bake or broil appears in the
display, the BROIL and BAKE pads
were not touched at the same time.
Touch the OFF pad and begin again.
and Cleaning
When the display shows the
oven is set in Sabbath. When the
display shows the oven is
baking/roasting.
Tips
Support
Touch the START TIME pad until SAb
bAtH appears in the display.
Touch the START pad and will
appear in the display.
Touch the BAKE pad. No signal will be
given.
Using the number pads, enter the desired
temperature between 77 °C (170 °F) and
288 °C (550 °F). No signal or
temperature will be given.
12
Touch the START pad.
After a random delay period of
approximately 30 seconds to 1 minute,
will appear in the display
indicating that the oven is baking/
roasting. If doesn't appear in the
display, start again at Step 4.
To adjust the oven temperature, touch the
BAKE pad, enter the new temperature using
the number pads and touch the START pad.
NOTE: The OFF and COOKING TIME
pads are active during the Sabbath feature.
Page 13
1 2 3 4 5
6
7
8
9
10 1 2
3 4 5
6
Instructions
Operating
Installation
Safety Instructions
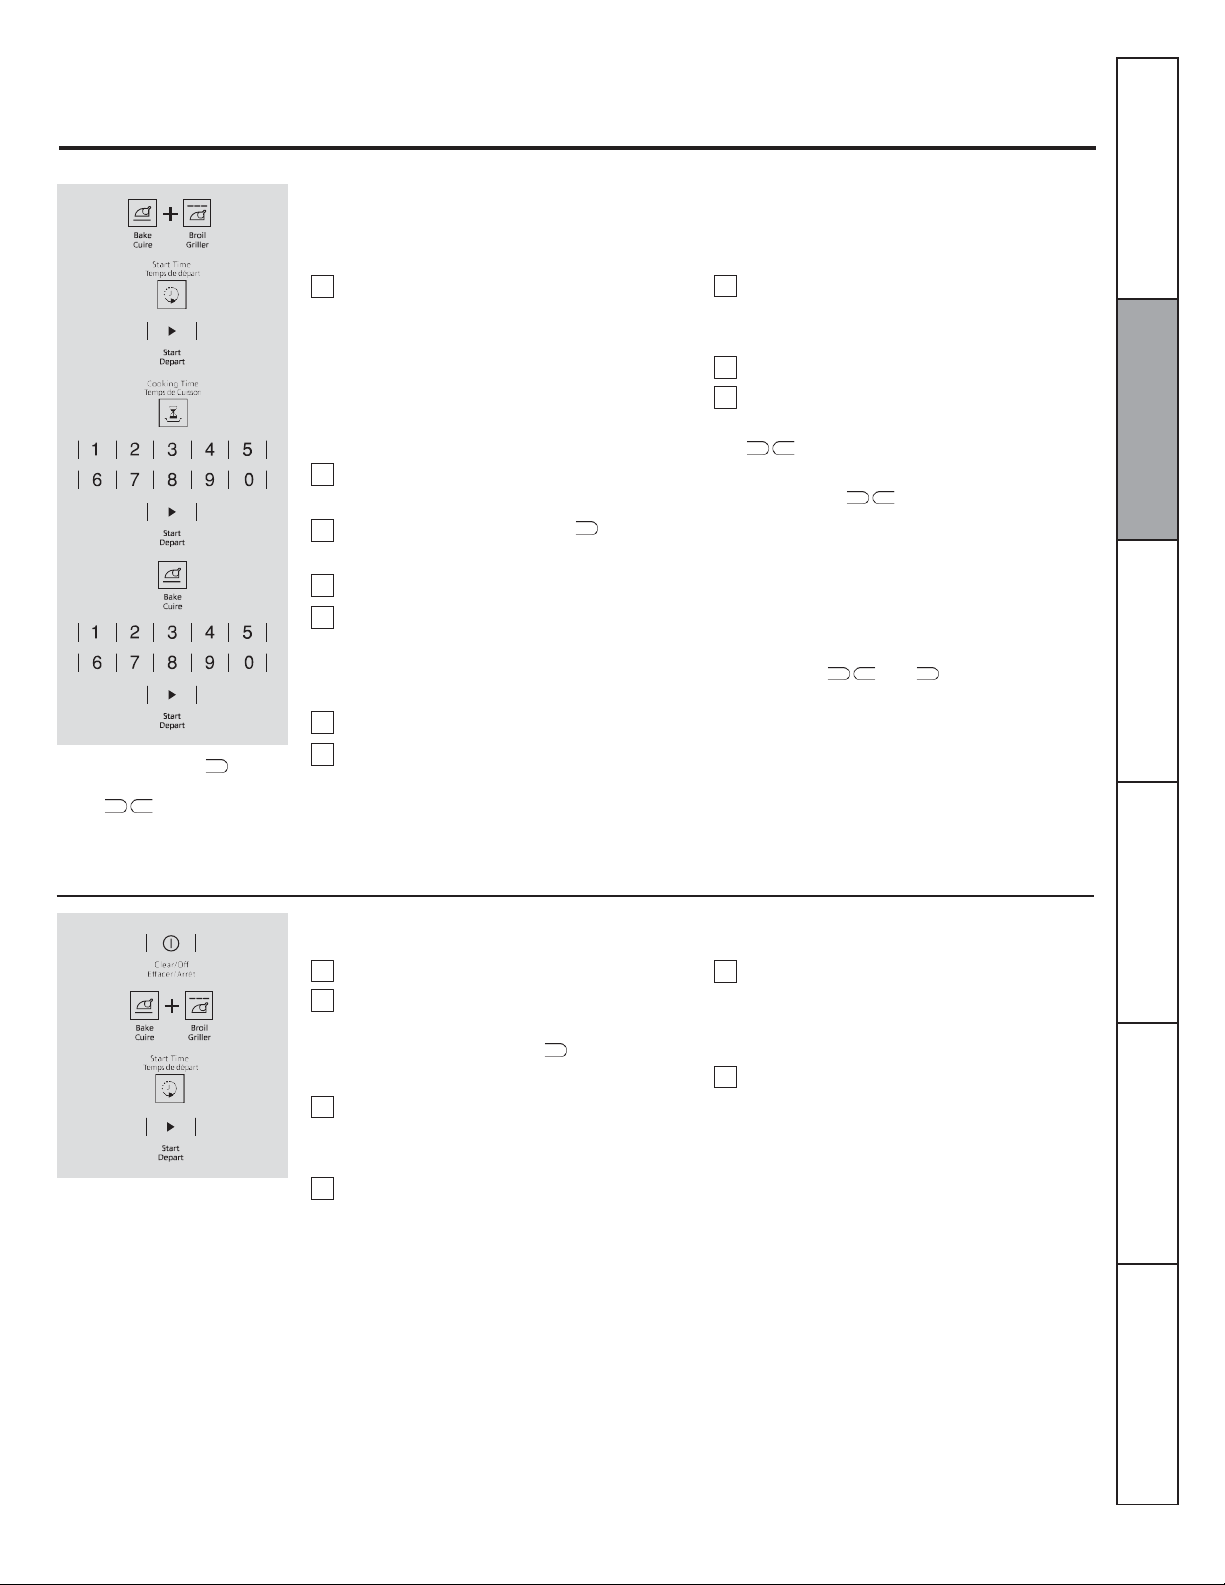
How to Set for Timed Baking/Roasting-Immediate Start and Automatic Stop
When the display shows the oven
is set in Sabbath. When the display
shows the oven is baking/
roasting.
Make sure the clock shows the correct time of day and the oven is off.
Touch and hold both the BROIL and
BAKE pads at the same time, until the
display shows SF.
NOTE: If bake or broil appears in the display,
the BROIL and BAKE pads were not touched
at the same time. Touch the OFF pad and
Using the number pads, enter the desired
temperature. No signal or temperature
will be given.
Touch the START pad.
After a random delay period of
approximately 30 seconds to 1 minute,
begin again.
Tap the START TIME pad until
SAbbAtH appears in the display.
Touch the START pad and will
appear in the display.
Touch the COOKING TIME pad.
Touch the number pads to set the desired
length of cooking time between 1 minute
and 9 hours and 99 minutes. The cooking
time that you entered will be displayed.
Touch the START pad.
Touch the BAKE pad. No signal will be
given.
indicating that the oven is baking/
roasting. If doesn't appear in the
display, start again at Step 7.
To adjust the oven temperature, touch the
BAKE pad, enter the new temperature using
the number pads and touch the START pad.
When cooking is finished, the display will
change from to and 0:00 will
appear, indicating that the oven has turned
OFF but is still set in Sabbath. Remove the
cooked food.
How to exit the Sabbath feature
Instructions
will appear in the display
Care and Cleaning
Touch the OFF pad.
If the oven is cooking, wait for a random
delay period ofapproximately 30 seconds
to 1 minute, until only is in the
display.
Touch and hold both the BROIL and
BAKE pads at the same time, until the
display shows SF.
Tap the START TIME pad until 12shdn
or no shdn appears in the display.
Choose 12 shdn, indicating that the oven
will automatically turn after 12 hours or
no shdn, indicating that the oven will not
automatically turn after 12 hours.
Press START when the option that you
want is in the display (12 shdn or no
shdn).
NOTE: If a power outage occurred while the oven
was in Sabbath, the oven will automatically turn
off and stay off even when the power returns. The
Troubleshooting Tips
oven control must be reset.
Consumer Support
13
Page 14
1 2 3 4 5
6
7
7
Instructions
Safety
Instructions
Operating
Instructions
Care
Installation
Troubleshooting
Consumer
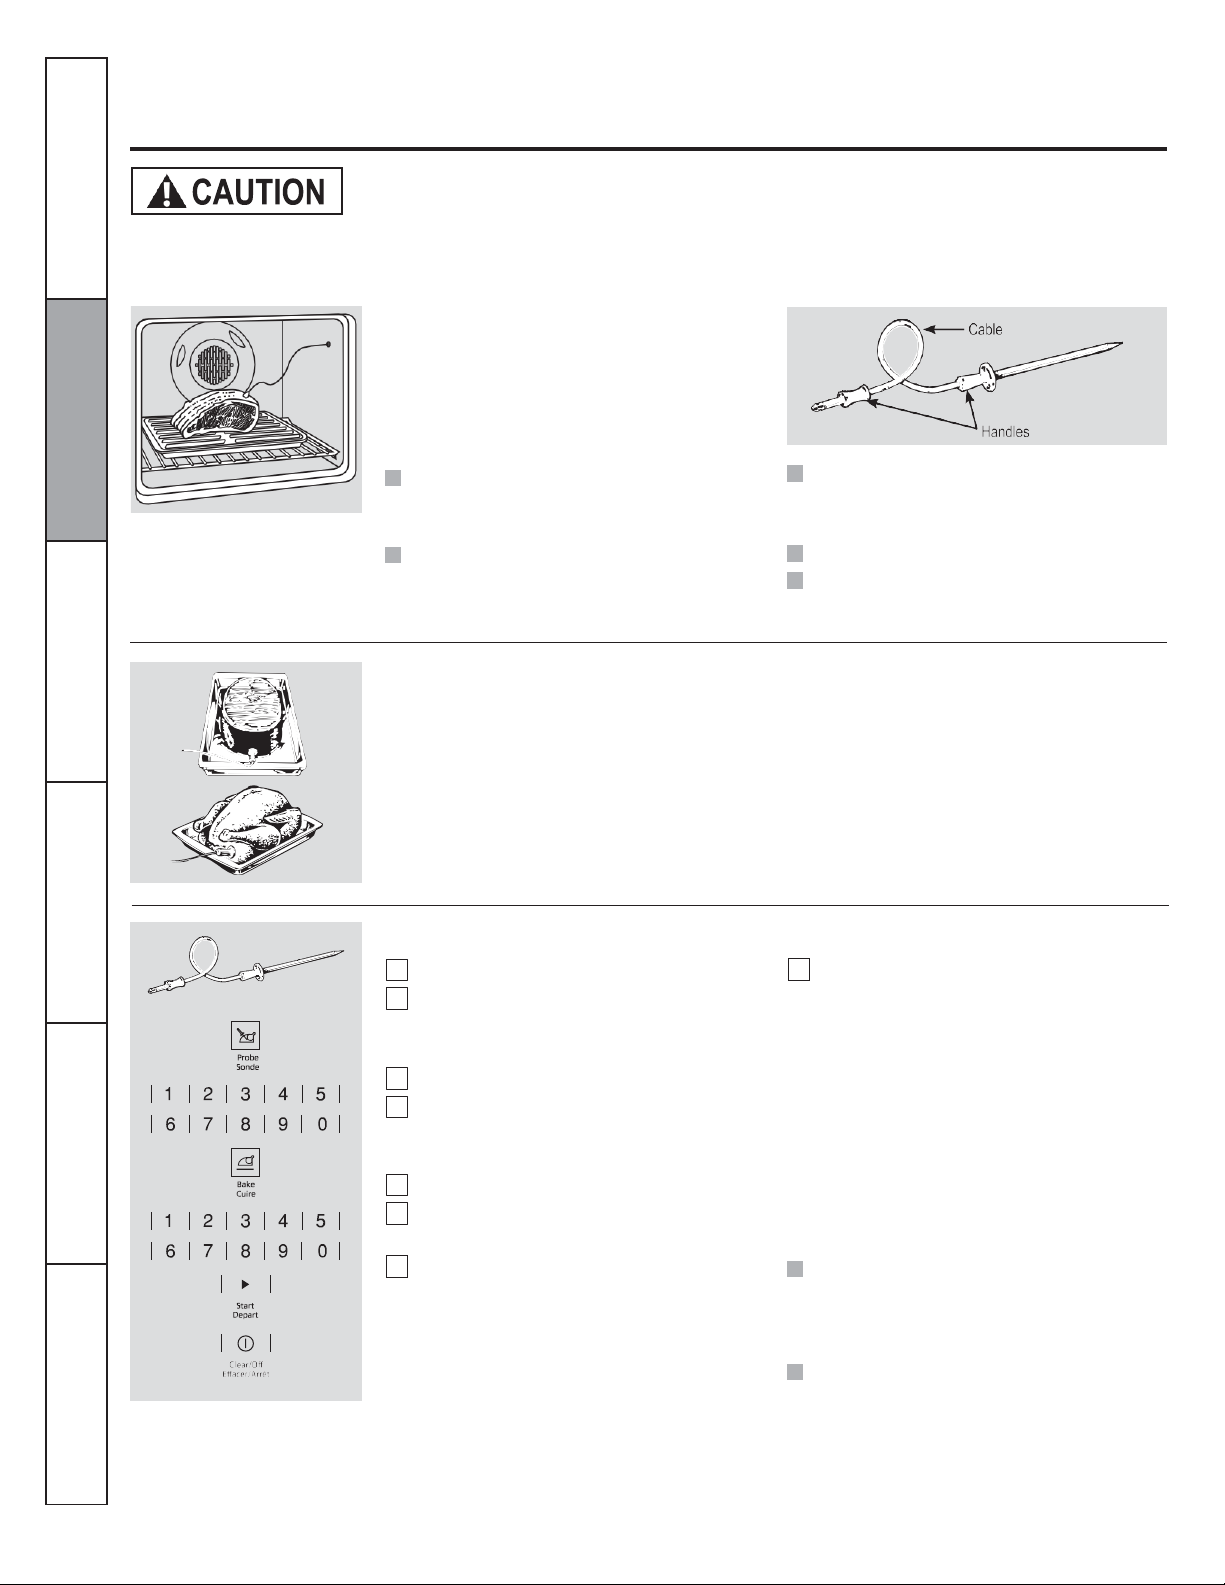
Using the probe.
To prevent burns, do not unplug the probe from the oven outlet until the oven has cooled. Do not store the
For many foods, especially roasts and poultry, internal food temperature is the best test for doneness. The temperature
probe takes the guesswork out of cooking foods to the exact doneness you want.
The temperature probe has a skewerlike probe at one end and a plug at the
other end that goes into the outlet in
the oven.
and Cleaning
probe in the oven.
Use of probes other than the one provided
with this product may result in damage to
the probe.
Use the handles of the probe and plug when
inserting and removing them from the food
and outlet.
To avoid damaging your probe, do not
use tongs to pull on the cable when
removing it.
To avoid breaking the probe, make sure
food is completely defrosted before
inserting.
After preparing the meat and placing it on a
trivet or on a broiler pan grid, follow these
directions for proper probe placement.
Insert the probe completely into the meat. It
should not touch the bone, fat or gristle.
For roasts with no bone, insert the probe into
the meatiest part of the roast. For bone-in
ham or lamb, insert the probe into the center
of the lowest large muscle.
To prevent possible burns, do not unplug
the probe from the outlet until the oven
has cooled.
Do not store the probe in the oven.
Never leave your probe inside the oven
during broil cycle.
Insert the probe into the center of dishes
such as meat loaf or casseroles.
Insert the probe into the meatiest part of the
inner thigh from below and parallel to the
leg of a whole turkey.
NOTE: Broil settings will not work if the
temperature probe is plugged in.
How to Set the Oven For Cooking When Using the Probe
Insert the probe into the food.
Plug the probe into the outlet in the
oven. Make sure it's pushed all the way
in. Close the oven door.
Tips
Support
14
Touch the Probe pad.
Touch the number pads to set the desired
internal food or meat temperature
between 100°F and 200°F.
Touch the Bake pad.
Touch the number pads to set the desired
oven temperature.
Touch the Start pad.
The display will flash LO if the probe is
inserted into the outlet and you have not set
a probe temperature and touched the Start
pad.
The display will show LO until the internal
temperature of the food reaches 100°F; then
the changing internal temperature will be
shown.
When the internal temperature of the
food reaches the number you have set,
the probe and the oven turn off and the
oven control signals. To stop the signal,
touch the Clear/Off pad. Use hot pads to
remove the probe from the food. Do not
use tongs to pull on it-they might
damage it.
To change the oven temperature during
probe cooking, touch the Bake pad and then
the number pads to set the new temperature.
If the probe is removed from the food before
the final temperature is reached, a tone will
sound and the display will flash until the probe
is removed from the oven.
You can use the timer even though you cannot
use timed oven operations while using the
probe.
Page 15
15
Instructions
Operating
Installation
Using the convection oven.
The convection oven fan shuts off when the oven door is opened. DO NOT leave the door open for long periods of time while using
convection cooking.
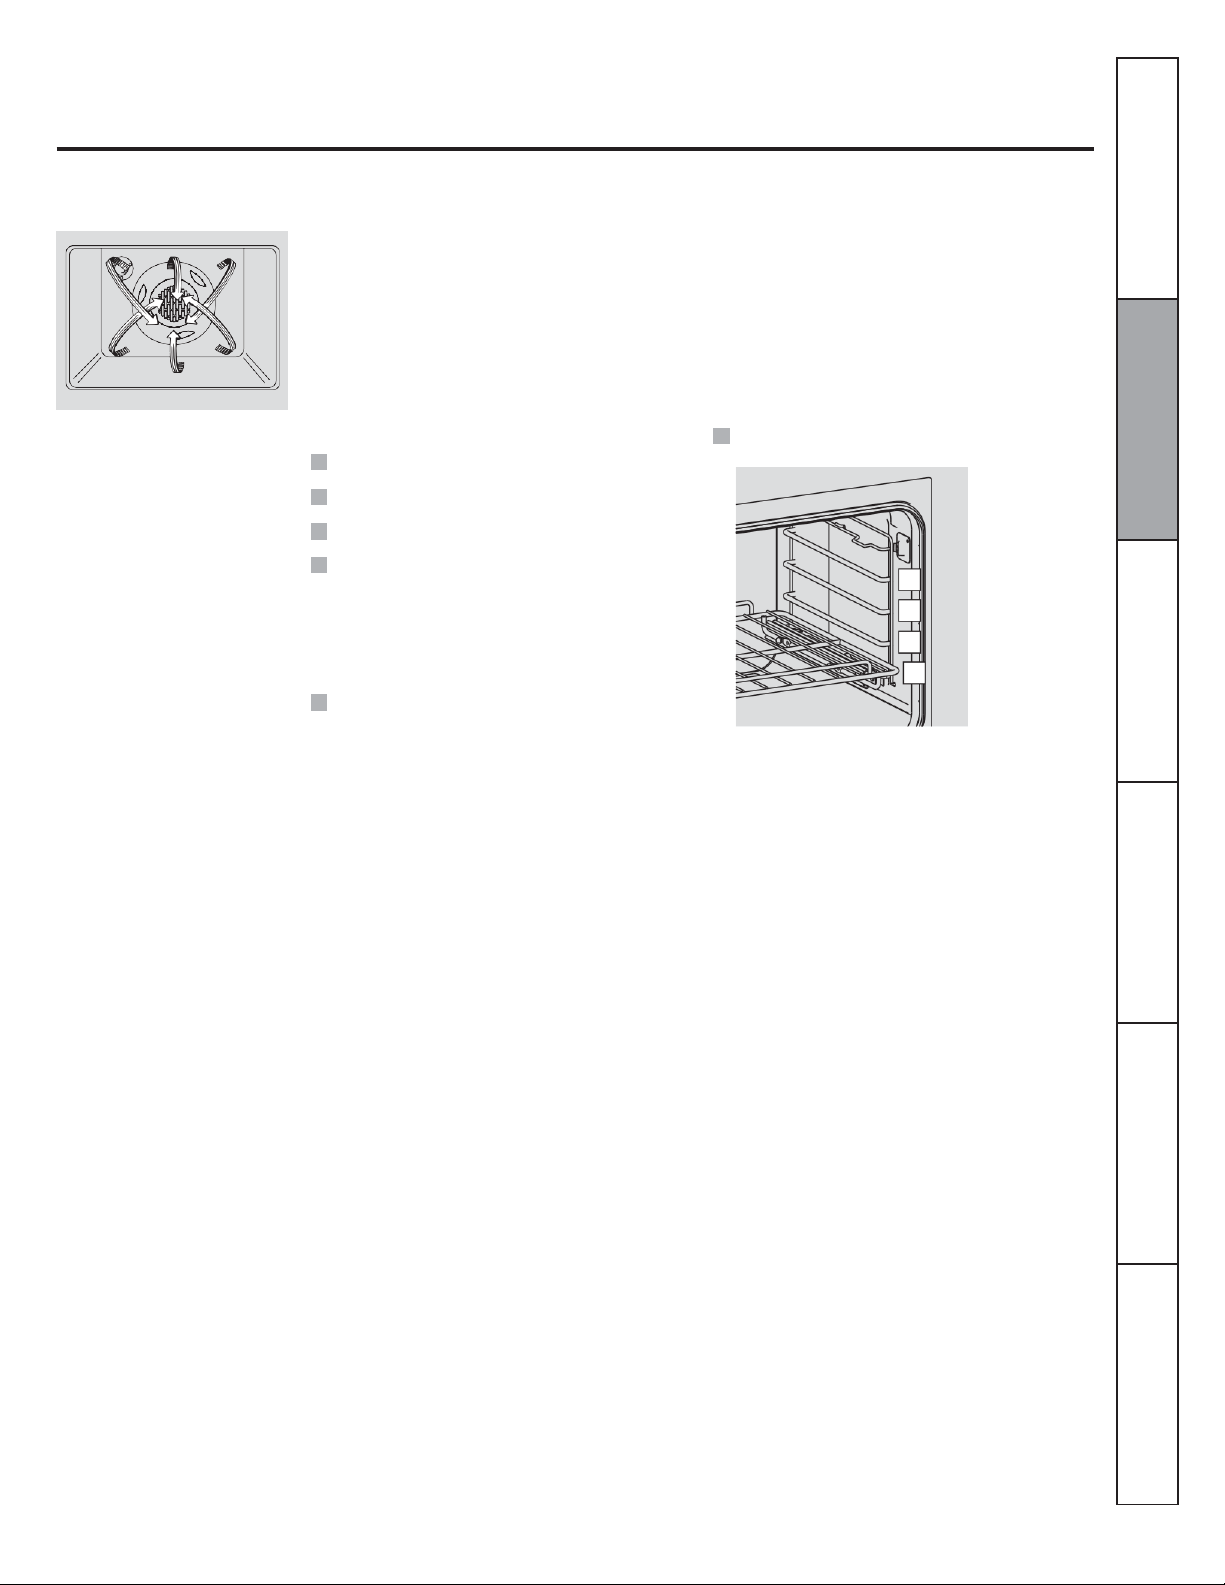
In a convection oven, a fan circulates
hot air over, under and around the
food. This circulating hot air is evenly
distributed throughout the oven cavity.
As a result, foods are evenly cooked
and browned-often in less time than
with regular heat.
To help you understand the difference
between convection bake and roast and
traditional bake and roast, here are some
general guidelines.
Convection Bake
The convection fan circulates the heated air
evenly over and around the food.
Preheat the oven.
Ideal for foods cooked on multiple racks.
Good for large quantities of baked foods.
Good results with cookies, biscuits,
brownies, cupcakes, cream puffs, sweet
rolls, angel food cake and bread.
Convection Roast
Good for large tender cuts of meat, uncovered.
Roasts or poultry should be cooked on rack
position (A).
When you are convection roasting, it is
important that you use a broiler pan and grid
for best convection roasting results. The pan
is used to catch grease spills and the grid is
used to prevent grease spatters.
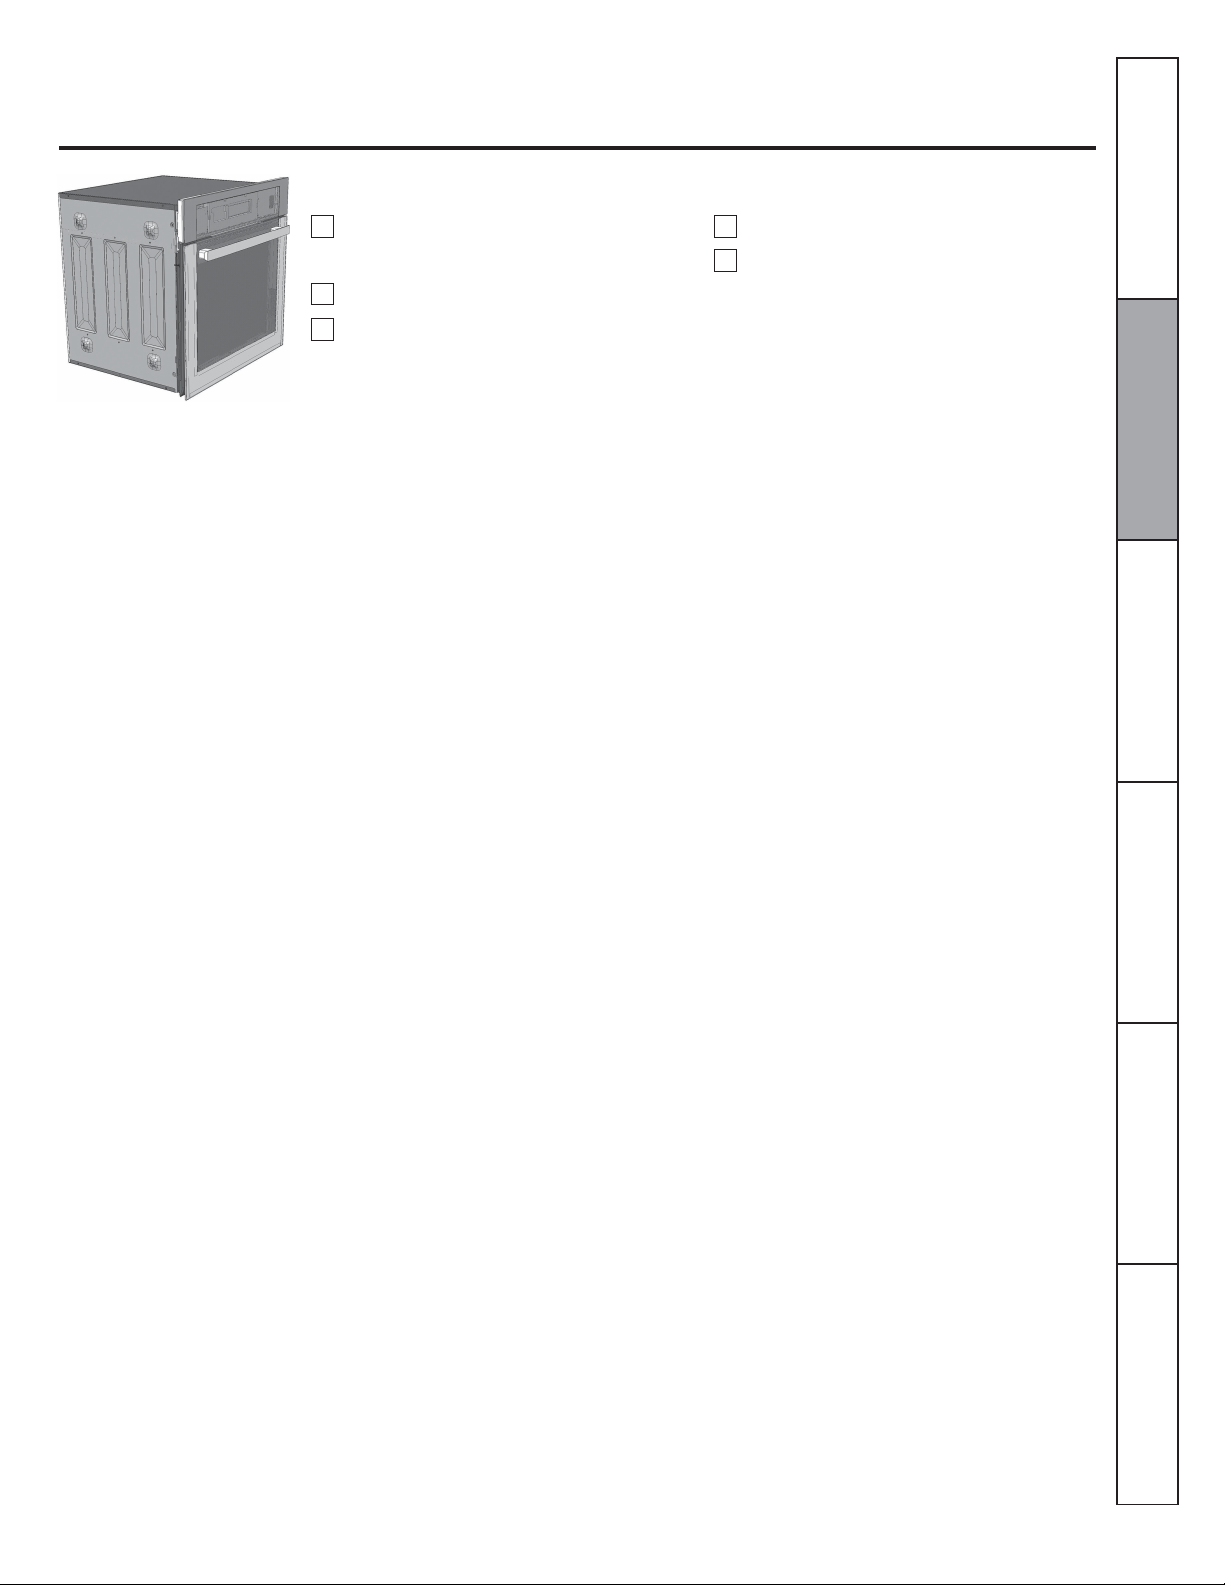
Place the rack in rack position (A).
D
C
B
A
Safety Instructions
Instructions
Care and Cleaning
The convection fan circulates the heated air
evenly over and around the food. Meat and
poultry are browned on all sides, as if they
were cooked on a rotisserie. Heated air will
be circulated over, under and around the
food being roasted. The heated air seals in
juices quickly for a moist and tender product
while, at the same time, creating a rich
golden-brown exterior.
Troubleshooting Tips
Consumer Support
Page 16
16
1 2 3
4
Instructions
Safety
Instructions
Operating
Instructions
Care
Installation
Troubleshooting
Consumer
Using the convection oven.
and Cleaning
Cookware for Convection Cooking
Before using your convection oven, check to
see if your cookware leaves room for air
circulation in the oven. If you are baking
with several pans, leave space between
them. Also, be sure the pans do not touch
each other or the walls of the oven.
Paper and Plastic
Heat-resistant paper and plastic containers
that are recommended for use in regular
ovens can be used in convection ovens.
Plastic cookware that is heat-resistant to
temperatures of 400°F can also be used,
when oven is below 400°F.
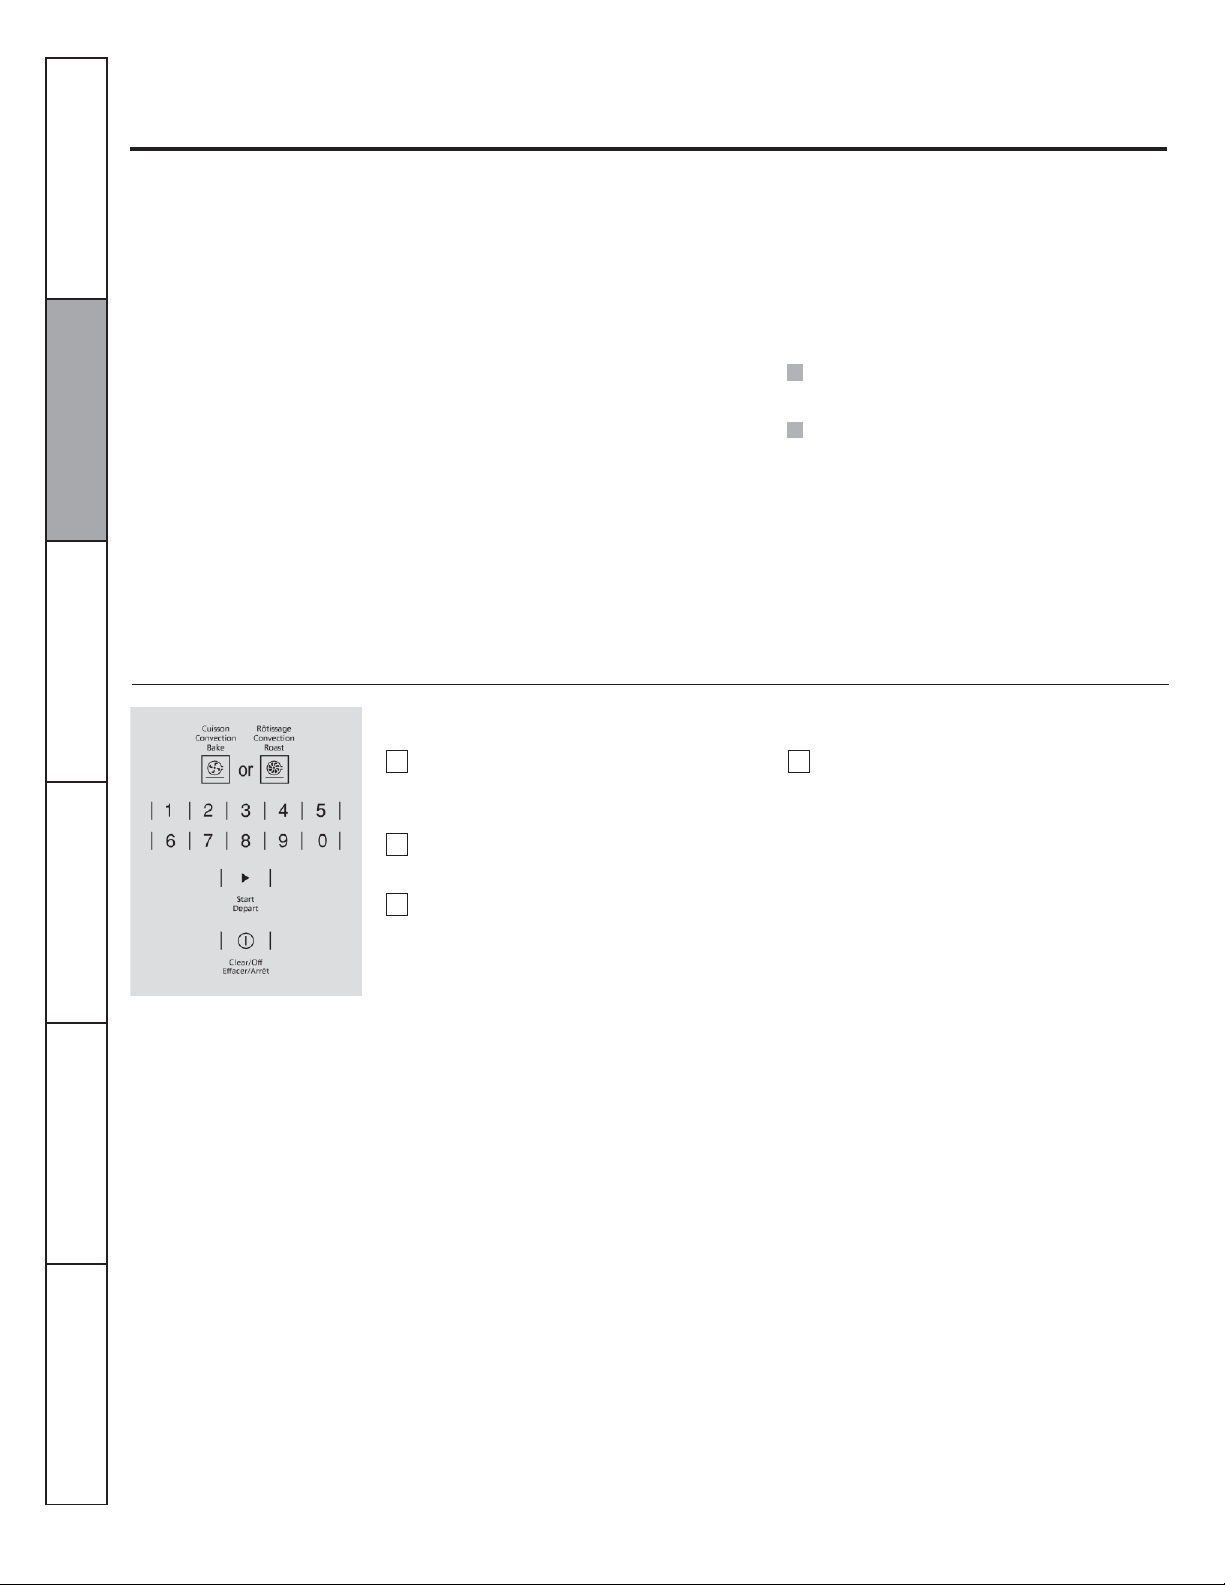
How to Set the Oven for Convection Baking or Roasting
Touch the CONVECTION
BAKE or CONVECTION
ROAST pad.
Touch the number pads to set the desired
oven temperature.
Touch the Start pad.
Metal and Glass
Any type of cookware will work in your
convection oven. However, metal pans heat
the fastest and are recommended for
convection baking.
Darkened or matte-finished pans will bake
faster than shiny pans.
Glass or ceramic pans cook more slowly.
When baking cookies, you will get the best
results if you use a flat cookie sheet instead
of a pan with low sides.
For recipes like oven-baked chicken, use a
pan with low sides. Hot air cannot circulate
well around food in a pan with high sides.
Touch the CLEAR/OFF pad when finished.
NOTE: You will hear a fan while cooking with
convection. The fan will stop when the door is
opened, but the heat will not turn off.
The fan will not start until the preheat
temperature is reached.
To change the oven temperature, touch the
CONVECTION BAKE or
CONVECTION ROAST pad and then the
number pads to set the new temperature.
Tips
When the oven starts to heat, the changing
temperature, starting at 100°F, will be
displayed. When the oven reaches the
temperature you set, 3 beeps will sound.
Support
Page 17
17
1
2
4 5 6
7
8
Instructions
Operating
Installation
For best results when roasting large
turkeys and roasts, we recommend
using the probe included in the
convection oven.
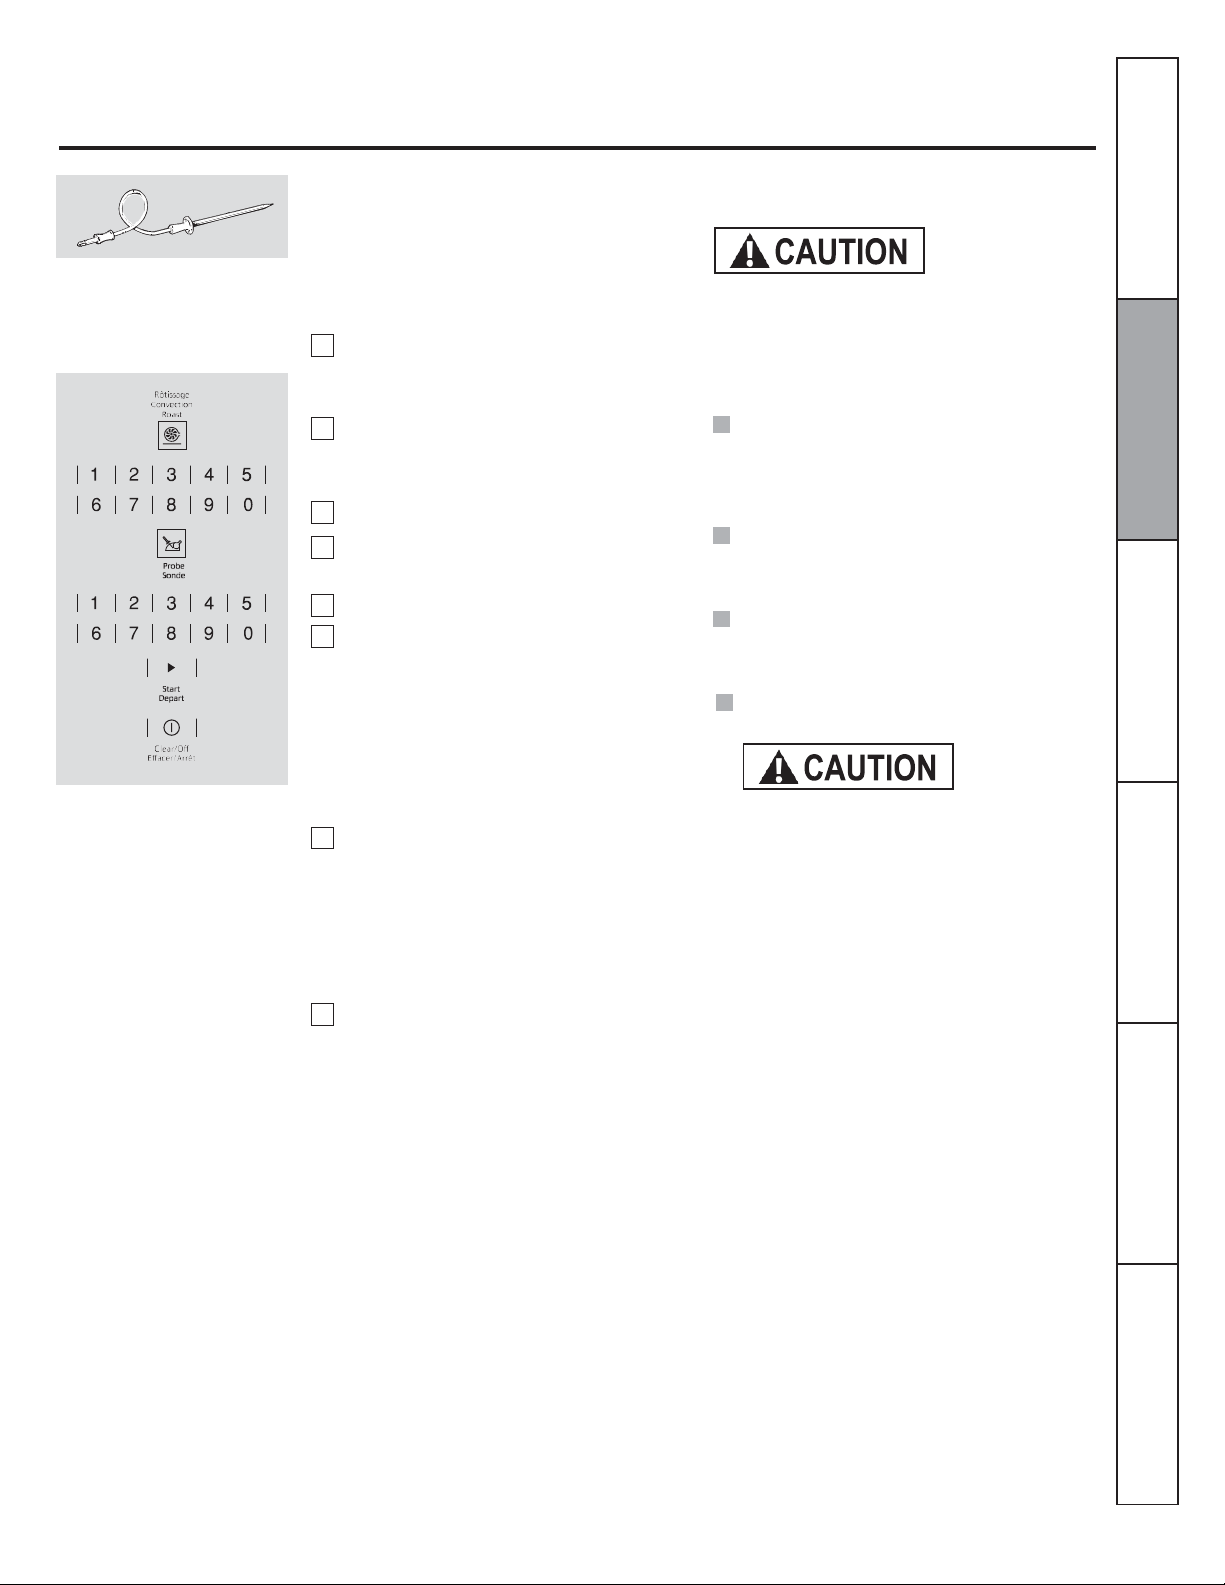
How to Set the Oven for Convection Roasting When Using the Probe
The display will flash PROBE and the oven
control will signal if the probe is inserted
into the outlet, and you have not set a probe
temperature and touched the Start pad.
Place the rack in the rack position (A).
Insert the probe completely into the
food.
Plug the probe into the outlet in the
oven. Make sure it is pushed all the way
in. Close the oven door.
Touch the CONVECTION ROAST pad.
3
Touch the number pads to set the desired
oven temperature.
Touch the Probe pad.
Touch the number pads to set the desired
internal food temperature.
To change the oven temperature during the
Convection Roast cycle, touch the
CONVECTION ROAST pad and then
touch the number pads to set the new
desired temperature.
Touch the Start pad.
To prevent burns, do not unplug the probe from
the oven outlet until the oven has cooled. Do not
store the probe in the oven.
NOTE:
If the probe is removed from the food before
the final temperature is reached, a tone will
sound and the display will flash until the
probe is removed from the oven.
You will hear a fan while cooking with this
feature. The fan will stop when the door is
opened but the heat will not turn off.
You can use the timer even though you
cannot use timed oven operations while
using the probe.
Probe is not for use in Broil functions.
Do not use probe when cooking in rack level D.
Safety Instructions
Instructions
Care and Cleaning
When the oven starts to heat, the word LO
will be in the display.
After the internal temperature of the food
reaches 100°F, the changing internal
temperature will be shown in the display.
When the internal temperature of the
Troubleshooting Tips
food reaches the number you have set,
the probe and the oven turn off and the
oven control signals. To stop the signal,
touch the CLEAR/OFF pad. Use hot pads
to remove the probe from the food. Do
not use tongs to pull on it-they might
damage it.
Consumer Support
Page 18
18
1
2
3 4 5
6
Instructions
Safety
Instructions
Operating
Instructions
Care
Installation
Troubleshooting
Consumer
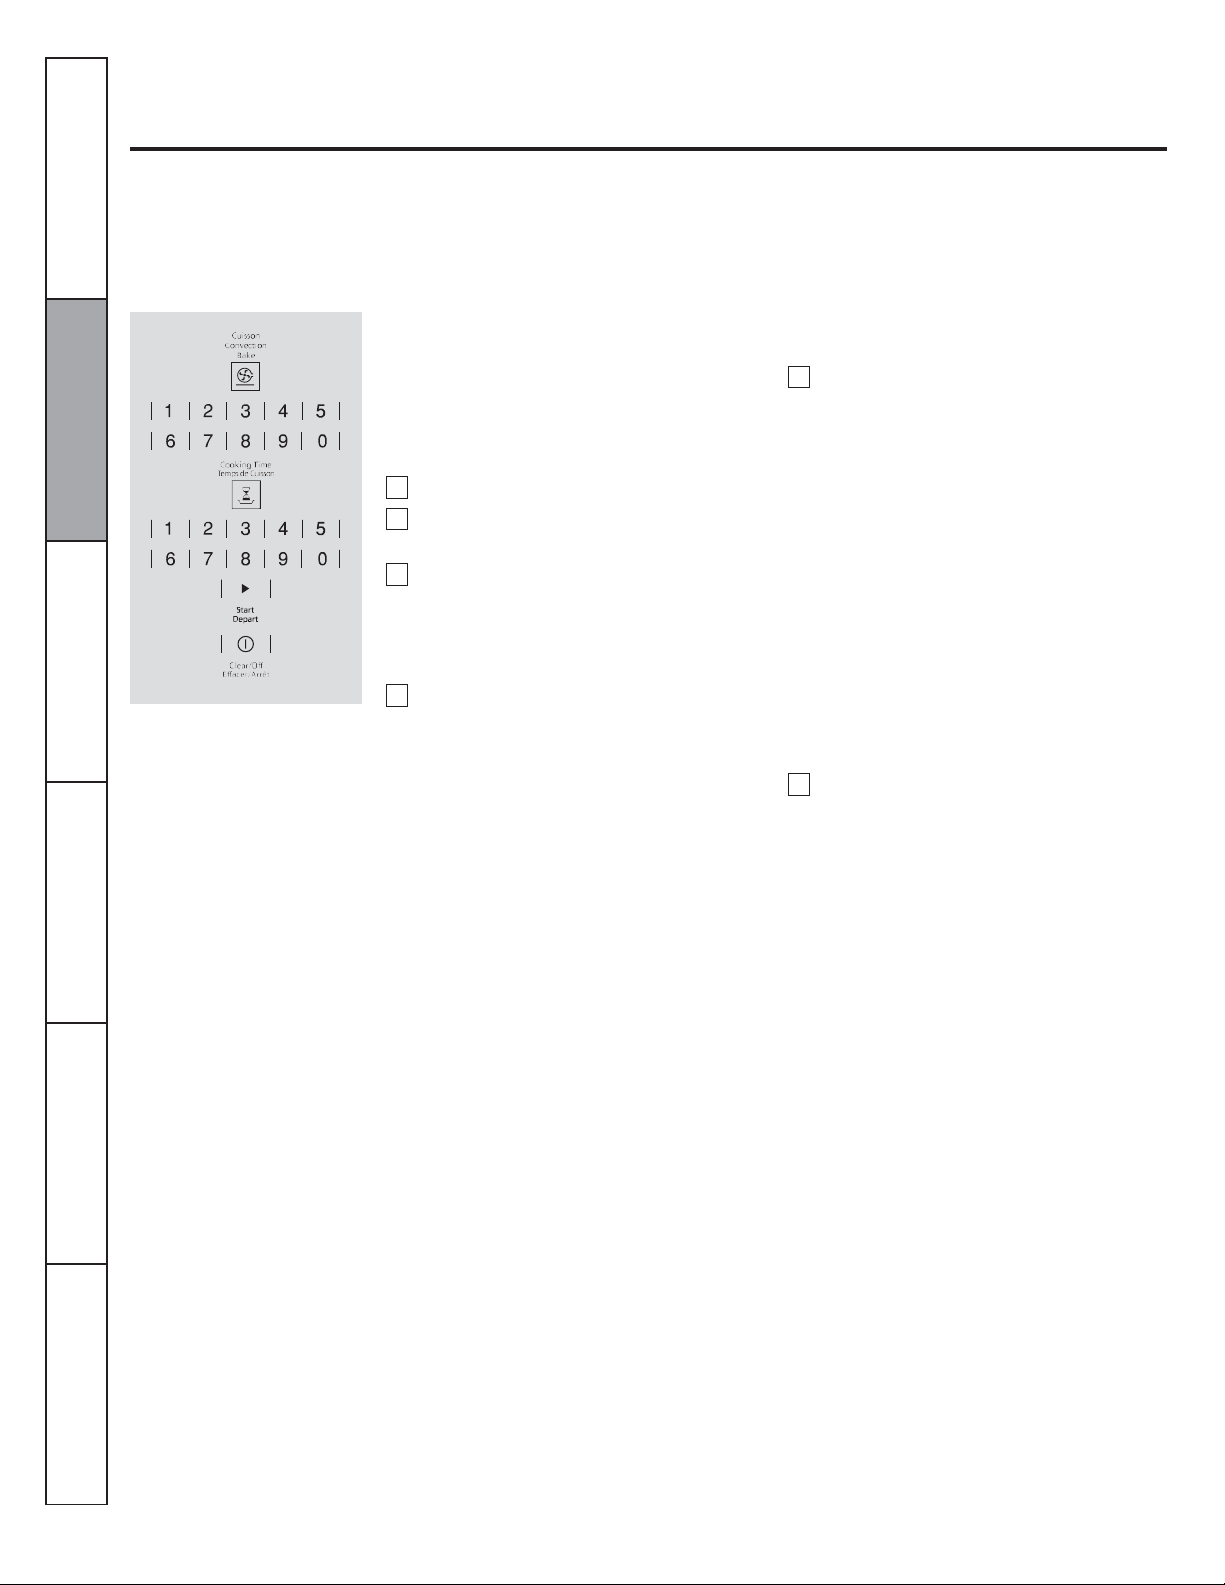
Using the oven timed convection baking features.
You will hear a fan while cooking with this feature. The fan will stop when the door is opened but the heat will not turn off.
NOTE: Foods that spoil easily-such as milk, eggs, fish, stuffing, poultry and pork-should not be allowed to sit for more than 1 hour
before or after cooking. Room temperature promotes the growth of harmful bacteria. Be sure that the oven light is off because heat from
the bulb will speed harmful bacteria growth.
and Cleaning
How to Set an Immediate Start and Automatic Stop
The oven will turn on immediately and cook
for a selected length of time. At the end of
the cooking time, the oven will turn off
automatically.
Touch the CONVECTION BAKE pad.
Touch the number pads to set the desired
oven temperature.
Touch the COOKING TIME pad.
NOTE: If your recipe requires preheating, you
may need to add additional time to the length of
the cooking time.
Touch the number pads to set the desired
length of cooking time. The minimum
cooking time you can set is 1 minute.
The oven temperature that you set and
the cooking time that you entered will be
in the display.
Touch the START pad.
The oven will turn ON, and the display will
show the cooking time countdown and the
changing temperature starting at 100°F. (The
temperature display will start to change once
the oven temperature reaches 100°F.) When
the oven reaches the temperature you set, 3
beeps will sound.
The oven will continue to cook for the set
amount of time, then turn off automatically,
unless the Cook and Hold feature was set.
See the Special features of your oven control
section.
After the oven turns off, the end-of-cycle
tone will sound.
Touch the CLEAR/OFF pad to clear
the display if necessary. Remove the
food from the oven. Remember, even
though the oven turns off automatically,
food left in the oven will continue
cooking after the oven turns off.
Tips
Support
Page 19
19
1 2 3
4
5
6
8
7
Instructions
Operating
Installation
Using the oven timed convection baking features.
Safety Instructions
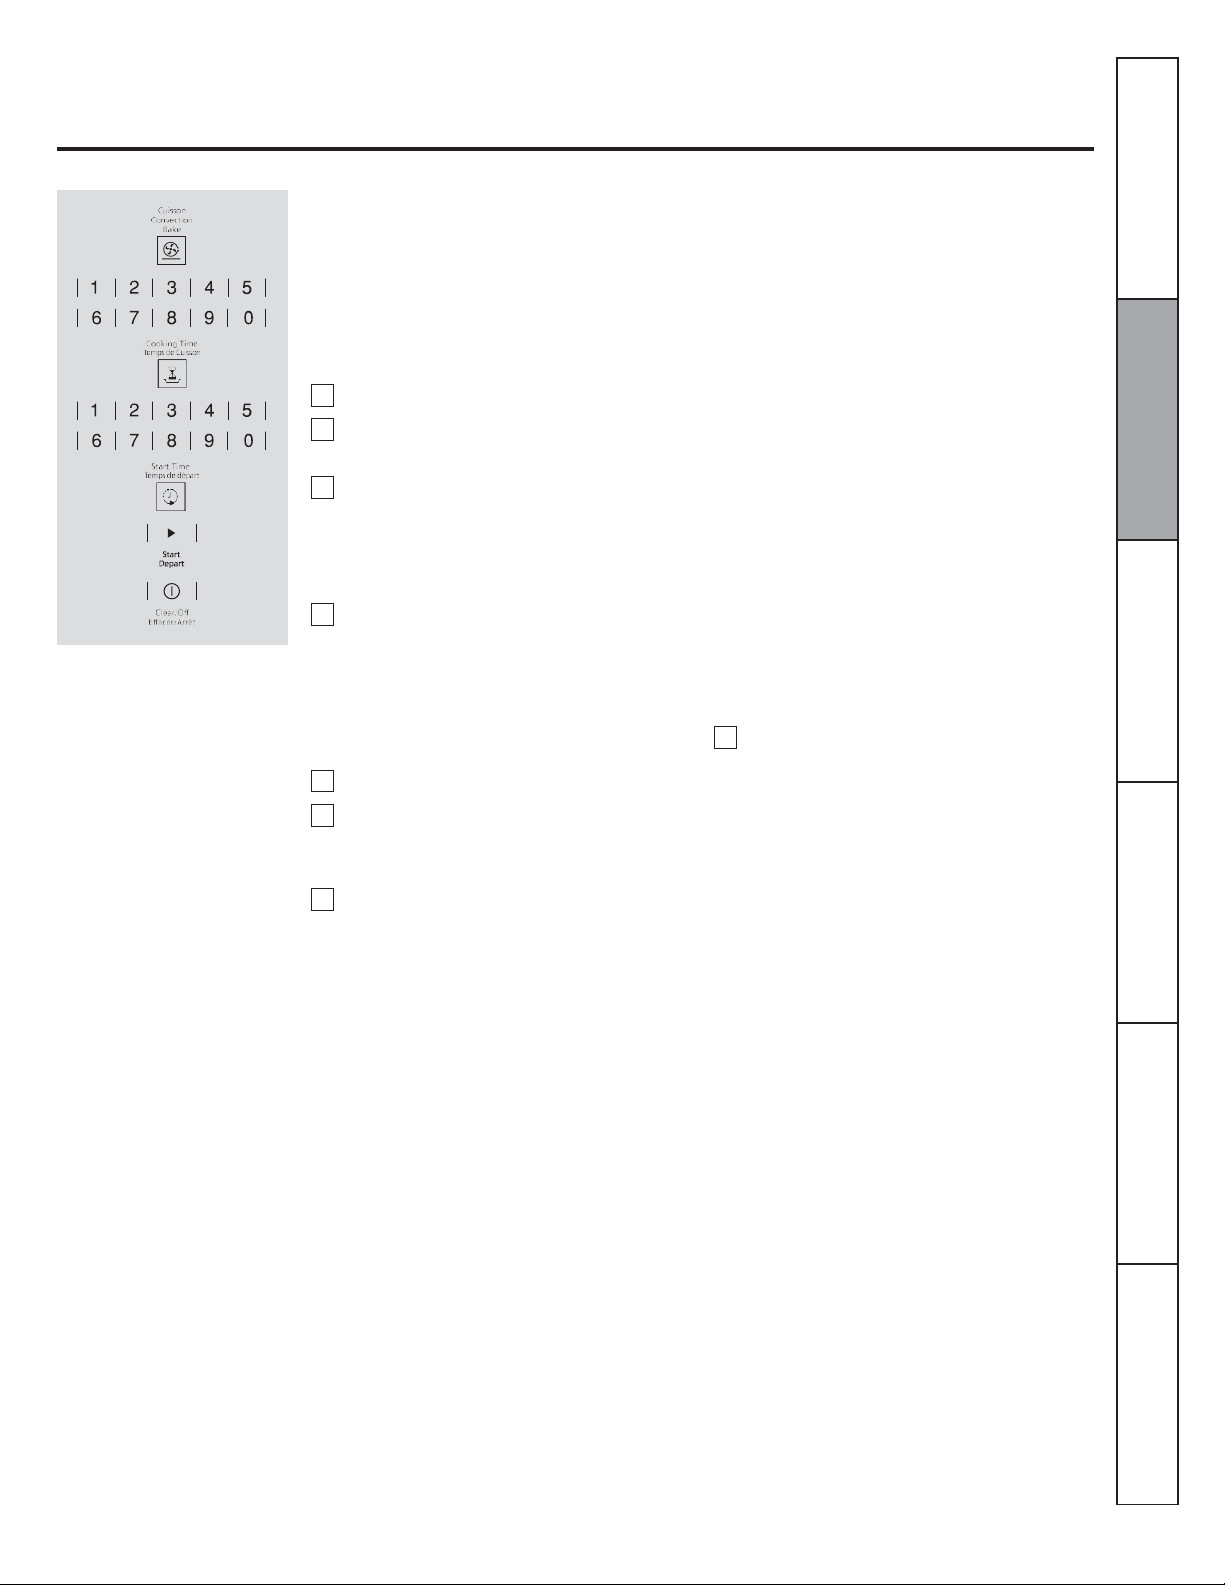
How to Set a Delayed Start and Automatic Stop
The oven will turn on at the time of day you
set, cook for a specific length of time and
then turn off automatically.
Make sure the clock shows the correct time
of day.
Touch the CONVECTION BAKE pad.
Touch the number pads to set the desired
oven temperature.
Touch the COOKING TIME pad.
NOTE: If your recipe requires preheating, you
may need to odd additional time to the length of
the cooking time.
Touch the number pads to set the desired
length of cooking time. The minimum
cooking time you can set is 1 minute.
The oven temperature that you set and
the cooking time that you entered will be
in the display.
Touch the START TIME pad.
Touch the number pads to set the time of
day you want the oven to turn on and
start cooking.
Touch the START pad.
NOTE: If you would like to check the times you
have set, touch the START TIME pad to check
the start time you have set or touch the
COOKING TIME pad to check the length of
cooking time you have set.
When the oven turns ON at the time of day you
set, the display will show the cooking time
countdown and the changing temperature starting
at 100°F. (The temperature display will start to
change once the oven temperature reaches
100 °F. When the oven reaches the temperature
you set, 3 beeps will sound.
The oven will continue to cook for the set amount
of time, then turn off automatically, unless the
Cook and Hold feature was set. See the Special
features of your oven control section.
After the oven turns off, the end-of-cycle tone will
sound.
Touch the CLEAR/OFF pad to clear
the display if necessary. Remove the
food from the oven. Remember, even
though the oven turns off automatically,
food left in the oven will continue
cooking after the oven turns off.
Instructions
Care and Cleaning
Troubleshooting Tips
Consumer Support
Page 20
1
2
3
4
5 6 1 2 3
4
Instructions
Safety
Instructions
Operating
Instructions
Care
Installation
Troubleshooting
Consumer
Adjust the oven thermostat - Do it yourself
You may find that your new oven cooks differently than the one it replaced. Use your new oven for a few weeks to become more familiar
with it. If you still think your new oven is too hot or too cold, you can adjust the thermostat yourself.
Do not use thermometers, such as those found in grocery stores, to check the temperature setting of your oven. These thermometers
may vary 6-11 degrees Celsius (20-40 degrees Fahrenheit).
NOTE: This adjustment will only affect baking and roasting temperatures; it will not affect broiling temperatures. The adjustment will be
retained in memory after a power failure.
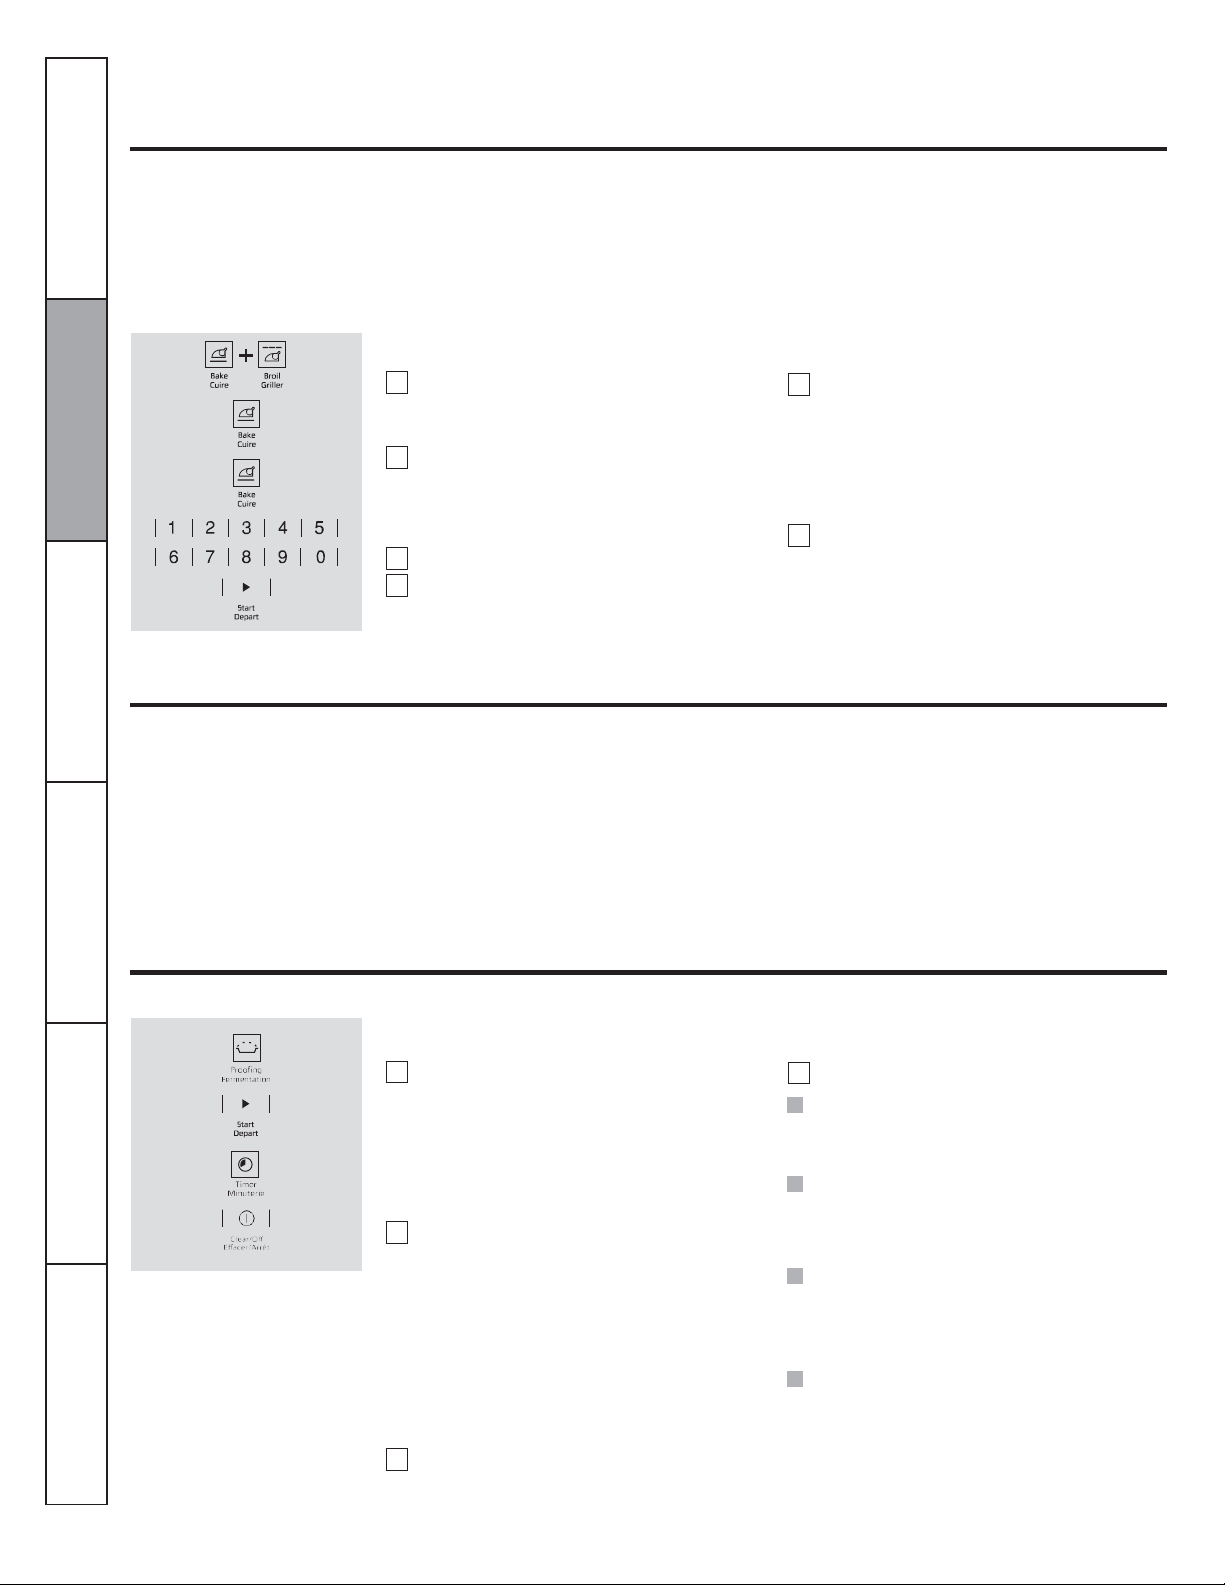
To Adjust the Thermostat
Touch the BAKE and BROIL pads at the
same time for 3 seconds until the display
shows SF.
Touch the BAKE pad.
Touch BAKE again to alternate between
increasing and decreasing the oven
temperature.
Press the number pads to set an user offset.
Press BAKE pad to switch between
positive or negative offset values.
The type of margarine will affect baking performance.
and Cleaning
Most recipes for baking have been developed using high fat products such as butter or margarine (80% fat). If you decrease the fat, the
recipe may not give the same results as with a higher fat product.
Recipe failure can result if cakes, pies, pastries, cookies or candies are made with low fat spreads. The lower the fat content of a spread
product, the more noticeable these differences become.
Federal standards require products labeled "margarine" to contain at least 80% fat by weight. Low fat spreads, on the other hand,
contain less fat and more water. The high moisture content of these spreads affects the texture and flavor of baked goods. For best
results with your old favorite recipes, use margarine, butter or stick spreads containing at least 70% vegetable oil.
The oven temperature can be adjusted up to
(+) 19 °C (35 °F) hotter or (-) 19 °C (35
°F) cooler. Touch the number pads the
same way you read them. For example, to
change the oven temperature 12 °C (15 °F),
touch 1 and 5.
When you have made the adjustment, touch
the START pad to go back to the time of
day display. Use your oven as you would
normally.
Using the proofing feature.
The proofing feature maintains a warm environment useful for rising yeast-leavened products.
How to Set the Oven For Proofing
Tips
NOTE:
Use as an optional feature the proofing
mode to defrost food placed in a baking
Support
dish. Periodically monitor the
unfreezing of food grade and remove
from oven as soon as it has thawed.
Defrost cycle is a slow process required
for optimal results.
20
Place the covered dough in a dish in the
oven on rack B or C.
NOTE: For best results, cover the dough with a
cloth or with greased plastic wrap (the plastic
may need to be anchored underneath the
container so the oven fan will not blow it off).
Touch the PROOF pad and then the
START pad.
The display will show PrF (proof).
The oven interior light turns on and
remains on during proofing.
The proofing feature automatically
provides the optimum temperature for the
proofing process, and therefore does not
have a temperature adjustment.
Set the TIMER for the minimum proof
time.
When proofing is finished, touch the OFF pad.
To avoid lowering the oven temperature and
lengthening proofing time, do not open the
oven door unnecessarily.
Check bread products early to avoid
over-proofing.
NOTE:
Do not use the proofing mode for warming
food or keeping food hot. The proofing oven
temperature is not hot enough to hold foods at
safe temperatures.
Proofing will not operate when oven is above
65 °C (150 °F). "HOT" will show in the display.
Page 21
21
1
2
3
4
5 6 7 8 9
10
Instructions
Operating
Installation
Using Steam Clean
During the steam clean cycle, the
oven bottom becomes hot
enough to cause burns. Wait
until the cycle is over (30 minutes) before wiping the inside
surfaces of the oven. Failure to do so may result in burns.
The Steam Clean cycle makes it easier to clean light soiling
off the porcelain oven interior.
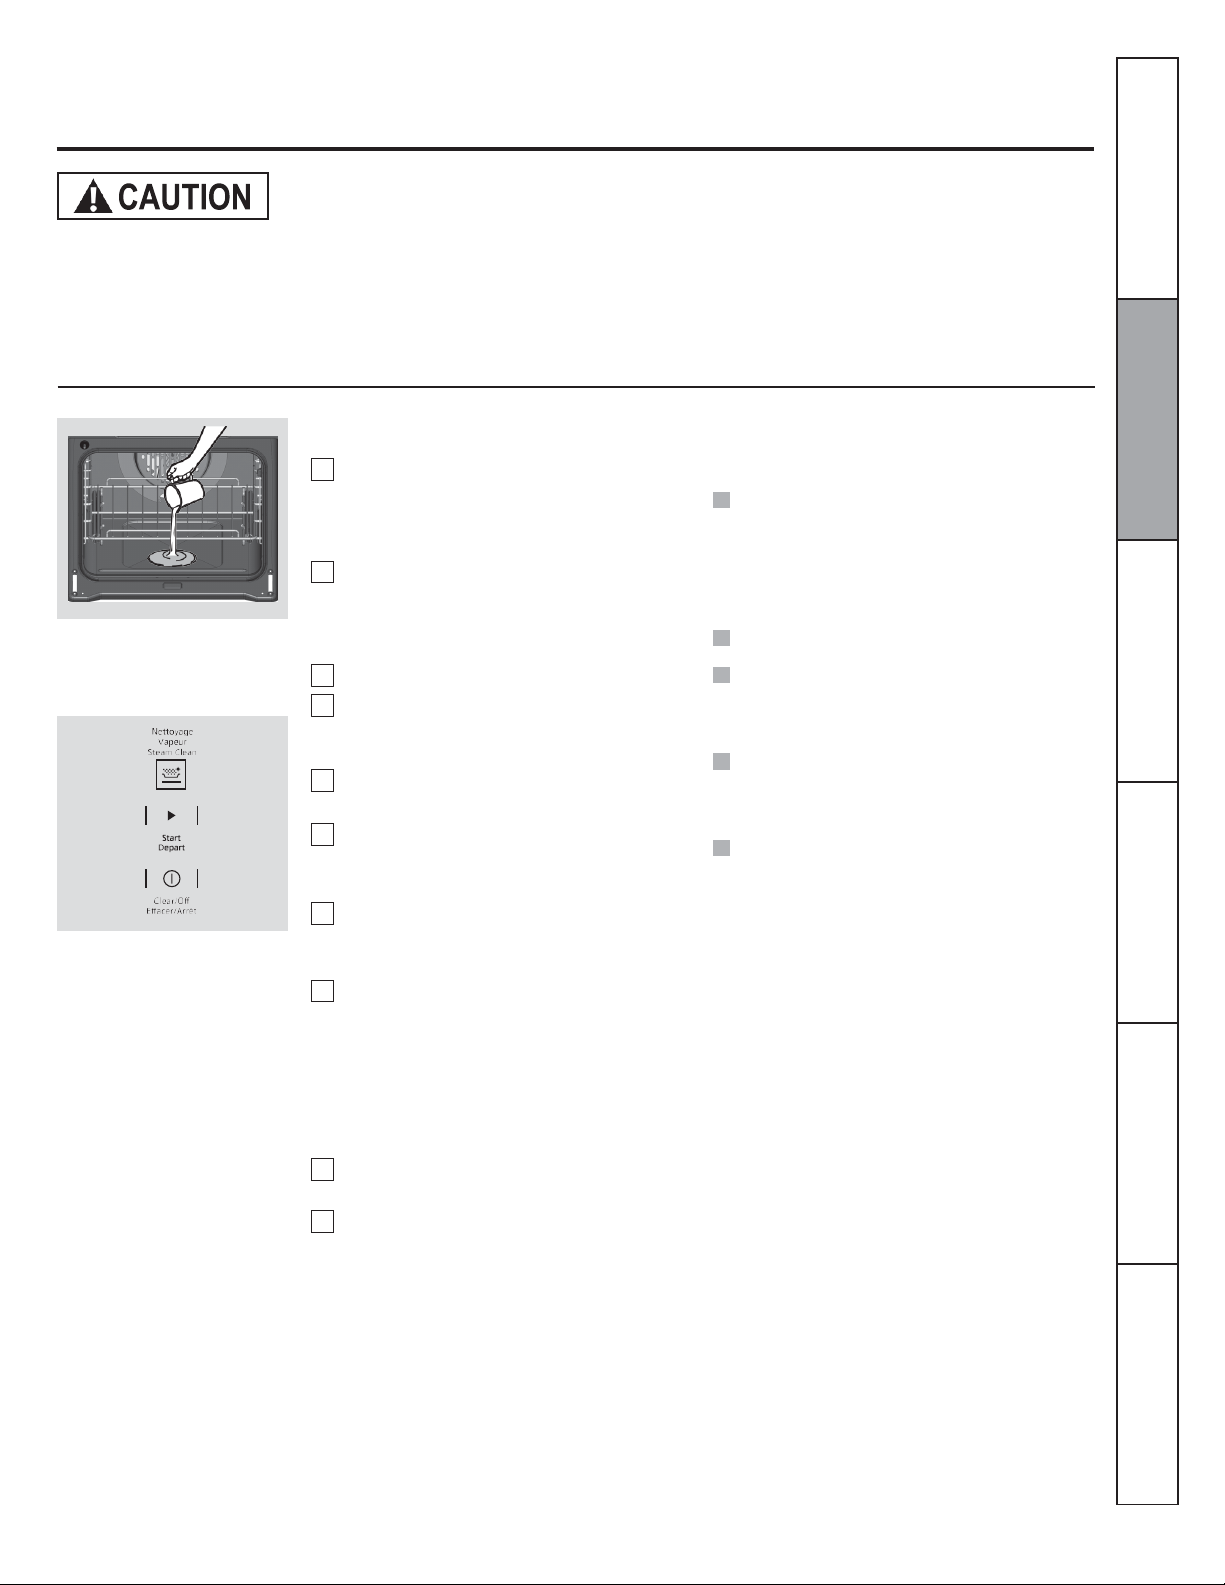
Pour 7 ounces of water onto the oven
floor.
To Begin Steam Clean Cycle:
Remove racks and accessories from the
oven cavity. Do not place cookware or
other items in the oven during the Steam
Clean cycle.
Pour 200 ml (7 oz.) room-temperature
water onto the recessed area of the oven
bottom. Do not add cleaning solutions or
chemicals of any kind to the water.
Close the door.
Activate the Steam Clean function by
pressing the STEAM CLEAN pad, then
press start.
A 30-minute cycle will begin to count
down on the display.
When the Steam Clean cycle is
complete, the oven control will beep.
Press OFF pad and open the door.
The oven bottom and remaining water
will still be warm at the end of the cycle.
This is normal.
Remove soils using a scrub brush or
nylon scouring pad. A soap-filled steel
wool pad may be used only on the
porcelain oven interior. The use of
abrasive pads will scratch the door glass.
Do not wipe soil or water onto the door
gasket.
Remove any remaining water with a dry cloth or sponge.
Leave the door open to air dry.
The wall oven should be at room temperature before
beginning the Steam Clean cycle. If the oven is too hot,
"hot" will appear on the display and the cycle will not
activate until the oven cools down.
The Steam Clean cycle performs best on new spills or soils.
Burned-on food is more difficult to remove.
IMPORTANT NOTES:
If a steam clean cycle is initiated without
water, press the off pad to end the cycle. Wait
for the wall oven to cool to room temperature
before pouring water into the recessed area
and initiating another steam cycle.
Press OFF pad at any time to end the cycle.
If mineral deposits remain in the oven bottom
after cleaning, use a cloth or sponge soaked
in vinegar to remove them.
Some water may drip from the bottom of the
oven door. If this happens, wipe it up at the
end of the cycle.
The door gasket may be wet when the Steam
Clean cycle finishes. This is normal. Do not
clean the gasket.
NOTE: Water will remain and will be still warm
(this is normal) this will need to be wiped up at
end of cycle.
NOTE: Minimal temperature 120 °F is allowed for
enable steam clean.
Safety Instructions
Instructions
Care and Cleaning
Troubleshooting Tips
Consumer Support
Page 22
22
1 2 3 1 2
3
Instructions
Safety
Instructions
Operating
Instructions
Care
Installation
Troubleshooting
Consumer
Care and cleaning of the oven.
Be sure electrical power is off before cleaning any part of the oven.
How to Remove Protective Shipping Film and Packaging Tape
Carefully grasp a corner of the protective
shipping film with your fingers and slowly
peel it from the appliance surface. Do not
use any sharp items to remove the film.
Remove all of the film before using the
appliance for the first time.
To assure no damage is done to the finish of
the product, the safest way to remove the
adhesive from packaging tape on new
appliances is an application of a household
liquid dishwashing detergent. Apply with a
soft cloth and allow to soak.
NOTE: The adhesive must be removed from all
parts. It cannot be removed if it is baked on.
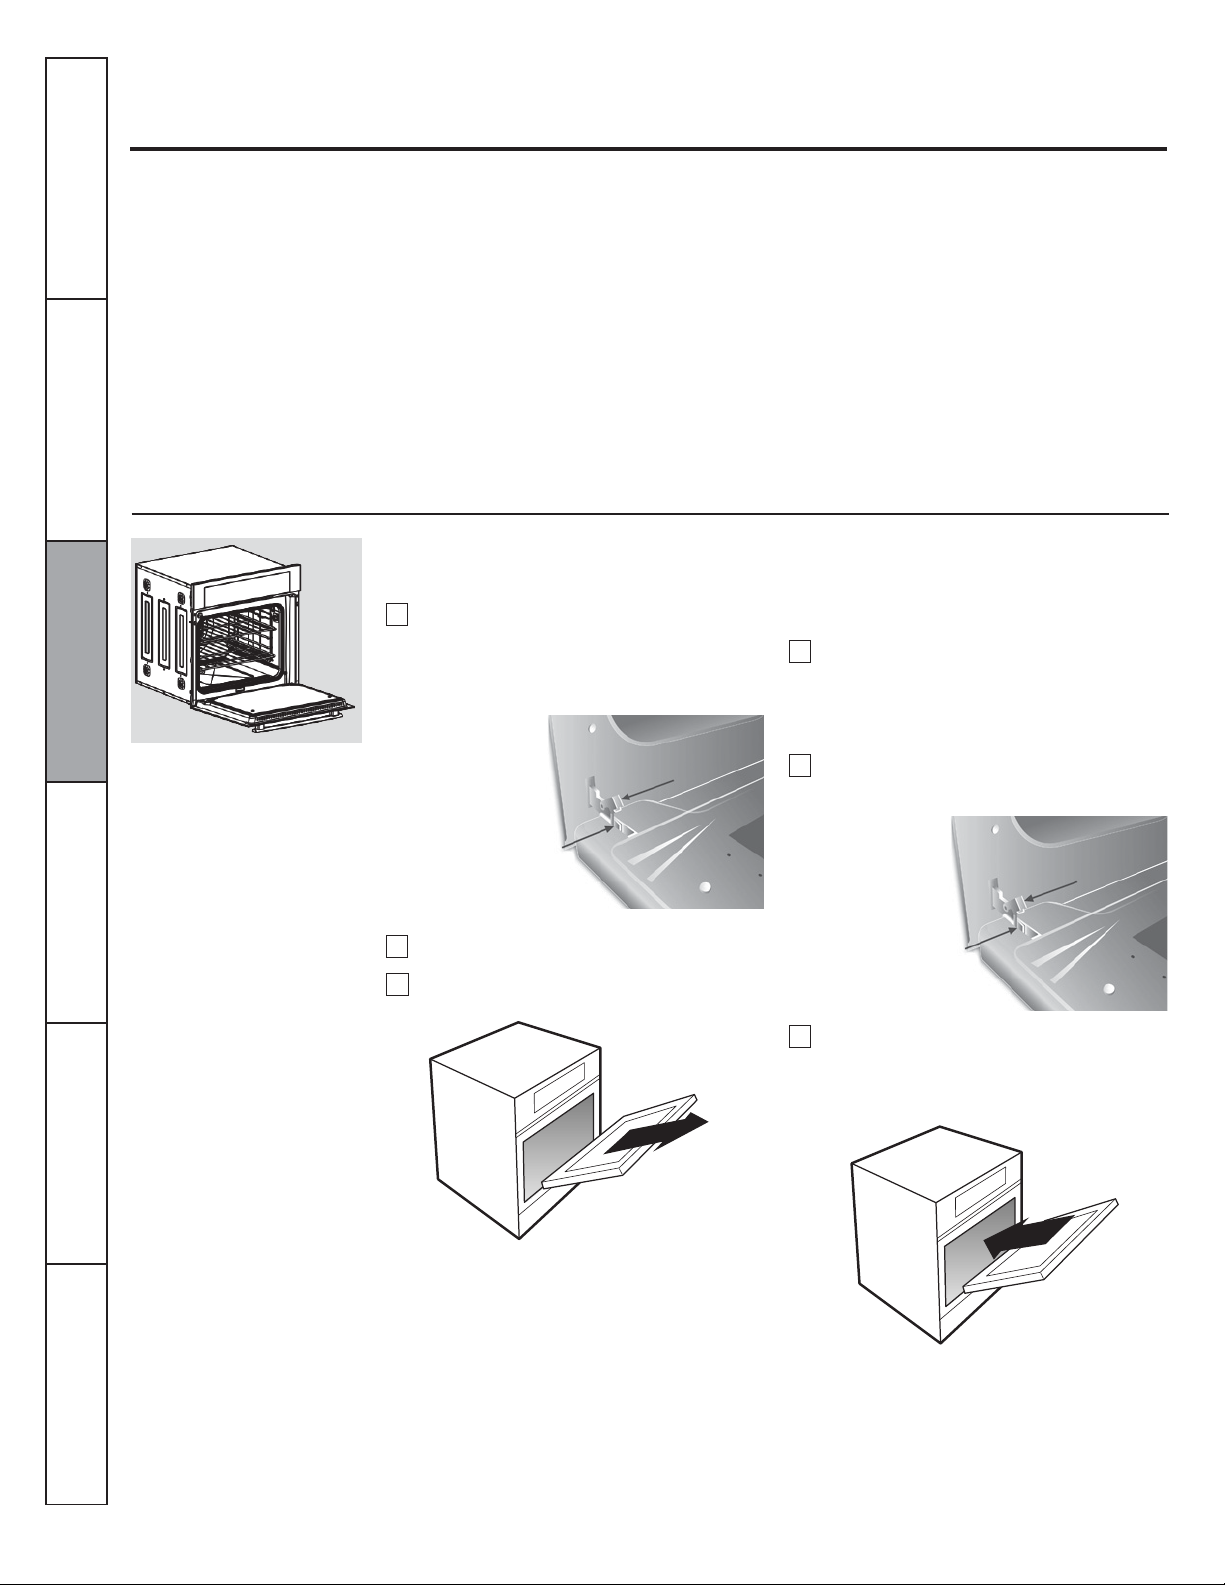
Lift-Off Oven Door
and Cleaning
Tips
The oven door is removable for easy access to oven cavity. Follow the instructions:
Full open the door and with the help of
this manual, locate the following parts:
• Hinge arm.
• Safe Bracket.
Safe
Hinge Arm
Mounting Oven Door
Place the door at an angle of
approximately 45° and insert the snap
hinge compartment located on front
frame.
Open the door fully and return safe
bracket in off position in both hinges.
Lift the safe bracket in each hinge.
Move the door about 45° and pull it out.
Completely close the door, until you hear
a slight click, this indicates that the door
has been mounted correctly.
Hinge Arm
Safe
Support
Page 23
23
1 2 1
2
Fig. 1
Fig. 2
Instructions
Operating
Installation
Oven Rack and Accessories.
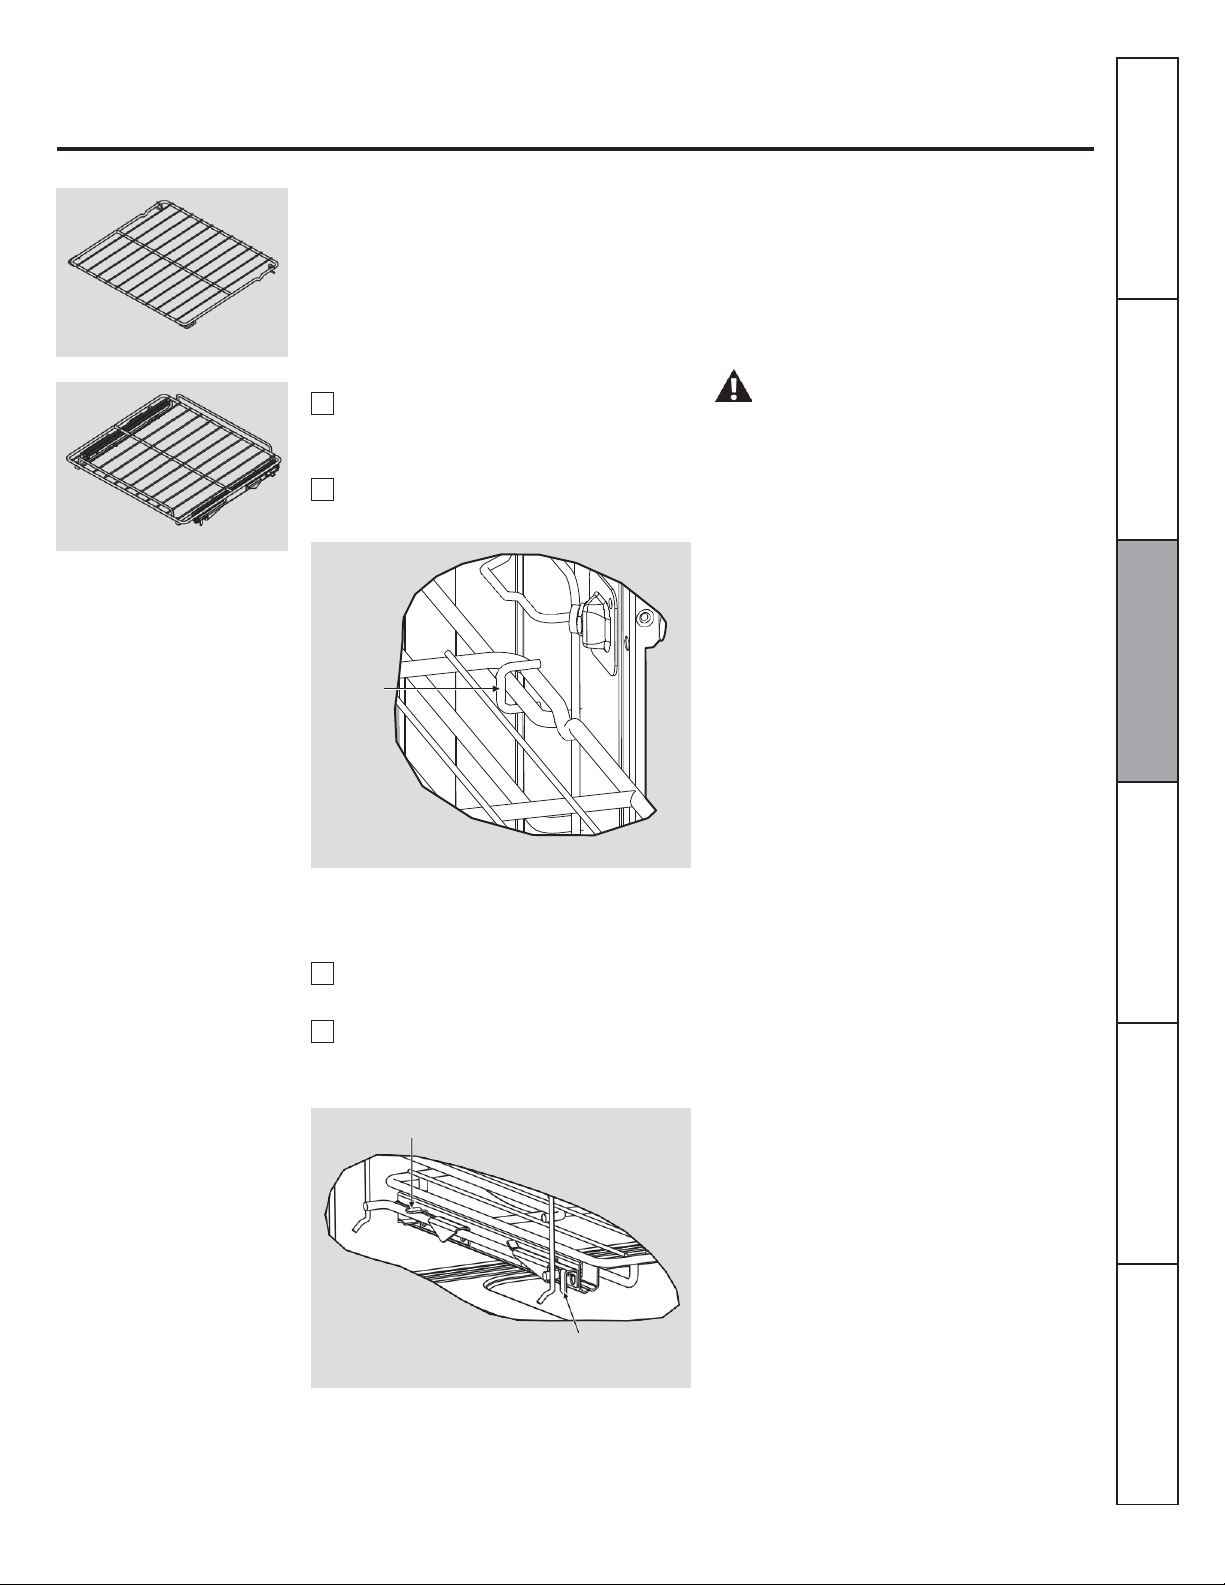
Removing and Installing Oven Racks
Oven Racks
The flat conventional rack (fig. 1) and the
full-extension rack (fig. 2) can be installed at
any level position into cavity.
Installing conventional rack
Insert guides "C" in sides support, these
guides are located in the rear of the flat
rack. See (fig. 3).
Pull flat rack into oven cavity.
Locate broiler pan
The wall oven has a broiler pan. Use this for
roast the food.
WARNING!
Always place the broiler pan on the oven rack.
Safety Instructions
Instructions
Care and Cleaning
Guide "C"
Fig. 3
Installing full extension racks
Insert guide of sliders on wires of oven
rack supports. (Fig. 4).
Slide the rack. Be sure the wire stop is in
the cut of the slides. The rails must be
fixed.
Slider Guides
Troubleshooting Tips
Consumer Support
Wire stop into cut of the slices
Fig. 4
Page 24
24
Instructions
Safety
Instructions
Operating
Instructions
Care
Installation
Troubleshooting
Consumer
Care and cleaning of the oven.
Be sure electrical power is off and all surfaces are cool before cleaning any part of the oven.
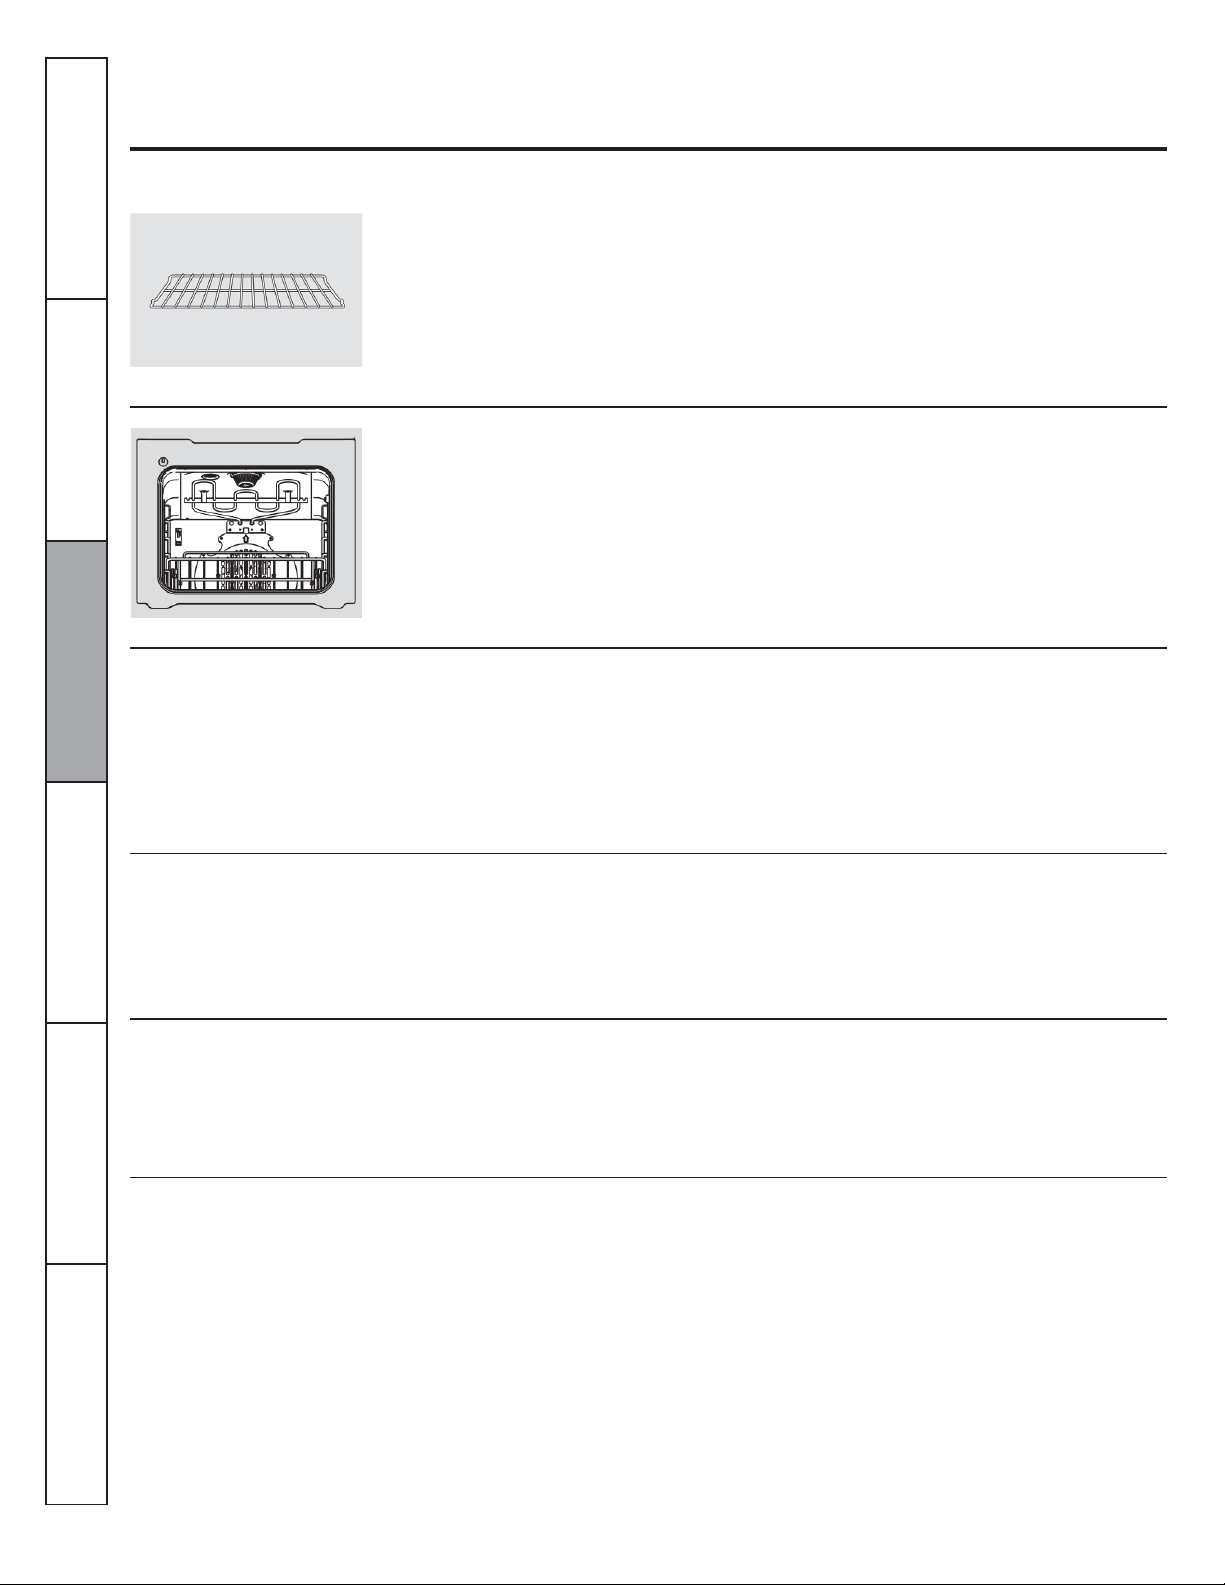
Oven Racks
Clean the oven racks with an abrasive
cleanser or steel wool. After cleaning, rinse
the racks with clean water and dry with a
clean cloth.
Oven Heating Elements
Do not clean the broil element. Any soil will burn
off when the elements are heated.
Control Panel
and Cleaning
Tips
It is a good idea to wipe the control panel
after each use. Clean with mild soap and
water or vinegar and water, rinse with clean
water and polish dry with a soft cloth.
Painted Surfaces
Clean with soap and water or a vinegar and
water solution.
Glass Surfaces
To clean the outside glass finish, use a glass
cleaner. Rinse and polish with a dry cloth.
To make the racks slide more easily; apply a
small amount of vegetable oil or cooking oil
to a paper towel and wipe the edges of the
oven racks with the paper towel.
Do not use abrasive cleansers, strong liquid
cleansers, plastic scouring pads or oven
cleansers on the control panel-they will
damage the finish. A 50/50 solution of
vinegar and hot water works well.
Do not use commercial oven cleaners
cleansing powders, steel wool or harsh
abrasives on any painted surface.
Do not allow the water or cleaner to run
down inside the oven door while cleaning.
Stainless Steel Surfaces
Do not use a steel wool pad, it will scratch the surface.
To clean the stainless steel surface, use
warm sudsy water or a stainless steel cleaner
or polish. Always wipe the surface in the
Support
direction of the grain. Follow the cleaner
instructions for cleaning the stainless steel
surface.
Page 25
25
Instructions
Operating
Installation
Non-Self-Clean Oven Interior
Safety Instructions
With proper care, the porcelain enamel
Finish on the inside of the oven top,
bottom, sides, back and inside of the
door will stay new looking for years.
Let the oven cool before cleaning. We
recommend that you wear rubber gloves
when cleaning the oven.
Soap and water will normally do the job.
Heavy spattering or spillovers may require
cleaning with a mild abrasive cleaner. Soapfilled scouring pads may also be used.
Do not allow food spills with a high sugar or acid
content (such as tomatoes, sauerkraut, fruit
juices or pie filling) to remain on the surface.
They may cause a dull spot even after cleaning.
Household ammonia may make the cleaning
job easier. Place 1/2 cup in a shallow glass
or pottery container in a cold oven
overnight.
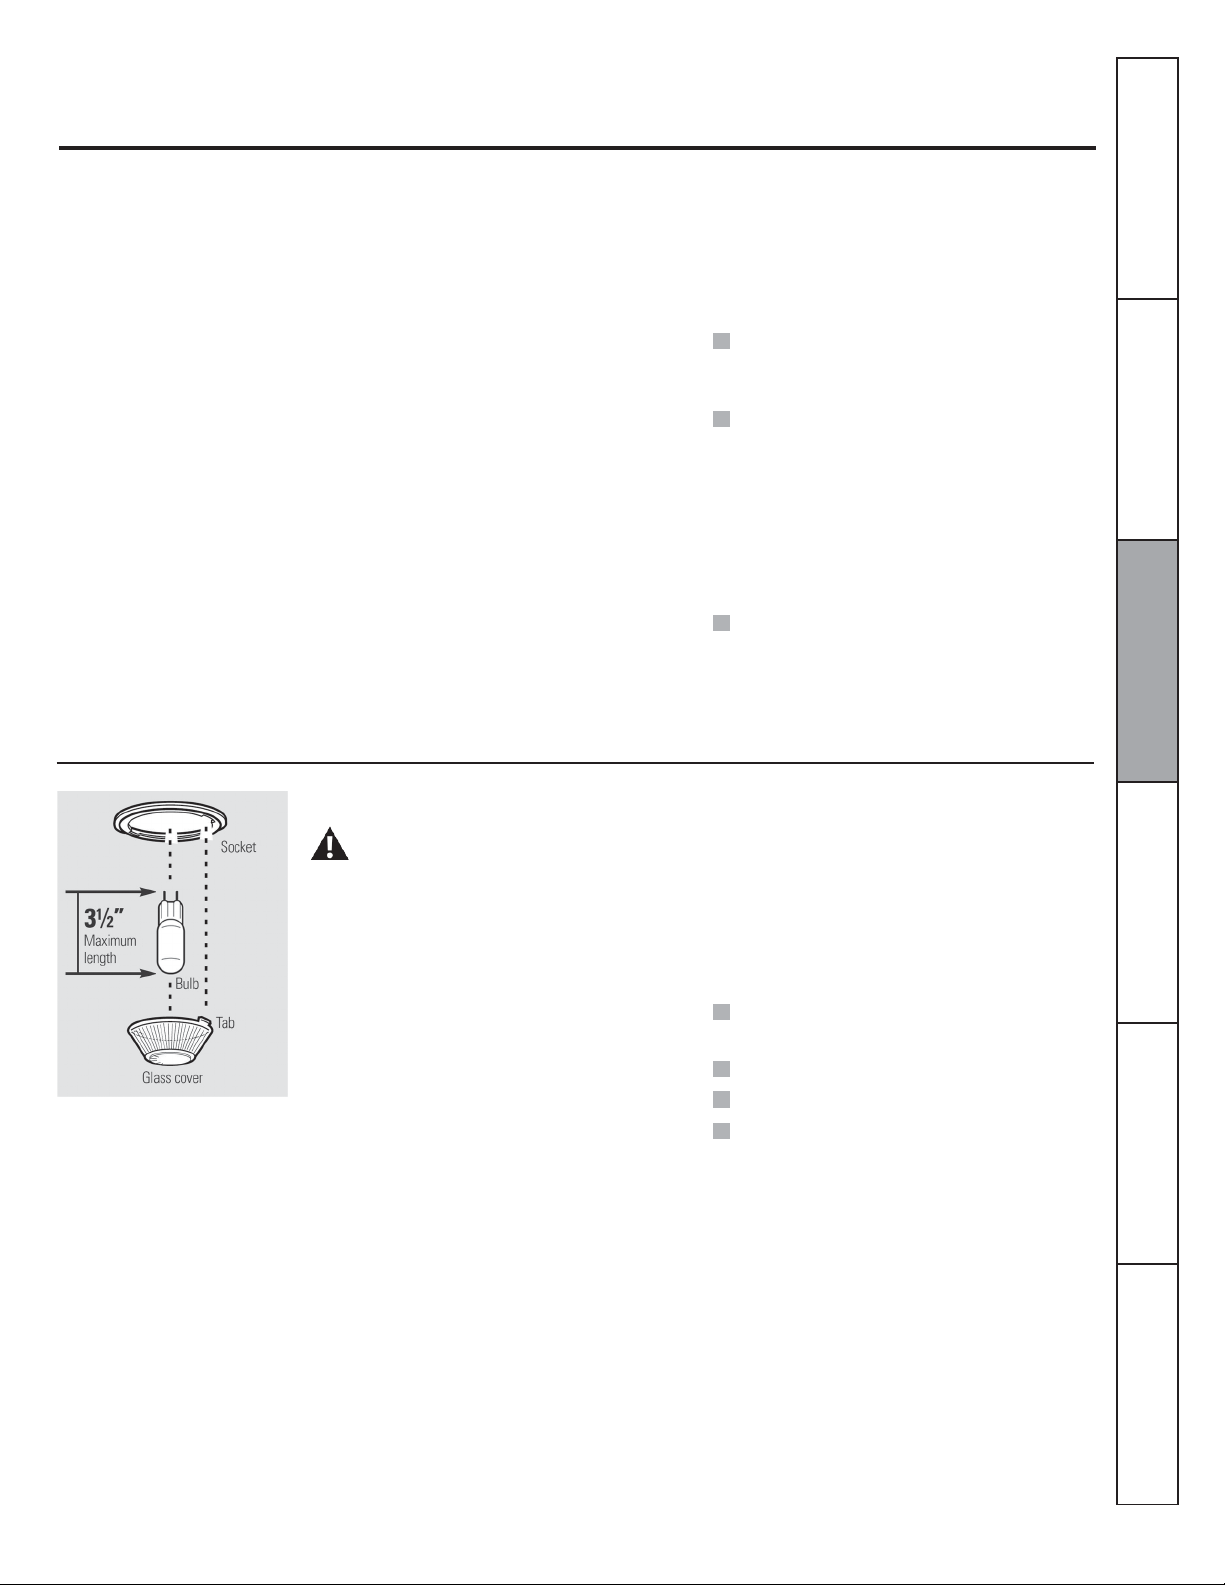
Oven Light Bulb
The ammonia fumes will help loosen the
burned-on grease and food.
If necessary, you may use an oven cleaner.
Follow the package directions.
Do not spray oven cleaner on the electrical
controls and switches because it could cause
a short circuit and result in sparking or fire.
Do not allow a film from the cleaner to build up
on the temperature sensor-it could cause the
oven to heat improperly. (The sensor is
located at the top of the oven.) Carefully wipe
the sensor clean after each oven cleaning,
being careful not to move the sensor as a
change in its position could affect how the
oven bakes.
Do not spray any oven cleaner on the oven
door, handles or any exterior surface of the
oven, cabinets or painted surfaces. The
cleaner can damage these surfaces.
Instructions
Care and Cleaning
CAUTION:
Before replacing your oven light bulb, disconnect
the electrical power to the oven at the main fuse
or circuit breaker panel.
Be sure to let the light cover and bulb cool
completely.
NOTE: The glass cover (on some models) should
be removed only when cold. Wearing latex gloves
may offer a better grip.
Before replacing the bulb, disconnect
electrical power to the oven at the main fuse
or circuit breaker panel. Let the bulb cool
completely before removing it. For your
safety, do not touch a hot bulb with a damp
cloth. If you do, the bulb will break.
To remove:
Turn the glass cover counterclockwise 1/4
turn until the tabs of the glass cover clear the
grooves of the socket. Remove the bulb.
To replace:
Put in a new 50-watt appliance bulb. Place
the tabs of the glass cover into the grooves
of the socket. Turn the glass cover clockwise
1/4 turn.
NOTE:
A 50-watt appliance bulb is smaller than a
standard 50-watt household bulb.
Install and tighten the cover clockwise.
Reconnect electrical power to the oven.
For improved lighting inside the oven, clean
the glass cover frequently using a wet cloth.
This should be done when the oven is
completely cool.
Troubleshooting Tips
Consumer Support
Page 26

26
Built-In Wall Oven
Instructions
Safety
Instructions
Operating
Instructions
Care
Installation
Troubleshooting
Consumer
Installation instructions.
Installation
24” (61 cm) model
Instructions
Before You Begin
Read these instructions carefully and
completely.
IMPORTANT— Save these instructions
•
for local inspector’s use.
•
IMPORTANT— Observe all governing
codes and ordinances.
and Cleaning
• Note to Installer—Be sure to leave these
instructions with the consumer.
• Note to Consumer—Keep these
instructions for future reference.
• Proper installation is the responsibility of the
installer and product failure due to improper
installation is NOT covered under warranty.
• NOTE—This appliance must be properly
grounded.
• ATTENTION INSTALLER
All electric wall ovens must be hard wired
(direct wired) into an approved junction box. A
plug and receptacle is NOT permitted on
these products.
Tips
Support
Page 27
27
KW Rating KW Rating
Instructions
Operating
Installation
Installation instructions.
Important safety instructions
Safety Instructions
For Your Safety
• Be sure your oven is installed properly by a
qualified installer or service technician. Never
install the wall oven in a horizontal cabinet.
• Be sure the oven is securely installed in a cabinet
that is firmly attached to the house structure.
Weight on the oven door could cause the oven to
tip and result in injury. Never allow anyone to
climb, sit, stand or hang on the oven door.
• Make sure the cabinets and wall coverings around
the oven can withstand the temperatures (up to
93°C [200°F]) generated by the oven.
WARNING: The electrical
power to the oven supply line must be
shut off while line connections are being
made. Failure to do so could result in
serious injury or death.
Electrical
Requirements
This appliance must be supplied with the proper
voltage and frequency, and connected to an
individual, properly grounded branch circuit,
protected by a circuit breaker or fuse. See the rating
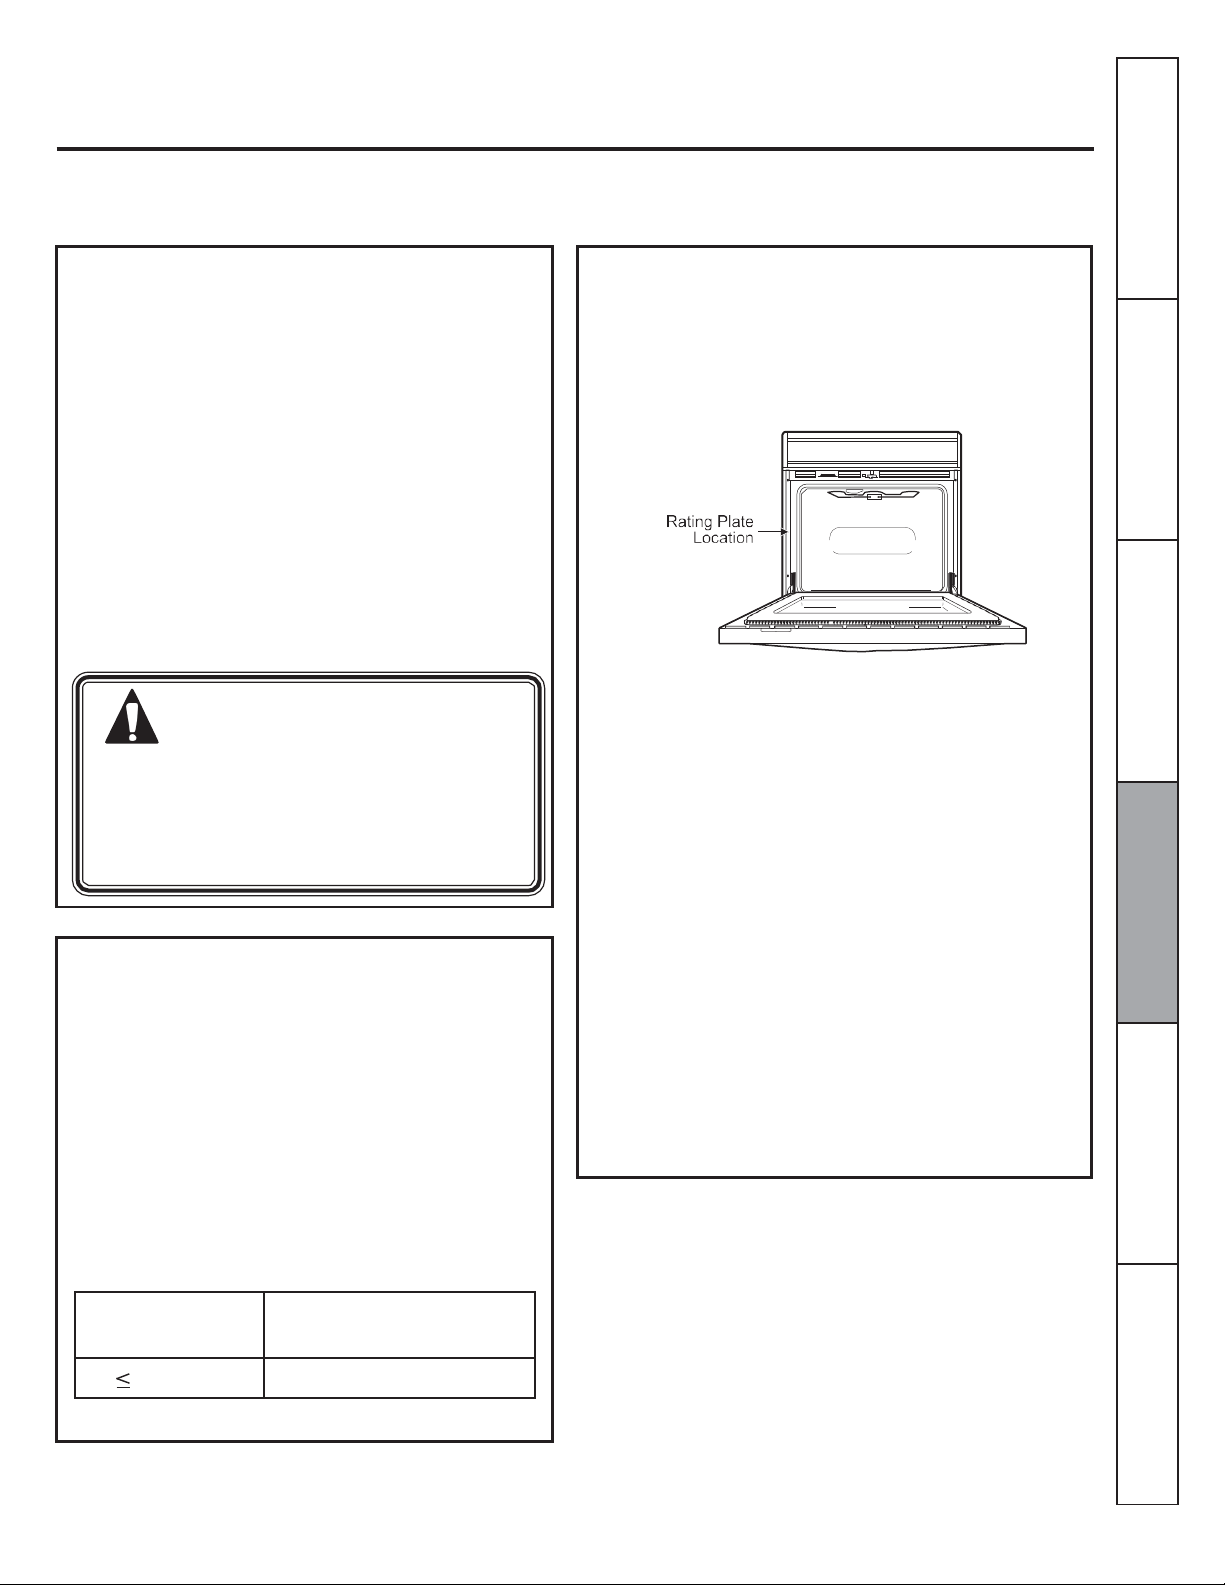
plate located on the oven frame to determine the
rating of the product. Use the chart below to
determine the minimum recommended dedicated
circuit protection.
kW Rating
120V
208V
1.8 kW 20 Amp
Recommended Circuit Size
Recommended
(Dedicated)
240V
Circuit Size
(Dedicated)
Electrical
(cont.)
Requirements
Rating Plate location.
We recommend you have the electrical wiring and
hookup of your oven connected by a qualified
electrician. After installation, have the electrician
show you where your main oven disconnect is
located.
Check with your local utilities for electrical codes
which apply in your area. Failure to wire your oven
according to governing codes could result in a
hazardous condition. If there are no local codes,
your oven must be wired and fused to meet the
requirements of CAN/CSA C22.2 No. O-M91 or
latest edition.
You must use a three-wire, single-phase A.C. 120
Volt, 60 hertz electrical system. If you connect to
aluminum wiring, properly installed connectors
approved for use with aluminum wiring must be
used.
Instructions
Care and Cleaning
Troubleshooting Tips
Consumer Support
Page 28
28
B C B B D
F J E I G
J F H
E
H
Instructions
Safety
Instructions
Operating
Instructions
Care
Installation
Troubleshooting
Consumer
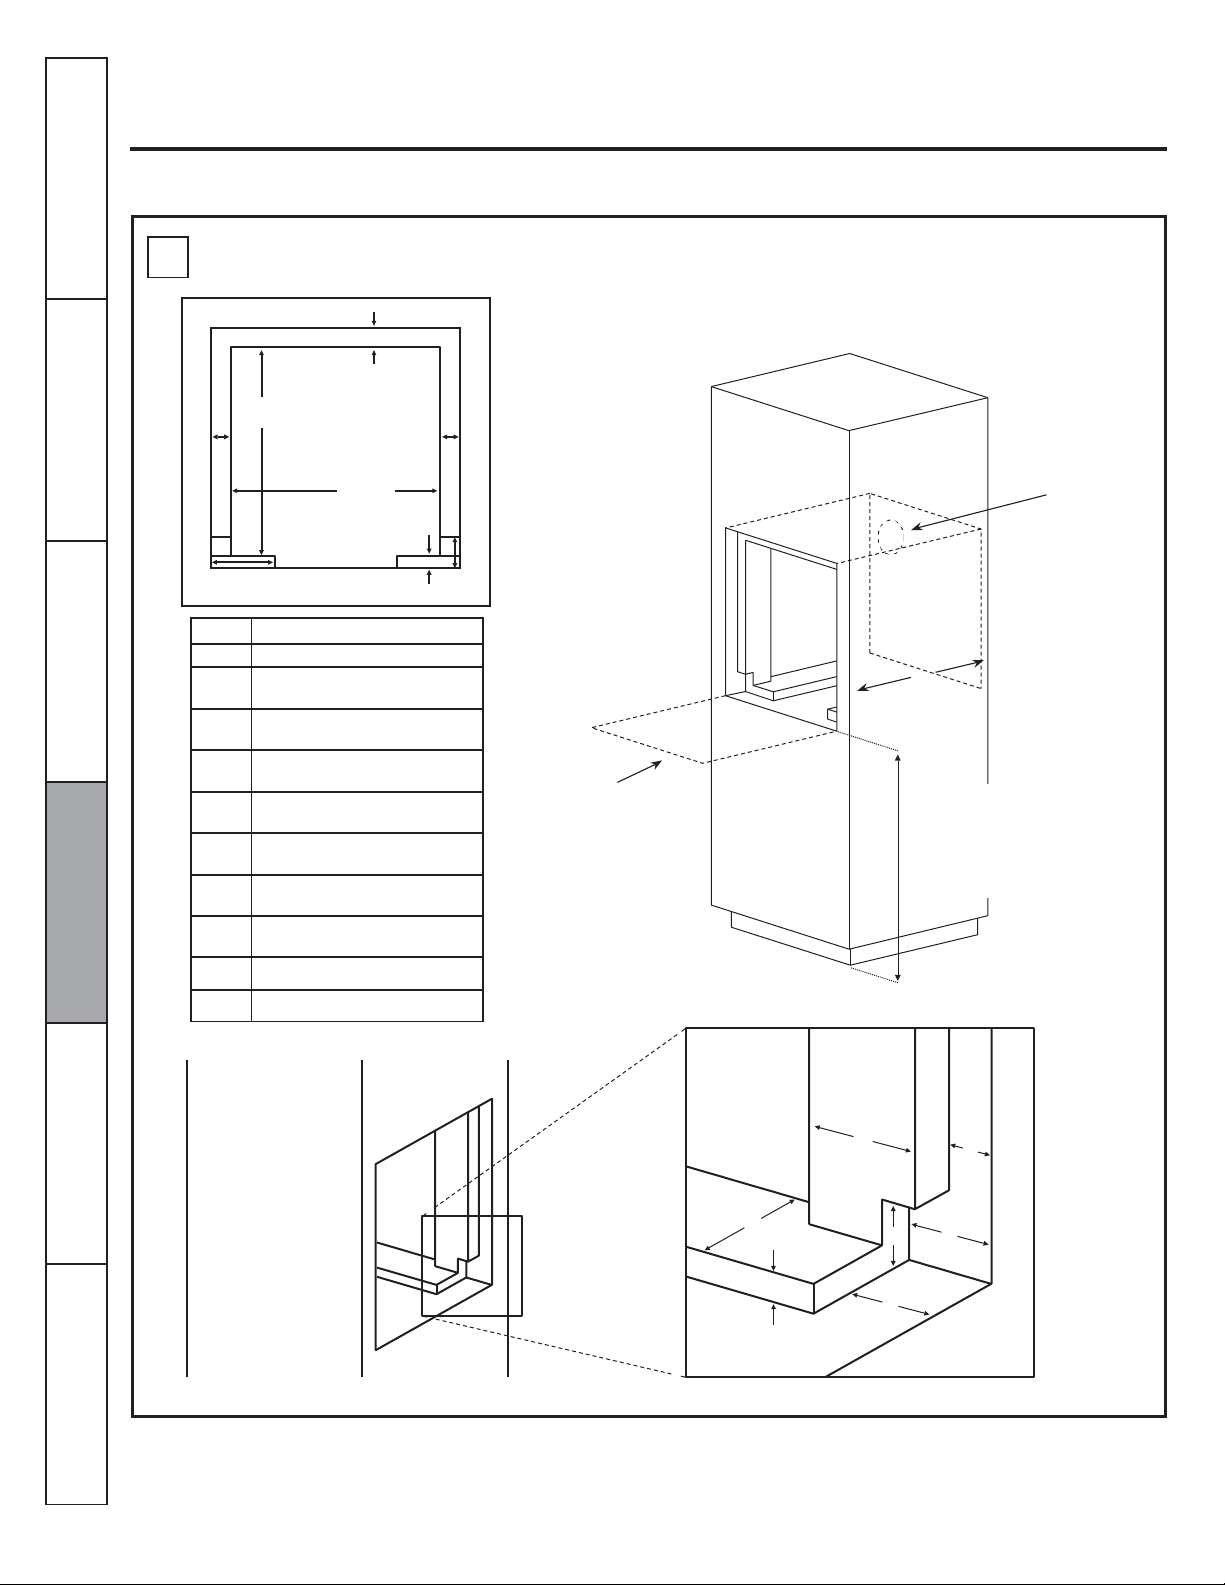
Dim.
A
25 in (63.5 cm) min.
3/4 in (1,8 cm) min.
13/16 in (2,0) max.
23 1/8 in (58,7 cm) min.
23 3/16 in (58,9) max.
22 1/8 in (56,1 cm) min.
22 3/16 in (56,4) max.
5/16 in (0,8 cm) min.
1 in (2,5 cm) min.
1 1/8 in (2,8 cm) max.
11/16 in (1,8 cm) min.
3/4 in (2,0 cm) max.
1 1/4 in (3.1 cm) min.
Installation instructions.
A Cutout for 24" (61 cm) Single Built-In Ovens only
The furniture must
support 50 kg (110 lb)
Junction box
recommended to
be in left side
adjacent cabinet.
and Cleaning
B
C
D
E
F
G
24” Single Electric Wall Oven
3/8 in (1,0 cm) max.
Allow a minimum of 50.8
cm (20 in) for clearance
to adjacent cabinets,
drawers, walls, etc.
When door is open.
A
Minimum
recommended
cutout location
from floor 91.4 cm
(36 in)
Tips
Support
H
1 3/8 in (3,5 cm) max.
2 in (5 cm) min.
I
5 1/2 (14 cm) min.
J
Page 29
Page 30
30
C
Instructions
Safety
Instructions
Operating
Instructions
Care
Installation
Troubleshooting
Consumer
Important safety instructions.
Securing the Oven in the Opening
Drilling the Pilot Holes and
Mounting the Oven
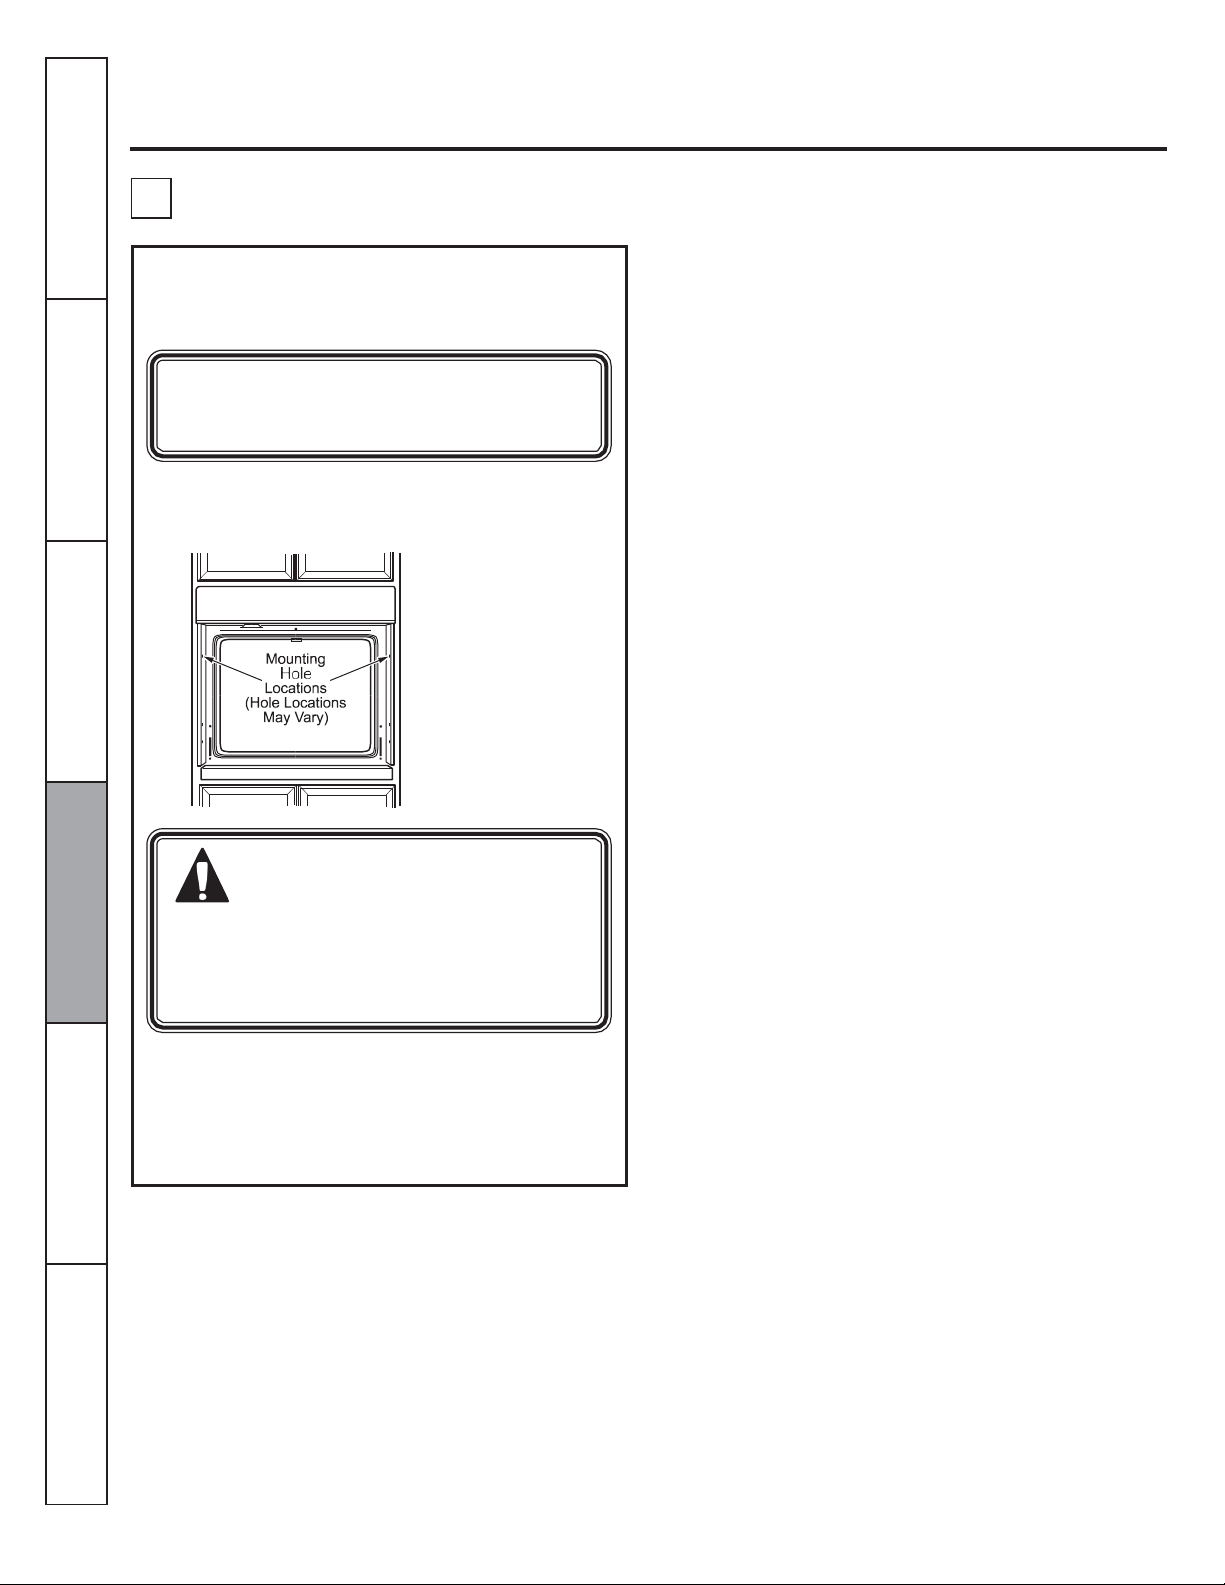
NOTE: Before drilling the pilot holes, make sure
the oven is pushed as far back into the opening as
it will go and is centered.
a. Drill through the mounting holes in front frame,
for the #8 screws provided.
The screws must be a
and Cleaning
minimum of 6 mm (1/
4") from the front of
the cutout.
WARNING: Mounting screws
Tips
Support
must be used. Failure to do so could
result in the oven falling out of the
cabinet, causing serious injury.
b. Secure the oven to cabinet with screws provided.
NOTE: If the cabinet is particle board, you must
use #8 x 19 mm (3/4”) particle board screws. These
may be purchased at any hardware store.
Page 31
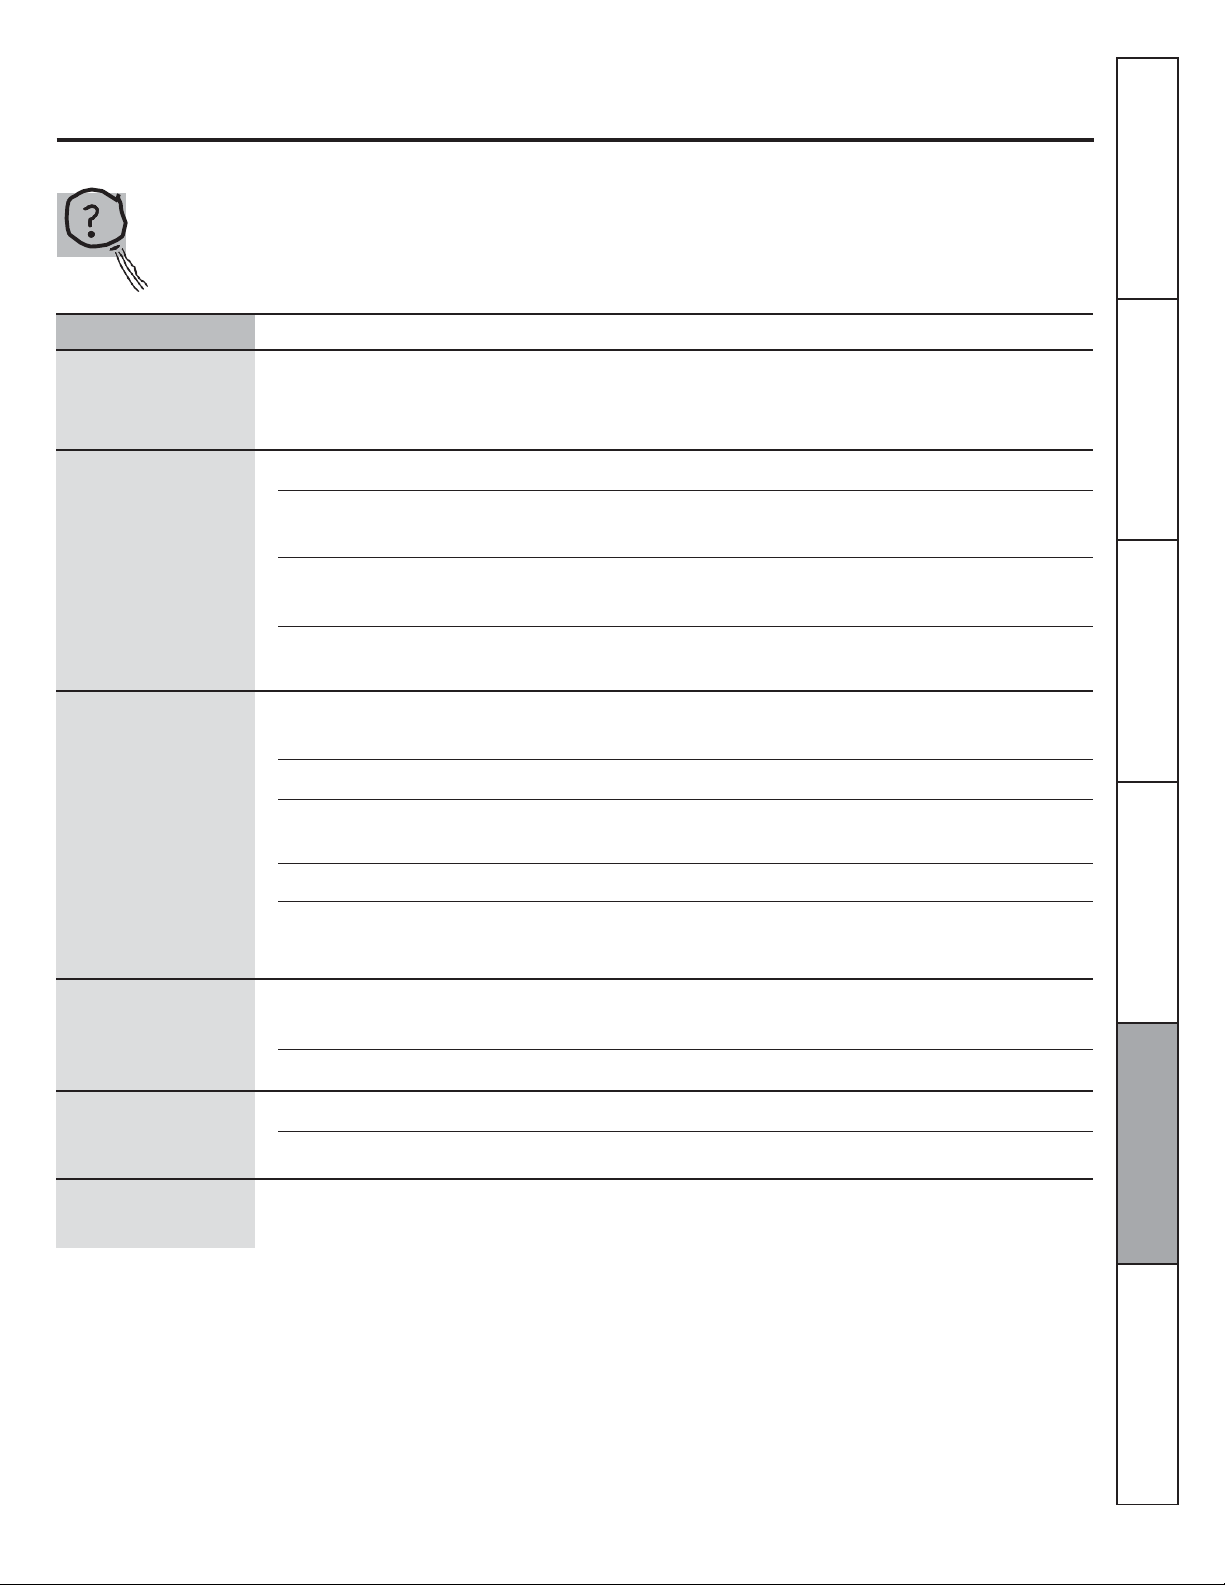
31
Problem
Possible Causes
What To Do
Control signals after
Cookware not suited for broiling.
Instructions
Operating
Installation
Before you call for service...
Troubleshooting Tips
Save time and money! Review the charts on the following
pages first and you may not need to call for service.
You forgot to enter a bake
entering cooking time
or delay start.
temperature or cleaning time.
Safety Instructions
Instructions
• Touch the BAKE pad and desired temperature.
Food does not bake or
roast properly.
Food does not broil
properly
Clock and timer do
not work.
Oven controls improperly set. • See the Using the oven section.
Rack position is incorrect or the
rack is not level.
Incorrect cookware or cookware of
improper size being used.
Oven thermostat needs adjustment. • See the Adjust the oven thermostat—Do it yourself!
Door not open to the broil stop
position as recommended.
Oven controls improperly set. • Make sure you touch the BROIL pad.
Food being cooked in a hot pan.
In some areas the power (voltage)
may be low.
A fuse in your home may be blown
or the circuit breaker tripped.
• See the Using the oven section.
• See the Using the oven section.
section.
• See the Using the oven section.
• For best results, use a pan designed for broiling.
Make sure it is cool.
• For best results, use a pan designed for broiling.
• Preheat the broil element for 10 minutes.
• Replace the fuse or reset the circuit breaker.
Care and Cleaning
Troubleshooting Tips
Oven controls improperly set. • Set the Using the clock and timer section.
Oven light does not
work.
"Burning or oily" odor
emitting from the vent
Lightbulb is loose or defective. • Tighten or replace the bulb.
Pad operating light is broken. • Call for service.
This is normal in a new oven and will • To speed the process, set bake mode for a minimum
disappear in time. of 3 hours.
Consumer Support
Page 32

32
Instructions
Safety
Instructions
Operating
Instructions
Care
Installation
Troubleshooting
Consumer
Problem
Possible causes
What To Do
A fuse in your home may be blown
or
Oven
cool.
Oven temperature too
hot or too cold
Oven will not work
"Cracking" or
"popping" sound
Excessive smoking
during clean cycle
and Cleaning
Oven door will not
open after a clean
cycle
LOCKED light is on
when you want to
cook
Oven thermostat needs adjustment. • See the Adjust the oven thermostat section—Do it
yourself.
• Replace the fuse or reset the circuit breaker.
the circuit breaker tripped.
controls improperly set. • See the Using the oven section.
This is the sound of the metal
heating and cooling during both,
the cooking and cleaning functions.
Excessive soil.
Oven too hot. • Allow the oven to cool below locking temperature.
The oven door is locked because the
temperature inside the oven has not
dropped below the locking
temperature.
• This is normal.
• Touch the CLEAR/OFF pad. Open the windows to
rid the room of smoke. Wait until the LOCKED light
goes off. Wipe up the excess soil and reset the clean
cycle.
• Touch the CLEAR/OFF pad. Allow the oven to
Tips
Support
Page 33
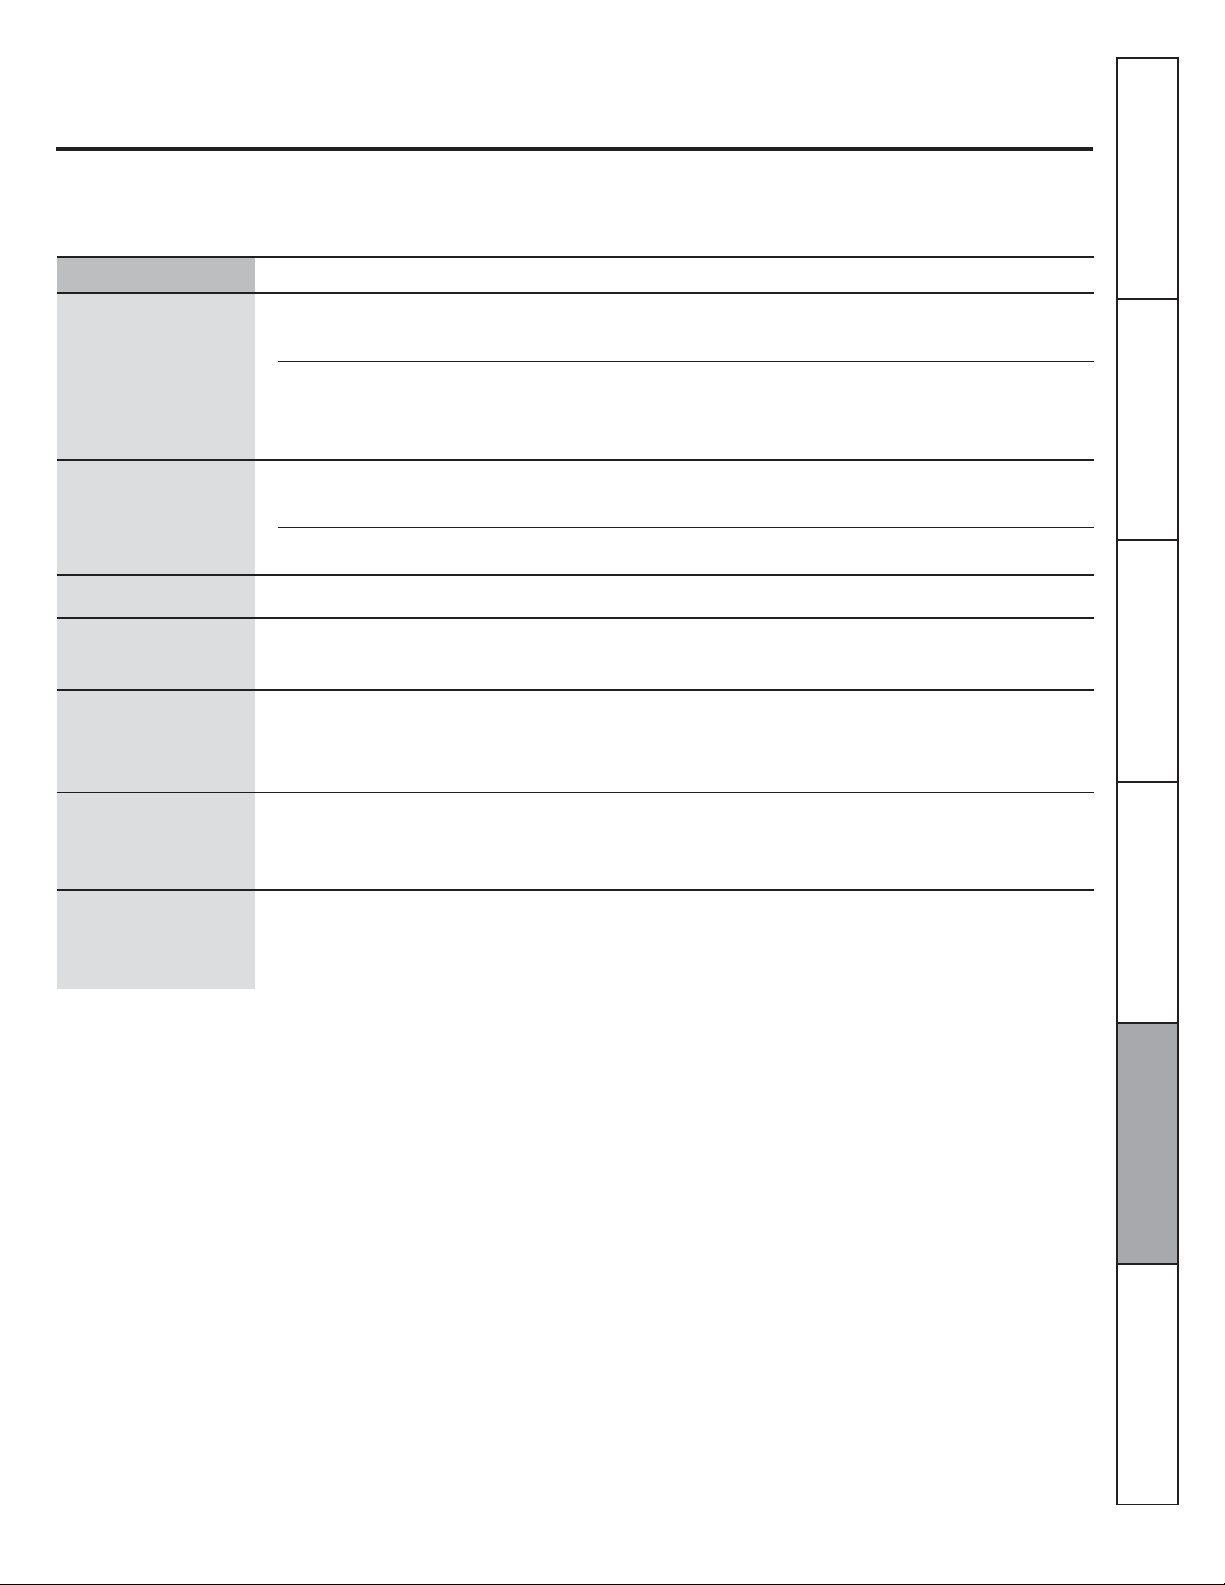
33
Instructions
Operating
Installation
Problem
Possible Causes
What To Do
Safety Instructions
"F- and a number or
letter" flash in the
display
Display goes blank
Display flashes Power failure. • Reset the clock.
Unable to get the
display to show "SF"
Power outage, clock
flashes
Strong odor
You have a function error code.
If the function code repeats. • Disconnect all power to the oven for at least 30
A fuse in your home may be blown
or the circuit breaker tripped.
The clock is in the black-out mode. • See the Special features of your oven control section.
Oven control pads were not pressed
properly.
Power outage or surge. • Reset the clock. If the oven was in use, you must
An odor from the insulation around
the inside of the oven is normal for
the first few times the oven is used.
• Touch the CLEAR/OFF pad. Allow the oven to cool
for one hour. Put the oven back into operation.
seconds and then reconnect power. If the function
error code repeats, call for service.
• Replace the fuse or reset the circuit breaker.
• The BAKE and BROIL pads must be touched at the
same time and held for 3 seconds.
reset it by touching the CLEAR/OFF pad, setting the
clock and resetting any cooking function.
• This is temporary.
Instructions
Care and Cleaning
Fan noise
A cooling fan may automatically
turn on.
• This is normal. The cooling fan will turn on to cool
internal parts. It may run for up to 30 minutes after
the oven is turned off.
Troubleshooting Tips
Consumer Support
Page 34
34
Instructions
Safety
Instructions
Operating
Instructions
Care
Installation
Troubleshooting
Consumer
Accessories
Looking for something more?
To inquire about purchasing a part or an accesory for your appliance, contact the authorized service
center.
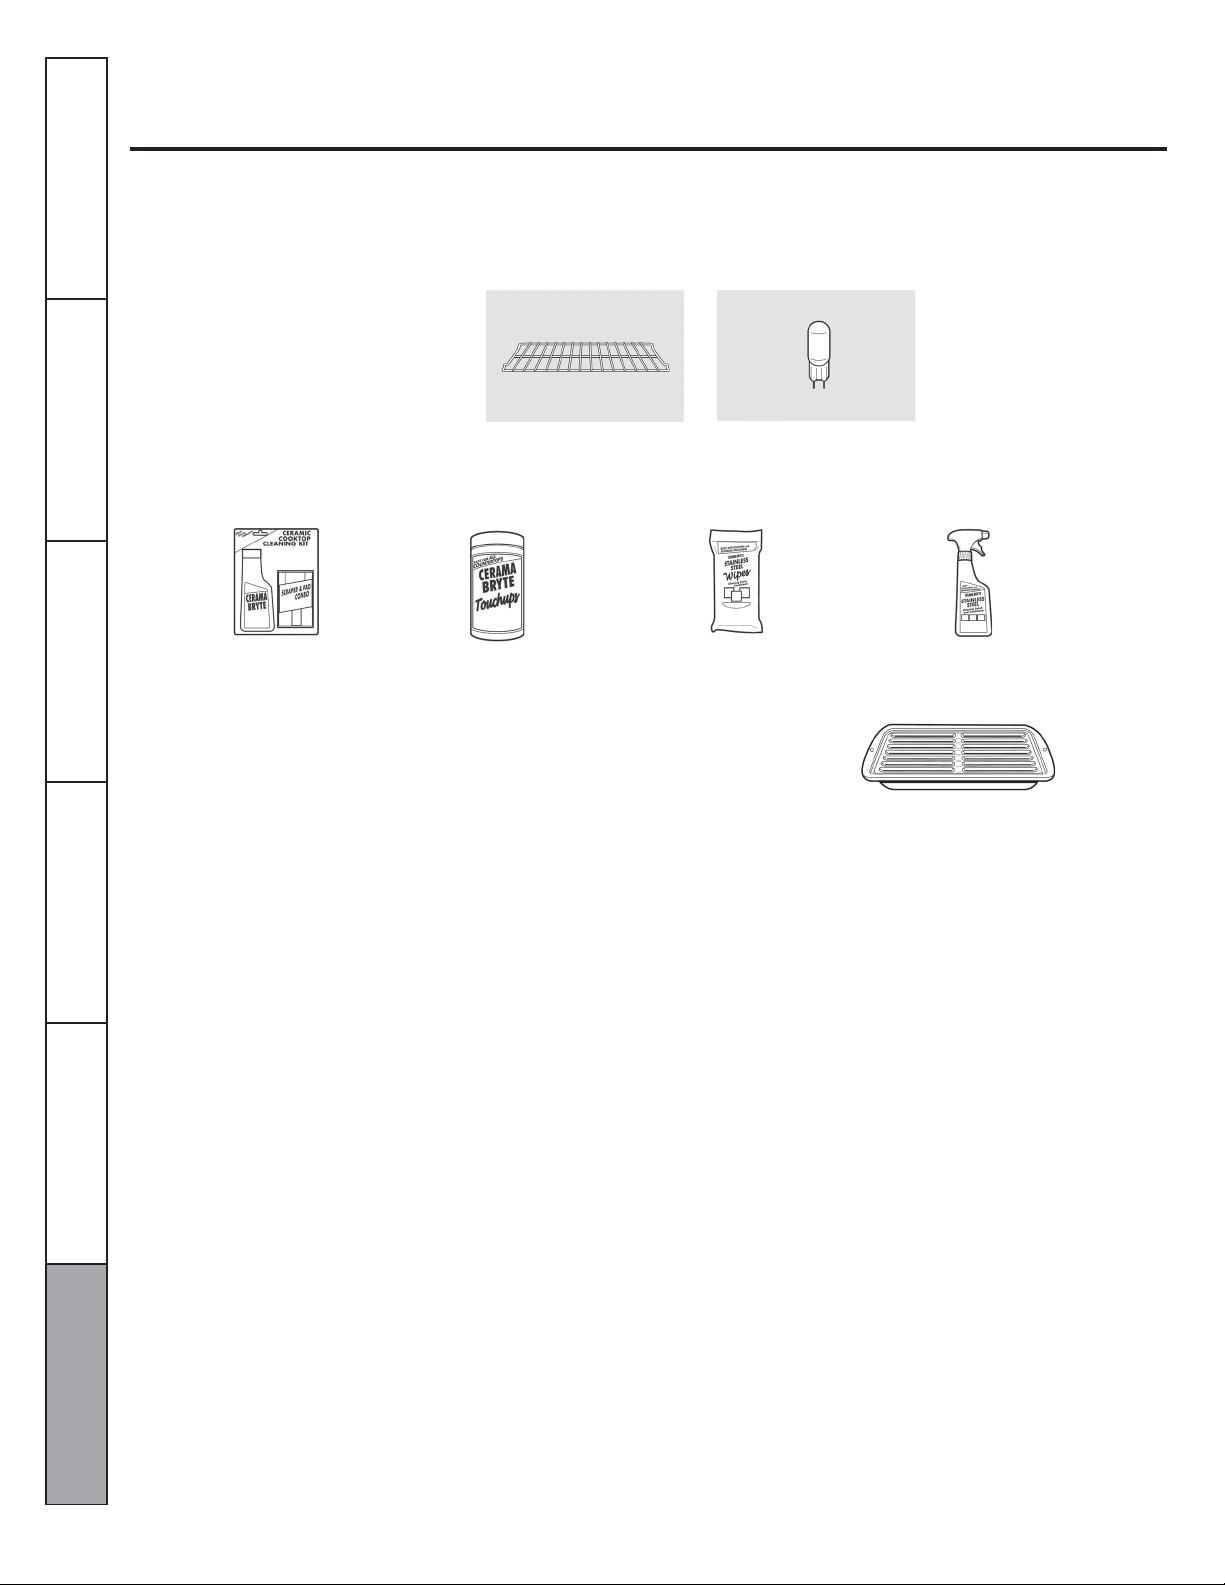
Oven racks Light Bulbs
and Cleaning
Experience these other great products to keep your kitchen looking great!
Ceramic Cooktop
Cleaning Kit: Includes
cleaner, scraper and
pad
WXIOX117GCS
Ceramic Cooktop
Cleaning Wipes
WXIOX305
Stainless Steel
Appliance Polish
Wipes
WX10X100001
Broiler Pan
Use your pan and grid cover to broil hamburgers, seafood, steaks, vegetables,
bacon, chops and so much more! The pan below catches the excess fats and oils.
Stainless Steel
Appliance Cleaner
PMI0X311
Tips
Support
Page 35

Instructions
Safety Instructions
Operating
Installation
Felix Storch, Inc.
www.summitappliance.com
An ISO 9001:2015 registered company
770 Garrison Ave
Bronx, New York 10474
PARTS AND LABOR WARRANTY INFORMATION
SUMMIT Appliances are manufactured to provide outstanding value, and your satisfaction is our goal on
every product. All SUMMIT major appliances carry a one-year limited warranty on both parts and labor. All
refrigerators and freezers carry an additional four years on the compressor. Certain exclusions may apply.
GENERAL PARTS AND LABOR WARRANTY
Summit warrants, to the original purchaser of every new unit, that the cabinet and all parts thereof be free
from defects in material or workmanship, under normal and proper use and maintenance service as
specified by Summit and upon proper installation and start-up in accordance with the instruction packet
supplied with each Summit unit. Summit’s obligation under this warranty is limited to a period of 12 months
from the date of original purchase.
Any parts, covered under this warranty, that are determined by Summit to have been defective, within the
above said period, are limited to the repair or replacement, including labor charges, of defective parts or
assemblies. The labor warranty shall include pre-approved standard straight time labor charges only and
reasonable travel time, as determined by Summit.
Instructions
Care and Cleaning
WARRANTY CLAIMS
All claims for labor or parts must be made directly through Summit. All claims should include: model number of the unit, the serial number of the cabinet, proof of purchase, date of installation, and all pertinent
information supporting the existence of the alleged defect. All claims should be filed within 30 days of
completed repair or the warranty claim could be refused.
THINGS NOT COVERED BY THIS WARRANTY
Summit’s sole obligation under this warranty is limited to either repair or replacement of parts, subject to
the additional limitations below. This warranty neither assumes nor authorizes any person to assume obligations other than those expressly covered by this warranty.
• NO CONSEQUENTIAL DAMAGES: Summit is not responsible for economic loss; profit loss; or special,
direct, indirect, or consequential damages, including without limitation, losses or damages arising
from food or product spoilage claims whether or not on account of refrigeration failure.
• WARRANTY IS NOT TRANSFERRABLE: This warranty is not assignable and applies only in favor of the
original purchaser/user to whom delivered. Any such assignment or transfer shall void the warranties
herein made and shall void all warranties, express or implied, including any warranty of merchant-
ability or fitness for a particular purpose.
• IMPROPER USE: Summit assumes no liability for parts or labor coverage for component failure or
other damages resulting from improper usage or installation or failure to clean and/or maintain
product as set forth in the warranty packet provided with the unit.
• ALTERATION, NEGLECT, ABUSE, MISUSE, ACCIDENT, DAMAGE DURING TRANSIT OR
INSTALLATION, FIRE,FLOOD, ACTS OF GOD: Summit is not responsible for the repair or replacement
of any parts that Summit determines have been subjected after the date of manufacture to alteration, neglect,
abuse, misuse, accident, damage during transit or installation, fire, flood, or act of God.
• IMPROPER ELECTRICAL CONNECTIONS: Summit is not responsible for the repair or replacement of
failed or damaged components resulting from electrical power failure, the use of extension cords,
low voltage, or voltage drops to the unit.
35
Troubleshooting Tips
Consumer Support
Page 36
36
Instructions
Safety
Instructions
Operating
Instructions
Installation
Troubleshooting
Consumer
WARNING: This product can expose you to chemicals including Nickel
For parts and accessory ordering,
www.summitappliance.com/support
• NO IMPLIED WARRANTY OF MERCHANTABILITY OR FITNESS FOR A PARTICULAR PURPOSE:
There are no other warranties, expressed, implied or statutory, except the parts & labor warranty specifically
described above. These warranties are exclusive and in lieu of all other warranties, including implied
warranty and merchantability or fitness for a particular purpose. There are no other warranties which
extend beyond the description on the face hereof.
• OUTSIDE UNITED STATES: This warranty does not apply to, and Summit is not responsible for, any
warranty claims made on products sold or used outside the United States.
REQUESTING SERVICE
If you are in need of service, please either fill out a service request on our website, http://
www.summitappliance.com/support, or call us at 800-932-4267 or 718-893-3900. Please be prepared to
give us the following information: your name, address, phone, email, model, serial, date of purchase, place
of purchase, and the problem you are having.
(Metallic) which is known to the State of California to cause cancer.
For more information go to www.P65Warnings.ca.gov
Note: Nickel is a component in all stainless steel and some other metallic compositions.
Tips
troubleshooting and helpful hints, visit:
Support
 Loading...