

Page 1
RANGE HOODS
Models
SEH1524SS
SEH1530SS
SEH1536SS
FELIX STORCH, INC.
770 Garrison Avenue
Bronx, New York 10474
www.summitappliance.com
Page 2

TABLE OF CONTENTS
Safety Warnings. ................................................................................................ 2-
Location of Parts. ................................................................................................. 5
Technical Specifications. ..................................................................................... 6
Dimensional Diagram. .......................................................................................... 7
Installation. ........................................................................................................ 8-
Positioning the Range
Preparing the Site. .................................................................................. 8-9
Installing the Range Hood on the Wall. ................................................. 9-11
Using your range hood. ...................................................................................... 12
Push-Button Controls
Efficient Ventilation
Cleaning and Maintenance. ........................................................................... 13-
Carbon Filter Replacement. ..................................................................... 13
Replacement of Lighting Components. ..................................................... 14
Moving the Hood. ..................................................................................... 14
Troubleshooting. .................................................................................................. 15
Troubleshooting Guide
Service and Spare Parts
Exploded View .................................................................................................... 16
Parts List .............................................................................................................. 17
Wiring Diagram. ................................................................................................... 21
Limited Warranty .................................................................................................
Hood.
..................................................................... 8
4
12
14
22
Page 3

2
SAFETY WARNINGS READ AND SAVE THESE INSTRUCTIONS
a. This product is designed for domestic use.
b. Electric input for the device must be 110-120V, 60Hz.
c. A grounded cable is installed in your device. It must be connected to a grounded electrical
socket.
d. All electrical installations must be done by a qualified electrician. Installations done by
unqualified people may result in poor performance, failure of the device, and accidents.
e. Do not let the power cord become pinched or squeezed during installation. Keep the cord
away from cooking surfaces; otherwise, the cord could melt and cause a fire.
f. Do not connect the power cord before installation is complete.
g. If the lights in your device have been on for a long time, do not touch them, they are hot
enough to burn your hands.
h. Kitchen hoods are designed for cooking in domestic residences. There is a risk of failure
if they are used for other purposes, and this will void the warranty.
i. Comply with local codes and regulations related to discharging air. (This warning does not
apply to hoods without a stack).
j. Do not cook flammable foods below the hood.
k. Start the hood after placing pots or pans on your cooking surface. Otherwise, high
temperatures may result in the deformation of parts of the hood.
l. Do not leave hot oil on the cooking surface. Pots that contain hot oil can ignite, causing
fires.
m. When frying foods, be mindful of curtains. They may catch fire.
n. Change the filters regularly. Oily residues could become fire risks.
o. When replacing filters, always use the same type of filter as the original. Substitutes may
be unsuitable.
p. Do not use the device without a filter. Do not remove filters while the device is in use.
q. If there is ignition or sparking, cut off the electric power to the device. (Turn off the switch.)
r. If the device is not cleaned regularly, built-up grime and dirt could cause a fire.
s. When you make the stack installation for your hood, use 5.9" (150mm) diameter pipes.
The stack installation must be as short and with as few bends as possible.
t. Keep the packing materials away from children, as these materials could be dangerous
to them.
u. Ensure that children do not play with the device. Do not let little children use the device.
v. If the electrical cable is defective, it must be changed by the manufacturer or a qualified
service technician.
w. If there is a fire, cut off the power to the hood and cooking devices and cover the flame.
Do not use water to extinguish the fire.
x. Do not operate any fan with a damaged cord or plug. Discard fan or return it to
an authorized service facility for examination and/or repair.
y. Do not run cord under carpeting. Do not cover cord with throw rugs, runners, or similar
coverings. Do not route cord under furniture or appliances. Arrange cord away from traffic
area and where it will not be tripped over.
Page 4

3
GROUNDING INSTRUCTIONS
This appliance must be grounded. In the event of an electrical short circuit, grounding
reduces the risk of electric shock by providing an escape wire for the electric current. This
appliance is equipped with a cord having a grounding wire with a grounding plug. The plug
must be plugged into an outlet that is properly installed and grounded.
WARNING – Improper grounding can result in a risk of electric shock.
Consult a qualified electrician if the grounding instructions are not completely understood,
or if doubt exists as to whether the appliance is properly grounded. Do not use an extension
cord. If the power supply cord is too short, have a qualified electrician install an outlet near
the appliance."
Use only with rangehood cord-connection kits that have been investigated and found
acceptable for use with this model rangehood."
WARNING! TO REDUCE THE RISK OF A RANGE-TOP GREASE FIRE:
a. Never leave surface units unattended at high settings. Boil-overs cause smoking
and greasy spillovers that may ignite. Heat oils slowly on low or medium settings.
Always turn the hood ON when cooking at high heat or when flambéing food.
b.
c. Clean ventilating fans frequently. Grease should not be allowed to accumulate on fan
or filters.
d. Use proper pan size. Always use cookware appropriate for the size of the surface
element.
WARNING! TO REDUCE THE RISK OF INJURY TO PERSONS IN THE EVENT OF A RANGE-TOP GREASE FIRE, OBSERVE THE FOLLOWING:
a. SMOTHER FLAMES with a close-fitting lid, cookie sheet, or metal tray, then turn off
the burner. BE CAREFUL TO PREVENT BURNS. If the flames do not go out
immediately, EVACUATE AND CALL THE FIRE DEPARTMENT.
b. NEVER PICK UP A FLAMING PAN – you may be burned.
c. DO NOT USE WATER, including wet dishcloths or towels, to douse the fire –
this co
uld result in a violent explosion of hot steam.
Use an extinguisher ONLY if:
d.
1. You know you have a Class ABC extinguisher, and you already know how to operate
it.
2. The fire is small and contained in the area where it started.
3. The fire department is being called.
4. You can fight the fire with your back to an exit.
Page 5

4
WARNING! TO REDUCE THE RISK OF FIRE, ELECTRIC SHOCK, OR OTHER INJURY, OBSERVE THE FOLLOWING:
WARNING: Use this unit only in the manner intended by the manufacturer. If you have questions, contact the manufacturer.
a. Before servicing or cleaning the unit, switch power off at the service panel and lock the
service-disconnecting means to prevent power from being switched on accidentally.
If the service disconnecting means cannot be locked, securely fasten a prominent
warning device, such as a tag, to the service panel.
b. WARNING: To reduce the risk of fire or electric shock, do not use this fan with any
solid-state speed control device.
CAUTION:
a. WARNING: The fan in this device is for general ventilating use only. Do not use to
exhaust hazardous or explosive materials and vapors.
b. To reduce the risk of fire and to properly exhaust air, be sure to duct air outside. Do not
vent exhaust air into spaces within walls, ceilings, attics, crawl spaces, or garages.
c. WARNING: Use only metal ductwork.
WARNINGS ABOUT HANDLING AND CARRYING
a. All the materials used in the packaging of your device are suitable for recycling.
b. Comply with the warning labels on the packs during transportation.
c. Grasp handling grips while carrying your device.
How to obtain the electronic version manual: www.summitappliance.com
Page 6
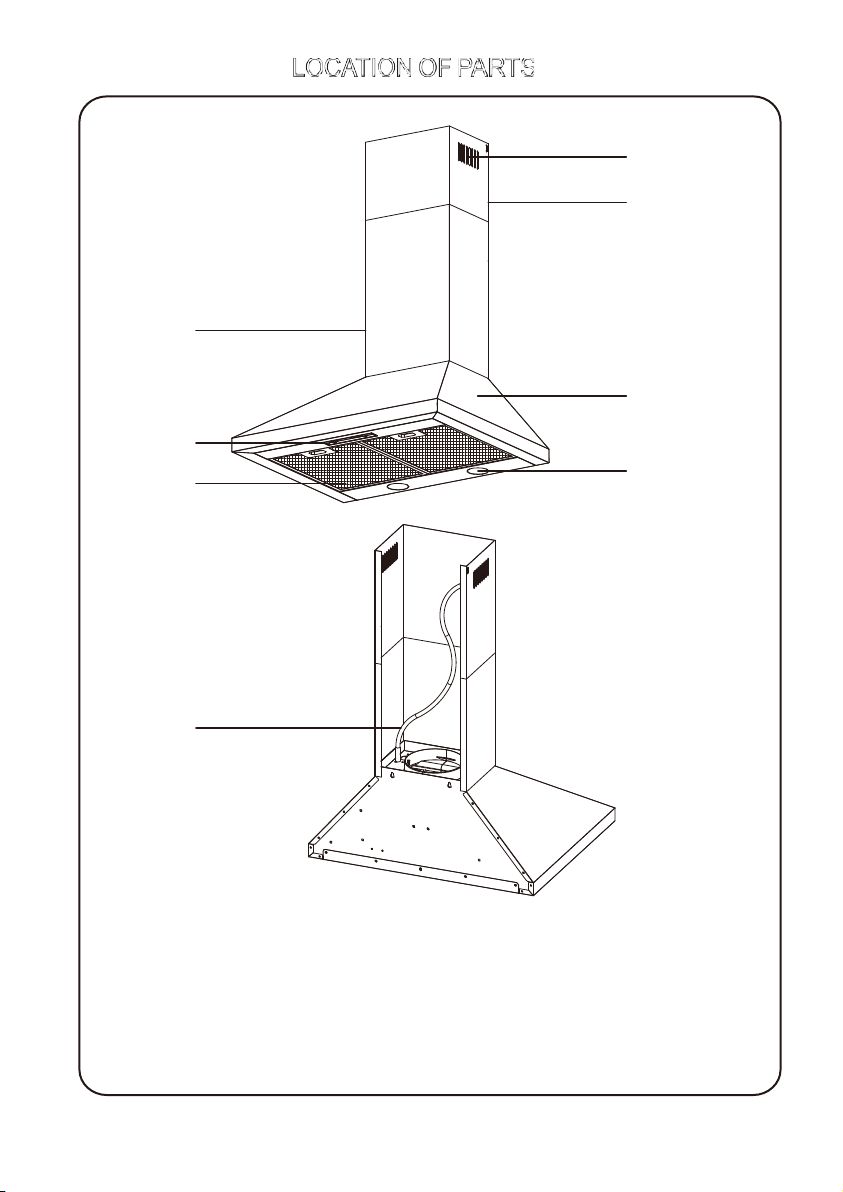
8
7
6
5
4
3
2
1
1- 120V Supply Cord
2- Illumination
3- Aluminum Cassette Filter
4- Control Panel
5- Body
6- External Chimney
7- Internal Chimney
8- Ventilation
5
Page 7
6
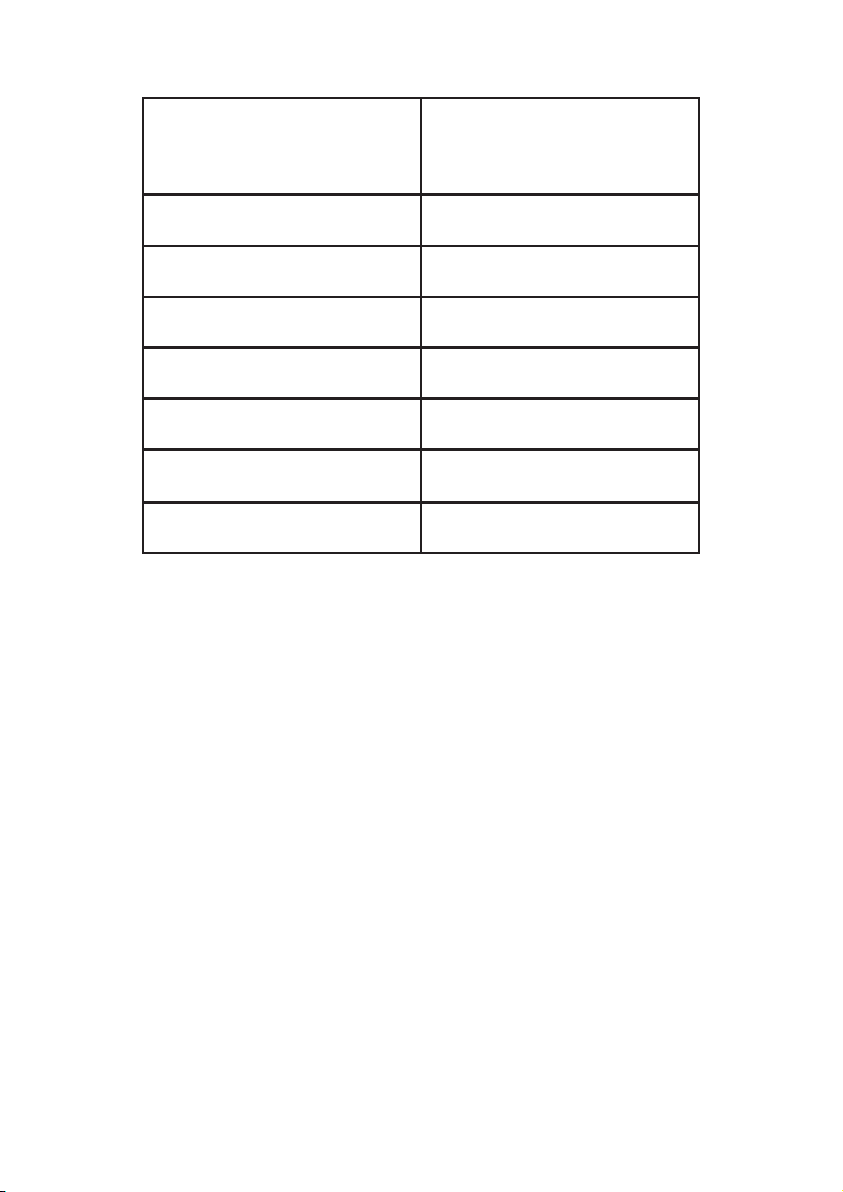
TECHNICAL
Model
SPECIFICATIONS
SEH1524SS
SEH1530SS
SEH1536SS
Voltage(V)
Lamp (W)
Control Type
Motor Power (W)
Capacity (CFM)
Motor Insulation Class
Insulation Class
Table 2
120V
2 x 5W LED
Slide switch
310W
400CFM ±10%
B
CLASS I
Page 8
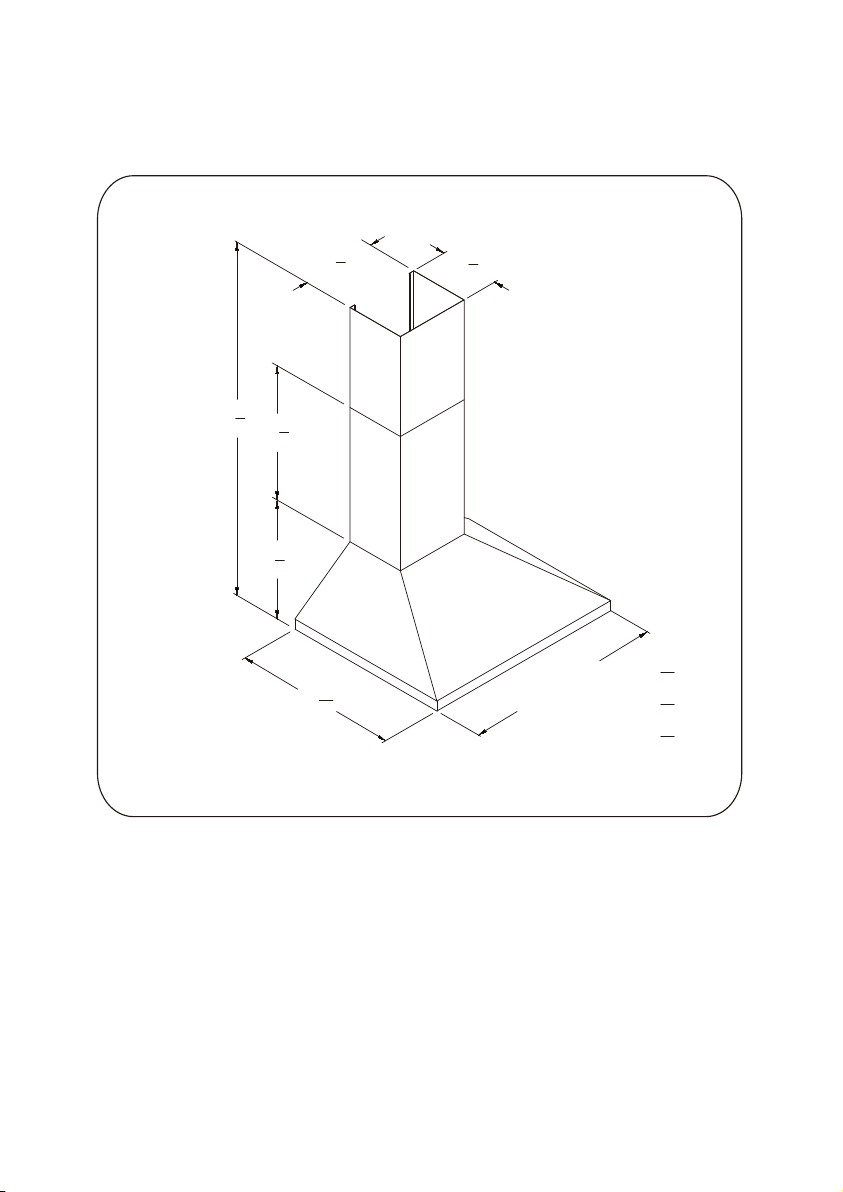
DIMENSIONAL DIAGRAM
WARNING!
TO REDUCE THE RISK OF FIRE, USE ONLY METAL DUCTWORK.
37
1
”
9
2
1
”
4
3
”
15
4
3
”
9
4
11
”
19
16
7
”
6
8
9
”
23SEH1524SS:
16
1
”
29SEH1530SS:
2
7
”
35SEH1536SS:
16
7
Page 9
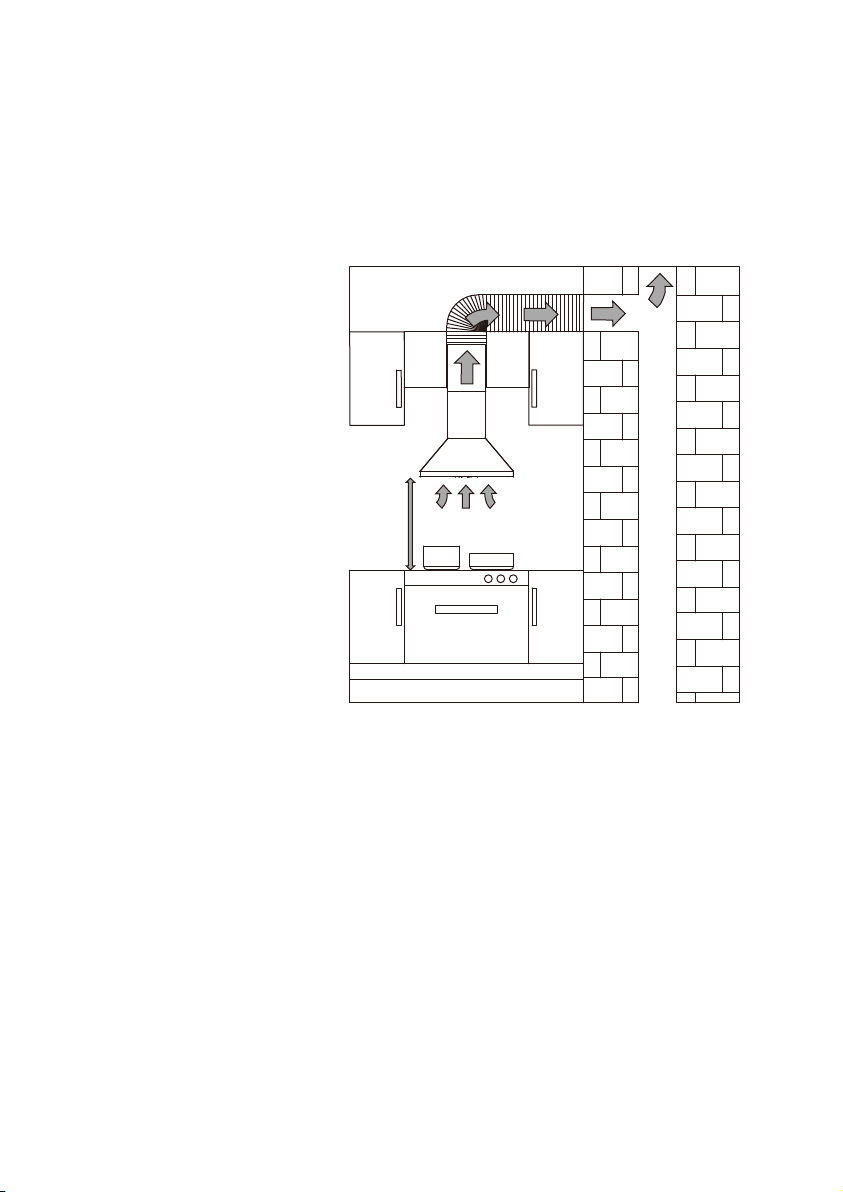
INSTALLATION
CAUTION:
to protect against sharp edges.
POSITIONING THE RANGE HOOD
Upon completion of installation, the distance between the hood and an electric
rangetop must be a minimum of 26" (65cm), and the distance between the hood and a
gas rangetop must be a minimum of 30" (75cm).
During installation, persons installing the hood must wear heavy gloves
min. 30" for gas ranges
min. 26" for elec
tric ranges
PREPARING THE SITE
WARNING – TO REDUCE THE RISK OF FIRE, ELECTRIC SHOCK, OR INJURY,
OBSERVE THE FOLLOWING:
a. Installation work and electrical wiring must be done by qualified personnel in
accordance with all applicable codes and standards, including re-rated
construction.
b. Sufficient air is needed for proper combustion and exhausting of gases through
the chimney of fuel-burning equipment to prevent
range manufacturer's guidelines and safety standards such as those published by
the National Fire Protection Association (NFPA), the American Society for
Heating, Refrigeration and Air Conditioning Engineers (ASHRAE), and the local
code authorities.
c. When cutting or drilling into a wall or ceiling, do not damage electrical wiring
and other hidden utilities.
d. Ducted fans must
back-drafting. Follow the
always be vented to the outdoors.
8
Page 10
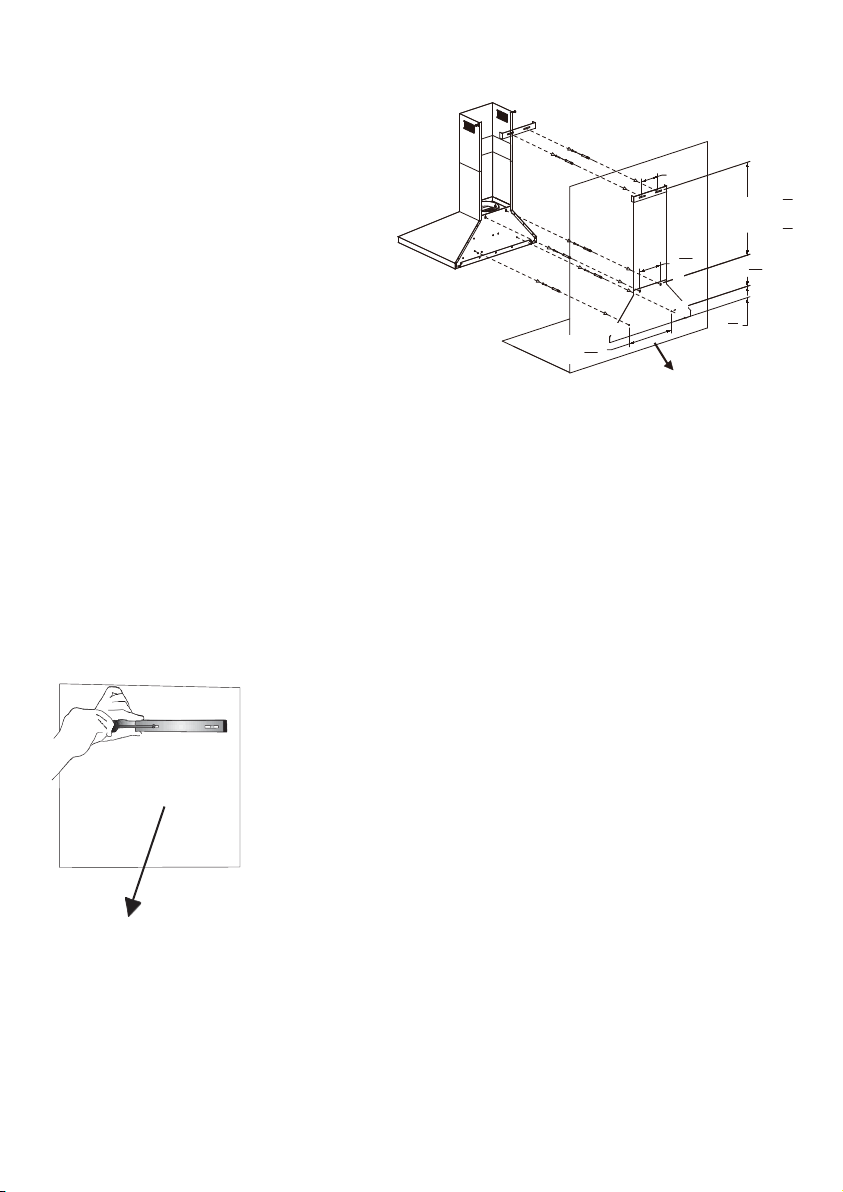
INSTALLING THE RANGE HOOD ON THE
F
Plate
WALL
A)
DRILLING OF HANGING HOLES
Confirm the installation position of the
hood and install it according to the
Figure at right.
Open the holes on A, B,C,D points with
Ø 8mm sized drill bit.
Open holes at points E and F with a
Ø 8mm sized drill bit in order to screw
chimney assembly parts
Refer to the chimney installation
dimensions to fix the position of the
chimney bracket.
B)
SCREWING OF WALL PLUGS
Screw the Ø 8mm sized wall plugs
into A, B,C,D holes for hanging screws.
Screw the Ø 8mm sized wall plugs into
E, F holes for chimney mounting parts.
C)
SCREWING OF HANGING SCREWS
Screw the hanging screws into Ø 8mm
sized wall plugs in A, B holes.
There must be 5mm distance between
the screw head and the wall.
12
C
3
”
16
6
E
F
7
B
A
wood wall
”
MIN
1
”
16
D
2
5
”
25MAX
8
1
”
18
2
11
”
7
16
3
”
4
Chimney Mounting
wooden wall
E
Screw the chimney mounting parts into Ø 8mm sized wall
plugs on E,F points which are provided with yo
9
ur product.
Page 11
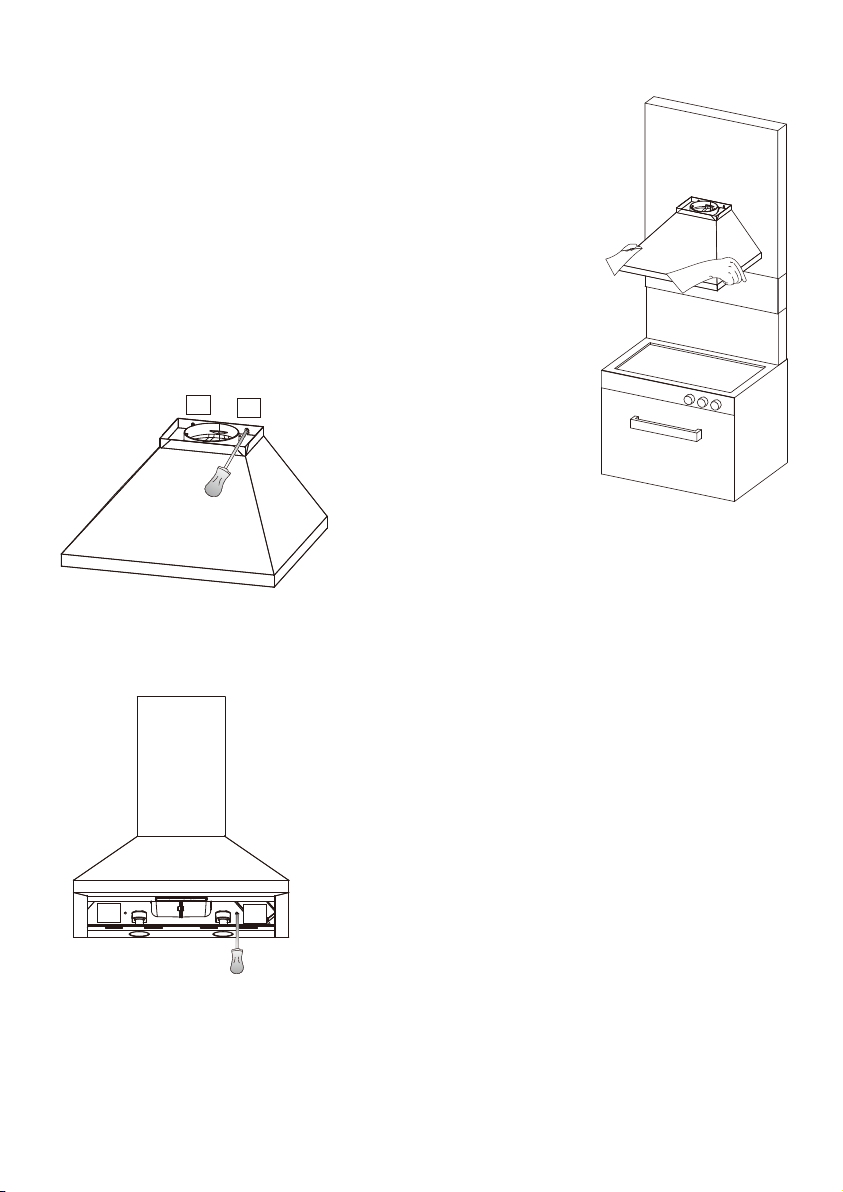
D)
MOUNTING THE PRODUCT ONTO WALL
Hang the product by already mounted -L shaped- hanging the
parts covering the body.
Then fix the body on (A, B) holes to the wall using the screws.
A
B
Fix the body onto the wall with a screw through the (C,D) holes that are located
inside the body.
D
C
NOTE: If the hood seems to be tilting, slightly loosen the screws that are used
on the hanging parts at the top and straighten until the hood is vertical.
10
Page 12
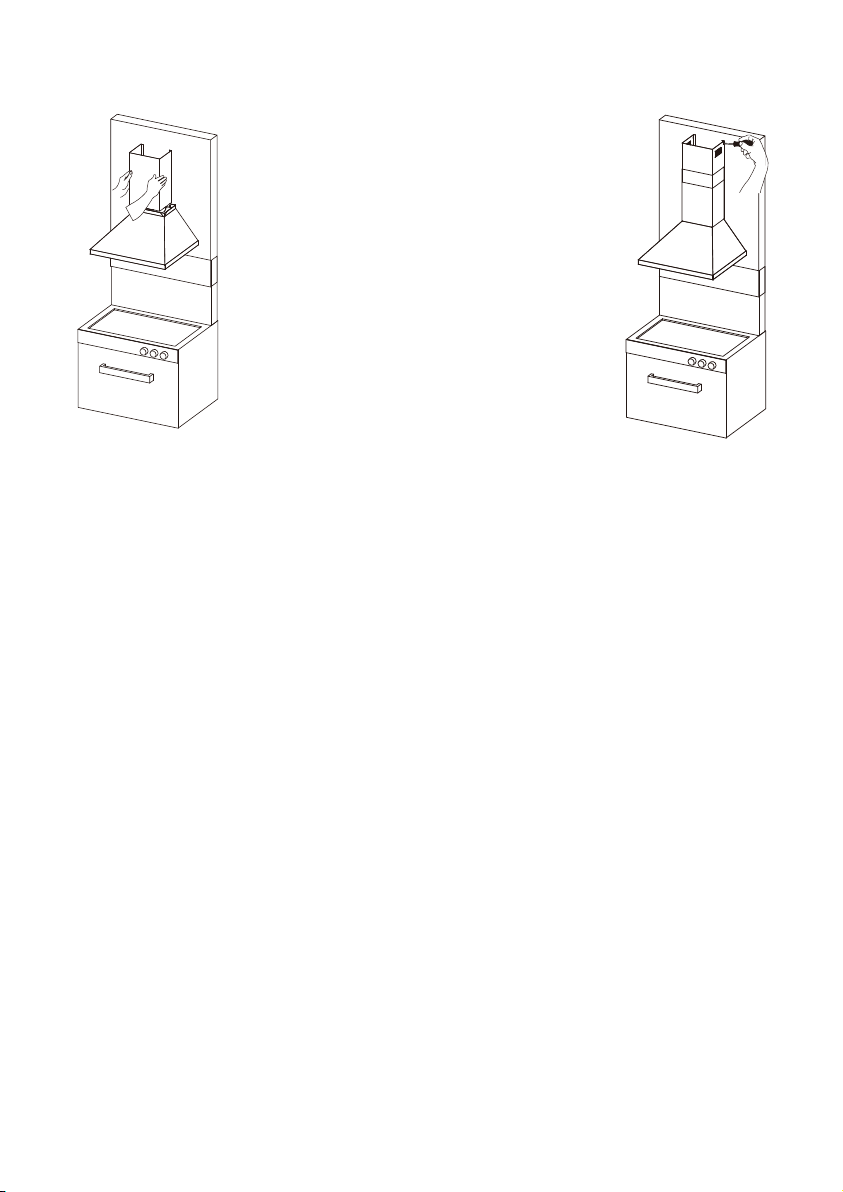
WARNING!
TO REDUCE THE RISK OF FIRE, USE ONLY METAL DUCTWORK.
Place metal chimneys over product body.
Screw internal chimney on chimney
fixing sheet, fixed over upper corner of
external chimney.
11
Page 13
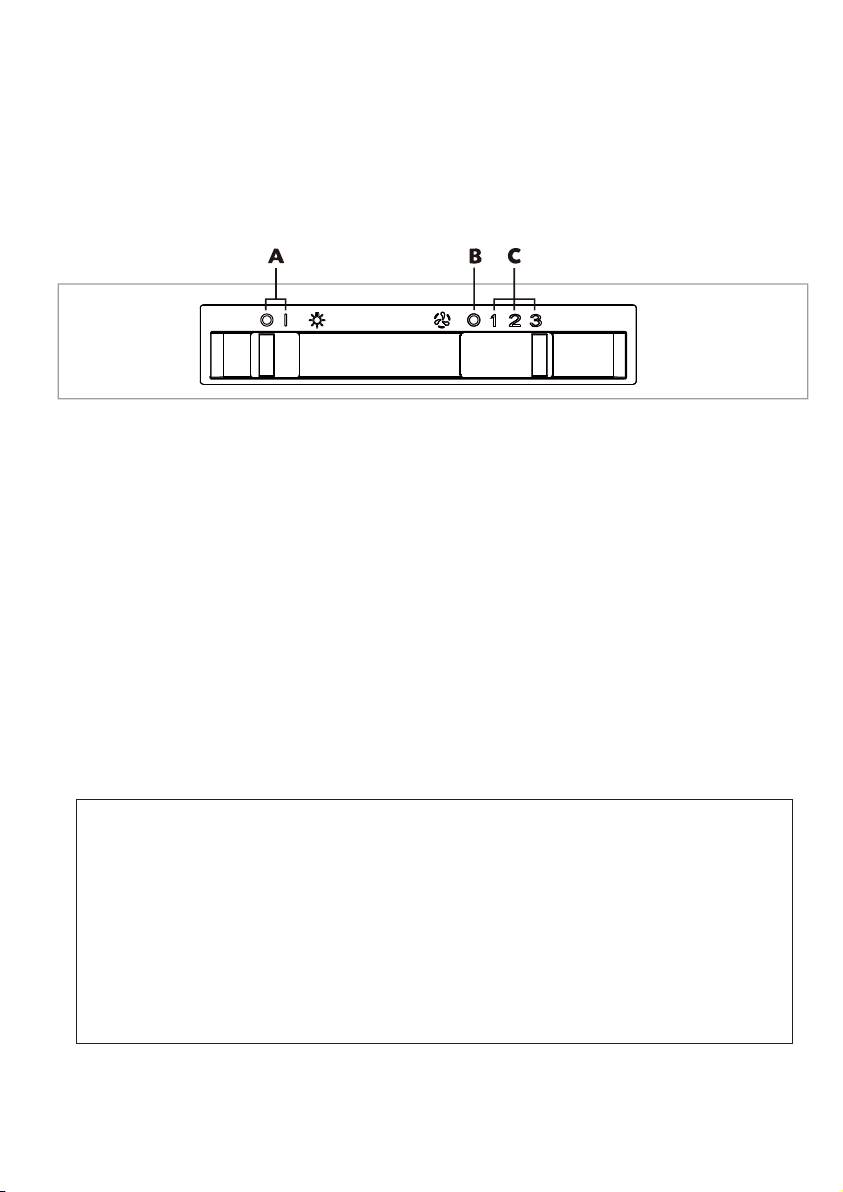
Using your range hood
For best performance, you should switch on the range hood 15 minutes before starting
to cook and leave it to run for appr
oximately 15 minutes after the end of cooking.
Control Panel
A – Light switch
B – Power switch
C – Speed levels
To switch the hood light on or off.
Slide the light switch (A) to operate the light.
To switch on the hood or to change the speed at any time when the hood is running.
Slide the power switch to the required position depending on the speed you require.
To switch the hood off.
Slide the power switch to position (B) on the control panel
EFFICIENT VENTILATION
For proper ventilation, windows must be kept closed. Doors and windows opening to
other rooms may be kept open.
.
IMPORTANT
NOTE!
Pay attention when operating the hood simultaneously with devices that
work by burning the ambient air with fuel (such as gas heaters). The
burning may be affected because the hood discharges air in the room to
the outside.
This advice does not apply to hoods not having an outside exhaust.
12
Page 14
CLEANING AND MAINTENANCE
Disconnect the device prior to maintenance (cut off its power supply by turning off
*
the switch).
The aluminum cassette filter holds oils and dust from the air. The metal filter must
*
be washed in hot soapy water every month, if possible, in the dishwasher at
140°F.
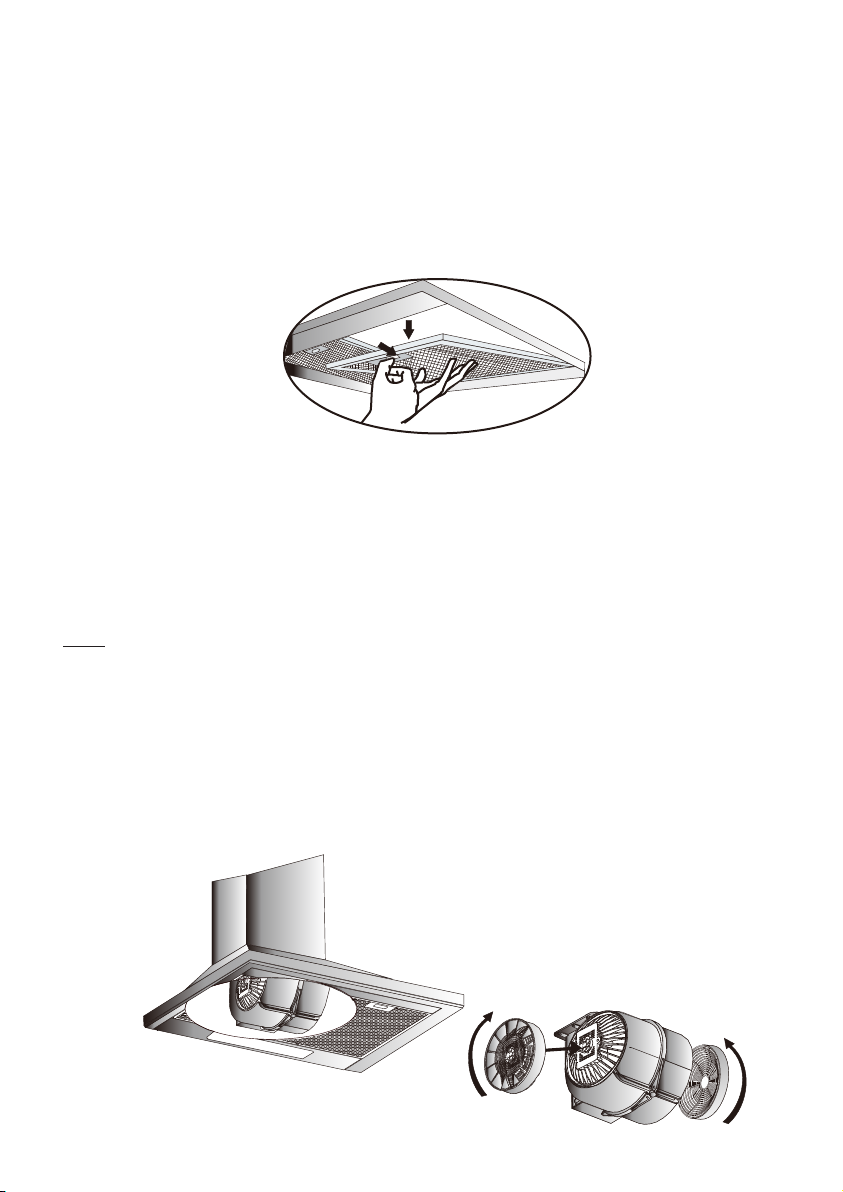
* To disassemble, press on the spring clamps at the edge of the cassette filter.
(After cleaning, do not reassemble before drying.)
* Outer su
rfaces of the hood should be wiped with a cloth dampened with a solution
of liquid detergent. Do not clean the unit with products containing corrosive
substances.
* Avoid wetting switches or other electronic parts when cleaning with water or
other liquids.
* When cleaning stainless steel surfaces, use products specifically made for this
use.
Note: Aluminum filters may change color after several washings in the dishwasher.
This is normal and does not affect the performance of the filter.
CARBON FILTER REPLACEMENT
Before replacing the round carbon filters, disconnect the power to your device. The
carbon filters are located behind the metal filter, on the left and the right sides of the
blower. First, take out the metal filter. To replace the carbon filters, remove the old
ones from the device and mount the new ones as shown. In kitchens that do not
a chimney outlet, the carbon filter should be replaced every 3-5 months
have
depending on usage.
13
Page 15
14
REPLACEMENT OF LIGHTING COMPONENTS
Disconnect the hood.
Remove the aluminum cassette filter.
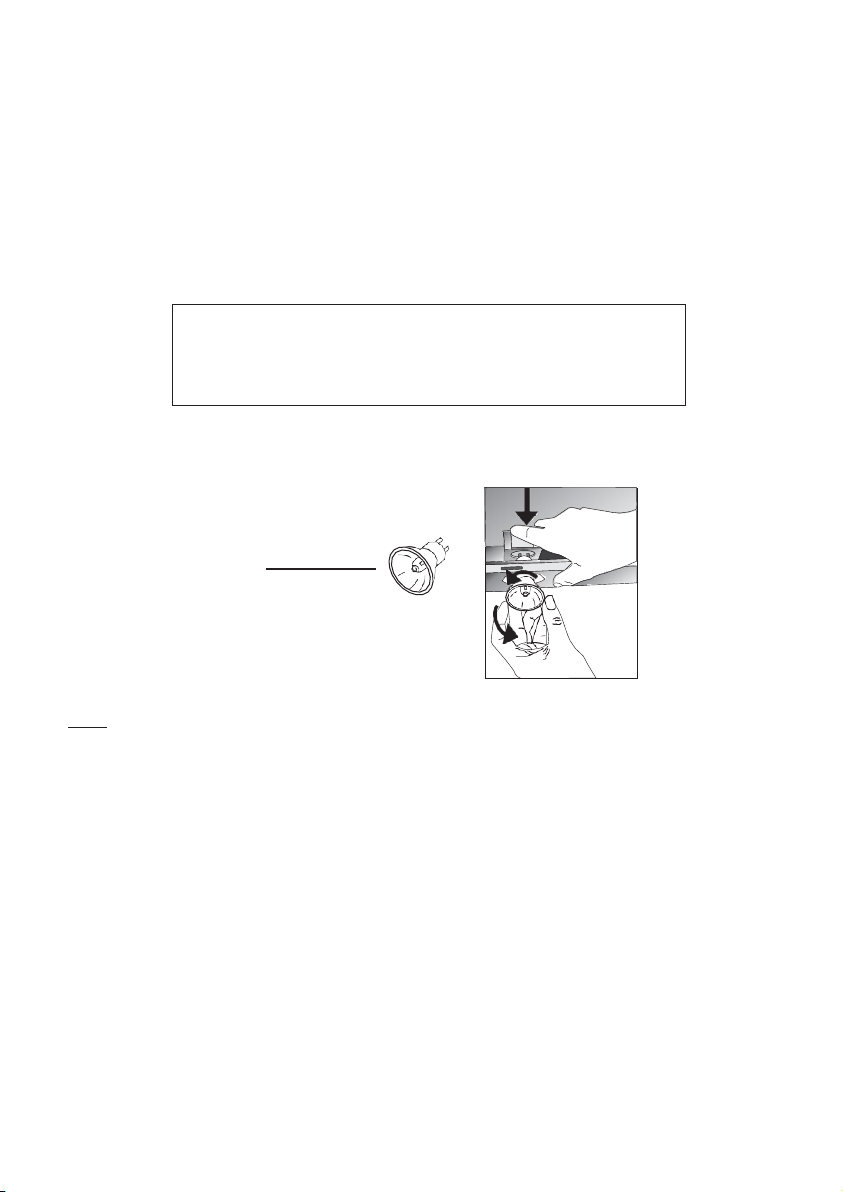
In order to change the 5W LED light, refer to diagram below . (1) Press down
on the back part of the lamp holder and (2) turn it counter-clockwise.
Replace the old bulb with the new one. Turn in the reverse direction when installing new
bulb.
WARNING!
Be sure the bulb is cool before trying to change it.
5W LED
Note: Replacement bulbs can be purchased directly from SUMMIT by calling us at
1-800-932-4267 or by going to our website at www.summitappliance.com/support.
Have the model number of your range hood handy.
MOVING THE HOOD
If you expect to have to move your range hood:
* Keep original packaging. Move your hood using original packaging; comply
with moving instructions printed on the packaging.
1
2
If you do not have original packaging:
* Do not put any load on the range hood.
* Avoid any possible impacts.
* Pack the hood in such a way as to prevent damage.
Page 16
15
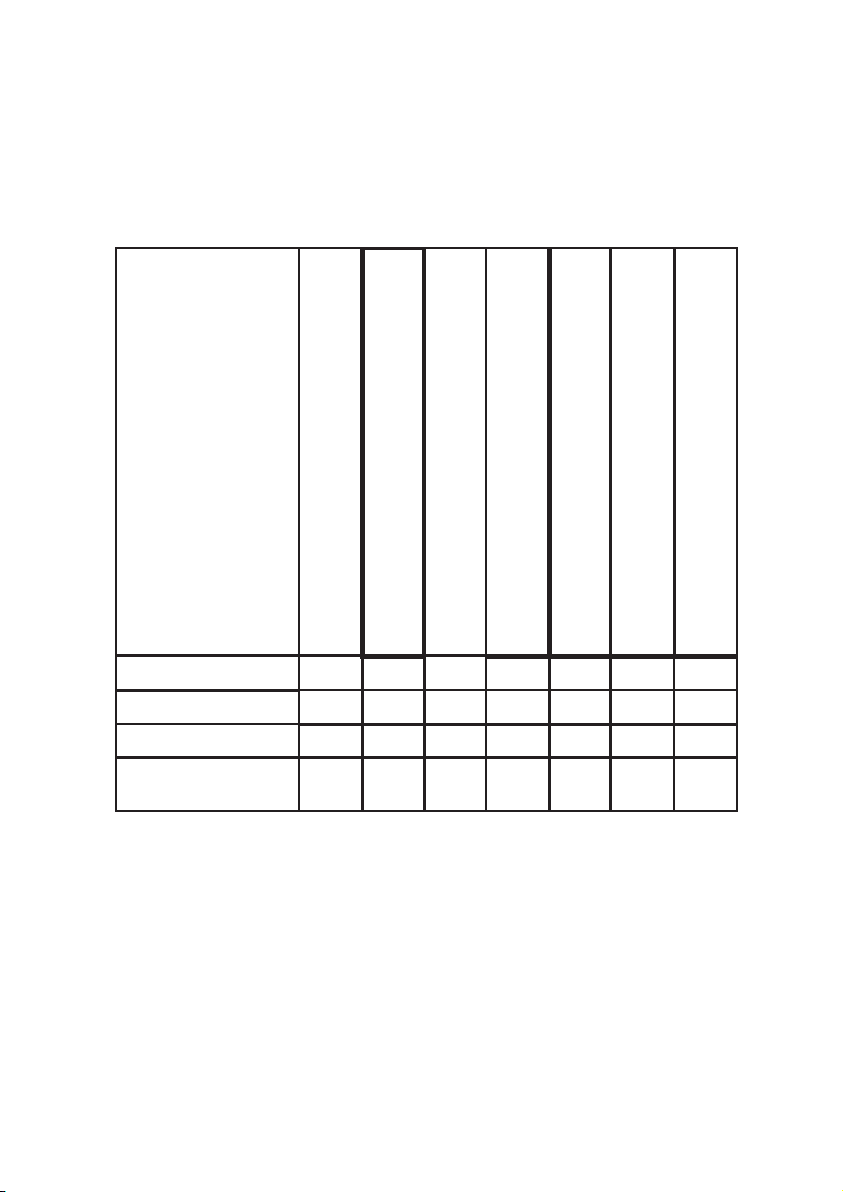
TROUBLESHOOTING
Check
(Supply
should
Check
(Motor
Check
(Lamp
Check
(Aluminum
under normal conditions.)
Check
(Bulbs
Check
(Air
Check
(If
operates
replaced
Illumination lamp
does not illuminate
X
Air suction of
hood is weak
It does not exhaust
If hood does not operate, before contacting customer service:
Be sure that the power cable is connected to the power supply and that the electric
fuse for the installation is in good condition. Before contacting the service, check
your hood according to the table below. If the problem continues, contact your dealer
or authorized service center.
Troubleshooting Guide
voltage should be 110-120V, hood
Electric connection.
Hood does not operate
air(in the ambient
without chimney)
X
motor switch.
be connected to grounded socket.)
X
switch should be in 1,2,3 position)
lamp switch.
switch should be in on position.)
X
cassette filter should be washed once a month
aluminum filter.
bulbs.
X
X
X
with carbon filter, carbon filter should be
should be in good conditions.)
air outlet chimney.
outlet chimney should be open.)
quarterly.)
carbon filter.
it
X
X
X
Service and Spare Parts
You can obtain service advice and spare parts for your product directly from
SUMMIT by calling us at 1-800-932-4267 or by going to our website at
www.summitappliance.com/support
Have the model number of your range hood handy. This can be found on the
product label, which can be seen when you remove the aluminum cassette filter.
An exploded view, parts list and wiring diagram for your unit can be found on the
following pages of this manual.
Page 17
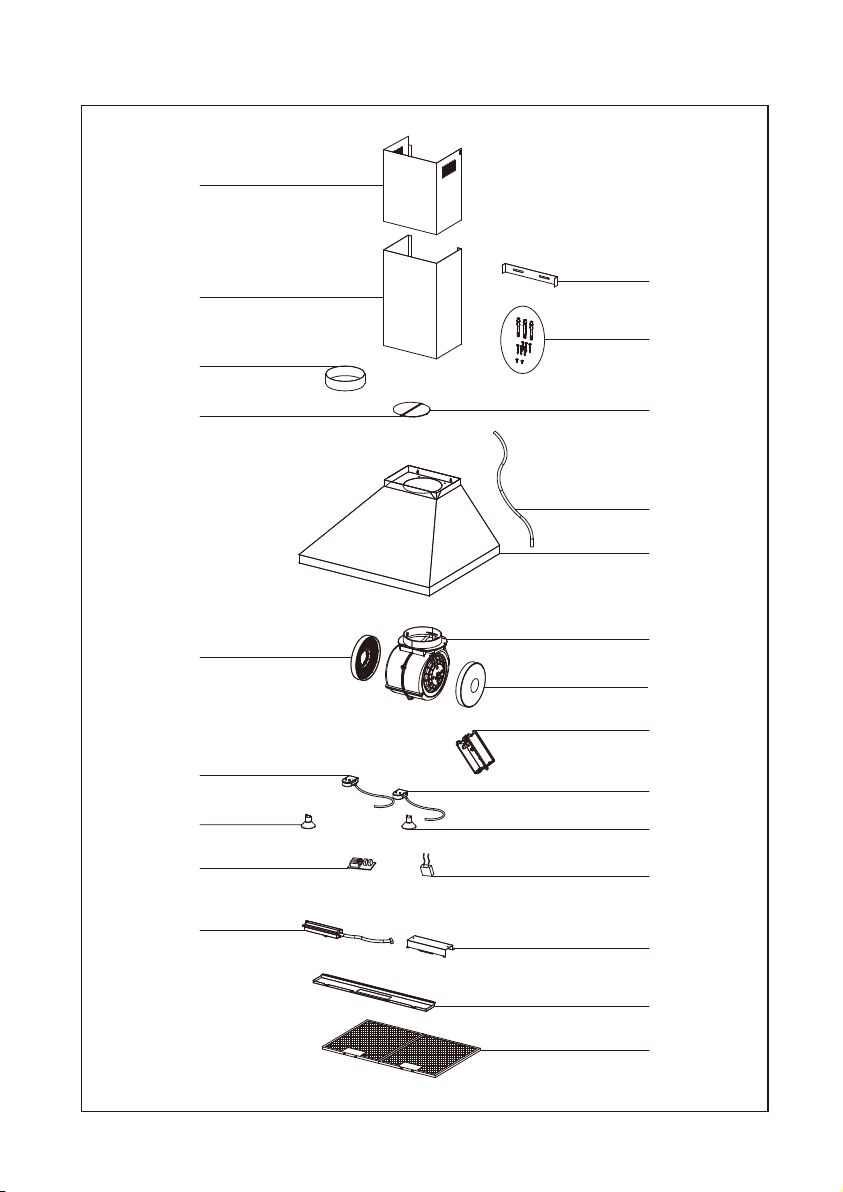
EXPLODED VIEW
SEH1524SS
SEH1530SS
2190.8.579.01
20
19
16
Exploded View For 24" Model
18
17
15
11
15
14
13
12
11
10
8
7
6
9
7
5
4
3
2
1
16
Page 18
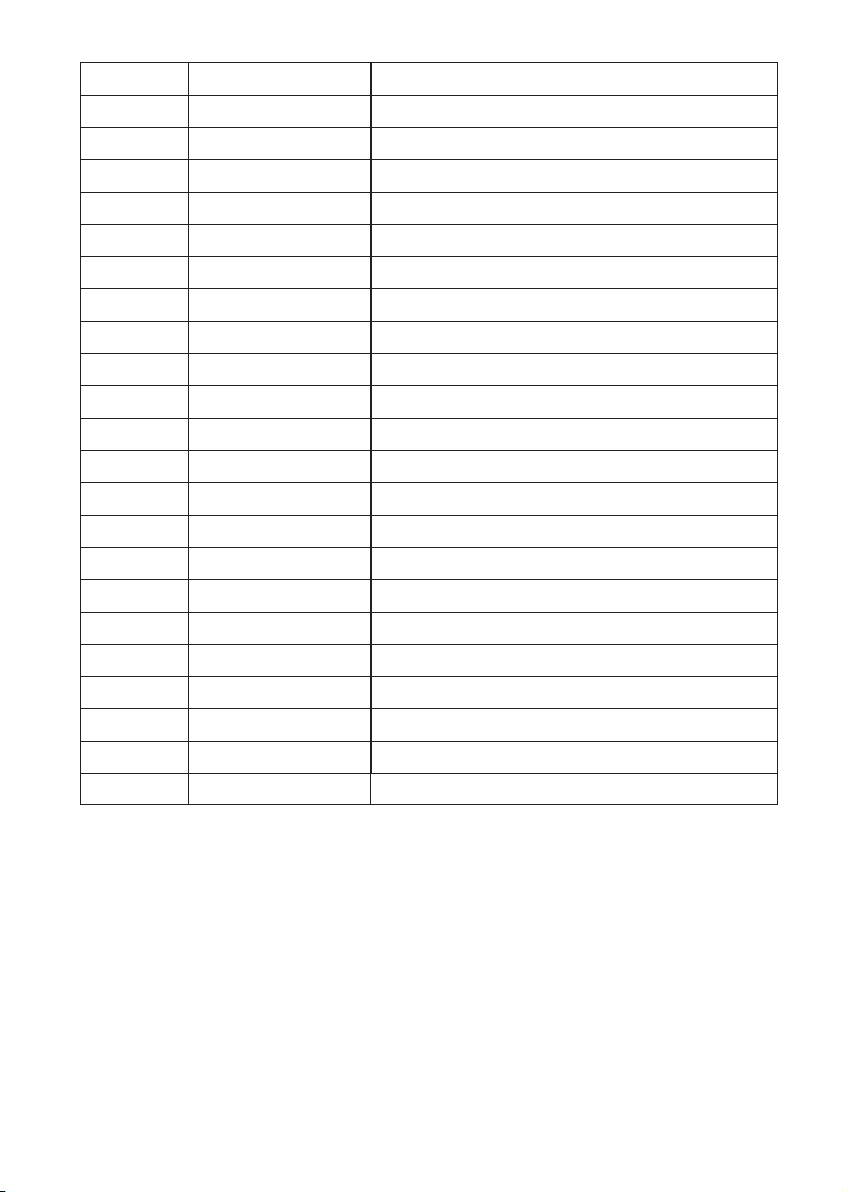
17
Model No
2190.8.579.01
Pos.
Part No.
10
0010101162
Junction box
11
0010800396
Charcoal filter
12
0011405534
Blower assembly
13
0011405537
Main body
14
0010902492
Power cord
15
0010201263
Damper flap
16
0010108117
Metal protective case
17
0011405536
Screw bag assembly
18
0010100709
Chimney bracket
19
0010105033
External Chimney
20
0010105032
Internal Chimney
Model SEH1524SS
1 0010800207 Cassette aluminum filter
2 0010108042 Switch front panel
3 0010108048 Switch bracket
4 0011405533 Switch assembly
5 0010900276 Capacitor
6 0010902116 Power strip
7 0010902447 LED LAMP 5W
8 0011405562 Lamp holder assembly-with long wire
9 0011405563 Lamp holder assembly-with short wire
Page 19
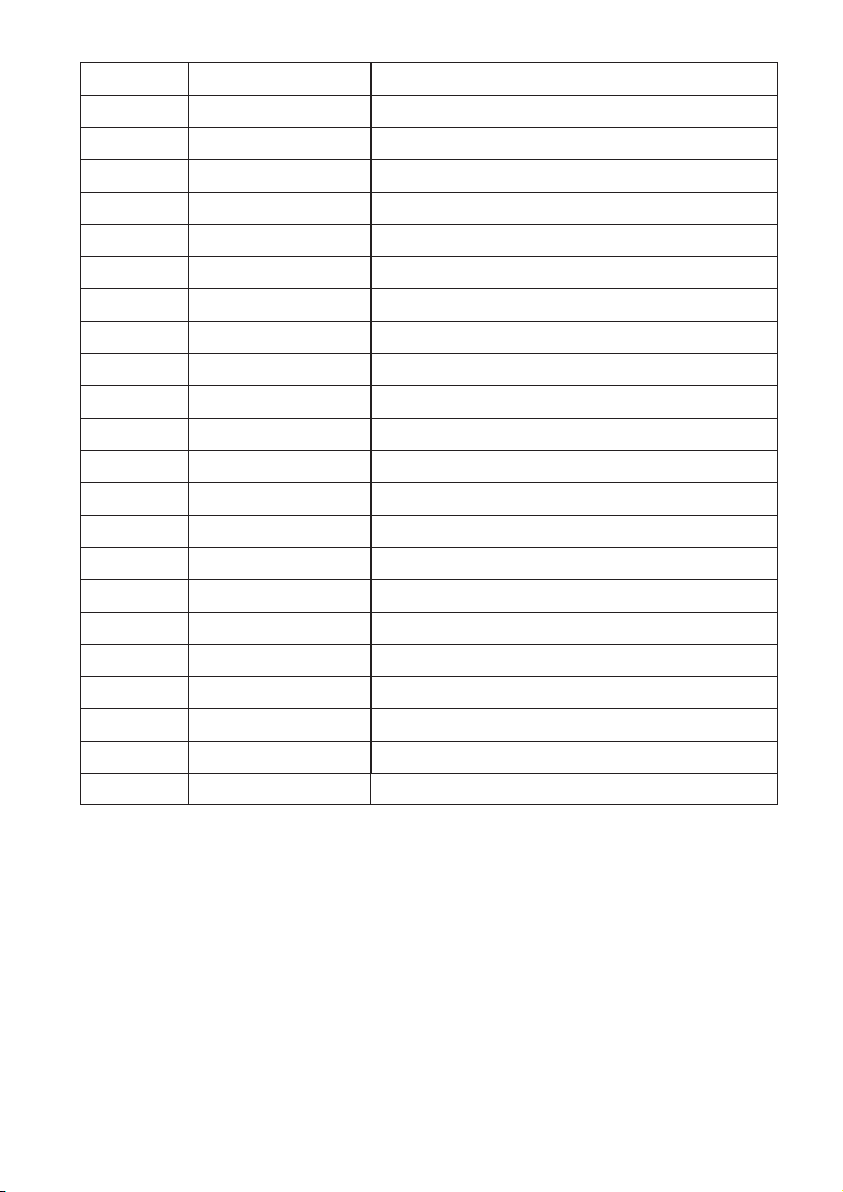
18
Model No
2190.8.579.01
Pos.
Part No.
10
0010101162
Junction box
11
0010800396
Charcoal filter
12
0011405540
Blower assembly
13
0011405538
Main body
14
0010902492
Power cord
15
0010201263
Damper flap
16
0010108117
Metal protective case
17
0011405536
Screw bag assembly
18
0010100709
Chimney bracket
19
0010105033
External Chimney
20
0010105032
Internal Chimney
Model SEH1530SS
1 0010800394 Cassette aluminum filter
2 0010108054 Switch front panel
3 0010108048 Switch bracket
4 0011405539 Switch assembly
5 0010900276 Capacitor
6 0010902116 Power strip
7 0010902447 LED LAMP 5W
8 0011405564 Lamp holder assembly-with long wire
9 0011405565 Lamp holder assembly-with short wire
Page 20
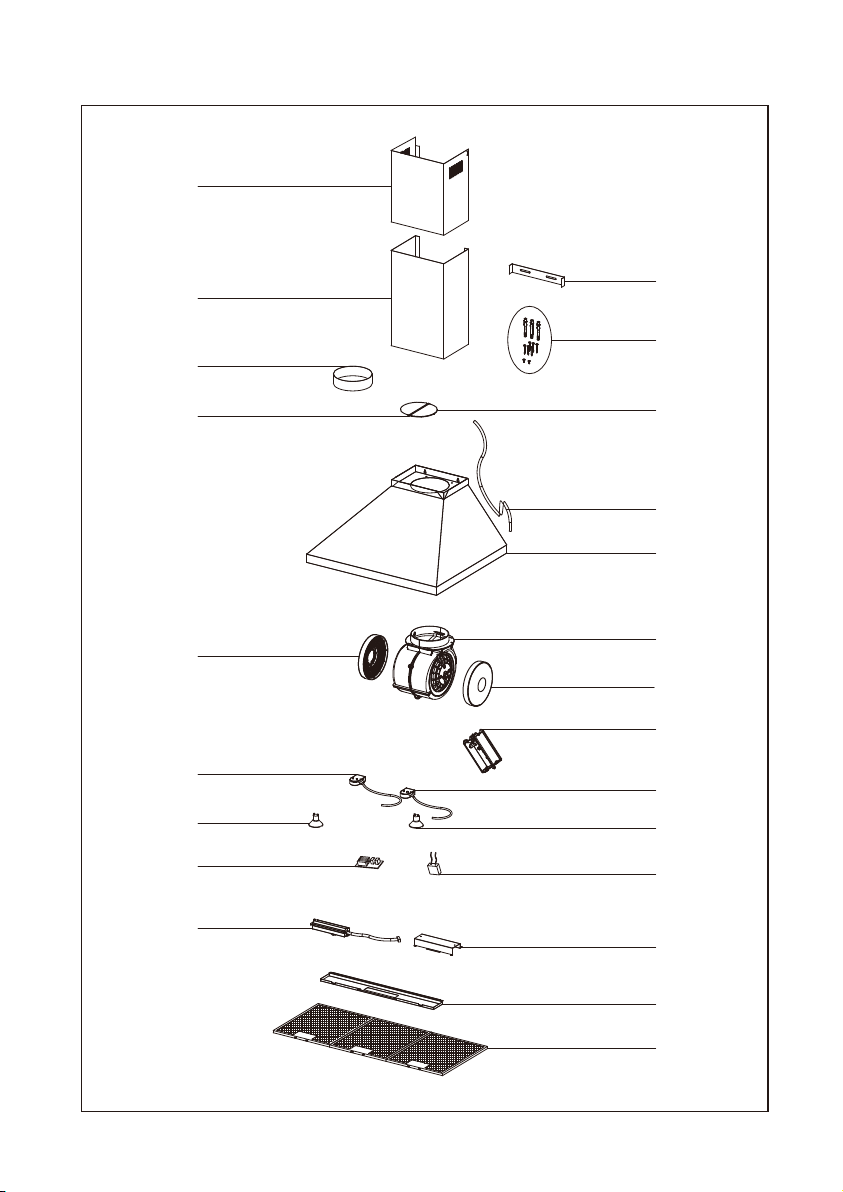
20
EXPLODED VIEW
SEH1536SS
2190.8.579.01
Exploded View For 24" Model
19
16
15
11
18
17
15
14
13
12
11
10
8
7
9
7
6
5
4
3
2
1
19
Page 21
20
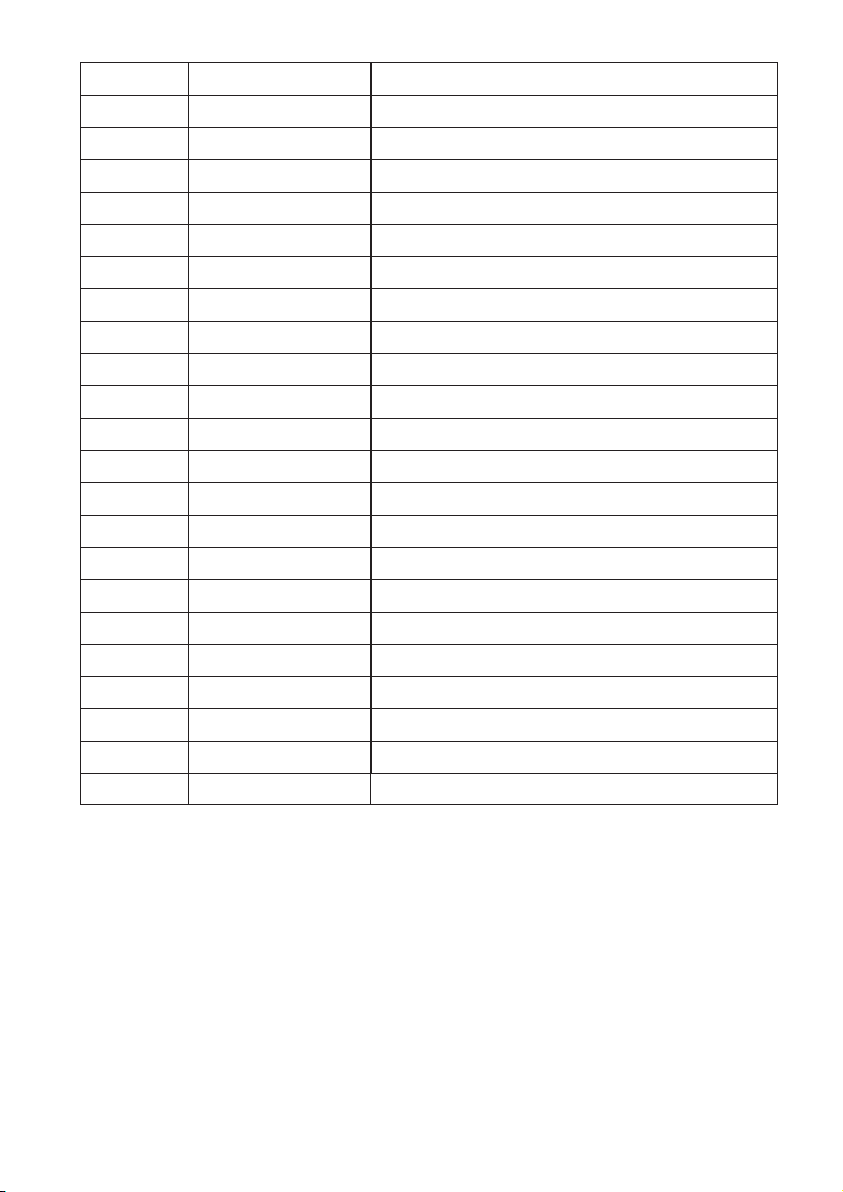
Model No
2190.8.579.01
Pos.
Part No.
10
0010101162
Junction box
11
0010800396
Charcoal filter
12
0011405501
Blower assembly
13
0011405543
Main body
14
0010902492
Power cord
15
0010201263
Damper flap
16
0010108117
Metal protective case
17
0011405536
Screw bag assembly
18
0010100709
Chimney bracket
19
0010105033
External Chimney
20
0010105032
Internal Chimney
Model SEH1536SS
1 0010800395 Cassette aluminum filter
2 0010108062 Switch front panel
3 0010108048 Switch bracket
4 0011405542 Switch assembly
5 0010900276 Capacitor
6 0010902116 Power strip
7 0010902447 LED LAMP 5W
8 0011405566 Lamp holder assembly-with long wire
9 0011405567 Lamp holder assembly-with short wire
Page 22
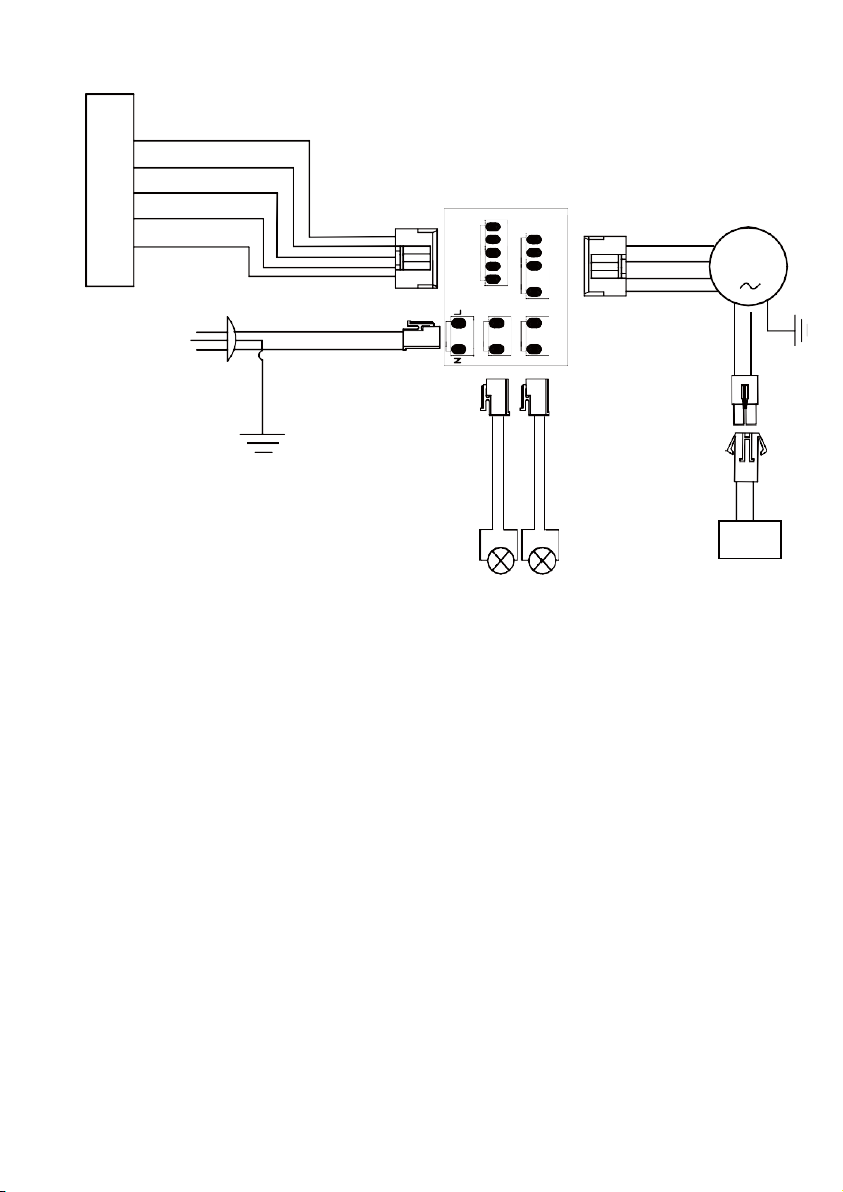
BLUE(H)
ORANGE(LAMP)
PLUG BOARD
BLACK(L)
INPUT:120V~60Hz
WHITE
M
SWITCH
SWITC
WHITE
(N)
LAMP
MOTO
BLACK
WIRING DIAGRAM
YELLOW(M)
RED(LOW)
BROWN(L)
WHITE(N)
LED
lamp:2*5W
POWER
(N)
WHITE
BLACK(L)
BLACK(L)
RED
YELLOW
BLUE
Motor:300W
RAY
G
capacitor
21
Page 23
22
WARNING: This product can expose you to chemicals including Nickel
LIMITED WARRANTY
SUMMIT Appliance warrants this product to be free from defects in materials and
workmanship for a period of one year from the date of original purchase or delivery. Any
parts determined to be defective will be replaced by SUMMIT at no charge to you. Plastic
parts, liners, and outer cabinets are warranted to be manufactured to commercially
acceptable standards and free from defects at the time of delivery.
This limited warranty does not apply to:
1.
Improper installation
2.
Customer misuse, negligence or damage
3.
Incorrect electrical current
4.
Products with serial number altered or removed
5.
Products sold or used outside the fifty United States or District of Columbia
6.
Commercial or industrial users
7.
Damage to this product from accidents, alterations, failure to follow
instructions, fire, floods, earthquakes, war, civil disturbance or Acts of God.
SUMMIT is not liable for consequential or incidental damage.
DISCLAIMER OF IMPLIED WARRANTIES; LIMITATION OF REMEDIES
SOLE AND EXCLUSIVE REMEDY UNDER THIS LIMITED WARRANTY
REPAIR AS PROVIDED HEREIN. IMPLIED WARRANTIES,
MERCHANTABILITY OR FITNESS FOR A PARTICULAR
PURPOSE, ARE LIMITED TO ONE YEAR. WARRANTOR SHALL NOT BE LIABLE FOR
INCIDENTAL OR CONSEQUENTIAL DAMAGES. SOME STATES DO NOT ALLOW THE
EXCLUSION OR LIMITATION OF INCIDENTAL OR CONSEQUENTIAL DAMAGES, OR
LIMITATIONS ON THE DURATION OF IMPLIED WARRANTIES
FITNESS, SO THESE EXCLUSIONS
WARRANTY GIVES YOU SPECIFIC LEGAL RIGHTS AND YOU MAY ALSO HAVE OTHER
RIGHTS, WHICH VARY FROM STATE TO STATE.
OR LIMITATIONS MAY NOT APPLY TO YOU. THIS
CUSTOMER'S
SHALL BE PRODUCT
INCLUDING WARRANTIES OF
OF MERCHANTABILITY
OR
(Metallic) which is known to the State of California to cause cancer.
For more information go to www.P65Warnings.ca.gov
Note: Nickel is a component in all stainless steel and some other metallic compositions.
FELIX STORCH, INC.
Summit Appliance Division
770 Garrison Avenue
Bronx, NY 10474
Phone: (718) 893-3900
Fax: (718) 842-3093
www.summitappliance.com
For parts and accessory ordering,
troubleshooting and helpful hints, visit:
www.summitapplianceparts.com
 Loading...